Fujitsu Client Computing FOMA-F905I Part 15 Low Power Communication Device Transmitter User Manual F905i
Fujitsu Limited Part 15 Low Power Communication Device Transmitter F905i
Contents
- 1. Manual 1
- 2. Manual 2
- 3. Manual part 1
- 4. Manual part 2
Manual part 2
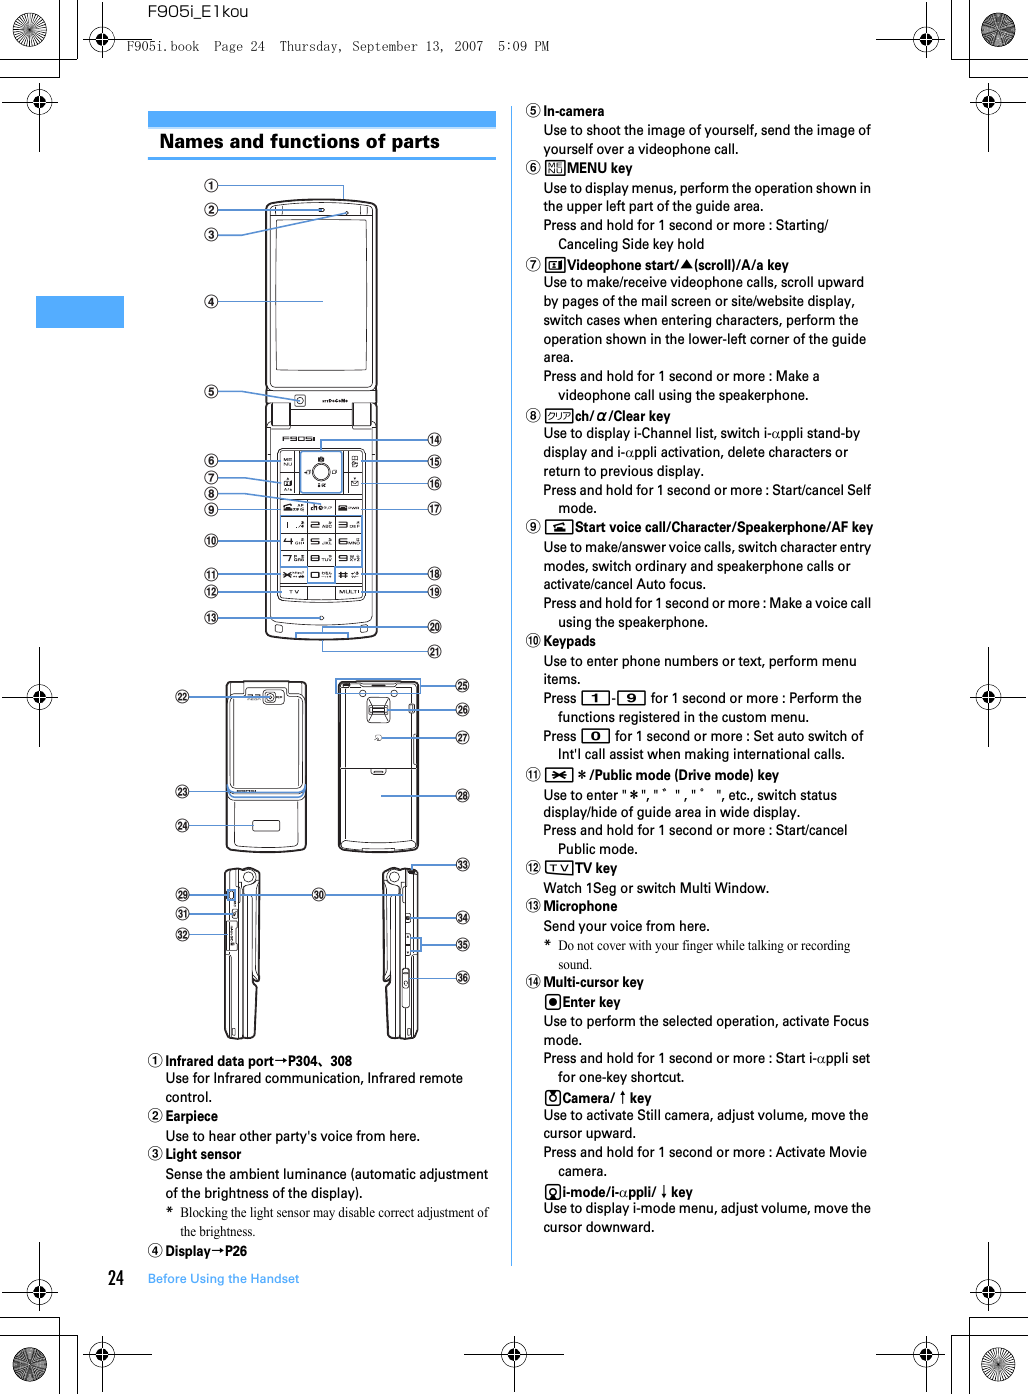
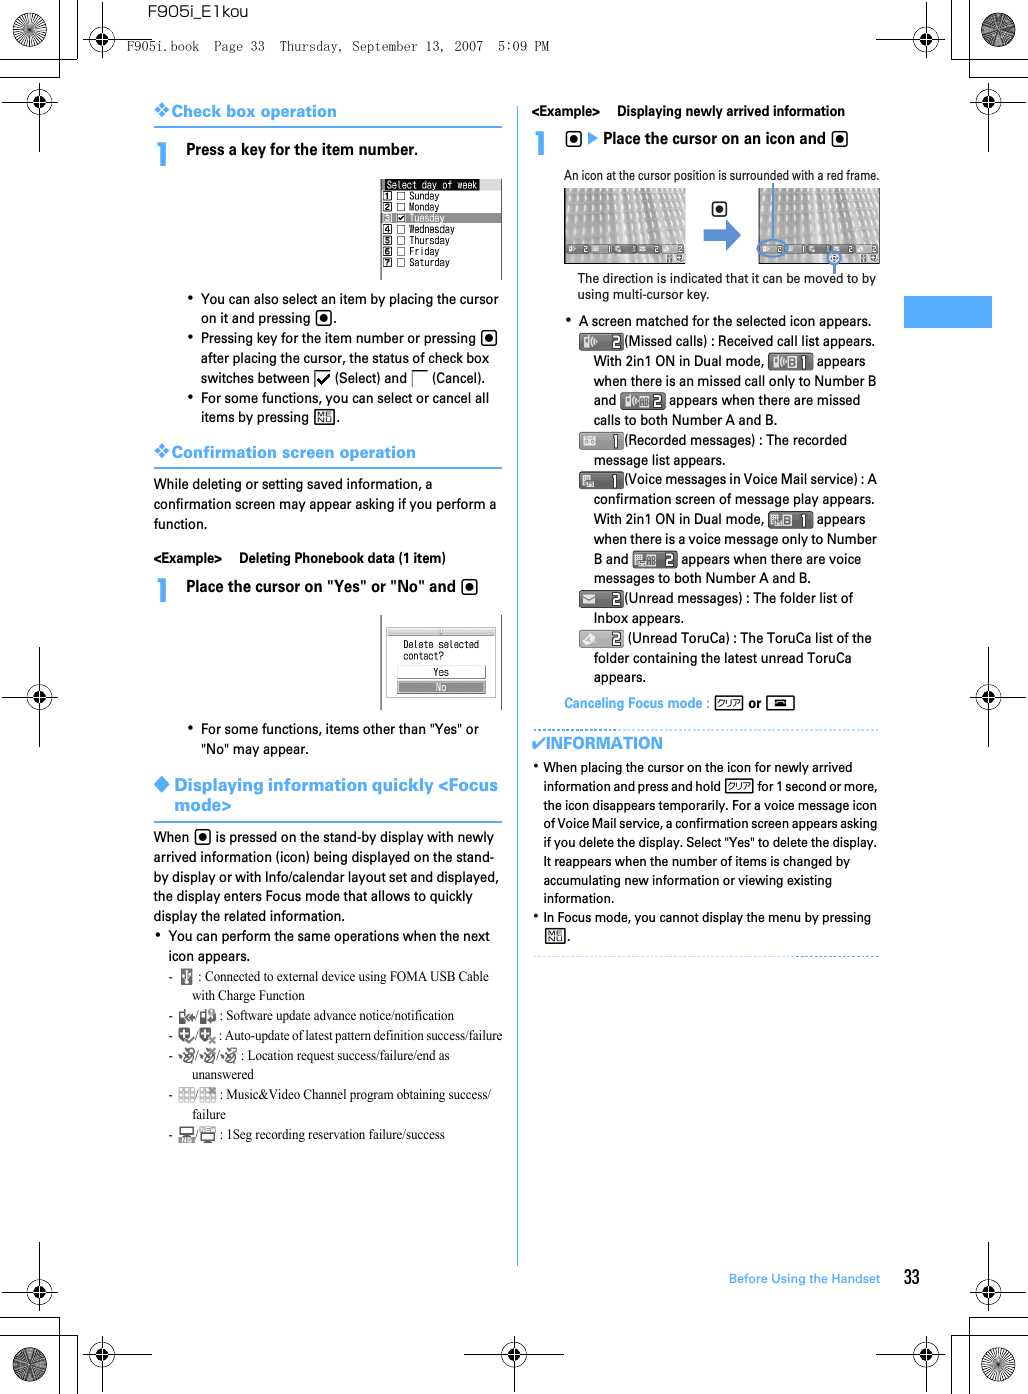
![25Before Using the HandsetF905i_E1kouPress and hold for 1 second or more : Display i-αppli folder list.lReceived calls/← (previous) keyUse to display Received calls, switch displays, move the cursor leftward.Press and hold for 1 second or more : Set/cancel Privacy mode.rRedial/→(next) keyUse to display Redial, switch displays, move the cursor rightward.Press and hold for 1 second or more : Start/cancel IC card lock.*Representation of the icon may vary by the key operations as jhk.opPhonebook/Schedule keyUse to display Phonebook, perform the operation shown in the upper right part of the guide area.Press and hold for 1 second or more : Display SchedulerpaMail/▼ (Scroll)/Lower-right soft keyUse to display mail menu, scroll downward the mail screen or site/website display by pages, perform the operation shown in the lower-right corner of the guide area.Press 2 times : Check new messagePress and hold for 1 second or more : Display Compose new message screen.qfPower/End keyUse to terminate on-hold, calling/operating function, display/hide calendar layout.Press and hold for 2 seconds or more : Turn power ON/OFF.r##/Line-feed key/Macro shooting/Silent modeUse to enter "#", start a new line when entering characters, switch Macro mode while using out-camera.Press and hold for 1 second or more : Start/cancel Silent mode.ssMultitask keyUse to perform another function while talking or perform an operation (Multiaccess/Multitask).tCharging jackuJackConnect various optional devicesvOut-cameraUse to shoot still images or movies, send images over a videophone call.wLight→P62, 105, 142, 347105Turn on or blink when activating Lock on close, shooting an image, recording a movie, operating Music&Video Channel player or Music player operate according to the settings of Indicator light or Light alert, Simple light or Light.xSub-display→P29yFOMA Built-in antenna*The terminal has a FOMA built-in antenna. To talk in better conditions, do not cover the antenna with your hand.zFingerprint sensor→P112Register/authenticate fingerprintAFeliCa mark→P232, 305Installation of IC card*You can use Osaifu-Keitai by placing it over IC card reader or send/receive data by iC transmission. The IC card cannot be detached.BBack coverCStrap openingDSpeakerHear ring alert or voice of the caller using the speakerphone, etc. from here.EPPushTalk/REC keyUse to display a menu on the sub-display, operate PushTalk, save still image during 1Seg watching.Press and hold for 1 second or more : Video recording during 1Seg watchingFmicroSD memory card slot→P292G1Seg antenna→P253HMMusic keyUse to perform menu items on the sub-display, operate Music&Video Channel player or Music playerPress and hold for 1 second or more : Start Music playerISide keys[▲▼]Side keys[▲] : Stop ring tone, alarm or vibrate effect, increase the volume during a call or PushTalk call, turn on the light of the sub-display while the FOMA terminal is folded, switch display, select menuSide key[▲](1 sec. or more) : Start Quick answer machine while a call is incoming, start/stop voice memo/movie memo during a call, starting/cancel Silent mode while the FOMA terminal is folded*, activate answer machines/voice memos on the stand-by display while the FOMA terminal is openSide key[▼] : Decrease the volume during a call or PushTalk call, Turn sub-display light ON while the FOMA terminal is open, switch display, select menu itemSide key [▼] (1 sec. or more) : Silence while watching 1Seg or playing video, check new message on the stand-by display**The setting of pressing and holding the Side keys is the operation in the default state.JEarphone/microphone jack→P354Connecting the Earphone/microphone with switch Slide cover in the direction of a, connect an optional Flat-plug Earphone/Microphone with Switch, etc (b).*Securely insert the plug.*Avoid wrapping the cord around FOMA terminal or bringing it close to the antenna. Doing so may lower wave reception level or generate noise.CoverF905i.book Page 25 Thursday, September 13, 2007 5:09 PM](https://usermanual.wiki/Fujitsu-Client-Computing/FOMA-F905I.Manual-part-2/User-Guide-847614-Page-3.png)
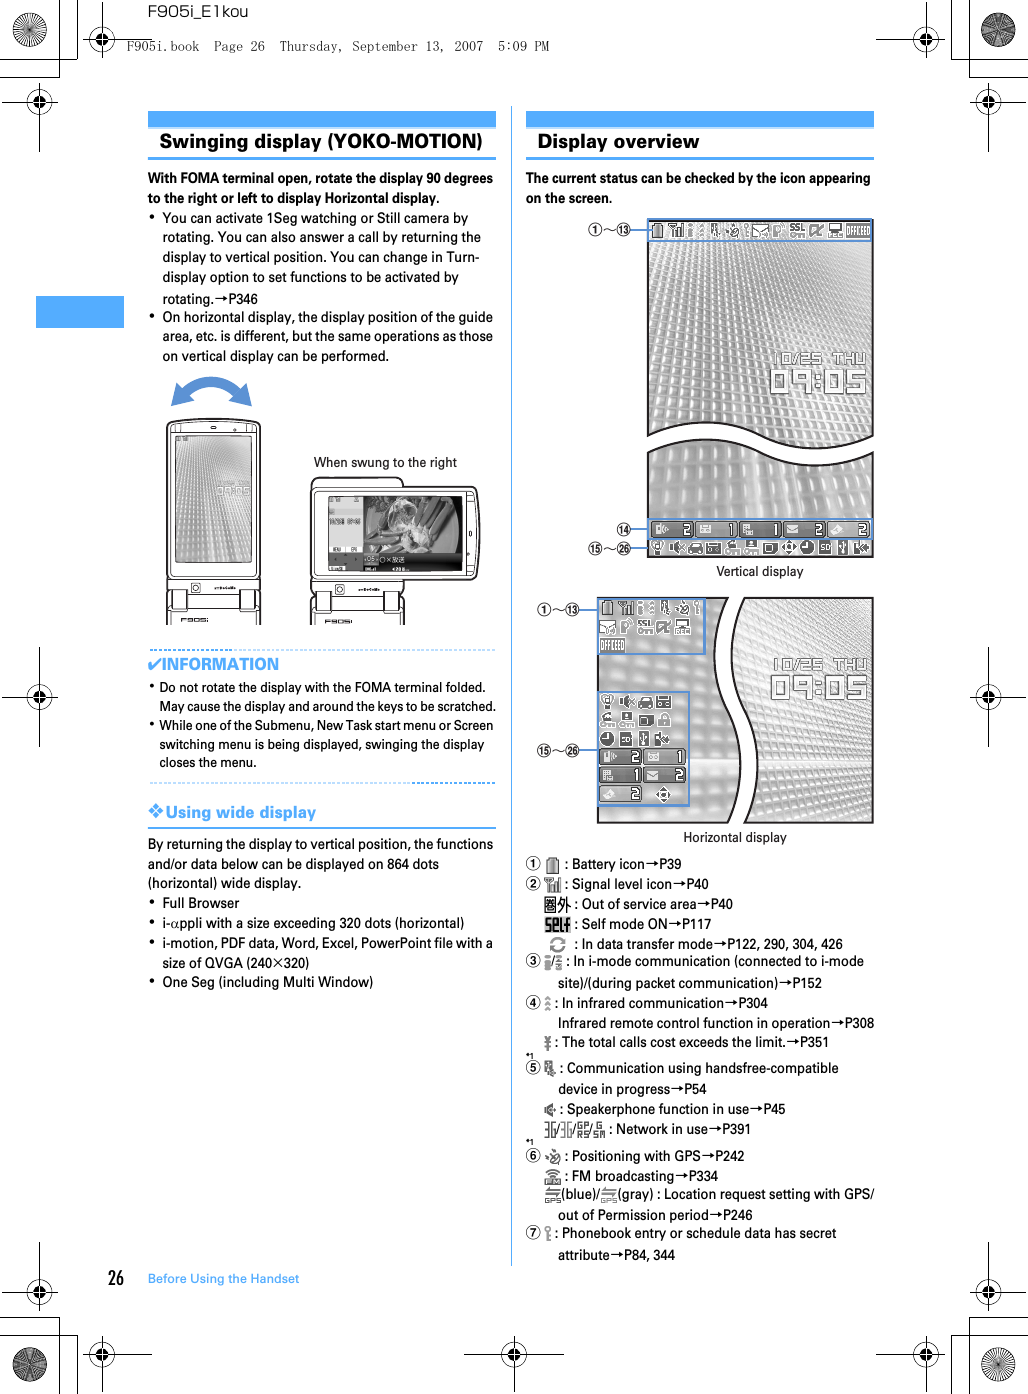
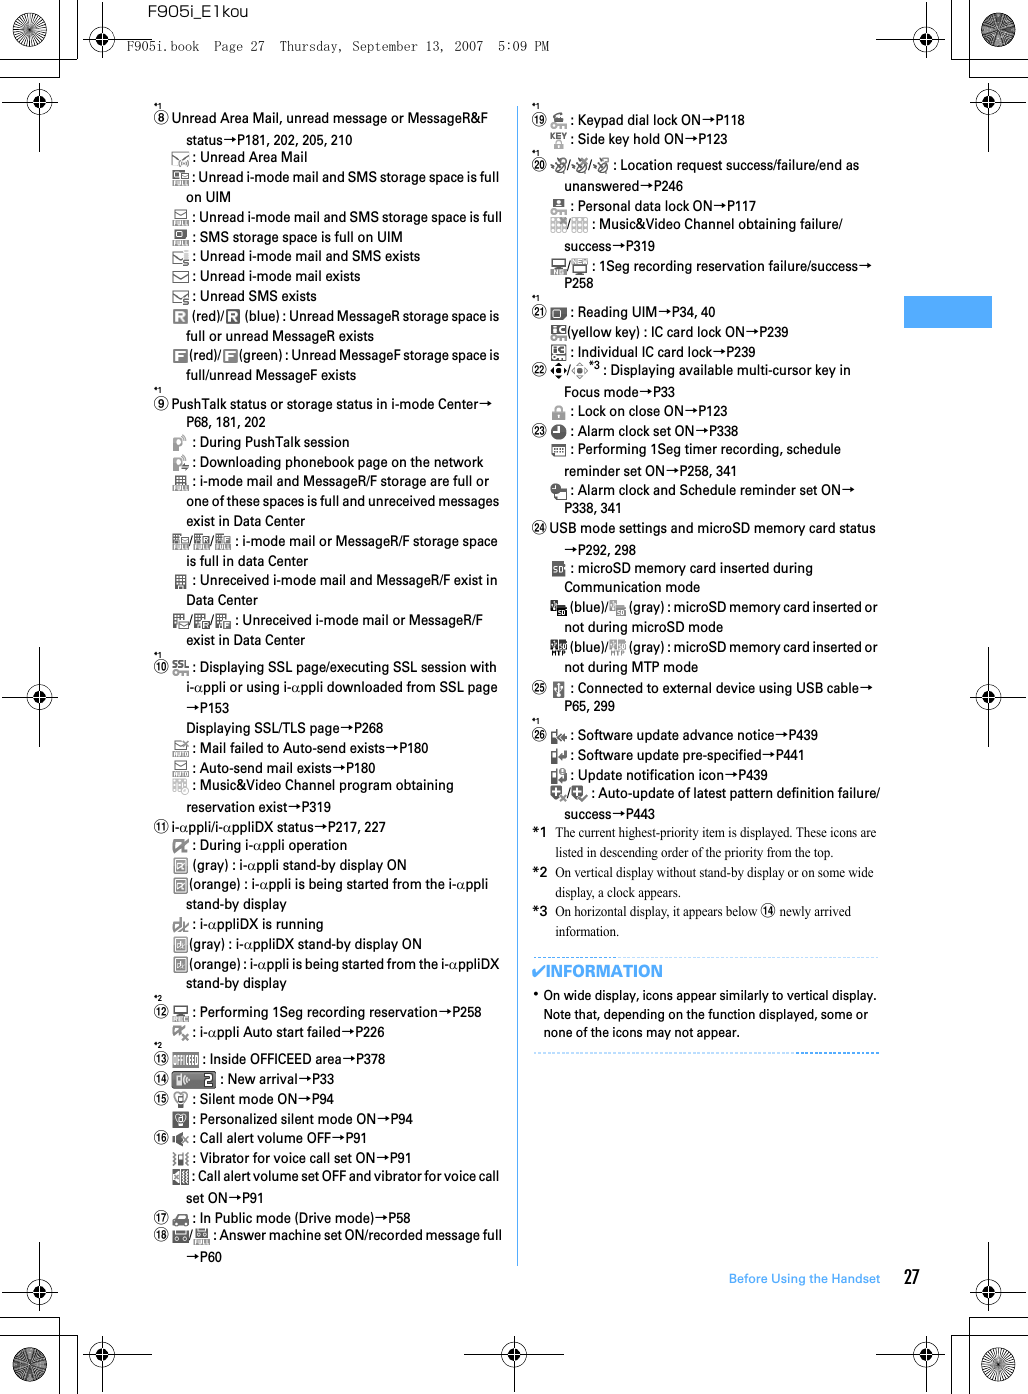
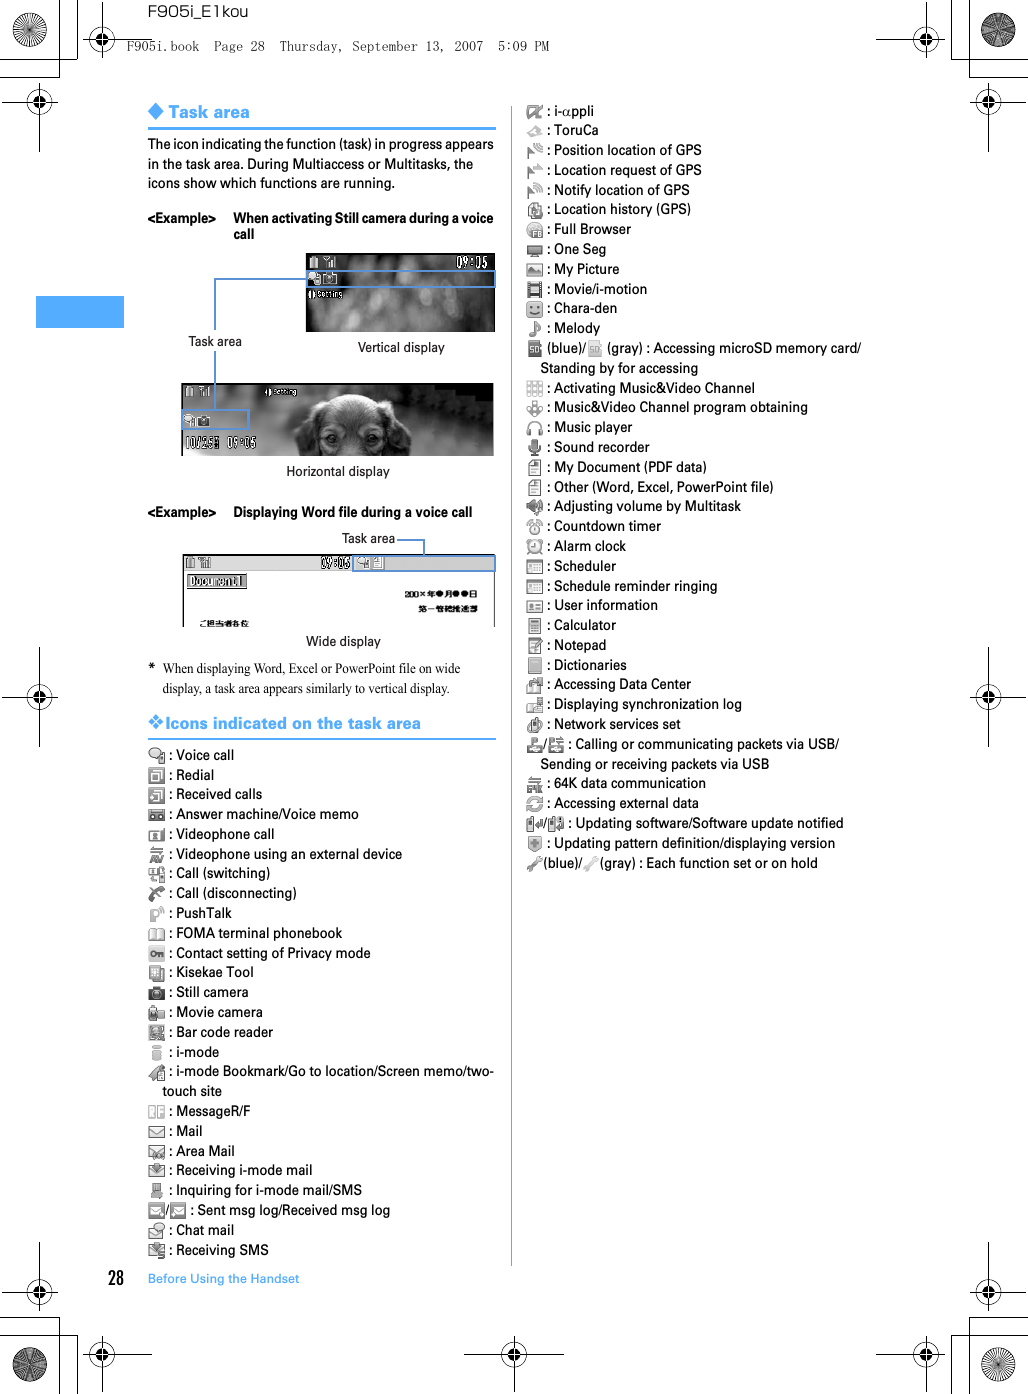
![29Before Using the HandsetF905i_E1kou◆Guide areaOperations that can be executed by pressing m, t, g, p and a are displayed in the guide area. Displayed operations vary by the screen.Display locations and keys correspond as shown in the figure.・ on the guide area corresponds to multi-cursor keys k (It may be different depending on the function you are using or how the site or website is made).・When the display is placed in horizontal position, this is displayed at the left bottom of the display.・In wide display, press * to display a guide area; each pressing of this key switches guide area display/hide (except during One Seg watching).◆List screenaWhen a list extends to multiple pages, the currently displayed page number and the total number of pages appear.bThe items can be selected by pressing the keypads corresponding to the displayed number (1-9). On vertical display, item can be selected also by pressing the displayed next key. : 0 : M : * : Side key[▲] : # : Side key[▼]cindicates that other selectable items exist above and below the item at the cursor position. Press j to move the cursor. When d is pressed on the last item of the page, the next page appears, when u is pressed on the first item of the page, the previous page appears. indicates that selectable items exist over the multiple pages. Press h to change the page. Some screens such as an icon selection screen cannot be switched.Sub-display overviewEven when FOMA terminal is folded, various information can be checked on the sub-display.・Main displayed information are as follows.- Status display of voice call, videophone (including Chaku-moji and Voice messages in Voice Mail service), PushTalk, recorded message- Inquiring or receiving i-mode mail, SMS or MessageR/F- Status display of Position location of GPS, Location request, Notify location function- While watching 1Seg, playing melody, activating Music&Video Channel player, activating Music player or using microSD memory card- During Alarm clock, Schedule reminder or Countdown timer sounding- Status display of packet communications, 64K data communication, via USB communication, infrared communication・In All lock, Omakase Lock, Side key hold, pressing side keys [▲▼], P or M shows a message indicating the lock is set, and after a period of time, the display is switched to the date/time display screen.・When the FOMA terminal is folded, the light on the sub-display turns on. When no operation is carried out for approximately 15 seconds, the light goes unlit; it goes lit again when one of side keys [▲▼], P or M is pressed.・When opening the FOMA terminal with information displayed on the sub-display, display disappears. During shooting a still image, recording movie, shooting stand-by or recording stand-by with Sound recorder, the status appears only when the FOMA terminal is open. While recording with Sound recorder, the status appears regardless of the status of the FOMA terminal.・By pressing P while watching 1Seg or activating Music player , you can display date and time.Guide areaacbF905i.book Page 29 Thursday, September 13, 2007 5:09 PM](https://usermanual.wiki/Fujitsu-Client-Computing/FOMA-F905I.Manual-part-2/User-Guide-847614-Page-7.png)
![30 Before Using the HandsetF905i_E1kou❖Icon list displayed on the sub-displaya : Battery iconb : Signal level icon : Out of service area : Self mode ON : In data transfer modec/ : In i-mode communication (connected to i-mode site)/(during packet communication)d : Silent mode ON : Personalized silent mode ON : Activating Music player : During One Seg watchinge/ : Location request setting with GPS/Out of permission periodf : IC card lock ONg/ : i-mode mail and MessageR/F storage spaces are full in the Centerh/ : Auto-send mail exists/failed auto-send mail existsi : Missed calls/recorded messages/Voice messages in Voice Mail service existsj/ / : Unread Area mail exists/Unread i-mode mail and SMS exist/storage space is fullk/ : Unread MessageR exists or unread MessageR storage space is full/ : Unread MessageF exists or unread MessageF storage space is full◆Switching display of sub-displayWhen missed calls, recorded messages, unread messages, unread MessageR/F or Voice messages in Voice Mail service in the Center exist, turn on the sub-display light and press side key [▼] to check the number of these items. While checking the number of items, if you press side key [▲], detail information appears for approx. 5 seconds (except for voice mail in the Center).・Up to 10 detail info can be confirmed by pressing the side key [▼].<Example> Switching to detail information of missed calls 1Side key [▲] while confirming the number of itemsThe Number of items, total number of items, receive date/time, and the caller information are scroll-displayed.Selecting functions from menu◆Menu screen and switching method❖Menu screenThe menu screen below is available.Kisekae menu : A menu that you can change the design using Kisekae tool.In addition to menus compatible with movies, Large menu (AdvancedMode) that is easy to view with large font and Simple Menu are available. A Kisekae menu matched with the color of the FOMA terminal is set by default.*Some Kisekae menu changes the menu structure of its first layer according to usage frequency. In the Kisekae tool set by default, "DoCoMo-Dake" in the "i-mode" folder is compatible with this function.Basic menu : A basic menu that the menu numbers are fixed. Compatible with Large font.Shortcut menu : A menu that menu items can be freely registered.→P344d j h i af e b c g k Side key [▲]F905i.book Page 30 Thursday, September 13, 2007 5:09 PM](https://usermanual.wiki/Fujitsu-Client-Computing/FOMA-F905I.Manual-part-2/User-Guide-847614-Page-8.png)
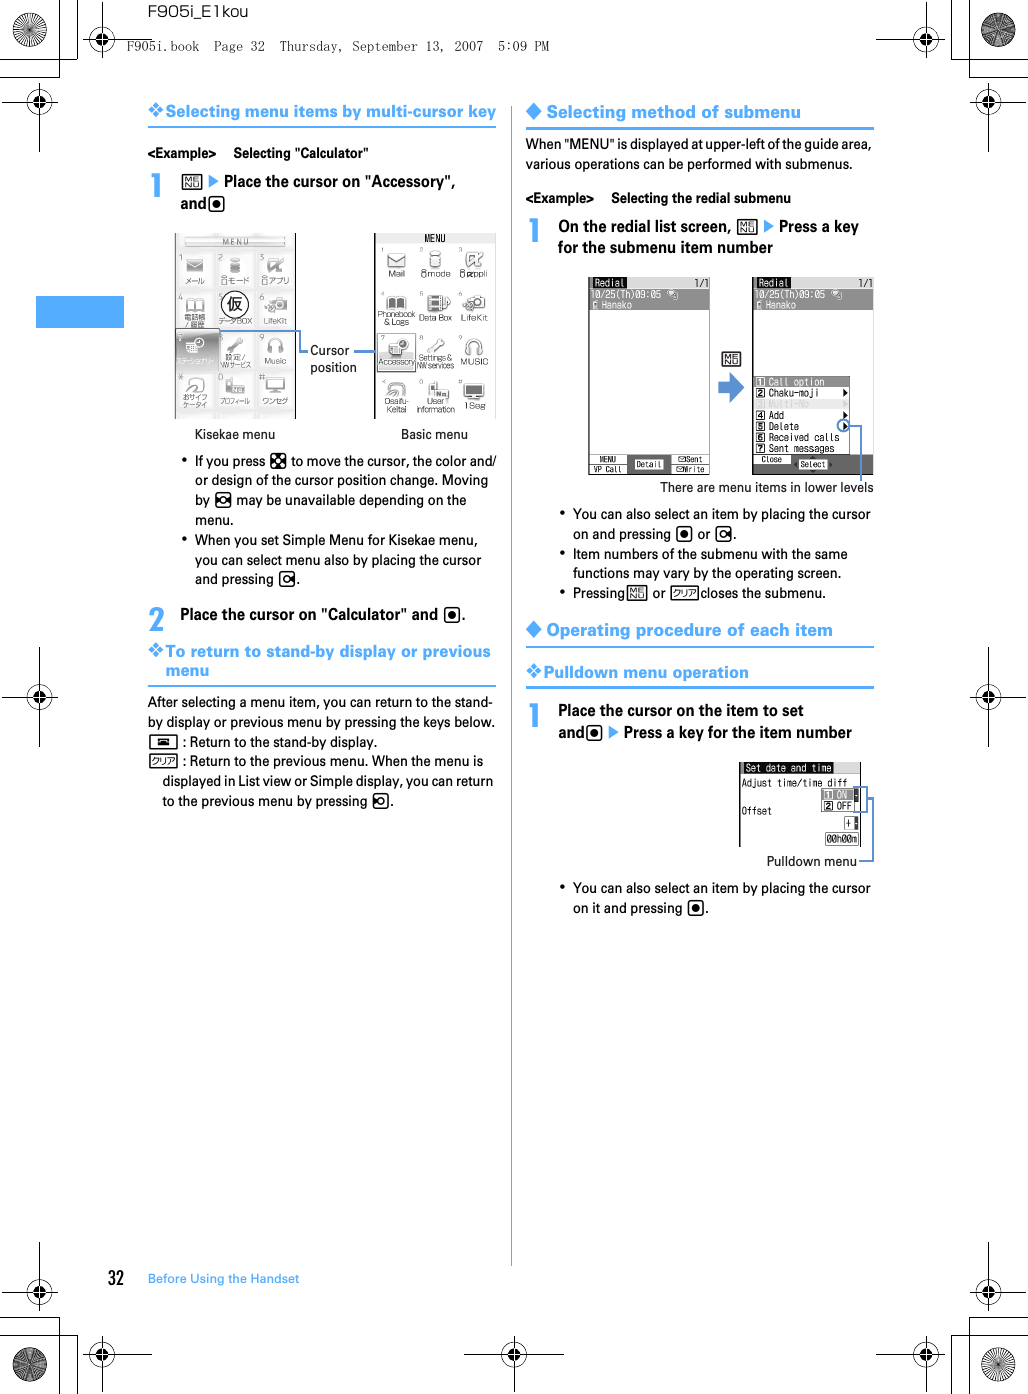
![31Before Using the HandsetF905i_E1kou❖To switch the menu screen temporarilyIn each menu screen, you can temporarily switch to a different menu screen by the operations below. You can also set which menu to display when pressing m on the stand-by display.→P101*1Cannot be switched when "Basic menu" is set as Select startup menu.*2Cannot be switched when "Kisekae menu" or "Shortcut menu" is set as Select startup menu.❖Precautions on using Kisekae menuAlthough "me[Settings & NW services]e572" is described in this manual, when using a Kisekae menu that the menu structure of the first layer is changed according to the usage frequency, [Settings & NW services] may not be displayed in the menu of the first layer. In such a case, switch to the basic menu or reset (→P104) the menu settings.◆Selecting a functionPress m in stand-by and select and execute the functions from the menu displayed.There are 2 ways. One method involves using the key corresponding to the menu items (Shortcut operation). In the other method, the multi-cursor key is used to select from among the menu items.・When any function is restricted by lock functions or no UIM in slot, icon appears or characters are displayed in a different color that the function is disabled. The display does not change for Kisekae menu or Basic menu on horizontal display. When a function is selected, the reason the function is nonexecutable, etc. appears.・On vertical display, function description about the menu item at the cursor position may appear depending on the type or level of the menu. And the setting may be displayed depending on the menu item.❖Selecting menu items by key (Shortcut operations)A number (item number) is assigned to each menu item. The menu icons can be selected by pressing the corresponding key (0-9, *, #).・When the menu items or numbers of the first layer are switched in Kisekae menu, press the item number displayed with the menu item you want to select.・Item numbers differ when Simple Menu is set in Kisekae Tool.・Item number of the menu→P394"Menu list"<Example> Selecting "Calculator"1me7e4tp*1p*1p*2p*2Custom menuKisekae menu Basic menum74F905i.book Page 31 Thursday, September 13, 2007 5:09 PM](https://usermanual.wiki/Fujitsu-Client-Computing/FOMA-F905I.Manual-part-2/User-Guide-847614-Page-9.png)
![34 Before Using the HandsetF905i_E1kouSelecting a function from menu on sub-displayYou can select 5 functions of MusicPlayer/End MusicPlayer, Lock/Unlock IC card, Silent mode ON/OFF, Check new msg , Simple light.<Example> Performing i-mode inquiry1While sub-display light is ON, PeUsing side key [▲▼], place the cursor on "Check new msg" and M・During menu display, press P to return to date/time display.・Authentication is required when "Unlock IC card" is selected.Using UIM (FOMA card)UIM (FOMA card) is a card for storing user information such as phone numbers.・If a UIM has been inserted incorrectly or if there is a problem with the UIM, you cannot make/receive a call or send/receive a mail.・For details on handling UIM, see the UIM manual.◆Attaching/removing UIM・After turning the power OFF, fold FOMA terminal and hold it with your hand.・Take care not to touch or scratch the IC portion.・Attaching/removing back cover and battery pack→P36✔INFORMATION・Forcing the UIM into or out of FOMA terminal may damage UIM or the tray.・If the tray is removed, press it straight along the guide rail inside the UIM slot with the UIM left detached.◆Security code of UIMTwo security codes, "PIN code" and "PIN2 code", are set for the UIM.You can change the security codes by yourself.→P112CursoraHolding the tab, pull out the tray until it clicks.TrayTab■ AttachingbPut UIM with the IC side upward on the tray in the direction shown in the figure.ICCorner cutUIMcPush the tray fully until it stops.aHolding the tab, pull out the tray until it clicks and carefully remove UIM.■ RemovingUIM slotTabF905i.book Page 34 Thursday, September 13, 2007 5:09 PM](https://usermanual.wiki/Fujitsu-Client-Computing/FOMA-F905I.Manual-part-2/User-Guide-847614-Page-12.png)
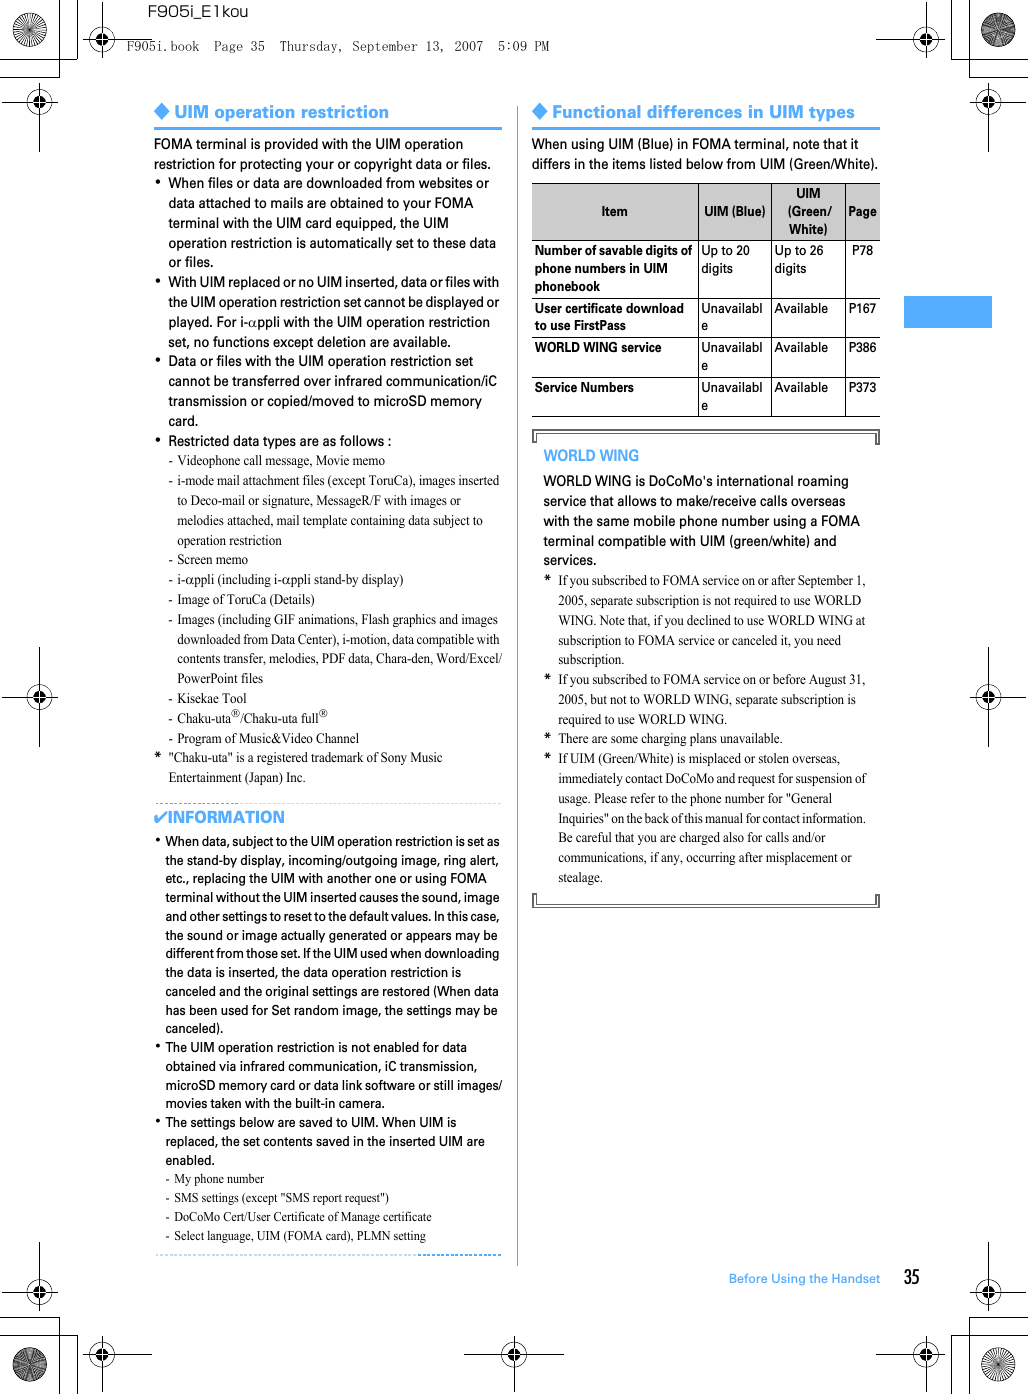
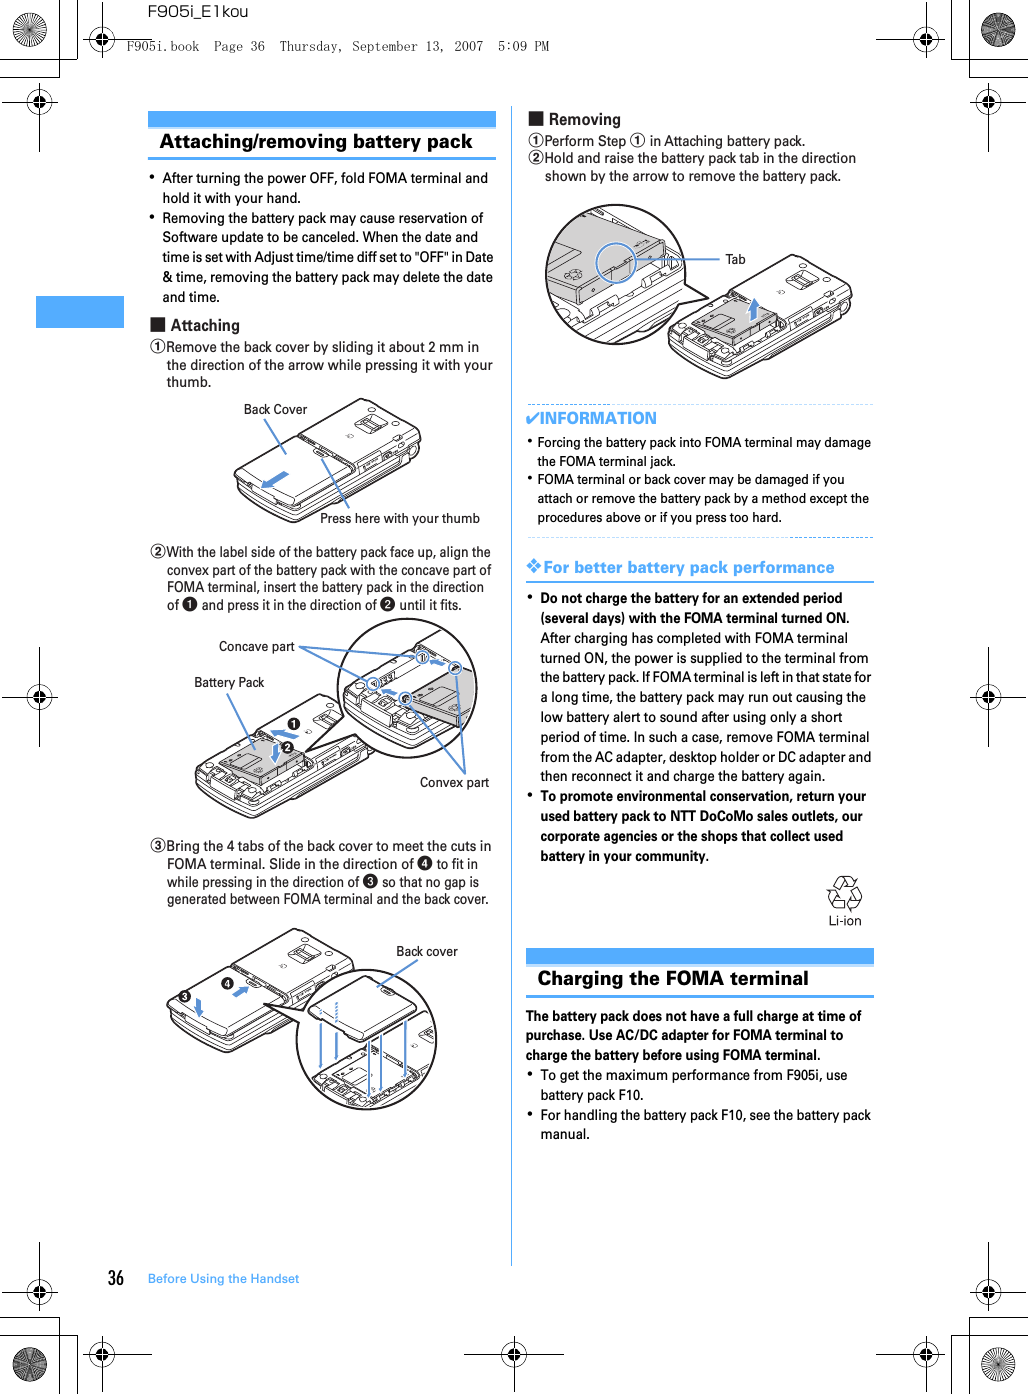
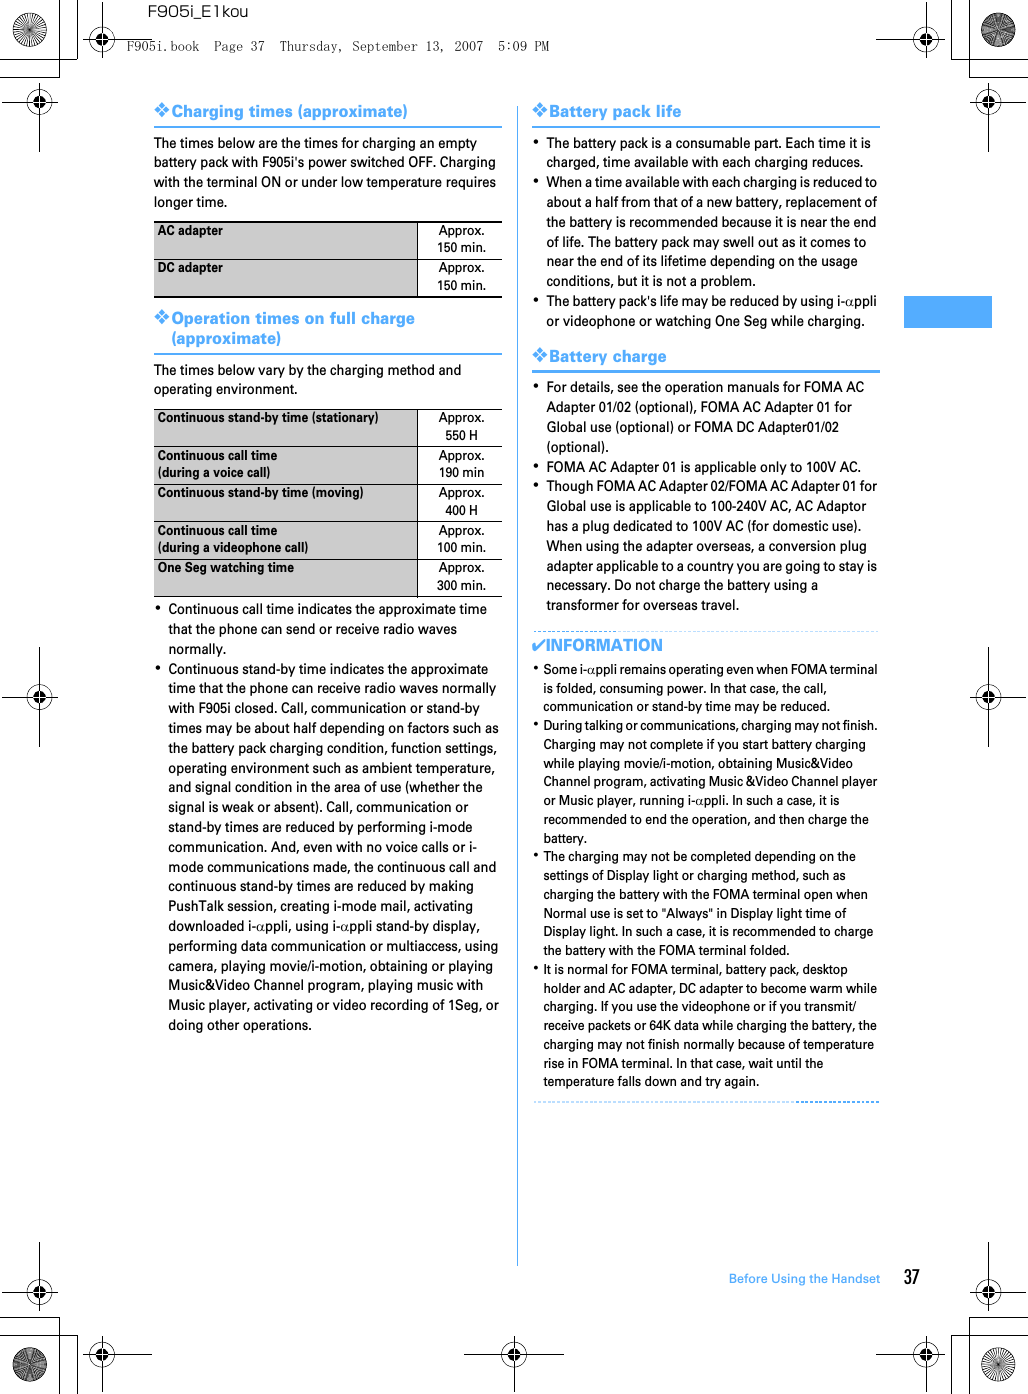
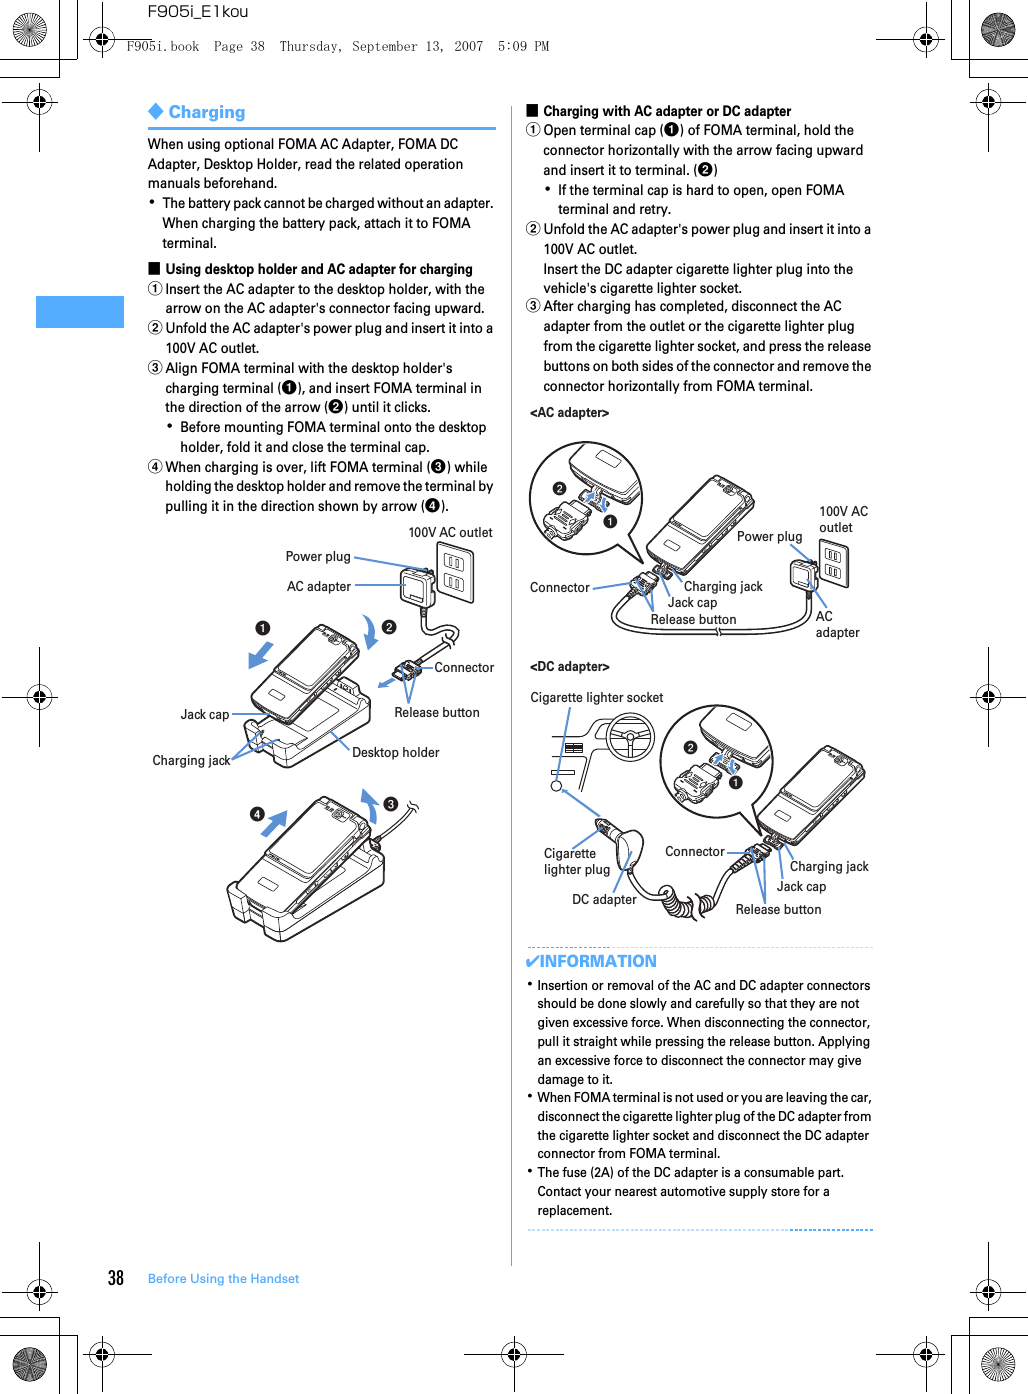
![39Before Using the HandsetF905i_E1kou❖Operations and precautions for chargingWhen charging starts, a charge start alert sounds, light turns ON and the battery icon (the default battery icon) on the display or sub-display blinks. When charging is over, a charge completion alert sounds, the light turns off and the battery icon stops blinking.・When resuming the battery charging, the light turns on in red. In some environments, the light may not light immediately when charging starts; this is normal and not a malfunction. However, if the light fails to light after a while, disconnect FOMA terminal from the AC adapter, desktop holder or DC adapter then connect it again to start charging. Contact the sales outlet such as DoCoMo Shop if the light fails to light for a while after charging starts.・If the light is used for mail reception, camera shooting, etc. during charging, the light turns to a different color, but it is lit in red soon.When the light blinks while charging in cases except these reasons→P428 "Troubleshooting"・When attaching the fully charged battery pack to the FOMA terminal and connecting it to the AC adapter, desktop holder or DC adapter, the light may turn on for a moment and turn off. This is normal and not a malfunction.・During a call, communication or PushTalk session, in Silent mode or Public mode or with Charge alert "OFF", the charge alert does not sound at start or completion of charge.Remaining battery levelChecking remaining battery levelA battery icon appearing on the top of the display shows an approximate remaining battery level.(Battery level 3) : Ample charge(Battery level 2) : Low charge.(Battery level 1) : Battery level very low. Charging required・The battery icon set by default varies by the color of the FOMA terminal.・When FOMA terminal is folded, the remaining battery level can be checked on the sub-display.❖When battery is almost exhaustedA message indicating low battery appears on the display. Pressing any one of g, c, f keys deletes the message temporarily. After a period of time, a battery alarm sounds from the speaker and all icons on the top of the display start blinking. The power is turned off after approximately 1 minute. These operations stop when charging starts; press f to immediately stop the battery alarm.・During a call, the message remains displayed and the battery alarm keeps sounding from the earpiece. After approximately 20 seconds, the call is terminated, the battery alarm sounds from the speaker and all icons on the top of the display blink. ・With the FOMA terminal folded, the sub-display shows "Low battery".◆Checking remaining battery level by sound and display <Battery level>1me[Settings & NW services]e775The battery level appears and the keypad sound (→P92) is emitted depending on the battery level. After a while, the screen returns to the menu list.Battery icon"Three pips" "Two pips" "One pip"(Battery level 3) (Battery level 2) (Battery level 1)F905i.book Page 39 Thursday, September 13, 2007 5:09 PM](https://usermanual.wiki/Fujitsu-Client-Computing/FOMA-F905I.Manual-part-2/User-Guide-847614-Page-17.png)
![40 Before Using the HandsetF905i_E1kouPower ON/OFFTurning power ON/OFF❖Turning power ON1f (2 sec. or more)The wake-up screen appears and the stand-by display appears. appears at the bottom of the display while reading UIM.・A signal level icon appearing in the top of the display shows the approximate received signal level.・The battery icon set by default varies by the color of the FOMA terminal.・With the FOMA terminal folded, the reception level can be confirmed on the sub-display.❖Turning power OFF1f (2 sec. or more)◆Operations to perform after turning the power ON for the first timeWhen turning the power ON for the first time, operate in the order of "AdvancedMode setting" → "Initial setting". The settings made can be changed later.・When initialization is finished, a confirmation screen of software update function appears. Press g to display the stand-by screen.❖AdvancedMode setting1"Yes" or "No" on the confirmation screen.・When selecting "Yes", "AdvancedMode" of Kisekae Tool is set.→P406If you cancel the confirmation screen by pressing c or f, the confirmation screen reappears when the power is turned ON the next time.❖Default settingMENU [Settings & NW services] 779・Set Password and Request permit/deny. When p or c, f is pressed before setting terminal security code or Request permit/deny, a confirmation screen appears asking if you exit. If you exit by selecting "Yes", this confirmation screen reappears when the power is turned ON the next time.1Set the required items on the initial setting screenepDate & time : Set the date and time.→P41Password : Change the terminal security code, after performing authentication.→P111Fingerprint : After performing authentication, register a fingerprint to be used for authentication.→P113Keypad sound : Set a confirmation sound to be generated when a key is pressed.→P92Font size setting : Specify size of characters for Phonebook or mail.→P106Request permit/deny : Set if you provide location information after performing authentication. To permit Location request only in a specified period of time, make settings to Permission period of Request permit/deny.→P246✔INFORMATION・When turning FOMA terminal ON, do not touch the fingerprint sensor with fingers before the stand-by display appears.・When the UIM is replaced, authentication is required after turning on the FOMA terminal. When authentication has succeeded, the stand-by display appears. If an incorrect terminal security code is entered 5 times consecutively or if authentication has failed 5 times consecutively when Fingerprint access is "ON", the power is automatically turned OFF (the power can be turned ON again).・If no operations are carried out for approximately 5 minutes with the FOMA terminal open, the display is automatically deactivated (power saving mode). The same situation occurs during voice call. The display light is turned on again if there is any operation or incoming call.Stand-by displaySignal level iconIconReceived signal levelOutside the service area and where radio waves are hard to reachStrong WeakF905i.book Page 40 Thursday, September 13, 2007 5:09 PM](https://usermanual.wiki/Fujitsu-Client-Computing/FOMA-F905I.Manual-part-2/User-Guide-847614-Page-18.png)
![41Before Using the HandsetF905i_E1kouSelect languageSwitching to English1me[Settings & NW services]e273e1 or 2✔INFORMATION・The setting of Select language are saved to UIM. When a UIM is replaced, the setting switches to that saved in the inserted UIM.Date & timeSetting date and timeYou can set so that the time or time difference is automatically corrected or directly enter the date and time. With automatic correction set, the time is corrected when receiving the time information from the DoCoMo's network in Japan or the time difference correction information from the telecommunications carrier used overseas.1me[Settings & NW services]e721eSet the required itemsepAdjust time adjust : Set if you automatically correct time.・When "ON", Offset can be set.・When "OFF", set the date and time. Time zone and Summer time may also be set.Offset : When "+", the displayed time is always set forward the specified period of time from the corrected time. When "-", the displayed time is always set back the specified period of time from the corrected time.Date : The date can be entered up between January 1, 2000 and December 31, 2050.Time : Enter the time in the 24-hour format.Time zone : When moving to a place with time difference, set the time zone without changing the date and time settings.・Time difference from the previously set time zone is calculated and displayed.・Set "GMT+09:00" in Japan.Summer time : When "ON", the displayed time is set forward one hour from the specified time.✔INFORMATION・With Adjust time/time diff set to "ON", the time or time difference is corrected when FOMA terminal is turned ON or at other timings. With no UIM inserted or for some signal conditions, the time is not corrected. During execution of certain i-αppli, time correction may be disabled.・Even when Adjust time/time diff is set to "ON", the corrected time may have an error of several seconds. Time difference correction may not be performed for some network of the telecommunications carrier used overseas.・When time correction is made overseas with Auto time adjust set to "ON", a message to that effect appears. After time is corrected with Auto time adjust, times displayed for call histories and sent messages are local times.・With Auto time adjust and Two time zone clocks set to "ON", two time zone clocks appear in 24 hour when time correction information is received from a network of the telecommunications carrier used overseas.・After setting the date and time with Auto time adjust set to "OFF", removing the battery pack or leaving it exhausted for a long time may cause the date and time to be deleted. In this case, set the date and time again after charging the battery.・If correction has never been performed and date and time are displayed with "--" or "?", clocks or Flash graphics using the date and time information do not appear correctly. The functions below are not available : - SSL session (authentication)- Certificate download- Message search (With calendar)- Downloading Chaku-uta full® with replay restriction set for copyright protection or downloading and playing i-motion.-i-αppliDX, i-αppli Auto start- Playing the program that program setting, obtaining or playing restrictions of Music&Video Channel is set.- Playing WMA files with replay restriction under copyright protection- Request permit/deny (GPS)- Alarm clock, Scheduler (including data transmission of schedule and displaying schedule data)- Timed theme, Programed activation, Update, Auto power ON, Auto power OFF, Software update- Watching/recording reservation of 1Seg, playing Uta-hodai, updating replay expiration, setting ring tone・If automatic correction of date and time has never been performed and date and time are displayed with "--" or "?", the functions below do not record the date and time, in stead display them as "----/--/--" or "----------------". A segmental number furthermore (number to segmentalize) may be appended.- Date and time of sent message, unsent message, and mail logs, date and time of saving created message template- Date and time of saving downloaded data or file- Date and time of i-αppli download- Received calls, Redial, Recorded messages/Voice memo- Date and time in the file name of still images, movies, sound files or data read with Bar code reader- Reception date and time of ToruCa, Location history (GPS)- Replay expiration of detail information of Uta-hodaiF905i.book Page 41 Thursday, September 13, 2007 5:09 PM](https://usermanual.wiki/Fujitsu-Client-Computing/FOMA-F905I.Manual-part-2/User-Guide-847614-Page-19.png)
![42 Before Using the HandsetF905i_E1kouCaller ID notificationNotifying your phone number to the other partyYou can set FOMA terminal to display your number (Caller ID) on the other party's terminal when making a voice call, videophone call or PushTalk call.・For details, see "Mobile Phone User's Guide [Network Services]".・Caller ID is your important information. Carefully consider whether you want to include caller ID information when making a call.・The caller ID is displayed only when the phone of the other party is a digital mobile phone, etc. enabled to display the caller ID.1me[Settings & NW services]e8411・Press m[Settings & NW services]8412 and select "Yes" to check the current settings.21 or 2❖Priority of caller ID notificationThere are multiple methods to notify your phone number to the other party. If you set or perform these methods simultaneously, the caller ID operations are performed with the priorities below. The displayed setting and actual Notify/Not notify may differ.aWhen whether to notify a caller ID in Call option for the dialing is set→P52、68bWhen "186"/"184" is prefixed to a phone number→P50cCaller ID settings for the Phonebook entry→P84dActivate/Deactivate of Caller ID notification✔INFORMATION・If an announcement of requesting caller ID is heard when making a call, make a call again after setting your caller ID to be notified.User informationChecking your own phone numberMENU [Phonebook & Logs] 9You can check your phone number (My phone number), Name, Mail address, etc.1me[User information]Check during a call, etc. : s0✔INFORMATION・For details of how to check i-mode mail address, see "Mobile Phone Users Guide [i-mode]".・When 2in1 is ON in Dual mode, you can press a to switch User information between Number A and B.・With 2in1 ON, when replacing the UIM (2in1 subscriber to 2in1 subscriber), set 2in1 to OFF then set it to ON again to obtain a correct Number B. Also, when replacing the UIM (2in1 subscriber to 2in1 non-subscriber), set 2in1 to OFF to update to the new user information.→P376F905i.book Page 42 Thursday, September 13, 2007 5:09 PM](https://usermanual.wiki/Fujitsu-Client-Computing/FOMA-F905I.Manual-part-2/User-Guide-847614-Page-20.png)
