Fujitsu Client Computing HMD01 Head Mounted Display (HMD), Model - IOT001 User Manual
Fujitsu Limited Head Mounted Display (HMD), Model - IOT001
UserManual.wiki
>
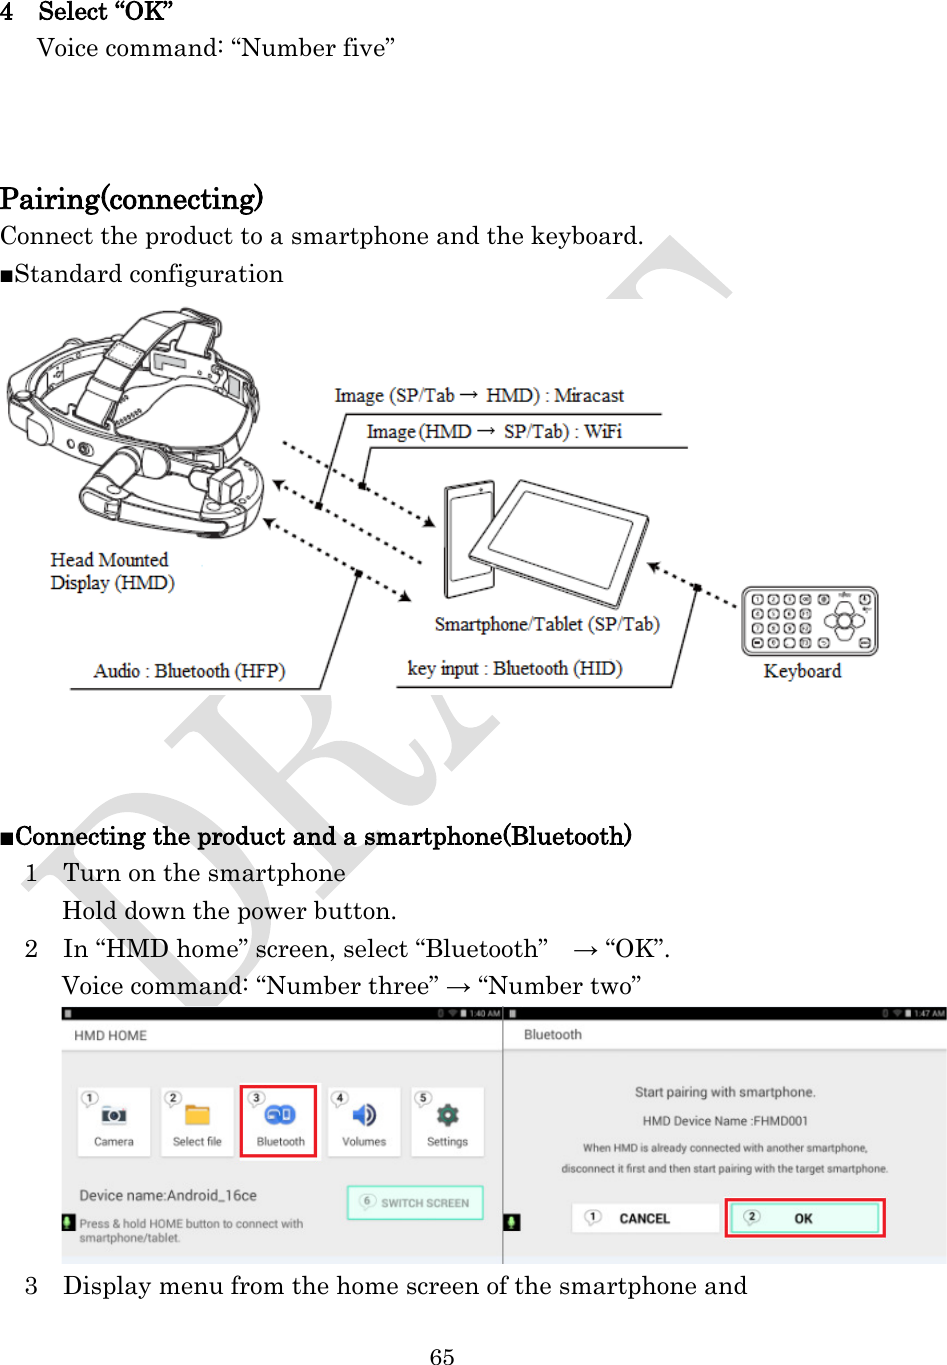
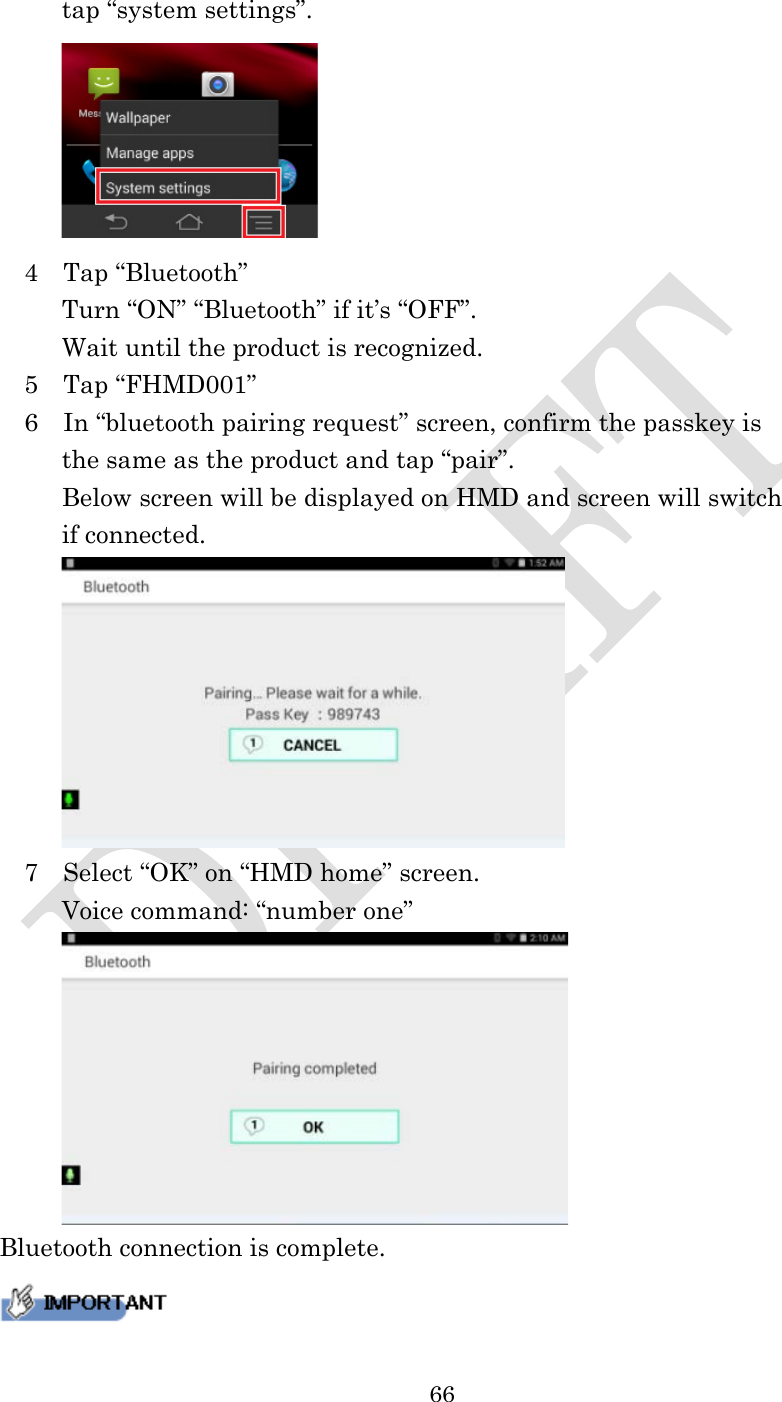
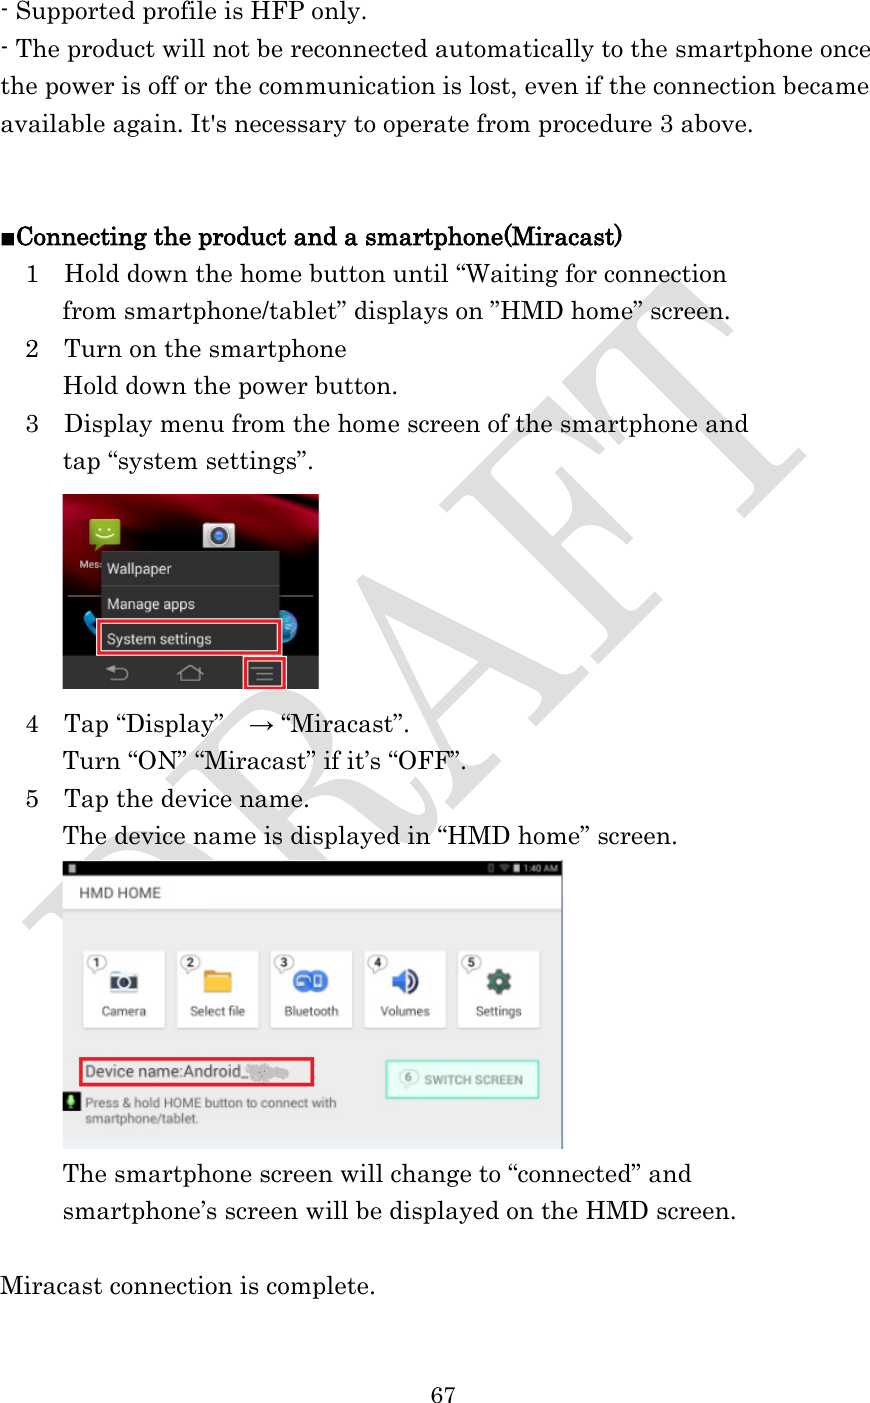
Fujitsu Client Computing
>
HMD01 User Manual
User Manual
Navigation menu
Upload a User Manual
Namespaces
Wiki Guide
HTML
PDF
Info
Views
User Manual
Discussion / Help
Navigation

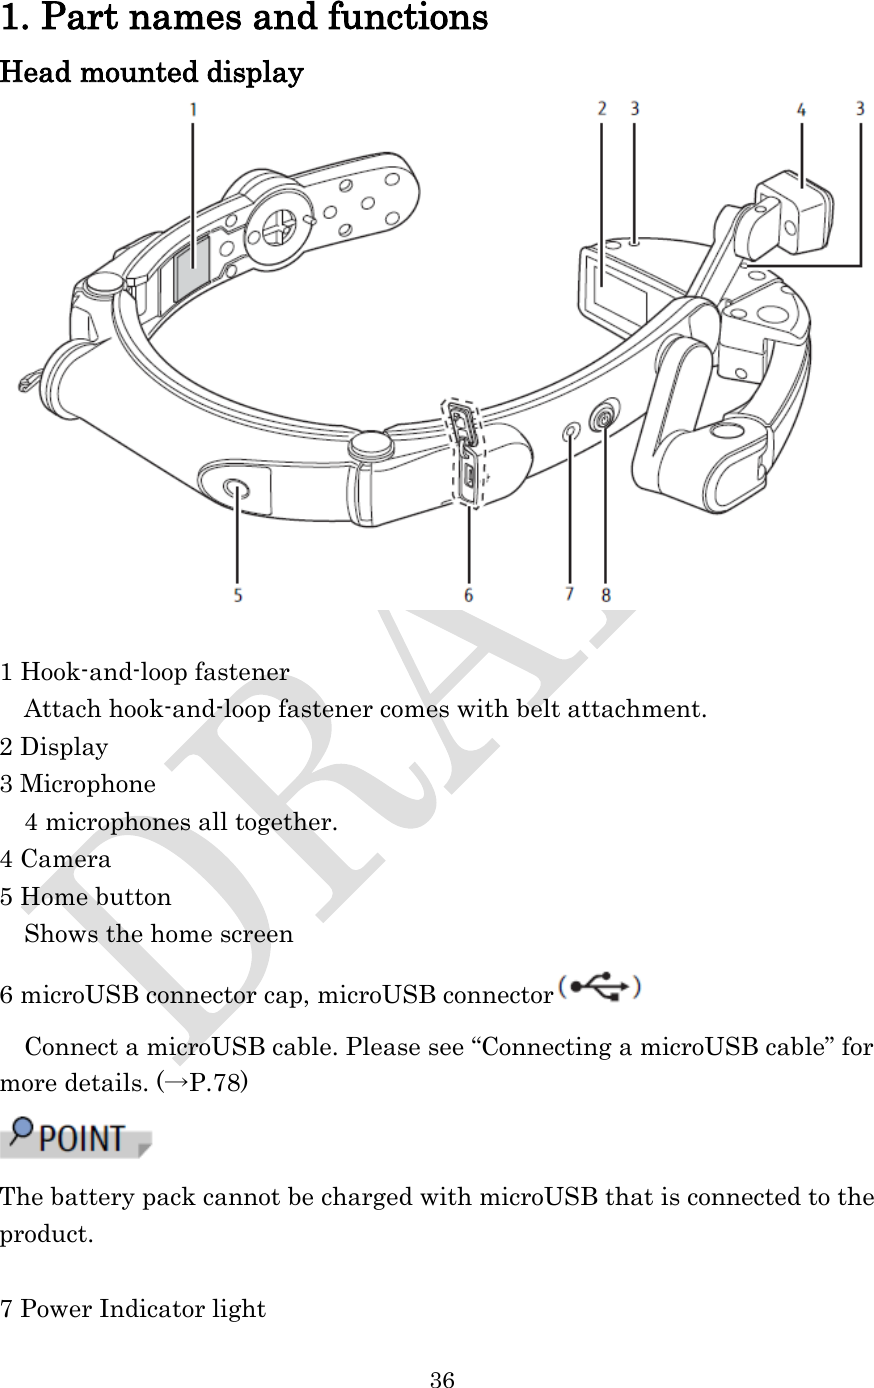
![10 ・To use in airplane, confirm with airline company in advance. About this product ・Display is manufactured by taking advantage of highly advanced technology but some dots may always or never be lit. Note that, this shows characteristics of liquid crystal displays and not defects in the products. ・The date and time settings will be cleared if the battery pack’s power level reaches 0%. Perform the operation below to set the current time and date. On the HMD home screen: → [Settings] → [other settings] → [Date & Time] Moreover, when this product is connected to a smartphone by using Miracast, the date and time on this product will be synchronized to the one on the smartphone. ・Fujitsu does not guarantee the compatibility of any commercially available accessories. ・Do not use a remodeled product. Using a remodeled product violates the Radio Law/Telecommunications Business Act. The product is certified according to technical standard conformance of specified wireless equipment based on the Radio Law/Telecommunications Business Act, and as a proof of it, the "Technical Compliance Mark" is depicted on the electronic nameplate of the product. If you remodel the product by removing its screws, your certification of technical standard conformance becomes invalid. Do not use the product with its certification of technical standard conformance invalid as it violates the Radio Law/Telecommunications Business Act.](https://usermanual.wiki/Fujitsu-Client-Computing/HMD01/User-Guide-2601105-Page-10.png)
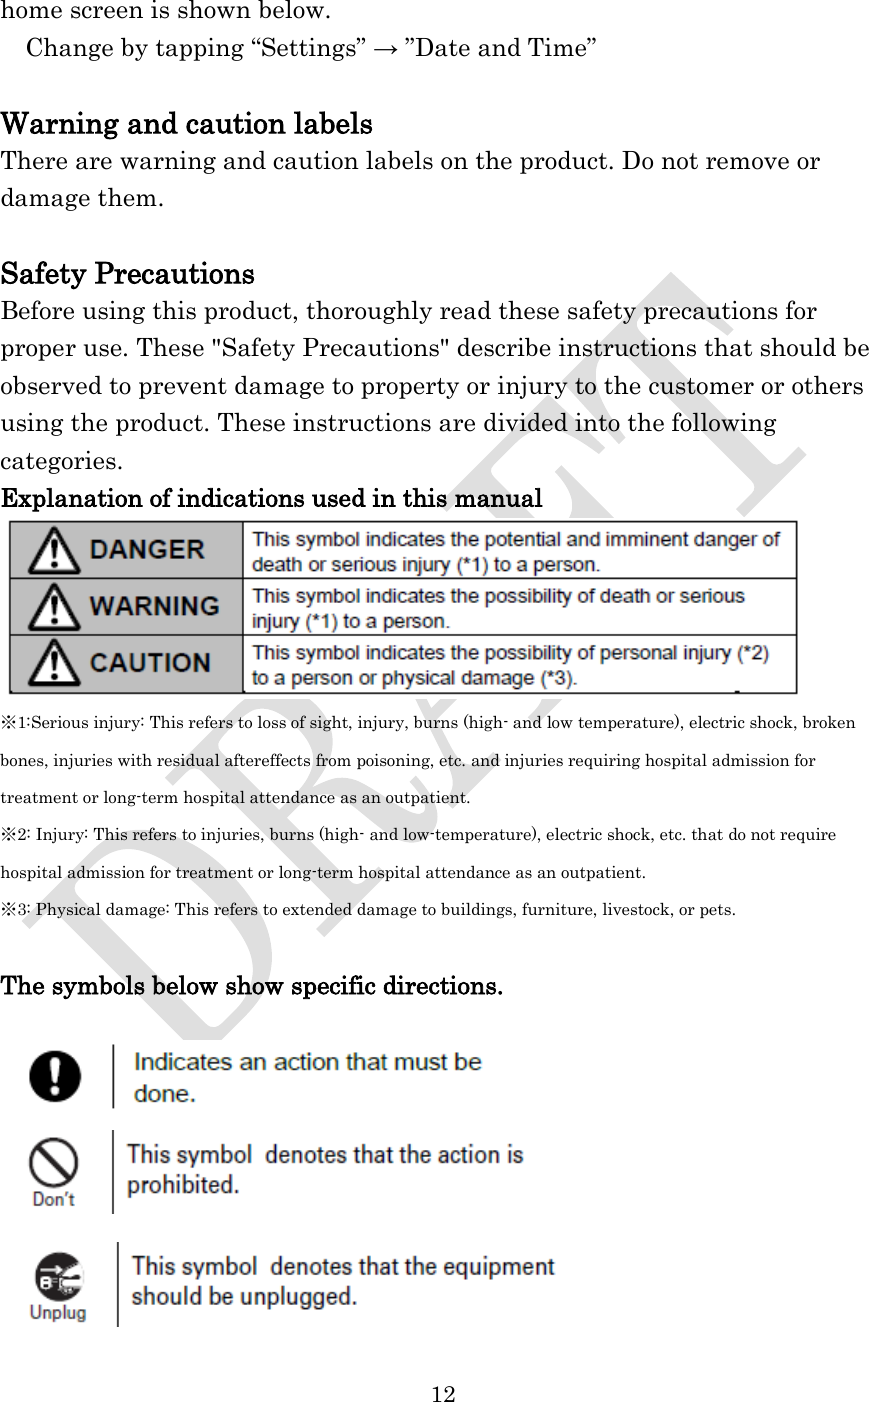
![11 Notational conventions The meaning of the signs in this manual are described below. Indicates precaution and should not do for use. Please be sure to read the information. Indicates information related to operational points. Read when needed. → Indicates reference page Name of items and notations Name of item Notation in this manual Head Mounted Display product, HMD, terminal, device Smartphone/Tablet Smartphone Wearable keyboard keyboard Mono earphone earphone microUSB cable, power cable cable microUSB connection cap, diopter adjustment cap, microSD card slot cap, battery cap, external audio connection jack cap cap Android™ Android Bluetooth® Bluetooth The images or illustration used in this manual The images or illustration used in this manual are examples. They may differ from the actual image, illustration or file name. Moreover, cables may be omitted or simplified in the illustration. Key notation and operation procedures The key notation in this manual is not the actual key image on the keyboard but description of the key. For example, [BackSpace] key, [Bluetooth] key, [Power] key, etc. Notation of continuous operations Continuous operations in this manual are shown using ‘→’ notation. For example, to change “Date and Time” by tapping “Settings” in android](https://usermanual.wiki/Fujitsu-Client-Computing/HMD01/User-Guide-2601105-Page-11.png)
![28 Bluetooth®/Wireless LAN (Wi-Fi®) function ●This product supports security features for wireless communications that are compliant with the Bluetooth® and Wi-Fi® standard specifications, but the security may not be sufficient depending on the usage environment and configuration. Be careful when making data communication using Bluetooth® or wireless LAN (Wi-Fi®) function. ●Wi-Fi® has the advantage that it can be freely connected anywhere within the radio wave range, as it uses radio waves for exchanging information. At the same time, there is a risk that a malicious third party may obtain unauthorized access if security settings have not been configured. You are recommended to configure security settings before using wireless LAN at your direction and responsibility. ●The Company assumes no responsibility for leakage of data or information that may occur during Bluetooth®/ Wi- Fi® communication. Notes on waterproof/dustproof property Before using the product, thoroughly read below to ensure correct use. Failure to follow the contents described in these sections may cause intrusion of water, sand or other foreign material, resulting in overheating, ignition, electric shock, injury or a fault. ■Waterproof/Dustproof There are microUSB connector cap, diopter adjustment cap, microSD card slot cap, battery cap, external audio connection jack cap on this product. Moreover, there are microUSB connector cap and battery cover on the keyboard. The product provides waterproofness of IPX5, IPX7 end dustproof of IP5X with firmly closing all the caps and a battery cover (based on in-house testing). [Equivalent to IPX5] IPX5 equivalent means that the product will maintain its operability as HMD even if it is sprayed with water from a 6.3 mm diameter nozzle at a distance of about 3 meters for more than 3 minutes at a rate of about 12.5 liters per minute from any direction.](https://usermanual.wiki/Fujitsu-Client-Computing/HMD01/User-Guide-2601105-Page-28.png)
![29 [Equivalent to IPX8] IPX8 equivalent means that the product will maintain its performance as HMD with no water getting inside the main unit when the main unit is gently submerged in a tank of still tap water at room temperature to a depth of 1.0 meters and left for about 30 minutes. [Equivalent to IP5X] IP5X means a protection degree that HMD keeps functioning and safety after it is placed in a device with dust in diameter 75μ or less for 8 hours, agitated and then taken out. However, proper operation of the product in every possible condition during actual use is not guaranteed. Malfunctions determined to be caused by mishandling by the customer are not covered by the warranty. ■Important items to remember before use ●Do not place the product directly on sand at a beach etc. Sand or other small particles might get inside the receiver/speaker, microphone, etc. causing the volume to drop. If sand gets inside the product, it might cause overheating or a fault. ●Close all the caps and a battery cover firmly and make sure that there are no spaces between them and the product. ●Waterproofness is only effective when all the caps and the cover are securely closed. ●Even a small particle (a hair, a grain of sand, fine fiber, etc.) between the product and the caps or the battery cover and the keyboard could cause water leakage. ●Do not poke the microphone and the speaker holes shown below with a sharp object. Damaging waterproof membrane may result in water leakage.](https://usermanual.wiki/Fujitsu-Client-Computing/HMD01/User-Guide-2601105-Page-29.png)


![39 9 Earphone connection jack cap, Earphone connection jack 10 Speaker Keyboard ■Front 1 microUSB connector cap, microUSB connector 2 [BackSpace] key 3 [Bluetooth] key 4 [Power] key Following can be done by pressing the power key. [Power] key operation Detail of operation Press the power key once Confirm remaining of dry batteries level - If the power is ON, Bluetooth/Power indicator light will be on. - If the power is OFF, Bluetooth/Power indicator light will NOT be on. Hold down the power key for few seconds Power ON/OFF. When the power is ON, Bluetooth/Power indicator light will be on.](https://usermanual.wiki/Fujitsu-Client-Computing/HMD01/User-Guide-2601105-Page-39.png)
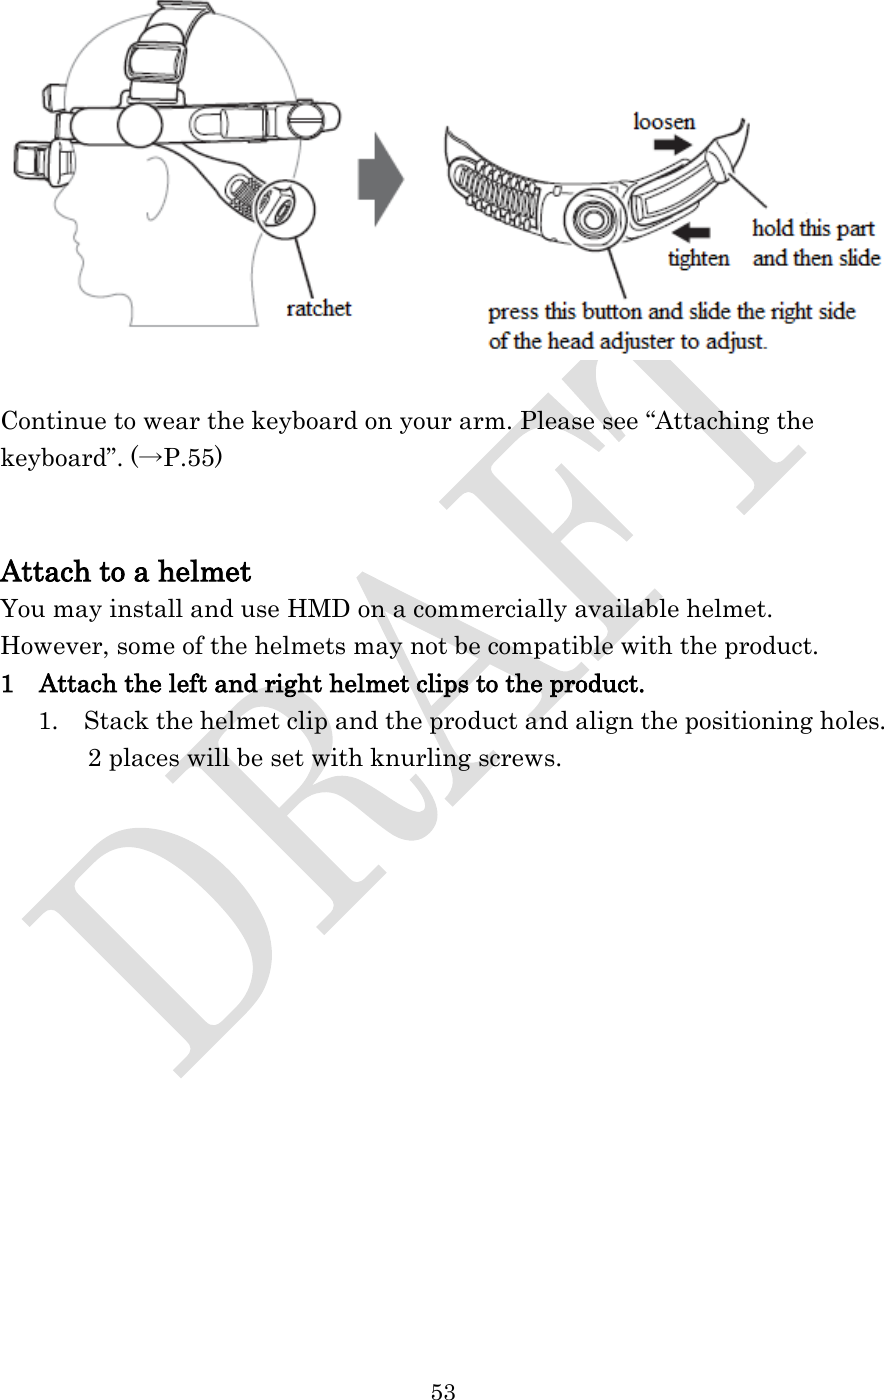
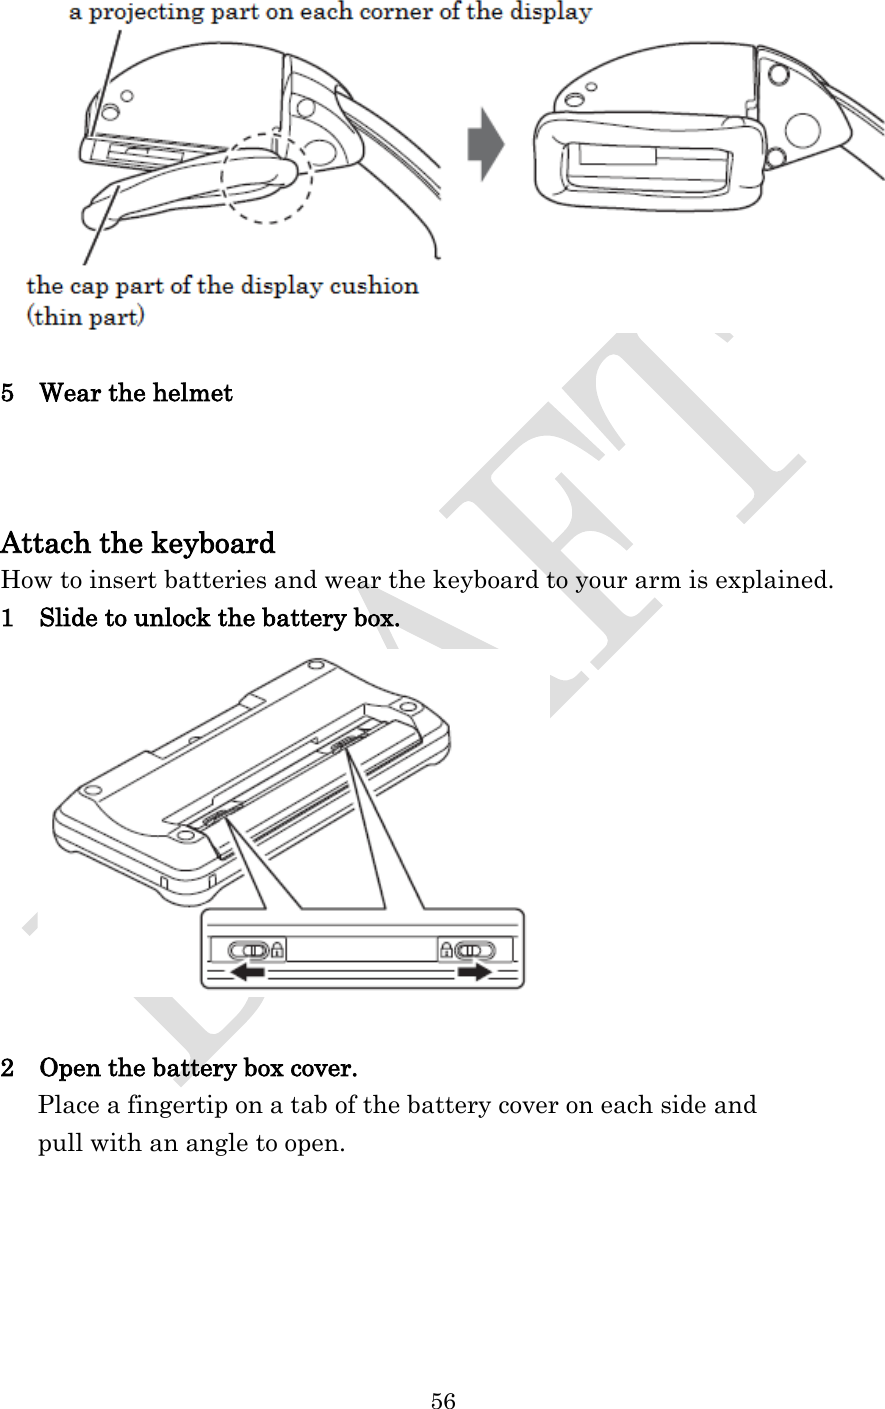
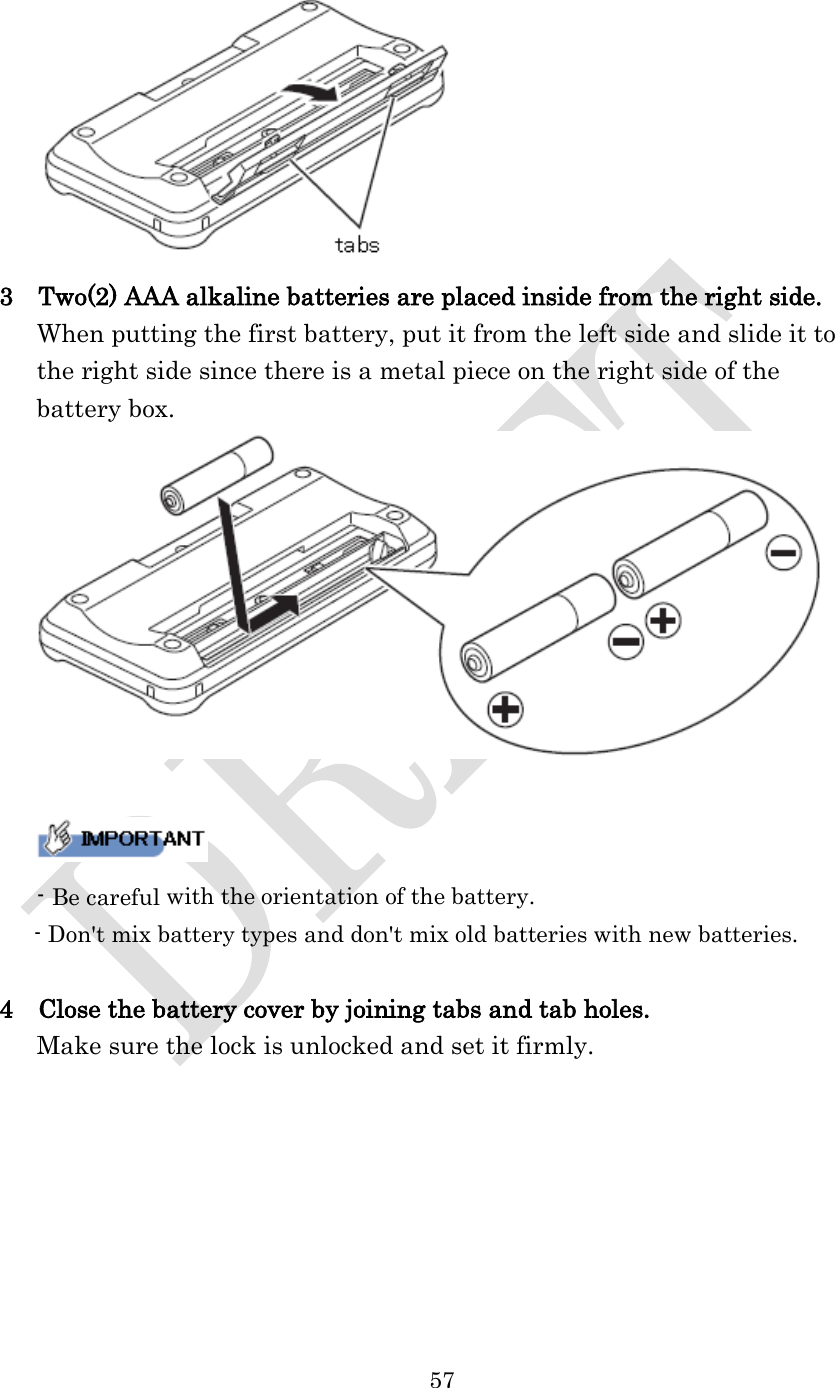
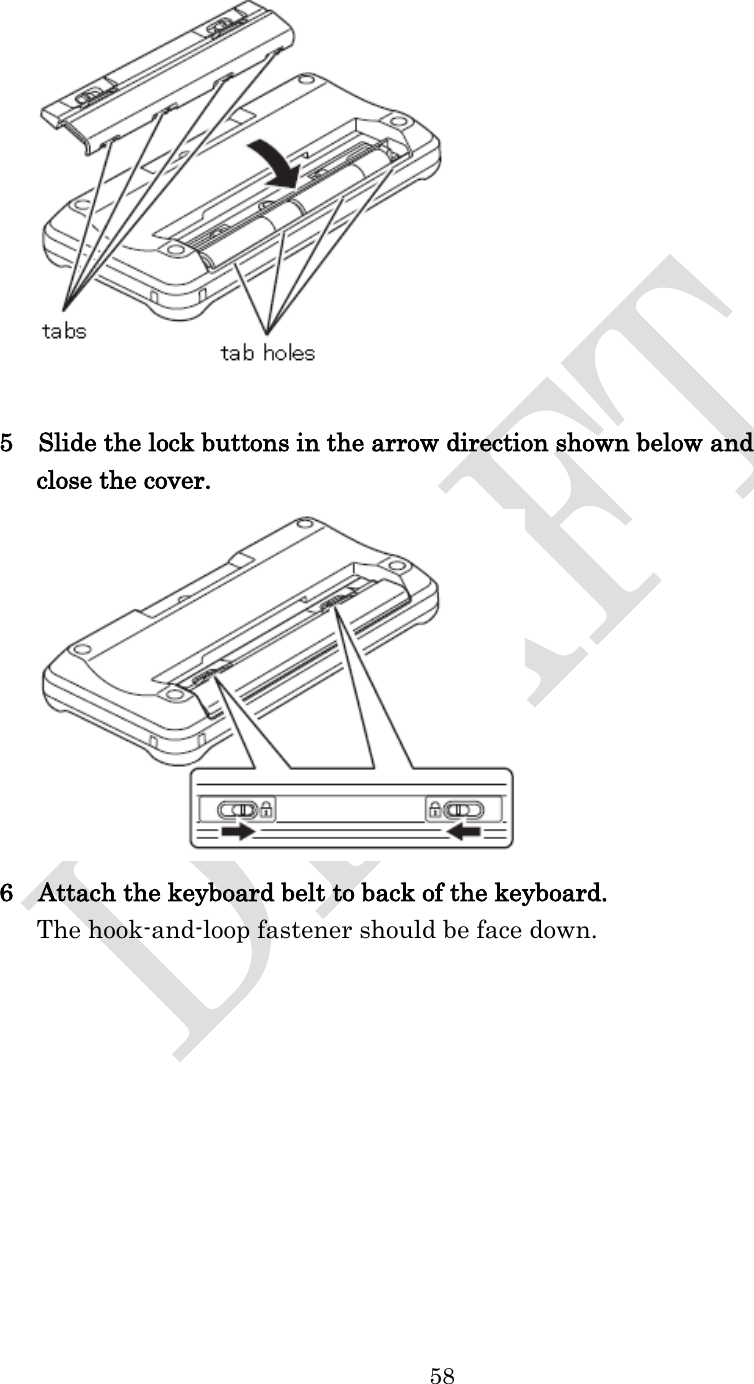
![40 Keyboard cannot be turned ON if the microUSB is connected. Make sure to pull the cord out before turning ON. 5 Bluetooth/Power indicator light Displays status of connection or remaining of dry batteries level. Please see (→P.76) 6 One-touch button([F1]to[F3]) You can launch apps with a single action of pressing a button by pre-assigning apps to those buttons. 7 [Back] key 8 cursor key Move cursor to up/down/left/right 9 [MENU] key 10 [Enter] key ■Back 1 Lock button Slide to open/close the battery box 2 Battery box, battery cover Use two(2) AAA dry alkaline batteries. Please see “Attach the keyboard” to change the batteries. (→P.55)](https://usermanual.wiki/Fujitsu-Client-Computing/HMD01/User-Guide-2601105-Page-40.png)

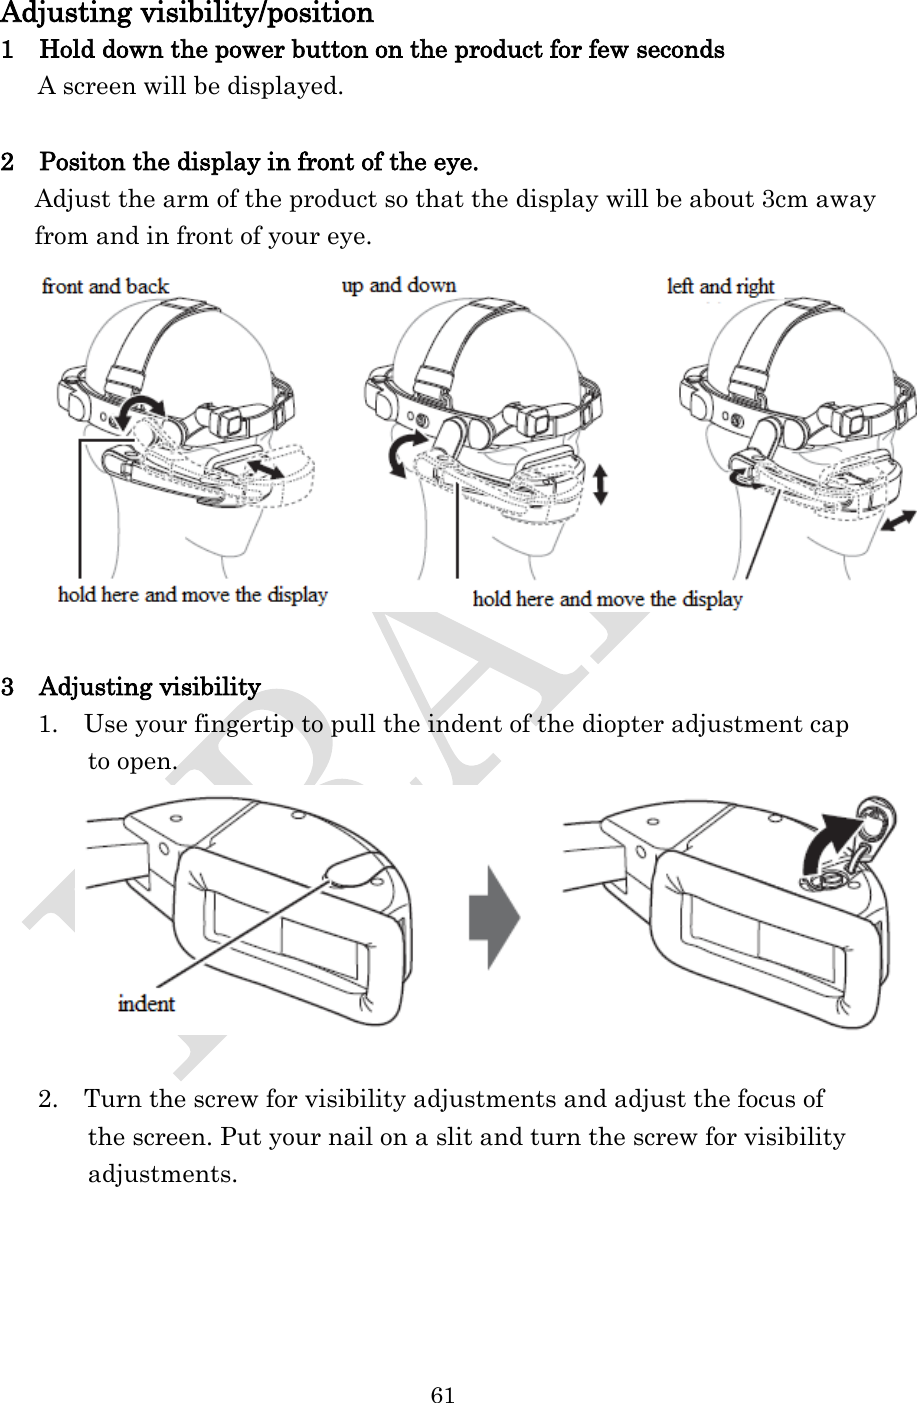
![62 - If it is hard to adjust the screw while wearing, take the product off from your head. 3. Close the diopter adjustment cap Launch ”HMD home” screen 1 Select “HMD home” in the screen. Voice command: “Number one” - You may select an item by speaking "Number [actual number]"(e.g. "Number one") when there is a number with a balloon. Please see terminology list of voice commands for words used in voice command. (→P.72) - If voice command cannot be used, you may use the keyboard. In this case, please connect the keyboard to the microUSB cable. Please see “connecting a microUSB cable” for more details. (→P.78)](https://usermanual.wiki/Fujitsu-Client-Computing/HMD01/User-Guide-2601105-Page-62.png)
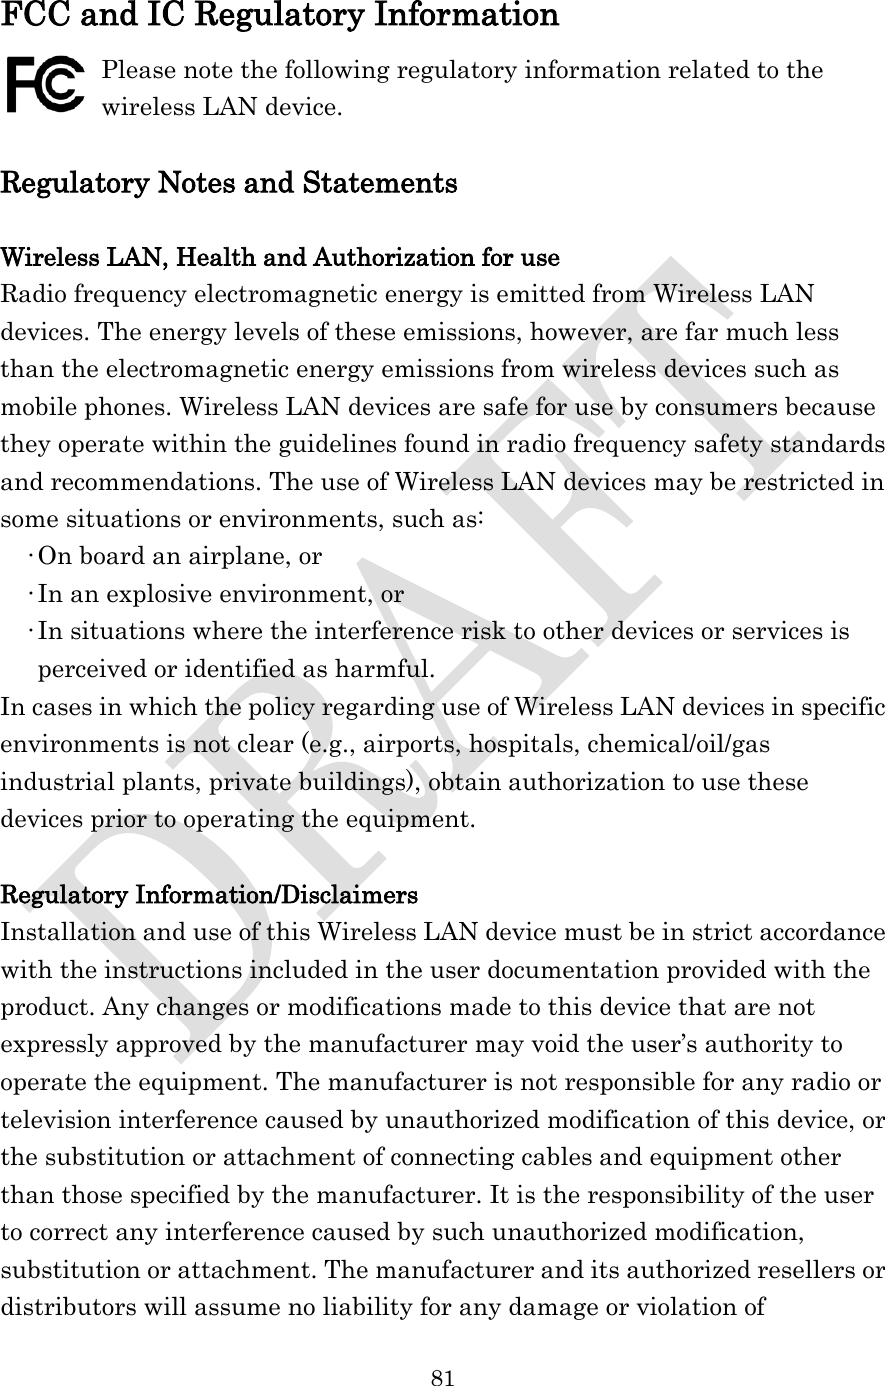
![68 - The product will not be reconnected automatically to the smartphone once the power is off or the communication is lost, even if the connection became available again. It's necessary to operate from procedure 3 above. - Miracast connection uses 2.4GHz band wireless LAN. If you are unable to use 2.4GHz band wireless LAN or has radio wave interference, use microUSB cable for wired connection. See page “Connecting a microUSB cable” for how to connect. (→P.78) When the product is connected to a smartphone by using Miracast, the time and date on the product will synchronized to the time and date on the smartphone. ■Connecting the keyboard and a smartphone(Bluetooth) 1 Turn on the keyboard. Hold down the [Power] key until Bluetooth/power indicator light turns on. 2 Press [Bluetooth] key on the keyboard. Hold down the key until Bluetooth/power indicator light starts flashing. It will change to pairing standby state. 3 Display menu from a home screen of the smartphone and tap “system settings”. 4 Tap “Bluetooth” Turn “ON” “Bluetooth” if it’s “OFF”. Wait until the keyboard is recognized.](https://usermanual.wiki/Fujitsu-Client-Computing/HMD01/User-Guide-2601105-Page-68.png)

![74 Cancel Cancel OK OK Voice command Voice command Keyboard operation Keyboard operation Switch camera mode Switch camera mode Photo resolution Photo resolution Video resolution Video resolution Location Location Storage Storage Exit Exit Below commands are used in camera Yes Yes No No When a balloon is not displayed on the screen, you may use below voice commands and their functions. Function Voice command Same function as [Back] key on the keyboard Go Back Show settings screen Menu Move focus up Up Move focus down Down Move focus, screen or operation of a control bar. Left Right Activate a function where the cursor is located. Enter Below commands are used in File viewer Display previous page Previous Display next page Next End File viewer Close Close a file Close file Expand the view Expand Reduce the view Reduce Return to the first page Top Go to the last page Bottom](https://usermanual.wiki/Fujitsu-Client-Computing/HMD01/User-Guide-2601105-Page-74.png)
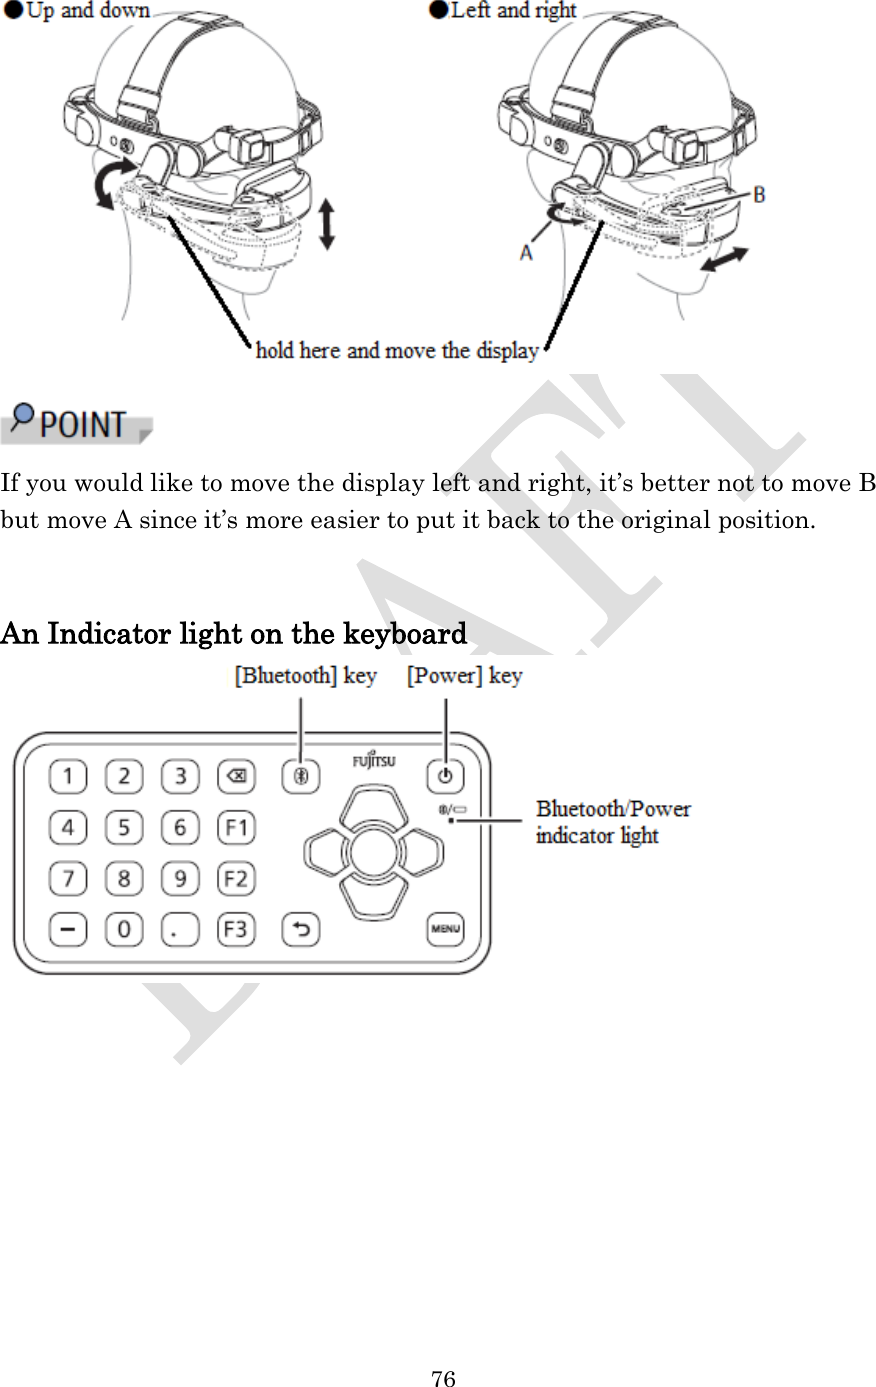
![77 Status of the keyboard Key operation Bluetooth/Power indicator light Status/handling OFF Hold down [Power] key (3 sec or more) Lights red Low battery or internal error. Turn off the power and change 2 batteries. If this problem continues, please contact your local sales representative OFF Hold down [Power] key (3 sec or more) Lights green (3 sec) Lights orange (3 sec) Lights red (3 sec) Enough battery Battery is getting low Almost empty ON Press [Power] key ON Press [Power] key or while using the keyboard. Lights red Low battery or internal error. Turn off the power and change 2 batteries. If this problem continues, please contact your local sales representative ON Hold down [Bluetooth] key (3 sec or more) Blue light flashing (every second for up to 120 second) Waiting to pair status. If pairing completes, lights for 5 sec and turns off. Lights red Low battery or internal error. Turn off the power and change 2 batteries. If this problem continues, please contact your local sales representative ON Press [Bluetooth] key Lights blue (5 sec) Bluetooth connecting Light turns off Bluetooth unconnected Please see “Attaching the keyboard” to change the batteries. (→P.55)](https://usermanual.wiki/Fujitsu-Client-Computing/HMD01/User-Guide-2601105-Page-77.png)
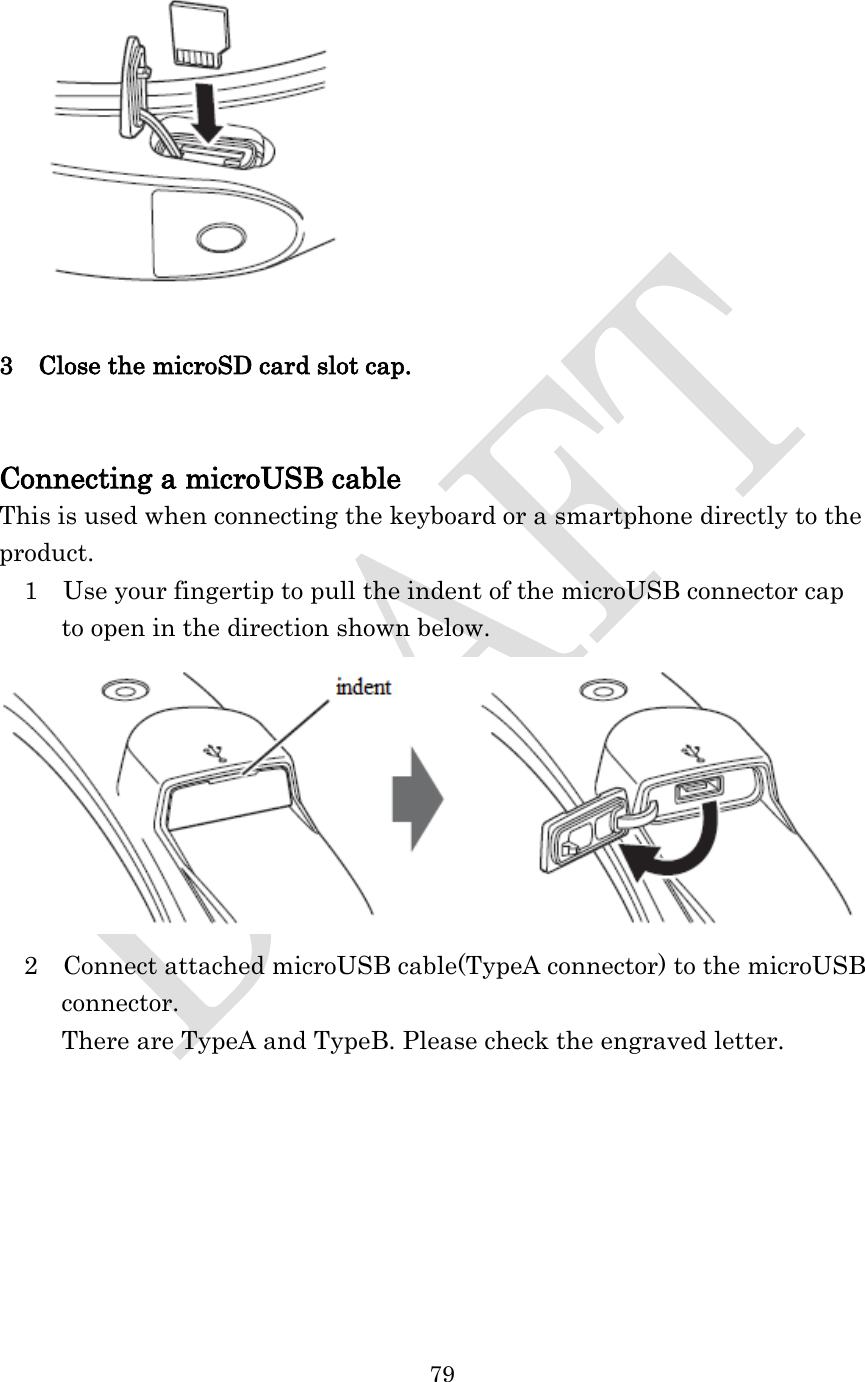
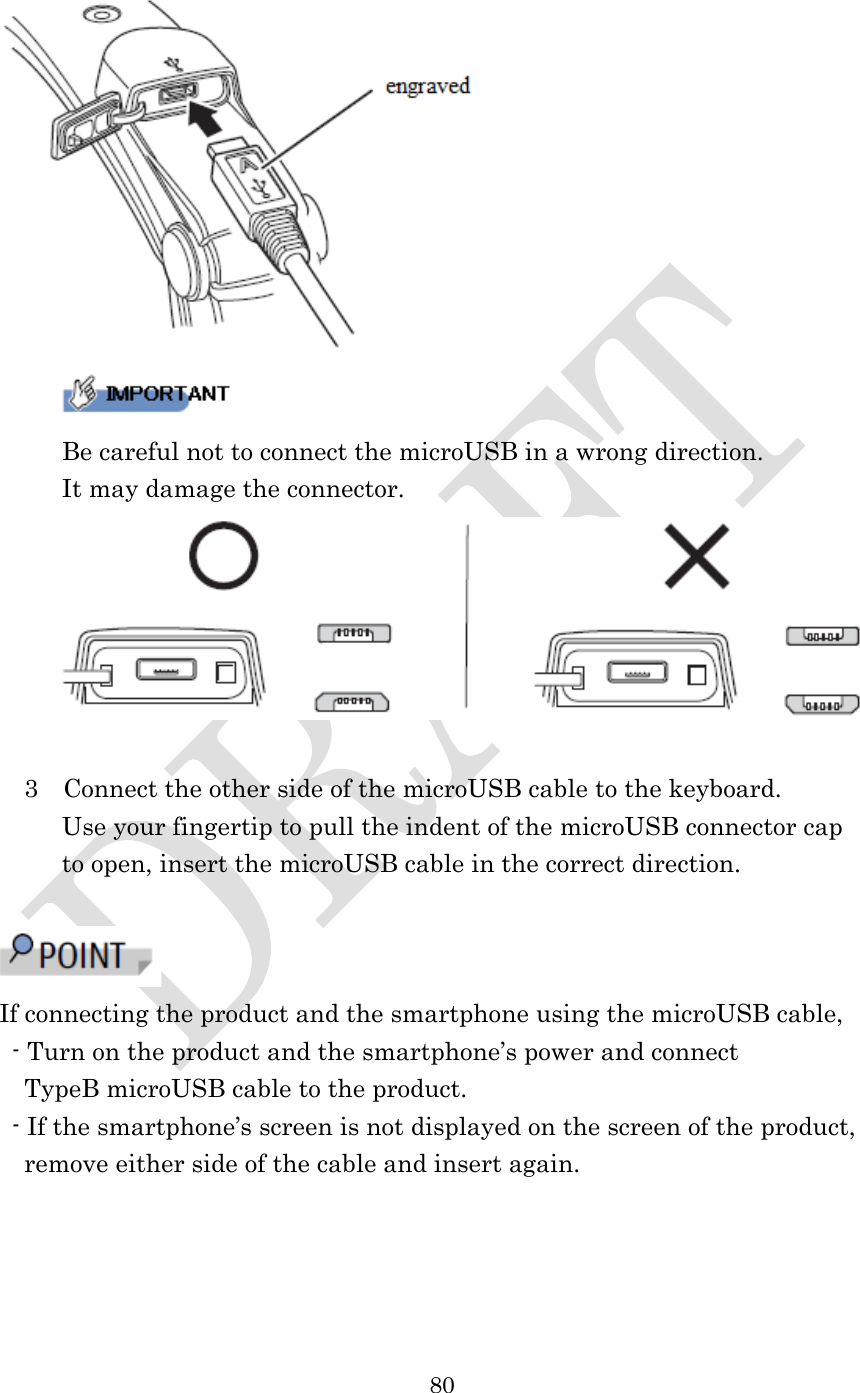
![78 microSD card ■Supported microSD cards type of microSD card capacity microSD card Up to 2GB microSDHC card Up to 32GB microSDHC UHS-I card Up to 32GB ■Inserting/removing microSD card 1 Use your fingertip to pull the indent of the microSD card slot cap to open. 2 Use your fingertip to pull the indent of the microSD card slot cap to open. Insert a microSD card into the microSD card slot until it clicks. When removing, push the microSD card lightly and release it, then pull the microSD card straight out. When removing the microSD card, follow the procedure below to unmount it. On “HMD home” screen: → [Settings] → [Other settings] → [Storage] → [Unmount SD card]](https://usermanual.wiki/Fujitsu-Client-Computing/HMD01/User-Guide-2601105-Page-78.png)