Fujitsu Client Computing WB0003 LifeBook S Series with WLAN WLL3050 and Bluetooth User Manual Appendix P User Manual
Fujitsu Limited LifeBook S Series with WLAN WLL3050 and Bluetooth Appendix P User Manual
Contents
- 1. Users Manual Part 1
- 2. Users Manual Part 2
Users Manual Part 1

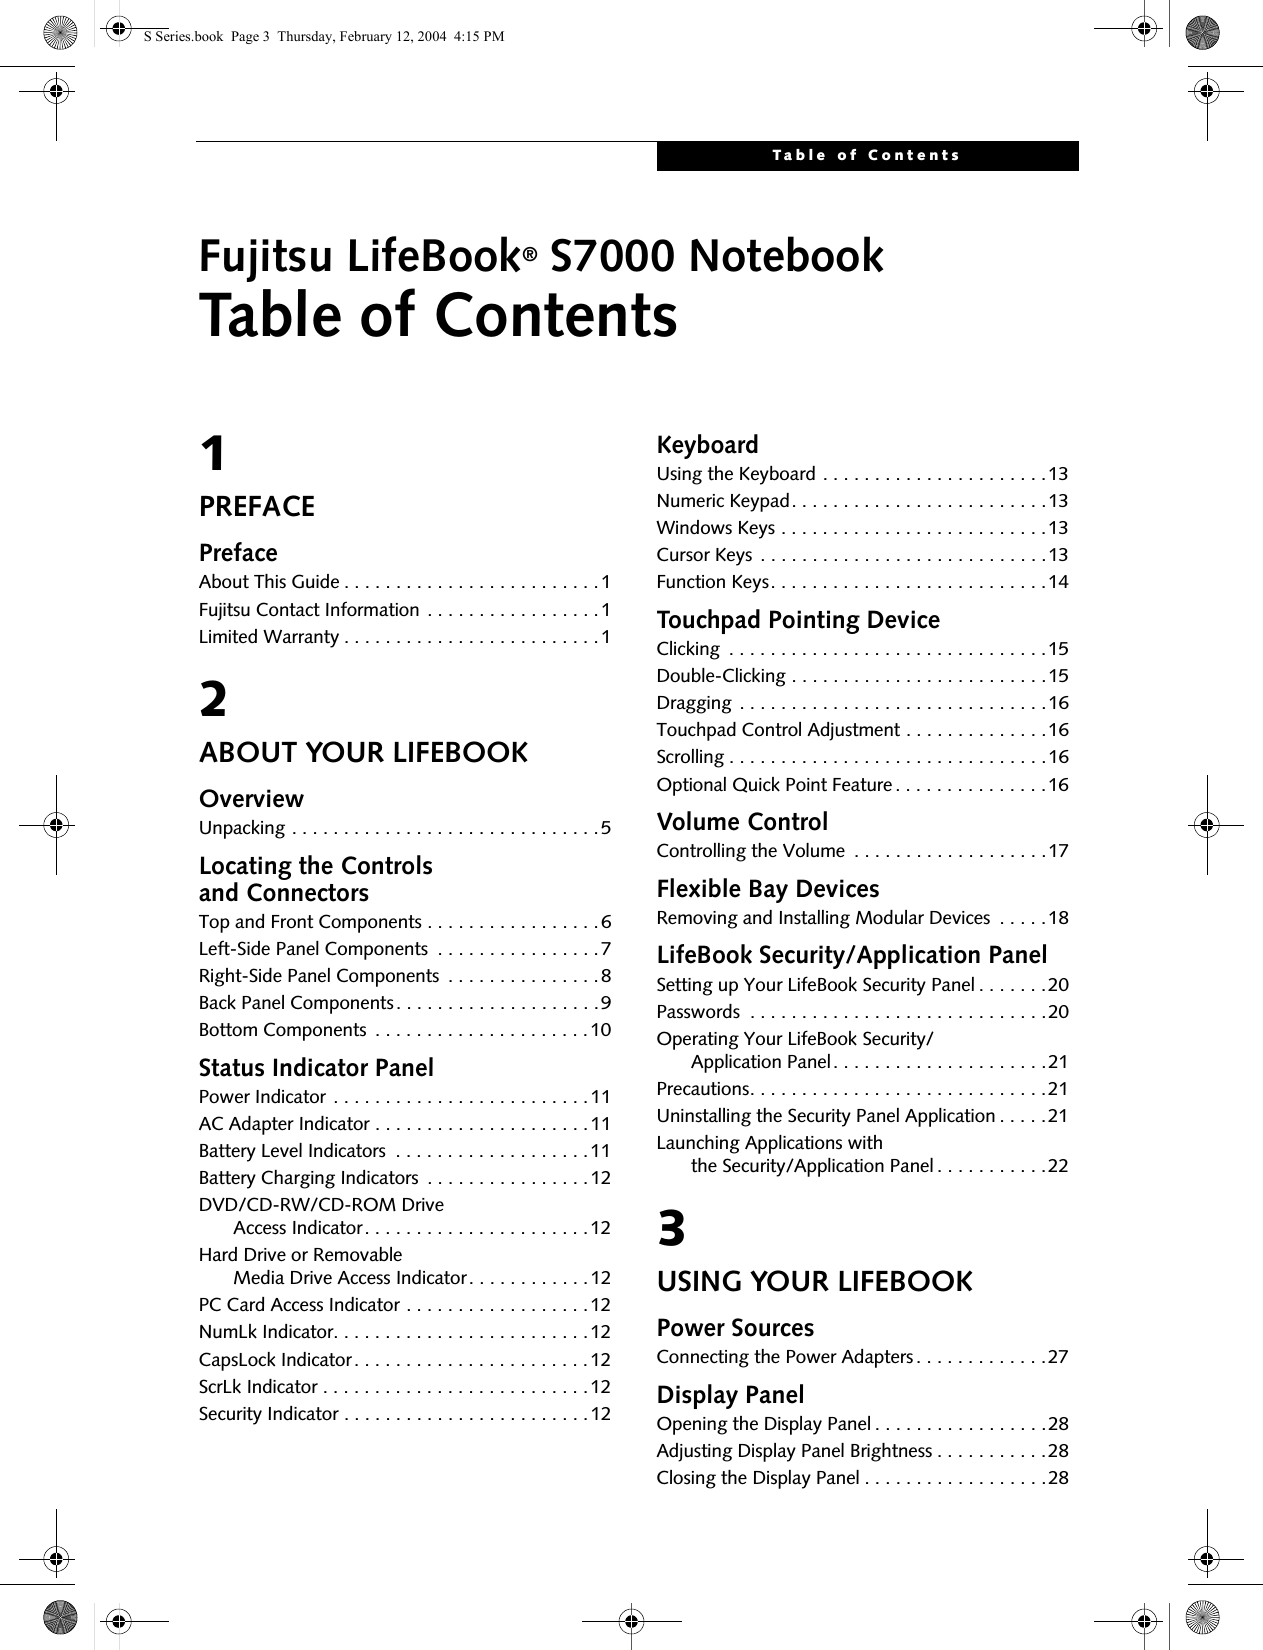
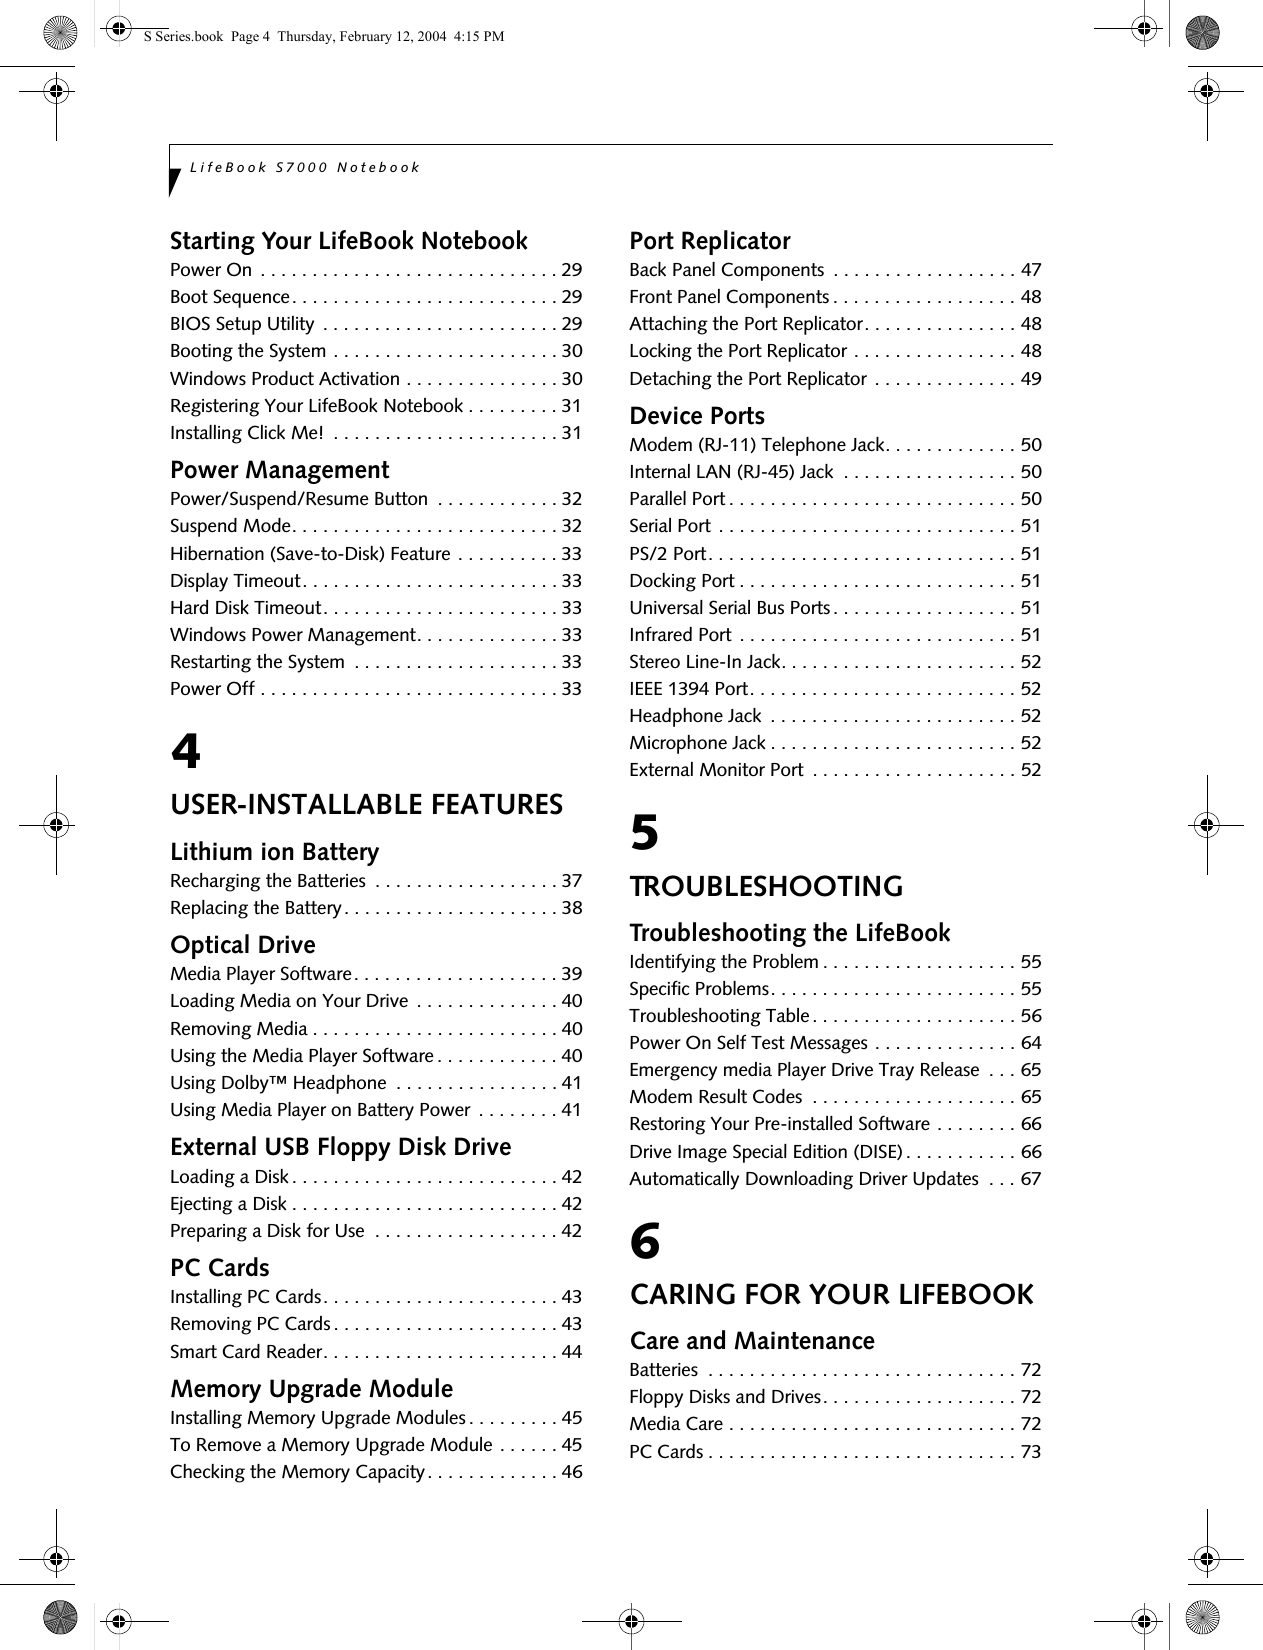
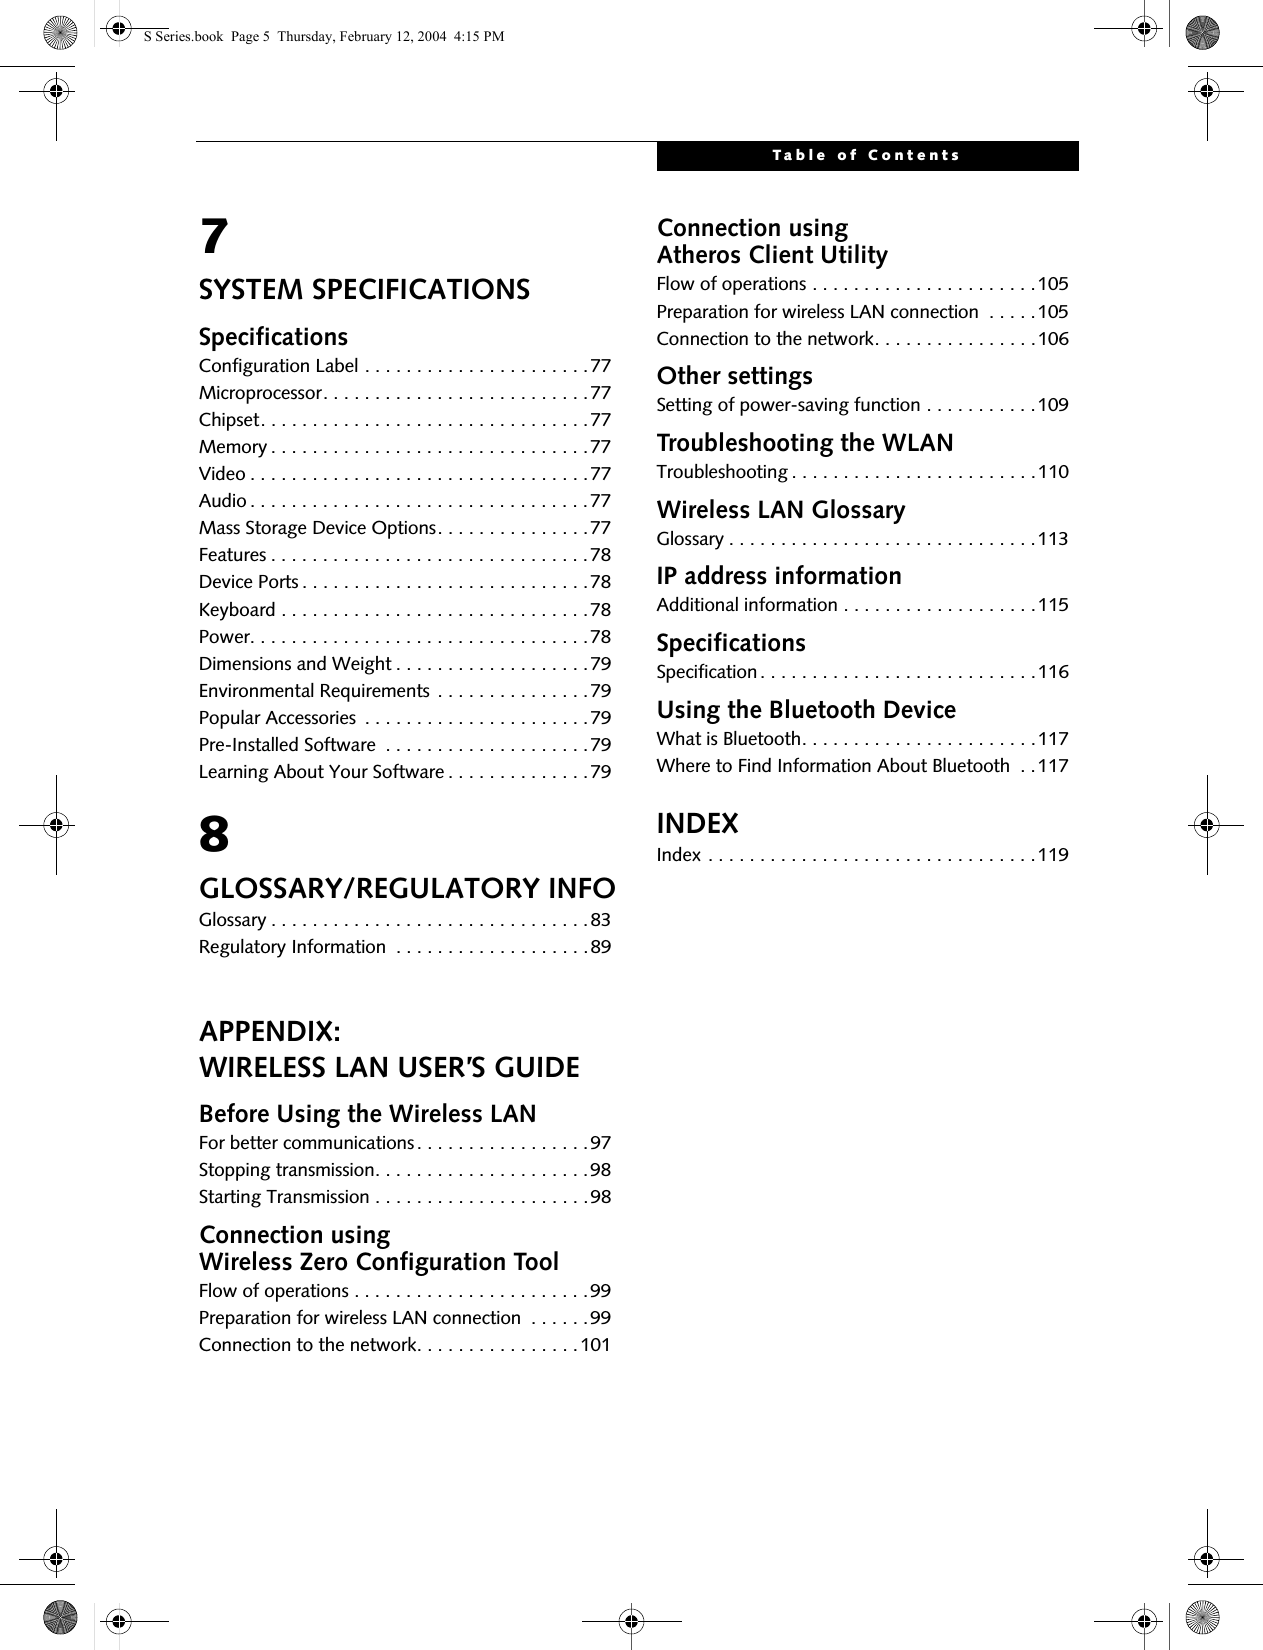



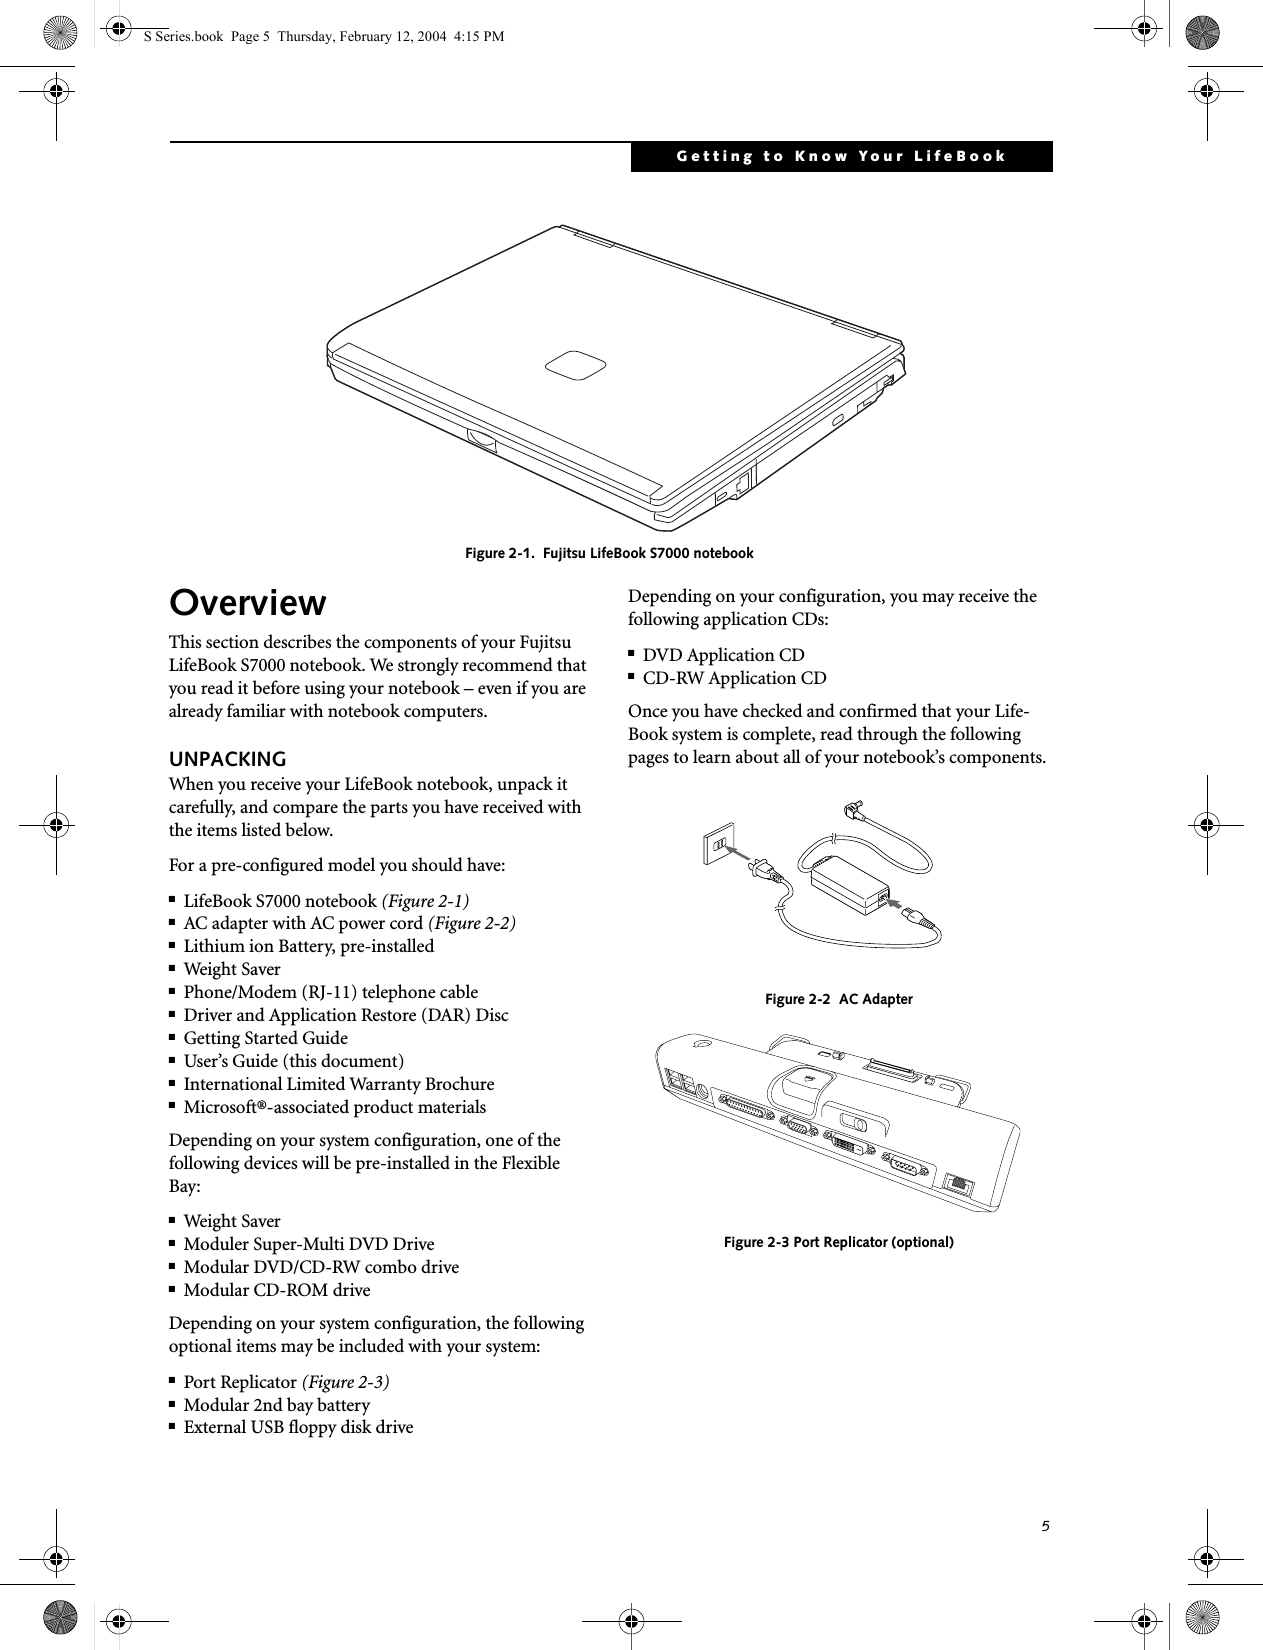
![1PrefacePrefaceABOUT THIS GUIDEThe LifeBook S7000 notebook from Fujitsu is a powerful computer. It is powered by an Intel Pentium M micro-processor, has a built-in TFT XGA color display, a number of possible configurations, and brings the computing power of desktop personal computers (PCs) to a portable environment.This manual explains how to operate your LifeBook notebook’s hardware and built-in system software. Your notebook is compatible with the IBM® PC AT. Your computer comes with Microsoft Windows® XP Home, Windows XP Professional, or Windows 2000 Professional pre-installed. (See note below.)The LifeBook S7000 notebook is a completely self-contained unit with an active-matrix (TFT) color LCD display. It has a powerful interface that enables it to support a variety of optional features. Conventions Used in the GuideKeyboard keys appear in brackets. Example: [Fn], [F1], [ESC], [ENTER] and [CTRL].Pages with additional information about a specific topic are cross-referenced within the text.For example: (See page xx.)On screen buttons or menu items appear in boldExample: Click OK to restart your LifeBook notebook.DOS commands you enter appear in Courier type. Example: Shutdown the computer?FUJITSU CONTACT INFORMATIONService and SupportYou can contact Fujitsu Service and Support in the following ways:■Toll free: 1-800-8Fujitsu (1-800-838-5487)■E-mail: 8fujitsu@us.fujitsu.com ■Web site: us.fujitsu.com/computersBefore you place the call, you should have the following information ready so that the customer support representative can provide you with the fastest possible solution:■Product name■Product configuration number■Product serial number■Purchase date■Conditions under which the problem occurred■Any error messages that have occurred■Hardware configuration■Type of device connected, if anyFujitsu OnlineYou can go directly to the online Fujitsu Product catalog for your LifeBook notebook by clicking on the LifeBook Accessories Web site URL link located in the Service and Support Software folder of the Windows Start menu.You can also reach Fujitsu Service and Support online by clicking on the Service and Support Web site URL link, located in the Service and Support Software folder of the Windows Start menu.LIMITED WARRANTYYour LifeBook notebook is backed by a Fujitsu Interna-tional Limited Warranty. Check the service kit that came with your notebook for the Limited Warranty period and terms and conditions.If your system was delivered with Windows 2000 as the operating system, the Windows 2000 image is on the D: partition, but the Restore Disc contains Windows XP. If you decide to restore your system from the Restore Disc, you will overwrite Windows 2000 with the Windows XP operating system. Please refer to “Restoring Your Pre-installed Software” on page 66.The information icon highlights information that will enhance your understanding of the subject material.The caution icon highlights information that is important to the safe operation of your computer, or to the integrity of your files. Please read all caution information carefully.The warning icon highlights information that can be hazardous to either you, your LifeBook notebook, or your files. Please read all warning information carefully.You must have an active internet connection to use the online URL links.S Series.book Page 1 Thursday, February 12, 2004 4:15 PM](https://usermanual.wiki/Fujitsu-Client-Computing/WB0003.Users-Manual-Part-1/User-Guide-400610-Page-10.png)


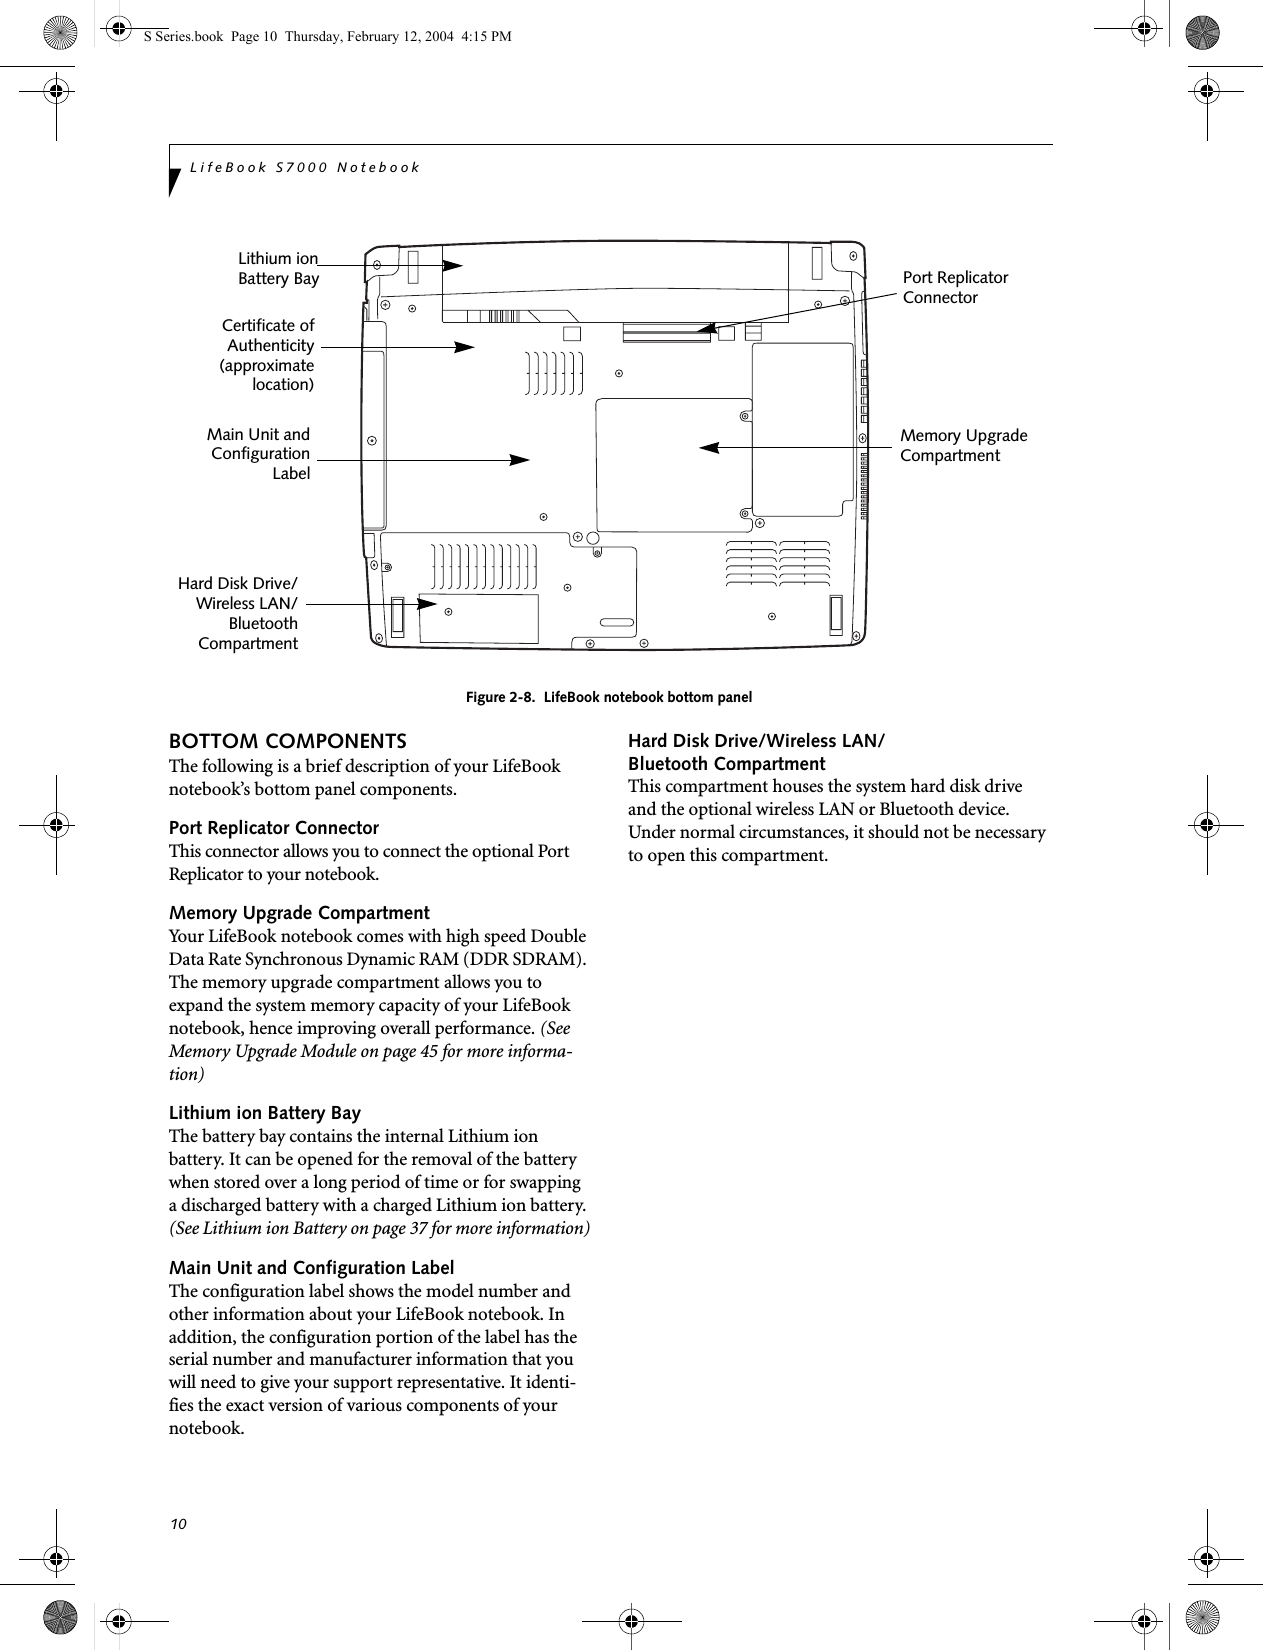

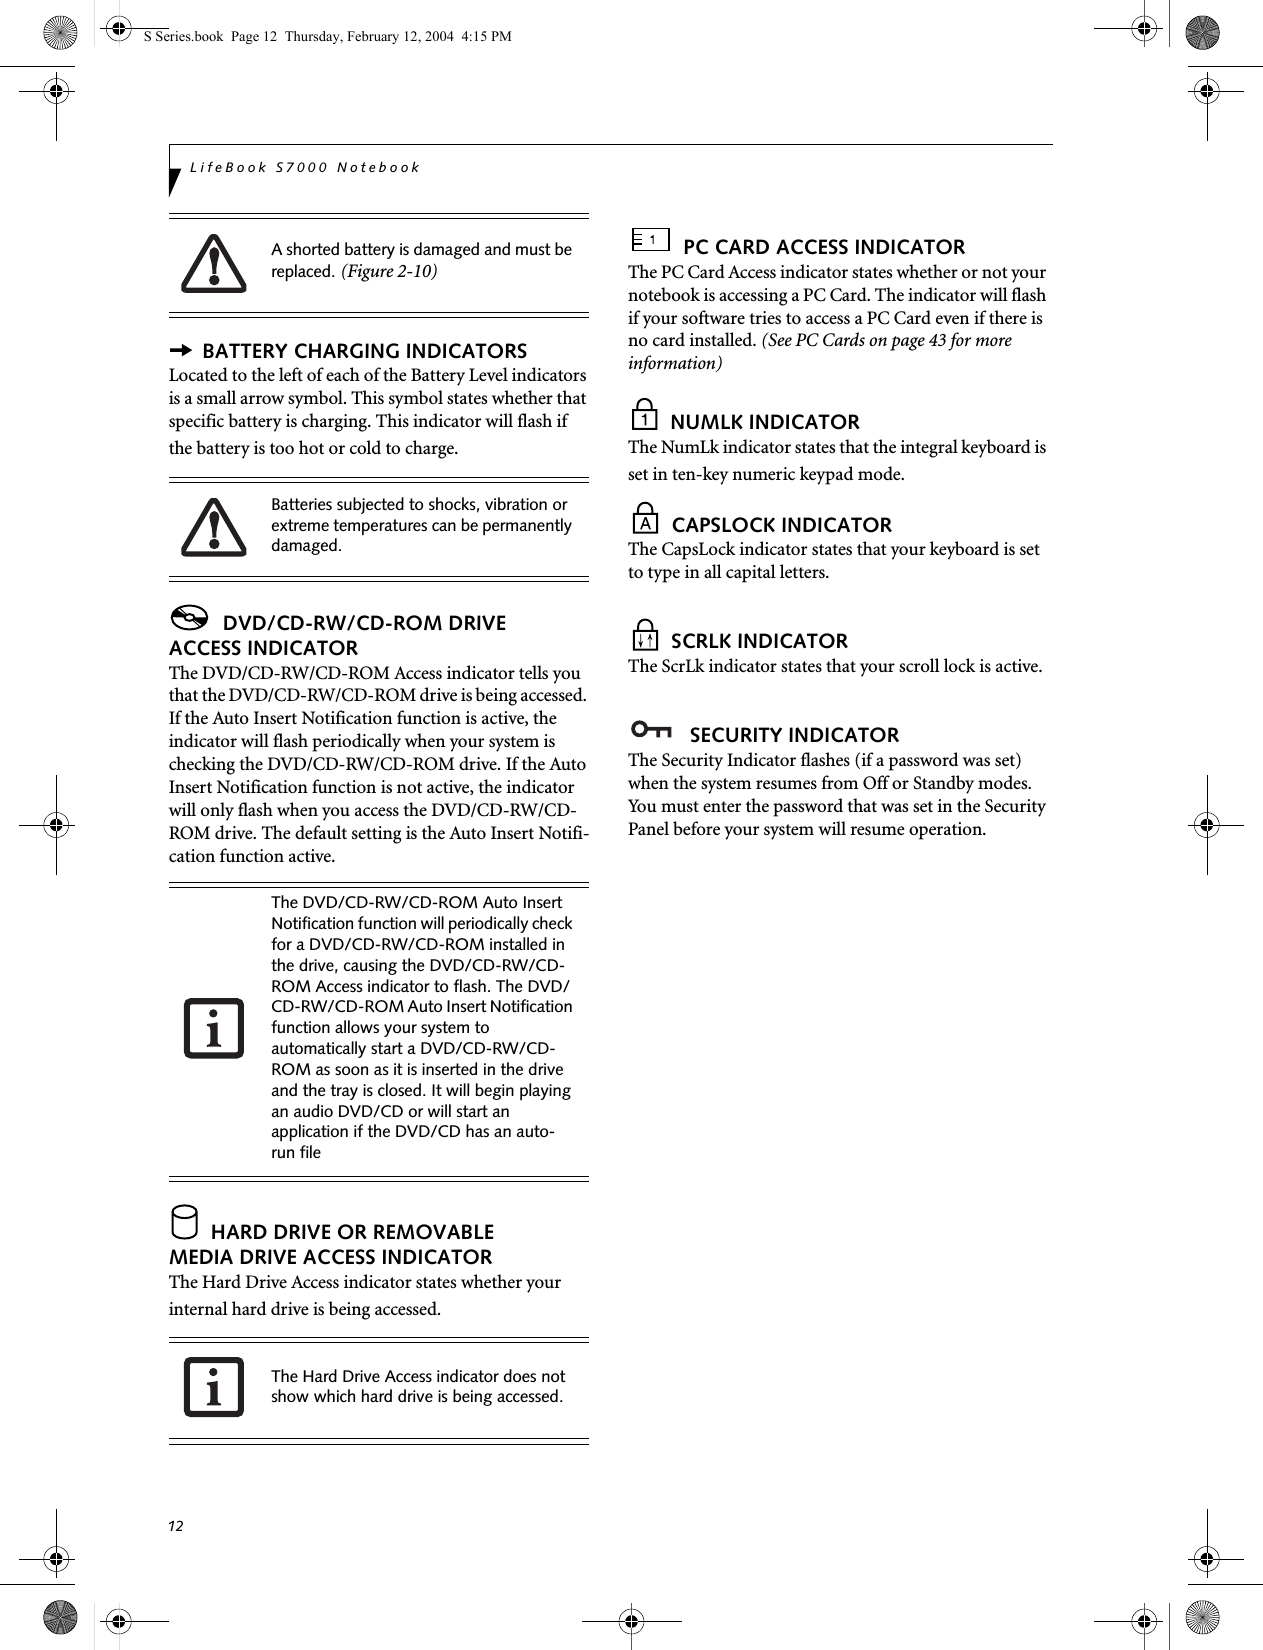
![13Getting to Know Your LifeBookFigure 2-11 KeyboardKeyboard USING THE KEYBOARDYour Fujitsu LifeBook notebook has an integral 84-key keyboard. The keys perform all the standard functions of a 101-key keyboard, including the Windows keys and other special function keys. This section describes the following keys. (Figure 2-11)■Numeric keypad: Your notebook allows certain keys to serve dual purposes, both as standard characters and as numeric and mathematical keys. The ability to tog-gle between the standard character and numerical keys is controlled through the [NumLk] key.■Cursor keys: Your keyboard contains four arrowkeys for moving the cursor or insertion point to the right, left, up, or down within windows, applications and documents. ■Function keys: The keys labeled [F1] through [F12], are used in conjunction with the [Fn] key to produce special actions that vary depending on what program is running. ■Windows keys: These keys work with your Windows operating system and function the same as the onscreen Start menu button, or the right buttonon your pointing device.NUMERIC KEYPADCertain keys on the keyboard perform dual functions as both standard character keys and numeric keypad keys. NumLk can be activated by pressing the [NumLk] keys. Turning off the NumLk feature is done the same way. Once this feature is activated you can enter numerals 0 through 9, perform addition ( + ), subtraction ( - ),multiplication ( * ), or division ( / ), and enter decimal points ( . ) using the keys designated as ten-key function keys. The keys in the numeric keypad are marked on the front edge of the key to indicate their secondary functions. (Figure 2-11) WINDOWS KEYSYour LifeBook notebook has two Windows keys, consisting of a Start key and an Application key. The Start key displays the Start menu. This button functions the same as your onscreen Start menu button. The Application key functions the same as your right mouse button and displays shortcut menus for the selected item. (Please refer to your Windows documentation for additional information regarding the Windows keys.) (Figure 2-11)CURSOR KEYSThe cursor keys are the four arrow keys on the keyboard which allow you to move the cursor up, down, left and right in applications. In programs such as Windows Explorer, it moves the “focus” (selects the next item up, down, left, or right). (Figure 2-11)EndHomeFn Key Start KeyFunction KeysNumeric Keypad Application Key Cursor Keys(surrounded by heavy line) S Series.book Page 13 Thursday, February 12, 2004 4:15 PM](https://usermanual.wiki/Fujitsu-Client-Computing/WB0003.Users-Manual-Part-1/User-Guide-400610-Page-22.png)
![14LifeBook S7000 NotebookFUNCTION KEYSYour LifeBook notebook has 12 function keys, F1 through F12. The functions assigned to these keys differ for each application. You should refer to your software documentation to find out how these keys are used. (Figure 2-11)The [Fn] key provides extended functions for thenotebook and is always used in conjunction with another key. ■[Fn+F3]: Pressing [F3] while holding [Fn] will toggle the Audio Mute on and off.■[Fn+F4]: Pressing [F4] while holding [Fn] will toggle the Quick Point feature on and off. Note that the [Fn+F4] combination only works if Manual Setting is selected in the BIOS. (See “BIOS Setup Utility” on page 29)■[Fn+F6]: Pressing [F6] repeatedly while holding [Fn] will lower the brightness of your display.*■[Fn+F7]: Pressing [F7] repeatedly while holding [Fn] will increase the brightness of the display.*■[Fn+F8]: Pressing [F8] repeatedly while holding [Fn] will decrease the volume of your LifeBook note-book.**■[Fn+F9]: Pressing [F9] repeatedly while holding [Fn] will increase the volume of your LifeBook notebook.**■[Fn+F10]: Pressing [F10] while holding [Fn] allows you to change your selection of where to send your display video. Each time you press the combination of keys you will step to the next choice. The choices, in order, are: built-in display panel only, external monitor only, or both built-in display panel and external monitor.* There are eight brightness levels.** There are 26 audio levels.S Series.book Page 14 Thursday, February 12, 2004 4:15 PM](https://usermanual.wiki/Fujitsu-Client-Computing/WB0003.Users-Manual-Part-1/User-Guide-400610-Page-23.png)
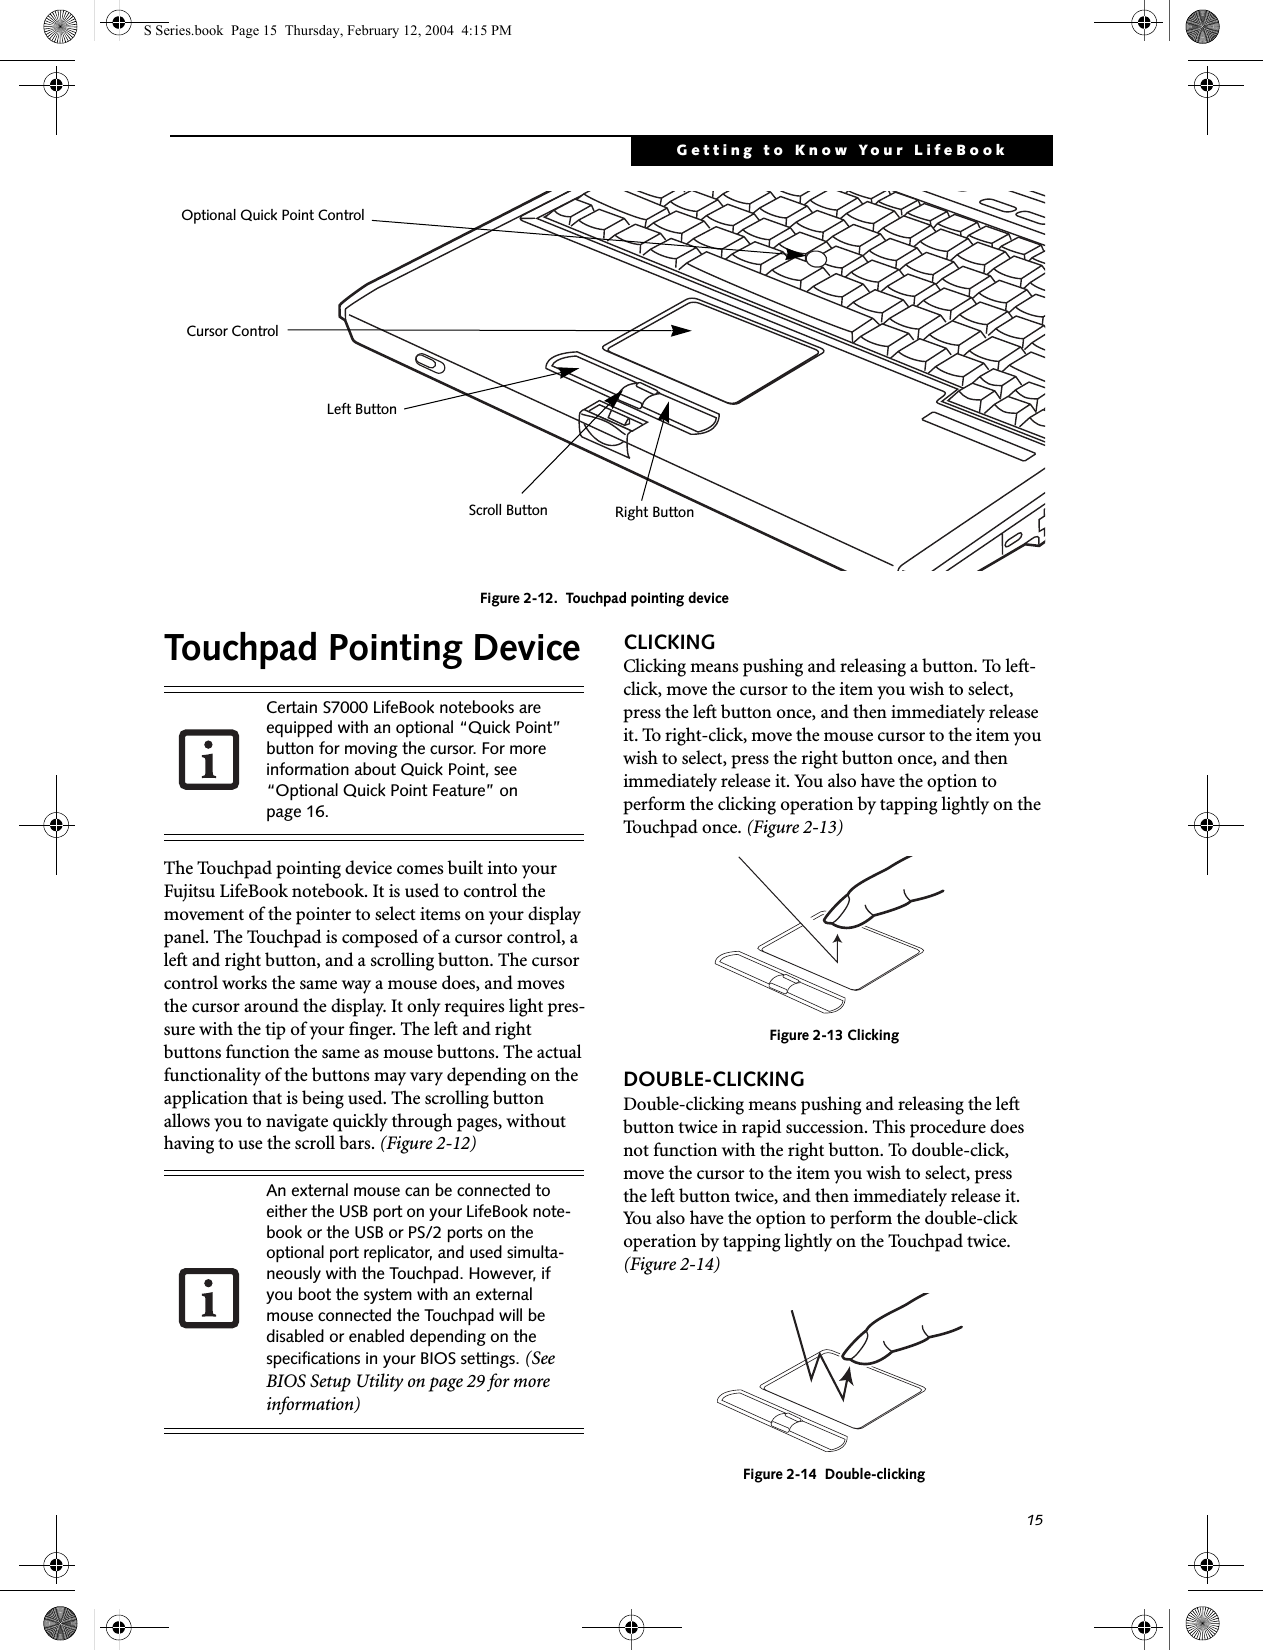
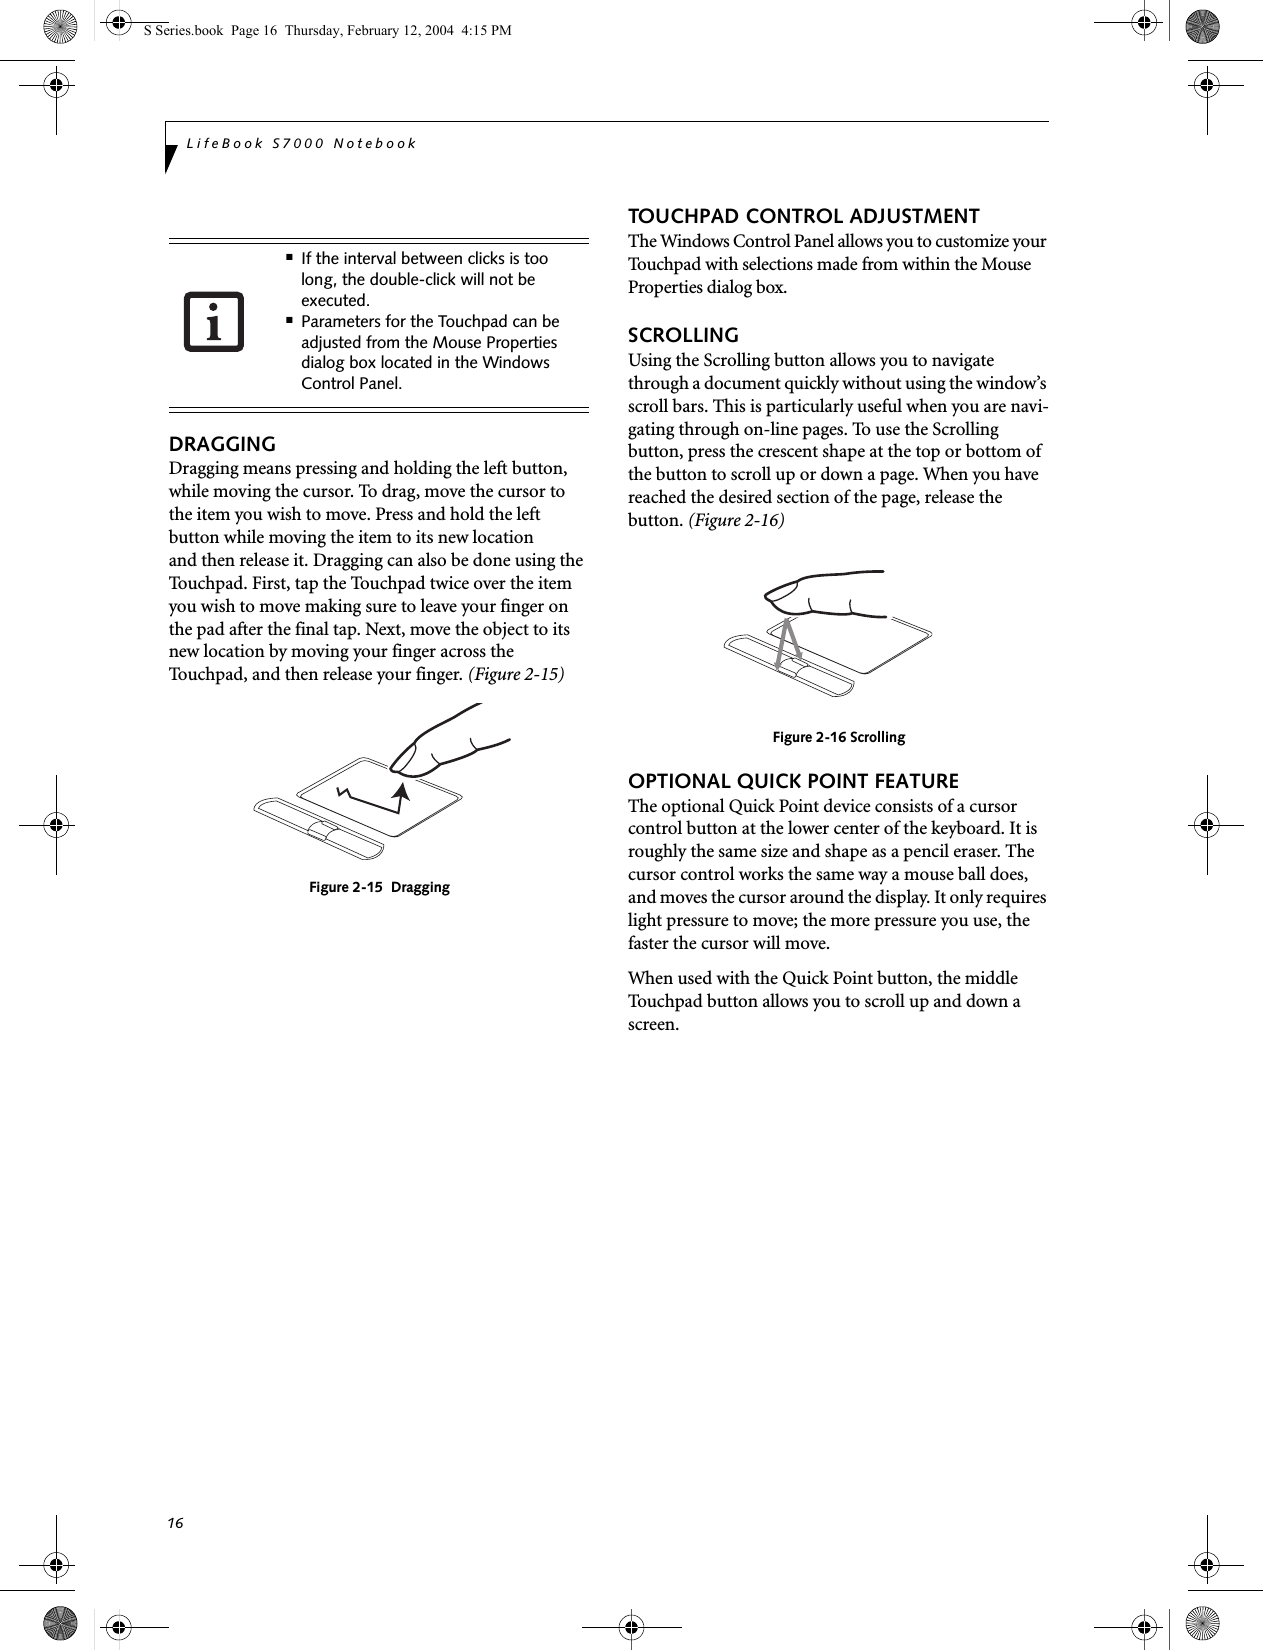
![17Getting to Know Your LifeBookVolume ControlYour Fujitsu LifeBook notebook has multiple volume controls which interact with each other. CONTROLLING THE VOLUMEThe volume can be controlled in several different ways:■Volume can be set from within the Volume Control on the Taskbar.■Volume can be controlled with the F8 and F9 func-tions keys. Pressing [F8] repeatedly while holding [Fn] will decrease the volume of your notebook. Pressing [F9] repeatedly while holding [Fn] will increase the volume of your notebook.■Volume can be controlled by many volume controls that are set within individual applications.■Certain external audio devices you might connect to your system may have hardware volume controls.Each source discussed above puts an upper limit on the volume level that must then be followed by the other sources. We recommend that you experiment with the various volume controls to discover the optimal sound level.Any software that contains audio files will also contain a volume control of its own. If you install an external audio device that has an independent volume control, the hardware volume control and the software volume control will interact with each other. It should be noted that if you set your software volume to Off, you will override the external volume control setting. There are 26 levels through which the function keys cycle. S Series.book Page 17 Thursday, February 12, 2004 4:15 PM](https://usermanual.wiki/Fujitsu-Client-Computing/WB0003.Users-Manual-Part-1/User-Guide-400610-Page-26.png)
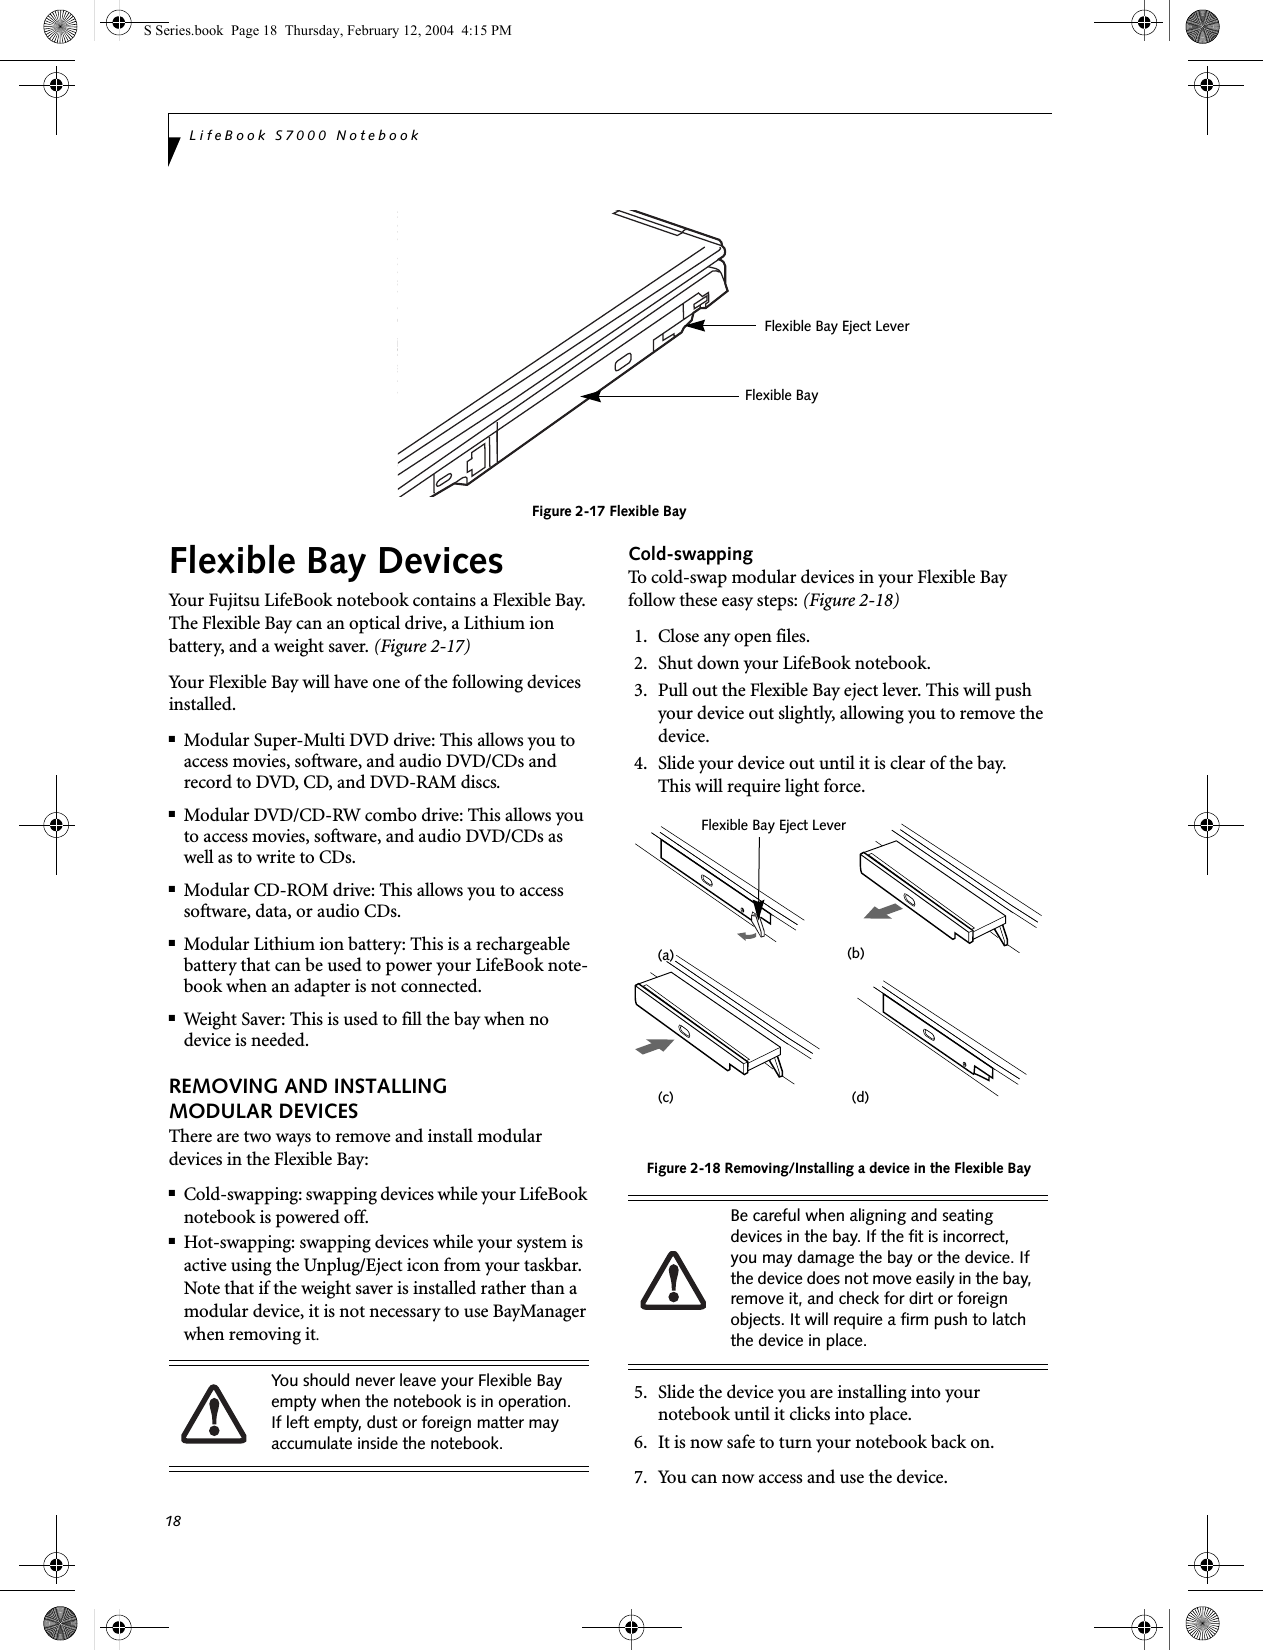
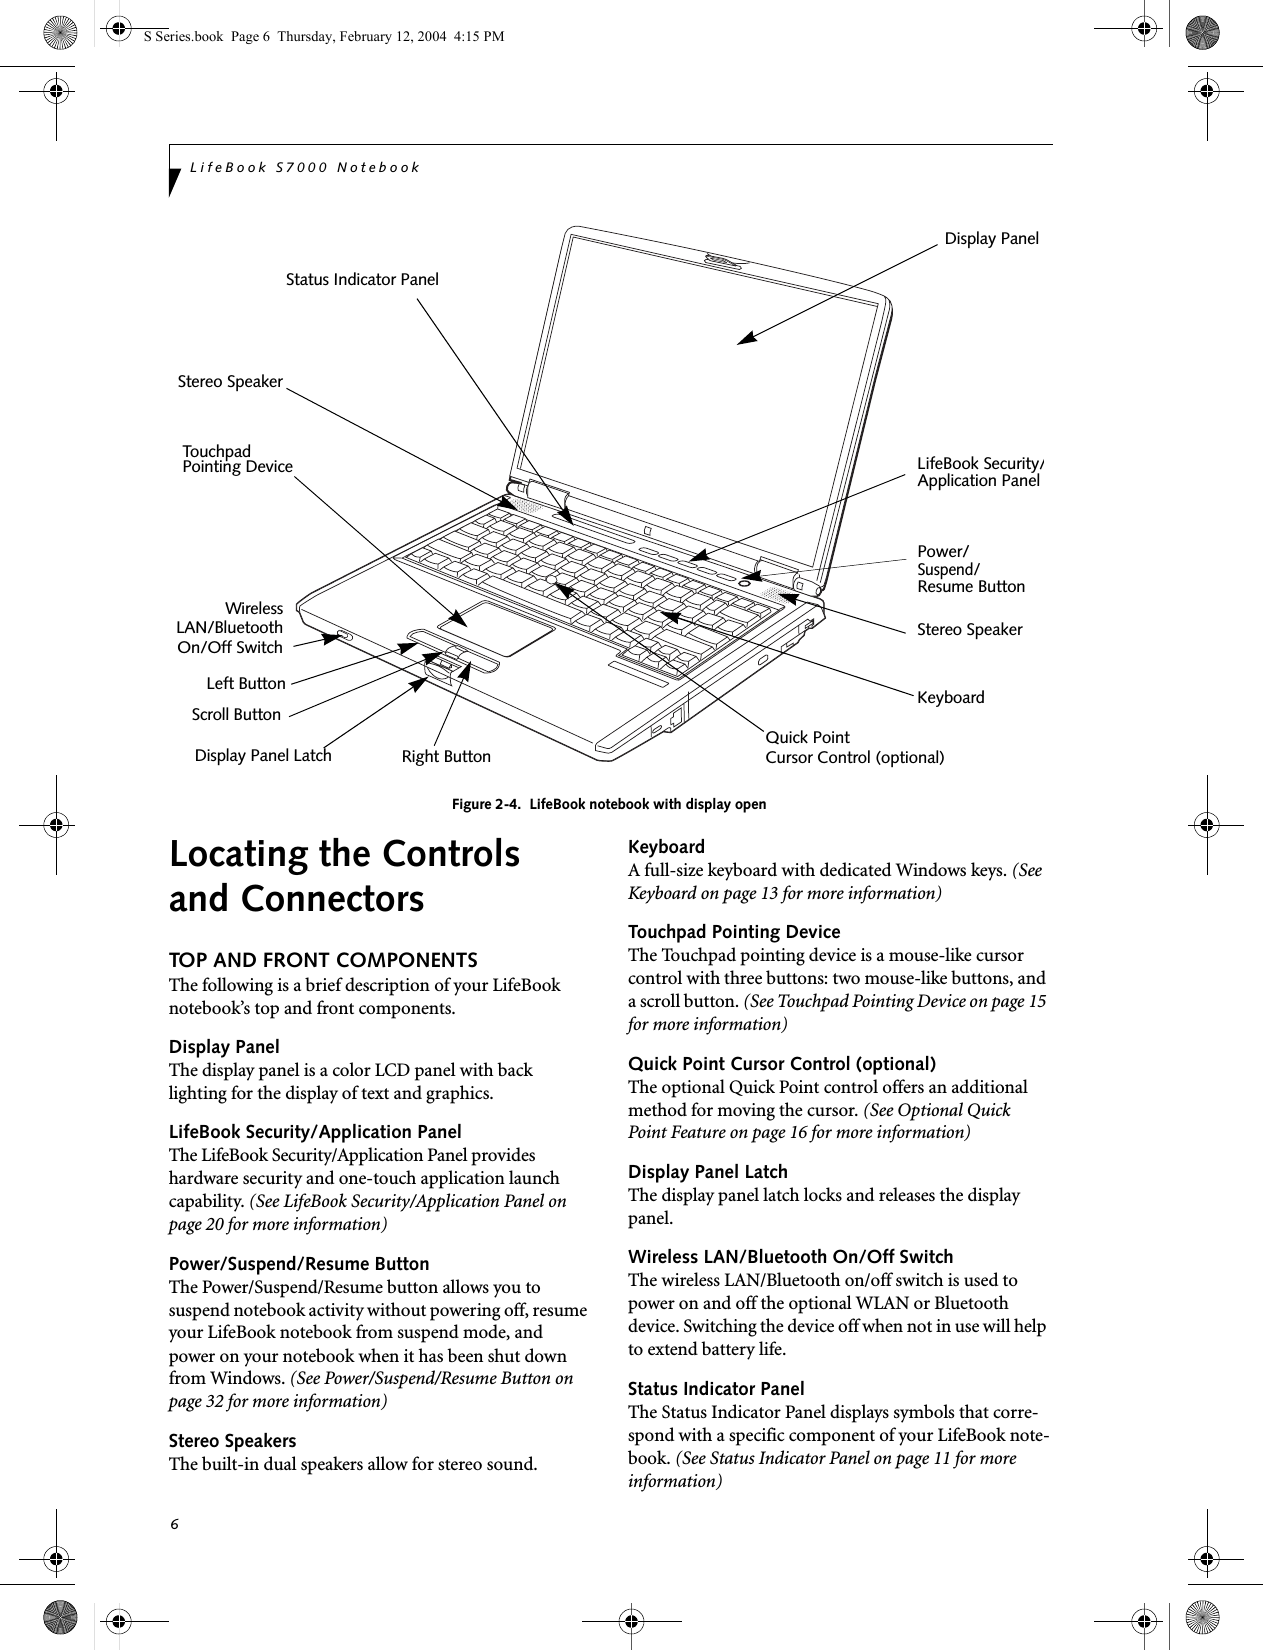
![20LifeBook S7000 NotebookFigure 2-19 LifeBook Security/Application Panel LifeBook Security/Application PanelA unique feature of your LifeBook notebook is the Security/Application Panel that allows you to secure your notebook from unauthorized use. The Security/Applica-tion Panel also allows you to launch applications with the touch of a button when your system is on.If the security system is activated, upon starting your notebook or resuming from suspend mode the security system requires you to enter a password code using the buttons on the Security/Application Panel. After entering a correct password, your notebook resumes system operation. (Figure 2-19)SETTING UP YOUR LIFEBOOK SECURITY PANELWhen you receive your LifeBook notebook, the security panel application is pre-installed without any passwords. The following sections provide detailed information on your security panel, and how to set, change or remove passwords.Numbered ButtonsUse these buttons to enter your password.(Figure 2-19)Enter ButtonAfter entering the button strokes, push this button to enter the password into the LifeBook notebook. (Figure 2-19)PASSWORDSThe user and supervisor password may be set on this notebook. A supervisor password is typically the same for all LifeBook notebooks in a working group, office, or company to allow for system management. Individual LifeBook notebooks in a group environment should not use a common password. A password consists of one to five button strokes plus the enter button. A valid stroke consists of pushing one or up to four buttons simulta-neously. The following are valid button strokes: nPushing [4] by itselfnPushing [2] and [3] at the same timenPushing [1], [2], and [4] at the same timenPushing [1], [2], [3], and [4] at the same timeThe following are valid passwords. The numberswithin braces ({ }) are button strokes using morethan one button. n{[2]+[3]}, [1], [enter]n[4], [enter]n{[1]+[3]}, {[2]+[3]+[4]}, [1], [4], [2], [enter]Setting PasswordsWhen shipped from the factory, no passwords are set. You have a choice of having no password or setting a supervisor and user password. You must set the super-visor password before the user password. Setting Supervisor PasswordYou must have set a supervisor password before setting any user passwords. The supervisor password can bypass the user password.1. Go to the Start menu.2. Click on Run.* Security/Application Launcherbuttons (for entering passwordsand launching applications)Enter buttonButton 1*Button 2*Button 3*Button 4*nThe purpose of supervisor password is to be able to bypass the user password in case the user password is forgotten. The supervisor password alone will not lock the system.nYou have to set both the supervisor and user passwords for the security panel to work.S Series.book Page 20 Thursday, February 12, 2004 4:15 PM](https://usermanual.wiki/Fujitsu-Client-Computing/WB0003.Users-Manual-Part-1/User-Guide-400610-Page-29.png)
![21Getting to Know Your LifeBook3. Type in:C:\Program Files\Fujitsu\Security Panel Application\Supervisor\FJSECS.EXE, then press [Enter]4. Follow the on-screen instructions to set theSupervisor password.Setting User Password1 Go to the Start menu.2. Click on Programs.3. Click on Security Panel Application andSet User Password.4. Follow the on-screen instructions to set theuser password.OPERATING YOUR LIFEBOOK SECURITY/ APPLICATION PANELThe security lock feature is in effect both when the system resumes from Off or suspend state. You always need to push the Suspend /Resume button to input the user pass-word. Your system will not begin the boot sequence without entering your supervisor/user password.From Off State1. Turn on your system.2. When the Security Indicator flashes, enter the pass-word and press Enter button.For example, if the password is 22222,Press Button Number 2 five times and press Enter button.The LifeBook notebook will boot to normal opera-tion.From Suspend State1. Press your Power/Suspend/Resume button.2. When the Security Indicator flashes, enter the pass-word and press Enter button.The notebook should resume normal operation.Incorrect Password EntryIf an invalid supervisor or user password is entered three times in succession, the system will “beep” for about one minute. If a valid password is entered within a minute (while system beeps), the beeping will stop and the note-book will resume normal operation. If no password (or an invalid one) is entered while the system beeps, the system will return to its previous locked state (suspend or off) and the Security Indicator will go off. To reacti-vate the notebook after a password failure, you must press the Power/Suspend/Resume button, then enter a correct password.PRECAUTIONSOpening and Closing the CoverClosing the cover automatically places the notebook into suspend mode. Opening the cover does not automati-cally place the notebook into normal operation. Instead, you must enter the proper security password after pushing the Power/Suspend/Resume button.Low Battery OperationsIf your LifeBook notebook has low battery, pushing the Power/Suspend/Resume button only turns on the Secu-rity Indicator. Your notebook does not unlock, the Secu-rity Indicator turns off after one minute. To resume normal operation, first attach a power supply to the notebook. Then you may unlock the notebook.UNINSTALLING THE SECURITY PANEL APPLICATIONYou have two options when uninstalling the securitypanel application:nUninstall the security panel application software.This will disable all security feature.nUninstall the security panel application with password still active. This will not allow any changes to the password. Uninstalling the Security Panel Application SoftwareRemove passwords when User wants no password protection whatsoever and doesn’t want to give anybody the utility to set a password on their computer. In this case, if passwords (supervisor, user, or both) are set, the passwords must first be cleared BEFORE removing the application. To clear passwords, follow same procedure in SETTING PASSWORD CODES except this time, select REMOVE, enter current password then click Next. When asked to confirm select Yes.You may change or remove the supervisor or user password by repeating the steps defined above.Remember the user password you specified on the Security Panel Application. If you forget the password you will not be able to use your computer. The super-visor password can override the user password.S Series.book Page 21 Thursday, February 12, 2004 4:15 PM](https://usermanual.wiki/Fujitsu-Client-Computing/WB0003.Users-Manual-Part-1/User-Guide-400610-Page-30.png)
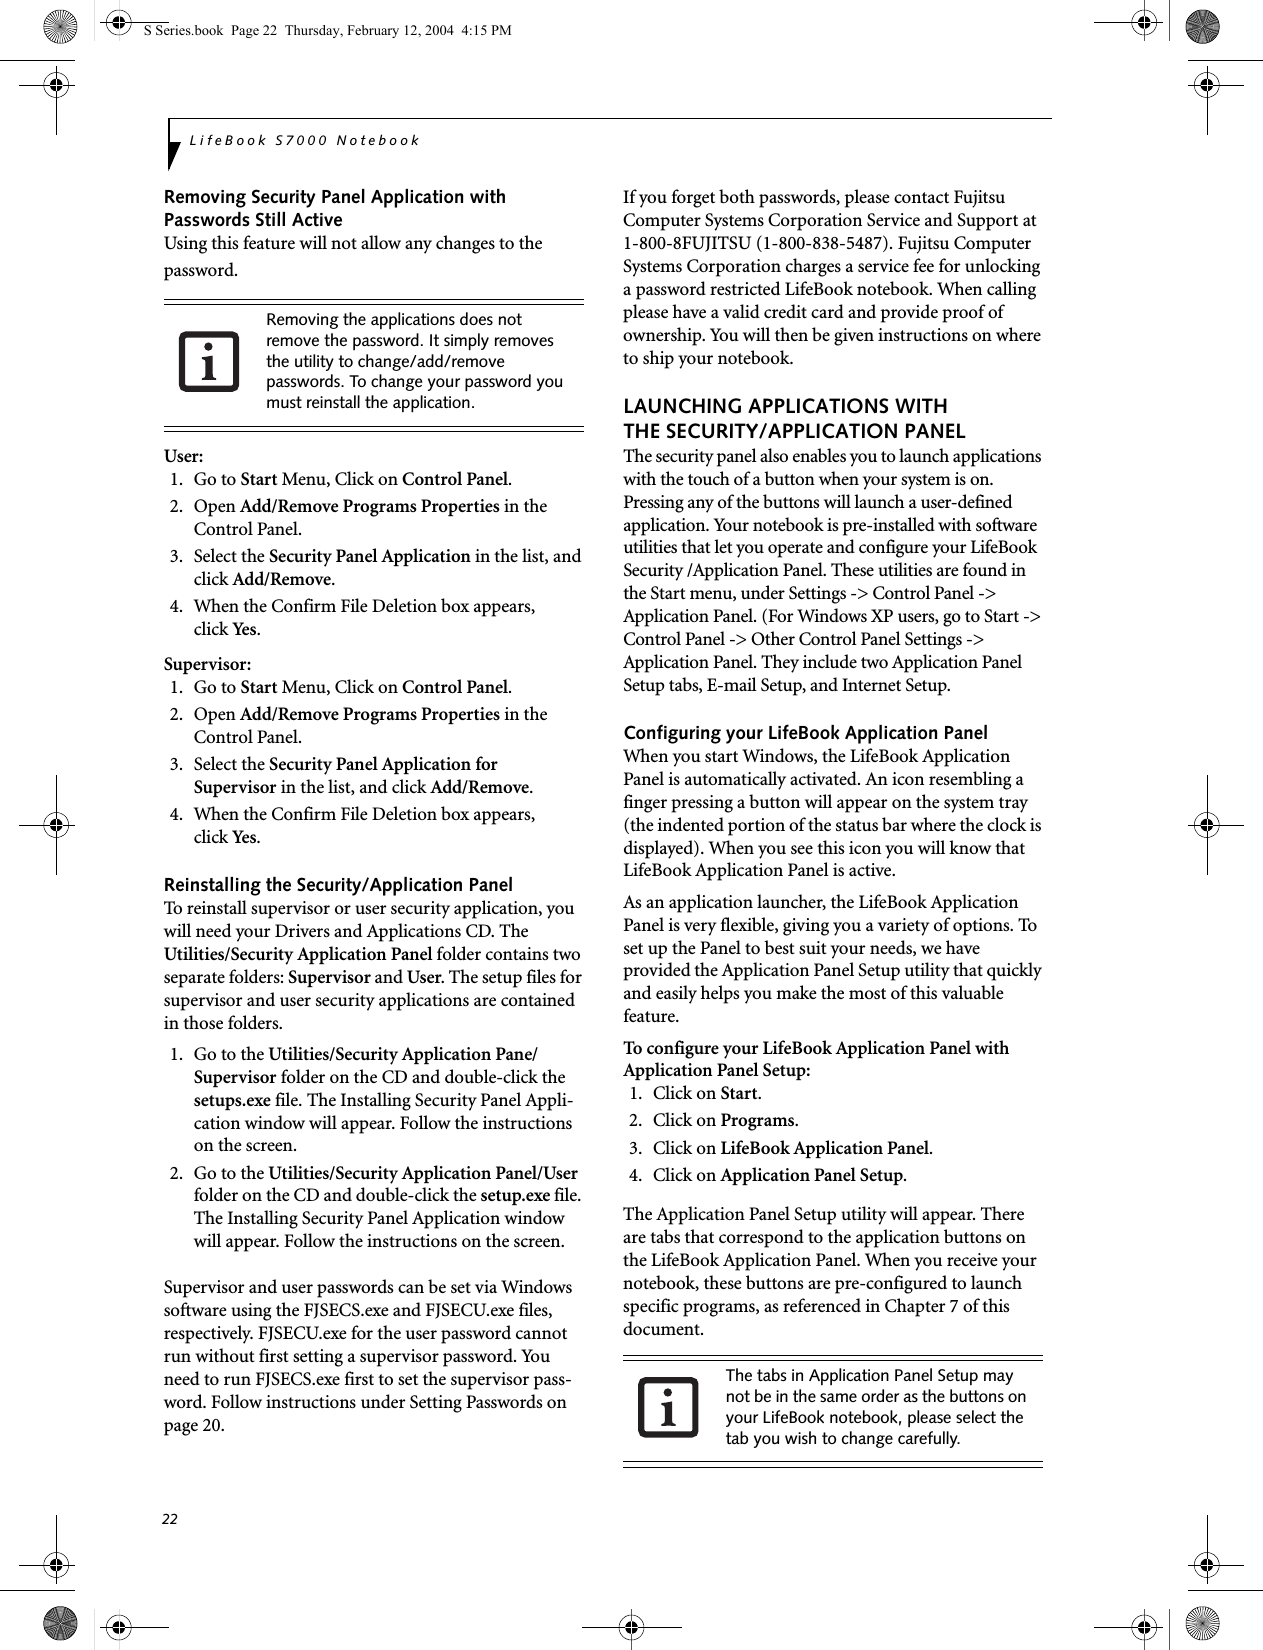


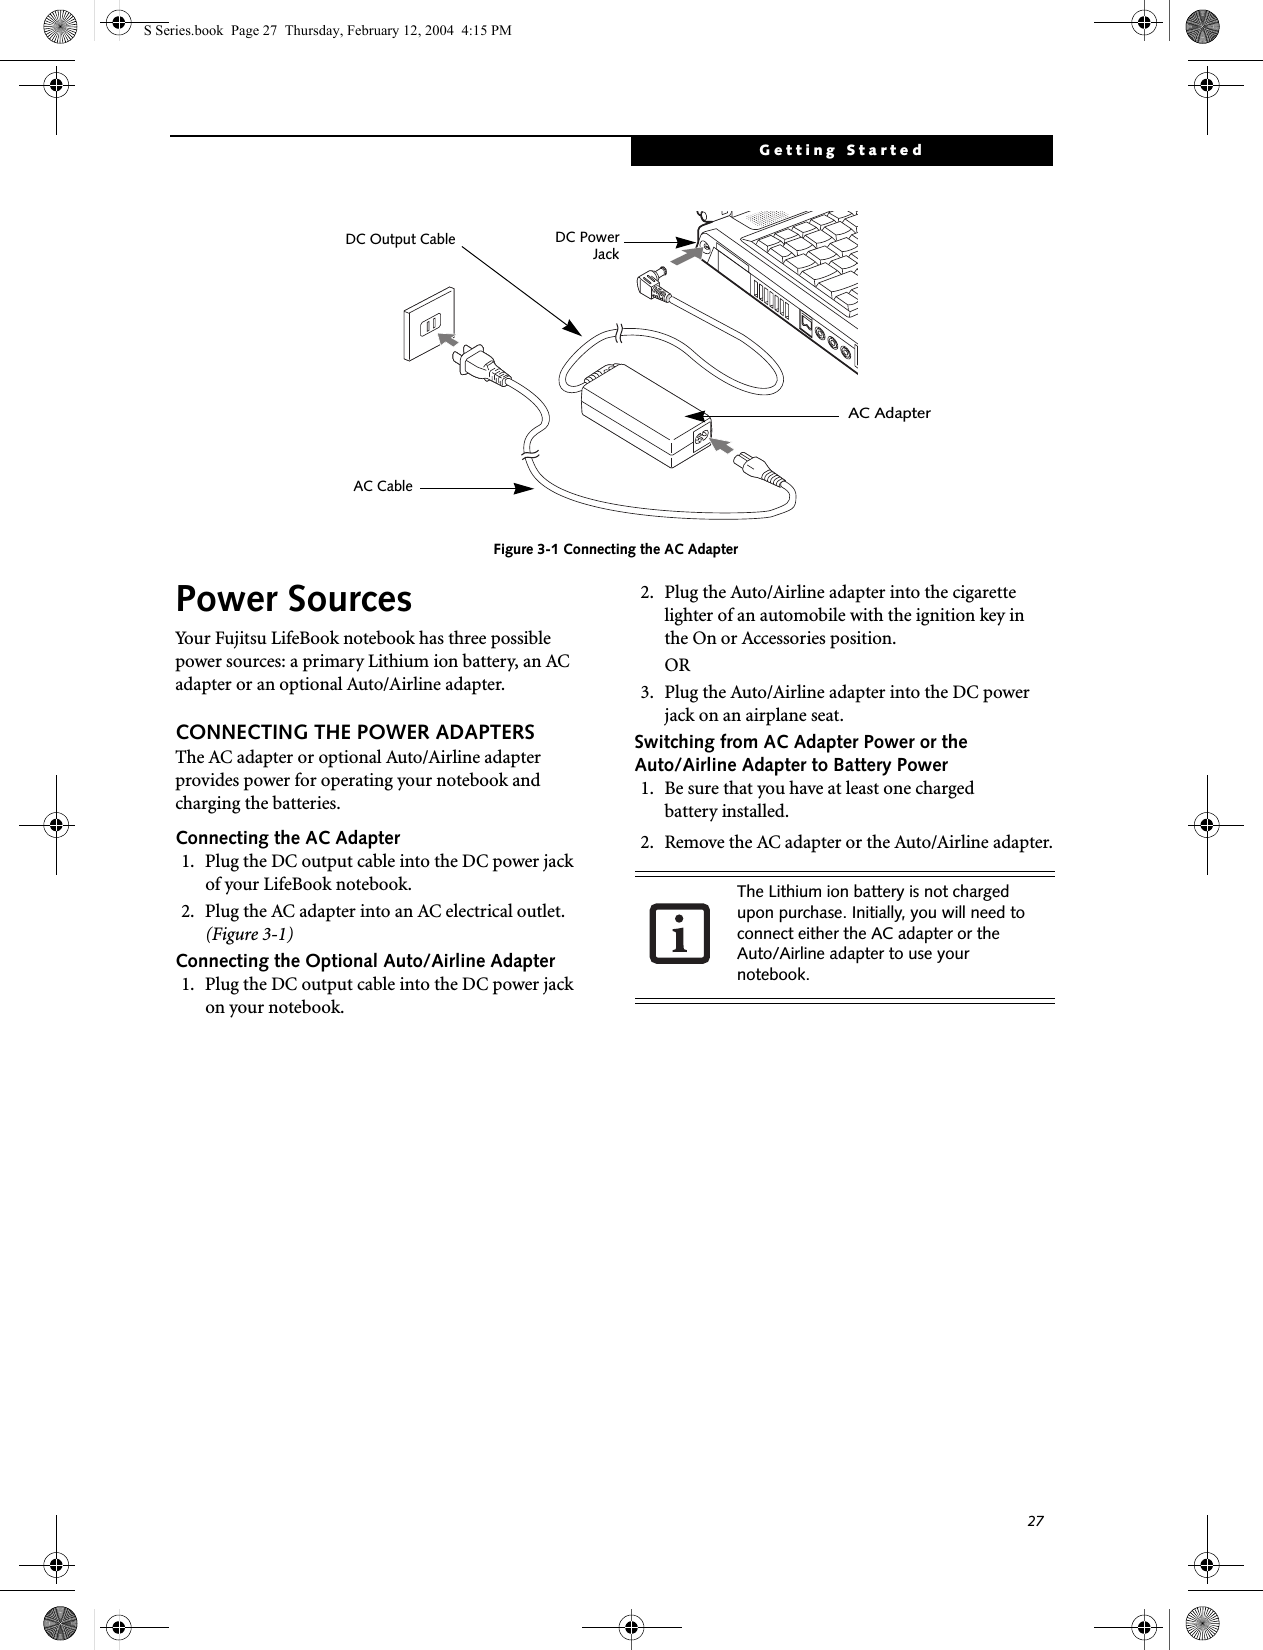
![28LifeBook S7000 NotebookFigure 3-2 Opening the Display PanelDisplay PanelYour Fujitsu LifeBook notebook contains a display panel that is backlit for easier viewing in bright environments and maintains top resolution through the use of active-matrix technology. OPENING THE DISPLAY PANEL1. Press the Display Panel latch. This releases the locking mechanism and raises the display slightly.2. Lift the display backwards, being careful not to touch the screen, until it is at a comfortableviewing angle. (Figure 3-2)ADJUSTING DISPLAY PANEL BRIGHTNESSOnce you have turned on your LifeBook notebook, you may want to adjust the brightness level of the screen to a more comfortable viewing level. There are two ways to adjust the brightness, by using the keyboard or the power management utility. Using the KeyboardAdjusting the brightness using the keyboard changes the setting only temporarily. ■[Fn+F6]: Pressing repeatedly will lower thebrightness of your display.■[Fn+F7]: Pressing repeatedly will increase thebrightness of the display.Using the Power Management Utility (Windows 2000 only) Adjusting the brightness using the Power Management changes the setting permanently. 1. Double-click the BatteryAid icon in the lower right corner of your display. This will open the BatteryAid Properties dialog box. 2. Select the Power Control tab and adjust yourLCD Backlighting to the desired level.3. Click OK or Apply to permanently changethe settings.You may need to readjust the brightness level periodi-cally depending on your operating environment. CLOSING THE DISPLAY PANEL1. Holding the edge of your display panel, pull it forward until it is flush with the body of your Life-Book notebook. 2. Push down until you hear a click. This willengage the locking mechanism and preventyour display panel from opening unexpectedly.Display Panel LatchWhen using AC power your brightness setting is set to its highest level by default. When using battery power your brightness setting is set to approximately mid-level by default.The higher the brightness level, the more power the notebook will consume and the faster your batteries will discharge. For maximum battery life, make sure that the brightness is set as low as possible.S Series.book Page 28 Thursday, February 12, 2004 4:15 PM](https://usermanual.wiki/Fujitsu-Client-Computing/WB0003.Users-Manual-Part-1/User-Guide-400610-Page-37.png)
![29Getting StartedStarting Your LifeBook NotebookPOWER ONPower/Suspend/Resume ButtonThe Power/Suspend/Resume button is used to turn on your LifeBook notebook from its off state. Once you have connected your AC adapter or charged the internal Lithium ion battery, you can power on your LifeBook notebook. (See figure 2-4 on page 6 for location)To turn on your LifeBook notebook from its off state, press the Power/Suspend/Resume button, located above the keyboard. When you are done working you can either leave your LifeBook notebook in Suspend mode, (See Suspend Mode on page 32 for more information), or you can turn it off (See Power Off on page 33 for more information). When you power on your LifeBook, it will perform a Power On Self Test (POST) to check the internal parts and configuration for correct functionality. If a fault is found, your LifeBook notebook will emit an audio warning and/or an error message will be displayed. (See Power On Self Test Messages on page 64 for more information) Depending on the nature of the problem, you may be able to continue by starting the operating system or by entering the BIOS setup utility and revising the settings.After satisfactory completion of the Power On Self Test (POST), your notebook will load your operating system.BOOT SEQUENCEThe procedure for starting up your notebook is called the Bootup sequence and involves your notebook’s BIOS. When your LifeBook notebook is first turned on, the main system memory is empty, and it needs to find instructions to start up your notebook. This information is in the BIOS program. Each time you power up or restart your notebook, it goes through a boot sequence which displays a Fujitsu logo until your operating system is loaded. During booting, your notebook is performing a standard boot sequence including a Power On Self Test (POST). If the sequence is completed without a failure and without a request for the BIOS Setup Utility, the system displays the operating system’s opening screen.The boot sequence is executed when:■You turn on the power to your LifeBook notebook.■You restart your notebook from the WindowsShut Down dialog box.■The software initiates a system restart. Example:When you install a new application.■You reset the system by pressing [CTRL+ALT+DEL]. BIOS SETUP UTILITYThe BIOS Setup Utility is a program that sets up the operating environment for your LifeBook notebook. Your BIOS is set at the factory for normal operating conditions, therefore there is no need to set or change the BIOS’ environment to operate your notebook.The BIOS Setup Utility configures:■Device control feature parameters, such as changingI/O addresses and boot devices.■System Data Security feature parameters, such as passwords.Entering the BIOS Setup UtilityTo enter the BIOS Setup Utility do the following: 1. Turn on or restart your LifeBook notebook.2. Press the [F2] key once the Fujitsu logo appears on the screen. This will open the main menu of the BIOS Setup Utility with the current settings displayed.3. Press the [RIGHT ARROW] or [LEFT ARROW] key to scroll through the other setup menus to review or alter the current settings.BIOS GuideA guide to your notebook’s BIOS is available online. Please visit our service and support Web site at us.fujitsu.com/computers. Once there, select Support, then select Notebooks under User’s Guides. Select Life-Book BIOS Guides from the pull-down menu for your LifeBook series. If you are unsure of your notebook’s BIOS number, refer to your packing slip.When you turn on your LifeBook notebook be sure you have a power source. This means that at least one battery is installed and charged, or that the AC or Auto/Airline adapter is connected and has power.Do not carry your LifeBook notebook around with the power on or subject it to shocks or vibration, as you risk damaging your notebook.Never turn off your LifeBook notebook during the Power On Self Test (POST) or it will cause an error message to be displayed when you turn your LifeBook notebook on the next time. (See Power On Self Test Messages on page 64 for more information)S Series.book Page 29 Thursday, February 12, 2004 4:15 PM](https://usermanual.wiki/Fujitsu-Client-Computing/WB0003.Users-Manual-Part-1/User-Guide-400610-Page-38.png)


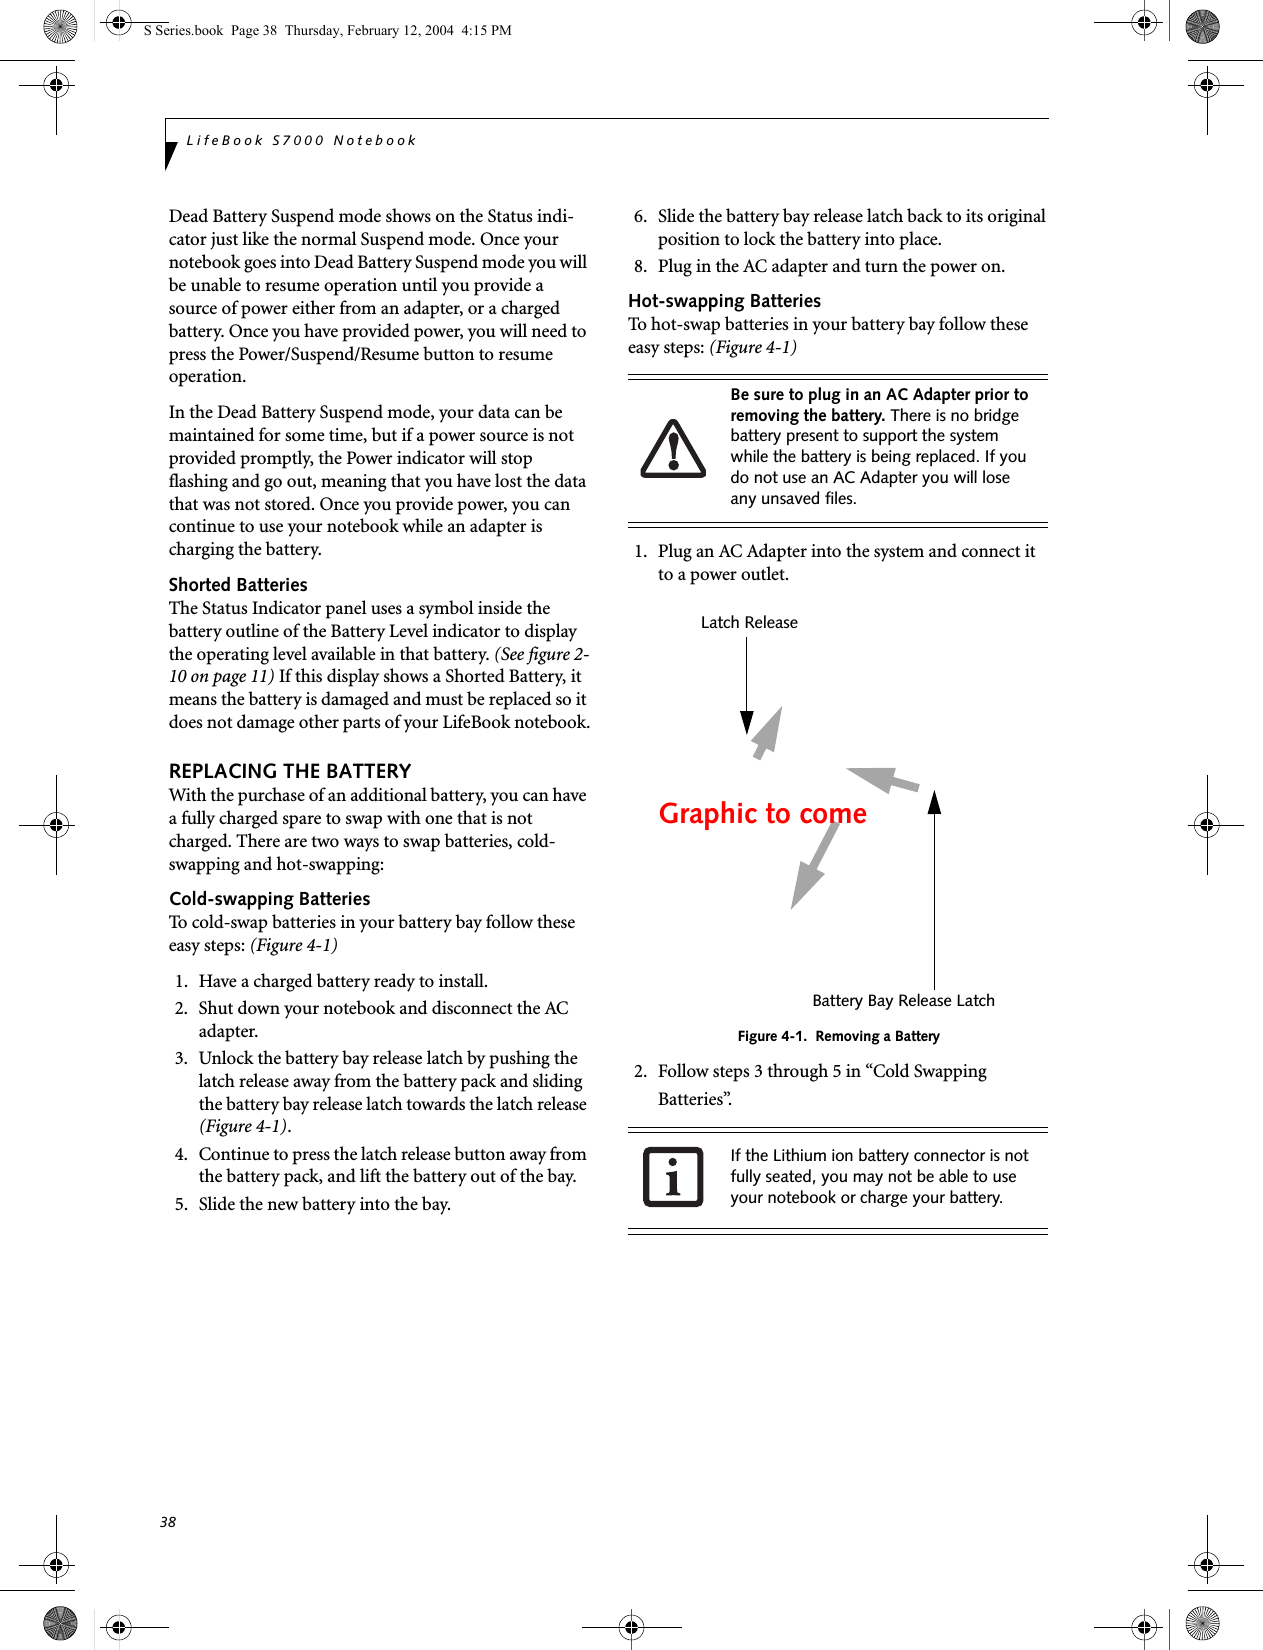
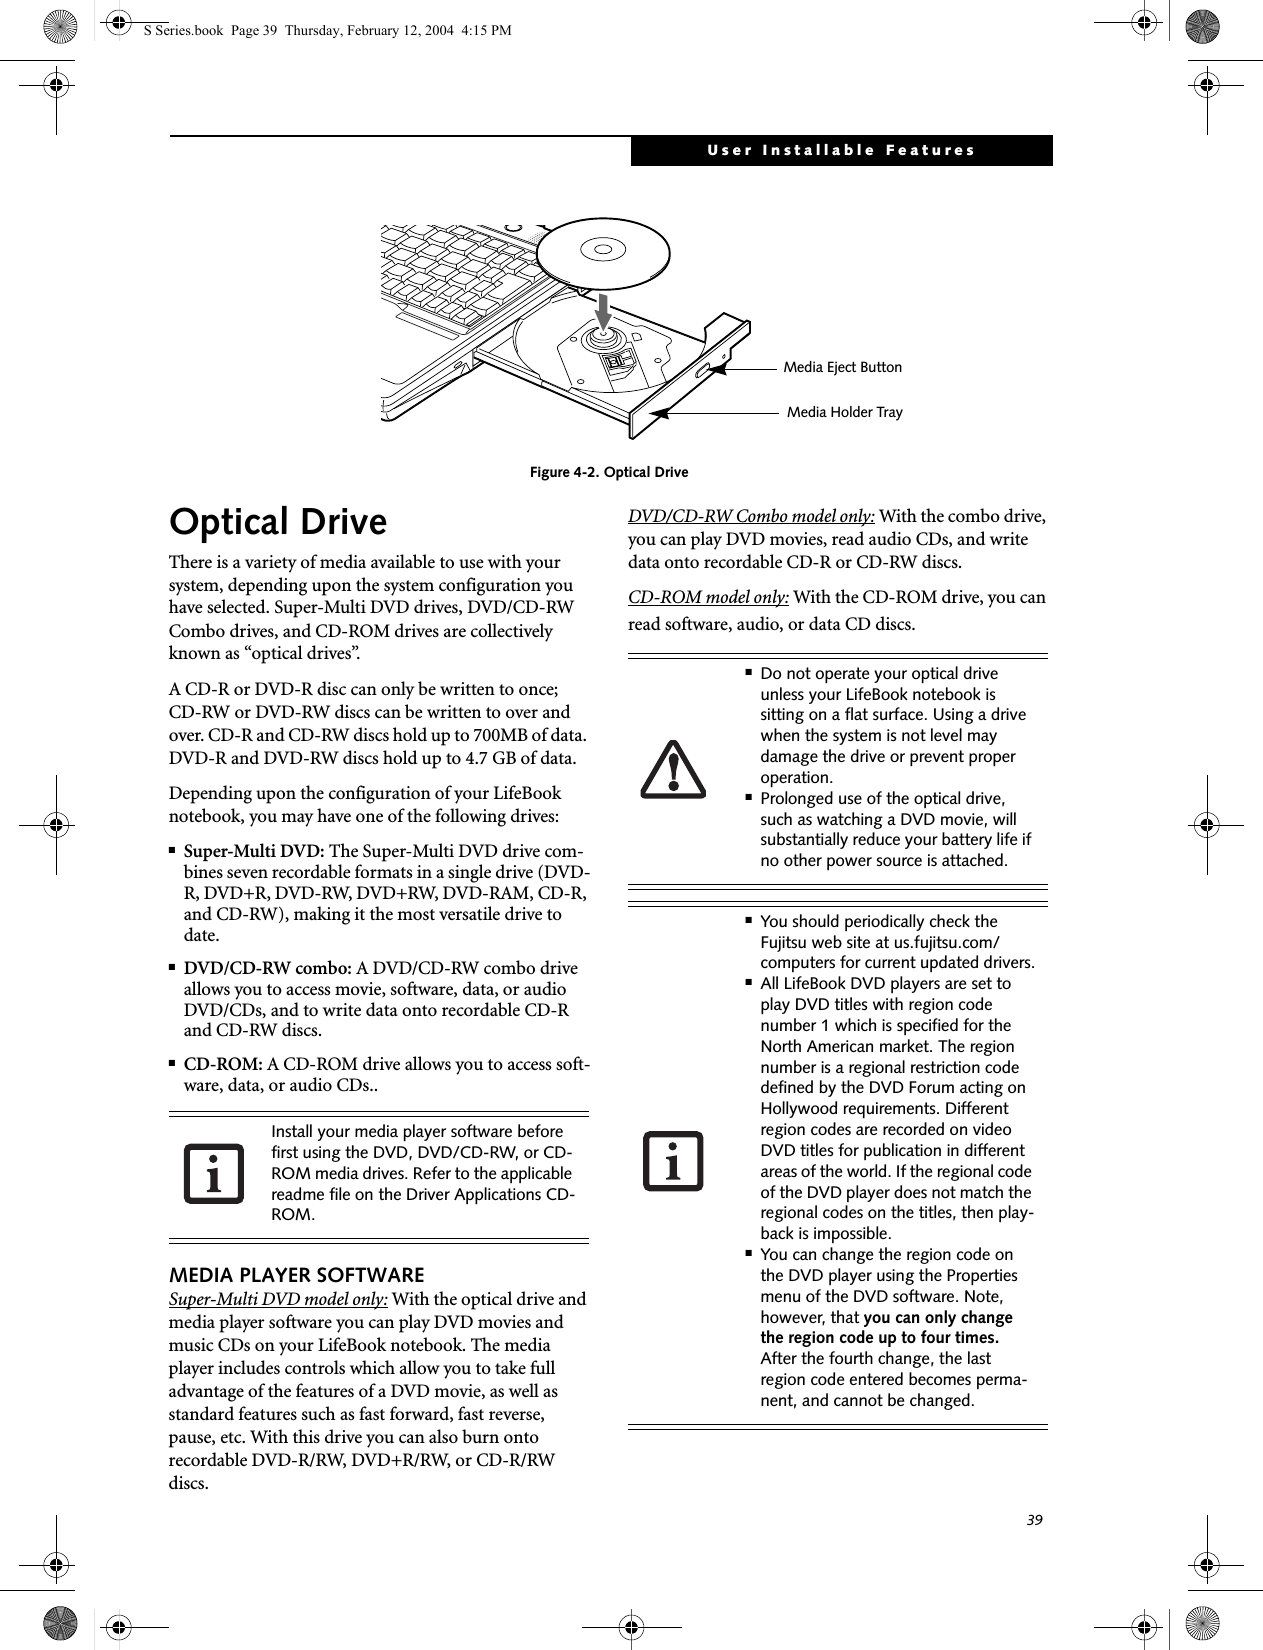
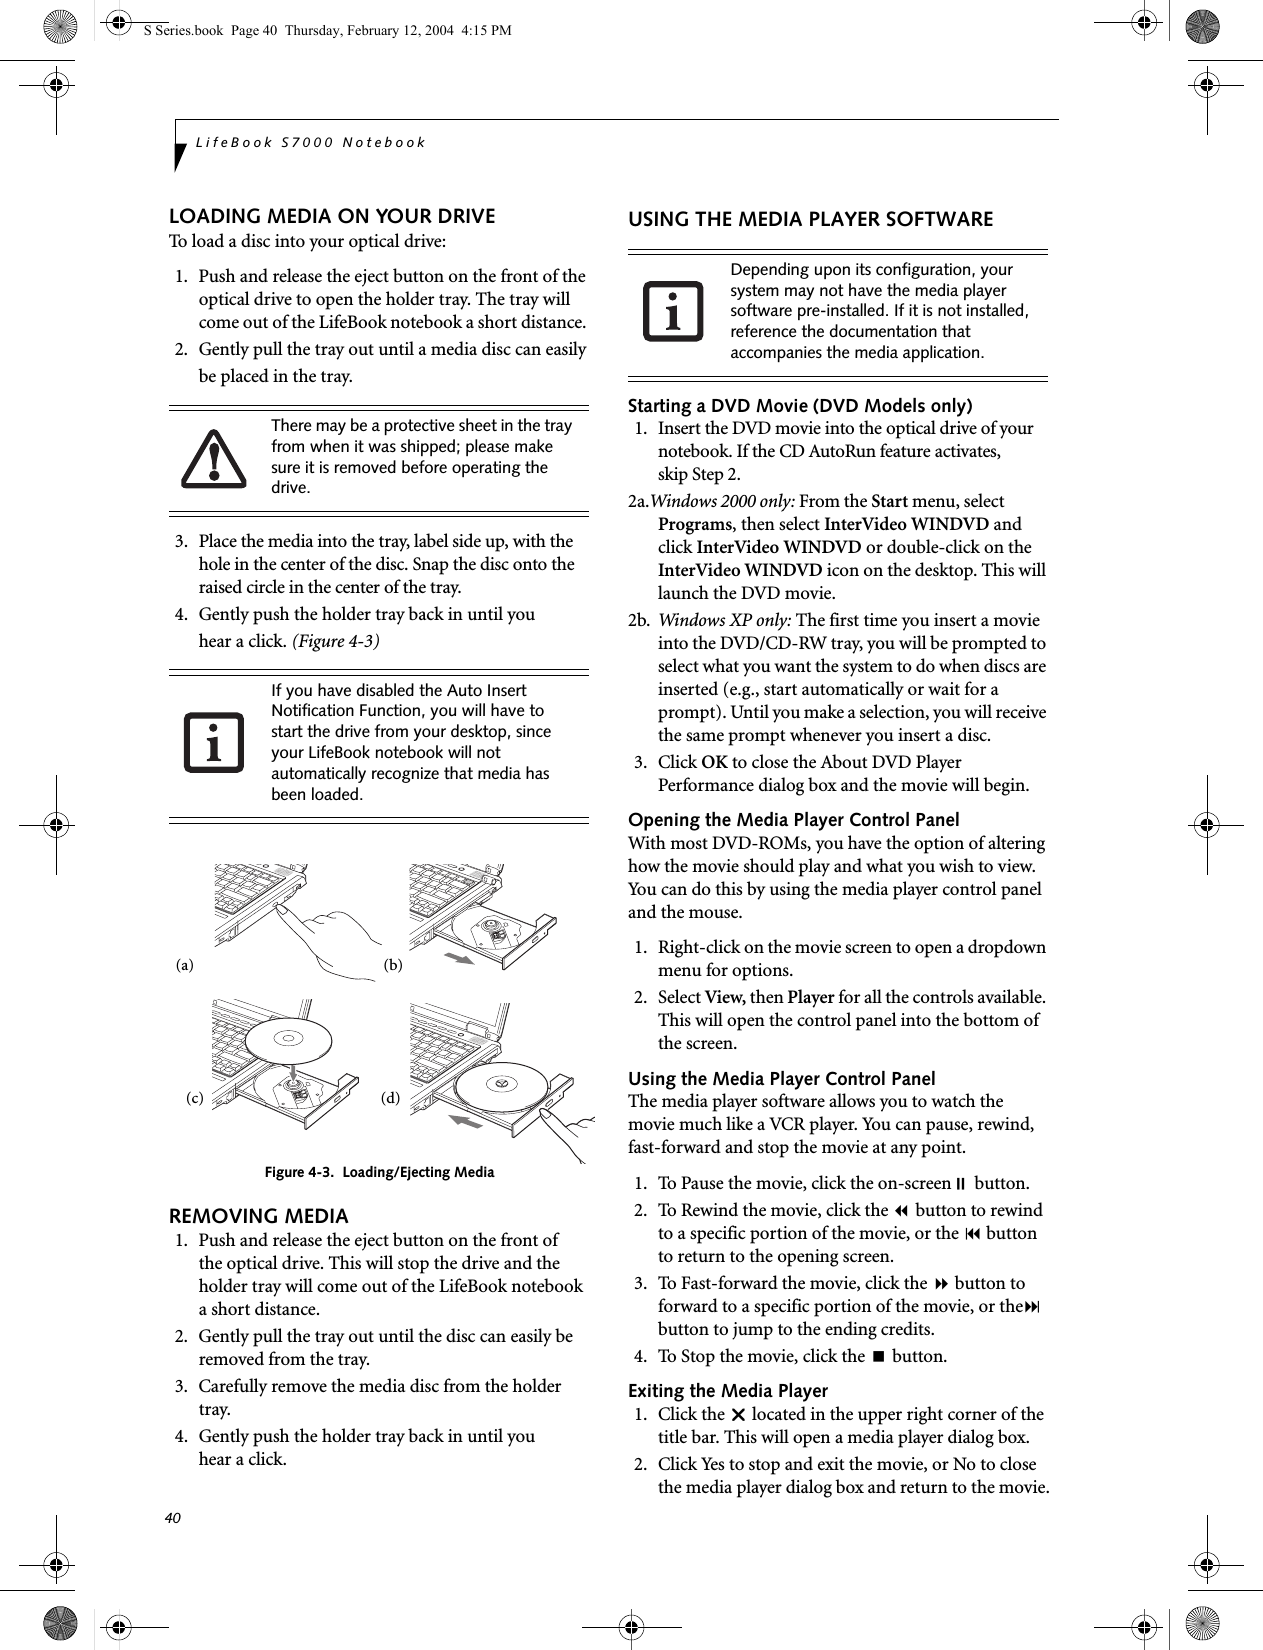
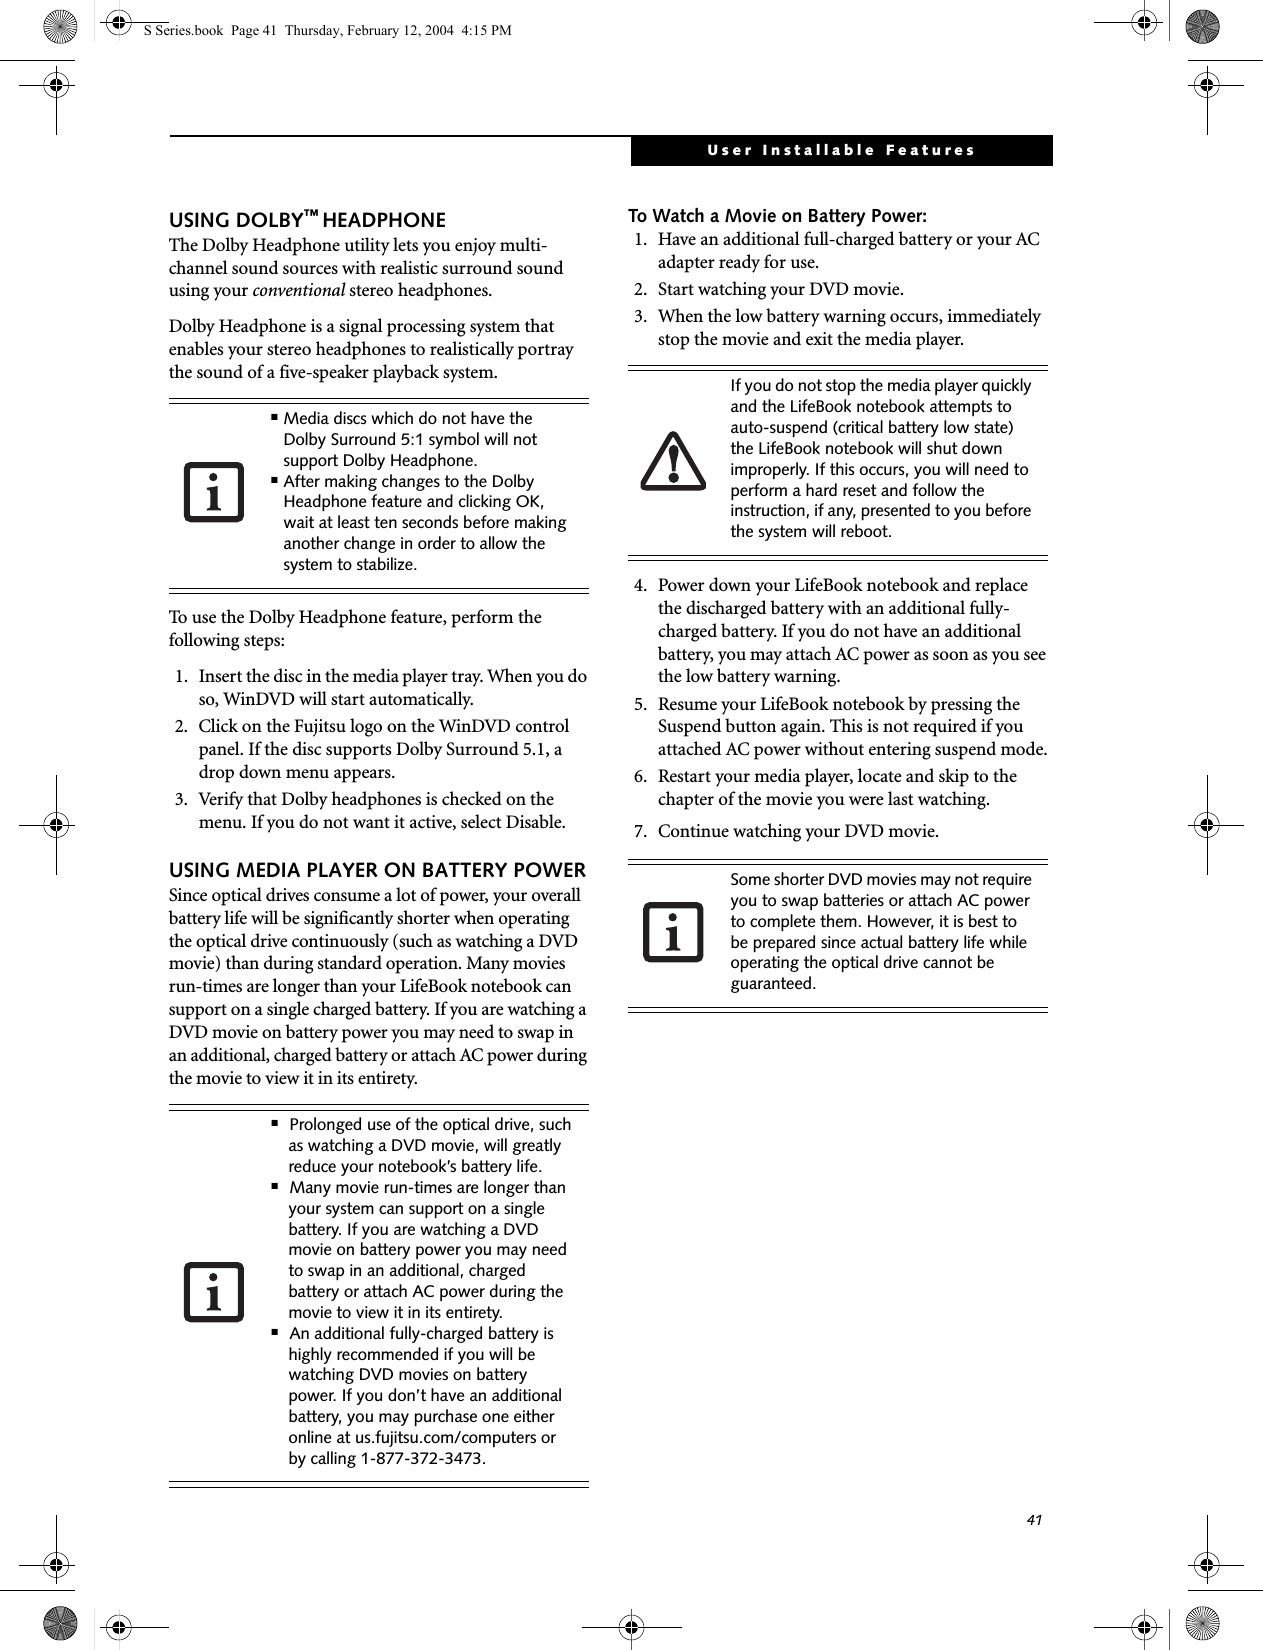
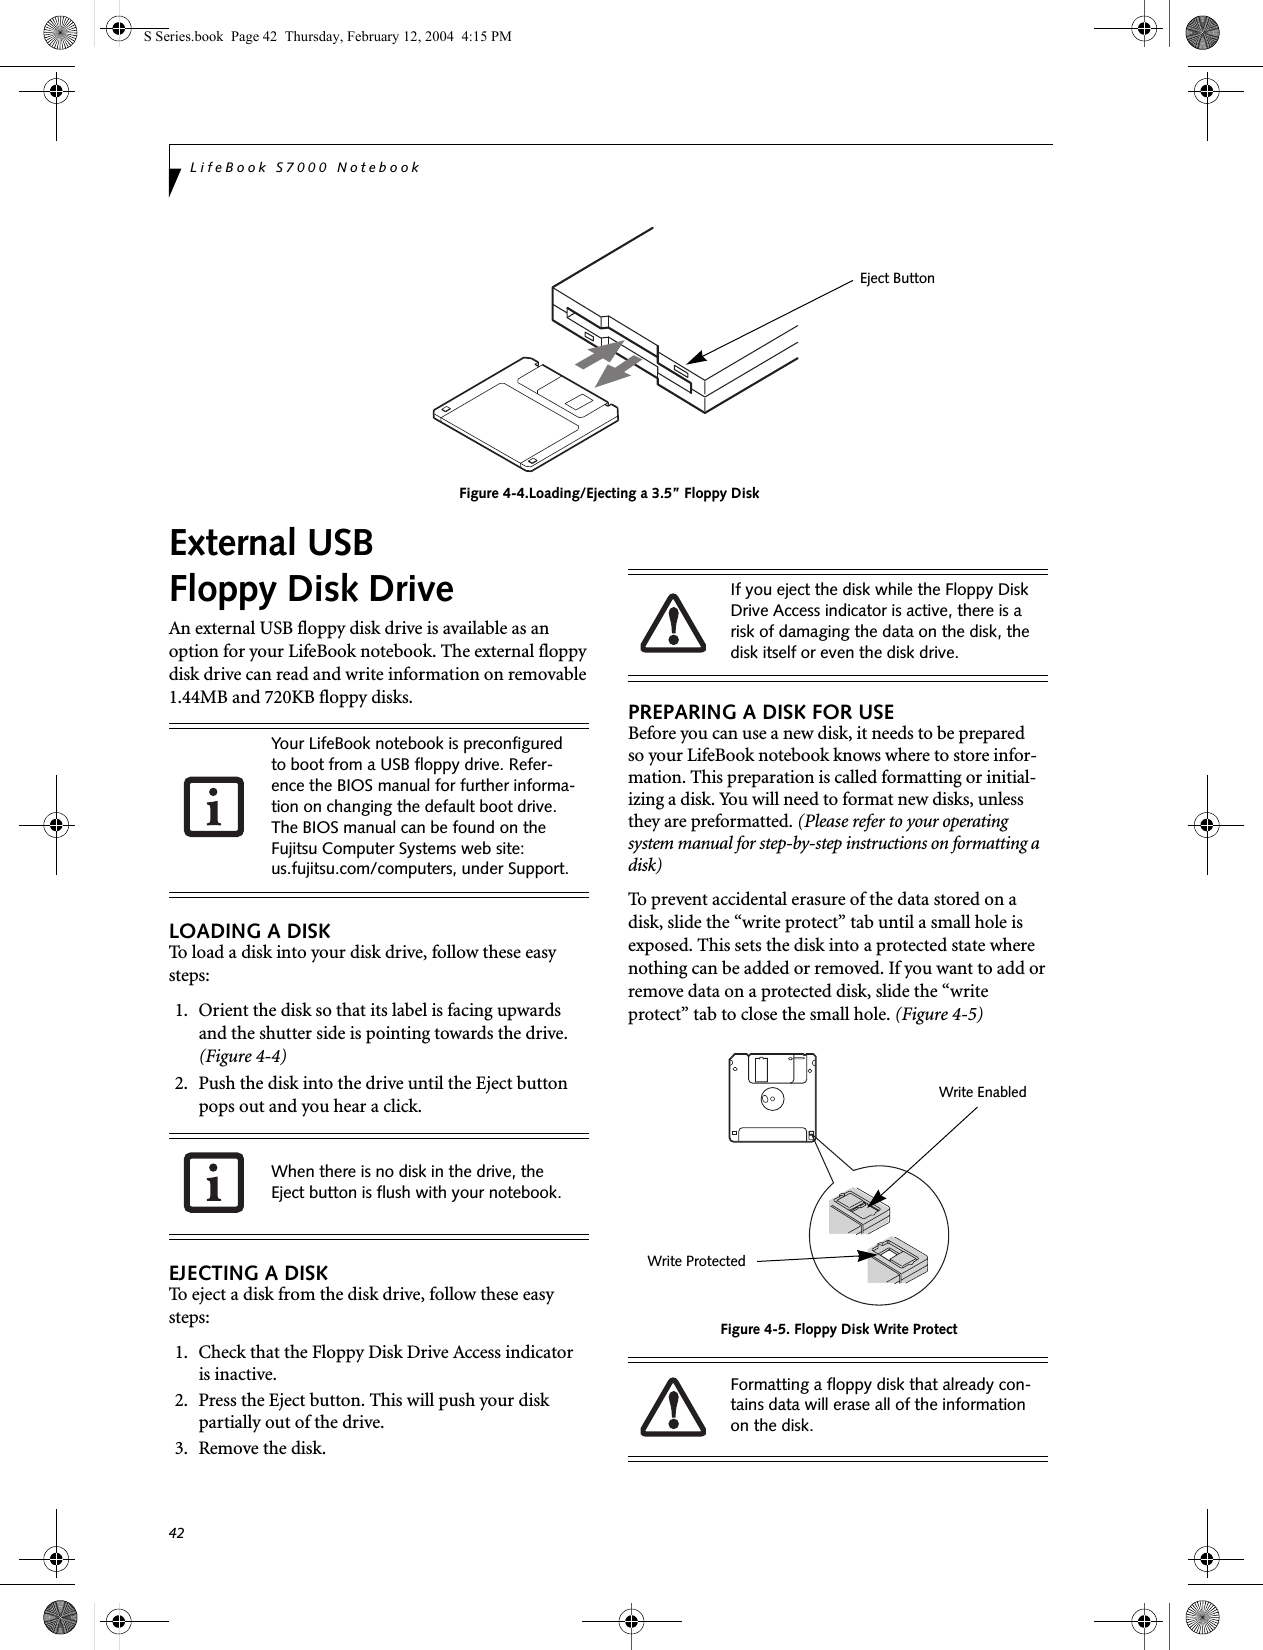
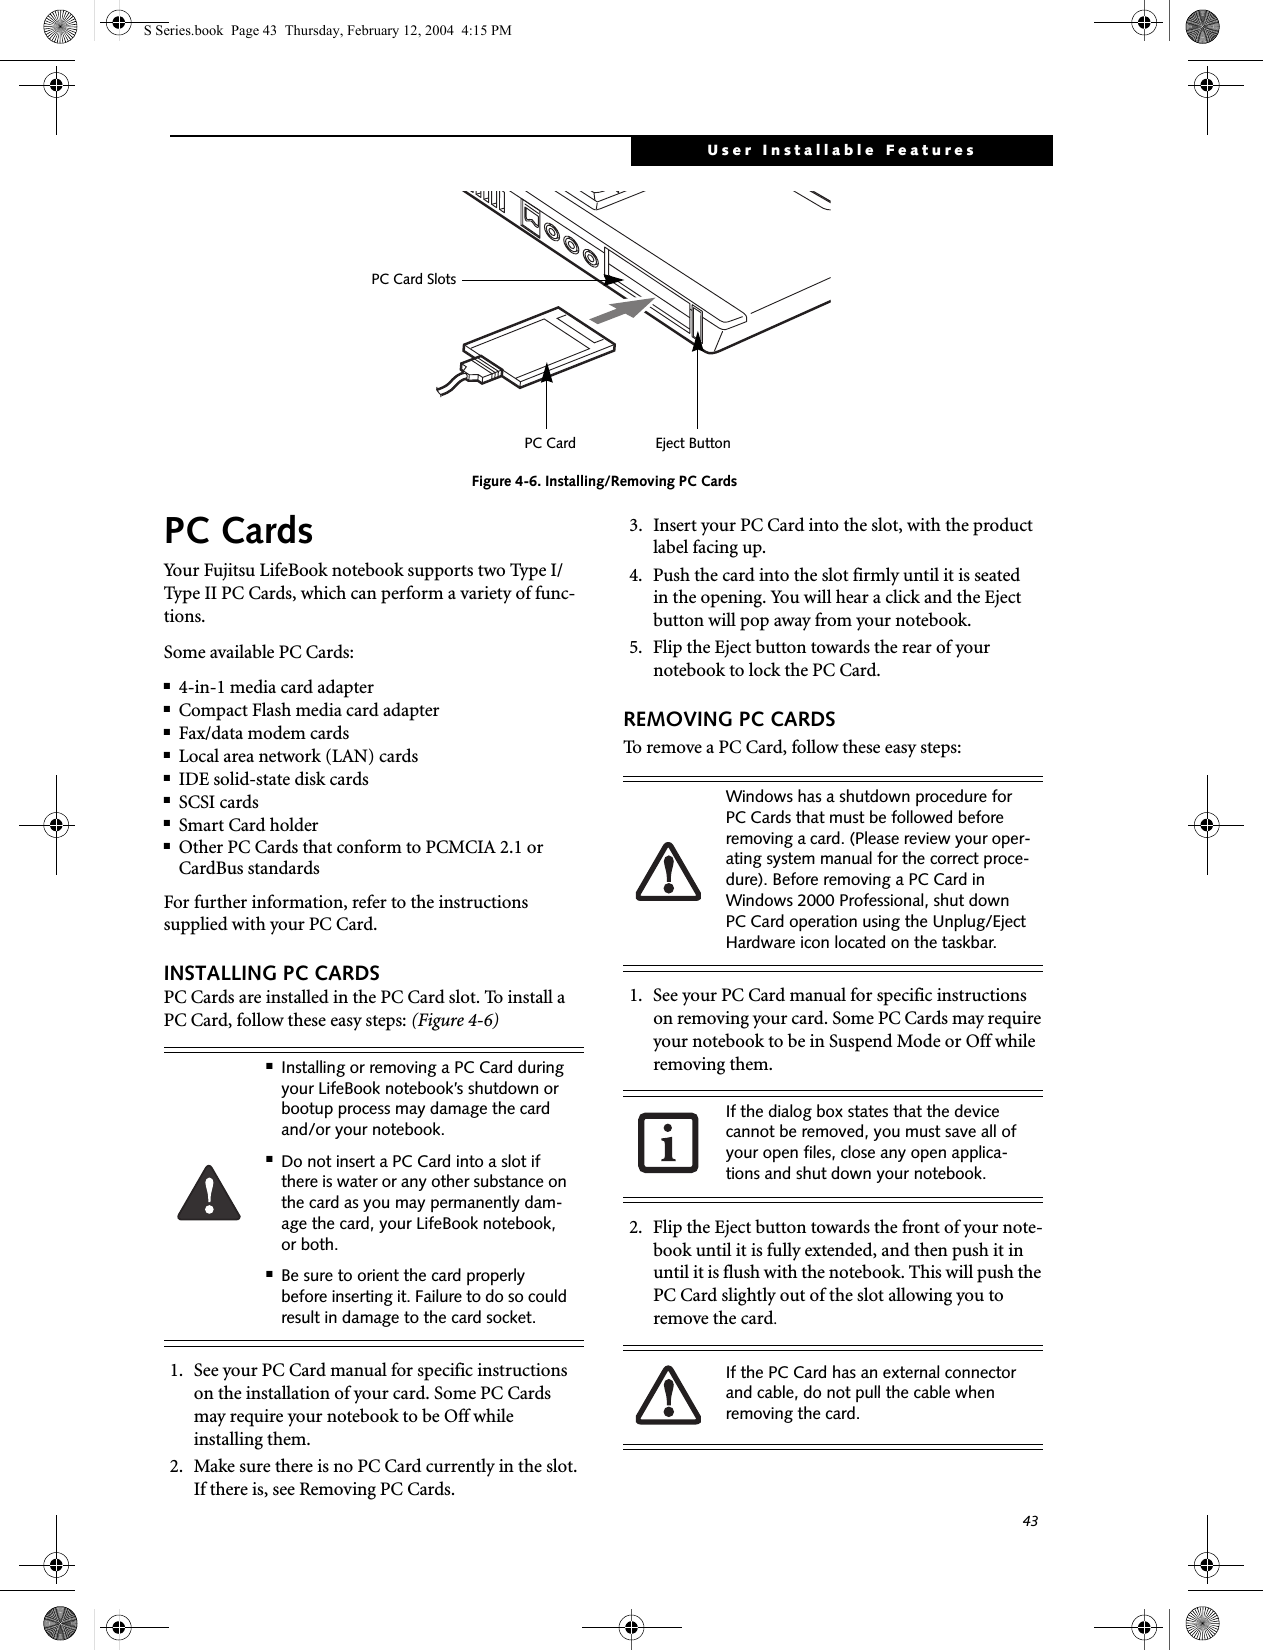
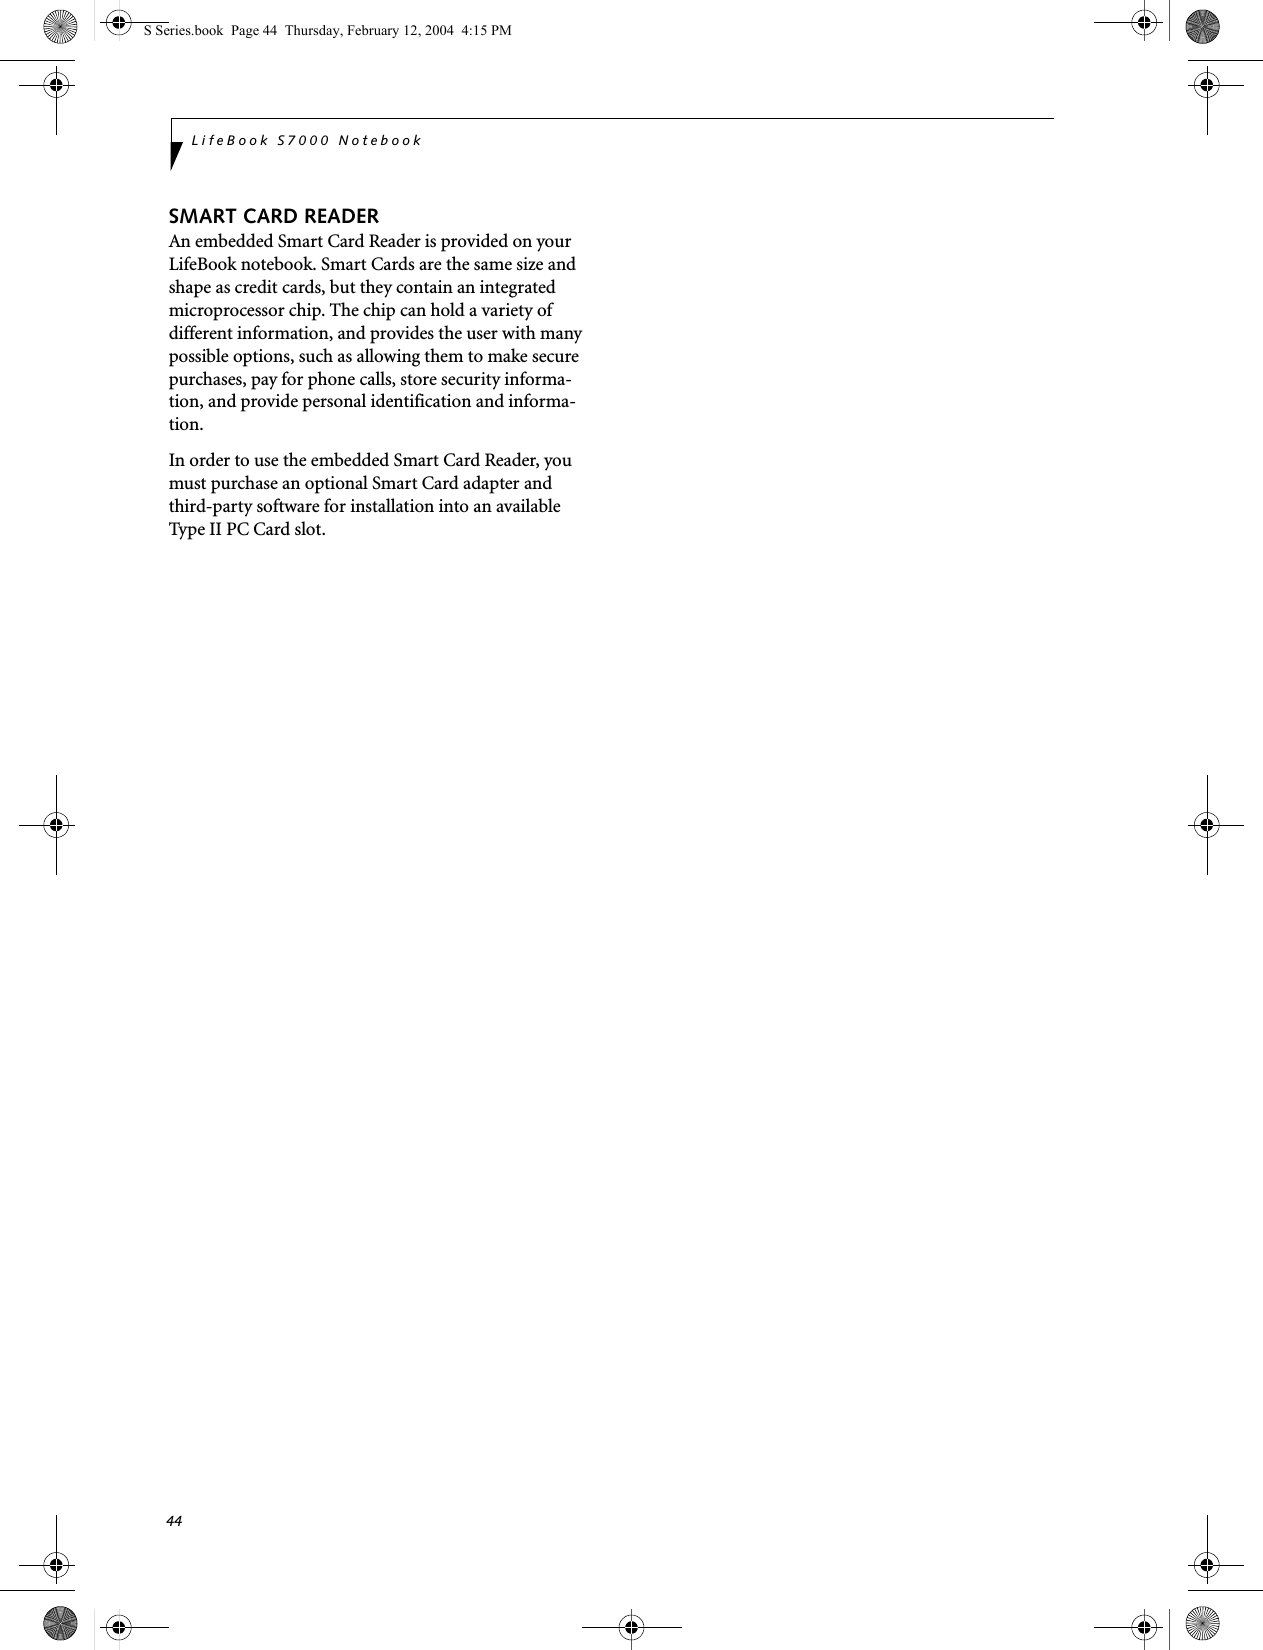
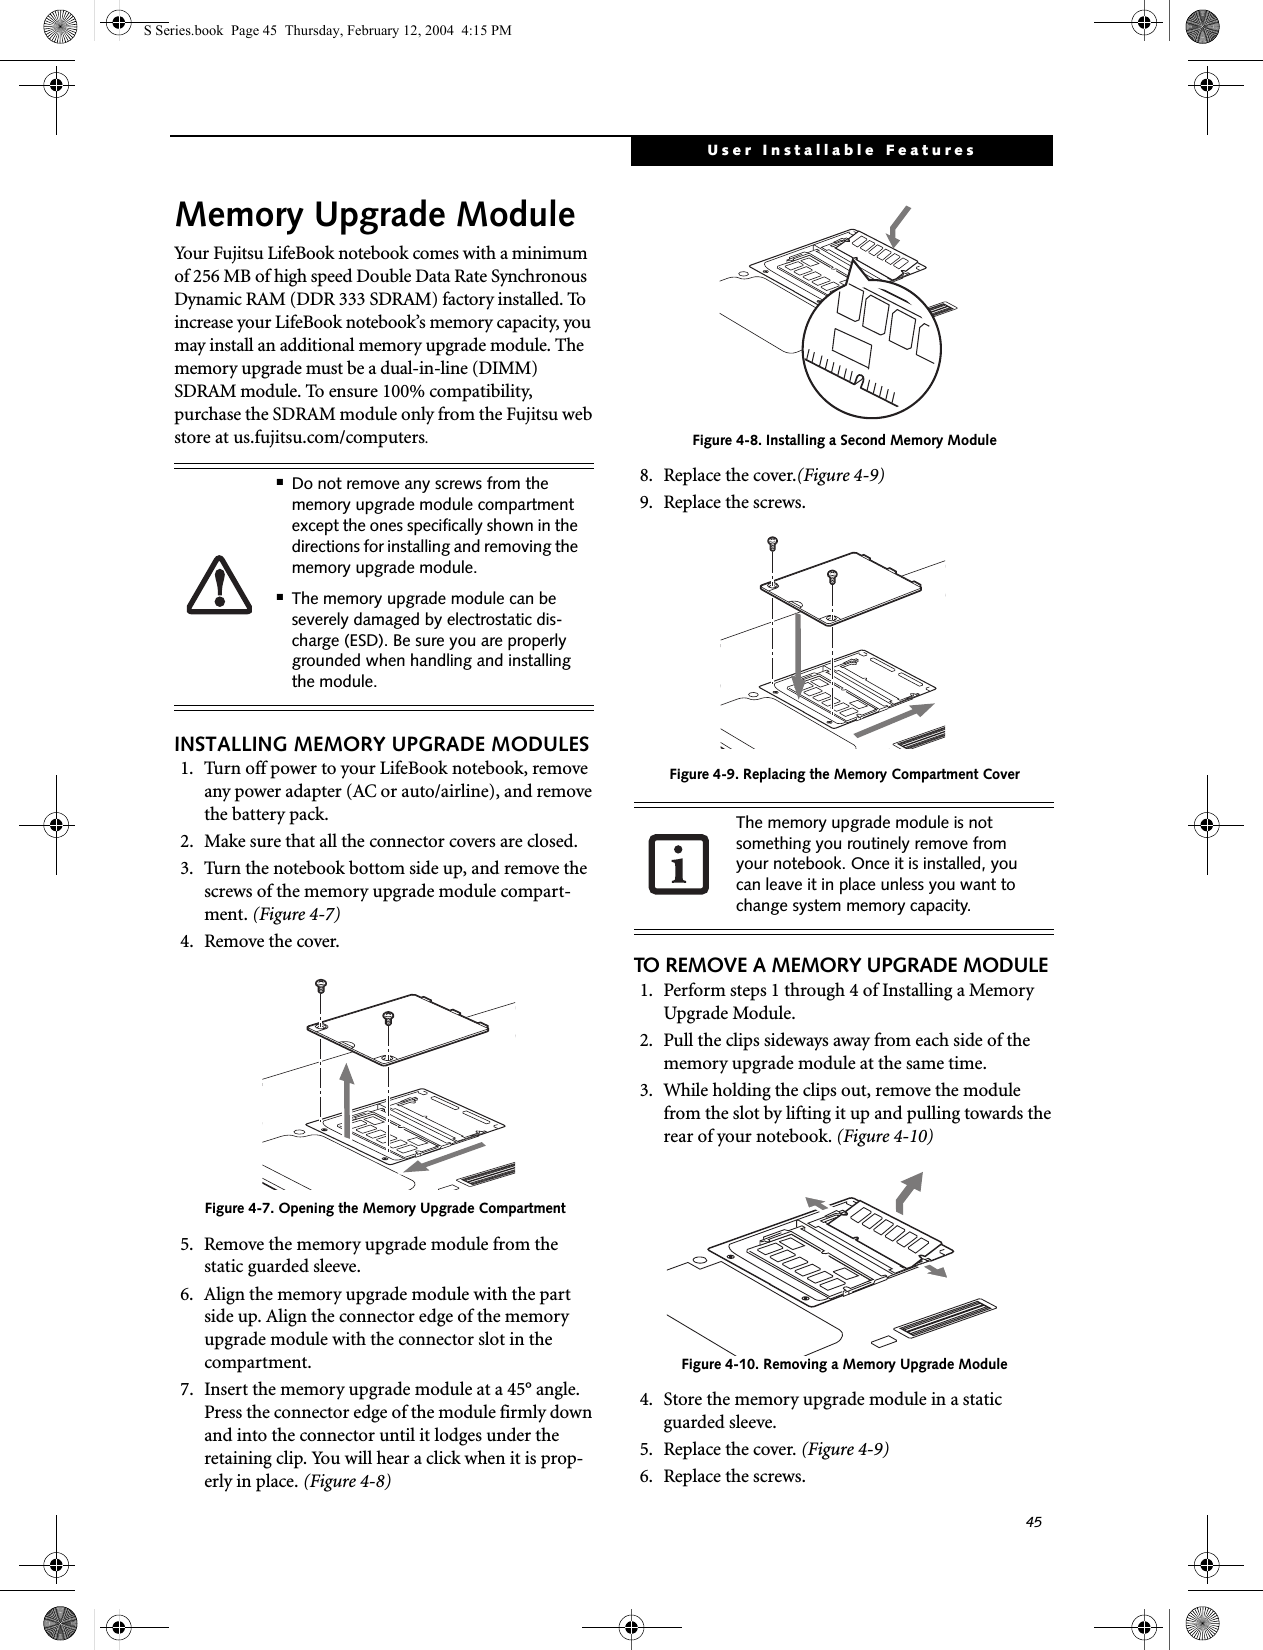
![46LifeBook S7000 NotebookCHECKING THE MEMORY CAPACITYOnce you have changed the system memory capacity by replacing the installed module with a larger one, be sure to check that your notebook has recognized the change.Check the memory capacity by clicking [Start] -> Settings -> Control Panel, then double-clicking the System icon. Select the General tab and check the amount of memory under “Computer:”.There may be a variation between the actual memory size and what is displayed. This is due to the fact that your system uses a video graphics chip which dynami-cally allocates system memory to accelerate graphics performance. Up to 64 MB of memory is dynamically shared on an as-needed basis using Dynamic Video Memory Technology (DVMT).If the total memory displayed is incorrect, check that your memory upgrade module is properly installed. (If the module is properly installed and the capacity is still not correctly recognized, see Trouble-shooting on page 55.S Series.book Page 46 Thursday, February 12, 2004 4:15 PM](https://usermanual.wiki/Fujitsu-Client-Computing/WB0003.Users-Manual-Part-1/User-Guide-400610-Page-55.png)
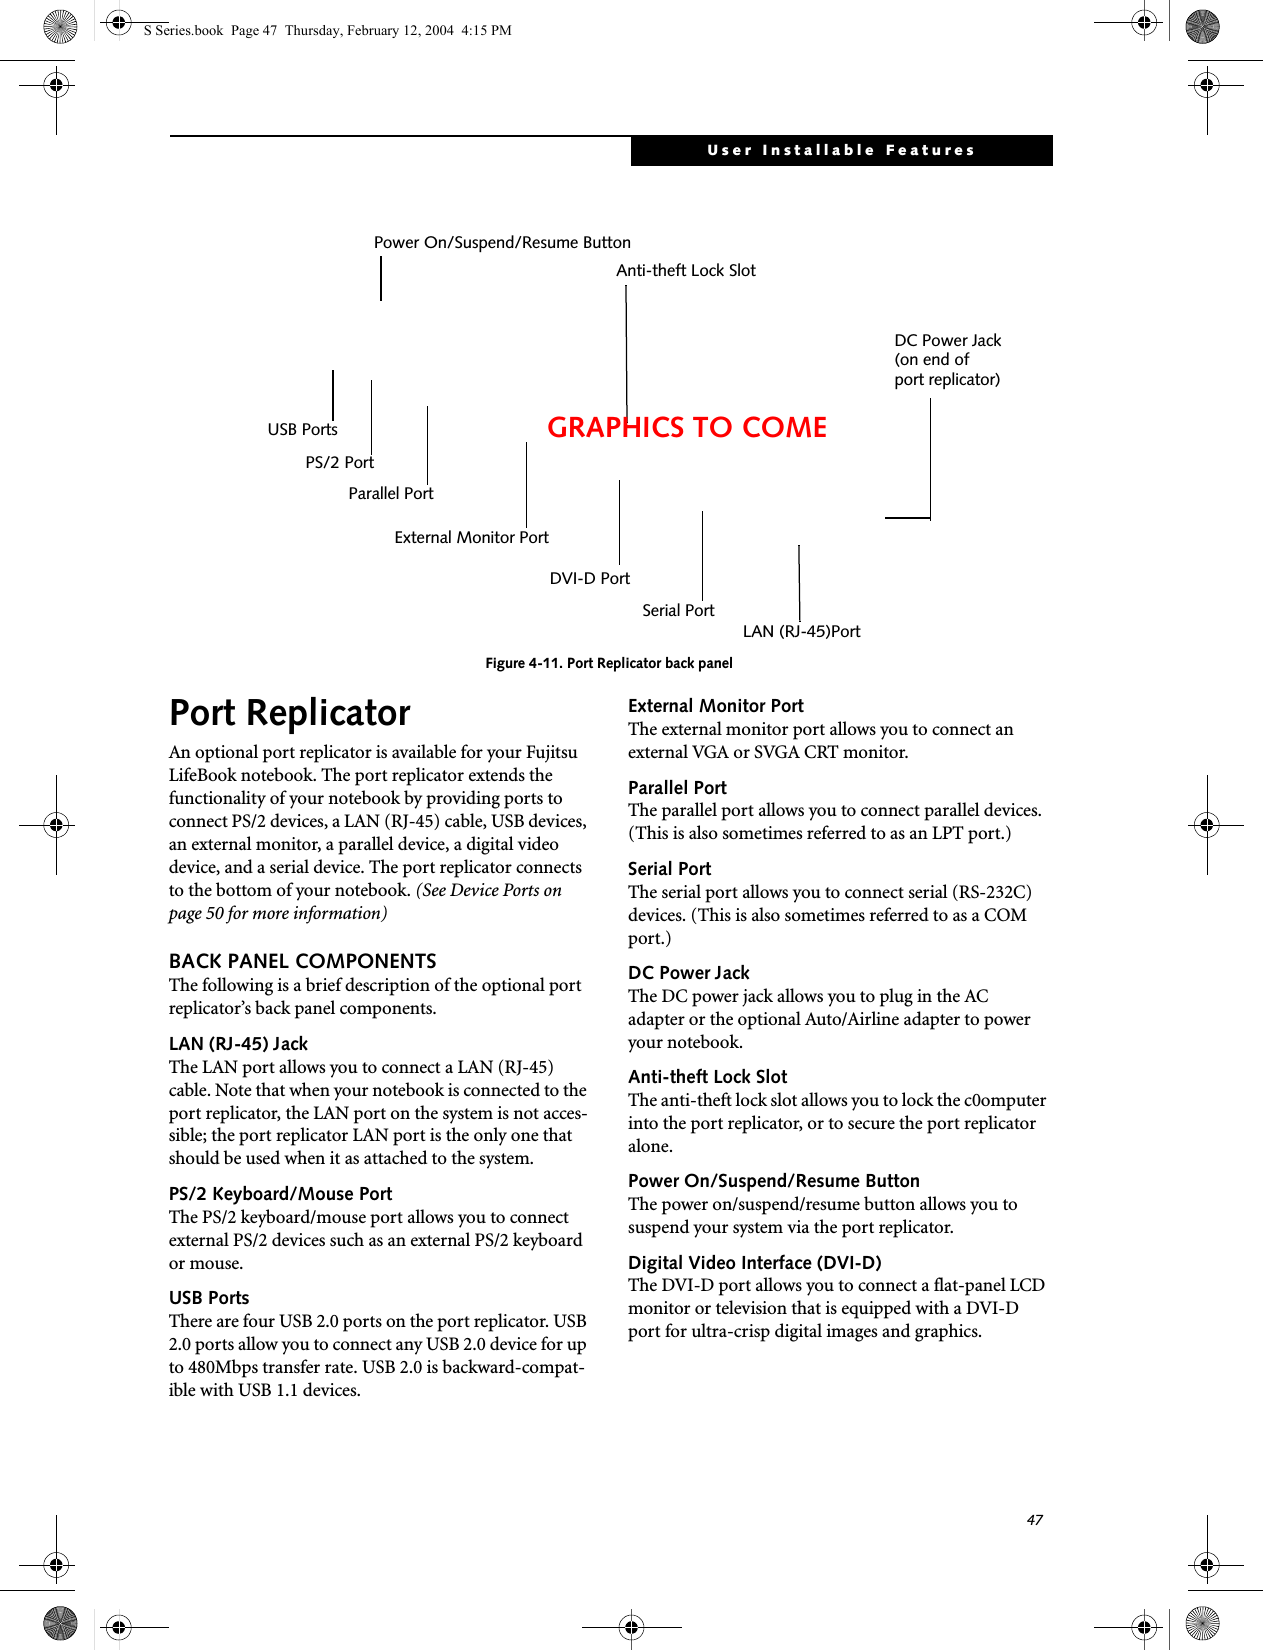
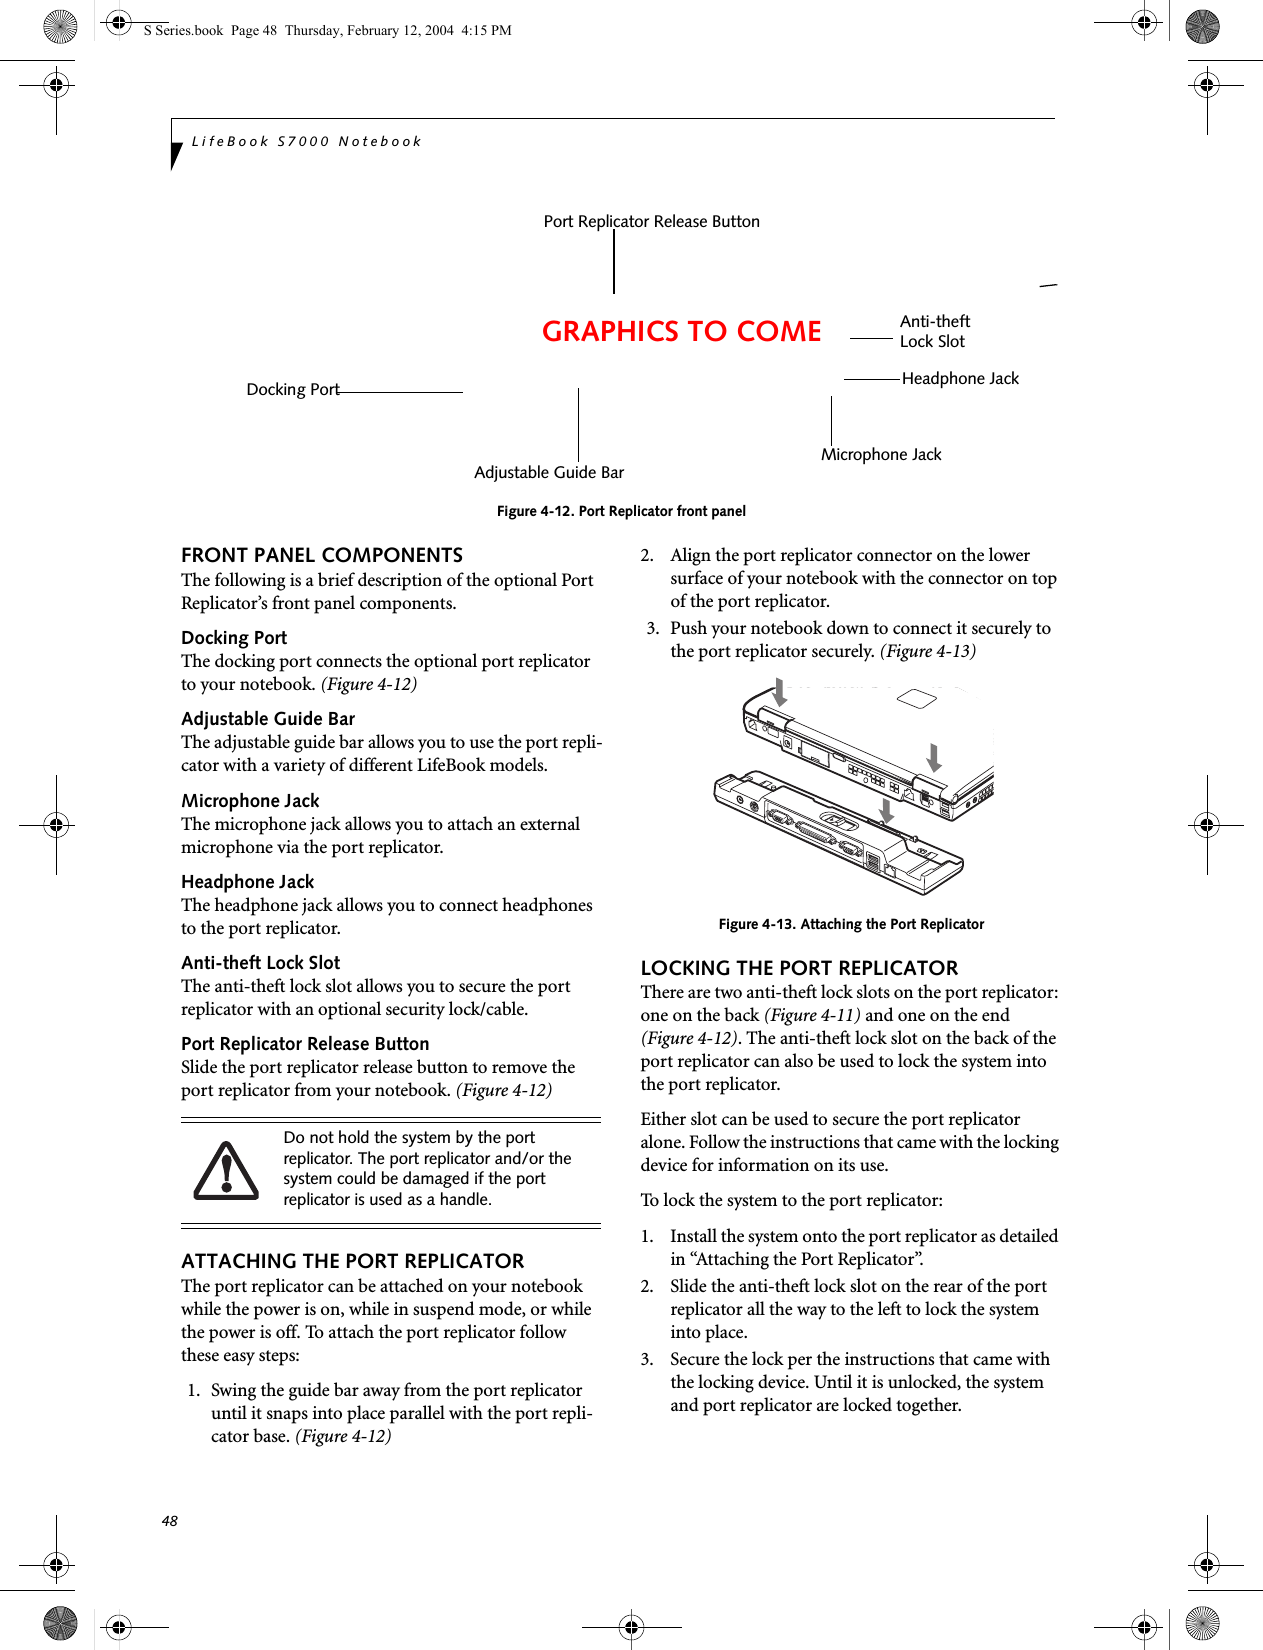
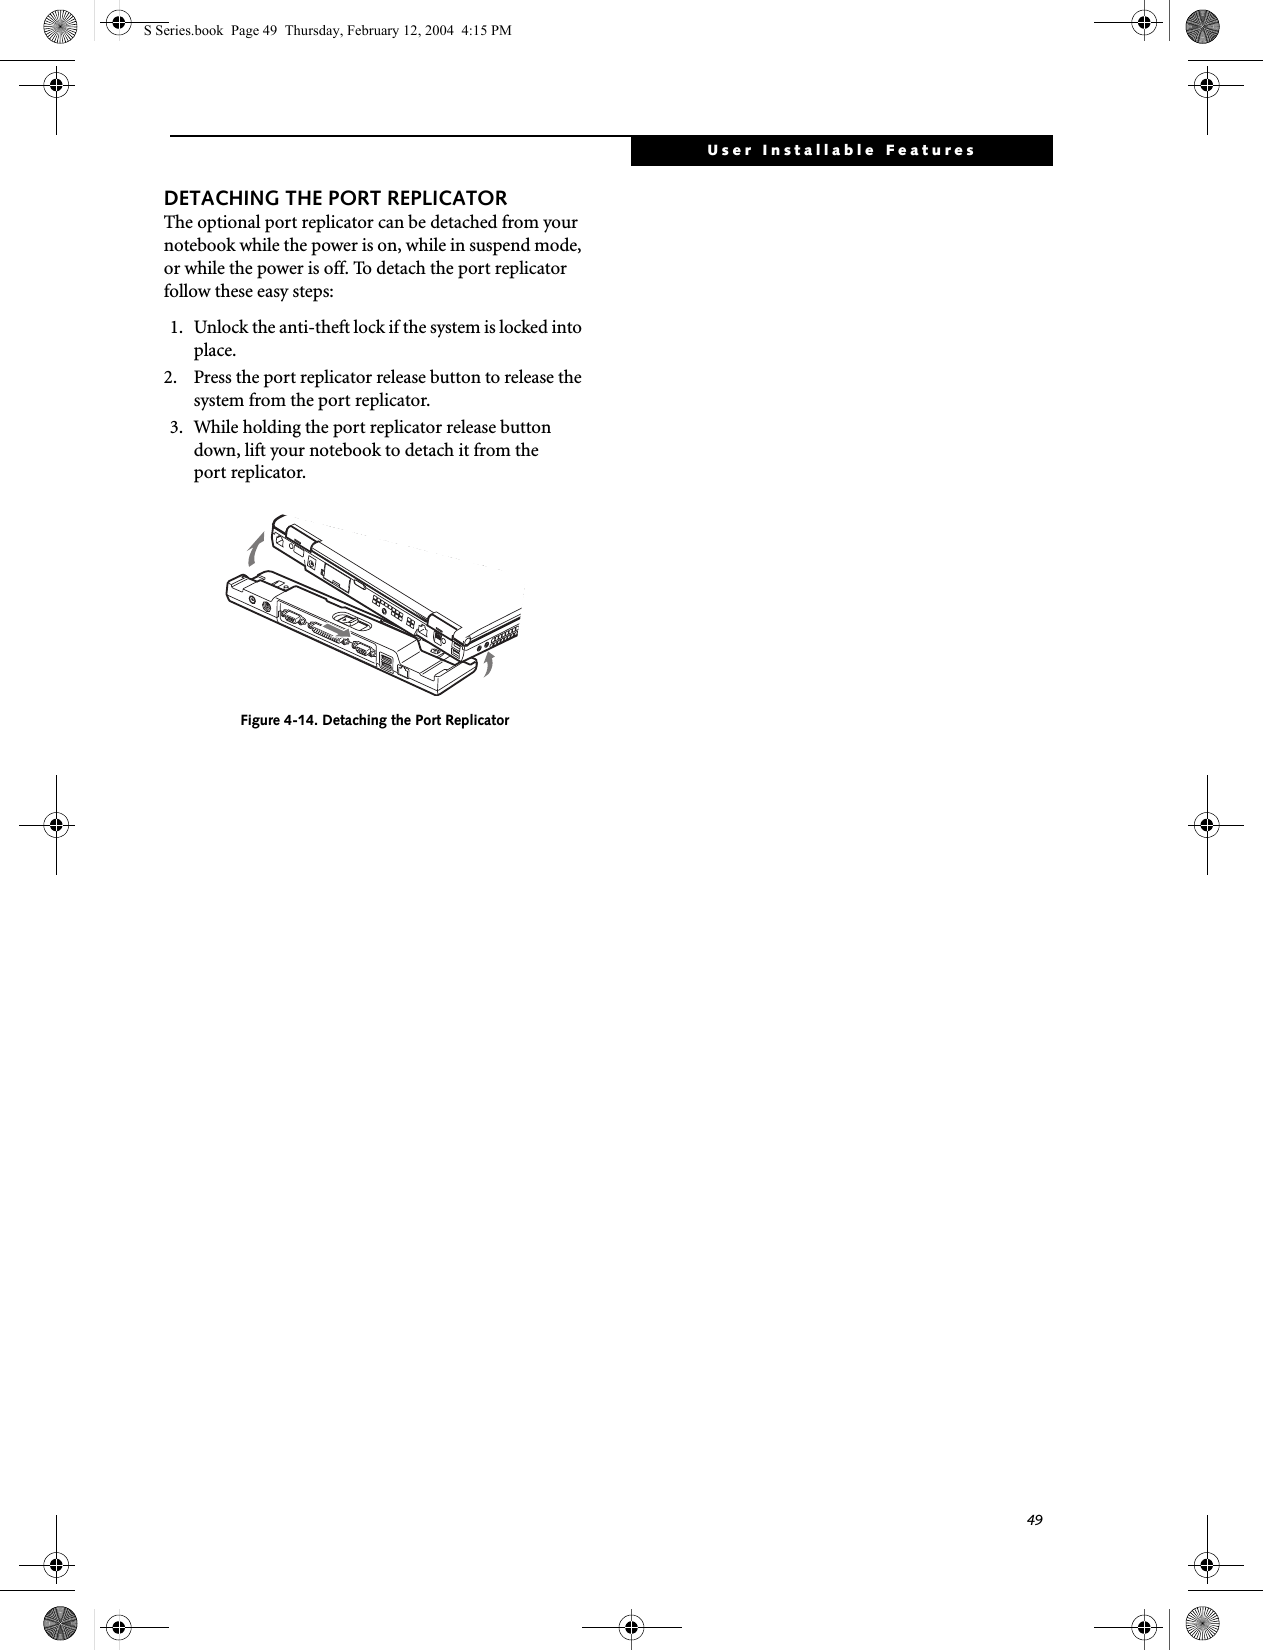
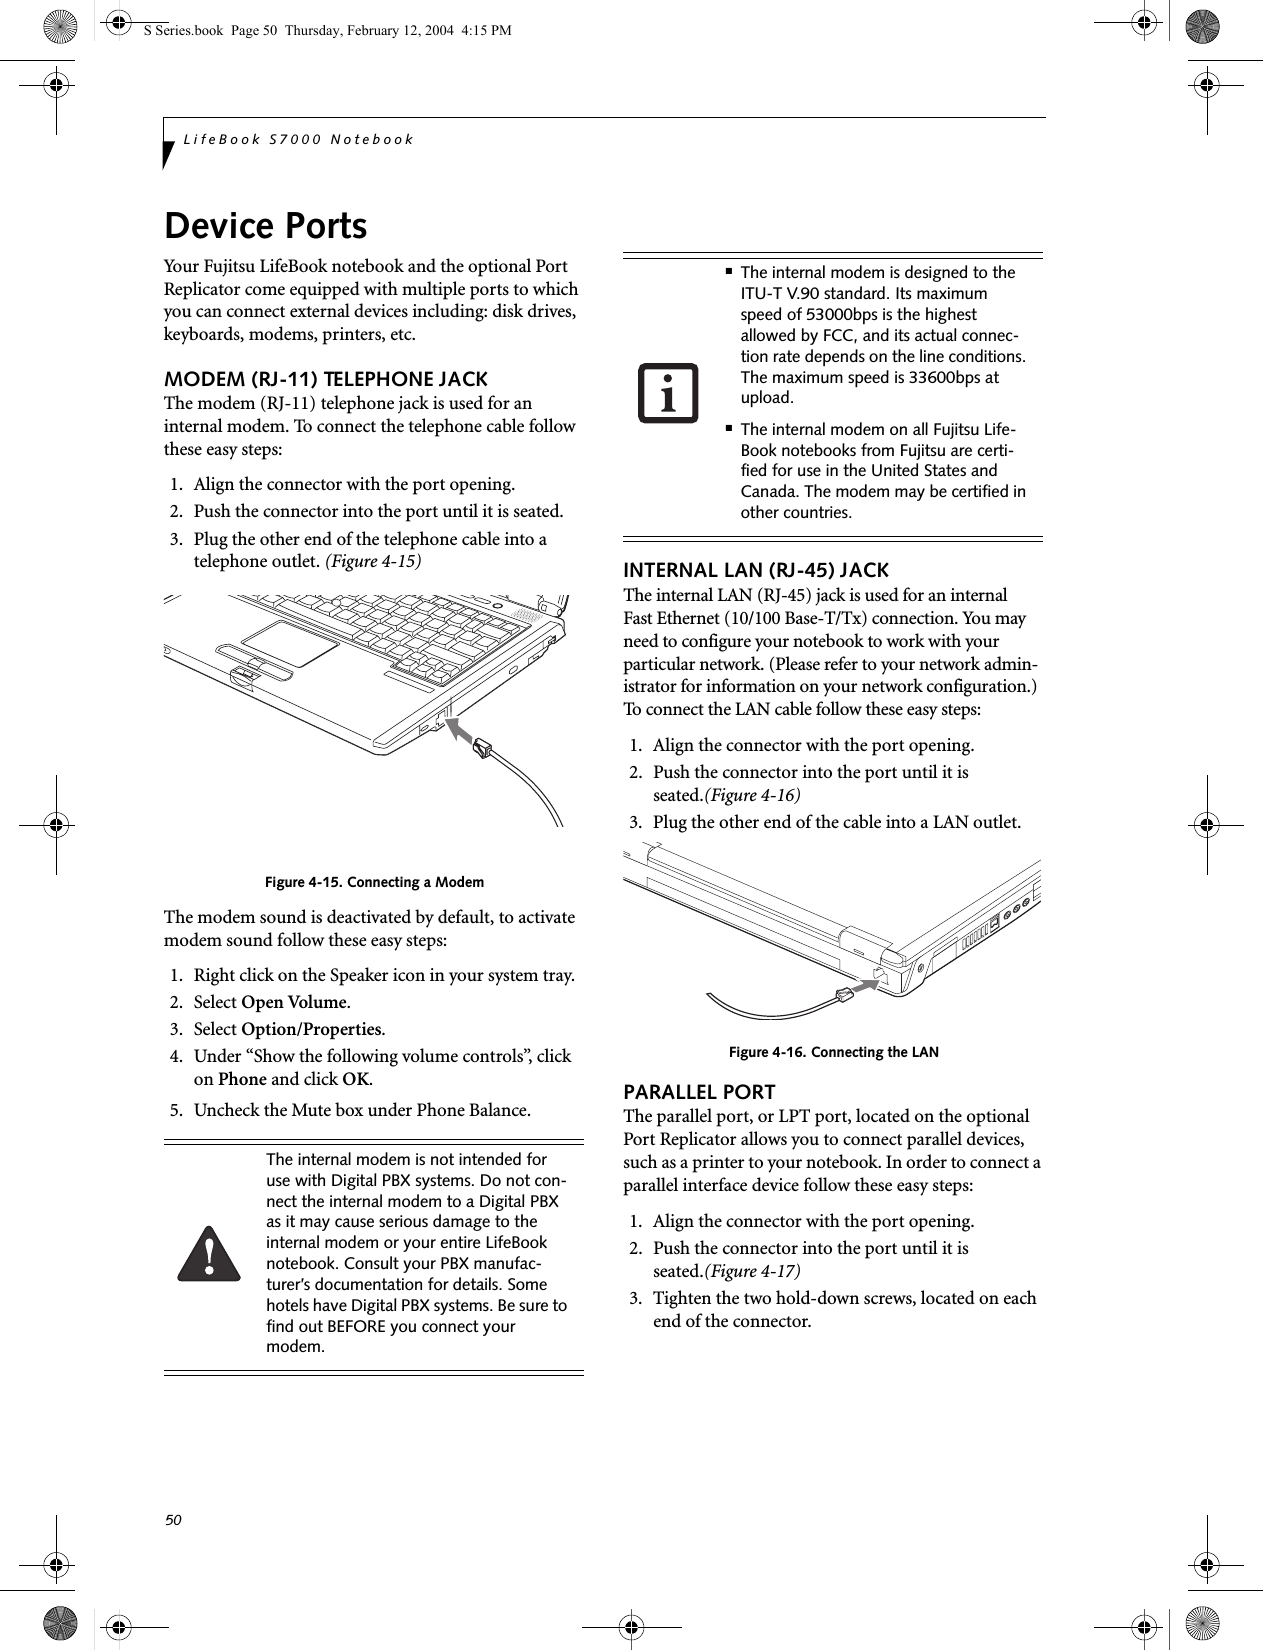
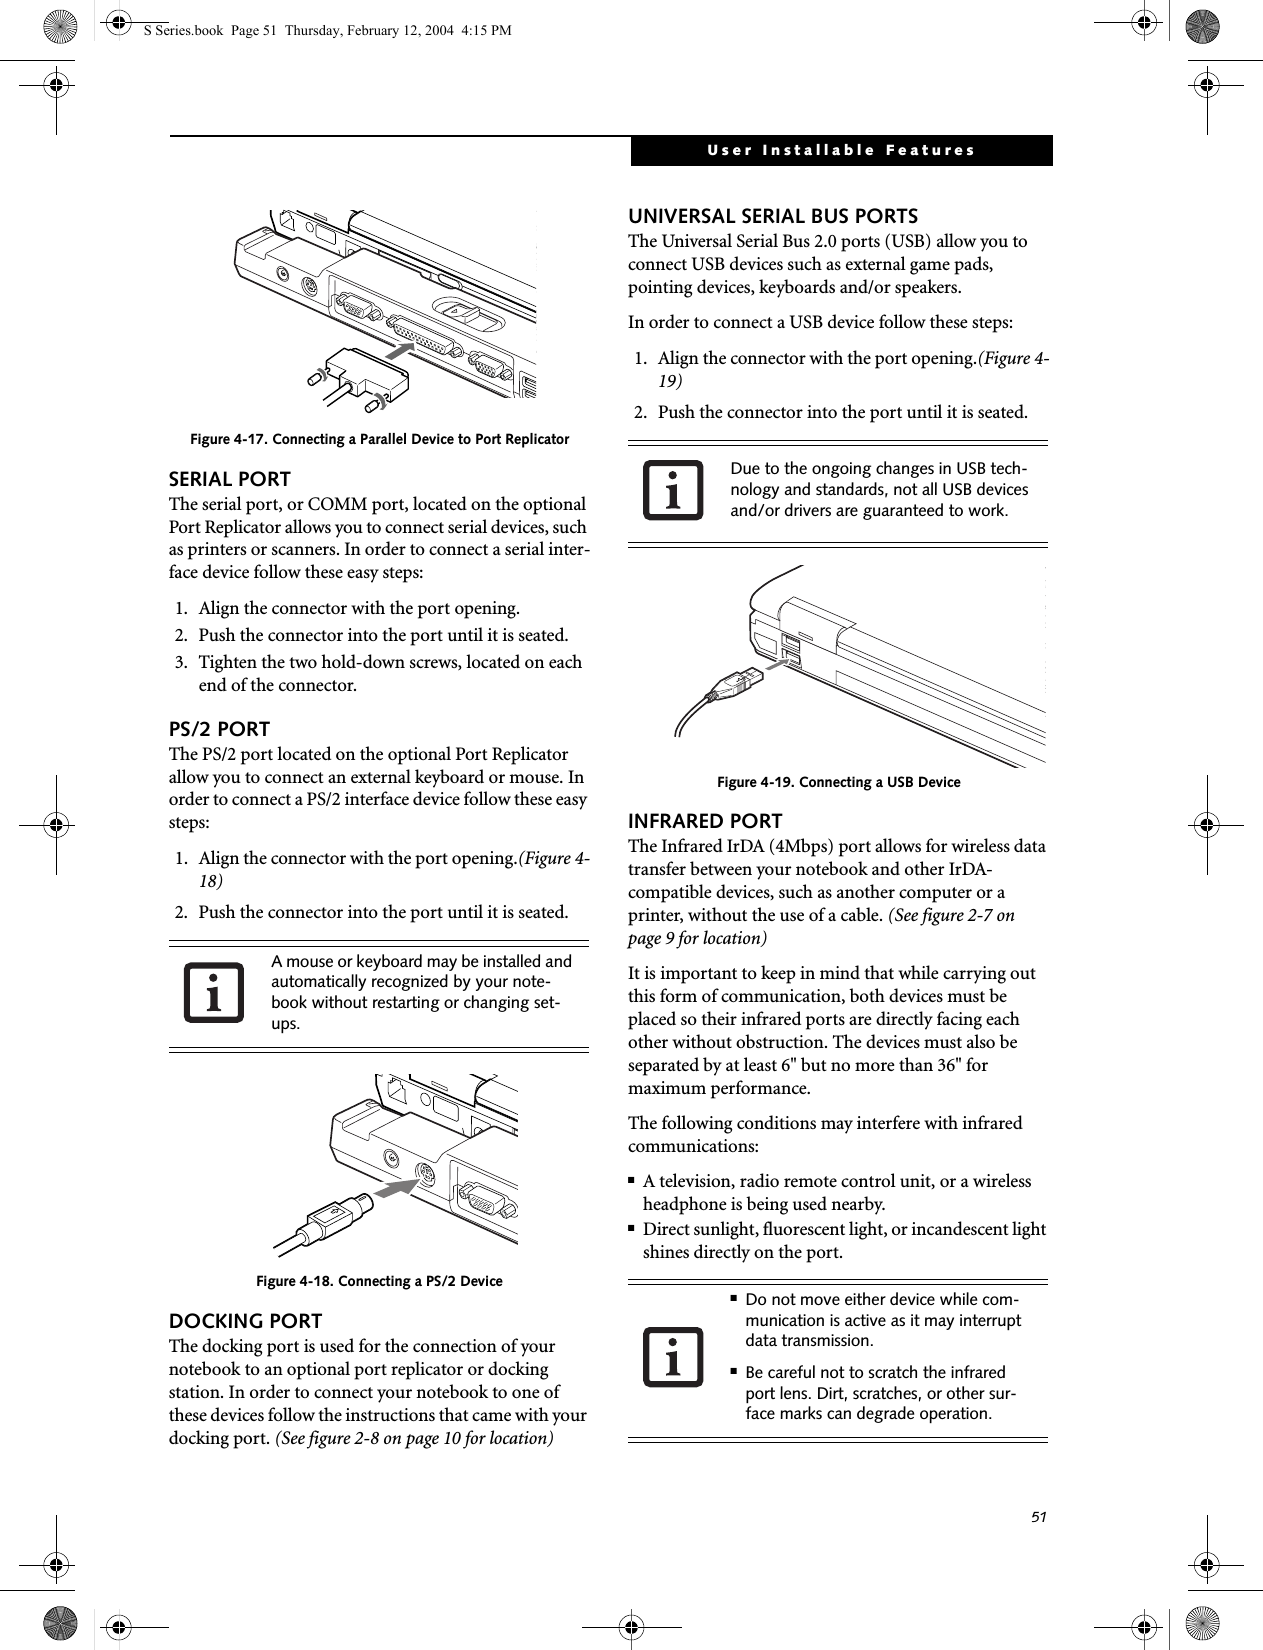
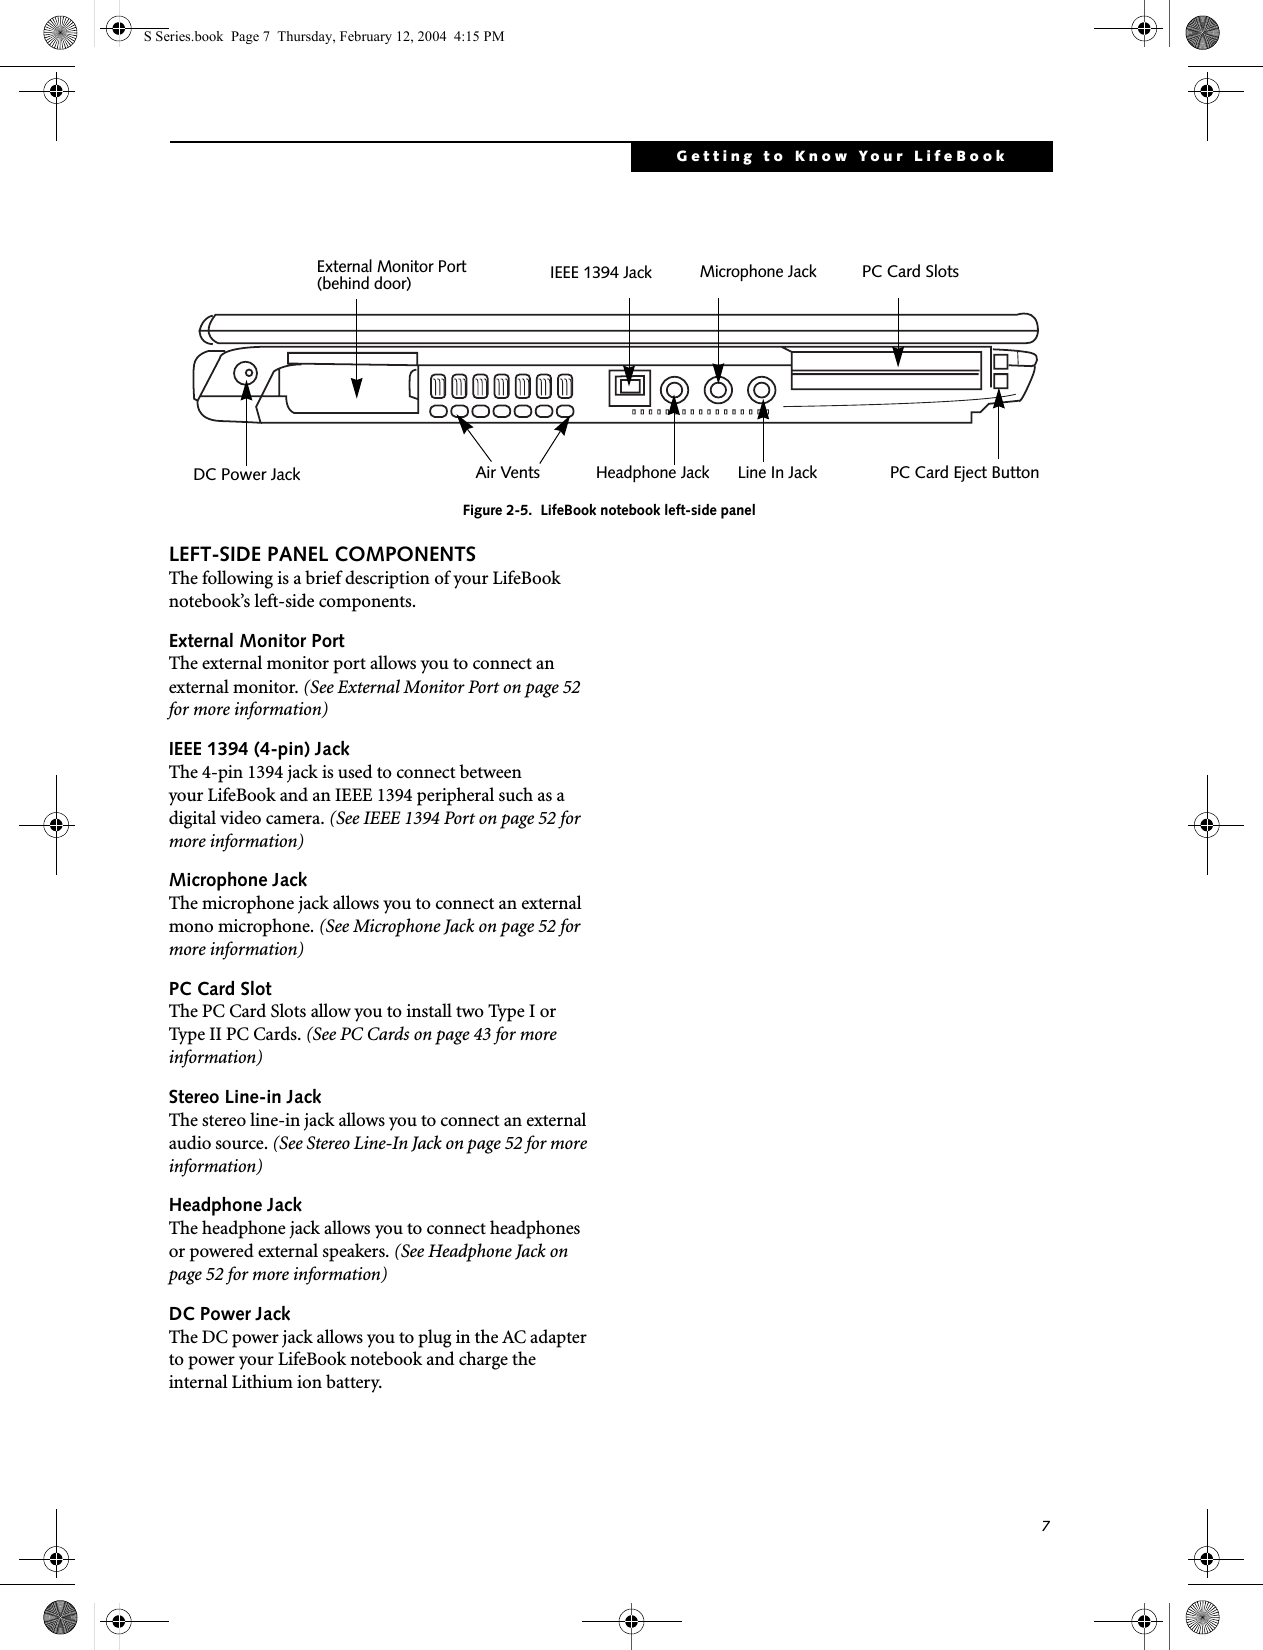
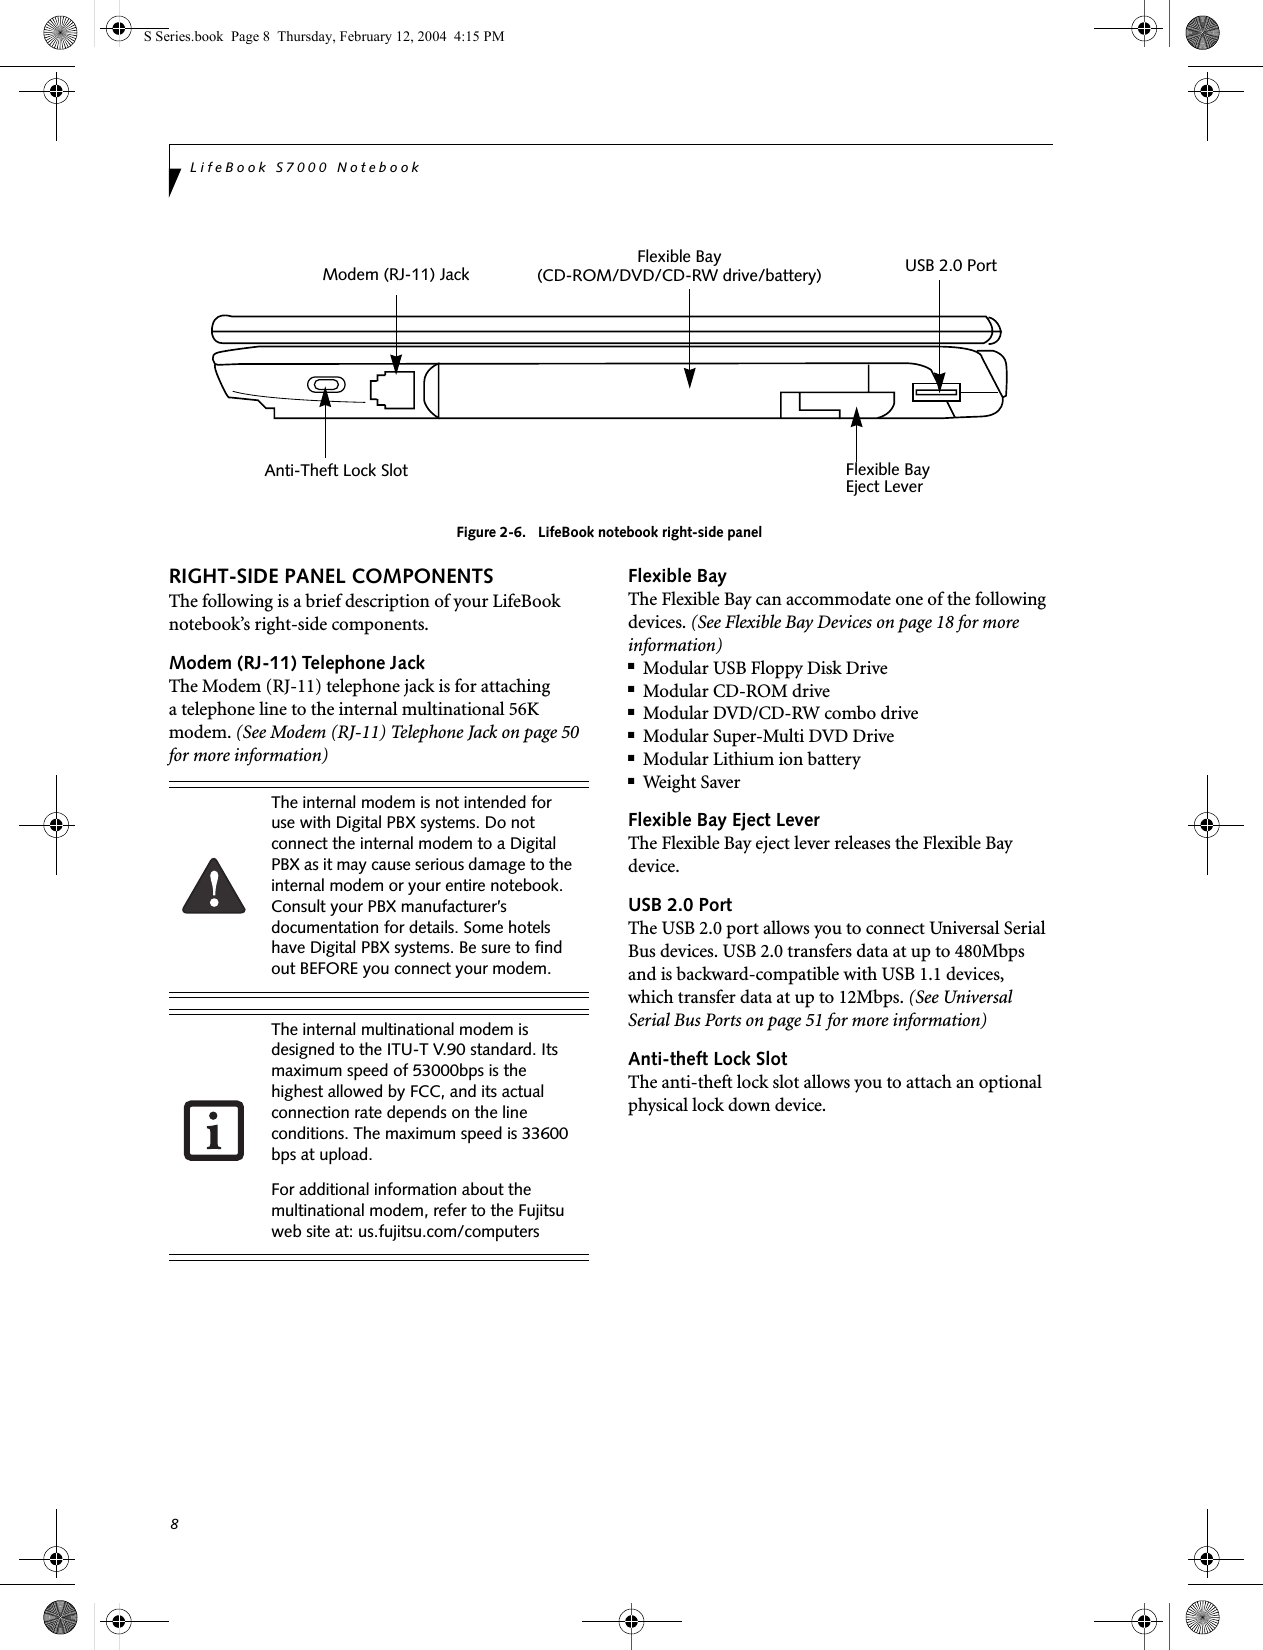
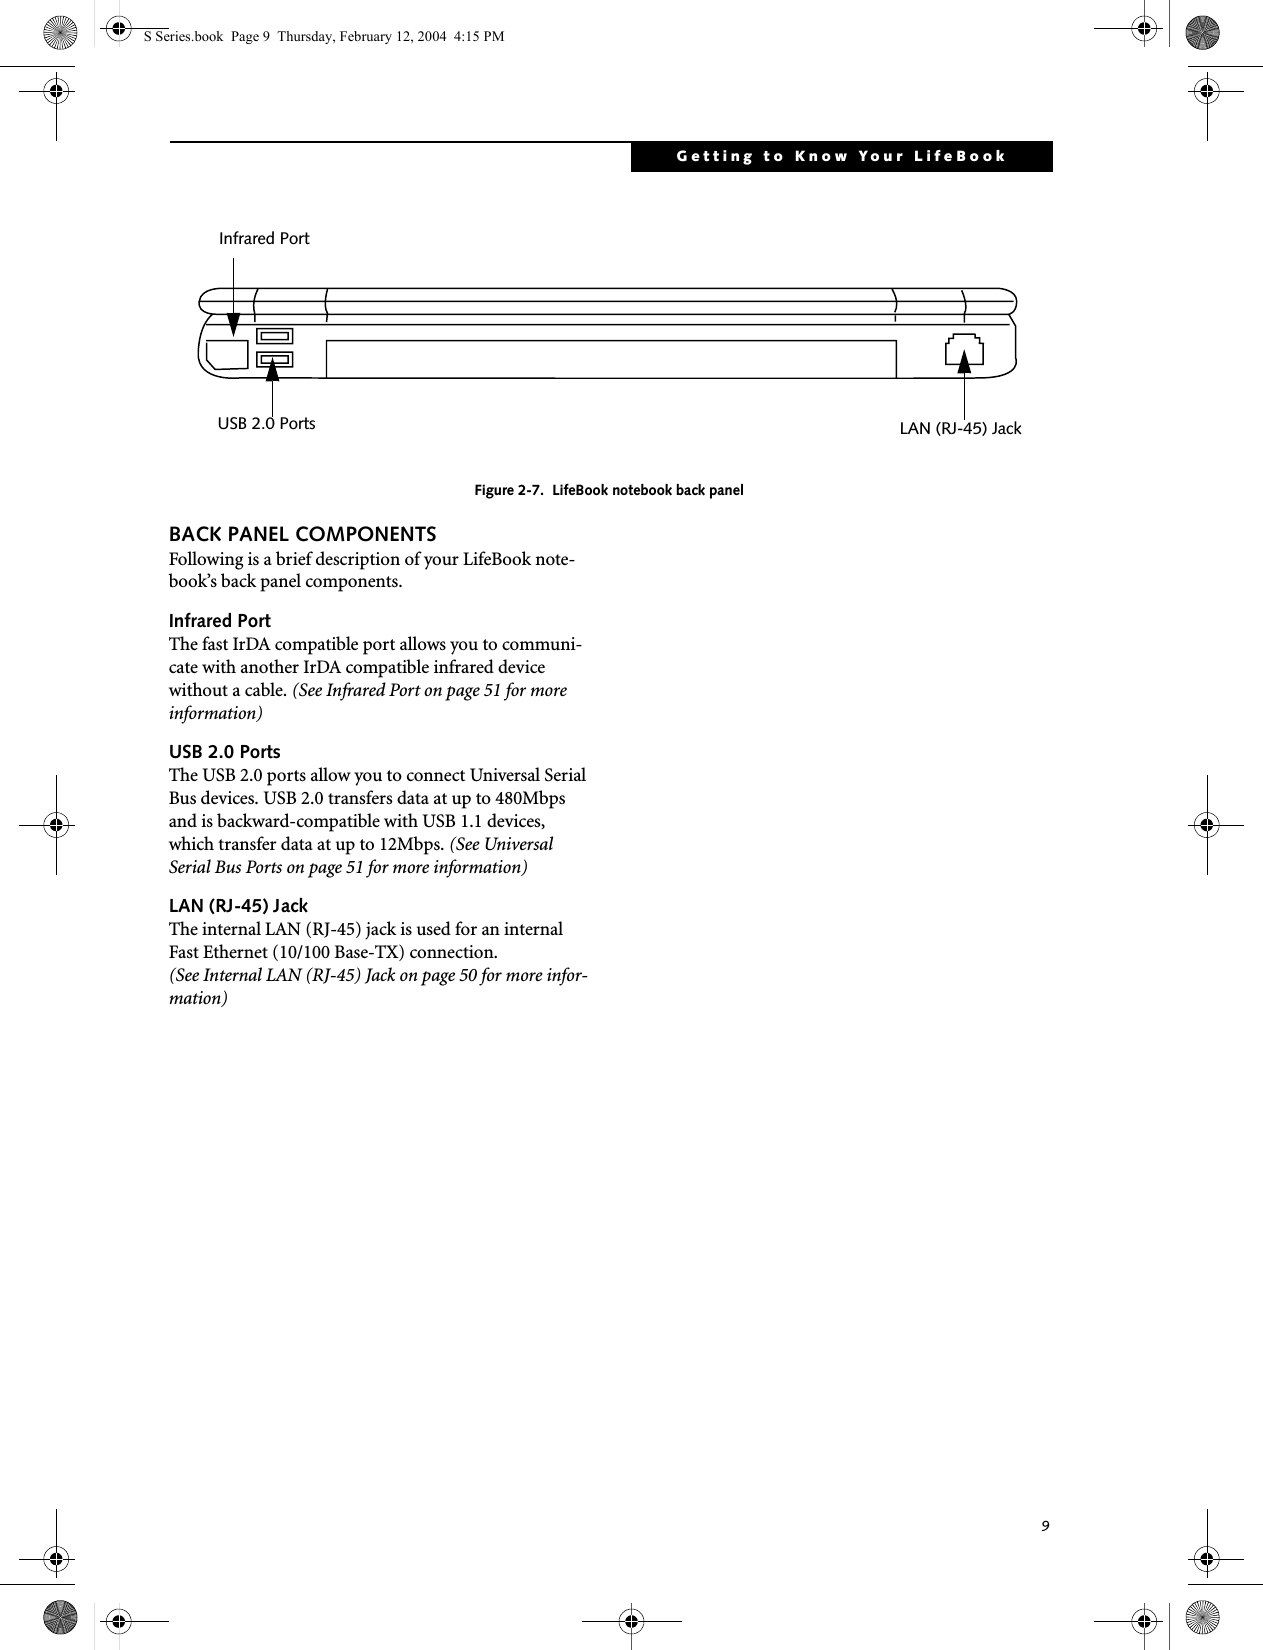
![52LifeBook S7000 NotebookSTEREO LINE-IN JACKThe stereo line-in jack allows you to connect an external audio source to your notebook, such as an audio cassette player. Your audio device must be equipped with a 1/8" (3.5 mm) stereo mini-plug in order to fit into the stereo line-in jack of your notebook. In order to connect a external audio source follow these easy steps: (See figure 2-7 on page 9 for location)1. Align the connector with the port opening.2. Push the connector into the port until it is seated.IEEE 1394 PORTThe 4-pin 1394 port allows you to connect digital devices that are compliant with IEEE 1394 standard. The IEEE 1394 standard is easy to use, connect, and discon-nect. This port can allow up to 400 Mbps transfer rate. A third-party application is required to operate your digital device with the 1394 port.In order to connect a 1394 device, follow these steps: 1. Align the connector with the port opening.2. Push the connector into the port until it is seated.(Figure 4-20)Figure 4-20. Connecting an IEEE 1394 DeviceHEADPHONE JACKThe headphone jack allows you to connect headphones or powered external speakers to your notebook. Your headphones or speakers must be equipped with a 1/8” (3.5 mm) stereo mini-plug. In order to connect head-phones or speakers follow these easy steps: (See figure 2-6 on page 8 for location)1. Align the connector with the port opening.2. Push the connector into the port until it is seated.MICROPHONE JACKThe microphone jack allows you to connect an external mono microphone. Your microphone must be equipped with a 1/8”(3.5 mm) mono mini-plug in order to fit into the microphone jack of your notebook. In order to connect a microphone follow these easy steps: (See figure on page 7 for location)1. Align the connector with the port opening.2. Push the connector into the port until it is seated.EXTERNAL MONITOR PORTThe external monitor port allows you to connect an external monitor. In order to connect an external monitor follow these easy steps: (See figure 2-7 on page 9 for loca-tion)1. Align the connector with the port opening.2. Push the connector into the port until it is seated.3. Tighten the two hold-down screws, located oneach end of the connector. Turn down the audio volume when con-necting electronic devices to the line-in jack. The internal speakers might break if unexpected large soundsare inputted.The stereo line-in jack will not support an external microphone.The 1394 port used in this system uses a four-pin configuration. If you intend to interface with devices which use a six-pin configuration, you will need to purchase an adapter.If you plug headphones into the head-phone jack, the built-in stereo speakers will be disabled.Pressing the [Fn] + [F10] keys allows you to change your selection of where to send your display video. Each time you press the key combination, you will step to the next choice, starting with the built-in display panel only, moving to the external monitor only, finally moving to both the built-in display panel and an external monitor.S Series.book Page 52 Thursday, February 12, 2004 4:15 PM](https://usermanual.wiki/Fujitsu-Client-Computing/WB0003.Users-Manual-Part-1/User-Guide-400610-Page-61.png)


