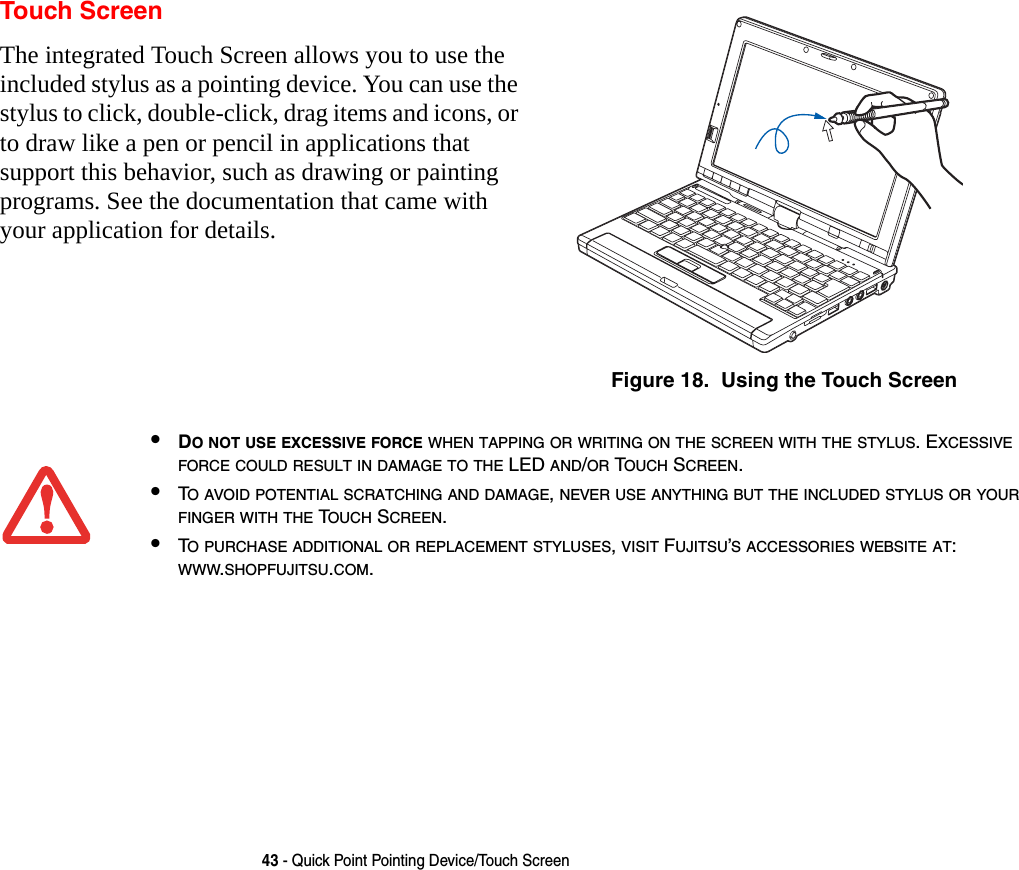
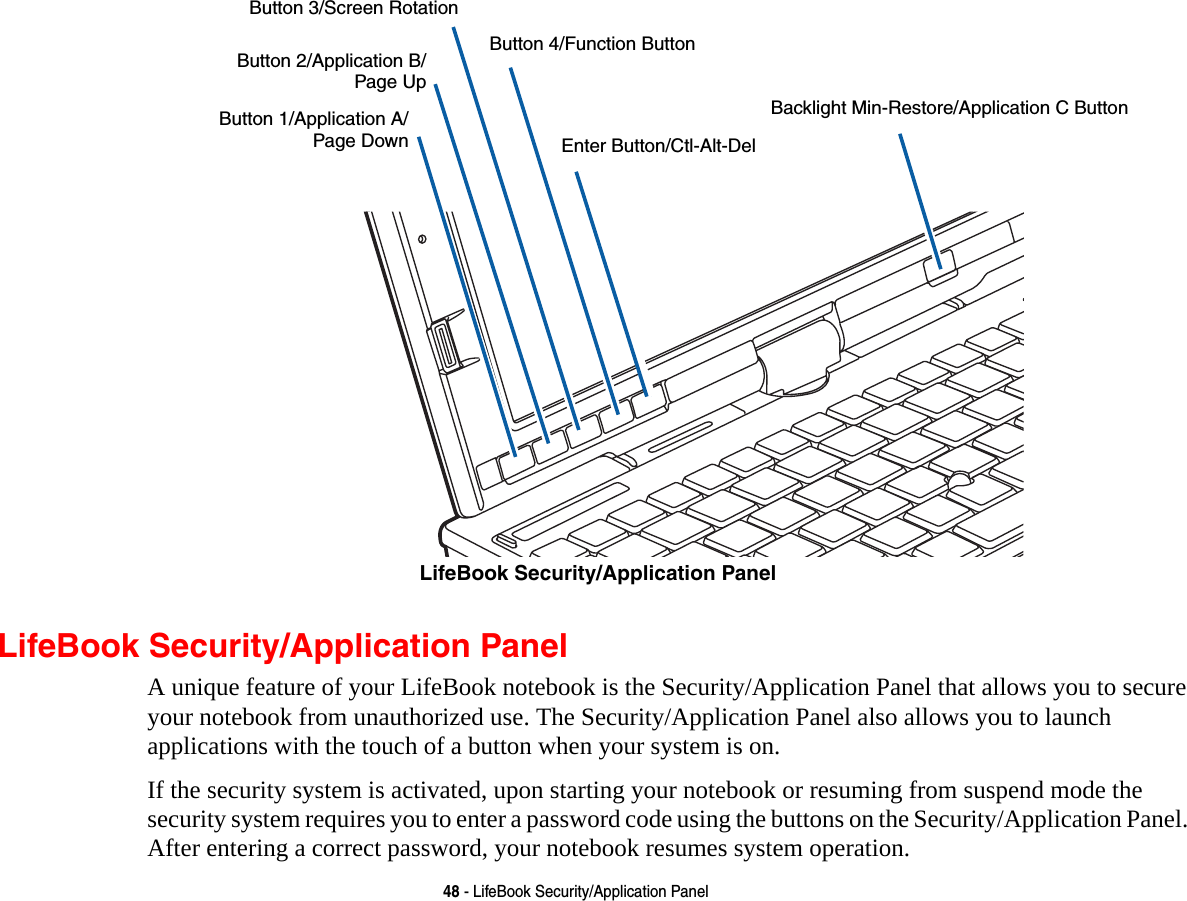
Fujitsu Client Computing WB0055 LifeBook P Series with 4965AG WLAN + EYTF3CSFT BT User Manual Appendix I
Fujitsu Limited LifeBook P Series with 4965AG WLAN + EYTF3CSFT BT Appendix I
UserManual.wiki
>
Fujitsu Client Computing
>
WB0055 User Manual
Users Manual
Navigation menu
Upload a User Manual
Namespaces
Wiki Guide
HTML
PDF
Info
Views
User Manual
Discussion / Help
Navigation


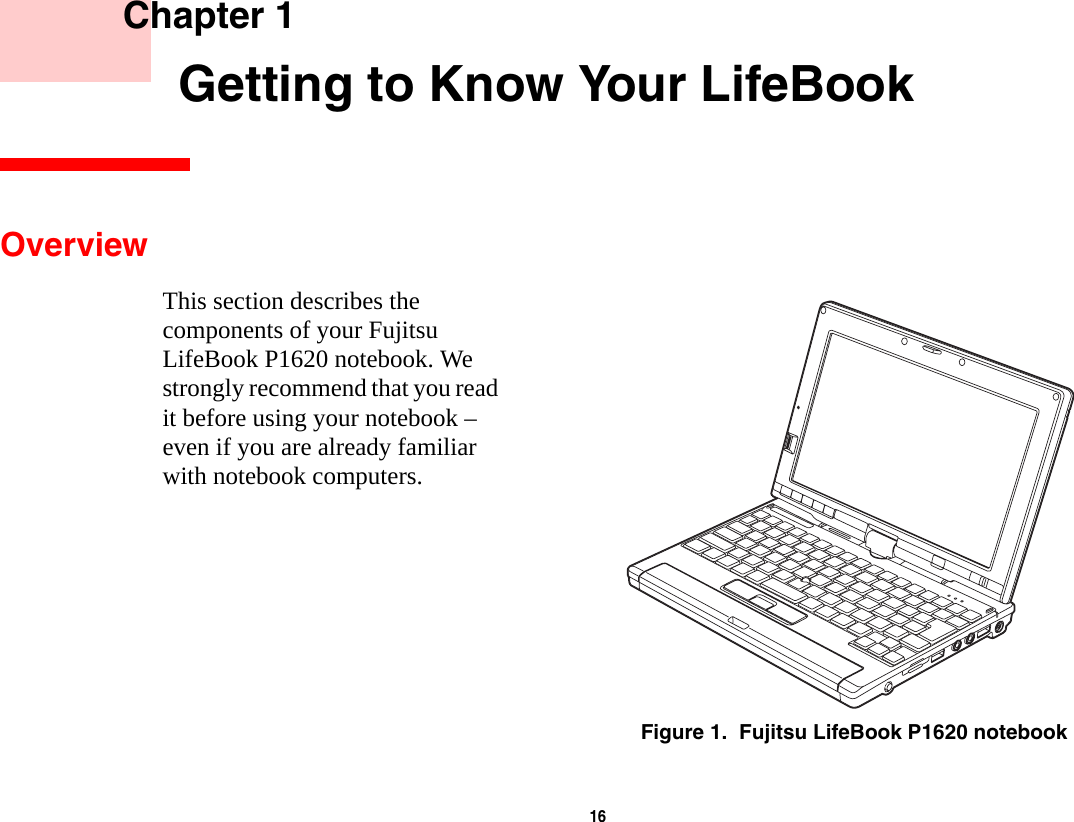
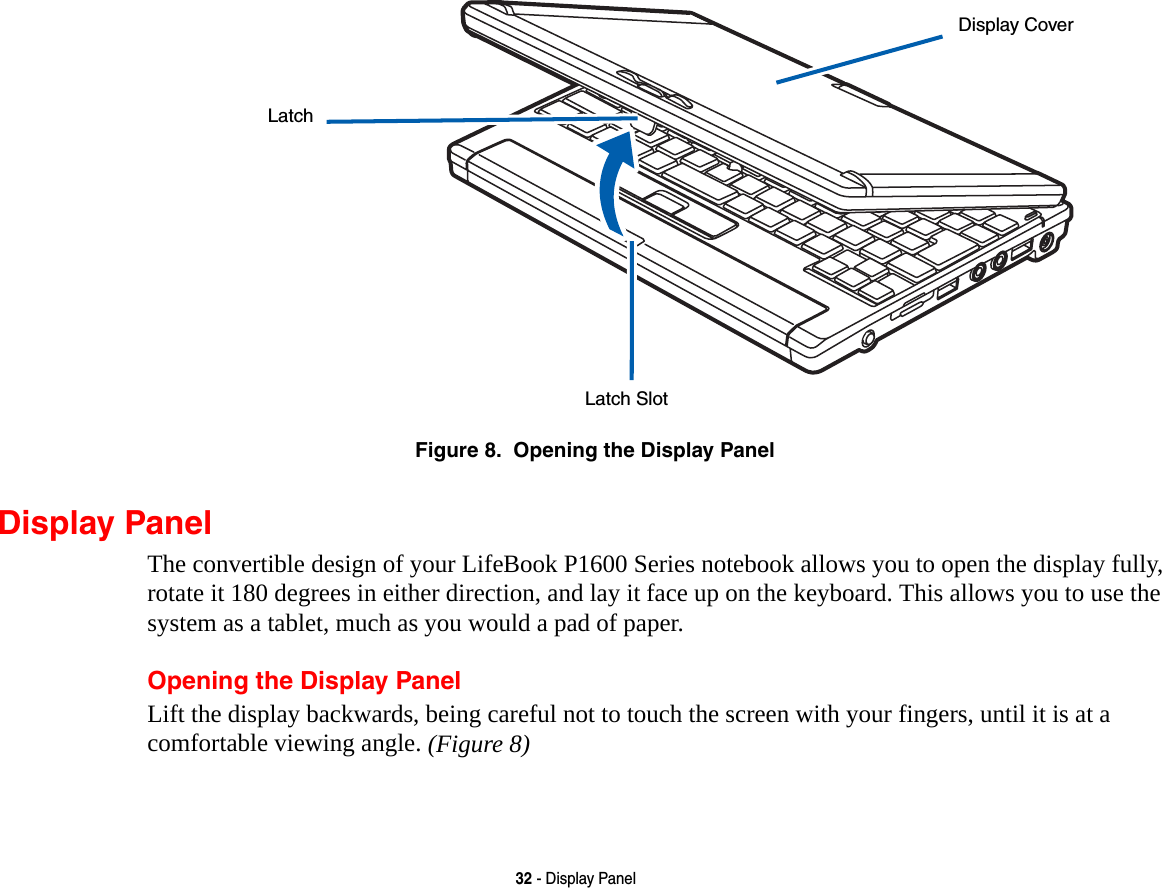
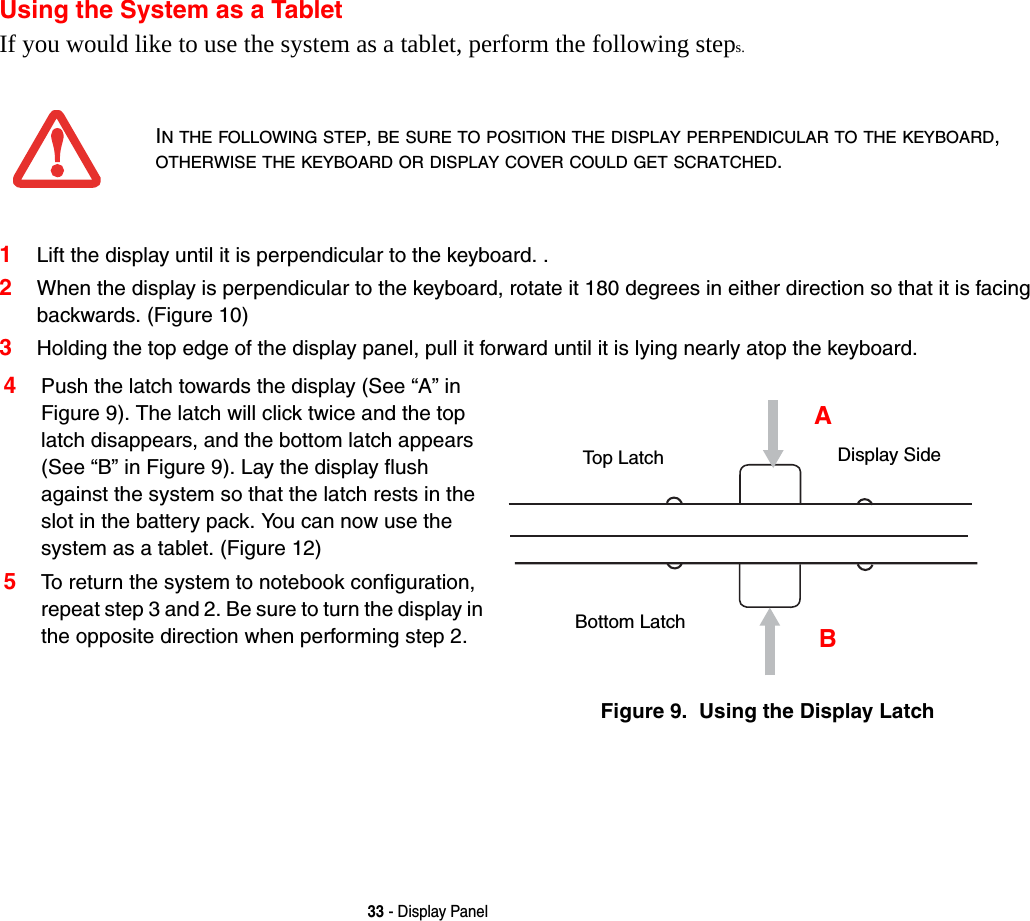
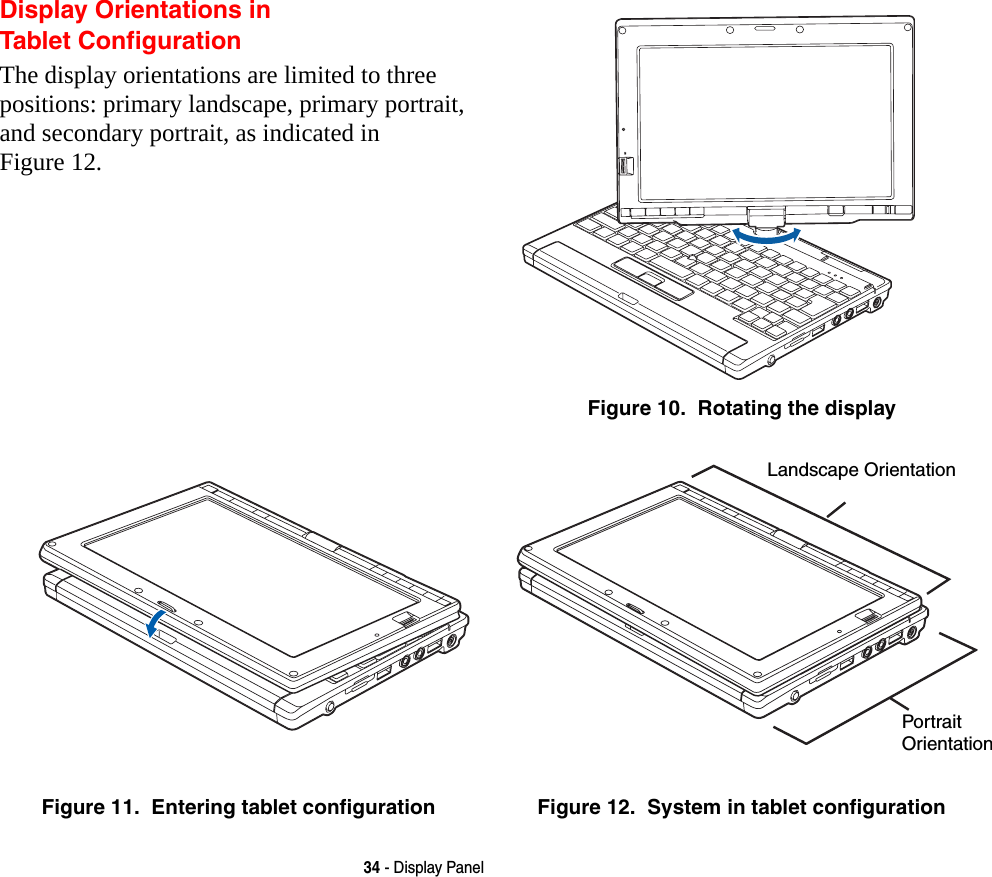
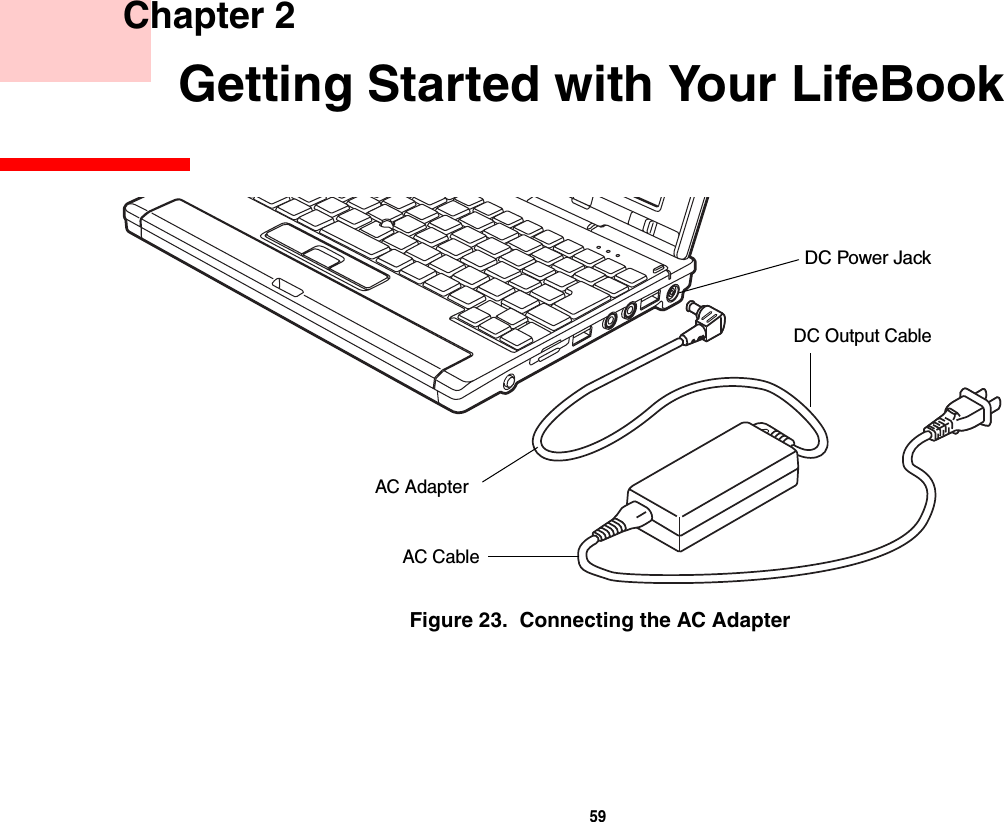
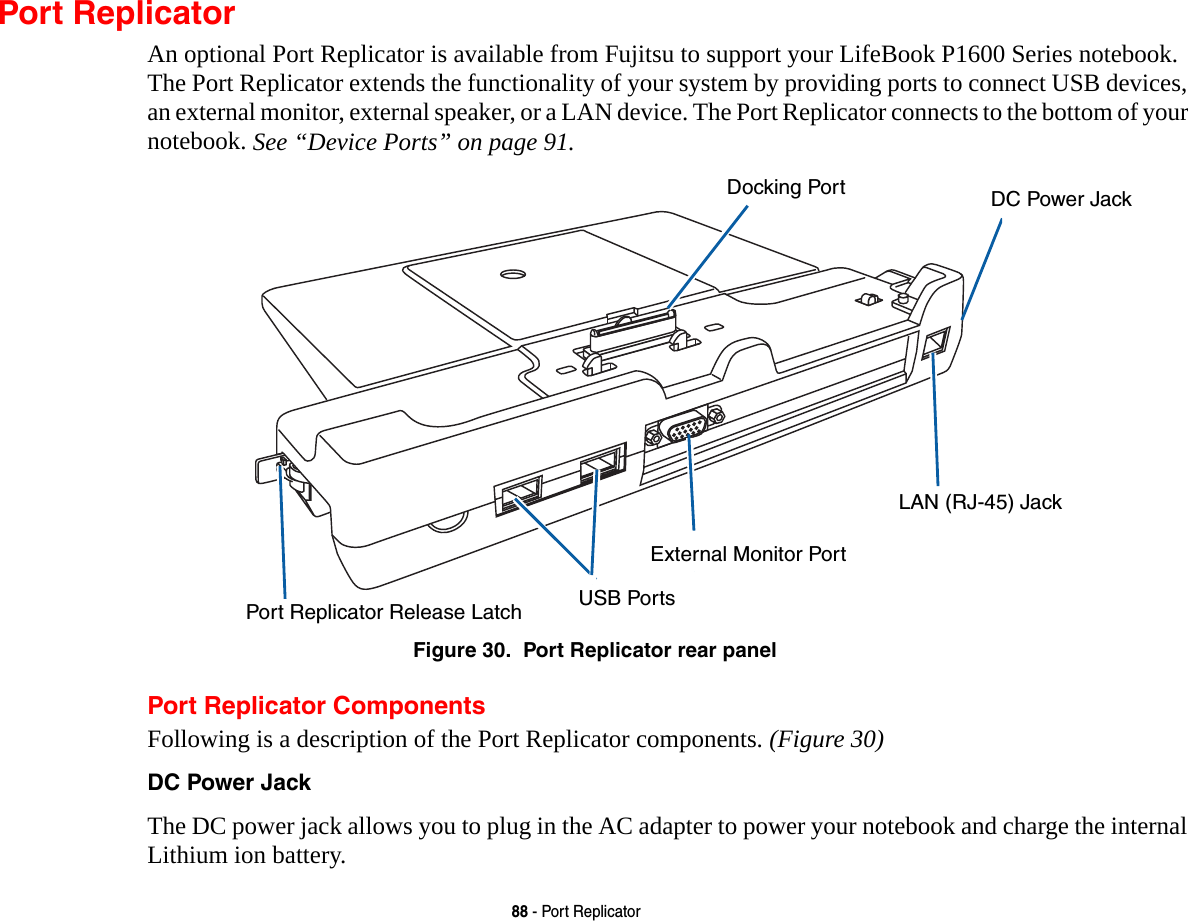
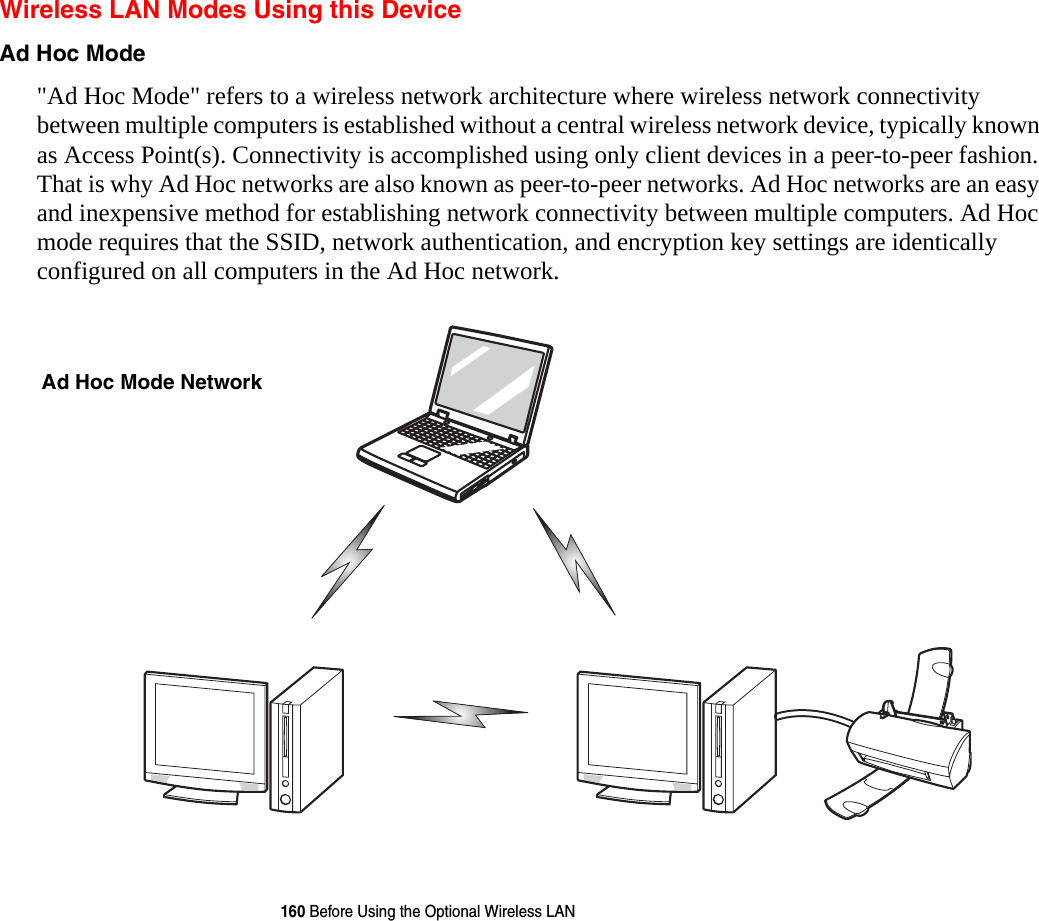
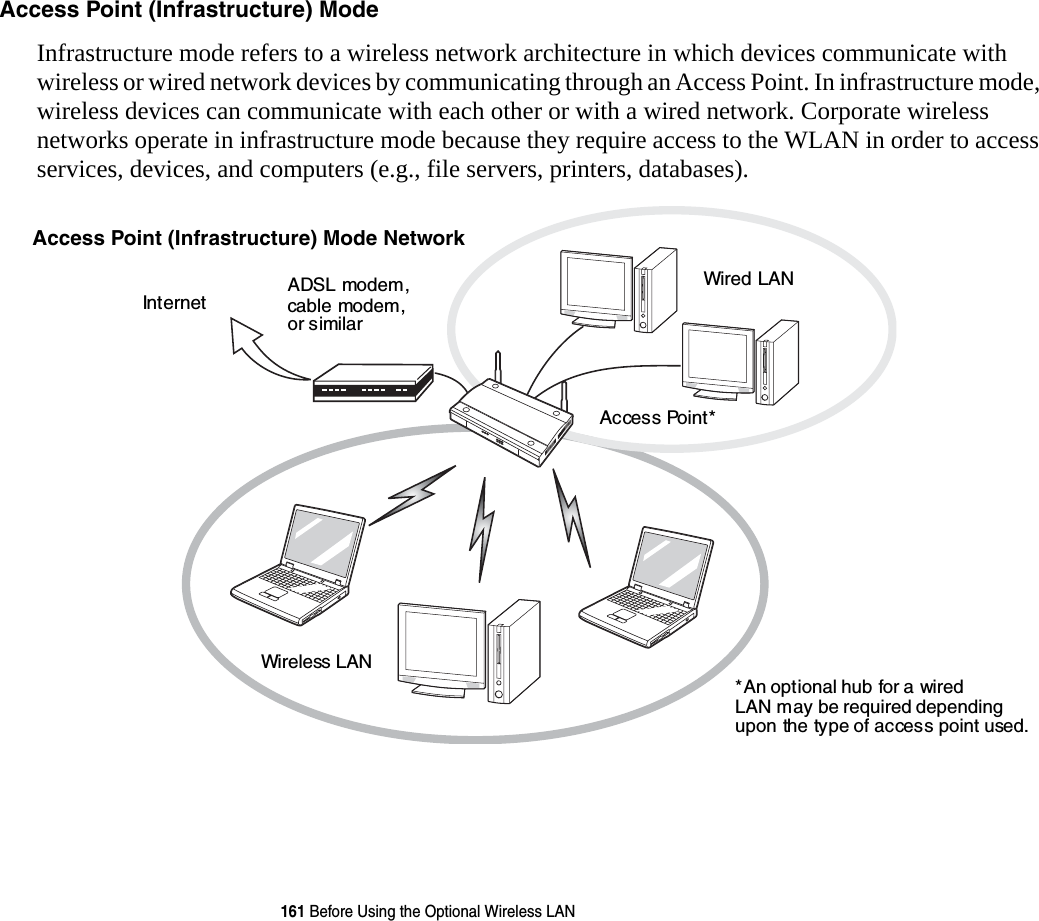
![13 PrefaceAbout This GuideThe LifeBook® P1600 Series notebook from Fujitsu Computer Systems Corporation is a small yet powerful convertible computer. It can be used either as a standard notebook using keyboard or pen input, or as a tablet using pen input. It is powered by an Intel® Core2™ Duo processor and an integrated Intel 945GMS graphics controller with support for up to 224 MB of shared graphics memory. The notebook has a built-in 8.9” TFT wide XGA color display.This manual explains how to operate your LifeBook P1600 Series notebook’s hardware and built-in system software. Your LifeBook P1620 notebook comes with Windows® XP Tablet PC Edition 2005, Windows XP Professional Edition, or Windows Vista™ Business pre-installed.Conventions Used in the GuideKeyboard and on-screen keys appear in brackets. Example: [Fn], [F1], [ESC], [ENTER] and [CTRL].Pages with additional information about a specific topic are cross-referenced within the text. For example: (“See Installation Procedure on page 43”.) Note that all cross-references are linked to the referenced items, so by clicking the link, you will automatically go to the referenced item or page.On-screen menu items appear in bold. Example: “Click Fujitsu Menu, and select your choice”.](https://usermanual.wiki/Fujitsu-Client-Computing/WB0055/User-Guide-892412-Page-14.png)
![35 - Display PanelAdjusting Display Panel BrightnessOnce you have turned on your system, you may want to adjust the brightness level of the screen to a more comfortable viewing level. There are three ways to adjust the brightness, keyboard, power management utility, and Fujitsu menu. Additionally, in Windows Vista systems, you can change the brightness using the Power Options in the Control Panel.Using the Keyboard to Adjust Brightness Use the following key combinations to adjust the scren brightness:•[Fn+F6]: Pressing repeatedly will lower the brightness of your display.•[Fn+F7]: Pressing repeatedly will increase the brightness of the display.Using Power Management to Adjust Brightness To adjust brightness with the power management utility,:Windows XP Tablet PC: Click Start > Control Panel. If you are not in Classic View, select it in the left panel. Double-click the Tablet and Pen Settings icon, then select the Display tab. Set the screen brightness slider for When plugged in and Powered by batteries scenarios.Windows XP Pro: To adjust brightness with the power management utility, click Start > Control Panel > Brightness Control. Set the screen brightness slider for battery and AC power scenarios.Windows Vista: Click Start > Control Panel. If you are not in Classic View, select it in the left panel. Double-click the Windows Mobility Center icon, then double-click the icon adjacent to Display brightness. Set the screen brightness sliders for On battery and Plugged in scenarios.NOTE THAT WHEN YOU CHANGE THE DISPLAY SETTINGS IN WINDOWS XP SYSTEMS, THE CHANGES WILL BE RETAINED AFTER STANDBY AND RESTART. IN WINDOWS VISTA SYSTEMS, THE CHANGED SETTINGS ARE TEMPORARY BY DEFAULT, BUT THEY CAN BE MADE PERMANENT BY USING THE POWER OPTIONS UTILITY IN THE CONTROL PANEL.](https://usermanual.wiki/Fujitsu-Client-Computing/WB0055/User-Guide-892412-Page-36.png)
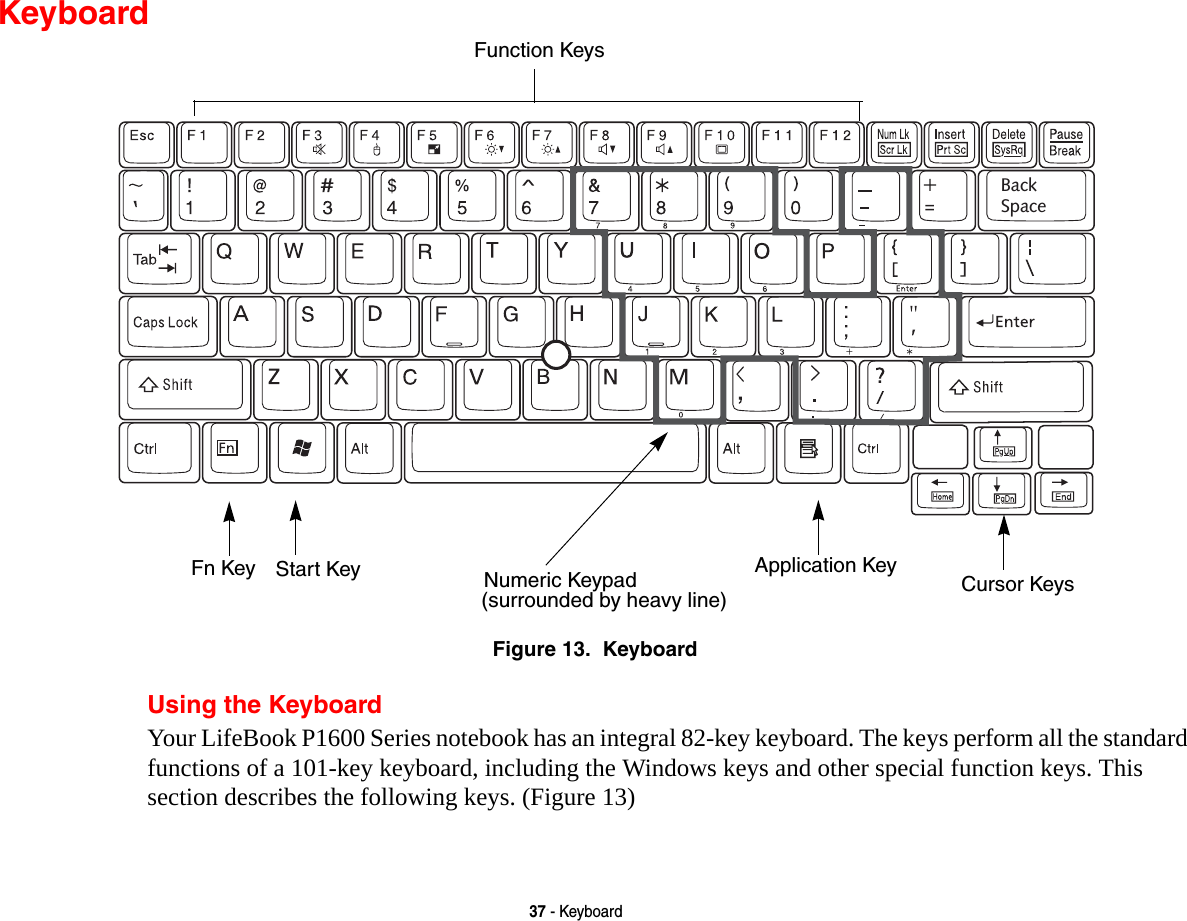
![38 - Keyboard•Numeric keypad: Your system allows certain keys to serve dual purposes, both as standard characters and as numeric and mathematical keys. The ability to toggle between the standard character and numerical keys is controlled through the [NumLk] key.•Cursor keys: Your keyboard contains four arrow keys for moving the cursor or insertion point to the right, left, up, or down within windows, applications and documents. •Function keys: The keys labeled [F1] through [F12], are used to produce special actions that vary depending on what program is running. They are also used in conjunction with the [Fn] key to perform certain tasks, as detailed below under “Function Keys”.•Windows keys: These keys work with your Windows operating system and function the same as the onscreen Start menu button, or the right button on your pointing device.Numeric Keypad Certain keys on the keyboard perform dual functions as both standard character keys and numeric keypad keys. NumLk can be activated by pressing the [NumLk] key. Turning off the NumLk feature is done the same way. Once this feature is activated you can enter numerals 0 through 9, perform addition ( + ), subtraction ( - ), multiplication ( * ), or division ( / ), and enter decimal points ( . ) using the keys designated as ten-key function keys. The keys in the numeric keypad are marked on the front edge of the key to indicate their secondary functions. (Figure 13) Windows Keys Your LifeBook P1600 Series notebook has two Windows keys: a Start key and an Application key. The Start key displays the Start menu. This button functions the same as your onscreen Start menu button. The Application key functions the same as your right mouse button and displays shortcut menus for the selected item. (Please refer to your Windows documentation for additional information regarding the Windows keys.) (Figure 13)Cursor Keys The cursor keys are the four arrow keys on the keyboard which allow you to move the cursor up, down, left and right in applications. In programs such as Windows Explorer, it moves the “focus” (selects the next item up, down, left, or right).](https://usermanual.wiki/Fujitsu-Client-Computing/WB0055/User-Guide-892412-Page-39.png)
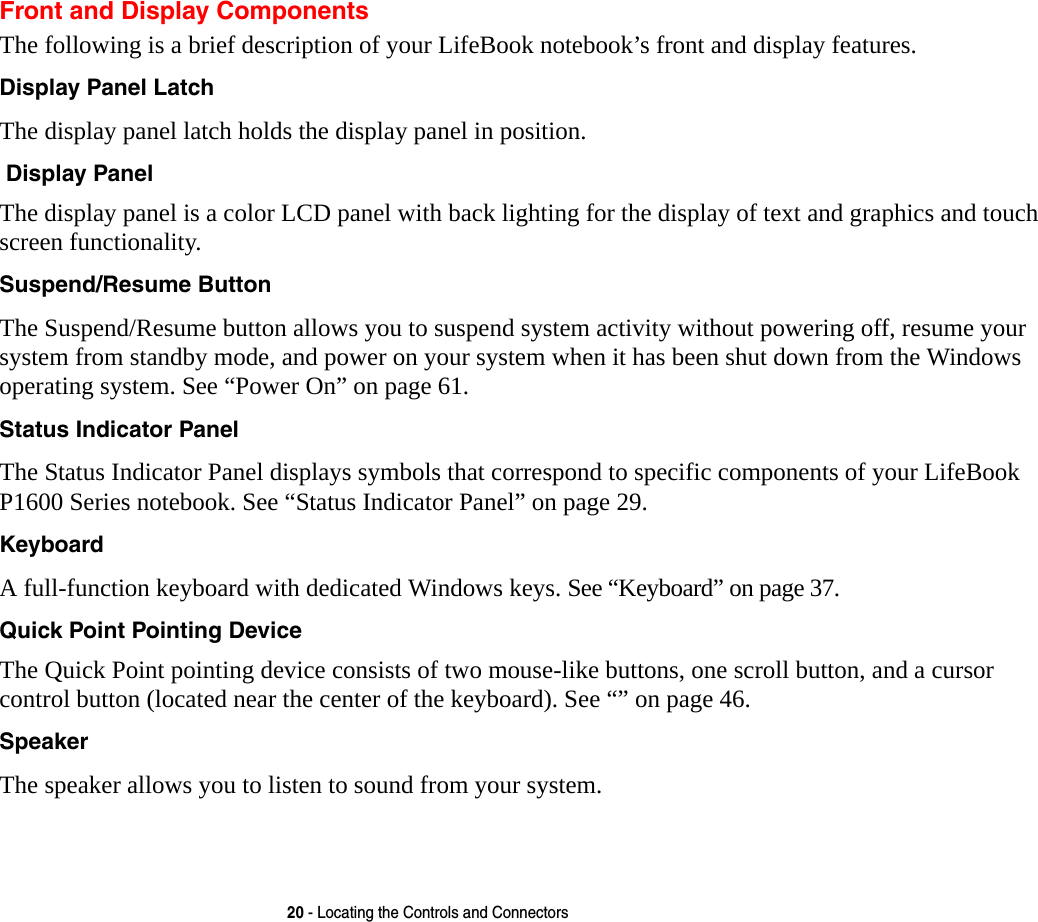
![39 - KeyboardFunction Keys Your LifeBook notebook has 12 function keys, F1 through F12. The functions assigned to these keys differ for each application. You should refer to your software documentation to find out how these keys are used. •[Fn+F3]: Pressing [F3] while holding [Fn] will toggle the Audio Mute on and off.•[Fn+F4]: Pressing [F4] while holding [Fn] will toggle the built-in pointing device on and off. Note that the [Fn+F4] combination only works if Manual Setting is selected in the BIOS. (See “Entering the BIOS Setup Utility” on page 63)•[Fn +F5]: Pressing [F5] while holding [Fn] allows you to toggle between video compensation and no compensation. (Video compensation controls spacing on the display. When it is enabled, displays with less than 1024 x 600 or 800 x 600 pixel resolution will still cover the entire screen.)•[Fn+F6]: Pressing [F6] repeatedly while holding [Fn] will lower the brightness of your display. Note that adjusting the brightness using the keyboard changes the system setting.•[Fn+F7]: Pressing [F7] repeatedly while holding [Fn] will increase the brightness of the display.•[Fn+F8]: Pressing [F8] repeatedly while holding [Fn] will decrease the volume of your system.•[Fn+F9]: Pressing [F9] repeatedly while holding [Fn] will increase the volume of your system.•[Fn+F10]: Pressing [F10] while holding [Fn] allows you to change your selection of where to send your display video. Each time you press the combination of keys you will step to the next choice. The choices, in order, are: built-in display panel only, external monitor only, and both built-in display panel and external monitor.](https://usermanual.wiki/Fujitsu-Client-Computing/WB0055/User-Guide-892412-Page-40.png)
![44 - Quick Point Pointing Device/Touch ScreenClickingTo left-click, touch the object you wish to select and then lift the stylus tip immediately. You also have the option to perform the left-click operation by tapping lightly with your finger on the Touch Screen once. (Figure 19)Right-Clicking Windows Vista:Right-click can be accomplished by holding the pen down until a circular icon appears. To change the settings for the right-click feature, go to Start > Control Panel > Pen and Input Devices. In the Pen Options tab, select “Press and Hold” then click the [Settings] button.Windows XP Tablet PC Edition:Right-click can be accomplished by holding the pen down until a circular icon appears. To change the settings for the right-click feature, go to Start > Control Panel > Tablet and Pen Settings. In the Pen Options tab, select “Press and Hold” then click the [Settings] button. Figure 19. Clicking the Touch ScreenWindows XP Professional Edition:Right-click can be accomplished by holding the pen down until a circular icon appears. To change the settings for the right-click feature, go to Start > Control Panel > Touch Panel. From the Right Button Simulation tab you can specify a right button tool by using the selected button prior to the desired right mouse click.](https://usermanual.wiki/Fujitsu-Client-Computing/WB0055/User-Guide-892412-Page-45.png)
![46 - Quick Point Pointing Device/Touch Screen2Windows XP Tablet PC Edition: Double-click the Tablet and Pen Settings icon and select the Settings tab. Windows XP Professional Edition: Double-click the Touch Panel icon and select the Calibration tab. Windows Vista: Double-click the Tablet PC Settings icon and select the General tab.3Click the [Calibrate] or [Calibrate Now] button.4Adjust the display of your notebook to a comfortable angle and find the (+) symbol in the upper-left corner of the display.5Using the stylus, firmly touch the screen directly on the (+) symbol. Lift the stylus from the screen and the target will move to a different location on the screen.6Repeat step 4 until you have selected all of the (+) symbols.7Once you have selected all the symbols, press the [OK] button. 8Touch the stylus to various points on the screen to verify that the screen is correctly calibrated. If you are not satisfied with the screen’s calibration, press the [Calibrate]) button to begin again.DO NOT USE EXCESSIVE FORCE WHEN TAPPING ON THE SCREEN DURING CALIBRATION. USE OF EXCESSIVE FORCE COULD RESULT IN DAMAGE TO THE DISPLAY AND/OR TOUCH PANEL.WHEN USING THE STYLUS TO CALIBRATE THE SCREEN, BE SURE TO AVOID TOUCHING THE SCREEN WITH YOUR FINGERS; DOING SO COULD RESULT IN FAULTY CALIBRATION.](https://usermanual.wiki/Fujitsu-Client-Computing/WB0055/User-Guide-892412-Page-47.png)
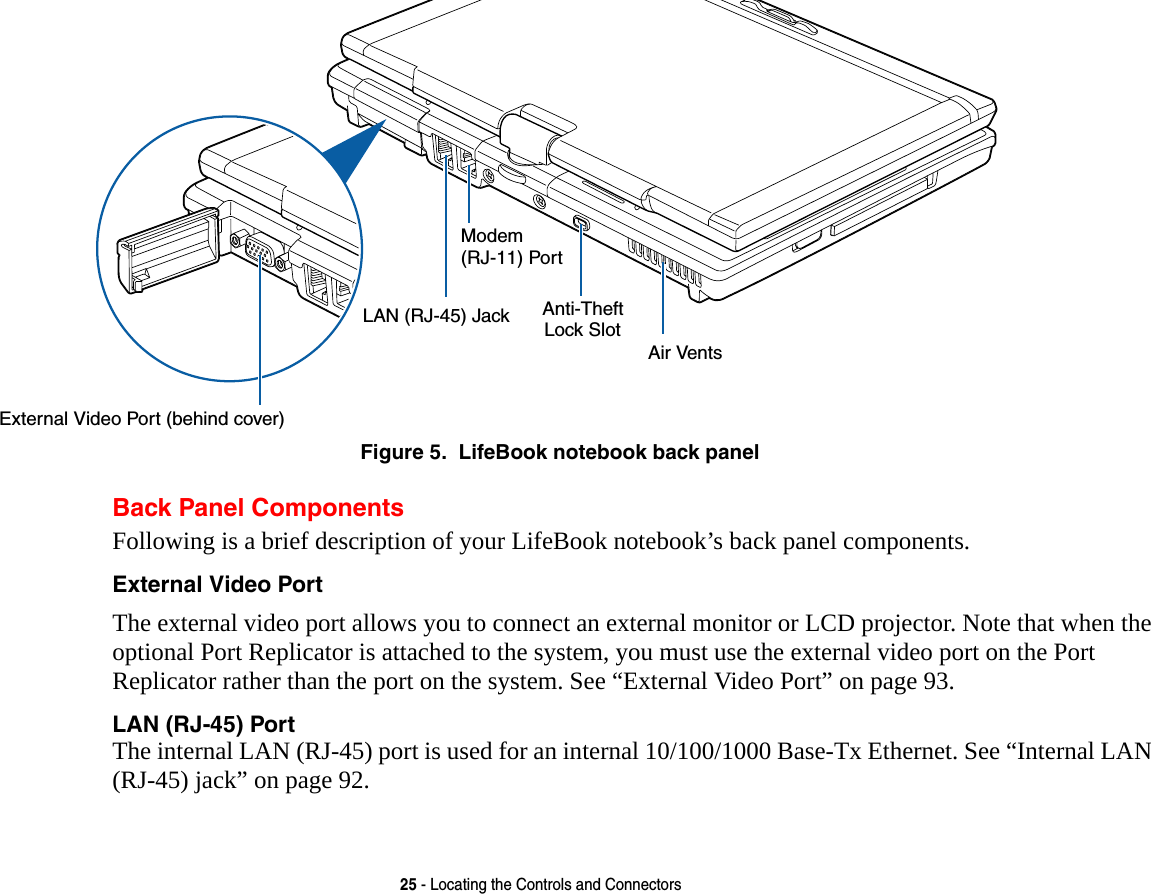
![47 - Volume ControlVolume ControlYour Fujitsu LifeBook notebook has multiple volume controls which interact with each other. Controlling the VolumeThe volume can be controlled in several different ways:•Volume can be set from within the Volume Control in the Notification Area at the boittom right of your screen.•Volume can be controlled with the [F8] and [F9] functions keys. Pressing [F8] repeatedly while holding [Fn] will decrease the volume of your notebook. Pressing [F9] repeatedly while holding [Fn] will increase the volume of your notebook.•Volume can be controlled by many volume controls that are set within individual applications.•Certain external audio devices you might connect to your system may have hardware volume controls.•Each source discussed above puts an upper limit on the volume level that must then be followed by the other sources. Each source discussed above puts an upper limit on the volume level that must then be followed by the other sources. We recommend that you experiment with the various volume controls to discover the optimal sound level.ANY SOFTWARE THAT CONTAINS AUDIO FILES WILL ALSO CONTAIN A VOLUME CONTROL OF ITS OWN. IF YOU INSTALL AN EXTERNAL AUDIO DEVICE THAT HAS AN INDEPENDENT VOLUME CONTROL, THE HARDWARE VOLUME CONTROL AND THE SOFTWARE VOLUME CONTROL WILL INTERACT WITH EACH OTHER. IT SHOULD BE NOTED THAT IF YOU SET YOUR SOFTWARE VOLUME TO OFF, YOU WILL OVERRIDE THE EXTERNAL VOLUME CONTROL SETTING.](https://usermanual.wiki/Fujitsu-Client-Computing/WB0055/User-Guide-892412-Page-48.png)
![49 - LifeBook Security/Application PanelSetting up Your LifeBook Security PanelWhen you receive your LifeBook notebook, the security panel application is pre-installed without any passwords. The following sections provide detailed information on your security panel, and how to set, change or remove passwords.Numbered Buttons Use these buttons to enter your password.Enter Button After entering the button strokes, push this button to enter the password into the LifeBook notebook. PasswordsThe user and supervisor password may be set on this notebook. A supervisor password is typically the same for all LifeBook notebooks in a working group, office, or company to allow for system management. Individual LifeBook notebooks in a group environment should not use a common password. A password consists of one to five button strokes plus the [Enter] button. A valid stroke consists of pushing one or up to four buttons simultaneously. The following are valid button strokes: •Pushing [4] by itself•Pushing [2] and [3] at the same time•Pushing [1], [2], and [4] at the same time•Pushing [1], [2], [3], and [4] at the same timeThe following are valid passwords. The numbers within braces ({ }) are button strokes using more than one button. •{[2]+[3]}, [1], [enter]•[4], [enter]•{[1]+[3]}, {[2]+[3]+[4]}, [1], [4], [2], [enter]](https://usermanual.wiki/Fujitsu-Client-Computing/WB0055/User-Guide-892412-Page-50.png)
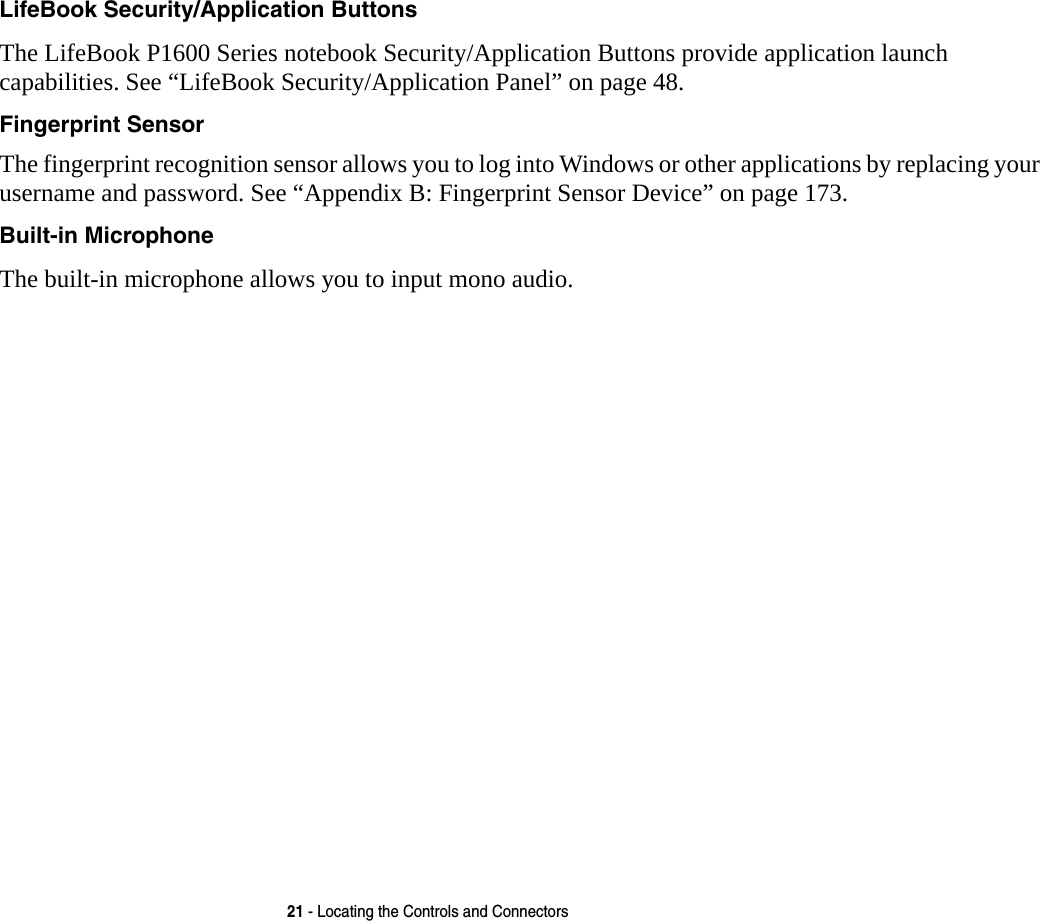
![50 - LifeBook Security/Application PanelSetting Passwords When shipped from the factory, no passwords are set. You have a choice of having no password or setting supervisor and user passwords. You must set the supervisor password before the user password. Setting Supervisor Password You must have set a supervisor password before setting any user passwords. The supervisor password can bypass the user password. Depending upon your operating system, use the appropriate procedure below.Windows XP:1Go to the Start menu.2Click on Run.3Type in: C:\Program Files\Fujitsu\Security Panel Application\Supervisor\FJSECS.EXE, then press [Enter]4Follow the on-screen instructions to set the Supervisor password.Windows Vista:1Go to the Start menu.2Select All Programs.3Select Accessories, then select Run.4Type in: C:\Program Files\Fujitsu\Security Panel Application\Supervisor\FJSECS.EXE, then press [Enter]5Follow the on-screen instructions to set the Supervisor password.THE PURPOSE OF SUPERVISOR PASSWORD IS TO BE ABLE TO BYPASS THE USER PASSWORD IN CASE THE USER PASSWORD IS FORGOTTEN. THE SUPERVISOR PASSWORD ALONE WILL NOT LOCK THE SYSTEM.YOU MUST SET BOTH THE SUPERVISOR AND USER PASSWORDS FOR THE SECURITY PANEL TO WORK.](https://usermanual.wiki/Fujitsu-Client-Computing/WB0055/User-Guide-892412-Page-51.png)
![51 - LifeBook Security/Application PanelSetting User Password Windows XP:1Go to the Start menu.2Click on Programs.3Click on Security Panel Application and Set User Password.4Follow the on-screen instructions to set the user passwordWindows Vista:1Go to the Start menu.2Select All Programs.3Select Security Panel Application and Set User Password. 4Follow instructions to set the user password.Operating Your LifeBook Security/Application PanelThe security lock feature is in effect both when the system resumes from Off or suspend state. You will need to enter the user password right after pressing the Suspend/Resume button. Your system will not boot or resume from Standby without entering your supervisor/user password.From Off State 1Turn on your system.2When the Security Indicator flashes, enter the password and press [Enter] button. For example, if the password is 22222, press button number [2] five times and press [Enter] button.3The notebook will boot to normal operation.YOU MAY CHANGE OR REMOVE THE SUPERVISOR OR USER PASSWORD BY REPEATING THE STEPS DEFINED ABOVE.](https://usermanual.wiki/Fujitsu-Client-Computing/WB0055/User-Guide-892412-Page-52.png)
![52 - LifeBook Security/Application PanelFrom Standby State 1Press your Power/Suspend/Resume button.2When the Security Indicator flashes, enter the password and press [Enter] button.3The notebook should resume normal operation.Incorrect Password Entry If an invalid supervisor or user password is entered three times in succession, the system will “beep” for about one minute. If a valid password is entered within a minute (while system beeps), the beeping will stop and the notebook will resume normal operation. If no password (or an invalid one) is entered while the system beeps, the system will return to its previous locked state (Standby or off) and the Security Indicator will go off. To reactivate the notebook after a password failure, you must press the Power/Suspend/Resume button, then enter a correct password.PrecautionsOpening and Closing the Cover Closing the cover automatically places the notebook into standby mode. Opening the cover does not automatically place the notebook into normal operation. Instead, you must enter the proper security password after pushing the Power/Suspend/Resume button. This setting can be changed in the Power Options Control Panel.Low Battery Operations If your LifeBook notebook has low battery, pushing the Power/Suspend/Resume button only turns on the Security Indicator. Your notebook does not unlock, the Security Indicator turns off after one minute. To resume normal operation, first attach a power supply to the notebook. Then you may unlock the notebook.REMEMBER THE USER PASSWORD YOU SPECIFIED ON THE SECURITY PANEL APPLICATION. IF YOU FORGET THE PASSWORD YOU WILL NOT BE ABLE TO USE YOUR COMPUTER. THE SUPERVISOR PASSWORD CAN OVERRIDE THE USER PASSWORD.](https://usermanual.wiki/Fujitsu-Client-Computing/WB0055/User-Guide-892412-Page-53.png)
![53 - LifeBook Security/Application PanelUninstalling the Security Panel ApplicationYou have two options when uninstalling the security panel application:•Uninstall the security panel application software. This will disable all security features.•Uninstall the security panel application with password still active. This will not allow any changes to the password. Uninstalling the Security Panel Application Remove passwords when the User wants no password protection whatsoever and doesn’t want to give anybody the utility to set a password on their computer. In this case, if passwords (supervisor, user, or both) are set, the passwords must first be cleared BEFORE removing the application. To clear passwords, follow same procedure in “Setting Passwords” except this time, select [Remove], enter current password then click [Next]. When asked to confirm, select [Yes].Removing Security Panel Application with Passwords Still Active Using this feature will not allow any changes to the password. User: 1Go to Start Menu, Click on Control Panel.2Open Add or Remove Programs (In Vista: Programs and Features) in the Control Panel. 3Select the Security Panel Application (In Vista: Security Panel) in the list, and click Add/Remove. 4When the Confirm File Deletion box appears, click Yes.Supervisor: 1Go to Start Menu, Click on Control Panel.2Open Add/Remove Programs Properties in the Control Panel. REMOVING THE APPLICATIONS DOES NOT REMOVE THE PASSWORD. IT SIMPLY REMOVES THE UTILITY TO CHANGE/ADD/REMOVE PASSWORDS. TO CHANGE YOUR PASSWORD YOU MUST REINSTALL THE APPLICATION.](https://usermanual.wiki/Fujitsu-Client-Computing/WB0055/User-Guide-892412-Page-54.png)
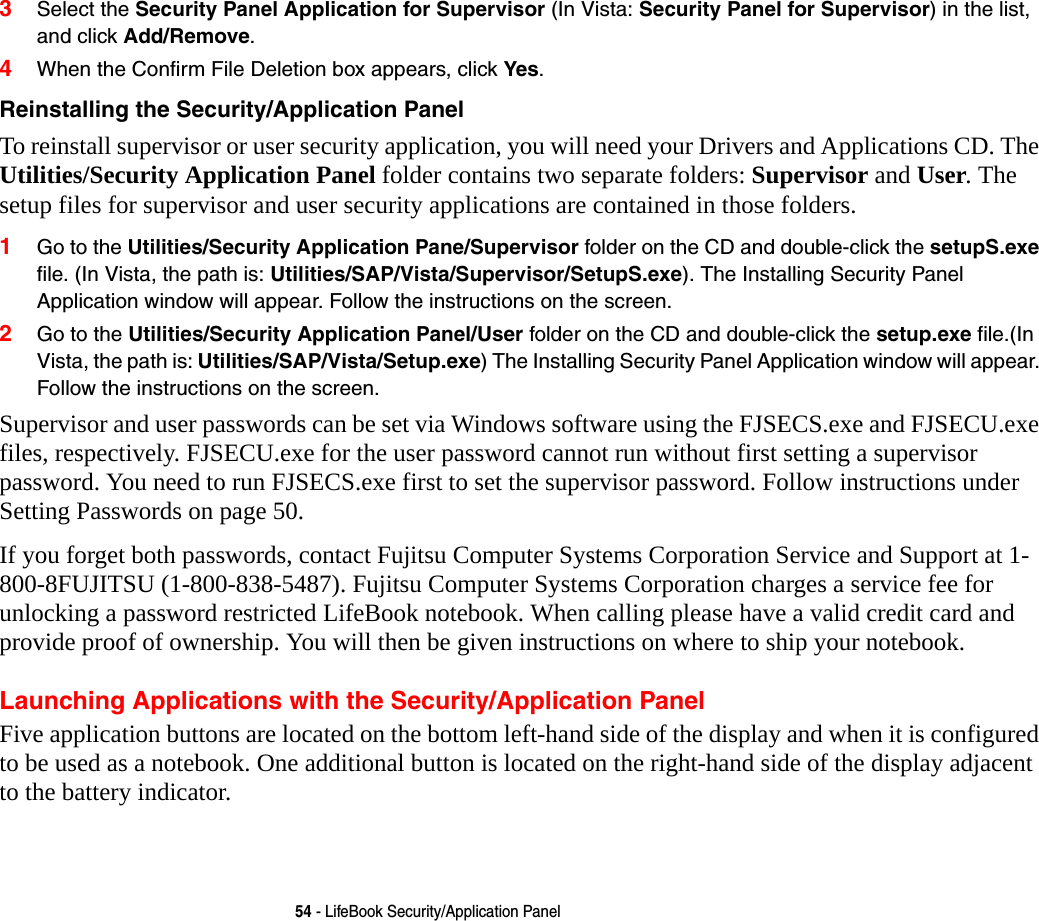

![56 - LifeBook Security/Application PanelWhen you press the Screen Rotation / VGA-Out button, the system screen orientation changes from portrait (vertical) to landscape (horizontal) or from landscape to portrait. Figure 22. LAP/SAP iconsTHE SCREEN ORIENTATION DEFAULT CAN BE CHANGED. FIRST USE THE SCREEN ROTATION BUTTON TO SELECT THE DESIRED ORIENTATION, THEN GO TO THE CONTROL PANEL AND DOUBLE-CLICK ON THE FUJITSU DISPLAY CONTROL ICON (WINDOWS XP PRO) OR FUJITSU TABLET CONTROLS ICON (WINDOWS XP TABLET PC/VISTA EDITIONS) AND CLICK THE [SAVE CURRENT PROFILE] BUTTON. THE DEFAULT ORIENTATIONS MUST BE CONFIGURED SEPARATELY FOR DOCKED AND UNDOCKED MODES.Button Icon Primary Function Secondary Function (Fn + Button)Page Down User-defined Application ADefault = CalculatorPage UpUser-Defined Application BWindows XP Professional Default = WordPadWindows XP Tablet PC/Vista Edition Default = MS JournalScreen Rotation VGA-OutSecondary Function Selection Fujitsu Menu UtilityCtl+Alt+Del Button NoneBackight Min/Restore User-Defined Application CNo Default assigned](https://usermanual.wiki/Fujitsu-Client-Computing/WB0055/User-Guide-892412-Page-57.png)
![58 - LifeBook Security/Application Panel2Select the Tablet Buttons tab and select the button you would like to change from the list.3Click [Change] and open the drop down list in the Action: field.4Select the action you would like the button to perform. If you want to launch a program, click on Launch an Application then browse to the location of the program.Click [OK], then click [OK] again. The buttons will now perform the actions you have assigned to them.Windows XP Professional:1Double-click on the Tablet Button Settings icon in the Control Panel. 2Select the button you would like to change from the list.3Click [Change] and open the drop down list in the Action: field.4Select the action you would like the button to perform. If you want to launch a program, click on Launch an Application then browse to the location of the program.5Click [OK], then click [OK] again. The buttons will now perform the actions you have assigned to them.Windows Vista:1Double-click on the Tablet PC Settings icon in the Control Panel. 2Select the Buttons tab and select the button you would like to change from the list.3Click [Change] and open the drop down list in the Press: field.4Select the action you would like the button to perform. If you want to launch a program, click on Launch an Application then browse to the location of the program.5Click [OK], then click [OK] again. The buttons will now perform the actions you have assigned to them.](https://usermanual.wiki/Fujitsu-Client-Computing/WB0055/User-Guide-892412-Page-59.png)
![63 - Starting Your LifeBook NotebookBIOS Setup UtilityThe BIOS Setup Utility is a program that sets up the operating environment for your LifeBook notebook. Your BIOS is set at the factory for normal operating conditions, therefore there is no need to set or change the BIOS’ environment to operate your notebook.The BIOS Setup Utility configures:•Device control feature parameters, such as changing I/O addresses and boot devices.•System Data Security feature parameters, such as passwords.Entering the BIOS Setup Utility To enter the BIOS Setup Utility do the following (or use the TrustedCore Menu, as detailed in the next section):1Turn on or restart your LifeBook notebook.2To enter the BIOS Setup Utility, press the [F2] key once the Fujitsu logo appears on the screen. This will open the main menu of the BIOS Setup Utility with the current settings displayed.3Press the [RIGHT ARROW] or [LEFT ARROW] key to scroll through the other setup menus to review or alter the current settings.Using the TrustedCore Menu When the Fujitsu logo appears on the screen. press the [Enter] key or click on the left mouse or touchpad button; the TrustedCore Menu will appear. REMEMBER YOUR PASSWORDS. IF YOU SET AND FORGET YOUR USER AND MASTER HARD DISK PASSWORDS, FUJITSU COMPUTER SYSTEMS WILL NOT BE ABLE TO RESET IT. YOU MAY LOSE DATA AND HAVE TO REPLACE YOUR SYSTEM BOARD OR HARD DISK DRIVE.](https://usermanual.wiki/Fujitsu-Client-Computing/WB0055/User-Guide-892412-Page-64.png)
![64 - Starting Your LifeBook NotebookThe TrustedCore Menu provides shortcuts to the following menus and information screens: •BIOS Setup•Diagnostic Screen•Boot Menu•Patent Information•System Information•Continue BootingClicking on any of the fields will invoke the screen, information, or action described.The Boot Menu can also be invoked by pressing the [F12] key when the Fujitsu logo appears on the screen.BIOS Guide A guide to your notebook’s BIOS is available online. Please visit our service and support website at http://www.computers.us.fujitsu.com/support, then select User’s Guides under Online Support. Select your Product, Series, and Model, then click [Go]. Under the Manuals tab, select the BIOS Guide. Booting the SystemWe strongly recommend that you not attach any external devices until you have gone through the initial power on sequence.When you turn on your notebook for the first time, it will display a Fujitsu logo on the screen. If you do nothing the system will load the operating system, and then the Windows Welcome will begin.Depending upon your operating system (Windows Vista or XP edition), there is a different procedure for stating your system for the first time, as outlined below.](https://usermanual.wiki/Fujitsu-Client-Computing/WB0055/User-Guide-892412-Page-65.png)
![67 - Starting Your LifeBook NotebookSeveral additional windows will appear, prompting you to enter a name and description for your computer, an Administrator password, and a domain name. Read the instructions on the screens carefully and fill in the information as directed. You will then be automatically connected to the Internet, if you have an appropriate connection available. If an automatic connection is not possible, you will be asked about how you dial out from where you will be using your LifeBook notebook. If you are not connected to a phone line and plan to register at a later time, you may click the Skip button.Once you are connected to the Internet, you will be asked if you wish to continue with the registration. If you select Yes you will then enter your name and address, and email address if desired. Click Next to complete registration.Registering Your LifeBook notebook with FujitsuYou can register your LifeBook by going to our website at: us.fujitsu.com/computersYou will need to be set up with an Internet Service Provider (ISP) to register online. Installing ClickMe! Windows Vista Systems The first time you boot up your system, you will see a “Primary Settings for the PC” window. This window explains the installations which will be performed by the Click Me! utility. If you click [Execute], ClickMe! will begin installing. If after clicking the button you receive a “User Account BEFORE INSTALLING THE CLICKME! UTILITY, BE SURE THE WIRELESS LAN SWITCH IS TURNED ON.ClickMe!](https://usermanual.wiki/Fujitsu-Client-Computing/WB0055/User-Guide-892412-Page-68.png)
![68 - Starting Your LifeBook NotebookControl” window, you will be asked for your permission to continue. Click [Continue] to continue. If you cancel the operation, the ClickMe! icon will appear on your desktop for later installation. Windows XP Systems The first time you boot up your system, you will see an icon called Click Me! in the Start menu. We highly recommend that you install the ClickMe! utility the first time you boot up. When you click the Click Me! icon, your system will automatically create the related icons in the system tray in the bottom right of the screen. These icons provide links to utilities that you will frequently access, such as wireless LAN software provided by the wireless LAN manufacturer. Fujitsu Driver Update Utility Your system has a convenient tool called the Fujitsu Driver Update (FDU) utility. With FDU, you can choose to automatically or manually go to the Fujitsu site to check for new updates for your system. For more information about the FDU utility, refer to “Automatically Downloading Driver Updates” on page 83.THERE MAY BE SOME THIRD-PARTY APPLICATIONS THAT DO NOT GET INSTALLED USING THE CLICKME! UTILITY. FOR MORE INFORMATION, REFER TO YOUR GETTING STARTED GUIDE.](https://usermanual.wiki/Fujitsu-Client-Computing/WB0055/User-Guide-892412-Page-69.png)
![72 - Power ManagementRestarting the SystemIf your system is on and you need to restart it, be sure that you use the following procedure. Windows Vista:1Click the [Start] button, and then move the mouse over the small arrow at the bottom right of the right-hand pane.2Select Restart from the list.Windows XP:1Click the [Start] button, and then click Turn Off Computer.2Select the Restart option. Your notebook will shut down and then reboot.Powering OffBefore turning off the power, check that the hard drive/optical drive access indicator is off. If you turn off the power while accessing a disk there is a risk of data loss. To ensure that your notebook shuts down without error, use the Windows shut down procedure.Using the correct procedure to shut down from Windows allows your notebook to complete its operations and turn off power in the proper sequence to avoid errors. The proper sequence is:TURNING OFF YOUR LIFEBOOK NOTEBOOK WITHOUT EXITING WINDOWS OR TURNING ON YOUR NOTEBOOK WITHIN 10 SECONDS OF THE NOTEBOOK BEING SHUT OFF MAY CAUSE AN ERROR WHEN YOU START THE NEXT TIME. BE SURE TO CLOSE ALL FILES, EXIT ALL APPLICATIONS, AND SHUT DOWN YOUR OPERATING SYSTEM PRIOR TO TURNING OFF THE POWER. IF FILES ARE OPEN WHEN YOU TURN THE POWER OFF, YOU WILL LOSE ANY CHANGES THAT HAVE NOT BEEN SAVED, AND MAY CAUSE DISK ERRORS.](https://usermanual.wiki/Fujitsu-Client-Computing/WB0055/User-Guide-892412-Page-73.png)
![73 - Power ManagementWindows Vista:1Click the [Start] button, and then move the mouse over the small arrow at the bottom right of the right-hand pane.2Select Shut Down from the list.Windows XP:1Click the [Start] button, and then click Turn Off Computer.Select the Turn Off option. If you are going to store your notebook for a month or more, see Care and Maintenance Section.](https://usermanual.wiki/Fujitsu-Client-Computing/WB0055/User-Guide-892412-Page-74.png)

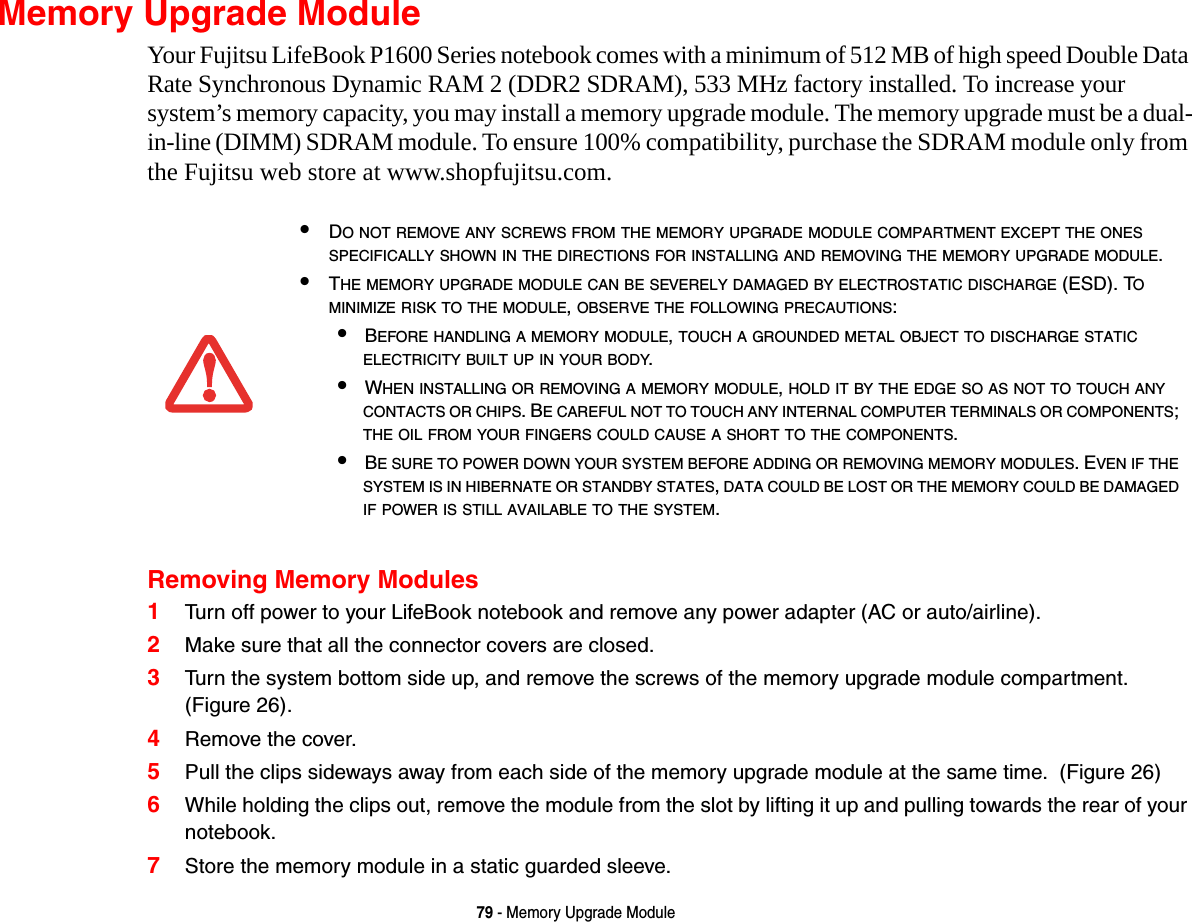
![81 - Memory Upgrade ModuleChecking the Memory CapacityOnce you have changed the system memory capacity by replacing the installed module with a larger one, be sure to check that your notebook has recognized the change.Windows XP: Check the memory capacity by clicking [Start] > Control Panel, then double-clicking the System icon. Select the General tab and check the amount of memory under “Computer:”Installing a Memory Upgrade Module1Remove the new memory upgrade module from the static guarded sleeve. 2Align the memory upgrade module with the component side up. Align the connector edge of the memory upgrade module with the connector slot in the compartment. (Figure 27)3Insert the memory upgrade module at a 45° angle. Press the connector edge of the module firmly down and into the connector until it lodges under the retaining clip. You will hear a click when it is properly in place. 4Replace the cover. 5Replace the screws.Figure 27. Installing a Memory ModuleTHE MEMORY UPGRADE MODULE IS NOT SOMETHING YOU ROUTINELY REMOVE FROM YOUR NOTEBOOK. ONCE IT IS INSTALLED, YOU SHOULD LEAVE IT IN PLACE UNLESS YOU WANT TO CHANGE SYSTEM MEMORY CAPACITY.](https://usermanual.wiki/Fujitsu-Client-Computing/WB0055/User-Guide-892412-Page-82.png)
![82 - Memory Upgrade ModuleWindows Vista: •If you are in Control Panel Home view, check the memory capacity by clicking [Start] > Control Panel > System and Maintenance > System > View amount of RAM and processor speed. The amount of memory is displayed next to “Memory - RAM:” •If you are in Classic view, check the memory capacity by clicking [Start] > Control Panel > System. The amount of memory is displayed next to “Memory - RAM:”There may be a variation between the actual memory size and what is displayed. This is possible if your system is configured with an integrated Intel Graphics Media Accelerator which dynamically allocates system memory to accelerate graphics performance.IF THE TOTAL MEMORY DISPLAYED IS INCORRECT, CHECK THAT YOUR MEMORY UPGRADE MODULE IS PROPERLY INSTALLED. (IF THE MODULE IS PROPERLY INSTALLED AND THE CAPACITY IS STILL NOT CORRECTLY RECOGNIZED, SEE TROUBLESHOOTING ON PAGE 95.](https://usermanual.wiki/Fujitsu-Client-Computing/WB0055/User-Guide-892412-Page-83.png)


![94 - Device PortsWHEN AN EXTERNAL MONITOR IS PLUGGED IN, PRESSING THE [FN] + [F10] KEYS ALLOWS YOU TO CHANGE YOUR SELECTION OF WHERE TO SEND YOUR DISPLAY VIDEO. EACH TIME YOU PRESS THE KEY COMBINATION, YOU WILL STEP TO THE NEXT CHOICE, STARTING WITH THE BUILT-IN DISPLAY PANEL ONLY, MOVING TO THE EXTERNAL MONITOR ONLY, FINALLY MOVING TO BOTH THE BUILT-IN DISPLAY PANEL AND AN EXTERNAL MONITOR.WHEN AN EXTERNAL MONITOR IS PLUGGED IN, PRESSING THE LIFEBOOK APPLICATION PANEL SECONDARY FUNCTION BUTTONS (FN + SCREEN ROTATION BUTTON) ALSO ALLOWS YOU TO CHANGE YOUR SELECTION OF WHERE TO SEND YOUR DISPLAY VIDEO.](https://usermanual.wiki/Fujitsu-Client-Computing/WB0055/User-Guide-892412-Page-95.png)
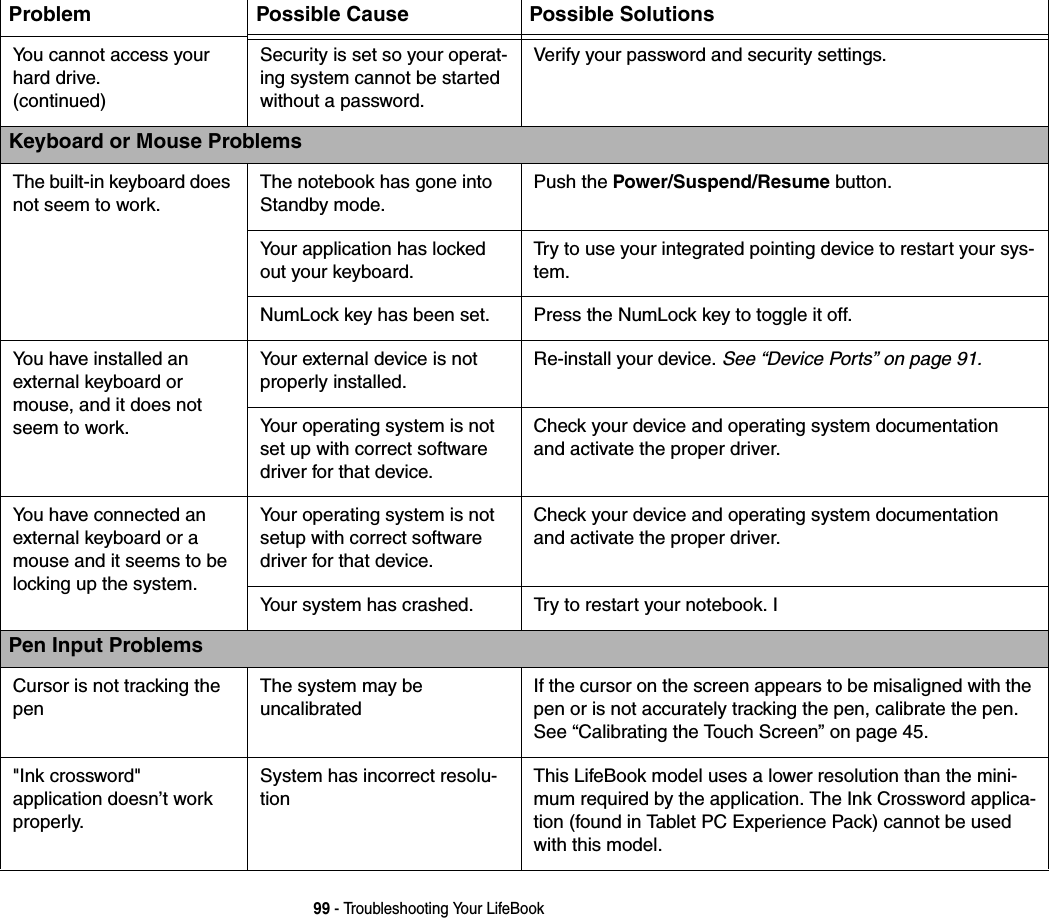
![98 - Troubleshooting Your LifeBookProblem Possible Cause Possible SolutionsAudio ProblemsThere is no sound coming from the built-in speaker.The volume is turned too low. Adjust the volume control on your notebook and operating system. Use the [Fn+F9] key combination on your keyboard to increase the volume of your notebook.The software volume control is set too low.Manually adjusting the volume (i.e., keyboard "hot keys") should dynamically adjust the volume of the operating sys-tem (see above). If that doesn’t work, adjust the sound vol-ume control settings in your software or application.Headphones are plugged into your notebook.Plugging in headphones disables the built-in speakers. Remove the headphones.Software driver is not configured correctly.The audio driver can be installed or reinstalled using the Drivers and Applications CD that came with your LifeBook. Refer to application and operating system documentation.The speakers have been muted using the Volume icon in the system tray.Click on the Volume icon in the system tray on the bottom right of the screen. If the Mute box is checked (Windows XP) or the Mute icon has a red circle on it (Windows Vista), click on it to unselect it. You can also press [F3] while holding [Fn] will toggle the audio on and off.Port Replicator Problems (optional external device)System does not turn on when installed in optional Port ReplicatorPort Replicator AC adapter is not plugged in. Provide power to the Port Replicator.LifeBook is not properly seated in the Port Replicator.Remove and re-dock your notebook.Hard Drive ProblemsYou cannot access your hard drive.The wrong drive designator was used by an application when a bootable disc was used to start the notebook.Verify drive designator used by application is in use by the operating system. When the operating system is booted from a CD, drive designations are automatically adjusted.](https://usermanual.wiki/Fujitsu-Client-Computing/WB0055/User-Guide-892412-Page-99.png)
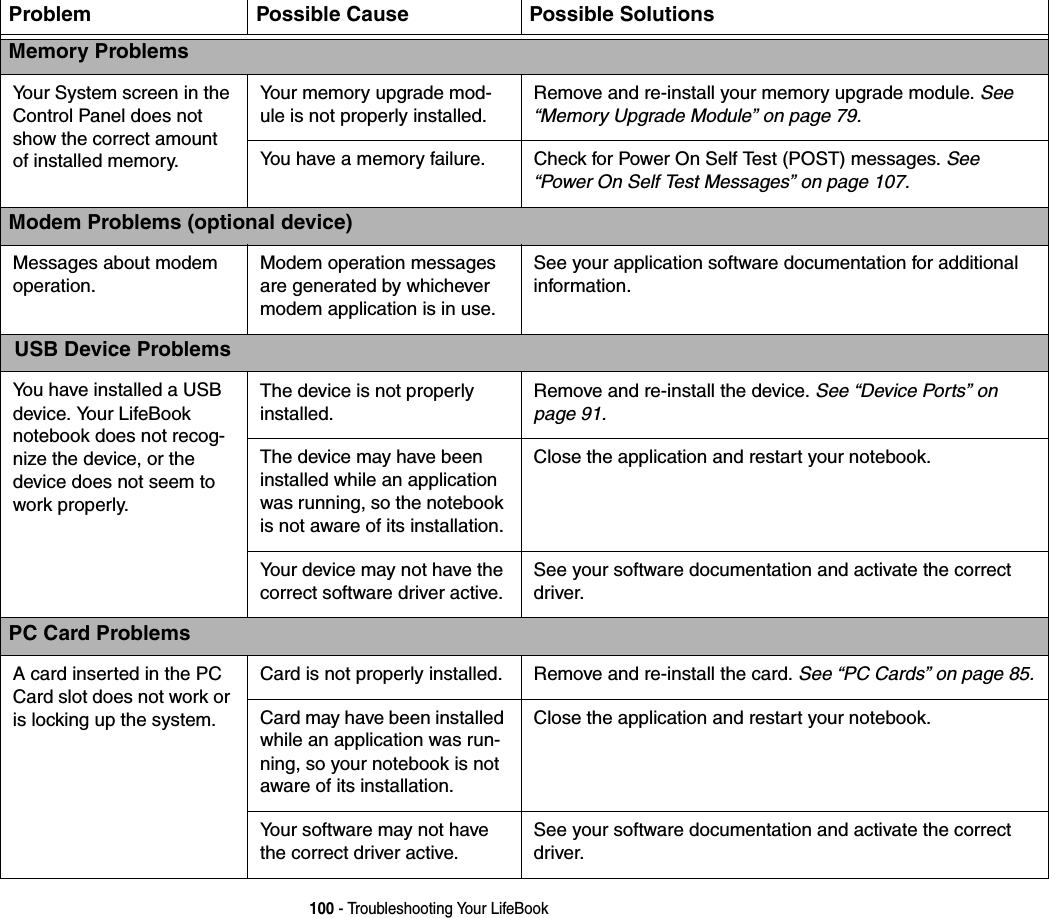
![103 - Troubleshooting Your LifeBookThe battery seems to discharge too quickly. (continued)The brightness is turned all the way up.Turn down the brightness adjustment. The higher the bright-ness the more power your display uses.The battery is very old. Replace the battery.Battery has been exposed to high temperatures.Replace the battery.The battery is too hot or too cold. Restore the notebook to normal operating temperature. Charging icon on the Status Indicator panel will flash when battery is outside of operating range.Shutdown and Startup ProblemsThe Suspend/Resume button does not work.Suspend/Resume button is disabled. In Windows XP, enable the button by going to the Control Panel > Power Options Properties and clicking on the Advanced tab. In the Power buttons area, select the option that best suits your needs. In Windows Vista, select the Change what the power button does” option.There may be application software conflict.Close all applications and try the button again.The system powers up, and displays power on information, but fails to load the operating system.The boot sequence settings of the setup utility are not compatible with your configu-ration.Set the operating source by pressing the [ESC] key while the Fujitsu logo is on screen or use the [F2] key and enter the setup utility and adjust the source settings from the Boot menu. See “BIOS Setup Utility” on page 63.You have a secured system requiring a password to load your operating system.Make sure you have the right password. Enter the setup util-ity and verify the Security settings and modify them as accordingly. See “BIOS Setup Utility” on page 63.An error message is displayed on the screen during the boot sequence.Power On Self Test (POST) has detected a problem.See the Power On Self Test (POST) messages to determine the meaning and severity of the problem. Not all messages are errors; some are simply status indicators. See “Power On Self Test Messages” on page 107.Problem Possible Cause Possible Solutions](https://usermanual.wiki/Fujitsu-Client-Computing/WB0055/User-Guide-892412-Page-104.png)
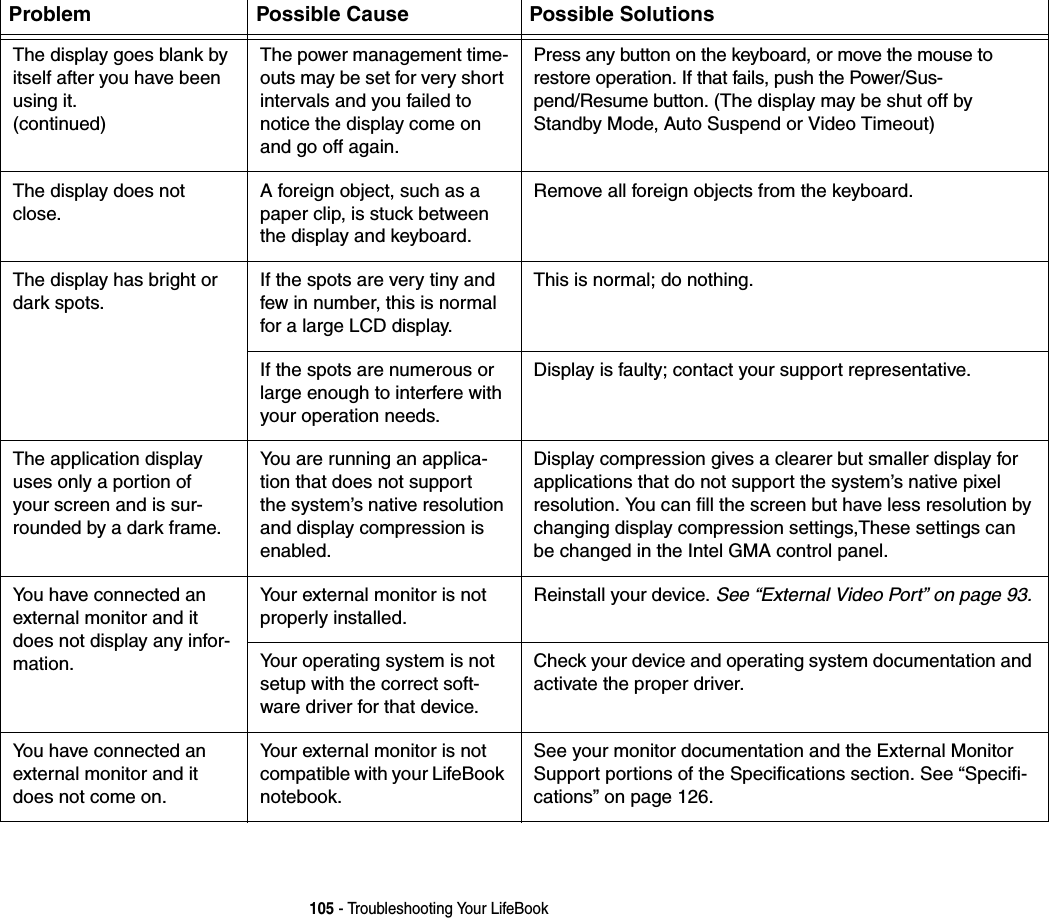
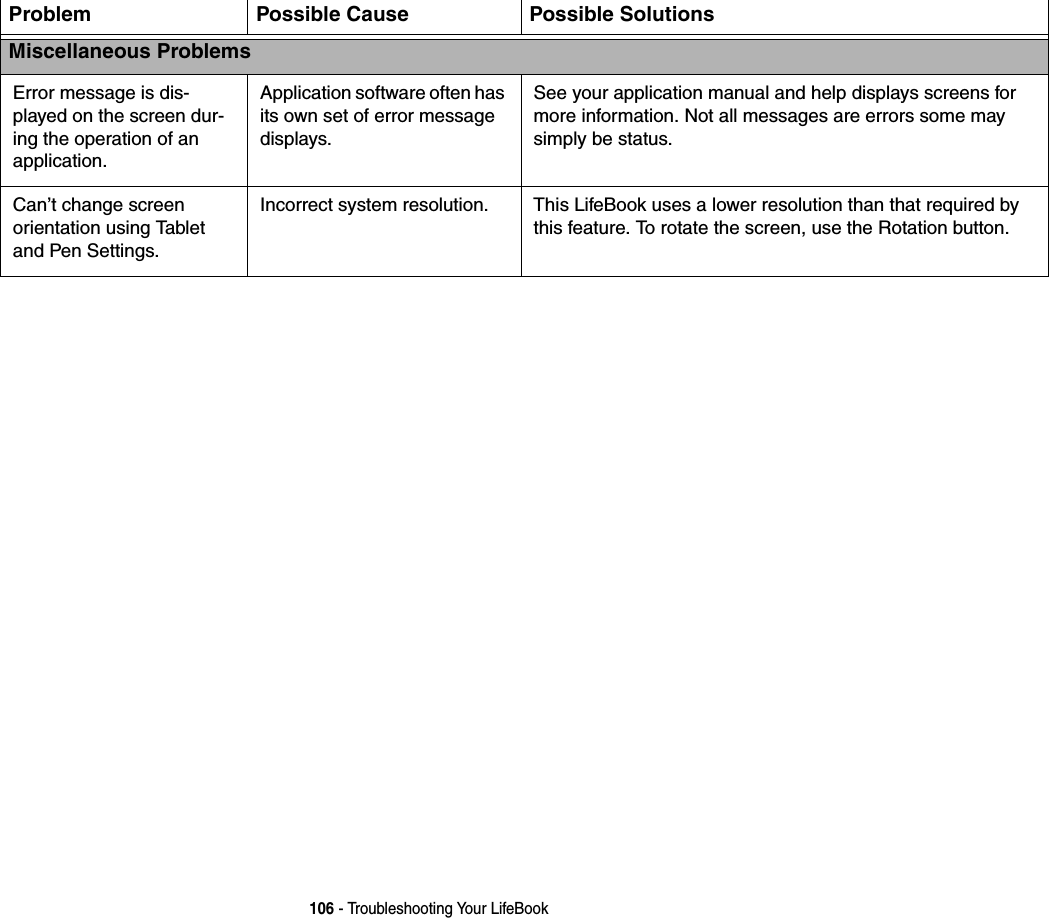
![104 - Troubleshooting Your LifeBookYour notebook appears to change setup parameters when you start it.BIOS setup changes were not saved when made and you exited the setup utility.Make sure you select Save Changes And Exit when exiting the BIOS setup utility.The BIOS CMOS hold-up bat-tery has failed.Contact your support representative for repairs. This is not a user serviceable part but has a normal life of 3 to 5 years.Video ProblemsThe built-in display is blank when you turn on your LifeBook notebook.The optional Port Replicator is attached, an external moni-tor is plugged in, and the sys-tem is set for an external monitor only.Pressing [F10] while holding down [Fn] allows you to change where to send your display video. Each time you press the combination of keys you will step to the next choice. The choices, in order are: built-in display, external monitor, both built-in display and external monitor.Display angle and brightness settings are not adequate for your lighting conditions.Move the display and the brightness control until you have adequate visibility. Pressing either the [F6] or [F7] keys while holding down the [Fn] key also allows you to change the brightness level of the display.Power management timeouts are set for short intervals and you didn’t see the display go on and off again.Press a keyboard button or move the mouse to restore oper-ation. If that fails, push the Power/Suspend/Resume button. (The display may be shut off by Standby mode, Auto Sus-pend or Video Timeout)The notebook turned on with a series of beeps and the built-in display is blank.Power On Self Test (POST) has detected a failure which does not allow the display to operate. Contact your support representative.The display goes blank by itself after you have been using it.The notebook has gone into Video timeout, Standby mode, or Save-to-Disk mode because you have not used it for a period of time.Press any button on the keyboard, or move the mouse to restore operation. If that fails, push the Power/Sus-pend/Resume button. Check your power management set-tings, or close your applications and go to the Power Savings menu of the setup utility to adjust the timeout values to better suit your operation needs. See “BIOS Setup Utility” on page 63.Problem Possible Cause Possible Solutions](https://usermanual.wiki/Fujitsu-Client-Computing/WB0055/User-Guide-892412-Page-105.png)
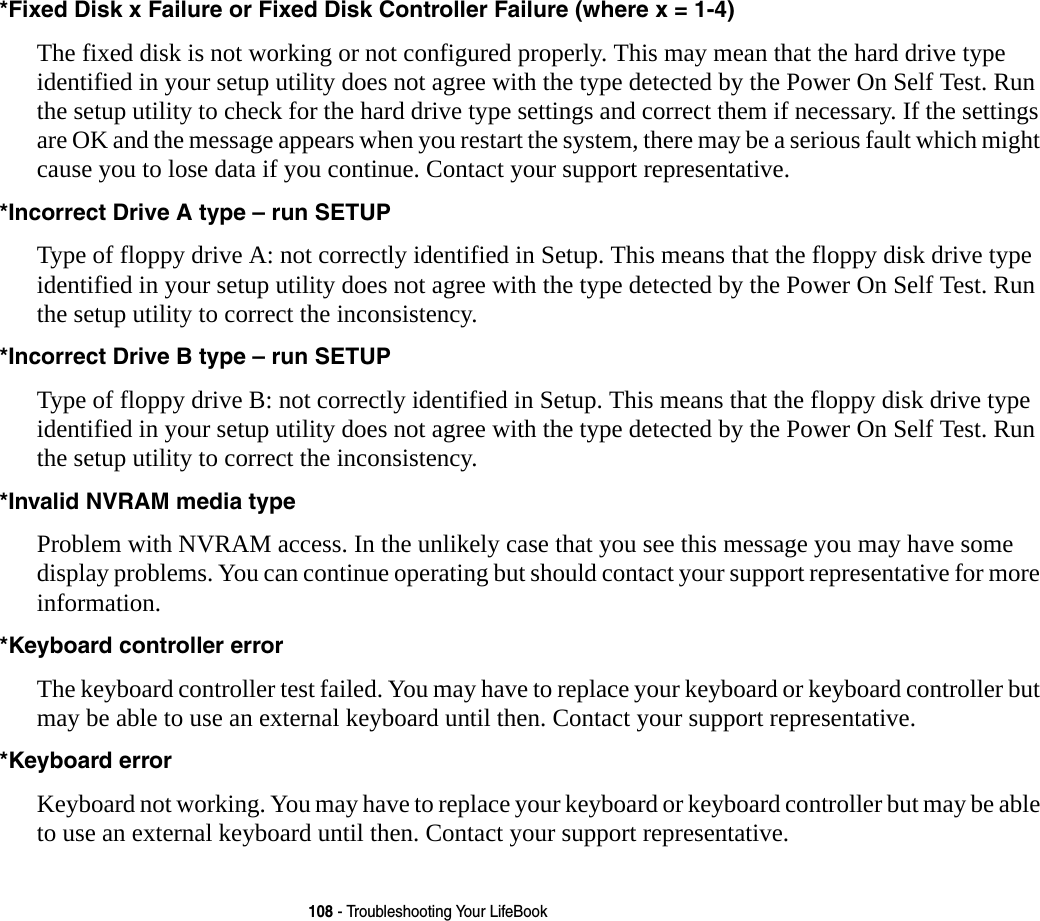
![110 - Troubleshooting Your LifeBook*Press <F1> to resume, <F2> to SETUP Displayed after any recoverable error message. Press the [F1] key to continue the boot process or the [F2] key to enter Setup and change any settings.*Previous boot incomplete – Default configuration used Previous Power On Self Test did not complete successfully. The Power On Self Test will load default values and offer to run Setup. If the previous failure was caused by incorrect values and they are not corrected, the next boot will likely fail also. If using the default settings does not allow you to complete a successful boot sequence, you should turn off the power and contact your support representative.*Real time clock error Real-time clock fails BIOS test. May require board repair. Contact your support representative.*Shadow RAM Failed at offset: nnnn Shadow RAM failed at offset nnnn of the 64k block at which the error was detected. You are risking data corruption if you continue. Contact your support representative.nnnn Shadow RAM Passed Where nnnn is the amount of shadow RAM in kilobytes successfully tested.*System battery is dead – Replace and run SETUP The BIOS CMOS RAM memory hold up battery is dead. This is part of your BIOS and is a board mounted battery which requires a support representative to change. You can continue operating but you will have to use setup utility default values or reconfigure your setup utility every time you turn off your notebook. This battery has an expected life of 2 to 3 years.System BIOS shadowed System BIOS copied to shadow RAM.](https://usermanual.wiki/Fujitsu-Client-Computing/WB0055/User-Guide-892412-Page-111.png)
![112 - Restoring Your Pre-installed SoftwareRestoring Your Pre-installed SoftwareThe Drivers and Applications Restore (DAR) DVD contains sets of device drivers and Fujitsu utilities (in specific directories) that are unique to your computer configuration for use as documented below.Re-installing Individual Drivers and ApplicationsThe Drivers and Applications CD can be used to selectively re-install drivers and/or applications that may have been uninstalled or corrupted. To re-install drivers and/or applications:1Boot up the system and insert the DAR CD after Windows has started. A Fujitsu Installer screen is displayed after the CD is inserted.2After reading the License Agreement, click [I agree].3A window will appear containing a list of applications, drivers, and utilities that you can install from the Drivers and Applications CD.IN ORDER TO INSTALL APPLICATIONS AND/OR DRIVERS FROM THE DAR DVD, YOU WILL NEED TO USE A DVD DRIVE ATTACHED EXTERNALLY.IF YOU HAVE ACCESS TO THE INTERNET, VISIT THE FUJITSU SUPPORT WEBSITE AT HTTP://WWW.COMPUTERS.US.FUJITSU.COM/SUPPORT TO CHECK FOR THE MOST CURRENT INFORMATION, DRIVERS AND HINTS ON HOW TO PERFORM RECOVERY AND SYSTEM UPDATES.THERE MAY BE CERTAIN FREE THIRD-PARTY APPLICATIONS PRE-INSTALLED ON YOUR SYSTEM THAT ARE NOT ON THE DAR CD. THE LATEST VERSIONS OF THE APPLICATIONS CAN BE DOWNLOADED FROM THE THIRD-PARTY’S WEBSITE.](https://usermanual.wiki/Fujitsu-Client-Computing/WB0055/User-Guide-892412-Page-113.png)
![113 - Restoring Your Pre-installed Software4In the list, check off all components you want to install. If you want to install all components, click [Select All]. Clicking [Select All] will select all of the blue-coded components; select gray and green components separately.5Once you have selected the components you wish to install, click [Install Selected Subsystems]; the components will be installed.6After the components are installed, click [OK], then click [Yes] when asked if you want to reboot the system. Restoring the Operating System for Windows XP SystemsThe Recovery and Utility disc contains three utilities:•The Recovery utility allows you to restore the system operating system (OS). The restored OS is the same one that was originally installed on the hard disk drive. After the OS is restored, you will need to reinstall the drivers and applications from the Drivers and Applications Restore disc and from any application discs that were bundled with the system when you purchased it. •The Hard Disk Data Delete utility on this disc is used to delete all data on your hard disk and prevent it from being reused. Do not use the Hard Disk Data Delete utility unless you are absolutely certain that you want to erase your entire hard disk, including all partitions.•The Partition Creation utility allows you to create or resize partitions on your hard disk. NOTE: Creating or resizing partitions with this utility will cause all data on the hard disk to be completely erased.THE COMPONENTS LISTED ARE COLOR-CODED IN TERMS OF THEIR INSTALL STATUS. BLUE INDICATES THAT THE COMPONENT CAN BE INSTALLED. GREEN INDICATES THAT THE COMPONENT NEEDS TO BE INSTALLED SEPARATELY. GRAY INDICATES A COMPONENT THAT IS ALREADY INSTALLED; GRAY ITEMS CAN BE REINSTALLED, BUT PRIOR TO INSTALLATION YOU WILL RECEIVE A REMINDER THAT THE COMPONENT IS ALREADY INSTALLED. •THE USE OF THIS DISC REQUIRES THAT YOU HAVE A DEVICE CAPABLE OF READING DVDS ATTACHED TO YOUR SYSTEM. YOU WILL NEED TO ATTACH AN EXTERNAL PLAYER. FOR MORE INFORMATION ON AVAILABLE EXTERNAL DEVICES, VISIT OUR WEB SITE AT: US.FUJITSU.COM/COMPUTERS. •THIS DISC CAN ONLY BE USED WITH THE SYSTEM WITH WHICH IT WAS PURCHASED.](https://usermanual.wiki/Fujitsu-Client-Computing/WB0055/User-Guide-892412-Page-114.png)
![114 - Restoring Your Pre-installed SoftwareBOOT Priority Change Before restoring an image, you must first verify that the system is set up to boot from the optical drive. To verify/change the boot-up priority (rather than booting-up from the hard drive or an external floppy disk drive), perform the following steps:1Power on your system. When the Fujitsu logo appears on the screen. press the [Enter] key or click on the left mouse or touchpad button; the TrustedCore Menu will appear. 2Select the Boot Menu from the TrustedCore Menu.3Highlight the CD/DVD option, then click [OK].4Insert the Recovery and Utility Disc into the drive tray.After the system boots, follow the instructions that appear to restore your operating system, erase all data from your hard disk, or create or resize partitions on the hard disk.Restoring the Operating System for Windows Vista SystemsThe Recovery and Utility disc contains four utilities:•The Recovery utility allows you to restore the system operating system (OS). The restored OS is the same one that was originally installed on the hard disk drive. After the OS is restored, you will need to reinstall the drivers and applications from the Drivers and Applications Restore disc and from any application discs that were bundled with the system when you purchased it.•The Hard Disk Data Delete utility on this disc is used to delete all data on your hard disk and prevent it from being reused. Do not use the Hard Disk Data Delete utility unless you are absolutely certain that you want to erase your entire hard disk, including all partitions.•The Partition Creation utility allows you to create a new D: partition or resize existing partitions on your hard disk. NOTE: Creating or resizing partitions with this utility will cause all data on the hard disk to be completely erased.•The Diagnostics utility allows the IT professional to determine device status/condition by executing diagnostics tests on selected system components.](https://usermanual.wiki/Fujitsu-Client-Computing/WB0055/User-Guide-892412-Page-115.png)
![115 - Restoring Your Pre-installed SoftwareMethods for accessing the utilities Certain LifeBooks have the Recovery and Utility applets pre-installed on a hidden drive. Other systems require that the Recovery and Utility disc be used (or in the event the hard disk has been reformatted).In order to determine the method for accessing the Recovery and Utility applet, perform the following procedures in order.Determining whether Recovery and Utility is pre-loaded 1Turn on or reboot your system. When the Fujitsu logo appears, press [F12] key. 2From the Boot Menu that appears, check whether the <Recovery and Utility> option is present. If it is not present, it means that the utility must be used from the disc. Proceed to “Running Recovery and Utility from the disc” if <Recovery and Utility> is unavailable.3You can also use the TrustedCore menu to determine whether the utility is pre-loaded by powering on your system then pressing the [Enter] key when the Fujitsu logo appears on the screen. The TrustedCore Menu will appear and the Recovery and Utility option will appear in the menu.Running Recovery and Utility from hard disk 1Cursor down to <Recovery and Utility> and press the [Enter] key.2While the files are being loaded from the disc, a progress bar will appear at the bottom of the screen.3When the System Recovery Options dialog opens, select a new keyboard layout, if necessary, then click [Next].4When the Operating System dialog appears, click [Next]. 5If necessary, enter your password, then click [OK].6When System Recovery Options window appears, click on Recovery and Utility.7The Recovery and Utility screen appears on the screen with three tabs: Diagnostics, Recovery and Utility. Please note that Diagnostics tab is not supported on certain LifeBook/Stylistic models when running Recovery and Utility from the hard disk. In order to restore the operating system, please insert the “Recovery and Utility” disc in the CD/DVD drive and use the Start Recovery function under the Recovery tab. For more information about the tabs, go to “Recovery and Utility tabs” on page 117.](https://usermanual.wiki/Fujitsu-Client-Computing/WB0055/User-Guide-892412-Page-116.png)
![116 - Restoring Your Pre-installed SoftwareRunning Recovery and Utility from the disc BOOT Priority Change Before restoring an image, you must first verify that the system is set up to boot from the optical drive. To verify/change the boot-up priority (rather than booting-up from the hard drive or an external floppy disk drive), perform the following steps:1Power on your system. When the Fujitsu logo appears on the screen. press the [Enter] key or click on the left mouse or touchpad button; the TrustedCore Menu will appear. 2Select the Boot Menu from the TrustedCore Menu.3Highlight the CD/DVD option, then click [OK].4Insert the Recovery and Utility Disc into the drive tray.After you have changed the boot priority, you can restore a backup image when booting up.Procedure for using Recovery and Utility disc 1Turn on the power to your system.2Ensure that you have a device that can read CDs either installed in your system or attached externally to it, and that it has been set up as the Boot device (in accordance with “BOOT Priority Change” on page 116).3Insert the Recovery and Utility disc into the drive tray. With the boot priority set in the procedure above, the system will boot from the Recovery and Utility disc.4Reboot your system. After the system reboots, the Recovery and Utility screen appears. On the screen are three tabs: Diagnostics, Recovery, and Utility.•THE USE OF THIS DISC REQUIRES THAT YOU HAVE A DEVICE CAPABLE OF READING CDS ATTACHED TO YOUR SYSTEM. YOU WILL NEED TO ATTACH AN EXTERNAL PLAYER. FOR MORE INFORMATION ON AVAILABLE EXTERNAL DEVICES, VISIT OUR WEB SITE AT: US.FUJITSU.COM/COMPUTERS. •THIS DISC CAN ONLY BE USED WITH THE SYSTEM WITH WHICH IT WAS PURCHASED.](https://usermanual.wiki/Fujitsu-Client-Computing/WB0055/User-Guide-892412-Page-117.png)
![117 - Restoring Your Pre-installed SoftwareRecovery and Utility tabs Diagnostics tab: The Diagnostics tool is designed for use by IT professionals. It is not likely you will need to use this tool. When you select devices from the Diagnosis window then click [Execute], several tests are performed on the selected components.Recovery tab: The Recovery tab contains the Start Recovery tool. Note that the recovery process erases all data from the C: drive. If you decide to use the recovery tool, be sure to back up all data that you don’t want to lose. Also note that you must run the system using your AC adapter while running the recovery tool. To use the Recovery tool, select the Start Recovery function, click on the [Execute] button, then follow the instructions on the screen.Utility tab: The Utility tab contains three tools: System Restore, Hard Disk Data Delete and Partition Creation.•System Restore can help fix problems that might be making your computer run slowly or stop responding. System Restore enables you in rolling back the system to an earlier restore point, and does not affect any of your documents, pictures, or other personal data. •The Hard Disk Data Delete utility is used to delete all data on the hard disk and prevent the data from being reused. NOTE: Do not use the Hard Disk Data Delete utility unless you are absolutely certain that you want to erase your entire hard disk, including all partitions.•The Partition Creation utility allows you to create a D: partition or resize existing partitions on your hard disk. NOTE: Creating or resizing partitions with this utility will cause all data on the hard disk to be completely erased.](https://usermanual.wiki/Fujitsu-Client-Computing/WB0055/User-Guide-892412-Page-118.png)
![118 - Restoring Your Pre-installed SoftwareAutomatically Downloading Driver UpdatesYour system has a convenient tool called the Fujitsu Driver Update (FDU) utility. With FDU, you can choose to automatically or manually go to the Fujitsu site to check for new updates for your system.The FDU icon should appear in the system tray at the bottom right of your screen (roll the cursor over the icons to find the correct one). If the icon does not appear in the system tray, go to [Start] > All Programs, and click on Fujitsu Driver Update; this will create the icon automatically.To invoke the FDU menu, you can either right-click on the FDU icon or hold the pen on the icon for a couple of seconds until the menu appears. The menu contains the following items:Check for updates now Allows for manual driver update search. The first time it is used, you are prompted to agree to a user agreement. After clicking on the icon, the FDU automatically connects with the Fujitsu site to check for updates and downloads them. While downloading, the icon has a red bar through it, indicating that it cannot be used while the download is in process. When the update is complete, a message appears informing you of the fact.Enable Automatic Update Notifications Automatically searches for new updates on a regular basis (approximately every 3 days).Show update history Brings up a screen that displays a history of updates that have been made via the FDU.About Fujitsu Driver Update Displays the FDU version number and copyright informationFujitsu Driver Update Readme Displays the FDU readme.](https://usermanual.wiki/Fujitsu-Client-Computing/WB0055/User-Guide-892412-Page-119.png)


![163 Before Using the Optional Wireless LANDeactivation using the Wireless On/Off Switch The WLAN device can be deactivated quickly and efficiently by toggling the Wireless On/Off Switch to the Off position. The Wireless LAN/Bluetooth On/Off switch has no effect on systems without wireless devices.Wireless LAN/Bluetooth SwitchWindows Vista: Deactivation using the icon in the taskbar Right-click the WLAN icon in the system tray at the bottom right of your screen. Choose Disconnect from a network.The Wireless LAN/Bluetooth On/Off Switch will power off both the optional wireless LAN and Bluetooth devices at the same time. To enable or disable either one of the devices individually, perform the following steps:1Slide the Wireless LAN/Bluetooth on/off switch to On position.2In the Control Panel, double-click the Fujitsu Radio Control icon.3In the window that appears, click the button associated with Bluetooth and/or Wireless LAN Status to enable or disable the individual devices.4Click [OK].](https://usermanual.wiki/Fujitsu-Client-Computing/WB0055/User-Guide-892412-Page-164.png)
![164 Before Using the Optional Wireless LANWindows XP: Deactivation using the Intel PROSet Software The WLAN device can also be deactivated in Windows using the Intel PROSet Software. The procedure to accomplish this:1Click [Start] > [All Programs].2Select Intel ProSet Wireless, then click on Intel ProSet Wireless from the menu that appears. The Intel ProSet Wireless utility will be displayed.3At the bottom left corner of the window, select Wireless Off from the dropdown list. Windows XP: Deactivation using Atheros Client Utility software 1Click [Start] > [Program Files] > [Atheros] > Atheros Client Utility.2Choose Action and click Disable Radio.Activating the WLAN DeviceActivation of the WLAN device can be accomplished using the same methods as the deactivation process•Using the Wireless On/Off Switch•In Windows XP, using the Intel PROSet Software or Atheros Software.•In Windows Vista, by right-clicking the WLAN icon then clicking “Connect to a network”](https://usermanual.wiki/Fujitsu-Client-Computing/WB0055/User-Guide-892412-Page-165.png)
![165 Configuring the Wireless LANConfiguring the Wireless LANThe optional WLAN device can be configured to establish wireless network connectivity using the software that is built into Windows Vista. Support for most industry standard security solutions is contained in this software.Pre-defined parameters will be required for this procedure. Please consult with your network administrator for these parameters:Configuring the WLAN Using Windows Vista1Click the Start button, then select Control Panel.2If the Control Panel is not in Classic View, select Classic View from the left panel. Double-click the Network and Sharing Center icon.3Select “Manage wireless networks” from the left panel.4Click on the [Add] button.5Depending upon what type of connection you would like to make, make a selection. For an infrastructure network, select “Manually create a network profile. For ad hoc network, select “Create an ad hoc network”.6Enter the required information. It may be necessary to consult with your network administrator for some of the information.7In the event you require assistance, go to the Network and Sharing Center window (Start > Control Panel > Network and Sharing Center), and type in relevant keywords in the Search box. Connecting to a Network After you have configured your computer, you can connect to an active network by performing the following steps:1Click on the WLAN icon in the system tray.2Select “Connect to a network”.3Select a network from the list that appears, and click the [Connect] button.](https://usermanual.wiki/Fujitsu-Client-Computing/WB0055/User-Guide-892412-Page-166.png)
![166 Configuring the Wireless LANConfiguring the WLAN Using Windows XP Procedure 1Click the Start button, then select Control Panel.2If the Control Panel is not in Classic View, select Classic View from the left panel. 3Double-click on the Wireless Network Connection icon.4Choose a wireless network.5Click [Connect].6Enter the Network Key, if required.7Enter any required information. It may be necessary to consult with your network administrator for some of the information.8In the event you require assistance, go to [Start] > Help and Support > Networking and the Web. Select the main topic in which you are interested, then type in relevant keywords in the Search box. Connection to the networkAfter you have configured your computer, you can connect to an active network by clicking on the Wireless Network icon in the system tray:](https://usermanual.wiki/Fujitsu-Client-Computing/WB0055/User-Guide-892412-Page-167.png)
![167 Troubleshooting the WLANTroubleshooting the WLANTroubleshootingCauses and countermeasures for troubles you may encounter while using your wireless LAN are described in the following table. If you are unfamiliar with the steps required, consult your System Administrator or go to [Start] > Help and Support > Networking and the WebProblem Possible Cause Possible SolutionUnavailable network connectionIncorrect network name (SSID) or network keyAd hoc connection: verify that the network names (SSID’s) and network keys (WEP) of all computers to be connected have been configured correctly. SSID’s and WEP key values must be identical on each machine.Access Point (Infrastructure) connection: set network name (SSID) and network key to the same values as those of the access point. Set the Network Authentication value identically to that of the Access Point. Consult your network administrator for this value, if necessary. Weak received signal strength and/or link qualityAd hoc connection: Retry connection after shortening the distance to the destination computer or removing any obstacles for better sight.Access Point (Infrastructure) connection: Retry connection after shortening the distance to the access point or removing any obstacles for better sight.The WLAN device has been deactivated or disabledCheck if the wireless switch is turned On. In Windows XP, go to Start > Control Panel> Network Connections and right-click on Wireless Network Connection. If Enable appears at the top of the menu, click it to enable the device. In Windows Vista, go to Start > Control Panel, and double-click on Windows Mobility Center. If the wireless network is off, click the [Turn wireless on] button..](https://usermanual.wiki/Fujitsu-Client-Computing/WB0055/User-Guide-892412-Page-168.png)

![171 Using the Bluetooth DeviceUsing the Bluetooth DeviceThe Integrated Bluetooth module (EYTF3CSFT) is an optional device available for Fujitsu mobile computers. What is BluetoothBluetooth technology is designed as a short-range wireless link between mobile devices, such as laptop computers, phones, printers, and cameras. Bluetooth technology is used to create Personal Area Networks (PANs) between devices in short-range of each other. Where to Find Information About BluetoothThe Bluetooth module contains a robust Help user’s guide to assist you in learning about operation of the Bluetooth device.Windows XP: To access the Help file, click [Start] > All Programs, and click on Toshiba. Select Bluetooth, then select User’s Guide.Windows Vista: To access the Help file, click [Start] > All Programs, and click on Bluetooth, then select User’s Guide.For additional information about Bluetooth Technology, visit the Bluetooth Web site at: www.bluetooth.com.THE WIRELESS LAN/BLUETOOTH ON/OFF SWITCH WILL POWER OFF BOTH THE OPTIONAL WIRELESS LAN AND BLUETOOTH DEVICES AT THE SAME TIME. TO ENABLE OR DISABLE EITHER ONE OF THE DEVICES INDIVIDUALLY, PERFORM THE FOLLOWING STEPS:1Slide the Wireless LAN/Bluetooth on/off switch to On position.2In the Control Panel, click the button associated with Bluetooth and/or Wireless LAN Status to enable or disable the individual devices.3Click [OK].](https://usermanual.wiki/Fujitsu-Client-Computing/WB0055/User-Guide-892412-Page-172.png)
![177 - Introducing the Fingerprint Sensor DeviceUser EnrollmentBefore you can use any OmniPass features you must first enroll a user into OmniPass.Master Password Concept Computer resources are often protected with passwords. Whether you are logging into your computer, accessing your email, e-banking, paying bills online, or accessing network resources, you often have to supply credentials to gain access. This can result in dozens of sets of credentials that you have to remember.During user enrollment a "master password” is created for the enrolled user. This master password “replaces” all other passwords for sites you register with OmniPass. Example: A user, John, installs OmniPass on his system (his home computer) and enrolls an OmniPass user with username “John_01” and password “freq14”. He then goes to his webmail site to log onto his account. He inputs his webmail credentials as usual (username “John_02” and password “lifebook”), but instead of clicking [Submit], he directs OmniPass to Remember Password. Now whenever he returns to that site, OmniPass will prompt him to supply access credentials. John enters his OmniPass user credentials (“John_01” and “freq14”) in the OmniPass authentication prompt, and he is allowed into his webmail account. He can do this with as many web sites or password protected resources he likes, and he will gain access to all those sites with his OmniPass user credentials (“John_01” and “freq14”). This is assuming he is accessing those sites with the system onto which he enrolled his OmniPass user. OmniPass does not actually change the credentials of the password protected resource. If John were to go to another computer without he OmniPass account to access his webmail, he would need to enter his original webmail credentials (“John_02” and “lifebook”) to gain access. If he attempts his OmniPass user credentials on a system other than a system he’s enrolled on, he will not gain access.](https://usermanual.wiki/Fujitsu-Client-Computing/WB0055/User-Guide-892412-Page-178.png)
![178 - Introducing the Fingerprint Sensor DeviceBasic Enrollment The Enrollment Wizard will guide you through the process of enrolling a user. Unless you specified otherwise, after OmniPass installation the Enrollment Wizard will launch on Windows login. If you do not see the Enrollment Wizard, you can bring it up by clicking Start on the Windows taskbar; select Programs; select Softex; click OmniPass Enrollment Wizard.1Click Enroll to proceed to username and password verification. By default, the OmniPass Enrollment Wizard enters the credentials of the currently logged in Windows user.2Enter the password you use to log in to Windows. This will become the “master password” for this OmniPass user. In most cases, the Domain: value will be your Windows computer name. In a corporate environment, or when accessing corporate resources, the Domain: may not be your Windows computer name. Click [Next] to continue.3In this step OmniPass captures your fingerprint. Refer to “Enrolling a Fingerprint” on page 179 for additional information.4Next, choose how OmniPass notifies you of various events. We recommend you keep Taskbar Tips on Beginner mode taskbar tips and Audio Tips on at least Prompt with system beeps only until you get accustomed to how OmniPass operates. Click [Next] to proceed with user enrollment. You will then see a Congratulations screen indicating your completion of user enrollment.5Click [Done] to exit the OmniPass Enrollment Wizard. You will be asked if you’d like to log in to OmniPass with your newly enrolled user; click [Yes].THE ENROLLMENT PROCEDURE ASSUMES YOU HAVE NO HARDWARE AUTHENTICATION DEVICES OR ALTERNATE STORAGE LOCATIONS THAT YOU WISH TO INTEGRATE WITH OMNIPASS. IF YOU DESIRE SUCH FUNCTIONALITY, CONSULT THE APPROPRIATE SECTIONS OF THIS DOCUMENT.](https://usermanual.wiki/Fujitsu-Client-Computing/WB0055/User-Guide-892412-Page-179.png)
![179 - Introducing the Fingerprint Sensor DeviceEnrolling a Fingerprint Enrolling a fingerprint will increase the security of your system and streamline the authentication procedure. You enroll fingerprints in the OmniPass Control Center. With an OmniPass user logged in, double-click the system tray OmniPass icon. Select the User Settings tab and click Enrollment under the User Settings area. Click Enroll Authentication Device and authenticate at the authentication prompt to start device enrollment.1During initial user enrollment, you will be prompted to select the finger you wish to enroll. Fingers that have already been enrolled will be marked by a green check. The finger you select to enroll at this time will be marked by a red arrow. OmniPass will allow you re-enroll a finger. If you choose a finger that has already been enrolled and continue enrollment, OmniPass will enroll the fingerprint, overwriting the old fingerprint. Select a finger to enroll and click [Next].2It is now time for OmniPass to capture your selected fingerprint. It may take a several capture attempts before OmniPass acquires your fingerprint. Should OmniPass fail to acquire your fingerprint, or if the capture screen times out, click [Back] to restart the fingerprint enrollment process. Your system has a “swipe” fingerprint sensor. A swipe sensor is small and resembles a skinny elongated rectangle. To capture a fingerprint, gently swipe or pull your fingertip over the sensor (starting at the second knuckle) towards yourself. Swiping too fast or too slow will result in a failed capture. The Choose Finger screen has a [Practice] button; click it to practice capturing your fingerprint. When you are comfortable with how your fingerprint is captured, proceed to enroll a finger.3Once OmniPass has successfully acquired the fingerprint, the Verify Fingerprint screen will automatically appear. To verify your enrolled fingerprint, place your fingertip on the sensor and hold it there as if you were having a fingerprint captured. Successful fingerprint verification will show a green fingerprint in the capture window and the text Verification Successful under the capture window.](https://usermanual.wiki/Fujitsu-Client-Computing/WB0055/User-Guide-892412-Page-180.png)
![181 - Introducing the Fingerprint Sensor DeviceUsing the following procedure, you can store a set of credentials into OmniPass. These credentials will then be linked to your “master password” or fingerprint.Go to a site that requires a login (username and password), but do not log in yet. At the site login prompt, enter your username and password in the prompted fields, but do not enter the site (do not hit [Enter], [Submit], [OK], or Login). Right-click the OmniPass system tray icon and select Remember Password from the submenu. The Windows arrow cursor will change to a golden key OmniPass cursor. Click the OmniPass cursor in the login prompt area, but don’t click [Login] or [Submit].Associating a Friendly Name After clicking the OmniPass key cursor near the login prompt, OmniPass will prompt you to enter a “friendly name” for this site. You should enter something that reminds you of the website, the company, or the service you are logging into. In its secure database, OmniPass associates this friendly name with this website.Additional Settings for Remembering a Site When OmniPass prompts you to enter a “friendly name” you also have the opportunity to set how OmniPass authenticates you to this site. There are three effective settings for how OmniPass handles a remembered site.The default setting is Automatically click the “OK” or “Submit” button for this password protected site once the user is authenticated. With this setting, each time you navigate to this site OmniPass will prompt you for your master password or fingerprint authentication device. Once you have authenticated with OmniPass, you will automatically be logged into the site. Less secure is the option to Automatically enter this password protected site when it is activated. Do not prompt for authentication. Check the upper box to get this setting, and each time you navigate to this site OmniPass will log you into the site without prompting you to authenticate.](https://usermanual.wiki/Fujitsu-Client-Computing/WB0055/User-Guide-892412-Page-182.png)
![182 - Introducing the Fingerprint Sensor DeviceIf you uncheck both boxes in Settings for this Password Site, OmniPass will prompt you for your master password or fingerprint authentication device. Once you have authenticated with OmniPass your credentials will be filled in to the site login prompt, but you will have to click the website [OK], [Submit], or [Login] button to gain access to the site. Click Finish to complete the remember password procedure. The site location, the credentials to access the site, and the OmniPass authentication settings for the site are now stored in the OmniPass secure database. The OmniPass authentication settings (Settings for this Password Site) can always be changed in Vault Management.Logging in to a Remembered Site Whether or not OmniPass prompts you to authenticate when you return to a remembered site is determined by Settings for this Password Site and can be changed in Vault Management. The following cases are applicable to using OmniPass to login to: Windows, remembered web sites, and all other password protected resources.With Master Password Once you return to a site you have remembered with OmniPass, you may be presented with a master password prompt. Enter your master password and you will be allowed into the site.THIS SETTING IS MORE CONVENIENT IN THAT WHENEVER YOU GO TO A SITE REMEMBERED WITH THIS SETTING, YOU WILL BYPASS ANY AUTHENTICATION PROCEDURE AND GAIN INSTANT ACCESS TO THE SITE. BUT SHOULD YOU LEAVE YOUR SYSTEM UNATTENDED WITH YOUR OMNIPASS USER LOGGED IN, ANYONE USING YOUR SYSTEM CAN BROWSE TO YOUR PASSWORD PROTECTED SITES AND GAIN AUTOMATIC ACCESS.](https://usermanual.wiki/Fujitsu-Client-Computing/WB0055/User-Guide-892412-Page-183.png)
![184 - Introducing the Fingerprint Sensor DeviceThe two check boxes in Manage Passwords govern whether OmniPass prompts you to authenticate or directly logs you into the remembered site.OmniPass will overwrite an old set of credentials for a website if you attempt to use Remember Password on an already remembered site. The exception to the above rule is when resetting the Windows password. If your password is reset in Windows, the next time you login to Windows, OmniPass will detect the password change and prompt you to “Update” or “Reconfirm” the password with OmniPass. Enter your new Windows password in the prompt and click OK. Your OmniPass "master password" will still be your Windows password.OmniPass User Identities Identities allow OmniPass users to have multiple accounts to the same site (e.g., bob@biblomail.com and boballen@biblomail.com). If OmniPass did not provide you identities, you would be limited to remembering one account per site.To create and manage identities, double-click the OmniPass key in the system tray. Click Vault Management; OmniPass will prompt you to authenticate. Once you gain access to Vault Management, click Manage Identities under Vault Settings. You can only manage the identities of the currently logged in OmniPass userTo add a new identity, click New Identity or double-click Click here to add a new identity. Name the new identity and click [OK], then click [Apply]. You can now switch to the new identity and start remembering passwords.To delete an identity, highlight the identity you want to delete and click [Delete Identity], then click [Apply].WHEN YOU DELETE AN IDENTITY, ALL OF ITS ASSOCIATED REMEMBERED SITES AND PASSWORD PROTECTED DIALOGS ARE LOST.](https://usermanual.wiki/Fujitsu-Client-Computing/WB0055/User-Guide-892412-Page-185.png)
![185 - Introducing the Fingerprint Sensor DeviceTo set the default identity, highlight the identity you want as default and click [Set as Default]; click [Apply] to ensure the settings are saved. If you log in to OmniPass with a fingerprint device, you will automatically be logged in to the default identity for that OmniPass user. You can choose the identity with which you are logging in if you login using "master password".Choosing User Identity during Login To choose your identity during login, type your username in the User Name: field. Press [Tab] and see that the Domain: field self-populates. Click the Password: field to bring the cursor to it, and you will see the pull-down menu in the Identity: field. Select the identity to login as, then click OK.Switch User Identity To switch identities at any time, right-click the OmniPass system tray icon and click Switch User Identity from the submenu. The Switch Identity dialog will appear. Select the desired identity and then click OK.Identities and Password Management On the Manage Passwords interface of the Vault Management tab of the OmniPass Control Center, there is a pull-down selection box labeled, Identity. This field lets you choose which identity you are managing passwords for. When you select an identity here, only those password protected dialogs that are associated with that identity are shown. You can perform all the functions explained in “Password Management” on page 183.](https://usermanual.wiki/Fujitsu-Client-Computing/WB0055/User-Guide-892412-Page-186.png)