Fujitsu Client Computing WB0072 AR5BHB92 WLAN & EYSMJCS BT IN LIFEBOOK ST SERIES User Manual Appendix H
Fujitsu Limited AR5BHB92 WLAN & EYSMJCS BT IN LIFEBOOK ST SERIES Appendix H
Users Manual

FCC ID: EJE-WB0072 (IC: 337J-WB0072)
EMC Technologies Pty Ltd – 176 Harrick Road, Keilor Park, VIC 3042 Australia
www.emctech.com.au
APPENDIX H
USER MANUAL
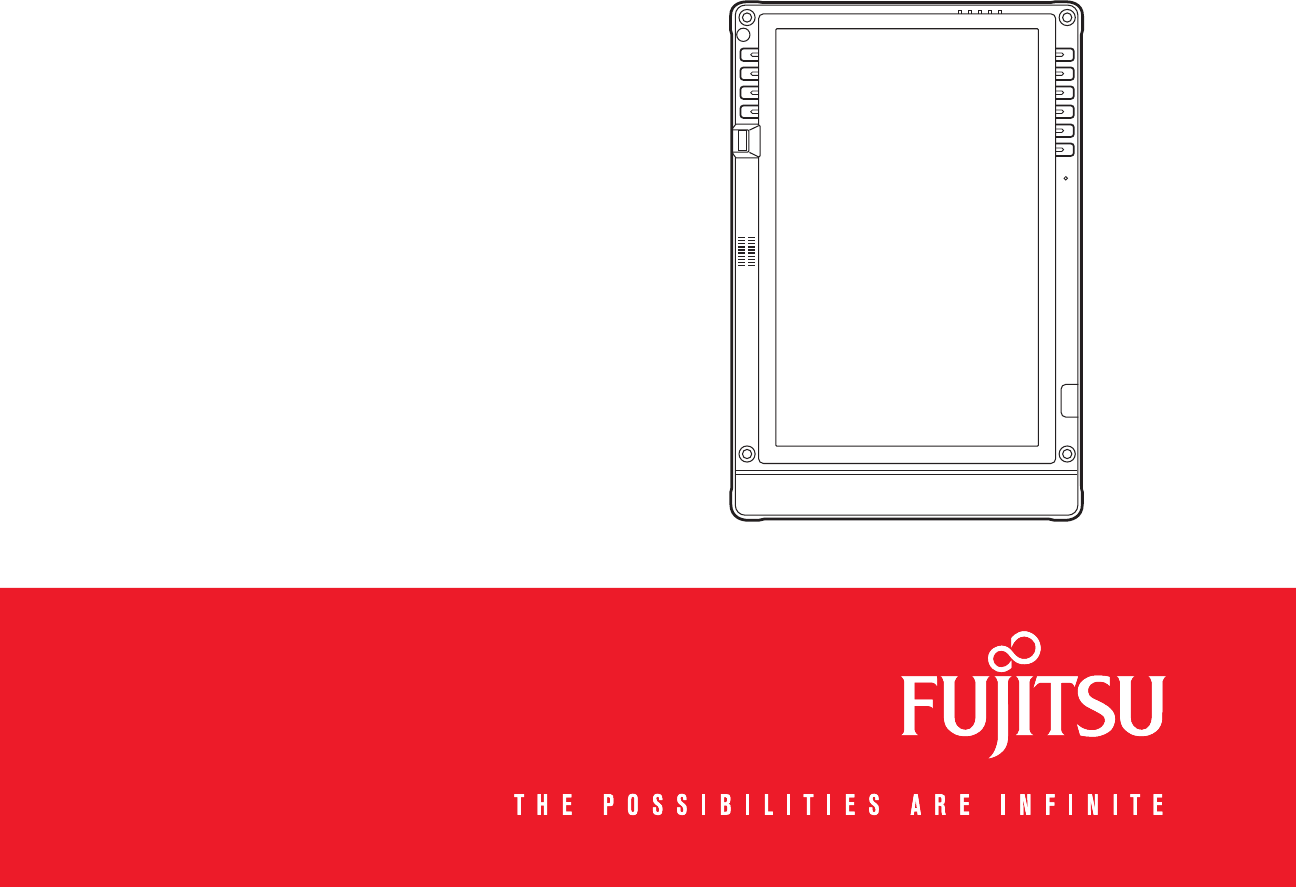
User’s Guide
Learn how to use your
Fujitsu Stylistic
ST6010 Tablet PC

Copyright and Trademark Information
Fujitsu Computer Systems Corporation has made every effort to ensure the accuracy and completeness of this document. Because ongoing
development efforts are made to continually improve the capabilities of our products, however, the data contained herein represents Fujitsu
design objectives and is provided for comparative purposes; actual results may vary based on a variety of factors. This product data does not
constitute a warranty. Specifications are subject to change without knowledge.
Fujitsu and the Fujitsu logo are registered trademarks of Fujitsu Limited; Stylistic is a registered trademark of Fujitsu Computer Systems
Corporation.
Microsoft, Windows, and Windows Vista are registered trademarks or trademarks of Microsoft Corporation in the United States and/or other
countries.
PCMCIA and CardBus are registered trademarks of the Personal Computer Memory Card International Association.
Centrino, Intel, and Intel Core are trademarks or registered trademarks of Intel Corporation or its subsidiaries in the United States and other
countries.
OmniPass is a trademark of Softex, Inc.
Adobe, Acrobat, and Acrobat Reader are either registered trademarks or trademarks of Adobe Systems Incorporated in the United States
and/or other countries.
Atheros and Super AG are registered trademarks of Atheros Communications, Inc.
SigmaTel is a registered trademark of SigmaTel, Inc.
Bluetooth and the Bluetooth logo are registered trademarks of Bluetooth SIG, Inc.
Memory Stick is a registered trademark of Sony Corporation and/or its affiliates
Wi-Fi is a trademark of the Wireless Ethernet Compatibility Alliance (WECA).
All other products are trademarks or registered trademarks of their respective companies. All other trademarks mentioned herein are the
property of their respective owners.

Copyright 2008 Fujitsu Computer Systems Corporation. All rights reserved. No part of this publication may be copied, reproduced, or
translated, without the prior written consent of Fujitsu Computer Systems Corporation. No part of this publication may be stored or
transmitted in any electronic form without the prior consent of Fujitsu Computer Systems Corporation.
B5FJ-DRAFT-01EN-00
WARNING
HANDLING THE CORD ON THIS PRODUCT WILL EXPOSE YOU TO LEAD, A CHEMICAL KNOWN TO THE STATE
OF CALIFORNIA TO CAUSE BIRTH DEFECTS OR OTHER REPRODUCTIVE HARM.
WASH HANDS AFTER HANDLING.
DECLARATION OF CONFORMITY
according to FCC Part 15
Responsible Party Name: Fujitsu Computer Systems Corporation
Address: 1250 E. Arques Avenue, MS 122
Sunnyvale, CA 94085
Telephone: 408-746-6000
Declares that product: Model Series: Stylistic® ST6010 Tablet PC
Complies with Part 15 of the FCC Rules
This device complies with Part 15 of the FCC rules. Operation is subject to the following two conditions: (1) This device
may not cause harmful interference, and, (2) This device must accept any interference received, including interference
that may cause undesired operation.
IMPORTANT SAFETY INSTRUCTIONS
This unit requires an AC adapter to operate. Use only UL Listed I.T.E. Class II Adapters with an output rating of 16 VDC, with a current of
3.75 A (60 W).
When using your notebook equipment, basic safety precautions should always be followed to reduce the risk of fire, electric shock and injury
to persons, including the following:
•Do not use this product near water for example, near a bathtub, washbowl, kitchen sink or laundry tub, in a wet basement
or near a swimming pool.
•Avoid using a modem during an electrical storm. There may be a remote risk of electric shock from lightning.
•Do not use a modem to report a gas leak in the vicinity of the leak.
•Use only the power cord and batteries indicated in this manual. Do not dispose of batteries in a fire. They may explode.
Check with local codes for possible special disposal instructions.
•To reduce the risk of fire, use only No. 26 AWG or larger UL Listed or CSA Certified Telecommunication Line Cord.
•For TV tuner use: To protect from overvoltages and transients on the Cable Distribution System, make sure that the outer
shield of the coaxial cable is connected to earth (grounded) at the building premise as close to the point of cable entrance
as practicable, as required per NEC Article 820.93, ANSI/NFPA 70: 2005. If you have questions about your CATV
installation, contact your service provider.
SAVE THESE INSTRUCTIONS
For Authorized Repair Technicians Only
DANGER OF EXPLOSION IF LITHIUM (CLOCK) BATTERY IS INCORRECTLY REPLACED. REPLACE ONLY
WITH THE SAME OR EQUIVALENT TYPE RECOMMENDED BY THE MANUFACTURER. DISPOSE OF USED
BATTERIES ACCORDING TO THE MANUFACTURER’S INSTRUCTION.
FOR CONTINUED PROTECTION AGAINST RISK OF FIRE, REPLACE ONLY WITH THE SAME TYPE AND
RATING FUSE.
+
AC adapter output polarity:

Recycling your battery
Over time, the batteries that run your mobile computer will begin to hold a charge for a shorter amount of time; this is a natural occurrence
for all batteries. When this occurs, you may want to replace the battery with a fresh one*. If you replace it, it is important that you dispose of
the old battery properly because batteries contain materials that could cause environmental damage if disposed of improperly.
Fujitsu is very concerned with environmental protection, and has enlisted the services of the Rechargeable Battery
Recycling Corporation (RBRC)**, a non-profit public service organization dedicated to protecting our environment by
recycling old batteries at no cost to you.
RBRC has drop-off points at tens of thousands of locations throughout the United States and Canada. To find the location
nearest you, go to www.RBRC.org or call 1-800-822-8837.
If there are no convenient RBRC locations near you, you can also go to the EIA Consumer Education Initiative website (http://EIAE.org/) and
search for a convenient disposal location.
Remember – protecting the environment is a cooperative effort, and you should make every effort to protect it for current and future
generations.
* To order a new battery for your Fujitsu mobile computer, go to the Fujitsu shopping site at www.shopfujitsu.com in the US or
www.fujitsu.ca/products/notebooks in Canada.
** RBRC is an independent third party to which Fujitsu provides funding for battery recycling; RBRC is in no way affiliated with Fujitsu.

6
-
ENERGY STAR® Compliance
Your Fujitsu system is an ENERGY STAR® qualified mobile PC. By choosing a computer
with the latest energy-saving technology, you’re helping to preserve our environment for
future generations.
ENERGY STAR is a joint program of the U.S. Environmental Protection Agency, U.S.
Department of Energy, Natural Resources Canada, and other governments around the world
helping us save money while protecting the environment through energy efficient products
and practices. With energy costs and global warming top-of-mind for consumers, Fujitsu is committed to
offering solutions that help consumers conserve energy and improve the quality of our environment.
Sleep Mode:
You will notice that your computer is initially set so that the display turns off after 15 minutes of user
inactivity, and the computer goes into Sleep mode after 20 minutes of user inactivity. When going into
Sleep mode, the computer also reduces the speed of any active Ethernet network links. To “wake” the
computer from Sleep mode, press the Suspend/Resume Button.
Energy saving benefits:
Fujitsu ENERGY STAR qualified mobile PCs use about half as much electricity as standard equipment –
saving half in utility costs. But more than that, ENERGY STAR also makes a difference for the
environment. Did you know that the average house can be responsible for twice the greenhouse gas
emissions as the average car? That’s because every time you flip on a light switch, run your dishwasher,
or turn on your PC, you use energy, which means more greenhouse gas emissions from power plants. So
the more energy we can save through energy efficiency, the more we help to reduce greenhouse gases and
the risks of global warming.
To learn more about the important ENERGY STAR program, visit: www.energystar.gov.
To read about how Fujitsu is supporting Sustainable Management along with several other environmental
activities, visit the Fujitsu Corporate Citizenship page at:
http://www.computers.us.fujitsu.com/www/content/aboutus/environmental/environment.php

Contents
Preface
About This Guide . . . . . . . . . . . . . . . . . . . . . . . . . . . . . . . . . . . . . . . . . . . . . 14
Conventions Used in the Guide . . . . . . . . . . . . . . . . . . . . . . . . . . . . . . . . . 14
Fujitsu Contact Information . . . . . . . . . . . . . . . . . . . . . . . . . . . . . . . . . . . . 15
Chapter 1 Getting to Know Your Tablet PC
Overview . . . . . . . . . . . . . . . . . . . . . . . . . . . . . . . . . . . . . . . . . . . . . . . . . . . . 17
Locating the Connectors and Controls . . . . . . . . . . . . . . . . . . . . . . . . . . . . 18
Front Features: . . . . . . . . . . . . . . . . . . . . . . . . . . . . . . . . . . . . . . . . . . . . . . 19
Back Features: . . . . . . . . . . . . . . . . . . . . . . . . . . . . . . . . . . . . . . . . . . . . . . 20
Top Features: . . . . . . . . . . . . . . . . . . . . . . . . . . . . . . . . . . . . . . . . . . . . . . . 22
Left-Side Features: . . . . . . . . . . . . . . . . . . . . . . . . . . . . . . . . . . . . . . . . . . . 24
Right-Side Features:. . . . . . . . . . . . . . . . . . . . . . . . . . . . . . . . . . . . . . . . . . 26
Status Display . . . . . . . . . . . . . . . . . . . . . . . . . . . . . . . . . . . . . . . . . . . . . . . . 27
Application, Navigation, and Security Buttons . . . . . . . . . . . . . . . . . . . . . 30
Application Buttons . . . . . . . . . . . . . . . . . . . . . . . . . . . . . . . . . . . . . . . . . . 30
Navigation Buttons. . . . . . . . . . . . . . . . . . . . . . . . . . . . . . . . . . . . . . . . . . . 33
Tertiary Functions of Application and Navigation Buttons . . . . . . . . . . . . 34
Security Functions of Application Buttons . . . . . . . . . . . . . . . . . . . . . . . . 36
Setting up the Security Panel . . . . . . . . . . . . . . . . . . . . . . . . . . . . . . . . . . . 36

8
Using Your Security Panel . . . . . . . . . . . . . . . . . . . . . . . . . . . . . . . . . . . . . 39
Precautions . . . . . . . . . . . . . . . . . . . . . . . . . . . . . . . . . . . . . . . . . . . . . . . . . 40
Uninstalling the Security Panel Application. . . . . . . . . . . . . . . . . . . . . . . . 40
Reinstalling the Security Panel Application. . . . . . . . . . . . . . . . . . . . . . . . 41
Installing Click Me! . . . . . . . . . . . . . . . . . . . . . . . . . . . . . . . . . . . . . . . . . . 42
Fujitsu Driver Update Utility . . . . . . . . . . . . . . . . . . . . . . . . . . . . . . . . . . . 43
Connectors and Peripheral Interfaces. . . . . . . . . . . . . . . . . . . . . . . . . . . . . 43
Chapter 7 Using the Stylistic ST6000 Series Tablet PC
System States . . . . . . . . . . . . . . . . . . . . . . . . . . . . . . . . . . . . . . . . . . . . . . . . . 46
Proper Tablet PC Orientations . . . . . . . . . . . . . . . . . . . . . . . . . . . . . . . . . . 49
Starting the Tablet PC . . . . . . . . . . . . . . . . . . . . . . . . . . . . . . . . . . . . . . . . . 49
Powering Up . . . . . . . . . . . . . . . . . . . . . . . . . . . . . . . . . . . . . . . . . . . . . . . . 49
Booting the First Time . . . . . . . . . . . . . . . . . . . . . . . . . . . . . . . . . . . . . . . . 50
Shutting Down . . . . . . . . . . . . . . . . . . . . . . . . . . . . . . . . . . . . . . . . . . . . . . 53
Suspending System Operation . . . . . . . . . . . . . . . . . . . . . . . . . . . . . . . . . . 53
Resuming Operation . . . . . . . . . . . . . . . . . . . . . . . . . . . . . . . . . . . . . . . . . . 56
Productivity Applications and Utilities . . . . . . . . . . . . . . . . . . . . . . . . . . . . 57
Using the Shock Sensor Utility. . . . . . . . . . . . . . . . . . . . . . . . . . . . . . . . . . 58
Display Profiles . . . . . . . . . . . . . . . . . . . . . . . . . . . . . . . . . . . . . . . . . . . . . 60
Adjusting the Display Brightness . . . . . . . . . . . . . . . . . . . . . . . . . . . . . . . . 60
Using the Pen . . . . . . . . . . . . . . . . . . . . . . . . . . . . . . . . . . . . . . . . . . . . . . . . . 62
Calibrating the Pen . . . . . . . . . . . . . . . . . . . . . . . . . . . . . . . . . . . . . . . . . . . 64
Installing a Pen Tether . . . . . . . . . . . . . . . . . . . . . . . . . . . . . . . . . . . . . . . . 64
. . . . . . . . . . . . . . . . . . . . . . . . . . . . . . . . . . . . . . . . . . . . . . . . . . . . . . . . . . 65
Replacing the Pen Tip. . . . . . . . . . . . . . . . . . . . . . . . . . . . . . . . . . . . . . . . . 65
User-Installable Features . . . . . . . . . . . . . . . . . . . . . . . . . . . . . . . . . . . . . . . 66
Lithium ion Battery. . . . . . . . . . . . . . . . . . . . . . . . . . . . . . . . . . . . . . . . . . . 66

9
Operation of the Bridge Battery . . . . . . . . . . . . . . . . . . . . . . . . . . . . . . . . . 68
Memory Stick/SD Card Slot. . . . . . . . . . . . . . . . . . . . . . . . . . . . . . . . . . . . 69
PC Card Slot . . . . . . . . . . . . . . . . . . . . . . . . . . . . . . . . . . . . . . . . . . . . . . . . 71
Removing and Installing Memory . . . . . . . . . . . . . . . . . . . . . . . . . . . . . . . 72
Chapter 2 Care and Maintenance
Caring for your Tablet PC . . . . . . . . . . . . . . . . . . . . . . . . . . . . . . . . . . . . . . 74
Precautions . . . . . . . . . . . . . . . . . . . . . . . . . . . . . . . . . . . . . . . . . . . . . . . . . 75
Protecting the Display Screen. . . . . . . . . . . . . . . . . . . . . . . . . . . . . . . . . . . 75
Storing the Tablet PC . . . . . . . . . . . . . . . . . . . . . . . . . . . . . . . . . . . . . . . . . 77
Avoiding Overheating . . . . . . . . . . . . . . . . . . . . . . . . . . . . . . . . . . . . . . . . 78
Cleaning the Display Screen. . . . . . . . . . . . . . . . . . . . . . . . . . . . . . . . . . . . 78
Troubleshooting. . . . . . . . . . . . . . . . . . . . . . . . . . . . . . . . . . . . . . . . . . . . . . . 79
Restoring the Included Software TBD - NEW PROCEDURE?. . . . . . . . 81
BOOT Priority Change . . . . . . . . . . . . . . . . . . . . . . . . . . . . . . . . . . . . . . . . 83
Automatically Downloading Driver Updates . . . . . . . . . . . . . . . . . . . . . . . 84
Chapter 3 System Specifications
Specifications . . . . . . . . . . . . . . . . . . . . . . . . . . . . . . . . . . . . . . . . . . . . . . . . . 86
Configuration Label . . . . . . . . . . . . . . . . . . . . . . . . . . . . . . . . . . . . . . . . . . 86
Microprocessor . . . . . . . . . . . . . . . . . . . . . . . . . . . . . . . . . . . . . . . . . . . . . . 87
Chipset . . . . . . . . . . . . . . . . . . . . . . . . . . . . . . . . . . . . . . . . . . . . . . . . . . . . 87
Memory. . . . . . . . . . . . . . . . . . . . . . . . . . . . . . . . . . . . . . . . . . . . . . . . . . . . 87
Video. . . . . . . . . . . . . . . . . . . . . . . . . . . . . . . . . . . . . . . . . . . . . . . . . . . . . . 87
Audio . . . . . . . . . . . . . . . . . . . . . . . . . . . . . . . . . . . . . . . . . . . . . . . . . . . . . 88
Mass Storage Device Options. . . . . . . . . . . . . . . . . . . . . . . . . . . . . . . . . . . 89
Communications. . . . . . . . . . . . . . . . . . . . . . . . . . . . . . . . . . . . . . . . . . . . . 89
Security Features . . . . . . . . . . . . . . . . . . . . . . . . . . . . . . . . . . . . . . . . . . . . 89
Device Ports . . . . . . . . . . . . . . . . . . . . . . . . . . . . . . . . . . . . . . . . . . . . . . . . 90
Power . . . . . . . . . . . . . . . . . . . . . . . . . . . . . . . . . . . . . . . . . . . . . . . . . . . . . 91

10
Dimensions and Weight . . . . . . . . . . . . . . . . . . . . . . . . . . . . . . . . . . . . . . . 91
Environmental Requirements . . . . . . . . . . . . . . . . . . . . . . . . . . . . . . . . . . . 91
Popular Accessories . . . . . . . . . . . . . . . . . . . . . . . . . . . . . . . . . . . . . . . . . . 91
Included Software. . . . . . . . . . . . . . . . . . . . . . . . . . . . . . . . . . . . . . . . . . . . 92
Learning About Your Software . . . . . . . . . . . . . . . . . . . . . . . . . . . . . . . . . 92
Regulatory Information . . . . . . . . . . . . . . . . . . . . . . . . . . . . . . . . . . . . . . . . 95
Notice . . . . . . . . . . . . . . . . . . . . . . . . . . . . . . . . . . . . . . . . . . . . . . . . . . . . . 95
FCC NOTICES. . . . . . . . . . . . . . . . . . . . . . . . . . . . . . . . . . . . . . . . . . . . . . 95
DOC (INDUSTRY CANADA) NOTICES . . . . . . . . . . . . . . . . . . . . . . . . 97
Appendix A: WLAN User’s Guide
FCC Regulatory Information. . . . . . . . . . . . . . . . . . . . . . . . . . . . . . . . . . . 100
Regulatory Notes and Statements. . . . . . . . . . . . . . . . . . . . . . . . . . . . . . . . 100
Before Using the Optional Wireless LAN . . . . . . . . . . . . . . . . . . . . . . . . . . 103
Wireless LAN Device Covered by this Document. . . . . . . . . . . . . . . . . . . 103
Characteristics of the WLAN Device. . . . . . . . . . . . . . . . . . . . . . . . . . . . . 103
Wireless LAN Modes Using this Device . . . . . . . . . . . . . . . . . . . . . . . . . . 104
Deactivating/Disconnecting the WLAN Device . . . . . . . . . . . . . . . . . . . . 106
Deactivation Using the Wireless On/Off Switch . . . . . . . . . . . . . . . . . . . . 107
Disconnection Using the Icon in the Taskbar. . . . . . . . . . . . . . . . . . . . . . . 107
Activating the WLAN Device . . . . . . . . . . . . . . . . . . . . . . . . . . . . . . . . . . 107
Configuring the Wireless LAN. . . . . . . . . . . . . . . . . . . . . . . . . . . . . . . . . . . 108
Configuring the WLAN Using Windows Vista . . . . . . . . . . . . . . . . . . . . . 108
Configuring the WLAN Using Windows XP . . . . . . . . . . . . . . . . . . . . . . 109
Connection to the network . . . . . . . . . . . . . . . . . . . . . . . . . . . . . . . . . . . . . 109
Troubleshooting the WLAN. . . . . . . . . . . . . . . . . . . . . . . . . . . . . . . . . . . . . 110
Troubleshooting . . . . . . . . . . . . . . . . . . . . . . . . . . . . . . . . . . . . . . . . . . . . . 110
WLAN Specifications . . . . . . . . . . . . . . . . . . . . . . . . . . . . . . . . . . . . . . . . . . 112
Specifications . . . . . . . . . . . . . . . . . . . . . . . . . . . . . . . . . . . . . . . . . . . . . . . 112

11
Using the Bluetooth Device. . . . . . . . . . . . . . . . . . . . . . . . . . . . . . . . . . . . . . 114
What is Bluetooth? . . . . . . . . . . . . . . . . . . . . . . . . . . . . . . . . . . . . . . . . . . . 114
Where to Find Information About Bluetooth . . . . . . . . . . . . . . . . . . . . . . . 114
Appendix B: Fingerprint Sensor Device
Introducing the Fingerprint Sensor Device . . . . . . . . . . . . . . . . . . . . . . . . 116
Getting Started . . . . . . . . . . . . . . . . . . . . . . . . . . . . . . . . . . . . . . . . . . . . . . 117
Installing OmniPass . . . . . . . . . . . . . . . . . . . . . . . . . . . . . . . . . . . . . . . . . . 117
User Enrollment . . . . . . . . . . . . . . . . . . . . . . . . . . . . . . . . . . . . . . . . . . . . . 120
Using OmniPass . . . . . . . . . . . . . . . . . . . . . . . . . . . . . . . . . . . . . . . . . . . . . 123
Configuring OmniPass . . . . . . . . . . . . . . . . . . . . . . . . . . . . . . . . . . . . . . . . 128
OmniPass Control Center . . . . . . . . . . . . . . . . . . . . . . . . . . . . . . . . . . . . . . 130
Troubleshooting . . . . . . . . . . . . . . . . . . . . . . . . . . . . . . . . . . . . . . . . . . . . . 133
Index

12

13

14
Preface
About This Guide
The Stylistic® ST6000 Series Tablet PC is a high- performance, pen-based computer that has been
designed to support Microsoft®Windows® Vista Business or Windows XP Tablet PC Edition.
This manual explains how to operate your Stylistic ST6000 Series Tablet PC hardware and built-in system
software.
The Stylistic ST6000 Series Tablet PC is a completely self-contained unit with an active-matrix (TFT)
color indoor-outdoor LCD display and an active digitizer. It has a powerful interface that enables it to
support a variety of optional features.
Conventions Used in the Guide
Keyboard keys appear in brackets. Example: [Fn], [F1], [ESC], [ENTER] and [CTRL].
Pages with additional information about a specific topic are cross-referenced within the text.
Example: (See page xx.)
On screen buttons or menu items appear in bold. Example: Click OK to restart your Tablet PC.

15
- About This Guide
Fujitsu Contact Information
Service and Support
You can contact Fujitsu Service and Support in the following ways:
•Toll free: 1-800-8Fujitsu (1-800-838-5487)
•E-mail: 8fujitsu@us.fujitsu.com
•Website: http://www.computers.us.fujitsu.com/support
Before you place the call, you should have the following information ready so that the customer support
representative can provide you with the fastest possible solution:
•Product name
•Product configuration number
•Product serial number
THE INFORMATION ICON HIGHLIGHTS INFORMATION THAT WILL ENHANCE YOUR UNDERSTANDING OF
THE SUBJECT MATERIAL.
THE CAUTION ICON HIGHLIGHTS INFORMATION THAT IS IMPORTANT TO THE SAFE OPERATION OF YOUR
COMPUTER, OR TO THE INTEGRITY OF YOUR FILES. PLEASE READ ALL CAUTION INFORMATION
CAREFULLY.
THE WARNING ICON HIGHLIGHTS INFORMATION THAT CAN BE HAZARDOUS TO EITHER YOU, YOUR
TABLET PC, OR YOUR FILES. PLEASE READ ALL WARNING INFORMATION CAREFULLY.

16
- About This Guide
•Purchase date
•Conditions under which the problem occurred
•Any error messages that have occurred
•Type of device connected, if any
Fujitsu Shopping Online
You can go directly to the online by going to the website at: www.shopfujitsu.com.
Limited Warranty
Your Stylistic ST6010 Tablet PC is backed by a Fujitsu International Limited Warranty. Check the service
kit that came with your notebook for the Limited Warranty period and terms and conditions.
YOU MUST HAVE AN ACTIVE INTERNET CONNECTION TO USE THE ONLINE URL LINKS.
17
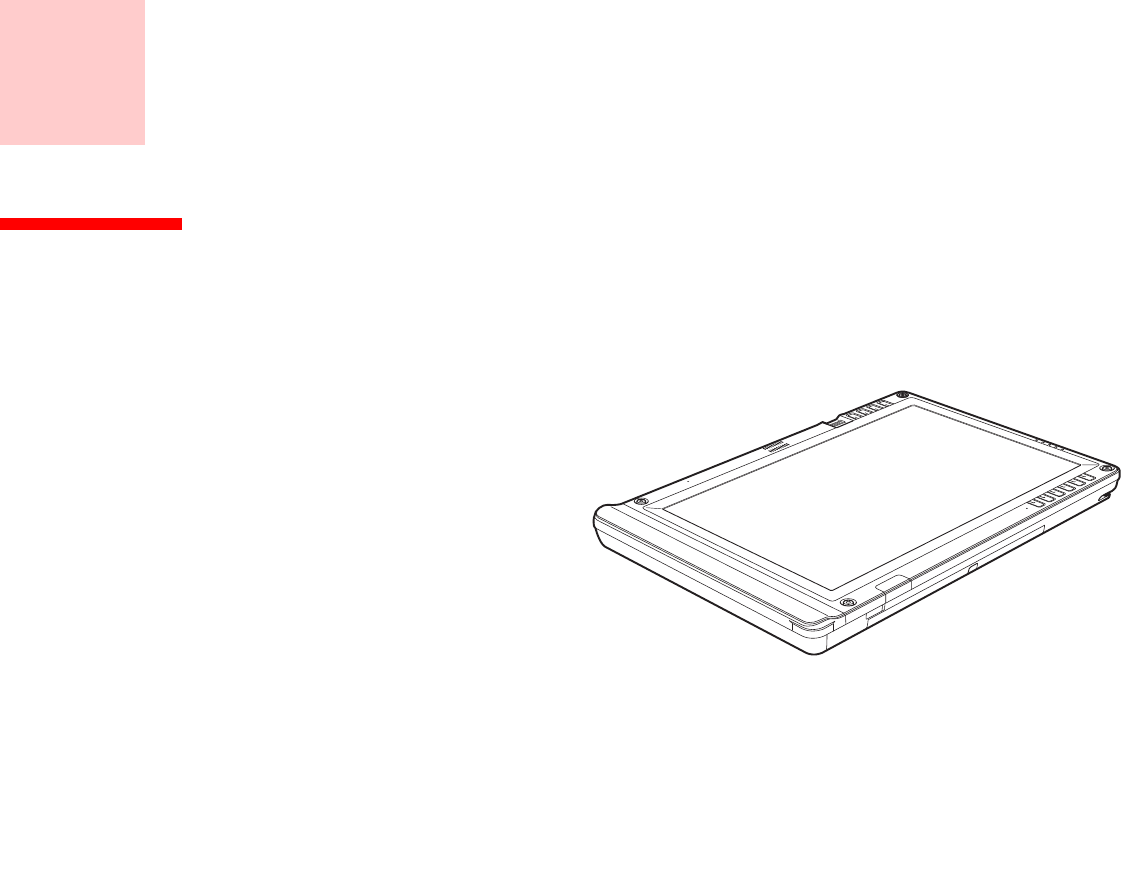
Chapter 1
Getting to Know Your Tablet PC
Overview
The Stylistic® ST6000 Series Tablet PC is
a high-performance, pen-based computer
that has been designed to support
Microsoft® Windows® XP Tablet PC
Edition 2005 or Windows Vista™
Business. This chapter provides an
overview of the Stylistic ST6000 Series
Tablet PC and its features.
Figure 1. Stylistic ST6010 Tablet PC
18
- Locating the Connectors and Controls
Locating the Connectors and Controls
Features and controls that you use to operate the Stylistic ST6000 Series Tablet PC are outlined below and
illustrated in Figures 2 through 5. Details on using these features and controls are provided later in this
manual.
Figure 2. Stylistic ST6000 Series Tablet PC Features (Front View)
Fingerprint Sensor
Navigation Buttons
Speaker
Built-in Microphone
Built-in Microphone
System Status Indicators
Application/
Security Buttons
Display
Infrared Keyboard/
Mouse Port

19
- Locating the Connectors and Controls
Front Features:
System status indicatorss:
Indicate the operational status of the Tablet PC and hard disk drive, the charge level of the battery, and the
security panel. See “Status Display” on page 27.
Application/Security buttons:
Allow you to quickly launch pre-defined applications, utilities, and security features by pressing a button.
See “Application, Navigation, and Security Buttons” on page 30.
Built-in Microphones:
The built-in microphones allow you to input mono audio.
Infrared keyboard/mouse ports:
The infrared ports are used for communicating with a proprietary infrared keyboard or mouse.†
Speaker:
Allows you to listen to audio files.
Fingerprint Swipe Sensor:
The optional fingerprint swipe sensor allows you to start your system by swiping your finger over the
sensor. See “Introducing the Fingerprint Sensor Device” on page 116.
Navigation buttons:
The navigation buttons allow you to move: Page Up/Page Down, Tab Right/Tab Left, Cursor Up/Cursor
Down, and Cursor Right/Cursor Left. See “Navigation Buttons” on page 33.
20
- Locating the Connectors and Controls
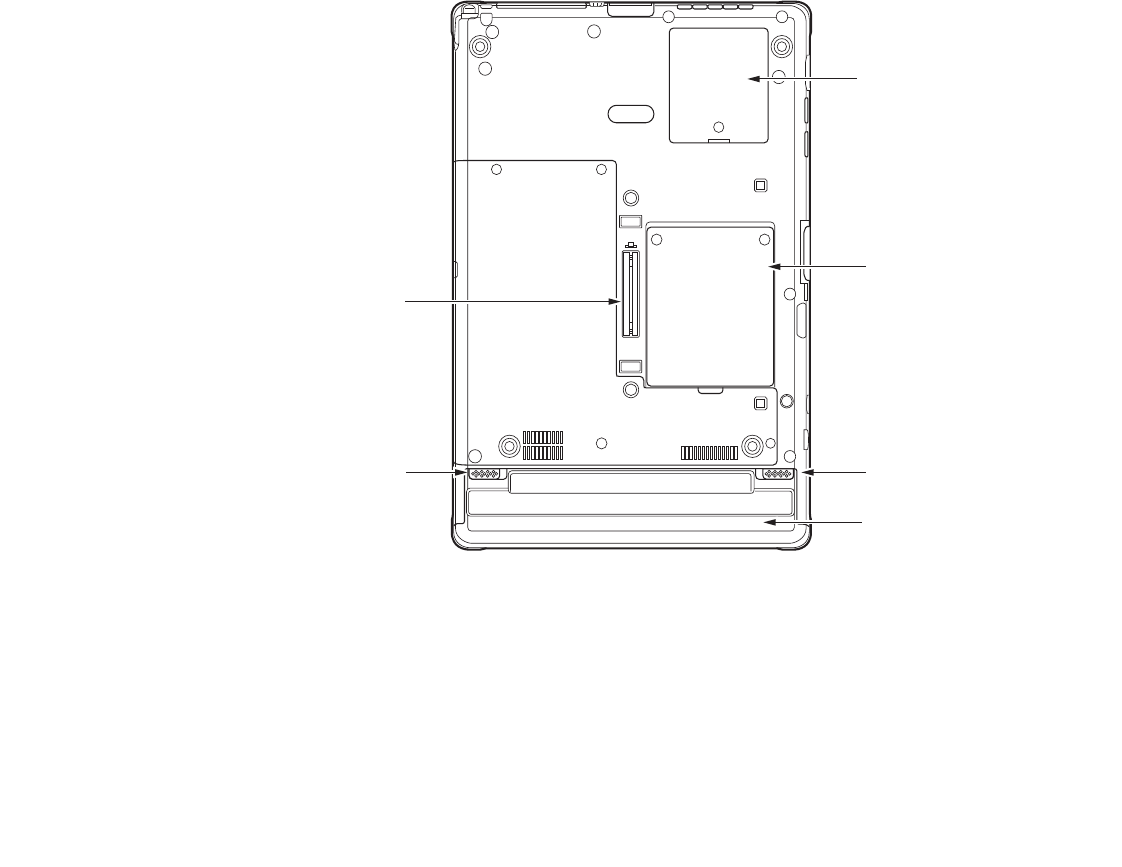
Figure 3. Stylistic ST6000 Series Tablet PC Features (Back View)
Back Features:
Wireless LAN module cover:
Provides protection for the optional wireless LAN radio. See “Configuring the Wireless LAN” on
page 108.
Memory module cover:
Removable cover over the memory modules. See “Removing and Installing Memory” on page 72.
Memory module cover
System
interface
connector
Removable battery
Battery release latch
Battery release latch
Wireless LAN module cover

21
- Locating the Connectors and Controls
Battery release latch:
Used to release the removable battery.
Removable battery:
Can be removed and replaced with a charged battery. See “Lithium ion Battery” on page 66.
System interface connector:
Allows you to connect the optional Stylistic Tablet Dock.
Tablet Dock latch point:
Allows you to attach the system to an optional Tablet Dock.
Thermal Suede:
The back of the memory module is covered with “thermal suede”. This material should not be removed.
It is designed to minimize the heat that the user feels when the system has been operating for an extended
period of time.
22
- Locating the Connectors and Controls
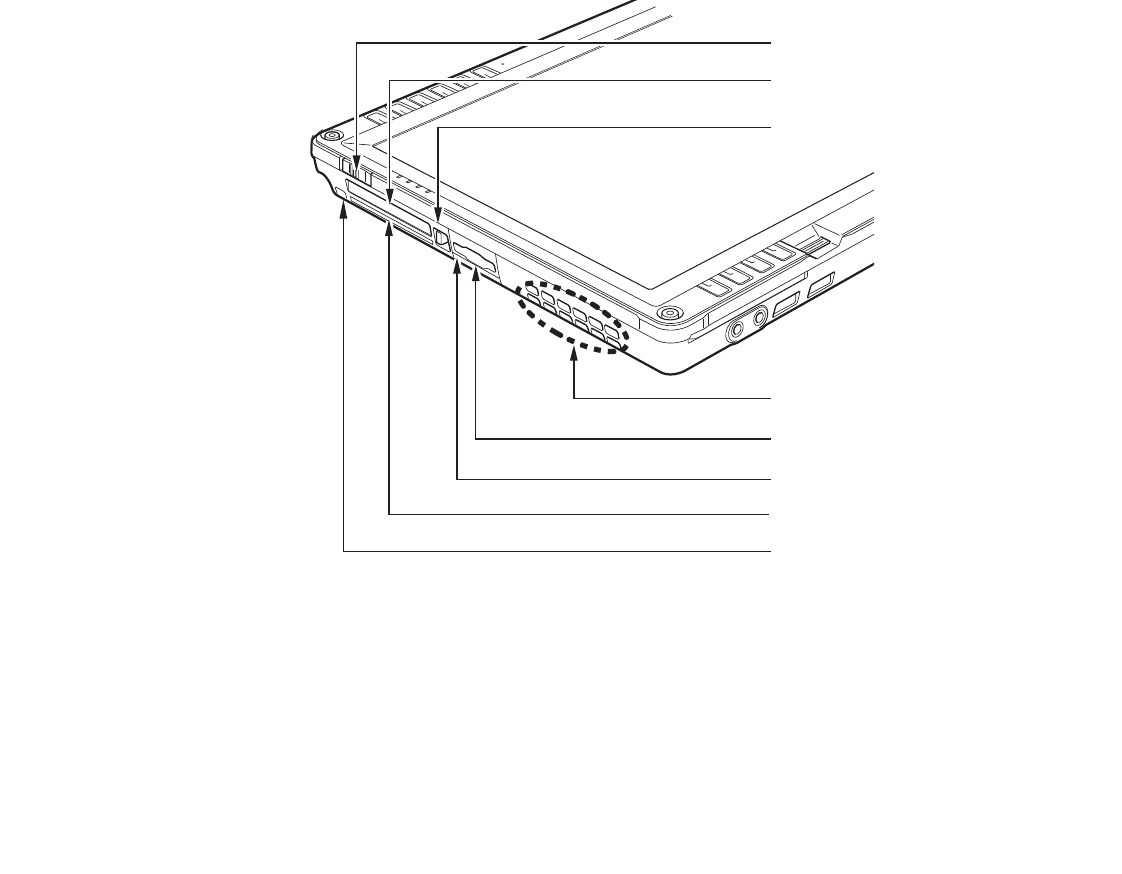
Figure 4. Stylistic ST6000 Series Tablet PC Features (Top View)
Top Features:
Power On/Suspend/Resume switch:
Allows you to turn on, off, sleep, resume, hibernate or wake the Tablet PC in order to optimize battery life.
See “Powering Up” on page 49.
Power On/Suspend/Resume switch
PC Card slot
PC Card eject button
Air vents
Memory Stick/SD Card slot
Infrared port
Smart Card slot
Pen tether attachment point

23
- Locating the Connectors and Controls
PC Card slot:
Allows you to insert a Type I or Type II PCMCIA Card† in the system. See “PC Card Slot” on page 71.
PC Card Eject Button:
The PC Card eject button is used to remove a PC Card from the PC Card slot.
Air flow vents:
Provides secondary cooling for processor.
SD Card/Memory Stick Slot:
The Secure Digital (SD) card/Memory Stick slot allows you to insert a flash memory card for data storage.
Flash memory cards allow you to transfer data to and from a variety of different digital devices. See
“Memory Stick/SD Card Slot” on page 69.
Infrared port:
Provides infrared interface for communication with devices compliant with IrDA Standard Revision 1.1.
Smart Card Slot:
The dedicated Smart Card slot allows you to insert a Smart Card on which you can store such data as
medical information or electronic “cash”.
Pen Tether Point:
The pen tether point is used to attach a pen tether to help prevent loss of the pen. See “Installing a Pen
Tether” on page 64.
TO PROTECT YOUR NOTEBOOK FROM DAMAGE AND TO OPTIMIZE SYSTEM PERFORMANCE, BE SURE TO
KEEP ALL AIR VENTS UNOBSTRUCTED, CLEAN, AND CLEAR OF DEBRIS. THIS MAY REQUIRE PERIODIC
CLEANING, DEPENDING UPON THE ENVIRONMENT IN WHICH THE SYSTEM IS USED.

24
- Locating the Connectors and Controls
Figure 1-1. Stylistic ST6000 Series Tablet PC Features (Left Side View)
Left-Side Features:
Headphone Jack:
Allows you to connect a set of stereo headphones.
USB 2.0 ports:
Allow you to connect Universal Serial Bus-compliant devices (compliant with USB Standard Revision
2.0) to the Tablet PC. Additional USB ports are located on the optional Tablet Dock.
External Monitor Connector:
The External Monitor connector allows you to connect an external monitor or projector.
External monitor connector (behind cover)
Headphone jack
USB 2.0 ports
Microphone jack LAN jack (RJ-45)
Security lock slot
DC Input connector

25
- Locating the Connectors and Controls
Security lock slot:
Allows you to attach a compatible security cable.
DC input connector:
Allows you to connect the AC adapter or auto adapter.
LAN jack:
Allows you to connect a standard RJ-45 connector to the Tablet PC’s internal local area network (LAN).
Microphone Jack:
Allows you to connect an external microphone.
26
- Locating the Connectors and Controls
Figure 5. Stylistic ST6000 Series Tablet PC Features (Right Side View)
Right-Side Features:
Wireless LAN/Bluetooth On/Off switch:
For systems with the optional wireless LAN radio or Bluetooth device, this switch toggles the radio on or
off. See “Using the Bluetooth Device” on page 114.
Pen holder:
The pen is the main pointing device that you use to execute programs and enter data. A pen holder is built
into the Tablet PC to store the pen when not in use.
Wireless LAN/Bluetooth On/Off switch Pen holder
27
- Status Display
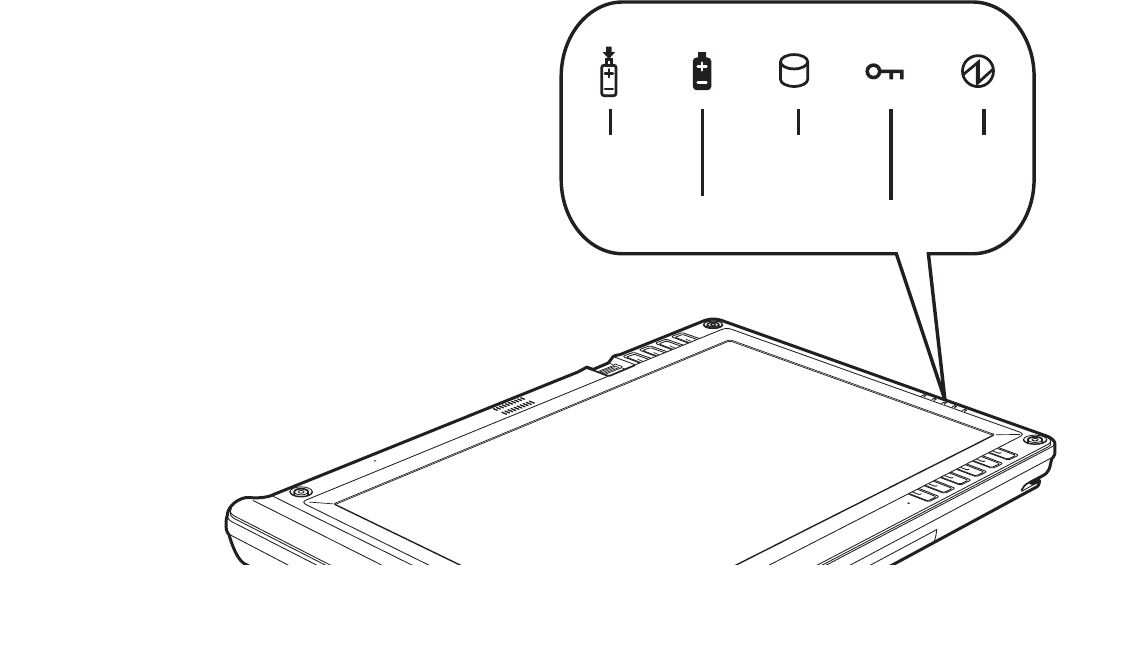
Status Display
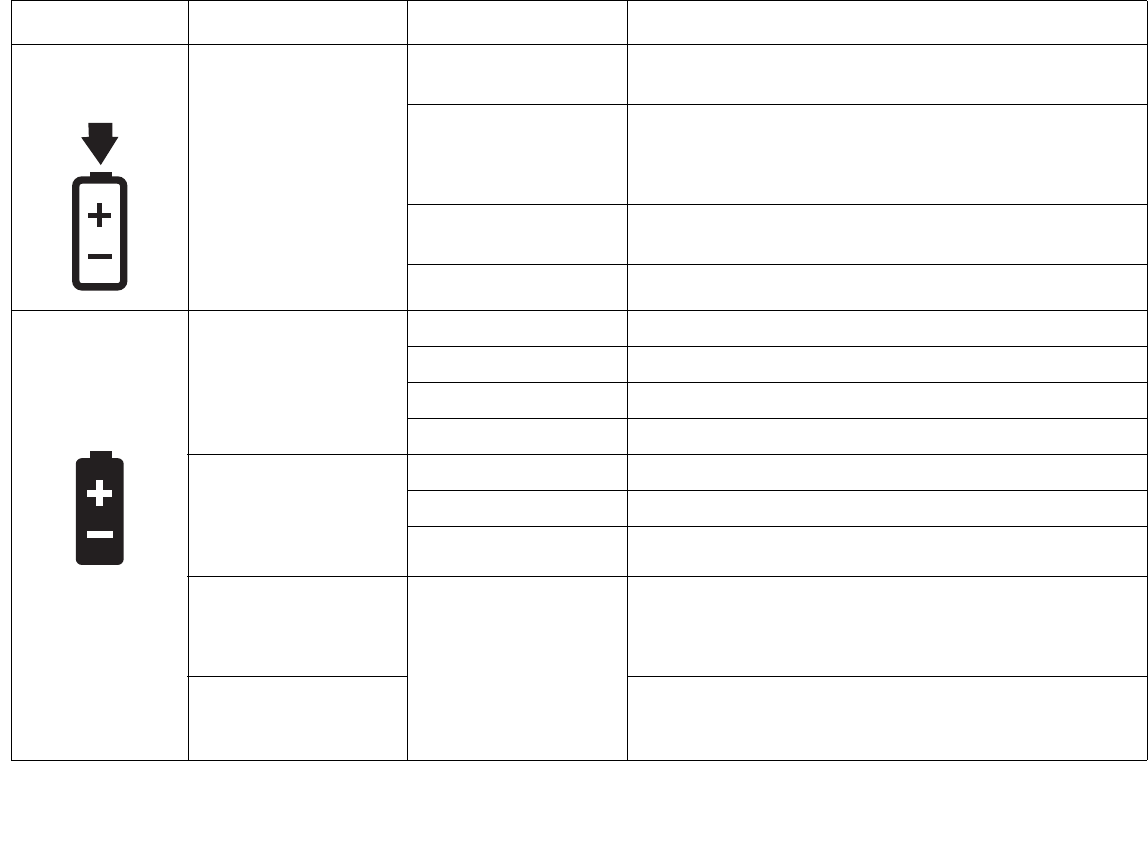
Icons appear under each of the system status LEDs in the status display indicating the status of system
functions such as system power and battery charge level. The location of icons in the Status display is
shown in Figure 6.
Table 1. explains how the LEDs associated with the individual icons are displayed, and describes what the
variations of that display indicate. (If an icon is not displayed, it indicates that the related system function
is off or inactive.
Figure 6. Status Display Icons
Charge/
DC in
Battery
Hard disk
drive access
Security
Power
28
- Status Display
In the following table, a “blinking” LED flashes at the rate of once per second; an LED that is “blinking, slow” flashes at the rate of one second on,
five seconds off.
Icon Mode/State LED State Remarks
Charge/DC In • On State
• Idle Mode
•Sleep
• Hibernate
• Off State
Amber AC adapter and battery are available and system is
charging.
Green • AC adapter and battery are available and system is
not charging (battery fully charged).
• AC adapter is available but battery is not present.
Amber, blinking AC adapter and battery are available and waiting to
charge (battery is out of thermal range).
Off AC adapter is not available.
Battery
• On State
• Idle Mode
Green, continuous Battery charge is between 50%-100%
Amber, continuous Battery charge is between 13%-49%
Red, continuous Battery charge is between 0%-12%
Red, blinking There is a battery error.
• Sleep, without AC
adapter
• Sleep with AC
adapter
Green, blinking slow Battery charge is between 50%-100%.
Amber, blinking slow Battery charge is between 13%-49%.
Red, blinking slow Battery charge is between 0%-12%.
• Hibernate, with AC
adapter
• Off State
Off Battery is not installed, or system is off or in Hibernate
mode.
• Hibernate, without
AC adapter If battery is inserted during power off, LED blinks amber
for 4 seconds to detect battery. Battery status is
displayed for 5 seconds after that.

29
- Status Display
Table 1. System Status Indicators
HDD Access • On State (or
flashing)
• Idle Mode
Green Displayed when hard disk drive is accessed.
•Sleep
• Hibernate
• Off State
Off Hard disk drive is not being accessed.
Security • On State Green, continuous
(until password is
entered)
The Security Indicator lights (if a password was set)
when the system resumes from Off or Sleep modes. You
must enter the password that was set in the Security
Panel before your system will resume operation. See
“Security Functions of Application Buttons” on page 36.
Power • On State
• Idle Mode
Green, continuous The system is powered on and ready for use.
• Sleep Green, blinking The system has suspended and saved active settings to
RAM.
• Off State
• Hibernate
Off The system has suspended and saved settings and data
to the hard disk drive.
In the following table, a “blinking” LED flashes at the rate of once per second; an LED that is “blinking, slow” flashes at the rate of one second on,
five seconds off.
Icon Mode/State LED State Remarks
30
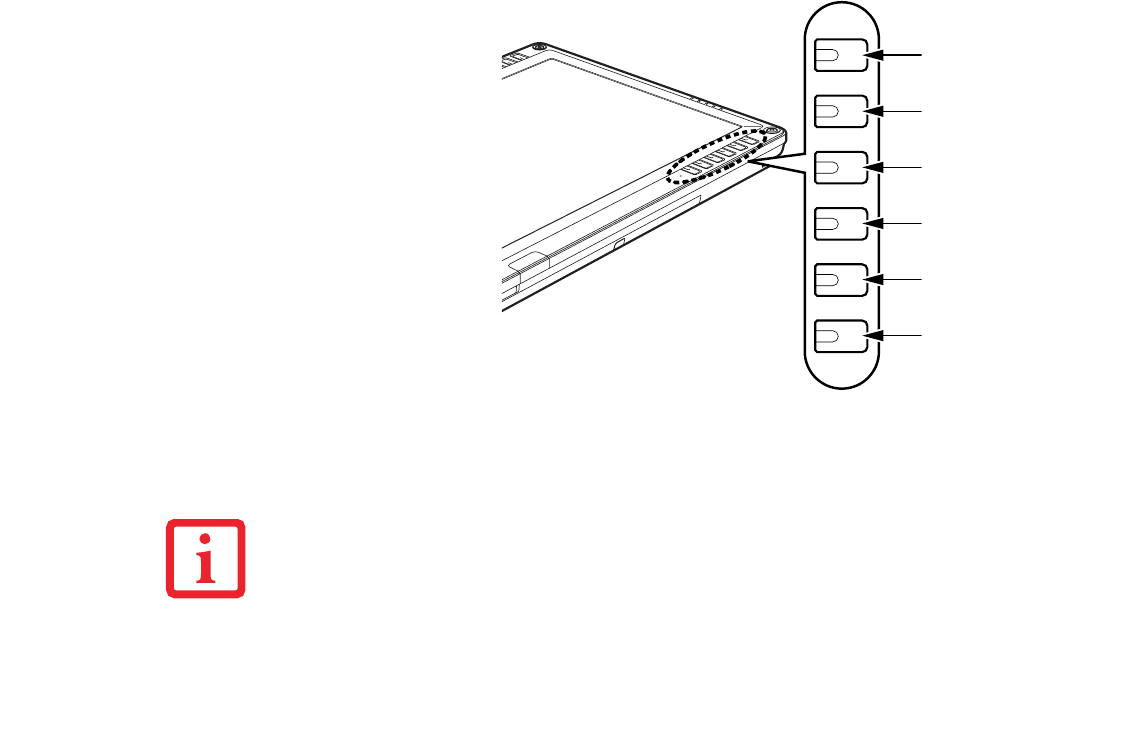
- Application, Navigation, and Security Buttons
Application, Navigation, and Security Buttons
Application Buttons
The six application buttons
are located on the upper right-
hand side of a vertically-
oriented system. Five of the
buttons have secondary
functions. The secondary
functions are activated by
pressing the Function (Fn)
button while pressing the
application button.
The buttons also have
separate tertiary functions
that can be used while the
system is booting up. For
more information about the
tertiary functions, refer to
Table 4 on page 35. Figure 7. Application buttons
CTL-ALT-DEL IS THE ONLY APPLICATION BUTTON THAT CAN BE USED WHILE THE SYSTEM IS LOGGING
ON OR WHEN THE SYSTEM IS LOCKED (I.E., WHEN YOU HAVE THE LOGON OR COMPUTER LOCKED
WINDOW SHOWING ON YOUR DESKTOP).
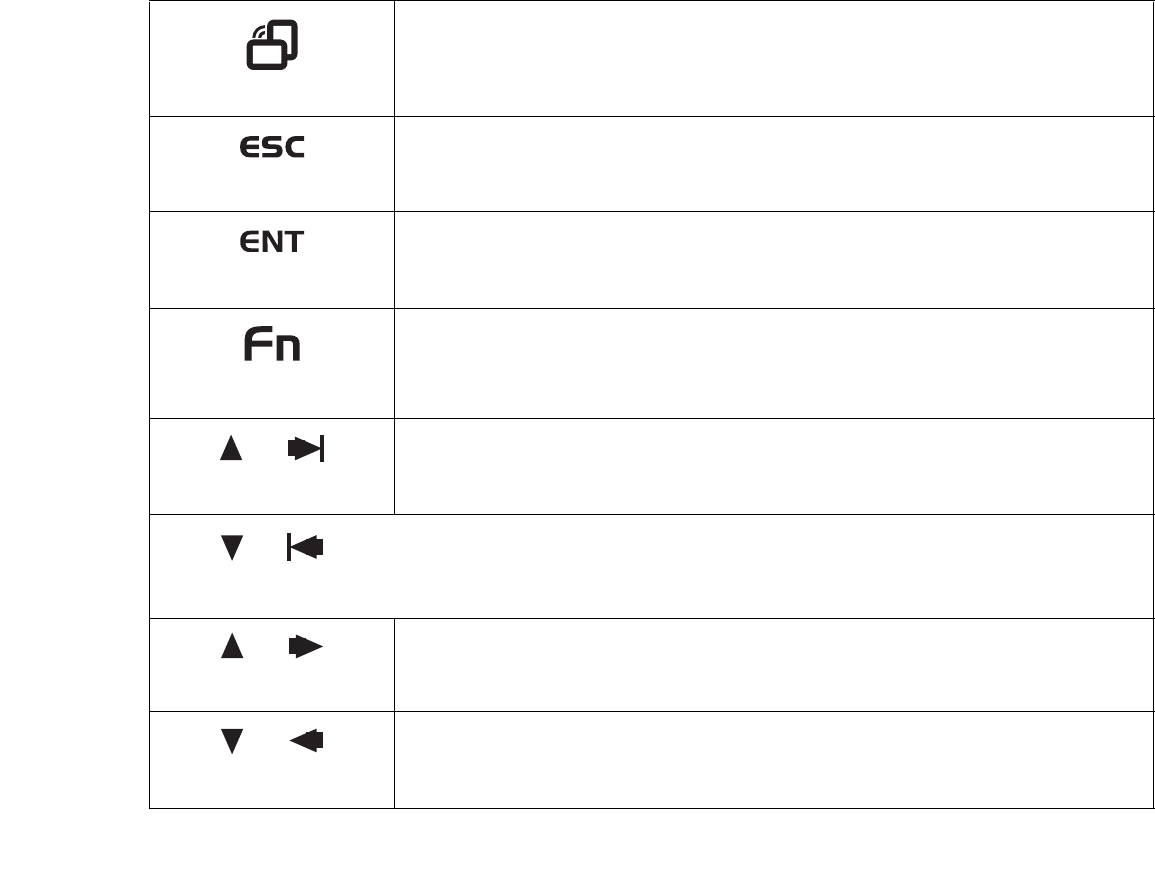
Ctl-Alt-Del/
Security button
EMail/Internet button
Orientation/Display
Mode button
Escape/App A button
Enter/App B button
Function/Fujitsu
Menu button
31
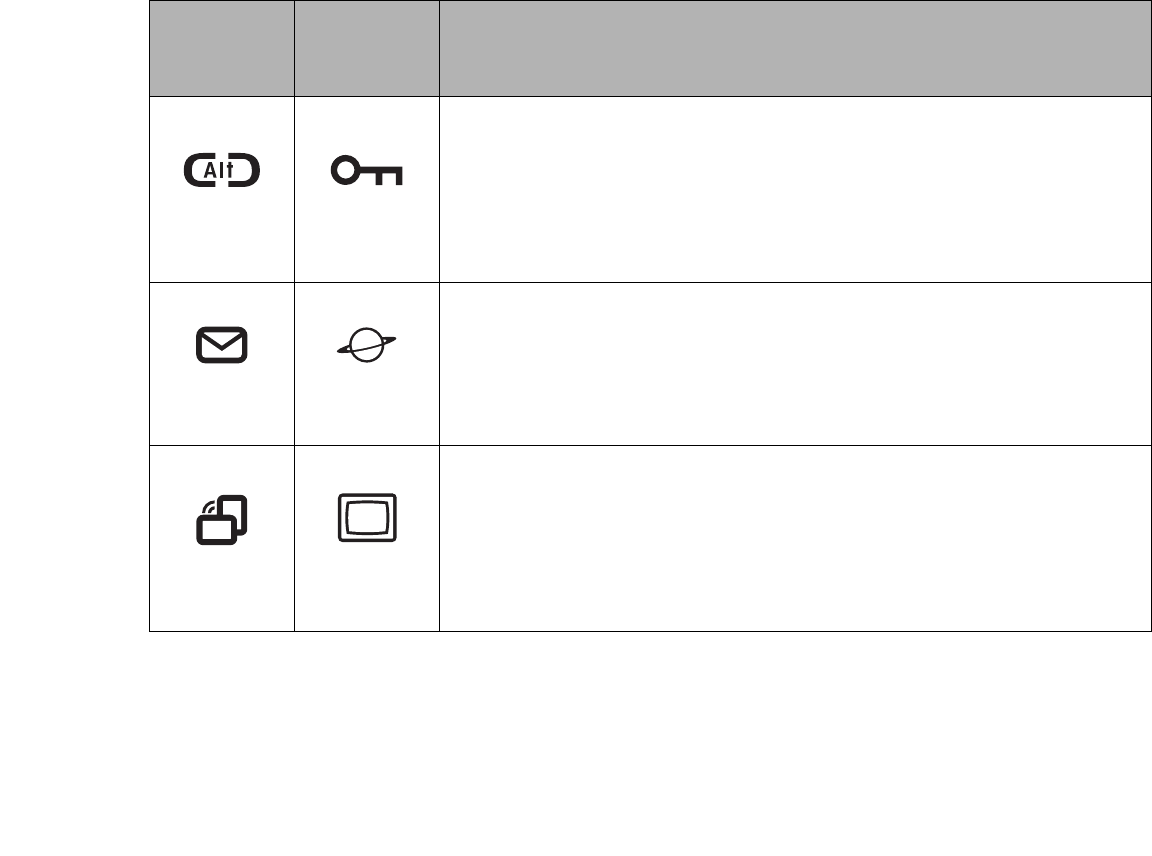
- Application, Navigation, and Security Buttons
Button Icon
and Name
Primary)
Tablet Icon
(Fn + Button)
(Secondary) Description
Ctl-Alt-Del
Button Security
Button
Pressing the Ctl-Alt-Del button for approximately one second allows you to log on after
boot or after resuming from power management. Holding the button down for
approximately two seconds causes it to act as if Ctl-Alt-Del had actually been entered
from a keyboard.
Security Button: All five buttons are used when implementing security functions. Four
of the buttons are used to enter the password, and the fifth is used as an Enter button.
See “Security Functions of Application Buttons” on page 36.
EMail
Button
Internet
Button
When you press the EMail button, you automatically launch Microsoft Outlook Express,
where you can read, create, and send emails.
When you press the Fn + EMail buttons at the same time, you automatically launch the
Web browser. The default page to which you go is the Fujitsu home page. If you would
like to change your home page, go to the Control Panel-> Internet Options. Select the
General tab and enter the starting address you would like to use.
Orientation
Button Display Mode
Button
When you press the Orientation button, the system screen orientation changes from
portrait (vertical) to landscape (horizontal) or from landscape to portrait. When you
would like to use the Tablet PC as an eBook, for example, you would use the portrait
orientation, when accessing spreadsheets, you would more typically use a landscape
orientation.
When you press the Fn + Orientation buttons at the same time*, the display output will
switch between internal, external, and simultaneous display.

32
- Application, Navigation, and Security Buttons
Table 2. Application Buttons - Primary and Secondary Functions
* The Fn button has a handy “sticky” feature that allows you to press two buttons in immediate
succession, rather than at exactly the same time. After pressing the Fn button, you have a short time (2
to 3 seconds) to press the second button.
Escape
Button Application A
Button
The Escape application button acts the same way as an Escape key on a keyboard.
When you press the Fn + Esc buttons at the same time*, they act to invoke a pre-
determined application or generate a combination keystroke, as assigned in the Tablet
Button Settings utility. (You can change the settings in Control Panel -> Tablet Button
Settings).
By default, pressing the Fn + Esc combination acts the same as if you had pressed Ctl
+ Esc on a keyboard: the Start menu is launched.
Enter Button Application B
Button
The Enter application button acts the same way as an Enter key on a keyboard.
Pressing the Fn + Ent buttons at the same time*, acts to invoke a pre-determined
application or keystroke combination, as assigned in the Tablet Button Settings utility.
(You can change the settings in Control Panel -> Tablet Button Settings).
By default, pressing the Fn + Ent combination acts the same as if you had pressed Alt
on a keyboard: it selects a main menu in the typical Windows application.
Function
Button
Fujitsu
Menu Utility
The Function button works in conjunction with the other application buttons to provide
additional functionality for the buttons. Refer to specific details above.*
Pressing the Fn button twice in succession (within the “sticky” time*), causes the
Fujitsu menu to appear on your screen, allowing you to modify certain system settings.
Button Icon
and Name
Primary)
Tablet Icon
(Fn + Button)
(Secondary) Description
33
- Application, Navigation, and Security Buttons
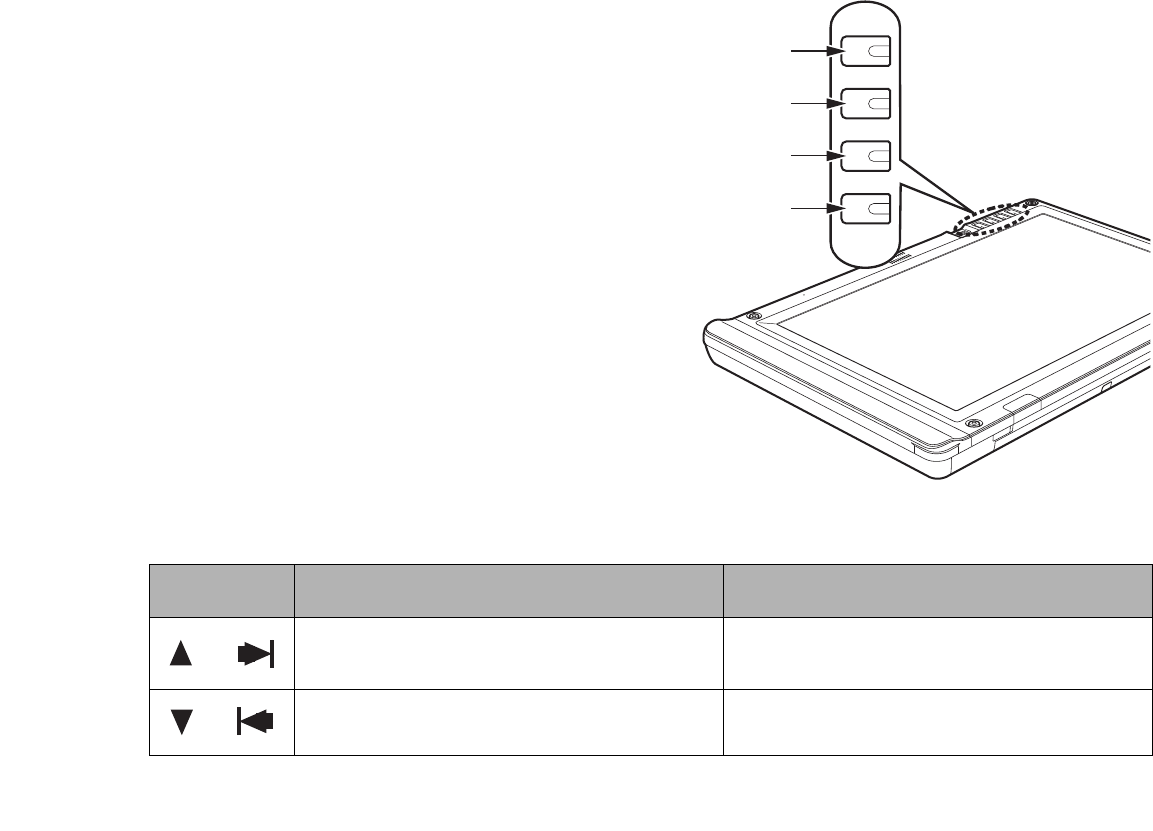
Navigation Buttons
The four navigation buttons are located
on the upper left-hand side of a
vertically-oriented system.
The buttons have dual functions. The
secondary functions are activated by
pressing the Function (Fn) button while
pressing the application button*.
The buttons also have separate tertiary
functions that can be used while the
system is booting up. For more
information about the tertiary functions,
refer to Table 4 on page 35.
* The Fn button has a handy “sticky” feature
that allows you to press two buttons in
immediate succession, rather than at exactly the
same time. After pressing the Fn button, you
have a short time (2 to 3 seconds) to press the
second button. Figure 8. Navigation buttons
Button/Icon Purpose (when pressed alone)
(“Primary” function) Description
When Page Up is pressed, you will scroll up one
page.
When pressed with the Function (Fn) button*, this
button allows you to tab right.
When Page Down is pressed, you will scroll down
one page.
When pressed with the Function (Fn) button*, the
Down button allows you to tab left.
Page Up/Tab Right
Page Down/Tab Left
Cursor Up/Cursor Right
Cursor Down/Cursor Left

34
- Application, Navigation, and Security Buttons
Table 3. Navigation Buttons
Tertiary Functions of Application and Navigation Buttons
While you are booting up your system, the Application Buttons and Navigation buttons can be used for
entering and navigating through the Basic Input-Output System (BIOS), and for invoking the Advanced
Options Menu, where you can enter different modes (such as Safe Mode).
The BIOS is a program and a set of parameters that are stored in ROM, which tests and operates your
Tablet PC from when you turn it on until it loads your installed operating system from disk. Information
from the BIOS is transferred to the operating system to provide it with information on the configuration
and status of the hardware.
The system is booting up while the Fujitsu logo is displayed immediately after turning on the system. The
table below indicates how the buttons act while the system is booting up and while you are in the BIOS..
When Cursor Up portion is pressed, the cursor will
move up.
When pressed with the Function (Fn) button*, the
Cursor Up button will move the cursor to the right.
When Cursor Down portion is pressed, the cursor
will move down.
When pressed with the Function (Fn) button*, the
Cursor Down button will move the cursor to the left.
Buttons/icons Purpose (when pressed while the system is booting up)
Ctl-Alt-Del Button
Pressing the Ctl-Alt-Del button while the system is booting up takes you into BIOS setup.
This is the same as if you had tapped [F2] on a keyboard.
EMail Button
Pressing the EMail button while the system is booting up opens the Boot Options menu. This
is the same as if you had tapped [F12] on a keyboard.
Button/Icon Purpose (when pressed alone)
(“Primary” function) Description
35
- Application, Navigation, and Security Buttons
Table 4. Tertiary Functions of Application and Navigation Buttons
Orientation Button
Pressing the Orientation button while the BIOS setup screen is open causes the selected
item (if applicable) to change to the next item. Pressing this is the same as tapping the
spacebar on a keyboard.
Escape Button
Pressing the Esc button while the BIOS is open acts to escape from the BIOS. This is the
same as if you had tapped [Esc] on a keyboard.
Enter Button
Pressing the Ent button while the BIOS is open acts the same as the [Ent] button on a
keyboard.
Function Button
Pressing the Fn button while the system is displaying the operating system boot menu,
opens the Advanced Operating System Options menu. This menu allows you to enter
different operating system modes (such as Safe Mode). Pressing this button is the same as if
you had tapped [F8] on a keyboard.
Cursor Up
Pressing the top navigation button while the BIOS setup screen is open causes the cursor in
the BIOS setup screen to move up. This is the same as if you had tapped Arrow Up on a
keyboard. This feature is also functional in the operating system boot menu.
Cursor Down
Pressing the second navigation button from the top while the BIOS setup screen is open
causes the cursor in the BIOS setup screen to move down. This is the same as if you had
tapped Arrow Down on a keyboard. This feature is also functional in the operating system
boot menu.
Next Menu
Pressing the second navigation button from the bottom while the BIOS setup screen is
open causes the BIOS setup screen to jump to the next menu. This is the same as if you
had tapped Arrow Right on a keyboard.
Previous menu
Pressing the bottom navigation button while the BIOS setup screen is open causes the BIOS
setup screen to jump to the previous menu. This is the same as if you had tapped Arrow Left
on a keyboard.
36
- Application, Navigation, and Security Buttons
Security Functions of Application Buttons
Five buttons are used when implementing security functions. Four of the buttons are used to enter the
password, and the fifth is used as an Enter button. Instructions for using the security feature follow the
table.
Table 5. Security Functions of Application Buttons
Setting up the Security Panel
When you receive your Tablet PC, the security panel application is pre-installed without any passwords.
The following sections provide detailed information on your security panel, how to set, change or remove
passwords.
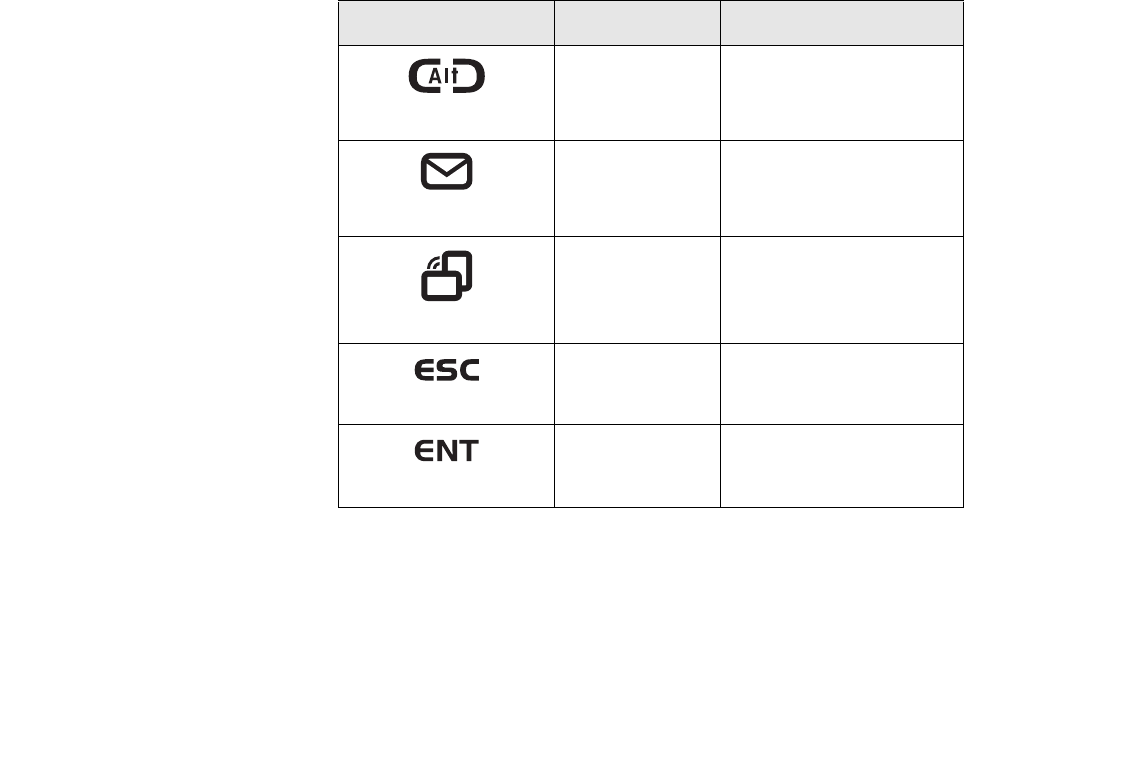
Button Icons Security Icons Security Purpose
Ctl-Alt-Del Button
Security Enter Button
EMail Button
1 Security Button 1
Orientation Button
2 Security Button 2
Escape Button
3 Security Button 3
Enter Button
4 Security Button 4

37
- Application, Navigation, and Security Buttons
Numbered Buttons
Use these buttons to enter your password.(Figure 5)
Enter Button
After entering the button strokes, push this button to enter the password into the Tablet PC. (Figure 5)
Passwords
The user and supervisor password may be set on this Tablet PC. A supervisor password is typically the
same for all Tablet PC’s and notebooks in a work group, office, or company to allow for system
management. Individual computers in a group environment should not use a common password. A
password consists of one to five button strokes plus the enter button. A valid stroke consists of pushing
one or up to four buttons simultaneously.
The following are examples of valid button strokes:
•Pushing [4] by itself
•Pushing [2] and [3] at the same time
•Pushing [1], [2], and [4] at the same time
•Pushing [1], [2], [3], and [4] at the same time
The following are valid passwords. The numbers within braces ({ }) are button strokes using more than
one button.
•{[2]+[3]}, [1], [Enter]
•[4], [enter]
•{[1]+[3]}, {[2]+[3]+[4]}, [1], [4], [2], [Enter]

38
- Application, Navigation, and Security Buttons
Setting Passwords
When shipped from the factory, no passwords are set. You have a choice of having no password or setting
a supervisor and user password. You must set the supervisor password before the user password.
Setting Supervisor Password
You must have set a supervisor password before setting any user passwords. The supervisor password can
bypass the user password.
1Go to the Start menu.
2Click on Run.
3Type in :
C:\Program Files\Fujitsu\Security Panel Application\Supervisor\ FJSECS.EXE, then press [Enter]
4Follow the on-screen instructions to set the Supervisor password.
Setting User Password
1Go to the Start menu.
2Click on All Programs.
3Click on Security Panel Application -> Security Panel Application.
4Follow the on-screen instructions to set the user password.
•THE PURPOSE OF SUPERVISOR PASSWORD IS TO BE ABLE TO BYPASS THE USER PASSWORD IN CASE
THE USER PASSWORD IS FORGOTTEN. THE SUPERVISOR PASSWORD ALONE WILL NOT LOCK THE
SYSTEM.
•YOU MUST SET THE SUPERVISOR AND USER PASSWORDS FOR THE SECURITY PANEL TO WORK.
YOU MAY CHANGE OR REMOVE THE SUPERVISOR OR USER PASSWORD BY REPEATING THE STEPS
DEFINED ABOVE.

39
- Application, Navigation, and Security Buttons
Using Your Security Panel
The security lock feature is in effect both when the system resumes from Off, Sleep, or Hibernation state.
You always need to push the Security Panel buttons to input the user password. Your system will not begin
the boot sequence until you enter your supervisor/user password.
From Off State
1Turn on your system.
2When the Security Indicator flashes, enter the password and press Enter button.
For example, if the password is 22222, first press Button 2 five times and press the Enter button. The Tablet PC
will boot to normal operation.
From Sleep/Hibernation State
1Press your Suspend/Resume button.
2When the Security Indicator flashes, enter the password and press Enter button. The Tablet PC should resume
normal operation.
Incorrect Password Entry
If an invalid supervisor or user password is entered three times in succession, the system will “beep” for
about one minute. If a valid password is entered within a minute (while system beeps), the beeping will
stop and the Tablet PC will resume normal operation. If no password is entered or an invalid password is
entered while the system beeps, the system will return to its previous locked state (sleep or off) and the
Security Indicator will go off. To reactivate the Tablet PC after a password failure, you must press the
Suspend/Resume button, then enter a correct password.
REMEMBER THE USER PASSWORD YOU SPECIFIED ON THE SECURITY PANEL APPLICATION. IF YOU
FORGET THE PASSWORD YOU WILL NOT BE ABLE TO USE YOUR COMPUTER. THE SUPERVISOR
PASSWORD CAN OVERRIDE THE USER PASSWORD.

40
- Application, Navigation, and Security Buttons
Precautions
Low Battery Operations
If your Tablet PC has a low battery, pushing the suspend/resume button does not unlock the Tablet PC. To
resume normal operation, first attach a power supply to the system. Then you may unlock the Tablet PC.
Uninstalling the Security Panel Application
You have two options when uninstalling the security panel application:
•Remove passwords and uninstall the security panel application software. This will disable all
security features.
•Uninstall the security panel application with password still active. This will not allow any changes
to the password.
Uninstalling the Security Panel Application Software
Remove passwords when User wants no password protection whatsoever and doesn’t want to give
anybody the utility to set a password on their computer. In this case, if passwords (supervisor, user, or
both) are set, the passwords must first be cleared BEFORE removing the application. To clear passwords,
follow same procedure in SETTING PASSWORD CODES except this time, select REMOVE, enter
current password then click Next. When asked to confirm select Yes.
Removing Security Panel Application with Passwords Still Active
Using this feature will not allow any changes to the password.
REMOVING THE APPLICATIONS DOES NOT REMOVE THE PASSWORD. IT SIMPLY REMOVES THE UTILITY
TO CHANGE/ADD/REMOVE PASSWORDS. TO CHANGE YOUR PASSWORD YOU MUST REINSTALL THE
APPLICATION.

41
- Application, Navigation, and Security Buttons
User:
1Go to Start Menu. Click on Control Panel.
2Open Add or Remove Programs (In Vista: Programs and Features) in the Control Panel.
3Select the Security Panel Application (In Vista: Security Panel) in the list, and click Add/Remove.
4When the Confirm File Deletion box appears, click Yes.
Supervisor:
1Go to Start Menu, Click on Control Panel.
2Open Add or Remove Programs (In Vista: Programs and Features) in the Control Panel.
3Select the Security Panel Application for Supervisor (In Vista: Security Panel for Supervisor) in the list,
and click Add/Remove (In Vista: Uninstall).
4When the Confirm File Deletion box appears, click Yes.
Reinstalling the Security Panel Application
To reinstall supervisor or user security application, you will need your Drivers and Applications CD. The
Utilities\Security Panel Application folder contains two separate folders: Supervisor and User. The
setup files for supervisor and user security applications are contained in those folders.
1Go to the Utilities\Security Panel Application\ Supervisor folder on the CD and double-click the setup.exe
file. The Installing Security Panel Application window will appear. Follow the instructions on the screen.
2Go to the Utilities\Security Panel Application\User folder on the CD and double-click the setup.exe file. The
Installing Security Panel Application window will appear. Follow the instructions on the screen.
Supervisor and user passwords can be set via Windows software using the FJSECS.exe and FJSECU.exe
files, respectively. FJSECU.exe for the user password cannot run without first setting a supervisor
password. You need to run FJSECS.exe first to set the supervisor password. Follow instructions under
Setting Passwords on page 38.

42
- Application, Navigation, and Security Buttons
If you forget both passwords, please contact Fujitsu Computer Systems Corporation Service and Support
at 1-800-8Fujitsu (1-800-838-5487). Fujitsu Computer Systems Corporation charges a service fee for
unlocking a password-restricted Tablet PC. When calling please have a valid credit card and provide proof
of ownership. You will then be given instructions on where to ship your Tablet PC.
Installing Click Me!
Windows Vista Systems
The first time you boot up your system, you will see a “Primary Settings for the PC” window. This window
explains the installations which will be performed by the Click Me! utility. If you click [Execute], Click
Me! will begin installing. If after clicking the button you receive a “User Account Control” window, you
will be asked for your permission to continue. Click [Yes] to continue. If you cancel the operation, the
Click Me! icon will appear on your desktop for later installation.
Windows XP Systems
The first time you boot up your system, you will see an icon called Click Me! in the Start menu. We highly
recommend that you install the ClickMe! utility the first time you boot up. When you click the Click
Me! icon, your system will automatically build the icon tray in the bottom right of the screen. These icons
provide links to utilities that you will frequently access., such as wireless LAN software provided by the
wireless LAN manufacturer.
BEFORE INSTALLING THE CLICKME! UTILITY, BE SURE THE WIRELESS LAN SWITCH IS TURNED ON.
THERE MAY BE ADDITIONAL THIRD-PARTY APPLICATIONS THAT ARE NOT INSTALLED BY THE CLICKME!
UTILITY. FOR MORE INFORMATION, REFER TO YOUR GETTING STARTED GUIDE.
43
- Connectors and Peripheral Interfaces
Fujitsu Driver Update Utility
Your system has a convenient tool called the Fujitsu Driver Update (FDU) utility. With FDU, you can
choose to automatically or manually go to the Fujitsu site to check for new updates for your system. For
more information about the FDU utility, refer to “Fujitsu Driver Update Utility” on page 43.
Connectors and Peripheral Interfaces
Connectors and peripheral interfaces on the Stylistic ST6000 Series Tablet PC allow the connection of a
variety of devices. Specific locations are illustrated in Figures 1-2 through 1-5.
Table 6 provides a description of each peripheral connector on the Stylistic ST6000 Series Tablet PC. Each
of the illustrated icons is either molded into or printed on the Tablet PC chassis.
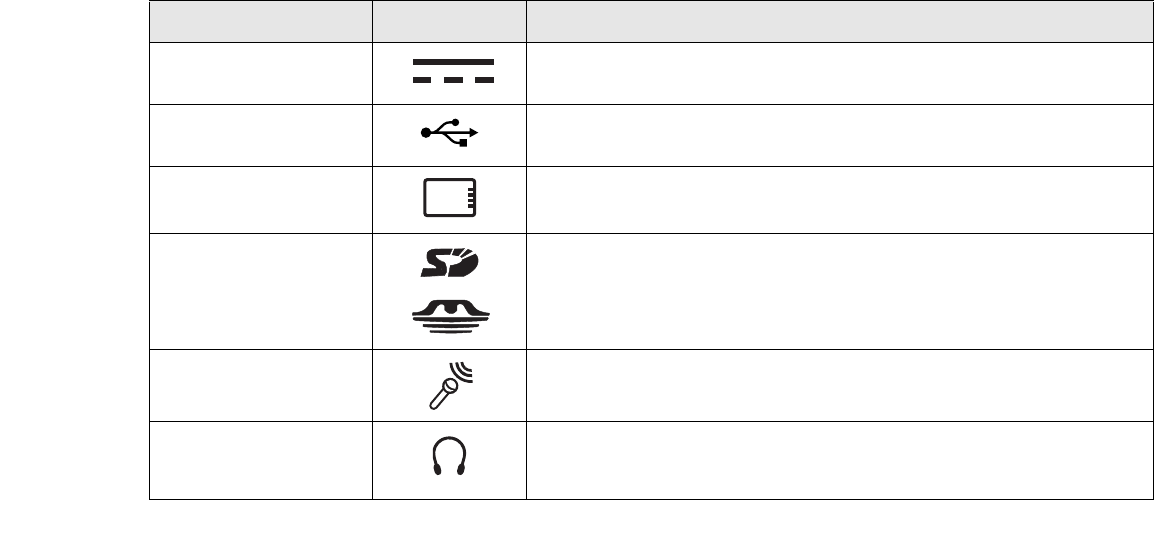
Connector/Peripheral Tablet PC Icon Purpose
DC input connector Connect an external power source such as the AC adapter or auto/airline
adapter.
USB Port Connect Universal Serial Bus 2.0 compliant devices to the Tablet PC.
PCMCIA Card slot Insert a Type I or Type II PC Card.
SD Card/Memory Stick
slot
Insert a Secure Digital (SD) Card or a Memory Stick.
Microphone jack Connect an external microphone. The internal microphone is disabled when
you plug in an external microphone.
Headphone jack Connect stereo headphones or powered external speakers. The internal
speaker is disabled when you plug in external headphones or powered
speakers.
44
- Connectors and Peripheral Interfaces
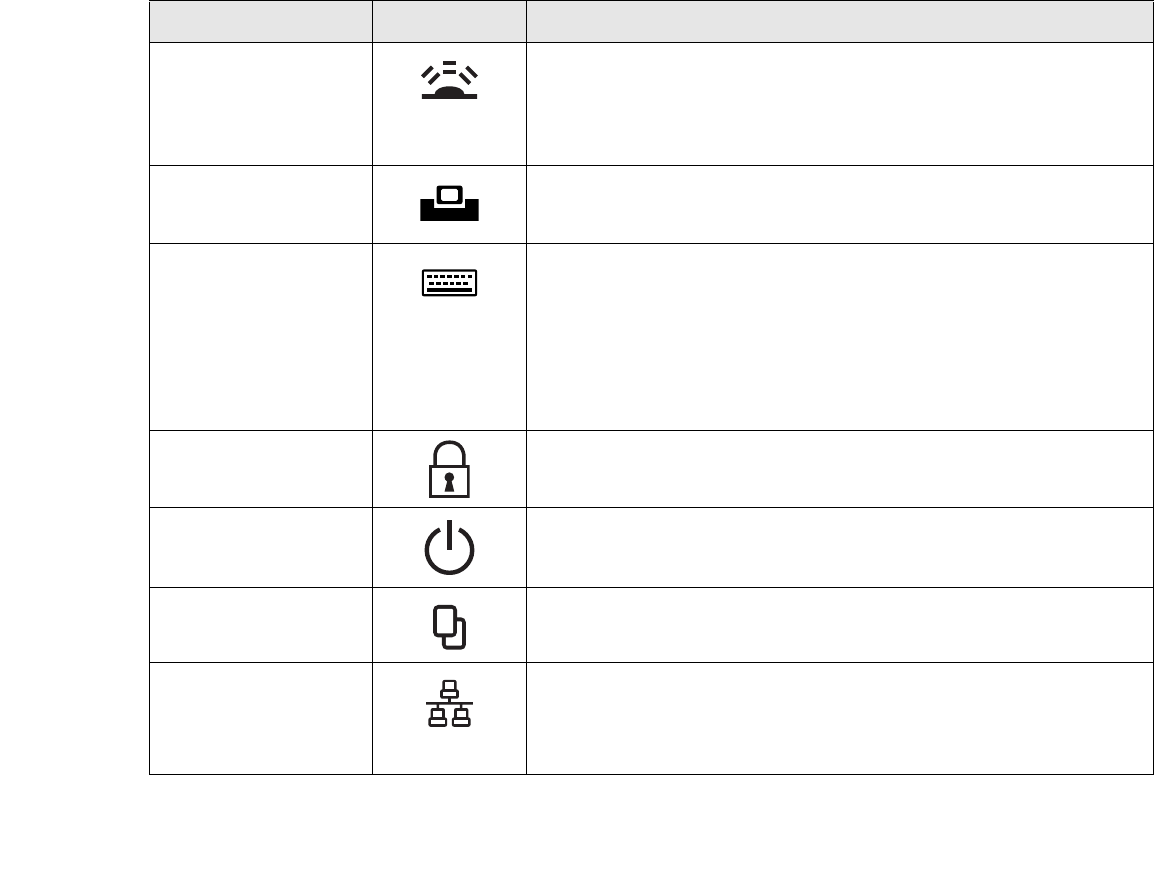
IrDA/FIR port An infrared transceiver built into the Tablet PC allows you to communicate
with other devices that are compliant with the IrDA Standard Rev. 1.1.
Effective range for infrared communication is about 3 feet, and within 15
degrees off center. A clear line-of-sight path must exist between the IrDA
port on the Tablet PC and the IrDA transceiver on the other device.
Tablet Dock port Connect the Stylistic ST6000 Series Tablet Dock or other approved docking
device. Refer to documentation accompanying the docking device for more
information.
Infrared keyboard/
mouse port
An infrared receiver built into the Tablet PC allows you to communicate with
a Fujitsu wireless infrared keyboard or mouse. The keyboard infrared port
works optimally when it is placed between 10 to 30 cm (approximately 4 in.
to 12 in.) from the keyboard infrared port (which is located on the bottom
edge of the Tablet PC). Ensure there is a clear line-of-sight path between the
infrared receiver on the Tablet PC and the infrared transmitter on the
keyboard or mouse. Note that an infrared keyboard or mouse works best
when the system is in landscape orientation.
Lock slot The security slot allows you to secure the Tablet PC using compatible
locking devices.
Suspend/Resume button The Suspend/Resume/Power On button allows you to suspend Tablet PC
activity without powering off, resume your Tablet PC from sleep mode, and
power on the system when it has been shut down from Windows.
Page Up/Page Down The Page Up/Page Down button allows you to navigate quickly from page to
page without scrolling.
Local Area Network
(LAN)
The LAN (RJ-45) jack is used to connect the internal 10/100/1000* Base-T/Tx
Ethernet to a Local Area Network (LAN) in your office or home, or broadband
devices such as a cable modem, DSL, or satellite internet.
*1000 Mbps, commonly referred to as Gigabit Ethernet.
Connector/Peripheral Tablet PC Icon Purpose
45
- Connectors and Peripheral Interfaces
Table 6. Connectors and Interfaces
Battery Release Latch The battery release latch allows you to remove the battery from your system
for storage or replacement.
Wireless LAN/Bluetooth
On-Off Switch
The wireless LAN/Bluetooth switch allows you to turn power to the optional
wireless LAN or Bluetooth devices on and off.
Connector/Peripheral Tablet PC Icon Purpose

46
Chapter 7
Using the Stylistic ST6000 Series Tablet PC
This chapter covers the fundamental concepts, basic system operation and use, and system functions of the
Stylistic ST6000 Series Tablet PC. You should familiarize yourself with this information before you
attempt to operate the system.
System States
Before you begin using your Tablet PC, review the different system states (or modes) that the system can
use. Being familiar with these states will help you determine whether it is appropriate to turn on, resume,
sleep, hibernate or shut down the system when you begin or end a session. System behavior for each
system state is described briefly in the following, with each system state listed in decreasing order of power
usage:
•On state: The system is running and the display screen is on.
PRIOR TO USING YOUR SYSTEM, BE SURE TO FULLY CHARGE THE BATTERY IF YOU PLAN TO RUN ON
BATTERY POWER. FAILURE TO DO SO MAY RESULT IN ERRATIC PERFORMANCE.

47
- System States
•Idle state: Some system functions are regulated or turned off to conserve power. The display screen
may be turned off. The system returns to the On state when pen activity or other input is detected.
•Sleep mode (S3): System operation is suspended. Most system functions are turned off to conserve
power. Power to memory is on, maintaining data in programs that were running before system
operation was suspended. The system does not respond to the pen or other input when in Sleep
mode. Refer to the “Resuming System Operation” section later in this chapter for information on
returning the system to the On state.
•Hibernate mode (S4): System operation is suspended. All system functions are turned off to
conserve power. Active data in programs that were running before suspending system operation is
stored on the hard disk drive. The system does not respond to the pen or other input. Refer to the
“Resuming System Operation” section later in this chapter for information on returning the system
to the On state.
•Off state: All system functions are turned off to conserve power. The system does not respond to
the pen or other input. The system boots at the next system power-on.
Your system may be configured to enter some of these states automatically after a period of inactivity to
conserve battery power.
THE SYSTEM CONSUMES THE SAME AMOUNT OF POWER WHETHER IT IS IN HIBERNATE MODE OR THE
OFF STATE.
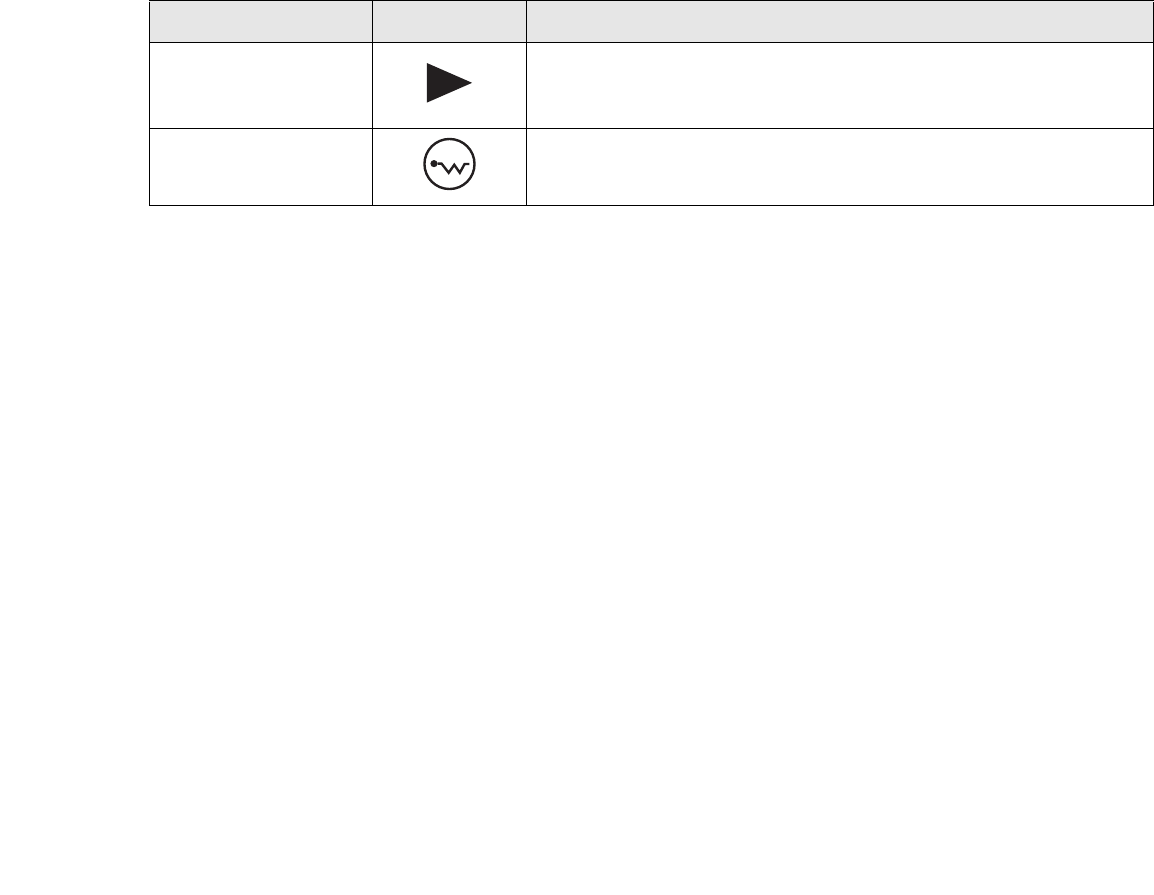
Icon Appearance Current State To Change State*
Power icon
displayed
continuously
On State or
Idle State
To enter Off state, shut down the system using the Start menu on your
system.
To enter Sleep or Hibernate† state, suspend system operation using
either a hardware or software suspend.

48
- System States
Table 1. Changing System States
*Information in Table 1 is supplied to help you understand which system states your system can enter
from the current system state. Refer to the procedures on starting the system, shutting down the
system, suspending system operation, and resuming system operation given later in this chapter.
†Your system may be configured to use either Sleep mode or Hibernate mode.
When you use your Tablet PC, you can change the current system state in a number of ways, depending
on the system’s current state. To determine the current system state, observe the Power icon in the Status
display. Table 1 on page 48 gives the different system states represented by the Power icon and describes
how you can change the system state from the current state.
Power icon
blinking Sleep†To enter the On state, resume system operation by pressing the
Suspend/Resume button.
To enter the Off state, resume system by pressing the Suspend/Resume
button, then shut down your system.
Power icon not
displayed
Off State, or,
Hibernate
To enter the On state, start your system, or resume system operation by
pressing the Suspend/Resume button.
Icon Appearance Current State To Change State*
49
- Starting the Tablet PC
Starting the Tablet PC
Powering Up
Follow the procedure below to start your Tablet PC. Before you begin, confirm that the system is in the
Off state. To do so, observe the Status display. If the Power icon is not visible in the Status display, the
system is in Off state or in Hibernate mode and it is safe to perform this procedure. If the Power icon is
visible (either blinking or on continuously), do not perform this procedure. See “System States” earlier in
this chapter for details on modes represented by the Power icon.
1Ensure that the battery in your Tablet PC is sufficiently charged, or connect an external power source such as
the AC adapter or auto adapter to your Tablet PC.
Proper Tablet PC Orientations
Your computer can be used in in two
different orientations.
Portrait Orientation: Hold the system
with the fingerprint sensor positioned
vertically on the left.
Landscape Orientation: Hold the system
with the fingerprint sensor positioned
horizontally on the top.
Table 1. Holding the Tablet PC
Portrait orientation
Landscape
orientation
Non-functional
orientation
Non-functional
orientation

50
- Starting the Tablet PC
2Press the Power On/Suspend/Resume button to start the system. After performing initialization, the system
starts the operating system installed on the hard disk drive. Once the operating system is running, you can use
the system.
Booting the First Time
We strongly recommend that you not attach any external devices until you have gone through the initial
power on sequence.
When you turn on your tablet for the first time, it will display a Fujitsu logo on the screen. If you do
nothing the system will load the operating system, and then the Windows Welcome will begin.
Depending upon your operating system (Windows Vista or XP edition), there is a different procedure for
stating your system for the first time, as outlined below.
Starting Windows Vista the first time
In order to ensure that you receive the most benefits from the Windows Vista operating system, it should
be registered the first time you use it.
1First of all, you will need to read and accept the End User License Agreements (EULAs).
THE FIRST TIME YOU INITIALIZE YOUR WINDOWS VISTA SYSTEM, THE SCREEN WILL BE BLANK FOR
APPROXIMATELY TWO MINUTES. THIS IS NORMAL. AFTER INITIALIZATION, A “SET UP WINDOWS” DIALOG
BOX WILL APPEAR.
IMPORTANT: DURING THE SETUP PROCEDURE, DO NOT DISCONNECT THE POWER SUPPLY, PRESS ANY
BUTTONS, OR USE ANY PERIPHERAL DEVICES SUCH AS A MOUSE, KEYBOARD, OR REMOTE CONTROL.
•IF YOU REJECT THE TERMS OF THE LICENSE AGREEMENTS YOU WILL BE ASKED TO REVIEW THE LICENSE
AGREEMENTS FOR INFORMATION ON RETURNING WINDOWS OR TO SHUT DOWN YOUR TABLET PC.
•YOU CANNOT USE YOUR TABLET UNTIL YOU HAVE ACCEPTED THE LICENSE AGREEMENTS. IF YOU STOP THE
PROCESS YOUR TABLET WILL RETURN TO THE BEGINNING OF THE WINDOWS WELCOME PROCESS, EVEN IF YOU
SHUT YOUR TABLET DOWN AND START IT UP AGAIN.

51
- Starting the Tablet PC
2You will be prompted to enter your User Name and Password and you will be given a chance to select an icon
for your account.
3The next screen asks for a Computer Name and allows you to choose a desktop background.
4You will next see a "Help protect Windows automatically" screen in which the default choice is "Use
recommended settings”. The other two choices are "Install important updates only" and "Ask me later". Select
from the three choices.
5On the next screen set your time and date settings.
6You will next see the "Select your computer's current location" screen. Make your selection from Home, Work
(Default), and Public location.
7The "Thank you" screen follows and an offer for free Norton Internet Security is extended. Following are several
screens while Windows checks the system performance.
8Windows will then boot up for the first time. After the first boot, press [Execute] to install the Primary Settings.
This will take several minutes.
9After the Primary Settings are installed, reboot the system again.
Registering Windows Vista with Microsoft
1After Windows has booted up for the first time, the Control Panel Welcome Center will appear. If the Register
Windows Online icon is not seen in the window, click on “Show all xx items” (where “xx” is the number of topics
in the Welcome Center).
2Click on Register Windows Online and follow the instructions that appear to register your copy of Windows.
Registering Windows XP with Microsoft
In order to ensure that you receive the most benefits from the Windows operating system, it should be
registered the first time you use it.
After you receive the Windows Welcome screen, you will be prompted to enter registration information
in the following order.

52
- Starting the Tablet PC
First of all, you will need to read and accept the End User License Agreements (EULAs). After accepting
the EULAs, you will be asked if you want to enable the Automatic Updates feature. Acceptance of this
feature is recommended because it allows your system to be updated automatically whenever an important
change becomes available for your tablet.
Several additional windows will appear, prompting you to enter a name and description for your computer,
an Administrator password, and a domain name. Read the instructions on the screens carefully and fill in
the information as directed.
You will then be automatically connected to the Internet, if you have an appropriate connection available.
If an automatic connection is not possible, you will be asked about how you dial out from where you will
be using your tablet. If you are not connected to a phone line and plan to register at a later time, you may
click the Skip button.
Once you are connected to the Internet, you will be asked if you wish to continue with the registration. If
you select Yes you will then enter your name and address, and email address if desired. Click Next to
complete registration.
Registering Your Stylistic Tablet PC with Fujitsu
You can register your tablet by going to our website at: us.fujitsu.com/computers
You will need to be set up with an Internet Service Provider (ISP) to register online.
•IF YOU REJECT THE TERMS OF THE LICENSE AGREEMENTS YOU WILL BE ASKED TO REVIEW THE LICENSE
AGREEMENTS FOR INFORMATION ON RETURNING WINDOWS OR TO SHUT DOWN YOUR TABLET PC.
•YOU CANNOT USE YOUR TABLET UNTIL YOU HAVE ACCEPTED THE LICENSE AGREEMENTS. IF YOU STOP THE
PROCESS YOUR TABLET WILL RETURN TO THE BEGINNING OF THE WINDOWS WELCOME PROCESS, EVEN IF YOU
SHUT YOUR TABLET DOWN AND START IT UP AGAIN.

53
- Starting the Tablet PC
Shutting Down
Follow these steps to shut down/turn off your system:
1If system operation has been suspended, resume system operation. See “Resuming System Operation” later
in this chapter for details.
2Save your work and close all running programs.
3Choose Shut Down from the Windows Start menu.
4Carry out the Shut Down command.
The system is now in the Off state.
Suspending System Operation
The Tablet PC allows you to suspend the system operation without closing programs or exiting the
operating system. Use this feature to conserve battery power when a system shutdown is not practical or
when the battery needs to be changed.
To suspend system operation:
1Press the Suspend/Resume button, or carry out the Sleep command from your operating system or power
management program. (If your system is configured to suspend operation using Hibernate mode, which is
explained later in this procedure, a message is displayed while data is saved to your hard disk.)
2The Power icon either flashes (Sleep) or is not displayed (Hibernate) when system operation is suspended,
depending on how your system is configured. At this point, programs that were running are stopped, active data
is saved, and the system enters one of two different low-power states, or sleep modes, as explained in the
following paragraphs.
IF YOU HAVE SET YOUR SYSTEM TO TURN POWER OFF FROM THE POWER OPTIONS UTILITY IN THE
CONTROL PANEL, THE FOLLOWING PROCEDURE WILL NOT BE POSSIBLE, SINCE PRESSING THE BUTTON
SHUTS THE SYSTEM DOWN RATHER THAN SUSPENDING IT. TO CHANGE YOUR POWER OPTIONS, GO TO
START -> SETTINGS -> CONTROL PANEL -> POWER OPTIONS.

54
- Starting the Tablet PC
3Observe the Power icon in the Status display to determine which suspend mode your system is using.
•Power icon is blinking: Sleep mode.
In this mode, active data is saved by maintaining power to RAM while most other system
components are powered off. The Battery Gauge icon in the Status display indicates the battery
charge level.
•Power icon is not displayed: Hibernate mode.
In this mode, active data is stored on the hard disk drive and power usage is reduced to the same
level used in the Off state. When the system is in Hibernate mode, the Battery Gauge icon is not
visible in the Status display. In this mode, there is no danger of losing data if battery power is lost.
If you have successfully performed this procedure, system operation is now suspended. Refer to
“Resuming System Operation” later in this chapter to resume system operation. Also, note the
following with regard to suspending system operation:
•You can remove the battery while the system is in Sleep or Hibernate modes in order to install a
charged battery. To prevent losing unsaved data, wait until system operation has suspended before
you remove the battery. Note that after you remove the battery, you have approximately five
minutes to replace it with a new battery or to plug in a power supply before the bridge battery is
depleted.
•Your system may be configured to suspend operation automatically after a period of inactivity.
•Your system may be configured to enter Hibernate mode automatically after a period of time in
Sleep mode.
IF YOU ARE REPLACING THE BATTERY, WAIT UNTIL SYSTEM OPERATION IS SUSPENDED AND THE POWER
ICON IS FLASHING BEFORE YOU REMOVE THE BATTERY. FAILURE TO DO SO COULD RESULT IN LOSS OF
YOUR UNSAVED DATA. (NOTE THAT IF THE RESUME ON LAN FUNCTION IS ENABLED IN THE BIOS
SETUP, YOU SHOULD NOT REMOVE THE BATTERY UNLESS THE SYSTEM IS SHUT DOWN. WHEN RESUME
ON LAN IS ENABLED, THE BRIDGE BATTERY IS DISABLED IN ORDER TO OPTIMIZE BATTERY LIFE.)

55
- Starting the Tablet PC
•The system uses a small amount of battery power when in Sleep mode. Eventually, the battery will
become fully discharged.
•If the battery charge drops to a Low-Battery Warning level while the system is running, the system
will beep periodically. If this occurs, suspend system operation, shut down the system, or attach an
external power source, such as the AC adapter, to the Tablet PC.
•If the battery charge drops to a Critically Low level while the system is running, the system is forced
into a Sleep or Hibernate mode. If this occurs, you must either install a charged battery, or connect
an external power source such as the AC adapter before you can resume system operation. (If the
charge drops to a Critically Low level while the system is in Sleep mode, the system stays in that
mode until power is restored or totally dissipated.)
•Suspending system operation interrupts data communications; therefore, some programs may block
the system from suspending to prevent an interruption.
•The suspend action of the Suspend/Resume button may be disabled to prevent accidental
interruption. If this is the case, pressing the Suspend/Resume button will not suspend system
operation as described here. (In this case, sleep mode can only be achieved using the system
software). Contact your local help desk or reseller if your system configuration is not suitable.
•If your system is equipped with a PC Card that allows you to connect to a wired or wireless network,
you may be logged off the network after a period of inactivity while system operation is suspended.
Contact a network administrator or help desk, or call Fujitsu Service and Support at 1-800-8Fujitsu
(1-800-838-5487) for details on your network log-off parameters.
IF YOU WILL NOT BE USING THE SYSTEM FOR AN EXTENDED PERIOD, SHUT DOWN THE SYSTEM RATHER
THAN USING SLEEP MODE.

56
- Starting the Tablet PC
Resuming Operation
To resume operation from either Sleep or Hibernate modes, press the Suspend/Resume button.
•From Sleep mode
Status lights indicate that the system state is changing. It may take up to a minute before the system
returns to the On state and system operation resumes. Note that the display turns on shortly before
the pen becomes active due to the power-up sequences observed by the system.
•From Hibernate mode
Active data is read from the hard disk drive, and the system returns to the On state after a short time.
Use the system as you normally would once system operation resumes.
All programs resume at the point where execution stopped when system operation was suspended.
NOTE THAT POWER TO SEVERAL SYSTEM COMPONENTS MUST BE RESTORED BEFORE SYSTEM
OPERATION RESUMES. ALLOW SUFFICIENT TIME FOR SYSTEM OPERATION TO RESUME BEFORE
ATTEMPTING TO USE THE SYSTEM. IF YOUR SYSTEM USES HIBERNATE MODE, IT WILL TAKE LONGER TO
RESUME OPERATION AS COMPARED TO USING SLEEP MODE. TIME IS NEEDED TO READ DATA FROM THE
HARD DISK DRIVE.

57
- Productivity Applications and Utilities
Productivity Applications and Utilities
Depending upon your system, one of the following productivity applications is installed on your system:
TBD
Microsoft Office Ready
With Office Ready PCs it's now even easier to take advantage of Microsoft® Office 2007. The full
versions of Microsoft® Office Basic, Small Business and Professional 2007 are already preinstalled on
your PC, so there’s nothing to install, and all Office Ready PCs give you the option to activate a 60 day
trial of Microsoft® Office Professional 2007! All you need to do is purchase the appropriate Office 2007
license kit which allows you to "un-lock" the full version of Office that you want.
Fujitsu offers a Media License Kit for Microsoft® Office Small Business 2007. Simply enter your product
key and you’re ready to go.
Another option is to purchase a Microsoft® Office 2007 media-less license kit (MLK) from either your
computer reseller or online from Microsoft within 90 days of the purchase of your computer.
Microsoft Office OneNote® 2007
Microsoft® Office OneNote® 2007 is a digital notebook that provides a flexible way to gather and
organize your notes and information, powerful search capabilities so you can find what you're looking for
quickly, and easy-to-use shared notebooks for teams to work together more effectively. Unlike paper-
based systems, word processing programs, e-mail systems, or other productivity programs, Office
OneNote® 2007 delivers the flexibility to gather and organize text, pictures, digital handwriting, audio and
video recordings, and more — all in one digital notebook on your computer. Office OneNote® 2007 can
help you become more productive by keeping the information you need at your fingertips and reducing
time spent searching for information across e-mail messages, paper notebooks, file folders, and printouts.

58
- Productivity Applications and Utilities
Using the Shock Sensor Utility
Shock Sensor Utility is designed to decrease the risk of damage to the computer's hard disk drive (HDD)
in the event of excessive impact or vibration. The Shock Sensor Utility also improves the security of the
computer by automatically locking the computer with a password when it is carried. Note that the HDD
protection and computer locking features are mutually exclusive; both cannot be selected at the same time.
1Double-click the Shock Sensor Utility icon in the system tray at the bottom-right of the screen. The [Shock
Sensor Utility] window appears.
2Click the red [Setting] button. The [Shock Sensor Utility Settings] window appears.
Action
Select the action you wish this utility to perform:
•Protect HDD from impact. HDD head is retracted when an impact to the computer is detected.
•Lock computer when carried. Lock the computer when it is being carried.
•Nothing. No action.
Sensitivity of impact/horizontal move/fall/carry detection
Adjust the sensitivity of the acceleration sensor based on system motion or impact.
Ignore periodic vibration.
If vibration is periodic, disregard it.
Ignore mouse click
When the mouse is clicked, sensitivity is temporarily lowered.
•SHOCK SENSOR UTILITY DOES NOT COMPLETELY PROTECT THE HDD AND DOES NOT PROVIDE ABSOLUTE
SECURITY FOR THE COMPUTER.
•THE COMPUTER MAY STOP TEMPORARILY WHILE THE HDD HEAD IS RETRACTED. TO RESTART THE COMPUTER,
KEEP THE SYSTEM HORIZONTAL.

59
- Productivity Applications and Utilities
Ignore keyboard action
When the keyboard is used, sensitivity is temporarily lowered.
Confirm calibration when user logs on
Select [Confirm calibration when user logs on] if you want to recognize the current orientation as
horizontal at logon.
Perform calibration automatically when user logs on
Select [Perform calibration automatically when user logs on] if the system is normally used on a horizontal
surface.
[Calibrate Now]
The calibration is executed. Please position the computer as horizontally as possible, then click the
[Calibrate Now] button. The current horizontal position will be recognized as the true horizontal by
performing the calibration.
3Click the [OK] or [Cancel] button. The [Setup] window closes.
Using the Shock Sensor Monitor Window
Right-click the Shock Sensor Utility icon in the system tray at the bottom-right of the screen, and select
[Monitor] from the menu. The Monitor window appears.
Note that the Monitor is designed for entertainment, and has no effect on system settings or orientation.
To navigate the monitor, use the buttons described below.
•Advance. Incline the display to the hinge side, or use [Up] key.
•Back. Incline the display to the mouse-button side, or use [Down] key.
•Right. Incline the display to the right side, or use [Right] key.
•Left. Incline the display to the left side, or use [Left] key.
•Go up. Use [A] key.

60
- Productivity Applications and Utilities
•Go down. Use [Z] key.
•Close. Use [Esc] key.
Display Profiles
The Fujitsu Tablet Controls utility allows you to set different display configurations when the system is
undocked, docked in portrait mode, and docked in landscape mode. When the tablet transitions between
these three configurations, the selected configuration will automatically be applied.
Setting Display Profiles
To change display configurations, perform the following steps:
1Go to Start > Control Panel.
2Open “Intel® GMA Driver for Mobile”.
3Modify the settings to your desired configuration. You will be able to change the Display mode and Display
Settings for all available monitors.
4Once the desired configuration is applied, go to the Control Panel and open “Fujitsu Tablet Controls”.
5On the “Fujitsu Tablet Controls” click “Save Current Profile”.
Repeat the above steps for all three modes of the slate:
a) when the system is docked in landscape mode,
b) when the system is docked in portrait mode, and,
c) when the system is undocked.
Adjusting the Display Brightness
There are four ways to adjust your display’s brightness:
DEPENDING UPON WHETHER YOU ARE RUNNING YOUR SYSTEM ON BATTERY OR AC POWER, THE
DEFAULT SCREEN BRIGHTNESS SETTINGS WILL BE DIFFERENT. THE SCREEN BRIGHTNESS DEFAULT FOR
RUNNING ON BATTERY IS LOWER THAN THAT ON AC POWER IN ORDER TO OPTIMIZE BATTERY LIFE.

61
- Productivity Applications and Utilities
•Windows XP Tablet PC: Click the Tablet icon in the system tray at the bottom right of the screen.
(When the cursor is on top of the icon, a message stating “Change tablet and pen settings” is
displayed.) When the Tablet and Pen Settings window appears, select the Display tab, and move the
Screen Brightness slider to change the brightness.
Windows Vista: Open the Windows Mobility Center control panel by right-clicking on the Power
Options (battery) icon in the system tray. From there you can adjust display brightness.
•Click Start -> Control Panel -> Tablet and Pen Settings. Select the Display tab, and move the Screen
Brightness slider to change the brightness.
•Click the Fujitsu Menu icon in the system tray at the bottom right of the screen. (When the cursor
is on top of the icon, a message stating “Fujitsu Menu...” is displayed.) Select Tablet and Pen
Settings and select the Display tab. Move the Screen Brightness slider to change the brightness.
•Press the Fn key twice to invoke the Fujitsu menu and select Tablet and Pen Settings.
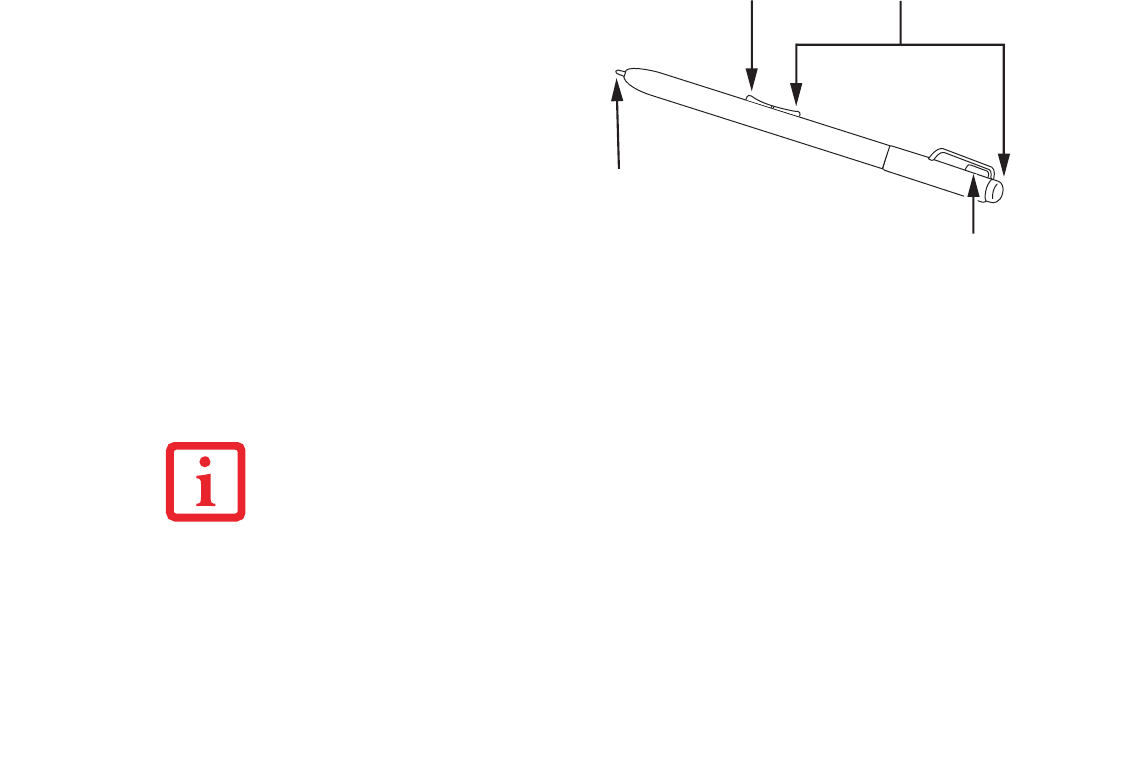
62
- Using the Pen
Using the Pen
The screen reacts when the pen tip is approximately 1/8 inch (3-5 mm) from the screen. The pen has four
switches: a tip switch, a barrel button toggle switch with switches at both ends, and an "eraser" switch,
located on the end of the barrel. By default, the tip switch corresponds to the left mouse button, and the
You can use the Stylistic ST6000
Series pen to generate and create
electronic “ink”, to select items, and
to navigate through programs on the
Tablet PC. Programs that support
handwriting recognition also allow
you to write characters directly on
the screen with the pen. You can also
use the pen as a drawing tool.
TBD - VERIFY PEN CONFIG
Figure 9. Stylistic ST6000 pen
THE STYLISTIC ST6000 PEN IS A SOPHISTICATED, HIGH-QUALITY ELECTRONIC INSTRUMENT THAT CAN BE DAMAGED
IF USED IMPROPERLY. TREAT THE PEN AS YOU WOULD ANY PRECISION DEVICE. THE FOLLOWING LIST CONTAINS
GUIDELINES FOR PROPER PEN HANDLING:
•DO NOT USE THE PEN AS A POINTER OR TAP IT ON SURFACES OTHER THAN THE TABLET SCREEN.
•DO NOT TRY TO TURN THE THUMB GRIP ON THE PEN; IT IS DESIGNED FOR INSERTING AND REMOVING THE
PEN FROM THE PEN HOLDER AND FOR ATTACHING A PEN TETHER.
•NEVER STORE THE PEN WITH THE TIP BEARING THE PEN’S WEIGHT PEN (E.G., SITTING TIP DOWN IN A PENCIL
CUP). STORING THE PEN TIP DOWN COULD DISTORT THE INTERNAL MECHANISM OVER A PERIOD OF TIME
(ESPE-CIALLY IN HIGHER TEMPERATURES), CAUSING THE TIP TO ACT AS IF IT IS ALWAYS DEPRESSED. TO
AVOID DAMAGE, STORE THE PEN IN THE PEN HOLDER WHEN NOT IN USE.
Barrel switch Eraser switches
Tip switch
Pen tether attachment point

63
- Using the Pen
front toggle (closest to the pen tip) barrel button switch corresponds to the right mouse button (when used
in combination with the tip switch). The rear toggle of the barrel button switch and the eraser switch at the
end of the barrel act as electronic ink “erasers”.
The rear toggle, eraser, and tip click pressures can be changed by clicking [Start] -> Control Panel, and
double-clicking Fujitsu Pen Settings (XP) or Pen and Input Devices (Vista) icon. Note that the rear toggle
switch and the eraser switch are both affected by the same settings; they cannot be changed individually.
To change rear toggle and eraser button functions, select the drop-down list to select a new function, then
click [Apply]. If you don’t want the rear toggle and button switch to have any function, select Ignore.
Adjusting the click pressure determines how much pressure must be put on the pen tip in order for the
screen to react. The softer it is set, the less pressure required; the harder it is set, the more pressure
required. To change the click pressure, use the slider bar to make the click pressure harder or softer, then
click [Apply].
Here are some hints that may help you use the pen more effectively:
•To activate the tip switch, tap or hold the pen tip against the screen.
•To activate the barrel button switch, press and hold the end of the button you wish to use (front
toggle is the right mouse button switch; the rear toggle acts as an electronic “eraser”).
•To move the cursor, hold the pen tip within 1/8 inch (3 - 5mm) from the screen and move the pen.
•To start a program, double-tap the pen tip (tap the pen tip twice rapidly) on the program icon as you
would double-click a mouse.
•To select an object, tap the pen tip on the object once.
•To “double-click” an object, tap twice on the object quickly.
•ENSURE THAT A SCREEN PROTECTOR IS INSTALLED ON THE TABLET PC SCREEN BEFORE YOU USE THE PEN.
THE WARRANTY DOES NOT COVER A SCRATCHED SCREEN.
•USE ONLY THE PEN PROVIDED WITH YOUR TABLET PC. DO NOT USE SUBSTITUTES THAT WERE NOT DESIGNED
FOR THE STYLISTIC ST6000 SERIES TABLET PC.

64
- Using the Pen
•To move, or “drag”, an object on the screen, place the pen tip directly over the object, then as
you hold the pen tip against the screen, move the pen.
Calibrating the Pen
In order to ensure accurate tracking between the pen and cursor, you must run the Touch Screen
Calibration Utility before you use the active digitizer for the first time, or after you change the display
resolution.
To run the calibration utility:
1Go to Start -> Control Panel and double-click on the Tablet and Pen Settings icon.
2Click Calibrate.
3Adjust the display of your Tablet PC to a comfortable angle.
4Using the pen, firmly touch the screen directly on the (+) symbol; the (+) symbol will move to the next location.
5Repeat step 4 in the four corners, then click OK.
Installing a Pen Tether
To prevent dropping or losing your pen, you should attach it to the system using the pen tether that is
included with the system.
To attach the pen tether to your Tablet PC, perform the following steps:
1Attach the end of the pen tether with the smaller loop to your pen. Do do so, push the end of the tether through
the hole in the pen, then thread the opposite end of the tether through the loop.
2Attach the end of the pen tether with the larger loop to the attachment point on your pen tablet. To do so, insert
the end of the pen tether through the attachment point, then feed the pen through the large loop in the tether.

65
- Using the Pen
Figure 10. Installing a Pen Tether
Replacing the Pen Tip
With use, the pen tip may become worn or may pick up foreign particles
that can scratch the screen. A damaged or worn tip may not move freely,
causing unpredictable results when using the pen. If your pen exhibits
these problems, you should replace the pen tip. To do so, use the pen tip
removal tool included with your pen.
To remove the tip, position the tip in the gap between the two ends of
the tool. Pinch the tool together so the tip is firmly clasped, then pull it
from the barrel. If the tip is worn or damaged, discard it.
To replace the tip, retrieve one of the new tips that accompanied your
pen. Insert the flat end of the tip into the barrel and push it in firmly until
it is seated.
If you need more tips, they can be ordered from the Fujitsu website at:
us.fujitsu.com/computers.
Figure 11. Tip Removal Tool

66
- User-Installable Features
User-Installable Features
Lithium ion Battery
Charging the Battery
The Stylistic ST6000 Series battery can be charged while it is installed in the Tablet PC. To charge the
battery:
1Connect a DC power source, such as the AC adapter, to the DC input connector on the Tablet PC. The DC Input
icon appears in the Status display. If the battery charge is below 90%, the battery begins charging and the
Charging icon appears in the Status display. If the battery charge is 90% or higher when you connect DC power,
the battery will not charge, preventing battery overcharging.
2Look at the Battery Charge icon in the Status display to determine the percent of charge in the battery. See
“Status Display” in Chapter 1 of this manual for a description of the Battery Charge icon.
As long as DC power remains connected to the Tablet PC, the charging process continues until the battery
charge reaches 100%.
Also note the following with respect to charging the battery:
•You can use the system, suspend system operation, or shut down and turn off the system without
interrupting the charging process; however, using the system while the battery is charging will
cause the battery to charge at a slower rate.
•As noted in the procedure above, the system will not begin charging the battery if the battery charge
level is 90% or higher when the system is initially connected to external DC power. (This prevents
the battery from being overcharged.)
•The battery uses Lithium ion battery cells which have no “memory effect.” You do not need to
discharge the battery before you begin charging.
Removing and Installing the Battery
The battery can be removed from the Tablet PC and swapped with a charged battery. The battery can then
be charged in an external charger if one is available.
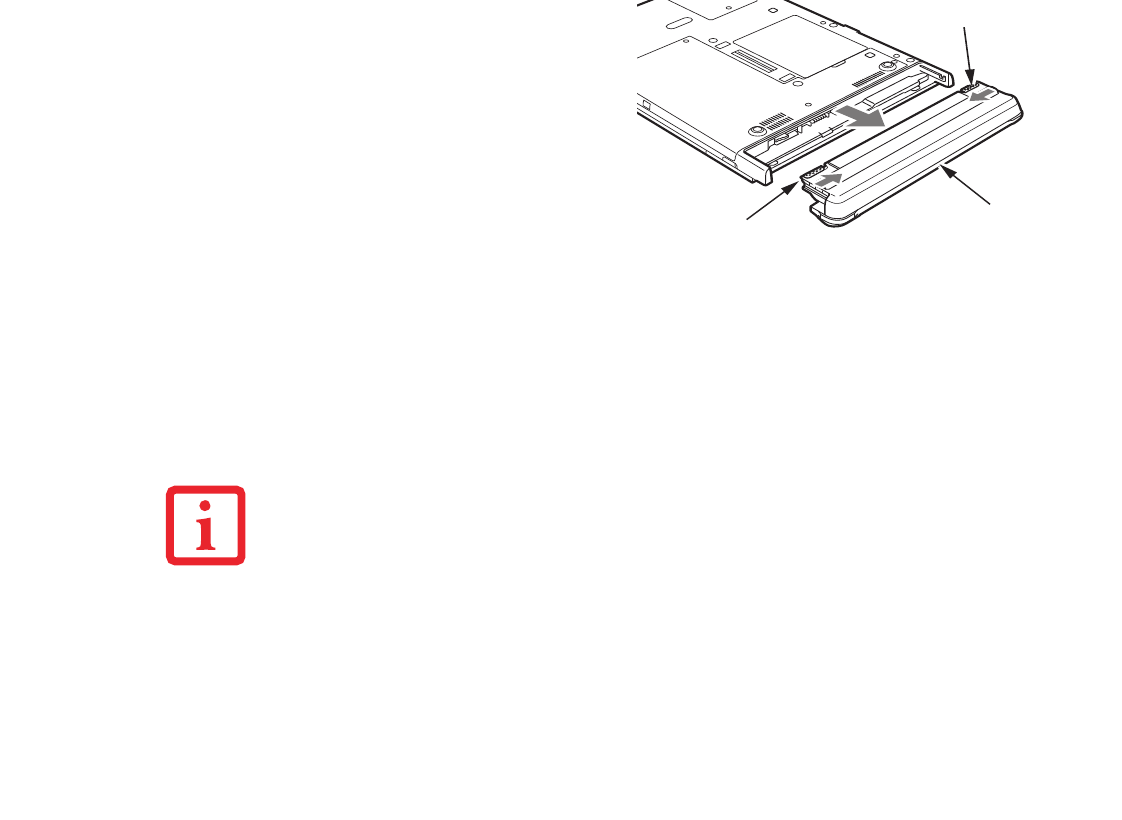
67
- User-Installable Features
To remove the battery from the Tablet PC:
2Slide the battery release latches in the direction indicated. (See Figure 12.)
3Pull the battery away from the system, as shown in the illustration and remove the battery from the Tablet PC.
If you are using an external battery charger, refer to the instructions provided with the battery charger.
To install the battery:
1Orient the battery with the slides in the empty battery tray. Slide the battery into the tray and press it firmly until
it is seated. When it is properly seated, the battery release latches will return to position and lock the battery.
2Once the battery is installed, you can resume system operation or start and use your system normally.
1Choose one of the following:
•If a charged battery is available, you can
suspend system operation. A built-in
“bridge” battery will maintain the system
in Sleep mode for about 5 minutes while
the battery is removed; this allows time
for replacement with a charged battery.
•If a charged battery is not available, save
your work and close all running programs,
then shut down the system or Hibernate.
•Plug in an external DC power source. Figure 12. Removing the battery
UNDER FEDERAL, STATE, OR LOCAL LAW, IT MAY BE ILLEGAL TO DISPOSE OF BATTERIES BY PUTTING
THEM IN THE TRASH. BE SURE TO DISPOSE OF BATTERIES IN ACCORDANCE WITH LOCAL GOVERNMENT
REGULATIONS.
Release latch
Release latch
Battery

68
- User-Installable Features
Tips for Conserving Battery Power
You can extend the charge life of your battery by conserving battery power. (Your results may vary
depending on your application and how the system is configured.) Here are some suggestions to help you
conserve battery power:
•Use an external power source such as the AC adapter whenever the system is docked.
•Suspend system operation if you know that you won’t be using the system for a while.
•Shut down the system if you won’t be using the system for an extended period of time.
•Switch the wireless LAN switch Off when wireless LAN functionality in not needed (applicable
only for systems with optional wireless LAN).
•Use power management (available from the Power Options in the Control Panel) to help you
conserve power automatically.
•Reduce the brightness of the LCD.
•Battery life is dependent upon the operating system, power settings, and applications in use.
Operation of the Bridge Battery
When installed in the Tablet PC, the battery provides power to some system components—even when the
system is in the Off state. When the battery is removed, power is supplied to these components by a
“bridge” battery that is built into the Tablet PC.
The bridge battery is not designed for long-term operation. To maintain the bridge battery properly,
observe the following measures:
•To prevent draining the bridge battery, always store the system with a charged battery installed.
•If the bridge battery becomes drained, it takes approximately 8 hours for it to be fully recharged.
•THE BRIDGE BATTERY FUNCTION IS DISABLED IF WAKE ON LAN IS ENABLED IN THE BIOS.
•THE SYSTEM ARRIVES WITH THE BRIDGE BATTERY IN A DISCHARGED STATE. BE SURE TO CHARGE IT
SUFFICIENTLY BEFORE RELYING UPON IT TO SUPPORT THE SYSTEM IN THE EVENT OF BATTERY REMOVAL.
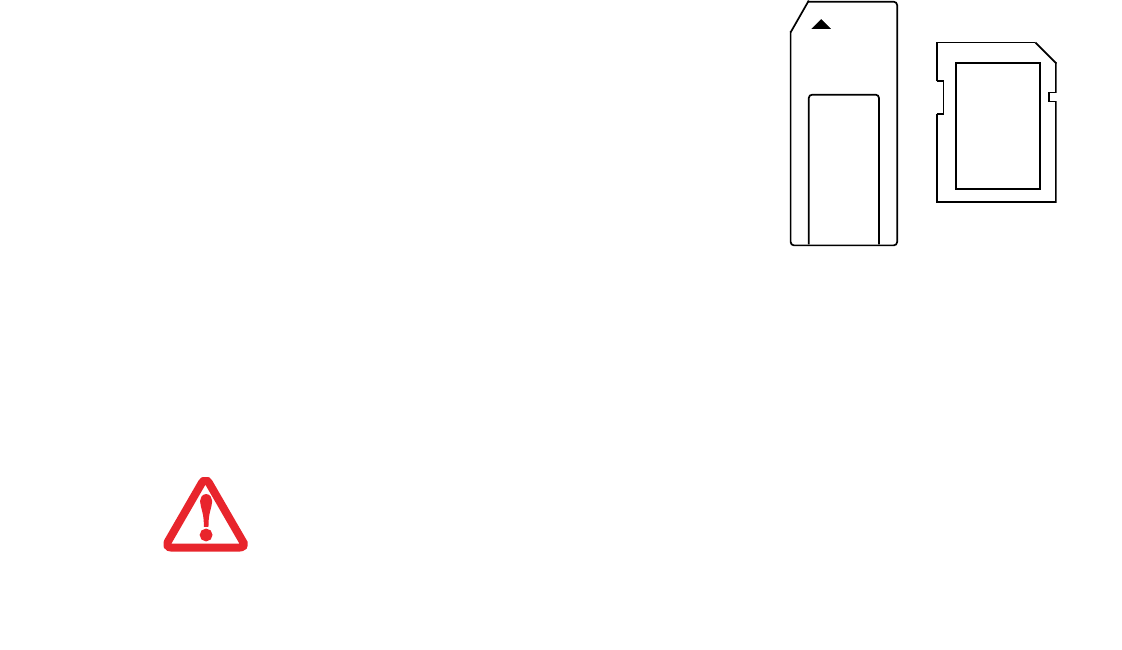
69
- User-Installable Features
• The bridge battery charges when the AC Adapter is connected and the system is in On or Off states
or Sleep mode. It charges from the battery only when the system is in the On state.
Memory Stick/SD Card Slot
Your Tablet PC supports Memory Stick and SD flash memory cards on which you can store and transfer
data to and from a variety of digital devices. These cards use flash memory architecture, which means they
don’t need a power source to retain data.
Inserting Memory Stick/SD Cards
Memory Sticks and SD Cards are inserted in the Memory Stick/SD Card slot (Figure 14). To insert a
Memory Stick or SD Card, follow these steps:
Memory Stick is a flash memory technology developed
by Sony Electronics. Memory Stick allows you to record,
transfer and share digital content, such as digital pictures,
movies, music, voice, and computer data and
applications.
Secure Digital (SD) Cards are very similar to Memory
Sticks, but they are shorter. Like the Memory Stick, SD
Cards allow portable storage among a variety of devices,
such as cell phones, GPS systems, and digital cameras.
SD Cards transfer data quickly, with low battery
consumption. It uses flash memory architecture. Figure 13. Memory Stick and SD Card
•INSERTING OR REMOVING A MEMORY STICK OR SD CARD DURING YOUR SYSTEM’S SHUTDOWN OR BOOTUP
PROCESS MAY DAMAGE THE CARD AND/OR YOUR COMPUTER.
•DO NOT INSERT A CARD INTO A SLOT IF THERE IS WATER OR ANY OTHER SUBSTANCE ON THE CARD AS YOU
MAY PERMANENTLY DAMAGE THE CARD, YOUR TABLET PC, OR BOTH.
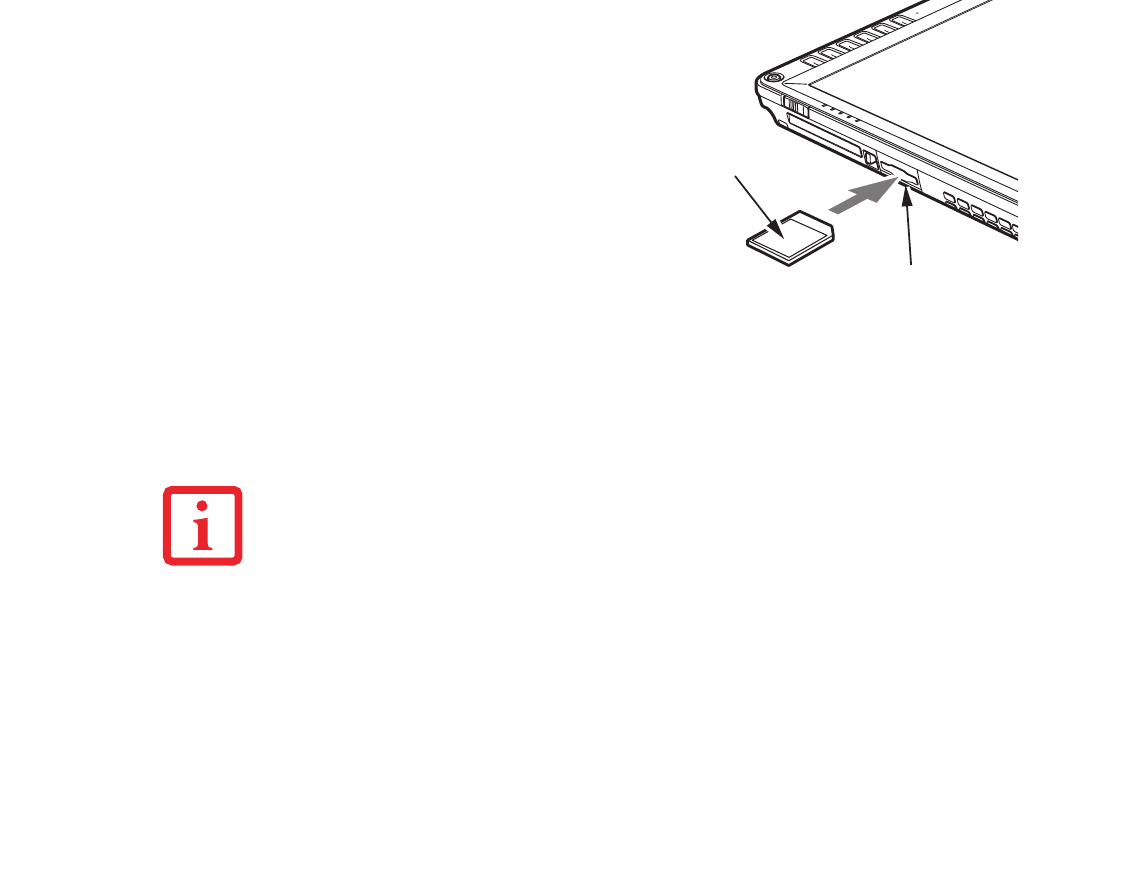
70
- User-Installable Features
Removing A Memory Stick/SD Card
To remove a Memory Stick/SD Card, follow these steps:
Push the Memory Stick or SD Card in until it unlatches. It will then eject from the slot for removal
1See your Memory Stick or SD Card manual for
instructions on the insertion of your card.
Some cards may require that your system is
off while inserting them.
2Make sure there is no card currently in the
slot. If there is, see Removing a Memory
Stick/SD Card.
3Insert your card into the slot with the product
label facing up.
4Push the card firmly into the slot until it is
seated in the connector.
Figure 14. Inserting an SD Card
SEE YOUR MEMORY STICK OR SD CARD MANUAL FOR SPECIFIC INSTRUCTIONS ON THE REMOVAL OF
YOUR CARD. SOME CARDS MAY REQUIRE YOUR COMPUTER TO BE IN SLEEP MODE OR OFF WHILE
REMOVING THEM.
SD Card
Memory Stick/SD Card slot
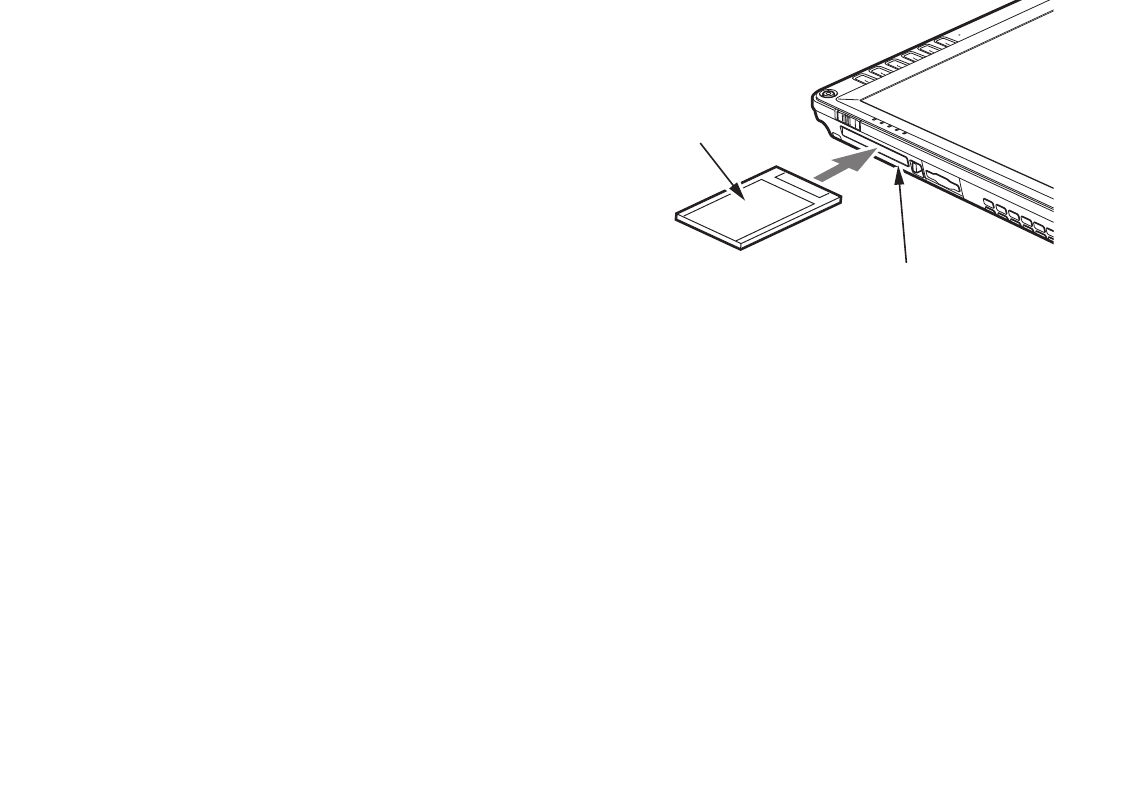
71
- User-Installable Features
PC Card Slot
The Stylistic ST6000 Series Tablet PC Card slot allows you to insert a Type I or Type II PCMCIA Card.
Removing a PC Card
To remove a PC Card, first click the Safely Remove Hardware icon in the system tray in the bottom right-
hand corner of the display. Select PC Card from the list, and click [Stop].
Press the PC Card eject button so that it pops out. Once the button has popped out, press it firmly to eject
the card.
Inserting a PC Card
To insert a PC card, position the side with the
arrow facing up (i.e., when looking at the
tablet’s display side, the arrow on the card
should be visible.) Slide the card into the PC
Card slot, and press it firmly to ensure proper
seating. (See Figure 15 for location)
If you need assistance inserting a PC Card in
the Stylistic ST6000 Series Tablet PC, contact
your corporate help desk or reseller.
Figure 15. Inserting a PC Card
PC Card
PC Card slot

72
- User-Installable Features
Removing and Installing Memory
There are two DIMM slots in your Tablet PC. 256 MB, 512 MB, 1 GB, and 2 GB modules are available,
so you can install a combination of up to 4 GB in the system.
Installing a Memory Module
To install a DIMM module in the Tablet PC:
1Ensure that the Tablet PC is off. To do so, carry out the Shut Down command in the Start menu. (Do not attempt
to remove or install a DIMM module when the system is in Sleep mode or running.)
2Remove the two screws from the cover plate on the back of the Tablet PC and remove the cover plate as shown
in Figure 16.
3Insert the DIMM module in the socket at an angle and push it down until it locks into place as shown in Figure
17. Note that the DIMM module is keyed to prevent it from being inserted backwards.
4Reinstall the cover and screws that you removed in step 2.
5Confirm that the DIMM module is recognized by the system. To do so, run BIOS Setup. The size of the DIMM
module should be displayed in the Info menu in BIOS Setup.
The DIMM module is installed in the Tablet PC and you can now use the system.
•DO NOT REMOVE ANY SCREWS FROM THE MEMORY UPGRADE MODULE COMPARTMENT EXCEPT THE ONES
SPECIFICALLY SHOWN IN THE DIRECTIONS FOR INSTALLING AND REMOVING THE MEMORY UPGRADE MODULE.
•THE MEMORY UPGRADE MODULE CAN BE SEVERELY DAMAGED BY ELECTROSTATIC DISCHARGE (ESD). TO
MINIMIZE RISK, OBSERVE THE FOLLOWING PRECAUTIONS:
- BEFORE HANDLING A MEMORY MODULE, TOUCH A GROUNDED METAL OBJECT TO DISCHARGE STATIC
ELECTRICITY BUILT UP IN YOUR BODY.
- WHEN INSTALLING OR REMOVING A MEMORY MODULE, HOLD IT BY THE EDGE SO AS NOT TO TOUCH ANY
CONTACTS OR CHIPS. BE CAREFUL NOT TO TOUCH ANY COMPUTER TERMINALS OR COMPONENTS; THE OIL
FROM YOUR FINGERS COULD CAUSE A SHORT.
•BE SURE TO POWER DOWN YOUR SYSTEM BEFORE ADDING OR REMOVING MEMORY MODULES. EVEN IF THE
SYSTEM IS IN HIBERNATE OR SLEEP, DATA COULD BE LOST OR MEMORY COULD BE DAMAGED IF POWER IS STILL
AVAILABLE TO THE SYSTEM.
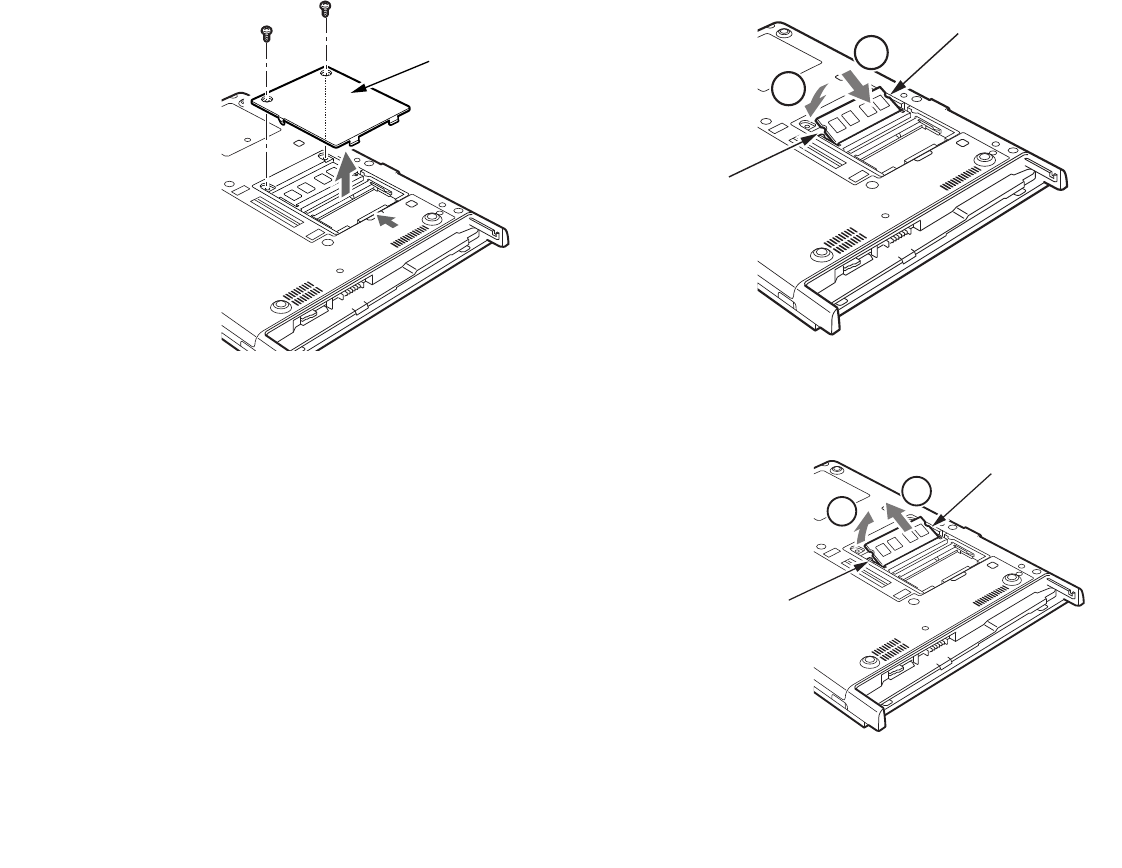
73
- User-Installable Features
Figure 16. Accessing the Memory Slot Figure 17. Installing a DIMM Module
Removing a Memory Module
To remove a DIMM module:
1Ensure that the Tablet PC is off. To do so, carry out the Shut
Down command in the Start menu. (Do not attempt to
remove or install a DIMM module when the system is in
Sleep mode or running.)
2Remove the screws from the cover plate on the back of the
Tablet PC and remove the cover plate as shown in Figure 16.
3Spread the finger latches on the socket that lock the DIMM
module in place until the DIMM module is loose.
4Remove the DIMM module from the socket.
See "Installing a Memory Module" to install a new module. Figure 18. Removing a DIMM Module
Memory
module
cover
1
2
Alignment key
Alignment key
12
Finger latch
Finger latch

74
Chapter 2
Care and Maintenance
Caring for your Tablet PC
This chapter gives you pointers on how to care for and maintain your Stylistic ST6000 Series Tablet PC.
•IN THE EVENT YOU DROP YOUR TABLET PC OR DAMAGE THE HOUSING IN ANY WAY, IMMEDIATELY TURN OFF
POWER AND DISCONNECT THE POWER PLUG. FAILURE TO DO SO COULD RESULT IN A SHORT CIRCUIT, SMOKE,
AND/OR FIRE. CONTACT FUJITSU SERVICE AND SUPPORT BY PHONE AT 1-800-8FUJITSU (1-800-838-5487), BY
EMAIL AT 8FUJITSU@US.FUJITSU.COM, OR THROUGH THE WEBSITE AT
HTTP://WWW.COMPUTERS.US.FUJITSU.COM/SUPPORT TO LEARN HOW TO GET THE SYSTEM REPAIRED.
•DO NOT REMOVE ANY SCREWS FROM THE MEMORY UPGRADE MODULE COMPARTMENT EXCEPT THE ONES
SPECIFICALLY SHOWN IN THE DIRECTIONS FOR INSTALLING AND REMOVING THE MEMORY UPGRADE MODULE.
•THE MEMORY UPGRADE MODULE CAN BE SEVERELY DAMAGED BY ELECTROSTATIC DISCHARGE (ESD). TO
MINIMIZE RISK TO THE MODULE, OBSERVE THE FOLLOWING PRECAUTIONS:
- BEFORE DOCKING OR UNDOCKING YOUR SYSTEM (WHEN USING A TABLET DOCK) OR HANDLING A MEMORY
MODULE, IT IS GOOD PRACTICE TO ALWAYS TOUCH A GROUNDED METAL OBJECT TO DISCHARGE STATIC
ELECTRICITY BUILT UP IN YOUR BODY.
- WHEN INSTALLING OR REMOVING A MEMORY MODULE, HOLD IT BY THE EDGE SO AS NOT TO TOUCH ANY
CONTACTS OR CHIPS. BE CAREFUL NOT TO TOUCH ANY INTERNAL COMPUTER TERMINALS OR COMPONENTS;
THE OIL FROM YOUR FINGERS COULD CAUSE A SHORT TO THE COMPONENTS.
- BE SURE TO POWER DOWN YOUR SYSTEM BEFORE ADDING OR REMOVING MEMORY MODULES. EVEN IF THE
SYSTEM IS IN HIBERNATE OR SLEEP STATES, DATA COULD BE LOST OR THE MEMORY COULD BE DAMAGED IF
POWER IS STILL AVAILABLE TO THE SYSTEM.

75
- Caring for your Tablet PC
Precautions
Please note the following information regarding proper treatment of your Tablet PC:
•Your Tablet PC is a durable but sensitive electronic device. Treat it with respect and care.
•Make a habit of transporting the system in a suitable carrying case.
•Do not attempt to service the computer yourself. Always follow installation and operation
instructions closely.
•If you accidentally spill liquid on your Tablet PC:
1Tur n it off.
2Position it so that the liquid can run out.
3Let it dry out for 24 hours, or longer if needed.
4If your Tablet PC will not boot up after it has dried out, call your support representative.
•Do not use your Tablet PC in a wet environment (near a bathtub, swimming pool).
•Always use the AC adapter and batteries that are approved for your system.
•Avoid exposure to sand, dust and other environmental hazards.
•Do not expose your Tablet PC to direct sunlight for long periods of time as excessive temperatures
may damage your system.
•Do not put heavy or sharp objects on the computer.
•Do not carry your system in a bag or briefcase while it is running; doing so could result in
overheating or hard disk drive problems.
•If you are carrying your system in a briefcase, or any other carrying case, make sure that there are
no objects in the case pressing on the display.
•Do not drop your Tablet PC or touch the screen with any sharp objects.
Protecting the Display Screen
The Stylistic ST6000 Series Tablet PC is designed to provide you with years of service. Using a screen
protector will help ensure the screen remains as clear as possible. When installed, the screen protector
becomes a durable, replaceable writing surface that protects the display screen from abrasion.

76
- Caring for your Tablet PC
To obtain additional screen protectors, use Fujitsu part number FPCSP08AP (6-pack) when ordering.
Additional information about installation is included with the screen protectors.
To install a new screen protector on your Tablet PC:
1If a screen protector is already installed on the display screen, remove it before installing the new screen
protector. The screen protector is held onto the display screen surface by a thin strip of adhesive around the
edges.
2Clean the display by wiping the screen gently using a soft cotton cloth dampened with isopropyl alcohol. Ensure
that all residue has been removed from the screen before applying a new screen protector. Remove the
protective coating from the adhesive side of the screen protector first.
3Apply the screen protector to the display screen surface. When doing so, orient the screen protector with the
adhesive side of the screen protector facing the display screen as shown in Figure 19.
4Apply pressure to the screen protector with your finger using a continuous wiping motion along the edges. The
adhesive sets completely within 48 hours. To ensure a good seal between the screen protector and the display,
do not lift the screen protector from the display once it has been applied.
5Remove the protective plastic cover from the face of the screen protector, as shown in Figure 20.
DURING NORMAL USE OF THE TABLET PC, SMALL PARTICLES FROM THE ENVIRONMENT CAN BECOME
EMBEDDED IN THE PEN TIP AND SCRATCH THE SCREEN. TO PREVENT SCRATCHING THE SCREEN,
ENSURE THAT A SCREEN PROTECTOR IS INSTALLED BEFORE USING YOUR TABLET PC. THE
WARRANTY DOES NOT COVER A SCRATCHED SCREEN.
•THE STYLISTIC ST6000 SERIES TABLET PC IS NOT WATERPROOF. DO NOT POUR LIQUIDS ON THE SYSTEM
OR WASH IT WITH A HEAVILY SOAKED CLOTH.
•DO NOT PLACE ITEMS ON THE TOP OF THE DISPLAY, OR DAMAGE MAY OCCUR.
/
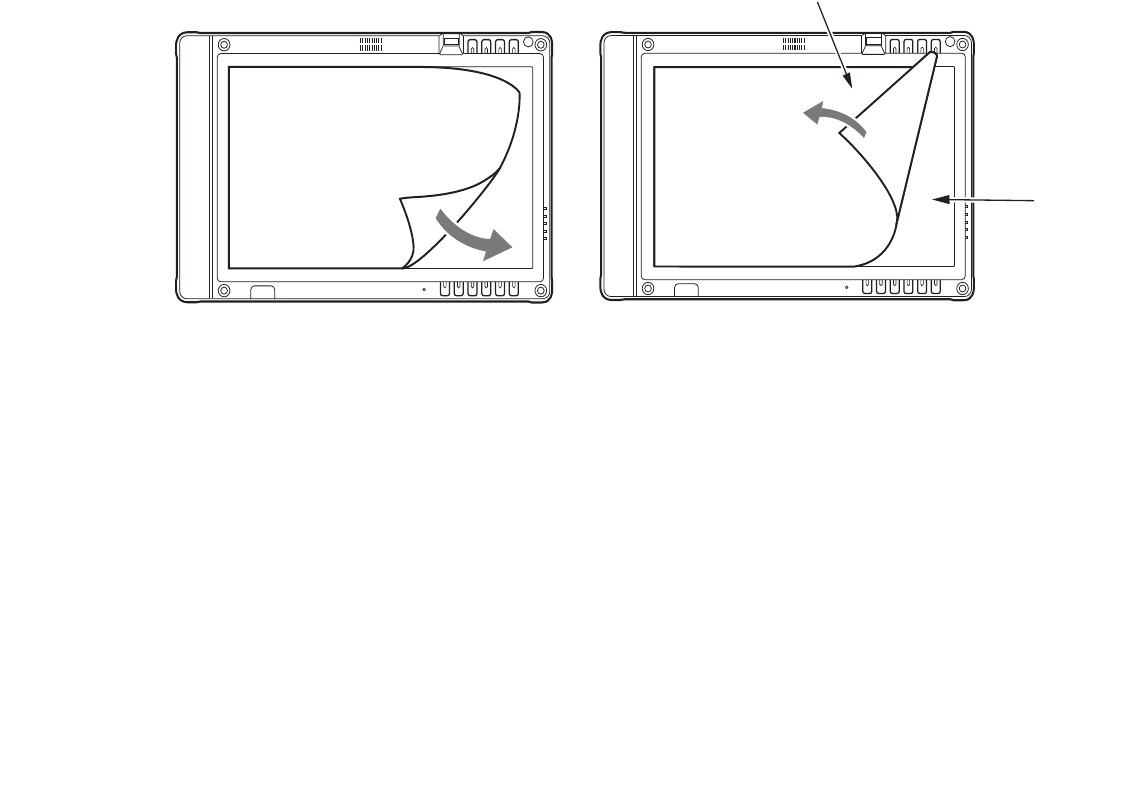
77
- Caring for your Tablet PC
.
6Clean any residue left behind by the protective coating from the exposed surface of the screen protector by
wiping gently with a soft cotton cloth dampened with isopropyl alcohol. Wipe the screen protector with a soft dry
cloth to remove any low-tack adhesive; this will help prevent the pen tip from squeaking.
Storing the Tablet PC
Store the Stylistic ST6000 Series Tablet PC in the Off state with a fully charged battery installed. You can
store the Tablet PC in the Off state for about 30 days with a fully charged battery installed. After this
period, the battery should be recharged or replaced with a charged battery.
If you intend to store the Tablet PC for a longer period of time, the small battery that maintains system
time may need to be replaced. Replacement of the clock battery should only be performed by authorized
technicians.
Figure 19. Installing the screen protector Figure 20. Removing the protective cover
Protective cover
Screen
protector

78
- Caring for your Tablet PC
Avoiding Overheating
The Tablet PC monitors its internal temperature. As the internal temperature approaches the tolerable
limits of heat-sensitive components, system functions are automatically limited or turned off to prevent
damage.
To protect your tablet from damage and to optimize performance, keep all air all vents unobstructed,
clean, and clear of debris. This may require periodic cleaning, depending upon the system environment.
Do not operate the tablet in areas where the air vents can be obstructed, such as in tight enclosures or on
soft surfaces like a bed or cushion.
Cleaning the Display Screen
To clean the Tablet PC display screen, wipe the screen surface gently using a soft cotton cloth slightly
dampened with water or isopropyl alcohol.
DO NOT EXPOSE YOUR TABLET PC TO DIRECT SUNLIGHT FOR EXTENDED PERIODS OF TIME. HIGH
TEMPERATURES COULD DAMAGE YOUR TABLET.
THE TABLET PC IS NOT WATERPROOF. DO NOT POUR LIQUIDS ON THE TABLET PC OR WASH IT WITH
A HEAVILY SOAKED CLOTH.

79
- Troubleshooting
Troubleshooting
Solutions to some common problems are described in the following sections. If you are experiencing a
problem with your Tablet PC that you cannot solve by taking the actions described, contact your local help
desk or reseller, or call Fujitsu Service and Support at 1-800-8Fujitsu (1-800-838-5487) for further
assistance.
System Will Not Resume Operation
If the system will not resume operation after system operation has been suspended, check the following:
•The battery may either be defective, or discharged to a critically low level. When the battery reaches
a critically low level, the system is forced into Sleep mode to avoid a total system power failure. To
correct this problem, either connect an external power supply (such as the AC adapter), or install a
charged battery in the Tablet PC.
•The system may be at the critical thermal limit. To avoid damage to heat-sensitive components, the
system enters sleep mode when it gets too hot. System operation cannot be resumed until the Tablet
PC cools off to a tolerable temperature. Move the Tablet PC to a cooler location.
Display Screen Blank or Difficult to Read
If the display screen on your Tablet PC appears blank or is unreadable, confirm that the system is running
(the Power icon is displayed continuously on the Status display), and check the following:
•The system brightness may be set too low, causing the screen to appear too dark. To change system
brightness, press the Fn button twice to open the Fujitsu menu. Brightness can be adjusted from the
menu.
•The video timeout may have expired. Tap on the display screen to reactivate the display. Note that
this is a normal, power-saving feature.
Cursor Is Not Tracking Pen
If the cursor on the screen appears to be misaligned with the pen or is not accurately tracking the pen,
calibrate the pen. See “Calibrating the Pen” on page 64 for more information.

80
- Troubleshooting
Infrared Data Transfer Is Not Working
If you are experiencing problems transferring data over the system’s infrared interface, note the following:
•Can the IrDA port on the Tablet PC “see” the IrDA port on the other device? A direct line-of-sight
path must exist between the IrDA port on the Tablet PC and the IrDA port on the other device.
•The distance between the two devices must not be more than 3 feet.
•The viewing angle from the IrDA port on the Tablet PC must not be more than 15 degrees from a
center line between the IrDA port on the Tablet PC and the IrDA port on the other device.
•The device with which you are trying to communicate must be compliant with the IrDA Standard
Revision 1.1 (or 1.0).
•It may be necessary for both computers to be using the same network connection protocols.
Tablet PC is Not Responding to the Pen
If the Tablet PC does not respond to the pen, connect an external keyboard to the system to see if it
responds to keyboard commands. If the system doesn’t respond to a keyboard, the application or system
may have crashed, and it may be necessary to reboot the system. If the system responds to a keyboard but
not to a pen, contact your local help desk or reseller, or call Fujitsu Service and Support at 1-800-8Fujitsu
(1-800-838-5487) for further assistance.
Speaker/Headphone Volume Too Low
If the audio volume on your Tablet PC speaker or external headphones is too low, check the following:
•Ensure the speaker (or headphone output if using headphones) is enabled. To do so, open the
Control Panel and double-click on the Sounds and Audio Devices icon. Select the proper tab, and
increase the volume using the slider bar. (If you aren’t getting any sound, uncheck the Mute box if
it is checked.)
•Press the Fn button twice to open the Fujitsu menu. Volume can be adjusted from the menu.
•Ensure the mute box in the system volume control (accessible from the system tray) is not set.
•Ensure any volume control in your audio software is set to an audible level.

81
- Restoring the Included Software TBD - NEW PROCEDURE?
Configuring Peripheral Interfaces
Certain peripheral devices can be disabled during the BIOS Setup. If the peripheral interface you want to
use does not appear to be working with your peripheral device, ensure that it is enabled in the BIOS.
Contact your local help desk or reseller, or call Fujitsu Service and Support at 1-800-8Fujitsu (1-800-838-
5487) if you need assistance using BIOS Setup.
Restoring the Included Software TBD - NEW PROCEDURE?
The Drivers and Applications Restore (DAR) DVD contains sets of device drivers and Fujitsu utilities (in
specific directories) that are unique to your computer configuration for use as documented below.
Re-Installing Individual Drivers and Applications
The Drivers and Applications CD can be used to selectively re-install drivers and/or applications that may
have been uninstalled or corrupted.
To re-install drivers and/or applications:
1Boot up the system and insert the DAR CD after Windows has started. A Fujitsu Installer screen is displayed
after the CD is inserted.
2After reading the License Agreement, click [I agree].
3A window will appear containing a list of applications, drivers, and utilities that you can install from the Drivers
and Applications CD.
IF YOU HAVE ACCESS TO THE INTERNET, VISIT THE FUJITSU SUPPORT WEBSITE AT:
HTTP://WWW.COMPUTERS.US.FUJITSU.COM/SUPPORT TO CHECK FOR THE MOST CURRENT
INFORMATION, DRIVERS AND HINTS ON HOW TO PERFORM RECOVERY AND SYSTEM UPDATES.
THERE MAY BE CERTAIN FREE THIRD-PARTY APPLICATIONS PRE-INSTALLED ON YOUR SYSTEM THAT
ARE NOT ON THE DAR CD. THE LATEST VERSIONS OF THE APPLICATIONS CAN BE DOWNLOADED
FROM THE THIRD-PARTY’S WEBSITE.

82
- Restoring the Included Software TBD - NEW PROCEDURE?
4In the list, check off all the components you want to install. If you want to install all components, click [Select
All]. Clicking [Select All] will select all of the blue-coded components; you must select grey and green
components separately.
5Once you have selected the components you wish to install, click [Install Selected Subsystems]; the
components will be installed.
6After the components are installed, click [OK], then click [Yes] when asked if you want to reboot the system.
Restoring the Factory Image
The Restore Disc that came with your system contains two utilities:
•The Recovery utility allows you to restore the original contents of the C: drive.
•The Hard Disk Data Delete utility on this disc is used to delete all data on your hard disk and
prevent it from being reused. Do not use the Hard Disk Data Delete utility unless you are absolutely
certain that you want to erase your entire hard disk, including all partitions.
THE COMPONENTS LISTED ARE COLOR-CODED IN TERMS OF THEIR INSTALL STATUS. BLUE INDICATES
THAT THE COMPONENT CAN BE INSTALLED. GREEN INDICATES THAT THE COMPONENT NEEDS TO BE
INSTALLED SEPARATELY. GREY INDICATES A COMPONENT THAT IS ALREADY INSTALLED; GREY ITEMS
CAN BE REINSTALLED, BUT PRIOR TO INSTALLATION YOU WILL RECEIVE A REMINDER THAT THE
COMPONENT IS ALREADY INSTALLED.
THE RESTORE DISC ONLY RESTORES THE PRIMARY HARD DISK DRIVE. IF YOU HAVE A SECOND
PARTITION ON YOUR HARD DRIVE, IT WILL NOT BE RESTORED USING THESE UTILITIES.
•THE USE OF THIS DISC REQUIRES THAT YOU HAVE A DEVICE CAPABLE OF READING DVDS ATTACHED TO YOUR
SYSTEM. IF YOU DO NOT HAVE A BUILT-IN DVD PLAYER, YOU WILL NEED TO ATTACH AN EXTERNAL PLAYER.
FOR MORE INFORMATION ON AVAILABLE EXTERNAL DEVICES, VISIT OUR WEBSITE AT:
US.FUJITSU.COM/COMPUTERS.
•THIS DISC CAN ONLY BE USED WITH THE SYSTEM WITH WHICH IT WAS PURCHASED.

83
- Restoring the Included Software TBD - NEW PROCEDURE?
BOOT Priority Change
Before restoring an image, you must first verify that your system is set up to boot from the DVD drive. To
verify/change the boot-up priority (rather than booting-up from the hard drive or an external floppy disk
drive), perform the following steps:
Using SecureCore Menu
To change the priority using the SecureCore menu, simply press the [ent] button when the Fujitsu logo
appears after powering on. Select Boot Menu, then select “CD/DVD Drive”.
Using BIOS Setup Utility
1Start your system and press the [Ctl-Alt-Del] button when the Fujitsu logo appears. You will enter the BIOS
Setup Utility.
2Using the arrow keys, go to the Boot menu.
3Arrow down to the Boot Device Priority submenu. Press [Enter].
4If “Optical Media Drive” or “CD-ROM Drive” is not at the top of the list, arrow down to the drive in the list, and
press the space bar (or the + key) to move it to the top of the list. (The system attempts to boot from the devices
in the order in which they are listed.). Note that the BIOS for some systems will indicate “CD-ROM Drive”, even
when a DVD drive is connected.
5If you have an external DVD drive connected, proceed to the next step; otherwise, proceed to
step 7.
6If you have an external DVD drive connected:
•Select the Advanced menu in the BIOS window.
•Scroll down to the USB Features submenu and press the Enter key to open it.
•If Legacy USB Support is disabled, press the space bar to enable it.
•Scroll down to SCSI SubClass Support and press the space bar to enable it.
7Press [F10], then click on [Yes] to exit the BIOS Setup Utility and return to the boot process.
After you have changed the boot priority, you can restore a backup image when you are booting up.

84
- Restoring the Included Software TBD - NEW PROCEDURE?
Procedure
1Turn on the power to your system.
2Ensure that you have a device that can read DVDs either installed in your system or attached externally to it.
3Insert the Restore Disc into the drive tray.
4Reboot your system.
5After the system reboots, follow the instructions that appear to either restore your system image or erase all
data from your hard disk.
Automatically Downloading Driver Updates
Your system has a convenient tool called the Fujitsu Driver Update (FDU) utility. With FDU, you can
choose to automatically or manually go to the Fujitsu site to check for new updates for your system.
The FDU icon should appear in the system tray at the bottom right of your screen (roll the cursor over the
icons to find the correct one). If the FDU icon does not appear in the system tray, it can be started by going
to [Start] -> All Programs, and clicking on Fujitsu Driver Update; this will create the icon automatically.
To invoke the FDU menu, right-click on the FDU icon. The menu contains the following items:
Check for updates now
Allows for manual driver update search. The first time it is used, you are prompted to agree to a user
agreement. After clicking on the icon, the FDU automatically connects with the Fujitsu site to check for
updates and downloads them. While downloading, the icon has a red bar through it, indicating that it
cannot be used while the download is in process. When the update is complete, a message appears
informing you of the fact.
Enable Automatic Update Notifications
Automatically searches for new updates on a regular basis (approximately every 3 days).
Show update history
Brings up a screen that displays a history of updates that have been made via the FDU.

85
- Restoring the Included Software TBD - NEW PROCEDURE?
About Fujitsu Driver Update
Displays the FDU version number and copyright information
Fujitsu Driver Update Readme
Displays the FDU readme.
86
Chapter 3
System Specifications
Specifications
This section provides the hardware and environmental specifications for your Fujitsu Stylistic Tablet PC.
Specifications of particular configurations will vary.
Configuration Label
The configuration label located on the back of your Tablet PC contains specific information regarding the
options you’ve chosen for your Tablet PC. Following is an example configuration label.
A2KXXXXXXXXXXXXX
ST6012, SU9400 ULV, VBE, 1GB, 120G, WLAN, 12.1WXGA
FPC P/N: FPCMXXXXX
Configuration P/N:
Hard Drive
Part Number
Processor
Model #
Memory
Operating System Screen Size/Type
Configuration ID
Communications

87
- Specifications
Microprocessor
Intel® Core™ 2 Duo Ultra Low Voltage processors (Refer to the system label to determine the speed of
your processor).
Chipset
•Intel GS45
•I/O Controller Hub 9 Mobile (ICH9M-SFF-Enhanced)
Memory
System Memory
•DDR2-667 MHz SDRAM dual-channel memory module.
•Two DIMM slots; upgradeable to 4 GB of total memory (2 GB x 2). Note that when 4 MB of
memory is installed in a Windows Vista system, approximately 3.3 GB is addressable memory; the
upper memory is reserved by Vista for hardware usage.
Cache Memory
3 MB L2 cache on-die
Video
•Color flat-panel TFT active matrix LCD display with simultaneous display capability.
•Indoor/outdoor viewability
Video Color and Resolution
12.1" Crystal View Wide XGA display
•Internal: 1280 x 800 pixel resolution, 16M colors
•External: 1600 x 1200 pixel resolution, 16M colors
•Simultaneous: 1280 x 800, 16M colors

88
- Specifications
Video RAM
Intel® GS45 video graphics controller, with the following amounts of shared video memory using
Dynamic Video Memory Technology (DVMT), as determined by the amount of system memory:
Audio
•Realtek codec ALC269
•Headphones: Stereo headphone jack, 3.5 mm, 1 Vrms or less, minimum impedance 32 Ohms
•Microphone: Stereo microphone jack, 3.5 mm, 100 mVp-p or less, minimum impedance 10K Ohms
•One built-in speaker, 20 mm diameter
•Two built-in dual digital microphones
Operating System System Memory Maximum Graphics Memory
Windows Vista 1 GB 271 MB
2 GB 783 MB
3 GB 1295 MB
4 GB 1295 MB
Windows XP 1 GB 512 MB
2 GB 1024 MB
3 GB 1024 MB
4 GB 1024 MB

89
- Specifications
Mass Storage Device Options
Hard Drive Options
•Serial ATA, 150 Mbps data buffer, 5400 rpm, 2.5”, 9.5 mm
•Serial ATA, 150 Mbps data buffer, 7200 rpm, 2.5”, 9.5 mm
•MLC Solid State Drive, 64 GB, 2.5”
•Shock-mounted
•Shock Sensor utility
Communications
•Gigabit LAN: Internal wired 10/100/1000 Gigabit Ethernet LAN
•WLAN: Optional Integrated Intel Wireless WiFi Link 5300 (533AN_HMW), or, Atheros
AR9280AL1E (AR5BHB92) Half Mini-Card Wireless network card
•Bluetooth: Bluetooth 2.1 device for wireless personal area network communication
Security Features
Trusted Platform Module
The Stylistic Tablet PC ST6010 has a Trusted Platform Module (TPM) installed for added system security.
Stylistic Security/Application Panel
Six Security/Application buttons, each with primary, secondary, and tertiary functions. For detailed
information about the Security and Application buttons, refer to “Application, Navigation, and Security
Buttons” on page 30 and “Security Functions of Application Buttons” on page 36.
Theft Prevention Lock
One lock slot for use with security restraint systems.
Fingerprint Recognition Sensor
Swipe sensor for biometric security.

90
- Specifications
Device Ports
On the Stylistic Tablet PC:
•PC Card slot for one Type I or Type II card: PCMCIA Standard 2.1 with CardBus support
•Memory Stick/SD Card slot
•One 15-pin D-SUB connector for VGA external monitor (see Display specifications)
•Two USB 2.0 (Universal Serial Bus) connectors for input/output devices
•One DC In connector
•One LAN (RJ-45) connector
•Docking port (100-pin, to dock with port replicator)
•One stereo headphone jack
•One stereo microphone jack
•Dedicated Smart Card slot (requires third-party application)
•IR port for external USB keyboard/mouse support
•IrDA port for communications
On the Optional Port Replicator:
•One 15-pin D-SUB connector for VGA external monitor
•Four USB 2.0 connectors for input/output devices
•One LAN (RJ-45) connector
•One DC-in connector
•One DVI-D connector
•One Headphone-Out connector

91
- Specifications
Power
Batteries
Standard Lithium ion battery, rechargeable, 6-cell 10.8V, 5800 mAh
AC Adapter
Autosensing 100-240V AC, supplying 16V DC, 3.75A, 60W to the Tablet PC; includes an AC cable
Power Management
Conforms to ACPI (Advanced Configuration and Power Interface).
Dimensions and Weight
Overall Dimensions
Approximately 11.69"(w) x 8.62"(d) x 1.34”(h) (297 mm x 219 mm x 34 mm)
Weight
Approximately 3.57 lbs. (1.62 kg) with 6-cell battery
Environmental Requirements
Temperature
Operating: 41° to 95° F (5° to 35° C). Non-operating: 5° to 140° F (–15° to 60° C)
Humidity
Operating: 20% to 85%, relative, non-condensing. Non-operating: 8% to 85%, relative, non-condensing
Altitude
Operating: 10,000 feet (3,048 m) maximum
Popular Accessories
For ordering or additional information on Fujitsu accessories please visit our Web site at
www.shopfujitsu.com or call 1-800-FUJITSU.

92
- Specifications
Included Software
Depending on your pre-installed operating system, your Tablet PC comes with software for playing audio
and video files of various formats. In addition there is file transfer software, virus protection software and
Power Management software. The following list indicates the software included with your system.
•Acrobat Reader
•Norton Internet Security™ (90-day free trial)
•ArcSoft Webcam Companion 2
•Roxio Creator LJ (on select models)
•Google Desktop
•Google Tool Bar
•Google Picasa
•OmniPass Fingerprint application
•Fujitsu Driver Update utility
•Microsoft Office Ready 2007 (60-day free trial) with Activation Assistant
•Microsoft Office OneNote 2007 (on select models)
•Evernote 2.0 Plus
Learning About Your Software
Tutorials
All operating systems and most application software have tutorials built into them upon installation. We
highly recommend that you step through the tutorial before you use an application.
Manuals
Included with your Tablet PC you will find manuals for your installed operating system and other pre-
installed software. Any manuals that are not included, are available online through the help system of the
software. We recommend that you review these manuals for general information on the use of these
applications.

93
- Specifications
Acrobat Reader
The Acrobat Reader allows you to view, navigate, and print PDF files from across all of the major
computing platforms.
ArcSoft Webcam Companion 2
WebCam Companion 2 offers a variety of webcam-optimized functions such as automatically recording
movement detected by the cam, launching video chat sessions, capturing still and video images, and
editing photos.
Norton Internet Security
Your system is preinstalled with a free 90-day trial version of Symantec’s Norton Internet Security™.
Norton Internet Security is a suite of tools designed to protect your Tablet PC from computer viruses,
hackers, spyware, and spam. It assists in the protection of data currently on your hard disk from
destruction or contamination. The trial version is activated upon your acceptance of software license
agreement. After 90 days, you will need to purchase a subscription from Symantec to download latest
virus, spyware, and spam definitions.
Roxio Creator LJ
(Available with some configurations of the optional port replicator) Creator LJ allows you to easily burn
CDs and organize, edit and share digital photos, music, data, and videos.
OmniPass Fingerprint application
The fingerprint sensor uses Softex OmniPass which provides password management capabilities to
Microsoft Windows operating systems. OmniPass lets you use a "master password" for all Windows,
applications, and on-line passwords, and presents a convenient user interface through which you can
securely manage passwords, users, and multiple identities for each user.
Google Desktop
Google Desktop lets you to search the contents of your computer for emails, web history, and files. It also
allows you to view news and photos from anywhere on your desktop.

94
- Specifications
Google Picasa
Google Picasa lets you to search for, locate, move and label all of the photos on your computer.
Google Toolbar
Google Toolbar lets you to search the Internet quickly, block pop-ups, and perform a variety of other tasks
to make your Internet experience easier and more pleasant.
Fujitsu Driver Update Utility
The Fujitsu Driver Update (FDU) utility is pre-installed on your system. With FDU, you can choose to
automatically or manually go to the Fujitsu site to check for new updates for your system. See
“Automatically Downloading Driver Updates” on page 117.
Microsoft OneNote
OneNote lets you collect all of your notes and information in an electronic “notebook” so that you can
organize your pictures, text, notes, and audio/video files in a single, searchable place.
EverNote
EverNote allows you to easily capture, store and access a variety of documents, such as typed and
handwritten memos, webpage excerpts, emails, phone messages, addresses, passwords, sketches, and
documents.
Operating System Option
The following operating system configuration is installed on your system:
•Microsoft Windows Vista Business Edition
With Microsoft Office Ready and and Microsoft Office Activation Assistant
•TBD - WINDOWS XP?

95
- Regulatory Information
Regulatory Information
Notice
Changes or modifications not expressly approved by Fujitsu could void this user’s authority to operate the
equipment.
FCC NOTICES
Notice to Users of Radios and Television
This equipment has been tested and found to comply with the limit for class B digital devices, pursuant to
parts 15 of the FCC Rules.
These limits are designed to provide reasonable protection against harmful interference in a residential
installation. This equipment generates, uses, and can radiate radio frequency energy and, if not installed
and used in accordance with the instructions, may cause harmful interference to radio communications.
However, there is no guarantee that interference will not occur in a particular installation. If this
equipment does cause harmful interference to radio or television reception, which can be determined by
turning the equipment off and on, the user is encouraged to try to correct the interference by one or more
of the following measures:
•Reorient or relocate the receiving antenna.
•Increase the separation between the equipment and receiver.
•Connect the equipment into an outlet that is on a different circuit than the receiver.
•Consult the dealer or an experienced radio/TV technician for help.
Shielded interconnect cables must be employed with this equipment to ensure compliance with the
pertinent RF emission limits governing this device.

96
- Regulatory Information
Notice to Users of the US Telephone Network
This equipment complies with Part 68 of the FCC rules, and the requirements adopted by ACTA. On the
bottom of this equipment is a label that contains, among other information, the FCC registration number
and ringer equivalence number (REN) for this equipment; or a product identifier in the format
US:AAAEQ##TXXXX. If requested, this information or number must be provided to the telephone
company.
This equipment is designed to be connected to the telephone network or premises wiring using a standard
jack type USOC RJ11C. A plug and jack used to connect this equipment to the premises wiring and
telephone network must comply with the applicable FCC Part 68 rules and requirements adopted by the
ACTA. A compliant telephone cord and modular plug is provided with this product. It is designed to be
connected to a compatible modular jack that is also compliant.
The ringer equivalent number (REN) of this equipment is 0.1B as shown on the label. The REN is used
to determine the number of devices that may be connected to a telephone line. Excessive RENs on a
telephone may result in the devices not ringing in response to an incoming call. In most but not all areas,
the sum of RENs should not exceed five (5.0). To be certain of the number of devices that may be
connected to a line, as determined by the total RENs, contact the local telephone company.
If this equipment causes harm to the telephone network, the telephone company will notify you in advance
that temporary discontinuance of service may be required. But if advance notice isn’t practical, the
telephone company will notify the customer as soon as possible. Also, you will be advised of your right
to file a complaint with the FCC if you believe it is necessary.
The telephone company may make changes in its facilities, equipment, operations or procedures that
could effect the operation of the equipment. If this happens the telephone company will provide advance
notice in order for you to make necessary modifications to maintain uninterrupted service.
If trouble is experienced with this equipment, for repair or warranty information, please refer to the
manual or contact Fujitsu Computer Systems Corporation, Customer Service. If the equipment is causing
harm to the telephone network, the telephone company may request that you disconnect the equipment
until the problem is resolved.

97
- Regulatory Information
The equipment cannot be used on public coin service provided by the telephone company. Connection to
party line service is subject to state tariffs. (Contact the state public utility commission, public service
commission or corporation commission for information).
If your home has specially wired alarm equipment connected to the telephone line, ensure the installation
of this computer does not disable your alarm equipment. If you have any questions about what will disable
alarm equipment, consult your telephone company or a qualified installer.
The Telephone Consumer Protection Act of 1991 makes it unlawful for any person to use a computer or
other electronic device to send any message via a telephone fax machine unless such message clearly
contains in a margin at the top or bottom of each transmitted page or on the first page of the transmission,
the date an time it is sent and an identification of the business or other entity, or other individual sending
the message and the telephone number of the sending machine or such business, other entity, or individual.
DOC (INDUSTRY CANADA) NOTICES
Notice to Users of Radios and Television
This Class B digital apparatus meets all requirements of Canadian Interference-Causing Equipment
Regulations.
CET appareil numérique de la class B respecte toutes les exigence du Réglement sur le matérial brouilleur
du Canada.
Notice to Users of the Canadian Telephone Network
NOTICE: This equipment meets the applicable Industry Canada Terminal Equipment Technical
Specifications. This is confirmed by the registration number. The abbreviation, IC, before the registration
number signifies that registration was performed based on a Declaration of Conformity indicating that
Industry Canada technical specifications were met. It does not imply that Industry Canada approved the
equipment.

98
- Regulatory Information
Before connecting this equipment to a telephone line the user should ensure that it is permissible to
connect this equipment to the local telecommunication facilities. The user should be aware that
compliance with the certification standards does not prevent service degradation in some situations.
Repairs to telecommunication equipment should be made by a Canadian authorized maintenance facility.
Any repairs or alterations not expressly approved by Fujitsu or any equipment failures may give the
telecommunication company cause to request the user to disconnect the equipment from the telephone
line.
NOTICE: The Ringer Equivalence Number (REN) for this terminal equipment is 0.1B. The REN assigned
to each terminal equipment provides an indication of the maximum number of terminals allowed to be
connected to a telephone interface. The termination on an interface may consist of any combination of
devices subject only to the requirement that the sum of the Ringer Equivalence Numbers of all the devices
does not exceed five.
Avis Aux Utilisateurs Du Réseau Téléphonique Canadien
AVIS: Le présent matériel est conforme aux spécifications techniques d’Industrie Canada applicables au
matériel terminal. Cette conformité est confirmée par le numéro d’enregistrement. Le sigle IC, placé
devant le numéro d’enregistrement, signifie que l’enregistrement s’est effectué conformément à une
déclaration de conformité et indique que les spécifications techniques d’Industrie Canada ont été
respectées. Il n’implique pas qu’Industrie Canada a approuvé le matériel.
Avant de connecter cet équipement à une ligne téléphonique, l’utilisateur doit vérifier s’il est permis de
connecter cet équipement aux installations de télécommunications locales. L’utilisateur est averti que
même la conformité aux normes de certification ne peut dans certains cas empêcher la dégradation du
service.
FOR SAFETY, USERS SHOULD ENSURE THAT THE ELECTRICAL GROUND OF THE POWER UTILITY, THE
TELEPHONE LINES AND THE METALLIC WATER PIPES ARE CONNECTED TOGETHER. USERS SHOULD
NOT ATTEMPT TO MAKE SUCH CONNECTIONS THEMSELVES BUT SHOULD CONTACT THE APPROPRIATE
ELECTRIC INSPECTION AUTHORITY OR ELECTRICIAN. THIS MAY BE PARTICULARLY IMPORTANT IN RURAL
AREAS.

99
- Regulatory Information
Les réparations de l’équipement de télécommunications doivent être effectuées par un service de
maintenance agréé au Canada. Toute réparation ou modification, qui n’est pas expressément approuvée
par Fujitsu, ou toute défaillance de l’équipement peut entraîner la compagnie de télécommunications à
exiger que l’utilisateur déconnecte l’équipement de la ligne téléphonique.
AVIS: L’indice d’équivalence de la sonnerie (IES) du présent matériel est de 0.1B. L’IES assigné à chaque
dispositif terminal indique le nombre maximal de terminaux qui peuvent être raccordés à une interface
téléphonique. La terminaison d’une interface peut consister en une combinaison quelconque de
dispositifs, à la seule condition que la somme d’indices d’équivalence de la sonnerie de tous les dispositifs
n’excède pas 5.
POUR ASSURER LA SÉCURITÉ, LES UTILISATEURS DOIVENT VÉRIFIER QUE LA PRISE DE TERRE DU
SERVICE D’ÉLECTRICITÉ, LES LIGNES TÉLPHONIQUES ET LES CONDUITES D’EAU MÉTALLIQUES SONT
CONNECTÉES ENSEMBLE. LES UTILISATEURS NE DOIVENT PAS TENTER D’ÉTABLIR CES CONNEXIONS
EUX-MÊMES, MAIS DOIVENT CONTACTER LES SERVICES D’INSPECTION D’INSTALLATIONS ÉLECTRIQUES
APPROPRIÉS OU UN ÉLECTRICIEN. CECI PEUT ÊTRE PARTICULIÈREMENT IMPORTANT EN RÉGIONS
RURALES.

100
Appendix A: WLAN User’s Guide
FCC Regulatory Information
Please note the following regulatory information related to the optional wireless LAN device.
Regulatory Notes and Statements
Wireless LAN, Health and Authorization for use
Radio frequency electromagnetic energy is emitted from Wireless LAN devices. The energy levels of these emissions, however,
are far much less than the electromagnetic energy emissions from wireless devices such as mobile phones. Wireless LAN
devices are safe for use by consumers because they operate within the guidelines found in radio frequency safety standards and
recommendations. The use of Wireless LAN devices may be restricted in some situations or environments, such as:
•On board an airplane, or
•In an explosive environment, or
•In situations where the interference risk to other devices or services is perceived or identified as harmful.
In cases in which the policy regarding use of Wireless LAN devices in specific environments is not clear (e.g., airports,
hospitals, chemical/oil/gas industrial plants, private buildings), obtain authorization to use these devices prior to operating the
equipment.

101
Regulatory Information/Disclaimers
Installation and use of this Wireless LAN device must be in strict accordance with the instructions included in the user
documentation provided with the product. Any changes or modifications made to this device that are not expressly approved
by the manufacturer may void the user’s authority to operate the equipment. The manufacturer is not responsible for any radio
or television interference caused by unauthorized modification of this device, or the substitution or attachment of connecting
cables and equipment other than those specified by the manufacturer. It is the responsibility of the user to correct any
interference caused by such unauthorized modification, substitution or attachment. The manufacturer and its authorized
resellers or distributors will assume no liability for any damage or violation of government regulations arising from failure to
comply with these guidelines.
This device must not be co-located or operated in conjunction with any other antenna or transmitter.
For IEEE 802.11a Wireless LAN: For operation within 5.15~5.25 GHz frequency range, it is restricted to indoor
environments, and the antenna of this device must be integral.
Federal Communications Commission statement
This device complies with Part 15 of FCC Rules.
Operation is subject to the following two conditions: (1) This device may not cause interference, and, (2) This device must
accept any interference, including interference that may cause undesired operation of this device.
FCC Interference Statement
This equipment has been tested and found to comply with the limits for a Class B digital device, pursuant to Part 15 of the FCC
Rules. These limits are designed to provide reasonable protection against harmful interference in a residential installation. This
equipment generates, uses, and can radiate radio frequency energy. If not installed and used in accordance with the instructions,
it may cause harmful interference to radio communications. However, there is no guarantee that interference will not occur in
a particular installation.
If this equipment does cause harmful interference to radio or television reception, which can be determined by turning the
equipment off and on, the user is encouraged to try and correct the interference by one or more of the following measures:
1Reorient or relocate the receiving antenna.
2Increase the distance between the equipment and the receiver.
3Connect the equipment to an outlet on a circuit different from the one the receiver is connected to.
4Consult the dealer or an experienced radio/TV technician for help.
Figure A-1. Ad Hoc Mode Network

102
FCC Radio Frequency Exposure statement
The available scientific evidence does not show that any health problems are associated with using low power wireless devices. There is no
proof, however, that these low power wireless devices are absolutely safe. Low power wireless devices emit low levels of radio frequency
energy (RF) in the microwave range while being used. Whereas high levels of RF can produce health effects (by heating tissue), exposure to
low-level RF that does not produce heating effects causes no known adverse health effects. Many studies of low-level RF exposure have not
found any biological effects. Some studies have suggested that some biological effects might occur, but such findings have not been
confirmed by additional research. The wireless LAN radio device has been tested and found to comply with FCC radiation exposure limits
set forth for an uncontrolled equipment and meets the FCC radio frequency (RF) Exposure Guidelines in Supplement C to OET65.
Export restrictions
This product or software contains encryption code which may not be exported or transferred from the US or Canada without
an approved US Department of Commerce export license. This device complies with Part 15 of FCC Rules., as well as ICES
003 B / NMB 003 B. Operation is subject to the following two conditions: (1) this device may not cause harmful interference,
and (2) this device must accept any interference received, including interference that may cause undesirable operation.
Modifications not expressly authorized by Fujitsu Computer Systems Corp. may invalidate the user's right to operate this
equipment.
Canadian Notice
The device for the 5150 - 5250 MHz band is only for indoor usage to reduce the potential for harmful interference to co-channel
mobile satellite systems.
The maximum antenna gain of 6 dBi permitted (for devices in the 5250 - 5350 MHz, 5470 - 5725 MHz and 5725 - 5825 MHz
bands) to comply with the e.i.r.p. limit as stated in A9.2 of RSS210.
In addition, users are cautioned to take note that high power radars are allocated as primary users (meaning they have priority)
of 5250 - 5350 MHz and 5650 - 5850 MHz and these radars could cause interference and/or damage to LE-LAN devices.

103
Before Using the Optional Wireless LAN
Before Using the Optional Wireless LAN
This manual describes the procedures required to properly set up and configure the optional integrated
Wireless LAN Mini-PCI device (referred to as "WLAN device" in the rest of the manual). Before using
the WLAN device, read this manual carefully to ensure it's correct operation. Keep this manual in a safe
place for future reference.
Wireless LAN Device Covered by this Document
This document is applicable to systems containing one of the following optional devices:
•Intel Wireless WiFi Link 5300 (533AN_HMW)
•Atheros AR9280AL1E (AR5BHB92) Half Mini-Card Wireless network card
Characteristics of the WLAN Device
•The WLAN devices are Mini-PCI card attached to the main board of the mobile computer.
•The WLAN devices operate in license-free RF bands, eliminating the need to procure an FCC operating
license. The WLANs operate in the 2.4GHz Industrial, Scientific, and Medical (ISM) RF band and the lower,
middle, and upper bands of the 5GHz Unlicensed National Information Infrastructure (UNII) bands.
•The wireless devices are capable of four operating modes, IEEE802.11a, IEEE802.11b, IEEE802.11g, and
IEEE802.11n (draft)
•The WLAN devices are Wi-Fi certified and operate (as applicable0 at a the maximum data rate of 540 Mbps
(theoretical) in IEEE802.11n (draft) mode; 54 Mbps in IEEE802.11a or IEEE802.11g mode; and 11 Mbps in
IEEE802.11b mode.
•The WLAN devices support the following encryption methods - WEP, TKIP, CKIP, and AES encryption.
•The Wireless LAN devices are compliant with the following standards: WPA, WPA2, CCX1.0, CCX2.0,
CCX3.0, and CCX4.0.
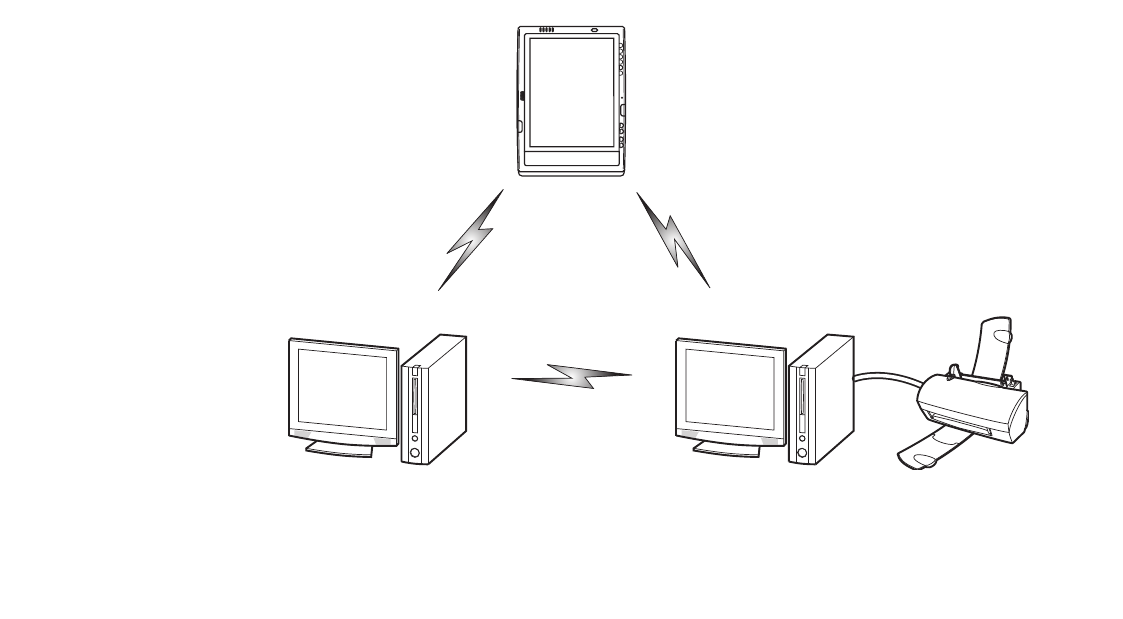
104
Before Using the Optional Wireless LAN
Wireless LAN Modes Using this Device
Ad Hoc Mode
"Ad Hoc Mode" refers to a wireless network architecture where wireless network connectivity between
multiple computers is established without a central wireless network device, typically known as Access
Point(s). Connectivity is accomplished using only client devices in a peer-to-peer fashion. That is why Ad
Hoc networks are also known as peer-to-peer networks. Ad Hoc networks are an easy and inexpensive
method for establishing network connectivity between multiple computers. Ad Hoc mode requires that the
SSID, network authentication, and encryption key settings are identically configured on all computers in
the Ad Hoc network.
Figure 21. Ad Hoc Mode Network
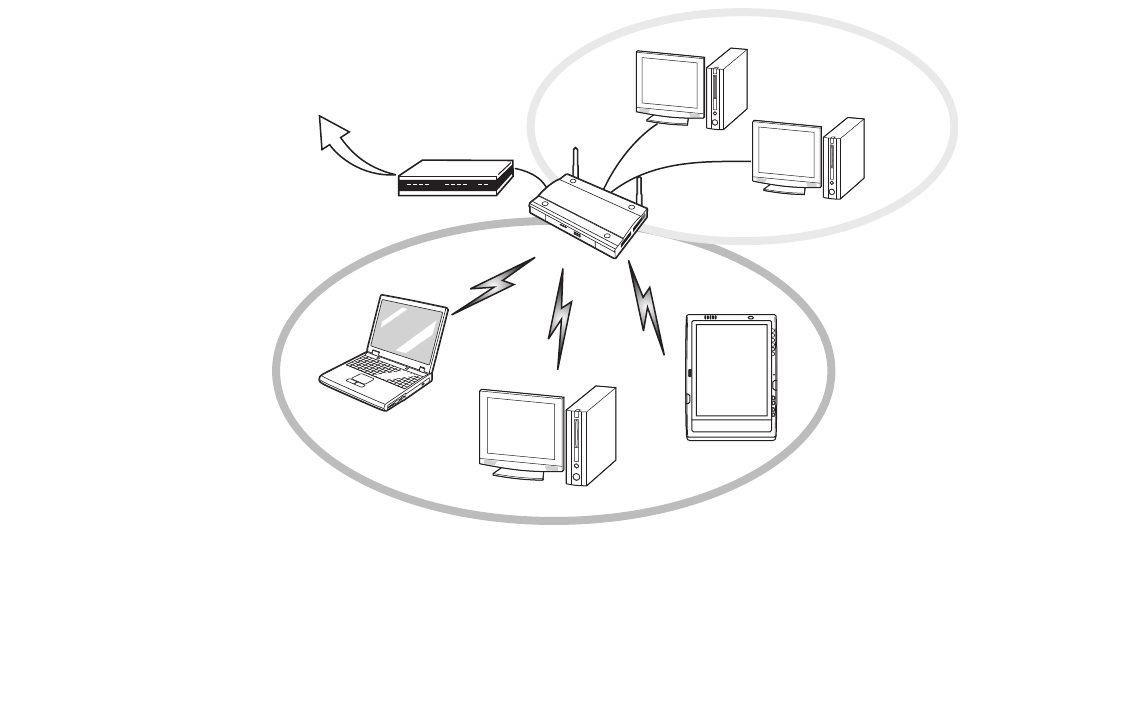
105
Before Using the Optional Wireless LAN
Access Point (Infrastructure) Mode
Infrastructure mode refers to a wireless network architecture in which devices communicate with wireless
or wired network devices by communicating through an Access Point. In infrastructure mode, wireless
devices can communicate with each other or with a wired network. Corporate wireless networks operate
in infrastructure mode because they require access to the WLAN in order to access services, devices, and
computers (e.g., file servers, printers, databases).
Figure 22. Access Point (Infrastructure) Mode Network
ADSL modem,
cable modem,
or similar
Internet Wired LAN
Access Point*
Wireless LAN *An optional hub for a wired
LAN may be required depending
upon the type of access point used.

106
Before Using the Optional Wireless LAN
How to Handle This Device
The WLAN device is an optional device that may come pre-installed in your mobile computer. Under
normal circumstances, it should not be necessary for you to remove or re-install it. The operating system
that your mobile computer comes with has been pre-configured to support the WLAN device.
•The wireless devices support IEEE802.11a, IEEE802.11b, IEEE802.11g, and IEEE802.11n.
•The WLAN devices operate in the 2.4 GHz ISM band and the 5 GHz lower, middle, and upper UNII bands.
•Microwave ovens may interfere with the operation of WLAN devices since they operate in the same 2.4 GHz
frequency range as IEEE802.11b/g/n devices. Interference by microwaves does not occur with IEEE802.11a
radio which operates in the 5 GHz RF band.
•Wireless devices that transmit in the 2.4 GHz range may interfere with operation of WLAN devices in
IEEE802.11b/g/n modes. Symptoms of interference include reduced throughput, intermittent disconnects,
and many frame errors. It is HIGHLY recommended that these interfering devices be powered off to ensure
proper operation of the WLAN device.
Deactivating/Disconnecting the WLAN Device
Disconnecting the WLAN device may be desired in certain circumstances (to extend battery life) or where
certain environments require it (i.e. hospitals, clinics, airplanes, etc.). The WLAN device can be
deativated by using the Wireless On/Off Switch, and it can be disconnected in Windows using the WLAN
icon in the system tray (Note that disconnecting via the icon in the system tray does not turn off the radio;
it continues to transmit and receive even though it’s not connected.).
BEFORE USING THE WIRELESS LAN DEVICE, YOU MUST FIRST INSTALL CLICKME! TO ENSURE THAT THE
CORRECT SOFTWARE FOR YOUR DEVICE IS INSTALLED. SEE “INSTALLING CLICKME!” ON PAGE 70.
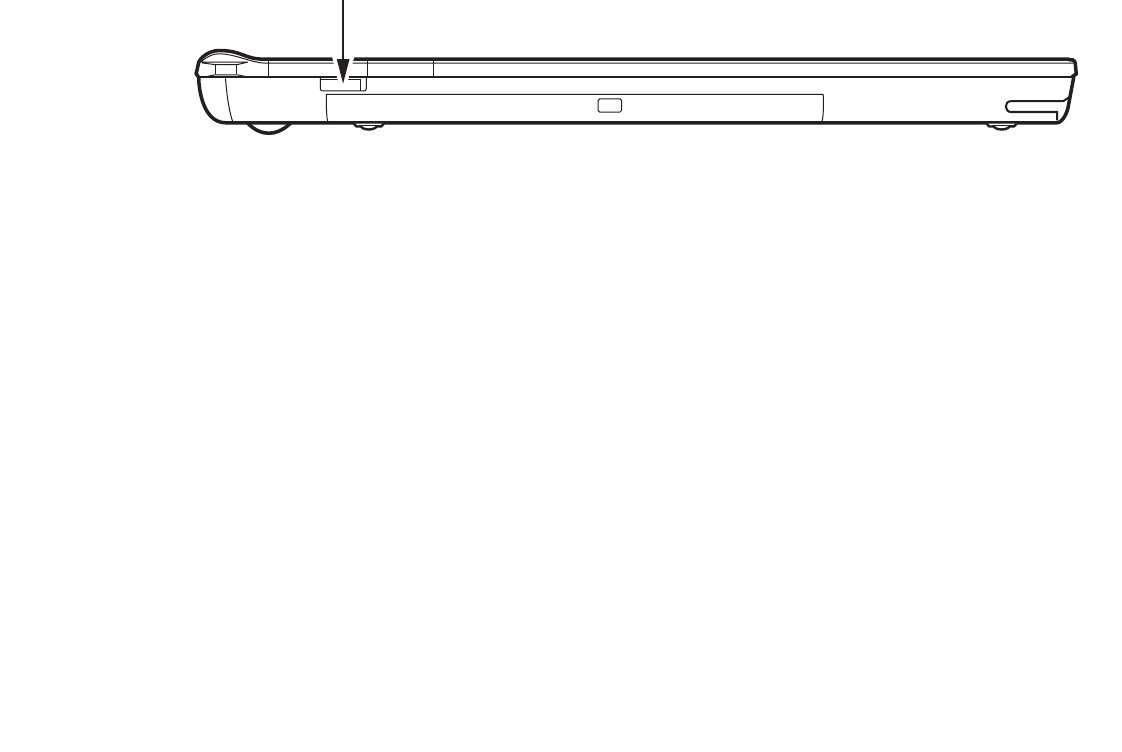
107
Before Using the Optional Wireless LAN
Deactivation Using the Wireless On/Off Switch
The WLAN device can be deactivated quickly and efficiently by toggling the Wireless LAN/Bluetooth
On/Off Switch to the Off position. The switch has no effect on non-Wireless LAN models.
Figure 23. Wireless LAN/Bluetooth On/Off Switch Location
Disconnection Using the Icon in the Taskbar
Note that disconnecting via the icon in the system tray does not turn off the radio; it continues to transmit
and receive even though it’s not connected.
1Right-click the WLAN icon in the taskbar at the bottom right of your screen.
2Choose Disconnect from a network.
Activating the WLAN Device
Activation of the WLAN device can be accomplished using the same methods as the deactivation process
•Using the Wireless On/Off Switch
•In Windows, by right-clicking the WLAN icon then clicking “Connect to a network”
WLAN/Bluetooth Switch

108
Configuring the Wireless LAN
Configuring the Wireless LAN
The optional WLAN device can be configured to establish wireless network connectivity using the
software that is built into Windows Vista. Support for most industry standard security solutions is
contained in this software.
Pre-defined parameters will be required for this procedure. Please consult with your network
administrator for these parameters:
Configuring the WLAN Using Windows Vista
1Click the Start button, then select Control Panel.
2If the Control Panel is not in Classic View, select Classic View from the left panel. Double-click the Network and
Sharing Center icon.
3Select “Manage wireless networks” from the left panel.
4Click on the [Add] button.
5Depending upon what type of connection you would like to make, make a selection. For an infrastructure
network, select “Manually create a network profile. For ad hoc network, select “Create an ad hoc network”.
6Enter the required information. It may be necessary to consult with your network administrator for some of the
information.
7In the event you require assistance, go to the Network and Sharing Center window (Start -> Control Panel ->
Network and Sharing Center), and type in relevant keywords in the Search box.
Connecting to a Network
After you have configured your computer, you can connect to an active network by performing the
following steps:
1Click on the WLAN icon in the system tray.
2Select “Connect to a network”.
3Select a network from the list that appears, and click the [Connect] button.

109
Configuring the Wireless LAN
Configuring the WLAN Using Windows XP
Procedure
1Click the Start button, then select Control Panel.
2If the Control Panel is not in Classic View, select Classic View from the left panel. Double-click the Network
Connections icon.
3Select “New Connection” wizard.
4Click the [Next] button.
5Select “Connect to the Internet”, then click [Next].
6Depending upon what type of connection you would like to make, make a selection. For an infrastructure
network, select “Manually create a network profile. For ad hoc network, select “Choose from a list of Internet
service providers”.
7Enter any required information. It may be necessary to consult with your network administrator for some of the
information.
8In the event you require assistance, go to [Start] -> Help and Support -> Networking and the Web. Select the
main topic in which you are interested, then type in relevant keywords in the Search box.
Connection to the network
After you have configured your computer, you can connect to an active network by clicking on the
Wireless Network icon in the system tray:

110
Troubleshooting the WLAN
Troubleshooting the WLAN
Troubleshooting
Causes and countermeasures for troubles you may encounter while using your wireless LAN are described
in the following table. If you are unfamiliar with the steps required, consult your System Administrator or
go to [Start] -> Help and Support -> Networking and the Web
Problem Possible Cause Possible Solution
Unavailable
network
connection
Incorrect network
name (SSID) or
network key
Ad hoc connection: verify that the network names (SSID’s) and
network keys (WEP) of all computers to be connected have been
configured correctly. SSID’s and WEP key values must be identical on
each machine.
Access Point (Infrastructure) connection: set network name (SSID)
and network key to the same values as those of the access point.
Set the Network Authentication value identically to that of the Access
Point. Please consult your network administrator for this value, if
necessary.
Weak received
signal strength
and/or link quality
Ad hoc connection: Retry connection after shortening the distance to
the destination computer or removing any obstacles for better sight.
Access Point (Infrastructure) connection: Retry connection after
shortening the distance to the access point or removing any obstacles
for better sight.
The WLAN device
has been
deactivated or
disabled
Check if the wireless switch is turned On. In Windows XP, go to Start ->
Control Panel-> Network Connections and right-click on Wireless
Network Connection. If Enable appears at the top of the menu, click it
to enable the device. In Windows Vista, go to Start -> Control Panel,
and double-click on Windows Mobility Center. If the wireless network is
off, click the [Turn wireless on] button..

111
Troubleshooting the WLAN
Unavailable
network
connection
(continued)
The computer to
be connected is
turned off
Check if the computer to be connected is turned ON.
RF interference
from Access
Points or other
wireless networks
The use of identical or overlapping RF channels can cause interference
with the operation of the WLAN device. Change the channel of your
Access Point to a channel that does not overlap with the interfering
device.
Wireless network
authentication has
failed
Re-check your Network Authentication, Encryption, and Security
settings. Incorrectly configured security settings such as an incorrectly
typed WEP key, a mis-configured LEAP username, or an incorrectly
chosen authentication method will cause the LAN device to associate
but not authenticate to the wireless network.
Incorrectly
configured
network settings
Recheck the configuration of your network settings.
Incorrect IP
address
configuration
This only applies to networks using static IP addresses. Please contact
your network administrator for the correct settings.
Problem Possible Cause Possible Solution

112
WLAN Specifications
WLAN Specifications
Specifications
Item Specification
Type of network The Intel WiFi Link 5300 (533AN_HMW) and Atheros AR9280AL1E (AR5BHB92) Half
Mini-Card Wireless network cardconform to IEEE 802.11a, 802.11b/g, and 802.11n
(draft-compliant), Wi-Fi based*.
Transfer rate (Automatic switching) 54 Mbps maximum data rate (IEEE802.11n to be determined)
Active frequency •802.11n (draft): 2.4 GHz or 5 GHz
•802.11b/g: 2400~2473 MHz
•802.11a: 4900 ~ 5850 MHz
Typical operating distances** •802.11a: 40 ft. (12 m) @ 54 Mbps; 300 ft. (91 m) @ 6 Mbps
•802.11b: 100 ft. (30 m) @ 11 Mbps; 300 ft. (91 m) @ 1 Mbps
•802.11g: 100 ft. (30 m) @ 54 Mbps; 300 ft. (91 m) @ 1 Mbps
•802.11n (draft): Estimated double the operating distance of 802.11g and
802.11a in their respective frequencies.
Number of channels •802.11a: 8 independent channels
•802.11b/g: 11 channels, 3 non-overlapping channels
•802.11n (draft): 2.4 GHz - 3 non-overlapping channels when Channel Bonding
is not used; 2 non-overlapping channels when Channel Bonding is used.
5 GHz - 12 non-overlapping UNII channels with or without Channel Bonding
Security Encryption Types - WEP, TKIP, AES***, WPA 1.0 compliant
Encryption Key lengths Supported: 64 bits and 128 bits 802.1x/EAP
Maximum recommended number
of computers to be connected
over wireless LAN (during ad hoc
connection)
10 units or less ****

113
WLAN Specifications
* “Wi-Fi based” indicates that the interconnectivity test of the organization which guarantees the interconnectivity of
wireless LAN (Wi-Fi Alliance) has been passed.
** The communication ranges shown above will increase or decrease depending on factors such as number of walls, reflective
material, or interference from external RF sources.
*** Encryption with network key (WEP) is performed using the above number of bits, however, users can set 40 bits/ 104
bits after subtracting the fixed length of 24 bits.
**** Depending on practical environments, the allowable number of computers to be connected may be decreased.

114
Using the Bluetooth Device
Using the Bluetooth Device
The Integrated Bluetooth module (EYTF3CSFT) is an optional device available for Fujitsu mobile
computers.
What is Bluetooth?
Bluetooth technology is designed as a short-range wireless link between mobile devices, such as laptop
computers, phones, printers, and cameras. Bluetooth technology is used to create Personal Area Networks
(PANs) between devices in short-range of each other.
Where to Find Information About Bluetooth
The Bluetooth module contains a robust Help user’s guide to assist you in learning about operation of the
Bluetooth device.
Windows XP: To access the Help file, click [Start] -> All Programs, and click on Toshiba. Select
Bluetooth, then select User’s Guide.
Windows Vista: o access the Help file, click [Start] -> All Programs, and click on Bluetooth, then select
User’s Guide.
For additional information about Bluetooth Technology, visit the Bluetooth Web site at:
www.bluetooth.com.
THE WIRELESS LAN/BLUETOOTH ON/OFF SWITCH WILL POWER OFF BOTH THE OPTIONAL WIRELESS
LAN AND BLUETOOTH DEVICES AT THE SAME TIME. TO ENABLE OR DISABLE EITHER ONE OF THE
DEVICES INDIVIDUALLY, PERFORM THE FOLLOWING STEPS:
1Slide the Wireless LAN/Bluetooth on/off switch to On position.
2In the Control Panel, click the button associated with Bluetooth and/or Wireless LAN Status to
enable or disable the individual devices.
3Click [OK].

115
Using the Bluetooth Device
FCC Radiation Exposure Statement
This equipment complies with FCC radiation exposure limits set forth for an uncontrolled environment.
The Bluetooth antenna is located on the front edge of the right palm rest and is exempt from minimum
distance criteria due to its low power.
The transmitters in this device must not be co-located or operated in conjunction with any other antenna
or transmitter.
Canadian Notice
To prevent radio interference to the licensed service, this device is intended to be operated indoors and
away from windows to provide maximum shielding. Equipment (or its transmit antenna) that is installed
outdoors is subject to licensing.
Warranty
Users are not authorized to modify this product. Any modifications invalidate the warranty.
This equipment may not be modified, altered, or changed in any way without signed written permission
from Fujitsu. Unauthorized modification will void the equipment authorization from the FCC and
Industry Canada and the warranty.
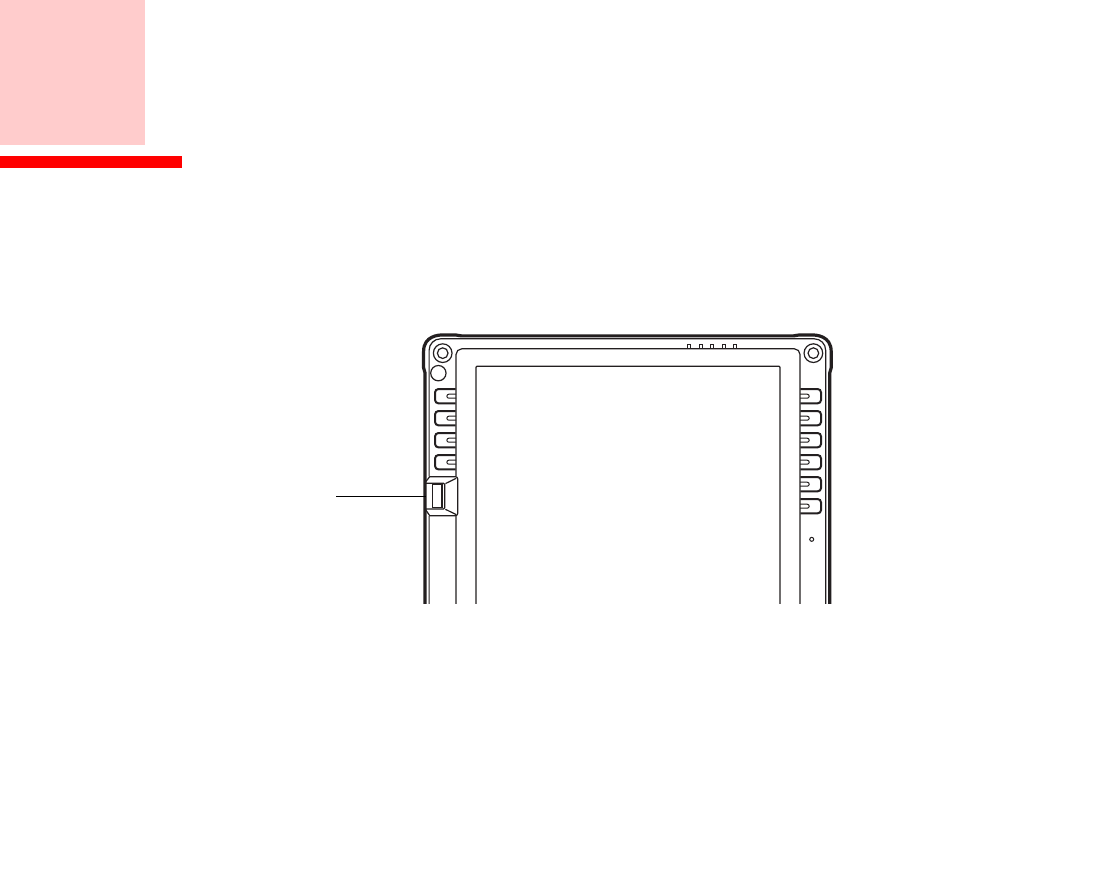
116
Appendix B: Fingerprint Sensor Device
Introducing the Fingerprint Sensor Device
Your system has a fingerprint sensor device at the top left of the display screen (when holding the display
in pportrait mode).
Figure 24. Fingerprint sensor
With a fingerprint sensor, you can avoid having to enter a username and password every time you want to:
•Log onto Windows
•Resume from sleep mode
•Cancel a password-protected screen saver
•Log into homepages that require a username and password
Fingerprint
Sensor Device

117
- Introducing the Fingerprint Sensor Device
After you have “enrolled” - or registered - your fingerprint, you can simply swipe your fingertip over the
sensor for the system recognize you.
The fingerprint sensor uses Softex OmniPass which provides password management capabilities to
Microsoft Windows operating systems. OmniPass enables you to use a "master password" for all
Windows, applications, and on-line passwords.
OmniPass requires users to authenticate themselves using the fingerprint sensor before granting access to
the Windows desktop. This device results in a secure authentication system for restricting access to your
computer, applications, web sites, and other password-protected resources.
OmniPass presents a convenient graphical user interface, through which you can securely manage
passwords, users, and multiple identities for each user.
Getting Started
This section guides you through the preparation of your system for the OmniPass fingerprint recognition
application. You will be led through the OmniPass installation process. You will also be led through the
procedure of enrolling your first user into OmniPass.
Installing OmniPass
If OmniPass has already been installed on your system, skip this section and go directly to “User
Enrollment” on page 120. You can determine whether OmniPass has already been installed by checking
to see if the following are present:
•The gold key-shaped OmniPass icon in the system tray at the bottom right of the screen.
•The Softex program group in the Programs group of the Start menu
CERTAIN MODELS SUPPORT PRE-BOOT AUTHENTICATION OR PBA. PBA ALLOWS THE USER TO LOG IN
PRIOR TO WINDOWS' OWN AUTHENTICATION MECHANISM. A PBA ENVIRONMENT SERVES AS AN
EXTENSION OF THE BIOS OR BOOT FIRMWARE AND ALLOWS FOR A MORE SECURE ENVIRONMENT
EXTERNAL TO THE OPERATING SYSTEM.

118
- Introducing the Fingerprint Sensor Device
System Requirements
The OmniPass application requires space on your hard drive; it also requires specific Operating Systems
(OS’s). The minimum requirements are as follows:
•Windows XP Professional or WIndows Vista operating system
•At least 35 MB available hard disk space
Installing the OmniPass Application
If OmniPass is already installed on your system, go to “User Enrollment” on page 120. Otherwise
continue with this section on software installation.
To install OmniPass on your system you must:
1Insert the installation media for the OmniPass application into the appropriate drive. If you are installing from
CD-ROM or DVD-ROM, you must find and launch the OmniPass installation program (setup.exe) from the
media.
2Follow the directions provided in the OmniPass installation program. Specify a location to which you would like
OmniPass installed. It is recommended that you NOT install OmniPass in the root directory (e.g. C:\).
3Once OmniPass has completed installation you will be prompted to restart you system. Once your system has
rebooted you will be able to use OmniPass. If you choose not to restart immediately after installation, OmniPass
will not be available for use until the next reboot.
4The installation program automatically places an icon (Softex OmniPass) in the Windows Control Panel as well
as a golden key shaped icon in the taskbar.
•INSTALLATION OF THE APPLICATION REQUIRES THAT YOU HAVE AN EXTERNAL OPTICAL DRIVE
ATTACHED TO YOUR SYSTEM.
•FOR INSTALLATION, OMNIPASS REQUIRES THAT THE USER INSTALLING OMNIPASS HAVE
ADMINISTRATIVE PRIVILEGES TO THE SYSTEM. IF YOUR CURRENT USER DOES NOT HAVE
ADMINISTRATIVE PRIVILEGES, LOG OUT AND THEN LOG IN WITH AN ADMINISTRATOR USER BEFORE
PROCEEDING WITH OMNIPASS INSTALLATION.

119
- Introducing the Fingerprint Sensor Device
Verifying Information about OmniPass
After you have completed installing OmniPass and restarted your system, you may wish to check the
version of OmniPass on your system.
To check the version information of OmniPass:
1From the Windows Desktop, double-click the key-shaped OmniPass icon in the taskbar (usually located in the
lower right corner of the screen),
or,
Click the Start button, select Settings, and click Control Panel (if you are using Windows XP you will see the
Control Panel directly in the Start menu; click it, then click Switch to Classic View). Double-click Softex
OmniPass in the Control Panel, and the OmniPass Control Center will appear. If it does not appear, then the
program is not properly installed,
or,
Click the Start button, select Programs, and from the submenu select the Softex program group, from that
submenu click OmniPass Control Center.
2Select the About tab at the top of the OmniPass Control Panel. The About tab window appears with version
information about OmniPass.
Uninstalling OmniPass
To remove the OmniPass application from your system:
1Click Start on the Windows taskbar. Select Settings, and then Control Panel.
2Double-click Add/Remove Programs.
3Select OmniPass, and then click Change/Remove.
FOR UNINSTALLATION, OMNIPASS REQUIRES THAT THE USER UNINSTALLING OMNIPASS HAVE
ADMINISTRATIVE PRIVILEGES TO THE SYSTEM. IF YOUR CURRENT USER DOES NOT HAVE
ADMINISTRATIVE PRIVILEGES, LOG OUT AND THEN LOG IN WITH AN ADMINISTRATOR USER BEFORE
PROCEEDING WITH OMNIPASS UNINSTALLATION.

120
- Introducing the Fingerprint Sensor Device
4Follow the directions to uninstall the OmniPass application.
5Once OmniPass has finished uninstalling, reboot your system when prompted.
User Enrollment
Before you can use any OmniPass features you must first enroll a user into OmniPass.
Master Password Concept
Computer resources are often protected with passwords. Whether you are logging into your computer,
accessing your email, e-banking, paying bills online, or accessing network resources, you often have to
supply credentials to gain access. This can result in dozens of sets of credentials that you have to
remember.
During user enrollment a "master password” is created for the enrolled user. This master password
“replaces” all other passwords for sites you register with OmniPass.
Example: A user, John, installs OmniPass on his system (his home computer) and enrolls an OmniPass
user with username “John_01” and password “freq14”. He then goes to his webmail site to log onto his
account. He inputs his webmail credentials as usual (username “John_02” and password “Tablet PC”), but
instead of clicking [Submit], he directs OmniPass to Remember Password. Now whenever he returns to
that site, OmniPass will prompt him to supply access credentials.
John enters his OmniPass user credentials (“John_01” and “freq14”) in the OmniPass authentication
prompt, and he is allowed into his webmail account. He can do this with as many web sites or password
protected resources he likes, and he will gain access to all those sites with his OmniPass user credentials
(“John_01” and “freq14”). This is assuming he is accessing those sites with the system onto which he
enrolled his OmniPass user. OmniPass does not actually change the credentials of the password protected
resource. If John were to go to another computer without he OmniPass account to access his webmail, he
would need to enter his original webmail credentials (“John_02” and “Tablet PC”) to gain access. If he
attempts his OmniPass user credentials on a system other than a system he’s enrolled on, he will not gain
access.

121
- Introducing the Fingerprint Sensor Device
Basic Enrollment
The Enrollment Wizard will guide you through the process of enrolling a user. Unless you specified
otherwise, after OmniPass installation the Enrollment Wizard will launch on Windows login. If you do
not see the Enrollment Wizard, you can bring it up by clicking Start on the Windows taskbar; select
Programs; select Softex; click OmniPass Enrollment Wizard.
1Click Enroll to proceed to username and password verification. By default, the OmniPass Enrollment Wizard
enters the credentials of the currently logged in Windows user.
2Enter the password you use to log in to Windows. This will become the “master password” for this OmniPass
user. In most cases, the Domain: value will be your Windows computer name. In a corporate environment, or
when accessing corporate resources, the Domain: may not be your Windows computer name. Click [Next] to
continue.
3In this step OmniPass captures your fingerprint. Refer to “Enrolling a Fingerprint” on page 122 for additional
information.
4Next, choose how OmniPass notifies you of various events. We recommend you keep Taskbar Tips on
Beginner mode taskbar tips and Audio Tips on at least Prompt with system beeps only until you get
accustomed to how OmniPass operates. Click [Next] to proceed with user enrollment. You will then see a
Congratulations screen indicating your completion of user enrollment.
5Click [Done] to exit the OmniPass Enrollment Wizard. You will be asked if you’d like to log in to OmniPass with
your newly enrolled user; click [Yes].
THE ENROLLMENT PROCEDURE ASSUMES YOU HAVE NO HARDWARE AUTHENTICATION DEVICES OR
ALTERNATE STORAGE LOCATIONS THAT YOU WISH TO INTEGRATE WITH OMNIPASS. IF YOU DESIRE
SUCH FUNCTIONALITY, CONSULT THE APPROPRIATE SECTIONS OF THIS DOCUMENT.

122
- Introducing the Fingerprint Sensor Device
Enrolling a Fingerprint
Enrolling a fingerprint will increase the security of your system and streamline the authentication
procedure.
You enroll fingerprints in the OmniPass Control Center. With an OmniPass user logged in, double-click
the system tray OmniPass icon. Select the User Settings tab and click Enrollment under the User
Settings area. Click Enroll Authentication Device and authenticate at the authentication prompt to start
device enrollment.
1During initial user enrollment, you will be prompted to select the finger you wish to enroll. Fingers that have
already been enrolled will be marked by a green check. The finger you select to enroll at this time will be marked
by a red arrow. OmniPass will allow you re-enroll a finger. If you choose a finger that has already been enrolled
and continue enrollment, OmniPass will enroll the fingerprint, overwriting the old fingerprint. Select a finger to
enroll and click [Next].
2It is now time for OmniPass to capture your selected fingerprint. It may take a several capture attempts before
OmniPass acquires your fingerprint. Should OmniPass fail to acquire your fingerprint, or if the capture screen
times out, click [Back] to restart the fingerprint enrollment process.
Your system has a “swipe” fingerprint sensor. A swipe sensor is small and resembles a skinny elongated
rectangle. To capture a fingerprint, gently swipe or pull your fingertip over the sensor (starting at the second
knuckle) towards yourself. Swiping too fast or too slow will result in a failed capture. The Choose Finger
screen has a [Practice] button; click it to practice capturing your fingerprint. When you are comfortable with how
your fingerprint is captured, proceed to enroll a finger.
3Once OmniPass has successfully acquired the fingerprint, the Verify Fingerprint screen will automatically
appear. To verify your enrolled fingerprint, place your fingertip on the sensor and hold it there as if you were
having a fingerprint captured. Successful fingerprint verification will show a green fingerprint in the capture
window and the text Verification Successful under the capture window.
4After you are done enrolling and verifying your fingerprints, you will have the option to Enable PBA with
enrolled finger. If you enable this option, then you must choose two fingers to save in PBA. If you have
enrolled successfully, the Finger Enrollment Status in PBA screen will state Finger saved in PBA
successfully.

123
- Introducing the Fingerprint Sensor Device
Using OmniPass
You are now ready to begin using OmniPass. Used regularly, OmniPass will streamline your
authentications.
Password Replacement
You will often use the password replacement function. When you go to a restricted access website (e.g.,
your bank, your web-based email, online auction or payment sites), you are always prompted to enter your
login credentials. OmniPass can detect these prompts and you can teach OmniPass your login credentials.
The next time you go to that website, you can authenticate with your fingerprint to gain access.
OmniPass Authentication Toolbar
After installing OmniPass and restarting, you will notice a dialog you have not seen before at Windows
Logon. This is the OmniPass Authentication Toolbar, and it is displayed whenever the OmniPass
authentication system is invoked. The OmniPass authentication system may be invoked frequently: during
Windows Logon, during OmniPass Logon, when unlocking your workstation, when resuming from sleep
or hibernate, when unlocking a password-enabled screensaver, during password replacement for
remembered site or application logins, and more. When you see this toolbar, OmniPass is prompting you
to authenticate.
The Logon Authentication window indicates what OmniPass-restricted function you are attempting. The
icons in the lower left (fingerprint and key) show what authentication methods are available to you.
Selected authentication methods are highlighted while unselected methods are not. When you click the
icon for an unselected authentication method, the authentication prompt associated with that method is
displayed.
IF YOU ENABLE PBA ON YOUR SYSTEM, YOU MUST SET THE SUPERVISOR PASSWORD AND PASSWORD
ON BOOT SETTINGS. SEE “SETTING THE SUPERVISOR PASSWORD AND PASSWORD ON BOOT SETTINGS”
ON PAGE 66 FOR ADDITIONAL INFORMATION.

124
- Introducing the Fingerprint Sensor Device
When prompted to authenticate, you must supply the appropriate credentials: an enrolled finger for the
fingerprint capture window or your master password for the master password prompt (the key icon).
Remembering a Password
OmniPass can remember any application, GUI, or password protected resource that has a password
prompt.
Using the following procedure, you can store a set of credentials into OmniPass. These credentials will
then be linked to your “master password” or fingerprint.
Go to a site that requires a login (username and password), but do not log in yet. At the site login prompt,
enter your username and password in the prompted fields, but do not enter the site (do not hit [Enter],
[Submit], [OK], or Login). Right-click the OmniPass system tray icon and select Remember Password
from the submenu. The Windows arrow cursor will change to a golden key OmniPass cursor. Click the
OmniPass cursor in the login prompt area, but don’t click [Login] or [Submit].
Associating a Friendly Name
After clicking the OmniPass key cursor near the login prompt, OmniPass will prompt you to enter a
“friendly name” for this site. You should enter something that reminds you of the website, the company,
or the service you are logging into. In its secure database, OmniPass associates this friendly name with
this website.
Additional Settings for Remembering a Site
When OmniPass prompts you to enter a “friendly name” you also have the opportunity to set how
OmniPass authenticates you to this site. There are three effective settings for how OmniPass handles a
remembered site.
The default setting is Automatically click the “OK” or “Submit” button for this password protected
site once the user is authenticated. With this setting, each time you navigate to this site OmniPass will
prompt you for your master password or fingerprint authentication device. Once you have authenticated
with OmniPass, you will automatically be logged into the site.

125
- Introducing the Fingerprint Sensor Device
Less secure is the option to Automatically enter this password protected site when it is activated. Do
not prompt for authentication. Check the upper box to get this setting, and each time you navigate to
this site OmniPass will log you into the site without prompting you to authenticate.
If you uncheck both boxes in Settings for this Password Site, OmniPass will prompt you for your master
password or fingerprint authentication device. Once you have authenticated with OmniPass your
credentials will be filled in to the site login prompt, but you will have to click the website [OK], [Submit],
or [Login] button to gain access to the site.
Click Finish to complete the remember password procedure. The site location, the credentials to access
the site, and the OmniPass authentication settings for the site are now stored in the OmniPass secure
database. The OmniPass authentication settings (Settings for this Password Site) can always be changed
in Vault Management.
Logging in to a Remembered Site
Whether or not OmniPass prompts you to authenticate when you return to a remembered site is determined
by Settings for this Password Site and can be changed in Vault Management.
The following cases are applicable to using OmniPass to login to: Windows, remembered web sites, and
all other password protected resources.
With Master Password
Once you return to a site you have remembered with OmniPass, you may be presented with a master
password prompt. Enter your master password and you will be allowed into the site.
THIS SETTING IS MORE CONVENIENT IN THAT WHENEVER YOU GO TO A SITE REMEMBERED WITH THIS
SETTING, YOU WILL BYPASS ANY AUTHENTICATION PROCEDURE AND GAIN INSTANT ACCESS TO THE
SITE. BUT SHOULD YOU LEAVE YOUR SYSTEM UNATTENDED WITH YOUR OMNIPASS USER LOGGED IN,
ANYONE USING YOUR SYSTEM CAN BROWSE TO YOUR PASSWORD PROTECTED SITES AND GAIN
AUTOMATIC ACCESS.

126
- Introducing the Fingerprint Sensor Device
Logging into Windows with a Fingerprint Device
When logging into Windows with a fingerprint device, the fingerprint capture window will now appear
next to the Windows Login screen. Place your enrolled fingertip on the sensor to authenticate. You will
be simultaneously logged into Windows and OmniPass. The capture window will also appear if you have
used Ctrl-Alt-Del to lock a system, and the fingerprint device can be used to log back in as stated above.
In Windows XP, your login options must be set either for classic login, or for fast user switching and logon
screen to be enabled to use your fingerprint to log on to Windows. To change this go to Control Panel,
select User Accounts and then click Change the way users log on or off. If your Windows screensaver
is password protected, the fingerprint capture window will now appear next to screensaver password
dialog during resume. You can authenticate to your screensaver password prompt with your enrolled
finger.
Password Management
OmniPass provides an interface that lets you manage your passwords. To access this GUI, double-click
the OmniPass key in the system tray. Click Vault Management; you will be prompted to authenticate.
Once you gain access to Vault Management, click Manage Passwords under Vault Settings. You will
see the Manage Passwords interface, with a list of friendly names.
You can view the credentials stored for any remembered website by highlighting the desired resource
under Password Protected Dialog and clicking Unmask Values. Should a password be reset, or an
account expire, you can remove stored credentials from OmniPass. Highlight the desired resource under
Password Protected Dialog and click Delete Page. You will be prompted to confirm the password
deletion.
IF A MACHINE IS LOCKED AND OMNIPASS DETECTS A DIFFERENT USER LOGGING BACK IN WITH A
FINGERPRINT, THE FIRST USER WILL BE LOGGED OUT AND THE SECOND USER LOGGED IN.

127
- Introducing the Fingerprint Sensor Device
The two check boxes in Manage Passwords govern whether OmniPass prompts you to authenticate or
directly logs you into the remembered site.
OmniPass will overwrite an old set of credentials for a website if you attempt to use Remember
Password on an already remembered site.
The exception to the above rule is when resetting the Windows password. If your password is reset in
Windows, the next time you login to Windows, OmniPass will detect the password change and prompt
you to “Update” or “Reconfirm” the password with OmniPass. Enter your new Windows password in the
prompt and click OK. Your OmniPass "master password" will still be your Windows password.
OmniPass User Identities
Identities allow OmniPass users to have multiple accounts to the same site (e.g., bob@biblomail.com and
boballen@biblomail.com). If OmniPass did not provide you identities, you would be limited to
remembering one account per site.
To create and manage identities, double-click the OmniPass key in the system tray. Click Vault
Management; OmniPass will prompt you to authenticate. Once you gain access to Vault Management,
click Manage Identities under Vault Settings. You can only manage the identities of the currently logged
in OmniPass user
To add a new identity, click New Identity or double-click Click here to add a new identity. Name the
new identity and click [OK], then click [Apply]. You can now switch to the new identity and start
remembering passwords.
To delete an identity, highlight the identity you want to delete and click [Delete Identity], then click
[Apply].
WHEN YOU DELETE AN IDENTITY, ALL OF ITS ASSOCIATED REMEMBERED SITES AND PASSWORD
PROTECTED DIALOGS ARE LOST.

128
- Introducing the Fingerprint Sensor Device
To set the default identity, highlight the identity you want as default and click [Set as Default]; click
[Apply] to ensure the settings are saved. If you log in to OmniPass with a fingerprint device, you will
automatically be logged in to the default identity for that OmniPass user. You can choose the identity with
which you are logging in if you login using "master password".
Choosing User Identity during Login
To choose your identity during login, type your username in the User Name: field. Press [Tab] and see
that the Domain: field self-populates. Click the Password: field to bring the cursor to it, and you will see
the pull-down menu in the Identity: field. Select the identity to login as, then click OK.
Switch User Identity
To switch identities at any time, right-click the OmniPass system tray icon and click Switch User Identity
from the submenu. The Switch Identity dialog will appear. Select the desired identity and then click OK.
Identities and Password Management
On the Manage Passwords interface of the Vault Management tab of the OmniPass Control Center,
there is a pull-down selection box labeled, Identity. This field lets you choose which identity you are
managing passwords for. When you select an identity here, only those password protected dialogs that are
associated with that identity are shown. You can perform all the functions explained in “Password
Management” on page 126.
Configuring OmniPass
This section gives an overview of both the Export/Import function and the OmniPass Control Center.
Exporting and Importing Users
YOU CANNOT IMPORT A USER INTO OMNIPASS IF THERE ALREADY IS A USER WITH THE SAME NAME
ENROLLED IN OMNIPASS.

129
- Introducing the Fingerprint Sensor Device
Using OmniPass Control Center, you can export and import users in and out of OmniPass. The export
process backs up all remembered sites, credentials, and enrolled fingerprints for an OmniPass user. All
OmniPass data for a user is backed up to a single encrypted database file. During the import process, the
Windows login of the exported user is required. If the proper credentials cannot be supplied, the user
profile will not be imported.
Exporting an OmniPass User Profile
To export a user, open the OmniPass Control Center, and click Import/Export User under Manage
Users.
Click Exports an OmniPass user profile. OmniPass will prompt you to authenticate. Upon successfully
authentication, you must name the OmniPass user profile and decide where to save it. An .opi file is
generated, and you should store a copy of it in a safe place.
This .opi file contains all your user specific OmniPass data, and it is both encrypted and password
protected. This user profile does NOT contain any of your encrypted data files.
Importing an OmniPass User Profile
To import an OmniPass user open the OmniPass Control Center, and click Import/Export User under
Manage Users. Click Imports a new user into OmniPass and then select OmniPass Import/Export File
(*.opi) and click Next. OmniPass will then prompt you to browse for the file you had previously exported
(.opi file). When you select the .opi file for importation, OmniPass will prompt you for authentication.
•YOU SHOULD PERIODICALLY EXPORT YOUR USER PROFILE AND STORE IT IN A SAFE PLACE. IF
ANYTHING HAPPENS TO YOUR SYSTEM, YOU CAN IMPORT YOUR OMNIPASS PROFILE TO A NEW
SYSTEM AND HAVE ALL YOUR REMEMBERED SETTINGS AND FINGERPRINTS INSTANTLY.
•YOU DON'T FORGET THE WINDOWS LOGIN CREDENTIALS WHEN EXPORTING. WHEN YOU EXAMINE
THE IMPORTATION, YOU ARE PROMPTED FOR AUTHENTICATION. THE CREDENTIALS THAT WILL
ALLOW A USER PROFILE TO BE IMPORTED ARE THE WINDOWS LOGIN CREDENTIALS OF THE
EXPORTED USER. THEY ARE THE CREDENTIALS THAT HAD TO BE SUBMITTED WHEN THE USER
PROFILE WAS EXPORTED. YOU WILL NEED USER NAME, PASSWORD, AND DOMAIN.

130
- Introducing the Fingerprint Sensor Device
The credentials that will allow a user profile to be imported are the Windows login credentials of the
exported user. They are the credentials that had to be submitted when the user profile was exported. You
will need User Name, Password, and Domain. If you don’t remember the value for Domain, in a PC or
SOHO environment Domain should be your computer name.
OmniPass will notify you if the user was successfully imported.
Things to Know Regarding Import/Export
•Assume you export a local Windows User profile from OmniPass. You want to import that profile
to another machine that has OmniPass. Before you can import the profile, a Windows user with the
same login credentials must be created on the machine importing the profile.
Example: I have a Windows user with the username “Tom” and the password “Sunshine” on my
system. I have enrolled Tom into OmniPass and remembered passwords. I want to take all my
passwords to new system. I export Tom’s OmniPass user profile. I go to my new system and using
the Control Panel I create a user with the username "Tom" and the password "Sunshine". I can now
successfully import the OmniPass user data to the new system.
•If you export an OmniPass-only user, you can import that user to any computer running OmniPass,
provided that a user with that name is not already enrolled in OmniPass.
•If you attempt to import a user profile who has the same name as a user already enrolled in
OmniPass, the OmniPass import function will fail.
OmniPass Control Center
This section will serve to explain functions within the OmniPass Control Center that weren’t explained
earlier.
You can access the OmniPass Control Center any of three ways:
•Double-click the golden OmniPass key shaped icon in the Windows taskbar (typically in the lower-
right corner of the desktop)

131
- Introducing the Fingerprint Sensor Device
•Click the Start button; select the Programs group; select the Softex program group; and click the
OmniPass Control Center selection.
•Open the Windows Control Panel (accessible via Start button --> Settings --> Control Panel) and
double-click the Softex OmniPass icon.
User Management
The User Management tab has two major interfaces: Add/Remove User and Import/Export User.
Import/Export User functionality is documented in “Exporting and Importing Users” on page 128.
Add/Remove User functionality is straightforward.
If you click Adds a new user to OmniPass you will start the OmniPass Enrollment Wizard. The
Enrollment Wizard is documented in “User Enrollment” on page 120.
If you click Removes a user from OmniPass, OmniPass will prompt you to authenticate. Authenticate
with the credentials (or enrolled fingerprint) of the user you wish to remove. OmniPass will prompt you
to confirm user removal. Click OK to complete user removal.
User Settings
The User Settings tab has four interfaces: Audio Settings, Taskbar Tips, and Enrollment. User settings
allow users to customize OmniPass to suit their individual preferences. Under User Settings (Audio
Settings and Taskbar Tips) you can set how OmniPass notifies the user of OmniPass events (e.g.,
successful login, access denied, etc.). The details of each setting under the Audio Settings and Taskbar
Tips interfaces are self-explanatory.
REMOVING A USER WILL AUTOMATICALLY DESTROY ALL OMNIPASS DATA ASSOCIATED WITH THAT USER.
ALL IDENTITIES AND CREDENTIALS ASSOCIATED WITH THE USER WILL BE LOST.
IF YOU’RE SURE YOU WANT TO REMOVE THE USER, WE RECOMMEND YOU EXPORT THE USER PROFILE.

132
- Introducing the Fingerprint Sensor Device
The Enrollment interface allows you to enroll fingerprints. For the procedure to enroll and authentication
device refer to Chapter 2.3. To enroll additional fingerprints, click Enroll Authentication Device, and
authenticate with OmniPass. Select the fingerprint recognition device in the Select Authentication
Device screen (it should already be marked by a green check if you have a finger enrolled) and click Next.
System Settings
The OmniPass Startup Options interface can be found in the System Settings tab. With these options you
can specify how your OmniPass Logon is tied to your Windows Logon.
The first option, Automatically log on to OmniPass as the current user, will do just as it says; during
Windows login, you will be logged on to OmniPass using your Windows login credentials. If the user
logging into Windows was never enrolled into OmniPass, upon login no one will be logged on to
OmniPass. This setting is appropriate for an office setting or any setting where users must enter a
username and password to log into a computer. This is the default setting.
With the second option, Manually log on to OmniPass at startup, OmniPass will prompt you to login
once you have logged on to Windows.
With the third option, Do not log on to OmniPass at startup, OmniPass will not prompt for a user to be
logged on.
You can manually log on to OmniPass by right-clicking the OmniPass taskbar icon and clicking Log in
User from the right-click menu.

133
- Introducing the Fingerprint Sensor Device
Troubleshooting
You cannot use OmniPass to create Windows users. You must first create the Windows user, and you will
need administrative privileges to do that. Once the Windows user is created, you can add that user to
OmniPass using the same username and password
Cannot add Windows users to OmniPass
If you experience difficulties adding a Windows user to OmniPass, you may need to adjust your local
security settings. You can do this by going to Start, Control Panel, Administrative Tools, and Local
Security Settings. Expand Local Policies, expand Security Options, and double-click Network
Access: Sharing and Security Model for Local Accounts. The correct setting should be Classic -
Local Users Authenticate as Themselves.
Cannot add a User with a Blank Password to OmniPas
If you experience difficulties adding a user with a blank password to OmniPass, you may need to adjust
your local security settings. First attempt the procedure explained in the Cannot add Windows user to
OmniPass section. If the difficulties persist, then try the following procedure.
Click Start, Control Panel, Administrative Tools, and Local Security Settings. Expand Local
Policies, expand Security Options, and double-click Accounts: Limit local account use of blank
passwords to console login only. This setting should be set to Disabled.
Dialog appears after OmniPass authentication during Windows Logon
After installing OmniPass on your system, you can choose to logon to Windows using OmniPass. You
authenticate with OmniPass (via master password, or an enrolled security device) and OmniPass logs
you into Windows. You may, during this OmniPass authentication, see a Login Error dialog box.
This dialog box occurs when OmniPass was unable to log you into Windows with the credentials
supplied (username and password). This could happen for any of the following reasons:
•Your Windows password has changed
•Your Windows account has been disabled

134
- Introducing the Fingerprint Sensor Device
If you are having difficulties due to the first reason, you will need to update OmniPass with your
changed Windows account password. Click Update Password and you will be prompted with a dialog
to reconfirm your password.
Enter the new password to your Windows user account and click OK. If the error persists, then it is
unlikely the problem is due to your Windows user account password changing.

135
Index
A
About This Guide 1, 14
adjusting the display brightness 60
air flow vents 23
application buttons 19
application A 32
application B 32
Ctl-Alt-Del button 31
display mode button 31
EMail 31
enter button 32
escape button 32
Fujitsu Menu Utility 32
function button 32
Internet 31
orientation button 31
security button 31
tertiary functions 34, 36
Automatically Downloading Driver Updates 84
B
battery gauge 66
battery gauge icon 54
battery icon 28
battery pack
charging 66
critically low level 55
low-battery warning 55
no memory effect 66
overcharge protection 66
removing and installing 66, 67
will not begin charging 66
battery power
conserving 68
used in Standby mode 55
battery release latch 21, 45
BIOS 34
application buttons, for 34, 36
Bluetooth
Where to Find Information 114
BOOT Priority Change 83
bridge battery 68
built-in microphone 19
C
calibrating the pen 64
charge/DC input icon 28
charging the battery pack 66
cleaning the display screen 78
Click Me! 42
Configuration Label 86
configuring peripherals interface 81
connectors and peripheral interfaces 43
conserving battery power 68
Contact Information 15
conventions used in the guide 14

136
critically low battery level 55
cursor
not tracking pen 79
D
DC input connector 25, 43
display
screen is blank 79
screen, cleaning 78
Drivers and Application Restore CD 81
E
external monitor connector 24
F
FDU 43, 84, 94
Fingerprint Sensor Device 116
enrolling a fingerprint 122
getting started 117
installing OmniPass 117
logging into a remembered site 125
OmniPass authentication toolbar 123
password replacement 123
remembering a password 124
uninstalling OmniPass 119
user enrollment 120
using OmniPass 123
fingerprint sensor device 19
Fujitsu Contact Information 15
Fujitsu Driver Update utility 43, 84, 94
Fujitsu Shopping Online 16
H
hard disk drive access icon 29
headphone 24
headphone jack 43
Hibernate (Save-to-Disk) mode 54, 56
Hibernate mode 47
I
idle state 47
infrared data transfer not working 80
infrared keyboard port 19
infrared keyboard/mouse port 44
Installing a Memory Stick 69
interfaces
connectors and peripherals 43
IrDA/FIR port 44
L
LAN jack 25
Local Area Network (LAN) 44
Lock 44
low-battery warning 55
M
memory cover 20
Memory Stick 23
installing 69
microphone 25
microphone jack 43
Microsoft Works 94
modem
connection 69
N
navigation buttons 19, 33
O
Off state 47, 53
overheating, avoiding 78

137
P
page up/page down 44
PC Card eject button 23
PC card slot 43, 71
PC Cards
removing 70
pen 23, 26
installing a pen tether 64
not responding 80
replacing the tip 65
using 62
pen tether 64
pen tether point 23
peripheral connectors 43
power icon 29, 47
blinking 48, 54
not displayed 48
power on/suspend/resume
button 23
power usage 46
powering up the pen tablet 49
Pre-Installed Software 92
Adobe Acrobat Reader 93
Google Toolbar 93, 94
manuals 92
problems, solving 79
protecting the display screen 75
R
Registration 52
Regulatory Information 95
removable battery pack 21
removing a Memory Stick 70
restoring the factory image 82
restoring your pre-installed software 81
resuming system operation 56, 79
RJ-45 44
S
SD Card
removing 70
SD Card slot 43
SD Card/Memory Stick Slot 23
Secure Digital Card
removing 70
Security 25
Security Application Panel
operating 39
passwords 37
uninstalling 40
Setting up Security Panel 36
Shock Sensor Utility 58
shutting down the system 53
Smart Card slot 23
solving problems 79
speaker 19
speaker/headphone volume too low 80
Specifications 86
Audio 88
Chipset 87
Device Ports 90
Dimensions and Weight 91
Environmental Requirements 91
mass storage device options 89
Memory 87
Microprocessor 87
Power 91
Video 87
status display 27
battery icon 28

138
charge/DC input icon 28
hard disk drive access icon 29
power icon, blinking 48
power icon, system states indicated by 29, 47
storing the system unit 77
Stylistic ST5000
features 20, 22, 24, 26
storing 77
suspend mode, determining 54
Suspend/Resume
disabled 55
Suspend/Resume button 44
suspending system operation 53
Suspend-to-RAM
mode 54, 56
system interface connector 21
system states 46, 47
Idle state 47
Off state 47
On state 46
Sleep Mode 47
system status LEDs 19
system will not resume operation 79
T
Tablet Dock latch point 21
Tablet Dock port 44
tertiary functions of application buttons 34, 36
thermal suede 21
troubleshooting 79
turning off the system 53
U
Universal Serial Bus 24
USB ports 24, 43
using the pen 62
W
Warranty 16
Windows Vista
configuring the WLAN 108
Windows XP
configuring the Wireless LAN 109
Windows XP Tablet PC Edition 14, 17
Wireless LAN
Before Using the Wireless LAN 103
configuring 103
connection to the network 109
deactivating/disconnecting 106
modes 104
Specifications 112
Troubleshooting 110
wireless LAN 21
wireless LAN/Bluetooth on/off switch 21, 45