Fujitsu Client Computing WB0079 Notebook Computer User Manual Coco B6FJ 3001 01ENZ0 00
Fujitsu Limited Notebook Computer Coco B6FJ 3001 01ENZ0 00
UserManual.wiki
>
Fujitsu Client Computing
>
WB0079 User Manual
>
users manual
Contents
1.
users manual
2.
USERS MANUAL
users manual
Navigation menu
Upload a User Manual
Namespaces
Wiki Guide
HTML
PDF
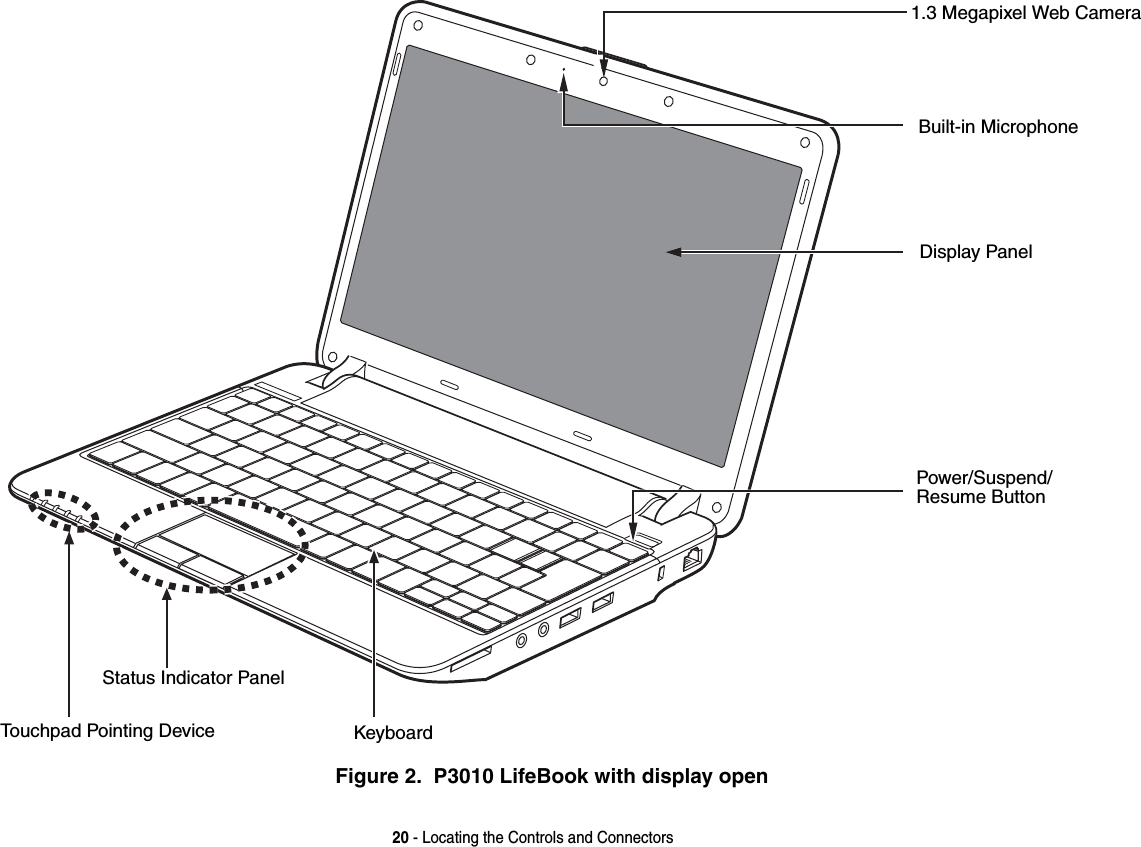
Info
Views
User Manual
Discussion / Help
Navigation


![14 PrefaceAbout This GuideThe P3010 LifeBook from Fujitsu is a small yet powerful computer, perfect for networking. It is powered by an AMD Athlon™ Neo MV-40 processor and integrated AMD RS780MN chipset. The notebook has a built-in 11.6” wide SVGA color display with LED backlight.This manual explains how to operate your P3010 notebook’s hardware and built-in system software. Your P3010 notebook comes with Windows® 7 Home Premium Edition pre-installed.Conventions Used in the GuideKeyboard and on-screen keys appear in brackets. Example: [Fn], [F1], [ESC], [ENTER] and [CTRL].Pages with additional information about a specific topic are cross-referenced within the text.For example: (“See Installation Procedure on page 43”.) Note that all cross-references are linked to the referenced items, so by clicking the link, you will automatically go to the referenced item or page.On-screen menu items appear in bold. Example: “Click Object Properties and select your choice”.THE INFORMATION ICON HIGHLIGHTS INFORMATION THAT WILL ENHANCE YOUR UNDERSTANDING OFTHE SUBJECT MATERIAL.](https://usermanual.wiki/Fujitsu-Client-Computing/WB0079.users-manual/User-Guide-1195620-Page-14.png)


![32 - Display PanelAdjusting Display Panel BrightnessOnce you have turned on your system, you may want to adjust the brightness level of the screen to a more comfortable viewing level. There are two ways to adjust the brightness: keyboard and power management utility.Using the Keyboard to Adjust BrightnessUse the following key combinations to adjust the screen brightness:•[Fn+F6]: Pressing repeatedly will lower the brightness of your display.•[Fn+F7]: Pressing repeatedly will increase the brightness of the display.Using Power Management to Adjust BrightnessTo adjust brightness with the power management utility, click Start > Control Panel (Classic View) > Brightness Control. Set the screen brightness slider for battery and AC power scenarios.NOTE THAT WHEN YOU CHANGE THE DISPLAY SETTINGS,THE CHANGES WILL BE RETAINED AFTERSLEEP AND RESTART.IF USING AC POWER,YOUR BRIGHTNESS SETTING IS SET TO ITS HIGHEST LEVEL BY DEFAULT. IF USINGBATTERY POWER,YOUR BRIGHTNESS SETTING IS SET TO APPROXIMATELY MID-LEVEL BY DEFAULT.THE HIGHER THE BRIGHTNESS LEVEL,THE MORE POWER THE NOTEBOOK WILL CONSUME AND THEFASTER YOUR BATTERIES WILL DISCHARGE. FOR MAXIMUM BATTERY LIFE,MAKE SURE THAT THEBRIGHTNESS IS SET AS LOW AS POSSIBLE.](https://usermanual.wiki/Fujitsu-Client-Computing/WB0079.users-manual/User-Guide-1195620-Page-32.png)
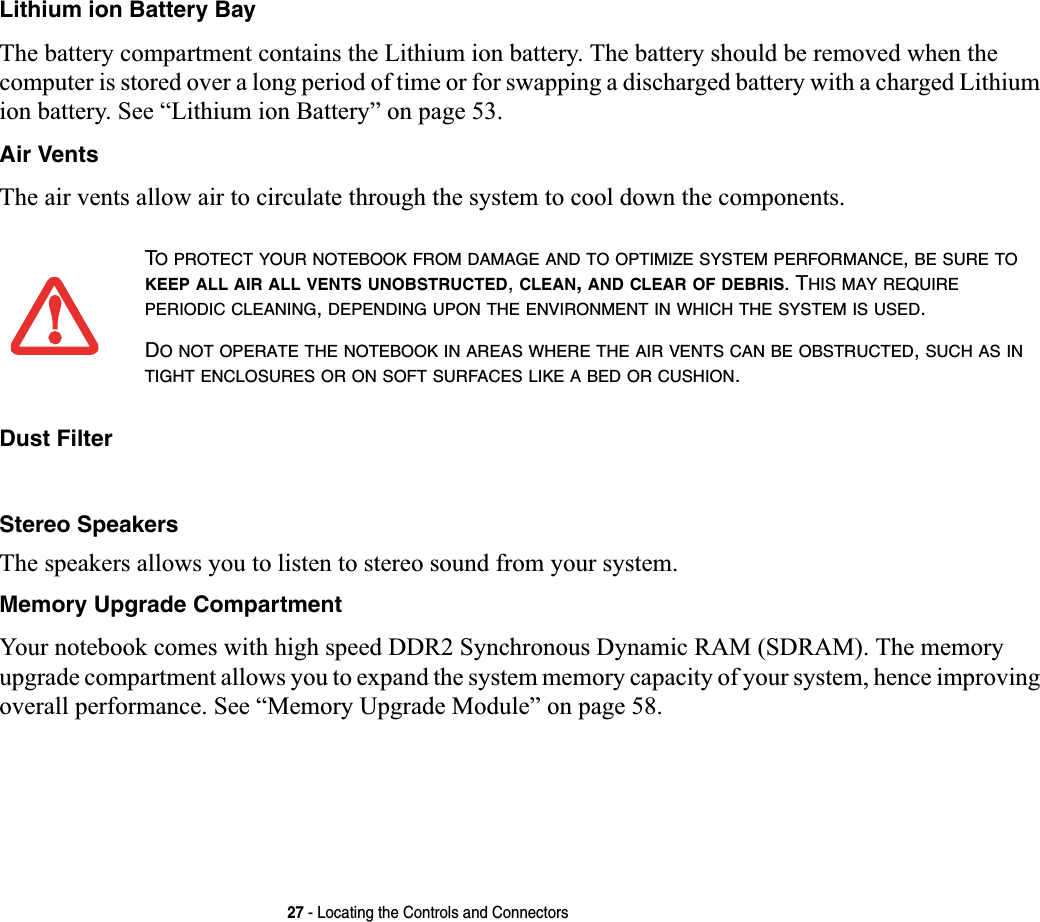
![33 - KeyboardKeyboardFigure 3. KeyboardUsing the KeyboardYour P3010 notebook has an integral 84-key keyboard. The keys perform all the standard functions of a 101-key keyboard, including the Windows keys and other special function keys. This section describes the following keys. (Figure 3)•Numeric keypad: Your system allows certain keys to serve dual purposes, both as standard characters and as numeric and mathematical keys. The ability to toggle between the standard character and numerical keys is controlled through the [NumLk] key.BackSpaceECOFn Key Start KeyFunction KeysNumeric Keypad Application Key Cursor Keys(surrounded by heavy line)](https://usermanual.wiki/Fujitsu-Client-Computing/WB0079.users-manual/User-Guide-1195620-Page-33.png)
![34 - Keyboard•Cursor keys: Your keyboard contains four arrow keys for moving the cursor or insertion point to the right, left, up, or down within windows, applications and documents. •Function keys: The keys labeled [F1] through [F11/F12], are used to produce special actions that vary depending on what program is running. They are also used in conjunction with the [Fn] key to perform certain tasks, as detailed below under “Function Keys”.•Windows keys: These keys work with your Windows operating system and function the same as the onscreen Start menu button, or the right button on your pointing device.Numeric KeypadCertain keys on the keyboard perform dual functions as both standard character keys and numeric keypad keys. NumLk can be activated by pressing the [NumLk] key. Turning off the NumLk feature is done the same way. Once this feature is activated you can enter numerals 0 through 9, perform addition ( + ), subtraction ( - ), multiplication ( * ), or division ( / ), and enter decimal points ( . ) using the keys designated as ten-key function keys. The keys in the numeric keypad are marked on the front edge of the key to indicate their secondary functions. (Figure 3)Windows KeysYour P3010 notebook has two Windows keys: a Start key and an Application key. The Start key displays the Start menu. This button functions the same as your onscreen Start menu button. The Application key functions the same as your right mouse button and displays shortcut menus for the selected item. (Please refer to your Windows documentation for additional information regarding the Windows keys.) (Figure 3)Cursor KeysThe cursor keys are the four arrow keys on the keyboard which allow you to move the cursor up, down, left and right in applications. In programs such as Windows Explorer, it moves the “focus” (selects the next item up, down, left, or right).](https://usermanual.wiki/Fujitsu-Client-Computing/WB0079.users-manual/User-Guide-1195620-Page-34.png)
![35 - KeyboardFunction KeysYour notebook has 11 function keys, F1 through F11/F12. The functions assigned to these keys differ for each application. •[Fn+F3]: Pressing [F3] while holding [Fn] will toggle the Audio Mute on and off.•[Fn +F4]: Pressing [F4] while holding [Fn] allows you to toggle the mouse on and off.•[Fn+F6]: Pressing [F6] repeatedly while holding [Fn] will lower the brightness of your display.Note that adjusting the brightness using the keyboard changes the system setting.•[Fn+F7]: Pressing [F7] repeatedly while holding [Fn] will increase the brightness of the display.•[Fn+F8]: Pressing [F8] repeatedly while holding [Fn] will decrease the volume of your system.•[Fn+F9]: Pressing [F9] repeatedly while holding [Fn] will increase the volume of your system.•[Fn+F10]: Pressing [F10] while holding [Fn] allows you to change your selection of where to send your display video. Each time you press the combination of keys you will step to the next choice. The choices, in order, are: built-in display panel only, external monitor only, and both built-in display panel and external monitor.•[Fn +F11]: Pressing [F11] while holding the [Fn] (ECO) key will help to extend system power by reducing the LCD brightness, shutting down the optical drive, and enabling the hard disk drive’s auto power off mode.](https://usermanual.wiki/Fujitsu-Client-Computing/WB0079.users-manual/User-Guide-1195620-Page-35.png)

![40 - Volume ControlVolume ControlYour Fujitsu notebook has multiple volume controls which interact with each other. Controlling the VolumeThe volume can be controlled in several different ways:•Volume can be set from within the Volume Control in the Notification Area at the bottom right of your screen.•Volume can be controlled with the [F8] and [F9] functions keys. Pressing [F8] repeatedly while holding [Fn] will decrease the volume of your notebook. Pressing [F9] repeatedly while holding [Fn] will increase the volume of your notebook.•Volume can be changed by opening the Control Panel and selecting Windows Mobility Center. From there, you can either mute or adjust the sound in the Volume area.•Volume can be controlled by many volume controls that are set within individual applications.•Certain external audio devices you might connect to your system may have hardware volume controls.Each source discussed above puts an upper limit on the volume level that must then be followed by the other sources. We recommend that you experiment with the various volume controls to discover the optimal sound level.ANY SOFTWARE THAT CONTAINS AUDIO FILES WILL ALSO CONTAIN A VOLUME CONTROL OF ITS OWN. IFYOU INSTALL AN EXTERNAL AUDIO DEVICE THAT HAS AN INDEPENDENT VOLUME CONTROL,THEHARDWARE VOLUME CONTROL AND THE SOFTWARE VOLUME CONTROL WILL INTERACT WITH EACHOTHER. IT SHOULD BE NOTED THAT IF YOU SET YOUR SOFTWARE VOLUME TO OFF,YOU WILL OVERRIDETHE EXTERNAL VOLUME CONTROL SETTING.](https://usermanual.wiki/Fujitsu-Client-Computing/WB0079.users-manual/User-Guide-1195620-Page-40.png)
![45 - Starting Your P3010 LifeBookEntering the BIOS Setup UtilityTo enter the BIOS Setup Utility do the following:1Turn on or restart your notebook.2To enter the BIOS Setup Utility, press the [F2] key once the Fujitsu logo appears on the screen. This will open the main menu of the BIOS Setup Utility with the current settings displayed.3Press the [RIGHT ARROW] or [LEFT ARROW] key to scroll through the other setup menus to review or alter the current settings.The Boot Menu can also be invoked by pressing the [F11] key when the Fujitsu logo appears on the screen.Setting the Supervisor Password and Password on Boot Settings1Enter the BIOS Setup Utility.2Scroll to the Security Tab.3Select Set Supervisor Password, press [ENTER]. 4Enter New Password and confirm new password.5In the Security Tab, scroll to Password on Boot, and press [ENTER].6Press [F10]. The Save and Exit, a screen will pop up. If you are finished making changes, select Yes and press [ENTER]. BIOS GuideA guide to your notebook’s BIOS is available online. Please visit our service and support website at http://www.computers.us.fujitsu.com/support, then select User’s Guides under Online Support. Select your Product, Series, and Model, then click [Go]. Under the Manuals tab, select the BIOS Guide. Booting the SystemWe strongly recommend that you not attach any external devices until you have gone through the initial power on sequence.When you turn on your notebook for the first time, it will display a Fujitsu logo on the screen. If you do nothing the system will load the operating system, and then the Windows Welcome will begin.](https://usermanual.wiki/Fujitsu-Client-Computing/WB0079.users-manual/User-Guide-1195620-Page-45.png)

![47 - Starting Your P3010 LifeBookRegistering your notebook with FujitsuYou can register your notebook by going to our website at: us.fujitsu.com/computers. You will need to be set up with an Internet Service Provider (ISP) to register online. Installing ClickMe! The first time you boot up your system, you will see an icon called Click Me! in the Start menu. We highly recommend that you install the ClickMe! utility the first time you boot up. When you click the Click Me! icon, your system will automatically create the related icons in the system tray in the bottom right of the screen. These icons provide links to utilities that you will frequently access, such as wireless LAN software provided by the wireless LAN manufacturer.Fujitsu Driver Update Utility Your system has a convenient tool called the Fujitsu Driver Update (FDU) utility. With FDU, you can choose to automatically or manually go to the Fujitsu site to check for new updates for your system. For more information about the FDU utility, refer to “Automatically Downloading Driver Updates” on page 82.BEFORE INSTALLING THE CLICKME!UTILITY,BE SURE THE WIRELESS LAN DEVICE IS ENABLED BYPRESSING THE [FN] + [F5] KEY COMBINATION.THERE MAY BE SOME THIRD-PARTY APPLICATIONS THAT DO NOT GET INSTALLED USING THE CLICKME!UTILITY. FOR MORE INFORMATION,REFER TO YOUR GETTING STARTED GUIDE.ClickMe!](https://usermanual.wiki/Fujitsu-Client-Computing/WB0079.users-manual/User-Guide-1195620-Page-47.png)

![50 - Power ManagementHibernation (Save-to-Disk) FeatureThe Hibernation feature saves the contents of your notebook’s system memory to the hard drive as a part of the Suspend/Resume mode. You can enable or disable this feature. Enable or Disable the Hibernation FeatureThe default settings are not enabled. To enable or disable the Hibernation feature follow these steps:1From the Start menu, select Settings, and then select Control Panel.2From the Control Panel select Power Options.3Select the Hibernate tab. Select the box to enable or disable this feature.Windows Power Management The Power Options icon located in the Windows Control Panel allows you to configure some of the power management settings. For example, you can use the Power Options to set the timeout values for turning off the display and hard disks whether you are running the notebook on battery power or one of the adapters. Restarting the SystemIf your system is on and you need to restart it, be sure that you use the following procedure. 1Click the [Start] button, and then click Turn Off Computer.2Select the Restart option. Your notebook will shut down and then reboot.TURNING OFF YOUR NOTEBOOK WITHOUT EXITING WINDOWS OR TURNING ON YOUR NOTEBOOK WITHIN10 SECONDS OF THE NOTEBOOK BEING SHUT OFF MAY CAUSE AN ERROR WHEN YOU START THE NEXTTIME.](https://usermanual.wiki/Fujitsu-Client-Computing/WB0079.users-manual/User-Guide-1195620-Page-50.png)
![51 - Power ManagementPowering OffBefore turning off the power, check that the hard drive/optical drive access indicator is off. If you turn off the power while accessing a disk there is a risk of data loss. To ensure that your notebook shuts down without error, use the Windows shut down procedure.Using the correct procedure to shut down from Windows allows your notebook to complete its operations and turn off power in the proper sequence to avoid errors. The proper sequence is:1Click the [Start] button, and then click Turn Off Computer.2Select the Turn Off option. If you are going to store your notebook for a month or more, see Care and Maintenance Section. BE SURE TO CLOSE ALL FILES,EXIT ALL APPLICATIONS,AND SHUT DOWN YOUR OPERATING SYSTEMPRIOR TO TURNING OFF THE POWER. IF FILES ARE OPEN WHEN YOU TURN THE POWER OFF,YOU WILLLOSE ANY CHANGES THAT HAVE NOT BEEN SAVED,AND MAY CAUSE DISK ERRORS.](https://usermanual.wiki/Fujitsu-Client-Computing/WB0079.users-manual/User-Guide-1195620-Page-51.png)


![61 - Memory Upgrade ModuleChecking the Memory CapacityOnce you have changed the system memory capacity by replacing the installed module with a larger one, be sure to check that your notebook has recognized the change.Check the memory capacity by clicking [Start] > Control Panel, then double-clicking the System icon. Select the General tab and check the amount of memory in the General tab.IF THE TOTAL MEMORY DISPLAYED IS INCORRECT,CHECK THAT YOUR MEMORY UPGRADE MODULE ISPROPERLY INSTALLED. (IF THE MODULE IS PROPERLY INSTALLED AND THE CAPACITY IS STILL NOTCORRECTLY RECOGNIZED,SEE TROUBLESHOOTING ON PAGE 67.](https://usermanual.wiki/Fujitsu-Client-Computing/WB0079.users-manual/User-Guide-1195620-Page-61.png)
![66 - Device PortsWHEN AN EXTERNAL MONITOR ISPLUGGED IN,PRESSING THE [FN]+ [F10] KEYS ALLOWS YOU TOCHANGE YOUR SELECTION OFWHERE TO SEND YOUR DISPLAYVIDEO. EACH TIME YOU PRESS THE KEYCOMBINATION,YOU WILL STEP TO THE NEXTCHOICE,STARTING WITH THE BUILT-IN DISPLAYPANEL ONLY,MOVING TO THE EXTERNALMONITOR ONLY,FINALLY MOVING TO BOTH THEBUILT-IN DISPLAY PANEL AND AN EXTERNALMONITOR.Figure 18. Connecting an external video device](https://usermanual.wiki/Fujitsu-Client-Computing/WB0079.users-manual/User-Guide-1195620-Page-66.png)
![70 - Troubleshooting Your NotebookProblem Possible Cause Possible SolutionsAudio ProblemsThere is no sound coming from the built-in speakers.The volume is turned too low. Adjust the volume control on your notebook and operating system. Use the [Fn+F9] key combination on your keyboard to increase the volume of your notebook.The software volume control is set too low.Manually adjusting the volume (i.e., keyboard "hot keys") should dynamically adjust the volume of the operating sys-tem (see above). If that doesn’t work, adjust the sound vol-ume control settings in your software or application.Headphones are plugged into your notebook.Plugging in headphones disables the built-in speakers. Remove the headphones.The speakers have been muted using the Volume icon in the system tray.Click the Volume icon in the system tray on the bottom right of the screen. If the Mute box is checked, click on it. You can also press [Fn] + [F3] to toggle the audio on and off.Hard Drive ProblemsYou cannot access your hard drive.The wrong drive designator was used by an application when a bootable disc was used to start the notebook.Verify drive designator used by application is in use by the operating system. When the operating system is booted from a CD, drive designations are automatically adjusted. Security is set so your operat-ing system cannot be started without a password.Verify your password and security settings.Keyboard or Mouse ProblemsThe built-in keyboard does not seem to work.The notebook has gone into Standby mode.Push the Power/Suspend/Resume button.Your application has locked out your keyboard.Try to use your integrated pointing device to restart your sys-tem. NumLock key has been set. Press the NumLock key to toggle it off.](https://usermanual.wiki/Fujitsu-Client-Computing/WB0079.users-manual/User-Guide-1195620-Page-70.png)
![74 - Troubleshooting Your NotebookThe battery seems to discharge too quickly.(continued)The brightness is turned all the way up.Turn down the brightness adjustment. The higher the bright-ness the more power your display uses.Battery has been exposed to high temperatures.Replace the battery.The battery is too hot or too cold.Restore the notebook to normal operating temperature. Charging icon on the Status Indicator panel will flash when battery is outside of operating range.Shutdown and Startup ProblemsThe Suspend/Resume button does not work.Suspend/Resume button is disabled. Enable the button by going to the Control Panel > Power Options Properties and clicking on the Advanced tab. In the Power buttons area, select the option that suits your needs.There may be application software conflict.Close all applications and try the button again.The system powers up, and displays power on information, but fails to load the operating system.The boot sequence settings of the setup utility are not compatible with your configu-ration.Set the operating source by pressing the [ESC] key while the Fujitsu logo is on screen or use the [F2] key and enter the setup utility and adjust the source settings from the Boot menu. See “BIOS Setup Utility” on page 44.You have a secured system requiring a password to load your operating system.Make sure you have the right password. Enter the setup util-ity and verify the Security settings and modify them as accordingly. See “BIOS Setup Utility” on page 44.An error message is displayed on the screen during the boot sequence.Power On Self Test (POST) has detected a problem.See the Power On Self Test (POST) messages to determine the meaning and severity of the problem. Not all messages are errors; some are simply status indicators. See “Power On Self Test Messages” on page 77.Your notebook appears to change setup parameters when you start it.BIOS setup changes were not saved when made and you exited the setup utility.Make sure you select Save Changes And Exit when exiting the BIOS setup utility.Problem Possible Cause Possible Solutions](https://usermanual.wiki/Fujitsu-Client-Computing/WB0079.users-manual/User-Guide-1195620-Page-74.png)
![75 - Troubleshooting Your NotebookYour notebook appears to change setup parameters when you start it..(continued)The BIOS CMOS hold-up bat-tery has failed.Contact your support representative for repairs. This is not a user serviceable part but has a normal life of 3 to 5 years.Video ProblemsThe built-in display is blank when you turn on your notebook.An external monitor is plugged in, and the system is set for an external monitor only.Pressing [F10] while holding down [Fn] allows you to change where to send your display video. Each time you press the combination of keys you will step to the next choice. The choices, in order are: built-in display, external monitor, both built-in display and external monitor.Display angle and brightness settings are not adequate for your lighting conditions.Move the display and the brightness control until you have adequate visibility. Pressing either the [F6] or [F7] keys while holding down the [Fn] key also allows you to change the brightness level of the display.Power management timeouts are set for short intervals and you didn’t see the display go on and off again.Press a keyboard button or move the mouse to restore oper-ation. If that fails, push the Power/Suspend/Resume button. (The display may be shut off by Standby mode, Auto Sus-pend or Video Timeout)The notebook turned on with a series of beeps and the built-in display is blank.Power On Self Test (POST) detected a failure which does not allow display to operate.Contact your support representative.The display goes blank by itself after you have been using it.The notebook has gone into Video timeout, Standby mode, or Save-to-Disk mode because you have not used it for a period of time.Press any button on the keyboard, or move the mouse to restore operation. If that fails, push the Power/Sus-pend/Resume button. Check power management settings, or close your applications and go to the Power Savings menu of the setup utility to adjust the timeout values to better suit your operation needs. See “BIOS Setup Utility” on page 44.The display does not close.Foreign object stuck between display and keyboard.Remove all foreign objects, such as a paperclip, from the keyboard.Problem Possible Cause Possible Solutions](https://usermanual.wiki/Fujitsu-Client-Computing/WB0079.users-manual/User-Guide-1195620-Page-75.png)

![78 - Troubleshooting Your Notebook*Keyboard error Keyboard not working. You may have to replace your keyboard or keyboard controller but may be able to use an external keyboard until then. Contact your support representative.Non-system disk or disk errorReplace the disk and then press any key to continue.NTLDR is missingPress any key to restart.*Operating system not found Operating system cannot be located on either drive A: or drive C: Enter the setup utility and see if both the fixed disk, and drive A: are properly identified and that the boot sequence is set correctly. Unless you have changed your installation greatly, the operating system should be on drive C:. If the setup utility is correctly set, your hard drive may be corrupted.*Press <F1> to resume, <F2> to SETUP Displayed after any recoverable error message. Press the [F1] key to continue the boot process or the [F2]key to enter Setup and change any settings.PXE-E32: TFTP open timeoutContact your support representative for more information.PXE-E53: No boot filename receivedContact your support representative for more information.PXE-E61: Media test failure, check cableCheck the system cables. If that does not correct the failure, contact your support representative for more information.](https://usermanual.wiki/Fujitsu-Client-Computing/WB0079.users-manual/User-Guide-1195620-Page-78.png)
![80 - Restoring Your System Image and SoftwareRestoring Your System Image and SoftwarePacked with your system you will find two discs for recovering your pre-installed software:•Drivers and Applications Restore Disc•Recovery and Utility DiscDrivers and Applications Restore DiscThe Drivers and Applications Restore (DAR) disc included with your system contains sets of device drivers and Fujitsu utilities (in specific directories) that are unique to your computer configuration.Re-installing Individual Drivers and ApplicationsThe Drivers and Applications disc can be used to selectively re-install drivers and/or applications that may have been un-installed or corrupted. To re-install drivers and/or applications:1Boot up the system and insert the DAR disc after Windows has started. A Fujitsu Installer screen is displayed after the disc is inserted.2After reading the License Agreement, click [I agree].3A window will appear containing a list of applications, drivers, and utilities that you can install from the DAR disc.IF YOU HAVE ACCESS TO THE INTERNET,VISIT THE FUJITSU SUPPORT WEBSITE ATHTTP://WWW.COMPUTERS.US.FUJITSU.COM/SUPPORT TO CHECK FOR THE MOST CURRENT INFORMATION,DRIVERS AND HINTS ON HOW TO PERFORM RECOVERY AND SYSTEM UPDATES.THERE MAY BE CERTAIN FREE THIRD-PARTY APPLICATIONS PRE-INSTALLED ON YOUR SYSTEM THAT ARENOT ON THE DAR DISC. THE LATEST VERSIONS OF THE APPLICATIONS CAN BE DOWNLOADED FROM THETHIRD-PARTY’S WEBSITE.](https://usermanual.wiki/Fujitsu-Client-Computing/WB0079.users-manual/User-Guide-1195620-Page-80.png)
![81 - Restoring Your System Image and Software4In the list, check off all the components you want to install. If you want to install all components, click [Select All]. Clicking [Select All] will select all of the blue-coded components; you must select grey and green components separately.5Once you have selected the components you wish to install, click [Install Selected Subsystems]; the components will be installed.6After the components are installed, click [OK], then click [Yes] when asked if you want to reboot the system. Recovery and Utility DiscThe Recovery and Utility disc contains four utilities:•The Recovery utility allows you to restore the system operating system (OS). The restored OS is the same one that was originally installed on the hard disk drive. After the OS is restored, you will need to reinstall the drivers and applications from the Drivers and Applications Restore disc and from any application discs that were bundled with the system when you purchased it.•The Hard Disk Data Delete utility on this disc is used to delete all data on your hard disk and prevent it from being reused. Do not use the Hard Disk Data Delete utility unless you are absolutely certain that you want to erase your entire hard disk, including all partitions.•The Partition Creation utility allows you to create a new D: partition or resize existing partitions on your hard disk. NOTE: Creating or resizing partitions with this utility will cause all data on the hard disk to be completely erased.•The Diagnostics utility allows the IT professional to determine device status/condition by executing diagnostics tests on selected system components.To use the disc, follow the instructions in the “Using the Recovery and Utility Disc” booklet that is packaged with the disc.](https://usermanual.wiki/Fujitsu-Client-Computing/WB0079.users-manual/User-Guide-1195620-Page-81.png)
![82 - Restoring Your System Image and SoftwareAutomatically Downloading Driver UpdatesYour system has a convenient tool called the Fujitsu Driver Update (FDU) utility. With FDU, you can choose to automatically or manually go to the Fujitsu site to check for new updates for your system.The FDU icon should appear in the system tray at the bottom right of your screen (roll the cursor over the icons to find the correct one). If the icon does not appear in the system tray, go to [Start] -> All Programs, and click on Fujitsu Driver Update; this will create the icon automatically.To invoke the FDU menu, right-click on the FDU icon. The menu contains the following items:Check for updates now Allows for manual driver update search. The first time it is used, you are prompted to agree to a user agreement. After clicking on the icon, the FDU automatically connects with the Fujitsu site to check for updates and downloads them. While downloading, the icon has a red bar through it, indicating that it cannot be used while the download is in process. When the update is complete, a message appears informing you of the fact.Enable Automatic Update NotificationsAutomatically searches for new updates on a regular basis (approximately every 3 days).Show update history Brings up a screen that displays a history of updates that have been made via the FDU.About Fujitsu Driver UpdateDisplays the FDU version number and copyright information.Fujitsu Driver Update ReadmeDisplays the FDU readme.](https://usermanual.wiki/Fujitsu-Client-Computing/WB0079.users-manual/User-Guide-1195620-Page-82.png)


![122 Configuring the Wireless LANConfiguring the Wireless LANThe optional WLAN device can be configured to establish wireless network connectivity using the software that is built into Windows for most industry standard security solutions is contained in this software.Pre-defined parameters will be required for this procedure. Please consult with your network administrator for these parameters:Configuring the WLAN using Windows XPProcedure1Click the Start button, then select Control Panel.2If the Control Panel is not in Classic View, select Classic View from the left panel. Double-click the Network Connections icon.3Double-click on the Wireless Network Connection icon.4Choose a wireless network.5Click [Connect].6Enter the Network Key, if required.7Enter any required information. It may be necessary to consult with your network administrator for some of the information.8In the event you require assistance, go to [Start] -> Help and Support -> Networking and the Web. Select the main topic in which you are interested, then type in relevant keywords in the Search box. Connection to the networkAfter you have configured your computer, you can connect to an active network by clicking on the Wireless Network icon in the system tray:](https://usermanual.wiki/Fujitsu-Client-Computing/WB0079.users-manual/User-Guide-1195620-Page-122.png)
![123 Troubleshooting the WLANTroubleshooting the WLANTroubleshootingCauses and countermeasures for troubles you may encounter while using your wireless LAN are described in the following table. If you are unfamiliar with the steps required, consult your System Administrator or go to [Start] -> Help and Support -> Networking and the WebProblem Possible Cause Possible SolutionUnavailable network connectionIncorrect network name (SSID) or network keyAd hoc connection: verify that the network names (SSID’s) and network keys (WEP) of all computers to be connected have been configured correctly. SSID’s and WEP key values must be identical on each machine.Access Point (Infrastructure) connection: set network name (SSID) and network key to the same values as those of the access point. Set the Network Authentication value identically to that of the Access Point. Please consult your network administrator for this value, if necessary. Weak received signal strength and/or link qualityAd hoc connection: Retry connection after shortening the distance to the destination computer or removing any obstacles for better sight.Access Point (Infrastructure) connection: Retry connection after shortening the distance to the access point or removing any obstacles for better transmission.The WLAN device has been deactivated or disabledGo to Start -> Control Panel, and double-click on Windows Mobility Center. If the wireless network is off, click the [Turn wireless on] button. The computer to be connected is turned offCheck if the computer to be connected is turned ON.](https://usermanual.wiki/Fujitsu-Client-Computing/WB0079.users-manual/User-Guide-1195620-Page-123.png)
![127 Using the Bluetooth DeviceUsing the Bluetooth DeviceThe Integrated Bluetooth module (QBTM400) is an optional device available for Fujitsu mobile computers. What is BluetoothBluetooth technology is designed as a short-range wireless link between mobile devices, such as laptop computers, phones, printers, and cameras. Bluetooth technology is used to create Personal Area Networks (PANs) between devices in short-range of each other. Where to Find Information About BluetoothThe Bluetooth module contains a robust Help user’s guide to assist you in learning about operation of the Bluetooth device.To access the Help file, click [Start] > All Programs, and click on Toshiba. Select Bluetooth, then select User’s Guide.For additional information about Bluetooth Technology, visit the Bluetooth Web site at: www.bluetooth.com.TO ENABLE OR DISABLE EITHER THE WIRELESS LAN OR BLUETOOTH DEVICES INDIVIDUALLY,PERFORMTHE FOLLOWING STEPS:1Press the WLAN On/Off key combination (Fn + F5) on the keyboard.2Go to Start > All Programs > Bluetooth.3Click on Options under the Bluetooth menu and click on the Bluetooth Radio Power button.4Click [OK].](https://usermanual.wiki/Fujitsu-Client-Computing/WB0079.users-manual/User-Guide-1195620-Page-127.png)