Fujitsu Client Computing WB0088 FUJITSU LIFEBOOK T SERIES T904 WITH INTEL WP2 User Manual Tercel T902 Win8 B5FK 0871 01ENZ0 00
Fujitsu Limited FUJITSU LIFEBOOK T SERIES T904 WITH INTEL WP2 Tercel T902 Win8 B5FK 0871 01ENZ0 00
Contents
- 1. USERS MANUAL 1 OF 2
- 2. USERS MANUAL 2 OF 2
- 3. Users Manual
USERS MANUAL 1 OF 2


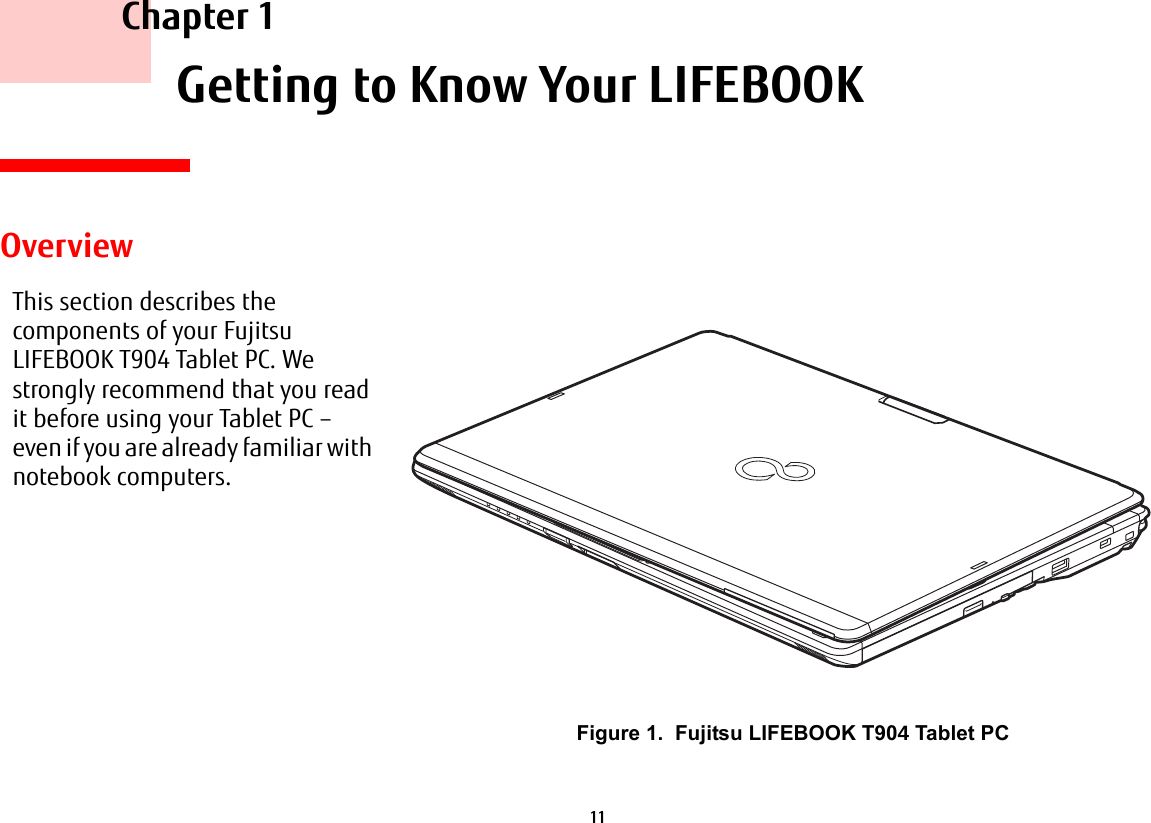
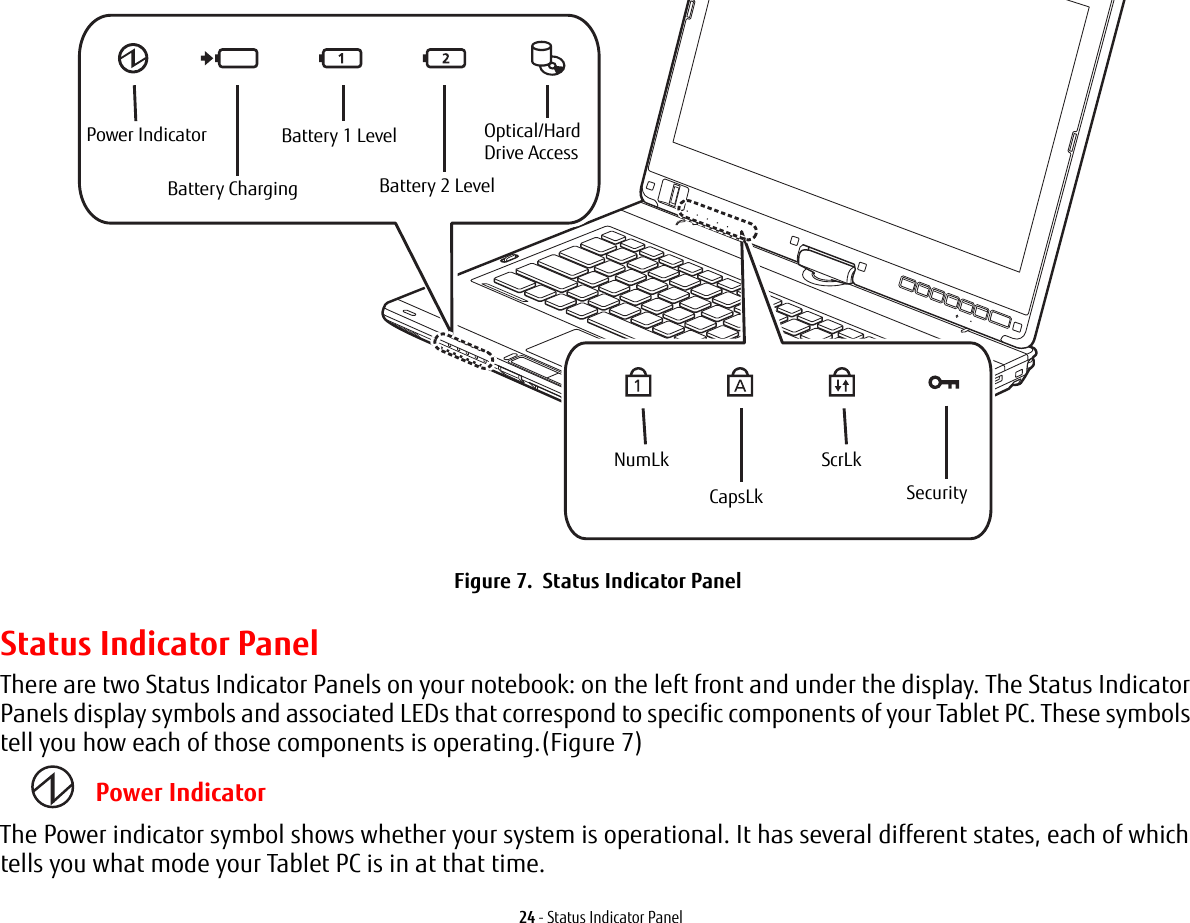
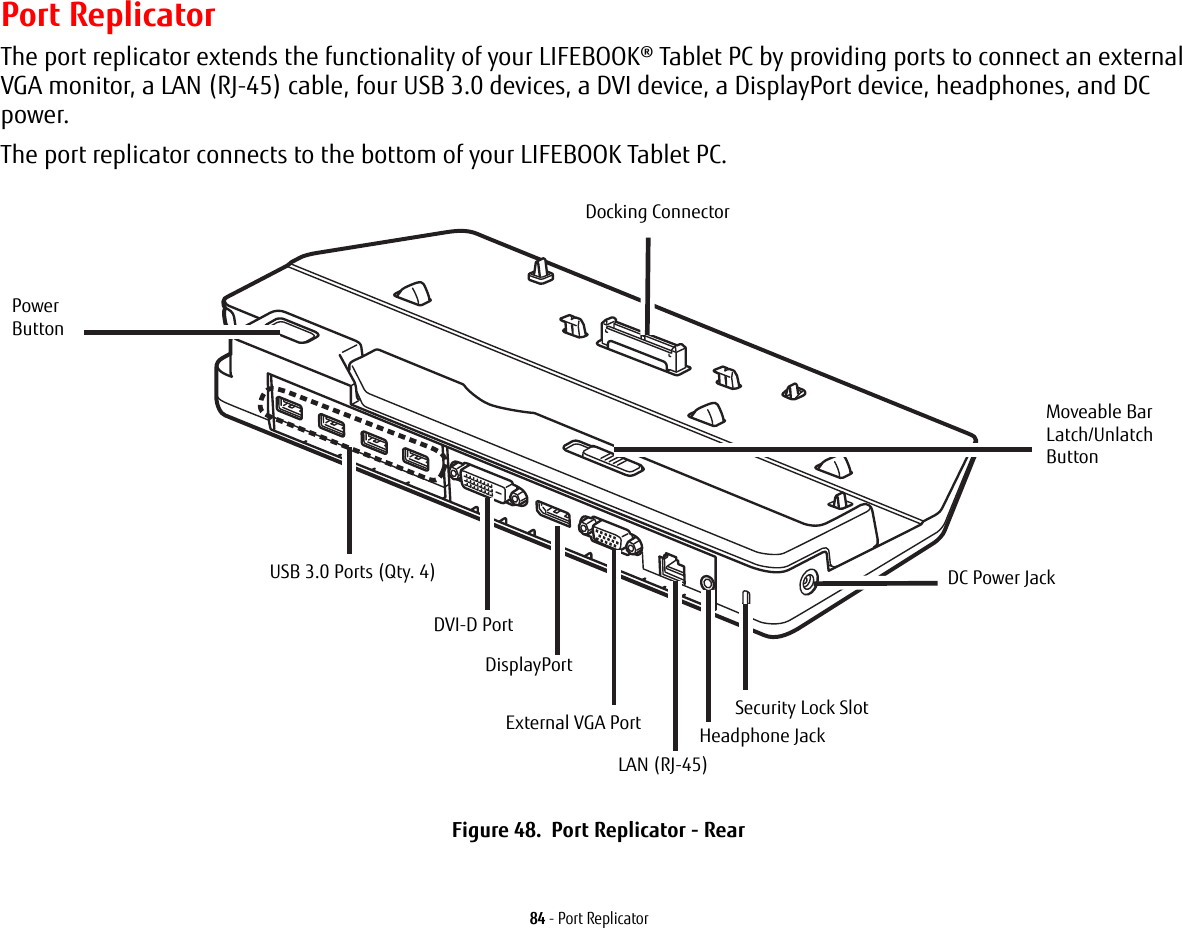
![8 PrefaceAbout This GuideThe LIFEBOOK T904 Tablet PC from Fujitsu America is a powerful convertible computer. It can be used either as a standard notebook using keyboard input, or in tablet configuration using pen input. It is powered by the new 3rd Generation Intel® Core™ Processor, has a built-in color display with a dual digitizer, and brings the computing power of desktop personal computers (PCs) to a portable and versatile environment.The LIFEBOOK T904 Tablet PC is designed to support Microsoft Windows 8 Pro or Windows 7 Professional.This manual explains how to operate your LIFEBOOK T904 Tablet PC’s hardware and pre-installed system software. Conventions Used in the GuideKeyboard and on-screen keys appear in brackets. Example: [Fn], [F1], [ESC], [ENTER] and [CTRL].Pages with additional information about a specific topic are cross-referenced within the text. For example: (“See Installation Procedure on page 43”.) Note that all cross-references are linked to the referenced items, so by clicking the link, you will automatically go to the referenced item or page.On-screen menu items appear in bold. Example: “Click Fujitsu Menu, and select your choice”.THE INFORMATION ICON HIGHLIGHTS INFORMATION THAT WILL ENHANCE YOUR UNDERSTANDING OF THE SUBJECT MATERIAL.](https://usermanual.wiki/Fujitsu-Client-Computing/WB0088.USERS-MANUAL-1-OF-2/User-Guide-2133567-Page-14.png)
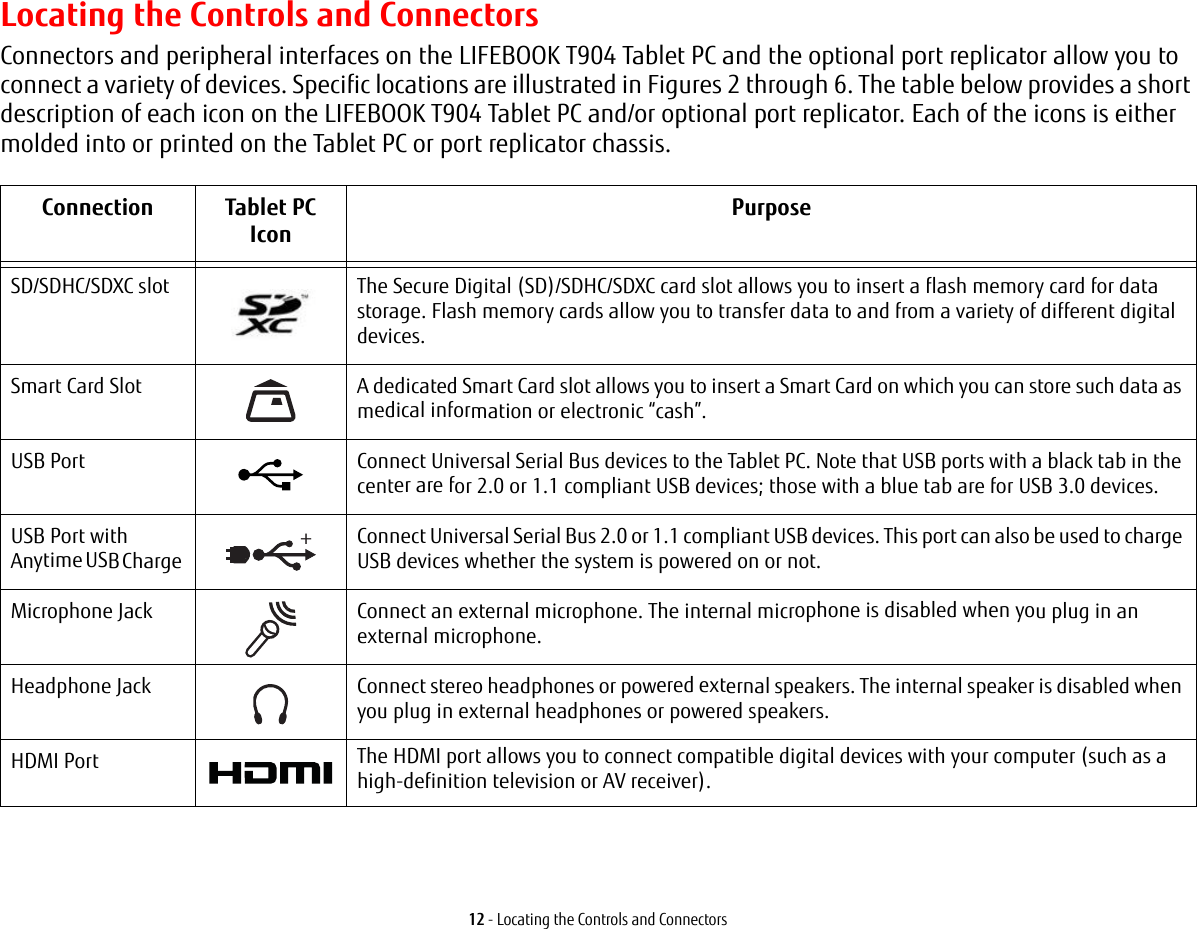
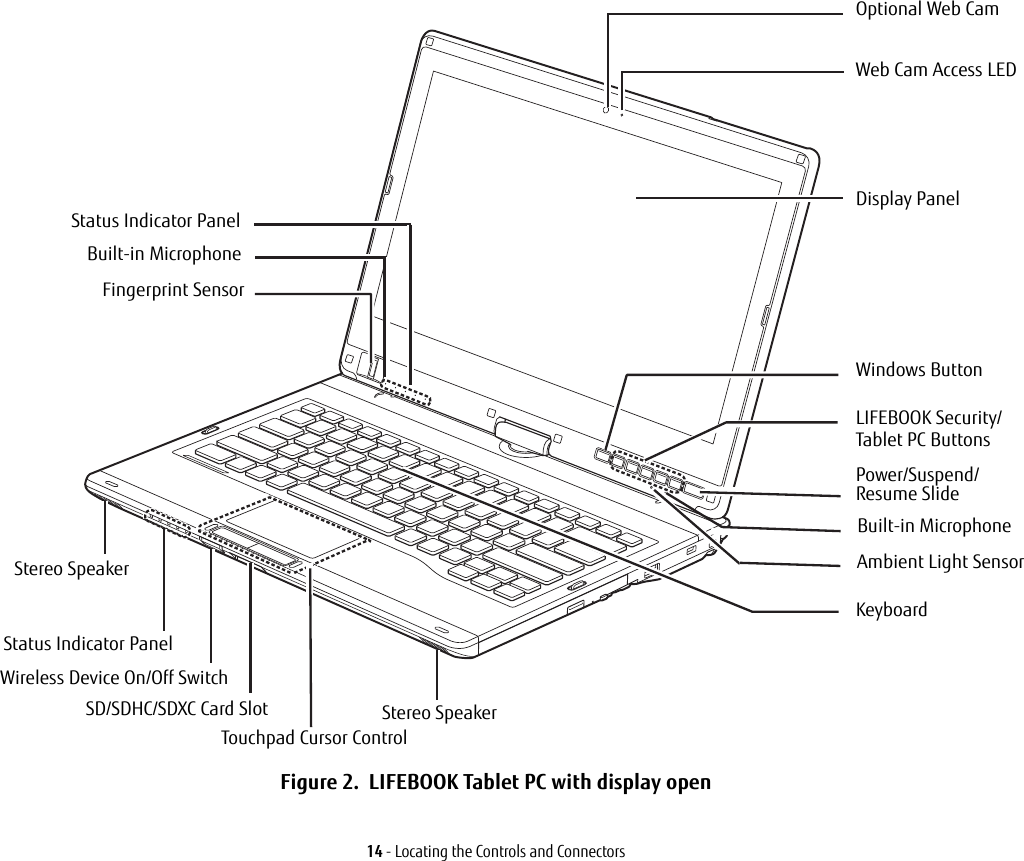
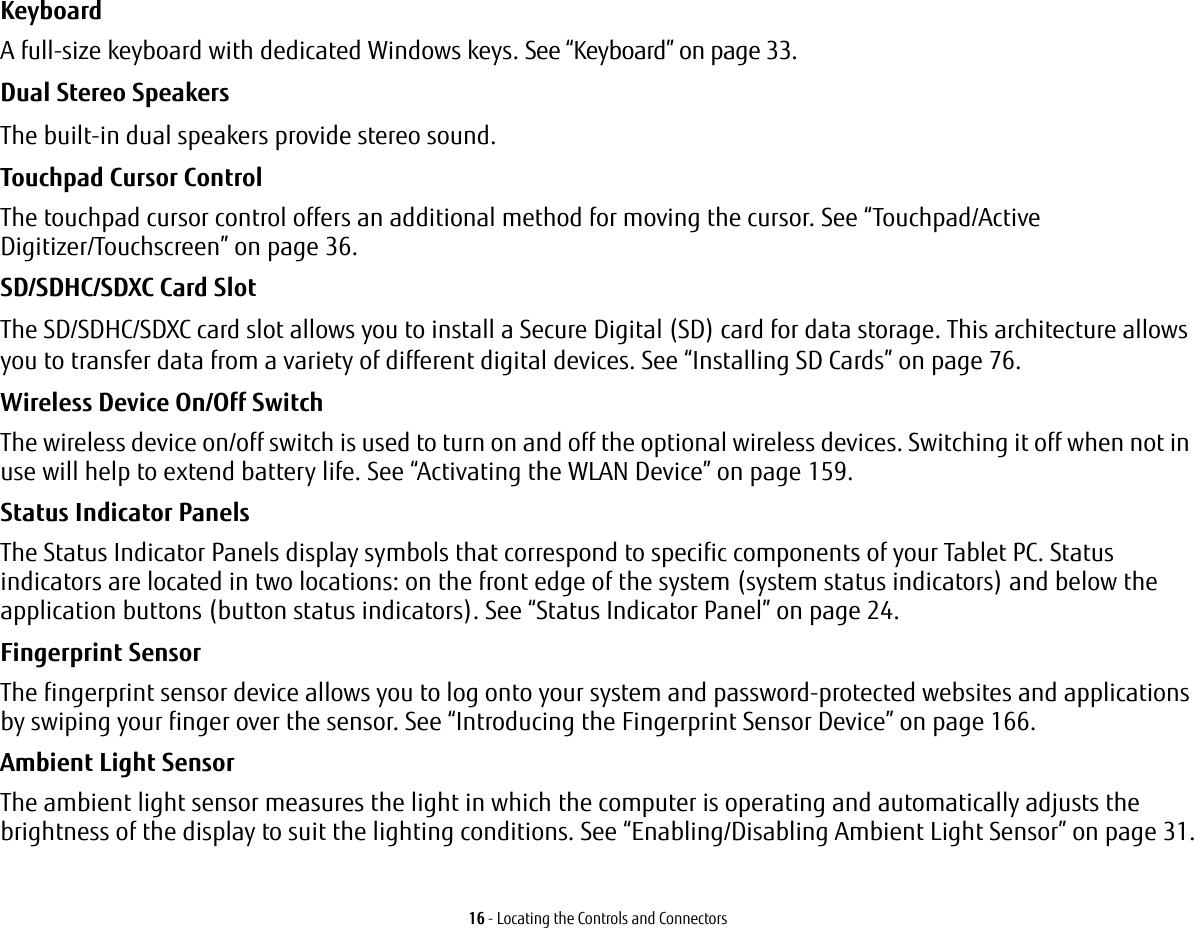
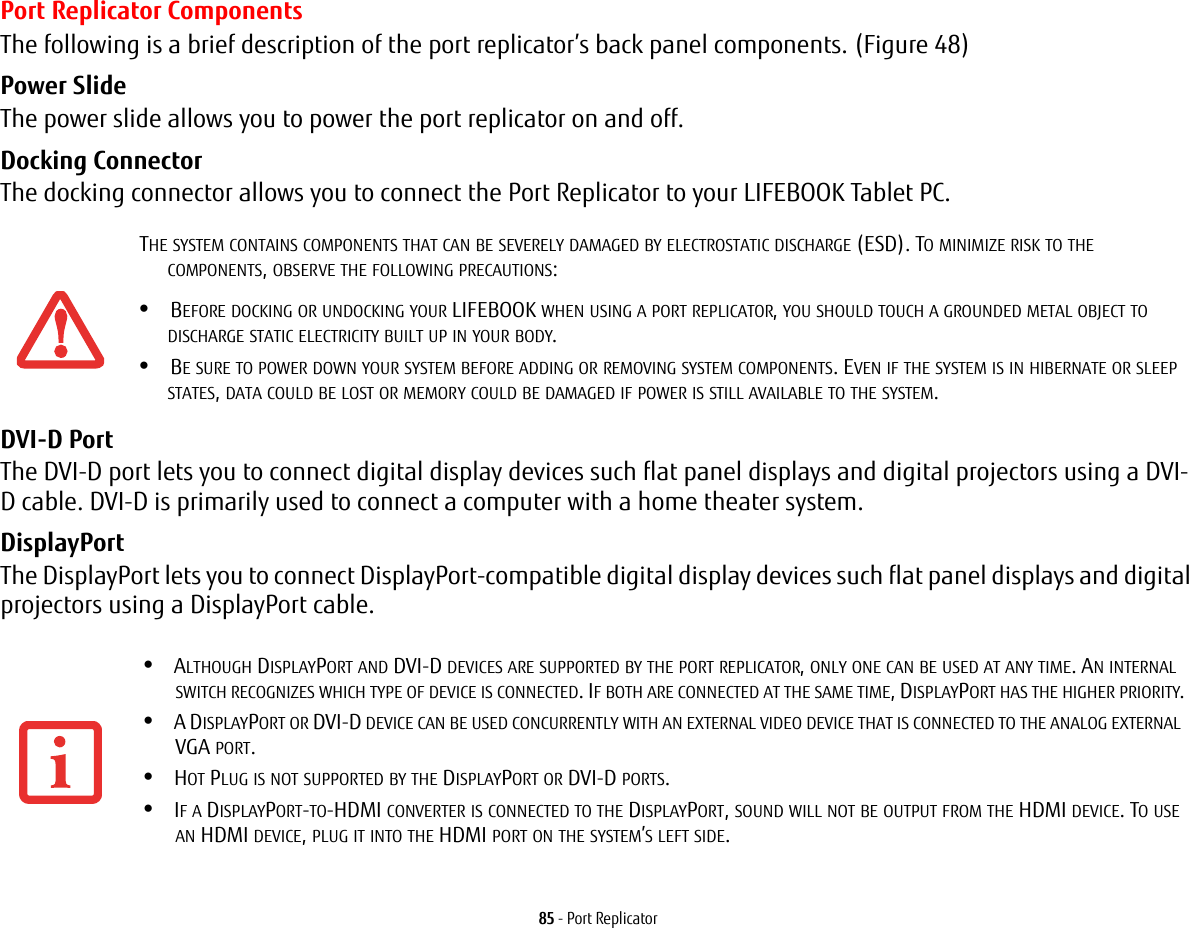
![15 - Locating the Controls and ConnectorsTop ComponentsThe following is a brief description of your LIFEBOOK Tablet PC’s top components. Web Camera The optional FHD (1920 x 1080 pixel) digital web camera can be used to take pictures of yourself to send over the internet. Web Cam Access LED The web cam access LED indicates when the web camera is activated.Display Panel The display panel is a color LED panel with backlighting for the display of text and graphics. The display has an active digitizer that is used with a stylus, and a dual digitizer that can be used with either a stylus or your fingers. Windows Button After you log on, the Windows button can be used to perform two functions. When pressed alone, it opens up the Start menu. If you press the power slide while the Windows button is being pressed, it acts the same as if pressing [Ctl] + [Alt] + [Del].LIFEBOOK Security/Tablet PC Buttons The LIFEBOOK Security/Tablet PC Buttons provide password security for your system, as well as one-touch application launch capability. See “LIFEBOOK Security/Tablet PC/Windows Buttons” on page 49.Power/Suspend/Resume Slide The Power/Suspend/Resume slide allows you to suspend Tablet PC activity without powering off, resume your LIFEBOOK Tablet PC from sleep mode, and power on your Tablet PC when it has been shut down from Windows. See “Power and Suspend/Resume Slide” on page 65.Dual Built-in Microphones The built-in microphones allows you to record voice and annotations.](https://usermanual.wiki/Fujitsu-Client-Computing/WB0088.USERS-MANUAL-1-OF-2/User-Guide-2133567-Page-21.png)
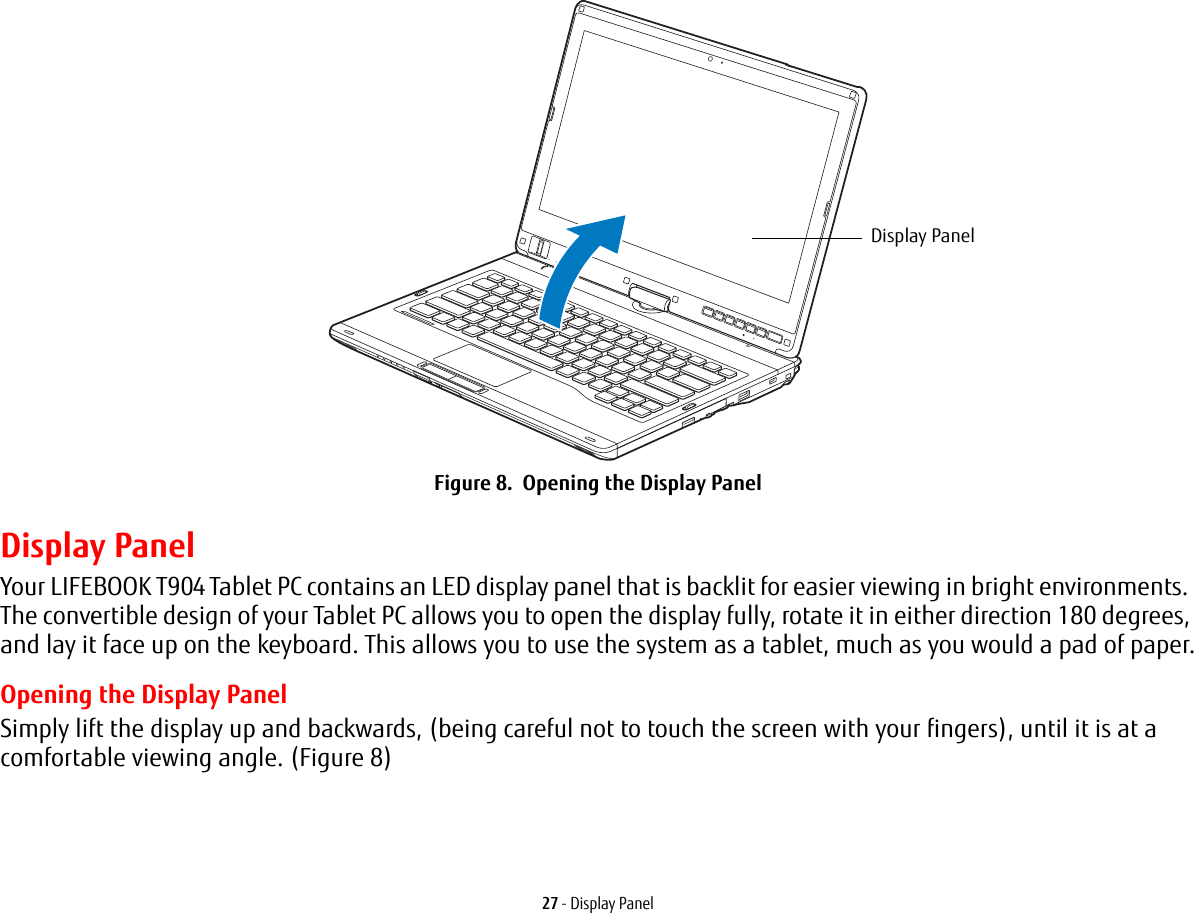
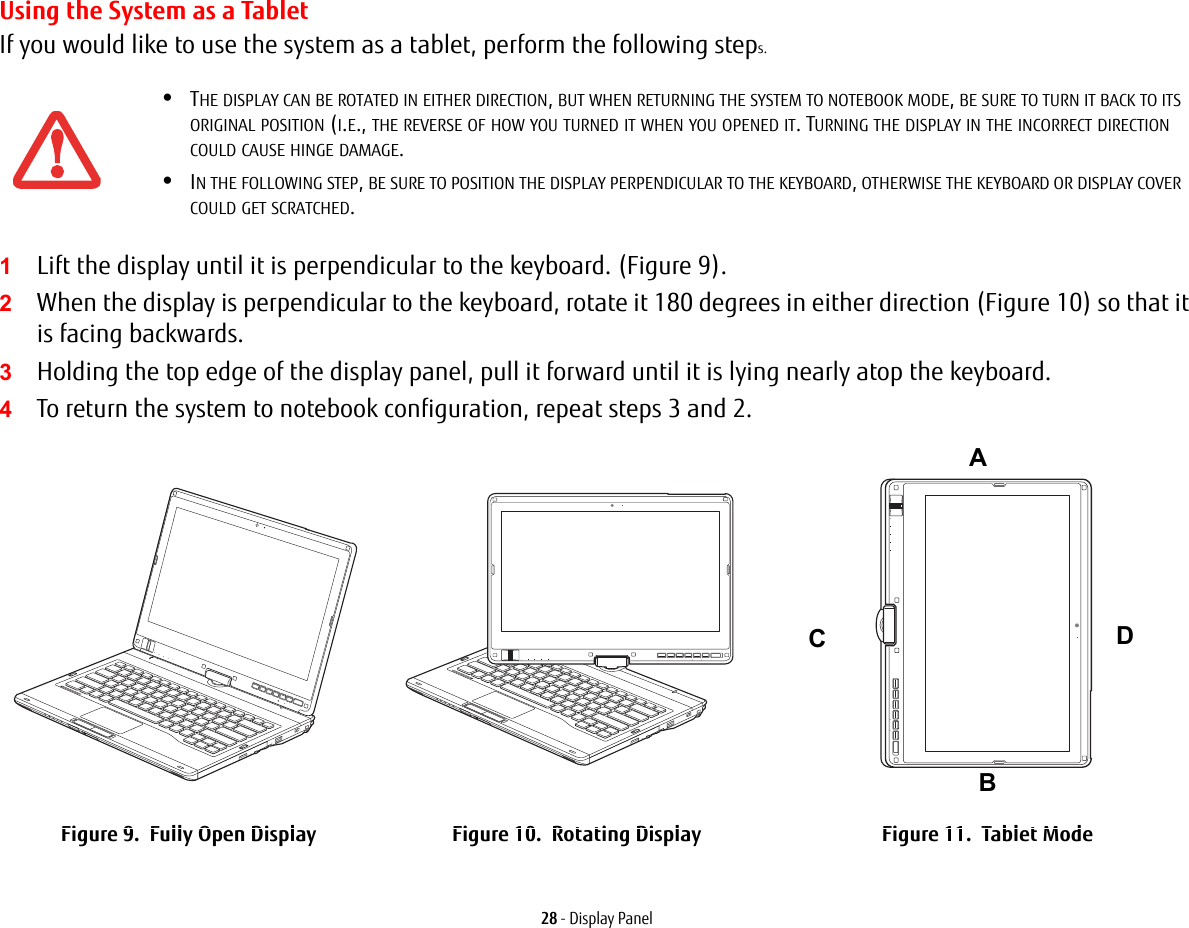
![30 - Display PanelWhen the system is in Pause state, there are several ways to enable it:•Go to the Start menu > All Programs > Auto Rotation Utility, and click Resume.•Right-click on the Auto Rotation Utility icon in the system tray and click Resume.•Open the Fujitsu Menu by pressing the [A] button or by clicking the Fujitsu Menu icon in the system tray, then clicking the [AutoRotation Resume] button on the second page of the Fujitsu Menu.Note: If you have Windows 8 Pro installed, pressing and holding the rotation button also turns off Auto Rotate. Adjusting Display Panel BrightnessOnce you have turned on your Tablet PC, you may want to adjust the brightness level of the screen to a more comfortable viewing level. There are three ways to adjust the brightness: keyboard, power management utility, and Fujitsu Menu. Using Keyboard to Adjust Brightness Adjusting the brightness using the keyboard changes the system setting (i.e., the settings you make via the function keys automatically changes the brightness settings in the system’s Pen and Tablet Settings). •[Fn+F6]: Pressing repeatedly will lower the brightness of your display.•[Fn+F7]: Pressing repeatedly will increase the brightness of the display.Using Power Management to Adjust Brightness To adjust brightness with the power management utility:Click Start -> Control Panel. In View by:, select one of the icon views. Select Display, then click Adjust brightness in the left pane. Drag the Screen brightness: slider to the left or right, depending upon your preference.Using the Fujitsu Menu to Adjust Brightness To adjust brightness using the Fujitsu menu, click on the Fujitsu Menu icon in the system tray in the lower right corner of the screen. (You can also open the Fujitsu menu by pressing the [A] button.) Scroll down to the Windows Mobility Center and double-click it, then double-click the icon adjacent to Display brightness. Set the screen brightness sliders for On battery and Plugged in scenarios.You can also use the Fujitsu Menu as a quick way to reduce the brightness to a minimum or increase it to a maximum. This is done by clicking the corresponding button in the Fujitsu Menu: LCD Brightness Min or LCD Brightness Max.](https://usermanual.wiki/Fujitsu-Client-Computing/WB0088.USERS-MANUAL-1-OF-2/User-Guide-2133567-Page-36.png)
![31 - Display PanelEnabling/Disabling Ambient Light SensorThis system has an ambient light sensor (just below the Tablet buttons) that automatically senses the light conditions in which the computer is operating. If the lighting is very bright, the brightness of the LCD will increase to make it easier to see the display. Conversely, if it is used in a darkened room, the display will automatically dim.The light sensor can be enabled or disabled from the Control Panel as follows:Windows 7:1Open the system Control Panel and click in the View by: field, select either large or small icons.2Click on the Location and Other Sensors icon.3To enable or disable the Light Sensor utility, check or uncheck the box in the Enabled column.4For more information about the light sensor, click on Light Sensor in the Sensor column to open the Sensor Properties window.5From the Sensor Properties window, you can change the sensor’s description, uninstall the sensor, or enable or disable selected users.•To change the sensor’s description, click the [Change description] button, enter the new description, and click the [OK] button.IF USING AC POWER, YOUR BRIGHTNESS SETTING IS SET TO ITS HIGHEST LEVEL BY DEFAULT. IF USING BATTERY POWER, YOUR BRIGHTNESS SETTINGS IS SET TO APPROXIMATELY MID-LEVEL BY DEFAULT.THE HIGHER THE BRIGHTNESS LEVEL, THE MORE POWER THE TABLET PC WILL CONSUME AND THE FASTER YOUR BATTERIES WILL DISCHARGE. FOR MAXIMUM BATTERY LIFE, MAKE SURE THAT THE BRIGHTNESS IS SET AS LOW AS POSSIBLE.NOTE THAT WHEN YOU FIRST START YOUR SYSTEM, THE AMBIENT LIGHT SENSOR IS DISABLED. YOU WILL INITIALLY NEED TO ENABLE IT USING THE FOLLOWING STEPS.](https://usermanual.wiki/Fujitsu-Client-Computing/WB0088.USERS-MANUAL-1-OF-2/User-Guide-2133567-Page-37.png)
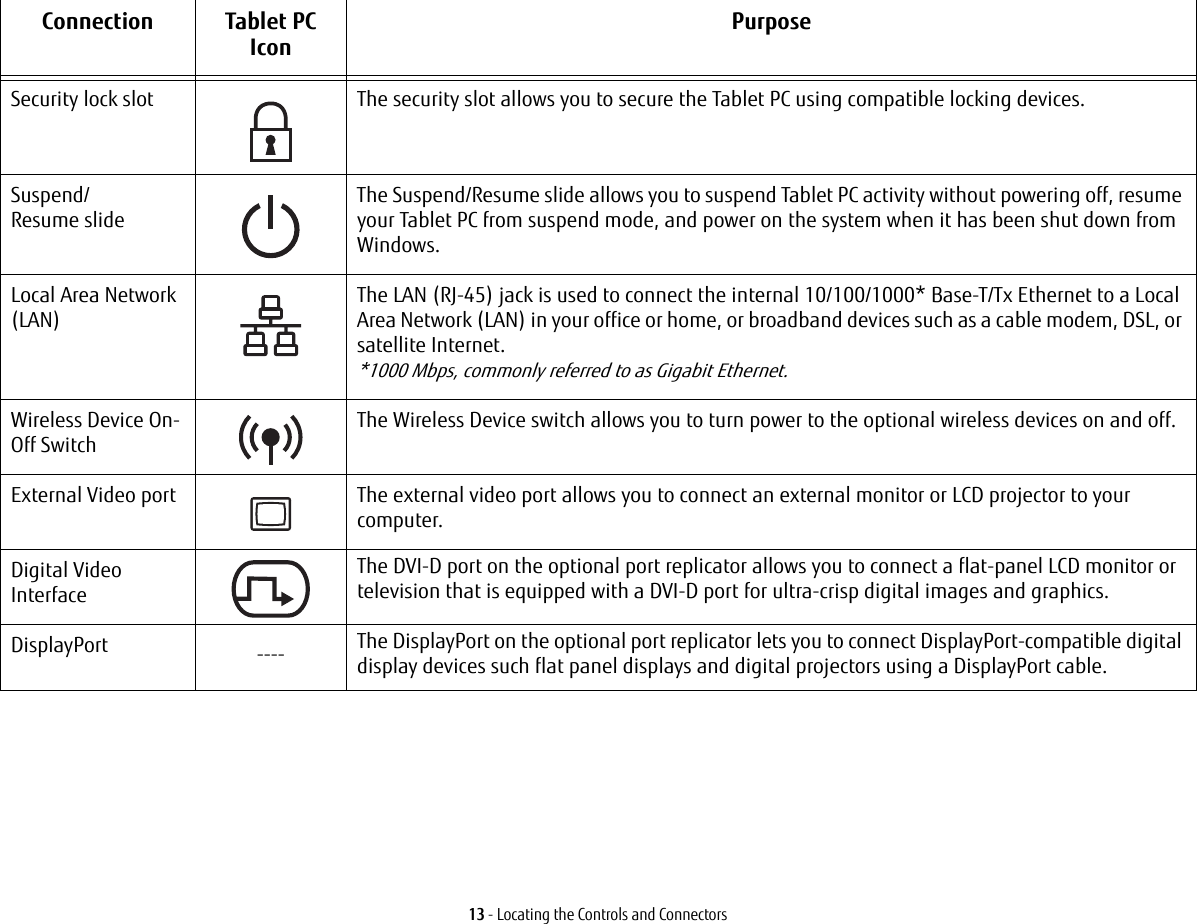
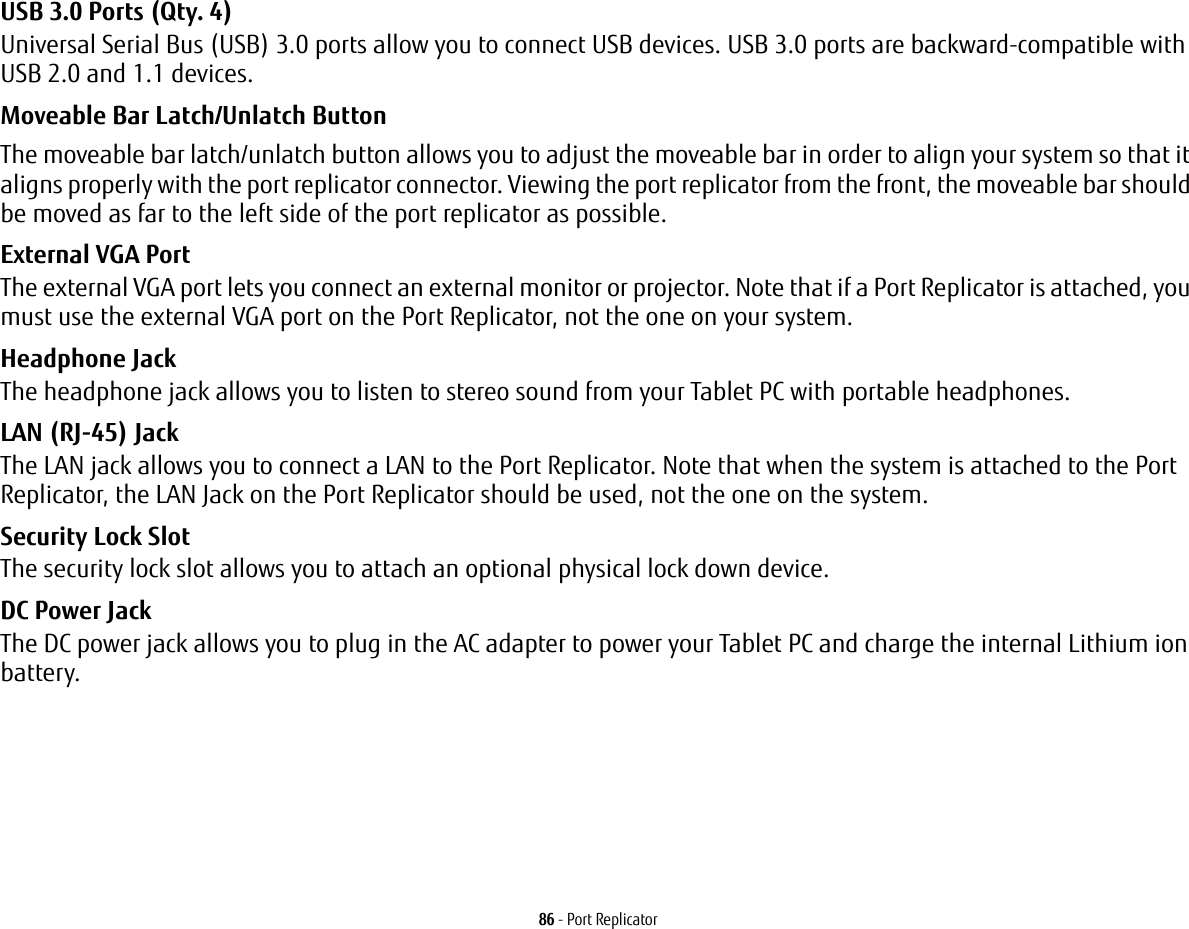
![33 - KeyboardKeyboardFigure 12. KeyboardUsing the KeyboardYour Fujitsu LIFEBOOK Tablet PC has an integral 84-key keyboard. The keys perform all the standard functions of a 101-key keyboard, including the Windows keys and other special function keys. This section describes the following keys (Figure 12):•Numeric keypad: Your Tablet PC allows certain keys to serve dual purposes, both as standard characters and as numeric and mathematical keys. The ability to toggle between the standard character and numeric keys is controlled through the [NumLk] key.Fn Key Start KeyFunction KeysNumeric Keypad Application Key Cursor Keys(surrounded by heavy line)](https://usermanual.wiki/Fujitsu-Client-Computing/WB0088.USERS-MANUAL-1-OF-2/User-Guide-2133567-Page-39.png)
![34 - Keyboard•Cursor keys: Your keyboard contains four arrow keys for moving the cursor or insertion point to the right, left, up, or down within windows, applications and documents. •Function keys: The keys labeled [F1] through [F12], are used in conjunction with the [Fn] key to produce special actions that vary depending on what program is running. •Windows keys: These keys work with your Windows operating system. These keys switch between desktop and Modern Start screen modes and open the Application bar on the bottom of the screen.Numeric Keypad Certain keys on the keyboard perform dual functions as both standard character keys and numeric keypad keys. NumLk can be activated by pressing the [NumLk] keys. Turning off the NumLk feature is done the same way. Once this feature is activated you can enter numerals 0 through 9, perform addition ( + ), subtraction ( - ), multiplication ( * ), or division ( / ), and enter decimal points ( . ) using the keys designated as ten-key function keys. The keys in the numeric keypad are marked on the front edge of the key to indicate their secondary functions. Windows Keys Your LIFEBOOK notebook has two Windows keys, consisting of a Windows key and an Application key. The Windows key switches between the Modern Start screen and the desktop. The Application key opens the Application bar located at the bottom of the screen. (Please refer to your Windows documentation for additional information regarding the Windows keys.) Cursor Keys The cursor keys are the four arrow keys on the keyboard which allow you to move the cursor up, down, left and right in applications. In programs such as Windows File/Explorer, it moves the “focus” (selects the next item up, down, left, or right).](https://usermanual.wiki/Fujitsu-Client-Computing/WB0088.USERS-MANUAL-1-OF-2/User-Guide-2133567-Page-40.png)
![35 - KeyboardFunction Keys Your LIFEBOOK Tablet PC has 12 function keys, F1 through F12. Functions assigned to these keys differ for each application. You should refer to your software documentation to find out how these keys are used. •The [Fn] key provides extended functions for the Tablet PC and is always used in conjunction with another key.•[Fn+F2]: On backlit computers, pressing [F2] while holding [Fn] will toggle the backlit keyboard on (darker), on (brighter), and off.•[Fn+F3]: Pressing [F3] while holding [Fn] will toggle the Audio Mute on and off.•[Fn+F4]: Pressing [F4] while holding [Fn] will toggle the Quick Point feature on and off. Note that the [Fn+F4] combination only works if Manual Setting is selected in the BIOS. (See “BIOS Setup Utility” on page 62)•[Fn+F6]: Pressing [F6] repeatedly while holding [Fn] will lower the brightness of your display.•[Fn+F7]: Pressing [F7] repeatedly while holding [Fn] will increase the brightness of the display.•[Fn+F8]: Pressing [F8] repeatedly while holding [Fn] will decrease the volume of your LIFEBOOK Tablet PC.•[Fn+F9]: Pressing [F9] repeatedly while holding [Fn] will increase the volume of your LIFEBOOK Tablet PC.•[Fn+F10]: Pressing [F10] while holding [Fn] allows you to change your selection of where to send your display video. Each time you press the combination of keys you will step to the next choice. The choices, in order, are: built-in display panel only, external monitor only, and both built-in display panel and external monitor.](https://usermanual.wiki/Fujitsu-Client-Computing/WB0088.USERS-MANUAL-1-OF-2/User-Guide-2133567-Page-41.png)

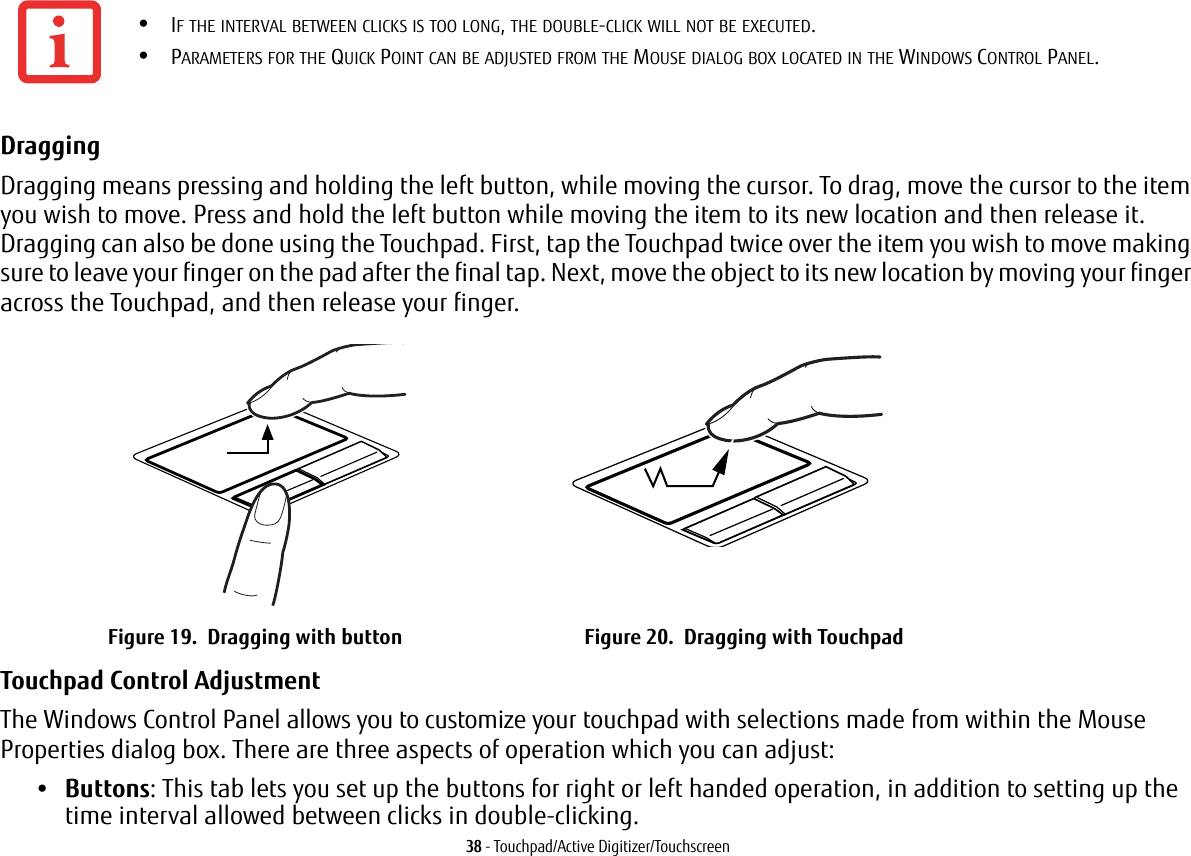
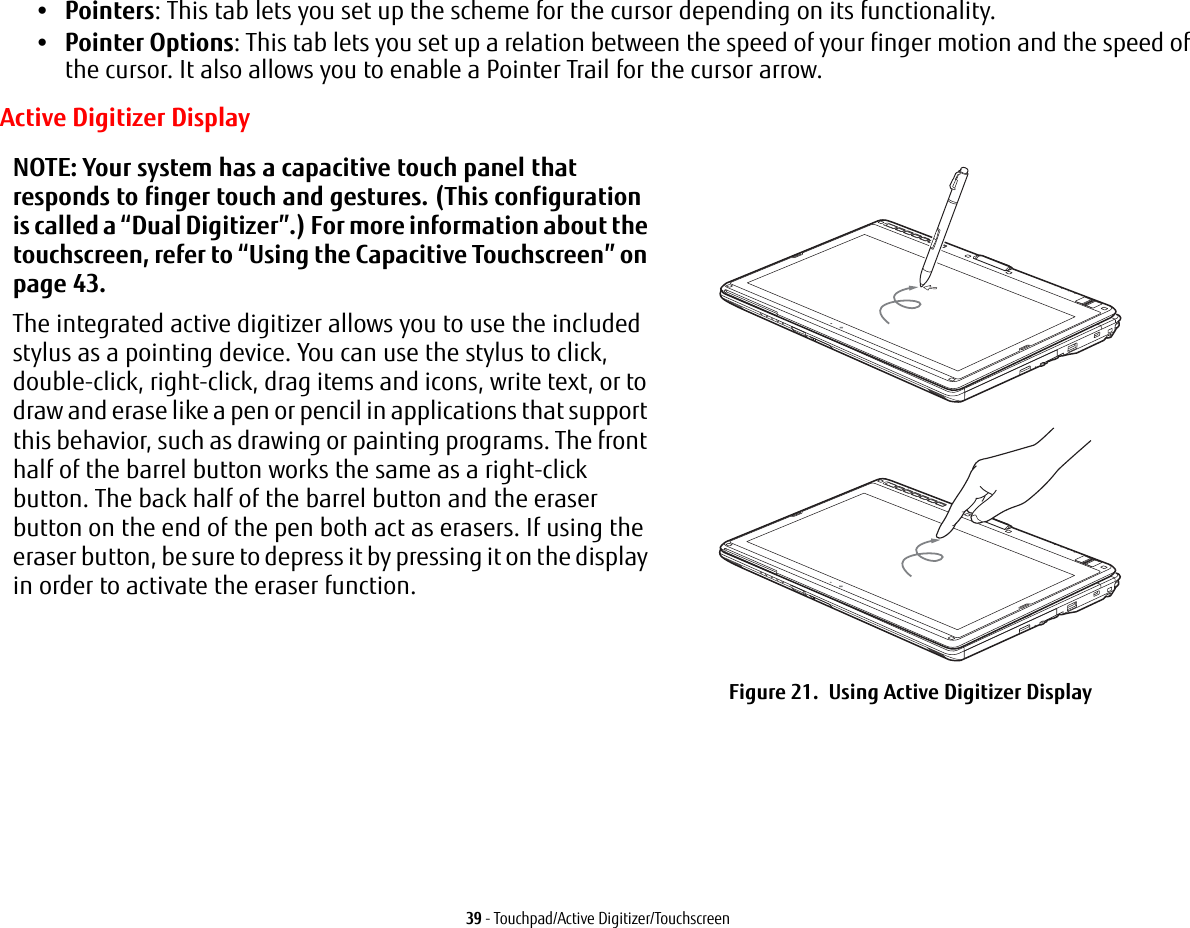

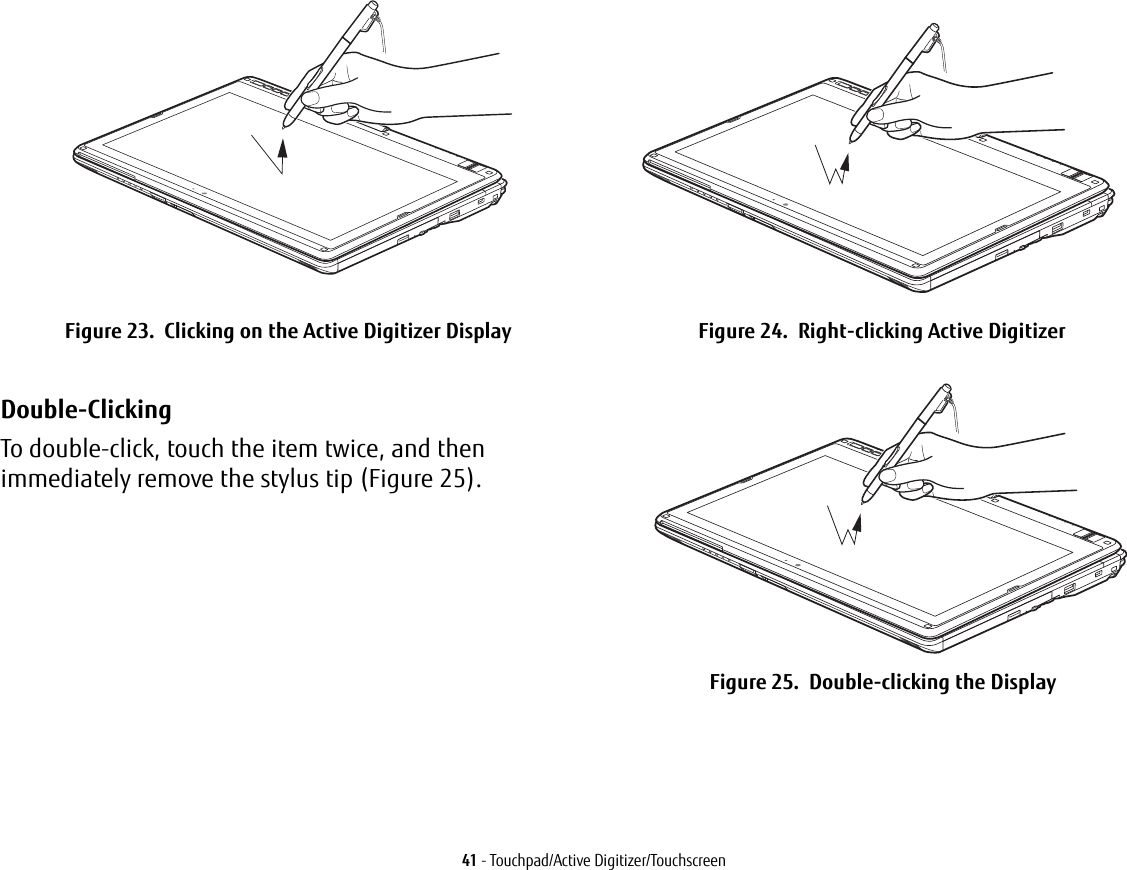
![42 - Touchpad/Active Digitizer/TouchscreenCalibrating the Active Digitizer Display In order to ensure accurate tracking between the stylus and cursor, you must run the Calibration Utility before you use the system for the first time, or after you change the display resolution.To run the calibration utility:1Go to Start -> Control Panel. 2Click Hardware and Sound, then select Tablet PC Settings3Under the Display tab, click the [Calibrate] button.(Note: If you have the optional capacitive touchscreen, you will need to click on either Pen input or Touch input, depending upon which method you want to calibrate.)4Adjust the display of your Tablet PC to a comfortable angle and find the (+) symbol in the upper-left corner of the display.Dragging Dragging means moving an item with the stylus by touching the screen, moving and then lifting the stylus. To drag, touch the Active Digitizer Display with your stylus on the item you wish to move. While continuing to touch the screen with the stylus, drag the item to its new location by moving the stylus across the screen, and then lifting the stylus to release it (Figure 26). Figure 26. Dragging on the Display•THE FIRST TIME YOU PERFORM A CALIBRATION, THE SYSTEM DISPLAY SHOULD BE IN LANDSCAPE MODE. SUBSEQUENT CALIBRATIONS CAN BE PERFORMED IN LANDSCAPE OR PORTRAIT MODE.•THE FIRST TIME YOU CALIBRATE, THERE WILL BE 16 CALIBRATION POINTS; SUBSEQUENT CALIBRATIONS WILL REQUIRE ONLY FOUR CALIBRATION POINTS.](https://usermanual.wiki/Fujitsu-Client-Computing/WB0088.USERS-MANUAL-1-OF-2/User-Guide-2133567-Page-48.png)
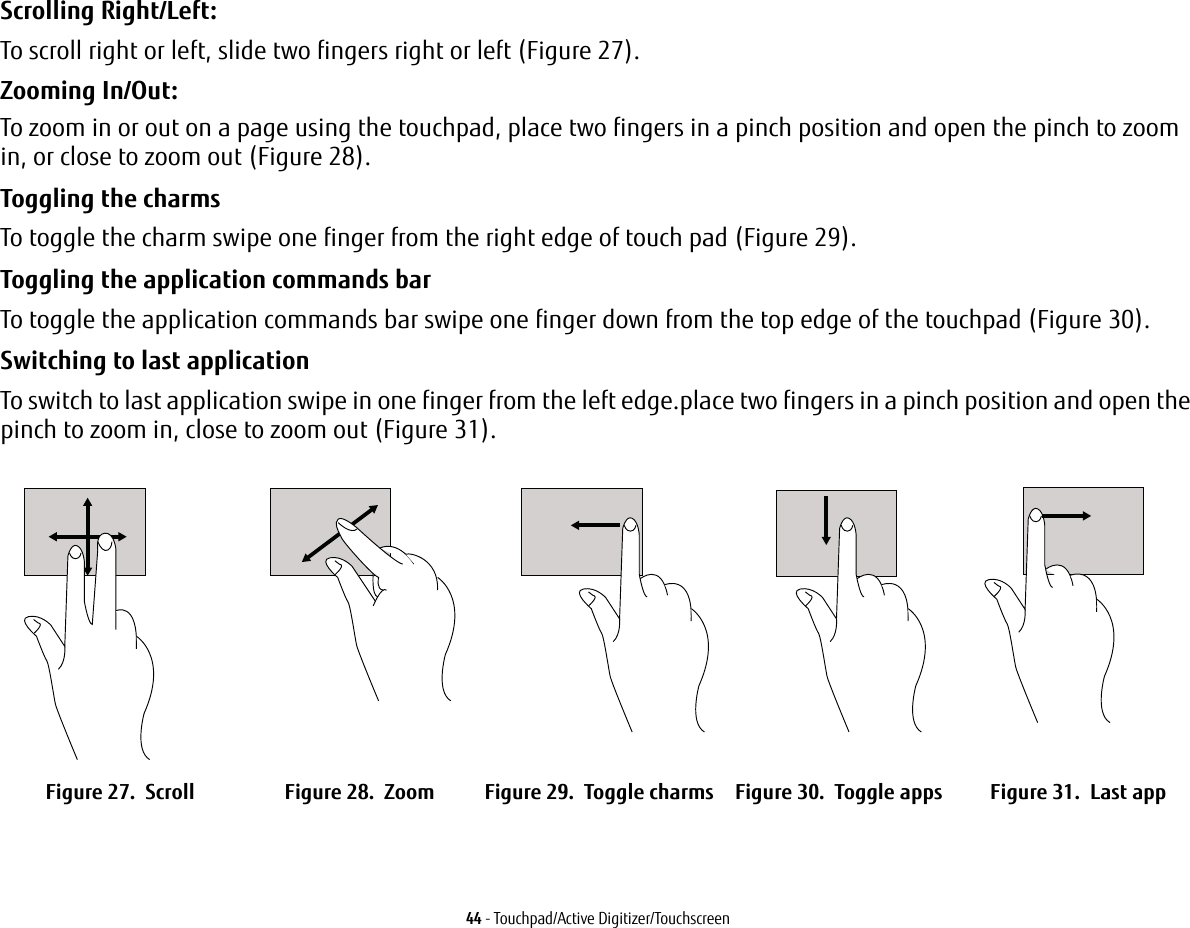
![43 - Touchpad/Active Digitizer/Touchscreen5Depending upon whether you are calibrating pen input or touch input, firmly touch the screen with the stylus or your finger directly on the (+) symbol. Lift the stylus or your finger from the screen and the target will move to a different location on the screen.6Repeat step 4 until you have selected all of the (+) symbols.7Once you have selected all the symbols, press the [OK] button. 8Touch the stylus or your finger to various points on the screen to verify that the screen is correctly calibrated. If you are not satisfied with the screen’s calibration, press the [Calibrate]) button to begin again.Using the Capacitive TouchscreenThis Tablet PC has a dual digitizer that allows you to use either the stylus or your finger(s) as a pointing device. This type of display also allows you to use “gestures” to perform such actions as scroll, zoom, and rotate.Navigating Using GesturesThe touchpad allows you to use gestures to zoom in or out on a page, scroll quickly through large documents, toggle the charms, toggle the application commands bar, and switch to last application. Scrolling Up/Down:To scroll up or down, slide two fingers up or down (Figure 27).DO NOT USE EXCESSIVE FORCE WHEN TAPPING ON THE SCREEN DURING CALIBRATION. USE OF EXCESSIVE FORCE COULD RESULT IN DAMAGE TO THE LED AND/OR TOUCH PANEL.•GESTURE SUPPORT IS DETERMINED BY THE APPLICATION IN USE.•THE STYLUS TAKES PRECEDENCE OVER FINGER TOUCH. IF THE STYLUS IS WITHIN ACTIVE RANGE OF THE SCREEN, FINGER TOUCH WILL BE DISABLED.•WHEN ONE FINGER IS USED ON THE TOUCHSCREEN, IT BEHAVES IN THE SAME MANNER AS A STYLUS.](https://usermanual.wiki/Fujitsu-Client-Computing/WB0088.USERS-MANUAL-1-OF-2/User-Guide-2133567-Page-49.png)

![46 - Volume ControlVolume ControlYour Fujitsu LIFEBOOK Tablet PC has multiple volume controls which interact with each other. Controlling the VolumeThe volume can be controlled in several different ways:•Volume can be changed or muted from within the Volume Control in the system tray.•Volume can be controlled using the Volume Up and Volume Down buttons on the button panel•Volume can be controlled with the F8 and F9 functions keys. Pressing [F8] repeatedly while holding [Fn] will decrease the volume of your Tablet PC. Pressing [F9] repeatedly while holding [Fn] will increase the volume of your Tablet PC.•Volume can be changed by opening the Control Panel and selecting Windows Mobility Center. From there, you can either mute or adjust the sound in the Volume area.•Volume can be muted by pressing the [F3] key while holding down the [Fn] key. To restore audio, repeat the [Fn+F3] procedure.•Volume can be controlled by many volume controls that are set within individual applications.•Certain external audio devices you might connect to your system may have hardware volume controls.Each source discussed above puts an upper limit on the volume level that must then be followed by the other sources. We recommend that you experiment with the various volume controls to discover the optimal sound level.ANY SOFTWARE THAT CONTAINS AUDIO FILES WILL ALSO CONTAIN A VOLUME CONTROL OF ITS OWN. IF YOU INSTALL AN EXTERNAL AUDIO DEVICE THAT HAS AN INDEPENDENT VOLUME CONTROL, THE HARDWARE VOLUME CONTROL AND THE SOFTWARE VOLUME CONTROL WILL INTERACT WITH EACH OTHER. IT SHOULD BE NOTED THAT IF YOU SET YOUR SOFTWARE VOLUME TO OFF, YOU WILL OVERRIDE THE EXTERNAL VOLUME CONTROL SETTING.](https://usermanual.wiki/Fujitsu-Client-Computing/WB0088.USERS-MANUAL-1-OF-2/User-Guide-2133567-Page-52.png)
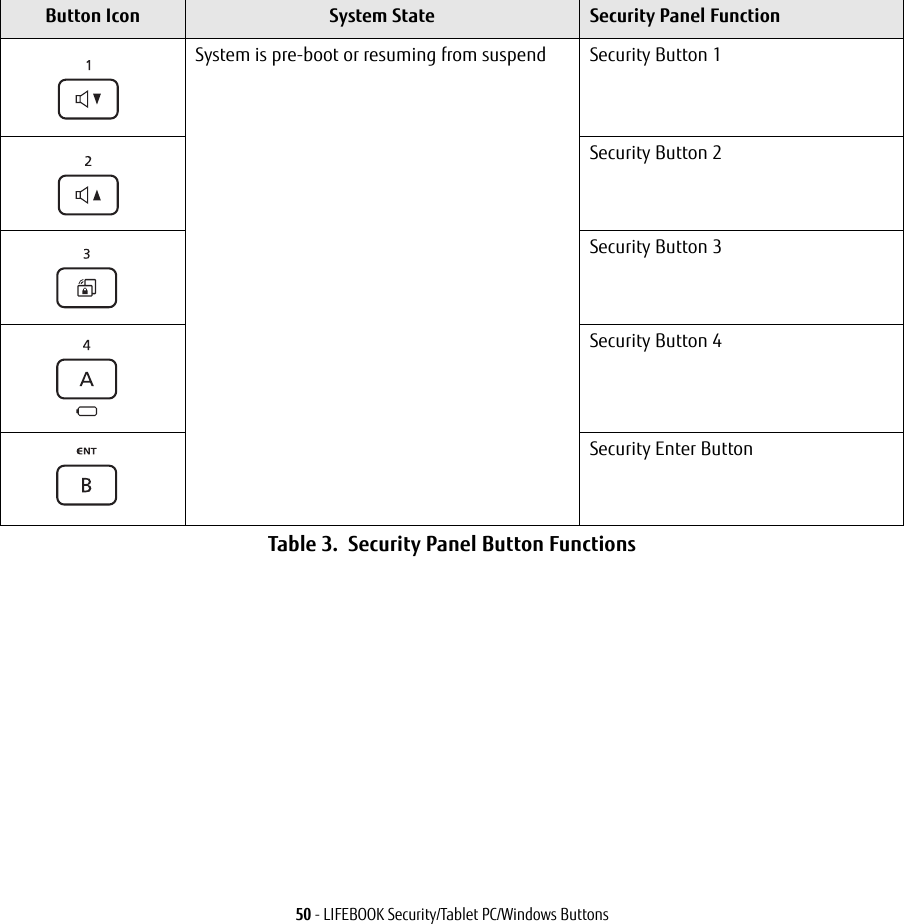
![51 - LIFEBOOK Security/Tablet PC/Windows ButtonsPost-logon button functionsAll six buttons can be used after logging on. See Table 3 for information about each of the post-logon functions.Table 3. Post-logon Tablet PC Button FunctionsWindows ButtonIn post-logon, the Windows button can be used to perform two functions. When pressed alone, it opens up the Start menu. If you press the power slide while the Windows button is being pressed, it acts the same as if pressing [Ctl] + [Alt] + [Del].Button Icon System State Tablet PC FunctionSystem is post-logon (Windows desktop is displayed) Windows Button has two functions.Primary action: opens up the Start menu[Windows] button + [Power] button: Opens up CTRL+ALT+DEL screenVolume DownVolume UpPauses and resumes the rotation lock feature.Opens the Fujitsu Menu utilityOpens the Windows Journal application.](https://usermanual.wiki/Fujitsu-Client-Computing/WB0088.USERS-MANUAL-1-OF-2/User-Guide-2133567-Page-57.png)
![52 - LIFEBOOK Security/Tablet PC/Windows ButtonsVolume Down/Volume Up ButtonsThe Volume Down and Volume Up buttons allow you to decrease and increase the volume.Rotation Lock The rotation lock feature is used to Pause or Resume the auto rotation feature. When the system is in tablet mode, if the auto rotation feature is resumed, the display rotates automatically when the system is rotated. When the auto rotation feature is paused, the display doesn't rotate automatically when the tablet is rotated.Button AWhen Button A is pressed post-logon, the Fujitsu Menu utility opens. When Button A is pressed, the Battery LED shows the remaining capacity of the battery (See “Status Indicator Panel” on page 24.) Five seconds after releasing the button, the LED will turn off automatically. Note: The battery capacity confirmation feature functions only when the system is in off mode (S3/S4/S5).Button BWhen Button B is pressed post-logon, the Windows Journal opens.Changing Tablet PC Button FunctionsThe Application A and B buttons can be changed to launch a program or perform an action you select. By default, the Application A button launches the Fujitsu Menu, and the Application B button launches MS Journal.To launch different applications or cause the Application A or B buttons to perform a specific action:1Double-click on the Tablet PC Settings icon in the Control Panel. 2Select the Buttons tab and select the button you would like to change from the list.3Click [Change] and open the drop down list in the Press: field.4Select the action you would like the button to perform. If you want to launch a program, click on Start a Program, then browse to the location of the program.5Click [OK], then click [OK] again. The buttons will now perform the actions you have assigned to them.](https://usermanual.wiki/Fujitsu-Client-Computing/WB0088.USERS-MANUAL-1-OF-2/User-Guide-2133567-Page-58.png)
![53 - LIFEBOOK Security/Tablet PC/Windows ButtonsSetting up LIFEBOOK Security PanelWhen you receive your Tablet PC, the security panel application is pre-installed without any passwords. The following sections provide detailed information on your security panel, how to set, change or remove passwords.Numbered Buttons Use these buttons to enter your password.Enter Button After entering the button strokes, push this button to enter the password into the Tablet PC. PasswordsThe user and supervisor password may be set on this Tablet PC. A supervisor password is typically the same for all tablets and notebooks in a work group, office, or company to allow for system management. Individual computers in a group environment should not use a common password. A password consists of one to five button strokes plus the enter button. A valid stroke consists of pushing one or up to four buttons simultaneously. The following are valid button strokes: •Pushing [4] by itself•Pushing [2] and [3] at the same time•Pushing [1], [2], and [4] at the same time•Pushing [1], [2], [3], and [4] at the same timeThe following are valid passwords. The numbers within braces ({ }) are button strokes using more than one button. •{[2]+[3]}, [1], [Enter]•[4], [enter]•{[1]+[3]}, {[2]+[3]+[4]}, [1], [4], [2], [Enter]Setting Passwords When shipped from the factory, no passwords are set. You have a choice of having no password or setting a supervisor and user password. You must set the supervisor password before the user password.](https://usermanual.wiki/Fujitsu-Client-Computing/WB0088.USERS-MANUAL-1-OF-2/User-Guide-2133567-Page-59.png)
![54 - LIFEBOOK Security/Tablet PC/Windows ButtonsSetting Supervisor Password You must have set a supervisor password before setting any user passwords. The supervisor password can bypass the user password.1Windows 7: Go to the Start menu. WIndows 8: Click on the Modern start screen, then right-click on "All Apps".2Click on Run.3Type in: C:\Program Files\Fujitsu\Security Panel Application\Supervisor\ FJSECS.EXE, then press [Enter]4Follow the on-screen instructions to set the Supervisor password.Setting User Password 1Go to the Start menu.2Click on All Programs.3Click on Security Panel Application -> Security Panel Application.4Follow the on-screen instructions to set the user password.•THE PURPOSE OF SUPERVISOR PASSWORD IS TO BE ABLE TO BYPASS THE USER PASSWORD IN CASE THE USER PASSWORD IS FORGOTTEN. THE SUPERVISOR PASSWORD ALONE WILL NOT LOCK THE SYSTEM.•YOU MUST SET THE SUPERVISOR AND USER PASSWORDS FOR THE SECURITY PANEL TO WORK.YOU MAY CHANGE OR REMOVE THE SUPERVISOR OR USER PASSWORD BY REPEATING THE STEPS DEFINED ABOVE.](https://usermanual.wiki/Fujitsu-Client-Computing/WB0088.USERS-MANUAL-1-OF-2/User-Guide-2133567-Page-60.png)
![56 - LIFEBOOK Security/Tablet PC/Windows Buttons1Open the system Control Panel. If the display is in Category view, click one of the icon selections in the View by: field. Click on Power Options.2Click Choose what closing the lid does in the left pane.3Select the desired action for When I close the lid, then click the [Save changes] button.Low Battery Operations If your Tablet PC has a low battery, pushing the suspend/resume slide only turns on the Security Indicator. Your Tablet PC does not unlock, the Security Indicator turns off after one minute. To resume normal operation, first attach a power supply to the Tablet PC. Then you may unlock the Tablet PC.Uninstalling/Re-installing the Security Panel ApplicationYou have two options when uninstalling the security panel application:•Remove passwords and uninstall the security panel application software. This will disable all security features.•Uninstall the security panel application with password still active. This will not allow any changes to the password. Uninstalling the Security Panel Application Software Remove passwords when User wants no password protection whatsoever and doesn’t want to give anybody the utility to set a password on their computer. In this case, if passwords (supervisor, user, or both) are set, the passwords must first be cleared BEFORE removing the application. To clear passwords, follow same procedure in SETTING PASSWORD CODES except this time, select REMOVE, enter current password then click Next. When asked to confirm select Yes.Removing Security Panel Application with Passwords Still Active Using this feature will not allow any changes to the password. REMOVING THE APPLICATIONS DOES NOT REMOVE THE PASSWORD. IT SIMPLY REMOVES THE ABILITY TO CHANGE/ADD/REMOVE PASSWORDS. TO CHANGE YOUR PASSWORD YOU MUST REINSTALL THE APPLICATION.](https://usermanual.wiki/Fujitsu-Client-Computing/WB0088.USERS-MANUAL-1-OF-2/User-Guide-2133567-Page-62.png)
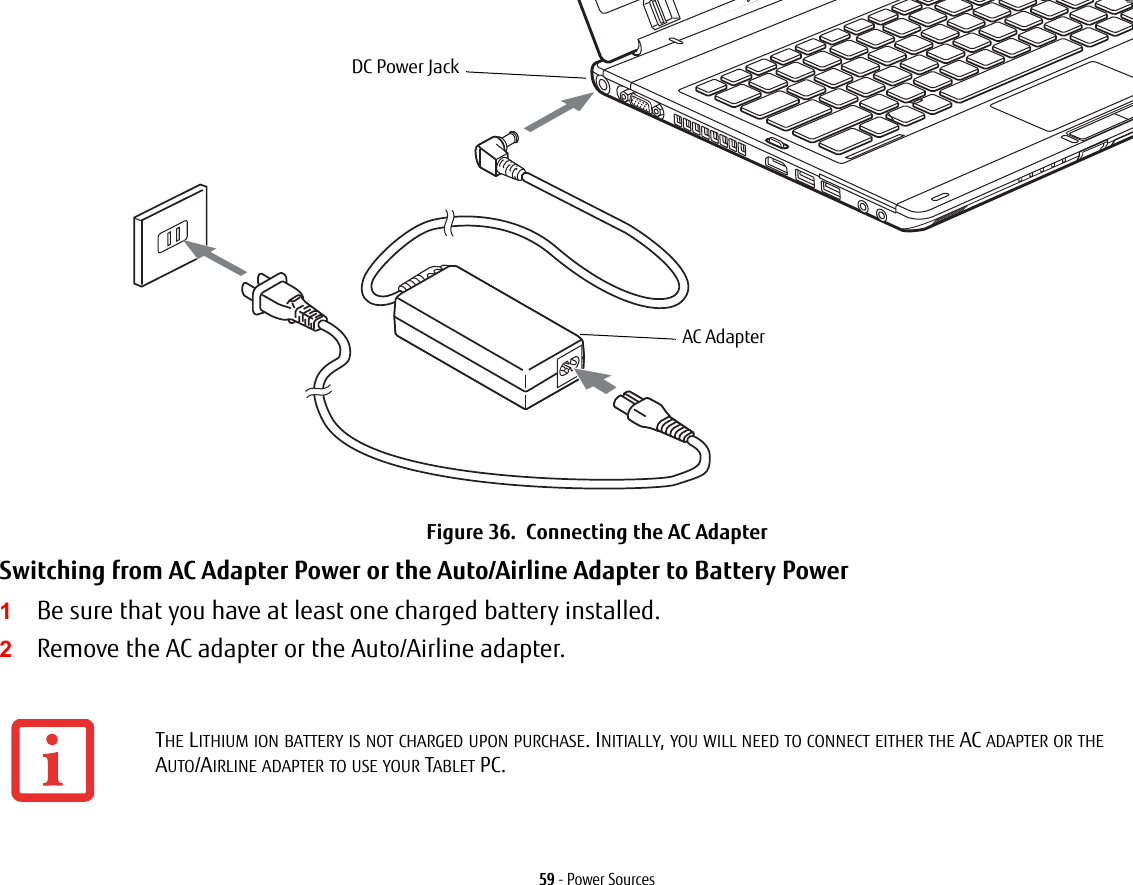
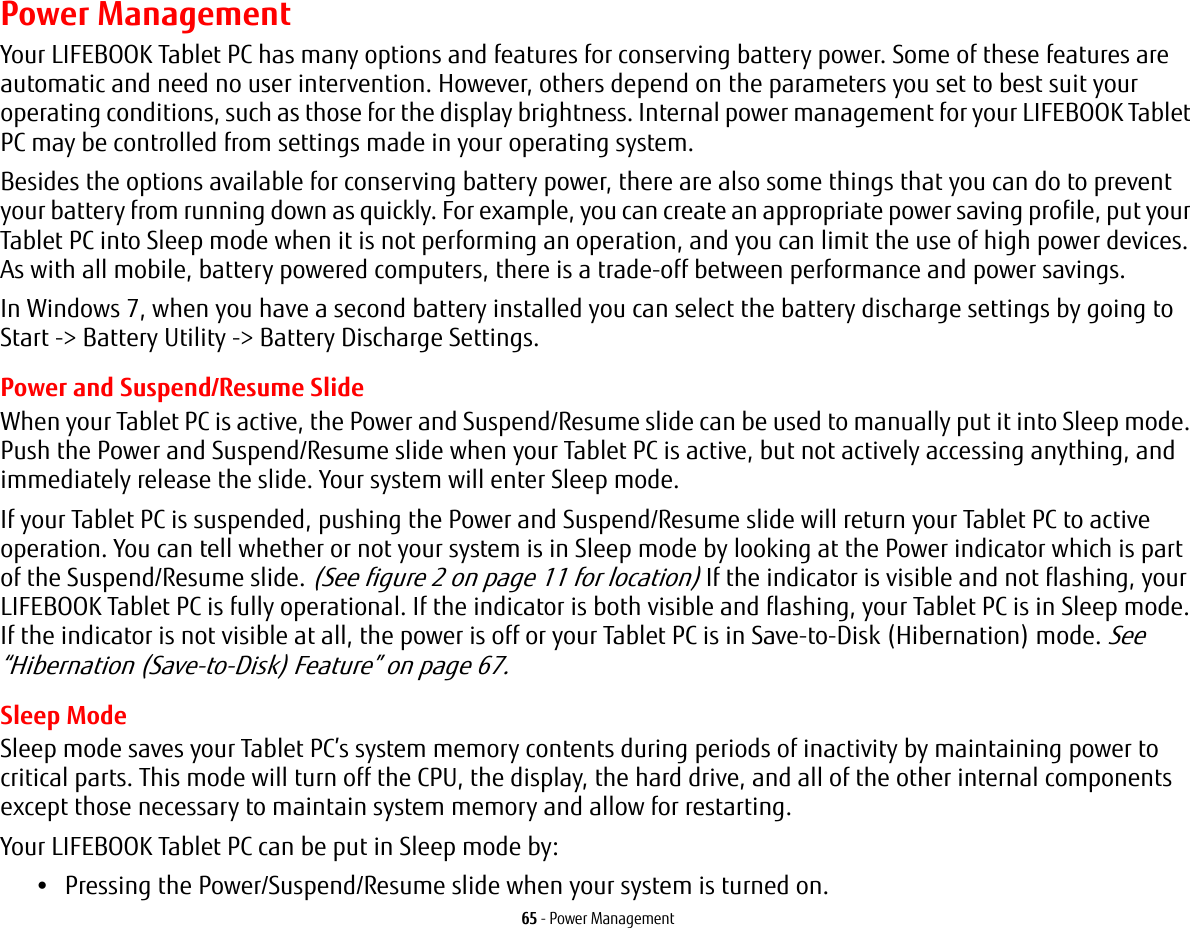
![60 - Starting Your LIFEBOOK Tablet PCStarting Your LIFEBOOK Tablet PCPower OnPower/Suspend/Resume Slide The Power and Suspend/Resume slide is used to power on your LIFEBOOK notebook, to resume from Sleep or Save-to-Disk mode or to place your notebook in Sleep or Save-to-Disk mode. (You can also use the slide to power down the system by holding it for approximately five seconds. This can be useful if the system is “hung up”. This shouldn’t be used as the normal means of shutdown, however.) You can also turn off your notebook by using the following method: from Modern Start screen, open Charms ([Windows] + C or mouse over [-] in the bottom right corner of the screen), then click [Settings] -> [Power] Select Shutdown from the list. WHEN YOU TURN ON YOUR LIFEBOOK TABLET PC BE SURE YOU HAVE A POWER SOURCE. THIS MEANS THAT AT LEAST ONE BATTERY IS INSTALLED AND CHARGED, OR THAT THE AC OR AUTO/AIRLINE ADAPTER IS CONNECTED AND HAS POWER.Once you have connected your AC adapter or charged the internal Lithium ion Battery, you can press this slide to power up your notebook. (Figure 37)Figure 37. Starting the Tablet PCPower/Suspend/Resume Slide](https://usermanual.wiki/Fujitsu-Client-Computing/WB0088.USERS-MANUAL-1-OF-2/User-Guide-2133567-Page-66.png)
![61 - Starting Your LIFEBOOK Tablet PCWhen you power on your LIFEBOOK, it will perform a Power On Self Test (POST) to check the internal parts and configuration for correct functionality. If a fault is found, your LIFEBOOK Tablet PC will emit an audio warning and/or an error message will be displayed. See “Power On Self Test Messages” on page 99. Depending on the nature of the problem, you may be able to continue by starting the operating system or by entering the BIOS setup utility and revising the settings.After satisfactory completion of the POST, your Tablet PC will load your operating system.Boot SequenceThe procedure for starting-up your notebook is termed the Bootup sequence and involves your notebook’s BIOS. When your notebook is first turned on, the main system memory is empty, and it needs to find instructions to start up your notebook. This information is in the BIOS program. Each time you power up or restart your notebook, it goes through a boot sequence which displays a Fujitsu logo until the operating system is found. During booting, your notebook is performing a standard boot sequence including a Power On Self Test (POST). When the boot sequence is completed without a failure and without a request for the BIOS Setup Utility, the system displays the operating system’s opening screen.The boot sequence is executed when:•You turn on the power to your LIFEBOOK notebook.•You restart your LIFEBOOK notebook from [Settings]->[Power] menu.•The software initiates a system restart; for example, when you install a new application.DO NOT CARRY YOUR LIFEBOOK TABLET PC AROUND WITH THE POWER ON OR SUBJECT IT TO SHOCKS OR VIBRATION, AS YOU RISK DAMAGING YOUR TABLET PC.NEVER TURN OFF YOUR LIFEBOOK TABLET PC DURING THE POWER ON SELF TEST (POST) OR IT WILL CAUSE AN ERROR MESSAGE TO BE DISPLAYED WHEN YOU TURN YOUR LIFEBOOK TABLET PC ON THE NEXT TIME. See “Power On Self Test Messages” on page 99.](https://usermanual.wiki/Fujitsu-Client-Computing/WB0088.USERS-MANUAL-1-OF-2/User-Guide-2133567-Page-67.png)
![62 - Starting Your LIFEBOOK Tablet PCHard Disk Drive PasswordsTo provide additional security for your data, you can assign passwords to your hard disk drive(s). This feature is managed in the system BIOS Setup Utility. See BIOS Setup Utility below for information about accessing the utility.BIOS Setup UtilityThe BIOS Setup Utility sets up the operating environment for your notebook. Your BIOS is set at the factory for normal operating conditions, therefore there is no need to set or change the BIOS’ environment to operate your notebook.The BIOS Setup Utility also allows you to configure such features as the System Data Security feature parameters, such as passwords.Entering the BIOS Setup Utility To enter the BIOS Setup Utility do the following:1Turn on or restart your LIFEBOOK notebook.2To enter the BIOS Setup Utility, press the [F2] key once the Fujitsu logo appears on the screen. This will open the main menu of the BIOS Setup Utility with the current settings displayed.Press the right or left arrow keys key to scroll through the other setup menus to review or alter the current settings.BIOS Guide A guide to your notebook’s BIOS is available online at our service and support Website at: http://solutions.us.fujitsu.com/www/content/support/contact/index.php. Once there, select User’s Guides under Online Support. Select your Product, Series, and Model, then click [Go].REMEMBER YOUR PASSWORDS. IF YOU SET AND FORGET YOUR USER AND MASTER HARD DISK PASSWORDS, FUJITSU AMERICA WILL NOT BE ABLE TO RESET IT. YOU MAY LOSE DATA AND HAVE TO REPLACE YOUR SYSTEM BOARD OR HARD DISK DRIVE.IF YOUR DATA SECURITY SETTINGS REQUIRE IT, YOU MAY BE ASKED FOR A PASSWORD BEFORE THE BIOS MAIN MENU WILL APPEAR.](https://usermanual.wiki/Fujitsu-Client-Computing/WB0088.USERS-MANUAL-1-OF-2/User-Guide-2133567-Page-68.png)
![64 - Starting Your LIFEBOOK Tablet PCSelect the applications you wish to install by selecting the checkbox adjacent to your selection, or click [Select All] if you would like to install all available applications. Once you have made your selections, click [Install].Note that in some cases (depending upon which application was selected for installation) after installation completes, the system will prompt you to reboot. There are also cases in which if multiple applications are selected to install but one of them needs a reboot, the system will reboot and continue installing the rest of the selected applications. Registering your LIFEBOOK with Fujitsu You can register your notebook by going to our website at: http://www.us.fujitsu.com/computers. You will need to be set up with an Internet Service Provider (ISP) to register online.](https://usermanual.wiki/Fujitsu-Client-Computing/WB0088.USERS-MANUAL-1-OF-2/User-Guide-2133567-Page-70.png)
![66 - Power Management•Clicking the power icon on the lock menu.•Selecting Sleep from the [Settings]->[Power] menu.•Timing out from lack of activity.•Allowing the battery to reach the Dead Battery Warning condition.Your Tablet PC’s system memory typically stores the files on which you are working, open application information, and any other data required to support the operations in progress. When you resume operation from Sleep mode, your Tablet PC will return to the point where it left off. You must use the Power and Suspend/Resume slide to resume operation, and there must be an adequate power source available, or your Tablet PC will not resume.•IF YOU ARE RUNNING YOUR TABLET PC ON BATTERY POWER, BE AWARE THAT THE BATTERY CONTINUES TO DISCHARGE WHILE YOUR TABLET PC IS IN SLEEP MODE, THOUGH NOT AS FAST AS WHEN FULLY OPERATIONAL.•DISABLING THE SUSPEND/RESUME SLIDE PREVENTS IT FROM BEING USED TO PUT YOUR LIFEBOOK TABLET PC IN SLEEP OR SAVE-TO-DISK MODE. THE RESUME FUNCTION OF THE SLIDE CANNOT BE DISABLED.•THE SLEEP OR HIBERNATION (SAVE-TO-DISK) MODE SHOULD NOT BE USED WITH CERTAIN PC CARDS. CHECK YOUR PC CARD DOCUMENTATION FOR MORE INFORMATION.•WHEN PC CARDS OR EXTERNAL DEVICES ARE IN USE, HIBERNATION (SAVE-TO-DISK) MODE CANNOT RETURN TO THE EXACT STATE PRIOR TO SUSPENSION BECAUSE ALL OF THE PERIPHERAL DEVICES WILL BE RE-INITIALIZED WHEN THE SYSTEM RE-STARTS.•IF YOUR TABLET PC IS ACCESSING INFORMATION WHEN YOU ENTER SLEEP OR HIBERNATION (SAVE-TO-DISK) MODE, CHANGES TO OPEN FILES ARE NOT LOST. THE FILES ARE LEFT OPEN AND MEMORY IS KEPT ACTIVE DURING SLEEP MODE, OR THE MEMORY IS TRANSFERRED TO THE INTERNAL HARD DRIVE DURING HIBERNATION MODE.•THE MAIN ADVANTAGE OF USING THE HIBERNATION (SAVE-TO-DISK) FUNCTION IS THAT POWER IS NOT REQUIRED TO MAINTAIN YOUR DATA. THIS IS PARTICULARLY IMPORTANT IF YOU WILL BE LEAVING YOUR LIFEBOOK TABLET PC IN A SUSPENDED STATE FOR A PROLONGED PERIOD OF TIME. THE DRAWBACK OF USING HIBERNATION MODE IS THAT IT LENGTHENS THE POWER DOWN AND POWER UP SEQUENCES AND RESETS PERIPHERAL DEVICES.•YOUR SYSTEM IS SET TO USE THE MAX BATTERY POWER SCHEME WHEN RUNNING ON BATTERY POWER. IF YOU CHANGE THE POWER SCHEME TO A DIFFERENT PROFILE, YOUR BATTERY LIFE MAY VARY.](https://usermanual.wiki/Fujitsu-Client-Computing/WB0088.USERS-MANUAL-1-OF-2/User-Guide-2133567-Page-72.png)
![67 - Power ManagementHibernation (Save-to-Disk) FeatureThe Hibernation feature saves the contents of your Tablet PC’s system memory to the hard drive as a part of the Suspend/Resume mode. You can enable or disable this feature. Enable or Disable the Hibernation Feature To enable or disable the Hibernation feature follow these steps:1From the Modern Start screen, press [Windows]+[X].Select Control Panel from the menu, then select Power Options.2Select “Choose what the power button does” or “Choose what closing the lid does”, then make your selections (Do Nothing, Sleep, Hibernate, or Shut Down).Windows Power Management The Power Options icon located in the Windows Control Panel allows you to configure some of the power management settings. For example, you can use the Power Options to set the timeout values for turning off the display and hard disks whether you are running the Tablet PC on battery power or one of the adapters. Restarting the SystemIf your system is on and you need to restart it, be sure that you use the following procedure. 1From the Modern Start screen, open Charms ([Windows]+C) or mouse over [-] in the bottom right corner of the screen), then click [Settings]-> [Power].2Select Restart from the list.TURNING OFF YOUR LIFEBOOK TABLET PC WITHOUT EXITING WINDOWS OR TURNING ON YOUR TABLET PC WITHIN 10 SECONDS OF THE TABLET PC BEING SHUT OFF MAY CAUSE AN ERROR WHEN YOU START THE NEXT TIME.](https://usermanual.wiki/Fujitsu-Client-Computing/WB0088.USERS-MANUAL-1-OF-2/User-Guide-2133567-Page-73.png)
![68 - Power ManagementPower OffBefore turning off the power, check that the hard drive/optical drive access indicator is off. If you turn off the power while accessing a disk there is a risk of data loss. To ensure that your Tablet PC shuts down without error, use the Windows shut down procedure.Using the correct procedure to shut down from Windows allows your Tablet PC to complete its operations and turn off power in the proper sequence to avoid errors. The proper sequence is:From the Modern Start screen, open Charms ([Windows] + C) or mouse over [-] in the bottom right corner of the screen), then click [Settings] -> [Power]. Select Shut down from the list.If you are going to store your Tablet PC for a month or more see the Care and Maintenance Section. •ALWAYS POWER OFF THE COMPUTER BEFORE TRANSPORTING AND/OR PACKAGING IT. AFTER SHUTTING DOWN THE SYSTEM, WAIT UNTIL THE STATUS LED PANEL INDICATES POWER OFF CONDITION (I.E., NO LIGHTS ARE ILLUMINATED).•IT IS POSSIBLE THAT THE UNIT MAY NOT AUTOMATICALLY GO TO POWER OFF OR HIBERNATE MODE WHEN YOU CLOSE THE LID. THIS SITUATION MAY OCCUR DUE TO PRE-OS BOOT PASSWORD SECURITY SETTINGS OR SOME OTHER APPLICATION RUNNING ON THE COMPUTER. •ATTEMPTING TO TRANSPORT THE COMPUTER WHILE POWER IS ON MAY DAMAGE THE TABLET PC DUE TO SHOCK OR OVERHEATING SINCE THE AIR VENTS MAY BE BLOCKED OR RESTRICTED.BE SURE TO CLOSE ALL FILES, EXIT ALL APPLICATIONS, AND SHUT DOWN YOUR OPERATING SYSTEM PRIOR TO TURNING OFF THE POWER. IF FILES ARE OPEN WHEN YOU TURN THE POWER OFF, YOU WILL LOSE ANY CHANGES THAT HAVE NOT BEEN SAVED, AND MAY CAUSE DISK ERRORS.](https://usermanual.wiki/Fujitsu-Client-Computing/WB0088.USERS-MANUAL-1-OF-2/User-Guide-2133567-Page-74.png)

![71 - Lithium ion BatteryRecharging the BatteriesIf you want to know the condition of the primary Lithium ion battery, check the Battery Level indicator located on the Status Indicator panel. The indicator changes as the battery level changes.The Lithium ion battery is recharged internally using the AC adapter or Auto/Airline adapter. To recharge the battery make sure the battery that needs to be charged is installed in your LIFEBOOK Tablet PC and connect the AC or Auto/Airline adapter.There is no memory effect on the Lithium ion battery therefore you do not need to discharge the battery completely before recharging. The charge times will be significantly longer if your Tablet PC is in use while the battery is charging. If you want to charge the battery more quickly, put your Tablet PC into Sleep mode, or turn it off while the adapter is charging the battery. (See Power Management on page 65 for more information on Sleep mode and shutdown procedure)•ACTUAL BATTERY LIFE WILL VARY BASED ON SCREEN BRIGHTNESS, APPLICATIONS, FEATURES, POWER MANAGEMENT SETTINGS, BATTERY CONDITION AND OTHER CUSTOMER PREFERENCES. OPTICAL DRIVE OR HARD DRIVE USAGE MAY ALSO HAVE A SIGNIFICANT IMPACT ON BATTERY LIFE. THE BATTERY CHARGING CAPACITY IS REDUCED AS THE BATTERY AGES. IF YOUR BATTERY IS RUNNING LOW QUICKLY, YOU SHOULD REPLACE IT WITH A NEW ONE.•UNDER FEDERAL, STATE, OR LOCAL LAW IT MAY BE ILLEGAL TO DISPOSE OF BATTERIES BY PUTTING THEM IN THE TRASH. PLEASE TAKE CARE OF OUR ENVIRONMENT AND DISPOSE OF BATTERIES PROPERLY. CHECK WITH YOUR LOCAL GOVERNMENT AUTHORITY FOR DETAILS REGARDING RECYCLING OR DISPOSING OF OLD BATTERIES. IF YOU CANNOT FIND THIS INFORMATION ELSEWHERE, CONTACT YOUR SUPPORT REPRESENTATIVE AT 1-800-8FUJITSU (1-800-838-5487)WHEN BUTTON A IS PRESSED WHILE THE SYSTEM IS IN OFF MODE, THE BATTERY LED SHOWS THE REMAINING CAPACITY OF THE BATTERY (SEE “STATUS INDICATOR PANEL” ON PAGE 24.) FIVE SECONDS AFTER RELEASING THE BUTTON, THE LED WILL TURN OFF AUTOMATICALLY.MAKE SURE THAT THE PERCENTAGE CHARGE IS INDICATED BY THE BATTERY CHARGING INDICATOR ON THE STATUS INDICATOR PANEL.WHEN THE [PUSH] MARK ON THE BATTERY ITSELF IS PRESSED, THE LED BESIDE THE [PUSH] MARK SHOWS THE REMAINING CAPACITY OF THE BATTERY (GREEN: 50-100%, ORANGE: 11-49%, RED: 1-10%).](https://usermanual.wiki/Fujitsu-Client-Computing/WB0088.USERS-MANUAL-1-OF-2/User-Guide-2133567-Page-77.png)
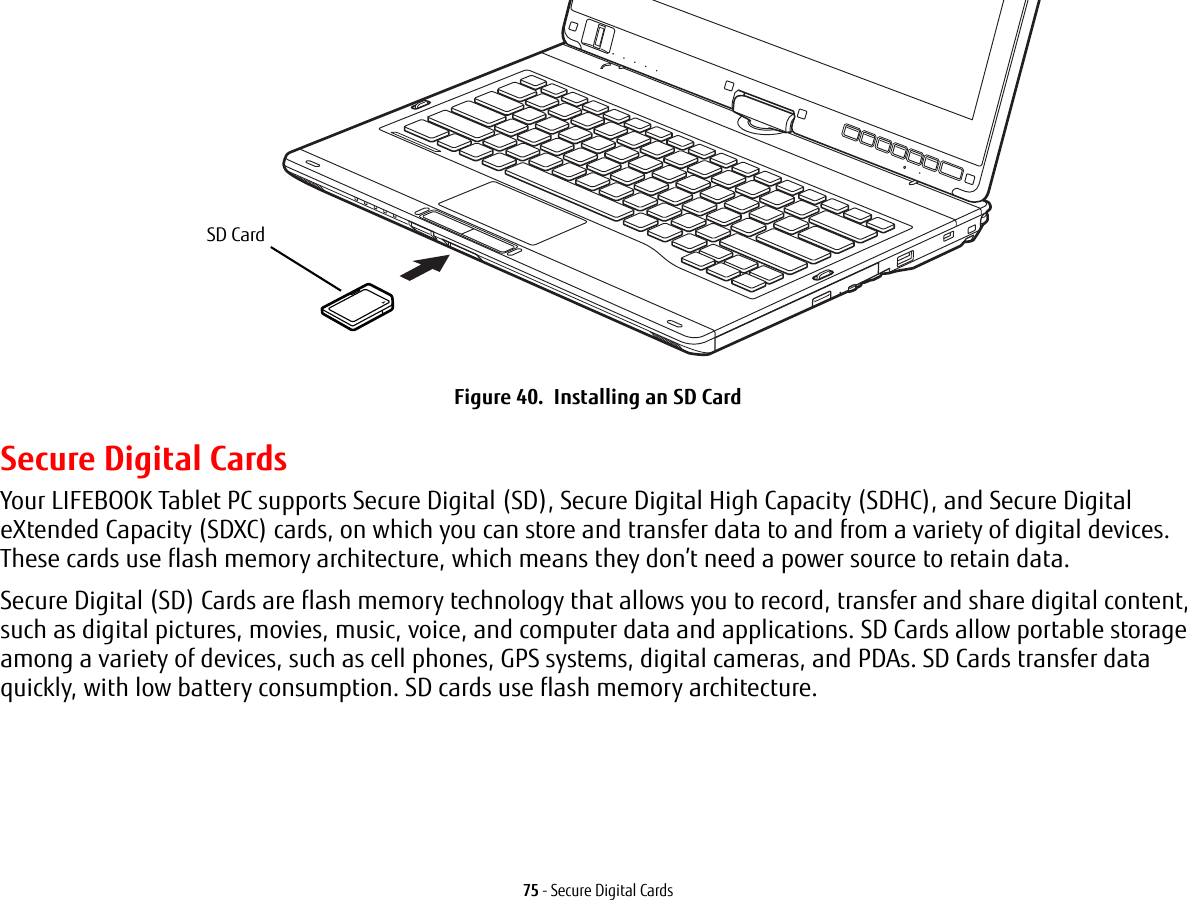
![76 - Secure Digital CardsInstalling SD CardsSD Cards are installed in the SD Card slot. To install an SD Card, follow these steps:1See your specific card manual for instructions on the installation of your card. Some cards may require that your Tablet PC is off while installing them.2Make sure there is no card currently in the slot. If there is, see Removing an SD Card below.3Insert your card into the slot with the product label facing up.4Push the card firmly into the slot until it is seated in the connector. Removing an SD CardTo remove an SD Card, follow these easy steps:1Select Safely Remove Hardware from the System Tray. Highlight the card in the list, then click [Stop].2Push the SD Card in until it unlatches. It will then eject from the slot for removal.INSTALLING OR REMOVING AN SD CARD DURING YOUR LIFEBOOK TABLET PC’S SHUTDOWN OR BOOTUP PROCESS MAY DAMAGE THE CARD AND/OR YOUR LIFEBOOK TABLET PC.DO NOT INSERT A CARD INTO A SLOT IF THERE IS WATER OR ANY OTHER SUBSTANCE ON THE CARD AS YOU MAY PERMANENTLY DAMAGE THE CARD, YOUR LIFEBOOK TABLET PC, OR BOTH.SEE YOUR CARD MANUAL FOR SPECIFIC INSTRUCTIONS ON THE REMOVAL OF YOUR CARD. SOME CARDS MAY REQUIRE YOUR LIFEBOOK TABLET PC TO BE IN SLEEP MODE OR OFF WHILE REMOVING THEM.](https://usermanual.wiki/Fujitsu-Client-Computing/WB0088.USERS-MANUAL-1-OF-2/User-Guide-2133567-Page-82.png)
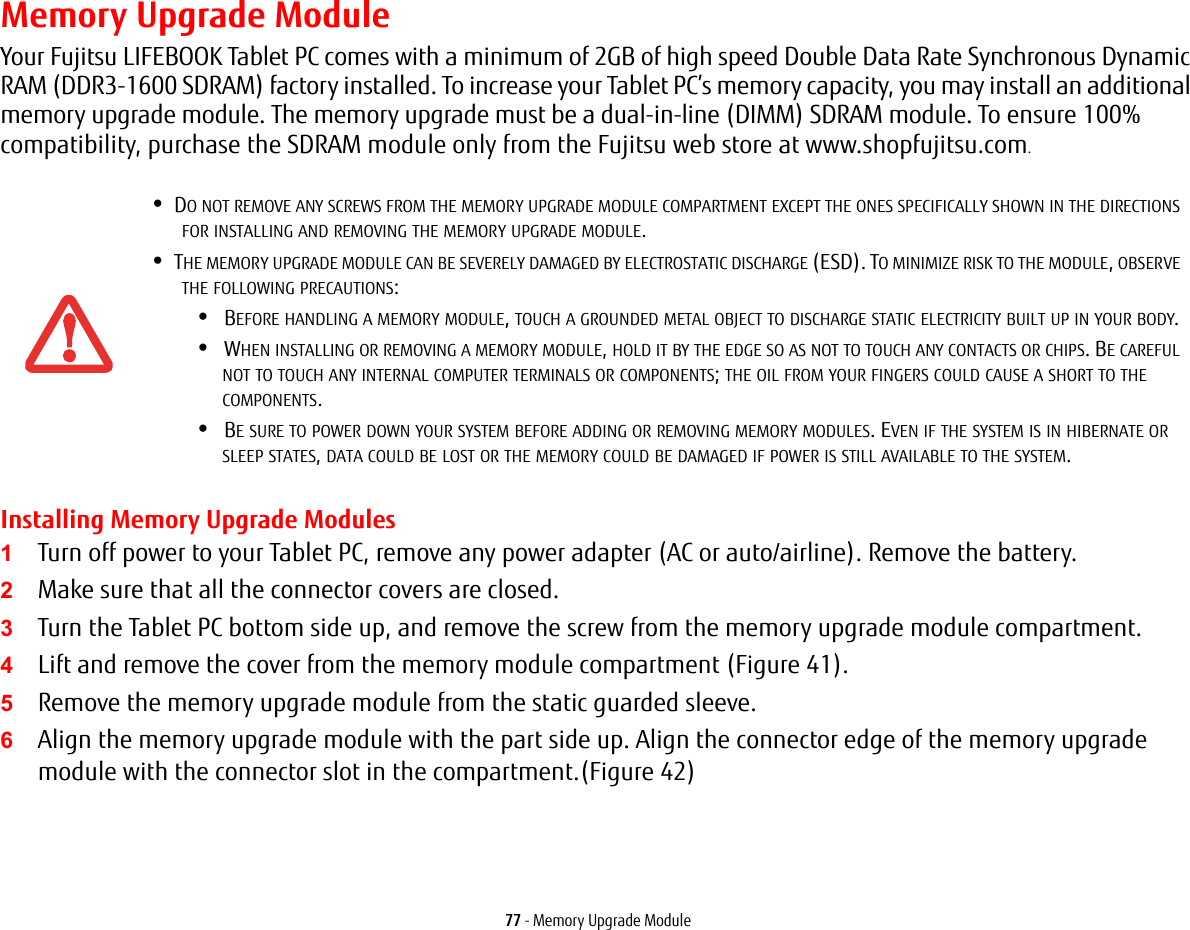
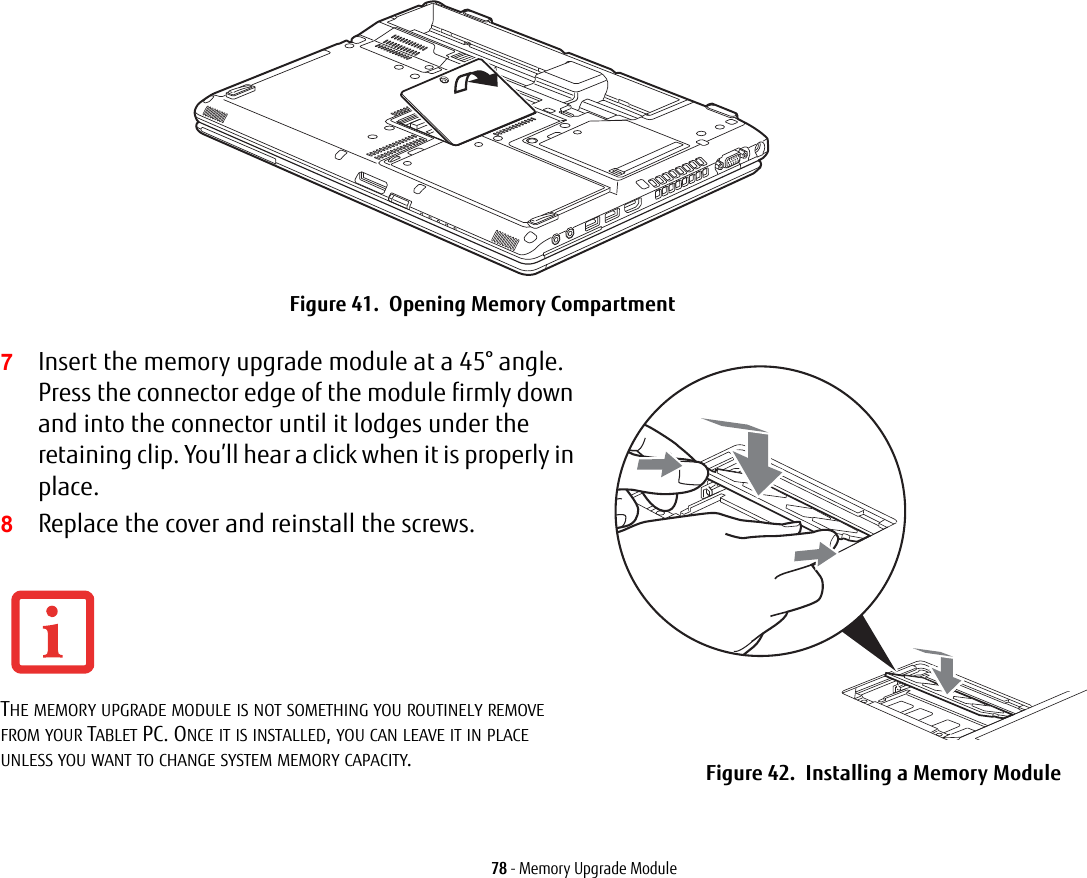
![79 - Memory Upgrade ModuleChecking the Memory CapacityOnce you have changed the system memory capacity by replacing the installed module with a larger one, be sure to check that your notebook has recognized the change.Check the memory capacity by doing the following: from Modern Start screen press [Windows]+[X], then select Control Panel> System. The amount of memory is displayed next to Installed Memory (RAM): The amount of memory displayed should be approximately the total of all memory modules installed. There may be a discrepancy which is allocated for fixed video memory.Removing a Memory Upgrade Module1Perform steps 1 through 4 of Installing a Memory Upgrade Module.2Pull the clips sideways away from each side of the memory upgrade module at the same time. 3While holding the clips out, remove the module by lifting it up and pulling it away from your Tablet PC. 4Store the memory upgrade module in a static guarded sleeve.5Replace the cover and reinstall the screws.Figure 43. Removing a Memory ModuleIF THE TOTAL MEMORY DISPLAYED IS INCORRECT, CHECK THAT YOUR MEMORY UPGRADE MODULE IS PROPERLY INSTALLED. (IF THE MODULE IS PROPERLY INSTALLED AND THE CAPACITY IS STILL NOT CORRECTLY RECOGNIZED, SEE TROUBLESHOOTING ON PAGE 88.](https://usermanual.wiki/Fujitsu-Client-Computing/WB0088.USERS-MANUAL-1-OF-2/User-Guide-2133567-Page-85.png)
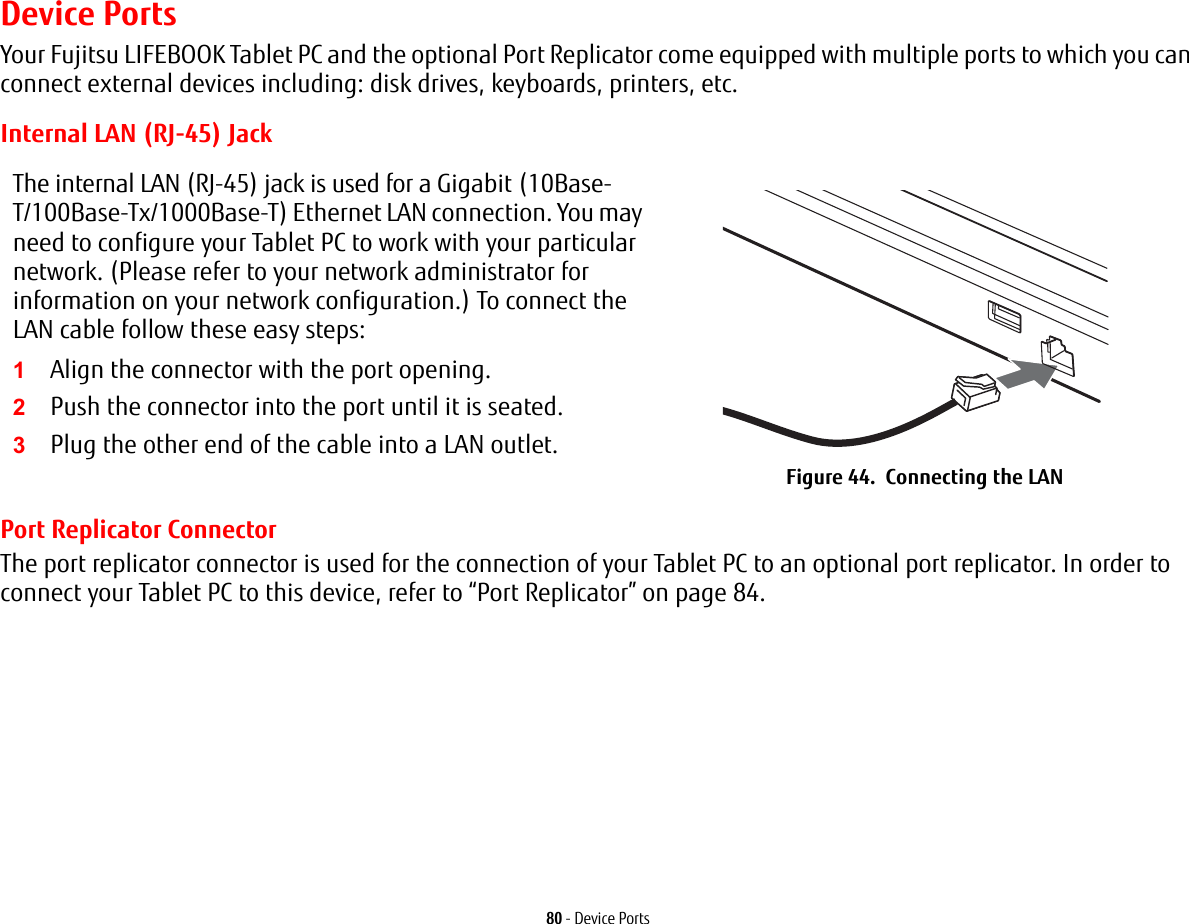
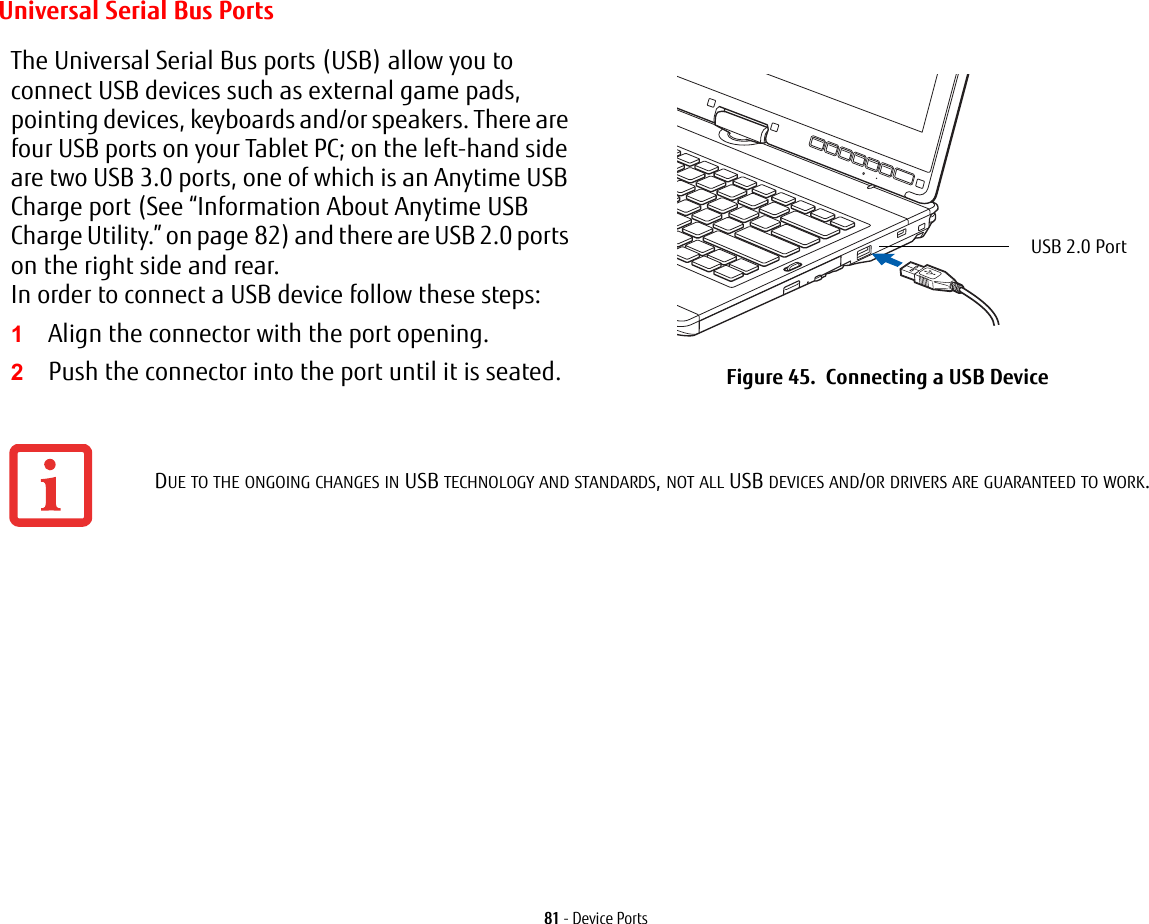
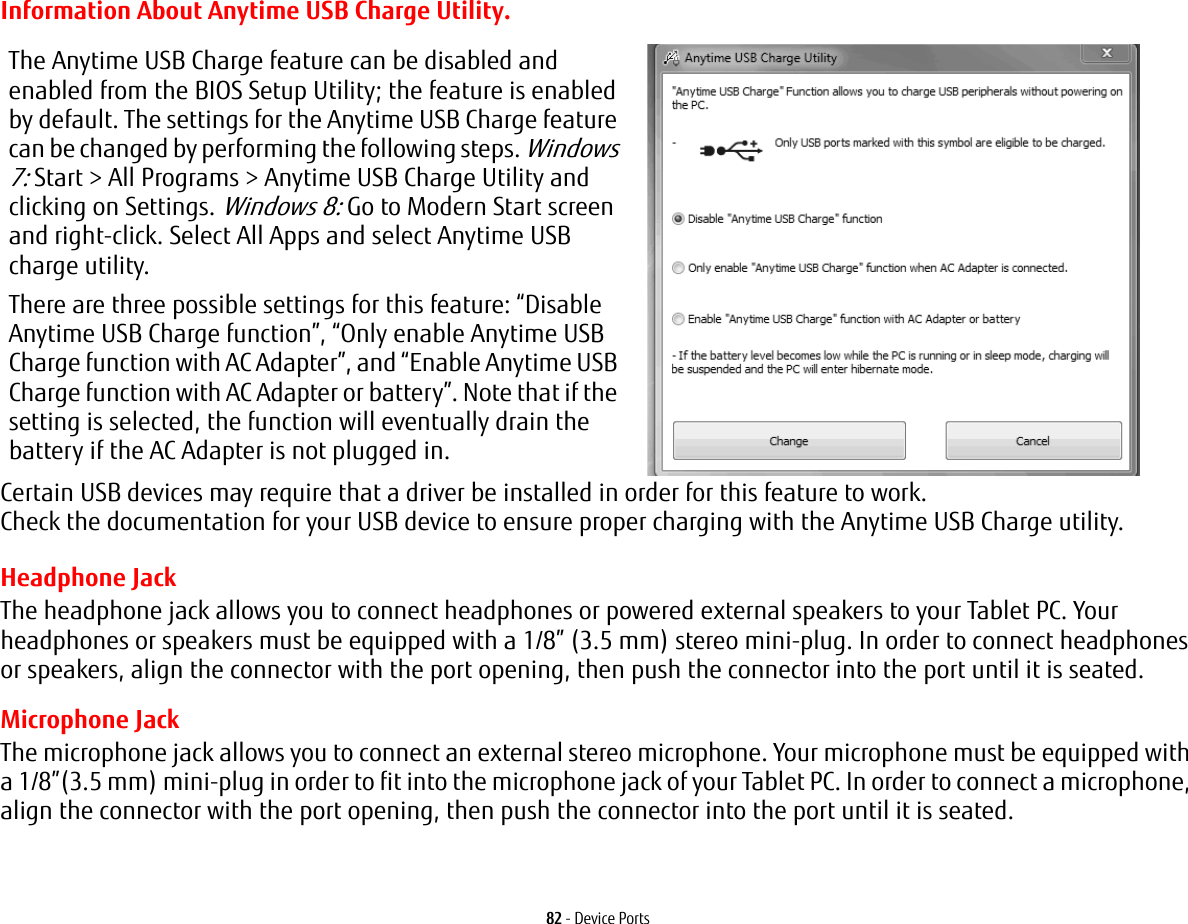
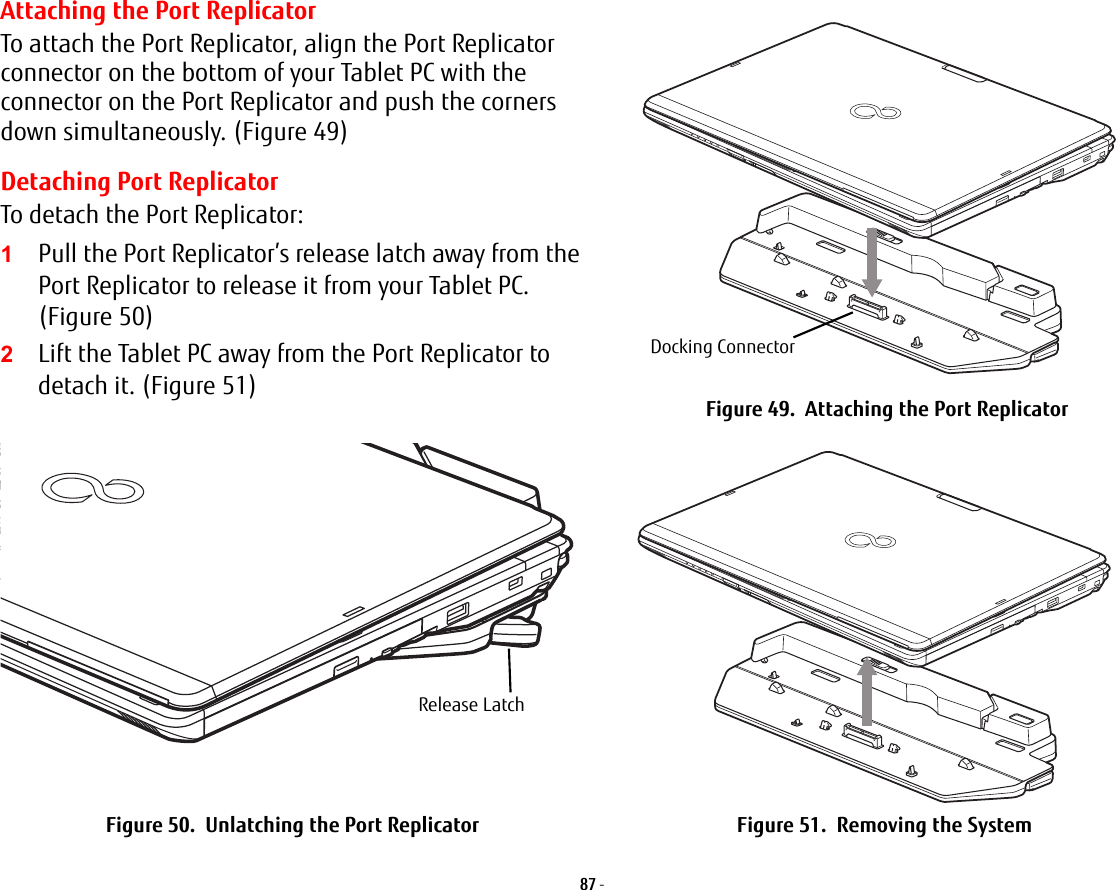
![83 - Device PortsHDMI Port.External Video PortThe High-Definition Multimedia Interface (HDMI) port is a digital audio/video interface over which uncompressed streams can be transmitted. HDMI is used to connect compatible digital devices with your computer (such as big-screen TVs and video recorders).To connect an HDMI device:1Align the connector with the port opening.2Push the connector into the port until it is seated. Figure 46. Connecting an HDMI DeviceThe external video port allows you to connect an external monitor or LCD projector. In order to connect an external video device, follow these easy steps: 1Align the connector with the port opening.2Push the connector into the port until it is seated.3Tighten the two hold-down screws, located on each end of the connector.Figure 47. Connecting an External Video DevicePRESSING THE [FN] + [F10] KEYS ALLOWS YOU TO CHANGE YOUR SELECTION OF WHERE TO SEND YOUR DISPLAY VIDEO. EACH TIME YOU PRESS THE KEY COMBINATION, YOU WILL STEP TO THE NEXT CHOICE, STARTING WITH THE BUILT-IN DISPLAY PANEL ONLY, MOVING TO THE EXTERNAL MONITOR ONLY, FINALLY MOVING TO BOTH THE BUILT-IN DISPLAY PANEL AND AN EXTERNAL MONITOR.](https://usermanual.wiki/Fujitsu-Client-Computing/WB0088.USERS-MANUAL-1-OF-2/User-Guide-2133567-Page-89.png)
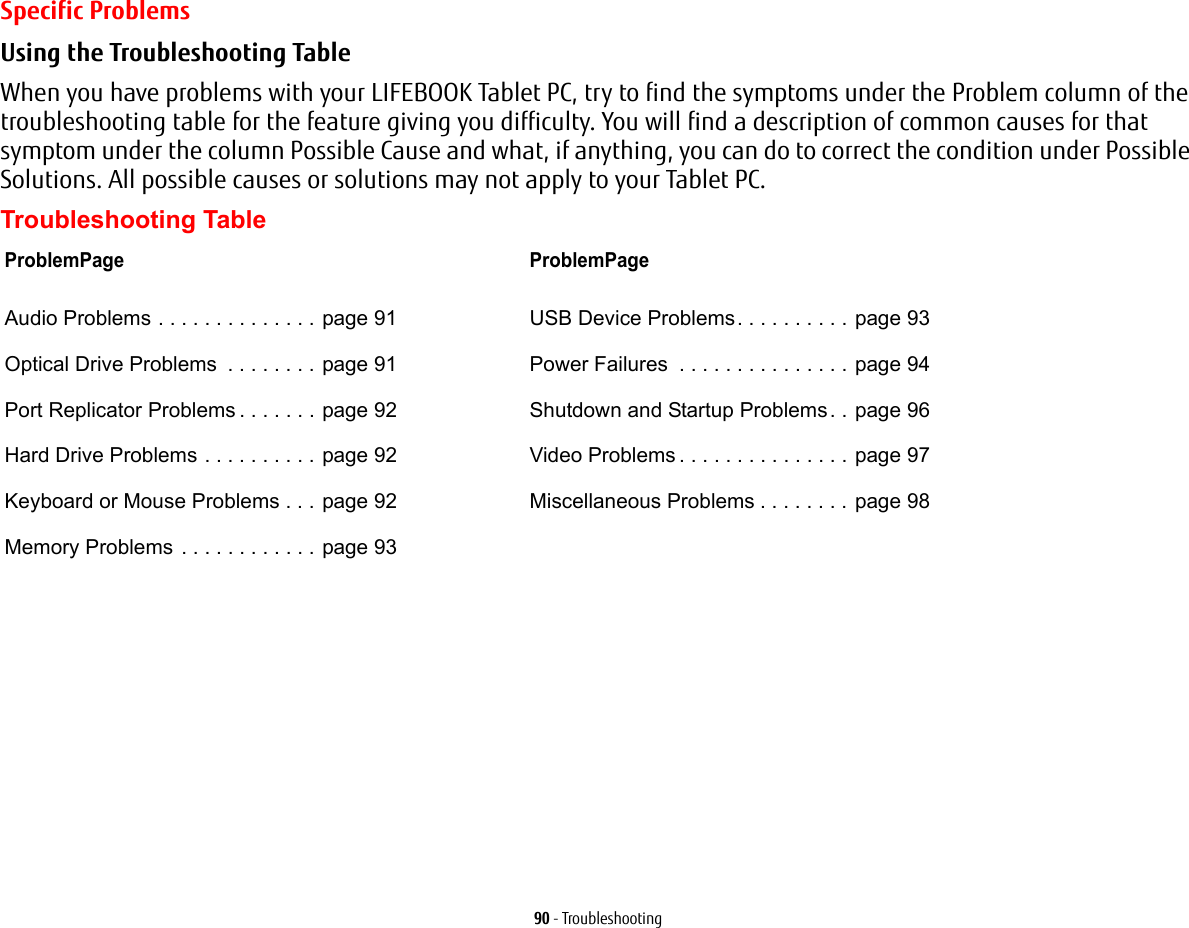
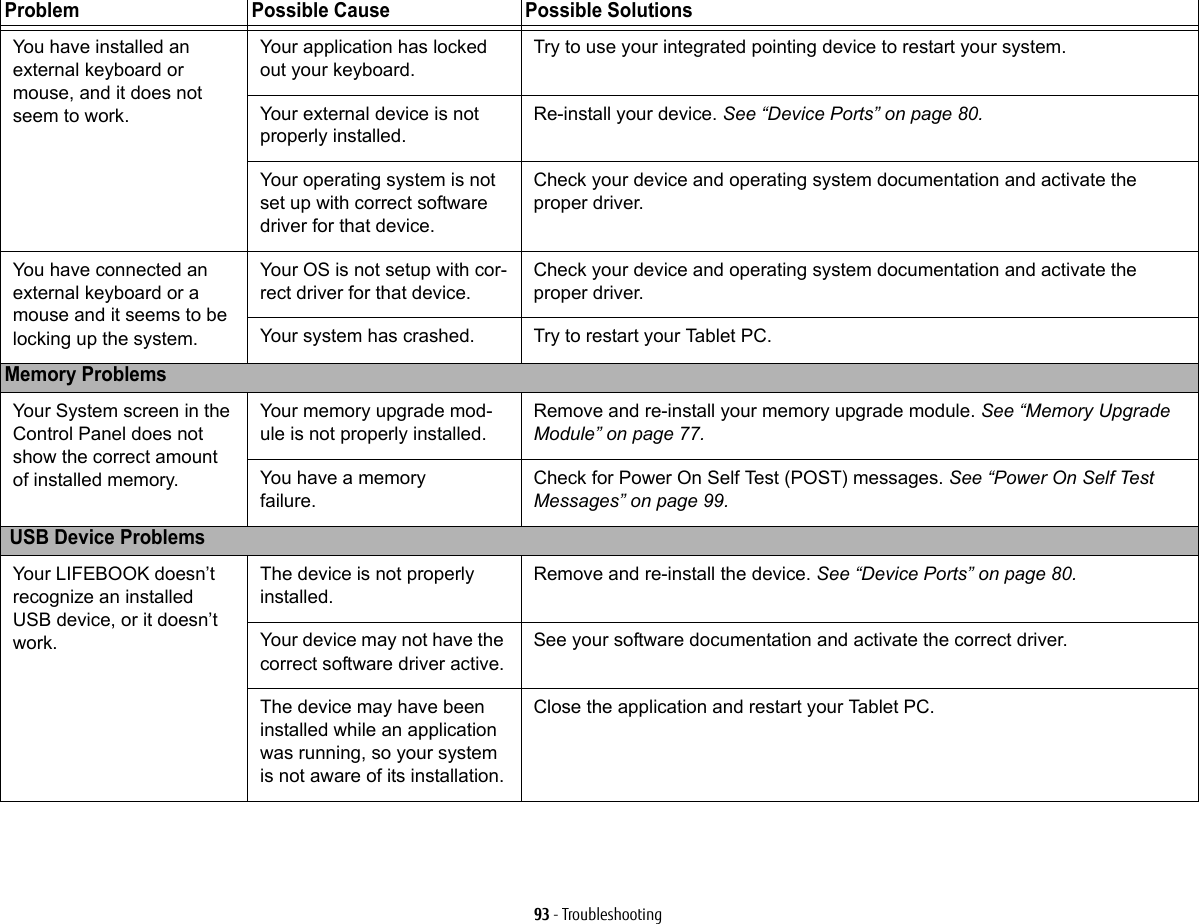
![91 - TroubleshootingProblem Possible Cause Possible SolutionsAudio ProblemsThere is no sound coming from the built-in speaker.The volume is turned too low. Adjust the volume control on your Tablet PC and operating system. Use the [Fn+F9] key combination on your keyboard. Pressing [F9] repeatedly while holding [Fn] will increase the volume of your Tablet PC.The software volume control is set too low.Manually adjusting the volume (i.e., keyboard "hot keys") should dynamically adjust the volume of the operating system (see above). If that doesn’t work, adjust the sound volume control settings in your software or application.Headphones are plugged into your Tablet PC.Plugging in headphones disables the built-in speakers. Remove the head-phones.Software driver is not configured correctly.The audio driver may be installed or reinstalled using the Drivers and Applica-tions CD that came with your Fujitsu LIFEBOOK. Refer to your application and operating system documentation for help.The speakers have been muted using the Volume icon in the system tray.Click the Volume icon in the system tray on the bottom right of the screen. (It looks like a speaker). If the Mute box has a red circle on it, click on it to unselect it. You can also use the [Fn+F3] key combination to toggle the volume on and off. Pressing [F3] while holding [Fn] will toggle the audio mute.Optical Drive Problems LIFEBOOK Tablet PC fails to recognize DVD/CD-RW/CD-ROM’s.The disc is not pushed down onto raised center circle of the drive.Open optical drive tray and re-install the disc properly.Optical drive tray is not latched shut.Push on the front of the optical drive tray until it latches. If that doesn’t work, pull out the modular drive latch to remove the device from the bay, then re-insert the drive until it latched; this ensures that the drive is properly seated. Incorrect DVD Player or player software is installed.Install DVD Player software. DVD/CD-RW/CD-ROM is dirty or defective.Wipe the disc with a non-abrasive CD cleaning cloth and reinsert. If it still will not work try another DVD/CD-RW/CD-ROM in the drive.](https://usermanual.wiki/Fujitsu-Client-Computing/WB0088.USERS-MANUAL-1-OF-2/User-Guide-2133567-Page-97.png)
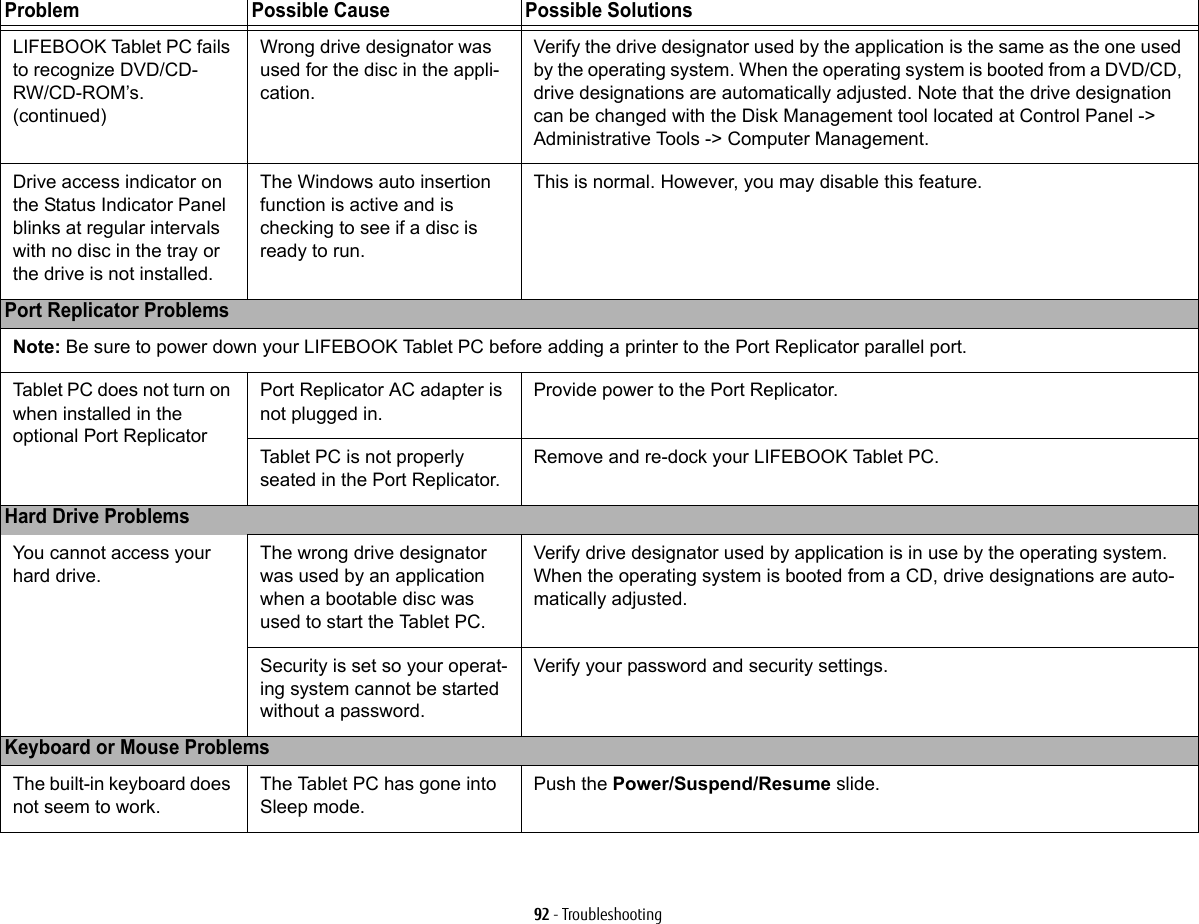
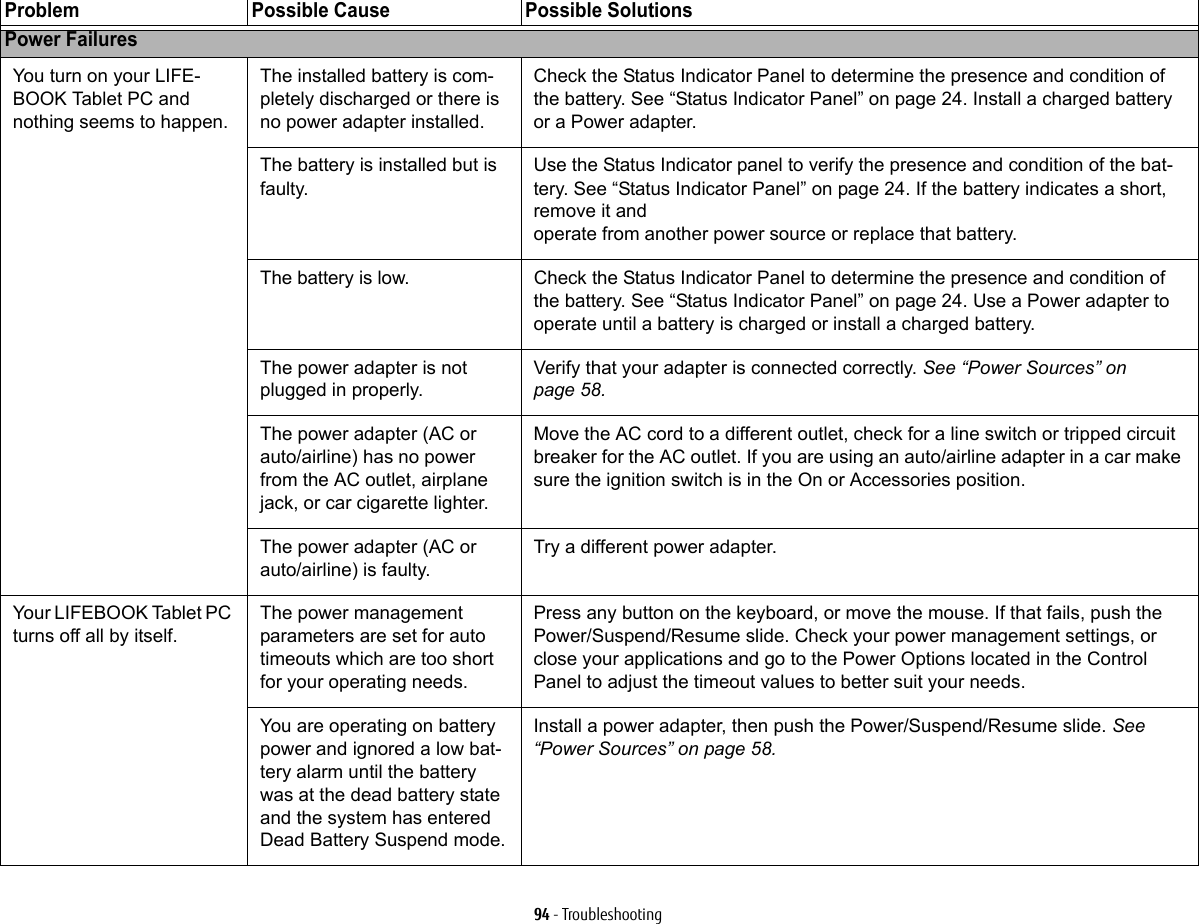
![96 - TroubleshootingShutdown and Startup ProblemsThe Suspend/Resume slide does not work.Suspend/Resume slide is disabled. To enable the button, go to the Control Panel -> Power Options Properties and click the Advanced tab. In the Power buttons area, select “Change what the power button does” .There may be application software. conflictClose all applications and try the button again.The system powers up, and displays power on information, but fails to load the operating system.The boot sequence settings of the setup utility are not compatible with your configu-ration.Set the operating source by pressing the [ESC] key while the Fujitsu logo is on screen or use the [F2] key and enter the setup utility and adjust the source set-tings from the Boot menu. See “BIOS Setup Utility” on page 62.You have a secured system requiring a password to load your operating system.Make sure you have the right password. Enter the setup utility and verify the Security settings and modify them as accordingly. See “BIOS Setup Utility” on page 62.Internal hard drive was not detected.Use the BIOS setup utility or Primary Master submenu, located within the Main menu, to try to auto detect the internal hard drive.An error message is dis-played on the screen dur-ing the Boot sequence.Power On Self Test (POST) has detected a problem.See the POST messages to determine the meaning and severity of the prob-lem. Not all messages are errors; some are simply status indicators. See “Power On Self Test Messages” on page 99.Your Tablet PC appears to change setup parameters when you start it.BIOS setup changes were not saved when made and you exited the setup utility.Make sure you select Save Changes And Exit when exiting the BIOS setup utility.The BIOS CMOS hold-up bat-tery has failed.Contact your support representative for repairs. This is not a user serviceable part but has a normal life of 3 to 5 years.Your system display won’t turn on when the system is turned on or has resumed.You have installed the LIFE-BOOK/Security Application panel.Check the Status Indicator Panel for presence of the Security icon. If it is visi-ble, enter your password See “Status Indicator Panel” on page 24.Problem Possible Cause Possible Solutions](https://usermanual.wiki/Fujitsu-Client-Computing/WB0088.USERS-MANUAL-1-OF-2/User-Guide-2133567-Page-102.png)
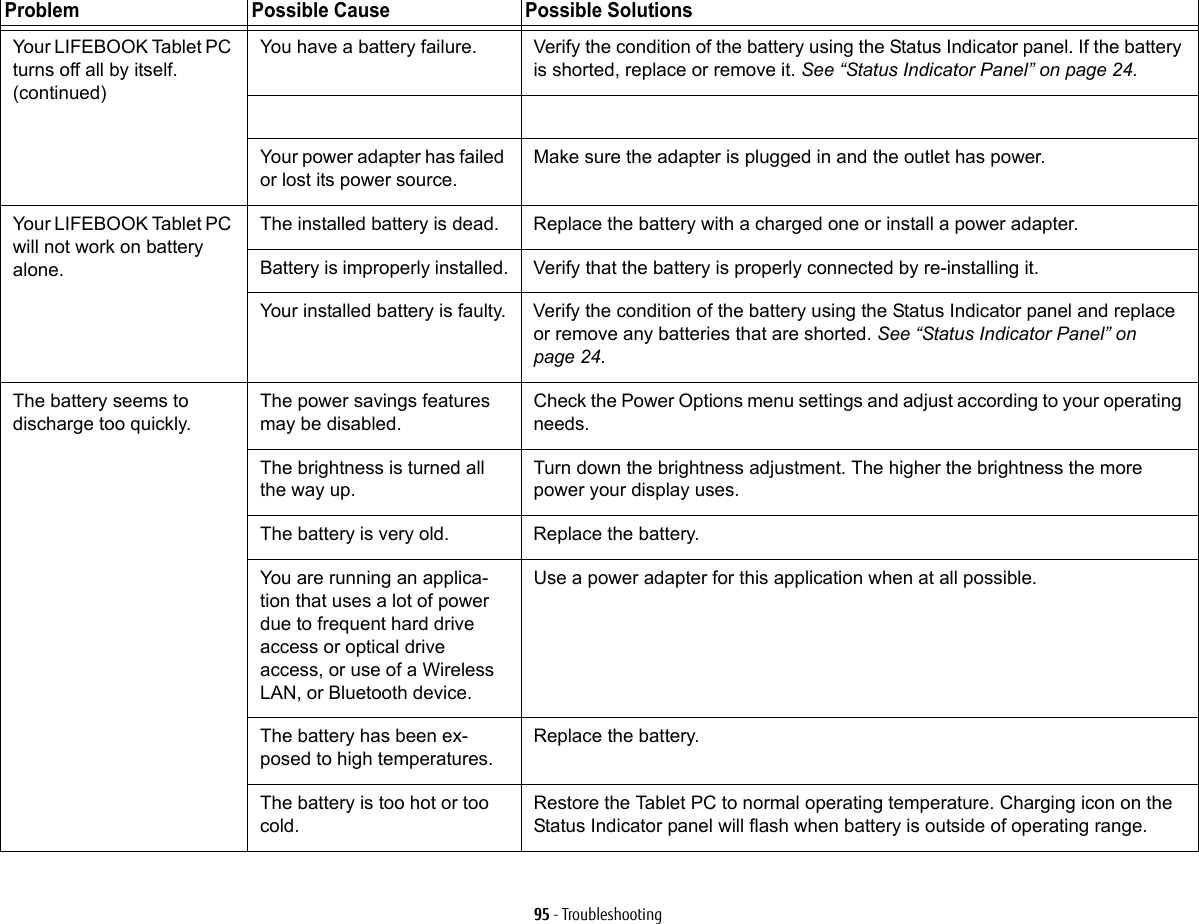
![97 - TroubleshootingVideo ProblemsThe built-in display is blank when you turn on your LIFEBOOK Tablet PC.The Tablet PC is set for an external monitor only.Pressing [F10] while holding down the [Fn] key allows you to change your selection of where to send your display video. Each time you press the keys you will step to the next choice. The choices, in order are: built-in display only, external monitor only, both built-in display and external monitor.Display angle and brightness settings are not adequate for your lighting conditions.Move the display and the brightness control until you have adequate visibility. Pressing either the [F6] or [F7] keys while holding down the [Fn] key also allows you to change the brightness level of the display.Power management time- outs are set for short intervals and you didn’t see the display go on and off again.Press a keyboard button or move the mouse to restore operation. If that fails, push the Power/Suspend/Resume slide. (The display may be shut off by Sleep mode, Auto Suspend or Video Timeout)The Tablet PC turned on with a series of beeps and the built-in display is blank.Power On Self Test has detected a failurethat doesn’t allow the display to operate.Contact your support representative.The display goes blank by itself after you have been using it.The Tablet PC has gone into Video timeout, Sleep mode, or Save-to-Disk mode because you have not used it for a period of time.Press any keyboard button, or move the mouse to restore operation. If that fails, push the Power/Suspend/Resume slide. Check your power management settings, or close your applications and go to the Power Savings menu of the setup utility to adjust the timeout values to better suit your operation needs. See “BIOS Setup Utility” on page 62.The power management time-outs may be set for very short intervals and you failed to notice the display come on and go off again.Press any button on the keyboard, or move the mouse to restore operation. If that fails, push the Power/Suspend/Resume slide. (The display may be shut off by Sleep Mode, Auto Suspend or Video Timeout)Your display won’t turn on when the system is turned on or when it has resumed.The system may be pass-word-protected.Check the status indicator panel to verify that the Security icon is blinking. If it is blinking, enter your password.Problem Possible Cause Possible Solutions](https://usermanual.wiki/Fujitsu-Client-Computing/WB0088.USERS-MANUAL-1-OF-2/User-Guide-2133567-Page-103.png)
![98 - TroubleshootingThe display does not close.A foreign object, such as a paper clip, is stuck between the display and keyboard.Remove all foreign objects from the keyboard.The display has bright or dark spots.If the spots are very tiny and few in number, this is normal for a large LCD display.This is normal; do nothing.If the spots are numerous or large enough to interfere with your operation needs.Display is faulty; contact your support representative.The display is dark when on battery power.The Power Management util-ity default is set on low bright-ness to conserve power.Press [Fn] + [F7] to increase brightness or click the battery gauge, click on More power options, and select Adjust the display brightness.You have connected an external monitor but it does not display anything.Your operating system is not setup with the correct soft-ware driver for that device. Check your device and operating system documentation and activate the proper driver.Your BIOS setup is not set to enable your external monitor.Toggle the video destination by pressing [Fn]+ [F10] together, or check your BIOS setup and enable your external monitor. (See the Video Features sub-menu, located in the Advanced Menu of the BIOS. See “BIOS Setup Utility” on page 62.Your external monitor is not properly installed. Reinstall your device. See “External Video Port” on page 83.You have connected an external monitor and it does not come on.Your external monitor is not compatible with your LIFE-BOOK Tablet PC.See your monitor documentation and the External Monitor Support portions of the Specifications section. See “Specifications” on page 129.Miscellaneous ProblemsError message is dis-played on the screen dur-ing the operation of an application.Application software often has its own set of error message displays. See your application manual and help displays screens for more information. Not all messages are errors some may simply be status.Problem Possible Cause Possible Solutions](https://usermanual.wiki/Fujitsu-Client-Computing/WB0088.USERS-MANUAL-1-OF-2/User-Guide-2133567-Page-104.png)
![99 - TroubleshootingPower On Self Test MessagesThe following is a list of error-and-status messages that the Phoenix BIOS and/or your operating system can generate and an explanation of each message. Error messages are marked with an *. If an error message is displayed that is not in this list, write it down and check the operating system documentation on screen and in the manual. If you can find no reference to the message, contact a support representative.*Invalid NVRAM Data Problem with NVRAM access. In the unlikely case that you see this message you may have a display problem. You can continue operating but should contact your support representative for more information.*Keyboard controller error The keyboard controller test failed. You may have to replace your keyboard or keyboard controller but may be able to use an external keyboard until then. Contact your support representative.*Keyboard not detected Keyboard not working. You may have to replace your keyboard or keyboard controller but may be able to use an external keyboard until then. Contact your support representative.*Operating system not found Operating system cannot be located on either drive A: or drive C: Enter the setup utility and see if both the fixed disk, and drive A: are properly identified and that the boot sequence is set correctly. Unless you have changed your installation greatly, the operating system should be on drive C:. If the setup utility is correctly set, your hard drive may be corrupted.*Press <F1> to resume, <F2> to SETUP Displayed after any recoverable error message. Press [F1] key to Continue or [F2] key to Enter Setup.*Real time clock error - Check date and time settings Real-time clock fails BIOS test. May require board repair. Contact your support representative.*Fan error, system shutdown in 30s. Contact Fujitsu tech support Fan error occurred. Please contact your sales representative.*Fan error occurred during previous boot. Fan error occurred during previous boot. Please contact your sales representative.](https://usermanual.wiki/Fujitsu-Client-Computing/WB0088.USERS-MANUAL-1-OF-2/User-Guide-2133567-Page-105.png)
![101 - Restoring Your System Image and Software (Windows 7)To make a copy of the Factory Image to DVD discs, you will need several blank discs (DVD-R or DVD+R discs are recommended) to create the copy. After creating the copy, be sure to label the discs and keep them in a safe place to ensure they do not get damaged.Creating Backup Images of Factory Image and Discs Using the [Manage/Change] button, you can create backup images of the Factory Image, Application Disc(s), or Bootable Disc.1Launch My Recovery from desktop icon2Select [Manage/Create]-> [Manage Backup Images]. The Backup Images menu displays a list from which you can choose which type of disc you want to burn: Bootable Disc, Application Discs, or Recovery Disc.3Select Recovery Disc, then click [Make DVD].4Confirm that the # box has “2” (Note that in some cases the box may display a larger number for the factory image, depending upon its size.)5The message “Recovery Disc #1 will be created. Enter your comments and the number of media on the DVD”. Click [YES] to burn the Factory Image.6While the copy is being made, a “Writing to the media screen displays a progress bar. When the copy is complete, a dialog will appear informing you of the successful completion of the backup.7Repeat the process for the remaining images on disc (Bootable Disc and Application Discs). The number of images available may vary depending on your system model; some models do not have the applications loaded on the hard drive.•SOME CONFIGURATIONS OF CERTAIN STYLISTIC MODELS DO NOT HAVE APPLICATIONS LOADED ON THE HARD DRIVE; RATHER, THEY ARE AVAILABLE AT THE FUJITSU SUPPORT SITE FOR DOWNLOAD. PLEASE TAKE THAT INTO ACCOUNT WHEN READING THE FOLLOWING PROCEDURES.•ALL USER-CREATED DATA WILL BE DELETED FROM YOUR SYSTEM WHEN THE FACTORY IMAGE IS RESTORED.](https://usermanual.wiki/Fujitsu-Client-Computing/WB0088.USERS-MANUAL-1-OF-2/User-Guide-2133567-Page-107.png)
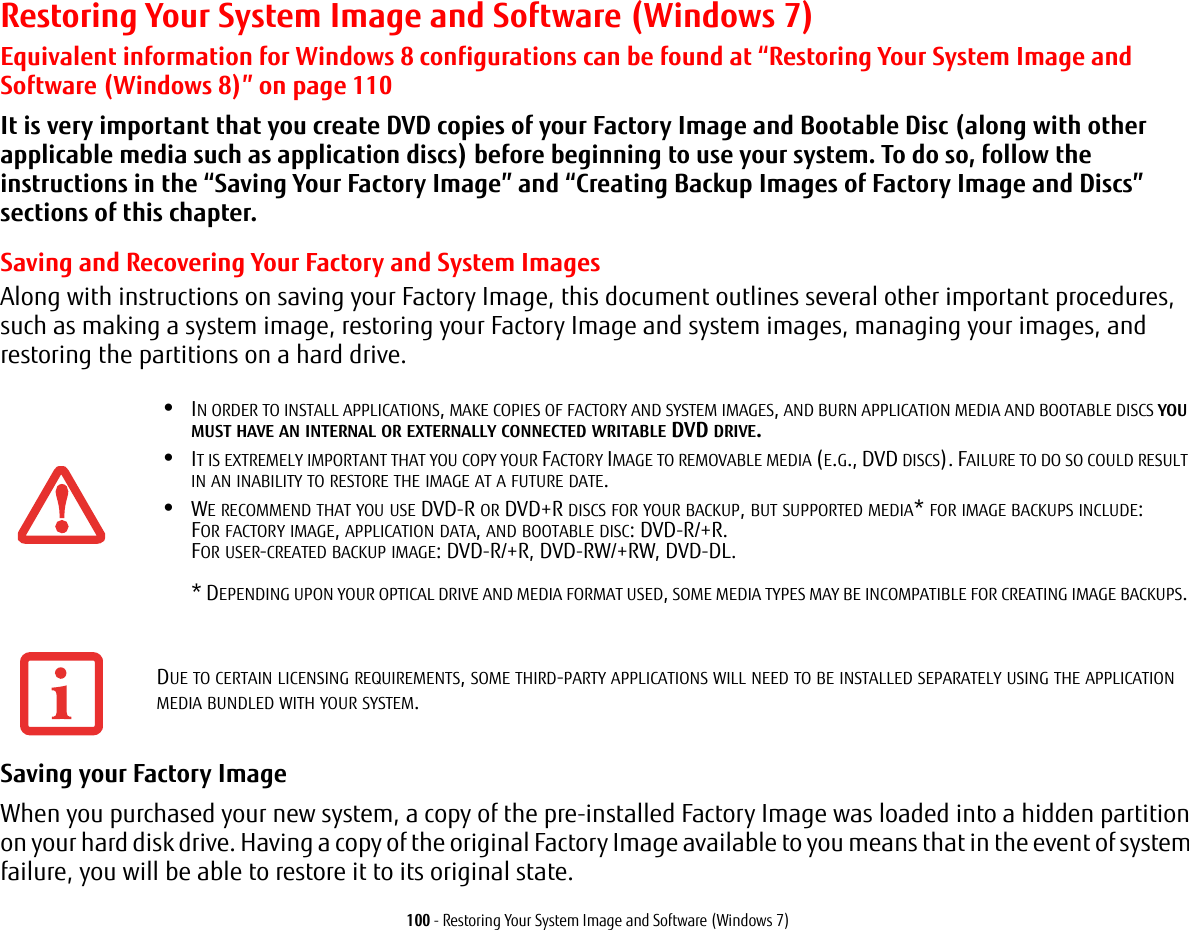
![102 - Restoring Your System Image and Software (Windows 7)Recovering Your Factory Image In the event you need to restore your original Factory Image, perform the following steps. Note that there may be some third-party applications that need to be installed from the application media bundled with your system.In order to recover your Factory Image, perform the steps outlined in “Running Recovery and Utility from hard disk”. Backing Up a System ImageOptional Step: Launch the Fujitsu Bonus Apps utility from your desktop, and select the components you wish to install.User-Configured System Backups: On your desktop, there is a [MyRecovery] icon that allows you to make backups of your current system image either to another location on your hard drive or on removable media. A system image is the configuration of your C: drive at a particular point of time. You may want to make system image backups occasionally in order to have points to which you can return without having to go all the way back to the Factory Image.By default, system images are saved in the MyRecovery folder (either on D:\ or external hard drive, depending on your hardware type).1Click the [MyRecovery] icon on your desktop. The My Recovery screen will appear (See Figure 52). Note that the screen illustrated may vary, depending upon your system configuration.)2Click the [Backup] button on the MyRecovery screen.3On the next screen that appears, you can enter up to 200 characters of information about the backup file. This information will help you to identify the image at a later date.ALL USER-CREATED DATA WILL BE DELETED FROM YOUR SYSTEM WHEN THE FACTORY IMAGE IS RESTORED.My Recovery](https://usermanual.wiki/Fujitsu-Client-Computing/WB0088.USERS-MANUAL-1-OF-2/User-Guide-2133567-Page-108.png)
![103 - Restoring Your System Image and Software (Windows 7)Figure 52. MyRecovery screen4Click the [Next] button and the system will reboot.5After rebooting, the “Creating of the backup image” window appears, in which you can either click [Create the image on D drive] or [Select the drive] if you want to save to an external hard disk drive. (Note that the [Create the image on D drive may not be available on all configurations.)6An image appears showing you graphically how the image will be stored. Click the [Next] button.7Click [Execute] to start the backup.](https://usermanual.wiki/Fujitsu-Client-Computing/WB0088.USERS-MANUAL-1-OF-2/User-Guide-2133567-Page-109.png)
![104 - Restoring Your System Image and Software (Windows 7)Managing Your Backup Images With the MyRecovery tool you can also make copies of backup images, archive them on DVD, or delete them from your hard drive.1To begin, click the [MyRecovery] icon on your desktop.2Click the [Manage/Create] button in the MyRecovery window.3When the MyRecovery Manager window appears, click [Manage Backup Images].4In the next window, a list of your backup images appears. Below the list are three buttons allowing you to [Make DVD], [Copy], or [Delete] your backup images.5Select an image title from the list, then click the action button you would like to perform.6Note that you need to have an external disk drive connected for the [Copy] button to be enabled. If you elect to copy the image, you will be prompted to enter the destination. If you are ready to copy, click [OK] to proceed. A progress screen appears while the backup copy is being made.7Note that if you copy an image to an external hard drive, both the original and the copy will appear in the [Backup Images] window with identical names, dates, and file sizes, but with the different drive letter to distinguish them. Before you select [Make DVD], make sure you have a recordable DVD drive connected and blank DVDs available.Using the Recovery and Utility Tools The Recovery and Utility tools consist of a variety of tools that will help you recover your Factory Image, recover system images, and delete the data from your hard disk.Methods for accessing the utilitiesRecovery and Utility Tools are preinstalled in a hidden partition by the factory, or they can be accessed by using the bootable disc. Please note that you can delete Recovery and Utility tools from your hard disk drive if you modify the partitions. In this case you will not be able to use the hidden partition for booting to Recovery and Utility Tools, but you will still be able to boot from the Bootable Disc.](https://usermanual.wiki/Fujitsu-Client-Computing/WB0088.USERS-MANUAL-1-OF-2/User-Guide-2133567-Page-110.png)
![105 - Restoring Your System Image and Software (Windows 7)Determining whether Recovery and Utility is pre-loaded1Turn on or reboot your system. When the Fujitsu logo appears, press [F12] key. The Boot Menu will appear.2Press the Tab key to select Application menu. 3Check whether the <Recovery and Utility> option is present. If it is not present, it means that the utility must be used from the disc. Proceed to “Running Recovery and Utility from the Bootable Disc” if <Recovery and Utility> is unavailable.Running Recovery and Utility from hard disk1Turn on or reboot your system. When the Fujitsu logo appears, press [F12] key. The Boot Menu will appear.2Press the Tab key to select Application menu.3Cursor down to <Recovery and Utility> and press the [Enter] key.4While the files are being loaded from the disc, a progress bar will appear at the bottom of the screen.5When the System Recovery Options dialog opens, select a new keyboard layout, if necessary, then click [Next].6When the Operating System dialog appears, select “Use recovery tools...”, then click [Next]. 7If necessary, enter your password, then click [OK].8When System Recovery Options window appears, click on Recovery and Utility.9The Recovery and Utility screen appears on the screen with three tabs: Diagnostics, Recovery and Utility. Please note that Diagnostics tab is not supported on certain LIFEBOOK/STYLISTIC models when running Recovery and Utility from the hard disk. In order to restore the operating system, please use the middle icon “Restoring the Factory Image (only C:\drive)” under the Recovery tab. Running Recovery and Utility from the Bootable discTo verify/change the boot-up priority (rather than booting-up from the hard drive or an external floppy disk drive), perform the following steps:1Power on your system. When the Fujitsu logo appears on the screen. press the [F12] key to get to the Boot Menu. 2Highlight the CD/DVD option.3Insert the bootable disc into the drive tray.](https://usermanual.wiki/Fujitsu-Client-Computing/WB0088.USERS-MANUAL-1-OF-2/User-Guide-2133567-Page-111.png)
![106 - Restoring Your System Image and Software (Windows 7)4Click [OK]. While the files are being loaded from the disc, a progress bar will appear at the bottom of the screen.5When the System Recovery Options dialog opens, select a new keyboard layout, if necessary, then click [Next].6When the Operating System dialog appears, click [Next]. 7If necessary, enter your password, then click [OK].8When System Recovery Options window appears, click on Recovery and Utility.9When the Recovery and Utility screen appears, three tabs will be present: Diagnostics, Recovery, and Utility.Recovery and Utility tabsDiagnostics tab: The Diagnostics tool is designed for use by IT professionals. It is not likely you will need to use this tool. When you select devices from the Diagnosis window then click [Execute], several tests are performed on the selected components.Recovery tab: The Recovery tab contains three tools: Recovering User-Configured System Backups, Restoring the Factory Image (only C: drive), and Restoring the Factory Image (full hard drive recovery). You can use these tools to restore the Factory Image from the hidden partition, restore backup image(s) created by you or images stored on DVD discs, and perform a full hard drive recovery. Please refer to instructions above for details on how to create Factory Image Recovery DVDs, user backup DVDs and system image backup. Utility tab: The Utility tab contains three tools: Hard Disk Data Delete, Restore Recovery and Utility, and Windows Complete PC Restore.•The Hard Disk Data Delete utility is used to delete all data on the hard disk and prevent the data from being reused. NOTE: Do not use the Hard Disk Data Delete utility unless you are absolutely certain that you want to erase your entire hard disk, including all partitions.•Restore Recovery and Utility allows you to restore the first hidden partition.•Windows Complete PC Restore utility allows you to restore an image created with Windows Backup and Restore Center. Complete PC Restore will overwrite the data on your hard disk drive.](https://usermanual.wiki/Fujitsu-Client-Computing/WB0088.USERS-MANUAL-1-OF-2/User-Guide-2133567-Page-112.png)
![107 - Restoring Your System Image and Software (Windows 7)Using Windows 7 Recovery DVD on Windows 8 64-bit system (downgrade option).When using the Windows 7 Recovery DVD on a system that was supplied with Windows 8 x64 pre-installed, you should first deactivate Secure Boot and activate CSM and Fast Boot using the following procedure:1To access the BIOS Setup, press the [F2] key after switching on the system.2Use right/left arrow keys to switch to the "Security" page. NOTE: If your system doesn't have Supervisor Password, you cannot change the Secure Boot Configurations. In this case you need to select Set Supervisor Password and set the password.3Use up/down arrow keys to select Secure Boot Configurations.4Select Secure Boot or Secure Boot Option and using [Enter] key set it to [Disabled], then the use [ESC] key to exit Secure Boot Configurations.5Use arrow keys to switch to the "Advanced" page.6Select CSM and set it to [Enabled].7Select the Fast Boot and set it to [Disabled].8Use the arrow keys to switch to the "Exit" page. 9Exit the BIOS Setup via Exit Saving Changes. You can then start the system from Windows 7 Recovery DVD and install Windows 7 on the system.Recovering your Factory Image using Recovery and Utility (for new hard drive or non-bootable hard drive)If you have installed a new hard drive or your hard drive is not bootable, perform the following steps. Note that first you will need to create new partitions on the hard drive, then restore the Factory Image:1Power on your system. When the Fujitsu logo appears on the screen. press the [F12] key. 2Highlight the CD/DVD option.3Insert the bootable disc in your DVD drive, then click [OK].4When System Recovery Options window appears, click on <Recovery and Utility>.5When the System Recovery Options dialog opens, select a new keyboard layout, if necessary, then click [Next].](https://usermanual.wiki/Fujitsu-Client-Computing/WB0088.USERS-MANUAL-1-OF-2/User-Guide-2133567-Page-113.png)
![108 - Restoring Your System Image and Software (Windows 7)6When the Operating System dialog appears, click [Next]. 7If necessary, enter your password, then click [OK].8When System Recovery Options window appears, click on Recovery and Utility.9Click the Recovery tab in the Recovery and Utility window, then click Restoring the Factory Image icon.10 Click [Execute].11 Read the precautions, then select “I Agree”. 12 Click [Next], then click [Execute] to start the recovery process. 13 “1. Recovery Disc Check” will be in bold and the rest will be grayed out. Follow the instructions and “Insert the Recovery Disc #1”. In some cases, you may prompted to “Insert the Recovery Disc #2”, depending upon the size of the Recovery Image14 Click [Next] to begin the check. Click [Next] again when the check is complete.15 “2. Initializing hard disk drive” will be in bold with the message “Please insert the Bootable Disc into your optical drive”. Insert the bootable disc. Click [Next] to proceed. A dialog box appears, with a checking disc message.16 “Warning All DATA on the Hard Disk will be completely erased!!!” will appear. Select [OK]. The partition creation process will begin.17 “3. Restoring Factory Image to hidden partition” will be in bold with the message “Please insert the Recovery Disk#1 into the optical drive”. Click [Next] to proceed.After completion, the tool will automatically go back to "3.Restoring Factory Image to hidden partition" but will include the note “Please insert your Third Party Applications Disc or CyberLink DVD, then click [OK]. After installation of each disc, insert the next and continue until all have been installed. If you don't have your Third Party Applications Disc and/or CyberLink DVD, or you have already inserted these discs, please click [Skip] to continue. NOTE: In some cases (products without an optical drive) you will not have a CyberLink DVD". At this point, you can either:•Insert Application Disc(s) to restore back to hidden partition, or, •Click [Skip] to skip restoring Application disc(s) and continue with restore.](https://usermanual.wiki/Fujitsu-Client-Computing/WB0088.USERS-MANUAL-1-OF-2/User-Guide-2133567-Page-114.png)
![109 - Restoring Your System Image and Software (Windows 7)18 If you select to insert Application Disc, after copying of application disc(s) to hidden partition is completed, the message will appear again. Repeat inserting application disc(s) until all discs have been copied, then click [Skip] to continue with Restore.19 After clicking [Skip], a confirmation message will appear "If you want to skip copying or you have finished copying, click [OK]. Click [Cancel] to go back to Restoring Factory Image to hidden partition.” 20 Click [OK] and Restoring Factory Image will begin.21 When restoration is complete, you will see the message “Restoration has been completed. Click [OK] to reboot the computer.” Click [OK].Downloading Driver UpdatesThe Fujitsu Software Download Manager (FSDM) utility is available to allow you to download the latest drivers, utilities, and applications from the Fujitsu Support site. If you have a Windows 8 or Windows 7 operating system, you will need to go to the Support Site (http://support.fujitsupc.com/CS/Portal/support.do?srch=DOWNLOADS).](https://usermanual.wiki/Fujitsu-Client-Computing/WB0088.USERS-MANUAL-1-OF-2/User-Guide-2133567-Page-115.png)
![111 - Restoring Your System Image and Software (Windows 8)To make a copy of the Factory Image to DVD discs, you will need four or five blank discs (DVD-R or DVD+R discs are recommended) to create the copy. After creating the copy, be sure to label the discs and keep them in a safe place to ensure they do not get damaged.Creating Backup Images of Factory Image and Bootable Disc Using the [Manage/Change] button, you can create backup images of the Factory Image and/or Bootable Disc.1Launch System Backup and Restore from the desktop icon and click [Yes] on the User Account Control dialog.2Click [Next] on the Backup Your Data screen.3Select the [Manage/Create] tab, then click [Make Recovery Disc set] to burn your factory image to DVD.4On “Step 1: Please select a media type for Recovery Disc” screen select Media Type from the drop down box, then click [Next]. (Note: This screen shows the number of discs required for backup.)5On “Step 2: Confirm your Recovery Disc” both the Bootable Disc and Recovery disks are selected by default under “List of Recovery Discs”. When the backup is created for the first time, these options should stay selected. Click [Next].6Click [OK] on the “Attention about media” confirmation screen.7Click [Start] on “Step 3: Making Recovery Disc” . 8The process will prompt you to insert your discs.9Once the process completes successfully, click [Finish] on “Step 4: Making Recovery Disc process has been completed” screen.ALL USER-CREATED DATA WILL BE DELETED FROM YOUR SYSTEM WHEN THE FACTORY IMAGE IS RESTORED.DURING THE FOLLOWING PROCESS, YOU SHOULD CONNECT AN AC ADAPTER SINCE THE PROCESS MAY TAKE A LONG TIME.](https://usermanual.wiki/Fujitsu-Client-Computing/WB0088.USERS-MANUAL-1-OF-2/User-Guide-2133567-Page-117.png)
![112 - Restoring Your System Image and Software (Windows 8)Recovering Your Factory Image. In the event you need to restore your original Factory Image, perform the following steps. In order to recover your Factory Image, perform the steps outlined in “Running Recovery and Utility from hard disk”. Backing Up a System ImageOptional Step: Launch the Fujitsu Bonus Apps utility from your desktop, and select the components you wish to install.User-Configured System Backups: On your desktop, there is a [System Backup and Restore] icon that allows you to make backups of your current system image either to another location on your hard drive or on removable media. A system image is the configuration of your C: drive at a particular point of time. You may want to make system image backups occasionally in order to have points to which you can return without having to go all the way back to the Factory Image.By default, system images are saved in the D: drive in the System Backup and Restore folder. You can also elect to save the image to an external hard drive.1Launch System Backup and Restore from the desktop icon and click [Yes] on User Account Control dialog2Click [Next] on Backup Your Data screen3Select the [Backup] tab on System Backup and Restore screen.4Click the [Backup User System] button.5On the “Step 1: Select a backup destination” screen select your destination drive. By default the Destination is set to D: drive. You can also select the [Other drive] option to back up to an external drive. Select whether you would like the system to [Shutdown] or [Restart] after the process is completed.ALL USER-CREATED DATA WILL BE DELETED FROM YOUR SYSTEM WHEN THE FACTORY IMAGE IS RESTORED.](https://usermanual.wiki/Fujitsu-Client-Computing/WB0088.USERS-MANUAL-1-OF-2/User-Guide-2133567-Page-118.png)
![113 - Restoring Your System Image and Software (Windows 8)6On the “Step 2: Name your backup images” screen that appears, you can enter up to 300 characters of information about the backup file. This information will help you to identify the image at a later date.7On “Step 3: Backup the entire C: drive image” verify your backup settings and click [Next].8Click [OK] on “Step 4: Please confirm the following before starting your backup” to restart you computer and begin backup.9After backup completes and the system restarts, “Step 5: Backup Completed. Confirm the results” screen should appear on your desktop confirming that backup image has been created successfully. Click [Close] to close System Backup and Restore dialog.10 Click [OK] to quit the System Backup and Restore utility.Managing Your Backup Images With the System Backup and Restore tool you can also make copies of backup images, archive them on DVD, or delete them from your hard drive.1Launch System Backup and Restore from the desktop icon and click [Yes] on User Account Control dialog.2Click [Next] on the Backup Your Data screen.3Select the [Create/Manage] tab and click on [Manage User System Backup].4In the next window there are three options allowing you to [Copy], [Delete], or [Add Comment] to your images. Click the action button you would like to perform:Selecting [Copy] option (Note that you must have an external disk drive connected for the [Copy] button to work, otherwise an attempt to copy will result in an error.)a. On “Step 1: Select a backup file that you wish to copy”, select the location of a backup file. A list of backup files will appear. Select the file you wish to copy from the list and click [Next].b. On “Step 2: Select a drive to copy a backup file”, select the destination drive and click [Next].c. On “Step 3: Start to copy the following information” confirm the information and click [Start].d. “Step 4: Processing backup data copying” screen displays the progress bar.e. Click [Finish] on “Step 5: Copy completed. Confirm the results” screen.](https://usermanual.wiki/Fujitsu-Client-Computing/WB0088.USERS-MANUAL-1-OF-2/User-Guide-2133567-Page-119.png)
![114 - Restoring Your System Image and Software (Windows 8)Selecting “Delete” option a. On “Step 1: Please select your target data” screen select location of a backup file. A list of backup files will appear. Select the file(s) you wish to delete and click [Next].b. Click [Start] on “Step 2: Delete backup data” screen.c. Click [OK] to the confirmation message.d. Click [Finish] on “Step 4: Delete process has been completed” screen. Selecting “Add Comment” optiona. On the “Step 1: Select target data” screen select location of a backup file. A list of backup files will appear. Select the file you wish to add comments to and click [Next].b. On the “Step 2: Add comment” screen, type in a maximum of 300 characters in “Comment” text area and click [Add].c. Click [Finish] on the “Step 3: Adding comment has been completed” screen.Restoring your backup images 1Launch System Backup and Restore from the desktop icon and click [Yes] on the User Account Control dialog2Click [Next] on the Backup Your Data screen3Select the Restore tab and click on “Restore User System Backup”4On “Step 1: Please confirm the following before starting restore process”, confirm information and click [OK]. The system will restart to begin restoring your backup.5After the system restarts, the “Explanation about Restore User System Backup” screen is shown. Once you read the EULA, select [Agree] choice and click [Next].6Select an image to restore from the Backup data list and click [Next]7Click [Start] on “Confirm before restoration” screen8Once restoration finishes, click [Close] in “Finished restoration” screen, the computer will restart to Windows.](https://usermanual.wiki/Fujitsu-Client-Computing/WB0088.USERS-MANUAL-1-OF-2/User-Guide-2133567-Page-120.png)
![115 - Restoring Your System Image and Software (Windows 8)Using the Recovery and Utility Tools The Recovery and Utility tools consist of a variety of tools that will help you recover your Factory Image, recover system images, and delete the data from your hard disk.Methods for accessing the utilitiesRecovery and Utility Tools are preinstalled in a hidden partition by the factory, or they can be accessed by using the bootable disc. Please note that you can delete Recovery and Utility tools from your hard disk drive if you modify the partitions. In this case you will not be able to use the hidden partition for booting to Recovery and Utility Tools, but you will still be able to boot from the Bootable Disc.Determining whether Recovery and Utility is pre-loaded 1Turn on or reboot your system. When the Fujitsu logo appears, press [F12] key. 2From the Boot Menu that appears, check whether the <Recovery and Utility> option is present. If it is not present, it means that the utility must be used from the disc. Proceed to “Running Recovery and Utility from the Bootable Disc” if <Recovery and Utility> is unavailable.Running Recovery and Utility from hard disk1Turn on or reboot your system. When the Fujitsu logo appears, press the [F12] key.2Cursor down to <Recovery and Utility> and press the [Enter] key.3Choose your Language (English or French).4Three tool options appear: Diagnostics, Recovery and Utility (Please see Recovery and Utility tools section below for instructions on how to use these tools).Running Recovery and Utility from the Bootable discTo verify/change the boot-up priority (rather than booting-up from the hard drive or an external floppy disk drive), perform the following steps:1Power on your system. When the Fujitsu logo appears on the screen. press the [F12] key.2Highlight the CD/DVD option from the Boot menu, then press [Enter].](https://usermanual.wiki/Fujitsu-Client-Computing/WB0088.USERS-MANUAL-1-OF-2/User-Guide-2133567-Page-121.png)
![116 - Restoring Your System Image and Software (Windows 8)3Insert the bootable disc into the drive tray.4Click [OK]. NOTE: In the following step, the Fujitsu logo screen may appear on the display for a couple of minutes before the progress bar appears.5Select CD/DVD boot mode: UEFI Mode) and press [Enter]. While the files are being loaded from the disc, the Fujitsu logo screen will appear followed by a progress bar screen at the bottom of the screen.Recovery and Utility toolsDiagnostics tool: The Diagnostics tool is designed for use by IT professionals. It is not likely you will need to use this tool. If you should need to use this tool, perform the following steps:1Press the “Diagnostics Tool” button to start the Diagnostics tool. A progress bar appears while the Diagnostics tool is starting up.2Read the note, then click [OK].3Choose one or more of the following options for diagnostics on the “Fujitsu Hardware Diagnostics Tool window”: CPU, Memory, Display, Hard Disk, CD/DVD/BD, Floppy Disk, Keyboard, and Mouse. Click the [Option] button to specify how many times the tool should run diagnostics on each selected component. Press [Execute] to start the Diagnostics tool.4After the execution is completed, the selected components are circled in red to indicated that they have been diagnosed and the result dialog window is opened.5Click [End] to close the Diagnostics tool, then click [Yes] to confirm the end of diagnostics session.Recovery tool: The Recovery tool contains three options. User System Backups: Recovering C: Drive from D: Drive or external storage device), Restore C: Drive: Restore factory image (only C: drive), and Restore Full Hard Drive: Restore factory image (full hard drive).You can use these tools to restore the Factory Image from the hidden partition, restore backup image(s) created by you or images stored on DVD discs, and perform a full hard drive recovery. Please refer to instructions above for details on how to create Factory Image Recovery DVDs, user backup DVDs and system image backup.](https://usermanual.wiki/Fujitsu-Client-Computing/WB0088.USERS-MANUAL-1-OF-2/User-Guide-2133567-Page-122.png)
![117 - Restoring Your System Image and Software (Windows 8)To recover from D: drive or external storage device:1Click [User System Backups] 2The progress bar screen is followed by EULA screen. Click [Agree] to accept the EULA.3On “Select an image to restore” screen select the image to restore from the list of images and click [Next].4Click [Start] on the “Confirm before restoration” screen to begin the restoration process.5Once restoration finishes, click [Close] in the “Finished restoration” screen; the computer will restart to Windows.To restore from the Factory Image (hidden partition):1Click [Restore C: drive].2The progress bar screen is followed by “Restore Factory Image (only C: drive) screen confirming that the Factory Image will be restored to the C: drive and D: drive data will remain. Click [Next].3Read the instruction screen and select [Agree], then [Next].4Click [OK] to the warning message to restore factory image to the C: drive.5When the progress bar screen, wait for the process to complete.6Click [Finish] when the process completes; the computer will restart to Windows.To restore full hard drive:Follow the steps in section “Recovering your Factory Image using Recovery and Utility (for new hard drive or non-bootable hard drive)”Utility tool: The Utility tool contains two options: Hard Disk Data Delete and Partition Creation.•The Hard Disk Data Delete utility is used to delete all data on the hard disk and prevent the data from being reused. NOTE: Do not use the Hard Disk Data Delete utility unless you are absolutely certain that you want to erase your entire hard disk, including all partitions.](https://usermanual.wiki/Fujitsu-Client-Computing/WB0088.USERS-MANUAL-1-OF-2/User-Guide-2133567-Page-123.png)
![118 - Restoring Your System Image and Software (Windows 8)To delete hard disk data:a. Click the [Hard Disk Data Delete] buttonb. The progress bar appears, followed by the EULA screen.c. Agree to the EULA and click [Next].d. Choose the hard disk from which the data should be deleted in the list of hard disks and click [Next].•The Partition Creation utility is used to change the C: and D: drive partition sizes. To run this utility:a. Click the [Partition Creation] button.b. A progress bar screen appears, followed by the EULA screen. Agree to the EULA.c. On the Recovery Tool - Partition Creation screen move the slider to set disk size, then click [OK].d. Click YES in the Partition Creation confirmation dialog.Recovering your Factory Image using Recovery and Utility (for new hard drive or non-bootable hard drive)If you have installed a new hard drive or your hard drive is not bootable, perform the following steps. 1Power on your system. When the Fujitsu logo appears on the screen, press the [Enter] key.2Highlight the CD/DVD option from the Boot Menu and press [Enter].3Insert the bootable disc in your DVD drive, then click [OK].4Select CD/DVD boot mode: UEFI Mode and press [Enter]. While the files are being loaded from the disc, Fujitsu logo screen will appear followed by a progress bar screen at the bottom of the screen.5Choose your language ([English or French).6Three tool options appear: Diagnostics, Recovery and Utility. Select [Recovery].7Select [Restore full hard drive].8Click [Next] to confirm full hard drive restoration. (All data on HDD will be deleted).9Agree to EULA by selecting [Agree] option and clicking [Next].10 Click [Next] on the Recovery Disk Check screen to verify that the bootable disk has been inserted into the optical drive.](https://usermanual.wiki/Fujitsu-Client-Computing/WB0088.USERS-MANUAL-1-OF-2/User-Guide-2133567-Page-124.png)
![119 - Restoring Your System Image and Software (Windows 8)11 The Checking for Recovery Disk screen appears followed by the prompt to insert the first disk. Click [OK] to continue. Repeat this step for all disks. After all recovery disks have been checked and the check has been completed, click [Next]12 Reinsert the first recovery disk and click [Next]13 Click [OK] when you receive the final warning informing you that all data on drives C: and D: will be lost. This starts the recovery process.14 Follow the prompts to insert the next recovery disks and click [OK].15 After the copying of the factory image to the HDD completes and the factory image is restored, follow the prompt to insert bootable disk.16 After the restore process is complete, click [Finish] to restart the system. The computer will restart automatically and then go through the first boot process.Changing BIOS settings between Windows 8 32-bit and Windows 8 64-bit In order to install a 32-bit version of Windows 8 and to be able to boot from 32-bit media, you must disable the Security Boot option in the BIOS settings. Switching back to the 64-bit version of Windows 8 from the 32-bit version of Windows 8 will require you to revert the above change and to re-enable Secure Boot. If you do not re-enable Secure Boot, the following product functionalities will not be enabled as it relies on native UEFI (Unified Extensible Firmware Interface) mode boot:1Secure Boot2Seamless Boot experience3Network unlock for Bitlocker for systems with a Trusted Platform Module (TPM)4eDrive supportWARNING: Reverting back to UEFI mode will require a hard drive reformat. All data and personal settings will be lost. It is highly recommended that you back up your data before you revert back to UEFI mode.For further information please refer to our support pages: http://www.fujitsu.com/us/support/1To access the BIOS Setup, press the [F2] key after switching the system on.](https://usermanual.wiki/Fujitsu-Client-Computing/WB0088.USERS-MANUAL-1-OF-2/User-Guide-2133567-Page-125.png)
![120 - Restoring Your System Image and Software (Windows 8)2Use the right/left arrow keys to switch to the Security page. * If your system doesn't have Supervisor Password, you cannot change the Secure Boot Configurations. In this case you need to select Set Supervisor Password and set the password.3Use the up/down arrow keys to select Secure Boot Configurations.4Select Secure Boot or Secure Boot Option and using the [Enter] key set it to [Disabled] for 32-bit and to [Enabled] for 64-bit, then use the [ESC] key to exit Secure Boot Configurations.5Use the arrow keys to switch to the Advanced page.6Select CSM and set it to [Enabled] for 32-bit and [Disabled] for 64-bit.7Select the Fast Boot and set it to [Enable] for 32-bit and [Disabled] for 64-bit.8Use the arrow keys to switch to the Exit page.9Exit the BIOS Setup via Exit Saving Changes. Downloading Driver UpdatesThe Fujitsu Software Download Manager (FSDM) utility is available to allow you to download the latest drivers, utilities, and applications from the Fujitsu Support site. If you have a Windows 8 or Windows 7 operating system, you will need to go to the Support Site (http://support.fujitsupc.com/CS/Portal/support.do?srch=DOWNLOADS).](https://usermanual.wiki/Fujitsu-Client-Computing/WB0088.USERS-MANUAL-1-OF-2/User-Guide-2133567-Page-126.png)
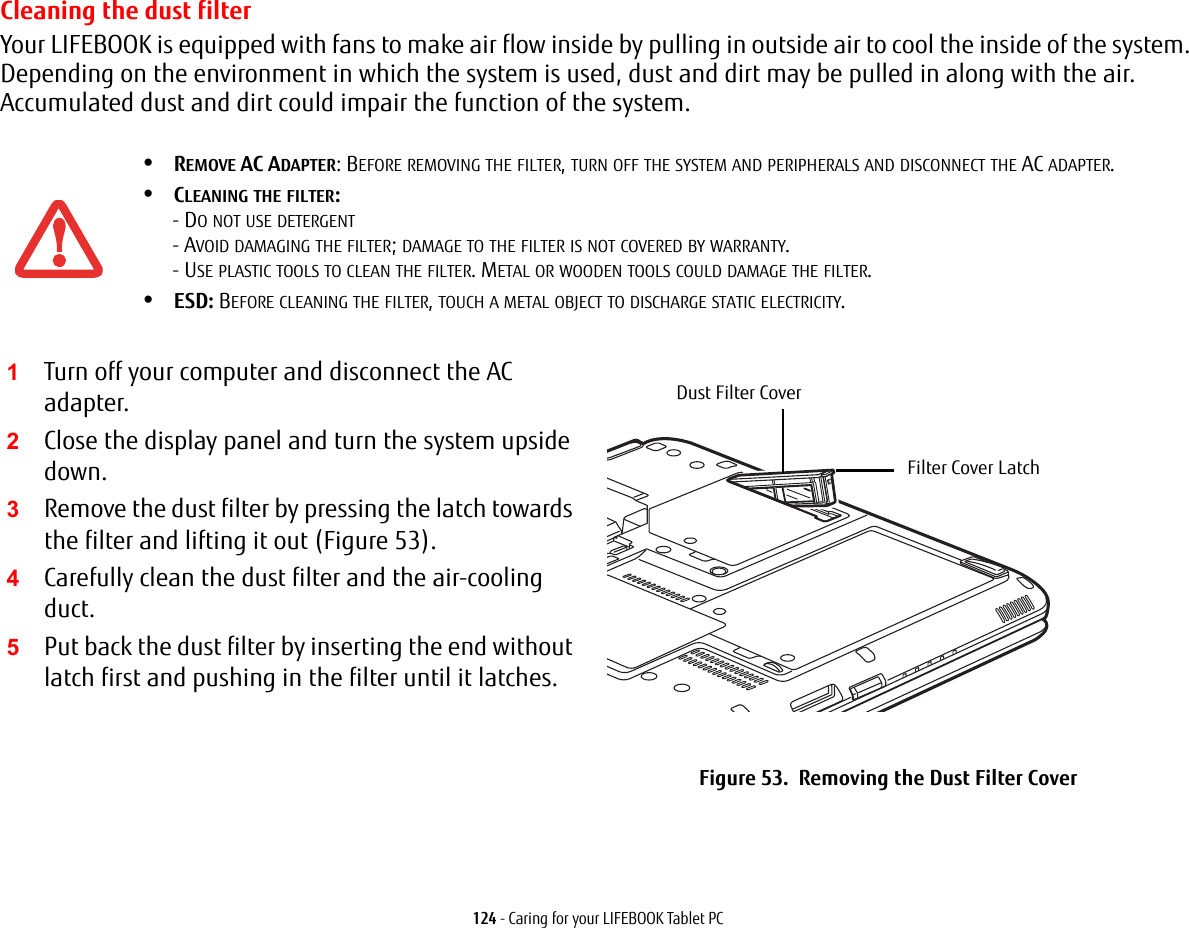
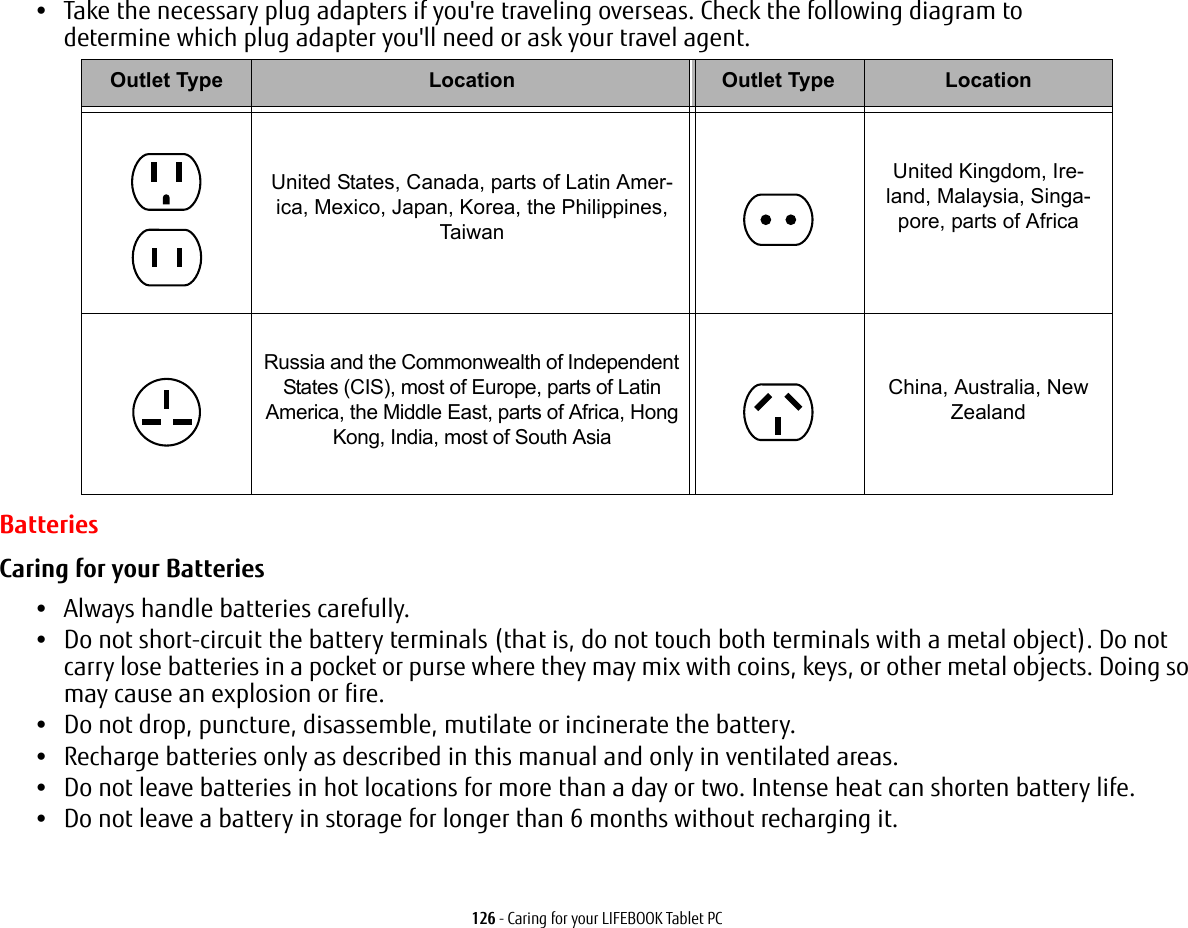


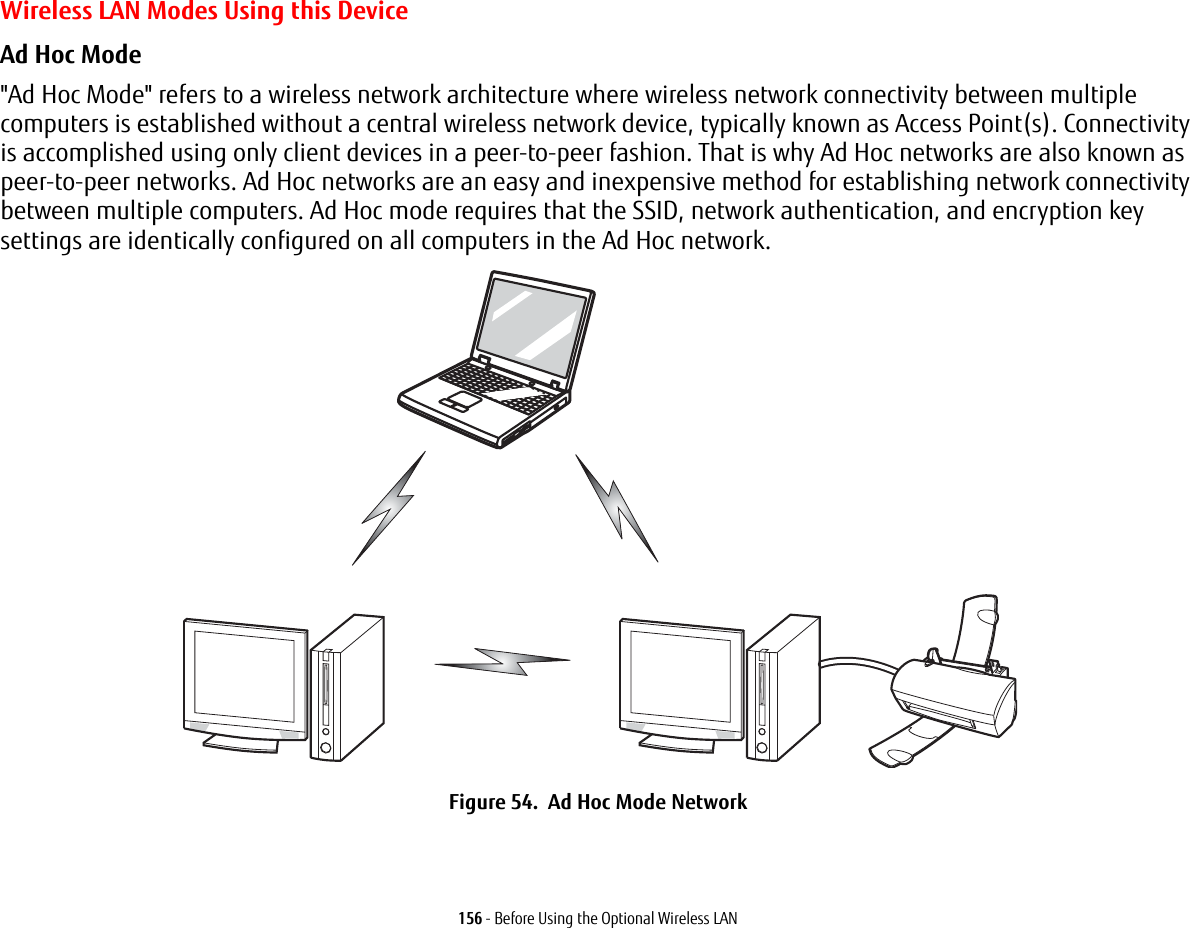
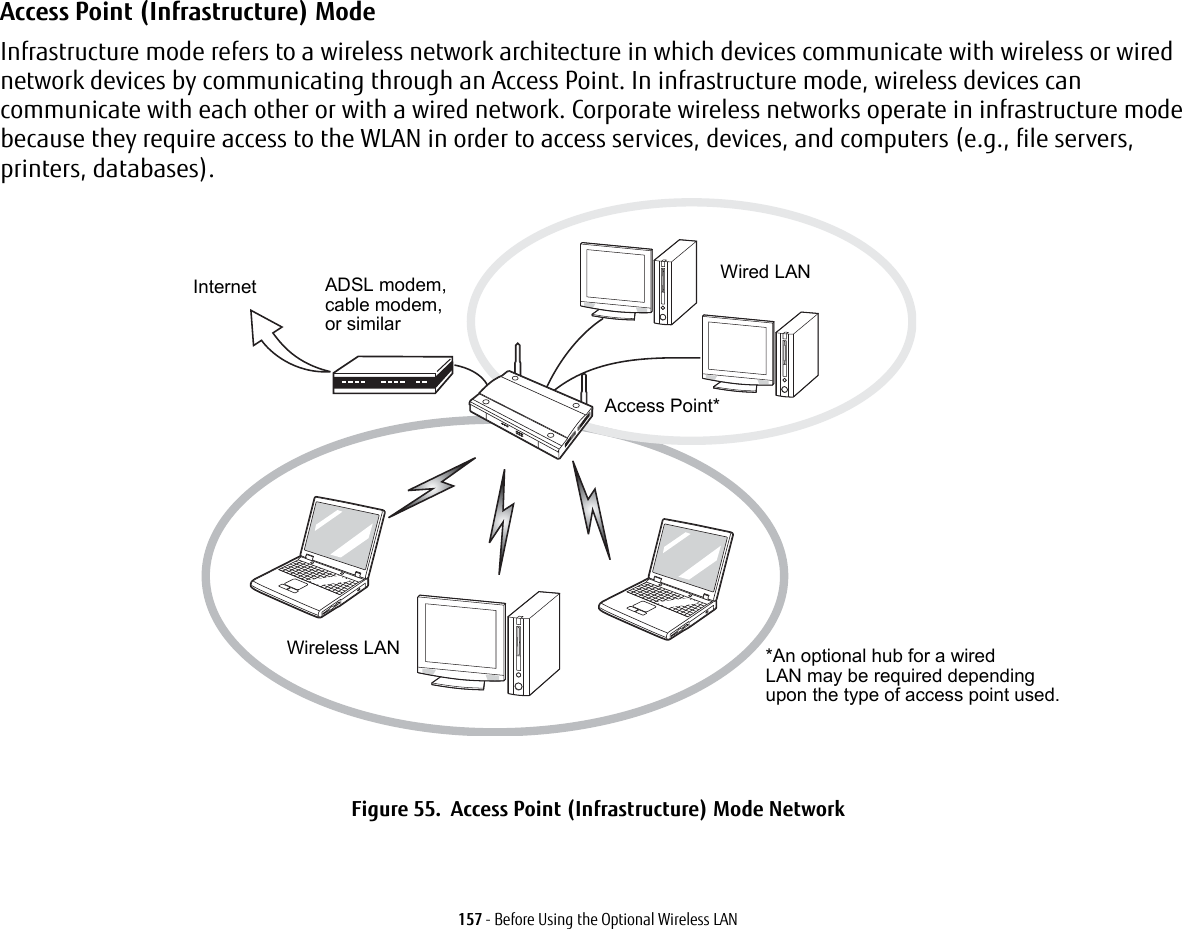
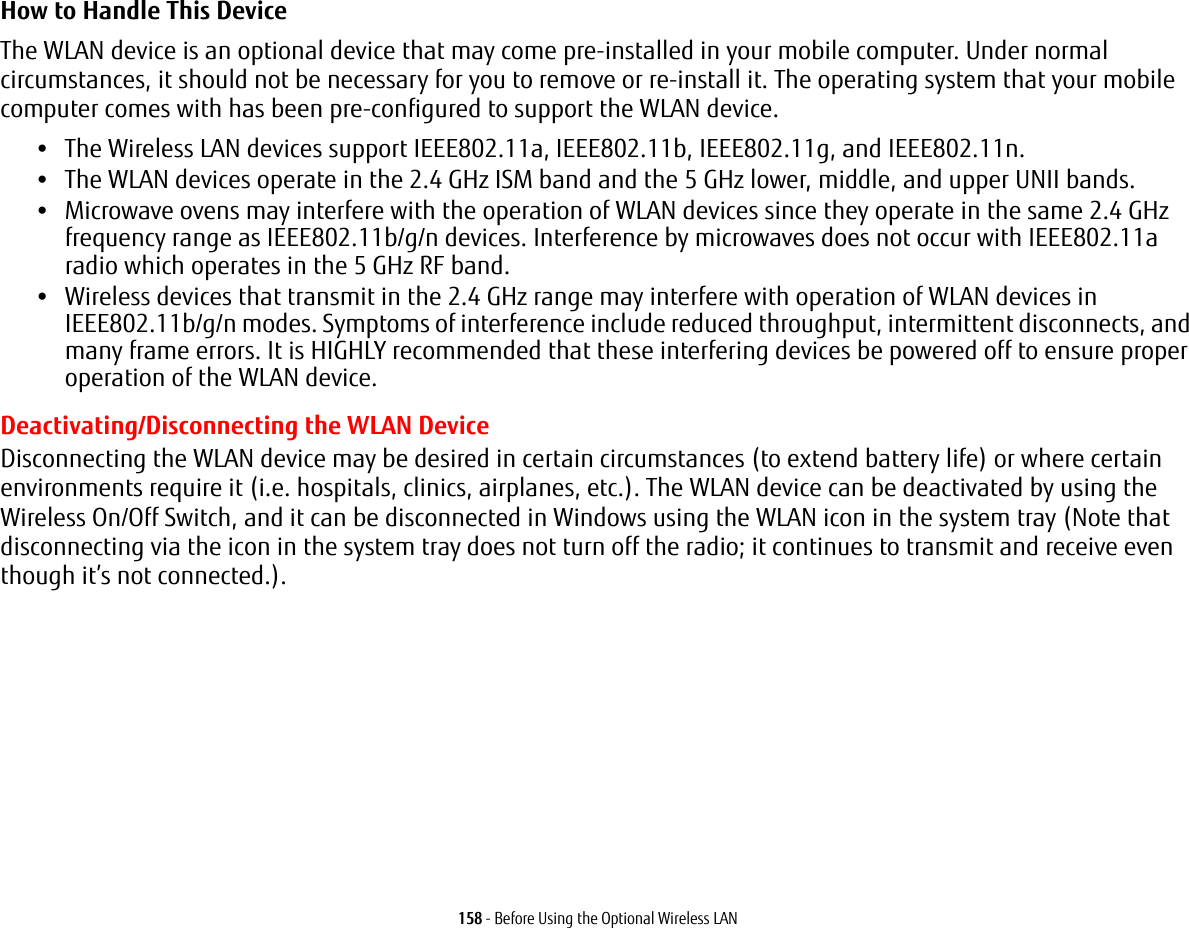
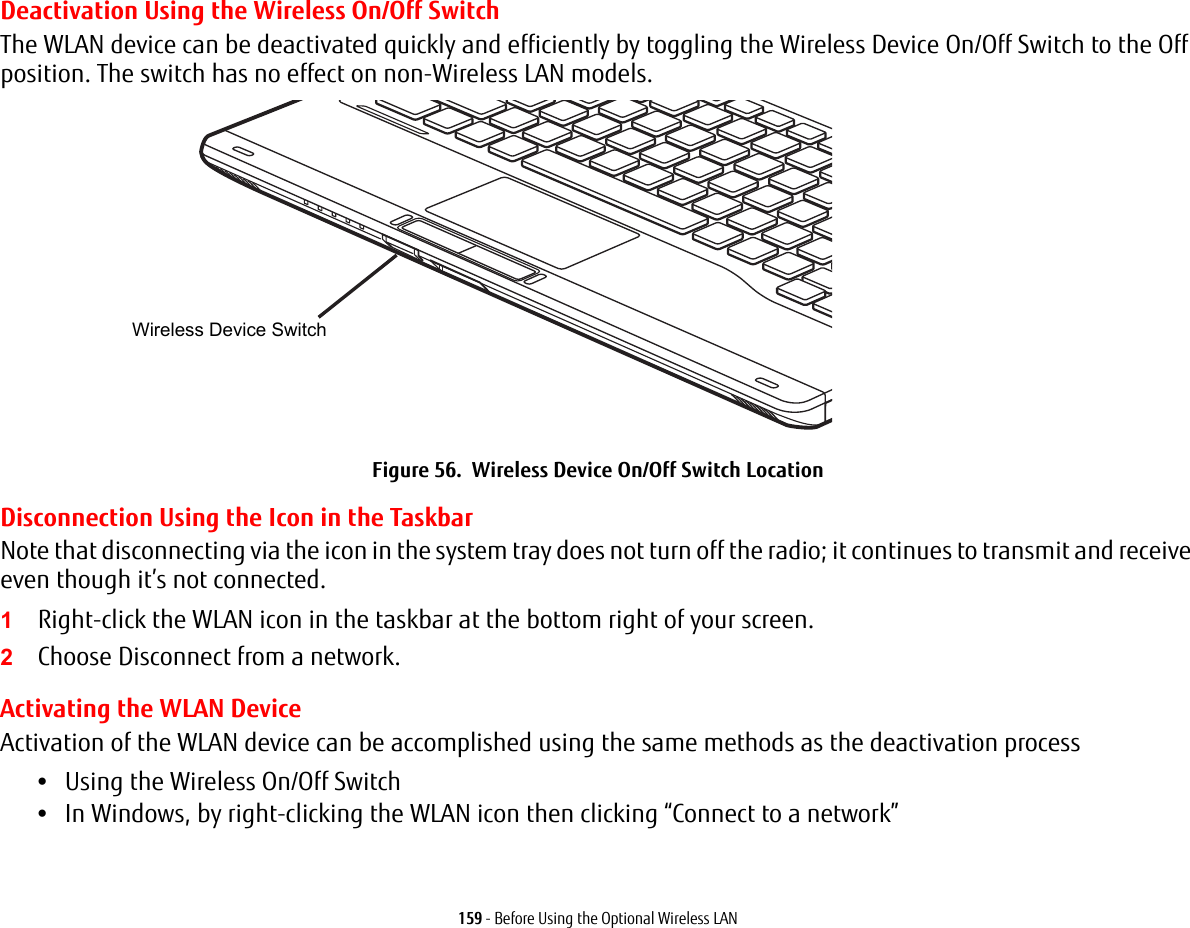
![160 - Configuring the Wireless LANConfiguring the Wireless LANThe WLAN device can be configured to establish wireless network connectivity using the software that is built into the operating system. Support for most industry standard security solutions is contained in this software.Pre-defined parameters will be required for this procedure. Please consult with your network administrator for these parameters:1From the Modern Start screen, press [Windows]+[X], then select Control Panel from the menu.2If the Control Panel is not in Classic View, select Classic View from the left panel. Double-click the Network and Sharing Center icon.3Select "Setup a new connection or network".4Depending upon what type of connection you would like to make, make a selection. For an infrastructure network, select “Manually connect to a wireless network”.5Enter the required information. It may be necessary to consult with your network administrator for some of the information.6In the event you require assistance, go to the Network and Sharing Center window (Control Panel > Network and Sharing Center), and type in relevant keywords in the Search box. Connecting to a Network After you have configured your computer, you can connect to an active network by performing the following steps:1Click on the WLAN icon in the system tray.2Select “Connect to a network”.3Select a network from the list that appears, and click the [Connect] button.Connection to the networkAfter you have configured your computer, you can connect to an active network by clicking on the Wireless Network icon in the system tray:](https://usermanual.wiki/Fujitsu-Client-Computing/WB0088.USERS-MANUAL-1-OF-2/User-Guide-2133567-Page-166.png)
![161 - Troubleshooting the WLANTroubleshooting the WLANTroubleshootingCauses and countermeasures for troubles you may encounter while using your wireless LAN are described in the following table. If you are unfamiliar with the steps required, consult your System Administrator or go to [Start] -> Help and Support -> Networking and the WebProblem Possible Cause Possible SolutionUnavailable network connectionIncorrect network name (SSID) or network keyAd hoc connection: verify that the network names (SSID’s) and network keys (WEP) of all computers to be connected have been configured correctly. SSID’s and WEP or WPA/WPA2 Pre-Shared key values must be identical on each machine.Access Point (Infrastructure) connection: set network name (SSID) and network key to the same values as those of the access point. Set the Network Authentication value identically to that of the Access Point. Please consult your network administrator for this value, if necessary. Weak received signal strength and/or link qualityAd hoc connection: Retry connection after shortening the distance to the destination computer or removing any obstacles for better sight.Access Point (Infrastructure) connection: Retry connection after shortening the distance to the access point or removing any obstacles for better transmission.The WLAN device has been deactivated or disabledCheck if the wireless switch is turned On. Go to Start -> Control Panel, and double-click on Windows Mobility Center. If the wireless network is off, click the [Turn wireless on] button. The computer to be connected is turned offCheck if the computer to be connected is turned ON.](https://usermanual.wiki/Fujitsu-Client-Computing/WB0088.USERS-MANUAL-1-OF-2/User-Guide-2133567-Page-167.png)
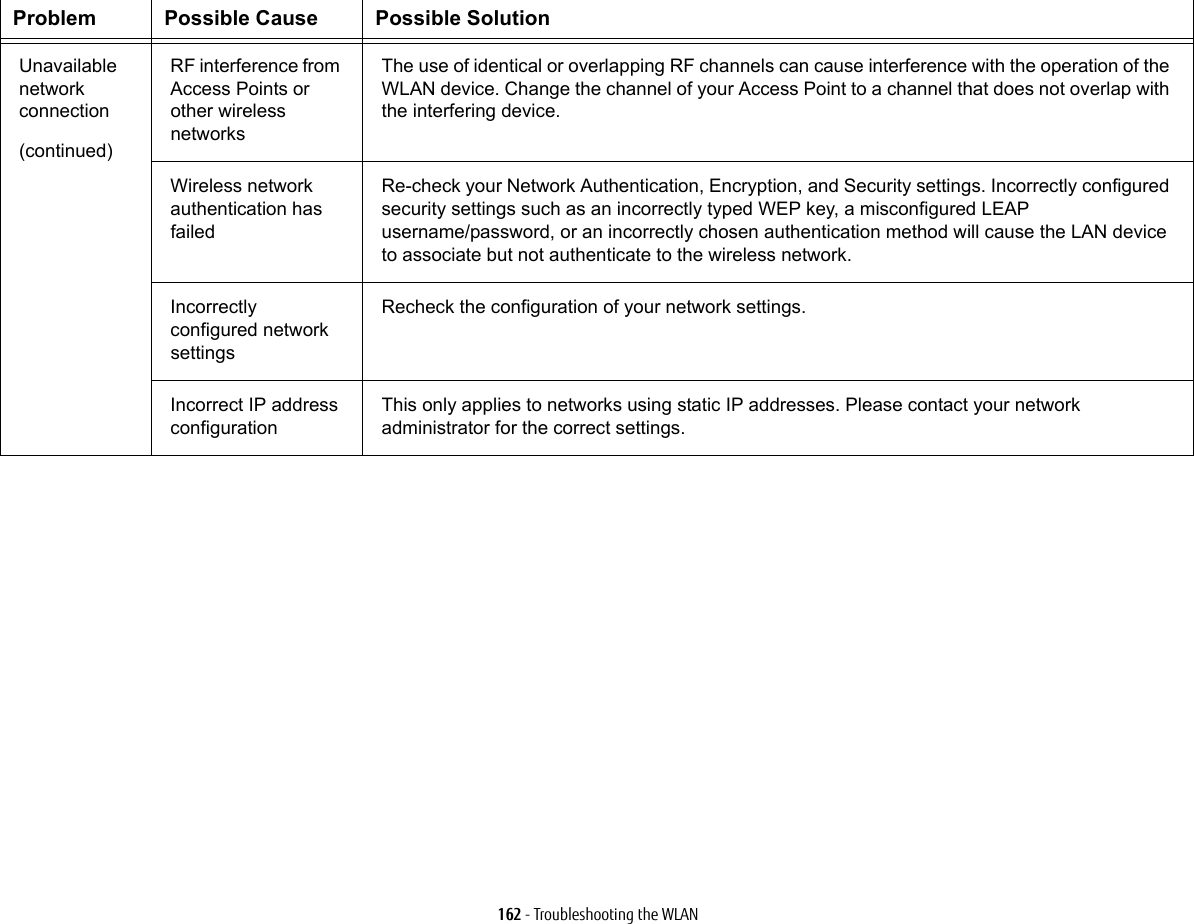
![164 - Using the Bluetooth DeviceUsing the Bluetooth DeviceThe Integrated Bluetooth module is a wireless device installed in selected Fujitsu mobile computers. What is BluetoothBluetooth technology is designed as a short-range wireless link between mobile devices, such as laptop computers, phones, printers, and cameras. Bluetooth technology is used to create Personal Area Networks (PANs) between devices in short-range of each other. Where to Find Information About BluetoothFor additional information about Bluetooth Technology, visit the Bluetooth Web site at: www.bluetooth.com.CLICKING THE [FN] + F5] KEYS WILL TOGGLE BOTH THE OPTIONAL WIRELESS LAN AND BLUETOOTH DEVICES ON AND OFF AT THE SAME TIME. TO ENABLE OR DISABLE EITHER ONE OF THE DEVICES INDIVIDUALLY, PERFORM THE FOLLOWING STEPS:•PRESS THE [FN] AND [F5] KEYS AT THE SAME TIME. CHECK THE STATUS INDICATOR PANEL TO VERIFY THAT THE WIRELESS DEVICE IS ON.•GO TO THE MODERN START SCREEN -> CHARMS -> SETTINGS -> CHANGE PC SETTINGS -> WIRELESS.•UNDER WIRELESS -> WIRELESS DEVICES CLICK ON "BLUETOOTH" SWITCH TO TURN IT ON.](https://usermanual.wiki/Fujitsu-Client-Computing/WB0088.USERS-MANUAL-1-OF-2/User-Guide-2133567-Page-170.png)
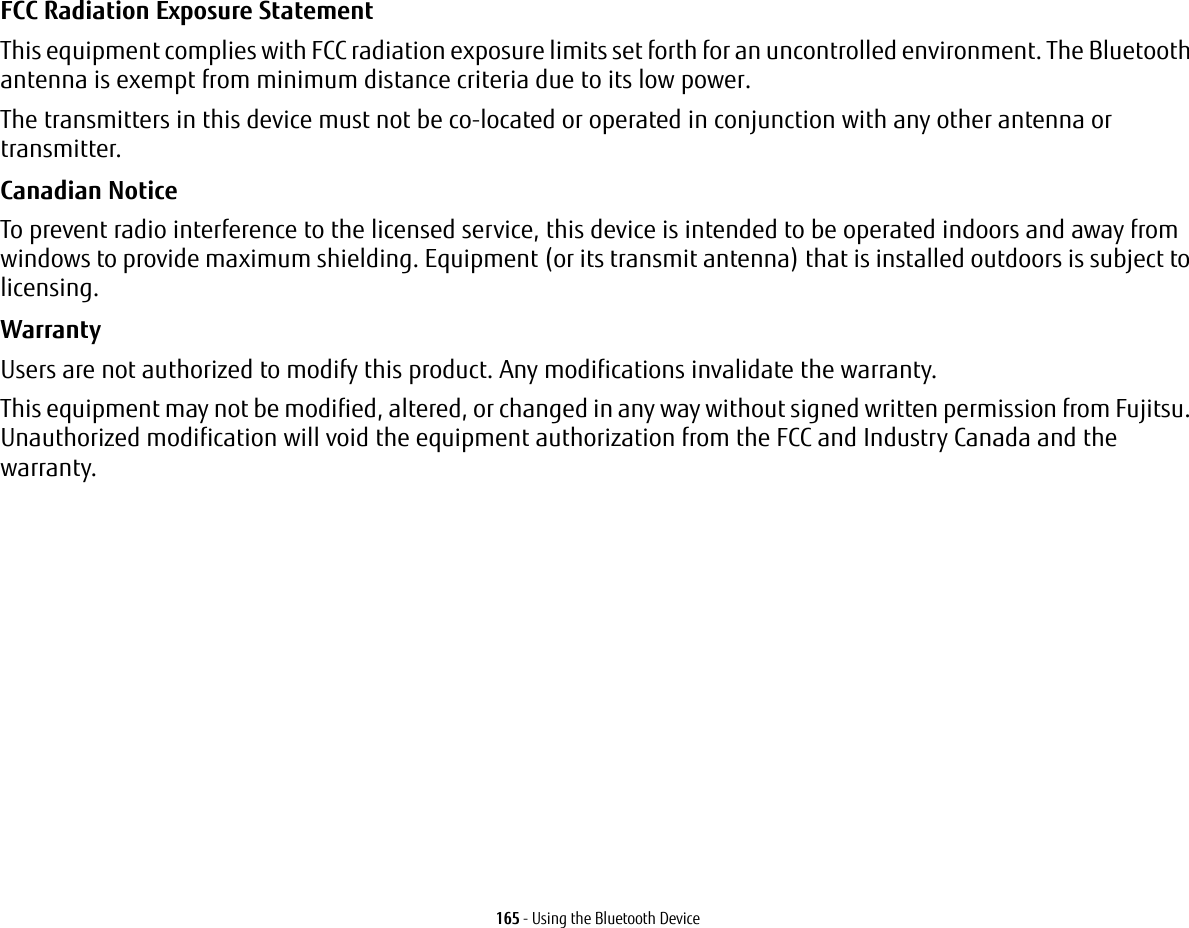
![168 - Introducing the Fingerprint Sensor Device•Windows XP Professional operating system or later•At least 35 MB available hard disk spaceInstalling the OmniPass Application If OmniPass is already installed on your system, go to “User Enrollment” on page 169. Otherwise continue with this section on software installation.To install OmniPass on your system you must:1Omnipass is included in the Fujitsu Bonus Apps. To install Omnipass, start the Fujitsu Bonus Apps application from the desktop icon, select Softex Omnipass and click [Install]. 2Once OmniPass has completed installation you will be prompted to restart you system. Once your system has rebooted you will be able to use OmniPass. If you choose not to restart immediately after installation, OmniPass will not be available for use until the next reboot.3The installation program automatically places an icon (Softex OmniPass) in the Windows Control Panel as well as a golden key shaped icon in the taskbar. Verifying Information about OmniPass After you have completed installing OmniPass and restarted your system, you may wish to check the version of OmniPass on your system.To check the version information of OmniPass:1From the Windows Desktop, double-click the key-shaped OmniPass icon in the taskbar (usually located in the lower right corner of the screen), or, Windows 7: Click Start on the Windows taskbar. Select Control Panel. •INSTALLATION OF THE APPLICATION REQUIRES THAT YOU HAVE AN EXTERNAL OPTICAL DRIVE ATTACHED TO YOUR SYSTEM.•FOR INSTALLATION, OMNIPASS REQUIRES THAT THE USER INSTALLING OMNIPASS HAVE ADMINISTRATIVE PRIVILEGES TO THE SYSTEM. IF YOUR CURRENT USER DOES NOT HAVE ADMINISTRATIVE PRIVILEGES, LOG OUT AND THEN LOG IN WITH AN ADMINISTRATOR USER BEFORE PROCEEDING WITH OMNIPASS INSTALLATION.](https://usermanual.wiki/Fujitsu-Client-Computing/WB0088.USERS-MANUAL-1-OF-2/User-Guide-2133567-Page-174.png)
![170 - Introducing the Fingerprint Sensor DeviceDuring user enrollment a "master password” is created for the enrolled user. This master password “replaces” all other passwords for sites you register with OmniPass. Example: A user, John, installs OmniPass on his system (his home computer) and enrolls an OmniPass user with username “John_01” and password “freq14”. He then goes to his webmail site to log onto his account. He inputs his webmail credentials as usual (username “John_02” and password “lifebook”), but instead of clicking [Submit], he directs OmniPass to Remember Password. Now whenever he returns to that site, OmniPass will prompt him to supply access credentials. John enters his OmniPass user credentials (“John_01” and “freq14”) in the OmniPass authentication prompt, and he is allowed into his webmail account. He can do this with as many web sites or password protected resources he likes, and he will gain access to all those sites with his OmniPass user credentials (“John_01” and “freq14”). This is assuming he is accessing those sites with the system onto which he enrolled his OmniPass user. OmniPass does not actually change the credentials of the password protected resource. If John goes to another computer without he OmniPass account to access his webmail, he would need to enter his original webmail credentials (“John_02” and “lifebook”) to gain access. If he attempts his OmniPass user credentials on a system other than a system he’s enrolled on, he will not gain access.Basic Enrollment The Enrollment Wizard will guide you through the process of enrolling a user. Unless you specified otherwise, after OmniPass installation the Enrollment Wizard will launch on Windows login. If you do not see the Enrollment Wizard, you can bring it up by clicking Start on the Windows taskbar; select Programs; select Softex; click Enroll a new user.1Click Enroll to proceed to username and password verification. By default, the OmniPass Enrollment Wizard enters the credentials of the currently logged in Windows user.THE ENROLLMENT PROCEDURE ASSUMES YOU HAVE NO HARDWARE AUTHENTICATION DEVICES OR ALTERNATE STORAGE LOCATIONS THAT YOU WISH TO INTEGRATE WITH OMNIPASS. IF YOU DESIRE SUCH FUNCTIONALITY, CONSULT THE APPROPRIATE SECTIONS OF THIS DOCUMENT.](https://usermanual.wiki/Fujitsu-Client-Computing/WB0088.USERS-MANUAL-1-OF-2/User-Guide-2133567-Page-176.png)
![171 - Introducing the Fingerprint Sensor Device2Enter the password you use to log in to Windows. This becomes the “master password” for this OmniPass user. In most cases, the Domain: value will be your Windows computer name. In a corporate environment, or when accessing corporate resources, Domain: may not be your Windows computer name. Click [Next] to continue.3In this step OmniPass captures your fingerprint. See “Enrolling a Fingerprint” on page 171 for more information.4You will then see a Congratulations screen indicating your completion of user enrollment.5Click [OK] to exit the OmniPass Enrollment Wizard. You will be asked if you’d like to log in to OmniPass with your newly enrolled user; click [Yes].Enrolling a Fingerprint Enrolling a fingerprint increases the security of your system and streamlines the authentication procedure. You enroll fingerprints in the OmniPass Control Center. With an OmniPass user logged in, click the Start button > Select Programs > Select Softex > Select Enroll a new user.1During initial user enrollment, you will be prompted to select the finger you wish to enroll. Fingers that have already been enrolled will be marked by a green check. The finger you select to enroll at this time will be marked by a red arrow. OmniPass will allow you re-enroll a finger. If you choose a finger that has already been enrolled and continue enrollment, OmniPass will enroll the fingerprint, overwriting the old fingerprint. Select a finger to enroll and click [Next].2It is now time for OmniPass to capture your selected fingerprint. It may take a several capture attempts before OmniPass acquires your fingerprint. Should OmniPass fail to acquire your fingerprint, or if the capture screen times out, click [Back] to restart the fingerprint enrollment process. Your system has a “swipe” fingerprint sensor. A swipe sensor is small and resembles a skinny elongated rectangle. To capture a fingerprint, gently swipe or pull your fingertip over the sensor (starting at the second knuckle) towards yourself. Swiping too fast or too slow will result in a failed capture. The Choose Finger screen has a [Practice] button; click it to practice capturing your fingerprint. When you are comfortable with how your fingerprint is captured, proceed to enroll a finger.](https://usermanual.wiki/Fujitsu-Client-Computing/WB0088.USERS-MANUAL-1-OF-2/User-Guide-2133567-Page-177.png)
![173 - Introducing the Fingerprint Sensor DeviceThe Logon Authentication window indicates what OmniPass-restricted function you are attempting. The icons in the lower left (fingerprint and key) show what authentication methods are available to you. Selected authentication methods are highlighted while unselected methods are not. When you click the icon for an unselected authentication method, the authentication prompt associated with that method is displayed.When prompted to authenticate, you must supply the appropriate credentials: an enrolled finger for the fingerprint capture window or your master password for the master password prompt (the key icon).Remembering a Password OmniPass can remember any application, GUI, or password protected resource that has a password prompt.Using the following procedure, you can store a set of credentials into OmniPass. These credentials will then be linked to your “master password” or fingerprint.Go to a site that requires a login (username and password), but do not log in yet. At the site login prompt, enter your username and password in the prompted fields, but do not enter the site (do not hit [Enter], [Submit], [OK], or Login). Right-click the OmniPass system tray icon and select Remember Password from the submenu. The Windows arrow cursor will change to a golden key OmniPass cursor. Click the OmniPass cursor in the login prompt area, but don’t click [Login] or [Submit].Associating a Friendly Name After clicking the OmniPass key cursor near the login prompt, OmniPass will prompt you to enter a “friendly name” for this site. You should enter something that reminds you of the website, the company, or the service you are logging into. In its secure database, OmniPass associates this friendly name with this website.Additional Settings for Remembering a Site When OmniPass prompts you to enter a “friendly name” you have the opportunity to set how OmniPass authenticates you to this site. There are three settings for how OmniPass handles a remembered site.The default setting is Automatically click the “OK” or “Submit” button for this password protected site once the user is authenticated. With this setting, each time you navigate to this site OmniPass will prompt you for your master password or fingerprint authentication device. Once you have authenticated with OmniPass, you will automatically be logged into the site.](https://usermanual.wiki/Fujitsu-Client-Computing/WB0088.USERS-MANUAL-1-OF-2/User-Guide-2133567-Page-179.png)
![174 - Introducing the Fingerprint Sensor DeviceLess secure is the option to Automatically enter this password protected site when it is activated. Do not prompt for authentication. Check the upper box to get this setting, and each time you navigate to this site OmniPass will log you into the site without prompting you to authenticate.If you uncheck both boxes in Settings for this Password Site, OmniPass will prompt you for your master password or fingerprint authentication device. Once you have authenticated with OmniPass your credentials will be filled in to the site login prompt, but you will have to click the website [OK], [Submit], or [Login] button to gain access to the site. Click Finish to complete the remember password procedure. The site location, the credentials to access the site, and the OmniPass authentication settings for the site are now stored in the OmniPass secure database. The OmniPass authentication settings (Settings for this Password Site) can always be changed in Vault Management.Logging in to a Remembered Site Whether or not OmniPass prompts you to authenticate when you return to a remembered site is determined by Settings for this Password Site and can be changed in Vault Management. The following cases are applicable to using OmniPass to login to: Windows, remembered web sites, and all other password protected resources.With Master Password Once you return to a site you have remembered with OmniPass, you may be presented with a master password prompt. Enter your master password and you will be allowed into the site.Logging into Windows with a Fingerprint Device When logging into Windows with a fingerprint device, the fingerprint capture window will now appear next to the Windows Login screen. Place your enrolled fingertip on the sensor to authenticate. You will be simultaneously logged into Windows and OmniPass. The capture window will also appear if you have used Ctrl-Alt-Del to lock a system, and the fingerprint device can be used to log back in as stated above.THIS SETTING IS MORE CONVENIENT IN THAT WHENEVER YOU GO TO A SITE REMEMBERED WITH THIS SETTING, YOU WILL BYPASS ANY AUTHENTICATION PROCEDURE AND GAIN INSTANT ACCESS TO THE SITE. BUT SHOULD YOU LEAVE YOUR SYSTEM UNATTENDED WITH YOUR OMNIPASS USER LOGGED IN, ANYONE USING YOUR SYSTEM CAN BROWSE TO YOUR PASSWORD PROTECTED SITES AND GAIN AUTOMATIC ACCESS.](https://usermanual.wiki/Fujitsu-Client-Computing/WB0088.USERS-MANUAL-1-OF-2/User-Guide-2133567-Page-180.png)
![176 - Introducing the Fingerprint Sensor DeviceTo create and manage identities, double-click the OmniPass key in the system tray. Click Vault Management; OmniPass will prompt you to authenticate. Once you gain access to Vault Management, click Manage Identities under Vault Settings. You can only manage the identities of the currently logged in OmniPass userTo add a new identity, click New Identity or double-click Click here to add a new identity. Name the new identity and click [OK], then click [Apply]. You can now switch to the new identity and start remembering passwords.To delete an identity, highlight the identity you want to delete and click [Delete Identity], then [Apply].To set the default identity, highlight the identity you want as default and click [Set as Default]; click [Apply] to ensure the settings are saved. If you log in to OmniPass with a fingerprint device, you will automatically be logged in to the default identity for that OmniPass user. You can choose the identity with which you are logging in if you login using "master password".Choosing User Identity during Login To choose your identity during login, type your username in the User Name: field. Press [Tab] and see that the Domain: field self-populates. Click the Password: field to bring the cursor to it, and you will see the pull-down menu in the Identity: field. Select the identity to login as, then click OK.Switch User Identity To switch identities at any time, right-click the OmniPass system tray icon and click Switch User Identity from the submenu. The Switch Identity dialog will appear. Select the desired identity and then click OK.Identities and Password Management On the Manage Passwords interface of the Vault Management tab of the OmniPass Control Center, there is a pull-down selection box labeled, Identity. This field lets you choose which identity you are managing passwords for. When you select an identity here, only those password protected dialogs that are associated with that identity are shown. You can perform all the functions explained in “Password Management” on page 175.WHEN YOU DELETE AN IDENTITY, ALL OF ITS ASSOCIATED REMEMBERED SITES AND PASSWORD PROTECTED DIALOGS ARE LOST.](https://usermanual.wiki/Fujitsu-Client-Computing/WB0088.USERS-MANUAL-1-OF-2/User-Guide-2133567-Page-182.png)
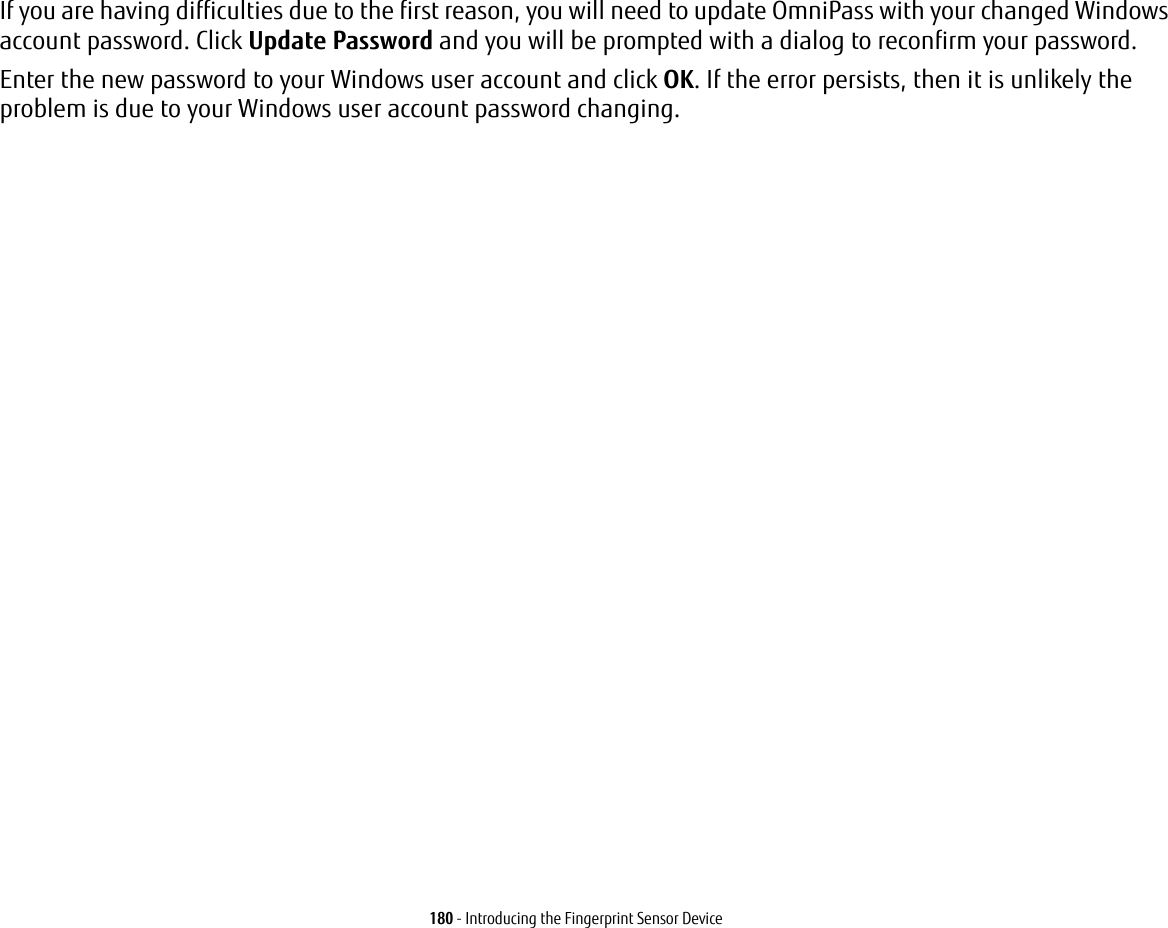
![182 - Using the Wireless Display technologyStarting the WiDi applicationTo launch Intel® Wireless Display, perform the following steps:1Verify that you have a display adapter connected to the television on which you want to use WiDi and turn on the television.2If you haven’t yet turned on the wireless device switch on your Tablet PC, do so now.3Click on the WiDi icon on your desktop or the Start menu shortcut.4The PC content is displayed on the big screen TV.After the initial set-up between the laptop and a compatible display adapter, you can set the adapter as the default to auto-connect. In the future, simply opening the application will automatically connect the two.For detailed information about using and troubleshooting the WiDi technology, click on the WiDi icon then click the [Help] button in the upper right-hand corner to open the Wireless Display Help file.•IF YOU PURCHASED A SYSTEM WITH AN INTEL WIRELESS LAN AND OPTIONAL INTEL WIDI TECHNOLOGY, THE WIDI APPLICATION MAY OR MAY NOT BE PRE-INSTALLED (DEPENDING UPOON YOUR SYSTEM CONFIGURATION). SYSTEMS WITH INTEL WIDI PRE-INSTALLED WILL HAVE A WIDI ICON LOCATED ON THEIR DESKTOP. IF THE ICON IS NOT PRESENT, INTEL WIDI CAN BE DOWNLOADED FROM THE FUJITSU SUPPORT WEBSITE.•THE INTEL WIDI TECHNOLOGY WILL ONLY WORK IN COMBINATION WITH AN INTEL WIRELESS LAN.•ONLY WINDOWS MEDIA PLAYER CAN BE USED AS THE MEIA PLAYER FOR WIDI 3.0.•BEFORE USING INTEL WIDI, BE SURE THAT THE SYSTEM’S WIRELESS DEVICE SWITCH IS TURNED ON.•NOTE THAT SECURE CONTENTS ARE NOT SUPPORTED BY INTEL WIDI 3.0. CONTENT REQUIRING OUTPUT PROTECTION SUCH AS BLU-RAY® AND DVD MOVIE PLAYBACK IS NOT SUPPORTED BY WIDI. •THERE MAY BE A SLIGHT TIME LAG WHEN USING WIDI WHEN YOU MOVE THE MOUSE OR TYPE IN CHARACTERS.•THE FIRST TIME YOU USE WIDI, THE DEFAULT DISPLAY RESOLUTION IS 1280X720. IF YOU WOULD LIKE TO CHANGE THE RESOLUTION, GO TO THE CONTROL PANEL -> DISPLAY PROPERTIES UNDER THE SETTINGS TAB. ONCE YOU HAVE SET THE RESOLUTION, IT WILL BECOME THE DEFAULT UNLESS YOU CHANGE IT AGAIN.Figure A-1. Ad Hoc Mode Network](https://usermanual.wiki/Fujitsu-Client-Computing/WB0088.USERS-MANUAL-1-OF-2/User-Guide-2133567-Page-188.png)