Fujitsu Client Computing WB0098 Tablet Computer User Manual Manual Rezel EN draft for FJ 151124 ver02
Fujitsu Limited Tablet Computer Manual Rezel EN draft for FJ 151124 ver02
Contents
- 1. Manual_Rezel_EN_draft_ for FJ_151124 ver02
- 2. Pcikup_FCC_IC_Draft2-B5FK-7101-01ENZ0-00_en-us_160314
Manual_Rezel_EN_draft_ for FJ_151124 ver02


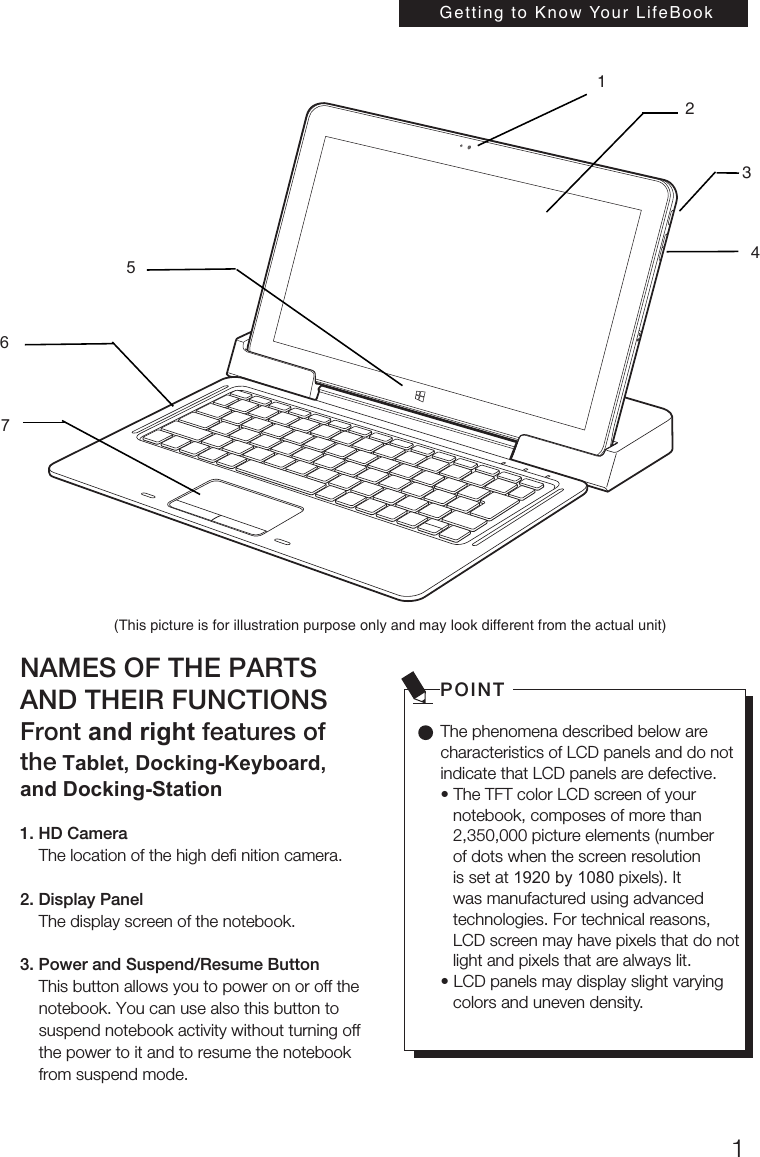
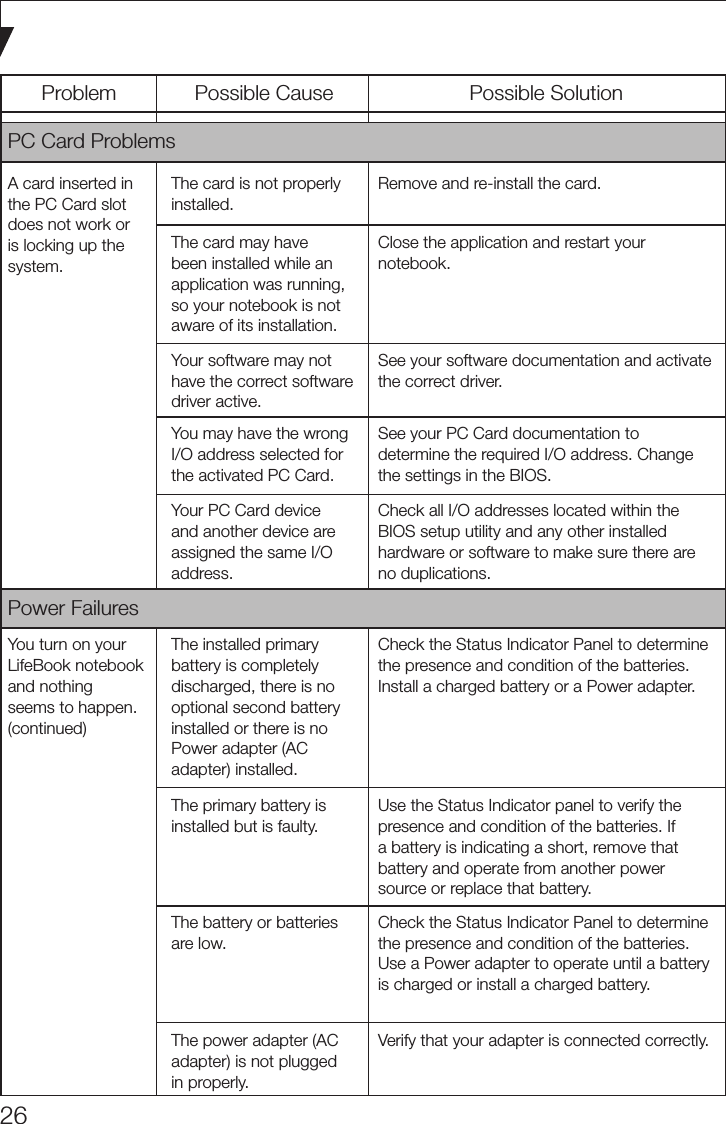
![6STATUS INDICATOR Docking-Keyboard LED1.Num Lock Indicator ( )This indicator lights up when the keyboard islocked in Num Lock mode. (You can use thekeyboard as a ten-digit keyboard when theNum Lock mode is turned on).You can toggle the Num Lock mode by usingthe [ ] key.2.Caps Lock Indicator ( )You can toggle the Caps Lock mode by usingthe [ ] key.(This picture is for illustration purpose only and may look different from the actual unit)Exterior features: Front view of Docking-Keyboard2313.Scroll Lock Indicator ( )You can toggle the Scroll Lock mode by using the [ ] key.](https://usermanual.wiki/Fujitsu-Client-Computing/WB0098.Manual-Rezel-EN-draft-for-FJ-151124-ver02/User-Guide-2960888-Page-18.png)

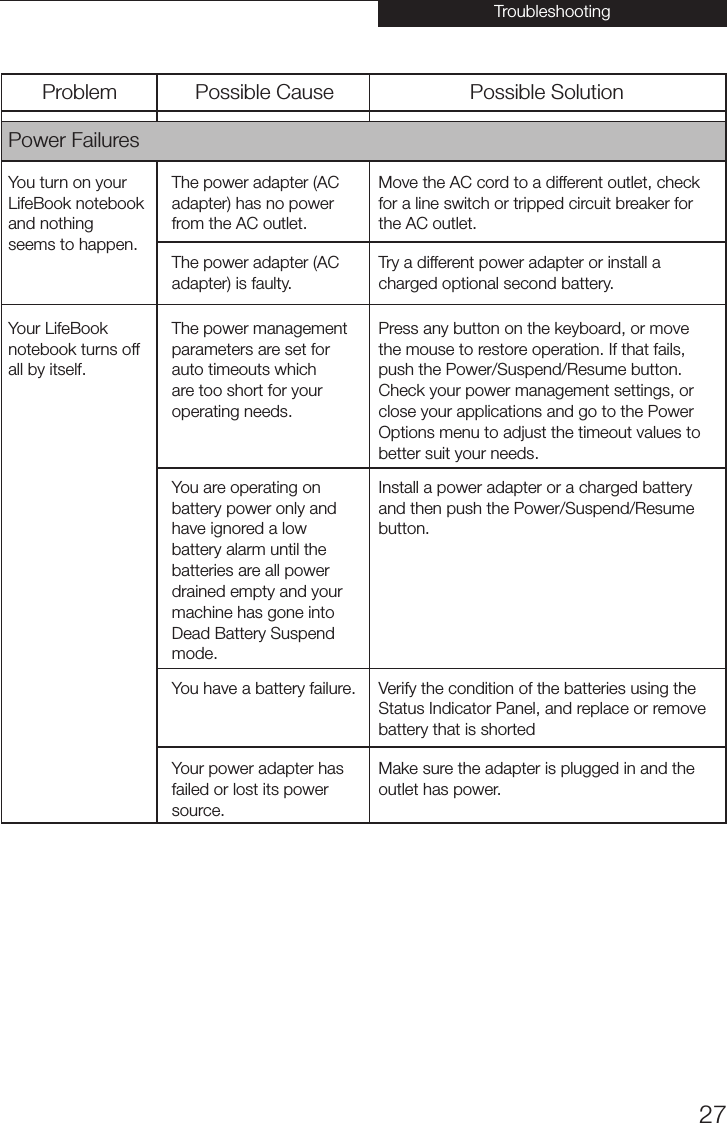
![8Running the Tablet PCon its batteryThis section describes the steps to run thenotebook on its internal standard battery.1. Disconnect the AC adapter from yournotebook and press the power button.Checking the power level of the batteryChecking the power level of the battery1. Built-in Battery Pack ChargingLamp ( )This lamp indicates charging status of builtinbattery when AC adaptor is connected toPC.• Blue lamp is litCharging completed.• Amber lamp is litCharging• Blue and Amber lamp flashesCharging stopped (due to batterytemperature alarm, etc. [Note 1])• OFFNo charging due to disconnected ACadaptor.(This picture is for illustration purpose only and may look different from the actual unit)The power level of the battery decreasesfaster when it is used in a cold place.The chargeability of the battery decreases after it has been used over a long period of time. If the battery runs down very fast, replace it with a new battery.POINTWhen the power is turned off, the statusdisplay LEDs are all OFF except forduring battery charging.POINTPower button](https://usermanual.wiki/Fujitsu-Client-Computing/WB0098.Manual-Rezel-EN-draft-for-FJ-151124-ver02/User-Guide-2960888-Page-20.png)

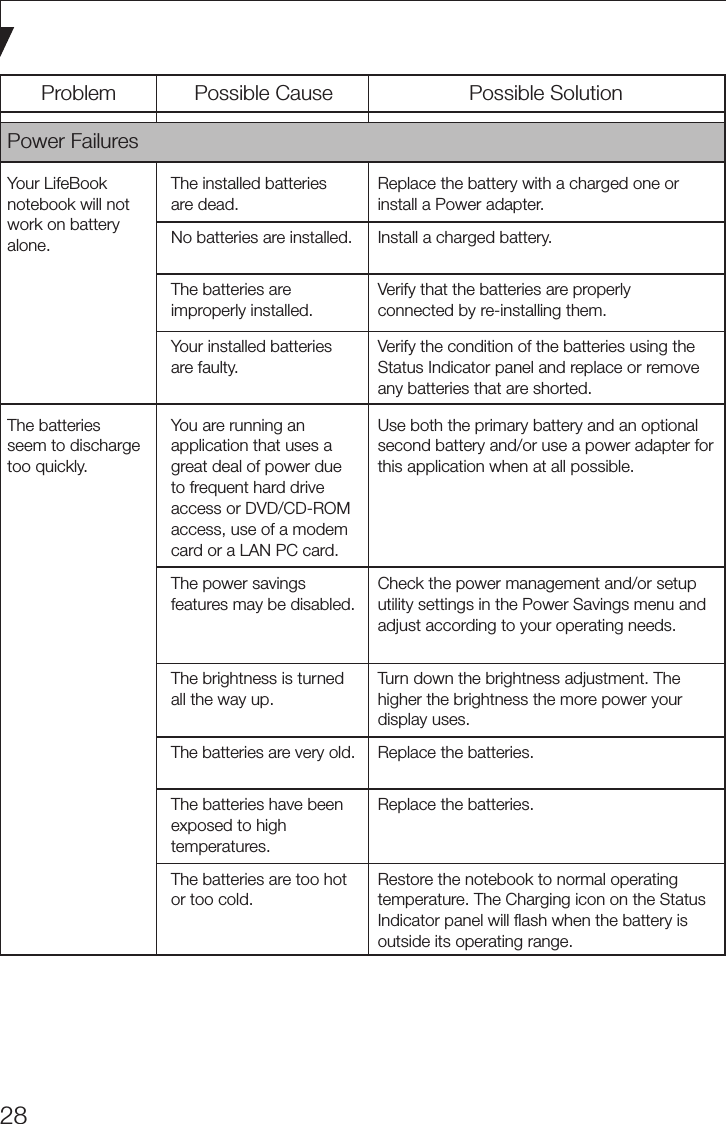
![29TroubleshootingProblem Shutdown and Startup ProblemsThe Suspend/Resume buttondoes not work.The systempowers up, anddisplays power oninformation, butfails to load theoperating system.An error messageis displayed on thescreen during thenotebook (boot)sequence.The Suspend/Resumebutton is disabled from the Advanced submenu of the Power menu of the setup utility.The boot sequencesettings of the setup utility are not compatible with your confi guration.Power On Self Test(POST) has detected aproblem.You did not hold the button in long enough.There may be a conictwith the applicationsoftware.You have a securedsystem requiring apassword to load youroperating system.Internal hard drive wasnot detected.Enable the button from the setup utility.Set the operating source by pressing the[ESC] key while the Fujitsu logo is on screenor use the [F2] key and enter the setup utilityand adjust the source settings from the Bootmenu.See the Power On Self Test (POST)messages to determine the meaning andseverity of the problem.Not all messages are errors; some are simplystatus indicators.Hold the button longer. This may need to be a few seconds if your application is preventingthe CPU from checking for button pushes.Close all applications and try the button again.Make sure you have the right password. Enterthe setup utility and verify the Security settings and modify them as accordingly.Use the BIOS setup utility or Primary Mastersubmenu, located within the Main menu, to try to auto detect the internal hard drive.Possible Cause Possible Solution](https://usermanual.wiki/Fujitsu-Client-Computing/WB0098.Manual-Rezel-EN-draft-for-FJ-151124-ver02/User-Guide-2960888-Page-41.png)
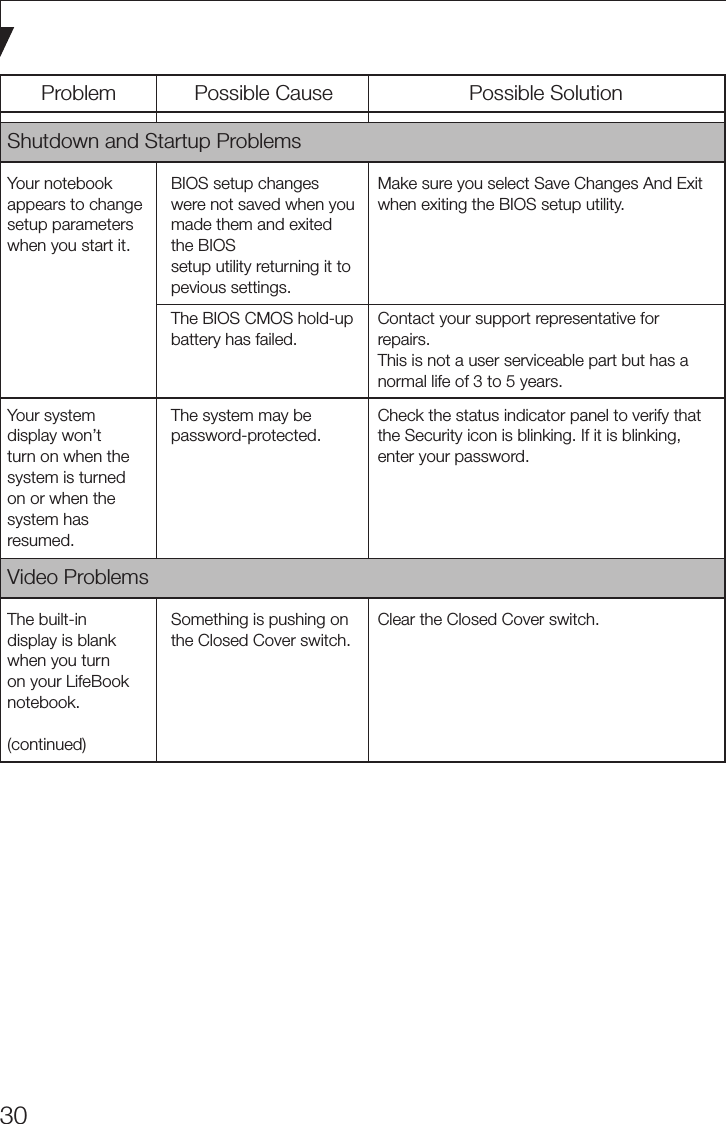
![31TroubleshootingProblem Video ProblemsThe built-indisplay is blankwhen you turnon your LifeBooknotebook.The LifeBooknotebook turnedon with a series ofbeeps and yourbuilt-in display isblank.The display goesblank by itself afteryou have beenusing it.The notebook is set for an external monitor only.Power On Self Test(POST) has detecteda failure which doesnot allow the display tooperate.The notebook has goneinto Video Timeout,Standby mode, Suspendmode or Save-to-Diskmode because you havenot used it for a period of time.The angle of the displayand the brightnesssettings are not dequatefor your lighting conditions.The power managementtime-outs may be set forvery short intervals andyou failed to notice thedisplay come on and gooff again.The power managementtime-outs may be set forvery short intervals andyou failed to notice thedisplay come on and gooff again.Something is pushing onthe Closed Cover switch.Pressing [F10] while holding down the [Fn]key allows you to change your selection ofwhere to send your display video. Each timeyou press the combination of keys you willstep to the next choice. The choices, in orderare: built-in display only, external monitor only, both built-in display and external monitor.Contact your support representative.Press any button on the keyboard, or movethe mouse to restore operation. If that fails,push the Power/Suspend/Resume button.Check your power management settings, orclose your applications and go to the PowerSavings menu of the setup utility to adjust thetimeout values to better suit your operationneeds.Move the display and the brightness controluntil you have adequate visibility.Press any button the keyboard, or move themouse to restore operation. If that fails, pushthe Power/Suspend/Resume button. (Thedisplay may be shut off by Stanby mode, Auto Suspend or Video Timeout)Press any button on the keyboard, or movethe mouse to restore operation. If that fails,push the Power/Suspend/Resume button.(The display may be shut off by StandbyMode, Auto Suspend or Video Timeout)Check the Closed Cover switch.Possible Cause Possible Solution](https://usermanual.wiki/Fujitsu-Client-Computing/WB0098.Manual-Rezel-EN-draft-for-FJ-151124-ver02/User-Guide-2960888-Page-43.png)
![32Problem Video ProblemsMiscellaneous ProblemsThe applicationdisplay uses onlya portion of yourscreen and issurrounded by adark frame.An error messageis displayed on thescreen during theoperation of anapplication.The Display isdark when onbattery power.You haveconnected anexternal monitorand it does notdisplay anyinformation.You haveconnected anexternal monitorand it does notcome on.You are running anapplication that does notsupport 800 x 600/1024x 768 pixel resolutiondisplay and displaycompression is enabled.Application software oftenhas its own set of errormessage displays.The Power Managementutility default is set on low brightness to conserve power.Your BIOS setup is not set to enable your external monitor.Your external monitor isnot compatible with yourLifeBook notebook.Your external monitor isnot properly installed.Your operating systemsoftware is not setup with the correct software driver for that device.Display compression gives a clearer butsmaller display for applications that do notsupport 800 x 600/1024 x 768 pixel resolution. You can fi ll the screen but have less resolution by changing your display compression setting, (See the Video Features submenu, located within the Advanced menu of the BIOS.)See your application manual and help displayscreens for more information. Not allmessages are errors. Some may simply bestatus messages.Press [Fn] + [F7] to increase brightness ordouble- click on the battery gauge and adjustPower Control under battery settings.Try toggling the video destination by pressing[Fn] and [F10] together, or check your BIOSsetup and enable your external monitor. (Seethe Video Features submenu, located withinthe Advanced Menu of the BIOS.)See your monitor documentation and theExternal Monitor Support portions of theSpecifi cations section.Reinstall your device.Check your device and operating systemdocumentation and activate the proper driver.Possible Cause Possible Solution](https://usermanual.wiki/Fujitsu-Client-Computing/WB0098.Manual-Rezel-EN-draft-for-FJ-151124-ver02/User-Guide-2960888-Page-44.png)