Fujitsu Network Communications B25F80P-201 EC 2500 CDMA Cellular Telephone Handset User Manual Users Guide

Fujitsu Network Communications, Inc. EC 2500 CDMA Cellular Telephone Handset Users Guide

Users Guide

Fujitsu Confidential 05/16/01Fujitsu Confidential Page 1 C:\Ready_To_Convert\Doc\71213.DOCFujitsu Network Communications (FNC), Inc.Wireless Development DivisionDate:  28 October 1999EC2500 CDMA Mobile Phone User GuideRev 1.1
Fujitsu Confidential 05/16/01Fujitsu Confidential Page 2 C:\Ready_To_Convert\Doc\71213.DOCRevision History•  Revision 1.0 (author: Jared Crane, July 21, 1999) creation of this document•  Revision 1.1 (David Hill, 15 October, 1999) Correct typos, Delete descriptions of non-functional features, Add feature descriptions thatwere omitted.
Fujitsu Confidential 05/16/01Fujitsu Confidential Page 3 C:\Ready_To_Convert\Doc\71213.DOC1.0 THE BASICS........................................................................................................................................................41.1 SWITCHING ON/OFF ..................................................................................................................................................41.2 MAKING A CALL .......................................................................................................................................................41.3 ENDING A CALL.........................................................................................................................................................41.4 ANSWERING A CALL..................................................................................................................................................41.5 AUTO-ANSWERING ....................................................................................................................................................41.6 LAST NUMBER REDIAL..............................................................................................................................................41.7 SPEED DIAL...............................................................................................................................................................41.8 “9” KEY EMERGENCY DIALING.................................................................................................................................41.9 LOCKING THE KEYPAD ..............................................................................................................................................51.10 MUTE ......................................................................................................................................................................52.0 FEATURES.................................................................................................................................................................52.1 SETTING THE BANNER ...............................................................................................................................................52.2 ADJUST THE EAR SPEAKER VOLUME..........................................................................................................................52.3 ADJUST THE RINGER VOLUME ...................................................................................................................................52.4 RECENT DIALED LIST................................................................................................................................................52.5 ENTER DIRECTORY ITEMS .........................................................................................................................................52.6 CHANGING DIRECTORY ITEMS...................................................................................................................................62.7 SCRATCH PAD USAGE WHILE IN CALL........................................................................................................................62.8 DIALING FROM THE SCRATCH PAD............................................................................................................................62.9 DIALING A  "MANUAL PAUSE" AND "TIMED PAUSE" ................................................................................................62.10 BATTERY VOLTAGE INDICATOR..............................................................................................................................72.11 RECEIVED SIGNAL STRENGTH.................................................................................................................................73.0 ALPHA ENTRY.........................................................................................................................................................74.0 SENDING DTMF.......................................................................................................................................................84.1 MANUALLY SENDING TONES ....................................................................................................................................84.2 AUTOMATICALLY SENDING TOUCH TONES...............................................................................................................8
Fujitsu Confidential 05/16/01Fujitsu Confidential Page 4 C:\Ready_To_Convert\Doc\71213.DOC1.0 The BasicsNote: The term “the home screen” used in this manual refers to the character display which appearsimmediately after powering on the phone.1.1 Switching On/OffPress and hold the POWER/END key for one second to switch the phone on or off.1.2 Making a CallEnter the area code + number then press the SEND key. Check with your operator to see ifyou must enter the area code. If you make a mistake dialing, press CLR to erase digits oneby one. Press and hold CLR to clear the entire display. Once the SEND key has beenpressed,  “Dialing…” will be displayed on line one of the display and the number beingcalled will be on line two. Once a connection has been made the call timer will be displayedand continue to increment as seconds pass.1.3 Ending a CallPress END1.4 Answering a CallPress any key to answer the call.When there is an incoming call, the phone rings and flashes “Call” on line one of thedisplay and the caller id on line two.1.5 Auto-answeringIn addition to Press Any Key Answering, the phone will automatically answer an incomingcall after four rings. The number of rings before answering can be modified by pressingMENU, then using the Down Arrow key to highlight the SETUP menu selection, pressingOK, then highlighting Auto Answer, pressing OK, then entering the desired number ofrings, then pressing OK. Entering “0” for the number of rings will disable Auto-answering.1.6 Last Number RedialPress SEND, SENDThe first send will display the recent dialed list and the second will dial the last numbercalled.1.7 Speed DialPress the number location (1-99) in the directory, then press SEND. If the location is emptya message will be displayed to that effect.1.8 “9” Key Emergency DialingPress the 9 key and hold it for 3 seconds. The phone will dial 911.Note: Does NOT work if Keypad is locked.
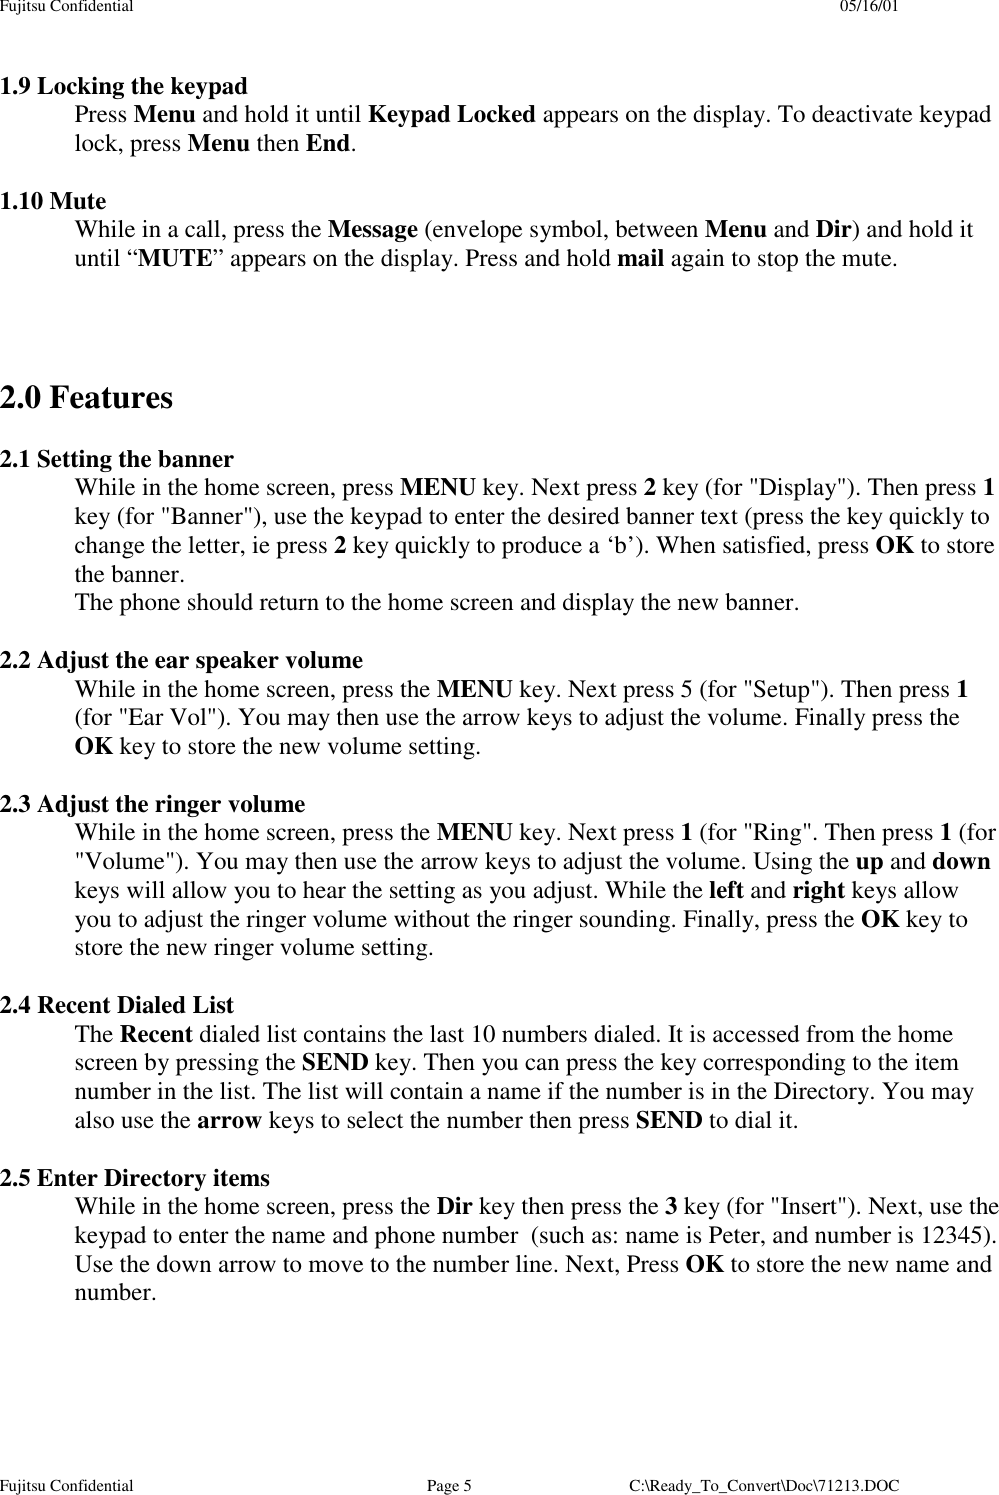
Fujitsu Confidential 05/16/01Fujitsu Confidential Page 5 C:\Ready_To_Convert\Doc\71213.DOC1.9 Locking the keypadPress Menu and hold it until Keypad Locked appears on the display. To deactivate keypadlock, press Menu then End.1.10 MuteWhile in a call, press the Message (envelope symbol, between Menu and Dir) and hold ituntil “MUTE” appears on the display. Press and hold mail again to stop the mute.2.0 Features2.1 Setting the bannerWhile in the home screen, press MENU key. Next press 2 key (for "Display"). Then press 1key (for "Banner"), use the keypad to enter the desired banner text (press the key quickly tochange the letter, ie press 2 key quickly to produce a ‘b’). When satisfied, press OK to storethe banner.The phone should return to the home screen and display the new banner.2.2 Adjust the ear speaker volumeWhile in the home screen, press the MENU key. Next press 5 (for "Setup"). Then press 1(for "Ear Vol"). You may then use the arrow keys to adjust the volume. Finally press theOK key to store the new volume setting.2.3 Adjust the ringer volumeWhile in the home screen, press the MENU key. Next press 1 (for "Ring". Then press 1 (for"Volume"). You may then use the arrow keys to adjust the volume. Using the up and downkeys will allow you to hear the setting as you adjust. While the left and right keys allowyou to adjust the ringer volume without the ringer sounding. Finally, press the OK key tostore the new ringer volume setting.2.4 Recent Dialed ListThe Recent dialed list contains the last 10 numbers dialed. It is accessed from the homescreen by pressing the SEND key. Then you can press the key corresponding to the itemnumber in the list. The list will contain a name if the number is in the Directory. You mayalso use the arrow keys to select the number then press SEND to dial it.2.5 Enter Directory itemsWhile in the home screen, press the Dir key then press the 3 key (for "Insert"). Next, use thekeypad to enter the name and phone number  (such as: name is Peter, and number is 12345).Use the down arrow to move to the number line. Next, Press OK to store the new name andnumber.
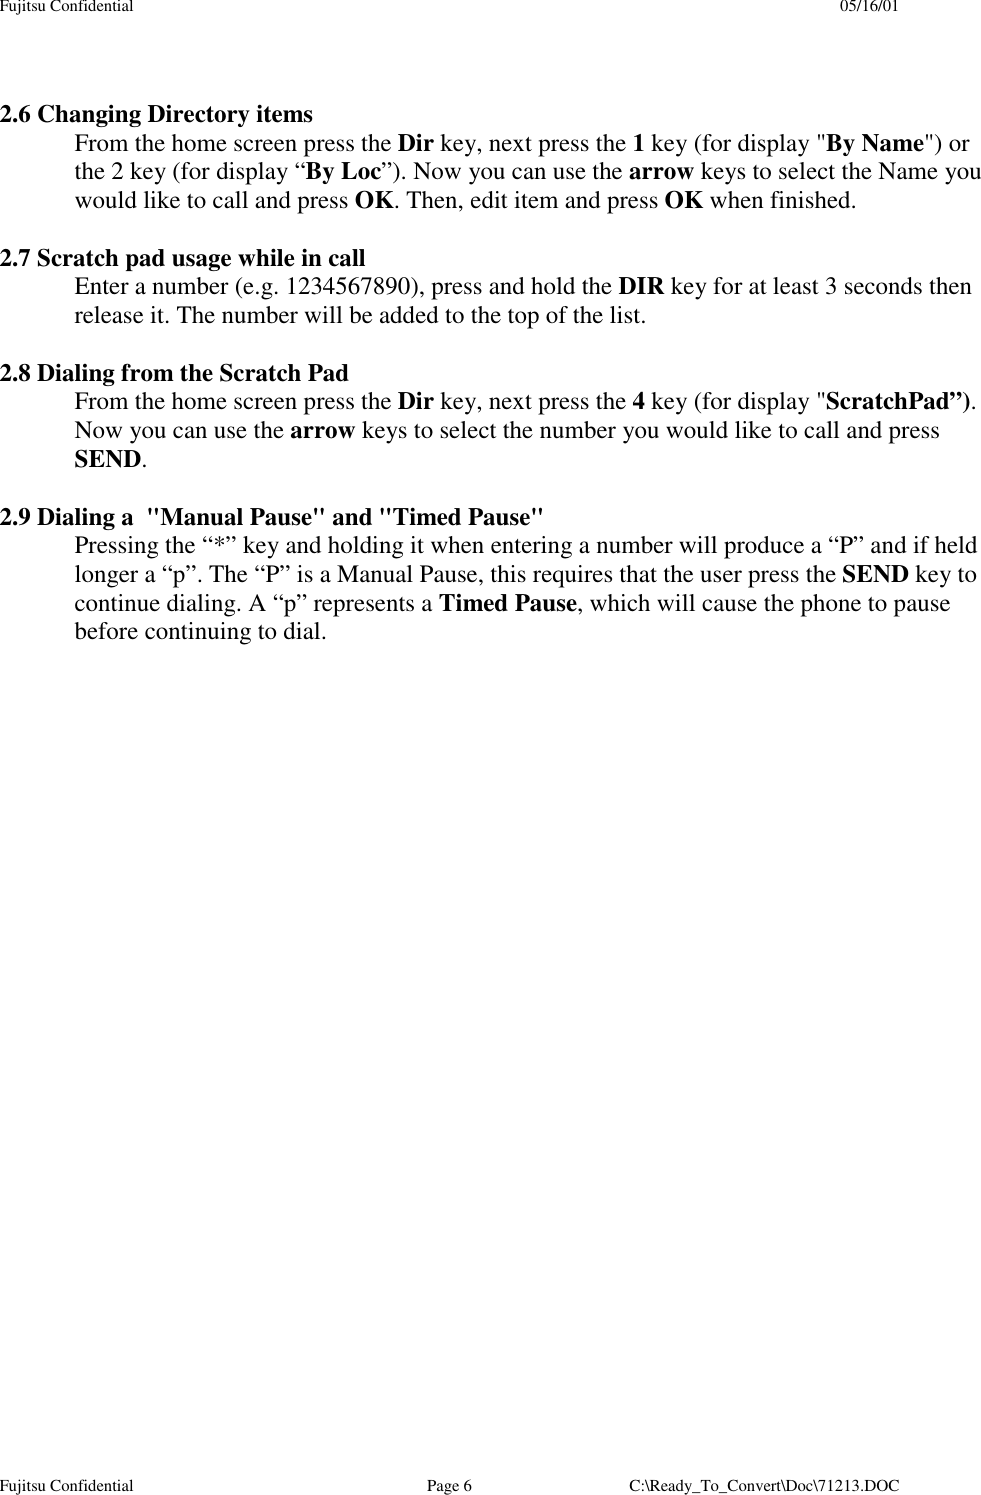
Fujitsu Confidential 05/16/01Fujitsu Confidential Page 6 C:\Ready_To_Convert\Doc\71213.DOC2.6 Changing Directory itemsFrom the home screen press the Dir key, next press the 1 key (for display "By Name") orthe 2 key (for display “By Loc”). Now you can use the arrow keys to select the Name youwould like to call and press OK. Then, edit item and press OK when finished.2.7 Scratch pad usage while in callEnter a number (e.g. 1234567890), press and hold the DIR key for at least 3 seconds thenrelease it. The number will be added to the top of the list.2.8 Dialing from the Scratch PadFrom the home screen press the Dir key, next press the 4 key (for display "ScratchPad”).Now you can use the arrow keys to select the number you would like to call and pressSEND.2.9 Dialing a  "Manual Pause" and "Timed Pause"Pressing the “*” key and holding it when entering a number will produce a “P” and if heldlonger a “p”. The “P” is a Manual Pause, this requires that the user press the SEND key tocontinue dialing. A “p” represents a Timed Pause, which will cause the phone to pausebefore continuing to dial.
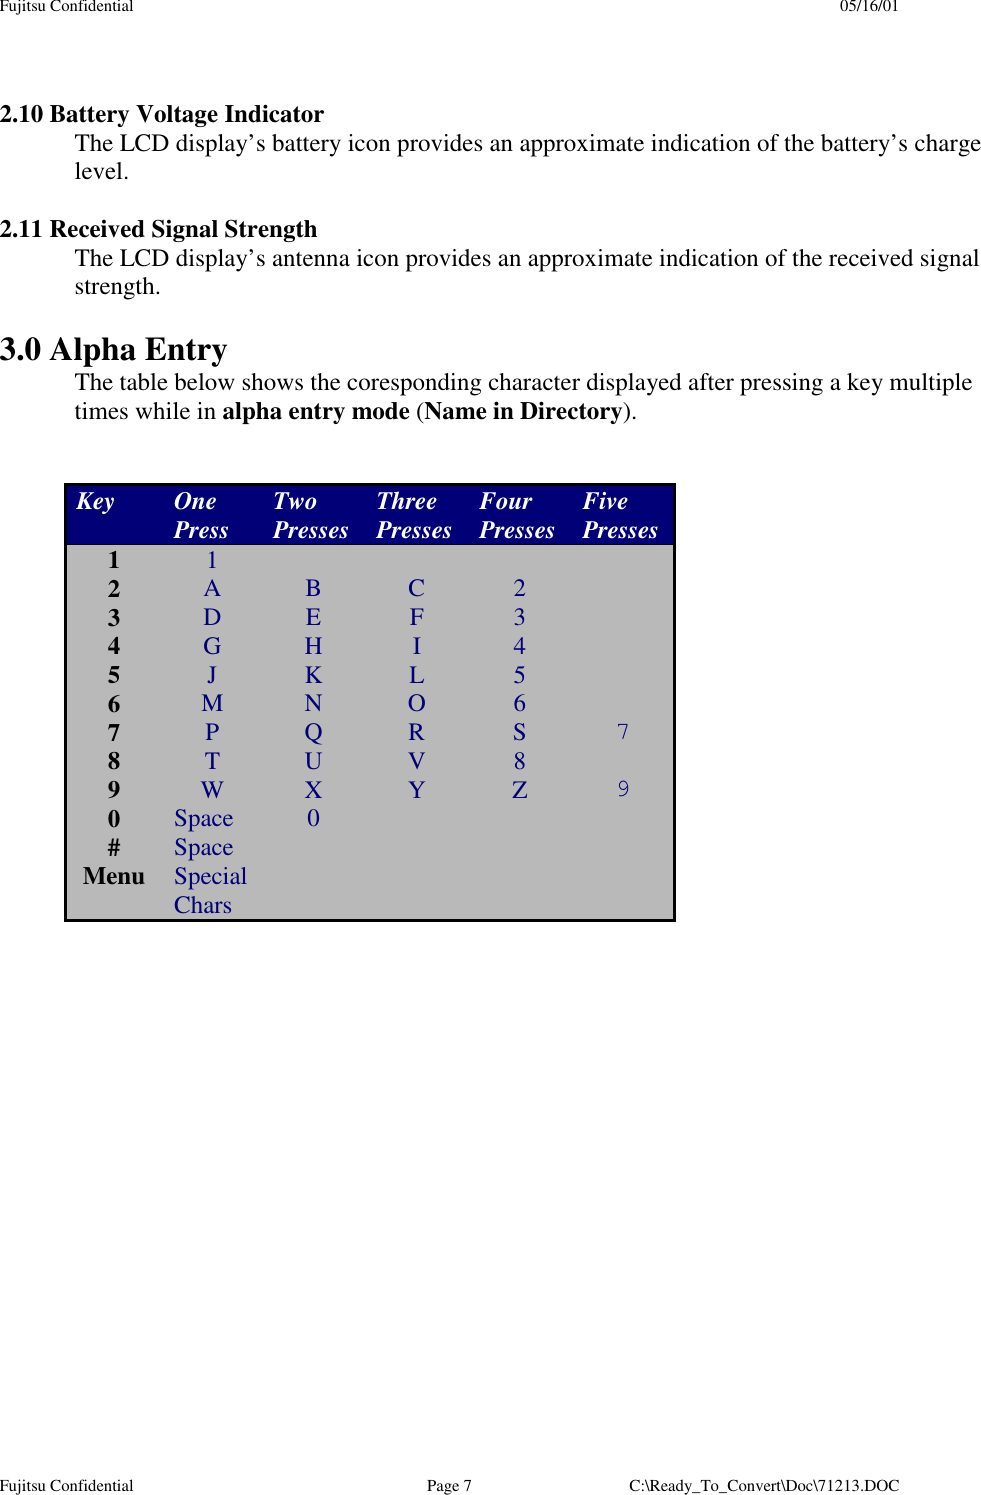
Fujitsu Confidential 05/16/01Fujitsu Confidential Page 7 C:\Ready_To_Convert\Doc\71213.DOC2.10 Battery Voltage IndicatorThe LCD display’s battery icon provides an approximate indication of the battery’s chargelevel.2.11 Received Signal StrengthThe LCD display’s antenna icon provides an approximate indication of the received signalstrength.3.0 Alpha EntryThe table below shows the coresponding character displayed after pressing a key multipletimes while in alpha entry mode (Name in Directory).Key OnePress TwoPresses ThreePresses FourPresses FivePresses112A B C 23D E F 34G H I 45J K L 56M N O 67P Q R S 78T U V 89W X Y Z 90Space 0#SpaceMenu SpecialChars
Fujitsu Confidential 05/16/01Fujitsu Confidential Page 8 C:\Ready_To_Convert\Doc\71213.DOC4.0 Sending DTMF4.1 Manually Sending TonesPressing the keys during a call sends “Touch Tones”. Make a call in the usual way (e.g. toyour bank's computer phone number). Manually enter the digits to be sent as “TouchTones” (e.g., your bank account number and password).4.2 Automatically Sending Touch TonesTo automatically send touch-tones, store the touch tone sequence after the access phonenumber separated by a "pause" [see section 2.11] character. Store "pauses" between touchtone digits to be sent (a "pause" cannot be stored as the first special character). For detailson storing "pause" characters, see section 2.11. Here is an example of a number you couldstore in your phone. This number contains a phone number (18005551212), a manual pausecharacter, an access number ("1234"), a timed pause, and a password ("1212").1800555P1234p1212When you recall this number from memory and press SEND, the phone dials 18005551212(the stored number). The phone will then wait for you to manually press SEND beforecontinuing to dial the rest of the number. Once SEND is pressed the phone then dials the1234, pauses for one second (timed pause), then continues, dialing 1212.

Navigation menu