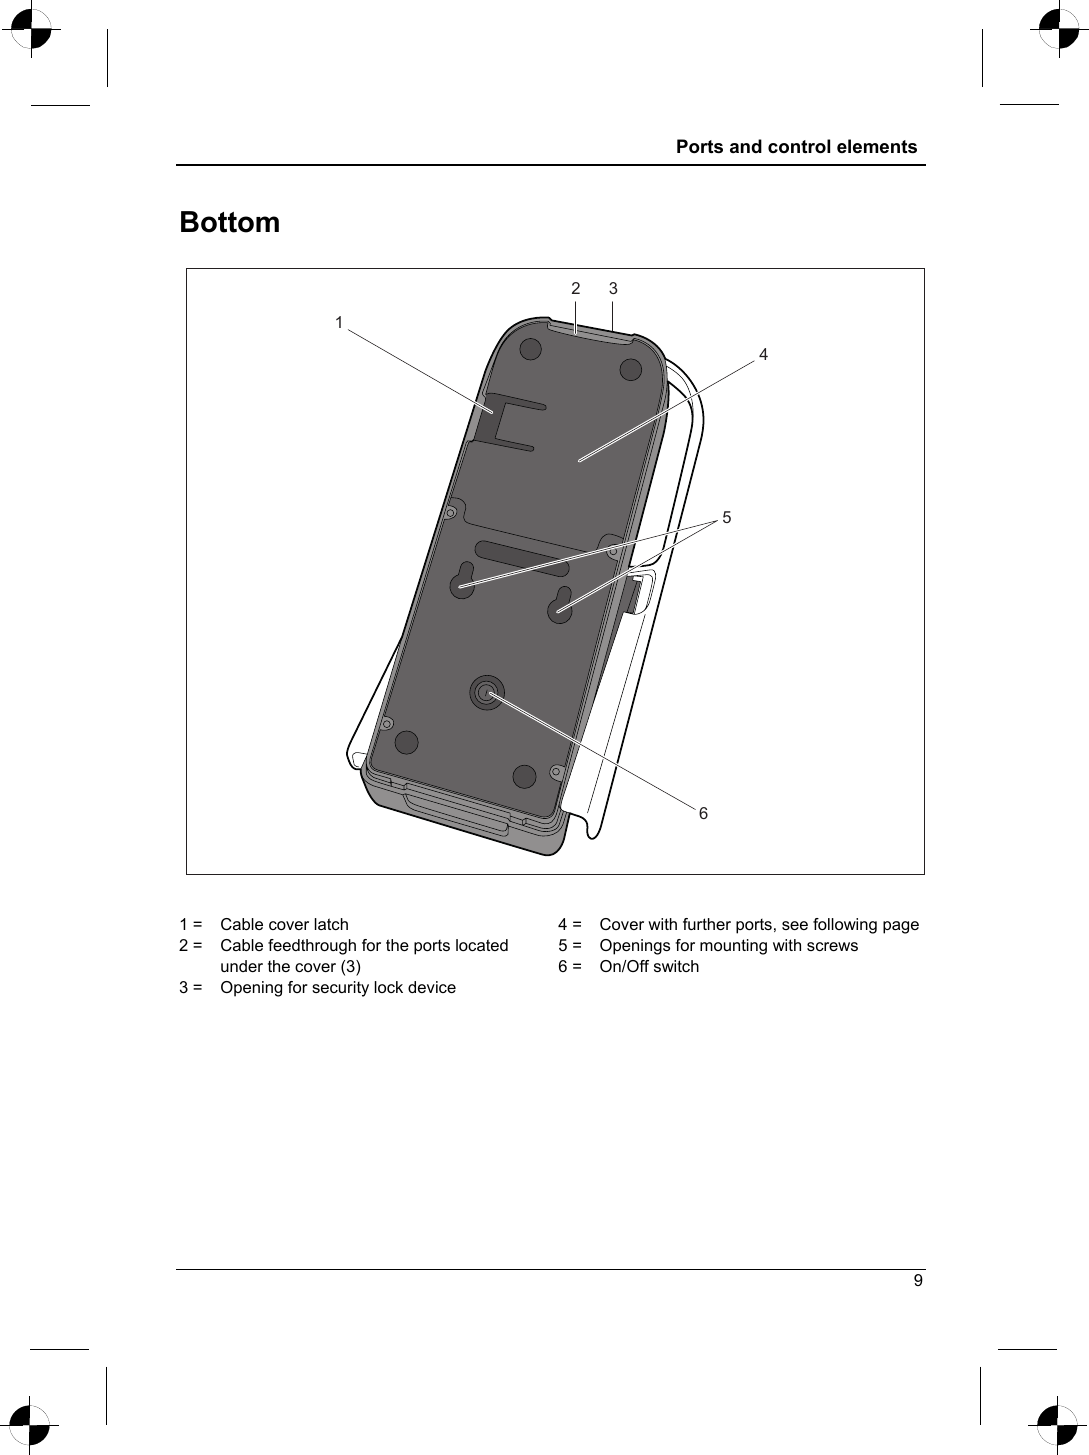
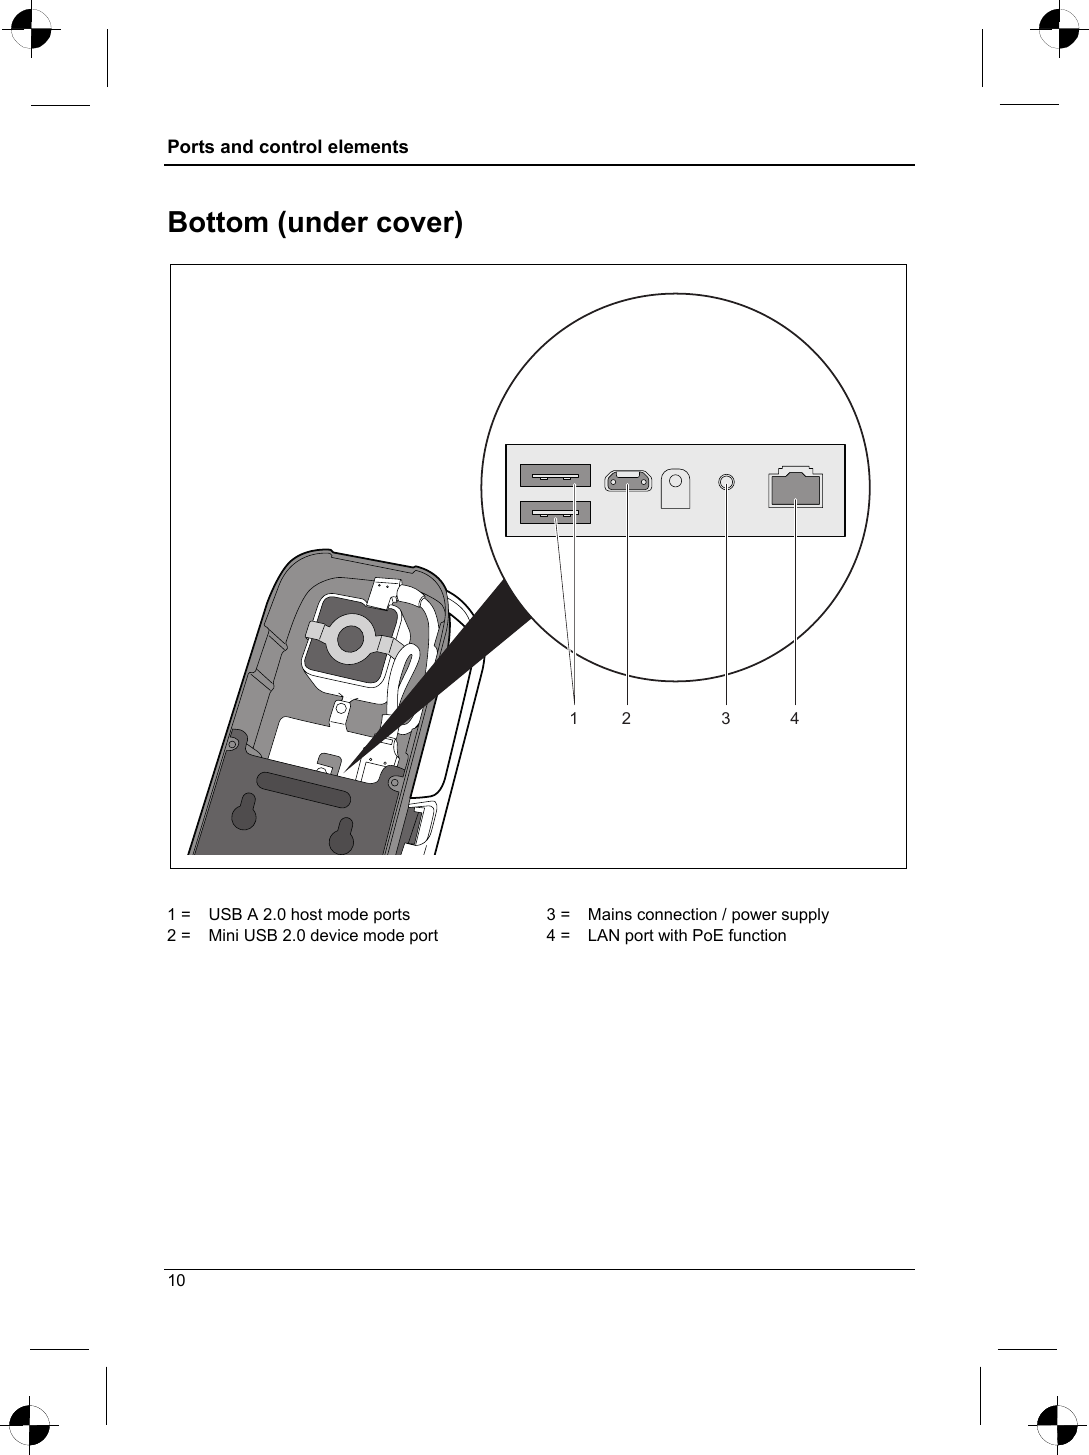
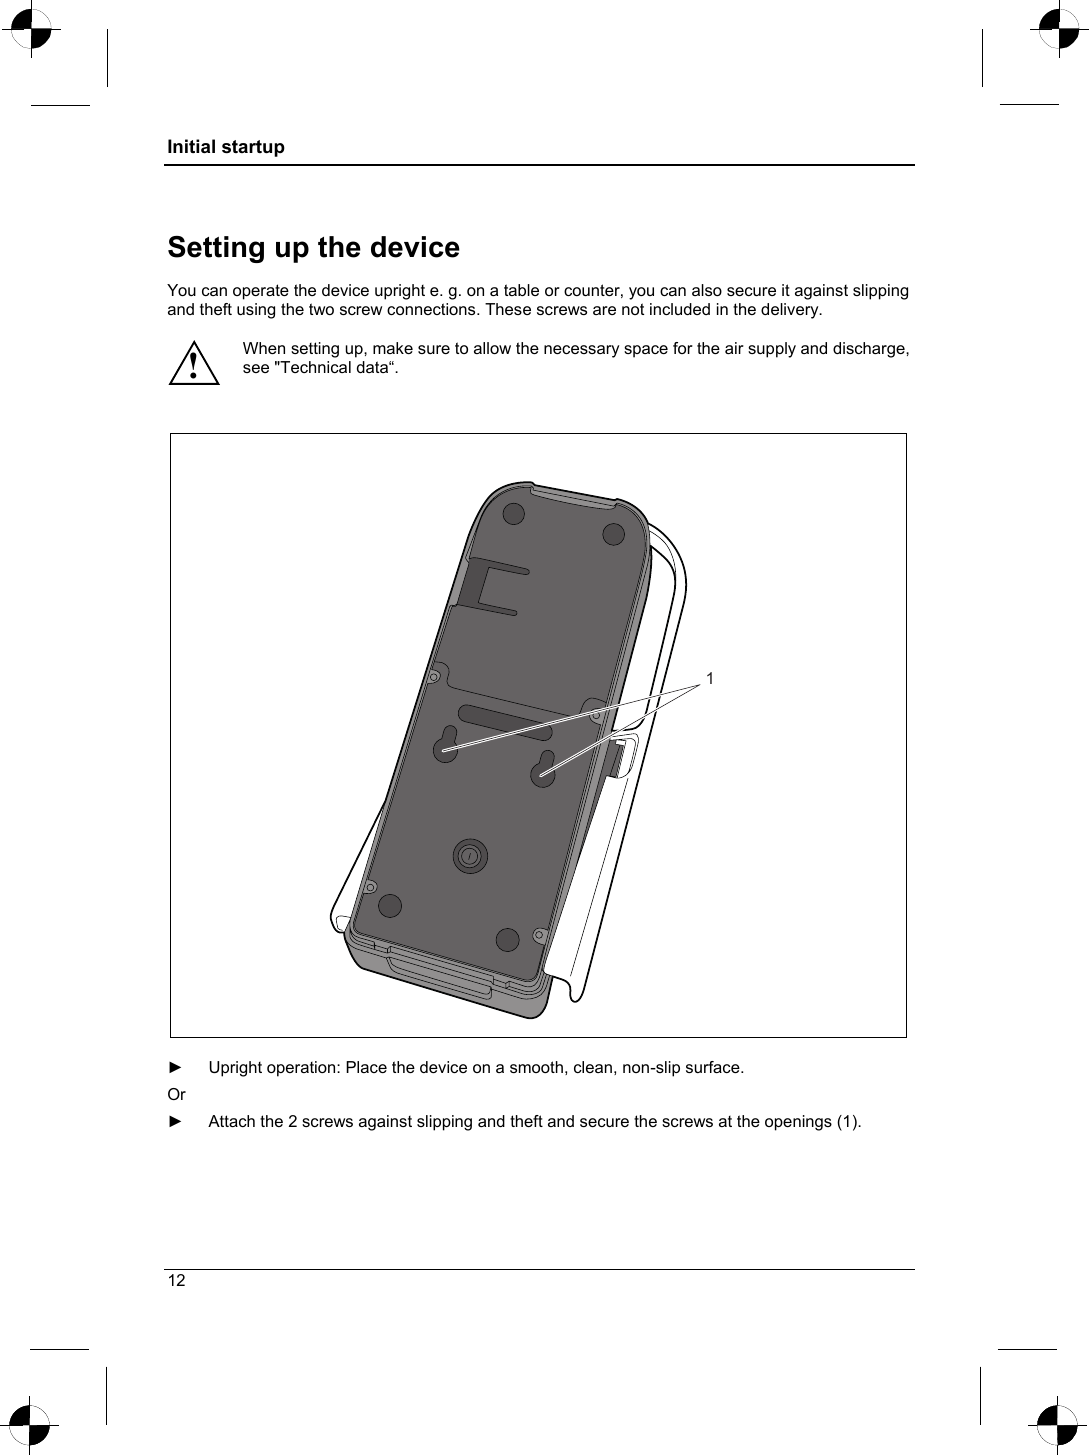
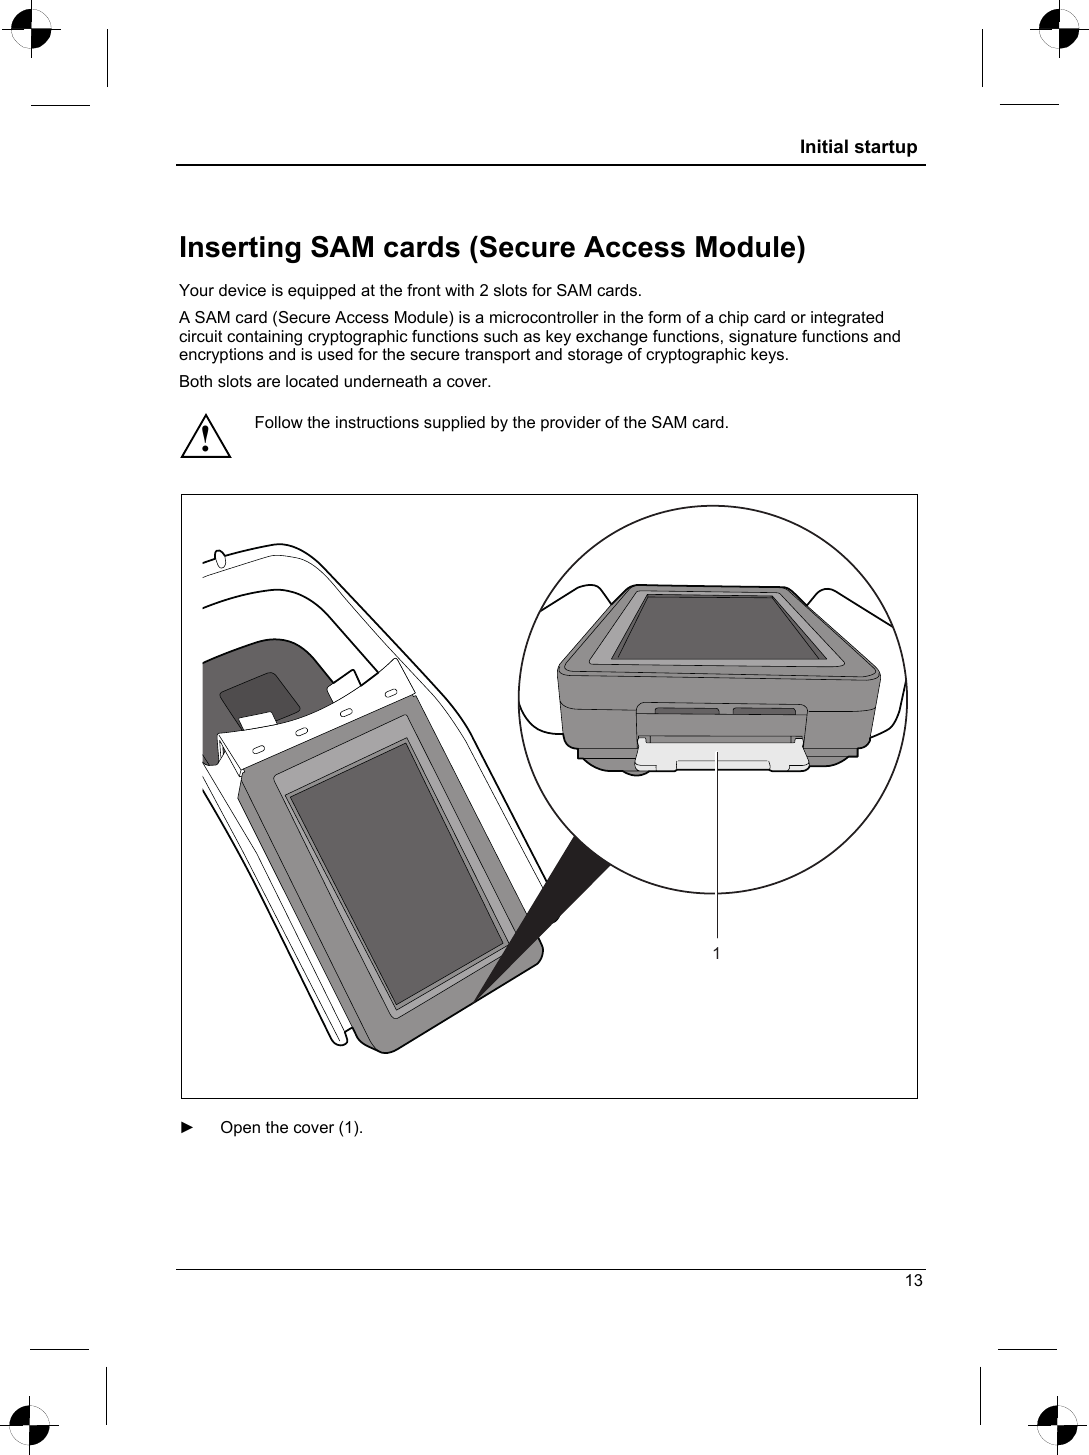
Fujitsu Technology Solutions PSID1 Security Access Sensor User Manual A26361 K1500 Z320 1 7619

Fujitsu Technology Solutions GmbH Security Access Sensor A26361 K1500 Z320 1 7619

UserManual.pdf

       Operating Manual  Component PalmSecure ID Match
 Thank you for buying an innovative product from Fujitsu. The latest information on our products as well as tips, updates, etc., can be found on our website at: http://www.fujitsu.com/ftsYou can find driver updates at: http://support.ts.fujitsu.com/downloadShould you have any technical questions, please contact ●  our Hotline/Service Desk (see the Service Desk list or visit: http://support.ts.fujitsu.com/contact/servicedesk) ●  Your authorized distributor ●  your sales office We hope you enjoy using your new Fujitsu system!
   Published by / Contact address in the EU Fujitsu Technology Solutions GmbH Mies-van-der-Rohe-Straße 8  80807 Munich, Germany  http://www.fujitsu.com/fts Copyright © Fujitsu Technology Solutions GmbH 2015. All rights reserved.  Edition date 11/2015  Order no.: A26361-K1500-Z320-1-7619, edition 2
 PalmSecure ID Match Operating Manual PalmSecure ID Match 2Important notes 4Ports and control elements 8Initial startup   11Using the palm scanner 22Restore factory default settings 23Using the SmartCard reader 24Using the magnetic card reader (optional) 25Using the Security Lock 26Technical data 27
 Remarks  Notes on the product description are consistent with the design specifications from Fujitsu and are made available for comparison purposes. The actual results may differ due to several factors. Technical data is subject to change without notification. Fujitsu does not accept any responsibility for technical or editorial errors or omissions.  Trademarks  Fujitsu and the Fujitsu logo are registered trade marks of Fujitsu Limited or its subsidiaries in the United States and other countries.  Microsoft and Windows are trademarks or registered trademarks of Microsoft Corporation in the United States and/or other countries.  All other trademarks mentioned here are the property of their particular owner.  Copyright  No part of this publication may be copied, reproduced or translated without prior written permission from Fujitsu.  No part of this publication may be stored or transmitted in any electronic manner without written permission from Fujitsu.
 Contents PalmSecure ID Match ......................................................................................................................... 2 Notational conventions ......................................................................................................................... 3 Important notes .................................................................................................................................. 4 Safety notes.......................................................................................................................................... 4 Power cable and mains adapter ........................................................................................................... 4 Transporting the device ........................................................................................................................ 4 Cleaning the device .............................................................................................................................. 5 CE mark................................................................................................................................................ 5 FCC and Industry Canada compliance statements for unintentional radiators .................................... 7 Ports and control elements ............................................................................................................... 8 Front ..................................................................................................................................................... 8 Bottom .................................................................................................................................................. 9 Bottom (under cover).......................................................................................................................... 10 Initial startup ..................................................................................................................................... 11 Unpacking and checking the delivery................................................................................................. 11 Setting up the device .......................................................................................................................... 12 Inserting SAM cards (Secure Access Module)................................................................................... 13 Open the bottom cover (LAN, USB, power) ....................................................................................... 15 Connecting external devices to the USB port............................................................................. 16 Connecting the device to the power supply........................................................................................ 17 Connect the mains adapter (option 1) ........................................................................................ 18 Connect the device to the LAN port (option 2) ........................................................................... 19 Switching the device on...................................................................................................................... 20 Switching the device off...................................................................................................................... 21 Using the palm scanner ................................................................................................................... 22 Restore factory default settings...................................................................................................... 23 Using the SmartCard reader............................................................................................................ 24 Using the magnetic card reader (optional)..................................................................................... 25 Using the Security Lock................................................................................................................... 26 Technical data................................................................................................................................... 27 PalmSecure ID Match......................................................................................................................... 27 Mains adapter..................................................................................................................................... 28 1
PalmSecure ID Match    PalmSecure ID Match FUJITSU PalmSecure ID Match adds a whole new dimension of security to your security solution, whether it is for access protection, protection of data or payment processes. The device offers the facility to record the unique palm scan and store it depending on the desired application, such as on a personal SmartCard. This makes it unnecessary to store biometric patterns in a central database. It can be used for a variety of authentication options: ● swipe card ● palm identification ● SmartCard etc.  It can be integrated into your system via LAN. Power protection is ensured either through the LAN port using Power over Ethernet (PoE) and / or a mains adapter. 2
 PalmSecure ID Match  Notational conventions The following notational conventions apply in this manual:  Refers to important information which must be read. Non-compliance can lead to personal injury, damage to the device or loss of data.  If there is any damage to the device which occurs through failure to comply with such warnings, the warranty loses its validity.  ! This symbol indicates important information and tips that are required to use the system properly. i ►   Indicates a step/operation that must be performed. This font indicates text which must be entered into a dialogue field or other command line, e. g. a password (Name123) or a command to start a program (start.exe). This font  indicates text that is shown on the screen, e. g.: Installation finished. This font indicates the following: ●  terms and text in a software interface, e. g.: Click on Save. ●  Names of applications or files, e. g.: Windows or setup.exe. Text inside quotation marks indicates the following: ●  Cross-references to other sections, e. g. "Safety Notes" ●  References to external sources, e. g. a web address: Further information can be found at the following address: "http://www.fujitsu.com/fts" ●  Names of CDs, DVDs as well as titles/names of other materials, e. g.: "Drivers & Utilities CD/DVD" or "Safety/Regulations" manual  3
Important notes  Important notes In this chapter you will find information regarding safety which it is essential to take note of when working with your device. Safety notes ●  Pay attention to the information provided in the "Safety/Regulations" manual and in the following safety notes. ●  During installation and while operating the device, please observe the instructions on environmental conditions in the "Technical data“ chapter and the instructions in the "Initial startup" chapter. ●  Repairs to the device must only be carried out by qualified technicians. ●  Incorrect repairs could put the user at great risk (electric shock, hazardous energy emissions, risk of fire) or cause serious damage to the equipment. ●  Operate the device only with the casing closed. ●  Keep a minimum distance of 7 cm away from the RFID antenna in compliance with the radiation level. ●  Do not use the device close to the body during continuous operation. Power cable and mains adapter ●  The supplied power cable conforms to the requirements of the country in which you purchased your device. Make sure that the power cable is approved for use in the country in which you intend to use it. ●  The mains adapter's power cable should only be connected to a mains socket if the device is connected. ●  Do not use the mains adapter for other devices. ●  Use only the mains adapter which is intended for use with the device, see chapter "Technical data". ●  Make sure that the rated current of the mains adapter is not higher than that of the power supply system to which you connect the mains adapter. ●  ON/OFF switches do not disconnect the device from the mains voltage. To completely disconnect the mains voltage, remove the mains supply plug from the mains supply socket. Transporting the device . ●  Transport all parts separately in their original packaging or in packaging which protects them from knocks and jolts. ●  Do not unpack them until at the place where they are to be set up. ●  If the device is brought from a cold environment into the room where it will be used, condensation may occur. Before operating the device, wait until it is absolutely dry and has reached approximately the same temperature as the room in which it will be used. 4
 Important notes  Cleaning the device . ●  Switch off the device and all equipment connected to it and remove the mains plug from the mains supply socket. ●  Do not clean any interior parts yourself, leave this job to a service technician. ●  Do not use any cleaning agents that contain abrasives or that may attack plastic (alcohol, thinners or acetone). ●  Never wet-clean the device with water! Water entering into the device could present a serious risk to users (e. g. electric shock). ●  Ensure that no liquid enters the inside of the device. ●  The display surface of the device is sensitive to pressure and scratches. Clean it only using a soft, slightly moistened cloth. ●  The casing surfaces may be cleaned with a dry cloth. If particularly dirty, use a cloth that has been moistened in mild domestic detergent and then carefully wrung out. CE mark  The shipped version of this device complies with the requirements of the EC Directives: 1999/5/EC "Radio and Telecommunication Terminal Equipment", as well as 2004/108/EC "Electromagnetic Compatibility", 2006/95/EC "Low Voltage Directive", 2011/65/EU "RoHS Directive" and 2009/125/EC "Ecodesign Directive".  This device may be used in the following countries:  Belgium  Bulgaria Denmark Germany Estonia  Finland France  Greece United Kingdom  Rep. of Ireland  Iceland  Italy Croatia  Latvia Liechtenstein Lithuania Luxembourg  Malta Netherlands Norway Austria  Poland Portugal Romania Sweden  Switzerland Slovakia  Slovenia Spain  Turkey Czech Republic Hungary Cyprus     Please contact the appropriate government office in the particular country for current information on possible operating restrictions. If your country is not included in the list, please contact the appropriate supervisory authority to establish whether the use of this product is permitted in your country.  5
Important notes  Notes/information about the "Ecodesign directive" Regulation 1275/2008, based on the EU Ecodesign Directive (2009/125/EC), defines requirements for the power consumption of electrical and electronic domestic and office devices in stand-by and off mode. Generally, the PalmSecure device was developed for energy-efficient operation and low stand-by losses. Customer-specific requirements and requirements of the operating system, which are a priority for optimal operation, can contradict the requirements of the above-mentioned  regulation. The PalmSecure device is delivered with a software development interface for integration into a customer environment. Depending on application or customer integration of the PalmSecure device, different classifications may apply according to the directive (EC) 1275/2008 (ErP Standby-VO) and different procedures must therefore be implemented in the end customer software so that this directive is complied with.  Possible classifications: a)  Stand-alone device (e.g. access control) - not a networked device  Using the On/Off switch, the PalmSecure device can be put into an off mode with a maximum power consumption of 0.5 W. Because the device must be always available - so that it can quickly react to customer requirements (authentication) - and other energy-using products are dependent upon its function, implementation of an automatic consumption-minimising function is not compatible with the intended use.  For more information, please see the section "Switching the device off"   b)  Auxiliary device (connected with a main unit, e.g. PC ) - not a networked device Using the On/Off switch, the PalmSecure device can be put into an off mode with a maximum power consumption of 0.5 W. It can also be programmed so that it automatically passes into this off mode if it receives an appropriate command from the main unit. It can therefore be ensured that the PalmSecure being used as an auxiliary device also switches off when the main unit is in off mode. In addition, please take note of the instructions in the PalmSecure software development kit. c)  Networked device with HiNA function  Using the On/Off switch, the PalmSecure device can be put into an off mode with a maximum power consumption of 0.5 W. Constant availability of the PalmSecure device in mains operation mode is necessary to be able to react quickly to customer requirements (authentication).  The PalmSecure device is configured so that standby service is automatically entered directly (max. 5 min.) after a customer request is completed and thus the required power consumption according to the ErP-VO is achieved. Information on power consumption can be found in the section "Technical data". The PalmSecure device does not have any wireless network ports. 6
 Important notes  FCC and Industry Canada compliance statements for unintentional radiators Note: This equipment has been tested and found to comply with the limits for a Class B digital device, pursuant to part 15 of the FCC or ICES-003 Rules. These limits are designed to provide reasonable protection against harmful interference in a residential installation. This equipment generates, uses and can radiate radio frequency energy and, if not installed and used in accordance with the instructions, may cause harmful interference to radio communications. However, there is no guarantee that interference will not occur in a particular installation. If this equipment does cause harmful interference to radio or television reception, which can be determined by turning the equipment off and on, the user is encouraged to try to correct the interference by one or more of the following measures: ●  Reorient or relocate the receiving antenna. ●  Increase the separation between the equipment and receiver. ●  Connect the equipment into an outlet on a circuit different from that to which the receiver is connected. ●  Consult the dealer or an experienced radio/TV technician for help. Fujitsu is not responsible for any radio or television interference caused by unauthorized modifications of this equipment or the substitution or attachment of connecting cables and equipment other than those specified by Fujitsu. The correction of interferences caused by such unauthorized modification, substitution or attachment will be the responsibility of the user. The use of shielded I/O cables is required when connecting this equipment to any and all optional peripheral or host devices. Failure to do so may violate FCC and ICES rules. The following regulatory statements apply to intentional radiators This device complies with Part 15 of the FCC Rules and with Industry Canada license-exempt RSS standard(s). Operation is subject to the following two conditions: (1) this device may not cause harmful interference, and (2) this device must accept any interference received, including interference that may cause undesired operation- Le présent appareil est conforme aux CNR d’Industrie Canada applicables aux appareils radio exempts de licence. L’exploitation est autorisée aux deux conditions suivantes: (1) l’appareil ne doit pas produire de brouillage, et (2) l’utilisateur de l’appareil doit accepter tout brouillage radioélectrique subi, même si le brouillage est susceptible d’en compromettre le fonctionnement.  FCC and Industry Canada Radiation Exposure Statement This equipment complies with FCC and Industry Canada radiation exposure limits set forth for an uncontrolled environment. The transmitters in this device must not be co-located or operated in conjunction with any other antenna or transmitter. To prevent radio interference to the licensed service, this device is intended to be operated indoors and away from windows to provide maximum shielding. Equipment (or its transmit antenna) that is installed outdoors is subject to licensing. Users are not authorized to modify this product. Any modifications invalidate the warranty. This equipment may not be modified, altered, or changed in any way without signed written permission from Fujitsu. Unauthorized modification will void the equipment authorization from the FCC and Industry Canada and the warranty. 7
Ports and control elements  Ports and control elements Front 12349675810  1 =   Touch screen for messages and status indicators 2 =   SmartCard slot (contact-based cards) 3 =   Hand placement area for palm scanning process 4 =   Palm scanner 5 =   Position LED (yellow) for magnetic card reader 6 =   Magnetic card reader 7 =   RFID antenna with card placement area 8 =   Status LED 9 =   Position LED (yellow) for SmartCard slot (contact-based cards) 10 =  Position LED (blue) for hand placement area of the palm scanner 8
 Ports and control elements  Bottom 132456  1 =   Cable cover latch 2 =   Cable feedthrough for the ports located under the cover (3) 3 =   Opening for security lock device 4 =   Cover with further ports, see following page 5 =   Openings for mounting with screws 6 =   On/Off switch  9
Ports and control elements  Bottom (under cover) 1 2 3 4  1 =   USB A 2.0 host mode ports 2 =   Mini USB 2.0 device mode port 3 =   Mains connection / power supply  4 =   LAN port with PoE function  10
 Initial startup  Initial startup Unpacking and checking the delivery You can operate the device upright e. g. on a table or counter, you can also secure it against slipping and theft using the two screw connections. These screws are not included in the delivery.  Please follow the safety instructions, see "Safety notes". !  You should keep the device's original packaging as it may be needed for transporting it in the future.  ►  Check the contents for any visible damage which may have occurred during transport. ►  Check whether the delivery conforms to the details in the delivery note. ►  If you find that the items received are damaged or do not correspond to the delivery note, contact your local sales outlet immediately. 11
Initial startup  Setting up the device  You can operate the device upright e. g. on a table or counter, you can also secure it against slipping and theft using the two screw connections. These screws are not included in the delivery.  When setting up, make sure to allow the necessary space for the air supply and discharge, see "Technical data“. !   1  ►  Upright operation: Place the device on a smooth, clean, non-slip surface. Or  ►  Attach the 2 screws against slipping and theft and secure the screws at the openings (1). 12
 Initial startup  Inserting SAM cards (Secure Access Module) Your device is equipped at the front with 2 slots for SAM cards.  A SAM card (Secure Access Module) is a microcontroller in the form of a chip card or integrated circuit containing cryptographic functions such as key exchange functions, signature functions and encryptions and is used for the secure transport and storage of cryptographic keys. Both slots are located underneath a cover.  Follow the instructions supplied by the provider of the SAM card. !  1  ►  Open the cover (1).  13
Initial startup  12  ►  Insert SAM cards in the slot provided (1) or (2) with the chip contacts downwards and with the bevelled corner to the left as shown.  ►  Close the cover again. 14
 Initial startup  Open the bottom cover (LAN, USB, power) To be able to access the ports on the bottom, you must first open the bottom cover: 1  ►  Press into the recess (1) and lift the cover. You can now connect external devices to the USB ports, connect the device to a LAN network or connect the mains adapter. ►  Once you have connected all the components, close the cover again. 15
Initial startup  Connecting external devices to the USB port You have the option to connect external USB devices to the device. To find out which USB devices are supported, please refer to the SDK documentation or ask your Fujitsu distributor.  i The USB devices must be connected or detached while they are switched off, otherwise they will not be recognised.  A USB connection cable is included in the scope of the delivery, for use when connecting external USB storage media (T26139-Y3825-V1)  ►  Open the cover on the bottom (see "Open the bottom cover (LAN, USB, power)").  1  ►  Connect the USB device or USB connection cable to the USB port (1).   16
 Initial startup  Connecting the device to the power supply You have the following options for connecting the device to the power supply: ●  Use the supplied mains adapter via an earthed mains supply socket (see Connect the mains adapter (option 1)). ●  LAN port with Power over Ethernet function (see Connect the device to the LAN port (option 2))  i Please note that the power can only be supplied from one source.  Connecting an additional power supply has no effect and fault-free operation cannot be guaranteed.  17
Initial startup  Connect the mains adapter (option 1) ►  Open the cover on the bottom (see "Open the bottom cover (LAN, USB, power)"). 4231  ►  Connect the power cable (2) to the mains adapter. ►  Plug the mains supply plug into an earthed mains supply socket (3). ►  Connect the power cable (4) to the power connector (1) of the device (see "Ports and control elements").  18
 Initial startup  Connect the device to the LAN port (option 2) Provided the appropriate network infrastructure with Power over Ethernet is available, the device is supplied with power via the LAN port. In addition, you can use it to establish a connection to a local network (LAN = Local Area Network).  i Your network administrator can help you in configuring and using the LAN connections and using Power over Ethernet. The network cable is not included in the delivery scope. This type of cable can be obtained from a specialist dealer.  ►  Open the cover on the bottom (see "Open the bottom cover (LAN, USB, power)").  1  ►  Connect the network cable to the LAN port (1). ►  Connect the network cable to your network port. A network connection is also created. 19
Initial startup  Switching the device on 1  ►  Press the ON/OFF switch (1) on the bottom of the device. The green LED lights up.  The example software appears.  The example software shows you options for biometric data capture and storage, as well as the matching of this data in a demonstration version.  Process  Description Enrolment  Read and store biometric data using the palm scanner Match on device  Match the biometric data with a template on a SmartCard which was stored during enrolment. 20
 Initial startup  Switching the device off i Depending on the operating system or application software, you can shut down the system by command. You will find information about this in the documentation for the operating system or the application software. If you shut down the device by pressing the On/Off switch for 4 seconds, this may lead to loss of data.  1  ►  If the operating system does not automatically switch the device into power-saving mode or switch it off, press the ON/OFF switch (1) on the bottom of the device for at least 4 seconds. The device is switched off. i The ON/OFF switch does not disconnect the device from the mains voltage. To completely disconnect from the mains voltage, you must remove the mains supply plug from the mains supply socket. 21
Using the palm scanner  Using the palm scanner The Fujitsu PalmSecure OEM sensor captures a person's palm pattern using near infra-red light.  The surface of the hand must be positioned on the hand placement area so that the palm of the hand lies centrally over the palm scanner. In doing so, the palm of the hand and slightly spread fingers should form an even surface. You will be guided through the functions by the example application on the display. You can find more detailed information on how you can use the palm scanner for your own applications in the documentation for the Software Development Kit (SDK).   22
 Restore factory default settings  Restore factory default settings If the software no longer works correctly, the device can either be returned to the delivery state manually or it can automatically activate a system restore process. In addition, it is possible to reset the configuration of the device or perform a software update. You will find information about this in the documentation of the SDK. 23
Using the SmartCard reader  Using the SmartCard reader The card reader can read and write contact-based cards of type ISO 7816-4 (2) in the SmartCard slot (1), and also RFID cards of type ISO 14443A (3) via the sensitive placement area (4).  Depending on the variant of SmartCard reader that was ordered, cards of type Mifare Classic and Desfire are also supported. The SmartCard slot (1) for the contact-based cards is indicated by yellow LEDs. The RFID card must be placed sideways on the sensitive placement area (4).    1234  ►  Insert the contact-based card (2) into the SmartCard slot (1) in the direction of the arrow. Or  ►  Lay the contact-free RFID card (3) in the sensitive placement area (4). i Only one reader can be used at a time.  The contact-based reader has priority. 24
 Using the magnetic card reader (optional)  Using the magnetic card reader (optional) If your device is equipped with a magnetic card reader (optional), follow the instructions on the display and slide the magnetic strip of the card through the slot at an even speed between the display frame and the RFID card placement area that is indicated with a yellow position LED.   12  ►  Position the magnetic strip card (1) on the magnetic card reader (2) which is identified by a yellow position LED. ►  Pull it through the reader at an even speed in the direction of the arrow.   ►  Follow the instructions on the screen. 25
Using the Security Lock  Using the Security Lock Your device has a Security Lock device. You can protect your device against theft using the Security Lock device and the Kensington Lock cable. Please consult the manual for your Kensington Lock.  26
 Technical data  Technical data PalmSecure ID Match Electrical data Processor:  ARM Cortex A8 single core Rated voltage:  12 V Power consumption  Off state: 0.13 W Networked device in standby 3.8 W (device is automatically set into this mode after about 5 minutes or less without system activity) Max. rated current:  0.55 A Dimensions Width x Depth x Height:  262 mm x 122.6 mm x 95.3 mm / 10.31 inches x 4.83 inches x 3.75 inches Weight In basic configuration:  Approx. 0.86 kg / 1.9 lbs Ambient conditions Temperature Operation (3K2)    15 °C to 35 °C /   59 °F to 95 °F Transportation (2K2)  –25 °C to 60 °C / –13 °F to 140 °F Clearance required to ensure adequate ventilation: Minimum of 200 mm / 7.87 inches on all sides The formation of condensation is not permitted while the device is in operation!  The data sheet for this device contains further technical data. You can find the data sheet on the Internet at http://fujitsu.com/fts/support.  i 27
Technical data  Mains adapter Electrical data Rated voltage:  100 - 240 V Max. rated current:  1 A Rated frequency:  50 - 60 Hz  i Only the following adapters with Limited Power Source may be used: 36W: P/N: CP531960-01 Model: A13-036N2A           28

Navigation menu