Fujitsu F-06A Fujitsu F-06A Cellular Phone User Manual L01
Fujitsu Limited Fujitsu F-06A Cellular Phone L01
Fujitsu >
Contents
- 1. Manual 1
- 2. Manual 2
Manual 2
27
Before Using the Handset
F906i_E1kou
r
Speaker
Hear ring alert or voice of the caller using the
speakerphone etc. from here.
s
External connection jack
Connect various optional devices.
t
1Seg antenna
→
P273
u
microSD card slot
→
P312
v
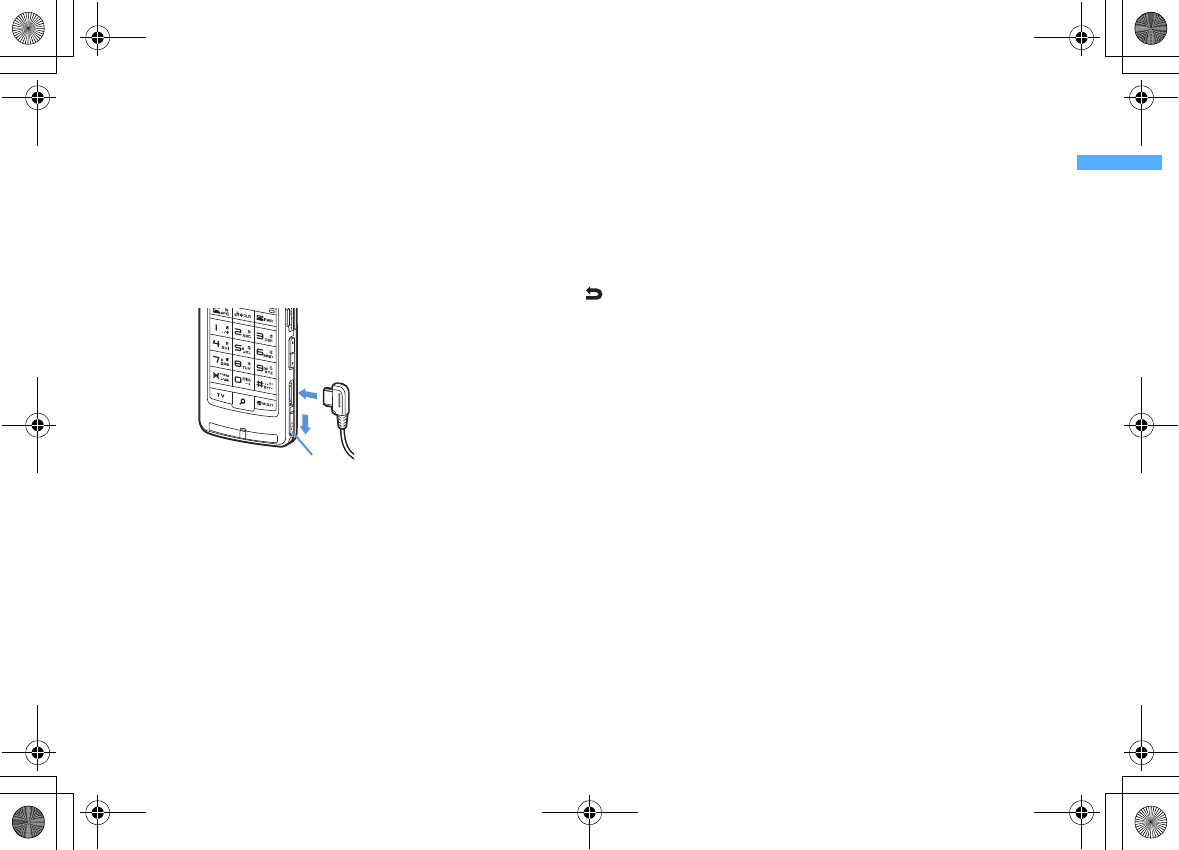
Earphone/Microphone jack
→
P378
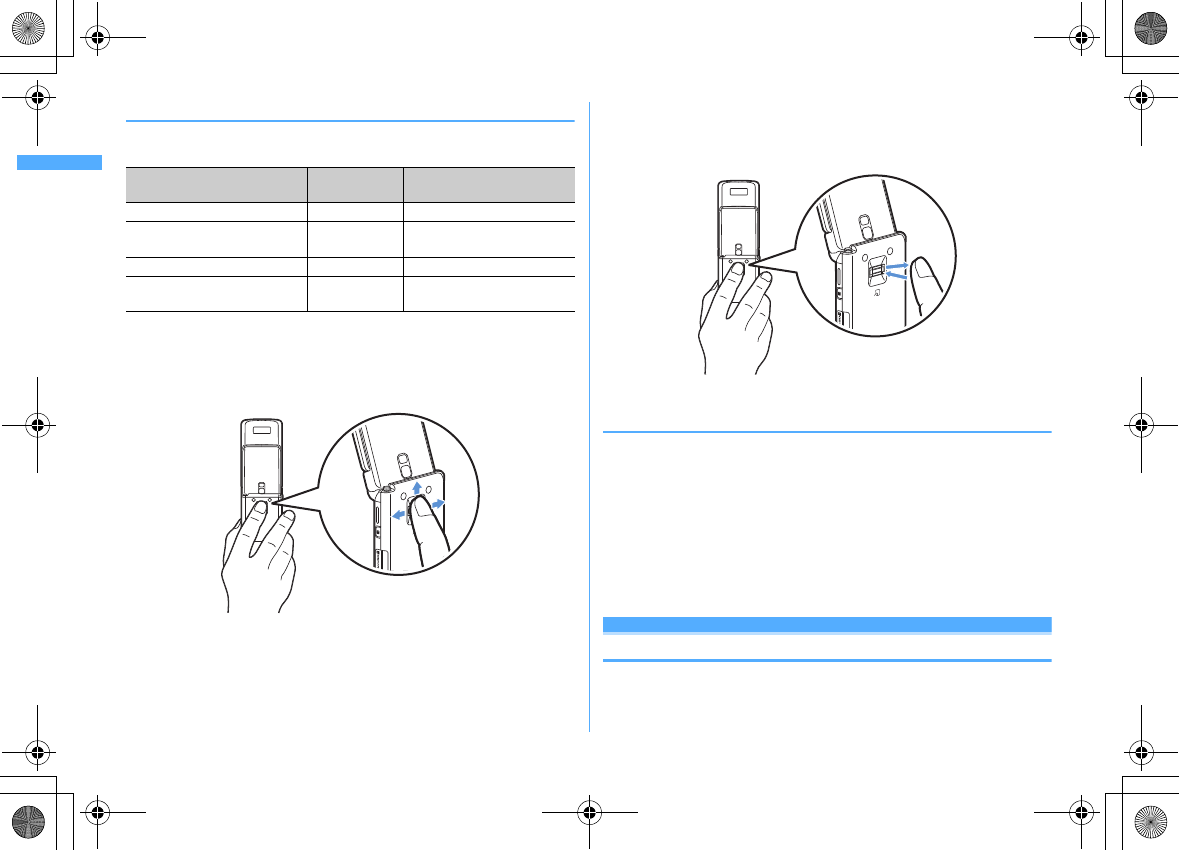
Connecting the earphone/microphone with switch
Slide cover in the direction of
a
, connect an
optional Flat-plug Earphone/Microphone with
Switch etc. (
b
)
*
Securely insert the plug.
*
Avoid wrapping the cord around FOMA terminal or
bringing it close to the antenna. It may lower wave
reception level or generate noise.
<Functions of keys>
The functions available by pressing keys are as
below.
●
: Press
■
: Press for 1 second or more
am
MENU key
●
Display menus, perform the operation shown at
the upper left of the guide area.
■
Start/Cancel side key hold.
bI
i-mode/i-
α
ppli/
▲
(scroll)/Character
●
Display i-mode Menu.
●
Scroll upward the mail screen or site/website
display by pages.
●
Perform the operation shown in the lower-left
corner of the guide area, switch character entry
modes.
■
Display i-
α
ppli folder list.
cc
ch/
α
/Clear key
●
Display i-Channel list, switch i-
α
ppli stand-by
display and i-
α
ppli activation.
●
Delete characters or return to previous screen.
■
Start/Cancel Self mode.
dn
Start a voice call/ /Speakerphone/AF key
●
Make/Receive a voice call, return to the previous
character while entering characters.
●
Switching the speakerphone function, start/
cancel auto-focus.
■
Make a voice call using the speakerphone
function.
■
Restore the character string to the previous state
(while entering mail message text, signature or
SMS message text).
e
Keypads
1
-
9
●
Enter phone numbers (1-9) or characters, select
menu/items.
■
Perform the function registered in Custom menu.
0
●
Enter phone number (0) or characters, select
menu/items.
■
Use Auto switch of Int'l call assist when making
international calls.
f*
*
/A/a/Line feed/Public mode (Drive mode)
key
●
Enter "
*
", "
゛
", "
゜
", etc., switch upper/lower
case.
●
Line feed while entering characters, select menu/
items.
●
Switch display/hide of guide area in wide
display.
■
Start/Cancel Public mode.
gT
TV key
●
Watch 1Seg or switch Multi window.
■
Start/Stop video recording during 1Seg
watching.
hU
Search key
→
P357
●
Enter the target word, place or name and search.
i
Multi-cursor key
g
Enter key
●
Perform the operation, activate Focus mode.
■
Start i-
α
ppli registered for one-key shortcut.
u
Schedule/
↑
key
●
Display Scheduler.
●
Adjust volume, move the cursor upward.
■
Display alarm list.
d
Phonebook/
↓
key
●
Display phonebook.
●
Adjust volume, move the cursor downward.
■
Add to the phonebook.
l
Received calls/
←
(previous) key
●
Display Received calls, switch displays, move the
cursor leftward.
■
Start/Cancel privacy mode when "Activate/
Deactivate" of Activation option is set to "Hold L-
cursor key".
r
Redial/
→
(next) key
●
Display Redial, switch displays, move the cursor
rightward.
■
Start/Cancel IC card lock.
*
May be described as
jhk
.
jC
Camera key
●
Start still image shooting, perform the operation
shown at the upper right of the guide area.
■
Start movie recording.
Cover
a
b
L03.fm Page 27 Monday, November 10, 2008 5:09 PM
28 Before Using the Handset
F906i_E1kou
ka
Mail/
▼
(scroll) key
●
Display mail menu, perform the operation
shown at the lower right of the guide area.
●
Scroll downward the mail screen or site/website
display by pages.
●
Press 2 times : Check new message
■
Display mail creation screen
lf
Power/End key
●
Terminate on-hold, calling/operating function,
display/hide calendar layout.
■
Press for 2 seconds or more : Turn power ON/
OFF.
m#
#/Macro shooting/Silent mode key
●
Enter "
#
", "
、
", "
。
", "?", "!", "
・
", select menu/
items.
●
Switch Macro mode while using out-camera.
■
Start/Cancel Silent mode.
ns
Multitask key
●
Perform another function while talking or
operating (Multiaccess/Multitask).
oP
PushTalk/REC key
●
Operate PushTalk, display menu on the sub-
display.
●
Save a still image during 1Seg watching.
■
Start/Stop video recording during 1Seg
watching.
pM
Music key
●
Perform menu items on the sub-display, operate
Music&Video Channel player or Music player.
■
Start/End Music player.
q
Side keys [
▲▼
]
Side key [
▲
]
●
Stop ring alert, alarm sound or vibrator.
●
Adjust volume, increase volume during a call or
PushTalk session.
●
Turn sub-display light on, switch display or
select menu item while FOMA terminal is folded.
■
Activate the quick answer machine while
receiving a call, activate/stop voice memo or
movie memo during a call.
■
With FOMA terminal folded, start/cancel Silent
mode
*
, with FOMA terminal open, start
Ans.Machine&Voice memo on stand-by display.
Side key [
▼
]
●
Adjust volume, decrease volume during a call or
PushTalk session.
●
Turn sub-display light on, switch display or
select menu item while FOMA terminal is folded.
■
Silence while watching 1Seg or playing video,
check new message on the stand-by display.
*
*
The setting of Side key shortcut is the operation in the
default state.
L03.fm Page 28 Monday, November 10, 2008 4:42 PM
29
Before Using the Handset
F906i_E1kou
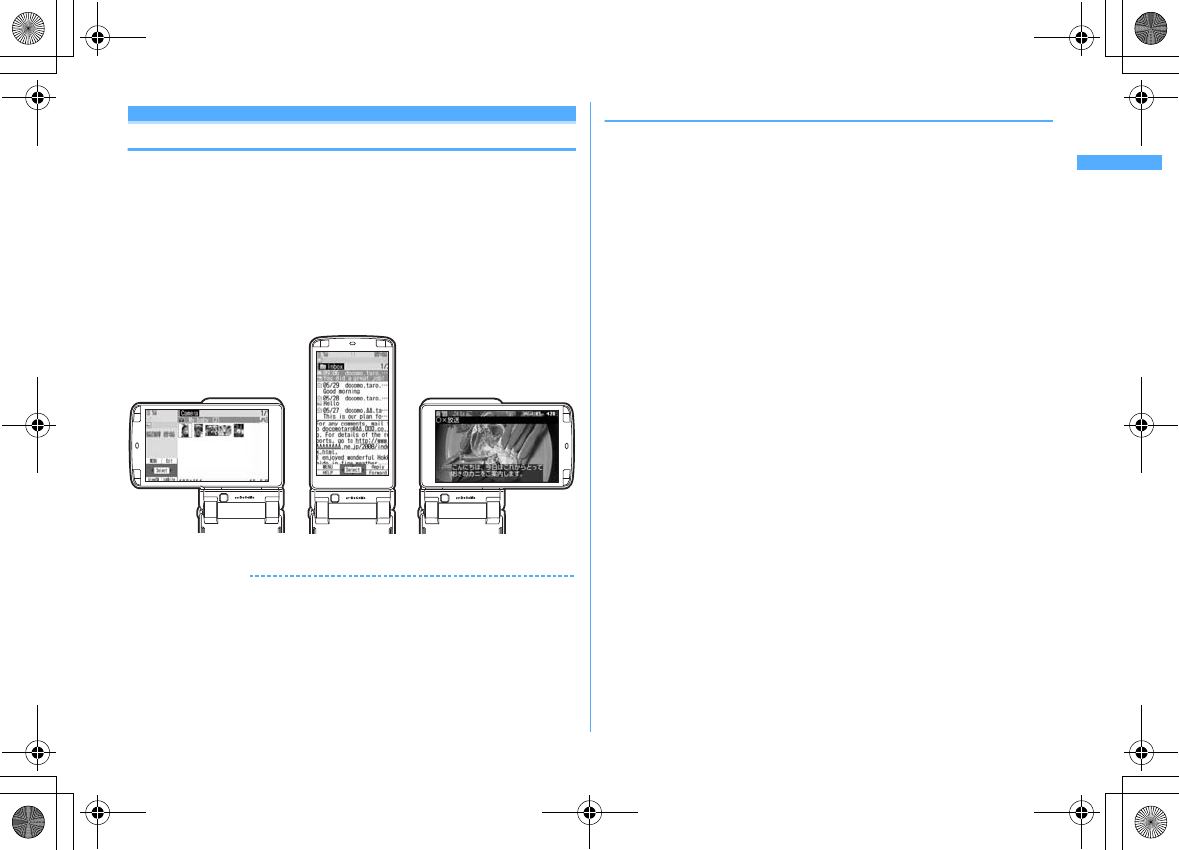
YOKO-MOTION
Swinging display
With FOMA terminal open, rotate the display 90 degrees to the right or left to use
Horizontal display. On horizontal display, Full Browser or 1Seg can be displayed
on the wide display in addition to the same operations as on vertical display.
Moreover, by rotating, you can activate 1Seg or Still camera, and by returning to
vertical display, you can answer a call.
・
You can change in Turn-display option to set functions to be activated by
rotating etc.
→
P369
・
The position etc. of the guide area on horizontal display are different, but the
operations are the same as those on vertical display.
■
Display examples
✔
INFORMATION
・
Do not rotate the display with FOMA terminal folded. May cause the display and
around the keys to be scratched.
・
While one of the submenu, New Task start menu or Switch Task menu is being
displayed, swinging the display closes the menu.
❖
Using wide display
By returning the display to horizontal position, the functions and/or data below can
be displayed on 864 dots (horizontal) wide display.
・
Full Browser
・
i-
α
ppli applicable to the wide display with the size exceeding 320 dots
・
i-motion, PDF data, Word, Excel, PowerPoint file with a size of QVGA (240
×
320)
・
1Seg (including Multi window)
Image list screen Inbox message list screen 1Seg watching screen
L03.fm Page 29 Monday, November 10, 2008 4:42 PM
30 Before Using the Handset
F906i_E1kou
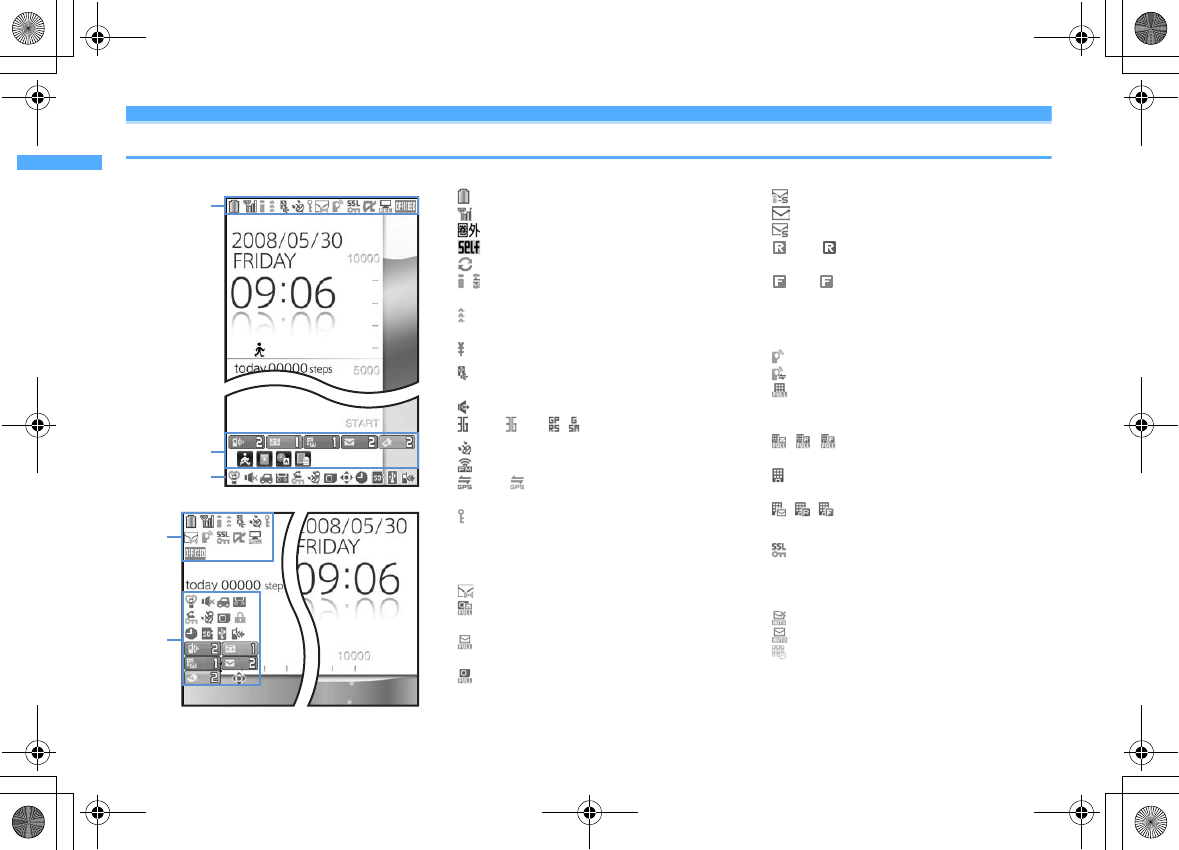
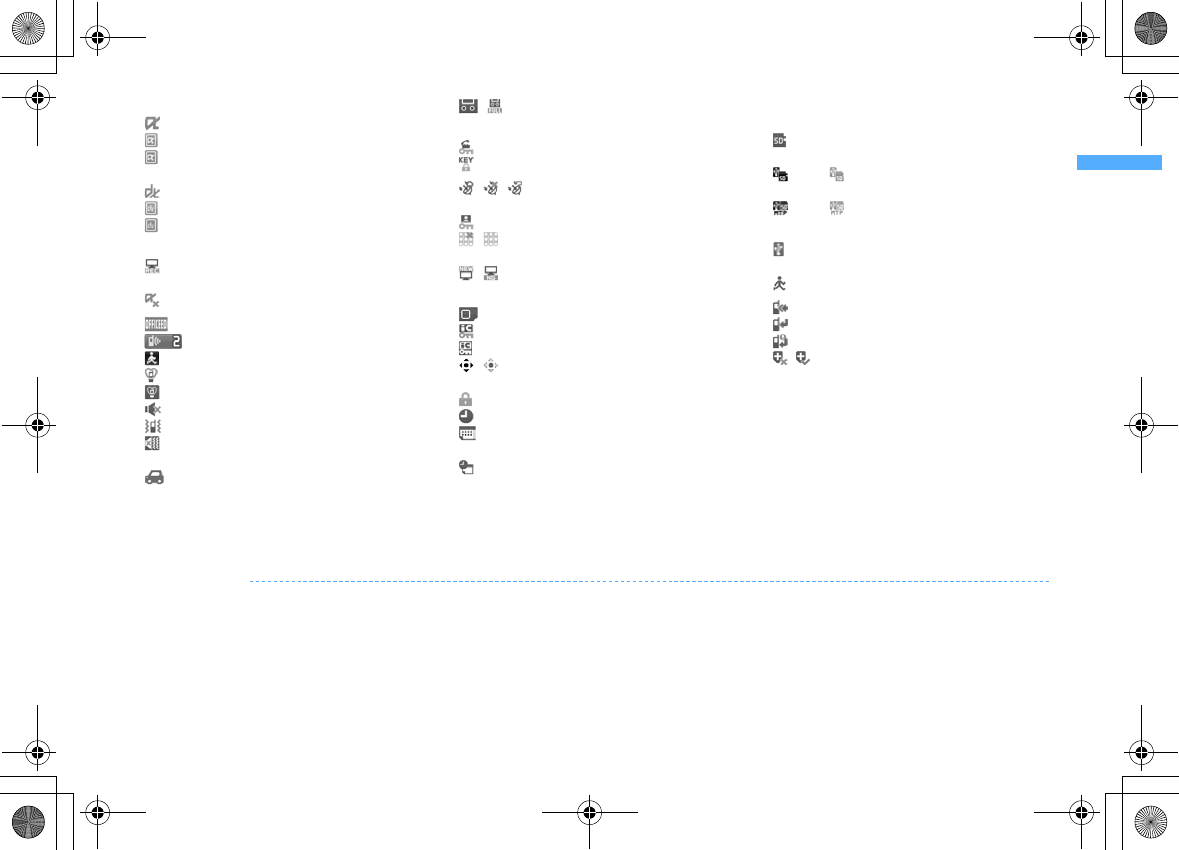
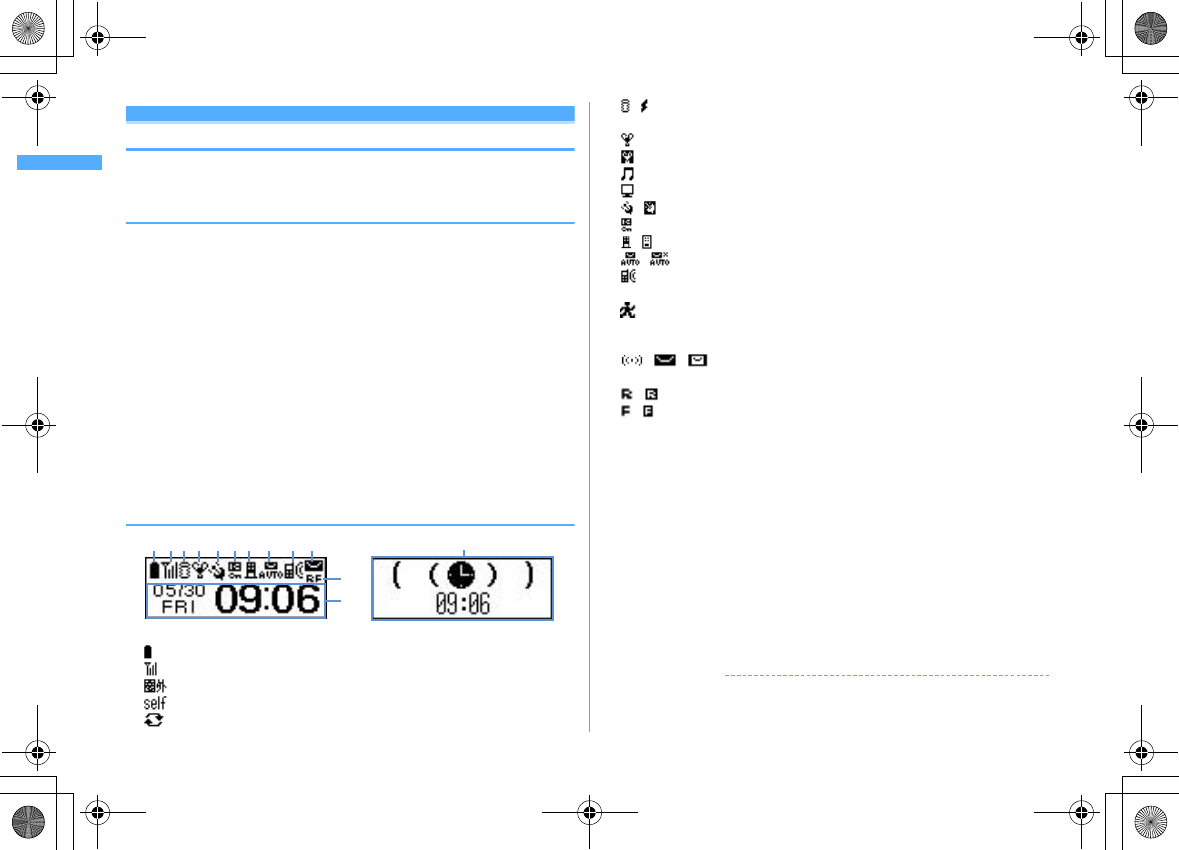
Display overview
The current state can be checked by the icon appearing on the screen.
a
: Battery icon
→
P47
b
: Signal level icon
→
P47
: Out of service area
→
P47
: Self mode ON
→
P124
: Data transfer mode ON
→
P130, 311, 326
c
/ : In i-mode (during i-mode connection)/(during
packet communication)
→
P160
d
: In infrared communication
→
P326
Infrared remote control in operation
→
P329
: The total calls cost exceeds the limit
→
P373
*1
e
: Communication using handsfree-compatible
device in progress
→
P64
: Speakerphone function in use
→
P55
(blue)/ (red)/ / : Network in use
→
P414
*1
f
: Positioning with GPS
→
P256
: FM transmission in progress
→
P354
(blue)/ (gray) : Location request setting with
GPS/Out of permission period
→
P264
g
: Phonebook entry or schedule data has secret
attribute
→
P92, 365
*1
h
Unread Area Mail, unread mail or MessageR/F state
→
P192, 213, 217, 223
: Unread Area Mail
: Unread i-mode mail and SMS storage space is
full on UIM
: Unread i-mode mail and SMS storage space is
full
: SMS storage space is full on UIM
: Unread i-mode mail and SMS exist
: Unread i-mode mail exists
: Unread SMS exists
(red)/ (blue) : Unread MessageR storage
space is full or unread MessageR exists
(red)/ (green) : Unread MessageF storage
space is full or unread MessageF exists
*1
i
PushTalk state or storage state in i-mode Center
→
P76, 192, 213
: During PushTalk session
: Downloading phonebook page on the network
: i-mode mail and MessageR/F storage are full or
one of these spaces is full and unreceived mails
exist in Data Center
/ / : i-mode mail or MessageR/F storage
space is full in Data Center
: Unreceived i-mode mail and MessageR/F exist
in Data Center
/ / : Unreceived i-mode mail, MessageR or
MessageF exists in Data Center
*1
j
: Displaying SSL page/Executing SSL session
with i-
α
ppli or using i-
α
ppli downloaded from
SSL page
→
P161
Displaying SSL/TLS page
→
P290
: Mail failed to Auto-send exists
→
P191
: Auto-send mail exists
→
P191
: Music&Video Channel program obtaining
reservation exists
→
P339
Vertical display
Horizontal display
a-m
o-z
a-m
n-z
n
L03.fm Page 30 Monday, November 10, 2008 4:42 PM
31
Before Using the Handset
F906i_E1kou
k
i-
α
ppli/i-
α
ppliDX state
→
P229, 242
: During i-
α
ppli operation
(gray) : i-
α
ppli stand-by display ON
(orange) : i-
α
ppli is being started from the i-
α
ppli
stand-by display
: i-
α
ppliDX is running
(gray) : i-
α
ppliDX stand-by display ON
(orange) : i-
α
ppli is being started from the i-
α
ppliDX stand-by display
*2
l
: Performing 1Seg recording reservation/1Seg
recording (only watching stopped)
→
P280, 285
: i-
α
ppli Auto start failed
→
P241
*2
m
: Inside OFFICEED area
→
P401
n
: Arrival information
→
P39
: Shortcut icons
→
P365
o
: Silent mode ON
→
P101
: Personalized silent mode ON
→
P102
p
: Call alert volume is Silent
→
P98
: Vibrator for voice call ON
→
P99
: Call alert volume is Silent and vibrator for voice
call ON
→
P99
q
: In Public mode (Drive mode)
→
P67
r
/ : Answer machine ON/recorded messages
full
→
P69
*1
s
: Keypad dial lock ON
→
P125
: Side key hold ON
→
P131
*1
t
/ / : Location request of GPS success/
failure/end as unanswered
→
P263
: Personal data lock ON
→
P124
/ : Music&Video Channel obtaining failure/
success
→
P339
/ : 1Seg recording reservation completion/
failure
→
P280
*1
u
: Reading UIM
→
P41, 47
(key is yellow) : IC card lock ON
→
P253
: Individual IC card lock
→
P254
v
/
*3
: Displaying available multi-cursor key in
Focus mode
→
P39
: Lock on close ON
→
P131
w
: Alarm clock ON
→
P359
: 1Seg watching/recording reservation,
schedule reminder ON
→
P279, 362
: Schedule reminder or 1Seg watching/
recording reservation and alarm clock are
simultaneously ON
→
P279, 359, 362
x
State of USB mode settings and microSD card
→
P312, 320
: microSD card installed during Communication
mode
(blue)/ (gray) : microSD card installed or not
during microSD mode
(blue)/ (gray) : microSD card installed or not
during MTP mode
*1
y
: Connected to external device using USB cable
→
P74, 320
: Pedometer ON
→
P377
*1
z
: Software update notice
→
P430
: Software update pre-specified
→
P432
: Update notification icon
→
P431
/ : Auto-update of the latest pattern definition
failed/succeeded
→
P434
*1
The current highest-priority item is displayed. These icons are listed in descending order of the priority from the top.
*2
On vertical display without stand-by display or on some wide display, a clock is displayed.
*3
On horizontal display, it appears below
n
New arrival.
✔
INFORMATION
・
On wide display, icons appear similarly to vertical display. Note that, depending on the function displayed, some or none of the icons may not appear.
L03.fm Page 31 Monday, November 10, 2008 4:42 PM

Before Using the Handset
32
F906i_E1kou
◆
Task area
The icon indicating the function (task) in progress appears in the task area. During
Multiaccess or Multitasks, the icons show which functions are running.
<Example> Activating Still camera during a voice call
<Example> Displaying Word file during a voice call
*
When displaying Word, Excel or PowerPoint file on wide display, a task area is displayed
similarly to vertical display.
❖
Icons indicated on the task area
: Voice call
: Received calls
: Redial
: Answer machine/Voice memo
: Videophone call
: Videophone using an external device
: Call (switching)
: Call (disconnecting)
: PushTalk
: FOMA terminal phonebook
: Contact setting of Privacy mode
: Kisekae Tool
: Still camera
: Movie camera
: Bar code reader
: i-mode
: i-mode Bookmark/Go to location/Browser history/Screen memo/two-touch
site
: Mail/MessageR/F
: Area Mail
: Receiving i-mode mail
: Inquiring for i-mode mail/SMS
/ : Sent msg log/Received msg log
: Chat mail
: Receiving SMS
: i-
α
ppli
: ToruCa
: Position location of GPS
: Location request of GPS
: Notify location of GPS
: Location history (GPS)
: Full Browser
: 1Seg
: My Picture
: Movie/i-motion
: Chara-den
: Melody
(blue)/ (gray) : Accessing microSD card/Standing by for accessing
: Activating Music&Video Channel
: Music&Video Channel program obtaining
: Music player
: Sound recorder
: My Document (PDF data)
: Other (Word, Excel, PowerPoint file)
: Adjusting volume by Multitask
: Countdown timer
: Alarm clock
Vertical display
Horizontal display
Task area
Wide display
Task area
L03.fm Page 32 Monday, November 10, 2008 4:42 PM
33
Before Using the Handset
F906i_E1kou
: Scheduler/Schedule reminder ringing (including activation notification of
1Seg)
: Fake call
: User information
: Calculator
: Pedometer
: Search engine
: Notepad
: Dictionaries
: Accessing Data Center
: Displaying synchronization log
: Network services set
/ : Calling or communicating packets via USB/Sending or receiving packets
via USB
: 64K data communication
: Accessing external data
/ : Updating software/Software update notified
: Updating pattern definition/Displaying version
/ (gray) : Each function set or on hold
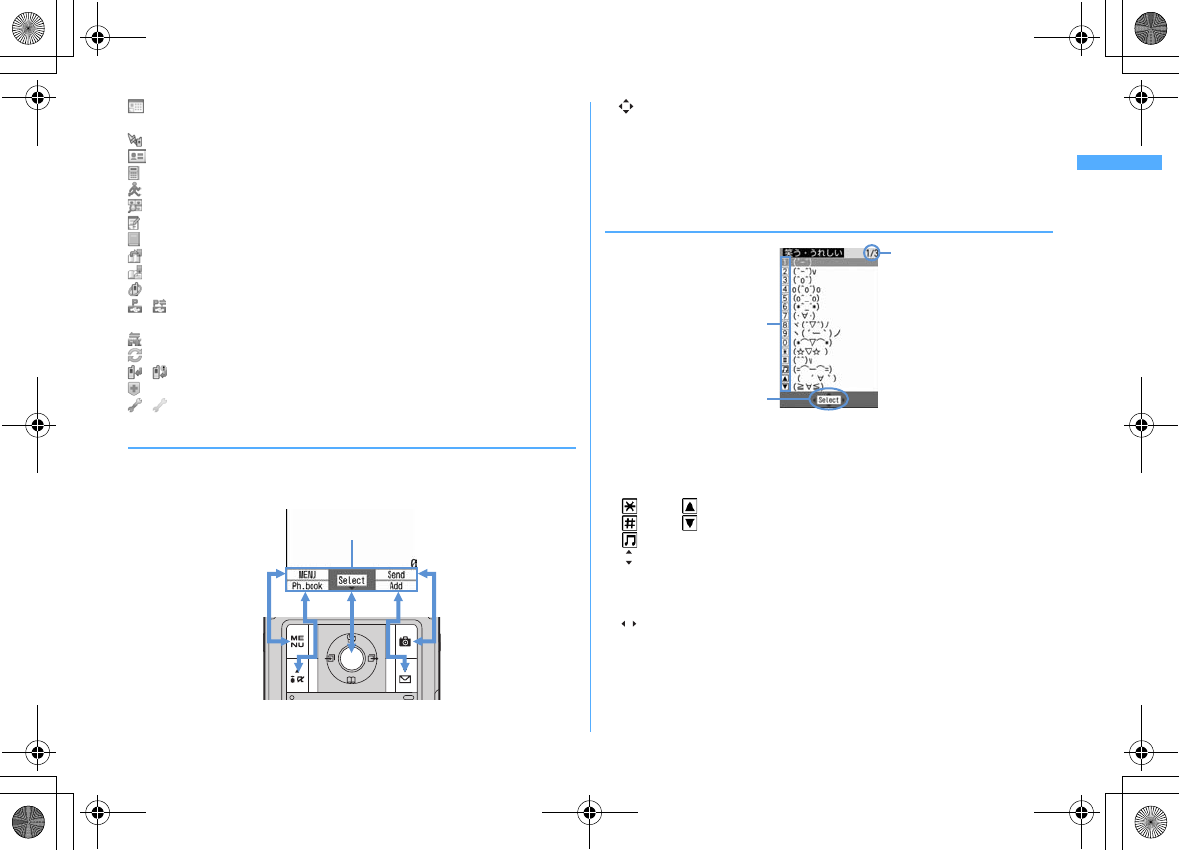
◆
Guide area
Operations that can be performed by pressing
m
,
I
,
g
,
C
and
a
are
displayed in the guide area. Displayed operations vary by the screen.
Display locations and keys correspond as shown in the figure.
・
on the guide area corresponds to multi-cursor keys
k
(It may be different
depending on the function you are using or how the site or website is made).
・
When the display is placed in horizontal position, this is displayed at the left
bottom of the display.
・
In wide display, press
*
to display a guide area each time you press this key,
it switches guide area display/hide (except during 1Seg watching).
◆
List screen
a
When a list extends to multiple pages, the currently displayed page number and
the total number of pages appear.
b
The items can be selected by pressing the keypads corresponding to the
displayed number (
1
-
9
,
0
). On vertical display, item can be selected
also by pressing the displayed next key.
:
*
: Side key [
▲
]
:
#
: Side key [
▼
]
:
M
c
indicates that there are items that can be selected above and below the
cursor position. Press
j
to move the cursor. When
d
is pressed on the last
item of the page, the next page appears, when
u
is pressed on the first item
of the page, the previous page appears.
indicates that there are items that can be selected over the multiple pages.
Press
h
to change the page. Some screens such as an icon selection screen
cannot be switched.
Guide area
a
c
b
L03.fm Page 33 Monday, November 10, 2008 4:42 PM
Before Using the Handset
34
F906i_E1kou
Sub-display/Light overview
With sub-display or light of FOMA terminal, various information or states can be
checked.
◆
Displaying sub-display
When FOMA terminal is folded, the sub-display shows icons or messages.
Selecting menu item, displaying detail information of missed calls or pedometer
are also available.
・
In All lock, Omakase Lock or Side key hold, pressing one of side keys [
▲▼
],
P
or
M
shows a message indicating the lock is set, and after a period of time, the
display is switched to the clock display screen.
・
When FOMA terminal is folded, the sub-display light turns on. If no operation is
performed for approximately 15 seconds, the light turns off, but it turns on again
if one of side keys [
▲▼
],
P
or
M
is pressed.
・
When opening FOMA terminal with information displayed on the sub-display,
display disappears. While shooting a still image, recording movie, shooting
stand-by or recording stand-by with Sound recorder, the state appears only
when FOMA terminal is open. While recording with Sound recorder, the state
appears regardless of the state of FOMA terminal.
・
By pressing
P
while watching/recording 1Seg, playing video, activating Music
player or Music&Video Channel player, you can display clock.
❖
Displayed icon or state
a
: Battery icon
b
: Signal level icon
: Out of service area
: Self mode ON
: In data transfer mode
c
/ : In i-mode communication (connected to i-mode site)/(during packet
communication)
d
: Silent mode ON
: Personalized silent mode ON
: Activating Music player
: During 1Seg watching
e
/ : Location request setting with GPS/Out of permission period
f
: IC card lock ON
g
/ : i-mode mail and MessageR/F storage spaces are full in the Center
h
/ : Auto-send mail exists/Failed auto-send mail exists
i
: Missed calls/Recorded messages/Voice messages in Voice Mail service
exist
: Setting Pedometer
・
The currently highest-priority item is displayed. These icons are listed in
descending order of the priority from the top.
j
/ / : Unread Area Mail exists/Unread i-mode mail and SMS exist/
Storage space is full
k
/ : Unread MessageR exists or unread MessageR storage space is full
/ : Unread MessageF exists or unread MessageF storage space is full
l
The clock is displayed according to the settings of "Clock style" of Clock & alert
image.
m
The states below are notified by message or image.
・
State display of voice call, videophone call (including Chaku-moji and voice
messages in Voice Mail service), PushTalk, recorded message
・
Inquiring or receiving i-mode mail, SMS or MessageR/F
・
State display of Position location, Location request, Notify location function
of GPS
・
While watching /recording 1Seg, playing video, playing melody, activating
Music&Video Channel player, activating Music player or using microSD card
・
While alarm clock or schedule reminder (including activation notification of
1Seg) is sounding, Countdown timer is operating/sounding
・
State display of packet communications, 64K data communication,
communication via USB, infrared communication or iC transmission
✔
INFORMATION
・
Because of the characteristics of surface panel, sub-display may not be seen clearly
at places in the sunlight. In this case, check the display in the shade, or make a shadow
with your hand to check the display.
k
l
dj m
hifebc ga
Icon and date/time
State display (e.g. : While Alarm clock is emitting)
L03.fm Page 34 Monday, November 10, 2008 4:42 PM
35
Before Using the Handset
F906i_E1kou
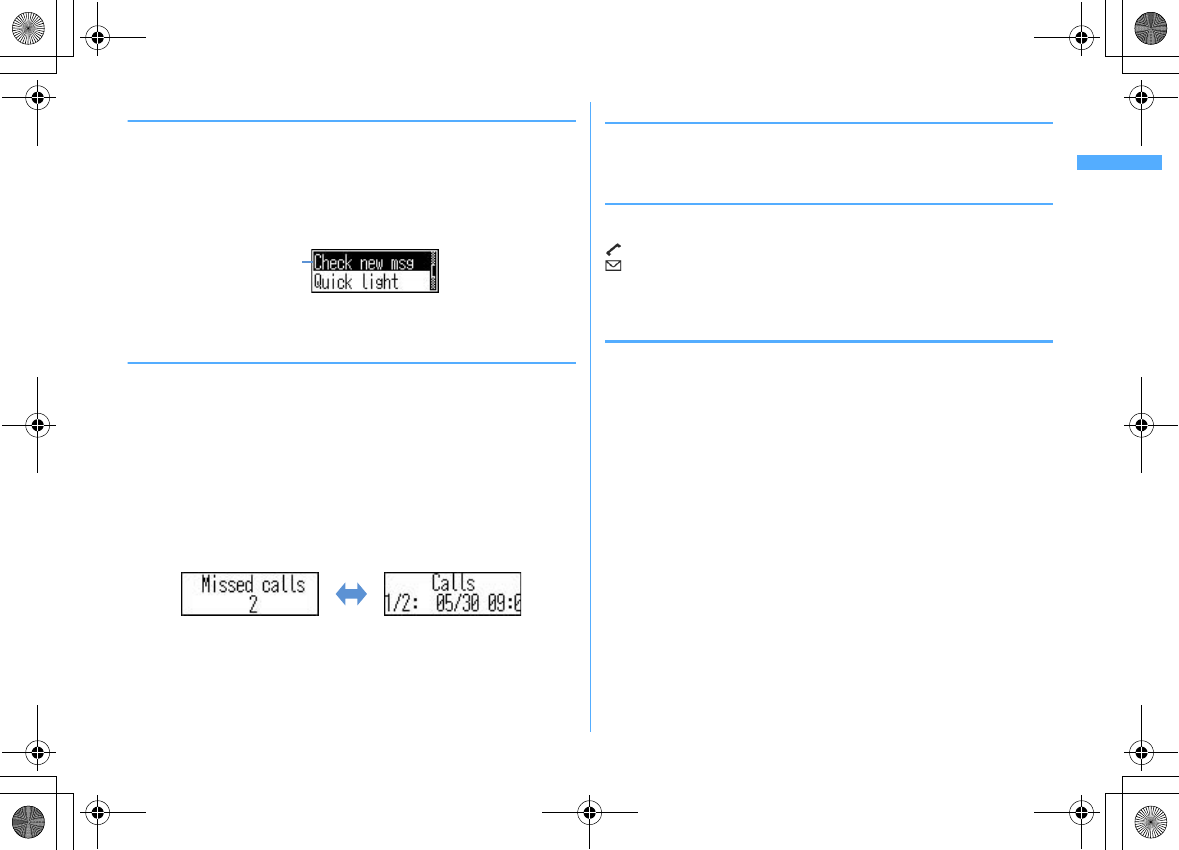
❖
Selecting functions from the menu of sub-display
You can select 6 functions of MusicPlayer/End MusicPlayer, Lock/Unlock IC card,
Silent mode ON/OFF, Check new msg, Quick light, Fake call
・
While IC appli is activated, you cannot perform IC card Lock/Unlock.
<Example> Performing i-mode inquiry
1
While displaying clock,
Pe
Using side keys [
▲▼
], move the cursor
to "Check new msg" and
M
・
While displaying menu, press
P
twice to return to clock display.
・
Authentication is required when "Unlock IC card" is selected.
❖
Displaying missed call or unread mail
When missed calls, recorded messages, unread messages, unread MessageR/F or
voice messages in Voice Mail service exist, turn on the sub-display light and press
side key [
▼
] to check the number of these items. Pressing [
▲
] while checking the
number of items displays the detail information for approximately 5 seconds
(except voice messages in Voice Mail service).
・
Up to 10 detail information can be checked by pressing side key [
▼
].
<Example> Switching to detail information of missed calls
1
Side key [
▲
] while confirming the number of items
The number of items, total number of items, receive date/time, and the caller
information are scroll-displayed.
◆
Displaying pedometer
1
While displaying the date and time,
PeP
・
Press
P
or
M
to return to the date and time display.
◆
Displaying call light and mail light
The call light and mail light at the both sides of sub-display blink in the cases
below.
(Call light) : When unchecked missed call exists
(Mail light) : When unread message exists
・
Effective when Indicator light is set to "ON".
・
Checking missed call or arrival information stops blinking.
◆
Displaying light
・
Turn on or blink in the cases below.
- When receiving an incoming call/mail, calling, obtaining ToruCa or accessing IC card
- When opening/closing/rotating FOMA terminal, GPS positioning (Position location, Notify
location, Location request)
- When activating Lock on close, shooting still image or movie, operating Music&Video
Channel player or Music player
- When alarm clock, schedule reminder or countdown timer is sounding
- During iC transmission
・
For some functions, operation is performed according to Light alert. And, tilting
or rotating FOMA terminal may change the lighting method.
Cursor
Side key
[▲]
L03.fm Page 35 Monday, November 10, 2008 4:42 PM
Before Using the Handset
36
F906i_E1kou
Selecting functions from menu
◆
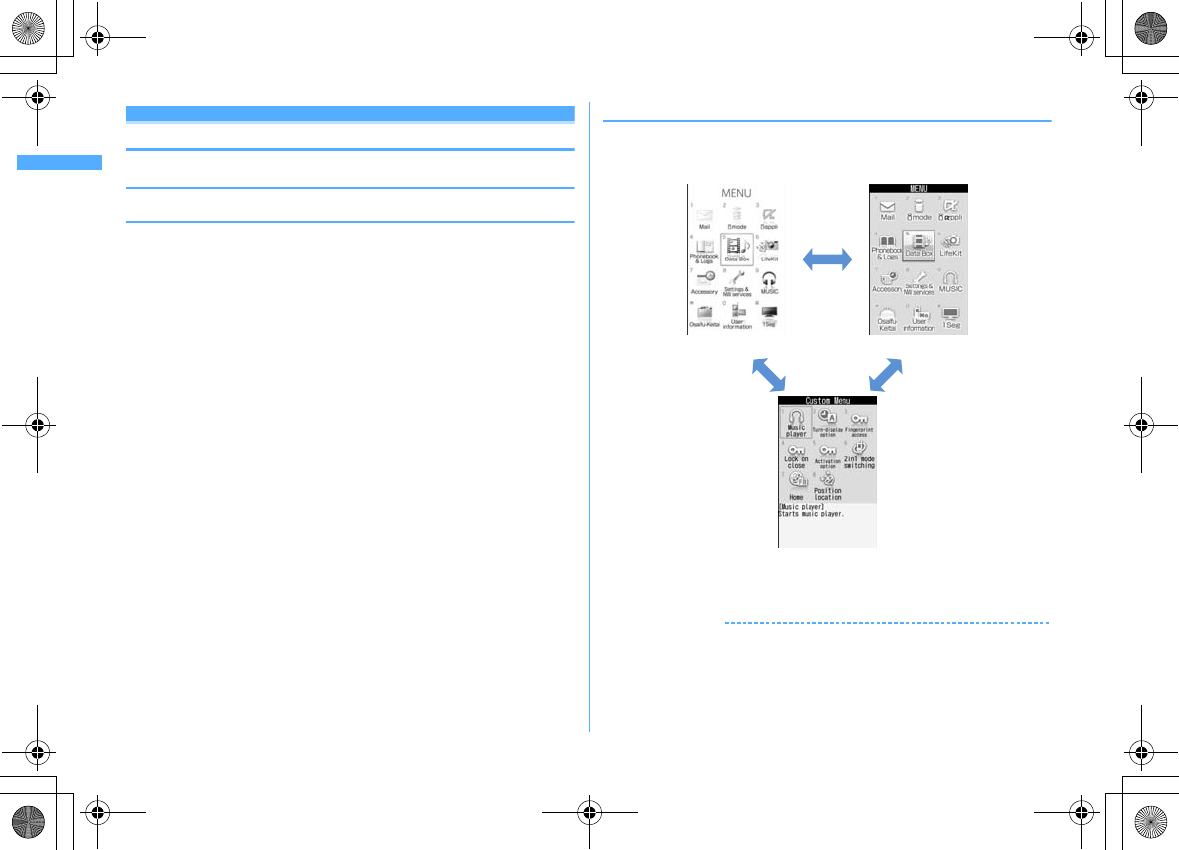
Menu screen and switching method
❖
Menu screen
The menu screen below is available.
Kisekae menu :
A menu that you can change the design using Kisekae tool.
In addition to menus compatible with movies, "
拡大メニュー
(AdvancedMode)"
that is easy to view with large font and "Simple Menu" are available. A Kisekae
menu matched with the color of FOMA terminal is set by default.
・
Some Kisekae menu changes the menu structure according to usage
frequency. In the Kisekae Tool stored by default, "
ダイレクトメニュー
(Direct
menu)" in the "Preinstalled" folder supports this function.
・
Some Kisekae menu does not support English display when setting Select
language to "English".
Basic menu :
A basic menu that the menu structure and menu numbers are fixed.
・
Menu icons or background design can be changed by customizing Kisekae
Tool or menu.
→
P109, 113
・
The font size of the menu changes synchronized with Kisekae Tool.
Custom menu :
A menu that menu items can be freely registered.
→
P367
❖
To switch the menu screen temporarily
In each menu screen, you can temporarily switch to a different menu screen by the
operations below. You can also set which menu to display when pressing
m
on
the stand-by display.
→
P109
*1
Cannot be switched when Basic menu is set as Select startup menu.
*2
Cannot be switched when Kisekae menu or Shortcut menu is set as Select startup menu.
✔
INFORMATION
・
Some types of Kisekae menus change the menu structure according to usage
frequency. And, the number assigned to menu item (item number) may not be
applicable. In this case, as operations cannot be performed as described in this
manual, switch to Basic menu.
Custom menu
Kisekae menu Basic menu
I
C*1C*2
L03.fm Page 36 Monday, November 10, 2008 4:42 PM
37
Before Using the Handset
F906i_E1kou
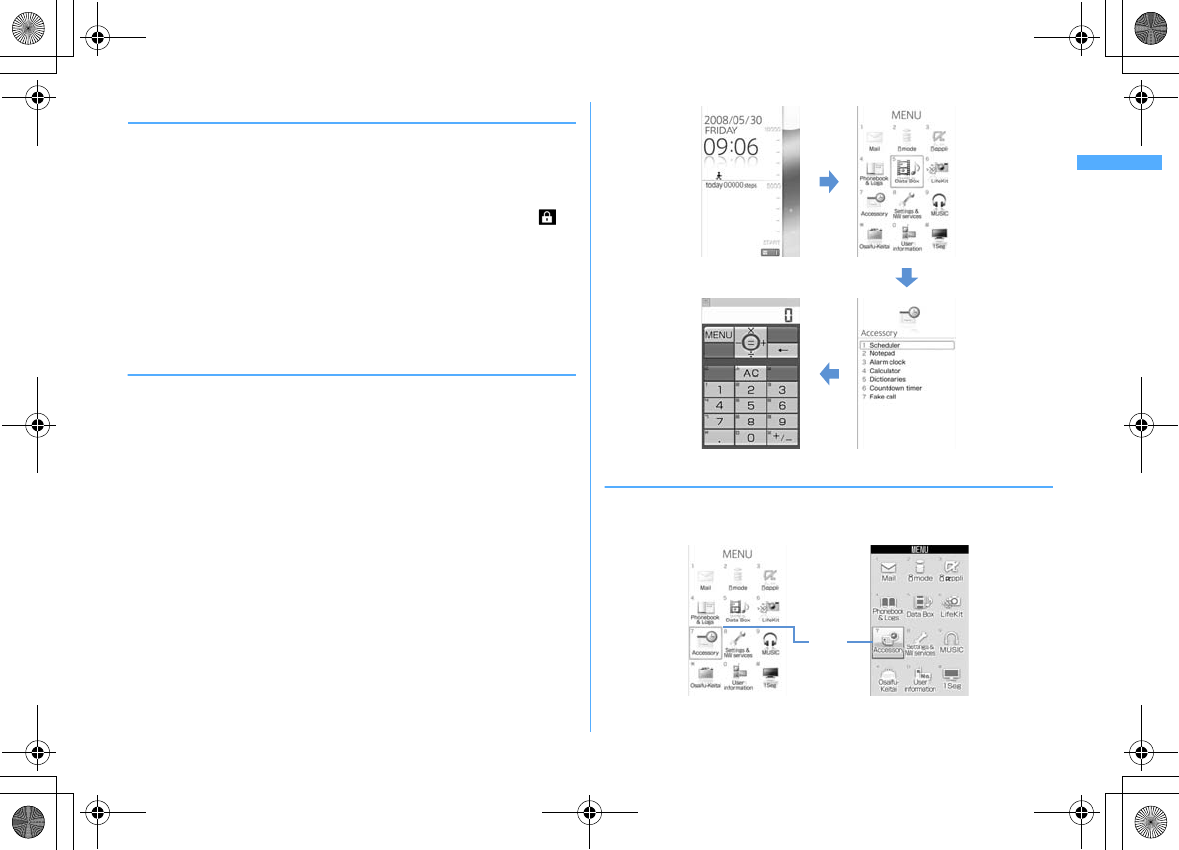
◆
Selecting a function
Press
m
in stand-by and select and perform the functions from the menu
displayed.
There are 2 ways. One method involves using the keypad corresponding to the
menu items (Shortcut operation). In the other method, the multi-cursor key is used
to select from among the menu items.
・
When any function is restricted by lock functions or no UIM in slot, icon
appears or characters are displayed in a different color that the function is
disabled. The display does not change for Kisekae menu or Basic menu on
horizontal display. When a function is selected, the reason that the function
cannot be performed etc. is displayed.
・
On vertical display, function description about the menu item at the cursor
position appears by some types or levels of the menu. And the setting is
displayed for some menu items.
❖
Selecting menu items by keypad (Shortcut operations)
When numbers (item number) are assigned to menu items, a menu item can be
selected by pressing the corresponding keypad (
1
-
9
,
0
,
*
,
#
).
・
Press the item number displayed with the preferred menu item.
・
Item numbers differ when "Simple Menu" is set by Kisekae Tool.
・
Item number of the menu
→
P422
<Example> Selecting "Calculator"
1
m74
❖
Selecting menu items by multi-cursor key
<Example> Selecting "Calculator"
1
me
Move the cursor to "Accessory" and
g
m
7
4
Basic menu
Cursor
position
Kisekae menu
L03.fm Page 37 Monday, November 10, 2008 4:42 PM
Before Using the Handset
38
F906i_E1kou
・
If you press
k
to move the cursor, the color and/or design of the cursor
position change. Moving by
h
is unavailable for some menus.
・
When setting "Simple Menu" for Kisekae menu, you can select menu (to the
second layer) also by placing the cursor and pressing
r
.
2
Move the cursor to "Calculator" and
g
❖
To return to stand-by display or previous menu
After selecting a menu item, you can return to the stand-by display or previous
menu by pressing the keys below.
f
: Return to the stand-by display.
c
: Return to the previous menu. Depending on the menu, you can return to the
previous menu also by pressing
l
.
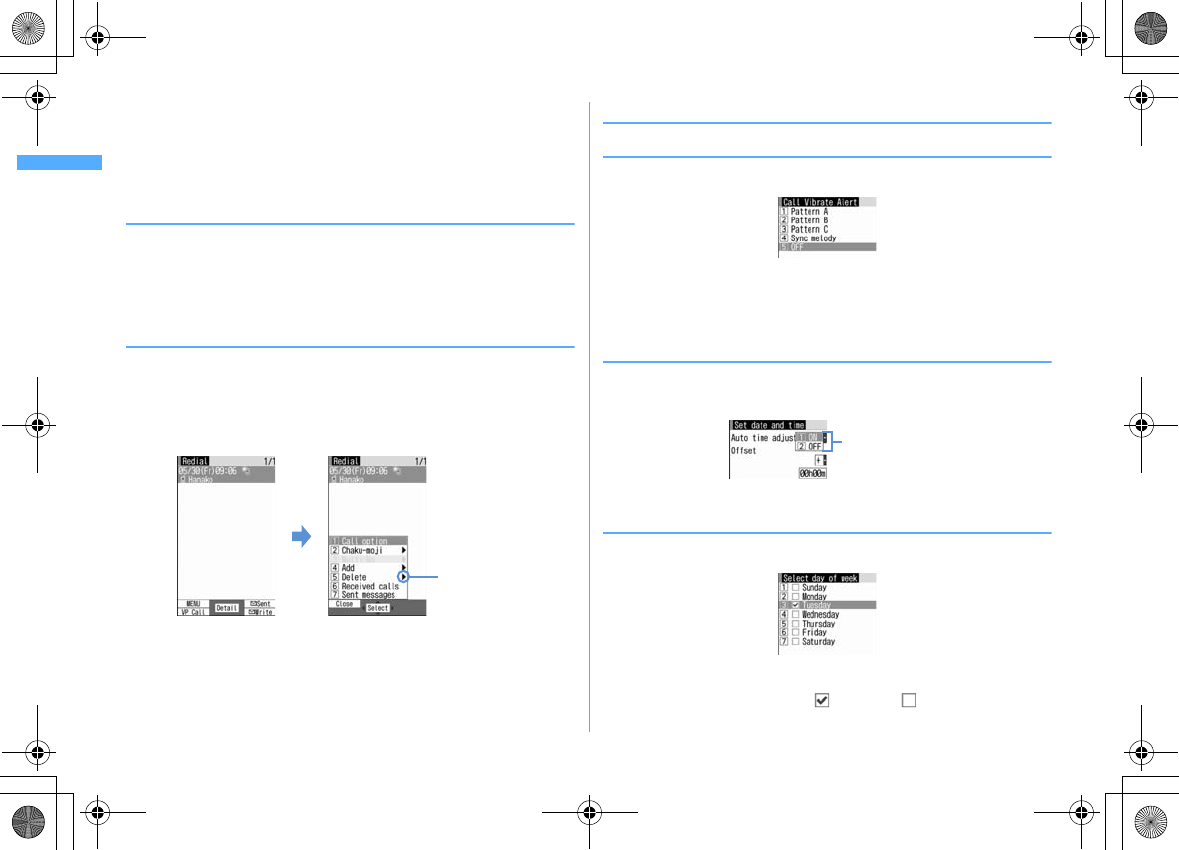
◆
Selecting method of submenu
When "MENU" is displayed at upper-left of the guide area, various operations can
be performed with submenus.
<Example> Selecting the redial submenu
1
On the redial list screen,
me
Press a keypad for the submenu
item number
・
You can also select an item by moving the cursor to and pressing
g
or
r
.
・
Item numbers of the submenu with the same functions may vary by the
operating screen.
・
Pressing
m
or
c
closes the submenu.
◆
Operating procedure of each item
❖
Selection of an item
1
Press the keypad for the item number
・
You can also select an item by moving the cursor to it and pressing
g
.
・
Depending on the function, you can check vibration pattern of the vibrator,
color or lighting pattern of light alert, the color scheme of screen settings
or brightness of the display by moving the cursor to an item.
❖
Pulldown menu operation
1
Move the cursor to the item to set and
ge
Press a keypad for the
item number
・
You can also select an item by moving the cursor to it and pressing
g
.
❖
Check box operation
1
Press a keypad for the item number
・
You can also select an item by moving the cursor to it and pressing
g
.
・
Pressing keypad for the item number or pressing
g
after placing the
cursor, the check box switches (Select) and (Cancel).
・
For some functions, you can select or cancel all items by pressing
m
.
There are menu
items in lower
levels
m
Pulldown menu
L03.fm Page 38 Monday, November 10, 2008 4:42 PM
39
Before Using the Handset
F906i_E1kou
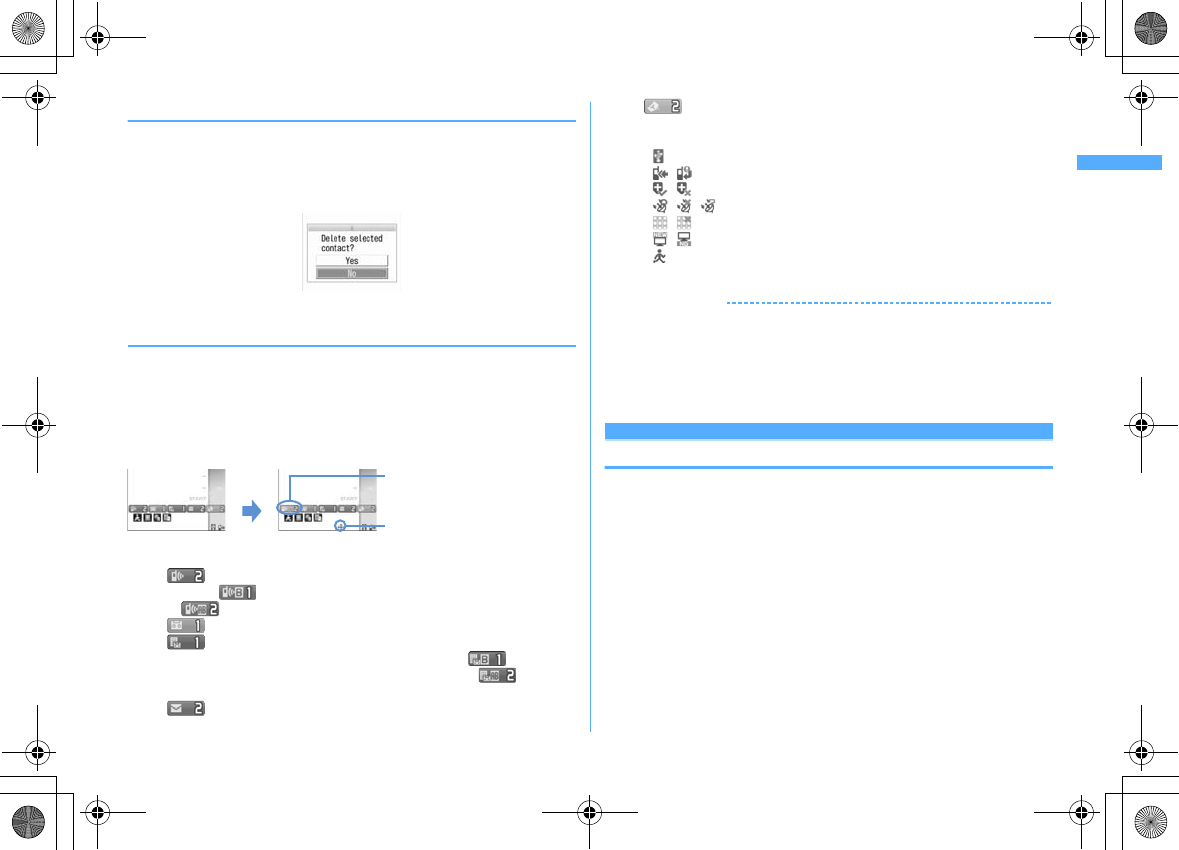
❖
Confirmation screen operation
While deleting or setting saved information, a confirmation screen may appear
asking you to perform a function.
<Example> Deleting phonebook data (1 item)
1
Move the cursor to "Yes" or "No" and
g
・
For some functions, items other than "Yes" or "No" may appear.
◆
Displaying information quickly <Focus mode>
When
g
is pressed on the stand-by display with arrival information icon
displayed on the stand-by display, or with Info/calendar layout or shortcut icons
set, the display is changed to Focus mode that allows you to quickly display the
related information.
・
Shortcut icons
→
P365
1
ge
Move the cursor to an icon and
g
・
A screen matched for the selected icon appears.
(Missed calls) : Received call list appears. With 2in1 ON in Dual
mode, appears when there is a missed call only to Number B and
appears when there are missed calls to both Number A and B.
(Recorded messages) : The recorded message list appears.
(Voice messages in Voice Mail service) : A confirmation screen of
message play appears. With 2in1 ON in Dual mode, appears
when there is a voice message only to Number B and appears
when there are voice messages to both Number A and B.
(Unread messages) : The folder list of Inbox appears.
(Unread ToruCa) : The ToruCa list of the folder containing the latest
unread ToruCa appears.
・
You can perform the same operations when the next icon appears.
- : Connect to external device using USB cable
- / : Software update advance notice/notification
- / : Auto-update of latest pattern definition success/failure
- / / : Location request success/failure/end as unanswered
- / : Music&Video Channel program obtaining success/failure
- / : 1Seg recording reservation completion/failure
- : Pedometer
Canceling Focus mode :
c
or
f
✔
INFORMATION
・
When moving the cursor to the icon for arrival information and press
c
for 1
second or more, the icon disappears temporarily. For a voice message icon of Voice
Mail service, a confirmation screen appears asking you to delete the display. Select
"Yes" to delete the display. It reappears when the number of items is changed by
accumulating new information or viewing existing information.
・
In Focus mode, you cannot display the menu by pressing
m
.
Pointing device
Pointing operation using fingerprint sensor
By operating fingerprint sensor, menu operation or display operation of i-
α
ppli
(compatible i-
α
ppli only) or Full Browser can be performed in the same way as
multi-cursor key (
gudlr
).
And, when displaying the menu on the sub-display, operations can be performed
in the same way as side keys [
▲▼
] or
M
.
・
Operations of pointing device are unavailable in the cases below.
- Stand-by display (Except in Focus mode)
- When the menu of sub-display is not displayed with FOMA terminal folded
- Calling screen
・
Precautions on Fingerprint sensor
→
P121 "Fingerprint sensor"
An icon at the cursor position is
surrounded with a red frame.
The direction is indicated that it can be
moved to by using multi-cursor key.
g
L03.fm Page 39 Monday, November 10, 2008 4:42 PM
Before Using the Handset
40
F906i_E1kou
❖
Pointing operation
Operations of pointing device and those of multi-cursor key are supported as
below.
・
When operating pointing device, do it with light touching. Scratching or giving
excessive force may damage the fingerprint sensor.
■
Slide
Keep touching the fingerprint sensor lightly, move your finger from side to side
and up and down.
■
Double-tapping
Tap the fingerprint sensor so that a ball of the finger hits the center of fingerprint
sensor lightly 2 times. For this operation, touch the fingerprint sensor with finger
as parallel as possible.
◆
Setting the effective area or sensitivity of pointing
device <Pointing device>
1
m
[Settings & NW services]
78e
Set the required
items
eC
Use sensor for: :
Set the effective area for pointing device.
・
When setting to "F-browser/i-
α
ppli", pointing device can be used only for
Full Browser and i-
α
ppli.
・
If setting to "Not use", fingerprint sensor is available only for fingerprint
authentication.
Sensitivity :
Set the sensitivity for sliding operation.
Double-tap speed :
Set the sensitivity for double-tapping.
Using motion sensor
Motion sensor allows you to perform various operations by double-tapping or
tilting FOMA terminal.
Pointing device Multi-cursor key Side key on the sub-display
menu
Slide
k
Side keys [
▲▼
]
Continue touching after sliding
k
(1 sec. or
more)
ー
Double-tap
gM
Touch for 1 sec. or more
g
(1 sec. or
more)
ー
L03.fm Page 40 Monday, November 10, 2008 4:42 PM
41
Before Using the Handset
F906i_E1kou
■
Stop alarm sound by double-tapping FOMA terminal
If double-tapping (tapping twice) while alarm clock, schedule reminder or
countdown timer is sounding when FOMA terminal is folded, the sound stops.
Alarm clock stops or performs snooze operation.
■
Light alert changes
While talking or when folding FOMA terminal, if tilting FOMA terminal while the
light is on, the light changes according to the direction of tilting.
■
Flash graphics change
・
When setting Flash graphics compatible with motion sensor to stand-by display,
the image changes by moving FOMA terminal.
✔
INFORMATION
・
Depending on the spot or strength you tap, the alarm may not stop. And, note that
tapping too strongly may cause malfunction.
・
Double-tapping does not operate while walking or in the place with much vibration.
・
It may operate as double-tapping when lifting FOMA terminal with your hand.
◆
Enabling Motion sensor <Motion sensor>
1
m
[Settings & NW services]
79e1
or
2
・
Even if setting to "OFF", the Flash graphics compatible with motion sensor
operate.
Using UIM (FOMA card)
UIM (FOMA card) is a card for storing user information such as phone numbers.
・
If UIM is installed incorrectly or if there is a problem with UIM, you cannot make/
receive a call or send/receive a mail.
・
For details on handling UIM, refer to the UIM manual.
◆
Installing/Removing
・
After turning the power OFF, fold FOMA terminal and hold it with your hand.
・
Take care not to touch or scratch the IC part.
・
Installing/Removing back cover and battery pack
→
P43
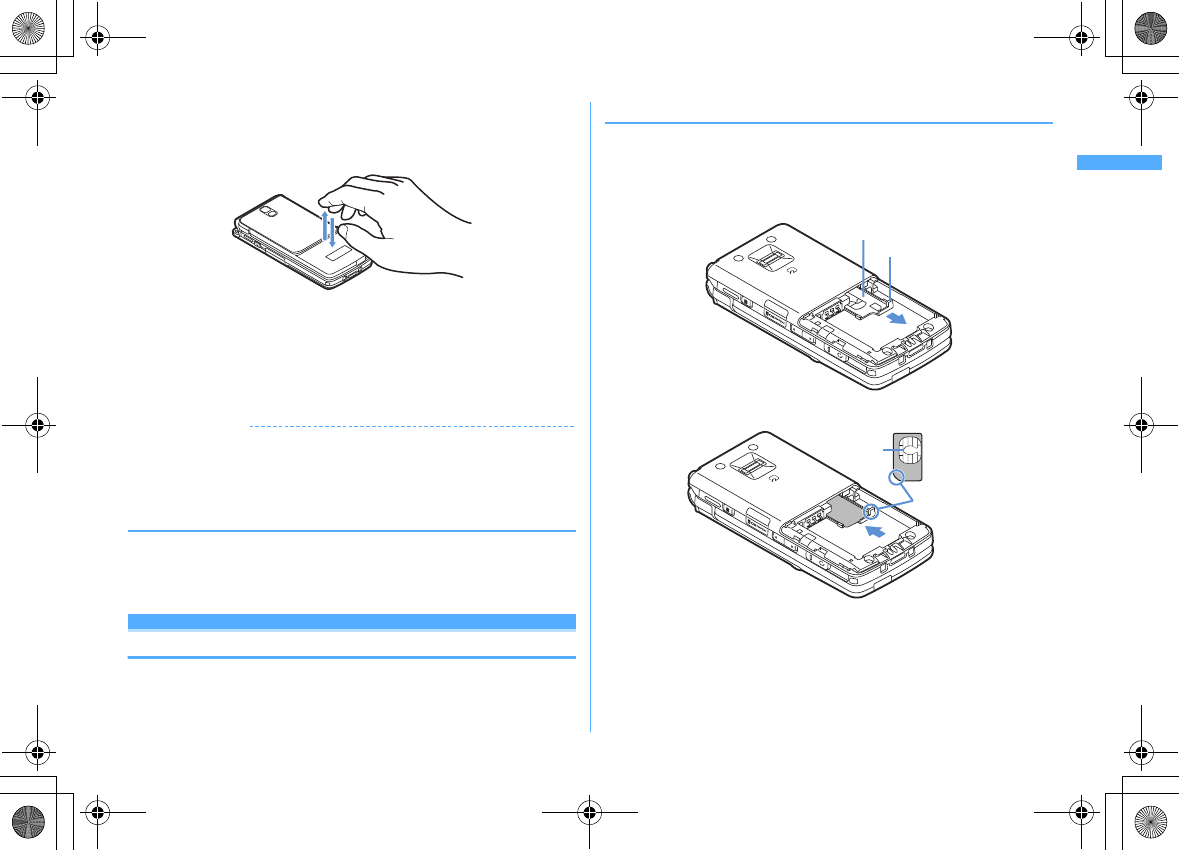
■
Installing
a
Pull the tab and pull out the tray until it clicks.
b
Put UIM on the tray with IC face downward, then push the tray until it stops.
■
Removing
a
Perform
a
of installing operation.
b
Take out UIM.
Tray
Tab
IC
Corner cut
UIM
L03.fm Page 41 Monday, November 10, 2008 4:42 PM
Before Using the Handset
42
F906i_E1kou
✔
INFORMATION
・
Note that forcible installing or removing UIM, or installing battery pack with the tray
inserted at a slant may break UIM or the tray.
・
If the tray is removed, press it straight along the guide rail inside the UIM slot with
UIM left detached.
◆
Security code
Two security codes, "PIN code" and "PIN2 code", are set for UIM.
・
You can change the security codes by yourself.
→
P119
◆
UIM operation restriction
FOMA terminal is provided with UIM operation restriction for protecting your data/
files or data/files copyrighted by a third party.
・
When files or data are downloaded from websites or data attached to mails are
obtained to your FOMA terminal with UIM equipped, UIM operation restriction
is automatically set to these data or files.
・
With UIM replaced or no UIM installed, data or files with UIM operation
restriction set cannot be displayed or played. For i-
α
ppli with UIM operation
restriction set, no functions except deletion are available.
・
Data or files with UIM operation restriction set cannot be transferred over
infrared communication/iC transmission or copied/moved to microSD card.
・
The data types subject to UIM operation restriction are as follows.
- Videophone call message, Movie memo
- i-mode mail attachment files (except ToruCa), images inserted to Deco-mail or signature,
Decome-Anime template, MessageR/F, Decome-Anime template containing data subject to
UIM operation restriction
- Screen memo
-i-
α
ppli (including i-
α
ppli stand-by display)
- Image of ToruCa (Details)
- Images (including GIF animations, Flash graphics and images downloaded from Data
Center), i-motion, data compatible with contents transfer, melodies, PDF data, Chara-den,
Word/Excel/PowerPoint files
-Kisekae Tool
-Chaku-uta
®
/Chaku-uta full
®
- Program of Music&Video Channel
*
"Chaku-uta" is a registered trademark of Sony Music Entertainment (Japan) Inc.
✔
INFORMATION
・
When data subject to UIM operation restriction is set as the stand-by display,
incoming/outgoing image, ring alert, etc., replacing UIM with another one or using
FOMA terminal without the UIM installed causes the sound and image settings to be
reset to the default state. In this case, the sound or image actually generated or
appears may be different from those set. If UIM used when downloading the data is
installed, UIM operation restriction of the data is canceled and the original settings are
restored (When data is used for Set random image, the settings may be canceled).
・
UIM operation restriction is not set to data obtained via infrared communication, iC
transmission, microSD card or DOCOMO keitai datalink or still images/movies taken
with the built-in camera.
・
The settings below are saved to UIM.
- My phone number
- SMS settings (except "SMS report request")
- DoCoMo Cert/User certificate of Manage certificate
- Select language, UIM, PLMN setting
◆
Settings when replacing UIM
If replacing the currently installed UIM with another UIM, the settings below are
changed.
Setting Changed contents
My phone number , Select language,
SMS settings (except "SMS report
request"), "DoCoMo Cert"/"User
certificate" of Manage certificate, PIN
code and PIN2 code of UIM, PIN1 code
ON/OFF, PLMN setting
Changed to the contents saved in the inserted
UIM.
i-Channel setting, Reset call cost Restored to the default settings.
Access setting of Full Browser Set to "No" regardless of the setting before
replacement.
Cookie set/delete of Full Browser Set to "Invalid" regardless of the setting
before replacement. Cookie information is
retained, but if setting to "Valid" or
"Valid(notify)" again, a confirmation screen
for deleting Cookie information appears.
Set program of Music&Video Channel The setting before replacement is canceled.
Set the program again if necessary.
L03.fm Page 42 Monday, November 10, 2008 4:42 PM
43
Before Using the Handset
F906i_E1kou
◆
UIM types
When using UIM (blue) in FOMA terminal, note that it differs in the items listed
below from UIM (green/white).
WORLD WING
WORLD WING is DOCOMO's international roaming service that you can make/
receive calls with the same phone number overseas by UIM (green/white) and
the terminals compatible with the service.
*
If you subscribed to FOMA service on or after September 1, 2005, separate subscription
is not required to use WORLD WING. Note that, if you declined to use WORLD WING
at subscription to FOMA service or canceled it, you need subscription.
*
If you subscribed to FOMA service on or before August 31, 2005, but not to WORLD
WING, separate subscription is required to use WORLD WING.
*
There are some charging plans unavailable.
*
If UIM (green/white) is misplaced or stolen overseas, immediately contact DOCOMO
and request for suspension of usage. Please see "General Inquiries" on the back of this
manual for contact information. Be careful that you are charged also for calls and/or
communications, if any, occurring after misplacement or stealage.
Installing/Removing battery pack
・
After turning the power OFF, fold FOMA terminal and hold it with your hand.
・
Removing the battery pack may cause reservation of Software update to be
canceled. When the date and time are set with Auto time adjust set to "OFF" in
Date & time, removing the battery pack may delete the date and time.
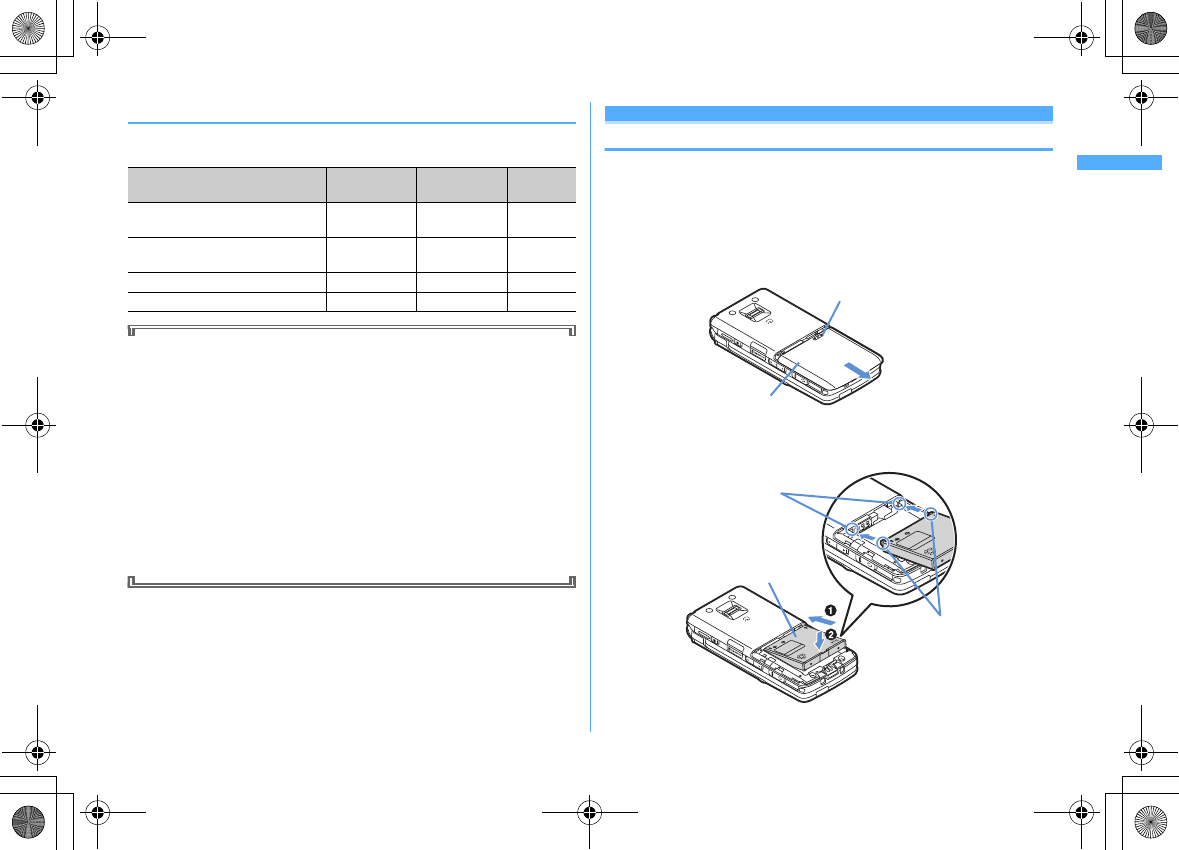
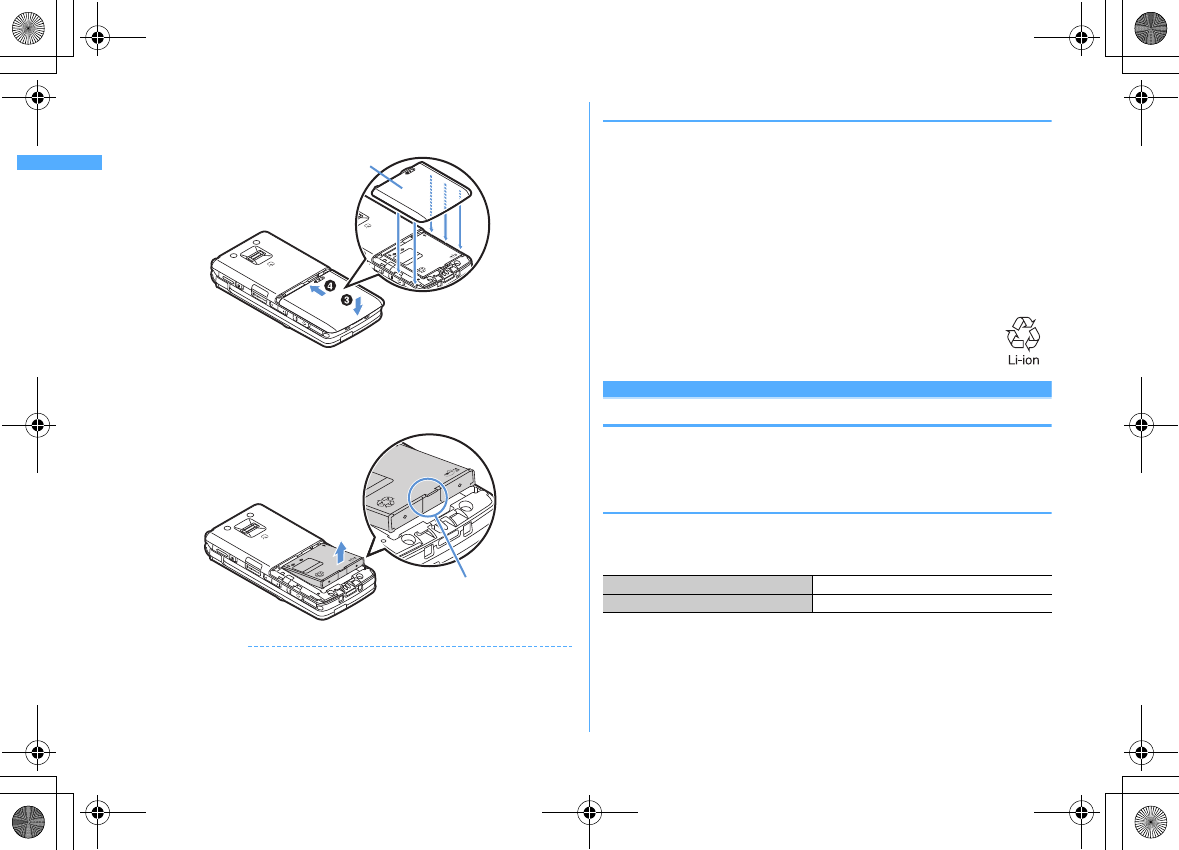
■
Installing
a
Remove the back cover by sliding it about 2 mm in the direction of the arrow
while pressing the back cover with your thumb.
b
With the label of the battery pack facing up, place the convex of the battery pack
to the concave of FOMA terminal and plug in the direction of
a
, and fit it in by
pressing in the direction of
b
.
Item UIM (blue) UIM
(green/white) Page
Number of savable digits of phone
numbers in UIM phonebook
Up to 20 digits Up to 26 digits P85
User certificate download to use
FirstPass
Unavailable Available P175
WORLD WING service
Unavailable Available P412
Service Numbers
Unavailable Available P396
Press here with your thumb
Back Cover
Concave part
Convex part
Battery Pack
L03.fm Page 43 Monday, November 10, 2008 4:42 PM
Before Using the Handset
44
F906i_E1kou
c
Fit the five tabs of the back cover to the ditches of FOMA terminal. While
pressing the back cover in the direction of
c
not to produce a gap between
FOMA terminal and the back cover, slide it in the direction of
d
.
■
Removing
a
Perform
a
of installing operation.
b
Pinch the tab of the battery pack and lift it up in the direction of the arrow to
remove.
✔
INFORMATION
・
Forcing the battery pack into FOMA terminal may damage FOMA terminal jack.
・
FOMA terminal or back cover may be damaged if you install or remove the battery
pack by a method except the procedures above or if you press too hard.
❖
For better battery pack performance
・
Do not charge the battery for an extended period (several days) with FOMA
terminal turned ON.
After charging has completed with FOMA terminal turned ON, the power is
supplied to the terminal from the battery pack. If FOMA terminal is left in that
state for a long time, the battery pack may run out causing the low battery alert
to sound after using only a short period of time. In this case, remove FOMA
terminal from the AC adapter, desktop holder or DC adapter and then reconnect
it and charge the battery again.
・
To promote environmental conservation, return your used battery pack to NTT
DOCOMO sales outlets, our corporate agencies or the shops that collect used
battery in your community.
Charging
The battery pack does not have a full charge at time of purchase. Use AC/DC
adapter for FOMA terminal to charge the battery before using FOMA terminal.
・
To get the maximum performance from F-06A, use battery pack F10.
❖
Charging times (approximate)
The times below are the times for charging an empty battery pack with F-06A's
power switched OFF. Charging with the terminal ON or under low temperature
requires longer time.
Back Cover
Tab
AC adapter
Approx. 150 min.
DC adapter
Approx. 150 min.
L03.fm Page 44 Monday, November 10, 2008 4:42 PM
45
Before Using the Handset
F906i_E1kou
❖
Operation times on full charge (approximate)
The times below vary by the charging method and operating environment.
・
Continuous call time indicates the approximate time that the phone can send or
receive radio waves normally.
・
Continuous stand-by time indicates the approximate time that the phone can
receive radio waves normally with F-06A closed. Call, communication or stand-
by times are about half or 1Seg watching time is shortened by some factors
such as the battery pack charging condition, function settings, operating
environment such as ambient temperature, and radio wave conditions in the
area of use (whether the radio wave conditions is weak or absent). Call,
communication or stand-by times are reduced by performing i-mode
communication. And, even with no voice calls or i-mode communications
made, the continuous call and continuous stand-by times are reduced by
making PushTalk session, creating i-mode mail, activating downloaded i-
α
ppli,
using i-
α
ppli stand-by display, performing data communication or multiaccess,
using camera, playing movie/i-motion, obtaining or playing Music&Video
Channel program, playing music with Music player, activating or recording of
1Seg, or doing other operations.
❖
Battery pack life
・
The battery pack is a consumable part. Each time it is charged, time available
with each charging reduces.
・
When a time available with each charging is reduced to about a half from that
of a new battery, replacement of the battery is recommended because it is near
the end of life. The battery pack may swell out as it comes to near the end of its
lifetime depending on the usage conditions, but it is not a problem.
・
The battery pack's life may be reduced by using i-
α
ppli or videophone or
watching 1Seg while charging.
❖
Battery charge
・
For details, refer to the operation manuals for FOMA AC Adapter 01/02
(optional), FOMA AC Adapter 01 for Global use (optional) or FOMA DC Adapter
01/02 (optional).
・
FOMA AC Adapter 01 is applicable only to 100V AC. Though FOMA AC Adapter
02 and FOMA AC Adapter 01 for Global use is applicable to 100-240V AC.
・
AC Adaptor has a plug dedicated to 100V AC (for domestic use). When using the
AC adapter in the range of AC 100V and 240V overseas, a conversion plug
adapter applicable to the country you are staying is required. Do not charge the
battery using a transformer for overseas travel.
✔
INFORMATION
・
Some i-
α
ppli remains operating even when FOMA terminal is folded, consuming
power. In this case, the call, communication or stand-by time may be reduced.
・
During a call or communications, charging may not finish. Charging may not
complete if you start battery charging while watching/recording 1Seg, playing movie/
i-motion, obtaining Music&Video Channel program, activating Music&Video Channel
player or Music player, running i-
α
ppli. In this case, it is recommended to end the
operation, and then charge the battery.
・
The charging is not completed by some settings of Display & Key light or charging
method, such as charging the battery with FOMA terminal open when Normal use is
set to "Always" in Display light time of Display & Key light. In this case, it is
recommended to charge the battery with FOMA terminal folded.
・
It is normal for FOMA terminal, battery pack, desktop holder and AC adapter, DC
adapter to become warm while charging. If you use the videophone or if you transmit/
receive packets or 64K data while charging the battery, the charging may not finish
normally because of temperature rise in FOMA terminal. In that case, wait until the
temperature falls down and try again.
Continuous
stand-by time
FOMA/3G
Stationary (Auto) : Approx. 620 H
Moving (Auto) : Approx. 395 H
Moving (3G static) : Approx. 430 H
GSM
Stationary (Auto) : Approx. 340 H
Continuous call
time
FOMA/3G
Voice call : Approx. 210 min.
Videophone call : Approx. 120 min.
GSM
Approx. 210 min.
1Seg watching time
Approx. 260 min. (ECO mode : Approx. 320
min.)
L03.fm Page 45 Monday, November 10, 2008 4:42 PM
Before Using the Handset
46
F906i_E1kou
❖
Charging using AC adapter or Desktop holder
Charge using optional FOMA AC adapter or Desktop Holder.
・
The battery pack cannot be charged without FOMA terminal. When charging the
battery pack, install it to FOMA terminal.
・
Also, refer to the operation manual of AC adapter or Desktop Holder.
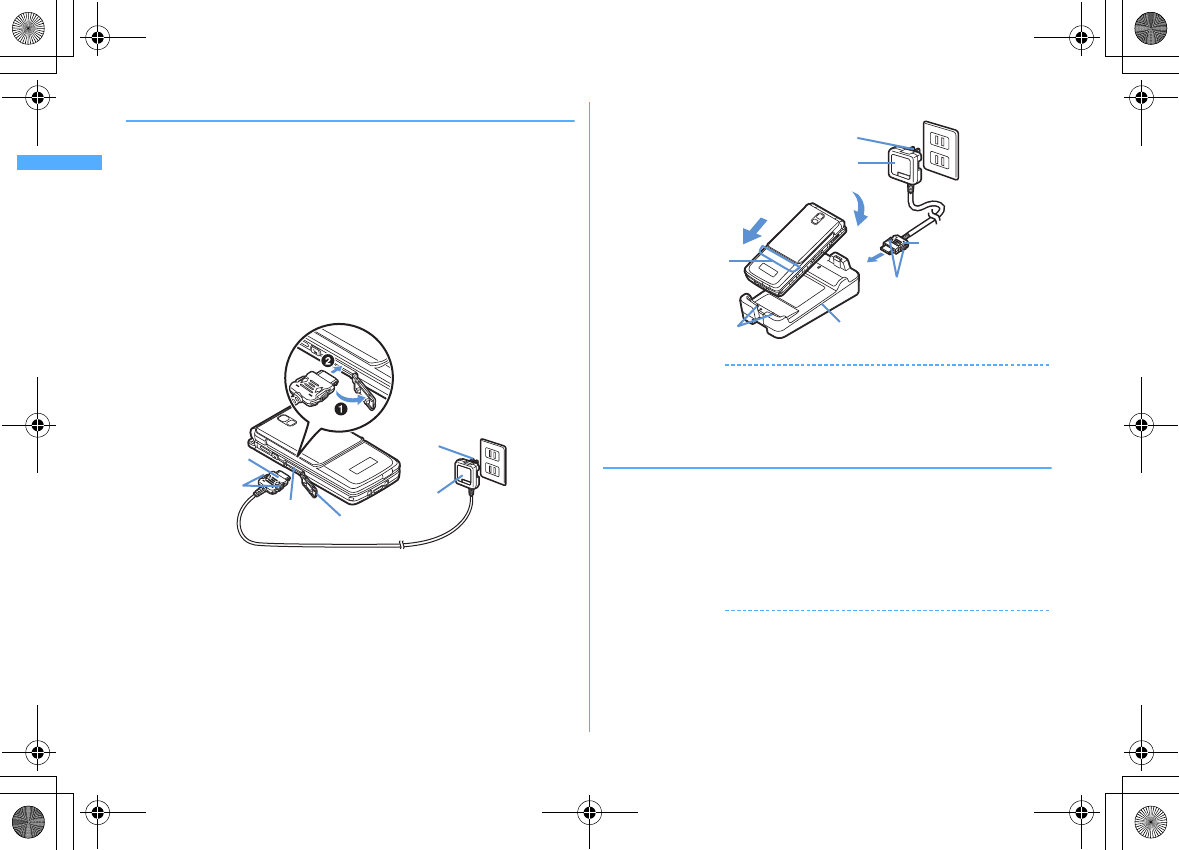
■
Charging the battery using AC adapter only
a
Open jack cap (
a
) of FOMA terminal, hold the connector horizontally with the
arrow side upward and insert it to the jack. (
b
)
b
Unfold the power plug and insert it into a 100V AC outlet.
c
When charging is over, pull out the power plug from the outlet, and pull out
from FOMA terminal horizontally while pressing the release buttons on both
sides of the connector.
■
Using desktop holder and AC adapter in combination for charging
a
Insert the AC adapter to the desktop holder, with the arrow on the AC adapter's
connector upward.
b
Unfold the AC adapter's power plug and insert it into a 100V AC outlet.
c
Align FOMA terminal with the desktop holder's charging jack (
a
), and insert
FOMA terminal in the direction of the arrow (
b
) until it clicks.
d
When charging is over, lift and pull out FOMA terminal in the opposite direction
of the arrow of
b
while pressing the desktop holder.
✔
INFORMATION
・
When charging by placing FOMA terminal on the desktop holder, remove the sticker
of written precautions attached on the fingerprint sensor side of the terminal. And, do
not attach other stickers etc. FOMA terminal cannot be correctly placed and the
charging may not be completed if the stickers etc. are attached.
❖
Charging in a car
By using FOMA DC Adapter 01/02 (optional), charging is available in a car.
・
For details, refer to the operation manual of DC adapter.
・
When FOMA terminal is not used or you are leaving the car, disconnect the
cigarette lighter plug of the DC adapter from the cigarette lighter socket and
disconnect the DC adapter connector from FOMA terminal.
・
The fuse (2A) of the DC adapter is a consumable part. Contact your nearest
automotive supply store for a replacement.
✔
INFORMATION
・
Insertion or removal of the AC and DC adapter connectors should be done slowly and
carefully so that they are not given excessive force. When disconnecting the
connector, pull it straight while pressing the release button. Applying an excessive
force to disconnect the connector may give damage to it.
Connector
Release
button
Jack cap
External
connection
jack
AC adapter
Power plug
100V AC
outlet
AC adapter
100V AC
outlet
Power plug
Connector
Release button
Desktop holder
Charging jack
Light
b
a
L03.fm Page 46 Monday, November 10, 2008 4:42 PM
47
Before Using the Handset
F906i_E1kou
❖
Operations and precautions for charging
When charging starts, a charge start alert sounds, light turns on and the battery
icon on the display or sub-display blinks. When charging is over, a charge
completion alert sounds, the light turns off and the battery icon stops blinking.
・
When starting the battery charging, the light turns on in red. In some
environments, the light may not light immediately when charging starts; this is
normal and not a malfunction. However, if the light does not turn on after a
while, disconnect FOMA terminal from the AC adapter, desktop holder or DC
adapter then connect it again to start charging. Contact the sales outlet such as
DOCOMO Shop if the light does not turn on for a while after charging starts.
・
If you receive a mail or shoot with the camera while charging, the light turns on
temporarily in a different color, but it turns on in red after a while.
When the light blinks while charging in cases except these reasons
→
P460
"Troubleshooting"
・
When installing the fully charged battery pack to FOMA terminal and connecting
it to the AC adapter, desktop holder or DC adapter, the light may turn on for a
moment and turn off. This is normal and not a malfunction.
・
During a call, communication or PushTalk session, in Silent mode or Public
mode or with Charge alert "OFF", the charge alert does not sound at start or
completion of charge.
・
If a battery icon is set for Kisekae Tool other than Preinstalled folder, the battery
icon set by default blinks.
Remaining battery level
Checking remaining battery level
A battery icon appearing on the top of the display shows an approximate
remaining battery level.
(Battery level 3) : Ample charge.
(Battery level 2) : Low charge.
(Battery level 1) : Very low. Charge the battery.
・
The battery icon set by default varies by the color of FOMA terminal.
・
When FOMA terminal is folded, the remaining battery level can be checked on
the sub-display.
❖
When battery is almost exhausted
A message indicating low battery appears. Pressing any one of
g
,
c
,
f
keys deletes the message temporarily. After a period of time, a battery alarm
sounds from the speaker and all icons on the top of the display start blinking. The
power is turned off after approximately 1 minute. While these operations stop
when charging starts, press
f
to immediately stop the battery alarm.
・
During a call, the message remains displayed and the battery alarm keeps
sounding from the earpiece. After approximately 20 seconds, the call ends, the
battery alarm sounds from the speaker and all icons on the top of the display
blink.
・
With FOMA terminal folded, the sub-display shows "Low battery".
◆
Checking remaining battery level by sound and display
<Battery level>
1
m
[Settings & NW services]
765
The battery level is displayed and the keypad sound (
→
P100) is emitted
according to the level. After a while, the screen returns to the menu list.
Battery level 3 : Three pips sound.
Battery level 2 : Two pips sound.
Battery level 1 : One pip sounds.
Power ON/OFF
Turning power ON/OFF
❖
Turning power ON
1
f
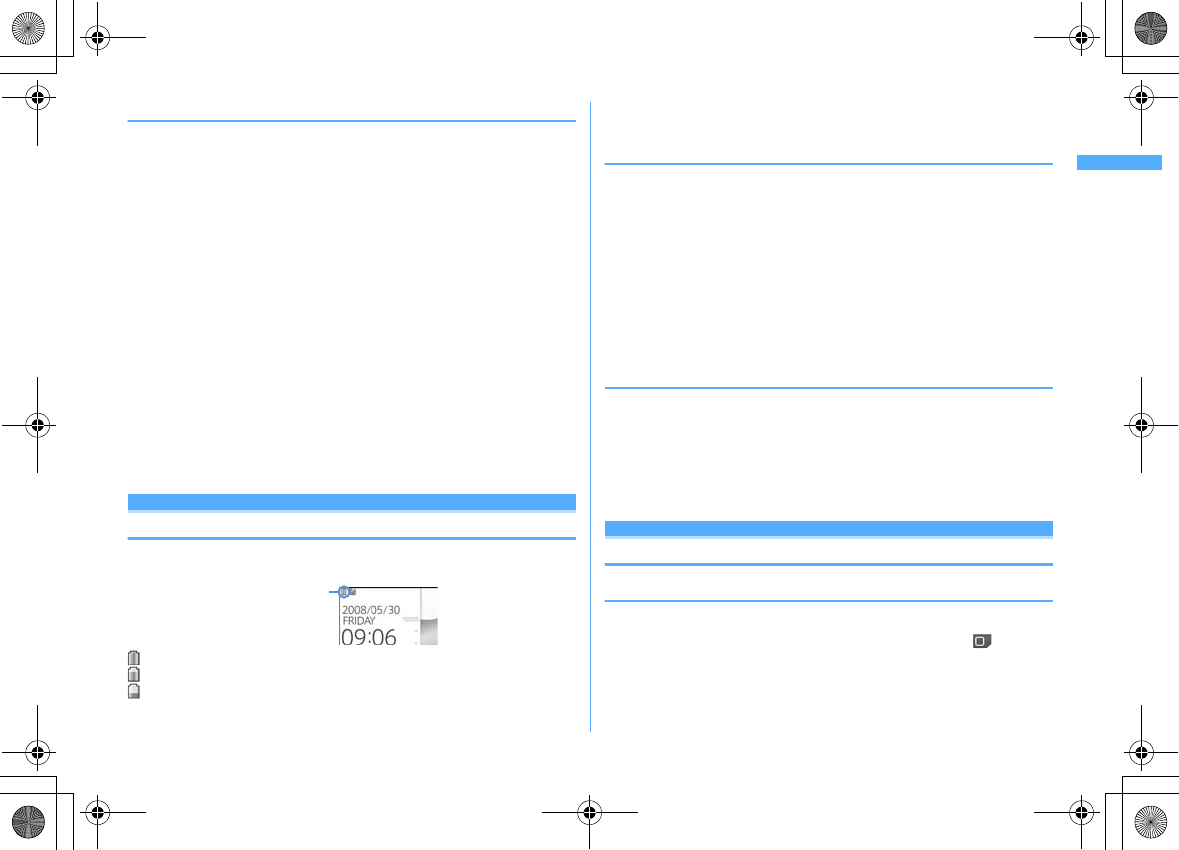
(2 sec. or more)
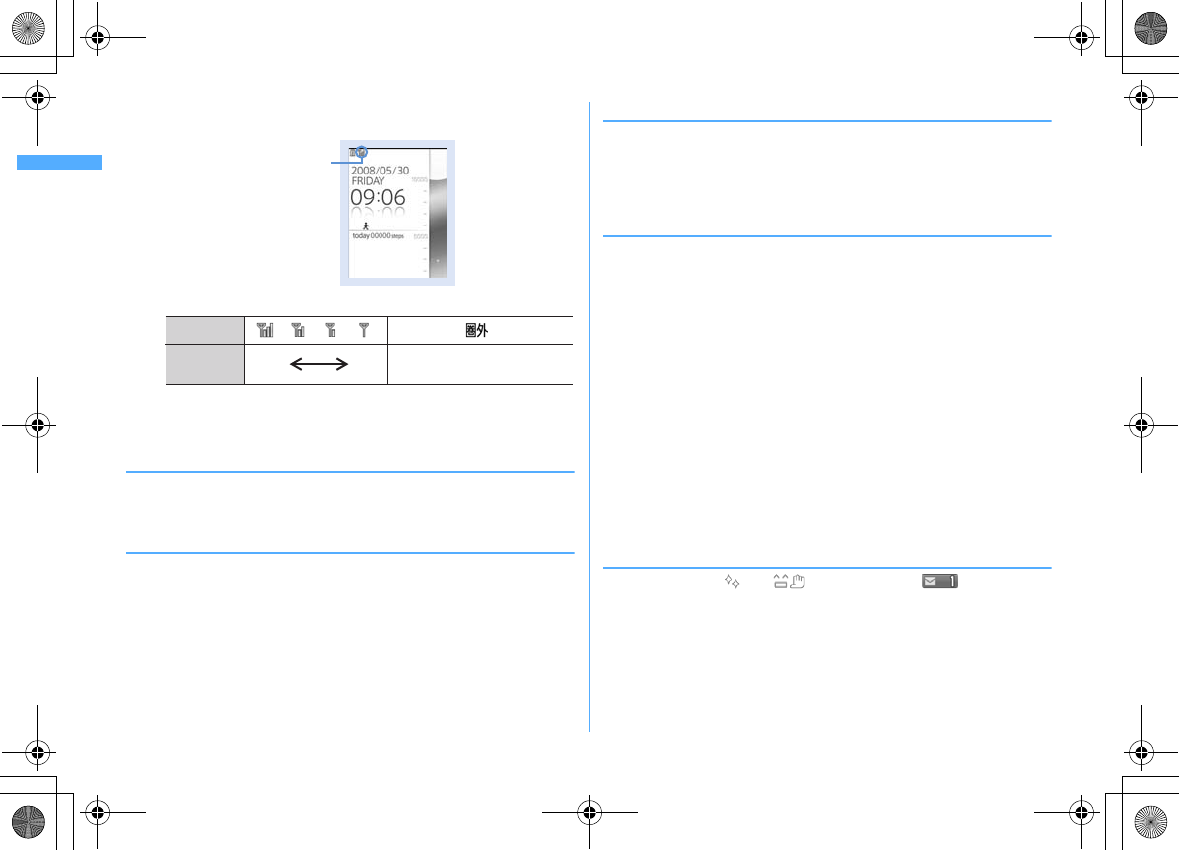
The wake-up screen appears and the stand-by display appears. appears at
the bottom of the display while reading UIM.
Battery icon
L03.fm Page 47 Monday, November 10, 2008 4:42 PM
Before Using the Handset
48
F906i_E1kou
・
A signal level icon appearing at the top of the display shows the
approximate received signal level.
・
The battery icon set by default varies by the color of FOMA terminal.
・
With FOMA terminal folded, the reception level can be confirmed on the
sub-display.
❖
Turning power OFF
1
f
(2 sec. or more)
◆
Operations to perform after turning the power ON at
the first time
When turning the power ON for the first time, operate in the order of
"AdvancedMode setting"
→
"Initial setting". The settings made can be changed
later.
・
When initialization is finished, a confirmation screen of software update
function appears. Press
g
to display the stand-by screen.
❖
AdvancedMode setting
1
"Yes" or "No" on the confirmation screen
・
When selecting "Yes", "AdvancedMode" of Kisekae Tool is set.
If you cancel the confirmation screen by pressing
c
or
f
, the
confirmation screen reappears when the power is turned ON the next time.
❖
Default setting
・
Always set Password and Request permit/deny. When
C
or
c
,
f
is
pressed before setting terminal security code or Request permit/deny, a
confirmation screen appears asking you to exit. If you exit by selecting "Yes",
this confirmation screen reappears when the power is turned ON the next time.
1
Set the required items on Initial setting screen
eC
Date & time :
Set the date and time.
→
P49
Password :
Change the terminal security code after performing
authentication.
→
P119
Fingerprint :
After performing authentication, register a fingerprint to be used
for authentication.
→
P121
Keypad sound :
Set a confirmation sound emitted when a key is pressed.
→
P100
Text size :
Set size of characters for phonebook, mail, etc.
→
P115
Request permit/deny :
Set if you provide location information after
performing authentication. To permit Location request only in a specified
period of time, make settings to Permission period of Request permit/deny.
→
P264
❖
Checking Welcome mail
The mail of "Welcome F906i " is saved by default. appears on the
stand-by display, and if folding FOMA terminal, the light (blinking in blue) and the
mail light indicate that there is an unread mail.
1
geg
The next procedures
→
P199 Step 2 and the following steps in "Displaying mail
in Inbox/Outbox"
Stand-by display
Signal level icon
Icon
Received
signal level Strong Out of service area or where
radio waves do not reach
Weak
L03.fm Page 48 Monday, November 10, 2008 4:42 PM
49
Before Using the Handset
F906i_E1kou
✔
INFORMATION
・
When turning FOMA terminal ON, do not touch the fingerprint sensor with fingers
before the stand-by display appears.
・
When UIM is replaced, authentication is required after turning ON FOMA terminal.
When authentication has succeeded, the stand-by display appears. If an incorrect
terminal security code is entered 5 times consecutively or if authentication has failed
5 times consecutively when Fingerprint access is "ON", the power is automatically
turned OFF (the power can be turned ON again).
・
If no operations are performed for approximately 5 minutes with FOMA terminal
open, the display is automatically deactivated (power saving mode). The same
situation occurs during voice call. The display light is turned on again if there is any
operation or incoming call.
Select language
Switching to English
1
m
[Settings & NW services]
273e1
or
2
✔
INFORMATION
・
The setting of Select language is saved to UIM.
・
Even if this setting is set to "English", the displayed menu is not switched to English
for some Kisekae Tool. Note that, when a Kisekae Tool in "Preinstalled" folder is set,
a menu dedicated to "English" appears.
・
Even if changing this setting, the title of Shortcut icon is not changed from the
language set when the shortcut icon was pasted.
Date & time
Setting date and time
You can set so that the time or time difference is automatically corrected or
directly enter the date and time. With automatic correction set, the time is
corrected when receiving the time information from DOCOMO's network in Japan
or the time difference correction information from the telecommunications carrier
used overseas.
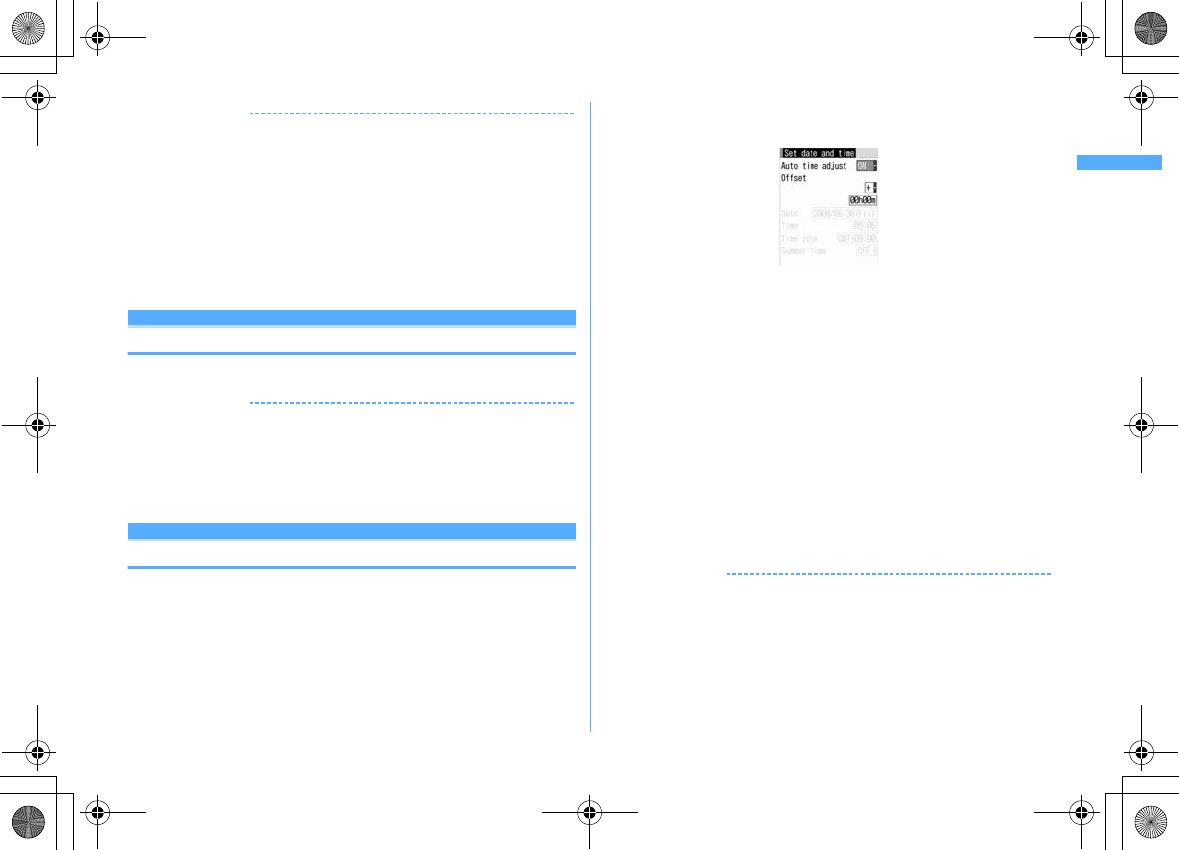
1
m
[Settings & NW services]
721e
Set the required
items
eC
Auto time adjust :
Set if you automatically correct time.
・
When "ON", Offset can be set.
・
When "OFF", set the date and time. Time zone and Summer time may
also be set.
Offset :
When "+", the displayed time is always set forward the specified
period of time from the corrected time. When "-", the displayed time is
always set back the specified period of time from the corrected time.
Date :
The date can be entered up between January 1, 2000 and December 31,
2050.
Time :
Enter the time in the 24-hour format.
Time zone :
When moving to a place with time difference, set the time zone
without changing the date and time settings.
・
Time difference from the previously set time zone is calculated and
displayed.
・
Set "GMT+09:00" in Japan.
Summer time :
When "ON", the displayed time is set forward one hour from
the specified time.
✔
INFORMATION
<When setting Auto time adjust to "ON">
・
Time or time difference is corrected when FOMA terminal is turned ON etc. If not
corrected for a while after turning FOMA terminal ON, once turn FOMA terminal OFF
and then turn it ON again. With no UIM installed or for some radio wave conditions,
time is not corrected even if FOMA terminal is once turned OFF and turned ON again.
For some i-
α
ppli, time correction is unavailable during operation.
・
The corrected time or time difference may have an error of several seconds.
L03.fm Page 49 Monday, November 10, 2008 4:42 PM
Before Using the Handset
50
F906i_E1kou
<When the correction has never been performed and date and time are displayed with
"--" or "?">
・
Flash graphics etc. using clock or date/time are not displayed correctly. And, functions
requiring date/time information such as Auto start, Reserve, downloading or playing
data with Replay Restriction, operating a user certificate, etc., cannot be activated.
・
Date and time of each data are not recorded and displayed as "----/--/--" or "--------------
--". A segmental number furthermore (number to segmentalize) may be appended.
<When setting date/time with Auto time adjust set to "OFF">
・
When the date/time are deleted because of removing of the battery pack or leaving
the battery for a long time after the battery exhausted, set the date/time again after
charging the battery.
Caller ID notification
Notifying your phone number to the other party
You can set FOMA terminal to display your number (Caller ID) on the other party's
terminal when making a voice call, videophone call or PushTalk call.
・
For details, refer to "Mobile Phone User's Guide [Network Services]".
・
Caller ID is your important information. Carefully consider whether you want to
include caller ID information when making a call.
・
The caller ID is displayed only when the phone of the other party is a digital
mobile phone etc. enabled to display the caller ID.
・
Setting operations for this function is disabled from a location out of service
area.
1
m
[Settings & NW services]
8411e1
or
2
・
Press
m
[Settings & NW services]
8412
and select "Yes"
to check the current settings.
❖
Priority of Caller ID notification
There are multiple methods to notify your phone number to the other party. If you
set or perform these methods simultaneously, the caller ID operations are
performed with the priorities below. The displayed setting and actual Notify/Not
notify may differ.
a
When setting a caller ID notification method in Call option for dialing
→
P61, 76
b
When "186" or "184" is prefixed to a phone number of the other party
→
P60
c
Caller ID settings of phonebook (for PushTalk, dialing 1 party)
→
P91
d
Activate/Deactivate of Caller ID notification
✔
INFORMATION
・
If an announcement of requesting caller ID is heard when making a call, make a call
again after setting your caller ID to be notified.
User information
Checking your own phone number
You can check your phone number (My phone number), Name, Mail address, etc.
1
m
[User information]
Checking during a call etc. :
s0
✔
INFORMATION
・
For details of how to check i-mode mail address, see "Mobile Phone User's Guide [i-
mode] FOMA version".
・
When 2in1 is ON in Dual mode, you can press
a
to switch User information
between Number A and B.
・
With 2in1 ON, when replacing UIM (2in1 subscriber
→
2in1 subscriber), set 2in1 to OFF
then set it to ON again to obtain a correct Number B, or obtain Number B from User
information.
→
P370
And, when replacing UIM (2in1 subscriber
→
2in1 non-subscriber), set 2in1 to OFF to
update to the correct user information.
→
P398
L03.fm Page 50 Monday, November 10, 2008 4:42 PM
438 Appendix/External Devices/Troubleshooting
F906i_E1kou
SAR certification information
◆
SAR certification information
This model phone F-06A meets the MIC's
*1
technical regulation governing
exposure to radio waves.
The technical regulation established permitted levels of radio frequency energy,
based on standards that were developed by independent scientific organizations
through periodic and thorough evaluation of scientific studies. The regulation
employs a unit of measurement known as the Specific Absorption Rate, or SAR.
The SAR limit is 2 watts/kilogram (W/kg)
*2
averaged over 10 grams of tissue. The
limit includes a substantial safety margin designed to assure the safety of all
persons, regardless of age and health. The value of the limit is equal to the
international guidelines recommended by ICNIRP.
*3
All phone models should be confirmed to comply with the regulation, before they
are available for sale to the public. The highest SAR value for this F-06A is 1.230 W/
kg. It was taken by the Telecom Engineering Center (TELEC). The test for SAR was
conducted according to the MIC testing procedure using standard operating
positions with the phone transmitting at its highest permitted power level in all
tested frequency bands. While there may be differences between the SAR levels of
various phones and at various positions, they all meet the MIC's technical
regulation. Although the SAR is determined at the highest certified power level,
the actual SAR of the phone during operation can be well below the maximum
value.
For further information about SAR, please see the websites below.
World Health Organization (WHO) :
http://www.who.int/peh-emf/
ICNIRP :
http://www.icnirp.de/
MIC :
http://www.tele.soumu.go.jp/e/ele/body/ index.htm
TELEC :
http://www.telec.or.jp/ENG/Index_e.htm
NTT DOCOMO :
http://www.nttdocomo.co.jp/english/product/
FUJITSU LIMITED :
http://www.fmworld.net/product/phone/sar/
*1
Ministry of Internal Affairs and Communications.
*2
The technical regulation is provided in Article 14-2 of the Ministry Ordinance Regulating
Radio Equipment.
*3
International Commission on Non-Ionizing Radiation Protection.
◆
Declaration of Conformity
The product "F-06A" is declared to conform with the essential requirements of
European Union Directive 1999/5/EC Radio and Telecommunications Terminal
Equipment Directive 3.1(a), 3.1(b) and 3.2. The Declaration of Conformity can
be found on http://www.fmworld.net/product/phone/doc/.
This mobile phone complies with the EU requirements for exposure to radio
waves.
Your mobile phone is a radio transceiver, designed and manufactured not to
exceed the SAR
*
limits
**
for exposure to radio-frequency (RF) energy, which
SAR
*
value, when tested for compliance against the standard was 1.33 W/Kg. While
there may be differences between the SAR
*
levels of various phones and at
various positions, they all meet
***
the EU requirements for RF exposure.
L026.fm Page 438 Monday, November 10, 2008 3:17 PM
439
Appendix/External Devices/Troubleshooting
F906i_E1kou
* The exposure standard for mobile phones employs a unit of measurement
known as the Specific Absorption Rate, or SAR.
** The SAR limit for mobile phones used by the public is 2.0 watts/kilogram (W/
Kg) averaged over ten grams of tissue, recommended by The Council of the
European Union. The limit incorporates a substantial margin of safety to
give additional protection for the public and to account for any variations in
measurements.
*** Tests for SAR have been conducted using standard operation positions with
the phone transmitting at its highest certified power level in all tested
frequency bands. Although the SAR is determined at the highest certified
power level, the actual SAR level of the phone while operating can be well
below the maximum value. This is because the phone is designed to operate
at multiple power levels so as to use only the power required to reach the
network. In general, the closer you are to a base station antenna, the lower
the power output.
◆
Federal Communications Commission (FCC) Notice
・
This device complies with part 15 of the FCC rules.
Operation is subject to the following two conditions :
a
this device may not cause harmful interference, and
b
this device must accept any interference received, including interference that
may cause undesired operation.
・
Changes or modifications made in or to the radio phone, not expressly
approved by the manufacturer, will void the user's authority to operate the
equipment.
◆
Industry Canada (IC) Notice
・
Operation is subject to the following two conditions :
a
this device may not cause interference, and
b
this device must accept any interference, including interference that may
cause undesired operation of the device.
◆
FCC and IC RF Exposure Information
This model phone meets the U.S. Government's and Canadian Government's
requirements for exposure to radio waves.
This model phone contains a radio transmitter and receiver. This model phone is
designed and manufactured not to exceed the emission limits for exposure to
radio frequency (RF) energy as set by the FCC of the U.S. Government and IC of the
Canadian Government. These limits are part of comprehensive guidelines and
establish permitted levels of RF energy for the general population. The guidelines
are based on standards that were developed by independent scientific
organizations through periodic and thorough evaluation of scientific studies.
The exposure standard for wireless mobile phones employs a unit of
measurement known as the Specific Absorption Rate (SAR). The SAR limit set by
the FCC and IC is 1.6 W/kg. Tests for SAR are conducted using standard operating
positions as accepted by the FCC and IC with the phone transmitting at its highest
certified power level in all tested frequency bands. Although the SAR is
determined at the highest certified power level, the actual SAR level of the phone
while operating can be well below the maximum value. This is because the phone
is designed to operate at multiple power levels so as to use only the power
required to reach the network. In general, the closer you are to a wireless base
station antenna, the lower the power output level of the phone.
Before a phone model is available for sale to the public, it must be tested and
certified to prove to the FCC and IC that it does not exceed the limit established by
the U.S. and Canadian government-adopted requirement for safe exposure. The
tests are performed on position and locations (for example, at the ear and worn on
the body) as required by FCC and IC for each model. The highest SAR value for this
model phone as reported to the FCC and IC, when tested for use at the ear, is 0.557
W/kg, and when worn on the body, is 0.503 W/kg. (Body-worn measurements differ
among phone models, depending upon available accessories and FCC and IC
requirements).
While there may be differences between the SAR levels of various phones and at
various positions, they all meet the U.S. and Canadian government requirements.
The FCC and IC has granted an Equipment Authorization for this model phone with
all reported SAR levels evaluated as in compliance with the FCC and IC RF
exposure guidelines. SAR information on this model phone is on file with the FCC
and can be found under the Equipment Authorization Search section at http://
www.fcc.gov/oet/ (please search on FCC ID VQK-F-06A).
L026.fm Page 439 Monday, November 10, 2008 3:17 PM
440 Appendix/External Devices/Troubleshooting
F906i_E1kou
For body worn operation, this phone has been tested and meets the FCC and IC RF
exposure guidelines when used with an accessory designated for this product or
when used with an accessory that contains no metal and which positions the
handset at a minimum distance of 1.5 cm from the body.
*
In the United States and Canada, the SAR limit for wireless mobile phones used by the
general public is 1.6 Watts/kg (W/kg), averaged over one gram of tissue. SAR values may
vary depending upon national reporting requirements and the network band.
◆
Important Safety Information
AIRCRAFT
Switch off your wireless device when boarding an aircraft or whenever you are
instructed to do so by airline staff. If your device offers flight mode or similar
feature consult airline staff as to whether it can be used on board.
DRIVING
Full attention should be given to driving at all times and local laws and regulations
restricting the use of wireless devices while driving must be observed.
HOSPITALS
Mobile phones should be switched off wherever you are requested to do so in
hospitals, clinics or health care facilities. These requests are designed to prevent
possible interference with sensitive medical equipment.
PETROL STATIONS
Obey all posted signs with respect to the use of wireless devices or other radio
equipment in locations with flammable material and chemicals. Switch off your
wireless device whenever you are instructed to do so by authorized staff.
INTERFERENCE
Care must be taken when using the phone in close proximity to personal medical
devices, such as pacemakers and hearing aids.
Pacemakers
Pacemaker manufacturers recommend that a minimum separation of 15 cm be
maintained between a mobile phone and a pace maker to avoid potential
interference with the pacemaker. To achieve this use the phone on the opposite ear
to your pacemaker and does not carry it in a breast pocket.
Hearing Aids
Some digital wireless phones may interfere with some hearing aids. In the event
of such interference, you may want to consult your hearing aid manufacturer to
discuss alternatives.
For other Medical Devices :
Please consult your physician and the device manufacturer to determine if
operation of your phone may interfere with the operation of your medical device.
Export Administration Regulations
This product and its accessories may be under coverage of the Export
Administration Regulations of Japan ("Foreign Exchange and Foreign Trade
Control Laws" and the related laws and regulations). And, they are also under
coverage of Export Administration Regulations of the U.S. When exporting and
reexporting this product and its accessories, take necessary procedures on your
responsibility and expense. For details, contact Ministry of Economy, Trade and
Industry of Japan or US Department of Commerce.
L026.fm Page 440 Monday, November 10, 2008 3:17 PM