Fujitsu F01D Tablet PC User Manual 2
Fujitsu Limited Tablet PC 2
UserManual.wiki
>
Fujitsu
>
F01D User Manual
>
User Manual2
Contents
1.
Users Manual 1
2.
Users Manual 2
3.
User Manual1
4.
User Manual2
5.
Users Manual1
6.
Users Manual2
User Manual2
Navigation menu
Upload a User Manual
Namespaces
Wiki Guide
HTML
PDF
Info
Views
User Manual
Discussion / Help
Navigation

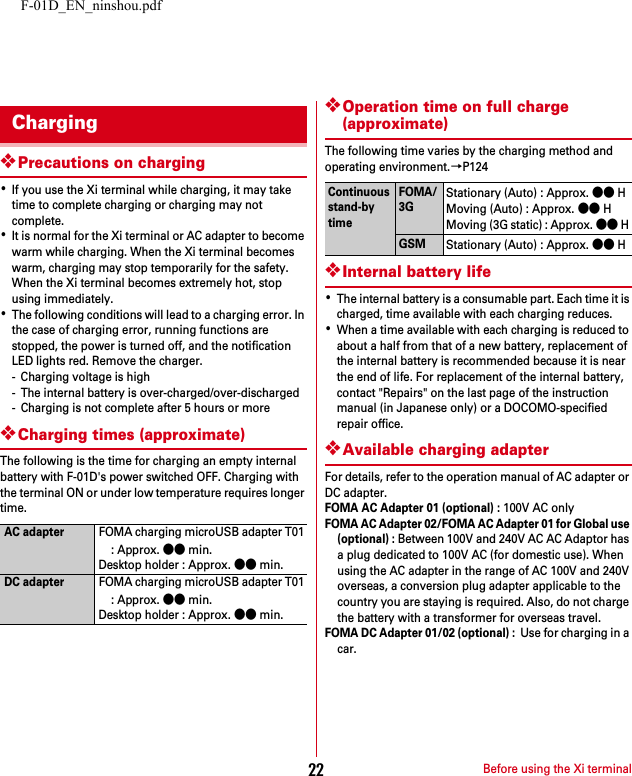
![F-01D_EN_ninshou.pdfBefore using the Xi terminal23❖Checking battery levelA battery icon is displayed on the status bar to show estimated battery level.→P27・When the battery level is nearly empty, a warning message appears, and power is turned off after a few seconds.・From the Applications menu, tap [Settings]→[About phone]→[Status] to check the remaining battery power by percentage.✔INFORMATION・When charging starts with the battery empty, the Xi terminal may not be immediately activated after turning the power ON. In this case, charge the Xi terminal while keeping it turned OFF, and turn it on after a while.◆Charging with Desktop holderCharge the Xi terminal with FOMA AC Adapter 01/02 (optional), the included FOMA charging microUSB adapter T01 and desktop holder F34.aInsert the AC adapter connector to the external connection jack of the FOMA charging microUSB adapterbInsert the microUSB plug of the charging microUSB adapter into the jack on the back side of the desktop holdercUnfold the AC adapters power plug and insert it into a 100V AC outletdInsert the Xi terminal into the desktop holder・Notification LED lights red while charging, and turns off when charging is complete.eWhen charging is complete, remove the Xi terminal from the desktop holderfRemove the micro USB plug of the charging microUSB adapter from the desktop holder, and remove the AC adapter connector from the external connection jack of the charging microUSB adapter・Pull it straight while pressing the release button of the connector.gRemove the AC adapter power plug from the wall outletTo AC 100VoutletLightDesktopholder Jack on the back side of desktop holderPower plugmicroUSB plugAC Adapter F05Power cableUSB cable](https://usermanual.wiki/Fujitsu/F01D.User-Manual2/User-Guide-1535134-Page-4.png)
![F-01D_EN_ninshou.pdfBefore using the Xi terminal24◆Charging with AC adapterCharge the Xi terminal with FOMA AC Adapter 01/02 (optional) and the included FOMA charging microUSB adapter T01.aInsert the AC adapter connector to the external connection jack of the FOMA charging microUSB adapterbOpen the jack cap (a) of the Xi terminal, insert the microUSB plug of the charging microUSB adapter into the jack (b)cInsert the AC adapter power plug into an outlet・Notification LED lights red while charging, and turns off when charging is complete.dAfter charging is completed, remove the microUSB plug from the Xi terminal, and close the connection jack capeRemove the AC adapter connector from the charging microUSB adapter・Pull it straight while pressing the release button of the connector.fRemove the AC adapter power plug from the wall outlet✔INFORMATION・FOMA charging microUSB adapter T01 is an adapter for connecting the Xi terminal with the AC adapter. If you connect the Xi terminal with a PC using the FOMA USB Cable etc., you cannot send/receive data or charge the Xi terminal. For connection to a PC, use the included FOMA USB Cable for PC connection T01.◆Charging with FOMA USB Cable for PC connectionIf you connect the Xi terminal with a PC using the included FOMA USB Cable for PC connection T01, you can charge the Xi terminal.・When "新しいハードウェアの検索ウィザードの開始 (New hardware detection wizard)" appears on the PC, select "キャンセル (Cancel)".◆Turning power ON1Press and hold X (approx. 2 sec.) until the notification LED lights in greenThe lock screen appears following the startup screen.・Unlocking the screen→P46❖Turning power ON for the first timeWhen you turn power ON for the first time, tap [OK] on the confirmation screen for software update to make initial settings from "はじめに(Getting started)". The settings made can be changed later.→P261[Settings] on each item→Follow the screen to set itemsTo AC 100VoutletmicroUSBplugExternal connectionjackJack capPower plugLightAC Adapter F05Power cableUSB cablePower ON/OFF](https://usermanual.wiki/Fujitsu/F01D.User-Manual2/User-Guide-1535134-Page-5.png)
![F-01D_EN_ninshou.pdfBefore using the Xi terminal25◆Turning power OFF1Press and hold X until the phone options menu appears2[Power off]→[OK]After vibrating once, the terminal turns off.The Xi terminal display is composed of a touch panel designed for being touched directly with fingers. The Xi terminal supports a motion sensor that senses the orientation or motion of the terminal. You can switch the display view by tilting the Xi terminal vertical or horizontal.◆Notes for using the touch panelThe touch panel is designed for being touched lightly with fingers. Do not push it forcibly with a finger or press it with sharp objects (nail, ballpoint pen, pin, etc.).・Touching the touch panel may not work in the following cases. Note that it may cause malfunction.- Operation with gloved hands- Operation with tip of fingernail- Operation with a foreign object on the display- Operation with protective sheet or seal on the display- Operation with wet hand- Operation under water◆Main operations❖Tap/Double-tapTap : Touch the screen lightly and release. The operation becomes effective when you release your finger from the screen.Double-tap : Tap twice quickly. By double-tapping you can zoom in/out the screen such as web page or still image.❖Touch and hold for 1 second or moreTouch and hold the screen for 1 second or more and release. You may need to perform the subsequent action with your finger kept touching the screen.*In this manual, the operation may be described as "(1 sec. or more)".❖Drag/Slide/PanDrag : Touch an item or icon on the screen and move it to the desired position.Slide : Touch the screen and crisscross.Pan : Drag the screen in any direction to view the desired part.・The operation is used when displaying in a single view is not available, such as viewing a web page, Office file, or enlarged still image etc.Basic operation (Using touch panel)Example : Tap](https://usermanual.wiki/Fujitsu/F01D.User-Manual2/User-Guide-1535134-Page-6.png)
![F-01D_EN_ninshou.pdfBefore using the Xi terminal26❖PinchTouch the screen with two fingers and widen (pinch-out) or narrow (pinch-in) the fingers' distance.・This operation is mainly for zooming in/out the screen such as web page or still image.❖FlickTouch the screen and flick away.◆Switching between landscape and portrait viewYou can switch between landscape and portrait view by turning the Xi terminal sideways/upright.・Even when you change the orientation of the Xi terminal, the screen may not change depending on the screen displayed.You can set necessary items collectively for the first time to use the Xi terminal.・Each setting can be changed anytime.1From the Applications menu, [Settings]→[Initial settings]2Set each itemScreen lock : Set screen lock.→P46HOME screen wallpaper : Set wallpaper on the Home screen.→P30Photo screen : Set an image for lock screen.PhoneBookCopy : Copy phonebook.→P53Google Account : Set Google Account.Charge with Desktop Holder : TBD❖About other initial settingsSet the following items as required in addition to the initial setting items.・Email account settings→P75・Wi-Fi functions settings→P57・Access point (ANP) settings→P55Example : DragInitial setting](https://usermanual.wiki/Fujitsu/F01D.User-Manual2/User-Guide-1535134-Page-7.png)
![F-01D_EN_ninshou.pdfBefore using the Xi terminal28◆Notification panelWhen a notification icon appears, you can open the Notification panel to check information on messages or schedule etc.❖Opening the Notification panel1Drag the status bar downward・Tap each notification to check the detailed or make necessary settings.・Tap [Clear] to delete on the notification panel. However, some notification may be deleted depending on the content.・Tap each setting button to turn ON/OFF Wi-Fi, Bluetooth, GPS function, Wi-Fi hotspot, or USB access point. When set to ON, the buttons turn to yellow green.✔INFORMATION・Alternatively, from the Home screen, →Tap [Notifications] to open the notification panel.❖Closing the Notification panel1Drag the tab at the bottom of the Notification panel ( ) upward, or ◆When the screen display is turned offWhen no operation is performed in certain period of time, the display is automatically turned off according to the screen time out setting and the Xi terminal goes into sleep mode.1X or The sleep mode is canceled.・When screen lock is activated, screen lock is deactivated.→P46✔INFORMATION・When activating sleep mode manually, press X while in display mode.・When receiving a call or SMS message while in sleep mode, sleep mode is deactivated.Setting buttonsNotifications](https://usermanual.wiki/Fujitsu/F01D.User-Manual2/User-Guide-1535134-Page-9.png)
![F-01D_EN_ninshou.pdfBefore using the Xi terminal29Home screen is a start screen to use applications. You can return to the Home screen anytime by pressing .You can customize the home screen by locating applications or widgets. Up to 5 home screens can be set. You can switch the screens by sliding left and right.◆Viewing home screenaStatus bar→P27Conditions on the Xi terminal, etc. are notified with icons.bCustomize area→P29Part of the Home screen, which you can customize You can locate shortcuts, widgets, folders, wallpaper and App history. Yon can delete items displayed by default.cApp historyThe 3 most recently-used applications are displayed among used applications which are activated from the application menu. Tap to start the applications.・Applications displayed with customized shortcuts on the Home screen are not included.dThe position of the Home screenIndicate which screen is currently displayed among the 5 Home screens .eMail/new mailTap to activate any of sp-mode mail, Email, or SMS according to the settings of new mail type. When new mails arrive, it is notified with .fActivate an applicationTap to display the application list.Touch and hold for 1 second or more to display 5 panels so that you can switch the Home screen.✔INFORMATION・From the Applications menu, tap [Settings] to display the setting menu.→P55◆Customizing the Home screenYou can locate desired application shortcuts or widgets on the Home screen.Home screenabfed : Missed call : Calling : New mailgc](https://usermanual.wiki/Fujitsu/F01D.User-Manual2/User-Guide-1535134-Page-10.png)
![F-01D_EN_ninshou.pdfBefore using the Xi terminal30❖Adding shortcuts or widgets1From the Home screen, →[Edit Homescreen]Switch to edit screen.・Slide left and right to switch the Home screen that you want to customize.2[Add]→[Shortcuts]/[Widgets]/[Folders]/[App history]→Select an itemYou can paste a selected item on the Home screen.・When you tap [App history], items are not selectable.・You can drag pasted items to change their positions or put them into to delete.・From the Home screen, touch and hold the customize area for 1 second or more to display the menu.3[Done]✔INFORMATION・Even though 2 or more widgets for speed dials are pasted, up to 4 items can be registered. All widgets for speed dials are linked and their contents become the same.❖Deleting shortcuts or widgets1→Slide left and right to display the Home screen that you want to customize2Select a shortcut or widget you want to delete (1 sec. or mode)→Drag it to ◆Changing Home screen wallpaper1From the Home screen, →[Wallpaper]・You can also customize by touching and holding the customize area for 1 second or more and tapping [Wallpapers].2[Gallery]/[Live wallpapers]/[Wallpaper]→Select an image→[Set wallpaper]・When you select an image by tapping [Gallery], drag the inside of the trimming frame to specify the position, and drag the corner of the trimming frame to zoom in/out, and tap [Save] before setting is complete.・When you tap [Live wallpapers]→[Photo Collage], tap [Settings・・・]→[Select image folders]→[Select folders]→Mark a folder to specify so that you specify an image folder in the microSD. Display mode can also be set. Still images taken with the camera are saved in the DCIM\Camera folder, and downloaded images are saved in the download folder.You can also specify an image folder saved to a microSD card from a PC. For details on saving still images to a microSD card from a PC, see "Operating data on a microSD card from a PC".→P89◆Switching to another home screen1From the Applications menu, [Homescreen selector]→[OK]2Select another Home screen・If you mark [Use by default for this action], the Home screen will not be displayed when pressing .✔INFORMATION・To return to the Home screen, tap [Home] in Step 2.](https://usermanual.wiki/Fujitsu/F01D.User-Manual2/User-Guide-1535134-Page-11.png)
![F-01D_EN_ninshou.pdfSettings71◆Checking profile1From the Applications menu, [Settings]→[Profile]Your phone number and information saved to [Profile] can be displayed.◆Checking device information and version1From the Applications menu, [Settings]→[About tablet]2Check itemsSoftware updates : Update software to latest one.→P123Status : Check battery status, phone number, network name and address, IMEI (individual serial number), etc.Battery use : Check battery usage for each application.Legal information : Check Open source license or the Terms of use of Google.Authenticate : Display authenticate logoModel numger : Check the device number.Android version/Baseband version/Kernel version, Build number : Check each version or number.About phone](https://usermanual.wiki/Fujitsu/F01D.User-Manual2/User-Guide-1535134-Page-12.png)