Fujitsu OG Cover En If Not Then Fi 4530c Ops Guide
User Manual: Fujitsu If not then Manual: ://www.fujitsu.com/s/COMP/fcpa/scanners/discontinued/fi-4530c_ops-guide
Open the PDF directly: View PDF ![]() .
.
Page Count: 133 [warning: Documents this large are best viewed by clicking the View PDF Link!]
- fi4530C.pdf
- Chapter1 Chapter1 BASIC SCANNER OPERATIONS
- Chapter2 Chapter2 SCANNING VARIOUS TYPES OF DOCUMENTS
- 2.1 Scanning double sided Documents
- 2.2 Scanning Documents with different Widths
- 2.3 Scanning thin Documents
- 2.4 Scanning Documents longer than A3 size
- 2.5 Saving scanned Images in PDF Format
- 2.6 Excluding a Color from the Image (dropout color)
- 2.7 Skipping blank Pages
- 2.8 Detecting Double-Feeds
- 2.9 Correcting the skewed Documents
- Chapter3 Chapter3 DAILY CARE
- Chapter4 Chapter4 REPLACING CONSUMABLES
- Chapter5 Chapter5 TROUBLESHOOTING
- Chapter6 Chapter6 DOCUMENT SPECIFICATIONS FOR THE ADF
- Chapter7 Chapter7 SCANNER SPECIFICATIONS
- APPENDIX APPENDIX Before using the [Scan] or the [Send to] button
- GLOSSARY GLOSSARY OF TERMS
- INDEX
Operator's Guide
fi-4530C Image Scanner
P3PC-E577-01EN

fi-4530CImage Scanner Operator's Guide i
CONTENTS
Chapter1 BASIC SCANNER OPERATIONS............................ 1
1.1 Turning the Scanner ON .................................................... 2
1.2 Loading Documents on the ADF for Scanning ................ 3
1.3 Scanning Documents ......................................................... 7
1.4 How to use the Scanner Driver.......................................... 9
Chapter2 SCANNING VARIOUS TYPES OF DOCUMENTS. 25
2.1 Scanning double sided Documents................................ 26
2.2 Scanning Documents with different Widths .................. 28
2.3 Scanning thin Documents ............................................... 29
2.4 Scanning Documents longer than A3 size ..................... 31
2.5 Saving scanned Images in PDF Format ......................... 34
2.6 Excluding a Color from the Image (dropout color)........ 42
2.7 Skipping blank Pages....................................................... 44
2.8 Detecting Double-Feeds................................................... 46
2.9 Correcting the skewed Documents................................. 48
Chapter3 DAILY CARE .......................................................... 51
3.1 Cleaning Materials and Locations requiring Cleaning.. 52
3.2 Cleaning the ADF.............................................................. 54

ii
Chapter4 REPLACING CONSUMABLES .............................. 59
4.1 Consumable and Replacement Cycle............................. 60
4.2 Replacing the Pad ASSY.................................................. 66
4.3 Replacing the Pick Roller................................................. 70
Chapter5 TROUBLESHOOTING............................................ 79
5.1 Removing Jammed Documents ...................................... 80
5.2 Remedying Common Troubles........................................ 82
5.3 Items to check before contacting the agent where you
bought the scanner .......................................................... 97
5.4 Checking Labels on the Scanner .................................... 99
Chapter6 DOCUMENT SPECIFICATIONS
FOR THE ADF ...................................................... 101
6.1 Document Size ................................................................ 102
6.2 Document Quality ........................................................... 103
6.3 Maximum ADF Capacity................................................. 106
6.4 Area not to be perforated............................................... 107
6.5 Double-feed Detection Conditions................................ 108
Chapter7 SCANNER SPECIFICATIONS ............................. 111
7.1 Basic Specifications....................................................... 112
7.2 Installation Specifications ............................................. 114
7.3 External Dimensions ...................................................... 116

fi-4530CImage Scanner Operator's Guide iii
APPENDIX Before using the [Scan] or the [Send to] button ...... AP-1
GLOSSARY GLOSSARY OF TERMS............................................... GL-1
INDEX ...................................................................................................... IN-1

iv

1
fi-4530CImage Scanner Operator's Guide 1
Chapter1
BASIC SCANNER OPERATIONS
This chapter describes basic scanner operations.
In this chapter Windows XP screenshots are illustrated.
The screens and operations may differ slightly if the OS you are using is not Windows XP.
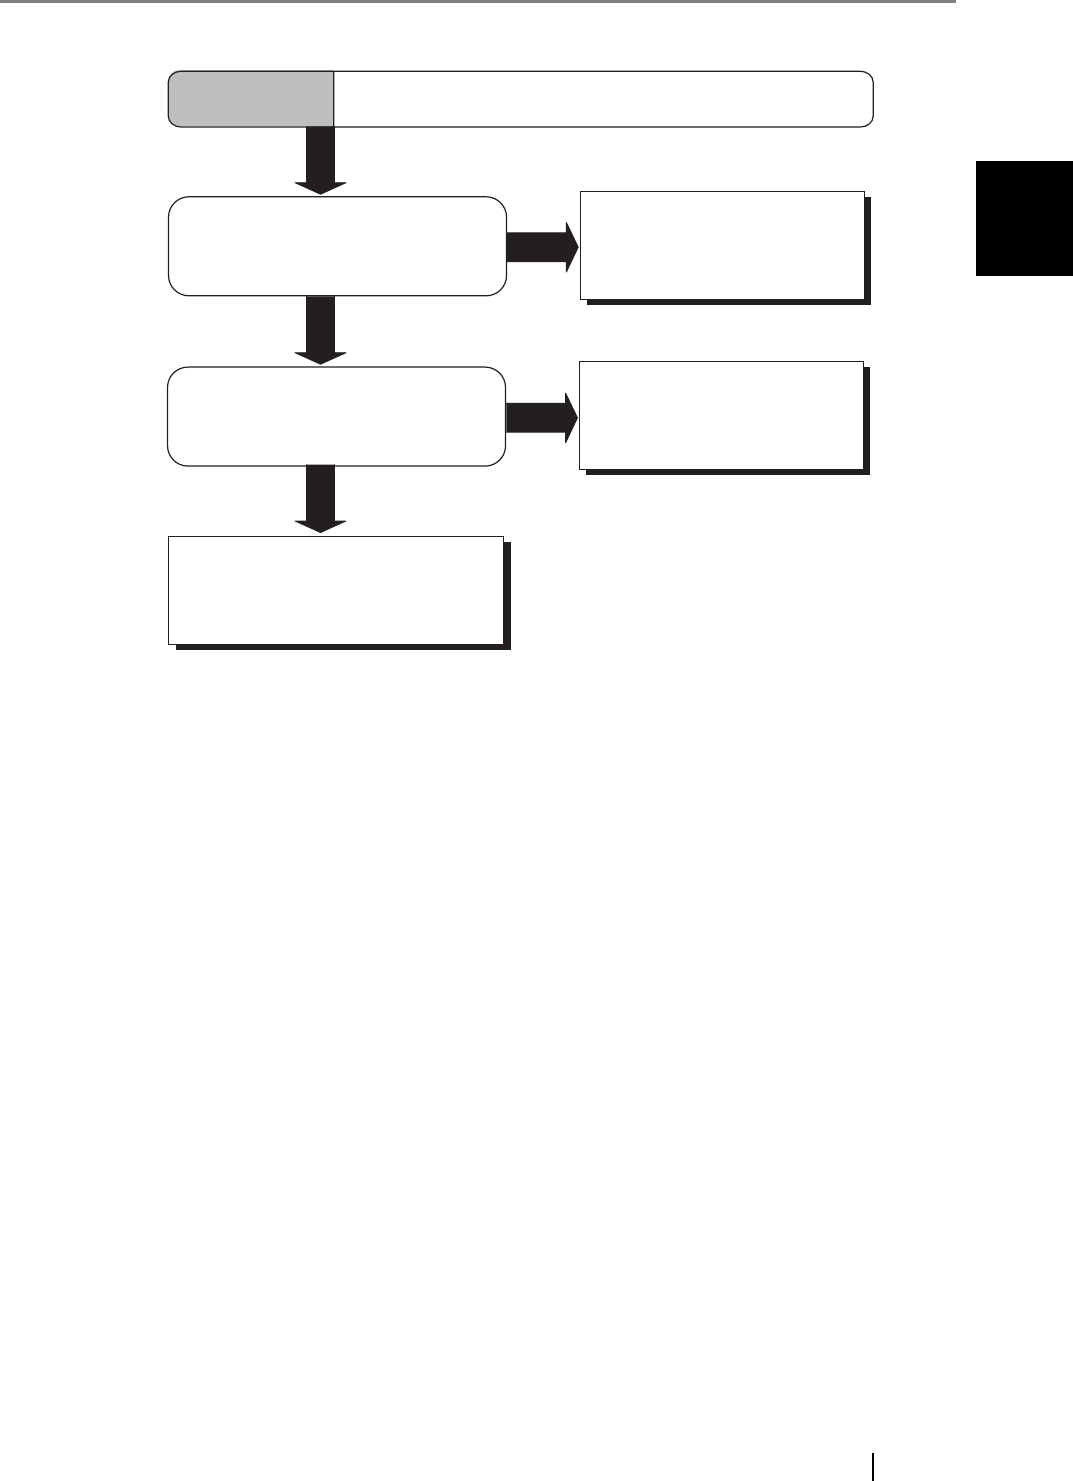
Also, when FUJITSU TWAIN32 is updated the screens and operations noted in this chapter will
differ slightly.
1.1 Turning the Scanner ON......................................................................................... 2
1.2 Loading Documents on the ADF for Scanning .................................................... 3
1.3 Scanning Documents ............................................................................................. 7
1.4 How to use the Scanner Driver.............................................................................. 9

2
1.1 Turning the Scanner ON
1. Press the power button on the operator panel.
The scanner is turned ON, and the green LED on the operator panel lights.
During the initialization, the indication of the Function No. display changes as follows:
“8”->"P" -> "0" -> "1"
The indication "1" means that the operator panel is in the ready status.
■ Power Save Mode
The Power Save mode keeps the scanner in a low-powered state if no operation is performed on the
scanner for 15 minutes after it has been turned ON. The scanner is automatically switched to the
Power Save mode.
In the Power Save mode, the indication of the Function No. display on the operator panel goes out,
while the green LED is kept lit.
To return the scanner from the Power Save mode, perform one of the following operations:
•Load documents on the ADF paper chute.
•Press any button on the operator panel.
The scanner will be turned OFF when pressing down the power button for two seconds.
•Execute a command from the scanner driver.
HINT
To turn the scanner OFF, hold the power button down for two seconds.
Power button

1.2 Loading Documents on the ADF for Scanning
fi-4530CImage Scanner Operator's Guide 3
BASIC SCANNER OPERATIONS
1
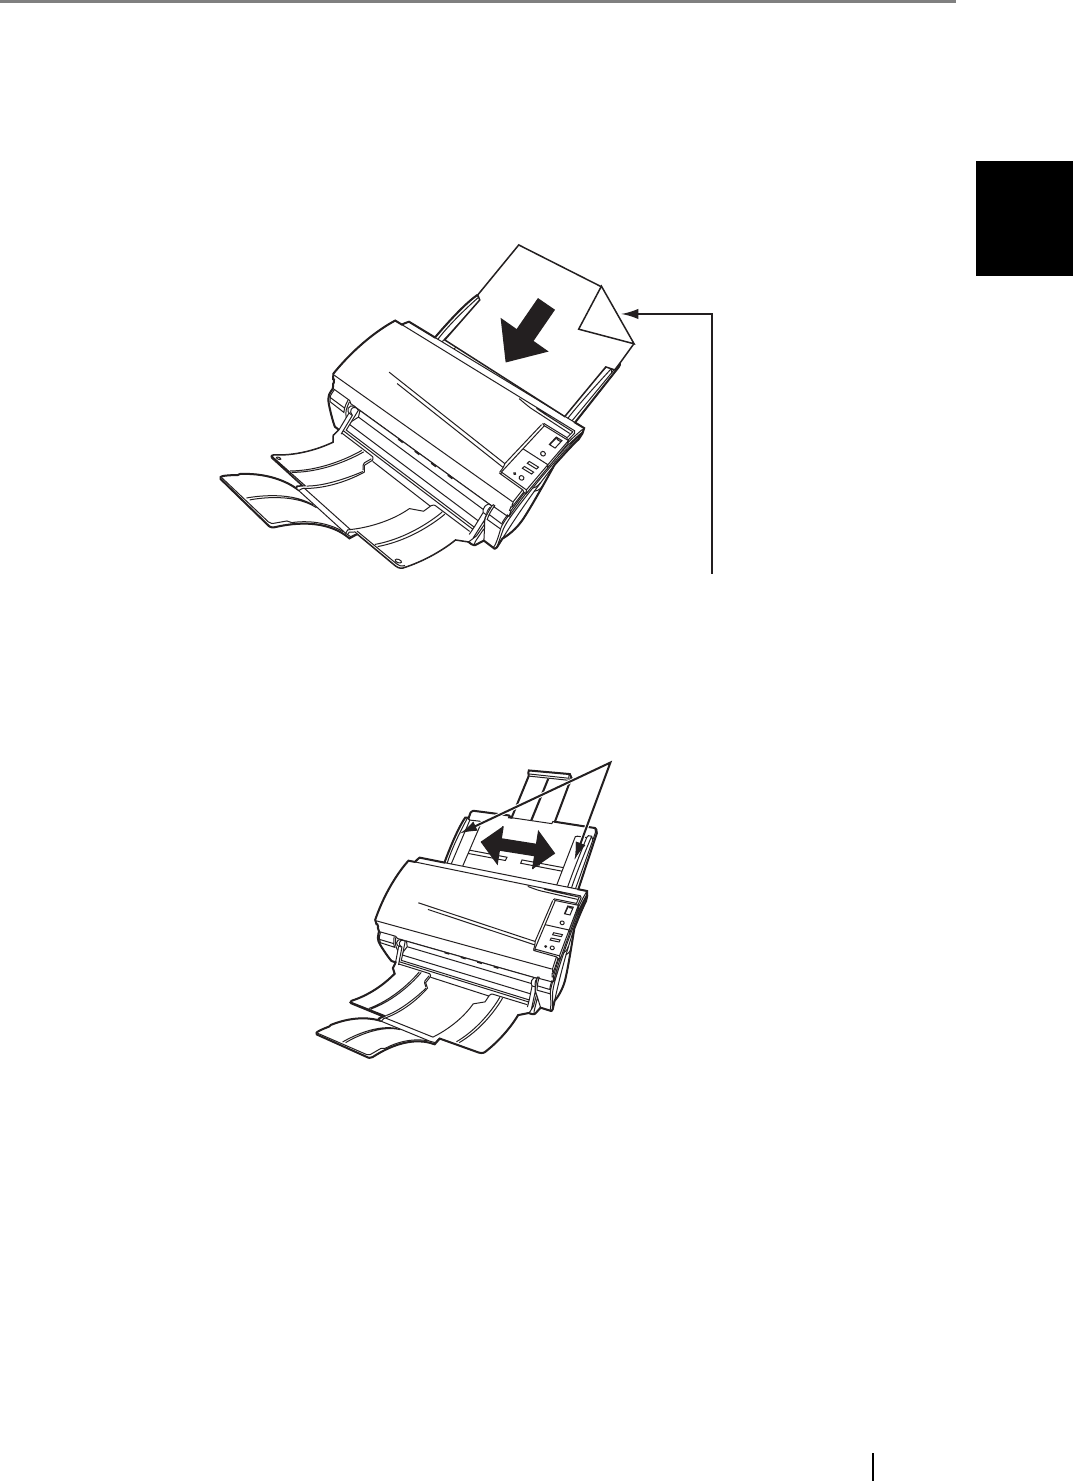
1.2 Loading Documents on the ADF for Scanning
1. Align the edges of the documents.
1) Confirm that all the documents have the same width.
2 ) Check the number of the sheets in the document stack.
The standard number of sheets that can be loaded on the scanner is as follows:
•A4-size paper or smaller that makes a document stack of 10mm or less (100 sheets
at 64 g/m2)
•A3-size paper or smaller that makes a document stack of 5mm or less (50 sheets at
64 g/m2)
2. Fan the documents as follows:
1) Lightly grip both ends of the documents with both hands, and bend the documents as fol-
lows.
2 Hold the documents firmly with both hands and bend them back as follows so that the
bent section rises up in the middle of the stack as shown below.
3 Repeat steps 1) to 3) a couple of times.
4 Rotate documents 90 degrees, and fan again.
10mm
4
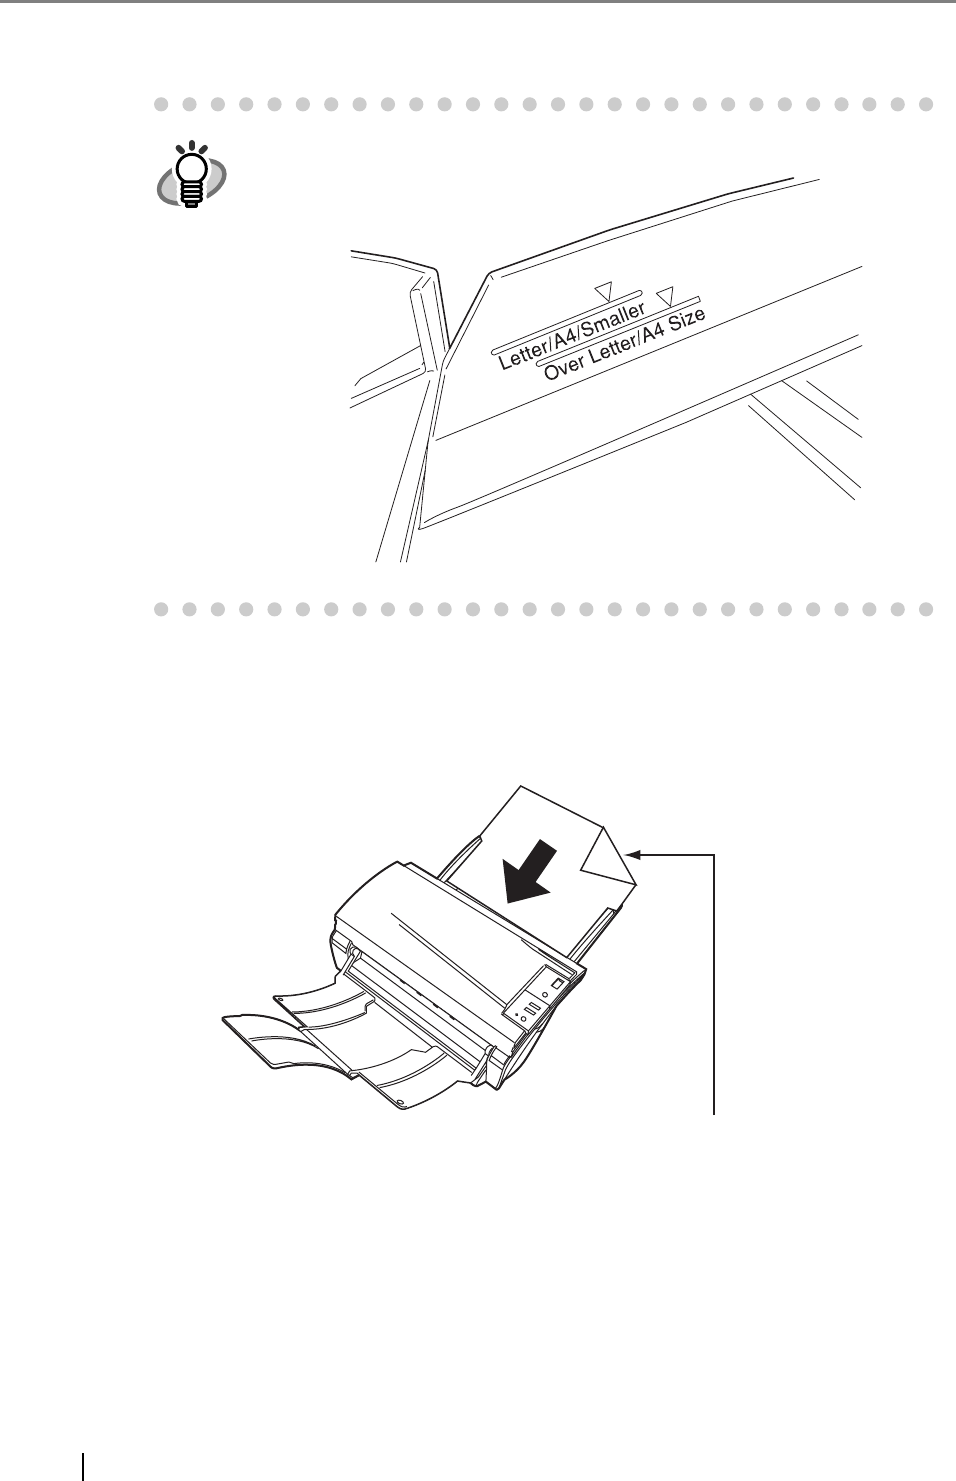
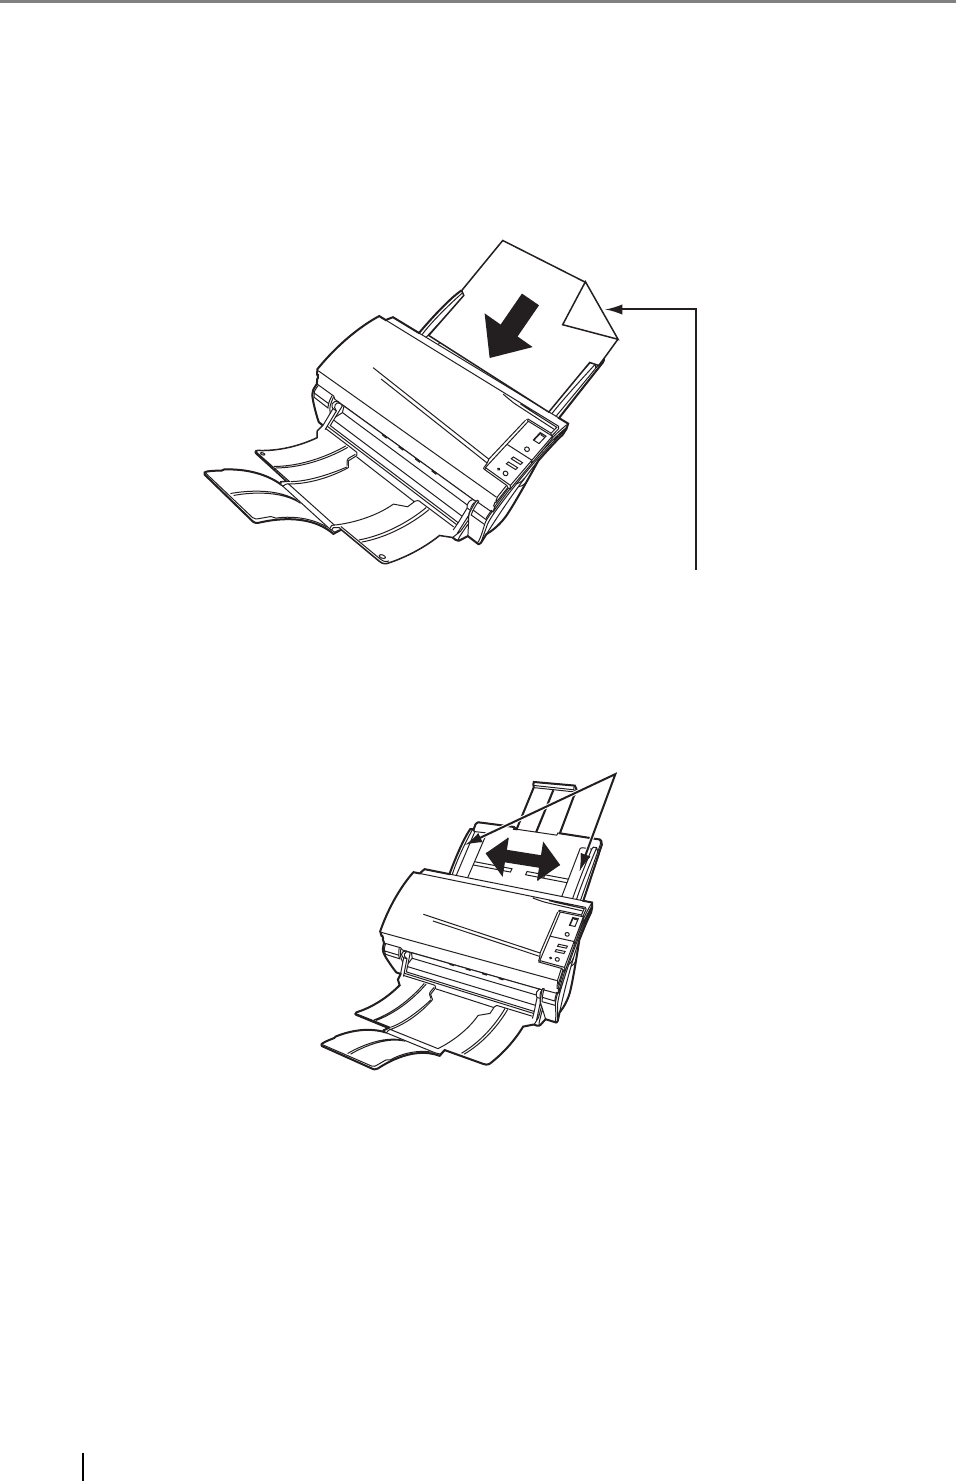
3. Align the top of the documents.
4. Load the documents on the ADF paper chute.
Set the documents face-down in the ADF paper chute (so that the side to be scanned faces
towards the ADF paper chute).
HINT
Set the documents so that the stack will be lower than the line mark.
Load the documents facing the ADF
paper chute.(face down)
A
1.2 Loading Documents on the ADF for Scanning
fi-4530CImage Scanner Operator's Guide 5
BASIC SCANNER OPERATIONS
1
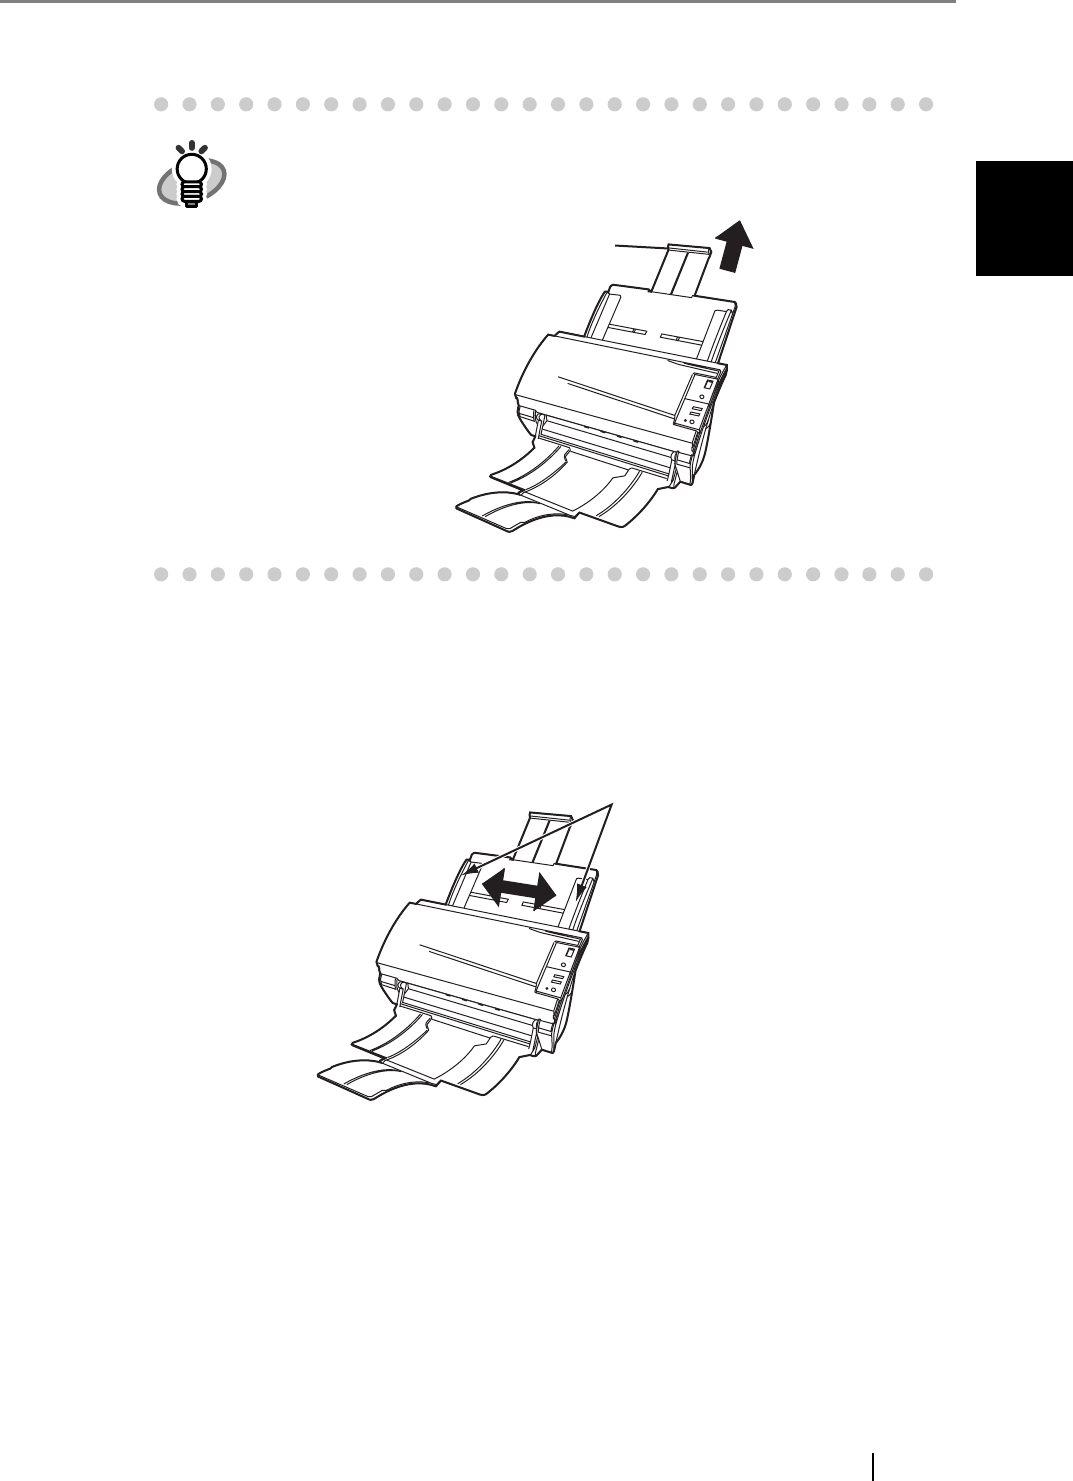
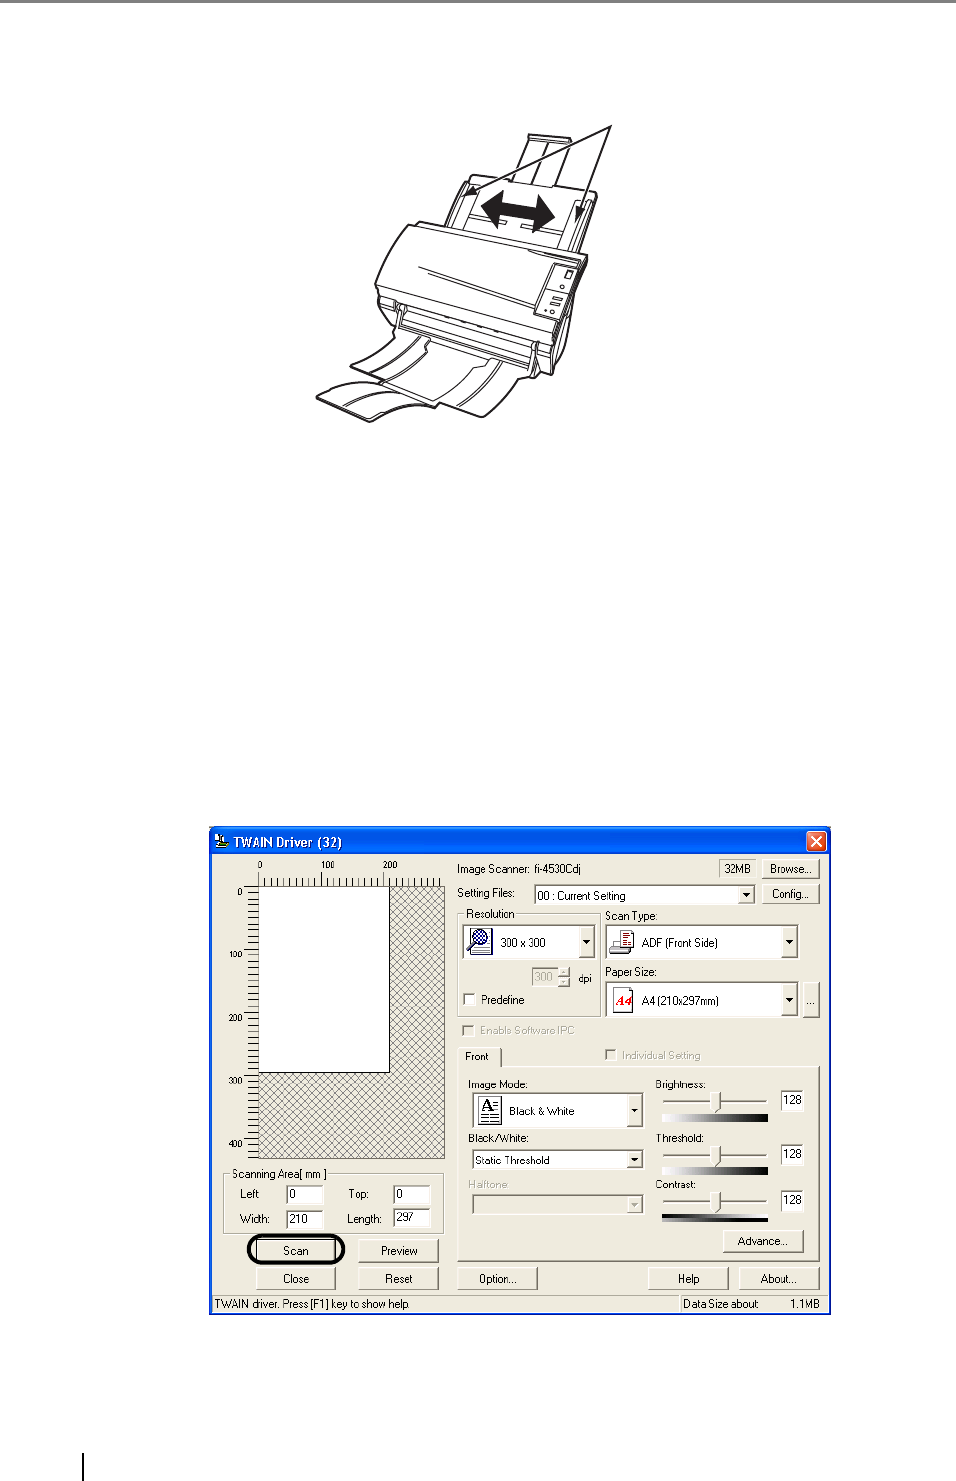
5. Adjust the side guides to the width of the documents.
Move the side guides so that they touch both sides of the documents.
If there is any clearance between the side guides and the edges of documents, the scanned
image may be skewed.
HINT
Before loading pull out the ADF paper chute extension according to the
lengths of the documents.
Extension
Side guides
6
6. Start up the scanner application and scan the documents.
For details on how to scan documents using the ScandAll 21 application, refer to "1.3 Scan-
ning Documents" on page 7.
HINT
The stacker prevents document sheets from dropping after they were
scanned.
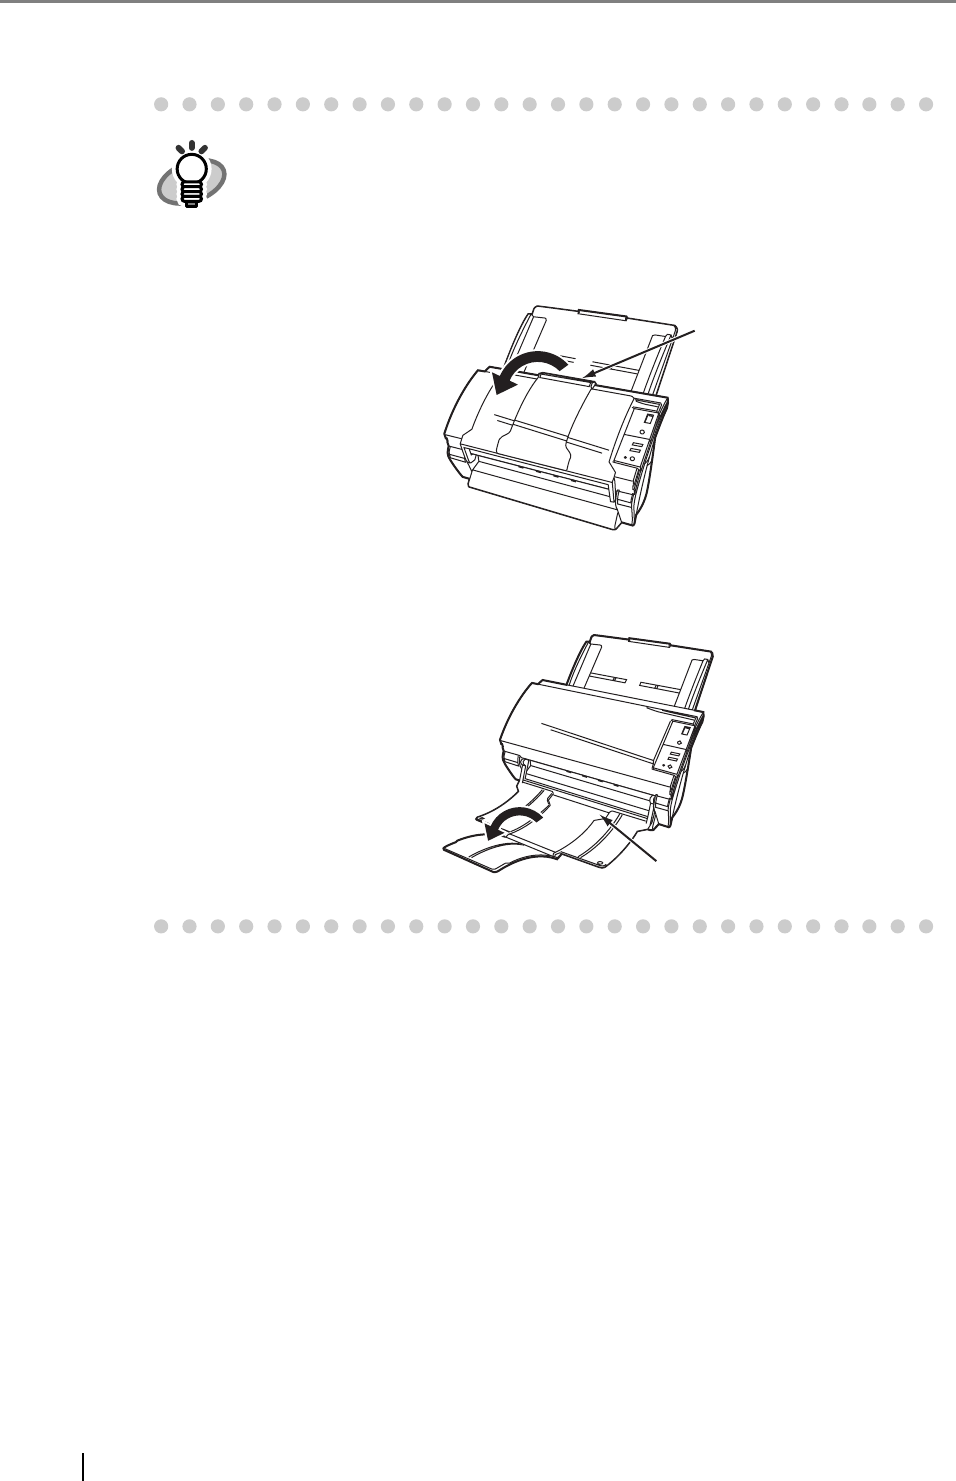
Use the stacker as follows:
1. Lift up the stacker towards you by inserting your fingertips into the
handle on the scanner.
2. Lift the paper stop and swing forward by inserting your fingertips into
the indentations on the stacker.
handle
Indentation
1.3 Scanning Documents
fi-4530CImage Scanner Operator's Guide 7
BASIC SCANNER OPERATIONS
1
1.3 Scanning Documents
1. Load documents on the scanner's ADF paper chute.
For details about loading documents, refer to "1.2 Loading Documents on the ADF for Scan-
ning" on page 3.
2. Start up ScandAll 21.
Select [Start] - [Program] - [Scanner Utility for Microsoft Windows] - [ScandAll 21].
⇒ This starts up ScandAll 21.
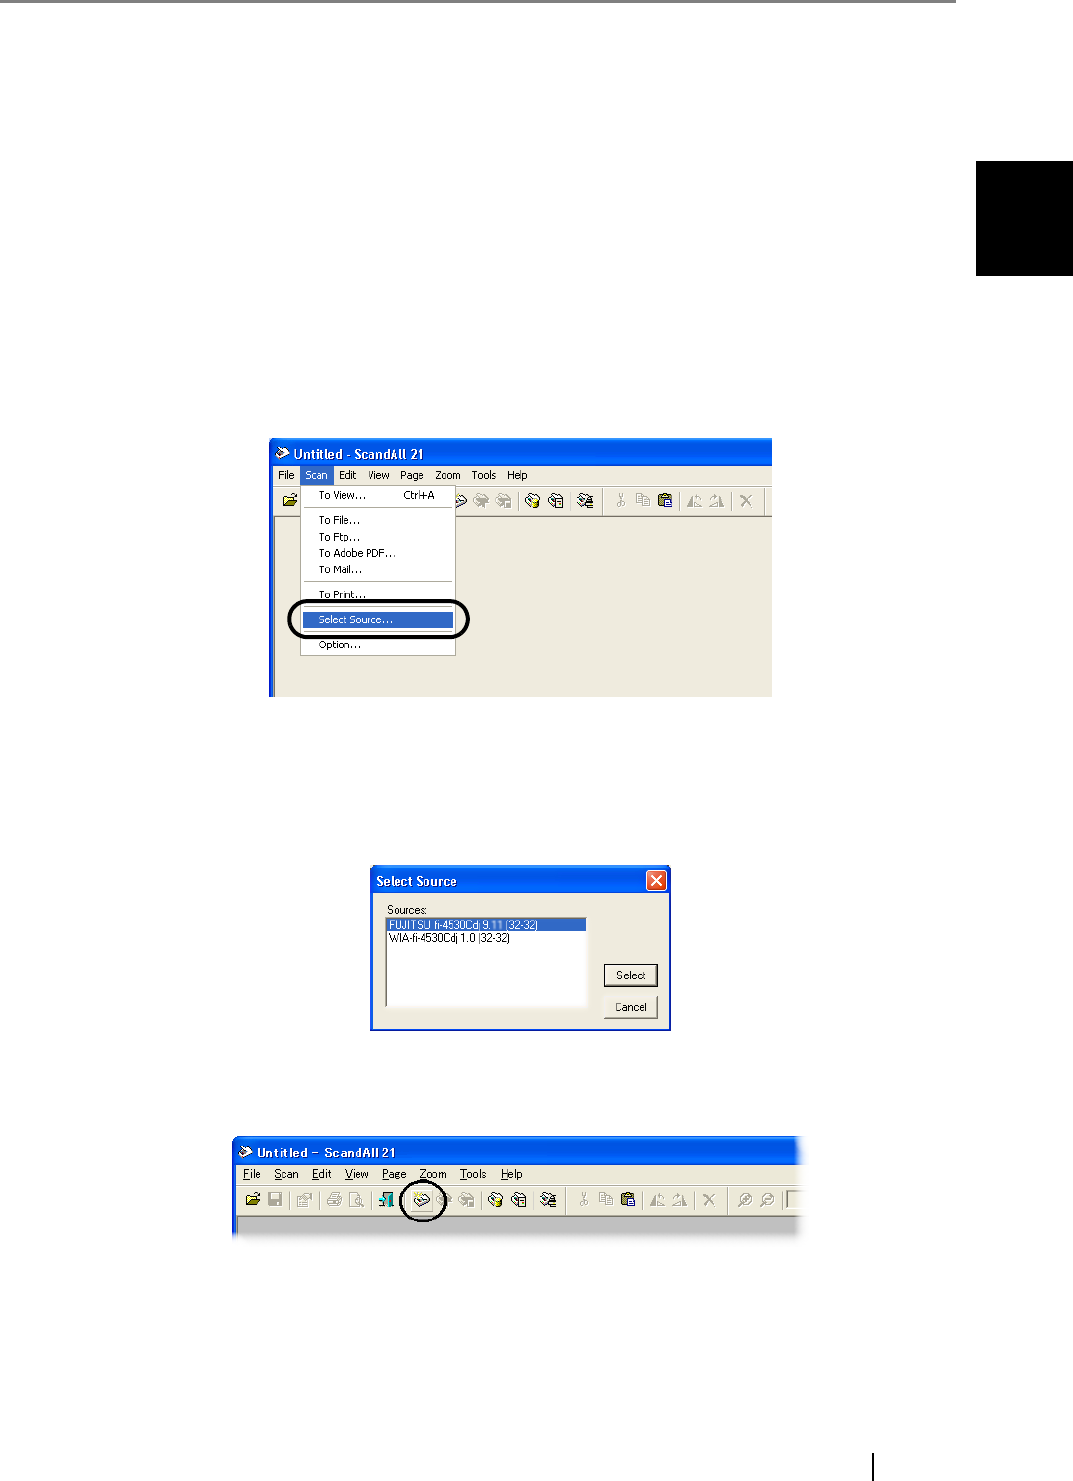
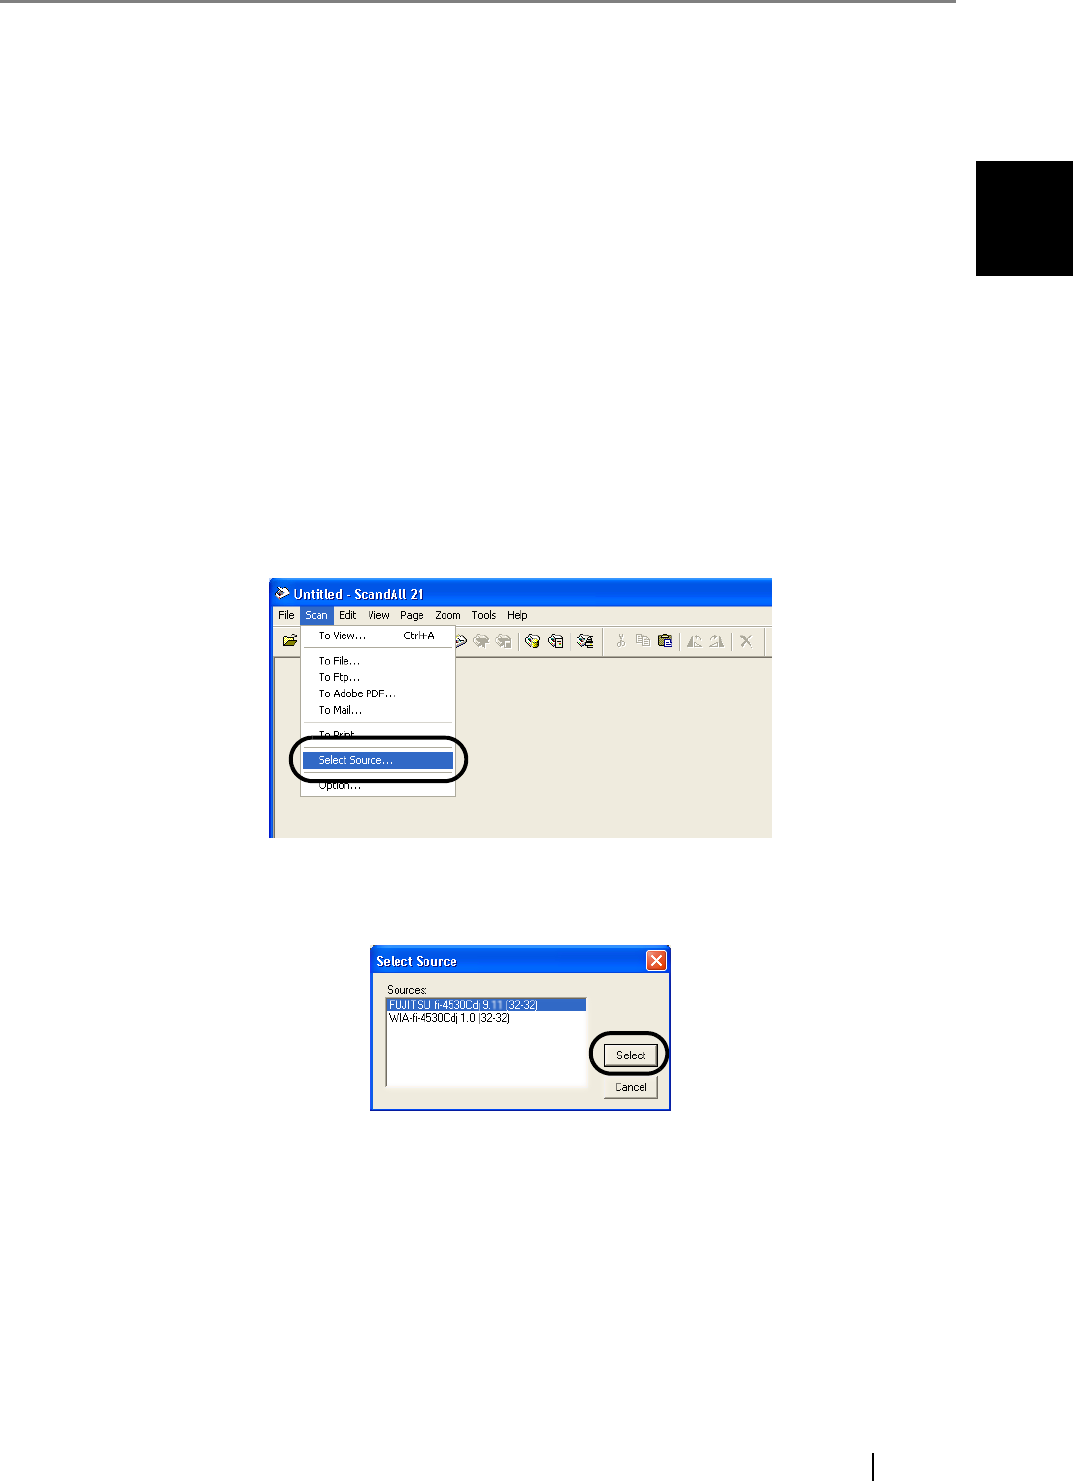
3. Select the scanner to use.
Select [Select Source] from the [Scan] menu.
⇒ The [Select Source] dialog box appears.
Select "FUJITSU fi-4530Cdj" (for Windows 95 and WindowsNT 4.0, select “FUJITSU
TWAIN 32”) and click the [Select] button.
4. Click the [Scan To View] button on the tool bar.
⇒ The [TWAIN Driver] dialog box (for setting the scan conditions) appears.
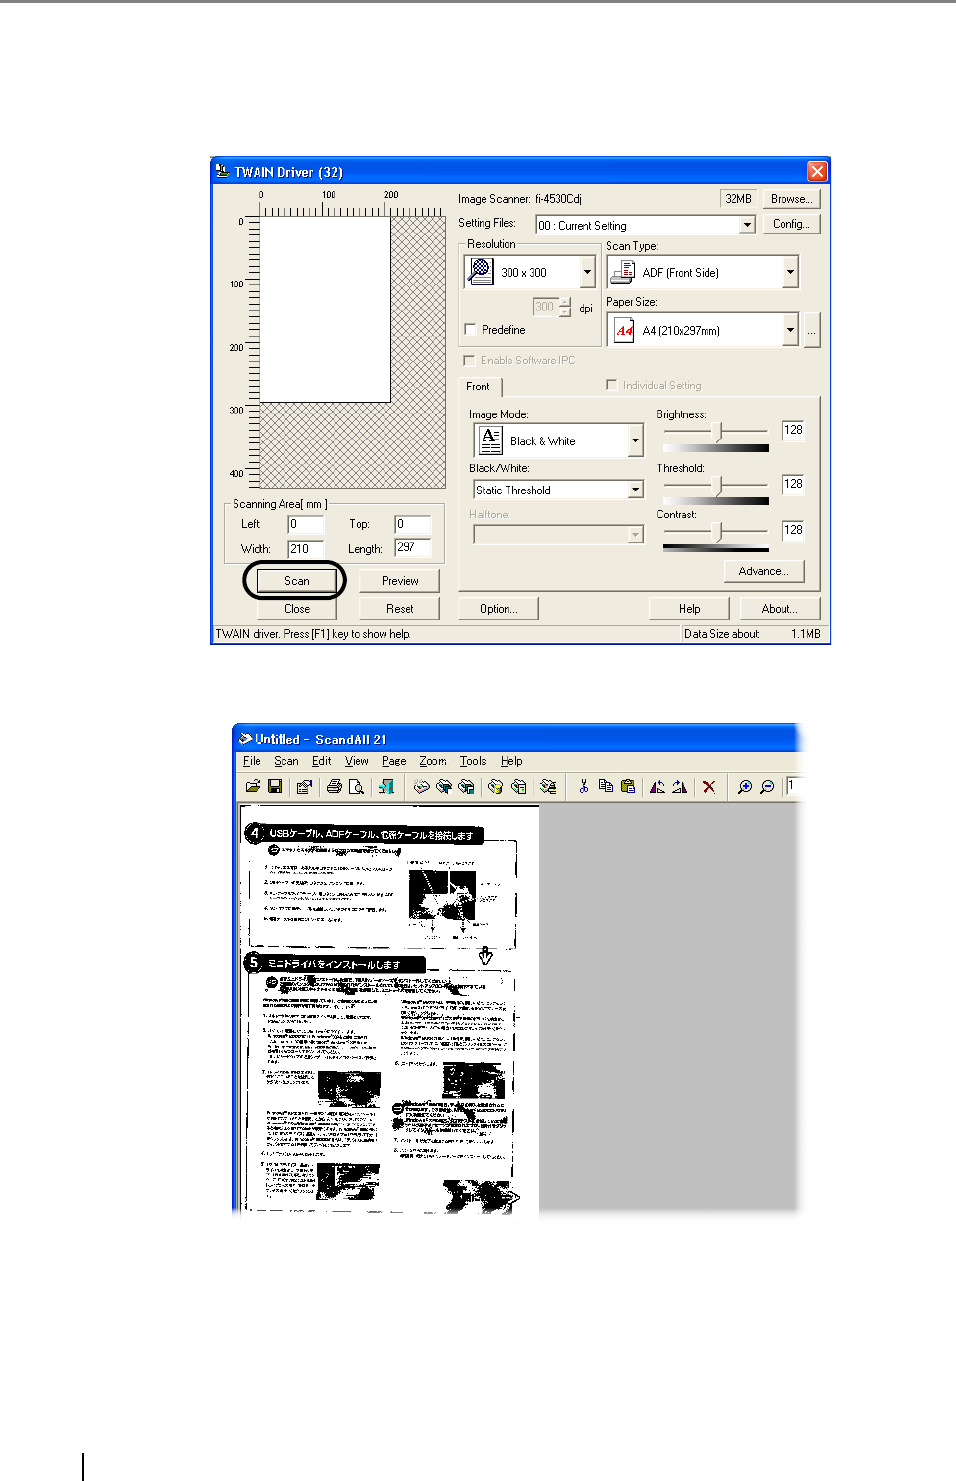
8
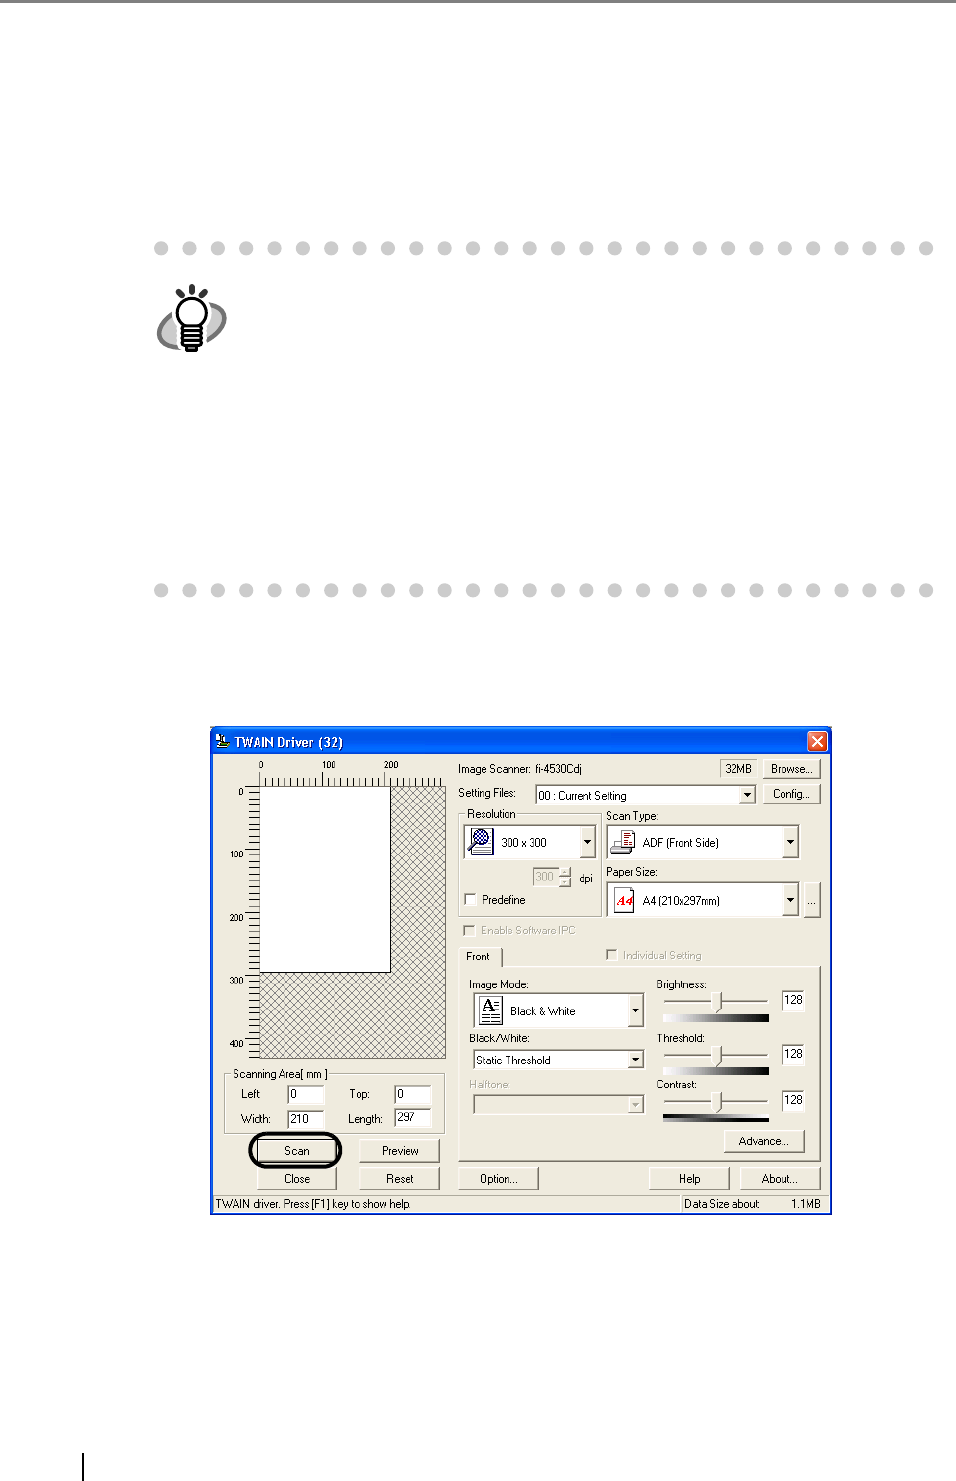
5. Set the scan resolution, paper size, etc., and click the [Scan] button.
For details on settings in the [TWAIN Driver] dialog box, refer to the "FUJITSU TWAIN 32
Scanner Driver Help" on the Setup CD-ROM.
⇒ The images of scanned documents are displayed on the [ScandAll 21] window.
For details on different types of scanning, refer to "2 SCANNING VARIOUS TYPES OF
DOCUMENTS" on page 25.
For details on functions and operations of ScandAll 21, refer to "ScandAll 21 Help".
1.4 How to use the Scanner Driver
fi-4530CImage Scanner Operator's Guide 9
BASIC SCANNER OPERATIONS
1
1.4 How to use the Scanner Driver
■ FUJITSU TWAIN32 Scanner Driver
FUJITSU TWAIN32 Scanner Driver is designed for scanning documents with FUJITSU image
scanner fi series by using application software that complies with the TWAIN standard.
The following describes the procedure with examples of ScandAll 21 for ordinary scanning by
using this driver software.
1. Procedure for Basic Scanning Operation
1. Startup the application.
From the [Start] menu, select [Programs]-[Scanner Utility for Microsoft Window] and
click [ScandAll 21].
2. Select your scanner on the window below.
Select [Select Source] from the [Scan] menu.
3. Select the scanner to use, then click the [Select] button.
Select
•[FUJITSU fi-4530C] for FUJITSU TWAIN32 V9
or
•[FUJITSU TWAIN32] for FUJITSU TWAIN32 V8
then click the [Select] button.
10
4. Load the documents on the scanner.
Methods for loading documents vary depending on the type of the scanner.
For details, refer to "fi-4530C Operator's Guide" on the Setup CD-ROM.
5. Open the TWAIN Driver window.
Select [Scan To View] from the [Scan] menu.
6. Configure settings for scanning and click the [Scan] button.
For details about the settings on this window, refer to "Setting Window for FUJITSU
TWAIN32 Scanner Driver" on page 12.
HINT
ScandAll 21 provide scanning methods as follows:
•[To View...] :Displays scanned images on the window.
•[To File...:] :Saves scanned images as files (*.BMP, *.TIF, *.JPG).
•[To FTP...:] :Transfers scanned images to a FTP server.
•[To Adobe PDF...:] :Saves scanned images as PDF files.
(*Adobe Acrobat must be installed beforehand.)
•[To Microsoft &SharePoint Portal Server...] :Transfers scanned images to
Microsoft Share Point Portal Server.
•[To Mail...] :Launches mailer software and attaches scanned images to e-
mail.
For details, refer to "ScandAll 21 Help".

1.4 How to use the Scanner Driver
fi-4530CImage Scanner Operator's Guide 11
BASIC SCANNER OPERATIONS
1
7. The images of scanned documents are displayed on the [ScandAll 21] window.
Depending on the settings of application software, images may not displayed.
For details, refer to the documentation or Help file of your application.
e.x.) When you select [To File...] from the [Scan] menu of ScandAll 21, images of
scanned documents are not displayed on the window.
8. Save the scanned images.
Select [Save As...] from the [File] menu to save the scanned images.
IF you wish to start another scanning, return to the procedure 4.
9. End the application.
Select [Exit] from the [File] menu.
12
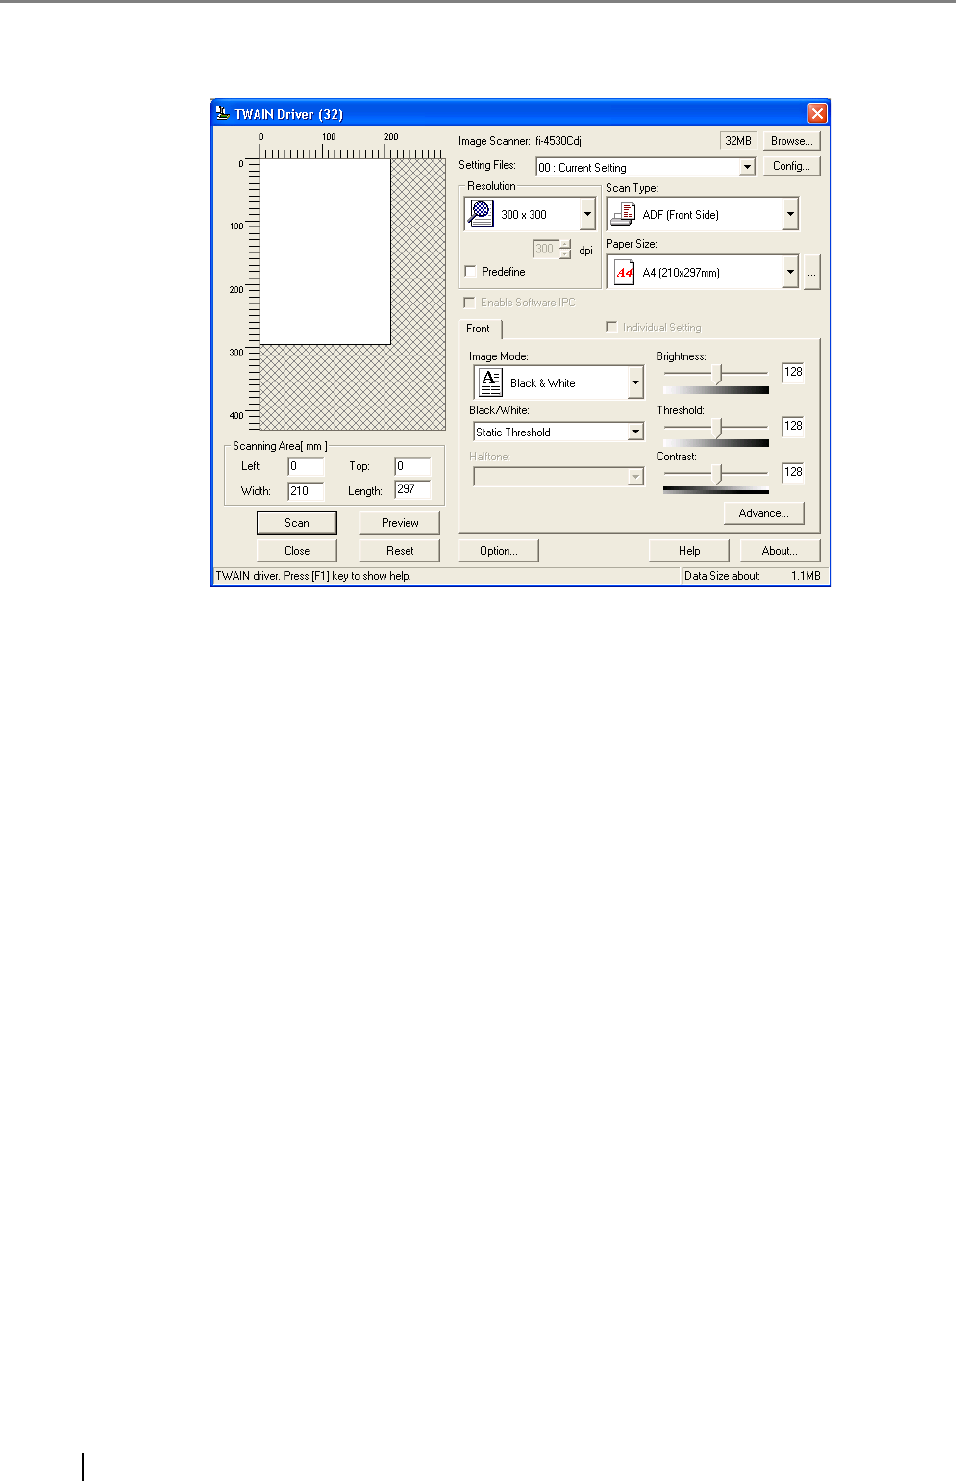
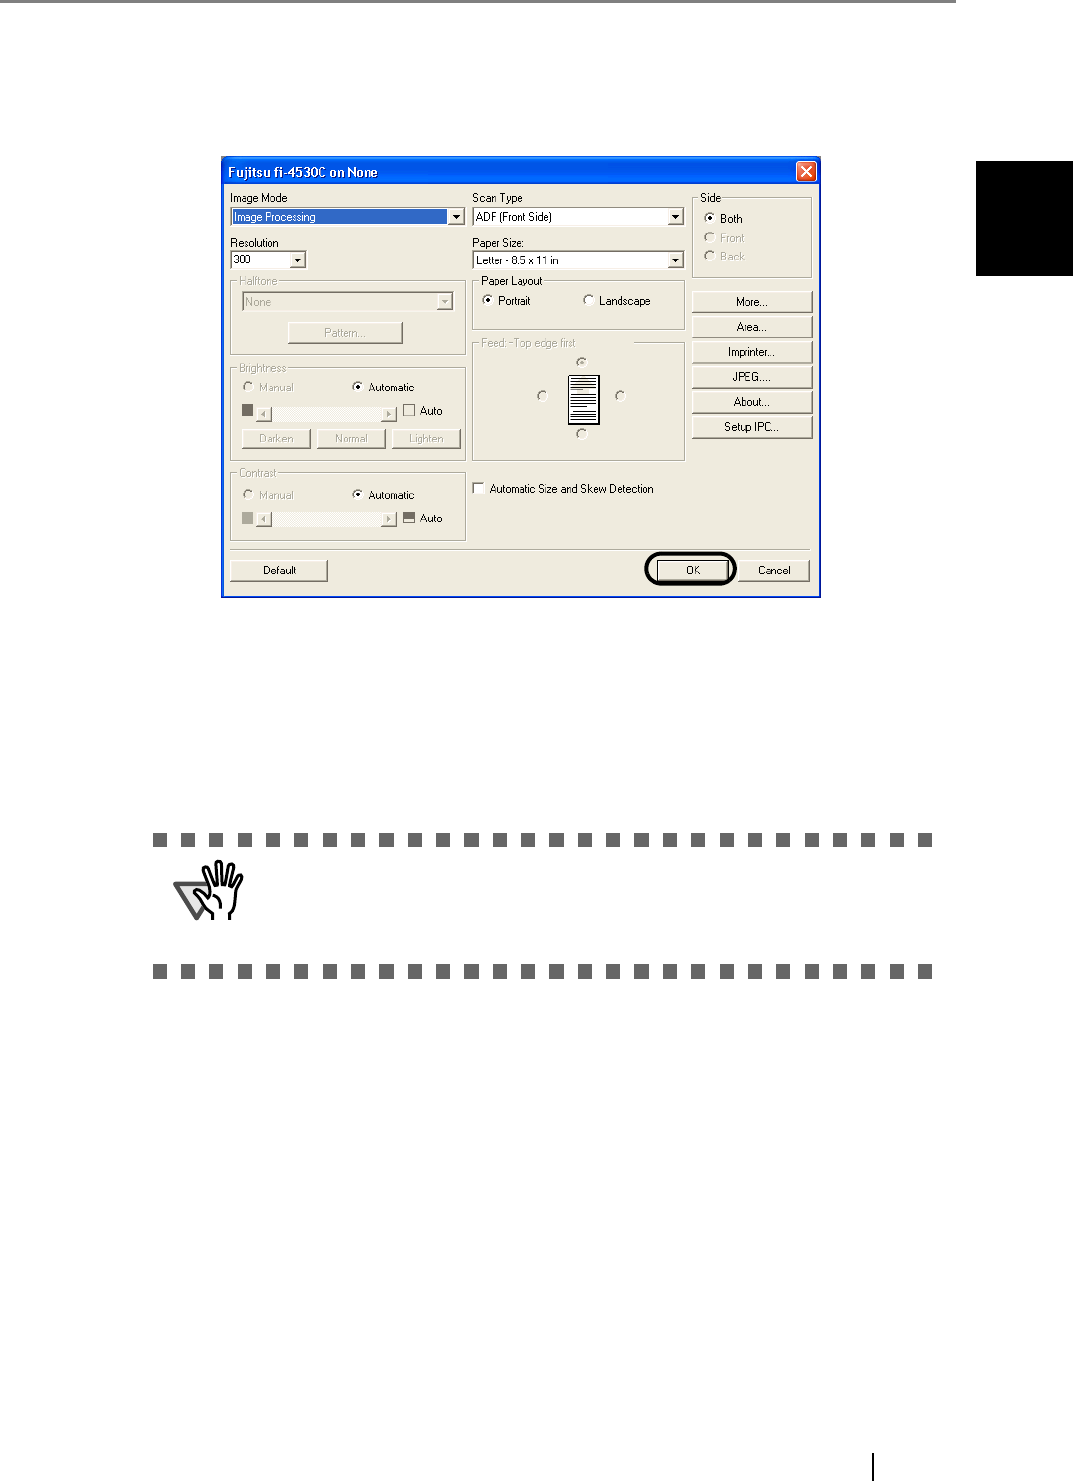
2. Setting Window for FUJITSU TWAIN32 Scanner Driver
You can perform settings for the FUJITSU TWAIN32 Scanner Driver on this window.
The following describes the main setting items.
•For details on each functions, refer to "FUJITSU TWAIN32 Scanner Driver Help"
(appears by pressing [Help] or [F1] button).
•Depending on the type of your scanner, available setting items or range of setting
values vary.
Resolution
Specifies the resolution of scanning.
It can be specified by selecting a default value from the list or customizing (specify any
resolution in 1 dpi unit).
By marking the [Predefine] checkbox, you can select one from three predefined set-
tings as [Normal], [Fine], [Super Fine] to scan documents instead of setting details by
yourself.
Otherwise, you can change the details of the predefined settings on the [Resolution Set-
ting] window, which appears when you click on the [...] button.
Scan Type
Specifies the feeding method (Flatbed/ADF), the side(s) to be scanned (Front Side,
Back Side, Duplex) or details of Long page (the size of documents longer than A3).
Paper Size
Select the size of documents to be scanned from this list.
Windows for customizing the paper size will appear when you click on [...] besides the
list. You can save any document size as a customized setting (up to three) or for chang-
ing the order of the paper size in the list.
1.4 How to use the Scanner Driver
fi-4530CImage Scanner Operator's Guide 13
BASIC SCANNER OPERATIONS
1
Image Mode
Specifies the image type for the scanned documents.
[Scan] button
Starts scanning documents with the current settings.
[Preview] button
Documents are scanned preliminarily before the actual scanning.
You can confirm the image of the documents in the preview window.
[Close] button
Saves the current settings and closes this window.
[Reset] button
Used to undo changes of settings.
[Help] button
Opens the "FUJITSU TWAIN32 Scanner Driver Help" window. The window also
opens by pushing the [F1] key.
[About...] button
Opens an information window about the FUJITSU TWAIN32 Scanner Driver's ver-
sion.
[Option...] button
You can set up the details of optional functions on the window below.
Black & White Documents are scanned in binary (black and white).
Halftone Documents are scanned through halftone process-
ing in black and white.
Grayscale Documents are scanned with 256 gradations of
black and white.
Color Documents are scanned colored. For this mode, you
can select 24 bit Color, 256Color or 8 Color.

14
[Rotation] tab
Select this tab when setting image rotation, detection of document size, etc.
[Job/Cache] tab
Select this tab when setting cache mode, job controls, double-feed detection, blank
page skipping, etc.
[Generic] tab
Select this tab to change the unit displayed on the Setting Window for the FIJITSU
TWAIN32 Scanner Driver. (Millimeters, Inches, and Pixels are available)
[Startup] tab
Select this tab for setting the Scanner Operation Panel.
(Displayed only when using the scanner of supported type.)
[Filter] tab
Select this tab for setting the image processing filter(s).
Page Edge Filler: Fills up the margins of the scanned documents with a selected color.
[Compression] tab
Select this tab for setting the compression rate of JPEG Transfer.
(Displayed only when using a scanner that supports JPEG Transfer.)
[Imprinter (Endorser)] tab
Select this tab for configuration of the Imprinter option (sold separately).
(Displayed only when the scanner is equipped with the Imprinter option.)
[Advance...] button
Click this button for settings of the advanced image processing.
You can set Edge Extract, Gamma Pattern, White Level Follower, Dropout Color,
Reverse, etc.
[Config...] button
Click this button for configuring the Setting Files.
You can save the changed settings as a Setting File. From next scanning, the settings
are quickly changed by using these Setting Files.
For details of each function, refer to the "FUJITSU TWAIN32 Scsnner Driver Help".
1.4 How to use the Scanner Driver
fi-4530CImage Scanner Operator's Guide 15
BASIC SCANNER OPERATIONS
1
■ FUJITSU ISIS Scanner Driver
FUJITSU ISIS Scanner Driver is designed for scanning documents with FUJITSU image scanner fi
series by using application software that complies with The ISIS standard.
The following describes the procedure with examples of QuickScan for ordinary scanning by using
this driver software.
The procedure may vary depending on your application.
If you use an application other than QuickScan, please refer to its Guide or Help for further
information.
1. Procedure for Basic Scanning Operation
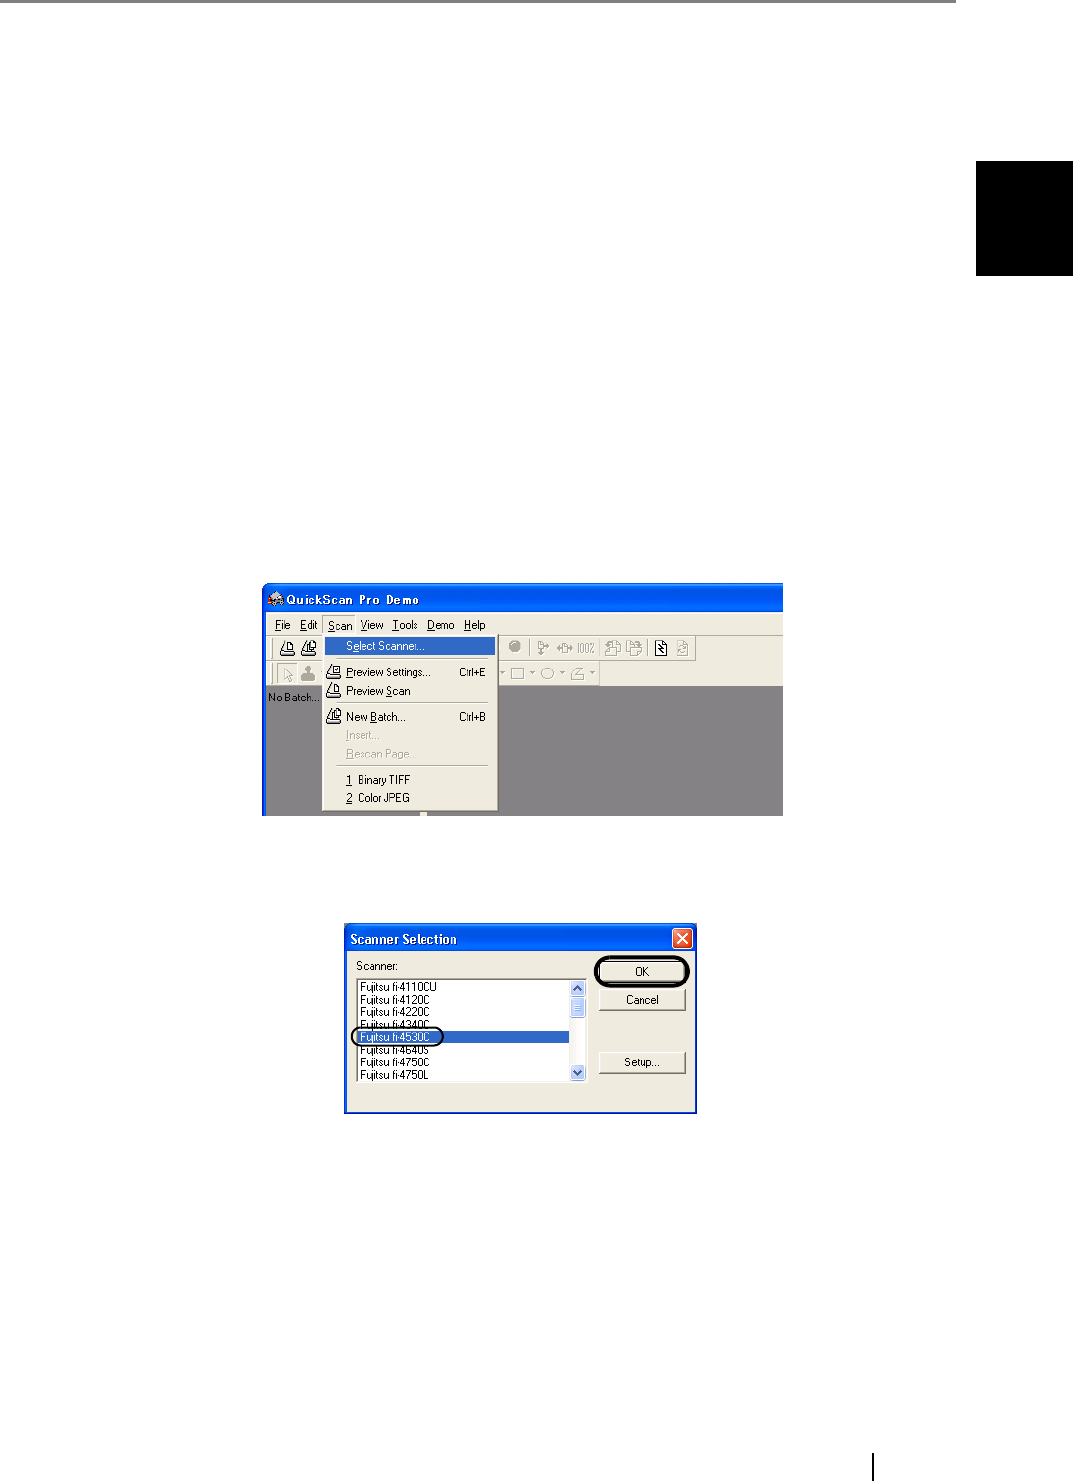
1. Startup the application.
From the [Start] menu, select [Programs]-[QuickScan] and click [QuickScan].
2. Select your scanner on the window below.
Select [Scan] - [Select Scannerc] on the menu bar.
3. Select the scanner to use, then click the [OK] button.
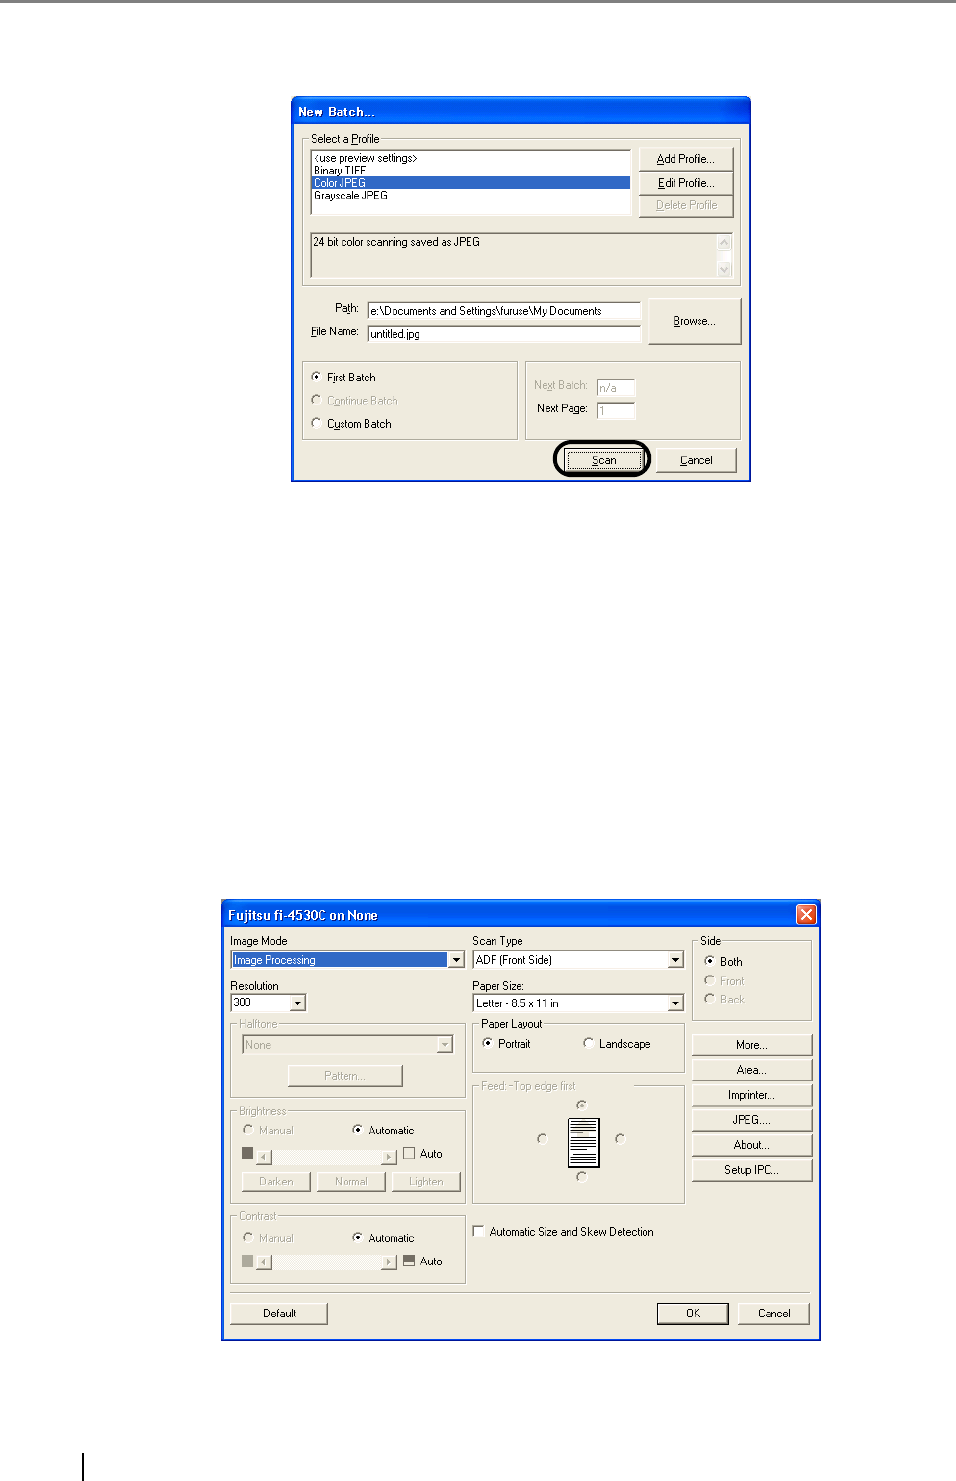
4. Select [Scan] - [New Batch] on the menu bar.
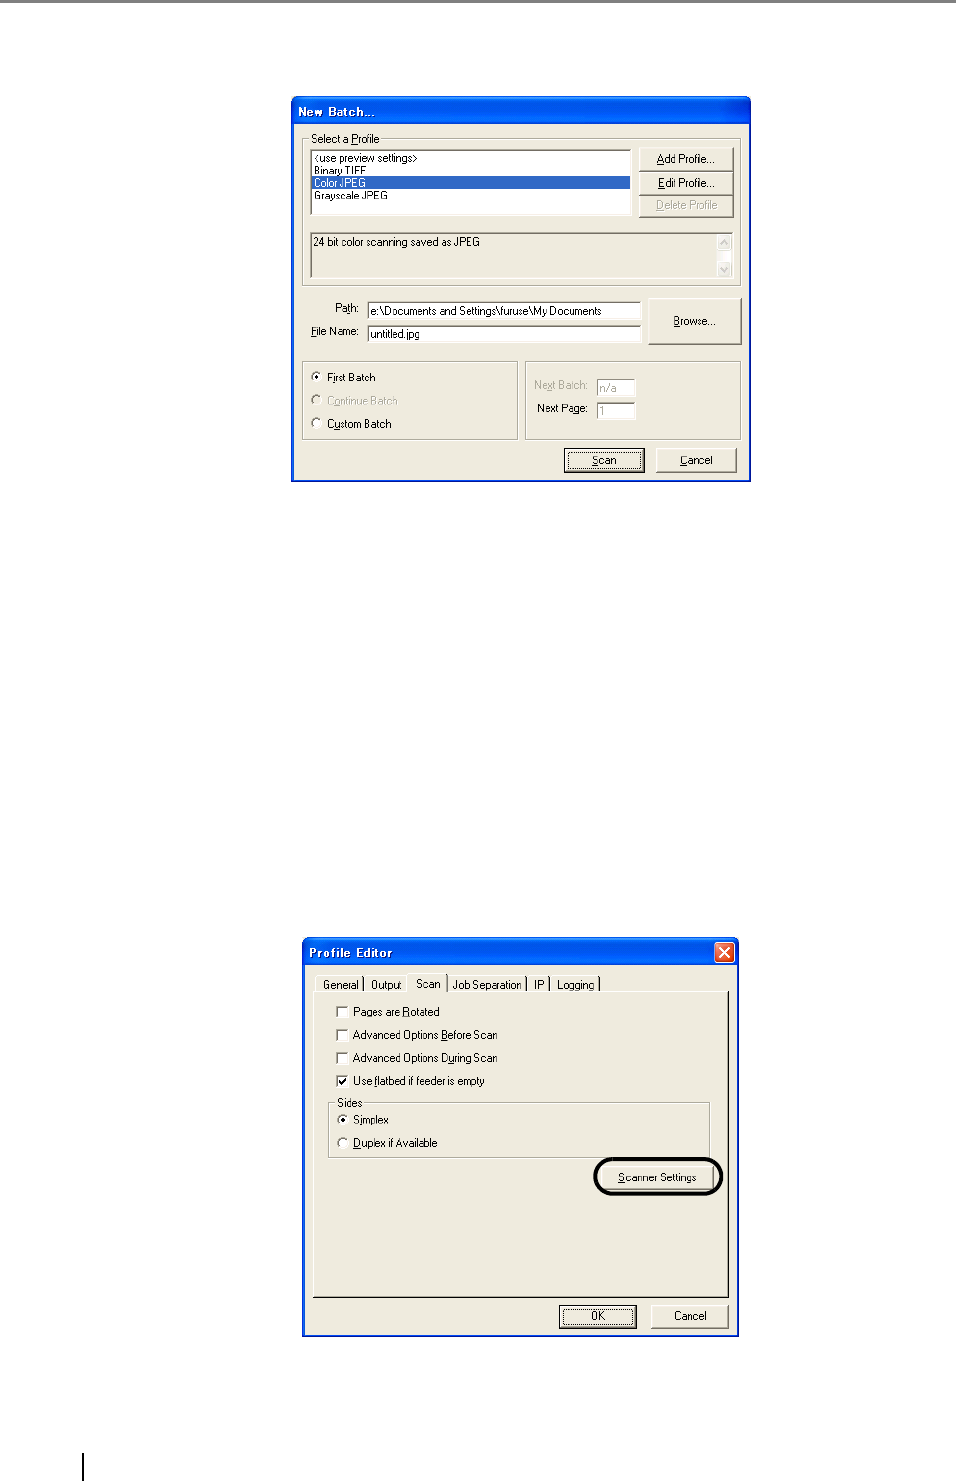
16
5. Select the profile for scanning.
•When creating a new profile
Select one from already existing profiles and click [Add Profile...] button.
⇒A new profile will be created based on the profile you select.
•When changing the settings of already existing profiles
Select one from already existing profiles and click [Edit Profile...] button.
⇒The settings of the selected profile will be changed.
•When using already existing profiles
Select one from already existing profiles
⇒Scanning will be started according to the settings of the selected profile.
Go to the procedure 10.
6. Open the window of ISIS Driver.
Select the [Scan] tab and click the [Scanner Settings] on the [Profile Editor] window.
1.4 How to use the Scanner Driver
fi-4530CImage Scanner Operator's Guide 17
BASIC SCANNER OPERATIONS
1
⇒ The configuration widow of ISIS driver appears.
7. Configure settings for scanning and click the [OK] button.
For details on this dialog box, refer to "Configuration Window of FUJITSU ISIS Scan-
ner Driver" on page 18.
8. The [Profile Editor] window appears. Click the [OK] button to return to [New batch]
dialog.
9. Load the documents on the scanner.
ATTENTION Configure other settings of the profile, if necessary.
Refer to the "QuickScan Overview" or the "QuickScan Help" for further
information on functions and operations of QuickScan. After the installa-
tion of QuickScan, it is registered in the [Start] menu.
18
10. Click the [Scan] button.
⇒ Scanned images are displayed on the window.
11. End the application.
Select [Exit] from the [File] menu.
Refer to the "QuickScan Overview" or the "QuickScan Help" for further information
on functions and operations of QuickScan. After the installation of QuickScan, it is reg-
istered in the [Start] menu.
2. Configuration Window of FUJITSU ISIS Scanner Driver

1.4 How to use the Scanner Driver
fi-4530CImage Scanner Operator's Guide 19
BASIC SCANNER OPERATIONS
1
Image Mode
Select a color mode suitable for the purpose from the menu.
Resolution
Specifies the number of pixels (dots) per inch.
Select a fixed resolution from the list or enter any value manually.
A higher resolution produces finer image, but requires much more memory.
Halftone
Select the halftone pattern for halftone scanning. This setting is available when "Black
& White" is selected in the "Image Mode".
Black & White Scans data in binary (black and white). Distinguishes
black from white according to the fixed threshold.
This scanning mode is suitable for scanning line
drawings and text documents.
16-level Grayscale Scans data by 14 shades of gray plus black and white.
This mode uses 4 bits per pixel.
256-level Grayscale Scans data by 254 shades of gray plus black and
white. This mode uses 8 bits per pixel. This mode is
switable for scanning monochrome photographs.
24-bit Color Scans data as full-colored image using 24 bits per
pixel. This mode is suitable for scanning color photo-
graphs.
Image Processing Binary processing is applied to the scanned images
This mode is available only when Image Processing
Software Option (separately sold) is installed. Please
refer to the "User’s Guide of Image Processing Soft-
ware Option" for details.
Dither Pattern 0 This setting is suitable for scanning dark photo-
graphs.
Dither Pattern 1 This setting is suitable for scanning dark-colored
documents containing both text and photographs.
Dither Pattern 2 This setting is suitable for scanning light photo-
graphs.
Dither Pattern 3 This setting is suitable for scanning light-colored
documents containing both text and photographs.
Error Diffusion This function minimizes differences of color levels
due to subtractive color process by diffusing the dif-
ference to the adjacent pixels. This mode is suitable
for scanning images of photographs, etc.
Download Executes processing with the dithered download pat-
tern specified in the dithered download file.

20
Brightness
Sets the brightness of the entire image. Specify the brightness as a number within the
range of 1 (dark) to 255 (bright). To brighten the entire image, decrease the value of the
setting. To darken the entire image, increase the value.
Contrast
Sets the contrast between light and shadow of the scanned image. Specify the contrast
as a number within the range of 1 (low [soft]) to 255 (high [sharp]). Increasing this
value makes the contrast sharper.
Scan Type
Selects the scanning method.
Paper Size
Selects a paper size according to the size of the document to be scanned. Select a stan-
dard paper size from the list.
Paper Layout
Specifies orientation of the documents as portrait or landscape.
Automatic Size and Skew Detection
Automatically detects the document’s page size, and the output will be adjusted to the
detected page size. Document skewing is automatically detected and corrected for the
output image.
[More...] button
Opens [More Settings] window. Used for setting advanced features.
ADF (Front Side) Scans only the front sides of documents.
ADF (Back Side) Scans only back sides of documents.
ADF (Duplex) Scans both the front and the back sides of documents.
When this option is selected, the each page of docu-
ments is scanned in "front to back" order. This option
can be used only for the models that support duplex
scanning.
1.4 How to use the Scanner Driver
fi-4530CImage Scanner Operator's Guide 21
BASIC SCANNER OPERATIONS
1
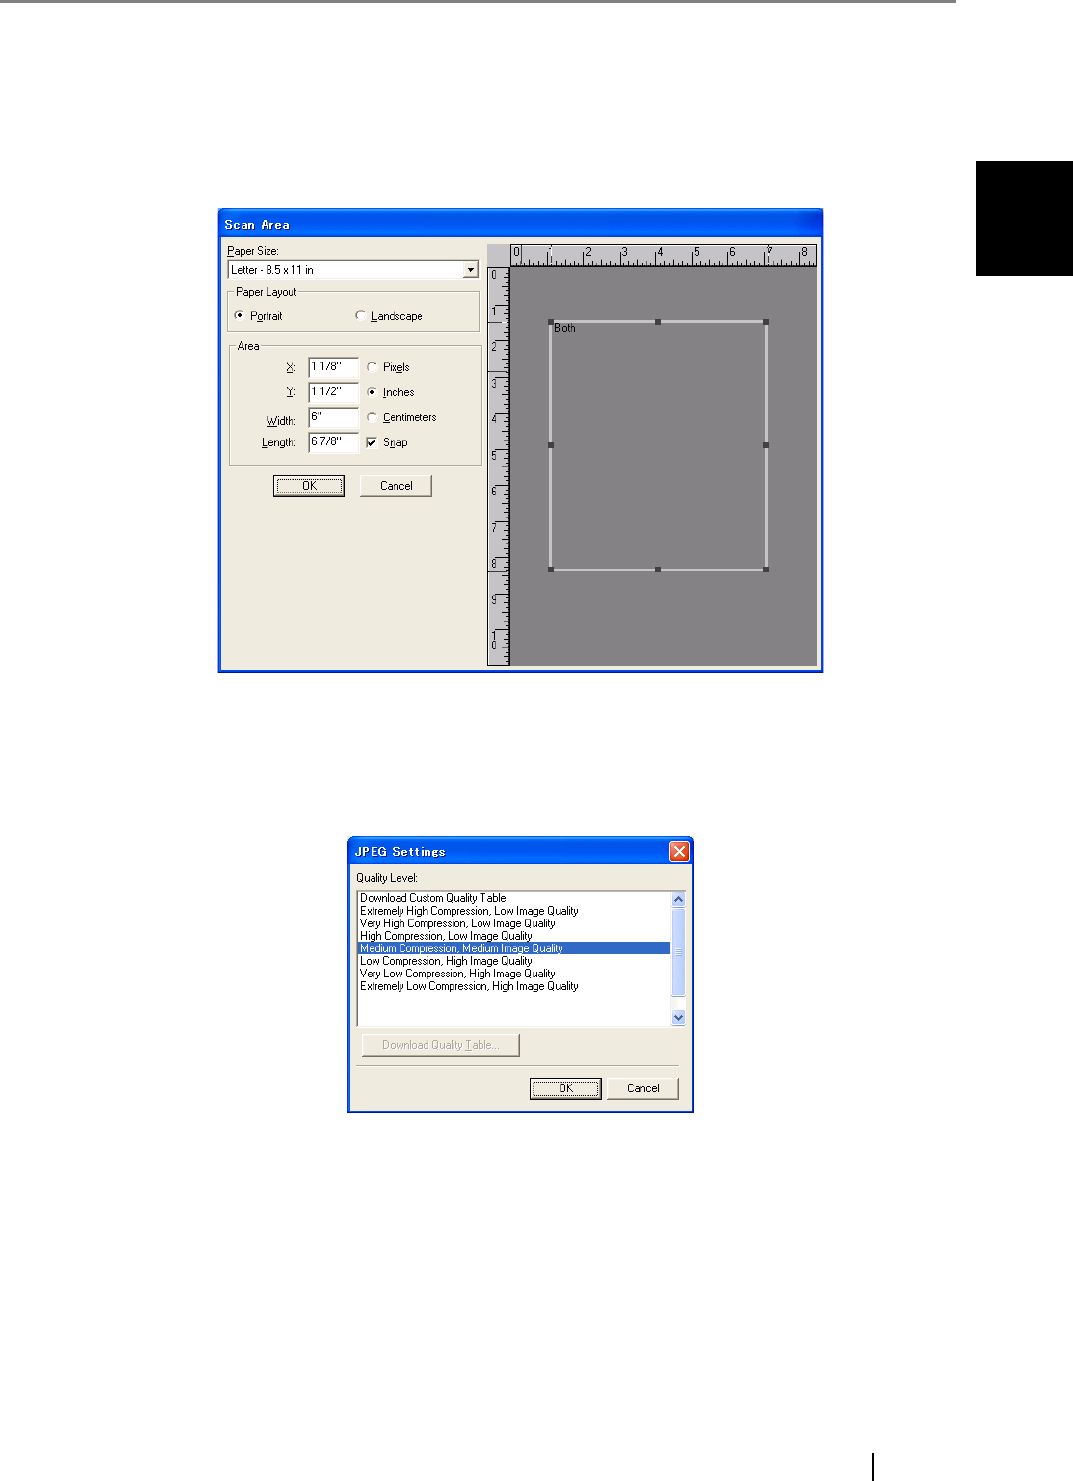
[Area...] button
Opens the Scan Area dialog box.
Specify scan area for the document size.
The size can be set by dragging the frame with mouse.
Otherwise, enter any value for the setting.
[JPEG...] button
Opens the JPEG Settings dialog box. Used for setting the compression rate of JPEG
transfer.
[About...] button
This button displays the version information.
22
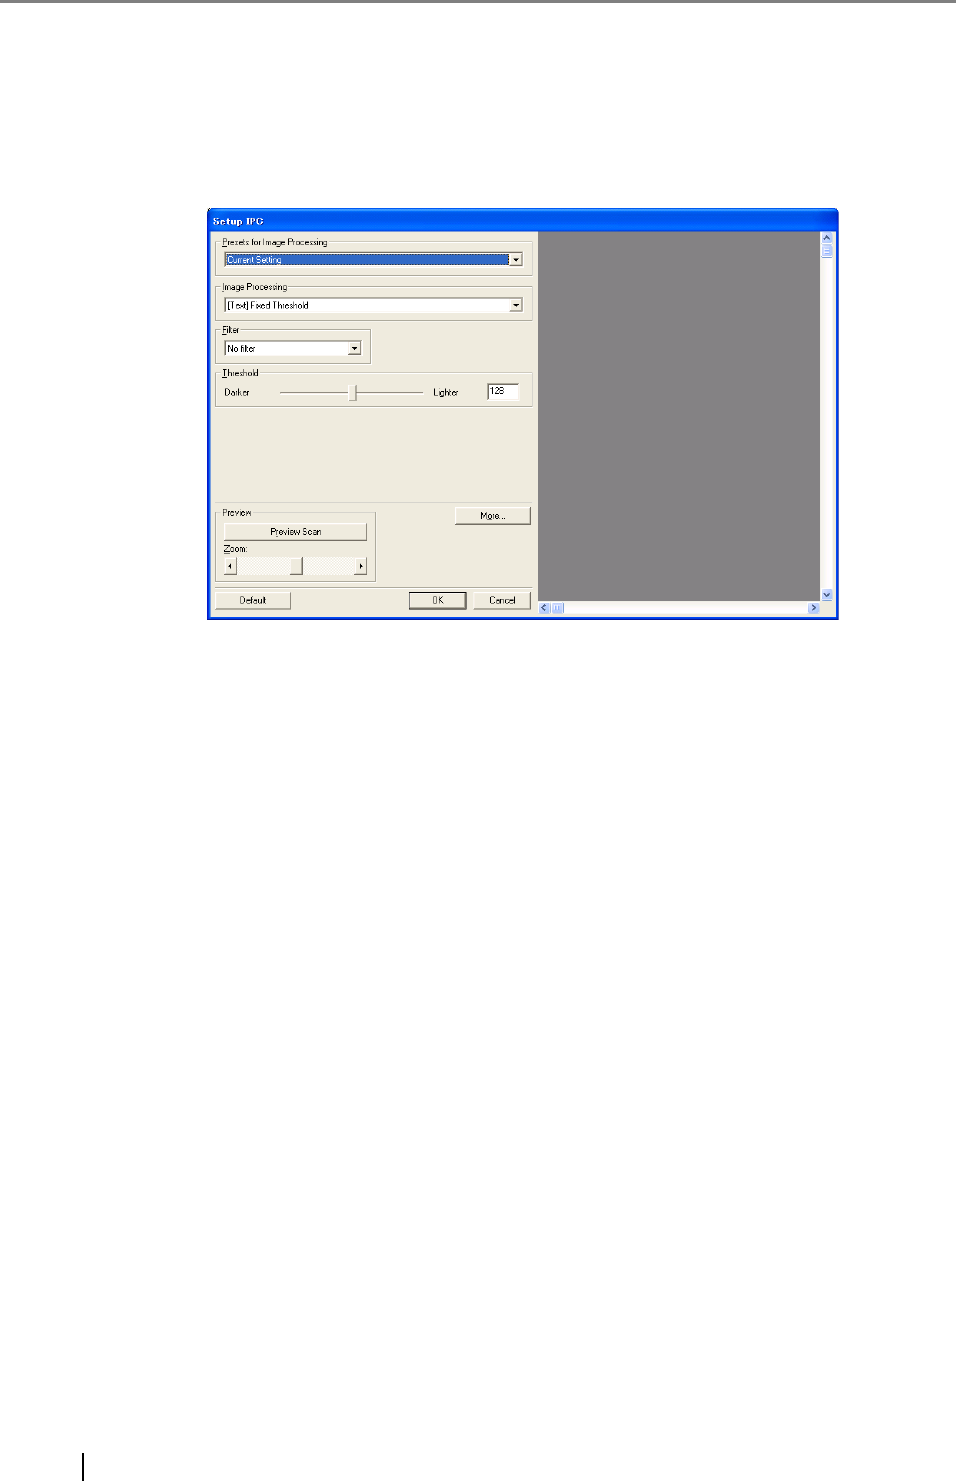
[Setup IPC...] button
This button displays the Image Processing dialog. This button is enabled when Image
Processing Software Option (separately sold) is installed and "Image Processing" is
selected in the "Image Mode". Refer to the documentation provided with Image Pro-
cessing Software Option.
End of Page Detection
Scans the edge (bottom) of the documents and outputs data adjusted to the document
length. When any page shorter than specified "Paper Size" is included, the output size
is adjusted to the detected short size.
Overscan
This option specifies the overscan function. This function makes the scanned images
larger than the original documents by adding margins.
Gamma
Specifies Gamma correction. Correction patterns are: "Normal", "Soft", "Sharp",
"Custom", or "Download".
DTC Variance
This option specifies the value for adjusting the variance based on the brightness of the
image.
Edge Processing
This option specifies the sharpness of contour extraction.
Low, Mid, High Emphasizes contour of images. Available settings
are: Low, Mid, High
Smoothing Smoothes jaggy images.

1.4 How to use the Scanner Driver
fi-4530CImage Scanner Operator's Guide 23
BASIC SCANNER OPERATIONS
1
Dropout Color
This option excludes selected color (the three primary colors of light i.e. green, red,
blue) from scanned images. For example, if the document contains black text in a red
frame and when the red color is selected, the scanner reads only the text and eliminate
(drop out) the red frame.
Reverse
Colors of scanned images are reversed.
Background
Specifies the Background color. Enabled only for the scanners equipped with Back-
ground color switching mechanisms.
Power saving
This option specifies the waiting time before the scanner switches to the Power save
mode.
Double Feed Detection
Detects Double-feeds (phenomena that two or more sheets are accidentally fed). You
can set conditions for detecting Double-feeds so that the scanner should stop and dis-
play error messages. Double feeds are scanned by the differences in document lengths
or thicknesses.

24

2
fi-4530CImage Scanner Operator's Guide 25
Chapter2
SCANNING VARIOUS TYPES OF
DOCUMENTS
This chapter describes how to scan various types of documents.
In this chapter Windows XP screenshots are illustrated.
The screens and operations may differ slightly if the OS that you are using is not Windows XP.
Also, when FUJITSU TWAIN32 is updated the screens and operations noted in this chapter will
differ slightly.
2.1 Scanning double sided Documents .................................................................... 26
2.2 Scanning Documents with different Widths....................................................... 28
2.3 Scanning thin Documents.................................................................................... 29
2.4 Scanning Documents longer than A3 size ......................................................... 31
2.5 Saving scanned Images in PDF Format.............................................................. 34
2.6 Excluding a Color from the Image (dropout color)............................................ 42
2.7 Skipping blank Pages........................................................................................... 44
2.8 Detecting Double-Feeds....................................................................................... 46
2.9 Correcting the skewed Documents..................................................................... 48
26
2.1 Scanning double sided Documents
1. Load documents on the ADF paper chute.
For details on how to load documents, refer to "1.2 Loading Documents on the ADF for
Scanning" on page 3.
2. Adjust the side guides to the width of the documents.
3. Start up ScandAll 21
From [Start] menu, select [Program] - [Scanner Utility for Microsoft Windows] - [ScandAll
21]. This starts up ScandAll 21.
4. Select the scanner to use.
Load the documents facing the ADF
paper chute.(face down)
A
Side guides
2.1 Scanning double sided Documents
fi-4530CImage Scanner Operator's Guide 27
SCANNING VARIOUS TYPES OF DOCUMENTS
2
5. Click [Scan To View] on the tool bar. The [TWAIN Driver] dialogbox appears.
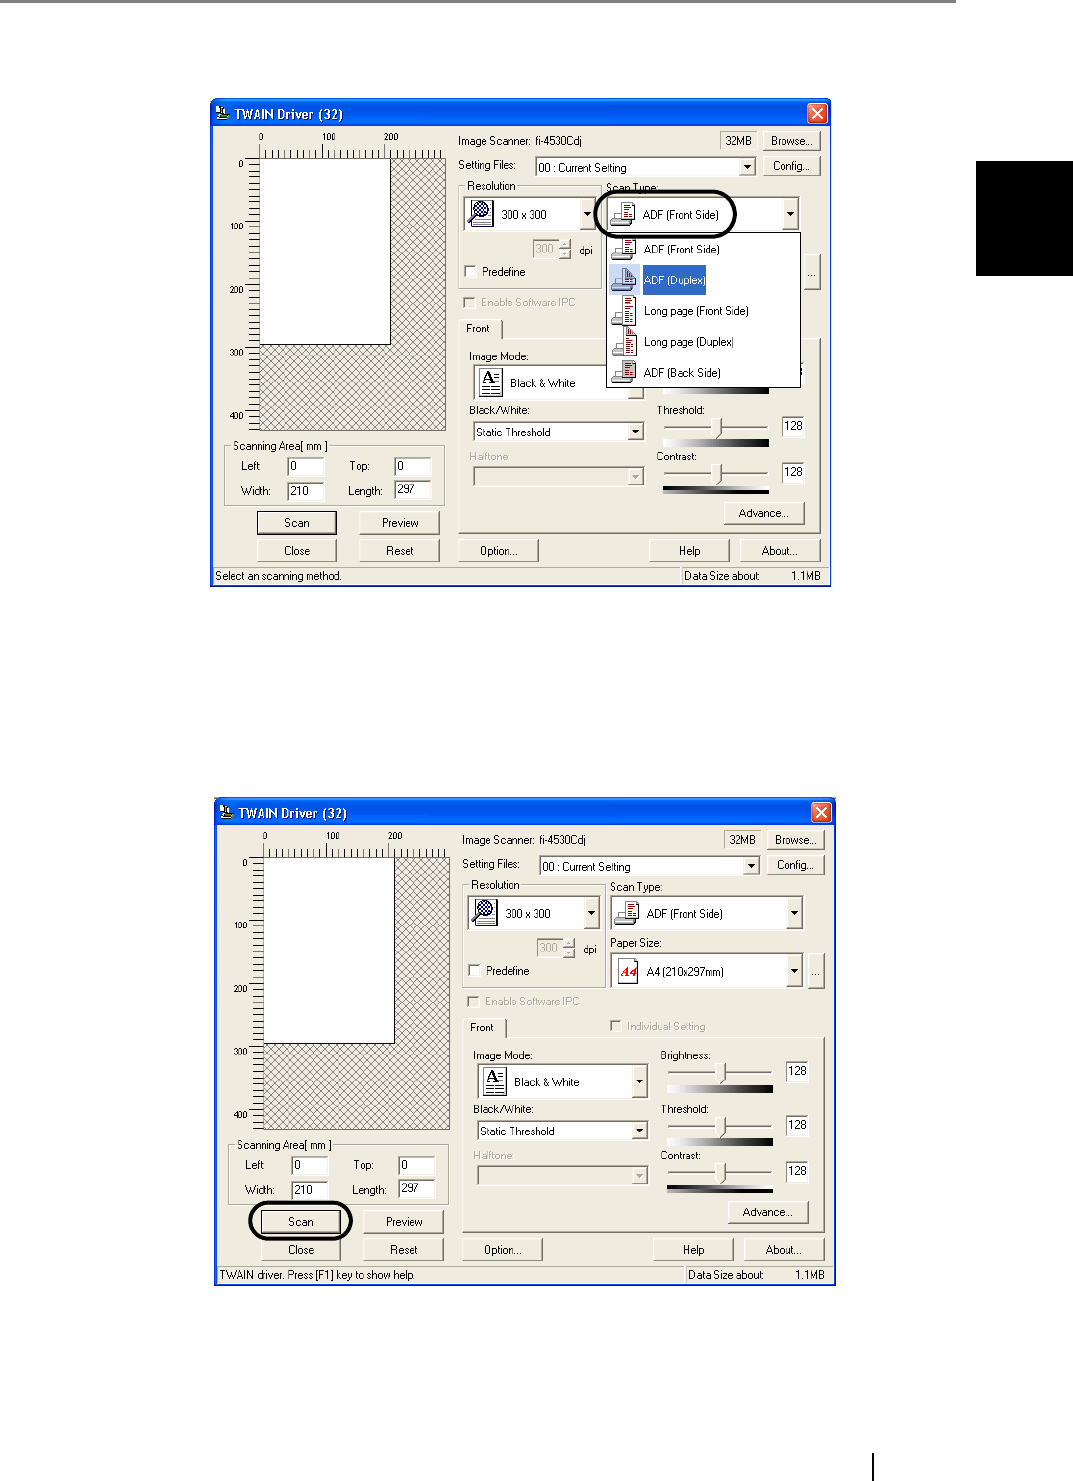
6. Select [ADF (Duplex)] from [Scan Type] and click the [Scan] button.
7. Click the [Scan] button.
For settings in the [TWAIN Driver] dialogbox, refer to the "FUJITSU TWAIN 32 Scanner
Driver Manual" stored on the Setup CD-ROM.
⇒The images of scanned documents are displayed on the [ScandAll 21] window.
For details on functions and operations of ScandAll 21, refer to "ScandAll 21 Help".

28
2.2 Scanning Documents with different Widths
When you scan a batch of documents with different widths by using the ADF, you may get skewed
images from smaller sized documents.
Be sure to scan only documents of the same width together.
The following shows the procedure for scanning a batch of mixed size documents.
1. Sort out the batch into stacks of the same width.
2. Adjust the side guides to the width of each document stack.
3. Scan the batches of the same widths sparately one by one.
For details on how to scan documents, refer to "1.3 Scanning Documents" on page 7.
2.3 Scanning thin Documents
fi-4530CImage Scanner Operator's Guide 29
SCANNING VARIOUS TYPES OF DOCUMENTS
2
2.3 Scanning thin Documents
When you scan a batch of thin documents, document jams (double-feed) and mis-pickings may
occur.
1. Confirm that the thin documents fulfill the requirements of "6.2 Document Quality" on
page 103.
2. Shift the position of the paper thickness switch to the right.
3. Load the documents on the ADF paper chute.
For details on loading documents, refer to"1.2 Loading Documents on the ADF for Scan-
ning" on page 3.
Paper Thickness Switch
Load the documents facing the ADF
paper chute.(face down)
A
30
4. Adjust the side guides to the document width.
5. Start up ScandAll 21.
For starting up ScandAll 21, select [Programs] - [Scanner Utility for Microsoft Windows] -
[ScandAll 21] from [Start].
6. Select the scanner to use.
7. Click [Scan To View] on the tool bar.
⇒ The [TWAIN Driver] dialogbox appears.
8. Click the [Scan] button.
For settings in the [TWAIN Driver] dialogbox, refer to "1.4 How to use the Scanner
Driver" on page 9.
⇒ Images of scanned documents are displayed on the window of ScandAll 21.
For details on functions and operations of ScandAll 21, refer to "ScandAll 21 Help".
Side guides
2.4 Scanning Documents longer than A3 size
fi-4530CImage Scanner Operator's Guide 31
SCANNING VARIOUS TYPES OF DOCUMENTS
2
2.4 Scanning Documents longer than A3 size
1. Load the documents on the ADF paper chute.
For details on loading documents, refer to "1.2 Loading Documents on the ADF for Scan-
ning" on page 3.
2. Adjust the side guides to the document width.
3. Start up ScandAll 21.
For starting up ScandAll 21, select [Programs] - [Scanner Utility for Microsoft Windows] -
[ScandAll 21] from [Start].
4. Select the scanner to use.
5. Click [Scan To View] on the tool bar.
⇒ The [TWAIN Driver] dialogbox appears.
Load the documents facing the ADF
paper chute.(face down)
A
Side guides
32
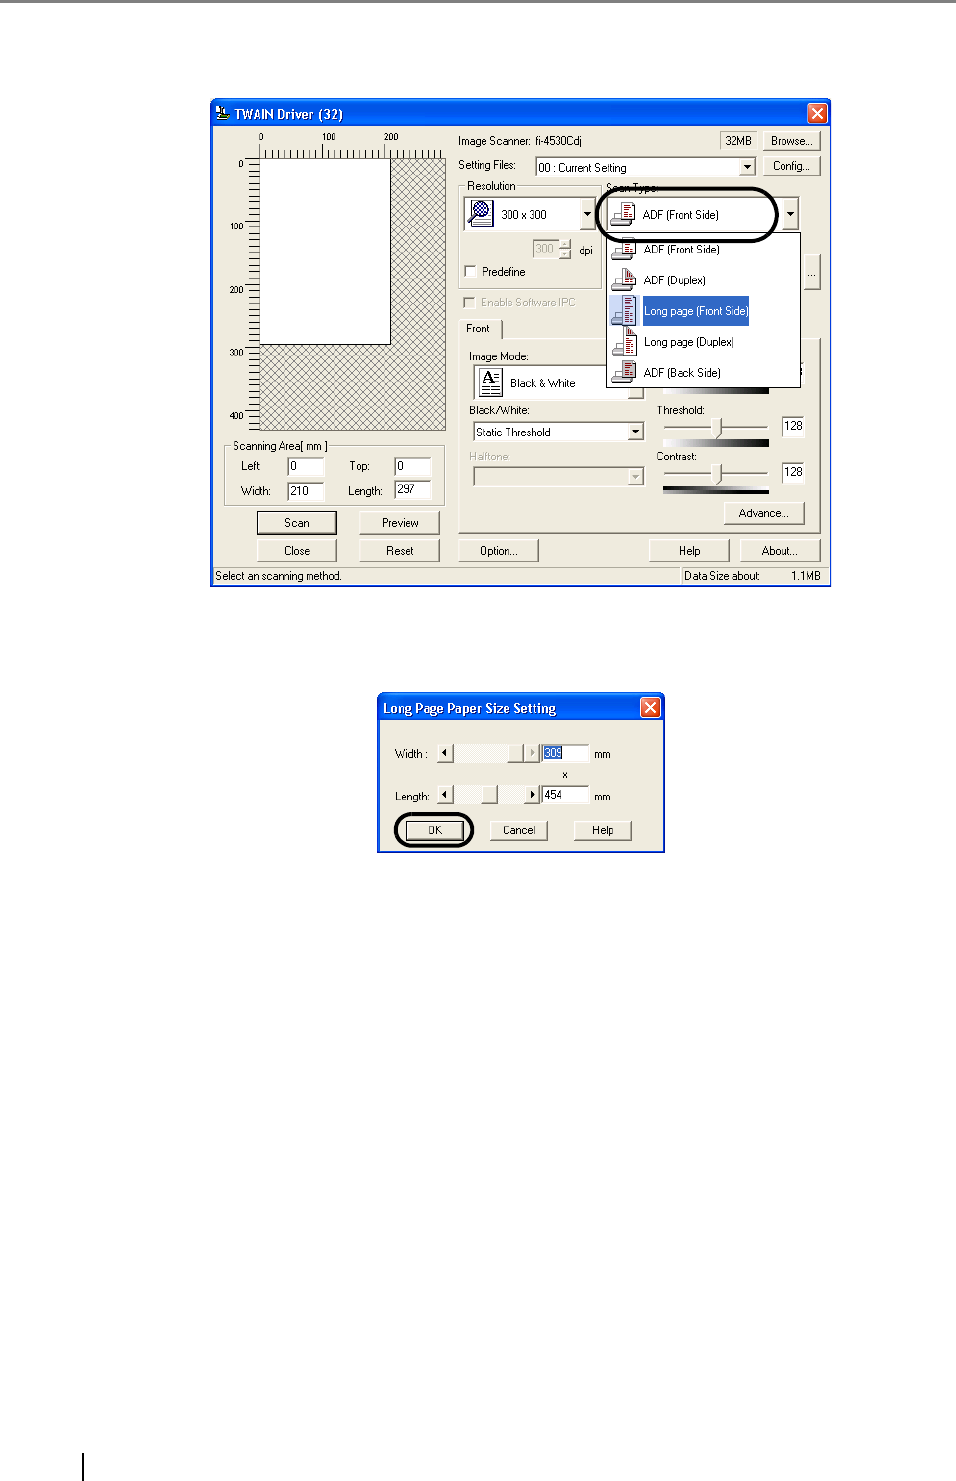
6. Select [Long page (Front Side)] or [Long page (Duplex)] from [Scan Type].
7. Specify the length of documents.

2.4 Scanning Documents longer than A3 size
fi-4530CImage Scanner Operator's Guide 33
SCANNING VARIOUS TYPES OF DOCUMENTS
2
8. Click the [Scan] button.
For settings in the [TWAIN Driver] dialogbox, refer to "1.4 How to use the Scanner
Driver" on page 9.
⇒ Images of scanned documents are displayed on the window of ScandAll 21.
For details on functions and operations of ScandAll 21, refer to "ScandAll 21 Help".

34
2.5 Saving scanned Images in PDF Format
To save scanned images in PDF format, Adobe Acrobat 5.0 or later must be installed on your PC.
Adobe Acrobat 5.0 can be installed from the provided Adobe Acrobat CD-ROM.
There are two methods for saving scanned images in PDF format.
1. Using ScandAll 21
This method is recommended for color or grayscale scanning and when a smaller PDF file
size is required.
Your benefits are :
•Reduced PDF data size smaller than that by ordinary methods.
•Simplified method for creating PDF files with no troublesome operations.
2. Using Adobe Acrobat 5.0
This method is recommended for faster creation of PDF files and for black and white scan-
ning.
Your benefits are :
•Quick creation of PDF files with the original scan resolution
• Flexibile creation of PDF files by changing the PDF compression rates
The file size increases when scanning color documents by an ordinary method. However, you can
drastically reduce the size by using the Acrobat Distiller before saving the file.
For details, please refer to the hints on page 40.
2.5 Saving scanned Images in PDF Format
fi-4530CImage Scanner Operator's Guide 35
SCANNING VARIOUS TYPES OF DOCUMENTS
2
■ Using ScandAll 21
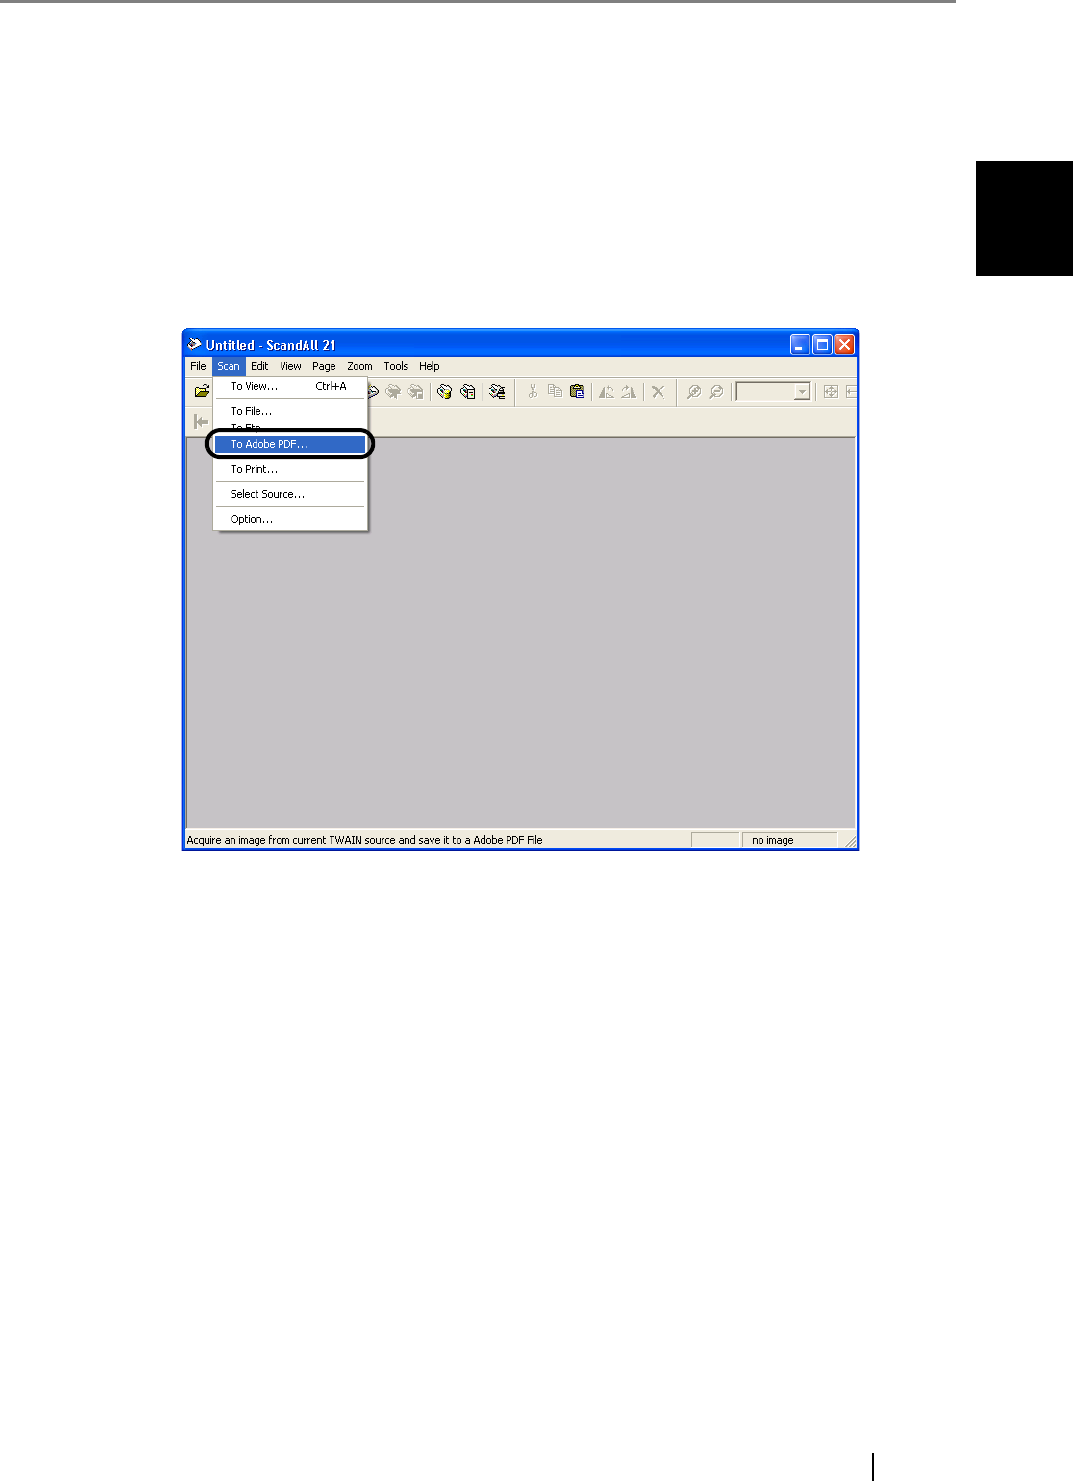
1. Load the documents on the ADF paper chute.
2. Start up ScandAll 21.
Select [Program] - [ScannerUtility for Microsoft Windows] - [ScandAll21] from the [Start]
menu. This will start up the application.
3. From the [Scan] menu select [To Adobe PDF].
⇒ [TWAIN Driver] dialogbox appears.
36
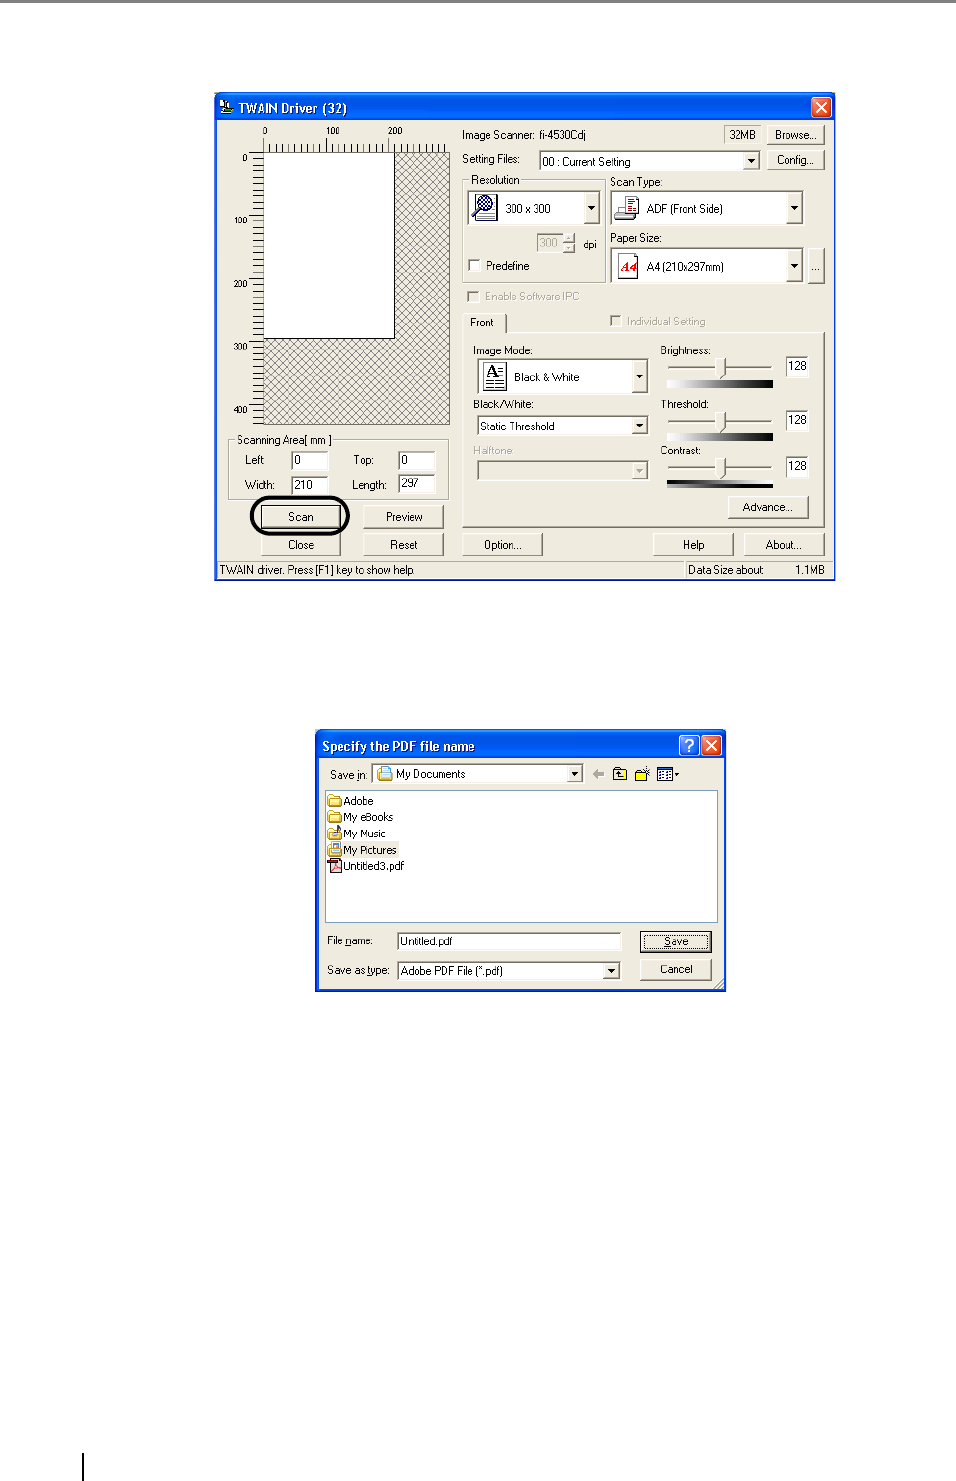
4. Set the scan resolution, paper size, etc., and then click the [Scan] button.
5. To end scanning, click the [Close] button.
⇒ The scanned image is displayed.
6. Enter the file name and select the destination to save the scanned image.
For details, refer to "ScandAll 21 Help".
2.5 Saving scanned Images in PDF Format
fi-4530CImage Scanner Operator's Guide 37
SCANNING VARIOUS TYPES OF DOCUMENTS
2
■ Using Adobe Acrobat 5.0
1. Load the documents on the ADF paper chute.
2. Start up Adobe Acrobat 5.0
Select [Program] - [Adobe Acrobat 5.0] from the [Start] menu. This starts up Adobe Acrobat
5.0.
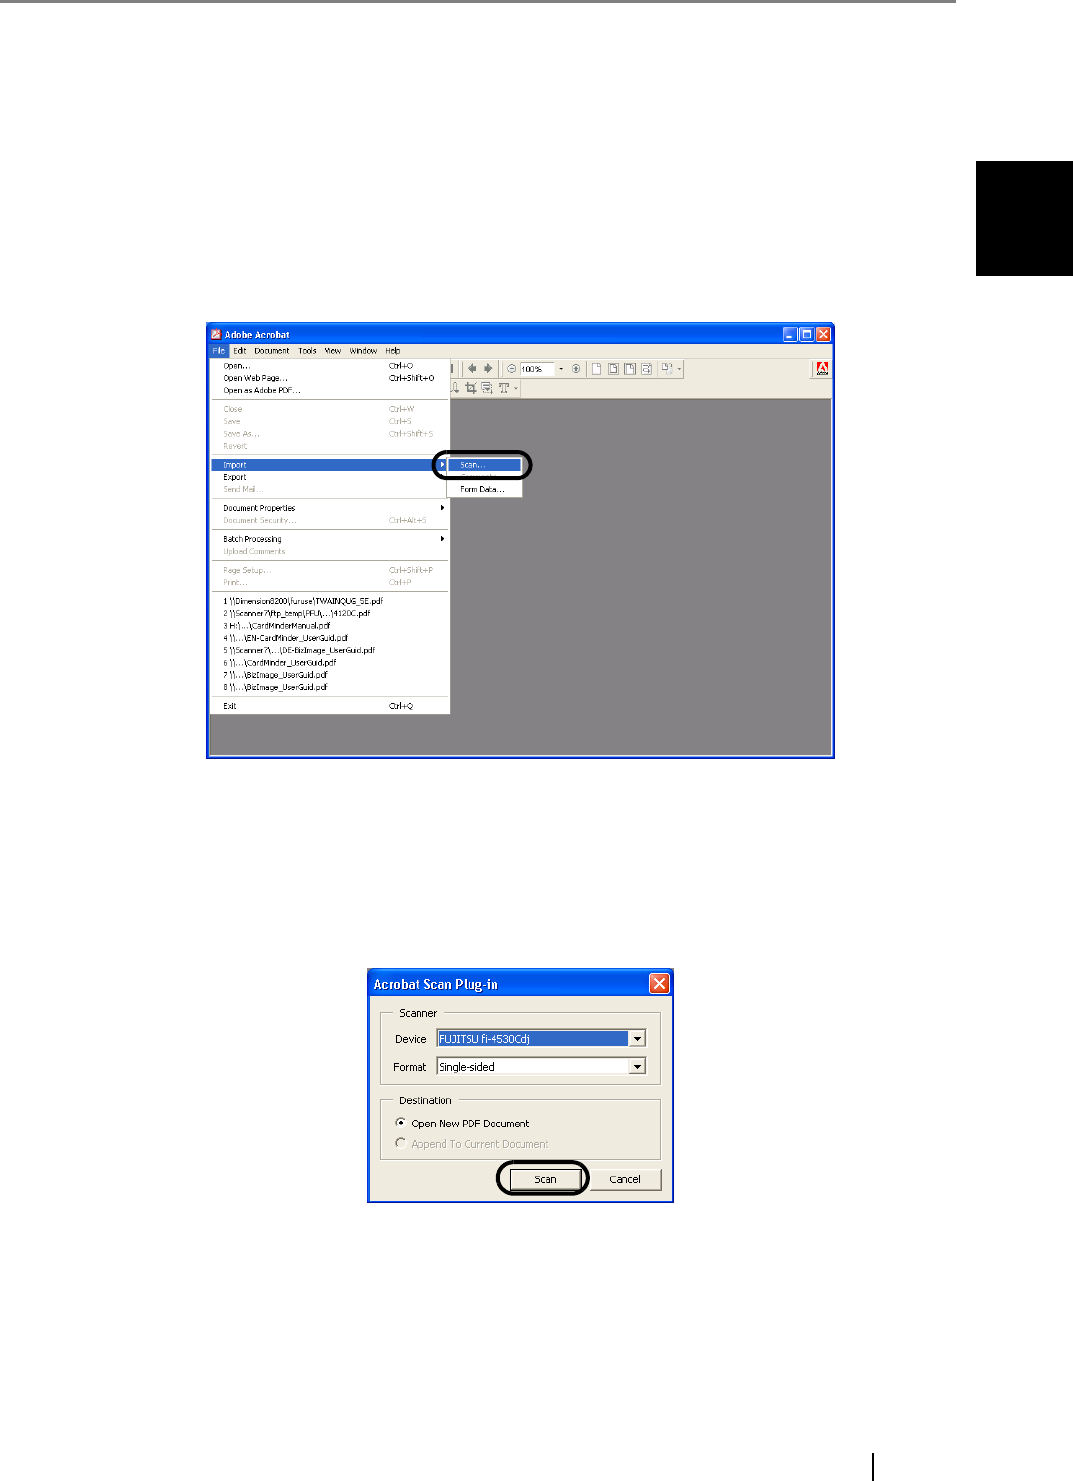
3. From the [File] menu select [Import] - [Scan...].
⇒ The [Acrobat Scan Plug-in] dialogbox appears.
4. Select [FUJITSU fi-4530Cdj] ([FUJITSU TWAIN 32] for WindowsNT 4.0) at [Device]
and click the [Scan] button.
⇒ [TWAIN driver] dialogbox appears.
38
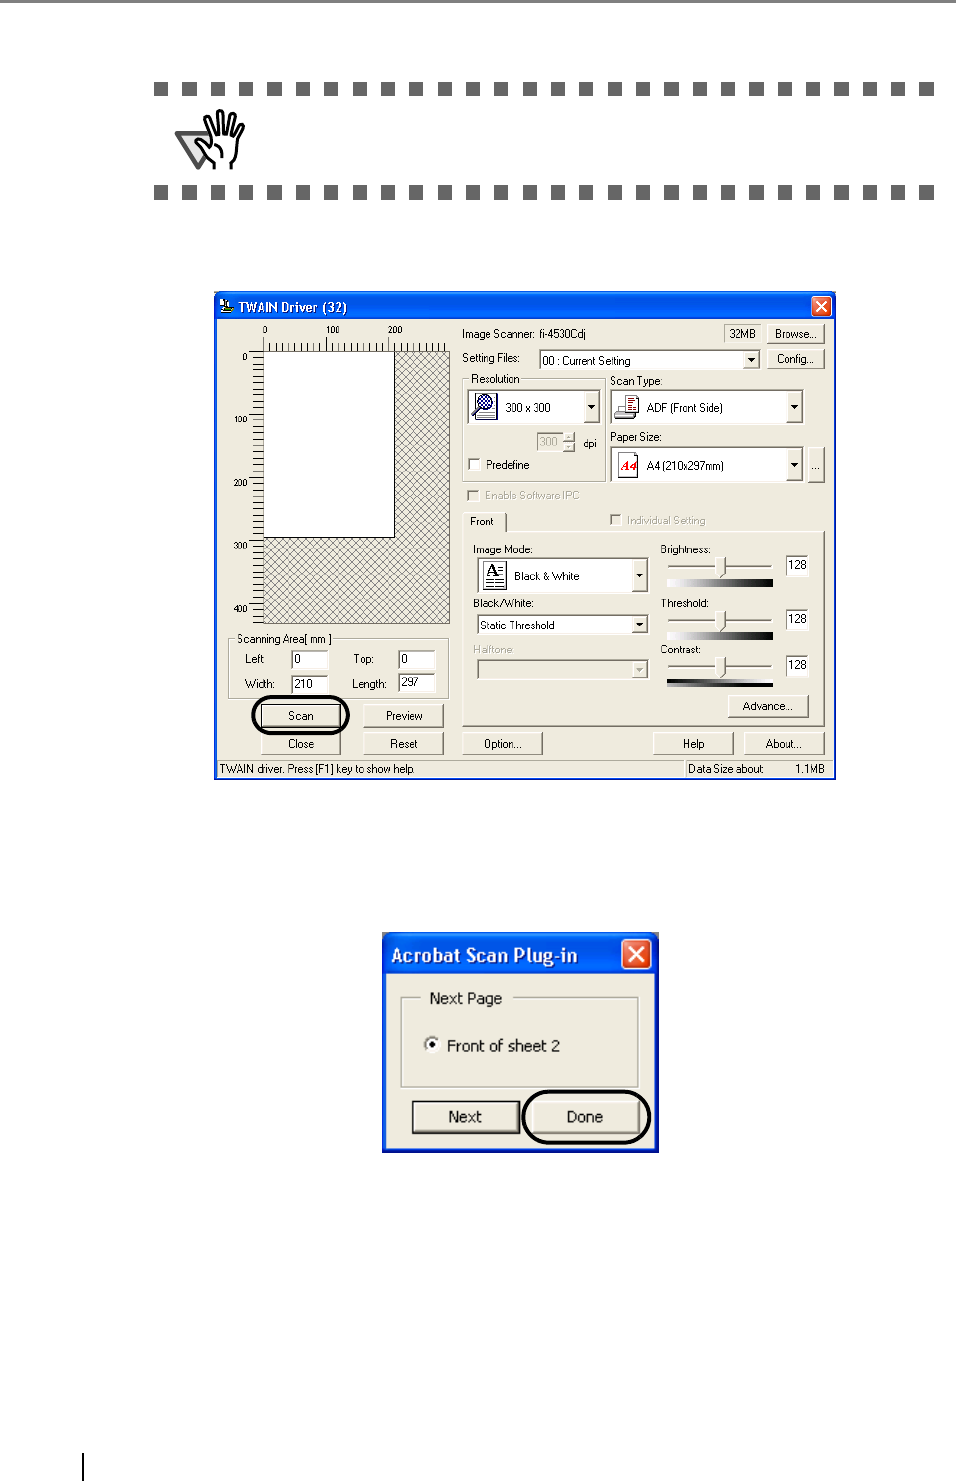
5. Select the scan resolution, document size, etc., and click the [Scan] button.
6. To end scanning, click the [Done] button.
⇒ The scanned image is displayed.
ATTENTION Select [Simplex] even if you intend to do duplex scanning.
2.5 Saving scanned Images in PDF Format
fi-4530CImage Scanner Operator's Guide 39
SCANNING VARIOUS TYPES OF DOCUMENTS
2
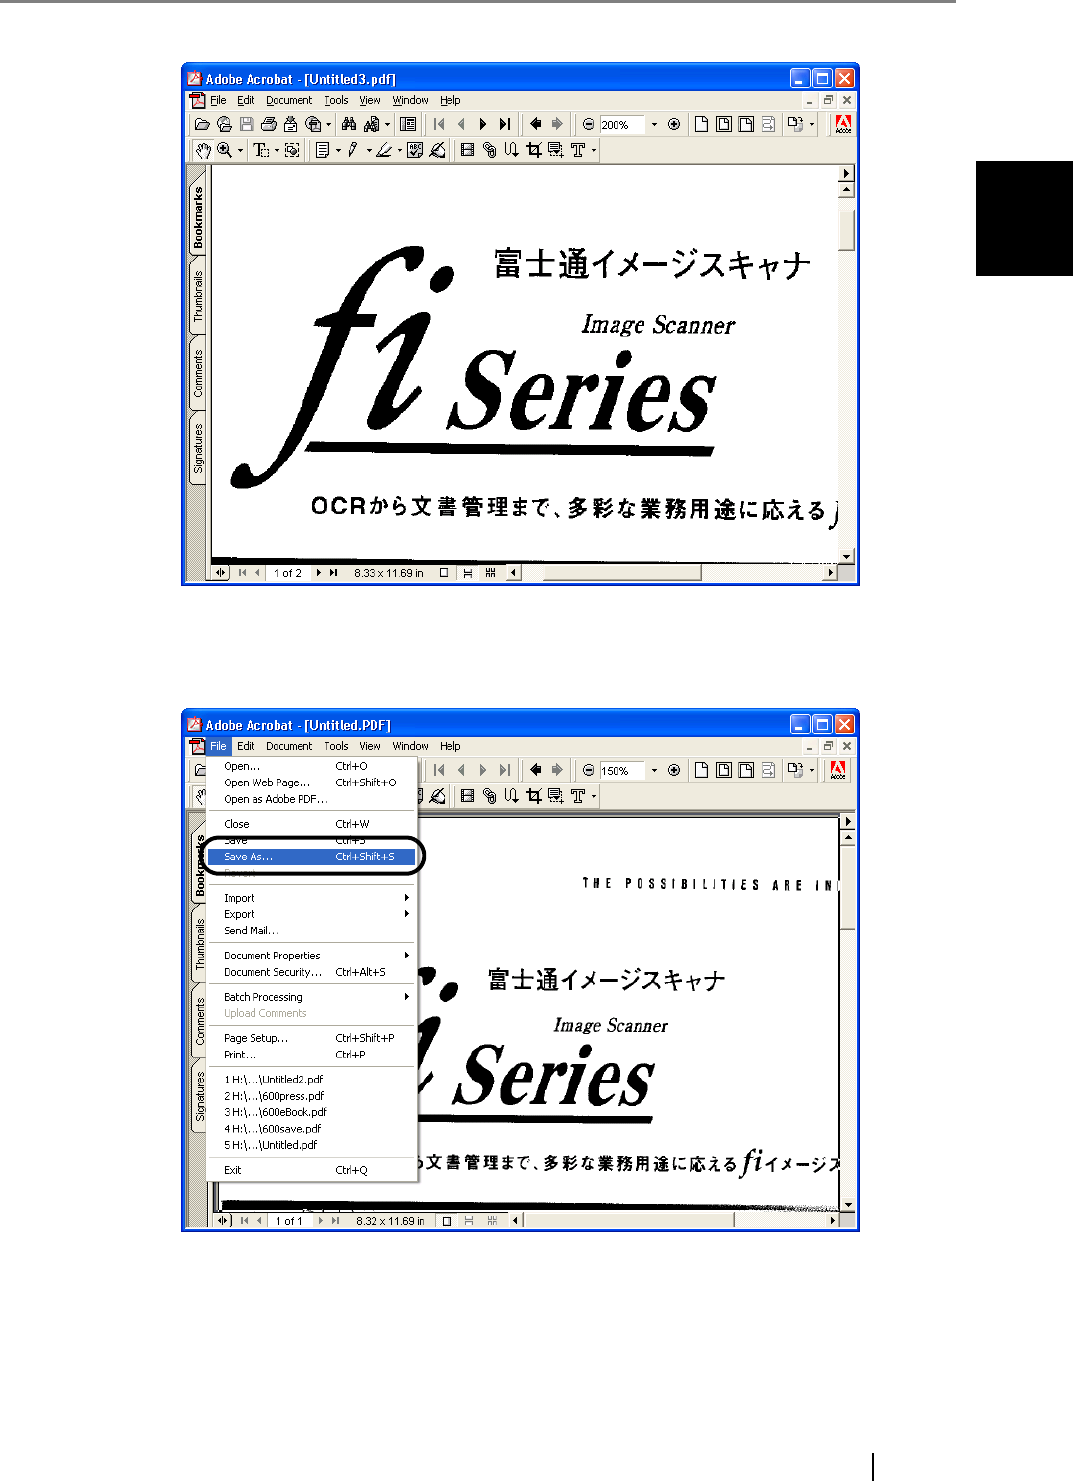
7. Select [Save as...] or [Save] from the [File] menu to save the scanned image.
For the details on Adobe Acrobat 5.0 operations, refer to the Adobe Acrobat 5.0 manual and
Help.
40
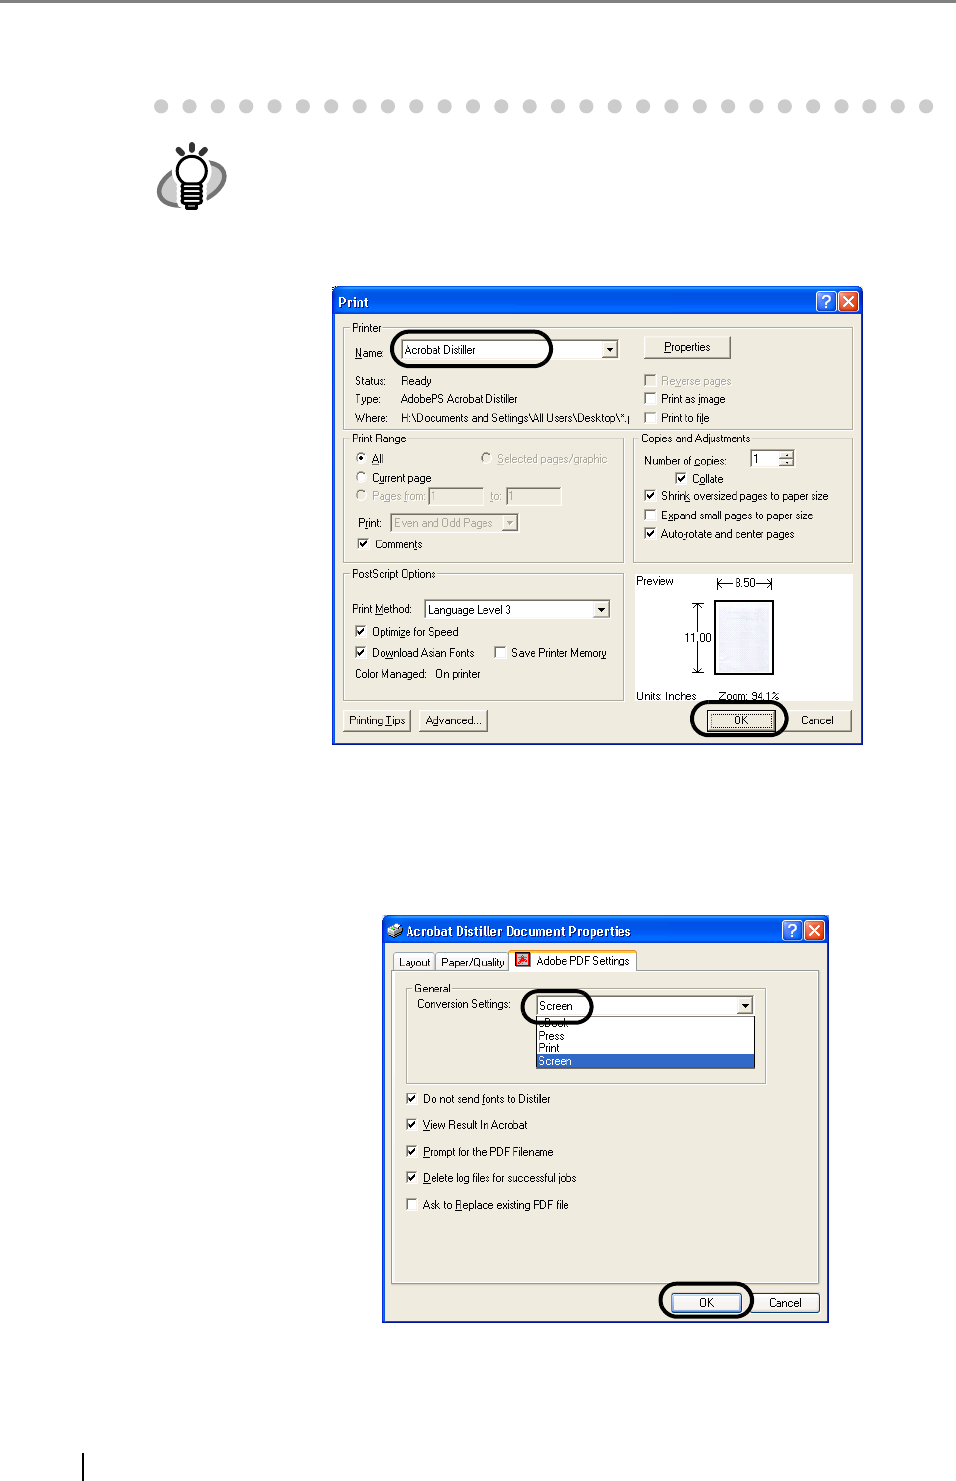
HINT
If you save scanned images by this procedure, the file size may increase
greatly. For reducing the file size, follow the procedure below. (It may take
much more time than the usual saving procedure.)
1. Select [File] - [Print...]
2. On the following dialog specify [Acrobat Distiller] for [Name]
.
3. Click the [Properties] button.
4. Click the [Adobe PDF Settings] tab.
5. Select [Conversion Settings] to [Print].
The following shows an example of [CJKScreen].

2.5 Saving scanned Images in PDF Format
fi-4530CImage Scanner Operator's Guide 41
SCANNING VARIOUS TYPES OF DOCUMENTS
2
6. Click [OK].
7. Enter a file name and click the [Save] button on the [Save PDF File
As] dialogbox.
42
2.6 Excluding a Color from the Image (dropout color)
A selected color (primary colors: red, green or blue) can be removed (dropped out) from the
scanned image data. For example, if the document contains black text in a green frame, you can set
the scanner to read only the text and eliminate (drop out) the green frame.
To set the scanner to drop out a color, change the settings in the [TWAIN Driver] dialogbox before
scanning.
The following shows the procedure for changing the settings in this dialogbox.
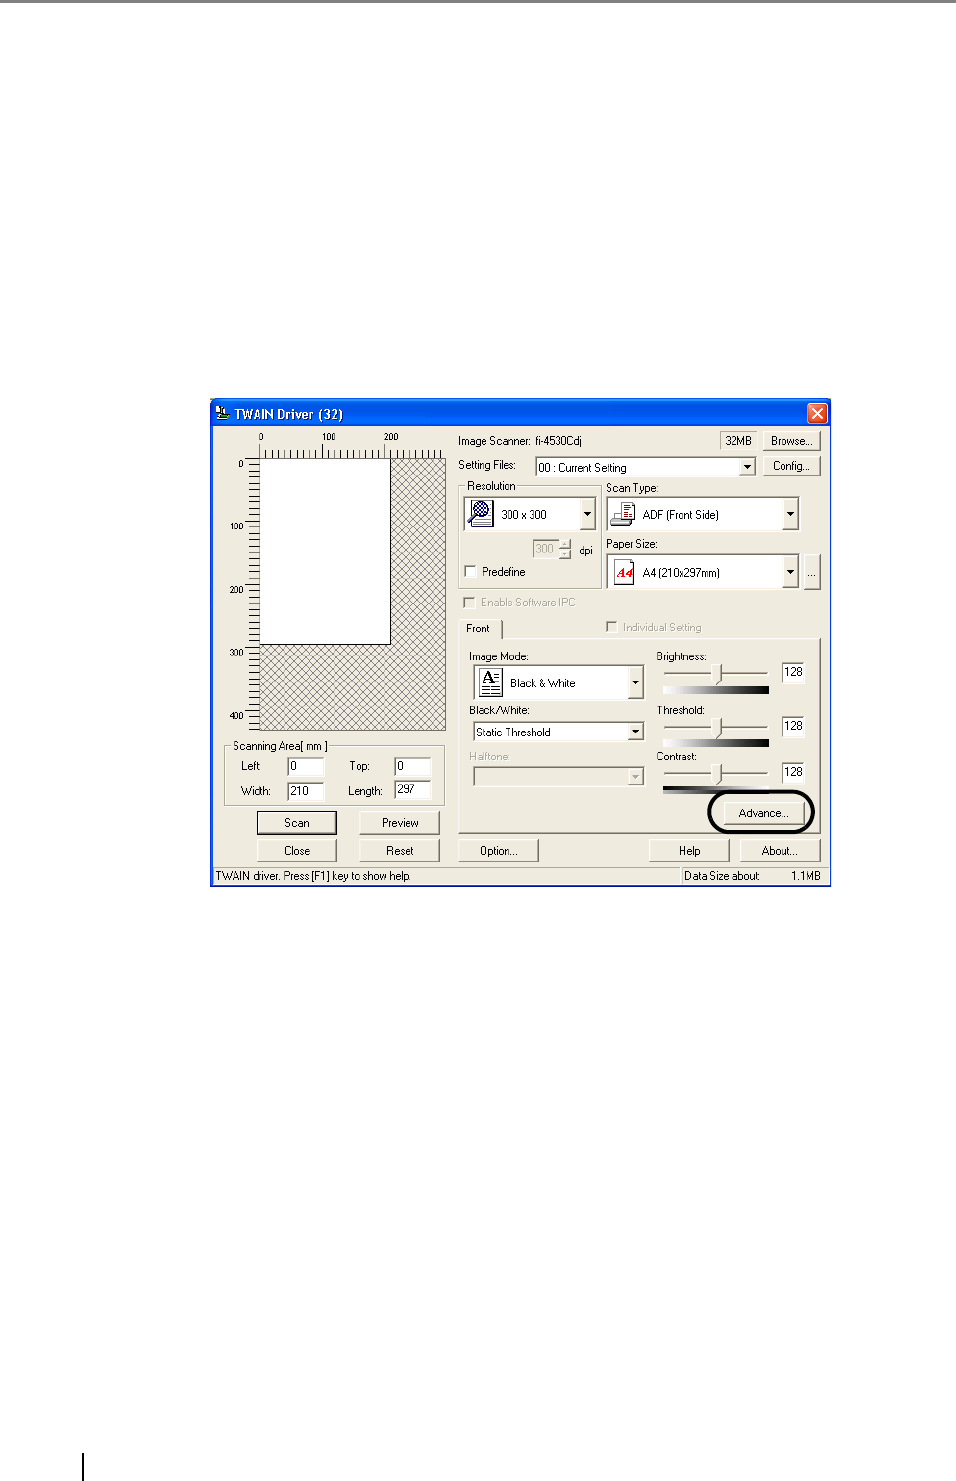
1. Click the [Advance...] button in the [TWAIN Driver] dialogbox.
⇒ The [Advance] dialogbox appears.

2.6 Excluding a Color from the Image (dropout color)
fi-4530CImage Scanner Operator's Guide 43
SCANNING VARIOUS TYPES OF DOCUMENTS
2
2. Select the color to be dropped out from [Dropout Color] under [More].
For example, if the document contains black text in green frame, select [Green] so that the
scanner only reads the text and eliminates the frames.
3. Click the [OK] button.
The [TWAIN Driver] dialogbox will be redisplayed. Then, perform the scanning operation
on the dialogbox.
44
2.7 Skipping blank Pages
Change settings in the [TWAIN Driver] dialogbox for skipping blank pages at scanning
documents.
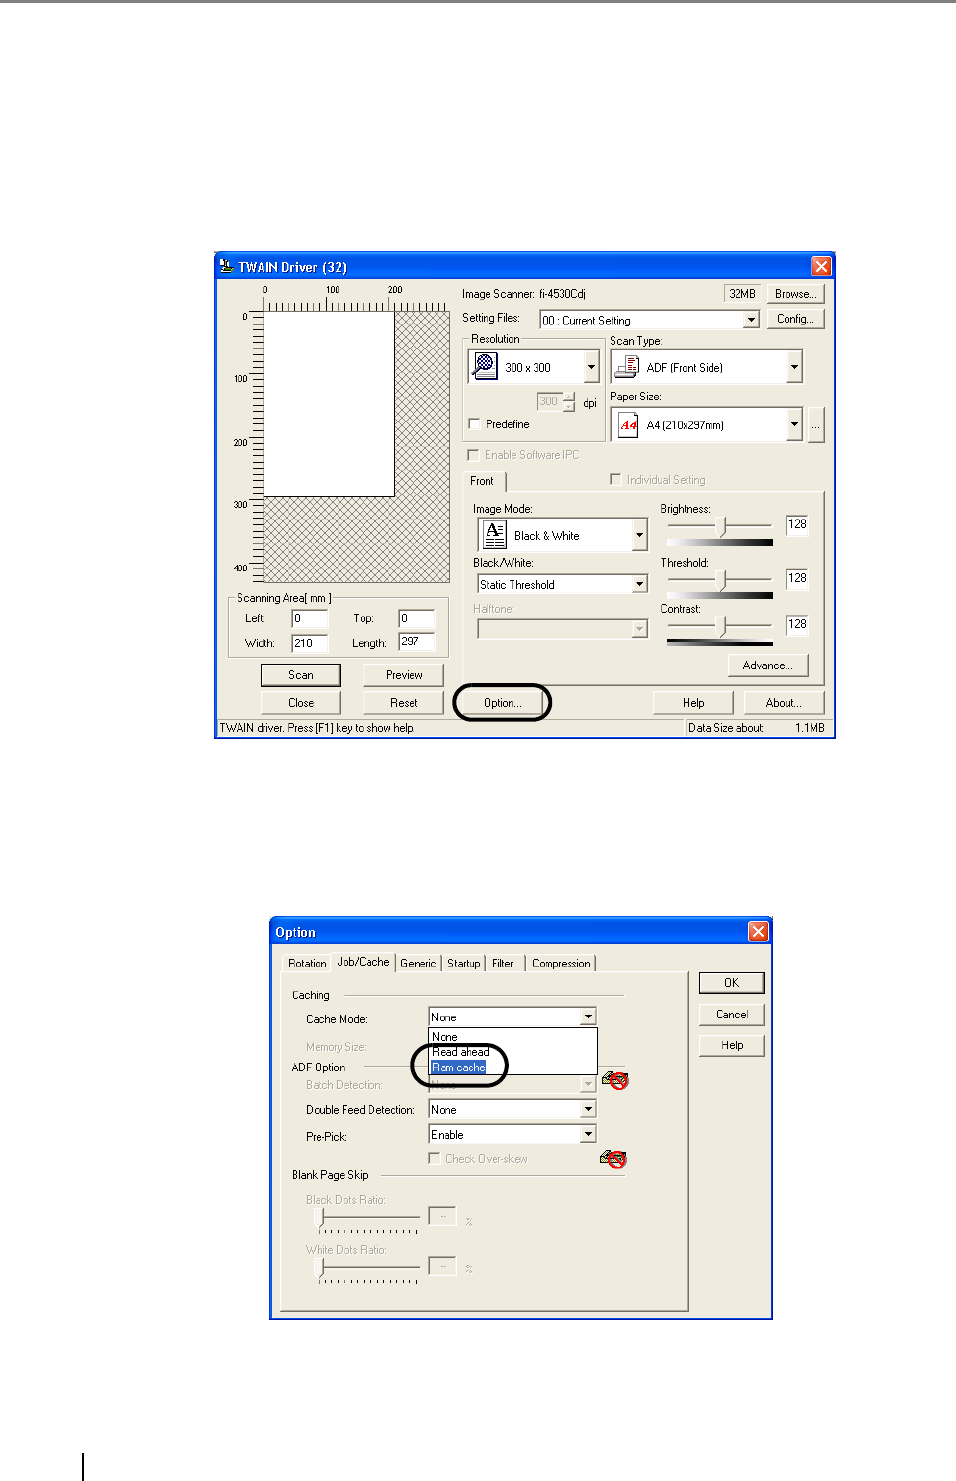
1. Click the [Option ...] button in the [TWAIN Driver] dialogbox.
⇒ The [Option] dialogbox appears.
2. Click the [Job/Cache] tab, then select [Ram Cache] from the [Cache Mode] menu
under [Caching].

2.7 Skipping blank Pages
fi-4530CImage Scanner Operator's Guide 45
SCANNING VARIOUS TYPES OF DOCUMENTS
2
3. By using the slider control under [Blank Page Skip], specify the [Black Dots Ratio]
or [White Dots Ratio] (ratio of black or white parts on the documents) for judging if the
scanned documents are recognized as blank pages by the scanner.
4. Click the [OK] button.
The [TWAIN Driver] dialogbox will be redisplayed. Then, perform the scanning operation
on the dialogbox.

46
2.8 Detecting Double-Feeds
"Double-feed" is an error that occurs when two or more sheets are accidentally fed into the ADF at
the same time. You can set the scanner to display an error message when it detects a double-feed.
To set conditions for the double-feed detection, change the settings in the [TWAIN Driver]
dialogbox.
The following shows the procedure for changing the settings in the dialogbox.
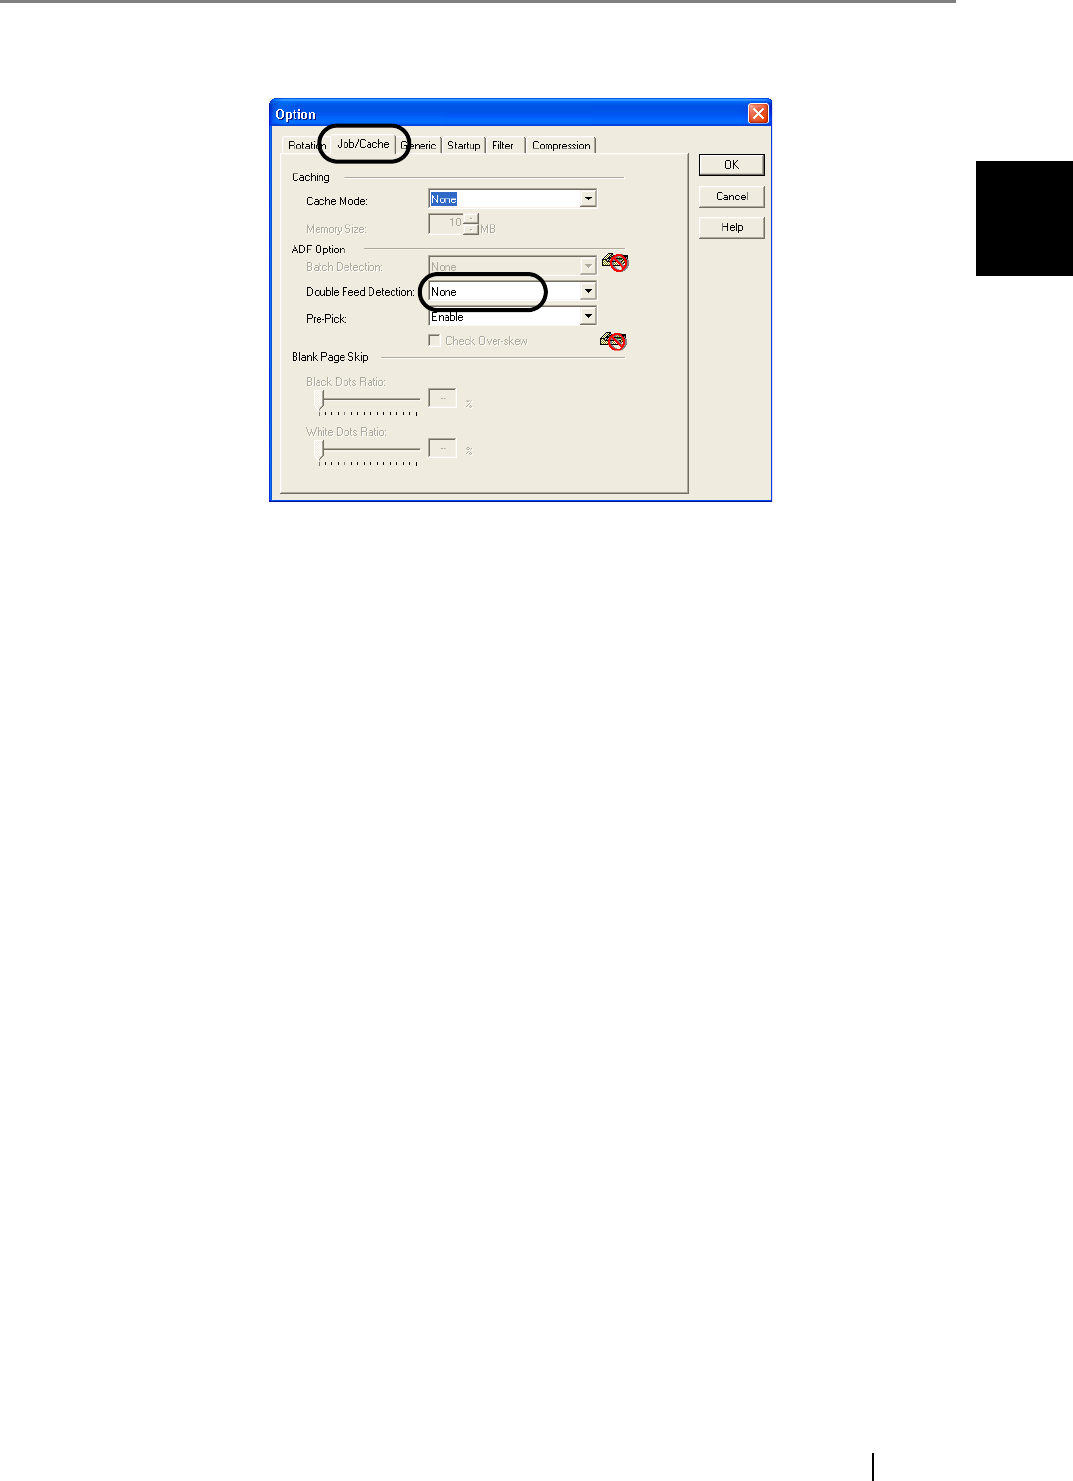
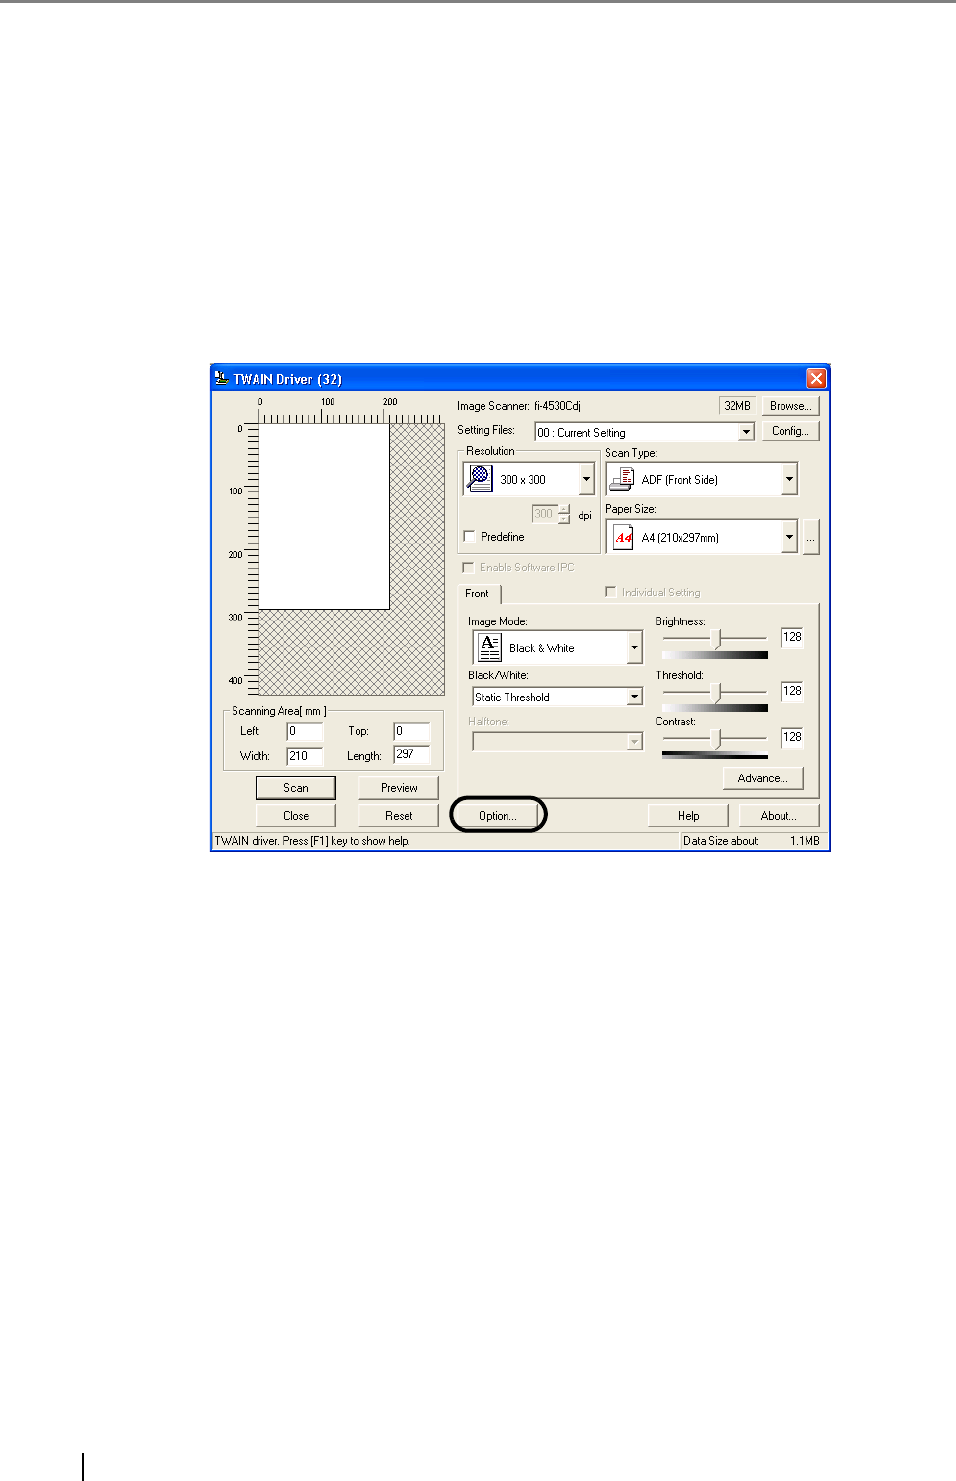
1. Click the [Option...] button in the [TWAIN Driver] dialogbox.
⇒ The [Option] dialogbox appears.
2. Click the [Job/Cache] tab.
2.8 Detecting Double-Feeds
fi-4530CImage Scanner Operator's Guide 47
SCANNING VARIOUS TYPES OF DOCUMENTS
2
3. Select the detection conditions from [Double Feed] under [ADF Option].
The following are the detection conditions
Furthermore, refer to "6.5 Double-feed Detection Conditions" on page 108 for detailed
information about the document for double-feed detection.
4. Click the [OK] button.
The display returns to the [TWAIN Driver] dialogbox. Then, perform the scanning operation
on the dialogbox.
None Double-feed detection is not performed
Check overlapping The scanner uses a ultra sonic sensor to monitor the
thickness of documents that are fed. It detects a dou-
ble-feed by differences in document thickness when
two or more document sheets are fed overlapping.
Check length The scanner uses an optical sensor to monitor the
length of documents that are fed. It detects a double-
feed by differences in the document length when two
or more document sheets are fed overlapping.
Check overlapping
and length
The scanner monitors both document thickness and
length to detect double-feeds.
48
2.9 Correcting the skewed Documents
You can set the scanner so that skew of documents are detected and corrected automatically when
skewed documents are fed into the ADF.
Change the setting in the [TWAIN Driver] dialogbox to enable this function.
The following shows the procedure for changing the setting in the dialogbox.
1. Click the [Option...] button in the [TWAIN Driver] dialogbox.
⇒ The dialogbox appears.
2. Click the [Rotation] tab.
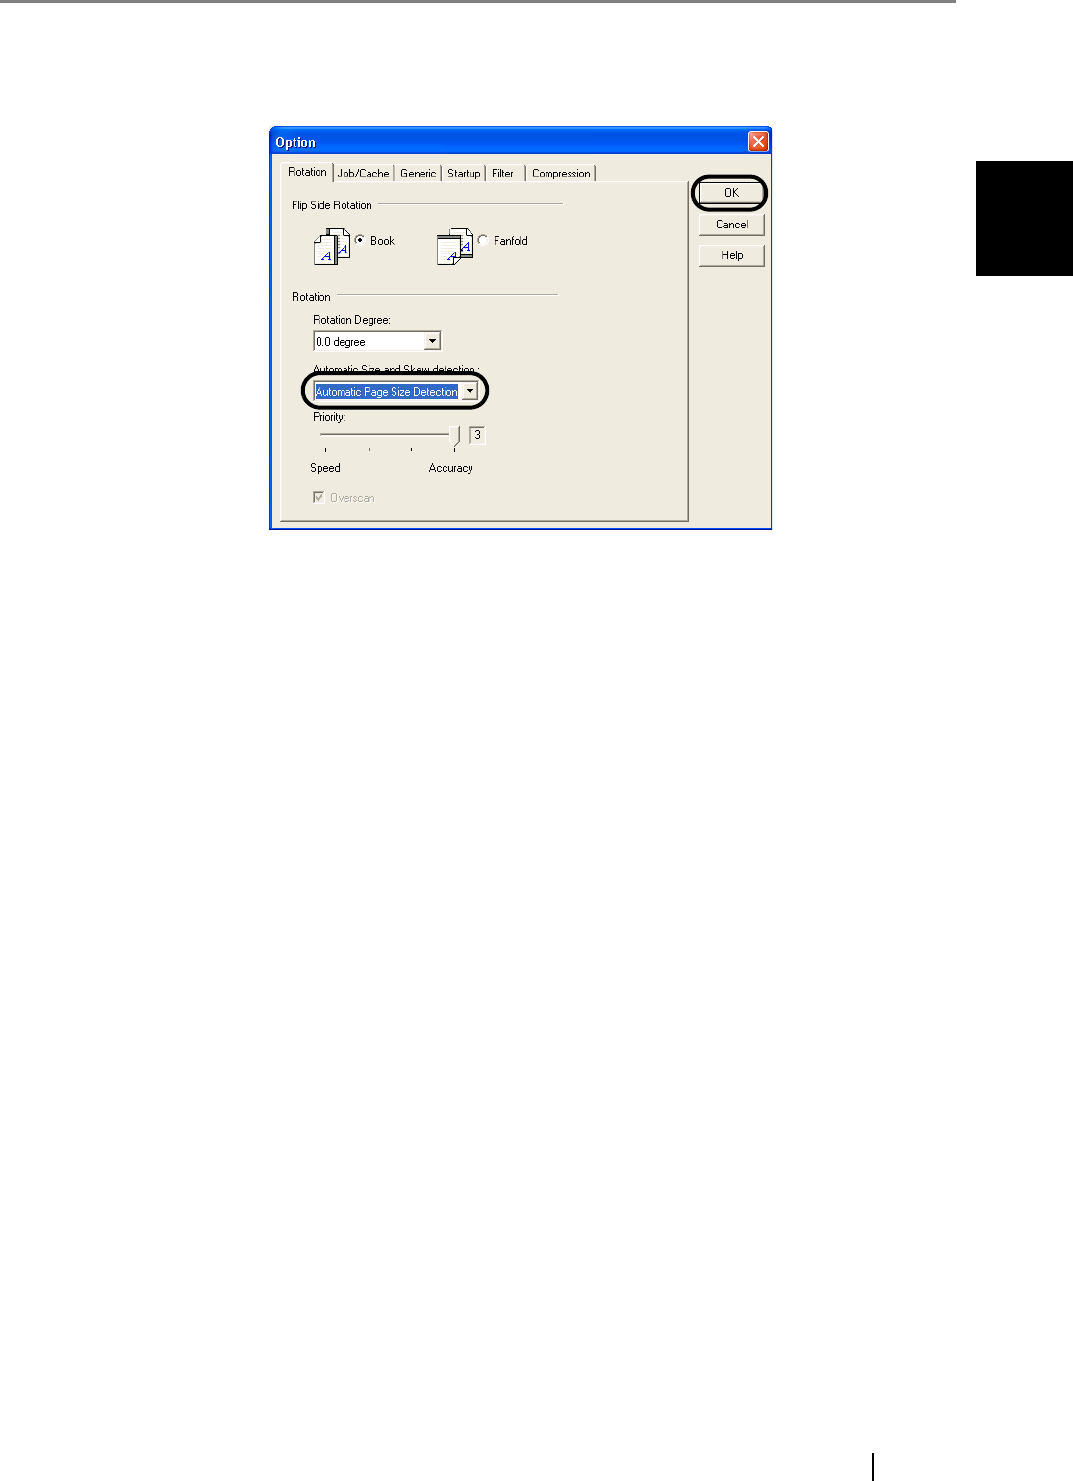
2.9 Correcting the skewed Documents
fi-4530CImage Scanner Operator's Guide 49
SCANNING VARIOUS TYPES OF DOCUMENTS
2
3. Select the [Automatic Page Size Detection] from the [Automatic Size and Skew
Detection] menu.
4. Click the [OK] button.
The display returns to the scanninig operation [TWAIN Driver] dialogbox.
Then, perform the scanning operation on the dialogbox.

50

3
fi-4530CImage Scanner Operator's Guide 51
Chapter3
DAILY CARE
This chapter describes how to clean the scanner.
When cleaning the scanner, turn off the power, and
unplug the AC cable from the outlet, except for replac-
ing the feed rollers or the eject rollers.
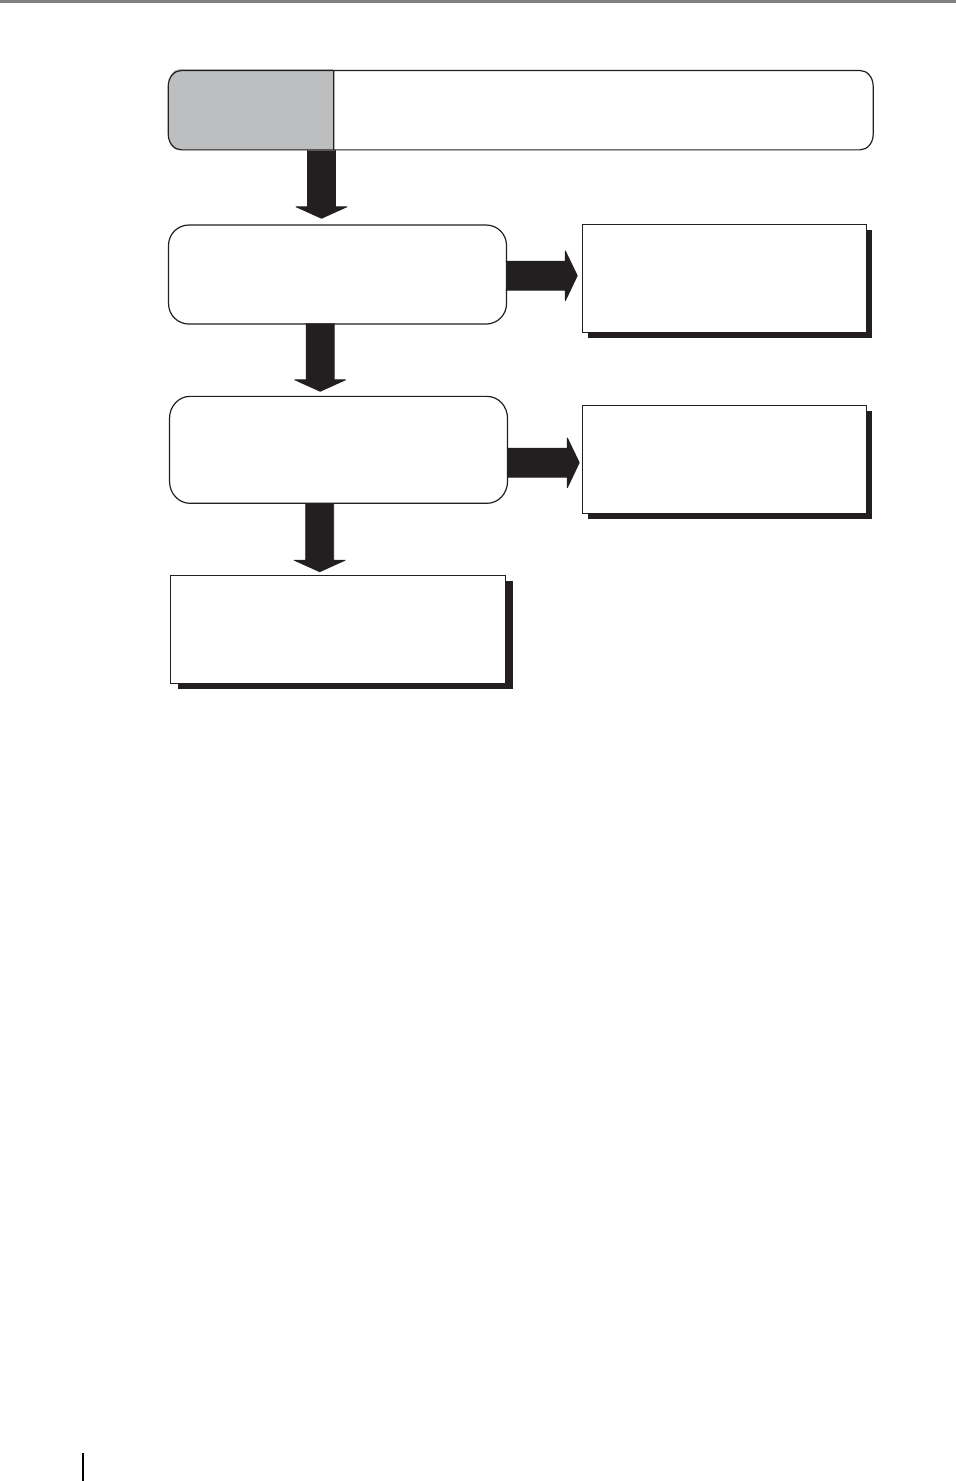
3.1 Cleaning Materials and Locations requiring Cleaning ...................................... 52
3.2 Cleaning the ADF .................................................................................................. 54

52
3.1 Cleaning Materials and Locations requiring
Cleaning
■ Cleaning Materials.
For details about the cleaning materials, contact the FUJITSU scanner dealer where you pur-
chased the scanner.
■ Locations requiring Cleaning
The ADF must be cleaned with a lint-free cloth moistened with the Cleaner F1.
■ Locations and Cycle for Cleaning
The following table shows the standard cleaning cycle for each location.
Cleaning Materials Parts No. Remarks
Cleaner F1
(or isopropyl alcohol)
CA99501-0013 1 bottle
Moisten a cloth with this fluid and wipe the
scanner clean.
Lint-free dry cloth - Commercially available one
Part to clean Standard Cleaning Cycle
Pad ASSY Clean these parts after every 5,000 scans.
Pick roller
Feed rollers
Plastic rollers
Eject rollers
Sheet guides
Glass
Ultra sonic sensor

3.1 Cleaning Materials and Locations requiring Cleaning
fi-4530CImage Scanner Operator's Guide 53
DAILY CARE
3
ATTENTION The scanner must be cleaned more frequently if you scan any of the fol-
lowing type of sheets:
•Documents of coated paper
•Documents that are almost completely covered with printed text or graph-
ics
•Chemically treated documents such as carbonless paper
•Documents containing a large amount of calcium carbonate
•Handwritten documents
54
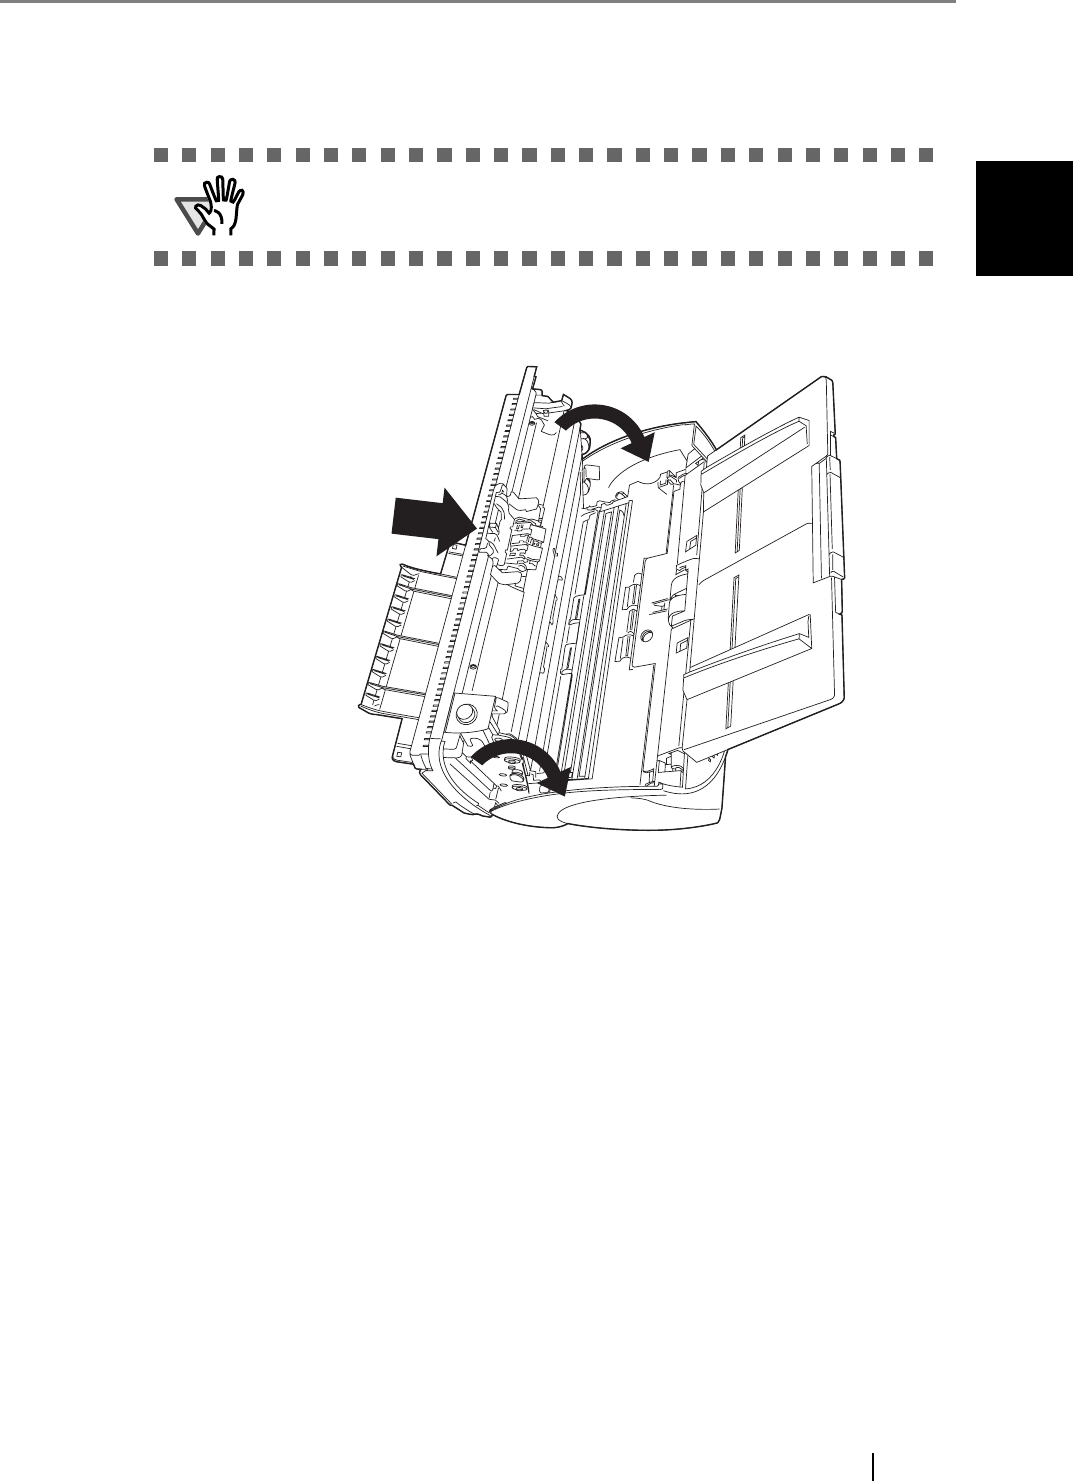
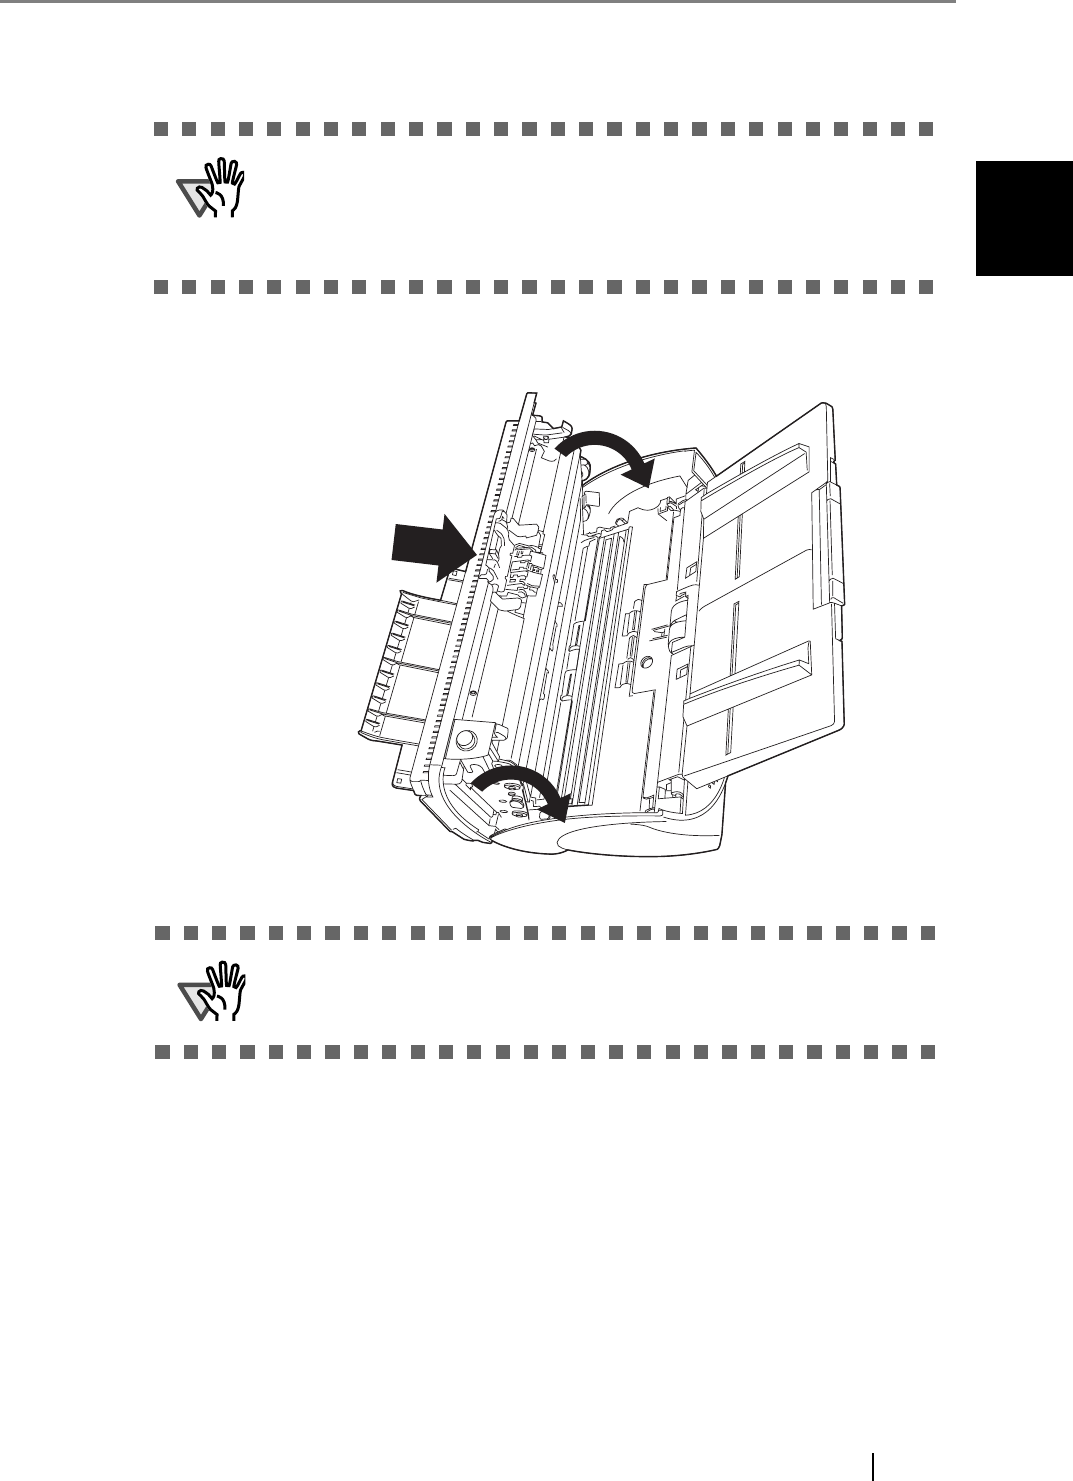
3.2 Cleaning the ADF
As a guideline, clean the ADF after every 5,000 scans. Note that this guideline varies according to
the type of documents you are scanning. For example, it may be necessary to clean the ADF more
frequently if documents are scanned when the toner is not sufficiently fixed on the printout.
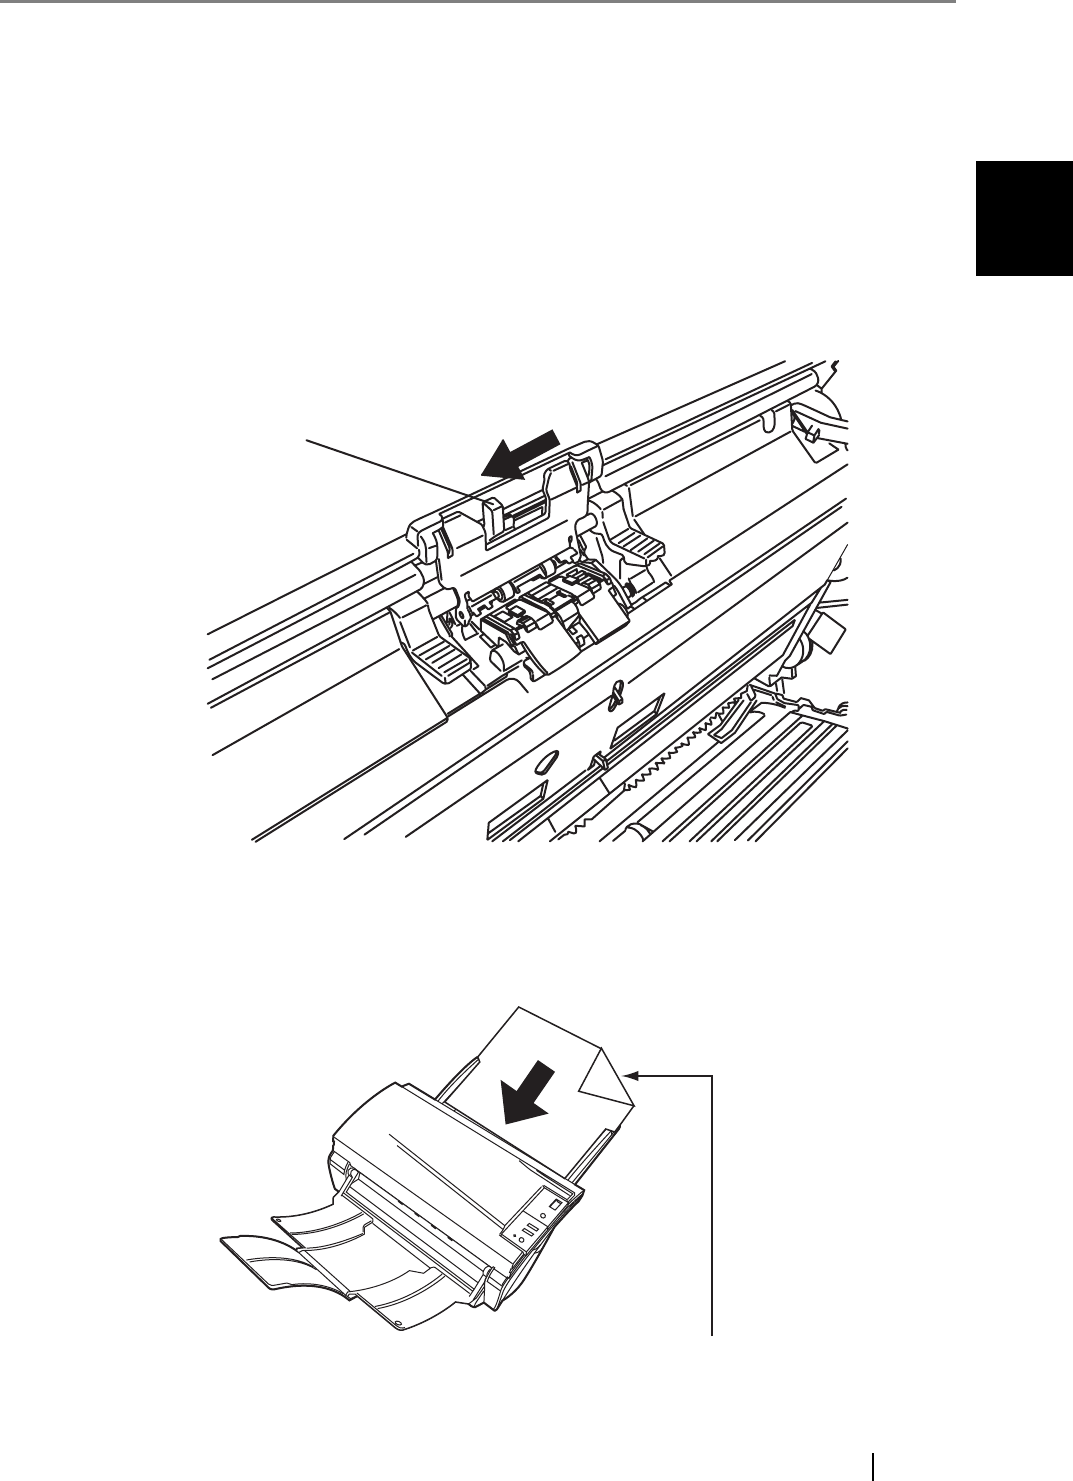
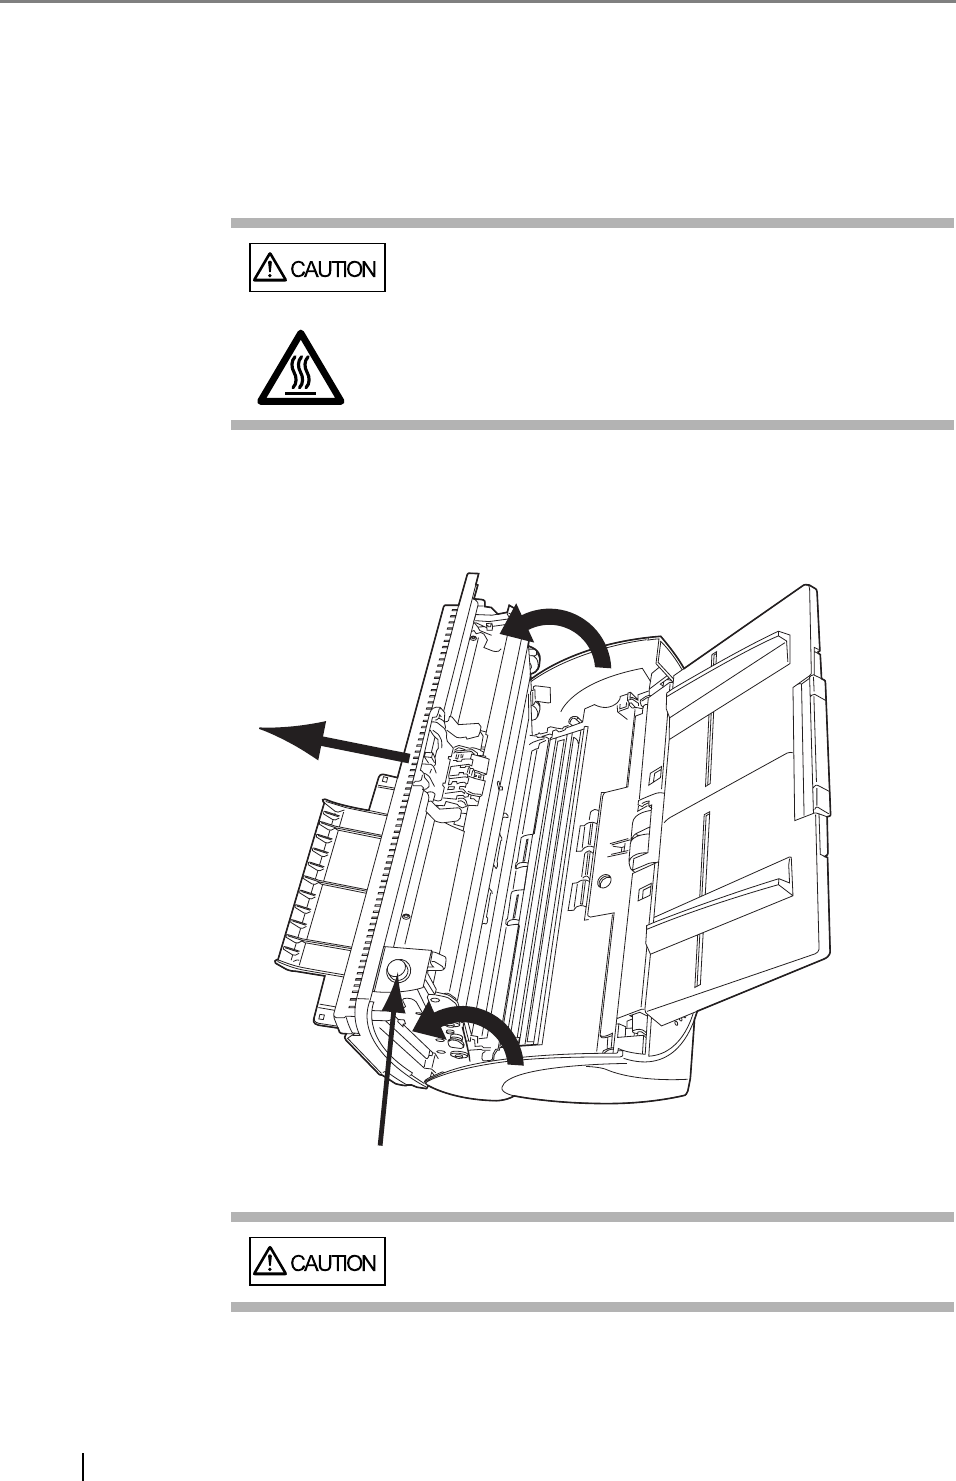
1. Open the ADF cover while pushing down the ADF button.
The glass surface inside the ADF becomes hot during
the operation of the scanner. Before you start to clean
the inner parts of the scanner, disconnect the AC
adapter from the power outlet, and wait at least 15
minutes to let the glass cool down.
Be careful, the ADF cover may close and pinch your
fingers.
The front portion
ADF button
3.2 Cleaning the ADF
fi-4530CImage Scanner Operator's Guide 55
DAILY CARE
3
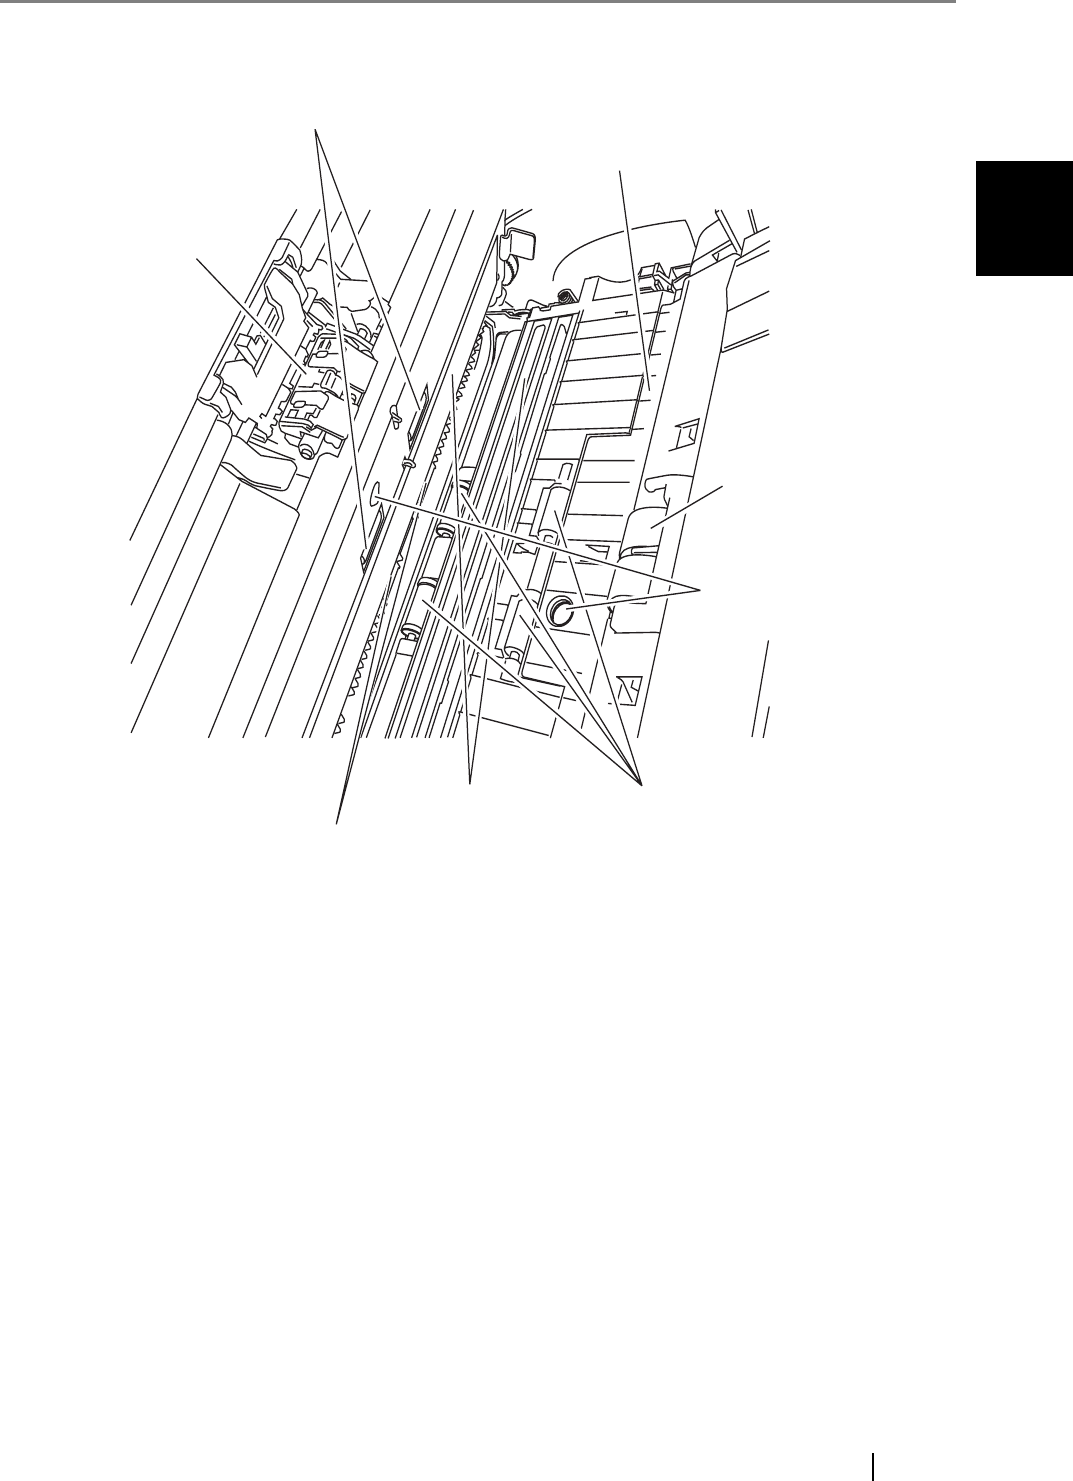
2. Clean the following locations with a lint-free cloth moistened with the Cleaner F1.
Pad ASSY
Feed rollers (2)
Sheet guide
Pick roller
Ultra sonic sensors (2)
Plastic rollers (4)
Glasses (2)
Eject rollers (2)

56
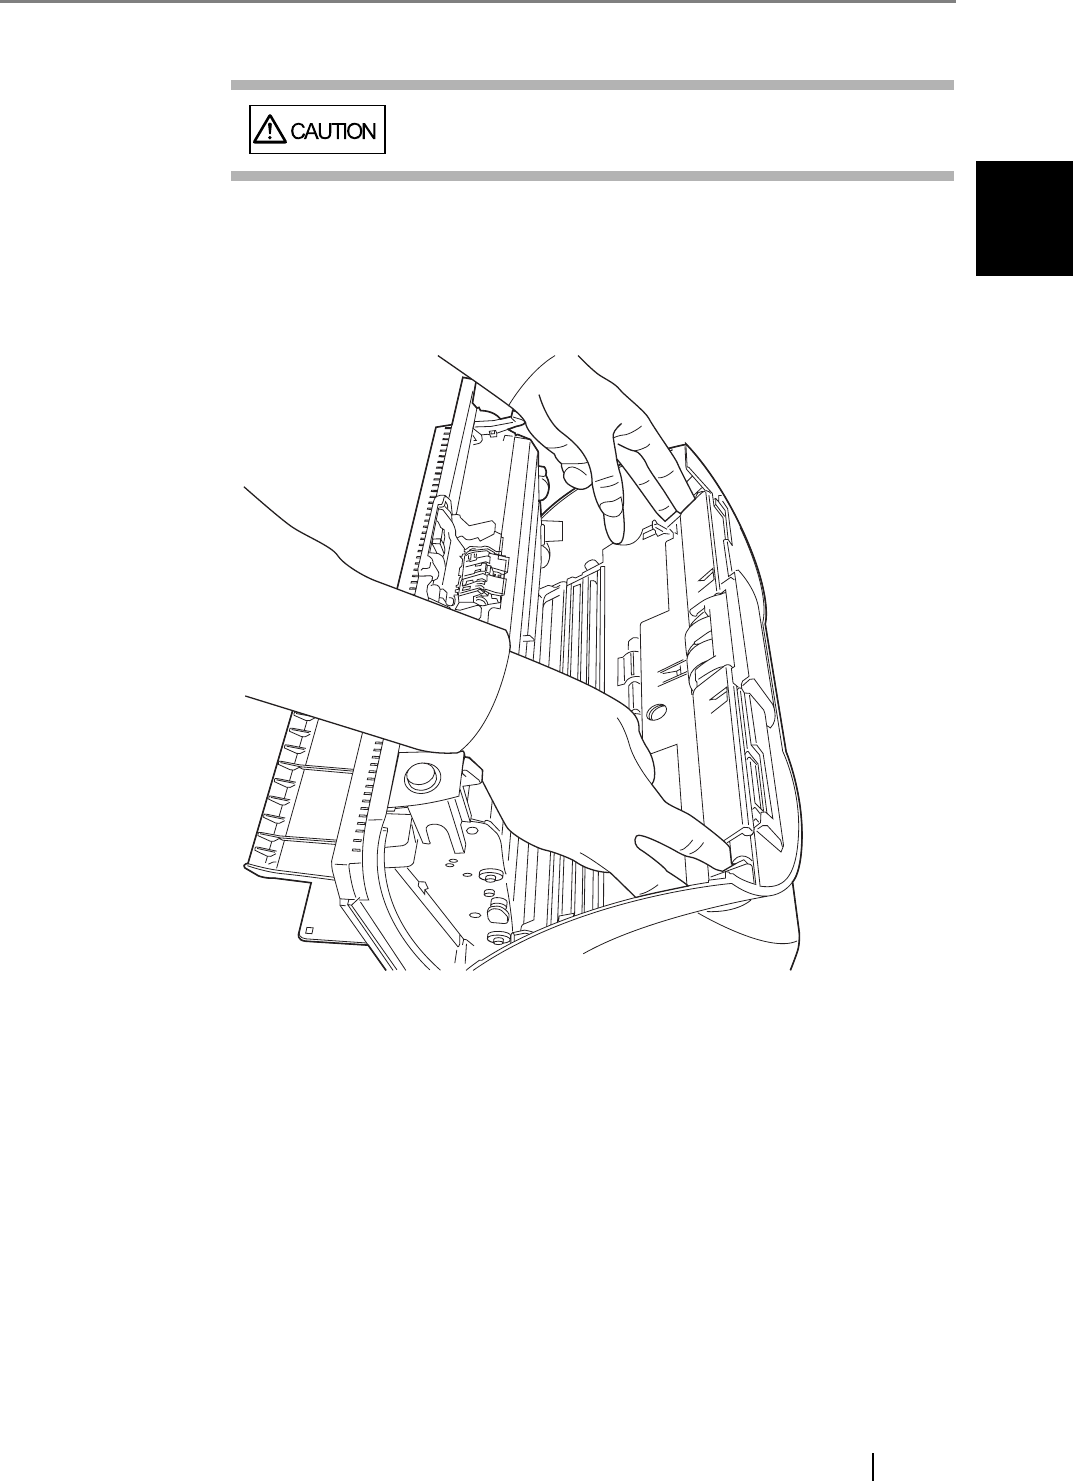
•Pad ASSY.
Clean the Pad ASSY (rubber surface) downward (in the direction of the arrow).
•Pick rollers
Clean the Pick rollers lightly, not to roughen the roller’s surface. Take particular care in
cleaning this roller as black debris on it advesely affects the pickup performance.
The portion to be clean
Pick roller

3.2 Cleaning the ADF
fi-4530CImage Scanner Operator's Guide 57
DAILY CARE
3
•Feed rollers
1) Open the ADF while pushing down the ADF button. If you open the ADF cover
when the indication of the Function No. display is "P" or "0", the Feed rollers do
not rotate even you perform the operation of step 2) below. So open the ADF cover
when the indication is not "P" or "0".
2) Simultaneously hold down the "Send to" and "Scan" buttons on the operator panel.
The Feed rollers rotate a little. For details on locations of the "Send to" and "Scan"
buttons, refer to "1.3 Operator panel" in fi-4530C Getting Started on the Setup CD-
ROM.
3) Hold a lint-free dry cloth moistened with the Cleaner F1 against the surfaces of the
rotating Feed rollers so that it lightly cleans their surfaces. Take particular care in
cleaning these rollers as black debris on them adversely affects pickup perfor-
mance. As a guideline, seven presses of the "Send to" and "Scan" buttons rotates
the Feed rollers one full turn.
•Plastic rollers
Clean the Plastic rollers lightly, not to roughen the roller surfaces. Take particular care in
cleaning these rollers as black debris on them adeversely affects the pickup performance.
Be careful no to damage the sponges beside the rollers.
•Eject rollers
1) Open the ADF while pushing down the ADF button. If you open the ADF cover
when the indication of the Function No. display is "P" or "0", the Eject rollers do
not rotate even you perform the operation of step 2) below. So open the ADF cover
when the indication is not "P" or "0".
2) Simultaneously hold down the "Send to" and "Scan" buttons on the operator panel.
The Eject rollers start to rotate a little. For details on locations of the "Send to" and
"Scan" buttons, refer to "1.3 Operator panel" in fi-4530C Getting Started on the
Setup CD-ROM.
Hold lint-free dry cloth moistened with the Cleaner F1 against the surfaces of the rotating
Eject rollers so that it lightly cleans the surfaces of the rollers. Take particular care in clean-
ing these rollers as black debris on them adversely affects the pickup performance. As a
guideline, seven presses of the "Send to" and "Scan" buttons rotate the Eject rollers one full
turn.
In step 2, the Feed rollers turn at the same time while
rotating the Eject rollers.
When cleaning the Eject rollers, be careful not to touch
the Feed rollers.
58
•Sheet guides
Clean lightly.
•Glass
Clean lightly.
•Ultra sonic sensor
Clean lightly with a dry cloth.
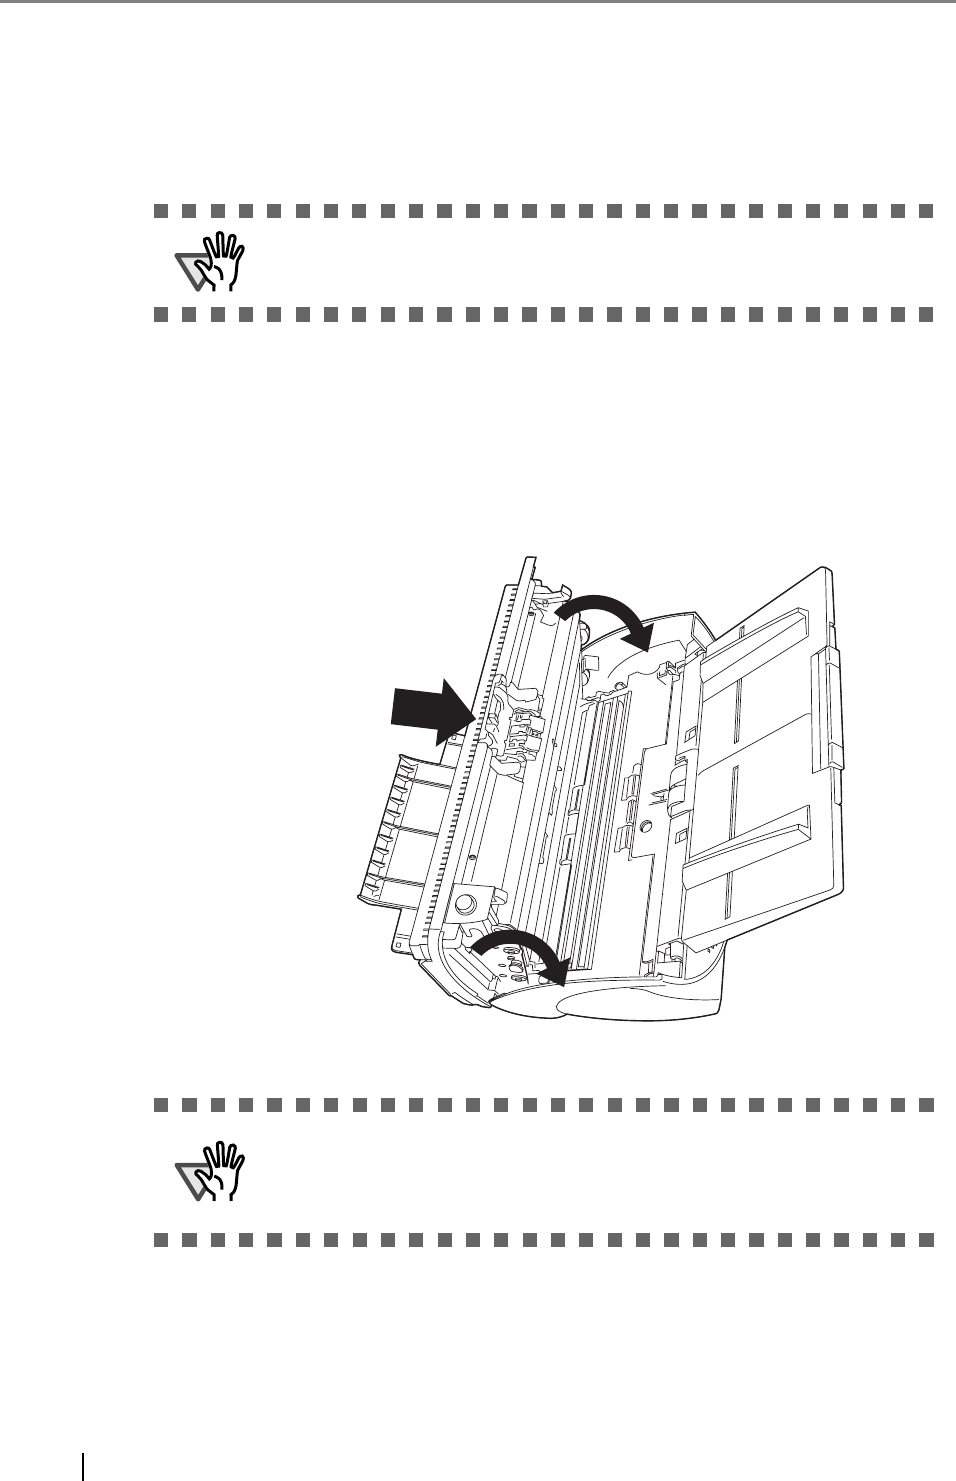
3. Push in the center of the ADF to return it to its original position, till the ADF button
locks.
ATTENTION If the glass is dirty, vertical black streaks may apper in the scanned
images.
ATTENTION
When the ADF has returned to its original position, make sure that it is
completely closed. Paper jams or feeding errors may occur if the ADF is
not closed completely.
Press the center of the ADF
4
fi-4530CImage Scanner Operator's Guide 59
Chapter4
REPLACING CONSUMABLES
This chapter describes how to replace scanner consumables.
In this chapter Windows XP screenshots are illustrated.
The screens and operations may differ slightly if the OS that you are using is not Windows XP.
Also, when FUJITSU TWAIN32 is updated the screens and operations noted in this chapter will
differ slightly.
Turn off the power and unplug the AC adapter from the
outlet before changing the scanner’s consumable
products.
4.1 Consumable and Replacement Cycle ................................................................. 60
4.2 Replacing the Pad ASSY ...................................................................................... 66
4.3 Replacing the Pick Roller..................................................................................... 70

60
4.1 Consumable and Replacement Cycle
The following table shows the specifications of consumables and guidelines for the
replacement cycle.
The replacement cycles above are rough guidelines for the case of using A4/Letter woodfree or
wood containing paper 64 g/m2 (17 lb). This cycle varies according to the type of the used paper
and how frequently the scanner is used and cleaned.
Description S/N Standard Replacement Cycle
Pad ASSY PA03289-0002 After 100,000 scans or one year
Pick roller PA03289-0001 After 200,000 sheets or one year
ATTENTION Use only the specified consumables. Do not use other consumables.
4.1 Consumable and Replacement Cycle
fi-4530CImage Scanner Operator's Guide 61
REPLACING CONSUMABLES
4
■ Guidelines for Consumable Replacement Cycle
With this product, you can learn how many times the consumables are used so that you can
estimate the right timing for the replacement.
1. When turning on the power, check that the scanner is connected to your PC.
Refer to "2.2 Connecting the Scanner to a PC" in fi-4530C Getting Started on the CD-ROM
for information about connecting the scanner to your personal computer.
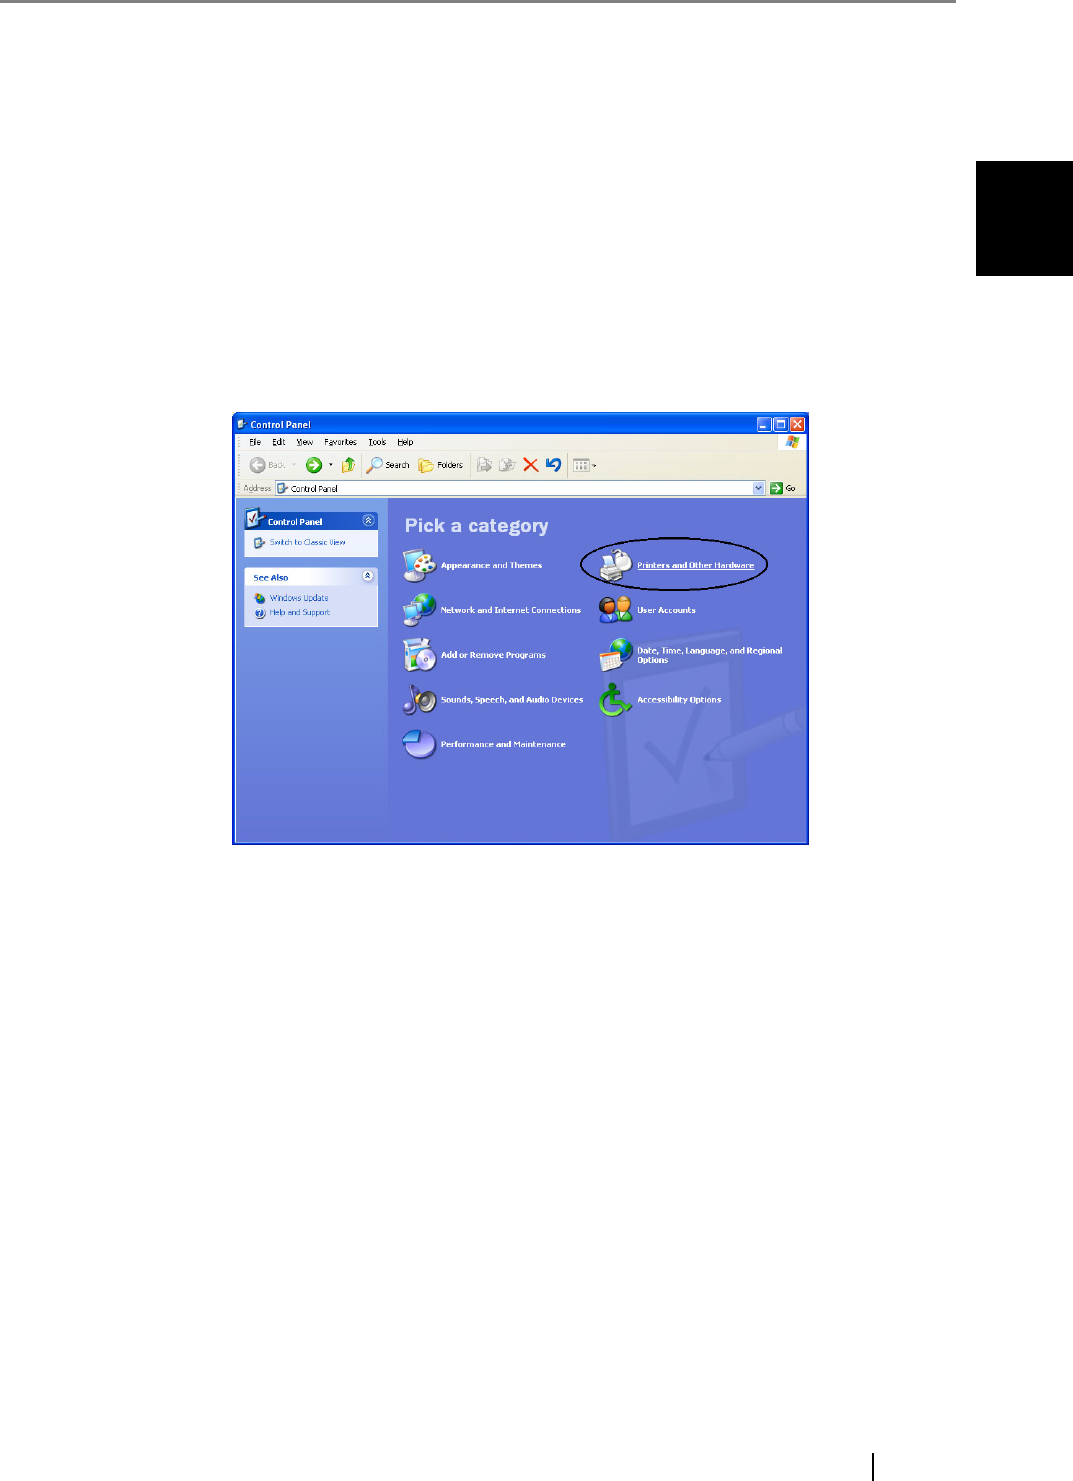
2. Double click the "Printer and Other Hardware" icon on the operator panel of your PC.
⇒ The [Printer and Other Hardware] window appears.
62
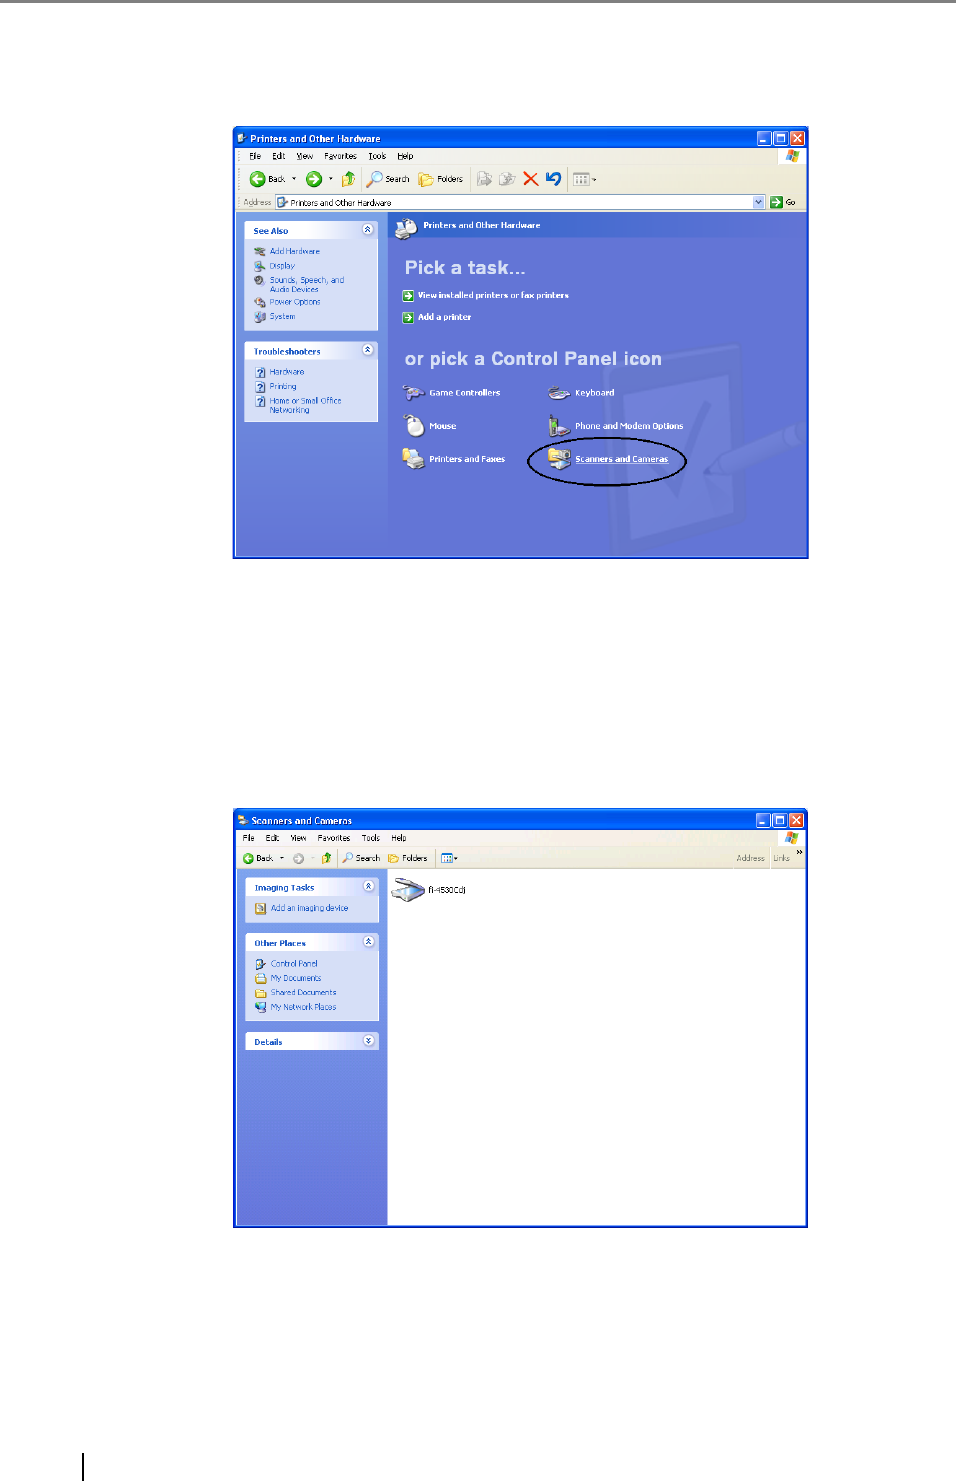
3. On the [Printers and Other Hardware] window, double click the
[Scanners and Cameras] icon.
⇒ The [Scanners and Cameras] window is displayed.
4. Right click the "fi-4530Cdj", and select [Properties] from the menu.
(For Windows 95 and WindowsNT 4.0, select the [FUJITSU TWAIN 32] icon and click the
[Properties] button.)

4.1 Consumable and Replacement Cycle
fi-4530CImage Scanner Operator's Guide 63
REPLACING CONSUMABLES
4
⇒ The [fi-4530Cdj Properties] dialogbox appears.
5. Click the "Device Set" tab.
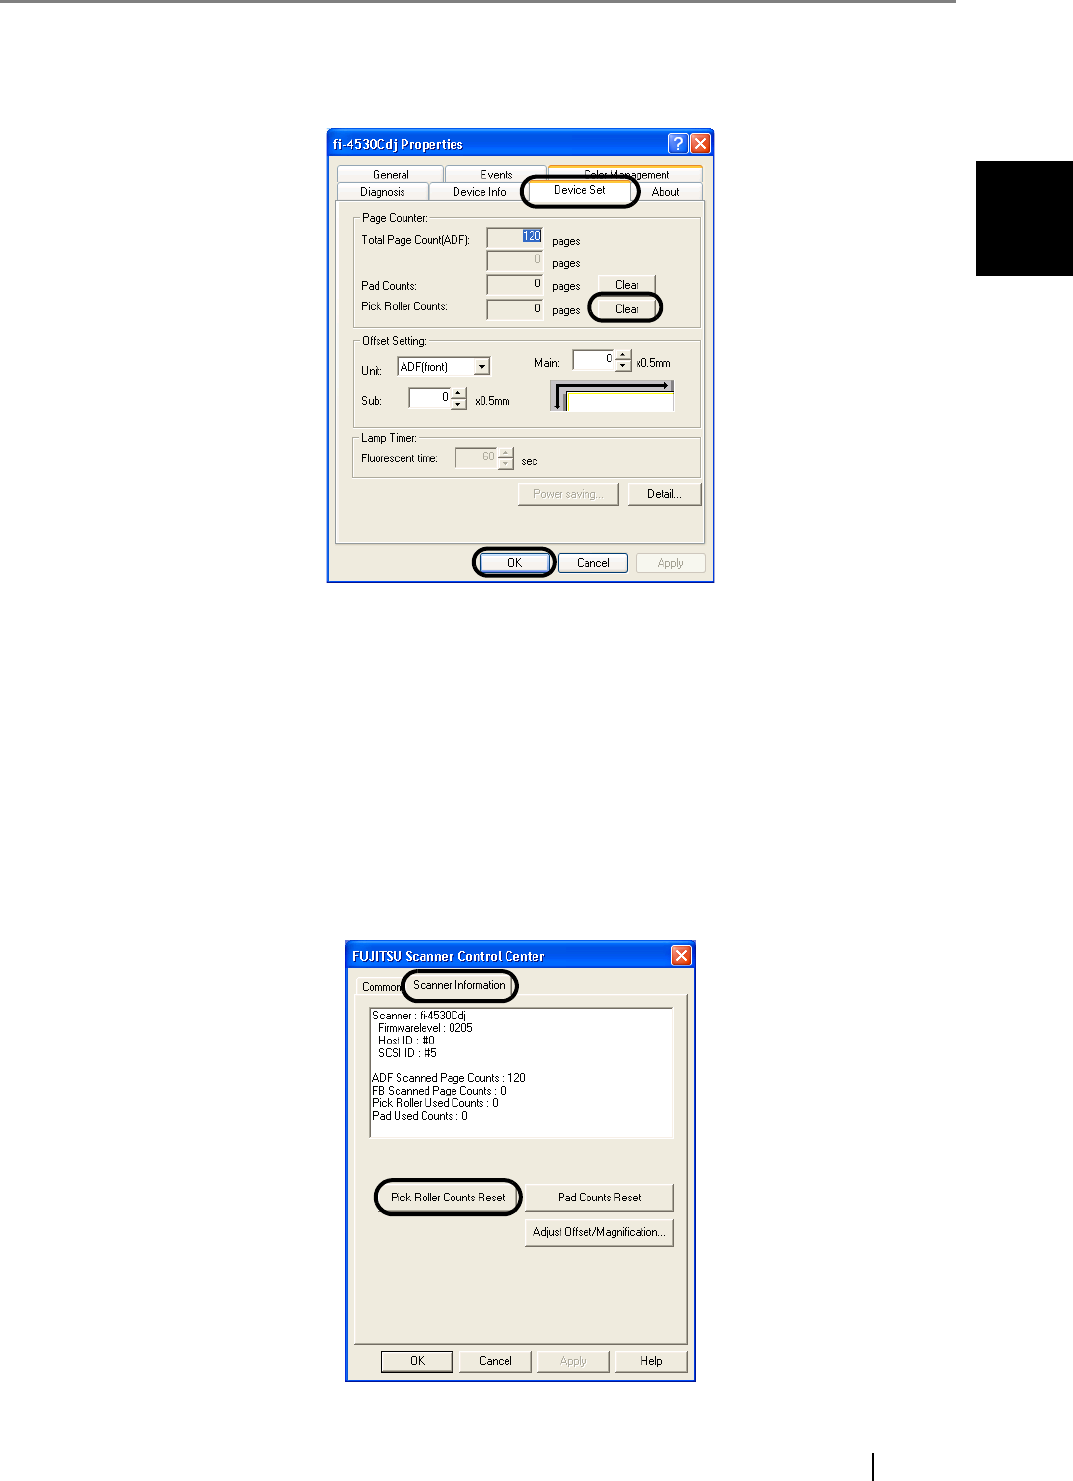
⇒ The following panel appears.
You can confirm the following information on this panel:
•Total number of scans
•Pad counter (approximate number of scans after resetting the pad counter)
•Pick roller counter (approximate number of scans after resetting the Pick roller counter)

64
The following message may appear while you use the scanner:
Replace consumables when this message is displayed.

4.1 Consumable and Replacement Cycle
fi-4530CImage Scanner Operator's Guide 65
REPLACING CONSUMABLES
4
■ When Replacing Consumables Immediately
1. Mark the [This message not display again] checkbox. Note that when this checkbox is
marked, it will not be displayed unless you reset the consumables counter.
2. To replace consumables after completing the scanning of all the document sheets in the
ADF, click the [Ignore] button. To abort scanning and replace the consumables immedi-
ately, click the [Cancel] button.
3. Replace the consumables. For details on how to replace consumables, refer to "4.2
Replacing the Pad ASSY" on page 66 and "4.3 Replacing the Pick Roller" on page 70.
■ When Consumables Cannot Be Replaced Immediately
1. To disable display of this message, mark the "This message not display again" checkbox.
Note that when the "This message not display again" checkbox is marked, this message is
not displayed until the consumables counter is reset.
2. To display the message again after scanning 100 sheets, mark the [Warns again after scan-
ning 100 pages] checkbox. To continue scanning of the current document, click the
[Ignore] button. To discontinue scanning, click the [Cancel] button.
3. Replace the consumable when the following message is displayed, or as soon as possible
before the message is displayed, as soon as you can. For details on how to replace con-
sumables, refer to "4.2 Replacing the Pad ASSY" on page 66 and "4.3 Replacing the Pick
Roller" on page 70.
66
4.2 Replacing the Pad ASSY
1. Remove all documents from the ADF paper chute.
2. Open the ADF cover by pushing down the ADF button.
3. Remove the Pad ASSY.
Press down on the upside of the Pad ASSY, slide it to the left and remove it.
The front portion
ADF button
4.2 Replacing the Pad ASSY
fi-4530CImage Scanner Operator's Guide 67
REPLACING CONSUMABLES
4
4. Attach the new Pad ASSY.
Insert the claws of the Pad ASSY into the holes on the ADF. Pressing down the Pad ASSY
and slide it to the right to fix.
5. Push in the center of the ADF to close it till the ADF button is locked.
6. Reset the pad counter.
•For Windows 98 / Windows Me / Windows 2000 /Windows XP
1) When turning on the power, check that the scanner is connected to your PC.
2) Double click the [Printers and Other Hardware] icon on the operator panel of your
PC.
⇒ The [Printers and Other Hardware] window is displayed.
3) On the [Printers and Other Hardware] window, double click the [Scanners and
Cameras] icon.
⇒ The [Scanners and Cameras] screen is displayed.
4) Rihgt click the [fi-4530Cdj], and select [Properties] from the menu.
5) The [Properties of fi-4530Cdj] dialogbox appears.
ATTENTION Make sure that the Pad ASSY is firmly attached. When the Pad ASSY is
not correctly attached, document jams or other feeding errors may occur.
Press the center of the ADF
68
6) Click the "Device Set" tab. The following panel appears.
Click the [Clear] button beside the [Pad Counter] in [Page Counter], then click the
[OK] button. This resets the pad counter to "0".
•For Windows 95 / Windows NT 4.0
1) When turning on the power, check that the scanner is connected to your PC.
2) Right click the [FUJITSU Scanner Control Center] icon in the task tray, then select
[Option].
3) Select the [Scanner Information] tab. The following screen is displayed.

4.2 Replacing the Pad ASSY
fi-4530CImage Scanner Operator's Guide 69
REPLACING CONSUMABLES
4
4) Click the [Pad Counter Reset] button.
⇒ The following message is displayed.
Click "Yes".
The Pad counter returns to “0”.
70
4.3 Replacing the Pick Roller
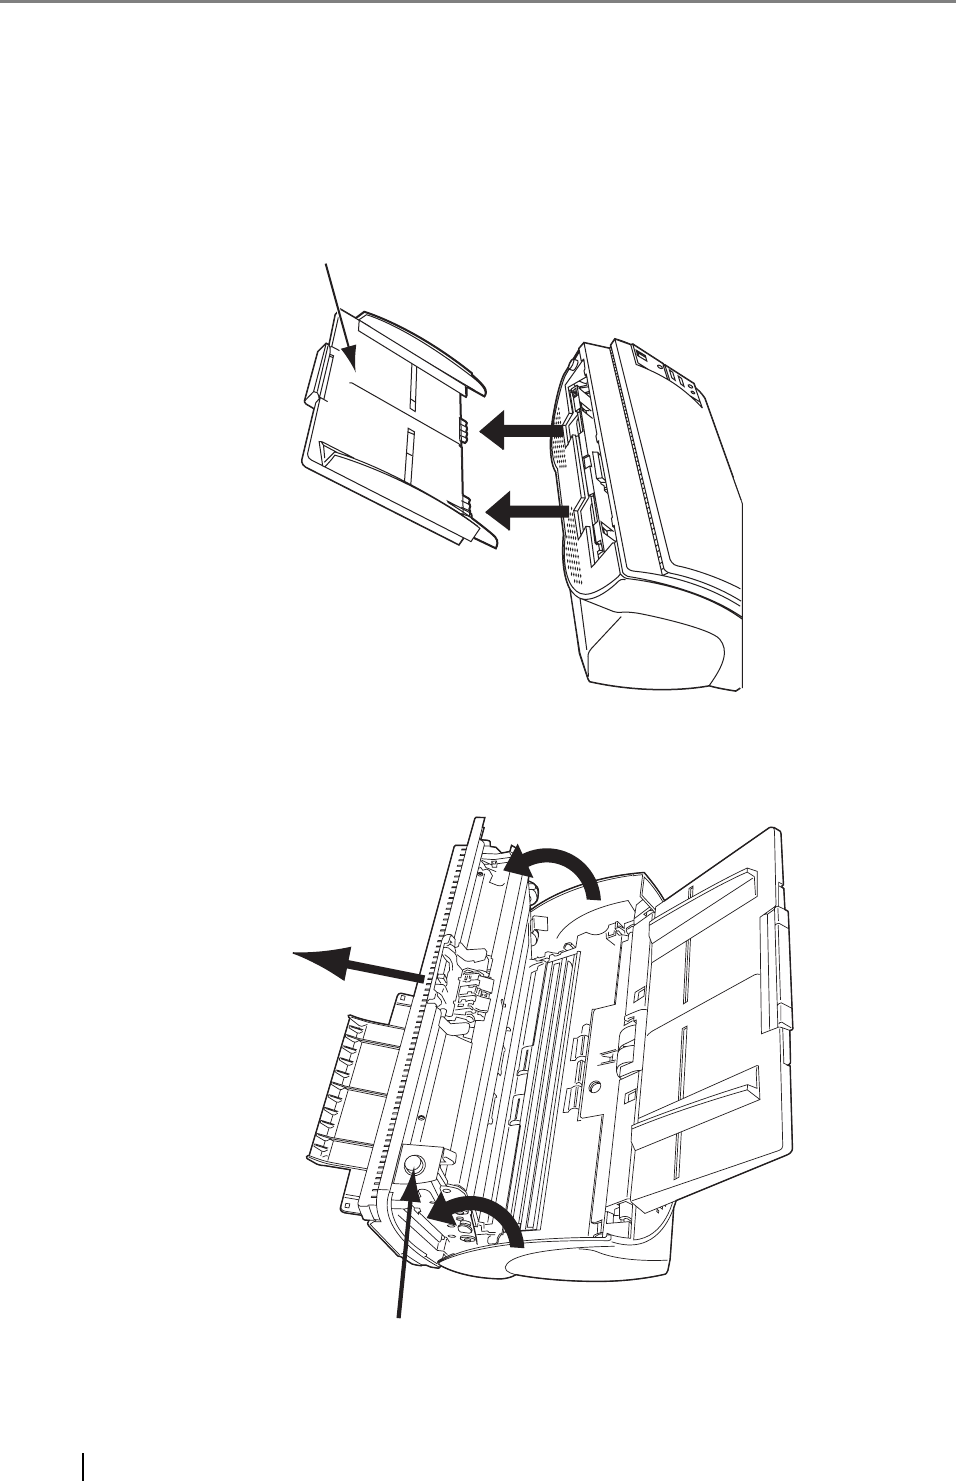
1. Remove all documents from the ADF paper chute.
2. Remove the ADF paper chute.
3. Open the ADF by pushing down the ADF button.
ADF paper chute
The front portion
ADF button
4.3 Replacing the Pick Roller
fi-4530CImage Scanner Operator's Guide 71
REPLACING CONSUMABLES
4
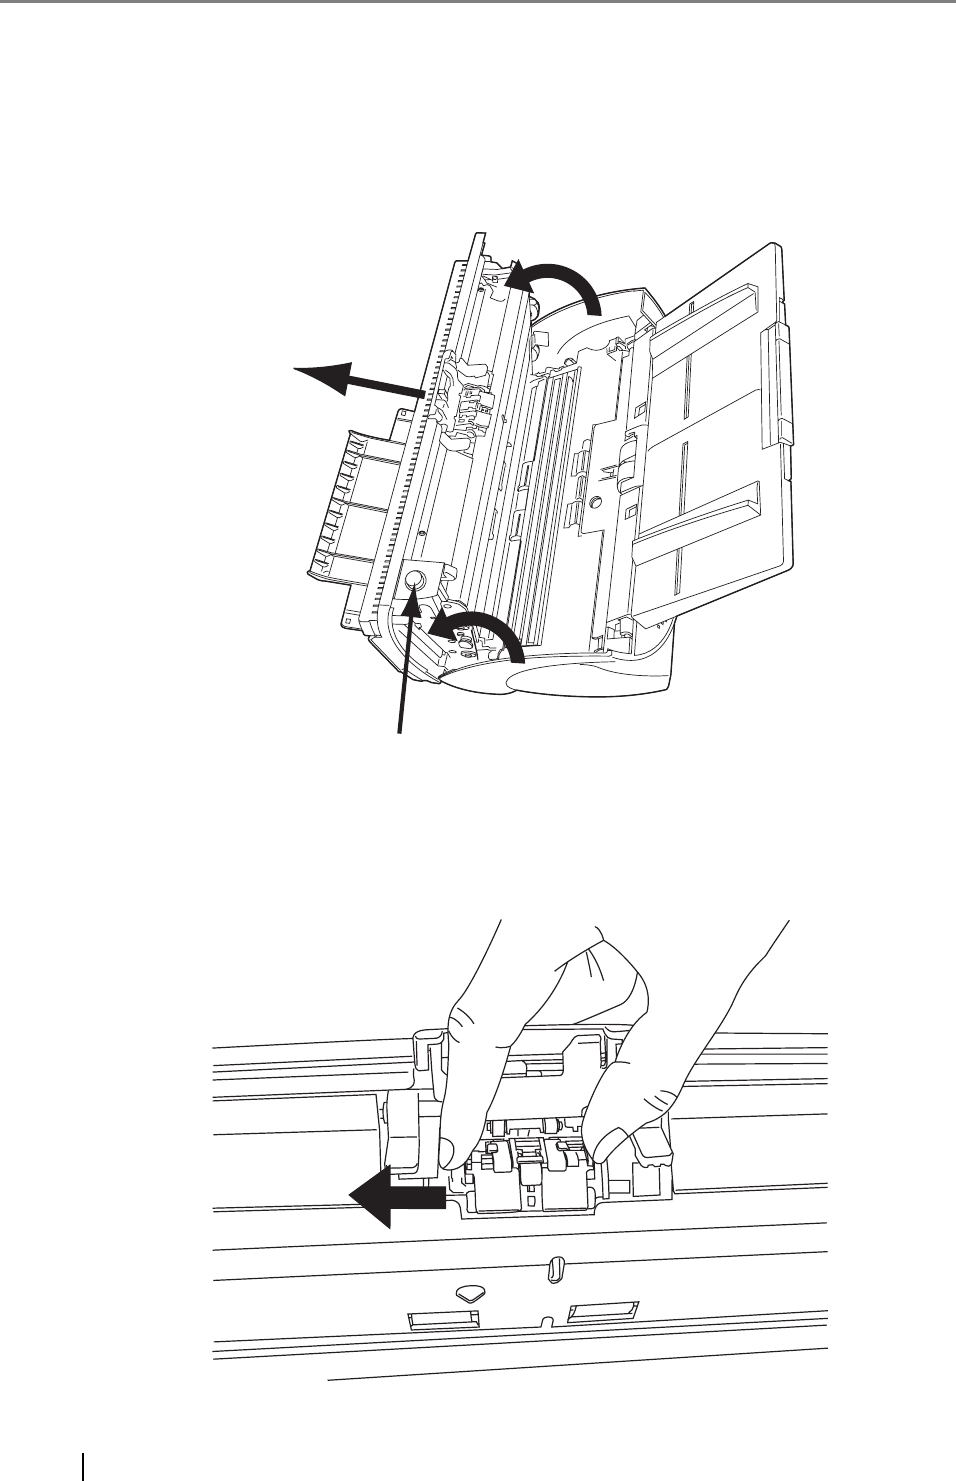
4. Remove the Pick roller from the scanner.
1. Pinch the knobs on the sheet guide and lift up the sheet guide to remove it.
Be careful, the ADF cover may close and pinch your
fingers.

72
2. Rotate the Pick roller bushing in the direction of the arrow.
3. Remove the Pick rollers while lifting it up in the direction of the arrow.
As the Pick roller bushing is firmly fixed, do not turn it
with your fingernails.
Pick roller bushing
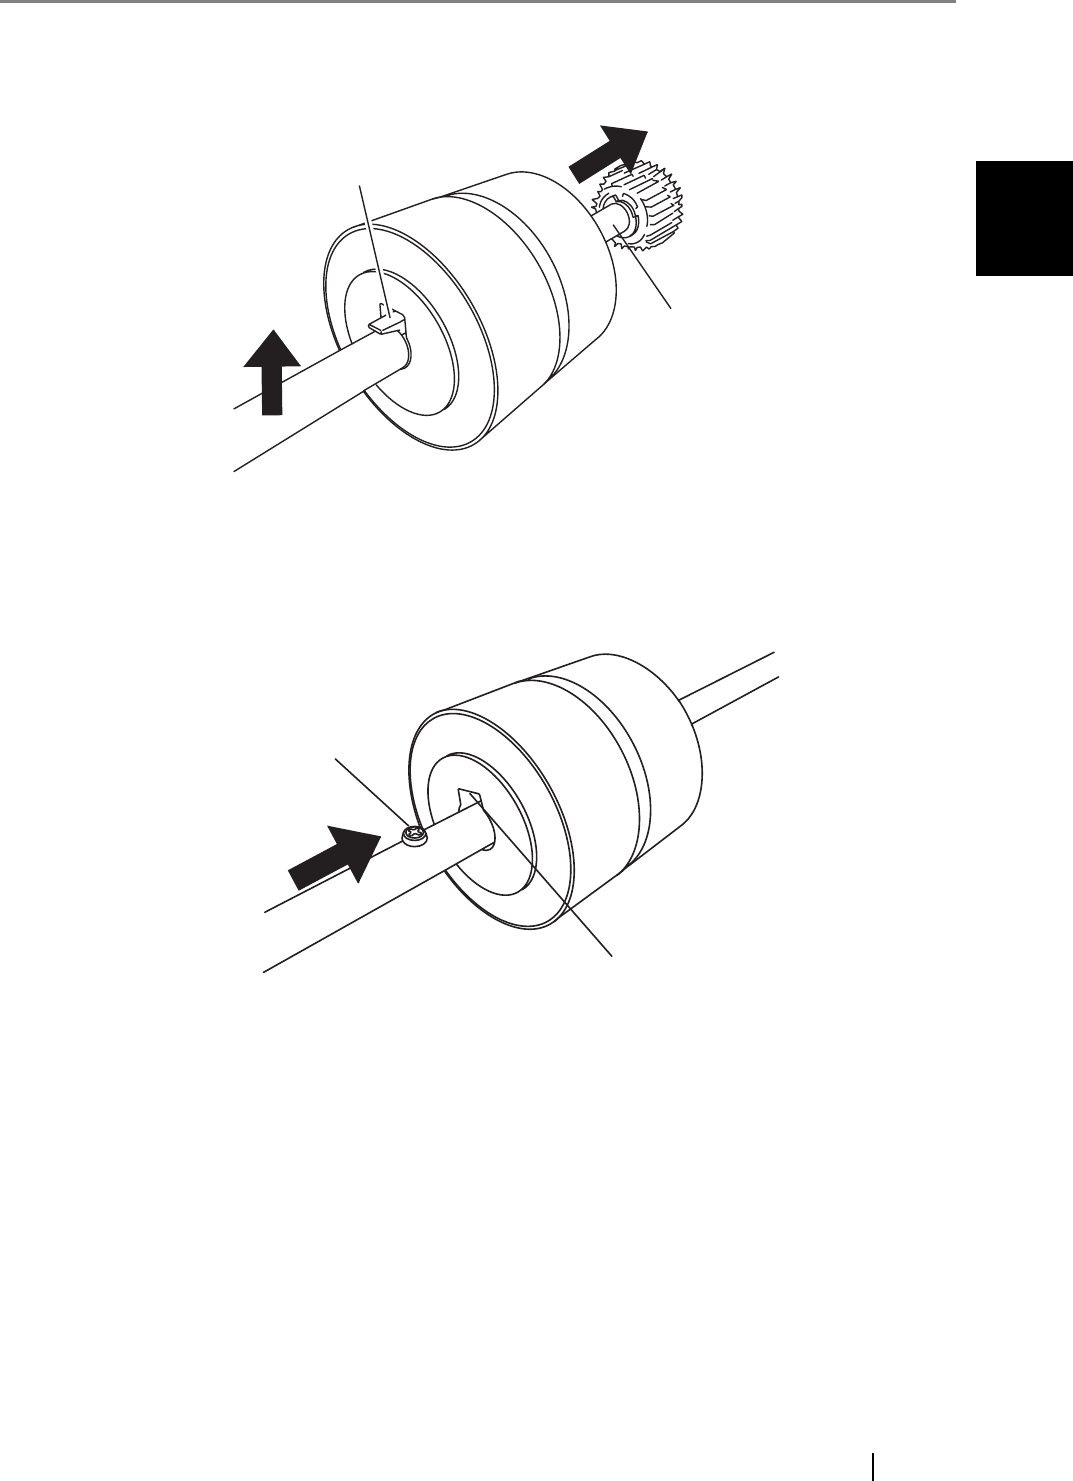
4.3 Replacing the Pick Roller
fi-4530CImage Scanner Operator's Guide 73
REPLACING CONSUMABLES
4
5. Remove the Pick roller from the shaft while lifting up the tab on the Pick roller.
6. Attach the new Pick roller.
Insert the new Pick roller aligning the screw on the shaft with the slot for the screw in the
Pick roller.
Tab
Lift up.
Pull shaft to remove
Shaft
Screw
Slot
74
7. Attach the Pick roller to the scanner.
Attatch the Pick roller to the scanner in reverse order of the procedure for removing.
1. Set the Pick roller fixing the and of shaft into the shaft hole.
ATTENTION
Be sure to insert the Pick roller till it makes a clicking sound.
"Click"
Shaft
Shaft hole
4.3 Replacing the Pick Roller
fi-4530CImage Scanner Operator's Guide 75
REPLACING CONSUMABLES
4
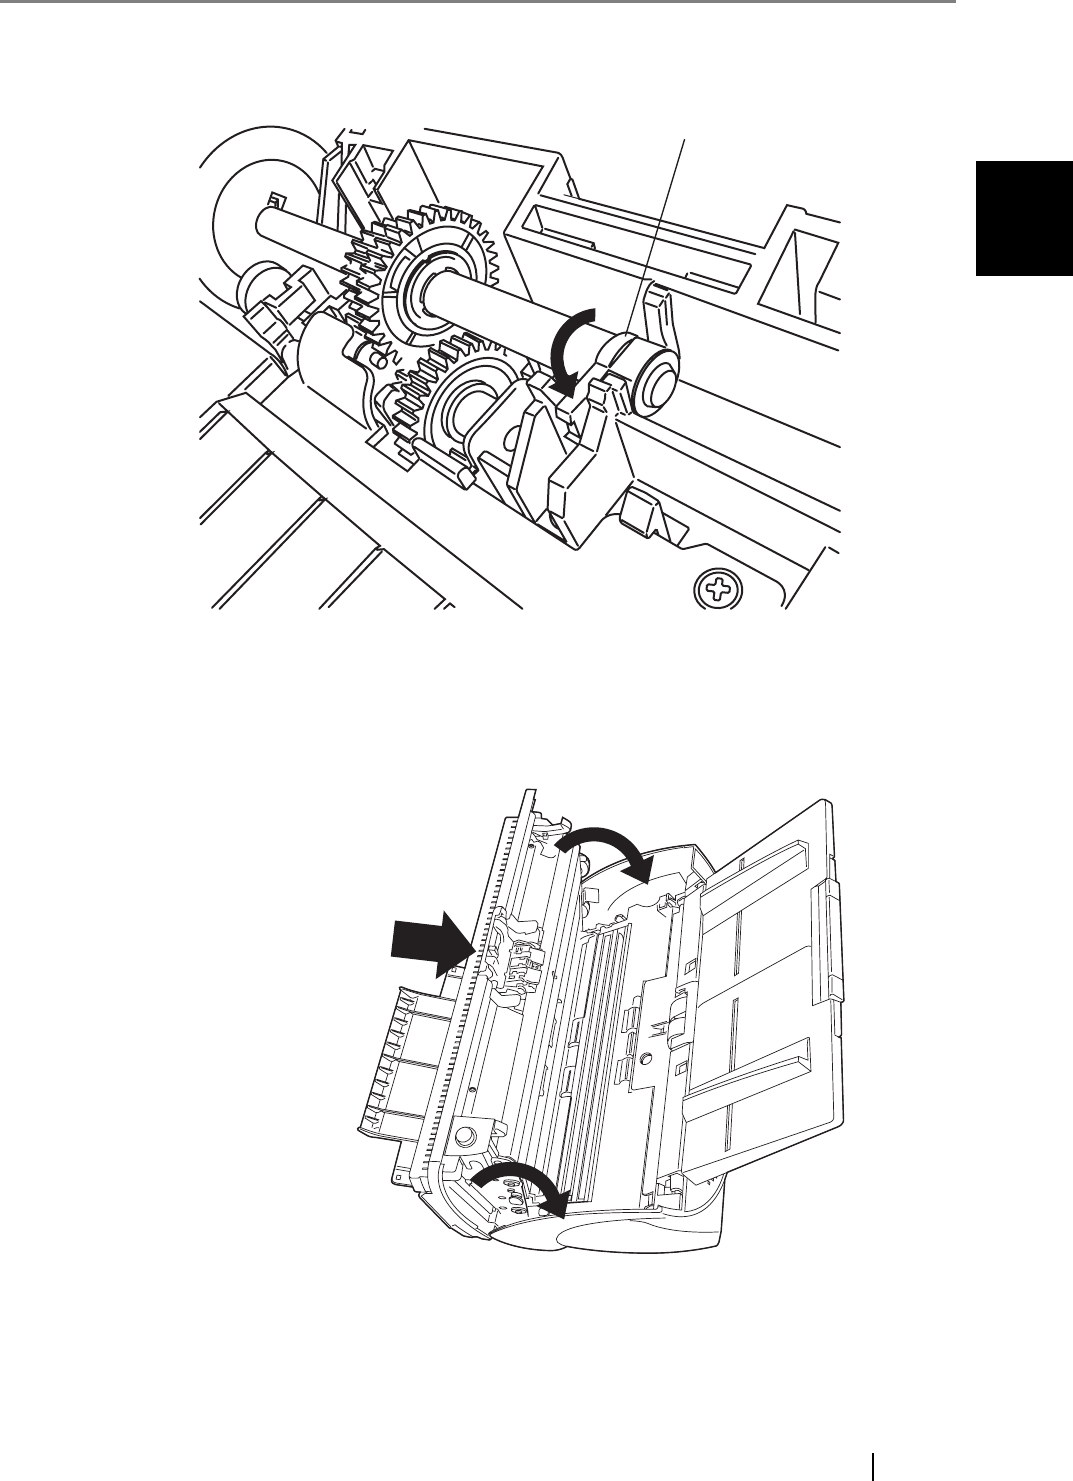
2. Turn the Pick roller bushing in the direction of the arrow.
3. Move the sheet guide knobs in the direction indicated by the arrow to fix the sheet guide.
8. Push in the center of the ADF to close it till the ADF button is locked.
Pick roller bushing
Press the center of the ADF

76
9. Attach the ADF paper chute to the scanner.
10. Reset the pick counter.
•For Windows 98 / Windows Me / Windows 2000 / Windows XP
1) When turning on the power, check that the scanner is connected to your PC.
2) Double click the [Printers and Other Hardware] icon on the operator panel of your
PC.
⇒ The [Printers and Other Hardware] window is displayed.
3) In the [Printers and Other Hardware] window, double click the [Scanners and Cam-
eras] icon.
⇒ The [Scanners and Cameras] screen is displayed.
4) Right click on [fi-4530Cdj], and select [Properties] from the menu.
⇒ The [Properties of fi-4530Cdj] dialogbox is displayed.
ADF paper chute
4.3 Replacing the Pick Roller
fi-4530CImage Scanner Operator's Guide 77
REPLACING CONSUMABLES
4
5) Click the [Device Set] tab.
⇒ The following panel appears.
Click the [Clear] button beside the [Pick Counter] under [Page Counter], then click the
[OK] button. This resets the pick counter to "0".
•For Windows 95 / Windows NT 4.0
1) When turning on the power, check that the scanner is connected to your PC.
2) Right click the [FUJITSU Scanner Control Center] icon in the task tray, then select
[Option]
3) Double click [Scanner Information]. The following screen is displayed.

78
4) Click the [Pick Counter Reset] button.
⇒ The following message is displayed.
Click "Yes".
The Pick counter returns to “0”.

5
fi-4530CImage Scanner Operator's Guide 79
Chapter5
TROUBLESHOOTING
This chapter describes how to remedy document jams, other troubles, items to check before
contacting the agent where you bought the scanner, and how to check the device labels.
ATTENTION About troubles that are not described here, and the details of the errors,
refer to the FUJITSU TWAIN32 Scanner Driver Help on the Setup CD-
ROM.
5.1 Removing Jammed Documents .......................................................................... 80
5.2 Remedying Common Troubles............................................................................ 82
5.3 Items to check before contacting the agent where you bought the scanner.. 97
5.4 Checking Labels on the Scanner ........................................................................ 99

80
5.1 Removing Jammed Documents
If a document jam occured, follow the procedure below to remove the jammed documents.
1. Remove all documents from the ADF paper chute.
2. Open the ADF by pushing down the ADF button.
•Take care not to get injured when removing the
jammed documents.
•Be careful not to get neckties, necklaces, etc. entan-
gled in the scanner when removing the jammed docu-
ments.
•The surface of the glass may become hot during oper-
ation. Take care not to get burned.
Be careful, the ADF cover may close and pinch your
fingers.
The front portion
ADF button
5.1 Removing Jammed Documents
fi-4530CImage Scanner Operator's Guide 81
TROUBLESHOOTING
5
3. Remove the jammed documents.
4. Push in the center of the ADF to close it till the ADF button is locked.
ATTENTION
Staples, paper clips, etc. cause document jams. Be sure to fully check the
document and feed path, and remove any small metal objects such as
these.
Also, before you start scanning, be sure to remove any staples, clips, etc.
from the document.
ATTENTION
Make sure that the ADF is completely closed. When it is not completely
closed, document jams or feeding errors may occur.
Press the center of the ADF

82
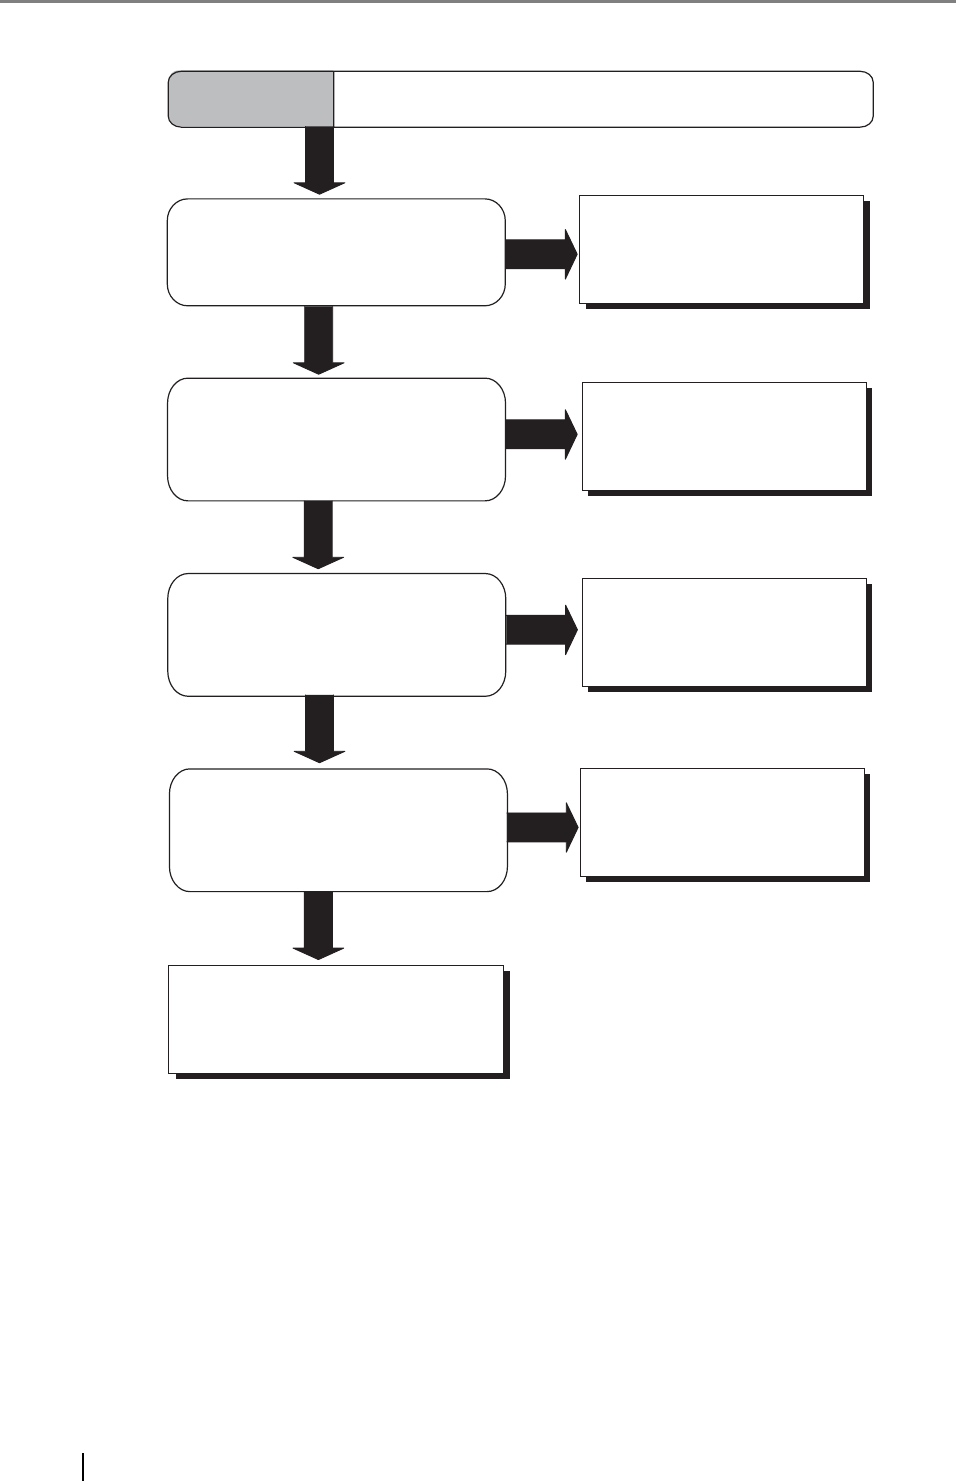
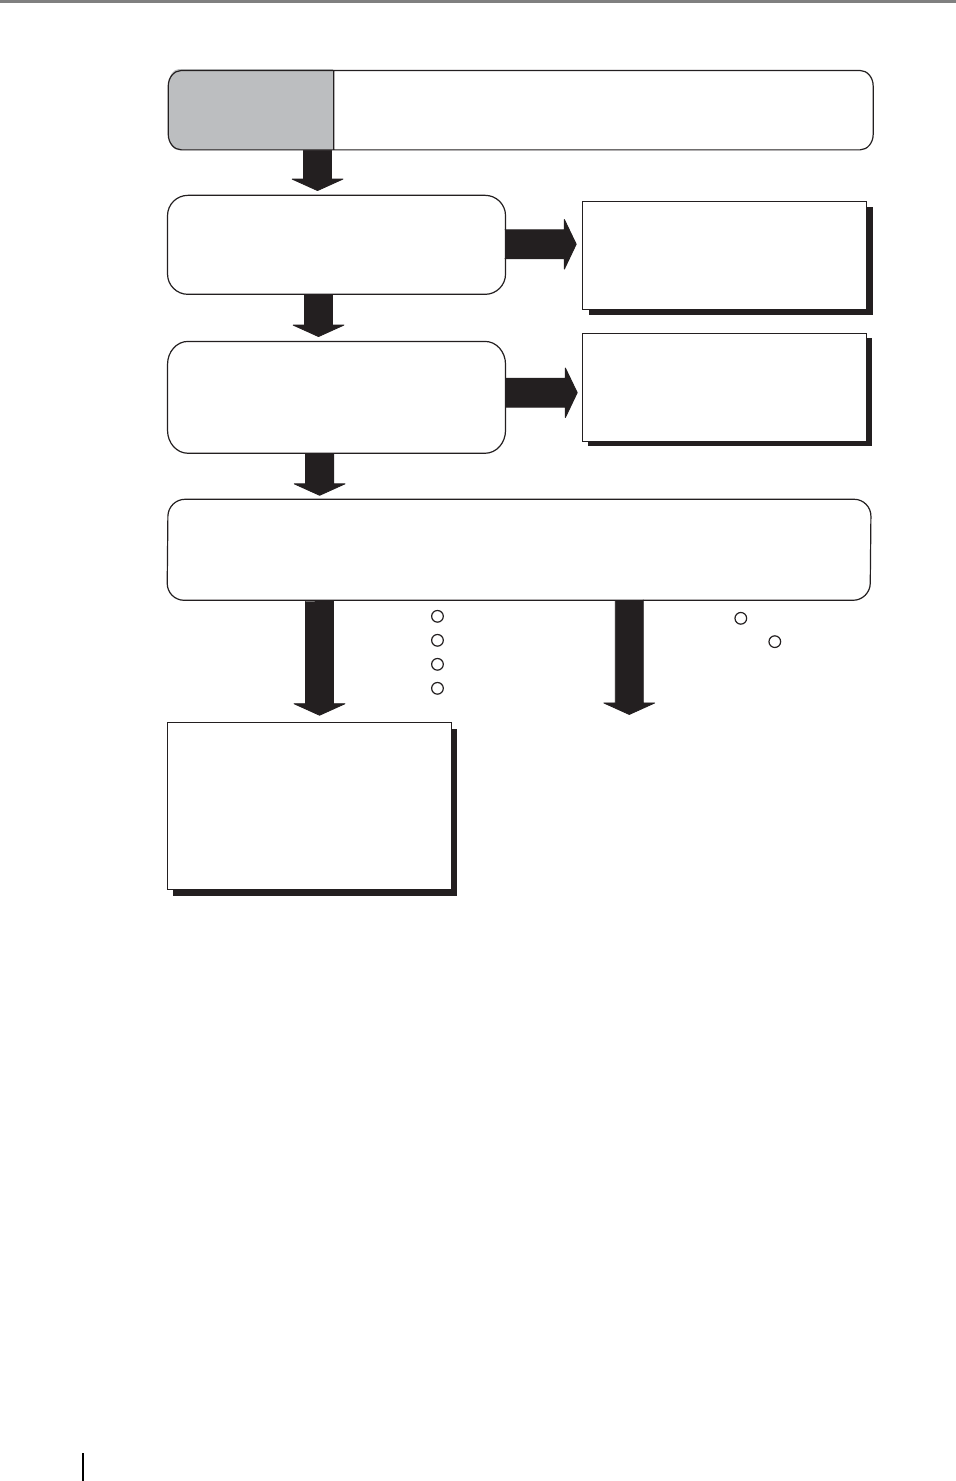
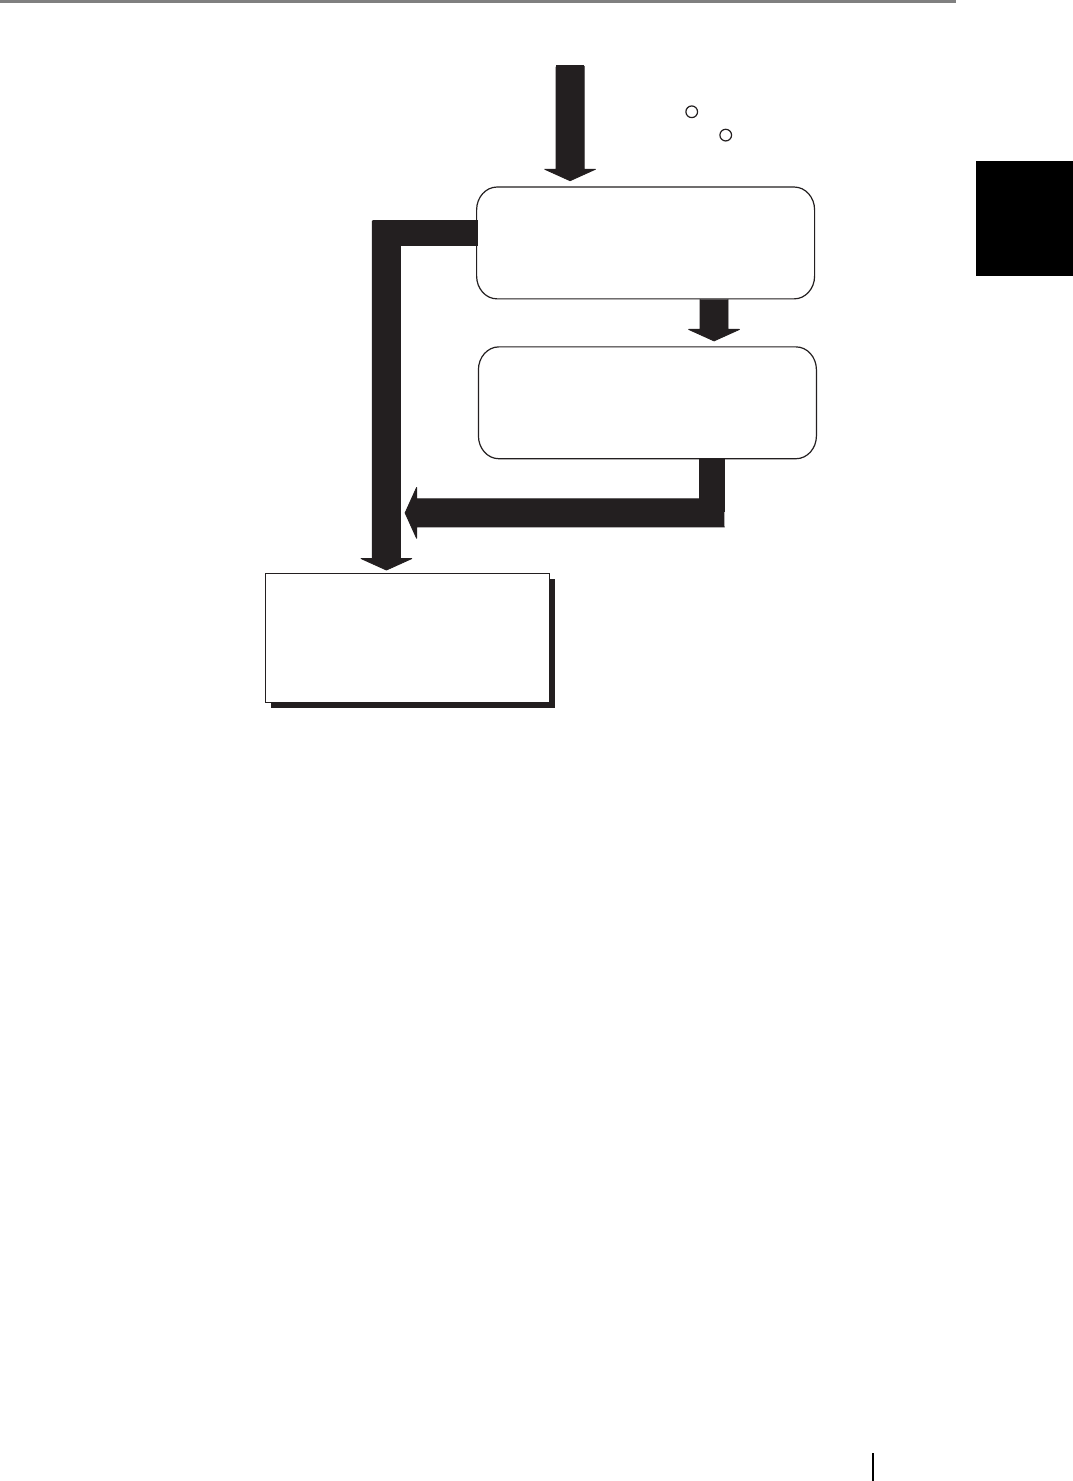
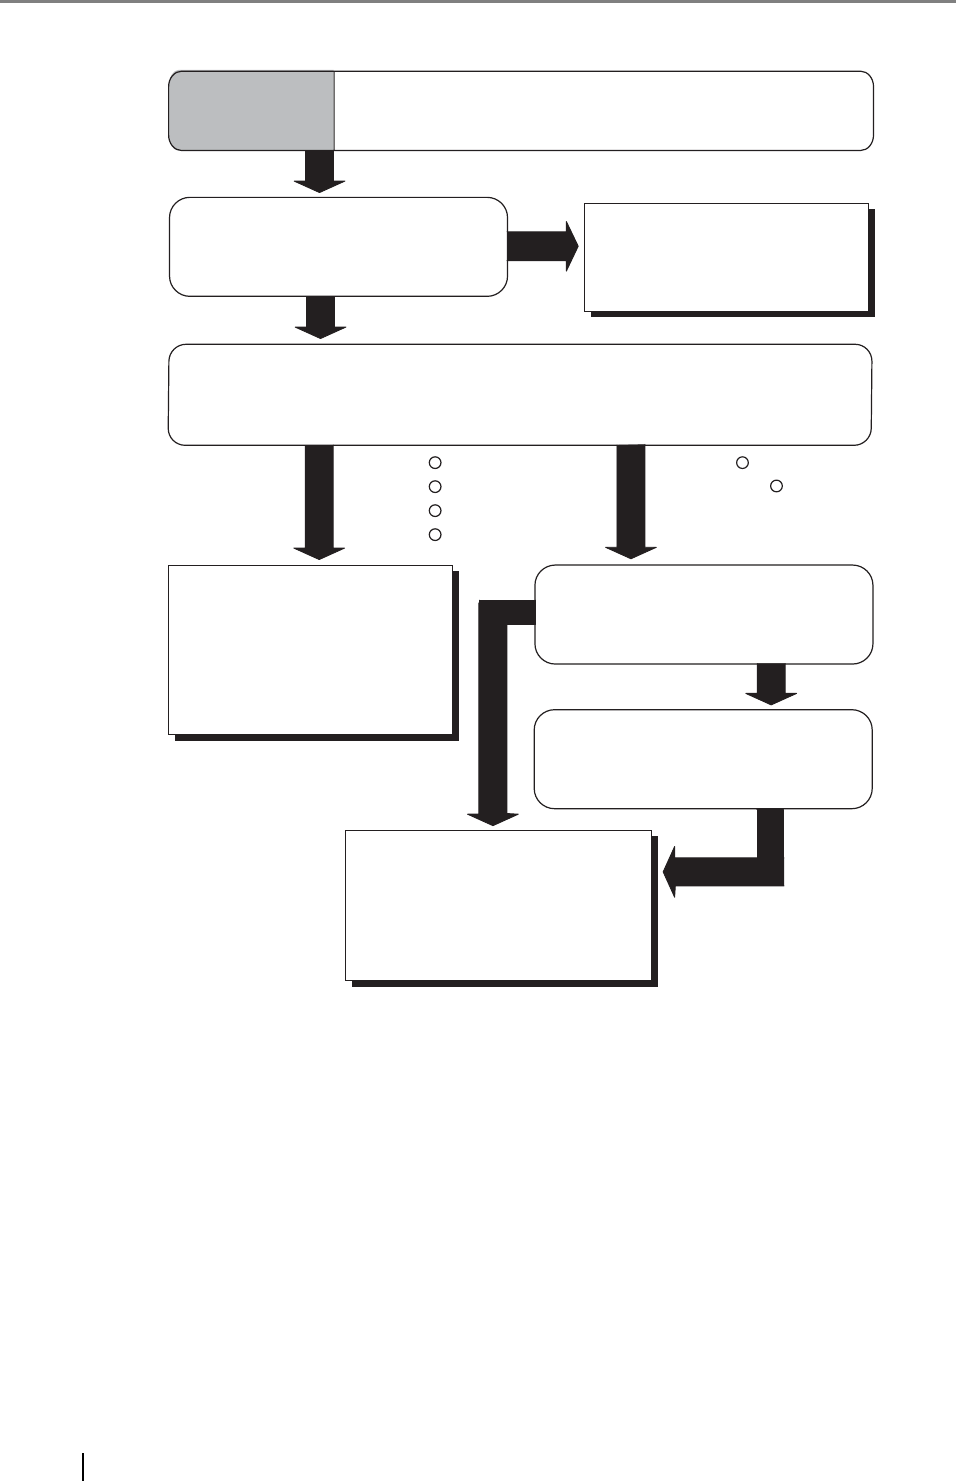
5.2 Remedying Common Troubles
This section describes troubles that may occur during scanning and how to remedy them.
Before you ask for repair service, check the following flowcharts.
If you cannot solve the problem after checking the remedies in the flowcharts, check the items in
"7.3 Items to check before contacting the agent where you bought the scanner" on page 124 and
then contact the agent where you bought the scanner.
Are the power cable and the AC
adapter correctly connected?
YES
YES
Connect the power cable
correctly.
NO Press power the button.
Contact the manufacturer’s
authorized service center.
Have you pushed the power
button?
NO
Symptom 1 The scanner does not turn ON.
5.2 Remedying Common Troubles
fi-4530CImage Scanner Operator's Guide 83
TROUBLESHOOTING
5
Has a long time passed since you
used the scanner for the last time?
YES The scanner is in the Power
Save mode. Press any
button on the control panel
to start up the scanner.
NO
Contact the manufacturer’s
authorized service center.
Does the display remain blank
even after you have turned on
the power again?
YES
NO The scanner operation is
normal.
Symptom 2 Indication on the Function No. display goes out.
84
NO Load the documents correctly
on the ADF paper chute.
Are the documents loaded correctly
on the ADF paper chute?
YES
Is the ADF closed completely?
YES
Is the interface cable connected
correctly?
NO Close the ADF completely.
NO Connect the interface cable
correctly.
YES
Continued on the next page
Symptom 3 The scanning does not start.
(when using the scanner on SCSI
interface)
Is the SCSI ID set correctly?
YES
NO Set the SCSI ID correctly by
the SCSI ID switch on the
rear side of scanner.
Does the Function No. display
indicate any alarm?
NO The scanner operation is
normal.
YES

5.2 Remedying Common Troubles
fi-4530CImage Scanner Operator's Guide 85
TROUBLESHOOTING
5
Continued from the previous page
Does the alarm state remain
displayed even after the scanner
has been turned off and on again?
YES
NO The scanner operation is
normal.
Contact the manufacturer’s
authorized service center.
86
*) For details on how to clean dirty locations, refer to "3 DAILY CARE" on page 51.
YES
NO Select halftoning or dithering
on your PC.
Is halftoning or dithering selected?
YES
Is the glass clean? NO Clean dirty locations.(*)
Symptom 4 Quality of scanned pictures or photos is not
satisfactory.
Contact the manufacturer’s
authorized service center.

5.2 Remedying Common Troubles
fi-4530CImage Scanner Operator's Guide 87
TROUBLESHOOTING
5
*) For details on how to clean dirty locations, refer to "3 DAILY CARE" on page 51.
NO Clean dirty locations.(*)
Symptom 5 Quality of scanned text or lines is not satisfactory.
YES
Is the glass clean?
Contact the manufacturer’s
authorized service center.
88
*) For details on how to clean dirty locations, refer to "3 DAILY CARE" on page 51.
Clean dirty locations.(*)
YES Do not press down the ADF
or place heavy objects on the
ADF during scanning.
NO
YES
Is the ADF cover pressed down
or heavy object placed on the ADF
during scanning?
YES Do not allow anything to
cause the scanner to
vibrate while scanning.
Is something causing the scanner
to vibrate during scanning?
NO
NO
Symptom6 Images are distorted or blurred.
Is the glass clean?
YES
Contact the manufacturer’s
authorized service center.
Is the scanner not installed on a
flat, level surface or is a scanner’s
rubber foot missing?
Install the scanner on a flat,
level surface or attach rubber
the foot.
NO


90
YES
NO The scanner operation is
normal.
Contact the manufacturer’s
authorized service center.
Turn the scanner OFF and then
ON again.
Does the Function No. display still
indicates the alarm?
Symptom 8 The Function No. display indicates an alarm
after the scanner is turned ON.
5.2 Remedying Common Troubles
fi-4530CImage Scanner Operator's Guide 91
TROUBLESHOOTING
5
Use documents that satisfy
the requirements. (*1)
NO Fulfill the double-feed
detection conditions. (*2)
NO
YES
Do the documents satisfy the
conditions described under the
"Precautions" in "6.2 Document
Paper Quality"?
When the double-feed detection is
ON, are the double-feed detection
conditions fulfilled?(*2)
Were the documents fanned before
loaded into the ADF paper chute?
NO Fan the documents before
loading, or reduce the
number of sheets of the
documents.
YES
Have the documents just been
printed out on a copier or laser
printer?
YES Fan the documents 3 or 4
times to remove static
electricity from the paper.
YES
Is the document stack 5mm or
less?
NO Reduce the number of
sheets in the stack.
YES
YES
Continued on the next page
Symptom 9 Do double-feeds occur frequently?
Is there any debris in the ADF? YES Remove debris from the
ADF.
Is the ultra sonic sensor covered
with paper dust?
YES Clean the ultra sonic sensor.
(*5)
NO
NO
92
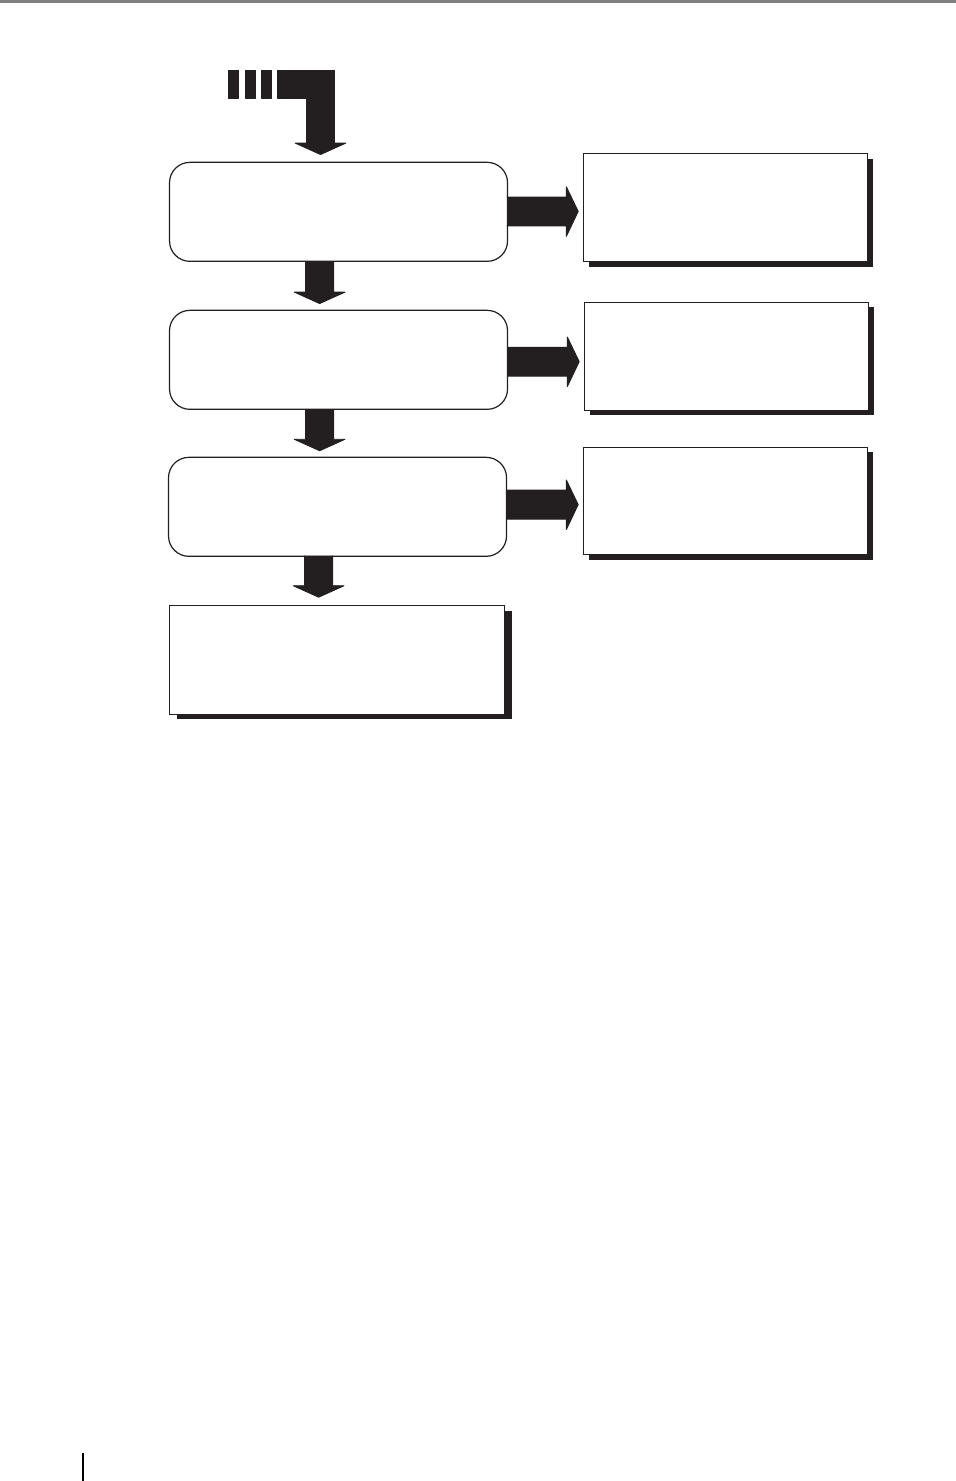
*1) For details on the requirements, refer to "6.2 Document Quality" on page 103.
*2) For details on double-feeds, refer to "6.5 Double-feed Detection Conditions" on page
108.
*3) For details on how to clean the Pad ASSY, refer to "3.2 Cleaning the ADF" on page 54.
*4) For details on how to replace the Pad ASSY, refer to "4.2 Replacing the Pad ASSY" on
page 66.
*5) For details on how to clean the Ultra sonic sensor, refer to the "3.2 Cleaning the ADF"
on page 54.
YES Clean the Pad ASSY.(*3)
Is the Pad ASSY dirty?
Is the Pad ASSY worn out? YES Replace the Pad ASSY.(*4)
NO
Is the Pad ASSY attached
correctly?
NO Attach the Pad ASSY
correctly.(*4)
NO
YES
Contact the manufacturer’s
authorized service center.
Continued from the previous page
5.2 Remedying Common Troubles
fi-4530CImage Scanner Operator's Guide 93
TROUBLESHOOTING
5
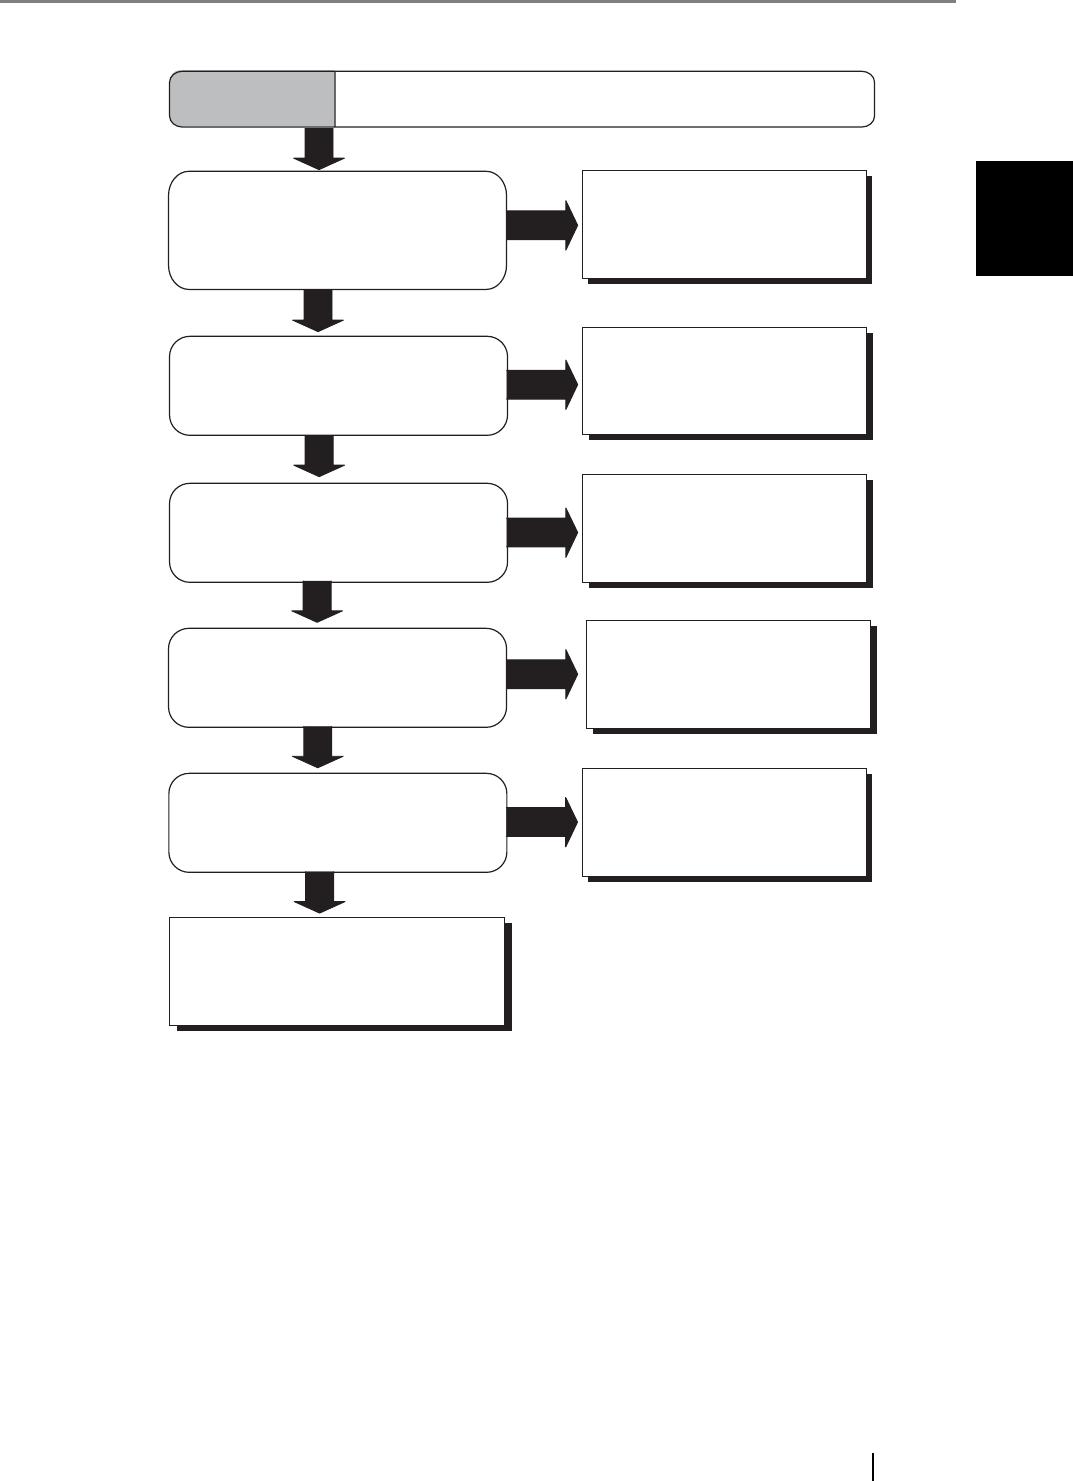
*1) For details on requirements, refer to "6.2 Document Quality" on page 103.
*2) For details on how to attach the Pad ASSY, refer to "4.2 Replacing the Pad ASSY" on
page 66.
*3) For details on how to clean the Pick roller, refer to "3.2 Cleaning the ADF" on page 54.
*4) For details on how to replace the Pick roller, refer to "4.3 Replacing the Pick Roller" on
page 70.
Use documents that satisfy
the requirements. (*1)
NO
YES
Were the documents fanned
before loading into the ADF paper
chute?
NO Fan the documents before
loading, or reduce the
number of sheets of the
documents.
Is the Pad ASSY attached
correctly?
NO Attach the Pad ASSY
correctly.(*2)
YES
Is the pick roller dirty? YES Clean the pick roller.(*3)
YES
Contact the manufacturer’s
authorized service center.
Is the pick roller worn out? Replace the pick roller.(*4)
NO
YES
NO
Symptom10 Do pickup errors occur frequently?
Do the documents satisfy the
conditions described under the
"Precautions" in "6.2 Document
Paper Quality"?
94
*) For details on how to clean the rollers, refer to "3.2 Cleaning the ADF" on page 54.
Clean all of the rollers
(*1)
YES Contact the manufacturer’s
authorized service center.
NO
YES
Have you cleaned all the rollers?
Have you adjusted the scan
scale?
Continued on the next page
Set the scan scale.
Which OS do you use?
In [Scanners and Cameras]
on the control panel, select
the properties of the scanner
to use, then adjust the scan
scale.
NO
Symptom11 Are the scanned images elongated?
Windows 98/
Windows Me/
Windows 2000/
Windows XP
Windows 95/
Windows NT 4.0
R
R
R
R
R
R
5.2 Remedying Common Troubles
fi-4530CImage Scanner Operator's Guide 95
TROUBLESHOOTING
5
Right click the Scanner
Control Center icon and
select [Options] then adjust
the scan scale.
Is the Scanner Control Center
icon displayed in the task tray?
NO
Continued from the previous page
Select [FUJITSU Scanner Control
Center] from the Start menu and
run it.
YES
Windows 95/
Windows NT 4.0
R
R
96
Contact the manufacturer’s
authorized service center.
YES
NO
Did you adjust the offset
(starting position for scanning
the document)?
Adjust the offset.
Which OS do you use?
In [Scanners and Cameras]
on the control panel, select
the properties of the scanner
to use then adjust the
[Sub-scan Setting].
Is the Scanner Control Center
icon displayed in the task tray?
YES
NO
Select [FUJITSU Scanner Control
Center] from the Start menu and
run it.
Right click the Scanner
Control Center icon and
select [Options] then
adjust the [Sub-scan Setting].
Symptom12 Is there a shadow on the leading edge of the
scanned image?
Windows 98/
Windows Me/
Windows 2000/
Windows XP
Windows 95/
Windows NT 4.0
R
R
R
R
R
R

5.3 Items to check before contacting the agent where you bought the scanner
fi-4530CImage Scanner Operator's Guide 97
TROUBLESHOOTING
5
5.3 Items to check before contacting the agent where
you bought the scanner
Check the following items before you contact the agent where you bought the scanner.
■ General Details
Item Findings
Model (Example) fi-4530C
For details on the model, refer to "5.4 Checking Labels
on the Scanner" on page 99.
Serial No. (Example) 000001
For details on the serial No., refer to "5.4 Checking
Labels on the Scanner" on page 99.
Production date (Example) 2003-07 (July, 2003)
For details on the production date, refer to "5.4 Checking
Labels on the Scanner" on page 99.
Date of purchase
Symptom
Frequency of trouble

98
■ Installation or PC connection issues
•Trouble of connection to your PC
•Feed system trouble
•Imaging system trouble
•Others
Item Findings
OS
Displayed error message
Interface (Example) SCSI interface
Interface controllers (Example) made by Adaptec SCSI Card
2940AU
Item Findings
Document type
Main purpose of use
Last cleaning date
Last consumables replacement
date
Operator panel status at trouble
Item Findings
Type and version of scanner
driver
Type of interface controller (Example) made by Adaptec SCSI Card
2940AU
OS (Windows®)
Application software (Example) ScandAll 21, Acrobat
Item Findings
Can both the original document
and the scanned image be sent to
us by e-mail or Fax?
5.4 Checking Labels on the Scanner
fi-4530CImage Scanner Operator's Guide 99
TROUBLESHOOTING
5
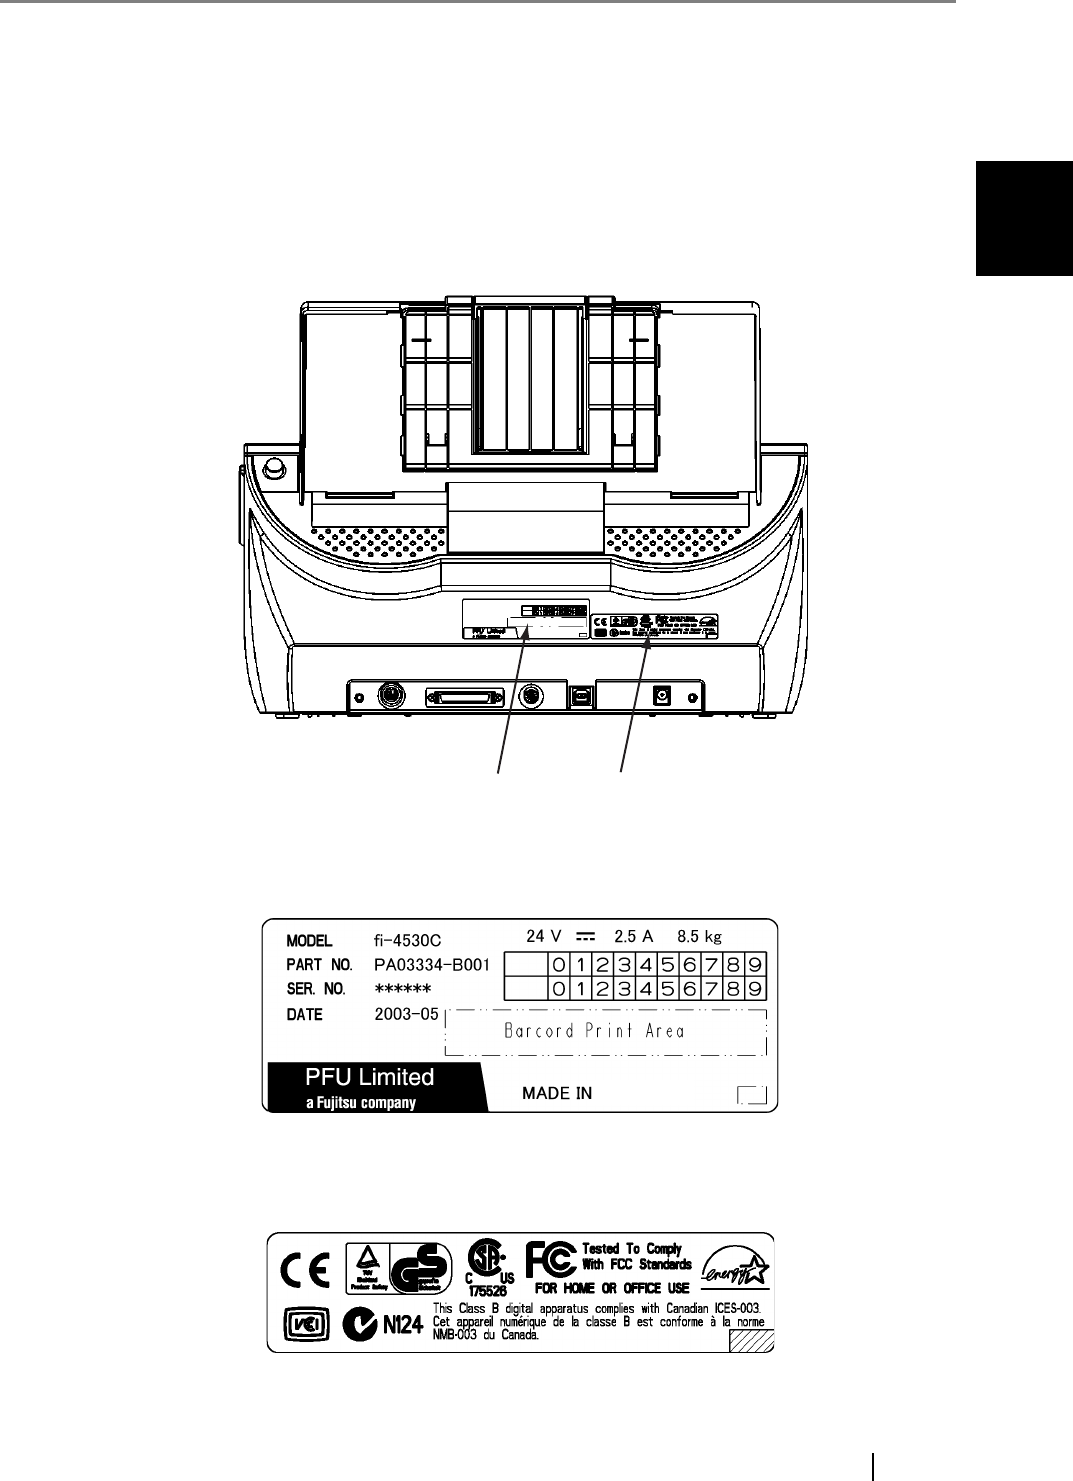
5.4 Checking Labels on the Scanner
This section describes how to check the labels on the scanner.
■ Positions of Labels on the Scanner
Label A (example): Indicates scanner information.
Label B (example): Indicates various standards that the scanner conforms with.
Label A Label B
******

100

6
fi-4530CImage Scanner Operator's Guide 101
Chapter6
DOCUMENT SPECIFICATIONS
FOR THE ADF
This chapter describes the required document sizes and paper quality for ensuring a correct
operation when scanning documents on the ADF.
6.1 Document Size .................................................................................................... 102
6.2 Document Quality ............................................................................................... 103
6.3 Maximum ADF Capacity ..................................................................................... 106
6.4 Area not to be perforated ................................................................................... 107
6.5 Double-feed Detection Conditions .................................................................... 108
102
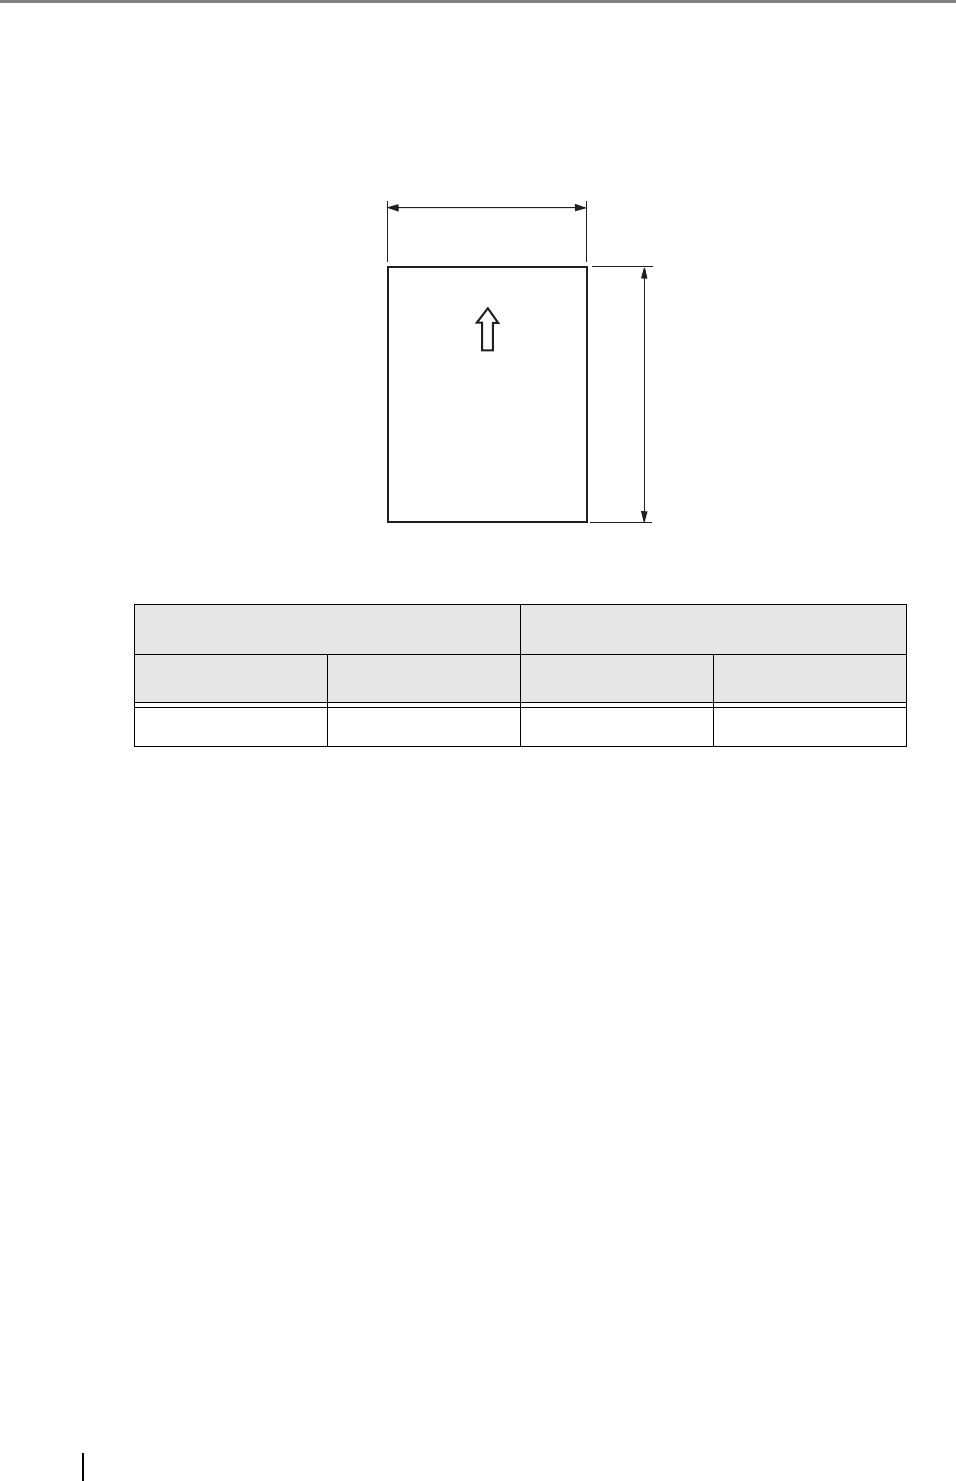
6.1 Document Size
The following shows the size of documents that can be scanned.
(Unit : mm)
Maximum Minimum
A B A B
297 (11.7 in) 432 (17 in) 51 (2.0 in) 74 (2.9 in)
Feeding Direction
A
B

6.2 Document Quality
fi-4530CImage Scanner Operator's Guide 103
DOCUMENT SPECIFICATIONS FOR THE ADF
6
6.2 Document Quality
This section describes the types and thicknesses of documents that can be loaded on the scanner,
and precautions to follow.
■ Document Type
The recommended following paper types are:
•Woodfree paper
•Wood containing paper
When using documents of a paper type other than the above, perform a test-scanning with a
few sheets of the same type before executing the actual task in order to check whether or not
the documents can be scanned.
■ Document Thickness
Paper thickness is expressed by "paper weight." The following shows the paper weights that
can be used on this scanner:
•52 g/m2 to 127 g/m2
Only a paper weight of 127 g/m2 is allowed for A8-size documents.

104
■ Precautions
The following documents may not be scanned successfully.
•Documents of non-uniform thickness (e.g. envelopes)
•Wrinkled or curled documents (Refer to HINT on page 105.)
•Folded or torn documents
•Tracing paper
•Coated paper
•Carbon paper
•Carbonless paper
•Photosensitive paper
•Perforated or punched documents
•Documents that are not square or rectangular
•Very thin documents
Do not use the following documents:
•Paper-clipped or stapled documents
•Documents on which the ink is still wet
•Documents smaller than A8 (Portrait) in size
•Documents wider than A3 or 11 in. x 17 in. size
•Documents other than paper such as fabric, metal foil, or transparencies
HINT
•When scanning semi-transparent documents, set the density to light to
avoid a bleed through.
•To prevent the rollers from becoming dirty, avoid scanning documents
containing large areas written or filled in pencil. If scanning of such docu-
ments is inevitable, clean the rollers more frequently.
ATTENTION
Carbonless paper contains chemical substances that may harm the Pad
ASSY or rollers (e.g. Pick roller) when documents are fed. Pay attention to
the following:
Cleaning: If pick errors occur frequently, clean the Pad ASSY
and the Pick roller. For details on cleaning the Pad
ASSY and the Pick roller, refer to "3.2 Cleaning the
ADF" on page 54.
Replacing parts: The service life of the Pad ASSY and the Pick roller
may be shortened compared to the case of scanning
wood containing paper documents.
•When scanning wood containing paper, the life of the Pad ASSY and the
Pick roller may be shortened compared to the case of scanning woodfree
paper.
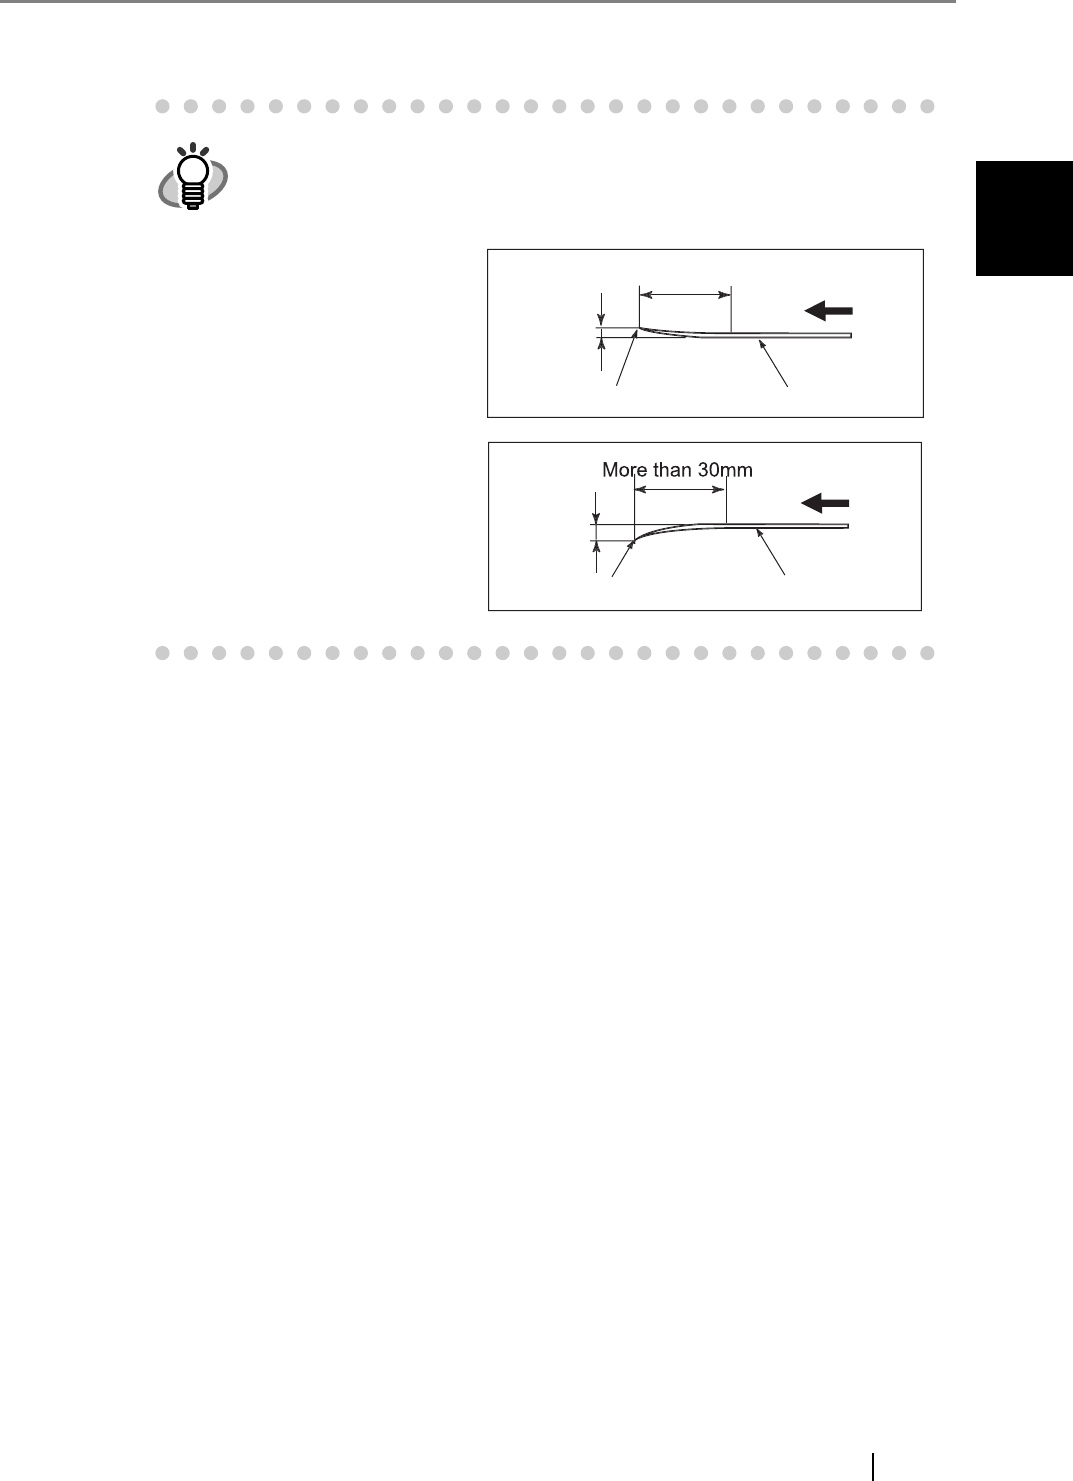
6.2 Document Quality
fi-4530CImage Scanner Operator's Guide 105
DOCUMENT SPECIFICATIONS FOR THE ADF
6
HINT
When using the ADF, the leading edge of all document sheets must be
evenly aligned. Make sure that curling at the leading edge is within the fol-
lowing tolerances:
More than
30
m
m
F
eed
d
ir
ec
ti
on
R
ead
su
rf
ace
To
p
of the
p
a
p
e
r
L
ess
th
an
3mm
F
eed
d
ir
ec
ti
on
Read surface
Top of the paper
L
ess
th
an
5mm
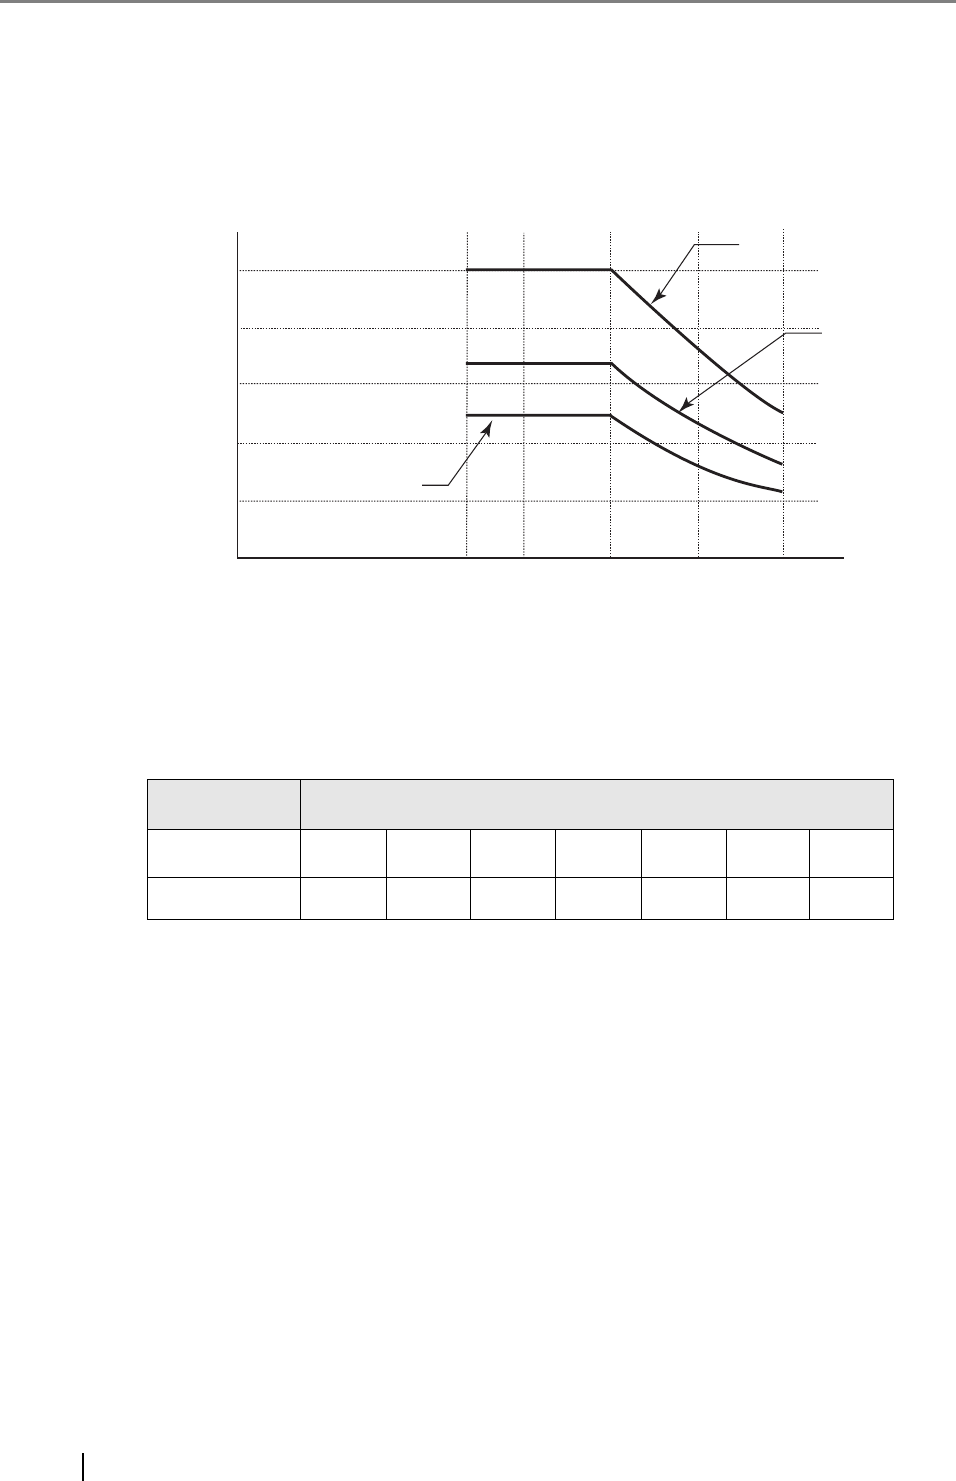
106
6.3 Maximum ADF Capacity
The maximum number of sheets that can be loaded on the ADF paper chute is determined by the
size and weight of the documents. The following graph shows the maximum document loading
capacity of ADF according to paper weight.
Paper weight conversion table
Unit Conversion
g/m252 64 75 80 90 104 127
lb 13.9 17.0 20.0 21 24.0 27.9 34.0
A3/11 in. x 17 in.
60
40
20
52 80 127
80
100
Paper weight (g/m )
64 104
0
2
B4
100
67
50
70
47
35
50
33
25
Capacity of ADF (sheets)
A4/Letter or smaller
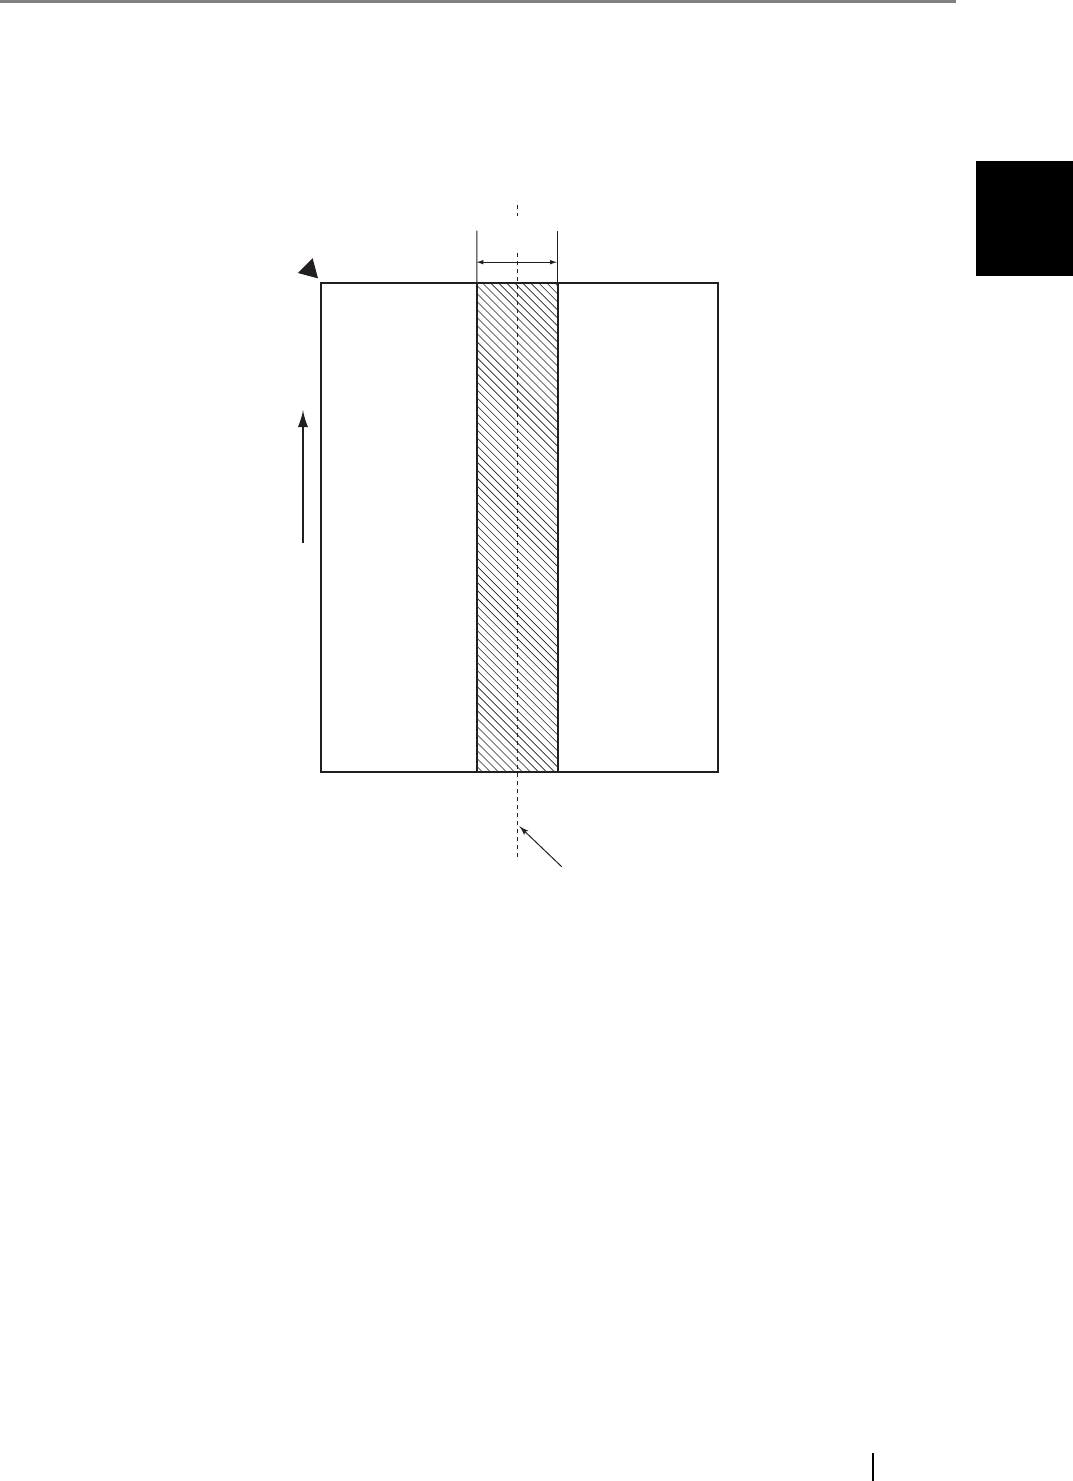
6.4 Area not to be perforated
fi-4530CImage Scanner Operator's Guide 107
DOCUMENT SPECIFICATIONS FOR THE ADF
6
6.4 Area not to be perforated
When using the ADF, document trouble might occur if there is any punched hole in the shaded area
in the following figure.
(Unit : mm)
Top of paper
Read reference
position
Front side
Feeding
direction
Center of paper
Bottom of pape
r
35

108
6.5 Double-feed Detection Conditions
Select one of the following:
•Check overlapping
•Check length
•Check overlapping and length
The following condition is required when any of the above options is selected:
■ Check overlapping
■ Check length
■ Check overlapping and length
Paper weight 52 g/m2 - 127 g/m2
Punched holes are not allowed within 35 mm (1.4 in.) of the vertical centerline of the doc-
ument.
Other paper shall not be glued within 35 mm (1.4 in.) of the vertical centerline of the doc-
ument.
Document length deviation 1 % or less
Punched holes are not allowed within 35 mm (1.4 in.) of the vertical centerline of the doc-
ument.
Paper weight 52 g/m2 - 127 g/m2
Document length deviation 1 % or less
Punched holes are not allowed within 35 mm (1.4 in.) of the vertical centerline of the doc-
ument.
Other paper shall not be glued within 35 mm (1.4 in.) of the vertical centerline of the doc-
ument.
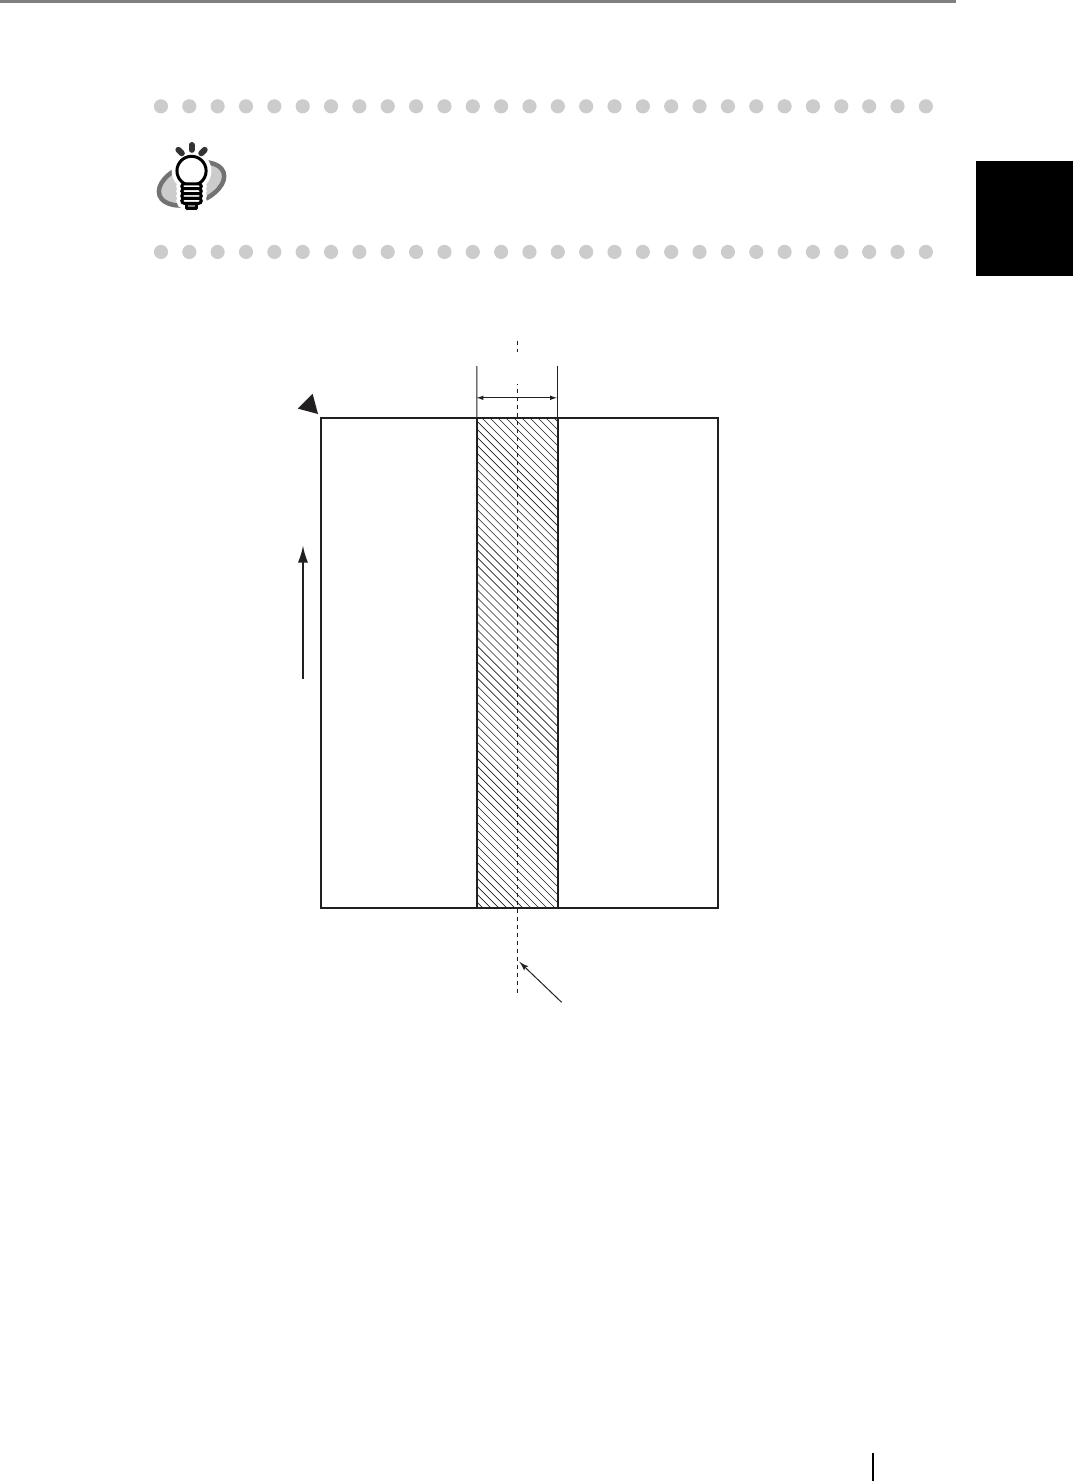
6.5 Double-feed Detection Conditions
fi-4530CImage Scanner Operator's Guide 109
DOCUMENT SPECIFICATIONS FOR THE ADF
6
HINT
When the overlapping check is specified, the papers which contact closely
each other, such as glued paper or electro-statically charged paper, can
result in the miss-detection of double-feed.
(Unit : mm)
Top of paper
Read reference
position
Front side
Feeding
direction
Center of paper
Bottom of pape
r
35

110

7
fi-4530CImage Scanner Operator's Guide 111
Chapter7
SCANNER SPECIFICATIONS
This chapter lists the scanner specifications.
7.1 Basic Specifications ........................................................................................... 112
7.2 Installation Specifications.................................................................................. 114
7.3 External Dimensions .......................................................................................... 116

112
7.1 Basic Specifications
No. Item Specification
1 Scanner Type ADF
(
A
utomatic
D
ocument
F
eeder)
-
2 Image sensor CCD x 2 Front / Back
3 Light source Incandescent cold cath-
ode fluorescent lamp x 2
Front / Back
4 Scanning area Minimum A8 portrait 127 g/m2 paper
Maximum A3 / 11 in. x 17 in. US Ledger
5 Paper Weight 52 g/m2 to 127 g/m2(Note(*1))
6 Scanning
Speed
(A4 Portrait)
(Note(*2))
Black & White Simplex: 35 sheets/min.
Duplex: 35 sides/min.
200 dpi
Glayscale Simplex: 35 sheets/min.
Duplex: 35 sides/min.
200 dpi
Color Simplex: 45 sheets /min.
Duplex: 45 sides/min.
150 dpi
7 Capacity of ADF 100 sheets A4, 80 g/m2
(Note(*3))
50 sheets A4, 80 g/m2
(Note(*3))
8 Optical Resolution 600 dpi -
9 Output
resolution
(Halftone)
Black & White 50 - 600 dpi Scalable
in 1 dpi
increments
Glayscale
Color
10 Grayscale level (internal) 8 bits per color Internal 10 bits
11 Halftone Patterns Dither / Error diffusion -
12 Interface (Note(*4)) Ultra SCSI Shield-type 50
pin (pin-type)
halfpich
USB 2.0 / USB 1.1 B Type
13 Other function JPEG compression -

7.1 Basic Specifications
fi-4530CImage Scanner Operator's Guide 113
SCANNER SPECIFICATIONS
7
*1) For details, refer to "6 DOCUMENT SPECIFICATIONS FOR THE ADF" on page 101
*2) The scanning speed is the maximum speed of the scanner hardware. Software processing
time such as data transfer time is added to the actual scanning time.
*3) The maximum stacking capacity varies according to the document thickness. For details,
refer to "6 DOCUMENT SPECIFICATIONS FOR THE ADF" on page 101
*4) The Ultra SCSI and USB2.0/1.1 interfaces cannot be used at the same time.

114
7.2 Installation Specifications
Item Specification
Dimensions
(Without ADF paper chute and Stacker)
Depth Width Height
225 mm
(8.9 in.)
399 mm
(15.7 in.)
193 mm
(7.6 in.)
Installation Space
(D x W x H)
800 mm (31.5 in.) x 500 mm (19.7 in.) x 500 mm
(19.7 in.)
Weight 8.5 kg (18.7 lb)
Input power Voltage 100 to 120 VAC ±10%
Phases Single-phase
Frequency 50 / 60 ± 3Hz
Power consumption 57 W or less
Ambient
condition
Device status Operating Not operating
Temperature 5 to 35 °C
(41 to 95 °F)
-20 to 60 °C
(-4 to 140 °F)
Humidity 20 to 80 % 8 to 95 %
Heat capacity kcal / H or less
Shipping Weight 12 kg (33 lb)
Support period 5 years
Guaranteed number of sheets 13 Milion
ATTENTION Installation Space is the reference value of an installation space required
to read A3 documents.
ATTENTION Refer to "4 REPLACING CONSUMABLES" on page 59 for details on the
guaranteed number of sheets.

7.2 Installation Specifications
fi-4530CImage Scanner Operator's Guide 115
SCANNER SPECIFICATIONS
7
ATTENTION The guaranteed number of sheets may become lower when the recom-
mned conditions for cleaning, replacement cycle of consumables, docu-
ment types, etc. are not satisfied.
ATTENTION Use of the scanner over its service life may lead to malfunction of the
device or deterioration of scanning performance.
ATTENTION This scanner is guaranteed for five years from the date of purchase.
Replaceing the rollers enables a further using after scanning 13 million
sheets. So you are able to perform scanning even a huge amount of docu-
ments after the scanner’s estimated service life has exceeded. However,
when you scan documents over the guaranteed number of sheets, the
scanning performance may deteriorate.
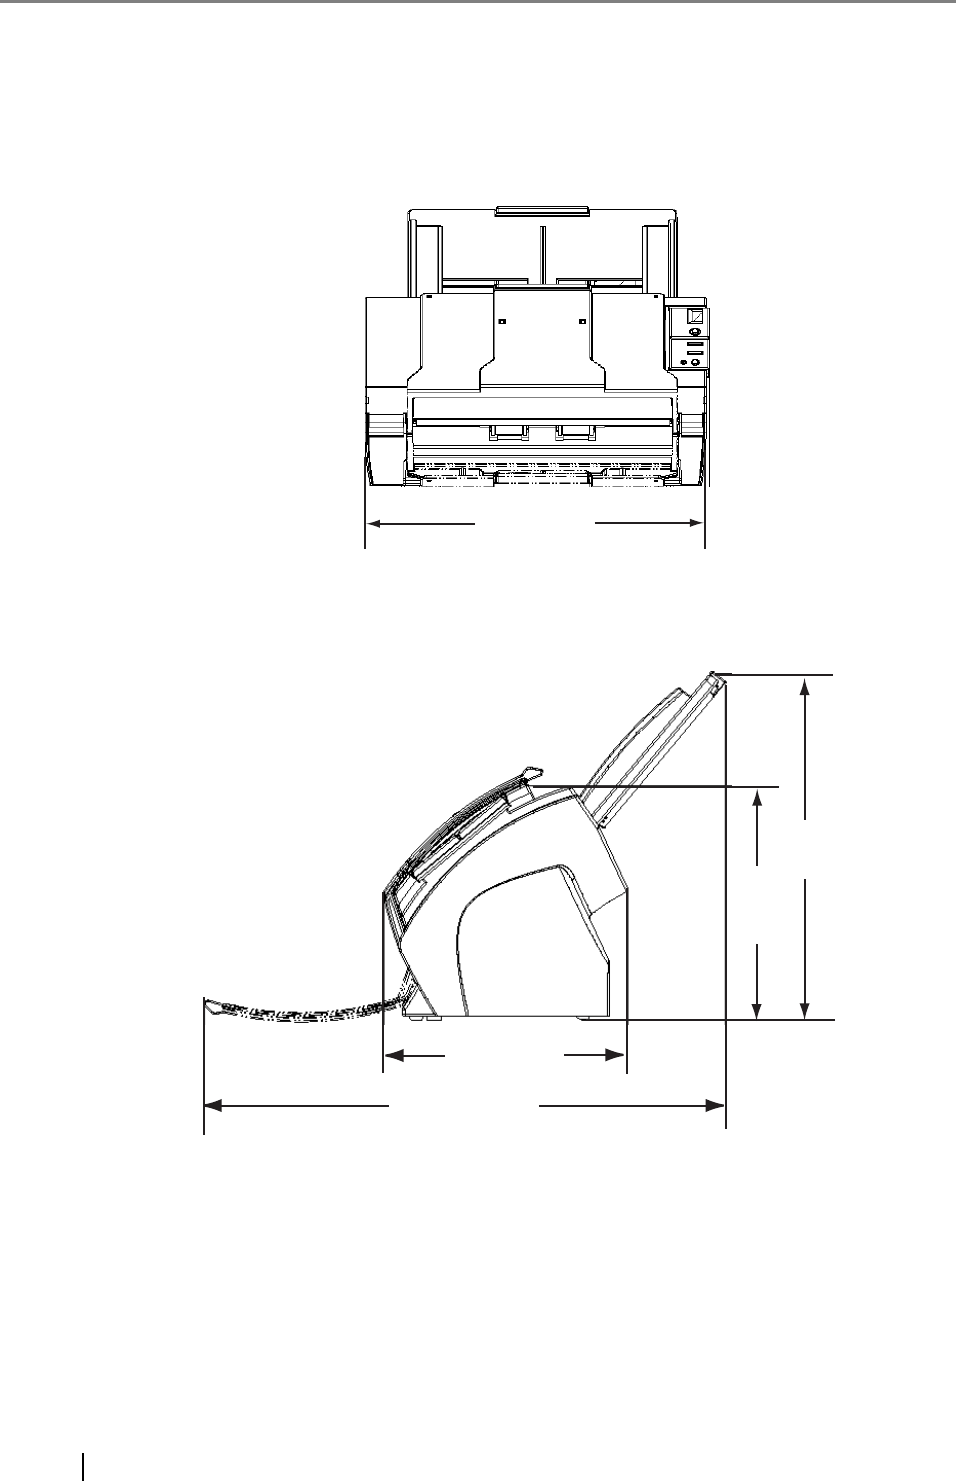
116
7.3 External Dimensions
The following shows the external dimensions of the fi-4530C.
(Unit : mm)
399 (15.7")
225 (8.8")
457 (17.9")
193
(7.5")
293
(11.5")
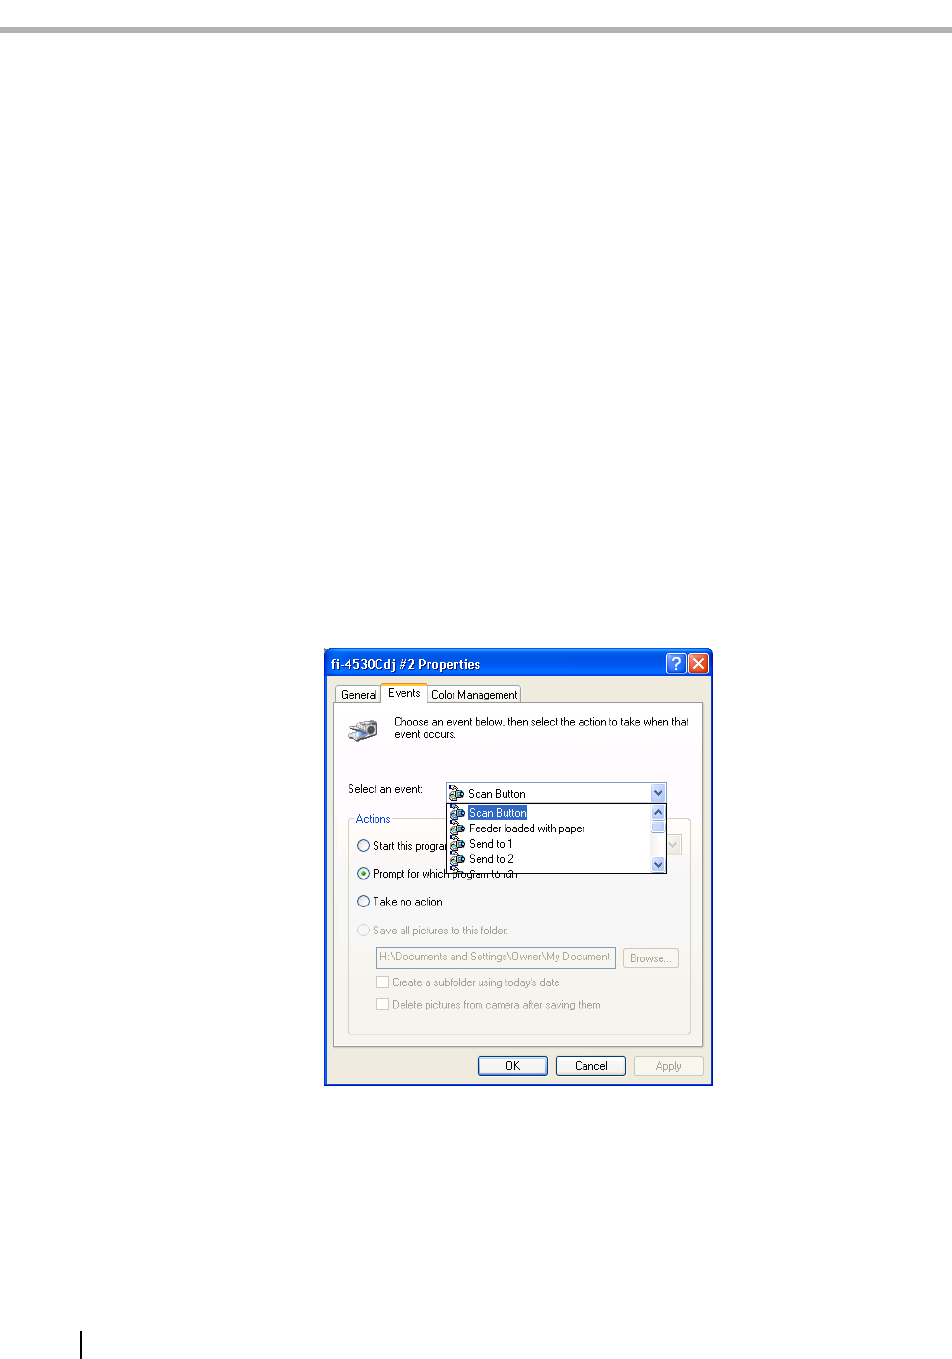
AP-1
APPENDIX
Before using the [Scan] or the [Send to]
button
By setting the link of the application software to the [Scan] or [Send to] button, you can launch the
linked application by simply pushing the button.
■ For Windows 98, Windows Me, Windows 2000, Windows XP
1. Select [Start]-[Control Panel], and [Printers and other Hardware].
2. Select [Scanners and Cameras], and right click [fi-4530cdj], then select [Properties].
3. Select the [Events] tab.
4. Select an Event. For Windows XP, select the event for starting up any application
from the [Select an event] menu.
The events available for this function are:
- Scan button (When pushing the [Scan] button)
- Feeder loaded with paper (When setting the documents in the ADF)
- Send to 1-9 (When pushing the [Send] to button)
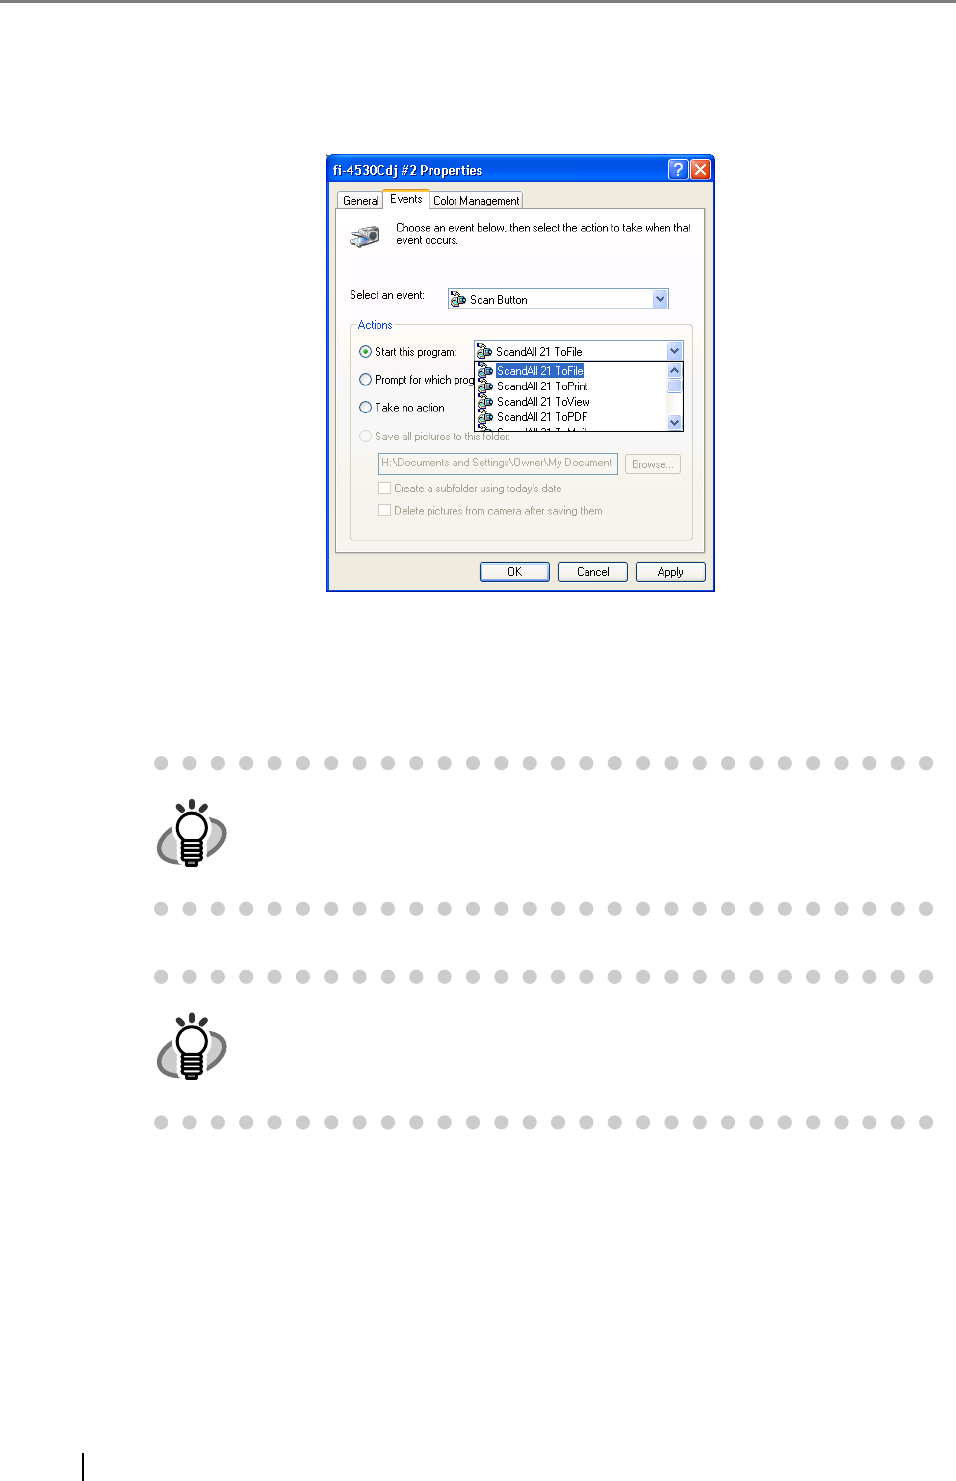
AP-2
5. Select the application with its process, excuted by the event. For Windows XP, click
[Start this program] under [Actions] and select the application and process from the
menu.
6. Click [OK] button.
HINT
A window may appear when documents are set on the ADF.
If you wish not to display this window, select [Feeder loaded with paper]
from [Select an event] and click [Take no action], then click [OK].
HINT
The window and operations may vary depending on your OS.
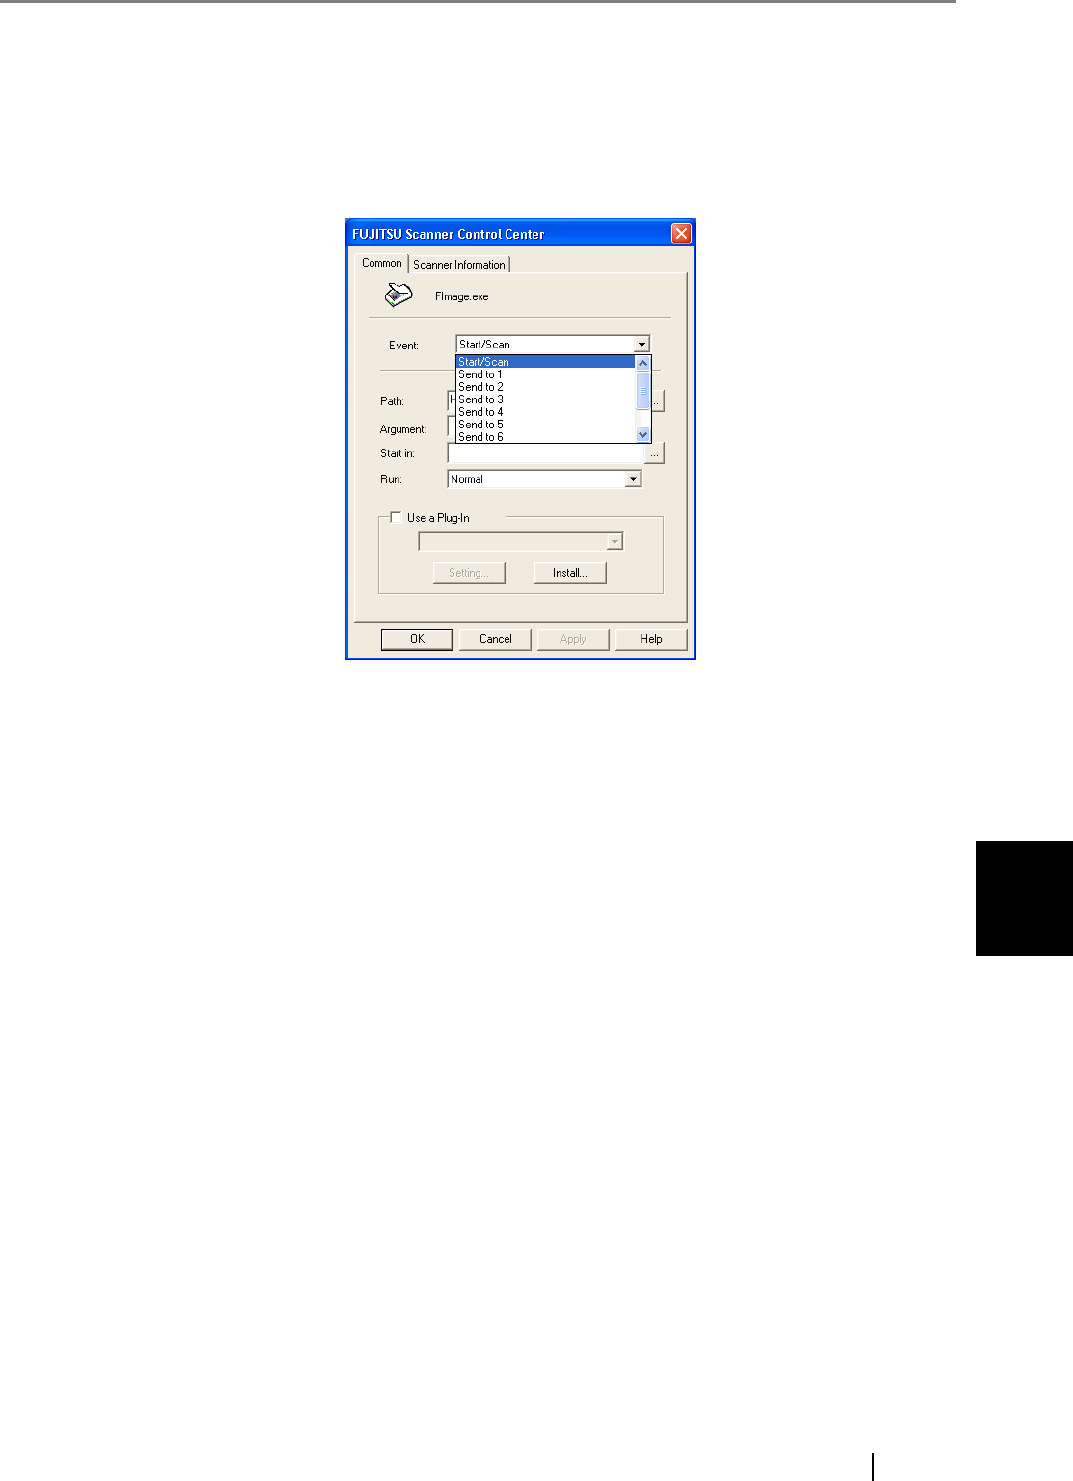
fi-4530CImage Scanner Operator's Guide AP-3
A
■ For Windows 95, WindowsNT 4.0
1. Right click the [FUJITSU Scanner Control Center] in the task tray and select [Option].
2. Select the event for starting up the application from the [Event] menu.
The events available for this function are:
- Scan button (When pushing the [Scan] button)
- Send to 1-9 (When pushing the [Send] to button)
3. Click [...] button right to the entry field of [Path].
4. Click [OK].

AP-4

GL-1
GLOSSARY
GLOSSARY OF TERMS
A4 size
A standard paper size. Paper size is 210 x 297 mm.
A5 size
A standard paper size. Paper size is 148 x 210 mm.
A6 size
A standard paper size. Paper size is 105 x 148 mm.
A7 size
A standard paper size. Paper size is 74 x 105 mm.
A8 size
A standard paper size. Paper size is 53 x 74 mm.
ASCII
The acronym for American Standard Code for Information Interchange.ASCII is a set of 256 codes
(numbered 0 to 255) used to communicate information between a computer and another device
such as a scanner.
Backside reading = Back-side scanning
Refers to reading the backside of the document, specifically in Duplex reading mode.
Bit
The smallest unit of information in computer memory. A bit is a single digit, either a 1 or a 0, in the
binary numbering system. Eight bits equal one byte.
Density
In this manual, refers to a measurement of the depth of the display.
Dither
Technique for producing halftone images by representing the entire grayscale with only two pixel
levels, black and white.
Double feed detection
A scanner function which detects the accidental feeding of multiple sheets by the ADF unit. Can be
turned on or off by the operator.
Double Letter Size

GL-2
A standard paper size used in the U.S.A. and other countries. Paper size is 11 x 17 inches.
dpi
Dots per inch.
Dropout color
A color which is used in the document but does not appear in the read image.
Duplex reading mode
A reading mode in which both sides of the document are read.
Equipment Error
An error that cannot be corrected by the operator. Call CE.
Error diffusion
High-quality halftone (pseudo-grayscale) image production based on black-and-white pixel bina-
rization. A pixel’s optical density and that of adjacent pixels are summed, with black pixels relo-
cated in their order of density as they relate to adjacent pixels.
The purpose of this technique is to minimize the average error between read and printed densities.
Density data for adjacent pixels is modified by diffusing errors on the objective pixel into several
pixels, which are then binarized. This maintains high grayscale levels and resolution during read-
ing, while suppressing more patterns by dotted halftone images such as newspaper photographs.
Filtering
A correction method that improves the read quality of handwritten documents. The read quality of
images written in pencil or ball-pointed pen depends on the reflective light characteristics of the
specific ink or lead used. Dropped pixels may produce outlines, gaps, or thin, barely connected
lines due to uneven optical density. Filtering detects areas lighter than their surroundings and
increases their density to improve image clarity.
Front-side reading = Front-side scanning
Refers to reading the front side of the document, specifically in Duplex reading mode.
Halftone processing
Any method used to reproduce a photograph which includes a shade as an image composed of dots,
namely, a binary image. Dithering and error diffusion processing are examples of halftone process-
ing.
Hexadecimal
A base-16 numbering system (also commonly referred to as hex numbers). Since a base-16 system
requires 16 digits, numbers 0 through 9 and letters A through F are used. It is convenient to express
binary numbers in hexadecimal because fewer digits are required.
Image emphasis
Density is decreased for lighter but not completely white areas adjacent to black areas. Weakening
this emphasis eliminates spot noise or produces softened images.
Image processing
An image is read with specified parameters.

fi-4530CImage Scanner Operator's Guide GL-3
B
Interface
The connection that allows communication from one part of a system to another. For example,
electrical signals are transferred between the computer and scanner over an interface cable.
Inversion (Reverse-image reading)
In reverse-image reading, data is changed from black to white and vice versa.
IRAS
Initialization of the hardware.
Landscape orientation
A document is transported and read with the long side vertical to the moving direction.
Letter size
A standard paper size used in the U.S.A. and other countries. Paper size is 8-1/2 x 11 inches.
Linedrawing mode
Selecting linedrawing mode makes threshold and contrast settings effective but prevents brightness
from being set. The specified threshold value determines whether black or white pixels are
scanned. Line drawing mode is therefore appropriate for scanning text and line art images.
Manual Feed mode = Manual Mode
Requires the operator to feed each document manually into the ADF paper chute.
Manual start mode (<-> automatic start mode)
The reading operation is activated by pressing the START button in this mode. Available only
when video option board is installed.
Mirror image
The read image is symmetrically flipped to produce a mirror image of the original detected in the
main scanning direction.
Noise removal
Isolated noise from an image appearing as black spots in white areas and voids in black areas is
removed to improve image quality.
Operator panel
A panel containing the scanner indicators and buttons. The operator panel is used to control scan-
ner operations such as loading document, selecting features, and changing setup options.
Outline extraction
The boundary between black and white areas is traced and the outline extracted for closed areas.
Paper jam
A warning informing the user that document is jammed in the transport unit, or that transportation
is disabled because the transport unit is slippery. This warning also appears when a double feed is
detected.

GL-4
Photograph mode (White level follower OFF)
Selecting photograph mode makes brightness and contrast settings effective but prevents the
threshold from being set. With photograph mode, the darkness of image corresponds to the black-
pixel density, making it suitable in scanning images such as photographs having gradations.
Photo mode = photograph mode
A photograph is read properly in this mode.
Portrait orientation
A document is transported and read with the long side parallel to the moving direction.
Read operation
Refers to the reading operation including Simplex reading and Duplex reading.
RS-232C interface
A type of serial interface. See Serial interface.
SCSI ID
Used to specify a particular SCSI device when the initiator selects a target or the target reconnects
to the initiator.
Simplex reading mode
Only the front side of the document is read in this mode. Place the documents face up at the center
of the ADF paper chute.
Smoothing
A process that eliminates “jaggies” from slanted lines and curves. Irregular convexities are deleted
and irregular concavities filled in. This is useful in OCR applications, for example.
Temporary Error
An error correctable by the operator.
Time-out limit
This is the time the scanner waits for next document insertion after the last document feeding. The
scanner returns Paper Empty when no document is set after time-out limit.

ScanSnap! fi-4110EOX2 Operator's Guide IN-1
INDEX
B
button ........................................................ 1
C
Checking Labels on the Scanner ............ 99
Cleaning Materials .................................. 52
Cleaner F1 ........................................ 52
Configuration Window of FUJITSU ISIS Scan-
ner Driver ................................................ 18
Consumable and Replacement Cycle ..... 60
Correcting the skewed Documents ......... 48
D
Detecting Double-Feeds ......................... 46
Dimensions ........................................... 116
Document specifications ....................... 101
Area not to be perforated ................ 107
Document Quality ............................ 103
Document Size ................................ 102
Double-feed Detection Conditions ........ 108
E
Eject roller ............................................... 57
Excluding a Color from the Image (dropout col-
or) ............................................................ 42
Extension .................................................. 5
F
Feed roller ............................................... 57
FUJITSU ISIS Scanner Driver ................ 15
FUJITSU TWAIN32 Scanner Driver .......... 9
G
Glass ....................................................... 58
H
How to use the Scanner Driver ................. 9
L
Loading Documents on the ADF for Scanning
..................................................................... 3
Locations for cleaning ............................. 55
Eject roller .......................................... 55
Feed roller ......................................... 55
Glasses .............................................. 55
Pad ASSY .......................................... 55
Pick roller ........................................... 55
Plastic roller ....................................... 55
Sheet guide ....................................... 55
Ultra sonic sensor .............................. 55
M
Maximum ADF Capacity ........................ 106
P
Pad ASSY ......................................... 56, 60
Paper Thicknesss Switch ........................ 29
Paper weight ......................................... 106
Pick roller ........................................... 56, 60
Plastic roller ............................................. 57

IN-2
Power button ............................................. 2
Power Save Mode ..................................... 2
R
Remedying Common Troubles ............... 82
Removing Jammed Documents .............. 80
Replacing the Pad ASSY ........................ 66
Replacing the Pick Roller ........................ 70
Reset the pad counter ............................. 67
Reset the pick counter ............................ 76
S
Saving scanned Images in PDF Format .34
Using Adobe Acrobat 5.0 .................. 37
Using ScandAll 21 ............................. 35
Before using the ........................................ 1
Scanner spacifications .......................... 111
Capacity of ADF .............................. 112
Dimensions ..................................... 114
Guaranteed number of sheets ........ 114
Input power ..................................... 114
Interface .......................................... 112
Paper Weight .................................. 112
Scanning area ................................. 112
Scanning Speed .............................. 112
Support period ................................. 114
Weight ............................................. 114
Scanning Documents ................................ 7
Scanning Documents longer than A3 size 31
Scanning Documents with different Widths
28
Scanning double sided Documents ........ 26
Scanning thin Documents ....................... 29
or the ......................................................... 1
Setting Window for FUJITSU TWAIN32 Scan-
ner Driver ................................................. 12
Sheet guide ............................................. 58
Side guide ................................................. 5
Skipping blank Pages .............................. 44
Standard Cleaning Cycle ......................... 52
T
Troubleshooting ....................................... 79
Turning the Scanner ON ........................... 2
U
Ultra sonic sensor .................................... 58

zThe contents of this manual are subject to change without notice.
zPFU LIMITED assumes no liability for incidental or consequential
damages arising from the use of this manual, and any claims by a
third party.
zCopying of the contents of this manual in whole or in part and
copying of the scanner application is forbidden under the copyright
law.
zMissing or wrongly collated pages will be supplied free of charge.
fi-4530C Image Scanner Operator's Guide
P3PC-E577-01EN
Date of issuance: May, 2003
Issuance responsibility: PFU LIMITED
Printed in JAPAN

This Manual uses recycled paper.
