Fujitsu Intel Unite Standalone Setup Guide Intel® Unite™
User Manual: Fujitsu Intel® Unite™ Standalone Setup Guide FUJITSU Desktop ESPRIMO Q956/MRE - Fujitsu United States
Open the PDF directly: View PDF ![]() .
.
Page Count: 32

Intel® Unite™ Standalone Setup Guide V1.6 1 of 32
Intel® Unite™
Standalone Setup Guide

Intel® Unite™ Standalone Setup Guide V1.6 2 of 32
Legal Disclaimers & Copyrights
All information provided here is subject to change without notice. Contact your Intel representative to
obtain the latest Intel product specifications and roadmaps.
Intel technologies’ features and benefits depend on system configuration and may require enabled
hardware, software or service activation. Performance varies depending on system configuration. No
computer system can be absolutely secure. Check with your system manufacturer or retailer or learn
more at intel.com.
You may not use or facilitate the use of this document in connection with any infringement or other
legal analysis concerning Intel products described herein. You agree to grant Intel a non-exclusive,
royalty-free license to any patent claim thereafter drafted which includes subject matter disclosed
herein.
No license (express or implied, by estoppel or otherwise) to any intellectual property rights is granted
by this document.
The products described may contain design defects or errors known as errata which may cause the
product to deviate from published specifications. Current characterized errata are available on request.
Intel disclaims all express and implied warranties, including without limitation, the implied warranties
of merchantability, fitness for a particular purpose, and non-infringement, as well as any warranty
arising from course of performance, course of dealing, or usage in trade.
Intel, the Intel logo, and Intel Unite are trademarks of Intel Corporation in the United States and/or other
countries.
*Other names and brands may be claimed as the property of others
© 2015 Intel Corporation. All rights reserved.

Intel® Unite™ Standalone Setup Guide V1.6 3 of 32
Table of Contents
1 Introduction ............................................................................................................................................................................. 4
1.1 Intel Unite Terminology ................................................................................................................................ 4
1.2 Intel Unite Overview ....................................................................................................................................... 4
2 Intel Unite Standalone Requirements ................................................................................................................... 6
2.1 Software Requirements ................................................................................................................................. 6
2.2 Hardware Minimum Requirements ........................................................................................................ 6
2.3 Network Recommendations ....................................................................................................................... 6
3 Intel Unite Standalone Installation ......................................................................................................................... 7
3.1 Getting Started.................................................................................................................................................... 7
3.2 Intel Unite Hub Installation ........................................................................................................................ 7
3.3 Selecting a Shared Key ............................................................................................................................... 10
3.4 Intel Unite Client Installation .................................................................................................................. 12
3.5 Launching Intel Unite ................................................................................................................................... 15
4 Advanced Configuration ................................................................................................................................................ 17
4.1 Advanced Configuration (Hub Configuration) ............................................................................. 17
4.2 Valid Keys for Configuration .................................................................................................................... 18
APPENDIX A ........................................................................................................................................................................................................ 20
Help Guide to Configure Firewall Settings ....................................................................................................... 20
A1 Windows Firewall ............................................................................................................................................. 20
A2 McAfee Host Intrusion Prevention ..................................................................................................... 23
A3 Symantec............................................................................................................................................................... 29

Intel Unite Standalone Setup Guide 4 of 32
1 Introduction
Welcome to the Intel® Unite™ Standalone Setup Guide. Intel Unite modernizes meeting spaces for a better way to
work, with a simple application, you can create an innovative conference space anywhere a display is located,
allowing functionality, communication, and flexibility while incorporating business needs.
Intel® Unite™ Standalone was designed for use by Small Business Professionals, where there is no a dedicated IT
department, little to no networking or computer security knowledge is needed.
Businesses using Intel Unite Standalone is recommended for up to 25 users, in no more than 5 conference rooms
or simultaneous sessions, (recommendation: 25 users and 5 conference rooms).
1.1 Intel Unite Terminology
Through this setup guide the following terms will be used:
Client – Client software installed on a client system and connects to a hub
Hub – a system that is displaying a PIN and hosting plugins as in a conference room display
IP Address – Internet Protocol Address
Plugin – a software component installed on a hub that surfaces additional functionality
Flat Network - a network in which all stations can reach other without going through any intermediary hardware
devices, such as a bridge or router
Shared key – it refers to a key that would be shared among participants in Intel Unite sessions. Only Intel Unite Hubs
and Clients that use the same shared key will be able to participate in collaboration sessions
1.2 Intel Unite Overview
Intel Unite software is designed to allow fast wireless screen sharing and collaboration in few steps:
Get to a display where Intel Unite is installed
Launch the client application in your device
Enter the Shared Key provided by the Administrator
Enter the PIN number displayed in the Hub to connect to a specific session
Once you are connected , click ‘Share’ to display content
Intel Unite uses a non-touch display and can support any size monitor. User interaction is limited to wireless display
but includes easy connection via PIN entry and easy handover between presenters.
Once Intel Unite has been installed, the Hub creates its own WiFi hotspot, displaying the instructions for the clients
to connect to this hotspot. The Intel Unite Software should be downloaded in each client that connects to the Intel
Unite session.

Intel® Unite™ Standalone Setup Guide V1.6 5 of 32
Intel Unite Features
Wireless Display from Anywhere
Users can connect to a session and display their screen or display,
no cables needed to connect to a projector
Up to 4 Split Screen View
Multiple users can connect and share concurrently to the same
monitor/ display or projector
File Transfer
Users can send and receive files during sessions
Interactive Participant List
Users can see all participants connected to the same session. The
user list includes avatars, location, presenters and sharing status.
Annotation
Users can make annotations on the presenter’s display, this is a
simple and instant collaboration tool
Supported Clients
Works with v-Pro Platforms, Client App Microsoft® Windows 7,
8.1, 10, Mac® OS X

Intel® Unite™ Standalone Setup Guide V1.6 6 of 32
2 Intel Unite Standalone Requirements
Please verify that the software, hardware and network requirements are met as specified below.
2.1 Software Requirements
HUB
Client
Microsoft® Windows 7, 8, 8.1 or 10
Microsoft® .Net 4
Microsoft® Windows 7, 8, 8.1 or 10
Microsoft® .Net 4
Mac® OSX 10.9 or greater
2.2 Hardware Minimum Requirements
HUB
Client
System meeting the Intel® vPro Technology
4 GB RAM
Wired or Wireless Network Connection
32GB available storage
1 GB Ram
1 GB available storage
2.3 Network Recommendations
Intel Unite Standalone requires a Flat Network which is typically used in homes or small businesses where network
requirements are low.
It is recommended, but not required, to connect all hubs to a wired LAN for these two reasons:
1. The display quality of high frame rate improved over LAN compared to WLAN
2. WWLAN infrastructure bandwidth optimization through avoiding the room system to access point WLAN
traffic
Intel® Unite™ Standalone Setup Guide V1.6 7 of 32
3 Intel Unite Standalone Installation
3.1 Getting Started
1. If a Mini-PC would be used as Hub, connect it to the monitor that will be used with Intel Unite, using the
cables contained in the box.
2. Browse the drive of the Mini-PC or the PC to be used as a Hub, and identify the location of the folder or
media provided containing the 2 Intel Unite installers:
Hub Installer : Intel Unite Hub.mui.msi
Client Installer: Intel Unite Client.mui.msi
3. Start with the Hub installation, then you will continue with the Client installation
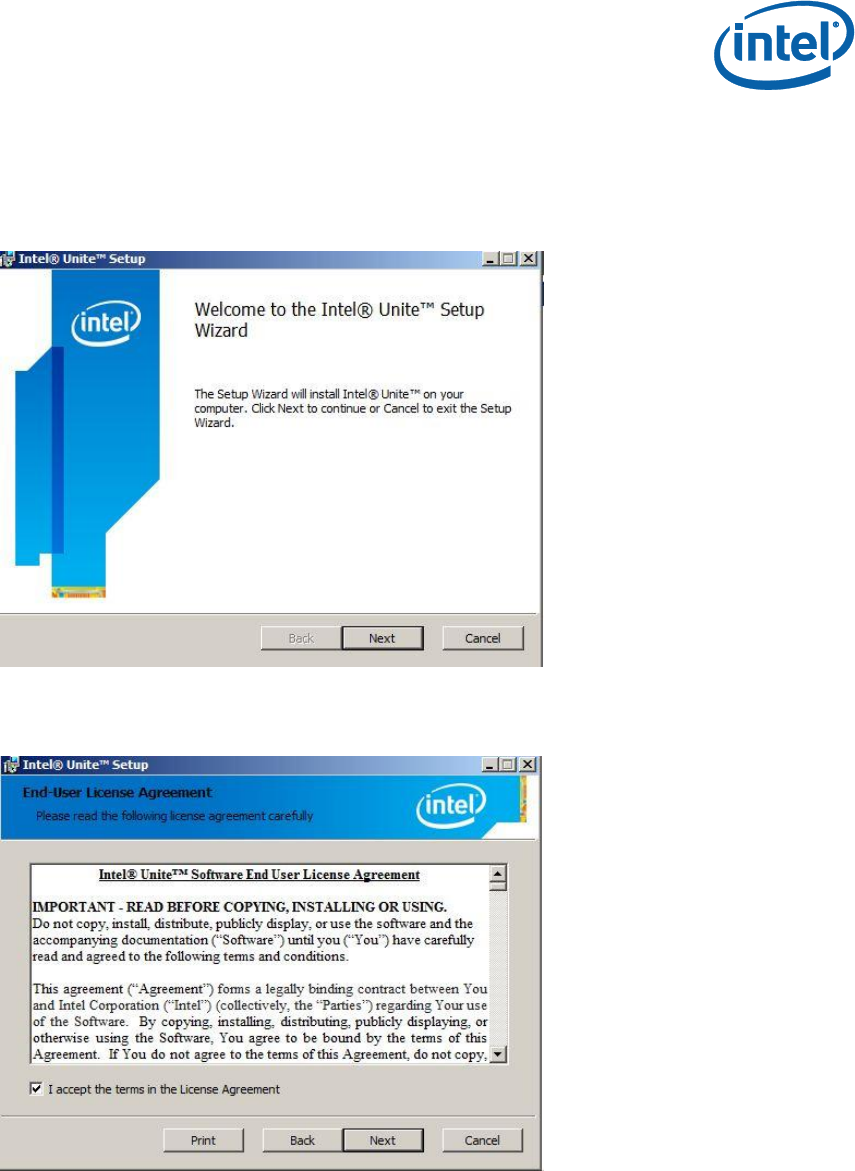
3.2 Intel Unite Hub Installation
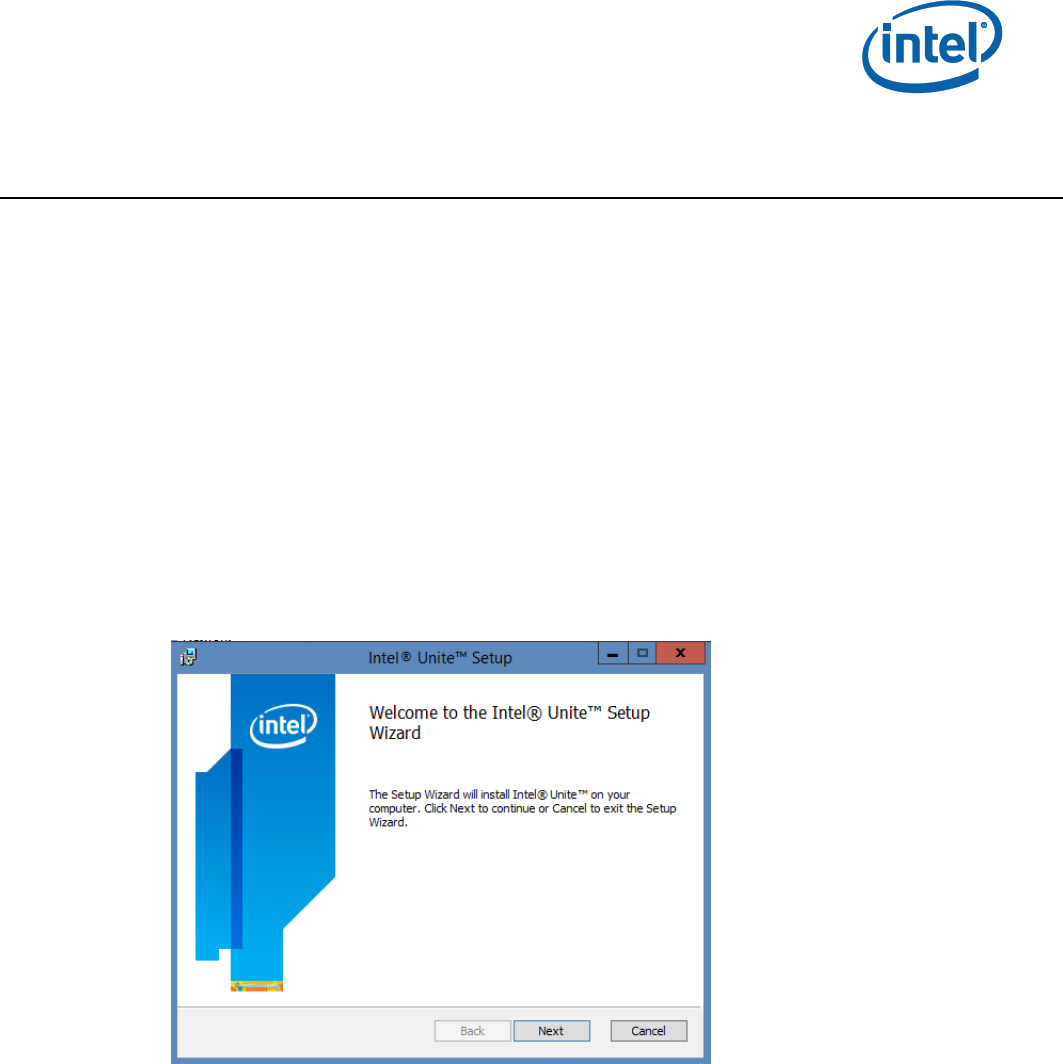
1. Locate the installer folder and run the file for the Hub: Intel Unite Hub.mui.msi
2. The Intel Unite Setup window will be displayed
3. Click Next to continue.
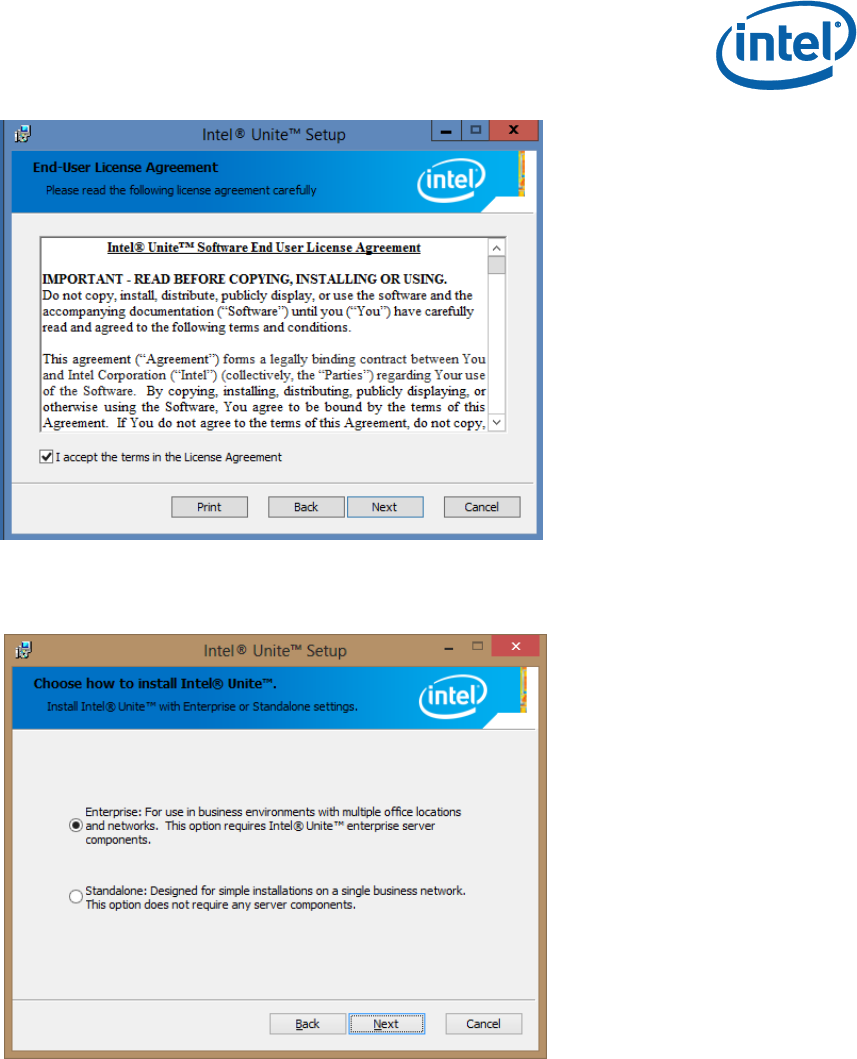
4. The End-User License Agreement window will be displayed
Intel® Unite™ Standalone Setup Guide V1.6 8 of 32
5. Check the box I accept the terms in the License Agreement and click Next to continue
6. Select Standalone and click Next to continue.
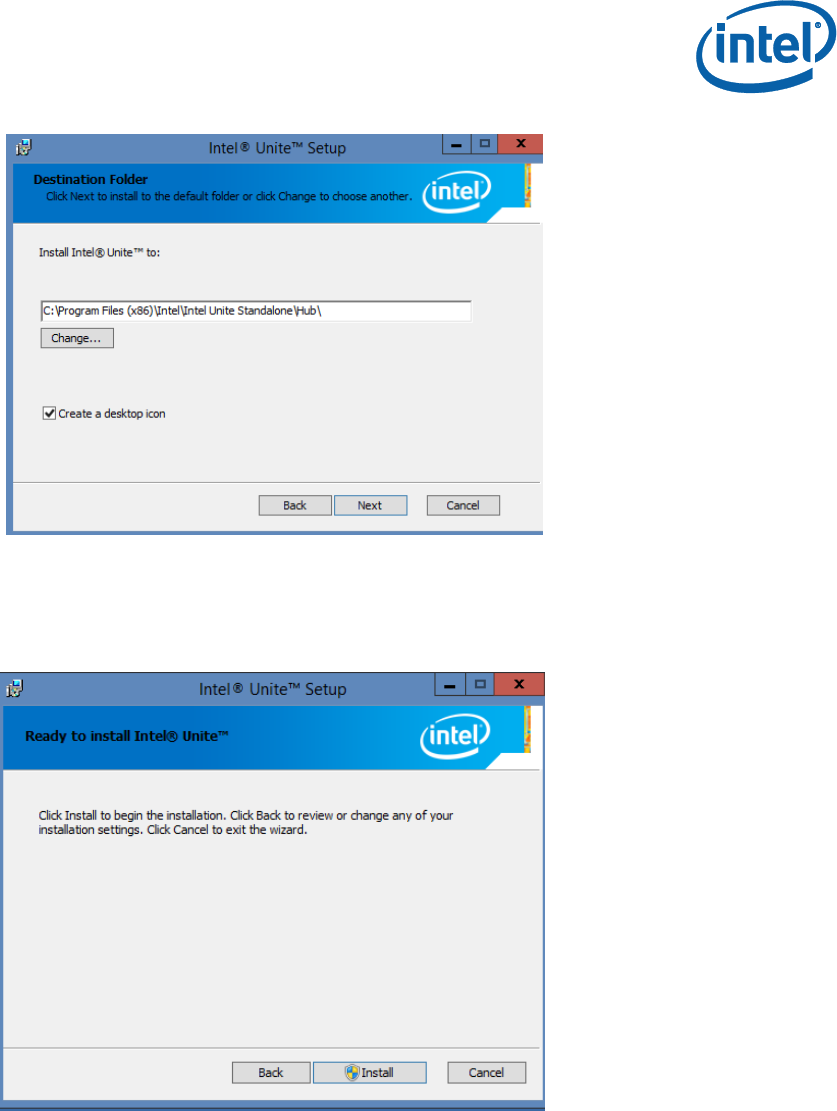
7. The next section will prompt you to select a Destination Folder, click Next to accept the default. In this
step you can also create a desktop icon.
Intel® Unite™ Standalone Setup Guide V1.6 9 of 32
8. When you see the Ready to install Intel Unite window, you can go back to review your settings or click
on Install to continue. You can also Cancel the installation.
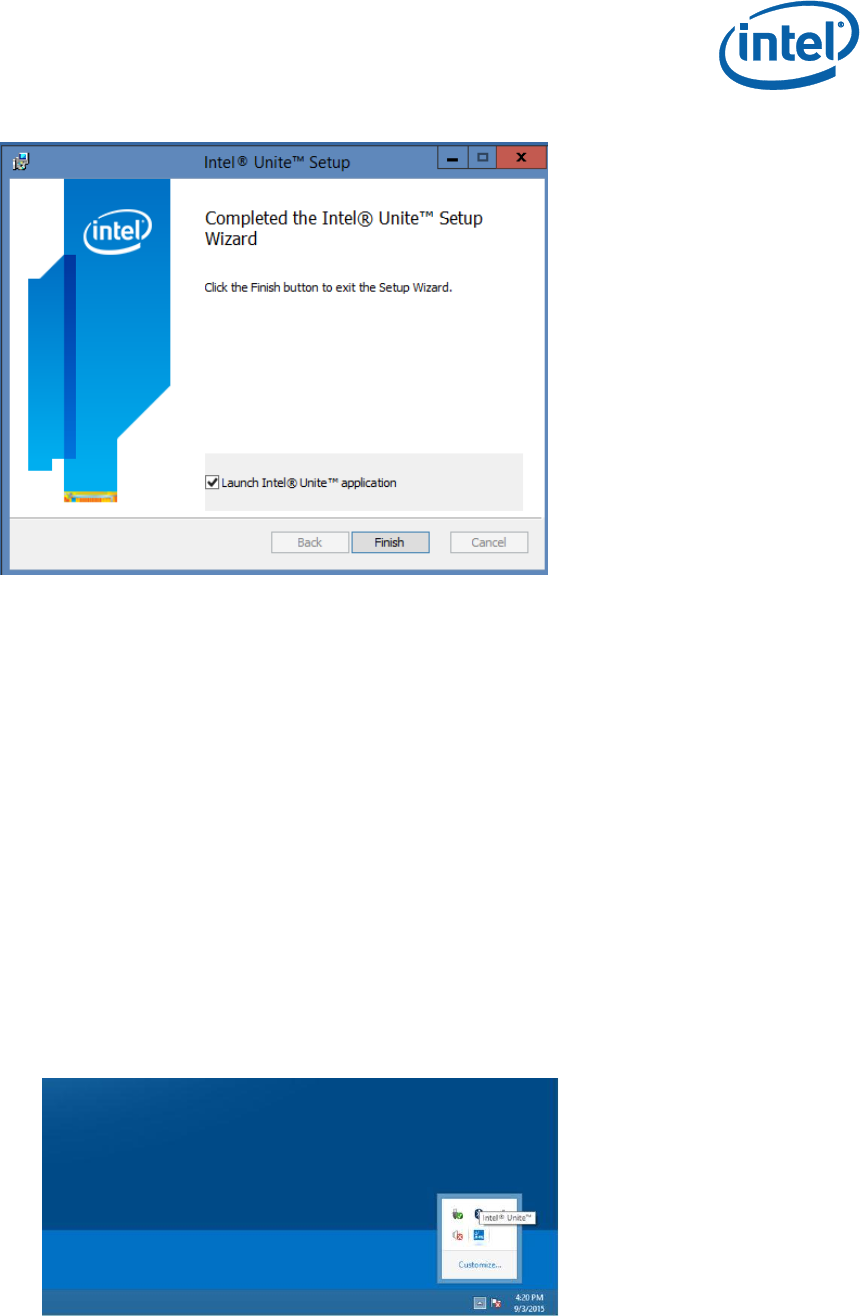
9. Once the installation has ended, you will see the Completed the Intel Unite Setup Wizard window.
Intel® Unite™ Standalone Setup Guide V1.6 10 of 32
10. Click Finish to end the Hub installation process, make sure you launch the application (select box Launch
Intel Unite), we needed launched in order to continue with the next step.
3.3 Selecting a Shared Key
After the Hub installation has ended, proceed to select a Shared Key. A common password, known here as Shared
Key, must be created in order for the Clients to access the application, it is used to enhance security. Only Intel
Unite Hubs and Clients that use the same shared key will be able to participate in a collaboration session.
1. You must select a Shared key that will be used by Intel Unite session participants or presenters. Please
note that all systems must have the same Key (access password) to communicate. The shared key is at
least 8 characters, you can have any combination of characters (alphanumeric, numeric, symbols, etc.).
2. Go to the task bar, find the Unite icon, make sure the Hub has been launched, otherwise the icon will not
appear in the task bar.
3. Right click on the unite icon, when the Open/Close menu opens, select Open.
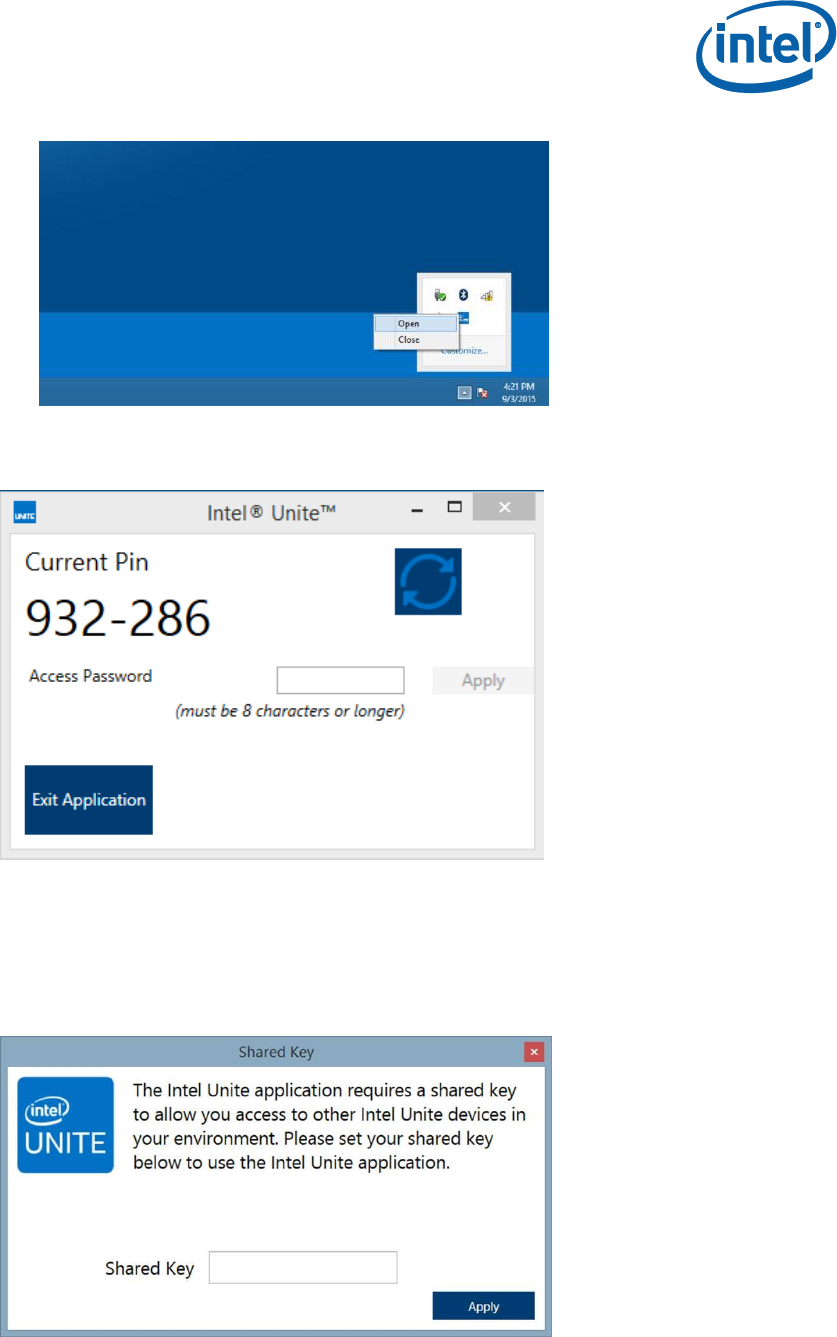
Intel® Unite™ Standalone Setup Guide V1.6 11 of 32
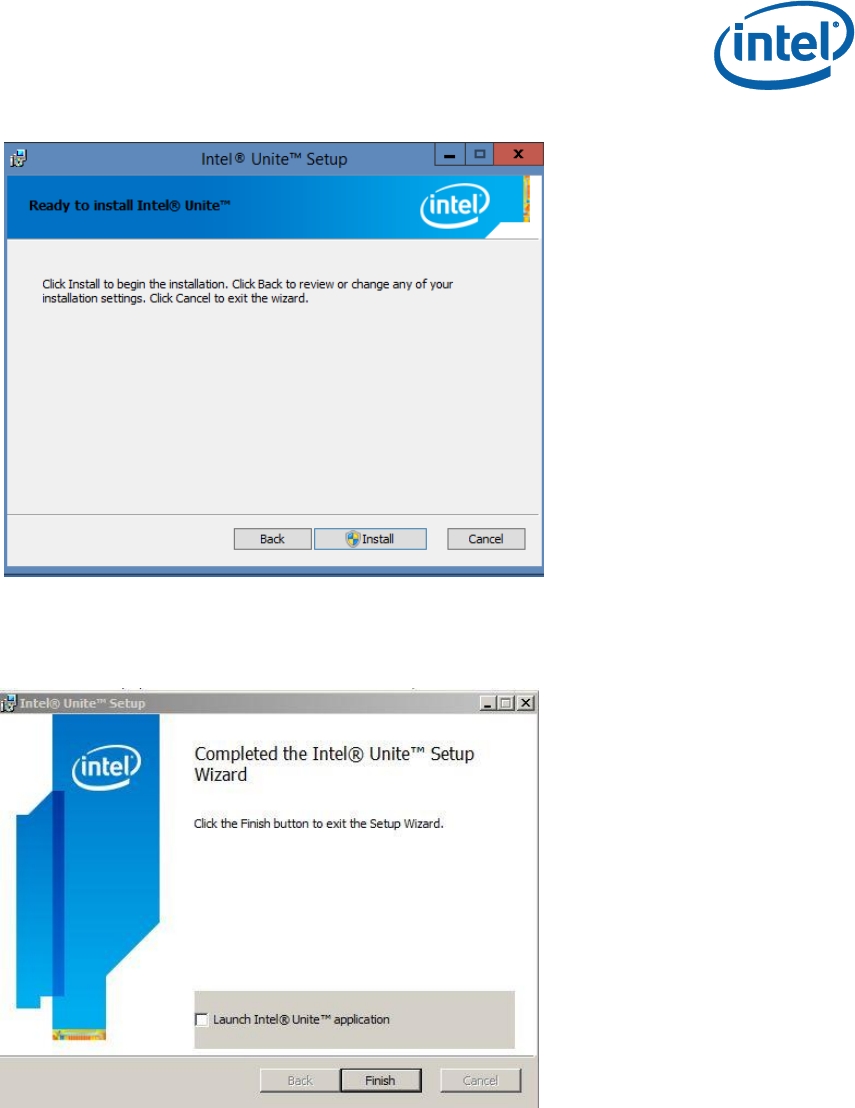
4. The following window will be displayed:
5. Select and enter the 8 character Access Password which will become the Shared Key.
6. Click on Apply and then on Exit Application to close this window.
7. The Shared Key window each Client will see when launching Intel Unite is the following:
8. Continue with the Intel Unite Client installation.
Intel® Unite™ Standalone Setup Guide V1.6 12 of 32
3.4 Intel Unite Client Installation
1. Locate the installer folder and run the file for the Client: Intel Unite Client.mui.msi
2. The Intel Unite Setup window will be displayed
3. Click Next to continue.
3. Check the box I accept the terms in the License Agreement, and click Next

Intel® Unite™ Standalone Setup Guide V1.6 13 of 32
4. Select Standalone and click Next to continue.
5. The next section will prompt you to select a Destination Folder, click Next to accept the default. In this
step you can also create a desktop icon.
6. When you see the Ready to install Intel Unite window, you can go back to review your settings or click on
Install to continue. You can also Cancel the installation.
Intel® Unite™ Standalone Setup Guide V1.6 14 of 32
7. Once the installation wizard has ended, you will see the Completed the Intel Unite Setup Wizard
window.
8. Select the Launch Intel Unite application box if you wish to open the application, or click Finish to end
the Client installation process. If you choose to launch the application in the Client continue to the next
section.
Intel® Unite™ Standalone Setup Guide V1.6 15 of 32
3.5 Launching Intel Unite
Once the installation has finished, launch the Client application, before it opens, you may get the Privacy Statement
window and the Shared Key window.
1. Privacy Statement: The Intel Unite Privacy Statement function is used to collect anonymous usage data.
Intel is always looking to improve its products and would like to collect data to continue to improve the
product. Please select YES or NO and check the box if you do not want to show the dialog box again.
2. Then the Shared Key window will be displayed.
3. Enter the Shared Key provided by the system Administrator and click on Apply. Remember to use the
same Shared Key later on.
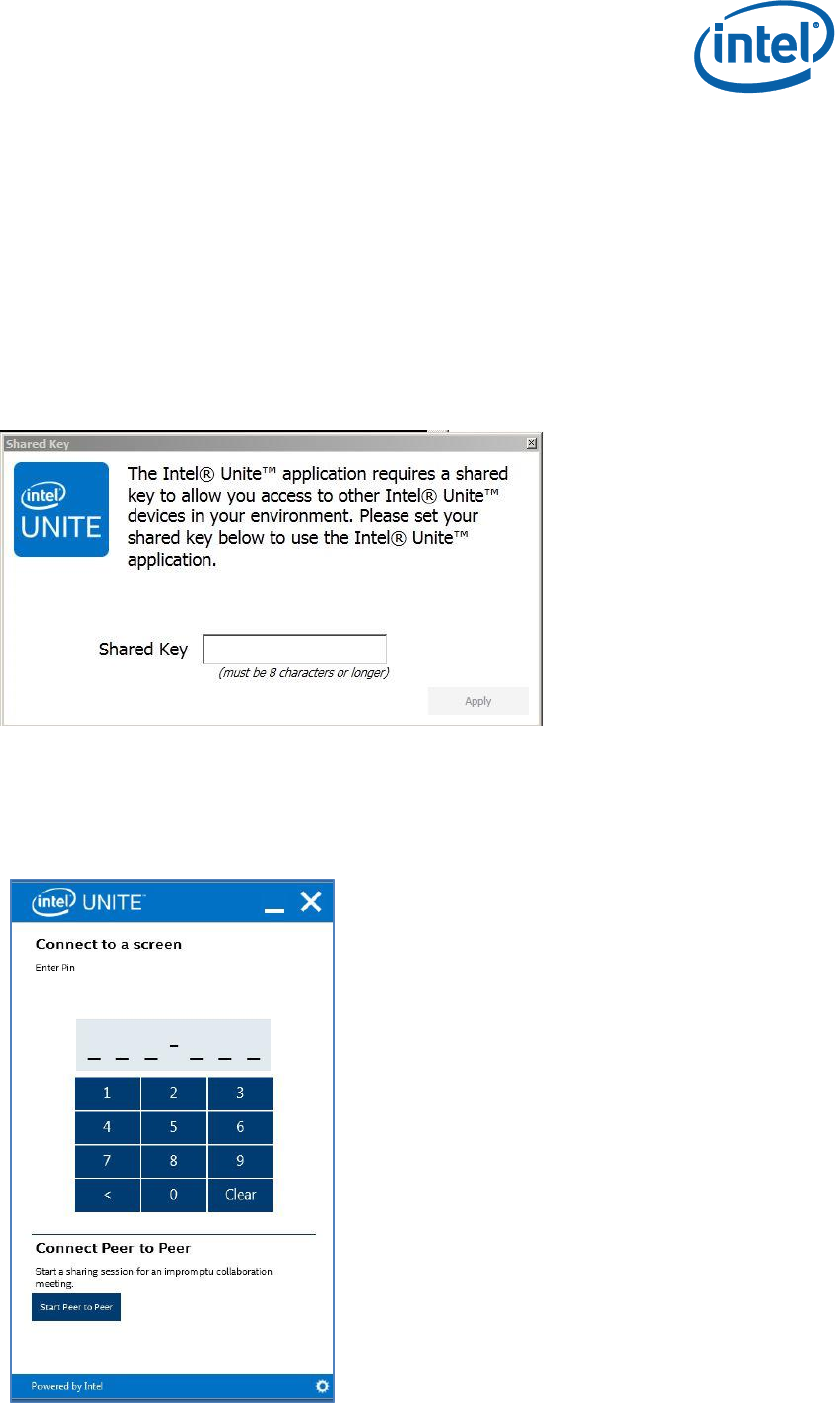
4. The following Connect to a screen window appears:
Intel® Unite™ Standalone Setup Guide V1.6 16 of 32
5. To connect to an Intel Unite session, enter the PIN displayed in the Hub/ monitor you wish to connect.
6. Once connected, you can click on “Share” if you wish to present or show the Intel Unite session.
NOTE: If you are having problems connecting, make sure the firewalls are disabled or have exceptions in
place for Intel Unite.exe. APPENDIX A of this guide will guide you to configure Firewall Settings.
PIN
Intel® Unite™ Standalone Setup Guide V1.6 17 of 32
4 Advanced Configuration
4.1 Advanced Configuration (Hub Configuration)
The Intel Unite Hub can be customized to fit the needs of your organization. Additional options allows you to add
a theme to the hub, or enable/disable features such as file share, this a manual editing process.
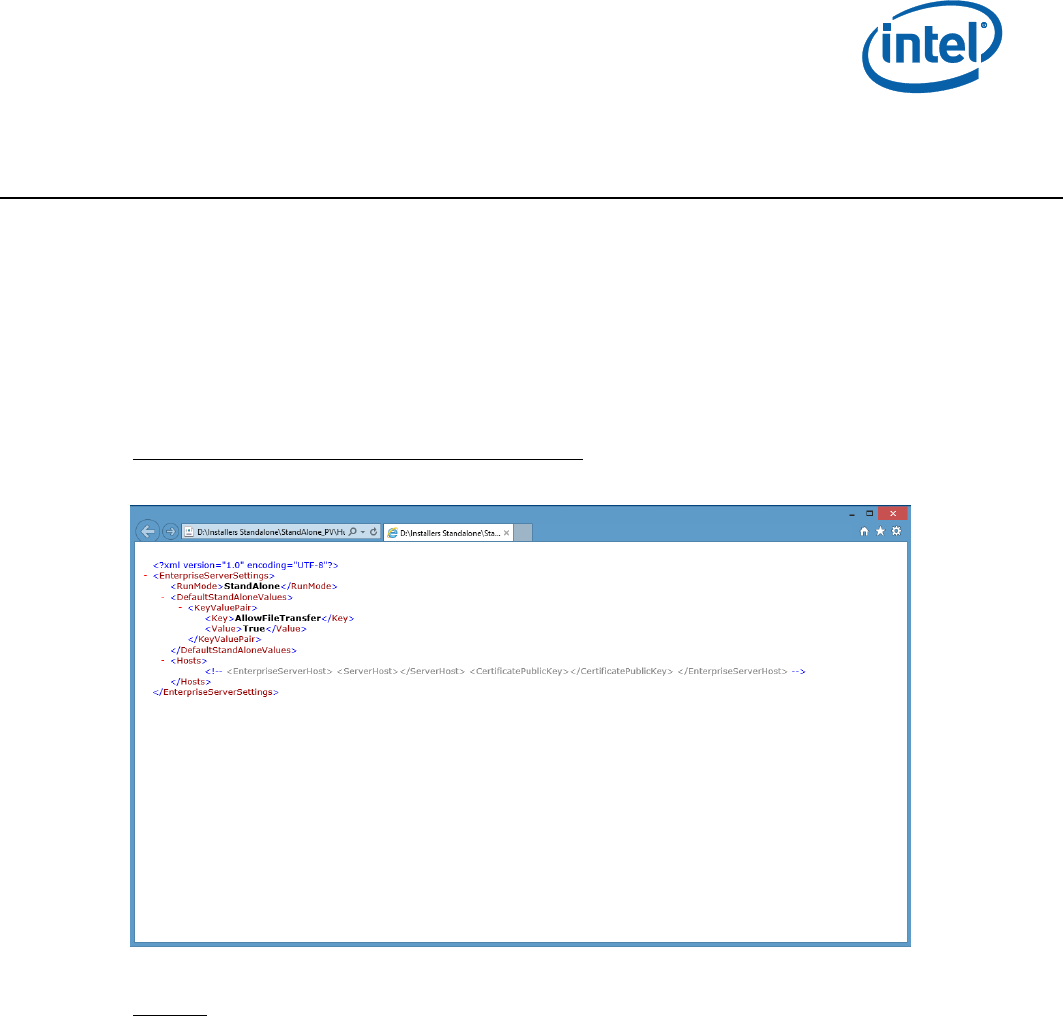
Additional configuration requires you to manually modify the “serverconfig.xml” settings file. This file can be found
in the installation path (default: C:\Program Files (x86)\Intel\Intel Unite\Hub\ServerConfig.xml).
Here is an example of the contents of ServerConfig.xml:
Within DefaultStandAloneValues, you can specify additional settings (KeyValuePair) on the hub application.
Example:
<DefaultStandAloneValues>
<KeyValuePair>
<Key></Key>
<Value></Value>
</KeyValuPair>
<KeyValuePair>
<Key></Key>
<Value></Value>
</KeyValuePair>
.
.
.
</DefaultStandAloneValues>

Intel® Unite™ Standalone Setup Guide V1.6 18 of 32
4.2 Valid Keys for Configuration
This table outlines the valid Key/Value pairs:
Key
Description
Data Type
Default
Value
DisplayPinSize
Size in Pixels. The value is the height in pixels for
the onscreen pin (larger values make the pin
easier to read from across the room)
Integer
48
TileCompression
JPG compression level. % of compression to
apply to a changed portion of the display (tile)
being transmitted over the network
Integer
80
(valid range:
5-100)
TileSize
Tile size for breaking screen into chunks. The
size, in pixels, for each tile. A tile is a section of
the screen which is evaluated for change. Only
changed tiles are transmitted
Integer
128
(valid range:
32-512)
ServiceListenPort
The TCP port that the service should listen on
Integer
0
(0 indicates
OS assigned
port)
FileMaxSize
Max file size for file transfers
Integer
2000000000
(2GB)
(valid range:
0-2GB)
FileBlockedExtensions
Comma separated list of blocked file extensions
String
(example:
exe, bin)
FullScreenRoomMode
TextColor
Text color of onscreen text
Hex Color
Code
(Example:
#ffffff)
FullScreenRoomMode
PinColor
Text color of PIN
Hex Color
Code
(Example:
#ffffff)
FullScreenRoomMode
TextFont
Name of font for instructions
String
(Example:
Ariel)

Intel® Unite™ Standalone Setup Guide V1.6 19 of 32
AllowFileTransfer
Flag to enable/disable the ability for a hub or
client to transfer a file
Boolean
(True or
False)
True
HubLockKeyboard
Lock out the following: Ctrl-Esc, Alt-Tab, Charms
bar, Windows keys and Alt-F4 in Hub
If set to True hub lock out is enabled. Can
override with password set in Reg Key Machine
Boolean
(True or
False)
False
HubShowClock
Show clock in bottom right corner
Boolean
(True or
False)
True
FullScreenRoomMode
Enable/disable hub full screen
False: Pin in upper right only
True: Pin in upper right and a full screen
background
Boolean
(True or
False)
True
FullScreenRoomMode
BackgroundURL
Sets the Hub background to the URL or image
(jpg/png) specified. Set value to True if you want
this feature
Example: http://myserver.com/background.jpg
Boolean
(True or
False)
(none)
FullScreenRoomMode
BackgroundColor
Background color of the Hub. Named color or
html style color
Valid values are named colors or RGB
values/HTML colors in the format: #000000
(For example red is #FF0000)
Hex Color
Code
(none)
FullScreenRoomMode
ShowPin
Show instructions. Set value to True if you want
this feature.
Boolean
True
FullScreenRoomMode
Instructions
Text instructions to be displayed on Hub. can use
{pin} and {host} as replacements
URL for download of the client. This item is
displayed on the full screen room mode screen.
String
VerifyPluginPublicKey
Verify plugin public key before loading plugins
Boolean
False
Intel® Unite™ Standalone Setup Guide V1.6 20 of 32
APPENDIX A
Help Guide to Configure Firewall Settings
Users need to ensure the operating system firewalls have exceptions in place for Intel Unite.exe (both TCP and
UDP). A firewall exception has to be configured for Intel Unite.exe to allow UDP and TCP ports that are bound to
the application.
This section is a guide to help configure firewall settings to allow Intel Unite application on the end user system.
The three sub-sections have instructions on how to allow Intel Unite application on an end user system running
Windows Firewall, McAfee Host Intrusion Prevention and Symantec Endpoint Protection agents respectively.
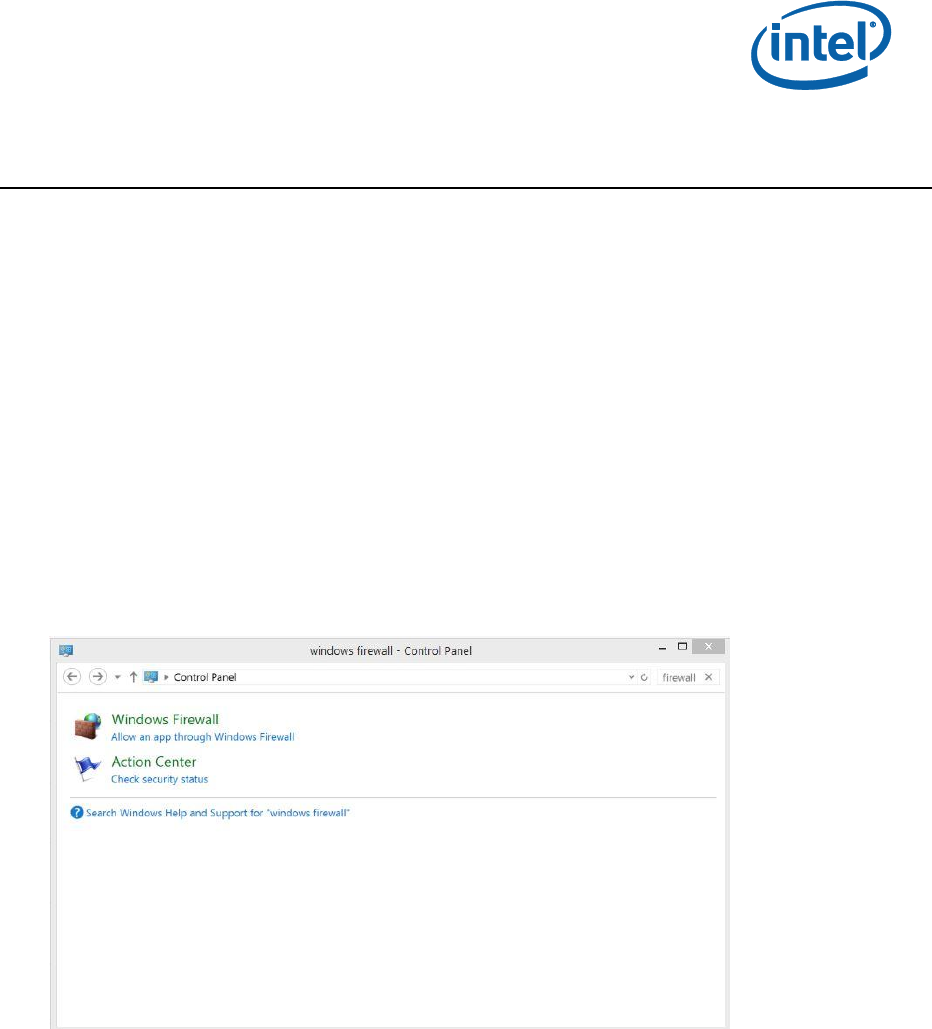
A1 Windows Firewall
1. In Control Panel, search for Windows Firewall and open the Allow an app through Windows Firewall.
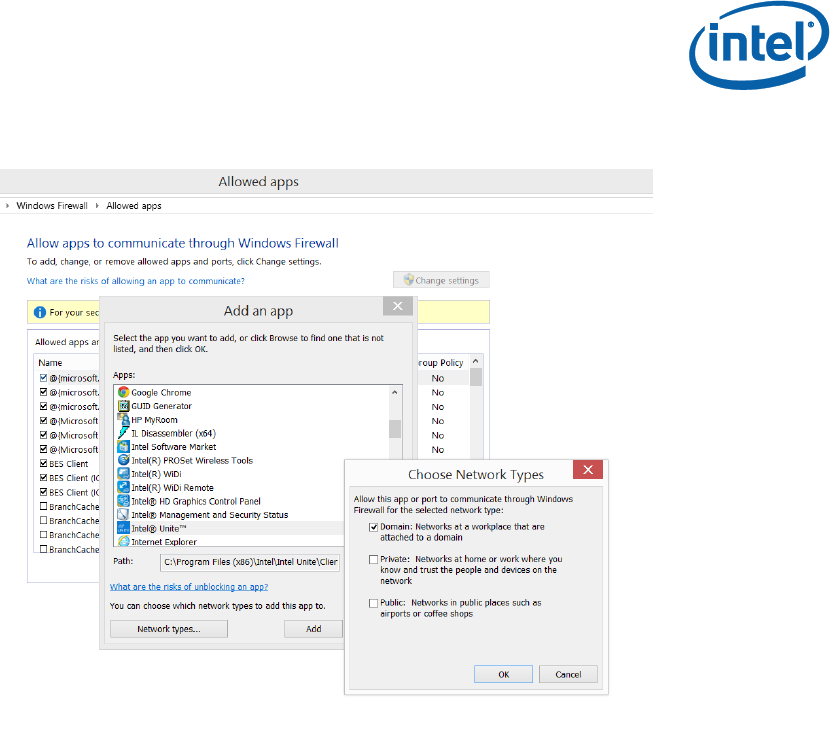
2. Click on Allow another app at the lower right side of the window, you may have to click on Change
Settings to activate the Allow another app button.

Intel® Unite™ Standalone Setup Guide V1.6 21 of 32
3. When the Add an app window opens, browse for Intel Unite.
4. Click on Network Types…
5. In the Choose Network Types window, select Domain: Networks at a workplace that are attached to a
Domain and click OK.
Intel® Unite™ Standalone Setup Guide V1.6 22 of 32
6. Click Add to add the application to the allowed apps.
7. You have allowed Intel Unite in your Windows Firewall.
Intel® Unite™ Standalone Setup Guide V1.6 23 of 32
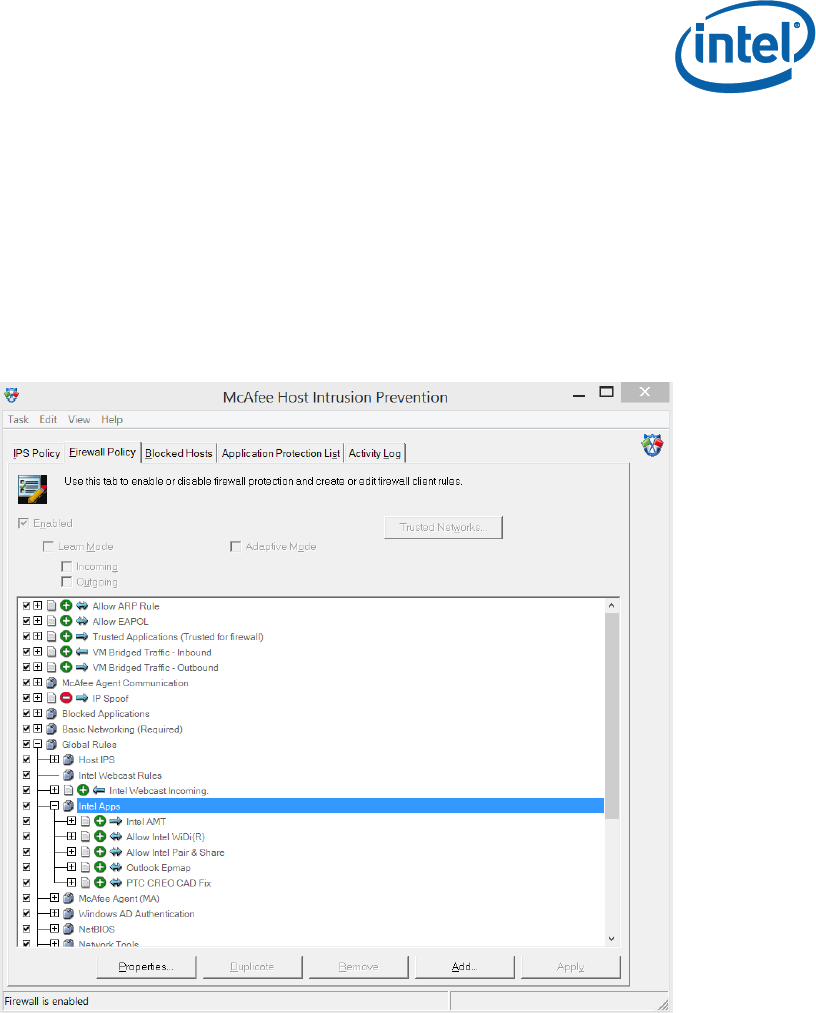
A2 McAfee Host Intrusion Prevention
1. In the taskbar, click on the McAfee icon and from the opened menu, select Manage Features Host
Intrusion Prevention.
2. Click on the Firewall Policy tab and then Click on Global Rules to expand to the options.
3. Select Intel Apps and click on Add..
Intel® Unite™ Standalone Setup Guide V1.6 24 of 32
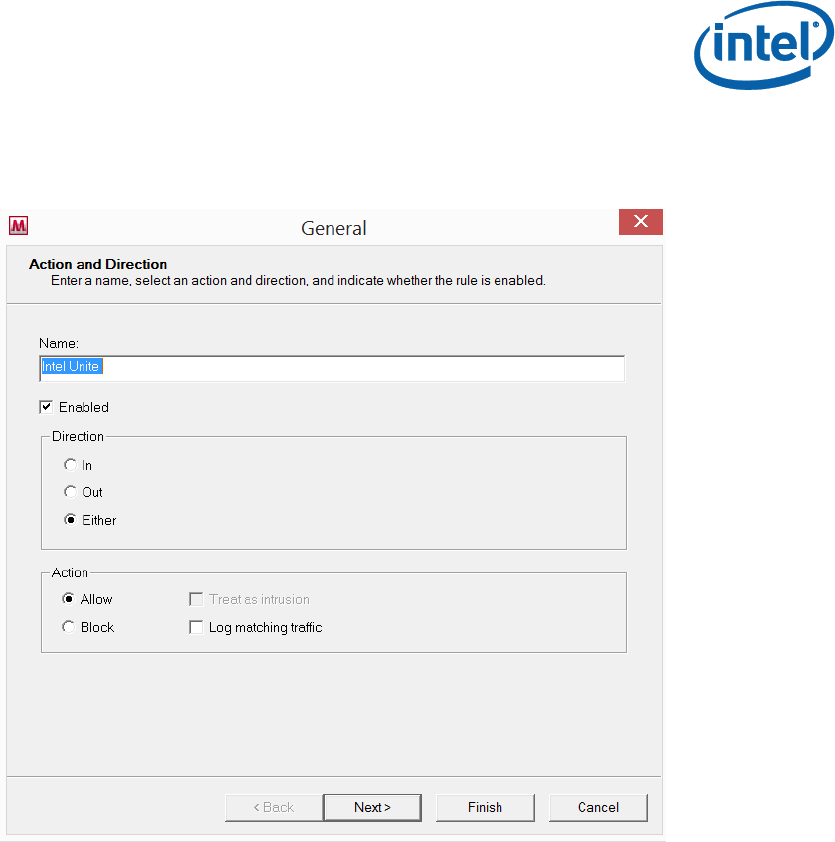
4. In the General window, enter Intel Unite in the name box, then select Either in the Direction box and
Allow in the Action box. Click Next.
Intel® Unite™ Standalone Setup Guide V1.6 25 of 32
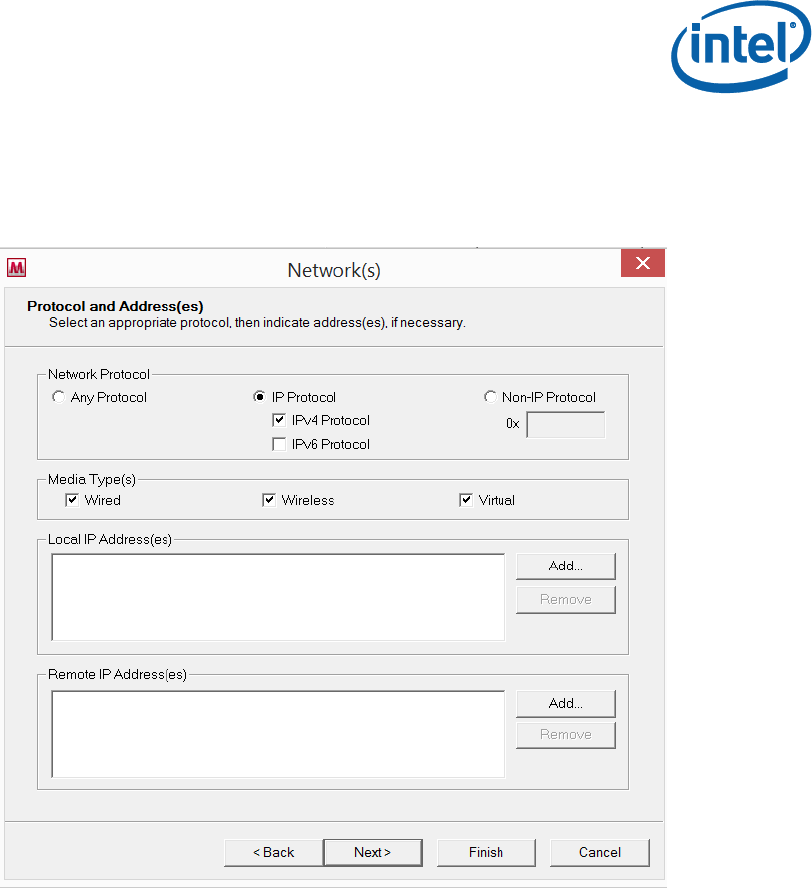
5. In the Network(s) window select IP Protocol and check IPv4 Protocol in the Network Protocol box. In
the Media Type(s) box, check all media types and add any local IP address depending on your
organizations requirement. Click Next.
Intel® Unite™ Standalone Setup Guide V1.6 26 of 32
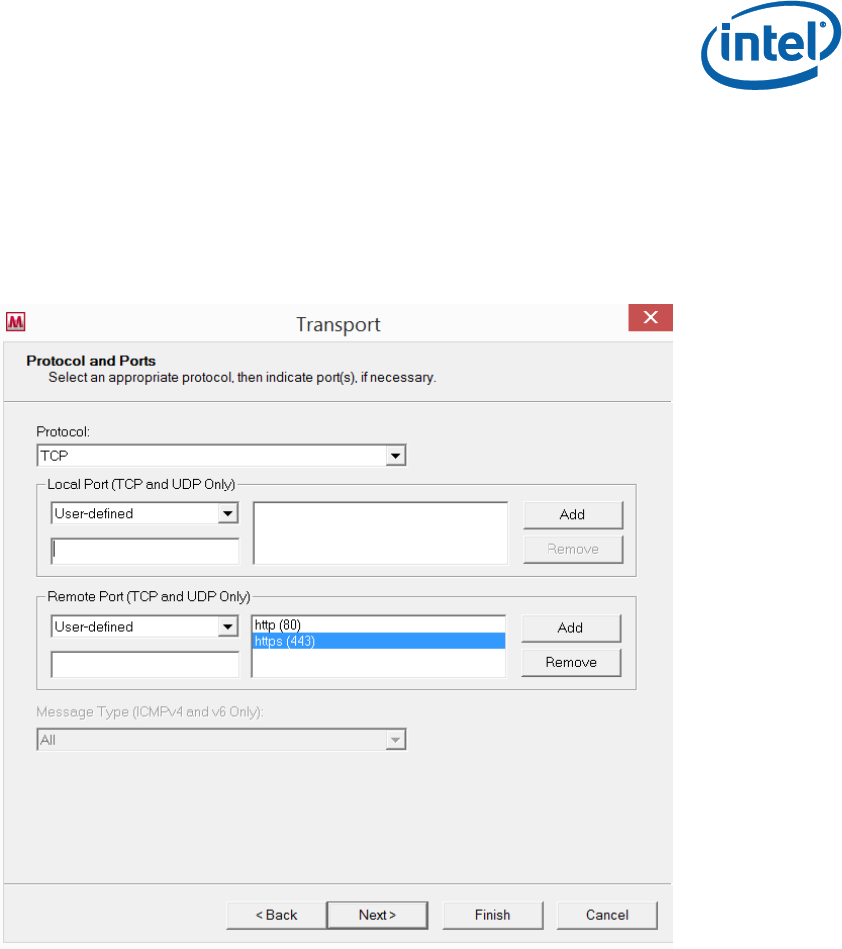
6. In the Transport window, use the dropdown menu in Protocol, select TCP. In the Remote Port (TCP and
UDP Only) box, enter ports 80 and 443, as http (80) and https (443), click on Add, then click Next.
Note: There are 2 ports that Unite listens on and these are randomly chosen by the OS on each launch.
The Intel Unite application connects out to remote ports 80, 443 for HTTP and HTTPS connections and
randomized ports on remote hubs.
Intel® Unite™ Standalone Setup Guide V1.6 27 of 32
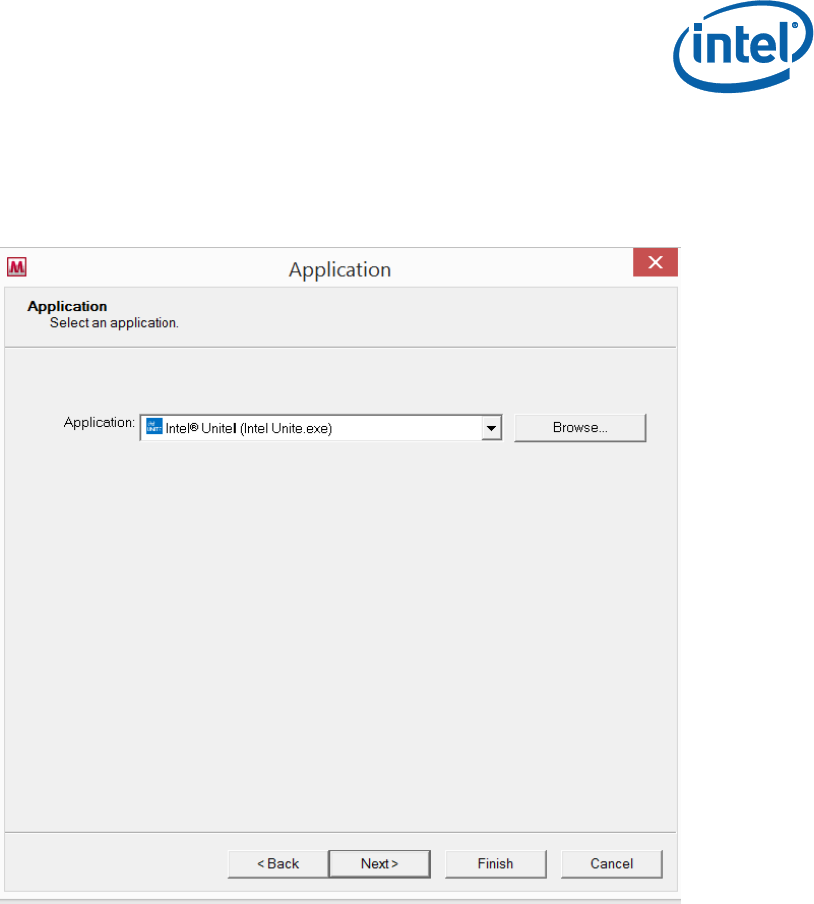
7. In the Application window, browse to the location of the application and add the Intel Unite.exe file.
Click on Finish to complete the firewall setup.
Intel® Unite™ Standalone Setup Guide V1.6 28 of 32
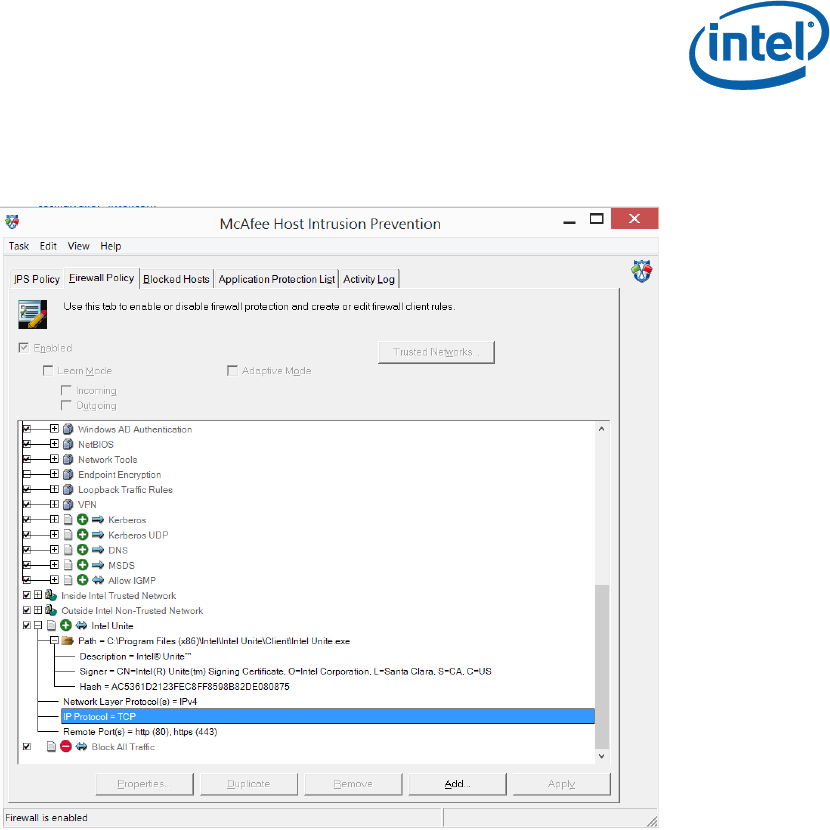
8. After completing the Firewall Setup, verify that the policy has been added by checking the Firewall Policy
tree, as shown below, Firewall is enabled.
9. You have allowed Intel Unite in your McAfee Firewall.
Intel® Unite™ Standalone Setup Guide V1.6 29 of 32
A3 Symantec
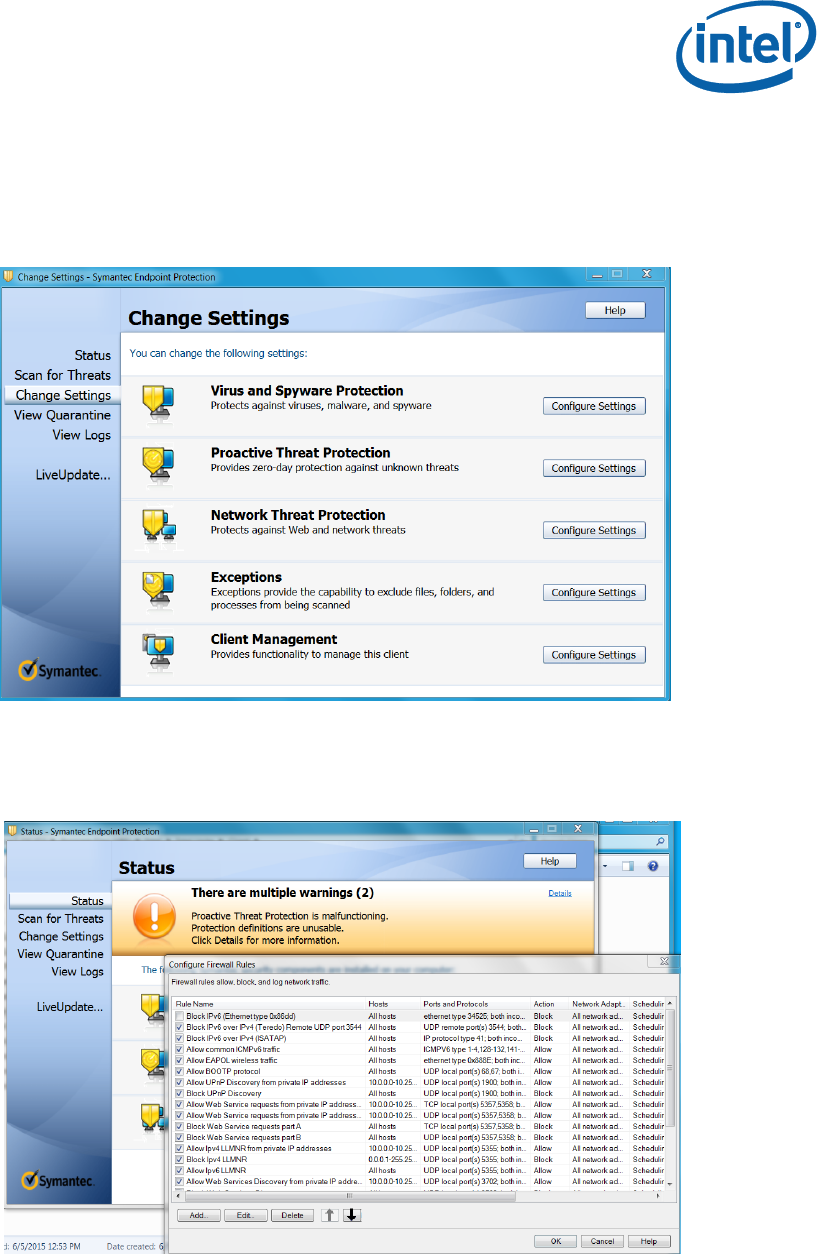
1. Open Change Settings - Symantec End point Protection on the client
2. In the setting Network Threat Protection (3rd option shown above), click on Configure Settings.
3. Select Configure Firewall Rules.
4. Click on Add.. to add a firewall rule.
Intel® Unite™ Standalone Setup Guide V1.6 30 of 32
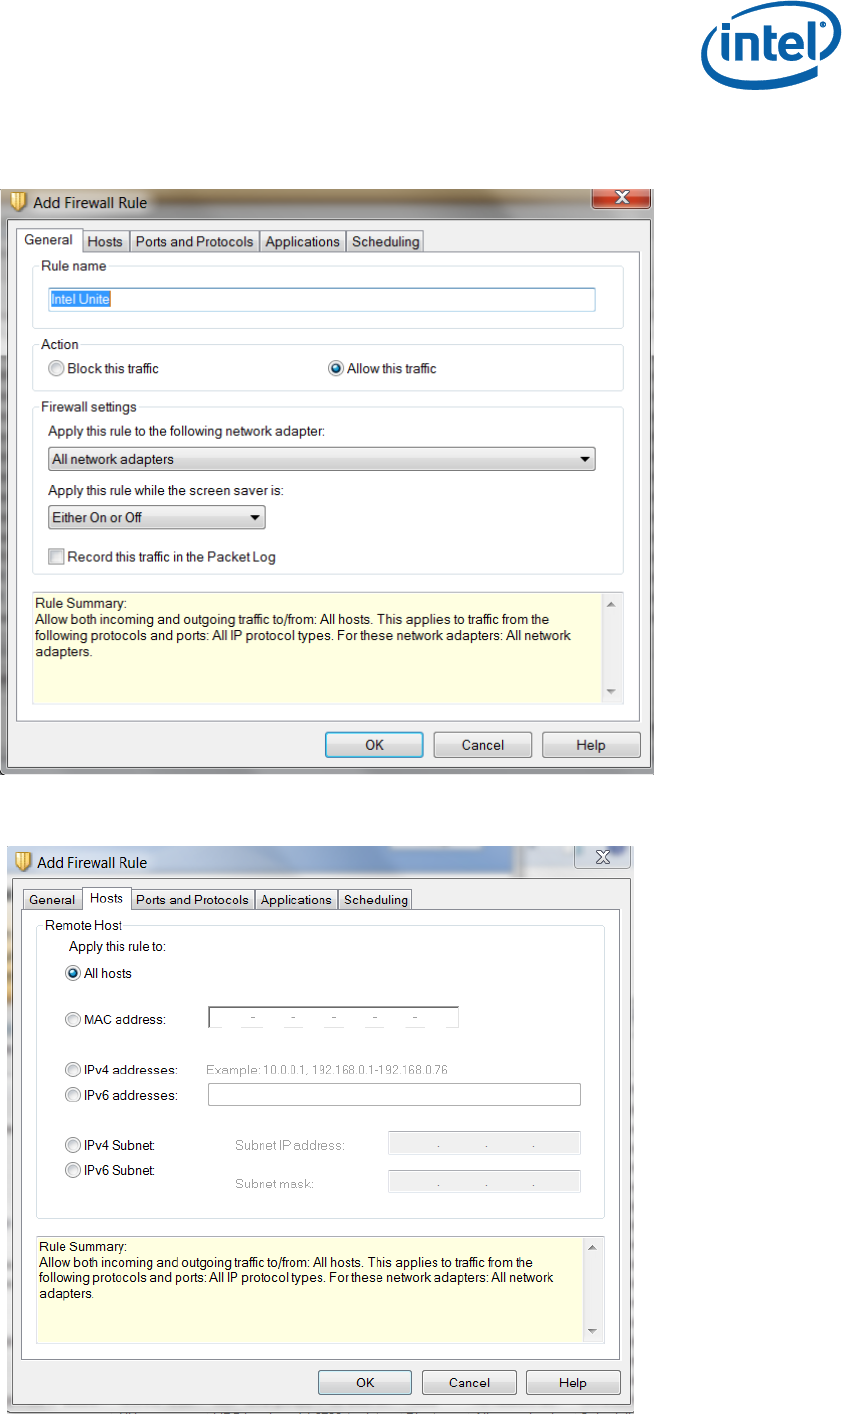
5. Enter Intel Unite in the Rule name box and select Allow this traffic .
6. In the Firewall settings box, select All network adapters and click OK.
7. In the Hosts tab, select the appropriate option, to either apply the rule to all hosts or a set of hosts within
a subnet.
Intel® Unite™ Standalone Setup Guide V1.6 31 of 32
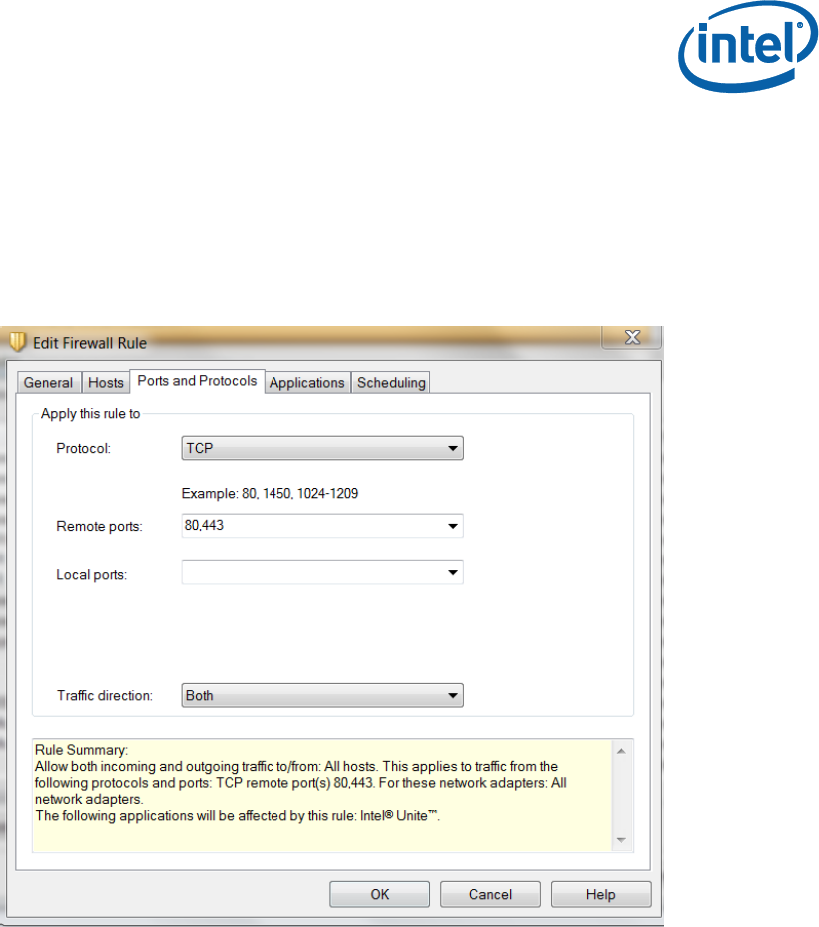
8. In the Ports and Protocols tab, select TCP for the Protocol rule and for Remote ports select 80 and 443
for HTTP and HTTPS respectively.
Note: There are 2 ports that Unite listens on and these are randomly chosen by the OS on each launch.
The Intel Unite application connects out to remote ports 80, 443 for HTTP and HTTPS connections and
randomized ports on remote hubs.
9. In Traffic direction select Both.
10. Add another rule for UDP protocol, all ports and Traffic direction as Both for this rule.
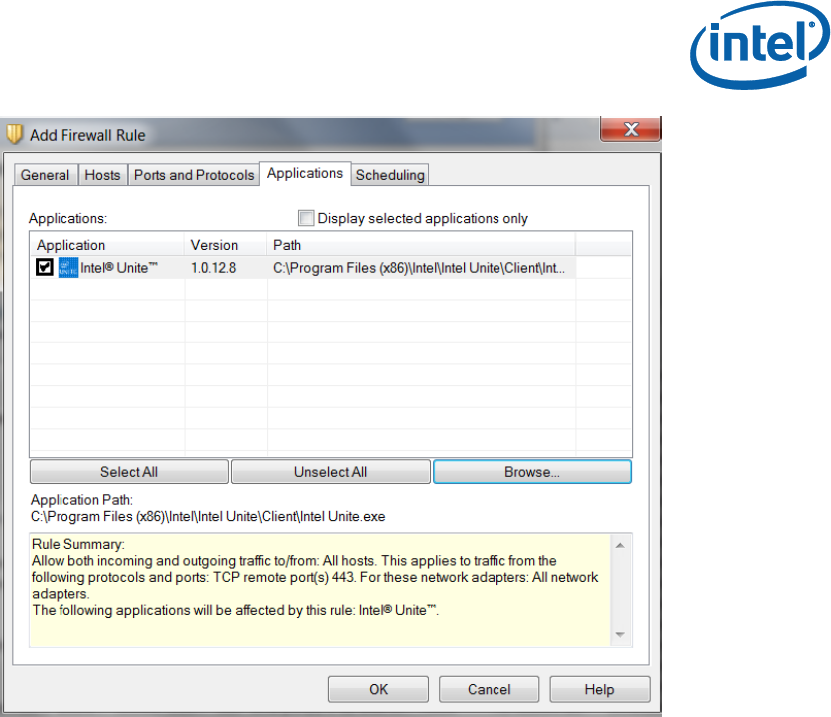
11. In the Applications tab, browse to Intel Unite.exe and click OK.
Intel® Unite™ Standalone Setup Guide V1.6 32 of 32
12. Finally, verify the rule has been added by checking the list of firewall rules.
13. You have allowed Intel Unite in your Symantec Firewall.
