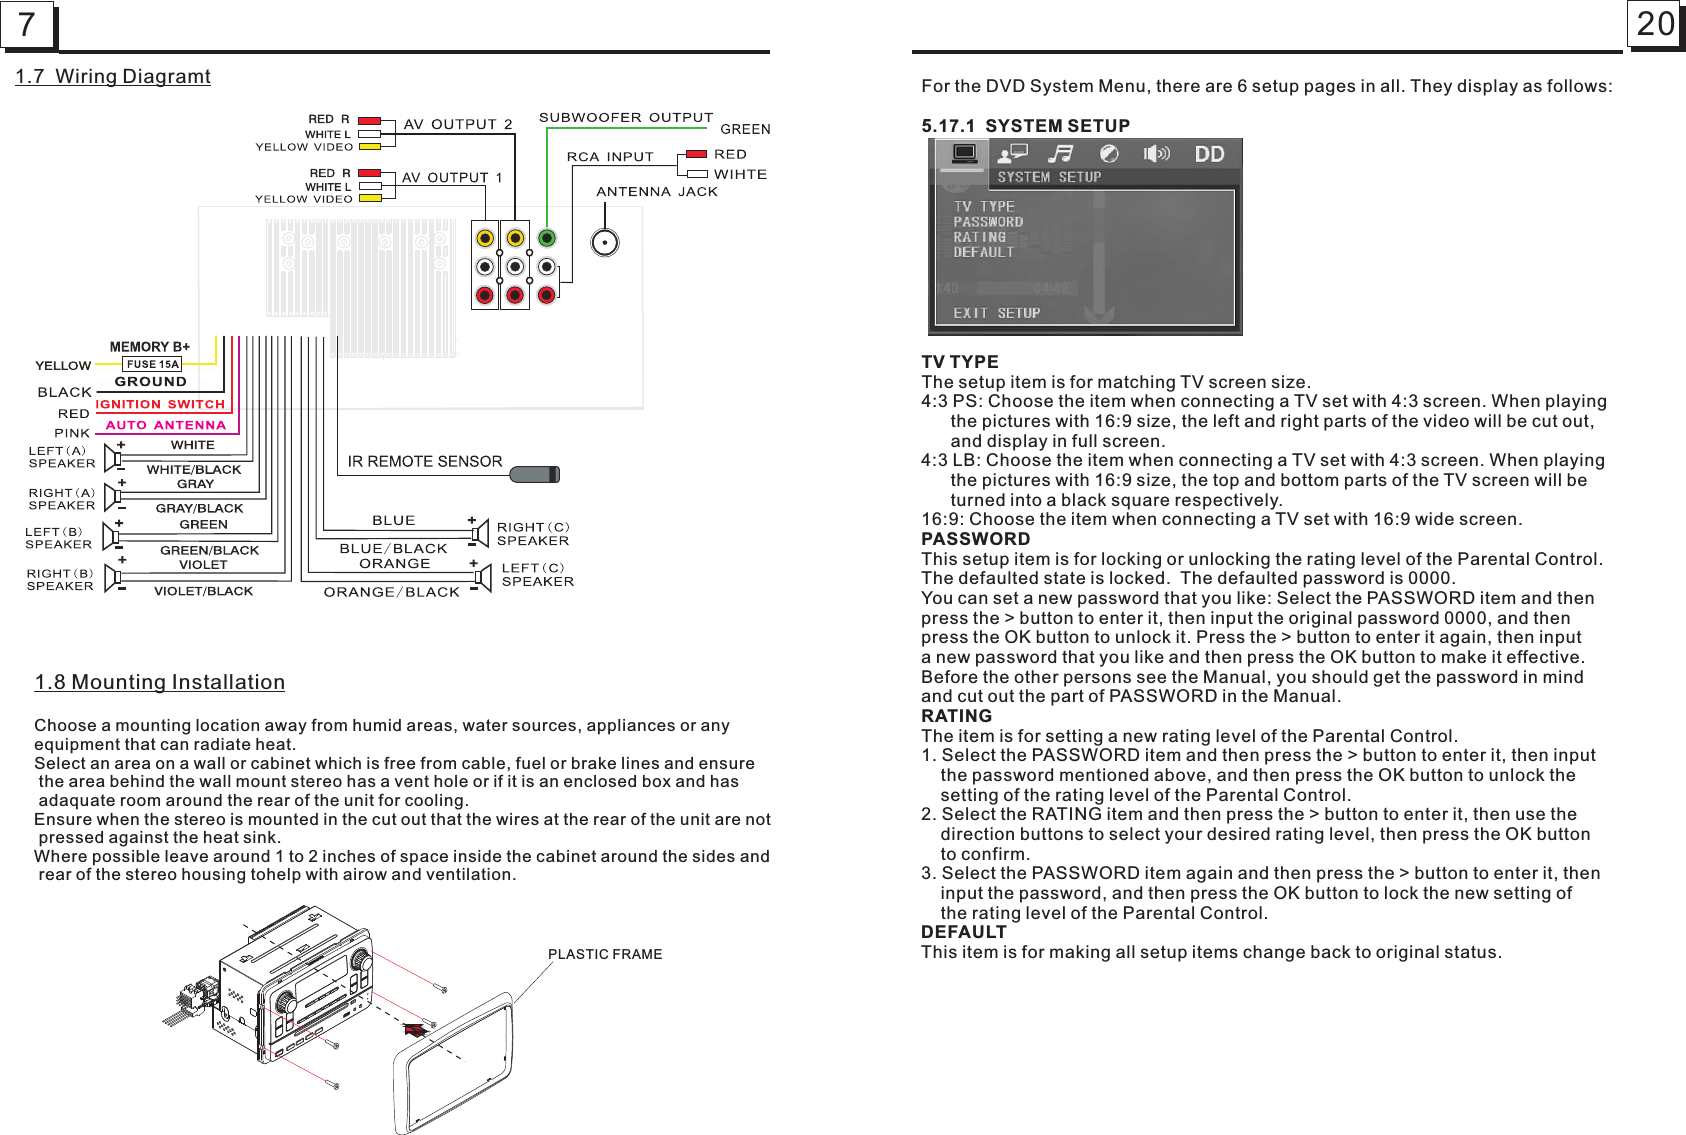
Furrion DV11 Car Radio Player with AM FM RDS USB SD DVD CD MP3 WMA ESP AUX ISO BT REMOTE User Manual Manual
Furrion Ltd Car Radio Player with AM FM RDS USB SD DVD CD MP3 WMA ESP AUX ISO BT REMOTE Manual
UserManual.wiki
>
Furrion
>
DV11 User Manual
Manual
Navigation menu
Upload a User Manual
Namespaces
Wiki Guide
HTML
PDF
Info
Views
User Manual
Discussion / Help
Navigation
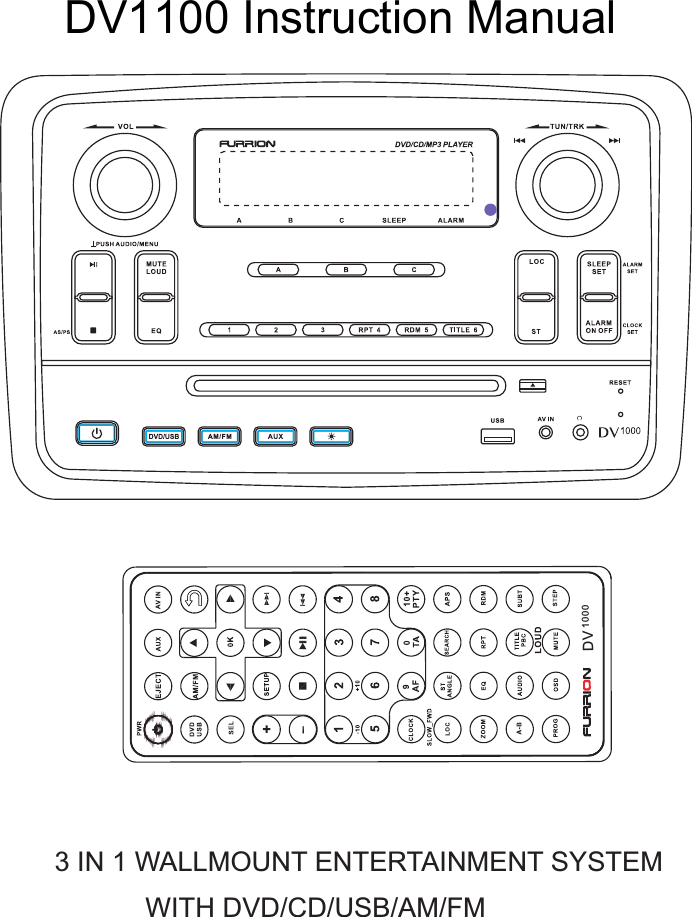

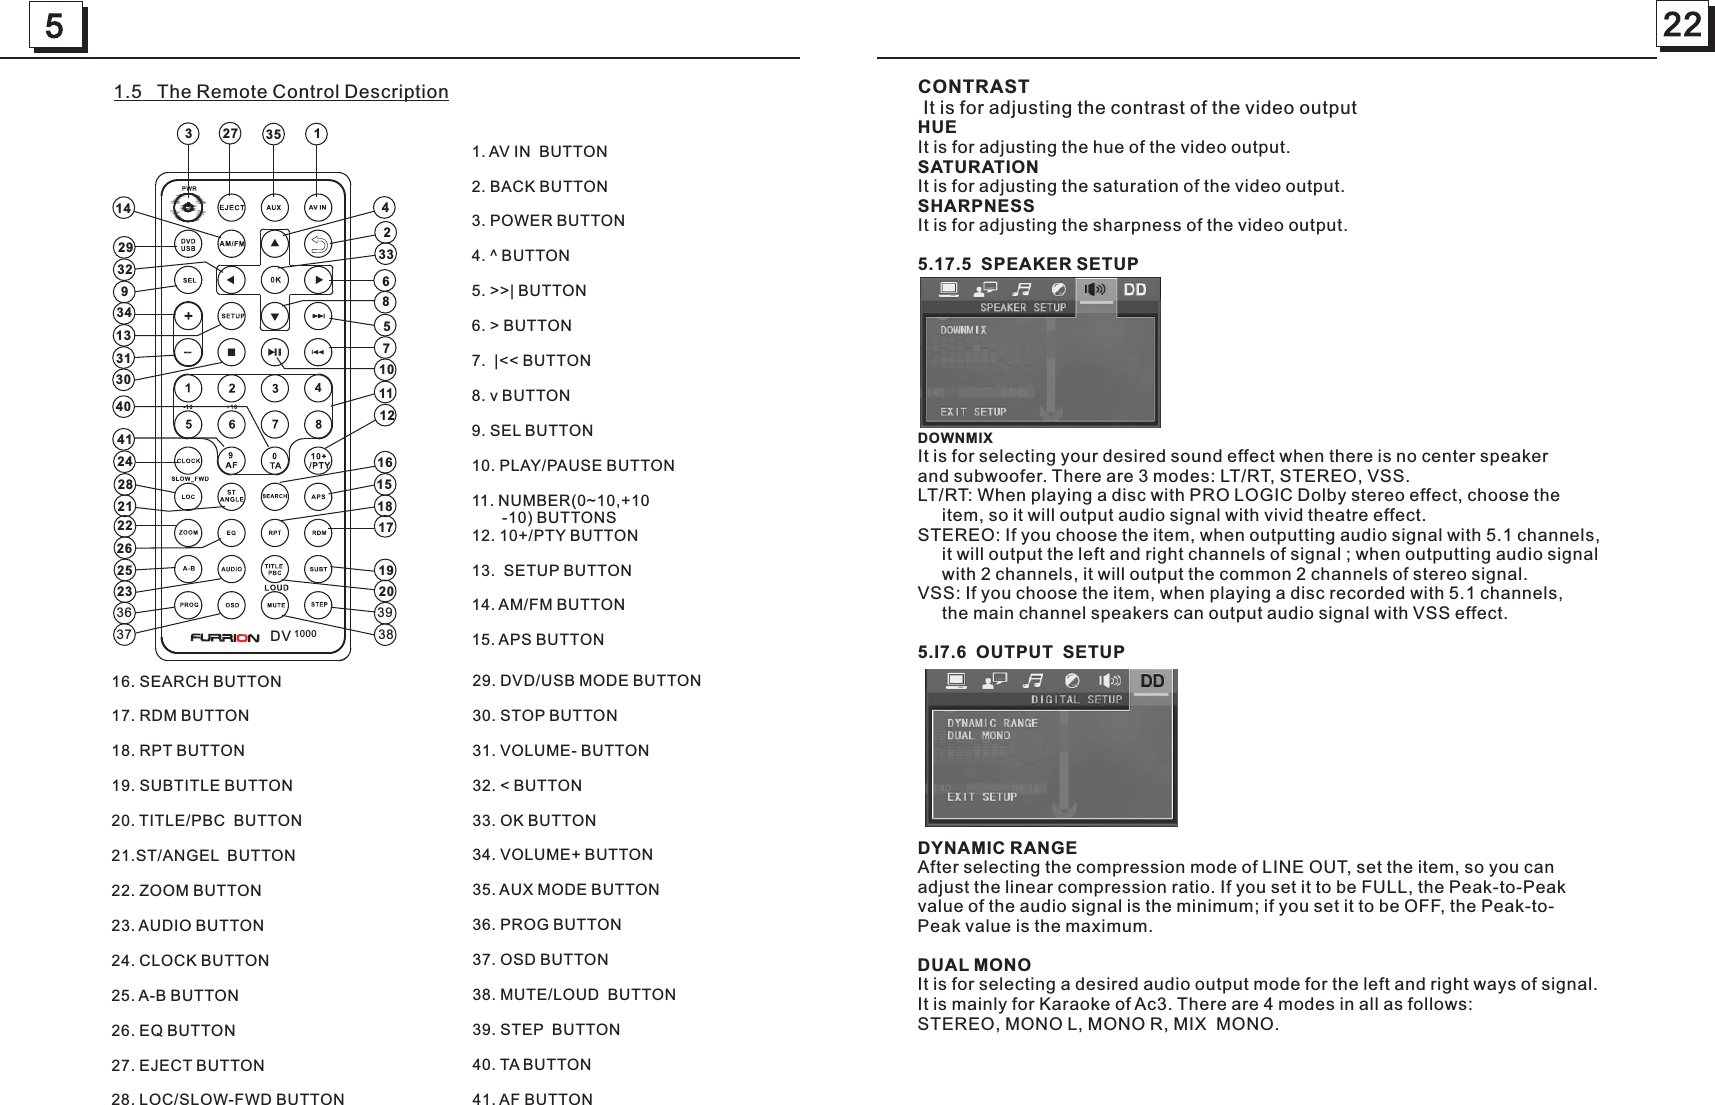
![17 103. Radio Operation1. FREQUENCY SELECT In RADIO mode. Press and hold the AM/FM button to select your desired frequency EUROPE, USA1 or USA2.2. AM/FM BUTTON In RADIO mode, press the AM/FM button to select your desired radio band of FM1, FM2, FM3, AM1, AM2 , and the selected band will be displayed on the small monitor of the front panel.3. TUNE/SEEK UP/DOWN In RADIO mode: 1) Rotate the TUN/TRK KNOB to the right or left limit position stopping for about 1 second or Press and hold the >>|/ |<< button on the remote control to automatically search up/down for a available station from the current frequency. 2) Rotate the TUN/TRK KNOB or the press the >>| / |<< button on the remote control to manually search up or down with step by step for your desired station from the current frequency. 4. AS/PS BUTTON In RADIO mode: 1) When pressing and holding the AS/PS button on the front panel or APS button on the remote control, the radio searches from the lowest frequency and checks the signal strength level until 1 cycle search is finished. And then the 6 strongest stations are preset to the corresponding preset number memory bank. The AS operation is implemented in each bank of the selected band. When the AS operation is finished, it will resume broadcasting on the M1.(It can store 3x6 stations for FM and 2x6 stations for AM in all) 2) When briefly pressing the AS/PS button on the front panel or APS button on the remote control, the radio searches for each preset station from the M1. When the field strength level is more than the threshold level of the stop level, the radio holds at that preset number for a few seconds with releasing mute, and then searches again. After finishing a circle of searching, it will stop searching on the M1.NOTE: In FM band, FM1,FM2,FM3 is checked one at a time. In AM band, AM1, AM2 is checked one at a time.5. PRESET STATION [ 1-6 ] BUTTONS In RADIO mode:1) To memorize the current frequency on the current band, press and hold any one of the six preset buttons (1-6) .2) To recall the preset memory on the current band, press one of the preset buttons [1-6] .6. STEREO/MONO BUTTON Press the ST button to select the STEREO or MONO sound mode for FM band.7. LOC BUTTON 1) In RADIO mode, when the signal of the distance radio station are very weak and the receiving effect is bad during tuning, check whether there is the word LOC on LCD. If there is the word LOC on LCD, press this button to turn off the LOC function, then tune again for the distance radio station; 2) In RADIO mode, when the signals from the local radio stations are too strong, this could lead to interference. press this button to turn on the LOC function, and the LOC icon will be lit up on the LCD. Re-tune for the local station required. ZOOMx2,ZOOMx3,ZOOMx4,ZOOMx1/2,ZOOMx1/3,ZOOMx1/4,ZOOM OFF. Press one of the ^/v/>/< buttons to select the area you want to enlarge.5.9 Change the Caption Language When playing DVD discs, press the SUBTITLE button repeatedly to select the language of the caption or turn off the caption.(depend on the disc used.) When playing VCD/MP3/WMA/CD discs, the button is not available.5.10 Change the Audio Language1. When playing DVD discs, press the AUDIO button repeatedly on the IR remote control to select the desired language type(depend on the disc used)2. When playing VCD discs, press the AUDIO button repeatedly to select the sound mode of the MONO L, MONO R, and Stereo, no language function.3. When playing CD/WMA/MP3 discs, the AUDIO button is invalid. 5.11 Look over the Playback Status1. When playing DVD discs, press the OSD button repeatedly on the remote control to turn on/off the playback status. When it is on, it will display the information such as: the serial number of the playing title, the serial number of the playing chapter, the elapsed time of the playing chapter, the remaining time of the playing chapter, the elapsed time of the playing title, the remaining time of the playing title, etc.2. When playing VCD/CD discs, press the OSD button repeatedly on the remote control to turn on/off the playback status. When it is on, it will display the information such as: the serial number of the playing track, the elapsed time of the playing track, the remaining time of the playing track, the elapsted time of the disc, the remaining time of the disc.](https://usermanual.wiki/Furrion/DV11/User-Guide-2016472-Page-11.png)
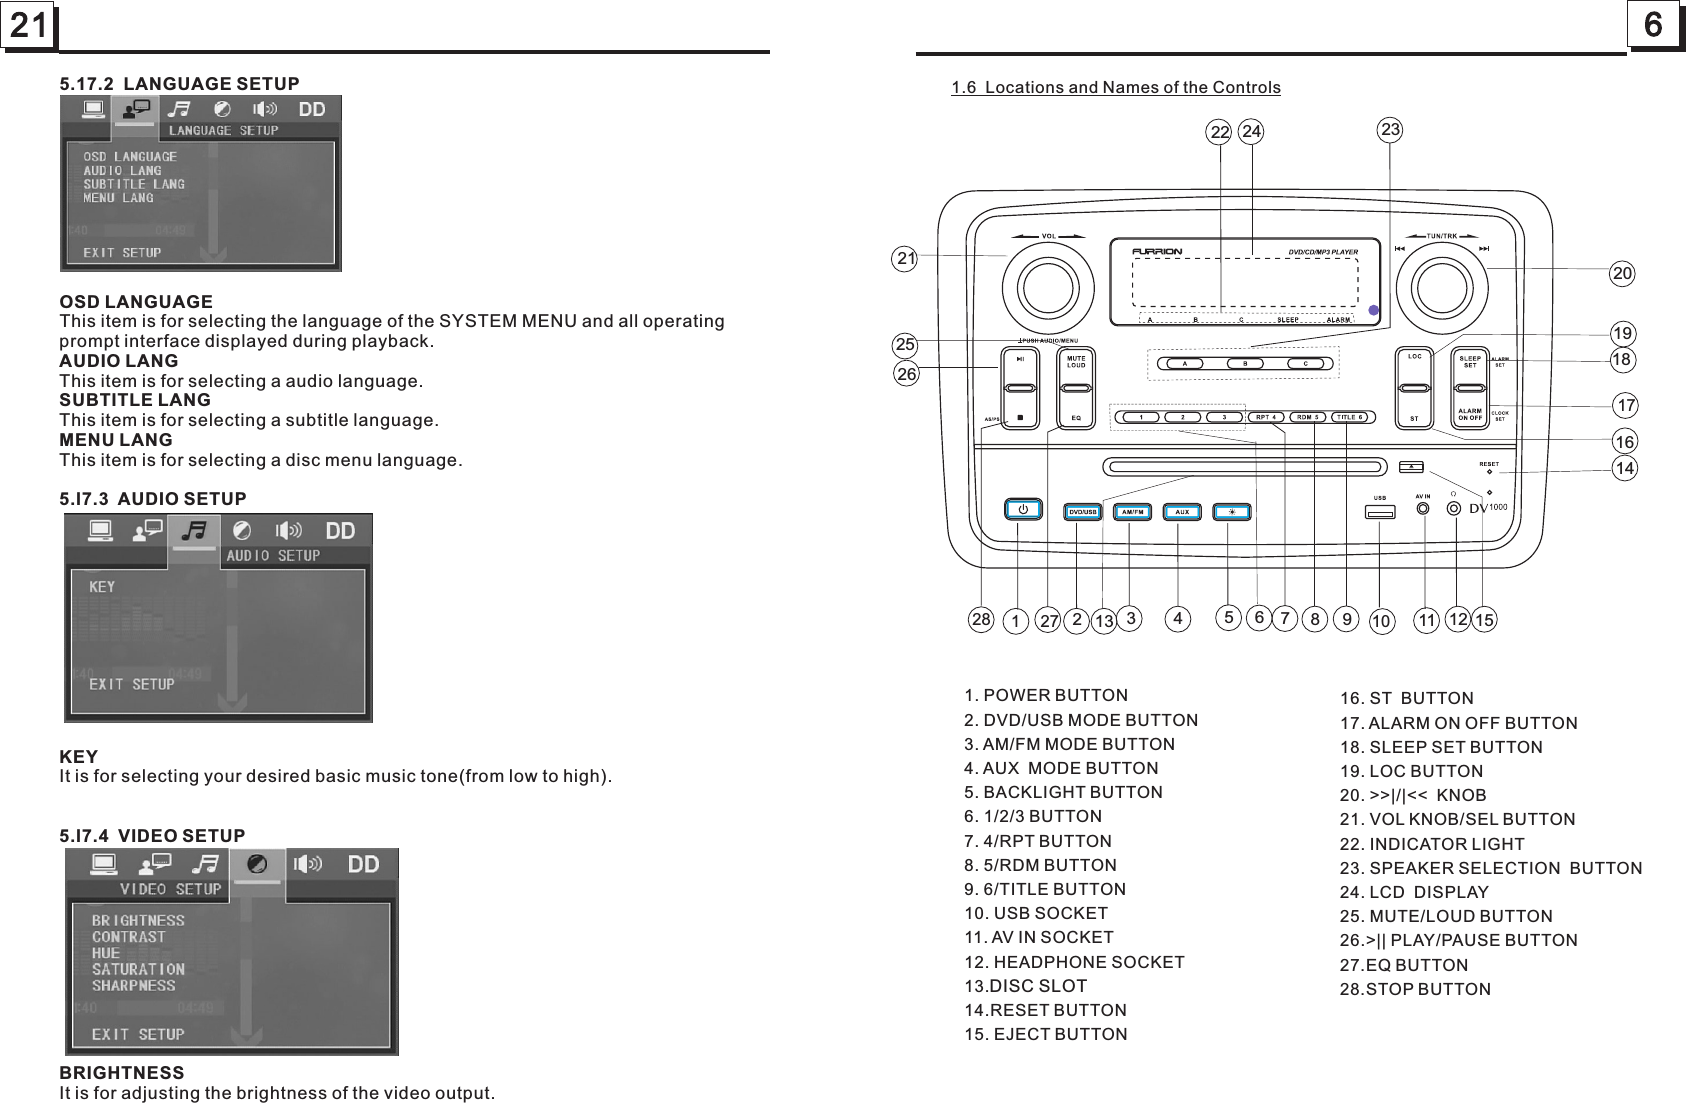
![11 168. PTY (PROGRAM TYPE) BUTTON Long press the SEL button on the front panel or press the PTY button on remote shortly to select one of the following mode. When PTY group is on, press the VOL+ or VOL- button on the remote controller or rotate the VOL knob on the front panel to select one of PTY programs: <-->NEWS<-->AFFAIRS<-->INFO<-->SPORT<-->EDUCATE <-->DRAMA<-->CULTURE <-->SCIENCE<--> VARIED<-->WEATHER<--> FINANCE<-->CHILDREN<-->SOCIAL<-->RELIGION<-->PHONE IN<--> TRAVEL<-->LEISURE<-->DOCUMENT< -->PTY NONE<-->POP M< --> ROCK M<-->EASY M<-->LIGHT M<--> CLASSICS<-->OTHER M<--> JAZZ<-->COUNTRY<-->NATION M<-->OLDIES<-->FOLK M<--> When PTY group is on, pressing the 6 number buttons also can select one of PTY programs as above. After selecting one of the PTY programs, it will display SEEK PTY and automatically search for the station of the PTY program. If the station of the PTY program does not exist, it will display PTY NONE and then return back to the normal station.Note: Press and hold the SPEAKER SELECTION BUTTON B on the front panel for5 seconds can turn on/off RDS mode. 9. AF [ALTERNATIVE FREQUENCIES] BUTTON Long press the SEL button on the front panel or press the AF button on the remote control briefly, the AF switchingmode is selected and the state of the AF switching mode is displayed by AF segment. Segment off: AF switching mode off. Segment on: AF switching mode on, and has RDS information. Segment flashing: AF switching mode on, but RDS information is not received yet. When the AF switching mode is selected, the radio checks the signal strength of the AF all the time. The interval of checking time of each AFs depends on the signal strength of the current station, from a few minute for the strong station to a few seconds for the weak station. Every time that a new AF is stronger than the current station, it switches over to that frequency for very short time, and the NEW FREQUENCY is displayed for 1-2 second. Because the mute time of the AF switching or the checking time is very short, it is almost inaudible in case of normal program. (When AF flash on LCD, it will search for the stronger RDS station. If AF and TP flash on LCD, it can only search for the traffic announcement station). In FM mode, when AF is on, SEEK, (SCAN), AUTO-MEMORY function can only receive and save the RDS program. 10. TA [TRAFFIC ANNOUNCEMENT] BUTTON Long press SEL button on the front panel then rotate it or press the TA button on remote shortly to turn on TA search mode. When traffic announcement is transmitted: 1).If the unit is in Disc Play mode, it will switch to radio mode temporarily. 2).Temporarily switch over to an EON linked station when EON detects a traffic announcement on that other program, and TA, TP will be displayed on LCD * TA interruption function: The current traffic announcement is cancelled by pressing TA button shortly. * When TA is on, SEEK, (SCAN), AUTO MEMORY function can be received or saved only when traffic program identification code has been received. 5.5 Playback from a specified chapter/track or a specified time 1. When playing DVD discs, press the SEARCH button to display a interface and highlight the title item, then use the number buttons to input the serial number of the title; use the direction buttons to highlight the chapter item, then use the number buttons to input the serial number of the chapter; finally press the OK or PLAY button to play the selected chapter. 2. When playing VCD/MP3/WMA/CD discs, press the SEARCH button to display a interface and highlight the track item, then use the number buttons to input the serial number of the track; finally press the OK or PLAY button to play the selected track . 5.6 Playback in Random When playing DVD/VCD(PBC OFF)/MP3/WMA/CD discs, press the RDM button to switch between RANDOM (ON)/RANDOM OFF. When in RANDOM (ON) mode, it will play in random.5.7 Playback in Different Angle1. When playing VCD/MP3/WMA/CD discs, the ANGLE button on the IR remote control is not available.2. When playing DVD discs, press the ANGLE button repeatedly on the IR remote control to view in different angle.(This function is only for the DVD discs with ANGLE function)5.8 Playback in Zoom Mode In DVD/VCD mode, during playback, press the ZOOM button continuously to enlarge a certain area of the images on the screen with these multiples:](https://usermanual.wiki/Furrion/DV11/User-Guide-2016472-Page-12.png)