Users Manual
Instruction Manual
Entertainment System
DV3150
ZONE1 ZONE2ALARM
Welcome
Thank you for purchasing this Furrion DV3150 Entertainment System.
Before operating your new appliance, please read these instructions carefully.
This instruction manual contains information for safe use, installation and
maintenance of the appliance.
Please keep this instruction manual in a safe place for future reference.
This will ensure safe use and reduce the risk of injury. Be sure to pass on this
manual to new owners of this appliance.
The manufacturer does not accept responsibility for any damages due to not
observing these instructions.If you have any further questions regarding our
products, please contact us at support@furrion.com
®
PAGE 1
WARNING
1.Do not ingest the battery,Chemical Burn Hazard (The remote control supplied with).
2.This product contains a coin/button cell battery.
3.If the coin/button cell battery is swallowed, it can cause severe internal burns in just 2 hours and
can lead to death.
4.Keep new and used batteries away from children.
5.If the battery compartment does not close securely, stop using the produce and keep it away from
children.
6.If you think batteries might have been swallowed or placed inside any part of the body,seek,
immediate medical attention.
CAUTION
1.Danger of explosion if battery is incorrectly replaced.
2.Replace only with the same or equivalent type.
3.The battery shall not be exposed to excessive heat such as sunshine, fire or the like.
PRECAUTION
CAUTION
RISK OF ELECTRIC SHOCK
WARNING: TO REDUCE THE
RISK OF FIRE OR ELECTRIC
SHOCK, DO NOT EXPOSE
THIS APPLIANCE TO RAIN OR
MOISTURE.
WARNING: TO REDUCE THE RISK OF FIRE OR ELECTRIC SHOCK, DO NOT REMOVE
COVER ( OR BACK). NO USER SERVICEABLE PARTS INSIDE. REFER
SERVICING TO QUALIFIED SERVICE PERSONNEL.
DO NOT OPEN
The lightning ash with arrowhead symbol, within an equilateral triangle, is
intended to alert the user to the presence of uninsulated dangerous voltage
within the products enclosure that may be of sufcient magnitude ti constitute
a risk of electric shock to persons.
The exclamation point within an equilateral triangle is intended to alert user to
the presence of important operating and maintenance (servicing) instructions
in the literature accompanying the appliance.
CLASS 1 LASER PRODUCT
Laser product symbol: located on the rear panel of the unit, indicate this player is a class laser
product, only use weak laser and no hazardous radiation outside of the unit.
1. Read through this instruction manual before installation and use.
2. Do not touch the power plug with wet hand.
3. Switch off the power when the unit is not in use. (Disconnect the power plug from the power
outlet when you do not intend to use the unit for a prolonged period of time.) Before moving
the unit, remove the disc from the unit/tray rst.
4. Do not open the cover or touch any of the components inside of the unit. Only a qualied
technician should service the unit.
5. Do not expose the unit under direct sunlight or nearby objects that radiate heat to avoid
damaging the unit.
6. Do not place the unit in moist or humid conditions. Moisture will affect normal operation and
damage the unit.
7. Place the unit on a at surface and ventilative condition. Please ensure the ventilation
holes are not covered to avoid overheating and malfuncion.
8. Clear the panel and case with soft dry cloth only, do not apply any kind of thinner, alcohol or
sprays.
9. The apparatus shall not be exposed to dripping or splashing and that no objects lled with
liquids, such as vases, shall be paced on the apparatus.
PAGE 2
1. Before Operation
Thank you for purchasing a Furrion Product, we hope you will enjoy using our
product. For maximum enjoyment please look through the following manual
to learn about all the features of your Furrion Stereo.
1.1 Features:
Digital AM / FM Tuner
Auxiliary inputs on front and rear
USB input with charging function
Bluetooth with NFC function
2 Zone multi room audio output
Clock/Alarm Clock
1 x HDMI output
1 x RCA Audio/Video outputs for connecting additional TV
1.2 Precautions
Connect this product to a 12V DC negative ground battery system which is
standard in North America and European Vehicles.
Ensure when installing the stereo, all wire ends which are not being used are
terminated with a insulated end to avoid wires shorting or earthing which
can lead to the risk of fire or electrical shock.
Avoid inserting foreign objects into the disk loading slot of the stereo as this
will cause malfunction.
Do not expose this product to moisture or wet environments, if condensation is
present in the screen, wait for 1 hour or more for the moisture to evaporate.
If the interior of the vehicle is extremely hot, do not use the player until the
vehicle internal temperature has cooled down.
Do not use cleaning products on the front face of the product, only use a
slightly damp cloth for cleaning.
Do Not attempt to disassemble or adjust this product, contact a service center
for assistance.
PAGE 3
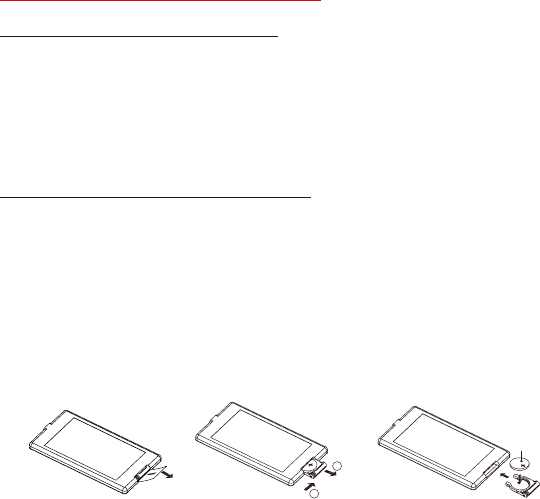
Fig.1 Fig.2 Fig.3
A
B
+ side up
1.3 Battery information of the Remote Control
Replace Battery in the Remote Control:
1. Before using the remote control for the rst time, pull the insulating sheet out of the
remote control as the direction indicated by the arrow (see g.1).
2. Press the movable block holder as the direction indicated by the A arrow (see g.
2), then pull the battery holder out of the remote control as the direction indicated by
the B arrow (see g. 2).
3. Replace the old battery with a new battery with (+) polarity side upward (see g. 3).
4. Insert the battery holder to the original position in remote control (see g. 3)
Note about the Battery of the remote control
1. Improper use of battery may cause overheating or explosion that could result in
injury or re.
2. battery leakage may cause damage to the remote control( Battery life: 6 months
with normal use in normal room temperature.
3. Do not short the battery.
4. Do not throw the battery into the re.
5. To avoid the disc of accident, keep the battery out of reach of children.
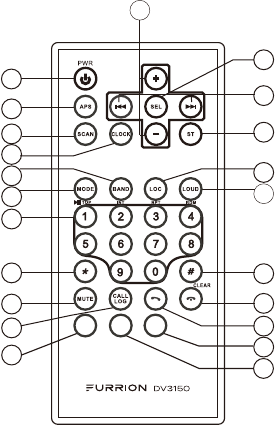
1.4 The Remote Control Description
1
3
4
5
2
6
7
8
9
10
20
19
14
15
13
17
18
11
22
21
12
16
1. POWER BUTTON
2. APS BUTTON
3. SCAN BUTTON
4. CLOCK BUTTON
5. BAND BUTTON
6. MODE BUTTON
7. NUMBER(0-9) BUTTONS
1/ PLAY/PAUSE/TOP BUTTON
2/INT BUTTON
3/RPT BUTTON
4/RDM BUTTON
8. * BUTTON
9. MUTE BUTTON
10. CALL LOG BUTTON
11. TEL BUTTON
12. HANG UP BUTTON
13. # BUTTON
14. LOUD BUTTON
15. LOCAL BUTTON
16. ST BUTTON
17. UP & DOWN BUTTON
18. SEL BUTTON
19. + & - BUTTON
20. ALARM BUTTON
21. ZONE 1 BUTTON
22. ZONE 2 BUTTON
ZONE1 ZONE2ALARM
PAGE 4
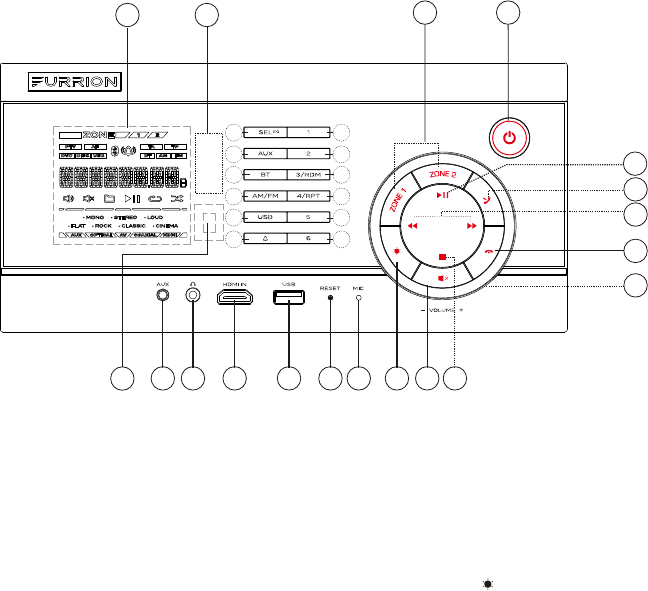
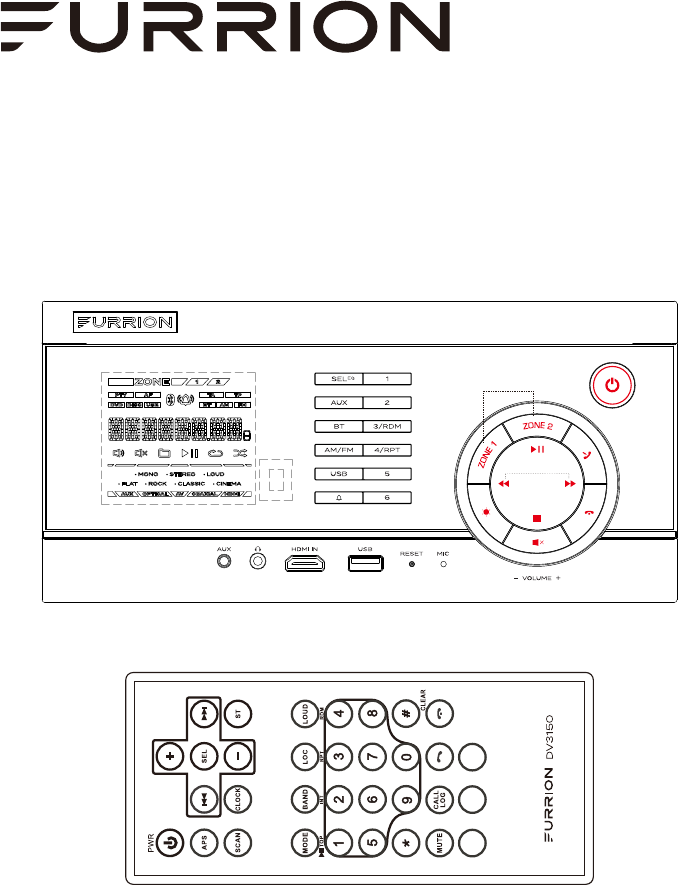
1.5 Locations and Names of the Controls
1
2
3
17 18 19 20 21 22 23 24 25 26
27
27
29
30
31
16
14
15
10
12
11
13
9
7
5
8
6
4
1. POWER BUTTON
2. ZONE 1/ZONE 2 BUTTON
3. NFC DETECTION AREA
4. 1 BUTTON
5. 2 BUTTON
6. 3/RDM BUTTON
7. 4/RPT BUTTON
8. 5 BUTTON
9. 6 BUTTON
10. ALARM ON OFF/CLOCK SET BUTTON
ALARM SET BUTTON
11. USB BUTTON
12. AM/FM BUTTON
13. BT BUTTON
14. AUX BUTTON
15. SEL/EQ BUTTON
16. LCD DISPLAY
17. IR REMOTE CONTROL SENSOR
18. AUX SOCKET
19. HEADPHONE SOCKET
20. HDMI IN SOCKET
21. USB SOCKET
22. RESET BUTTON
23. MICROPHONE
24. DIMMER BUTTON
25. MUTE BUTTON
26. STOP/AP/PS BUTTON
27. VOL KNOB
28. HANG UP BUTTON
29. UP/DOWN BUTTON
30. TEL BUTTON
31. PLAY/PAUSE BUTTON
PAGE 5
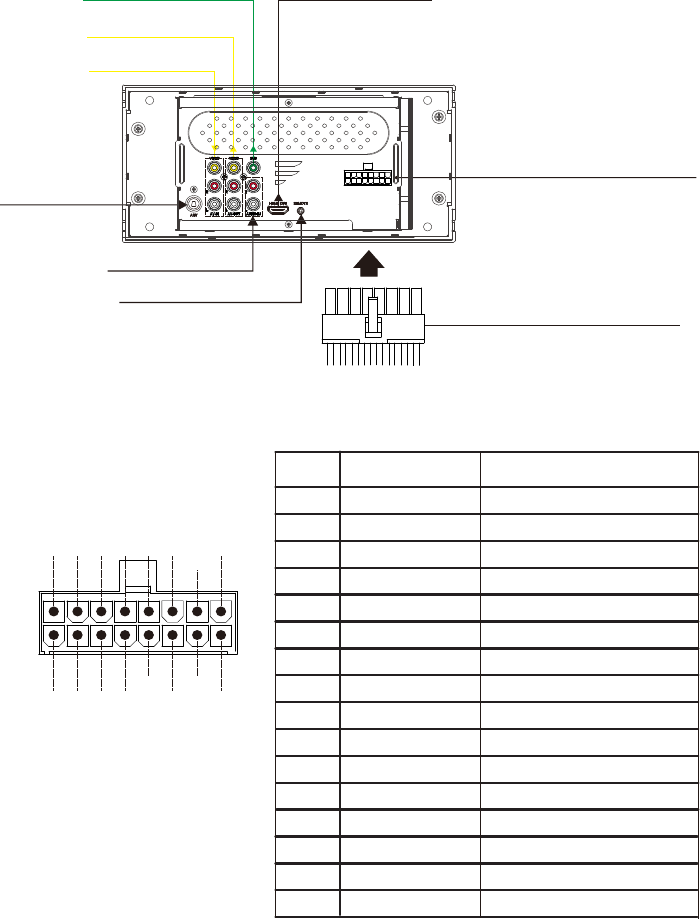
1.6 Wiring Diagram
The WIRING CONNECTING SOCKET VIEW
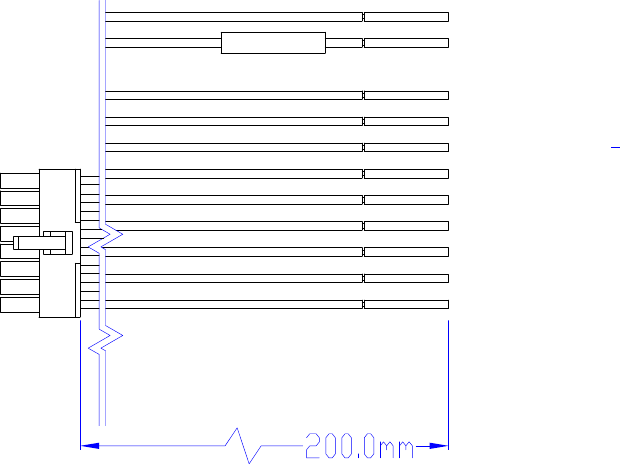
WIRING CONNECTING SOCKET
WIRING CONNECTING CABLES
AV IN
IR REMOTE JACK
AV OUT
SUBWOOFER OUT HDMI OUT JACK
AUDIO IN
ANTENNA JACK
1
2
3
4
5
6
7
8
911
1012
131 5
1416
1 3 5791113
15
246810
12
1416
GREY
WHITE
WHITE/BLACK
GREEN
PURPLE
BLUE
NONE
POWER +12VDCRED
BLACK GROUND
AUTO ANTENNA
GREEN/BLACK
PURPLE/BLACK
GREY/BLACK
ZONE1 RIGHT SPEAKER (+)
ZONE2 RIGHT SPEAKER (+)
ZONE1 LEFT SPEAKER (+)
ZONE2 LEFT SPEAKER (+)
ZONE1 RIGHT SPEAKER (-)
ZONE2 RIGHT SPEAKER (-)
ZONE1 LEFT SPEAKER (-)
ZONE2 LEFT SPEAKER (-)
PIN NO COLOR FUNCTION
1
2
3
4
5
6
7
8
9
10
11
12
13
14
15
16
PAGE 6
The description of WIRING CONNECTING CABLES
FUSE 15A
BLACK GROUND
MEMORY B+
NC
AUTO ANTENNA
ZONE2 RIGHT SPEAKER +
ZONE2 RIGHT SPEAKER -
ZONE2 LEFT SPEAKER +
ZONE2 LEFT SPEAKER -
ZONE1 LEFT SPEAKER -
ZONE1 LEFT SPEAKER +
ZONE1 RIGHT SPEAKER -
ZONE1 RIGHT SPEAKER +
5
6
7
8
9
10
11
12
13
14
15
16
RED
BLUE
PURPLE
PURPLE/BLACK
GREEN
GREEN/BLACK
WHITE/BLACK
WHITE
GREY/BLACK
GREY
PAGE 7

1. Remove plastic shell of the front panels from the unit.
2. Fix the unit with 4 pieces #8 pan head self tapping screws.
3. Put back plastic shell of the front panel to the unit.
PLASTIC SHELL OF THE
FRONT PANEL(UP)
PLASTIC SHELL OF THE
FRONT PANEL(DOWN)
SCREW
SCREW
PAGE 8
1.7 Mounting Installation
Location
* Choose a mounting location away from humid areas, water sources, appliances or any
equipment that can radiate heat.
* Select an area on a wall or cabinet which is free from cable, fuel or brake lines and ensure
the area behind the wall mount stereo has a vent hole or if it is an enclosed box and has
adequate room around the rear of the unit for cooling.
* Ensure when the stereo is mounted in the cut out that the wires at the rear of the unit are not
pressed against the heat sink.
Installing the unit.
* Before finally installing the unit, connect the wiring temporarily and make sure
the unit and the system work properly.
* the unit with screws according to following diagram. Fix
QUICK REFERENCE GUIDE
General Operation
Press POWER to turn the unit on or enter standby mode.
Long press POWER to turn the unit off.
Press MUTE to silence the audio. The icon will flash in the
display. Press MUTE again to cancel.
Press USB,AM/FM, AUX, BT to select between
USB( After inserting a USB storage),Tuner,AUX and Bluetooth mode.
Rotating VOL KNOB to adjust volume.
Briefly press SEL/EQ to select between VOL,BAS(without EQ
preset),TRE(without EQ preset),BAL(L I R),LOUD ON/OFF,
LOC ON/OFF,ST ON/OFF,BEEP ON/OFF,SUB ON/OFF.
Rotate it to select audio feature.
Press to dim the face illumination LOW, MIDDLE or HIGH.
Press and hold ZONE 1,ZONE 2 to select speaker output,
the corresponding zone number will display on the LCD once it
is selected.
Press PRSET with a cuspidal object to make the unit be reset to
factory default and re-instate the correct functions.
Power On/Off
STANDBY
Mute
Selecting
a Source
Volume Adjust
Audio
Adjustment
Preset EQ
Curves
ALARM
ON/ OFF
DIMMER
SPEAKER
SELECTION
RESET
Press and hold SEL/EQ to select between FLAT, CLASSIC, ROCK,
CINEMA,EQ OFF.
CLOCK SET
Press to turn on or cancel the alarm setting.
When alarm is set on ,the icon will display on the LCD all the
time.
Briefly and repeatedly press SEL/EQ button on the front panel to enter
CLOCK Setup mode, rotate VOL KNOB to adjust hour.
Use the and button to adjust minute.
Once time is set, the unit will automatically set after a few seconds.
Press and hold repeatedly to enter ALARM CLOCK and ALARM
SOURCE setting.
with the same way to set the ALARM CLOCK as CLOCK SET
There are two alarm sources for selection: TUNER and USB
ALARM SET
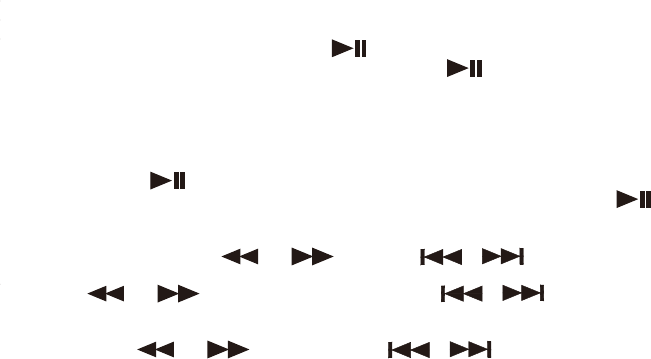
PAGE 9

Radio Operation
Area frequency
selection
Storing and recalling
Station Presets
Automatically
Store Stations
Manual Tuning
Seek Tuning
Band
Scan Tuning
LOCAL/DX
Stereo/Mono
Press and hold AM/FM for 2 seconds to set AM/FM
Radio region ( USA1/AUSTRALIA/EUROPE/ USA2).
Press AM/FM to select between FM1,FM2,FM3,AM1, AM2
Press and hold any one of the six preset buttons(1-6)
to store the current frequency.
Press the corresponding preset button to recall the
frequency stored.
Press SEL repeatedly to set the LOCAL or DX.
In FM mode, Press SEL repeatedly to set STEREO or MONO
Press or button to move radio frequence down or up
one step at a time.
Press and hold or button to
search the next strongest station automatically.
Press and hold /AS/PS to automatically store the six
strongest stations in the current band. (Up to 18 FM stations
and 12 AM stations can be stored).
Press /AS/PS to scan presets1-6 on the current band.
PAGE 10
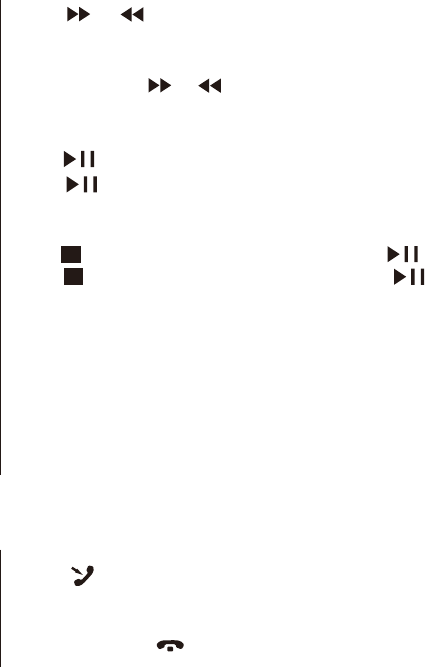
Press once to pause the playback,press to resume;
press twice to stop playback, then press to start
playback from the beginning of the first chapter/track.
USB Opreation
Track Select
Fast Forward
and Backward
Pause
Playback
Stop
Playback
Repeat
Random
Press or button to skip to next or previous
track/chapter.
Press and hold or button to fast forwards or
backwards.
Press to temporarily stop the playback.
Press again to resume playback.
Press RDM to play each track in random order.
Press RDM again to resume.
BLUETOOTH OPERATION
Dial or
accept call
Reject or
End call
Press to accept, dial or redial a call.
Press and hold to reject or end a call.
Press RPT to switch among RPT ONE/RPT DIR/RPT ALL
/RPT OFF MODE
PAGE 11

2. Common Operation
1.Turning On and Off the unit
By pressing the POWER button will turn on or enter standby mode.
2.Selecting a Source:
USB - once a USB is inserted into the unit, the unit will automatically switch
to display this source menu.
AM/FM - by pressing this button will scroll through the FM1, FM2, FM3, AM1, AM2,
By pressing and hold this button repeatedly to select receive area: USA1,AUSTRALIA,
EUROPE,USA2.
BT - by pressing this button will enable bluetooth connection.
AUX-this button allows you to scroll through the AUX inputs fitted to the strereo:
F AUX- connection on front of unit to connect an external audio source
R AUX - connection on the rear of the unit, (normally used to connect TV sound input)
AV - connection on the rear of the unit to connect a external audio source
3.Volume Adjust
Rotate the VOL knob clockwise to increase volume, rotate anticlockwise to decrease volume.
4. Mute
Press MUTE button to mute what ever source is playing and display mute on the screen.
Press the MUTE button again to resume.
5. To display and set the Clock
1) To display the clock on the LCD display, press Clock button on the remote control.
In standby mode, the CLOCK time display on the LCD all the time.
2) To Adjust or set the clock,
Briefly and repeatedly press SEL/EQ button on the front panel to enter CLOCK Setup
mode, rotate VOL KNOB to adjust hour. Use the and to adjust minute.
Once time is set, the unit will automatically set after a few seconds.
6. To set the Alarm
Press to turn on or off the alarm setting. When alarm is set on, the icon 1)
will display on the LCD all the time.
2) Press and hold repeatedly to enter ALARM CLOCK and ALARM
SOURCE setting. with the same way to set the ALARM CLOCK as CLOCK SET.
There are two alarm sources for selection: TUNER and USB
7. To select a preset EQ mode
Press and hold SEL/EQ button to select the preset music equalizer curves:
FLAT, CLASSIC, ROCK, CINEMA, EQ OFF.
8. To turn on/off LOUD mode
Briefly and repeatedly Press SEL/EQ button on the front panel to select
LOUD ON/ LOUD OFF mode.
PAGE 12
9. To adjust the sound equalizer curves
To adjust the sound equalizer curves, briefly and repeatedly press the SEL/EQ
button to select the sound equalizer curves BAS(without preset EQ),
TRE (without preset EQ), BAL(L I R),LOUD ON/OFF,VOL LAST/DEFA,
BEEP ON/OFF, LOCAL/DX, STEREO/MONO, SUBW ON/OFF, CL XX XX.
Rotate VOL Knob to select audio feature.
10. ZONE 1/ZONE 2 BUTTON
Pressing and hold ZONE 1 / ZONE 2 button will turn on or off the audio source
in each of the different areas which your speakers are connected,
the corresponding zone number will display on the LCD once it is selected.
Note: The ZONE 2 has independent audio output control function.
*Short-press ZONE 2 button to active independent audio selection mode, the
icon "ZONE 2" flashes on the LCD.
*Select the media source(USB,AM/FM,BT,F AUX,R AUX ,AV),adjust audio effect
and preset EQ independently.
* After your setting of audio output of ZONE 2, Short-press ZONE 2 button
back to ZONE1 audio output control mode. The icon "ZONE 2" will not flash.
If the media source of ZONE 2(ZONE 1) selected AM/FM,F AUX,R AUX,AV, the
media source of ZONE 1(ZONE2) can be selected USB,BT,AM/FM,F AUX,
R AUX and AV.
If the media source of ZONE 2 (ZONE 1) selected USB, the media source of
ZONE 1(ZONE 2) can be selected USB,AM/FM,F AUX,R AUX and AV.
If the media source of ZONE 2 (ZONE 1) selected BT, the media source of
ZONE 1(ZONE 2) can be selected AM/FM,F AUX,R AUX and AV.
11. To reset the unit
when the display is incorrect, or the function buttons are not effective or
sound is distorted, then use a sharp point to press the RESET button, that
will make the unit be reset to factory default and re-instate the correct functions.
PAGE 13

3. Radio Operation
1. FREQUENCY SELECT
In RADIO mode. Press and hold the AM/FM button to select your desired frequency USA1/USA2
/AUSTRALIA/EUROPE.
2. AM/FM BUTTON
In RADIO mode, press the AM/FM button on the remote control or AM/FM button on the front
panel to select your desired radio band of FM1, FM2, FM3, AM1, AM2, and the selected band
will be displayed on the small monitor of the front panel.
3. TUNE/SEEK UP/DOWN
1) Press and hold or button on the front panel or press and hold
/ button on the remote control to automatically search down/up for a available
station from the current frequency.
2) Press or button on the front panel or press / button on
the remote control to manually search up or down with step by step for your desired station
from the current frequency.
4. AS/PS BUTTON
In RADIO mode:
1) When pressing and holding the AS/PS button on the front panel or APS button on the remote
control, the radio searches from the current frequency and checks the signal strength level until 1
cycle search is finished. And then the 6 strongest stations are preset to the corresponding preset
number memory bank. The AS operation is implemented in each bank of the selected band.
When the AS operation is finished, it will resume broadcasting
on the M1.(It can store 3x6 stations for FM and 2x6 stations for AM in all)
2) When briefly pressing the AS/PS button on the front panel or APS button on the remote control,
the radio searches for each preset station from the M1. When the field strength level is more than
the threshold level of the stop level, the radio holds at that preset number for a few seconds with
releasing mute, and then searches again. After finishing a circle of searching, it will stop
searching on the M1.
NOTE: In FM band, FM1,FM2,FM3 is checked once at a time.
In AM band, AM1, AM2 is checked once at a time.
5. PRESET STATION [ 1-6 ] BUTTONS
In RADIO mode:
1) To memorize the current frequency on the current band, press and hold any one of the six preset
buttons (1-6) .
2) To recall the preset memory on the current band, press one of the preset buttons [1-6] .
6. STEREO/MONO FUNCTION
Repeatedly press SEL/EQ button to select STEREO or MONO mode in FM mode.
7. LOCAL/DX function
1) In RADIO mode, when the signals of the distance radio stations are very weak and the receiving
effect is bad during tuning, repeatedly press SEL/EQ button to select DX mode, then
tune again for the distance radio station.
2) In RADIO mode, when the signals from the local radio stations are too strong, this could lead
to interference. Repeatedly press SEL/EQ button to select LOCAL mode. Re-tune the local
station required.
PAGE 14
4. USB Operation
1. Pause Playback
During playback, press PLAY/PAUSE button on the front panel or remote
control to pause the playback, press PLAY/PAUSE button again to resume
normal playback.
2. Stop Playback
During playback, press STOP button once to pause the playback, then press the
PLAY/PAUSE button to resume the normal playback;
press STOP button twice to stop the playback, then press PLAY/PAUSE
button to start playback from the beginning of the first chapter/track.
3. Select Chapter with the or button or / button
Press or button on the front panel or / button
on the remote control during playback to select the previous or next chapter
to playback.
Note: Press or button or press / button
multiple times to advance multiple chapters/tracks backward or forward.
4. To scan tracks
During playback, press INT button on the front panel briefly to play the first 10
seconds of each track.
Press INT button again to cancel INT function and retain playing the track
currently selected.
5. To repeat track(s)
During playback, press RPT button briefly to play the current track repeatedly,
and the LCD will display RPT ONE.
Press RPT button twice to play the tracks in the album repeatedly, and the LCD
will display RPT DIR.
Press RPT button a third time to play the tracks of the albums, and the LCD will
display RPT ALL.
Press RPT button again to cancel RPT function, and the LCD will display RPT OFF.
6. To play tracks in random
During playback, press RDM button briefly to play all tracks in random. Press it
again to cancel RDM function.
7. Tracks search
Press USB button on the front panel, it will activate TRK SEARCH mode.
The LCD will display TRK 0000(decide on the total number of tracks in the
USB stick) and flash the 0 on the biggest digit position. Then press + or - button
on the remote control or rotate the VOLUME Knob to select number on the
flashing digit position from 0 ~ 9, Press USB button to change the
position and with the same means to input numbers in the other position.
After finishing selecting the numbers on all digit positions, press PLAY/PAUSE
button to play the track of selected serial number.
PAGE15
5. BLUETOOTH HANDFREE SYSTEM
1. Pairing and connection
1) Turn on the Bluetooth mode of the mobile phone;
2) Select the item of Finding the Bluetooth Device and enter it. After finishing the
searching, it will show the name of the Bluetooth Device FURRION DV3150-XXXX (where
X can be any character A-Z or number 0-9 ).Select it and enter it, ( for some phones
it will ask you to input a password, input the password 0000 and enter it.
Then it will tell you pair OK.
3) For some mobile phones, they can automatically connect with the BT device of the
car audio system after pairing is ok; for some mobile phones, they need to select the
paired BT device and press the CONNECTION button . When connection is ok, the
LCD of the car audio system will show LINK OK.
2. Use the mobile phone to do connection or disconnection
In the connection status, find the paired and connected Bluetooth Device, then press
the disconnection button to do disconnection.
In the disconnection status, find the paired and disconnected Bluetooth Device, then
press the connection button to do connection.
3. In the connection status: Mobile phone transfers to the car audio whenever a dialing
takes place; Mobile phone transfers to the car audio whenever receiving a call.
4. Forget(or Unpair)
You can explicitly forget(or unpair) DV3150. If you do that while connected in range,
DV3150 will be properly notified and all settled.
If you do after an out-of range disconnection, DV3150 will repair and reconnect the mobile.
In that case, you can press and hold the BT button for about 5 seconds in DV3150 to clear
its memory.
5. Dialing when in connection status
5.1 Dial with the mobile phone directly.
5.2 Dial with remote control with the following procedures:
(1) Input telephone number with number buttons 0-9
* Short press CLEAR button to cancel the wrongly input number if necessary
(2) Short press TEL to execute the dialing.
5.3 To redial the last phone number dialed
(1) Short press button ,it will show last phone number on LCD, then it willTEL
execute the dialing
PAGE 16

PAGE 17
(2) Short press button, It will dial the last phone number.REDIAL
6. Accept/Reject/End Call
6.1 Incoming call Ringing, short press button to accept the call
6.2 To reject incoming call, long press button to reject the call
6.3 During a phone call, long press button to end the call
Note: When a incoming call is present the caller’s phone number will be displayed
on the screen.
7. In BT mode, press CALL LOG button to check the LAST DIAL, LAST IN, LAST MISS phone
numbers(press + or - button to cycle).
8. To play an audio file from an external Bluetooth device(mobile phone) on the wall
mount Stereo.
After the device has been paired successfully and Wall mount Stereo screen displays
LINK OK.
If your mobile device supports A2DP you will then be able to stream music from
your Bluetooth device so it can be played by stereo speaker.
You must select on your mobile Bluetooth device to play the audio through Bluetooth.
If your mobile device supports AVRCP then you will be able to control the basic phone
audio output functions by the Wall mount Stereo controls. Eg.Play Pause.
9.To setup your Stereo using NFC(only support mobile phone with NFC function)
(1) Turn on the NFC function of your mobile phone and make sure the screen is active
and unlocked.
(2) With the NFC detection area of your phone touch with the NFC detection area
of the Stereo,you can connect or disconnect your mobile phone with the Stereo
conveniently.
Note: For the first time pair and connect, it maybe ask you to input a password.
The password is “0000”.
10. Mobile App
You can use the Furrion ES Control App (both Android and iOS versions) and thus your mobile
as a remote control.
The app uses BT Low Energy (BLE) technology to connect to DV3150 instead of infrared in the
physical remote control, and thus not limited by line-of-sight connection.
While the App checks for compatibility, it will be good for you to cross-check the specifications
of your mobile to see if it supports BLE technology before the installation.
Search for “Furrion ES Control” in Google Play (Android) or App Store (iOS) according to your
mobile device and install. Run the app according to the instructions within.
The App works with multiple models in the Furrion DV range entertainment system.
PAGE 18
Changes or modications not expressly approved by the party responsible for compliance
could void the user’s authority to operate the equipment.
This equipment has been tested and found to comply with the limits for a Class B digital
device, pursuant to Part 15 of the FCC Rules. These limits are designed to provide reasonable
protection against harmful interference in a residential installation. This equipment
generates, uses and can radiate radio frequency energy and, if not installed and used in
accordance with the instructions, may cause harmful interference to radio communications.
However, there is no guarantee that interference will not occur in a particular installation.
If this equipment does cause harmful interference to radio or television reception, which can
be determined by turning the equipment off and on, the user is encouraged to try to correct the
interference by one or more of the following measures:
-- Reorient or relocate the receiving antenna.
-- Increase the separation between the equipment and receiver.
-- Connect the equipment into an outlet on a circuit different from that to which the receiver is
connected.
-- Consult the dealer or an experienced radio/TV technician for help.
This equipment complies with FCC radiation exposure limits set forth for an uncontrolled
environment. This transmitter must not be co-located or operating in conjunction with any
other antenna or transmitter.

Specification
GENERAL
Supply Voltage DC 12V
Current Consumption Max.10A
Power Output 4x20W RMS
FM SECTION
Frequency range 87.5Mhz - 108Mhz (Europe)
87.5 Mhz - 107.9Mhz(U.S.A.)
87.5 Mhz - 108Mhz(Australia)
Effective sensitivity 3uV.
I.F Frequency 10.7MHz.
AM SECTION
Frequency range 522Khz - 1620Khz(Europe)
530khz - 1710Khz(U.S.A.)
522 Khz - 1710Khz(Australia)
Effective sensitivity 40dB
I.F Frequency 450KHz
Preamp Output 2 V Output
USB PLAYBACK
System MP3 audio system
<=5
Frequency characteristics 20Hz -100Hz dB
<=5
10KHz-20KHz dB
Signal to noise (USB) 50dB [1KHz]
IM-DV3150 V1.0
Furrion Innovation Center & Institute of Technology
● 52567 Independence Ct., Elkhart, IN 46514, USA ● Toll free:1-888-354-5792
● Email: support@furrion.com
and registered in the U.S. and other countries.
FURRION.COM
2007-2018 Furrion Ltd. Furrion and the Furrion logo are trademarks licensed for use by Furrion Ltd.
© ®
Dimensions(w x h x d) 249 x 118 x 178mm