Furrion DV3300S RV wall mount stereo User Manual 1
Furrion Ltd. RV wall mount stereo 1
UserManual.wiki
>
Furrion
>
DV3300S User Manual
Users Manual
Navigation menu
Upload a User Manual
Namespaces
Wiki Guide
HTML
PDF
Info
Views
User Manual
Discussion / Help
Navigation

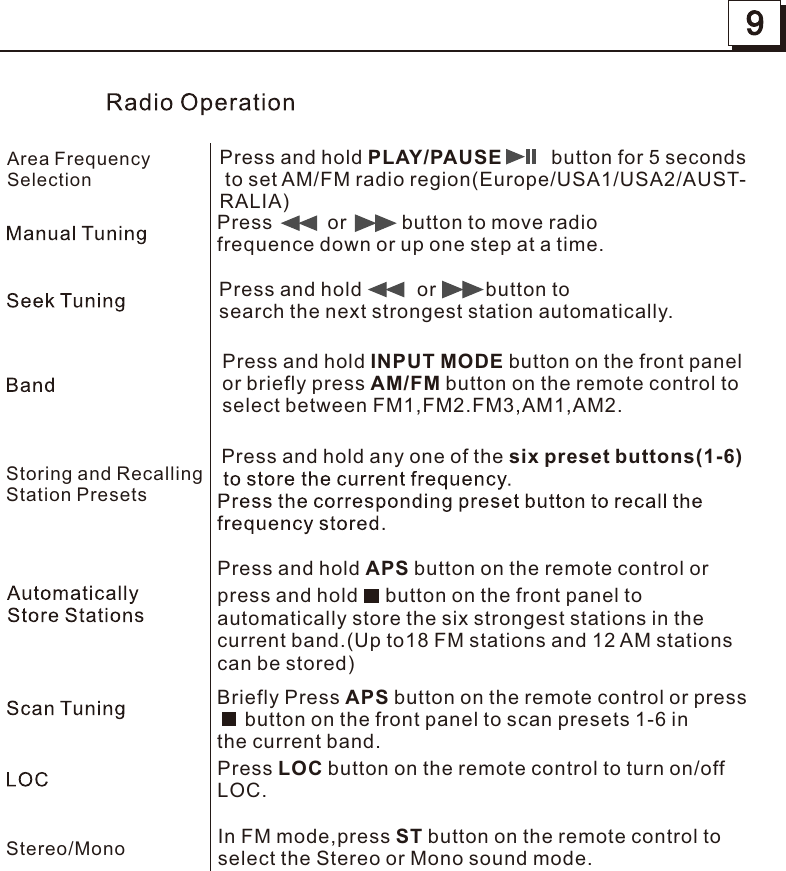

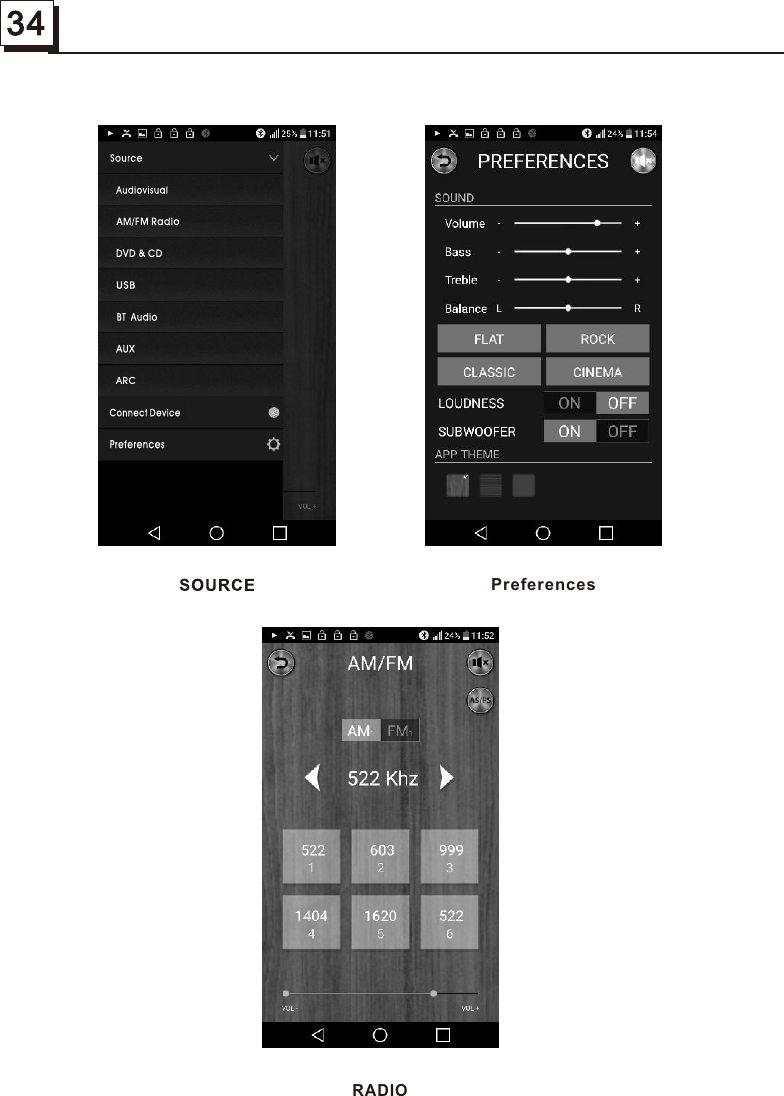
![3. Radio Operation1. FREQUENCY SELECT In RADIO mode. Press and hold PLAY/PAUSE button for about 5 seconds to select your desired frequency EUROPE,USA1,USA2 or AUSTRALIA.2. AM/FM BUTTON In RADIO mode, press and hold INPUT MODE button on the front panel or briefly press AM/FM button on the remote control to select your desired radio band of FM1, FM2, FM3, AM1, AM2 , and the selected band will be displayed on the LCD of the front panel.3. TUNE/SEEK UP/DOWN In RADIO mode: 1) Press and hold or button on the front panel or press and hold / button on the remote control to automatically search down/up for a available station from the current frequency. 2) Press or button on the front panel or press / button on the remote control to manually search up or down with step by step for your desired station from the current frequency. 4. APS BUTTON In RADIO mode: 1) When pressing and holding APS button on the remote control or press and hold button on the front panel, the radio searches from the lowest frequency and checks the signal strength level until 1 cycle search is finished.And then the 6 strongest stations are preset to the corresponding preset number memory bank. The AS operation is implemented in each bank of the selected band. When the AS operation is finished, it will resume broadcasting on the M1.(It can store 3x6 stations for FM and 2x6 stations for AM in all) 2) When briefly pressing APS button on the remote control or press button on the front panel, the radio searches for each preset station from the M1. When the field strength level is more than the threshold level of the stop level, the radio holds at that preset number for a few seconds with releasing mute, and then searches again. After finishing a circle of searching, it will stop searching on the M1. NOTE: In FM band, FM1,FM2,FM3 is checked once at a time. In AM band, AM1, AM2 is checked once at a time.5. PRESET STATION [ 1-6 ] BUTTONS In RADIO mode:1) To memorize the current frequency on the current band, press and hold any one of the six preset buttons (1-6) .2) To recall the preset memory on the current band, press one of the preset buttons [1-6] .6. STEREO/MONO BUTTON Press ST button on the remote control to select the STEREO or MONO sound mode for FM band.7. LOC BUTTON 1) In RADIO mode, when the signals of the distance radio stations are very weak and the receiving effect is bad during tuning, press LOC button on the remote control to turn off the LOC function, then tune again for the distance radio station; 2) In RADIO mode, when the signals from the local radio stations are too strong, this could lead to interference. Press LOC button on the remote control to turn on the LOC function, Re-tune for the local station required.17](https://usermanual.wiki/Furrion/DV3300S/User-Guide-3905609-Page-19.png)