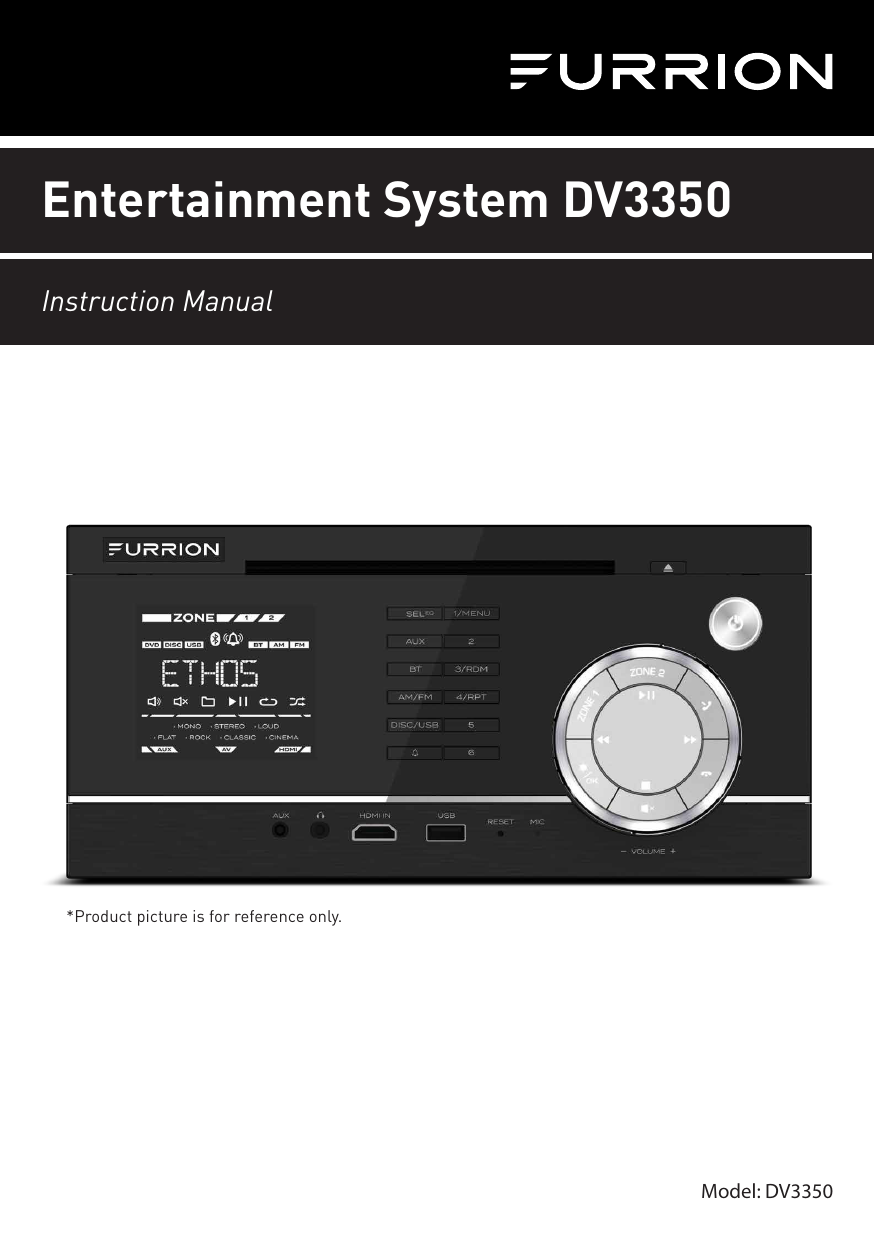
Furrion DV3350 RV wall mount stereo User Manual
Furrion Ltd. RV wall mount stereo
UserManual.wiki
>
Furrion
>
DV3350 User Manual
User Manual
Navigation menu
Upload a User Manual
Namespaces
Wiki Guide
HTML
PDF
Info
Views
User Manual
Discussion / Help
Navigation
![This drawing contains proprietary information and trade secrets of The Furrion Company, Inc. Unauthorized use or copying is prohibited.METRIC [INCH]METRIC [INCH]CRITICAL DIMENSIONCHECKING IS COMPULSORYVOLUME cm3MASS grams REV. DATE MODIFICATIONS NAME ECN NO.DENSITY g/cm3MATERIAL: The Furrion Company, Inc.GENERAL TOLERANCESEXCEPT AS NOTED0 TO 6mm = ±0.1>6 TO 30mm = ±0.2>30 TO 80mm = ±0.3>80 TO 180mm = ±0.4>180mm = ±0.5ANGULAR = ± 3°FINISH SPEC:COMPOSITE-NO SHEET 1 OF 1SCALE: DATE: DRAWN BY: APPROVED BY: REVISION:NAME: PART NO.Program: Indesign CCBlackIM for DV3350 entertainment system. IM-FAV000401.0Ricky DengSally Peng XXSally Peng26-Jun-18V1.0 26-Jun-18 NEWPrinting Notes:Material: 80 GSM Bond Paper or 50# Bond Paper WhiteInk: BlackResolution: 150 DPI or abovePrinting method: Offset PrintingBinding: Saddle StitchFolded size: 148 x 210 mm (W x H)DO NOT PRINT THIS PAGE](https://usermanual.wiki/Furrion/DV3350/User-Guide-4041005-Page-1.png)

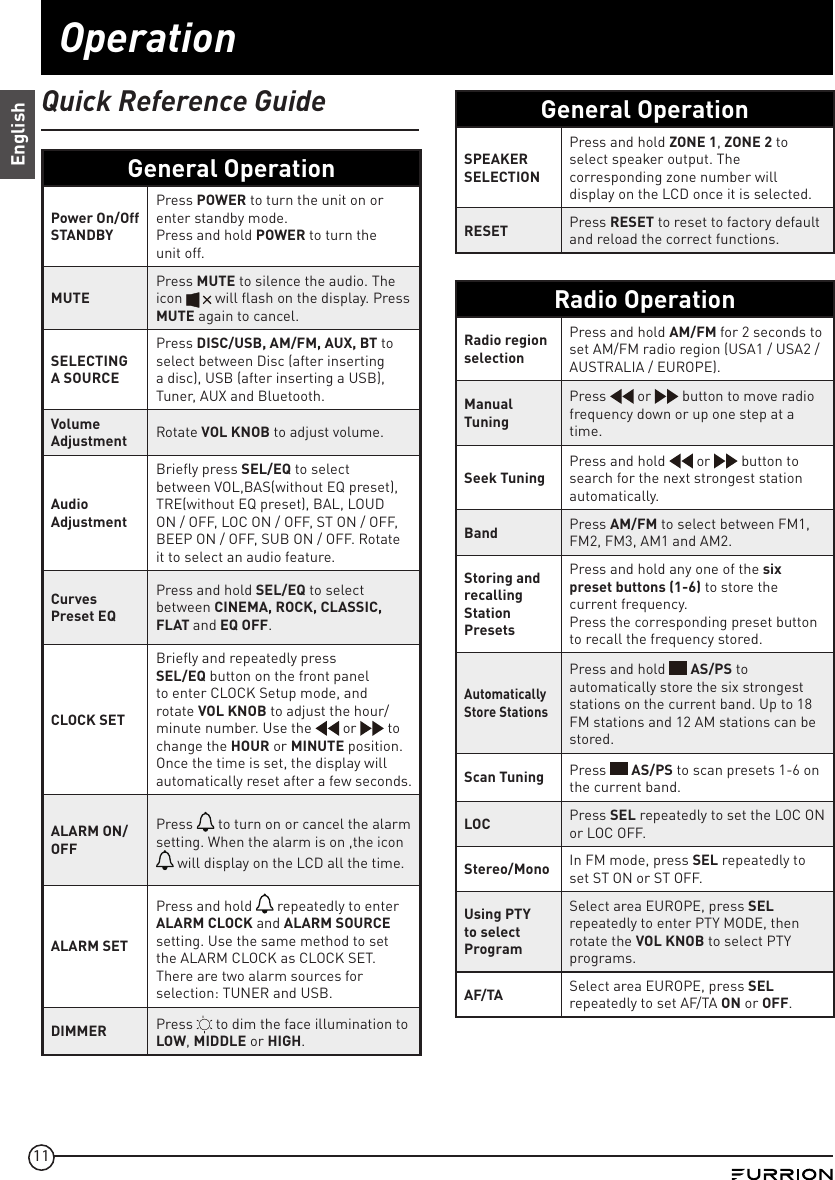
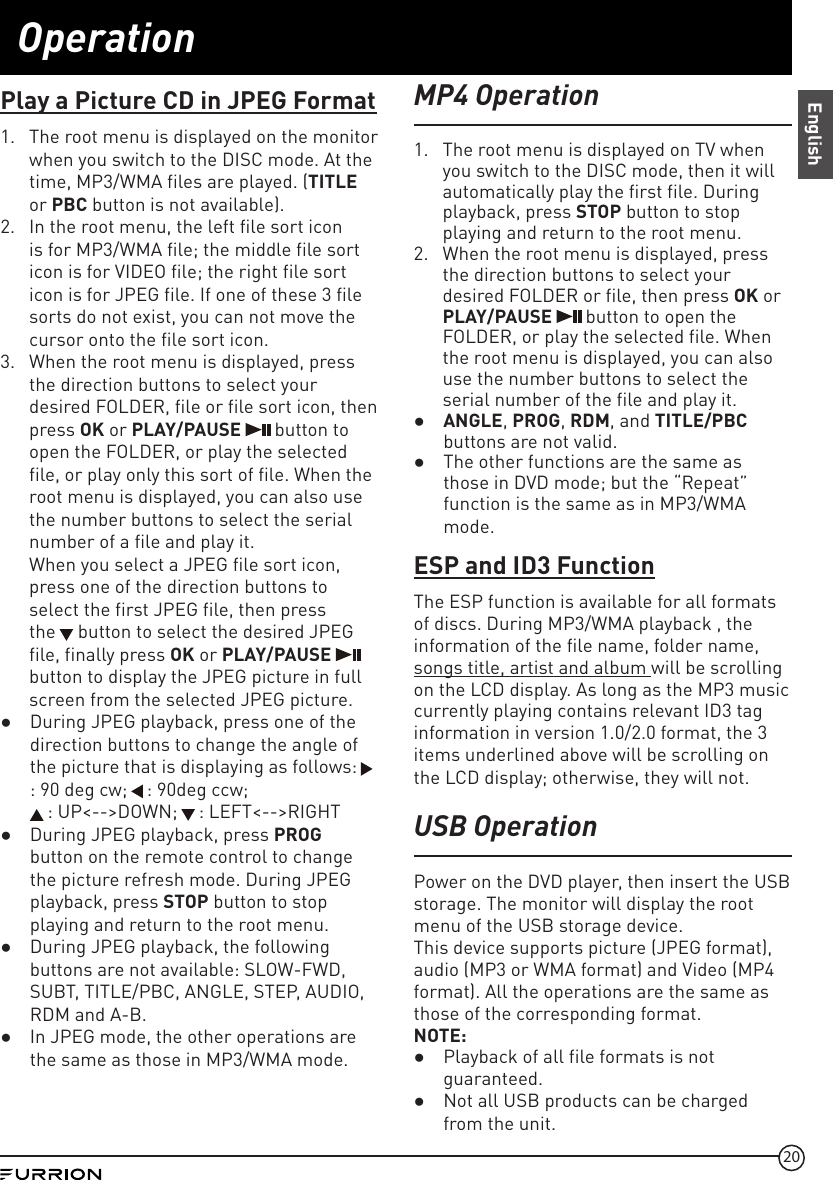
![14OperationEnglishTo reset the unitWhen the display is incorrect, or the function buttons are not effective or sound is distorted, use a sharp point to press the RESET button. The unit will be reset to factory default and the correct functions will be reloaded. Radio OperationRadio region selectionIn RADIO mode, press and hold the AM/FM button to select your desired radio region USA1, USA2, AUSTRALIA or EUROPE.AM/FM ButtonIn RADIO mode, press the AM/FM button on the remote control or AM/FM button on the front panel to select your desired radio band of FM1, FM2, FM3, AM1, AM2. The selected band will be displayed on the small monitor of the front panel.Tune/Search Up/DownIn RADIO mode:1. Press and hold or button on the front panel or press and hold / button on the remote control to automatically search down/up for an available station from the current frequency. 2. Press or button on the front panel or press / button on the remote control to manually search up or down for your desired station from the current frequency. / APS Button1. Press and hold button on the front panel or APS button on the remote control, the radio searches from the lowest frequency and checks the signal strength level until 1 cycle search to search for radio frequencies with sufficient signal strength (starting from the lowest frequency and ending until the search cycle is finished). Then the 6 strongest stations are preset to the corresponding preset number memory band. The AS operation is implemented in each bank of the selected band. When the AS operation is finished, it will resume broadcasting on M1. (It can store 3x6 stations for FM and 2x6 stations for AM in all).2. Press button on the front panel or APS button on the remote control to search for each preset radio station starting from M1. When the field strength level is above the threshold of the stop level the radio holds at that preset number for a few seconds, and then searches again. After finishing a cycle of searching, it will stop searching on M1.NOTE: In FM band, FM1, FM2, FM3 is checked once at a time.In AM band, AM1, AM2 is checked once at a time.Preset Station [ 1-6 ] Buttons In RADIO mode:1. To memorize the current frequency on the current band, press and hold any one of the six preset buttons (1-6) .2. To recall the preset memory on the current band, press one of the preset buttons [1-6] .Stereo/Mono FunctionRepeatedly press SEL/EQ button to select ST ON or ST OFF mode in FM mode.LOC ON/LOC OFF FunctionIn RADIO mode:1. When the signals of the distant radio stations are very weak and the reception is poor during tuning, repeatedly press SEL/EQ button to select LOC OFF mode,](https://usermanual.wiki/Furrion/DV3350/User-Guide-4041005-Page-16.png)
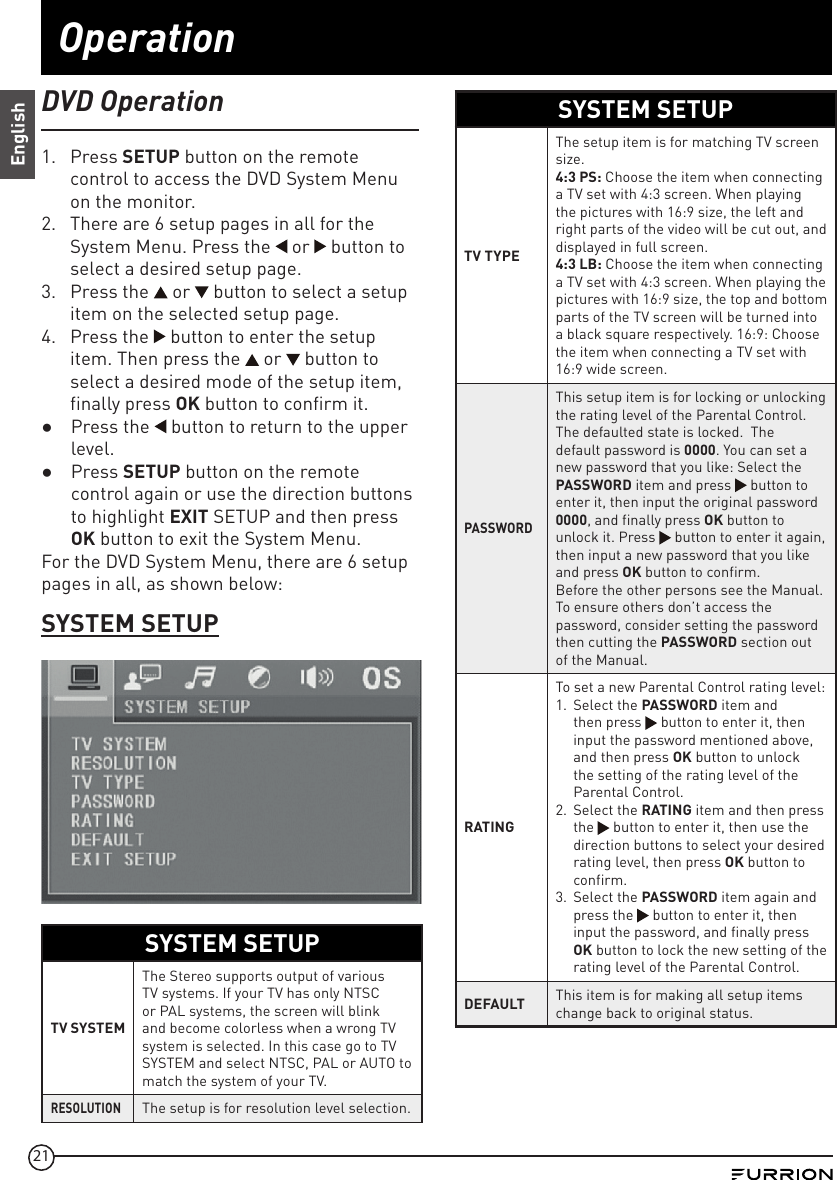
![15OperationEnglishthen tune again for the distant radio stations. 2. In radio mode, too strong signals from the local radio stations may lead to interference. Repeatedly press SEL/EQ button to select LOC ON mode. Re-tune the local station if required.PTY (Program Type) Button (For Europe only)Select area EUROPE. Press SEL/EQ button on the front panel or press the PTY button on the remote control to select PTY mode. When PTY group is on, press the 6 number buttons on the remote control or rotate the VOL KNOB on the front panel to select one of the PTY programs: NEWS <--> AFFAIRS <--> INFO <--> SPORT <--> EDUCATE <--> DRAMA <--> CULTURE <--> SCIENCE <--> VARIED <--> WEATHER <--> FINANCE <--> CHILDREN <--> SOCIAL <--> RELIGION <--> PHONE IN <--> TRAVEL <--> LEISURE <--> DOCUMENT <--> PTY NONE <--> POP M < --> ROCK M<-->EASY M <--> LIGHT M <--> CLASSICS <-->OTHER M <--> JAZZ <--> COUNTRY <--> NATION M <--> OLDIES <--> FOLK M <-->. After selecting one of the PTY programs, it will display SEEK PTY and automatically search for the station of the PTY program. If the station of the PTY program does not exist, it will display PTY NONE and then return back to the normal station.AF [Alternative Frequencies] Function (For Europe only)1. Repeatedly press the SEL/EQ button on the front panel or press the AF button on the remote control to select AF ON/ AF OFF mode. The state of the AF switching mode is displayed by AF segment.2. Segment off: AF switching mode off.3. Segment on: AF switching mode on, with RDS information displayed.4. Segment flashing: AF switching mode on, but RDS information is not received yet.5. When the AF switching mode is selected, the radio checks the signal strength of the AF all the time. The interval of checking time of each AFs depends on the signal strength of the current station, from a few minutes for the strong station to a few seconds for the weak station. Every time that a new AF is stronger than the current station, it switches over to that frequency for a very short time, and the NEW FREQUENCY is displayed for 1-2 seconds. Because the mute time of the AF switching or the checking time is very short, it is almost inaudible in case of normal program. (When AF flashes on LCD, it will search for the stronger RDS station. If AF and TP flash on LCD, it can only search for the traffic announcement station).6. In FM mode, when AF is on, SEEK, (SCAN), AUTO-MEMORY function can only be used to receive and save the RDS program.TA [Traffic Announcement] Function (For Europe only)1. Repeatedly press SEL/EQ button on the front panel or press the TA button on the remote control to select TA ON / TA OFF mode.2. When a traffic announcement is transmitted: –If the unit is in Disc Play mode, it will switch to radio mode temporarily. –Temporarily switch over to an EON linked station when EON detects a traffic announcement on that other program, and TA, TP will be displayed on LCD.3. TA interruption function: The current traffic announcement is cancelled by pressing the TA button shortly.](https://usermanual.wiki/Furrion/DV3350/User-Guide-4041005-Page-17.png)