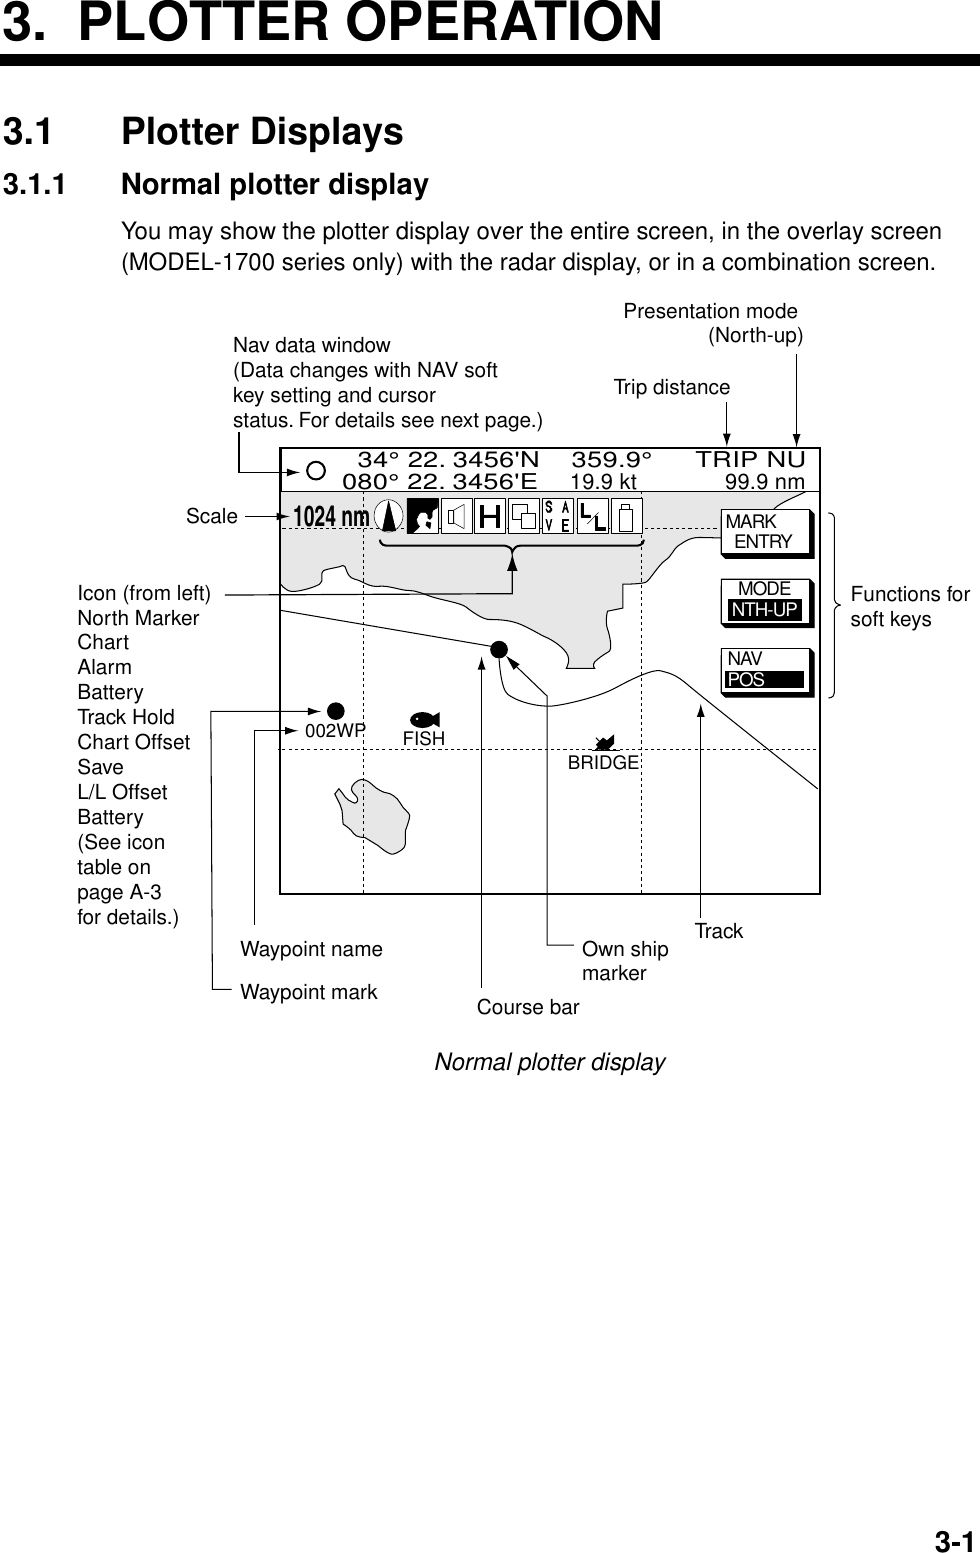
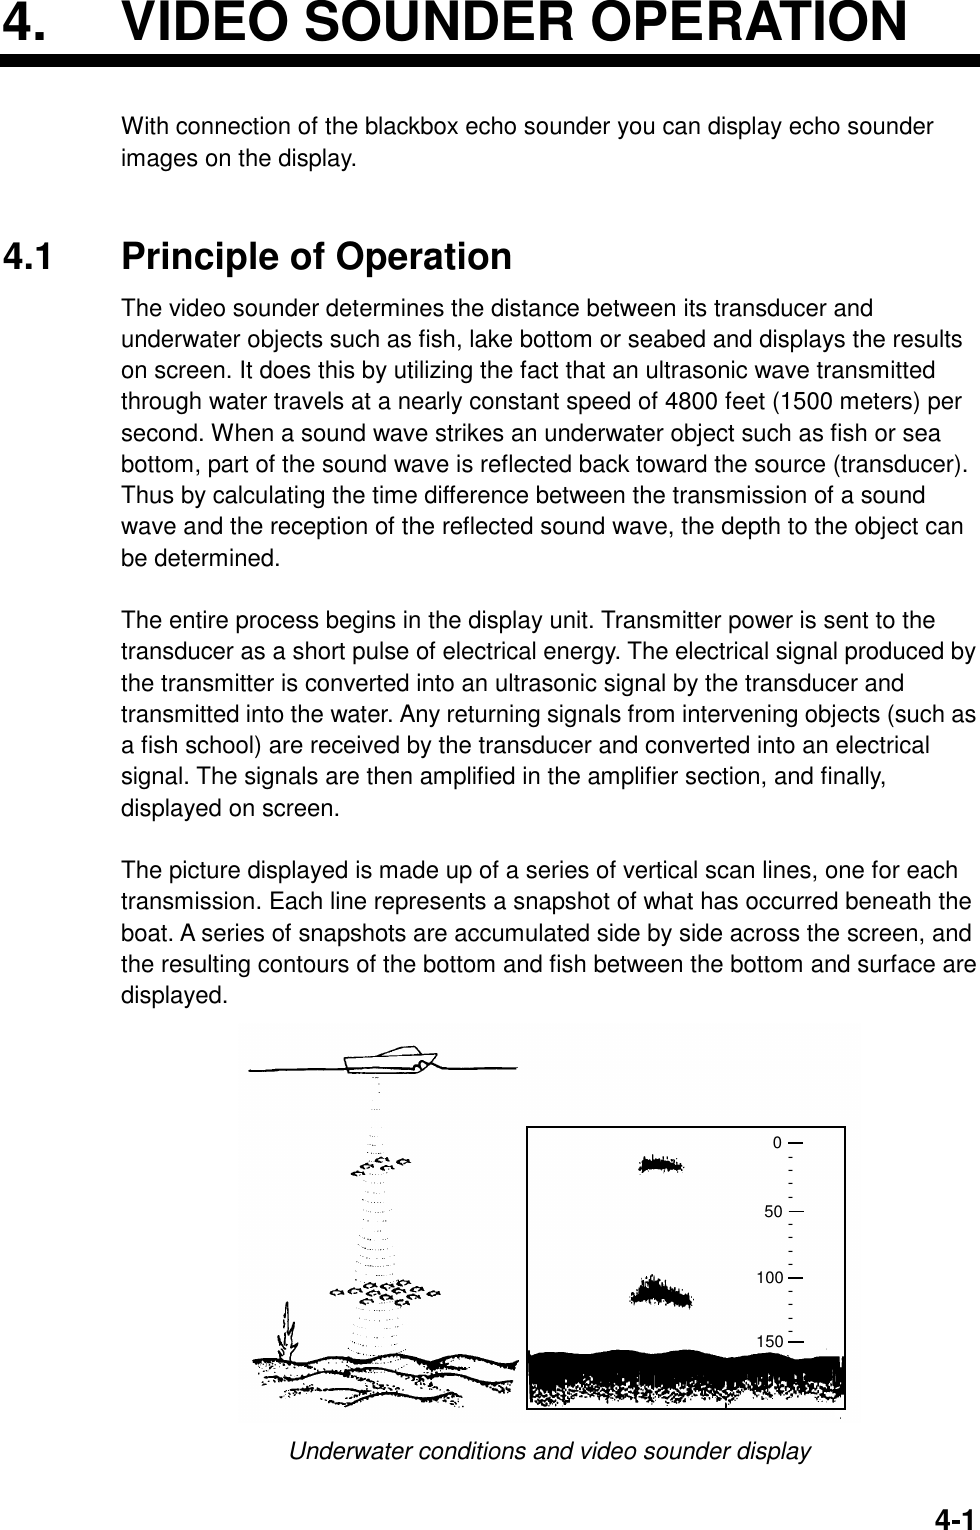
Furuno USA 9ZWRTR051 MARINE RADAR User Manual OPERATORS MANUAL PART3
Furuno USA Inc MARINE RADAR OPERATORS MANUAL PART3
Contents
- 1. OPERATORS MANUAL PART 1
- 2. OPERATORS MANUAL PART2
- 3. OPERATORS MANUAL PART3
- 4. OPERATORS MANUAL PART 4
OPERATORS MANUAL PART3
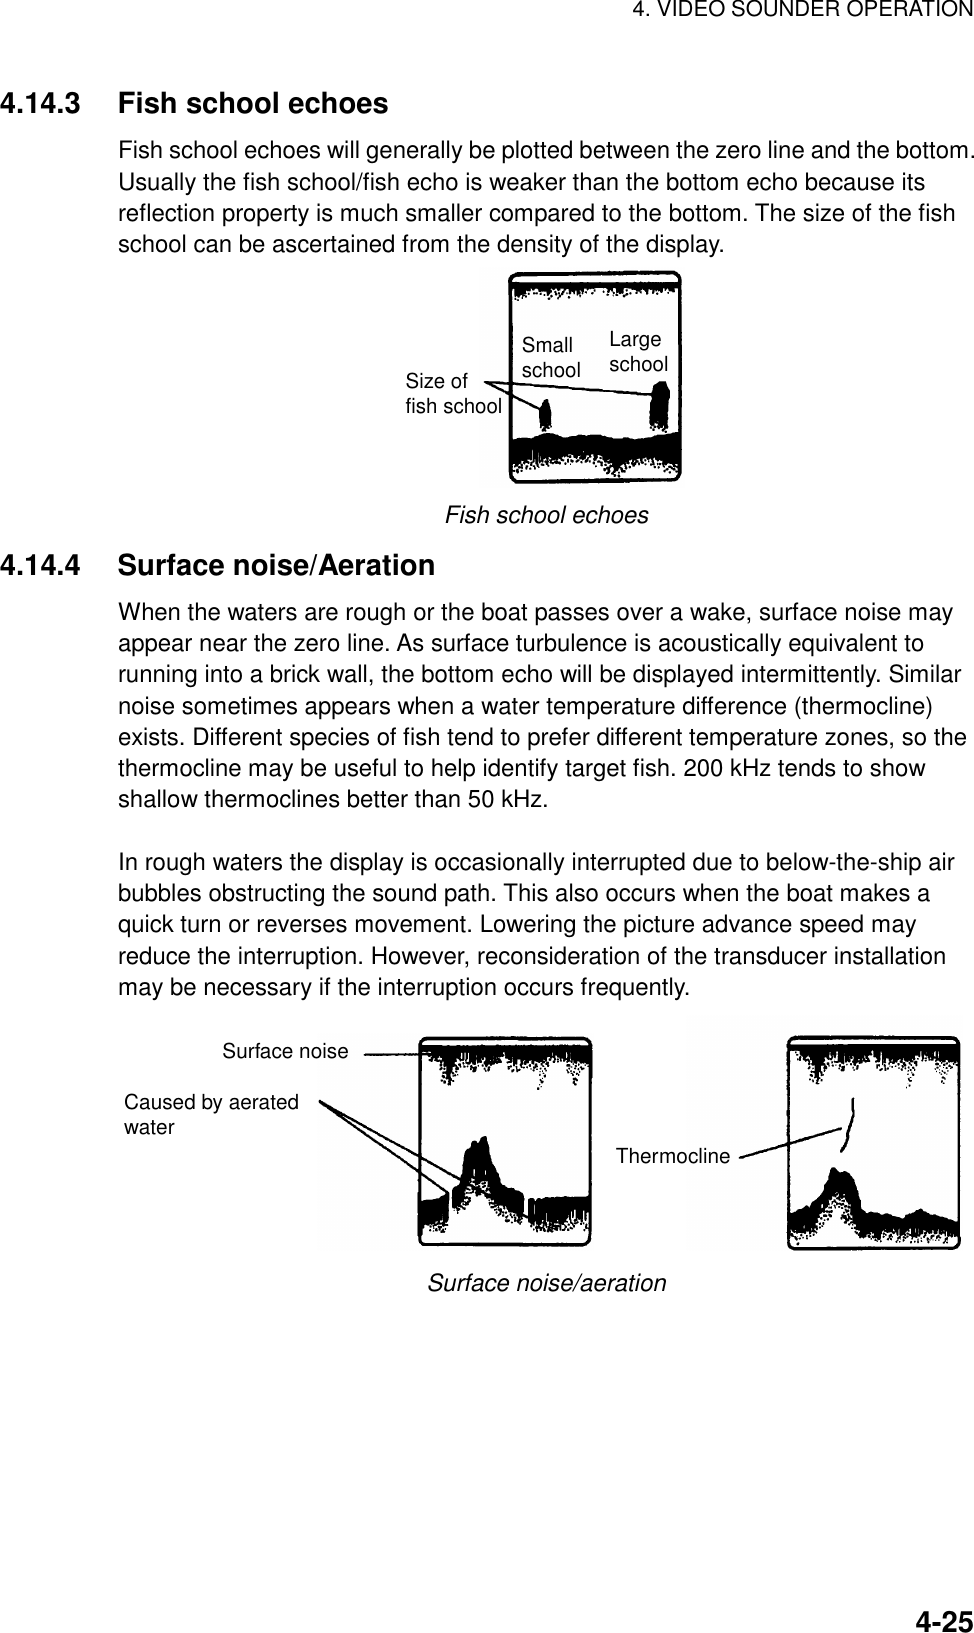
![3. PLOTTER OPERATION3-4Reading the XTE monitorThe XTE monitor, located below the compass rose, shows the direction you areoff course. In the example the monitor shows, by the solid triangle, that the vesselis off course to the port side. Steer the vessel so the triangle keeps at the centerof the monitor scale.Soft keysEDIT XT-LMT: Sets the range for XTE monitor scale. See the procedure belowfor how to set.RESET XTE: Displayed when destination is set, and enables you to restartnavigation. When the key is pressed the following message is displayed.RESTART NAVGATION TOCURRENT WAYPOINT.ARE YOU SURE?YES ... PUSH ENTER KNOBNO ... PUSH CLEAR KEYCOMPASS CNTRL: Switches control between the compass display and otherdisplay, in a combination display.Setting the range for the XTE monitor1. With the highway display shown, press the EDIT XT-LMT soft key to displaythe following window.XTE LIMIT0 .1nmDEFAULT: 0.1 nm (km, sm)XTE range setting window2. Use the cursor pad to select digit to change.3. Use the [ENTER] knob to set.4. Repeat steps 2 and 3.5. Press the [ENTER] knob to set, or press the CANCEL soft key to cancel.](https://usermanual.wiki/Furuno-USA/9ZWRTR051.OPERATORS-MANUAL-PART3/User-Guide-132230-Page-4.png)
![3. PLOTTER OPERATION3-53.1.3 Highway displayThe highway display, displayed at the lower half of the screen in theplotter/highway combination display, provides a graphic presentation of ship’strack along intended course. It is useful for monitoring ship’s progress to awaypoint. The own ship marker shows own ship’s movement and direction. TheXTE monitor to show the direction and amount your vessel is off course. Thearrow shows the direction to steer and the numeric the amount you are off course.Using the figure below as an example, you would steer starboard 0.009 nm toreturn to course.WPT001RANGSOG 10.0km/h STW 10.0km/h0d9h59mTTG 25th22:39ETA 99.9nmTime-to-goto destinationRange to waypointEstimated time ofarrival at destinationWPT0010.9 nmTO WaypointOwn shipSpeedXTE monitor0.009nm0.9 nmXTE rangeHighway displayNote that all digits may be cleared by pressing the [CLEAR] key.Soft keysEDIT XT-LMT: Sets the range for XTE monitor scale. See the procedure on theprevious page for how to set.RESET XTE: Displayed when destination is set, and enables you to restartnavigation. When the key is pressed the following message is displayed.RESTART NAVGATION TOCURRENT WAYPOINT.ARE YOU SURE?YES ... PUSH ENTER KNOBNO ... PUSH CLEAR KEYCOMPASS CNTRL: Switches control between the compass display and otherdisplay, in a combination display.](https://usermanual.wiki/Furuno-USA/9ZWRTR051.OPERATORS-MANUAL-PART3/User-Guide-132230-Page-5.png)
![3. PLOTTER OPERATION3-93.4 Shifting the DisplayThe display can be shifted on the plotter display as below.1. Press the cursor pad to display the cursor.2. Locate the cursor at a screen edge and press and hold down the cursor pad.The screen shifts in the direction opposite of cursor location.3.5 Selecting Chart Scale/RangeChart scale (range) may be selected with the [-] or [+] key. The [-] key expandsthe chart range; the [+] key shrinks it.Note: When the display is expanded or shrunk beyond the range of the chartcard in use NO CHART appears, along with the appropriate chart icon. Seethe table below for details.3.6 Chart Cards3.6.1 Chart card overviewThree types of chart cards can be used: FURUNO, Nav-Charts™ (NAVIONICS)and C-MAP.When you insert a suitable mini chart card in the slot and your boat is near land, achart appears. If a wrong card is inserted or a wrong chart scale is selected, theland will be hollow. Insert the proper card and select a suitable chart scale. Charticons appear to help you select a suitable chart scale. The table below shows thechart icons and their meanings.Chart icons and their meaningsIcon MeaningProper card is not inserted or chart scale is too small. Press the soft key ZOOM IN to adjust chart scale. Chart scale is too large. Press the soft key ZOOM OUT to adjust chart scale. Suitable chart scale is selected.](https://usermanual.wiki/Furuno-USA/9ZWRTR051.OPERATORS-MANUAL-PART3/User-Guide-132230-Page-9.png)
![3. PLOTTER OPERATION3-10Indices and chart enlargementWhen the [-] key is operated, you will see several frames appear on the chart.These frames are called indices and they show you what parts of the chart can beenlarged in the current picture range. The areas circumscribed with smallerframes can be enlarged, but the area enclosed by the largest frame cannot.Sample chart (Japan and South Korea) showing indicesWhen a chart cannot be displayedA chart will not be displayed in the following conditions:• When the chart scale is too large or too small.• When scrolling the chart outside the indices.• When this happens, select proper chart scale.3.6.3 FURUNO, Nav-Charts™Chart symbolsThe table below shows FURUNO mini chart symbols and their meanings.Chart symbolsSymbol DescriptionSummitWreckLighthouseLighted BuoyBuoyRadio StationSymbol DescriptionPosition of SoundingObstructionFishing ReefPlatformAnchorage](https://usermanual.wiki/Furuno-USA/9ZWRTR051.OPERATORS-MANUAL-PART3/User-Guide-132230-Page-10.png)
![3. PLOTTER OPERATION3-12Port service icons (Nav-Charts™ cards)Selected Nav-Charts™ mini chart cards show by icons services available at ports.Use the cursor pad to place the cursor on the sailboat icon (denotes a port orharbor), and then push the [ENTER] knob. The services available appear at thetop of the display. 34° 22. 3456'N 359.9° TRIP NU080° 22. 3456'E 19.9 kt 99.9 nmEmergency medical serviceWater supply stationCustomer service stationInformation centerFueling stationTraveler's service stationMarine equipment servicePortCANCELFIRST AIDSailboat mark (Port)Detailed information of serviceselectedList of services at the port selected1024 nmPlotter display showing Nav-Charts™ port service display](https://usermanual.wiki/Furuno-USA/9ZWRTR051.OPERATORS-MANUAL-PART3/User-Guide-132230-Page-12.png)
![3. PLOTTER OPERATION3-133.6.4 C-MAP cardsCursor and data displayBesides its fundamental functions of providing position data, the cursor can alsoshow caution area, depth area, source of data, etc. Further, you can displayinformation about an icon by placing the cursor on it.1. Press the cursor pad to turn the cursor on.2. Use the cursor pad to place the cursor on the position desired.3. Push the [ENTER] knob to open the Objects window. 34 24. 3456 N 359.9 NU124 24. 3456 W 59.9kt 024nm+OBJECTSTide heightCartographic areaSource of dataTRETURNObjects window4. Select the item desired.5. Push the [ENTER] knob to display details for object selected.Example of caution area window6. Press the RETURN soft key to close the window.7. Repeat step 4 to 6 to select other item.8. Press the RETURN soft key to close the Objects window and the [MENU] keyto close the menu.](https://usermanual.wiki/Furuno-USA/9ZWRTR051.OPERATORS-MANUAL-PART3/User-Guide-132230-Page-13.png)
![3. PLOTTER OPERATION3-14Icon dataYou may place the cursor on any icon to find information about the selected icon.1. For example, place the cursor on a lighthouse icon.D.BOXOFFGO TOCURSORCENTERMARKENTRYPlace the cursor on a lighthouse icon.MODENTH UP 34° 22. 3456'N 359.9° TRIP NU080° 22. 3456'E 19.9 kt 99.9 nm+1024 nmLighthouse icon2. Push the [ENTER] knob to show data. For example, the following windowappears for lighthouse.ObjectsNavigation mark, fixedExtended navigational aid, geLightLightLightLightDepth contourLand areaSource of dataObject windows3. Select the item desired.4. Push the [ENTER] knob to display detailed information.Color whiteHeight 7. 00 MetersLight characteristic occultingXXXXXXXXXXXXXXXXNavigation mark, fixed Light.Sample lighthouse data5. Press the RETURN soft key to close the Objects window and the [MENU] keyto close the menu.](https://usermanual.wiki/Furuno-USA/9ZWRTR051.OPERATORS-MANUAL-PART3/User-Guide-132230-Page-14.png)
![3. PLOTTER OPERATION3-15Tidal InformationThe C-MAP NT-FP chart card provides for calculation of the tide heights for anydate. Additionally it displays the times of sunrise and sunset.1. Press the cursor pad to place the cursor on a Tide icon (T).2. Push the [ENTER] knob to open the Objects window. 34 24. 3456 N 359.9 NU124 24. 3456 W 59.9kt 024nm+OBJECTSTide heightCartographic areaSource of dataTRETURNObjects window3. Select Tide height.4. Push the [ENTER] knob to open the TIDE window. 34 24. 3456 N 359.9 NU124 24. 3456 W 59.9kt 024nm+Time: 04:35Height: 0.45ftDraught: 0.65ft01/07/30 +13:30 43° 32.860N010° 18.022EPort infoLIVORNO (LEGHORN)High Water(max)0.86ft(13:30 L)Low Water(min)0.35ft(21:00 L)Sunrise 07:52L Sunset 16:53 L0.860.740.610.480.3504812162024RETURNDATETide window](https://usermanual.wiki/Furuno-USA/9ZWRTR051.OPERATORS-MANUAL-PART3/User-Guide-132230-Page-15.png)
![3. PLOTTER OPERATION3-165. Press the DATE soft key to open the DATE window.DATEDD/MM/YYYY01 / 01 / 2000Date window6. Place the cursor where desired and then rotate the [ENTER] knob to enter aappropriate date.7. Push the [ENTER] knob to show the tidal graph for entered date.8. Locate the vertical cursor on the time desired. Time and height are shown tothe left of the graph.9. Shift the level cursor. Draught is shown to the left of the graph.10.Press the RETURN soft key to close the TIDE window.11. Press the [MENU] key to close the menu.3.7 Resetting Trip DistanceTrip distance is shown on the navigation data display. You can reset the tripdistance to zero as follows.1. Press the [MENU] key.2. Press the SYSTEM CONFIGURATION and GENERAL SETUP soft keys inthat order to show the general setup menu.GENERALSETUP 1RETURNNEXTPAGEEDITKEY BEEPONLANGUAGEENGLISHRANGE/SPEED UNITnm, ktTEMP UNIT°CDEPTH UNITftTEMP SOURCENMEADEPTH SOURCENMEARESET TRIP LOGNO▲General setup menu, page 1](https://usermanual.wiki/Furuno-USA/9ZWRTR051.OPERATORS-MANUAL-PART3/User-Guide-132230-Page-16.png)
![3. PLOTTER OPERATION3-173. Select RESET TRIP LOG and press the EDIT soft key.4. Select YES.5. Press the RETURN soft key.6. Press the [MENU] key to close the menu.3.8 Working with TrackYour ship’s track is plotted on the screen using navigation data fed from a GPSreceiver. This section shows you what you can do with track, from turning it on oroff to changing its plotting interval.3.8.1 Displaying trackOwn ship track1. Press the [MENU] key followed by CHART SETUP and TRACK & MARKCONTROL soft keys to open the track control menu.TRACK DISPLAYONTARGET TRACK DISPLAYONPLOTTIMETIME INTERVAL10m00secDIST INTERVAL0.1nmTRACK MEMORY(MARK)2000PTS(6000PTS)OWN SHIP TRACK STATUSTRACKINGTRACK 1234/2000MARK 36/6000▲MODEL-1700 seriesTRACK DISPLAYONTRACK COLORREDTARGET TRACK DISPLAYONTARGET TRACK COLORWHITEPLOTTIMETIME INTERVAL10m00secDIST INTERVAL0.1nmTRACK MEMORY(MARK)2000PTS(6000PTS)OWN SHIP TRACK STATUSTRACKINGTRACK 1234/2000MARK 36/6000▲MODEL-1700C seriesTRACKCONTROLEDITERASET & MMARKSETUPRETURNTRACKHALTEDITERASET & MMARKSETUPRETURNTRACKHALTTRACKCONTROLTrack & mark control menu2. Select TRACK DISPLAY.3. Press the EDIT soft key to show the display track window.4. Select ON (default setting) or OFF as appropriate.5. Press the RETURN soft key.6. Press the [MENU] key to close the menu.Note: The number of track and mark points used appears at the TRACK STATUSwindow on the track control menu. Using the figure above as an example,1234 points (max. 2000 points) and 36 marks (max. 5000 points)respectively have been recorded.](https://usermanual.wiki/Furuno-USA/9ZWRTR051.OPERATORS-MANUAL-PART3/User-Guide-132230-Page-17.png)
![3. PLOTTER OPERATION3-18Target trackTarget track, NMEA format TTM data sentence or target data fed from an ARPAboard-equipped radar, may be turned on or off as desired. The default setting isoff.1. Press the [MENU] key followed by CHART SETUP and TRACK & MARKCONTROL soft keys to open the track control menu.2. Select TARGET TRACK DISPLAY.3. Press the EDIT soft key to show the target track display window.4. Select ON or OFF (default setting) as appropriate.5. Press the RETURN soft key followed by the [MENU] key to close the menu.3.8.2 Stopping, restarting plotting of own ship trackWhen your boat is at anchor or returning to port you probably won’t need torecord its track. You can stop recording the track, to conserve the track memory,as follows:1. Press the [MENU] key followed by CHART SETUP and TRACK & MARKCONTROL soft keys to open the track control menu.TRACK DISPLAYONTRACK COLORREDTARGET TRACK DISPLAYONTARGET TRACK COLORWHITEPLOTTIMETIME INTERVAL10m00secDIST INTERVAL0.1nmTRACK MEMORY(MARK)2000PTS(6000PTS)OWN SHIP TRACK STATUSNOT TRACKINGTRACK 1234/2000MARK 36/6000▲TRACK DISPLAYONTRACK COLORREDTARGET TRACK DISPLAYONTARGET TRACK COLORWHITEPLOTTIMETIME INTERVAL10m00secDIST INTERVAL0.1nmTRACK MEMORY(MARK)2000PTS(6000PTS)OWN SHIP TRACK STATUSTRACKINGTRACK 1234/2000MARK 36/6000▲TRACKCONTROLEDITERASET & MMARKSETUPRETURNTRACKHALTEDITERASET & MMARKSETUPRETURNTRACKRESUMETRACKCONTROLTRACKRESUMETRACKHALTTrack & mark control menu (MODEL-1700C series)2. Press the TRACK HALT soft key. The indication “TRACKING” in the TRACKSTATUS window changes to “NOT TRACKING.” Further the icon “H” isdisplayed at the top of the plotter display. To restart plotting the track, pressthe TRACK RESUME soft key.3. Press the RETURN soft key.4. Press the [MENU] key to close the menu.](https://usermanual.wiki/Furuno-USA/9ZWRTR051.OPERATORS-MANUAL-PART3/User-Guide-132230-Page-18.png)
![3. PLOTTER OPERATION3-193.8.3 Changing track color (MODEL-1700C series only)Track can be displayed in red, yellow, green, light-blue, purple, blue and white. Itcan be useful to change track color on a regular basis to discriminate betweenprevious day's track, past track, etc. The default own ship track color is red.Own ship’s track1. Press the [MENU] key followed by CHART SETUP and TRACK & MARKCONTROL soft keys to open the track control menu.2. Select TRACK COLOR.3. Press the EDIT soft key to display the track color window.TRACK COLOR▲REDYELLOWGREEN LIGHT BLUEPURPLEBLUEWHITE▼Track color window4. Select the color desired.5. Press the ENTER soft key.6. Press the RETURN soft key.7. Press the [MENU] key to close the menu.Target trackLike own ship’s track, target tracks can be displayed in red, yellow, green, light-blue, purple, blue and white (default setting).1. Press the [MENU] key followed by CHART SETUP and TRACK & MARKCONTROL soft keys to open the track control menu.2. Select TARGET TRACK COLOR.3. Press the EDIT soft key to display the track color window.4. Select the color desired.5. Press the ENTER soft key.6. Press the RETURN soft key.7. Press the [MENU] key to close the menu.](https://usermanual.wiki/Furuno-USA/9ZWRTR051.OPERATORS-MANUAL-PART3/User-Guide-132230-Page-19.png)
![3. PLOTTER OPERATION3-203.8.4 Track plotting method and interval for own ship trackIn drawing the own ship track, first the ship’s position (fed from the blackbox GPSunit or DGPS/GPS receiver) is stored into the unit’s memory at an interval of timeor distance. A shorter interval provides better reconstruction of the track, but thestorage time of the track is reduced. When the track memory becomes full, theoldest track is erased to make room for the latest.Track plotting methodTrack may be plotted by time or distance interval and the default setting is “time.”1. Press the [MENU] key followed by CHART SETUP and TRACK & MARKCONTROL soft keys to open the track control menu.2. Select PLOT.3. Press the EDIT soft key to display the plot window.PLOT▲ TIMEDISTANCE▼Plot window4. Select TIME or DISTANCE as appropriate. Distance is useful for conservingtrack memory, since no track is recorded when the boat is stationary.5. Press the ENTER soft key.6. Press the RETURN soft key.7. Press the [MENU] key to close the menu.Track plotting interval1. Press the [MENU] key followed by CHART SETUP and TRACK & MARKCONTROL soft keys to open the track control menu.2. Select TIME INTERVAL or DIST INTERVAL as appropriate3. Press the EDIT soft key to display the time or distance interval window,whichever you selected at step 2.TIME INTERVAL01 m 00 s(When selecting TIME INTERVAL.)DIST INTERVAL00.10 nm(When selecting DIST INTERVAL.)Setting range: 0 min 0 sec (continuous) - 99 min 59 secDefault setting: 10 secSetting range: 0 nm (continuous) - 9.9 nm (km, sm)Default setting: 0.1 nmInterval windows](https://usermanual.wiki/Furuno-USA/9ZWRTR051.OPERATORS-MANUAL-PART3/User-Guide-132230-Page-20.png)
![3. PLOTTER OPERATION3-214. Use the [ENTER] knob and the cursor pad to enter numeric data. The[CLEAR] key functions to clear an entire line of data.5. Press the ENTER soft key or the [ENTER] knob.6. Press the RETURN soft key followed by the [MENU] key to close the menu.3.8.5 Changing own ship track memory capacityThe equipment stores a total of 8000 points of track and marks. This amount maybe apportioned as desired, and the default setting is 2000 points of track and6000 marks.When you change the track memory capacity all tracks and marks in the memoryare erased. If necessary save the data to a memory card. For further details see6.1.2 Saving data to a memory card.1. Press the [MENU] key followed by CHART SETUP and TRACK & MARKCONTROL soft keys to open the track control menu.2. Select TRACK MEMORY(MARK).3. Press the EDIT soft key to display the track memory window.TRACK MEMORY2000 POINTSTrack memory window4. Use the [ENTER] knob to enter number of track memory points5. Press the ENTER soft key or the [ENTER] knob. You are asked if you aresure to change the track memory capacity.6. Press the [ENTER] knob or ENTER soft key again.7. Press the RETURN soft key.8. Press the [MENU] key to close the menu.](https://usermanual.wiki/Furuno-USA/9ZWRTR051.OPERATORS-MANUAL-PART3/User-Guide-132230-Page-21.png)
![3. PLOTTER OPERATION3-223.8.6 Erasing trackThis paragraph shows you how to erase own ship’s track and target tracks. Ownship’s track can be erased by area, color (MODEL-1700C series only) orcollectively.Erasing own ship track by areaYou can erase own ship’s track by area as below.1. Press the [MENU] key.2. Press the [MENU] key followed by CHART SETUP, TRACK & MARKCONTROL and ERASE T & M soft keys to show the erase menu.ERASE ALL TRACK ERASE TRACK BY AREA ERASE TARGET TRACKERASE ALL MARKS & LINES ERASE MARKS BY AREA▲MODEL-1700 seriesERASE ALL TRACK ERASE TRACK BY AREA ERASE TRACK BY COLOR ERASE TARGET TRACK ERASE ALL MARKS & LINES ERASE MARKS BY AREA ▲MODEL-1700C seriesERASE ERASERETURNRETURNEDIT EDITErase menu2. Select ERASE TRACK BY AREA and press the EDIT soft key. The menu iserased and the plotter display appears.3. Use the cursor pad to place the cursor at one of the corners which willencompass the area to process.4. Press the [ENTER] knob.5. Drag the cursor diagonally to enclose all the track to be erased.6. Press the [ENTER] knob. You are asked if it is all right to delete the track.7. Push the [ENTER] knob to delete the track selected.8. Press the RETURN soft key.9. Press the [MENU] key to close the menu.](https://usermanual.wiki/Furuno-USA/9ZWRTR051.OPERATORS-MANUAL-PART3/User-Guide-132230-Page-22.png)
![3. PLOTTER OPERATION3-23Erasing own ship track by color (MODEL-1700C series only)You may erase own ship’s track by color as follows:1. Press the [MENU] key followed by CHART SETUP, TRACK & MARKCONTROL and ERASE T & M soft keys to show the erase menu.2. Select ERASE TRACK BY COLOR and press the EDIT soft key.TRACK COLOR▲REDYELLOWGREEN LIGHT BLUEPURPLEBLUEWHITE▼Track color window3. Use the cursor pad to select the color you want to erase and push the[ENTER] knob.4. Press the [ENTER] knob to erase track color selected.5. Press the RETURN soft key.6. Press the [MENU] key to close the menu.Erasing all own ship track1. Press the [MENU] key followed by CHART SETUP, TRACK & MARKCONTROL and ERASE T & M soft keys to show the erase menu.2. Select ERASE ALL TRACK and press the EDIT soft key.3. Push the [ENTER] knob to erase all track.4. Press the RETURN soft key.5. Press the [MENU] key to close the menu.Erasing all target tracks1. Press the [MENU] key followed by CHART SETUP, TRACK & MARKCONTROL and ERASE T & M soft keys to show the erase menu.2. Select ERASE TARGET TRACK and press the EDIT soft key.3. Push the [ENTER] knob to erase all target tracks.4. Press the RETURN soft key.5. Press the [MENU] key to close the menu.](https://usermanual.wiki/Furuno-USA/9ZWRTR051.OPERATORS-MANUAL-PART3/User-Guide-132230-Page-23.png)
![3. PLOTTER OPERATION3-243.9 MarksMarks are useful for denoting important events such as a good fishing spot.Marks can be inscribed in colors (MODEL-1700C series only) of red, yellow,green, light-blue, purple, blue and white and seven shapes.✕Mark shapes3.9.1 Entering a mark1. Place the cursor on the location desired for a mark.2. Press the MARK ENTRY soft key.The mark is inscribed in the size, color (MODEL-1700C series only) and shapeselected on the mark setup menu. The default mark attributes are size, normal;color, yellow, and shape, hollow circle3.9.2 Changing mark attributesYou can select the shape, size and color (MODEL-1700C series only) of markson the mark1. Press the [MENU] key to show the menu.2. Press the CHART SETUP, TRACK CONTROL and MARK & LINE soft keysto show the mark & line menu.MARK & LINE COLORYELLOWMARK SHAPELINE STYLEMARK SIZENORMALMODEL-1700C seriesMARK &LINEMARK SHAPELINE STYLEMARK SIZENORMALMODEL-1700 seriesMARK &LINERETURNMARKSHAPERETURNMARKCOLORMARKSHAPELINESTYLEMARKSIZELINESTYLEMARKSIZEMark & line menu3. For the GD-1700C only, do the following to select mark & line color.a) Select MARK & LINE COLOR.b) Press the EDIT soft key.c) Choose color desired (default setting; yellow).](https://usermanual.wiki/Furuno-USA/9ZWRTR051.OPERATORS-MANUAL-PART3/User-Guide-132230-Page-24.png)
![3. PLOTTER OPERATION3-25d) Press the ENTER soft key or [ENTER] knob.4. Select MARK SHAPE.5. Press the EDIT soft key.MARK SHAPE▲▼✕Mark shape window3. Select mark shape and press the ENTER soft key.4. Select MARK SIZE.5. Press the EDIT soft key.6. Select NORMAL (default setting) or SMALL.7. Press the ENTER soft key or [ENTER] knob.8. Press the RETURN soft key.9. Press the [MENU] key to close the menu.3.9.3 Connecting marksYou may wish to connect marks with lines. This feature can be used to markboundaries, etc.1. Press the [MENU] key followed by CHART SETUP, TRACK & MARKCONTROL and MARK & LINE SETUP soft keys to show the mark & linemenu.MARK & LINE COLORYELLOWMARK SHAPELINE STYLEMARK SIZENORMALMODEL-1700C seriesMARK &LINEMARK SHAPELINE STYLEMARK SIZENORMALMODEL-1700 seriesMARK &LINERETURNMARKSHAPERETURNMARKCOLORMARKSHAPELINESTYLEMARKSIZELINESTYLEMARKSIZEMark & line setup menu](https://usermanual.wiki/Furuno-USA/9ZWRTR051.OPERATORS-MANUAL-PART3/User-Guide-132230-Page-25.png)
![3. PLOTTER OPERATION3-262. Select MARK STYLE.3. Press the EDIT soft key.MARK LINE▲▼Mark line window4. Select line style desired and press the ENTER soft key or [ENTER] knob.5. Press the RETURN soft key followed by the [MENU] key to close the menu.When you wish to enter marks without connection them with lines, select the linestyle “single dot” at step 5 in the above procedure.3.9.4 Erasing marksErasing an individual mark1. Operate the cursor pad to place the cursor on the mark you want to erase.2. Press the [CLEAR] key to erase the mark.Note: To erase a line, place the cursor on the mark which encloses the line, andthen press the [CLEAR] key. Place the cursor at the intersecting points oftwo lines will erase both lines.Erasing all marks, linesYou can erase all marks and lines. Be absolutely sure you want to erase all marksand lines; erased marks and lines cannot be restored.1. Press the [MENU] key followed by CHART SETUP, TRACK & MARKCONTROL and ERASE T & M soft keys to show the erase menu.2. Select ERASE ALL MARKS & LINES and press the EDIT soft key.3. Push the [ENTER] knob to erase all marks and lines.4. Press the RETURN soft key.5. Press the [MENU] key to close the menu.](https://usermanual.wiki/Furuno-USA/9ZWRTR051.OPERATORS-MANUAL-PART3/User-Guide-132230-Page-26.png)
![3. PLOTTER OPERATION3-273.10 WaypointsIn navigation terminology, a waypoint is a particular location on a voyage whetherit be a starting, intermediate or destination point. A waypoint is the simplest pieceof information your equipment requires to get you to a destination, in the shortestdistance possible.This unit has 1000 waypoints into which you can enter position information. Thereare five methods by which you can enter a waypoint: at own ship position, atMOB position, by cursor, by range and bearing, and through the waypoint list(manual input of latitude and longitude).3.10.1 Entering waypointsEntering a waypoint at own ship positionPress the [SAVE/MOB] key with a touch-and-release action to store your position.This new waypoint will automatically be saved in the waypoint list under theyoungest empty waypoint number.](https://usermanual.wiki/Furuno-USA/9ZWRTR051.OPERATORS-MANUAL-PART3/User-Guide-132230-Page-27.png)
![3. PLOTTER OPERATION3-28Entering a waypoint with the cursor1. Press the [MENU] key to open the menu.2. Press the WAYPOINT/ROUTE, WAYPOINTS and WAYPOINT BY CURSORsoft keys. The plotter display appears.3. Operate the cursor pad to place the cursor on the location desired.4. Press the NEW WPT soft key. The waypoint window appears and it showsmark shape, waypoint name, comment (default: date), position of waypointand proximity alarm radius.NEW WPT▲001WPT 00:00 01JAN00 34°44.000'N135°21.000'W 359.9°0.00nm002WPT 00:00 01JAN00 34°44.000'N135°21.000'W 359.9°0.00nm003WPT 00:00 01JAN00 34°44.000'N135°21.000'W 359.9°0.00nm004WPT 00:00 01JAN00 34°44.000'N135°21.000'W 359.9°0.00nmNAME001WPCOMMENT02:36 09SEP00POSITION34° 12. 345N134° 12. 345NPROXIMITY ALARM RADIUS 1. 23nSELECTMARKCOORDTYPEN⇔SE⇔WSAVERETURNWaypoint window5. If you do not need to change the waypoint data, go to step 16.6. Press the SELECT MARK soft key.7. Press the MARK SHAPE soft key to open the mark shape selection window.SELECT MARKMark shape selection window8. Operate the cursor pad to select shape desired.9. Press the ENTER soft key.10.Press the RETURN soft key.](https://usermanual.wiki/Furuno-USA/9ZWRTR051.OPERATORS-MANUAL-PART3/User-Guide-132230-Page-28.png)
![3. PLOTTER OPERATION3-2911. For the MODEL-1700C series, press the SELECT MARK and MARK COLORsoft keys to open the mark color selection window. Select the color desired,and then press the ENTER soft key.SELECT COLOR▲REDYELLOWGREENLIGHT BLUEPURPLEBLUEWHITE▼Mark color selection windowNote: You cannot change the shape and color of a waypoint when theproximity alarm radius for it is other than “zero.” To change shape orcolor, enter all zeroes as the proximity alarm radius.12.You can change the name (1 to 6 characters), comment (13 characters), L/Lposition and the proximity alarm radius as follows:a) Select the NAME, COMMENT or PROXIMITY ALARM RADIUS field.b) Use the Omnipad to select appropriate location.c) Use the [ENTER] knob to select appropriate alphanumeric character.d) Push the [ENTER] knob to enter character selected.13.Use the cursor pad to place the cursor in the POSITION box.14.Use the cursor pad to select the digit you want to change.15. Use the [ENTER] knob to select digit and push the knob to register.16. Press the SAVE soft key to register the waypoint.To enter another waypoint select its location with the cursor pad and press theNEW WPT soft key.](https://usermanual.wiki/Furuno-USA/9ZWRTR051.OPERATORS-MANUAL-PART3/User-Guide-132230-Page-29.png)
![3. PLOTTER OPERATION3-30Entering a waypoint by range and bearingThis method is useful when you want to enter a waypoint using range andbearing to a target found on a radar.1. Press the [MENU] key to open the menu.2. Press the WAYPOINT/ROUTE, WAYPOINTS and WAYPOINT BY RNG. &BRG. soft keys.3. Operate the cursor pad to place the cursor on the location desired. Range andbearing from own ship to the cursor appear at the top of the display.Note: The origin point of range and bearing can be shifted to the place youdesire. Operate the cursor pad to select location, and then press theSTART POINT soft key.4. Press the NEW WPT soft key. The waypoint window appears and it showsmark shape, waypoint name, comment (default: date), position of waypointand proximity alarm radius.NEW WPT▲001WPT 00:00 01JAN00 34°44.000'N135°21.000'W 359.9°0.00nm002WPT 00:00 01JAN00 34°44.000'N135°21.000'W 359.9°0.00nm003WPT 00:00 01JAN00 34°44.000'N135°21.000'W 359.9°0.00nm004WPT 00:00 01JAN00 34°44.000'N135°21.000'W 359.9°0.00nmNAME001WPCOMMENT02:36 09SEP00POSITION34° 12. 345N134° 12. 345NPROXIMITY ALARM RADIUS 1. 23nSELECTMARKCOORDTYPEN⇔SE⇔WSAVERETURNWaypoint window5. If necessary, change waypoint data following the instructions from step 7 in“Entering waypoints with the cursor.”6. Press the SAVE soft key to register the waypoint.](https://usermanual.wiki/Furuno-USA/9ZWRTR051.OPERATORS-MANUAL-PART3/User-Guide-132230-Page-30.png)
![3. PLOTTER OPERATION3-31Entering a waypoint from the waypoint list1. Press the [MENU] key to open the menu.2. Press the WAYPOINT/ROUTE and WAYPOINTS soft keys.3. Press the LOCAL LIST (lists waypoints in order from nearest to furthest) orALPHA/NUMERIC LIST (lists waypoints in alphanumeric order) soft key.Alphanumeric waypoint list ▲001WPT 00:00 01JAN00 34°44.000'N135°21.000'W 359.9°0.00nm002WPT 00:00 01JAN00 34°44.000'N135°21.000'W 359.9°0.00nm003WPT 00:00 01JAN00 34°44.000'N135°21.000'W 359.9°0.00nm004WPT 00:00 01JAN00 34°44.000'N135°21.000'W 359.9°0.00nmPUSH ENTER KEYTO SEARCH FOR▲001WPT 00:00 01JAN00 34°44.000'N135°21.000'W 359.9°0.00nm002WPT 00:00 01JAN00 34°44.000'N135°21.000'W 359.9°0.00nm003WPT 00:00 01JAN00 34°44.000'N135°21.000'W 359.9°0.00nm004WPT 00:00 01JAN00 34°44.000'N135°21.000'W 359.9°0.00nmWPTLOCALLocal waypoint listGO TONEWWPTEDITWPTERASEWPTRETURNWPTALPHAGO TONEWWPTEDITWPTERASEWPTRETURNAlphanumeric and local waypoint lists4. Press the NEW WPT soft key to show the waypoint window. Own shipposition is shown in the position box. If necessary, change the data followingfrom step 7 in “Entering waypoints with the cursor.”5. Press the SAVE soft key to register the waypoint.6. Press the RETURN soft key followed by the [MENU] key to close the menu.3.10.2 Editing waypoint dataWaypoint data may be from the waypoint list. You can select the waypoint to editdirectly from the waypoint list or with the cursor.Selecting waypoint data to edit from the waypoint list1. Press the [MENU] key to open the menu.2. Press the WAYPOINT/ROUTE and WAYPOINTS soft key.3. Press the LOCAL LIST or ALPHA/NUMERIC LIST soft key.4. Select the waypoint you want to edit.5. Press the EDIT WPT soft key.6. Edit waypoint as appropriate.7. Press the SAVE soft key.8. Press the RETURN soft key followed by the [MENU] key to close the menu.](https://usermanual.wiki/Furuno-USA/9ZWRTR051.OPERATORS-MANUAL-PART3/User-Guide-132230-Page-31.png)
![3. PLOTTER OPERATION3-32Selecting waypoint data to edit with the cursor1. Use the cursor pad to place the cursor on the waypoint to edit. A flashingdiamond appears over the waypoint when it is correctly selected.2. Press the EDIT MOVE soft key followed by the EDIT WPT soft key.3. Edit waypoint as appropriate.4. Press the SAVE SOFT key.5. Press the RETURN soft key followed by the [MENU] key to close the menu.Changing waypoint position from the plotter displayYou may change the latitude and longitude position of waypoints from the plotterdisplay as follows:1. Press the [MENU] key followed by the WAYPOINTS soft key to open thewaypoint menu.2. Press the WAYPOINT BY CURSOR soft key.3. Operate the cursor pad to place the cursor on the waypoint which you want tochange. A flashing diamond mark appears on the waypoint when it is correctlyselected.4. Press the EDIT MOVE soft key.5. Press the MOVE WPT soft key.6. Operate the cursor pad to place the cursor on the location desired. A lineconnects previous position and new position.7. Push the [ENTER] knob.The waypoint moves to the cursor position and its new position is recorded on thewaypoint list. If the waypoint is set as destination or is part of a route, you areasked if you are sure to move the waypoint. In this case, push the [ENTER] knobto move the waypoint, or press the [CLEAR] key to cancel.BRIDGEFISHWP-002 RNGBRGCANCELUse omnipad to placecursor at new locationfor waypoint. Press to alternately displayrange from own ship, rangefrom waypoint.1024 nm 34° 22. 3456'N 359.9° TRIP NU080° 22. 3456'E 59.9nm 99.9 nmPlotter display](https://usermanual.wiki/Furuno-USA/9ZWRTR051.OPERATORS-MANUAL-PART3/User-Guide-132230-Page-32.png)
![3. PLOTTER OPERATION3-333.10.3 Erasing waypointsErasing a waypoint with the cursor1. Press the cursor pad to turn on the cursor.2. Operate the cursor pad to place the cursor on the waypoint you want to erase.A flashing diamond mark appears over the waypoint when the waypoint iscorrectly selected.3. Press the [CLEAR] key, or press the EDIT MOVE soft key followed by theERASE WPT soft key. You are asked if you are sure to erase the waypoint.4. Push the [ENTER] knob. The waypoint is erased from both the plotter screenand the waypoint list.Erasing a waypoint from the waypoint list1. Press the [MENU] key to open the menu.2. Press the WAYPOINT/ROUTE followed by WAYPOINTS soft keys.3. Press the LOCAL LIST or ALPHA/NUMERIC LIST soft key.4. Select the waypoint you want to erase.5. Press the ERASE WPT soft key. You are asked if you are sure to erase thewaypoint.6. Push the [ENTER] knob. The waypoint is erased from both the waypoint listand the plotter screen (if it is currently displayed).7. Press the RETURN soft key followed by the [MENU] key to close the menu.](https://usermanual.wiki/Furuno-USA/9ZWRTR051.OPERATORS-MANUAL-PART3/User-Guide-132230-Page-33.png)
![3. PLOTTER OPERATION3-343.10.4 Changing waypoint mark size (FURUNO, NAV CHART)You may change the size of all waypoint marks to small or large (default), or youmay turn them off.1. Press the [MENU] key to open the menu.2. Press the CHART SETUP and CHART DETAILS soft keys.LAT LON GRIDONTEXT INFOONWAYPOINTLARGEWAYPOINT NAMEONCHART BOARDER LINESONLANDMASSONNAV AIDSONSECTOR INFOONOTHER SYMBOLONMARK SIZENORMAL▲MODEL-1700 seriesLAT LON GRIDGREENTEXT INFOONWAYPOINTLARGEWAYPOINT NAMEONCHART BOARDER LINESONLANDMASSBRT YELLOWBACKGROUNDBLUEBRT YELLOWSECTOR INFOONOTHER SYMBOLWHITEMARK SIZENORMAL▲MODEL-1700C seriesCHARTDETAILS CHARTDETAILSEDITDEPTHINFORETURNEDITDEPTHINFORETURNChart details menu3. Select WAYPOINT.4. Press the EDIT soft key.5. Select LARGE, SMALL or OFF.LARGE: Shows mark in actual shape.SMALL: Displays all waypoints with an “X” regardless of mark shapeselected.OFF: Turns off all waypoints and their names. Waypoints which are partof a route are always shown regardless of this setting.6. Press the ENTER soft key or the [ENTER] knob.7. Press the RETURN soft key followed by the [MENU] key to close the menu.](https://usermanual.wiki/Furuno-USA/9ZWRTR051.OPERATORS-MANUAL-PART3/User-Guide-132230-Page-34.png)
![3. PLOTTER OPERATION3-353.10.5 Searching waypointsYou can search for a waypoint through the alpha/numeric list as follows:1. Press the [MENU] key.2. Press the WAYPOINT & ROUTE, WAYPOINTS and ALPHA/NUMERIC LISTsoft keys to show the alpha/numeric list.▲001WPT 00:00 01JAN00 34°44.000'N135°21.000'W 359.9°0.00nm002WPT 00:00 01JAN00 34°44.000'N135°21.000'W 359.9°0.00nm003WPT 00:00 01JAN00 34°44.000'N135°21.000'W 359.9°0.00nm004WPT 00:00 01JAN00 34°44.000'N135°21.000'W 359.9°0.00nmPUSH ENTER KEYTO SEARCH FOREDITNEWWPTEDITWPTERASEWPTRETURNWPTALPHASearch windowAlphanumeric list3. Use the alphanumeric keys to enter the first 1 - 3 characters in the searchwindow. The waypoint searched appears at the top of the screen.4. Press the RETURN soft key followed by the [MENU] key to close the menu.](https://usermanual.wiki/Furuno-USA/9ZWRTR051.OPERATORS-MANUAL-PART3/User-Guide-132230-Page-35.png)
![3. PLOTTER OPERATION3-363.11 RoutesOften a trip from one place to another involves several course changes, requiringa series of route points (waypoints) which you navigate to, one after another. Thesequence of waypoints leading to the ultimate destination is called a route. Yourunit can automatically advance to the next waypoint on a route, so you do nothave to change the destination waypoint repeatedly.You can store up to 200 routes, and a route may have 35 waypoints.3.11.1 Creating routesEntering a route from the route listThis method constructs routes using existing waypoints.1. Press the [MENU] key.2. Press the WAYPOINT/ROUTE soft key.3. Press the ROUTES soft key to open the route menu. (No data will be shown ifthere is no route data entered.)ROUTEGO TONEWROUTEEDITROUTEERASEROUTERETURNPUSH ENTER KEYTO SEARCH FORPOTSLENGTH 56.7 nmLENGTH 4.7 nm12:30 01AUG00WAYPOINTS6LENGTH 25.6 nmNETSTRAPS15:21 01AUG0016:45 01AUG00WAYPOINTS35WAYPOINTS3WAYPOINTS1FISH01LENGTH 21.1 nm10:42 01SEP00Route menu4. Press the NEW ROUTE soft key to open the new route entry screen.ROUTE NAMECOMMENT0 0 1NEWROUTEPLOTLOCAL LISTALPH LISTCONECTROUTECANCELNew route entry screen](https://usermanual.wiki/Furuno-USA/9ZWRTR051.OPERATORS-MANUAL-PART3/User-Guide-132230-Page-36.png)
![3. PLOTTER OPERATION3-375. If desired you can change the route name shown and/or add a comment. Tochange route name, press the [CLEAR] key to clear the route name. Use thecursor pad to locate the cursor and then use the [ENTER] knob to enterappropriate alphanumeric. To enter a comment, place the cursor in theCOMMENT window. Use the cursor pad and the [ENTER] knob to enter yourcomment. A route name may consist of six characters; comment, 13characters.6. Press the LOCAL LIST or ALPH LIST soft key to open the waypoint list.7. Select a waypoint, and press the ADD WPT soft key to add it to the route.8. Repeat step 7 to complete the route.Note: To clear a waypoint, press the ERASE LST WP soft key. Each pressingof this key deletes the last waypoint entered.9. Press the SAVE soft key to register the route.10.Press the RETURN soft key followed by the [MENU] key to close the menu.Entering a route with the cursorThis method allows you to construct a route directly on the plotter display, usingexisting waypoints or new locations. Any new location will be saved as a waypoint,under the youngest empty waypoint number.1. Follow step 1-5 in “Entering routes through the route list.”2. Press the PLOT soft key. The plotter display appears.3. Operate the cursor pad to place the cursor on an existing waypoint (ADDWPT soft key appears) or new location (ADD NEW WPT soft key appears).4. Press the ADD WP soft key (or ADD NEW WPT soft key).5. Repeat steps 3 and 4 to complete the route.6. Push the [ENTER] knob to register the route.](https://usermanual.wiki/Furuno-USA/9ZWRTR051.OPERATORS-MANUAL-PART3/User-Guide-132230-Page-37.png)
![3. PLOTTER OPERATION3-383.11.2 Connecting routesTwo routes can be connected as follows:1. Press the [MENU] key to open the menu.2. Press the WAYPOINT/ROUTE soft key.3. Press the ROUTES soft key.4. Press the NEW ROUTE soft key.5. Enter the name for new route.6. Press the CONECT ROUTE soft key.7. Enter the route name for the first route beneath FIRST in the CONNECTROUTE window.NEWROUTECONNECT ROUTEFIRST SECOND_ _ _ _ _ _ _ _ _ _ _ _F FF⇔RSAVEROUTECANCELROUTE NAMECOMMENT0 0 1Connect route window8. Press the F⇔R soft key to select direction to transverse the waypoints of theroute, forward or reverse.9. Enter the route name of the second route as you did for the first route.10. Press the SAVE soft key.11. Press the RETURN soft key followed by the [MENU] key to close the menu.Note: The maximum number of waypoints in a route is 35. If this number isexceeded an error message appears. In this case, delete waypoints in oneor both routes so the total number of waypoints does not exceed 35.](https://usermanual.wiki/Furuno-USA/9ZWRTR051.OPERATORS-MANUAL-PART3/User-Guide-132230-Page-38.png)
![3. PLOTTER OPERATION3-393.11.3 Inserting waypoints in a routeInserting a waypoint from the route listWaypoints can be inserted in routes as follows:1. Press the [MENU] key to open the menu.2. Press the WAYPOINT/ROUTE soft key.3. Press the ROUTES soft key.4. Select a route.5. Press the EDIT ROUTE soft key. The route name screen appears.6. Press the LOCAL LIST soft key. All waypoints in the route are displayed.EDIT ROUTE▲01 34°44.000'N135°21.000'W001WPT359.9°6.00nm02 34°44.000'N135°41.000'W002WPT 29.9°12.0nm03 34°14.000'N135°21.000'W003WPT159.°6.00nm04 34°34.000'N135°51.000'W004WPT 50.5°29.8nm05 34°44.000'N135°21.000'W005WPT359.9° 3.0nmINSERTWPTREMOVEWPTCHANGEWPTCOORDTYPERETURNEdit route menu7. Place the cursor at the location where you want to insert a waypoint.8. Press the INSERT WPT soft key to show the waypoint list.EDIT ROUTE01 34°44.000'N135°21.000'W001WPT359.9°6.00nm02 34°44.000'N135°41.000'W002WPT29.9°12.0nm03 34°14.000'N135°21.000'W003WPT159.°6.00nm04 34°34.000'N135°51.000'W004WPT50.5°29.8nm05 34°44.000'N135°21.000'W005WPT359.9° 3.0nm01 34°44.000'N135°21.000'W001WPT02 34°44.000'N135°21.000'W002WPT03 34°44.000'N135°21.000'W003WPT04 34°44.000'N135°21.000'W004WPT▲SELECTWPTCOORDTYPEALPHALISTCANCELLOCALLISTWaypoint list for editing a route (local list)](https://usermanual.wiki/Furuno-USA/9ZWRTR051.OPERATORS-MANUAL-PART3/User-Guide-132230-Page-39.png)
![3. PLOTTER OPERATION3-409. Select the waypoint you want to insert. You can switch between the local listand alphanumeric list by pressing the LOCAL LIST or ALPH LIST soft key.10. Press the SELECT WPT soft key.11. Press the RETURN soft key followed by the [MENU] key to close the menu.Inserting a waypoint from the plotter displayInserting waypoints before the first waypoint or after the last waypoint1. Press the [MENU] key to open the menu.2. Press the WAYPOINT/ROUTE soft key.3. Press the ROUTES soft key.4. Select a route.5. Press the EDIT ROUTE soft key.6. Press the PLOT soft key to show the plotter screen.7. Operate the cursor to place the cursor on the waypoint which you want toinsert.8. Press the ADD TO START soft key.9. Operate the cursor pad to place the cursor on an existing waypoint (ADDWPT soft key appears) or new location (ADD NEW WPT soft key appears).10.Press the ADD WPT soft key (ADD NEW WPT soft key).11.Press the [ENTER] knob.To insert a waypoint after the last waypoint, press the ADD TO END soft key atthe step 8.Inserting waypoints in an intermediate location within a route1. Follow steps 1 through 4 in “Inserting waypoints before the first waypoint orafter the last waypoint.”2. Operate the cursor pad to place the cursor on a line connecting waypoints.3. Press the SPLIT LEG soft key. The selected line turns red.4. Operate the cursor pad to place the cursor on an existing waypoint (INSERTWPT soft key appears) or new location (INSERT NEW WPT soft keyappears).5. Press the appropriate soft key appearing at step 4.](https://usermanual.wiki/Furuno-USA/9ZWRTR051.OPERATORS-MANUAL-PART3/User-Guide-132230-Page-40.png)
![3. PLOTTER OPERATION3-413.11.4 Removing waypoints from a routeRemoving a waypoint from the route list1. Press the [MENU] key to open the menu.2. Press the WAYPOINT/ROUTE soft key.3. Press the ROUTES soft key4. Select a route.5. Press the EDIT ROUTE and LOCAL LIST soft keys to show the waypoint list.6. Select the waypoint you want to delete.7. Press the REMOVE WPT soft key.8. Press the RETURN soft key followed by the [MENU] key to close the menu.Removing a waypoint from the plotter display1. Press the [MENU] key to open the menu.2. Press the WAYPOINT/ROUTE soft key.3. Press the ROUTES soft key.4. Select a route.5. Press the EDIT ROUTE soft key.6. Press the PLOT soft key to show the plot screen.7. Operate the cursor pad to place the cursor on the waypoint you want toremove from the route.8. Press the REMOVE WPT soft key.3.11.5 Creating voyage-based routesYou can create routes based on your ship’s track. This can be done automaticallyby time or distance, or manually. 35 waypoints may be entered. This feature isuseful when you wish to retrace previous track.How to create a voyage-based route1. Press the [MENU] key to open the menu.2. Press the WAYPOINT/ROUTE soft key.3. Press the CREATE VOYAGE BASED ROUTE soft key.SAVEROUTEABCDEFGHIJKLLENGTH 25.6 nmHPT00112:30 29SE00TRAP15:21 01OCT00NET16:45 01OCT00WAYPOINTS35LENGTH 56.7 nm WAYPOINTS6LENGTH 21.1 nm WAYPOINTS3LENGTH 4.7 nm WAYPOINTS1SEARCH FORFISH12:30 29SE00NEWSELECTROUTERETURNSave route menu4. Press the NEW soft key to show the new route window.](https://usermanual.wiki/Furuno-USA/9ZWRTR051.OPERATORS-MANUAL-PART3/User-Guide-132230-Page-41.png)
![3. PLOTTER OPERATION3-42SAVEROUTEROUTE NAME0 0 6COMMENTNext consecutive route numberBCKTRKTIMEBCKTRKRANGEMANUALCANCELSave route window5. If required, you may change the route name and enter a comment. You mayalso enter an existing route, for which track-based waypoints will be tacked onfrom the last waypoint in the route.6. Choose how to record points for your route, by time, by range or manual entry.Press one of BCKTRK TIME and BCKTRK RANGE or MANUAL soft key asappropriate. For manual go to step 7. For BCKTRK TIME, BCKTRK RANGEone of the following displays appears.ROUTE NAMECOMMENT0 0 1SAVEROUTESTARTCANCELTIME INTERVAL01 m 00 sROUTE NAMECOMMENT0 0 1SAVEROUTESTARTCANCELRANGE INTERVAL05.0 nmSave route menu, displays for entry of time, range interval7. Enter interval desired and press the START and RETURN soft keys followedby the [MENU] key to close the menu.](https://usermanual.wiki/Furuno-USA/9ZWRTR051.OPERATORS-MANUAL-PART3/User-Guide-132230-Page-42.png)
![3. PLOTTER OPERATION3-438. For manual entry of waypoints, do the following:a) Press the [SAVE/MOB] key with a touch-and-release action to enter awaypoint mark at own ship position. A new waypoint is created under the nextconsecutive waypoint number and that waypoint is added to the route.b) Repeat step a) as necessary. 35 waypoints may be entered. The “SAVE” iconappears at the top of the screen when points are saved manually.To stop recording waypoints and save the routeWhen 35 waypoints have been entered the message “Total 35 WPTS have beenalready registered in the route. Stop creating voyage based route.” is displayed.In this case, follow the procedure above to stop recording waypoints and save theroute as shown below. You can also stop recording waypoints at any timedesired.1. Press the [MENU] key followed by the WAYPOINT/ROUTE and CREATEVOYAGE BASED ROUTE soft keys.2. Press the FINISH LOG soft key to register the route.3.11.6 Erasing routes1. Press the [MENU] key to open the menu.2. Press the WAYPOINT/ROUTE soft key.3. Press the ROUTES soft key.4. Select a route.5. Press the ERASE ROUTE soft key. You are asked if you are sure to erase theroute.6. Press the [ENTER] knob to erase the route.7. Press the RETURN soft key followed by the [MENU] key to close the menu.](https://usermanual.wiki/Furuno-USA/9ZWRTR051.OPERATORS-MANUAL-PART3/User-Guide-132230-Page-43.png)
![3. PLOTTER OPERATION3-443.12 NavigationThis section shows you how to get to a desired destination by “quick points,”waypoints, port services and routes.3.12.1 Navigating to a “quick point”The “quick point” feature allows you to navigate to point(s) without retaining thedata indefinitely in your unit‘s memory.Selecting quick point entry methodYou need to tell your unit how to set the quick point: 1 POINT, 35 POINT (up to 35points) or WPT/PORT SERV. (For WPT/PORT SERV, see the next page.)1. Press the [MENU] key.2. Press the PLOTTER SETUP soft key.3. Select SET GO TO METHOD and press the EDIT soft key.SET GO TO METHOD 1 POINT 35 POINT WPT/PORT Set go to method window4. Select 1 POINT.5. Press the ENTER soft key.6. Press the RETURN soft key followed by the [MENU] key to close the menu.Navigating to a single quick point1. Press the [MENU] key followed by the PLOTTER SETUP soft key.2. Place the cursor on an existing waypoint (GO TO WPT soft key appears) or anew location (GO TO CURSOR soft key appears).3. Depending on the selection you made at step, two press GO TO CURSOR orGO TO WPT soft key.A line (light-blue on the MODEL-1700C series) with arrows connects between ownship and destination, marked “QP<01>,” and it shows the shortest course to thedestination. Arrows on the line show the direction to follow to get to the quick point.Range and bearing from own ship to the destination appear at the top of screen.This location is saved to the waypoint list as waypoint “QP01.”Navigating to multiple quick points1. Press the [MENU] key followed by the PLOTTER OPTION soft key.2. Press the GO TO soft key.3. Place the cursor on an existing waypoint (SELECT WPT soft key appears) ora new location ADD QP soft key appears).](https://usermanual.wiki/Furuno-USA/9ZWRTR051.OPERATORS-MANUAL-PART3/User-Guide-132230-Page-44.png)
![3. PLOTTER OPERATION3-454. Depending on the action taken at step 3 press the SELECT WPT soft key orADD QP. “QP<01>” appears at the cursor location. To erase last-enteredwaypoint press the ERASE LST WPT soft key.5. Repeat steps 3 and 4 to complete the route.6. Push the [ENTER] knob to finish.A line (light-blue on the MODEL-1700C series) with arrows connects betweenown ship and all quick points, and it shows the shortest course to destination.Arrows on the line show the direction to follow to get to your destination. Quickpoints are numbered in sequential order from QP<01> and are saved to thewaypoint list. Range and bearing from own ship to the first destination appear atthe top of screen. The points are saved as a route, under the name “Q>RTE”(Quick Route).3.12.2 Navigating to waypoints1. Press the [MENU] key to open the menu.2. Press the WAYPOINT/ROUTE soft key.3. Press the WAYPOINTS soft key to open the waypoint menu.4. Press the LOCAL LIST or ALPHA/NUMERIC LIST soft key to showcorresponding waypoint list.5. Select a waypoint.6. Press the GO TO soft key.The plotter display appears. A line (light-blue on the MODEL-1700C series) runsbetween destination selected and own ship’s position. Arrows on the line showthe direction to the follow to get to the waypoint. Waypoint data appears at the topof screen.3.12.3 Navigating to ports, port servicesSome Nav-Charts™ and C-MAP have a port service list, shown at the top of thescreen, which shows services available at ports or harbors. (See page 3-4.) Youcan use the list to set destination as follows:1. Press the [MENU] key followed by the PLOTTER OPTION soft key.2. Press the DISPLAY OPTIONS soft key.3. Select SET GO TO METHOD and press the EDIT soft key. The followingdisplay appears.SET GO TO METHOD 1 POINT 35 POINT WPT/PORT Set go to method window4. Select WPT/PORT.5. Press the ENTER soft key or [ENTER] knob.](https://usermanual.wiki/Furuno-USA/9ZWRTR051.OPERATORS-MANUAL-PART3/User-Guide-132230-Page-45.png)
![3. PLOTTER OPERATION3-466. Press the [MENU] key to close the menu and return to the plotter display. Softkey titles change as in the figure below.FROMOS 0.26 nm180.2°PUNTA CORNACCHIAACCO AMENOI. ISCHIACASAMICCIOLAISCHIAPORTO40°45.971'N13°57.462'E+QUICKROUTENEARSRVCEPORTCANCELGO TOGO TO 1024 nmPlotter display7. Press the PORT or NEAR SRVICE soft key depending on objective. PORTshows a list of ports in your area. NEAR SRVICE displays the port service list.▼SELECT PORT SERVICESELECT PORT ACCIAROLIACQUAMORTAAGNONE S. NICOLAAGROPOLIAMALFIBAIACAPRICASA MICCIOLA-ISCHIA▲Port servicesPort list (Italy)Port services and sample port list8. If you selected PORT at step 7, use the Omnipad to select a port and pressthe ENTER soft key. Make a route using the soft keys and press the [ENTER]knob. (If you want to go directly to that port, simply press the ADD QP soft keyfollowed by the [ENTER] knob.)If you selected NEAR SERVICE at step 7, select service mark desired andthen press the ENTER soft key. Then, the display shows the locations ofthose services nearest you. (The figure below shows location of fillingstations in an area in southern Italy.) Place the “hand cursor” on the portservice icon desired and press the ENTER soft key. Make a route using thesoft keys and push the [ENTER] knob. (If you want to go directly to locationselected, simply press the ADD QP soft key followed by the [ENTER] knob.)](https://usermanual.wiki/Furuno-USA/9ZWRTR051.OPERATORS-MANUAL-PART3/User-Guide-132230-Page-46.png)
![3. PLOTTER OPERATION3-47FROMOS 0.26 nm180.2°PUNTA CORNACCHIAACCO AMENOI. ISCHIACASAMICCIOLAISCHIA PORTO40°45.971'N13°57.462'E+ENTERCANCELGO TOGO TO 1024 nmSample filling station locations (southern Italy)2.12.4 Following a routeSelecting the route to follow1. Press the [MENU] key to open the menu.2. Press the WAYPOINT/ROUTE soft key.3. Press the ROUTE soft key to open the route list.4. Select a route.5. Press the GO TO soft key to show the plotter display. The cursor is on theroute waypoint nearest own ship.WPT FROMOSFISH 1.3 nm208.5°WP-002WP-001FISHCRABGO TOROUTEMARKENTRYGO TOWPTRVSEROUTERETURNMODENTH UP 1024 nmPlotter display, route selected as destination6. Operate the cursor pad to place the cursor on the waypoint or leg desired inthe route.7. Press the GO TO WPT or FOLLOW LEG soft key (depending on the actiontaken at step 6).Green lines connect all route waypoints and arrows on the lines point in thedirection to traverse the route.Navigating route waypoints in reverse orderPress the RVSE ROUTE soft key to reverse the order to traverse waypoints. Thearrows on the route line point in direction selected.](https://usermanual.wiki/Furuno-USA/9ZWRTR051.OPERATORS-MANUAL-PART3/User-Guide-132230-Page-47.png)
![3. PLOTTER OPERATION3-49Restarting navigationWhen you steer to avoid an obstacle or the vessel drifts, you may go off yourintended course (Line 1 in the figure below). Use the steering or highway displayto return to course.Also, if you don’t need to return to the original course, you can go directly to thewaypoint (Line 2 in the figure below) using the restart function as on the nextpage.Original courseObstacle Line 1Line 2Example of when to restart navigation1. Set a destination.2. Press the [MENU] key to open the menu.3. Press the WAYPOINT/ROUTE soft key.4. Press the LOG soft key.Estimated Time of Arrival at destinationPassed waypoint (gray characters)TO Waypoint (WPT no. in reverse video)0201030405BRIDGEHARBOR002WPT003WPT004WPT 34°23.564'N135°23.456'E 34°32.456'N135°32.456'E 34°23.345'N135°12.456'E 34°34.555'N135°55.555'E 34°32.555'N134°99.999'E120.5°23.4nm23.6°23.4nm123.6°23.5nm180.5°23.5nm180.5°23.5nmETA 23:59 31.SEPLOGRE-STARTSTOPRVSEROUTESPEEDRETURNLog display5. Press the RESTART soft key.](https://usermanual.wiki/Furuno-USA/9ZWRTR051.OPERATORS-MANUAL-PART3/User-Guide-132230-Page-49.png)
![3. PLOTTER OPERATION3-50Setting speed for ETA calculationSpeed, which may be input manually or automatically, is required to calculateETA (Estimated Time of Arrival) to a waypoint.1. Press the [MENU] key to open the menu.2. Press the WAYPOINT/ROUTE soft key.3. Press the LOG soft key.4. Press the SPEED soft key.SELECT SPEED FOR ETA▲ SPD 10.0ktGPS AVG SPD▼Select speed for ETA window5. Key in speed manually in the SPD field, or use GPS speed data by selectingGPS AVG SPD.6. Press the ENTER soft key to register your selection.Switching waypointsWhen you arrive to a waypoint on a route, you can switch to the next waypointthree ways: AUTO1, AUTO2 and MANUAL.AUTO1: Automatically switches the TO waypoint when your boat is within thearrival alarm area. For how to set the arrival alarm area, see “9.3 Arrival Alarm”.AUTO2: Automatically switches the TO waypoint when the boat enters the arrivalalarm range or the boat passes an imaginary perpendicular line passing throughthe center of the destination waypoint.MANUAL: When the boat enters the arrival alarm area, the TO waypoint may beswitched by using the RESTART soft key (on the LOG display). If the arrivalalarm is not set, the waypoint will not be switched. To be alerted when you arriveat a waypoint turn on the audio alarm, on the alarm menu.To select waypoint switching method do the following:1. Press the [MENU] key.2. Press the PLOTTER OPTION soft key.3. Press the DISPLAY OPTION soft key.4. Select WAYPOINTS SW.5. Press the EDIT soft key to show the waypoint sw window.6. Select appropriate waypoint switching method; AUTO1, AUTO2, or MANUAL.7. Press the ENTER soft key to close the window.](https://usermanual.wiki/Furuno-USA/9ZWRTR051.OPERATORS-MANUAL-PART3/User-Guide-132230-Page-50.png)
![3. PLOTTER OPERATION3-51Cancelling route navigation1. Press the [MENU] key to open the menu.2. Press the WAYPOINT/ROUTE soft key.3. Press the LOG soft key.4. Press the STOP soft key.5. Push the [ENTER] knob.6. Press the RELEASE soft key.7. Push the [ENTER] knob.](https://usermanual.wiki/Furuno-USA/9ZWRTR051.OPERATORS-MANUAL-PART3/User-Guide-132230-Page-51.png)
![3. PLOTTER OPERATION3-523.13 AlarmsThe plotter section has eight conditions which generate both audible and visualalarms: Arrival alarm, Anchor Watch alarm, XTE (Cross Track Error) alarm,Proximity alarm, and Speed alarm, and Trip Alarm, Water Temperature Alarm andBottom Alarm. (The bottom and water temperature alarms require depth andwater temperature data respectively, via the blackbox echo sounder.)The alarm menu may be displayed by pressing the [ALARM] key.AUDIO ALARMOFFARRIVAL ALARMON 0.010nmANCHOR ALARMON 0.001nmPROXIMITY ALARMON XTE ALARMON 0.050nmSPEED ALARMON 12.0-20.0ktTRIP ALARM9999.9nmALARM INFOMATION NO ALARMALARMEDITNEXTPAGERETURNBOTTOM ALARMON 2000-2400ftTEMP ALARMON 68.0-99.9°FALARM INFOMATION NO ALARMALARMEDITPREVPAGEPage 1 Page 2Plotter alarm menu3.13.1 Audio alarm on/offThe audio alarm sounds whenever an alarm setting is violated. You can enable ordisable the audio alarm as follows:1. Press the [ALARM] key to show the alarm menu.2. Select AUDIO ALARM.3. Press the EDIT soft key to show the audio alarm window.AUDIO ALARM▲INT+EXTINT OFF▼Audio alarm window4. Select INT+EXT (Internal + External alarm), INT (Internal alarm) or OFF.5. Press the ENTER soft key or push the [ENTER] knob to register yourselection.](https://usermanual.wiki/Furuno-USA/9ZWRTR051.OPERATORS-MANUAL-PART3/User-Guide-132230-Page-52.png)
![3. PLOTTER OPERATION3-533.13.2 Arrival alarmThe arrival alarm informs you that your boat is approaching a destinationwaypoint. The area that defines an arrival zone is that of a circle which youapproach from the outside of the circle. The alarm will be released if your boatenters the circle. When the arrival alarm is active a red dashed circle marks thearrival alarm area.: Alarm area Own shipAlarmrangeDestinationwaypointHow the arrival alarm works1. Press the [ALARM] key to open the alarm menu.2. Select ARRIVAL ALARM.3. Press the EDIT soft key to show the arrival alarm window.ARRIVAL ALARM▲ON 0.500nmOFF▼Arrival alarm window4. Select ON.5. Operate the cursor pad to place the cursor on the digit desired.6. Use the [ENTER] knob to set the alarm range desired. The arrival alarm rangeis 0.001 to 9.999 miles.7. Press the ENTER soft key or the [ENTER] knob to finish.](https://usermanual.wiki/Furuno-USA/9ZWRTR051.OPERATORS-MANUAL-PART3/User-Guide-132230-Page-53.png)
![3. PLOTTER OPERATION3-543.13.3 Anchor watch alarmThe anchor watch alarm informs you that your boat is moving when it should beat rest. When the anchor watch is active, a red dashed circle marks the anchorwatch area.Your ship's position where you start the anchor watch alarm.Alarmsetting: Alarm areaHow the anchor watch alarm works1. Press the [ALARM] key to open the alarm menu.2. Select ANCHOR ALARM.3. Press the EDIT soft key to open the anchor alarm window.ANCHOR ALARM▲ON 0.050nmOFF▼Anchor watch alarm window4. Select ON.5. Use the [ENTER] knob to set the alarm range desired. The anchor watchrange is 0.001 to 9.999 miles.6. Press the ENTER soft key or the [ENTER] knob to finish.3.13.4 XTE (Cross Track Error) alarmThe XTE alarm warns you when your boat is off its intended course. When theXTE alarm is active two red dashed lines mark the XTE alarm area.: Alarm Destination waypointOwn shipposition AlarmsettingHow the XTE alarm works1. Press the [ALARM] key to open the alarm menu.2. Select XTE ALARM.3. Press the EDIT soft key to open the XTE alarm window.](https://usermanual.wiki/Furuno-USA/9ZWRTR051.OPERATORS-MANUAL-PART3/User-Guide-132230-Page-54.png)
![3. PLOTTER OPERATION3-55XTE ALARM▲ON 0.100nmOFF▼XTE alarm window4. Select ON.5. Use the [ENTER] knob to set the alarm range desired. The XTE alarm rangeis 0.001 to 9.999 miles.6. Press the ENTER soft key or the [ENTER] knob to finish.3.13.5 Speed alarmThe speed alarm warns when your boat’s speed is within, over/under or underthe speed range set.1. Press the [ALARM] key to open the alarm menu.2. Select SPEED ALARM.3. Press the EDIT soft key to display the speed alarm window.SPEED ALARM▲WITHIN 15.0 ~ 15.3 ktOVER/UNDEROFF▼Speed alarm window4. Select WITHIN, OVER/UNDER, or OFF.5. Use the [ENTER] knob to set the alarm range desired.6. Press the ENTER soft key or the [ENTER] knob to finish.3.13.6 Proximity alarmThe proximity alarm alerts you when your vessels nears a waypoint by thedistance set for that waypoint on the waypoint list. You can globally activate ordeactivate the proximity alarm here. Waypoints whose proximity alarm is activehave a ( ) mark near them.1. Press the [ALARM] key to open the alarm menu.2. Select PROXIMITY ALARM.3. Press the EDIT soft key to show the proximity alarm window.PROXIMITY ALARM▲ON OFF▼Proximity alarm window](https://usermanual.wiki/Furuno-USA/9ZWRTR051.OPERATORS-MANUAL-PART3/User-Guide-132230-Page-55.png)
![3. PLOTTER OPERATION3-564. Select ON or OFF by the Omnipad.5. Press the ENTER soft key or the [ENTER] knob to finish.3.13.7 Trip alarmThe trip alarm informs you when you traveled a certain distance.1. Press the [ALARM] key to open the alarm menu.2. Select TRIP ALARM.3. Press the EDIT soft key to show the trip alarm window.TRIP ALARM▲ON 00000 OFF▼Trip alarm window4. Select ON by the cursor pad.5. Use the [ENTER] knob to set the alarm range desired.6. Press the ENTER soft key or the [ENTER] knob to finish.3.13.8 Bottom alarmThe bottom alarm sounds when the bottom echo is within the alarm range set. Toactivate the bottom alarm the depth must be displayed. This function requiresdepth data, via the blackbox echo sounder1. Press the [ALARM] key to open the alarm menu.2. Select BOTTOM ALARM.3. Press the EDIT soft key to display the speed alarm window.BOTTOM ALARM▲ON 0000.0-0000.0ftOFF▼LIMIT: -0-9999.9ftDEFAULT: 0ftBottom alarm window4. Select ON or OFF.5. If you selected ON at step 4, use the [ENTER] knob to set the alarm rangedesired.6. Press the ENTER soft key or the [ENTER] knob to finish.](https://usermanual.wiki/Furuno-USA/9ZWRTR051.OPERATORS-MANUAL-PART3/User-Guide-132230-Page-56.png)
![3. PLOTTER OPERATION3-573.13.9 Water temperature alarmThere are two types of water temperature alarms: WITHIN and WITHOUT. TheWITHIN alarm sounds when the water temperature is within the range set; theWITHOUT alarm sounds when the water temperature is higher or lower than therange set. This function requires water temperature data via the black box echosounder.1. Press the [ALARM] key to open the alarm menu.2. Select TEMP. ALARM.3. Press the EDIT soft key to display the speed alarm window.TEMP. ALARM▲WITHIN 0000.0-0000.0ftWITHOUTOFF▼LIMIT: -999.9 - 999.9˚FDEFAULT: 0 - 0˚FTemperature alarm window4. Select ON or OFF.5. If you selected ON at step 4, use the [ENTER] knob to set the alarm rangedesired.6. Press the ENTER soft key or the [ENTER] knob to finish.](https://usermanual.wiki/Furuno-USA/9ZWRTR051.OPERATORS-MANUAL-PART3/User-Guide-132230-Page-57.png)
![3. PLOTTER OPERATION3-583.13.10 Alarm informationWhen an alarm setting has been violated the buzzer sounds and the speakericon appears. You can see which alarm has been violated, as well as silence thebuzzer, on the alarm menu display. In the example below the arrival alarm hasbeen violated.1. Press the [ALARM] key.AUDIO ALARMOFFARRIVAL ALARMON 0.010nmANCHOR ALARMON 0.001nmPROXIMITY ALARMON XTE ALARMON 0.050nmSPEED ALARMON 12.0-20.0ktTRIP ALARM9999.9nmALARM INFOMATIONYOU HAVE ARRIVEDAT WAYPOINT.CONTINUEALARMEDITNEXTINFOCLEARALARMNEXTPAGERETURNAlarm informationwindowAlarm menu2. Press the CLEAR ALARM soft key to silence the buzzer. For the MODEL-1700C the color of the alarm message and the speaker icon change from redto black.Note: The speaker icon is displayed until all alarms have been acknowledged onthe alarm menu display. If more than one alarm has been violated themessage CONTINUE appears at the bottom of the display. In this casepress the NEXT INFO soft key to see which other alarms have beenviolated.](https://usermanual.wiki/Furuno-USA/9ZWRTR051.OPERATORS-MANUAL-PART3/User-Guide-132230-Page-58.png)
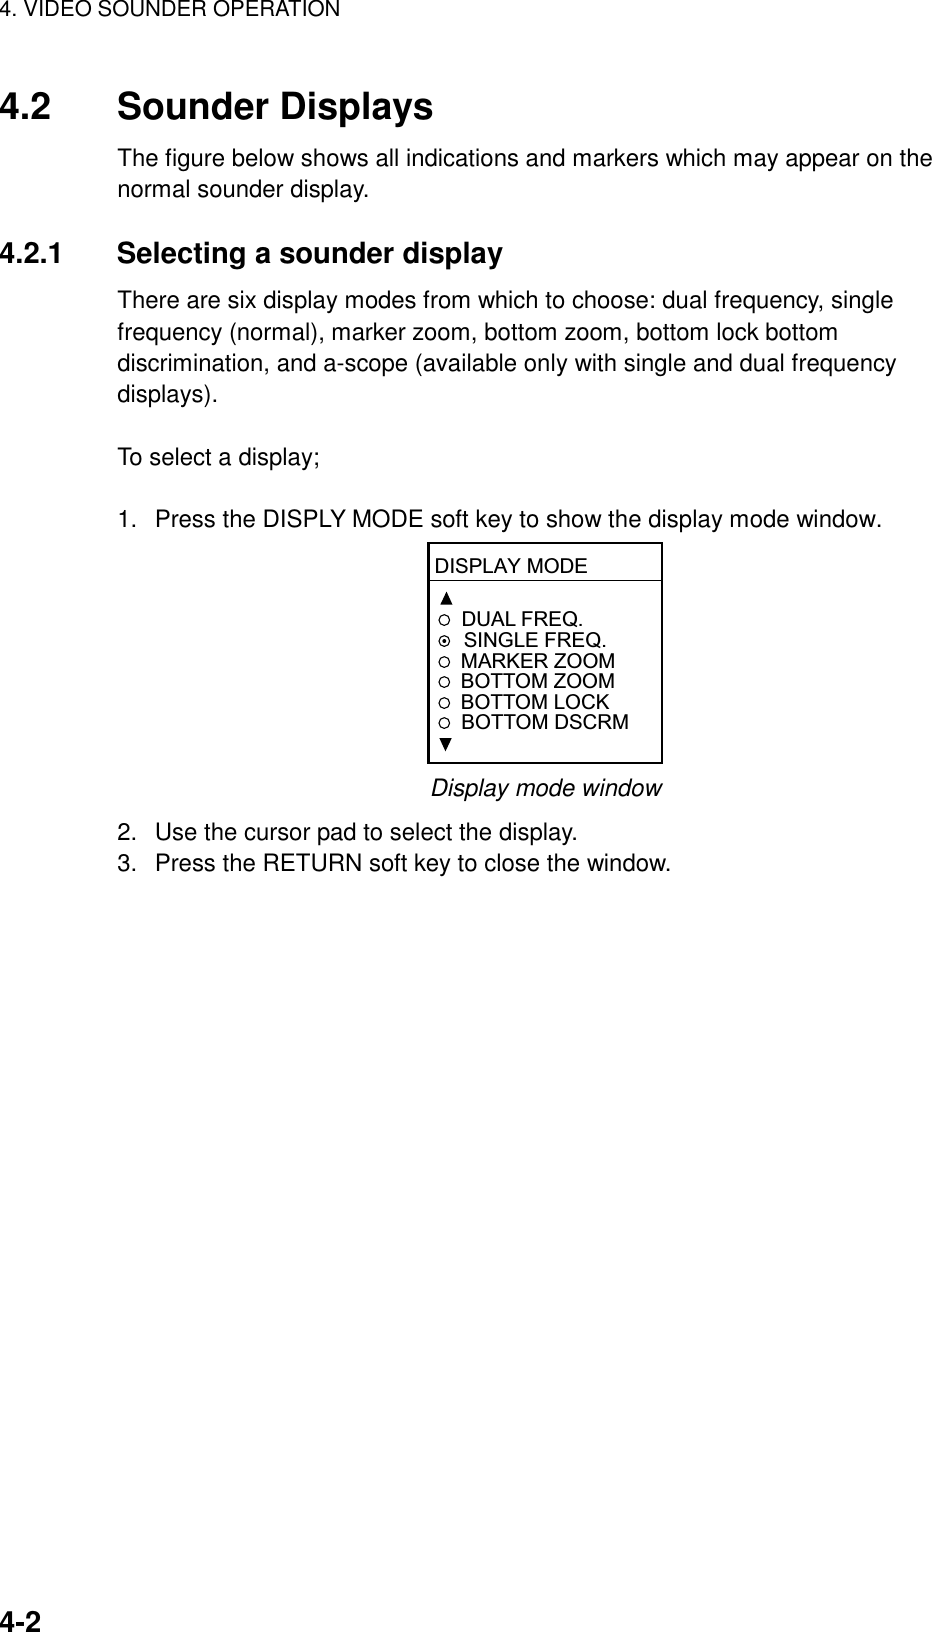
![4. VIDEO SOUNDER OPERATION4-94.4 Manual Sounder OperationManual operation is useful for observing fish schools and bottom using fixed gainsetting.The gain, range and range shifting functions used together give you the means toselect the depth you can see on screen. The basic range can be thought of asproviding a “window” into the water column and range shifting as moving the“window” to the desired depth.4.4.1 Selecting the manual mode1. Press the MODE/D. BOX soft key to show the mode/freq window.2. Select OFF (MANUAL).3. Press the RETURN soft key.4.4.2 Selecting display rangePress the [RANGE +] or [RANGE -] key to select a range.4.4.3 Adjusting the gainNormally, set the gain to the point where excessive noise does not appear onscreen. Use a higher gain setting for greater depths and a lower setting forshallow waters.Gain too high Gain proper Gain too lowExamples of proper and improper gainPress the [GAIN] key to show the gain window, and use the cursor pad to set thegain. Current level is shown above the bar. Press the RETURN key or the [GAIN]key to finish.GAIN57 ▲HIGHLOW ▼Gain window](https://usermanual.wiki/Furuno-USA/9ZWRTR051.OPERATORS-MANUAL-PART3/User-Guide-132230-Page-68.png)
![4. VIDEO SOUNDER OPERATION4-114.5 Measuring Depth, Range4.5.1 Measuring depth with the VRMThe VRM functions to measure the depth to fish schools, etc.1. Rotate the [ENTER] knob to shift the VRM; clockwise rotation to shift Itdownward, counterclockwise rotation to shift it upward. You may also use thecursor pad to shift the VRM.2. Depth is shown just above the VRM.4.5.2 Measuring depth, range with the cross-hair cursorA cross-hair cursor is provided to measure the depth and range to an object Thisfunction is not available on the bottom zoom or A-scope display.1. Press the cursor pad to show the cross cursor on the screen.2. Use the cursor pad to position the cross-hair cursor50kDISPLYMODESHIFTVRM (white)2010054.0 15.0Depth to VRMftDISPLYMODEAUTO/ D.BOXSHIFT20100 0.04nm 40.1 Depth to cursor intersectionRange to cursor intersectionCross-haircursorFREQ.50 /200 FREQ.50 /200050100150250200050100150250200MODE/ D.BOXHow to use the VRM, cross-hair cursor](https://usermanual.wiki/Furuno-USA/9ZWRTR051.OPERATORS-MANUAL-PART3/User-Guide-132230-Page-70.png)
![4. VIDEO SOUNDER OPERATION4-124.6 Reducing InterferenceInterference from other acoustic equipment operating nearby or other electronicequipment on your boat may show itself on the display as shown below.Interference from Electrical inteferenceother sounderTypes of interferenceTo reduce interference, do the following:1. Press the [MENU] key followed by the SOUNDER MENU soft key.2. Select NOISE LIMITER and press the EDIT soft key to show the noise limiterwindow.NOISE LIMITER▲OFFLOWMEDIUMHIGH▼Noise limiter window3. Use the cursor pad to select degree of suppression desired or turn the noiselimiter off.4. Press the RETURN soft key to finish.Turn the noise limiter circuit off when no interference exists, otherwise weakechoes may be missed.](https://usermanual.wiki/Furuno-USA/9ZWRTR051.OPERATORS-MANUAL-PART3/User-Guide-132230-Page-71.png)
![4. VIDEO SOUNDER OPERATION4-134.7 Reducing Low Level NoiseLight-blue dots may appear over most of screen. This is mainly due to dirty wateror noise. This noise can be suppressed by adjusting CLUTTER on theSOUNDER menu.Appearance of clutterWhen the sounder mode is Auto, the clutter suppression setting is fixed at AUTO.To reduce low level noise in manual sounder operation do the following:1. Press the [MENU] key followed by the SOUNDER MENU soft key.2. Select CLUTTER and press the EDIT soft key to show the clutter window. CLUTTER ▲ OFF ▼LIMITS: OFF, 1-9DEFAULT: 6CAN NOT CHANGE WHENAUTO MODE IS ON.Clutter window3. Use the cursor pad to select clutter rejection level desired; 0 (OFF) through 9.The higher the number the higher the degree of suppression. Note that weakechoes may not be displayed when the clutter circuit is on. Therefore turn offthe clutter when its use is not required.4. Press the RETURN soft key to finish.](https://usermanual.wiki/Furuno-USA/9ZWRTR051.OPERATORS-MANUAL-PART3/User-Guide-132230-Page-72.png)
![4. VIDEO SOUNDER OPERATION4-144.8 Erasing Weak Echoes (MODEL-1700C series)Dirty water or reflections from plankton may be painted on the display in green orlight blue. These weak echoes may be erased as follows:WeakechoesAppearance of weak echoes1. Press the [MENU] key followed by the SOUNDER MENU soft key.2. Select SIGNAL LEVEL, and press the EDIT soft key to show the signal levelwindow.SIG LVL▲ OFFSL1SL2SL3SL4SL5SL6▼SIG LVL▲ OFFSL1SL2SL3▼ 16-color display 8-color display Monochrome displayDEFAULT: OFF DEFAULT: OFFSIG LVL▲ OFFSL1SL2▼DEFAULT: OFFSignal level window3. Use the cursor pad to select level of erasure or OFF as appropriate. Thehigher the number the stronger the echo that will be erased.4. Press the RETURN soft key to finish.](https://usermanual.wiki/Furuno-USA/9ZWRTR051.OPERATORS-MANUAL-PART3/User-Guide-132230-Page-73.png)
![4. VIDEO SOUNDER OPERATION4-154.9 White Marker (MODEL-1700C series)The white marker functions to display a particular echo color in white. Forexample, you may want to display the bottom echo (reddish-brown) in white todiscriminate fish echoes near the bottom. Note that the bottom must be displayedin reddish-brown for the white marker to function.1. Press the [MENU] key followed by the SOUNDER MENU soft key.2. Select WHITE MARKER, and press the EDIT soft key to open the whitemarker window.WHITE MARKER ▲ OFF ▼WHITE MARKER ▲ OFF ▼LIMITS: OFF, 1-8 LIMITS: OFF, 1-168-color display 16-color displayWhite marker window3. Use the cursor pad to select color to display in white. As you Use the cursorpad, the number (corresponds to echo number) in the marker windowchanges, the white marker on the echo strength bar shifts and selected echocolor is displayed in white.←White marker shows color currently displayed in white.Echo strength bar (16 color) when white marker function is active4. Press the RETURN soft key to finish.To turn the white marker function off, display “0” in the white marker window.](https://usermanual.wiki/Furuno-USA/9ZWRTR051.OPERATORS-MANUAL-PART3/User-Guide-132230-Page-74.png)
![4. VIDEO SOUNDER OPERATION4-164.10 Picture Advance SpeedThe picture advance speed determines how quickly the vertical scan lines runacross the screen. When selecting a picture advance speed, keep in mind that afast advance speed will expand the size of the fish school horizontally on thescreen and a slow advance speed will contract it.The speed may be set independent or dependent on ship’s speed.4.10.1 Advancement independent of ship’s speed1. Press the [MENU] key followed by the SOUNDER MENU soft key.2. Select PICTURE ADVANCE, and press the EDIT soft key to open the pictureadvance window.PICTURE ADVANCE▲2/11/11/21/41/8STOP▼DEFAULT: 1/1Picture advance windowThe fractions in the window denote number of scan lines produced pertransmission. For example, 1/8 means one scan line is produced every eighttransmissions. STOP freezes the display and it is convenient for observing anecho.3. Use the cursor pad to select speed desired.4. Press the RETURN soft key to finish.](https://usermanual.wiki/Furuno-USA/9ZWRTR051.OPERATORS-MANUAL-PART3/User-Guide-132230-Page-75.png)
![4. VIDEO SOUNDER OPERATION4-174.10.2 Advancement synchronized with ship’s speedWith speed data provided by a speed measuring device, picture advance speedmay be automatically adjusted with ship’s speed. As shown in the figure belowthe horizontal scale of the display is not influenced with the speed dependentpicture advance mode active, thus it permits judgement of fish school size andabundance at any speed. With the advancement synchronized with ship’s speedthe picture advance speed setting (on the previous page) is ignored.FULLSPEEDHALFSPEEDActual MovementSame sizefish schoolsSpeedNormal ModeSpeed Dependent Picture Advance ModeFish school shrinks as speedis increased; expandedas speed is decreased.Fish schools are shownsame size regardlessof ship’s speed.How the speed dependent advance mode worksActivating/deactivating the speed dependent picture advance mode1. Press the [MENU] key followed by the SOUNDER MENU soft key.2. Select SPD SENSING PIC ADV.3. Press the EDIT soft key to open the setting window.4. Use the cursor pad to select ON or OFF (default setting) as appropriate.5. Press the RETURN soft key to finish.](https://usermanual.wiki/Furuno-USA/9ZWRTR051.OPERATORS-MANUAL-PART3/User-Guide-132230-Page-76.png)
![4. VIDEO SOUNDER OPERATION4-184.11 Display Colors (MODEL-1700C series)You can select the number of colors to display and background color as follows:1. Press the [MENU] key followed the SOUNDER MENU soft key.2. Select HUE, and then press the EDIT soft key to show the hue window.HUE ▲ 1 ▼LIMITS: 1-9DEFAULT: 1Hue window3. Use the cursor pad to select hue number, referring to the table below. (Youcan see the result of your selection on the display.)Available background and echo colors for the sounder displayHue No. Echo Color Background Color1 16 color Blue2 8 color Blue3 16 color Dark blue4 8 color Dark blue5 16 color White6 8 color White7 16 color Black8 8 color Black9 Monochrome, eight intensities4. Press the RETURN soft key to finish.](https://usermanual.wiki/Furuno-USA/9ZWRTR051.OPERATORS-MANUAL-PART3/User-Guide-132230-Page-77.png)
![4. VIDEO SOUNDER OPERATION4-194.12 AlarmsThe sounder section has five conditions which generate visual and audio alarms:Bottom Alarm, Fish Alarm (bottom lock), Fish Alarm (normal), Water TemperatureAlarm, and Speed Alarm.The sounder alarm menu may be displayed by pressing the [ALARM] key.ALARM AUDIOINTBOTTOM ALARM200.0~ 220.0ftFISH (B/L) ALARMBOTTOM~ 20.0ftFISH (NORMAL) ALARM100.0~ 129.0ftTEMP. ALARMIN 68.0~ 78.0FSPEED ALARMIn 00.0~ 99.9ktALARM INFOMATION NO ALARMSOUNDERALARMEDITNEXTINFOCLEARALARMRETURNSounder alarm menu4.12.1 Audio alarm on/offThe audio alarm sounds whenever an alarm setting is violated. You can enable ordisable the audio alarm as follows:1. Press the [ALARM] key to show the ALARM menu.2. Use the cursor pad to select ALARM AUDIO.3. Press the EDIT soft key to show the audio alarm window.ALARM AUDIOINT+EXT BUZZINTERNAL BUZZ OFFAudio alarm window4. Use the cursor pad to select INT+EXT (Internal + External alarm), INTERNAL(Internal alarm) or OFF.5. Press the ENTER soft key or push the [ENTER] knob to register yourselection.6. Press the [MENU] key to close the menu](https://usermanual.wiki/Furuno-USA/9ZWRTR051.OPERATORS-MANUAL-PART3/User-Guide-132230-Page-78.png)
![4. VIDEO SOUNDER OPERATION4-204.12.2 Bottom alarmThe bottom alarm sounds when the bottom echo is within the alarm range set. Toactivate the bottom alarm the depth must be displayed.1. Press the [ALARM] key to show the ALARM menu.2. Use the cursor pad to select BOTTOM ALARM.3. Press the EDIT soft key to show the bottom alarm window.BOTTOM ALARM▲ON 0000.0-0000.0ftOFF▼LIMIT: -0-9999.9ftDEFAULT: 0ftBottom alarm window4. Use the cursor pad to select ON or OFF as appropriate. For ON, enter alarmrange with the [ENTER] knob.5. Press the ENTER soft key or push the [ENTER] knob to register yourselection.6. Press the [MENU] key to close the menu.4.12.3 Fish (B/L) alarmThe bottom-lock fish alarm sounds when a fish echo is within a predetermineddistance from the bottom.1. Press the [ALARM] key to show the ALARM menu.2. Use the cursor pad to select FISH (B/L) ALARM.3. Press the EDIT soft key to show the fish alarm (B/L) window.FISH ALARM(B/L)▲ON BOTTOM -000.0ftOFF▼LIMIT: -0-20ftFish alarm(B/L) window4. Use the cursor pad to select ON or OFF as appropriate. For ON, enter alarmrange with the cursor pad.5. Press the ENTER soft key or push the [ENTER] knob to register yourselection.6. Press the [MENU] key to close the menu.](https://usermanual.wiki/Furuno-USA/9ZWRTR051.OPERATORS-MANUAL-PART3/User-Guide-132230-Page-79.png)
![4. VIDEO SOUNDER OPERATION4-214.12.4 Fish (normal) alarmThe normal fish alarm sounds when a fish echo is within the preset alarm range.Note that the sensitivity of the fish alarm (which echo strength triggers the alarm)can be set on the SOUNDER MENU.1. Press the [ALARM] key to show the ALARM menu.2. Use the cursor pad to select FISH ALARM(NORMAL).3. Press the EDIT soft key to show the fish alarm (normal) window.FISH ALARM(NORMAL)▲ON 0000.0-0000.0ftOFF▼LIMIT: -0-9999.9ft(m, fa, pb)Fish alarm(normal) window4. Use the cursor pad to select ON or OFF as appropriate. For ON, enter alarmrange with the cursor pad5. Press the ENTER soft key or push the [ENTER] knob to register yourselection.6. Press the [MENU] key to close the menu4.12.5 Water temperature alarmThere are two types of water temperature alarms: WITHIN and WITHOUT. TheWITHIN alarm sounds when the water temperature is within the range set, theWITHOUT alarm sounds when the water temperature is higher or lower than therange set. This alarm requires water temperature data.1. Press the [ALARM] key to show the ALARM menu.2. Use the cursor pad to select TEMP. ALARM.3. Press the EDIT soft key to show the temp. alarm window.TEMP. ALARM▲WITHIN 0000.0-0000.0ftWITHOUTOFF▼LIMIT: -999.9 - 999.9˚FDEFAULT: 0 - 0˚FWater temperature alarm window4. Use the cursor pad to select WITHIN, WITHOUT or OFF as appropriate. ForWITHIN, enter alarm range with the cursor pad.5. Press the ENTER soft key or push the [ENTER] knob to register yourselection.6. Press the [MENU] key to close the menu.](https://usermanual.wiki/Furuno-USA/9ZWRTR051.OPERATORS-MANUAL-PART3/User-Guide-132230-Page-80.png)
![4. VIDEO SOUNDER OPERATION4-224.12.6 When an alarm setting is violated...When an alarm setting is violated the buzzer sounds, and the speaker iconappears at the bottom of the screen. (The speaker icon is displayed until allalarms have been acknowledged on the alarm menu display.) You can silence thebuzzer with the [CLEAR] key, however the buzzer will sound whenever the alarmsetting is violated.To see which alarm(s) has been violated;1. Press the [ALARM] key. The offending alarm is shown in the ALARMINFORMATION window.ALARM AUDIOINTBOTTOM ALARM200.0~ 220.0ftFISH (B/L) ALARMBOTTOM~ 20.0ftFISH (NORMAL) ALARM100.0~ 129.0ftTEMP. ALARMIN 68.0~ 78.0FSPEED ALARMIn 00.0~ 99.9ktALARM INFOMATION NO ALARMSOUNDERALARMEDITNEXTINFOCLEARALARMRETURNAlarm informationwindowCONTINUEMeans multiple alarmshave been violated.Sounder alarm menu2. Press the CLEAR ALARM soft key to acknowledge the alarm. For theMODEL-1700C series the color of the alarm message and the speaker iconchange from red to black to indicate acknowledgement.Note: If more than one alarm has been violated the message CONTINUEappears at the bottom of the alarm information window. In this casepress the NEXT INFO soft key to see which other alarms have beenviolated.](https://usermanual.wiki/Furuno-USA/9ZWRTR051.OPERATORS-MANUAL-PART3/User-Guide-132230-Page-81.png)
![4. VIDEO SOUNDER OPERATION4-23Alarm messagesThe table below shows the sounder alarm messages and their meaningsAlarm messages and their meaningsMessage MeaningEXCEEDED THE FISH (B/L)ALARM.Fish (bottom lock) alarmviolated.EXCEEDED THE FISH (NORMAL)ALARM.Fish (normal) alarm violated.EXCEEDED SPEED ALARM LIMIT. Speed alarm violated.EXCEEDED BOTTOM ALARMLIMIT.Bottom alarm violated.EXCEEDED TEMPERATUREALARM LIMIT.Water temperature alarmviolated.4.13 Water Temperature GraphThe water temperature graph (appropriate sensor required) plots watertemperature on the sounder display. It can be turned on or off as below.1. Press the [MENU] key to open the menu.2. Press the SOUNDER MENU soft key to show the SOUNDER menu.3. Select TEMP GRAPH and press the EDIT soft key.4. Select OFF (default setting) or ON as appropriate.5. Press the RETURN soft key.6. Press the [MENU] key to close the menu.](https://usermanual.wiki/Furuno-USA/9ZWRTR051.OPERATORS-MANUAL-PART3/User-Guide-132230-Page-82.png)