Futaba T8FG-24G Radio Control (Transmitter) User Manual Instruction of the T14MZ
Futaba Corporation Radio Control (Transmitter) Instruction of the T14MZ
Futaba >
User manual

T8FG-2.4G
T8FG
Radio Control
Instruction Manual
INTRODUCTION
Thank you for purchasing a Futaba digital proportional R/C system. In order for you to make the
best use of your system and to use it safely, please read this manual carefully. If you have any
difficulties while using your system, please consult the manual, our online Frequently Asked
Questions (on the web pages referenced below), your hobby dealer, or the Futaba Service
Center.
Owner’s Manual and Additional Technical Help
This manual has been carefully written to be as helpful to you, the new owner, as possible.
There are many pages of setup procedures and examples. However, it need not be your sole
resource of setup guidelines. For example, the back cover includes a quick-start set of
instructions and the Frequently Asked Questions web page referenced below includes this type
of step-by-step setup instructions for a variety of other model types.
Due to potential unforeseen changes in production procedures, the information contained in this
manual is subject to change without notice. No part of this manual may be reproduced in any
form, at any time, without prior permission.
Support and Service: It is recommended to have your Futaba equipment serviced annually
during your hobby’s “off season” to ensure safe operation.
Futaba Corporation
1
T8FG-2.4G
IN NORTH AMERICA
Please feel free to contact the Futaba Service Center for assistance in operation, use
and programming. Please be sure to regularly visit the Frequently Asked Questions
web site referenced below. This page includes extensive programming, use, set up
and safety information on your radio system and is updated regularly. Any technical
updates and US manual corrections will be available on this web page. If you do not
find the answers to your questions there, please see the end of our F.A.Q. area for
information on contacting us via email for the most rapid and convenient response.
Futaba Service Center
3002 N. Apollo Drive Suite 1
Champaign, IL 61822
TEL(217)398-8970, FAX(217)398-7721
HOW TO ACCESS to FAQ:
http://www.futaba-rc.com/
OUTSIDE NORTH AMERICA
Please contact your Futaba importer in your region of the world to assist you with any
questions, problems or service needs.
Please recognize that all information in this manual, and all support availability, is
based upon the systems sold in North America only. Products purchased elsewhere
may vary. Always contact your region’s support center for assistance.
The product is subject to regulations of the FCC and is restricted
under United States law to such purposes.
(See end of this manual for detail)
Futaba Corporation
2

T8FG-2.4G
Instruction of the T8FG
1. Location
S
W
-H
S
W
-
G
S
W
-C
RD
Touch sensor
T1
T2
RS
S
W
-D
J2
LCD
J1
Ri
g
ht Stick
Power Switch
S
W
-E
S
W
-
F
LD
LS
T3
T4
Hook for neck strap
J3
J4
Left Stick
S
W
-
B
S
W
-
A
Fig. 1-1 Front view
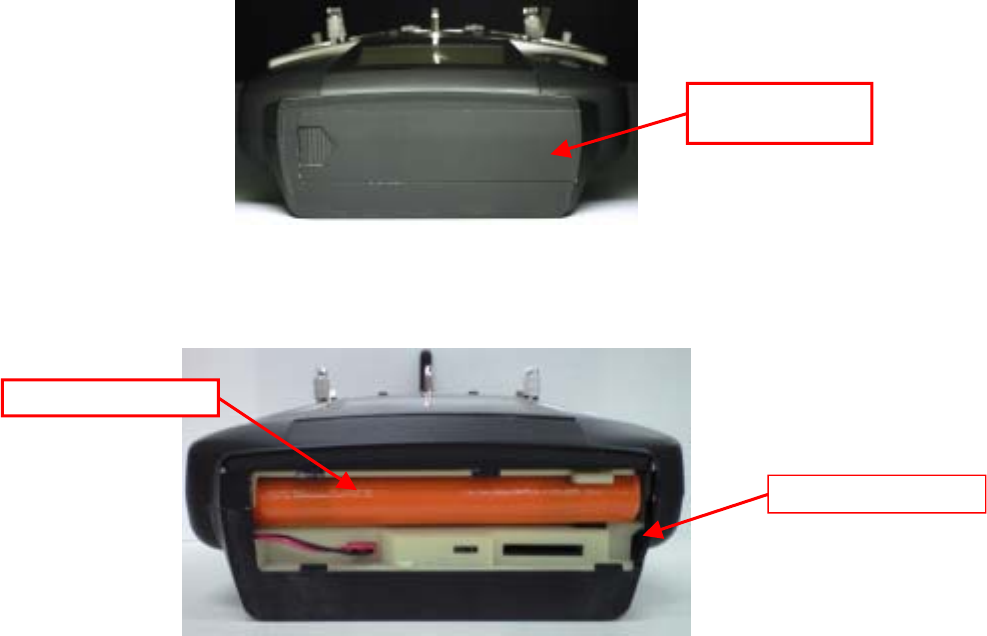
Charge jack
DSC connector
Fig.1-2 Rear view
Futaba Corporation
3
T8FG-2.4G
Battery li
d
(Slider type)
Fig. 1-3 Bottom view
Ni-MH batter
y
SD Card slo
t
Fig 1-4 Battery box
2. Charging the battery
1-1. Please confirms the power switch is off.
1-2. Insert the plug of the charger to charging bush of transmitter.
1-3. During the charging, the LED of the charger is on.
The charging time is appx. 15 hours. Please do not charge the battery for 15hours or more.
The overcharge damages the battery.
The battery is 6 cells Ni-MH battery the capacity is 7.2 V/ 1,700mAH.
Futaba Corporation
4
T8FG-2.4G
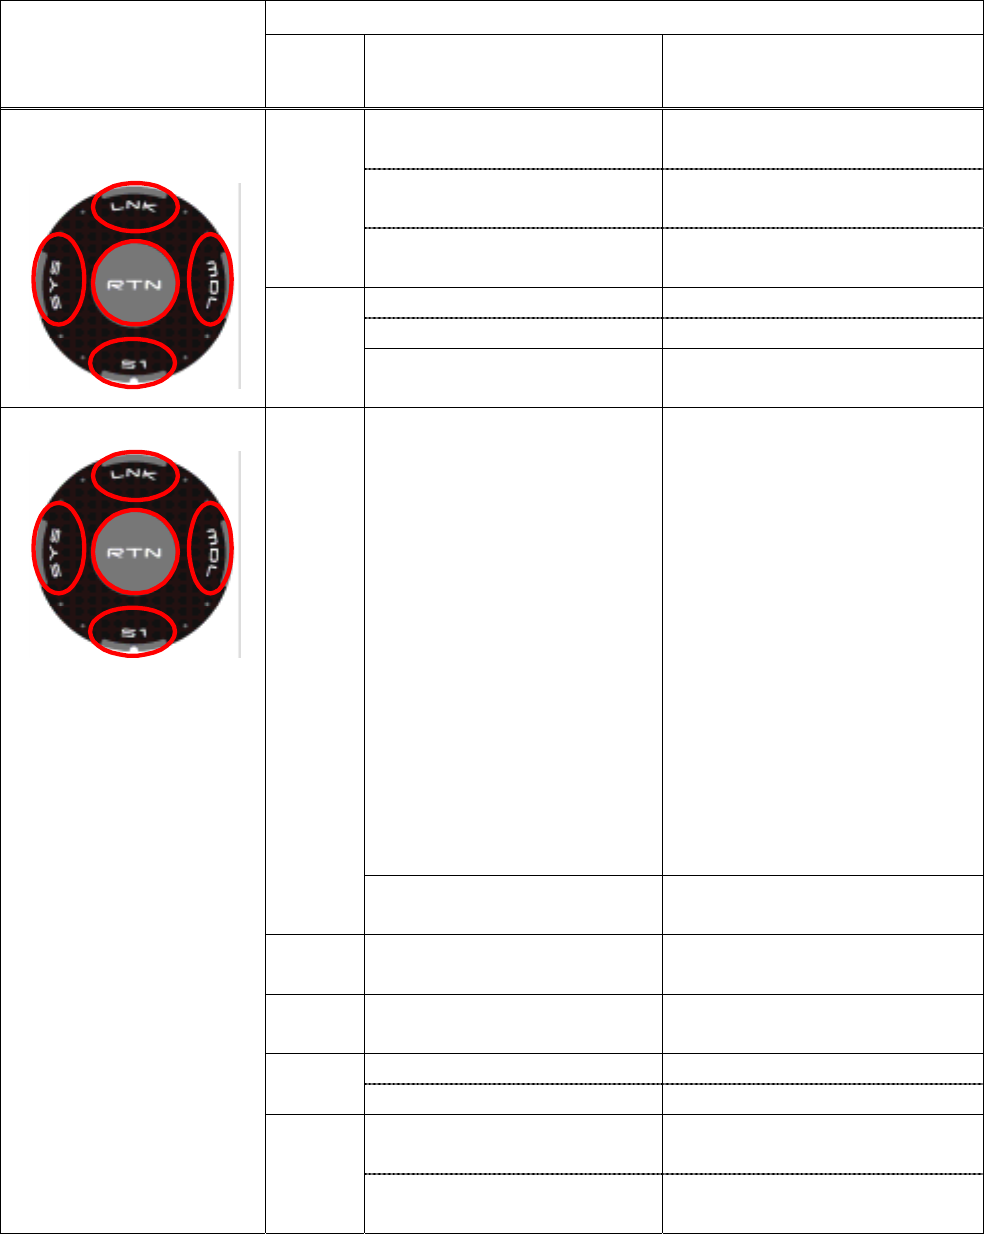
3. Operation of the touch sensor Contents Operation
Touch
part
Condition Working
At the screen have some pages.
(Ex. P-MIX screen) The cursor jumps to top of next
page
S1
At the screen have Only one(1)
page. The cursor jumps the top of page.
At the input data mode with
blinking the setting data. The setting data is canceled.
At the moving cursor mode. Change to the input data mode.
At the input data mode. Change to the moving cursor mode.
Short touch
RTN
At the input data mode with
blinking the setting data. The data is entered.
Home screen,
System menu,
Linkage Menu,
Model menu,
Selecting ON/OFF Switch,
USER NAME,
MODEL NAME,
DISPLAY, INFO,
MODEL SELECT,
MODEL TYPE,
FREQUECY,
DATA RESET,
TIMER,
Selecting Control,
Selecting Function,
SERVO MONITOR
Jump to “System Menu” screen
directly.
SYS
Except of above Jump to “SERVO MONITOR”
screen directly.
LNK At all screens Jump to “Linkage Menu” screen
directly.
MDL At all screens Jump to “Model Menu” screen
directly.
HOME screen Key lock On or Off S1 Except the HOME screen Jump to HOME screen directly.
RTN At the input data mode with
blinking the setting data. Entered decision.
Long touch(1 second)
At the input data mode without
blinking the setting data. Reset to the initialized value.
Futaba Corporation
5
T8FG-2.4G
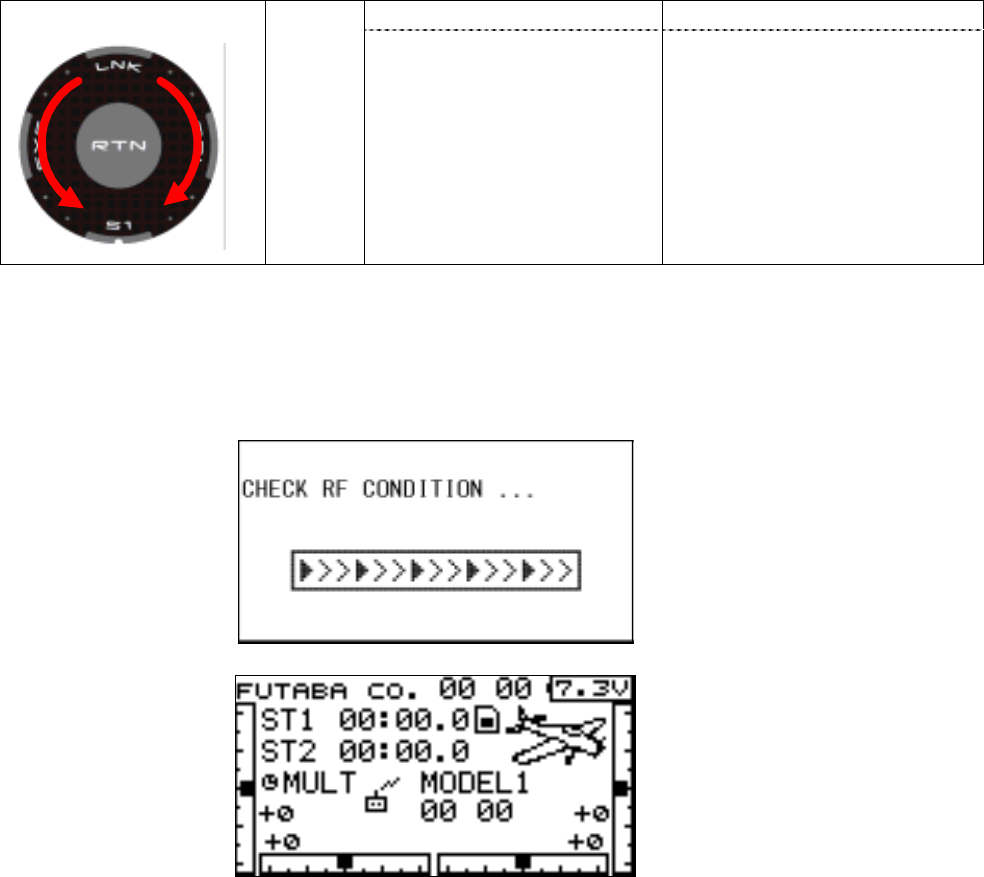
At the moving cursor mode The cursor is moved. Scrolling
Outline
of “RTN” Input data mode Increment or decrement the data.
Select Yes or No, and so on.
4. Turns on the transmitter
4-1 Power switch is to be on. The red LED is light. LCD displays the bar graph at moment.
4-2 Then, LCD displays the Home screen immediately.
Futaba Corporation
6
T8FG-2.4G
5. Basic operation of editing
LCD screen is consists of editing button and monitor display. You can go through editing menu
by touch sensor. If you want t o go back to previous menu, you move the cursor to screen title
and touch “RTN”.
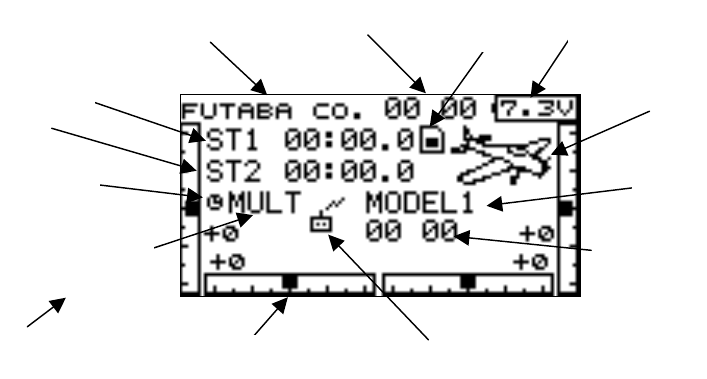
6. Home screen
You always enter this screen after turning on the power. It is a base screen to edit.
5
12
3
6
11
1
7
2
9
4
8
10
13
1. User Name 8. Mode (MULT / 7CH)
2. Timer #1 9. Timer #2
3. Model Name 10. Trim Indicator
4. Clock icon (Jump to timer screen) 11. Model Type Icon
5. Integrated Timer 12. Memory Card Icon (at detected card)
6. Model Timer 13. RF Transmit
7. Battery Gauge
Futaba Corporation
7

T8FG-2.4G
Futaba Corporation
8
7. Linkage menu
The linkage menu sets the primary data of the each model. These data are common to every
flight condition.
If you touch “LNK” of the touch sensor over 1 second, you can get into the linkage menu screen.
8. Model Menu
The model menu sets the data of mixer. These data of each flight condition can be set.
If you touch “MDL” of the touch sensor over 1 second, you can get into model menu screen.
9. System Menu
The system menu sets the transmitter setting data. For example, display contrast, stick mode.
If you touch “SYS” of the touch sensor over 1 second, you can get into system menu screen
INSTRUCTIONS MANUAL
FEDERAL COMMUNICATIONS COMMISSION
INTERFERENCE STATEMENT
This equipment has been tested and found to comply with the limits for a Class B digital
device, pursuant to Part 15 of the FCC Rules. These limits are designed to provide
reasonable protection against harmful interference in a residential installation. This
equipment generates, uses, and can radiate radio frequency energy and, if not installed
and used according to the instructions, may cause harmful interference to radio
communications. However, there is no guarantee that interference will not occur in a
particular installation. If this equipment does cause harmful interference to radio or
television reception, which it found by turning the equipment off and on, the user is
encouraged to try to correct the interference by one or more of the following measures:
-- Reorient or relocate the receiving antenna.
-- Increase the separation between the equipment and receiver.
-- Connect the equipment into an outlet other than the receiver’s
-- Consult the dealer or an experienced radio/TV technician for assistance.
CAUTION:
To assure continued FCC compliance:
(1) Any changes or modifications not expressly approved by the grantee of this device
could void the user's authority to operate the equipment.
FCC Label Compliance Statement:
This device complies with Part 15 of the FCC Rules. Operation is subject to the
following two conditions: (1) this device may not cause harmful interference, and (2)
this device must accept any interference received, including interference that may
cause undesired operation.
Exposure to Radio Frequency Radiation
To comply with FCC RF exposure compliance requirements, a separation distance of at
least 20cm must be maintained between the antenna of this device and all persons. This
device must not be co-located or operating in conjunction with any other antenna or
transmitter.