Futaba TM78-24G Radio Control User Manual Manual
Futaba Corporation Radio Control Manual
UserManual.wiki
>
Futaba
>
TM78 24G User Manual
Manual
Navigation menu
Upload a User Manual
Namespaces
Wiki Guide
HTML
PDF
Info
Views
User Manual
Discussion / Help
Navigation
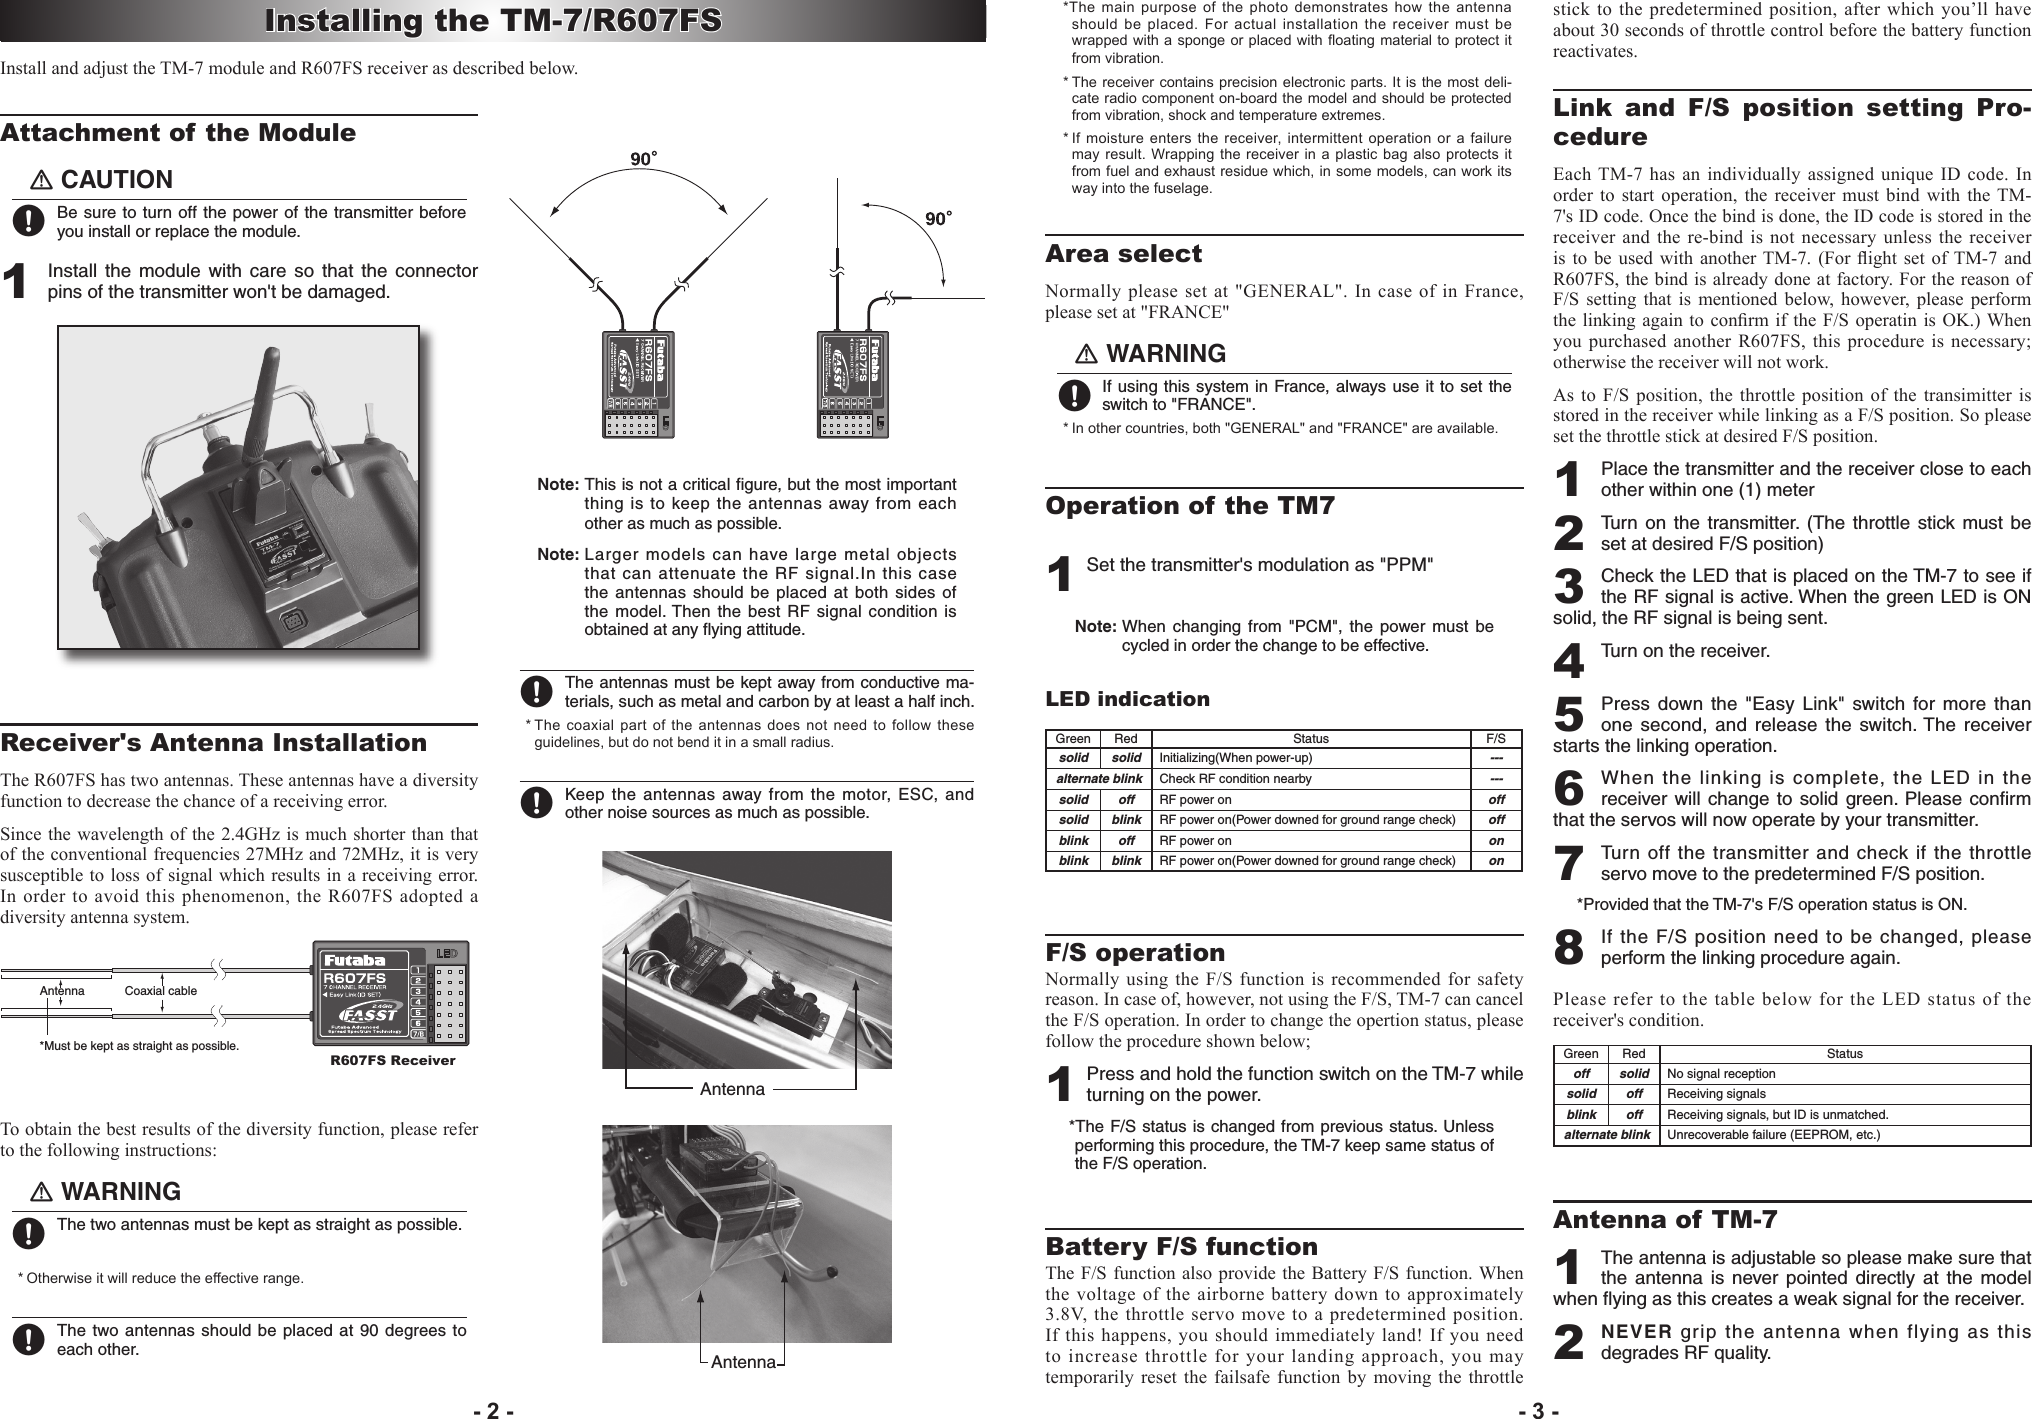
![• No part of this manual may be reproduced in any form without prior per-mission. • The contents of this manual are subject to change without prior notice.• This manual has been carefully written. Please write to Futaba if you feel that any corrections or clarications should be made.IMPORTANT: Since the 2.4GHz have different characteristics than that of the conventional 27MHz and 72MHz frequencies, please read this manual carefully to enjoy safe flight with the 2.4GHz system.1M23NContents and Technical SpecicationsYour 2.4GHz system includes the following components;[Specication]TM-7 RF Module:• Communication system: One-way communication• Antenna: 1/2 wavelength di-pole.• Current consumption: 150mA max.• Setting switch for F/S setting and range check• Monitor LED for indication of operation statusR607FS Receiver:• Diversity antenna• Power requirement: 4.8V or 6.0V battery or regulated out put from ESC, etc.• When using NiCd or NiMH, the 4-cell is recommended as it makes effective use of the battery f/s function. (Never use Dry batteries as it cause malfunctions)• F/S and Battery F/S function for throttle CH. (3rd Ch.)• Size: 1.64x1.08x0.36 in. (41.6x27.5x9.2 mm)• Weight: 0.34 oz. (9.8 g) TM-7 RF ModuleTM-7 RF Moduleand R607FS ReceiverThank you for purchasing the TM-7 2.4G FASST RF-module and R607FS FASST 7ch-receiver. The system can be utilized with Futaba transmitters of listed below. In order to use the TM-7, just replace it with the conventional RF- module. The receiver R607FS can output up to 7ch of servo control signal. Installation of the receiver needs special attention and please follow our guideline to enjoy safe ight with TM-7 and R607FS with your transmitter! Features2.4GHz Spread Spectrum radio communication systemExclusive ID code for avoiding a jamming from other FASST system.Fail Safe(F/S) function(for throttle Ch.)---F/S, Battery F/SDiversity antenna(R607FS)••••Applicable system; T7U, T8U, T9C, T9Z, FC-18 Plus or FC-28 Transmitter R607FS Receiver Mini screwdriver INSTRUCTION MANUALRepair Service Before requesting repair, read this instruction manual again and recheck your system. Should the problem continue, request repair service as follows: Describe the problem in as much detail as possible and send it with a detailed packing list together with the parts that require service.• Symptom (Including when the problem occurred) • System(Transmitter, Receiver, Servo's and model numbers)• Model (Model name) • Model Numbers and Quantity• Your Name, Address, and Telephone Number. If you have any questions regarding this product, please consult your local hobby dealer or contact the Futaba Service Center.FUTABA CORPORATION Phone: (043) 296-5118 Facsimile: (043) 296-5124Makuhari Techno Garden Bldg., B6F 1-3 Nakase, Mihama-ku, Chiba 261-8555, Japan©FUTABA CORPORATION 2007, 05 (1)Special Markings; Pay special attention to the safety at the parts of this manual that are indicated by the following marks. [Symbol] ; Prohibited ; MandatoryMark MeaningProcedures which may lead to a dangerous condition and cause death or serious injury to the user if not carried out properly. Procedures which may lead to a dangerous condition or cause death or serious injury to the user if not carried out properly, or procedures where the probability of superficial injury or physical damage is high.Procedures where the possibility of serious injury to the user is small, but there is a danger of injury, or physical damage, if not carried out properly.Range Check the Radio1 Turn on the transmitter. Wait until the RF signal becomes stable.(LED is solid green or blink) 2 Press and hold the function switch on the TM-7 then the RF power is reduced so the range test can be performed. While RF power is being reduced, the red LED on the TM-7 becomes blinking. Note: Please be careful that if press and hold the switch before turn on the transmitter then the F/S status is changed. To avoid this situation, please wait for while after turn on the transmitter then start ground range check.3 Walk away from the model while simultaneously operating the controls. Have an assistant stand by the model and signal what the controls are doing to confirm that they operate correctly. You should be able to walk approximately 30 - 50 paces from the model without losing control.4 If everything operates correctly, return to the model. Set the transmitter in a safe, yet accessible location so it will be within reach after starting the engine. Be certain the throttle stick is all the way down, then start the engine. Perform another range check with your assistant holding the plane and the engine running at various speeds. If the servos jitter or move inadvertently, there may be a problem. Do not fly the plane! Look for loose servo connections or binding pushrods. Also be certain that the battery has been fully charged. 5 NEVER press and hold the function switch when flying as it cause loss of total control!Other precautions1 When utilizing the trainer function of the transmitter as a instructor, please do not switch to the student's control until the RF starts output after turn on the power. Otherwise it may cause malfunction. USAGE PRECAUTIONS1. If there is a special regulation for using 2.4GHz radio systems at your flying site, please obey all regulations to enjoy safe flying with your 2.4GHz system. 2. 2.4GHz is very different than the frequencies we currently use. Please keep the model in sight at all times as large objects can block the RF signal. Please keep in mind that objects such as wire fences and wire mesh will also cause loss of signal.3. NEVER grip the transmitter antenna when flying as this degrades RF quality and cause loss of control.- 4 - - 1 -](https://usermanual.wiki/Futaba/TM78-24G/User-Guide-817240-Page-1.png)