G G Telecom 0011 Bluetooth Headset User Manual user guide1 back 0724 ai
G.G. Telecom (2002) Incorporated Bluetooth Headset user guide1 back 0724 ai
Users Manual
Multi-point
Technology
Power ON your headset:
Power OFF your headset:
To enter Pairing mode:
To Answer or End a call:
To Reject a call*:
To Redial the last call*:
To activate Voice Dialing:
To adjust the Volume:
To Disable/Enable the LED light indicators:
To Reset your headset to factory settings:
or
The device complies with Part 15 of he FCC rules.
Operation is subject to the following two conditions:
15.21
15.105(b)
To pair with another device
To connect 2 devices with your headset
To Redial the last call* / To activate Voice
To Answer / End / Reject a call*
To answer a call on one mobile while talking on the other.
Note: There is no chance for placing first call on
hold while answering the second call.
www.gg2002.com
1
2
3
4
Getting started
Introduction
Headset Call Controls
Headset Call Controls
1. MFB(Multi Function Button)
2. Volume Up Button
3. Volume Down Button
Pairing with your Bluetooth device
Before you can use your headset, you must ’link
link
’ it
with the device you wish to use.
Step A: Put your headset in Pairing Mode
Step A: Put your headset in Pairing Mode
Method1
When your headset is , not turn on, long press the
MFB button until the red and blue light alternate.
Method2
When your headset in standby mode, (blue light
blinking 1 time every 4 seconds), long press the
Volume Up button until the red and blue light
alternate.
2. Volume Up Button
3. Volume Down Button
1.
MFB
(Multi Function Button)
3.Select your headset from the
list of discovered device
4.Enter the Pincode
/Passkey “0000”
“0000”
5.Select your headset from the list
of paired device.
Note:
Note:
After pairing, some devices.
will automatically connect to
your bluetooth headset, and
some will not.
Step C: Initial Test
Step C: Initial Test
Your headset and your phone should now be paired
and connected, ready to make and receive calls.
To confirm they are successfully paired and operating
properly please try the following.
1.On your phones keypad, dial a contact you wish to
call.
2.Press Send
Send
on your phone to initiate the call.
The call will be heard on the headset.
Charging your Headset
Charging of your headset will take about 1.5 hours.
Follow the procedure as follows:
1.Insert the headset Wall Charger into a DC power
source and switch ON.
2.Insert the plug on the end of the headset charging
cable into your headset as shown below.
3.The Red LED indicators will light up showing that
the headset is being charged.
The Red LED
indicator is off
is off
The Red LED
indicator turns on
turns on
4. When charging is complete the Red LED indicat-
ors will turn off.
5. Remove the charger plug from the headset then
switch off the charger.
Step B: Pairing your headset to your phone/device
Step B: Pairing your headset to your phone/device
1.Turn on the Bluetooth function of your phone/device
2.Perform a “Bluetooth device discovery
Bluetooth device discovery
” from your
phone or device.
Paired devices
(no paired devices)
New paired device
Help
Exit
Select Cancel
Paired devices
(no paired devices)
Bluetooth
Baby-a
Select Cancel
Paired devices
(no paired devices)
Bluetooth
Passcode for Baby-a
Select Cancel
123
0000
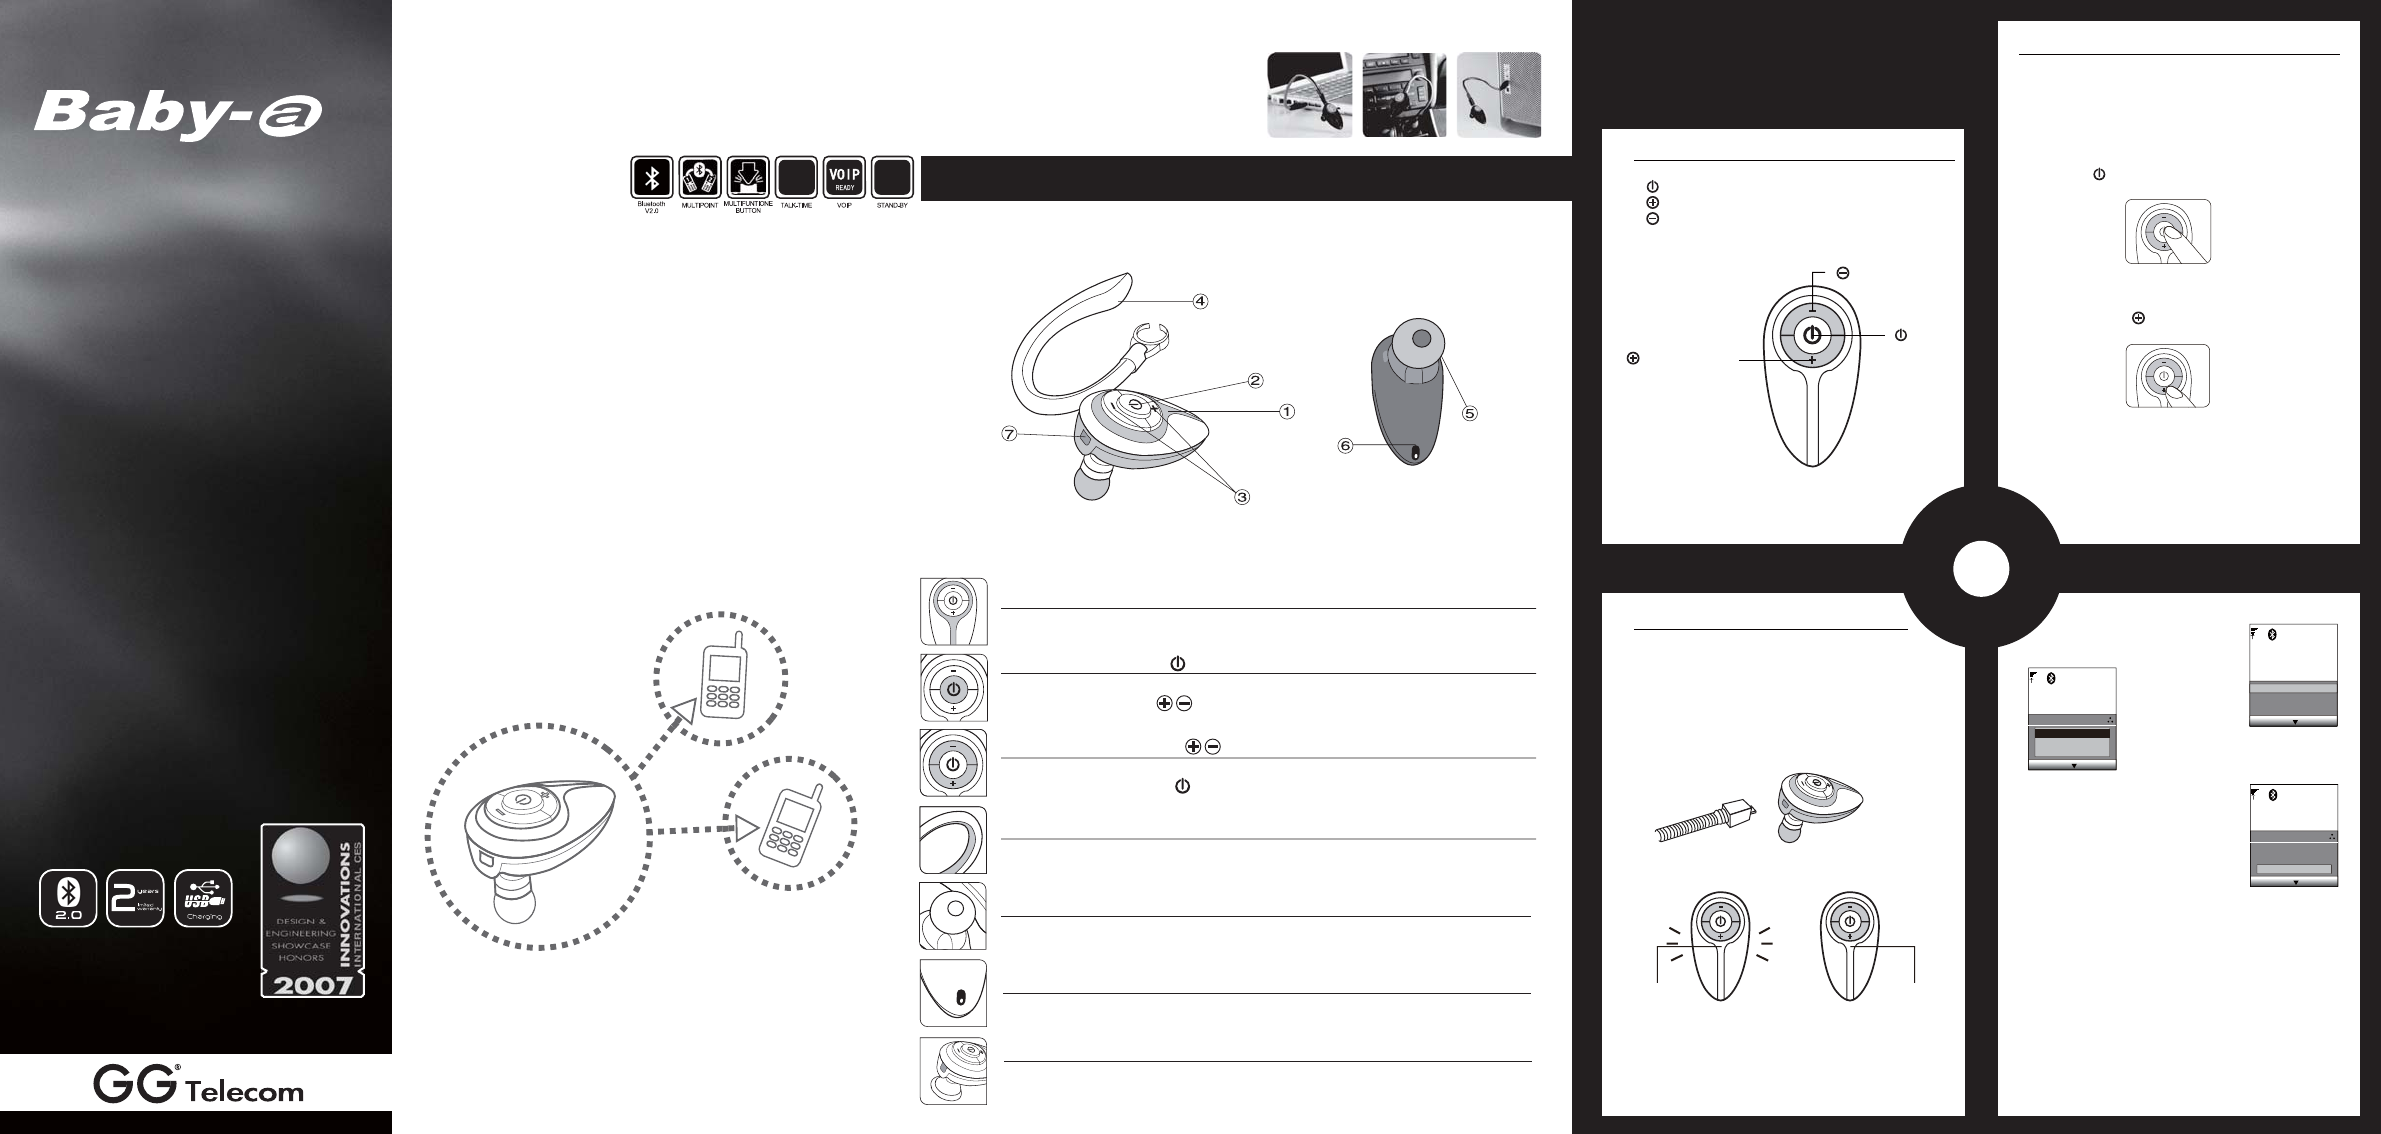
1.Indicator LED
1.Indicator LED
There are 3 colors(blue/red/purple) to show the status of your headset.
2.Multifunction button
2.Multifunction button
To answer, end, reject a call and control advance functions by constituting with
volume control button (please refer to the Function/Button matrix).
3.
3.V
olume control button
olume control button
To increase or decrease the volume of speaker and control advance functions
by constituting with MFB (please refer to the Function/Button matrix).
4.Ear-hook
4.Ear-hook
To wear the headset on your ear, you can switch the direction as your habit.
5. Speaker
5. Speaker
Plays the sound you receive on the call or the audio indicators
6. Microphone
6. Microphone
Voice input for outgoing voice.
Tel : + 886-2-87510222
Fax: + 886-2-87510668
Website : www.gg2002.com
Email : sales@ggtelecom2002.com
Bluetooth Headset
7. Charging Port
7. Charging Port
Plug in the USB charging cable to charge the battery of your headset.
Headset overview
● Bluetooth V2.0
● Bluetooth V2.0
● Multi-point Technology
● Multi-point Technology
● Firmware Upgradable
● Firmware Upgradable
● Echo Supression Technology
● Echo Supression Technology
● Up to 10 meters operating range
● Up to 10 meters operating range
● 100 mAh Li-polymer Battery
● 100 mAh Li-polymer Battery
● Support Headset and Handsfree Profile
● Support Headset and Handsfree Profile
● Weight 9 g
● Weight 9 g
9220
HOUR HOUR
5
6
7
8
● Red light flashes 2 time indicates that the
battery is40% full
● Red light flashes 1 time indicates that the
battery is 20% full
Headset Functions
1.Power ON your headset:Power ON your headset: Press and Hold the MFB
for about 3 seconds until the blue indicator flashes
twice. After powering on,your headset will automati-
cally connect to your last used phone if it is in oper-
ating range. If no paired phone is in range or no
phone has been paired, your headset will enter Sta-
ndby mode.
2.Power OFF your headset:
Power OFF your headset: Press and Hold the MFB
for about 3 seconds until the red indicator flashes
twice.
3.To enter Pairing mode:
To enter Pairing mode: While in Standby mode,Press
and Hold the Volume Up button for about 2 seconds.
4.To Answer or End a call:
To Answer or End a call: Press the MFB once when
there is an incoming call to Answer.Press the MFB
once again to end the call.
5.To Reject a call*:
To Reject a call*: Press and Hold the MFB for about
2 seconds when there is an incoming call.
6.To Redial the last call*:
To Redial the last call*: Press and Hold the Volume
Down Button for about 2 seconds.
7.To activate Voice Dialing:
To activate Voice Dialing: While connected to your
phone, Press the MFB once. Voice commands must
have been previously recorded into your phone
(see your phones user guide)
8.To adjust the Volume:To adjust the Volume: Click the Volume Up or
Volume Down Button during a call. Adjust to the
desired level. The volume level you set to will be
remembered by your headset and used on the next
call.
To indicate the battery status,
Short press Volume Up Button and Volume Down
Button at the same time when your headset is in
standby mode.
● Red light flashes 5 time indicates that the
battery is full
● Red light flashes 4 time indicates that the
battery is 80% ful
● Red light flashes 3 time indicates that the
battery is 60% full
9.To Disable/Enable the LED light indicators: To Disable/Enable the LED light indicators:
Double Press the Volume Up or Volume Down
Button when your headset is in standby mode.
10.To Reset your headset to factory settings:
To Reset your headset to factory settings: Press during
standby mode all three button together.
* To use these functions, your phone/devi-
ce must support the Bluetooth Handsfr-
ee Profile. Headset profile will not acti-
vate these features of your headset.
oror
Warranty Card
nottuBnoitcnuF
Pair
Voice dial using the current connected phone
when connected
Cancel voice dialing
Cancel last call redial
Answer a call
End a call
short press 1
time
long press for
2 seconds
Last call redial using the current connected
phone when connected
Last call redial using the last used phone
when not connected
Reject a call
Volume up
Volume down
Release the Bluetooth connection
Reset
long press for
2 seconds
long press for
2 seconds
short press 1
time
short press 1
time
short press at
the some time
short press at the
some time
Function / Button matrix
13
14
measures:
-Reorient or relocate the receiving antenna.
- -Increase the separation between the equipment and receiver.
-Connect the equipment into and outlet on a circuit different from that to
which the receiver is connected.
-consult the dealer or an experienced radio/TV technician for help.
You are cautioned that changes or modifications not expressly approved by
the party responsible for compliance could void your authority to operate the
equipment.
This transmitter must not be co-located or operating in conjunction with any
other antenna or transmitter.
<<Regulatory information>>
Any modification or changes (e.g. antennas) made to this headset that is not
expressly approved by G.G. Telecom may void the user’s authority to operate
this headset. G.G. Telecom is not responsible for any radio or television
interference caused by unauthorized modification of this headset. It is the
responsibility of the user to correct any interference caused by such unautho-
rized modification. G.G. Telecom and its authorized resellers or distributors
will assume no liabililty for any damage or violation of government regulations
arising from failing to comply with these guidelines.
This user manual is published by G.G. Telecom, without any guarantee.
The information contained in this document is subject to change without notice.
<<Declaration of conformity>>
FCC Statement
The device complies with Part 15 of he FCC rules. The device complies with Part 15 of the FCC rules.
Operation is subject to the following two conditions: Operation is subject to the following two conditions:
1. This device may not cause harmful interference, and
2. this device must accept any interference received, including interference
Federal communications commission (FCC) statement
15.2115.21
You are cautioned that changes or modifications not expressly approved by
the part responsible for compliance could void the user’s authority to
operate the equipment.
15.105(b)15.105(b)
This equipment has been tested and found to comply with the limits for a
class B digital device, pursuant to part 15 of the FCC rules. These limits are
designed to provide reasonable protection against harmful interference in a
residential installioan. This equipment generates, uses and can radiate
radio frequency energy and, if not installed and used in accordance with the
instructions, may cause harmful interference to radio communications.
However, there is no guarantee that interference will not occur in a particular
installation. If this equipment does cause harmful interference to radio or
television reception,which can be determined by turning the equipment
off and on, the user is encouraged to try to correct the interference by
one or more of the following
Emergency calls
You should never rely solely upon any electronic device for essential comm-
unications (e.g. 911 emergency calls).
Keep in mind that when making or receiving a call, your headset and the
electronic device connected to must be switched on and in a service are a
with adequate cellular signal strength. Emergency calls can sometimes be
disturbed on certain cellular phone networks or when certain network
services and/or phone features are in use. Check with your local cellular
service provider for more details.
Battery information
-The rechargeable battery of your headset is not fully charged when it is new.
Before your initial use, please charge your headset for 4 hours first.
-When the rechargeable battery of your headset is low, there will be a battery
low tone and the red indicator will rapidly flash twice every 5 seconds to alert
the user.
Potentially explosive atmospheres
For safety reason, turn off your electronic device when surrounded
by possible explosive atmosphere. It is rare, but your electronic device
could generate sparks which can cause and explosion or fire. Areas with a
potenatially explosive atmosphere are often, but not always, clearly marked.
Explosive atmosphere may include gas stations, fuel or chemical storage
facilities, and in environment where metal powders, grain are contained in the
air.
Power supply
-Do not wear your headset when charging.
-Power supply must be connected to designated power sources as marked
on the product.
-The reduce risk of damage to the electronic cord, only remove it by grasping
onto the AC adapter rather than the cord itself form the outlet.
-Make sure the cord is well positioned to avoid potential damage.
-Before attempting to clean the AC power adapter, please unplug the unit from
any power source to reduce risk of electronic shock.
-The AC power adapter is designed for indoor use only, and must not be used
outdoors.
-If the plug will not fit into the outlet, asking help from a qualified electrician.
Improper connection can result in risk of electric shock.
Blue i ndicator blinks twice
Red indicator blinks twice
Red & Blue indicator blinks by turns.
Purple indicator blinks twice and then
Blue & Red indicators blinks byturns
as pairing mode
Blue indicator blinks once every
4 seconds
Blue indicator rapidly blinks twice
every 4 seconds
Purple indicator blinks once per
second
Blue indicator rapidly blinks 3 times
every 4 seconds
Red indicator light steady on
Red indicator off
Power on
Power off
Pairing mode
Standby
mode
Sniff mode
Incoming call
Talking
Charging
Charging
complete
Reset
etatS tesdaeH noitacidnI DEL
-The rechargeable battery of your headset has a long service life if treated
properly.
-One new battery, or one that has not been used for a long period of time,
could have reduced capacity the first few times it is used.
-Use your headset in room temperature for maximum battery capacity.
-Do not expose your headset in an environment temperature above +55 ℃
(+131 ℉). If your headset is operated in cold temperatures, the battery
capacity will be reduced.
-The battery can only be charged in temperatures between +10℃ (+55℉)
and +45℃(+113℉)
LED Indicator Chart
Using your headset with mutiple devices
Multi-Connection Techology.
1. To pair with another device
To pair with another device
Repeat the previous pairing steps with the new device.
2. To connect 2 devices with your headset
To connect 2 devices with your headset
Please refer the user manual of your devices, setup
the Bluetooth connections from your devices.
3. To Redial the last call
To Redial the last call* / To activate Voice / To activate Voice
Please refer previous “Headset Functions” section,
Your headset assume you wish to use the last used
device.
4. To Answer / End / Reject a call*
To Answer / End / Reject a call*
Please refer previous “Headset Functions” section.
5. To answer a call on one mobile while talking on the other.
To answer a call on one mobile while talking on the other.
To terminate the first call by pressing the MFB once.
To answer the second call by pressing the MFB again
If you do not want to answer the second call, you need
not press the MFB after you terminate the first call.
Note: There is no chance for placing first call on
Note: There is no chance for placing first call on
hold while answering the second call. hold while answering the second call.
The product which produced by G.G. Telecom(2002) Inc. has b-
een fully exam and pass quality control. Sincere guarantees to
Guaranty Certificate by this product to be suitable for the follow-
ing conditions:
● G.G. Telecom provides 2 year limited warranty for this product
commencing from the date of purchase.
● Customers must present the original Warranty Card within pro-
duct serial number together with original purchase invoice to
retailer for verification when warranty service is rendered.
● Within the warranty period, G.G. Telecom will repair or replace
the parts that are damaged under normal circumstance(re-
value by G.G. Telecom) at no additional charge.
● Any cost of transportation is on the account of purchaser.
● Free guarantee service will not be provided to the said equip-
ment if:
(a) Any unauthorized repair or modification has been carried out
on the unit, or
(b) It has been damaged through misuse, negligence, accident,
insects or natural calamities, or
(c) It has been installed, maintained or operated otherwise than
in accordance with the instructions.
● Warranty service is valid worldwide.
● The warranty card is only valid through authorised retailer only.
Dealer:
Model No :
Product Serial Number :
Purchase Date : (yy) (mm) (dd)
GG Telecom Warranty Process
1. Should you be having difficulties in the operation of your hea-
dset please refer to the online FAQ and support documents.
2. Check our website for more information, updated manuals and
troubleshooting.
www.gg2002.com
www.gg2002.com
3. Return the unit directly to GG Telecom for testing and replace-
ment of faulty items - Please call or email to arrange a Return
Merchandise Authorization(RMA) number.
Warranty Terms and Conditions
1. GG Telecom Warrant the original purchaser of this product only.
2. GG Telecom will replace or repair any faulty product provided it
has not been misused or abused in any way.
3. There are no user serviceable parts inside this product. Using a
nonauthorized repairer will void the warranty.
4. The Baby-a Warranty is valid for 2 years(24 months) from the
date of purchase.
˙ Proof of purchase must be supplied to obtain warranty.
˙ Headset must be in original packaging with serial number for
warranty to be valid.
5. Warranties are effective from the proof of purchase date and
not from the date of any subsequent repair of replacement.
G
G
T
E
L
E
C
O
M
2
Y
E
A
R
H
A
R
D
W
A
R
E
G
G
G
G
2
9
10
11
12
Headset Call Controls
link
Step A: Put your headset in Pairing Mode
“0000”
Note:
Step C: Initial Test
Send
is off
turns on
Step B: Pairing your headset to your phone/device
Bluetooth device discovery
1.Indicator LED
2.Multifunction button
3.Volume control button
4.Ear-hook
5. Speaker
6. Microphone
7. Charging Port
● Bluetooth V2.0
● Multi-point Technology
● Firmware Upgradable
● Echo Supression Technology
● Up to 10 meters operating range
● 100 mAh Li-polymer Battery
● Support Headset and Handsfree Profile
● Weight 9 g
Bluetooth Headset
that may cause undesired operation.