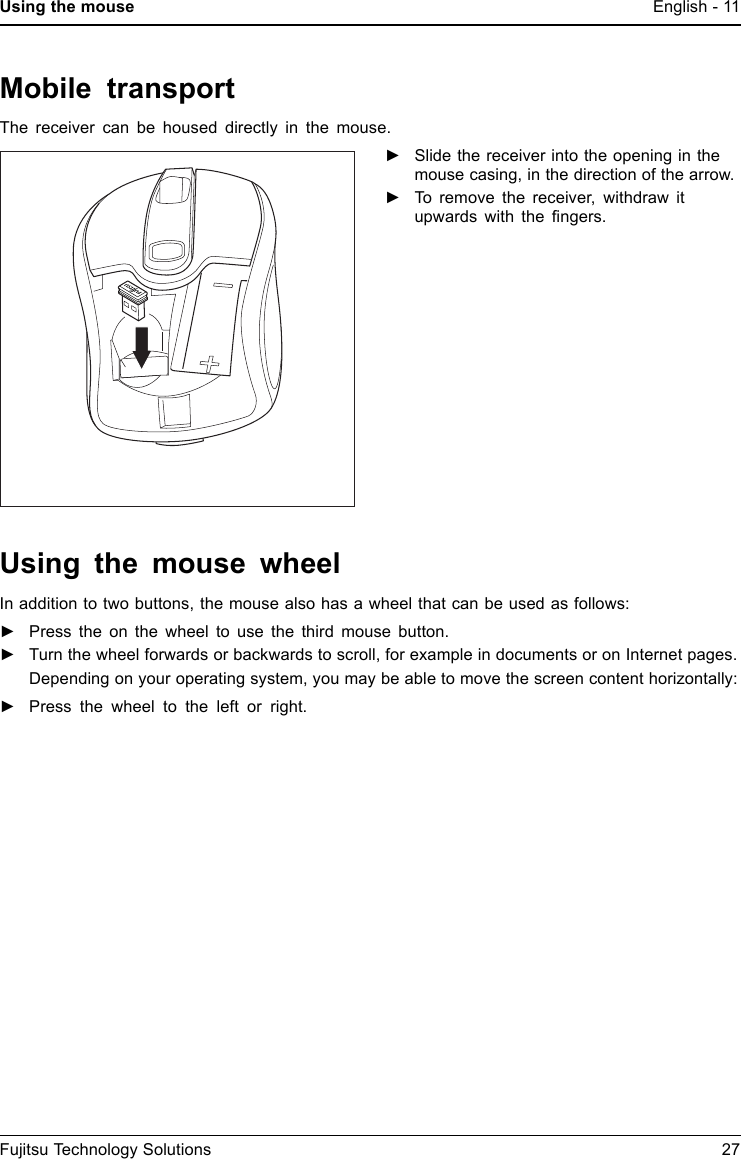
G Tech Technology WI610 2.4GHz Wireless Mouse Model Number: WI610 User Manual WI610

G.Tech Technology Ltd. 2.4GHz Wireless Mouse Model Number: WI610 WI610

WI610_User Manual

Contents English - 1EnglishContentsWirelessmouse ....................................................................... 3System requirements . . . . . ........................................................... 3Safetyinformation ................................................................... 3CEmarking ......................................................................... 3Limitedworldwidewarranty .......................................................... 3Connecting the receiver and the mouse . . . . ............................................ 4Connecting the receiver . . . . . . ........................................................... 4Preparing the mouse and establishing the wireless connection . ............................. 5Usingthemouse ....................................................................... 6Installingthesoftware ................................................................... 7Thebuttonsonthemouse ............................................................... 8LED ................................................................................... 9Settingthescanningsensitivity ........................................................... 9Switchingthemouseonandoff .......................................................... 10Stateofchargeofthebatteryinthemouse ................................................ 10Mobiletransport ........................................................................ 11Using the mouse wheel .................................................................. 11Workingenvironments ................................................................. 12Cleaning ............................................................................... 12Storingthebattery ...................................................................... 12Troubleshootingandtips .............................................................. 13The mouse is not detected or does not function . . . ........................................ 13Connection problems with mouse . ....................................................... 13Technicaldata ......................................................................... 14Environmentalconditions ................................................................ 14Fujitsu Technology Solutions 17
2 - English Contents18 Fujitsu Technology Solutions
Wireless mouse English - 3Wireless mouseThe wireless mouse works with digital radio technology and without the need for disruptive cables.You can use the mouse on any computer that has a free USB port whichmeets the system requirements specified below.The sections below describe how to set up the mouse ready for use.System requirements• Computer with Windows 7 or Windows Vista• At least one free USB port• CD/DVD drive for installing the softwareSafety informationPlease observe the safety information supplied.Use only type AA batteries for the mouse.CE markingThe shipped version of this device complies with the requirements of the ECdirectives 2004/108/EC "Electromagnetic compatibility", 2006/95/EC "Lowvoltage directive" and 2009/125/EC "Ecodesign directive".Limited worldwide warrantyFujitsu Technology Solutions provides a warranty for this device. This warranty can be assertedworldwide wherever Fujitsu Technology Solutions maintains a service office or an authorised servicepartner of Fujitsu Technology Solutions is present. Such claims can be made to the extent towhich the service concerned is available in the particular country. Please contact one of our helpdesks for details of the availability of the services and the response time, or visit our website at"http://ts.fujitsu.com/service" before you make any warranty claims in the particular country.Fujitsu Technology Solutions 19
4 - English Connecting the receiver and the mouseConnecting the receiver and the mouse►Switch on your PC.Connecting the receiverThe receiver is housed directly in the mouse.21►Open the cover of the battery compartmenton the top of the mouse by pressing thebutton (1) and remove the cover.►Remove the receiver from the mouse inthe direction of the arrow (2).►Replace the cover on the batterycompartment.►Connect the receiver to a spare USBport on the computer and follow theon-screen instructions.20 Fujitsu Technology Solutions
Connecting the receiver and the mouseEnglish - 5Preparing the mouse and establishing thewireless connectionBefore you can use your new mouse, you must make the following preparations.When inserting the battery, follow the safety notes and the chapter "Technical data",Page 14 - English.UseonlyAAtype batteries. Switch off the mouse when it isnot used for longer periods. This extends the service life of the battery.The mouse requires one AA battery.1►Open the cover of the battery compartmenton the top of the mouse by pressing thebutton (1) and remove the cover.►Insert the battery into the batterycompartment. The illustration in the batterycompartment shows how to insert thebattery in the correct orientation.►Close the battery compartment.OFF ON►Set the switch on the bottom ofthemouseto"On".The wireless connection between the mouse and the receiver is establishedautomatically and you can start using the mouse immediately.Fujitsu Technology Solutions 21
6 - English Using the mouseUsing the mouseIf the software is not installed, you cannot use all mouse functions.22 Fujitsu Technology Solutions
Using the mouse English - 7Installing the softwareThe supplied software must be installed in order to be able to configure the programmablekeys on the mouse and use its full range of functions.►Insert the supplied software CD in the CD/DVD drive for the PC.The CD will start automatically.►If the CD does not start automatically, double click on the file Setup.exe inthe CD folder in Windows Explorer.►Follow the instructions on the screen.The installed software allows you to call up the following configuration menu either via theinstalled programme group or via the mouse icon created in the task bar.Fujitsu Technology Solutions 23
8 - English Using the mouseThe buttons on the mouse51423Mouse buttonAssignment withoutsoftwareDefault assignmentwith installed softwareOptional with installedsoftwareRight mouse button Function as right mouse button -Left mouse button Function as left mouse button -DPI button Increase/decrease the resolution(scanning sensitivity)-1 (centre button)Function as centre button Freely programmable1 (centre button)turn mouse wheelforwardsScroll up -1 (centre button)turn mouse wheelbackwardsScroll down -2(forwardsbutton) Depending on the active application, you can usethis button to navigate forwards or scroll forwardsFreely programmable3 (backwards button) Depending on the active application, youcan use this button to navigate backwardsor scroll backwardsFreely programmable4(mousewheeltowards left)No function (underWindows Vista /Windows 7: screencontent is shifted to theleft)Screen content isshifted to the leftFreely programmable5 (mouse wheeltowards right)No function (underWindows Vista /Windows 7: screencontent is shifted to theright)Screen content isshifted to the rightFreely programmable24 Fujitsu Technology Solutions
Using the mouse English - 9LEDThe LED provides information on the state of charge/operating status and on the scanning sensitivity.Status indicators DescriptionThe LED lights up red Power-on indicator• The mouse is operative.The LED flashes redState of charge indicator as the mouse is being switched onDuringtheswitch-onprocess of the mouse, the LED flashes depending onthe state of charge of the battery.• The LED flashes 1x: The battery is nearly discharged.• The LED flashes up to 5x: The battery is fully charged.State of charge indicator in mouse operating modeDuring operation, the LED flashes red if the state of charge of the batteryin the mouse becomes lower (see chapter "State of charge of the batteryin the mouse", Page 10 - English).DPI indicatorWhile the resolution (DPI) is being adjusted, the LED flashes dependingon the level set (see chapter "Setting the scanning sensitivity", Page 9 -English).Setting the scanning sensitivityDPILEDThe mouse supports a resolution (scanningsensitivity) of 1000, 1500 and 2000 dpi.The default setting is 1500 dpi.►To switch the scanning sensitivity from onelevel to the next highest level, press the DPIbutton once in each case.After the highest level of 2000 dpi hasbeen reached, the next press of the DPIbutton begins again with the lowest levelof 1000 dpi.The higher the scanning sensitivity, thefaster the mouse reacts.The LED flashes with the individual levels as follows:• 1000 to 1500 dpi: flashes 2x red• 1500 to 2000 dpi: flashes 3x red• 2000 to 1000 dpi: flashes 1x redFujitsu Technology Solutions 25
10 - English Using the mouseSwitching the mouse on and offIf you are not intending to use the mouse for a long time, you can switch it off to save power.Set the switch on the bottom of the mouse to "Off".If you wish to resume work with the mouse, do not forget to switch it on again.Stateofchargeofthebattery in the mousePlease note that the battery status indicator can no longer light if thebattery is completely discharged.LEDIf the charge of the battery in the mousebecomes low, the LED on the mouse flashesred.►Replace the battery in the near future.26 Fujitsu Technology Solutions
Using the mouse English - 11Mobile transportThe receiver can be housed directly in the mouse.►Slide the receiver into the opening in themouse casing, in the direction of the arrow.►To remove the receiver, withdraw itupwards with the fingers.Using the mouse wheelIn addition to two buttons, the mouse also has a wheel that can be used as follows:►Press the on the wheel to use the third mouse button.►Turn the wheel forwards or backwards to scroll, for example in documents or on Internet pages.Depending on your operating system, you may be able to move the screen content horizontally:►Press the wheel to the left or right.Fujitsu Technology Solutions 27
12 - English Working environmentsWorking environmentsDuring signal transmission, interference can be caused by other radiodevices which use the same frequency range.• The mouse can be used on nearly all surfaces. To ensure optimumperformance, it is recommended that the mouse be used on a relativelylight-coloured but non-reflective surface.• The mouse switches to energy-saving mode if it is not used for a certain period of time.Move the mouse or press one of the mouse buttons to "wake up" the mouse again.CleaningSwitch off all equipment concerned.Do not use any cleaning agents that contain abrasives or which may dissolve plastic.Ensure that no liquid enters the inside of the device.The casing surfaces may be cleaned with a dry cloth. If particularly dirty, use a cloththat has been moistened in mild domestic detergent and then carefully wrung out,you can also clean the keyboard using disinfectant wipes.Storing the batteryIfyoudonotwant to use your mouse for a considerable period of time, remove thebattery and store it in a dry place at room temperature.28 Fujitsu Technology Solutions
Troubleshooting and tips English - 13Troubleshooting and tipsIf a fault occurs, try to eliminate it with the measures described in this chapter.If you cannot resolve the fault, contact your local sales office or computer dealer.If you need to exchange the device, please note that you must return it to your dealerin its original packaging and also a produce proof of purchase (receipt). Keep yourreceipt and the original packaging in a safe place after purchase.The mouse is not detected or does not function►Check that the mouse is switched on (on/off switch on bottom of mouse)►Check that the mouse battery is properly inserted.►Disconnect the receiver from the computer and reconnect it.►If the table top is made of glass or of a reflective material, this can interfere with the mousesensor. In this case use an ordinary mouse pad or move to a more favourable desk.►The receiver may be too far from the mouse.►Check whether the USB port on your computer is correctly configured.►Restart your computer.Connection problems with mouseThe connection can be disturbed by other radio devices in the surroundingarea that use the same radio frequency.►Insert the receiver into another USB port of your computer.On systems with a USB 3.0 port, connection problems may occurbecause of technical reasons.►Do not connect the receiver to a USB port which is very close to a USB 3.0 port which hasa USB 3.0 end device connected (e.g. immediately adjacent USB ports).►Where appropriate, use a USB extension cable to increase the separation.Fujitsu Technology Solutions 29
14 - English Technical dataTechnical dataSafety regulations complied with EN 60950Interface Compatible with USB 2.0 and 1.1Frequency band 2.4 GHzModulation GFSKNumber of channels 77Report rate max. 125Mouse• Power supply• Current consumption (on whitepaper)•Batterylife• Resolution• 1x AA alkaline battery, 1,5 V• Active mode: 7,5 mA,sleep mode: 2,29 mA - 0,11 mA• about 6 months for normal office use• 1000 dpi / 1500 dpi / 2000 dpi(selectable via the DPI button of the mouse)Receiver• Power supply• Power consumption• USB mode: 5 V• Active mode: < 40 mA, sleep mode: 2,5 mAEnvironmental conditionsOperating temperature 0 °C – 40 °CMouse/Keyboard range Up to 10 m (depending on ambient interference)30 Fujitsu Technology Solutions
Federal Communications Commission (FCC) Notice: Changes or modifications not expressly approved by the party   responsible for compliance could void the user's authority to operate the equipment   NOTE: THE MANUFACTURER IS NOT RESPONSIBLE FOR ANY RADIO OR TV INTERFERENCE CAUSED BY UNAUTHORIZED MODIFICATIONS TO THIS EQUIPMENT. SUCH MODIFICATIONS COULD VOID THE USER’S AUTHORITY TO OPERATE THE EQUIPMENT. NOTE: This equipment has been tested and found to comply with the limits for a Class B digital device, pursuant to Part 15 of the FCC Rules. These limits are designed to provide reasonable protection against harmful interference in a residential installation. This equipment generates, uses and can radiate radio frequency energy and, if not installed and used in accordance with the  instructions, may cause harmful interference to radio communications. However, there is no guarantee that interference will not occur in a particular installation. If this equipment does cause harmful interference to radio or television reception, which can be determined by turning the equipment off and on, the user is encouraged to try to correct the interference by one or more of the following measures:   -- Reorient or relocate the receiving antenna.   -- Increase the separation between the equipment and receiver.         -- Connect the equipment into an outlet on a circuit different   from that to which the receiver is connected.   -- Consult the dealer or an experienced radio/TV technician for help.   This device complies with Part 15 of the FCC Rules. Operation     is subject to the following two conditions: (1) this device may not cause    harmful interference, and (2) this device must accept any interference received, including interference that may cause undesired operation.   FCC Notice                              English - 13F ujitsu Technology Solut ions 31

Navigation menu