G Tek Electronics PWG Wireless IP Phone User Manual
G-Tek Electronics Corporation Wireless IP Phone
Contents
- 1. user manual
- 2. User Manual
user manual
G-Tek
PWG-500
Us
er
Manu
al

Welcome
T
ABLE
OF
C
ONTENTS
Overview
of
the
PWG-50
0
................................................
1
Features
......................................................................
1
Front
vi
ew
...................................................................
2
Side
views
...................................................................
4
Display
indicators
.........................................................
6
Package
contents
.............................................................
8
Specifications
..................................................................
9
Using
the
menu
..............................................................
12
Menu
map
.....................................................................
12
Getting
started
Inserting
the
SIM
cards
and
battery
..................................
18
Charging
the
battery
.......................................................
21
Conn
ectin
g
th
e
wired
ea
rp
hones
......................................
22
T
u
rning
the
phone
on
/
o
ff
................................................
22
Locking
/
u
nlocking
the
keypad
..........................................
23
Entering
text
..................................................................
23
Making
calls
Making
a
call
.................................................................
25
Selecting
the
call
type
.................................................
25
Using
the
keypad
to
dial
..............................................
26
Using
the
phone
book
to
dia
l
........................................
26
Making
an
international
call
.........................................
27
Adjusting
the
volume
..................................................
27
Answering
or
rejecting
a
call
............................................
27
Redialing
a
number
.........................................................
28
Speed
dialing
a
number
...................................................
28
Making
an
emergency
call
...............................................
29
Call
logs
........................................................................
30
Returning
a
missed
call
...............................................
31
Table
of
Cont
ent
s
---
iii

Deleting
call
logs
........................................................
31
Call
options
....................................................................
32
Using
the
speaker
phone
..............................................
32
Putting
a
call
on
hold
...................................................
32
Answering/rejecting
a
waiting
call
.................................
33
Conducting
a
conference
call.....
...................................
33
Transferring
a
call
.......................................................
33
Call
waiting
................................................................
34
Call
forwarding
...........................................................
34
Call
barring
................................................................
34
Caller
ID
....................................................................
35
DT
MF
........................................................................
35
Prefix
dialing
..............................................................
35
Using
the
phone
book
Adding
c
onta
c
ts
.............................................................
36
Cre
ating
a
new
entry
...................................................
36
Storing
a
number
........................................................
36
Searching
for
a
contact
...................................................
37
Modi
fying
conta
c
t
information
..........................................
37
Assigning
a
spee
d
dial
number
.........................................
38
Deleting
contacts
............................................................
38
Sending
messages
Writing
a
message
..........................................................
39
Reading
messages
..........................................................
39
Replying
to
a
message...
..................................................
40
Forwarding
messages
......................................................
40
Deleting
messages
..........................................................
40
Viewing
message
de
tails.....
.............................................
41
Setting
tones
Selecting
a
profile
...........................................................
42
Personali
zing
a
profile
......................................................
42
Saving
a
profile
..............................................................
43
iv
---
Ta
ble
o
f
Con
t
en
ts

Configuring
the
settings
Gene
ral
settings
.............................................................
44
Outgoing
calls
............................................................
44
Language
..................................................................
44
Power
saving
mode
....................................................
44
Keypad
light
..............................................................
45
LCD
sleep
inte
rval
......................................................
45
Backlight
...................................................................
45
Alarm
clock
...............................................................
45
Wi-Fi
settings
................................................................
46
General
settings
.........................................................
46
Profi
l
es
.....................................................................
46
VoIP
settings
.................................................................
49
General
settings
.........................................................
49
Call
control
................................................................
49
Profi
l
es
.....................................................................
49
GSM
setti
ngs
.................................................................
50
GPRS
setti
ngs
................................................................
51
B
l
uetooth
settings
..........................................................
51
Clock
settings
................................................................
52
Saving
settings
..............................................................
52
Viewing
the
status
Using
the
status
menu
....................................................
53
Advanced
features
Connecting
to
the
PC
......................................................
55
Installing
the
USB
drivers
and
WIM
...............................
56
Upgrading
the
firmware
...............................................
56
Using
WIM
................................................................
57
Browsing
the
Internet
from
the
PC
................................
66
Connecting
to
a
PDA
......................................................
67
Using
GPRS
to
browse
the
Internet
...............................
68
Using
Wi-Fi
to
browse
the
Internet
...............................
72
T
a
ble
of
Co
nte
n
ts
---
v

Appendix
Additional
information
.....................................................
73
FCC
regulations
..............................................................
73
European
regulations
.......................................................
75
RF
exposure
regulation
(SAR)
...........................................
76
vi
---
Ta
ble
o
f
Con
t
en
ts

1.
W
ELCOME
Congratulations
on
your
pu
rchase
of
the
w
i
reless
PWG-
500,
a
V
o
IP
(
V
oice
over
I
n
tern
et
Protocol)
and
GSM
(Global
System
for
Mobile
co
mmun
i
catio
ns)
phone
that
also
functions
as
yo
ur
personal
w
i
rel
e
ss
g
a
teway
for
connecti
ng
to
wireless
networks.
Read
this
user
manual
carefu
lly
to
understan
d
ho
w
to
op
erate
th
e
produ
ct
and
take
advantage
of
its
useful
features.
Overview
of
the
PWG-500
The
PWG-500
enables
you
to
m
ake
phone
calls
u
s
in
g
GSM
or
VoI
P
networks.
Moreover,
you
can
also
connect to
Wi-Fi
(Wireless
Fidelity)
(8
02.11
b)
or
GPRS
(General
Packet
Radio
Service)
networks
using
the
PWG-500
as
a
mo
dem
o
r
using
B
l
uetooth
.
Features
•
Seamless
voice
and
data
communication
•
D
ual
mode
fun
c
tionality
of
mobile
phone
(
G
SM)
and
p
e
rsonal
wireless
gateway
(Wi-Fi)
•
C
o
nnectivity
with
various
networks
such
as
GSM,
GPRS,
V
o
IP,
Wi-
F
i,
as
well
a
s
Bluetooth
devices
•
Standalo
ne
mo
de
lets
yo
u
use
the
PWG-500
as
a
GSM
phone
o
r
as
a
Wi-Fi
phone
to
make
a
nd
receive
phon
e
calls
withou
t
using
a
PD
A
or
porta
-
ble
co
mputer
•
B
luetooth
wireless
mo
dem
for
PDA
and
po
rtable
PC
•
U
SB
po
rt
to
conn
ect
to
PC
or
PD
A
for
phone
appli-
cations
and
high-
speed
data
transfer
•
M
ob
ile
extens
ion
for
IP-
P
B
X
I
P
telephony
Ove
r
view
of
t
h
e
P
W
G-
500
---
1
8
9
Front
vi
ew
7
1 Menu
Select
2
3
4
5
Wi-Fi
On/Off
VoIP
GSM
10
11
ABC
DEF
GHI
PQRS
JKL
TUV
MNO
12
WXYZ
6
Nam
e
Des
c
ript
ion
1.
Menu/Se
l
ect
key
2.
Up
arrow
key
3.
Down
arrow
key
⌃
Press
to
access
the
menu
or
select
an
option
from
the
m
e
nu.
•
Press
to
scroll
up
th
ro
ugh
menu
items.
•
F
rom
stand
b
y
mode
,
press
to
d
i
splay
th
e
phone
bo
ok.
Press
to
scro
ll
dow
n
through
m
e
nu
items.
2
---
Ove
r
view
of
th
e
PW
G-
500

Nam
e
Des
c
ript
ion
4.
Send
/Answer
key
•
Press
to
dial
a
phone
num-
ber.
•
Press
to
answer
an
incom-
ing
call
.
•
F
rom
stand
b
y
mode
,
press
to
display
a
list
of
recently
dialed
numbe
r
s.
5.
Display
screen
Displays
call
and
status
infor-
mat
i
on
.
6.
Microph
one
For
talking
during
phone
calls.
7.
Speaker
For
listening
to
phon
e
calls.
8.
Wi-Fi
On/Off
key
Press
to
activate
the
Wi-
F
i
m
ode.
9.
VoIP/
G
SM
key
Press
to
switch
betwe
e
n
VoIP
(
V
),
GSM
(
G
),
and
Auto
(
A
)
m
ode.
10.
Clear/Dele
te
key
•
Press
to
cancel
your
selec-
tion
and
go
to
the
previous
menu.
•
W
hil
e
enterin
g
te
xt
or
num-
bers,
press
to
erase
charac-
ters.
11.
End/Reject
key
•
Press
to
end
a
call.
•
Press
to
reject
an
incoming
call.
•
I
n
menu
m
ode,
press
to
can-
cel
your
selection
and
return
to
standb
y
m
ode.
12.
Alphanumeric
keypad
Use
these
ke
ys
to
enter
phone
numb
ers
and
text.
Ove
r
view
of
t
h
e
P
W
G-
500
---
3

Side
views
Left
view
Right
view
5
1
2
3 6
4 7
Name
Description
1.
USB
po
rt
Con
n
ect
to
USB
po
rt
of
your
PC
u
s
in
g
U
S
B
cable.
2.
Volume
up
key
Press
to
increase
the
volume.
3.
Reset
button
U
se
a
small
pointed
ob
ject
such
as
a
pin
to
reset
the
P
W
G-500
if
it
locks
up.
4.
Volu
me
do
wn
key
Press
to
decrease
the
volume.
4
---
Ove
r
view
of
th
e
PW
G-
500

Name
Description
5.
Power
but
t
on
P
r
e
ss
to
turn
the
PW
G-500
on
or
off.
6.
Earphon
e
socket
C
on
nect
the
provided
ear-
phon
es
here.
7.
Power
in
Connect
the
power
adapter
to
this
socket
to
charge
the
bat-
tery.
Ove
r
view
of
t
h
e
P
W
G-
500
---
5

Chunghwa
,
,
PTSGI-AP
Default0
12:33
AM
Display
indicators
In
standby
mode,
the
PWG-500
screen
displays
the
fol-
low
i
ng
i
c
ons:
1
2
3
4
5
6
7
8
9
Nam
e
Des
c
ript
ion
1.
B
a
tte
ry
charge
2.
GSM
signal
str
ength
3.
VoIP/
G
SM
m
ode
Displays
the
charge
level
of
the
battery.
Five
bars
indicate
that
the
battery
is
fully
charged
or
h
a
s
100%
charge.
Displays
the
signal
strength
of
GSM
in
the
current
location.
D
i
splays
VoI
P
or
GSM
opti
on
for
ou
tg
oing
calls.
G
indicates
that
the
current
outgoing
call
option
is
GSM
while
V
indicates
that
the
ou
tg
oing
call
op
tion
is
set
to
Vo
I
P
.
A
indic
a
tes
th
at
t
h
e
ou
tg
o-
in
g
call
opti
on
is
Automatic.
6
---
Ove
r
view
of
th
e
PW
G-
500

Nam
e
Des
c
ript
ion
4.
V
o
IP
band-
wid
t
h
5.
Wi-Fi
signal
str
ength
D
i
splays
the
avail
a
ble
band
width
for
VoIP.
D
i
splays
the
signal
st
reng
th
for
Wi-Fi
networks
availabl
e
at
the
cu
rrent
location.
Five
bars
indi-
cate
maximum
signal
strength.
6.
GSM
carrier
Displays
the
current
GSM
carrier
service.
7.
Wi-Fi
access
po
in
t
Displays
the
name
of
the
Wi-Fi
acce
ss
point.
8.
V
o
IP
profile
D
i
splays
th
e
n
a
me
of
the
current
V
o
IP
profile.
9.
Time
Displays
the
current
time.
Ove
r
view
of
t
h
e
P
W
G-
500
---
7

Package
c
ontents
PWG-500
AC
adapter
d
esktop
charger
L
i-ion
battery
wired
headset
pouch
u
tility
CD
user
manual
qui
ck
start
guide
8
---
P
ackage
con
t
ents

Specifications
GSM
characteristics
•
Q
uad-band
GSM
850,
GSM
900,
DCS
1800,
PCS
1900,
EGSM
•
O
utput
power:
GSM
850:
29
dBm
/
GPRS
850
:
28
dBm
/
GSM
1900:
26
dB
m
/
GPRS
1900
:
26
dBm
•
G
PR
S:
Mobile
station
class
B,
multi-slot
class
10
•
G
SM
voice:
HR
/
F
R
/
EFR
/
AMR
•
C
SD
up
to
14
.4kbps,
SMS
MT
/
MO
/
CB
,
G3
fax
class
2.0
•
SIM
application
tool
kit
class
1
/
2
/
3
•
2
SIM
slots
su
ppo
rted
•
S
MS,
EMS,
messaging
Wi-Fi
characteristic
•
I
EEE
80
2.11b
•
F
requency
range:
2412MHz
~
2612
MHz
•
W
ireless
ou
tput
po
wer:
Max.
25
m
W
•
O
p
erating
rang
e:
Outd
oor
up
to
300m
;
in-door
up
to
75m
•
S
u
pports
infrastructure
(pu
b
lic)
mode
and
Ad-
hoc
mode
(optional)
•
Q
oS
support
T
OS
/
DiffServ
Bluetooth
characteristics
•
B
luetooth
V1
.1,
class
II
c
o
mplian
t
•
F
requency
range:
2.402
~
2.480
MHz
•
Power
mo
des:
Park,
sniff,
hold
,
and
deep
sleep
•
N
et
capabilities:
Pico-net
and
Scatter-net
support
•
P
ro
files:
SPP,
D
UN,
HSP
VoIP
features
•
C
odec
supported:
G.711a,
G.711
u,
G.72
3.1,
G726,
and
G.7
29ab
•
A
daptive
jitter
bu
ffer
and
echo
can
cellatio
n
•
G
.168
echo
cancellation
•
S
ile
nce
supp
ression
•
V
oice
Ac
tivity
De
tecti
on
(VAD)
•
C
om
f
o
r
t
N
ois
e
G
e
ner
a
t
i
on
(CN
G
)
•
DTMF
detection
and
relay
S
p
ecif
i
cations
---
9

Ne
twork
and
protocols
•
S
N
MP
manager
•
DHCP
or
static
co
nfig
uration
option
•
A
lternate
TFTP
support
•
SIP
(RFC
3261)
version
2
•
S
DP
(RFC23
27)
•
R
T
C
P
(
R
FC1890)
•
S
u
pports
outboun
d
proxy
fo
r
NAT
traversal
•
S
ite
survey,
trace
route
(hidden
feature),
seaml
e
ss
secure
roaming
,
and
VLAN
support
Security
•
I
EEE
802
.1x
authenticatio
n
:
Optional
p
a
ssw
o
rd
prompt
at
powe
r
up
•
40
and
128
bit
static
Wired
Equivalen
t
Privacy
(WEP)
•
O
p
t
ion
a
l
phone
lock
password
Power
•
Replaceable
and
rechargeable
1300
mAH
L
i
-ion
battery
•
T
alk
time:
4
hou
rs
talk
ti
me,
72
hou
rs
standby
•
A
C
adapter
1
00~240V,
50~60Hz,
5V
650
mA
DC
output
Calling
features
•
C
aller
ID
display,
call
waiting,
call
forward,
Call
transfer
•
Pre-
d
ialing
before
sending
•
C
all
mute
•
Re
d
i
a
l
•
C
all
hold
/
resume
•
C
all
park
•
C
all
divert
between
2
SIMs
•
C
on
f
e
r
e
n
c
e
c
a
ll
User
interface
•
C
olor
STN
display
96
x
64
RGB
pixels
with
LED
backlight,
4
K
color
resolution,
pixel
size:
0.219mm
x
0.219
mm
10
---
Specifica
tion
s

•
F
ou
r
multi-function
soft
ke
ys
p
r
o
v
id
e
easy
user
operatio
n
dynam
i
cally
•
K
eys:
Power,
Volume,
Menu/Sel
ect,
Send/End,
12
keys
dialer
pad
•
S
ele
c
tion
of
menu,
user
profiles,
lang
uages,
and
r
i
ng
ty
pes
b
y
so
ft
keys
•
H
otkey
for
keypad
lock
•
H
otkey
for
voice
mail
access,
ca
ll
logs
•
T
en
configurable
speed
dial
numbe
r
s
•
I
dle
/
call
state-
based
soft
keys
•
Local
phone
book
•
T
ime
/
date
display
•
K
eypad
lock,
vibration
ic
on
in
dicato
r
s
•
R
F
level
and
ba
ttery
gas
g
a
uge
in
dication
•
P
olyphon
ic
ringer,
vib
r
ator,
and
visual
displa
y
a
l
ert
•
P
ocket
PC
2002/2003;
Windows-based
WIM
man-
agement
and
network
configuration
utili
ty
Physical
specificati
ons
•
D
imensions
(H
x
W
x
D):
100mm
x
60
mm
x
22
mm
•
W
eigh
t
(w
it
h
st
andard
b
a
tt
ery):
128g
•
Built-in
spea
ker
/
M
IC
•
Built-in
real
time
clock
(RTC)
in
12/24
-hour
format
•
U
SB
2.0
slave
•
J
ack
s
for
headset
and
DC
cha
rgi
ng
•
C
ertifications:
FCC,
CE,
BQB
•
A
ccessories:
AC
adapter,
desktop
charger,
Li-
i
on
battery,
wired
headset,
pouch,
utility
CD,
user
manua
l,
qui
ck
start
guide
Environmental
specifications
•
Operating
tempe
r
ature:
32
~11
3°F
(0~45°C)
•
Storage
temperature:
–22
~14
0°F
(–30
~60
°
C)
•
R
ela
t
ive
hum
idity:
10~95%
(no
n
-con
densing
)
•
T
hermal
shock:
–3
0C,
24
hours
to
+7
0C,
24
hours
Specifica
tion
s
---
11

Using
the
menu
Th
e
PWG-5
00’s
m
e
nu
lets
you
access
the
prod
uct
set-
tings
and
set
up
the
device
acc
ording
to
the
n
e
two
r
k
conditions.
The
menu
is
set
up
in
a
simple
and
easy-to-
understand
manne
r.
Follow
these
ste
p
s
to
access
the
m
e
nu
and
m
e
nu
it
ems
.
1.
In
standb
y
mode,
press
the
Menu/Select
ke
y
t
o
access
the
menu.
The
first
menu
option,
Phone
Book
,
is
displayed.
2.
Scroll
throu
gh
the
m
a
in
menu
op
tion
s
using
the
or
⌃
arrows
keys
and
press
the
Menu/Select
key
to
view
the
submenu.
For
example,
scroll
to
Mes-
sa
ges
and
press
Menu/Select
to
view
text
mes
-
sages
.
3.
Rep
eat
the
p
r
eviou
s
step
to
b
r
o
w
se
th
ro
ugh
the
menu
items,
su
bmen
us
and
options.
For
in
stance,
to
write
a
text
message,
select
Mess
ages
and
then
Create
New
.
4.
To
ch
oose
a
m
e
nu
setting
,
press
th
e
Menu/Select
key
to
save
it.
Men
u
map
•
P
hone
Bo
ok
•
Search
•
A
dd
•
Ed
i
t
•
D
elete
•
D
elete
One
by
One
•
D
elete
Al
l
•
A
ssign
Speed
Dial
•
Modify
•
V
i
e
w
•
D
e
l
e
t
e
12
---
Using
t
h
e
menu

•
M
e
ss
a
g
e
s
•
C
reate
New
•
I
nbox
•
F
o
r
w
a
r
d
•
D
elete
•
D
etails
•
O
u
t
bo
x
•
F
o
r
w
a
r
d
•
D
elete
•
D
etails
•
C
all
Logs
•
Missed
Calls
•
Received
Calls
•
D
ialed
Calls
•
R
ecent
Calls
Th
e
fo
llowing
submenu
op
tion
s
are
available
w
hen
you
select
a
number
from
any
of
the
Call
Logs:
•
C
a
ll
•
D
elete
•
Sa
v
e
•
D
elete
Recent
Calls
•
A
ll
•
Missed
Calls
•
D
ialed
Calls
•
Received
Calls
•
T
on
e
s
•
General
•
Silent
•
Meeting
•
Outd
oor
•
P
ager
Me
nu
map
---
13

The
fol
l
owing
submenu
option
s
are
avail
a
ble
for
each
of the
Tones:
•
A
ctivate
•
Personalize
•
R
ing
t
one
•
R
ing
Volume
•
A
l
e
r
t
T
y
p
e
•
K
ey
Beep
•
Ed
i
t
N
a
m
e
•
Save
to
Flash
•
S
ettings
•
General
•
O
u
t
Go
i
ng
C
a
ll
•
La
nguag
e
•
P
o
w
e
r
s
a
v
i
ng
•
K
eypad
Ligh
t
•
L
CD
Slee
p
Interval
•
B
acklight
On
/
O
ff
•
A
l
a
rm
C
l
o
ck
•
W
i
-F
i
•
General
•
W
i
-F
i
O
n
/
O
ff
•
W
i-Fi
Connectivity
•
Profiles
•
M
anual
•
Personalize
•
C
onfiguration
•
Operatin
g
Mode
•
C
h
a
nn
e
l
•
U
s
e
r
N
a
m
e
•
Password
•
E
SS
ID
•
A
uth.
Pro
t
oco
l
•
En
c
r
y
p
t
i
on
•
P
r
o
t
o
c
o
l
14
---
Men
u
m
a
p

•
V
o
I
P
•
W
E
P
K
e
y
•
A
d
v
a
n
c
e
d
•
P
ow
er
Sa
v
i
ng
•
R
TS/CTS
Threshold
•
F
rag.
Threshold
•
T
r
a
n
s
f
e
r
Ra
t
e
•
U
se
DHCP
(If
you
select
No,
the
following
opt
i
ons
are
available
for
modifica-
tion:
IP
Address,
Subnet
Mask,
D
e
fault
Gatew
a
y,
Primary
DNS,
Alternate DNS)
•
R
esto
re
defau
l
ts
•
D
e
f
a
u
l
t
•
A
c
t
i
v
a
t
e
•
Personalize
•
E
dit
Profile
Name
•
General
•
V
o
I
P
O
n
/
O
ff
•
S
t
un
Se
r
v
e
r
•
Speaker
Volume
•
M
icrophone
V
o
lume
•
Preferred
Codec
•
C
all
control
•
C
all
Waiting
•
C
all
Forward
•
W
hen
Bu
sy
•
N
o
Re
p
l
y
•
U
n
c
ondi
tion
al
•
C
all
Barring
•
C
aller
ID
•
D
T
M
F
•
P
r
e
f
i
x
D
i
a
l
Me
nu
map
---
15

•
Profiles
•
Default
0-9
•
A
c
t
i
v
a
t
e
•
Personalize
•
U
s
e
r
N
u
m
b
e
r
•
Password
•
Registrar
•
D
o
m
a
i
n
N
a
m
e
•
Outboun
d
Proxy
•
M
ail
Address
•
R
esto
re
Defau
l
ts
•
E
dit
Profile
Name
•
G
SM
•
G
SM
On/Off
•
S
I
M
S
w
i
t
c
h
•
S
p
ea
k
e
r
V
o
l
u
m
e
•
M
icrophone
volume
•
G
PRS
•
A
ccess
Poin
t
Name
•
I
P
Address
•
SMS
s
e
tt
i
ng
s
•
V
alidity
Period
•
Message
I
ndication
•
Message
Format
•
T
e
x
t
•
P
D
U
•
Preferred
Storage
•
Local
•
S
I
M
•
B
l
u
e
t
oo
t
h
•
H
eadset
•
F
ind
Headset
•
P
air
Headset
•
C
l
o
ck
•
Se
t
T
i
m
e
•
Se
t
D
a
t
e
16
---
Men
u
m
a
p

•
S
et
Time
Format
•
S
et
Date
Format
•
Save
to
Flash
•
S
t
a
t
u
s
•
G
SM
S
t
a
t
u
s
•
W
i-Fi
Strength
•
C
hannel
•
T
ransfer
Ra
te
•
SSID
•
W
i
-F
i
H
o
m
e
•
Link
Quality
•
N
e
t
w
o
r
k
M
od
e
•
En
c
ryption
Status
•
M
A
C
A
dd
r
e
ss
•
B
attery
Strength
•
A
uth.
Status
•
V
o
I
P
S
t
r
e
ng
t
h
•
B
lu
etoo
th
St
reng
th
•
G
PRS
Data
Account
•
V
ersion
Number
Me
nu
map
---
17

2.
G
ETTING
STARTED
Refer
to
this
sectio
n
to
learn
mo
re
abou
t
setting
up
the
PWG-500
before
you
start
using
i
t
.
Inserting
the
SIM
cards
and
battery
Th
e
PWG-5
00
supports
dual
SIM
cards
and
th
e
slots
are
plac
ed
underneath
the
battery.
One
of
the
SIM
cards
is
used
for
activating
and
authenticating
yo
ur
GSM
account.
The
othe
r
SIM
c
a
rd
can
be
used
for
Wi-Fi
authentication
if
required.
When
you
subscribe
to
a
serv
ice
provider,
you
are
given
a
SIM
card.
This
card
stores
your
phone
number
and
entitles
you
to
additional
services
inc
l
uded
with
your
subscription.
Your
p
e
rsonal
add
r
ess
bo
ok
is
also
stored
on
the
SIM
card.
The
SIM
card
lock
protects
your
sub- scripti
on
fro
m
un
authorized
u
s
e
.
Most
SIM
cards
are
locked
at
the
time
of
purchase.
If
the
SIM
card
lo
ck
is
on
,
you
h
ave
to
enter
a
PIN
(Perso
nal
Identity
Number)
each
time
you
turn
on
the
PWG-500.
If
you
enter
the
PIN
incorrectly
three
times
in
succession, the
SIM
card
is
blocked.
To
unblock
the
SIM
card,
you
mu
st
enter
the
PUK
(Perso
nal
U
nblockin
g
Key)
.
The
net- work
service
provider
su
pplies
the
PIN
and
the
PUK
details.
Note
:
The
SIM
card
lock
only
pr
otects
the
subscription
and
doe
s
not
protect
the
PWG-5
00
from
una
uth
orized
use.
The
PWG-500
is
equipped
with
a
rechargea
ble
Li-ion
battery
th
at
can
be
ch
arg
e
d
using
th
e
supp
lied
battery
charger.
18
---
Inser
t
ing
th
e
S
I
M
c
a
rds
and
bat
t
er
y

To
insert
the
SIM
cards
and
battery,
do
th
e
fo
llowing
:
1.
Push
down
the
tab
on
t
h
e
back
to
remove
the
bat
t
e
r
y
cover
as
shown.
2.
Move
the
SIM
card
slot
in
which
yo
u
wan
t
to
in
sert the
first
SIM
card,
in
t
h
e
directio
n
shown
to
unlo
ck
it.
3.
Lift
up
the
SIM
card
slot.
4.
Slide
in
the
SIM
c
a
rd
in
the
card
hol
der
with
th
e
gold
contacts
facing
down.
Inserting
the
SIM
cards
and
b
a
ttery
---
19
5.
Place
the
SIM
card
holder
back
in
place.
6.
Slide
the
SIM
card
holder
upwards
to
lock
the
card
in
place.
7.
Repeat
steps
2
through
6
to
insert
the
second
SIM
card.
8.
Place
the
battery
in
the
bat-
t
ery
slot
with
the
meta
l
con-
tacts
properly
align
e
d.
9.
Replace
the
back
cover
as
shown
and
snap
into
place.
20
---
Inser
t
ing
th
e
S
I
M
c
a
rds
and
bat
t
er
y

Charging
the
battery
The
PWG-500
is
provided
with
a
recharge
able
Li-ion
bat- tery
w
i
th
4
hou
rs
talk
time
and
72
hours
stan
dby
time
.
To
charge
the
battery,
conn
ect
the
battery
charger
to
the
Pow
e
r
in
slot
and
insert
th
e
po
wer
conn
ector
in
to
a
po
wer
outlet.
Note
:
You
can
a
l
so
cha
r
ge
th
e
battery
u
s
ing
the
desktop
charger
after
connecting
it
to
the
pow
er
outle
t
.
Insert
the
PWG-500
in
the
charger
mak
i
ng
sure
that
the
contacts
touch
those
of
the
charger.
Ch
argin
g
t
h
e
b
a
tt
ery
---
21
Connecting
the
wired
earphones
Connect
the
wired
earphones
to
the
earphone
jack
to
enjoy
handsfree
operati
on,
a
nd
answer
or
place
call
s with
ease.
No
t
e
:
If
th
e
P
W
G-
500
is
pair
ed
with
a
Blue
tooth-enable
d
head-
set,
th
e
w
i
red
head
set
w
ill
no
t
w
o
rk.
Turning
the
phone
on
/
o
ff
Press
the
Power
bu
tto
n
on
th
e
right
side
of
th
e
PWG-
500
to
turn
the
device
on
or
off.
22
---
Connecting
th
e
w
i
red
earphon
es

Locking
/
unlocking
the
keypad
You
can
lock
the
keypad
to
pr
event
the
ke
ys
from
being
pressed
a
c
cidentally,
for
example,
whe
n
your
phon
e
is
in
a
bag
or
in
the
pocket.
•
T
o
lock
the
keypad,
press
the
Menu/Select
key
and
then
press
the
*
key.
•
W
hen
the
keypad
is
locked,
press
the
Menu/Select
key
and
then
press
*
to
unlock
the
keypa
d.
Entering
text
The
PWG-500
has
an
alphanumeric
keypad
for
keying
in
the
numbers
you
are
diali
ng,
typing
your
text
m
essag
es,
and
adding
co
ntact
information
to
your
phone
book.
Each
key
represents
a
comb
ination
of
letters
a
nd
num-
bers.
The
following
table
shows
the
character
represen-
tation
for
the
alphanumeric
keys:
Key
C
haracters
1
1
:
.
–
_
2
2
A
B
C
a
b
c
3
3
D
E
F
d
e
f
4
4
G
H
I
g
h
i
5
5
J
K
L
j
k
l
6
6
M
N
O
m
n
o
7
7
P
Q
R
S
p
q
r
s
8
8
T
U
V
t
u
v
9
9
W
X
Y
Z
w
x
y
z
0
0
[space]
?
!
@
Locking
/
u
nlocking
the
keypad
---
23

Key
C
haracters
*
*
+
#
S
witch
between
lower
case
(abc),
upper
case
(ABC),
and
numeric
(123)
characters.
To
enter
text,
follow
these
guidelines:
1.
Enter
the
numbers
and
characters
as
desired
from
the
keypad,
using
the
preceding
table
for
your
ref- erence.
2.
The
characters
123
,
ABC
,
o
r
abc
are
displayed
at
the
bottom
of
the
screen
indicating
the
c
u
rrent
mode
fo
r
t
e
xt
en
try.
To
switch
between
lower
case
(
abc
),
upper
case
(
ABC
),
and
numeri
c
(
123
)
char-
acters,
press
the
#
key
at
any
time.
The
type
of
text
entry
changes.
3.
Pr
ess
the
Menu/Select
bu
tto
n
wh
en
you
are
done
entering
text
.
24
---
Ent
erin
g
t
e
xt

3.
M
AKING
CALLS
Now
that
you
are
familiar
with
the
PWG-
500,
you
are
ready
to
start
making
calls
and
take
full
benefi
ts
of
its
calling
features.
Making
a
call
The
PWG-5
00
supports
GSM
as
well
as
VoIP
calls.
It
can
use
a
GSM
network
to
make/receive
calls
and
can
also
make
use
of
other
services
offered
by
the
network.
The
SIM
card
provides
authentication
over
the
GSM
net-
wo
rk.
Alternat
ivel
y,
in
V
o
IP
m
ode,
the
PWG-50
0
offers
voice
connectivity
to
users
over
the
Internet
with
the
help
of
a
Vo
IP
server.
Selecting
the
call
type
Do
on
e
o
f
the
fo
llowing
to
sp
ecify
the
type
of
the
phone
call
you
wish
to
make:
•
P
r
e
ss
the
Vo
I
P
/GSM
key
to
switch
between
VoIP,
GSM,
o
r
Auto
mode.
•
P
r
e
ss
Menu/
Selec
t
to
view
the
menu
and
then
sc
roll
to
Setti
ngs
,
General
,
Out
Going
Call
.
Choose
an
op
tion
from
GSM,
V
o
IP,
or
Auto.
If
you
select
the
Auto
option,
the
PWG-500
first
searches
for
a
Wi-Fi
hotspot
in
the
vicinity
to
enable
a
VoIP
call
.
If
Wi-
Fi
is
not
available,
a
GSM
network
is
used
to
make
an
outgoing
call.
Making
a
ca
ll
---
25

Using
the
keypad
to
dial
1.
Key
in
the
phon
e
num
ber
using
the
keyp
a
d.
I
f
you
key
in
an
incorrect
digit,
press
the
Clear/
D
elete
(
C)
key
to
delete
the
chara
c
ter
to
the
left
of
the
cursor.
2.
Pr
ess
the
Send/Answer
key
to
call
the
number.
3.
Pr
ess
the
En
d/Reject
key
to
terminate
the
call
after
yo
u
fin
i
sh
talking.
Note
:
You
can
a
l
s
o
end
a
call
by
pre
ssi
ng
Menu/Se
lect
and
then
sele
cting
End.
Using
the
phone
book
to
dial
You
can
call
your
contacts
us
ing
the
contact
information from
the
phone
book.
To
m
ake
a
call
to
a
person
from
the
phone
b
ook,
do
the
follow
i
ng:
1.
Pr
ess
the
Menu/Select
key
to
display
the
m
e
nu.
2.
Sele
ct
Phone
Book
,
Search
,
and
press
the
Menu/
Sele
ct
key
to
locate
a
contact.T
he
Search
screen
is
displayed.
3.
Key
in
the
first
f
e
w
let
t
ers
of
the
name.
Press
t
h
e
Menu/Select
key
to
search
for
the
contact. A
list
of
names
that
corresp
ond
most
closely
to
yo
ur
search
criteria
is
displa
yed.
Note
:
If
th
e
cur
r
e
n
t
mod
e
of
t
e
xt
entr
y
is
set
t
o
nume
ric,
you may
have
to
change
the
text
entry
m
ode.
See
“
Entering
text”
on
page
23.
4.
Scroll
through
the
list
till
you
find
the
contact
you
want
to
call.
5.
Pr
ess
the
Send/Answer
key
to
call
the
number.
6.
Pr
ess
the
En
d/Reject
key
to
terminate
the
call
after
yo
u
fin
i
sh
talking.
26
---
Makin
g
a
call

Making
an
internati
onal
call
To
dial
an
international
nu
mber,
you
need
to
know
the
country
code
of
the
internationa
l
location.
1.
Pr
ess
the
*
key
twice
to
e
n
ter
the
+
characte
r
.
2.
Key
in
the
country
co
de
followe
d
by
the
phone
numb
e
r.
3.
Pr
ess
the
Send/Answer
key
to
call
the
number.
4.
Pr
ess
the
En
d/Reject
key
to
terminate
the
call
after
yo
u
fin
i
sh
talking.
Adjusting
the
volume
While
talking
on
the
PWG-
500,
use
the
V
o
lum
e
up/down
keys
to
increase
or
decrease
the
volume
accordi
ng
to
your
preference.
Y
ou
can
also
adjust
the
ring
to
ne
using
the
keys
when
not
ta
lking
on
the
ph
one.
Fo
r
ad
justin
g microphone
or
speaker
volume
separately,
see
“Wi-Fi settings”
on
page
46
and
“GS
M
settings
”
on
page
50.
Answering
or
rejecting
a
call
An
i
ncoming
call
i
s
indicated
by
a
ringing
tone
and
a
vibratio
n
if
selected
.
Choose
on
e
of
the
fo
llowing op
tion
s:
•
P
r
e
ss
the
Send/Answer
key
to
answer
an
incoming
call.
•
P
r
e
ss
the
En
d/Reject
key
to
reject
an
incoming
call.
Th
e
call
is
forwarded
or
transfe
r
red
i
f
you
have
acti
v
ated
call
forwarding.
See
“Call
forward-
ing”
on
pag
e
34.
Answering
or
rejec
t
ing
a
ca
ll
---
27

Redialing
a
number
To
quickly
dial
a
number
that
you
have
dialed
recently,
do
th
e
fol
l
owing
:
1.
Pr
ess
the
Send/Answer
key
from
stan
dby
mode.
A
list
of
you
r
most
recen
t
calls
i
s
displayed.
2.
Pr
ess
and
⌃
to
scro
ll
th
ro
ugh
the
nu
mb
ers
to
se
lect
the
number
you
wish
to
call.
3.
Pr
ess
the
Send/Answer
key
to
call
the
number
again.
Speed
dialing
a
number
You
can
assign
a
speed
dial
number
from
the
keypad
to the
mo
st
com
m
only
d
i
aled
numbers
in
yo
ur
phon
e
bo
ok
and
use
that
number
to
dial
the
number
qui
ckly
instead
of
keying
in
the
com
p
lete
numb
e
r.
See
“Assign
ing
a speed
dial
nu
mber”
on
page
38.
To
call
a
number
using
speed
dialin
g,
do
th
e
fo
llowing
:
1.
Press
the
num
ber
o
r
hotkey
that
has
been
assigned
to
the
phon
e
num
ber
from
the
numeric
keypad
.
2.
Pr
ess
the
Send/Answer
key
to
call
the
number.
3.
Pr
ess
the
En
d/Reject
key
to
terminate
the
call.
Note
:
You
can
a
l
so
spee
d
dia
l
a
numb
er
b
y
pressing
and
hold
-
ing
dow
n
the
ho
tkey.
28
---
Re
dialing
a
numbe
r

Making
an
emergency
call
You
can
make
an
emergency
call
to
a
number
that
has
been
set
in
th
e
SOS
numbers
setting.
You
can
save
up
to
three
emergency
numbers
using
the
WIM
applica-
tion’s
co
nfig
uration
feature
from
your
PC
or
PDA.
See
“Config.
Stat”
on
page
66
.
To
make
an
emergency
cal
l,
do
the
following:
1.
Press
and
ho
ld
th
e
Vo
lume
up
and
Volu
me
do
wn
keys
simultaneously
for
three
seconds.
2.
The
first
SOS
number
is
dialed.
If
the
cal
l
is
answered,
the
cal
l
gets
established
and
you
can
have
a
voice
conversation
with
the
called
party.
One
of
the
following
may
take
place
when
a
call
does
no
t
g
e
t
established:
•
I
f
the
call
remains
unanswered
by
the
called
party,
the
seco
nd
SOS
numb
e
r
is
dialed.
If
th
e
second SOS
call
also
rem
a
ins
una
nswered,
the
third
SOS
number
is
dialed.
If
the
call
to
the
third
number
rem
a
ins
unan
swered,
the
emergen
c
y
cal
l
operatio
n is
cancelled.
Repeat
the
same
procedure
to
initiate
the
emergency
call
again.
•
I
f
the
GSM
carrier
service
for
the
currently
inserted
SIM
card
is
unable
to
establish
a
call,
then
the
sec-
ond
SIM
card
is
activated
au
toma
tically.
T
h
e
PWG-
500
tries
to
make
an
outgoing
call
to
the
first
SOS
number
through
the
GSM
carrier
service
for
the
second
SIM
card
.
If
the
GSM
c
a
rrier
service
is unabl
e
to
establish
the
call,
the
emergency
call
operation
is
cancelled.
Repe
at
the
same
procedure
to
initiate
the
emergency
call
again.
Making
an
emerge
ncy
ca
ll
---
29

Call
logs
The
PWG-500
stores
information
about
all
ca
lls
made
or
received.
Your
phone
keeps
lists
of
the
calls
you
recently
received
and
dialed,
even
if
the
calls
di
d
not
connect.
The
lists
are
sorted
from
newe
st
to
oldest
entries.
The oldest
entries
are
deleted
as
new
entries
are
added.
Press
Menu/Select
and
then
select
the
Cal
l
Logs
menu
to view
cal
l
information.
The
following
calls
are
listed:
•
Missed
Calls
•
Received
Cal
l
s
•
D
ialed
Calls
•
R
ecent
Calls
Up
to
20
cal
ls
can
be
saved
for
each
of
the
missed,
received,
and
di
aled
call
logs.
The
Recent
Calls
list
consists
of
the
most
recent
calls
from
the
missed,
received,
and
dialed
call
logs.
Up
to
250
calls
can
be
saved.
The
recently
dialed
numbers, received
numbers,
and
missed
numbers
are
indicated
by
different
icons.
Select
a
call
from
a
call
log
and
press
the
Menu/Select
key.
Select
one
of
the
follo
wing
opti
ons:
•
Call
:
call
the
selected
number
•
Delete
:
delete
the
number
from
the
call
log.
•
Sav
e
:
save
the
number
to
you
r
phone
book
.
30
---
Call
log
s

Returning
a
mis
s
ed
call
If
you
miss
a
call,
it
is
indi
cated
on
the
screen.
To
return
a
missed
call,
do
on
e
of
the
following:
•
P
r
e
ss
the
Menu/Select
key
when
you
see
the
missed
call
i
ndication
on
the
screen.
T
h
e
missed
call
log
is
displayed.
Select
the
mi
ssed
call
and
press
the
Send
/Answer
key
to
call
th
e
num
ber.
•
P
r
e
ss
the
Menu/Select
key
and
then
select
Call
Logs
,
Missed
Calls.
Select
the
missed
call
and
press
the
Send
/Answer
key
to
call
th
e
num
ber.
Deleting
call
logs
You
can
delete
any
of
the
call
logs
that
are
not
needed.
To
delete
call
logs,
press
Menu/Select
and
then
select
Call
Logs
,
Delete
Recent
Call
s.
Ch
oose
the
typ
e
of
calls
that
you
wan
t
to
delete
fro
m
th
e
fo
llowing
options:
•
A
ll
•
Missed
Calls
•
D
ialed
Calls
•
Received
Cal
l
s
Call
log
s
---
31

Call
options
While
a
call
is
in
progress,
a
number
of
add
i
tion
al
op
tion
s
are
available.
Press
the
Menu/Sel
ect
key
to
view
these
op
tion
s.
Using
the
speaker
phone
For
handsfree
operation,
you
can
use
the
built-in
speaker
to
talk
on
the
ph
one.
D
o
one
of
the
follow
i
ng
to
use
the
speaker
phone.
•
P
r
e
ss
the
Clear/Delete
(
C
)
key
to
enable
the
speaker
phone.
Press
the
key
again
to
disable
the
speaker
phone.
•
W
h
ile
talking
on
th
e
phon
e,
press
Menu/Select
and
then
select
Spea
ker
On
from
t
h
e
op
tio
n
s.
Th
e speaker
is
enabl
e
d.
To
disable
the
speaker
phone, either
terminate
the
call
or
press
Menu/
Selec
t
and
Speaker
Off
.
Putting
a
call
on
hold
Yo
u
may
wan
t
to
pu
t
a
call
on
hold
tem
porarily
while
do
ing
so
me
work
o
r
attending
to
a
second
incom
i
ng
or
ou
tgo
i
ng
call.
To
pu
t
a
call
on
hold
,
do
on
e
of
the
follo
w-
ing:
•
P
r
e
ss
Menu/
Selec
t
and
select
Hold
.
•
W
hen
you
receive
a
sec
ond
c
all,
press
the
Send/
Answer
key
to
attend
to
the
new
call.
The
first
call
is
automatically
put
on
hold.
•
D
ial
a
call
using
the
keypad.
The
first
call
is
auto-
matica
lly
put
on
ho
ld.
32
---
Call
option
s

Answering/rejecti
ng
a
wait
ing
call
I
f
you
have
enabled
call
w
a
it
ing,
you
can
answer
a
sec-
ond
incoming
call
wh
ile
the
first
one
is
still
in
progress.
The
new
incoming
call
is
indicated
by
a
beeping
tone.
Press
the
Sen
d
/Ans
wer
key
to
answer
the
incoming
call.
Press
the
En
d/Reject
key
to
reject
the
call.
Conduct
i
ng
a
conference
call
Th
e
call
wai
t
ing
and
holdin
g
functions
also
h
e
lp
you
to
conduct
a
conference
ca
ll
using
the
PWG-500
as
follows:
1.
Call
the
first
participant
of
the
conference
call
as
described
in
“Makin
g
a
cal
l”
on
p
a
ge
25
.
2.
Put
the
first
participant
on
hold
as
described
in
“Pu
t
ting
a
call
on
hold
”
on
p
a
ge
32.
3.
Call
the
second
participant
of
the
call.
4.
Pr
ess
Menu/
Selec
t
and
then
select
Conference
to
include
all
participants
in
the
call.
5.
Pr
ess
the
En
d/Reject
key
to
end
the
c
all.
Transferr
i
ng
a
call
To
transfe
r
a
call
to
ano
t
her
phone
numbe
r
,
do
the
fol- low
i
ng:
1.
While
a
call
is
in
progress,
press
Menu/
Sele
ct
and
se
lect
Transfer
from
the
op
tions.
2.
Dial
the
number
to
which
you
want
to
transfer
the
call
and
then
press
the
End
/Re
j
ect
key
to
h
a
ng
up
and
transfer
the
call.
Call
option
s
---
33

Call
waiting
You
can
answer
a
call
while
you
have
another
call
in
prog
ress
if
you
activate
the
call
waiti
ng
function.
To
answe
r
the
cal
l
waiting
press
the
Send/An
sw
er
key.
Th
e
first
c
a
ll
is
put
on
hold
.
To
activate
the
call
waiting
function,
press
Menu/Select
and
then
select
Set
t
in
gs
,
Vo
IP
,
Call
Con
t
r
o
l
,
Call
Wait-
ing
,
and
Enab
l
e
.
Call
forwarding
If
you
do
not
answer
a
call
or
reject
a
call,
the
call
can
be
forwarded
to
a
specified
number.
To
ac
tivate
the
call
forwardi
ng
feature,
do
the
following:
1.
Pr
ess
Menu/
Selec
t
and
then
select
Set
t
in
gs
,
Vo
IP
,
Call
Co
ntr
o
l
,
and
Call
Forward
.
2.
Sele
ct
an
option
from
the
follow
i
ng
op
tio
n
s:
–
Wh
en
Bu
sy
:
to
forward
call
s
when
yo
ur
phone is
busy.
–
No
Rep
l
y:
to
forward
calls
when
yo
u
do
not
answer
th
e
pho
ne.
–
Unco
nditional:
to
forward
al
l
incoming
num-
bers.
3.
Key
in
the
number
to
which
the
selected
calls
a
r
e
to
be
forw
ard
e
d.
Call
barring
You
can
enable
cal
l
barring
of
all
incoming
or
outgoing
calls.
This
may
be
useful
to
block
all
incoming
calls when
roaming.
To
activate
call
barring,
press
Menu/Select
and
then
select
Set
t
in
gs
,
Vo
IP
,
Call
Con
t
r
o
l
,
and
Call
Barring
.
Select
Inco
ming
or
Outgo
i
ng
cal
ls
and
then
selec
t
On
to
enable
call
barring.
34
---
Call
option
s

Caller
ID
To
enable
the
display
of
th
e
num
ber
when
you
receive
an
incom
i
ng
cal
l
,
press
Menu/Select
and
then
select
Set
-
tings
,
VoI
P
,
Call
Control
,
Caller
Id
,
and
Enable
.
T
h
e
nu
m
-
ber
is
d
i
splayed
on
th
e
screen
.
DTMF
Yo
u
can
select
DT
MF
(D
ual
T
one
Multi
Frequency)
for
your
ou
tg
oing
calls
depend
ing
on
the
typ
e
of
network
being
used
by
th
e
recipient.
To
select
D
T
MF
options, press
Menu/Select
and
then
select
Settings
,
VoI
P
,
Call Contro
l
,
DTMF
to
cho
o
se
from
one
of
the
follo
wing
op
tion
s:
•
Inb
a
nd:
Select
this
option
if
the
person
you
are
calling
uses
only
PSTN
networks.
•
Outband
:
Select
this
option
if
the
person
you
are
calling
links
to
a
VoIP
server.
Prefix
dialing
The
prefix
dial
is
a
useful
f
eature
if
you
dial
numbers
in
an
international
location
fre
quently.
The
prefix
dial
fun
c
-
tion
memorizes
the
prefix
required
for
dialing
the
calls
and
append
s
them
to
all
ou
tgo
i
ng
calls.
Thu
s
you
do
no
t
need
to
key
in
the
prefix
every
time
you
make
a
ca
ll.
To
activate
the
prefix
dia
l
,
press
Me
nu/Select
and
then
select
Set
t
in
gs
,
Vo
IP
,
Call
Con
t
r
o
l
,
Prefix
Dial
,
and
Enable
.
Key
in
the
prefix
and
pre
ss
Menu/Se
l
ect
to
save
the
prefix.
Call
option
s
---
35

4.
U
SI
NG
THE
PHONE
BOOK
Th
e
phone
b
ook
is
an
important
component
of
the
PWG-
500
fo
r
storing
contact
in
form
ation
ab
out
your
frien
d
s,
relatives,
and
colleagues.
Th
is
eliminates
the
need
for you
to
m
e
morize
important
phon
e
num
bers.
Note
:
T
h
e
storage
capacity
o
f
the
phone
book
dep
ends
on
the
SIM
card
m
emory.
Adding
contacts
Th
e
phone
bo
ok
feature
en
ables
you
to
create
new
entries
for
your
conta
c
ts
and
edit
thei
r
contac
t
informa-
tion.
It
also
enables
you
to
store
a
number
from
a
missed
or
received
ca
ll
in
your
phone
book.
Creating
a
new
entry
1.
Pr
ess
Menu/
Selec
t
and
then
select
Phone
Book
,
Add
to
add
a
new
entry
to
the
phone
b
ook.
2.
Type
the
nam
e
of
the
new
co
ntact.
See
“En
t
ering
t
e
xt
”
on
p
a
ge
23.
3.
Pr
ess
Menu/
Selec
t
to
save
the
name.
4.
Enter
the
phon
e
num
ber
of
the
new
co
ntact.
5.
Pr
ess
Menu/
Selec
t
to
save
th
e
num
ber.
Storing
a
number
To
store
a
number
from
your
received
,
missed,
or
dialed
call
logs,
do
the
following:
1.
Sele
ct
the
number
you
wa
nt
to
store
fro
m
th
e
call
log
and
press
Menu/Select
.
See
“Call
logs”
on
page
30
.
2.
Sele
ct
Save
from
the
options.
3.
Key
in
the
name
o
f
the
new
contact
and
p
r
ess
Menu/Select
.
36
---
Adding
contac
ts

4.
The
selected
number
is
displayed
agai
n.
Mak
e
sure
that
th
e
num
ber
is
correct
o
r
edit
it
if
required
and
press
Menu
/Select
.
Th
e
selected
num
ber
and
corresp
onding
contact
nam
e
is
sto
r
ed
in
the
phone
book.
Searching
for
a
contact
1.
Pr
ess
Menu/
Selec
t
and
then
select
Phone
Book
,
Search
to
start
searching
for
contacts.
2.
Key
in
the
first
few
letters
of
the
contact
that
you
are
looking
fo
r
and
p
r
ess
Menu/Sel
ect.
Phone
book
entries
that
closely
ma
tch
your
sea
r
ch
crite-
ria
are
displayed.
For
example,
if
you
key
in
the
le
tters
SU
w
h
ile
searching
,
the
first
phon
e
bo
ok
entry
starting
with
SU
and
succe
ssive
entries
are
displayed.
Press
Send/Answer
to
di
al
the
entry
or
press
Menu/Select
and
select
an
option
from
Edit
,
Delete
,
or
Call
as
required.
Modifying
contact
information
1.
Pr
ess
Menu/
Selec
t
and
then
select
Phone
Book
to
vie
w
th
e
phone
bo
ok
entries.
2.
Scroll
throug
h
the
phone
boo
k
to
select
an
en
try
o
r
use
Search
to
locat
e
th
e
ent
r
y
you
want
to
mod
i
fy.
3.
Pr
ess
Menu/Select
and
select
Ed
it
to
make
changes
to
the
phon
e
boo
k
entry.
4.
Ch
ange
the
n
a
me
and
phone
number
as
required and
p
r
ess
Menu/
Sele
ct
to
save
t
h
e
entr
y
to
the
phon
e
boo
k.
Searc
h
ing
for
a
contact
---
37

Assigning
a
speed
dial
number
Yo
u
can
use
speed
dialing
to
assign
a
sh
ortcut
o
r
hotkey
(2
~9)
to
the
phon
e
num
bers
that
you
d
i
al
mo
st
fre-
quently.
You
can
then
press
the
speed
dial
number
to
quickly
dial
a
number
instead
of
keying
in
the
entire
phone
number
or
searchin
g
for
th
e
contact
num
ber
from
the
phone
b
ook.
See
“Speed
dialin
g
a
nu
mber”
on page
28.
1.
Pr
ess
Menu/Select
and
then
select
Phon
e
Book
and
Assign
Speed
Dial
.
A
li
st
of
phone
bo
ok
entries
with
the
speed
dialing
number
assigned
to
each entry
is
displayed.
The
keys
that
haven’t
been
assig
ned
to
a
phon
e
num
ber
are
displayed
as
Empty
.
2.
Sele
ct
a
hotkey
entry
and
press
Menu/Select
,
Mo
d-
ify
to
change
the
speed
dial
key
assigned
to
a
num-
ber.
Press
the
new
speed
dial
numb
e
r
to
assign
it
to
the
phon
e
boo
k
entry.
3.
Sele
ct
an
Empty
hotkey
and
press
Menu/Select
.
The
list
of
contacts
is
displayed.
Select
a
contact
and
p
r
ess
Menu/
Sele
ct
to
assign
a
hotkey
to
that
contact.
Press
the
new
speed
dial
number
to
assig
n
it
to
the
phon
e
boo
k
entry.
Note
:
You
can
a
l
s
o
select
View
to
view
the
hotkey
details
or
Delete
to
delete
a
hotkey.
Deleting
contacts
You
can
delete
all
the
contact
s
in
the
phon
e
boo
k
on
e
at
a
time
or
all
at
once
as
follows:
1.
Pr
ess
Menu/
Selec
t
and
then
select
Phone
Book
.
2.
Pr
ess
Menu/
Selec
t
and
then
select
Delete
.
3.
Sele
ct
Delete
One
by
One
to
delete
entries
one
at
a
time.
4.
Sele
ct
Delet
e
All
to
delete
al
l
entries.
Note
:
You
can
a
l
so
select
an
entry
from
the
phone
b
ook
and
press
Me
nu/Select,
Delete
to
delete
the
current
e
n
try.
38
---
Assigning
a
speed
dial
numb
er

5.
S
ENDING
MESSAGES
The
PWG-500
enables
you
to
send
SMS
(Short
Message
Service)
messages
to
your
fr
iends
and
relatives.
Re
fer
to
this
section
to
learn
how
to
send
and
receive
instant
text
messages.
Writing
a
message
1.
Click
Menu/Select
and
then
selec
t
Mess
ages
,
Cr
e-
ate
New
to
start
creating
a
new
text
message.
2.
Key
in
the
message
using
the
alpha-numerical
k
e
y-
pad.
See
“E
ntering
text”
on
p
a
ge
23.
3.
Pr
ess
Men
u
/Select
after
yo
u
fin
i
sh
w
r
iting
the
mes-
sa
ge
and
a
list
of
c
ontac
ts
is
displa
yed
.
Select
the
contact
to
w
hom
you
want
to
send
the
message
and
p
r
ess
Menu/
Sele
ct
to
send
the
mess
age.
4.
Alternatively,
you
can
key
in
the
number
of
th
e
recipient
of
the
SMS
and
press
Menu/Select
to
se
nd
the
message.
The
sent
messages
are
save
d
in
t
h
e
ou
tb
ox
automati
- cally.
Reading
messages
When
you
receive
an
SMS
message,
a
new
me
ssage
icon
is
displayed
on
the
PWG-5
00’s
screen.
To
read
yo
ur
messages,
do
the
follow
i
ng:
1.
Pr
ess
Menu/
Selec
t
and
then
select
Messages
,
Inbo
x
to
vi
ew
a
list
of
messages
received.
If
the
message
is
received
from
a
person
in
the
phone
book,
th
e
person’s
n
a
me
is
d
i
splayed
.
Otherwise, the
phon
e
num
ber
of
the
sender
of
th
e
SMS
is
di
s-
played.
2.
Scroll
and
p
r
e
ss
Menu/Sel
ect
to
read
the
newest
messages.
W
r
itin
g
a
message
---
39

Replying
to
a
message
To
reply
to
a
message,
do
the
follow
i
ng:
1.
Sele
ct
and
view
the
message
from
the
Inbox
that
yo
u
wan
t
to
reply
to,
u
s
in
g
the
Messages
menu
.
2.
Pr
ess
Menu/Select
and
select
Reply
to
write
a
reply
to
the
message.
3.
Key
in
the
message.
See
“Entering
text”
on
page
23
.
4.
Pr
ess
Menu/
Selec
t
to
send
the
message.
Forwarding
messages
To
forward
a
received
message
to
you
r
friends,
do
the
following:
1.
Sele
ct
and
view
the
message
from
the
Inbox
that
yo
u
wan
t
to
forward,
u
s
in
g
the
Mess
ages
menu
.
2.
Pr
ess
Menu/
Selec
t
and
select
Fo
rwa
r
d
.
3.
Key
in
the
recip
i
ent’
s
numb
e
r
to
whom
yo
u
wan
t
to
forward
the
message.
Alternately,
use
the
Search
option
to
lo
cate
a
numb
e
r
from
the
phone
book.
See
“Searchi
ng
for
a
con
t
act”
on
p
a
ge
37
.
4.
Pr
ess
Menu/
Selec
t
to
f
o
r
w
ard
t
h
e
message
to
the
recipient
.
Deleting
messages
To
delete
messages,
do
the
following:
1.
Sele
ct
and
view
the
message
you
want
to
delete,
using
the
Messages
menu
.
2.
Pr
ess
Menu/
Selec
t
and
select
Delete
to
delete
the
message.
40
---
Re
plying
to
a
m
essage

Viewing
message
details
To
view
details
about
your
received
or
sent
messages,
do
th
e
fol
l
owing
:
1.
Using
the
Messages
menu,
Select
and
view
a
mes-
sa
ge
from
the
Inbo
x
(received
message)
or
Ou
tbox
(sent
message).
2.
Pr
ess
Menu/
Selec
t
and
select
Details
to
view
detail
s
of
the
m
essag
e.
The
sender’s
phone
num- ber
and
the
time
at
wh
ich
the
message
was
received
or
sent
are
displayed.
Viewin
g
m
essage
deta
ils
---
41

6.
S
ETTING
TONES
The
PWG-
500
has
a
set
of
profiles,
ea
ch
customiz
ed
for
different
scenarios
of
usage
.
For
example,
you
can
use
the
Silent
profi
l
e
when
in
a
movie
theatre,
the
Meeting
profile
wh
ile
attendi
ng
bu
siness
meeti
ngs,
o
r
the
Out-
door
profile
when
travelling
outdoors
or
in
a
noisy
e
n
vi-
ronm
ent.
You
can
also
person
alize
each
profile
and
change
the
tone
settings
to
suit
your
pre
f
erences.
Selecting
a
profile
To
select
a
profile,
do
the
follo
wing:
1.
Pr
ess
Menu/
Selec
t
and
select
Tones
.
A
list
of
the
profiles
is
displayed.
2.
Sele
ct
the
profile
you
want
to
use
and
press
Men
u
/
Sele
ct
.
3.
Sele
ct
the
Activate
option
and
p
r
ess
Menu/
Sele
ct
to
set
th
e
prof
ile
fo
r
the
PWG-50
0.
Personalizing
a
profile
Each
profile
has
a
sp
ecific
ring
tone
,
ring
volume,
and
alert
tone
.
You
can
cu
stomize
your
profile
and
chan
ge
the
various
sound
tones
accord
ing
to
your
preferences as
follows:
1.
Pr
ess
Menu/
Selec
t
and
select
Tones
to
display
a list
of
profiles.
2.
Sele
ct
the
profile
that
you
want
to
mo
dify
and
press
Menu
/Select
.
3.
Sele
ct
Personaliz
e
and
press
Menu/Select
to
change
the
profile
.
The
follo
wing
options
can
be
change
d
wh
en
personali
zing:
–
Ring
tone:
ch
ange
the
ringing
tone
that
alerts
you
when
you
receive
a
n
incoming
call.
–
Ring
v
o
lu
me:
adju
st
the
ring
tone
volume.
42
---
Selecting
a
p
r
o
f
ile

–
Alert
type:
specify
the
type
of
alert
for
receiv-
ing
i
n
stant
messages.
For
instance,
you
can
choose
a
combinati
on
of
vibratio
n
and
aud
i
o
to
alert
you
when
you
receive
a
me
ssage.
–
Key
beep:
enab
les
or
disables
the
tone
sounded
every
time
yo
u
press
a
key.
4.
Sele
ct
an
op
tion
fro
m
the
li
st
above
and
use
Men
u
/
Sele
ct
to
modify
each
opti
on.
When
you
change
the
ringtone
or
th
e
alert
type,
you
c
a
n
hear
the
cur-
ren
t
ring
tone
or
alert
tone
to
help
you
choose
a
tone
.
5.
Return
to
previou
s
menu
(Actions)
and
sel
ect
Ed
it
Name
to
ch
ange
the
n
a
me
of
the
current
profil
e.
Use
the
keypad
to
c
hange
the
n
a
me
and
press
Menu/Select
when
done.
Saving
a
profile
To
save
a
profile
to
the
PWG-5
00’s
internal
flash
mem
- ory,
do
th
e
fo
llowing
:
1.
Pr
ess
Menu/
Selec
t
and
select
Tones
to
display
a list
of
profiles.
2.
Sele
ct
the
profile
that
you
wan
t
to
save
and
press
Menu/Select
.
3.
Sele
ct
Save
to
Flas
h
and
press
Menu/Select
to
save
the
p
r
o
f
ile
to
the
p
hone’
s
internal
memory.
Sa
ving
a
pr
ofile
---
43

7.
C
ONFIGURING
THE
SETTINGS
Th
e
settings
menu
provides
a
numb
e
r
of
options
to
con
-
figure
the
PWG-5
00,
its
m
ode
of
op
eration,
network
set-
tings,
and
preferences.
Read
this
section
carefully
to
learn
ho
w
to
co
nfig
ure
your
ph
one.
General
settings
Th
e
general
setting
s
provide
op
tio
n
s
to
custom
ize
the
PWG-500
according
to
your
preferences.
Outgoing
calls
Press
Menu/Select
and
select
Settings
,
General
,
Outgo-
ing
Call
to
specify
the
if
you
w
a
nt
to
use
GSM
o
r
V
o
I
P for
making
calls.
See
“Selecting
the
call
type”
on
page
25.
Language
Use
the
l
a
nguag
e
setting
to
specify
th
e
inte
rface
lan-
guage.
Press
Menu/Select
and
sel
ect
Settings
,
Ge
ner
a
l
,
Language
.
Select
the
l
a
nguag
e
of
your
ch
oice
fro
m
these
op
tion
s:
Eng
lish,
Span
ish
,
German,
and
Chin
ese.
Power
saving
mode
Th
e
pow
er
saving
mod
e
prevents
excess
use
o
f
po
wer.
Press
Menu/Select
and
then
selec
t
Settings
,
Gene
ra
l
,
Power
Saving
,
and
On
to
enable
power
saving
mode.
Note
:
P
o
we
r
saving
mode
is
only
enab
led
whe
n
Wi-Fi
mod
e
is
disabled
.
44
---
Gener
a
l
set
t
ing
s

Keypad
light
The
keypad
lights
can
be
disabled
to
prevent
excess
use
of
po
wer.
Press
Menu/Select
and
then
select
Settings
,
General
,
Keypad
Light
,
and
Of
f
to
disable
the
keypad
lig
hts. T
h
e
keypad
lights
are
usefu
l
when
you
w
a
nt
to
use
the
phone
in
the
dark.
LCD
sleep
inte
rval
The
LCD
can
be
disabled
after
a
specific
time
interva
l
to
prevent
excess
use
of
powe
r
.
To
specify
the
time
inter-
val,
press
Menu/Select
and
se
lect
Set
t
in
gs
,
Gene
ral
,
LCD
Sleep
Interval
.
Then
s
e
lect
the
time
interv
al
f
rom
the
time
op
tion
s
rang
ing
from
20
secon
d
s
th
ro
ugh
160
sec-
on
ds.
Backlight
The
LCD
screen
back
light
can
be
disabled
when
not
in
use
to
conserve
power.
To
disabl
e
the
backlight,
press
Menu/Select
,
and
select
Settings
,
General
,
Backlight
On/
Off
,
and
Off
when
Inactive
.
Alternativel
y,
select
the
Always
On
option
to
always
keep
the
backlight
enabled.
A
l
arm
clock
The
PWG-500
has
a
real
time
clock
that
keeps
track
of the
time
and
also
lets
you
set
an
alarm.
To
set
an
alarm, press
not
in
use
to
conserve
power.
To
disable
the
back-
lig
ht,
press
Menu/Select
,
and
select
Settings
,
General
,
and
Alarm
.
If
an
alarm
has
been
set
before,
the
previous
alarm
time
setting
is
displayed.
Press
Menu/Select
and
choose
the
Adjust
option.
Use
the
arrow
and
Menu/
Select
keys
to
adjust
the
time
setting.
If
you
want
to
dis-
able
the
alarm,
select
the
Of
f
op
t
i
on
.
Gener
a
l
set
t
ing
s
---
45

Wi-Fi
settings
The
Wi-Fi
settings
enable
y
ou
to
set
up
the
PWG-500
for
wireless
mo
de.
U
s
e
this
setu
p
to
specify
and
personal
i
ze
a
wirele
ss
profile
and
security
settings.
General
settings
The
general
settings
for
Wi-Fi
mode
specify
the
type
of
wireless
connectivity
and
enable
you
to
turn
on
Wi-Fi mode.
Press
Menu/Select
and
choose
Settings
,
Wi
-Fi
,
General
and
cho
o
se
one
of
the
follo
wing
options:
•
Se
l
e
c
t
Wi-Fi
On/Off
and
select
On
to
enable
Wi-Fi
mode.
•
Se
l
e
c
t
Wi-Fi
Conne
ctivity
and
select
Au
toma
tic
to
conne
ct
to
a
w
i
reless
n
e
two
r
k
i
n
th
e
vicinity
auto-
matica
lly.
The
PWG-500
scans
for
wireless
hotspots
automatically.
Alternatively,
select
Man-
ual
to
connect
to
a
wireless
network
manually.
A
list
of
ho
tspots
is
displayed.
Select
a
hotsp
ot
to
conne
ct
to
the
correspond
ing
w
i
rel
e
ss
n
e
two
r
k.
Profiles
Th
e
Wi-
F
i
profile
s
are
sets
of
wireless
parameters
that
can
be
used
for
d
i
fferen
t
ne
tworks. Y
ou
m
a
y
want
to create
separate
profiles
with
di
fferent
security
settings
for
use
in
different
networks,
each
of
which
may
have
its
own
secur
i
ty
settings.
Press
Menu/Select
and
ch
oose
Settings
,
Wi-F
i
,
and
Profiles
to
view
and
mod
i
fy
th
e
pro-
files.
The
PWG-500
provides
three
Default
profiles
which
you
can
activate
and
personalize
as
needed.
Select
Def
a
u
l
t
and
then
Personali
ze
to
adju
st
th
e
set
t
ing
s
o
r
Activate
to
activate
the
profile.
You
can
also
use
the
Manua
l
profi
l
e
to
individually
set
up
each
paramete
r
needed
for
wireless
setup.
46
---
W
i
-Fi
set
t
in
gs

Each
profile
has
the
followi
ng
p
a
ram
e
ters
th
at
can
be
further
set
up
as
d
e
sired
.
Configuration:
Th
is
option
p
r
o
v
id
es
va
rio
u
s
options
to
set
up
the
b
a
si
c
wireless
configuration
as
follows:
•
Op
erating
mode:
specifies
the
mode
of
operation
for
w
i
reless
connectivity.
Choose
Ad
Hoc
to
con-
nect
to
a
wireless
node
or
access
poi
nt
direc
t
ly.
Ch
oose
I
n
frastructure
to
become
a
part
of
a
wire- less
network.
•
Ch
annel:
specifies
the
channel
to
be
used
for
the
wireless
network.
Fourtee
n
channels
are
available.
•
User
Name:
specifies
the
user
name
used
when
signing
into
a
wireless
network.
Use
the
keypad
to
edit
the
name.
See
“E
ntering
text”
on
page
23.
•
Password:
specifies
the
password
for
authentica-
tion
while
logging
in
to
a
network.
U
s
e
the
keyp
a
d
to
edit
the
name.
See
“Entering
text”
on
page
23.
•
ESSID
(
E
xtended
Service
Set
Identificati
on):
speci-
fies
the
unique
ID
a
s
signed
to
the
device
for
com-
munic
ating
with
other
wireless
devices.
•
Auth.
Proto
c
ol:
specifies
the
protocol
or
communi-
cation
criteria
used
for
au
thentication
when
joining
a
wireless
network.
Cho
o
se
from
Of
f
,
Sim1
Based
,
Sim
2
Base
d
,
EAP-MD5
,
and
EAP-MS
CHAPv2
.
Encr
yp
tio
n
This
specifies
the
encryption
settings
to
allow
entry
into
an
encrypted
or
secure
wireless
network.
Encryption
provides
a
n
add
i
tion
al
level
of
security
for
wireless
net- wo
rks,
protecting
them
from
data
corru
p
tio
n
.
Th
e
fo
l-
lowing
options
are
available
for
modifica
tion:
•
Pr
ot
o
c
ol:
specifies
the
encryption
protocol.
Sele
ct
from
Disable
,
64
Bit
Open
,
128
Bi
t
Open
,
64
Bi
t
WE
P
,
and
128
B
i
t
WEP
.
•
WE
P
Key
:
speci
fies
the
WEP
(Wired
Equivalent
Pri-
vacy)
key.
Choose
from
Key
#1
through
Key
#
4
.
W
i
-
F
i
set
t
ing
s
---
47

Advanced
This
option
enables
you
to
make
advanced
settings
for
the
wireless
mo
de.
Th
e
fo
llowing
options
are
available:
•
Power
Saving:
Select
the
On
op
tion
to
enable
power
saving
when
the
PWG-500
is
connected
in
Wi-
F
i
mode.
•
RT
S/CT
S
Th
resh
old:
specifies
the
threshold
for
RT
S
a
nd
CTS
parameters.
Key
in
a
num
eric
val
u
e
using
the
ke
yp
ad.
•
Frag.
Threshold
:
specifies
the
fragment
threshold.
Key
in
a
numeric
value
using
the
keypad.
•
Transfer
Rate:
specifies
the
rate
at
which
data
transfer
takes
place.
Sel
ect
Auto
to
let
the
PWG-
500
to
set
the
transfer
rate
automatically.
•
Use
DH
CP:
Se
lect
this
op
tion
to
set
the
DH
CP
pro-
tocol
parameters.
Selec
t
Yes
if
you
w
a
nt
to
use
DHCP
and
a
DHCP
server
in
the
network
assigns
IP
addresses
dynamically
to
the
device.
Se
lect
No
if
there
is
no
DH
CP
server
or
if
you
w
a
nt
to
assign
the
IP
properties
manua
lly.
The
following
parame-
ters
have
to
be
set:
–
I
P
A
dd
r
e
ss
–
S
u
bnet
Mask
–
Default
Gateway
–
P
rim
ary
D
N
S
–
A
lternate
DNS
Re
store
Defaults
Choose
this
op
tion
to
restore
all
sett
ings
t
o
th
eir
d
efaul
t
factory
values.
48
---
W
i
-Fi
set
t
in
gs

VoIP
sett
ings
The
VoIP
settings
are
provided
to
set
up
the
VoIP
param-
eters.
General
settings
These
se
ttings
provide
the
basic
setup
for
VoIP
mode.
Press
Menu/Select
and
select
Settings
,
Vo
I
P
,
and
Gen-
eral
to
configure
these
settings
as
foll
ows:
•
VoIP
On/Off:
enables
o
r
disables
V
o
IP
m
ode.
•
St
un
Ser
v
er
:
specifies
the
Stun
server
for
VoIP
mode.
Key
in
the
server
nam
e
using
the
keyp
a
d.
See
“E
ntering
text”
on
p
a
ge
23
.
•
Speaker
Volume:
Adjusts
the
speaker
volume
in
VoI
P
m
ode.
Choose
from
Level
1
throu
gh
Level
10
.
•
Microphone
Volu
me:
Adju
sts
th
e
microphone
vol
-
ume
in
Vo
IP
mo
de.
Cho
o
se
from
Level
1
through
Leve
l
10
.
•
Preferred
Codec:
specifie
s
the
codec
to
be
used
for
VoIP
calls.
Select
from
GSM
,
a
Law
,
H
Law
,
G726
,
G729
,
and
G723.1
.
Call
control
The
call
control
options
set
up
the
call
waiting,
call
bar-
ring,
call
forwarding,
caller
ID
,
D
T
MF,
and
p
r
efix
dialin
g op
tion
s
for
the
ph
one.
See
“Call
op
tion
s”
on
pag
e
32
for details
about
these
options.
Profiles
Th
e
PWG-5
00
p
r
ovid
es
ten
defau
l
t
profiles
for
the
VoI
P
mo
de.
Select
a
profile
and
press
Activate
to
make
the selected
profile
active.
Pre
ss
Personali
ze
to
change
the
profile
settings.
Press
Edit
Profile
Name
to
change
the
profile
nam
e
.
VoIP
set
t
ing
s
---
49

I
f
you
select
th
e
Personalize
option,
the
fo
llowing
param-
eters
can
be
modified:
•
User
Numb
er:
specifies
the
number
used
to
make
VoIP
calls.
You
must
enter
a
number
to
be
able
to
make
calls.
•
Password:
specifies
the
password
for
VoIP
authen-
tication.
•
Reg
i
s
t
r
a
r:
specifies
the
registrar
name
for
the
VoIP
mode.
•
Doma
in
Name:
spe
c
ifies
the
domain
name
through
which
VoIP
calls
are
made.
•
Outbou
nd
Proxy:
speci
fies
the
proxy
server
for
out-
ward
VOIP
calls.
•
Mail
Address:
specifie
s
the
mail
address
for
VoIP
mode.
•
Restore
Default:
restores
all
settings
to
their
fac-
tory
default
values.
Note
:
Fo
r
mo
re
inform
atio
n
ab
out
VoIP
settings,
consu
l
t
y
our
service
provide
r
.
GSM
settings
The
GSM
settings
are
used
to
customize
the
GSM parameters
when
making
GSM
phone
c
a
lls.
Press
Menu/ Select
and
select
Settings
,
GSM
to
configure
the
GSM
settings.
The
follow
i
ng
op
tio
n
s
are
available:
•
GSM
On/Off:
Enables
GSM
m
ode.
Select
On
to
enable
GSM.
•
SI
M
Switch:
Switches
betwe
e
n
the
two
SIM
cards.
•
Speaker
Volume:
Adjusts
speaker
volume
in
GSM
mode.
Choose
from
Level
1
throu
gh
Level
10
.
•
Microphone
Volu
me:
Adjusts
speaker
volume
in
GSM
mo
de.
Choose
from
Level
1
through
Level
10
.
50
---
GSM
set
t
ing
s

GPRS
settings
GPRS
is
a
network
service
that
allow
s
yo
u
to
use
you
r
phone
for
sending
and
receiving
data
over
an
IP
network.
The
GPRS
settings
enable
you
to
set
up
the
PWG-
500
for
GPRS
mode.
Press
Menu/Select
and
sel
ect
Settings
,
GPRS
to
c
onfi
gure
th
e
GPRS
setting
s
.
The
follo
wing options
are
available:
•
Access
Point
Name:
Key
in
the
name
of
the
access
poin
t
to
be
used
for
GPRS
mo
de.
•
IP
Addr
ess:
Key
in
the
IP
address
of
the
access
poin
t
to
be
used
for
GPRS
mo
de.
Bluetooth
settings
The
PWG-500
is
equipped
with
Bluetooth
compatibility
enabling
it
to
connect
and
communicate
with
a
Blue-
tooth
device
in
th
e
vicinity.
For
instance,
you
can
pair
the
PWG-500
with
a
Bluetooth
headset
using
Bluetooth
technolo
g
y
and
crea
te
a
co
mmun
i
catio
n
chan
nel
between
the
two
de
vices.
T
h
e
Blue
tooth
settings
enable
you
to
c
onfi
gure
the
PWG-
500
for
Bluetooth
operation.
Note
:
If
you
are
pairing
a
new
de
vice
w
i
th
the
PWG-5
00
fo
r
th
e
f
i
r
s
t
tim
e
,
yo
u
h
ave
t
o
p
a
ir
it
twice
consec
utive
l
y
before
trying
to
esta
blish
a
connectio
n
w
i
th
the
device
.
To
pair
a
h
eadset
w
i
th
the
PWG-50
0,
do
th
e
fol
l
owing
:
1.
Pr
ess
Menu/
Selec
t
and
select
Set
t
ing
s
,
Bluetooth
,
and
Headset
.
2.
Sele
ct
Find
H
eadset
to
loca
te
a
Blu
etoo
t
h-
equipped
headset
in
the
vicinity.
A
list
of
a
v
ailable
headsets
in
the
vicinity
is
displayed.
3.
Sele
ct
a
headset
from
the
list
and
press
Menu/
Sele
ct
to
connect
to
i
t
.
4.
Enter
the
PI
N
numb
e
r
requ
ired
fo
r
pairing
(refer
to
headset
docu
m
entation
for
d
etails)
a
nd
p
r
ess
Menu/Select
.
The
pairing
information
is
saved.
GPRS
set
t
ing
s
---
51

Alte
rnatively,
select
Paired
Headset
after
step
1
to
see
which
hea
d
set
has
been
paired
with
the
PWG-500.
Clock
settings
The
clock
settings
enable
you
to
set
the
time
and
date
on
the
PWG-
500.
The
PWG-500
displays
the
time
on
the
screen
after
the
LCD
sleep
in
terval
if
the
power
saving
mo
de
is
set.
If
th
e
pow
er
savin
g
mo
de
is
disabl
ed,
the
screen
remains
blank.
Press
Menu/Select
and
select
Set-
tings
,
Clock
to
view
the
clock
settings.
The
following
options
are
available:
•
Set
Tim
e
:
sets
the
time.
Use
the
arrow
keys
to
move
between
the
h
our,
m
i
nute
and
AM/PM
fi
elds. Use
the
keypad
to
ke
y
i
n
the
time.
•
S
e
t
Date:
sets
the
date.
Use
the
arrow
keys
to
move
betw
een
th
e
d
a
y,
m
onth
and
year
fields.
Use
the
keypad
to
key
in
the
time.
•
S
e
t
time
format:
specifies
the
time
format.
Choose
from
12
hours
and
24
hours
format
.
•
S
e
t
dat
e
format:
specifies
the
date
format.
Choose
from
MM
D/D
D
/YY
YY
,
DD/MM/
YYYY
,
Y
YYY/MM/ DD
,
and
YYYY/DD/MM
.
Saving
settings
To
save
all
the
changes
to
the
PWG-500’s
internal
flash
mem
o
ry,
press
Menu/Select
and
then
choose
Settings
,
Save
to
Flas
h
.
All
settings
are
saved.
52
---
Clock
set
t
in
gs

8.
V
IEWING
TH
E
STATUS
Using
the
status
menu
The
Status
menu
enables
you
to
view
the
status
of
all
the
PWG-500
’s
confi
guration
settings
at
a
single
glan
ce.
To
view
the
PWG-
500’s
status,
press
Menu/Select
and
then
select
St
atus
.
A
list
of
the
configuratio
n
settings
is disp
layed
.
Scroll
to
th
e
required
settin
g
and
press
Men
u
/
Select
to
view
the
status
of
the
setting.
The
following
settings
are
d
i
splayed:
•
GSM
Strength:
displays
strength
o
f
GSM
sign
al.
•
Wi-
F
i
St
atus
:
displays
th
e
status
of
the
Wi-Fi
n
e
t-
work.
•
Ch
annel:
displays
current
Wi-Fi
channel.
Wi-Fi
is
avai
lable
in
variou
s
freque
ncy
band
s
and
in
differ-
ent
channel
s
.
•
Transfer
Rate:
Displays
th
e
rate
o
f
d
a
ta
t
r
an
sfer.
•
SS
I
D
:
Displays
the
SSID
or
identification
tag
of
the
device.
This
is
null
when
you
are
not
connected
to
a
Wi-Fi
network.
A
unique
SSID
or
tag
is
requ
ired
for
identifying
the
device
in
Wi-Fi
networks.
•
Wi-
F
i
St
reng
th
:
Displays
the
strength
of
the
Wi-Fi
si
gnal.
•
Link
Quality:
Displays
the
quality
of
the
link.
•
Netw
ork
Mode:
Displays
th
e
networking
mode.
•
Enc
Status:
Displays
the
wireless
encryption
sta-
tus.
If
this
is
Open
,
it
means
that
the
connection
is
not
encrypted
and
is
open
to
all
persons
a
ccessing
it.
If
it
is
Closed
,
it
means
that
the
e
n
cryption
has
been
e
nabled
to
pre
vent
unauthorized
users
from
accessing
the
network.
•
Device
MAC
Addr:
Displays
the
MAC
address
of the
PWG-50
0.
•
AP
MAC
Address:
D
i
splays
the
MAC
address
of
the
access
point
in
the
wireless
network.
View
ing
t
h
e
St
atu
s
---
53

•
Batt
ery
St
reng
th
:
Displa
ys
current
battery
strength.
•
Auth
Status:
Displays
if
he
communication
channel
is
authenti
cated
or
not.
•
VoI
P
Strength:
Displays
the
intensity
of
the
avail-
able
VoIP
signal.
•
Bluetooth
Strength:
Displays
th
e
strength
of
the
Bluetooth
network.
•
GPRS
Data
Coun
t:
D
i
splays
num
ber
of
data
units
se
nt
and
received.
•
Version
Numbe
r
:
Displays
current
firmware
ver-
si
on.
•
IMEI
Numb
er:
D
i
splay
s
th
e
IMEI
nu
m
b
er.
•
BT
Address:
Displays
the
BT
address.
54
---
Viewing
th
e
S
t
at
us
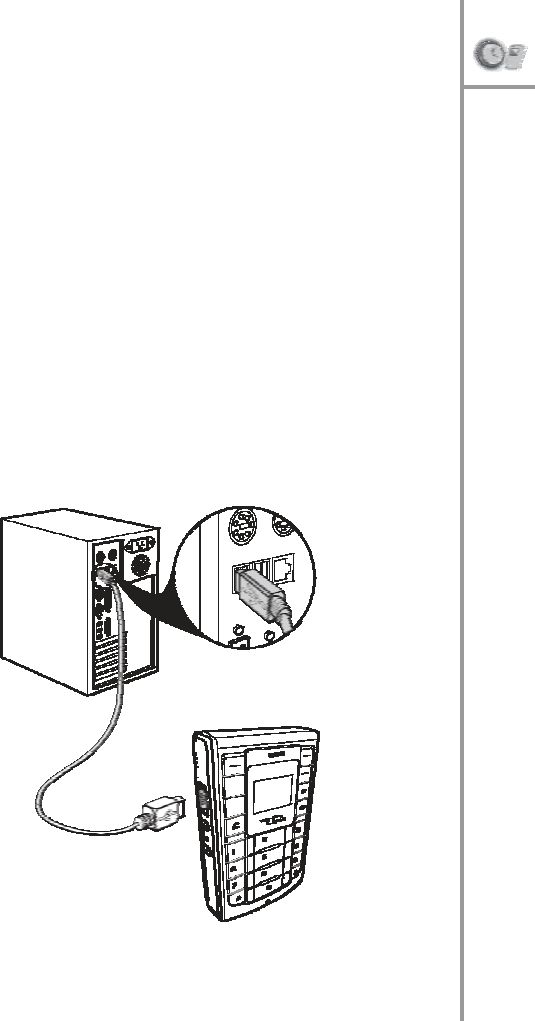
9.
A
DVANCED
FEAT
URES
The
PWG-500
is
designed
to
act
as
a
wirele
ss
or
USB
mo
dem
for
your
PD
A
or
PC,
thu
s
enabling
I
n
ternet
connectiv
ity.
Yo
u
can
connect
th
e
PWG-
500
to
you
r
PC
u
s
in
g
a
U
S
B
cable
and
use
the
device
to
connect
to
the
GPRS
net- work
for
Internet
acce
ss.
Alternatively,
you
can
connect the
PWG-500
to
a
Bluetooth-enabled
PDA
and
use
it
to
con
n
ect
to
wireless
or
GPRS
networks.
T
his
sectio
n
pro-
vides
de
tails
abou
t
how
to
u
s
e
the
PWG-5
00
wit
h
you
r
PC
or
PDA.
Connecting
to
the
PC
Use
a
mini
USB
cable
to
conn
ect
the
PWG-500
to
the
PC
as
shown.
Connectin
g
t
o
t
h
e
P
C
---
55

Installing
the
USB
drivers
and
WIM
To
use
the
PWG-500
as
a
U
S
B
modem
for
your
PC,
you
need
to
install
the
drivers
for
the
device.
When
you
con-
nect
the
device
to
the
PC,
the
PC
detects
the
new
hard-
ware
and
starts
the
New
H
a
rd
ware
Found
Wizard
.
Follow
the
instructions
on
the
screen
to
loca
te
and
install
the
USB
drivers
for
the
PWG-50
0
on
the
PC.
The
USB
driver
files
can
be
fo
und
on
the
utility
CD
provided
in
your
package.
WIM
(Wireless
in
Motion)
is
an
application
that
helps
you
in
configuring
and
using
the
PWG-500.
The
utility
CD
con
t
ains
two
version
s
of
WIM,
one
for
your
PC
and
one
for
your
PDA
(
P
ocket
PC
only).
Select
the
appropriate version
of
WIM
from
the
utility
CD
and
double-clic
k
Setup.exe
.
Follow
the
instructions
on
the
screen
to
install
the
software.
Refer
to
you
r
PDA
documentatio
n
for
deta
ils
about
installing
software
on
your
PDA.
Upgrading
the
firmware
Yo
u
can
upgrade
the
firmware
of
the
PWG-
500
if
required,
from
the
PC
using
the
U
S
B
cable.
The
follow
-
ing
files
are
needed
to
upgrade
the
firmware:
•
F
irmware
file
ca
lled
bu
ndle.b
i
n
•
F
irmware
application
called
uploader_usb.
e
xe
56
---
Connecting
to
the
P
C

Follow
these
instructions
to
upload
th
e
n
e
w
firmware
to the
PWG-500:
1.
Press
the
V
o
lume
do
wn
key
b
efore
you
tu
rn
on
the
PWG-500,
and
then
press
the
reset
button.
The
phon
e
enters
th
e
USB
down
l
oad
mode
.
A
m
essage
tit
l
ed
Firmware
upgrade
(U
SB)
appears
on
the
sc
reen.
2.
Connect
the
PWG-5
00
to
your
PC
using
th
e
USB
cable.
If
yo
u
have
no
t
installed
the
USB
drivers
on
yo
ur
PC,
you
are
p
r
o
m
pted
to
insta
ll
th
em
no
w.
See
“I
nstal
ling
the
U
S
B
drivers
and
WIM”
on page
56
.
3.
Make
a
note
of
the
COM
port
number
being
used for
connecting
the
PWG-500
to
the
PC.
This
can
be
obtained
by
checking
the
D
e
vice
Manage
r
under
Sys
t
em
on
you
r
PC.
Th
e
COM
port
num
ber
ap
pears
under
the
Ports
item.
4.
Op
en
th
e
command
prom
pt,
typ
e
uplo
a
der_u
sb.exe
COM
port
numb
e
r
and
p
r
ess
En
ter
t
o
start
the
uplo
a
d.
The
upload
status
is
shown
on
the
screen.
Wait
till
the
screen
shows
Initializing
b
efore
u
s
in
g
the
ph
one.
C
A
UTION:
Do
no
t
remo
ve
the
bat
t
ery,
turn
off
the
dev
i
ce,
or
ope
rate
the
device
w
h
ile
the
firm
ware
upgrade
is
in
proce
ss.
Using
WIM
The
WIM
application
is
a
usef
ul
interface
that
lets
you
set
up
and
con
f
igur
e
the
PWG-50
0
from
your
PC
or
PDA.
You
can
select
GSM,
VoIP,
GPRS,
and
Wi-Fi
pro-
files
and
personalize
them
according
to
your
network
specifications.
You
can
also
use
the
application
to
down-
load
ringtones,
co
nfig
ure
SOS
numbers
fo
r
the
phon
e,
and
make
any
setup
changes
for
the
phone.
Connectin
g
t
o
t
h
e
P
C
---
57
Double-
click
the
WIM
icon
to
start
the
application
from your
PC
or
PD
A.
The
following
scre
en
is
di
splaye
d
w
hen
yo
u
open
th
e
WIM
Desktop
ap
plication.
Please
wait
for
a
few
seconds
while
the
device
is
being
loca
ted.
You
c
a
n
start
using
the
ap
plication
on
ce
the
device
i
s
fou
nd.
If
there
is
a
problem
connect
ing
to
the
device
t
h
e
follo
w-
ing
scre
en
is
displ
a
yed.
When
the
d
evi
ce
is
fo
und,
the
follo
wing
screen
is
dis-
played.
58
---
Connecting
to
the
P
C
P
h
one
book
Loca
l
Phone
book
Th
is
phoneboo
k
is
saved
on
the
PC
o
r
PPC.
Click
Phone
Book
on
th
e
WI
M
st
art
screen.
By
defa
ult,
the
local
phon
e
book
is
displayed.
Yo
u
can
view
the
local
contacts
by
selecting
Local
contacts
fr
om
t
h
e
View
menu
.
Th
e
fo
llowing
options
are
d
i
splayed
when
you
click
the
Manage
menu:
•
Add
co
ntact:
Click
Add
contact
and
enter
the
name,
the
office
number,
the
home
number,
and
the
cell
number
of
the
contact
and
click
Save
.
Click
DTMF
for
eac
h
number
to
specify
the
DTMF
code
while
dialing
the
numb
e
r.
•
Edit
:
Click
Edit
and
enter
the
name,
the
office
num-
ber,
the
home
number,
and
the
cell
number
of
the
se
lected
contact
and
click
Save
.
•
Delete:
Select
the
co
ntac
t
t
o
be
deleted
from
the
list
shown
in
the
screen
and
click
Delete
to
delete
the
contact.
Connectin
g
t
o
t
h
e
P
C
---
59
•
Find
:
Click
Find
and
enter
the
name
of
the
contact
to
be
searched.
Cl
ick
the
Match
whole
word
check
box
to
search
for
a
specific
word.
Alternativel
y,
if
yo
u
type
only
th
e
first
few
letters
of
the
nam
e
yo
u
are
looking
for,
the
find
operation
will
display
all
match
i
ng
en
tries.
•
Co
py
:
Click
Copy
to
copy
details
of
a
selected
con-
tact
to
the
local
drive
or
to
the
SIM
card.
•
Paste:
Click
Paste
to
paste
details
of
a
contact
that
has
been
copied
.
•
As
sign
r
i
ng
t
o
ne:
Click
Assign
ring
to
ne
to
assign
a
ring
tone
to
a
selected
contact.
Assign
the
ring
tone
from
tho
s
e
displayed.
•
Dial:
Click
Dial
to
call
the
selected
contact.
•
C
hange
local
contacts
path:
Click
th
is
option
to
change
the
folder
or
directory
where
the
local
phon
e
boo
k
is
sto
r
ed
on
you
r
PC.
Note
:
The
home,
cell,
and
office
number
fields
are
available only
fo
r
lo
cal
contac
ts.
If
yo
u
sele
ct
S
I
M1
or
S
I
M2
fo
r
the
phone
book
,
yo
u
can
only
add
a
sing
le
number
fo
r
each
nam
e
.
Click
the
View
menu.
T
h
e
su
bmen
us
as
show
n
in
the
fol- low
i
ng
screen
are
displayed:
60
---
Connecting
to
the
P
C
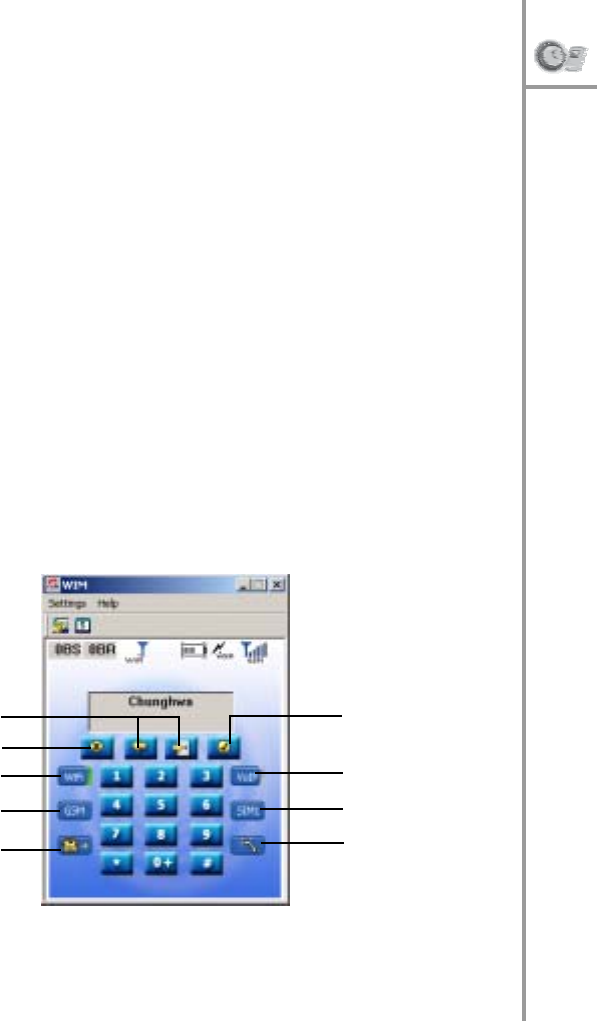
Th
e
descriptio
n
of
the
subm
enus
is
as
follow
s
:
Loca
l
contacts:
Select
th
is
option
to
view
the
details
o
f
contacts
saved
in
the
PC
memory.
SIM
1
contacts:
Select
this
option
to
view
contacts
saved
on
the
first
SIM
card.
SIM
2
contacts:
Select
this
option
to
view
contacts
saved
on
the
second
SIM
card.
Dialer
Click
the
Dia
l
er
button
on
the
WIM
sta
r
t
scree
n
as
show
n
in
Figure
2.
The
dialer
screen
is
displayed
as
follows:
S
c
roll
buttons
End
key
Wi
Fi
GSM
Transfer
call
Answer
ke
y
VoIP
SIM
Answer
ca
ll
waiting
Connectin
g
t
o
t
h
e
P
C
---
61
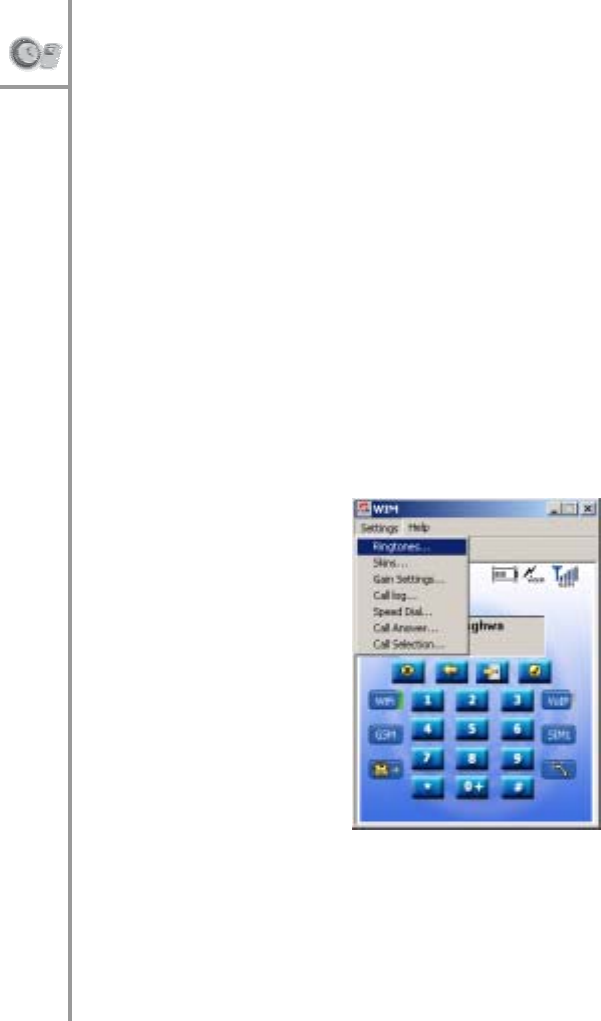
Th
e
descriptio
n
of
the
various
keys
is
given
below:
•
Scr
o
ll
keys
:
Clic
k
thi
s
key
to
m
o
ve
th
e
cursor
to
the
previo
us
or
the
next
menu
.
•
Answer
key:
Click
this
key
to
answer
an
incoming
call
or
to
dial
a
phone
nu
mber.
•
End
key:
Click
this
key
to
terminate
a
call
or
to
reje
ct
an
incoming
call.
•
Wi-
Fi:
Cli
ck
thi
s
key
to
start
using
Wi-Fi.
•
VoI
P
:
Click
this
key
to
start
using
VoIP.
•
GSM:
Click
this
key
to
start
using
GSM.
•
SIM
Card
selec
t
ion
key:
Click
this
key
to
sel
ect
SIM
1
or
S
I
M
2
.
•
Transfer
call:
Click
to
transfer
current
call
to
another
num
ber.
•
Answer
call
waiting:
Click
to
answer
a
call
waiting
on
the
second
lin
e
during
a
cu
rrent
call
in
progress.
Click
the
Settings
menu
on
the
Dialer
screen.
A
list
of
subm
enus
is
d
i
splayed
as
show
n
belo
w.
62
---
Connecting
to
the
P
C
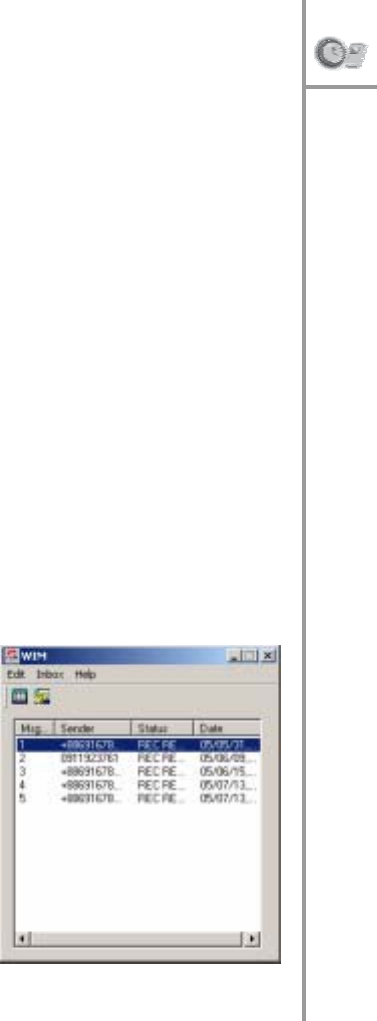
Th
e
descriptio
n
of
the
subm
enus
is
as
follow
s
:
•
Ring
to
nes
:
Select
this
menu
to
change
the
ring
tone
of
the
PWG-500.
You
can
choose
from
the
given
list
of
ring
tones
for
vo
ice
calls
and
text
mes-
sa
ges.
Click
Play
to
test
th
e
selected
rin
g
t
one.
•
Skin
s
:
Click
the
Skin
submenu
to
ch
ange
the
co
lor
of
the
dialer
scree
n
.
There
are
two
skins
to
chose from.
•
Gain
settings:
Select
the
Gain
settings
option
to
change
the
volume
of
the
speake
r
or
the
micro-
phon
e
fo
r
VoI
P
and
GSM
mo
des.
•
Call
l
og:
Click
the
Call
log
su
bm
enu
t
o
view
det
a
ils
of
dialed
c
a
lls,
missed
calls,
and
received
calls.
Sele
ct
a
number
and
click
Dial
to
call
the
number.
•
Speed
dial:
Cl
ick
the
Speed
dial
su
bmenu
to
speed
dial
a
preset
number.
Edit
the
Nam
e
,
Numb
er
,
and
Hotkey
fields
and
clic
k
Add
to
add
speed
dial
num-
bers.
•
Call
answer:
Click
the
Call
answer
submenu
to
specify
wa
ys
to
answer
i
ncoming
calls
or
transfer them
to
vo
ice
mail.
•
Call
se
lection:
Click
this
option
to
quickly
make
a
VoI
P
or
GSM
call
by
entering
a
phon
e
num
ber.
Messages
Click
SMS
on
th
e
WI
M
start
screen
to
send
and
receive
SMS
messages.
Th
e
screen
show
n
here
is disp
layed
.
Connectin
g
t
o
t
h
e
P
C
---
63
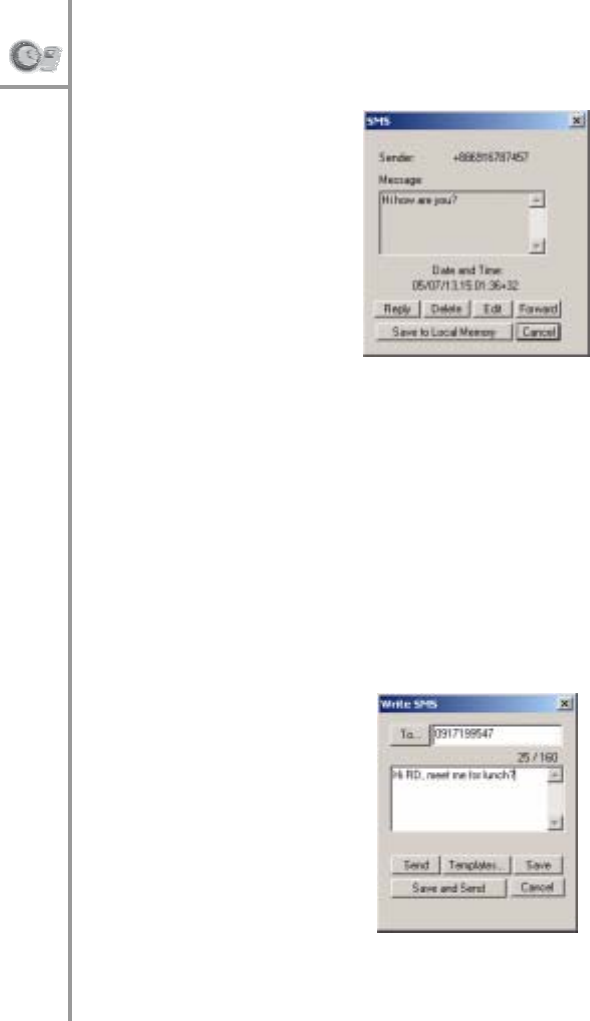
Vi
ewing
SMS
details
Select
a
message
and
click
to
view
detail
s
about
th
e message.
The
follo
wing
screen
is
displayed:
•
Rep
l
y:
Click
Reply
to
reply
to
the
message.
•
Delete:
Click
Dele
te
to
delete
the
message.
•
Edit:
Click
Ed
it
to
edit
the
message.
•
Fo
rw
ard
:
Click
Forward
to
forward
the
message.
•
Save
to
Local
Memory:
Click
th
is
button
to
save
the
message
in
the
PC
m
emory.
•
Cancel:
Click
Cancel
to
close
the
screen.
Wr
iting
an
SMS
Click
Write
Message
on
the
Edit
menu
show
n.
Th
e
fo
l-
low
i
ng
screen
is
sh
own:
64
---
Connecting
to
the
P
C
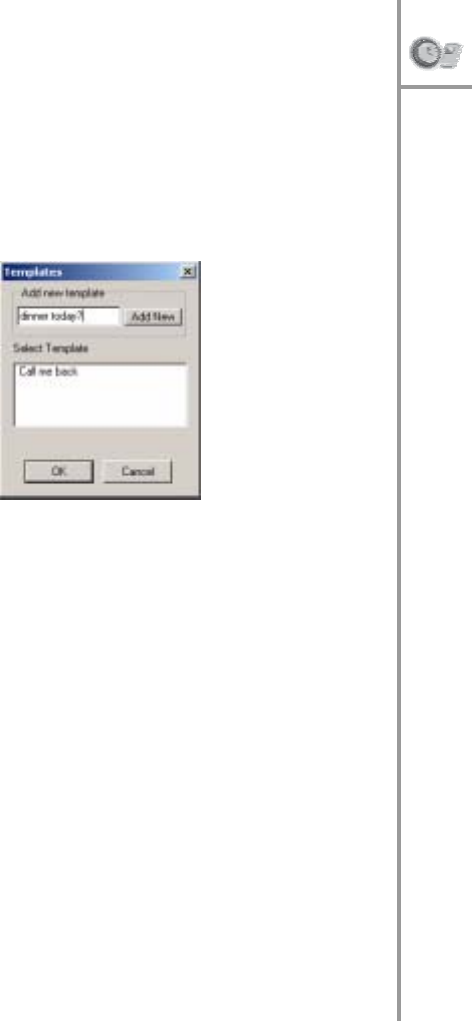
•
Enter
the
receiver's
number
in
the
To…
field
.
•
T
ype
the
message
(
not
more
than
160
characters)
in
the
field
as
shown
in
the
screen
above.
•
C
lick
Sen
d
to
send
the
mess
age.
•
C
lick
Sav
e
to
save
the
message.
•
C
lick
Save
and
Send
to
save
and
send
the
mes-
sa
ge.
•
C
lick
Can
c
el
to
close
the
screen.
•
C
lick
Templa
tes
to
send
a
message
fro
m
th
e
pre-
define
d
templates.
The
follo
wing
screen
is
dis- played:
•
S
ele
c
t
a
template
that
you
want
to
send
and
cli
ck
OK
.
•
K
ey
in
a
short
message
and
click
Add
New
to
cre- ate
a
new
template.
Connectin
g
t
o
t
h
e
P
C
---
65
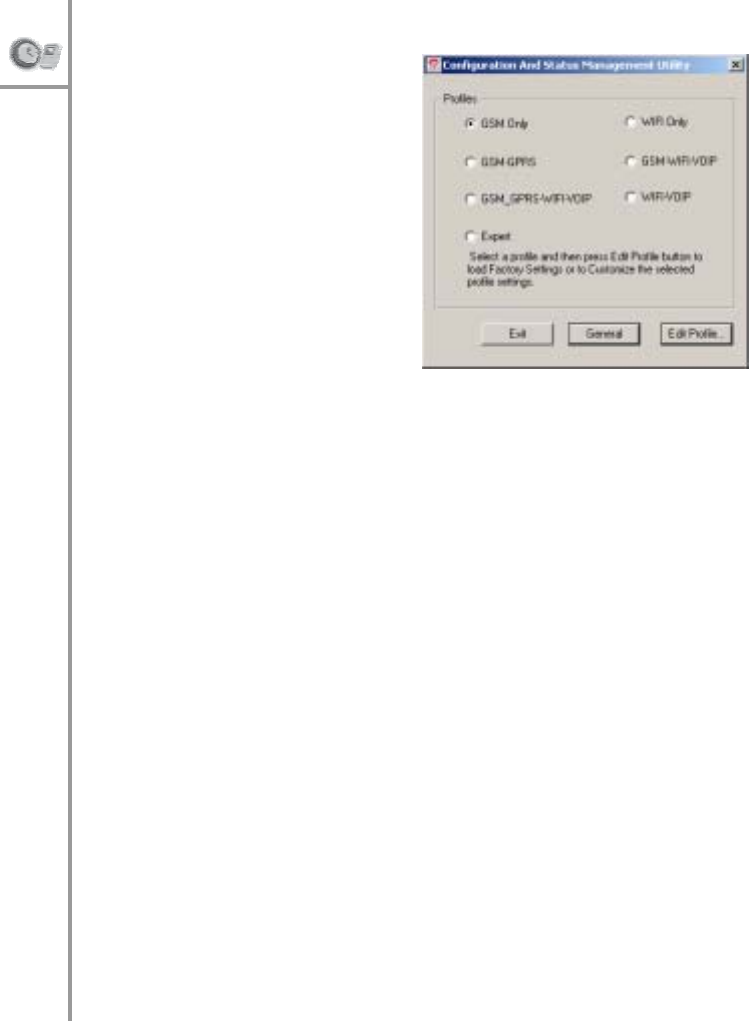
Config.
Stat
To
configure
WIM, click
the
Co
nfig
.Stat
bu
tton.
Th
is
brings
up
th
e
WI
M
conf
igur
atio
n
utility.
Select
a
pro-
file
from
the
options
and
click
Edit
Profile
,
Personaliz
e
to
mod
- ify
the
profile
set-
tings.
Alter
n
at
ively,
click
General
to
m
od-
ify
the
gene
ral
setup.
When
you
edit
a
profile,
all
th
e
options
and
settings
rele-
vant
to
the
profile
are
displayed
and
are
available
for
mo
dification
.
For
instan
ce,
if
you
select
the
GSM-GPRS
option,
you
can
configure
th
e
GSM
calling
settings
such
as
the
default
SIM,
SOS
nu
mbers,
call
waitin
g
op
tion
s
and
GPRS
c
onfi
guration
parameters
such
as
a
c
cess
point
nam
e
and
IP
ad
dress.
These
op
tion
s
have
been
described
under
“Configu
rin
g
th
e
settings”
on
page
44.
Browsing
the
Internet
from
the
PC
You
can
use
the
PWG-500
to
browse
the
Intern
et
o
r
check
e-mails
using
a
Wi-Fi
net
w
or
k
o
r
a
GPRS
net
w
or
k.
If
Wi-Fi
has
been
enabl
e
d
and
a
wireless
hotspot
is
avail-
able
in
the
vicinity,
then
Internet
connectivity
is
auto- matically
ach
ieved
th
ro
ugh
th
e
Wi-Fi
network.
If
Wi-
F
i
is
unavailable,
GPRS
is
automatically
selected
for
Internet
connectiv
ity.
66
---
Connecting
to
the
P
C

To
connect
to
the
Internet,
follow
these
steps:
1.
Connect
the
PWG-5
00
to
your
PC
using
a
USB
cable.
Make
sure
that
the
device
drivers
have
been
installed
correctly.
See
“I
nstalling
the
USB
drivers
and
WI
M”
on
page
56.
2.
Set
up
a
dial-up
n
e
two
r
k
connection
as
follo
ws:
–
C
lick
the
St
ar
t
bu
tt
on
on
t
h
e
tas
k
bar
and
th
en
select
Settings
|
Netw
ork
and
Dial-up
Connec-
tion
s
.
–
D
ouble-click
the
Make
New
Connection
icon.
The
N
e
two
r
k
Co
nnection
Wizard
guides
you throu
gh
the
steps
fo
r
settin
g
up
a
dial-up
co
n-
nection.
–
S
el
ect
the
correct
port
du
ring
the
set-up
pro-
cess.
To
see
the
port,
open
the
Device
Man-
ager
under
System
on
your
PC.
Th
e
COM
po
rt
numb
e
r
appears
under
th
e
Ports
item.
–
Enter
yo
ur
User
name
and
Passwor
d
to
con-
nect
to
the
Dial-up
service.
Consult
your
local ser
vice
pr
ov
ider
f
o
r
this
information.
3.
Wh
en
th
e
dial-up
co
nnection
h
a
s
been
set
up
,
dou
- ble-
click
the
connection
icon
to
dial
into
the
net- work
and
access
the
Internet.
Connecting
to
a
PDA
The
PWG-
500
can
be
used
along
with
B
l
uetooth
enabl
e
d
devices
(
like
PDAs)
that
conform
to
the
Serial
and
Dial-
up
Networking
profile
s.
When
the
PWG-500
i
n
terface
s with
the
PDA,
you
can
use
it
to
make
and
receive
calls,
browse
the
Internet,
chat
using
MSN,
and
send
SMS
messages.
It
is
recommended
that
the
di
stance
between
the
PWG-500
a
nd
the
other
Bluetooth
device
be
less
then
10
meters
away.
Make
sure
that
there
are
no
other
devices
between
these
two
devices
that
may
i
n
terfere
with
tra
nsmission
and
reception.
Connecting
t
o
a
PDA
---
67

Pairing
is
a
process
of
associating
Bl
uetooth
devices
with
each
other
such
that
they
can
automatically
connect
when
they
are
within
range
of
each
other.
The
PWG-500
can
be
paired
with
an
unlimited
number
of
Bluet
o
ot
h
d
e
vices
.
You
can
pai
r
the
PWG-500
with
your
PDA
by
adding
the
PWG-500
to
the
list
of
paired
device
s
using
the
B
l
ue-
tooth
man
ager.
For
pairing
,
you
h
ave
to
enter
the
pa
ss-
key
or
PIN
(
Pe
r
sonal
Identification
Number).
The
default
pass-key
is
1
.
This
ca
n
be
c
hanged
using
the
WI
M
con- figuration-status
utility.
Note
:
If
you
are
pairing
a
new
de
vice
w
i
th
the
PWG-5
00
fo
r
th
e
f
i
r
s
t
tim
e
,
yo
u
h
ave
t
o
p
a
ir
it
twice
consec
utive
l
y
before
trying
to
esta
blish
a
connectio
n
w
i
th
the
device
.
To
connect
the
PWG-500
to
yo
ur
PDA,
do
th
e
f
o
llo
w
i
ng
:
1.
Using
Bluetooth
Manage
r
from
yo
ur
PDA,
sc
an
and
locate
all
Bluetooth
devices
in
the
vicinity.
A
list
of
devices
is
displayed.
2.
Sele
ct
the
PWG-500
from
the
list
of
devices
dis-
played.
3.
Pair
the
PDA
with
the
PWG-500.
Enter
the
PIN
when
prompted.
When
paired
with
a
PDA,
you
can
use
the
PWG-500
with
Wi-Fi
or
GPRS
networks
to
access
the
Internet
Using
GPRS
t
o
browse
the
Int
ernet
I
n
order
to
use
GPRS
to
conn
ect
to
the
I
n
ternet,
you
have
to
first
set
up
a
d
i
al-up
connection
to
the
GPRS
net- wo
rk.
GPRS
set
t
ing
s
diff
er
for
d
i
ffe
ren
t
area
ne
tworks.
Consult
your
service
provider
for
additional
info
rm
ation about
your
local
GPRS
settings.
68
---
Connecting
to
a
P
DA

1.
To
create
a
dial-up
net-
work,
clic
k
St
ar
t
|
Pro-
grams
|
Settings
|Con
nections
|
Mod-
ify
|
Ne
w
.
2.
A
Make
New
Connec-
tion
scr
e
en
is
dis- played.
Enter
the
name,
modem
,
and baud
rate
in
the
corre- sp
ond
ing
fields.
Spec- ify
the
mo
dem
as
Bluetooth
Dialup
Mo
dem
.
Connecting
t
o
a
PDA
---
69
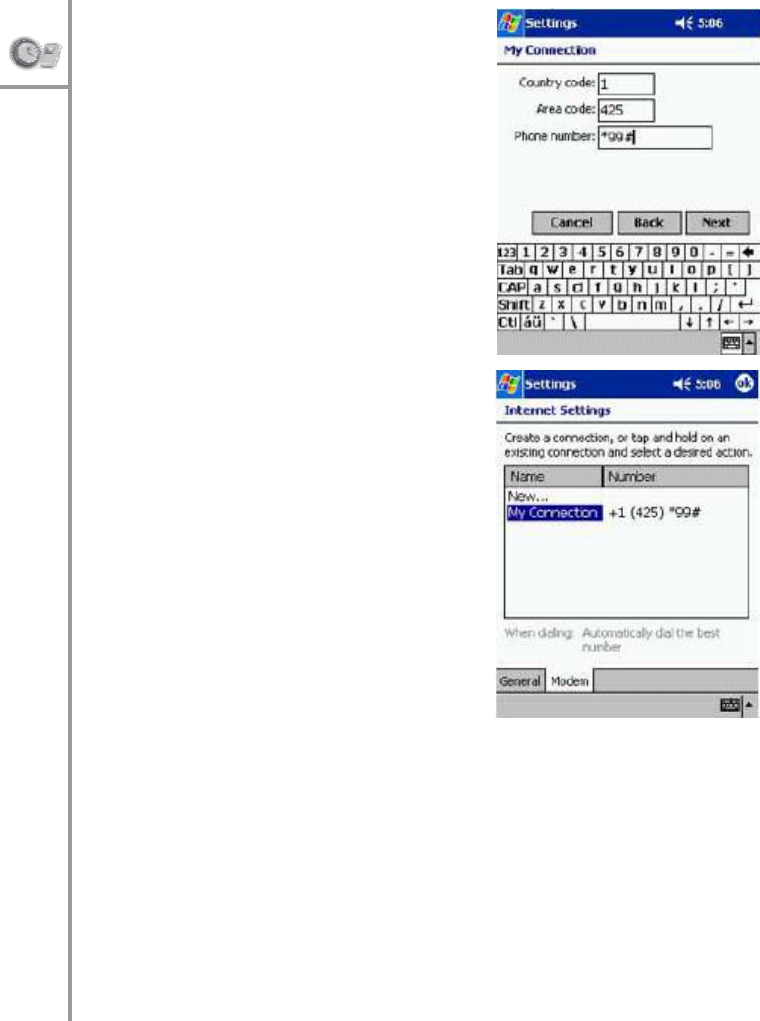
3.
Click
Next
.
4.
In
the
My
Connection
sc
reen
,
enter
th
e
coun-
try
code,
area,
code,
and
phone
numb
e
r
to
conne
ct
to
the
GPRS
numb
e
r.
Consult
your
s
e
r
vice
pr
ov
ider
f
o
r
this
information.
Cl
ick
Next
|
Finish
to
com-
plete
creating
the
con-
nection.
5.
Under
the
In
ter
n
et
Set
-
ting
s
,
a
new
item
called
My
Connection
is
now
displayed.
70
---
Connecting
to
a
P
DA
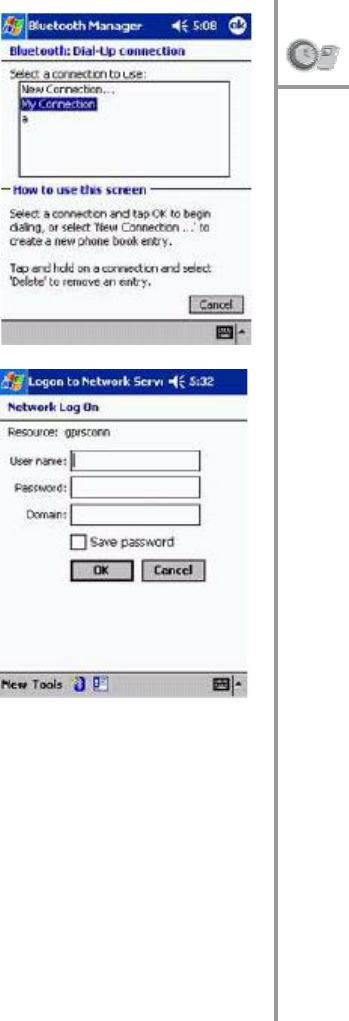
6.
Open
Blu
e
tooth
Man-
ager
and
set
up
a
dial
-
up
net
w
or
king
co
nn
ec-
tion
to
the
PWG-5
00.
Sele
ct
this
new
con-
nection
that
you
just
crea
ted
and
click
OK
to
connect.
A
login
sc
reen
is
displayed.
7.
Enter
the
user
name
and
p
a
ssw
o
rd
fo
r
the
GPRS
network
and
click
OK
.
T
h
e
PWG-
500
connects
to
the
GPRS
netw
ork
and
the
PDA
in
turn
i
s
also
conne
cted.
After
you
are
connected
to
the
network,
you
can
browse
the
Internet
o
r
chec
k
e-mails
as
needed.
Note
:
The
steps
described
abo
v
e
for
creating
a
dia
l
-up
network
co
nnection
and
conn
ect-
ing
to
it
m
a
y
differ
according
to
the
PDA
and
your
service
pro- vider
sett
ings.
Connecting
t
o
a
PDA
---
71

Using
Wi-Fi
to
browse
the
Internet
I
n
order
to
browse
the
Internet
u
s
ing
Wi-Fi,
you
have
to
set
up
and
enable
Wi-Fi
on
the
PWG-50
0.
Th
is
can
be done
directly
from
the
PWG-50
0
as
described
under
“Wi-Fi
settings”
on
page
46
or
fro
m
the
PDA
u
s
i
ng
the
WIM
configuration
utility.
Set
up
the
wireless
connection mode,
security
settings,
and
authentication
parameters
such
as
user
name,
password,
and
E
S
SID
from
th
e
PWG-500.
After
you
set
up
the
w
i
rel
e
ss
p
a
ram
e
ter,
connect
to
a wireless
network
m
a
nually
or
au
tomatically
using
the
PWG-500.
Se
t
up
a
dial
-up
co
nnection
from
the
PDA
to the
PWG-500
a
s
described
in
the
previous
section
and
connect
to
the
PWG-500.
When
the
connection
i
s
estab-
lished
,
open
Internet
Explorer
to
start
b
r
o
w
sing
the
In
ter-
net.
Note
:
T
o
browse
th
e
Internet
using
Wi-Fi,
use
the
same
u
s
er
name
and
pas
s
word
that
were
ente
red
for
t
h
e
Wi-
F
i
parame-
ter
s
.
72
---
Connecting
to
a
P
DA

10.A
PPENDIX
Additional
information
The
use
of
this
equipment
may
be
subject
to
local
rules and
regulations.
The
follo
wing
rules
and
regulations
may
be
relevant
in
some
or
al
l
areas.
FCC
regulations
Th
is
model
phon
e
com
plies
with
part
15
o
f
the
FCC
Rules.
Operati
on
is
subject
to
the
condition
that
this
device
does
not
cause
harmful
interference.
This
device
complies
with
Part
15
of
the
FCC
Rules.
Operation
is
subject
to
the
following
two
conditi
ons:(1)
this
device
may
not
cause
harmful
interference
a
nd
(2)
this
device
must
accept
any
i
n
terferenc
e
re
ceived,
incl
uding
interference
that
m
a
y
cause
undesired
ope
ra-
tion.
Th
is
equip
m
ent
has
been
te
sted
and
found
to
comply
with
the
limit
s
for
a
Class
B
digit
a
l
dev
i
ce,
pursuant
to
Part
15
of
th
e
FCC
Rules.
T
h
ese
limits
are
designed
to
provide
reasonable
protection
against
harmful
interfer- ence
in
a
residential
installation.
This
equipment
gener-
ates,
uses
and
can
radiate
radio
fre
quency
energ
y
a
nd,
if
not
installed
a
nd
used
in
accordance
with
the
instruc-
tions,
m
a
y
cause
harmful
interference
to
radio
communi-
cations.
Addit
i
onal
in
fo
rma
t
ion
---
73

However,
there
is
no
guarantee
that
interference
will
not
occur
in
a
particular
installa
t
i
on
If
th
is
eq
uipm
en
t
do
es
cause
harmful
interference
to
radio
or
television
recep-
tion,
wh
ich
can
be
determined
by
turning
the
equipm
ent
off
and
on
,
the
user
is
enc
our
aged
to
try
to
correct
the
interference
by
one
or
more
of
the
following
measures:
•
Reorient
or
relocate
the
receiving
antenna.
•
I
ncrease
the
separation
between
the
equipment and
receiver.
•
C
onnect
the
equipment
to
an
outlet
on
a
circuit
dif-
ferent
from
that
to
whic
h
the
receiver
is
con-
nected.
•
C
onsult
the
dealer
or
an
experienced
radio/TV
tech-
nician
for
help
.
Change
s
or
mo
dification
s
not
expressl
y
approved
by
th
e party
responsible
for
compliance
could
void
the
user‘s
authority
to
operate
the
equipment.
This
Transmitter
has
been
demonstrated
co-location
com
p
liance
requ
irements
with
Bluetooth
/
Model
No
:
UB
1
-
1112
and
WLAN/Model
No.
:
PWG-5
00.This
trans-
mitter
must
not
be
co-located
or
operating
in
conjunction
with
any
other
a
n
tenna
or
transmitter.
Th
is
EUT
is
in
co
mpliance
with
SAR
for
gen
e
ral
popula-
tion
un
controlled
exposure
limits
in
ANSI
/IEE
E
C95.1
-
1999
and
has
been
tested
in
accordance
with
the
mea-
suremen
t
method
s
and
p
r
o
ce
dures
specified
in
OET
Bul-
letin
65
Su
pplem
ent
C.
74
---
FCC
regulation
s

European
regulations
Products
with
the
CE
mark
comply
with
the
Radio
&
Telecommunication
Terminal
Equipment
Directive
(1999/
5/EEC),
the
Electromagnetic
Compati
b
ility
Directive
(89/
33
6/EEC)
a
nd
the
Low
Vo
ltage
Directive
(73/23/
EEC)
-
as
amended
by
Directive
93/68/
ECC
-
issued
by
the
Comm
ission
of
th
e
Europ
ean
Commu
nity.
Compliance
with
these
directives
implies
conformi
ty
to the
following
European
Standards:
•
1999/
5/EEC
Radio
&
Telecommunication
Terminal
Equi
pment
Directive
(R&TTE)
EN
301
511
•
S
p
e
cific
Ab
so
rp
tion
Rate
(
S
AR)
Standard:
E
N
50360
,
EN
50361
•
73/23/EEC
Low
Voltage
Di
rective
(LVD)
Standard:
EN
60950:2000
•
89/336/EEC
Electromagnet
i
c
Compatibility
(EMC-
Directive)
Standard:
EN30
1489-
1/7
•
T
he
m
anufacturer
cann
o
t
be
held
resp
onsible
for
modifications
mad
e
by
th
e
user
and
the
conse- quences
thereof,
which
may
alter
the
conformity
of the
product
with
the
mark.
European
regula
t
ion
s
---
75

RF
exposure
regulation
(SAR)
Th
is
mod
e
l
phone
m
eets
the
go
vern
ment’s
requirements
for
exposure
to
rad
i
o
waves.
Thi
s
phone
is
designed
and
manufactured
not
to
exceed
th
e
emission
limits
for
expo- sure
to
radio
frequen
c
y
(RF)
energy
set
b
y
the
Fede
ral
Communications
Comm
ission
of
th
e
U.S.
Governm
e
nt.
Th
e
exposure
stan
dard
for
wireless
mobile
pho
nes
emp
l
oys
a
uni
t
of
measuremen
t
known
as
the
Specific
Absorption
Rate,
or
SAR.
The
SAR
lim
it
set
by
th
e
FCC
is
1.
6W/k
g.
Tests
for
SAR
are
cond
ucted
using
standard
operatin
g
posi
tions
accepted
by
the
FCC
with
the
phone
transmit- ting
at
its
highest
certified
po
wer
level
in
al
l
tested
fre-
qu
ency
band
s.
Alth
ough
th
e
SAR
is
d
e
termined
at
the
highest
certified
power
level,
the
actual
SAR
level
of
the
phone
while
operating
can
be
well
below
the
maximum
value.
This
is
because
the
phone
is
designed
to
operate
at
multiple
power
levels
so
as
to
use
only
the
power
required
to
reach
the
network.
In
general,
the
closer
you
are
to
a
wireless
base
station
antenna,
th
e
lower
the
po
wer
output.Th
e
high
est
SAR
value
for
the
model
phone
as
reported
to
the
FCC
when
tested
for
use
at
the
ear
is
0.091
W/kg
and
when
worn
on
the
body,
as
d
e
sc
rib
e
d
in
this
user
gu
ide,
is
0.218
W/ kg.
(
Bod
y
-w
orn
measu
r
em
ents
d
i
ffe
r
among
phon
e
mod
-
els,
d
e
pend
ing
upon
available
enh
ancemen
ts
and
FCC
requireme
nts.)
While
there
may
be
differences
between
the
SAR
levels
of
variou
s
p
hones
and
at
variou
s
po
sition
s,
they
all
meet
the
government
requirement.
76
---
RF
expo
sure
regu
lat
i
on
(S
AR
)

Th
e
FCC
has
g
r
an
ted
an
Equipmen
t
Authoriza
t
ion
for
this
mod
e
l
phone
with
al
l
re
ported
SAR
levels
evaluated
as
in
compliance
with
the
FCC
RF
exposu
r
e
guidelin
es.
SAR
info
rm
ation
on
this
m
odel
phone
is
on
file
with
the
FCC
and
can
b
e
foun
d
under
th
e
Display
Grant
section
of
tap://www.fcc.gov/
oet/fccid
a
fter
searching
on
FCC
ID:
SNFG10.
For
bo
dy
worn
op
eratio
n,
this
phone
h
a
s
been
tested
and
meets
the
FCC
RF
exposure
guidelines
for
use
with
an
accessory
that
contains
no
meta
l
and
positions
the
hand
set
a
minim
u
m
of
1.5
cm
from
the
bo
dy.
Use
of
other
enh
ancemen
ts
may
no
t
ensure
compl
i
ance
with
FCC
RF
exposure
gu
idelin
es.
If
you
do
no
t
u
s
e
a
bod
y-
worn
accessory
and
are
not
holding
the
phone
at
the
ear,
po
sition
th
e
hand
se
t
a
m
i
nimum
of
1.5
cm
fro
m
your
b
ody
wh
en
th
e
phone
is
switched
on.
R
F
exp
osur
e
r
e
gulat
ion
(S
AR)
---
77