G53 STG10 Smart Phone User Manual 15 STG10 UserMan r2
G53 Limited Smart Phone 15 STG10 UserMan r2
G53 >
15_STG10 UserMan, r2.pdf
1
STG10
User Manual

2
1Safety & Notice ......................................................................................................... 3
2Your Phone ............................................................................................................... 5
2.1Battery ............................................................................................................. 5
2.1.1Remove and install of the Battery........................................................5
2.1.2Battery charging......................................................................................6
ATTENTION: ..................................................................................................................... 6
2.2Connect network ............................................................................................. 6
2.2.1SIM card...................................................................................................6
2.2.2Insertion of the SIM Card......................................................................6
2.2.3Insertion of the Memory Card...............................................................6
2.2.4Turning the Phone On or Off.................................................................6
2.3Home screen ................................................................................................... 7
3Function Menu ......................................................................................................... 7
3.1Using the mobile phone memory card as USB mass storage ......................... 7
3.2WLAN .............................................................................................................. 8
3.2.1Open the WLAN and connect to a wireless network.........................8
3.3Bluetooth ......................................................................................................... 9
4Application ............................................................................................................... 9
4.1Backup and Restore ........................................................................................ 9
4.2Browser ........................................................................................................... 9
4.2.1Open Browser.........................................................................................9
4.3Calculator ........................................................................................................ 9
4.4Calendar .......................................................................................................... 9
4.5Camera ......................................................................................................... 10
4.5.1Camera...................................................................................................10
4.5.2Video recorder.......................................................................................10
4.6Clock ............................................................................................................. 11
4.7Contacts ........................................................................................................ 11
4.8Downloads .................................................................................................... 11
4.9Email ............................................................................................................. 11
4.10File manager ................................................................................................. 11
4.11FM radio ........................................................................................................ 12
4.12Gallery ........................................................................................................... 12
4.13Messaging ..................................................................................................... 12
4.13.1Send SMS..............................................................................................12
4.13.2Send MMS.............................................................................................12
4.14Music ............................................................................................................. 12
4.14.1Open music player...............................................................................12
4.14.2Enjoy music...........................................................................................13
4.14.3Add to playlists......................................................................................13
4.14.4Management play lists.........................................................................13
4.14.5Add to play lists.....................................................................................13
4.14.6Set music use as ringtone...................................................................13
4.14.7Set sound effects..................................................................................13

3
4.15Phone ............................................................................................................ 13
4.16Setting ........................................................................................................... 14
4.16.1Wi-FI.......................................................................................................14
4.16.2Bluetooth................................................................................................14
4.16.3Data usage............................................................................................14
4.16.4More........................................................................................................14
4.16.5Audio profiles.........................................................................................14
4.16.6Display....................................................................................................14
4.16.7Storage...................................................................................................15
4.16.8Battery....................................................................................................15
4.16.9Apps........................................................................................................15
4.16.10Location..................................................................................................15
4.16.11Security..................................................................................................15
4.16.12Language & input.................................................................................15
4.16.13Backup Reset........................................................................................15
4.16.14Scheduled power on &off....................................................................15
4.16.15Date & time............................................................................................16
4.16.16Accessibility...........................................................................................16
4.16.17About phone..........................................................................................16
4.17Sound recorder ............................................................................................. 16
4.18Video player .................................................................................................. 16
4.18.1Open the video player..........................................................................16
4.18.2Enjoy video............................................................................................17
1 Safety & Notice
WARNING: Please pay attention to these guidelines, not following them may be
dangerous and illegal.
SWITCH OFF IN RESTRICTED AREA
Switch the device off when near mobile phone use is not allowed or when it
may cause interference or danger such as near the fuel tanks, chemicals,
Aircraft or blasting areas. Keep the device away from the children.
While driving please obey local laws and regulations with regard to use of
the device., .always keep your hands free to operate the vehicle while
driving, road safety comes first.
Non-original accessories and components are not provided with repair
warranty qualification.
Please do not disassemble your phone by yourself, if your phone is out of
order, please contact your supplier.
Please do not charge the Smart Phone before battery is installed. Do not
short-circuit the battery.
Smart Phone must be charged in a good ventilated and cooling environment,
and away from flammable and explosive materials.
In order to demagnetization, please keep Smart Phone away from the
4
magnetic material, such as disks, credit card etc.
Keep the device dry. Precipitation, humidity, and all types of liquids or
moisture can contain minerals that will corrode electronic circuits. If your
device does get wet, remove the battery, and contact with the supplier.
Do not use the Smart Phone in too high or too low temperature environment,
and do not expose the Smart Phone to strong sunlight or high humidity.
Do not use liquid or wet cloth with strong detergent to clean the device.
This Smart Phone has Camera, video recording and sound recording
functions; please follow the relevant laws and regulations to use those
functions. Photograph, video recording and sound recording without
authorization may be illegal.
While using the network functions, please do not download the files which
have virus, do not install any photos and ring tones which have been
damaged. doing so may void warranty
Please dispose of batteries according to local regulations, and use recycle
when possible. Do not dispose battery as household waste.
STATEMENT: Our Company reserves the right to revise this manual content
without prior notice.
FCC RF Exposure Information and Statement
The SAR limit of USA (FCC) is 1.6 W/kg averaged over one gram of tissue. Device types
Smart Phone (FCC ID: 2ADLM-STG10) has also been tested against this SAR limit. The
highest reported SAR values for head, body-worn accessory, wireless router(hotspot) ,
and simultaneous transmission conditions are 0.517 W/kg, 1.236 W/kg , 1.339 W/kg, and
1.339W/kg respectively. This device was tested for typical body-worn operations with the
back of the handset kept 10mm from the body. To maintain compliance with FCC RF
exposure requirements, use accessories that maintain a 10mm separation distance
between the user's body and the back of the handset. The use of belt clips, holsters and
similar accessories should not contain metallic components in its assembly. The use of
accessories that do not satisfy these requirements may not comply with FCC RF exposure
requirements, and should be avoided.
FCC Warning
This device complies with Part 15 of the FCC Rules. Operation is subject to the following
two conditions:
(1) This device may not cause harmful interference, and (2) this device must accept any
interference received, including interference that may cause undesired operation.
NOTE 1: This equipment has been tested and found to comply with the limits for a Class B
digital device, pursuant to part 15 of the FCC Rules. These limits are designed to provide
reasonable protection against harmful interference in a residential installation. This
equipment generates, uses and can radiate radio frequency energy and, if not installed

5
and used in accordance with the instructions, may cause harmful interference to radio
communications. However, there is no guarantee that interference will not occur in a
particular installation. If this equipment does cause harmful interference to radio or
television reception, which can be determined by turning the equipment off and on, the
user is encouraged to try to correct the interference by one or more of the following
measures:
- Reorient or relocate the receiving antenna.
- Increase the separation between the equipment and receiver.
-Connect the equipment into an outlet on a circuit different from that to which the receiver
is connected.
-Consult the dealer or an experienced radio/TV technician for help.
NOTE 2: Any changes or modifications to this unit not expressly approved by the party
responsible for compliance could void the user's authority to operate the equipment.
2 Your Phone
The pictures in this manual are only for reference, If individual picture does not match with
the product in kind. Please refer to the customer care..
Get Started
! Important: This device is designed to be used with a SIM card, use of incompatible
SIM cards may result in the device not working and could cause damage to the
device or SIM card. Make sure the phone is properly switched off when removing
battery and inserting the SIM
2.1 Battery
2.1.1 Remove and install of the Battery.
When removing the battery follow the following steps:
① Firmly lift the battery cover from bottom left corner of the phone while the phone is
faced down;
② Gently push the battery forward and lift it up.
When installing the battery follow the following steps:
① Make the battery metal contact completely with the phone in the battery
compartment, and then push the battery as shown in the picture below.
② Put the battery cover on.
Warning: Do not connect any external electric power directly to the battery, this
may result battery explosion and cause injury

6
2.1.2 Battery charging
Plug the charger connector with the phone, and plug the charger into the electrical outlet.
At this time the charge level icon will repeatedly flash at the top right corner of the
mobile phone’s screen; showing that battery is charging When charging is complete,
unplug the charge connector from the electrical outlet and the mobile phone.
ATTENTION:
Charging must be performed in a well-ventilated area with a temperature between
-10C and +45C. The factory-supplied charger must be used. Using an unapproved
charger could cause damage to the battery and void warranty.
2.2 Connect network
2.2.1 SIM card
Before using your phone, you must first insert a valid and active SIM
(Subscriber Identity Module) card in the phone from your network provider.
Your phone will not work with invalid SIM.
Warning: Do not connect any electrical wires to the SIM card metal slots
2.2.2 Insertion of the SIM Card
Turn off the phone; remove the battery and unplug other external power sources.
Insert the SIM card into the SIM slot.
When you need to remove the SIM card, please first turn off the phone, remove the
battery, then remove the SIM card.
2.2.3 Insertion of the Memory Card
It is recommended to use external memory card in order to have better performance
of this Device
Turn off the phone; remove the battery and unplug other external power sources.
Insert the T-FLASH card to the T-FLASH trough.
When you need to remove T-Flash card, please first turn off the phone, remove the
battery, then remove the memory card.
2.2.4 Turning the Phone On or Off
To turn ON or OFF the phone, hold down the Power key for few second.
If you turn ON the phone without having inserted the SIM card, phone will display “No SIM
card”. After inserting the SIM card, the phone will automatically check if the SIM is
activated on the Network.After startup, according to the prompt, set boot wizard, press
enter standby interface.
7
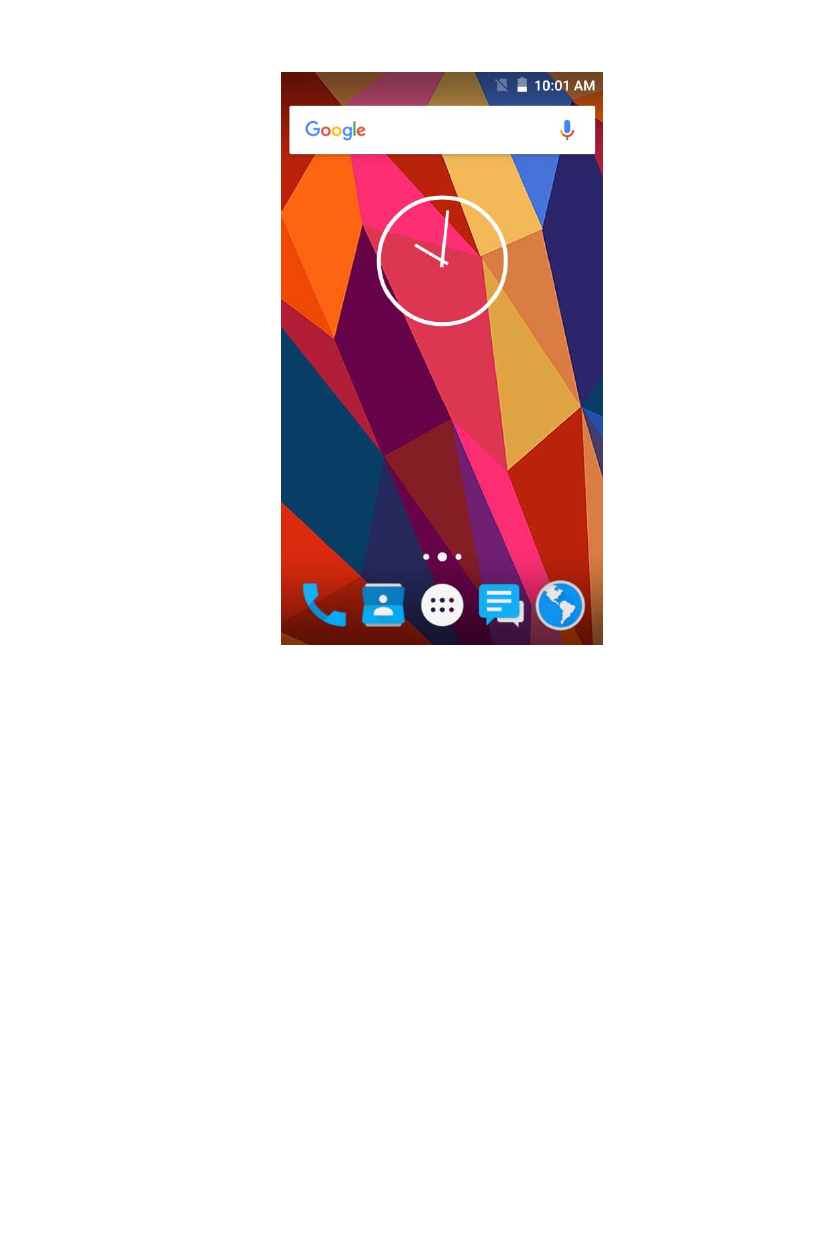
2.3 Home screen
Turned on and unlock the screen, the display shows the interface is the Home
screen;
In addition to the diagram shown in the shortcut icon of the Home screen, need to add
or delete a folder, other shortcuts or widgets. When idle space after use, you can slide
horizontally on the screen to open the home of the extension interface and add the
desired content.
3 Function Menu
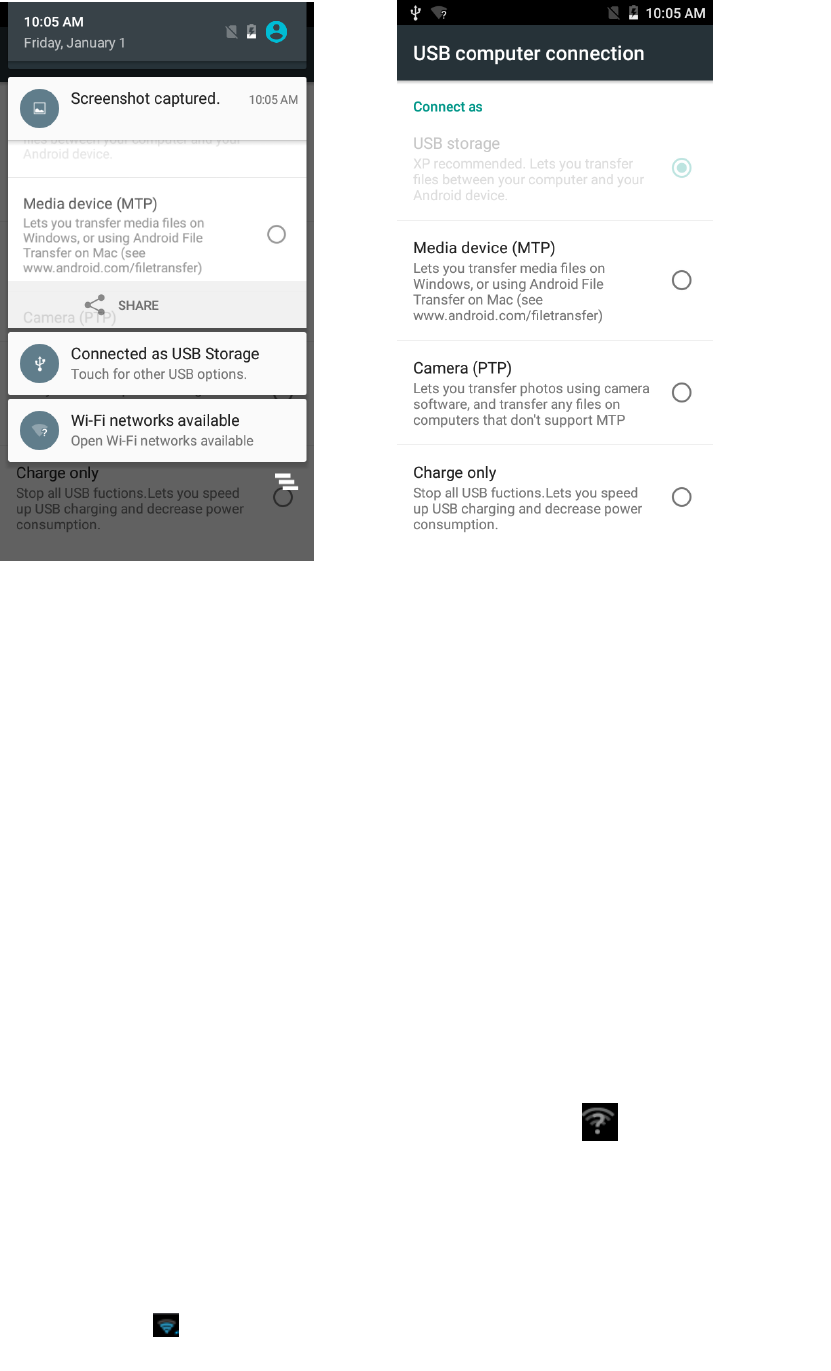
3.1 Using the mobile phone memory card as USB mass storage
1. Use USB line will be mobile phone connected to the computer. The status bar will
show the notification icon.
2. Open the notice panel.
3. In the notification panel, touch “USB connected”, and then touch "turn on USB
storage". when you want to disconnect, can touch ”turn off USB storage”
8
3.2 WLAN
Wireless Local Area Network (WLAN) links two or more devices using some wireless
distribution method and providing a connection through an access point to the wider
internet.
NOTICE: The WLAN signal coverage distance is about 100 meters and will depend
on the quantity, infrastructure, and other signals penetrate the object and decide.
3.2.1 Open the WLAN and connect to a wireless network
1. Press the Home key, click on Settings-> Wi-Fi.
2. Select and open Wi-Fi. The phone will automatically scan can be used a wireless
network.
3. Click on the Wi-Fi settings. Then WLAN network will display a list of WLAN to find
the network of the name and security Settings (open network or with WEP, WPA/WPA2
encryption). If the opening set of WLAN network notice, to find a cell phone in the open
wireless network can be used in the status bar shows the icon( ).
4. Touch one of the WLAN network to connection. When you select open network,
mobile phone will be connected to the network. If selected is WEP, WPA/WPA2
encryption network, it must first corresponding input password, and then the touch
connection
NOTICE: When the phone is connected to a wireless network, the status bar will display
the WLAN icon ( ), and displays the approximate signal strength (light up the number of
strip).If touch mobile phone at present the connected to a wireless network, will display

9
the name of the state, WLAN network, speed, signal strength, safety information and IP
address. If you want to remove phone wireless networks set, please touch this window on
the "don't save". If you want to connect to the network, you must enter again these
Settings.
Unless you choose not to save network, or the next mobile phone to connect to
previously had connected encryption wireless network, will not have to enter a password
accordingly. The network will search by WLAN, also is the mobile phone does not need to
perform additional steps can be connected to the WLAN network.
3.3 Bluetooth
1. Press the Home key, click on-> Settings.
2. Click on “Bluetooth” to open Bluetooth. After open, the status bar will appear
Bluetooth ( ).then will begin to scan for Bluetooth devices within range. All the
equipment will show up in Bluetooth devices list below.
Important: Default password is XXXX Matching and connecting Bluetooth headset
4 Application
4.1 Backup and Restore
Can backup and Restore you personal data and App to SD Card, Can Restore to the
phone.
4.2 Browser
Through a web browser, you can connect to the internet, Internet settings are default
to MTN SIM card.
4.2.1 Open Browser
Touch Brower can open the browser. Interface as shown in the diagram:
In the browser, you can open the page by the following methods:
1. Click on the browser address bar, input for the open web site. Click.
2. Touch the menu key-> bookmarks, choose need to open the bookmarks or click on
the most visited/history records label page to choose open other web pages.
4.3 Calculator
A have four basic function of the calculator, convenient for simple mathematical
calculation you.can you make calculator to separate thousand with a comma eg 1,000
4.4 Calendar
Enter calendar submenu, the calendar will display on the screen and the current date
marked with the special color background frame.
10
4.5 Camera
4.5.1 Camera
Your mobile phone and camera with dual, it is equipped with a high vivid camera
picture which you can use to take pictures at anytime or place and then save them on your
mobile phone, use them as your mobile phone wallpaper or send them to your friends and
colleagues via MMS and email.
4.5.1.1 Open camera
Click on the camera can turn on the camera.
Warm prompt: in the camera's interface, you can click " " fast switching to the
camera to video camera, click to panoramic photo mode
Taking a photo
1. During the view-finding mode, adjust the lens to allow what is being photographed to
appear in the viewfinder.
2. After framing the picture you wish to take, keep the camera steady and press” to
take photo;
3. After taking photos will auto save to camera folders in picture;
4. Click “ ” return to camera interface.
4.5.2 Video recorder
The mobile-phone supports shoot function, the extent of film restrict according as
current memory space.
4.5.2.1 Recorder
1. During the view-finding mode, adjust the lens to allow what is being photographed to
appear in the viewfinder.
2. Press” “ to recorder.
3. Press “ ” end recorder.
Complete recorder, you can click on the icon of the right, in the menu for the following in
operation:
1. Click delete, you can delete the video.
2. Click share, you can through the information, E-mail or Bluetooth, etc and good
friends share this video.
3. Click “ ” ,you can view the video.
4. Click more, You can view the video detailed information.
11
4.6 Clock
1. Click on the screen switch display mode.
2. Click on the "" set the alarm clock. Click the default alarm clock, or click add
alarm clock or by the menu button-> add alarm, Checked open alarm clock check box.
Set the alarm time, repeat and other necessary information. After the completion of
the set, you also can press menu button-> delete alarm /preview the alarm clock
deleted or edit alarm.
4.7 Contacts
You can store phone numbers on your phone’s memory.
This menu gives you quick and easy access to the people you want to search. You can
view and create contacts on your phone, and can also import contacts stored on your SIM
card.
To access this menu, press HOME, and touch the application tab, and then select People.
You can also press the People icon in the home screen and select the Contacts
tab.
4.8 Downloads
Show all content downloaded from the browser. Click to view the downloaded content;
checking the box you can choose to delete and clear all selected downloads.
4.9 Email
Enter E-mail address and login password, choose communication protocol,Select
data account [Edit wireless local area network or SIM card to connect to the E-mail
network],Setting receiving server and send server address,Edit user name [username
need to use the name generate itself], and save Settings, enter the mailbox options to
write and receive mails.
Note: Different email accounts communications business agreement may be different,
communication protocol choose wrong can lead to you can send and receive E-mail.
Selectable settings as below:
Account settings
You can change E-mail account Settings, such as name, email address and password
and specifications.
Email notification and ring Settings
Set the notification of email and select the ring settings.
E-mail inspection frequency Settings
Enter the optional settings of the E-mail checking frequency.
4.10 File manager
In the main menu click on file management can enter to file management list, memory
12
card shows all of the file. Root directory of the document according to the menu button
can be new folder, folders and files to copy, view, cut, delete, rename, share and details.
4.11 FM radio
In the menu before please to insert headphones.
1.Click the icon, can search, open Speaker, and have Record FM;
2.Click the icon, can review the channel you have searched;
4.12 Gallery
Click Gallery to enter you can view all the pictures and videos in the T-card. The video files
can use the video player.
4.13 Messaging
Click on the messaging, you can pass the messaging function sending or receiving
SMS and MMS.
4.13.1 Send SMS
1. Messaging ->Click the icon “ ” to Compose new message.
2. In the recipient field, enter the recipient number. You can also click “ ” Select
recipients from your contacts.
3. Click on a column of input, enter the message content.
4. Click send.
5. Select SIM card.
4.13.2 Send MMS
1. Messaging ->Compose new message.
2. In the recipient field, enter the recipient number. You can also click “ ” Select
recipients from your contacts.
3. Press the key
Tip: add a picture,videdos,Audio,Calendar files. You also can choose capture picture,
capture video, record audio and slideshow inserted into MMS attachments.
4.14 Music
4.14.1 Open music player
Play music files before, need to music file copy to memory CARDS. Click on the music can open
music player.

13
4.14.2 Enjoy music
1. Click on the artist/albums/songs/ library, find you need to play music files.
2. Click on the music files start playing.
4.14.3 Add to playlists
In order to facilitate the management of your music files, you can create some play
lists.
1. Click on the songs tag page.
2. Choose need to add to playlist of music files, long press until pop-up shortcut
menu.
3. Click on add to playlist.
4. Click on the new.
5. Input the name of the new play lists.
6. Click save.
Right now you choose music file will be automatically added to the new play list.
4.14.4 Management play lists
1. Music->play list
2. Choose from the list to edit or play playlist, long press until pop-up shortcut menu.
4.14.5 Add to play lists
1. Open the music, choose songs tag page
2. Choose need to add to playlist of music files, long press until pop-up shortcut
menu.
3. Click add to playlist.
4. Choose need to add playlist.
4.14.6 Set music use as ringtone
1. Open the music.
2. Choose songs/play list tag page.
3. The music files to choose and long press until pop-up shortcut menu.
4. Click used as phone ringtone.
4.14.7 Set sound effects
1. Open the music.
2. Press the menu button-> sound effects.
3. Tick enable sound, choose to enable the sound effects and checked open.
4.15 Phone
Usethismenutocallyourfriends.
Toaccessthismenu,pressHOME,touchtheapplicationtab,andselectPhone.
OryoucanpresstheCalliconinthehomescreen.

14
4.16 Setting
4.16.1 Wi-FI
To turn on the wifi the can scan the network to browse wap page or other apps;
Wi-Fi: select on or off.
Wi-Fi settings: Set up and management wireless access points, etc.
Wi-Fi Direct settings: Set up and management WLAN Direct.
Tethering & portable hotspot: Will you move data connection through cell phone
USB or as a portable WLAN hot share.
VPN settings: Setup and manage virtual private network.
Mobile networks: Check the mobile data usage, set access point name and
network operators.
GPRS transfer prefer: Will you move data connection through cell phone USB to
share.
4.16.2 Bluetooth
Open/close Bluetooth.
Bluetooth settings: ON/OFF
4.16.3 Data usage
Measured by your phone,Your carrier’s data usage according may differ;
4.16.4 More
Airplane mode: Disable all wireless connection.
VPN settings: Setup and manage virtual private network.
Tethering & portable hotspot: Will you move data connection through cell phone
USB or as a portable WLAN hot share.
Wi-Fi Direct settings: Set up and management WLAN Direct.
Mobile networks: Check the mobile data usage, set access point name and
network operators.
GPRS transfer prefer: Will you move data connection through cell phone USB to
share.
4.16.5 Audio profiles
General
Silent
Vibration
Outdoor
4.16.6 Display
Brightness: Set the brightness of the phone display
Scenes: to set the Scenes to default or work;
Wallpaper: Set up the wall paper of mobile phones
Theme: to set up the phone’s theme;
Auto-rotate screen: Set up if open automatically rotating screen.
Sleep: Automatic adjustment screen lock the delay time before

15
Font size: to set the phone’s font size;
4.16.7 Storage
SD card: view SD card total space and available space.
Mount SD card: After unloading SD card SD card will not display.
Erase SD card: Remove the SD card all the data.
Internal storage: Display size available space.
4.16.8 Battery
View Battery Condition
4.16.9 Apps
Unknown sources: Setting is allowed to install the electronic market to provide
application.
Manage applications: Management and delete installation applications.
Running services: Check and control the currently running services.
Storage use: Check the application of storage space.
4.16.10 Location
Use wireless network: The use of mobile network in application check position.
Use GPS satellites: Accurate location to street level.
GPS EPO assistance: Use GPS auxiliary material (EPO) to accelerate the GPS
positioning.
EPP settings: View the modified EPO configuration information
A-GPS: Use auxiliary data can accelerate the GPS positioning.
A-GPS: View the modified A-GPS Settings.
4.16.11 Security
You can configure settings that help secure your phone and its data.
4.16.12 Language & input
Language settings: can select language and user dictionary.
Keyboard settings: choose the Android keyboard, Sogou input method and
Google Pinyin input method.
Input method: Choose input method way.
4.16.13 Backup Reset
Automatic restore: When reinstalling an app,restore backed up settings and data
DRM reset: Delete all DRM licenses
Factory data reset: Erases all data on phone;
4.16.14 Scheduled power on &off
Each time, including the timing of the setup time and repeat way content, set up
complete and checked open the alarm clock check box, when the corresponding setting

16
time, will be set according to the switch machine operation and executive boot or
shutdown action.
4.16.15 Date & time
Automatic: Use networks offer a time and date.
Set date: Manually edit date.
Select time zone: Manually choose time zone.
Set time: Manual set a time.
Use 24-hour format: set Open/close.
Select date format: Choose the date the format of the show
4.16.16 Accessibility
Accessibility: set Open/close.
Power button ends call: Press power key words will end the call, not shut down the
screen.
Quick boot: set Open/close.
4.16.17 About phone
System updates
Status: Check the current state of the mobile phone.
About battery: View power consumption situation
Legal information: check the open source license
About version: Display model.
4.17 Sound recorder
Thesoundrecorderisasimplerecordingtoolthatprovidesalloftherequiredfunctionalitiesfor
youtomanagevoicefiles.
Tostartrecording
1.Inanymode,pressHomeKey,touchtheapplicationtabandthentouchSoundRecorder.
Touchbuttontostartrecording.
2.Duringtherecording,youcanpausethevoicerecordinganytimebytouchingbutton .
ThenchoosetoandtouchSavetosavetherecordingfile.
3.Toexitsoundrecorder,youcanpressBackKey.
4.18 Video player
4.18.1 Open the video player
1. Click to see the video of the choice in the folder.
2. Choose the video files to play, click open can use video player play.

17
4.18.2 Enjoy video
1. Choose the video files to play, and click open.
2. Play interface click " " stop playing video, click on the" " Play video; Click on the
"" choose showing the way.
FCC RF Exposure Information and Statement
The SAR limit of USA (FCC) is 1.6 W/kg averaged over one gram of tissue. Device types Smart
Phone (FCC ID: 2ADLM-STG10) has also been tested against this SAR limit. The highest
reported SAR values for head, body-worn accessory, wireless router(hotspot) , and simultaneous
transmission conditions are 0.517 W/kg, 1.236 W/kg , 1.236 W/kg, and 1.339W/kg respectively.
This device was tested for typical body-worn operations with the back of the handset kept 10mm
from the body. To maintain compliance with FCC RF exposure requirements, use accessories that
maintain a 10mm separation distance between the user's body and the back of the handset. The use
of belt clips, holsters and similar accessories should not contain metallic components in its
assembly. The use of accessories that do not satisfy these requirements may not comply with FCC
RF exposure requirements, and should be avoided.
FCC Warning
This device complies with Part 15 of the FCC Rules. Operation is subject to the following two
conditions:
(1) This device may not cause harmful interference, and (2) this device must accept any
interference received, including interference that may cause undesired operation.
NOTE 1: This equipment has been tested and found to comply with the limits for a Class B digital
device, pursuant to part 15 of the FCC Rules. These limits are designed to provide reasonable
protection against harmful interference in a residential installation. This equipment generates, uses
and can radiate radio frequency energy and, if not installed and used in accordance with the
instructions, may cause harmful interference to radio communications. However, there is no
guarantee that interference will not occur in a particular installation. If this equipment does cause
harmful interference to radio or television reception, which can be determined by turning the
equipment off and on, the user is encouraged to try to correct the interference by one or more of
the following measures:
- Reorient or relocate the receiving antenna.
- Increase the separation between the equipment and receiver.
-Connect the equipment into an outlet on a circuit different from that to which the receiver is
connected.
-Consult the dealer or an experienced radio/TV technician for help.
NOTE 2: Any changes or modifications to this unit not expressly approved by the party
responsible for compliance could void the user's authority to operate the equipment.