GE Healthcare IDR3543 Digital X-ray Image Detector User Manual III Rev1
GE Healthcare Digital X-ray Image Detector III Rev1
UserManual.wiki
>
GE Healthcare
>
IDR3543 User Manual
>
User Manual-III-Rev1
Contents
1.
User Manual-III-Rev1
2.
User Manual--II-Rev1
3.
User Manual-IV-Rev1
4.
User Manual-I-Rev3
User Manual-III-Rev1
Navigation menu
Upload a User Manual
Namespaces
Wiki Guide
HTML
PDF
Info
Views
User Manual
Discussion / Help
Navigation
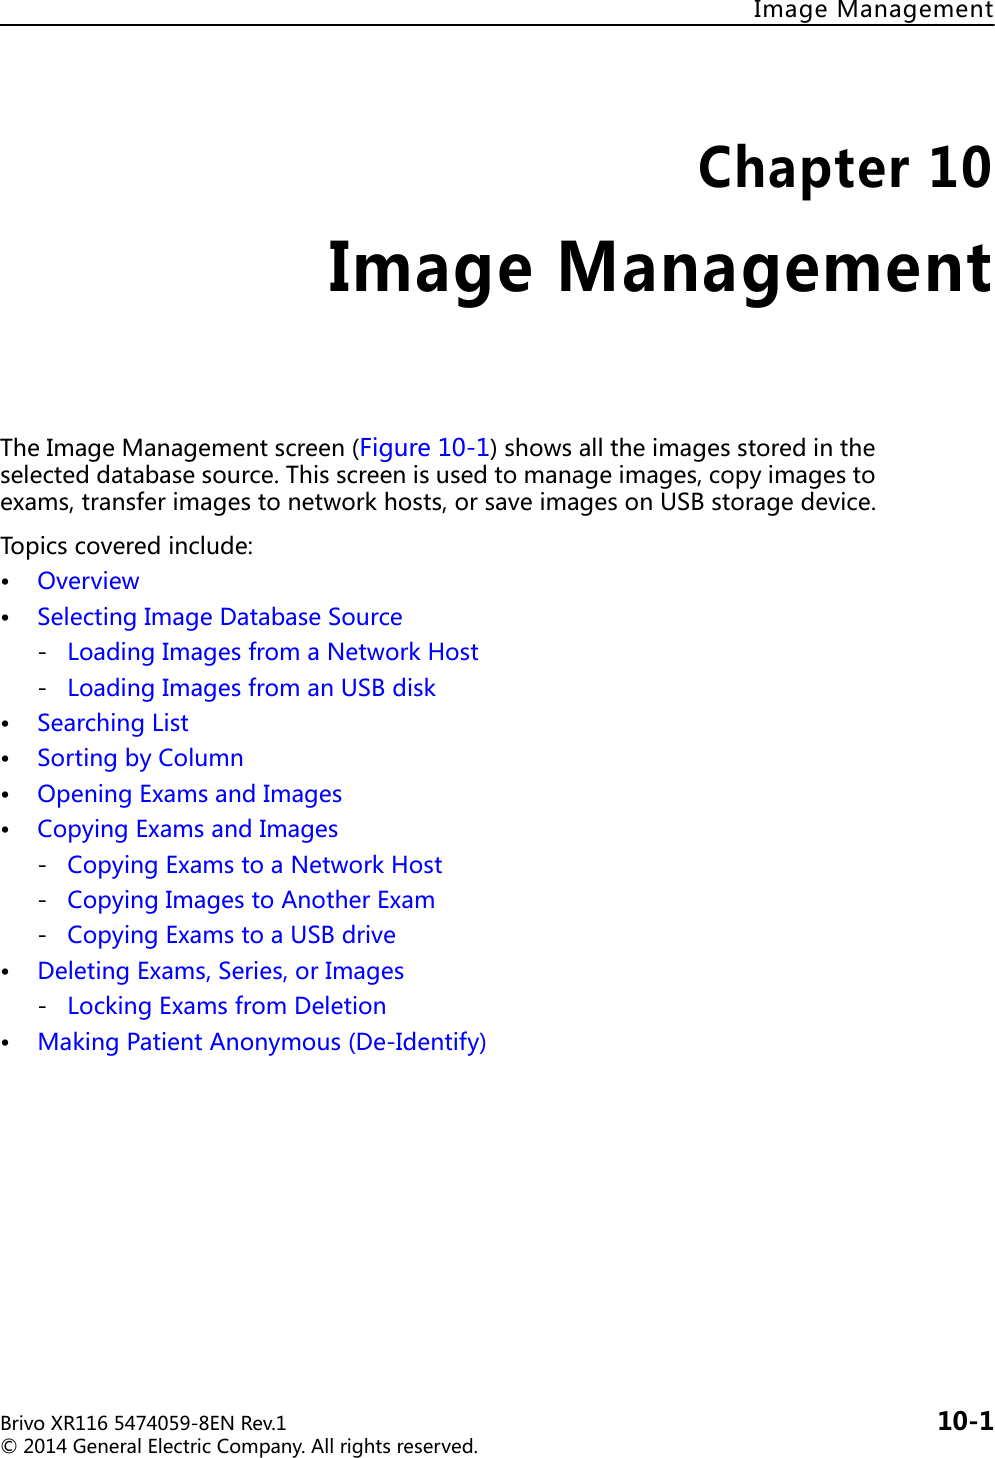
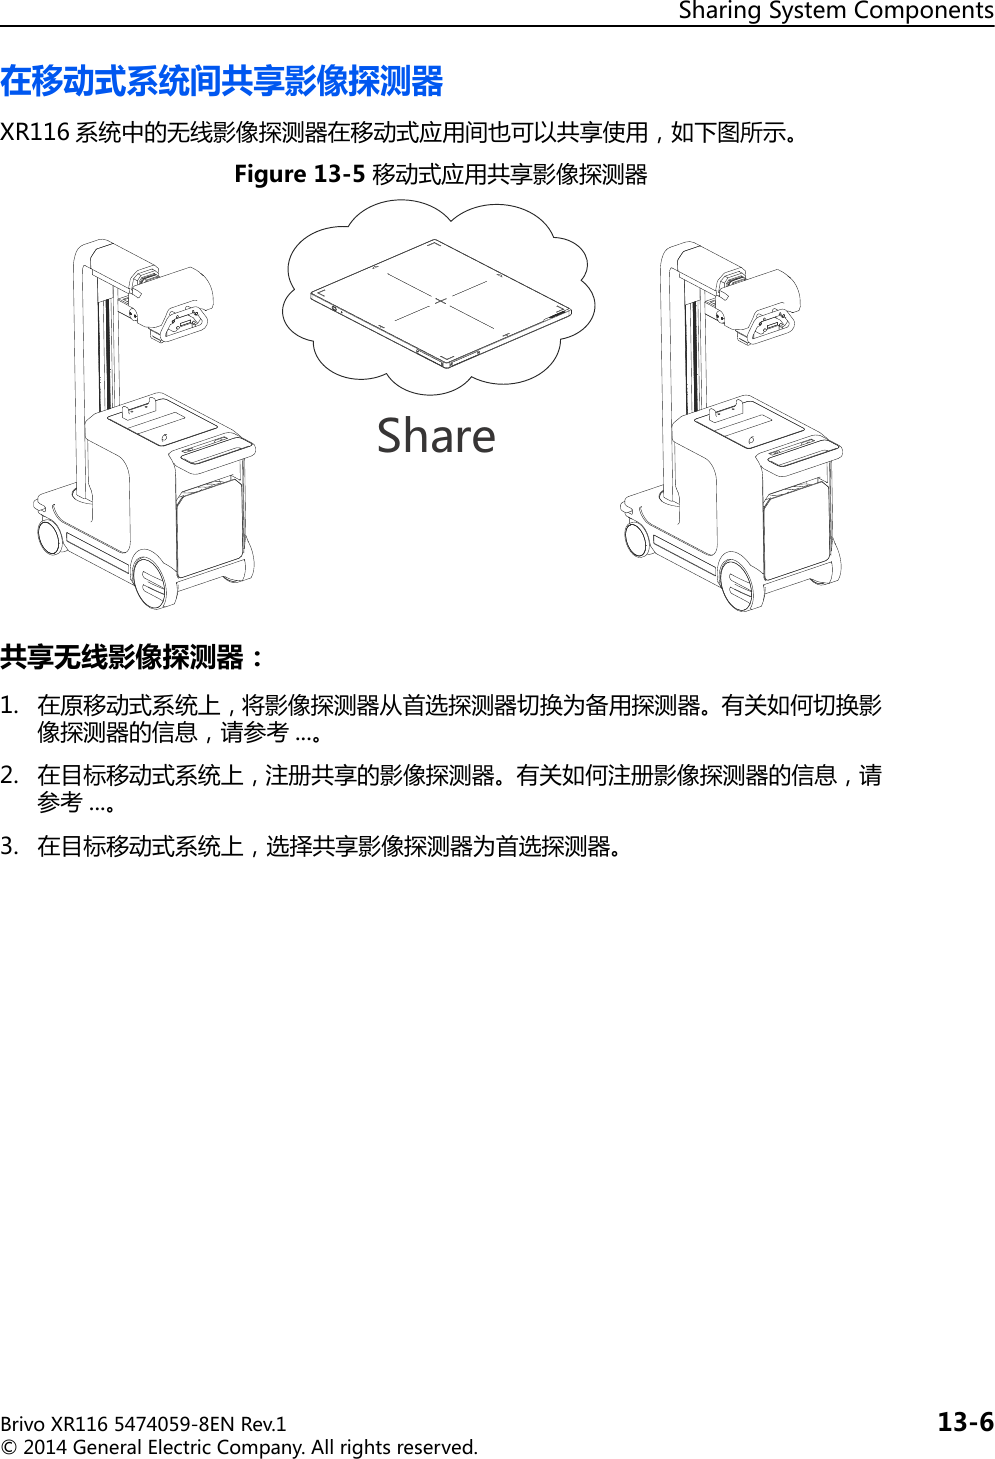
![BrivoXR1165474059-8ENRev.1 10-2©2014GeneralElectricCompany.Allrightsreserved.ImageManagementOverviewThemajorityoftheImageManagementscreenisdevotedtotheexamlist.Imagesareorganizedbyexam.Eachexamisarow.Ifmultipleexamswereacquiredinthesamesession,eachexamhasitsownrowonthelist.Theexamexpandstoshowtheseries.Withineachexamare“series”ofimages.Aseriesisacollectionofoneormoreimagesacquiredinasession.Eachprotocolisaseries.Anewseriesiscreatedwhenacompletedexamisappendedandeverytimeanimageisre-processed(inreviewmode).Therearetwotypesofimageseries:rawandprocessed.Rawimagesaretheexactimagesthatwereacquired.Processedimagesaretherawimageswithspecificprocessingandimageadjustments(suchasbrightnessandcontrast)applied.Itispossibletocreateseveralprocessedimagesfromonerawimage.Individualimagesresidewithintheseries.Double-clickingonaseriesorclickingthe[+]buttonopenstheimagedetailssectionoftheworklist.IntheImageDetailssection,eachrowisanimage.Selectingarowmakesasmallpreviewimage,or“thumbnail,”appear.Theimagemaybeopenedforviewingoradjustmentordeleted.SelectingmultipleexamsontheImageManagementscreenisdifferentthanontheWorklist.• TheImageManagementscreenallowsyoutoselectexamsthatdonothavethesamePatientIDorPatientName.• Toselectacontiguousgroupofexams:HolddowntheSHIFTkeyonthekeyboard.Clickanddragwiththemousetoselecttheexams.• Toselectnon-contiguousexams:HolddowntheCTRLkeyonthekeyboard.Clickonindividualexamstoselect.](https://usermanual.wiki/GE-Healthcare/IDR3543.User-Manual-III-Rev1/User-Guide-2522775-Page-2.png)
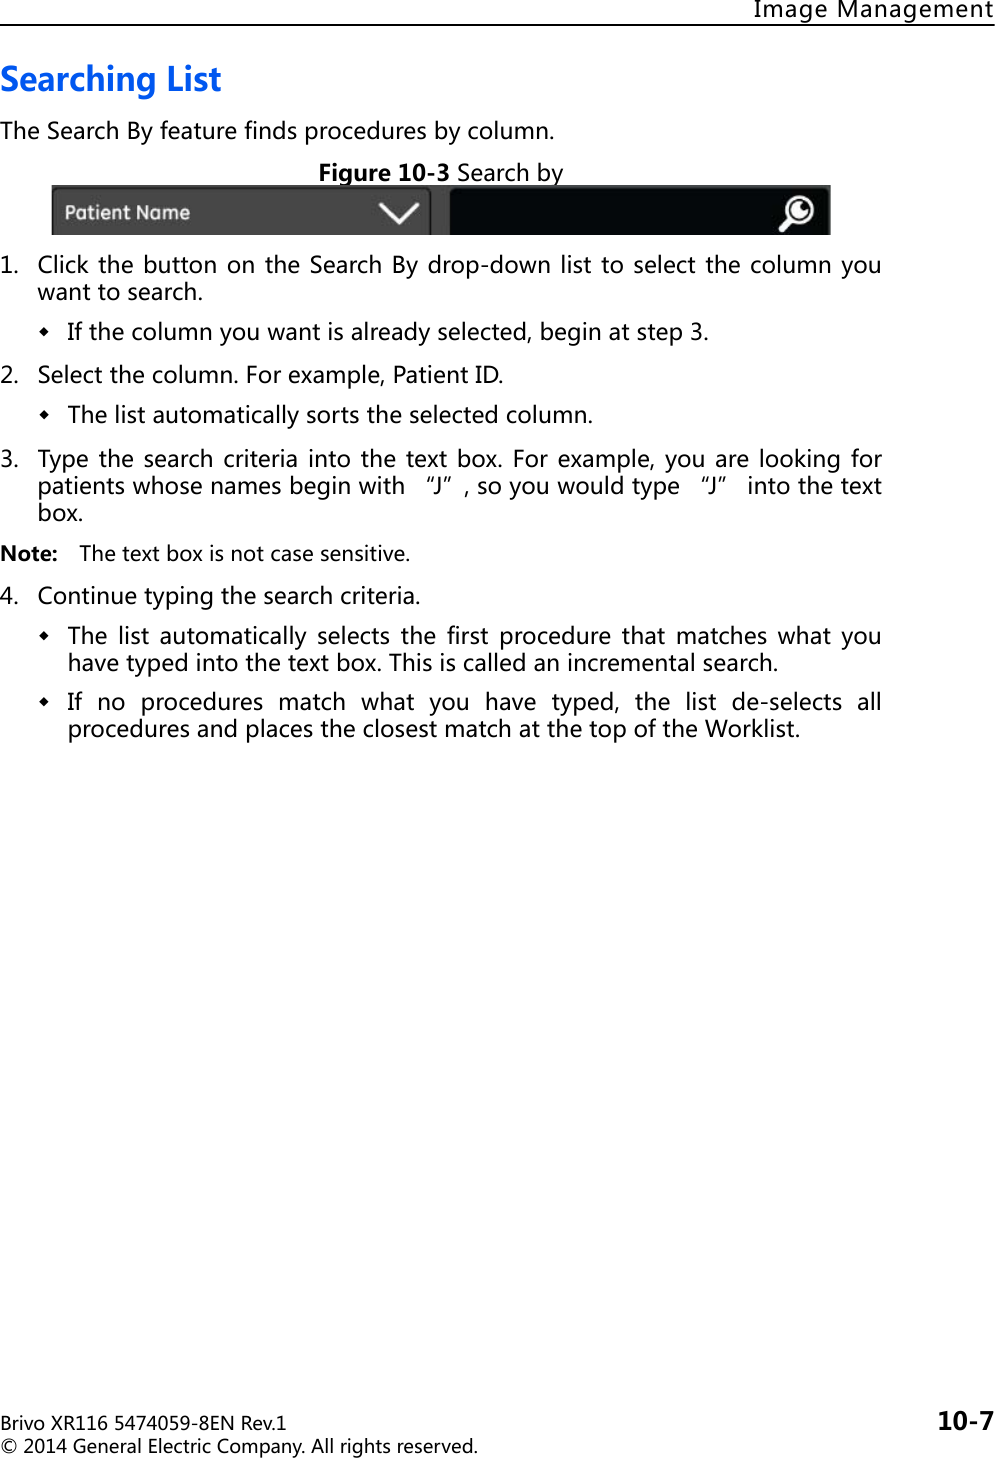
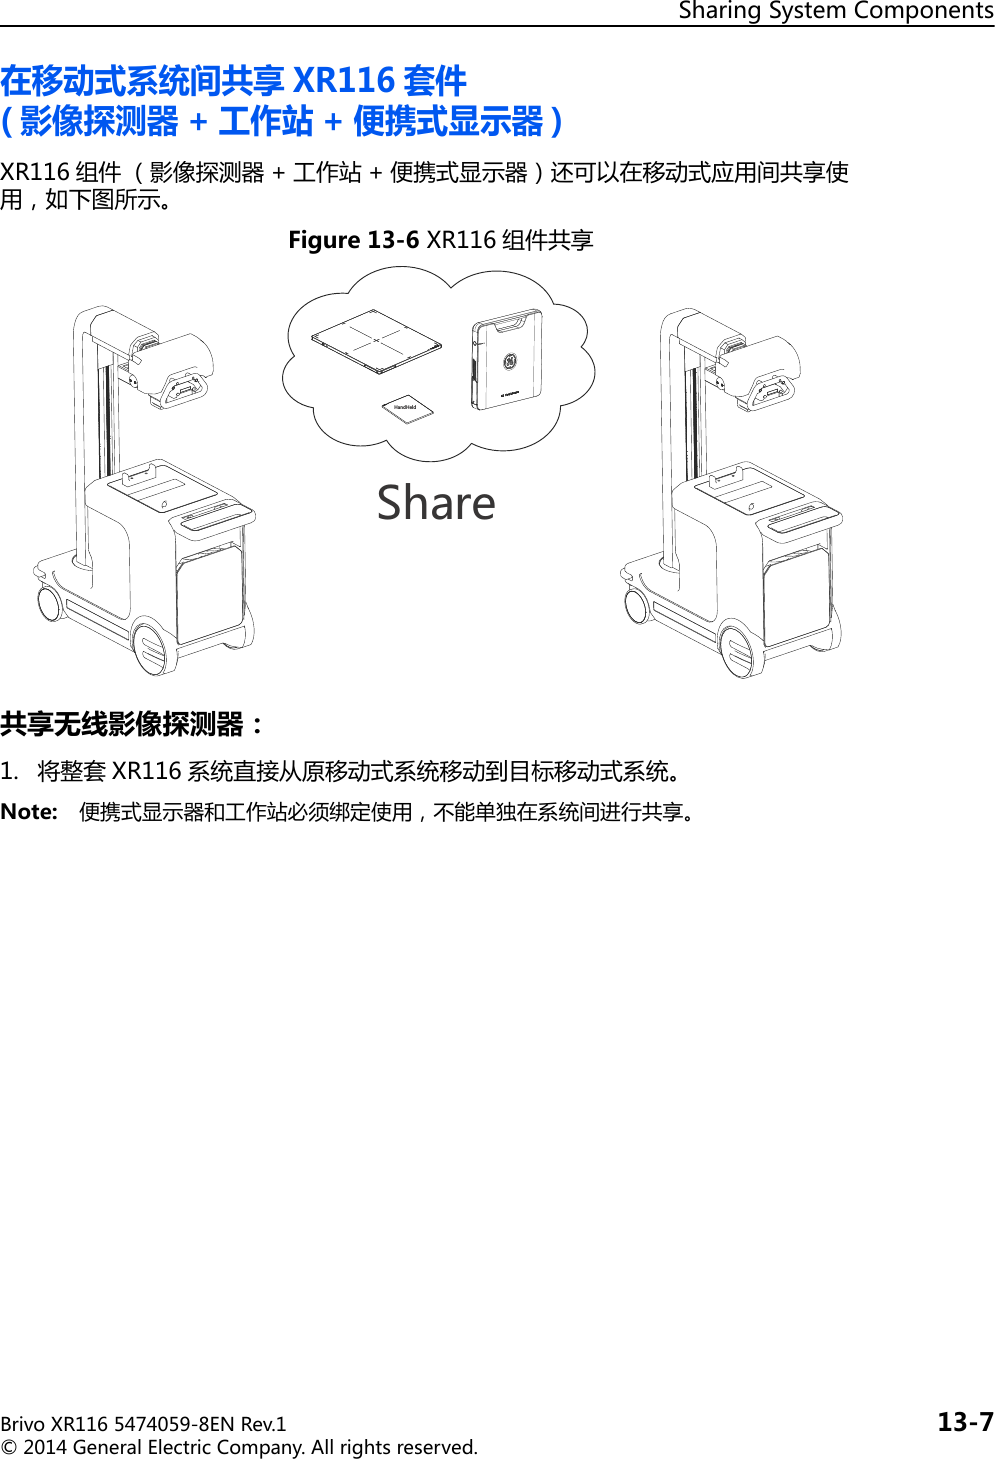
![ImageManagementBrivoXR1165474059-8ENRev.1 10-3©2014GeneralElectricCompany.Allrightsreserved.Figure10-1ImageManagementTable10-1IImageManagementfunctionsPatient InfoLock/UnlockImage ListDestinationViewerSearch ToolsSourceExam ListSortThumbnailDeleteFunction Description[PatientInformation] ShowsthePatientInformationscreenfortheselectedprocedure.Note: PatientInformationcannotbeeditedonceanexamhasstarted.Moreinformation,pleaserefertoChatper8:Worklist-Adding/Editing/ViewingPatientInformation.[Source] Selectsthesourceofimagestoview(e.g.,thelocalworkstation,oraUSBdrive).• 点击 [Local] 按钮显示系统中所有的检查。• 点击 [USB] 按钮显示插入 USB 盘中所有的检查。更多信息请参考 Selecting Image Database Source 小节。[SortbyColumn] Forinformationabouthowtosortthecolumn,pleaserefertoSortingbyColumn.](https://usermanual.wiki/GE-Healthcare/IDR3543.User-Manual-III-Rev1/User-Guide-2522775-Page-3.png)
![BrivoXR1165474059-8ENRev.1 10-4©2014GeneralElectricCompany.Allrightsreserved.ImageManagement[SearchBy] Searchesforproceduresbytheselectedthecolumnnameinthedrop-downlistandthesearchcriteriaenteredintothetextbox.RefertoSearchingList.[ImageTools] Performsvariousfunctionsonselectedexams.Availableoptionsare:• CopyExam:Allowsallexamimagesforapatienttobecopiedtoanotherpatient,toanotherlocation,ortoUSBdrive.Moreinformation,refertoCopyingExamsandImages.• De-identify:Makesthepatientanonymous(removesallidentifyinginformation,includingName,ID,andaccessionnumber).Referto MakingPatientAnonymous(De-Identify).• SMPTE:AllowsservicespersonneltoaccesstheSMPTEpatternforsystemcalibration.• CBT:Ifavailable,launchesComputerBasedTrainingforthesystem.IfComputerBasedTrainingisnotavailable,theoptionisdisabled.• PACSTestImages:LoadsasetofcalibrationimagesthatareusedtotestthequalityofimagessenttoPACSorprinters.• TG18Samples:Loadsasetoftestimagesthatareusedtocalibratethedisplaymonitor.Note: ItisnotexpectedthatyouwillneedtoaccesstheSMPTEpatternortestimagesduringthecourseofanormalday.Testimagesaretypicallyusedtocalibratethesystemortodeterminethecauseofqualityproblems.[Lock/Unlock] Lockstheselectedexamsfromdeletion.Ifalockedexamisselected,thebuttonnamechangesto[UNLOCK].[UNLOCK]removesthelockfromtheselectedexams.[Exam,Series,andImageList]Liststheimagessavedinthelocaldatabasecategorizedbyexamsandseries.Thefollowinginformationisdisplayed:•Exams:Theexamssavedinthelocaldatabase.•Seriesdetail:Theseriesfortheselectedexam.•Imagelist:Theimagesfortheselectedseries.•Imagepreview:Arepresentativethumbnailoftheselectedimage.[Delete] Deletestheselectedexamsorimagesfromthelocaldatabase.[Destination] Selectswhereimagesaretobecopiedorsaved.RefertoChatper16:设置参数formoreinformationabouthowtoconfigurethedifferentstoragedestination.Function Description](https://usermanual.wiki/GE-Healthcare/IDR3543.User-Manual-III-Rev1/User-Guide-2522775-Page-4.png)
![ImageManagementBrivoXR1165474059-8ENRev.1 10-5©2014GeneralElectricCompany.Allrightsreserved.[Viewer] OpenstheImageViewerscreenandshowstheimagesintheselectedseries.ImagesmaybeadjustedontheImageViewerscreen.RefertoChatper11:ImageViewerformoreinformation.IfMultiplePatientPrintfunctionisnotactivated,thisiconwillbeunavailablewhenyouselectmultiplepatientimages.Function Description](https://usermanual.wiki/GE-Healthcare/IDR3543.User-Manual-III-Rev1/User-Guide-2522775-Page-5.png)
![BrivoXR1165474059-8ENRev.1 10-6©2014GeneralElectricCompany.Allrightsreserved.ImageManagementSelectingImageDatabaseSourceTheSourcebuttonsallowyoutoloadandworkwithimagesfromdifferentlocations,suchasaUSBdrive,networkhost,orthelocalworkstation.Figure10-2Imagesources• Local:Showsexamsandimagesstoredonthelocalworkstation.• USB:显示保存在 USB 存储盘上的检查和图像。• Host:LoadingImagesfromaNetworkHostFollowthisprocesstoaccessimagesstoredonanetworkhost.1. Selectthenetworkhostfromthedrop-downlist,ifnecessary.Thefilterscreenappears.RefertoChatper8:Worklistformoreinformation.2. CompletetheFilterscreenasappropriate.3. Click[OK].Amessageappears:“Retrievingrequestedinformation.”TheImageManagementscreenlistupdateswithexamsfromtheselectedsource.LoadingImagesfromanUSBdiskFollowthisprocesstoaccessimagesstoredonaUSBdisk.1. 将有图像的 USB 存储器插入主机上的 USB 接口。2. 点击 [USB]。TheexamlistupdatestoshowtheimagesstoredontheUSBdisk.3. Selecttheexams.4. CopytheexamstotheLocaldatabase.RefertoCopyingExamsandImagesformoreinformation.5. OpentheexamsfromtheLocaldatabase.Note: IftheexamsarebeingviewedonacomputerthathastheDICOMviewerinstalled,imagesmaybevieweddirectlyfromtheUSBdisk.](https://usermanual.wiki/GE-Healthcare/IDR3543.User-Manual-III-Rev1/User-Guide-2522775-Page-6.png)
![ImageManagementBrivoXR1165474059-8ENRev.1 10-9©2014GeneralElectricCompany.Allrightsreserved.OpeningExamsandImagesFollowthisprocesstoopenexamsandimagesforviewing.1. Double-clicktheexamtoopenit(or,selecttheexamandpressENTERonthekeyboard).Theseriesfortheexamexpandsbelowtheexam.2. Double-click the series to open it (or, select the series andclick[+]imagedetails).Theimagedetailopens.3. Selecttheimage.Apreviewthumbnailappears.4. Double-clickontheimage(or,selecttheseriesandclick[VIEWER]).TheselectedseriesopensontheImageViewerscreenwiththeselectedimagedisplayed.](https://usermanual.wiki/GE-Healthcare/IDR3543.User-Manual-III-Rev1/User-Guide-2522775-Page-9.png)
![BrivoXR1165474059-8ENRev.1 10-10©2014GeneralElectricCompany.Allrightsreserved.ImageManagementCopyingExamsandImagesExams(includingallseriesandimages)maybecopiedtoanetworkhostortoaUSBdrive.Theimagesfromanexammaybecopiedtoanotherexam.Note: Copyingexamsdoesnotremovetheexamfromitsoriginallocation.CopyingExamstoaNetworkHostExamsmaybecopiedtoaconfigurednetworklocation.RefertoChatper16:设置参数 -网络连接forinformationaboutconfiguringnetworkhosts.1. Selecttheexamstocopy.2. Click[DESTINATION].Amessageappears:“Imageswillbecopiedtotheselectedexam.Imageswillnotautomaticallyberemovedfromthesourceexam.”3. Click[OK].Ifthereisaproblemandtheexamscannotbecopiedtotheselectednetworkhost,amessageappears:“Thenetworkdestinationisnotresponding.Iftheproblempersistscontactyournetworkadministrator.”ClickOKtoclosethemessage.Trycopyingtheexamsatalatertime.Toseethestatusoftheexamsbeingcopied,click[TRANSFERLOG]atthetopoftheImageManagementscreen.TheTransferLogscreenappears.Click [CLOSE] to close the screen and return to the Image Managementscreen.](https://usermanual.wiki/GE-Healthcare/IDR3543.User-Manual-III-Rev1/User-Guide-2522775-Page-10.png)
![ImageManagementBrivoXR1165474059-8ENRev.1 10-11©2014GeneralElectricCompany.Allrightsreserved.Figure10-5TransferStatusCopyingImagestoAnotherExamThisprocessisusedtocopyimagesfromoneexamtoanother.Copyingimagesisusedtoconsolidatetheimagesfrommultipleexamsforasinglepatientortoreconcilepatientstoexams.Forexample,imagestakenforanemergencyexamcanbeassignedtothepatient’srealnameoncethepatient’sinformationisknownorifimageswereacquiredforthewrongWorklistentry.Note: Youcanonlycopytheimagesfromoneexamatatime.1. Ifyouareassigninganemergencyexamtoapatient,youmayneedtoaddthepatienttotheWorklistfirst.a) OntheWorklistscreen,click[ADDPATIENT].b) Enter the patient’s information. Refer to Chatper 8: Worklist-Adding/Editing/ViewingPatientInformation.c) Click[SAVE].2. OntheImageManagementscreen,selecttheexamtobecopied.](https://usermanual.wiki/GE-Healthcare/IDR3543.User-Manual-III-Rev1/User-Guide-2522775-Page-11.png)
![BrivoXR1165474059-8ENRev.1 10-12©2014GeneralElectricCompany.Allrightsreserved.ImageManagement3. Switchthe[IMAGETOOLS]buttontoCOPYEXAM,ifnecessary.TheCopyExamscreenappears.TheCopyExamscreenshowsallavailableexamsforthecurrentlocationandallWorklistentrieswiththestatusof“Scheduled”.4. SearchorFiltertheexamlisttolocatethedestinationexam.5. Selecttheexamwhereyouwanttheimagescopiedto.6. Click[OK].Amessageappears:“Imageswillbecopiedtotheselectedexam.Imageswillnotautomaticallyberemovedfromthesourceexam.”7. Click[OK].Themessagecloses.Amessageappears:“Retrievinginformation.Pleasewait.”[CANCEL]stopsthecopyprocess,closesthemessage,andreturnsyoutotheImageManagementscreen.Allseriesandimagesarecopiedtotheexam.](https://usermanual.wiki/GE-Healthcare/IDR3543.User-Manual-III-Rev1/User-Guide-2522775-Page-12.png)
![ImageManagementBrivoXR1165474059-8ENRev.1 10-13©2014GeneralElectricCompany.Allrightsreserved.CopyingExamstoaUSBdriveExamsmaybecopiedtoaUSBdriveforarchivingpurposes,tosendtoalocationthatisnotwithinthenetwork,ortosendwithapatient’smedicalrecords.Note: Thediskusedforcopyingimagesmustberecordable.Thatis,the“write”buttonshouldbeON.Note: 您不能将检查复制到已保存有检查或其它信息的 USB 存储器上。否则,即使有足够的空间,您在写入时也会收“USB 存储器非空白,请插入空白 USB 存储器再继续 ” 的错误信息。复制信息时,请总是使用空白 USB 存储器。YoucannotcopyexamstoaCD/DVDthatalreadyhasexamssavedonit.Youwillreceivea“Notenoughspace”errorwhenyouattempttowritetotheCD,evenifthereisenoughspace.Alwaysuseanew,blankCD.1. 将空白 USB 存储设备插入主机上的 USB 接口。2. Selecttheexamstobecopied.3. PresstheDestination[USB1].TheUSBWritescreenappears.[STOREOPTIMALLY] 按钮将决定复制哪一个检查可最大程度地利用磁盘空间。该按钮将自动取消选择任何不符合 USB 的检查。automaticallychecksiftheselectedimageswillfitontheCD.Itwillautomaticallyun-checkanyitemsthatcannotfitontheCD.[WRITE]beginsthecopyingprocess.[CANCEL] closes the screen and returns you to the Image Managementscreen.](https://usermanual.wiki/GE-Healthcare/IDR3543.User-Manual-III-Rev1/User-Guide-2522775-Page-13.png)
![BrivoXR1165474059-8ENRev.1 10-14©2014GeneralElectricCompany.Allrightsreserved.ImageManagement4. Confirmtheexamstobecopied.Un-checkanyexamsthatyoudonotwantsavedtothedisk.5. Click[WRITE].Thediskbeginscopying.Thelight on the front ofthe computer flashesyellowasthedataisbeingwritten.Toseethestatusoftheexamsbeingcopied,click[TRANSFERLOG]atthebottomoftheImageManagementscreen.TheTransferLogscreenappears.Press[CLOSE]toclosethe screenand returntothe ImageManagementscreen.CAUTION: 在取出 USB 存储器前一定检查传输日志,如果在传输状态日志显示于传输日志界面下方前取出 USB 存储器,则此操作后,复制存储器中图片将失败,直到系统复位。Afterthesystemfinishesthedisk,opentheexamsonthedisktoensurethatthediskhasthedatawrittentoit.RefertoChapter9:ImageManagement-LoadImagesfromaCD/DVDformoreinformation.6. Removethedisk.7. Labelthediskandstoreinasafeplace.](https://usermanual.wiki/GE-Healthcare/IDR3543.User-Manual-III-Rev1/User-Guide-2522775-Page-14.png)
![ImageManagementBrivoXR1165474059-8ENRev.1 10-15©2014GeneralElectricCompany.Allrightsreserved.DeletingExams,Series,orImagesExams,series,andimagesmaybedeletedfromtheselecteddatabasesourcefromtheImageManagementscreen.Followthisprocesstodeleteexams,series,andimages.1. SelecttheSource,ifnecessary.Note: 只能删除本地数据。ItemscannotbedeletedfromaCD.2. Unlockexams,ifnecessary.RefertoLockingExamsfromDeletionformoreinformation.3. Selecttheitemstodelete.Theitemsmaybeexams,serieswithanexam,orimageswithina series.Multipleitemsmaybeselectedanddeletedatonce.4. Click[DELETE].A message appears: “Are you sure that you would like to delete theselecteditems?”5. Click[OK].Themessagecloses.TheitemsaredeletedfromtheImageManagementscreen.Clicking[CANCEL]closesthemessageandtheitemsremainontheImageManagementscreen.](https://usermanual.wiki/GE-Healthcare/IDR3543.User-Manual-III-Rev1/User-Guide-2522775-Page-15.png)
![BrivoXR1165474059-8ENRev.1 10-16©2014GeneralElectricCompany.Allrightsreserved.ImageManagementLockingExamsfromDeletionTheImageManagementscreenallowsyoutoprevent,or“lock”,examsfrombeingdeleted.Theexamcanonlybedeletedifthelockisremoved,or“unlocked.”ThelockpreventsexamsfrombeingdeletedbyotheroperatorsandfromAutoDelete.有关自动删除的信息,请参考 Chatper16:设置参数 -图像管理小节。Lockedexamscanbecopied,transferred,andviewed.Onlyexamscanbelocked.Individualseriesorimagescannotbelocked.Followthisprocesstolockandunlockexams.1. Selecttheexamstolock.2. Click[LOCK].Thelockiconappearsinthestatuscolumnofallselectedexams.TheLockbuttonchangestoUnlock.UnlockingExamsFollowthisprocesstounlockexamssothattheymaybedeleted.1. Selectthelockedexams.TheUnlockbuttonbecomesactive.2. Click[UNLOCK].Thelockiconisremovedfromthestatuscolumnoftheselectedexams.Theexamsmaynowbedeleted.](https://usermanual.wiki/GE-Healthcare/IDR3543.User-Manual-III-Rev1/User-Guide-2522775-Page-16.png)
![ImageManagementBrivoXR1165474059-8ENRev.1 10-17©2014GeneralElectricCompany.Allrightsreserved.MakingPatientAnonymous(De-Identify)Theremaybetimeswhenyouwantthenameofapatienttobekeptconfidentialtomaintainpatientprivacy.YoucandothisusingtheDe-Identifyfeature.Thisfeatureallowsyoutocreateananonymoussetofimages.Thepatientexaminationsarecopiedandusedtocreateanewpatient,withthename“Anonymitiespatient”andaunique,randomlycreatedPatientIDasshowninFigure10-7.Note: Onceananonymousexamiscreated,thereisnowaytorecoverthepatient’sidentifyinginformation.De-IdentifyisafeatureavailablefromtheImageToolsbutton(Figure10-6).Figure10-6ImageToolsbuttonFigure10-7AnonymitiespatientUsethisprocesstomakeexamimagesanonymous:1. Selectthepatientstomakeanonymous.2. SwitchtheImageToolsbuttonto[DE-IDENTIFY],ifnecessary.Amessageappears:“Theselectedexamswillbecopiedwithoutpatientidentification.Theoriginalswillnotbedeleted.”3. Click[OK].TheImageManagementscreenupdateswithcopied,anonymousexams.](https://usermanual.wiki/GE-Healthcare/IDR3543.User-Manual-III-Rev1/User-Guide-2522775-Page-17.png)
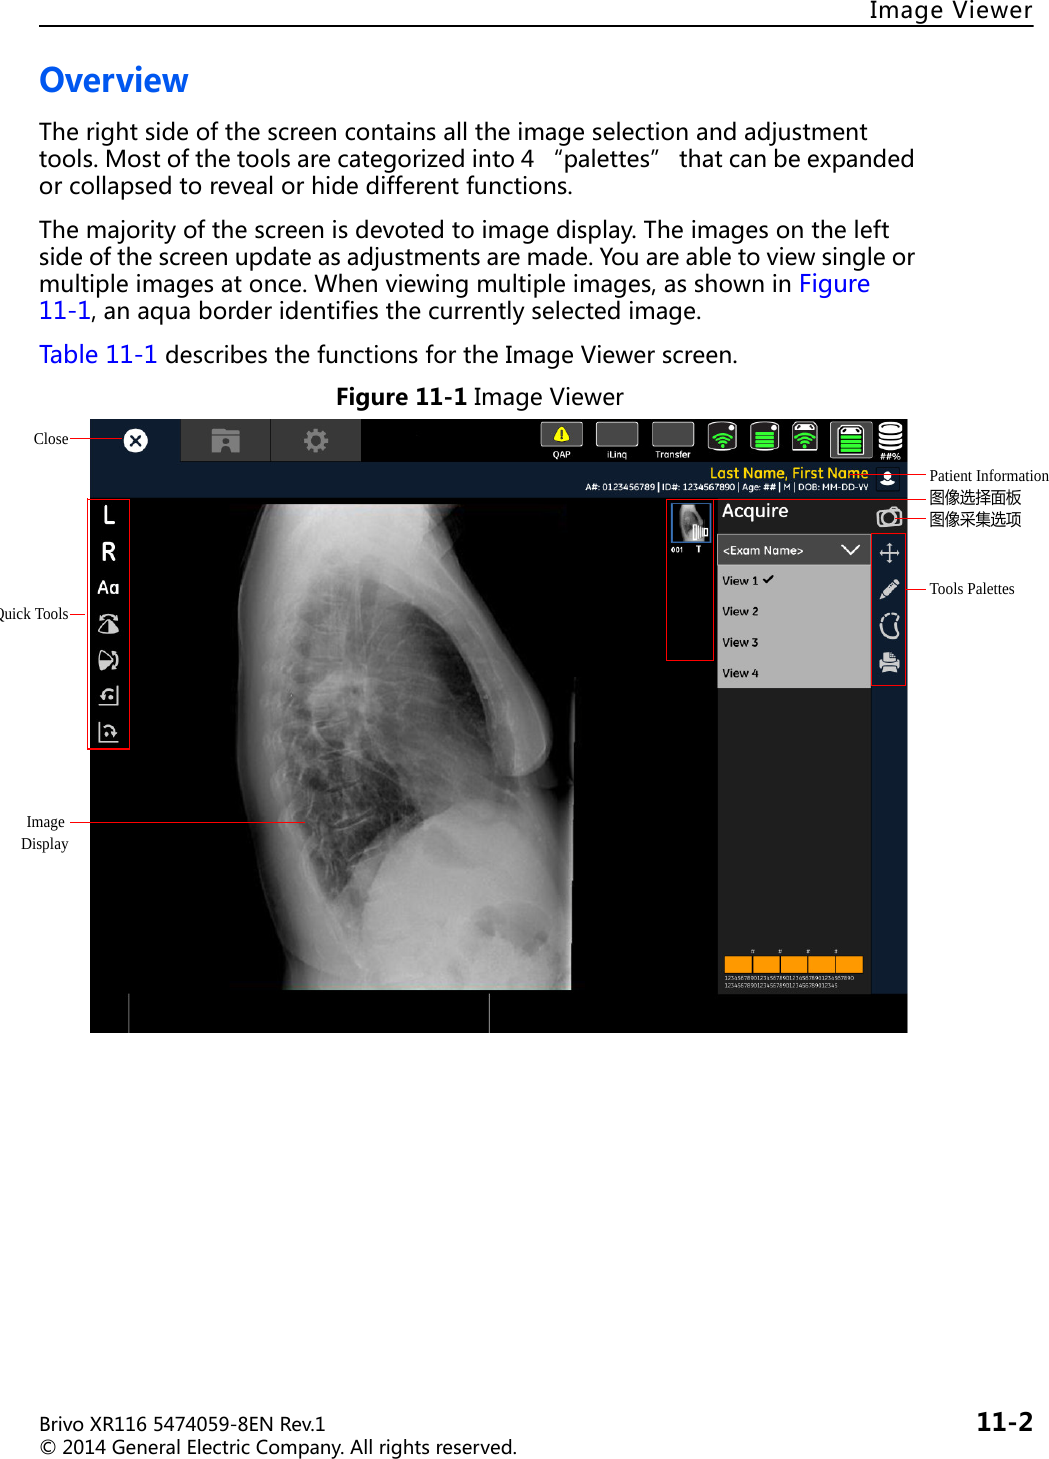
![ImageViewerBrivoXR1165474059-8ENRev.1 11-3©2014GeneralElectricCompany.Allrightsreserved.Table11-1ImageViewerfunctionsFunction Description[PatientIdentification] Identifiesthepatient.[QuickTools] Includescommonusedimageprocessingbuttons.Themenusvarywithdifferentselectedtoolpalette.[ImageDisplayZone] Showstheselectedimageindisplayzone.[ImageSelectionPalette]ImageSelectionPalettethatshowssmallpreviewsofallimagesintheselectedseriesandhighlightstheimagescurrentlyshownintheviewer.RefertoImageSelectionPaletteformoreinformation.[ImageAcquisitionPalette]Ifinanactiveexam,allowsyoutoswitchbacktotheAcquisitionscreen.Ifviewingimagesfromacompletedexam,theAcquisitionscreentabisdisabled.Warning: Whenacquiringmultipleimagesorifyouneedtoretakeanimage,youmustswitchbacktotheAcquisitionscreeninordertorecordtheexposure.MakinganexposurewhiletheViewerscreenisdisplayedwillexposethepatienttoradiation,butthedetectorwillnotacquiretheimage.[ToolsPalettes] ImageToolsPalettesforimageediting.• Orientation,refertoOrientation.• Annotation,refertoAnnotation.• Imagereprocess,refertoReprocess.• Print,refertoPrintingImages.[Close] ClosestheImageViewerscreenandpromptsyoutosaveanychangestoimages.Closealsoinitiatesautoprintandautopush,ifenabled.RefertoSavingChangestoImagesformoreinformation.](https://usermanual.wiki/GE-Healthcare/IDR3543.User-Manual-III-Rev1/User-Guide-2522775-Page-21.png)
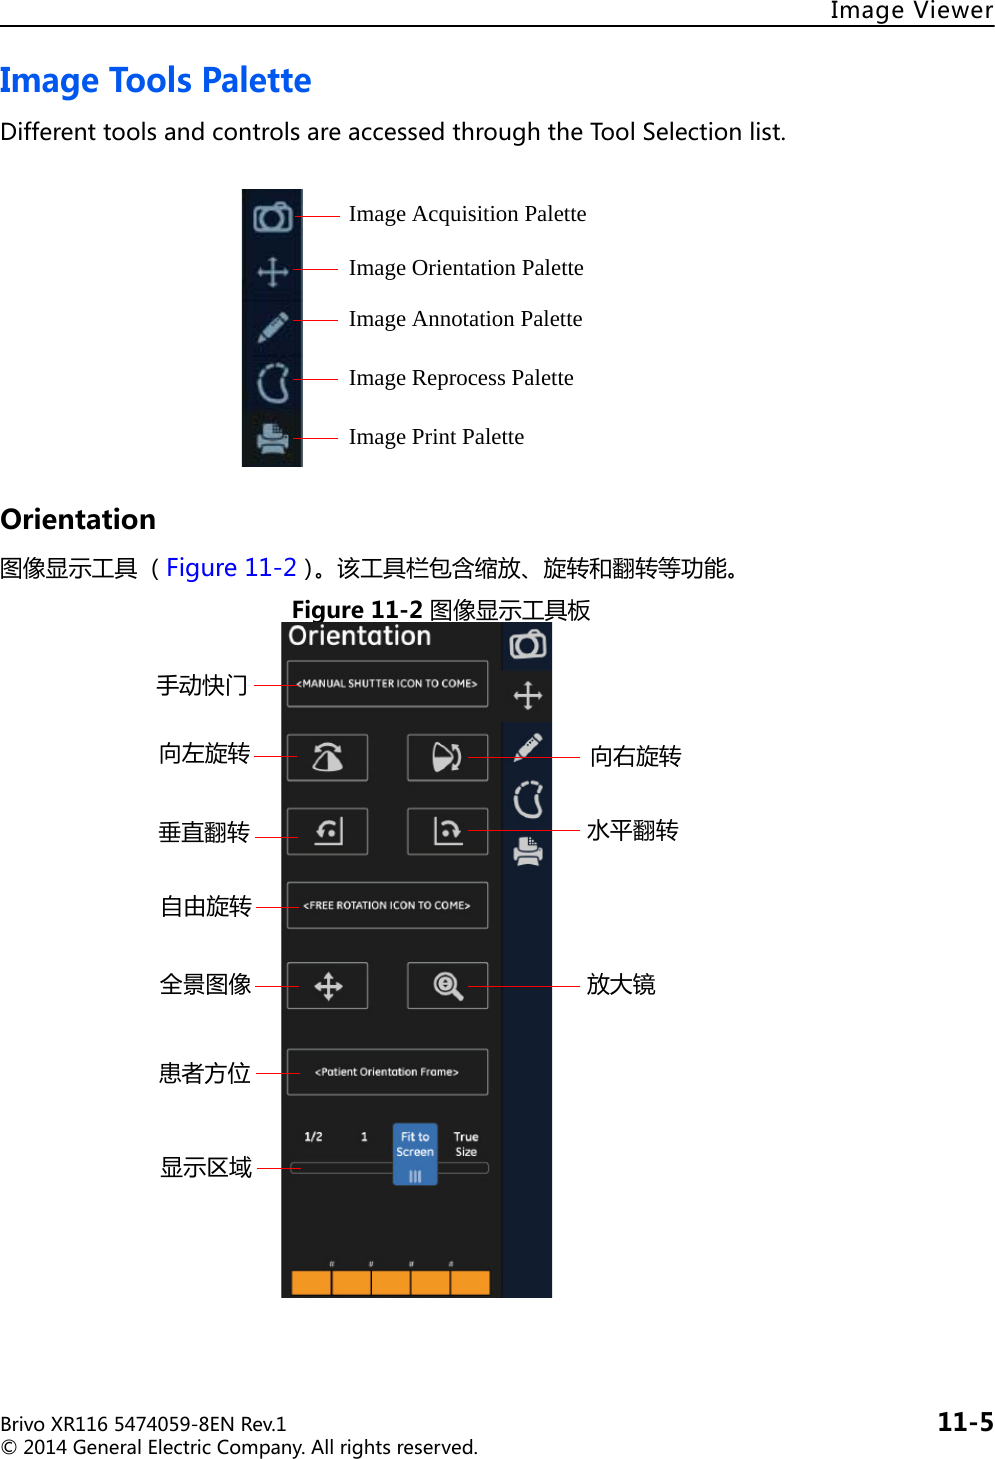
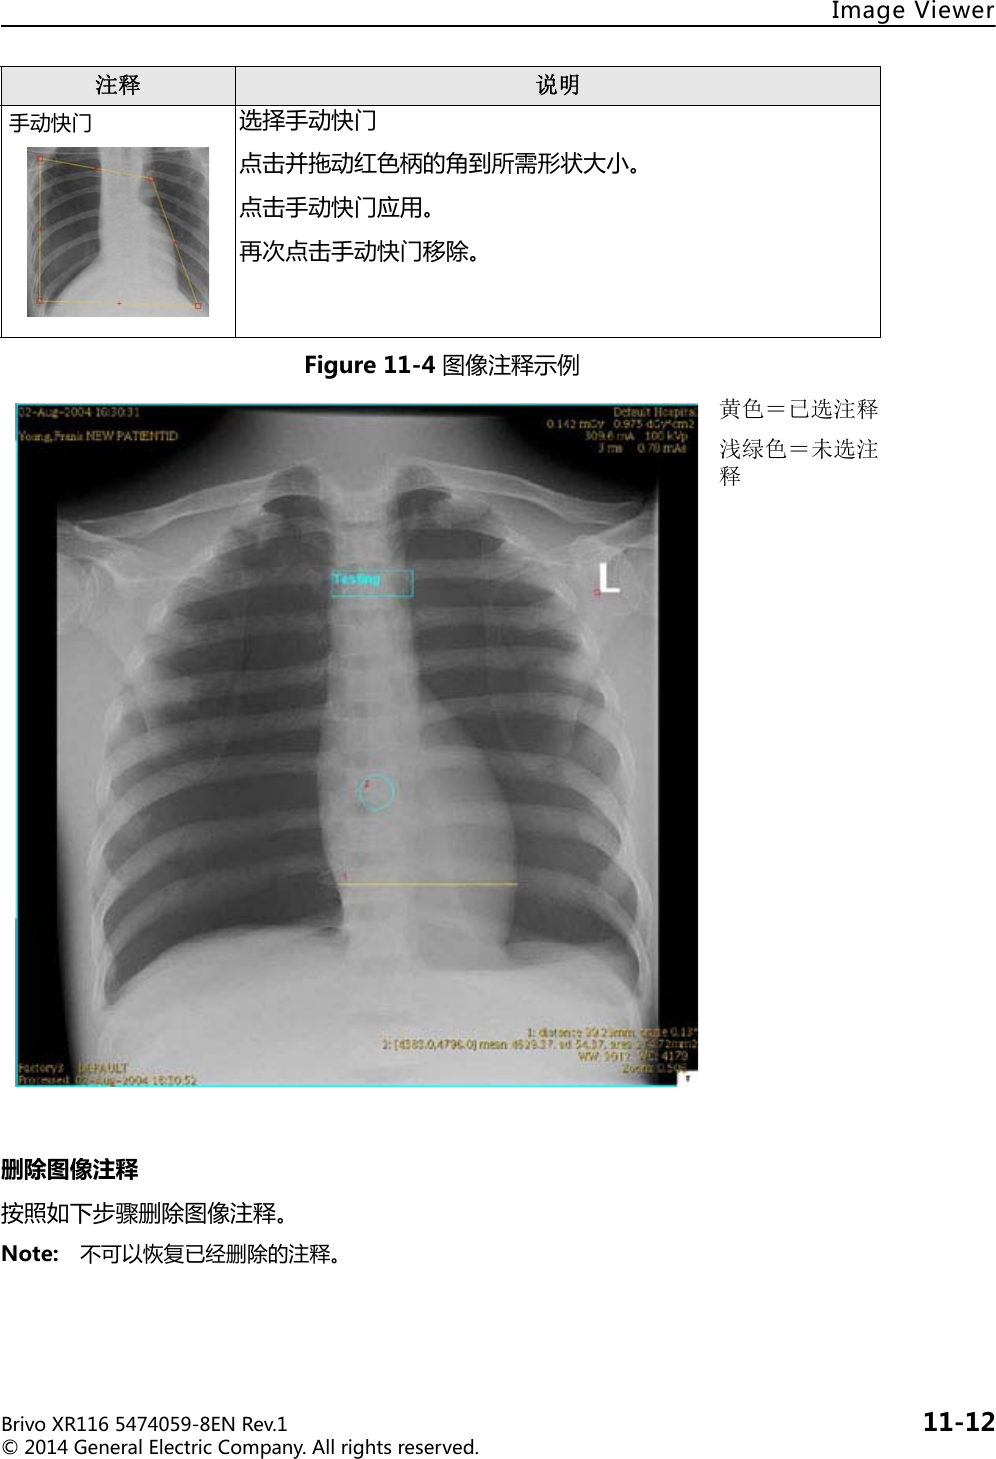
![BrivoXR1165474059-8ENRev.1 11-6©2014GeneralElectricCompany.Allrightsreserved.ImageViewerTable11-2图像显示工具板的操作说明工具 描述[ManualShutter] Appliesshuttersmanuallytocroptheimage.Inimagereviewmodetheimagemustbereprocessedtoenableshuttericon.Note: Thisfunctionisonlyavailablewhentheimageisopeninaliveexam. 只有当图像在活动检查中处于打开状态或用于重新处理时,此项功能才可用。Referto添加图像注释formoreinformation.[RotateLeft] Rotatestheselectedimagecounter-clockwisein90degreeincrements.[RotateRight] Rotatestheselectedimageclockwisein90degreeincrements.[VerticalFlip] Flipstheselectedimage180degreesonthehorizontalaxis;thatis,switchestopforbottom.[HorizontalFlip] Flipstheselectedimage180degreesontheverticalaxis;thatis,switchesleftforright.[FreeRotation] Rotatestheselectedimagebothclockwiseandcounter-clockwise.• Clicktheendbuttonstorotatetheimagein0.1degreeincrements.• Clickanddragtheslidertospintheimage.• Movethesliderrighttorotatetheimageclockwise.• Movethesliderlefttorotatetheimagecounter-clockwise.[ 全景图像 ] 在浏览区域内移动图像。[ 图像放大镜 ] 放大三倍显示一小部分图像。[ 患者方位 ][1/2Display] Reducestheimageto50%(fourpixelsonthedetectorequalsonepixelonscreen).[1:1Display] Showsdefaulttheimagesizewhereonepixelonthedetectorequalsonepixelonthescreen.[FitToScreen] ScalestheimagetofitwithintheImageViewerscreen.[TrueSize] Showstheimageintheexactsizeitwasacquiredfromthedetector(onecentimeteronthedetectorequalsonecentimeteronscreen).](https://usermanual.wiki/GE-Healthcare/IDR3543.User-Manual-III-Rev1/User-Guide-2522775-Page-24.png)
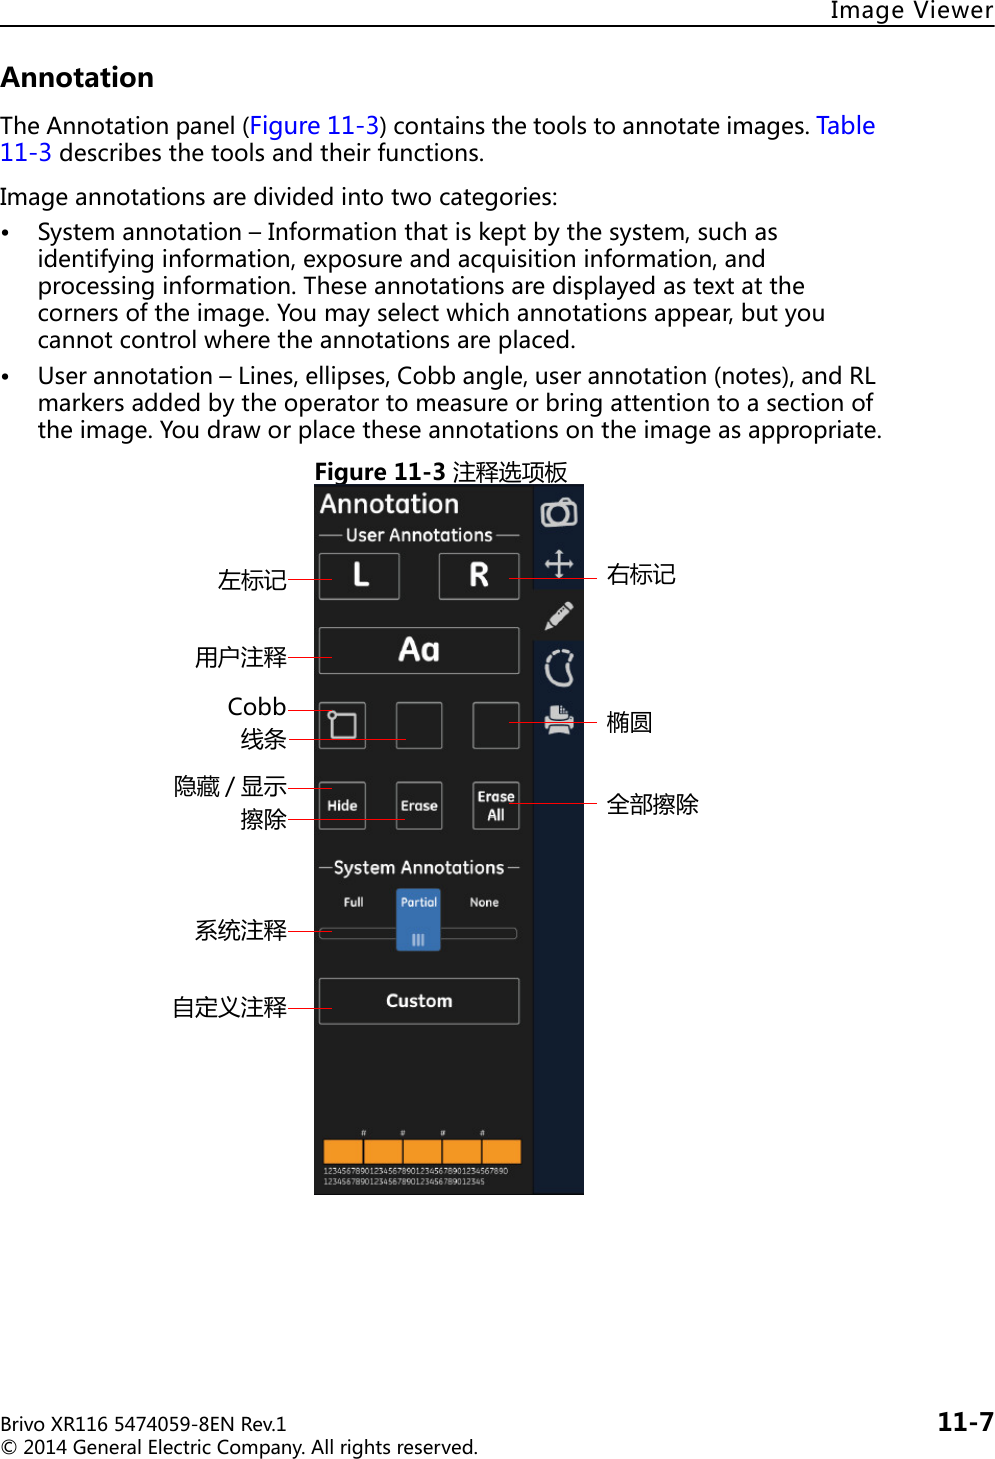
![BrivoXR1165474059-8ENRev.1 11-8©2014GeneralElectricCompany.Allrightsreserved.ImageViewerTable11-3AnnotationPaletteTools DescriptionUserAnnotations[L/R] SelecttheRightorLeftmarker.TaptheRmarkerortheLmarkerthentapontheimagewhereitistobeplaced.Note:OnlyoneRLmarkerisinsertedperimage.在图像上放置一个右或左标记,以作参考。Note: 只有当图像在活动检查中处于打开状态或用于重新处理时,L/R 标记器才可用。更多信息请参考添加图像注释小节。[Aa] Placesatextboxontheimagethatyoumayaddnotesinto.Note: Annotationsshallbeplacedwithintheimagefieldofview.[Cobb] PlacesaCobbangle(twolines)ontheimagethatyoumayre-size,move,orangle.CobbanglespecificationsareshownintheUserMeasurementsannotationatthebottomrightcorneroftheviewer.[Line] Placesalineontheimagethatyoumayre-size,move,orangle.LinespecificationsareshownintheUserMeasurementsannotationatthebottomrightcorneroftheviewer.[Ellipse] Placesanellipse(circleoroval)ontheimagethatyoumayre-size,move,orre-shape.EllipsespecificationsareshownintheUserMeasurementsannotationatthebottomrightcorneroftheviewer.[Hide/Show] Temporarilyremovesimageannotationsfromtheimage.Click[SHOW]toseetheannotations.[Erase] Deletestheselectedimageannotation.Deletedannotationscannotberecovered.[EraseAll] Deletesallimageannotations.Deletedannotationscannotberecovered.SystemAnnotations](https://usermanual.wiki/GE-Healthcare/IDR3543.User-Manual-III-Rev1/User-Guide-2522775-Page-26.png)
![ImageViewerBrivoXR1165474059-8ENRev.1 11-9©2014GeneralElectricCompany.Allrightsreserved.自定义系统注释按照下列步骤自定义显示在图像上的系统注释。[Full] Placesallavailablesystemannotationontheimage.• Patientinformation–(topleftcorner)examdateandpatientidentification• Studyinformation–(topleftcorner)examidentification• Seriesinformation–(topleftcorner)seriesidentification• Imageinformation–(topleftcorner)imageidentification• Acquisitioninformation–(toprightcorner)doseandDAP• Hospitalinformation–(toprightcorner)thenameofthefacilitywheretheimagewasacquired• X-rayparameters–(toprightcorner)themA,kVp,ms,andmAsoftheexposure• Anatomyinformation–(bottomleftcorner)theprotocolusedtoacquiretheimage• Processinginformation–(bottomleftcorner)thelookusedtoprocesstheimage• Usermeasurements–(bottomrightcorner)sizeandanglemeasurementsforline,ellipse,andCobbannotations• Displayparameters–(bottomrightcorner)thesizeoftheimageandthezoom[partial] DisplaysONLYthefacilityname,doseinformationandtechnicalfactors.[None] Removesallsystemannotationsfromtheimage.Systemannotationscanbere-appliedbyclicking[FULL],[PARTIAL],or[CUSTOM].[Custom] Bringsupascreenthatallowsyoutochoosewhichsystemannotationsappear.Moreinformation,pleasereferto自定义系统注释 .Tools Description](https://usermanual.wiki/GE-Healthcare/IDR3543.User-Manual-III-Rev1/User-Guide-2522775-Page-27.png)
![BrivoXR1165474059-8ENRev.1 11-10©2014GeneralElectricCompany.Allrightsreserved.ImageViewer1. 点击 [ 自定义 ] 按钮 -> 弹出用户选择界面2. 选择 (检查)您欲显示的注释。3. 如需要,调整字体大小。可用的字体有:–-3 (最小号 )–-2–-1–N (正常 )–+1–+2– +3 ( 最大号 )4. 点击 [OK] (确定)。取消按钮用于关闭该界面并且不改变的选择。添加图像注释Note: 所有图像注释显示在同一个位置 (图像中间)并且具有相同的形状,大小和 / 或角度。可能在相互堆积相同种类的多个注释。按照下列步骤添加图像注释。](https://usermanual.wiki/GE-Healthcare/IDR3543.User-Manual-III-Rev1/User-Guide-2522775-Page-28.png)
![ImageViewerBrivoXR1165474059-8ENRev.1 11-11©2014GeneralElectricCompany.Allrightsreserved.1. 如需要,选择要注释的图像。2. 点击注释按钮,插入注释。3. 如 Table11-4 所示,移动、重新调整大小或者改变注释的角度。Table11-4图像注释说明注释 说明线条 选择线条。• 移动:点击并拖动中间的线条。• 改变角度:点击并拖动线条末端其中的一个直角柄。• 调整大小:点击并拖动线条末端其中的一个直角柄。椭圆形 选择椭圆形。• 移动:沿边缘,点击并拖动椭圆 (不是沿直角柄或十字柄)。• 改变形状或改变大小:点击并拖动直角柄。• 旋转:点击并拖动十字柄。Cobb 选择 Cobb。• 移动:点击并拖动线的中间。• 改变角度:点击并拖动线条末端的一个直角柄。• 调整大小:点击并拖动线条末端的一个直角柄。用户注释 从图像工具栏中选择用户注释。点击 [ 文本注释 ] 界面中的自定义文本区。输入您的评注。点击确定。• 移动:点击和拖动用文本框左上角的红色方框。• 编辑:双击用户注释。确保所作的改变已出现在 “ 文本注释 ”界面上。RL 标记器 选择 RL 标记器。• 移动:选择标记器并且拖到所需区域。• R 和 L 之间进行切换:点击 [RL] 按钮。Note: 一幅图像只能插入一个标记器。](https://usermanual.wiki/GE-Healthcare/IDR3543.User-Manual-III-Rev1/User-Guide-2522775-Page-29.png)
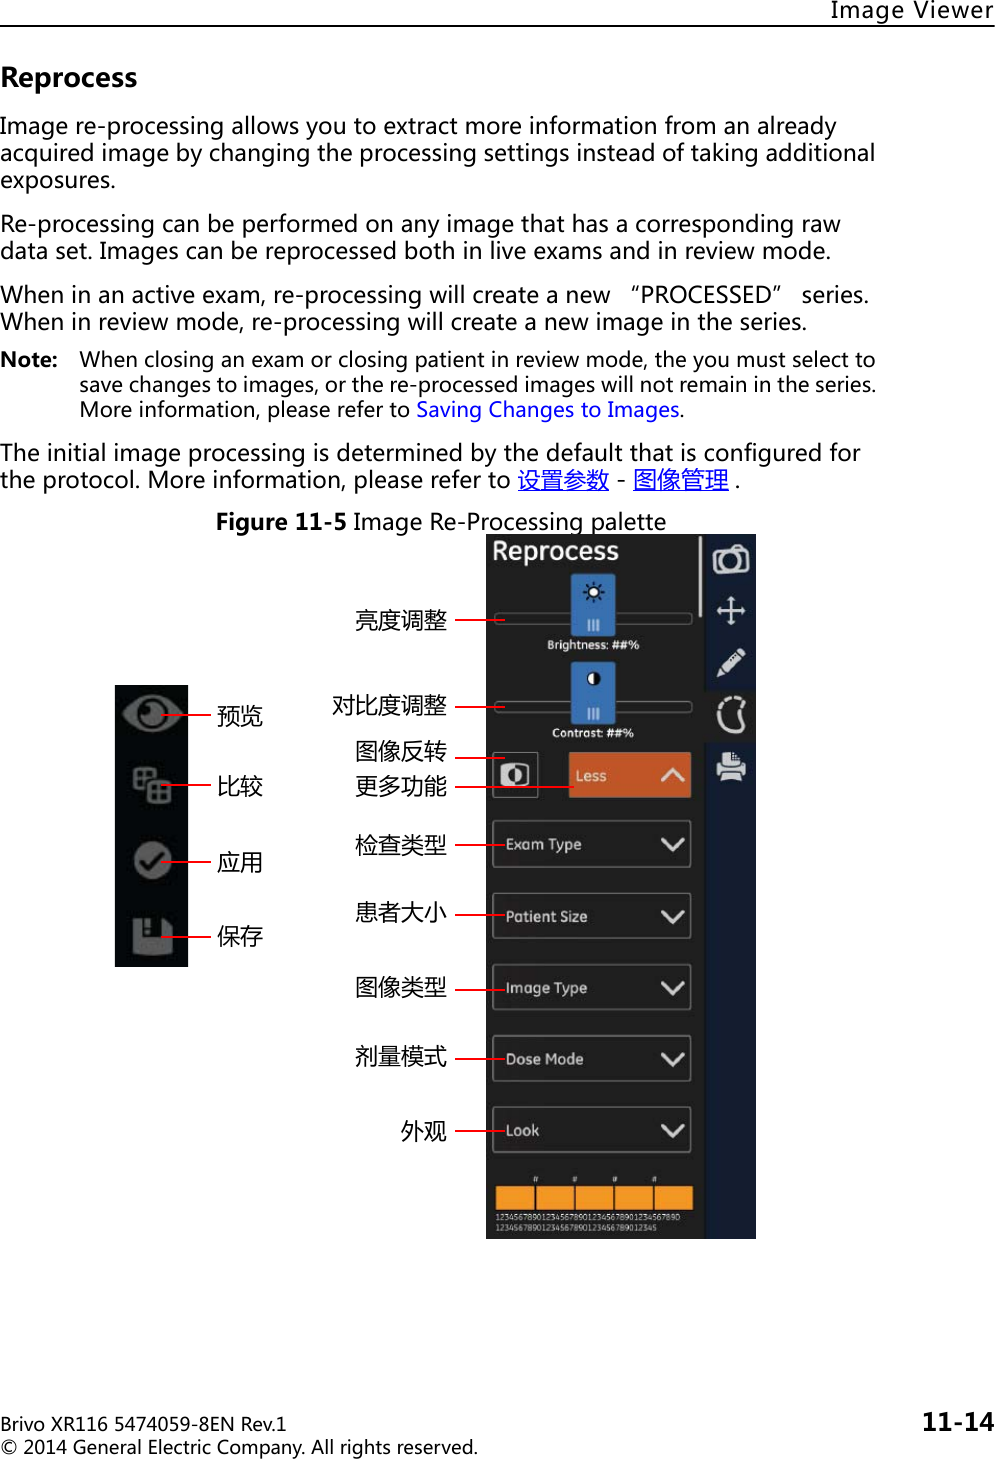
![ImageViewerBrivoXR1165474059-8ENRev.1 11-15©2014GeneralElectricCompany.Allrightsreserved.Table11-5ReprocessPaletteTool Description快捷工具栏[ 预览工具 ] 显示处理后的图像,实时查看处理结果。[ 比较工具 ][ApplyButton] Appliesthechangesandre-processestheimage.Note: Wheninanactiveexam,re-processingwillcreateanew“PROCESSED”series.Wheninreviewmode,re-processingwillcreateanewimageintheseries.[ 保存按钮 ] 保存对图像所做的处理结果。ImageReprocess[Brightness] Lightensordarkenstheselectedimage.• Movethesliderrightforalighterimage.• Movethesliderleftforadarkerimage.[Contrast] Adjuststhedifferencesbetweendarkandlightontheselectedimage.• Movethesliderrightformorecontrast(towardspureblackandwhite).• Movethesliderleftforlesscontrast(towardsuniformgray).[Invert] Reverseslightanddarkareasoftheselectedimage.MoreFunctions[Windowing] Applieswindowingtotheselectedimage.Availableoptionsare:• Normal–imageasacquired• Hard–adjuststheimagetowardsblackandwhite• Soft–adjuststheimagetowardsgray[Anatomy] Changestheanatomicalregion.[View] Changestheview.[ImageType] Changestheimagetype.Availableoptionsare:•Standard[PatientSize] Changesthepatientsize.](https://usermanual.wiki/GE-Healthcare/IDR3543.User-Manual-III-Rev1/User-Guide-2522775-Page-33.png)
![BrivoXR1165474059-8ENRev.1 11-16©2014GeneralElectricCompany.Allrightsreserved.ImageViewer[Look] Changestheprocessinglook.Looksarethewayanimageisprocessedtobeviewedbyaradiologistforinterpretation.Looksarepre-definedcombinationsofbrightness,contrast,edgeenhancement,andtissueequalization.FactoryLookdescriptions:• FactoryLook1–similartoanalogfilm,lowedge,noTE• FactoryLook2–lowCRlook,lowedge,moderatetissuecontrast• FactoryLook3–moderateCRlook,lowedge,TE• FactoryLook4–highlydigitallook,highedge,highTE• Customlooks–Thesystemallowstheusertobuildupto5customlooksinanycombinationofparameters.更多关于创建自定义外观的信息,请参考第 13 章:设置参数-图像处理。Tool Description](https://usermanual.wiki/GE-Healthcare/IDR3543.User-Manual-III-Rev1/User-Guide-2522775-Page-34.png)
![BrivoXR1165474059-8ENRev.1 11-20©2014GeneralElectricCompany.Allrightsreserved.ImageViewerPrintingImagesFigure11-10打印图像选项板Table11-6打印图像选项板描述Function Description[#ofCopies] Defineshowmanycopiestoprint.[Printer] Listsallavailableprintersconfiguredforyoursystem.[Orientation] Selectsverticalorhorizontalorientationoftheimageonfilmorpaper.Availableoptionsare:•Landscape•Portrait[PrintMode] Selectswhatsizetoprinttheimage.Availableoptionsare:•TrueSize• FittoFilm• ReducedSize[Magnification] OnlyavailableifReducedSizeisselectedforthePrintMode.只有在 [ 打印模式 ] 中选择了 [ 缩小的尺寸 ] 时才可用。图像将按所输入的百分比值缩小。可接受的缩小范围是 40% 至 90%。如果将 [ 实际尺寸 ] 或 [ 胶片尺寸 ] 选择为 [ 打印模式 ],此文本框将被禁用。副本数打印机方向打印模式放大率格式介质大小介质类型目的地放大类型注释打印 打印所有添加表单删除表单删除所有表单打印总结](https://usermanual.wiki/GE-Healthcare/IDR3543.User-Manual-III-Rev1/User-Guide-2522775-Page-38.png)
![ImageViewerBrivoXR1165474059-8ENRev.1 11-21©2014GeneralElectricCompany.Allrightsreserved.从系统打印图像有两种方法:手动打印和自动打印。自动打印可以配置系统使其在检查结束后执行自动打印。从应用程序界面获取参数选择。更多关于配置自动打印的信息,请参考 Chatper16:设置参数-图像管理小节。[Format] Selectstheprintformat.Availableoptionsare:•Standard•35mm•40mm[MediaSize] Showstheavailablesizesthatareconfiguredfortheselectedprinter.[MediaType] Selectsthetypeofmediatoprinton.Availableoptionsare:•Paper•Clearfilm• Bluefilm[Destination] Showsconfiguredprintersonthesystem.[MagnificationType] Selectsthemagnificationtype.Availableoptionsare:•Cubic•None[Annotation] Selectstheamountofannotationtoprintontheimage.Availableoptionsare:•Full• Partial•Custom•NoneMoreinformation,pleaserefertoAnnotation.[Print] Printtheselectedimage.[PrintAll] Printallimages.快捷按钮[ 添加表单 ] 在图像区域添加一个空白表单。[ 删除表单 ] 删除当前显示的表单。[ 删除所有表单 ] 删除所有可用的表单。[ 打印总结 ] 将显示区域调整为 4*4 的表格,然后显示所有可用表单的缩略图。Function Description](https://usermanual.wiki/GE-Healthcare/IDR3543.User-Manual-III-Rev1/User-Guide-2522775-Page-39.png)
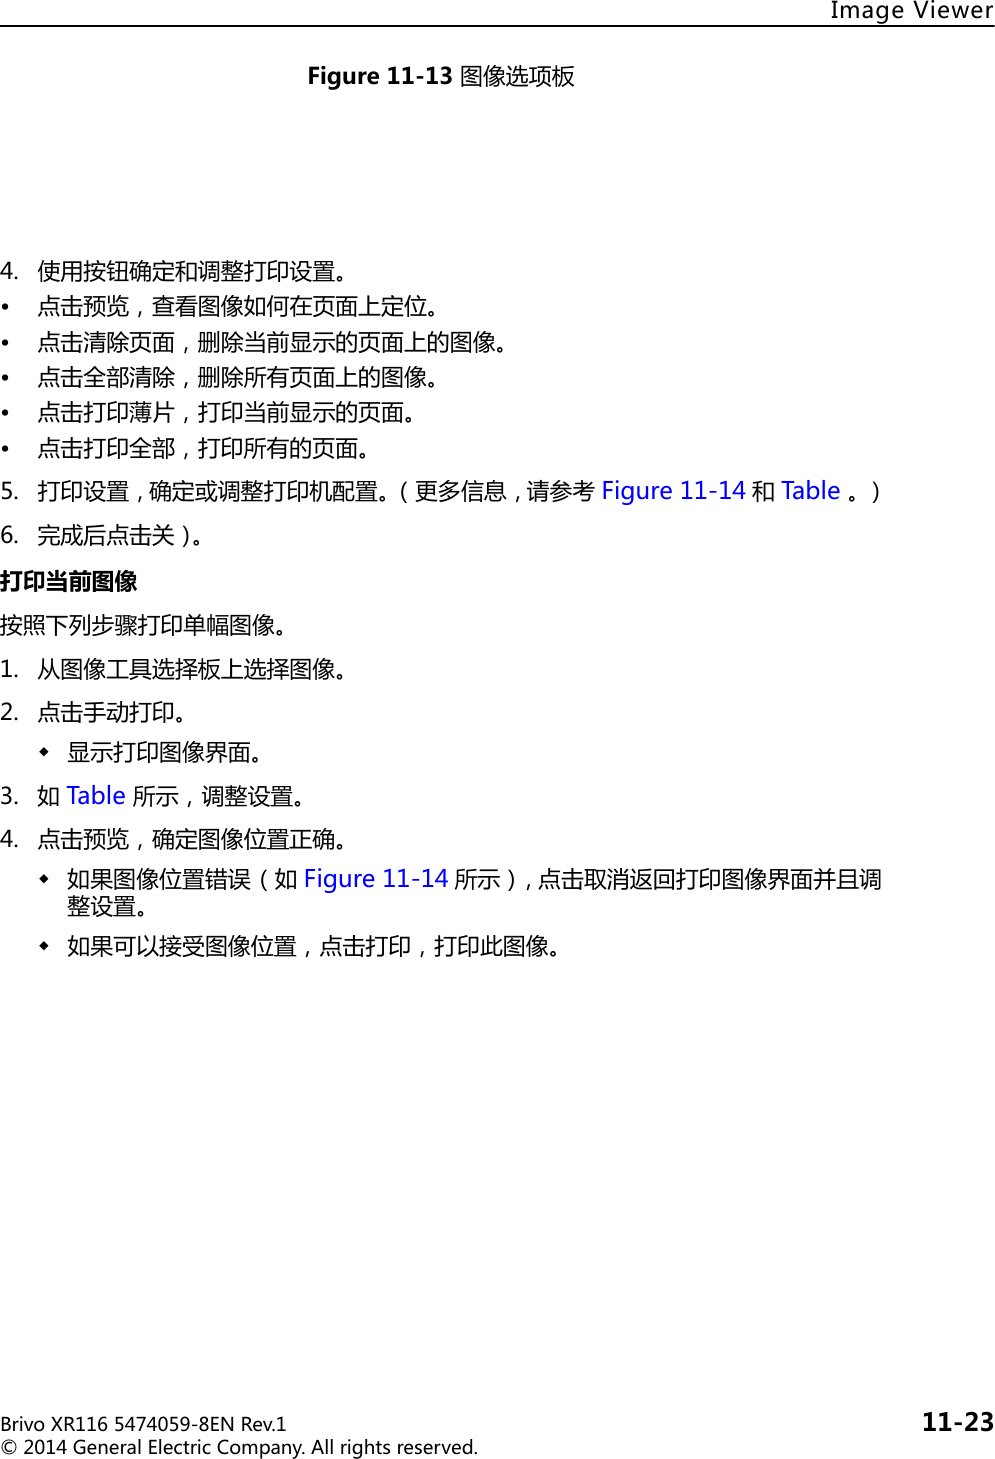
![BrivoXR1165474059-8ENRev.1 11-22©2014GeneralElectricCompany.Allrightsreserved.ImageViewer手动打印使用胶片管理器和手动打印按要求打印图像。• 胶片管理器允许配置和打印系列中的多幅图像。• 手动打印允许配置和打印当前所选的图像。手动打印按钮工具底部附近,鼠标控件下方,如 Figure11-11 所示。Figure11-11手动打印按钮 - 胶片管理器和手动打印打印多幅图像按照下列步骤打印多幅图像。1. 点击胶片管理器。显示胶片编辑器界面 (Figure11-12)。Figure11-12胶片编辑器界面 - 添加图像前和添加图像后2. 选择您想要在一个页面显示的图像数量。如果系列中的图像数量超过了一个页面中可以显示的图像数量,使用 Sheet [] 和[]按钮为每个页面配置打印选项。3. 用鼠标在图像选项板 (Figure 11-13)上点击并拖动图像缩略图,从而打开 FilmComposer (胶片编辑器)界面。](https://usermanual.wiki/GE-Healthcare/IDR3543.User-Manual-III-Rev1/User-Guide-2522775-Page-40.png)
![ImageViewerBrivoXR1165474059-8ENRev.1 11-25©2014GeneralElectricCompany.Allrightsreserved.SendingImages如果激活了自动发送,在检查关闭时所采集的图像会自动发送到预先指定的位置。更多关于配置自动发送的信息,请参考 Chatper16:设置参数。SavingChangestoImages当关闭图像浏览器界面或结束检查时,您可以选择保存或者放弃对图像所做的改变。1. 如果是在活动检查中,点击采集界面上的关闭按钮。2. 如果是在浏览模式中,点击图像浏览器界面上的关闭按钮。显示一条消息:“ 您是否要保存对图像的修改? "3. 点击 [ 是 ]。取消关闭界面并返回图像浏览器界面。[ 否 ] 关闭图像浏览器界面,而不保存改变。Note: 添加注释时不会产生新的图片。](https://usermanual.wiki/GE-Healthcare/IDR3543.User-Manual-III-Rev1/User-Guide-2522775-Page-43.png)

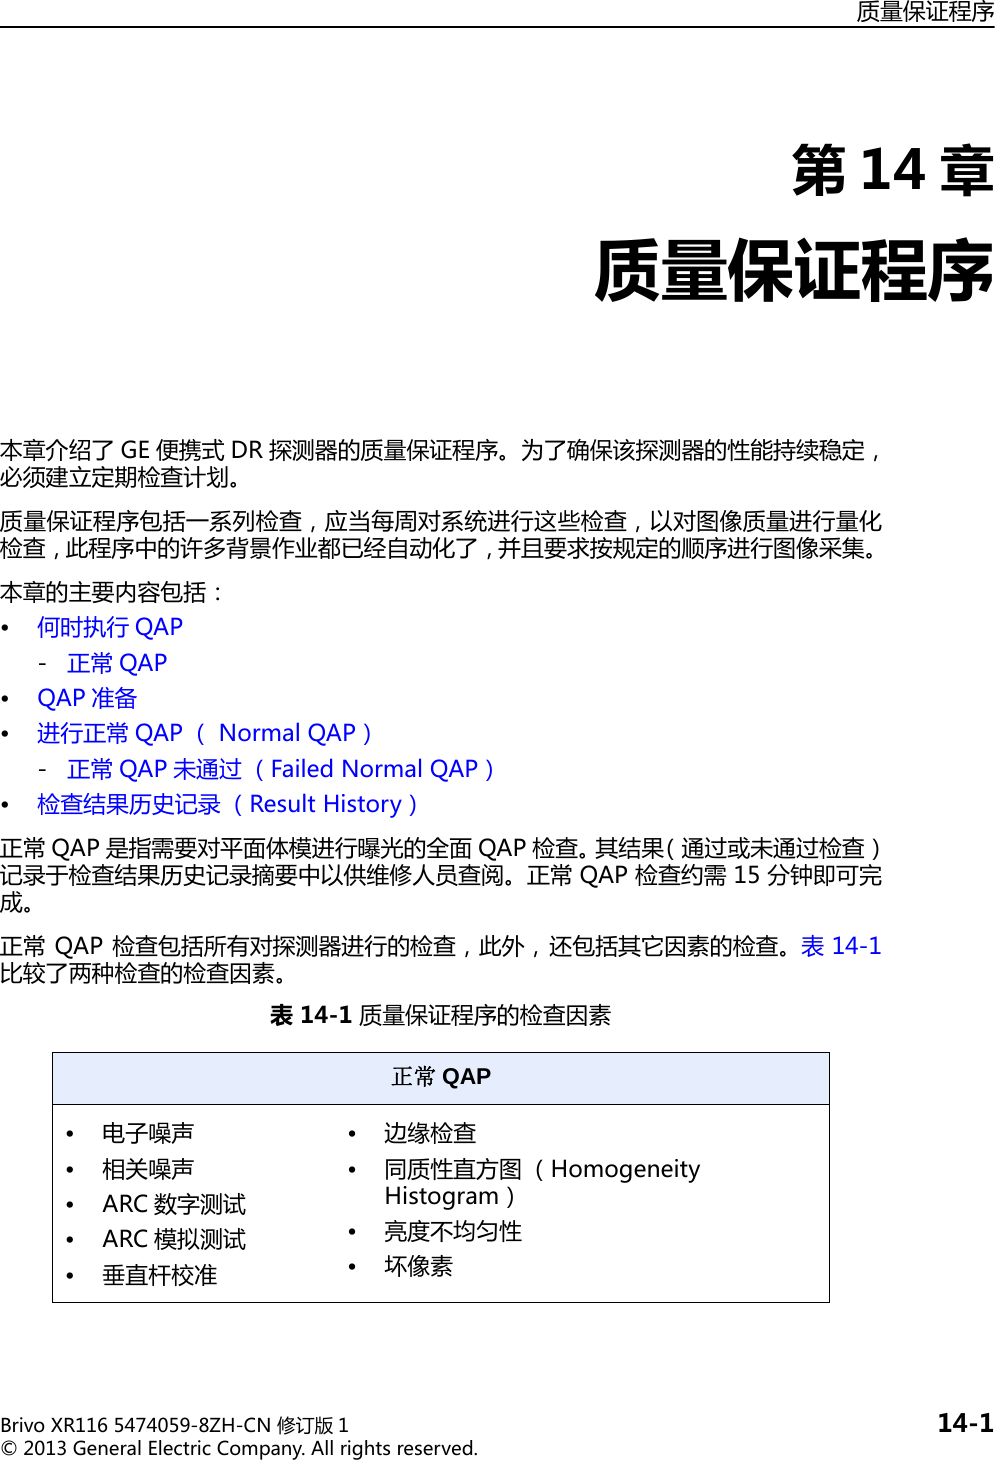
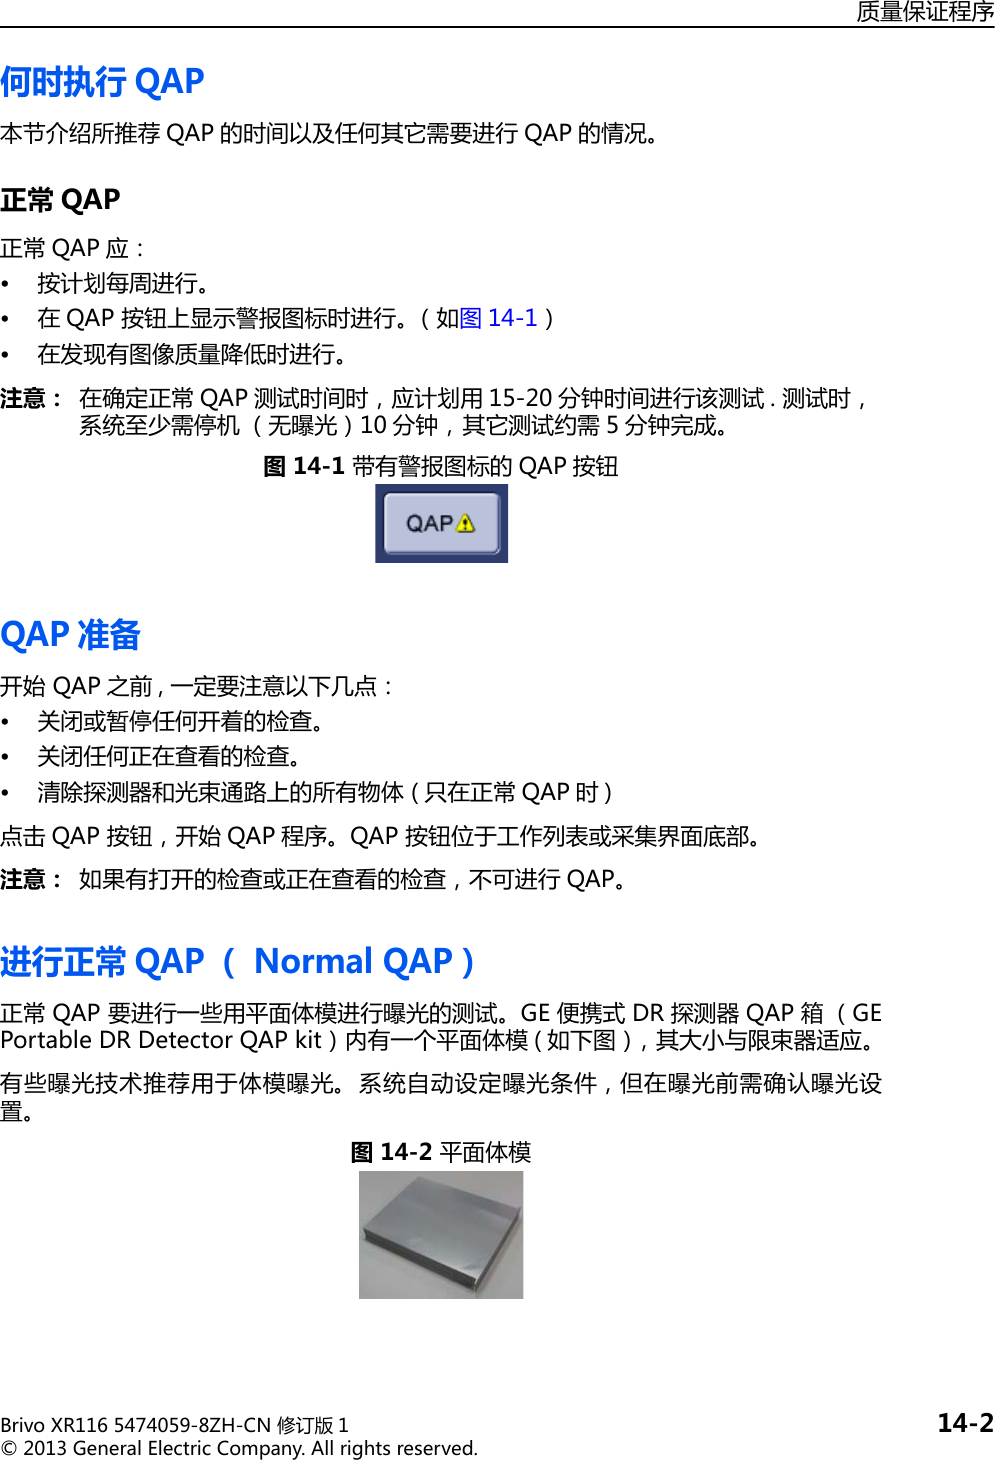
![质量保证程序BrivoXR1165474059-8ZH-CN修订版 1 14-3©2013GeneralElectricCompany.Allrightsreserved.小心: 应用体模完成 QAP 后,请在系统复位或关机前将其移除。按照该程序进行正常 QAP测试。1. 按下位于工作列表或采集界面底部的 [QAP]按钮。显示图像质量界面。图14-3图像质量界面2. 从界面的左侧选择图像质量 (如图14-4)。图14-4从界面的左侧选择](https://usermanual.wiki/GE-Healthcare/IDR3543.User-Manual-III-Rev1/User-Guide-2522775-Page-61.png)
![BrivoXR1165474059-8ZH-CN修订版 1 14-4©2013GeneralElectricCompany.Allrightsreserved.质量保证程序3. 从界面的左侧选择质量控制测试。图14-5质量控制测试界面4. 按下 [QAP] 开始 QAP 测试。垂直杆校准界面出现。](https://usermanual.wiki/GE-Healthcare/IDR3543.User-Manual-III-Rev1/User-Guide-2522775-Page-62.png)
![质量保证程序BrivoXR1165474059-8ZH-CN修订版 1 14-5©2013GeneralElectricCompany.Allrightsreserved.图14-6垂直杆校准界面。5. 按下 [START] 按钮开始垂直杆校准测试。注意: 正常QAP要求在开始测试的垂直杆校准之前,系统应进入空闲状态(inanidlestate)( 无曝光 )至少 10分钟。系统将会在 Q-QAP 和垂直杆校准界面上显示一个定时器图标 (timericon)。该定时器从 10 分钟开始到及时直到 0 为止。这段时间里,显示[INHIBIT]按钮,[START] 按钮失活。6. 等待测试完成。显示探测器检查测试界面。](https://usermanual.wiki/GE-Healthcare/IDR3543.User-Manual-III-Rev1/User-Guide-2522775-Page-63.png)
![BrivoXR1165474059-8ZH-CN修订版 1 14-6©2013GeneralElectricCompany.Allrightsreserved.质量保证程序图14-7探测器检查测试界面7. 按下 [START] 开始暗片测试。](https://usermanual.wiki/GE-Healthcare/IDR3543.User-Manual-III-Rev1/User-Guide-2522775-Page-64.png)

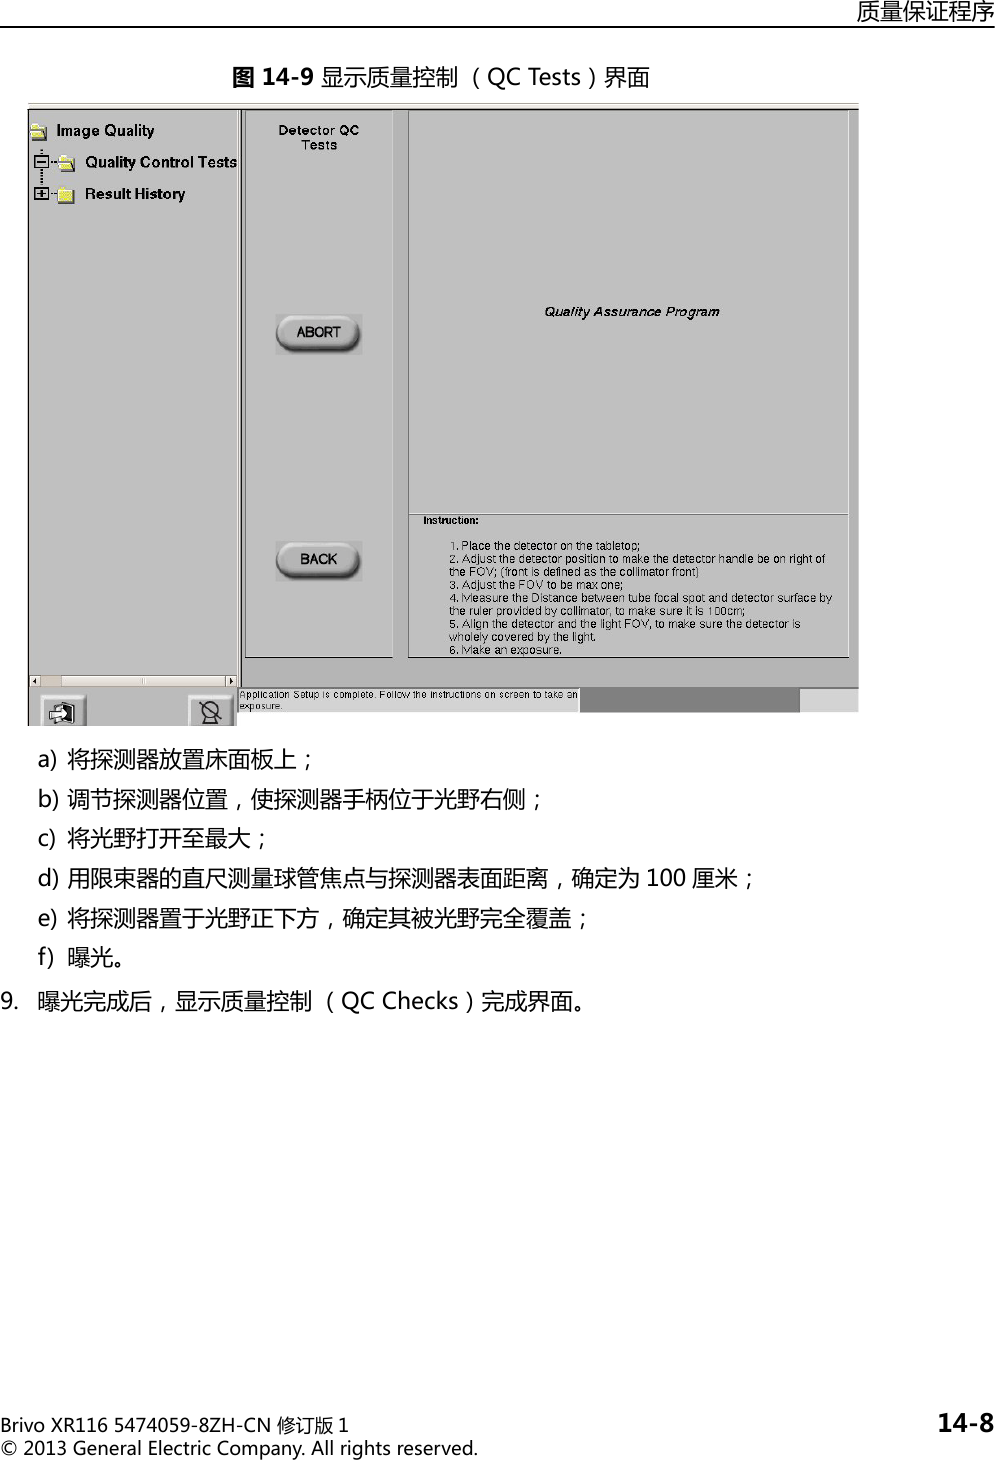
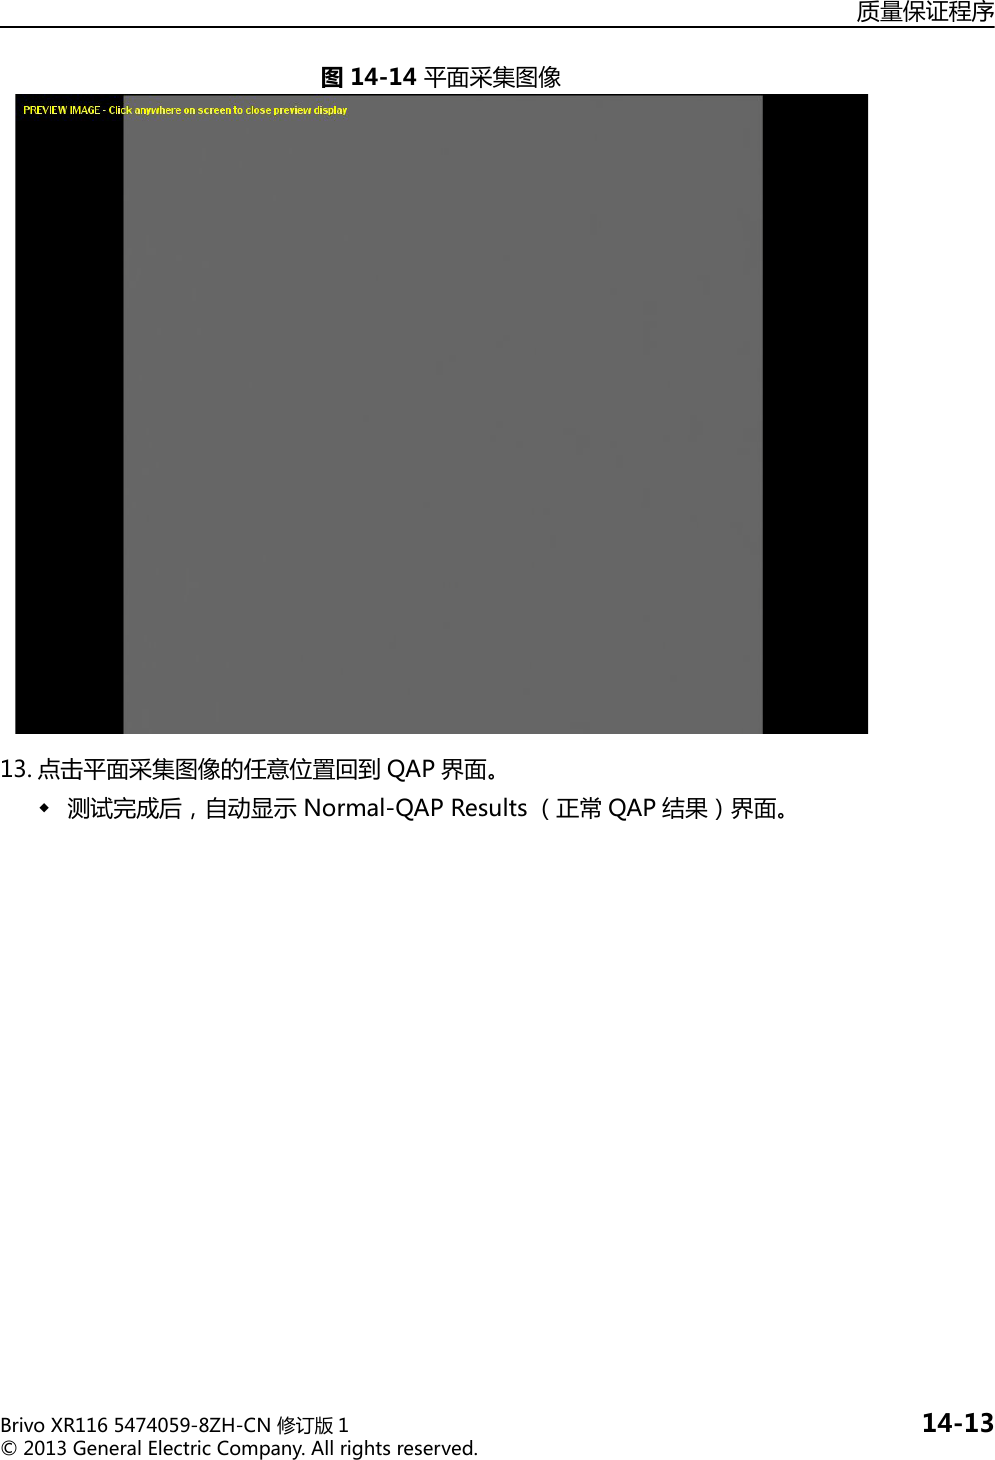
![质量保证程序BrivoXR1165474059-8ZH-CN修订版 1 14-9©2013GeneralElectricCompany.Allrightsreserved.图14-10显示质量控制 (QCTests)完成界面10. 按下 [START] 按钮开始平面测试 (Flat-fieldtests)。](https://usermanual.wiki/GE-Healthcare/IDR3543.User-Manual-III-Rev1/User-Guide-2522775-Page-67.png)

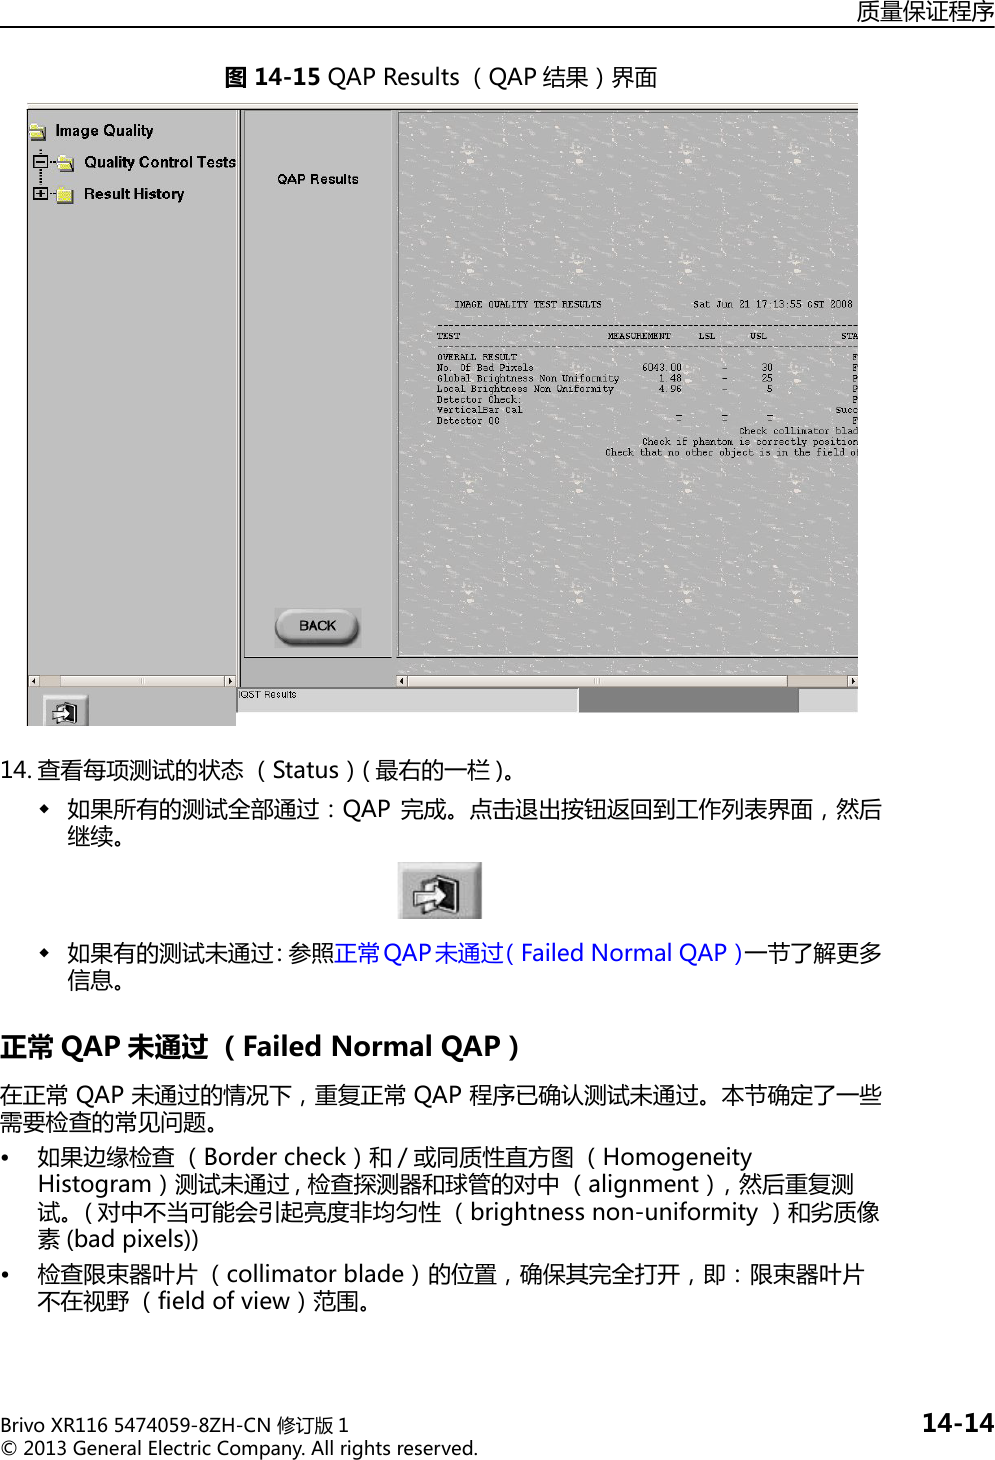
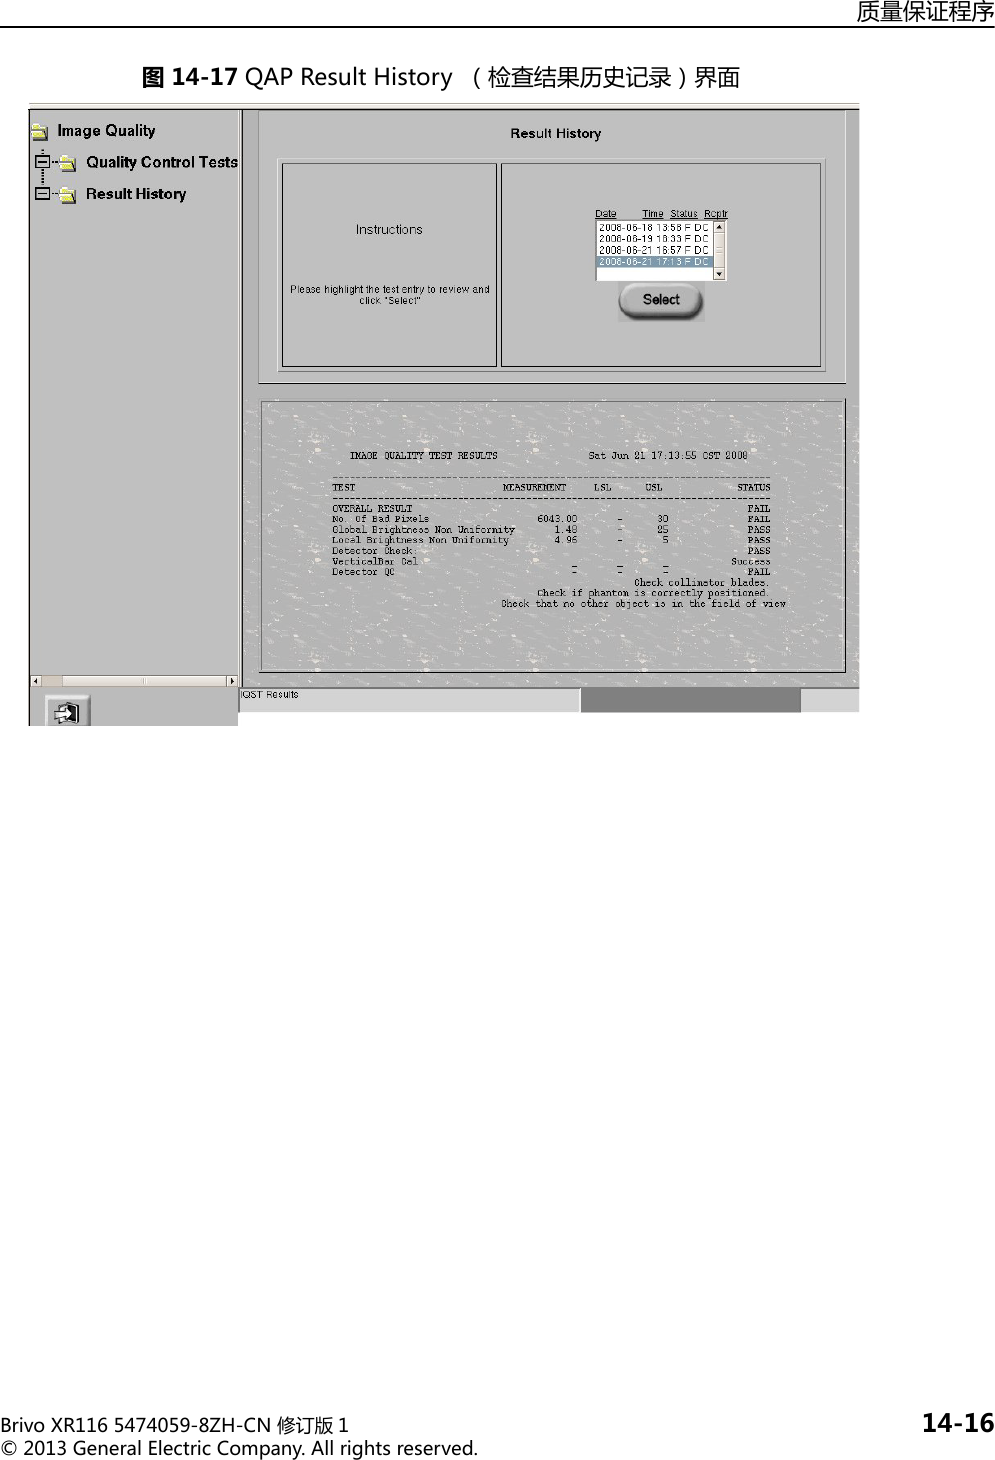
![质量保证程序BrivoXR1165474059-8ZH-CN修订版 1 14-15©2013GeneralElectricCompany.Allrightsreserved.如果确认单项测试未通过,请联系售后服务 (calltoscheduleservice)。虽然系统可以运行 ,但需要检查,也可能需要校准。如果确认多项测试未通过 ,可能会影响图像质量 ;停止使用该系统,请求立即维修。图14-16QAP结果未通过检查结果历史记录 (ResultHistory)正常 QAP 完成后,系统生成一页测试摘要 (testsummarypage)。测试结果摘要表包括内容有描述性名称(descriptivenames)测定值 , 测试规格(LSL 和 / 或USL)以及通过 / 未通过状态。最少包含有 25 项正常QAP测试结果。按照以下程序查看以前正常 QAP 测试的结果。1. 按下位于窗口左侧的[RESULTHISTORY] (检查结果历史记录)按钮。显示ResultHistory (检查结果历史记录)界面。2. 在列表上按下一个测试条目 (testentry)选择该项。3. 按下[SELECT] (选择)。显示测试详细内容。](https://usermanual.wiki/GE-Healthcare/IDR3543.User-Manual-III-Rev1/User-Guide-2522775-Page-73.png)


![设置参数BrivoXR1165474059-8ZH-CN修订版 1 16-1©2013GeneralElectricCompany.Allrightsreserved.第16章设置参数参数允许特级用户定义系统以便使用。也允许您预先定义 X射线程序参数,以便检索保存在内存中的任意一个程序。这样,您可以获取专为该类程序所编的技术因素。本章说明可供您利用的参数,及如何激活或改变参数以便您使用。本章说明如何为系统上的各种功能设置参数。您可以激活几个自动联网和打印功能,自定义系统默认注释、图像方向和图像处理参数进行自定义。您还可以将常用操作员姓名、医师姓名保存在系统中,以备日后使用。本部分向您介绍了成功创建和编辑预置程序从而自定义系统所需的概念。参数被设置于应用程序界面 (图 16-1)上,通过点击工作列表中的 [ 应用程序 ] 可以访问该界面。内容包括:•系统-网络连接-打印机•工作列表-默认查询-预设姓名•图像管理-拷贝检查-自动标记 (质量检查)-自动打印-自动发送 (自动发送)-自动删除•图像浏览器-预设注释-DEI (探测器曝光指示器)-更改 DEI显示-更改上限和下限-激活或失活技术模式-导出 DEI日志•图像处理-创建自定义风格-为检查更改预设风格-组织平衡概述•协议-将协议数据库备份到 CD 上-从 CD 上恢复协议数据库-编辑协议数据库-协议编辑器复制功能](https://usermanual.wiki/GE-Healthcare/IDR3543.User-Manual-III-Rev1/User-Guide-2522775-Page-79.png)
![BrivoXR1165474059-8ZH-CN修订版 1 16-2©2013GeneralElectricCompany.Allrightsreserved.设置参数系统本部分为您设置网络连接和打印机连接系统参数提供指导。在这个界面上,您还可以使用维护、退出、关机功能。更多关于退出和关闭的信息,请参考第 5 章:常规信息。图16-1系统应用程序界面网络连接通过应用程序系统 - 系统界面,可以配置网络连接与打印机连接。该界面允许合格的维修人员定义医学数字成像通讯 (DICOM)发送目的地。在该界面上,可添加、删除或编辑网络连接。按以下步骤访问网络连接界面:1. 在工作列表界面上点击 [ 应用程序 ] 按钮。显示系统 - 系统界面。2. 点击 [ 网络连接 ] 按钮。显示网络连接界面 (图16-2)。](https://usermanual.wiki/GE-Healthcare/IDR3543.User-Manual-III-Rev1/User-Guide-2522775-Page-80.png)