GE Healthcare IDR3543 Digital X-ray Image Detector User Manual III Rev1
GE Healthcare Digital X-ray Image Detector III Rev1
Contents
- 1. User Manual-III-Rev1
- 2. User Manual--II-Rev1
- 3. User Manual-IV-Rev1
- 4. User Manual-I-Rev3
User Manual-III-Rev1

ImageManagement
BrivoXR1165474059-8ENRev.1 10-1
©2014GeneralElectricCompany.Allrightsreserved.
Chapter10
ImageManagement
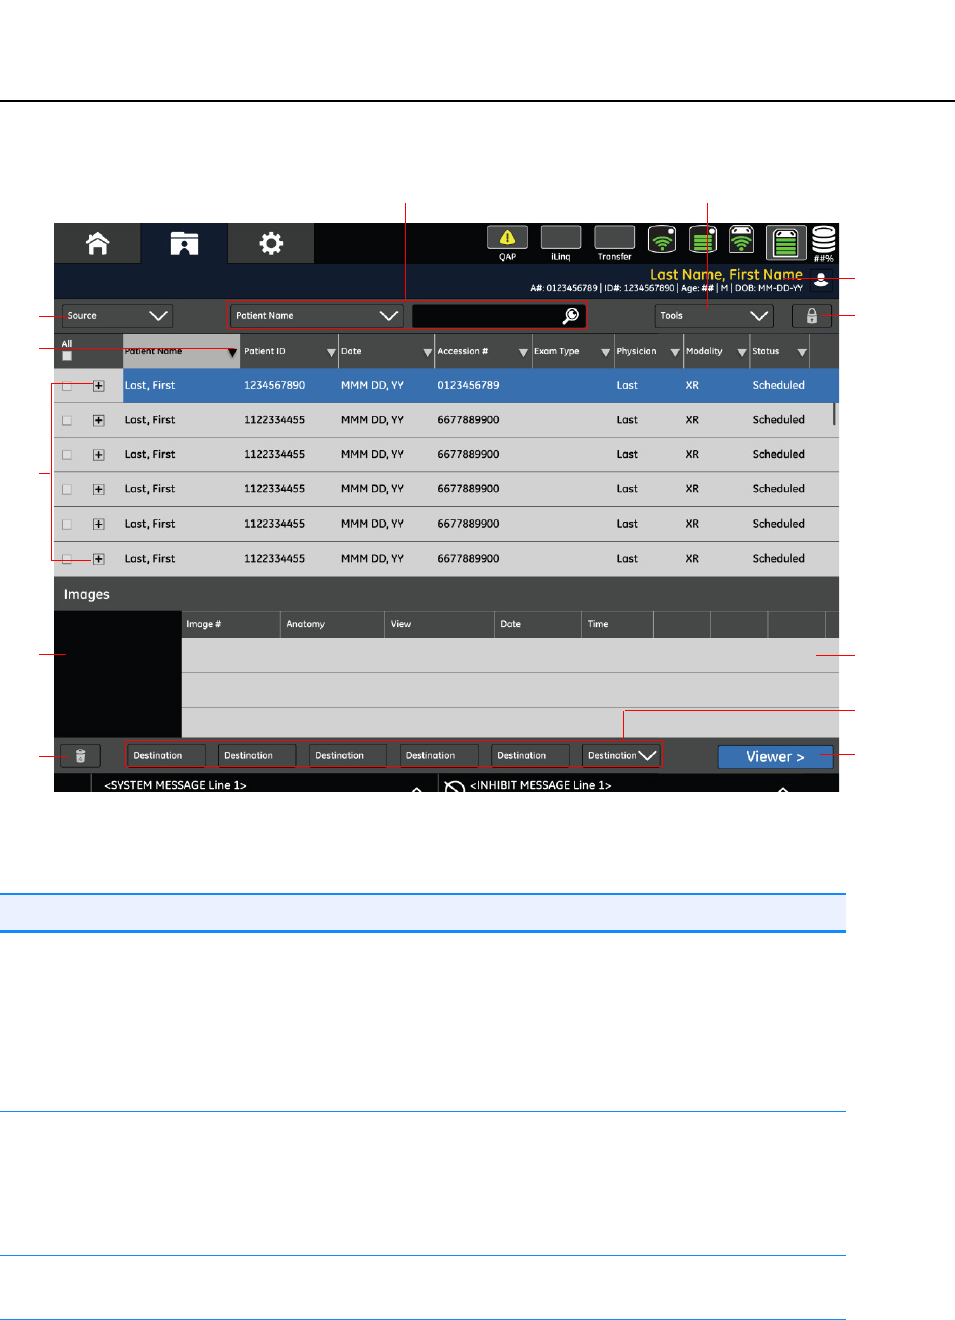
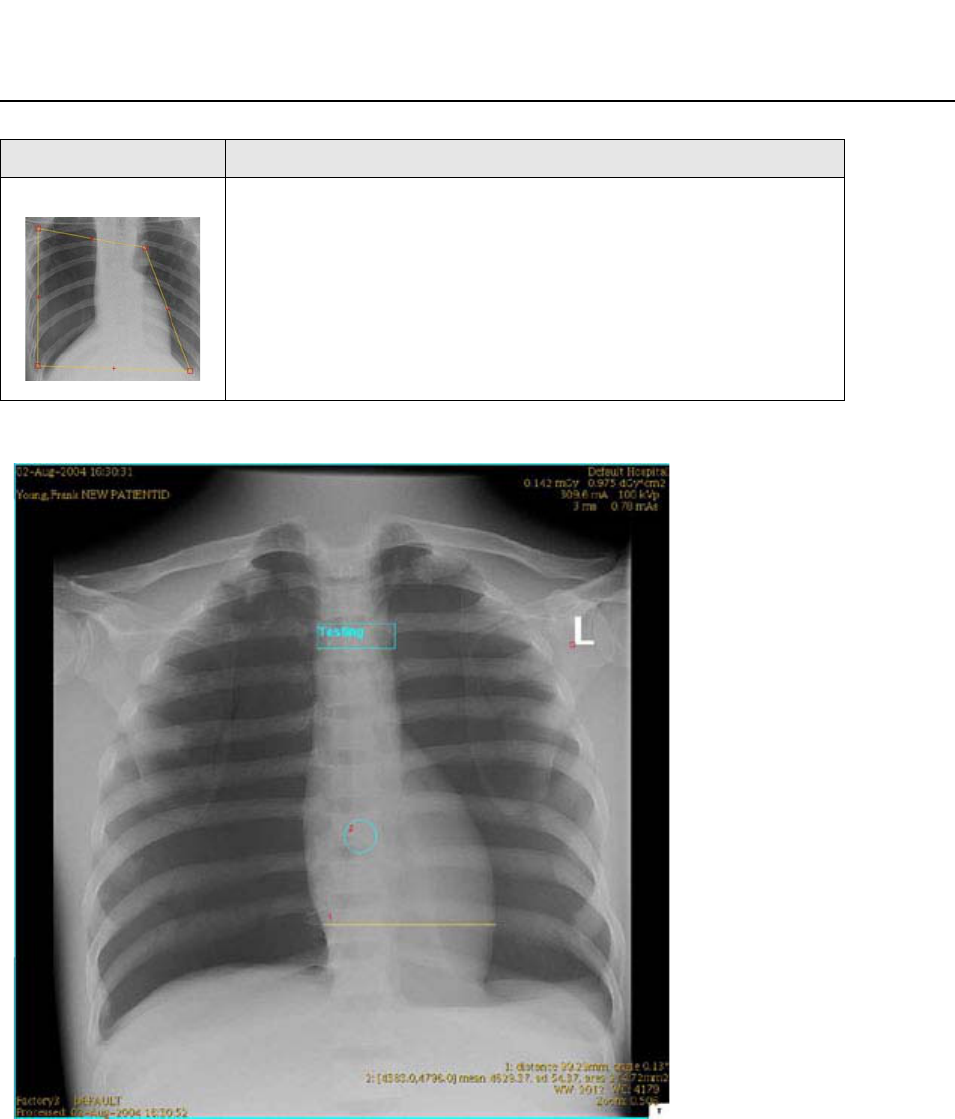
TheImageManagementscreen(Figure10-1)showsalltheimagesstoredinthe
selecteddatabasesource.Thisscreenisusedtomanageimages,copyimagesto
exams,transferimagestonetworkhosts,orsaveimagesonUSBstoragedevice.
Topicscoveredinclude:
• Overview
• SelectingImageDatabaseSource
-LoadingImagesfromaNetworkHost
-LoadingImagesfromanUSBdisk
• SearchingList
• SortingbyColumn
• OpeningExamsandImages
• CopyingExamsandImages
-CopyingExamstoaNetworkHost
-CopyingImagestoAnotherExam
-CopyingExamstoaUSBdrive
• DeletingExams,Series,orImages
-LockingExamsfromDeletion
• MakingPatientAnonymous(De-Identify)

BrivoXR1165474059-8ENRev.1 10-2
©2014GeneralElectricCompany.Allrightsreserved.
ImageManagement
Overview
ThemajorityoftheImageManagementscreenisdevotedtotheexamlist.
Imagesareorganizedbyexam.Eachexamisarow.Ifmultipleexamswere
acquiredinthesamesession,eachexamhasitsownrowonthelist.Theexam
expandstoshowtheseries.
Withineachexamare“series”ofimages.Aseriesisacollectionofoneormore
imagesacquiredinasession.Eachprotocolisaseries.Anewseriesiscreated
whenacompletedexamisappendedandeverytimeanimageisre-processed
(inreviewmode).
Therearetwotypesofimageseries:rawandprocessed.Rawimagesarethe
exactimagesthatwereacquired.Processedimagesaretherawimageswith
specificprocessingandimageadjustments(suchasbrightnessandcontrast)
applied.Itispossibletocreateseveralprocessedimagesfromonerawimage.
Individualimagesresidewithintheseries.Double-clickingonaseriesorclicking
the[+]buttonopenstheimagedetailssectionoftheworklist.IntheImage
Detailssection,eachrowisanimage.Selectingarowmakesasmallpreview
image,or“thumbnail,”appear.Theimagemaybeopenedforviewingor
adjustmentordeleted.
SelectingmultipleexamsontheImageManagementscreenisdifferentthanon
theWorklist.
• TheImageManagementscreenallowsyoutoselectexamsthatdonothave
thesamePatientIDorPatientName.
• Toselectacontiguousgroupofexams:HolddowntheSHIFTkeyonthe
keyboard.Clickanddragwiththemousetoselecttheexams.
• Toselectnon-contiguousexams:HolddowntheCTRLkeyonthekeyboard.
Clickonindividualexamstoselect.
ImageManagement
BrivoXR1165474059-8ENRev.1 10-3
©2014GeneralElectricCompany.Allrightsreserved.
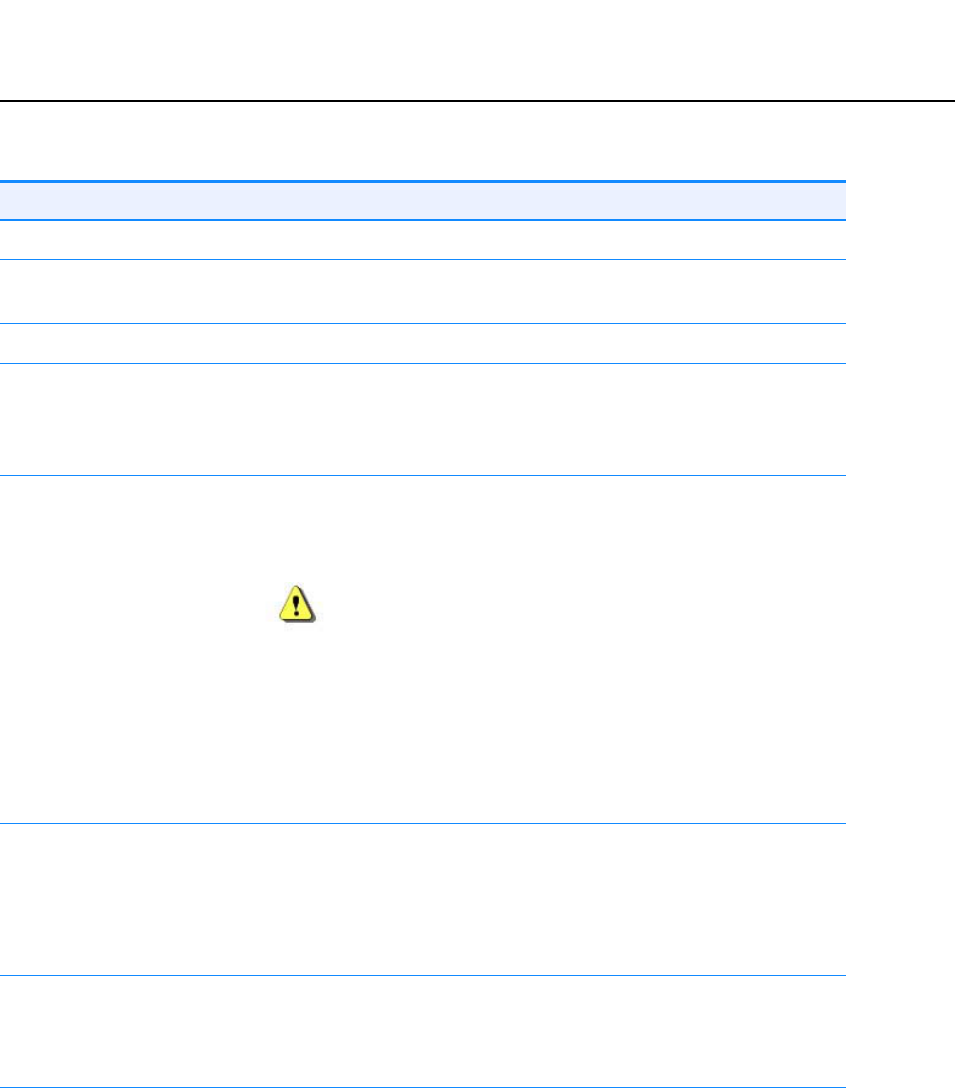
Figure10-1ImageManagement
Table10-1IImageManagementfunctions
Patient Info
Lock
/
Unlock
Image List
Destination
Viewer
Search Tools
Source
Exam List
Sort
Thumbnail
Delete
Function Description
[PatientInformation] ShowsthePatientInformationscreenfortheselected
procedure.
Note: PatientInformationcannotbeeditedonceanexam
hasstarted.
Moreinformation,pleaserefertoChatper8:Worklist-
Adding/Editing/ViewingPatientInformation.
[Source] Selectsthesourceofimagestoview(e.g.,thelocal
workstation,oraUSBdrive).
• 点击 [Local] 按钮显示系统中所有的检查。
• 点击 [USB] 按钮显示插入 USB 盘中所有的检查。
更多信息请参考 Selecting Image Database Source 小节。
[SortbyColumn] Forinformationabouthowtosortthecolumn,pleaserefer
toSortingbyColumn.

BrivoXR1165474059-8ENRev.1 10-4
©2014GeneralElectricCompany.Allrightsreserved.
ImageManagement
[SearchBy] Searchesforproceduresbytheselectedthecolumnnamein
thedrop-downlistandthesearchcriteriaenteredintothe
textbox.RefertoSearchingList.
[ImageTools] Performsvariousfunctionsonselectedexams.Available
optionsare:
• CopyExam:Allowsallexamimagesforapatienttobe
copiedtoanotherpatient,toanotherlocation,ortoUSB
drive.Moreinformation,refertoCopyingExamsand
Images.
• De-identify:Makesthepatientanonymous(removesall
identifyinginformation,includingName,ID,and
accessionnumber).Referto MakingPatientAnonymous
(De-Identify).
• SMPTE:AllowsservicespersonneltoaccesstheSMPTE
patternforsystemcalibration.
• CBT:Ifavailable,launchesComputerBasedTrainingfor
thesystem.IfComputerBasedTrainingisnotavailable,
theoptionisdisabled.
• PACSTestImages:Loadsasetofcalibrationimagesthat
areusedtotestthequalityofimagessenttoPACSor
printers.
• TG18Samples:Loadsasetoftestimagesthatareusedto
calibratethedisplaymonitor.
Note: Itisnotexpectedthatyouwillneedtoaccessthe
SMPTEpatternortestimagesduringthecourseofa
normalday.Testimagesaretypicallyusedtocalibrate
thesystemortodeterminethecauseofquality
problems.
[Lock/Unlock] Lockstheselectedexamsfromdeletion.Ifalockedexamis
selected,thebuttonnamechangesto[UNLOCK].
[UNLOCK]removesthelockfromtheselectedexams.
[Exam,Series,andImage
List]
Liststheimagessavedinthelocaldatabasecategorizedby
examsandseries.Thefollowinginformationisdisplayed:
•Exams:Theexamssavedinthelocaldatabase.
•Seriesdetail:Theseriesfortheselectedexam.
•Imagelist:Theimagesfortheselectedseries.
•Imagepreview:Arepresentativethumbnailoftheselected
image.
[Delete] Deletestheselectedexamsorimagesfromthelocal
database.
[Destination] Selectswhereimagesaretobecopiedorsaved.Referto
Chatper16:设置参数formoreinformationabouthowto
configurethedifferentstoragedestination.
Function Description
ImageManagement
BrivoXR1165474059-8ENRev.1 10-5
©2014GeneralElectricCompany.Allrightsreserved.
[Viewer] OpenstheImageViewerscreenandshowstheimagesinthe
selectedseries.ImagesmaybeadjustedontheImage
Viewerscreen.RefertoChatper11:ImageViewerformore
information.IfMultiplePatientPrintfunctionisnot
activated,thisiconwillbeunavailablewhenyouselect
multiplepatientimages.
Function Description

BrivoXR1165474059-8ENRev.1 10-6
©2014GeneralElectricCompany.Allrightsreserved.
ImageManagement
SelectingImageDatabaseSource
TheSourcebuttonsallowyoutoloadandworkwithimagesfromdifferent
locations,suchasaUSBdrive,networkhost,orthelocalworkstation.
Figure10-2Imagesources
• Local:Showsexamsandimagesstoredonthelocalworkstation.
• USB:显示保存在 USB 存储盘上的检查和图像。
• Host:
LoadingImagesfromaNetworkHost
Followthisprocesstoaccessimagesstoredonanetworkhost.
1. Selectthenetworkhostfromthedrop-downlist,ifnecessary.
Thefilterscreenappears.RefertoChatper8:Worklistformoreinformation.
2. CompletetheFilterscreenasappropriate.
3. Click[OK].
Amessageappears:“Retrievingrequestedinformation.”
TheImageManagementscreenlistupdateswithexamsfromtheselected
source.
LoadingImagesfromanUSBdisk
FollowthisprocesstoaccessimagesstoredonaUSBdisk.
1. 将有图像的 USB 存储器插入主机上的 USB 接口。
2. 点击 [USB]。
TheexamlistupdatestoshowtheimagesstoredontheUSBdisk.
3. Selecttheexams.
4. CopytheexamstotheLocaldatabase.RefertoCopyingExamsandImages
formoreinformation.
5. OpentheexamsfromtheLocaldatabase.
Note: IftheexamsarebeingviewedonacomputerthathastheDICOMviewerinstalled,
imagesmaybevieweddirectlyfromtheUSBdisk.
ImageManagement
BrivoXR1165474059-8ENRev.1 10-7
©2014GeneralElectricCompany.Allrightsreserved.
SearchingList
TheSearchByfeaturefindsproceduresbycolumn.
Figure10-3Searchby
1. ClickthebuttonontheSearchBydrop-downlisttoselectthe column you
wanttosearch.
Ifthecolumnyouwantisalreadyselected,beginatstep3.
2. Selectthecolumn.Forexample,PatientID.
Thelistautomaticallysortstheselectedcolumn.
3. Typethe searchcriteriaintothe textbox.Forexample,youare looking for
patientswhosenamesbeginwith“J”,soyouwouldtype“J”intothetext
box.
Note: Thetextboxisnotcasesensitive.
4. Continuetypingthesearchcriteria.
The list automatically selects the first procedure that matches what you
havetypedintothetextbox.Thisiscalledanincrementalsearch.
If no procedures match what you have typed, the list de-selects all
proceduresandplacestheclosestmatchatthetopoftheWorklist.
BrivoXR1165474059-8ENRev.1 10-8
©2014GeneralElectricCompany.Allrightsreserved.
ImageManagement
SortingbyColumn
Sortingallowsyoutoorganizetheproceduresbythecolumnofyourchoice.
1. Clickonthecolumnheadingyouwanttosort,orchoosethecolumninthe
SearchBydrop-downlist.Forexample,youwanttoseealltheprocedures
thathaveastatusof“Suspended”,soyouclickonthe“Scheduled
Status”columnheading.
An arrow appears in the column heading to indicate which column is
currentlybeingsorted.
2. Clickthecolumnheadingagaintoswitchbetweenascendinganddescending
order.
Anup-pointingarrowindicatesthatthecolumnissortedinascending
order.Thatis,sortedinalphabeticalorderornumericalorderfrom
smallesttolargest.
Adown-pointingarrowindicatesthatthecolumnissortedindescending
order.Thatis,sortedinreversealphabeticalorderornumericalorderfrom
largesttosmallest.
Figure10-4Columnwithdescendingsort

ImageManagement
BrivoXR1165474059-8ENRev.1 10-9
©2014GeneralElectricCompany.Allrightsreserved.
OpeningExamsandImages
Followthisprocesstoopenexamsandimagesforviewing.
1. Double-clicktheexamtoopenit(or,selecttheexamandpressENTERonthe
keyboard).
Theseriesfortheexamexpandsbelowtheexam.
2. Double-click the series to open it (or, select the series andclick[+]image
details).
Theimagedetailopens.
3. Selecttheimage.
Apreviewthumbnailappears.
4. Double-clickontheimage(or,selecttheseriesandclick[VIEWER]).
TheselectedseriesopensontheImageViewerscreenwiththeselected
imagedisplayed.

BrivoXR1165474059-8ENRev.1 10-10
©2014GeneralElectricCompany.Allrightsreserved.
ImageManagement
CopyingExamsandImages
Exams(includingallseriesandimages)maybecopiedtoanetworkhostortoa
USBdrive.Theimagesfromanexammaybecopiedtoanotherexam.
Note: Copyingexamsdoesnotremovetheexamfromitsoriginallocation.
CopyingExamstoaNetworkHost
Examsmaybecopiedtoaconfigurednetworklocation.RefertoChatper16:设置
参数 -网络连接forinformationaboutconfiguringnetworkhosts.
1. Selecttheexamstocopy.
2. Click[DESTINATION].
Amessageappears:“Imageswillbecopiedtotheselectedexam.Images
willnotautomaticallyberemovedfromthesourceexam.”
3. Click[OK].
Ifthereisaproblemandtheexamscannotbecopiedtotheselected
networkhost,amessageappears:“Thenetworkdestinationisnot
responding.Iftheproblempersistscontactyournetworkadministrator.”
ClickOKtoclosethemessage.Trycopyingtheexamsatalatertime.
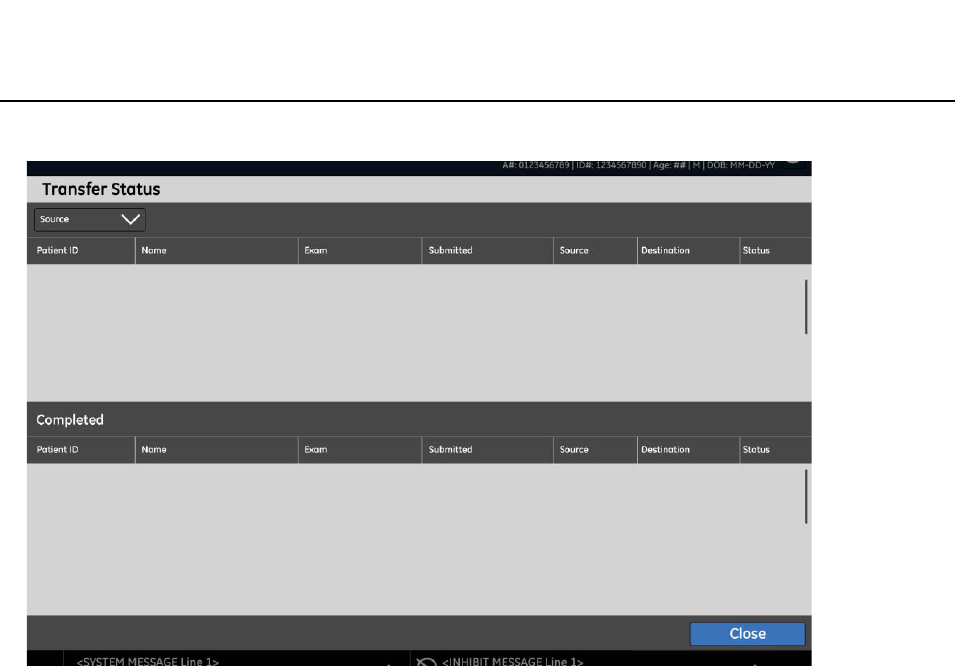
Toseethestatusoftheexamsbeingcopied,click[TRANSFERLOG]atthe
topoftheImageManagementscreen.
TheTransferLogscreenappears.
Click [CLOSE] to close the screen and return to the Image Management
screen.
ImageManagement
BrivoXR1165474059-8ENRev.1 10-11
©2014GeneralElectricCompany.Allrightsreserved.
Figure10-5TransferStatus
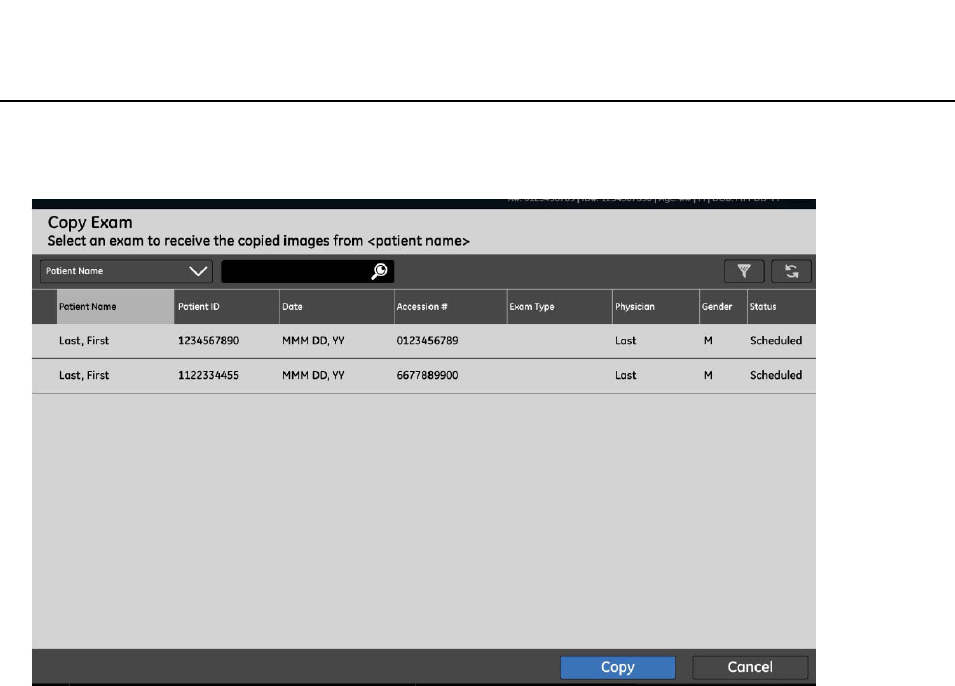
CopyingImagestoAnotherExam
Thisprocessisusedtocopyimagesfromoneexamtoanother.Copyingimages
isusedtoconsolidatetheimagesfrommultipleexamsforasinglepatientorto
reconcilepatientstoexams.Forexample,imagestakenforanemergencyexam
canbeassignedtothepatient’srealnameoncethepatient’sinformationis
knownorifimageswereacquiredforthewrongWorklistentry.
Note: Youcanonlycopytheimagesfromoneexamatatime.
1. Ifyouareassigninganemergencyexamtoapatient,youmayneedtoadd
thepatienttotheWorklistfirst.
a) OntheWorklistscreen,click[ADDPATIENT].
b) Enter the patient’s information. Refer to Chatper 8: Worklist-
Adding/Editing/ViewingPatientInformation.
c) Click[SAVE].
2. OntheImageManagementscreen,selecttheexamtobecopied.
BrivoXR1165474059-8ENRev.1 10-12
©2014GeneralElectricCompany.Allrightsreserved.
ImageManagement
3. Switchthe[IMAGETOOLS]buttontoCOPYEXAM,ifnecessary.
TheCopyExamscreenappears.
TheCopyExamscreenshowsallavailableexamsforthecurrentlocation
andallWorklistentrieswiththestatusof“Scheduled”.
4. SearchorFiltertheexamlisttolocatethedestinationexam.
5. Selecttheexamwhereyouwanttheimagescopiedto.
6. Click[OK].
Amessageappears:“Imageswillbecopiedtotheselectedexam.Images
willnotautomaticallyberemovedfromthesourceexam.”
7. Click[OK].
Themessagecloses.
Amessageappears:“Retrievinginformation.Pleasewait.”
[CANCEL]stopsthecopyprocess,closesthemessage,andreturnsyouto
theImageManagementscreen.
Allseriesandimagesarecopiedtotheexam.
ImageManagement
BrivoXR1165474059-8ENRev.1 10-13
©2014GeneralElectricCompany.Allrightsreserved.
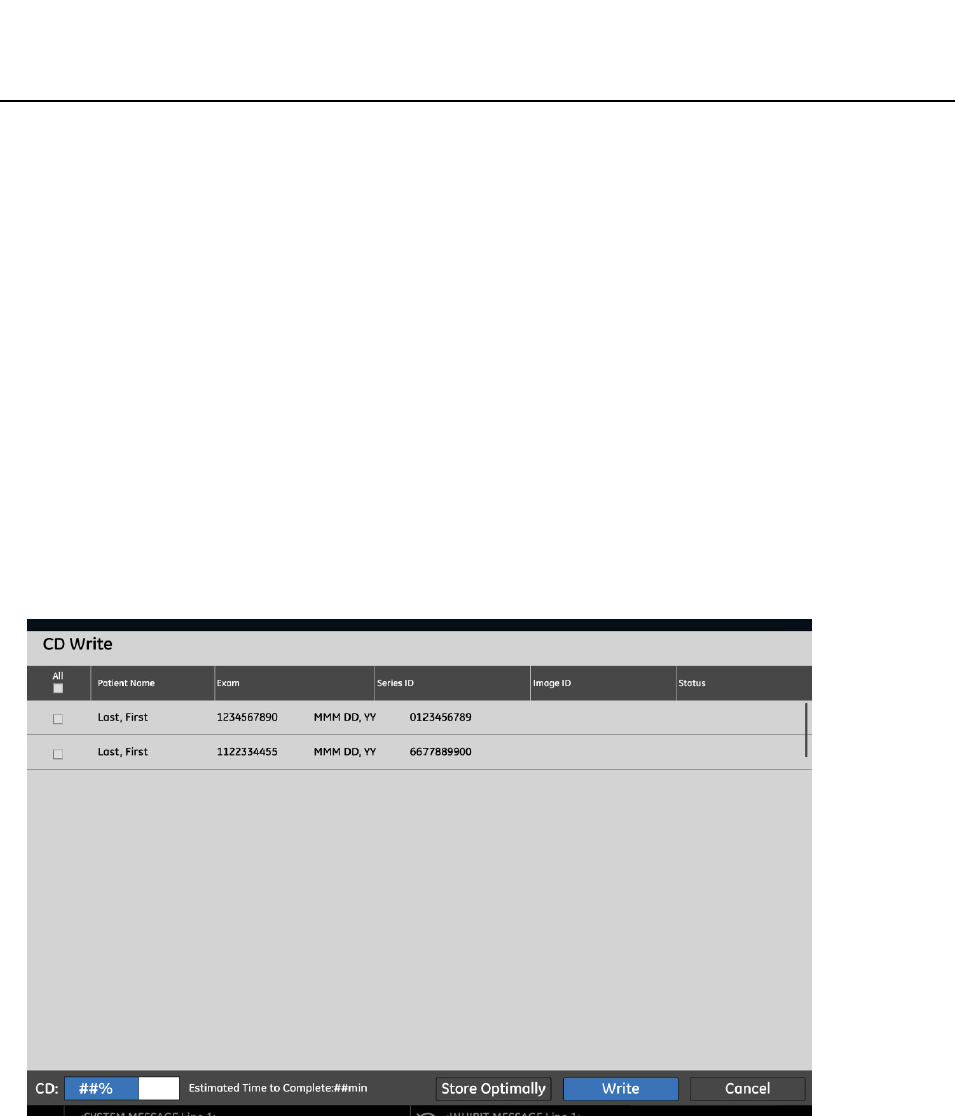
CopyingExamstoaUSBdrive
ExamsmaybecopiedtoaUSBdriveforarchivingpurposes,tosendtoalocation
thatisnotwithinthenetwork,ortosendwithapatient’smedicalrecords.
Note: Thediskusedforcopyingimagesmustberecordable.Thatis,the“write”button
shouldbeON.
Note: 您不能将检查复制到已保存有检查或其它信息的 USB 存储器上。否则,即使有足够的空
间,您在写入时也会收“USB 存储器非空白,请插入空白 USB 存储器再继续 ” 的错误
信息。复制信息时,请总是使用空白 USB 存储器。Youcannotcopyexamstoa
CD/DVDthatalreadyhasexamssavedonit.Youwillreceivea“Notenough
space”errorwhenyouattempttowritetotheCD,evenifthereisenoughspace.
Alwaysuseanew,blankCD.
1. 将空白 USB 存储设备插入主机上的 USB 接口。
2. Selecttheexamstobecopied.
3. PresstheDestination[USB1].
TheUSBWritescreenappears.
[STOREOPTIMALLY] 按钮将决定复制哪一个检查可最大程度地利用磁盘空间。该
按钮将自动取消选择任何不符合 USB 的检查。automaticallychecksifthe
selectedimageswillfitontheCD.Itwillautomaticallyun-checkanyitems
thatcannotfitontheCD.
[WRITE]beginsthecopyingprocess.
[CANCEL] closes the screen and returns you to the Image Management
screen.

BrivoXR1165474059-8ENRev.1 10-14
©2014GeneralElectricCompany.Allrightsreserved.
ImageManagement
4. Confirmtheexamstobecopied.Un-checkanyexamsthatyoudonotwant
savedtothedisk.
5. Click[WRITE].
Thediskbeginscopying.Thelight on the front ofthe computer flashes
yellowasthedataisbeingwritten.
Toseethestatusoftheexamsbeingcopied,click[TRANSFERLOG]atthe
bottomoftheImageManagementscreen.
TheTransferLogscreenappears.
Press[CLOSE]toclosethe screenand returntothe ImageManagement
screen.
CAUTION: 在取出 USB 存储器前一定检查传输日志,如果在传输状态日志显示于传输日
志界面下方前取出 USB 存储器,则此操作后,复制存储器中图片将失败,直
到系统复位。Afterthesystemfinishesthedisk,opentheexamson
thedisktoensurethatthediskhasthedatawrittentoit.Referto
Chapter9:ImageManagement-LoadImagesfromaCD/DVDfor
moreinformation.
6. Removethedisk.
7. Labelthediskandstoreinasafeplace.

ImageManagement
BrivoXR1165474059-8ENRev.1 10-15
©2014GeneralElectricCompany.Allrightsreserved.
DeletingExams,Series,orImages
Exams,series,andimagesmaybedeletedfromtheselecteddatabasesource
fromtheImageManagementscreen.
Followthisprocesstodeleteexams,series,andimages.
1. SelecttheSource,ifnecessary.
Note: 只能删除本地数据。ItemscannotbedeletedfromaCD.
2. Unlockexams,ifnecessary.
RefertoLockingExamsfromDeletionformoreinformation.
3. Selecttheitemstodelete.
Theitemsmaybeexams,serieswithanexam,orimageswithina series.
Multipleitemsmaybeselectedanddeletedatonce.
4. Click[DELETE].
A message appears: “Are you sure that you would like to delete the
selecteditems?”
5. Click[OK].
Themessagecloses.
TheitemsaredeletedfromtheImageManagementscreen.
Clicking[CANCEL]closesthemessageandtheitemsremainontheImage
Managementscreen.

BrivoXR1165474059-8ENRev.1 10-16
©2014GeneralElectricCompany.Allrightsreserved.
ImageManagement
LockingExamsfromDeletion
TheImageManagementscreenallowsyoutoprevent,or“lock”,examsfrom
beingdeleted.Theexamcanonlybedeletedifthelockisremoved,or
“unlocked.”Thelockpreventsexamsfrombeingdeletedbyotheroperators
andfromAutoDelete.有关自动删除的信息,请参考 Chatper16:设置参数 -图像管理
小节。
Lockedexamscanbecopied,transferred,andviewed.
Onlyexamscanbelocked.Individualseriesorimagescannotbelocked.
Followthisprocesstolockandunlockexams.
1. Selecttheexamstolock.
2. Click[LOCK].
Thelockiconappearsinthestatuscolumnofallselectedexams.
TheLockbuttonchangestoUnlock.
UnlockingExams
Followthisprocesstounlockexamssothattheymaybedeleted.
1. Selectthelockedexams.
TheUnlockbuttonbecomesactive.
2. Click[UNLOCK].
Thelockiconisremovedfromthestatuscolumnoftheselectedexams.
Theexamsmaynowbedeleted.

ImageManagement
BrivoXR1165474059-8ENRev.1 10-17
©2014GeneralElectricCompany.Allrightsreserved.
MakingPatientAnonymous(De-Identify)
Theremaybetimeswhenyouwantthenameofapatienttobekeptconfidential
tomaintainpatientprivacy.YoucandothisusingtheDe-Identifyfeature.This
featureallowsyoutocreateananonymoussetofimages.
Thepatientexaminationsarecopiedandusedtocreateanewpatient,withthe
name“Anonymitiespatient”andaunique,randomlycreatedPatientIDas
showninFigure10-7.
Note: Onceananonymousexamiscreated,thereisnowaytorecoverthepatient’s
identifyinginformation.
De-IdentifyisafeatureavailablefromtheImageToolsbutton(Figure10-6).
Figure10-6ImageToolsbutton
Figure10-7Anonymitiespatient
Usethisprocesstomakeexamimagesanonymous:
1. Selectthepatientstomakeanonymous.
2. SwitchtheImageToolsbuttonto[DE-IDENTIFY],ifnecessary.
Amessageappears:“Theselectedexamswillbecopiedwithoutpatient
identification.Theoriginalswillnotbedeleted.”
3. Click[OK].
TheImageManagementscreenupdateswithcopied,anonymousexams.

BrivoXR1165474059-8ENRev.1 10-18
©2014GeneralElectricCompany.Allrightsreserved.
ImageManagement

ImageViewer
BrivoXR1165474059-8ENRev.1 11-1
©2014GeneralElectricCompany.Allrightsreserved.
Chapter11
ImageViewer
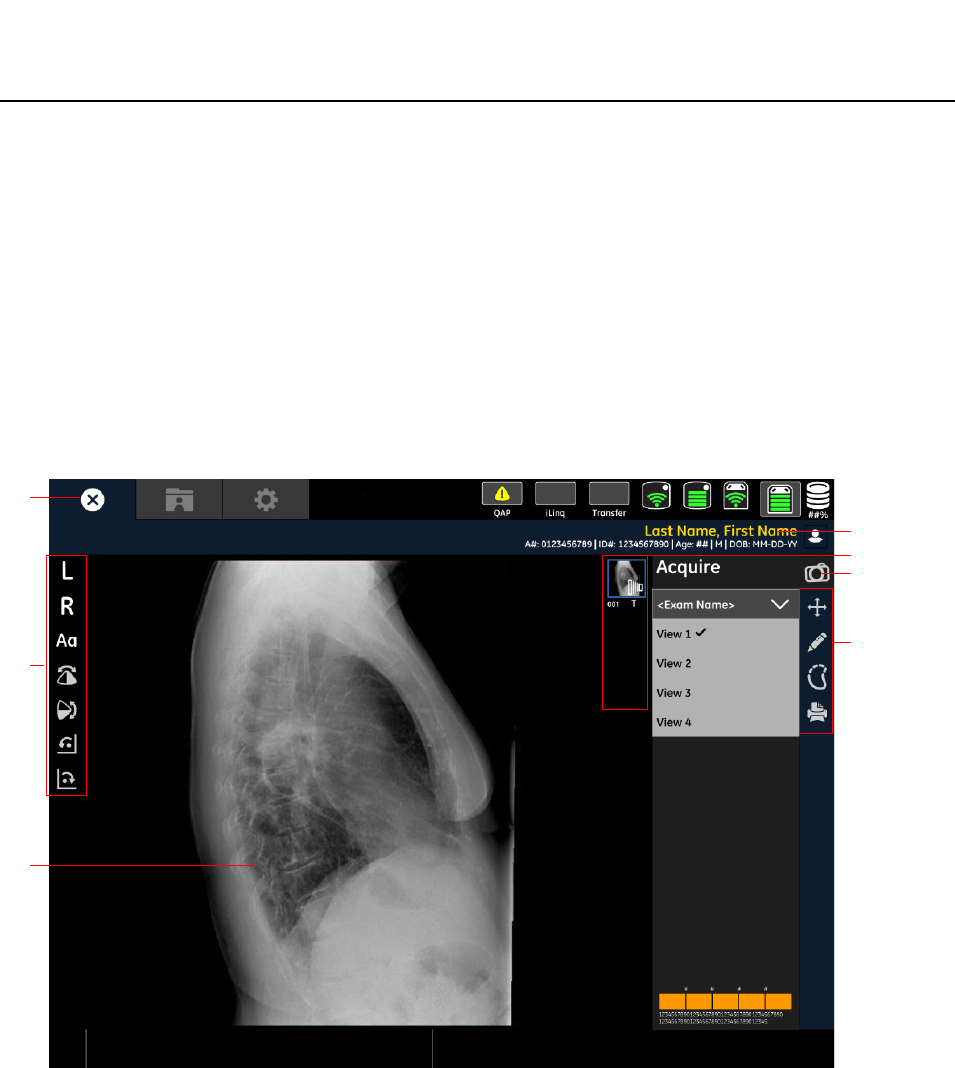
TheImageViewerscreen(Figure11-1)appearsonthemonitoronceanexposure
istakeninaliveexamorwhenanimageseriesischosenfromtheImage
Managementscreenforreview.Thisscreeniswhereimagesareadjustedand
viewed.Topicscoveredinclude:
•Overview
•ImageSelectionPalette
• ImageAcquisitionPalette
•ImageToolsPalette
-Orientation
-Annotation
-Reprocess
•Dose Exposure Indicator (DEI)
-DEI 不可用
–校正措施
-校正措施的例外
•QualityCheck
•QualityCheck
•PrintingImages
–自动打印
–手动打印
•SendingImages
• SavingChangestoImages
BrivoXR1165474059-8ENRev.1 11-2
©2014GeneralElectricCompany.Allrightsreserved.
ImageViewer
Overview
Therightsideofthescreencontainsalltheimageselectionandadjustment
tools.Mostofthetoolsarecategorizedinto4“palettes”thatcanbeexpanded
orcollapsedtorevealorhidedifferentfunctions.
Themajorityofthescreenisdevotedtoimagedisplay.Theimagesontheleft
sideofthescreenupdateasadjustmentsaremade.Youareabletoviewsingleor
multipleimagesatonce.Whenviewingmultipleimages,asshowninFigure
11-1,anaquaborderidentifiesthecurrentlyselectedimage.
Table11-1describesthefunctionsfortheImageViewerscreen.
Figure11-1ImageViewer
Close
Quick Tools
Image
Display
Patient Information
图像选择面板
图像采集选项
Tools Palettes
ImageViewer
BrivoXR1165474059-8ENRev.1 11-3
©2014GeneralElectricCompany.Allrightsreserved.
Table11-1ImageViewerfunctions
Function Description
[PatientIdentification] Identifiesthepatient.
[QuickTools] Includescommonusedimageprocessingbuttons.The
menusvarywithdifferentselectedtoolpalette.
[ImageDisplayZone] Showstheselectedimageindisplayzone.
[ImageSelection
Palette]
ImageSelectionPalettethatshowssmallpreviewsofall
imagesintheselectedseriesandhighlightstheimages
currentlyshownintheviewer.
RefertoImageSelectionPaletteformoreinformation.
[ImageAcquisition
Palette]
Ifinanactiveexam,allowsyoutoswitchbacktothe
Acquisitionscreen.Ifviewingimagesfromacompleted
exam,theAcquisitionscreentabisdisabled.
Warning: Whenacquiringmultipleimagesorifyou
needtoretakeanimage,youmustswitch
backtotheAcquisitionscreeninorderto
recordtheexposure.Makinganexposure
whiletheViewerscreenisdisplayedwill
exposethepatienttoradiation,butthe
detectorwillnotacquiretheimage.
[ToolsPalettes] ImageToolsPalettesforimageediting.
• Orientation,refertoOrientation.
• Annotation,refertoAnnotation.
• Imagereprocess,refertoReprocess.
• Print,refertoPrintingImages.
[Close] ClosestheImageViewerscreenandpromptsyoutosave
anychangestoimages.
Closealsoinitiatesautoprintandautopush,ifenabled.
RefertoSavingChangestoImagesformoreinformation.
BrivoXR1165474059-8ENRev.1 11-4
©2014GeneralElectricCompany.Allrightsreserved.
ImageViewer
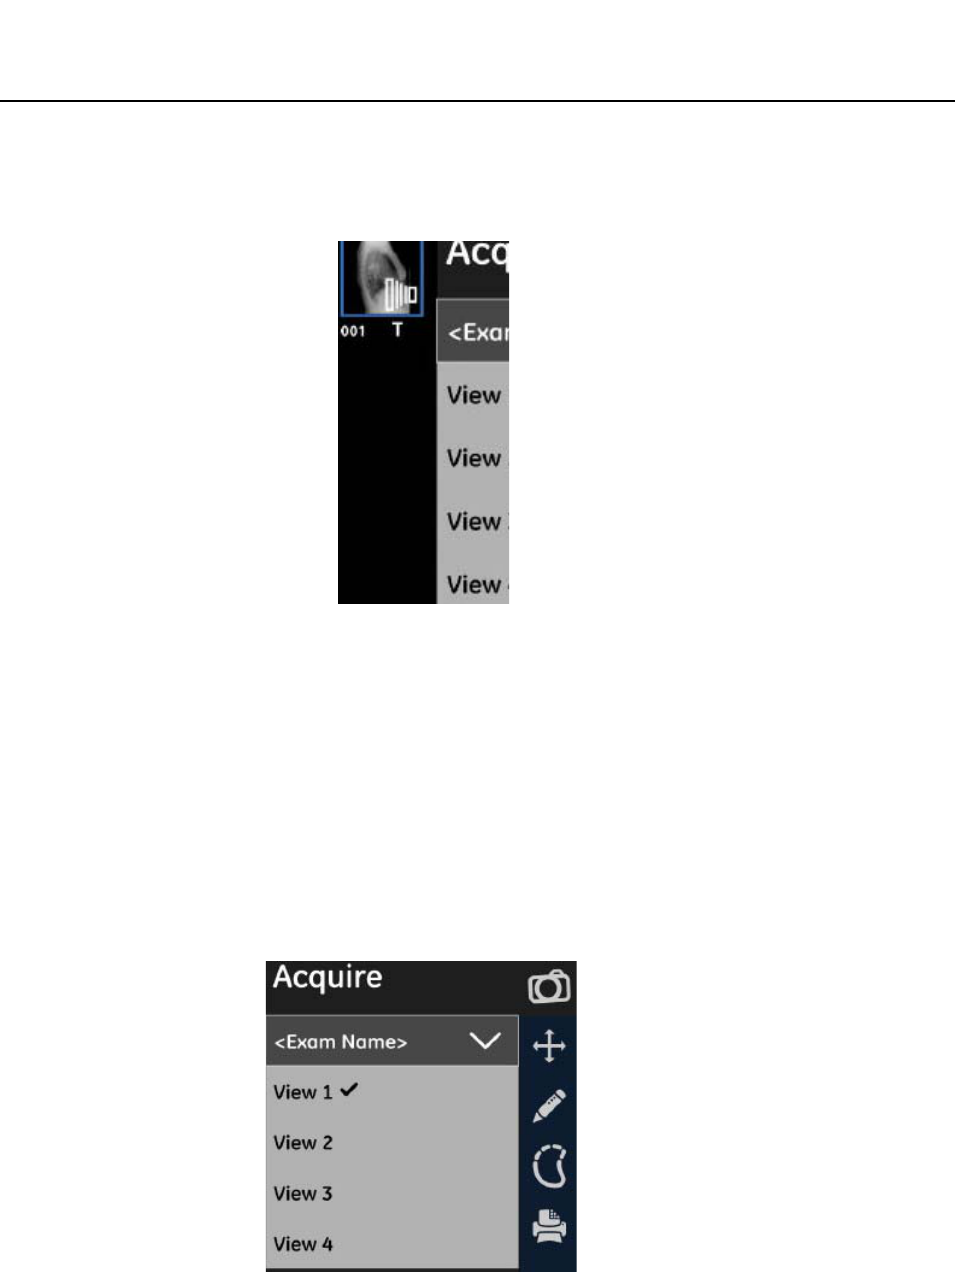
ImageSelectionPalette
ImageSelectionPaletteallowsyoutoselectwhichexamorseriesofimagesto
viewanddisplayformat.
TheImagespanelshowspreviewsofallimagesintheselectedseries.Thepanel
showsupto8imagepreviewsatatime.Iftherearemorethan8imagesinthe
series,ascrollbarappearsontherighttoallowyoutoseetherestoftheimages.
TheimagethatiscurrentlyselectedintheImageViewerisshownwithanorange
borderintheImagespanel.
Toviewanimage,clickanimagepreview.
ImageAcquisitionPalette
图像采集选项板允许继续进行未曝光的检查。点击未执行的检查条目后将进入曝光采集
界面,更多信息请参考 Chatper9:ImageAcquisition。
Note: 如果浏览已完成检查中的图像,则采集界面标签不可用。
ImageViewer
BrivoXR1165474059-8ENRev.1 11-5
©2014GeneralElectricCompany.Allrightsreserved.
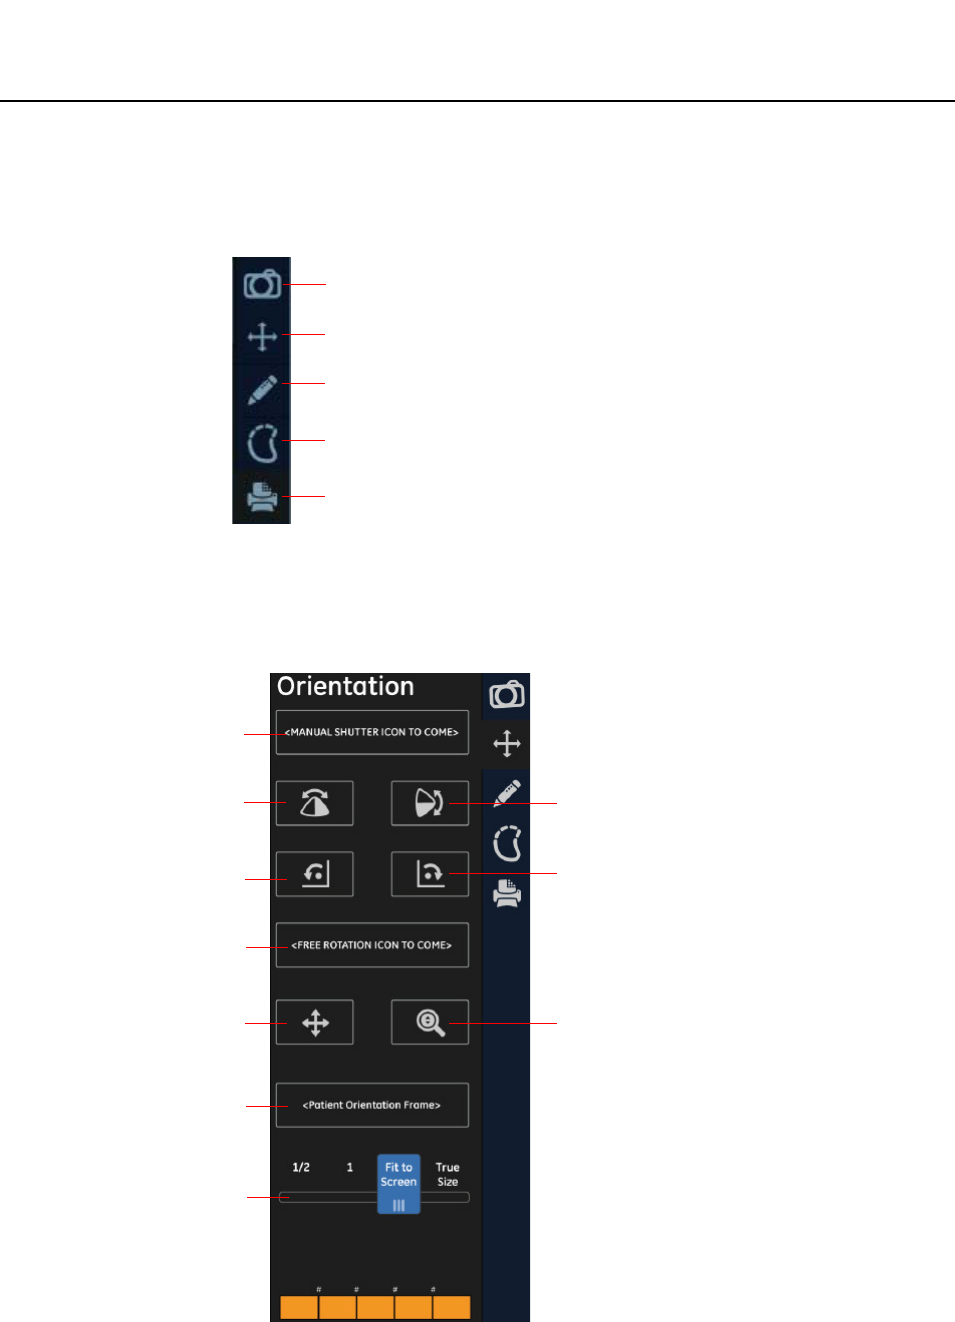
ImageToolsPalette
DifferenttoolsandcontrolsareaccessedthroughtheToolSelectionlist.
Orientation
图像显示工具 (Figure11-2)。该工具栏包含缩放、旋转和翻转等功能。
Figure11-2图像显示工具板
Image Acquisition Palette
Image Orientation Palette
Image Annotation Palette
Image Reprocess Palette
Image Print Palette
手动快门
向左旋转
垂直翻转
自由旋转
全景图像
患者方位
显示区域
向右旋转
水平翻转
放大镜

BrivoXR1165474059-8ENRev.1 11-6
©2014GeneralElectricCompany.Allrightsreserved.
ImageViewer
Table11-2图像显示工具板的操作说明
工具 描述
[ManualShutter] Appliesshuttersmanuallytocroptheimage.Inimage
reviewmodetheimagemustbereprocessedtoenable
shuttericon.
Note: Thisfunctionisonlyavailablewhentheimageisopen
inaliveexam. 只有当图像在活动检查中处于打开状态或
用于重新处理时,此项功能才可用。
Referto添加图像注释formoreinformation.
[RotateLeft] Rotatestheselectedimagecounter-clockwisein90degree
increments.
[RotateRight] Rotatestheselectedimageclockwisein90degree
increments.
[VerticalFlip] Flipstheselectedimage180degreesonthehorizontalaxis;
thatis,switchestopforbottom.
[HorizontalFlip] Flipstheselectedimage180degreesontheverticalaxis;
thatis,switchesleftforright.
[FreeRotation] Rotatestheselectedimagebothclockwiseand
counter-clockwise.
• Clicktheendbuttonstorotatetheimagein0.1degree
increments.
• Clickanddragtheslidertospintheimage.
• Movethesliderrighttorotatetheimageclockwise.
• Movethesliderlefttorotatetheimage
counter-clockwise.
[ 全景图像 ] 在浏览区域内移动图像。
[ 图像放大镜 ] 放大三倍显示一小部分图像。
[ 患者方位 ]
[1/2Display] Reducestheimageto50%(fourpixelsonthedetector
equalsonepixelonscreen).
[1:1Display] Showsdefaulttheimagesizewhereonepixelonthe
detectorequalsonepixelonthescreen.
[FitToScreen] ScalestheimagetofitwithintheImageViewerscreen.
[TrueSize] Showstheimageintheexactsizeitwasacquiredfromthe
detector(onecentimeteronthedetectorequalsone
centimeteronscreen).
ImageViewer
BrivoXR1165474059-8ENRev.1 11-7
©2014GeneralElectricCompany.Allrightsreserved.
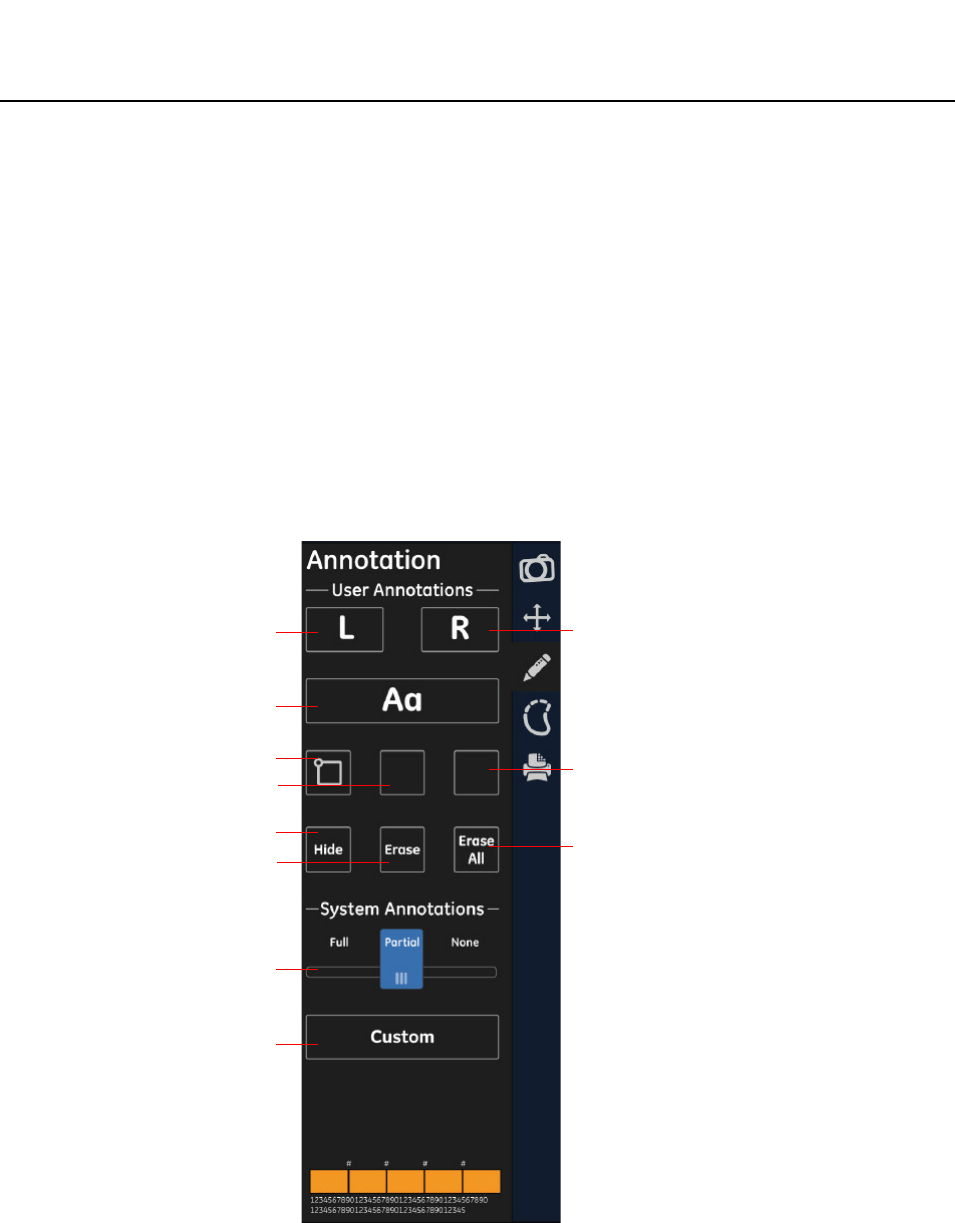
Annotation
TheAnnotationpanel(Figure11-3)containsthetoolstoannotateimages.Table
11-3describesthetoolsandtheirfunctions.
Imageannotationsaredividedintotwocategories:
• Systemannotation–Informationthatiskeptbythesystem,suchas
identifyinginformation,exposureandacquisitioninformation,and
processinginformation.Theseannotationsaredisplayedastextatthe
cornersoftheimage.Youmayselectwhichannotationsappear,butyou
cannotcontrolwheretheannotationsareplaced.
• Userannotation–Lines,ellipses,Cobbangle,userannotation(notes),andRL
markersaddedbytheoperatortomeasureorbringattentiontoasectionof
theimage.Youdraworplacetheseannotationsontheimageasappropriate.
Figure11-3注释选项板
左标记 右标记
用户注释
Cobb
线条
隐藏 / 显示
擦除
系统注释
自定义注释
椭圆
全部擦除

BrivoXR1165474059-8ENRev.1 11-8
©2014GeneralElectricCompany.Allrightsreserved.
ImageViewer
Table11-3AnnotationPalette
Tools Description
UserAnnotations
[L/R] SelecttheRightorLeftmarker.
TaptheRmarkerortheLmarkerthentapontheimage
whereitistobeplaced.
Note:OnlyoneRLmarkerisinsertedperimage.
在图像上放置一个右或左标记,以作参考。
Note: 只有当图像在活动检查中处于打开状态或用于重新处理
时,L/R 标记器才可用。
更多信息请参考添加图像注释小节。
[Aa] Placesatextboxontheimagethatyoumayaddnotesinto.
Note: Annotationsshallbeplacedwithintheimagefieldof
view.
[Cobb] PlacesaCobbangle(twolines)ontheimagethatyoumay
re-size,move,orangle.Cobbanglespecificationsareshown
intheUserMeasurementsannotationatthebottomright
corneroftheviewer.
[Line] Placesalineontheimagethatyoumayre-size,move,or
angle.LinespecificationsareshownintheUser
Measurementsannotationatthebottomrightcornerofthe
viewer.
[Ellipse] Placesanellipse(circleoroval)ontheimagethatyoumay
re-size,move,orre-shape.Ellipsespecificationsareshownin
theUserMeasurementsannotationatthebottomright
corneroftheviewer.
[Hide/Show] Temporarilyremovesimageannotationsfromtheimage.
Click[SHOW]toseetheannotations.
[Erase] Deletestheselectedimageannotation.Deletedannotations
cannotberecovered.
[EraseAll] Deletesallimageannotations.Deletedannotationscannot
berecovered.
SystemAnnotations

ImageViewer
BrivoXR1165474059-8ENRev.1 11-9
©2014GeneralElectricCompany.Allrightsreserved.
自定义系统注释
按照下列步骤自定义显示在图像上的系统注释。
[Full] Placesallavailablesystemannotationontheimage.
• Patientinformation–(topleftcorner)examdateand
patientidentification
• Studyinformation–(topleftcorner)examidentification
• Seriesinformation–(topleftcorner)seriesidentification
• Imageinformation–(topleftcorner)image
identification
• Acquisitioninformation–(toprightcorner)doseand
DAP
• Hospitalinformation–(toprightcorner)thenameofthe
facilitywheretheimagewasacquired
• X-rayparameters–(toprightcorner)themA,kVp,ms,
andmAsoftheexposure
• Anatomyinformation–(bottomleftcorner)theprotocol
usedtoacquiretheimage
• Processinginformation–(bottomleftcorner)thelook
usedtoprocesstheimage
• Usermeasurements–(bottomrightcorner)sizeand
anglemeasurementsforline,ellipse,andCobb
annotations
• Displayparameters–(bottomrightcorner)thesizeof
theimageandthezoom
[partial] DisplaysONLYthefacilityname,doseinformationand
technicalfactors.
[None] Removesallsystemannotationsfromtheimage.System
annotationscanbere-appliedbyclicking[FULL],[PARTIAL],
or[CUSTOM].
[Custom] Bringsupascreenthatallowsyoutochoosewhichsystem
annotationsappear.
Moreinformation,pleasereferto自定义系统注释 .
Tools Description

BrivoXR1165474059-8ENRev.1 11-10
©2014GeneralElectricCompany.Allrightsreserved.
ImageViewer
1. 点击 [ 自定义 ] 按钮 -> 弹出用户选择界面
2. 选择 (检查)您欲显示的注释。
3. 如需要,调整字体大小。
可用的字体有:
–-3 (最小号 )
–-2
–-1
–N (正常 )
–+1
–+2
– +3 ( 最大号 )
4. 点击 [OK] (确定)。
取消按钮用于关闭该界面并且不改变的选择。
添加图像注释
Note: 所有图像注释显示在同一个位置 (图像中间)并且具有相同的形状,大小和 / 或角度。
可能在相互堆积相同种类的多个注释。
按照下列步骤添加图像注释。

ImageViewer
BrivoXR1165474059-8ENRev.1 11-11
©2014GeneralElectricCompany.Allrightsreserved.
1. 如需要,选择要注释的图像。
2. 点击注释按钮,插入注释。
3. 如 Table11-4 所示,移动、重新调整大小或者改变注释的角度。
Table11-4图像注释说明
注释 说明
线条 选择线条。
• 移动:点击并拖动中间的线条。
• 改变角度:点击并拖动线条末端其中的一个直角柄。
• 调整大小:点击并拖动线条末端其中的一个直角柄。
椭圆形 选择椭圆形。
• 移动:沿边缘,点击并拖动椭圆 (不是沿直角柄或十字柄)。
• 改变形状或改变大小:点击并拖动直角柄。
• 旋转:点击并拖动十字柄。
Cobb 选择 Cobb。
• 移动:点击并拖动线的中间。
• 改变角度:点击并拖动线条末端的一个直角柄。
• 调整大小:点击并拖动线条末端的一个直角柄。
用户注释 从图像工具栏中选择用户注释。
点击 [ 文本注释 ] 界面中的自定义文本区。
输入您的评注。
点击确定。
• 移动:点击和拖动用文本框左上角的红色方框。
• 编辑:双击用户注释。确保所作的改变已出现在 “ 文本注释 ”
界面上。
RL 标记器 选择 RL 标记器。
• 移动:选择标记器并且拖到所需区域。
• R 和 L 之间进行切换:点击 [RL] 按钮。
Note: 一幅图像只能插入一个标记器。
BrivoXR1165474059-8ENRev.1 11-12
©2014GeneralElectricCompany.Allrightsreserved.
ImageViewer
Figure11-4图像注释示例
删除图像注释
按照如下步骤删除图像注释。
Note: 不可以恢复已经删除的注释。
手动快门 选择手动快门
点击并拖动红色柄的角到所需形状大小。
点击手动快门应用。
再次点击手动快门移除。
黄色=已选注释
浅绿色=未选注
释
注释 说明

ImageViewer
BrivoXR1165474059-8ENRev.1 11-13
©2014GeneralElectricCompany.Allrightsreserved.
1. 选择注释。
2. 点击擦除或者全部擦除。
如果点击了全部擦除,则会显示一条消息:“ 您确实要删除所选图像的所有注释
吗? ”
3. 点击是。
将会删除所有注释。
BrivoXR1165474059-8ENRev.1 11-14
©2014GeneralElectricCompany.Allrightsreserved.
ImageViewer
Reprocess
Imagere-processingallowsyoutoextractmoreinformationfromanalready
acquiredimagebychangingtheprocessingsettingsinsteadoftakingadditional
exposures.
Re-processingcanbeperformedonanyimagethathasacorrespondingraw
dataset.Imagescanbereprocessedbothinliveexamsandinreviewmode.
Wheninanactiveexam,re-processingwillcreateanew“PROCESSED”series.
Wheninreviewmode,re-processingwillcreateanewimageintheseries.
Note: Whenclosinganexamorclosingpatientinreviewmode,theyoumustselectto
savechangestoimages,orthere-processedimageswillnotremainintheseries.
Moreinformation,pleaserefertoSavingChangestoImages.
Theinitialimageprocessingisdeterminedbythedefaultthatisconfiguredfor
theprotocol.Moreinformation,pleasereferto设置参数-图像管理 .
Figure11-5ImageRe-Processingpalette
预览
比较
应用
保存
亮度调整
对比度调整
图像反转
更多功能
检查类型
患者大小
图像类型
剂量模式
外观

ImageViewer
BrivoXR1165474059-8ENRev.1 11-15
©2014GeneralElectricCompany.Allrightsreserved.
Table11-5ReprocessPalette
Tool Description
快捷工具栏
[ 预览工具 ] 显示处理后的图像,实时查看处理结果。
[ 比较工具 ]
[ApplyButton] Appliesthechangesandre-processestheimage.
Note: Wheninanactiveexam,re-processingwillcreatea
new“PROCESSED”series.
Wheninreviewmode,re-processingwillcreateanewimage
intheseries.
[ 保存按钮 ] 保存对图像所做的处理结果。
ImageReprocess
[Brightness] Lightensordarkenstheselectedimage.
• Movethesliderrightforalighterimage.
• Movethesliderleftforadarkerimage.
[Contrast] Adjuststhedifferencesbetweendarkandlightonthe
selectedimage.
• Movethesliderrightformorecontrast(towardspure
blackandwhite).
• Movethesliderleftforlesscontrast(towardsuniform
gray).
[Invert] Reverseslightanddarkareasoftheselectedimage.
MoreFunctions
[Windowing] Applieswindowingtotheselectedimage.Availableoptions
are:
• Normal–imageasacquired
• Hard–adjuststheimagetowardsblackandwhite
• Soft–adjuststheimagetowardsgray
[Anatomy] Changestheanatomicalregion.
[View] Changestheview.
[ImageType] Changestheimagetype.Availableoptionsare:
•Standard
[PatientSize] Changesthepatientsize.
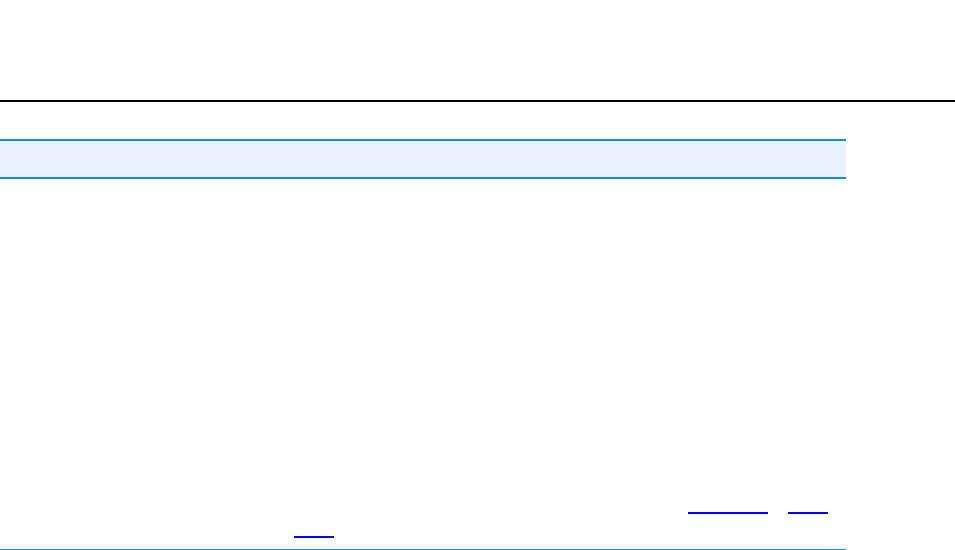
BrivoXR1165474059-8ENRev.1 11-16
©2014GeneralElectricCompany.Allrightsreserved.
ImageViewer
[Look] Changestheprocessinglook.Looksarethewayanimageis
processedtobeviewedbyaradiologistforinterpretation.
Looksarepre-definedcombinationsofbrightness,contrast,
edgeenhancement,andtissueequalization.
FactoryLookdescriptions:
• FactoryLook1–similartoanalogfilm,lowedge,noTE
• FactoryLook2–lowCRlook,lowedge,moderatetissue
contrast
• FactoryLook3–moderateCRlook,lowedge,TE
• FactoryLook4–highlydigitallook,highedge,highTE
• Customlooks–Thesystemallowstheusertobuildupto
5customlooksinanycombinationofparameters.更多关
于创建自定义外观的信息,请参考第 13 章:设置参数-图像
处理。
Tool Description
ImageViewer
BrivoXR1165474059-8ENRev.1 11-17
©2014GeneralElectricCompany.Allrightsreserved.
DoseExposureIndicator(DEI)
剂量曝光指数 (DEI)为用户提供了一个可视的指示器,用以显示探测器接收到的给定
图像的曝光数量。DEI 用作使用户可以在发生重摄时改变采集参数获得正确曝光图像的
工具。DEI 估计到达探测器的剂量并将其与解剖的预期剂量作比较,从而说明图像是否
曝光不足或过度曝光。
在胶片暗盒内,曝光直接与结果图像相关;曝光不足或者过度曝光的胶片太亮或者太
暗。使用 DR 探测器,动态范围探测运算法补偿曝光误差,以创建亮度和对比度均可以
接受的图像。因为在实际曝光和图像质量之间没有显著的关系,所以 DEI 识别并跟踪曝
光不足和过度曝光。
DEI 的可接受范围随解剖结构而变化。例如,一次胸腔 PA 曝光可以使 DEI 为 0.6,而一
次手掌曝光可以使 DEI 为 1.0。通过参数设置界面可以为每个解剖视图调整 DEI 的上限
和下限。
Figure11-6DEI 的可视范围显示
Figure11-7数字 DEI 显示示例
Figure11-8可视范围的 DEI 显示示例
本系统为采集的每幅图像提供了 3 个估计值:
• 未补偿探测器曝光 (UDExp):在患者解剖后,用假定 80kV 并且不含反分散光栅
的技术估计的探测器曝光 (μGy)。此信息被保存在 DICOM 标题里。
• 补偿的探测器曝光 (CDExp):在患者解剖后,用实际的 kV 和反分散光栅估计的探
测器曝光 (μGy)。此信息被保存在 DICOM 标题里。
1. 可接受的 DEI 范围 (上限或者下限)
2. 当前所选图像的 DEI
低DEI= 图像曝光不足
可接受的 DEI= 图像正确曝光
高DEI= 图像过度曝光

BrivoXR1165474059-8ENRev.1 11-18
©2014GeneralElectricCompany.Allrightsreserved.
ImageViewer
• 探测器曝光指数 (DEI):探测器曝光的相对测量,作为对特定解剖视图的预期曝光
的对比。这是浏览器显示屏上的可视指示器。
DEI 补偿系统的速度设置。例如:如果获取一个速度设置为 400 的物体的曝光,并且结
果 DEI 为 1.72,那么在将速度设置为 200 后,相同物体的曝光 (假定完全一样的技术
和定位)得出的 DEI 为 1.72。
Note: 较高的 DEI 表示对探测器较高的曝光。当曝光增加时,不应该与减少的系统 “ 速度 ”
混淆。
默认的 DEI 下限和上限被提供用作初步指南。这些指南不应该作为重摄 / 再曝光的严格
条件。DEI 读数是帮助技术专家决定图像是否需要再次采集的参考指南,指示器可以帮
助用户决定适当的技术调整从而为探测器提供充足的曝光。
为了便于您使用,具体的限制和重摄规则应由适当的人员最终确定。
DEI 不可用
以下情况下 DEI 将显示 “N/A” (不可用)。
• “ 图像管理 ” 界面打开了完整的检查。
• 重新处理的图像。
校正措施
如果 DEI 指示器不在可接受的范围之内而且图像质量很差,请按照下列步骤去做:
• 低DEI-增加mAs和kV值。
• 高DEI-减少mAs和kV值。
如果 DEI 指示器在可接收的范围之内而且图像质量依旧很差,则可能需要通过外观自定
义来调整图像。更多信息,请参考 Reprocess 和第 13 章:设置参数-图像处理。
Note: 如果系统继续显示低或高 DEI,请联系售后服务工程师。如果错误反复出现,则表明系
统需要校准或维修。
校正措施的例外
下列条件可以完成正确曝光的图像,但可能仍导致的 DEI。这种情况应被视为特例,而
且不可以应用标准重摄和技术调整规则。
• 视野内的外部患者护罩 (即铅围裙)能够导致出乎意料的低 DEI 和
(UDExp/CDExp)。通过浏览图像,很容易确定存在护罩。
• 系统 FOV 的错误决定会导致出乎意料的低 DEI 和 (UDExp/CDExp)。通过浏览图
像,很容易确定在最终图像中存在重要的准直区域。用 ManualShutter (手动快
门)功能纠正 FOV 不能纠正 DEI 值。
Note: 用户必须为解剖图像选择适当的 FOV,始终进行适当的准直。

ImageViewer
BrivoXR1165474059-8ENRev.1 11-19
©2014GeneralElectricCompany.Allrightsreserved.
QualityCheck
如果激活自动标签 (更多信息,请参考第 13 章:设置参数-图像管理),质量检查显
示图像质量可以接受并可以自动打印和自动传输图像 (如果被激活)。
质量检查指示器是一个显示在图像右下角落白框里的 “T” (Figure11-9)。质量检
查指示器默认为开启。删除指示器表示在结束该数检查后,关闭图像时,该图像不能自
动打印或自动传输,只能保存在本地数据库里。
Note: 质量检查指示器只在当前检查中可用。
要删除质量检查指示器,双击白框,“T” 消失。
要恢复质量检查指示器,双击白框,“T” 重新显示。
Figure11-9质量检查指示器
BrivoXR1165474059-8ENRev.1 11-20
©2014GeneralElectricCompany.Allrightsreserved.
ImageViewer
PrintingImages
Figure11-10打印图像选项板
Table11-6打印图像选项板描述
Function Description
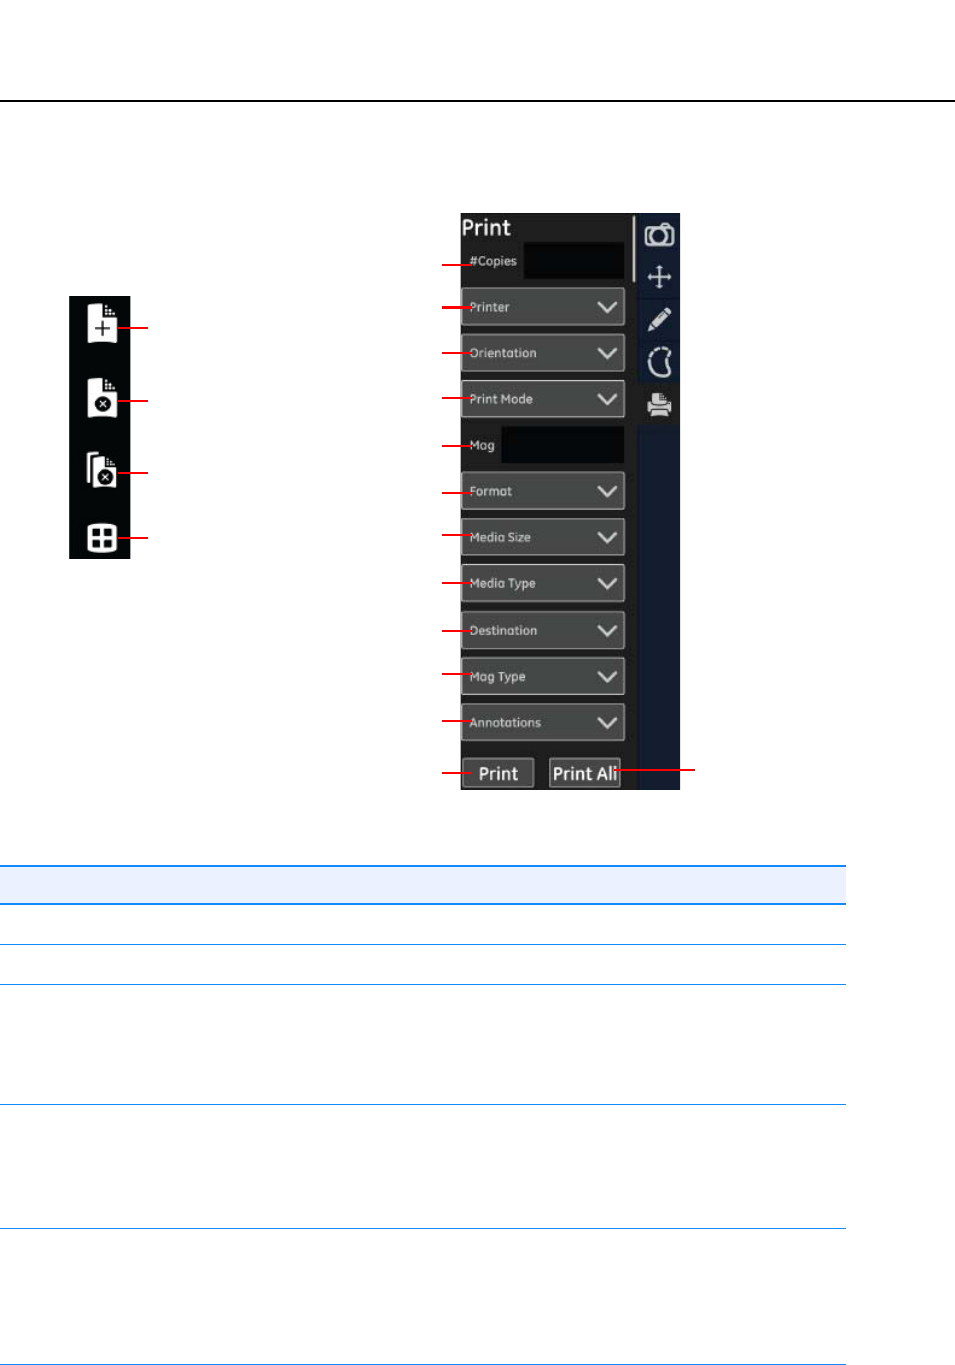
[#ofCopies] Defineshowmanycopiestoprint.
[Printer] Listsallavailableprintersconfiguredforyoursystem.
[Orientation] Selectsverticalorhorizontalorientationoftheimageonfilm
orpaper.Availableoptionsare:
•Landscape
•Portrait
[PrintMode] Selectswhatsizetoprinttheimage.Availableoptionsare:
•TrueSize
• FittoFilm
• ReducedSize
[Magnification] OnlyavailableifReducedSizeisselectedforthePrintMode.
只有在 [ 打印模式 ] 中选择了 [ 缩小的尺寸 ] 时才可用。图像将按
所输入的百分比值缩小。可接受的缩小范围是 40% 至 90%。如果
将 [ 实际尺寸 ] 或 [ 胶片尺寸 ] 选择为 [ 打印模式 ],此文本框将被
禁用。
副本数
打印机
方向
打印模式
放大率
格式
介质大小
介质类型
目的地
放大类型
注释
打印 打印所有
添加表单
删除表单
删除所有表单
打印总结

ImageViewer
BrivoXR1165474059-8ENRev.1 11-21
©2014GeneralElectricCompany.Allrightsreserved.
从系统打印图像有两种方法:手动打印和自动打印。
自动打印
可以配置系统使其在检查结束后执行自动打印。从应用程序界面获取参数选择。更多关
于配置自动打印的信息,请参考 Chatper16:设置参数-图像管理小节。
[Format] Selectstheprintformat.Availableoptionsare:
•Standard
•35mm
•40mm
[MediaSize] Showstheavailablesizesthatareconfiguredfortheselected
printer.
[MediaType] Selectsthetypeofmediatoprinton.Availableoptionsare:
•Paper
•Clearfilm
• Bluefilm
[Destination] Showsconfiguredprintersonthesystem.
[MagnificationType] Selectsthemagnificationtype.Availableoptionsare:
•Cubic
•None
[Annotation] Selectstheamountofannotationtoprintontheimage.
Availableoptionsare:
•Full
• Partial
•Custom
•None
Moreinformation,pleaserefertoAnnotation.
[Print] Printtheselectedimage.
[PrintAll] Printallimages.
快捷按钮
[ 添加表单 ] 在图像区域添加一个空白表单。
[ 删除表单 ] 删除当前显示的表单。
[ 删除所有表单 ] 删除所有可用的表单。
[ 打印总结 ] 将显示区域调整为 4*4 的表格,然后显示所有可用表单的缩略图。
Function Description

BrivoXR1165474059-8ENRev.1 11-22
©2014GeneralElectricCompany.Allrightsreserved.
ImageViewer
手动打印
使用胶片管理器和手动打印按要求打印图像。
• 胶片管理器允许配置和打印系列中的多幅图像。
• 手动打印允许配置和打印当前所选的图像。
手动打印按钮工具底部附近,鼠标控件下方,如 Figure11-11 所示。
Figure11-11手动打印按钮 - 胶片管理器和手动打印
打印多幅图像
按照下列步骤打印多幅图像。
1. 点击胶片管理器。
显示胶片编辑器界面 (Figure11-12)。
Figure11-12胶片编辑器界面 - 添加图像前和添加图像后
2. 选择您想要在一个页面显示的图像数量。
如果系列中的图像数量超过了一个页面中可以显示的图像数量,使用 Sheet [] 和
[]按钮为每个页面配置打印选项。
3. 用鼠标在图像选项板 (Figure 11-13)上点击并拖动图像缩略图,从而打开 Film
Composer (胶片编辑器)界面。

ImageViewer
BrivoXR1165474059-8ENRev.1 11-23
©2014GeneralElectricCompany.Allrightsreserved.
Figure11-13图像选项板
4. 使用按钮确定和调整打印设置。
• 点击预览,查看图像如何在页面上定位。
• 点击清除页面,删除当前显示的页面上的图像。
• 点击全部清除,删除所有页面上的图像。
• 点击打印薄片,打印当前显示的页面。
• 点击打印全部,打印所有的页面。
5. 打印设置,确定或调整打印机配置。(更多信息,请参考 Figure11-14 和Table。)
6. 完成后点击关)。
打印当前图像
按照下列步骤打印单幅图像。
1. 从图像工具选择板上选择图像。
2. 点击手动打印。
显示打印图像界面。
3. 如 Table所示,调整设置。
4. 点击预览,确定图像位置正确。
如果图像位置错误(如 Figure11-14 所示),点击取消返回打印图像界面并且调
整设置。
如果可以接受图像位置,点击打印,打印此图像。

BrivoXR1165474059-8ENRev.1 11-24
©2014GeneralElectricCompany.Allrightsreserved.
ImageViewer
Figure11-14错误设置的打印预览示例
5. 点击打),打印此图像。
取消关闭打印图像界面,不打印并返回图像浏览器界面。
Figure11-15打印图像界面

ImageViewer
BrivoXR1165474059-8ENRev.1 11-25
©2014GeneralElectricCompany.Allrightsreserved.
SendingImages
如果激活了自动发送,在检查关闭时所采集的图像会自动发送到预先指定的位置。更多
关于配置自动发送的信息,请参考 Chatper16:设置参数。
SavingChangestoImages
当关闭图像浏览器界面或结束检查时,您可以选择保存或者放弃对图像所做的改变。
1. 如果是在活动检查中,点击采集界面上的关闭按钮。
2. 如果是在浏览模式中,点击图像浏览器界面上的关闭按钮。
显示一条消息:“ 您是否要保存对图像的修改? "
3. 点击 [ 是 ]。
取消关闭界面并返回图像浏览器界面。
[ 否 ] 关闭图像浏览器界面,而不保存改变。
Note: 添加注释时不会产生新的图片。

BrivoXR1165474059-8ENRev.1 11-26
©2014GeneralElectricCompany.Allrightsreserved.
ImageViewer
此页空白。

DigitalDetectorApplication
BrivoXR1165474059-8ENRev.1 12-1
©2014GeneralElectricCompany.Allrightsreserved.
Chapter12
DigitalDetectorApplication
ThedigitaldetectorofthissystemcanbeshiftbetweentheDigitalWallStand
andIntegratedTable(RadiographicStretcherTable/PatientStretcher).This
sectionisintendedtooutlinethedigitaldetector’sshiftapplication.
Topicscoveredinclude:
• WallStandMode
• IntegratedTableMode
• IntegratedTableTop(StretcherTableTop)Mode
• DigitalCassetteMode
• Stepsforcassetteinstallation
BrivoXR1165474059-8ENRev.1 12-2
©2014GeneralElectricCompany.Allrightsreserved.
DigitalDetectorApplication
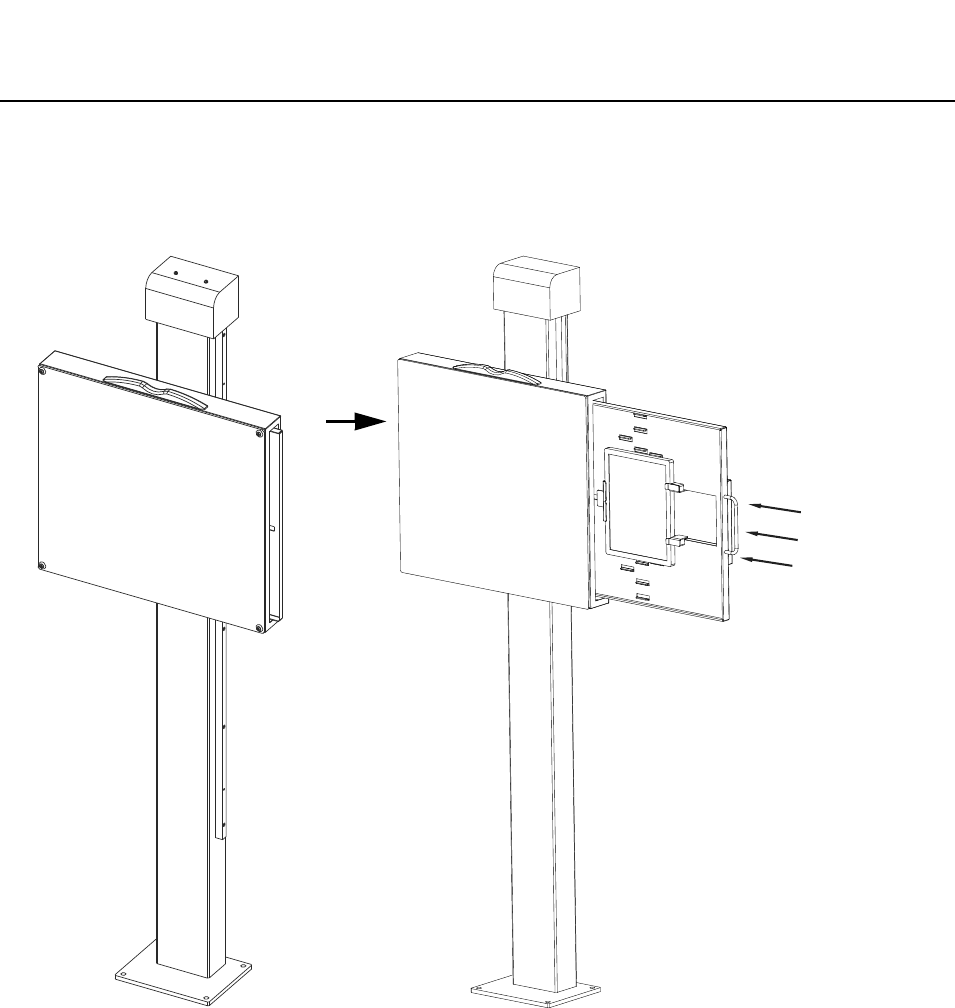
WallStandMode
Pulloutthewallstanddetectortray->Insertthedigitaldetectorintothewall
stand.
将无线影像探测器放入片屉的步骤请参考 Stepsforcassetteinstallation。
DigitalDetectorApplication
BrivoXR1165474059-8ENRev.1 12-3
©2014GeneralElectricCompany.Allrightsreserved.
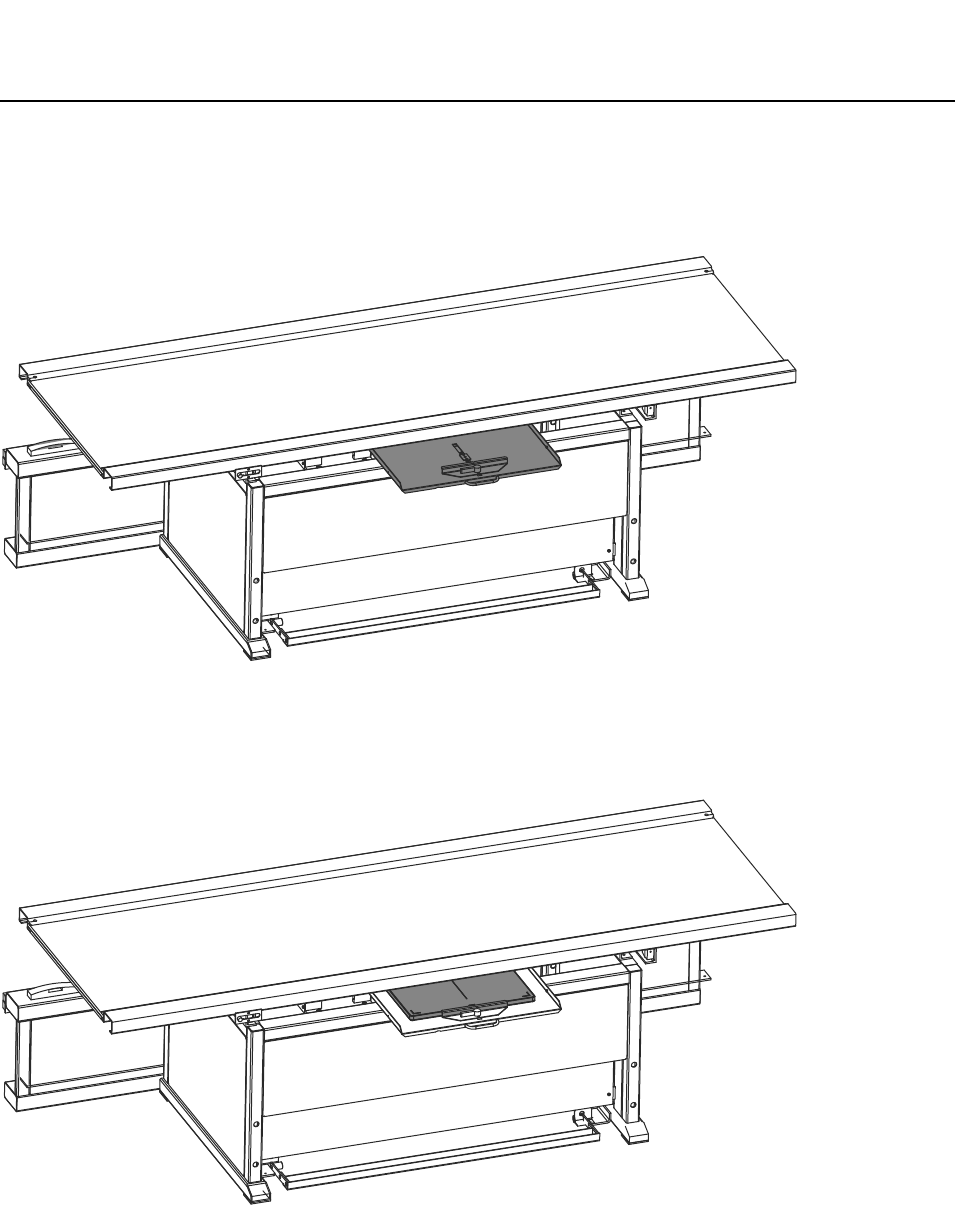
IntegratedTableMode
Pulloutthetabledetectortray->Insertthedigitaldetectorintotheintegrated
table.
将无线影像探测器放入片屉的步骤请参考 Stepsforcassetteinstallation。

BrivoXR1165474059-8ENRev.1 12-4
©2014GeneralElectricCompany.Allrightsreserved.
DigitalDetectorApplication
IntegratedTableTop(StretcherTableTop)Mode
Putthedigitaldetectortotheappropriatelocationonthetabletop.
Detector

DigitalDetectorApplication
BrivoXR1165474059-8ENRev.1 12-5
©2014GeneralElectricCompany.Allrightsreserved.
DigitalCassetteMode
BrivoXR1165474059-8ENRev.1 12-6
©2014GeneralElectricCompany.Allrightsreserved.
DigitalDetectorApplication
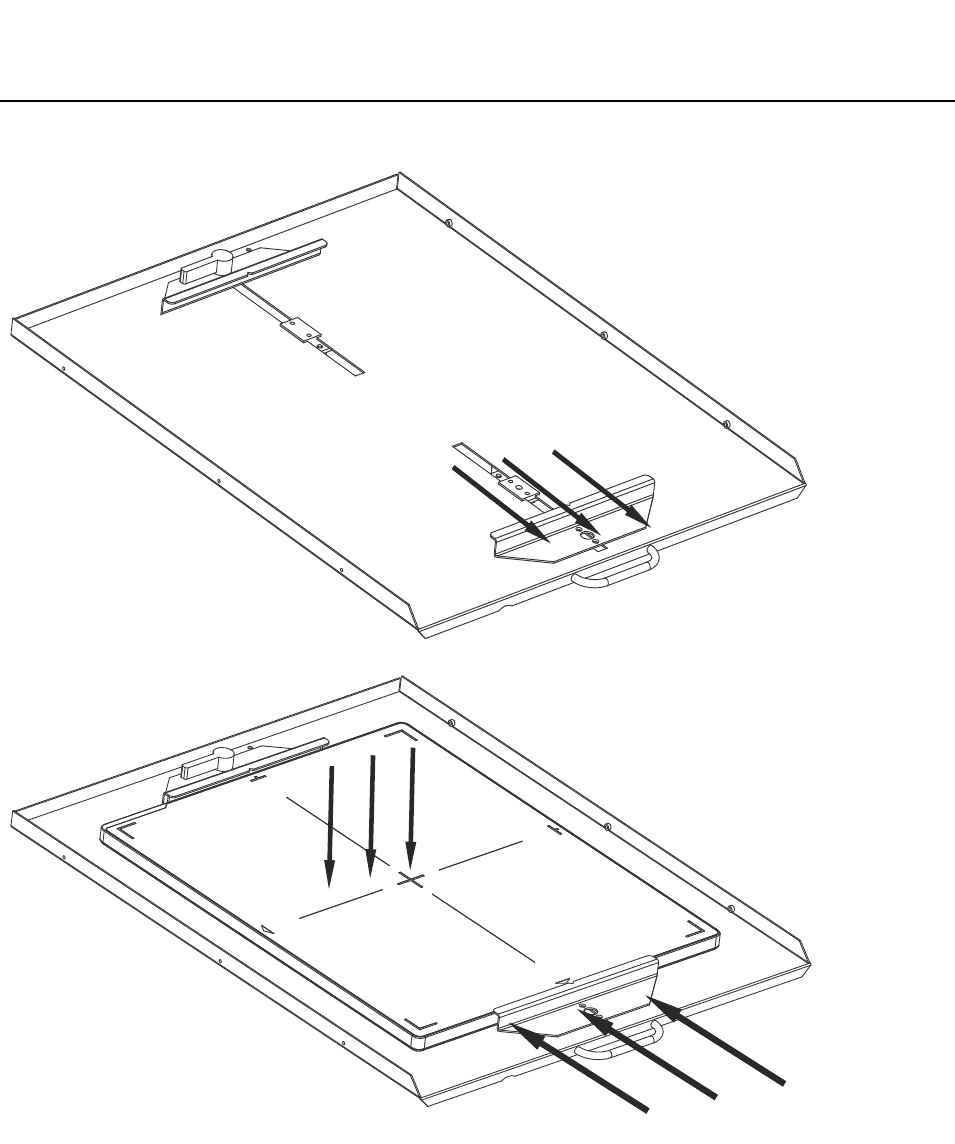
Stepsforcassetteinstallation
1. 分开夹具。
2. 放入影像探测器。
3. 使用夹具将影像探测器进行固定。

SharingSystemComponents
BrivoXR1165474059-8ENRev.1 13-1
©2014GeneralElectricCompany.Allrightsreserved.
Chapter13
SharingSystemComponents
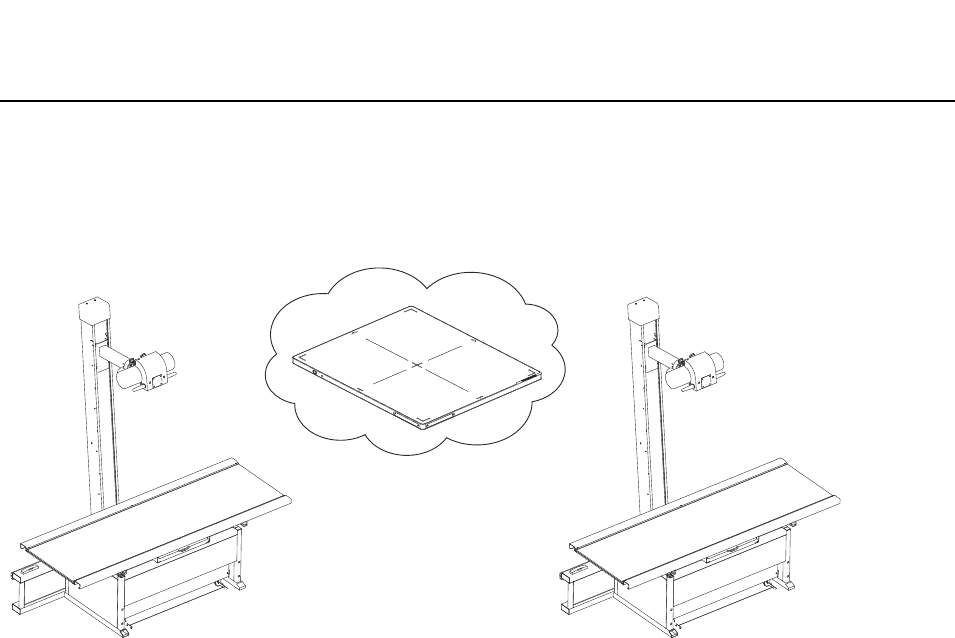
本章概述了 XR116 系统组件在不同应用模式下的共享使用。
主要包含以下内容:
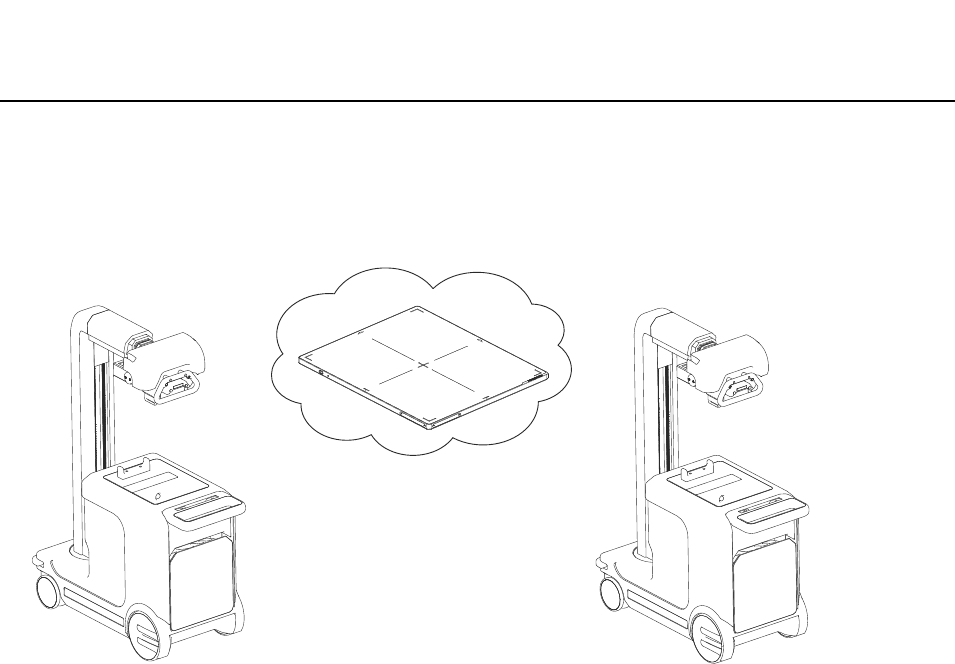
• 在固定式应用间共享影像探测器
• 在固定式应用间共享影像探测器和工作站
• 在固定式和移动式应用间共享影像探测器
• 在固定式和移动式应用间共享 XR116 组件( 影像探测器 + 工作站 + 便携式显示器 )
• 在移动式系统间共享影像探测器
• 在移动式系统间共享 XR116 套件( 影像探测器 + 工作站 + 便携式显示器 )
BrivoXR1165474059-8ENRev.1 13-2
©2014GeneralElectricCompany.Allrightsreserved.
SharingSystemComponents
在固定式应用间共享影像探测器
XR116 系统中的影像探测器可以在不同的固定式应用间共享使用,如下图所示。
Figure13-1在固定式系统间共享影像探测器
共享影像探测器:
1. 在原固定式系统上,将影像探测器从首选探测器切换为备用探测器。有关如何切换影
像探测器的信息,请参考 ...。
2. 在目标固定式系统上,注册共享的影像探测器。有关如何注册影像探测器的信息,请
参考 ...。
3. 在目标固定式系统上,选择共享影像探测器为首选探测器。
Note: 固定式系统间只能共享影像探测器,不能共享使用 XR116 系统的其它套件。
9NGXK
SharingSystemComponents
BrivoXR1165474059-8ENRev.1 13-3
©2014GeneralElectricCompany.Allrightsreserved.
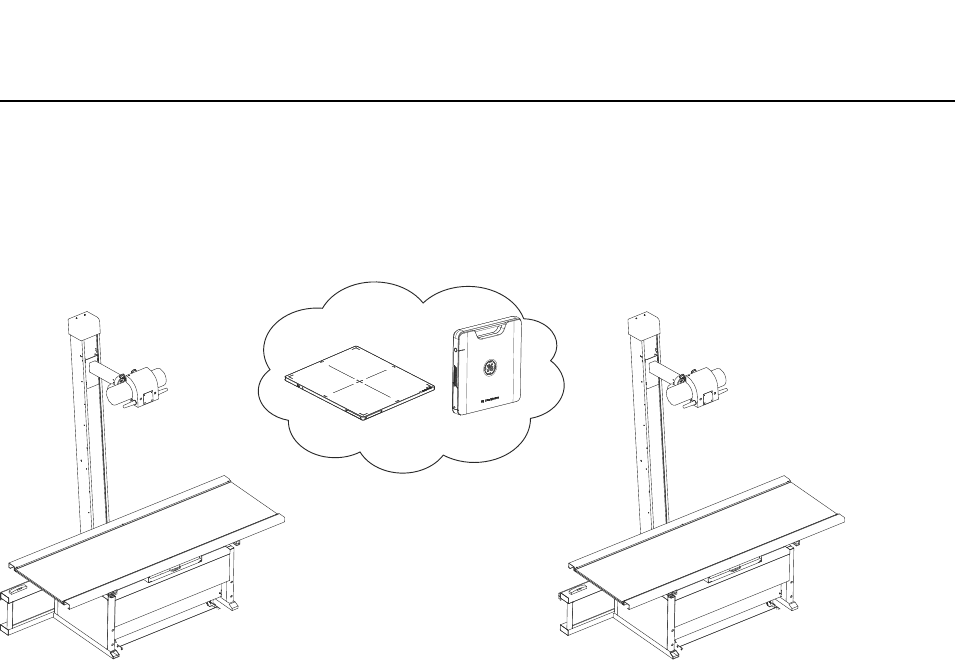
在固定式应用间共享影像探测器和工作站
XR116 系统中的影像探测器和影像工作站也可以在不同的固定式应用间共享使用,如下
图所示。
Figure13-2在固定式系统间共享影像探测器和影像工作站
共享影像探测器和影像工作站:
1. 将 XR116 组件 (影像探测器 + 工作站)从原固定式系统移动到目标固定式系统。
Note: 工作站从原固定式系统中的扩展坞中拔出后,原固定式系统中的无线接入点将被关闭。
Note: 工作站插入目标固定式系统的扩展坞插槽后,目标固定式系统的无线接入点将自动启
动,影像探测器和工作站的无线连接将随后在目标固定式系统中自动连接。
9NGXK
BrivoXR1165474059-8ENRev.1 13-4
©2014GeneralElectricCompany.Allrightsreserved.
SharingSystemComponents
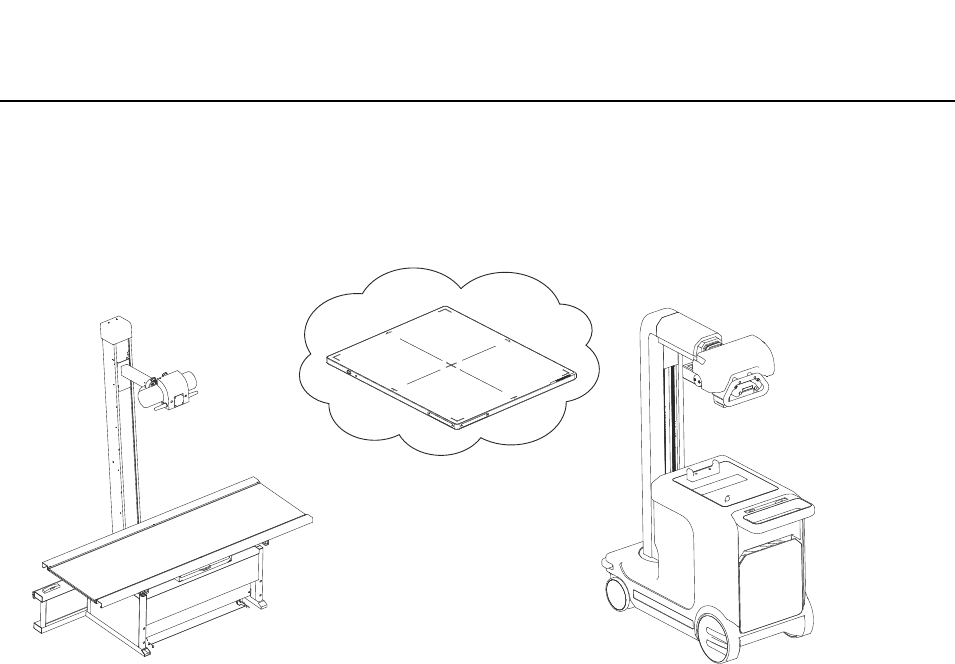
在固定式和移动式应用间共享影像探测器
XR116 系统中的无线影像探测器可以在固定式和移动式应用间共享使用,如下图所示。
Figure13-3
共享无线影像探测器:
1. 在原固定式系统上,将影像探测器从首选探测器切换为备用探测器。有关如何切换影
像探测器的信息,请参考 ...。
2. 在目标移动式系统上,注册共享的影像探测器。有关如何注册影像探测器的信息,请
参考 ...。
3. 在目标移动式系统上,选择共享影像探测器为首选探测器。
9NGXK
SharingSystemComponents
BrivoXR1165474059-8ENRev.1 13-5
©2014GeneralElectricCompany.Allrightsreserved.
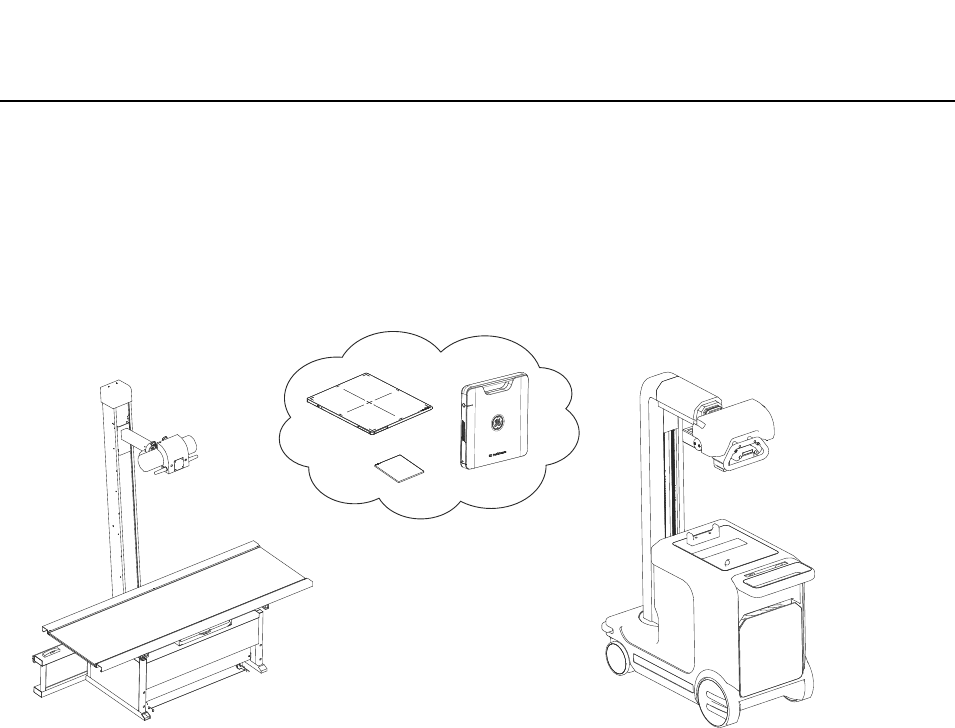
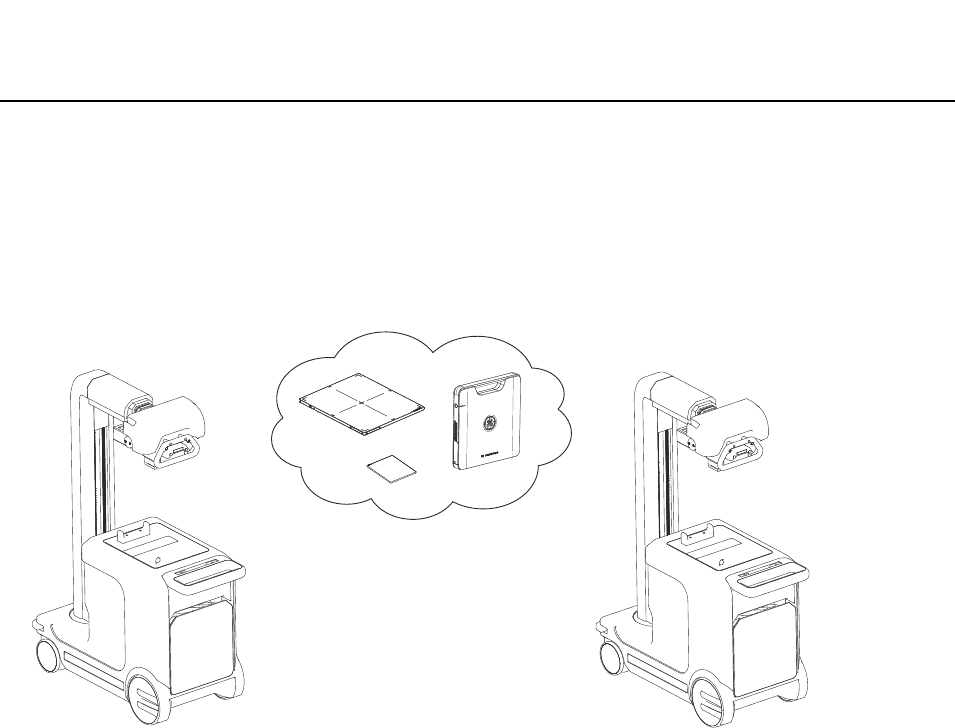
在固定式和移动式应用间共享 XR116 组件
( 影像探测器 + 工作站 + 便携式显示器 )
XR116 组件 (影像探测器 + 工作站 + 便携式显示器)也可以在固定式和移动式应用间
共享使用,如下图所示。
Figure13-4共享 XR116 组件
共享无线影像探测器:
1. 将 XR116 组件(影像探测器 + 工作站 + 便携式显示器)从原固定式系统移动到目标
移动式系统。
Note: 工作站从原固定式系统中的扩展坞中拔出后,固定式系统中的无线接入点将被关闭。
Note: 工作站从扩展坞拔出后将自动切换为移动式应用。
Note: 便携式显示器和工作站必须绑定使用,不能单独在系统间进行共享。
9NGXK
.GTJ.KRJ
BrivoXR1165474059-8ENRev.1 13-6
©2014GeneralElectricCompany.Allrightsreserved.
SharingSystemComponents
在移动式系统间共享影像探测器
XR116 系统中的无线影像探测器在移动式应用间也可以共享使用,如下图所示。
Figure13-5移动式应用共享影像探测器
共享无线影像探测器:
1. 在原移动式系统上,将影像探测器从首选探测器切换为备用探测器。有关如何切换影
像探测器的信息,请参考 ...。
2. 在目标移动式系统上,注册共享的影像探测器。有关如何注册影像探测器的信息,请
参考 ...。
3. 在目标移动式系统上,选择共享影像探测器为首选探测器。
9NGXK
SharingSystemComponents
BrivoXR1165474059-8ENRev.1 13-7
©2014GeneralElectricCompany.Allrightsreserved.
在移动式系统间共享 XR116 套件
( 影像探测器 + 工作站 + 便携式显示器 )
XR116 组件 (影像探测器 + 工作站 + 便携式显示器)还可以在移动式应用间共享使
用,如下图所示。
Figure13-6XR116 组件共享
共享无线影像探测器:
1. 将整套 XR116 系统直接从原移动式系统移动到目标移动式系统。
Note: 便携式显示器和工作站必须绑定使用,不能单独在系统间进行共享。
9NGXK
.GTJ.KRJ

BrivoXR1165474059-8ENRev.1 13-8
©2014GeneralElectricCompany.Allrightsreserved.
SharingSystemComponents
此页空白。

质量保证程序
BrivoXR1165474059-8ZH-CN修订版 1 14-1
©2013GeneralElectricCompany.Allrightsreserved.
第14章
质量保证程序
本章介绍了 GE 便携式 DR 探测器的质量保证程序。为了确保该探测器的性能持续稳定,
必须建立定期检查计划。
质量保证程序包括一系列检查,应当每周对系统进行这些检查,以对图像质量进行量化
检查,此程序中的许多背景作业都已经自动化了,并且要求按规定的顺序进行图像采集。
本章的主要内容包括:
• 何时执行 QAP
-正常 QAP
• QAP 准备
• 进行正常 QAP (NormalQAP)
-正常 QAP 未通过 (FailedNormalQAP)
• 检查结果历史记录 (ResultHistory)
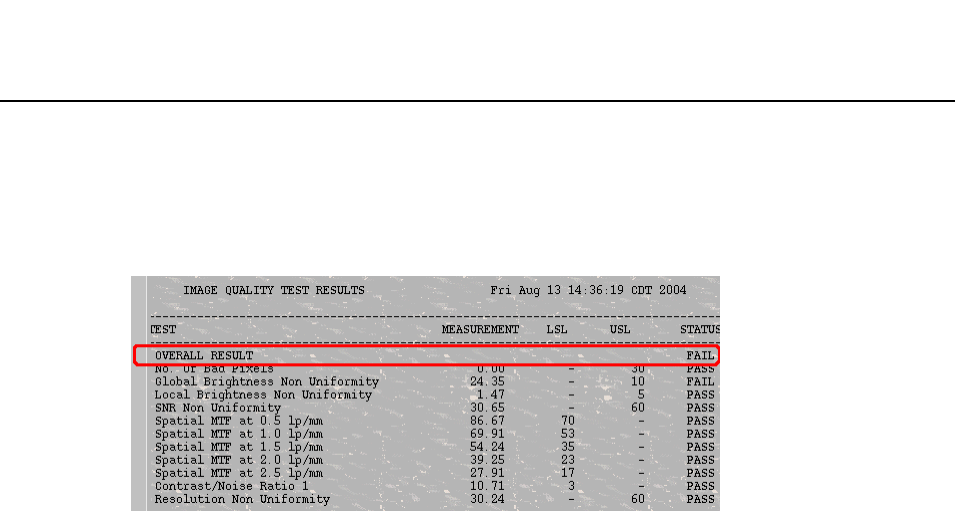
正常 QAP 是指需要对平面体模进行曝光的全面 QAP 检查。其结果(通过或未通过检查)
记录于检查结果历史记录摘要中以供维修人员查阅。正常 QAP 检查约需 15 分钟即可完
成。
正常 QAP 检查包括所有对探测器进行的检查,此外,还包括其它因素的检查。表14-1
比较了两种检查的检查因素。
表14-1质量保证程序的检查因素
正常 QAP
• 电子噪声
• 相关噪声
• ARC 数字测试
• ARC 模拟测试
• 垂直杆校准
• 边缘检查
• 同质性直方图 (Homogeneity
Histogram)
• 亮度不均匀性
• 坏像素

BrivoXR1165474059-8ZH-CN修订版 1 14-2
©2013GeneralElectricCompany.Allrightsreserved.
质量保证程序
何时执行 QAP
本节介绍所推荐 QAP 的时间以及任何其它需要进行 QAP 的情况。
正常 QAP
正常 QAP 应:
• 按计划每周进行。
• 在 QAP按钮上显示警报图标时进行。(如图14-1)
• 在发现有图像质量降低时进行。
注意: 在确定正常 QAP 测试时间时,应计划用 15-20 分钟时间进行该测试 .测试时,
系统至少需停机 (无曝光)10 分钟,其它测试约需 5 分钟完成。
图14-1带有警报图标的 QAP 按钮
QAP 准备
开始QAP 之前 ,一定要注意以下几点:
• 关闭或暂停任何开着的检查。
• 关闭任何正在查看的检查。
• 清除探测器和光束通路上的所有物体( 只在正常 QAP 时 )
点击 QAP按钮,开始 QAP 程序。QAP按钮位于工作列表或采集界面底部。
注意: 如果有打开的检查或正在查看的检查,不可进行 QAP。
进行正常 QAP (NormalQAP)
正常 QAP要进行一些用平面体模进行曝光的测试。GE 便携式 DR 探测器 QAP 箱 (GE
PortableDRDetectorQAPkit)内有一个平面体模 ( 如下图),其大小与限束器适应。
有些曝光技术推荐用于体模曝光。系统自动设定曝光条件,但在曝光前需确认曝光设
置。
图14-2平面体模
质量保证程序
BrivoXR1165474059-8ZH-CN修订版 1 14-3
©2013GeneralElectricCompany.Allrightsreserved.
小心: 应用体模完成 QAP 后,请在系统复位或关机前将其移除。
按照该程序进行正常 QAP测试。
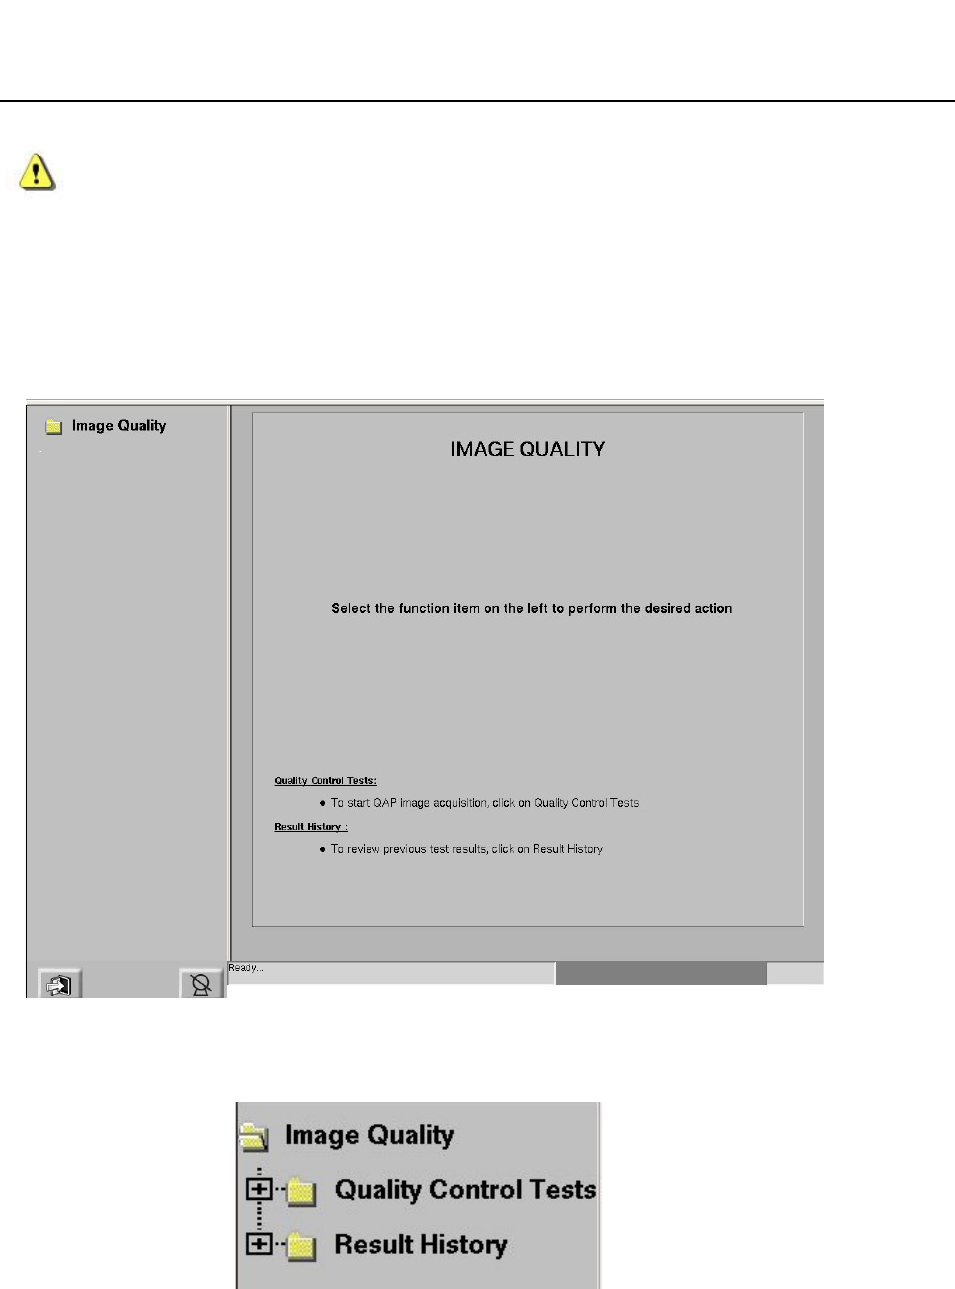
1. 按下位于工作列表或采集界面底部的 [QAP]按钮。
显示图像质量界面。
图14-3图像质量界面
2. 从界面的左侧选择图像质量 (如图14-4)。
图14-4从界面的左侧选择
BrivoXR1165474059-8ZH-CN修订版 1 14-4
©2013GeneralElectricCompany.Allrightsreserved.
质量保证程序
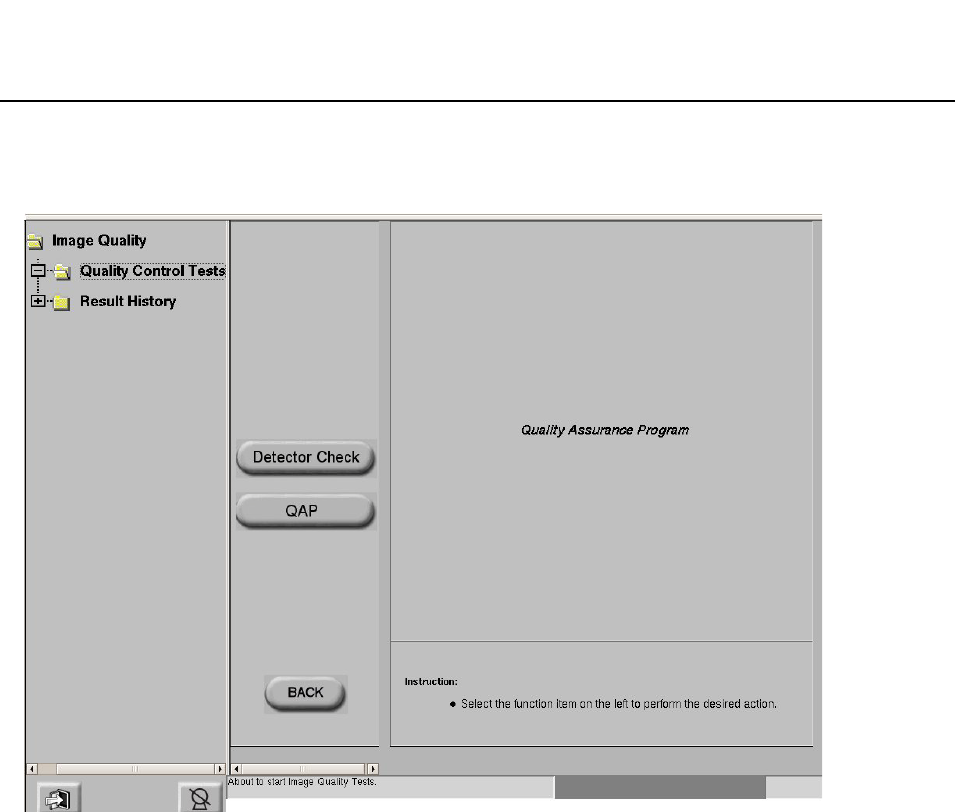
3. 从界面的左侧选择质量控制测试。
图14-5质量控制测试界面
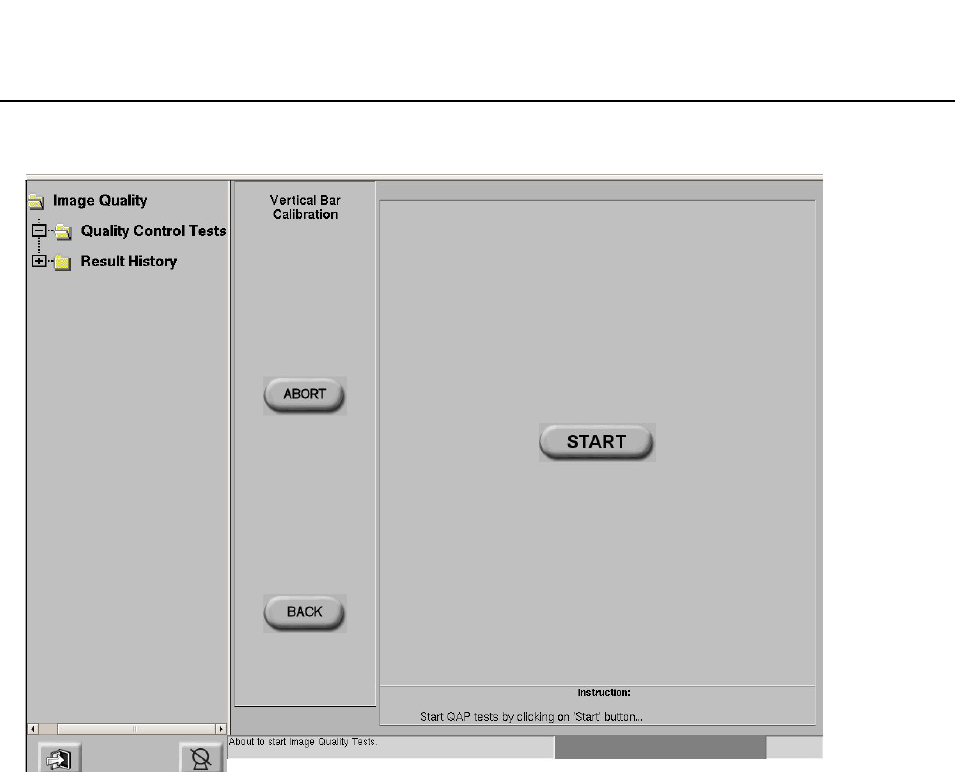
4. 按下 [QAP] 开始 QAP 测试。垂直杆校准界面出现。
质量保证程序
BrivoXR1165474059-8ZH-CN修订版 1 14-5
©2013GeneralElectricCompany.Allrightsreserved.
图14-6垂直杆校准界面。
5. 按下 [START] 按钮开始垂直杆校准测试。
注意: 正常QAP要求在开始测试的垂直杆校准之前,系统应进入空闲状态(inanidle
state)( 无曝光 )至少 10分钟。系统将会在 Q-QAP 和垂直杆校准界面上显示
一个定时器图标 (timericon)。该定时器从 10 分钟开始到及时直到 0 为止。
这段时间里,显示[INHIBIT]按钮,[START] 按钮失活。
6. 等待测试完成。
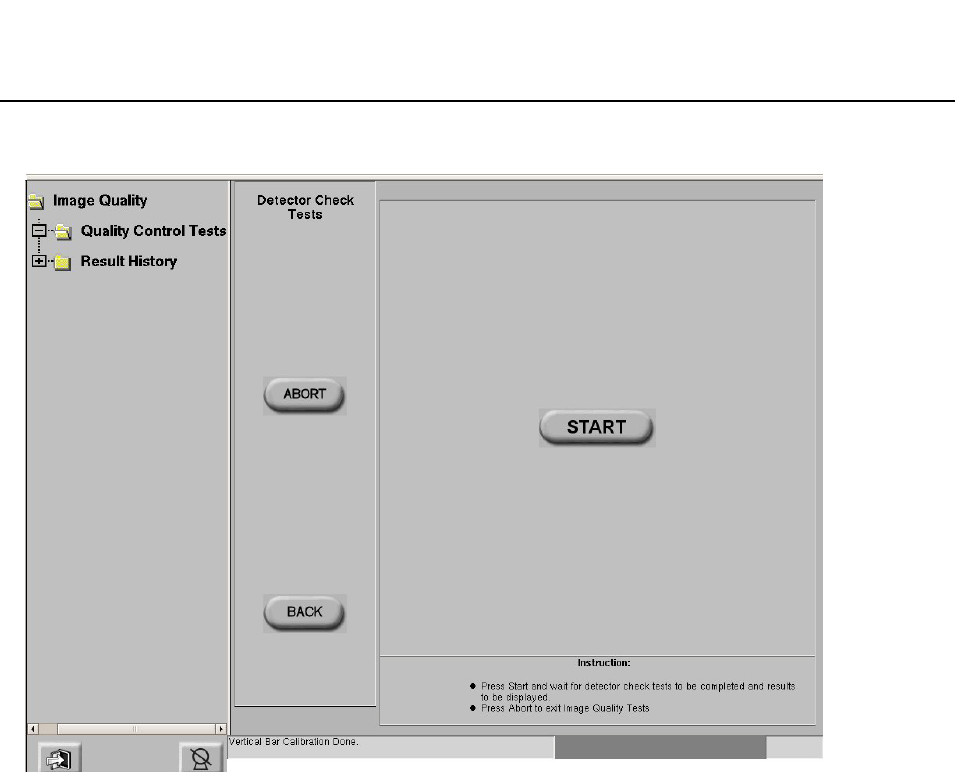
显示探测器检查测试界面。
BrivoXR1165474059-8ZH-CN修订版 1 14-6
©2013GeneralElectricCompany.Allrightsreserved.
质量保证程序
图14-7探测器检查测试界面
7. 按下 [START] 开始暗片测试。

质量保证程序
BrivoXR1165474059-8ZH-CN修订版 1 14-7
©2013GeneralElectricCompany.Allrightsreserved.
图14-8开始暗片测试
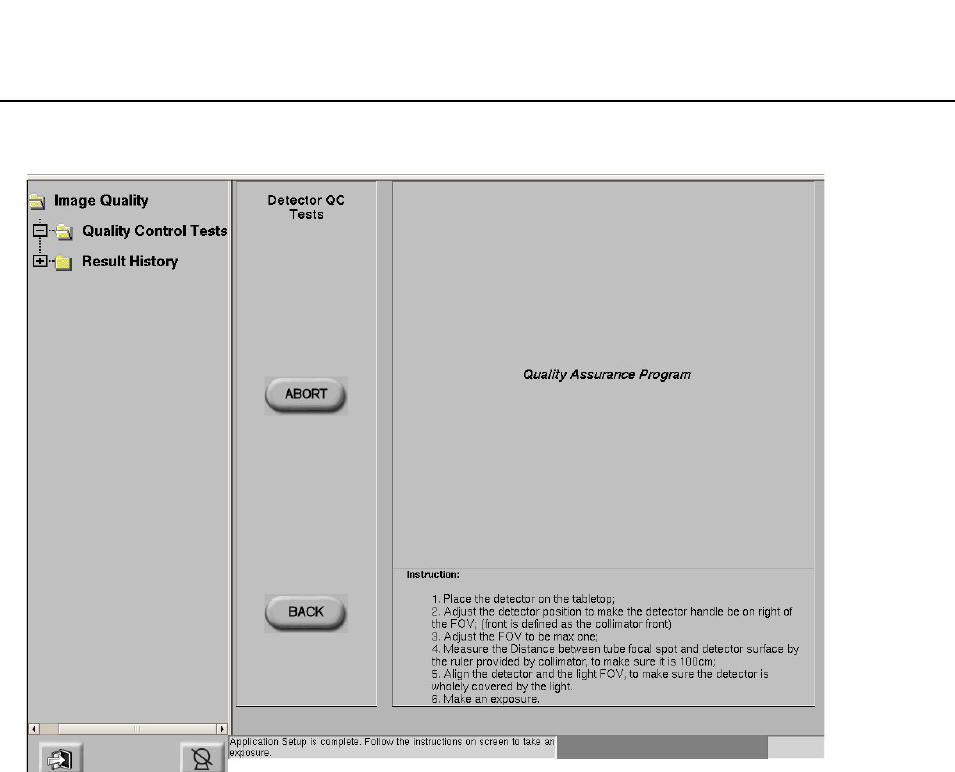
8. 应用设置完成后,按照界面上的说明完成本部分测试:
BrivoXR1165474059-8ZH-CN修订版 1 14-8
©2013GeneralElectricCompany.Allrightsreserved.
质量保证程序
图14-9显示质量控制 (QCTests)界面
a) 将探测器放置床面板上;
b) 调节探测器位置,使探测器手柄位于光野右侧;
c) 将光野打开至最大;
d) 用限束器的直尺测量球管焦点与探测器表面距离,确定为 100 厘米;
e) 将探测器置于光野正下方,确定其被光野完全覆盖;
f) 曝光。
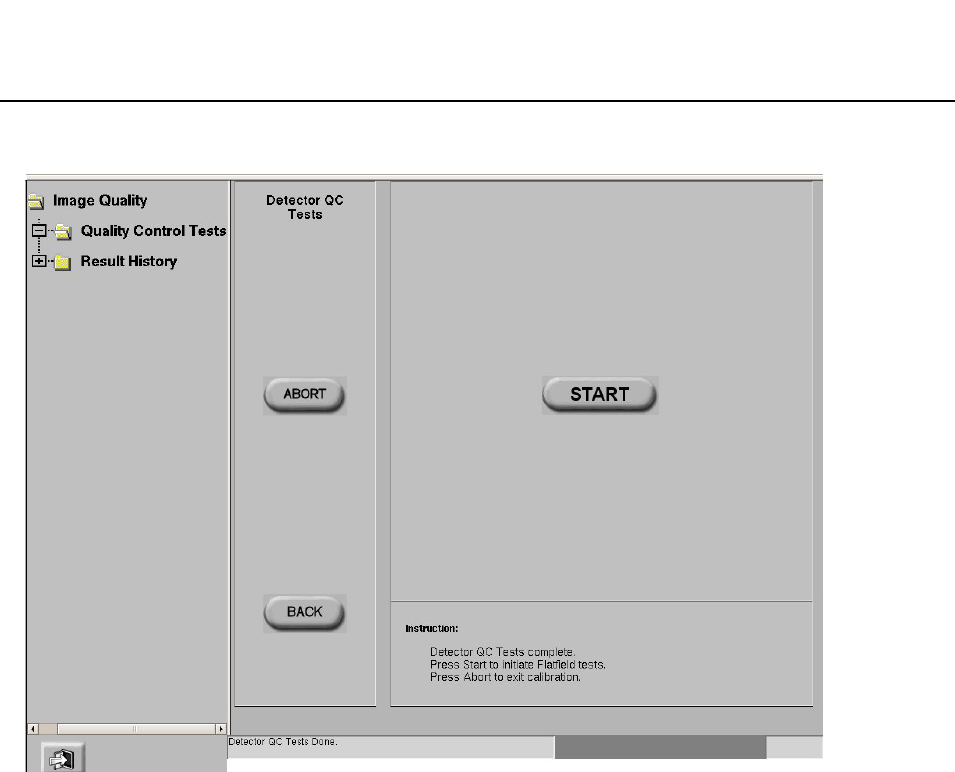
9. 曝光完成后,显示质量控制 (QCChecks)完成界面。
质量保证程序
BrivoXR1165474059-8ZH-CN修订版 1 14-9
©2013GeneralElectricCompany.Allrightsreserved.
图14-10显示质量控制 (QCTests)完成界面
10. 按下 [START] 按钮开始平面测试 (Flat-fieldtests)。
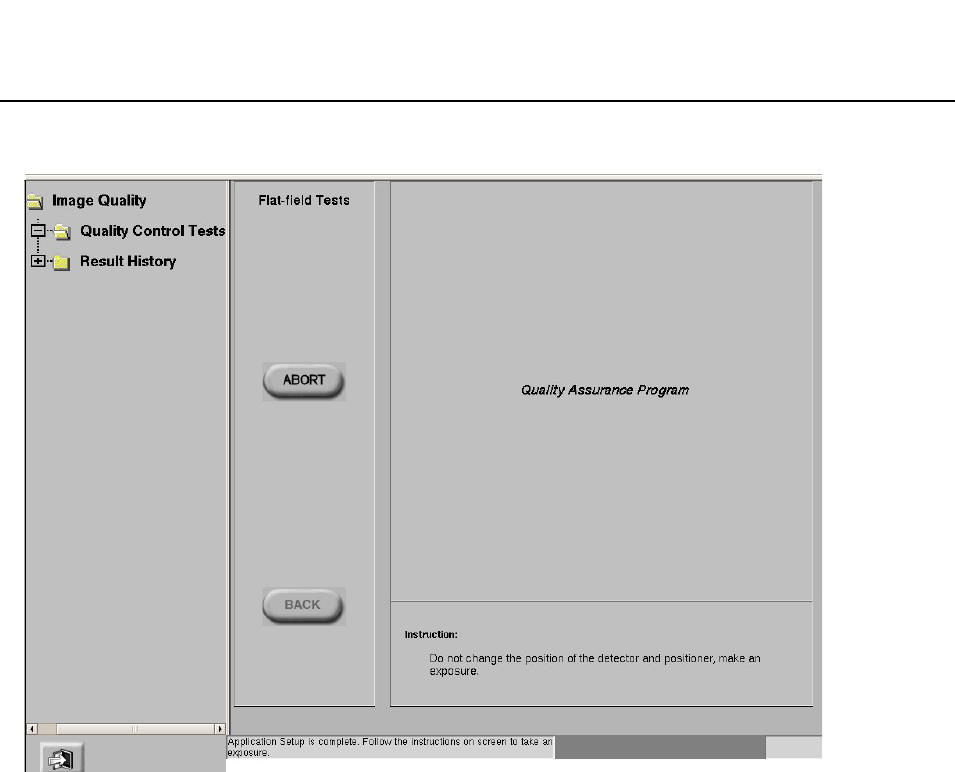
BrivoXR1165474059-8ZH-CN修订版 1 14-10
©2013GeneralElectricCompany.Allrightsreserved.
质量保证程序
图14-11显示平面测试 (Flat-fieldtests)界面。
11. 按照界面上的说明完成本部分测试:不要改变探测器与子系统的位置,并进行曝光。
质量保证程序
BrivoXR1165474059-8ZH-CN修订版 1 14-11
©2013GeneralElectricCompany.Allrightsreserved.
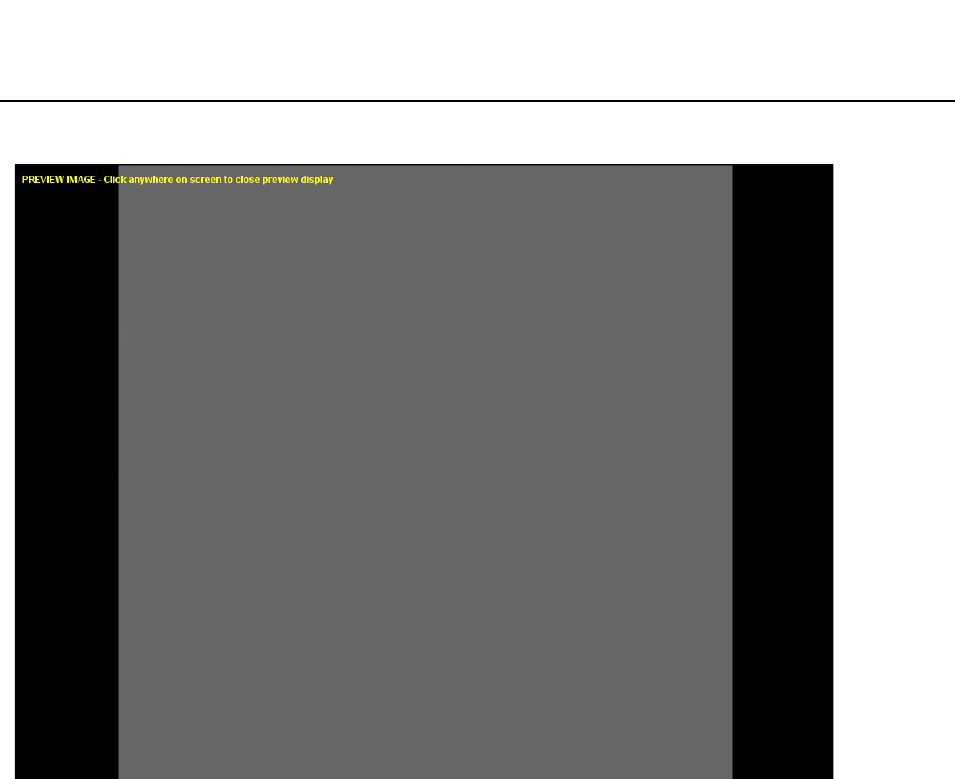
图14-12平面采集图像 (Flat-fieldacquiredimage)
BrivoXR1165474059-8ZH-CN修订版 1 14-12
©2013GeneralElectricCompany.Allrightsreserved.
质量保证程序
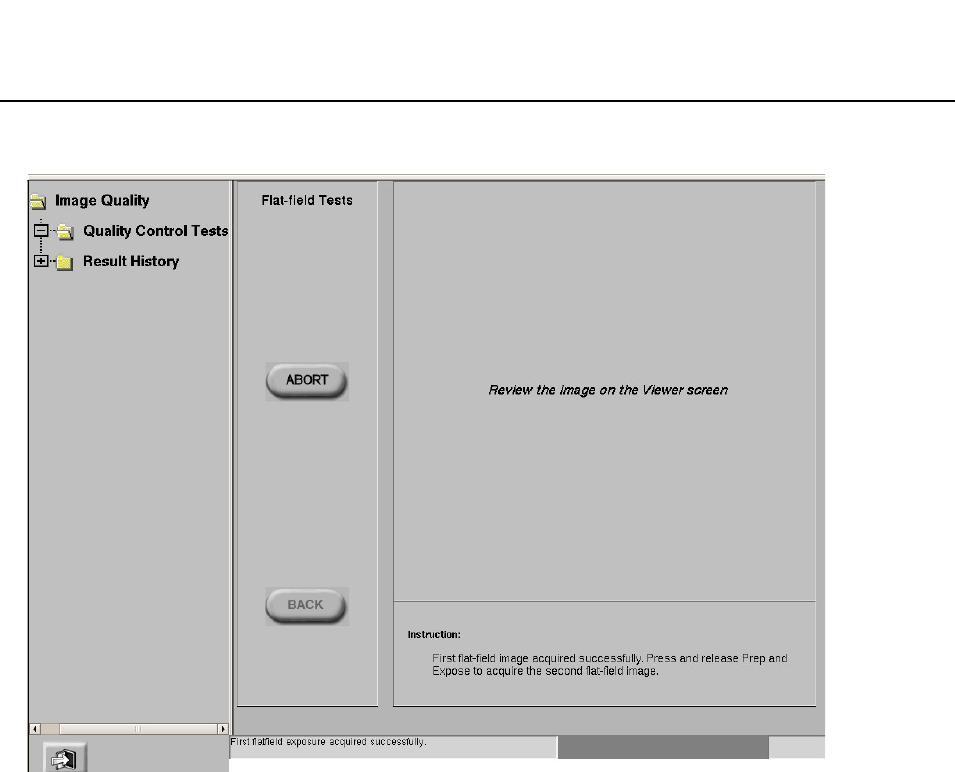
图14-13显示第二个平面测试 (Flat-fieldTests)界面。
12. 按照界面显示指导完成测试。

质量保证程序
BrivoXR1165474059-8ZH-CN修订版 1 14-13
©2013GeneralElectricCompany.Allrightsreserved.
图14-14平面采集图像
13. 点击平面采集图像的任意位置回到 QAP 界面。
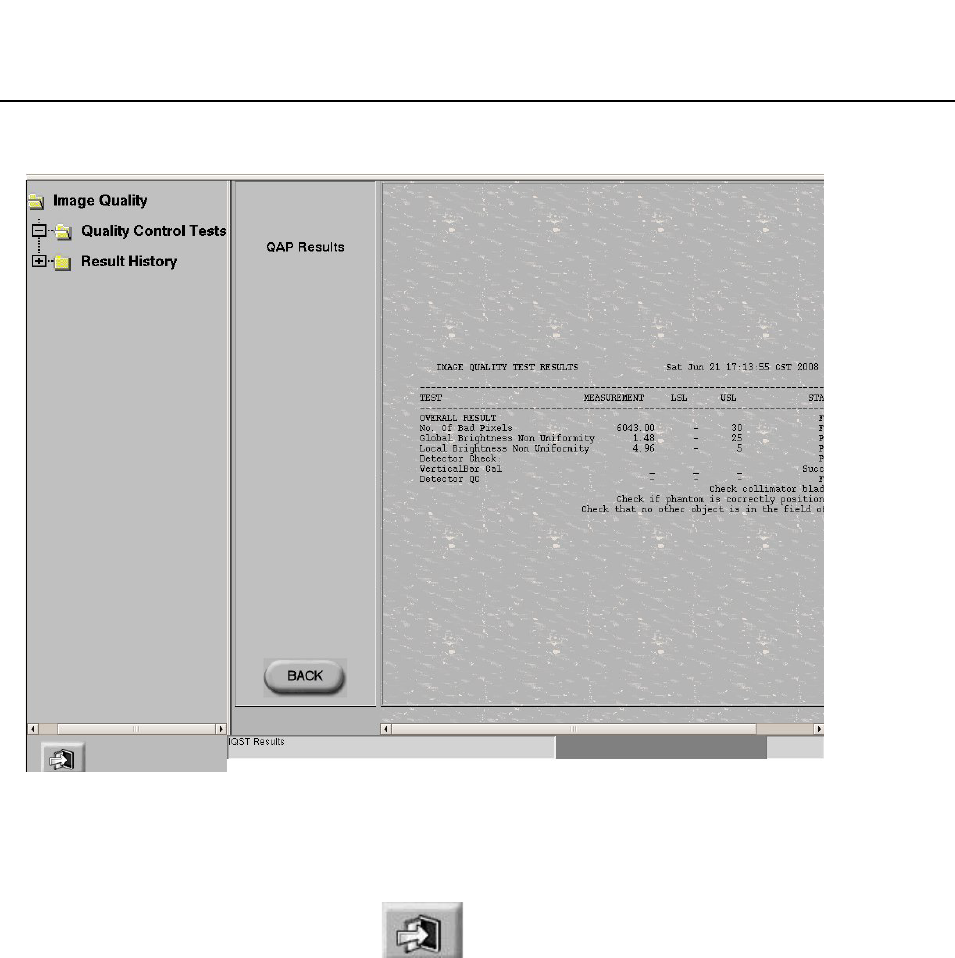
测试完成后,自动显示Normal-QAPResults (正常 QAP 结果)界面。
BrivoXR1165474059-8ZH-CN修订版 1 14-14
©2013GeneralElectricCompany.Allrightsreserved.
质量保证程序
图14-15QAPResults (QAP 结果)界面
14. 查看每项测试的状态 (Status)( 最右的一栏 )。
如果所有的测试全部通过:QAP 完成。点击退出按钮返回到工作列表界面,然后
继续。
如果有的测试未通过 :参照正常 QAP 未通过(FailedNormalQAP)一节了解更多
信息。
正常 QAP 未通过 (FailedNormalQAP)
在正常 QAP 未通过的情况下,重复正常 QAP程序已确认测试未通过。本节确定了一些
需要检查的常见问题。
• 如果边缘检查 (Bordercheck)和 / 或同质性直方图 (Homogeneity
Histogram)测试未通过 ,检查探测器和球管的对中 (alignment),然后重复测
试。( 对中不当可能会引起亮度非均匀性 (brightnessnon-uniformity)和劣质像
素(badpixels))
• 检查限束器叶片 (collimatorblade)的位置,确保其完全打开,即:限束器叶片
不在视野 (fieldofview)范围。
质量保证程序
BrivoXR1165474059-8ZH-CN修订版 1 14-15
©2013GeneralElectricCompany.Allrightsreserved.
如果确认单项测试未通过,请联系售后服务 (calltoscheduleservice)。虽然系统可
以运行 ,但需要检查,也可能需要校准。
如果确认多项测试未通过 ,可能会影响图像质量 ;停止使用该系统,请求立即维修。
图14-16QAP结果未通过
检查结果历史记录 (ResultHistory)
正常 QAP 完成后,系统生成一页测试摘要 (testsummarypage)。测试结果摘要表
包括内容有描述性名称(descriptivenames)测定值 , 测试规格(LSL 和 / 或USL)以及
通过 / 未通过状态。
最少包含有 25 项正常QAP测试结果。
按照以下程序查看以前正常 QAP 测试的结果。
1. 按下位于窗口左侧的[RESULTHISTORY] (检查结果历史记录)按钮。
显示ResultHistory (检查结果历史记录)界面。
2. 在列表上按下一个测试条目 (testentry)选择该项。
3. 按下[SELECT] (选择)。
显示测试详细内容。
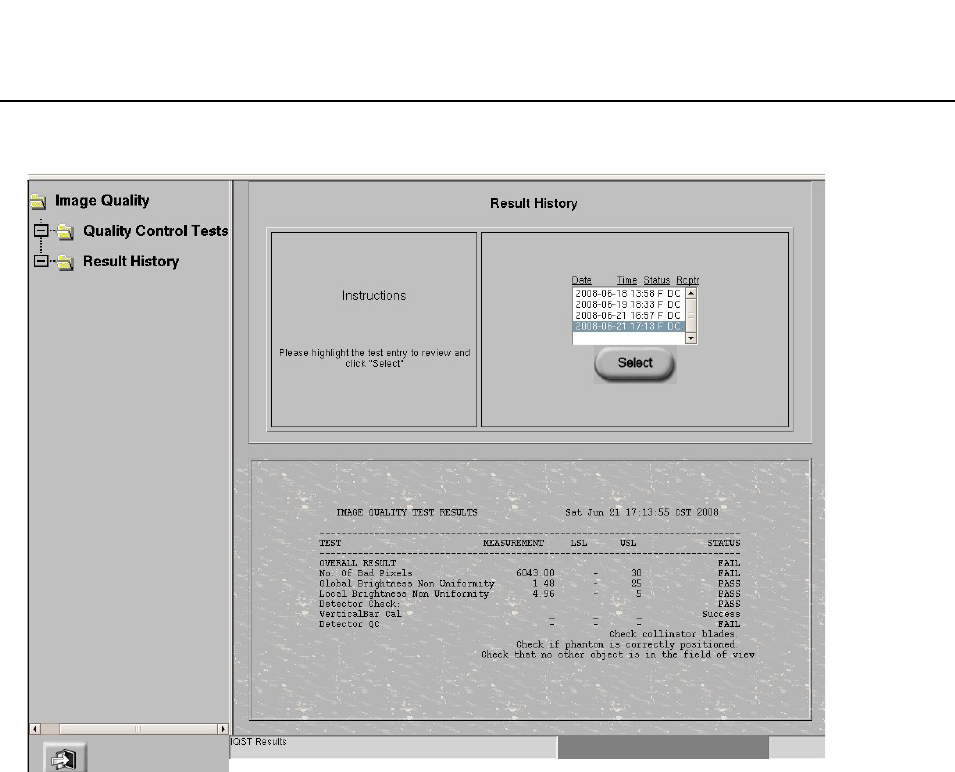
BrivoXR1165474059-8ZH-CN修订版 1 14-16
©2013GeneralElectricCompany.Allrightsreserved.
质量保证程序
图14-17QAPResultHistory (检查结果历史记录)界面

Maintenance
BrivoXR1165474059-8ENRev.1 15-1
©2014GeneralElectricCompany.Allrightsreserved.
Chapter15
Maintenance
Itistheownersresponsibilitytoprovideregularperiodicmaintenanceand
service.Onlythistypeofmaintenanceprogramcanidentifypotentialproblems.
Topicscoveredinclude:
• PeriodicMaintenance
• QualifiedService
• CleaningandDisinfecting
• Recycling
PeriodicMaintenance
PeriodicmaintenanceisrequiredforcontinuedSAFEoperation.Periodic
maintenanceshouldbeperformedasspecifiedinthemaintenancescheduleof
theservicemanualbyqualifiedpersonnel.Descriptionsandscheduledfrequency
oftherequiredperiodicmaintenanceareprovidedintheServicemanual(#
*******)suppliedwiththeequipment.Inspectionintervalsarebasedonaverage
dailyuseofoneeighthourshift.
TheseperiodicmaintenanceprocedureswillbeperformedbyGEserviceif
contractedtodoso.Generally,mostofthepartsneedmaintenancesonceayear;
generalcleaningandpaintingasrequired;Morefrequentinspectionis
appropriatewhereequipmentuseisaboveaverage.
CAUTION: Failuretoperformtheperiodicinspectionandmaintenancecould
allowdeterioratingconditionstodevelopwithoutbeingdetected.
Thisdeteriorationcouldresultinequipmentfailures,whichcould
causeseriousinjuryorequipmentdamage.

BrivoXR1165474059-8ENRev.1 15-2
©2014GeneralElectricCompany.Allrightsreserved.
Maintenance
CAUTION: 在执行维护之前,取下电源插座的电源插头。
QualifiedService
Safeequipmentperformancerequirestheuseofservicepersonnelspecially
trainedonmedicalX-rayapparatus.GeneralElectricMedicalSystemsandits
associates,maintainaworld-wideorganizationofstationsfromwhichtofurnish
periodicand/oremergencyserviceonacontractbasis.AGErepresentativewill
begladtodiscussthisplan.GeneralElectricMedicalSystemsX-rayequipment
containsoperatingsafeguardsdesignedtoprovidemaximumsafety.Before
callingforservice,becertainproperoperatingproceduresarebeingused.
CleaningandDisinfecting
Thisequipmentshouldbecleanedfrequently,particularlyifcorrodingchemicals
arepresent.Useaclothmoistenedinwarmsoapywater(usemildsoap)toclean
thetrimandnameplateoftheOperator’sControls.Wipewithacloth
moistenedincleanwater.Donotusecleanersorsolventsofanykindasthey
maydullthefinishorblurthelettering.Polishwithapureliquidorpastewax.
Othersurfacesoftheequipmentcanbecleanedusingacleanclothmoistened
slightlywithagoodmildcleanerandpolishacceptableforuseonenameled
metalsurfaces.Beforeeachuse,equipmentsurfacesthatcontactthepatient
shouldbecleanedwithanEPAregistered,low-leveldisinfectionorsanitizing
agent.
ThefollowingchemicalsandproductshavebeentestedandapprovedbyGEfor
cleaningtheGEImageWorkstation:
• 酒精、中性洗涤剂、普通盐水、漂白剂
有关影像探测器的清洁与消毒,请参考无线影像探测器章节中的 Cleaning 小节。
有关便携式显示器的清洁与消毒,请参考便携式显示器的操作手册。
CAUTION: Intheeventofequipmentcontactingbrokenskinorbeingused
withinfectedorimmunecompromisedpatients,theequipment
shouldbecleanedusingEPAclearedandEPAregisteredhigh-level
disinfectingagents.
Note: Besuretofollowthelabelinstructionsandpre-cautionsforuse,storage,and
disposalofalldisinfectingagents.

Maintenance
BrivoXR1165474059-8ENRev.1 15-3
©2014GeneralElectricCompany.Allrightsreserved.
Recycling
PackingMaterials
Thematerialsusedtopackourequipmentarerecyclable.Theymustbecollected
andprocessedinaccordancewiththeregulationsinforceforthecountrywhere
themachinesoraccessoriesareunpacked.
MachinesorAccessoriesatend-of-life
Theeliminationofmachinesandaccessoriesmustbeinaccordancewith
nationalregulationsforwasteprocessing.Allmaterialsandcomponentsthat
couldposearisktotheenvironmentmustberemovedfromthemachinesat
end-of-lifeandaccessories(examples:dryandwetcellbatteries,etc.).
PleaseconsultyourlocalGEHCrepresentativebeforediscardingtheseproducts.

BrivoXR1165474059-8ENRev.1 15-4
©2014GeneralElectricCompany.Allrightsreserved.
Maintenance
Thispageintentionallyleftblank.

设置参数
BrivoXR1165474059-8ZH-CN修订版 1 16-1
©2013GeneralElectricCompany.Allrightsreserved.
第16章
设置参数
参数允许特级用户定义系统以便使用。也允许您预先定义 X射线程序参数,以便检索保
存在内存中的任意一个程序。这样,您可以获取专为该类程序所编的技术因素。本章说
明可供您利用的参数,及如何激活或改变参数以便您使用。
本章说明如何为系统上的各种功能设置参数。您可以激活几个自动联网和打印功能,自
定义系统默认注释、图像方向和图像处理参数进行自定义。您还可以将常用操作员姓名、
医师姓名保存在系统中,以备日后使用。
本部分向您介绍了成功创建和编辑预置程序从而自定义系统所需的概念。
参数被设置于应用程序界面 (图 16-1)上,通过点击工作列表中的 [ 应用程序 ] 可以访
问该界面。
内容包括:
•系统
-网络连接
-打印机
•工作列表
-默认查询
-预设姓名
•图像管理
-拷贝检查
-自动标记 (质量检查)
-自动打印
-自动发送 (自动发送)
-自动删除
•图像浏览器
-预设注释
-DEI (探测器曝光指示器)
-更改 DEI显示
-更改上限和下限
-激活或失活技术模式
-导出 DEI日志
•图像处理
-创建自定义风格
-为检查更改预设风格
-组织平衡概述
•协议
-将协议数据库备份到 CD 上
-从 CD 上恢复协议数据库
-编辑协议数据库
-协议编辑器复制功能
BrivoXR1165474059-8ZH-CN修订版 1 16-2
©2013GeneralElectricCompany.Allrightsreserved.
设置参数
系统
本部分为您设置网络连接和打印机连接系统参数提供指导。在这个界面上,您还可以使
用维护、退出、关机功能。更多关于退出和关闭的信息,请参考第 5 章:常规信息。
图16-1系统应用程序界面
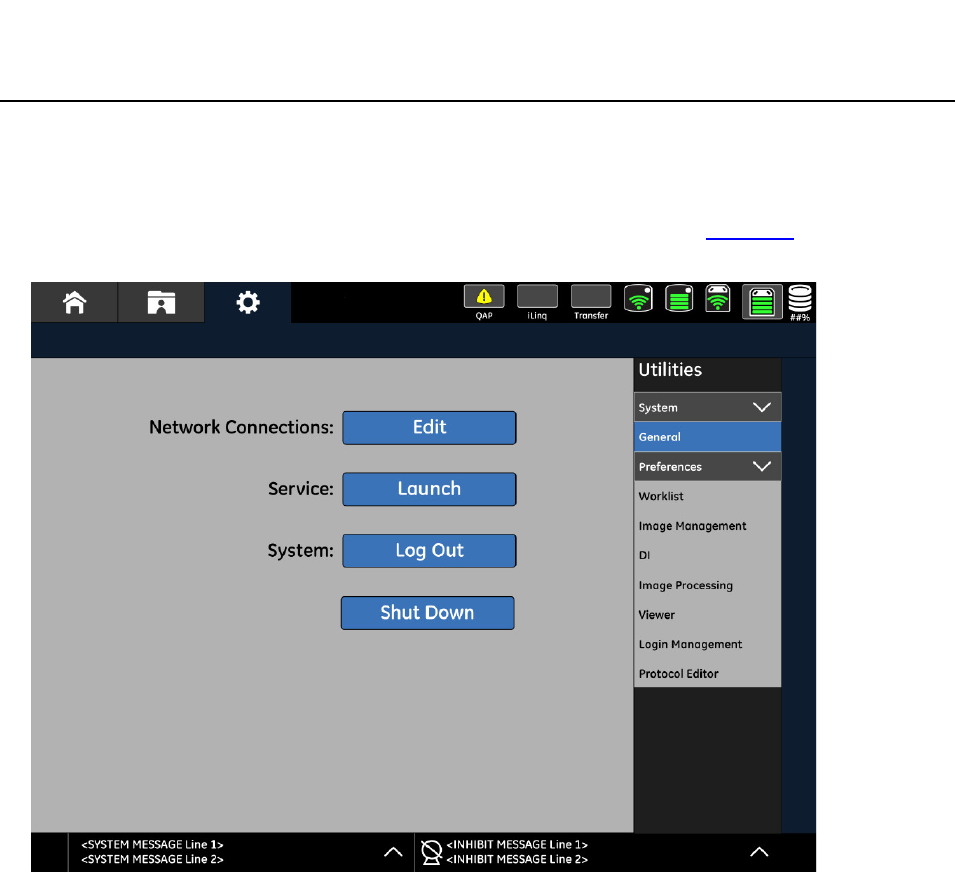
网络连接
通过应用程序系统 - 系统界面,可以配置网络连接与打印机连接。该界面允许合格的维修
人员定义医学数字成像通讯 (DICOM)发送目的地。
在该界面上,可添加、删除或编辑网络连接。
按以下步骤访问网络连接界面:
1. 在工作列表界面上点击 [ 应用程序 ] 按钮。
显示系统 - 系统界面。
2. 点击 [ 网络连接 ] 按钮。
显示网络连接界面 (图16-2
)。