GE AJES10DCAM1 User Manual ZONELINE Manuals And Guides L0521483
GE Air Conditioner Room (42) Manual L0521483 GE Air Conditioner Room (42) Owner's Manual, GE Air Conditioner Room (42) installation guides
User Manual: GE AJES10DCAM1 AJES10DCAM1 GE ZONELINE - Manuals and Guides View the owners manual for your GE ZONELINE #AJES10DCAM1. Home:Heating & Cooling Parts:GE Parts:GE ZONELINE Manual
Open the PDF directly: View PDF ![]() .
.
Page Count: 16
www.GEApp#ences.com
©
©
0
0
0
Safety Infolwlation
Adapter Plugs .................. 4
Connecting Electricity ........... g
Extension Cords ................ 4
Safety Precautions .............. 2
Operatil_g lnsh_uctions
Air Direction ................... 6
Conux)ls ..................... 5, 6
Fan Switch ..................... 6
TemperaUlre Hmiting .......... 6
Vent Control ................... 6
Care and Cleanil_g
Air Filter ....................... 8
Front Grille ..................... 7
Grille and Case ................. 7
Ontdoor (;oils .................. 7
Installation
Installing aJ-Model in an
Existing Wall Case .......... 10-12
Preparing u) Install ............. 9
Troubleshootil_g Tips
Befbr_ Yon (;all For Sere'ice .... 14
Normal Operating Sounds ..... 14
Consumer Supp(mt
Consumer Support .... Back Cover
Wammty ..................... 15
Write the model and serial numbers here:
#
#
Find these numbers on a label on the
flont of the base pan behind the fiont grille.
Chas,si,s()rdy
Cod()@: Aff;H 08, lO ACA
4ICH l(J, 12 [)CA
d/(:S 06 LeA
4]cf o,s',_o ACA
41c5 09, _o, _2 [)ca
Heal/Cool: A]ES 09, lO, 12 DCA
4I_'H _2 D(:a
Hea[P_r@: A]HS O& 10 DCA
49-7397 10-00JR
READALL INSTRUCTIONSBEFOREUSING.
For your safety, the information in this manual must be followed to minimize the risk of fire or
explosion, electric shock, or to prevent property damage, personal injury, or loss of fife,
_tl SSAFETYPflECAUTIONS
/_P'_ •Use this appliance only fbr its intended
purpose as described in this O_mer's
Manual.
•This air conditioner nmst be properly
installed in accordance with the
Installation Insmlctions before it is used.
•Never unplug your air conditioner by
pulling on the power co_d. Always gTip
plug firmly and pull straight out from the
receptacle.
•Repair or replace imme(fiately all elecuic
service cords that have become fiayed
or otherwise damaged. Do not use a co_d
that shows cracks or abrasion damage
along itslength or at either the ph|g or
connector end.
Turn lhe mode control to OFFand unph|g
your air conditioner before making any
repairs or cleaning.
NOTE:We strongly recommend that any
servicing be pe_t6rmed by a qualified
indMdual.
For your saf(ty...@) not store or use
combustible materials, gasoline or other
flammable vapors or liquids in the vicinity
of this or any other appliance.
2
vvvvvv.GEAppliances.com
HOWTOCONNECTELECTRICITY
Do not, under any circumstances, cut or remove the third (ground) prong from the power cord.
For personal safety, this appliance must be properly grounded.
The power cot,1 of dlis appliance is equipped
with a 3-prong (gTounding) plug which mates
with a standard 3-prong (g_mnding) _11
outlet u_ minimize the possibility ofelecuic
she& hazard from this appliance.
Have tile wall outlet and circuit checked by a
qualified elecuician m make sure the outlet is
pr_perly g_mn(led.
_qmre a 2-prong x_ll outlet is encountered,
it is your personal responsibility and
obligation to have it replaced with a properly
gTounded 3-prong wall oudet.
The air conditioner shouM always be
plugged inu_ its own individual electrical
outlet which has a voltage rating that matches
the rating plate.
This provides dm best perfbmmnce and also
prevents overloading house wiring circuits
which couM cause a fire hazard fi_)m
overheated wires.
See the Installation Insuuclkms, Electrical
Requirements section for specific elecuical
connection requirements.
3
IMPORTANTSAFETYINFORMAtiON.
READALLINSTRUCTIONSBEFOREUSING.
WARNING!
USEOFEXTENSIONCORDS-115-Voltmodelsonly
Because of potential safety hazards under
certain conditions, we strongly recommend _CAUTION:
against the use of an extension cord.
However, if yon must use an extension cord,
it is absolutely necessary that it be a U L-listed,
14 gauge, 3-wire g_mn(ling t}]-/e appliance
extension cot,1 having a gTounding b_e plug
and outlet and that tile elecuical rating of the
co_d be 15 amperes (minimum) and 125 volts.
DO NOT use an extension cord with any of
the 230/208 voltmodels.
USEOFADAPTERPLUGS-115-Voltmodelsonly
Because of potential safety hazards under
certain conditions, we strongly recommend
against the use of an adapter plug.
However, if you must use an adapter, where
local codes permit, a temporary connection
may be made m a properly g_mnded 2-prong
wall outlet by use of a UIAisted adapter
available at most local haidware stores.
The larger slot in tile adapter must be aligned
with tile larger slot in the wall outlet to
provide proper polarity in tile connection
of tile power cold.
V_qmn disconnecting tile pox_r cord from
tile adapter, always hold tile adapter ill place
with one band while pulling file power cord
plug with tile other hand. If this is not done,
tile adapter g_mnd terminal is very likely to
break with repeated use.
If file adapter gTound terminal breaks, DO
NOT USE tile air conditioner until a proper
gTound has been established.
Attaching the adaptergreundterminalto a waft
outlet coverscrew does not groundthe appliance
unlessthe coverscrew is metal, andnot bsulated,
and the waft outlet is groundedthreughthe house
wiring. Youshouldhave the circuit checkedby a
qualified electrician to makesure the outlet is
properlygrounded.
READANDFOLLOWTHISSAFETYINFORMATIONCAREFULLY.
SAVETHESEINSTRUCtiONS
4
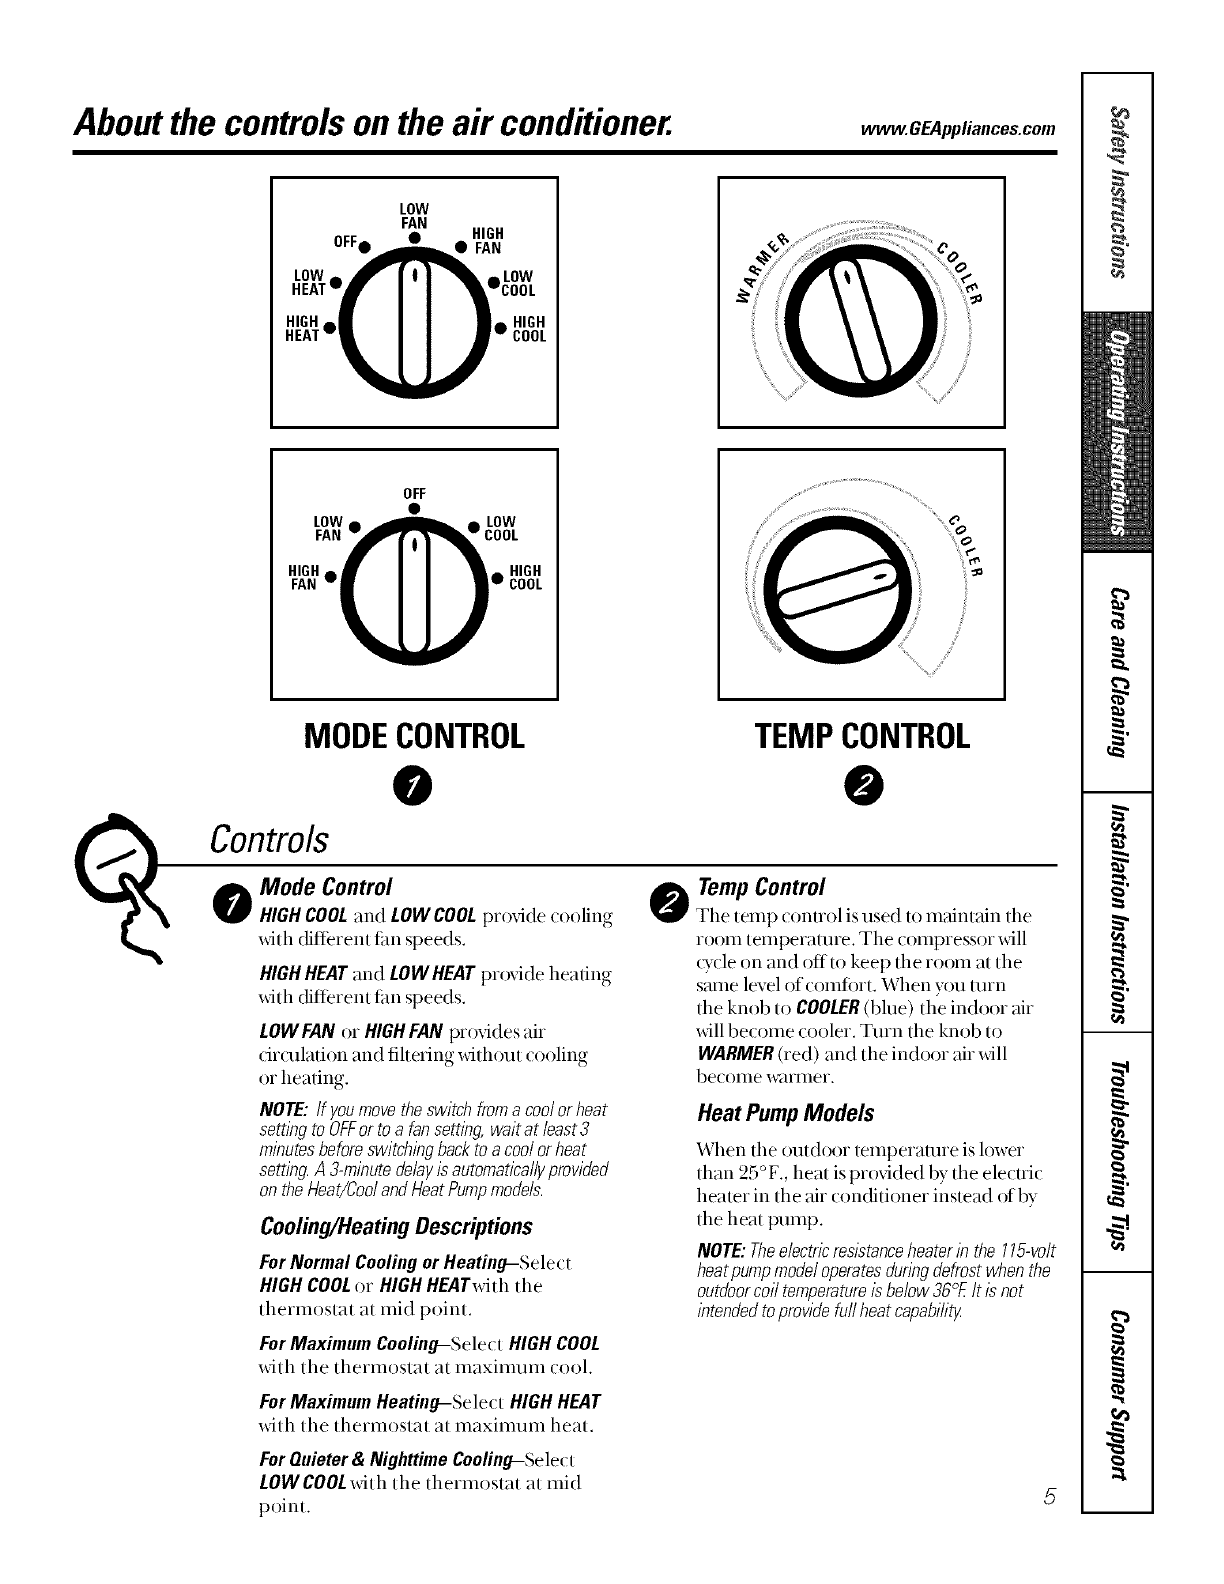
Aboutthe controlson the air conditioner. . .GE4ppliances.com
LOW
FAN HIGH
OFF@ @ @ FAN
OFF
@
LOW_ _LOW
FAN _r'_ '_COOL
FAN -- k_L_ /
,#
MODECONTROL
@TEMPCONTROL
@
Controls
Mode Control
HIGHCOOLand LOWCOOLproxdde (ooling
with (fiflerent tim speeds.
HIGHHEATand LOWHEATprovide heating
with (fiflerent fhn speeds.
LOWFAN or HIGHFAN pr_Mdes air
drQflation and fihering without cooling
or heating.
NOTE:If youmovetheswitchfroma coolorheat
settlbgto OFFerto a fansetting,waitat least3
minutesbeforeswitchingbacktoacoolorheat
setting.A 3-minutedelayisautomaticallyprovided
ontheHeat/CodandHeatPumpmodels.
Cooling/HeatingDescriptions
ForNormal CoolingorHeating-Sele( t
HIGH COOLor HIGH HEATwith the
thermostat at mid point.
For Maximum Cooling-Sele( tHIGH COOL
with tile thermostat at maximum cool.
TempControl
The temp (ontrol is used to maintain the
room temperature. The compressor will
_ycle on and offto keep the room at the
stone level of comtort. When you mrn
the knob to COOLER(blue) the indoor air
will become cooler. Turn the knob to
WARMER(red) and the indoor air will
become w:umer.
Heat PumpModels
When the outdoor temperature is lower
than 25°F., heat is provided by the elecuic
heater in the air conditioner instead of by
the heat pump.
NOTE:Theelectricresistanceheater/nthe 115-vdt
heatpumpmode/operatesdunbgdefrostwhenthe
outdoorcoil temperatureisbelow36°£ It isnot
intendedtoprovidefurlheatcapability
ForMaximum Heating-Sele( tHIGH HEAT
with the thermostat at maximum heat.
ForQuieter& NighttimeCooling-Select
LOWCOOLwith the thermostat at mid
point.
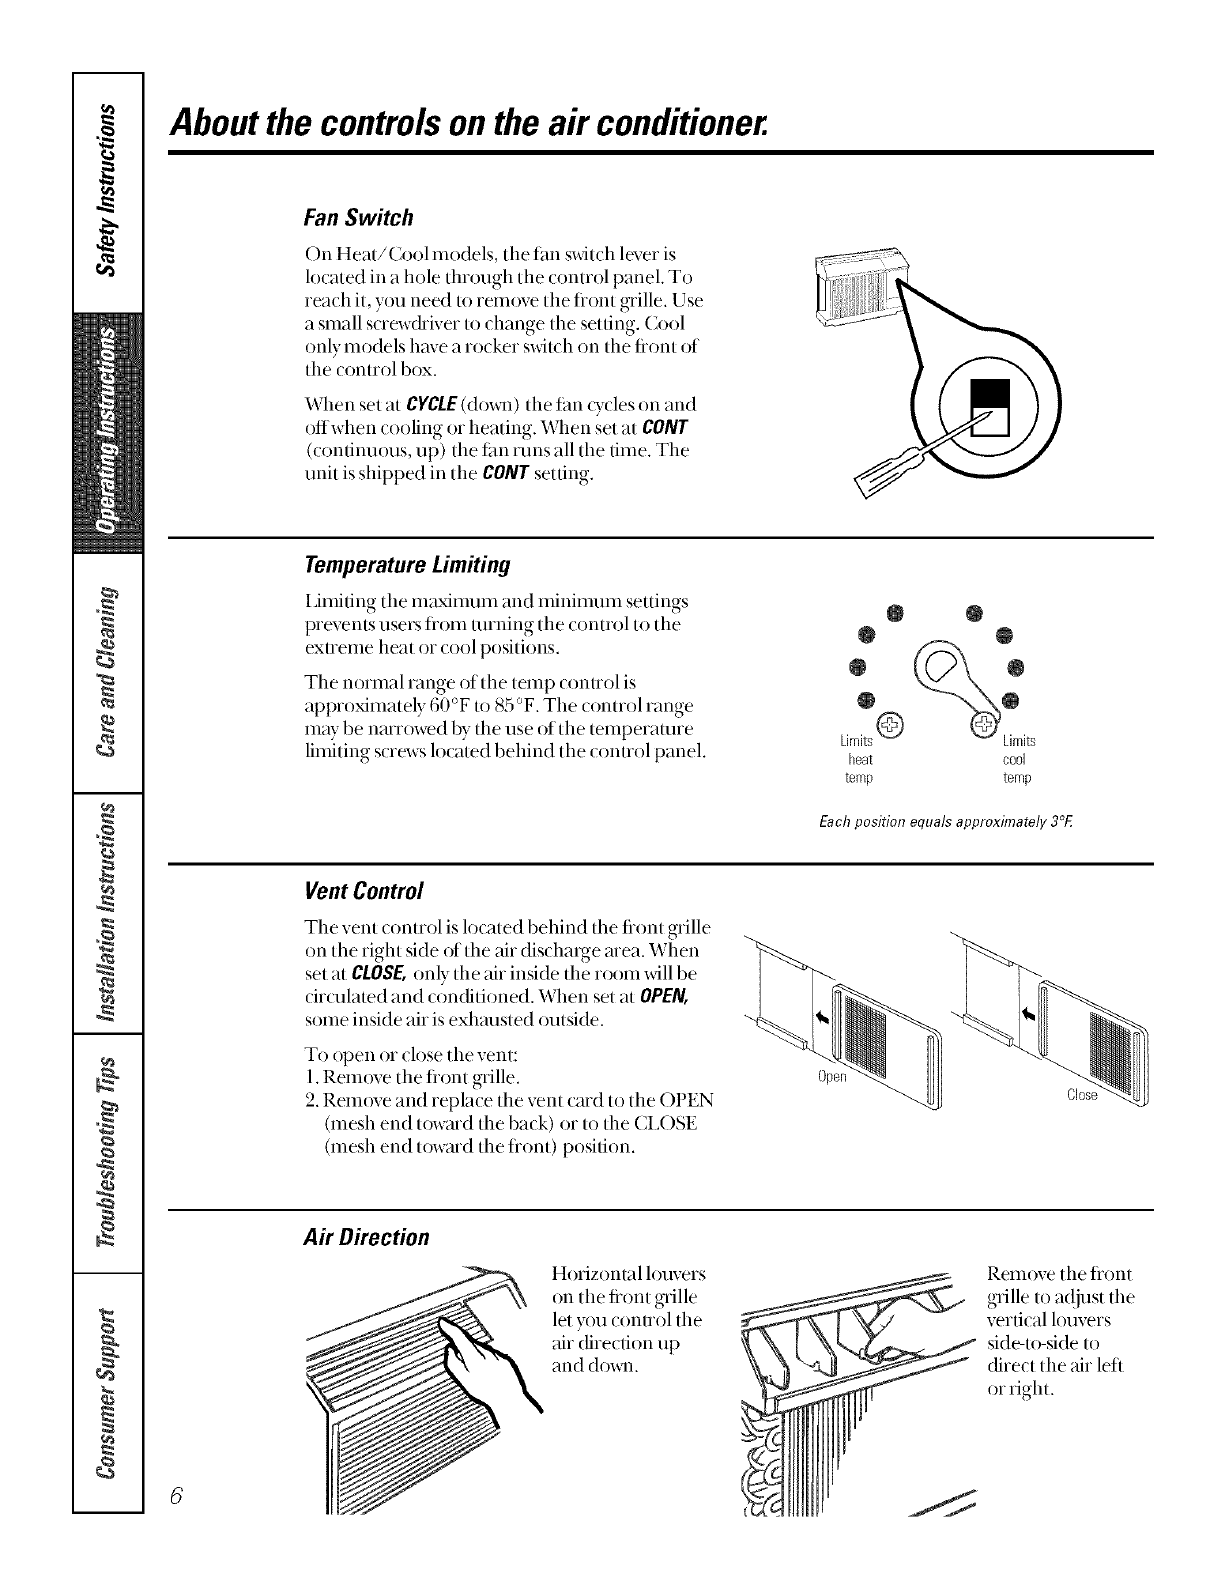
About the controlson the air conditioner.
Fan Switch
On Heat/Cool models, tile Lm sx_itchlever is
located in a hole through the control panel. To
reach it, you need u) remove the flont grille. Use
a small s(rew(hiver to change the setting. Cool
only models have a rocker swiwh on the fiont of
the control box.
When set at CYCLE(down) the tm_ (ycles on and
offwhen cooling or heating. When set at COIlff
(continuous, up) the tim runs all the time. The
unit is shipped in the CONT setting.
Temperature Limiting
I Jmiting the m_Lximum and minimum settings
prevents users flom turning the control Ix)the
extreme heat or cool positions.
The noxmal range of the temp connol is
approximately 60°F to 85 °F. The control range
may be nmTowed by the use of the temperature
limiting screws located behind the conuol panel.
@ @
@
Limits@
heat cool
temp temp
Eachposition equals approximately 3°E
Vent Control
The vent control is located behind the fiont grille
on the right side of the air discharge mea. When
set at CLOSE,only the air inside the room will be
circulamd and con(fitioned. When set at OPEN,
some inside air is exhm_sted outside.
To open or close the vent:
1.Remove the flont grille.
2. Remove and replace the vent card to the OPEN
(mesh end toward the back) or to the CI_OSE
(mesh end toward the flont) position.
0 en
Clos_
Air Direction
HorizolHal lotwers
on the fiont grille
let you conuol the
air (firecfion up
:rod d()_1].
Relnove the flon[
grille to a(!iust the
vertical louvers
side-to-side to
direct the air left
or right.
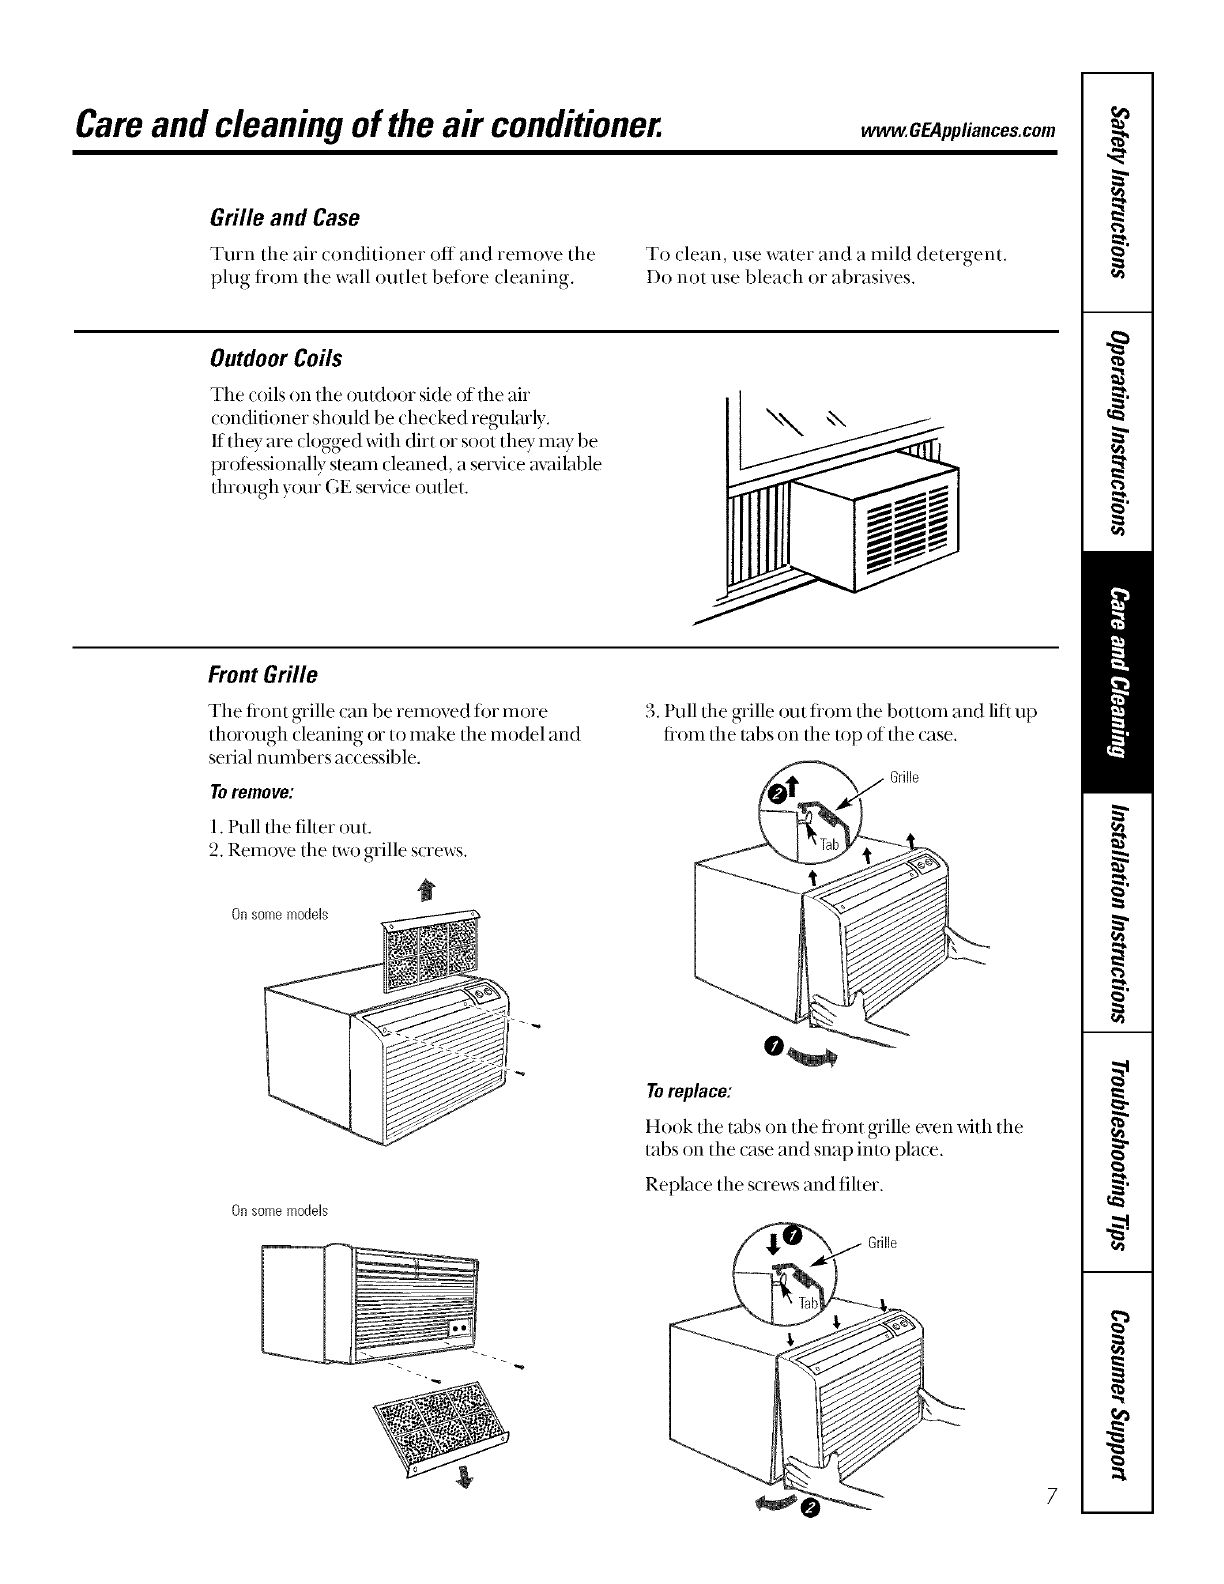
Careand cleaning of the air conditioner. . .CEApplia.ces.com
Grille and Case
Turn tile air (ondifioner off and remove the
plug fiom tile wall outlet before deaning.
To clean, use water and a mild detergent.
Do not use blea(h or abrasives.
OutdoorCoils
The coils on the omdoor side of the air
conditioner sh,)uM be checked regularly.
If they are clogged _dth dirt or soot they may be
protessionally steam cleaned, a sepAce ax_filable
through y_)ur GE secvice outlet.
Front Grille
The fiont grille can be rem,)ved ior more
thorough cleaning or to make the model and
serial numbers accessible.
Toremove:
1. l'ull the filter out.
2. Rem()ve the tw() grille screws.
Onsomemodels
3. l)ull tile grille out fiom tile bottom and lift up
fiom tile tabs on tile top of the case.
Grille
On some models
Toreplace:
Hook the tabs on the tiont grille even with the
tabs on the case and snap inu) place.
Replace the screws and fiher.
Grille
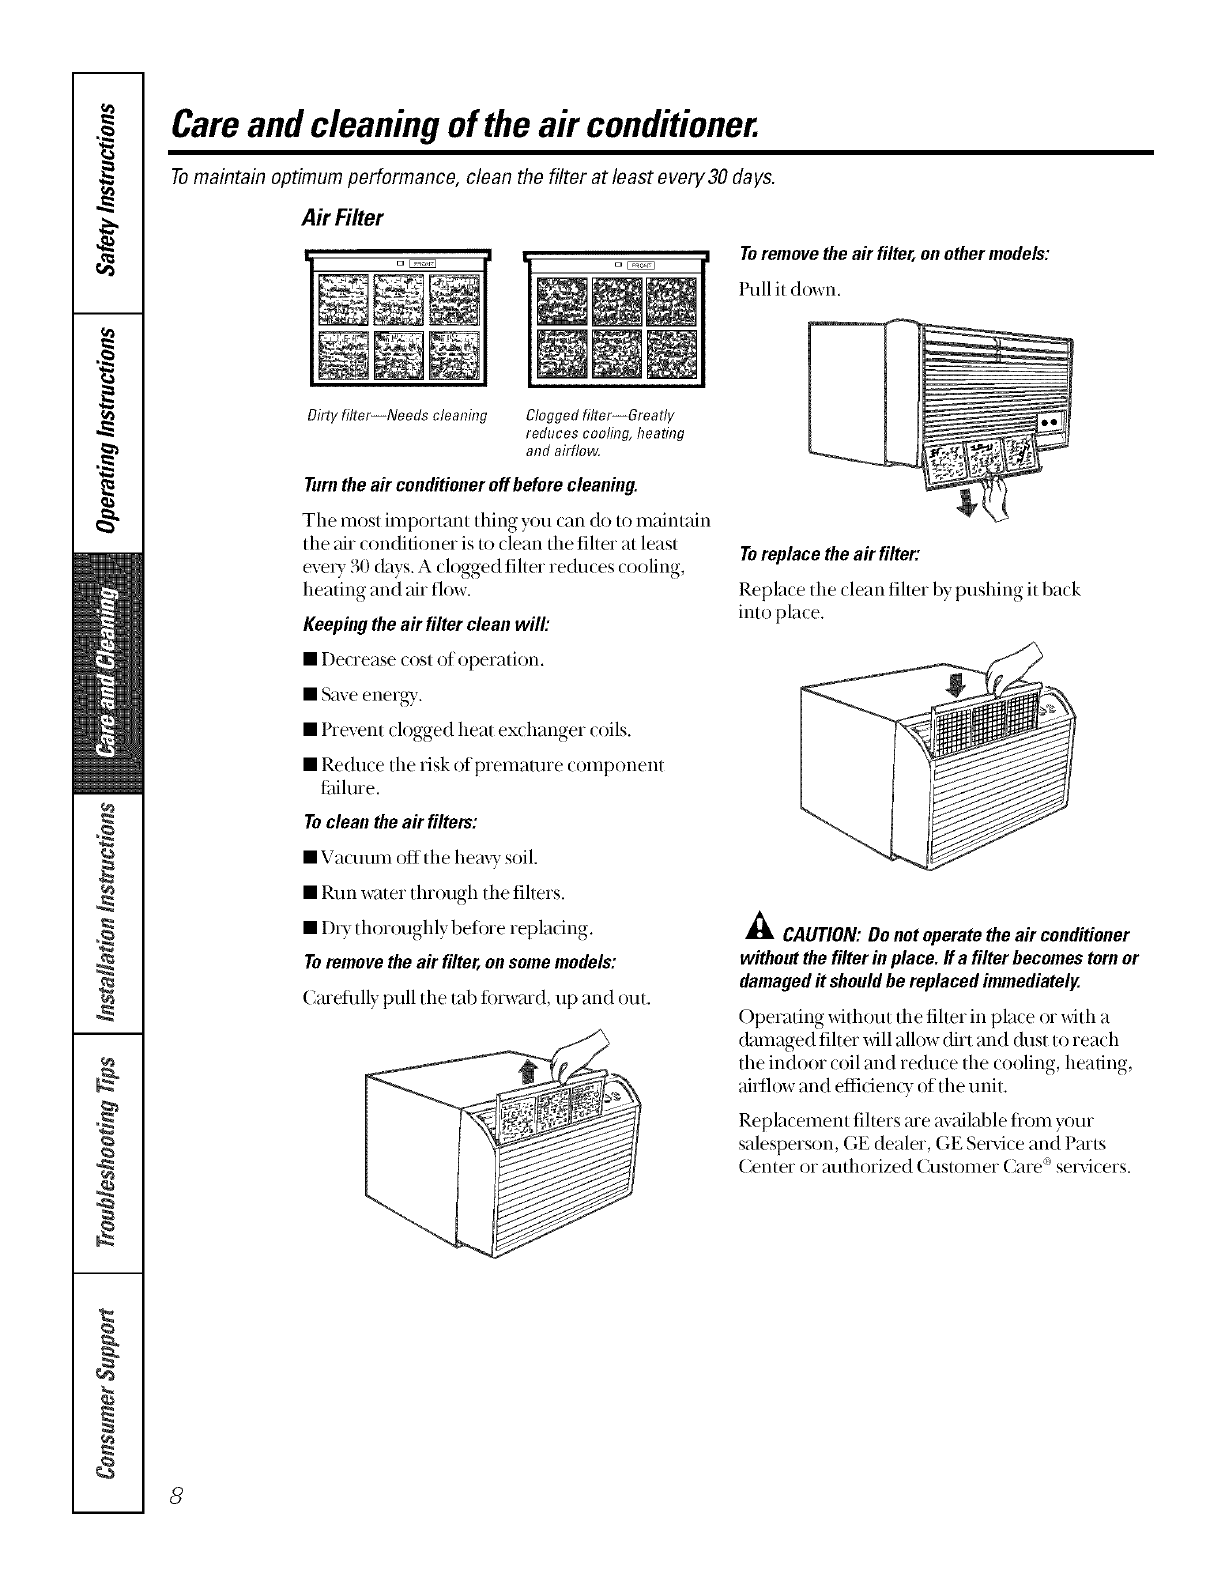
Careand cleaning of the air conditioner.
Tomaintain optimum performance, clean the filter at least every30 days.
Air Filter
Toremove the air filter, on other models:
Pull it down.
Dirty filter--Needs cleaning Clogged filter--Greatly
reduces cooling, heating
and airflow.
Turntheair conditioner offbeforecleaning.
Tile most important thing }_)u can (h) to maintain
the air conditioner is to clean tile fiher at least
eve U30 days. A clogged fiher re&rues cooling,
heating and air flow.
Keepingtheair filter cleanwill:
• Decrease cost of operation.
• Save energy.
• Prexvnt clogged heat exchanger coils.
• Reduce the risk of premature component
titilure.
Tocleantheair filters:
•Vacuum off the hem T soil.
•Run water through tim fihers.
• DUthor{)ughly betore repladng.
Toremovetheair filter,onsomemodels:
Cmetiflly l-rollthe tab ti)rwmd, up and out.
Toreplacetheair filter:
Repla(e the (lean fiher by pushing it ba(k
into place.
_CAUTION:Donotoperatetheair conditioner
withoutthefilterinplace, ffa filterbecomestornor
damagedit shouldbe replacedimmediately.
Operating without the fiher in place or with a
d:tmaged fiher will allow dirt and (h_stto reach
the indoor coil and reduce the cooling, heating,
ai_{l_)wand efliden_ T of the unit.
Replacement fihers are available fiom your
salesperson, (;E dealer, (;E Se_@e and Pmts
Center or authorized Customer Care <'servicers.
8
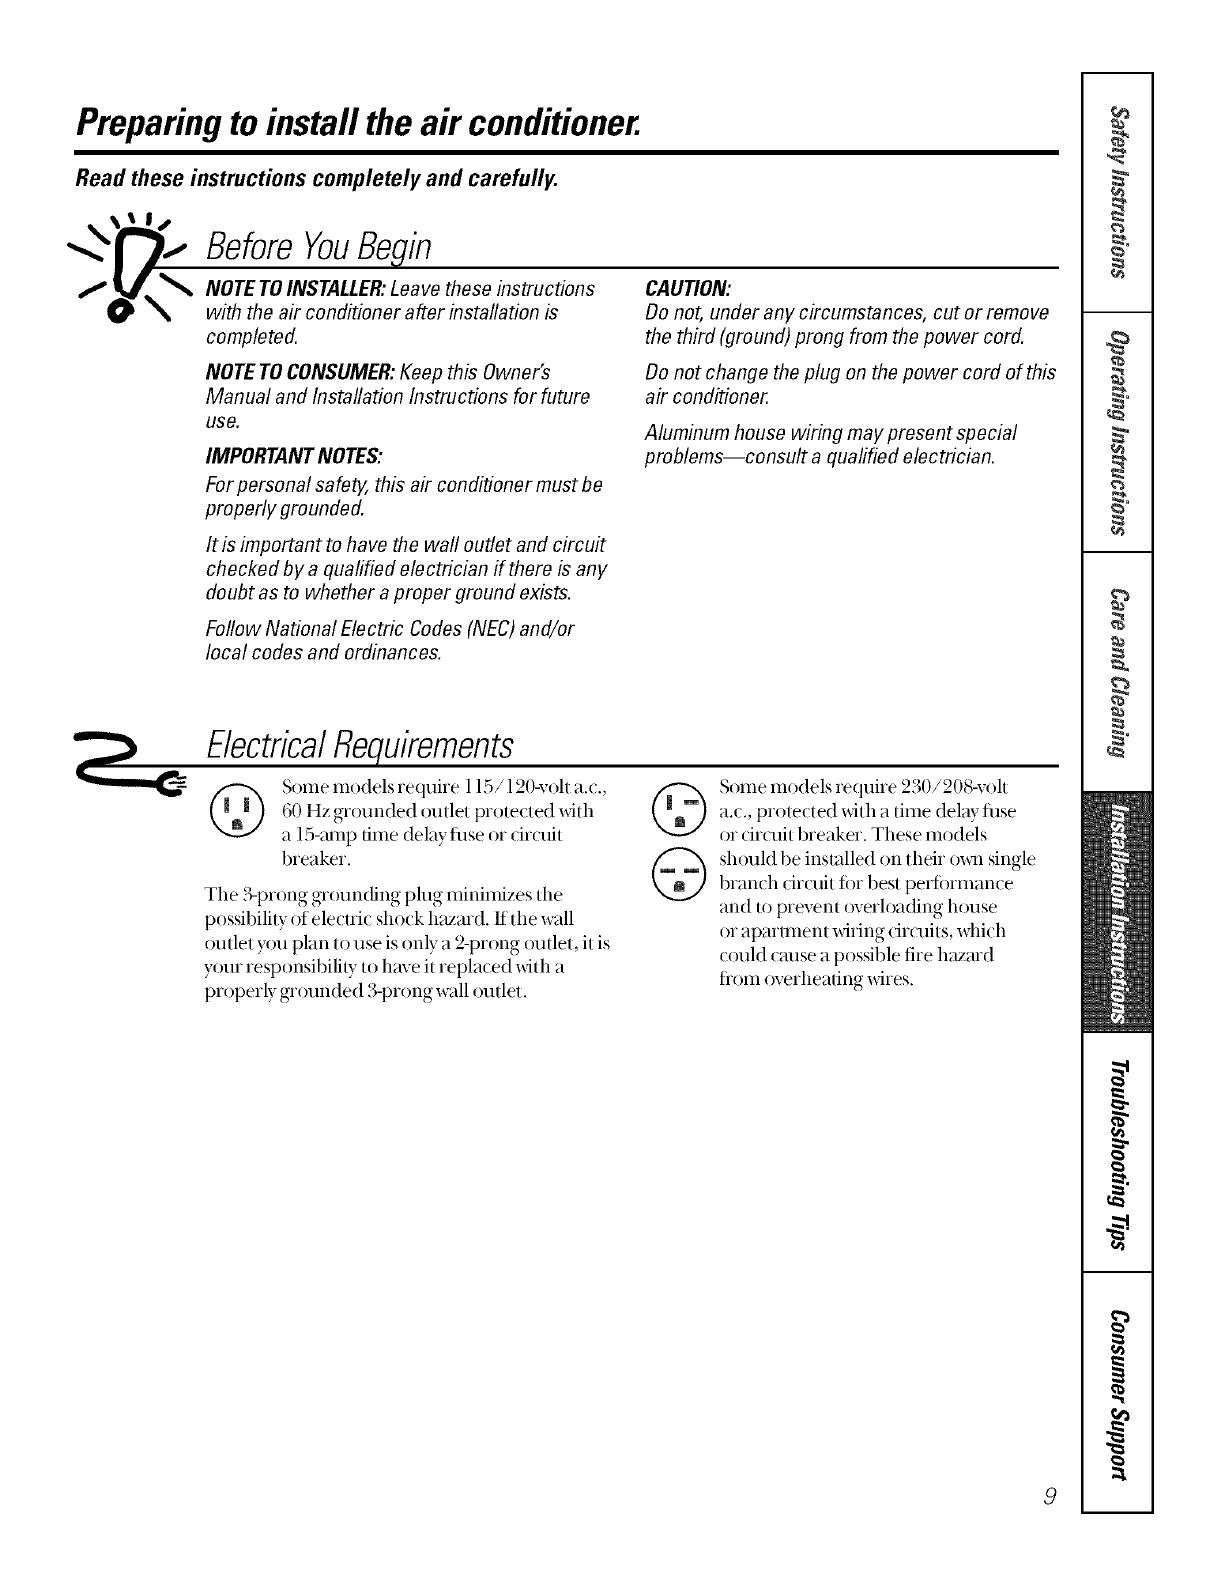
Preparingto install the air conditioner.
Read these instructions completely and carefully.
BeforeYouBegin
NOTE TO INSTALLER:Leave these instructions
with the air conditioner after installation is
completed.
CAUTION:
Do not, under any circumstances, cut or remove
the third (ground)prong from the power cord.
NOTE TO CONSUMER:Keep this Owner's
Manual and Installation Instructions for future
use.
IMPORTANT NOTES:
For personal safety, this air conditioner must be
properly grounded.
Do not change the plug on the power cord of this
air conditioner.
Aluminum house wiring may present special
problems--consult a qualified electrician.
It is important to have the wall outlet and circuit
checked by a qualified electrician if there is any
doubt as to whether a proper ground exists.
Follow National Electric Codes (NEC)and/or
local codes and ordinances.
ElectricalRequirements
Some models require l 15/120-volt _l.c.,
60 Hz grounded outlet protected _fith
a 15-,tmp time delayfl_se or circuit
breaker.
The 3-prong grounding plug minimizes the
possibili b of elecuic shock hazard. If the w:dl
mtlet you plan to use is only a 2-prong outlet, it is
your responsibility to have it replaced with a
properly grounded 3-prong wall outlet.
Some models require 230/208-volt
a.c., protected with a time delay fi_se
or drcuit breaker. These models
should be instzdled on their o_1_single
branch drcuit lot best perlormance
and to prevent overloacfing house
or aparmlent _dring drcuits, which
could cm_sea possible fire hazmd
tiom overheating wires.
Installing a J-Model in an existing wall case.
Read these instructions completely and carefully.
IMPORTANT!
GEstrongly recommends the removal of the old
wall case and the installation of a new GE Wall
Case. If you decide to keep the existing wall
case, you may need a kitto ensure proper
performance. If you DO NOT use a kit, you
run the risk of poor performance or product
failure. This is not covered under the terms
of the GEwarran_
J-Model OualifyingOuestions
J-model air conditioners may fit in existing wall
cases. However, they often need a kit to properly
adapt the case to the GEair conditioner. Answer
these questions and see the chart below for the
proper kit.
]Whatbrendair conditionerwill you be
replacing?
]What are the dimensions ofthe wall case
currently in use?
[] What is the model number of the chassis
currently in use? What is the model (or Type)
number of the wall case currently in use?
Frequently, the J-model adapter kit xfillapply
to another brand model "series" or spedfic
vintage. In these cases, you need the chassis
model number and/or the wall case or "type"
number to co_tiirm the use of the correct
adnpter kit.
Whattypeof outdoorgrille is usedwiththe
I,.,I currentwall case?
There may be an architectural grille attached
to a wall case to enhance the exterior
appemance (ff the buiMing. Custom grilles
may be used with J-model w;dl cases pr_)vided
aJ-model adapter kit is also used _) ensure
proper airflow.
10
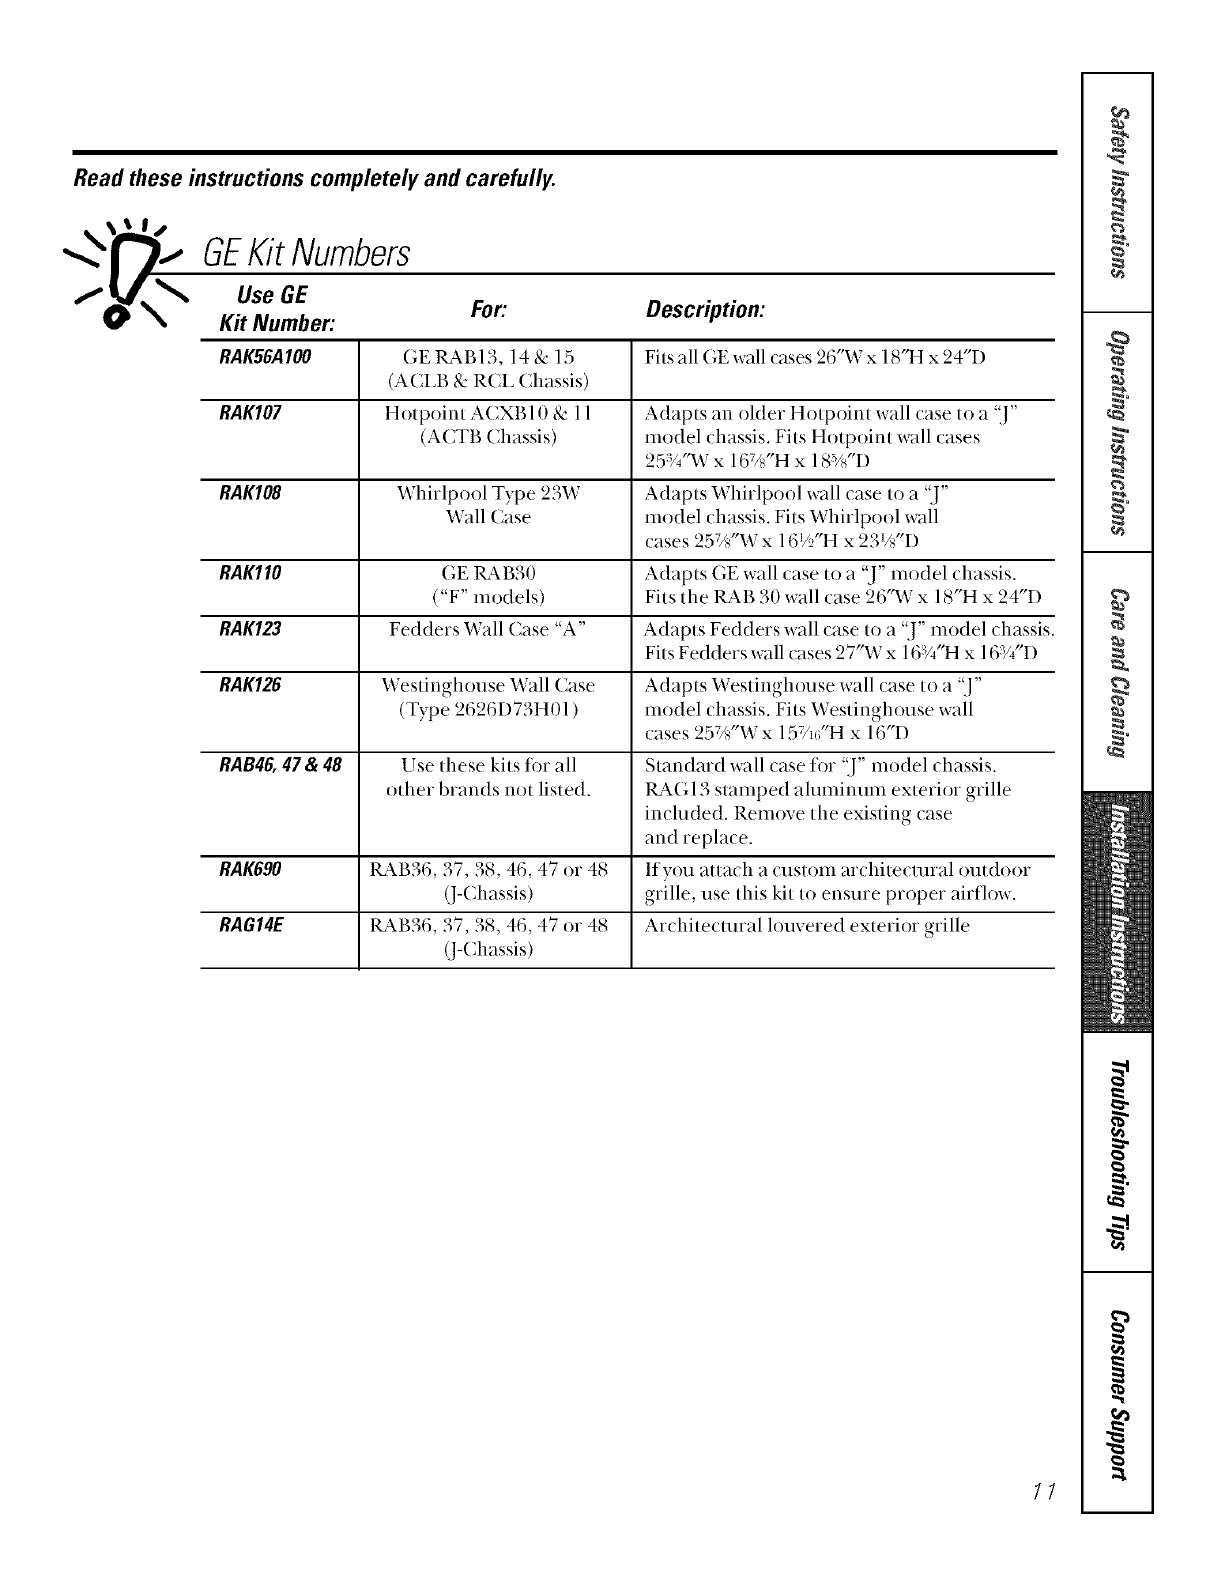
Read these instructions completely and carefully.
GEKit Numbers
fyX_ Use GE
Kit Number: For: Description:
RAK56A100 GE lL_kB13, 14 & 15 Fi/s _dl (;E wall (ases 26"W x 18"H x 24"D
(ACI.B & RCL (hassis)
RAKI07 Hotpoint ACXB10 & 11 Adapts an older Hotpoint wall case to a "J"
(ACTB Chassis) model chassis. Fits Hotpoint wall cases
25 F4"Wx 167/_"H x 18_'/_'D
RAKI08 Whirlpool Type 23W Adapts Whirlpool wall case to a "]"
Wall Case model chassis. Fits Whirlpool wall
cases 257_'W x 161_2"Hx 23_/_"D
RAK110 GE 1L_B30 Adapts (;E wall case to a "J" model chassis.
("F" models) Fits the IL_B 30 wall case 26"W x 18"H x 24"D
RAK123 Fedders Wall Case "A" Adapts Fedders wall case to a "J" model chassis.
Fits Fedders wall cases 27"W x 16_V_"Hx 16_V,"D
RAK126 Westinghouse Wall (ase Adapts Westinghouse wall case to a "J"
(Type 2626D73H01 ) model chassis. Fits Westinghouse wall
cases 25;/_s'Wx 15V_;'H x 16"D
RAB46, 47 & 48 Use these kits tin all Standard wall case fin "J" model chassis.
other brands not listed. RAG 13 stamped aluminum exterior grille
included. Remove the existing case
and replace.
RAK690 tL_kB36, 37, 38, 46, 47 or 48 If you attach a custom architeclural outdoor
(J-(hassis) grille, use this kit to ensure proper airfl()w.
RAGI4E 1L_B36, 37, 38, 46, 47 or 48 Architec/ural louvered exterior grille
(]-Chassis)
11
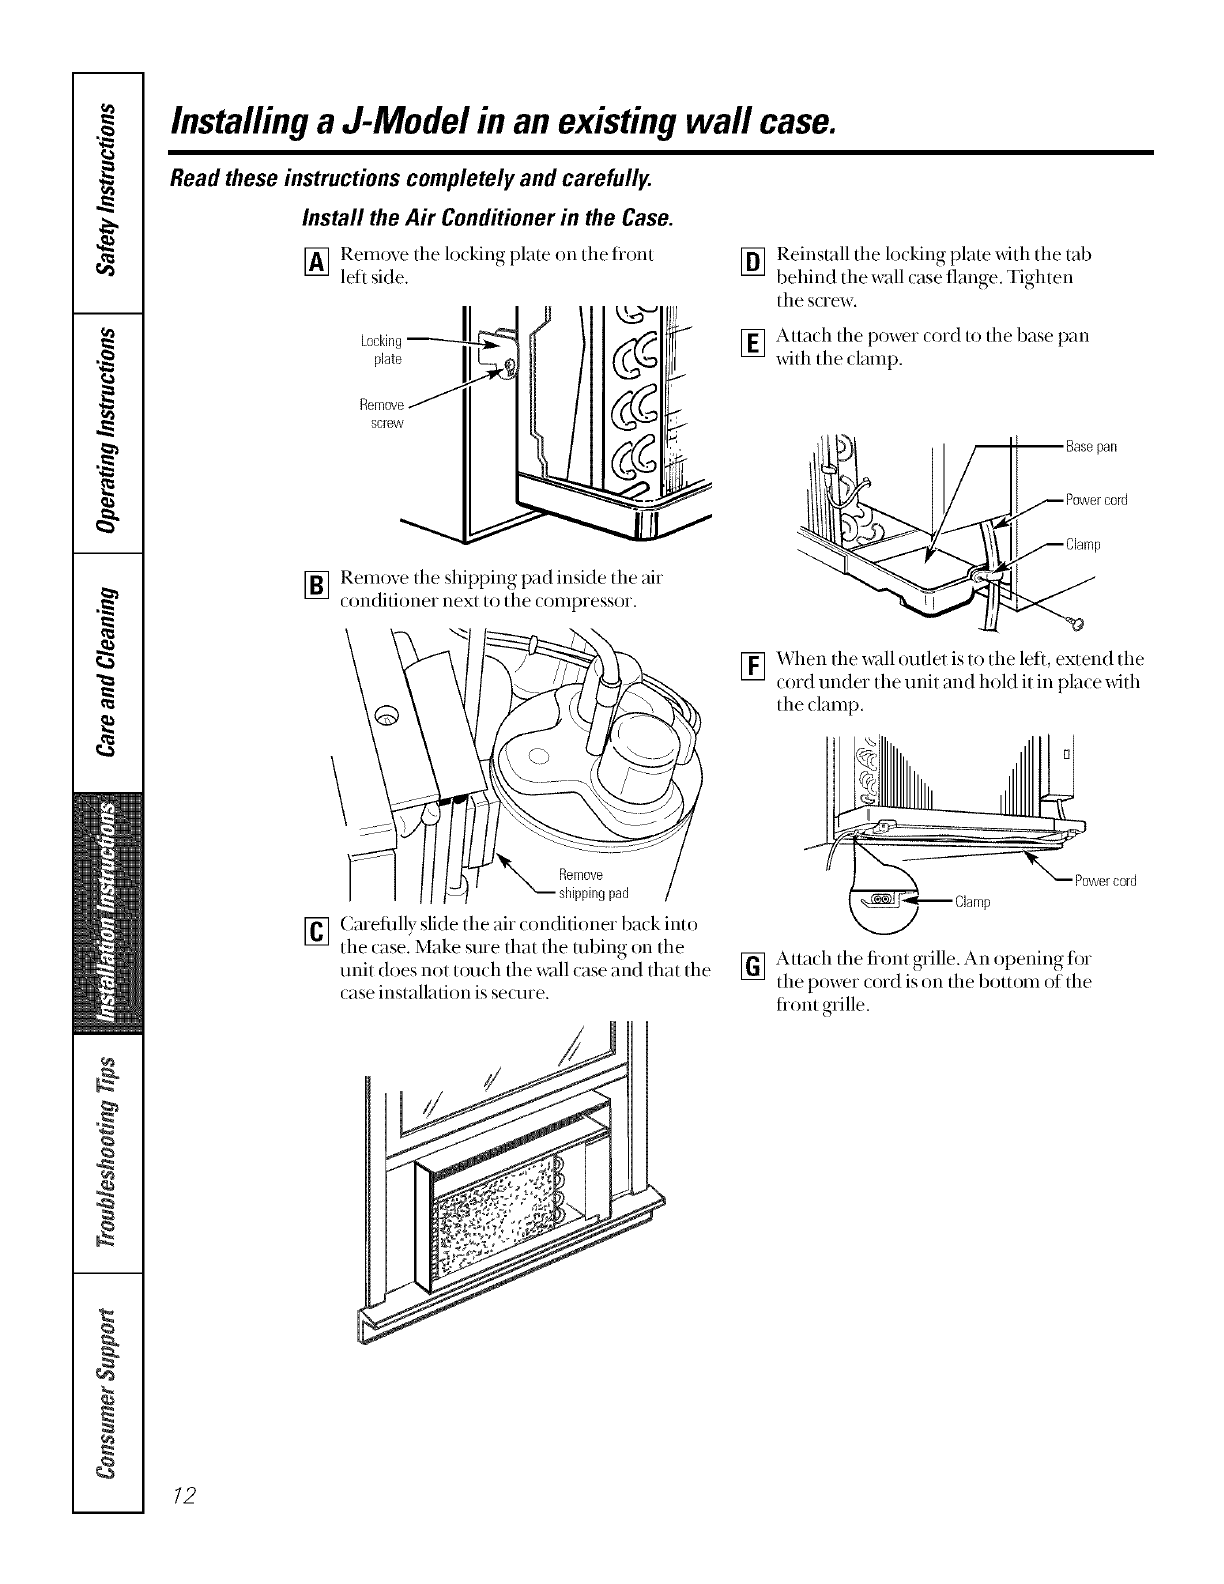
Installing a J-Model in an existing wall case.
Read these instructions completely and carefully.
Install the Air Conditioner in the Case.
[_ Remove tile lo(king plate on tile fiont
left side.
II J /ll l
/II B
Remove j
ew"qlI, 111¢ 1
_] Remove tile shipping pad inside tile air
conditioner next to tile compressor.
[_ Reinstall the locking plate wifll the tab
behind tlle wall (ase flange. Tighten
the s( rew.
_] Attach tile power cord to tile base pan
_dth tile clamp.
pan
_] When tile wall outlet is to tile left, extend tile
_ord under the unit and hoM it in pla_e xdth
tlle{ lamp.
Remove
shippingpad
_] Carefiflly slide the air conditioner back into
tile case. Make sure that tile robing on tile
unit does not touch the wall case and that the
case installation is secure.
_ Powercord
[_ Attach tile fiont grille. An opening for
tile power cord is on tile bottom of the
fiont grille.
12
_O_S, www, GEApptiances,com
13
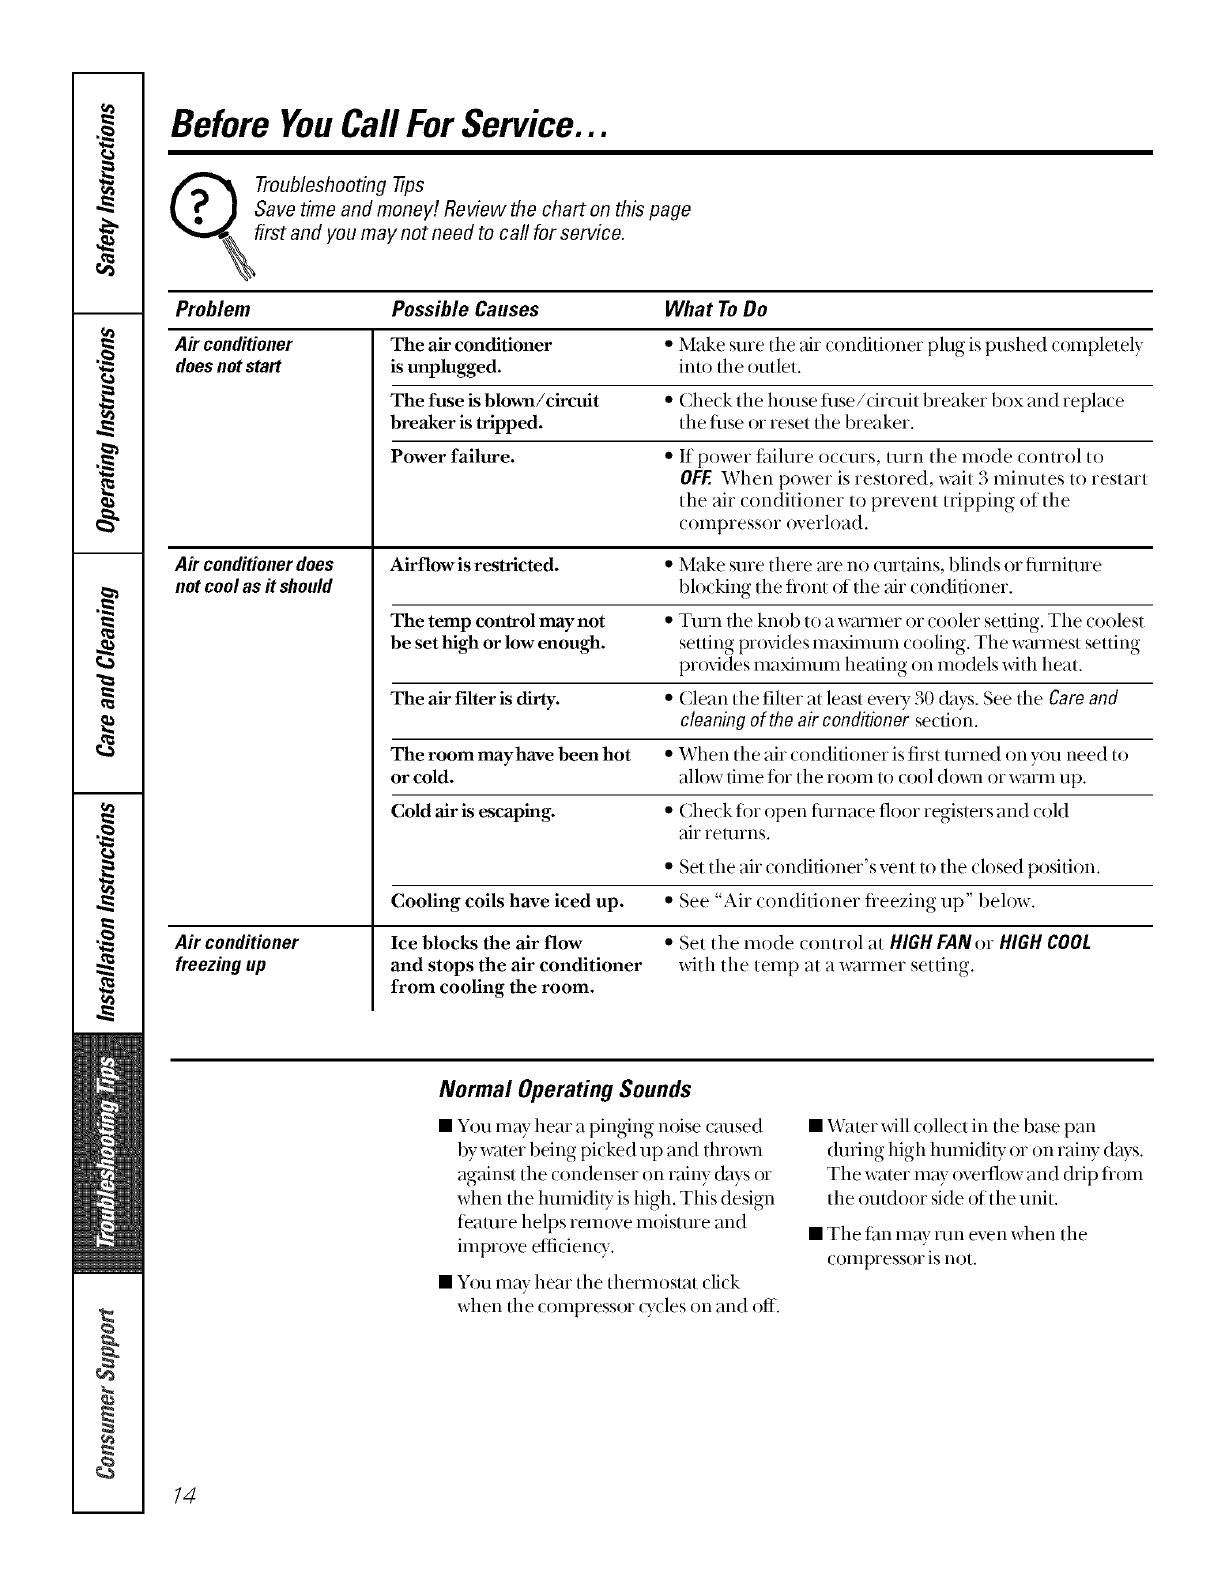
Before YouCall ForService...
TrOubleshooting -tips
Save time and money! Review the chart on this page
t and you may not need to call for service.
Problem Possible Causes What To Do
Air conditioner The air conditioner *Make sure the air conditioner plug is pushed completely
does not start is unplugged, into tile _mtlet.
The fuse is blown/circuit •(heck tile house fllse/dr( uit breaker box and replace
breaker is tripped, tlle thse or reset the breaker.
Power failure. •If power fitilure occurs, turn the mode control to
OFF. When power is restored, wait 3 minutes to restart
the air conditioner to prevent tripping of the
compressor overload.
Air conditioner does Airflow is restricted. '* Make sure there are no curtains, blinds or flnnimre
not cool as # should blocking tile flont of tile air conditioner.
The temp control may not *Turn the knob to a wmmer or cooler setting. The coolest
be set high or low enough, setting provides maximum cooling. Tile w:umest setting
pr(Mdes nlaxinmm heating on models _dth heat.
The air filter is dirty. • Clean the filmr at least exvty 30 days. See the Care and
cleaning of the air conditioner section.
The room mayhave been hot • When tile air conditioner is first turned on you need to
or cold. allow time fi)r the room to cool (h)_al or w_um up.
Cold air is escaping. *Check fin open finnace floor registers and coM
air relurns.
•Set the air conditioner's vent u) the closed position.
Cooling coils have iced up. • See "Air conditioner fieezing up" below.
A# conditioner
freezingup
Ice blocks the air flow • Set tile mode control at HIGH FAN or HIGH COOL
and stops the air conditioner with tile telnp at a warlner setting.
from cooling the room.
Normal Operating Sounds
• You Illdy hear a pinging noise cruised
by wa/er bring picked up and thrown
against tile condenser on rainy (hys or
when the lmmidi b"is high. This design
feature helps rem_)ve moisture and
impr()ve eflicien(y.
• Y()u may hear tile thermoslat click
when tile compressor _ycles on and off.
• Water will collect in tile base pan
during high humidity or on rainy days.
Tile w_ner may oxv_low and drip flom
the outdoor side of the unit.
• Tile tim may run even when tile
compressor is not.
14
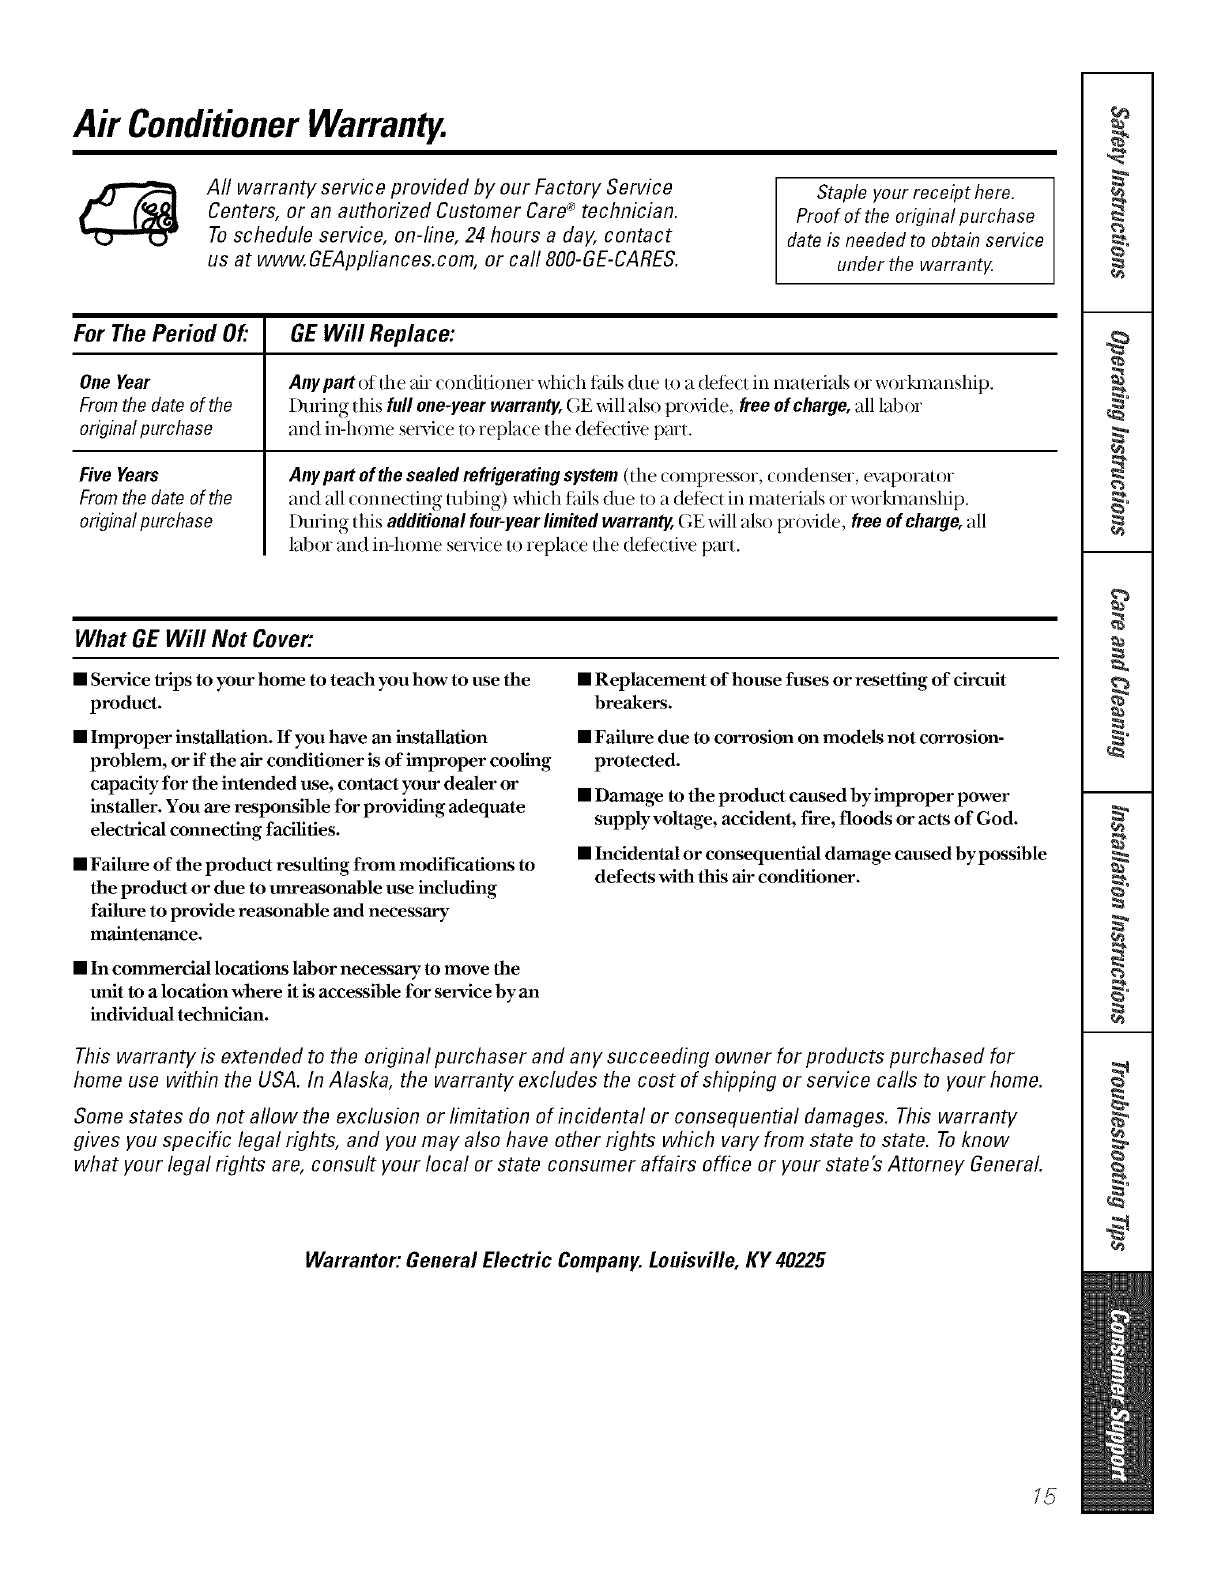
Air ConditionerWarranty.
Aft warranty service provided by our Factory Service
Centers, or an authorized Customer Care®technician.
To schedule service, on-line, 24 hours a day, contact
us at www. GEAppfiances.com, or call 800-GE-CARES.
Staple your receipt here.
Proof of the orig&al purchase
date is needed to obta& service
under the warrantF
For The Period Of."
OneYear
Fromthe date of the
originalpurchase
Five Years
Fromthe date of the
originalpurchase
GEWill Replace:
Any part of the air conditioner which tifils (h_e/o a detect in ma/erials or workmanship.
During this full one-yearwarranty,GE_dll also proxide, freeof charge,all labor
and in-home se_-ice to replace the detecti_v part.
Anypartofthe sealedrefrigeratingsystem(the compressor, condenser, evaporator
and all connecting robing) which t_dls &_e to a detect in materials or workmanship.
During this additional four-year limited warranty, GE will also pr{Mde, free of charge, all
labor and in-home sex_-ice/o replace the detective part.
What GE Will Not Cover:
• Service trips to your home to teach you how to use the
product.
•Improper installation, ff you have an installation
problem, or if the air conditioner is of improper cooling
capacity for the intended use, contact your dealer or
installer. You are responsible for providing adequate
electrical connecting facilities.
•Failure of the product resulting from modifications to
the product or due to unreasonable use including
failure to provide reasonable and necessary
maintenance.
• Replacement of house fuses or resetting of circuit
breakers.
•Failure due to corrosion on models not corrosion-
protected.
• Damage to the product caused byimproper power
supplyvoltage, accident, fire, floods or acts of God.
• Incidental or consequential damage caused bypossible
defects with this air conditioner.
•In commercial locations labor necessary to move the
unit to a location where it is accessible for service byan
individual technician.
This warranty is extended to the original purchaser and any succeeding owner for products purchased for
home use within the USA. In Alaska, the warranty excludes the cost of shipping or service calls to your home.
Some states do not aflow the exclusion or limitation of incidental or consequential damages. This warranty
gives you specific legal rights, and you may also have other rights which vary from state to state. To know
what your legal rights are, consult your local or state consumer affairs office or your state's Attorney General
Warranter: General Electric Company. Louisville, KY 40225
15
ConsumerSupport.
I I GEAppliancesWebsite vvvvvv.GEAppliances.com
Have a question or need assistance xfith your appliance? TUthe GE Appliances Website 24 hours a day,
any day of the yem! For greater convenience and titster se_'_ice,y_)ucan n_)wd_)wnload Owner's Manuals,
order parts, catalogs, or even sche(hfle service on-line. You can also "Ask Our Team of Experts ......
your questions, and so much more...
ScheduleService vvvvvv.GEAppliances.com
Expert GE repair setx4ce is only one step away flom your door. Get on-line and schedule your setx4ce at
your convenien(e 24 hou_ s any day of the yea_: O_ (all 800-(,E-CARES 800-432-2737) during normal
business hours.
RealLifeDesignStudio vvvvvv.GEAppliances.com
GE supports the Universal Design concept-products, sevvices and environments that can be used by
people of all ages, sizes and capabilities. We recognize the need to design for a wide range of phFfical and
mental abilities and impairments. For details of GE's Universal Design applications, including kitchen
design ideas fin people with disabilities, check out our Website tod W. For the heming impaired, please call
800-TDD-GL*kC (800-833-4322).
ExtendedWarranties vvvvvv.GEAppliances.com
Purchase a GE extended warranty and learn about special discounts that are available wlfile your warranty
is still in efle(t. You can purchase it on-line anytilne, or (all 800-626-2224 during norlnal business hours.
GE ( onsumer Home Sevvi(es will still be flmre after your warranty expires.
PartsandAccessories vvvvvv.GEAppliances.com
ln(fixfduals qualified to sev_fce their ox_ appliances can have parts or accessories sent directly to their homes
(VISA, MasterCard and Discover (ards are ac(epted). Order on-line today, 24 hours m_eUday or by phone at
800-626-2002 during normal business hours.
Instructions contained in this manual cover procedures to be performed by any user. Other servicing generally
should be referred to qualified service personnel Caution must be exercised, since improper servicing may cause
unsafe operation.
ContactUs wwvv.GEAppliances.com
If you are not satistied with the set'cice you receive flom GE, contact us on {)ur Website with all the details
includingyour phone number, or _Tite to: General Manager, (_ustomer Relations
GE Appliances, Appliance Park
I,ouisville, KY 40225
RegisterYourAppliance vvvvvv.GEAppliances.com
Re_ster your new appliance on-line--at your convenience! Timely product registration will allow for
enhan(ed (olnmuni(ation and prompt sev_d(e under the terms of your warranty, should the need arise.
You may also mail in the pre-printed registration card included in the packing material, or detach and
use the form in this Owner's Manual.
Printed in China
