GE EDW4000G10BB User Manual DISHWASHER Manuals And Guides L0409169
GE Dishwasher Manual L0409169 GE Dishwasher Owner's Manual, GE Dishwasher installation guides
User Manual: GE EDW4000G10BB EDW4000G10BB GE DISHWASHER - Manuals and Guides View the owners manual for your GE DISHWASHER #EDW4000G10BB. Home:Kitchen Appliance Parts:GE Parts:GE DISHWASHER Manual
Open the PDF directly: View PDF ![]() .
.
Page Count: 16
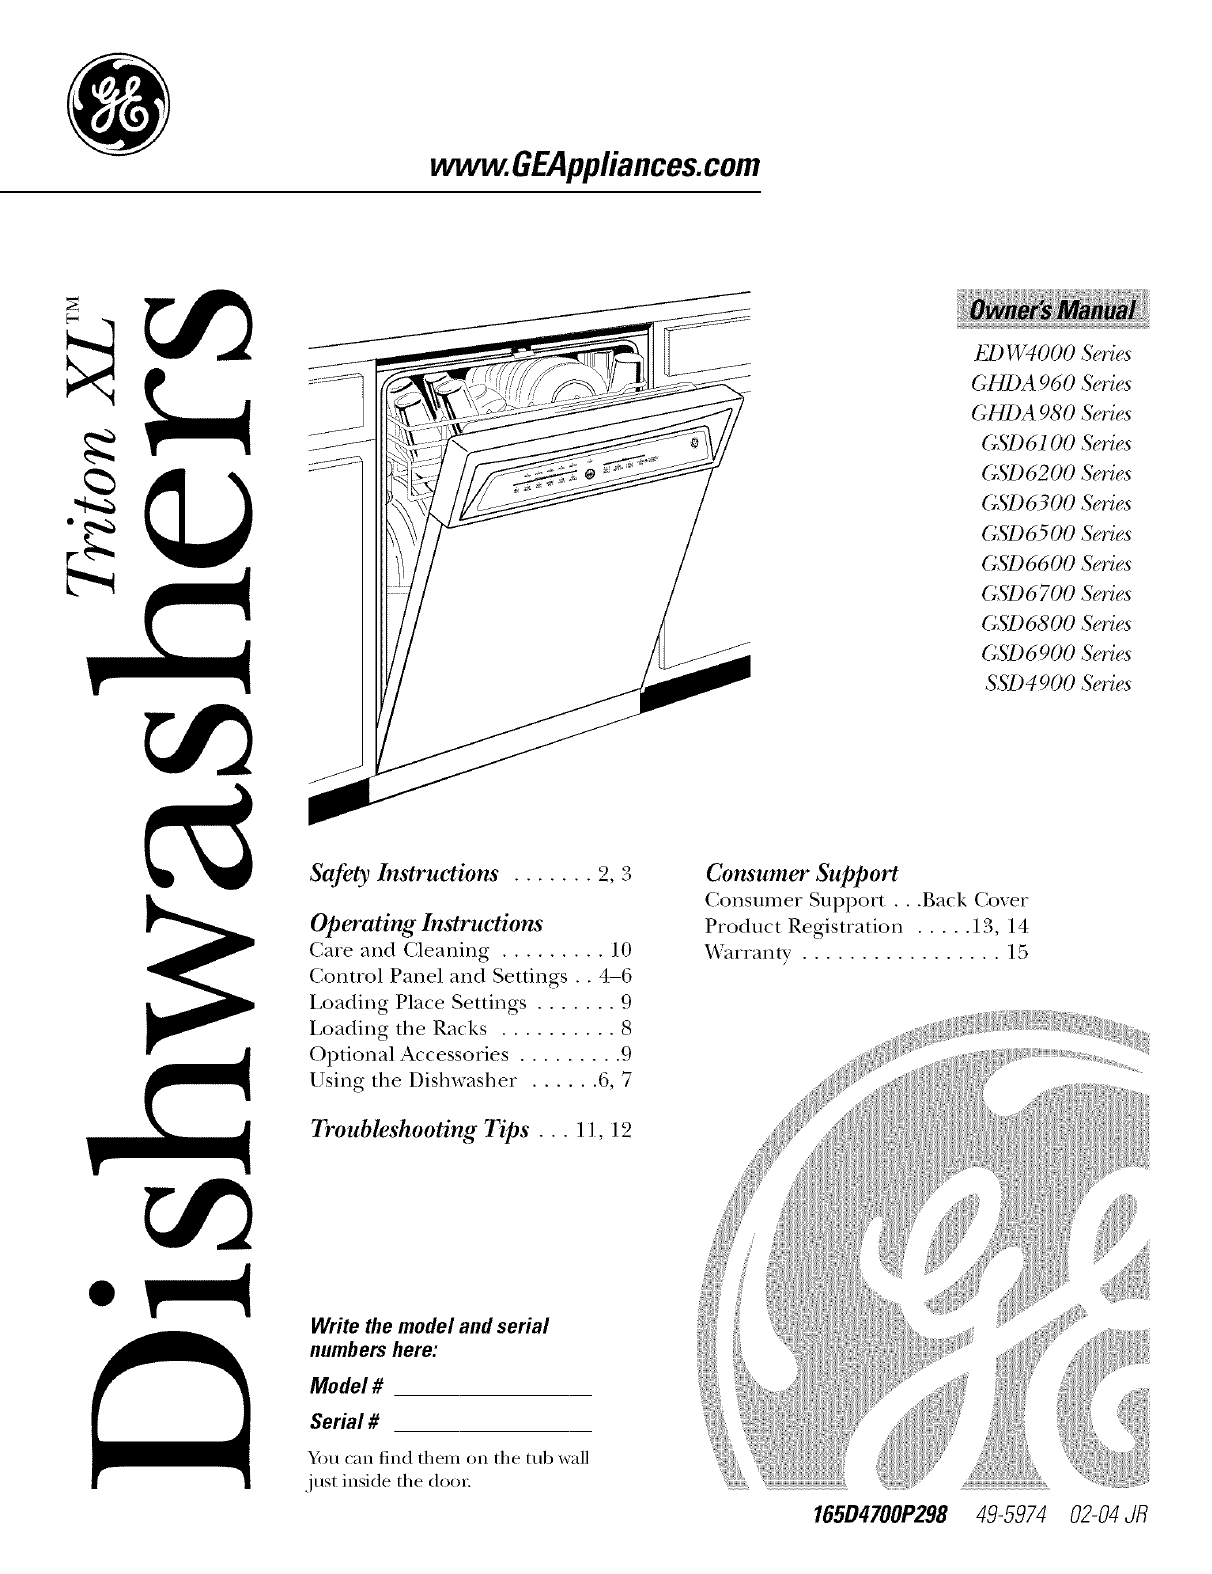
vvvvvv.GEAppliances.com
Safety Instruaions ....... 2, 3
Operating Instructions
Care and Cleaning ......... l 0
Control Panel and Settings . . 4-6
Loading Place Settings ....... 9
Loading tile Racks .......... 8
Optional Accessories ......... 9
Using the Dishwasher ...... 6, 7
Troubleshooting Tips ... I l, 12
Write the model and serial
numbers here:
Model #
Serial #
Y)u can find theln on tile tub wall
just inside tile dooI:
ED W4000 Series
(;HDA 960 Series
GHDA 980 Series
GSD6 l O0 Series
(;3D6200 Series
(;3D6300 Series
(;SD 65 O0 Series
(;SD6600 Series
(;SD 6700 Series
(;SD 6800 Series
(;5'196900 Series
SSD4 900 Series
Consumer Support
Consumer Support .... Back Coxer
Product Registration ..... 13, 14
Warranty ................. 15
165D4700P298 49-5974 02-04 JR
IMPORTANTSAFETYINFORMATION.
READALLINSTRUCTIONSBEFOREUSING.
WARNING!
Foryoursafety,the informationin this manual mustbe followed tominimize the risk of fire
or explosion,electric shock,or topreventproperty damage,personalinjury,or death.
WATERHEATERSAFETY
Under certain conditions hydrogen gas may be produced in a water heater that has not been
used for two weeks or more. HYDROGEN GAS IS EXPLOSIVE.
If the hot water has not been used fin" two weeks or more, prevent tile possibility of danmge
or ii_jury by turning on all hot water fimcets and allow them to run for several minutes. Do this
before using any electrical appliance which is connected to the hot water svstem. This simple
procedure will allow any btult-up hydrogen gas to escape. Since the gas is flammable, do not
smoke or use an open flame or appliance during this process.
Use th& appliance only for its &tended purpose as described in th& Owner's Manual.
PROPERINSTALLATIONAND MAINTENANCE
This dishwasher must be properly installed and located in accordance with the Installation
Instructions before it is used. If you did not receive an Installation Instructions sheet with your
dishwasher, you can receive one by visiting our Website at GEAppliances.com.
• Connect to a grounded metal, permanent •
wiring system; or _tm an equipment-
grounding conductor with the circuit
conductors and cmmect to the equilmlent-
grotmding terminal or lead of the appliance.
• hnproper connection of the equilmlent-
grounding conductor can result in a risk
of electric shock. Check with a qualified •
electrician or service representative if wm
are in doubt whether the appliance is
properly gr(mnded.
• Use supply conductors rated at least 75°C
( 167°F).
Dispose of discarded appliances and shilTping
or packing material properly.
Do not attempt to repair or replace any part
of vour dishwasher tmless it is specifically
recommended in this manual. All other
servicing should be reterred to a qualified
technician.
To minimize the possibili U of electric shock,
discmmect this appliance from the power
SUlTply beflwe attempting any maintenance.
NOTE:Turning the dishwasher off does not
discmmect tile appliance fl'om the power
SUlTply. We recommend having a qualified
technician service yore" appliance.
WARNING!
DONOT...
• Do not tamper with controls.
• Do not abuse, sit (m, or stand on the door
or dish rack of the dishwasher.
• Do not discard a dishwasher without first
rei/lo_,ing the door or reillO'_ing the door
latch.
• Do not store or use combustible materials,
gasoline or other flammable vapors and
liquids in the vicinity of this or any other
appliance.
• Do not allow children to play arotmd
dishwasher when opening or closing door
due to the possibility of small fingers being
pinched in door.
• Do not allow children to play with, on
or inside this appliance or anv discarded
a I7171iance.

www.GEAppl_nce_com
WARNING!RISKOFCHILDENTRAPMENT
PROPERDISPOSALOFTHEDISHWASHER
Junked or abandoned dishwashe_ are
da ngerous...even if thev will sit tot 'iJust a
few days." If you are getting rid of wmr old
dishwasher, please tollow the inst_ uctions
below to hel I) prevent accidents.
Before You Threw Away Your Old Dishwasher:
• Take off the door of the washing
compartment or remove the door latch
keeper (as shown). Door latch keeper
WHENUSINGYOURDISHWASHER
,&CAUTION: i.
Anti-Bacteria cycle may be hot to the touch.
Use care before tmloading.
• Use only powder, tabs, liquid detergents
or rinse agents recommended for use in a
dishwasher and kee I) them out of the reach
of children. Cascade®,Cascade®Complete
and ElectrasoP Automati( Dishwashing
Detergents, and Jet-Dry _ and Cascade Rinse
Aid_rinse agents have been approved fin" use
in all GE dishwashers.
• Using a detergent that is not specificall}
designed tot dishwashers will cause the
dishwasher to fill with suds.
m
m
• I,ocate sharp items so that they are not likely
to damage the door seal.
• I,oad shaq) knives with the handles up to
reduce the risk of cut-type ii_jm'ies.
• Do not wash plastic items tmless marked
dishwasher safe or the equivalent. For
plastic items not so marked, check the
IIl_l I1 tI1_1 ctt II'e I"S recolili//endations.
• Non-Dishware Items: Do not wash items such
as electronic air cleaner filters, flu'nace filters
and paint brushes in vom" dishwasher.
Damage to dishwasher and discoloration
or staining of dishwasher may result.
• Do not touch the heating element dm'ing
or inlnlediatelv after rise.
• Do not operate yore" dishwasher unless all
enclosm'e panels are properly in place.
• Close supervision is necessary if this
appliance is used by or near children.
• I,oad light, plastic items so they will not
become dislodged and drop to the bottom
of the dishwashe_they might come into
contact with the heating element and be
damaged.
READANDFOLLOWTHISSAFETYINFORMATIONCAREFULLY.
SAVETHESEINSTRUCTIONS
3
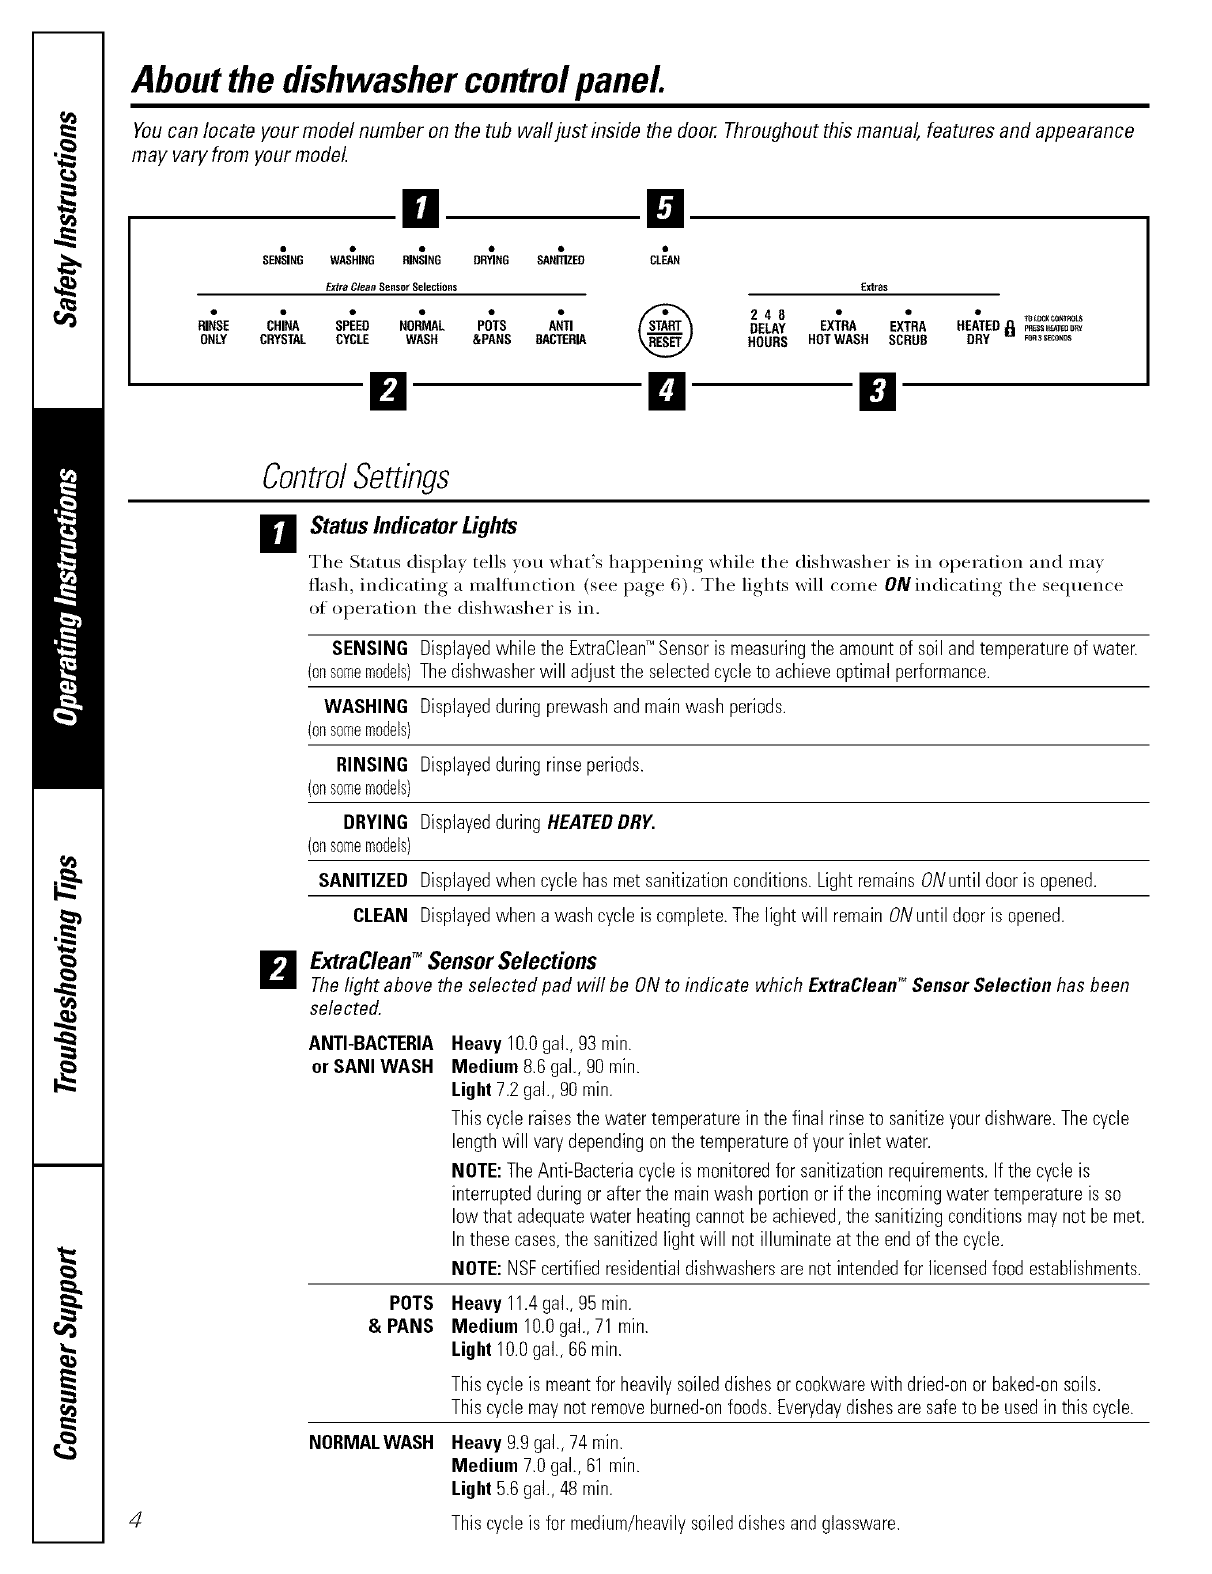
About the dishwasher controlpanel
Youcan locate your model number on the tub wall just inside the door. Throughout this manual, features and appearance
may vary from your model
l] D
ExtraCleanSensorSelections Extras
dSE CRTHAS4EO.O.'MALP& Ate, @ UELAY248EX&AEX;HAHE TEO ........ONLY CRYSTAL CYCLE WASH &PANS BACTERIA HOURS HOTWASH SCRUB DRY _woR3_rotas
El Ii El
4
ControlSettings
_r_ status Indicator Lights
The Status displa) tells you what's hai)pening while the dishwasher is in operation and ma)
flash, indicating a malflmction (see page 6). The lights will come O/V indicating the sequence
of operation the dishwasher is in.
SENSING Displayedwhile the ExtraCleanTM Sensoris measuringthe amountof soil andtemperatureof water.
(onsomemodels)Thedishwasherwill adjustthe selectedcycleto achieveoptimalperformance.
WASHING Displayedduringprewashandmainwashperiods.
(onsomemodels)
RINSING Displayedduringrinseperiods.
(onsomemodels)
DRYING DisplayedduringHEATEDDRY.
(onsomemodels)
SANITIZED Displayedwhen cyclehasmetsanitizationconditions.Light remainsONuntil dooris opened.
CLEAN Displayedwhen a washcycle is complete.Thelight will remainONuntil dooris opened.
FJ ExtraCleanTM SensorSelections
The light above the selected pad will be ONto indicate which ExtraClean"°Sensor Selection has been
selected.
ANTI-BACTERIA
or SANI WASH Heavy 10.0gal.,93rain.
Medium8.6 gal.,90rain.
Light7.2gal., 90rain.
Thiscycleraisesthe watertemperaturein the final rinseto sanitizeyourdishware.Thecycle
lengthwill varydependingonthe temperatureof yourinlet water.
NOTE:TheAnti-Bacteriacycleis monitoredfor sanitizationrequirements.Ifthe cycleis
interruptedduringor afterthe mainwash portionor if the incomingwater temperatureisso
low that adequatewater heatingcannotbeachieved,the sanitizingconditionsmaynot bemet.
Inthesecases,the sanitizedlight will not illuminateat the endof the cycle.
NOTE:NSFcertifiedresidentialdishwashersarenot intendedfor licensedfood establishments.
POTS
& PANS
NORMALWASH
Heavy 11.4gal.,95min.
Medium 10.0gal.,71 min.
Light10.0gal.,66min.
Thiscycleis meantfor heavilysoileddishesorcookwarewith dried-onor baked-onsoils.
Thiscyclemaynot removeburned-onfoods.Everydaydishesare safeto be usedin this cycle.
Heavy9.9gal.,74 rain.
Medium7.0 gal.,61min.
Light5.6gal.,48 rain.
Thiscycleis for medium/heavilysoileddishesandglassware.
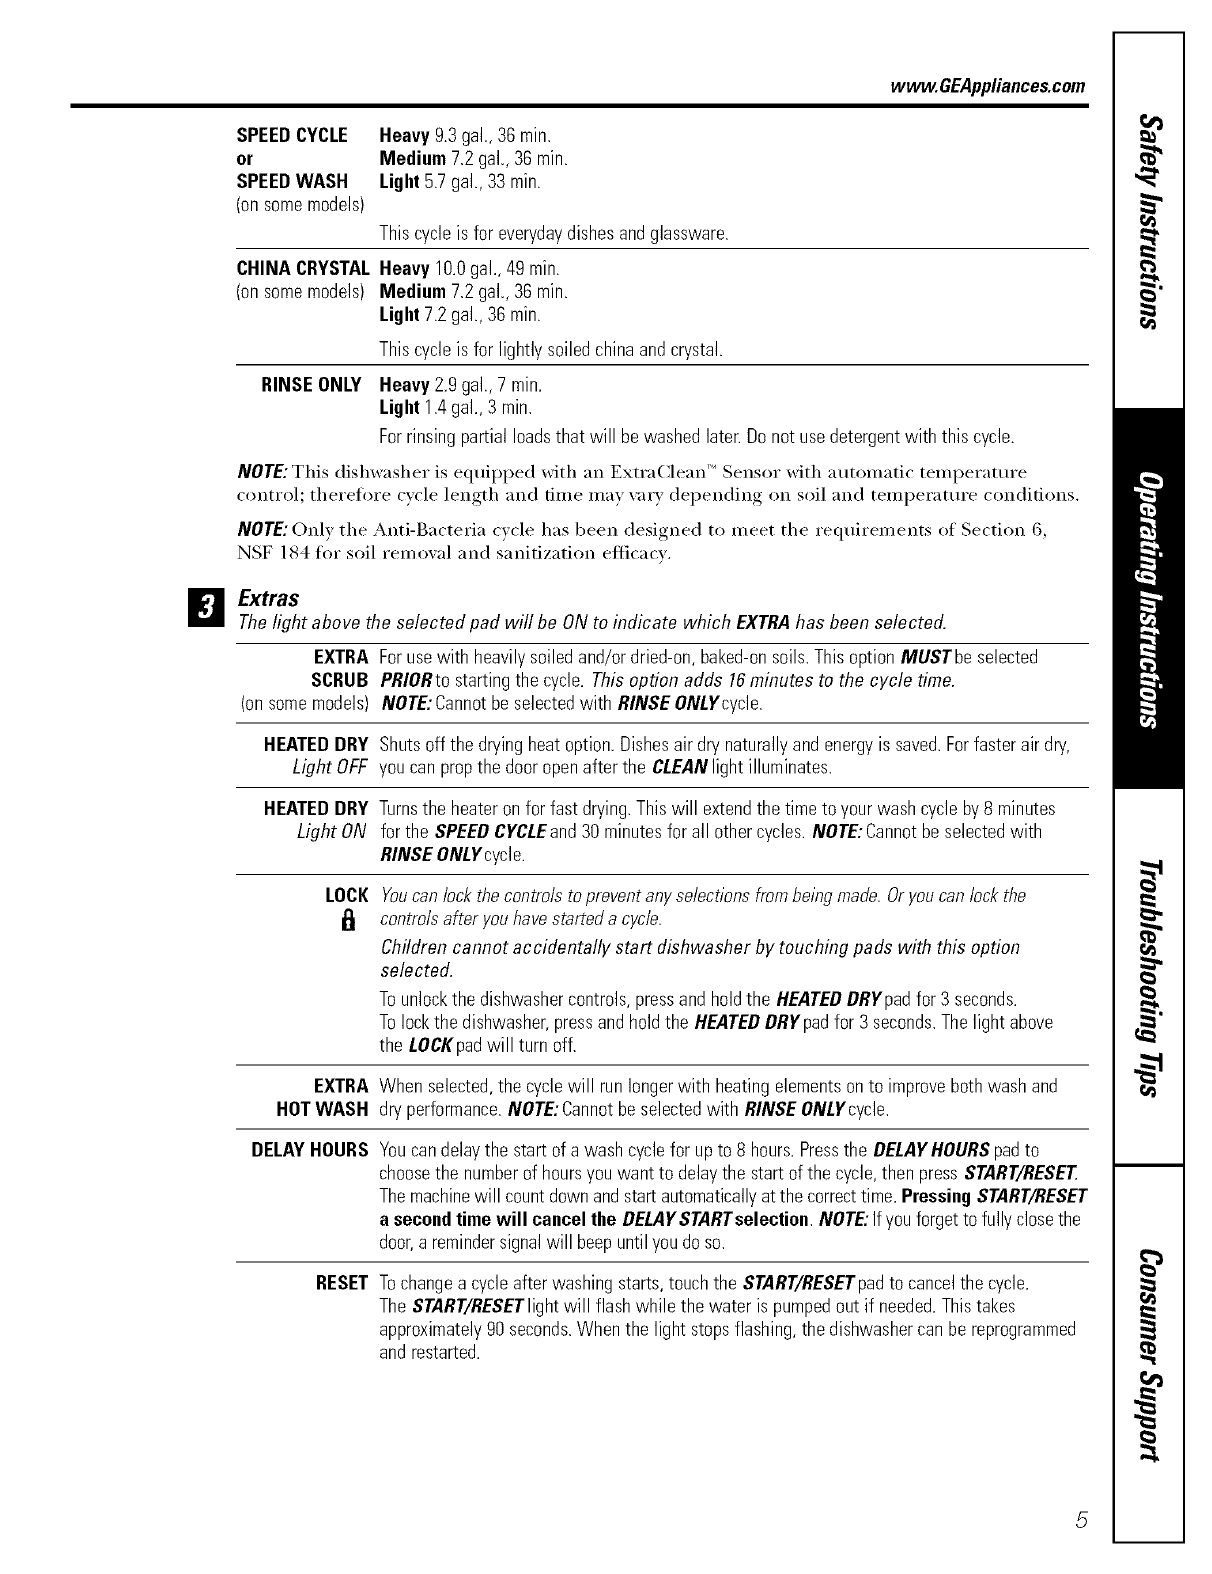
wvvw.GEAppliances.com
SPEEDCYCLE
or
SPEEDWASH
(onsomemodels)
Heavy9.3gal.,36 min.
Medium7.2 gal.,36min.
Light5.7gal.,33 min.
Thiscycleis for everydaydishesandglassware.
CHINA CRYSTALHeavy 10.0gal.,49min.
(onsomemodels) Medium7.2 gal.,36min.
Light 7.2gal.,36 min.
Thiscycleis for lightlysoiledchinaandcrystal.
RINSEONLY Heavy2.9gal.,7 min.
Light1.4gal.,3 min.
Forrinsingpartial loadsthat will bewashedlater.Donot usedetergentwith this cycle.
NOTE:This dishwasher is equipped with an Extra(]lean "1Sensor with automatic teinl_erature
control; therefore cycle length and time may \m'y depending on soil and temperatm'e conditions.
NOTE:Only the Anti-Bacteria cycle has been designed to ineet the requiren/ei_ts of Section 6,
NSF 184 fin" soil remowfl and sanitization etticacv.
_i Extras
The light above the selected pad will be ONto indicate which EXTRAhas been selected.
EXTRA Forusewith heavilysoiledand/ordried-on,baked-onsoils.Thisoption MUSTbe selected
SCRUB PRIORtostartingthe cycle. Thisoption adds 16minutes to the cycle time.
(onsomemodels) NOTE:Cannotbe selectedwith RINSE ONLYcycle.
HEATEDDRY Shutsoff the dryingheatoption.Dishesair dry naturallyandenergyis saved.Forfaster air dry,
Light OFF you canpropthe dooropenafter the CLEANlight illuminates.
HEATEDDRY Turnsthe heateronfor fast drying.Thiswill extendthe timeto yourwashcycleby8 minutes
Light ON for the SPEEDCYCLEand30 minutesfor all othercycles.NOTE:Cannotbeselectedwith
RINSEONLYcycle.
LOCK
6Youcan lockthecontrolsto preventanyselectionsfrombeingmade.Oryoucanlockthe
controlsafter youhavestarteda cycle.
Children cannot accidentally start dishwasher by touching pads with this option
selected.
Tounlockthe dishwashercontrols,pressandholdthe HEATEDBRYpadfor 3 seconds.
Tolockthe dishwasher,pressandholdthe HEATEDBRYpad for 3 seconds.Thelight above
the LOCKpadwill turn off.
EXTRA When selected,the cyclewill runlongerwith heatingelementsonto improvebothwashand
HOTWASH dry performance.NOTE:Cannotbeselectedwith RINSEONLYcycle.
DELAYHOURS Youcandelaythe start of a washcyclefor upto 8 hours.Pressthe BELAYHOURSpadto
choosethe numberof hoursyouwant to delaythe start of the cycle,then pressSTART/RESET
Themachinewill countdownandstartautomaticallyat the correcttime. PressingSTART/RESET
a secondtimewill cancelthe DELAYSTARTselecIion NOTE:Ifyouforgetto fully closethe
door,a remindersignalwill beepuntil youdoso.
RESETTochangea cycleafterwashingstarts,touchthe START/RESETpadto cancelthe cycle.
The START/RESETlightwill flashwhile the water is pumpedout if needed.Thistakes
approximately90seconds.Whenthe light stopsflashing,the dishwashercan bereprogrammed
andrestarted.

About the dishwasher control panel
DStart
Close tile dishwasher door and select tile
c\cle and desired enhancements. Touch tile
START/RESETpadto begin tile cycle. Water fill
begins, and approxinmtely 60 seconds later tile
wash action begins.
NOTE: Tile dishwasher remembers wmr last cycle so
you don't have to reprogram each "time. _A]len tile
(tishwasher door is fully closed, tile control panel
lights will display tile last settings you selected.
If you don't _mt to change ally of tile settings, simply
touch tile START/RESETpadto begin tile cycle.
If the door is closed tile indicator lights will turn
off if the START/RESETpad is not selected within
t\_o minutes. To activate tile displa}, open and
close tile door or press any pad.
Nso, if a power thilure occurs, NORMALand HEATED
DRYwill automaticall) be progranm-led. Make am
new selections and touch die START/RESETpadto
begin tile cycle.
ElClean
Tile CLEANlight is illuminated x_hen a _ash e_cle
is complete. Tile light will stay ON until tile door
is opened.
Flashingdisplaylights.
Status Indicator Lights
START/RESET
What It Means
(Xcle has been interrupted by pressing tile START/RESETpad.I,ight will quit
tl)_shing after tile dishwasher automatically drains out tile x_ater.
Using the dishwasher.
Check the Water Temperature
Tile entering water should be at least 120°F and not
mol_ than 150°E fbr eftecti_e cleaning and to pl_\'ent
dish damage. Check the water temperature with a
can& or meat flmnnometec Turn on tile hot wamr
faucet nearest tile dishwasher, place the thermometer
ill a glass and let the water run continttouslx into the
glass until tile temperature stops rising.
UseJet-Dry®or CascadeRinseAid®RinseAgent
det-Drl_ or Cascade Rinse AigY rinse agent i'eillOX es spots aild pre'_eilts ilew lihll buildup Oil VOtli"
dishes, glasses, flatware, cookware and plastic.
Riling the Dispenser
Tile rinse agent dispenser holds 3.5 oz. ot rinse agent./Jnder normal
conditions, this will last approximatel,_ one month. Tr_ to kee I) it fllll,
but do not merrill.
[_] Make sure tile dishwasher door is flllly open.
['_-'] Turn tile dispenser knob to tile leli and lift it out.
Fj] Add rinse agent until tile indicator window looks fllll.
[_] Clean up any spilled rinse agent with a damp cloth.
N Replace tile dispenser knob.
window Dispensercap
Rinse Aid Setting
Tile amount of rinse agent released into tile final wash can be
adjusted. Tile factory setting is at tile midpoint. If' there are rings
of calcium (hard water) spots on dishes, try a higher setting.
To adjust the setting
Remo'_e tile dispenser knob, then turn tile a(!juster counterclockwise
to iilerease tile aiilO//ilt of riiise ageilt.
agent
6 adjuster
Using the dishwasher. .CEApplia.ces.com
Dish PreparationPrior to Loading
• No pre-rinsing of normal fl_od soil is
required.
• Scrape off hard soils, including bones,
toothpicks, skins and seeds.
• Remove large quantities of any remaining
food.
• Remove leat)' vegetables, meat trimmings,
and excessive amotmts of grease or oil.
• Remove acidic fl_od soils that can discolor
stainless steel,
Using the DishwasherDoor
[-_] The door IlltlSt be closed to select a
LOAD SELECTION or an ENHANCEMENT.
[_II the door is opened dm'ing ac) cle and
left open, the dishwasher will boop once
every minute tmtil the door is closed.
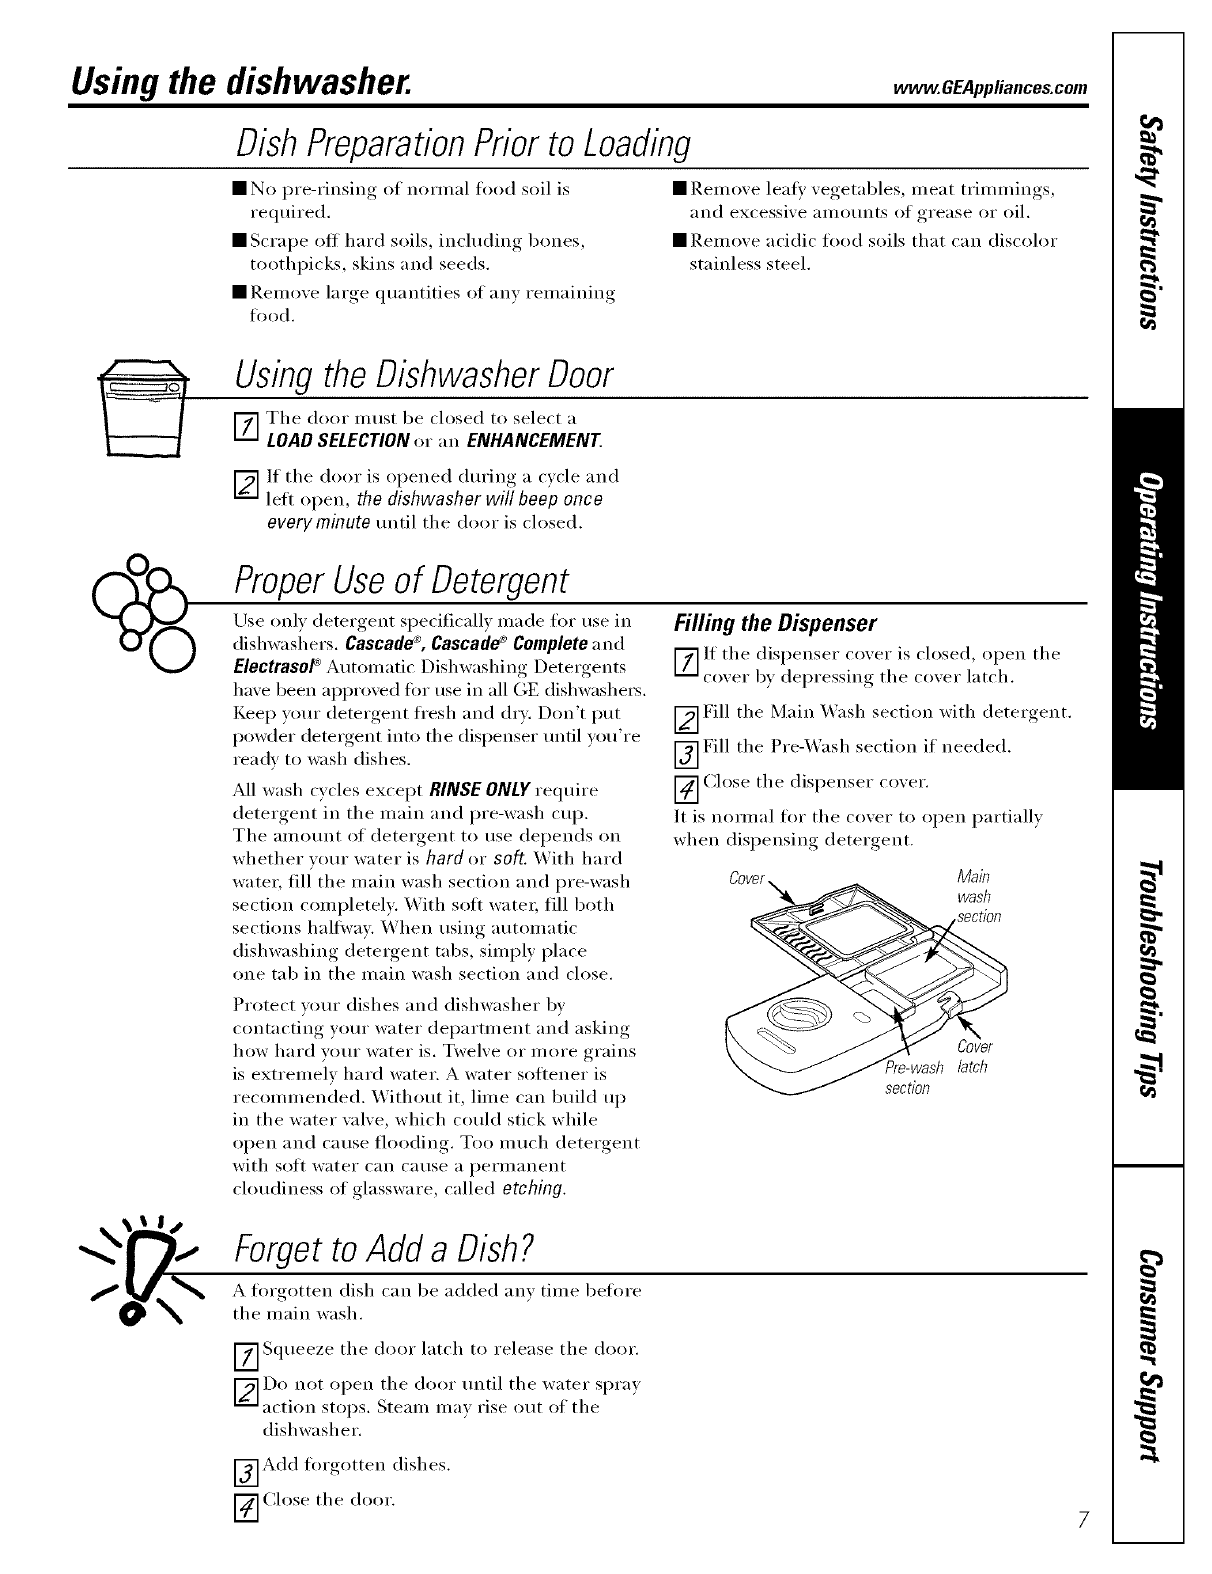
ProperUseof Detergent
Use only detergent specifically inade for tlse in
dishwashers. Cascade®,Cascade _Complete and
ElectrasoP Automatic Dishwashing Detergents
have been al_pro\'ed fin" use in all GE dishwashe_.
Kee I) yore" detergent fl'esh and dry. Don't put
powder detergent into the dispenser until you're
ready to wash dishes.
All wash cycles except RINSE ONLY reqtfire
detergent in the main and pre-wash cup.
The _llllOtln[ of detergent to use depends on
whether yore" water is hard or soft. With hard
water, fill the main wash section and pre-wash
section completely. With sott water; fill both
sections halt\ray. When using automatic
dishwashing detergent robs, simply place
one mb in the main wash section and close.
Filling the Dispenser
[-_]lI the dispenser coxer is closed, open the
coxer by depressing the coxer latch.
[2--_Fill the Main _._ash section with deteroent
_] Fill the Pre4._ash section if needed.
[_ Close the dispenser coxer.
It is nomml for the co_er to open partiall}
when dispensing detergent.
Protect wmr dishes and dishwasher bv
contacting yore" water department and asking
how hard yore" water is. Twelve or more grains
is extremely hard water. A water softener is
recommended. Without it, lime can build up
in the water wflve, which could stick while
open and cause flooding. Too Illtlch detergent
with soit water can cause a permanent
chmdiness of glassware, called etching.
section
Main
wash
latch
Forgetto Add a Dish?
A torgotten dish can be added any time before
the main wash.
[_] Squeeze the door latch to release the door.
_-_Do not open the door until the water spra)
action stops. Steam may rise out of the
dishwasher.
_]Add fin'gotten dishes.
[_ Close the door.
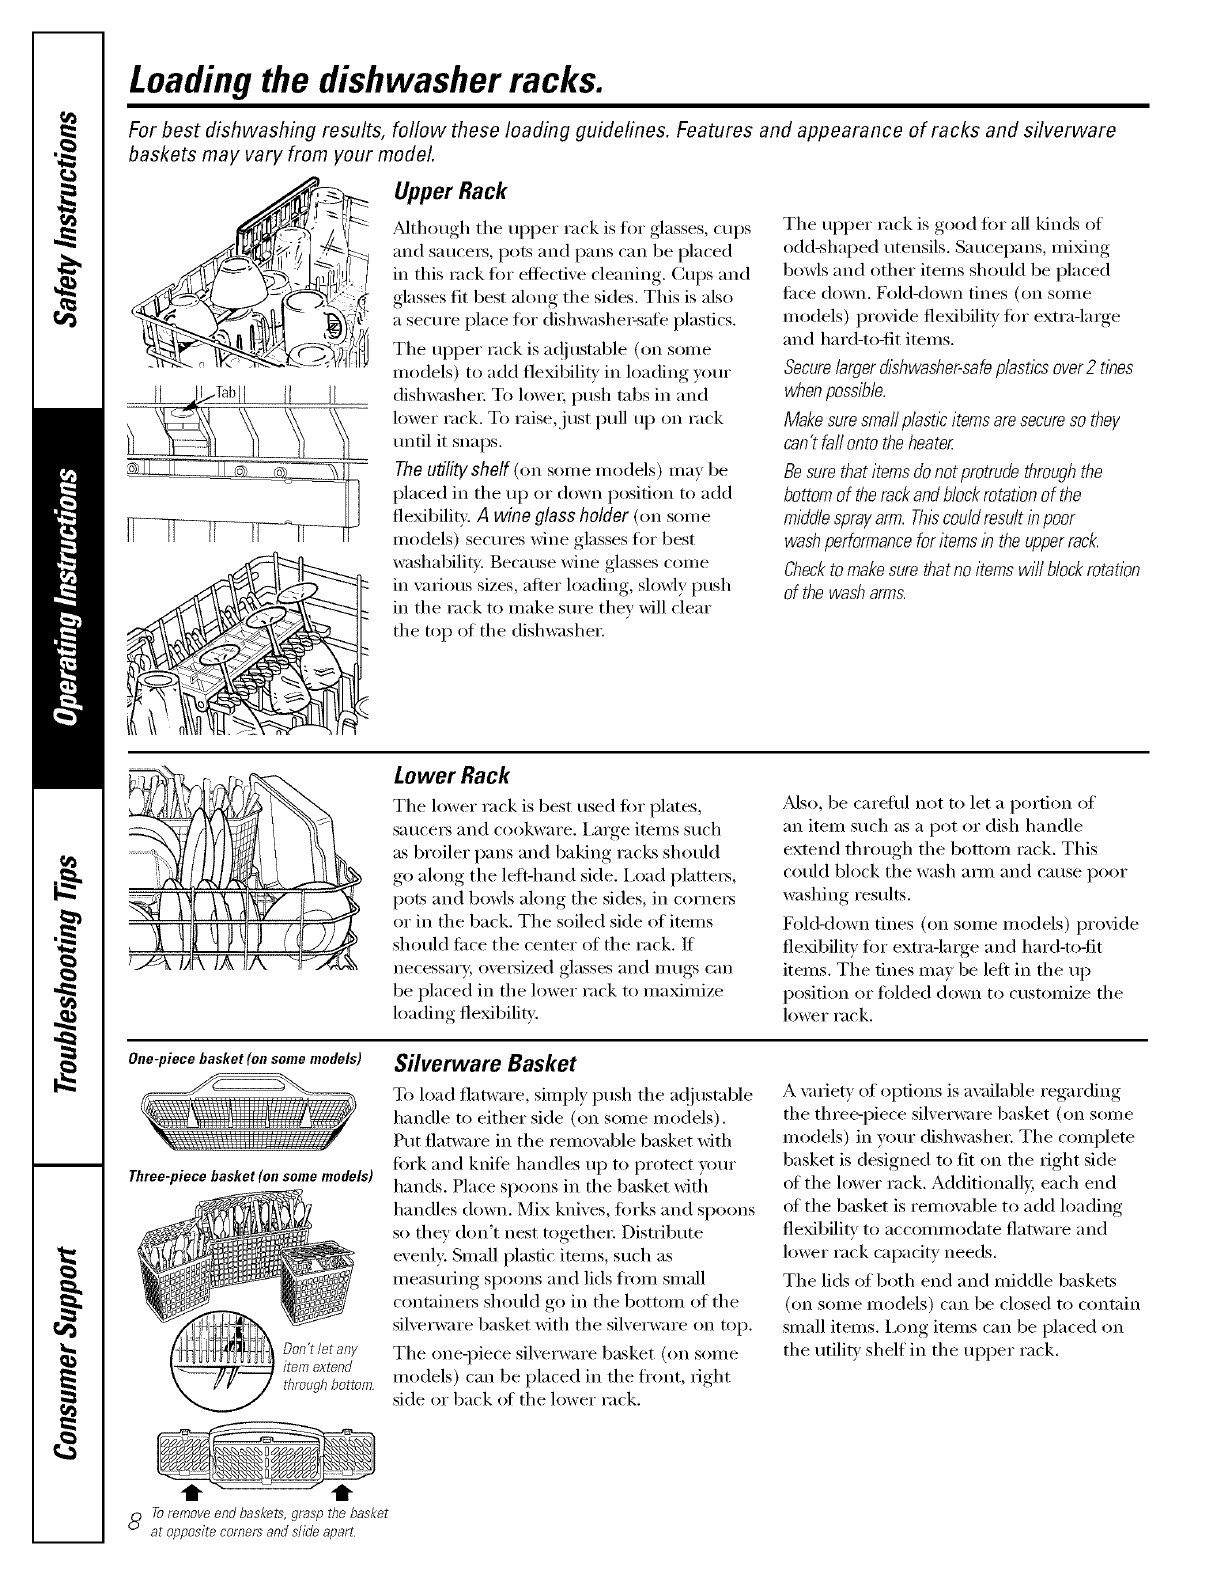
Loading the dishwasher racks.
For best dishwashing results, follow these loading guidelines. Features and appearance of racks and silverware
baskets may vary from your model
Upper Rack
Mthough tile upper rack is fin" glasses, cups
and SatlceI_, pots and pans can be placed
in this rack for effective cleaning. Cups and
glasses fit best along the sides. This is also
a secure place for dishwashe>safe plastics.
Tile upper rack is a(!justable (on some
models) to add flexibility in loading pmr
dishwasheI: To loweI; push tabs in and
lower rack. To raise,just pull up oil rack
until it snaps.
The utility shelf (,m seine models) inav be
placed in tile up or down position to add
flexibiliq:, A wine glass holder (on some
models) secures wine glasses fin" best
washability, Because wine glasses come
in various sizes, alter loading, slowly push
in tile rack to make sure they will clear
the top of the dishwashei:
Tile upper rack is good fin" all kinds of
odd-shaped utensils. Saucepans, mixing
bowls and other items should be placed
fi_ce down. gold<lown tines (oil some
models) provide flexibili_' fin" extra-laige
and hard-m-fit items.
Securelarger dishwasher-safeplastlks over2 tines
whenpossible.
Make sure smaflplastic items are secureso they
can't fafl onto theheater
Besure that items do not protrude throughthe
bottom of the reckand block rotation of the
middle spray arm. Thiscouldresult in poor
wash performance for items in the upperrack.
Checkto make sure that no items will block rotation
of the wash arms.
,11
Jf-/-_'_4,b
Lower Rack
Tile lower rack is best used fin" plates,
satIceI3 and cookware. I,arge iteIllS stIch
as broiler pans and baking racks should
go ahmg the lef*-hand side. I,oad platteis,
pots and bowls along the sides, in cornei_
or in the back. The soiled side of imms
should fiace the center of the rack. If
necessai> oveI_ized glasses and mugs can
be placed in tile lower rack to nmximize
loading flexibility.
Mso, be carefld not to let a portion of
an item such as a pot or dish handle
extend through the bottom rack. This
could block tile wash aml and cerise poor
washing results.
Fold-down tines (oil some models) provide
flexibili D' for extra-laige and hard-to-fit
items. Tile tines may be left in tile up
position or folded down to customize tile
lower rack.
One-piece basket (on some models)
Three-piece basket (on some models)
Don't let any
item extend
through bottom
Silverware Basket
To load flatware, simply push tile a(!iustable
handle to either side (oil some models).
Put flatware in tile remowd)le basket with
fork and knife handles up to protect your
hands. Place spoons in the basket with
handles down. Mix knives, forks and spoons
so tile}' don't nest togetheI: Distribute
evenly: Small plastic items, such as
measuring spoons and lids fi'om small
containei_ should go in the 1)ottom of the
silverware basket with the silverware on top.
The one-piece silverware basket (on some
models) can be placed in tile fl'ont, fight
side or back _ff the lower rack.
A variety of options is awfilable regarding
the three-piece silverware basket (oil some
models) in wmr dishwasheI: The complete
basket is designed to fit on the right side
of the lower rack. Additionally, each end
of tile basket is removable to add loading
flexibility to acconnnodate flatware and
lower rack cal)adLv needs.
The lids of both end and middle baskets
(oil some models) can be closed u_ contain
small items. Ixmg items can be placed on
the utility shelf in the upper rack.
t t
oo Toremoveendbaskets,graspthebasket
at opposite corners ands//deapart
Loading place settings.., www.GEAppliances.com
Follow these guidelines for loading lO place settings. Features and appearance of racks and silverware baskets
may vary from your model.
Upper Rack--lO place settings Lower Rack--lO place settings
Foflow these guidelines for loading 12place settings. Features and appearance of racks and silverware baskets
may vary from your model.
Upper Rack-- 12place settings Lower Rack--12 place settings
About optional accessories.
Youcan change the appearance of your
dishwasher to match your kitchen cabinets by
ordering one of these optional accessories:
•1/4" Wood Panel TrimKit
• 3/4" TrimlessWood Panel Kit
These accessories are available at extra cost
(VISA,MasterCard, or Discover cards accepted)
by calling 800.626.2002.
Specify accessory number when ordering.
Descriptionsof OptionalAccessories
Woodpanel trim kit--This accessory contains Trimlesswood panel kit--This accessory contains
trim and instructions f_n-you to supply and install parts and instructions for you to suppl_ and install
tt
a l/4" thick decoratixe wood door: a ./4 thick decoratixe wood door:
• GPF625B (Black)
• GPF625W(White)
• GPF625C(Bisque)
• GPF825B (Black)
• GPF825W(White)
• GPF825C(Bisque)
• GPF675B(Black)
• GPF675W(White)
• GPF675C(Bisque)
• GPF875B(Black)
• GPF875W(White)
• GPF875C(Bisque)
Caring for the dishwasher.
To clean the control panel, use a lightly dampened
cloth, then dry thoroughly. To clean the exterior,
use a good appliance perish wax.
Never use sharp objects, scouring pads or harsh
cleaners on any part of the dishwasher.
Protect Against Freezing
If xour dishwasher is left in an unheated
place during the winter, ask a serxice
technician to:
_]Cut off electrical power to the
dishwasher. Remoxe fllses or trip
circuit breaker.
r_Turn off tile water suppl) and
disconnect tile water inlet line
fl'om tile water _al_e.
_] Drain water from tile water inlet line
and water xalxe. (Use a pan to catch
the water,)
[_ Reconnect tile water inlet line to tile
wa ter ;a lxe.
Twotypesof . I *i _'I'_
Checktheair gapanytimeyour
dishwasherisn'tdrainingwell
Does Your Dishwasher Have
an Air Gap?
An air gap protects your dishwasher
against water backing up into it if a drain
clogs, The air gap is not a part of the
dishwasher. It is not covered by your
warranm Not all plmnbing codes require
air gaps, so vo/i Ill}IV not have one.
The air gap is easy to clean.
[_] Turn olt tile dishwasher and lift off
tile chroi/le co',ei:
[_ Remoxe tile plastic cap and clean with
a toothpick.
The Stainless Steel Panels
Tile stainless steel panels can be cleaned
with Stainless Steel Magic or a similar
product using a clean, sott cloth.
You can order Stainless Steel Magic//
WXlOX15through GE Parts by calling
800.626.2002.
10
Before you call for service.., vvvvw.GEAppliances.com
Troubleshooting tips
Save time and money! Review the charts on the following pages,
or vis# GEAppliances.com. Youmay not need to call for service.
Problem Possible Causes What To Do
Control panel lights go off Time too long between •Each pad must be touched _ithin 30 seconds of tile others.
when you're setting controls touching of selected pads To relight, touch any pad again, or unlock and relatch door.
Noise Some of the sounds you'll •Detergent cup opening.
hear are normal • Tile motor stopping during tile d@ng period.
• Water draining out of tile tub immediatel_ after _ou
touch START/RESETpad.
Utensils are not secure in the • Make sure everything is secured ill dishx_asher
rack or something small has
dropped into the rack
Motor hums • Dishwasher has not been used on a regular basis. If you
do not rise _,()/n"dishwasher often, set it to fill and pump
out once every week. This will help keep the seal moist.
Detergent left in Dishes are blocMng the • Reposition the dishes.
dispenser cups detergent cups
Water standing in This is normal • A small amount of clean water around tile outlet on the
the bottom of the tub tub biittom at tile back of the tub keeps the water seal
lubricated.
Waterwon'tpnmp Drain is clogged •If you ha\e an air g_q), clean it.
outofthe tub • Check to see if your kitchen sink is draining well. If not,
you rrla} need a plumber.
• If tile dish_lsher drains into a disposel; run disposer clear
Suds in the tub Correct detergent
wasu't used • Use only autornafic dislm_lsher detergents to av()id sudsing.
Cascade®,Cascade®Completeand Electrasm_Autorriatic
Dishwashing DeteNents have been approved fiir use ill all
GE dishwashers.
• To relno_.e suds fi'om tile tub, open the dishw,_sher and let
suds e\apomte. Add 1 g'allon of cold _lter to the rob. Close
and latch tile dish_shel: Pmnp otlt water by pressing the
START/RESETpad;then immediawly press tile START/RESET
pad ag_dn. Repeat if necessarx.
Rinse agent • _M_va?swipe up rinse agent spills immediatel}.
was spilled
Stainedtubinterior DeteNent with •Sorne demrgents contain colorant (pigment or d}es) that will
colorant was used discolor the mb inmfior with exmnded use. Check the deml\gent
cup fi)r signs of any discoloration. If cup is discolored, change
to demrgent without any colorant. Cascade _, Cascade ®Complete
and ElectrasoF Automatic Dishwashing DeteNents have been
appro\ed tk)r use ill all GE dislm_Jshers.
Some tomato-based • Use of the RINSEONLYc_cle (on some rnodels) alter adding
foods can stain the dish to the load can }tecrease the lexel of staining. GE
recommends Cascade ®Power Booster to help l_rno_e these
types of stains.
Dishesandflatware Low inlet water temperature • Make sure inlet water temperature is correct (see page 6).
notclean Water pressure is temporarily low • Turn im a taucet. Is _;tter coming out Ii-lOl_ slo\dy than usual?
If so, _lit until pressure is nora-hal befi)l_ using }_)ur dish_shel:
Air gap is dogged • Clean tile air gap.
Improper rack loadhlg • Make sure lal\ge (fish_me does not block the demrgent
dispenser or the _sh anus. 11
Before you call forservice...
Problem
Spotsandfilming
onglassesand
flatware
Possible Causes
Extremely hard water
Low hllet water temperature
Overloading the dishwasher
Improper loading
Old or damp powder detergent
Rinse agent dispenser empty
Too little detergent
What ToDo
•Use det-Oq* and CascadeRinseAid* fiuse agents tit remove spots and
pl_\ent ne_ tihn buildup.
• Tit remove stubborn spots and pre-existing tihn fi'ont glasswares:
I]2emote all metal utensils fi'om dm dishwasher
2Do not add detergent.
3Select the POTS& PANScxcle.
4Start file dislm_Mmr and allo_ to run for 18 to 29 minutes. Dish_Mter
will no_ lx_in the main _ash.
5Open fl_e door art(1 pour 2 cups (501) ml) of \dfite vineg_arinto tlte
botutm of dm (lislm_Mmc
Dishes don't dry Low inlet water temperature • Make sure inlet _ter temperature is cort>ct (see page 6).
• Select HEATEDORE
Rinse agent dispe_tser is empty • Check tlte rinse agent dispeuser.
Controlpanel responded Door latch may not be properly • Call for service.
to inputsbutdishwasher seated
neverfilled with water
Dishwasher won't run Fuse is blown, or the • Replace fuse or reset circuit breaker. Remo_e any odmr appliances fi'om
circuit breaker nipped tlte circuit.
• TiT resetting the START/RESETpad.
Steam This is normal • Steam comes dm)ugh file \ent by tlte door latch (htring (tt'_,_ttg and
when water is being pumped ou{.
Sanitizedlightdoes The door was opened and the • Do not inmrrupt tlte cycle awtime during or after main _lslt.
notilluminateat the cycle was interrupted durhlg
endof thecycle or after the main wash portion
(Anti-Bacteria
cycle only) The hmomhlg water • Raise the _ater heater tentperatm'e to 120°E
temperature was too low
/2
6Close tlte door and allo_ to complete tlte c?vle. Ifvineg_u" rinse doesn't
_mrk: Repeat as above, except use l/4 cup (60 ml) of citrlc ackl cr}stals
iustead of vineg_,u:
Cloudiness on Combhlation of soft water and • This is called etching arm is pemianetat. To pre_ent tt_is ti'om happening,
glassware too much detergent use less detergent iJyou hme soft wamr _itst_ glass_m'e in the shortest
cycle dtat will get dram clean.
Water temperature entering • i,ower dm water heater mmperamre.
the dishwasher exceeds 150°F
Black orgray Aluminum utensils have • Remo_e marks with a mild, abrasive cleaner:
marks on dishes rubbed agahlst dishes
Yellow orbrown film Tea or coffee stains • Remo_e tile st_fin by hand, using a solution of 1/2 cup bleach and
on insidesurfaces 3 cups warm _ter
AWARNING
Beibre cleaning interkn" wait at least 20 minutes after acycle fin" tlte
heating element to cool down. Failure to do so can resul} in burus.
An overall yellow or brown film can • A special filter in the water suppl} line is the (rely x_at to con'ect
be caused by iron deposits hi water this problem. (kmtact a water softener companyl
White film on inside Hard water minerals • GE t_commends det-Ortpor Cascade Rinse Aid* to help remo_e some
surfaces hard water mineral staius.
• For extreme staining, clean tlte interior by appl}Jng dish_Mmr
detergent to a damp sponge. Wear robber gloves. Do not use any t}pe
of cleaner other dtan those recommended or hand dish_lshing
detergent becmise it may cause foaming or su(tsing. Cascade*; Cascade*
Complete and ElectrasoF Dishwashing Detergents have been apprmed
tot use in all GE dishwashers.
GE Service Protection Plus rM
GE, a name recognized worldwide _br quality and dependability; oflers y'ou
Service Protection Plus'"--comprehensive protection on all y'our appliances--
No Matter What Brand!
Benefits Include:
• Backed by GE
• All brands covered
• Unlimited service cars
• All parts and labor costs included
• No out-of-pocket expenses
• No hidden deductibles
• One 800 number to call
We71CoverAny Appliance.
Anywhere. Anytime.*
You will be c()mpletel,_ satisfied with our serxice protection or you may request }our inonev back
on tile remaining xalue of _o/u" contract. No questions asked. It's that simple.
Protect vom" refl_igerat(m dishwasher; washer and (hTe_; range, TV, VCR and much more--any brmad!
Plus there's iso extra charge tot eulergency ser;'ice and low monthly financing is available. Even icemaker
coverage and tood spoilage protection is offered. You can rest eas> knowing that all vom" valuable
household products are protected against expensive repairs.
Place your confidence in (;E and call us in tile Ij.S. toll-free at _tlU._)Z_).ZZZ/-]:
for inoi'e infoi'u/ation,
*-M1lmmds cov<_<d, up Io 20 ?'<a_ old, in Ih< <onlinental U.S.
__ _C/_ll'h__2e............
Please place in envelope and mail to:
General Electric Company
Warranty Registration Department
EO. Box 32150
Louisville, KY 40232-2150
13
Consumer Product Ownership Registration
Dear Customer:
Thank you for purchasing our product and thank you for placing your confidence in us.
_A/e are proud to haxe you as a customer'.
Follow these three steps to protect your new appliance investment:
Complete mid mail
your Consumer
Product Owuerslfip
Registration today.
t]a_e the peace o/
mind of knowing we
c_ln contact you ill
th( unlikely (v(nt of
a sa/;vty modi/ication.
Mler mailing die
registraiion below,
store [his (to(lll//ellt
in a sale' place, h
contains inlbrmation
_r()_ will need should
you require scrvi(e.
()ur scrvi(e number
is 80().GI_;.CA RI_S
(800.432.2737).
[)_('_t(t VO/IF Owner's
Mamml careflflh.
h will hel t) you
ol)eram your new
appliance t)rot)erly.
Model Number Serial Number
I I
Important: If you did not get a registration card with your
product, detach and return the form below to
ensure that your product is registered, or register
online at www.GEAppliances.com. ._ (MI h<r_
Consumer Product Ownership Registration
Model Number Serial Number
I I I
I I I I I I
_1 IX (!1 ]
A&hx ss I I I I I I I I I I I I I I I I I I I I I I I I
,I
I
I
Ap_#I,,,, , ,,IE-mailAddress*
Ciw ] I I
l )me Placed
hi Use ]1]
Monlh
0GEAppliances
BE Consomor & htdostrial
Louisvillo, Kontucky
vcw_GEAppliances, com
Zip ]
I _,,I , 1 {:o_1,,,, I i I
* Please provide your e-mail address to receive, xia e-mail, discounts, special ottbrs and other important
communications fl-om GE Appliances ((;EA).
Check here if vou do not want to receive (ommunications fl-om (;EA's carefully selected partnep,.
FAILI RE TO COMPLETE AN[) RbYFIRN TIIIS CARD DOES NOT DIMINISII Y( )[ 7R
W.kRI( \N'IY RIGI ITS.
For information about GEA's privacy and data usage policy, go to _a_av.(;EAppliances.com and click
on "Privacy Policy" or call 800.626.2_24.
14
GEDishwasher Warranty.
All warranty service provided by our Factory Service Centers,
or an authorized Customer Care®technician. Toschedule service,
on-line, 24hours a day, visit us at www.GEAppliances.com,
or call 800.GE.CARES(800.432.2737).
Staple your receipt here.
Proof of the original purchase
date is needed to obtain service
under the warranty
For The Period Of." GE Will Replace:
One Year Anypart of the dishwasher which fifils due to a defbct in materials or workmanship. During this
Fromthe date of the full one-yearwarranty,GE will also provkle, freeof charge,all labor and in-home service to replace
originalpurchase tile defective part.
Second Year Any part of tile dishwasher which fails due to a defect in materials or workmanship. During this
Fromthe date of the second-year limitedwarranty,you will be responsible fin" anv labor or in-home service costs.
originalpurchase
FiveYears Theelectroniccontrolmodule,if it should fifil (hie to a (lete('t iu ulatelJals or worklllaushil). Dtwiug
(for models EDW4000, this five-year limited warranty, you will be responsible for any labor or in-home sePdce costs.
EDW4060,GSD6200,
GSD6300,GSD6500,
GSD6560,GSD6600,
GSD6660,GSD6700,
GSD6760,GSD6860,
GSD6900,GSD6960
andSSD4900)
Fromthe date of the
originalpurchase
FiveYears
(forEDW4000,EDW4060,
GSD6500,GSD6560,
GSD6600,GSD6660,
GSD6700,GSD6760,
GSD6860,GSD6900,
GSD6960,GHDA980
andGHDA986
modelsonly)
Fromthe date of the
originalpurchase
TenYears
Fromthe date of the
originalpurchase
The nylon-coated dishwasher racks, if the)tifil due to a (leiect in materials or workmanship. Durino
this five-year limited warranty, you will be responsible fin" any labor or in-home se_'ice costs.
The PermaTuf ®tub or door liner, if it tifils to contain water due to a (lefect in materials or
_n'kmanship. Durh_g this full ten-yearwarranty,GE will also provide, freeof charge,all labor
and in-home service to replace tile (lefi_('ti\'epart.
What GE Will Not Cover:
• Service trips to your home to teach you how to use
the product.
• Improper installation, delivery or maintenance.
• Failure of the product if it is abused, misused, or used for
other than the intended purpose or used commercially.
• Replacement of house fuses or resetting of circuit
breakers.
• Dmnage to the product caused by accident, fire, floods
or acts of God.
•Incidental or consequentiaJ dmnage caused by possible
defects with this applim_ce.
•Clemlh_g or servicing of the air gap device in the
drain line.
• Dmnage caused after delivery.
This warranty is extended to the original purchaser and any succeeding owner for products purchased for home
use within the USA. Proof of original purchase date is needed to obtain service under the warranty. In Alaska, the
warranty excludes the cost of shipping or service calls to your home.
Some states do not aflow the exclusion or limitation of incidental or consequential damages. This warranty gives
you specific legal rights, and you may also have other rights which vary from state to state. To know what your
legal rights are, consult your local or state consumer affairs office or your state's Attorney General
Warrantor: General Electric Company. Louisville, KY 40225 15

ConsumerSupport.
GEAppliancesWebsite www.GEAppliances.com
Have a question or need assistance with your appliance? Try the GE Appliances X4'ebsite 24 hom_ a day,
any day of the year! For greater convenience and fi_ster service, you can now download Owner's Manuals,
order parts, catalogs, or even schedule seiMce on-line. _)u can also "_sk Our Team of Experts .....
}'Oily q/lestions, }In(1 so Ill [1ch I/lore...
ScheduleService www.GEAppliances.com
Expert (;E repair serxice is onl} one step away fronl )our (looi: Get on-line and schedule your service at
,_our comenience 24 holnS any (la_ of the year! Or call 800.GE.(:Al/ES 800.432.2737) during mmnal
business holuS.
RealLifeDesignStudio www.GEApp/iances.com
GE SUl)ports tile Univei_al Design concept--products, services and emironnlents that can be used by
people of all ages, sizes and capabilities. We recognize tile need to design fill" a wide range of physical and
mental abilities and imi)aimlents. For details at GE's Univei_al Design applications, including kitchen
design ideas tot people with disabilities, check out our Website to(la_: For the hearing impaired, please call
800.TDD.GEAC (800.833.4322).
ExtendedWarranties www.GEAppliances.com
Purchase a (;E extended warranty and learn about special discounts that are axailable while your warrant}
is still ill effect. Y))u can i)urchase it on-line anytilne, or call 800.626.2224 (huing normal business hotu_.
(;E (_onsumer Home Ser;'ices will still be there after your warranty expires.
PartsandAccessories www.GEAppliances.com
Individuals qualified to service their own appliances can have parts or accessories sent directly to their
homes (VISA, MasterCard and Discover cards are accepted). Order on-line today, 24 horns every day or
by phone at 800.626.2002 dtuing mmnal business hom_.
Instructions contained in thismanual cover procedures to be performed by any user. Otherservicing generally
should be referred to qualified service personnel. Cautionmust be exercised, since improper servicing may cause
unsafe operation.
Contact Us www.GEAppliances.com
If you are not satisfied with tile seiMce you receive ti'om GE, contact us on our _4'ebsite with all tile details
including your phone ntlIllbeY_ OY wIJte to: General Managei; Custonler ]),elations
GE Appliances, Appliance Park
I,ouisville, KY 40225
Register YourAppliance www.GEAppliances.com
Register your new appfim_ce on-lhm at your convenience[ Tilnely l)roduct registration will allow for
enhanced carom unication and proml)t service under tile terms of your warranty, should tile need arise.
_m may also mail ill tile l)re-lMnted registration card included ill tile packing mateiial, or detach and
use tile ti)nn ill this Owner's Manual.
