GE JGB900BEF2BB User Manual GAS RANGE Manuals And Guides L1005581
User Manual: GE JGB900BEF2BB JGB900BEF2BB GE GAS RANGE - Manuals and Guides View the owners manual for your GE GAS RANGE #JGB900BEF2BB. Home:Kitchen Appliance Parts:GE Parts:GE GAS RANGE Manual
Open the PDF directly: View PDF ![]() .
.
Page Count: 64
www.GEPppliances.com
in Canada contact us at,'.
wvvvv.GEAppfiances,ca
Safety hTstructions ...... 2-7
Operating Instructions
Aiuminum Foi! ............. 13
Clock and Timer .............. 15
Oven ...................... 10-31
Baking and Roasting ........ 13
Broiling, Broiling Guide ., I4
Convection ............. I8-22
Oven Control .......... 10, t 1
Power Outage .............. 12
Preheating .............. 13
Probe ....................... 17
Sabbath Feature .......... 25, 26
Self-Cleaning ......... 30, 3I
Shelves ....................... 13
Special Features ....... 23, 24
Ttaermostat Adjustment ..... 27
Timed Baldng
and Roasting ................. 16
Timed Convection Baking , ,22
Surface Cooking ........... 8, 9
Warming Drawer ........ 28, 29
Care and Cleaning
Broiler Pan and Grid ........... 37
Burner Assembly ........ 32, 33
Burner Grates ................. 34
Control Panel and t_qobs ..... 39
Cooktop .................... 34-36
Glass ................... 35, 36
Porcelain ..................... 34
Door Removal ................ 37
Oven Bottom ................ 37
Oven Light Replacement ....... 40
Oven Vents ..................... 39
Self Cleaning ........... 30, 31
Shelves ..................... 40
Stainless Steel Surfaces ......... 34
Wan_aing Drawer _........... 38
Write the model and serial
numbem hero:
Model #
Serial #
You can find them on a label
on the fi'ont of the range behind
the warming drawm:.
h_stallation
Instructions .......... 41-5 ]
Air Adjustment .............. 50
kaati-Tip De_dce ......... 44, 5I
Checking Burner
Ignidon ...................... 49
Connecting the Range
to Gas .................... 45-47
Dimensions and Clearances ....43
Electrical Connections ..... 48, 49
Leveling the Range .......... 50
LP .............................. 5I
Troubleshooting
Tips ..................... 52-55
Accessories ............... 56
Consumer Support
Consumer Support ° ,Back Cover
Product Registration ..... 57, 58
Warranty for Customers
in Canada ....................... 63
Warranty for Customers
in the US,A .................... 62
::ow.a$:Maaaa:i::
:i:::i &::lnstallation ::::: :i
JGB900
]cB9o2
JGBg05
JGB915
IcB92o
350A4502P340 183D5580P138 49-85051 04-03JR
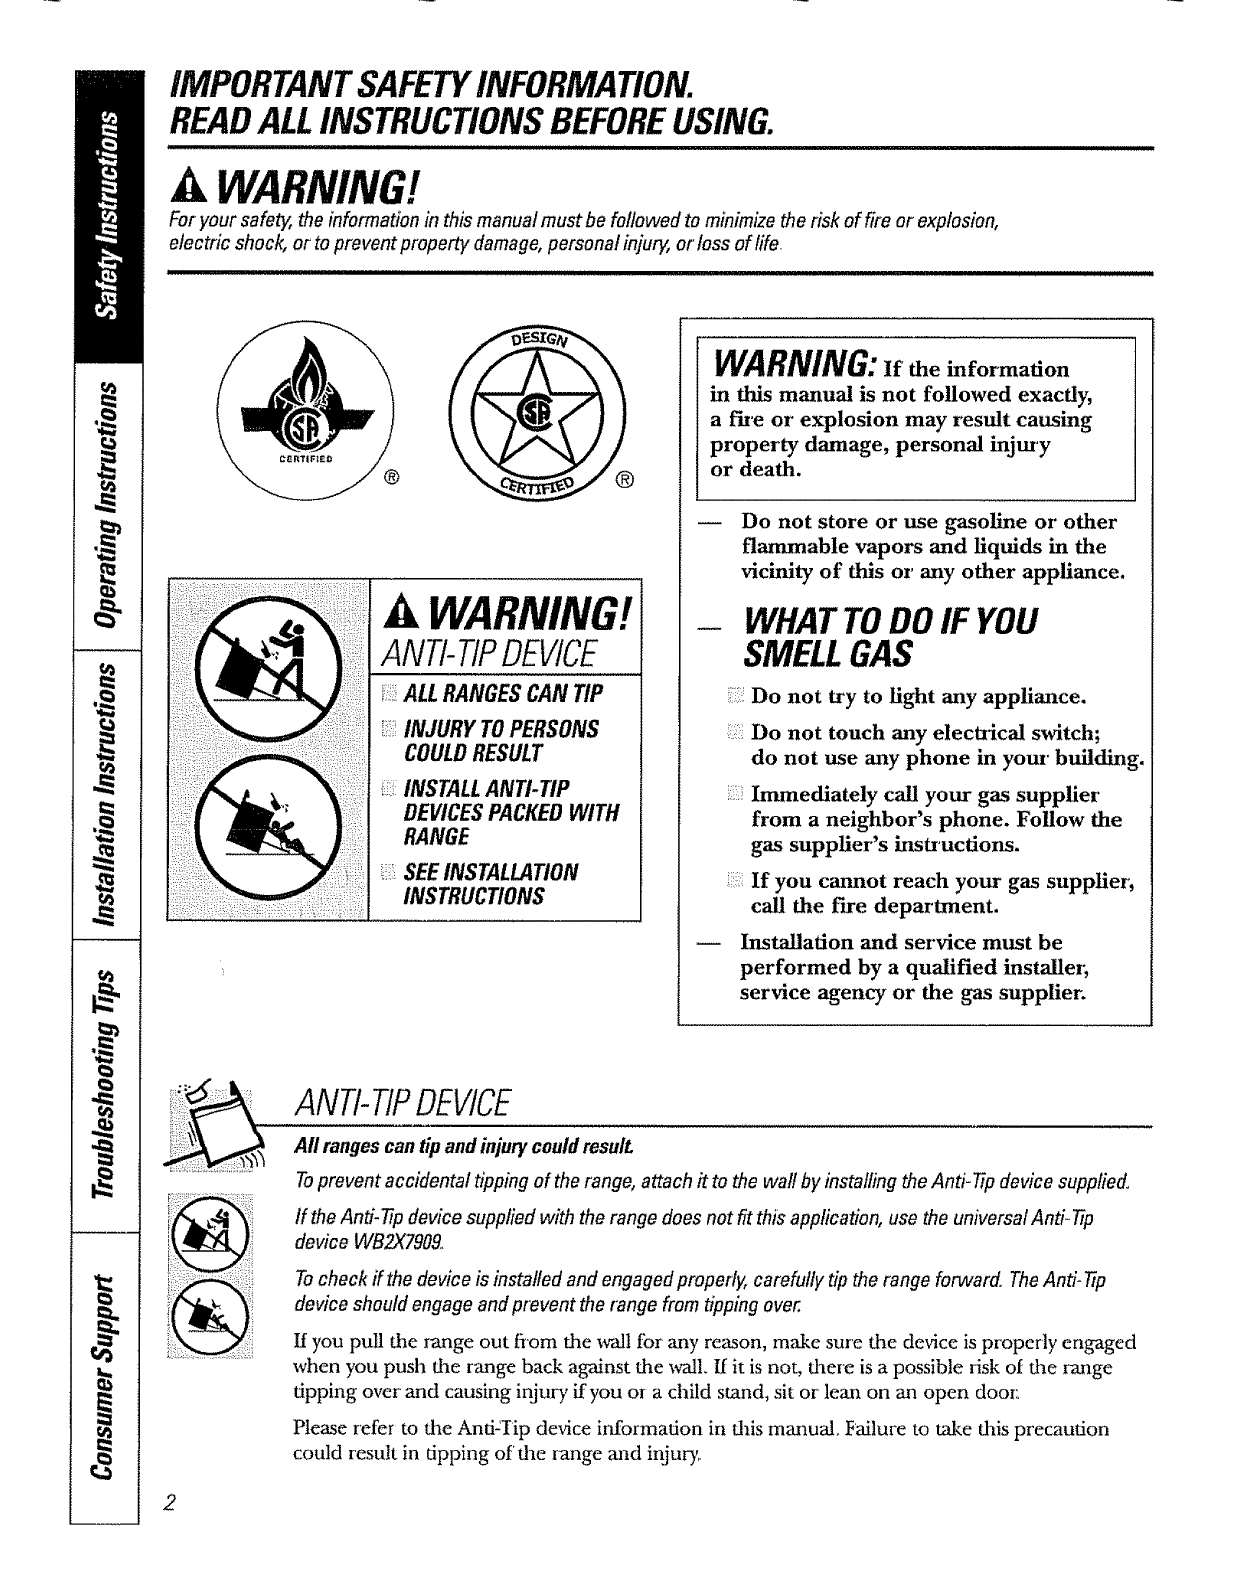
iMPORTANTSAFETYINFORMATION.
READALLINSTRUCTIONSBEFOREUSING.
AWARNING!
For your safety, the information in this manual must be followed to minimize the risk of fire or explosion,
electric shock, or to prevent property damage, personal injury, or loss of life.
WARNING!
ANTI-TIPDEVICE
i::::i::iALLRANGESCANTIP
INJURY TOPERSONS
COULDRESULT
INSTALLANTI-TIP
DEVICESPACKEDWITH
RANGE
i::iSEEINSTALLATION
INSTRUCTIONS
WARNING:if theinfo,'mation
in this manual is not followed exactly,
afire oi" explosion may result causing
property damage, personal injm T
or death.
Do not store or use gasoline oz' other
flammable vapors and liquids in the
vicinity of this or any other appliance.
WHATTODOIF YOU
SMELLGAS
&WARNING!
v._.,woGEAppliancesocom
IMPORTANTSAFETYNOTICE
The California Safe Drinking Water and ToxicEnforcement Act requires the Governor of Cafifomia to
publish a list of substances known to the state to cause birth defects or other reproductive harm, and
requires businesses to warn customers of potential exposure to such substances,
Gas appliances can cause minor exposure to four of these substances, namely benzene, carbon
monoxide, formaldehyde and soot, caused primarily by the incomplete combustion of natural gas or
LPfuels.,Properly adjusted burners, indicated by a bluish rather than a yellow flame, will mirfimize
incomplete combustion, Exposure to these substances can be minirrfizedby venting with an open
window or using a ventilation fan or hood
SAFETYPRECAUTIONS
Have the installer show you the location of the range gas shut-off valveand how to shut #off if necessan/
Have your range installed and properly
grounded by a qualified installer; in
accordance x'fid_ dae Installation Instructions,,
Any adjustment and se_a_iceshould be
perIbrmed only by qualified gas range
installers or service technicians°
Do not attempt to repair or replace ,any
part of your range unless it is specifically
recommended in dais m_-muaL All other
set€ice should be refer_ed to a qualified
technician
:;i::Plug your range into a 120-voh grounded
outlet only, Do not remove flae round
gr'ounding prong fiom dae plug, If in doubt
about tlae grounding of flae home electrical
system, it is your personal responsibility mad
obligation to have an ungrounded outlet
replaced witla a properly grounded,
d_ree-prong outlet in accordance x_ddl
flae National Elecuical Code° Do not use
an extension cord _dd_ this appliance,
3
IMPORTANTSAFETYINFORMATION.
READALLINSTRUCTIONSBEFOREUSING.
SAFETYPRECAUTIONS
i::,iLocate the range out of kitchen uaffic path
and out of drafty locations to prevent poor
air circulation.
Be sure all packaging mateiials me
removed fiom the range before operating it
to prevent fire or smoke damage should the
packaging material ignite.
Be sure your range is correcdy adjusted by
a qualified service technician or installer for
the type of gas (natural or LP) that is to be
used. Your range carl be converted for use
with either type of gas. See the Installation of
the range section,
WARNING:Theseadjus en must
be made by a qualified service technician
in accordance with the manufacturer's
instructions and all codes and requirements
of the authority ha\_ngjurisdicdon. Failure
to follow these instructions could result in
serious i_ury or property damage_ ][he
qualified agency performing this work
assumes responsibility 3[brthe conversion,
i:i:iAfter' prolonged use of a range, high floor
temperatures may result and many floor'
coverings will not withstand this kind of use.
Never install the range over _nyl dle or
linoleum that cannot withstand such type
of use,. Never install it directly over interior
kitchen carpeting
:):=iiDo not leave children alone or' unattended
where a range is hot or in operation.
They could be seriously burned.
i:::::Do not allow anyone to climb, stand or' hang
on the oven door; storage drawer; warming
drmver or cooktop They could damage the
range and even tip it over; causing severe
per_onat injury.
___:CAUTION:Items of interest to
children should not be stored in cabinets
above a range or on the backsplash of a
range--children climbing on the range to
reach items could be seriously injured,
5:_For your safety, never use your appliance
for warming or headng the room
Never wear loose fitting or hanging garments
while using the appliance, Be careful when
reaching for items stored in cabinets over the
range. Flammable material could be ignited
if brought in contact with flame or hot oven
surfaces and may cause severe burns.
Do not store flammable materials in an
oven, a range storage drawer; a waaming
drawer oi near a cooktop.
=::::Do not store or use combustible materials,
gasoline or other flammable -vapors and
liquids in the _4cinity of this or any odaer
apptiance_
i:i:::iDo not let cooking grease or other flammable
materials accumulate in or' near the range.
,::2 Do not use water' on grease fires_ Never pick
up a flaming pan_ Turn the conuols off;
Smother a flaming pan on a surface burner
by covering tt_e pan completely with
a well-fitting lid, cookie sheet or flat tray.
Use a multi-purpose dry chemical or
foam-type fire extinguisher;
Flaming grease outside a pan can be put
out by covering it with baking soda or;
if m_lable, by using a multi-purpose dry
chemical or foam-type fire extinguisher:
Flame in the oven or' warming drawer can be
smothered completely by closing the oven
door or drawer mad turning the control to
off or by using a multi-purpose dry chemical
or foam-type fire extingaaisher:
Let tim burner grates and other surfaces
cool before touching them or leaving them
where children can reach them,
ii_iNever block the vents (air openings) of the
range. They provide the air' inlet and outlet
that are necessary for t_he range to operate
properly with correct combustion. Air
openings are located at the rear of the
cooktop, at the top mad bottom of the oven
door; and at the bottom of the range under
the _<arming drawer; storage drawer or
kick panel.
:=:Large scratches or impacts to glass doois
or cooktops can lead to broken or'
shattered glass,
4
ww-m.GEAppliances.com
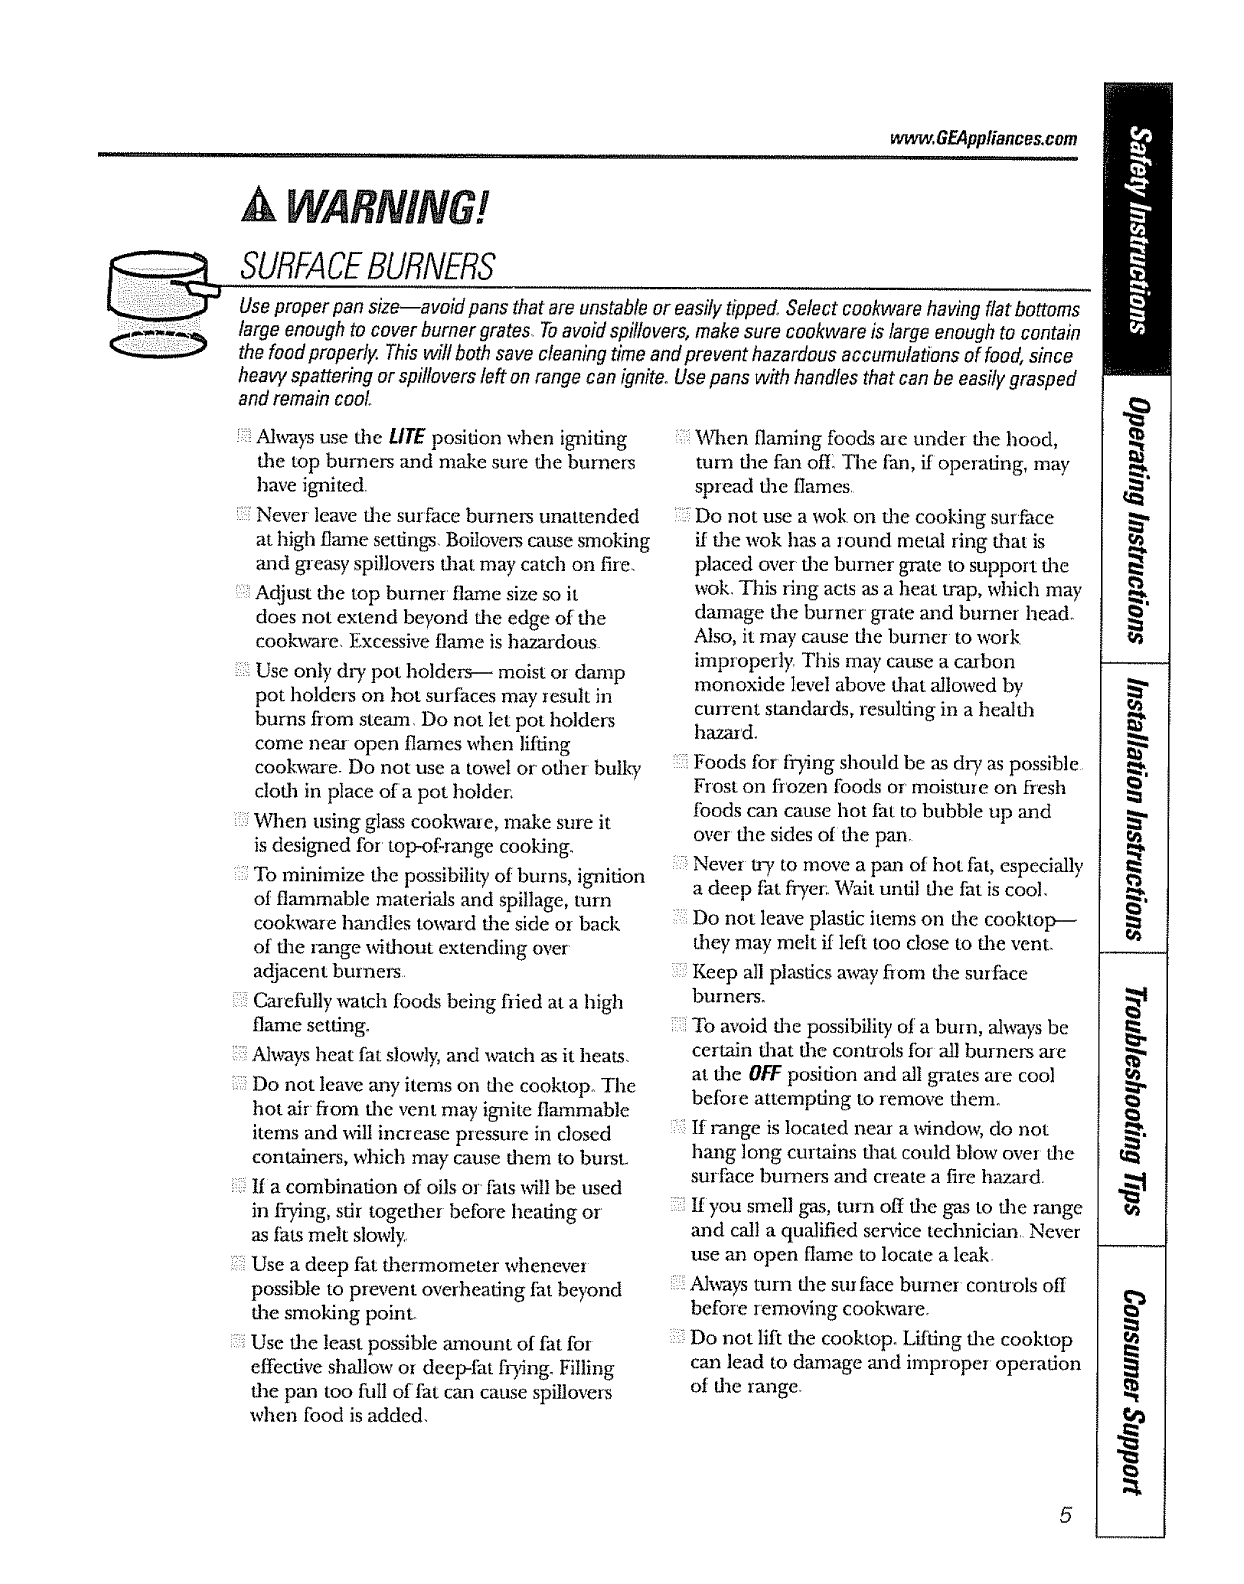
WARNING!
SURFACEBURNERS
Use proper pan size--avoid pans that are unstable or easily tipped. Select cookware having flat bottoms
large enough to cover burner grates..Toavoidspillovers, make sure cookware is large enough to contain
the food properly. This will both save cleaning time and prevent hazardous accumulations of food, since
heavy spattering or spi!!overs left on range can ignite. Usepans with handles that can be easily grasped
and remain cooL.
Ahvays use Ore LITE position when igniting
tim top burners and make sure dae burners
have ignited.
Never leave fire surface burners unattended
at high flame settings. Boitovers came smoking
and gneasy spillovers flaat may catch on fire.
Adjust d_e top burner flame size so it
does not extend beyond fire edge of dae
cookware. Excessive flame is hazardous
:.:::;:: Use only dr,i pot holders-- moist or damp
pot holders on hot surfaces may result in
burns from steatn. Do not let pot holders
come near open flames when lifting
cookware. Do not use a towel or oflaer bt, llW
clotta in place ofa pot holder:
When ttsing glass cook_vare, make sure it
is designed for top-ofrmlge cooking.
::' To minimize Ore possibility of burns, igmition
of flammable materials and spillage, turn
cookware bandies to_ard fire side or back
of dae range widmut extending over
adjacent burners.
Catefially watch foods being flied at a high
flame setting.
Always heat fat slowly, mad watch as it heats.
Do not leave any items on dae cooktopo The
hot air from the vent may ignite flammable
items and will increase pressure in closed
containers, which may cause daem to bursL
It a combination of oils or fats will be used
in frying, stir together before heating or
as lats melt slowly,.
;:: Use a deep fat daermometer whenever
possible to prevent overheating fat beyond
dae smoking poinL
:_:::iUse the least possible amount of fat for
etfective shallow or deep-fat hying. Filling
the pan too full of fat can cause spillovers
when food is added.
_A,q_enflaming foods ate under dae hood,
turn dae fan offl The fan, if operating, may
spread dae flames.
':! Do not use a wok. on dae cooking surface
if d_e wok has a round metal ring daat is
placed over tim burner grate to support dae
wok. This ring acts as a heat trap, which may
damage dae burner' grate and burner head_
Also, it may cause tire burner to work
improperly. This may cause a carbon
monoxide level above dmt allowed by
current standards, resulting in a healda
hazard.
Foods for frying should be as dr), as possible
Frost on frozen foods or moisture on fresh
foods cma cause hot fat to bubble up and
over dae sides of die pan.
Never try to move a pan of hot fat, especially
a deep fat fryer:. Wait until fire fat is cool.
Do not leave plastic items on die cooktop--
they m W melt if left too close to fire vent.
_( Keep all plastics mvay fiom d_e surface
burners.
:_:To avoid dae possibility of a burn, al_,ays be
certain drat d_e controls for all burners are
at fire OFFposition and all grates are cool
belbre attempting to remove flaem.
:::::If range is located near a _4ndo_; do not
haa_g long curtains d_at could blow over dm
surface burners and create a fire hazard
7:::lIyou smell gas, turn off dre gas to dae range
and call a qualitied service technician Never
use an open flame to locate a leak
Ahvays turn dae sur face burner conu"ols off
before remm_ng cook'_re.
:i::!Do not lift fire cooktop. Lifting dre cool<top
can lead to damage and improper operation
of fire range.
5
IMPORTANTSAFETYINFORMATION.
READALLINSTRUCTIONSBEFOREUSING.
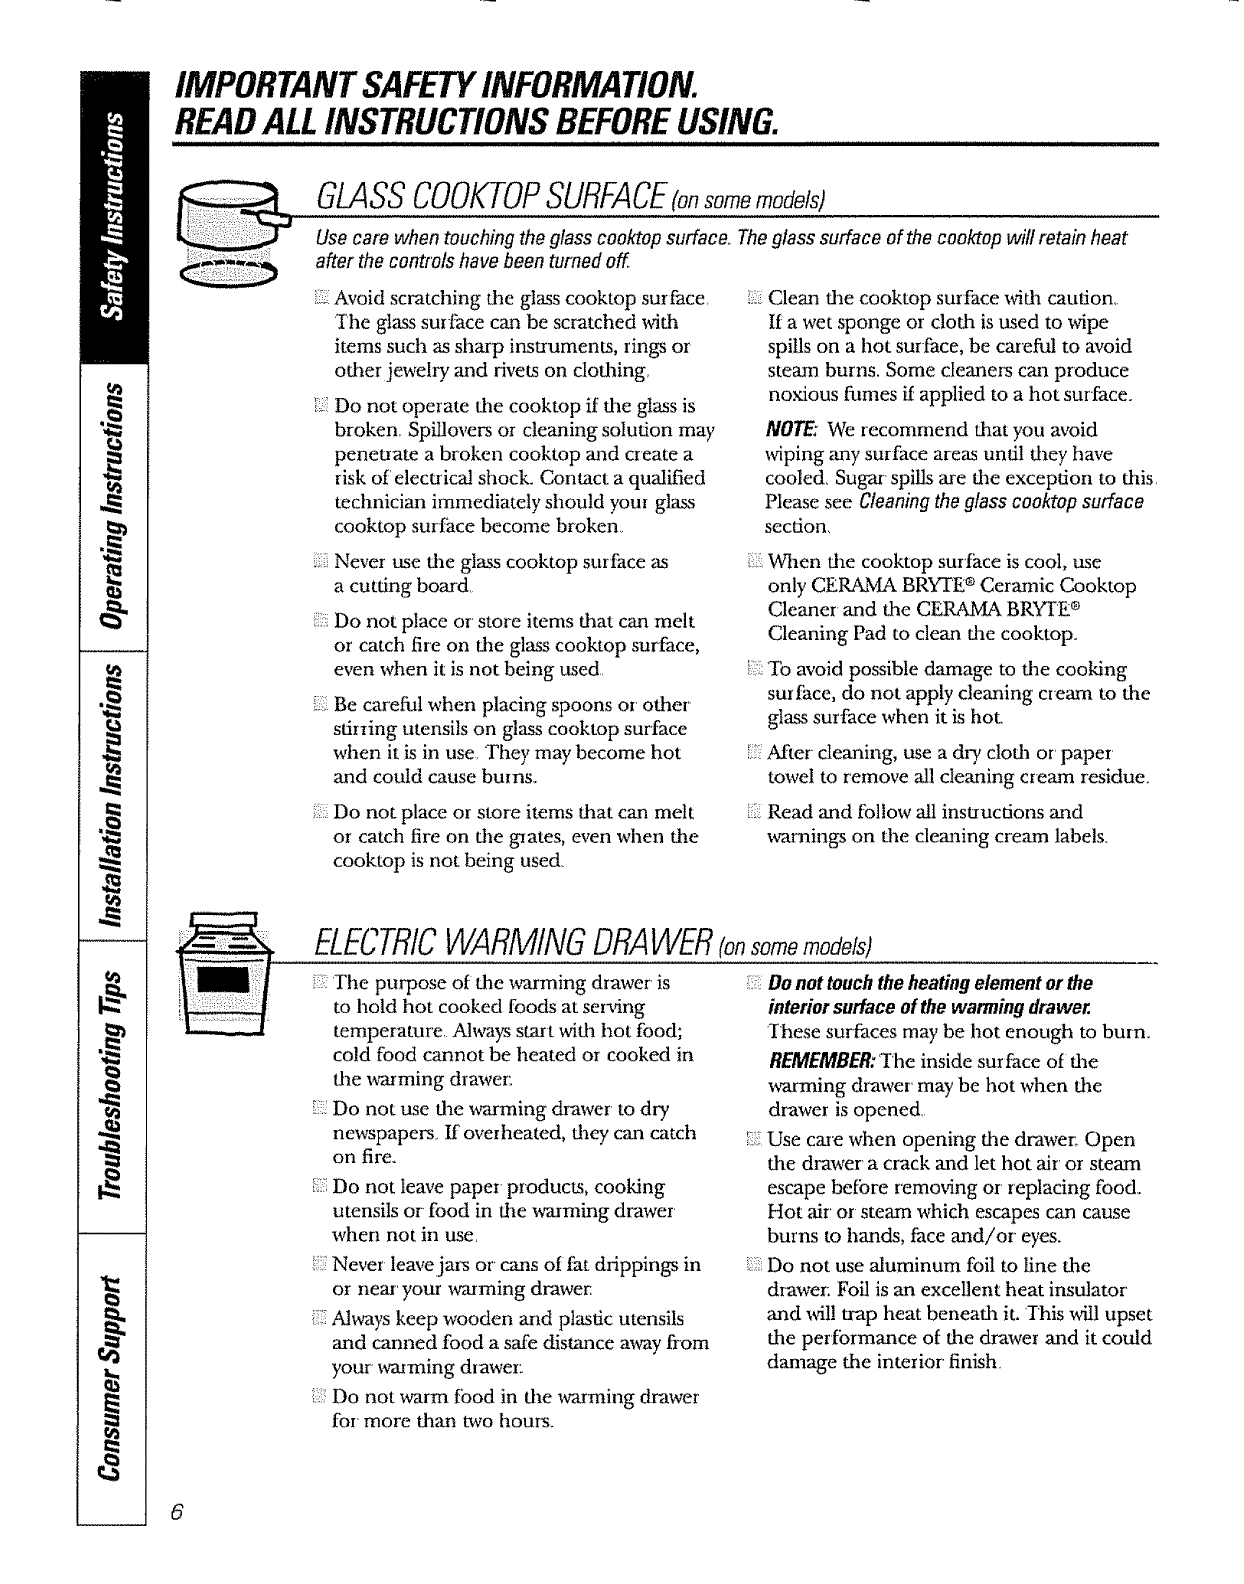
GLASSCOOKTOPSURFACE(onsomemodelsJ
Use care when touching the glass cooktop surface_ The glass surface of the cooktop will retain heat
after the controls have been turned off
_:,i:i:iAvoid scratching the glass cooktop surface, 2_i
The glass surface can be scratched with
items such as sharp instruments, rings or
other jewelry and rivets on clothing,
!!!i%:
Do not operate the cooktop if the glass is
broken, Spillovers or cleaning solution may
penetrate a broken cooktop and create a
risk of' electrica! shock. Contact a qualified
technician immediately should your glass
cooktop surfitce become broken,
Never use the glass cooktop surface as
a cutting board
Do not place or store items that can melt
or catch fire on the glass cooktop surface,
even when it is not being used.
Be cardiA when placing spoons or other
stiiring utensils on glass cooktop surface
when it is in use. They may become hot
and could cause bums.
ilL:Do not place or store items that can melt
or catch fire on the grates, even when the
cooktop is not being used,
Clean the cooktop surface with caution,.
Ira wet sponge or cloth is used to wipe
spills on a hot surface, be careful to avoid
steam burns. Some cleaners can produce
noxious flames if applied to a hot surface.
NOTE: We recommend that you avoid
wiping ,any surface areas until they have
cooled. Sugar` spills are the exception to this.
Please see Cleaning the glass cooktop surface
section,
When die cooktop sur'fb,ce is cool, use
only CERaXJvIABRYTE ®Ceramic Cooktop
Cleaner and the CERAM2k BRYrE ®
Cleaning Pad to clean dae cooktop.
!:::i_To avoid possible danaage to fire cooking
surface, do not apply cleaning cream to the
glass surface when it is hot.
!_:::After cleaning, use a dr,i cloth or' paper
towel to remove all cleaning cream residue_
i::?Read and follow all insuucfions and
warnings on the cleaning cretan labels.
ELECTRICWARMINGDRAWER(onsome models}
i::2The purpose of the warming drawer is
to hold hot cooked foods at serving
temperature. Always start with hot food;
cold food c_'mnot be heated or cooked in
the warming drawe_:
_1_._Do not use the warming drawer to dry
newspapers. If overheated, they can catch
on fire.
i_i'ilDo not leave paper products, cooking
utensils or food in the warming drawer
when not in use,
_:',:Never leave jars or cans of fat drippings in
or near` your warming drawer,
_i7Always keep wooden and plastic utensils
and canned food a safe distance away from
your warming dlawer:
;2:Do not warm fbod in the warming drawer
for more than two horns.
Donot touchthe heatingelement or the
interiorsurface of the warming drawer.
These surfaces may be hot enough to bum.
REMEMBER:The inside surface of fl_e
warming drawer may be hot when the
drawer is opened,
ii.:_Use ca_e when opening the drawer,. Open
the drawer a crack and let hot air' or steam
escape be[bre removing or replacing food.
Hot air or steam which escapes can cause
burns to hands, face and/or eyes.
ill Do not use aluminum foil to line the
drawer: Foil is art excellent heat insulator
and wil! trap heat beneath it. ]-his will upset
the perfbrmance of the drawer and it could
damage the interior finish
6
www.GEAppliances.com
COOKMEATANDPOULTRYTHOROUGHLY...
Cook meat and poultry thoroughly--meat to at least an INTERNALtemperature of 160°Fand poultry to
at least an INTERNAL temperature of 180°F.Cooking to these temperatures usually protects against
foodbome illness,,
OVEN
Stand away from the range when opening the door of a hot oven, The hot air and steam that escape can
cause burns to hands, face and eyes,.
Do not use the oven for a storage area..
Items stored in dae oven carl ignite°
-:i Keep dm oven flee ftom gTease buildup.
Place file oven sheh,es in fl_e desired
position while dae oven is cool.
Pulling out flae shelf to die stop-lock is a
convenience in lifting hea W foods, It is also
a precaution against burns from touching
hot surfaces of flae door or oven walls, The
lowest position is not designed to slide,.
i!::Do not heat unopened food containers,
Pressure could build up and the container
could burst, causing an injuD,.
:7:Never use aluminum foil to line fl_e oven
bottom. Improper" use of foil could start
a fire and resutt in high cmbon monoxide_
Do not use aluminum foil anDvbere in fl_e
oven except as described in this manual,
Misuse could result in a fire hazard or
When using cooking or roasting bags in file
oven, follow file manufacturer's directions,
::':::Do not use your oven to dry newspapers.
If overheated, dmy can catch fire,
:iii::Use only glass cookware fllat is
recommended for use in gas ovens.
Ah_,aysremove the broiler' pan from rvmge as
soon as you finish broiling. Grease left in d_e
pan can catch fire if oven is used widmut
removing the grease from fl_e broiler pan,,
hrhen broiling, if meat is too close to dae
flame, flae fat may ignite Trim excess fat to
prevent excessive flare-ups,,
Make sure flae broiler pan is in place colrectly
to reduce tim possibility of' gaease fires,
_::If you should have a grease fire in flae broiler
pan, press fl_e CLFa4B/Offpad, mad keep
dm oven door closed to contain fire until
it burns out.
damage to flae range.
SELF-CLEANINGTHEOVEN
For safety and proper cooking performance,
al_,ays bake and broil with d_e oven door
closed.
Be sure to x_dpe off excess spillage before
self-cleaning operation.
_:::Before self-cleaning fl_e oven, remove file
broiler pan, broiler grid, all cookware, probe
and any aluminum foil
Nickel oven shelves (on some models)
should be removed from file oven before
beginning tim self<lean cycle.
!I':' Gray porcelain-coated oven shelves (on some
models) may be cleaned in tim oven during
fl_e self-clean cycle
Do not ctema the door gasket, The door gasket
is essential for a good seal, Care should be
Laken not to rub, damage or move file gasket,
i:_Clean only par'ks listed in dais O_mer's Manual
:'::If flae self-cleaning mode malfunctions, turn
flae oven off and disconnect file power supply.
Have it serviced by a qualified technician°
Do not use oven cleaners, No commercial
oven cleaner or oven liner ofany kind
should be used in or around any part of
the oven. Residue fTom oven cleaners will
damage the inside of the oven when tim
self-dean cycle is used,
READANDFOLLOWTHISSAFETYINFORMATIONCAREFULLY.
SAVETHESEIIVSTRUCTIONS
Usingthe gas surface burners.
Throughout this manual, features and appearance may vary from your model
Before Lighting a Gas Burner
_i,;iMake sure all burner_ are in place_
i_!:;Make sure all grates on the range are
properly placed before using any burner,
After Lighting a Gas Burner
Do not operate the burner [br an
extended period of' time without
cook_are on the grate. Ihe finish on
the grate may chip without cookware
to abso[b the heat
Be sure the burners and grates are cool
before you place your hand, a pot holder,
cleaning cloths or other materials on
them,
Pushthe control knob in and turn it
to the LIFEposition.
How to Light a Gas Surface Burner
Make sure all the surf_tce burners are
placed in their" respective positions
Push the control knob in and mrn it to
the LIFE position,
You will hear a little clicking noise_
the sound of tim electric spark igniting
the burner_
rum the knob to adjtLst the flame size.
If the knob stays at LifE, it will continue
to ctick..
P,qaen one burner is turned to/JTE, all
the burners spm'k Do not attempt to
disassemble or clean around any burner
while another burner is on Aaaelectric
shock may result, which could cause you
to knock over hot cookware,
Medium Small
Large ExtraLarge
%0_
,,_, }0
,.. ".v_J ,/__=,=
Extra-largo burners only
Sealed Gas Burners
Your gas range cooktop has four sealed
gas burners "l'hey offer' convenience,
cleanabitity and flexibility to be used in
a wide range of cooking applications.
The smallest burner in the right rear'
position is the simmer burner_ Ihis burner
can be turned dram to LOfor a very low
simmer' setting tt provides precise cooking
performance for" delicate foods such as
sauces or foods that require low heat for a
long cooking time.
_Ihe medium (left rear) and the large (left
front) burners are the primary burners for'
most cooking. These general-purpose
burne,_ can be mined down from HI to LO
to suit a wide range of cooking needs.
the exua large burner (right front) is the
maximttm output burner. Like the other
tllree burners, it can be turned down from
HIto tO for a ",vide r,mge of cooking
applications; however, this burner is
designed to quickly bring large arnounts of
liquid to a boil. It has a special POWER BOILTM
setting designed to be used with cookware
10 inches or larger in diameter:
,9
How to Select Flame Size
Forsafehandlingof cookware,never let the flames
extendup thesidesof thecookware
Watch the flame, not the knob, as you
reduce heat. When fast heating is desired,
the flame size on a gas burner" should
match the cookware you are using.
Hames larger than the bottom of the
cook_e will not result in faster heating of
the cookware and could be hazardous.
wwwoGEAppliancesoeom
_,H q'II I
Top-of-Range Cookware
Aluminum:'Medium-weight coolavare is
recommended becattse it heats quickly
and evenly Most foods bro_l evenly in an
aluminum skillet, Use saucepans wifl_ tight-
fitting lids when cooldng with mininmm
amounts of water:
Cast-Iron:If heated sloMy, most skillets will
give sadsfactoxT results
Enamelware:Under some conditions,
flae enamel of some cookx_re may melt,
Follow cookware manufacturer's
recommendations for cooking methods.
Glass: There are two b_es of glass
cookware_those for oven use only and
dmse tbr top-of-z,qngecooking (saucepans,
coffee and teapots). Glass conducts heat
very s!owly
HeatproofGlass Ceramic: Can be used for
either surface or oven cooking It conducts
heat ve W slowly and cools vmT slowly Check
cook\<are manufacturer's directions to be
sure it can be used on gas _anges,
StainlessSteel: This metal alone has poor
heating properties and is usually combined
_4th coppm, aluminum or oilier metals for
improved heat distribution_ Combination
metal skillets usually work satisfactorily if
they are used wid_ medium heat as flae
naantffacmrer recommends,
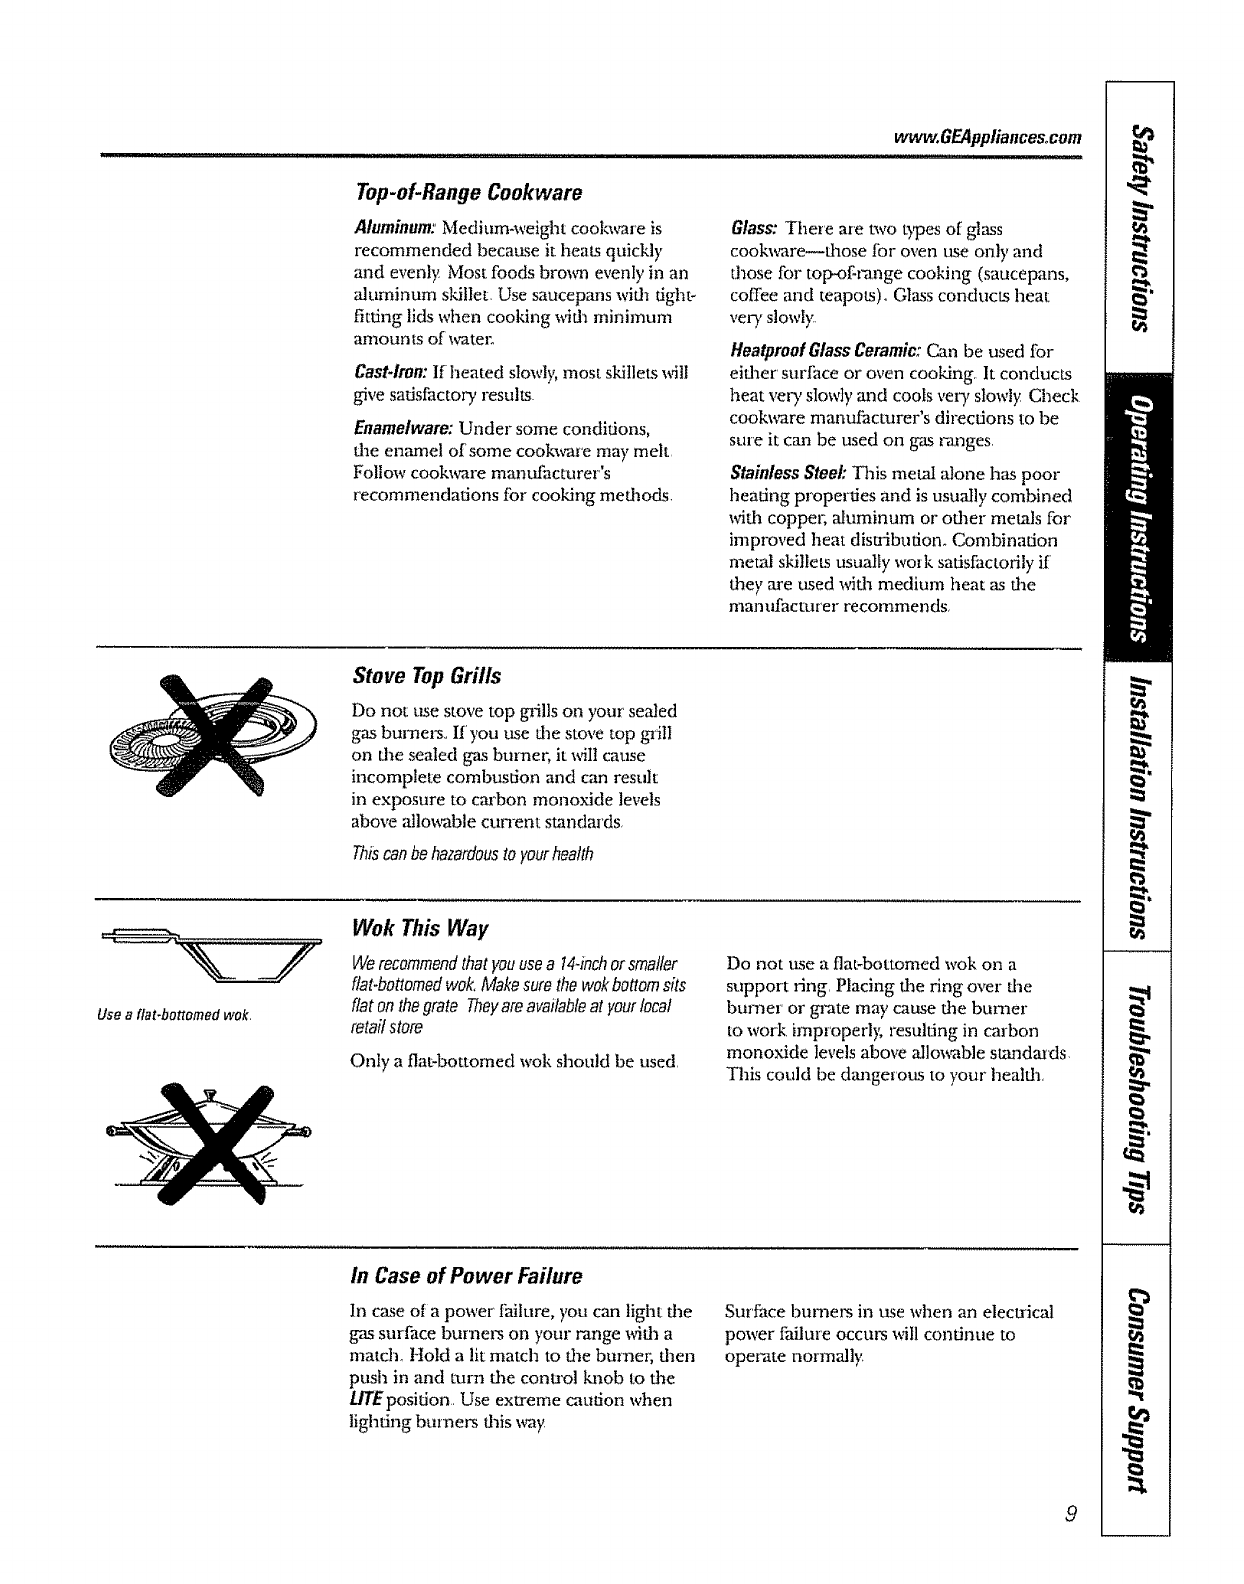
Stove Top Grills
Do not use stove top gTillson your sealed
gas burnel_., If you use d_e stove top gq'ilt
on dae sealed gas bumen it _It cause
incomplete combustion and can result
in exposure to cm'bon monoxide levels
above ailing,ablecunent standards.
Th_canbehazardoustoyourhealth
Use a flat-bottomed wok,
Wok This Way
Werecommendthat youusea 144nchorsmaller
flat-bottomedwok, Make surethe wok bottomsits
flat onthe grate Theyare availableat yourlocal
retail store
Only a flat-bottomed wok should be used,
Do not tksea flat-bottomed wok on a
support ring Placing dae ring over die
burner or grate mW cause fire burner
to work improperl); resulting in carbon
monoxide levels above allm_ble sumdaa'ds.
This could be dmagerom to your heatfll,
in Case of Power Failure
In case era power fhiture, you can light dae
gas surface bumms on your range wid_a
matrix., Hold a lit match to d_e bumez; fl]en
push in and turn the control "lmobto the
UTEposition. Use extreme caution when
lighting burners dais way
Surface bumm_ in ttse when an electrical
power failure occm_, will continue to
operate normally_
9
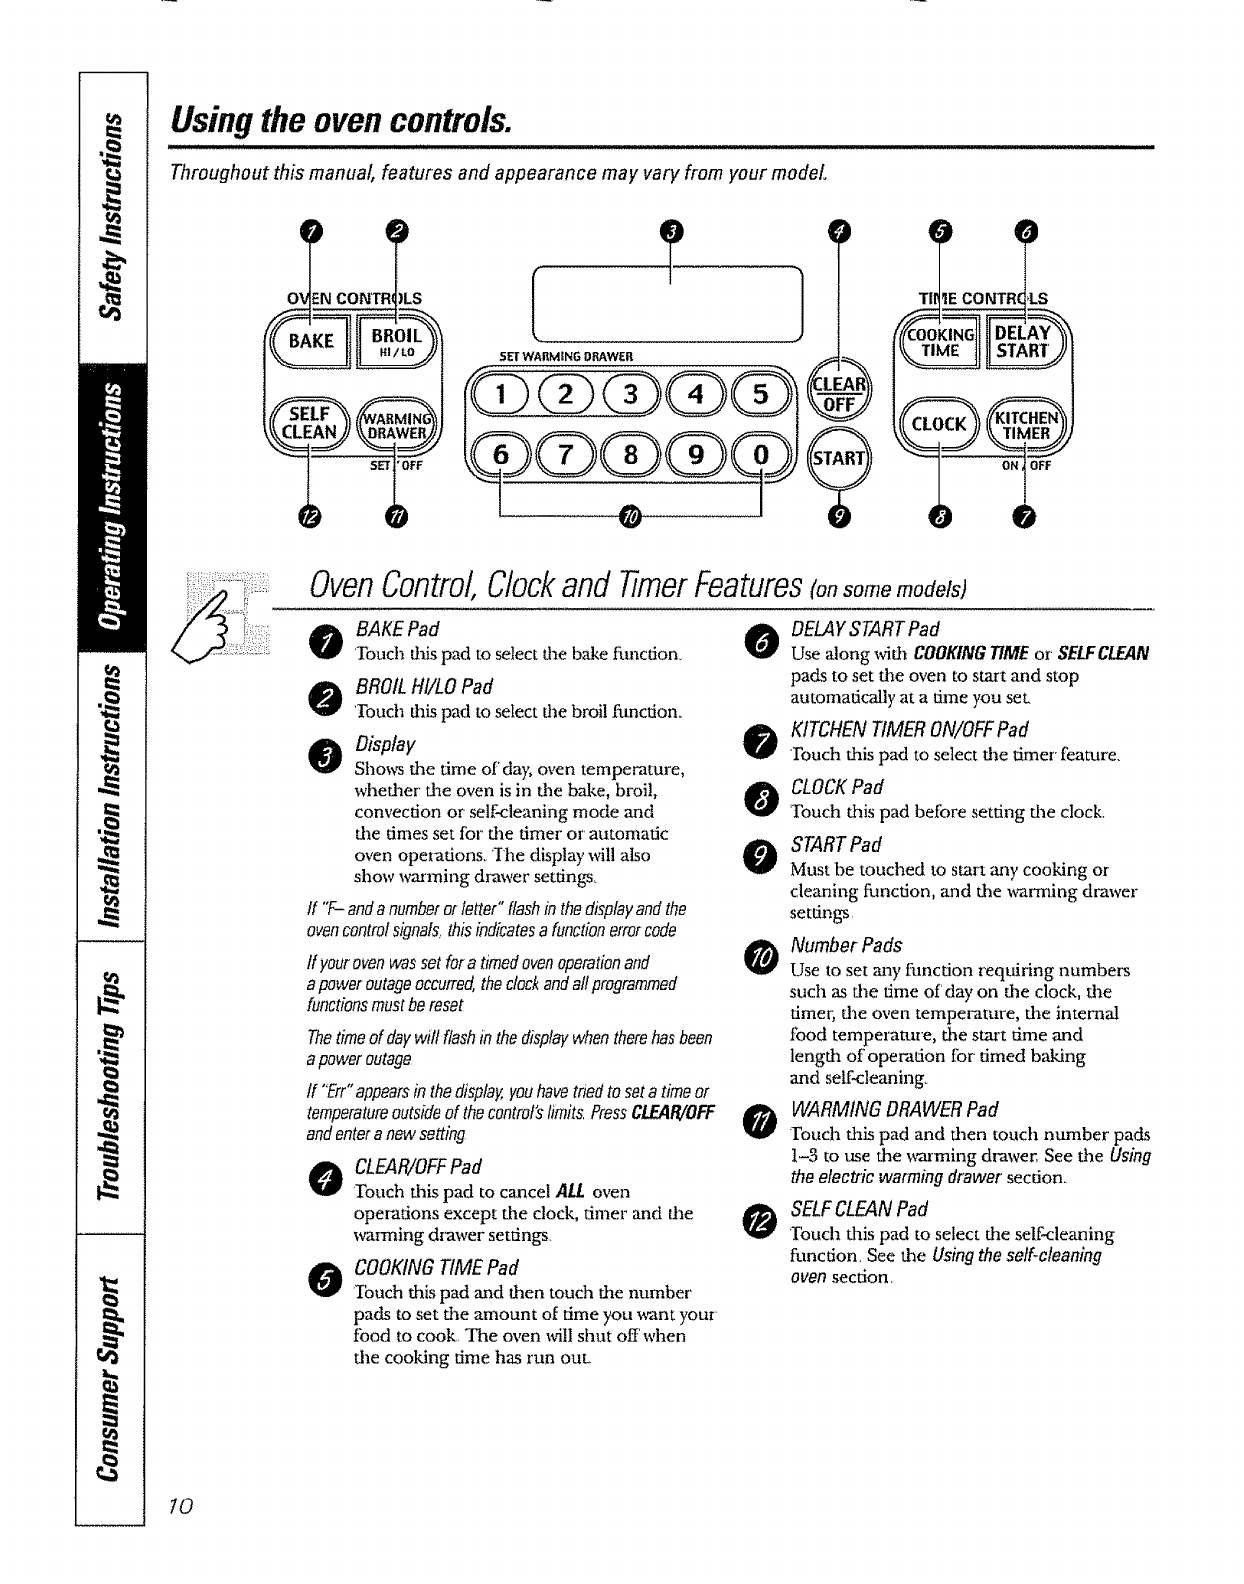
Using the oven controls.
IIIlll I I II I Illll I Ill]l
Throughout this manual, features and appearance may vary from your model.
0ENCONT! tLS I !' 1" () ,)
T|r _ECONTR _LS
OvenControl,Clockandtimer Features(on some models)
oAKEPad 0
Touch this pad to select d_ebake fm_ction
oBROILHI/LO Pad
'Touch dfis pad to select the broil ftmction_
oOisplay $
Shows the time of day, oven temperature,
whether" the oven is in the bake, broil, A
convection or"self-cleaning mode and
the dines set for the timer or' automatic
oven operations_ "Ihe display will also
show warming drawer settings_
ff 'T- andanumberorletter"flashin thedisplayandthe
ovencontrolsignal&thisindicatesafunctionerrorcode
ff your ovenwas set for a timedovenoperationand
a poweroutageoccurred theclockandallprogrammed
functionsmust bereset
Thetimeof daywill flashinthedisplaywhentherehasbeen
apoweroutage
tf "Err"appearsinthedisplay,youhavetriedto setatimeor
temperatureoutsideof thecontrorslimits,PressCLEAR/OFF
andenteranewsetting
@
0
CLEAR/OFFPad
Touch this pad to cancel ALL oven
operations except the clock, timer and the
wazming d_awer settings
COOKINGTIME Pad
Touch this pad and then tout1 the number
pads to set the amount of time you _nt your
food to cook. The oven will shut off' when
the cooking time has run OuL
O
DELAYSTARTPad
Use along _dth COOKINGTIME or SELFCLEAN
pads to set fl_e oven to start and stop
automatically at a time you set.
KITCHENTIMERON/OFFPad
Touch this pad to select fl_etimer' feature.
CLOCKPad
Touch this pad before setting the clock,
STARTPad
Must be touched to start any cooking or
cleaning function, and the warming drawer
setdngs
Atumber Pads
Use to set may function requiring numbers
such as the time of' day on the clock, the
timer, the oven temperature, the internal
food temperature, the start time and
length of operation for timed baking
and self<leaning.
WARMING DRAWERPad
Touch tiffs pad and then touch number pads
1-3 to use the warming drawer,. See fine Using
the electric warming drawer' section_
SELFCLEANPad
'Ibuch this pad to select the self-cleaning
function, Seethe Usingthe self-cleaning
oven section,
10
wvvvv,,GEAppliances,com
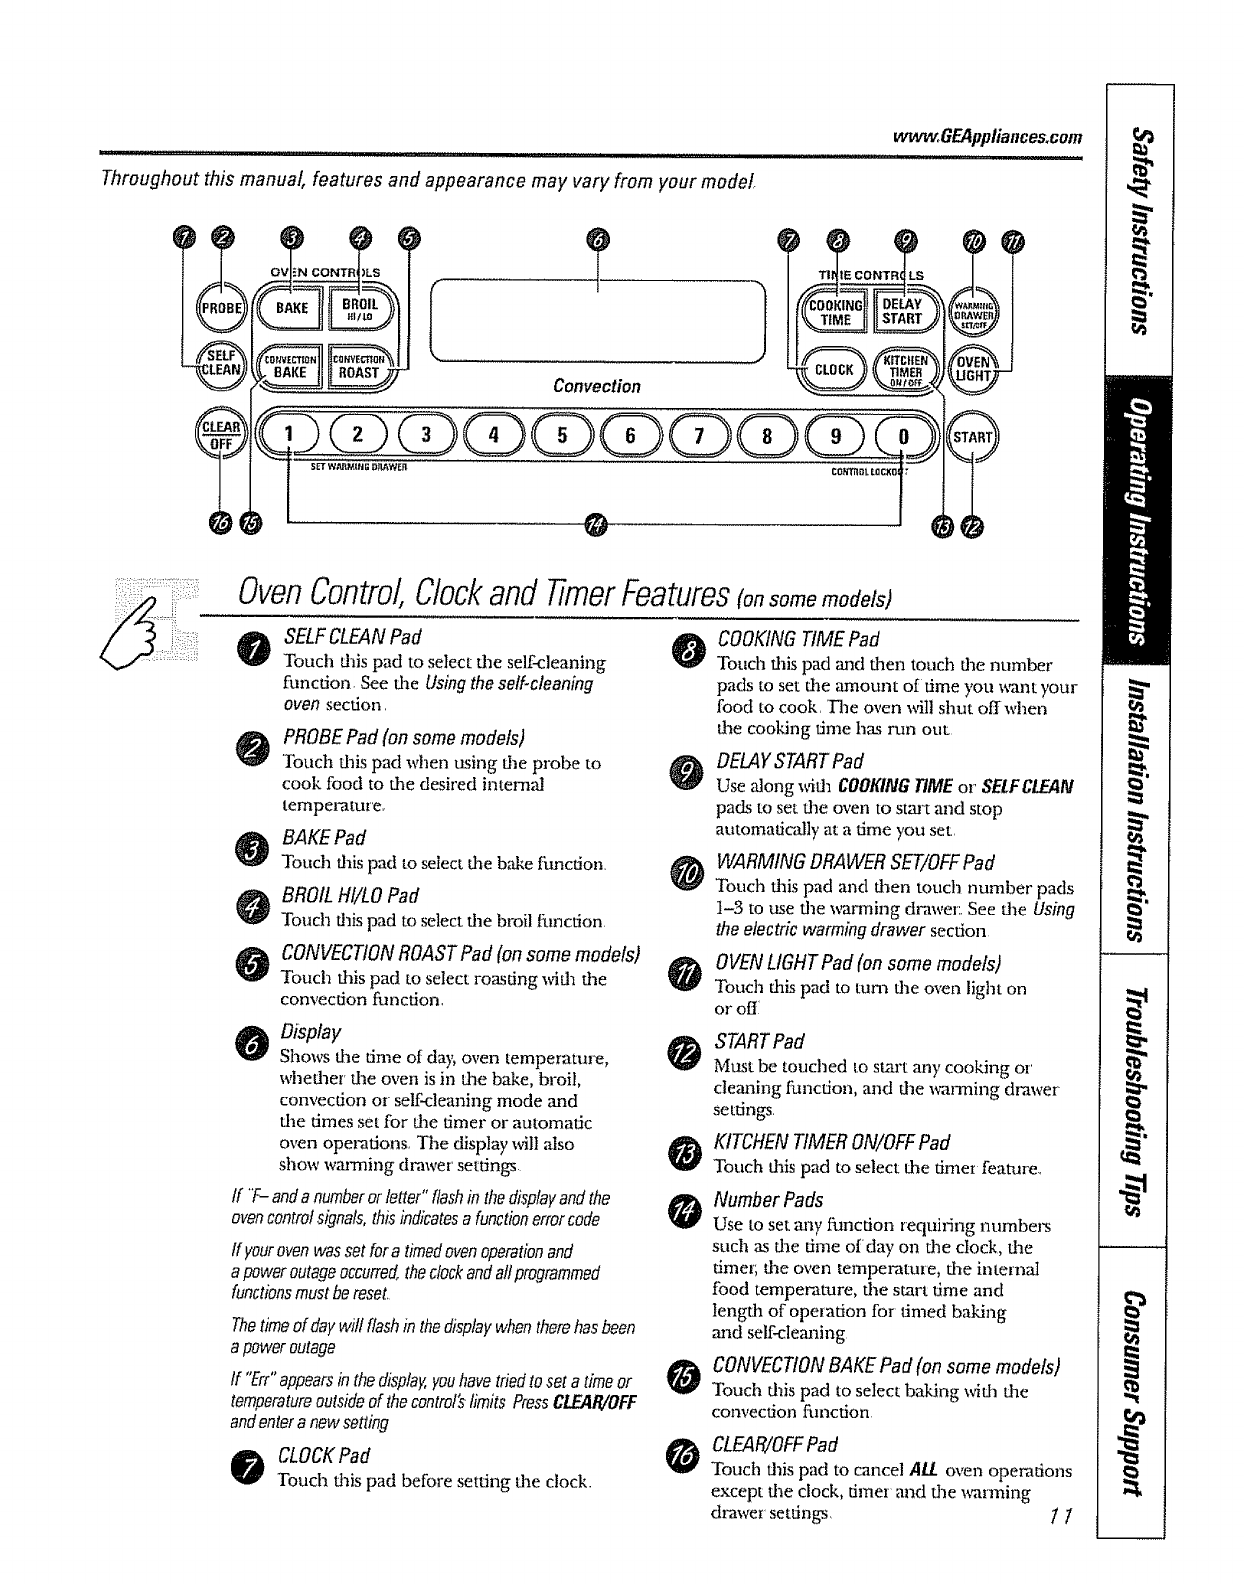
Throughout this manual, features and appearance may vary from your model.
Convection ?
OvenControl,Clockand timer Features(onsondemodels)
SELFCLEANPad
Touch this pad to select the self-cleaning
function. See dm Using the self-cleaning
oven section,
PROBEPad {on somemodels)
Touch dfis pad when using the probe to
cook food to flee desired internal
temperature,
BAKE Pad
Touch daispad to select tim b_e function.
BROILH!/LO Pad
Touch daispad to select deebroil I:unction
CONVECTIONROASTPad (on some models)
Touch dfis pad to select roasting _dl die
convection function,
Display
Shows d_e time of da); oven temperature,
whedaer flae oven is in dae bake, broil,
convection or self-cleaning mode and
the times set for flae timer or automatic
oven operations, The display will also
show warming drawer settings
If T-- anda numberor letter" flashm the displayand the
ovencontrolsignals,thisindicatesa functionerrorcode
If yourovenwas set for a timedovenoperationand
a poweroutageoccurred,theclockandall programmed
functionsmust bereset,
Thetime of daywifl flashin the displaywhentherehasbeen
a poweroutage
If "Err"appearsin the display,youhavetried to set atime or
temperatureoutside of thecontrol'slimits PressCLEAR/OFF
and enteranew setting
oCLOCKPad
Touch dais pad before setting dae clock.
COOKINGTIME Pad
Touch dfis pad and flaen touch die number
pads to set dae amount of time you _nt your
food to cook. The oven will shut off when
d_e cooking time has run out
DELAYSTARTPad
Use alongwide COOKINGtiME or SELFCLEAN
pads to set d_e oven to stm_tand stop
automaticNly at a time you set,
WARMING DRAWER SET/OFF Pad
Touch dais pad and dmn touch number pads
1-3 to use dm wanning dl,'awer:, See dae Using
the electric warming drawer section
OVENLIGHTPad (on some models)
Touch daispad to turn d_eoven light on
or off
STARTPad
Must be touched to start any cooking or
cleaning function, and d_e wanning di,'awer
settings.
KITCHENtiMER ON/OFFPad
Touch daispad to select d_e timer feature,
Number Pads
Use to set any fi.mction requiting numbers
such as dae time of day on dae clock, dae
dmel; dae oven temperature, d_e internal
food temperature, dae start time and
tengda of operation for timed baking
and self-cleaning
CONVECtiON BAKE Pad (on some models)
Touch tiffs pad to select baking widl dae
comection fmacdon
CLEAR/OFF Pad
Touch tiffs pad to cancel A//oven operations
except d_e clock, timer and die warming
&,-awer settings, t 1
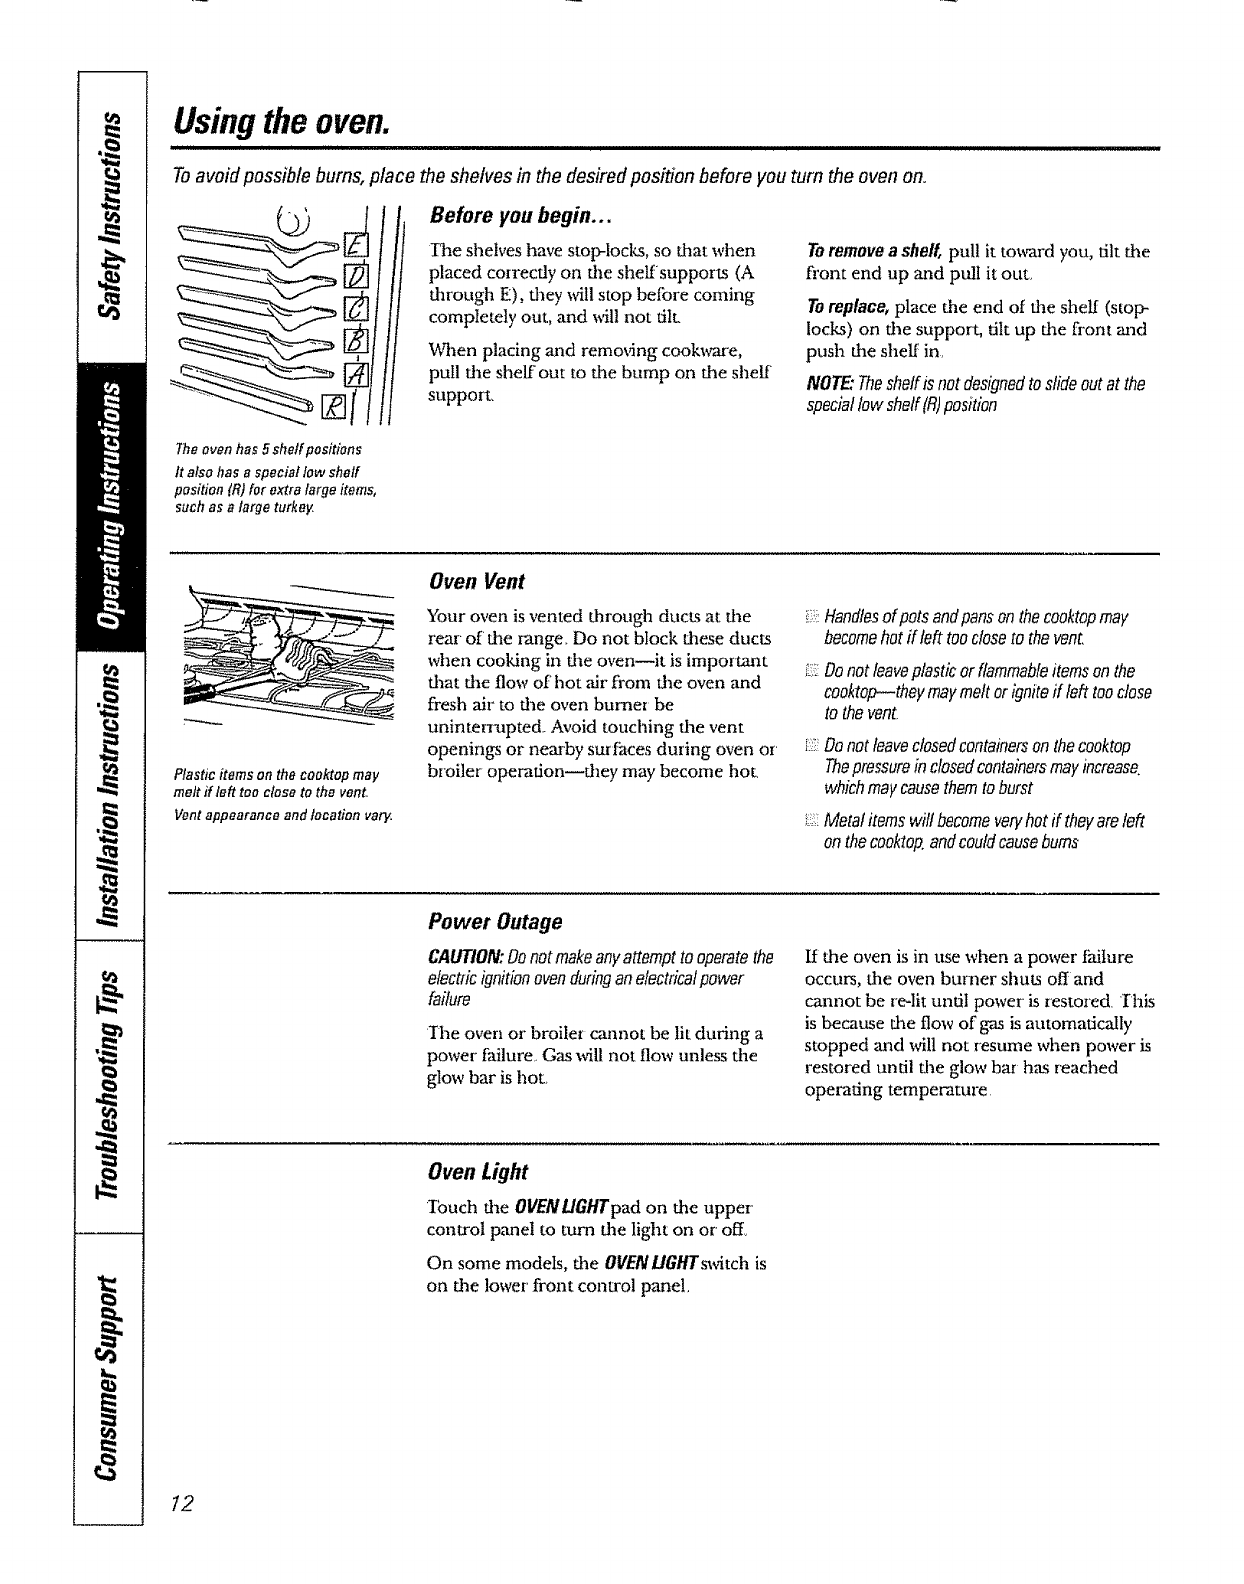
Usingthe oven.
Toavoidpossible bums, place the shelves in the desired position before you turn the oven on.
The oven has 5 sheffpositians
It also has a special low sheff
pesitien tR) for extra large items,
such as alarge turkey.
Before you begin...
l?lae shelves have stop-locks, so that when
placed con'ectly on flae shelf supports (A
through E). they will stop betbre coming
completely out, and _.il! not till
When placing mad remo\_ing cookware,
pull the shelf out to the bump on the sheff
support
To removea shelf, pull it toward you, tilt the
front end up and pull it out,
To replace, place the end of dae shelf (stop-
locks) on the support, tilt up the front mad
push the shelf in,
NOTE:Theshetfisnotdesignedtoslideoutat the
speciallow sheff[R)position
Plasticitems on the cooktop may
molt ff left teo close tothe vent.
Ventappearance and location va_
Oven Vent
"four oven is vented through ducts at the
rear of the range. Do not block these ducts
when cooking in the oven--it is important
that the flow of' hot ,air from the oven and
fresh air" to the oven burner be
unintemapted Avoid touching the vent
openings or nearby surfaces during oven or
broiler operation_they may become hot.
i,_,:Handlesof petsandpansonthecooktepmay
becomehotif teft toocloseto thevent.
i_7Donotleaveplasticorflammableitemsonthe
cooktop--theymaymeltorigniteff left tooclose
to thevent
t::71Donotleaveclosedcontainersonthecooktop
Thepressureinclosedcontainersmayincrease.
whichmaycausethemtoburst
Metalitemswiltbecomeveryhotif theyareleft
onthecooktopoandcouldcausebums
Power Outage
CAUTION:Donot makeanyattempt to operatethe
electric ignitionovenduringanelectricalpower
failure
'The oven or broile_ cannot be lit during a
power failure. Gas wiU not flow unless the
glow bar is hot.
If the oven is in use when a power failure
occurs, the oven burner shuts off and
cannot be re-lit until power is restored Ibis
is because the flow of gas is automatically
stopped ,and will not _esume when power is
restored until the glow bar has reached
operating temperature
Oven Light
Ibuch the OVENtlGHTpad on the upper
control panel to turn the light on or off_
On some models, the OllENLiaHTswitch is
on the lower front control panel,
t2
www.GEApptiances.eom
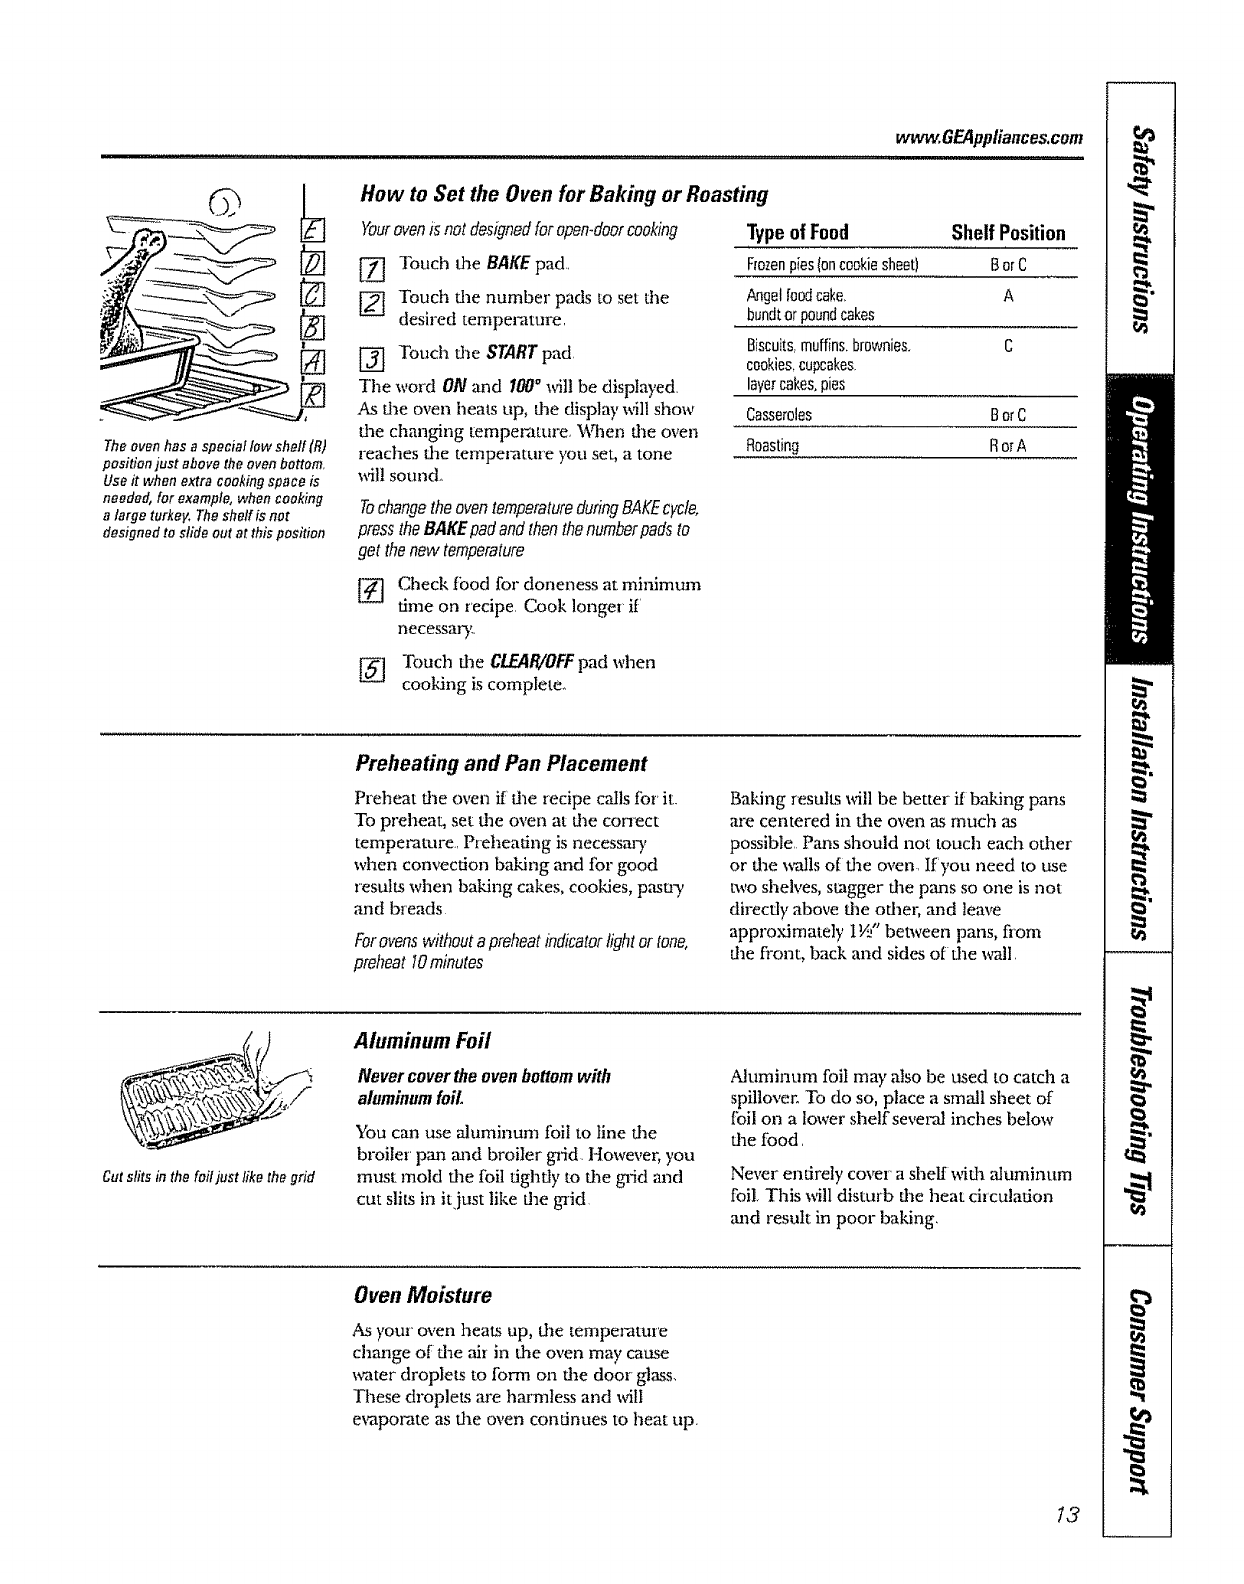
The oven has a special low shelf(R)
position just abovethe ovenbottom,
Use it when extra cookingspace is
needed, for example, when cooking
alarge turkey, The shelf#; net
designed to slide out at this position
How to Set the Oven for Baking or Roasting
YouroveniSnotdesignedfor open.doorcooking
_] _y] Touch die BAKE pad,,
_] [_ Touch die number pads to set tile
desired tempel,'ature,
[[_] Touch die START pad
Tile word ON and i00" will be displayed,
As the oven heats up, file display will show
dae changing temperature, V_qlen tile oven
reaches die tempel_tur'e you set, a tone
wil! sound_
Typeof Food Shelf Position
Frozenpies(oncookiesheet) BorC
Angelfoodcake, A
bundtor poundcakes
Biscuits,muffins,brownies. C
cookies,cupcakes.
layercakes,pies
Casseroles BorC
Roasting RorA
TochangetheoventemperatureduringBAKEcycle.
press theBAKEpad and then thenumberpads to
get thenew temperature
@Check fbod for doneness at minimum
ume on recipe Cook longer if
necessm3:,
[_ Touch die CIE!IR/OFFpad when
cooking is complete.
Preheating and Pan Placement
Preheat tile oven if die recipe ca!is for' it.
To preheat, set file oven at dae conect
temperature. Preheating is necessary
when convection baking and for good
results when ba "Idng cakes, cookdes, pasta 3,
and breads
Forovenswithout a preheatindicatorlight or tone,
preheat 10minutes
Baidng results will be better if baking pans
are centered in dae oven as much ,as
possible, Pans should not touch each other
or dae _-alls of dae oven. If you need to use
two sheh,es, stagger ttle pans so one is not
direcdy above the odlel; and leave
approximately IW' between pans, flora
file fi'ont, back mad sides of die wall.
Cut slits in the foil just like the grid
Aluminum Foil
Never cover the even bottomwith
aluminumfoil.
You can use aluminum foil to line d_e
broiler pan mad broiler grid However, you
must mold file foil fighdy to file gTid and
cut slits in it just like the gTid
Aluminum foil may also be used to catda a
spillover. To do so, place a sma/1 sheet of
Ibil on a lower shelf several inches below
dae food.
Never entirely cover a shelf wida aluminum
foil, This _ll disturb the heat circulation
mad result in poor ba "ldng,
Oven Moisture
As your oven heats up, file temperature
change of file air in file oven may cause
water droplets to form on dae door glass.
These droplets are harmtess and will
e_pol_te as dae oven continues to heat up
t3
Using the oven.
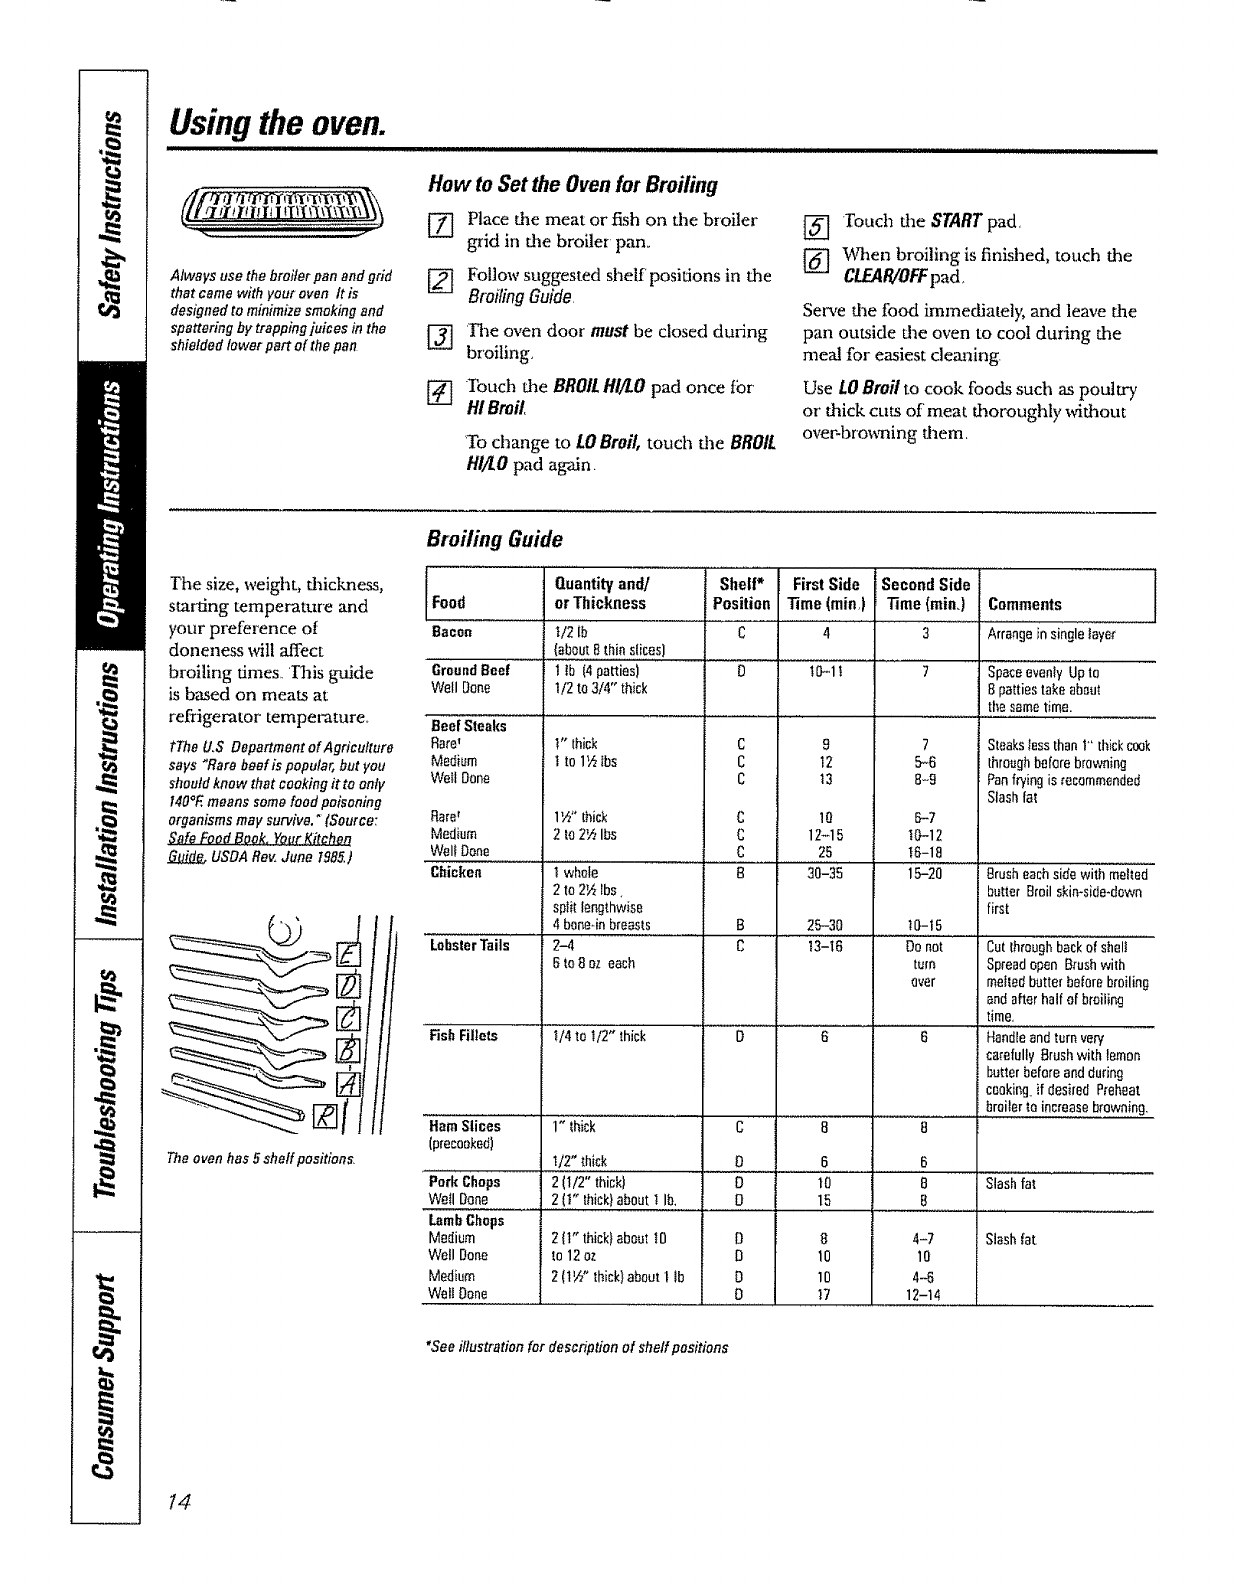
Always use the broilerpan and grid
that came with your oven It is
designed to minimize smoking and
spattering by trapping juices in the
shielded lower part of the pen
How to Set the Oven for Broiling
[Z] Place the meat or fish on the broiler
grid in the broiler pan_
[] Follow suggested shelf' positions in the
Broiling Guide.
[_] 'The oven door must be closed during
broiling,
[] Ibuch the BROILHi/LO pad once tbr
HI Broil,
'To change to LOBroil, touch the BROIL
HI/LOpad ag-An,
[_] Touch the START pad
l_ When broiling is finished, touch the
CLEAR/OFFpad,
Serve the food immediately, and leave doe
pan outside the oven to cool during the
meal for easiest cleaning.
Use LOBroil to cook foods such as poultry
or thick cuts of meat thoroughly without
over-browning them,
The size, weight, thickness,
starting temperature and
your preference of
doneness will affect
broiling times,, lhis gmide
is based on meats at
refrigerator temperature,,
tThe U,S Department of Agricufture
says "Rare beef is popular, but you
should know that cooking it to only
140*Emeans somefood poisoning
organisms may survive." {Source:
Safe FondBook, YourKitchen
USDA Rev,June t985.)
Theoven has 5sheff positions,
Broiling Guide
Food
Bacon
GroundBeef
Well Done
Beef Steaks
Raret
Medium
Well Done
Rare_
Medium
Wel!Done
Chicken
.....L'abs'ie'iTa'ils' '
FishFillets
HamSlices
(precooked)
Pork Chops
Well Done
LambChops
Medium
Well Done
Medium
Weli Done
Quantityand/
orThickness
U2 lb
(about8 thin slices)
! +b(4patties)
1/2 to 3/4" thick
V"thick
tto 1_ lbs
1W' thick
2to 2_ Ibs
t whole
2to 2fi Ibs
sptit lengthwise
4 bene4nbreasts
2-4
Bto 8 oz each
!/4 to 1/2" thick
1" thick
I/2" thick
2 (112"thick)
2 (t" thick}aboutlib,
2{1" thick}abouttO
to 12oz
2(1½" thick)aboutf tb
Shelf*
Position
c
c
c
C
C
C
| ....... B
B
C
C
D
D
O
D
D
O
O
FirstSide
Time(min,)
t0-1t
9
12
13
10
12-15
25
a0-35
25-30
13-I6
6
10
15
8
10
10
17
Second Side ...................]
Time (rain.) Comments I
3Arrangein singlelayer
7
5-6
8-9
8-7
t0-12
t8-18
Spaceevenly Upto
8 pattiestakeabout
the sametime.
SteaksIessthant' thickcook
throughbeforebrowning
Panfryingis recommended
Slashfat
15-20 Brusheachsidewith melted
_0-15
Donot
turn
aver
6
B
B
4-7
10
4-6
12-14
butter Broilskin-side-down
first
Cut throughbackof sheii
Spreadopen Brushwith
meitedbutter betorebroiling
andafterhalf ofbroiling
time.
Handle"and'{uln'vew
eaefully Brushwith lemon
butterbeforeandduring
cooking_if desired Preheat
bmiterte increasebrowning.
Slashfat
Slash(at
*See illustration for descriptionof shelf positions
t4
Using the clock and timer.
Ill:t....................................................
Not all features are on all models,
_t.arw.GEAppliances_com
,'" ,,i,,,i,u ul, ,, ,i, ill
@
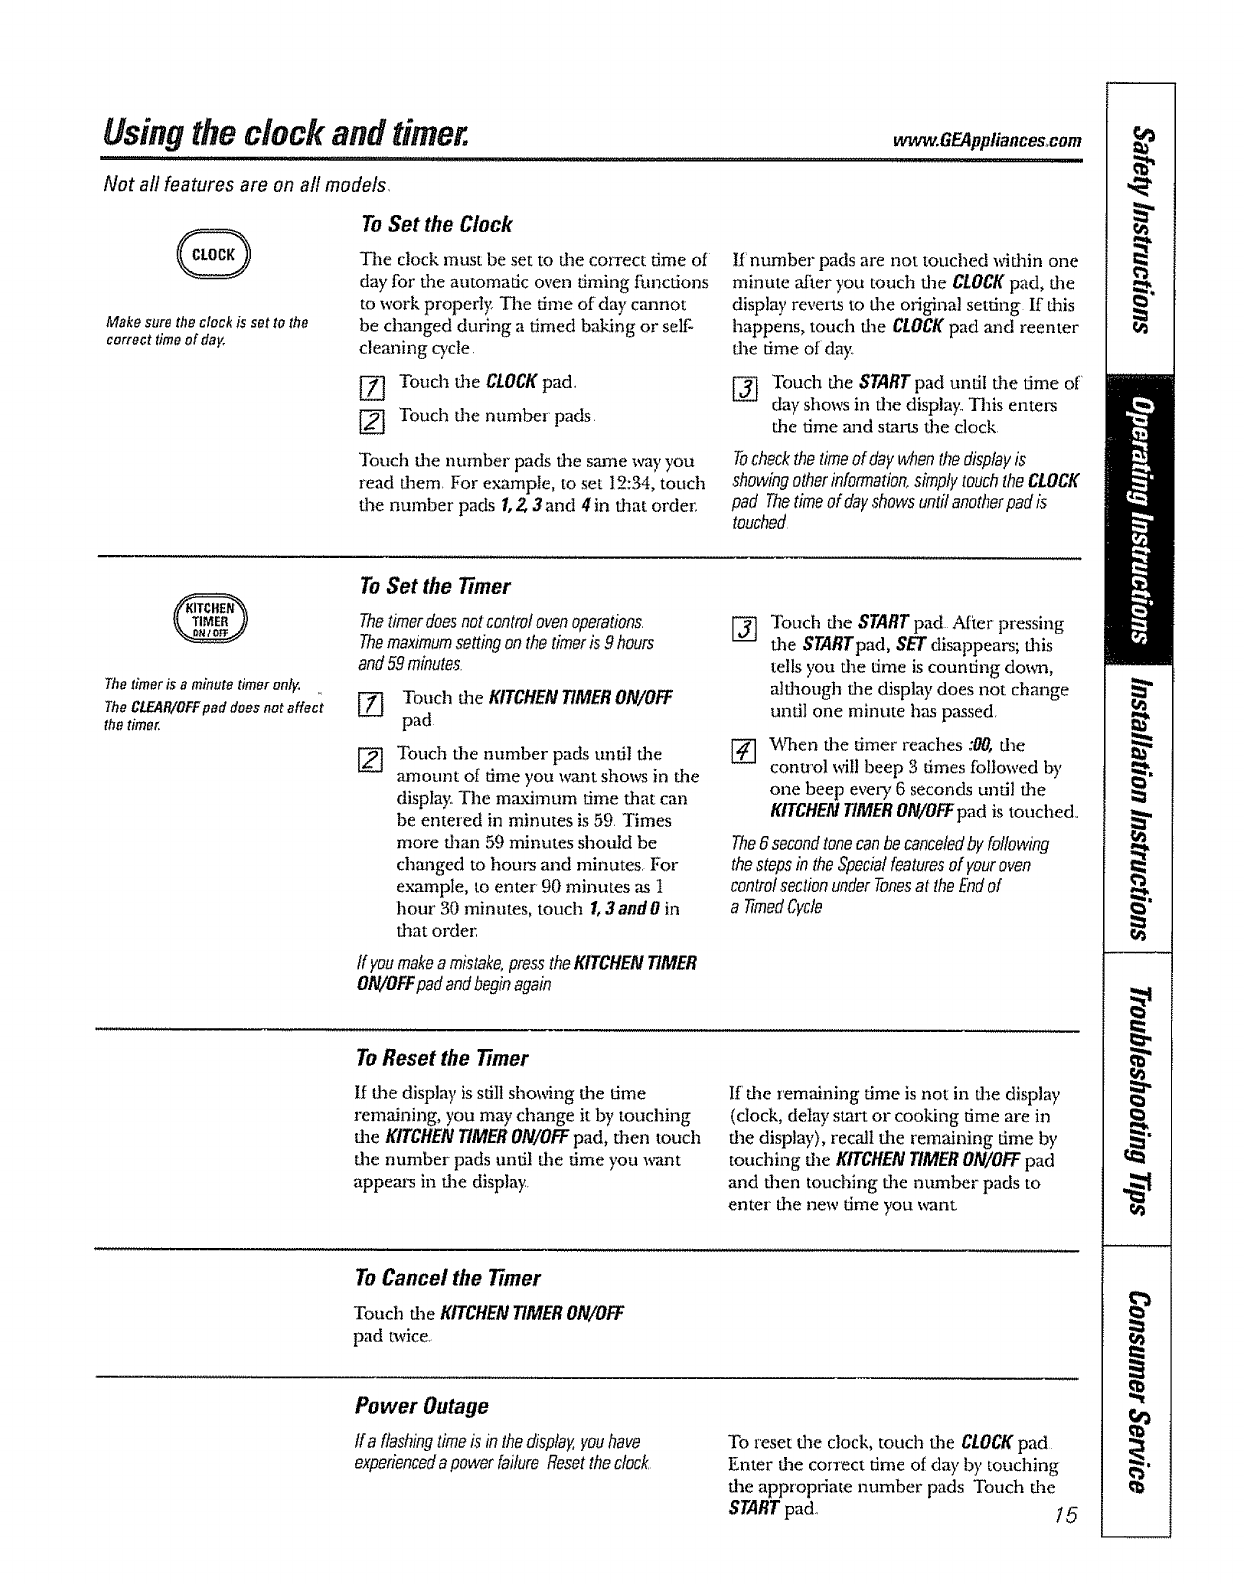
Make sure the clock is set to the
correct time of dayo
To Set the Clock
The clock must be set m dye co_rect time of
day for the automatic oven timing functions
to work properly. The time of day cannot
be changed during a timed b_ing or self-
cleaning cycle
[_ Touch dm CLOCKpad.
[_ Touch the number pads.
Touch dae number pads dae stone way you
read daem For example, to set 12:34, touch
fl_enumber pads/, 2,3and 4in daat order:
If number pads are not touched widfin one
minute 'afteryou touch d_e CLOCKpad, the
display reverts to dae original setting If dais
happens, touch dm CLOCKpad and reenter
d_e time of day.
[_ Touch dae START pad until ttle time of'
day shows in die display., This enters
dae time and starts the clock
Tocheckthe timeof daywhen thedisplayis
,showingotherinformation,simply touch theCLOCK
pad Thetime of dayshows until anotherpad is
touched
The timer is aminute timer only.
TheCLEAR/OFFpaddoes not affect
the timer.
ToSet the 77mer
Thetimer doesnotcontrolovenoperations.
Themaxtmumsetting onthe timer is9 hours
and 59minutes.
[_ Touch die KITCHENTIMERON/OFF
pad
[_ Touch the number pads until fl_e
amount of time you want shows in dae
display..The maximum time that can
be entered in minutes is 59. Times
more d_an 59 minutes should be
changed to hou,'s and minutes For
example, to enter 90 minutes ,as1
hour 30 minutes, touch/, 3andO in
that ordm:
tf youmakeamistake°presstheKITCHENTIMER
ON/OFFpadandbeginagain
@Touch dye START pad After pressing
the STARTpad, SET disappears; dais
tells you the time is counting do_al,
aldmugh fl_e display does not change
until one minute has passed,
When dae timer reaches :00,die
conu'ol will beep 3 times followed by
one beep evel T 6 seconds until flae
KITCHENTIMER ON/OFFpad is touched,
The6 secondtonecanbecanceledby following
the stepsin theSpecialfeaturesof youroven
controlsectionunder Tonesat the Endof
atimed Cycle
To Reset the timer
If fl_e display is still sho_ing dae time
remaining, you may change it by touching
dae KITCHEN TIMERON/OFFpad, then touch
flae number pads until dm time you __nt
appears in flae display.
If fine remaining time is not in dae display
(clock, delay start or cooking time are in
flae displw), recall flae remaining dme by
touching the KITCHENTIMERON/OFFpad
and daen touching d_e number pads to
enter d_e new time you _nt
To Cancel the timer
Touch d=eKITCHENTIMERON/OFF
pad twice.
Power Outage
lf a flashingtimeis inthedisplay,youhave
experiencedapowerfailureResettheclock, To reset dye clock, touch die CLOCKpad
Enter dye correct time of day by touching
d_e appr'opriate number pads Touch the
STARTpad.. 15
Using the timed baking and masting features.
/VOTE:Foodsthat spoil easily--such as milk, eggs, fish, stuffings, poultry and pork--should not be allowed to sit for more
than ! hour before or after cooking Room temperature promotes the growth of harmful bacteria. Be sure that the oven
light is off because heat from the bulb will speed harmful bacteria growth.
®
®
How to Set an Immediate Start and Automatic Stop
Theovenwill turnonimmediatelyandcookfora sefected
lengthof time At theendof thecookingtime,theoven
wltl turnoff automatically
[_ Ibuch the BAKEpad
[] Ibuch the number pads to set die desired
oven temperature
[_ Ibuch the COOKINGtiME pad
NOTE:Ifyourreciperequirespreheating,youmayneed
to addadditionaltimetothelengthof thecookingtime
l'_ I'ouch the number pads to set the desired
length of cooking time 'Ihe minimum
cooking time you can set is 1 minute,
The oven temperature thatyou set and the
cooking time that you entered will be in
the disptay_
1_ 'Ibuch the START'pad
the oven willturn ON,and die displaywillshow
the cooking time countdm_ and the ch_mging
temperatme starting at IO0°F (File temperaaue
displaywillstart to change once the oven
temperature reaches IO0°F) V_qlenthe oven
reaches the temperature you set, 3 beeps x_411
sound,
The oven will continue to cook for the set
amount at time, d_en turn off automadcall);
unless the Cookand Holdfeature was set See the
Specialfeaturesofyourovencontrolsection.
Afterfile oven turns off, the end-of-cycletone
willsound
"Ibuch the C/.EAR/OFFpadto clear the
display if necessary Remove die tbod fiom
tlae oven Remember; even though die
oven turns off automatically, food left in
the oven will continue cooking after the
oven turns o_
t6
®
®
How to Set a Delayed Start and Automatic Stop
Theovenwillturnonatthetimeofdayyouset.coakfor
aspecificlengthoftimeandthentumoffautomatically
Make sure fileclock showsthe con'ect time
ot day
ranch file BAKEpad
[_ Ibuch the number packsto set the desired
oven temperature
[_ Ibuch the COOKINGTIMEpad
NOTE:ffyourreciperequirespreheating,youmayneed
toaddadditionaltimetothelengthofthecookingtime
Fouch the number pads to set the desired
length of cooking dme The minimum
cooking time you can set is t minute
The oven temperature that you set and the
cooking time that you entered will be in
the display
[_ Ibuch the DELAYSTARTpad,
['_ Iouch the number pads to set the time of
day you want file oven to turn on and start
cooking
[_ touch d_e STARTpad
NOTE'.ff youwouldliketocheckthetimesyouhaveset.
touchtheDELAYSTARTpadtocheckthestarttimeyou
havesetortouchtheCOOKINGTIMEpadto checkthe
lengthof cookingtimeyouhaveset
When file oven turns ONat die time of day
you set, the display wilt show the cooking time
countdoml and the changing temperature
suu'ting at IO0°E ('ihe temperature display
_l start to change once the oven tempezamre
reaches ]O0°F) When the oven reaches the
temperature you set, beeps will sound
the oven MI1 continue to cook for the set
amount of time, dlen turn offantomatic;dly,
unless the Cook and Hold feature was set See
the Specia!featuresofyourovencontrolsecdon
Afier the oven turns off, the end.oikyde tone
will sound
rouch die CLEAR/OFFpadto clear' file
display if'necessa o, Remove the food from
file oven Remember; even though the
oven turns off automatically, food left in
the oven will continue cooking "after the
oven turns off
NOTE:Anattentiontonewillsoundffyouareusing
timedbakinganddonottouchtheSTARTpad
Usingtheprobe.(onsomemode/s)
I,"II"IWI,'I"II"'H'II' lUU'II " I I
www, GEAppliances,com
,,,i ,11..., I,111 ii
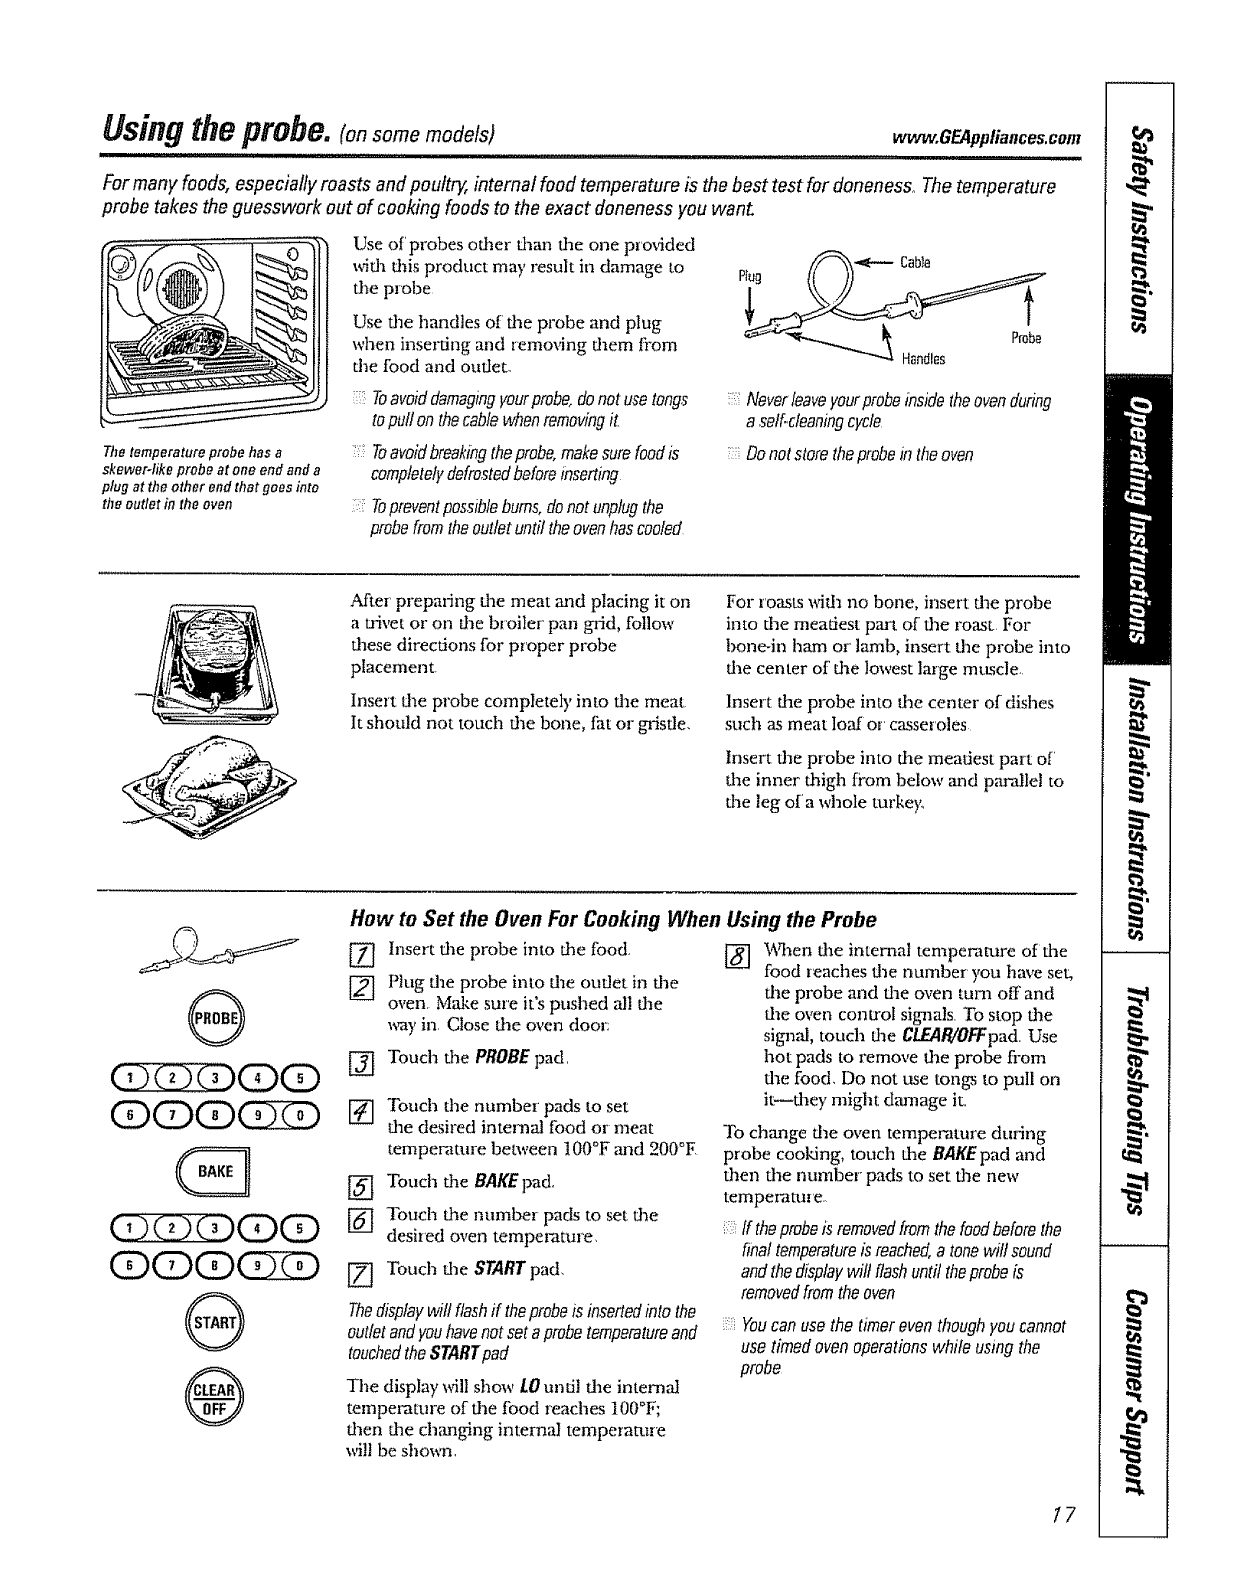
For many foods, especially roasts and poultry, internal food temperature is the best test for doneness, The temperature
probe takes the guesswork out of cooking foods to the exact alonenessyou wahl
Use of'probes other than the one prm4ded
with this product may result in damage to
the probe
Use dm handles of the probe and plug
when inserting and removing diem fi'om
the food and outlet,
The temperature probe has a
skewer-like probe at one end and a
plug at the other end that goes into
the outlet in the oven
Toavoiddamagingyourprobe,donot use tongs
topull on thecablewhenremovingit_
Toavoidbreakingtheprobe,makesurefoodis
completelydefrostedbeforeinserting
Topreventpossiblebums, donot unplugthe
probefromthe outlet until theovenhascooled
i:::Neverleaveyourprobeinsidetheovenduring
a self.cleaningcycle
Do notstore theprobein the oven
After' preparing the meat mid placing it on
a trivet or on the broiler' pan grid, follow
these directions for proper probe
placement
Insert the probe completely into file meat
It should not touch the bone, tht or gristle,
For roasts wifll no bone, insert the probe
into the meatiest part of file roast For
bone-in ham or lamb, insert the probe into
dae center of the lowest large muscle,
Insert the probe into the center of dishes
such as meat loaf or casseroles
Insert the pr'obe into the meatiest part of
dae inner thigh from below and pandlel to
the leg of a whole turke)<
®
@
(3X3XDCDCD
(D(DCD(3Z)
0
®
How to Set the Oven For CookingWhen Using the Probe
Insert the p,'obe into the food.
Plug the probe into flae outlet in die
oven, Mzd_esure it's pushed all tim
way in Close the oven door:
[_] Touch the PROBEpad,
r4] Touch tile number pads to set
the desired internal food or meat
temperature between 100°F ,and 200°E
_] Touch the BAKEpad,
Touch the number pads to set the
desired oven tempel_ture,
[_ Touch the START pad,
Thedisplay will flash if theprobeis insertedinto the
outlet and youhavenot set aprobe temperatureand
touchedtheSTARTpad
The display will show LO und! die intemat
temperature of die food reaches 100°F;
then the changing internal temperature
will be shox_a,
[_ hen dae internal temperature of the
food reaches the number you have set,
d_e probe and the oven tuna off and
the oven control signals To stop the
signal, touch file CLEAB/OFFpad Use
hot pads to remove the probe fiom
file food, Do not use tongs to pull on
it_dley might dt_age it,,
To change die oven temperature during
probe cooking, touch the BAKEpad and
then the number" pads to set the new
temperature,
ff theprobeis removedfromthefoodbeforethe
finaltemperatureisreached,a tonewiltsound
andthedisplaywiltflashuntiltheprobeis
removedfromtheoven
Youcan usethe timer even though you cannot
use timed oven operations while using the
probe
I7
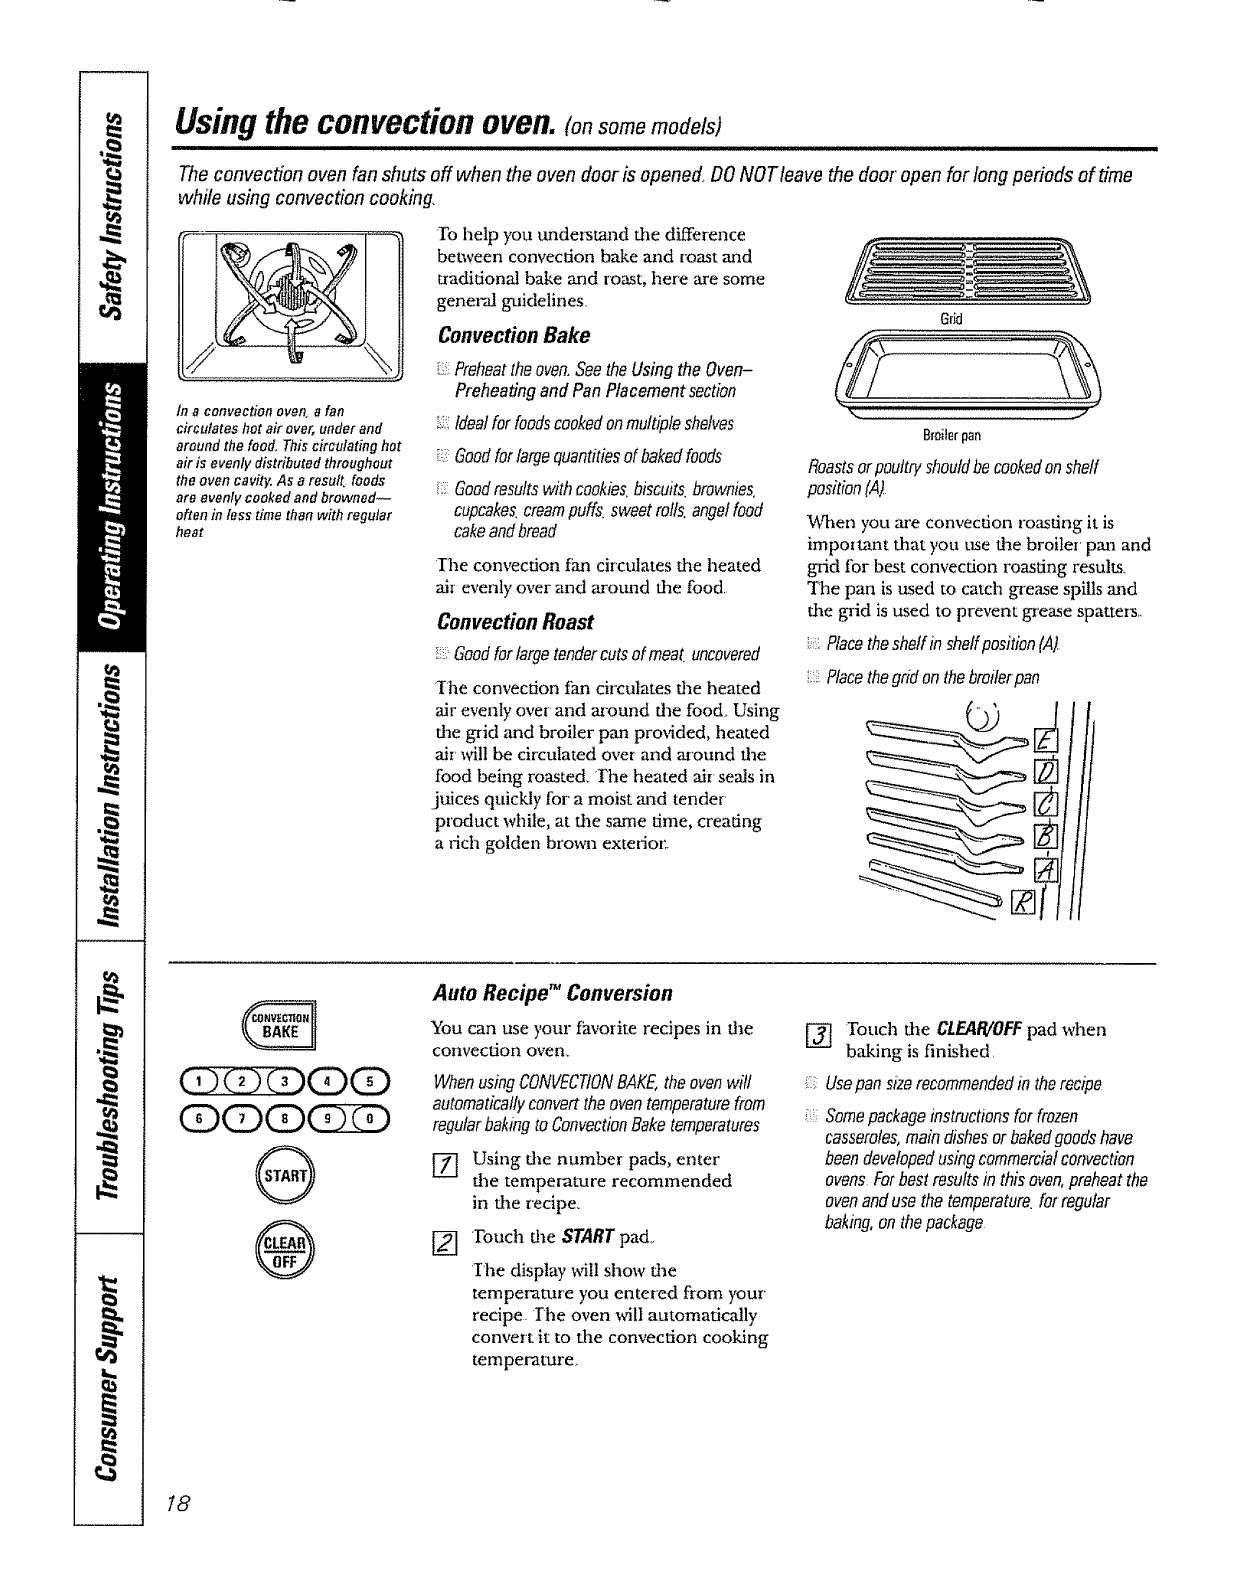
Using the colTvectioH ovell. (on some models)
The convection oven fan shuts off when the oven door is opened. DONOTleave the door' open for long periods of time
while using convection cookin#
tn aconvection oven a fan
circulates hot air over, under and
around the food, This circulating hot
air is evenly distributed throughout
the oven cavity. As a result foods
are evenly cooked and browned--
often in tesstime than with regular
heat
To help you understand the difference
between convection bake and roast and
traditional bake and roast, here are some
genelx-1 guidelines_
Convection Bake
i/ Preheattheoven,Seethe Using the Oven-
Preheating and Pan Placement section
_::::Idealfor foodscookedonmultiple shelves
i_:Goodfor largequantitiesof bakedfoods
Goodresults with cookies,biscuits,brownies,
cupcakes,creampuffs, sweetrolls, angel food
cakeandbread
Ihe convection fan circulates the heated
air evenly over and around the food.
Convection Roast
_:_-.Goodforlargetendercutsof meat.uncovered
The convection fan circulates the heated
air evenly over and around the food. Using
the grid and broiler pan provided, heated
air' vail be circulated over and around the
food being roasted. The heated air seals in
.juices quickly for a moist and tender'
product while, at the same time, creating
a rich golden brown exterior.
Grid
Bmiterpan
Roastsor pouttfyshouldbecookedonshelf
position (,4)
When you are convection roasting it is
important that you ttse the broiler pan and
grid tbr best convection roasdng results.
The pan is used to catch grease spills and
the grid is used to prevent grease spatters..
Placethesheff in sheffposition (At
:::i Placethegrid on the breiferpan
/
G
(Z22ZZ)(Z)(Z)
®
®
Auto Recipe TM Conversion
You can use your favorite recipes in the
convection oven,
When usingCONVECTIONBAKE,the oven will
automatically convertthe oven temperaturefrom
regularbaking to ConvectionBake temperatures
Using the number pads, enter
the temperature recommended
in the recipe.
[_ Touch the START pa&
Ihe display will show the
temperature you entered from your'
recipe The oven will automatically
convert it to the convection cooking
temperature_
['_ Touch the CLEAIVOFFpad when
baking is finished.
UsepansiZerecommendedin therecipe
Somepackageinstructionsfor frozen
casseroles,maindishesorbakedgoodshave
beendevelopedusingcommercialconvection
ovensForbestresultsinthisoven,preheatthe
ovenandusethetemperature,fatregular
bakmg,onthepackage
18
www.GEAppliances_com
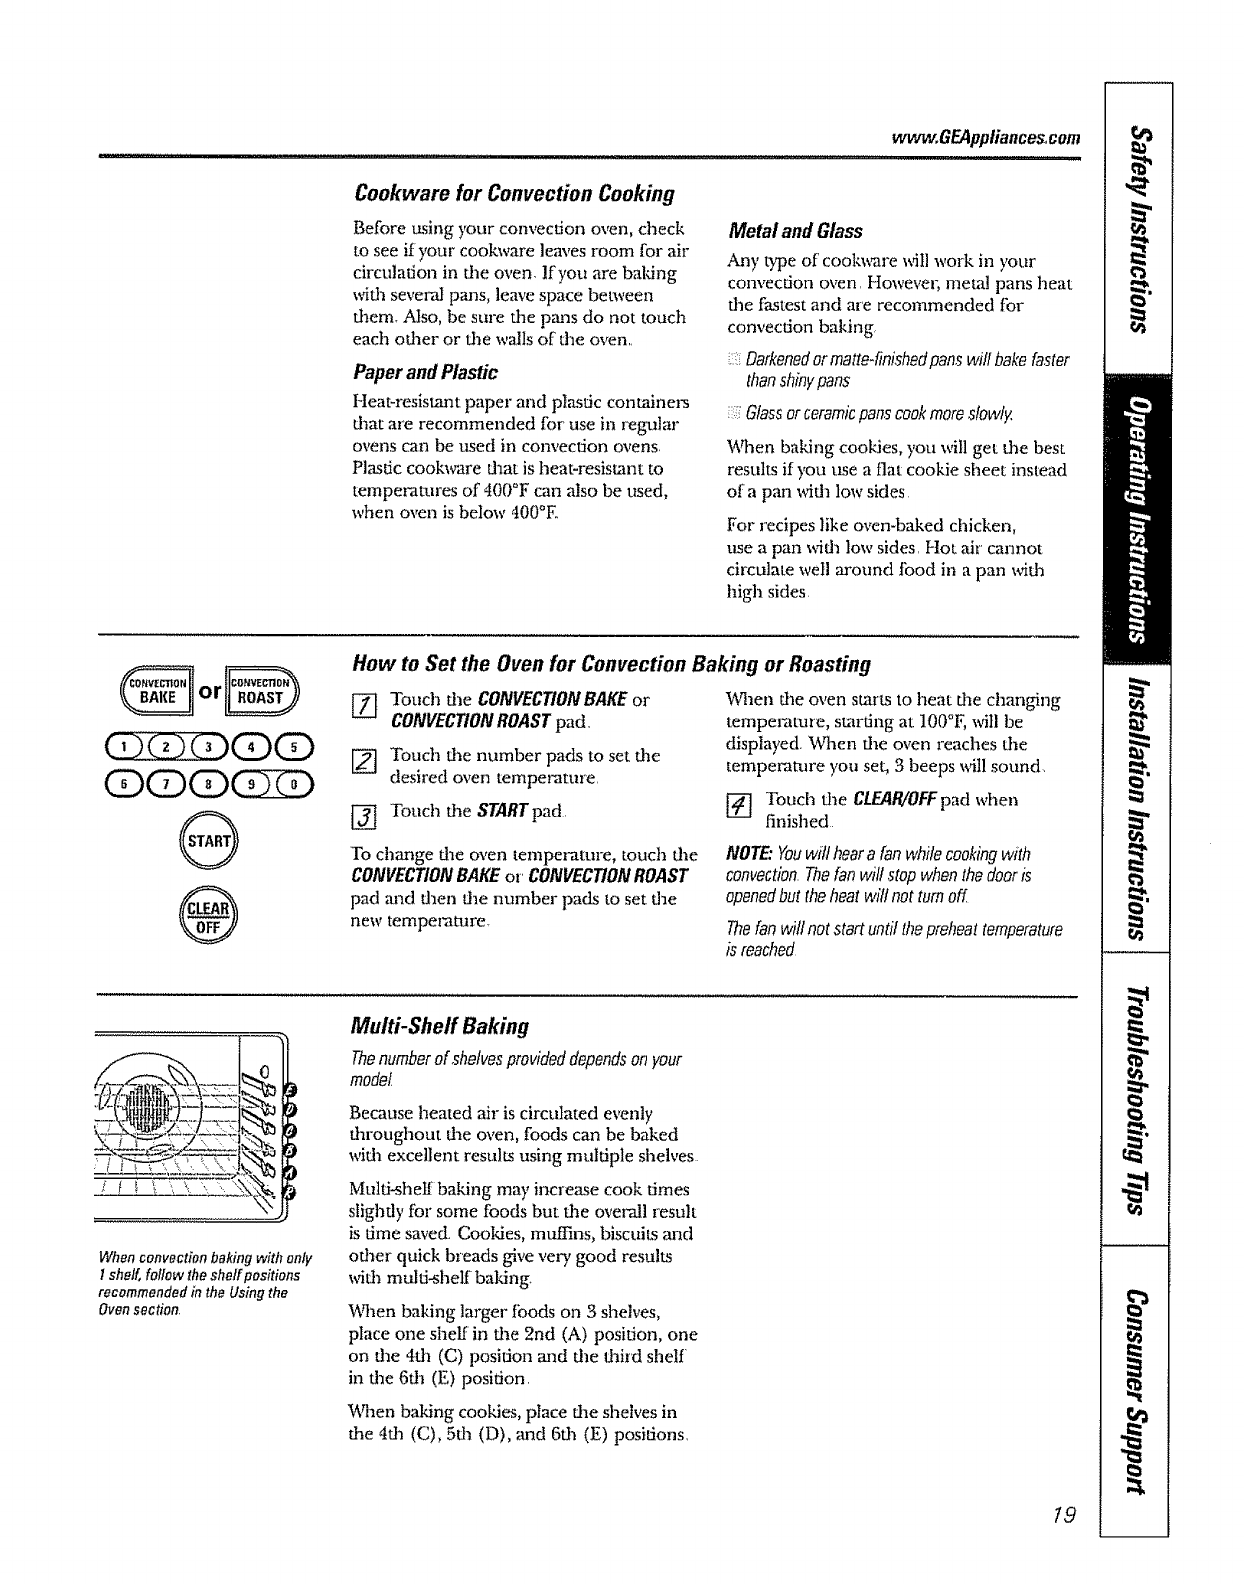
Cool(ware for Convection Cooking
Before rising your convection oven, check
to see if your cookware lem,es room for air
circulation in die oven lfyou are baldng
wifll several pans, leave space between
diem, Also, be sure die pans do not touch
each odler or die walls of the oven,,
Paper andPlastic
Heat-resistant paper and plastic containe_
d]at are recommended for use in regular
ovens can be used in convection ovens_
Plastic cook,s"are flaat is heat-resistant to
temperatures of 400°F can also be used,
when oven is below 400°E
Metal and Glass
Any type of' coolm.are x_II work in your
convection oven, However. metal pans heat
die fastest and are recommended fbr
convection baking
!:i Darkenedormatte4inishedpanswill bakefaster
thanshinypans
Glassorceramicpanscookmoreslowly,
When baking cookies, you will get d_e best
results if you use a flat cookie sheet instead
era pan wida low sides
For recipes like oven-baked chicken,
use a pan wida low sides, Hot air cannot
circulate well around tbod in a pan wifla
high sides
(DOD(D(3Z)
®
®
How to Set the Oven for Convection Baking or Roasting
_-[ Touch file CONVECTIONBAKE or
CONVECTIONROASTpad,
Touch die number pads to set die
desired oven temperature
[_ Touch die STARTpad,
V_qaendie oven starts to heat die changing
temperature, starting at IO0°F, _8tl be
displayed. When die oven reaches die
temperature you set, 3 beeps will sound
Touch file CLEAR/OFFpad when
finished
To change die oven temperatm-e, touch fide
CONVECTIONBAKEor CONVECTIONROAST
pad and fl]en the number pads to set die
new temperature
NOTE."Youwit hearafan while cooking with
convection Thefan will stop whenthe dooris
openedbut theheat wilt not turn off
Thefanwillnotstartuntilthepreheattemperature
is reached
When convection baking with only
1shelf, follow the sheffpositions
recommended in the Using the
Ovensection.
Multi-Sheff Baking
Thenumberof .shelvesprovideddependsonyour
model
Because heated air is circulated evenly
flaroughout die oven, foods can be baked
wifla excellent resuhs using muhiple shelves
Multi-slieR baking may increase cook times
slightly for some foods but die overall resuh
is time saved Cooldes, muffins, biscuits and
odler quick breads give very good results
wifll multi-shelf baking
When baking larger foods on 3 shelves,
place one shel_ in the 2nd (A) position, one
on die 4fll (C) position and die thi,d shelf
in the 6dl (E) position,
IAqaenbaking cookies, place fineshelves in
die 4dl (C), 5da (D), and 6dl (E) positions,
t9
Usingthe convection oven.(on some models)
,,,,,,,,,,,,,, ,,, ,,, ,,,,,,,,
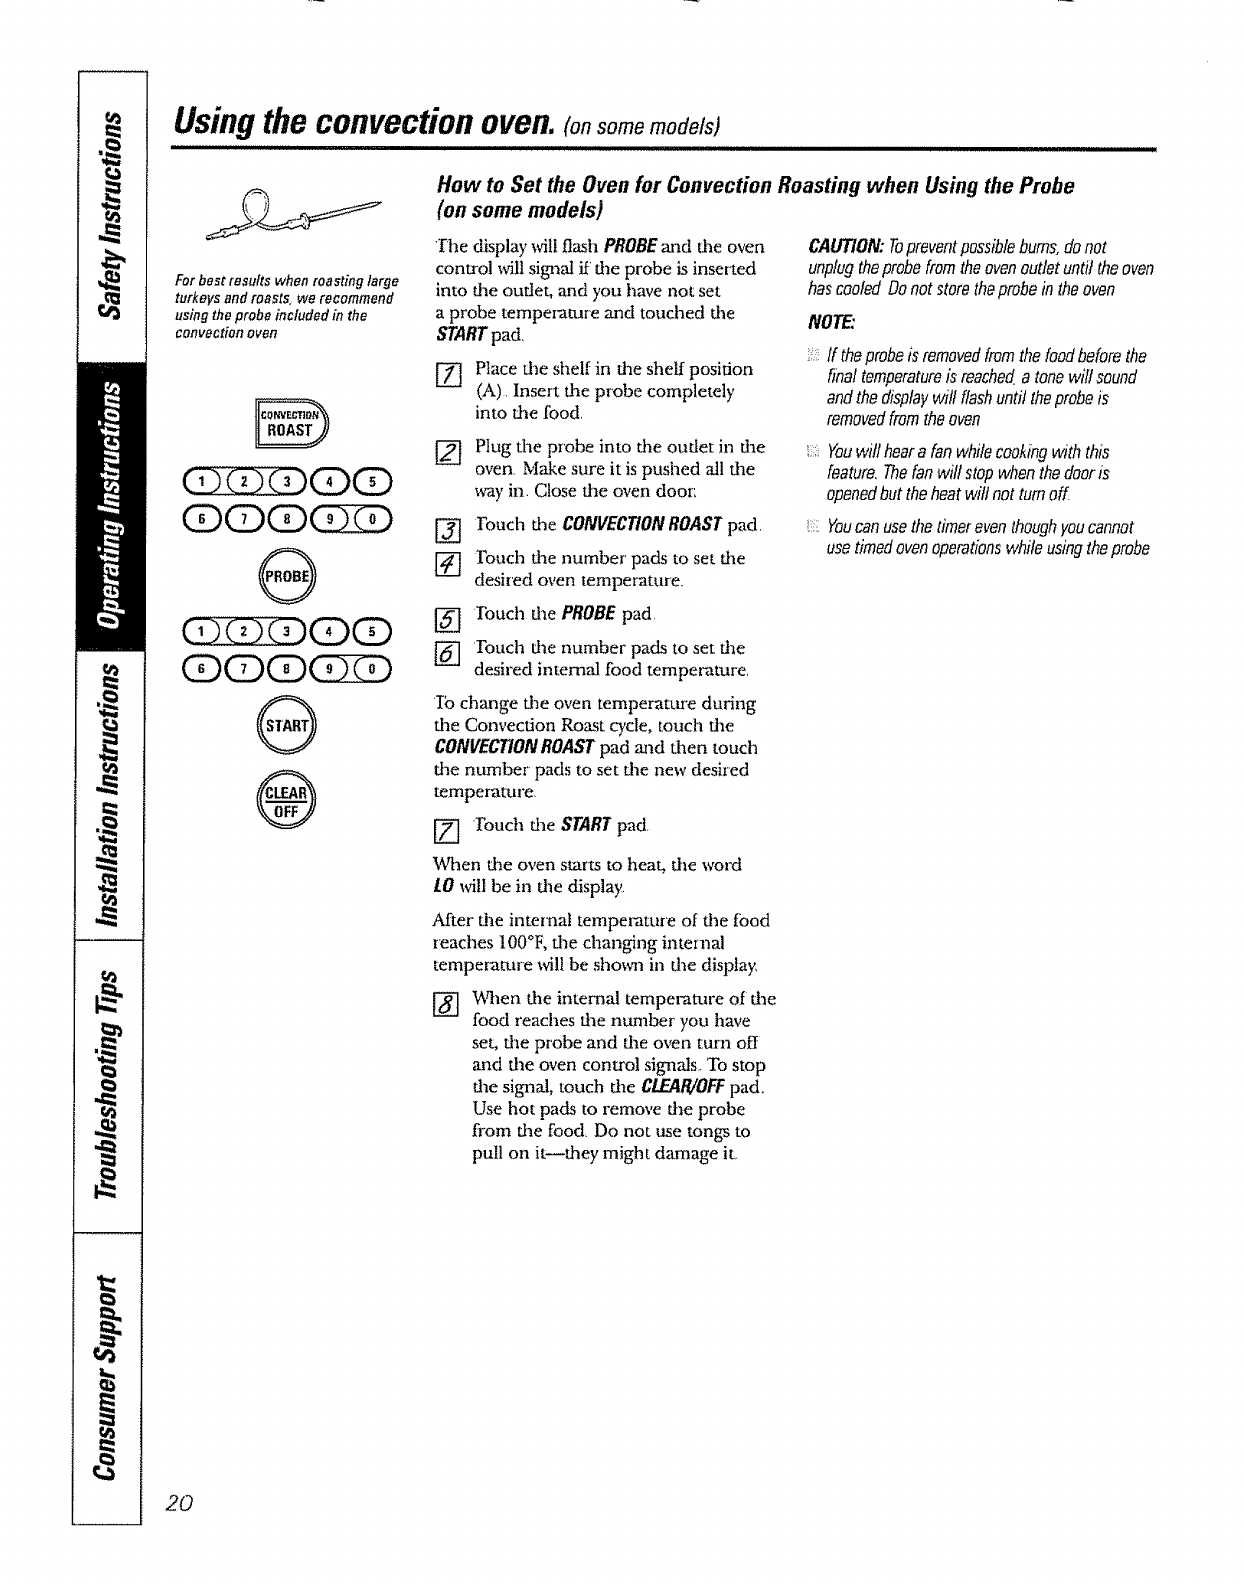
For bestresults when roasting large
turkeys and roasts, we recommend
usingthe probe included in the
convection oven
(DO(D(DZD
®
®
How to Set the Oven for Convection Roasting when Using the Probe
(on some models)
1"he display x_illflash PROBEand the oven
control will signal if the probe is inserted
into the outlet, and you have not set
a probe tempezature and touched the
STARTpad,
[] Place the shelf in the shelf position
(A). Insert the probe completely
into tile food,
[] Plug the probe into d_e outlet in tlae
oven. Make sure it is pushed all the
way in, Close fl_e oven door:
[_ Ibuch tile CONVECTIONROASTpad,
[] Fouch the number pads to set tl_e
desired oven temperature,
[_] 'Ibuch tire PROBE pad,
[] 'Touch tim number pads to set the
desired internal food temperature,
Ib change the oven temperature during
the Convection Roast cycle, touch the
CONVECTIONROASTpad and d_en touch
the number pads to set the new desired
temperature
Touch the START pad,
When the oven starts to heat, fire word
10 wilt be in die display,
After"the internal temperature of the tbod
reaches !00°F; die changing internal
tempe_'amre will he shown in dee display,
When the internal temperature of the
food reaches the ntmlber you have
set, the probe and tile oven turn ott
and the oven control signals. To stop
the signal, touch the CLEAR/0FFpa&
Use hot pads to remove the probe
from the food Do not use tongs to
pull on it_they might damage iL
CAUTION:Topreventpossiblebums,donot
unplugtheprobe fromthe ovenoutlet until theoven
hascooled Do not storetheprobe in theoven
NOTE:
!:,::z:If the probeis removedfromthe foodbefore the
final temperatureis reacherl atone wilt sound
andthe displaywill flashuntil theprobeiS
removedfromthe oven
',:::::Youwill heara fanwhile cookingwith this
feature,Thefan will stopwhen thedooriS
openedbut the heatwilt not turn off
,::::;Youcanusethetimereventhoughyoucannot
usetimedovenoperationswhileusingtheprobe
2O
vvww,GEAppliances,com
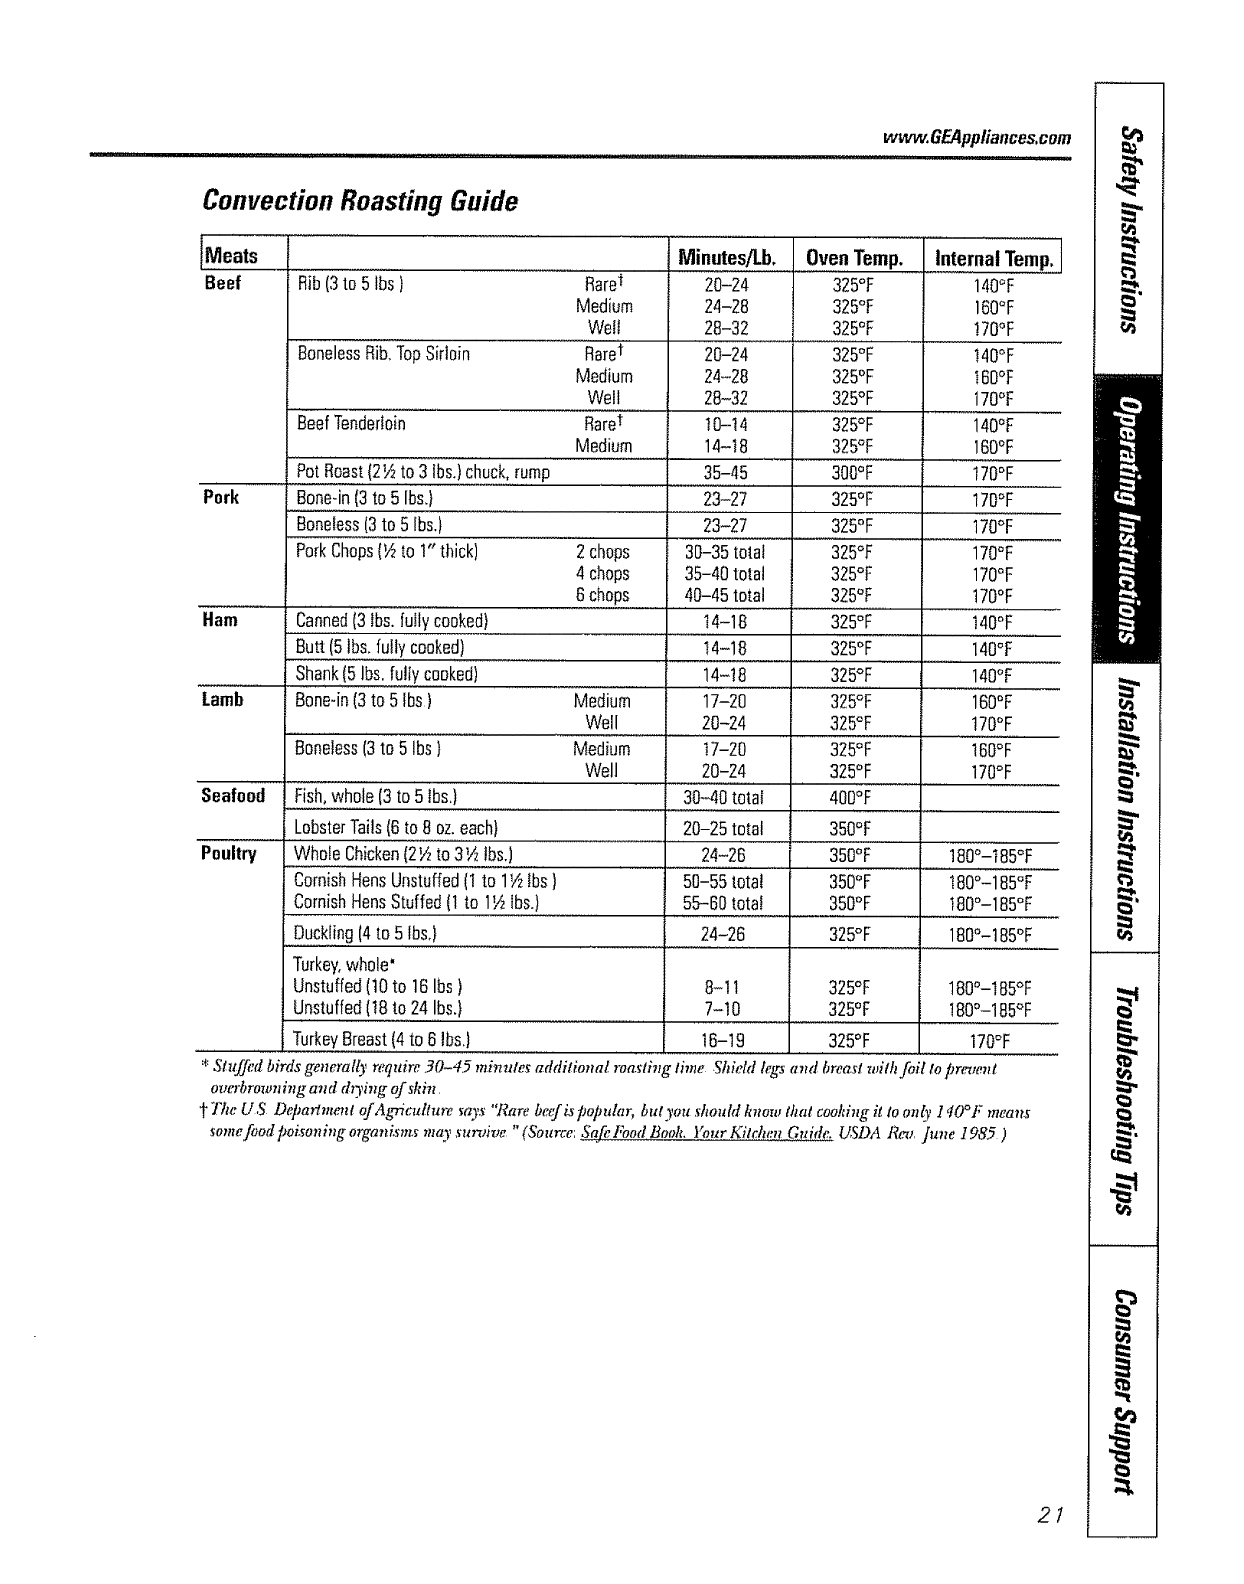
Convection Roasting Guide
Meats
Beef
Pork
Ham
Lamb
Seafood
Poultry
Rib(3to 5 lbsi
BonelessRib,TopSirloin
Beei TenderIoin.............
POiRoast(2'/2to3lbs.)&uck,,um
Bone-in(3to 5 Ibs.)
Rare/
Medium
Wett
.........Rare
Medium
Well
Raret .........
Medium
Minutes/Lb,
20-24
24-28
28-32
20-24
24-28
28-32
!0-t4
14-18
35-45
23-27
OvenTemp. IntemalTemp_ ....
325oF 140OF
325°F 160%
325°F 170%
32_&'# ........140oF
325°F t60OF
325OF 170OF
325°F 140%
325°F 160°F
3OOOF 17ooF
325% 170°F
Boneless(3to 5lbs.)
PorkChops(_ to 1"thick) 2chops
4chops
6chops
Canned(3lbs.fuilycooked)
Butt(5tbs.fully cooked)
Shank(5lbs.fultycooked)
Bone-in(3to 5 tbs)Medium
Well
Medium
Well
.....£oneiess(3to5 Ibs) .........
•Fish,wh_'i"e13to 5 tbs,)
LobsterTails(6to 8 oz.each)
WholeChicken(2½ to 3_Atbs.)
CornishHensUnstuffed(1to 1Vzlbs )
CornishHensStuffed(1to 1½lbs.)
Duckling(4to 5 lbs.)
Turkey,whole"
Unstuffed(t0 to t6 Ibs)
Unstuffed(t8 to 24Ibs.}
23-27
30-35total
35-40total
40-45total
t4-18
t4-18
14-t8
17-20
20-24
t7-20
20-24
30-40total
20-25total
24-26
50-55total
55-60total
24-26
325°F
325°F
325°F
325°F
325°F
325°F
325°F
325°F
325°F
325%
325°F
400%
170°F
170%
170°F
t70°F
140°F
140°F
............140%
160°F
170°F
160oF
170oF
350°F
350% t80o-t85oF
350OF t80o-185%
350% 1800-185°F
325°F 180o-185oF
8-11
7-10 325%
325°F 180°-!85°F
!80°-185°F
TurkeyBreast(4to8 lbsJ 16-19 325% 170°F
*Stuffed birds gencrally require 30-45 mi_zule,_ additional Toasti_tg lime S'hiehl legs and breast with foil to pre_lent
ovel+rowningand d_),ingof shin.
The U S Deparlment of Agriculture _'ays "Rare betf is popular, but you shouldknow thai cooking it toonly 140°F mea_s
_omefood poi._oning organism_ may survive "(Source: Sail, FoodBook,YourKitchenGuide. USDA Rmz June 1985 )
21
Using the timed convection baking features. (onsomomodels)
illl, ,,,i ,iul
Youwill hear a fan while cooking with this feature, The fan will stop when the door is opened but the heat will not turn oK
NOTE: Foods that spoil easily--such as milk, eggs, fish, stuffings, poultry and pork--should not be allowed to sit for more
than I hour before or after cooking,. Room temperature promotes the growth of harmful bacteria. Be sure that the oven
light is off because heat from the bulb will speed harmful bacteria growth.
How to Set an Immediate Start and Automatic Stop
Theovenwil! turnonimmediatelyandcookfora selected
lengthof time At theendof thecookingtime,theoven
willtumoffautomatically.
[7] Touch file CONVECtiONBAKEpad
[_ Touch the number pads to set tile desired
oven temperature
[_] 1"ouch the COOKINGTIMEpad
[_ Touch the STARTpad
1he oven MI1 turn ON,and the display will show
the cooking time countdo_aa ,and the chm]ging
temperature starting at 100°E (!he temperature
display will start to change once the oven
temperatm'e reaches 100°F) When the oven
reaches the temperature you set, 3 beeps will
sound
NOTE,"if yourrectpe requirespreheating,youmayneedto
addadditionaltimeto thelengthof thecookingtime
Ibuch the number pads to set the desired
length of cooking time The minimum
cooking time you can set is I minute,
Ilae oven temperature that you set and die
cooing time that you entered will be in
the display,
The oven willcontinue to cook for the set
amount of time, tt_en mrn ott automaticalt);
unless the CookandHoldfeature wasset, See the
Specialfeaturesofyourovencontrolsecfion.
After the oven turns oft, die end-oi:q,cletone
willsound
[_ Ibuch the CLEAf!,/OFFpadto clear the
displayif necess,'u3,Remove the food fiom
the oven Remember, even though the
m,en turns ott automatically,food leftin
the oven willcontinue cooking after the
oven turns off',
OZ!ZD(D(D
(D(D(D(DSD
(D(DO(ED
®
®
22
How to Set a Delayed Start and Automatic Stop
Theovenwilt turnonat tiletimeof dayyouset,cookfora
specificlengthof timeandthenturnoffautomatically.
Makesure the clockshmvsthe correct time
of day
[_] Touch the CONVECTIONBAKEpad
[_ rouch the number pads to set the desired
oven temperature
['_ ]'ouchthe COOKINGTIMEpad
NOTE"ffyourreciperequ#_spreheating,youmayneedto
addadditionaltimetotilelengthofthecookingtime
1_ lbuch the number pads to set ttmdesired
length of cooking time The minimum
cooking time you can set is 1 minute,
NOTE:ffyouwouldliketocheckthetimesyouhaveset
touchti_eDElAYSTARTpadtecheckthestarttimeyou
havesetortouchtheCOOKINGTIMEpadtocheckthe
lengthofcookingtimeyouhaveset.
When die oven turns O/Vat the time of day
you set, die display will show the cooking time
countdoml and die changing temperature
stanJ.ng at 100°E (Ihe temperature display
_1 start to change once the oven temperature
reaches 100°F) When the oven reaches the
temperature you set, 3 beeps will sound
'Ihe oven wil! continue to cook for the set
amount of time, then turn off automatica!l);
unless the CookandHoldfeature was set See
tile Specialfeaturesofyourovencontrolsection
@
@
The oven temperature that you set mid the
cooking time that you entered _411be in
die display
Touch the DEIAYSTARTpad
Touch tile number pads to set the time of
day you want tile m,en to tuna on and start
cooking
After the oven turns ott; the end-of-cycle tone
will sound,
[_ Ibuch d_e CLEAR/OFFpadto clear the
display it necessm3'. Remove die food from
the oven, Remembez; even though tile
oven turns offautomaticalty, food left hi
the oven _dll continue cooking after the
oven turns off[
I'_ Touch die STARTpad,
Special features of your oven control.
,11,,,,i...................
wvvw,GEAppliances,com
Yournew touch pad control has additional features that you may choose to use, The following are the features and
how you may activate them.,
The special feature modes can only be activatedwhile the display is showing the time of day. Theyremain in the
control's memory until the steps are repeated..
When the display shows your choice, touch the STARTpad, The special features wilt remain in memory after
a power failure,,
@
12 Hour Shut-Off
With this feature,shouldyouforgetand leavethe
ovenon,the controlwill automaticallyturn off the
ovenafter I2 hoursduringbaking functionsor after
3 hoursduringa broil function
If you wish to turn OFF this feature, fbllow
the steps below,
[-_ ]buch the BAKE and BROILHI/LO pads
at the s_le dine for 3 seconds until
file display shows SE
[]
%
Touch die DELAYSTARTpad, T!ae
display will show 12shdn (1.9 hotlr
shut-off), Touch dae DEMV STARTpad
again and the display will show no shdn
(rio shut-ofO,
Touch the START pad to activate the
no shut-off and leave the conu-o] set in
this special features mode,
(E+D
®
Fahrenheit or Celsius Temperature Selection
Yourovencontrolis set to use theFahrenheit
temperatureselectionsbutyoumaychangethis
to usethe Celsiusselections.
[_ Touch the BAKEand BROILHI/LOpads
at the same time ibr 3 seconds until
the display shows SE
Touch the BROILHI/LO and COOKING
TiMEpads at the same time. The
display will show F(Fahrenheit),
Tottch file BROILHI/LO and COOKING
TIMEpads again at the same time,
The display will show C(Celsius)
[-_ Touch tim START pad,,
(B÷D
®
Tones at the End of a timed Cycle
At theendofa timedcycle,3shortbeepswill
soundfollowedbyonebeepevery6,secondsunti!
theCLEAR/OFFpadistouchedThiscontinual
&secondbeepmagbecanceled
To cancel the 6-second beep:
[Z] Touch the BAKE and BROIL HIiZO pads
at file stone time for 3 seconds until
the display shows SF,
Touch the KITCHEN TIMER ON/OFF
pad, The display shows CON BEEP
(condnual beep) and BEEP.Touch the
KITCHEN TIMERON/OFFpad again,, The
display shows BEER(This cancels the
one beep ever), 6 seconds,)
[-_ Touch the STARTpad.,
23
Special features of your oven control.
Control Lockout (on some models)
Yourcontrolwilt allow youto lockout the touch
padsso theycannotbeactivatedwhentouchedor
cleaningtheglasspanel
Ib lock the controls:
[7] Touch the 9and 0touch pads at the
same time for 3 seconds until the
control beeps twice, The display will
show LOCcontinuously and the time
of day if not blacked ouL
NOTE:All cookingand timingfunctionswilt be
cancelledwhenlockingout thecontrol
To unlock the control, touch the
[] 9mad 0touch pads at ttae same time
for 3 seconds undl the control beeps
twice, and LOC will be removed hom
the display.
(B+D
G
O
12-Hour, 24-Hour or Clock Blackout
Yourcontrolis set to usea 12-hourclock
If you would prefer to have a 24-hour
militaly time clock or' black out the clock
display, follow the steps below,
[_] 'Ibuch die BAKE and BROIL HllZO
pads at the same time for 3 seconds
until the display shows SE
Touch the CLOCKpad once.
The display willshow 12hr.If dais
is the choice you want, touch the
STARTpad
'Touch the CLOCKpad again to change
to the 24-hour military time clock The
display will show 24hr. Ifthis is the choice
you want, touch dae STARTpad
Touch the CLOCKpad again to black out
the clock display. The display will show OFF.
If dais is the choice you want, touch the
START pad,
NOTE:tf theclockis in theblack-outmode.you
wiltnotbeabletousetheDelayStartfunction,
®
Cook and Hold
Yournew contmt hasa cookand hold feature that
keepscookedfoods warm for up to 3 hoursafter
thecookingfunctionis finished
Ihis feature can only be used when timed
cooking.
To activate dais feature, follow the steps
betm_z
[Z] Touch the BAKE and BROILHI/LO pads
at the same dme for3 seconds until
the display shows SE
Iouch the COOKINGTIMEpad, Tim
display will show HidOFE
@
"Ibuch the COOKINGTIME pad again
to acdvate the feature. 'Ihe display will
show Hid ON°
Touch the STARTpad to activate the
cook mad hold feature mad leave the
control set in this special features
mode,
24
UsingtheSabbathFeature.
(D__esignedfor use on the Jewish Sabbath and Holidays) v_'ww.GEAppliances.com
The Sabbath feature can be used for baking/roasting only. It cannot be used for convection, broiling, self-cleaning or
Delay Start cooking,
NOTE: The oven light comes on automatically (on some models) when the door is opened and goes off when the door is
closed. The bulb may be removed, See the OvenL_ghtReplacement sectiono Onmodels with a light switch on the control
panel, the oven light may be turned on and left on.
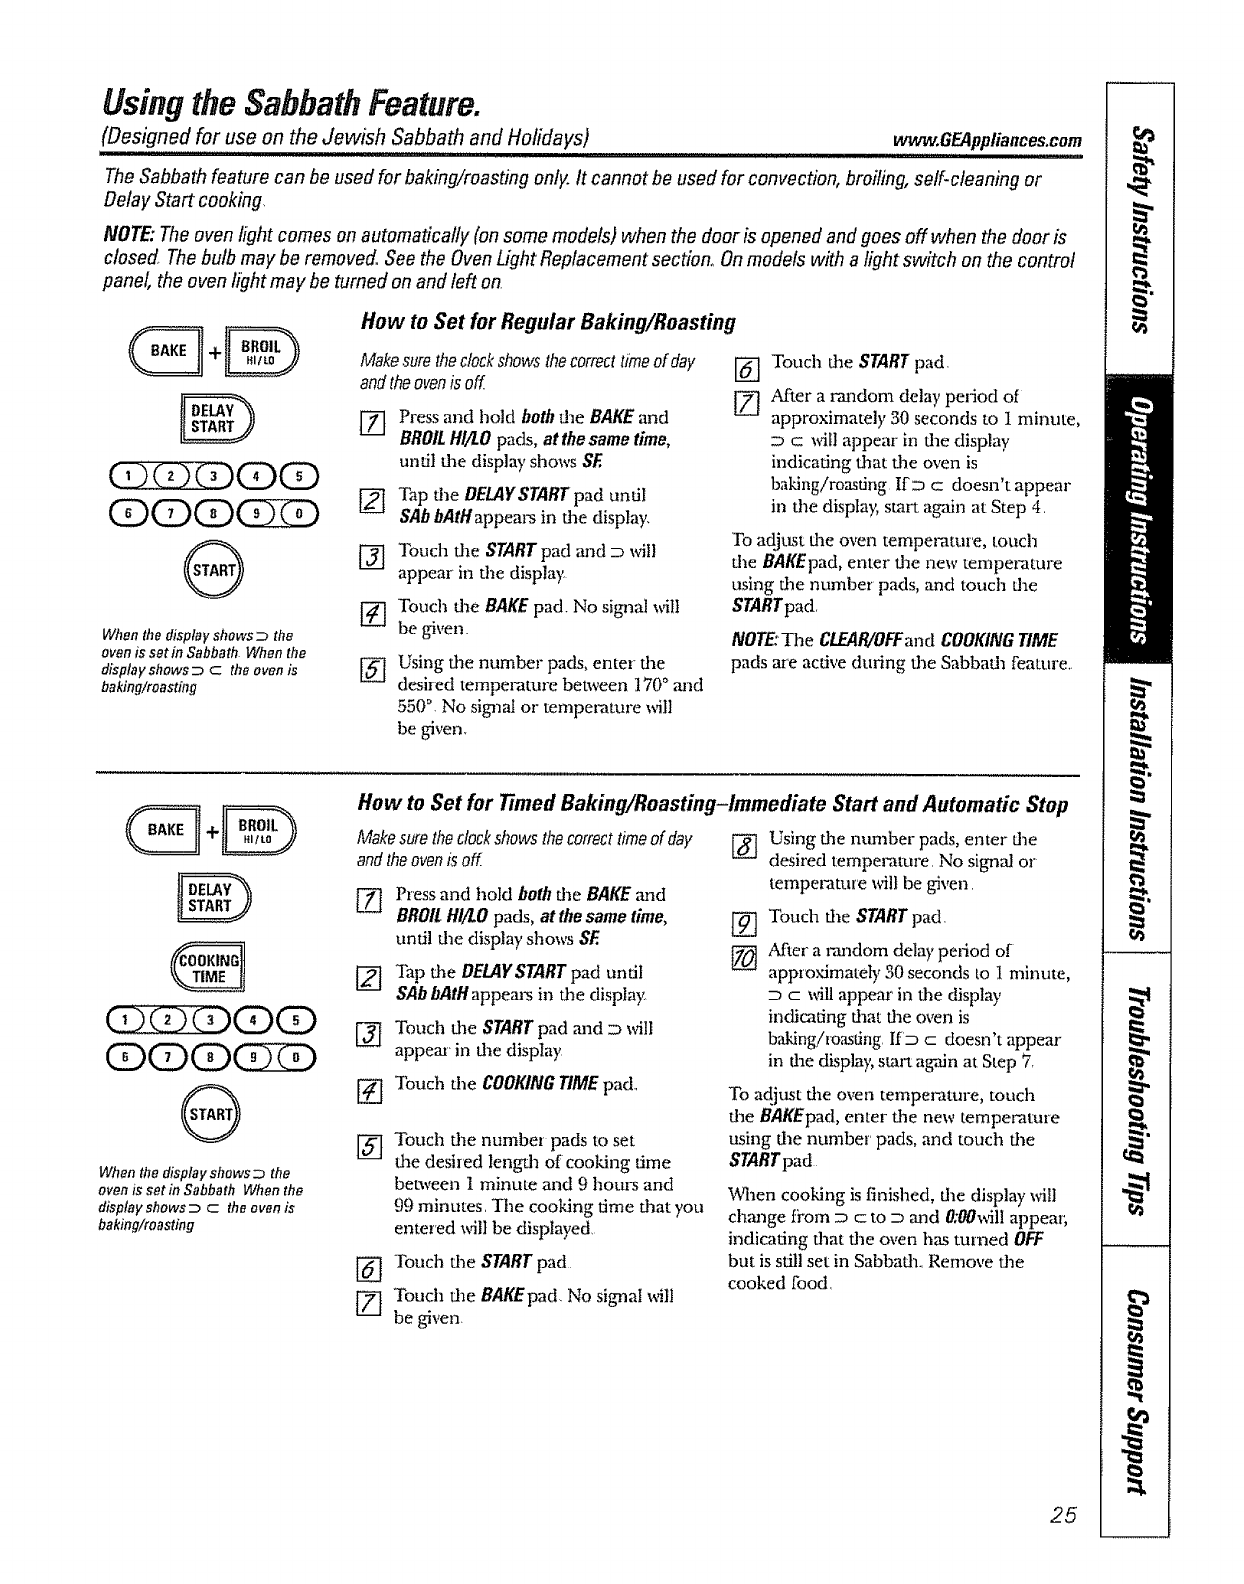
When the display shows Drite
oven is satin Sabbath When the
displayshows_ cthe ovenis
baking/roasting
How to Set for Regular Baking/Roasting
Make suretheclockshows thecorrecttime of day
andtheovenis off.
]-'fl] Press and hold both dae BAKE and
BROILHI/LO pads, at the same time,
until dae display shows SE
[] Tap dae DELAYSTARTpad until
SAb bAtH appears in dae display,
[] Touch tim START pad and D will
appear in die display
[_ Touch fl:e BAKE pad. No signal wilt
be given.
[_ Using dae number pads, enter flae
desired temperature between 170 ° ,'rod
550 °, No signal oz"tempet,'ature _It
be given,
Touch d:e START pad.
After a rmadom delay period of
approximately 30 seconds to I minute,
D c will appear in dae display
indicating daat the oven is
baking!roasting If :::3c doesn't appear
in dae displa); start agifin at Step 4,
To adjust dae oven tempm,-atuve, touch
dae BAKEpad, enter dae new temperature
using d_e number pads, and touch the
STaRTpad,
NOTE:'The CLFA!UOFFand COOKINGTIME
pads are active during the Sabbada feature,.
®
When the display showsD the
ovenis set in Sabbath When the
displayshews D c the oven is
baking!roasting
How to Set for timed Baking/Roasting-Immediate Start and Automatic Stop
Make sure theclockshows the correcttimeof day
and theovenisoff
[7] Press and hold both the BAKE and
BROIl HI/£O pads, at the same time,
until dae display shows SF.
Tap dae DELAYSTART pad until
SAbbAtHappem-s in d_e display.
[_ Touch d:e START pad mad _ will
appear in dae display,
[_] Touch the COOKINGTIME pad,,
@
%
D
Touch d_e number pads to set
dae desired length of cootdng Lime
between 1 minute and 9 hours and
99 minutes, The cooking time daat you
entered _ill be displayed,
Touch dae START pad
Touch dae BAKEpad, No sigmal,_fill
be given
@
Using flae number pads, enter file
desired temperature, No sigm;d or
temperature _ll be given,
Touch tile START pad.
After a random delay period of
approximately 30 seconds to 1 minute,
D c will appem" in d_e display
indicating dmt the oven is
b;_ing!roasting lfD c doesn't appear
in flae display, stm-t agpdn at Step 7,
To adjust d:e oven temperature, touch
dae BAKEpad, enter die new temperature
using dm number pads, and touch d_e
STARTpad
When cooking is finished, dae display will
ch;mge from D c to D mad O:O0_ll appear;
indicating dlat fl_e oven has turned OFF
but is still set in Sabbada.. Remove d_e
cooked food.
25
Usingthe Sabbath Feature.
m, mmm.lll ,llll L__
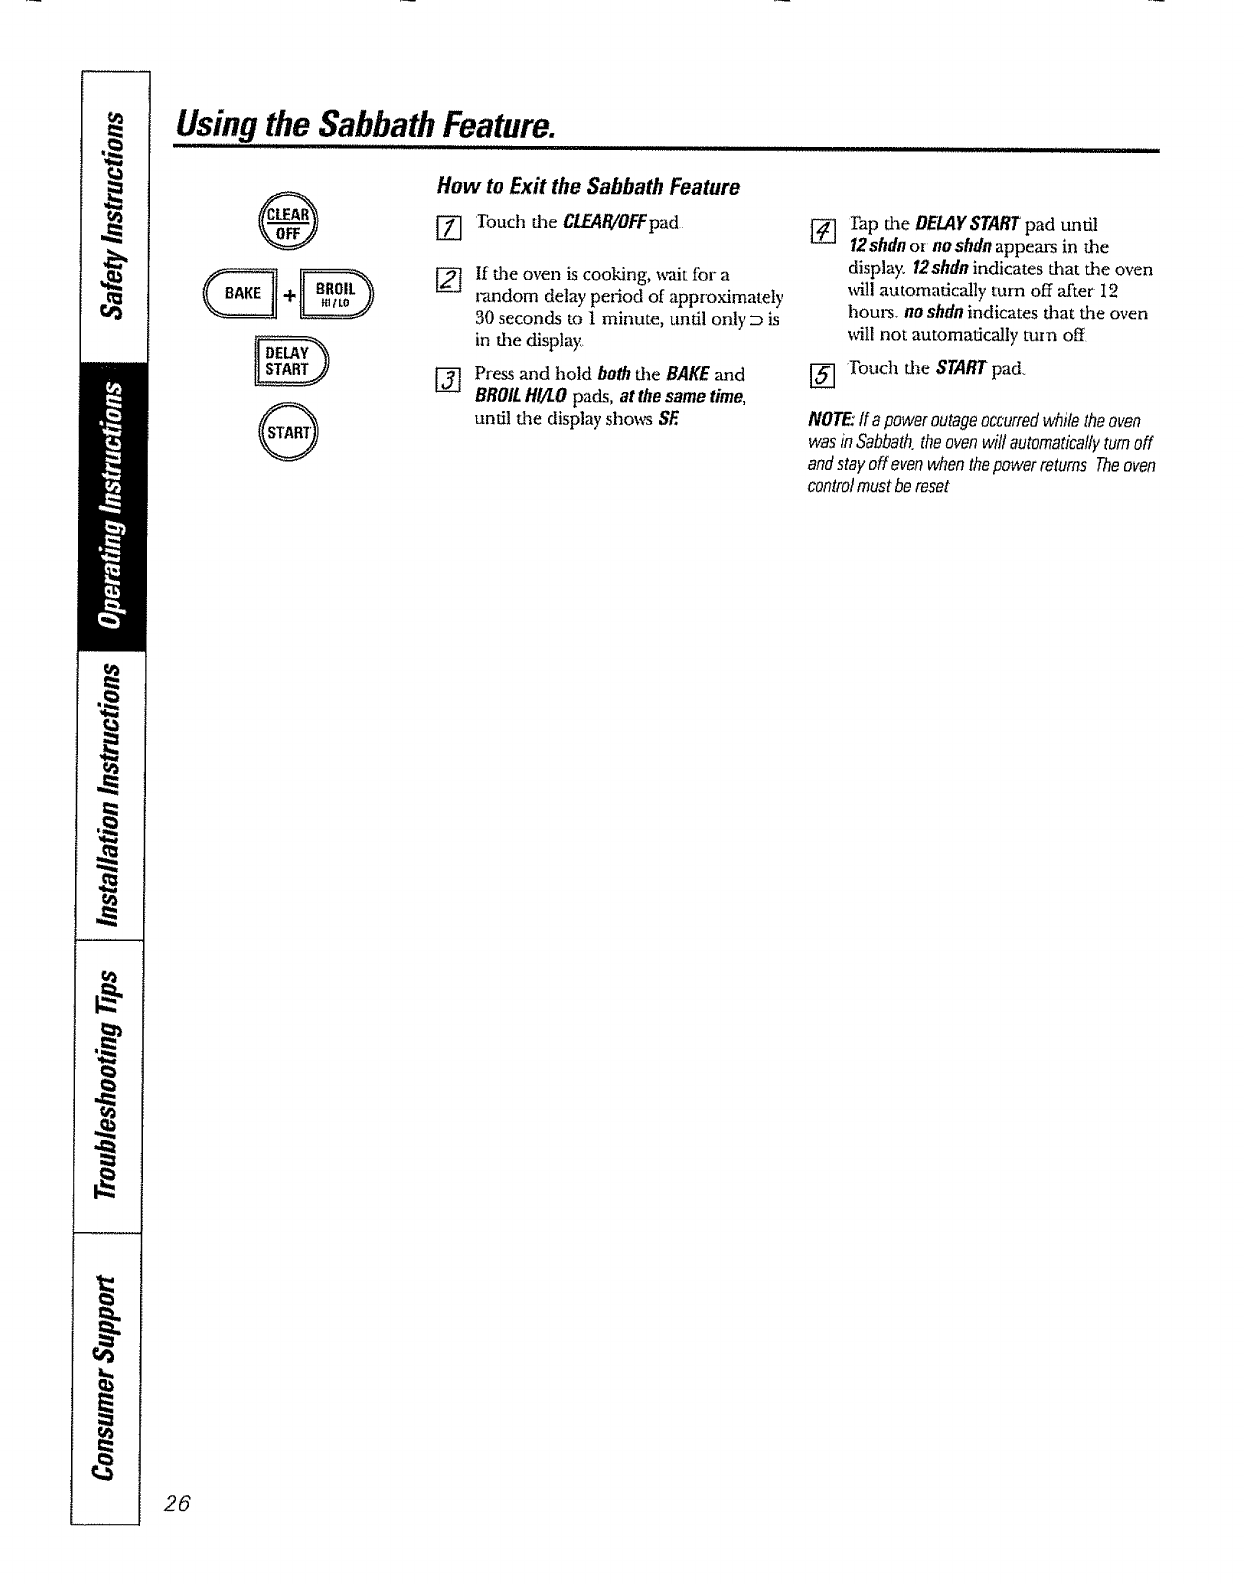
®
D
®
Hop,, to Exit the Sabbath Feature
[] Ibuch the CLEAR/OFFpad
[]
@
I[ the oven is cooking, wait for a
random delay period of approximately
30 seconds to 1 minute, undl only D is
in the display.
Press and hold both the BAKE and
BROILHI/tO pads, at the same time,
until the display shows SE
[_ Iap the DELAYSTARTpad until
12shdnor' noshdnappears in the
display. 12shdnindicates that the oven
will atttomatica!ly turn off after I2
hours, no shdn indicates daat the oven
will not aummatica!ly turn off,
[_] Touch the START pad_
NOTE:ffapoweroutageoccurredwhiletheoven
wasInSabbaththeovenwill automaticallyturnoff
andstayoffevenwhenthepowerreturnsTheoven
controlmustbereset
26
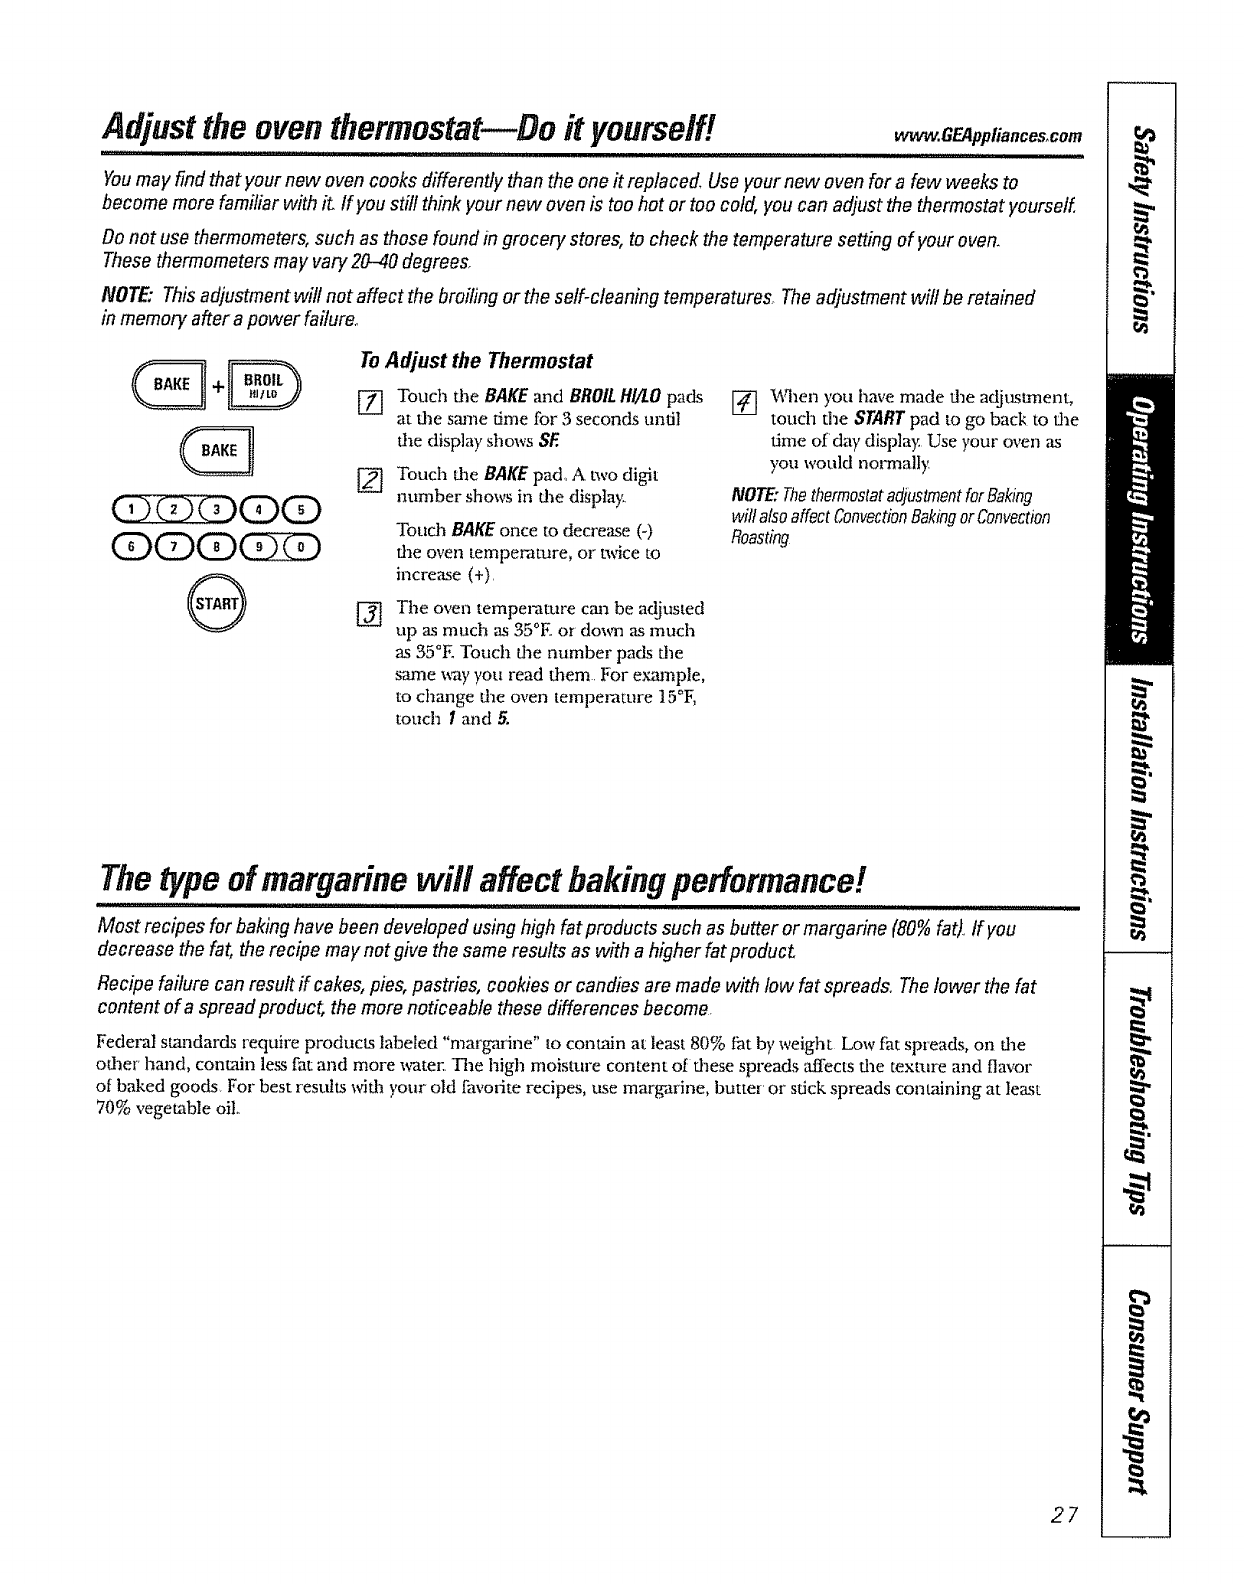
Adjust the oven thermostat--Do it yourself!
ii,ll,,lllll,l,,,iiiiii ............
www.GEAppliances_com
,,,l,,ll lll,i ii ill i i ,u,ii,,,,l,,Nl,lllll,,,,,,llll,,,,i1,1,i
Youmay find that your new oven cooks differently than the one it replaced. Useyour new oven for a few weeks to
become more familiar with iL If you still think your new oven is too hot or too cold, you can adjust the thermostat yourself.
Do not use thermometers, such as those found in grocery stores, to check the temperature setting of your oven.
These thermometers may vary 20-40 degrees.
NOTE,"This adjustment will not affect the broiling or the self-cleaning temperatures. The adjustment wilt be retained
in memory after a power failure..
@
ToAdjust the Thermostat
[_ Touch the BAKE and BROILHI/LO pads
at d_e stone time for 3 seconds until
file display shows SE
[_ Touch tlae BAKE pad, A two digit
number shows in the displa)_,
Touch BAKE once to decrease (-)
fl_e oven temperature, or twice to
increase (+)
The oven tempe],'ature cma be adjusted
up as much as 35°E or down as much
as 35°E Touch the number pads the
stone _ay you read them l-or example,
to change the oven temperature 15°E
touch Iand 5.
X'_riaenyou have made die adjustment,
touch the START pad to go back to dae
time of'day display Use your oven as
you would nolTnally
NOTE: Thethermostatadjustmentfor Baking
will also affect ConvectionBakingor Convection
Roasting
" " !
The type of margarine wall affect baking performance.
.... _...........................i,l,l,ll,l,l, i ,l,lll,llll ull HHHll Ill IH'""'ll'l'l ' I
Most recipes for baking have been developed using high fat products such as butter or margarine (80% fat),,If you
decrease the fat, the recipe may not give the same results as with ahigher fat producL
Recipe failure can result if cakes, pies, pastries, cookies or candies are made with low fat spreads..The lower the fat
content of a spread product, the more noticeable these differences become.
Fedez,nl standards require products labeled "margarine" to contain at least 80% fizt by weight Low fat spreads, on the
edger hm_d, contain le_s fat and more watez:. The high moisture content o[ d_ese spreads affects d_e text-ure and flavor
of baked goods, For best results with your old favorite recipes, use margarine, butter or stick spreads containing at least
70% vegetable oilo
27
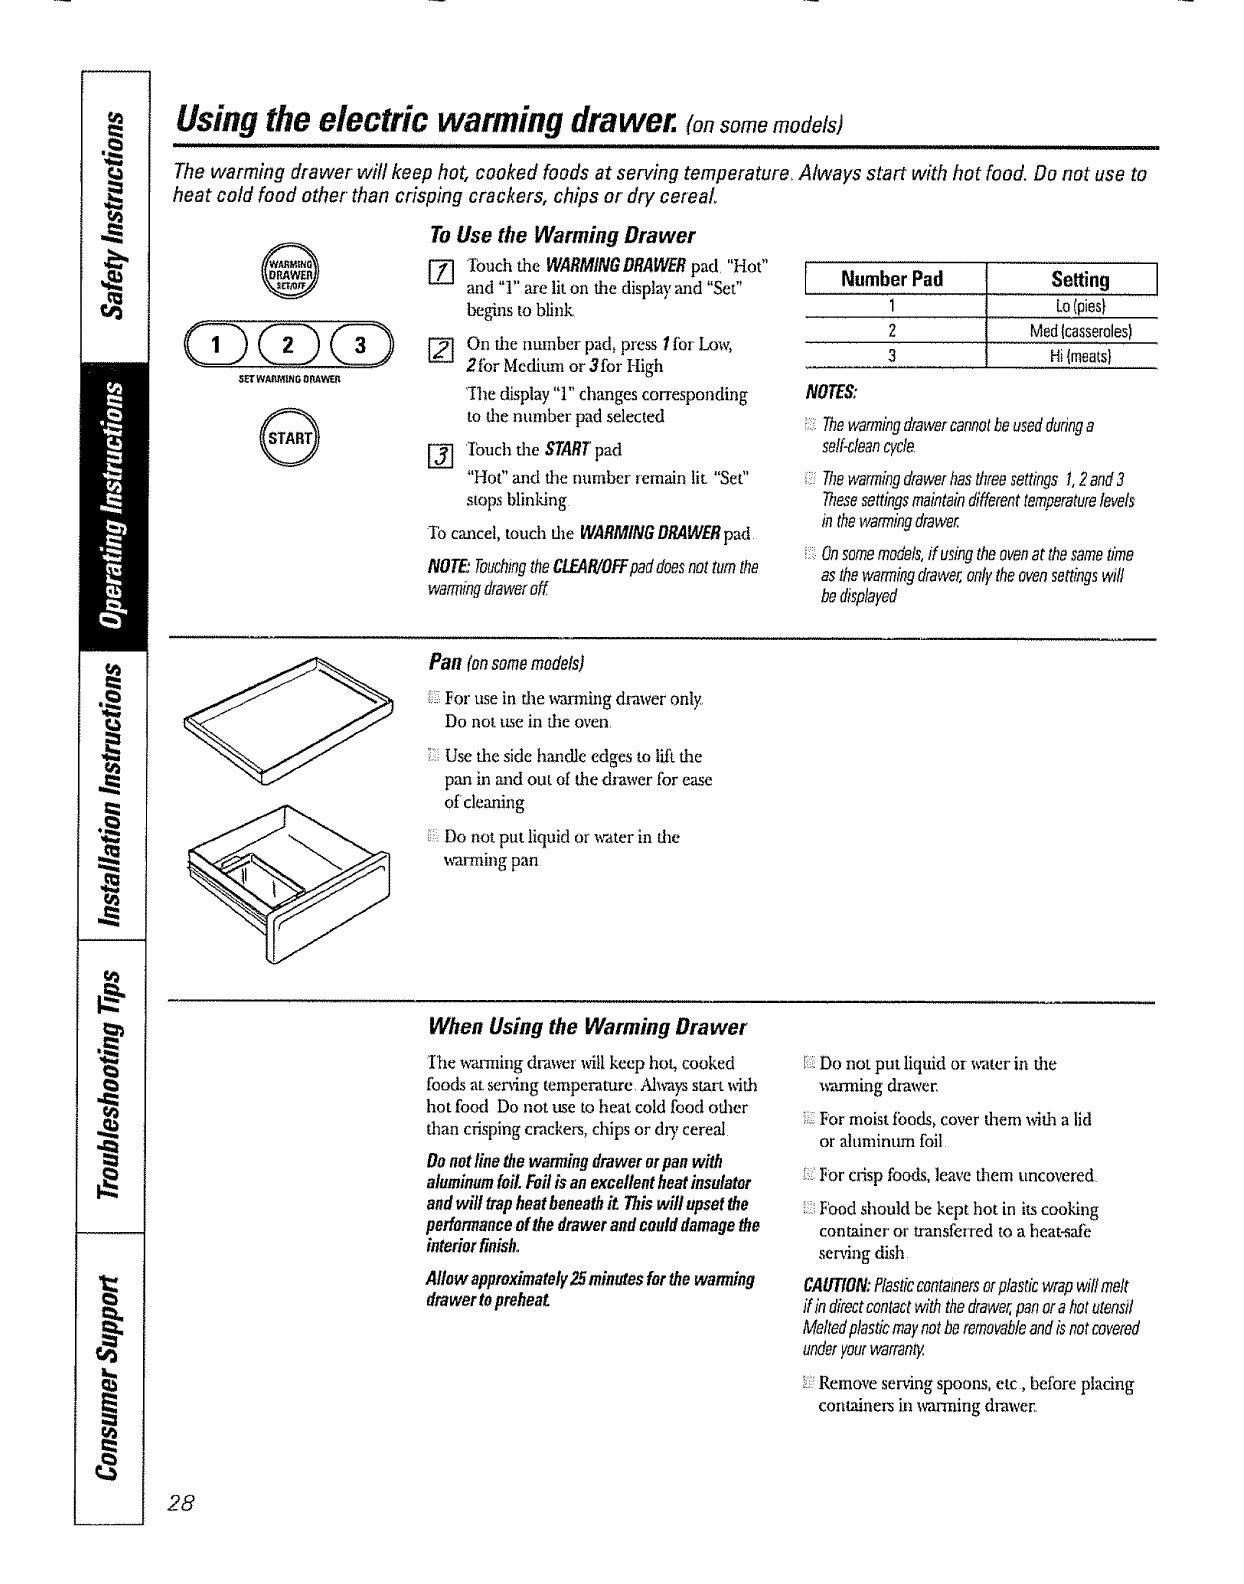
Usingthe electric warming drawer. (onsomemodels)
The warming drawer will keep hot, cooked foods at serving temperature_ Always start with hot food. Do not use to
heat cold food other than crisping crackers, chips or dry cereal
@
ODdZb(D
SETWAft,MINGOtlAWEtZ
®
To Use the Warming Drawer
[] Iouch the WARMINGDRAWERpad "Hot"
,and 'T' are lit on the display and "Set"
begins to blink
[] On Lhenumber pad, press Itbr Ix)w,
2fbr Medium or 3for High
-Ihe display"1"changes corresponding
to fl_enumber pad selected
[] Ibuch the STARTpad
"Hot" and the number remain tit "Set"
stops blinking
Ib cancel, touch dze WARMINGDPdtWERpad
NOTE:TouchingtheCLEAR!OFFpaddoesnotturnthe
warmingdraweroff.
NumberPad Setting
1 Lo(pies}
2 Med(casseroles)
3 Hi{meats}
NOTES:
_:.:::Thewarmingdrawercannotbeusedduringa
self-cleancycle,
i!::;Thewarmingdrawerhasthreesettings t, 2and3
Thesesettingsmaintaindifferenttemperaturelevels
in thewarmingdrawer.
Onsomemodels,if usingtheovenat the sametime
asthewarmingdrawer,onlytheevensettingswill
bedisplayed
Pan (onsomemodels)
i;!;::For use in d_e _mning drawer only,
Do not use in the ovea
;;::Use the side handle edges to lift the
pan in mad out of the dlawer for ease
of cleaning
Do not put liquid or _ter in the
_rming pan
When Using the Warming Drawer
'Ihe wanning drawer wiUkeep hot, cooked
foods at serving temperature, 'Ah_lys start with
hot food Do not use to heat cold food other
than crisping cracker_, chips or dl3,cereal
Donotlinethewarmingdrawerorpanwith
aluminumfoil.Foilisan excellentbeatinsulator
andwill trapheatbeneathit Thiswill upsetthe
peffonnanceofthedrawerandcoulddamagethe
interiorfinish,,
Allowapproximately25minutesforthewanning
drawertopreheat
Do not put liquid or _ater in the
_m'ming drawer,
For moist tbods, cover them _ddl a lid
or aluminum foil
_::For crisp foods, leave them uncovered
!: Food should be kept hot in its cooking
container or aansferred to a heat_ati_
serving dish
CAUTION:Plasticcontainersorplasticwrapwil!melt
if indirectcontactwiththedrawer,panorahotutensil
Meltedplasticmaynotberemovableandisnotcovered
underyourwarrant.
!;i_Remove serving spoons, etc, before pladng
containers in wanning drawer,,
28
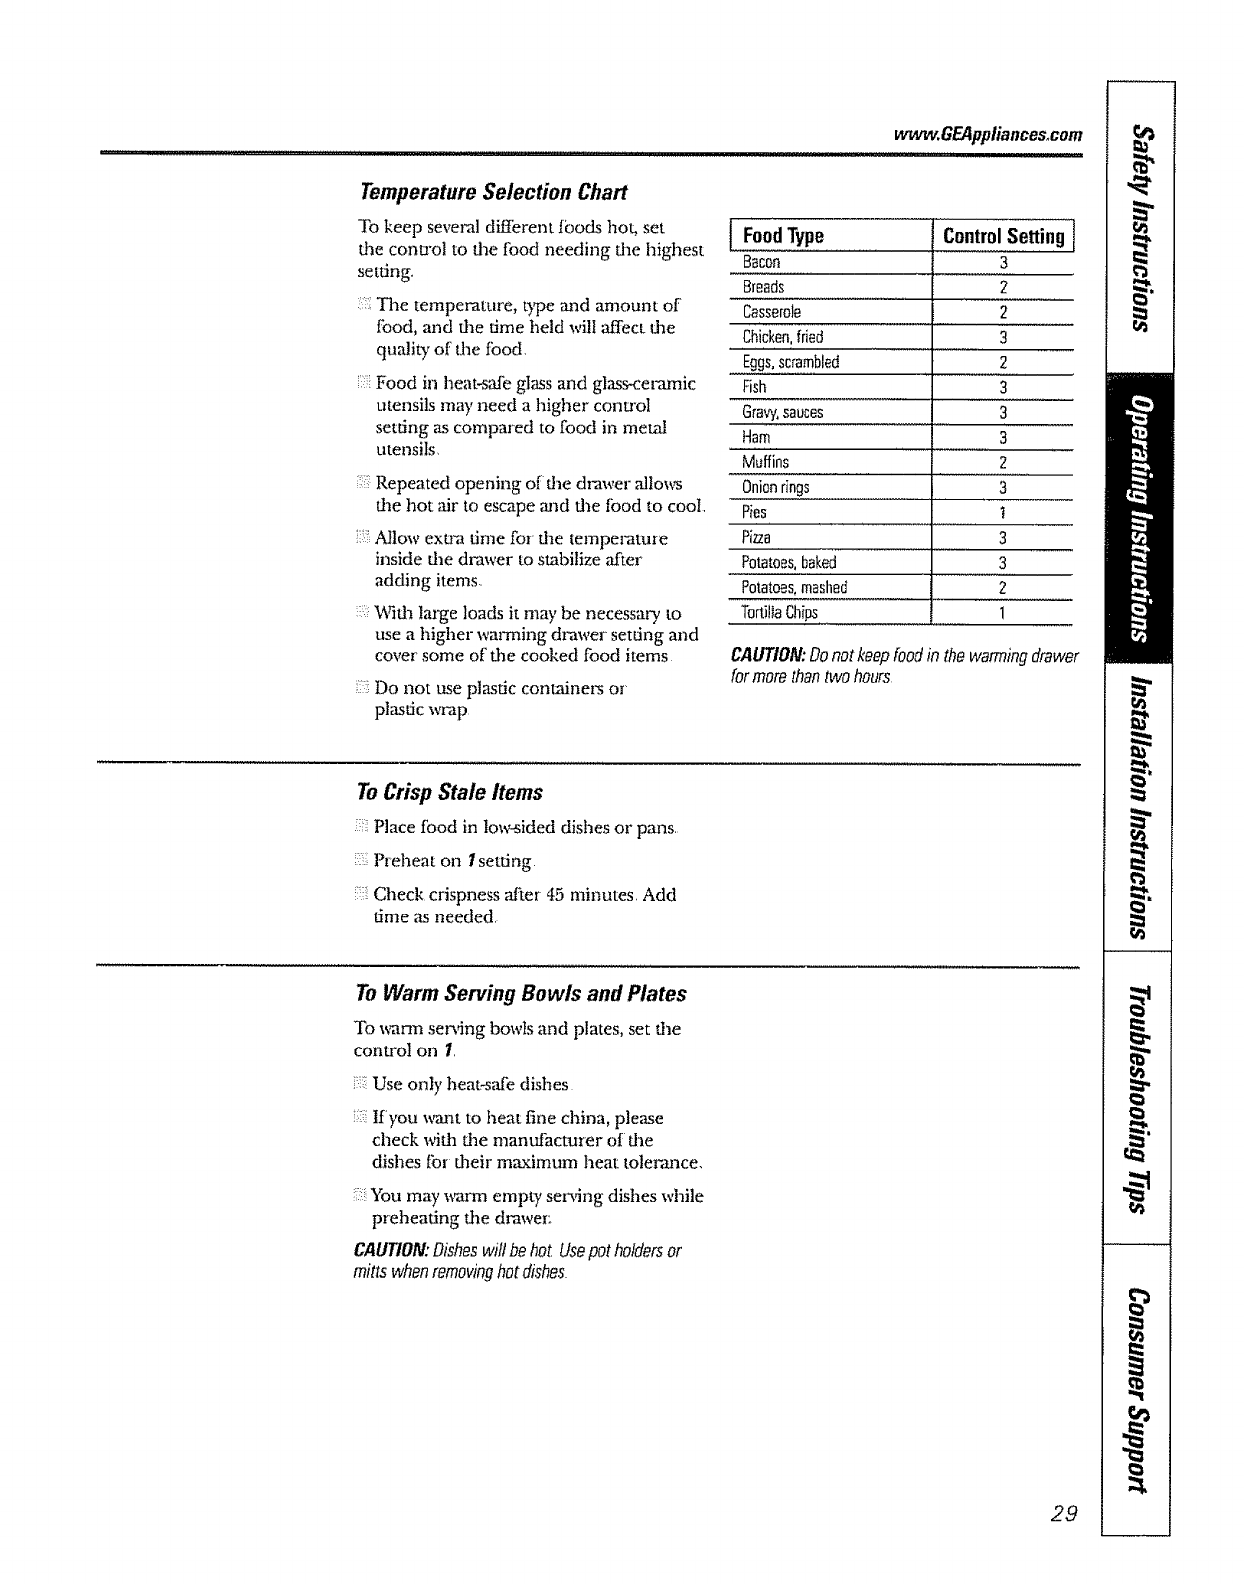
www, GEAppliances,com
Temperature Selection Chart
To keep sevm,'al different foods hot, set
the conu'ol to flae food needing dae laighest
setting,
The temperature, t)T)emad amount of"
food, and the time held will affect dae
qu;flity of lhe fbod,
Food in heat-s',_'e glass and glass-ce,mnic
utensils may need a higher conu'oI
setting as compared to food in metal
utensils,
Repeated opening of the dz,-awerallm_,s
die hot air to escape and flae lbod to coot,
.4]low exU,q time for the temperature
inside flae drawer to stabilize after
adding items..
Wifla Im'ge loads it may be necessary to
use a higher warming drawer setting and
cover' some of the cooked food items
Do not use plastic containm,'s or
plastic wrap
FoodType ControlSetting 1
Bacon 3
Breads 2
Casserole 2
Chicken,fried 3
Eggs,scrambled 2
Fish 3
Gravy,sauces 3
Ham 3
Muffins 2
Onionrings 3
Pies t
Pizza 3
Potatoes,baked 3
Potatoes,mashed 2
TortillaChips 1
CAUTION:Donotkeepfoodinthewarmingdrawer
formorethantwohours,
To Crisp Stale Items
Place food in low-sided dishes or pans
Preheat on Isetting
Check crispness ,after 45 minutes, Add
time as needed
To Warm Serving Bowls and Plates
To _¢mn smMng bowls and plates, set the
conu'oI on 1,
;::i Use only heat_safe dishes
:5 If you vamt to heat fine china, ple_e
check wifla dae mantffacturer of dae
dishes tbr daeir maximum heat tolerance,
:i:!:You may _azm empty se,Mng dishes while
p,eheating flae drawer:
CAUTION:Disheswillbehot Usepotholdersor
mittswhenremovinghotdishes
29
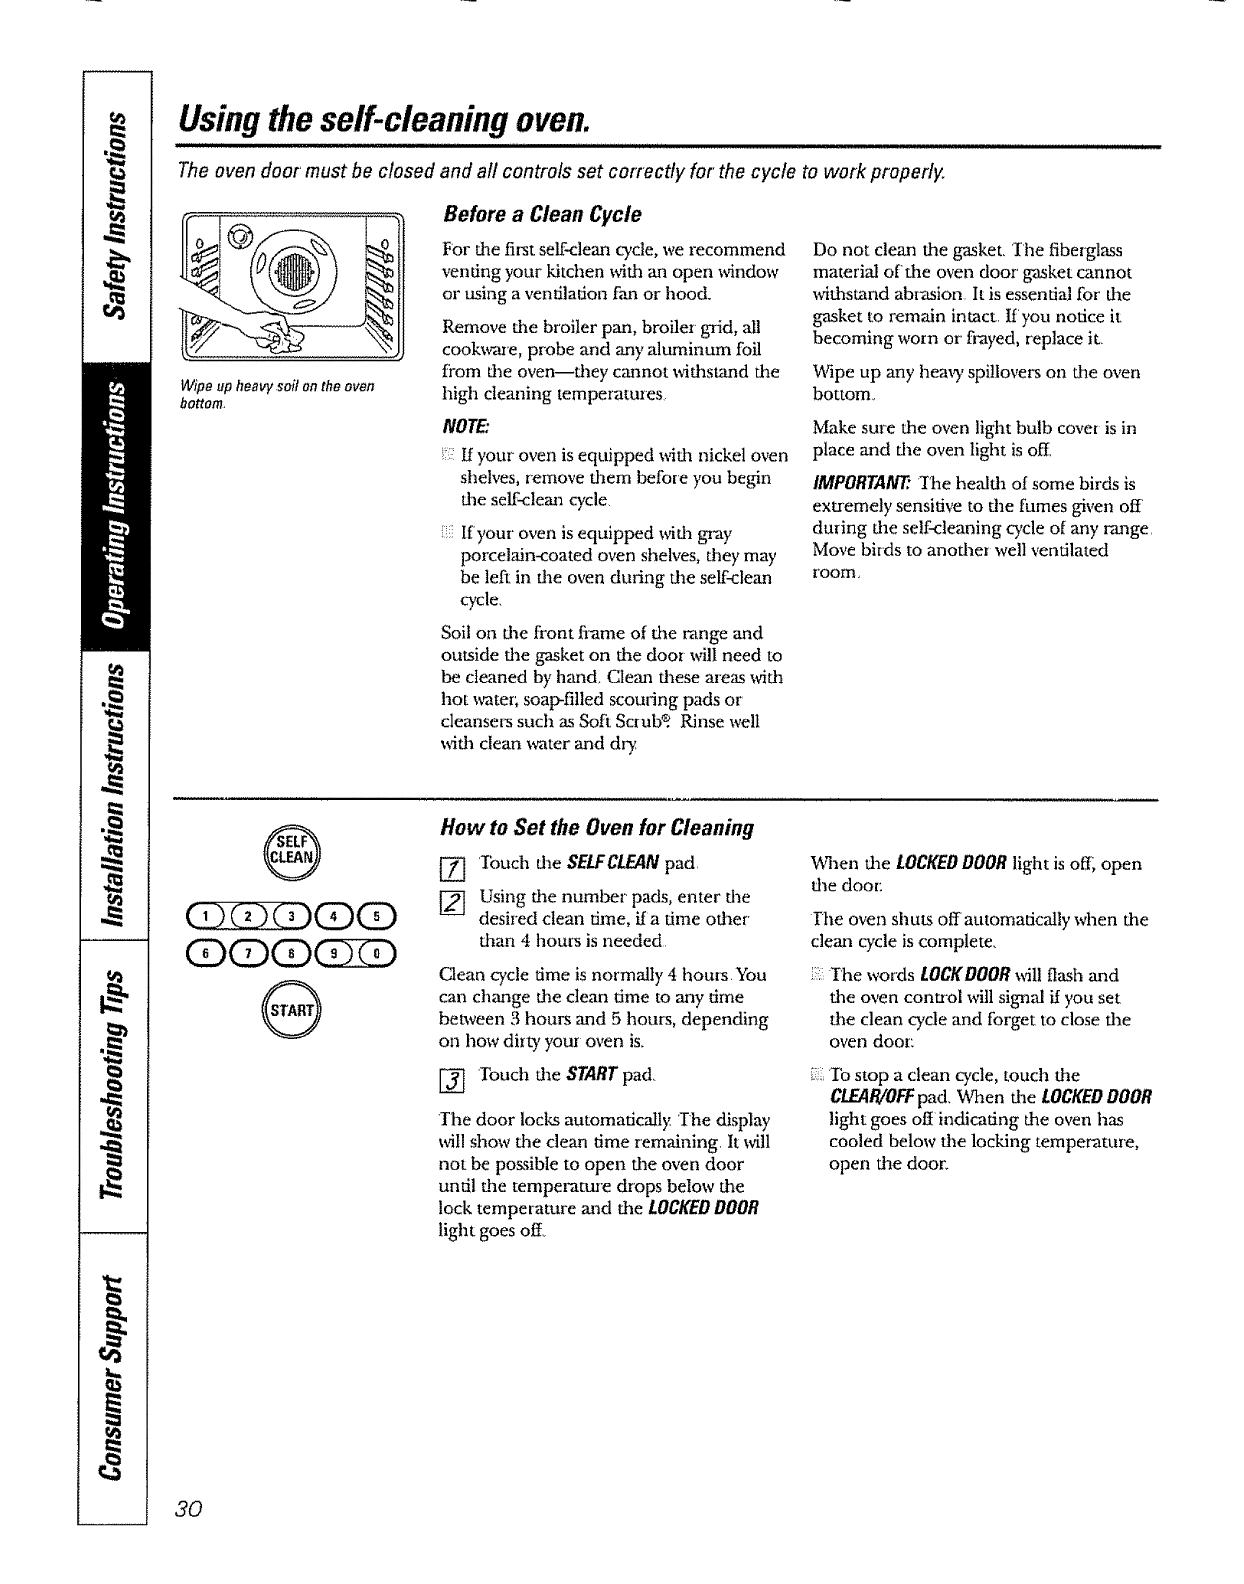
Using the self-cleaning oven.
II,lmll Illl I! I II ............................................
The oven door' must be closed and all controls set correctly for" the cycle to work properly.
Wipeupheavysoilontheoven
bottom,
Before aClean Cycle
For die first self.clean cycle, we recommend
venting your "kitchen with an open window
or using a ventilation fan or hood.
Remove the broiler pan, broiler grid, all
cookwme, probe and any aluminum foil
fi'om the oven--daey casmot _4thstand the
high cleaning temperatures
NOTE:
If your oven is equipped with nickel oven
shelves, remove daem before you begin
the self.clean cycle
:'_!If your oven is equipped with gray
porcelain-coated oven shelves, they may
be left in die oven during the self.clean
cycle.
Soil on the front liame of the range and
outside the gasket on the door will need to
be cleaned by hand, Clean flaese areas wit1
hot water; soap-filled scouring pads or'
cleansei_ such as SofL Scrub _. Rinse welt
_th clean water and dl_
Do not clean the gasket, l'he fiberglass
material of the oven door' gasket cannot
withstand abrasion It is essential for the
gasket to remain intact. If'you notice it
becoming worn or fi,'ayed, replace it.
Wipe up any hea D,spi!lovers on the oven
bottom
Make sure the oven light bulb covet is in
place and the oven light is off.
IMPORTAIV_ Ihe health of some birds is
extremely sensitive to the fumes given off'
during dre self.cleaning cycle of any range,
Move birds to another well ventilated
room,
®
®
How to Set the Oven for Cleaning
[_ Ibuch the SELFCLEANpad
[_] Using fire number pads, enter the
desired clean time, ifa time oilier
than 4 hours is needed
Clean cycle time is normally 4 horus. You
can change the clean time to any time
between 3 horns and 5 hours, depending
on how dirty your oven is_
Ibuch the START pad
The door locks automatically The display
will show the clean time remaining. It will
not be possible to open the oven door
until the tempemtme drops below the
lock temperature mad the LOCKEDDOOR
light goes off
V_qaen dae LOCKEDDOOR light is o[I; open
the dooc
the oven shuts off atttomatically when the
clean cycle is complete,
2Ihe words LOCKDOORwill flash and
the oven control will signal if you set
fl_e clean cycle and forget to close the
oven door:
;. Ib stop a clean cycle, touch the
CLEAR/OFFpad. When the LOCKEDDOOR
light goes ott indicating the oven has
cooled below the loc "Idng temperature,
open the door.
3O
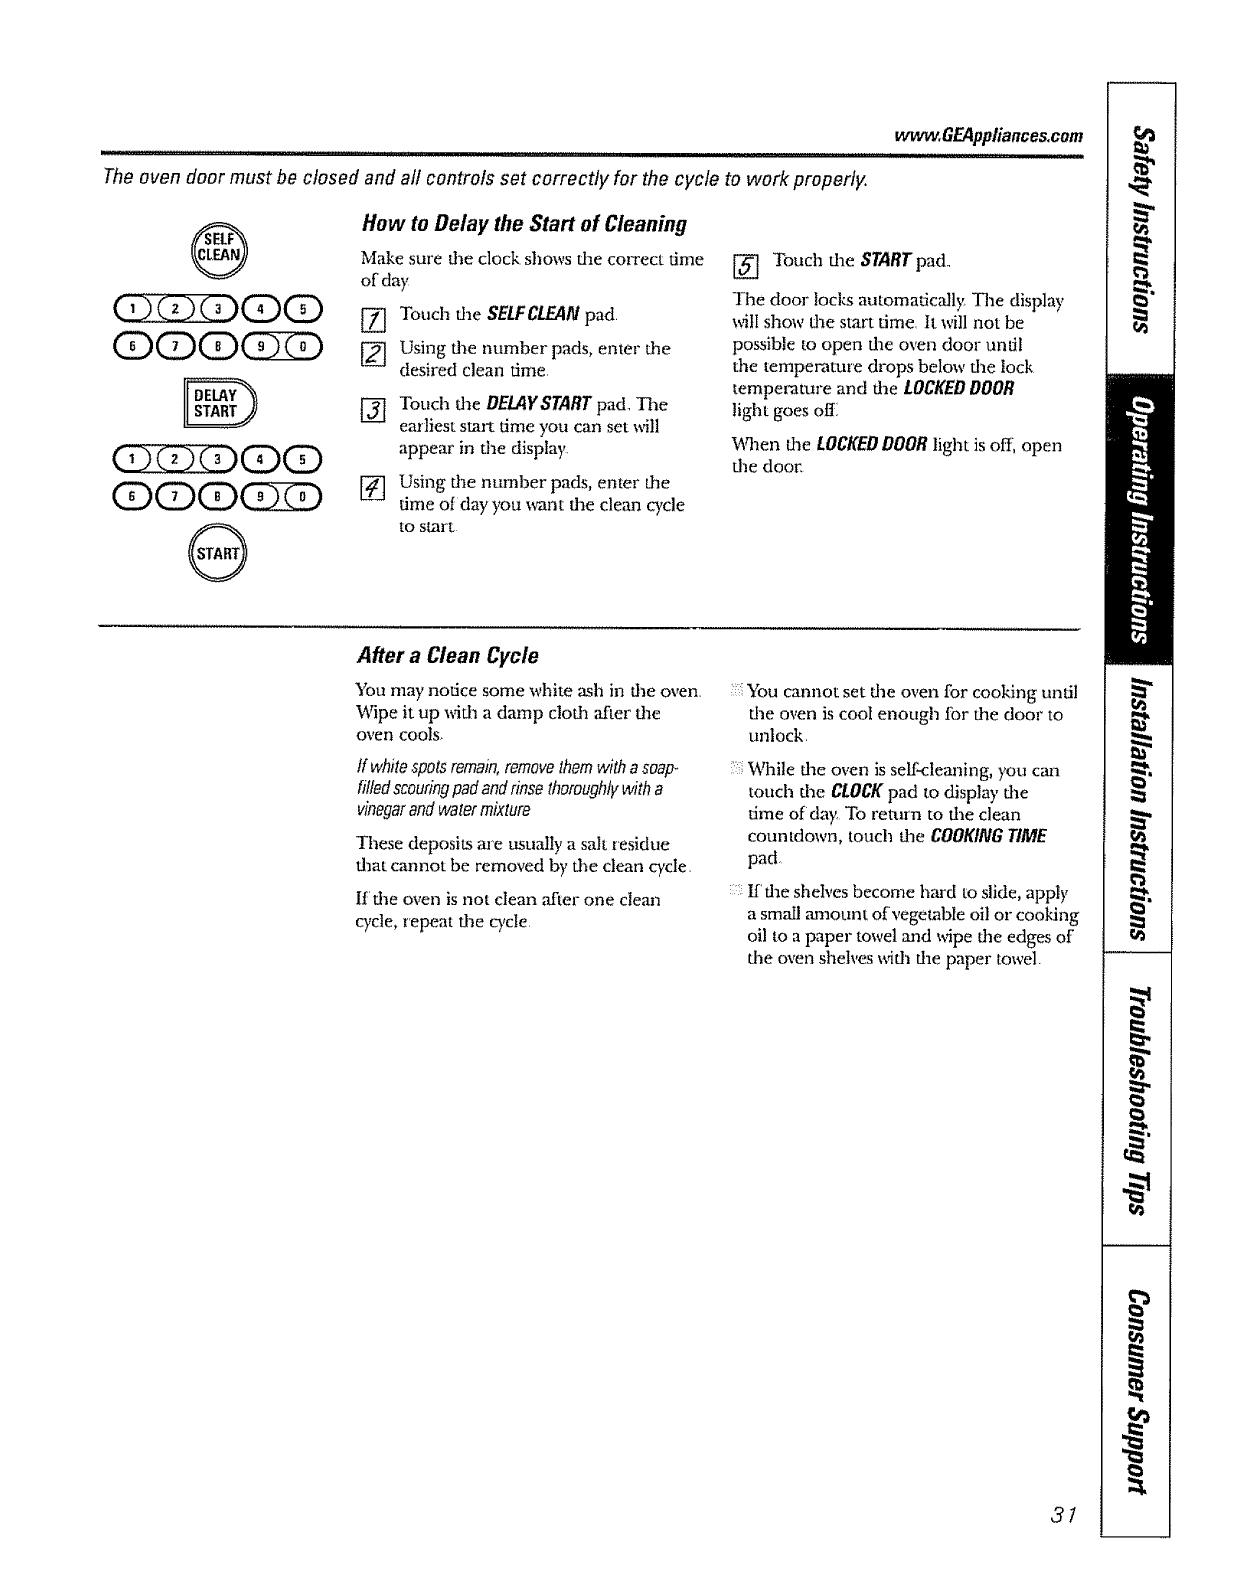
w,,,.,llll i ,i , u,.i ...................... ,,'Ill ........................
The oven door must be closed and all controls set correctly for the cycle to work properly.
wwvv,GEAppliances,com
How to Delay the Start of Cleaning
Make sure the clock• shows flae Co_Tect time [_ Touch file STARTpad.,
of day
®
[_ Touch die SELFCLEANpad.
[_ Using fl_e number pads, enter the
desired clean time.
[-_ Touch fl_e DELAYSTART pad, The
earliest start time you can set _ill
appear in the display
[_ Using the number pads, enter the
time ofday you _nt the clean cycle
to starL
The door locks automatically The display
will show dae start dme, It will not be
possible to open dae oven door until
the temperature drops below the lock
temperature and file LOCKEDDOOR
light goes off;
V_qaen file LOCKEDDOOR light is off, open
die dool:
After a Clean Cycle
You may notice some white ash in fl_e oven
Wipe it up with a damp cloda after fl_e
oven cools_
If white spotsremain,removethem with asoap-
filled scouringpadand rinsethoroughlywitha
vinegarand water mixture
These deposits are ttsualty a salt residue
flaat cannot be removed by the clean cycle.
If'the oven is not clean after one clean
cycle, repeat fl_ewcle
You cannot set the oven for cooking until
the oven is cool enough for the door to
unlock,
?_While dae oven is self-cleaning, you can
touch the CLOCKpad to display die
dme of day, To retmn to the clean
countdown, touch flae COOKINGTIME
pad•
If' flaeshelves become hard to slide, apply
a small ,'mmunt of vegetable oil or cooking
oil to a paper towel mad _4pe fl_eedges of
the oven sheh,es with the paper towel.
3t
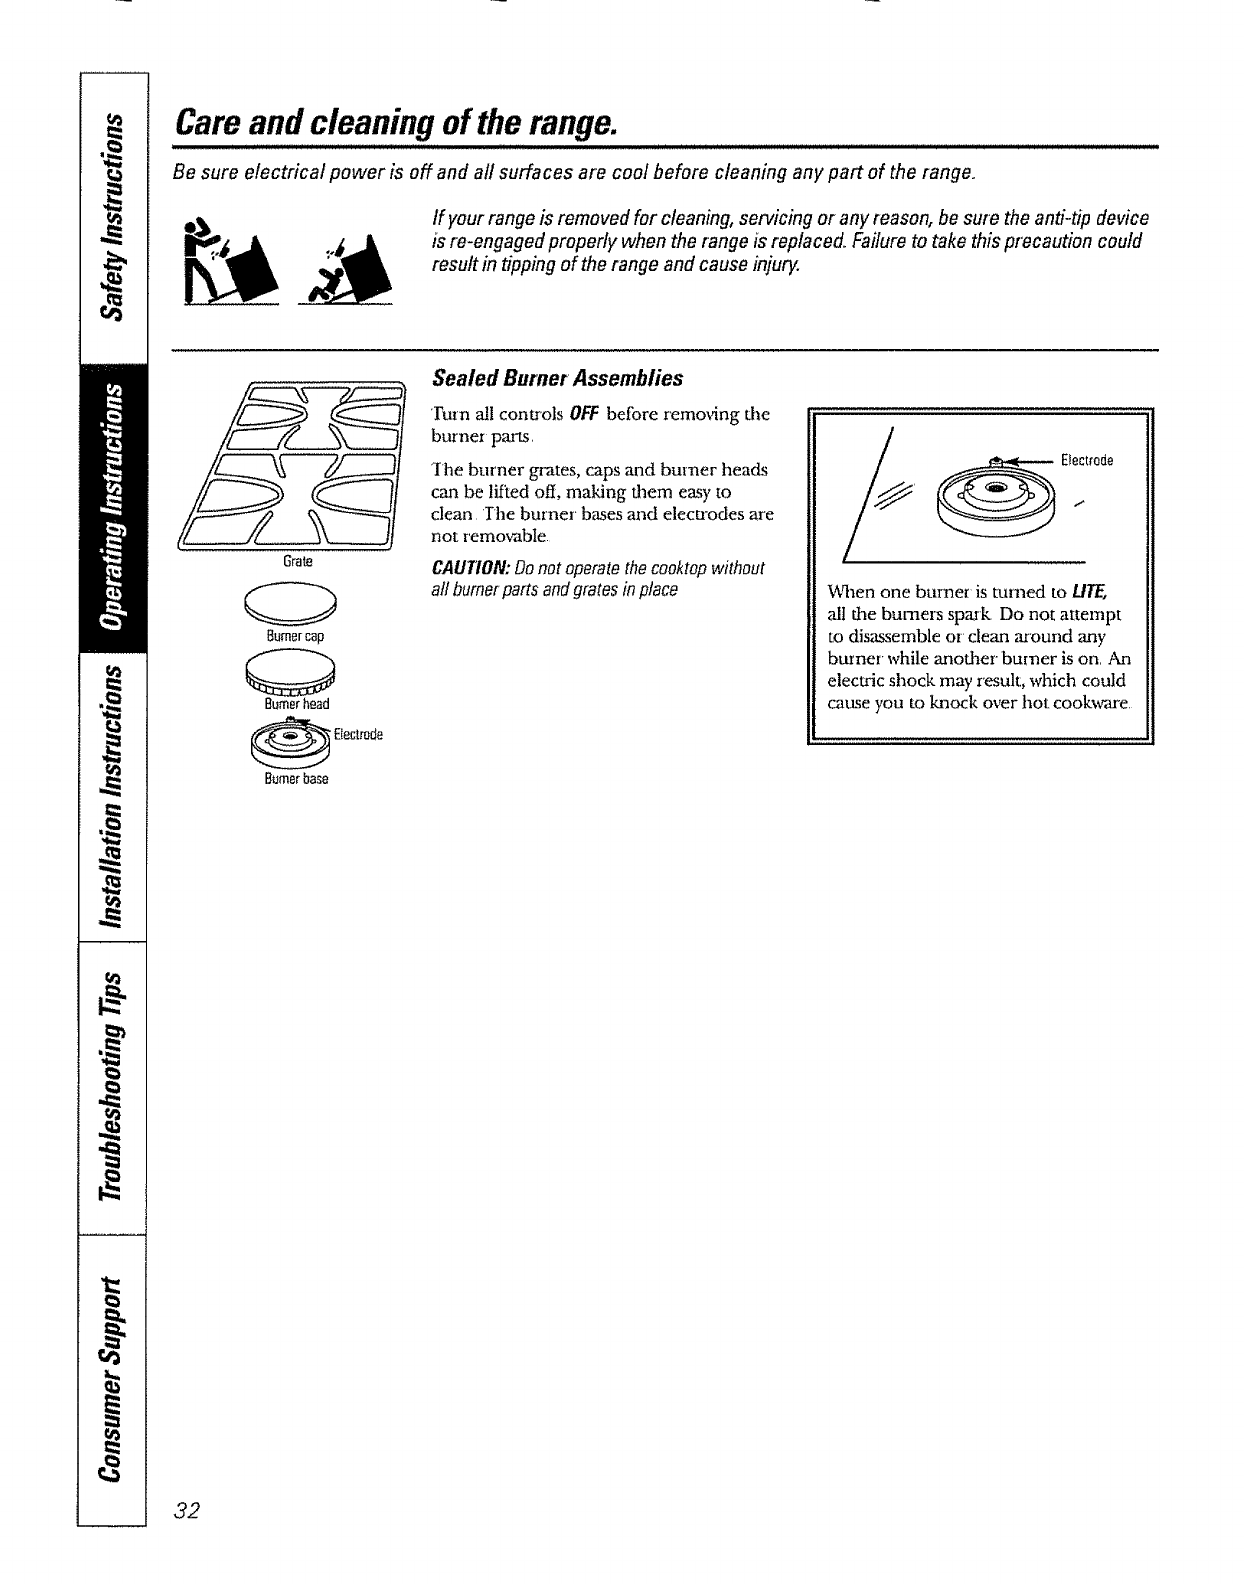
Care and cleaning of the range.
Be sure electrical power is off and a!l surfaces are cool before cleaning any part of the range.
If your range is removed for cleaning, servicing or any reason, be sure the and-tip device
is re-engaged properly when the range is replaced. Failure to take this precaution could
result in tipping of the range and cause injury.
Grate
8umercap
Burner head
Sealed Burner Assembfies
Turn ,all controls OFF before remm4ng dae
burner pm'ts,
The burner grates, caps and burner heads
can be lifted off, making flaem easy to
clean, Ihe burner bases and elecu'odes are
not remov'able
CAUTION:Donot operatethecooktopwithout
all burnerpartsandgratesinplace When one burner is turned to U/E,
all die burners spark, Do not attempt
to disassemble or' clean m"ound any
burner while anodaer burner is on, An
electric shock may result, which could
cause you to "knock over hot cookware
Burnerbase
32

Burner Caps and Heads
NOTE: Before removingthe burnercaps
and heads, remember their size and location
Replace them in the same location after
cleaning The top sides of the Right Front:
Right Rearand Left Front burner headsare
marked with the letters "RF," 'RR"and "LF,"
respectivetg to aid reassemblg
Burner caps
Lift off when cool, Wash burner" caps
in hot, soapy water and rinse with clean
watel: You may scour with a plastic
scouring pad to remove burned-on
food particles,
Burner heads
The slits in the burner heads of your
cooktop must be kept clean at all times,
Clogged or dirt), burner ports or
elecu'odes will not allow the burner to
operate properly,
Any spill on or around an elecu'ode must
be carefully cleaned, Take care to not hit
an electrode with anything hard or it
could be damaged
You should clean the burner caps,
burner heads and burner bases routinely,
especially after bad spillovers, which
could clog the openings in the burner
heads,, Lift off when cooI_
To remove burned-on fbod, soak the
burner beads in a solution of mild liquid
detergent and hot water for 20-30
minutes, For more stubborn stains,
use a toothbrush
After cleaning
Befbre putting d_e burner caps and
heads back, shake out excess water and
then dry them tlaoroughly by setting in a
warm oven for 30 minutes,
NOTE:Donotusesteelwoolorscouringpowders
tocleantheburnersorelectrodesThiscandamage
theburnersandelectricallyshorttheelectrodes
wwvv,GEAppliances,com
Replacement
The top sides of' the Right Front, Right
Rear and LeI;c Front burner heads are
mmked with the letters "Pd7,,'' "RR" and
"LE" respectively, to aid reassembly
Mediumh_ad
(notmad<edl
aadcap
Largohead
andcop
Smallhead
andcap
Frontofrange €
Extralarge
headand
cap
Replace the burner heads on the bases
matching d_e letters, Replace the caps on
the heads, Make sure that the caps and
heads are replaced in die correct
location, There is one small, one
medium, one large and one extra large
head and cap
When replacing, makesere the locater pins in the
burner head are seatedin the pin slots of the burner
base Rotatethe burner head aroundthe burner base
until ff is level and securely seated
33
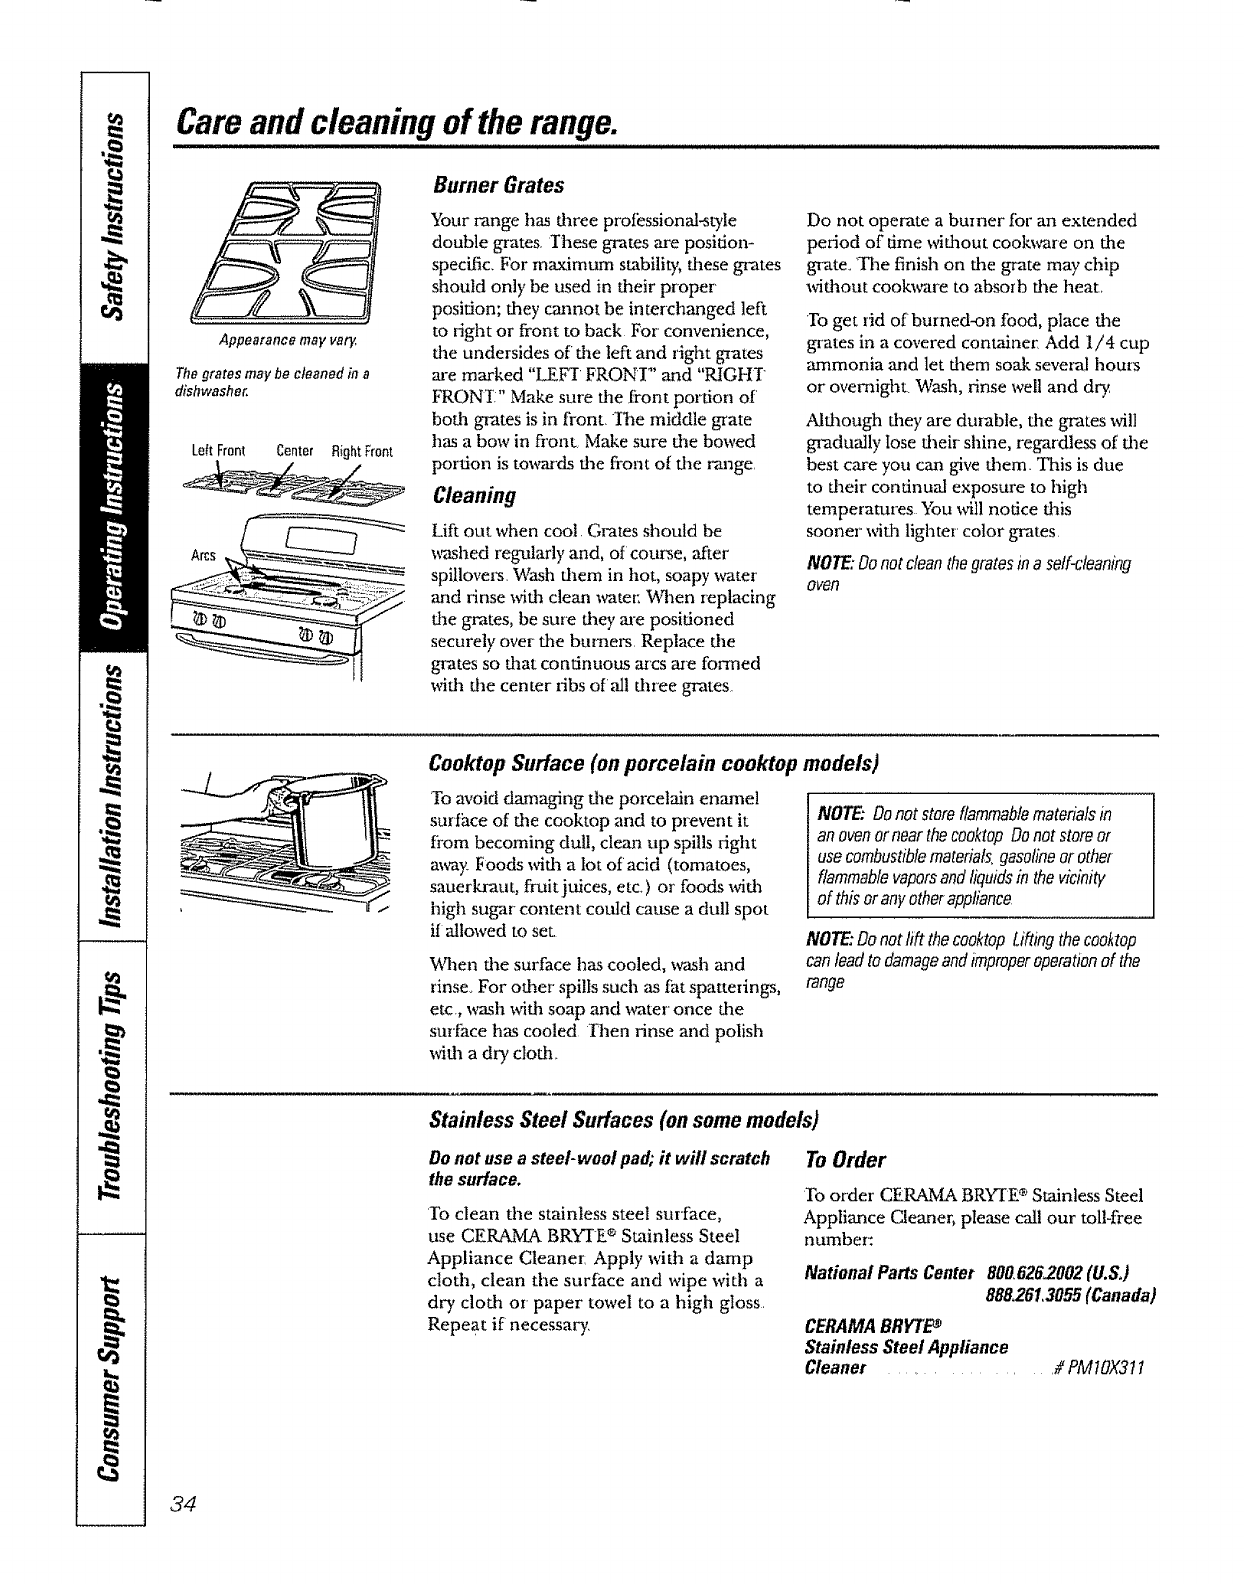
Care and cleaning of the range.
Appearance may va_
Thegrates may be cleaned in a
dishwasher,
LoftFront Center RightFront
Burner Grates
Your range has three profSssional-style
double grates, These grates are position-
specific, For maximum stability, these grates
should only be used in their proper
position; they cannot be interchanged left
to fight or front to back For' convenience,
die undersides of the left and right grates
are marked "LEFT FRONF' and "RIGHT
FRON1" Make sure file front portion of'
both grates is in front_ Ihe middle grate
has a bow in fronL, Make sure the bowed
portion is towards the front of the range
Cleaning
Lift out when cool. Gvates should be
_hed regularly and, of course, after
spillovm_. Wash diem in hot, soapy water
and rinse with clean vrater: When replacing
the grates, be sure they are positioned
securely over die burners, Replace the
grates so fliat continuous arcs are formed
with the center ribs oral! three grates,
Do not operate a brunet for an extended
period of time without cook_rare on the
grate_ The finish on the grate may chip
without cook-,_are to absorb the heal
To get rid of burned-on food, place the
grates in a covered container Add 1/4 cup
ammonia and let them soak several hours
or overnight. Wash, rinse well and dry.
Although fliey are durable, die grates will
gradually lose their shine, regardless of the
best care you can give diem, This is due
to their continual exposure to high
temperatures You will notice dais
sooner xs4th lighter' color grates,
NOTE"Donotclean thegratestn a self-cleaning
eyed
Cooktop Surface (on porcelain cooktop models)
To avoid damaging die porcelain enamel
surtace of die cooktop and to p[event it
from becoming dull, clean up spills right
mvay Foods _4th a lot of acid (tomatoes,
sauerMaut, fruit juices, etc) or' foods _dth
high sugar content could cause a dull spot
if allowed to set.
When the surface has cooled, wash and
rinse_ For other spills such as tat spatterings,
etc., wash Mth soap and water once the
surface has cooled rhen rinse and polish
with a dry cloth.
NOTE: Donot store flammablematerialsin
an ovenornearthe cooktopDo not store or
usecombustiblemateria& gasolineor other
flammablevaporsand liquidsin thevicinity
of this or anyotherappliance
NOTE:Donotlift thecooktopLiftingtheceoktop
canleadto damageandimproperoperationof the
range
Stainless Steel Surfaces (on some models)
Do not use a steel-wool pad, Rwill scratch
the surface.
're clean the stainless steel surface,
use CERAMA BRYIE ®Stainless Steel
Appliance Cleaner: Apply with a damp
cloth, clean the surface and wipe with a
dry cloth or paper towel to a high gloss,
Repeat if necessary,
ToOrder
leo order CERAMA BRYIE ®Stainless Steel
Appliance Cleaner, please cal! our toll-free
number:
National Parts Center 800.626,?002(U.S.)
888.261.3055(Canada)
CERAMA BRYT'_
Stainless Steel Appliance
Cleaner ................. # PMtOX311
34
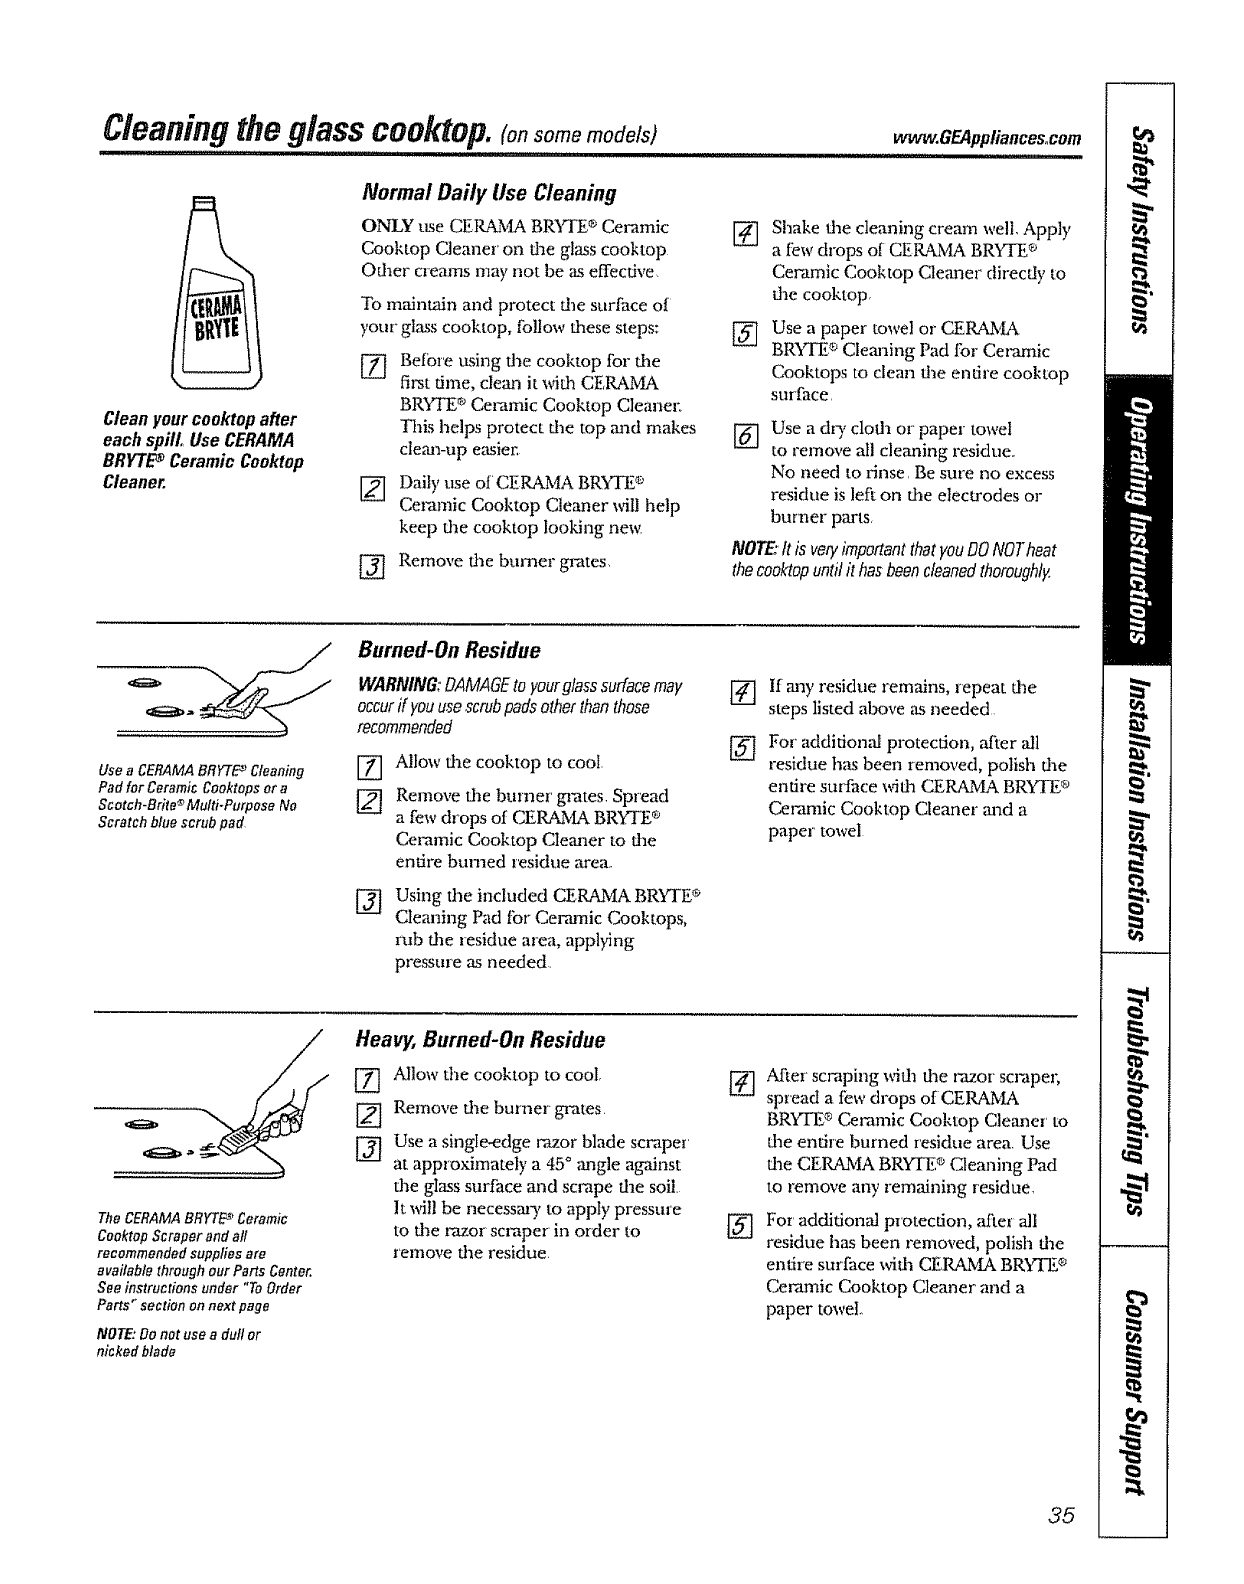
Cleaningtheglasscooktop.(o, om, www.GEAppliances,com
Clean your cooktop after
each spill° Use CERAMA
BRYTE_Ceramic Cooktop
Cleaner.
Normal Daily Use Cleaning
ONLY use CERAMA BR'_E ®Ceramic
Cooktop Cleaner on the glass cooktop
Other creams may not be as effective
To maintain and protect fl_e surface oI
your" glass cooktop, follow flaese steps:
[] Befbr'e using file cooktop for dae
first time, cleml it with CERAMA
BPJ_I'E ®Ceramic Cooktop Cleanm:
This helps protect dae top mad makes
ctema-up easim:
[_ Daily use of CERAMA BRYIE ®
Ceramic Cooktop Cleaner will help
keep die cooktop looking new,
[_ Remove die burner grates,
%
@
Shake dae cleaning cream well, Apply
a few drops of CERAMA BRYrE ®
Ceramic Cooktop Clemler directly to
dae cooktop,
Use a paper towel or CERAMA
BR_,q'E®Cleaning Pad for Cm_mic
Cooktops to dean the endre cooktop
surface
[_ Use a dry cloth or paper towel
to remove all demling residue..
No need to rinse Be sure no excess
residue is left on die electrodes or
burner parts,
NOTE"ftis vet),importantthatyouDONOTheat
thecooktopuntilit hasbeencleanedthoroughly.
Use aCERAMA BRYTE _Cleaning
Pad for Ceramic Cooktops or a
Scotch-Brite® Multi-Purpose No
Scratch blue scrub pad
Burned-On Residue
WARNING;'DAMAGEtoyour9fasssurfacemay
occurif youusescrubpadsotherthanthose
recommended
@
Allow flae cooktop to coot
Remove the brinier' gn-ates.Spread
a few d,"ops of CERAMA BRYTE®
Ceramic Cooktop Cleaner to flae
entire burned residue area..
Using the included CERAMA BRYTE ®
Cleaning Pad tbr Ceramic Cool<tops,
rub the residue area, applying
pressure as needed
@
@
If mayresidue ,'emains, repeat die
steps listed above ,asneeded
For additional protection, after all
residue h`asbeen removed, polish dm
entire surface wifla CER2uMABRY1-E®
Ceramic Cooktop Cleaner mad a
paper towel
TheCERAMABRYTL_Ceramic
CooktepScraper and all
recommended supplies are
availablethrough our Pails Center.
See instructions under "To Order
Parts" section onnext page
NOTE:Do not use adul!or
nickedblade
Heavy, Burned-On Residue
@
Allow the cooktop m coot,
Remove die burner gq'ates.
Use a single-edge razor blade scraper
at appzoximately a 45° mlgle against
the glass surface and scrape the soil.
It _dll be necessmT to apply pressure
to file t,'azorscraper in order to
remove die residue.
@
@
Alter scraping _dfla die razoi scrapeg
spread a f_wdrops of CERAMA
BRYTE®Ceramic Cooktop Cleaner to
dae entire burned residue area. Use
dae CEILa_dA BRYTE®Cleaning Pad
to remove any remaining residue.
For' additional protection, after all
residue has been ,'emoved, polish the
entire surface wifll CERAaMA BRYI-E ®
Ceramic Cooktop Cleaner and a
paper towel,,
35
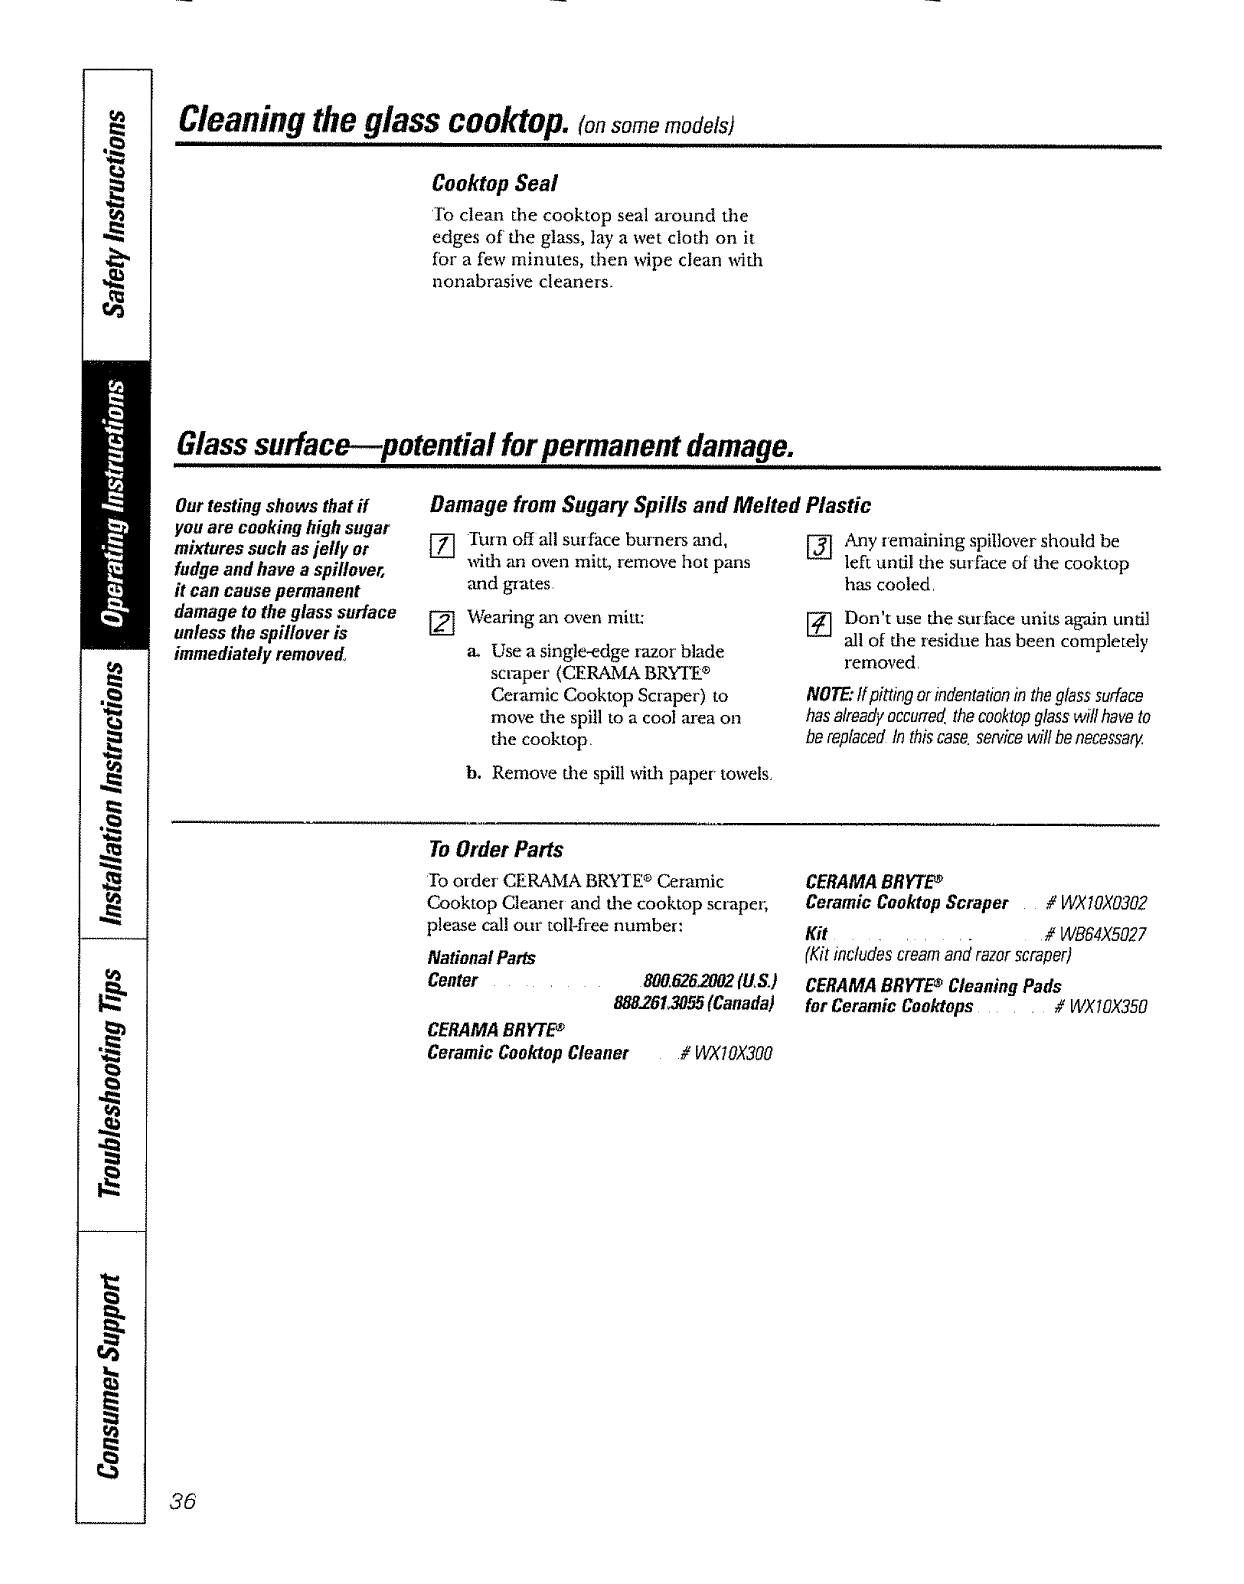
Cleaning the glass cooktop.(onsomemodels)
Cooktop Seal
'Io clean the cooktop seal ar'ound the
edges of the glass, lay a wet cloth on it
fbr a few minutes, then wipe clean with
nonabrasive cleaners._
Glasssurface--potential..forPermanentdamage.
Our testing shows that ff
you are cooking high sugar
mixtures such as jelly or
fudge and have a spillover,
it can cause permanent
damage to the glass surface
unless the spiilover is
immediately removed_
Damage from Sugary Spills and Melted Plastic
[] Iiarn off all smface burners and,
with an oven mitt, remove hot pans
and grates.
[2[] Any remaining spitlover should be
left undl the surface of the cooktop
has cooled.
[] Wearing an oven mite
a_ Use a single-edge razor blade
scl_per (CERAMA BRYI-E *
Ceramic Cooktop Scraper) to
move the spill to a cool area on
the cooktop.
[_ Don't use the surl?ace units again until
all of the residue has been completely
removed.
NOTE:tf pitting orindentationin theglass surface
hasalreadyoccurred,thecoo_topglass will haveto
be replaced tn this case,servicewill benecessa_
b. Remove the spill _4th paper towels,
To Order Parts
To order' CERAMA BRYIE ®Ceramic
Cooktop Cleaner and the cooktop sctapei;
please call our toll-flee number:
National Parts
Center ......... 800_6262002(U_S,)
888.761_055(Canada)
CERAMA BRYTE_
Ceramic Cooktop Cleaner #_vXlOX300
CERAMA BRYTE_
Ceramic Cooktop Scraper # WXIOX0302
Kit ........ # WB64X5027
(Kit includes creamand razor scraper)
CERAMA BRYTE_Cleaning Pads
for Ceramic Cooktops...... # WXIOX350
36'

Care and cleaning of the range. www, GEAppliances,com
Lift the door straight up and off the
hinges
The gasket is designed with a gap
at the bottom to allow forproper air
circulation,
Do not rub or clean the door
gasket--it has an extremely tow
resistance to abrasion,
ff you notice the gasket becoming
worn, frayed or damagedin any
way or flit has become displaced
on the door,youshould have it
replaced
Lift-Off Oven Door
Theovendoorisremovable,butit ishea_ Youmay
needhelpremovingandreplacingthedoor
Toremove the door, open it a few inches to
the special stop position fllat will hold die
door open, Gr&sp fi_xnly on each side and
lift tile door straight up and off the hinges
NOTE: Be carefulnot to placehandsbetweenthe
hingeandthe ovendoorframeas thehingecould
snapbackandpinch fingers
Ttle area outside the gasket can
be cleaned wire a soap-filled ptasdc
scouring pad
Toclean the outsideof the door:.
Use soap and water to flmroughly clean
file top, sides and front of'die oven door,
Rinse well You may also use a glass
cleaner to clean the glass on die outside
of flae door_
To replace the door,make sm e fl_e hinges
are in die special stop position, Position d_e
slots in dm bottom of die door squarely
over dee hinges. Then lower file door slowly
and evenly over both binges at the same
time. If din hinges snap back against die
oven flame, pull diem back out ::::::::
Tocleantheinside ofthedoor,
Do not allow excess \_ter to run into
,any holes or slots in tile doon
Because fleearea inside die gasket is
cleaned during the self clean wde, you
do not need to cle,-mthis by band. Any
soap felt on the liner causes addidonal
stains when fire oven is heated.
Spillage of marinades, fruit juices, tomato
sauces and basting materials containing
acids may cause discoloration and should
be wiped up immediately, D,q_en Ore
smfface is cool, clean and rinse,
Do not use oven cleane,_, cleansing
powdel_ or ha,'sh abt,-asiveson flee
outside of' fl_edool:
Oven Bottom
The oven bottom h;Ls a porcelain enamel
finish, To make cleaning ezLsier; protect file
oven bottom from excessive spilIovm_ by
placing a cookie sheet on file shelf below
file shelf you are cooking on This is
particularly important when baking a fruit
pie or ofl_er foods wid_ a high acid content.
Hot fiuit fillings or oflaer foods flint me
highly acidic (such .'is tomatoes, sauertmaut
mad sauces wid_ _4negar or lemon juice)
may cause pitting and drayage to dee
porcelain enamel suri:ace and should be
_iped up immediately
We don't recommend using ;fluminum foil
on the oven bottom. It can affect air flow if
die holes aae blocked and it can concenu,'ate
heat at the bottom of the oven, resulting in
poor baking performance.
To clean up spiltovers, use soap and watm.
an ablTLsive cleaner or soap-filled scouring
pad. Rinse well to remove any soap before
selfq:leaning
Grid
!II
'i,"-'..... " --2" I
Pan
Broiler Pan and Grid
Mter broiling, remove tl_e b,oiler pan t_mm
d_e oven, Remove die grid from dee pan,
Carefully pour' out gn'ease from dee pan into
a proper container: Wash and rinse dee
broiler pan and grid in hot water x_4flaa
soap-filled or plasdc scotuing pad,
If food has burned on, sprinkle die gaid
wide detergent while hot and cover widl wet
paper towels or a dishclod_. Soaking die
pan will ,'emove burned-on foods.
The broiler pan and grid may, be cleaned
Mda a commer'cial oven cleaner:
Bod_ die broiler pan mad grid can also be
cleaned in a dishwasher:
Do not store a soiled broiler pan and grid
an}avhere in file ,,-ange,
CAUTION:Oonot cleanthe broilerpan orgrid in
a self-cleaningoven 37
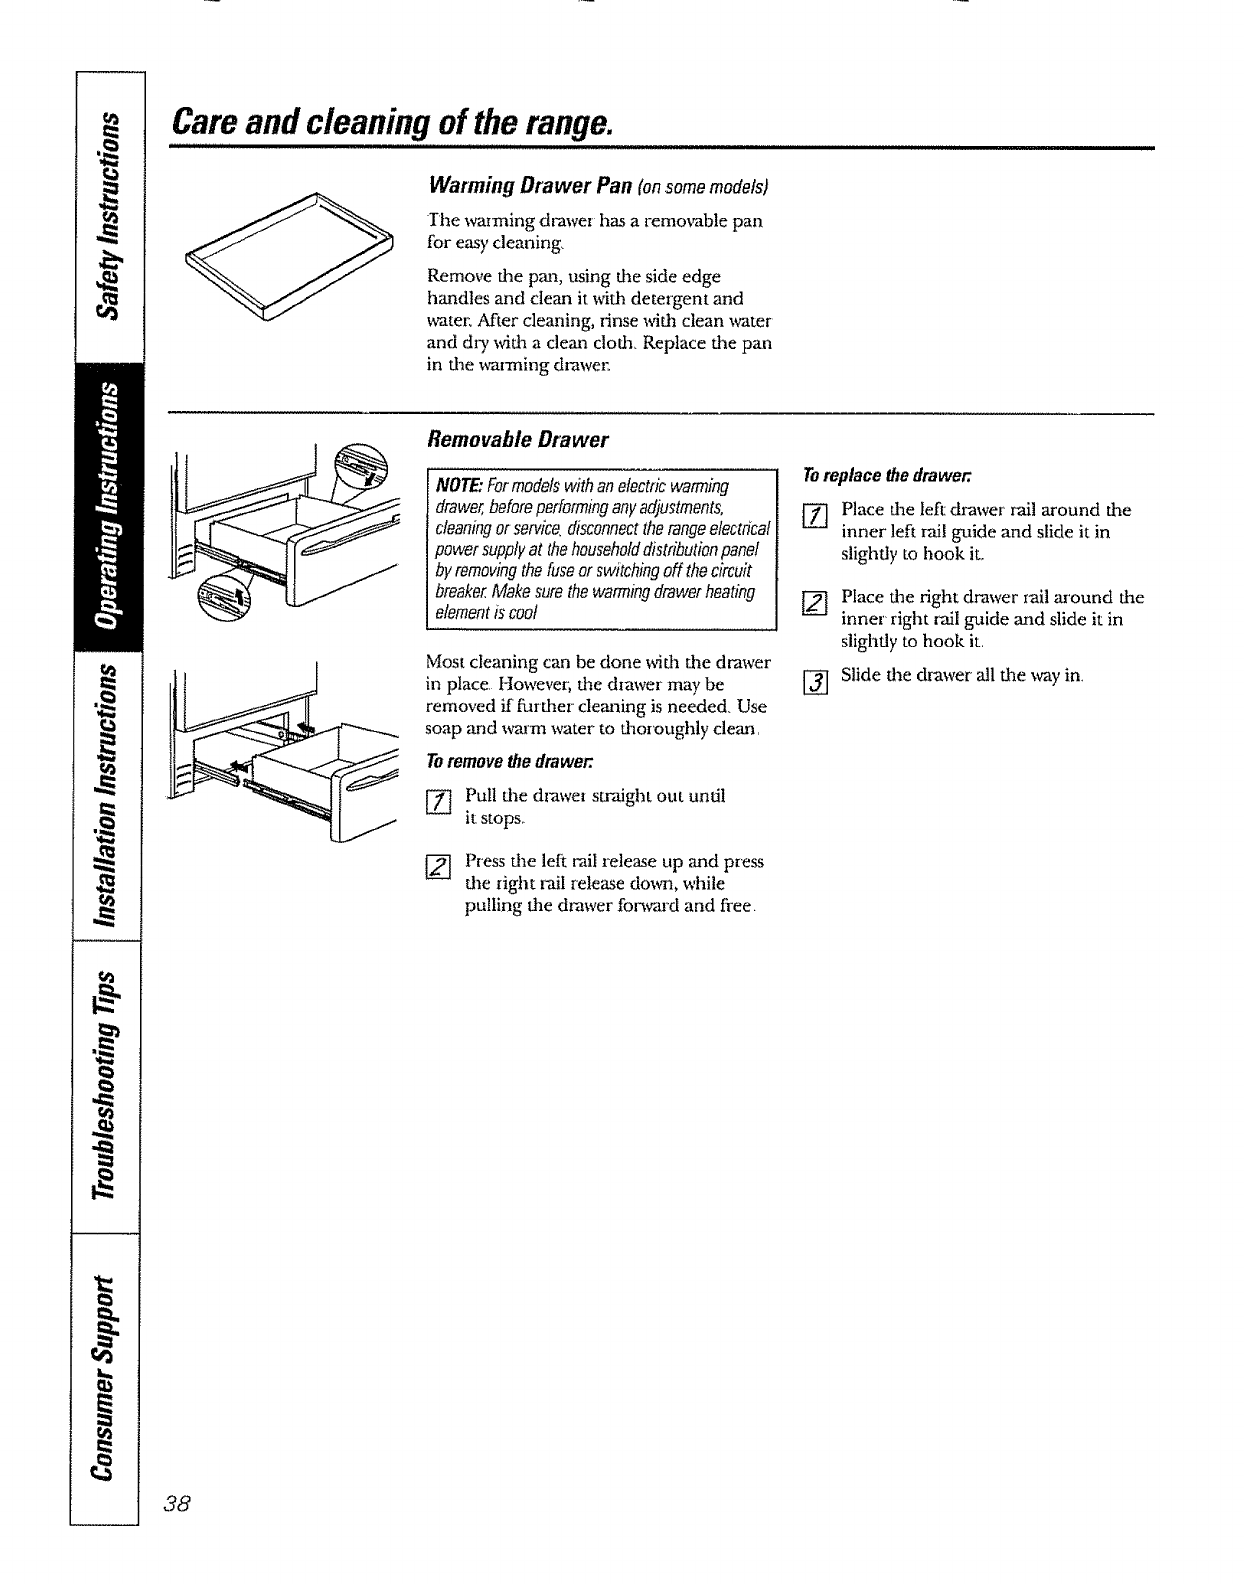
Careand cleaningoftherange.
Warming Drawer Pan (onsomemodels)
The waiming drawer has a removable pan
for easy cleaning,
Remove Lhe pan, using tlae side edge
handles and clean it with detergent and
_vater, After cleaning, rinse with clean water
and dl y with a clean cloth_ Replace the pan
in the _amfing drawer.
Removable Drawer
NOTE:Formodelswithanelectricwarming
drawer,beforeperforminganyadjustments,
cleaningorservice,disconnecttherangeelectrical
powersupplyat thehouseholddistributionpanel
byremovingthefuseor switchingoffthecircuit
breaker,Makesurethewarmingdrawerheating
elementis coot
Most cleaning can be done with fl_e drmver
in place. However, tlae drawer may be
removed if fiarther clemling is needed. Use
soap and warm water to thoroughly clean.
Toremove the drawer.
[Z] ,Pull the dz'awe_ straight out until
_t stops..
Press fine left iaiI release up ,and press
the right rail release down, while
pulling the dlmver fomvard and free.
Toreplace the drawer.
[Z] Place the left drawer rail around the
inner left rail guide and slide it in
slightly to hook it.
@
Place fine right drawer tail around tile
tuner' right rail guide and slide it in
slightly to hook it.
Slide the drawer "allthe way in,
38
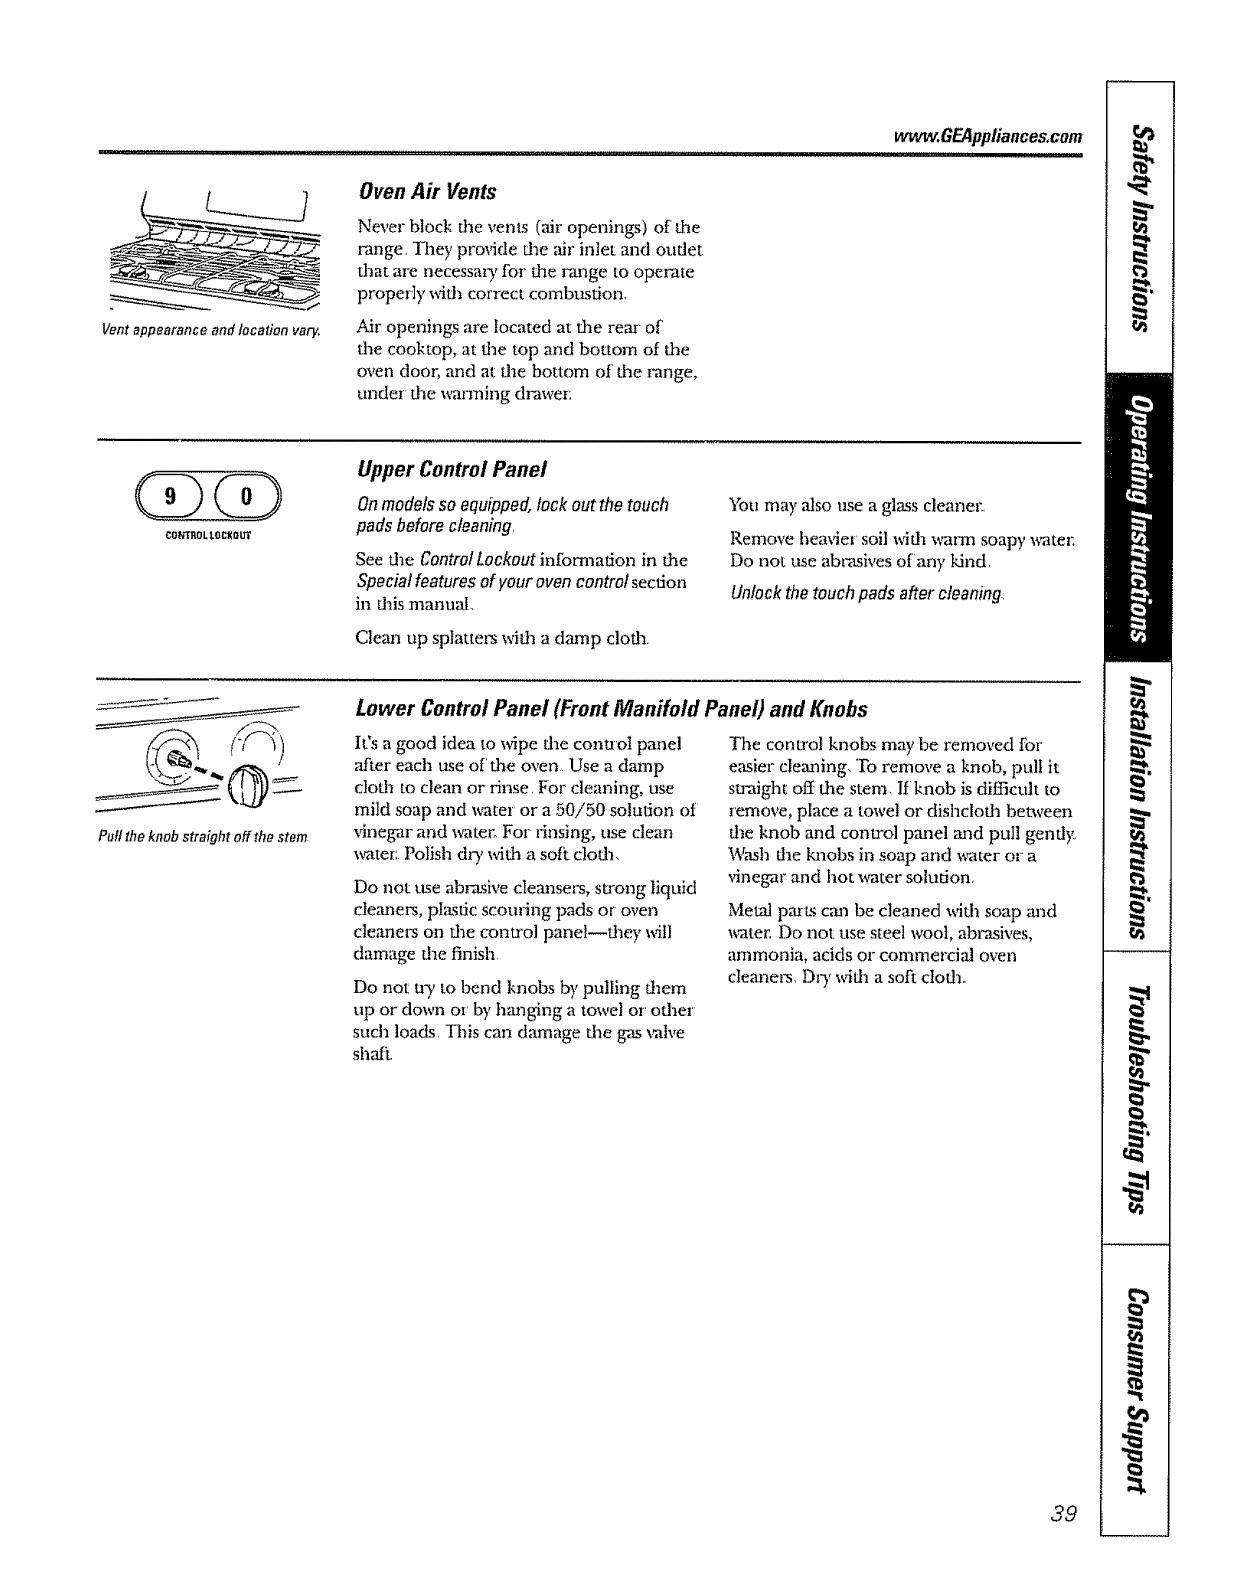
www.GEAppliances.com
....ll,,H,,,,i,,,,i i i j rl,ll,ii........................ii, , i
Vent appearance and location vary.
Oven Air Vents
Never block d_e vents (,'firopenings) of d_e
range, They provide d_e ah"inlet and oudet
that are necessa D,for the range to operate
properly wifl] correct combustion.
Mr openings are located at fl_e rear of'
fl_e cooktop, at the top and bottom of fl_e
oven dooz; and at file bottom of the 1,nnge,
under fl_e warming drawer:
Upper Control Panel
Onmodelssoequipped,lockout the touch
padsbeforecleaning,
See the ControfLockout information in the
Special features of your oven control section
in d]is manual.
Clean up splatters wid_ a dmnp clofl_.
You may also use a glass cleaner,
Remove hea\4er soil widl _tTn soapy _atez:
Do not use abrasives of any kind,
Unlockthe touchpads aftercleaning,
Purlthe knobstraight off the stem
Lower Control Panel (Front Manifold Panel) and Knobs
It's a good idea to Mpe flae conuoI panel
,after each use of' d_e oven Use a damp
cloth to clean or rinse. For cleaning, use
mild soap and water or a 50/50 soludon of
vinegar and _ter_ For rinsing, use clean
_tel: Polish dry wifl_ a soft clofl_,
Do not me abl,_sive cleansers, strong liquid
ctemaers, plasdc scouring pads or oven
cleaners on the conu'ol panel_tbey will
damage dae finish
Do not U'yto bend knobs by pulling dram
up or down or by banging a towel or other
stmh loads, This can damage the gas valve
sha&
The conu'ol knobs may be removed for
easier cleaning. To remove a knob, pull it
sn-aigbt off the stem, It knob is difficult to
remove, place a towel or dishclod] between
d_e knob and conu'ol pmle! and pull gently,
Wash the "haobsin soap and _.ater or a
\8negar and hot water solution,
Metal parts cm_ be cleaned wifl_soap and
x_ter. Do not use steel wool, ab_.-.,sives,
ammonia, acids or commerciaJ oven
cleaners, Dry _4th a soft clofllo
39
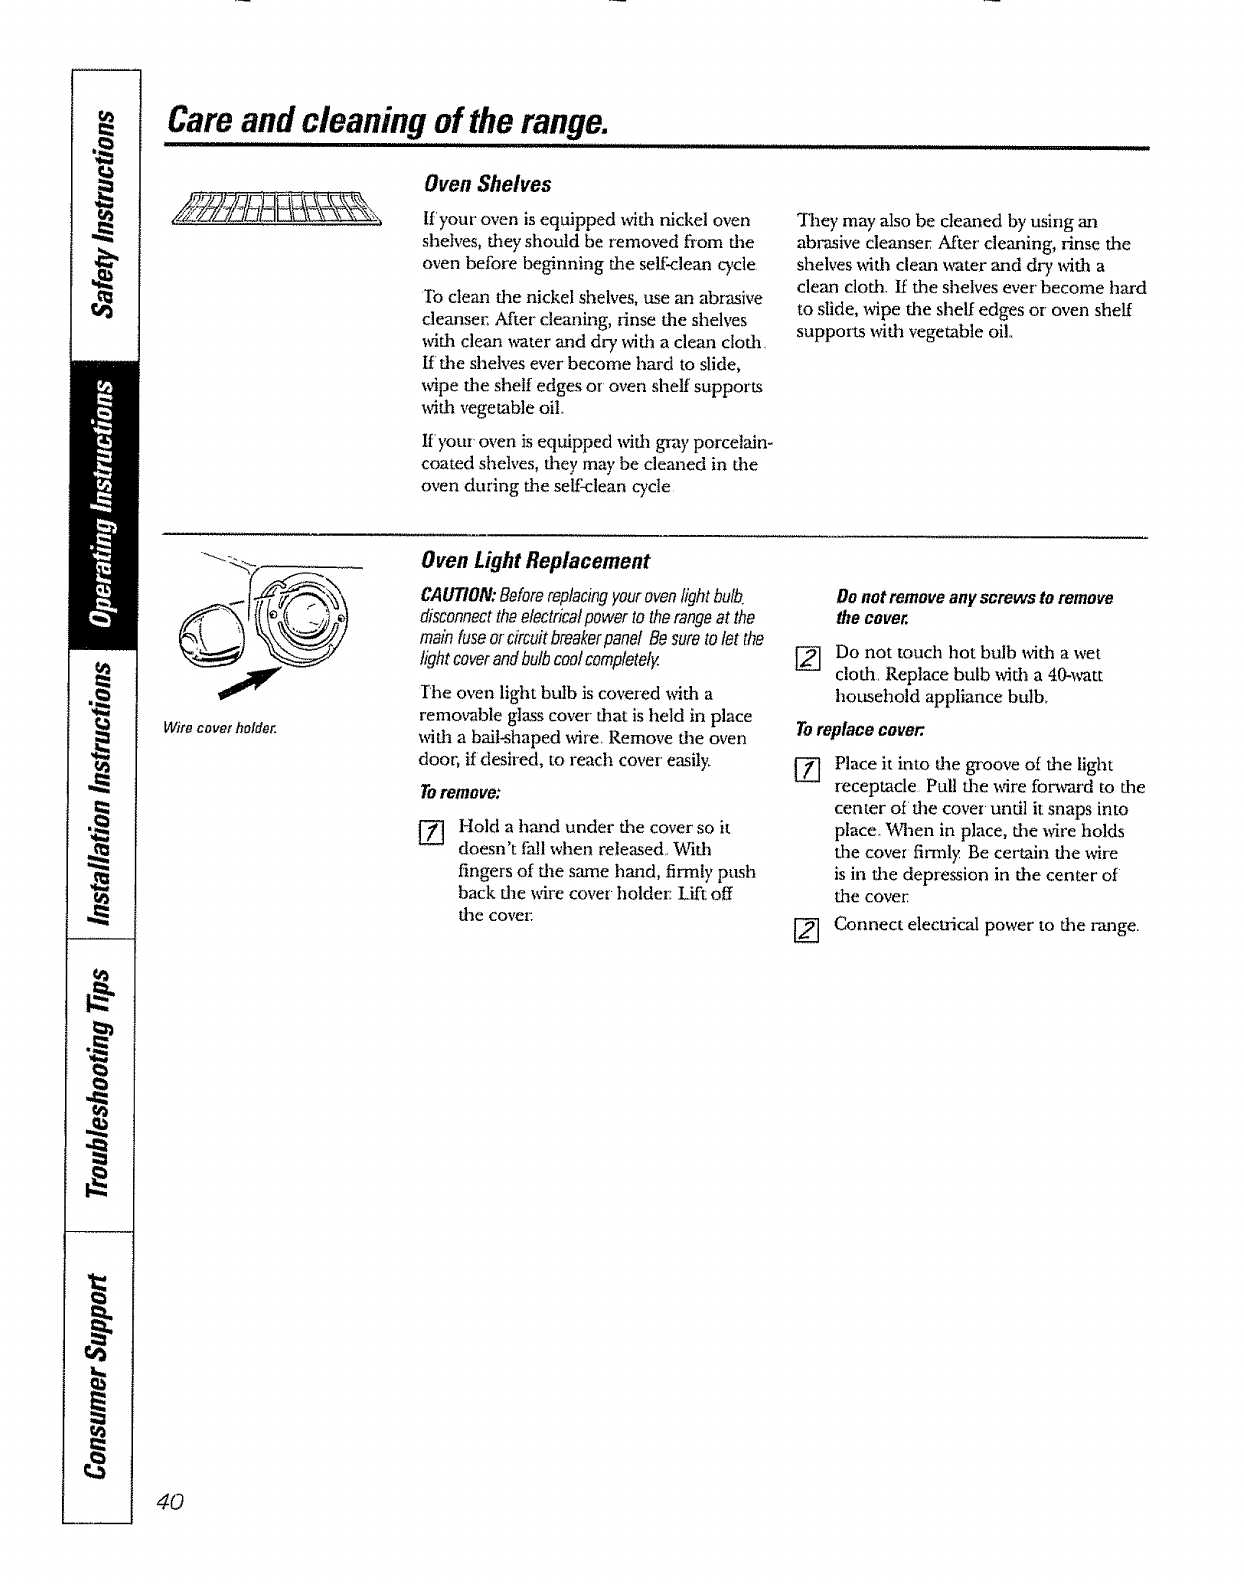
Care and cleaning of the range.......
Oven Shelves
If your oven is equipped with nickel oven
shelves, they should be removed fi'om the
oven before beginning the serf-clean cycle
Io clean the nickel shelves, use an abrasive
cleanser, After cleaning, rinse the sheh,es
with clean water and dry with a clean cloth,
If the sheh,es ever become hard to slide,
wipe the shelf edges or oven shelf supports
with vegetable oil
If your oven is equipped with gray porcelain-
coated sheh,es, they may he deaned in the
oven during t!_e self-clean cycle
_tley may also be cleaned by using an
abrasive deanser, After' cleaning, rinse the
shelves with clean water and dry _dth a
clean cloth, If the shelves ever"become hard
to slide, wipe the shelf edges or oven shelf
suppom with vegetable oil.,
Wire cover holder.
Oven Light Replacement
CAUTION:Beforereplacingyourovenlightbu&
disconnecttheelectricalpowerto therangeat the
mainfuseor circuitbreakerpanelBesuretolet the
lightcoverandbulbcoolcomplete&.
rhe oven light bulb is covered with a
removable glass cover that is held in place
with a bail-shaped wire, Remove the oven
door, if desired, to reach cover' easily,
Toremove:
Hold a hand under the cover so it
doesn't fall when released. With
fingers of the same hand, firmly push
back the _dre cover holder: Lift off
tire cove[:
Do not remove anyscrews to remove
the cover,
[_] Do not touch hot bulb with a wet
cloth, Replace bulb with a 40-x_tt
household appliance bulb_
Toreplace cover.
%Place it into the groove of the light
receptacle Pull the wire forwaa'd to the
center oI tim cover until it snaps into
place. When in place, the wire holds
the cover firmly Be certain tim wire
is in the depression in the center of
the covet_
Connect electrical power to the range.
4O
n
In the Commonwealth
of Massachusetts
,This product must be installed by a licensed
plumber or gas ilttel:
oWhen using bail type gas shut-oil valves, they shall
be the T-handle type.
• A flexible gas connectoL when used, must not
exceed 3 feet.
BEFORE YOU BEGIN
Read these instructions completely and carefully.
Installation of this range must conform with local
codes, or in the absence of local codes, with the
National Fuel Gas Code, ANSI Z223.1/NFPA.54,
latest edition, in Canada, installation must conform
with the cm'rent Natural Gas L'astallation Code,
CA.a'NiCGA-B149.1 or the cm'rent Propane Installation
Code, CAN/CGA-B149.2, and with local codes where
applicable. This range has been design-certified by
CSA International according to ANSI Z21.1, latest
edition and Canadian Gas Association according
to CAN!CGA-I.I latest edition.
As x_fth any appliance using gas and generating heat,
there are certain safety precautions you should follow,
You wilt iliad these precautions in flae Important Safety
Information section in the fiont of this manual. Read
them carefiflly,
• IMPORTANT - Savethese
instructions for local elecu'ical inspector's use,
. IMPORTANT - Obse, ,ealI
governing codes and ordinances_
• Note to Installer - Leave these instructions
with the appliance after installation is completed,
o Note to Consumer - Keep this Owner's
Manual and Installation Instructions ibr fumr'e
reference,
°Note - This appliance must be properly grounded,
°Servicer - The elecu'ical diagTam is in an envelope
attached to the back of flae range.
° Skill level - Installation of' this appliance requires
basic mechanical skills,
° Proper installation is the responsibility of' the
installer.
°Product failure due to improper' installation is not
covered under the Warranty
FOR YOUR SAFETY
Do not store or use combustible materials, gasoline or
other flammable vapors and liquids in the vicinity of
this or any other appliance.
If you smelt gas:
Open windows.
Don't touch electrical switches,
Extinguish an), open flame
Immediately call your gas supplier:
,i,1,1 ,i ,11 i, ,11,,,11,1,1111,11ii
TOOLS YOU WILL NEED
Phillipsscrewdriver
Flat-bladescrewdriver
I ........................ t
Pencilandruler
Open-endor
adjustablewrench
Lewl
Pipewrenches(21 (_3_========-
(oneforbackup} Drill,awl ornail
IUUIIIllIll H I I ,UIUUmJlII I
MATERIALS YOU MAY NEED
• Gas line shut-off x-alve
°Pipe joint sealant or UL-approved pipe fllread tape
_xfdaTeflon* fl_at resists action of natui,-al and LP gases
° Flexible metal appliance connector (1/2" I,D.)
A 5-foot lengfla is recommended for ease of installation
but other teng_hs m'e acceptable Never use an old
connector when installing a new range,
* Flare union adapter' for connection to gas supply line
(3/4" or 1/2" NPT x 1/2" I.D)
°Flme union adapter for connection to pressme
regulator on range (1/2" NPT x 1/2" !,D,)
°Liquid leak detector or soapy x_ter,
°Lag bolt or 1/2" O,D sleeve anchor (for concrete
flool_, only),
*Teflon: Registered mldemark of DuPom
41
Installation Instructions
i,iii iiii iiii iiii iiil/l/l/lll/ll/l/iJllllllllllllllllllllllll II IIII III I
WARNING!
INSTALLATION SAFETY
INSTRUCTIONS
Read these instructions completely and carefully.
Improper installation, adjustment, alteration, service
or maintenance can cause injur,y or property damage,
Refer' to this manual. For assistance or additional
information, consult aqualified installer_ service
agency, manufacturer' (dealer.) or' the gas supplier.
Never reuse old flexible connectors. "l'he use
of old flexible connectors can cause gas leaks and
personal injury Always use NEW flexible connectors
when installing a gas appliance.
IMPORTP,2 IT -Remove all paddng
material and literature from oven befbre connecting
gas and electrical supply to range.
CAUTION - Donotattempt to operate
tile oven of this range during a power failure (Electric
Ignition models only)
i Have your range installed by a qualified installer.
I Your range must be electrically grounded in
accordance with local codes or; in the absence
of local codes, in accordance with die National
Electrical Code (ANSI/NFPA 70, latest edition).
In Canada, electrical grounding must be in
accordance with the current CSA C221 Canadian
Electrical Code Part I and/or local codes. See
Electrical Connections in this section.
Ill Before installing your range on linoleum or any
other synthetic floor coveting, make sure the floor
covering can withstand I80°F without shrinking,
warping or' discoloring_ Do not install the range
over carpeting unless a sheet of 1/4" thick plywood
or similar insulator is placed between the range
and carpeting.
II Make sure the wall coverings around fl_e range can
withstand heat generated by the range up to 200°E
m
i
Avoid placing cabinets above the range, ro reduce
the hazard caused by reaching over the open
flames of operating burners, install a ventilation
hood over"the range that pr'ojects forward at least
5" beyond the front of the cabinets.
The ventilating hood must be constructed
of sheet metal not less than 0.0122" thick
Install above the cooktop with a clearance of not
less than 1/4" between the hood and the underside
of the combustible material or metal cabinet.. The
hood must be at least as wide as the appliance and
centered over' the appliance. Clearance between
the cooking surface and die ventilation hood
sur {ace MUST NEVER BE LESS THAN 24
INCHES.
EXCEPTION: Installation of a listed microwave oven
or' cooking appliance over the cooktop sha!l conform
to the installation instructions packed with that
appliance.
tIf cabinets are placed above the range,
allow a minimum clearance of 30" between the
cooking surface and tile bottom of unprotected
cabinets.
I1 If a 30" clearance between cooking sur face and
overhead combustible material or metal cabinets
cannot be maintained, protect the underside of the
cabinets above the cooktop with not less than 1/4"
insulating millboard covered with sheet metal not
less than 0..0122" thick Clearance between the
cooking surf_ace and pr'otected cabinets MUST
NEVER BE LESS THAN 24 INCHES.
i the vertical distance from tile plane of the cooking
surfirce to the bottom of adjacent overhead cabinets
extending closer than 1" to the plane of the range
sides must not be Iess than 18". (See the Dimensions
and Clearances illustration in this section_)
,, C&UTION - hemsofinterestto
children should not be stored in cabinets above a
range or' on the backsplash of a rangeichildren
climbing on the range to reach items could be
seriously irrjured,
42
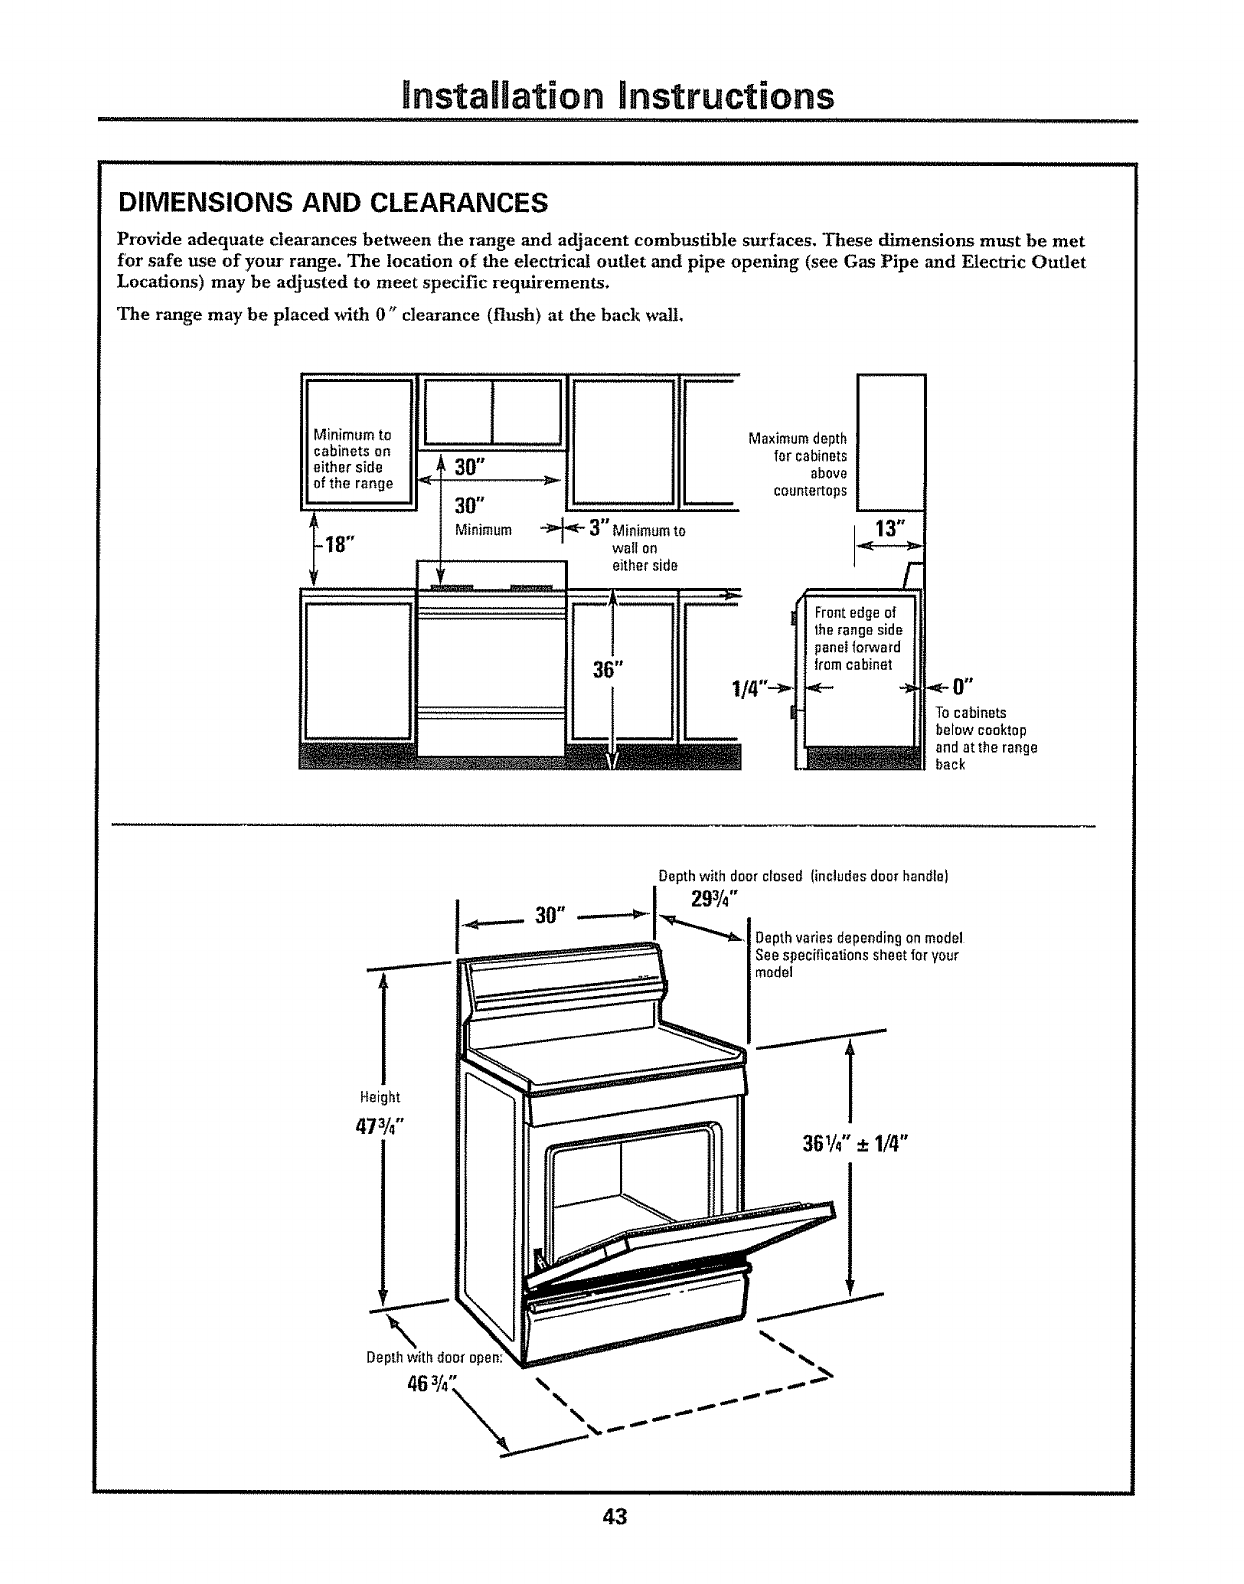
Installation instructions
DIMENSIONS AND CLEARANCES
Provide adequate clearances between the tange and adjacent combustible stncfaces. These dimensions must be met
for safe use of your range. The location of the electrical oudet and pipe opening (see Gas Pipe and Electric Oudet
Locations) may be adjusted to meet specific requirements.
The range may be placed with 0" clearance (flush) at the back wall,
ilMinimumto
Iloabinets on
Ileither side
Ilefthe range
-18" Minimum _'_ 3" Minimum to
wall on
............... either side
36" 1
,,':',, ": , ',
Maximum depth
for cabinets
above
countertops
##
Tocabinets
below cooktop
and at the range
back
Depth withdoor open:
Depthwith door closed lincludesdoer handle)
I293/,.,
_'1_., Depthvaries dependingon model
See specifications sheet foryour
model
,IIL,IIIIIIIIIIIIIIIIIIIllJlIIInii i i
43
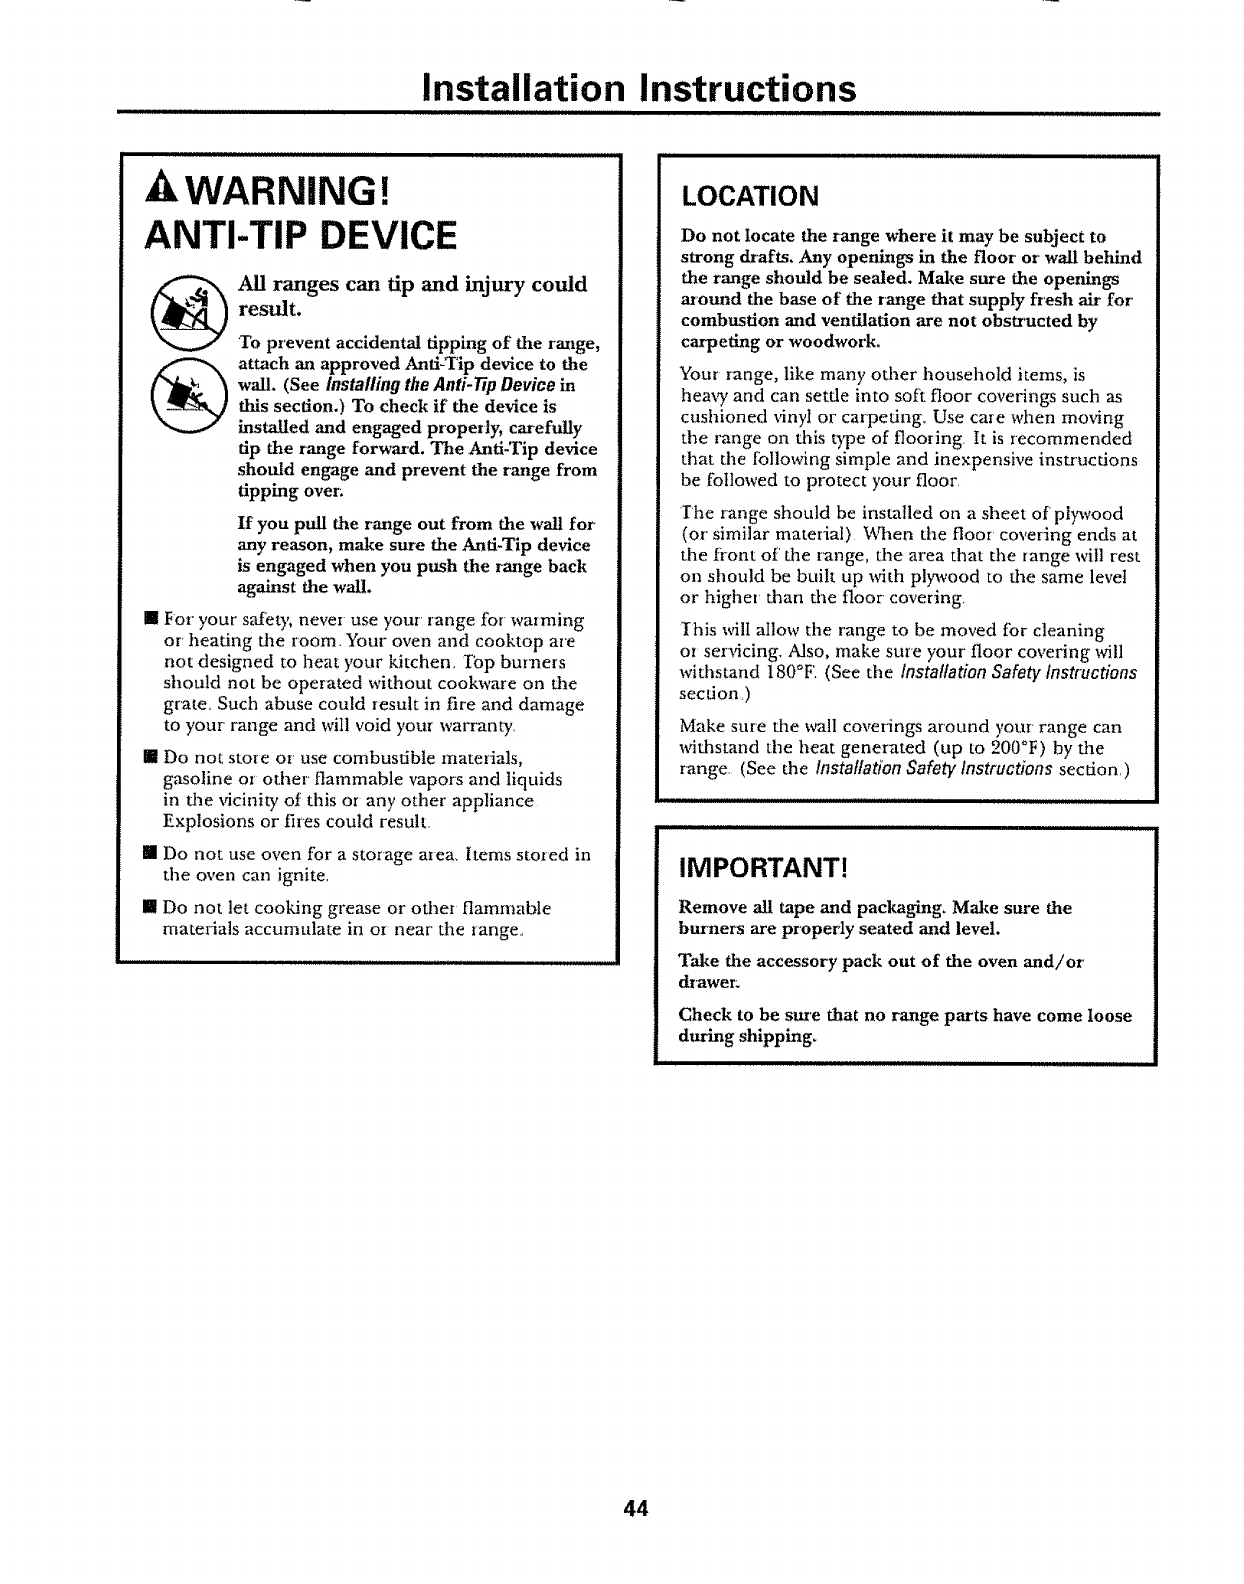
Installation Instructions
iiiiiiiiiii ii1,, ,,,,,,,,,,,,,,,,,,,,,,,,,,,,,,,,,,,,,,,, ,, ,,, ,, ,
AWARNING!
ANTI-TIP DEVICE
All ranges can tip and injury could
result.
To prevent accidental tipping of the range,
attach an approved Anti-Tip device to the
wall. (See Installing the Anti-tip Device in
this section.) To check if the device is
installed and engaged properly, cax'efully
tip the range forward. The Anti-Tip device
should engage and prevent the range from
tipping over_
If you pull the range out from the wall for
any reason, make sure the AntbTip device
is engaged when you push the range back
against the wall.
Ill For" your s,_my, never use your range for warming
or' heating the room. "Your oven and cooktop are
not designed to heat your kitchen, 'Iop but'nets
should not be operated without cookware on the
grate, Such abuse could result in fire and damage
to your range and will void your warranty.
[] Do not store or use combustible materials,
gasoline or other flammable vapors and liquids
in the vicinity of this or any other appliance
Explosions or fires could result.
[] Do not use oven for a storage area_ Items stored in
the oven can ignite,
[] Do not let cooking grease or other flammable
materials accumulate in or near the range°
LOCATION
Do not Iocate the range where it may be subject to
strong ds'afts, Any openings in the floor or wall behind
the range should be sealed. Make sure the openings
around the base of the range that supply fresh aLr for
combustion and ventilation are not obstructed by
carpeting or woodwork.
Your range, like many other household items, is
hea W and can setde into soft floor coverings such as
cushioned "dnyl or carpeting, Use care when moving
the range on dais type of flooring. It is recommended
that the fbllowing simple and inexpensive instructions
be followed to protect your floor
1?he range should be installed on a sheet of"plDvood
(or similar material) v_qmn the floor cm,ering ends at
the front of the range, the area that the range will rest
on should be built up with plywood to the same level
or higher than the floor covering,
Ihis will allow the range to be moved for cleaning
or servicing, Also, make sure your" floor covering will
withstand 180°E (See the Installation Safety instructions
section)
Make sure the wall coverings around your range can
withstand the heat generated (up to 200°F) by the
range (See the Installation Safety Instructions secdon,)
IMPORTANT!
Remove al! tape and packaging_ Make sure the
burghers are properly seated and level.
Take the accessory pack out of the oven and/or
d/awer_
Check to be sm'e that no range parts have come loose
during shipping.
44
Unstalnation instructions
PROVIDE ADEQUATE GAS
SUPPLY
Your range is designed to operate at a pressure of 4" of
water column on natural gas or, if designed for LP gas
(propane or butane), 10" of water' column.
Make sure you are supplying your range with die type
of gas fbr which it is designed,
This range is convertible fbr use on natural or
propane gas. If you decide to use this range on LP gas,
conversion must be made by a qualified LP installer
before attempting to operate the range on that gas
For proper operation, the pressure of natural gas
supplied to the regulator must be between 4" and 13"
of water column
For LP gas, die pressure supplied must be between 10"
and I3" of water column..
When checking for proper operation of the regulator;
fire inlet pressure must be at least 1" greater than die
operating (manifbld) presst,re as given above.
The pressure regulator located at the inlet of the range
manifold must remain in the supply line regardless of
whether natural or LP gas is being used,
A flexible metal appliance connector used to connect
the range to the gas supply line should have an LD. of
1/2" and be 5 feet in length fbr ease ofinstallation, in
Canada, flexible connector's must be single wall metal
connectors no longer than 6 feet in length.
['2-1CONNECT THE RANGE TO GAS
Shut off the main gas supply valve before disconnecting
the old range and leave it off until file new hook-up has
been completed. Don't forget to reHght the pilot on
other gas appliances when you turn the gas back on.
Because hard piping restricts movement of' the range,
the use of a CSA International-certified flexible metal
appliance connector is recommended unless local
codes require a hard-piped connection
Never use an old connector when installing a new
range. If the hm'd piping method is used, you must
carefully align the pipe; the range cannot be moved
after fl_e connection is made,
To p,-event gas leaks, put pipe joint compound on, or
wrap pipe thread tape with Teflon* around, al! male
(external) pipe threads.
A. Install a manual gas line shut-off vatve in the gas line
in an easily accessed location outside of the range°
Make sure everyone operating the range knows
where and how to shut off the gas supply to the
range
B_ Install male 1/2" flare union adapter to the 1/2 °
NPT internal thread at inlet of regulator_ Use a
backup wrench on the regulator fitting to avoid
damage,
When installing the range from the fi-ont, remove
the 90 =elbow for easier installation,
C_
D.
Install male 1/2" or 3/4" flare union adapter' to the
NPT internal thread of' the manual shut-offvalve,
taking care to back-up the shut-off valve to keep it
fi'om turning,
Connect flexible metal appliance connector to the
adapter on the range. Position range to permit
connection at the shut-off valve.
E, When all connections have been made, make sure
all range controls are in the off position and mrn on
the main gas supply valve, Use a liquid leak detector
at all joints and connections to check for leaLs in the
system,
WARNING: DO NOT USE A
FLAME TO CHECK FOR GAS LEAKS.
When using test pressures greater daan 1/2 psig to
pressure test the gas supply system of' the residence,
disconnect the range and individual shut-oft'valve fiom
the gas supply piping v_qaen using test pressures of 1/2
psig or less to test the gas supply system, simply isolate
the range fiom die gas supply system by closing the
indMdual shut-off \_lve,
'*Teflon: Registered traderaark of DuPont
45
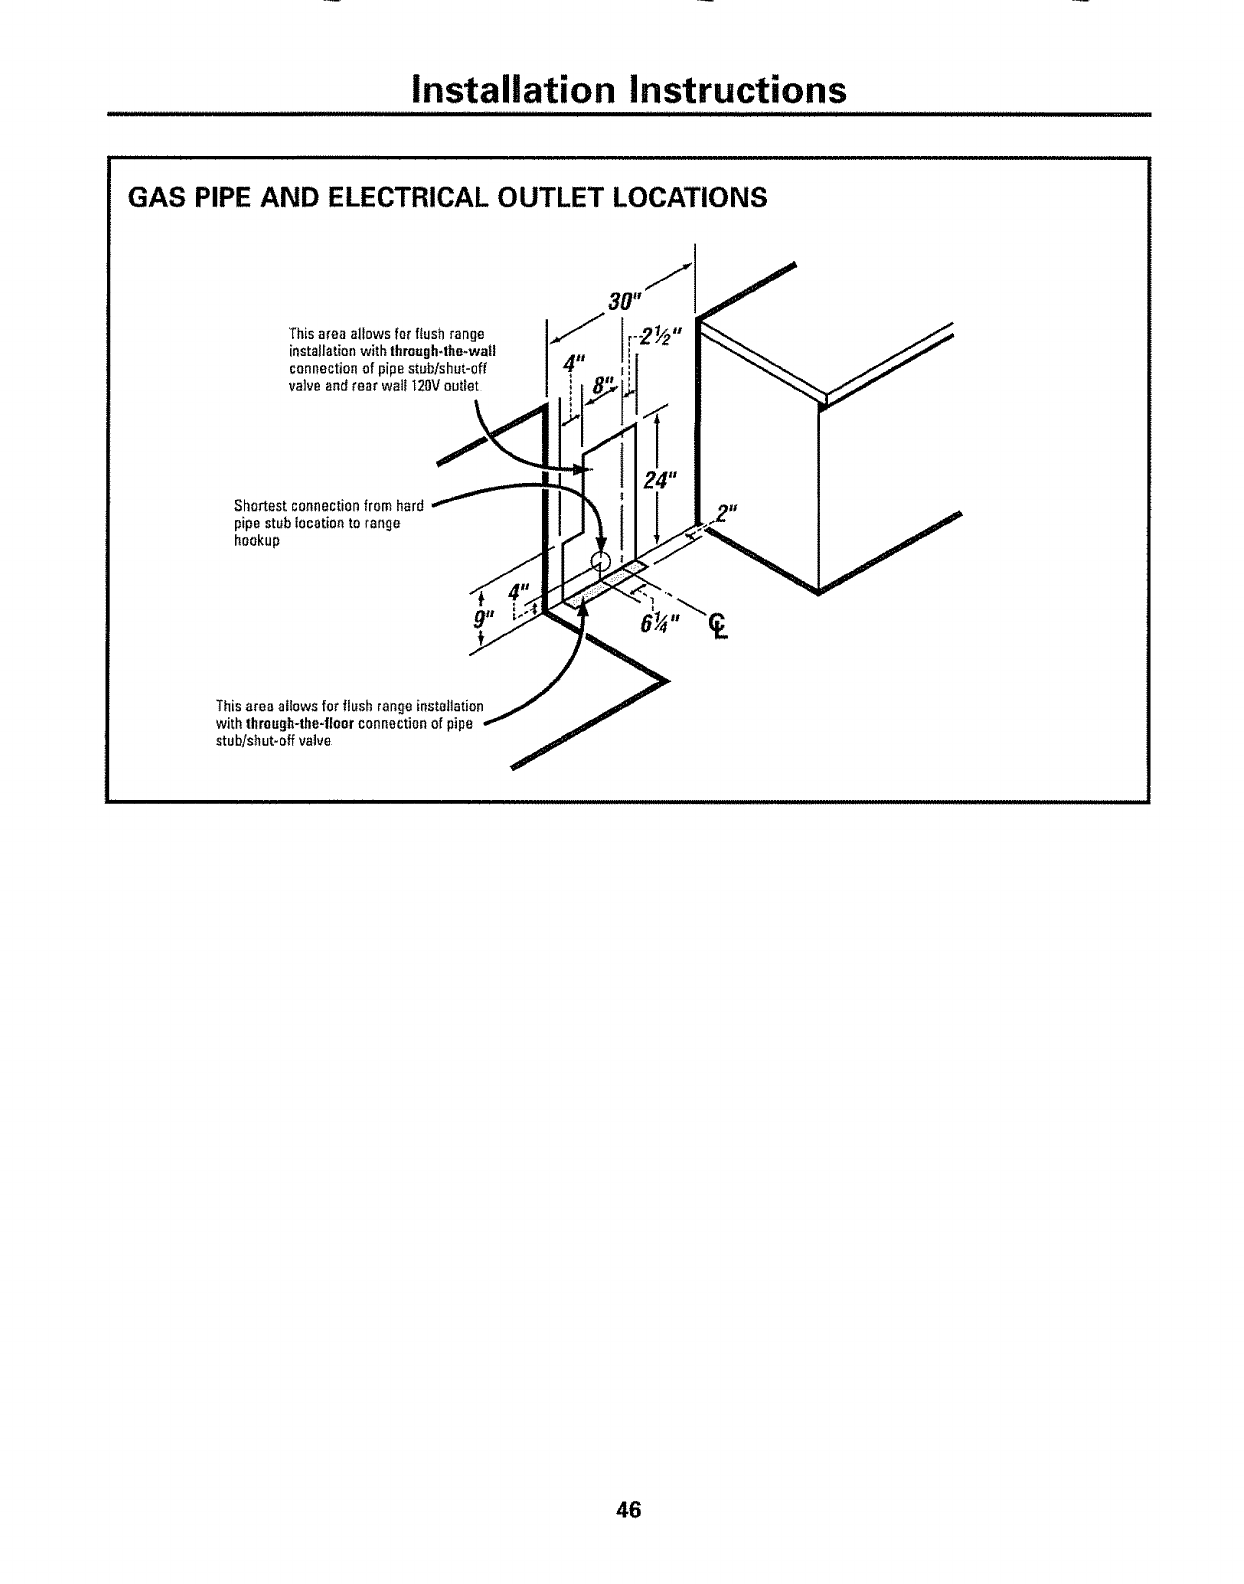
Installation Instructions
illlll illlll i ill ii ill i ii ii illll
GAS PIPE AND ELECTRICAL OUTLET LOCATIONS
Thisarea allows for ftushrange
installationwiththrough-the-wall
connectionof pipe stub/shut-off
valveand rear wail t20V outlet
\
Shortest connectionfrom hard
pipestubtocation to range
hookup
Thisarea allows for flushrange installation
withthrough-the-floor connectionof pipe
stub!shut-off valve
46
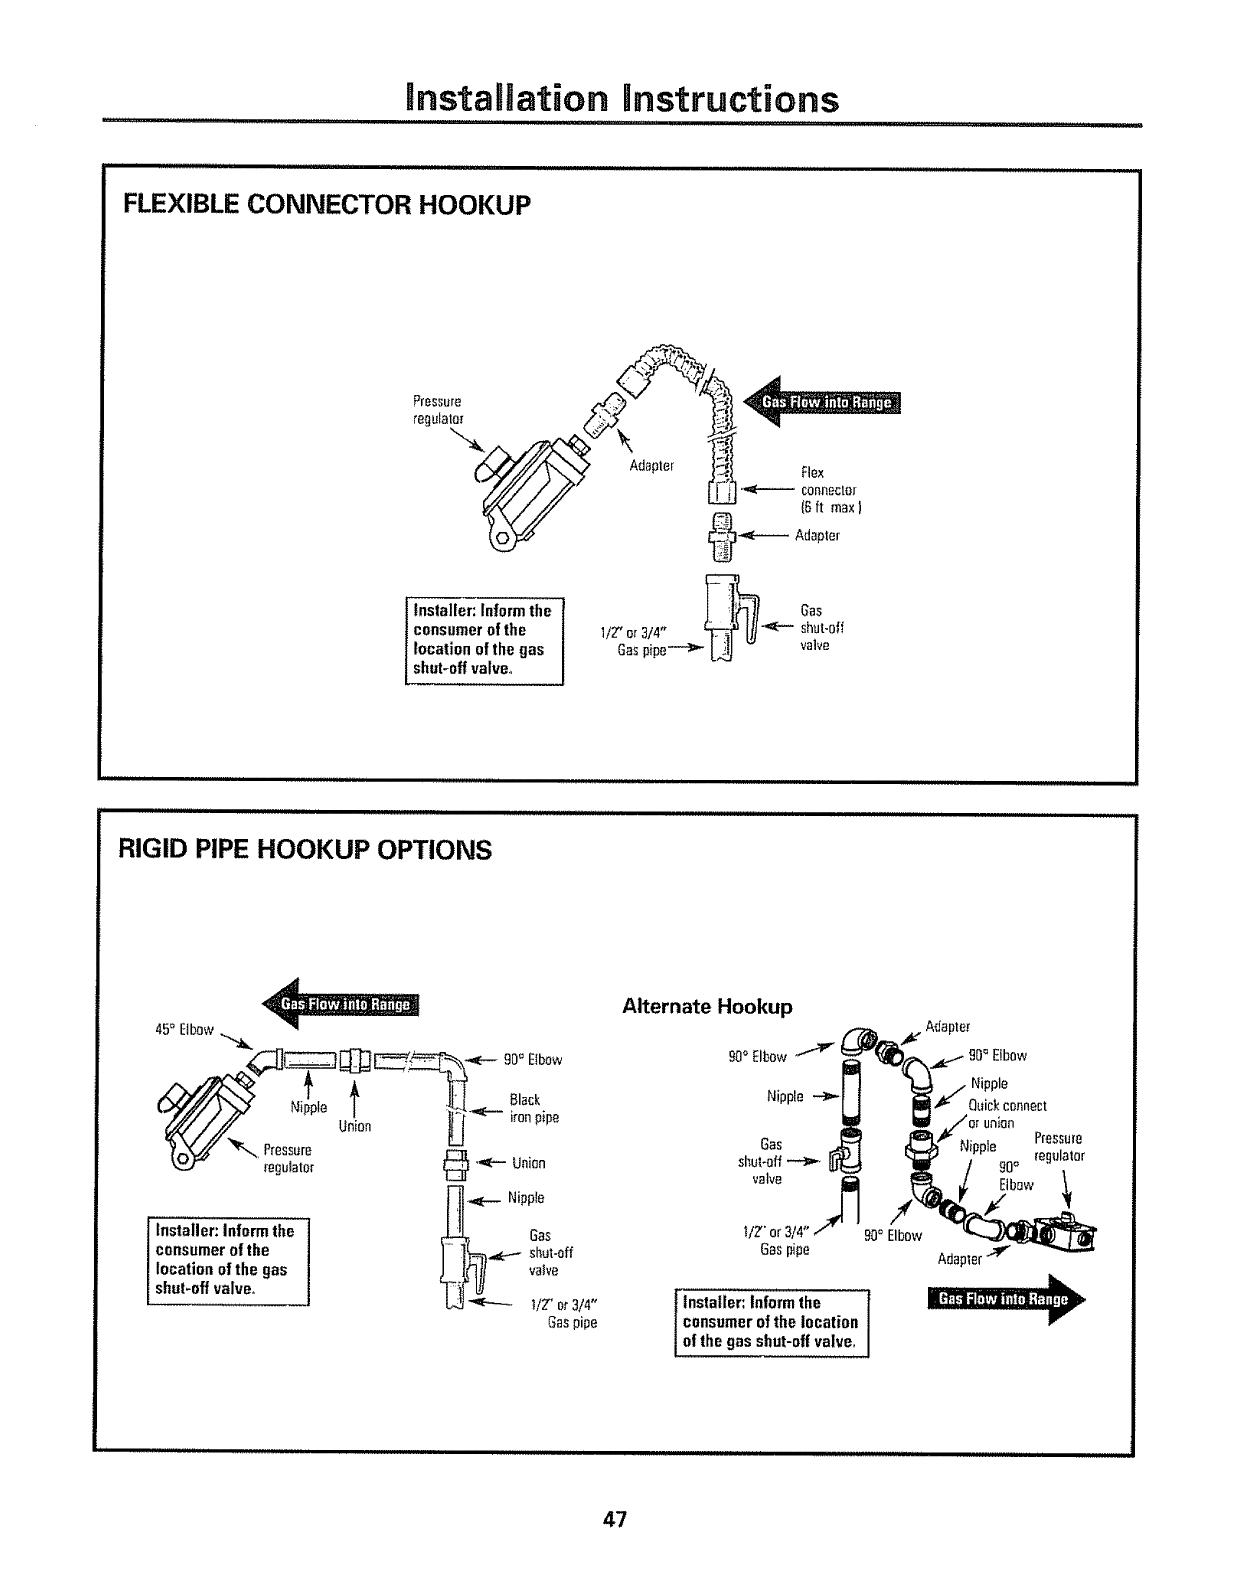
FLEXIBLE CONNECTOR HOOKUP
@.,<i__ Adapter
Installer: Inform the ]-I_ Gas
consumer of the 1/2"or3/4" _[/] _ shut-off
location of the gas Gaspipe--_" L_ - valve
shut-off valve°
inlUl lUUUlUllUUll,I, I
RIGID PIPE HOOKUP OPTIONS
45° Elbow.
_'_ _.,,Pressoro _ _ uoio°
regulator _ "
H _-,- Nipple
Installer: Inform the _ Gas
consumer of the ] [_._._ shut-off
location of the gas _'Fi_ valve
shut-off valve, 1_ _ V2" or3/4"
Gaspipe
Alternate Hookup
_ Adapter
90° Elbow _ _=_IFI_i'_Y'_'1,4L 33° Elbow
• , _ /Nipple
uU'uC_ocn°nnect
Gas Nipple Pressure
shut-off _ 90° regulator
valve _ Elbow 1
1/2"or 314"/" 90_ Elbow
Gaspipe Adapter.At
Installer: Inform the I
consumerofthe location
ofthe gas shut-offvalve.
47
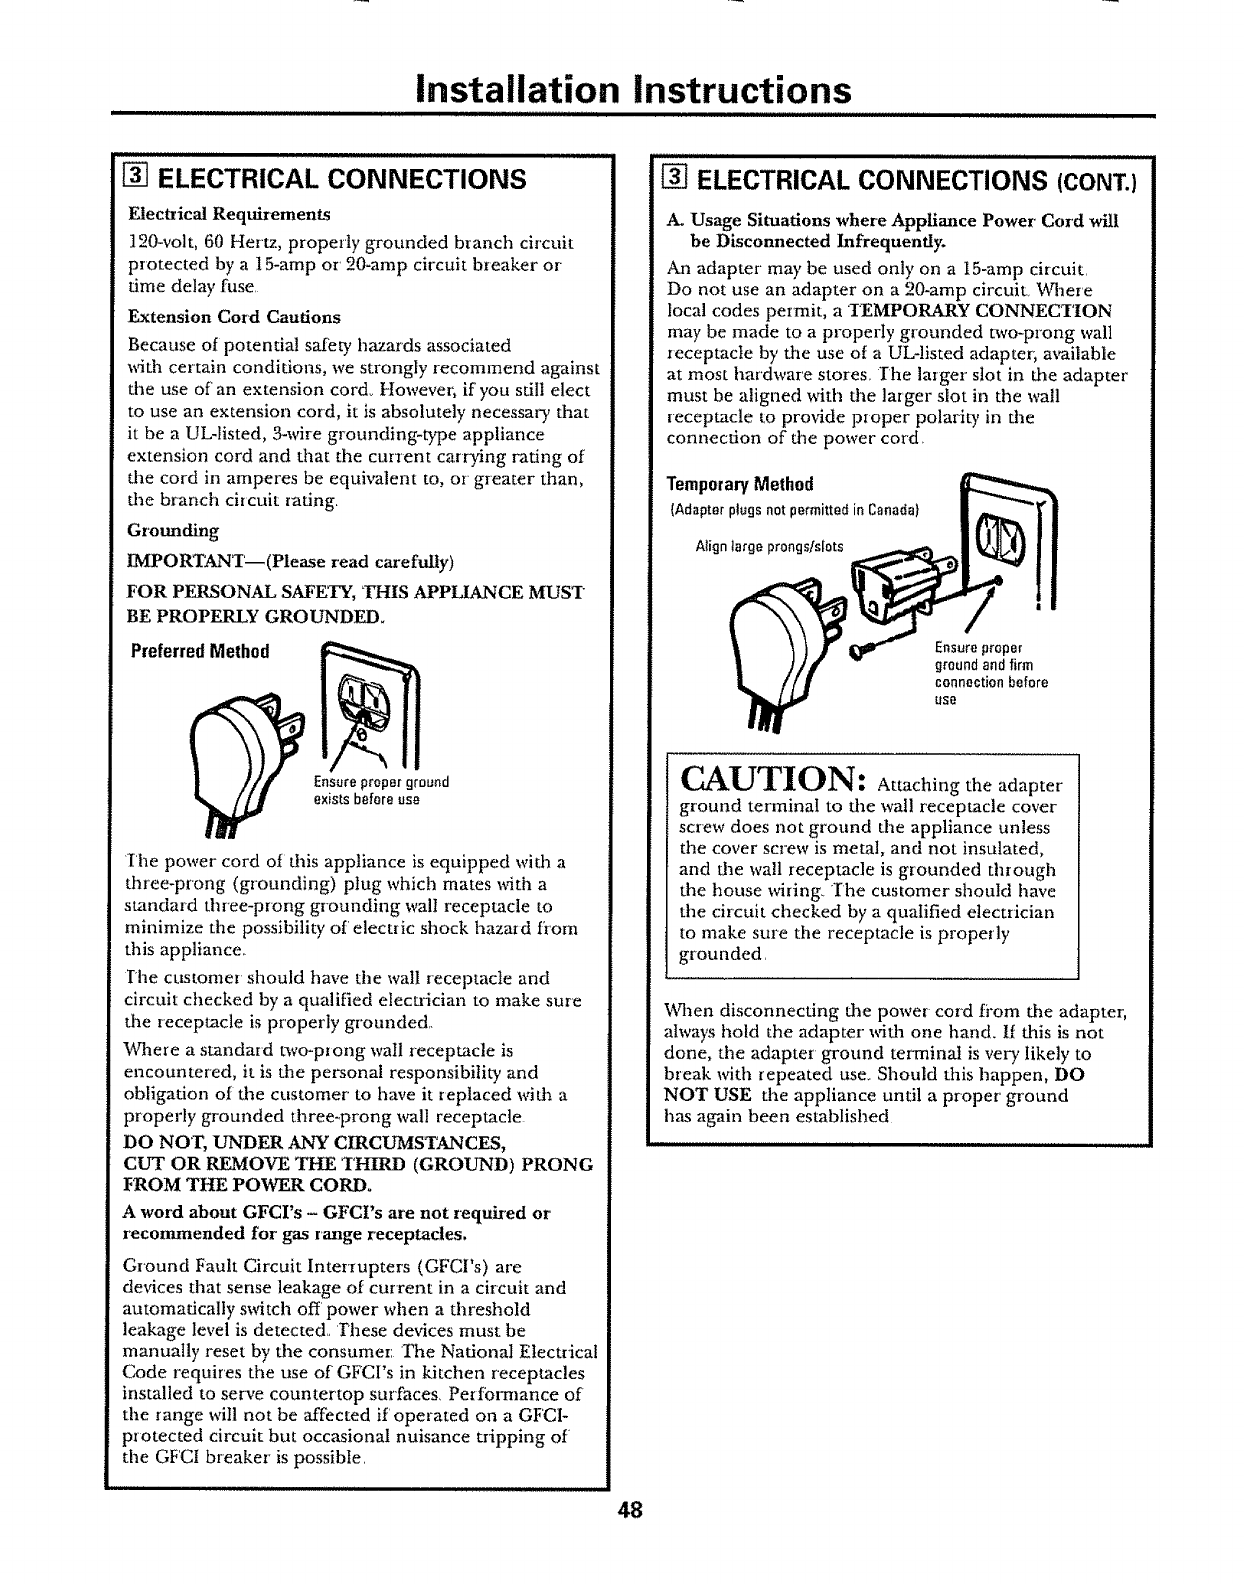
Installation Instructions
1-3-]ELECTRICAL CONNECTIONS
Electrical Requirements
120-volt, 60 Herm, properly grounded branch circuit
protected by a 15-amp or' 20-amp circuit breaker or
time delay fuse,
Extension Cord Cautions
Because of potential safety hazards associated
_dth certain conditions, we strongly recommend against
the use of an exterasion cord. However. if you still elect
to use an extension cord, it is absolutely necessary that
it be a UL-listed, 3-wire grounding-type appliance
extension cord and that the current carrying rating of
the cord in amperes be equivalent to, or greater than,
the branch circuit Eating,
Grounding
IMPORTANT--(Please read carefully)
FOR PERSONAL SAFETY, THIS APPLIANCE MIDST
BE PROPERLY GROUNDED.
Preferred Method
Ensureproperground
exists beforeuse
The power cord ot this appliance is equipped with a
three-prong (grounding) plug which mates with a
standard thr'ee-prong grounding wall receptacle to
minimize the possibility of electric shock hazard fi'om
this appliance..
rhe customer should have the wall receptacle and
circuit checked by a qualified electrician to make sure
the receptacle is properly grounded.
Where a standard two-prong wall receptacle is
encountered, it is the personal responsibility and
obligation of the customer to have it replaced wida a
properly grounded three-prong wall receptacle
DO NOT, UNDER ANY CIRCUMSTANCES,
CUT OR _OVE THE THIRD (GROUND) PRONG
I_I','.OMTHE POWER COP./).
A word about GFCI's - GFCI's are not required or'
recommended for gas range receptacles.
Ground Fault Circuit Interrupters (GFCI's) are
devices that sense leakage of current in a circuit and
automatically switch off' power when a threslmld
leakage level is detected_ These devices must be
manually reset by the consumer: The National Electrical
Code requires the use of' GFCI's in kitchen receptacles
installed to serve countertop sur'faces. Perfm'mance of
the range will not be affected if'operated on a GFCI-
protected circuit but occasional nuisance tripping of
the GFCI breaker' is possible.
ELECTRICAL CONNECTIONS (CONT.)
.4..Usage Situations where Appliance Power' Cord will
be Disconnected Infrequently.
An adapter may be used only on a 15-amp circuit
Do not use an adapter on a 20-amp circuit., Where
local codes permit, a TEMPORARY CONNEC'IION
may be made to a properly grounded two-prong wall
receptacle by the use of a UL-listed adapter; available
at most hardware stores, 1"he larger slot in the adapter
must be aligned with the larger slot in the wall
receptacle to provide proper polarity in the
connection of the power cord_
TemporaryMethod
{Adapter plugsnotpermittedin Cenadal
Align large prongslslots
Ensureproper
ground andfirm
connectionbefore
use
CAUTION: Attaching the adapter
ground terminal to the wall receptacle cover
screw does not ground the appliance unless
the cover screw is metal, and not insulated,
and the wall receptacle is grounded through
the house wiring_ The customer should have
the circuit checked by a qualified electrician
to make sure the receptacle is prope,ty
grounded,
_qren disconnecting dae power cord fi'om the adapter;
always hold the adapter with one hand. If this is not
done, the adapter ground terminal is very likely to
break with repeated use. Should this happen, DO
NOT USE the appliance until a proper ground
has again been established
48
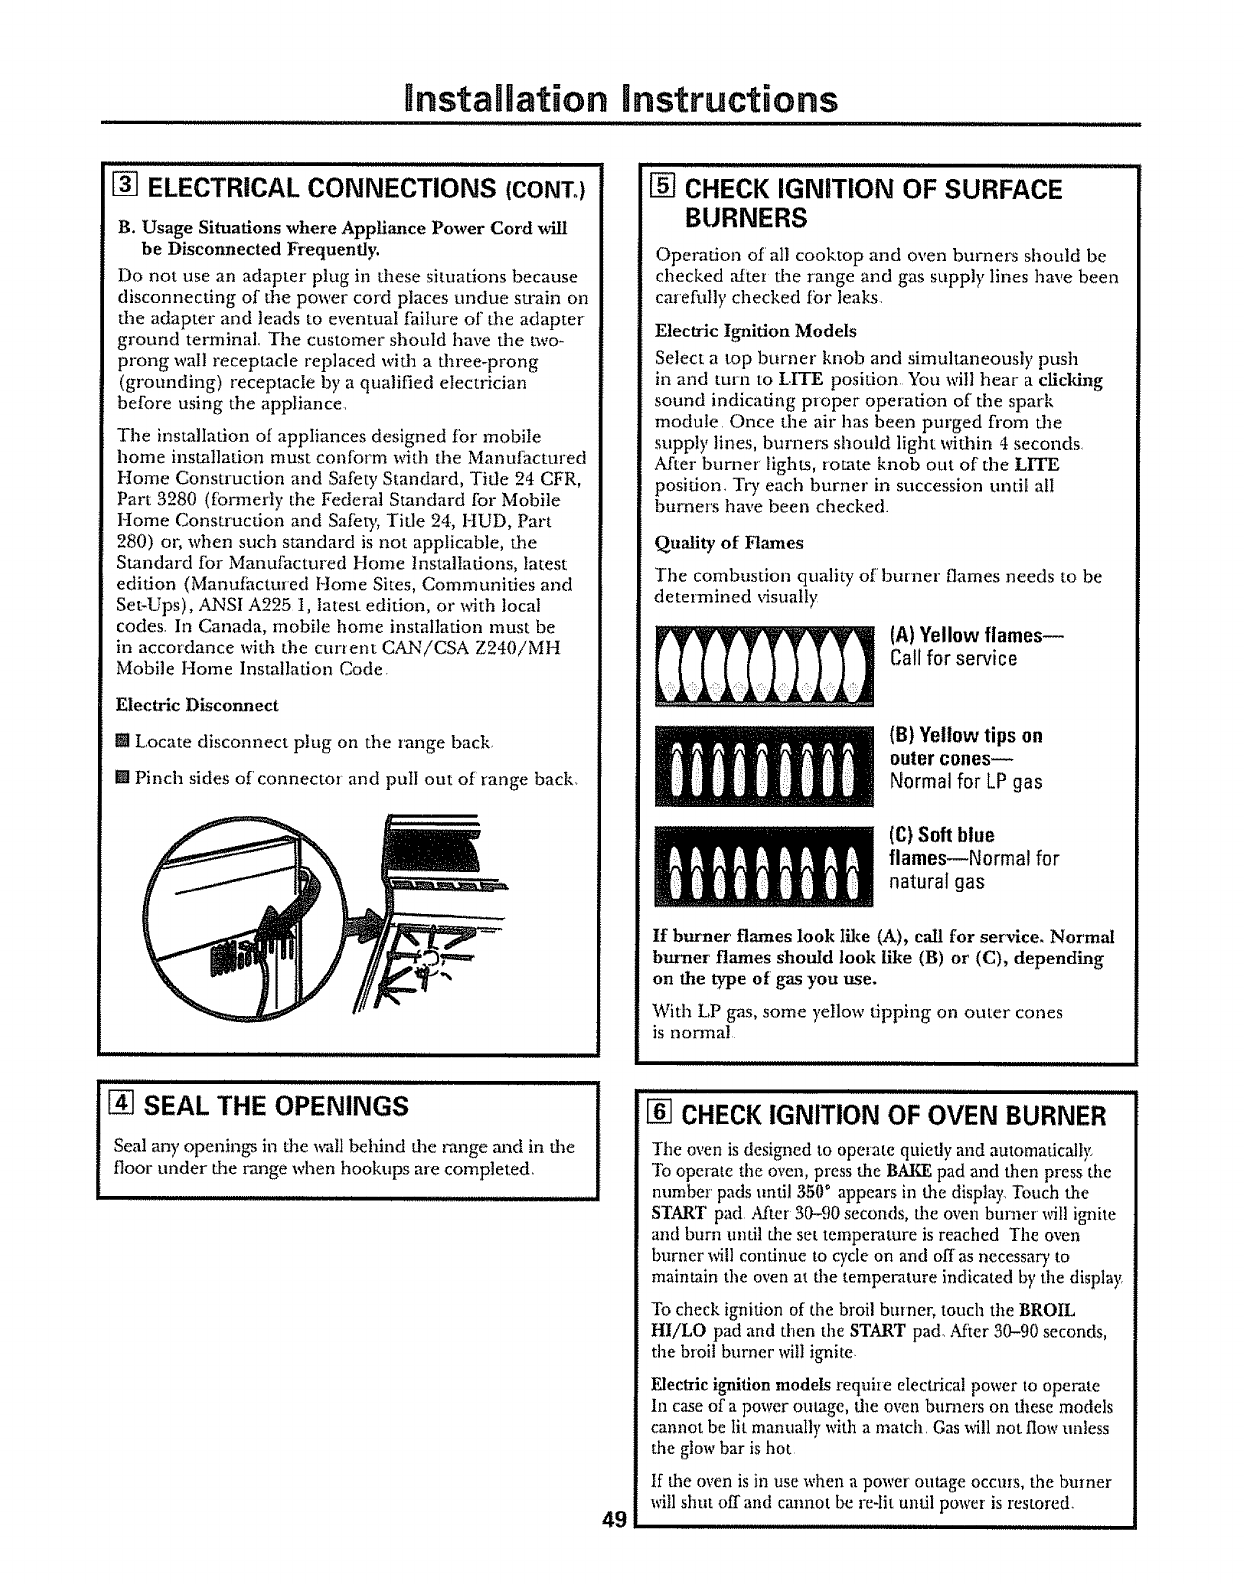
Instamlation instructions
[] ELECTRICAL CONNECTIONS (CONT.)
B. Usage Situations where Appliance Power Cord ,_I
be Disconnected Frequendy.
Do not use an adapter plug in these situations because
disconnecting of the power cord places undue su'ain on
the adapter and leads to eventual failure of the adapter
ground terminal. The customer should have the two-
prong wail receptacle replaced with a three-prong
(grounding) receptacle by a qualified electrician
before using the appliance
The installation of appliances designed fbr mobile
home installation must conform with the Manufactured
Home Construction and Safety Standard, Title 24 CFR,
Part 3280 (formerly the Federal Standard for Mobile
Home Construction and Safety, Title 24, HUD, Part
280) or, when sucta standard is not applicable, tlae
Standard for Manufactured Home Installations, latest
edition (Manufi_ctured Home Sites, Communities and
Set-Ups), ANSI A225 I, latest edition, ov with local
codes. In Canada, mobile home installation must be
in accordance with the current CAN/CSA Z240/MH
Mobile Home Installation Code
Electric Disconnect
J Locate disconnect plug on the range back,
[] Pinch sides of connector and pull out of range back_
SEAL THE OPENINGS
Seal any openings in d_e wall behind the range and in fl_e
floor under dae range when hookups are completed,
49
i..................................................
CHECK IGNITION OF SURFACE
BURNERS
Operation of' all cooktop and oven burners should be
checked _ter the range and gas supply lines have been
carefully checked for leaks.
Electxic Ignition Models
Select a top burner knob and simultaneously push
in and mrn to LITE position You will hear a clicking
sound indicating proper operation of the spark
module. Once the air has been purged from the
supply lines, burners should light within 4 seconds.
After burner' lights, rotate knob out of the LITE
position. To, each burner in succession until all
burners have been checked
Quality of Flames
The combustion quality of burner flames needs to be
determined visually
(A) Yellow flames_
Call for service
(B) Yellow tips on
outer cones--
Normal for LP gas
(C) Soft blue
flames_Normal for
natural gas
If burner flames look like (A), call for service. Nor'real
bttnaer flames should look like (B) or (C), depending
on the type of gas you use.
With LP gas, some yellow tipping on outer cones
is normal.
i_ ii i,.11 i i.....i,J.lllJlJll
CHECKIGNITION OF OVEN BURNER
The oven is designed to operate quietly and automaticall)_
To operate the oven, press the BAI_ pad and then press the
number pads until 350 ° appears in the display Touch the
START pad After 30-{)0 seconds, the oven burner _fill ignite
and burn undl the set temperature is reached The oven
burner will continue to cycle on and offas necessary to
maintain the oven at the temperature indicated by the display.
To check ignition of the broil burner, touch the BROIL
HI/LO pad and then the START pa4 After 30-90 seconds,
the broil burner will ignite.
Electric ignition models requile electrical power to operate
in case of a power outage, the oven burners on d,ese models
cannot be lit mamtaIly with a match Gas will not flow unless
the glow bar is hot
If the oven is in use when a power outage occms, the burner
will shut off and cannot be reqit until prover is restored.
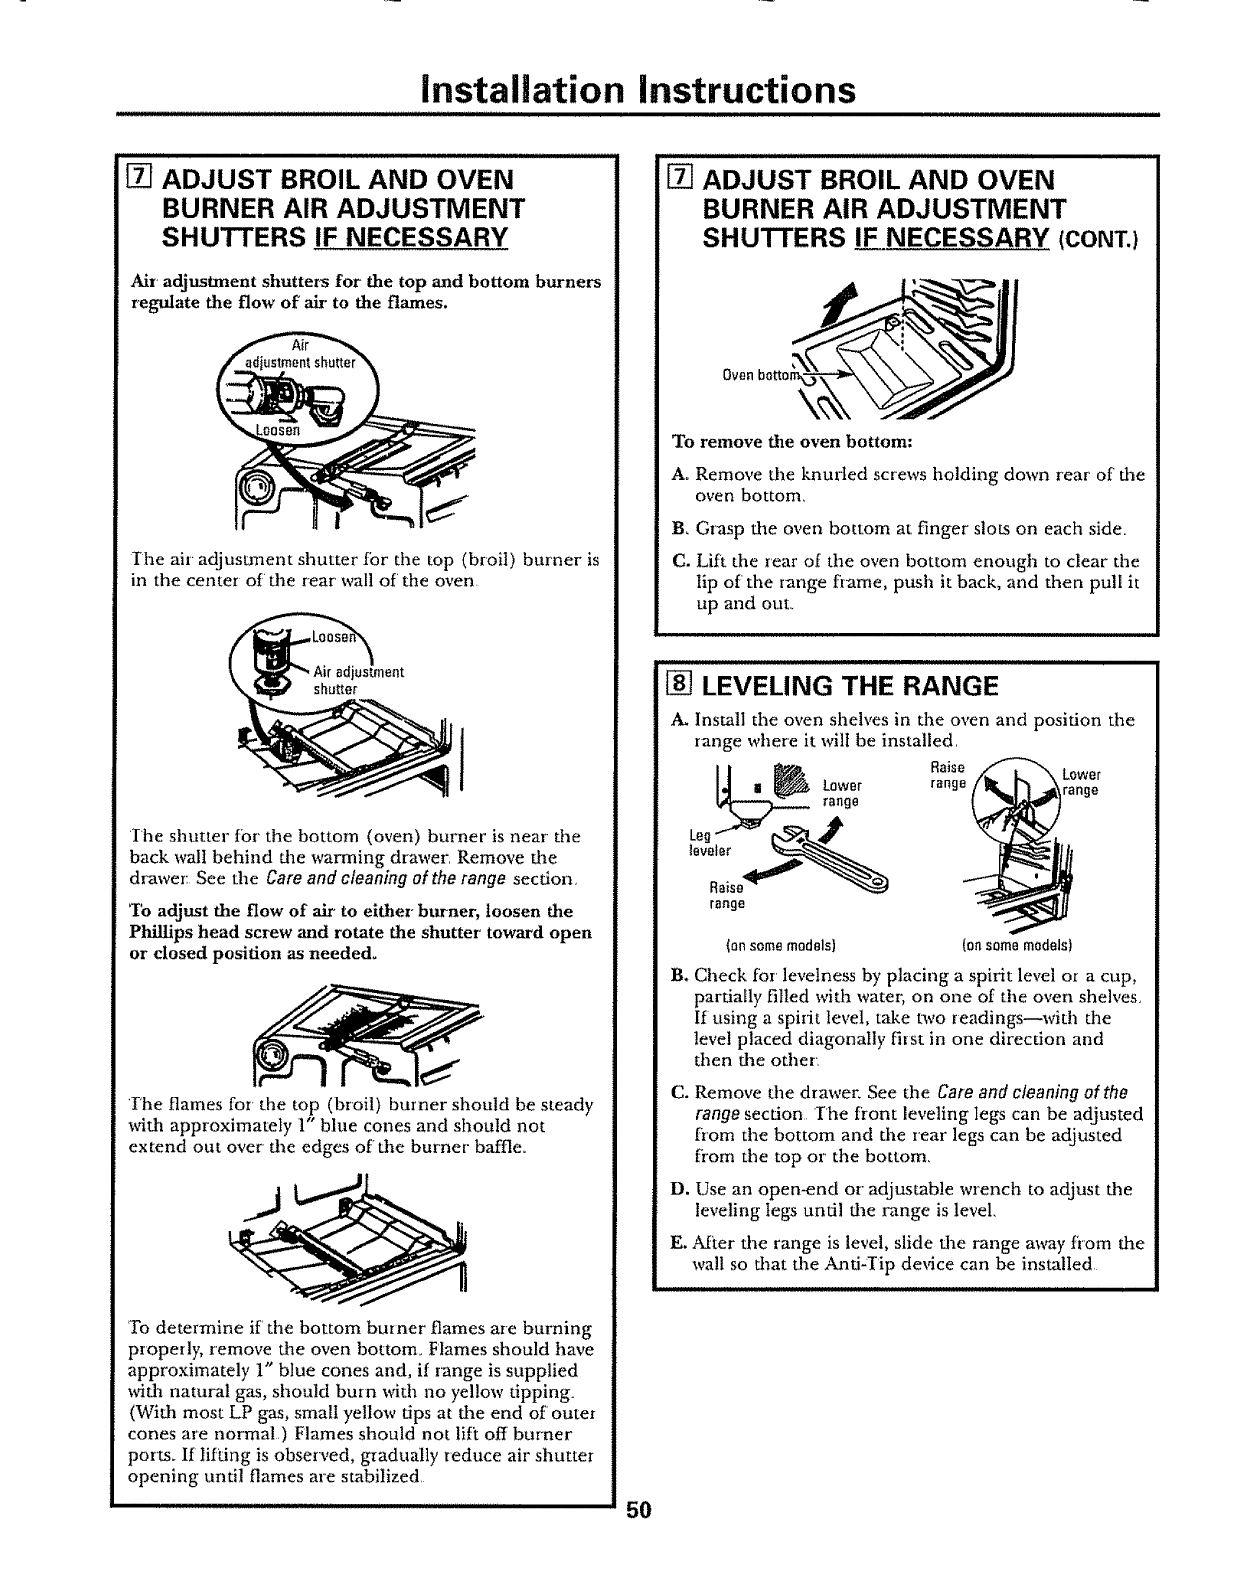
installation instructions
iiiiiiiiiiiiiii iiiii ,tul UlJlUl JlUUlJlUlJlUllJlUUlJlUlJll
[_ ADJUST BROIL AND OVEN
BURNER AIR ADJUSTMENT
SHUTTERS IF NECESSARY
Air adjustment shutters for the top and bottom burners
regulate the flow of ab" to the flames.
Ihe air adjustment shutter fbr the top (broil) burner is
in the center of flae tear wall of the oven,
ihe shutter fbr' the bottom (oven) burner is near the
back wall behind the warming drawer, Remove the
drawer: See the Care andcleaning of therange section_
To adjust the flow of air' to either burner, loosen the
Phillips head screw and rotate the shutter toward open
or closed position as needed.
the flames for the top (broil) burner should be steady
with approximately 1" blue cones and should not
extend out over the edges of the burner baffle°
To determine if' the bottom burner flames are burning
properly, remove the oven bottom, Flames should have
approximately 1" blue cones and, if range is supplied
with natural gas, should burn with no yellow tipping.
(With most LP gas, small yellow tips at the end of outer
cones are normal.) Flames should not lift off burner
ports, If lifting is observed, gradually reduce air shutter
opening until flames are stabilized
[Z] ADJUST BROIL AND OVEN
BURNER AIR ADJUSTMENT
SHUTTERS IF NECESSARY (CONT.)
Ovsn
To remove the oven bottom:
At Remove the knurted screws holding down rear of the
oven bottom
B, Grasp the oven bottom at finger slots on each side.
C. Lift the rear of the oven bottom enough to clear the
lip of the range flame, push it back, and then pull it
up and out,,
t_ LEVELING THE RANGE
A_ Install the oven shelves in the oven and position the
range where it wilt be installed.
Raise Lower
range range
range
(onsome models) Ion same models)
B. Check for levelness by placing a spirit level or a cup,
partially filled with water, on one of the oven shelves,
If using a spirit level, take two readings--with the
level placed diagonally first in one direction and
then the other,
C. Remove the drawer, See the Care and cleaning of the
range section The front leveling legs can be adjusted
from the bottom and the rear legs can be adjusted
from the top or' the bottom,
D. Use an open-end or adjustable wrench to adjust the
leveling legs until the range is level.
E. Af_,er the range is level, slide the range away fi'om the
wall so that the Anti-Tip device can be installed
Iltl/JIIllllllJIIllll Ill, II, I I IIIIII IIIIIIIIIIII 50

Instalaatien nstructions
[] INSTALLING THE ANTI-TIP
DEVICE
AWARNING!
[] Range must be secured with an approved Anti-
Tip device,
[] Unless properly installed, the range could be
tipped by you or a child standing, sitting or
leaning on an open door.
[] Mter installing the Anti-Tip device, verify that it
is in place by carefully attempting to tilt the
range fb,'ward_
[] This range has been designed to meet all
recognized industry tip standards lot all normal
conditions,
[] The use of this de\ice does not preclude dpping
of the range when not prope,'ly installed.
[] If the Anti-Tip device supplied with the range
does not fit this application, use the universal
Anti-Tip dm4ce WB2X7909
A_Mark the walt where the RIGHT EDGE of the range
is to be located. Be sure to allow for the countertop
overhang if you intend to install the range next to
cabinets,
Slotted head
screw
Approx
Marked edge of range
B. Locate the outside edge of the device 2_" toward the
center of the range fi'om the marked edge of the
range
C. Using the device as a template, mark the position of
the hole for the screw,
D. For wood construction, drill a pilot hole at an angle
of 20 degrees flora the horizontal. A nail or awl may
be used if a drill is not available,
Mount the And-Tip device with the screw pro\4ded,
For' cement or concrete construction, you wii! need
a 1/4" x 11/.,"lag bolt and a 1/2" OD. sleeve ancllor,
which are not provided. Drill the recommended size
hole tbr' the hardware,
INSTALLING THE ANTI-TIP
DEVICE (CONT,)
Wallboard Back oi range
Install the sleeve anchor into the drilled hole and then
install the lag bolt through the dm4ce The bolts must
be properly tightened as recommended for the
1tardwa re,,
E. Slide dae range against the wall, and check Ibl
proper installation by grasping the front edge of the
cooktop and cmefully attempting to tilt the range
forward,
,i,1,11 i ii ii,,i,,jl // /
WHEN ALL HOOKUPS ARE
COMPLETED
Make sure all controls are left in the off position. Make
sure the flow of combustion and ventiiadon air to the
range is unobstructed.
CONVERTING TO LP GAS (or
converting back to natural gas from LP)
T!ffs range leaves the factory set for use with natural
gas. If you want to convert to LP gas, the conversion
must be performed by a qualified LP gas installer°
The conversion instructions and LP orifices can be
found attached to the range next to the pressure
regulator.
Keep these instrucdons and the orifices in case you
want to convert back to namrat gas.
51
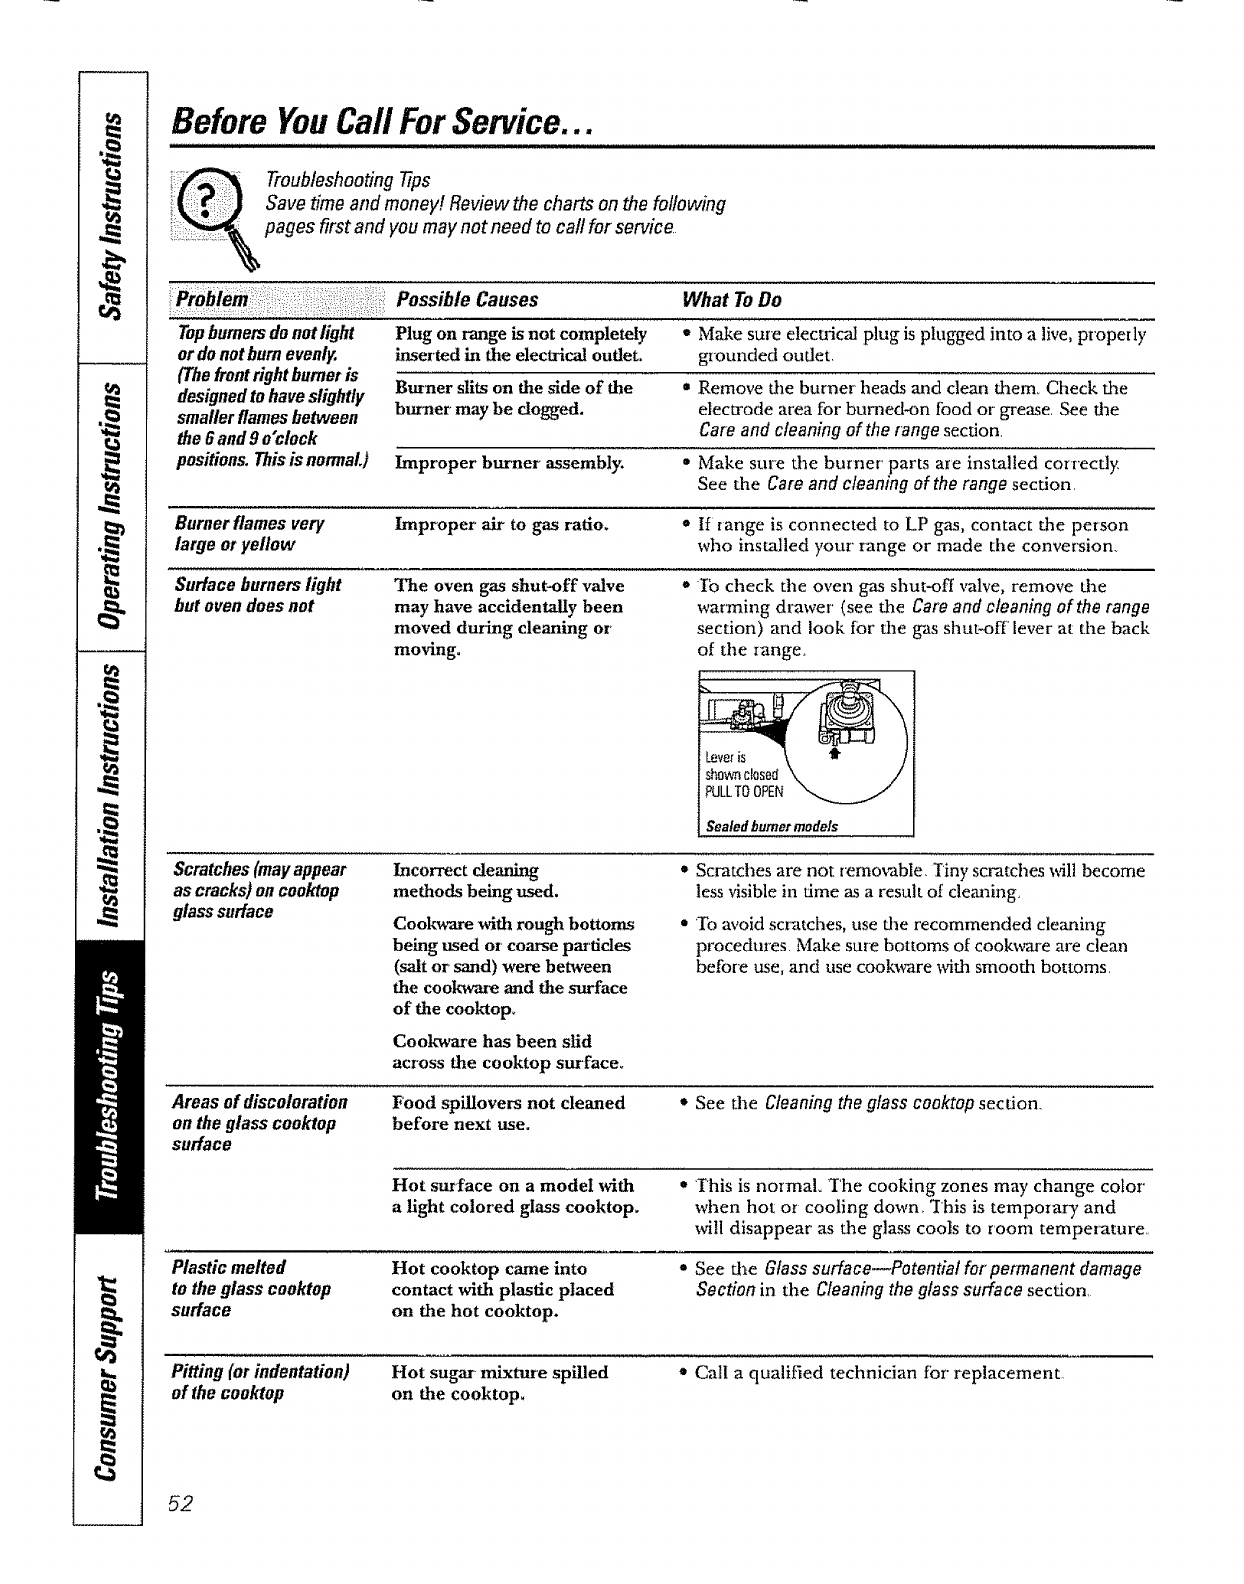
Before YouCall For Service...
Troubleshootingtips
Save time and money! Review the charts on the following
pages first and you may not need to call for service
: i:=:i:: Possible Causes What ToDo
Topburners de not light Plug on range = Make sure electrical plug is plugged into a live, pr'opezly
or do not hum evenly, inserted in the electrical outlet, grounded oudet.
(Thefront right burner is
designedto have slightly Buraaer slits on the side of the "Remove the burner heads and clean them_ Check the
smaller flames between burner may be dogged, elecu'ode area for burned-on food or grease, See the
the 6and g o'clock Care and cleaning of the range section,
positions. This is normaL) Improper bm'ner assembly. • Make sure the burner' parts are installed correctly
See the Care and cleaning of the range section,
Burner flames very Improper air to gas ratio, otf range is connected to LP gas, contact the person
large or yellow who installed ),our" range or made the conversion.
Surface burners light The oven gas shut-off valve *To check the oven gas shut-off valve, remove the
hut oven does not may have accidentally been warming drawer (see the Care and cleaning of the range
moved during cleaning or section) and look for the gas shut"off lever at the back
me,rig, of the range_
Scratches (may appear
as cracks) on cooldop
glass surface
Areas of discoloration
on the glass cooktop
surface
Plasticmelted
to the glasscooktop
surface
OPEN
Sealed burner models
Incorrect deaning
Cookware with rough bottoms
being used or'coarse pat'tides
(salt or sand) were between
the eookware and the surface
of the cooktopo
Cookware has been slid
across the cooktop sm'face_
Food spillovers not cleaned
before next use.
* Scratches are not zemov*able_ '/'iny scratches will become
less visible in time as a result of clemaing,
•To avoid scratches, use tire recommended cleaning
procedures, Make sure bottoms of cookware are clean
beibre use, and use cooM_re with smooth bottoms,
• See the Cleaning the glass cooktop section.
Hot surface on a model with
a light colored glass cooktop.
,' This is normal "/'he cooking zones may change color'
when hot or cooling down, "[his is temporary and
will disappear' as the glass cools to room temperature,,
Hot cooktop came into
contact with plastic placed
on the hot cooktop.
"See the Glasssurface_Potential for permanent damage
Sectionin the Cleaningthe glass surface section,
Pitting(orindentation)
of the cooktop Hot sugar mixture spilled
on the cooktop. " Call a qualified technician for"replacement,
52
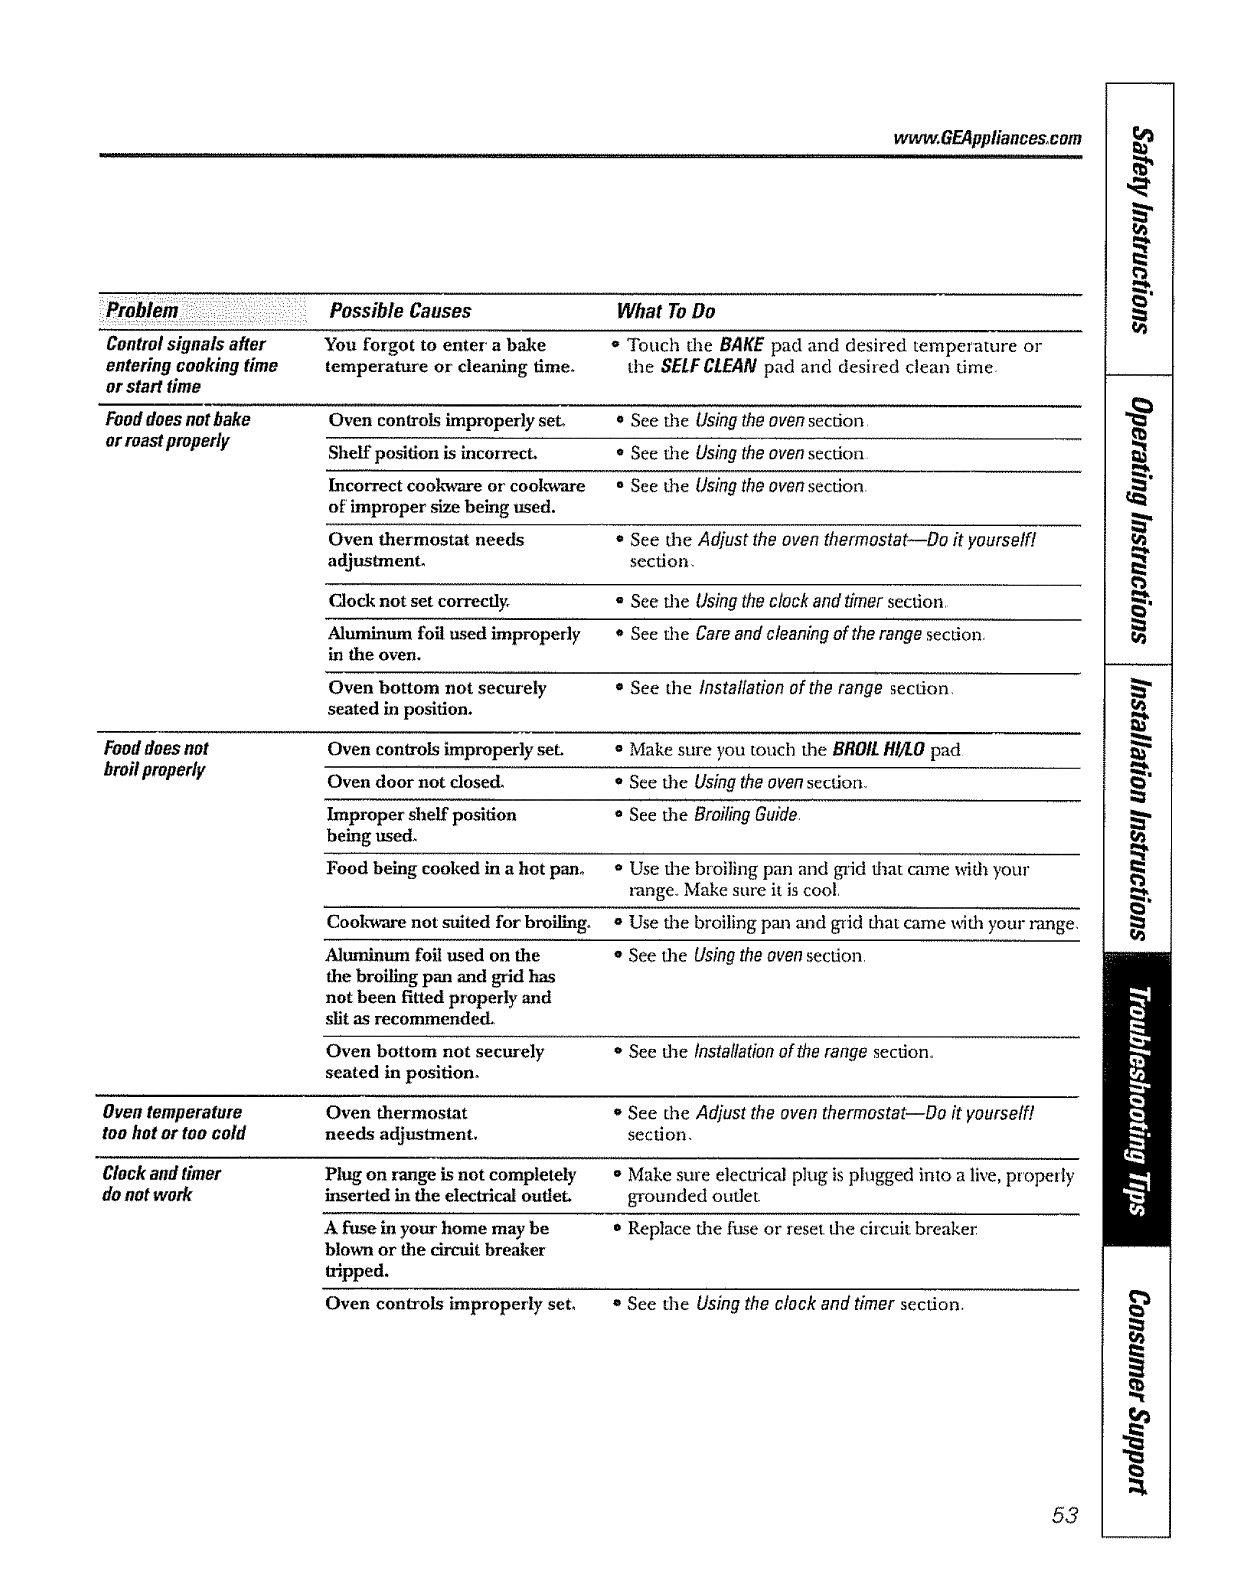
vvvvvv,GEAppliances,com
if,oh!era Po,sibleca,,es WhatToOo
Control signals after You forgot to enter' a bake * Touch the BAKE pad and desired temperature el-
entering cooking time temperature or cleaning time. the SELFCLEAN pad and desired clean time
or start time
Fooddoes not bake Oven controls improperly set° =See the Using the oven section,
or roastproperly Shelf position is incorrect, o See tile Usingthe oven section
Incorrect cookware or cookware • See die Using the oven section
of improper size being used.
Oven thermostat needs o See die Adjust the oven thermostat--Do it yourself/.
adjustment, sectioq
CAock not set correctly° = See the Using the clock and timer section
Aluminum foil used improperly e See the Care and cleaning of the range section,
in the oven.
Oven bottom not securely • See tile Installation of the range section_
seated in position.
Food does not Oven controls improperly set. " Make sure you touch dee BROILHI/LO pad
broilproperty Oven door not dosed, * See the Using the oven section
Improper sheff position • See tile BroilingGuide
being used.
Food being cooked in a hot pan. o Use the broiling pan and gaid that came with your
range., Make sure it is cool,
Cookware not suited for broiling° o Use the broiling pml mid grid that came x_fidlyour z-ange,
Aluminum foil used on the oSee die Using the oven section
the broiling pan and grid has
not been fitted properly and
slit as recommended.,
Oven bottom not securely "See the Installation of the range section,,
seated in position°
Oven temperature Oven thermostat *See tile Adjust the oven thermostat--Do it yourself!
too hot or too cold needs adjustment_ section,
Clockand timer Plug on range is not completely o Make sure elecu'ic_J plug is plugged into a live, properly
do not work inserted in flueelectrical outlet, gq'ounded ouflet_
A fuse k,1your home may be * Replace dae fuse or reset dae circuit bre;fker
blown or the circuit breaker
tripped.
Oven controls improperly set° o See die Using the clock and timer section.
53

Before YouCall For Service...
IIIIIIIIIIIIIIIIIIIIIIIIl!llqll!llllllllllllll!lll I J
Troubleshooting Tips
Possible Causes What To Do
Ovenlight does not work Light bulb is loose or defective, • Tighten or' replace the bulb,,
Plug on range is not completely • Make sure electrical plug is plugged into a live, properly
inserted in the electrical oudet, grounded oudet.
Ovenwillnot self*clean The oven temperature is too •Allow the range to coot to room temperature and
high to set a serf-dean operation, reset fire controls,
Oven controls kmpmperty set. •See the Using the self-cleaning oven section,
"Crackling" or 'Ibis is the sound of the t This is normal
"popping"sound metal heating and cooling
dmlng both the cooldng and
cleaning functions.
Excessive smoking Excessive soil. • Touch the CLEAR/OFFpad, Open the windows to
rid the room of smoke_ Wait undl the LOCKEDDOOR
light goes off Wipe up the excess soil and reset the
clean cycle_
Oven door will not open Oven too hot. •Allow the oven to cool below locking temperature.
after a clean cycle
Ovennot clean after a Oven controls not properly set •See the Using theself-cfeaning oven section
clean cycle Oven was heavily soiled. •Clean up heavy spillovers before starting the cIean
cycle_ Heavily soiled ovens may need to self<lean
again or [bra longer period of dme
"LOCK OOOR"flashes The self-clean cycle has been *Close the oven door.
in the display selected but the door is not
closed.
LOCKEDDOORlight The oven door" is locked ='Touch the CLEAR/OFFpad, Allow the oven to cool.
is on when you want because the temperatuxe
to cook inside the oven has not
dropped below the
locking temperature.
"F--and a number or You have afunction error' code. °Touch the CLEAR/OFFpad, Allow the oven to cool for
letter" flash in the display one hour, Put the oven back into operation.
If the function code repeats. * Disconnect all power to the range for5 minutes
and then reconnect power: I[ the function error
code repeats, call fbr service,
Ovenshelves are The nickel shelves (if so equipped) •Apply a smalI amount of vegetable oil to a paper
difficult to slide were cleaned in a serf-dean cycle, towel and wipe the edges of the oven shelves with
The gray porcelaln-coated shelves fl_e paper towel Do not spray with Pare _ or" other
(if so equipped) were improperly lubricant sprays,
cleaned.
"Probe"appears in This ksreminding you to enter a o Enter a probe temperature.
the display (some models) probe temperature after' plugging
in the probe,
54
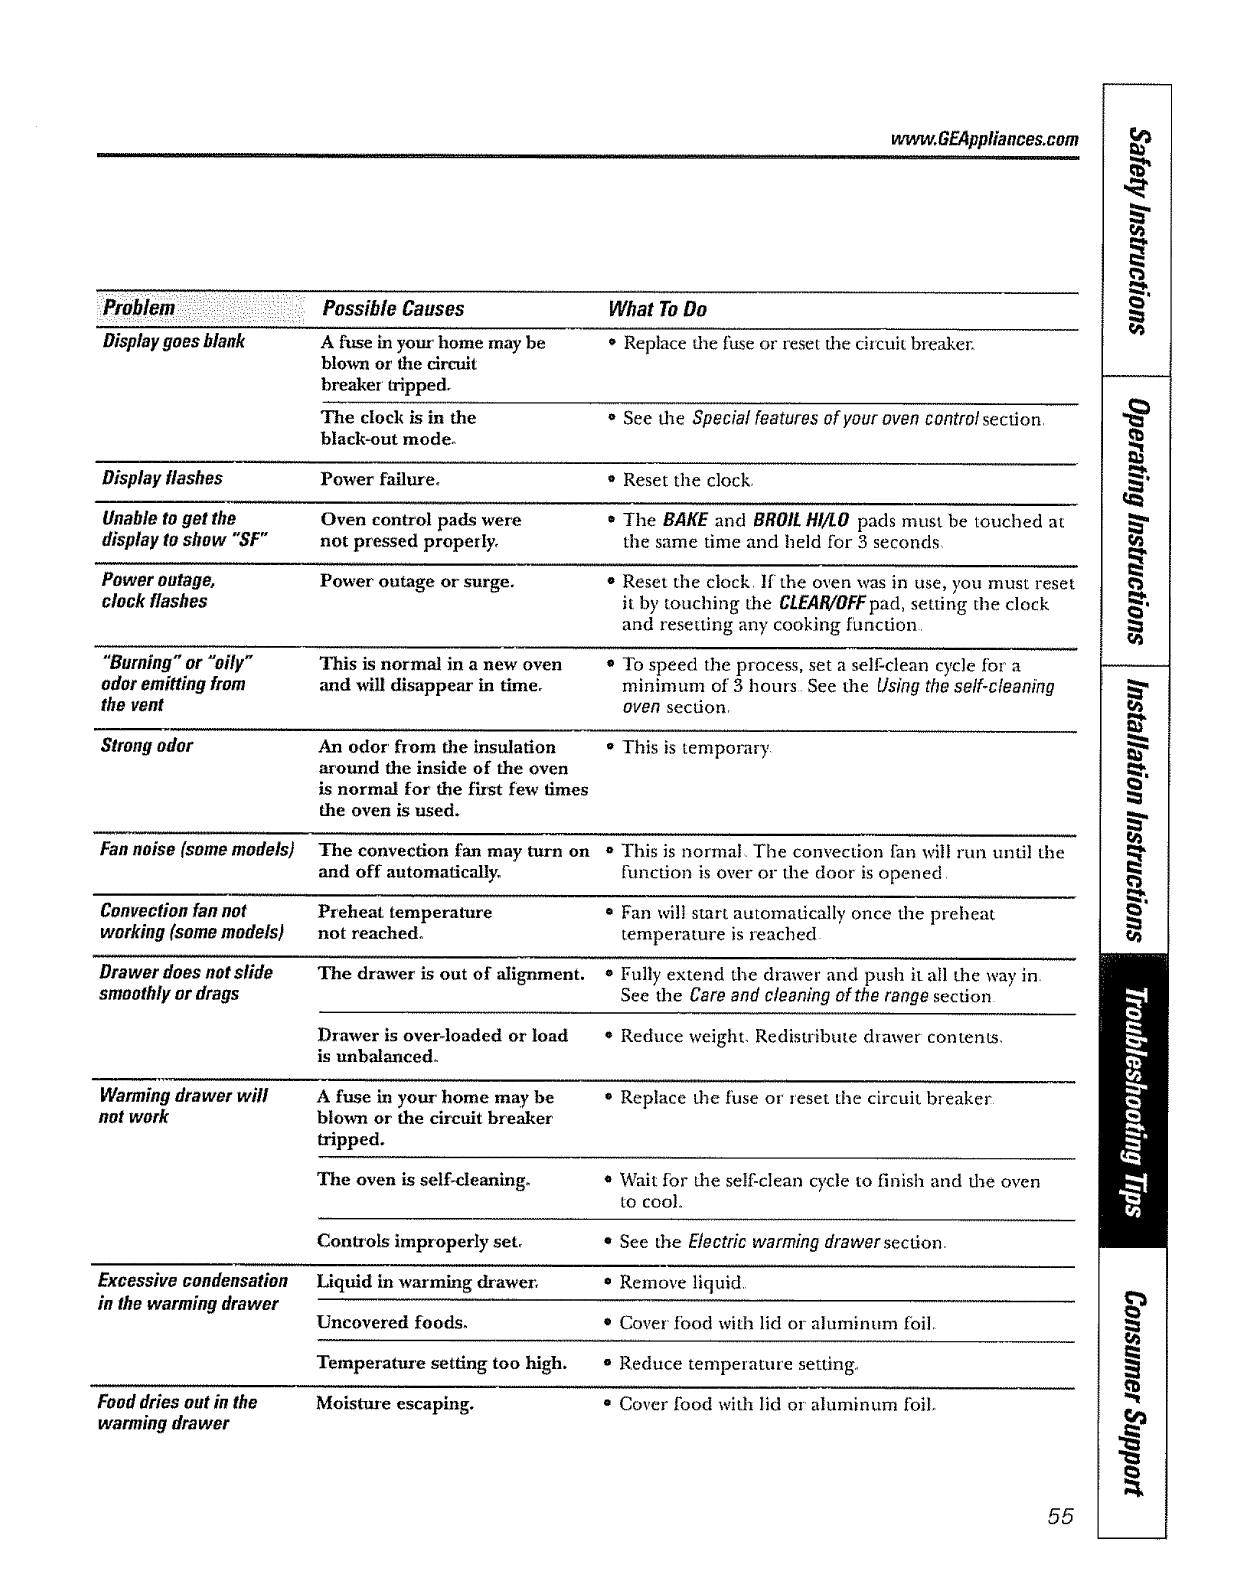
vvwvv,GEAppliances.eom
Possible Causes What To Do
_: :>:::4:--:::_ : ::-:; <::: -: ::%: v::::::::_
Displaygoes hlank A fuse in your home may be * Replace tile fuse or reset tile ch'cuit bre,'fl_er,,
blown or the circuit
breaker' tripped,
The clock is in the " See fl_e Special features of your oven control section,
black-out mode°
Display flashes Power failure_ _ Reset the clock,
Unable to get the Oven control pads were = The BAKE and BROIL HI/LO pads must be touched at
display to show "SF" not pressed properly, tile same time and held for S seconds
Power outage, Power outage or surge. " Reset the clock If the oven was in use, you must reset
clock flashes it by touching tile CLEAR/OFFpad, setting the clock
and resetting any cooking funcdon
"Burning" or _oily" This is normal in a new oven • To speed the process, set aself-clean cycle for a
odor emitting from and will disappear in time, minimum of 3 hours See the Using the self-cleaning
the vent oven section
Strong odor An odor from the insulation * This is temporary
around the inside of the oven
is normal for the fiIst few times
the oven is used.
Fan noise (some models) The convection fan may turn on = This is normal The convection fan will run until the
and off automatically, function is over oz" tile door is opened
Convection fan not Preheat temperature = Fan wilt start automatically once tile preheat
working (some models) not reached° temperature is reached
Orawerdoes notslide The drawer is out of alignment. _ Fully extend die drawer and push it all the way in
smoothly or drags See the Care and cleaning of the range section
Drawer is over-loaded or load * Reduce weight, Redistribute drawer contenLs,
is unbalanced.
Warming drawer will Afuse in your home may be •Replace the filse or reset the circuit breaker
not work blown or the circuit breaker
tripped.
The oven is self-cleaning. . Wait fbr tile self clean cycle to finish and die oven
to coolo
Controls improperly set, * See tile Electric warming drawer section,
Excessive condensation Liquid in warming drawer, =' Remove liquid,
in the warming drawer Uncovered foods, • Cover food with lid or aluminum foil
Temperature setting too high. " Reduce temperature setting
Fooddries outin the Moisture escaping. = Cover food with lid or aluminum foil
warming drawer
55
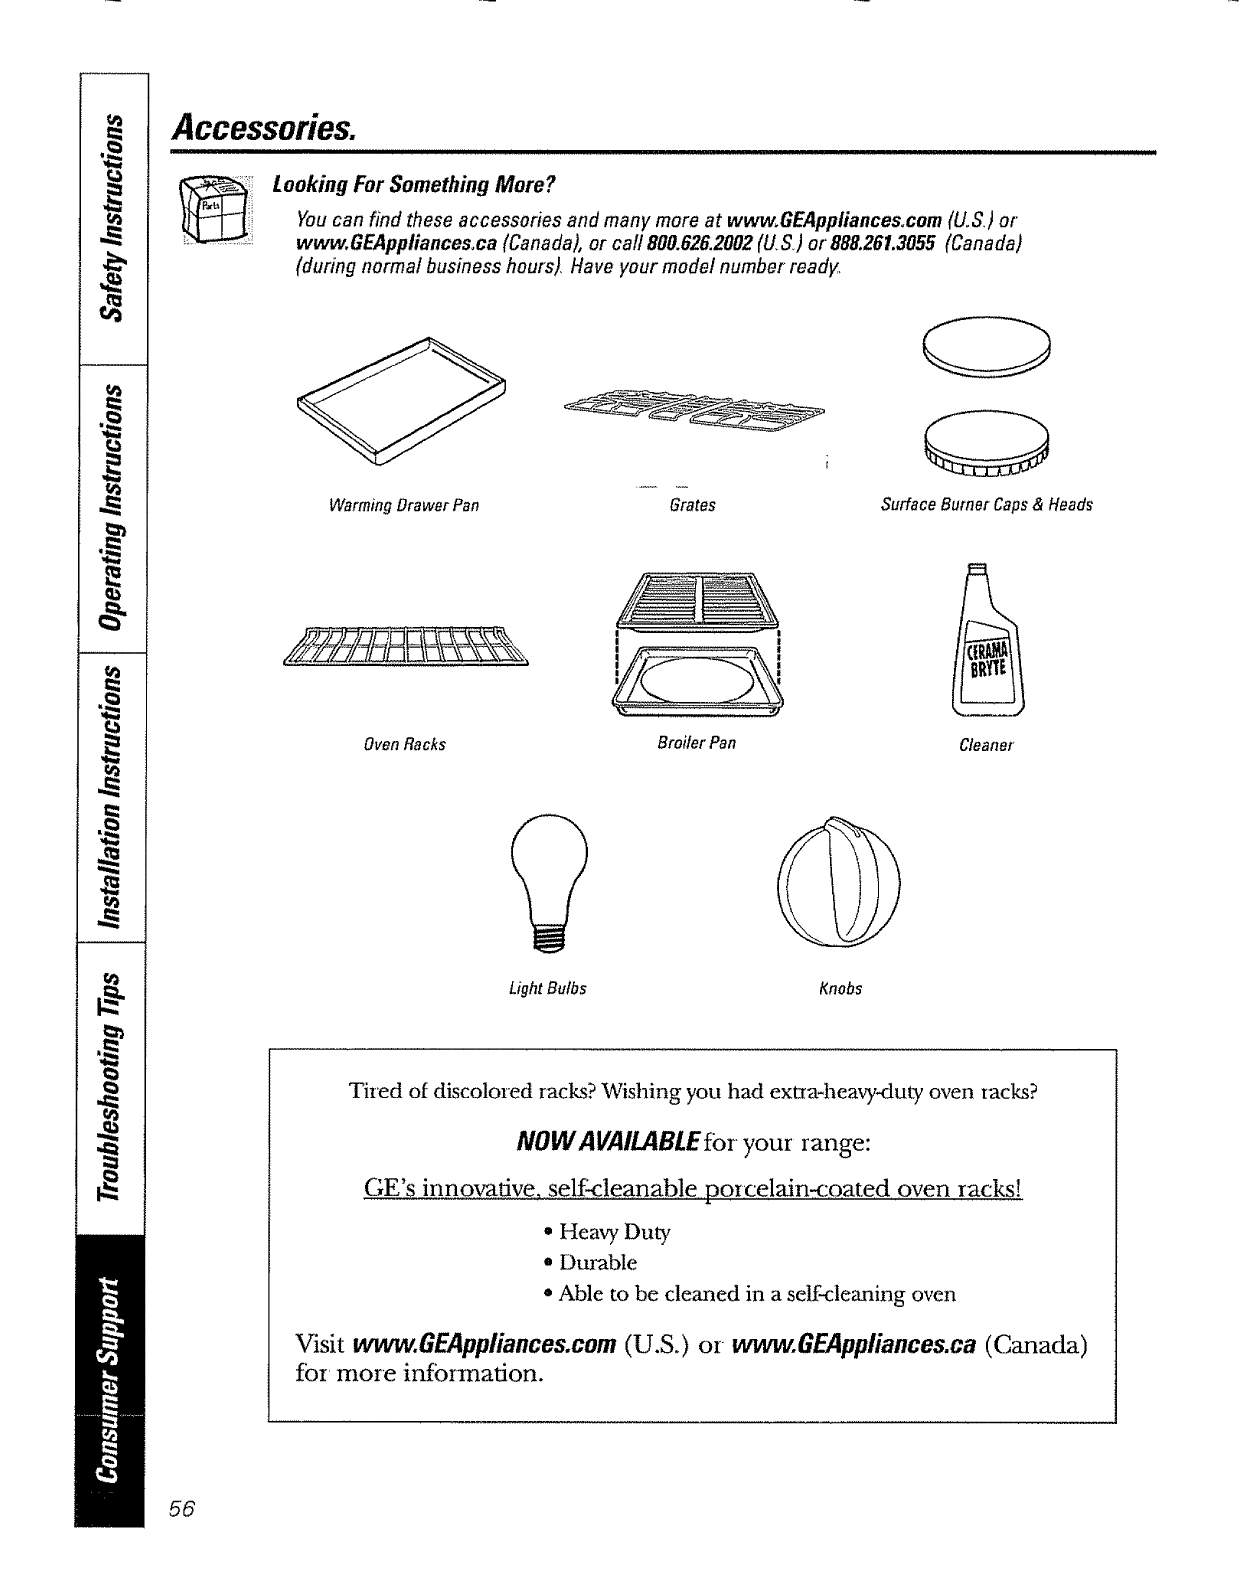
Accessories.
Looking For Something More?
Youcan find these accessories and many more at www_GEAppliances.com (U.S) or"
www, GEAppliances,ca (Canada), or call 800,626.2002(U,S) or 888,261.3055 (Canada)
(during normal business hours), Have your model number ready,
Warming Drawer Pan Grates Surface Burner Caps& Heads
!!
OvenRacks Broiler Pan Cleaner
LightBulbs Knobs
Tired o[ discolored racks? Wishing you had extra-heavy-duty oven tacks?
NOW AVAILABLEfor your range:
GE's innovative, self-cleanable porcelain-coated oven racks!
* Heavy Duty
* Durable
, Able to be cleaned in a self-cleaning oven
Visit www.GEAppliances.com (U.S.) or wwvv.GEAppliances.ca (Canada)
fbr' more infbrmafion.
56
GE Service Protection Plus TM
GE, a name recognized world_4de fbr quality and dependability, offers you
Service Protection I lus --comprehenslve plotection on all your appliances--
No Matter What Brand!
Benefits Include:
*Backed by GE
. All brands covered
* Unlimited service calls
*All parts and labor" costs included
*No out-of-pocket expenses
=No hidden deductibles
o One 800 number to call
We'll CoverAny Appliance.
Anywhere. Anytime.*
You will be completely satisfied x,ith our service protection or you may request your money back
on the remaining value of your contracL No questions asked° It's that simple
Protect your refrigerator, dishwasher, washer and dI3,ei; range, TV, VCR and much more--any brand!
Plus there's no extra charge for emergency seiMce and low monthly financing is available, Even icemaker
coverage and fbod spoilage protection is offered You can rest easy, knowing that all your valuable
household products are protected against expensive repairs,
Place your confidence in GE and cal! us in the U S tolI-fi'ee at 800.626.2224
for more information
*All br;mds covered, up to 2t) ),ears old, in tht,* continental U S
Please place in envelope and mail to:
General Electric Company
Warranty Registration Department
P,O. Box 32150
Louisville, NY 40232-2150
57
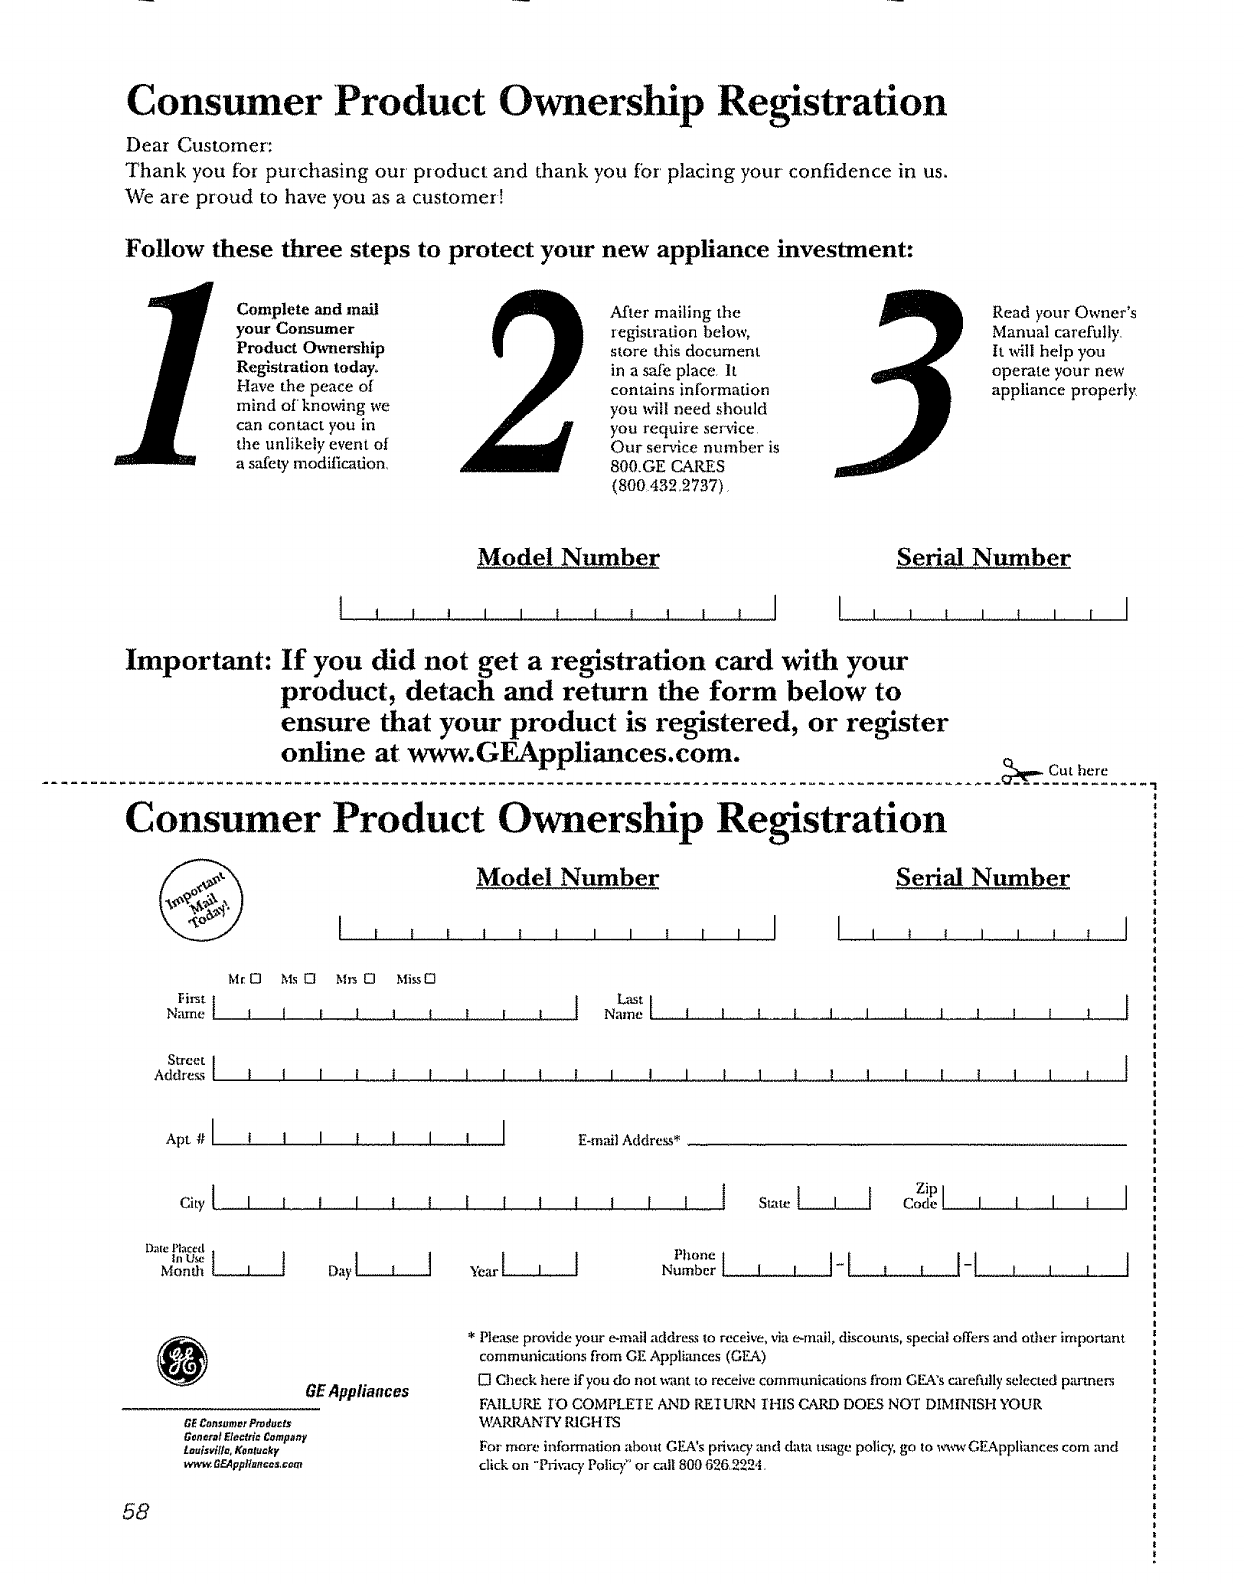
Consumer Product Ownership Registration
Dear Customer':
Thank you for purchasing our product and thank you for placing your confidence in us.
We are proud to have you as a customer[
Follow these three steps to protect your new appliance investment:
Complete and mail
your Consumer
Product O_nership
Registration today.
Have the peace of
mind of knowing we
can contact you in
the unlikely event of
a safety modification,
After mailing the
registration below,
store this document
in a safe place, It
contains inlormation
you will need should
you require ser_cice
Our service nmnber is
800.GE CARES
(800432,2737) _
Read your Owner's
Manual carefully,
It will help you
operate your new
appliance properly
Model Number Serial Number
L_ • d llJ 1 t 1 I t I I l [ I!I[]
Important: If you did not get a registration card with your
product, detach and return the form below to
ensure that your product is registered, or register
online m v_rw.GEAppliances.com.
Consumer Product Ownership
Model Number
[i [ t11I I t I
Registration
Serial Number
Mr:0 Ms 0Mrs 0Mi_ 0
Name t 1 f l t t l I t Name 1I .........i...........L, I ...... I II ............I i I !
gt3"eet l
Addrea_ I I I 1 i t I I ! l I ! I t 1 I I ,,,,,,,I
Apt #I , , , ,, , , I _-m,_ilAddress*
City I, I 1 ..... i I 1 t t I t t I
Dzl¢ Placed
Month
Zip
1 1 SulteL__.__ Code[ I , I I
Phone lI I I
Number I - t I - I I !
GEApptiances
GEComumer Praducts
GeneralElectti_ Company
touisvilfoo KonturkF
w_vvw,GF.Appftunc_s,com
* Please provide your e-mail address to receive, via c-mail, discounts, special offers and other important
communications from GE Appli,'mces (GEk)
[] Ctaeck here if you do not _¢mt to receive communications from G:EA'scarefiflly selected pan_nets
FAILURE IO COMPLE'TE AND REIURN IHIS CARD DOES NOT DIMINISH YOUR
WAt_,P,ANIY RIGH I'S
For more infbmmfion about GEA's pri_tcy m_ddata usage policy, go to _¢w GEAppliances tom and
click on -Pri_tcy Poficy_ or call 800 626,222't.
58
era=
eee,h
m
u_w=
w
t
w
z_
m
m
m
,,,_=
ld
_U
i
!
i
59
m
uij
m
-1,oh
i
run
.1win
rm
_m'q
B
Wlh
m
W
IWOm
m
m
m
R
llVad
Notes,
6O
Notes.
61
-=i =
i
L
l
GEGas Range Warranty. (Forcustomersi, t,eUnitedStates)
All warranty service provided by our Factory Service Centers,
or an authorized Customer Care_technician. To schedule service,
on-line, 24 hours a day, visit us at www_GEAppliances.com, or call
800_G£CARES (800432.2737).
Staple your receipt here,
Proof of the original purchase
date is needed to obtain service
under the warranty..
GEWill Replace:
One Year Any part of the range which fails due to a defect in materials or workmanship During this
From the date of the full one-year warranty, GE will also pro_4de, free of charge, all labor and inqaome service to
originalpurchase replace the defective part.
Five Years
From the date of the
original purchase
(onglasscooktop
modelsonly)
A replacement glass cooktopif it should: crock due to daez_al shock; discolor; crock at the
rubber seal between the glass cooktop and dae porcelain edge,
During flais h'mitedadditional four-year warranty, you wil! be responsible for any labor or
in-laome service.
!i: Service trips to yore' home to teach you how to use
the product.
_!:_Improper installation, delivery or maintenance°
Failm_e of the product if it is abused, _ed,
or used for' other than the intended purpose or'
used commercially.
Damage to the glass cooktop caused by hardened
spi!ls of sugary materials or melted plastic that
are not cleaned according to the directions in
the Owner's Manual.
i: Damage to the glass cooktop caused by use of deanezs
other" than the recommended cleaning creams_
:i Replacement of house fuses or resetting of circuit
breaker_.
Damage to the product caused by accident, F_e, floods
or acts of God°
:_:Incidental or consequential damage caused by possible
defects with this appliance,
Damage caused after- delivery°
This warranty is extended to the originaf putchaser and any succeeding owner for products purchased for home
use within the USA In Alaska, the warTanty excludes the cost of shipping or service calls to your home,
Some states do not allow the exclusion or limitation of incidental or consequential damages. This warranty gives
you specific legal rights, and you may also have other rights which vary from state to state.. Toknow what your
legal rights are, consult your local or state consumer affairs office or your state's Attorney General
Warrantor: GeneralElectric Company.Louisville,IIT40225
62
All warranty service provided by our Factory Service Centers
or an authorized Customer Care_technician_ For service,
call 1800.3613400o
Staple your receipt here,,
Proof of the original purchase
date is needed to obtain service
under the warranty,
............................ wmRepl.oe.............................................
ForThe PeriOd:Of::::i Camco
OneYear
Fromthedateof the
originalpurchase
Anypartof fl_e _,'ange which f_ils due to a defect in materials or workmanship During dais
full one-year warranty, Camco will ,',Jso provide, free of charge, ,--dllabor _md in-home se_,ice to
replace the defective part.
FiveYears
Fromthedate of the
originalpurchase
(onglasscooktop
modelsonly)
A replacementglass cooMop i{ it should: cl,'ack due to d_ermM shock; discolor; crack at the
rubber se_ between d_e glass cooktop and fl_e porcelain edge
During this limited additional four-year warranly, you will be responsible for any labor or
in-home service
;::Service trips to your home to teach you how to use
the pz.duct.
improper installation, delivery or maintenance.
Failure of the product if it is abused, misused,
or used for other than the intended purpose or
used commercially_
Damage to the glass cooktop caused by hardened
spilLs of sugary materials or melted plastic that
me not cleaned according to the directions in
the Owner's Manual.
=:=i:i:
Damage to the glass cooktop caused by use of cleaners
other than the recommended cleaning creams,
Replacement of house fuses or resetting of' circuit
breakers,
Damage to the product caused by accident, fire, floods
or acts of God.
Incidental or consequential damage caused by possible
defects with this appliance,
::3:Damage caused after delivery.
!
f,
WARRANTOR tS NOT RESPONSIBLE FOR CONSEQUENTIAL DAMAGES.
Warrantor: CAMCO INC,
I
t
63
ConsumerSupport.
GEAppliancesWebsite In theu,s.: www.GEAppliances, com
Have a quesdon or need assistance witta your appliance? Try the GE Appliances Website 24 hours a day
,any day of the year! For' greater convenience and faster service, you can now download Owner's Manuals,
order parts, catalogs, or' even schedule sea, ice on-line. You can also "Ask OurTeam of Experts ..... your questions,
and so much more... In Canada: w_,v.GEAppliances.ca
ScheduleService Inmeus: www.GEAppliances.com
Expert GE repair sen,ice is only one step a_y from your door. Get on-line m3d schedule your' service at your
convenience 24 hours any day of the year! Or call 800GECARES (800A.32.2737) dm'ing normal business horn-s.
In Canada, call 1,800.361.3400
RealLifeDesignStudio In the u,s.:vvww.GEAppliances.com
GE supports dae Universal Desigm concept--products, services and environments that can be used by people of all
ages, sizes and capabilities We recognize the need to design for a wide range of physical and mental abilities and
impairments. For details of GE's Universal Design applications, including "_tchen design ideas for people with
disabilities, check out our Website today For the hearing impaired, please cal! 800_TDD.GEAC (800,833,4322),
In Canada, contact: Manager, Consumer Relations, Camco, Inc.
Suite 310, 1 Factory Lane
Moncton, NB E1C 9M3
ExtendedWarranties In d_eus,: vvwvv,GEAppliances.com
Purchase a GE extended warranty mad learn about special discounts that are available while your wan'anty isstill
in effect You can purchase it on-line anytime, or call 800.626.2224 during normal business hours GE Consumer
Home Services willstill be there after your warranty expires In Canada, call 1.888,261,2133
I ...... i
PartsandAccessories tn theus: vvvvw.GEAppliances.com
IndMduals qualified to sen4ce their own appliances can have parts or accessories sent directly to their homes
(VISA, MasterCard and Discover cards are accepted) Order on-line toda); 24 trouts every day or by phone at
800 6262002 during normal business hours°
Instructionscontained inthis manual cover procedures to be pedormed by any user.Otherservicing generally should be
referred to qualified service personnel° Cautionmust be exercised, since improperservicing may cause unsafe operation_
Customers in Canada should consult the yellow pages for the nearest Caunco service center; or call 1888,261 3055.
ContactUs In theu,s,:www.GEAppliances.com
Ifyou are not satisfied _4th the service you receive fiom GE, contact us on our Website wida all the details
including your phone number; or write to: General Manageq Customer Retadons
GE Appliances, Appliance Park
Louisville, IW 40225
In Canada: wvcw.GF.,Appliances.ca, or write to: Director, Consumer Relations, Camco, Inc
Suite 310, 1 Factory Earle
Moncton, NB E1C 9M3
RegZsterYourAppliance In theus,: www.GEAppliances.com
Register your new appliance on-line--at your. convenience! Timely product registration _411allow for"enhanced
communication and prompt service tinder the terms of your warranty, should the need arise, You may also mail
in the pre-printed regisn'adon card included in the packing material, In Canada: www,GF__@pliances.ca
Printed in Mexico
This book is printed on recycled paper,
