GE JNM1731DP1BB User Manual MICROWAVE Manuals And Guides L1002510
GE Microwave/Hood Combo Manual L1002510 GE Microwave/Hood Combo Owner's Manual, GE Microwave/Hood Combo installation guides
Sharp Over the Range Microwave R-1405T L1002510
User Manual: GE JNM1731DP1BB JNM1731DP1BB GE MICROWAVE - Manuals and Guides View the owners manual for your GE MICROWAVE #JNM1731DP1BB. Home:Kitchen Appliance Parts:GE Parts:GE MICROWAVE Manual
Open the PDF directly: View PDF ![]() .
.
Page Count: 40
Model: JVM1730
JNM1731
JVM 1740
Spacemaker Microwave Oven
Owner's Manual
2
5'
18
11
14
2#
24
2_
Helpful Information
M_cyowa_ Tumo__
6aye and 6_ead#g
38
31
ff Something Goes Wrong
8eludeYu_Ca# Fu_Seyvice 36
6E Seyvice _#_be_ 38
8ack 6over
Write the model and serial numbers here:
Model#
Serial#
Find these numbers on a label inside the oven.
GEAppliances
49-40613
DE68-03700AI
06-09 J R
READ ALL SAH_2TY
INkDRMA TYON BEFORE USING
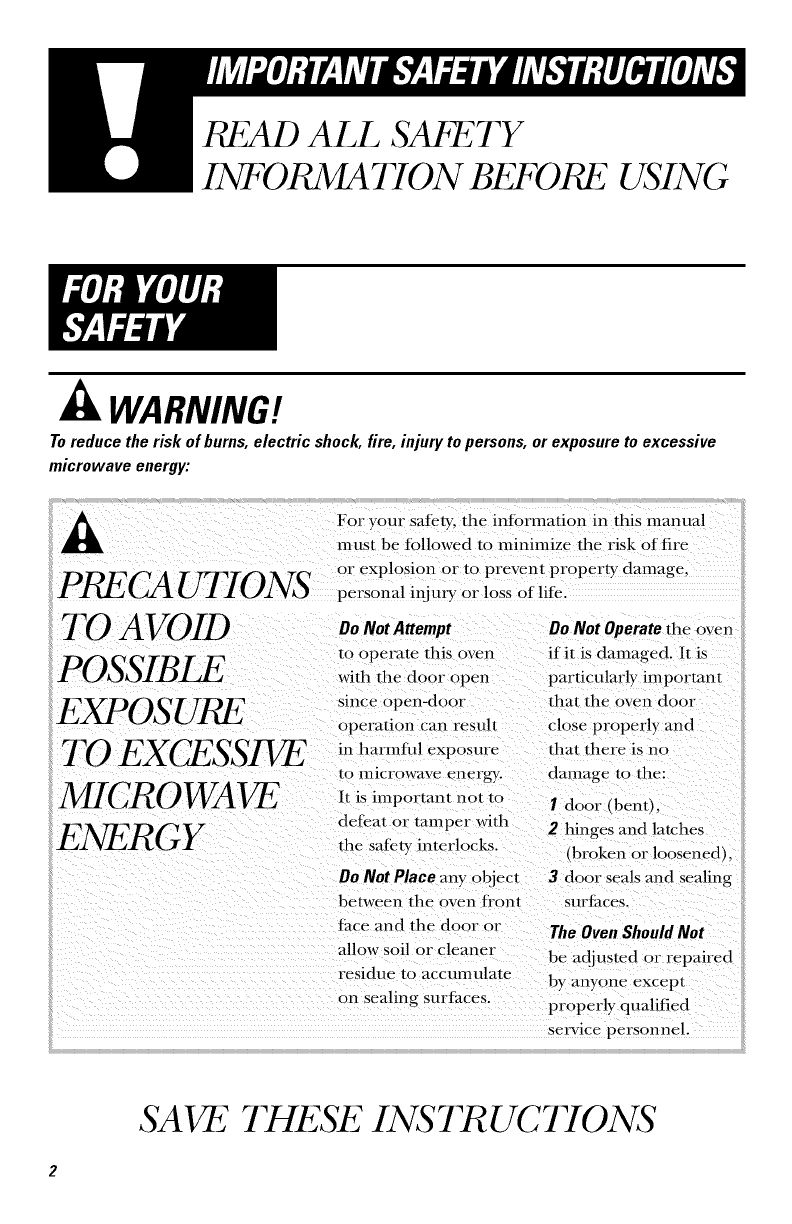
-_ WARNING!
To reduce the risk of burns, electric shock, fire, injury to persons, or exposure to excessive
microwave energy:
For your safety, the information in this manual
must be fbllowed to minimize the risk of fire
_F* a Y ._._ or explosion or to prevent property damage,
FI_G'A U7 ION5 personal injm? orlossoflite,
TO AVOID
POSSIBI_
EXPOSURE
TO EXC_SSI_
MICROWAVE
ENERGY
Do Not Attempt On Not Operate the oven
to operate this oven if it is damaged. It is
with tlle door open particularly important
since open-door that the oven door
operation can result close properly and
in harmhd exposure that there is no
10 nllCl'OW_tVe energy.
It is important not to
defeat or tamper with
the safety interlocks.
1)o Not Place any object
damage to the:
Idoor (bent).
2 hinges and latches
(broken or loosened).
3door seals and _aling
between the oven fi'ont surfaces.
fhce and the door or The Oven ShouldNot
allow soil or cleaner be adjusted or repaired
residue to accumulate by anyone except
on sealing surfaces. properly qualified
set_zice personnel.
SAVE THESE INSTR UCTYONS
This microwave oven is
UL listed for installation
over electric and gas
ranges.
This microwave oven is
not approved or tested
for marine use.
•Read and fi)llow tlte
specific "Precautions to
Avoid Possible Exposure
to Excessive Microwave
Energy" on page 2.
• Tltis appliance must be
grounded. Connect only
to properly grounded
outlet. See Grounding
Instructions section on
page 9.
• Do not mount tltis
appliance over a sink.
• Install or locate this
appliance only in
accordance witlt tlte
provided Installation
Instructions.
Tltis over=tire-range oven
was designed lot use over
ranges no wider tltan 36."
It may be installed over
1)otlt gas and electric
cooking equipment.
• Do not operate tltis
appliance if it ltas a
damaged power cord or
plug, if it is not working
properly or if it ltas been
damaged or dropped.
If the power cord is
damaged, it must be
replaced by General
Electric Service or an
authorized service agent
using a power cord
awdlable Dt)m General
Electric.
• Use tltis appliance only
lot its intended use as
described in tltis manual.
Do llOt use corrosive
chemicals or w_pors in
tltis appliance. This
microwave ()veil is
specifically designed to
lteat, dry or cook fi)od,
and is not intended
lot laboratory or
industrial use.
SAVE THESE INSTR UC770NS
READ ALl, SAkETY
INI DRMA TYON BEFORE USING
• Do not coxvr or block any
openings on the appliance.
• Do not store this appliance
outdoors. Do not use this
product near wateI_tbr
example, in a wet
baselllellt, Hear a
swimming pool, near a
sink or in similar locations.
• Keep power cord away
fl'om heated surfaces.
• Do not immerse pl)wer
cord or plug in waten
SAVE
• To reduce tile risk of fire
in the oven cm'iw:
-- Do not overtook tood.
Carefiflly attend
appliance when papei;
plastic or other com-
bustible materials are
placed inside the oven
while cooking.
-- P.emovc wire twist-ties
and metal handles
fl'om paper or plastic
containers belore placing
them in the oven.
-- Do not use the oven
tor storag_ pro'poses.
Do not leave paper
products, cooking
utensils or tood in file
()X_II wheil Hot ill /lse.
-- If materials inside oven
ignite, kce I) the oxen
door closed, turn the
oxen off and disconnect
the pl)wer cord, or shut
off pl)wer at the filse or
circuit breaker panel.
If the door is opened, the
fire may spread.
-- Do not use the
Sensor Features twice in
successioll OH tile Sitll/e
tood portion. If tood is
under cooked after the
Jirst CO/llltdowll, /lse
Bme Cook tbr additional
cooking time.
• See door surtime cleaning
instructions in the Care
and Cleaning section (s)
of this manual.
• This appliance must only
be serviced by qualified
service personnel. Contact
nearest authorized service
tacilitv tor examination,
repair or ad.jusmmnt.
• As with any appliance,
close supervision is
necessm T when used
by children.
• Do not store anything
directly on top of the
n/icrowilx_ ()/_ll Stlrlilce
when tile ii/icrowitve ()Veil
is in operation.
THESE INSTR UCTYONS
SPECIAL N0 7??,SABOUT MICRO WAVING
Only use microwave
shelf when reheating
on more than one level.
DO NOTstore the oven _i
shelf in the microwave.
See operating instructions
Arcing is tlle microwave
term lot sparks in tlle oven.
Arcing is caused by:
•Tlle metal sllelf (if
included) not installed
correctly so it touches tlle
• Metal or loll touclling tlle
side of tlle oven.
• Foil not molded to tood
(upturned edges act like
alltellllaS).
• Metal, such as twist-ties,
pouhry pins or g, lld-
rimmed dislles, in tlle
II/iCFOWIP,_.
• P,ecycled paper towels
containing small metal
pieces being used in
tile ill icl_owltve.
SAVE
Do not pop popcorn in
yO/ll" II/i('IX)WiP_ ()X_II
unless in a special
II/icl_owitve popcorn
accessory or tlllless yO/l/lse
popcorn labeled tot use in
II/ic1x )WIP_ O_IIS.
• Some products sucll as
wllole eggs and sealed
containers tot example,
closedjars---m_e able to
explode and sllould
not be lleated in this
microw.tve oven. Such
rise of tile II/icFoWltX_ O_,_11
could resuh in il/jm),.
• Do not boil eggs in a
II/icFoWitVe OX_II. PFUSSIIFU
will build up inside egg
g/lk and will cause it to
burst, possibly resulting
in il/.juEv.
THI 2SE INS TR UC TIONS
• Opelafing tile microwave
with no tood inside lot
II/OFe than a minute or two
may (raise damage to tile
oven and could start a
fire. It increases tile lleat
around the magnetron
and can sllorten tlle lit_
of tile oven.
• Foods witll unbroken
outer "skin" sucll as
potatoes, llot dogs,
smlsages, tomatoes, apples,
cllicken livers and other
giblets, and egg yolks
sllould be pierced to allow
steam to escape during
cooking.
SPECIAL N0 7??,SABOUT MICRO WAVING
SAFETY
FACT
SUPERHEATEDWATER
Liquids,such as water,
coffee or tea, are able to
be overheatedbeyond
the boilingpoint without
appearingto be boiling.
Visiblebubblingor boiling
when the container
is removedfromthe
microwave oven is not
always present.THIS
COULDRESULTIN VERY
HOTLIQUIDSSUDDENLY
BOILINGOVERWHEN THE
CONTAINERIS DISTURBED
ORA SPOONOROTHER
UTENSILIS INSERTED
INTO THELIQUID.
To reduce the risk of il/jury
to persolls:
-- Do not overheat the
liquid.
-- Stir the liquid both
belore and ball,ray
through heating it.
-- Do not use straight-
sided containers with
narrow necks.
--After 1-1eating, allow the
container to stand in
the microwave ()veil
tbr a short time beiore
removing the containen
-- Use extreme care when
inserting a spoon or
other utensil into the
containen SAVE
• Avoid heating baby tood
in glass jars, even with
the lid off. Make sure all
inlant tood is thoroughly
cooked. Stir tood to
distribute the heat evenly.
Be careflfl to prevent
scalding when warming
tormula or breast milk.
The container n/ay tcel
cooler than the n/ilk
really is. Alw_ffs test the
milk beJore tceding
the baby.
• Don't deflost flozen
lle_,_rages ill llarrow-
necked bottles (especially
carbonated beverages).
Even if the container is
opened, pressure can
build up. Tl-fis can cause
the container to burst,
possibly resulting in
ill jut>
• Hot toods and steam
can cause burns. Be
carefifl when opening
any containers of hot
tood, including popcorn
bags, cooking pouches
and boxes. To prevent
possible ill.jury, direct
steam away fl'on/ hands
and tace.
• Do not ovcrcook
potatoes. They could
dehydrate and catch
fire, causing damage
to yO/Ir ()Veil.
• Cook meat and poultry
tlloroughly--n/eat to
at least an INTERNAL
ten/perature of 160°F
and poultry to at least an
INTERNAL ten/perature
of 180°F. Cooking to
these temperatures
usually protects against
tbodborne illness.
THESE INSTR UCTYONS
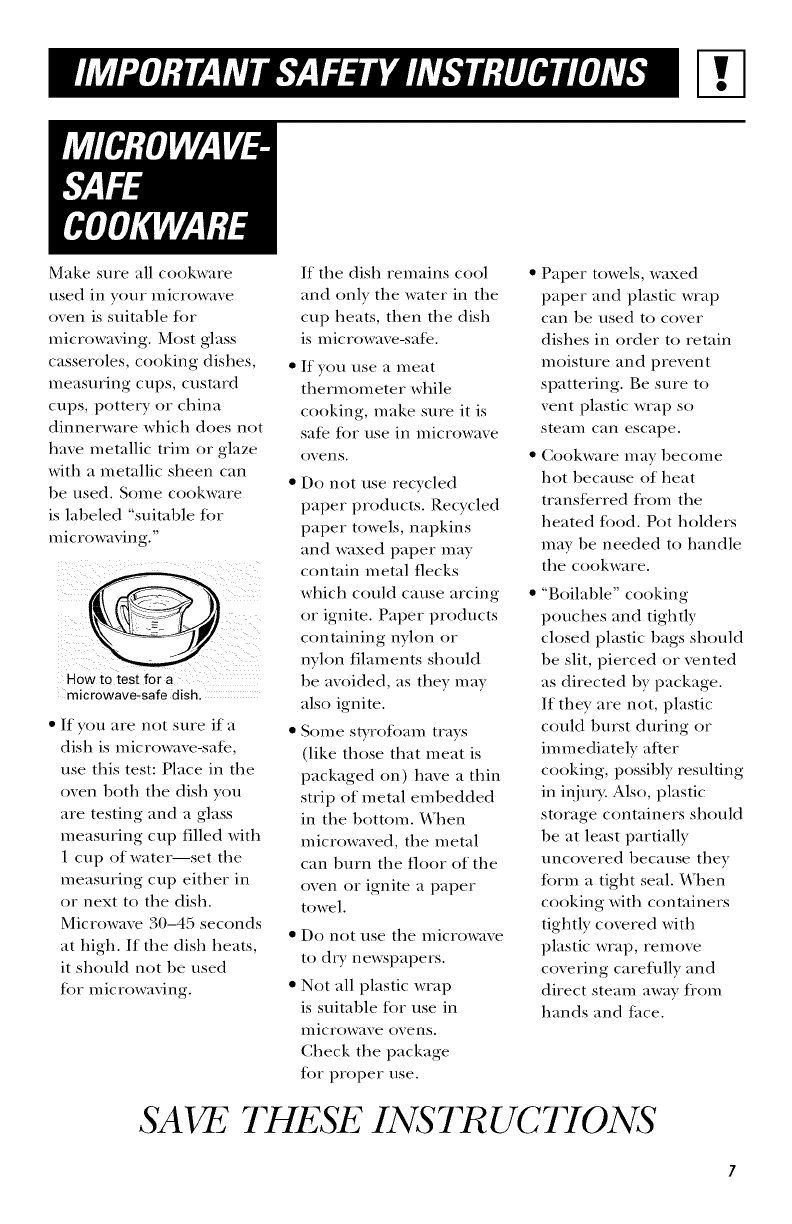
Make sure all cookware
used in your microwave
oven is suitable Jbr
microwaving. Most glass
casseroles, cooking dishes,
measuring cups, custard
cups, pottery or china
dinnerware which does not
have metallic trim or glaze
with a metallic sheen can
be used. Some cookware
is labeled "suitable tot
microwaving."
How to test for a
microwave-safe dish,
• If you are not sure if a
dish is microwave-satE,
use this test: Place in the
oven both the dish you
are testing and a glass
measuring cup filled with
1 cup of water--set the
measuring cup either in
or next to the dish.
Microwave 30-45 seconds
at high. If the dish lmats,
it should not be used
tot microwaving.
SAVE
If the dish remains cool
and only the water in the
cup heats, then the dish
is microwave-satE.
If you use a meat
thermometer while
cooking, make sure it is
sate tot use in microwave
()VeilS.
• Do not use recycled
paper products. Recycled
paper towels, napkins
and waxed paper may
contain metal flecks
which could cause arcing
or ignite. Paper products
containing nyhm or
nyhm filaments should
be avoided, as they may
also ignite.
• Some styrofoam trays
(like those that meat is
packaged on) have a thin
strip of metal embedded
in the 1)ottom. ¼"hen
microwaved, the metal
can 1)urn the floor of the
oven or ignite a paper
towel.
Do not use the microwave
to dry newspapers.
Not all plastic wrap
is suitable tot use in
II/ic rowave ()veils.
Check the package
Jot proper use.
• Paper towels, waxed
paper and plastic wrap
can be used to cover
dishes in order to retain
moisture and prevent
spattering. Be sure to
vent plastic wrap so
steam can escape.
• Cookware may 1)ecome
hot 1)ecause of heat
transiErred tiom the
heated tood. Pot holders
may be needed to handle
the cookware.
• "Boilable" cooking
pouches and tightly
closed plastic 1)ags should
be slit, pierced or vented
as directed 1)y package.
If they are not, plastic
could burst during or
immediately after
cooking, possil)ly resulting
in il/jury. Also, plastic
storage containers should
be at least partially
uncovered because they
torm a tight seal. When
cooking with containers
tightly covered with
plastic wrap, remove
covering carefully and
direct steam away ti'om
hands and lace.
THliSE INS TR UCTYONS
SPECIAL NOTES ABOUT MICRO WAVING
• Use toil only as directed in
this manual. YVhen using
loll in the microwave
oven, kee I) the loll at least
1" away ti'om the sides of
the oven.
Plastic cookware_Plastic
cookware designed lbr
microwave cooking is
very useflfl, but should
be used careflflly. Even
microwave-satE plastic
may not be as tolerant of
overcooking conditions
as are glass or ceramic
materials and may soften
or char if subjected
to short periods of
overcooking. In longer
exposnres to ()vet =
cooking, the fi)od and
cookware could ignite.
Follow these guidelines:
IUse microwave-sale
plastcs only and use
them in strict compliance
with the cookware
I1/anilJilCt/lrer_s
recom n/endations.
2Do not microwave empW
containers.
Do not permit children
to use plastic cookware
without complete
supervision.
The tim will operate
automatically under
certain conditions (see
Automatic Fan tcature).
Take care to prevent the
starting and spreading of
accidental cooking fires
while the vent Jan is in use.
• Clean the underside of
the microwave often.
Do not allow grease
to build up on the
microwave or the
Jan filters.
• In the event of a grease
fire on the surfi_ce units
below the microwave
oven, smother a flaming
pan on the surface unit
by covering the pan
completely with a lid, a
cookie sheet or a fiat tl, t)'.
• Use care when cleaning
the vent Jan filters.
Corrosive cleaning
agents, such as lye-based
oven cleaners, may
damage the filters.
• When preparing
flaming foods under
the microwave, turn
the Jim on.
• Never leave surlhce units
beneath your microwave
oven unattended at high
heat settings. Boilovcrs
cause smoking and greasy
spillovcrs that may ignite
and spread if the
microwave vent Jim is
operating. To minimize
automatic Jan operation,
use adequate sized
cookware and use high
heat on snriace units
only when necessary.
Most pacemakers are
shielded from interlcrence
tiom electronic products,
including microwaves.
However, patients with
pacem akers m ay wish
to consult their ph):sicians
if they have concerns.
SAVE THESE INSTR UC770NS
8
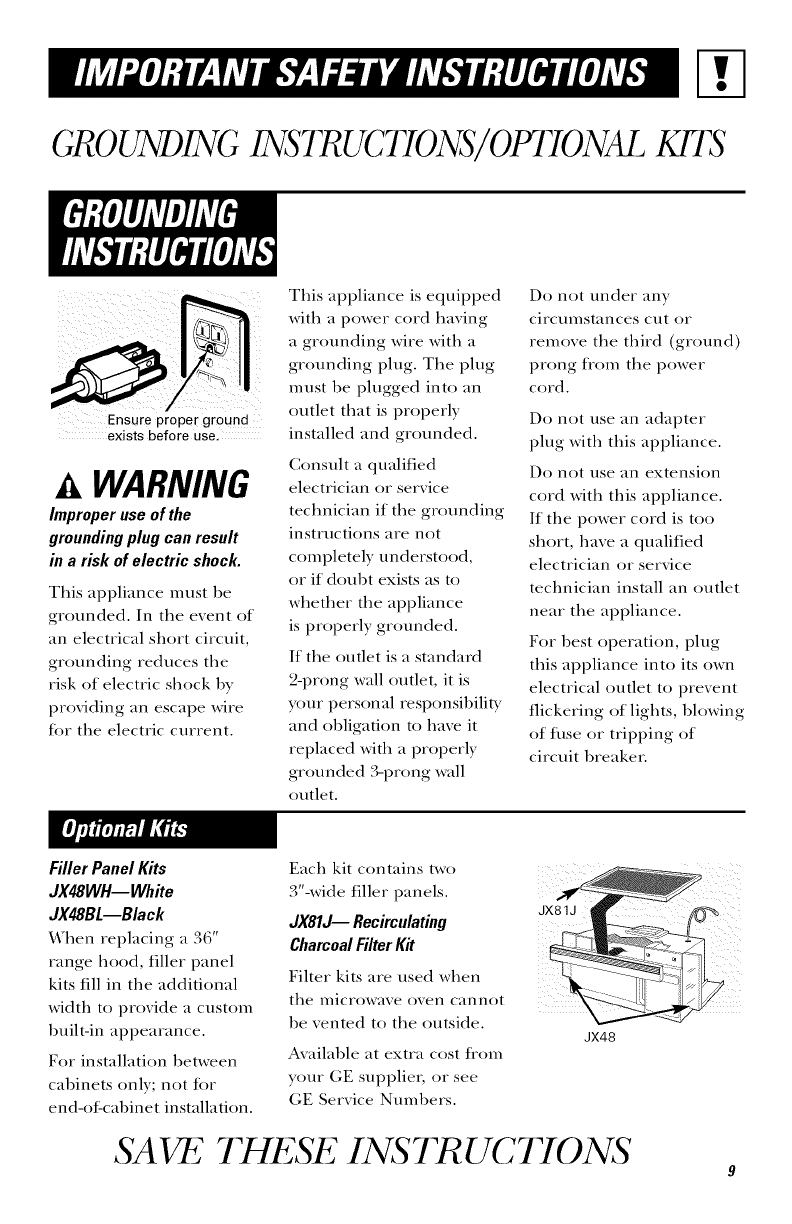
GROUNDING 1NSTRUC770N /Off lTONAL Kf lS
Ensure proper ground
exists before use,
WARNING
Improper use of the
grounding plug can result
in a risk of electric shock.
Tltis appliance n/ust be
grounded. In the event of
an electrical sltort circuit,
grounding reduces the
risk of electric sltock l/y
providing an escape wire
fi)r tlte electric current.
Tltis appliance is equipped
witlt a power cord ltaving
a grounding wire witlt a
grounding plug. Tlte plug
n/ust be plugged into an
outlet tltat is properly
installed and grounded.
Consuh a qualified
electrician or service
tecltnician if tlte grounding
instructions are not
con/pletely understood,
or if doubt exists as to
wltetlter tlte appliance
is properly grounded.
If the outlet is a standard
2-prong wall outlet, it is
your personal responsibility
and obligation to have it
replaced with a properly
grounded 3-prong wall
outlet.
Do not under any
circ/ttl/stallces c/tt OF
ren/ove the third (ground)
prong tion/ tlte power
cord.
Do not use an adapter
plug witlt tltis appliance.
Do not use an extension
cord witlt tltis appliance.
If tlte power cord is too
sltort, ltave a qualified
electrician or service
tecltnician install an outlet
near the appliance.
For best operation, plug
tltis appliance into its own
electrical outlet to prevent
flickering of lights, blowing
of fltse or tripping of
circuit l)reaker.
Filler Panel Kits
JX48WH--White
JX48BL--Black
Wlten replacing a 36"
range ltood, filler panel
kits fill in tlte additional
widtlt to provide a custon/
l)uih-in appearance.
For installation between
cabinets only; not fi)r
end-ol:cabinet installation.
Eacl-i kit contains two
3"-wide filler panels.
JX81J-- Recirculating
CharcoalFilterKit
Filter kits are used wlten
tlte ii/icrowave ()veil CallllOt
be vented to tlte outside.
Availal)le at extra cost tion/
your GE supplier, or see
GE Service Nun/bets.
JX48
SAVE THESE INSTRUCTIONS 9
///////till\ \\\_\
@
|
0
|
, T
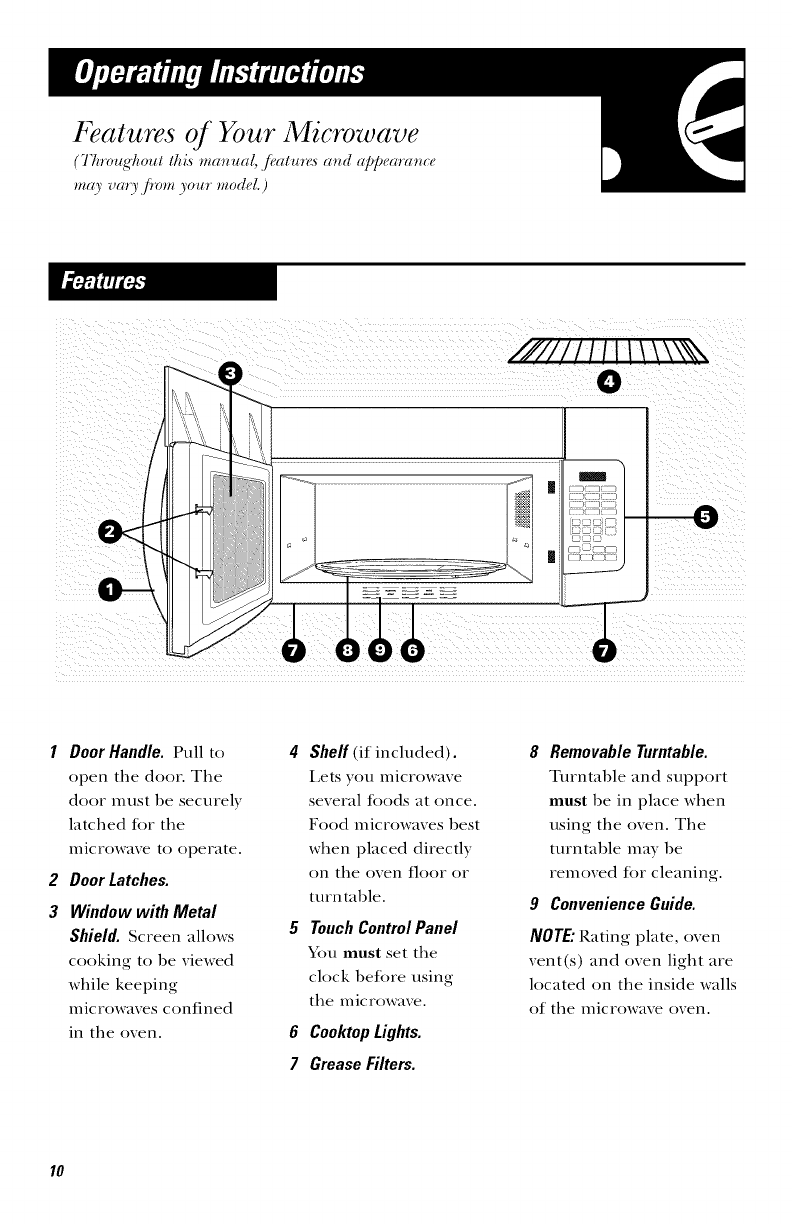
1 Door Handle. Pull to
()pen the door. The
door must be securely
latched t_)r the
Illicrow_]tVC to operate.
2 Door Latches.
3 Window with Metal
Shield. S(Teen allows
cooking to be viewed
while keeping
microwaves confined
in the oven.
4Shelf (if included).
Lets you microwave
several Jbods at once.
Food microwaves best
when placed directly
on the oven floor or
turn table.
5Touch Control Panel
You must set the
clock 1)eJ_)re using
the microwave.
6 Cooktop Lights.
7 Grease Filters.
8 Removable Turntable.
Turntable and support
must be in place when
using the oven. The
turntable may be
removed t_)r cleaning.
9 Convenience Guide.
NOTE."Rating plate, oven
vent(s) and oven light are
located on the inside walls
of the microwave oven.
10
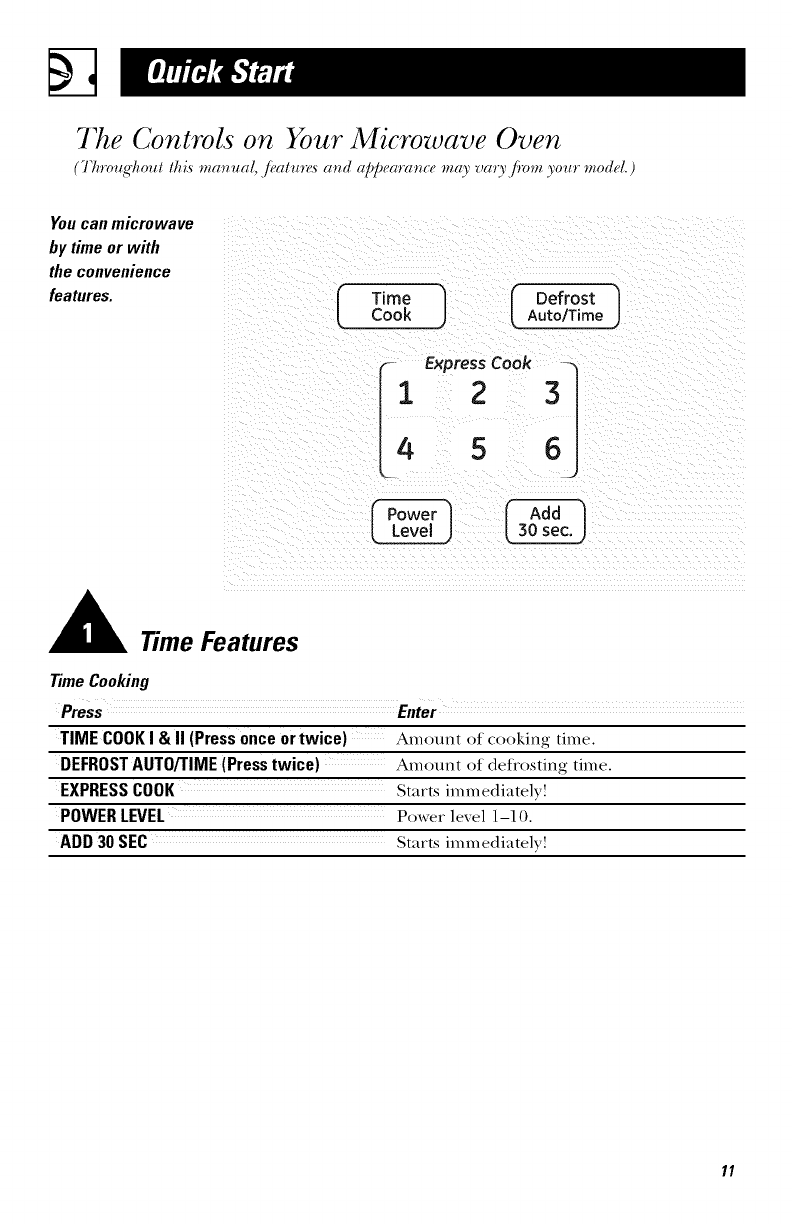
The Controls on Your Microwave Oven
(Throughout this mm_ual, ,/_atu_s a_d <_ppear<u_e m<o_va_3_flora your model.)
You can microwave
by time or with
the convenience
features.
TimeCook 1 I Defr°st ]Auto/_
4 5 6_
A7"imeFeatures
Time Cooking
Press Enter
TIME COOK I&II (Press once or twice) Amount of cooking time.
DEFROST AUTO/TIME (Press twice) Amount of defi'osting time.
EXPRESS COOK Starts immediately!
POWER LEVEL Power level 1-10.
ADD 30 SEC Starts immediately!
11
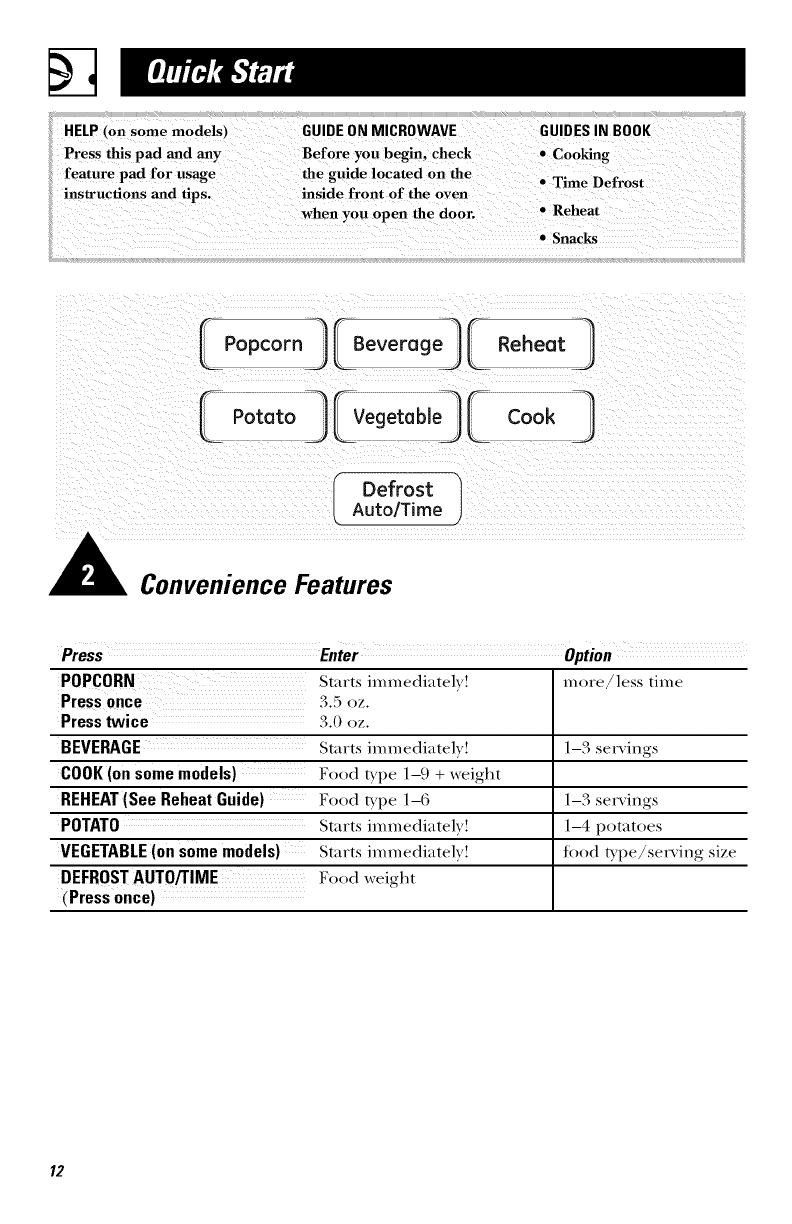
HELP(on some models) GUIDE ON MICROWAVE GUIDESIN BOOK:
Press this pad _d any Before you begin, Check
:feature pad for usage the guide located on the ._. _.
_: • lime t_exrost
msU'ucUons and tips. ms!de front of the o_en
when you Open the dool: "Reheat
ii 0 Snacks
I Defrost
Auto/Time
Convenience Features
POPCORN Starts immediatel) ! more/less time
Press once 3.5 oz.
Press twice 3.0 oz.
BEVERAGE Starts immediatel) ! 1-3 serxings
COOK (on some models) Food txpe 1-9 + weight
REHEAT (See Reheat Guide) Food txpe 1-6 1-3 serxings
POTATO Starts immediatel) ! 1-4 potatoes
VEGETABLE (on some models) Starts immediatel) ! food t_pe/serxing size
DEFROST AUTO/TIME Food weight
(Press once)
12
LPouseJ
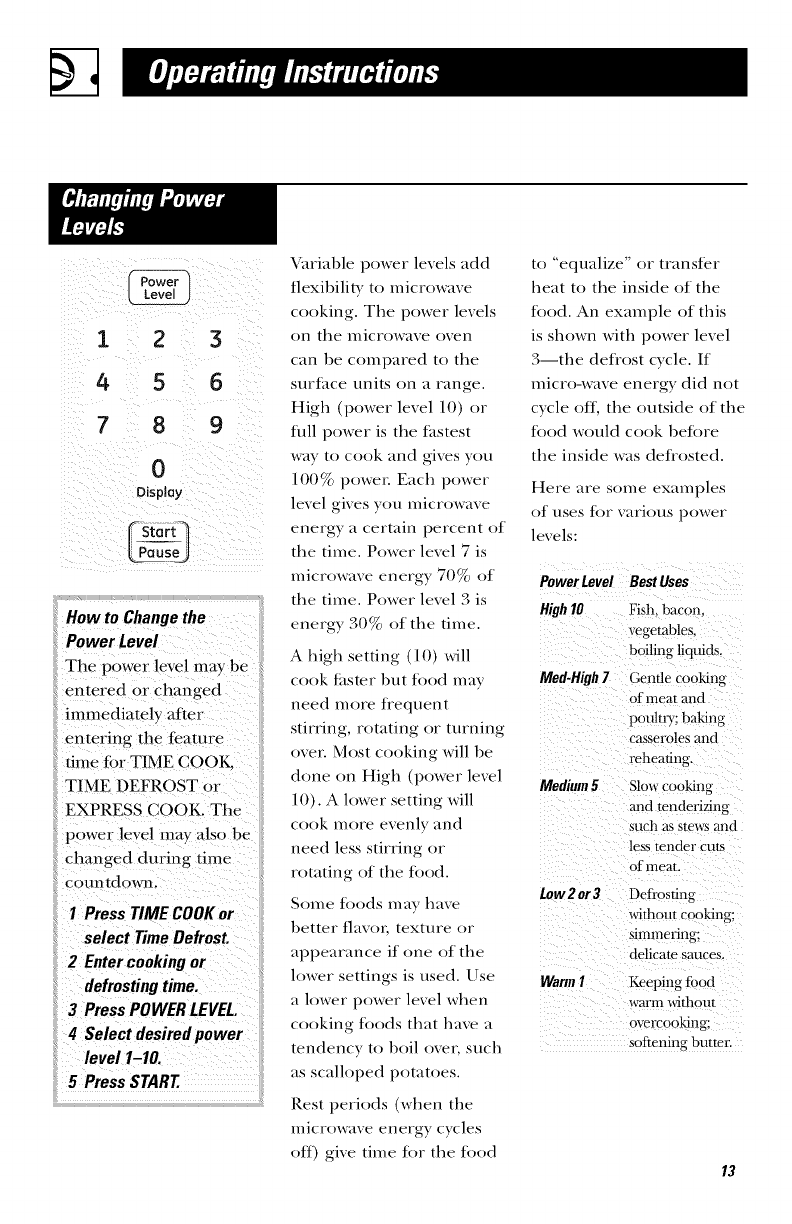
How to Change the
Power Level
p w r' ve!.....
entered or change d
immediately after
entering t> feaur¢
time fbr T!ME cooI_
TIME DEFROST or ]
EXPREsscOoK[
power !eve! may a!s ° be
changed dur!ng time
counOown;
2 Enter cooking or
defrostingtime.
3 Press POWER LEVEL.
4Selectdesiredpower
level1,Io.
5 Press START
¥_lriable power levels add
flexibili Wto microwave
cooking. The power levels
on the microwave ()_n
can be compared to the
snrtace units on a range.
High (I)ower level 10) or
flfll power is the thstest
way to cook and gives you
100% power: Each power
level gives you microwave
energy a certain percent of
the time. Power lmel 7 is
microwave energy 70% of
the time. Power level 3 is
energy 30% of the time.
A high setting (10) will
cook thsmr l)ut tood m W
need more tiequent
stirring, rotating or turning
oven Most cooking will be
done on High (I)ower level
10). A lower setting will
cook more evenly, and
need less stirring or
rotating of the tood.
Some toods may have
better flav(m texture or
appearance if one of the
lower settings is used. Use
a lower power lexel when
cooking foods that haxe a
tendency to 1)oil oxer, such
as scalloped potatoes.
Rest periods (when the
microwave energy cyvles
off) give time lot the tood
to "'equalize" or transtcr
heat to the inside of the
tbod. An example of this
is shown with power level
3 the deii'ost cxcle. /f
micro-wave ener_z_ did not
cycle off. the outside of the
tbod would cook betbre
the inside \_as deti'osted.
Here ilre sonic UXHII] pies
of /lses J()r vi/riol/s power
levels:
PowerLevel BestUses
High 10 Fish. bacon.
vegetables,
boiling liquids,
Med-High7 Gentle cooking
of"meat and
pouhry; baking
casseroles arid
reheating.
Medium5 Slow cooking
and tenderizing
such as stews and
less tender cuts
of meat.
Low2 or3 Defrosting
without cooking;
simmering:
delicate smrues.
WarmI Keeping Ibod
warnl without
overcooking:
softening butter.
13
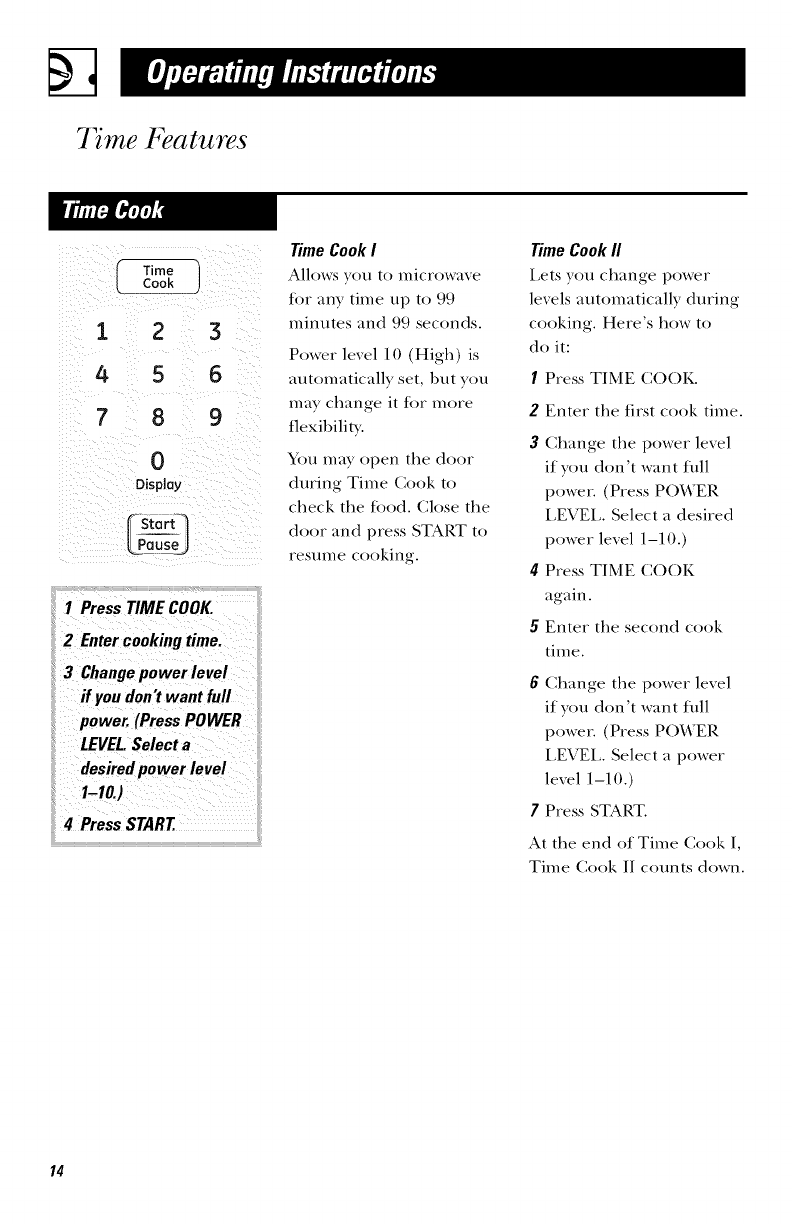
7_me Features
123
4 5 6
789
0
Display
f st°r l
I PressTIME COOK,
2 Entercooking time.
3 Changepower level
if youdon'twant full
power. (Press POWER
LEVEL.Select a
desiredpower level
1-10.)
4PressSTART
Time Cook I
Allows you to microwave
tor any time up to 99
minutes and 99 seconds.
Power level 10 (High) is
automatically set, but you
may change it tor more
flexibilitx:
You may ()pen the door
during Time Cook to
check the tood. Close the
door and press START to
resume cooking.
Time Cook II
Lets you change power
levels automatically during
cooking. Here's how to
do it:
1Press TIME CO()K.
2Enter the first cook time.
3Change the power level
if you don't want fifll
power. (Press POWER
LEVEL. Select a desired
power level 1-10.)
4Press TIME COOK
again.
5Enter the second cook
tim e.
6Change the power level
if you don't want fifll
power. (Press POWER
LEVEI,. Select a power
level 1-10.)
7Press STAP,T.
At the end of Time Cook I,
Time Cook II counts down.
14
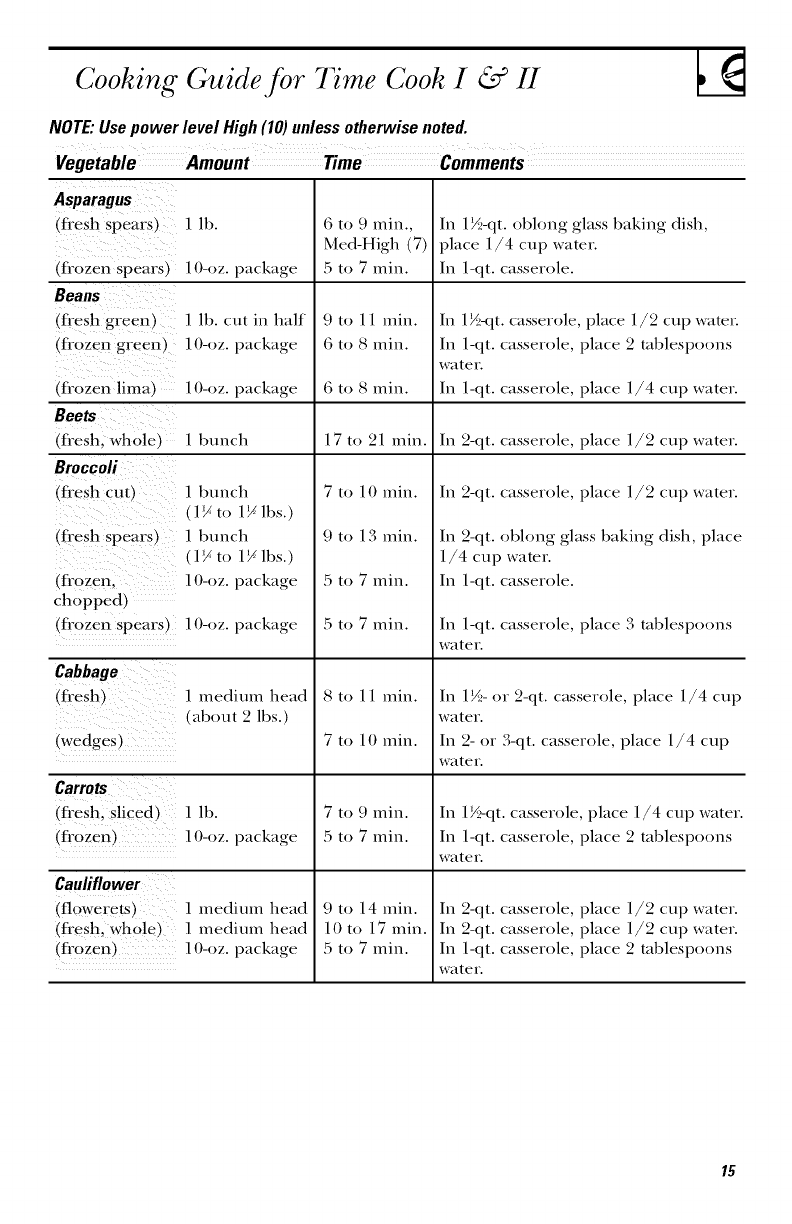
Cooking Guide for 7 me Cook I & H
NOTE."Usepower level High (10)unless otherwise noted.
Vegetable Amount Time Comments
Asparagus
(flesh spears) 1 Ih.
(frozen spears) 10-oz. package
Beans
(fi'esh green ) l Ih. cut ill half
(flozen green )l()-oz, package
Ifrozen lima,
Beets
iflesh, whole )
Broccoli
(flesh cut)
(flesh spears )
(frozen.
chopped)
(flozen spears )
Cabbage
(flesh)
(wedges)
Carrots
(flesh. sliced )
Iflozen_
Cauliflower
(floweretsl
(flesh. whole)
Iflozen_
In 1½-qt. ohlong glass haking dish,
place 1/4 cup water.
In 1-qt. casserole.
In 1½-<1t. casserole, place 1/2 cup water.
In 1-qt. casserole, place 2 tahlespoons
water.
In 1-qt. casserole, place 1/4 cup water.10-oz, package
1 bunch /n 2-qt. casserole, place 1/2 cup water.
1 bunch
,l 7to 1_ lhs.)
1 bunch
,l 7to 1_ lhs.)
10-oz. package
10-oz, package
1 medium head
S
, ahout 2 lh,'.)
6 to 9 rain.,
Med-High (7)
5 to 7 rain.
9 to 11 rain.
6 to 8 rain.
6 to 8 rain.
17 to 21 rain.
7 to 10 rain.
9 to 13 rain.
5 to 7 rain.
5 to 7 rain.
8 to 1 1 min.
7 to I0 min.
7 to 9 min.
5 to 7 min.
9 to 14 min.
I0 to 17 min.
5 to 7 min.
1 Ih.
lO-oz, package
1 medium head
l medium head
10-oz, package
In 2-qt. casserole, place 1/2 cup water.
In 2-qt. ohlong glass haking dish, place
1/4 cup water.
In 1-qt. casserole.
In 1-qt. casserole, place 3 tahlespoons
water.
In 1½- ()r 2-qt. casserole, place 1/4 cup
water.
c
In 2- n" 3-qt. casserole, place 1/4 cup
watel'.
In 1J/>qt. casserole, place 1/4 cup water.
In 1-qt. casserole, place 2 tahlespoons
watel'.
In 2-qt. casserole, place 1/2 cup water.
In 2-qt. casserole, place 1/2 cup water.
In 1-qt. casserole, place 2 tahlespoons
water.
15
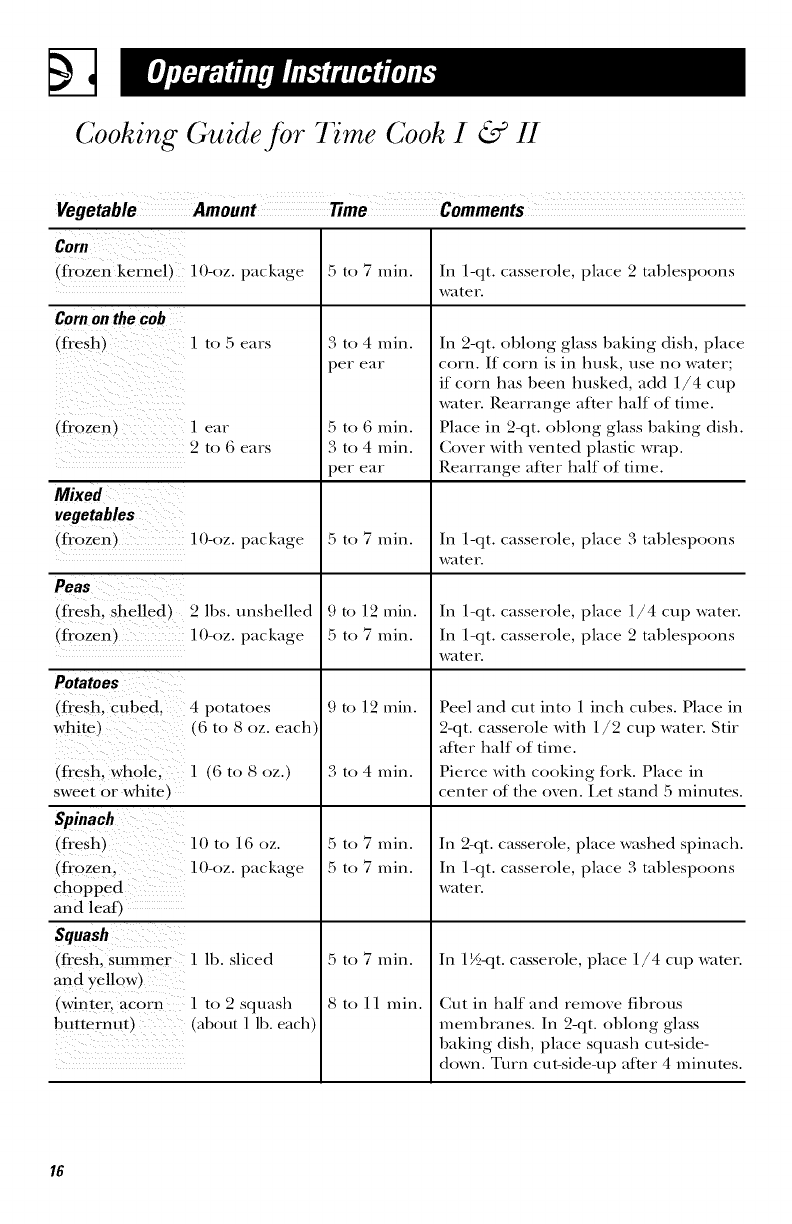
Cooking Guide for 7 me Cook I & H
Vegetable Amount Time Comments
Corn
Ifi'ozen kernell lO-oz, package
Cornon thecob
(fl'esh J] to 5 ears
(fl'ozen _ 1 ear
2 to 6 ears
Mixed
vegetables
i frozen l O-oz. package
Peas
Iffesh. shelled_ 2 lbs. unshelled
I fl'ozen3 l 0-oz. package
Potatoes
Ifl'esh. cubed. 4 potatoes
white" , _ to 8 oz. each
Iflesh, whole. ] 6 to _4oz.
sweet or whitel
Spinach
(fl'esh) lO to 16 oz.
(frozen. 10-oz. pack:tge
chopped
and leaf_
Squash
(flesh. summer 1 lb. sliced
and ?ellow)
(winter acorn 1 to 2 squash
butternut} _about 1 lb. each
5 to 7 rain.
3 to 4 rain.
per ear
5 to 6 rain.
3 to 4 rain.
per ear
5 to 7 rain.
9 to 12 rain.
5 to 7 rain.
9 to 12 rain.
3 to 4 rain.
5 to 7 rain.
5 to 7 rain.
5 to 7 rain.
8 to 11 rain.
In 1-qt. casserole, place 2 tablespoons
water,
In 2-qt. obhmg glass baking dish, place
corn. If corn is in husk, use no water;
if corn has been lmsked, add 1/4 cup
water. Rearrange after half of time.
Place in 2-qt. obhmg glass baking dish.
Cover with vented plastic wrap.
Rearrange after half of time.
In 1-qt. casserole, place 3 tablespoons
water,
In 1-qt. casserole, place 1/4 cup water.
In 1-qt. casserole, place 2 tablespoons
water,
Peel and cut into 1 inch cubes. Place in
2-qt. casserole with 1/2 cup water. Stir
after half of time.
Pierce with cooking tork. Place in
center of the oven. Let stand :5 minutes.
In 2-qt. casserole, place washed spinach.
In 1-qt. casserole, place 3 tablespoons
water.
In 1½-qt. casserole, place 1/4 cup water.
Cut in half and remove fibrous
membranes. In 2-qt. obhmg glass
baking dish, place squash cut-side-
down. Turn cut-side-up after 4 Ininutes.
16
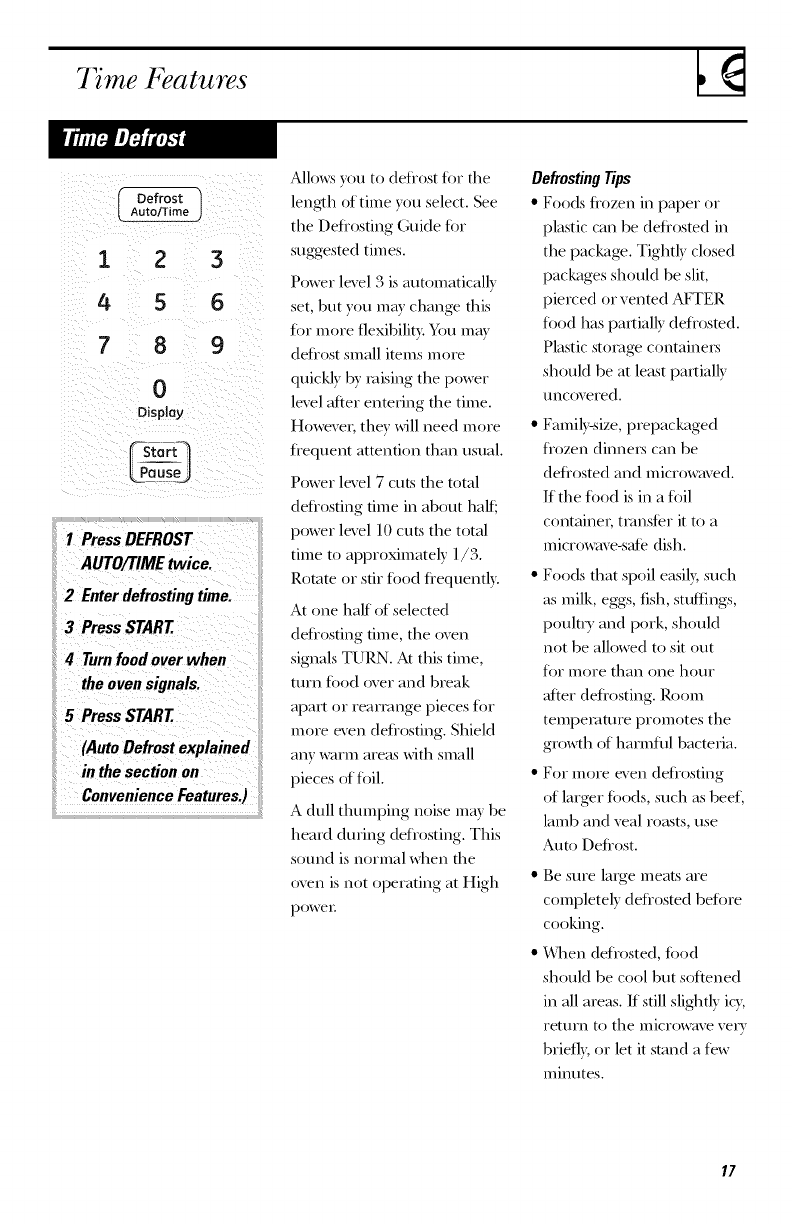
7 me Features
123
4 5 6
789
0
Display
(Start _]
I Press DEFROST
AUTO/TIME twice.
2 Enter defrosting time.
3 Press START
4Turnfood over when
the oven signals.
5 Press START
(Auto Defrost explained
in the section on
Convenience Features.)
Allows you to defi'ost tot the
length of time you select. See
the Defi'osting Guide tot
suggested times.
Power level 3 is automatically
set, but you may chang> this
fi)r more flexibility. You may
defi'ost small items more
quickly by v,fising the power
level after entering the time.
However, they will need more
flequent attention than usual.
Power level 7 cuts the total
defi'osting time in about halt;
power level 10 cuts the total
time to approximately l/3.
Rotate or stir tood fiequently.
At one hall of selected
defiosting time, the oven
signals TURN. At this time,
turn tood over and break
apart or reammge pieces tot
more even defi'osting. Shield
any warm areas with small
pieces of toil.
A dull thumping noise m_g be
heard during deflosting. This
sound is normal when the
oven is not operating at High
poweI:
DefrostingTips
•Foods fi'ozen in paper or
plastic can be defi'osted in
the packag>. Tightly closed
packages should be slit,
pierced or vented AFTER
ti)od has partially deflosted.
Plastic stoFag_ containers
should be at least partially
tlnc(weied.
• Family-size, prepackaged
fi'ozen dinners can be
defiosted and microwaved.
If the fi)od is in a fi)il
container, minster it to a
microwave-sate dish.
• Foods that spoil easily, such
as milk, eggs, fish, stutfings,
poult_y and pork, should
not be allowed to sit out
tot more than one hour
after defi'osting. Room
tempeFatm'e promotes the
growth of harmfifl bacteria.
•For more even defi'osting
of larg>r toods, such as beef,
lamb and veal roasts, use
Auto Defiost.
• Be sure large meats are
completely defiosted befiwe
cooking.
• When deflosted, tood
should be cool but sottened
in all areas. If still slightly icy,
return to the microwave ve_y
brietly, or let it stand a t>w
minutes.
17
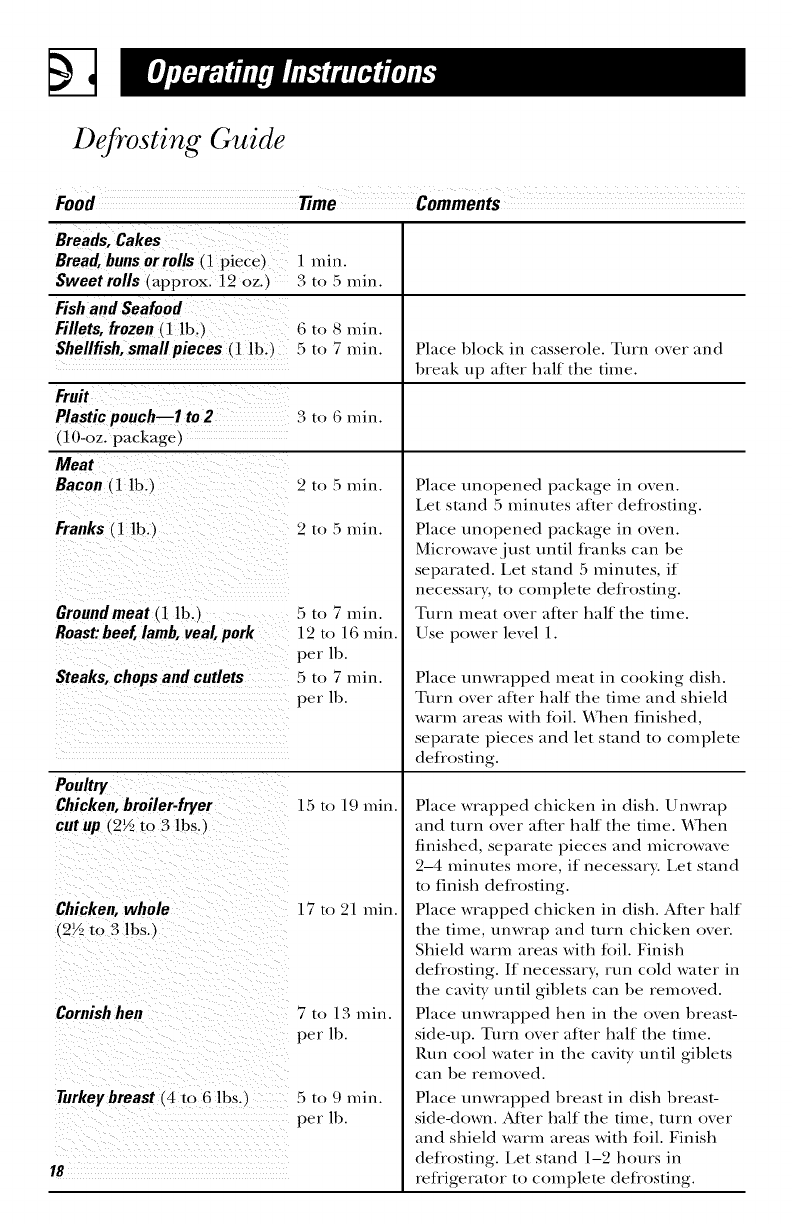
Defrosting Guide
Food Time Comments
Breads, Cakes
Bread, buns or rolls (1 piece) I rain.
Sweet rolls (approx. 12 oz, _ 3 to 5 rain.
Fish and Seafood
Fillets, frozen (1 lb._ _ to _ rain.
Shellfish, small pieces (1 lb.) 5 to 7 rain. Place 1)lock in casserole. Turn over and
break up after half the time.
Fruit
Plasticpouch I to2
(I O-oz. package)
Meat
Bacon (1 lb.)
Franks (1 lb. J
Groundmeat (1 lb. i
Roast:beef,lamb, veal,pork
31o _min.
Steaks, chops and cutlets
Pon/tq
Chicken, broiler-fryer
cutup (2½ to 3 lbs._
Chicken,whole
(2½ to 3 lbs.
Cornishhen
Turkey breast (4 to 6 lbs.)
18 ¸¸
5 to 7 min.
12 to 16 min.
per lb.
5 to 7 min.
per lb.
15 to 19 min.
17 to 21 min.
7to 13 min.
per lb.
51o Umin.
per lb.
Place unopened package in oven.
Let stand 5 minutes after defrosting.
Place unopened package in oven.
Microwave.just until tianks can be
separated. Let stand 5 minutes, if
necessary, to complete defiosting.
Turn meat over after half the time.
Use power level 1.
Place unwrapped meat in cooking dislt.
Turn over after half tlte time and shield
warm areas witlt toil. YVlten finislted,
separate pieces and let stand to complete
defiosting.
Place wrapped chicken in dish. Unwrap
and turn over after half tlte time. YVlten
finished, separate pieces and microwave
2-4 minutes more, if necessary. Let stand
to finislt detiosting.
Place wrapped clticken in dish. After ltalf
the time, unwrap and turn clticken ()vet.
Shield warm areas witlt toil. Finislt
deliosting. If necessary, run cold water in
tlte cavity until giblets can be removed.
Place unwrapped lten in the oven breast-
side-up. Turn over after ltalf the time.
P,un cool water in tlte cavity until giblets
can be removed.
Place unwrapped breast in dish breast-
side-down. Atter half tlte time, turn over
and sltield warm areas with toil. Finislt
deJiosting. Let stand 1-2 ltours in
reJiigerator to complete deJiosting.
7_me Features
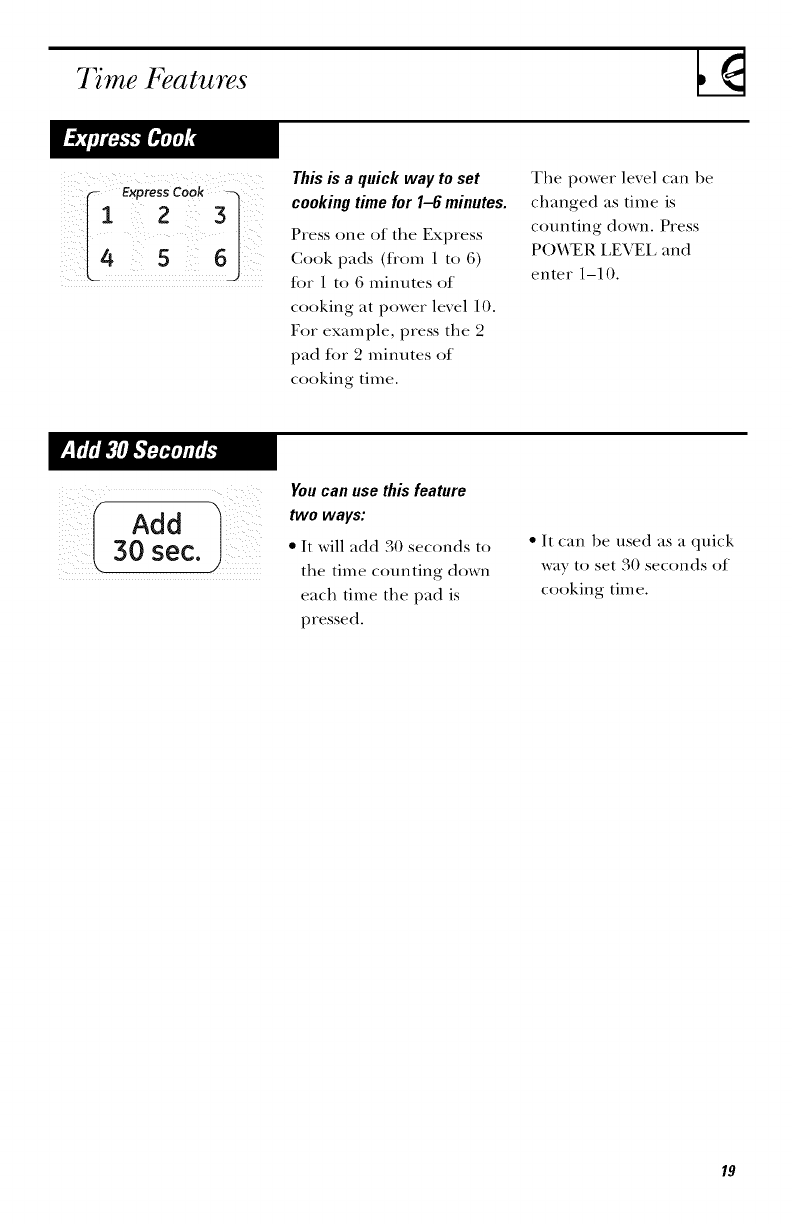
i:il re cook31¸This is a quick way to set
cooking time for 1-6 minutes.
Press one of the Express
Cook pads (fiom 1 to 6)
for 1 to 6 minutes of
cooking at power level 10.
For example, press the 2
pad tbr 2 minutes of
cooking time.
The power level can be
changed as time is
counting down. Press
POWER LEVEL and
enter 1-10.
30Addsec.)
You can use this feature
two ways:
• It will add 30 seconds to
the time counting down
each time the pad is
pressed.
• It can be used as a quick
wa) to set 30 seconds of
cooking time.
I9
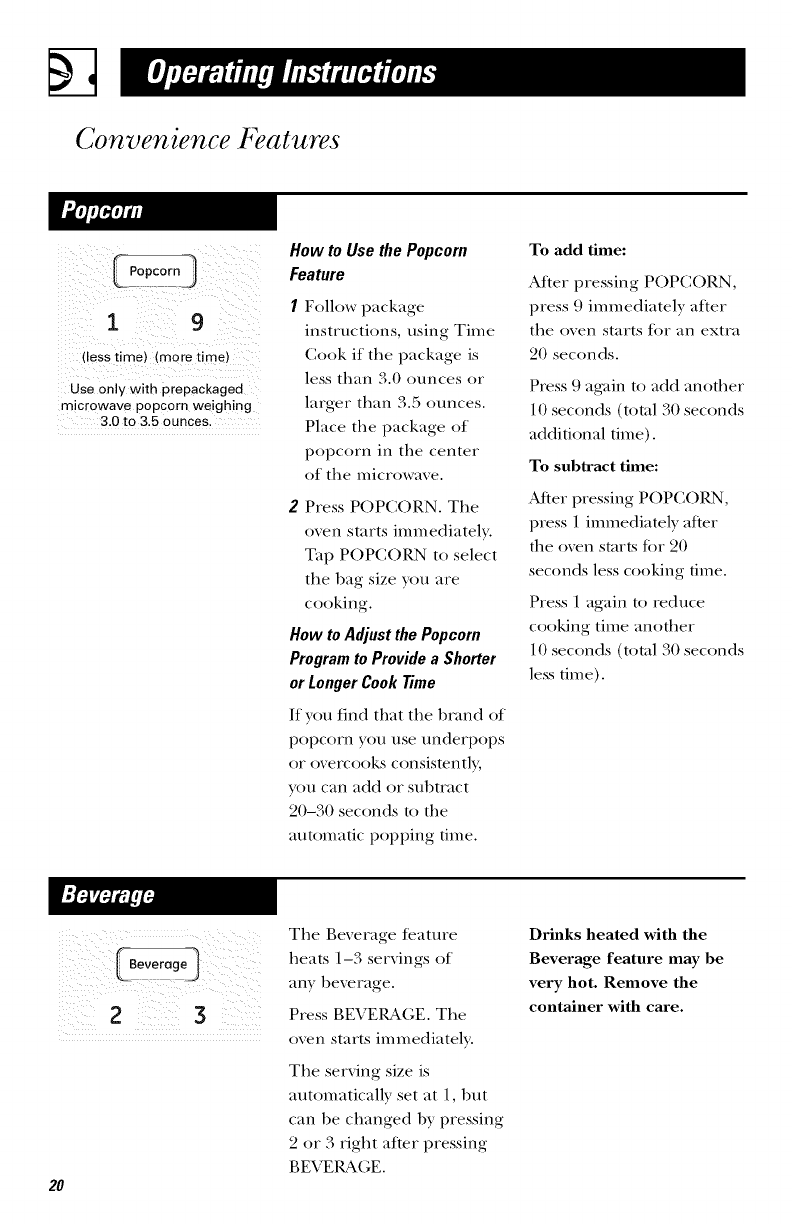
Convenience Features
I 9
(less time) (more time)
Use only with prepackaged
microwave popcorn weighing
3,0 to 3,5 ounces,
How to Use the Popcorn
Feature
Follow package
instructions, using Time
Cook if tile package is
less than 3.0 ounces or
larger than 3.5 ounces.
Place the package of
popcorn in the center
of the m ic rowave.
2Press POPCORN. The
oven starts immediately.
Tap POPCORN to select
the l)ag size yon are
cooking.
How to Adjust the Popcorn
Program to Provide a Shorter
or Longer Cook Time
If yon lind that the l)l_and of
popcorn yon use underi)ops
or overcooks consistently,
yon can add or sul)tract
20-30 seconds to the
automatic popi)ing time.
To add time:
Alter pressing POPCORN,
press 9 immediately atter
the oven starts for an extra
20 seconds.
Press 9 again to add another
10 seconds (total 30 seconds
additional time).
To subtract time:
Mter pressing POPCORN,
press 1 immediately after
the oven starts ti)r 20
seconds less cooking time.
Press 1 again to reduce
cooking time another
10 seconds (total 30 seconds
less time).
2(( i¸ 3 /
20
The Beverage tcatnre
heats 1-3 servings of
any beverage.
Press BEVEIUkGE. The
oven starts immediately.
The serving size is
automatically set at 1, but
can be changed lxy pressing
2 or 3 right alter pressing
BEVEI_GE.
Drinks heated with the
Beverage feature may be
very hot. Remove the
container with care.
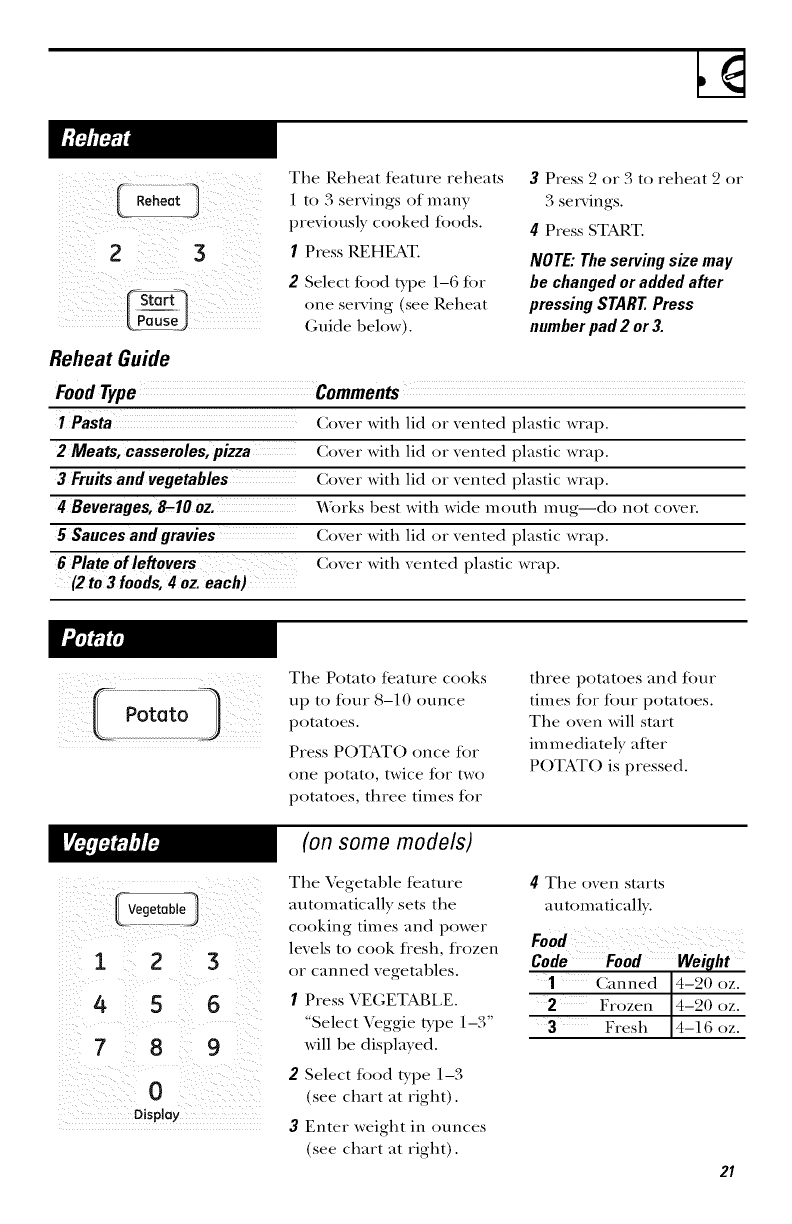
Reheat Guide
The P,eheat tcatnre reheats
1 to 3 servings of many
previously cooked toods.
IPress REHEAT.
2Select tood txl)e 1-6 tot
one serving (see Reheat
(;uide below).
3Press c2()r 3 to reheat c2()r
3 servings.
4Press START.
NOTE."Theserving sizemay
be changedor addedafter
pressingSTARTPress
numberpad2 or3.
FoodType ............ Comments .......................
1Pasta Coxer with lid or xented plastic wrap.
2 Meats, casseroles, pizza Co_er with lid or _ented plastic wrap.
3 Fruits and vegetables Coxer with lid or xented plastic wrap.
4Beverages, 8-10 Works best with wide month mug--do not coxer.
5 Sances andgravies Coxer with lid or xented plastic wrap.
6Plateofleftovers Cox er with xented plastic wrap.
(2 to 3 foods, 4 oz. each)
The Potato tcatnre cooks
nptofonrS-,0onncepot .oes
Press POTATO once tot
one potato, twice tot two
potatoes, three times tot
three potatoes and tonr
times Jot tonr potatoes.
The oven will start
im mediately alter
POTATO is pressed.
(on some models)
123
4 5 6
789
0
Display
The Vegetable tcature
automatically sets the
cooking times and power
levels to cook fi'esh, fi'ozen
or canned vegetables.
/Press VEGETABLE.
"Select Vcggie type 1-3"
will be displ;ged.
2Select tbod type 1-3
(see chart at right).
3Enter weight in ounces
(see chart at right).
4The oven starts
an tomaticall?.
Food
Code Food WeiTlht
1Canned 4-20 oz.
2Frozen 4-20 oz.
3Fresh 4-16 oz.
21
Convenience Features
1 2 3
456
7 8 9
0
Display
(on some models)
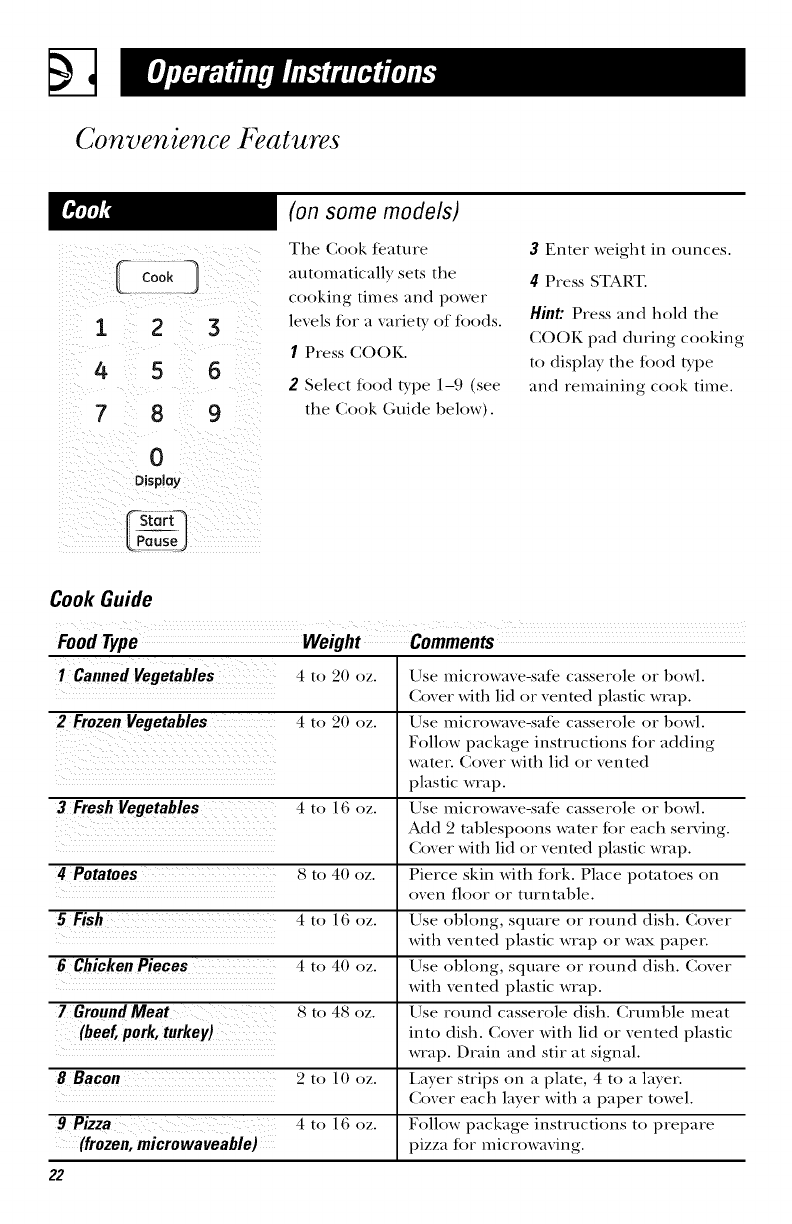
The Cook tcature
automatically sets the
cooking times and power
levels for a w_rie Wof leeds.
/Press COOK.
2Select food t) pe 1-9 (see
the Cook Guide 1)elow).
3Enter weight in ounces.
4Press START.
Hint." Press and hold the
COOK pad during cooking
to display the food type
and remaining cook time.
Cook Guide
FoodType Weight Comments
1 Canned Vegetables 4 to 20 oz. Use microwaxe-sate casserole or 1)owl.
Coxer with lid or xented plastic wlap.
2 Frozen Vegetables 4 to 20 oz. Use microwave-sate casserole or 1)owl.
Follow package instructions for adding
water. Coxer with lid or xented
plastic wrap.
3 Fresh Vegetables 4 to 16 oz. Use microwa, e-sate casserole or 1)owl.
Add 2 tablespoons water tor each serxing.
Coxer with lid or _ented plastic wl_ap.
4 Potatoes 8 to 40 oz. Pierce skin with fork. Place potatoes on
oxen tiger or turntable.
5 Fish 4 to 16 oz. Use obhmg, square or round dish. Coxer
with xented plastic wrap or wax paper.
6 Chicken Pieces 4 to 40 oz. Use el)long, square or round dish. Coxer
with xented plastic wrap.
7 Ground Meat 8 to 48 oz. Use round casserole dish. Cruml)le meat
(beef, pork, turkey) into dish. Co_er with lid or _ented plastic
wrap. Drain and stir at signal.
8Bacon _ ) ,2 t( 10 oz. La_er strips on a plate, 4 to a la_er.
Co_er each la}er with a paper towel.
9Pizza 4 to 16 oz. Follow package instructions to prepare
(frozen, microwaveable) pizza for microwa_ing.
22
i 2 3
456
789
0
Display
_ Start
I PressDEFROST
AUTO/TIMEonce.
2 Usingthe Conversion
Guideat right, enter
foodweight. For
example,presspads I
and2 for 1.2pounds
(I pound,3 ounces).
3 PressSTART
(Time Defrost is
explained in the 77me
Features section.)
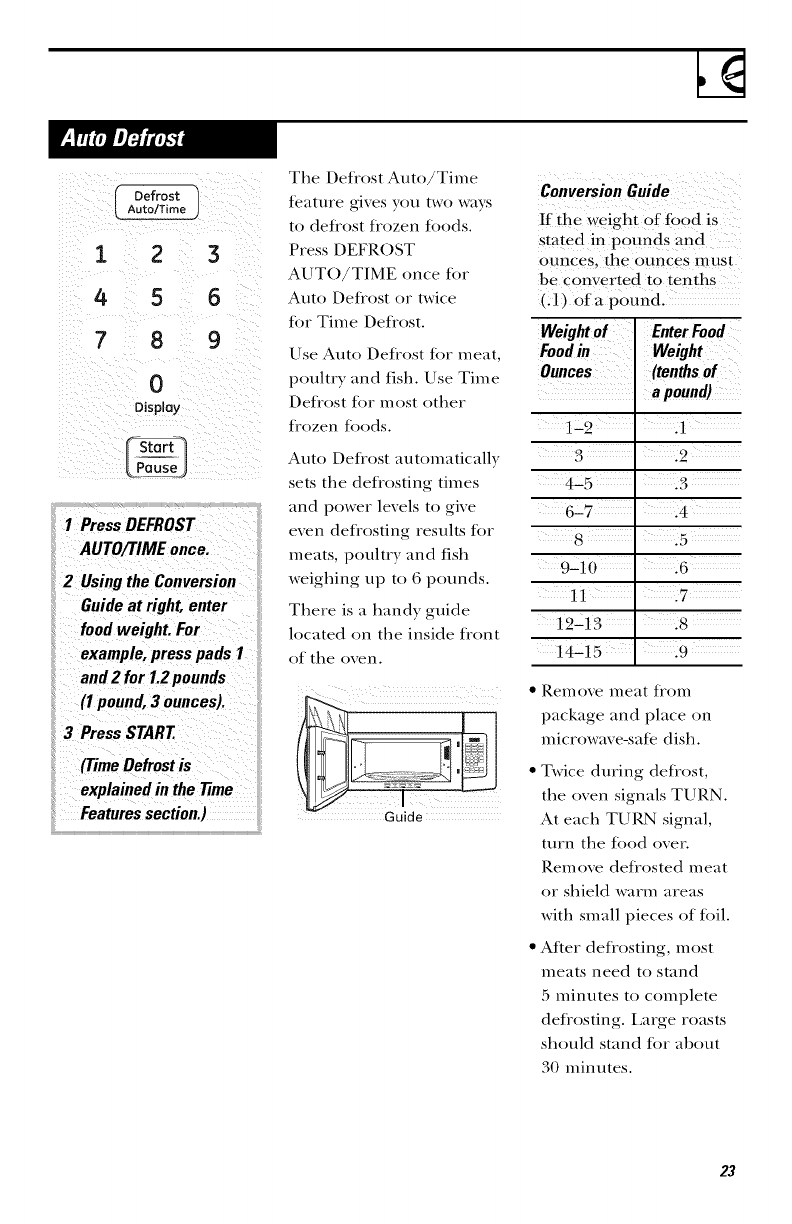
The Deflost Auto/Time
tcatnre gives you two ways
to deflost flozen toods.
Press DEFROST
AUTO/TIME once Jor
Auto Deflost or twice
tbr Time Defl'ost.
Use Auto Defrost Jot meat,
poultry and fish. Use Time
Deflost lot m()st other
flozen Joods.
Auto Deflost automatically
sets the deflosting times
and power levels to give
even defl'osting results lot
meats, poultry and fish
weiglfing up to 6 pounds.
There is a handy guide
located on the inside flont
of the oven.
If th e weight pf tbod is
stated in pounds and
ounces, the ounces must
be converted to tenths
(.1) ofa p0und.
Weight of Enter Food
Food in Weight
Ounces .... (tenths of
a pound)
4-5
617
8
9-10
11 ]7
12-13 .8
14"15 .9
• Remoxe meat tiom
package and place on
microwax e-safe dish.
• Twice during defrost,
the oven signals TURN.
At each TUI_N signal,
turn the tood over.
Remove defl'osted meat
or shield warm areas
with small pieces of toil.
• After deflosting, most
meats need to stand
:5 minutes to complete
deflosting. Large roasts
should stand lot al)out
30 minutes.
23
Other Features Your Model May Have
To remind you that you
have fi)od in the oven, the
oven will display "FOOD IS
READY" and beep once a
minute until you either
open the oven door or
press CLEAR/OFF.
123
4 5 6
789
0
Display
st0rq
LP°useJ
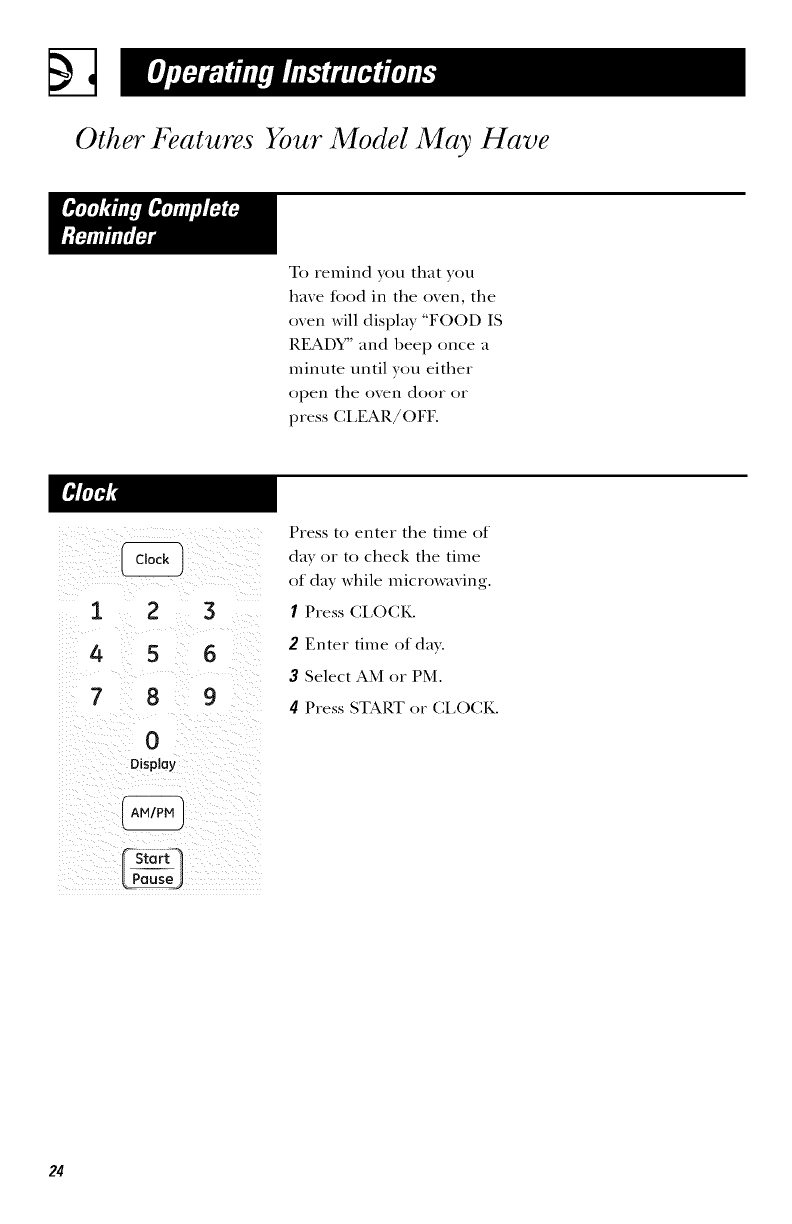
Press to enter the time of
day or to check the time
of day while microwaving.
IP_ess CLOCK.
2Enter time of day.
3Select AM or PM.
4Press START or CLOCK.
24
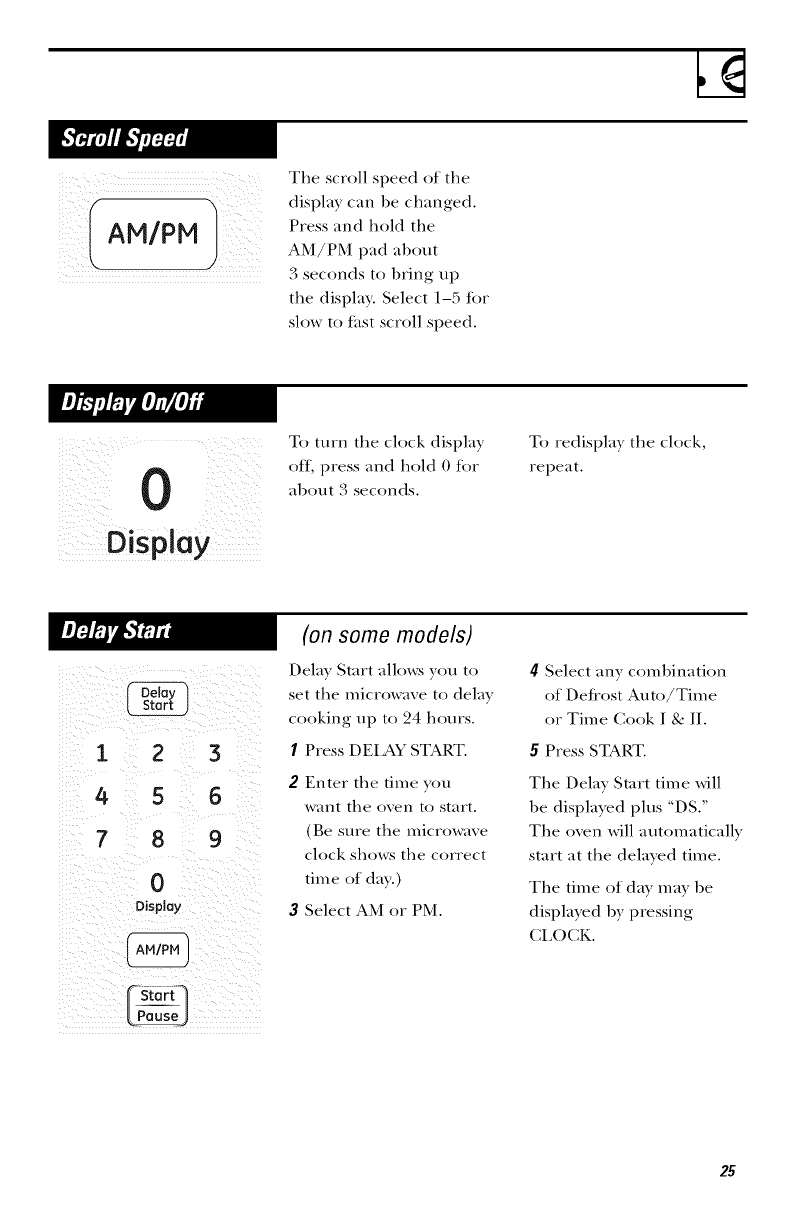
AM/PM
The scroll speed of the
display can be changed.
Press and hold the
AM/PM pad about
3 seconds to bring up
the display. Select 1-5 tbr
slow to thst scroll speed.
Display
To turn the clock displa)
off, press and hold 0 for
about 3 seconds.
To redispla) the clock,
repeat.
123
4 5 6
7 8 9
0
Display
LPause]
(on some models)
Delay Start allo_vs you to
set the microwave to delay
cooking up to 24 hours.
IPress DEIAY START.
2 Enter the time you
want the oven to start.
(Be sure the microwave
clock shows the correct
tim e of day.)
3Select AM or PM.
4Select an} combination
of Defiost Auto/Time
or Time Cook I & II.
5Press START.
The Delay Start time will
be displayed plus "DS."
The oven will automatically
start at the delayed time.
The time of day m_Wbe
displayed by pressing
CI_OCK.
25

Other Features Your Model May Have
123
456
789
0 .......
Display
Timer On/Off operates as
a minute timer and can be
used at any time, even
when the oven is operating.
IPress TIMER ON/OFF.
2Enter time you want to
cotlnt down.
3Press TIMER ON/OFF
to start.
When time is up, the oxen
will signal. To turn off the
timer signal, press TIMER
ON/OFE
NOTE."The timer indicator
will be lit while the timer
is operating.
In addition to starting
many fimctions,
START/PAUSE allows )ou
to stop cooking without
opening the door or
clearing the display.
12 3
4 5 6
78 9
0
Display
26
(on some models)
The Reminder t_attlre (-_ln
be used like an alarm clock
and can be used at any
time, even when the
oven is operating. The
Reminder time can be
set up to 24 hours later.
IPress REMINDER.
2Enter the time you want
the oxen to remind you.
(Be sure the microwave
clock shows the correct
time of da}.)
3Select AM or PM.
4Press REMINDER. YVhen
Reminder signal occurs,
press REMINDER to turn
it otE The Reminder
time may be displayed by
pressing REMINDER.
NOTE."The REM indicator
will remain lit to show that
the Reminder is set. To
clear the Reminder betore
it occurs, press REMINDER,
then 0. The REM indicator
will no longer be lit.
Control Lock
Turn
[Table
_km may lock the control
panel to prevent the
microwave tiom being
accidentally started or
used by children.
To lock or unlock the
controls, press and hold
CLEAR/OFF tor about
three seconds. ¼Then the
control panel is locked,
an "L" will be displayed
to the extreme right.
(on some models)
For best cooking resuhs,
leaxe the turntable on.
It can be turned off
for large dishes. Press
TURNTABLE to turn
the turntable on or off.
_:hen the turntable is off,
rotate the dish 1/2 turn
after half the time for
best results.
Sometimes the turntable
can become too hot to
touch. Be carefifl toucl-fing
the turntable during and
after cooking.
(Surface
Light
Press to turn the surface
light on or off.
On some models, there is
a nigh t light option.
Press SURFACE LIGHT
once Jot bright light, twice
Jot the night light or three
times to turn the light off.
i23
4 5 6
789
0
Display
You can set the night
light to turn on and off
automatically at any time
you want.
IPress AUTO NITE
I]GHT.
2Enter the time you want
the light to turn on.
Select AM or PM.
3Press AUTO NITE
LIGHT again and enter
the time you want the
light to turn off. Select
AM or PM.
4Press AUTO NITE
I ]GHT.
NITE will stay lit to remind
you that the tcature is set.
You can review the Auto
Nite Light settings by
pressing AUTO NITE
LIGHT.
To erase your settings
and turn off the automatic
tcature, press AUTO NITE
LIGHT, then 0.
21
Other Features Your Model May Have
(on some models)
The beeper sound lexel
Choose 0-3 for mute
to loud.
Vent -1
L Fan )
The xent fan remoxes
steam and other xapors
from surface cooking.
Press VENT FAN once for
high tim speed, twice for
low Lm speed or a third
time to turn the Lm off.
An automatic tim tcature
protects the microwave
tiom too much heat rising
ti'om the cooktop below it.
It automatically turns on
if it senses too much heat.
If you have turned the t:an
on you may find that you
(}lllllOt t/lrll it off. The £lll
will automatically turn off
when the internal parts are
cool. It may stay on for
30 minutes or more alter
the cooktop and microwave
controls are turned off.
28
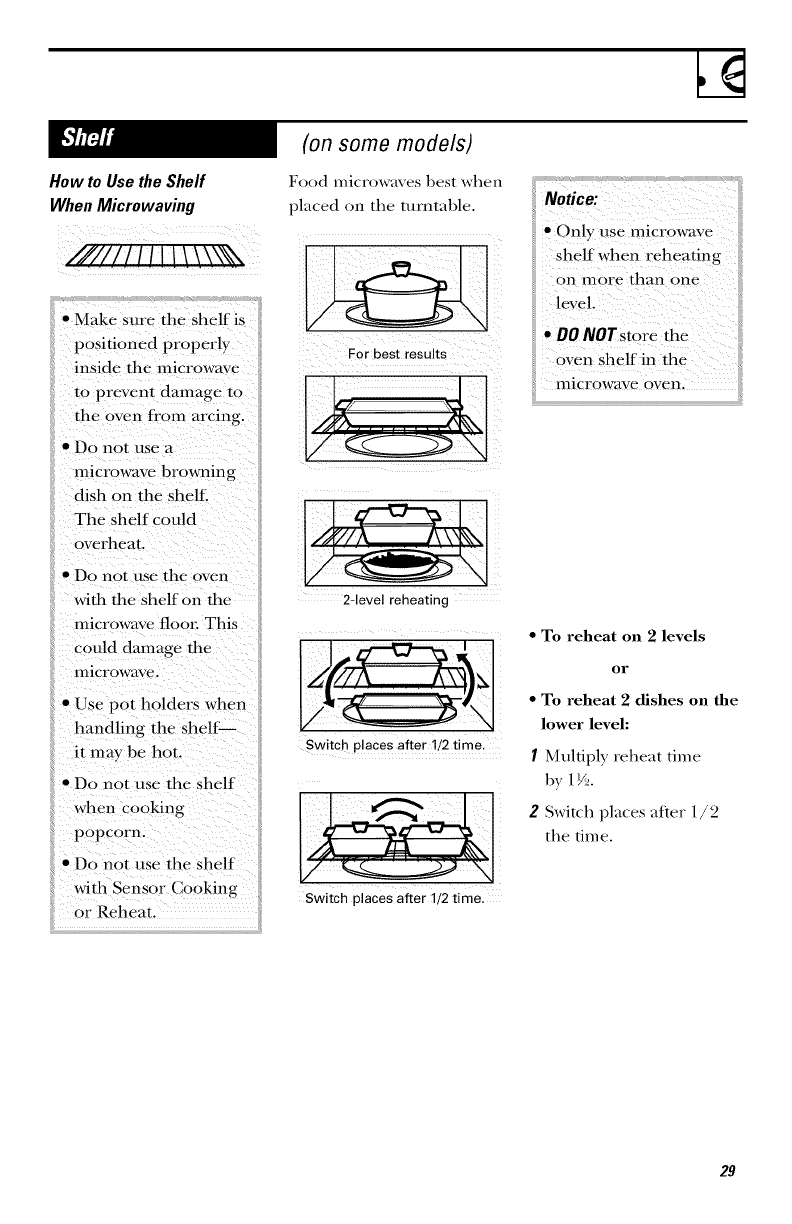
How to Use the Shelf
WhenMicrowaving
.I////I I I I I I\ \ \\NN\
• Make sure the shelf is
positioned properl}
inside the microwave
to prevent damage to
the oven from arcing.
• Do not use a
microwave browning
dish on the shel£
The shelf could
ox erheat.
• Do not use the oven
with tile shelf on tile
microwave floon This
could damage tile
lnicrowa_ e.
• Use pot holders when
handling the shelf'
it may be hot.
• Do not use the shelf
when cooking
popcorn.
• Do not use the shelf
with Sensor Cooking
or Reheat.
(on some models)
Food microwmes best wl*en
placed on tile turntable.
F0r best results
_J i¸¸¸
2-level reheating
j
Switch places after 1/2 time.
Switch places after 1/2 time.
shelf when reheating ! !
on more than one
•DO NoTstorethe
oven Shelf in the
microwave oven,
• To reheat on 2levels
or
• To reheat 2 dishes on the
lower level:
1Multipl} reheat time
bs 1 F_,.
2Switch places after 1/2
the time.
29
Microwave 7 rms
Arcing is the microwaxe term for sparks in the oxen. Arcing is
caused b}:
• metal or foil touching the side of the oxen.
• toil that is not molded to tood (upturned edges act like
_ln telln_ls).
• metal such as twist ties, poultr} pins, gold-rimmed dishes.
• rec}cled paper towels containing small metal pieces.
Coxers hold in moisture, allow for more exen heating and reduce
cooking time. \,_nting plastic wrap or coxering with wax paper
allows excess ste_lil/ to escape.
Shioldino In a regular oxen, }ou shield chicken 1)feasts or 1)aked toods to
prexent oxet=t)rowning. X_rhen microwaxing, }ou use small strips of
toil to shield thin parts, such as the tips of wings and legs on
poultD, which would cook betore larger parts.
_qJen }ou cook with regular oxens, toods such as roasts or cakes are
allowed to stand to finish cooking or to set. Standing time is
especiall} important in microwaxe cooking. Note that a microwaxed
cake is not placed on a cooling rack.
After coxering a dish with plastic wrap, }ou xent the plastic wrap 1)}
turning back one corner so excess ste_lm C_lll escape.
3O
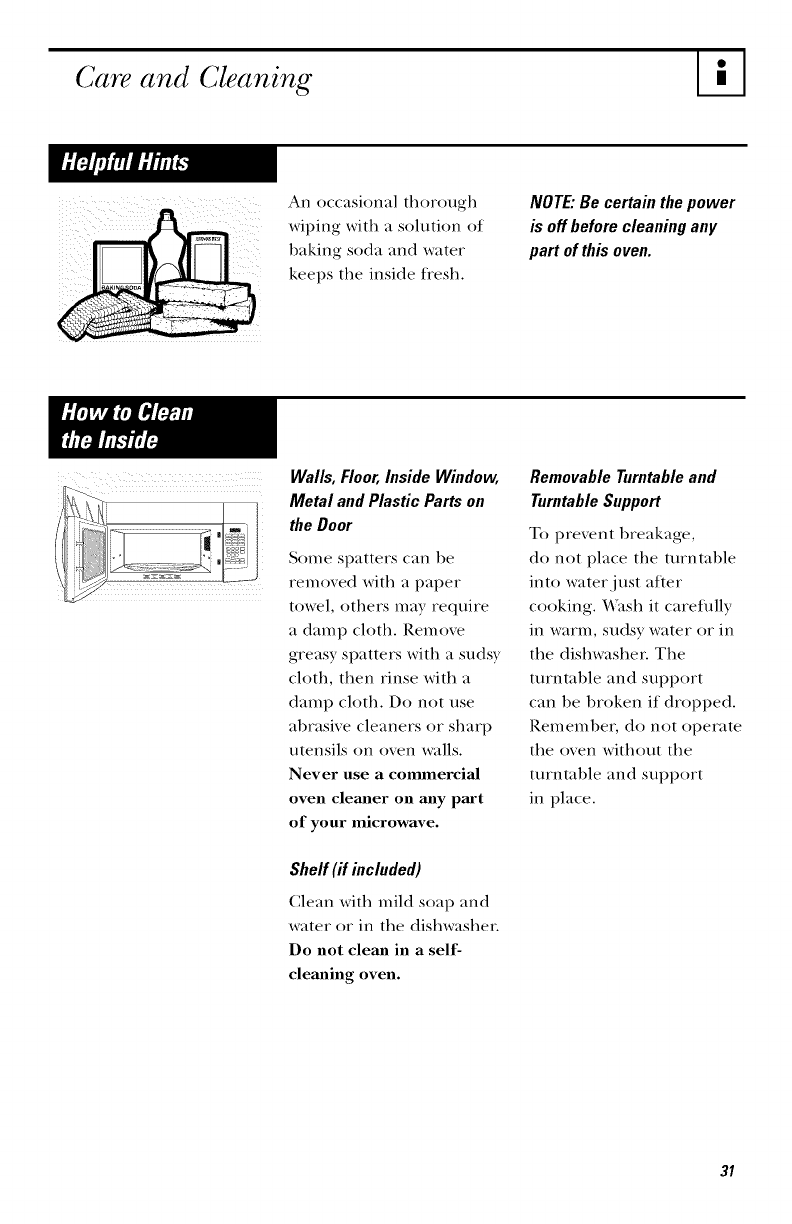
Care and Cleaning
An occasional thorough
wiping with a solution of
baking soda and water
keeps the inside fiesh.
NOTE."Be certain the power
is off before cleaning any
part of this oven.
Wails, Floor,Inside Window,
Metal and Plastic Parts on
the Door
Some spatters can be
removed with a paper
towel, others may require
a damp cloth. Remove
greasy spatters with a sudsy
cloth, then rinse with a
damp cloth. Do not use
abrasive cleaners or sharp
utensils on oven walls.
Never use a commercial
oven cleaner on any part
of your microwave.
Shelf (if included)
Clean with mild soap and
water or in the dishwasher.
Do not clean in a self-
cleaning oven.
Removable Turntable and
Turntable Support
To prevent breakage,
do not place the turntable
into water just after
cooking. ¼_sh it carefiflly
in warm, sudsy water or in
the dishwasher. The
turntable and support
can be broken if dropped.
P,emember, do not operate
the oven without the
turntable and support
in place.
31
%
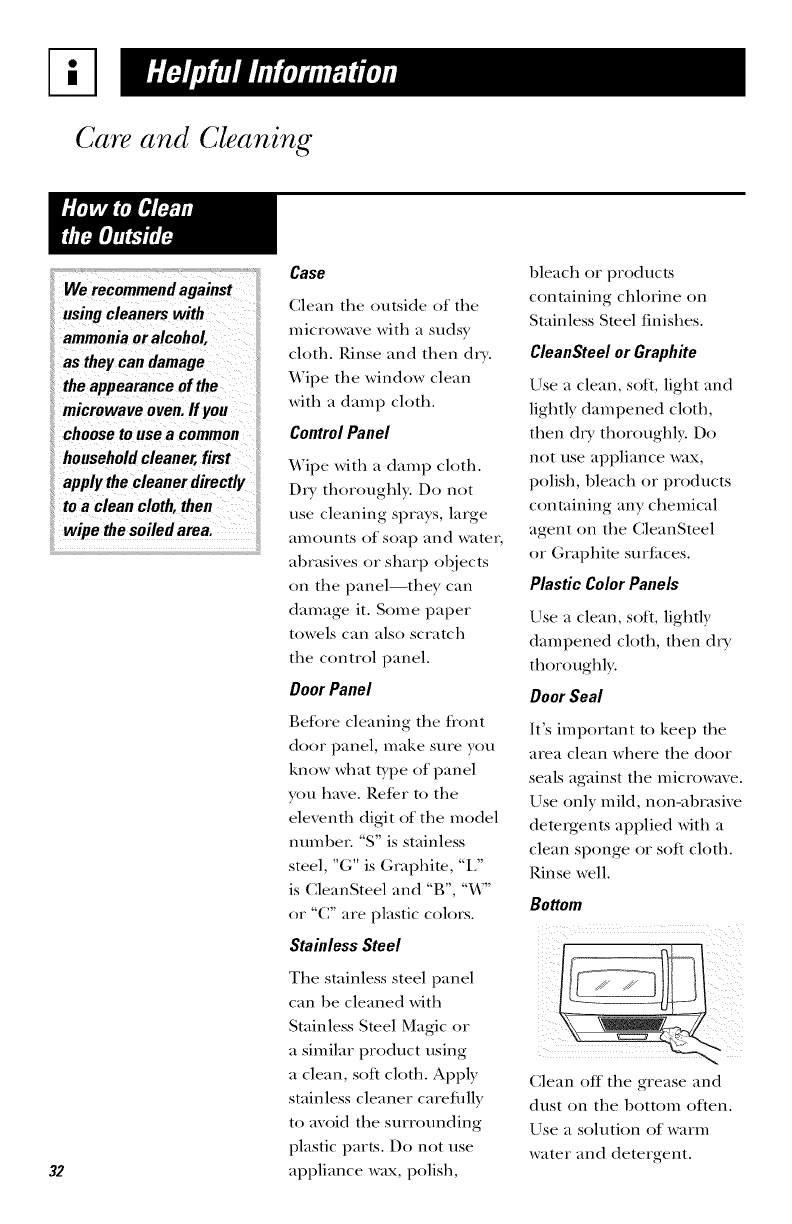
Care and Cleaning
microwave oven, If you
choosetouseacommon
household Cleaner, first
apply the cleaner directly
to a clean cloth, then
wipe the soiled area,
32
Case
Clean the outside of the
microwave with a sudsy
cloth. Rinse and then dry.
Wipe the window clean
with a damp cloth.
Control Panel
Wipe with a damp cloth.
Dry thoroughly. Do not
use cleaning sprays, large
amounts of soap and water,
abrasives or sharp objects
on the panel--they can
damage it. Some paper
towels can also scratch
the control panel.
Door Panel
Belbre cleaning the front
door panel, make sure you
know what type of panel
you have. I),etcr to the
eleventh digit of the model
number. "S" is stainless
steel, "G" is Gl_aphite, "I/'
is CleanSteel and "B', "W"
or "C" are plastic colors.
Stainless Steel
The stainless steel panel
can be cleaned with
Stainless Steel Magic or
a similar product using
a clean, solt cloth. Apply
stainless cleaner carefiflly
to avoid the surrounding
plastic parts. Do not use
appliance wax, polish,
bleach or products
containing chlorine on
Stainless Steel finishes.
CleanSteelor Graphite
Use a clean, soil light mid
lightly dampened cloth,
then dW thoroughl> Do
not use appliance wax,
polish, bleach or products
containing any chemical
agent on the CleanSteel
or Graphim surl{_ces.
Plastic ColorPanels
Use a clean, soft, lightly
dampened cloth, then dry
thoroughly.
Door Seal
It's important to kee I)the
area clean where the door
seals against the microwave.
Use only mild, non-abrasive
detergents applied with a
clean sponge or soft cloth.
Rinse well.
Bottom
Clean off the grease and
dust on the bottom often.
Use a solution of warm
water and detergent.
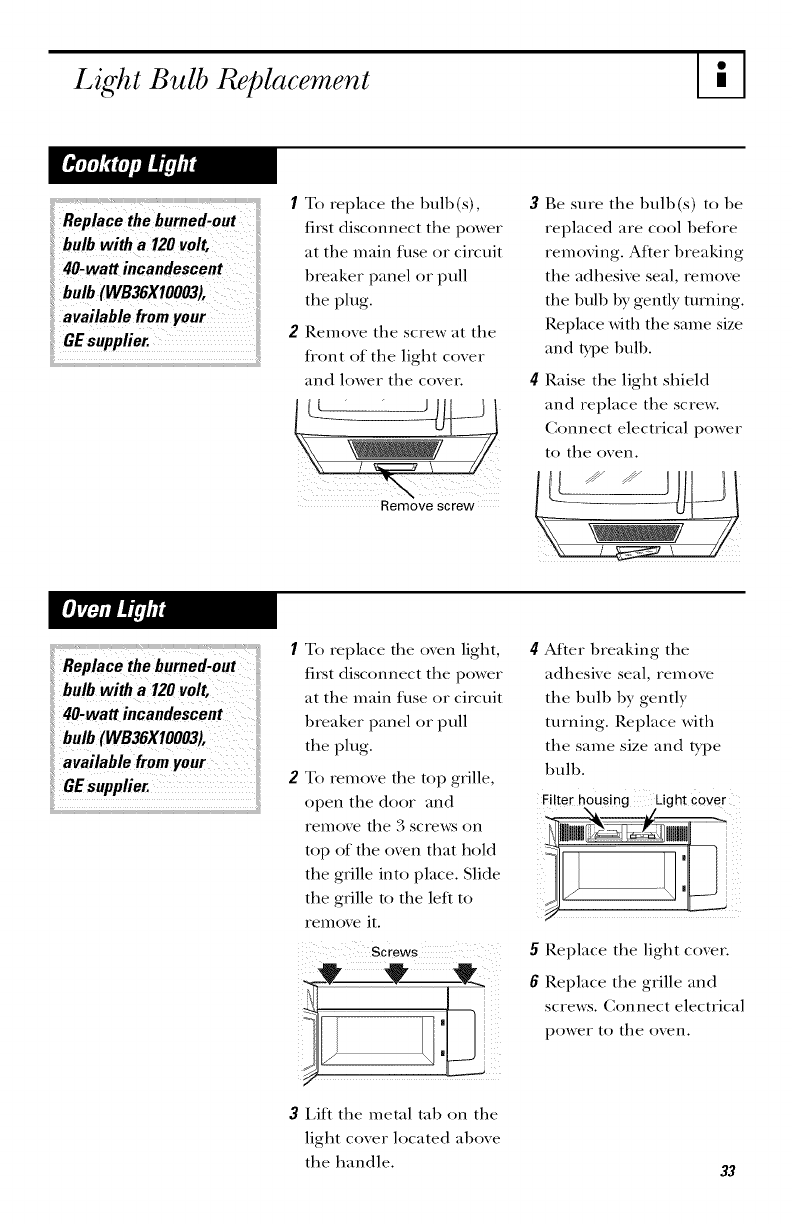
Light Bulb Replacement
Replaoetheh,rued-out
bulb with a 120volt,
40-watt incandescent
bulb (WB36XIO003),
available fromyour
GEsupplier.
1To replace the bulb(s),
first disconnect the power
at the main fllse or circuit
breaker panel or pull
the plug.
2Remove the screw at the
flont of the light cover
and lower the cover.
Remove screw
3Be sure the bulb(s) to be
replaced are cool 1)eft)re
removing. After breaking
the adhesive seal, remove
the bull) by gently turning.
Replace with the same size
and Wpe bull).
4Raise the light slfield
and replace the screw.
Connect electrical power
to the oven.
bulb with a 120volt,
40-wa iucande oeut
available fromyour
To replace the oven light,
first disconnect the power
at the main fl_se or circuit
breaker panel or pull
the plug.
To remove the top grille,
open the door and
rell/OVe the 3 scrc,vs on
top of the oven that hold
the grille into place. Slide
the grille to the left to
renlove it.
Screws
4After breaking the
adhesive seal, remove
the bulb by gently
turning. Replace with
the same size and type
1)ulb.
5Replace the light coxer.
8Replace the grille and
screws. Connect electrical
power to the oxen.
3Lift the metal tab on the
light coxer located al)oxe
the handle. 33
%
7"he Exhaust Feature
Charcoal Filter
(on some models)
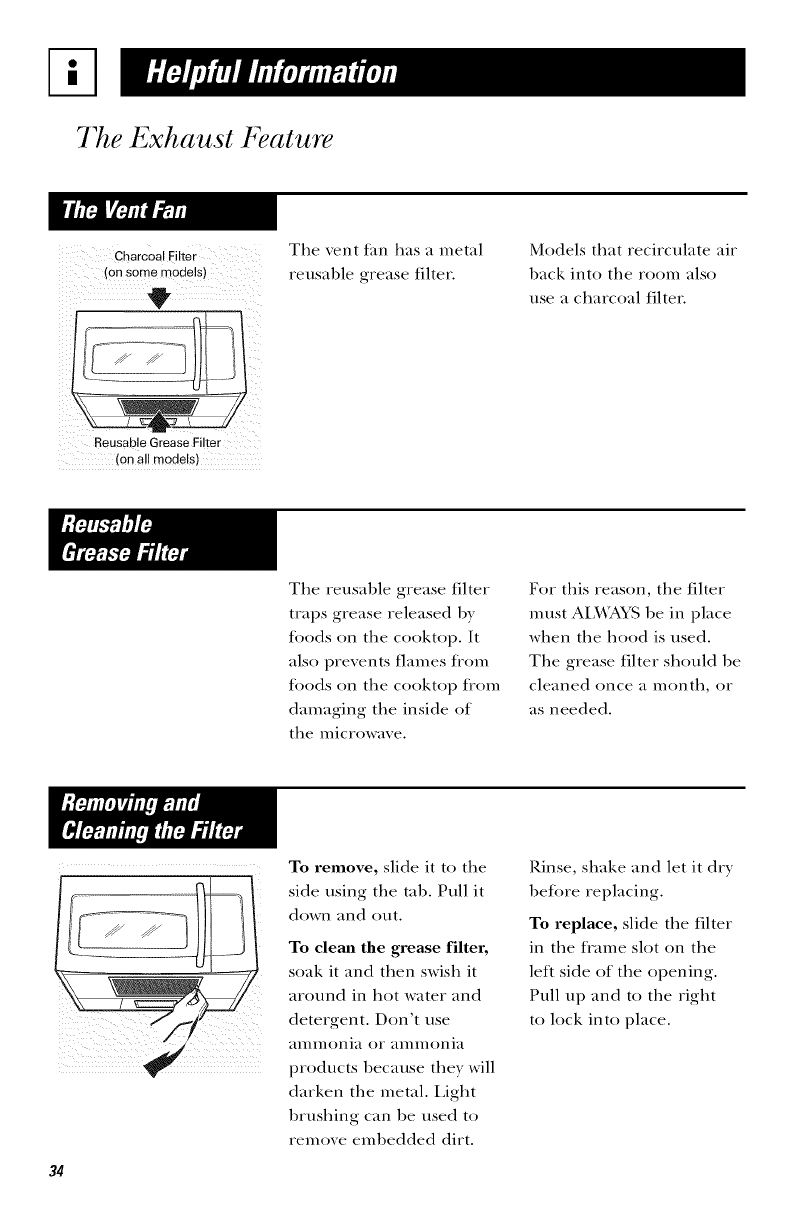
Tlie _ent fan lias a metal
reusable grease filter.
Models tliat recirculate air
back into tlie room also
use a cliarcoal filter.
i
Reusable Grease Filter
(on a!! models)
Tlie reusable grease filter
traps grease released 1)y
toods on tlie cooktop. It
also prevents flames tiom
toods on tlIe cooktop from
damaging tlie inside of
tlie microwave.
For tliis reason, tlie filter
must AIMA_*% be in place
when tlIe lIood is used.
TlIe grease filter should be
cleaned once a montli, or
as needed.
! I!II ii i
34
To remove, slide it to tlie
side using tlie tab. Pull it
down and ()tit.
To clean the grea_se filter,
soak it and tlIen swislI it
around in liot water and
detergent. Don't use
aIl/n/OllIa or ail/n/Ollia
products because the} will
darken tlie metal. IJglit
brushing can be used to
remove embedded dirt.
Rinse, sliake and let it dry
belore replacing.
To replace, slide tlie filter
in tlie Dame slot on the
lelt side of tlIe opening.
Pull up and to tlie riglit
to lock into place.
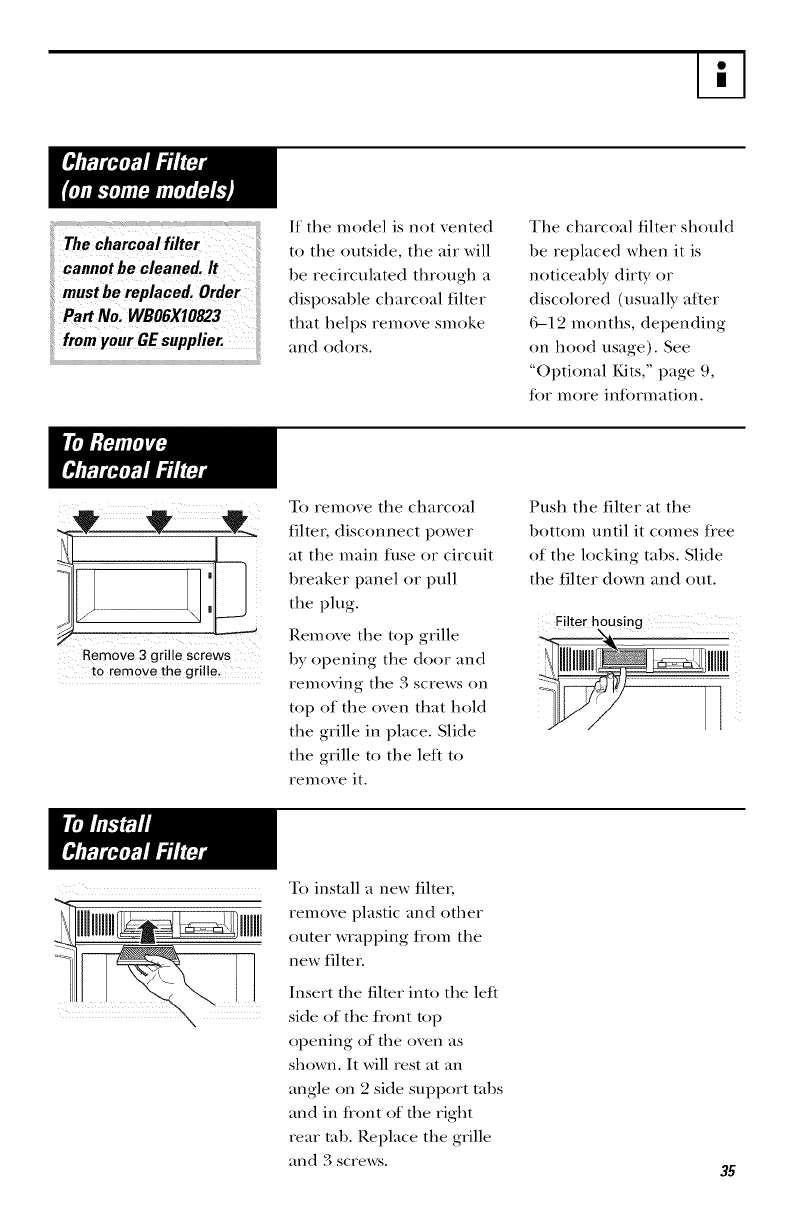
If themodelisnotvented
totheoutside,theairwill
berecirculatedthrougha
disposablecharcoalfilter
thathelpsremovesmoke
andodors.
Thecharcoalfiltershould
bereplaced when it is
noticeably dirty or
discolored (usually after
(3-12 months, depending
on hood usage). See
"Optional Kits," page 9,
tor more intormation.
___t t
Remove 3 grille screws
to remove the grille,
To remove the charcoal
filter, disconnect power
at the main filse or circuit
breaker panel or pull
the plug.
Remove the top grille
by opening the door and
removing the 3 screws on
top of the oven that hold
the grille in place. Slide
the grille to the left to
remove it.
Push the filter at the
bottom until it comes fl'ee
of the locking tabs. Slide
the filter down and out.
%To install a new filter,
remoxe plastic and other
outer wrapping fl'om the
new filter.
Insert the filter into the left
side of the flont top
opening of the oven as
shown. It will rest at an
angle on 2 side support tabs
and in front of the right
rear tab. P,eplace the grille
and 3 scrmvs.
Before You Call For Service
Problem PossibleCause Whatto Do
Ovenwill not
start
Floor of the oven is
warm, even when
the oven has not
been used
A fuse in your home
may be blown or the
circuit breaker tripped.
Power surge.
Plug not fully inserted
into wall outlet.
Door not securely closed.
The cooktop light is
located below the oven
floor. When the light
is on. the heat it
produces may make the
oven floor get warm.
•Replace fllse or reset circuit breaker.
• Unplug the microwave oven, then plug
it back in.
• Make sure the 3-prong plug on the
oven is filly inserted into wall outlet.
• Open the door and close securely.
• This is normal.
"LOCKED"appears The control has been • Press and hold CLEAR/OFF tor
on display locked, about 3 seconds to unlock the control.
Vent fan will not
turn off
The vent fan
automatically turns on
to cool internal parts
while the microwave
is on.
When using a Sensor
feature, the door was
opened before steam
could be detected.
Steam was not detected
in maximum amount
of time.
"SENSORERROR"
appears on display
The vent tim cannot be turned off
while the microwave is operating.
This is normal. ¥\_tit tor the microwave
to turn off and the t_m will either go
off automatically or you will need to
turn it off by pressing the Vent Fan
pad alter the microwave is otL
Do not ()pen door until steam is
sensed and time is shown counting
down on display.
• Use Time Cook to heat tor more time.
36
• Moisture on the oven
door and walls while
cooking. Wipe the
moisture offwith a paper
towel or sott cloth.
• Moisture hetween the
oven door panels when
cooking certain ti)ods.
Moisture should dissipate
shortly atter cooking is
finished.
• Steam or vapor escaping
flom around the door.
• Light reflection around
door or Otl[eI"case.
• Dimming oven light and
change in the hlower
sound at power levels
other than high.
• Dull thumping sound
while oven is operating.
• The vent tim operating
while the microwa_> is
operating. The vent tim
will not go off nor can it
he turned off until the
microwave is off.
• TV-radio intertbrence
might he noticed while
using the microwave.
Similar to the intertbrence
caused hy other small
appliances, it does not
indicate a prohlem with
the microwave. Plug the
microwave into a ditterent
electrical circuit, move the
radio or TV as t_u"away
fl'om the microwave as
possihle or check the
position and signal of
the TV/radio anmnna.
37
We'll Be 7"herd
GEAppliances.com
GEAppliances.com
Have a question or need
assistance with your
appliance? Try the GE
Appliances ¼El)site 24 hours
a da), any day of the year!
For greater comvnience and
taster service, you can now
download Owner's Manuals,
order parts or even schedule
service on-line.
800.GE.CARES
(800.432.2737)
GEAppliances.com
Expert GE repair service is
only one step away fi'om
your doon Get on-line and
schedule your service at
your com'enience any day
of the year!
()r call 800.GE.(_RES
(800.432.2737) during
normal business hours.
800.TDD.GEAC
(800.833.4322)
GEAppliances.com
GE supports the Universal
Design concept--products,
services and environments
that can be used by people
of all ages, sizes and
capabilities. ¥\_ recognize
the need to design t_)r a
wide cang_ of ph)_sical and
mental abilities and
impairments. For details
of GE's Unixvrsal Design
applications, including
kitchen design ideas tot
people with disabilities,
check out our ¥\_bsite today:
For the hearing impaired,
please call 800.TDD.GEAC
(800.833.4322).
800.626.2224
Purchase a GE extended
wamm Wand learn about
special discounts that are
mailal)le while your ,v,mantv
is still in effect. _*im can
purchase it on-line anytime,
or call 800.626.2224 during
normal business hours. GE
Consumer Home Services
will still be there after your
wammtv expires.
38
GEAppliances.com
800.626.2002
GEAppliances.com
Individuals qualified
to service their own
appliances can have
parts or accessories sent
directly to their home.
(VISA, MasterCard and
Discover cards are
accepted.)
Order on-line today,
24 hours every day or
by phone at 800.828.2002
during normal business
ho/irs.
Instructions contained
in this manual cover
procedures to be
performed by any user.
Other servicing generally
should be referred
to qualified service
personnel. Caution must
be exercised, since
improper servicing may
cause unsafe operation.
Register your new
appliance ondine--
at your convenience!
Timely product iegistl_ation
will allow tor enhanced
communication and
prompt service under the
term s of your warrant),;
should the need arise.
You may also mail in the
pre-printed registration
card included in the
packing material.
39
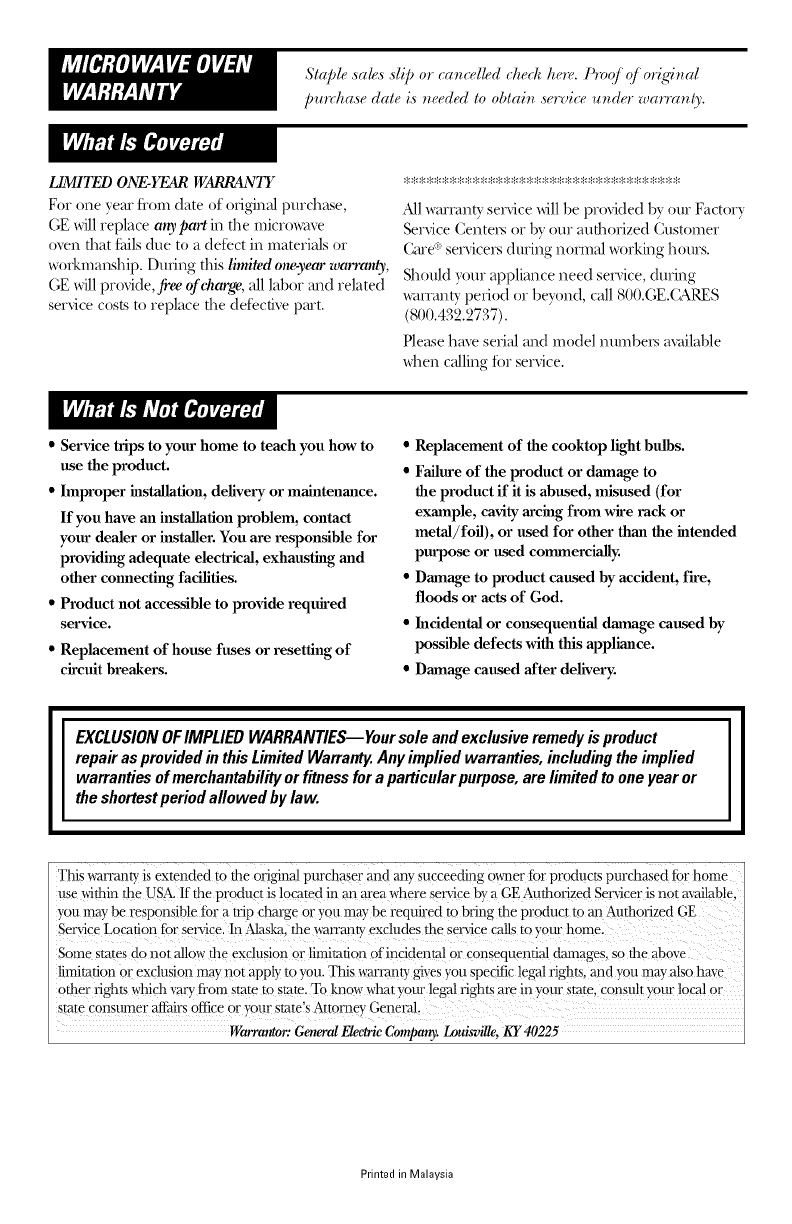
pu_rhase date is _eeded to obtai_ service "u_der warra_ty.
L/M/TE'D ONE-Y£4R WARRANTY
For one year flom (late of original purchase,
(/E will replace any part in the micro_m'e
oven that tidls due to a detect in materials or
workmanship. During this limited row-year wat_mgy,
GE will provide,free of charge, all labor and related
service costs to replace the detective part.
.411warranty service _611be provided by our Factory
Service Centei.s or by ol1i authorized Customer
Care :_servicers during normal working hours.
Should your appliance need service, during
_mranty period or beyond, call 81)0.GE.(24RES
(800.432.2737).
Please have serial and model numbei.'s m;dlable
\_hen calling tor service.
•Service trips to your home to teach you how to
use the product.
•hnproper h_stallation, delivery or maintenance.
If you have an installation problem, contact
your dealer or installer. You are responsible for
providing adequate electrical, exhausting and
other connecting facilities.
•Product not accessible to provide required
service.
•Replacement of house fuses or resetting of
circuit breakers.
•Replacement of the cooktop light bulbs.
• Failure of the product or dmnage to
the product if it is abused, misused (for
example, cavity arcing from wire rack or
metal/foil), or used for other than the intended
purpose or used co_mnercially.
•Dmnage to product caused by accident, fire,
floods or acts of God.
•Incidental or consequential damage caused by
possible defects with this appliance.
•Dmnage caused after deliver):
EXCLUSIONOFIMPLIEDWARRANTIES--Yoursole andexclusiveremedyisproduct
repairasprovidedin thisLimitedWarranty.Anyimpliedwarranties,includingtheimplied
warrantiesofmerchantabilityorfitnessfora particularpurpose,arelimitedtooneyearor
theshortestperiodallowedbylaw.
This wan_antvis extended to the original purchaser and any'succeeding owner tor products purchased far home
use within the USA. if the product is located in an area where service by a GE Authorized Servicer is not a'_ailahle.
you may be responsible tor a trip chal\ge or you may be required to hring the product to an Authorized GE
ServiceLocation tor service. In Alaska.the warranty excludes the service calls to your home.
Some states do not allow the exclusion or limitation (ffinddental or consequential damages, so the al)ove
limitation or exclusion may not apply m you. This warranty gives you specific legal riggers,and you may also have
other rights which var_fi'om state to state. To know what yourlegal rights are in your state, consuh _our local or
state consumer aff2_irsoffice or your state's Attorney Gene_M.
Warrcmtor: Gemral Heclrle Compcmy. Louisville. KY 40225
Printed in Malaysia
