GE JVM1190BD001 User Manual MICROWAVE Manuals And Guides L0709435
GE Microwave/Hood Combo Manual L0709435 GE Microwave/Hood Combo Owner's Manual, GE Microwave/Hood Combo installation guides
User Manual: GE JVM1190BD001 JVM1190BD001 GE MICROWAVE - Manuals and Guides View the owners manual for your GE MICROWAVE #JVM1190BD001. Home:Kitchen Appliance Parts:GE Parts:GE MICROWAVE Manual
Open the PDF directly: View PDF ![]() .
.
Page Count: 52
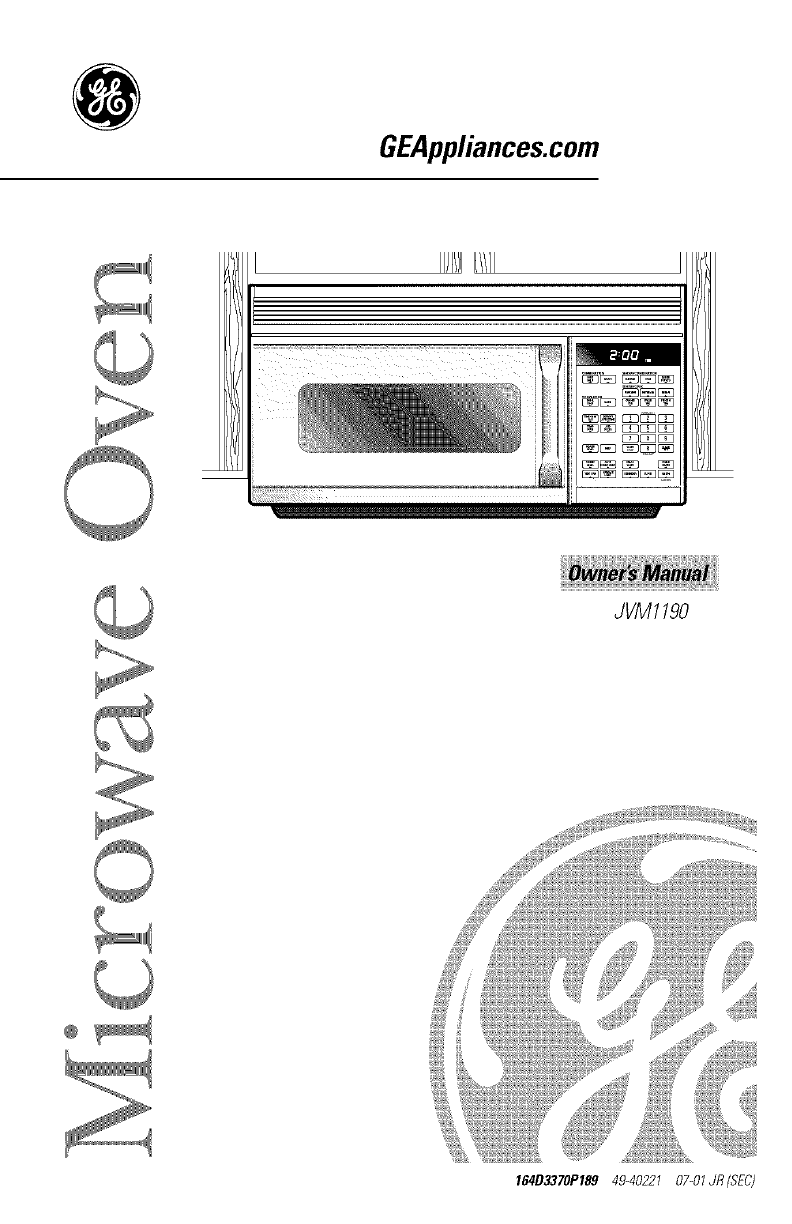
GEAppliances.com
JVM1190
164D3370P189 49-40221 07-01JR (SEC)
IMPORTANTSAFETYINFORMATION.
READALLINSTRUCTIONSBEFOREUSING.
WARNING!
For your safe_ the information in this manual must be
followed to minimize the risk of fire or explosion, electric shock,
or to prevent property damage,personal inju_ or loss of life.
PRECAUtiONSTOAVOIDPOSSIBLE
iliiii_iiiiiiiHH!
since open-door operation
can r(,suh ill harmflll
_'xposure to microwave
unerg-y. It is important not
to (h4('at or tamp_'r with the'
saJi_,tviHtcflocks.
J_ De Net Place any ot)ject
|)('tw('('H th(' ()_('H []7oHt ]_t((_
21Hd till' doo]7 o]7 _.]low soil
O]7 (l('_*.l/(fl" l_('sid/l( ' [O
a((mnu]atc on sc_ling
SII]?{_I('('S.
il//p()rt_tl/t t]l_it t]/(' ()',(']/
(toor close t)rol)erl)' and that
t]l('l'(' is HO (t_IH/_I_-(' to t]l(';
:i door (])(!llt)
...................(broken or loosened)
_ door seals and se_ding
S/117_I( (!S.
The Oven Should Not t)_,
a(/just('d or r('paired |)_'
H]IVOH(' ('XC('])[ ])]:o])('rly
qualified servi(e personnel.
SAFETYPRECAUtiONS
This microwave oven is UL listed for installation over
electric and gas ranges.
This microwave oven is not approved or tested for
marine use.
J_ R('ad all(t lb]low ti_e specific
t)]:('catuk)Hs in th(' Precautions
to Avoid Possible Exposure to
Excessive Microwave Energy
s('( tioH _] )o\ 1'.
_: This appliall(e must be
g_:omlde(t. Com_e(t on b,
to a properly groml(ted
outlet. Set' the Grounding
Instructions section OH t)age 9.
ii:: Install or locate this
al)plial_ce only i_ accordance
with the ])rovided Installation
Instm(tions.
i_i;Do Hot lnOUHt this at)l)lia_c('
()\,(,]-_t sil/k,
Use this appliance only for its intended purpose as
described in this Owner's Manual
_: This ovelqhe-range oven was
designed tot use o\er ranges
no wider than 42 inches. It
may be installed over both
gas and electric cooking
('qHit)lll(qlt.
J_ l)o not operate this al_pliance
if it has a damaged power
(ord or plug, if it is not
working t)rol}erl}, or if it has
been damaged or dmt}t}ed.
J? 1)1) not (oxer or block am
otmnings 1)}1the al)pliance.
N Use it}is appliance only/or
its intended use as described
in dfis mmmal. Do not use
corrosive chemicals or
vapors in this at@}ante. This
mic}x)wa\ e o\ell is specifically
desigaled to heat, dry ()t" cook
toad, mM is not imended/or
laboratory or industrial use.
J? 1)1) not store this apt)lian(e
outdoors. Do not use this
t)rodmt nero: water--
tar example, in a wet
lmsement, near a swilmning
t}///)1 or near a sink.
_: Kee t) power cord away fi'om
heated surta(es.
J? 1)11 not immerse power
(ord 111:plug in water.
J? See door surtace cleaning
instructions in dte Care and
cleaning of the microwa ve
oven section 1)1this Imu/uM.
i;i; To reduce the risk of fire in
the over1 cavity:
--1)11 not co_er the shelf or
altv other t)_trt of ttte ()Vt,lt
with metal toil. This will
cause o_vrheating at the
microwave!convection oven.
-- 1)1) not overtook toad.
Careflllly attend al)plian( e
if t}al}eC plastic or other
c(/mt)ustible materials at'+.'
t)la_ ed in.side the oven while
cooking.
-- P,emo_e wire twist-des and
metal handles tix)m 1)at)er
111:plastic containers be/ore
placing them in the oven.
-- 1)11 not use the oven tor
storage tmq}oses. I.)//not
lea\ e paper products,
(ooking utensils or load in
the oven _,,hen not in use.
-- ff materials inside the ov('11
should ignite, keep the oven
door closed, ttIFIl the O\'(ql
Off and disconnect the
t}ower cord, or shut off
t}oxvcr at the fllsc or circuit
breaker panel. If the door is
opened, the fire may spread.
N This al)l)liance should t}e
servi(ed only t)y qualitied
servi(e personnel. Conta(t
nearest authorized servi(e
/a}ilitv tar examination,
repair or adjusunent.
i_i;As with any at_pliam e, close
Stlt)ev_.isiotl is necessavv
when used by children.
IMPORTANTSAFETYINFORMATION.
READALLINSTRUCTIONSBEFOREUSING.
WARNING!
iliiii iiiii::HH:
ARCING
If you see arcing, press the CLEAR/OFFpad and correct
the problem.
Ar(ing is the microwave term
/k)r sparks in the oven. Arcing
is caused l)`.:
ii:: Foil not molded to t_)od
(Ul)mrned edges act like
HI/tel 11 IHS).
_: The temtmramre tn:obe in
the IIliCI'OW_l`. e 1)ut I/Or
inserted in the t[)od.
i;i; Metal, such as twist-ties,
poultry pins, or gold-rimmed
dishes, in the microwmv.
J? The meted shelf not inst_dled
correctly so it to/Icl/es the
microwa`, e wall.
N Metal or toil touching tile
side of the o`.en.
ii:: Recy(led paper towels
cont_fining sm_dl metal pieces
being used in the mi(ro_,"dvc.
FOODS
J? Do not poll popcorn in your
llli(Fowa`, e ()`.ell IIl/h'ss ill a
st)e( i_tl lIli( ro_'v"dve t)ot)corll
ac(essor} or ullless }_)u use
t/ot)(orn labeled tk)r use in
mi( mwa`. e o`.ens.
J? Some products such as
whole eggs and se_fled
(ontainers /[)r example,
dosed jars---will explode and
should not tie heamd ill this
lIliCFOWa`, e ()`.ell. S/loll Ilse of
the nli(ro_`._l`, e ()'.ell (ould
result ill il_jury.
_: I)o not boil eggs in a
microwa\ e o\en. Pressure will
build up inside egg yolk and
will (ause it to t/m'st, t/ossibly
resulting in in jur}.
Operating the microwave
with no tood inside/k)r more
than a mimlte or two lllHV
(ause damage to the OVCll
and (ouM start a/ire. It
increases the heat aromld tile
mag_mtron and can shorten
the lit_' of the oven.
Foods with unbroken outer
"skin" such as ])otatoes, hot
dogs, sausages, tomatoes,
at)t)les, (hicken li`.vrs and
other giblets, and egg yolks
should be pierced to allow
steam to escat/e (luting
(ooking.
_SUPERHEATEDWATER
Microwaved water and other
liquids do not always bubble
when they reach the boiling
poinL They can actuafly get
superheated and not bubble
at all
Superheated liquid will bubble
up out ofthe cup when it is
moved or when something like
a spoon or tea bag is put into iL
Toprevent this from happening
and causing injury,, do not heat
any liquid for more than 2
minutes per cup. After heating,
letthe cup stand in the
microwave for 30 seconds
before moving it or putting
anything into it
J? Avoid heating baby }hod in
g}assjars, +.'_+vnwith the }kt
o}E Make sure a}} intimt }ood
is thorough}y cooked. Stir
}ood to distribute the heat
e_'nl}, ge cm:eflfl to prevent
sca}ding when warming
}Dll///l}_L "I]le COl/t_lil/er IIIHV
}i'e} coo}er than the }omm}a
re_d}v is. Always test tile
}brmu}a be}ore }_'eding
the bah',.
_5_[)oll't de}i'ost fi:ozen
be_,vrages in llarrow-llecked
bottles (esi)ecia} b carbonated
be_,wt'ages). I_\ ell if the
cont_finer is opened, pressure
can b/fi}d up. This can cause
the (ont+dner to burst,
possibly resu}ting in iqjury.
ii_:Spontaneous boi}ing--Under
cemfin special circumstan(es,
lk}tfids may start to })oi}
during or shortly after
l'el//o_l} }}'()Ill the ii/ic£ow_l\ e
()veil. To pf'evellt btlrllS }l'oIIl
splashing liquk}, we
Ivcommend the }b}}owing:
be}ore removing the
container fi'om the o_en,
a}}o_ tile (ontainer to sumd
in the o\en }br 30 to 40
seconds a}ter the oven has
shut oH_ Do not boi} }}quids
in ilarrow-necked (ontainers
such as soft drhlk })ott}es,
Wil/e _]_lsks _lHd especia}}y
narrow-necked coH('e cups.
E\ en if the container is
opened, excessive steam can
build up and cause it to burst
or OVeFIIOW.
i_i;I lot }hods and ste_m_ can
cause burns. Be careflfl \+hen
opellillg ally CO]lt_dl/ers of
hot }hod, inc}uding popcorn
bags, (()()king t)ou(hes and
boxes. To prevent })ossib}e
iqjury, direct stemn _r_'
fl'om hands and }iwe.
ii;: 1)o not (wercook potatoes.
+I]lev cou}d dehydrate and
(arch fire, causing dmnage
to your o\en.
ii;:When cooking pork, }o}}ow
the directions exa(t}v and
_I}W_I_'4 (ook the IIle_lt to all
illterlla} teIllper_lttlt_e O} _It
least 170'q_ This assures that,
in the remote possibi}it_, that
trichina _r })e })resent in
the meat, it will })e kil}ed and
meat will be sa}(' to eat.
iiiiiiii+_iliiiiiii:iiii
+!+!t
IMPORTANTSAFETYINFORMATION.
READALLINSTRUCTIONSBEFOREUSING.
WARNING!
iliiii iiiiiiiHH!
MICROWAVE-SAFECOOKWARE
Make sure _fll cookware used in
VOIIF IIIiCFowavt' 0_+_'1/ is s/fital)le
tot microwaving. Most glass
casseroles, cooking dishes,
lIleaS/llJl/g" ClipS, C/IS|_tl'(t ClipS,
potter} or chilla (/]l/llel_'W_tlTe
\+hich does not ha\e n/etallic
trim or glaze with a metallic
sheell C_tll be/lsed. SolIle
cookware is labeled "suitat)le
tor microwaving."
If you are not sure if a dish is
lilicrowave-sa[(',/lse this test:
Place in tile oven both the
dish you are testing and a
glass measuring cup tilled
with 1 cup of wamr--set the
measmJng cup either in or
next to the dish. Microwave
1 mimlte at high. g the dish
heats, it should not be used
tor micmwaving.
If die dish rem_dns cool
and only the water in tlle
cup heats, then tile dish is
microwave-satk'.
ffvou use a meat
d/ermometer while cooking,
make sure it is sale'/or use
in microwmv (/_vns.
Do not use l)aper products
when tile microwmv!
(oI/vectioll OVCI/ is operamd
ill tile COl/V('clioll or
( omt)ination mode.
_: Do not use recyled pallet
tn:oducts. Recycled t)al)er
towels, llapkillS al/d 'vv_lxed
pat)er C_tl/€olHail/l//etal
flecks \vhich may cause arcing
or ignite. Paper products
containing n)lon or _Mon
filaments should be avoided,
as the'v ill,iV _tlso ig_lim.
N Some stwotDam mp_'s (like
those tl'tat meat is packaged
on) ha_e a thin stri 1) of metal
embedded in the l>ottoln+
When n/i_ rox_m ed, the metal
(an burn tile floor of tile
o\en or ignite a paper tOWel,
;_} Do I/Or/ISe tile Hlicrowave to
(tl'_ rnewst)al)ers.
_? Not all plastic wrap is suitable
/_)r use in microwa\ e o\ens.
Check d_e 1)ackage tor
t)rol)er use.
_: Pat)er towels, waxed pal)er
and 1)lastic wra t) can be used
to cover dishes in order to
retain moisture and prevent
st)auering. Be sure to vent
plastic wrap so steaH/C_tl/
escat)e.
_: Cookware IIl:d'v t)ecOlIle hot
becallSe of heat tl?allsl(Tred
/i'om the heated/k)od. Pot
holders may be needed to
handle d_e (ook_*are.
_!?"Boil_d)le"cookingt)ouches
andtig-hllyclosedt)laslicbags
shouldbeslit,pier(edor
vetoed as directed by
t)ackagc, ff {]ICy _tt'(' llOt,
plastic could burst during or
immediately al{cr cooking,
t)ossit)ly resulting in iqjm T.
Also, plastic storage
comainers should be at least
partially mwo\ ercd be(ause
flier/orm a tight seal. When
cooking wifll containers
tightly co\ered with plastic
wrap, relIlo\ e Covt'lJllg
careflflN and direct steam
awm fi:om hm_(ts m_d lace.
_!?Use toil only as directed in
tiffs guide. TV dimlers mm
be microwa\'cd in/oil m_vs
less than 3/4" high; remove
{lie {o 1) toil co_vr and return
{lie {ray to the box. When
using toil in file microwa_v
oven, keep the toil at least
1 inch awm ti'om the sides
of the ov('ll.
ii:: Plastic cookwarc Plastic
cookware designed/or
mi(rowavc cooking is very
use/ifl, but should be used
carefifll}. Even mi(rowa\e-
sail' plastic _{_r not be as
tolerant of o_vrcooking
(onditions as are glass or
ceramic materials and mm
so/ien or char if sut)je( {ed
to short periods of
overcooking. In longer
('xt)osHres to o\ ('l?cookillg,
the/ood m_d cookwarc
could ignite.
Follow thoso guidolinos:
Use microwm c-safe
t)lasti(s onl'_ m1(t /lse
fllem in su:ic{ compliance
wifll the cookwm:e
lIlal l[llitC|/IFel?'S
l?PCol//l//en(t_t|ioI IS.
_I)o not mi(rowaxc cml)t" _
( O1 l{_lin(!l/S.
{o usc t)lasti( (ook'w_}d?(_
wifllom complete
SHl)('Fvision,
IMPORTANTSAFETYINFORMATION.
READALLINSTRUCTIONSBEFOREUSING.
WARNING!
iliiii_iiiiiiiHH!
THEVENTFAN
The/ira will operate
mltomaticallv/Ill(let cer[_lin
condhions (see tile Automatic
Fan section). "I_&e care to
prevent the starting and
spreading of accidental cooking
fires while the vent/ira is in use.
i_i;Clean the underside of tile
microwave often. I)o not
allow grease to build ut) on
the ]//icrow_t_' or the ]:,In
filters.
In the event of a grease fire
on the sur/i_ce units below
the l//icrow_t_e ovun, Sl//other
a flaming pan on the sur/itce
refit by co\ ering tile pan
(ompletely with a lid, a
cookie sheet or a flat m_,.
_: Llse care when cleaning the
_mt lira filters. Corrosi_ •
cleaning agems, such as
1}_'-based o_en cleaners,
may damage tile Jilters.
J? When flaming/oods raider
tile l//icrow_t\'e, tllrn tile vent
lira o/E The tan, if operating,
may spread the flame.
J? Ne_vr lem e sIIrl_tce Ilnits
beneath your microwave
o\en unattended at high heat
settings, goilovers cause
smoking and greasy spillovers
that m m ig_fite and spread
if the microwm e _vnt lira
is operating. To minimize
automatic tiln operation, use
adequate sized cookware and
use high heat on sur/itce
units only when necessary.
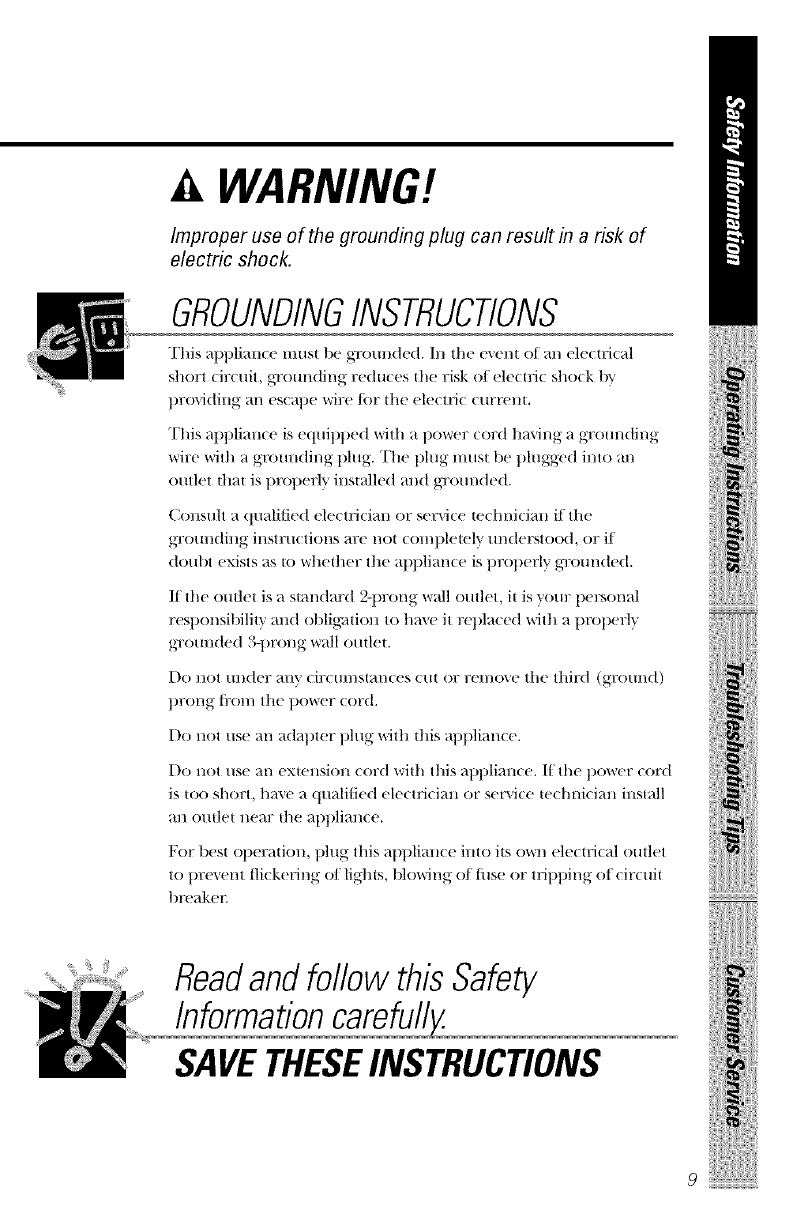
WARNING!
Improper use of the grounding plug can result in a risk of
electric shock.
GROUNDINGINSTRUCTIONS
This appliance must be grounded. In the exent of an electrical
short dr(uit, grounding redu(es the risk o/ele(tlfi( sho(k by
providing an es(ape wire for the ele(trk (urrent.
This appliance is equipped vdth a l_r_ _:_t hax_ng a grom_ding
wire with a gromlding plug. The plug must be plugged into an
outlet that is properl_ installed and grotmded.
Consult a qualified ele( trician or service te(hnician if"the
grotmding, inst_u('tions, .are not (ompletely m_derstood, or if
doubt exists as to vqh(!ih(!l" the al)plim_ce is prop(wly gTom_ded.
If the outlet is a smn(tard 2-prong wTtll outlet, it is yore: personal
responsibility and oblig_ltion to haxe it repla(ed with a prop(wl'_
grounded 3-prong wall outlet.
Do llOt/llld(?l; ally (il:( HH/S{aI/(PS (/l{ OF 1°(71//O_,(_ Ill(? third (gl:O/ll/d)
t)FoI/g t]'()l// the power (ord.
I)o not use an adapter plug with this apl)liance.
Do llOt lisp _tl/(?x|(!llSiOll (ol;d with this a|)|)liall(e. If" th(? t)()_r(_r ( ()r(t
is too short, haxe a qualified ele(tri(ian or ser\_ce te(hni(ian inst_dl
an otttlet 11(!_117 t]l(! _I})t)]i_tlI(P.
For best operation, plug this applian(e imo its (_r_ clccufical outlet
to prexent tlickering of lights, blowing of tuse or tripping of cir(uit
ReadandfollowthisSafety
Informationcarefully.
SAVETHESEINSTRUCTIONS
9
Congratulations!
YouAre Now Part of the GEFamily.
_%'re proud at our qualit,_
committed to pro'_iding
dependaNe ser\'i(e. 3bu'll
see it in this easy-to-use
Owner's Manual and _x)u'll
hear it in d_e ti_iendlv voi(es
ot 0[117 C/lStOIIlel _ seYvicc
d('l)artl//ent.
Best of all, you'll experience
these values each Ii}//e }_0/1
Ilse VOllr lnict'owa\ e (}\el/.
That's important, because
VOllr new l//icl7OW_lVe oven
will be pan of \star tamilv
tar maw: years. And we
hol)e you will be part of
ours lot a long time to
Collie.
\_i' thank \_m tor buying
GE. We appreciate your
tmrchase, and hope you
will contimm to rely on us
whellever you need quality
appliances tbr \_)ur home.
Important!
Staple sales slip or cancelled
check here.
Proof of the original purchase date
&needed to obtain service under
the warrantg
Write the model and serial
numbers here.
#
#
Youcan find them on alabel inside
the oven.
10
GE& You,
A ServicePartnership.
Ask any GEappliance owner and they will
tell you we stand behind our products with
unmatched quality service. However, did
you know that most questions result from
simple problems that you can easily fix
yourself in just a few minutes? This
Owner's Manual can tell you how.
this Manual
Inside you will lind many
hell)tiff hints on how to use and
maintain _x)m: mi(r(m_l,+e oxen
t)rol)efl}.Just a little tn:eventJvc
care on y)ur part can save
_x)u a great deal of time and
I//OII(W o\'eF the lilt of VOtlr
ReviewtheSectionon
Troubleshootingtips
COil/IliOn t)rol)lems here.
IJ Veil tt'view OIIF chart of
TrouMeshoodng Tips lit'st,
VOU I//}IV no| need IO call tot
ser\'ice at all.
If YouNeedService
Ilyou do l/ee(I set'vice, }_O/1 ('_11/
relax knowing help is only a
t_hone call a_l_. A list of toll-ti'ee
customer service numbers is
included in the back section.
()r you cml alwms call the
(;E Answer Center ¢'_at
800.626.2000, 94 hours a do}.
7 dm's a week.
SafeW Information
PrecautionstoAvoidPossibleExposure
to ExcessiveMicrowaveEnergy...... 2
SafetyPrecautions............... 2, 3
Arcing................. 4
gooos................. 4. 5
Microwave-SafeCoekware........ 6. 7
TheVentFan.................... 8
GroundingInstructions.............. 9
OperatingInstructions
MicrowaveOvenFeatures...... 12-15
Microwaw/ConwctionCooking..18,I7
ChangingPowerLeve........... 18
timeFeatures 1927
AutoFeature.................... 28
TemperatureFeatures . 29 33
SensorFeatures............ 34-38
OtherFeatures................ 38-42
MicrowaveTerms.............. 43
CareandCleaning ........... 44-48
TroubleshootingTips
BeforeYouCallForService...... 49.50
ThingsThatAre NormalWith
YourMicrowaveOven............. 50
Customer Service
Warranty ................. 51
Service Telephone
Numbers ........... Back Cover
ii!iiii;i¸
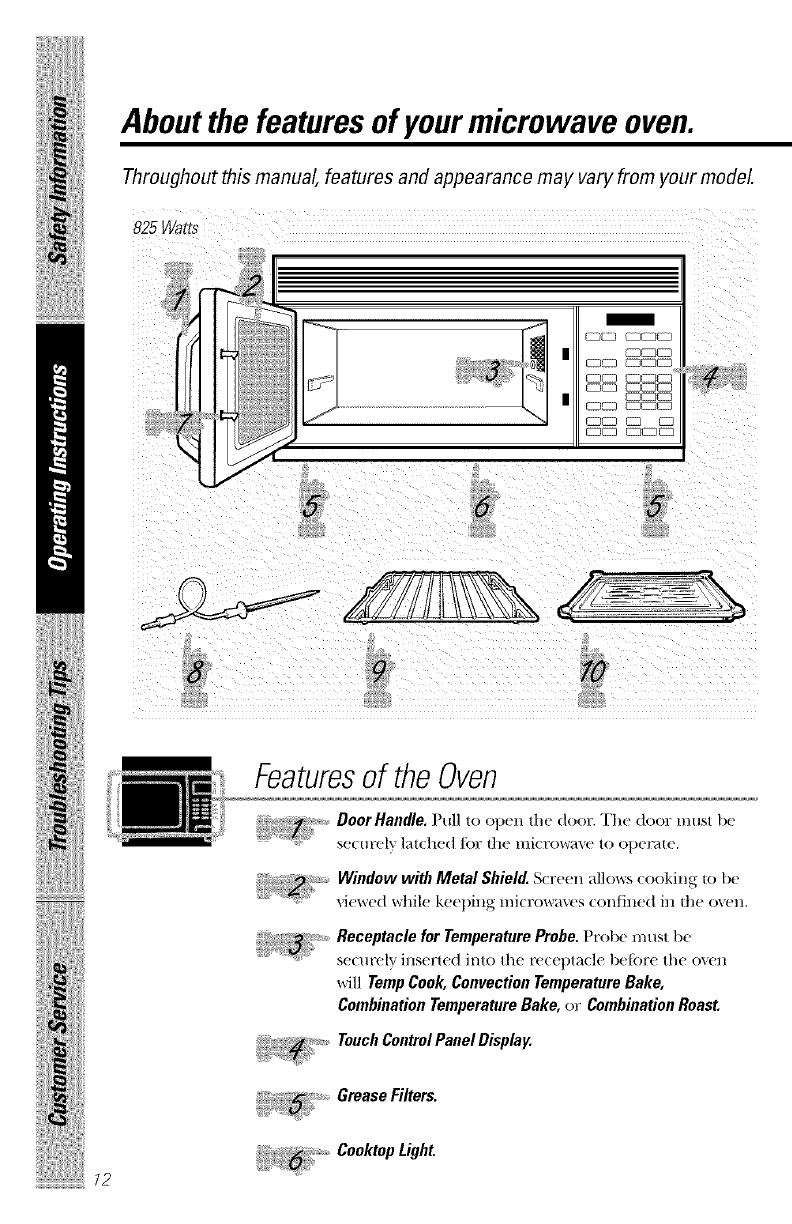
About the features of yourmicrowave oven.
Throughout this manual, features and appearance may vary from your model.
825 Warts
1
C_3C2 CBC_C_3
Fq_ C_CC3
8 9
Featuresof the Oven
Door Handle. Pull to ot)en the door. The door must be
S('( Ill'elv ]at(|l('(t for the llli(rOW_l_e tO o])el_lle.
Window with Metal Shield. S( reen allows (ooking to be
vi(fwed w]lil(' ke('[)ill_ ]//i(]7ow_t'_('s (Ol/_]]l(fd ill t]l(' o_ell.
)
Receptacle for Tmnperatere Probe. I robe must be
S('(/II'elY illsert(f(] into the fe(e])t_-i(]( |)e_()Fe the oxe]l
wi]l TmnpCook, Convection Temperature Bake,
Combination Temperature Bake, or Combination Roast.
TouchControl Panel Display.
Grease Filters.
Cooktop Light.
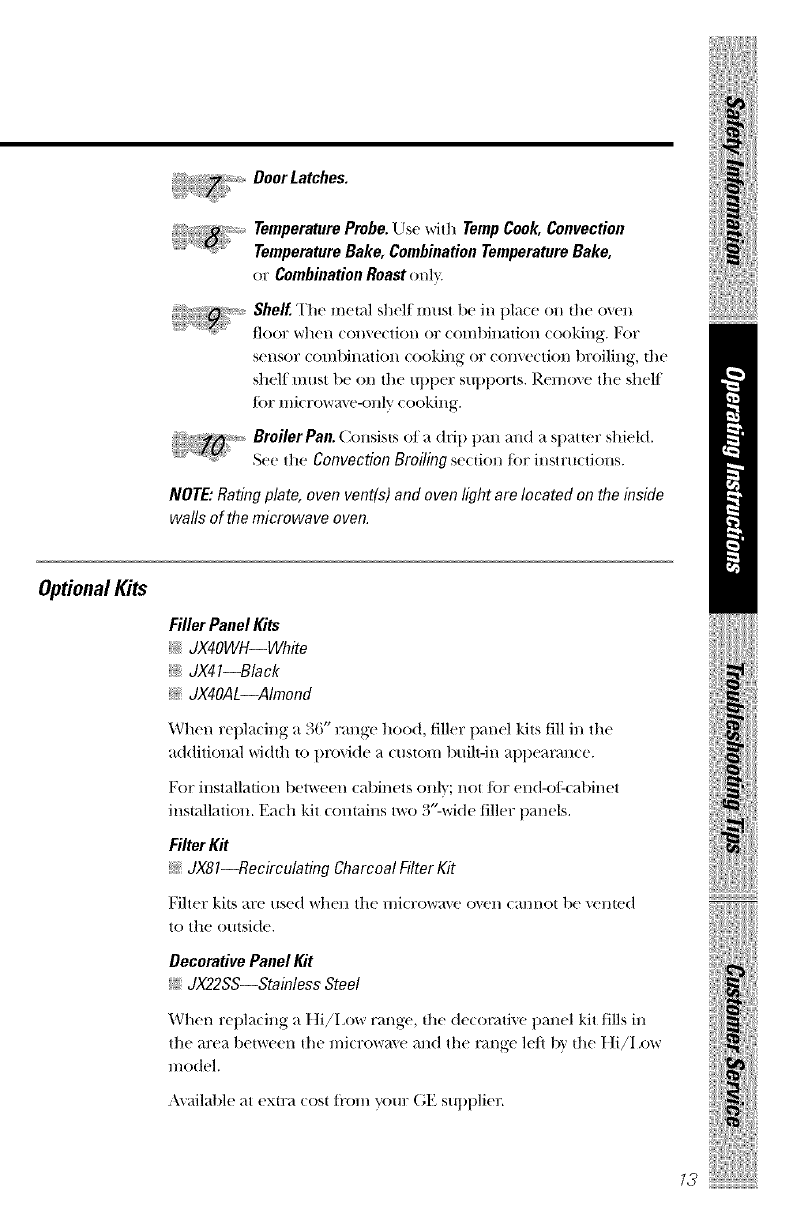
TemperatureProbe.Llse with Temp Cook, Convection
Temperature Bake, Combination Temperature Bake,
or Combination Roast onh
Shelf. The metal shelf must 1)ein t)la(e (m the o',ell
_]oor whel/ (Oll'_e(tiOI/ OY (olIlt)i]l_'diOll (ooki]l_. For
sel/sor (OlIll)il/_tiOI/ (ookill_ or (oll_e(tioI/ t)roi]il/g, {he
shelt HHISt l)e OH the Ul)l)er SUl)t)orts. Ren_oxe the shell
for mierow_e-olfly cooking.
_:, Broiler Pan. Collsists 7)f a drip t)all mid a spatter shield.
See the Convection Broiling se(tion for iHstru(tioHs.
NOTE: Rating plate, oven vent(s) and oven light are located on the inside
walls of the microwave oven.
!i iiiii iiiiiii
Optional Kits
Filler Panel Kits
_:_dX4OWH--White
_'_dX41--Black
_: dX4OAL--Almond
When rel)la(ing a 36" ravage hood, filler 1)_mel kits fill in the
_t,(]ditiOllal width |o Dl'ovide _l (]lS|OH/built-in at)t)eat_m(e.
For installation between (_ff>inets onI}; not for e_(t-ofi(_ff)inet
installation. Ea(h kit (()mains two 3"-wide filler panels.
Filter Kit
_: dX81--Recirculating Charcoal Filter Kit
Filter kits _t'('/lse(| whell the H/i(r()w_{_' o_'1/(_1/1/()| be vellte(]
to the outsi(h'.
Decorative Panel Kit
J_ dX22SS--Stainless Steel
When rel)lacia_g a t ]i!l ()_r range, the (tec(m_the t)aa_el kit fills i_
the _(re_t.be|we(!ll d_e l//i(row_l_.(! _lll(t the _mge lefl 1)vd_e t ]i/l ()_r
model.
A\ ailal)le at ex{ra cost t_'om "fern: (;E SUl)t)lier.

ii!iiii_i¸
About the features of yourmicrowave oven.
Youcan cook with convection heat, microwaves, or a combination of both.
Youcan cook by time or temperature.
Youcan also let the microwave choose the settings automatically by using
the sensor features.
CONVECTION
[HILl) J { HI-LO 30SEC.
[1][ 2]I 3]
[ ,4 }{5][ 6]
CONVECTION COMBINATION COMBINATION
_ {PoPcoRN]_EVERAOE][RE.E_]i?
i [ CANNED][ FRES./rFRozEN] i
i i i i
[AI_EFI_fOl_MfE]

CookingControls
time Features
.... Press Enter
TIME COOKI & II Amountof cookingtime.
Press once or twice
DEFROSTAUTO/rIME Amountof defrostingtime.
Press twice
ConvectionBAKE Oventemperatureandamountof
cookingtime.
CombinationBAKEHI-LO Oventemperatureandamountof
Press once or twice conkingtime,
ConvectionBROILHI-LO Highor Lowtemperatureautomatically
Press once or twice selected.Enteramountof broilingtime.
EXPRESSCOOK Startsimreediateiy!
ADD30 SEC Startsimmediately!
POWERLEVEL Powerlevel1 10.
TemperatureFeatures--Probe Cooking
Press Enter
TEMPCOOK Fondtemperature.
ConvectionBAKE Oventemperatureandfoodtemperature.
CombinationBAKEHI-LO Oventemperatureandfoodtemperature.
Press once or twice
CombinationROAST MEDIUMautomaticallyselected.
Press once
CombinationROAST WELLautoreaticallyselected.
Press twice
Sensor Features and Auto Feature
Press Enter Option
SensorCombination PressSTART
CHICKEN
SensorCombination PressSTART
FISH
SensorCombination PressSTART
BAKEDPOTATO
SensorCookPOPCORN Startsimmediately! more/Jesstime
SensorCookBEVERAGE Startsimmediately!
SensorCookREHEAT Startsimmediately! more/Jesstime
SensorCookCANNEDVEG Startsimmediately!
SensorCookFRESHVEG Startsimmediately! more/Jesstime
SensorCookFROZENVEG Startsimmediately!
Press Enter
DEFROSTAUTO/rIME Foodweight.
Press once
!i iiiii iiiiiii

ii!iiii;i¸
About microwave/convection cooking.
How It Works
Micl'ow_zve cooking uses very short, high/i'equenQ' radio wm'es.
The movement of the _C_)_r_[_t_xSthrough the Jood cl:e_ltes heat m_d
cooks most Joods Ji_stert]lan regular met]lods. Microwme cooking
he_tts the J()()d, Hot the cookw;t£e OF the il/tel-ior oJ the o_el/.
(k)l/xe(tio]l (ookil/g (OllSt_t]ltly (hT(/l]_ttes he,lied _til" _tFotl]ld the
food. It cl'('_ttes eveil |)]7()_rl/il/_ a]l(t S('_tl('([-il/ _]_£,'()r bv the lIl()ti()l/
of hot air oxer the tbod surt_(es.
Usil/g _l (o]//bi]latiOll of Hli( F()wvr{'i_e _]I(t (ol/xe(tiOll (ooki]lg is _l]so
You can cook by time or |)_r temperature. _;hen (ooking b}
t(_H/])el'_ttllre, tile t('III])(_]7_tHIF(_ })FO|)e ]//OHitOrS the iHterHal
[(!H/])(!F_ttlIYe Of the food 1o let _()/1 kl/ow when it is ready.
ComparisonGuide
Microwave Convection Combination
Cooking Microwave energy is Hot air circulates around Microwave energy
Method distributefl evenlyfor foofl to profluce brownefl anfl convection heat
fast, thorough cooking, exteriors and seal in juices, combine to cook foods.
Heat Microwave energg Circulating heatefl ai_ Microwave energy anfl
Source circulating heated ai_
Heat Heat produced within Heat conducted from Food heats from instant
Conduction food by instant energy outside of food to inside, energy penetration and
penetration, heat confluctefl from
outside of food.
Benefits Fast,high-efficiency
cooking.Ovenand
surrounflingsflo not
get hot.Easyclean-up.
Aids in browning and
seals in flavo_ Cooks
some foods faster
than regular ovens.
Shortened cooking
time from microwave
energy, plus browning
and crisping from
convection heal
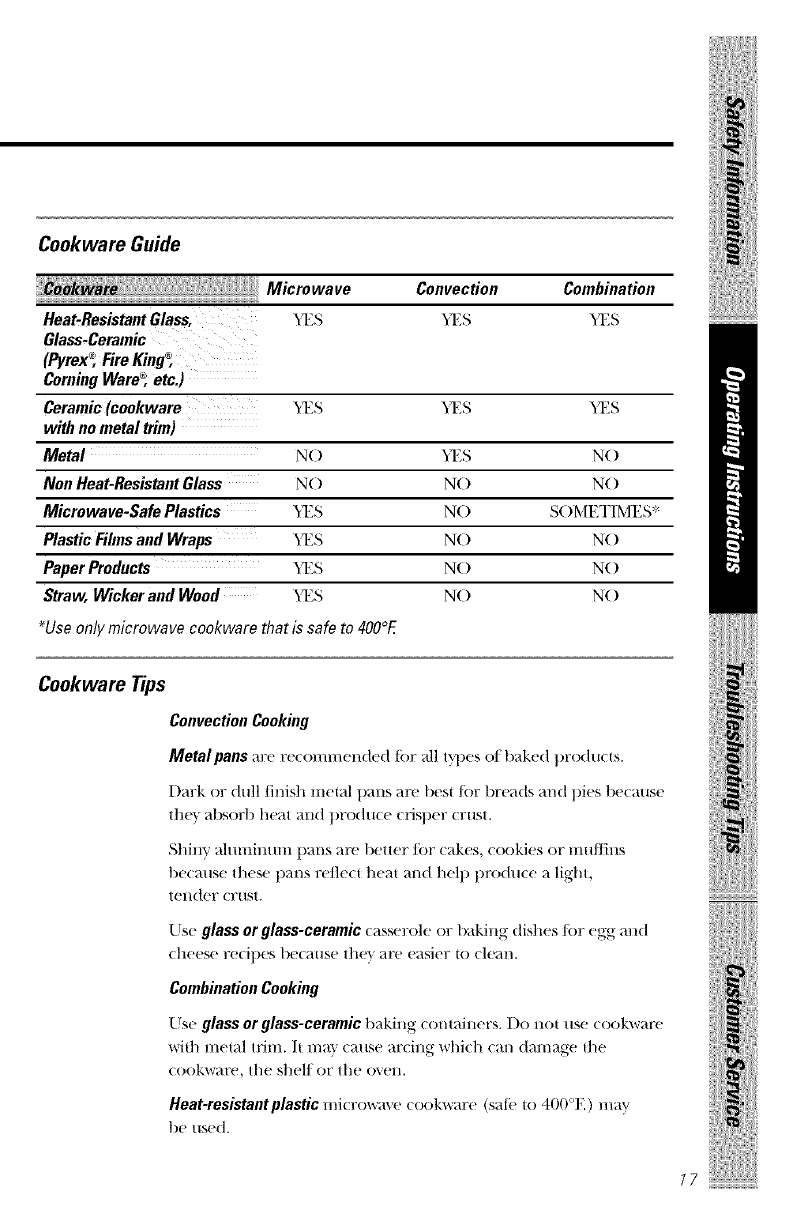
Cookware Guide
re;_i Microwave
Heat-ResistantGlass, "_T;S
Glass.Ceramic
(Pyrex_FireKing_
ComingWare_,etc.)
Ceramic(cookware _T_S
with nometal trim)
Metal N( )
Non Heat-ResistantGlass N( )
Microwave-SafePlastics "_1%
PlasticFilmsand Wraps _T_S
PaperProducts _T;S
Straw,Wickerand Wood _T;S
_Useonlymicrowave cookware that is safe to 400°E
Convection Combination
_1"_S _1%
_1_S N()
N() N()
N() S()METIMES*
N() N()
N() N()
N() N()
!i iiiii iiiiiii
Cookware Tips
ConvectionCooking
Metalpans are recommended tor _dl t_pes ot baked t)rodu(ts.
Dark or dull tinish metal pans are best for breads and pies be(ause
th("_ absorb heat and t)rodu(e (risl)er (rust,
Shiny _dumimm_ pans are better for (akes, (ookies or muffins
because these t)ans retle(t heat and help t)rodu(e a light,
t(!l/d(!F ( lqlSt.
Use glass orglass-ceramic casserole or baking dishes tor egg and
(]l('es(' r('(ipes |)e(allse they are eaSiel _R) (lean.
Combination Cooking
Use glass or glass-ceramic t)aki_ _g co_ _tai__ers. I)o _ot _se ( ookware
with metal tTilll. It may (ause ar(ing whi(h (all damage the
(ookwaFe, tile shelf OF tile OXell.
Heat-resistantplastic H/iC1X)v_r_{_(! (O()R'W_I'(_ (S_lt(! 10 400°E) ]//_y
be us(!(l.
ii!iiii;i¸
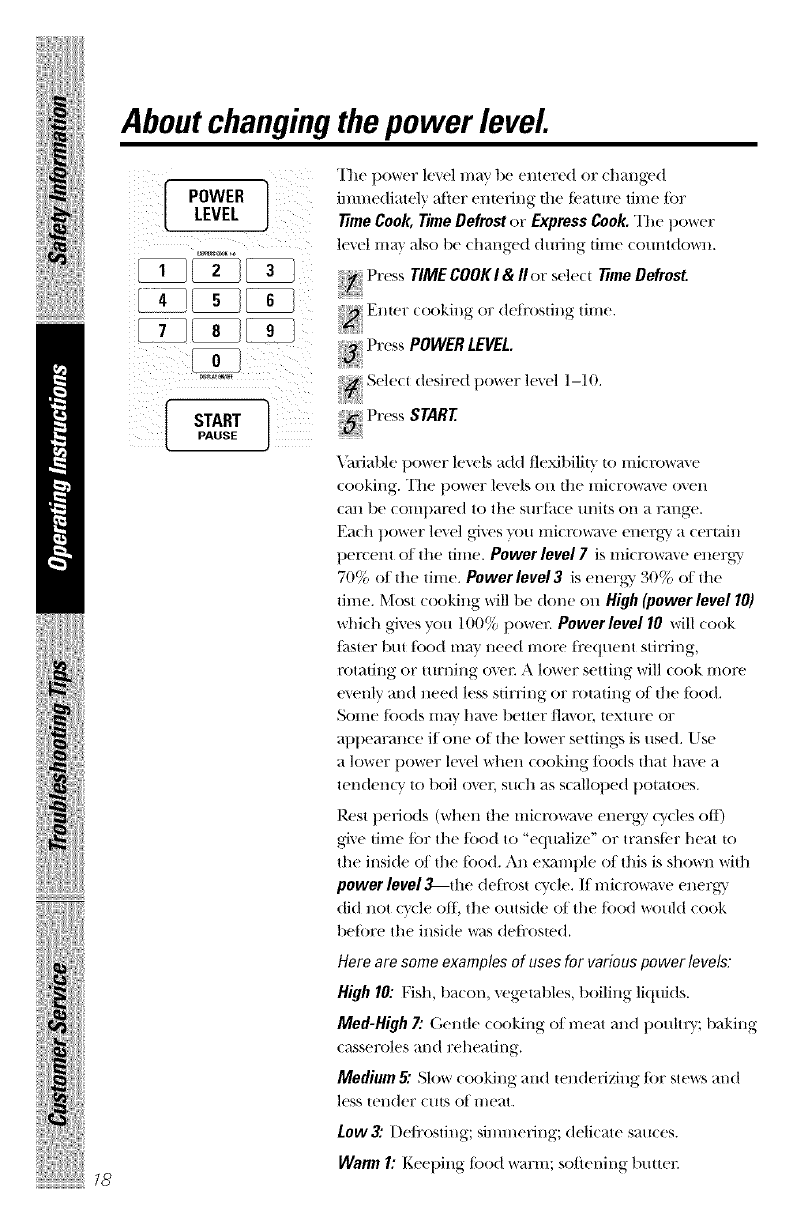
About changing the power level
'I]le power h'vel m_ly be eHtered or chmlged
immediately _lfler eHtefing the t(_m_re time lot
_me Cook, Time Defrost or Express Cook. The power
h",el may _dso be chm_ged during time countdown.
........... ) S
t reds TIMECOOKI & Ilor sele(t time Defrost
Enter (ooking or deti'osting time.
Press POWER LEVEL
o
_Sele( desired t)owerlexel 1-10.
Press START
_uJable power levels add flexil)ilit} to micmwm e
(()()king. The t)o_,er h'vels on the lili(row_l_' o\en
C_lll be C()II/t)}tl'ed to Ill(' sII17tktce Ill/its Ol/}t l'}tllg('.
I_aeh power h'\ el gives }_O/llIliCl'o_l\ e ellerg}" a eertaill
peI'_ent of the time. Power level 7is microwm e energy
70% of the time. Power leveI3 is energ?' 30% ot the
time. Most cooking will tie done on High (power level 101
which gives you 100% power. Powerleve110 will (ook
/i_ster but todd may Heed more ti'e(tuent stinJng,
rotating or turning over. A lower setting will cook more
e\ enly m_d need less stin-ing or rotating of the too(t.
Sonle/[)o(Is iil_lV l/_lve better flavo_; texttlre o17
at)t)earance if one of the lower settings is used. Use
a lower power le_vl when cooking/oo(ts that haw a
ten(tencv to boil ovec such as scalloped t)otatoes.
Rest t)elJo(ts (whell the miclx)wm e ellergy (_vcles eli)
gffe time lot the/oDd to "e(tuMize" or trmaslbr heat to
tile inside of the todd. An examl)le of this is shown with
power level,_-the deli'ost (_v(le. l/l//i( l'OW_l\e eHerg);
did not (}vle eli, the outside of the/oDd would cook
belore tile inside _*_s (leli:oste(I.
Hero are some examples of uses for various power levels:
High 10: Fish, bacon, _vgetat)les, boiling li(luids.
Med-High 7: (;emle cooking of meat and t)ouhry; baking
casseroles m_d reheating.
Medium 5: Slow cooking and tendedzing/or ste'_*,_;and
less telldel7 C/ItS O{ l//('_tt.
Low3: [)eti'ostJng; simmering; delieaw sau(es.
Warm 1: Keet)ing todd _r_]:_I_;softening butter.
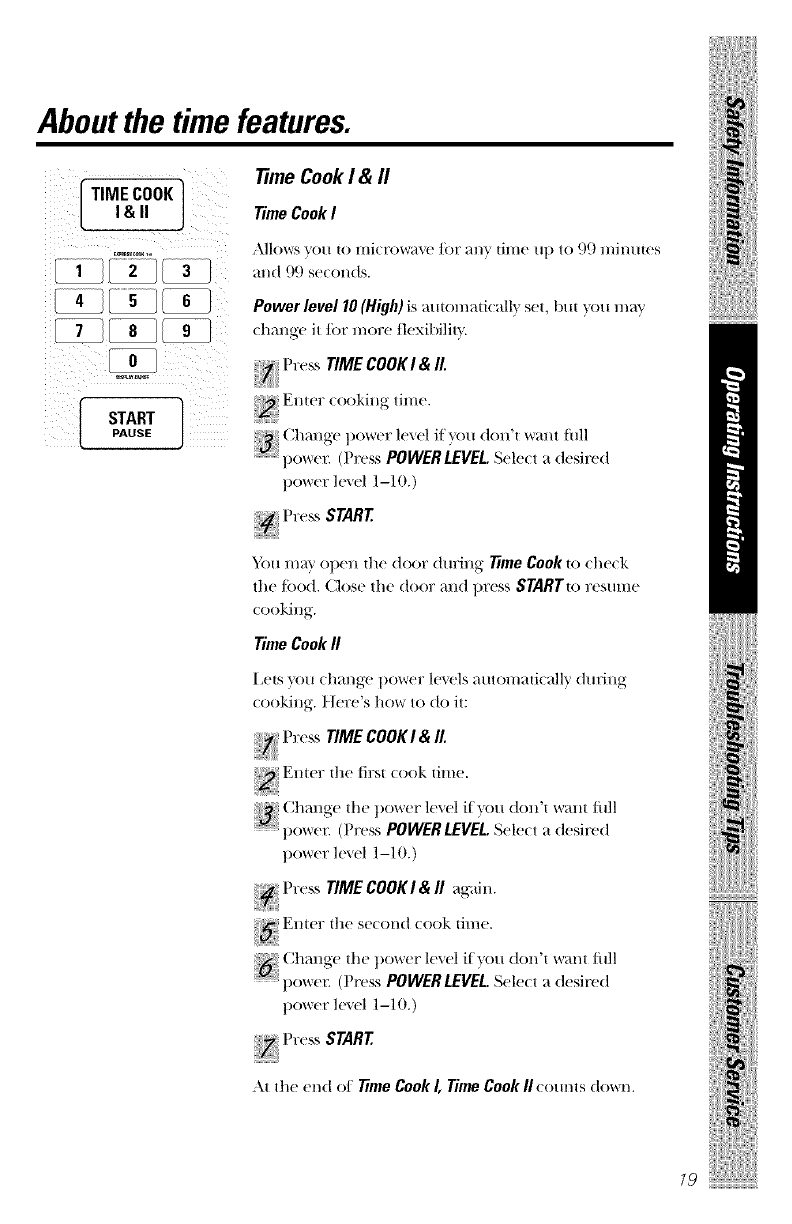
Aboutthe timefeatures.
It,mEcooK
t a j
time CookI & fl
Time Cook I
xkIlovvrs"VOlttO Illi(vo/vax, e tOl" an_ time up to 99 mimites
and 99 seconds.
Powerlevel 10(High)is amoma6eall} set, but _ou m_v
change it for more flexil)ilit',.
Pr( ss TIMECOOKI & II.
t)oweE (])I'(!SS POWERLEVEL Select a (tesired
power lexel 1-10.)
!i iiiii iiiiiii
You re:q,' open tile door (hn:ing time Cook to check
the/ood. Close the door mM press STARTto resume
looking.
Time Cook II
I ,eis _ou change power lexels automati( _dly (lut'ing
looking, l/ere's how to do it:
P ess TIME COOKI &II.
ii
t)oweE (])I'(!SS POWERLEVEL Select a desired
power lexel 1-10.)
Pr( ss TIMECOOK I&II _gain.
i
Emer die se(ond look time.
_:: (31m:ge the t)o_%rel"lexel if you don't _%r_tl/t11111
t)oweE (])F(!SS POWERLEVEL Sele/t a (tesired
t)oweF lexel l-lO.)
At the end of 7_me Cook I, Time Cook fl ( omits d()_£rl/.
79
ii!iiii;i¸
Aboutthe timefeatures.
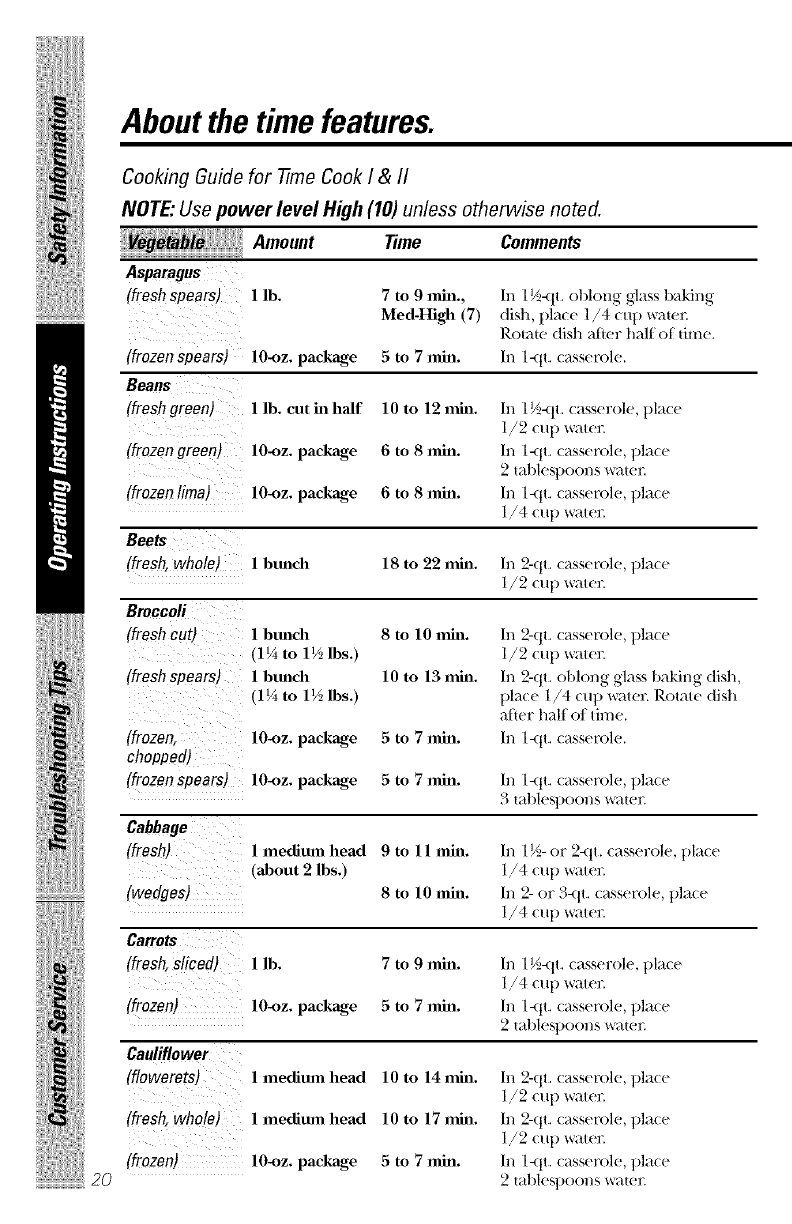
Cooking Guide for -time Cook I & II
NOTE,"Use power level High (10) unless otherwise noted.
Amo..t r me Comme.ts
Asparagus
(fresh spears) llb,
(frozen spears)
Beaus
(fresflgreen)
(frozen green)
(frozen lima)
7to 9 nfin.,
Med-ttigh (7)
In 1½-qt. oblong glass t)aking
dish, ])lace 1/4 cup water.
Rotate dish alter half of time.
In 1-qt. casserole.
Broccoli
(freshcut) 1 btmch 8 to lO rain.
(1¼ to 1F2 lbs.)
(fresh spears) 1 bunch 10 to 13 rain.
(1¼ to 1F2 lbs.)
(frozen, lO-oz, package 5 to 7 nfin.
chopped)
(frozen spears) lO-oz, package 5 to 7 nfin.
Cabbage
(fresh) 1medium head 9 to 11 mh].
(about 2 lbs.)
(wedges) 8 to 10 mh_.
Carrots
(fresh, sliced) 1lb. 7 to 9nfin.
(frozen) lO-oz, package 5to 7 nfin.
Cauliflower
(flowerets) I meditm_t head lO to 14 rain.
(fresh, whole) l meditun head 10 to 17 mh_.
(frozen) l O-oz. package 5 to 7 nfin.
Beets
•)
(fresh, whole) 1 btmch 18 to 22 mh_. Ill 2-qt. (_sser( ]e, pla(e
1/2 (up V_'_t[e]:.
Ill 2-(it. casserole, |)lace
1/2 cup Wiltel2
Ill 2-qt. oblong glass baking dish,
])lace 1/4 cup water. Rotate dish
aiter half of time.
Ill 1-qt. casserole.
Ill 1-qt. casserole, |)lace
._ tal)les])(/()_/s w_ffeE
In 1½- or 2-qt. casserole, ])lace
1/4 cup Wiltel'.
In 2- or 3-qt. casserole, ])lace
1/4 cup wiltel2
In 1½-qt. casserole, ])lace
1/4 cup water.
In 1-qt. casserole, t)lace
2 tables])(/ons w_t('g
Ill 2-(it. casserole, |)lace
1/2 cup W;lteL
Ill _-qt. c_sset_lle, ])lace
1/2 cup wiltel2
Ill 1-qt. casserole, ])lace
2tal)lesl)OOnS water.
lO-oz, package 5 to 7nth_.
llb. cuth_half lOto 12mh_.
lO-oz, package 6 to 8nth_.
lO-oz, package 6 to 8 nth_.
Ill 1½-qt. casserole, ])lace
1/2 cup Wiltel2
In 1-qt. casselx)le, ])lace
2tal)lesl)oons water.
In 1-qt. casser(/le, place
1/4 cup water.
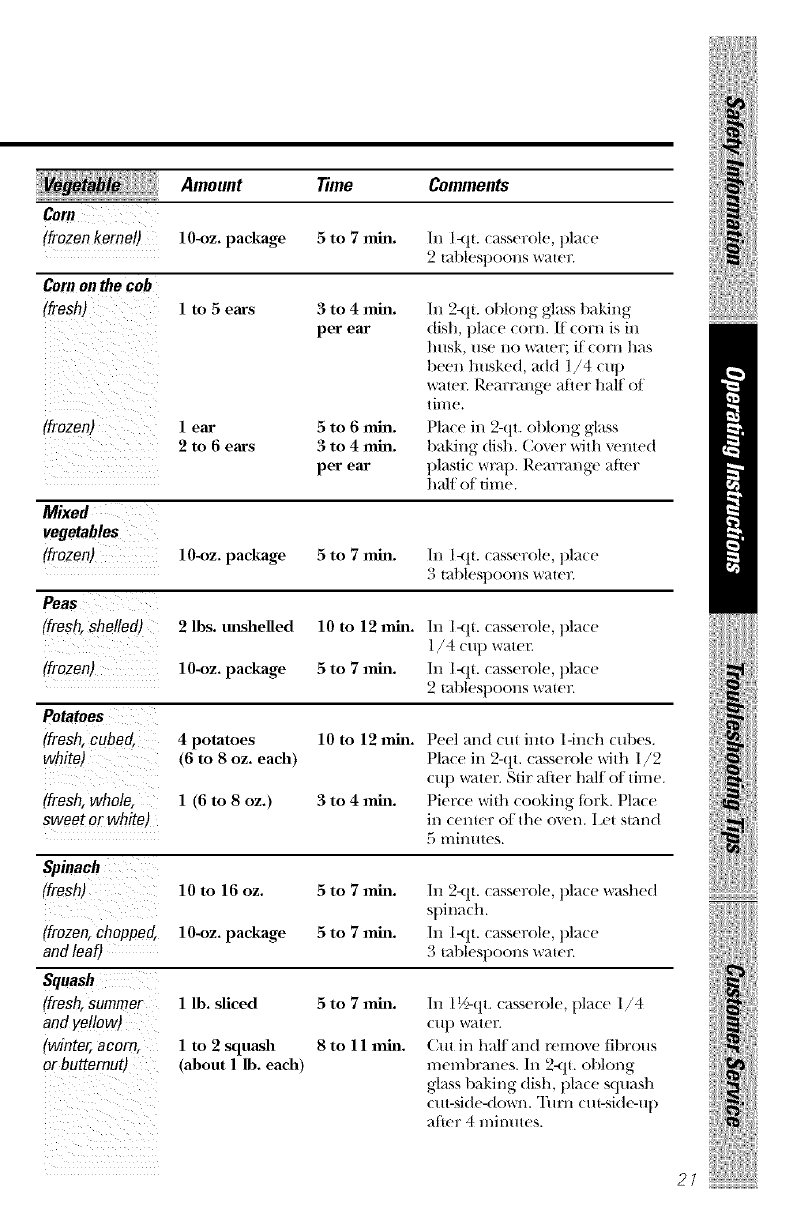
Amount Time Comments
(frozen kernel) lO-oz, package 5 to 7 nlhl. Ill 1-qt. (asserole, t)la(e
2tal)lesl)OOllS water.
Corn on the cob
(fresh) 1 to 5 ears 3 to 4 nfin. In 2-qt. oblong glass t)_lking-
per ear dish, t}la(e (orn. If (orn is in
1]Hsk, Hse ]]o _*_r_t_[er; it" corl] tilts
been husked, ad(t 1,/4 cup
water. Rearrange after halt" of
til]le.
1 ear Place in 2-qt. el)long glass
2to 6 ears baking dish. Coxer with xented
t}lasti(_rl_l]). RearDmge after
halt ot time.
ZZ
ii ii ii
(frozen) 5 to 6 nlin.
3to4 ,nin.
per ear
Mixed
vegetables
(frozen) lO-oz, package 5 to 7 nfin. In 1-qt. (asserole, pla(e
td)ks t O0]IS _ t1{].
Peas
(fresh, shelled) 2lbs. m_helled 10 to 12 nfin. In 1-qt. (;_sserole, t}la(e
l ,/4 (lit) vvr_tlel;
(frozen) lO-oz, package 5to 7 nfin. In 1-qt. (;,sserole, pla(e
2 t_ll)lest}oo]]s _Nr_{ter.
Potatoes
(fresh, cubed, 4 potatoes 10 to 12 nfin.
white) (6 to 8 oz. each)
(fresh, whole, 1 (6 to 8 oz.) 3 to 4 nfin.
sweet or white)
Peel mad cut into 1-inch cubes.
Place in 2-qt. (asserole with 1/2
cup _ter. Stir after half of time.
Pierce with cooking tork. Place
ill cel]ter of the ovel], I e[ stand
5 minutes.
Spinach
(fresh) 10 to 16 oz. 5 to 7 nlhl.
(frozen, chopped, lO-oz, package 5 to 7 nlhl.
and leaf)
Squash
(fresh, summer 1lb. sliced 5 to 7 rain.
aM yeflow)
(winter, acorn, 1to 2 squash 8 to 11 rain.
or butternut) (about 1lb. each)
In 2-qt. casserole, place washed
spinach.
In l-qt. casserole, t}lace
3 tal)lesl}oons wate]_
In 1½_-qt. cassetx)le, place 1/4
cup water.
Cut in halt and remove tibrous
H]C1//I)IP;-IIIeS.In 2-qt. oblong
gb_ss b_&ing dish, t)b_{ e s(tu;_sh
{ut-.qde-down. Tm'n cm-side-u t)
alier 4 minutes.
!i ii@iiiii
ii!iiii;i¸
Aboutthe timefeatures.
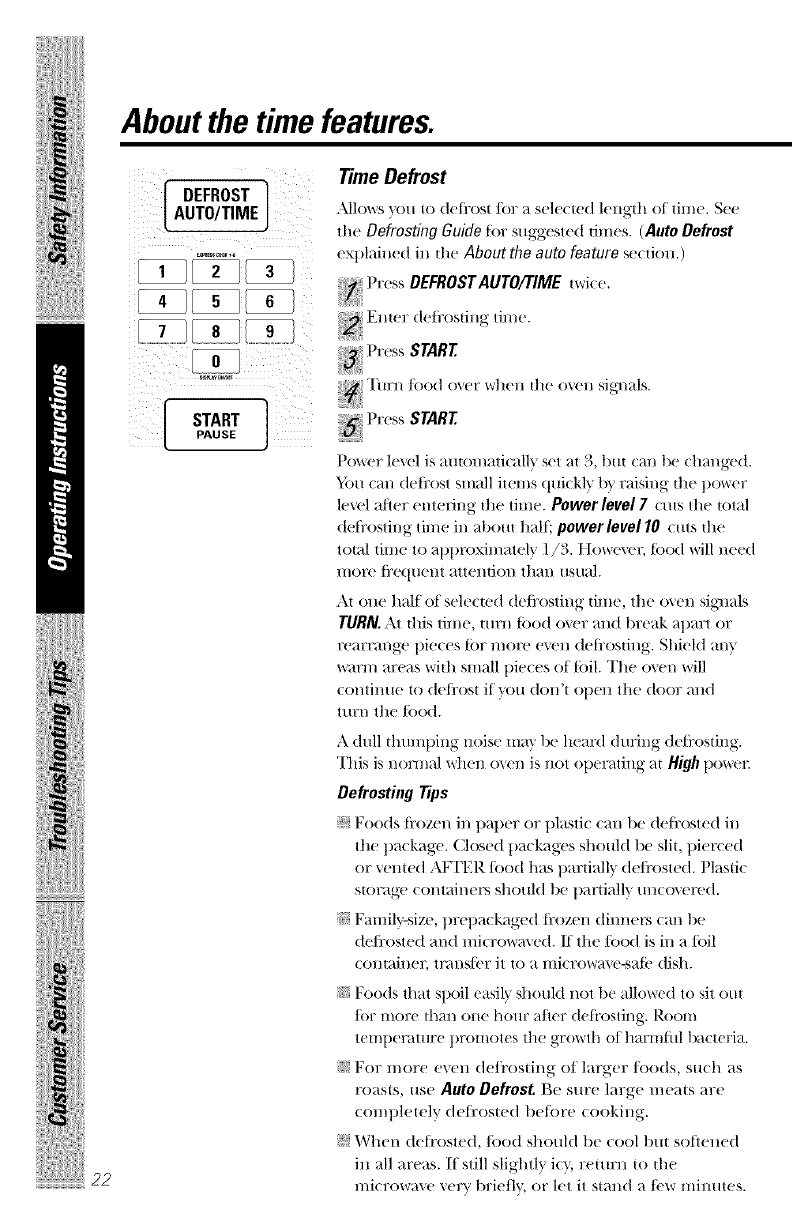
IA°TO'T'"
z
TimeDefrost
Allov, rsx.OU tO defrOSt for _ sele(wd length of time. See
the Defrosting Guide tar suggested umes. (Auto Defrost
explained in the About the auto feature secuon.)
N: Press DEFROSTAUTO/TIME tvvri((L
Enter deflx)sting lime.
_'['urn tbod oxer when the oxen sig_mls.
J
:,' Press START
Power level is amomadcally set at 3, bm can be changed.
kbu can deti'ost smNl items quickly by raising die power
level a/ier emering the lime. Power level 7cms the total
deti'osti/lg time in abom halt:, powerleve110 cuts die
total time to al)pro×inmtely l/3. tt()W_'_t_'C {[)()(I ""'ill need
l//()l'o ti'e(lllent attention thai/ iis/lal.
At one half of selected deti'osdng dine, the o\en sig_lals
TURN. At riffs time, mm tood o_x'r and break apart or
rcarrm/gc pieces {or more c_vn deli'osting. Shield m/v
warm areas wi_h small pieces ot toil. The oven will
continue to deli:os{ if you don't open tile door and
turn tile/k)o(I.
A dull thumping noise m_} b_ h_aM during defrosting.
This is normal when o_en is not op_ l:_ting at ttigh po_tl:
Defrosting rips
J? Foods ti:ozen ill paper or plastic can be defi:osted in
the package. Closed t)ackagcs should be slit, pierced
or vetoed AFI'ER/ood has t)artiall} de/i'osted. Plasdc
storage containers should be partially unco\ercd.
N Family-size, prepackaged ti:ozen di]mers can be
defl'osted and microwm ed. It the/ood is ill a loll
containeg mms/br it to a microw_v-sat_' dish.
_: Foods that spoil easil} should not be allowed to sit out
]O£ IlK)F(! thal/ Olle hO/ll? alter (telix)sting. l{OOll/
tempenm]re promt)tes tile growth of harmflfl 1);_cteria.
J? For more even deti'osting of larger/oods, such as
roas{s, use Auto Defrost Be sure large mea{s are
COml)le{ely del_Poswd betore cooking.
J? When (teli'osted,/ood should t)e cool t)m sollened
ill all areas. If still slightly ic}, return 1o {he
microwa\e _ery 1)riefly. or let it stand a/bw mim_tes.
Time
1 mln.
3 to 5n_m.
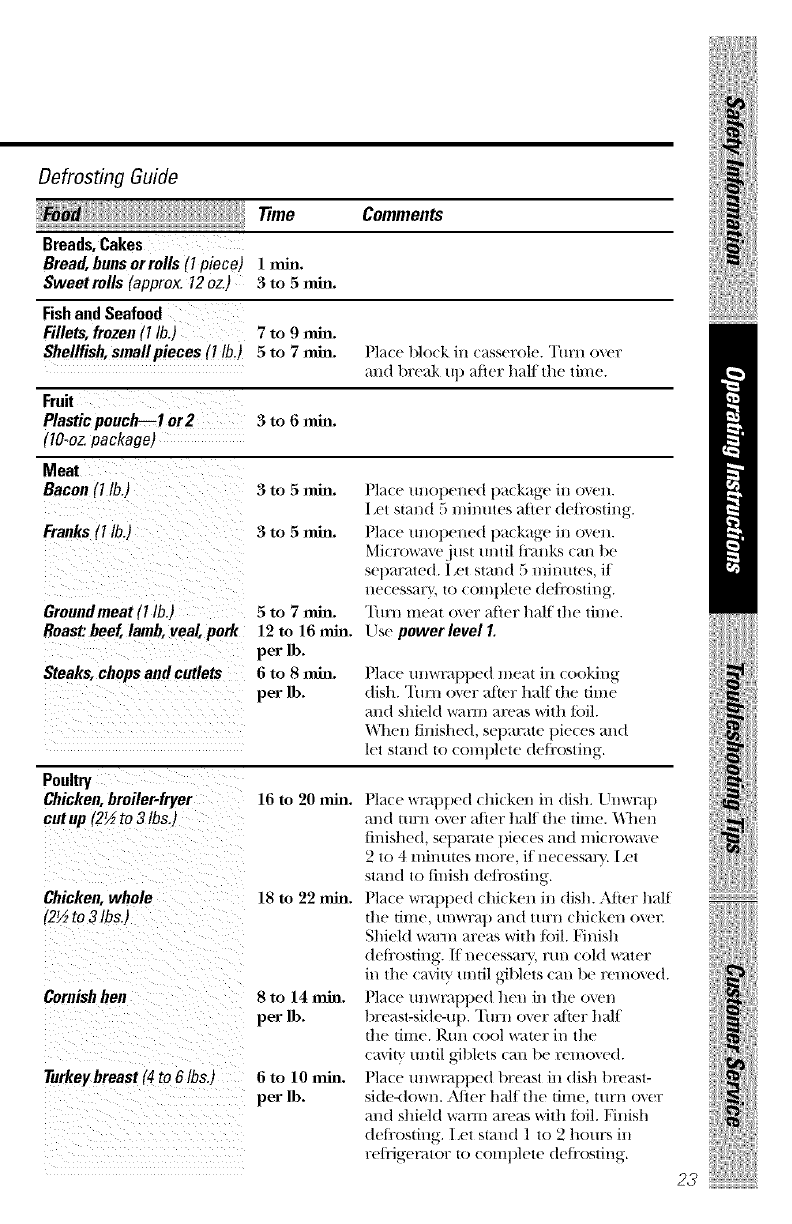
Defrosting Guide
Breads, Cakes
Bread, buns orrolls (I piece)
Sweetrolls (approx. 12 oz.)
Fish and Seafood
Fillets, frozen (I lb.) 7 to 9 nfin.
Shellfish, small pieces (I lb.) 5 to 7 nfin. Pbl(e block iu c_lsserole. Turn o_er
mMlwe_k ut) _di('r half the lime.
Fruit
Plastic pouch--1 or2 3 to 6 nfin.
(lO-oz. package)
Meat
Bacon (I lb.) 3 to 5 mhl. /'1_1((,mlot)eued t);_(kage in o_('u.
[el strum 5 minmes _fl('r de/msling
3 to .5 nlln, Place mtol)eued t);t(kage in o_eu.
Microwmeju._t re)Ill ti'mlks cm) be
Sel)m';oe(t. [ .el stand 5miuu|cs, i/
lleCeSS_lF}', tO (-O//l})]eIe de/msting.
TIIFII l_leat (),,el" ;atier t)aIf lhe lilne.
Llse power level 1.
Comments
!i ii,ii iiiiiii
Franks(1lbj
Groundmeat (1lb.)
Roast:beef,lamb,veal,pork
Steaks, chops and cutlets
5m 7 nfm.
12 to 16 mha.
per lb.
6 to 8 nfin.
per lb.
Place m_wmpt)ed mea| in cooking
dish. Turn over alier half the time
and shield _mn areas with loll.
When finished, set)arate t)ieces and
let stalld 10 COl//t)lete (tefl:osting.
Poultry
Chicken,broiler-fryer
cutup (2½to 3 lbs.,
Chicken,whole
(2½t_ 3 Ibs.)
Cornishhen
Turkeybreast(4to 6 lbsJ
16 to 20 mh].
18 to 22 mh_.
8m 14 rain.
per lb.
6to 10 rain.
per lb.
Place wrapped chicken in dish. Unwrap
and tm:H over after halI the time. '_\hen
fil/ishe(t, Sel)arate pieces alld l//icl'OWW_e
2 to 4 mimues more, if necessar}. [ ,et
stand to finish de/i'osting.
['lace wrat)t)ed chi(ken in dish. Atier half
tl_,e tilile, /lnWl)}l]) and tlll;n chicke]J, over.
Shield warm areas wid_ loll. Finish
(h'fl:osti1_g. II ne(essary, run (old _ter
in the e;wi| 3 until g_l)lets can be removed.
['lace tmwnq)l)ed hen in the ov(,l/
breast-side-up. Turn over alter half
the time. Rtm cool _smer in the
cavi|y m_|il gJt)lets can be remo\ed.
Place m_Wml)t)ed breast in dish breast-
side-down. Alier half the |ime, turn o\er
and shield warm areas with loll. Nnish
deli'osfing, let stand 1 to 2 hours in
re/i'igemtor |o eoml)lete (te/i'osting.
ii!iiii;i¸
Aboutthe timefeatures.
CONVECTION
ISTART I
PAUSE
ConvectionBake
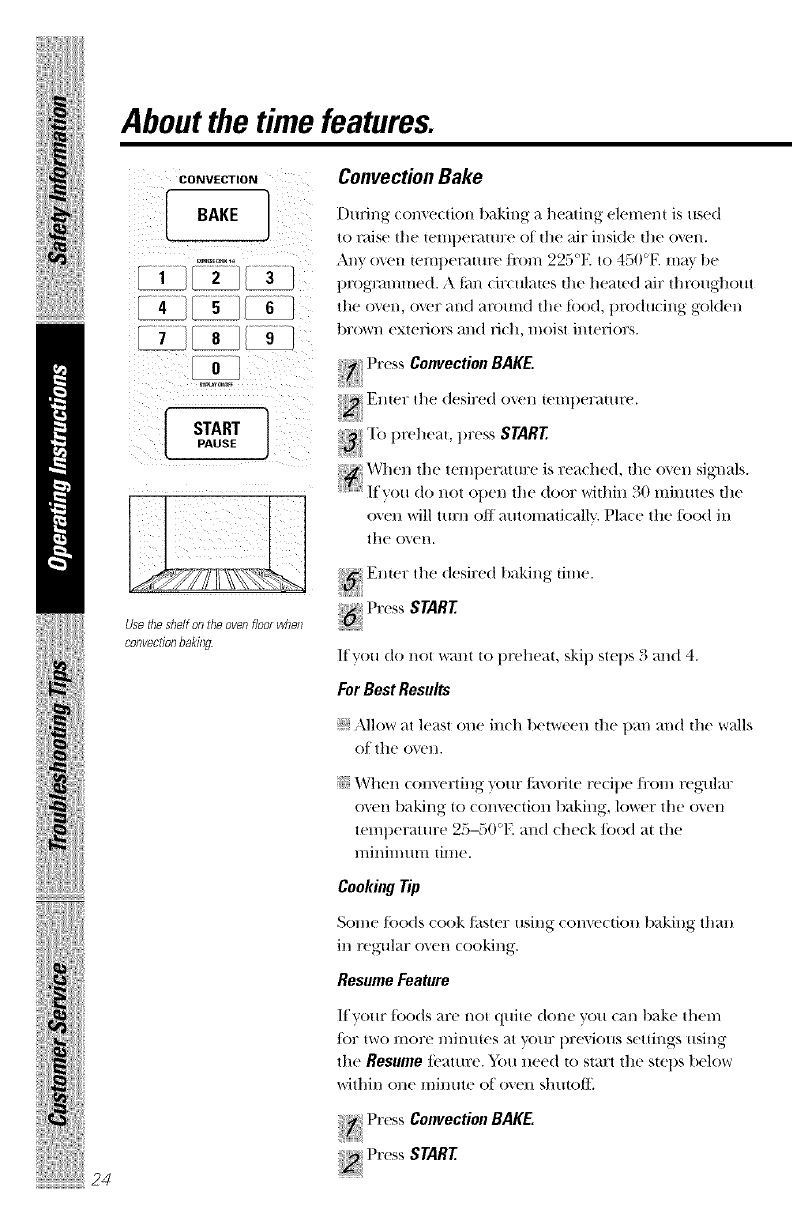
During conv('cti(m baking a heating element is used
to r;dse the telill)et_tlllTe of the _dr inside the ov(,n,
Any oven teml)enmm'/i'om 225°1£ t() 450°E mm be
programmed. A tim circulates the heamd air througllout
the o_en, ov(,r and arom_d the tbo(I, producing golden
t)rowl/exte_i()_ and ric]l, lIlOiSt intelJors.
_i_':; Press Convection BAKE.
l_2nter the desired oxen temi)erature.
To preheat, press START.
iiii_i%i
When the teml)erat m:e is tea(he(I, the o'_en signals.
I{'vou, (to not ot)en the door within }_;0minutes the
O_,(_11will tlllTI/ ()t_ alltOlllatJ(_lllv. Pla(e t]l(! food in
the ov(!n.
N l_2nter the desired baking time.
Usetheshelfon theovenfloor when
convectionbaking. If you do not _r_tll| to preheat, skip steps 3 m_d 4.
For Best Results
_) Allow _tt least one in(h between the t)m_ m_d the walls
ot tlle o'_(_1/.
_: When con\'erting y)ur |m'orite recipe fl:om regular
ovt'n baking to convt'ction baking, lower the o\en
teml)eratm:e 2.rS-.rS0°Eand check |ood at the
l//inil///llll |ilIl(f,
CookingTip
Sore(' |oods cook |i_,t('r using (onvt'(tion baking than
in regular o\en cooking.
ResmneFeature
If your |oo(ts m:e not quite done you can bake them
JDI7 two IIlOlTe l//in/lleS _tt _'()lll7 l)lT(WiO/IS settilJ, g_, IlSil/_
the Resume |batm:e. 5t)u need to start the steps below
within one minute of o\en shutoItl
;_/Press Convection BAKE.
BAKEHI-LO ]
[+l
PAUSE
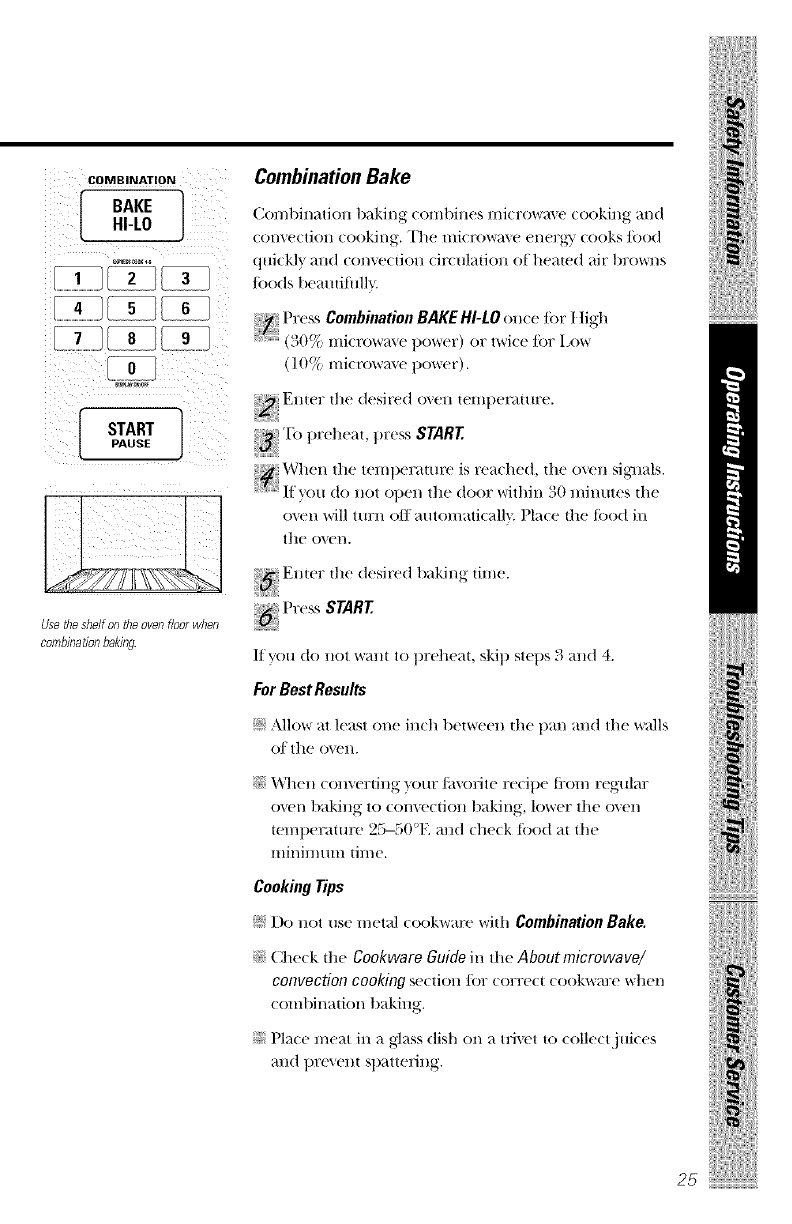
CombinationBake
Combination baking combines microwave cooking ;rod
conv('ctJon cooking. "I]le microw_l_e energy cooks/bod
qui(kly mid ('onve(tion cir(ula6on o{ h('tm'd air bl'owl/s
foods bcautiIiflh.
Press Combination BAKEHI-LO onle for t ligh
(3()r_c, ii/i(rowav(! pOW(_F) OF t'wi( (_ foF l()_r
(l ()r_,.lni(?rowax e pI)W(_I') .
Ellt(?l? t]l(! desired ()_,(!ll t(?lIIp(!l'_tt/|l'(_.
::++++;;++_To preheat press START
When the temperatureis re_,d/ed,the o_ensi_lmls.
....
....................I[ VO/l, do llOt Op(!l/ th(P dOOF wlthll/ ;)0 l//lntttes the
()X+el/will mrn off aut/m/atJcalh_: Place the tood in
ill(! /)x, (_l/.
Enter the desired baking time.
!i ii+ii iiiiiii
Usefile shelfon tile oval floor when
combinationbaking. Ifvl)tl do llOt Wa]lt t() preheat, skip steps 3 and 4.
For Best Results
J? Allow at least ()l/(! ill(h b(_tw(!(!ll th(! p_tl/ _uld thc W_I|IS
OJ: t]l(! OV(!l/+
_: "When converting your/5\'orite recipe fl:on/regular
oven baking to ( onv('(tion baking, lower tl/e o\en
temperature 25-50 'E mid (he(k {ood _t tile
lIlil/iI///lIIl till/c+
Cooking Tips
J_ Do not use m('tal (OOkVvr_ll'(+with Combination Bake.
_: (ih(,(-k the gookware Guide in th(' About microwave/
convection coo/dng se(tkm lot (orrc(t (ookxY_l]?('x_r]_('_
(ombinadon baking.
;_) Pl_lt't' l//('_tt ill _1 g']_tSS dish Ol/}t tlJVt't to colh'ct jukcs
arid pro\ ellt Sllatt('l'iHg.
ii!iiii;{
Aboutthe timefeatures.
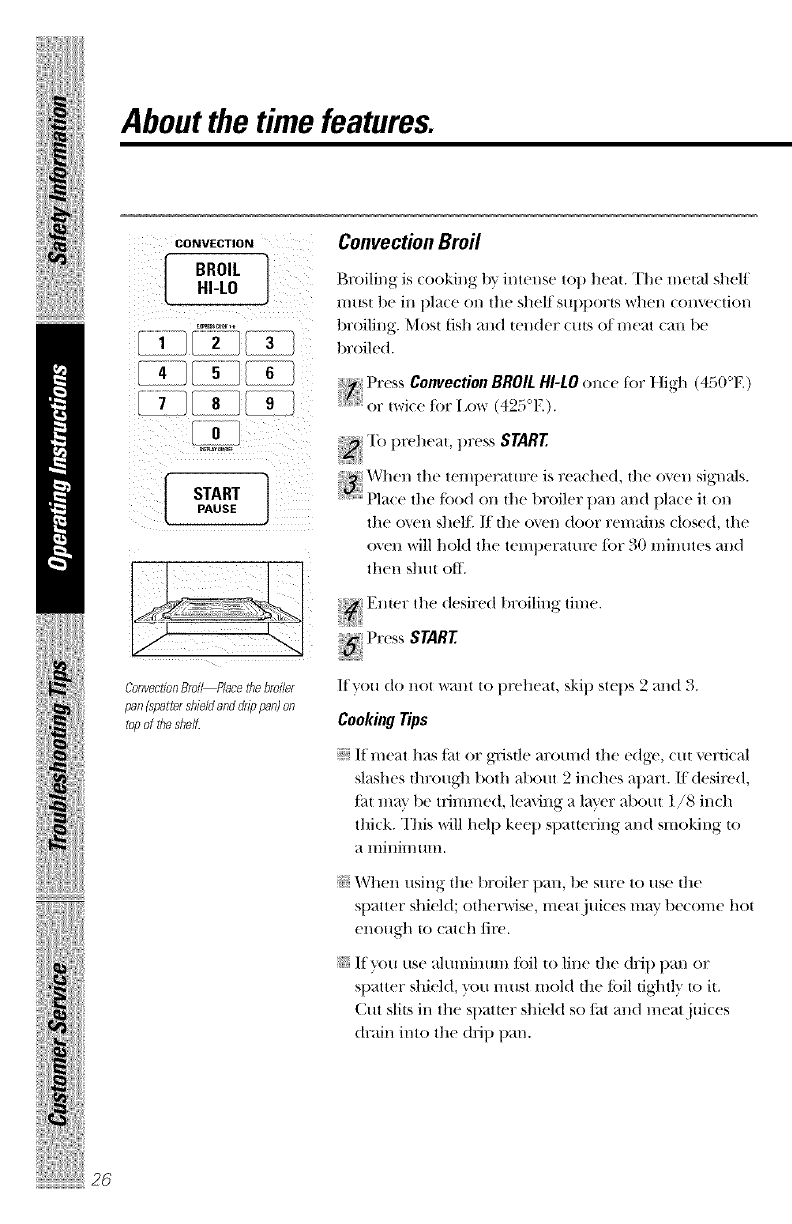
CONVECTION ConvectionBroil
HI-LO
1/[ zI{a
START I
PAUSE
Broiling is cooking by intense top heat. The metal shelf
must be in 1)lace on the shelf supports when conve(tion
broiling. Most fish and tender (uts of meat can be
l)roiled.
Press Convection BROIL HI-LO on(e tot t]igh (450'1_)
_+ To preheat press START
+i++++Wh,,._ll_,_"'t}_'"*I'}_'i+,_,.,ll,< ,tl_,,,,_,.sig._U+.
?; Pla(e the food Oll the 1)roller t}_l}l _l}/d l)lace it (m
the o'_e}/sllelt_ l_ the O_el/door rel//aillS dosed, the
OXell *,,,rillhold the teH/l)(!Fattt}7(: fOF _0 llli}ltlteS a}ld
then shut off
Enter the desired 1}roiling time.
!iiii++iiiii!
ConvectionBroi_Place file broiler
pan(spattersbieldanddrip pan)oil
topof theshell
If you do not %**'_!}ltto preheat, skip steps 2and 3.
CookingTips
_? If meat has lilt or g_Jstle at(rand the e(Igc, cut vcrtical
slashcs through both about 2 inches apm:t. I/desired,
/i_t may bc trimmed, h'a\iI_g a l[lyr('}: about 1/8 inch
thick. This will help kee t) spattering and smoking to
a lllillil//HIlI.
_: When using tlle broiler pan, be sure to use the
st/atter shield; otlle}-l*,'ise, meat j trices 1_ r1)ecome hot
enough to catch fit'('.
_: If _x)u use _duminum foil to line the drill llan or
Sllatt('r shield, you must mold the loll tightly to it
Cut slits in the Sl/atmr shield so lilt and meat jtfices
drain into the (hi l} tlan.
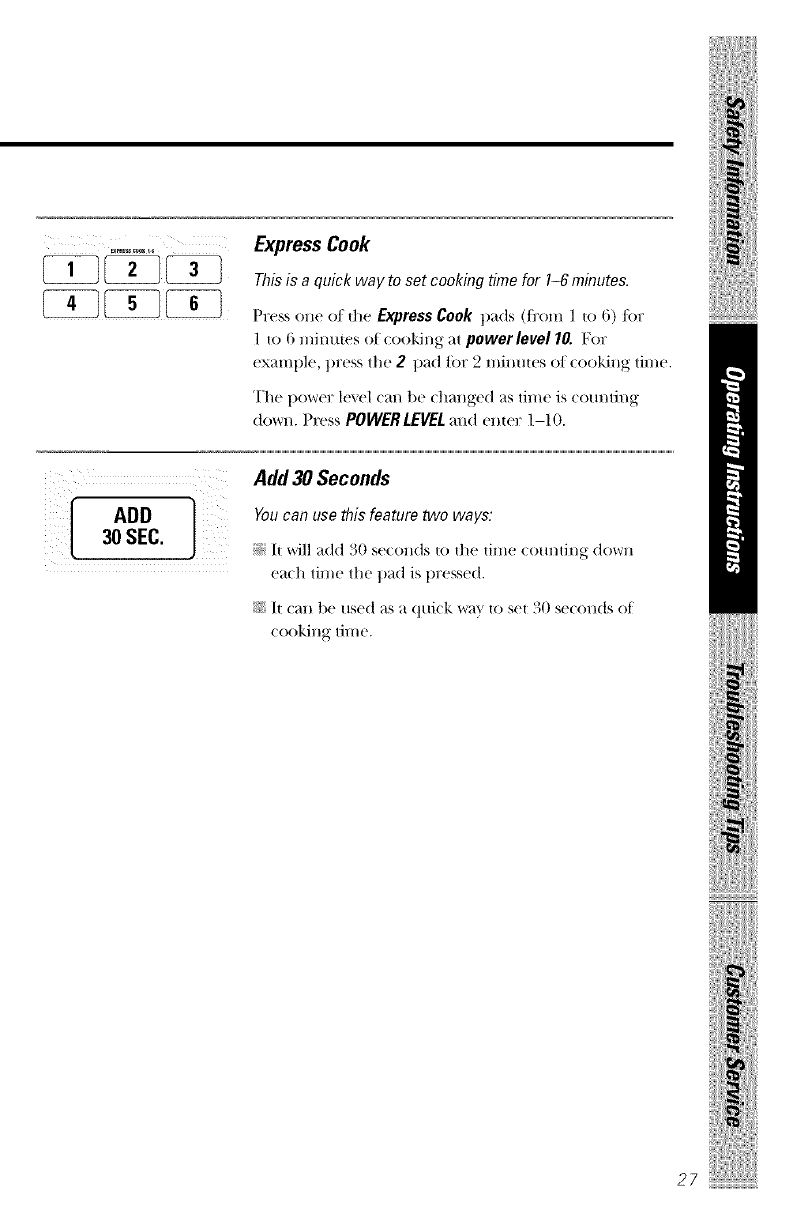
ExpressCook
This is a quick wayto set cooking time for 1-6minutes.
Pre_ one ot the Express Cook pads (flx)m ] to 6) for
1 to 6 minutes of (()()king at power level lO For
examl)k', t)re._s the 2t)_d for 2 minutes ot (ooking time.
"Fh(!t)ovq(_]?lexel (an be changed as time is (om_ting
(I()_r_.I)F_SSPOWERLEVELand emer 1-10
Add 3OSeconds
AOO ] Youc,nuse is,e,ture ow, ,:
30 SEC _;_ItWill tdd )0 s((( lids |o |]1(! ume ((mndng down
ea(h tin/(! the pad is pressed.
_! It ca1) be used as a qui(k wax_{o s( {oO s_(onds of
cooking dine.
!i iiiii iiiiiii
ii!iiii;i¸
Abouttheautofeature.
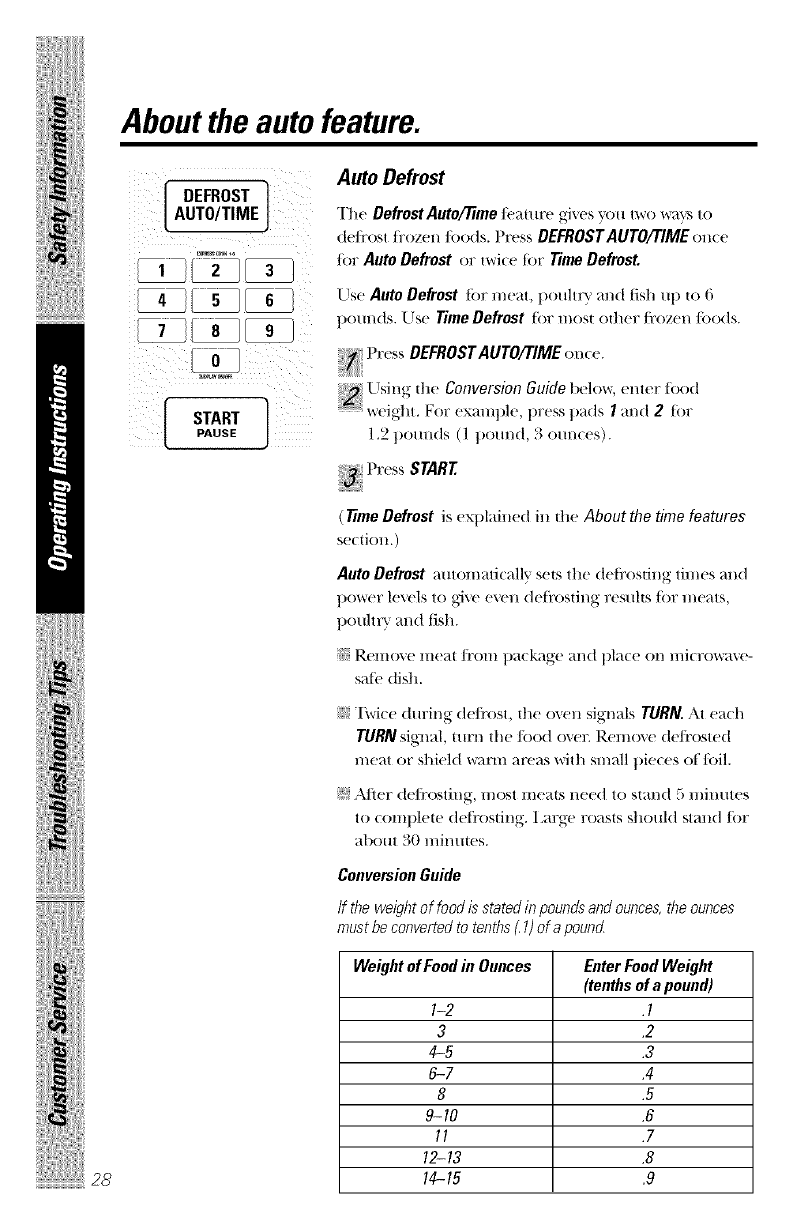
Auto Defrost
"llw DefrostAuto/Timef(_amre g_',esyou t_%ro_r(_ t()
deti'ost fi_ozenfoods. Press DEFROSTAUTO/TIMEon(e
for AutoDefrost (71:t_ri((__)_"TimeDefrost.
Use Auto Defrost ior meat, poultry and tish up t() 6
pounds. Use Time Defrost for most o|]ler t]:ozcn f()ods.
Press DEFROSTAUTO/TIME on( e.
Llsing dw Conversion Guide |)(_]OW, (_l/t(_l" i()od
_1weight. For ex_mlple, press p_(ts Iand 2tor
1.2 pounds (l pom_d, 3 om_(es).
I +it
(7line Defrost is explained in the About the time features
S(!(tiOll.)
Auto Defrost automati(allv sets the (tcfix)sdng times and
t)ower levels to g_ve even defrosting resuhs for meats,
poultry m_d fish.
_! RelllOX(? lll(faI ti'()lll p}t(k}tg(! }tl/d pl}t((f Ol/l//i(l°()w}tx(! -
saii_ dish.
J? "IX,ice dm:ing de/i'ost, d_e oven signals TURN. At each
TURN signal, turn the/ood o\er. Rcmo\e de/i'osted
meat or shield _mrm m'('as wit]l sm_dl pie(es of/oil.
J) .\tier (te/i'osting, most meats need to stand 5 mimttes
to complete deli'osfing. I,argc roasts should stand/or
about 30 milmtes.
Conversion Guide
If the weight of food is stated in pounds and ounces, the ounces
must be converted to tenths _1)era pound
Weight of Food in Ounces Enter Food Weight
(tenths of a pound)
I-2 .I
3 .2
4-5 .3
6-7 .4
8.5
9-10 .6
II .7
12-13 .8
14-15 .9
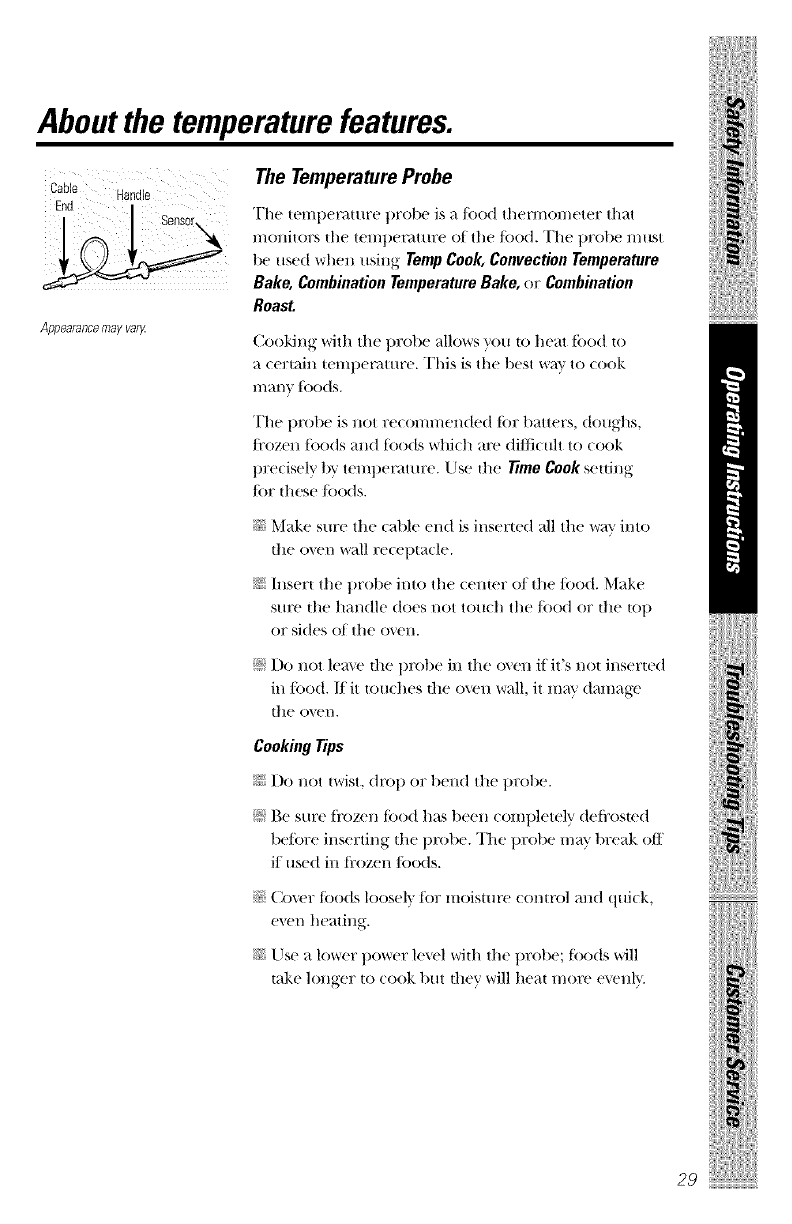
Aboutthe temperaturefeatures.
° ,a;o°
Appsaanc8mayvary.
The TemperatureProbe
The teinl)et_uure t)rol)e is a food thennon/cter that
n/OllitOrS the ten_t)et_Hure of the food. The t)rol)( nnBt
t)e used when using Tmnp Cook, Convection Tmnperatnre
Bake, Combination Tmnperatnre Bake, or Combination
Roast.
Cooking with tile prolle allows you to heat tood to
a certain temt)et_mu'e. This is tile best way to (ook
l//anv [()o(ts,
The t)robe is not recommended tot batter.,,, doughs,
/i'ozen toods and {oods which arc di//icult to cook
precisely t)y temt)eramre. Use die _me Cook seuing
/or these/oods.
_: Make sure tile caMe end is inserted _dl the way into
die oven wall recet)mcle.
_: Insert tile probe into tile center of the/ood. Make
sutv tile handle does not touch tile/ood or the top
or sides ot tile ()\ell.
J) l)o not lea_v the t)rot)e ill tile o\en if it's not inserwd
ill/ood, l/it touches die o\'cn wall, it may damage
the i)_vn.
CookingTips
_: l)o not twist, drop or l)end the t)robe.
J) Be sure ti'ozcn tood has been COml)letely defrosted
betore inserting tile 1)robe. The t)robe may break off
if used ill ti:ozen/oods.
_: Cover toods loosel} tor moisture conu'ol and quick,
even heating.
_: Use a lower t)ower level witl/the t)robe; toods will
rake longer to cook but they will heat more c_vnh.
!i iiiii iiiiiii
29
Aboutthe temperaturefeatures.
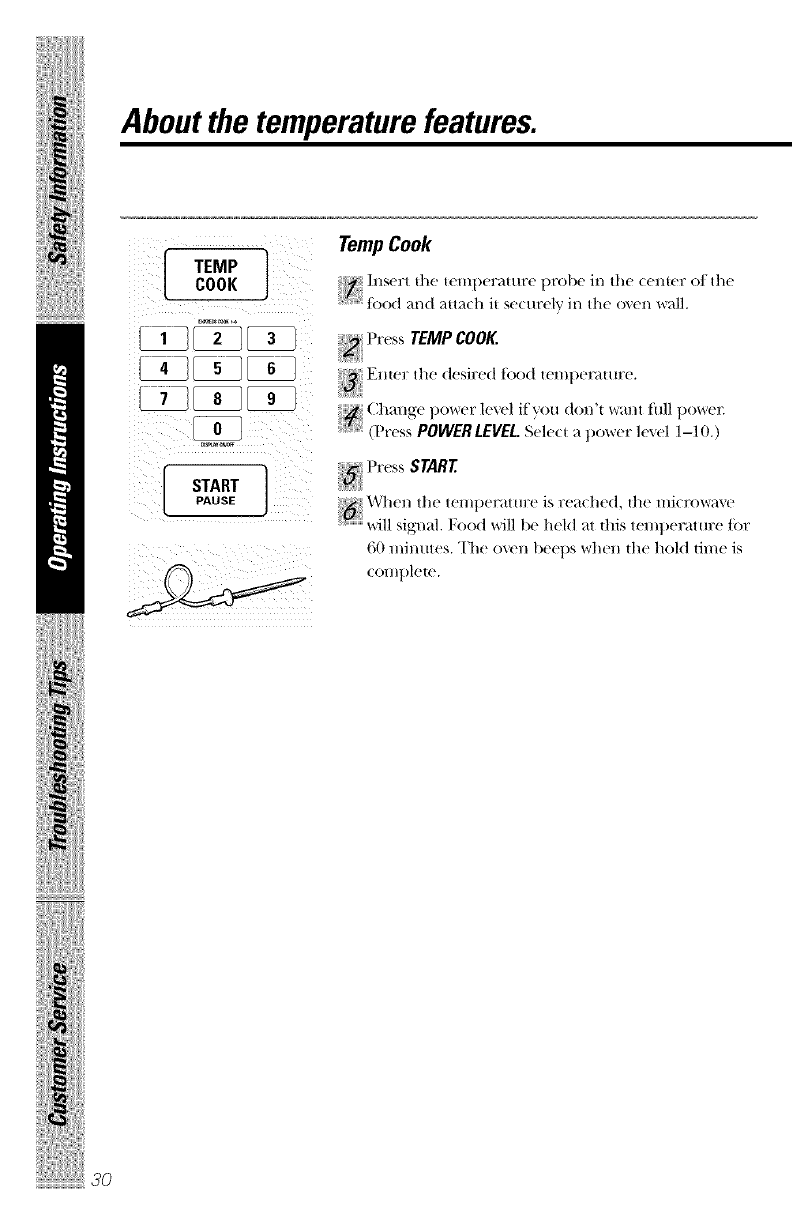
LTEMPcooK TempCook
+_ _ tbod and attadl it s(!(/ll'(_l'vrill the oxen wall.
Press TEMP COOK,
}{}{
{{ (2h_'tllg(_ pO*+%r(_Flexd if yOU don't want full po*3r(_12
_/ (Press POWERLEVEL Select a power lexd 1-10.)
......... ) *S
5 t r_ sSTART
ii+_ti!iiiiii
_ V';hen the temperature is _:ea(hed, the mi( mwa_e
will signal. Food will be hdd at this temperature tbr
60 minutes. The o',en beq)s when the hold time is
( Ol//pl(!t(!.
I +it
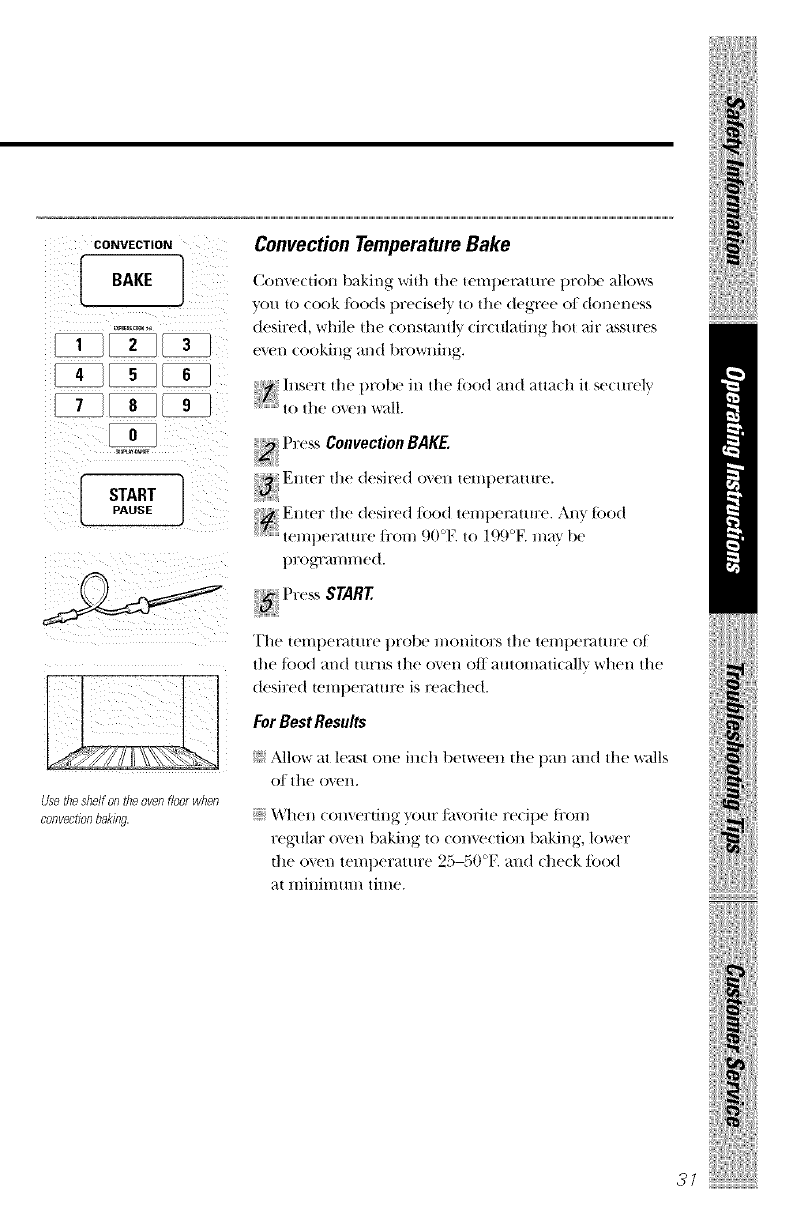
CONVECTION ConvectionTe:perature Bake
BAKE
t vOU tO ('ook foods precisely to the degree ot doneness
_,+_,,+ desired, while the constantly circulating hot air assures
START
PAUSE
even cooking and browning.
_ Insert the probe in the tk_od ;rod attach it securely
: to tile O'_(_n wall.
P ( ss Convection BAKE.
:i;:_ Freer die desired oxen temperature.
1_[111(?£ ill{! desired tk)od ten/t)et';ttllre. +_l/'_ tood
tel//perat Hl:e frol// (.)0°E tO l (.)(.)°F.l//_l} l>l._
t)l:O_T_ll//]//(!d.
!i iiiii iiiiiii
Usethedldf on file ovenfloor when
convectionbagng.
The telllpel'_l|/ll'e t)Fobe l//Onl|o1;s tile tt'l//l)el'_ltlll:e of
tile/ood and turns tile oven off automatically when tile
desired temperature is reached.
For Best Results
;:_: Allow at least one ill(h l)(_|/_r(!(!]l |h(! t)_tl/ _tlld t]/(! w_llls
of t]l_! ov(!l/.
+_?When converting }_)ur/i,\'ofite recipe ti'om
regular ov_'n baking to con_._'(tion baking, lower
{he o_._n teml)erature 2.r3--50OR and check/k)od
a| lllillillllll// tillle.
ii!iiii;i¸
Aboutthe temperaturefeatures.
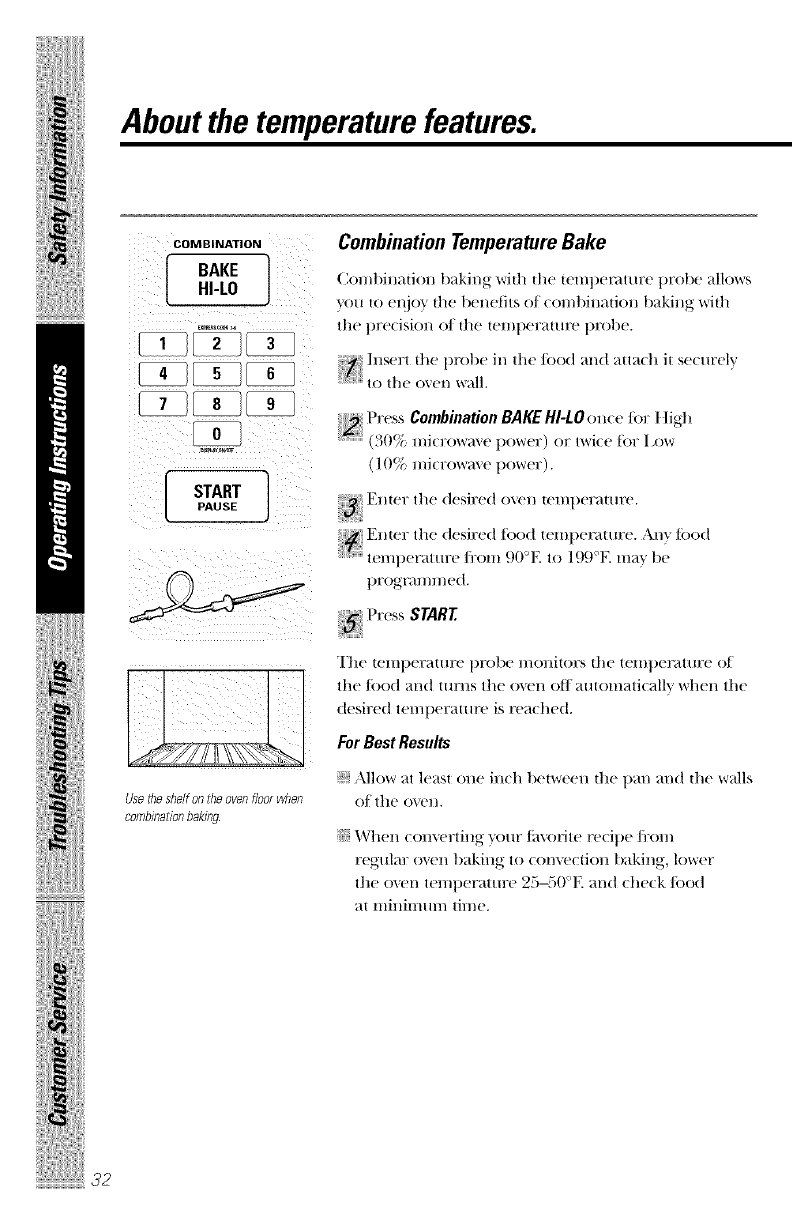
COMBINATION CombinationTemperatureBake
HI-L0
START ]PAUSE
Con/t)ination baking "_#rittl the temperature probe _tll()ws
_o/ to enjoy tile benefits of (on/billatioll baking wit]l
the t)re(isiol/ of tile |elIlt)el_tHIF(! t)Fobe.
tO the ()'_el/_¢_r_lll.
Press Combination BAKE HI-LO OllCe for t ]igh
..................(;)0?L, l//l( OV_a'_(? 1)O_t 1 ) OF t'_l(t tO1 1()_
( 1()0_;,mi(rowave power).
Ellter tile desil;ed ()_,ell telill)el;_tttlF(!.
!: Enter the desired tk)od tempemtttre. ,\n'_ tk>od
ten/l)erattB:e fi:om (.)()'_1_to 19(.)°F. ma}' be
t)FOgl';tl//l//ed.
Usefile shelfon tile ovenfloor when
combinationbaking.
The telllpel?at ill'e 1)l'obe l//OlliiOl°_, tile ielIll)eI'_ltllFe Of
tile/L)od and turns the o_'n off autom_d(_dlv when the
desired teml)eratm'e is reached.
For Best Results
;_ Allow _tt least one inch between the t)m_ m_d the w_dls
of tile o'_el/,
_: When com'erting }_o/lr/5\'orite recipe fl:ou/
regulm: o_en baking to (onvc_ don baking, lower
the oven teu/l)erature 25-50'E m_d (he(k/_)od
_tt lllillilf/[ll// th//e.
COMBINATION
ROAST
START
PAUSE
Usefile shdf on file ovenfloor when
combinationroasting
Combination Roast
CombinationRoast issimilar u) CombinationTemperature
Bake. It uses both mi(ro_ve and (Olp,'e(tJol/(()()king as
x_r(_l] _S t]_(' telnper;iture ])robe.
Ill_e,_,alep,'obei,/ale_'ooda.da.a,hi,_e.._e_._
[t tO the o_,en wall.
PressCombinationROASTonce for medium or twice
for well done.
"_}]lell the p]X)_Ta111]lle(J [eillpeF_HiiFe is Fe_l(hed,
the oxen holds the tbod at that temperature tot up
to ] ho/lr.
CookingTips
;_;The meted shelf must be on the o'_enfloor during
Combination Roast.
:>2)Place/_)od in a gla_,s dish on atrivet.
i::!lust as in regular roasting, only tender roasts should
be roasted 1)}using the probe. I,ess tender roa_,ts
should l)e microwav('d Lwtime.
_: Insert tile |)robe horizontally into tile center
meaw area n(x touching bone or |hr. Make sm:e the
handle does n(x touch file |()od or the lop or sides
of the oven,
!i iiiii iiiiiii
ii!iiii;i¸
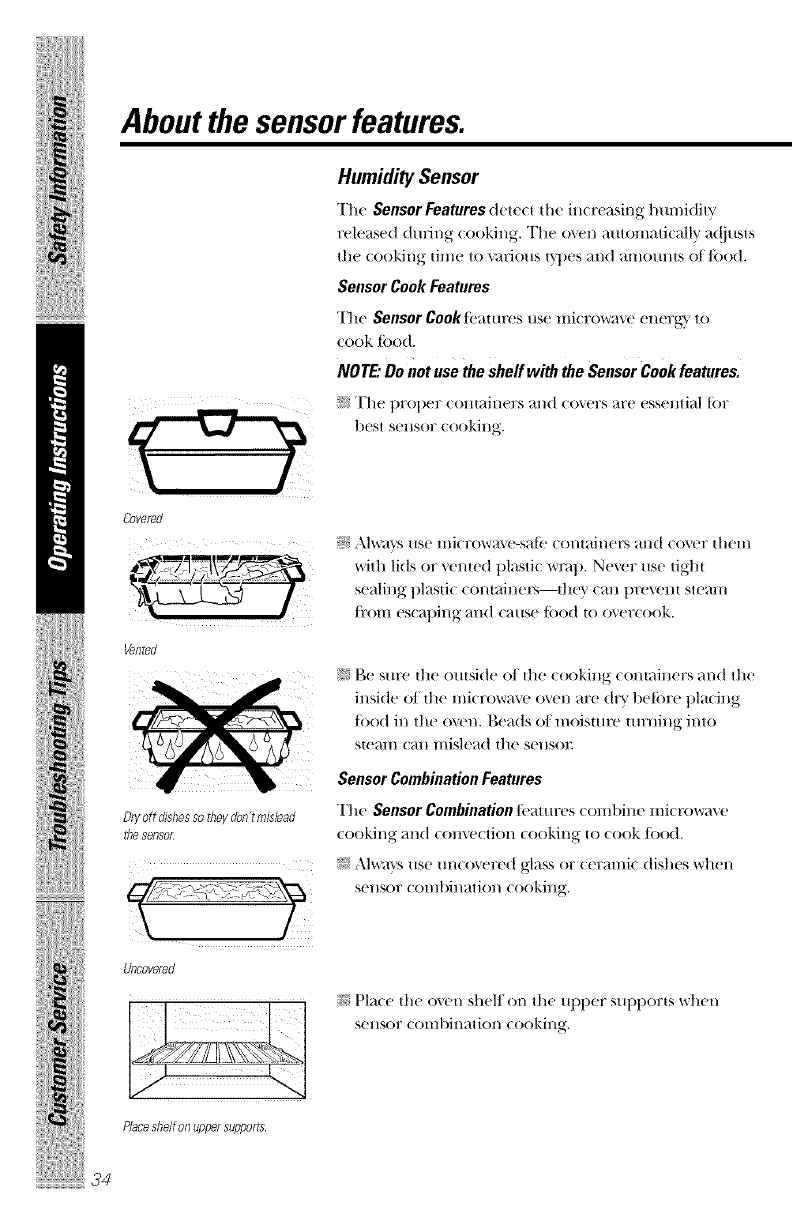
Aboutthesensorfeatures.
Humidity Sensor
The Sensor Features d(,tc(t the ill(rc_zsing ]mmi(tit_'
t'€'leas_'d (hll_ng (ooking. "I]w o_,_'n autolll_ltJc all_" _t(!i/lsts
the cooking trim' to _mfious tH)es and amoulltS of fi)o(].
Sensor Cook Features
"[]w Sensor Cookfeamres use lilicrovvrax(_ ell(_r_} tO
(ook tood.
NOTE."Do not use the shelf with the Sensor Cook features.
_ "['1/(_ pF()})(!I; (Oll{ail/(?l;S al/d ( ()_,(_l;S aF(? eSSelltial {or
best S(_llS()F (_()()killg.
CevefeU
_d
Dryoffdi_hessorileydee'tmislead
_/le seeso£
Ullcovered
Placeshelfonuppersuppert_.
.;:_Mwms use microwa_'-salk' cont_finers and covcr |hem
with lids or vented plastic wrap. Never use tight
sealing plastic COl/t_dl/el's--t]l(_' Call [)I'(WOII| ste_H/
|i:om escaping and cause toed to overcook.
+!!Be sure the outside ot the (()()king (ontainers and the
inside ot the mi(rowa_,e o_,en are dry betore pla(ing
tbod in the oxen. P,eads ot moisture turning into
S|{_alll (?all mislead the S(?IlSOE
Sensor Combination Features
The Sensor Combination |L'atures coral)|he microwm e
cooking and con\'('ction cooking |o (ook 1oo(I.
_' Mwa}_'_ use m_co',ered glass or ceramic dishes when
sensor combination cooking.
?::; Plac(_ the oven shelf on the ul)t)er suppor|s _r|l(._l/
S(!llS()F (olIl|)il/atiol/(ookillg.
" i i • i
(lesstime) (moretime)
Useonlywithprepackaged
microwavepopcornweighieg
1.75to3.5ounces.
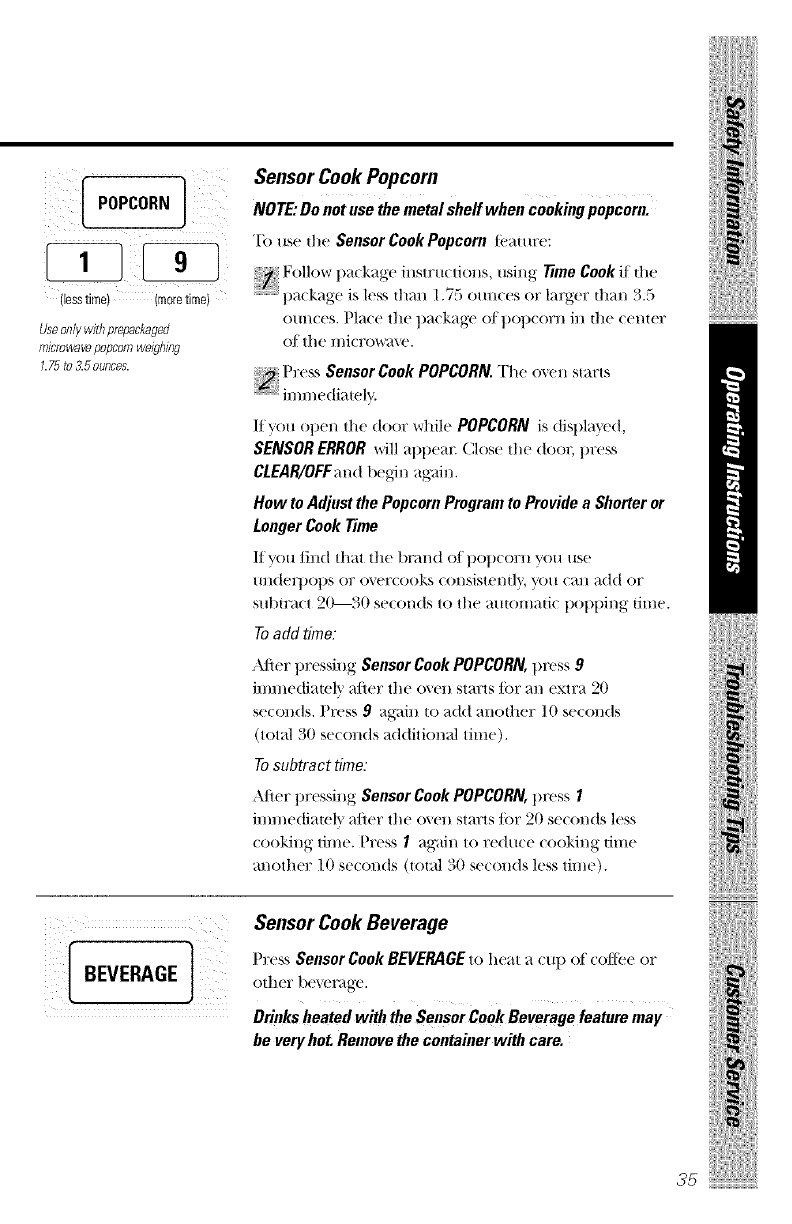
Sensor CookPopcorn
NOTE: Do not use the metal sheff when cooking popcorn.
'Ib use the Sensor Cook Popcorn t_'_mzre:
Follow' 1)at kage illstru( tiOllS, IlSil/_," 77me Cook it ttle
t)ackage is less than 1 75 ounces or larger than 3 5
ounces. Plate the package of popcorn in the center
of tile l//iCl?OW_l\'e.
+-'J Press Sensor Cook POPCORN. The (l'_en starts
immediately.
If you open the door while POPCORN is displ;i}_,d,
SENSOR ERROR will appear. Close the door, press
CLEAR/OFFand begin again.
How to Adjust the Popcorn Program to Provide a Shorter or
Longer Cook Time
Ilvou lind that the brand el popcor:l }'on use
undeq)ot)s or overcooks consistemly, g)u can add or
subtratt 20 30 seconds to tile automatic t)ot)ping time.
Toadd time:
\lier pressing Sensor Cook POPCORN,1)tess 9
immettiatel\' _dier tilt' oxen st;-u:tslot m_ extra 20
seconds. Press 9ag;dn to add another l0 seconds
(total 30 seconds additional time).
To subtract time:
•\lier pressing Sensor Cook POPCORN, press 1
immediatel\ a/ier tile o\en starts Jar 20 seconds less
cooking dine. Press 1again to reduce cooking time
another 10 seconds (total 30 seconds less time).
iiiiilliiiiiiiiiiii!i:l_iii!iil__
!iiiiii iiiiiiJ
Sensor Cook Beverage _
Prexs Sensor Cook BEVERAGE to hem a lup of cofli:e or
other bex emge.
Drinks heated with the Sensor Cook Beverage feature may
be very hot. Remove the container with care.
.l!i!
ii!iiii;i¸
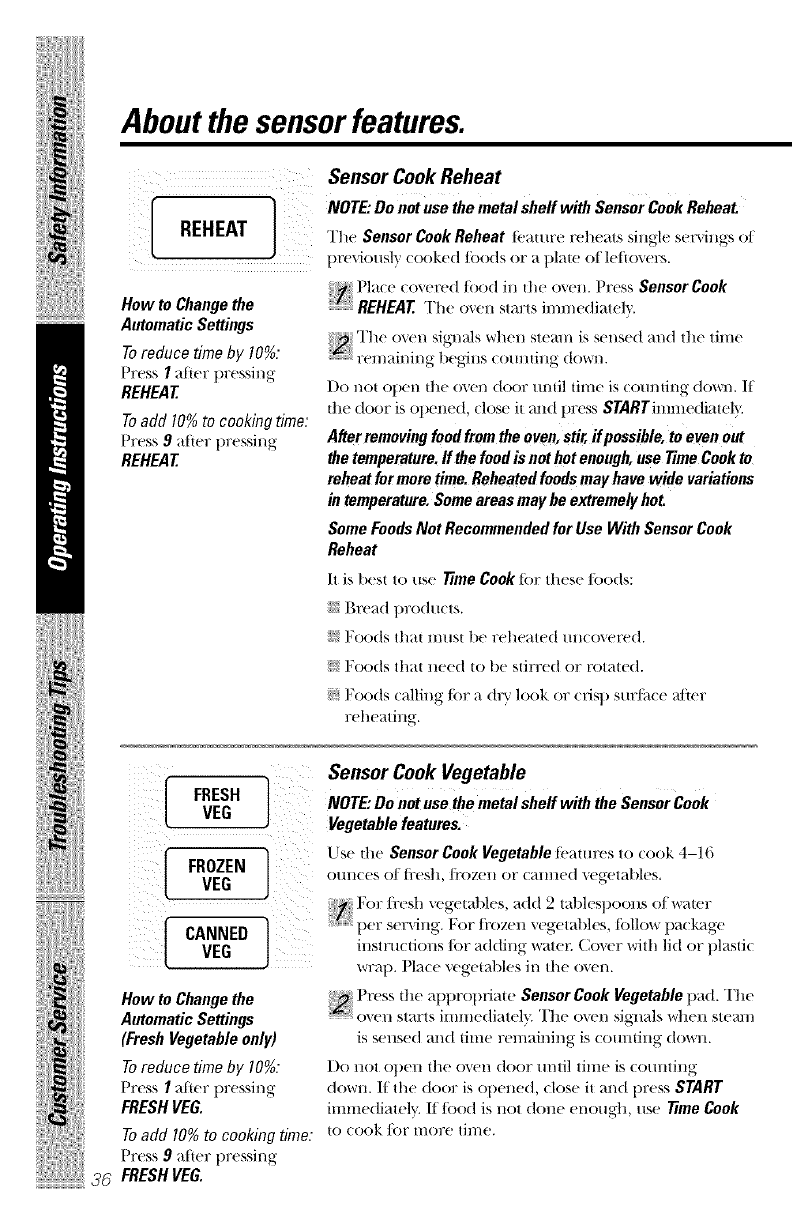
Aboutthesensorfeatures.
REHEAT
How toChangethe
AntmnaticSettings
Toreduce time by 10%:
Press Ia_icr pressing
REHEAT
Toadd 10% to cooking time."
Press 9after pressing
REHEAT
Sensor CookReheat
NOTE."Do not use the metal sheff with Sensor Cook Reheat
The Sensor Cook Reheat t_mlrc reh(ats single servings ot
previously (ooked foods or a plaw of lefloxers.
Pla(e co'_(Ted food in dw oxen. Press Sensor Cook
REHEAT The oxen starts immediately.
'1"t1(!oxen signals _r]_(_]lst(_ll_ is sensed and the time
::::::U_ F(_]]/_t_ I/il/g l)egJllS (O/flit llg ( ov_rI/•
Do not opeH the (Ben door tmtil time is counting (Io_nL If
the door is opened, dose it m:d press STARTimmedimel b
After removing food from the oven, stir, if possib/e, to even out
the temperature, ff the food is not hot enough,use Time Cook to
reheat formore time. Reheated foods may have wide variations
in temperature. Some areas may he extremely hot.
Some FoodsNot Recommended for Use With Sensor Cook
Reheat
It is best to us{' Time Cook {or these/_)ods:
i_i;Bread ]}roducts.
i_ Foods Ill,it lIl[ISt b{' rchc?lt{'(t/lll{O\{'I'{'d.
ii! Foods that I1{'{'(t to 1){' stirr{'d oF l'ot_ltcd.
!_1Foods {Mling/_)r _1dry look or cds]} sm'/il(c _,dtcr
]:{'ht",ltillg'.
[FRESH
VE_
[CANNEDFROZEN]vEGVEG
How to Change the
Automatic Settings
(Fresh Vegetable only)
Toreduce time by 10%:
Press Iafter pressing
FRESH VEG.
Toadd 10% to cooking time.•
Press 9after t)ressing
FRESH VEG.
Sensor Cook Vegetable
NOTE."Do not use the metal sheff with the Sensor Cook
Vegetable features.
Use dw Sensor Cook Vegetable t_m_res to (ook 4-16
O/lll{ (!S ()] t]_(_S]I, ]i'(}Z(!ll OF ( ;-Illll(_(] x(_getM)les.
For tix_sh vegetables, _(t(t 2 tablespoons el _r_li(!lP
per 3OY%tll_. _(}l" ]F()Z(!II 'Og(!t_t] 1(73, t(}ll(m 1)_(k_g-e
llISITII{ |10113 ]()F a(l(hllg _,tt{!12 { ,()'_OF with ]1(t oF ])]_tS|l(
wDq). Pla(e veg(riabl('s in the ovel].
I)ress the _q)i}rop_iaw Sensor Cook Vegetable pad. "[]]e
oxen starts imme(tiatel'_ The oxen signMs when steam
is S('llSe(t _tl/(t tilIl(' l:(_H/_til/]l/_" is (OIIlltillg (t()]_rll.
Do llOt ol)(!ll the o'_(!l/d()OF Itntil tilIl{! is (O/tlltillg
down. If the (toot is opened, dose it and press START
imme(li_tely. If f()od is not done enough, use Time Cook
1() ((}ok fOF Ill()]'(! [1Ill(!.
ZZZZZZZ
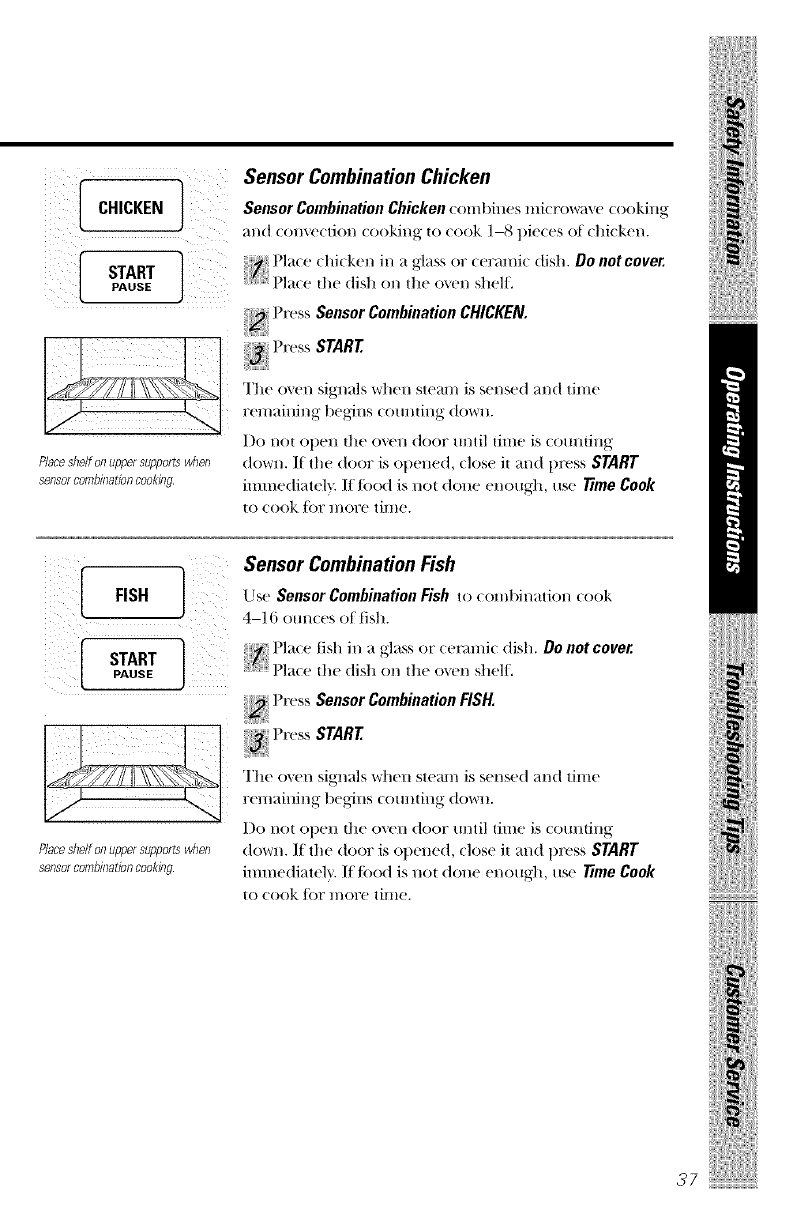
[ CHICKEN
Placeshelfonuppersupport5when
sensorcombinationcooking.
Sensor CombinationChicken
Sensor Combination Chicken (ombines mi< row;_e (ooking
;rod (on',e(don (ooking to (ook 1-8 pie(es of (hi(ken.
l)la(e (hi(ken in a gla._'_or (ermni( dish. Do not cover.
H_i ) S S
l la(e the ( 1.shon the oxen .shelt.
Press Sensor Combination CHICKEN
The oven signals when steam is sensed and dine
remaining begins comlting down.
Do not open the oven door tmtil time is c()tmting
down. I[ the door is op('n(xl, (lose it and pwss START
imm('di_m'l_. I//_)od is not don(' _'noug-h, use 7_meCook
to (ook/_)r more tim('.
!i iiiii iiiiiii
i[ !¸Seo,or omb a,,oo h
FISH Use Sensor Combination Fish to combination cook
4-16 om_(es of fish.
PAUSE P1 _(e fishin> s _gl _ss or ((minks dsh Oo not cover.
Placeshelfonuppersupportswhen
sensorcombinationcooking.
;_ Press SensorCombinationFISH.
The oven signals when steam is sensed and time
r('mainh]g begins (om_ting down.
I)o not ot)en the ov('n door tlntil tim{' is (otlntil]g
(]()%_r]].I{ the door is Ol)en{'d, (lose it and pwss START
immediately. If/ood is not done ('hough, use lime Cook
to (ook Jot more tim('.
Aboutthesensorfeatures.
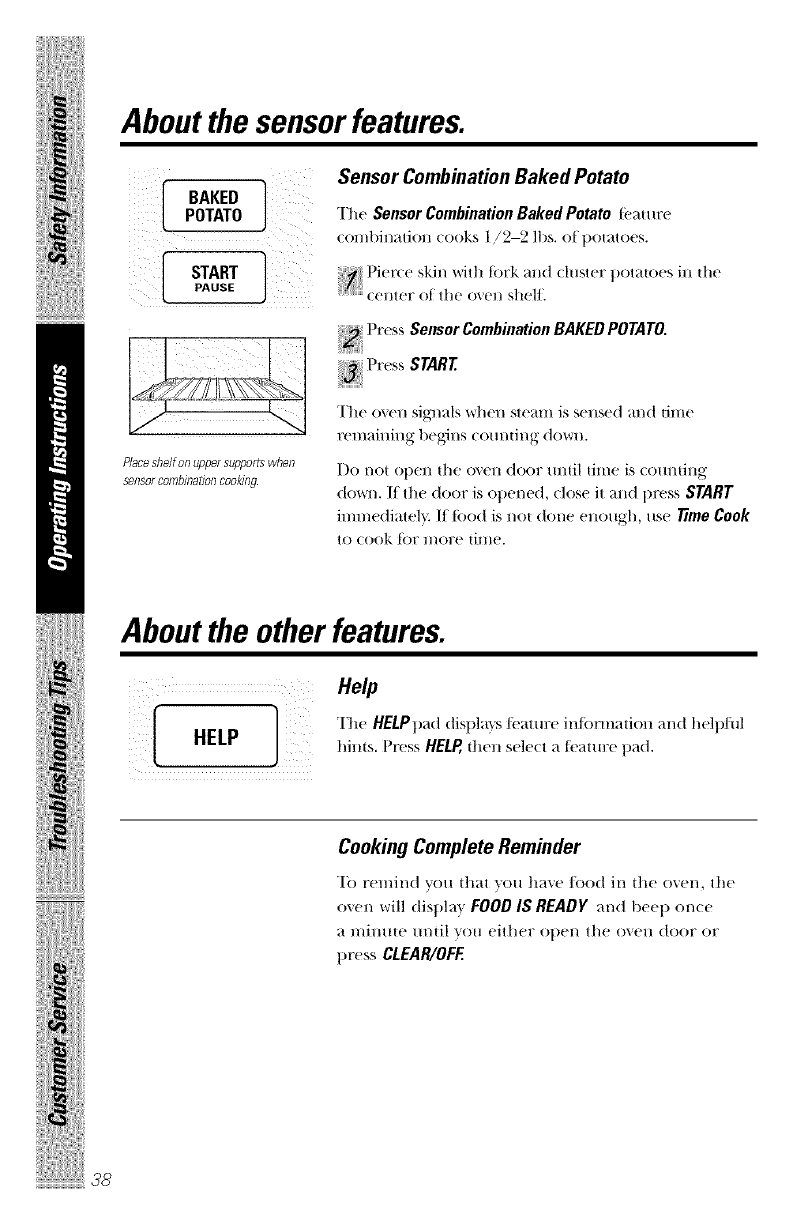
BAKEDPOTATO
STARTPAUSE
Placesheltenuppersuppert5when
$etlsor combJt?atJetlcooking.
Sensor CombinationBaked Potato
"[tle Sensor Combination Baked Potato t_amre
(on/l)ination (()()ks 1/2-2 lbs. of t)omtoes.
t)ier(e skill wit]l tork and (luster potatoes in the
(ellteF of the o_en sllel_
Pr_ ss Sensor Combination BAKED POTATO.
"[lie o'_ell signals _rl/ell steaIll is sellsed _tnd tillltJ
remaining 1)eg{ns ('(ranting dovvrll.
Do not open tile oxen door mltil time is cotmting
down. If the door is ot)ened, close it and lIress START
immediatel> If R)od is not done enough, use l_me Cook
tO cook t()l" l//ol'e [iIIle.
Aboutthe otherfeatures.
Help
hires. Press HELP,then select a t_amre t)ad.
HELP
I +it
CookingCompleteRemh_der
To remind you that you have/ood in the oven, the
oven will displa} FOODIS READYand bee l) once
a l//in/lle until YOU either Olien tile ()veil (]OOF OF
press CLEAR/OFF.
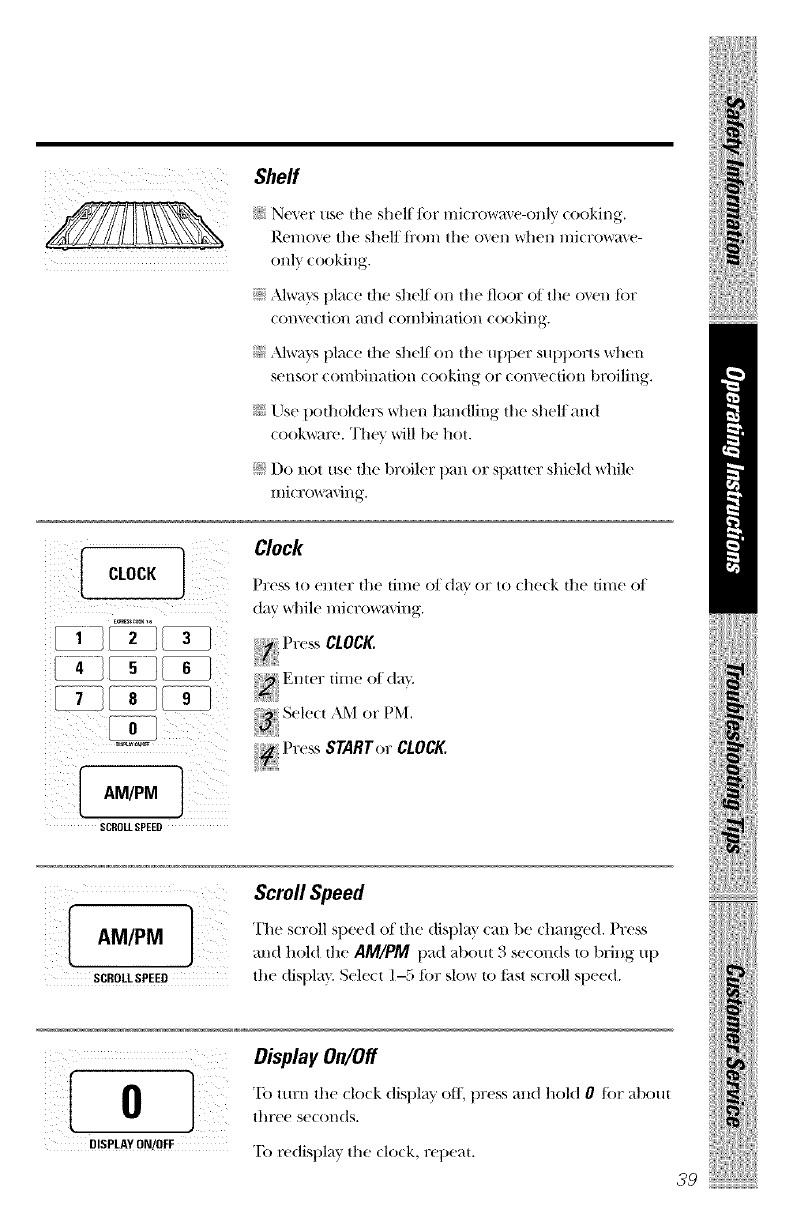
zSheff
_:_:Nexer use the shelf tbr IIli( rowa_e-ollly (ooking.
Ren/oxe the shelf [ix)l//the OX,(_l/ wh(?l/ l//i(1x)W_l_,(!-
(m b(ooking.
J? _Mwms place file shelf on the floor of the oven I[)r
convection and combination cooking.
J? _Mwms place file shelf on the upper supports when
sensor combination cooking or convection broiling.
_! Use podlolders +xgh(!l/handling the shelf and
cookware. They will be hot.
J? 1)o not use flw broiler pan or spatwr shMd _hile
II 1] ( 17OV_aviHg.
!i iiiii iiiiiii
{cLocK
ii i i !i i!ili
SCROLLSPEED
Clock
t)re,_'_ to enter the time ot day or to (he(k the time ot
(lay' _hile l//icroWaQllg.
Select AM or PM.
i_,iH_!iiii
t',_(ssSraRro,_crOCK.
AM/PM ]
SCROLLSPEED
Scrofl Speed
and hold the AIIll/PIIll pad al)ot_t 3 se(onds to bring up
the displa}. Select 1-5 tot slow to t:ast s(roll speed.
To mrn the clo(k display off[, press and hold 0for abom
three se(ol/ds,
To redisplay the clock, repeat.
39
0];
DISPLAY ON!OFF
ii!iiii;i¸
About the other
[START J
features.
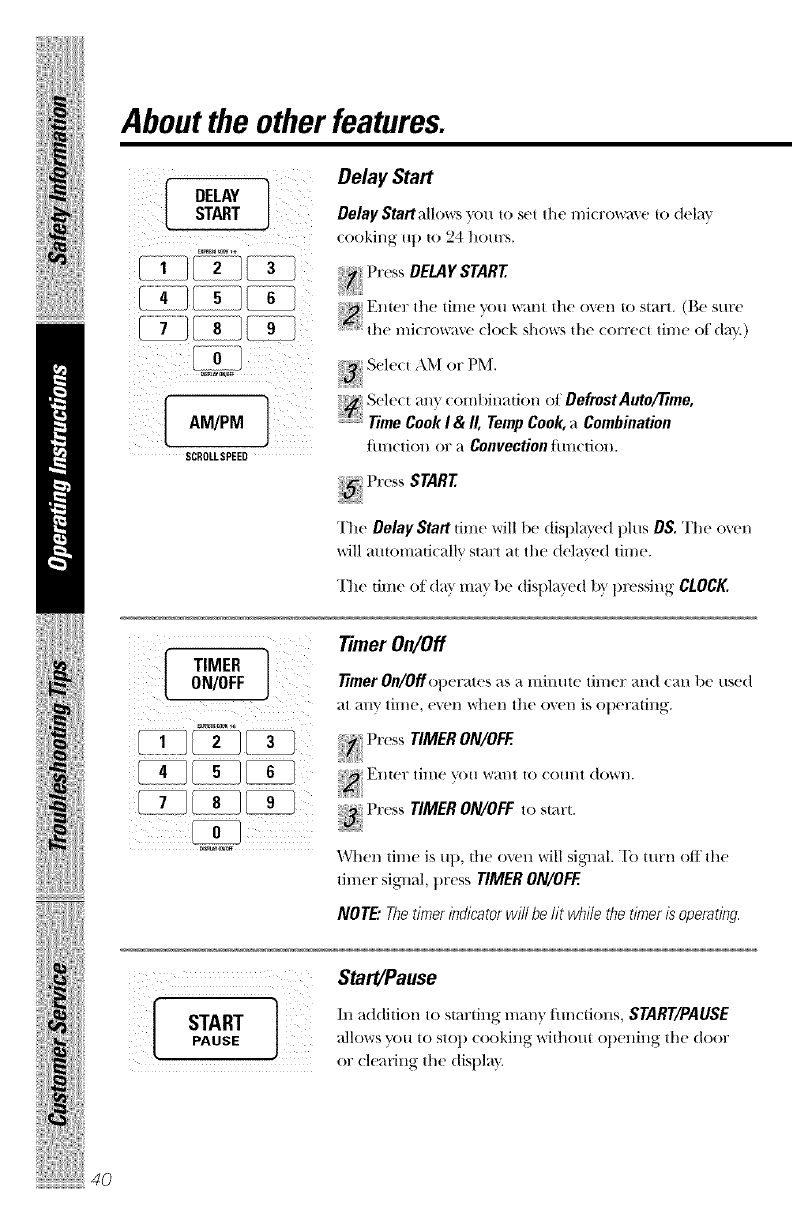
Delay Start
Delay Start;dl(lx_s ylu to set thc l//i(F(/w_i_(! |0 delay
(ooking up to 24 hours.
Enter the time y'ou wal/t the oxen to start. (Be sure
the l//i(l+(/wav{! <lo(k shows the ((/rre(t t]l//C (If d+l_'.)
AM].M]
SC[IOLL SPEED
Selc(t an) (olnbination (it DefrostAutoffime,
Time Cook I & II, Temp Cook, _Combination
tiUl(tJ(/ll (/r_z Convection tiUl(tJ(/ll.
"['bc Delay Start tilnc will |)e (tispla}cd plzm OS. The ()'_cn
will a/ltoln_zti(allv start _ztthe dela'v'_!d till/(!.
"[be time of dm ma'_ be (tispla'_ed 11}pressing CLOCK,
TIMER l
Timer On/Off
7_mer On/Off(lperates as a minute tinier and (an be used
at ally till/(!, (!'_(!1/ W]I('I/ t]l(' 0"_(!1/ iS o[)(!l_atillg+
4Press TIMER ON/OFF
Filler tim(! you _ral/t tO (Ol]l/t do_rll,
ii,,,ri_ iiiPr( ss TIMER ON/OFF to st:art.
When thnc is up, the oven will sig_lal. "['(/turn off the
thncr sig_lal, prcss TIMER ON/OFF.
NOTE" Thetimer indicator will be lit while the tinier isoperating.
PAUSE
StarYPause
In addition to starting n/an'_ flmcti(lns, START/PAUSE
71ll(/WSy'Otl to stop (ooking witholtt (/t)cning the door
or (lc_ting thc dist)la }

REMINDER I
0•
m_P
I+°l
SCROLLSPEED
Reminder
['h(` Reminder/_'mur(` (mr b(` us(`d Ilk(` mt _l_m. (to(k mid
('_111 |)1 _ Ilf_(%] ill _llt} tit[t(`, (`'_(`11 t_l/(+l/ tilt" O\ (`ll iS Ol/(`rHtitlg.
I'h(` Reminder din(" call b(` s(`t up t(/:24 h(/tu_ ]all,t;
t'r(,ss REMINDER.
Vtlt(`r tit(' titlt(' _'otl W;lltt till" o\(`11 to r('u/il/d VOlt.
(It( + Slit'( + t]|(` t/ti(TOV¢;t'i,'(` (h/(k Nh(lwN lI/(' ( orr(`('l
lil//(, O/(t_ly+)
Sele(I AM or PM
_ Pr(`ss REMINDER. Wh('u Reminder signed o((-urs,
pr(`ss REMINDER t(_ ltlrtl it off. Th(` Reminder tim(`
m;*y b(` dispiay(`d by pr(`ssiug REMINDER.
NOTE: The REM indicator will remain lit to show that the
Reminder is sot Toclear the Reminder before it occurs, press
REMINDER, then O. TheREM indicator will no longer be li_
!i ii+ii iiiiiii
CLEAROFF ]
Child Lock-Out
_()tt Itt_l} lock thT ¢Olttrol i)alt(,1 t/) pr(`\( tl_ th(, ttlicFot\;l\ (,
It'(mr Ixing accid(,ntall} started (tr us(d 1)} children.
"Ill lock (tr unlock th(` c(mtrols, I)r(`ss and hold CLEAR/OFF
Jar about thr((` setands+ V_'h(`n tit( control |)+m(`l is
lo(k( d, ml L\\'ill be displayed tit tit( (xtr(`m(` right.
VENT FAN
Vent Fan
'I'll(" V(,l/t ]itll r(,]//(/\ (,S St(,_ll// }tlld ()th(,r %_t)()rs ]i'OlIl
surtitce cooking.
Pr(,xs VENTFAN once/or high Jim speed, t\*,'i€(, lot low
Jim speed or _ third tint(` to turn the tim ()tl_
Automatic Fan
All _ttlt()IIlati( till/ ]('_ttllr(, protects till, l/it€row+l\ (, ti'Ol/l too l///l('h
heat +Jsing/i'om tit(, (ookt/)p kl(,l()w it. It automati(allv turns on at
low speed if it senses too nm(,h heat.
If\sin hme turned the Jim on }x)u inlay lind that you cannot turn it
Dill The tim will auton/aticall} turn off \dten tile internal parts at'('
cool. It I//_IV st_r¢ on/[)Y ._40 lllilltltes or l/lOFt, _tIt(,r the (,ooktop _tl/(t
t//icr()w_\ e ('anti'DiS are t/lrned ()t]_
ii!iiii;{
i_i+i+!+_ii+i+ii
About the otherfeatures.
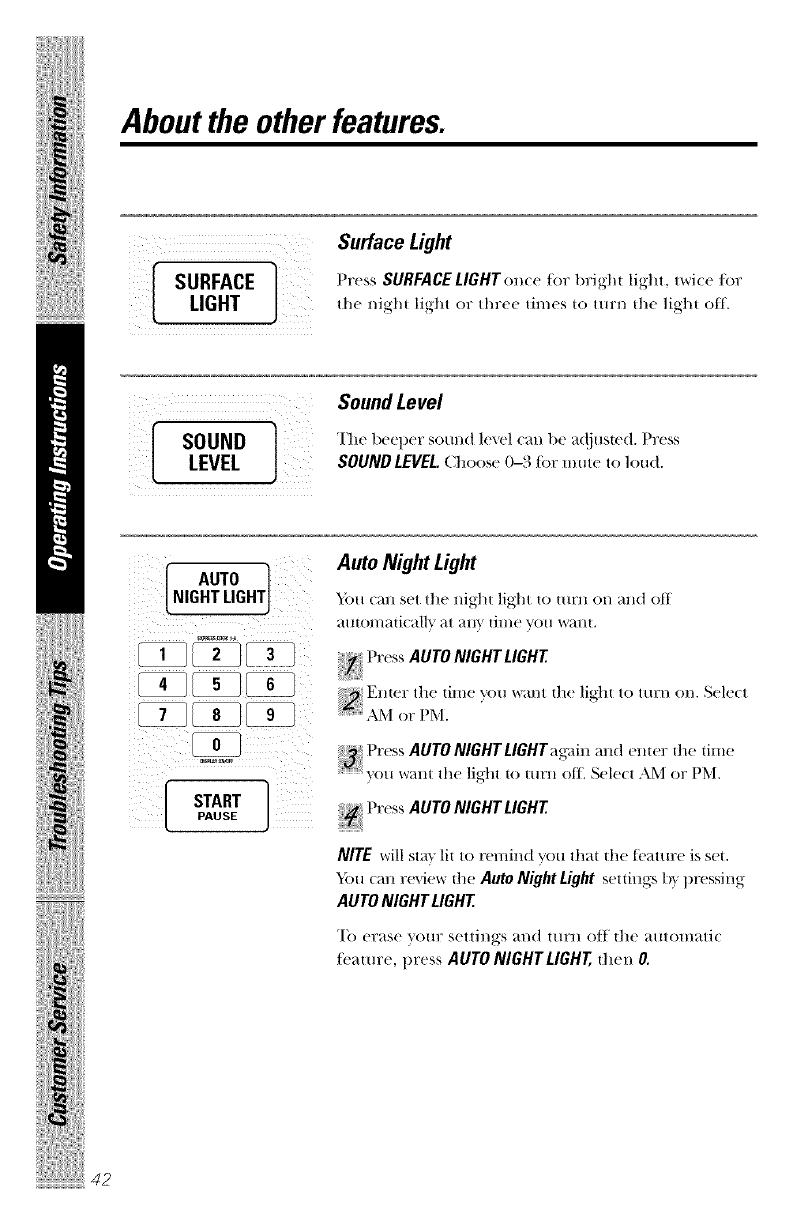
Surface Light
SURFACE J] PressSURFACELIGHTon( e tot bright light, t_vi((?fo]"LIGHT the night light or three times to turn the light off.
SOUND I
LEVEL
Sound Level
The beeper sound lexel _an be a(!iusted. Press
SOUND LEVEL. Choose 0-3 tot mute to loud.
[AUTO ]
LNGHT L GHTJ
ii:;iiiiiii: i:i:i ii
++++
Auto Night Light
_,bu can set the night light to turn on and ott
atltOl//atical]v at a]l_ til//_' voH Wallt+
! Press AUTO NIGHT LIGHT
Enter the time you %r_ll/tthe light to turn on. Sele(t
AM or PM.
,Press AUTO NIGHTLIGHTagain and enter the time
+++'you,want the light to turn off. Sele(t AM or PM.
Press AUTO NIGHT LIGHT
NITE will sta+, lit to remind you that the tcattm" is set.
_i)u can review the Auto NightLightsettings l>y pressing
AUTO NIGHT LIGHT
TO elTaS(! +ot117 S(!ttil/_S and ttlI'll ()t_" the a/lt()lllati(
feature, press AUTO NIGHT LIGHT, then O.
Microwave terms.
Definition
Arcing Ar(ing is the |/]i(1X)_r_xe|e]7lll _()1_sparks in the oxen. Ar(ing is
caused by:
t]le telllpel°atllF(! t)Fol)e St_lVil/g- ill t]le O'_(!ll 1)Ill llO{ illserted
ill the tood.
!i iiiii iiiiiii
;_!_ the metal shelt being installed in(orre(ilT_ and tou(hiug the
iili( l'owave walls.
ii i:;: metal or/_)il touching the side of tile o\en.
_):: loll thai is not molded to t_)od (Ul)mrned edges act like
_llllellll_lS).
_: metal such as twist-ties, t)oulu3 pins, gold-lJmmed dishes.
i_: re(vcled t)al)er towels containing small meted t)ieces.
Covering Co'_ers hold ill moisture, alloy, tor more e'_en heating and r_ (lu(e
(ooking time. Venting t)lasti( wl'_tt) OF (X)'_eYillg with WaX t)at)er
allows ex(ess sleal//to es(al)e.
Shielding In a regular oven, you shiel(t (hi(ken 1)reasts or lmke(t too(ts to
pre'_ent o'_e>l)rowning. V(hen lni(rowa'_ng, _ou use small stdt)s
ot toil to shield dfin 1)arts, such as the tips of wings and legs on
t)oultry, which wo/lld cook 1)eibre larger parts.
Standing Time _qllen vo/l cook with regular ovens, foods such as roasts or cakes
are allowed to stand to finish cooking or to set. Standing time is
(Sl)e(ial b iml)ortam ill mierowme cooking. Note thai a
]//i(Towaved cake is llOI placed Oll a (oolilJ, g rack.
Venting After co'_ering a dish with t)lasfi(w1;al) , "}'o/1vent th( t)lastic wm l) 1)7_
tlll;llil/g 1)a(k Olle COl'neF SO excess ste}ll// ( }t_1/ es(at)e.
ii!iiii;?
Care and cleaning of the microwave oven.
Helpful Hints
Open the o_'n door a J_'w minutes aJR'r cooking to air
out the inside. An occasional thorough wiping with a
solution el baking soda and water keeps the inside ii'esh.
Be certain the power is offbefore cleaning any part of
this oven.
How to Clean the Inside
Walls, Floor, Inside Window, Metal and Plastic Parts on
the Door
SoIIle spatters can be F_'l//Ov('d with a paper towel, ()thelTs
may require a dmnp cloth. Remove grea Uspatte_.'s with
a sudsy cloth, then _Jnse with a damp cloth./)o not use
abrasive cleall(:rs or shaft) lltensils on ovcil walls.
Never use a commercial oven cleaner on anypart Of your
microwave.
Temperature Probe
Clean immediately alter using. "Ib clean, wipe with
sud. W cloth, then rub ligh@ wit]l plastic scom_ing ball if
necessary. Rinse and dr}. The probe can also be x_shed
in the dishwasher.
Shelf
Clean "with mild soap and water or in thc (tishwashel;
Do not clean in a seff-cleaning oven.
Broiler Pan (Spatter Shield and Drip Pan)
Remove spatter shield/i'om drip pan. Carefl_ll} pour
gTease {i:om (hi l) pan into t)roper (ontainer. Clean
immediately al_er using. If necessary, scour with a soap-
/illed or plasti( s(om'ing pad in hot, soap} _,_te_: I//_)od
ha_, bin:ned on, sprinkle spatter shield \_,hile hot with
(tete_\gent and cover with wet paper towels or a dish
cloth to soak loose burned-on/[)ods. The broiler pan
can also be wa_,hed in tt_e dishwasher.
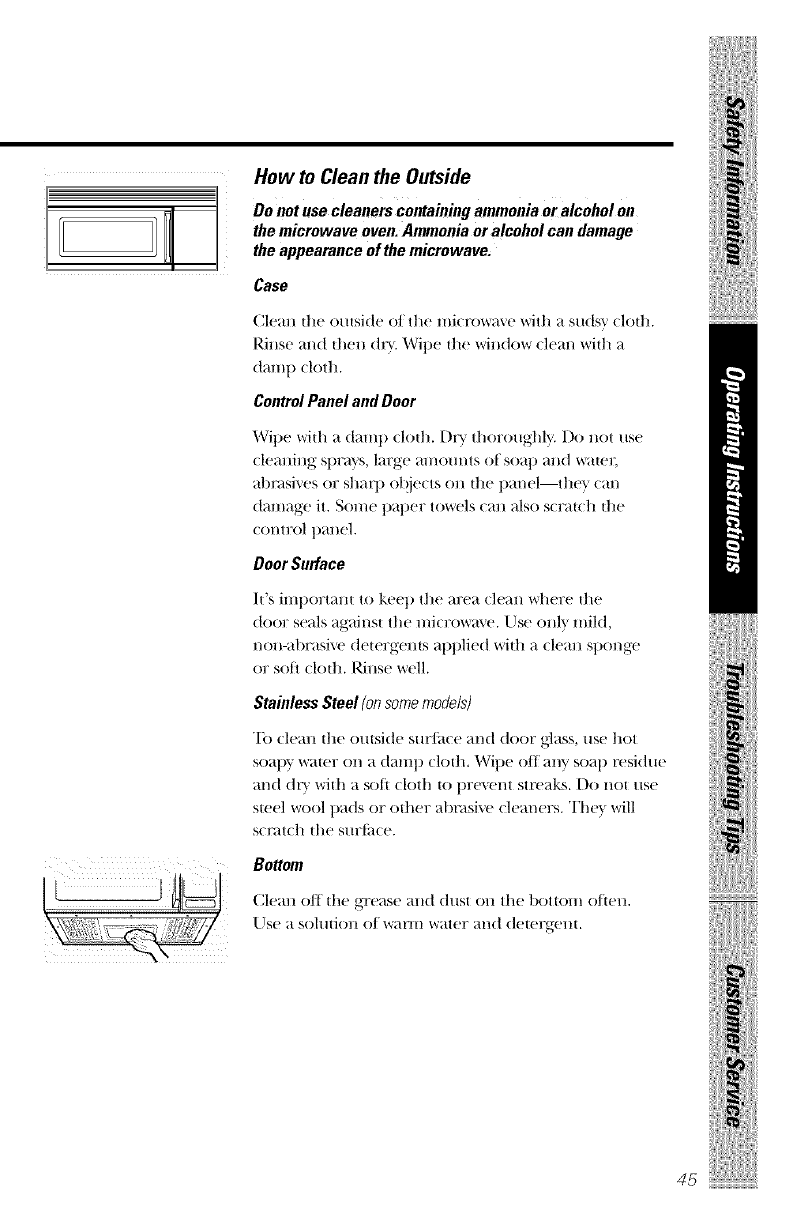
How to Clean the Outside
Do not use cleaners containing ammonia or alcohol on
the microwave oven. Aimnonia or alcohol can damage
the appearance of the microwave.
Case
Clean the outside of the microwa\ e with a sudsy cloth.
Rinse and then dr}. Wipe the window clean with a
damp cloth.
Control Panel and Doer
Wit)e with a damp cloth. Dry thoroughly. Do not use
cleaning sprays, large mnomns of soap and ware1;
al)msi_es or shaq) o[!iects on {lie l)anel--th_\_ (an
damage it. Some paper towels can also scrat(h file
contl?Ol t)al lel.
DoorSurface
It's importam to kee t) the area clean where the
door seals against the microwave'. Use onl} mild,
non-abrasive detergems applied with a clean sponge
or soti clofll. Rinse well.
Stainless Steel (on some models]
To clean lhe omside sur/i_ce and door glass, use hot
soat)_ rwa|el: on a damp clo|h. Wipe off all_ rsoap residue
and dry wi|h a soli ch)th |o pre_'nt sm'aks. Do no| use
s|eel wool pads or o|her abrasive cleaners. Thc_ will
sct_ltc Ii the sm:tilce.
Bettom
(]leall of[" |he grease alld d/|s| Oll the t)oHol/l ot_ell,
Use a sohltiOll of w_'tNil wateF al/d de|el_ell|.
!i iiiii iiiiiii
ii!iiii;i¸
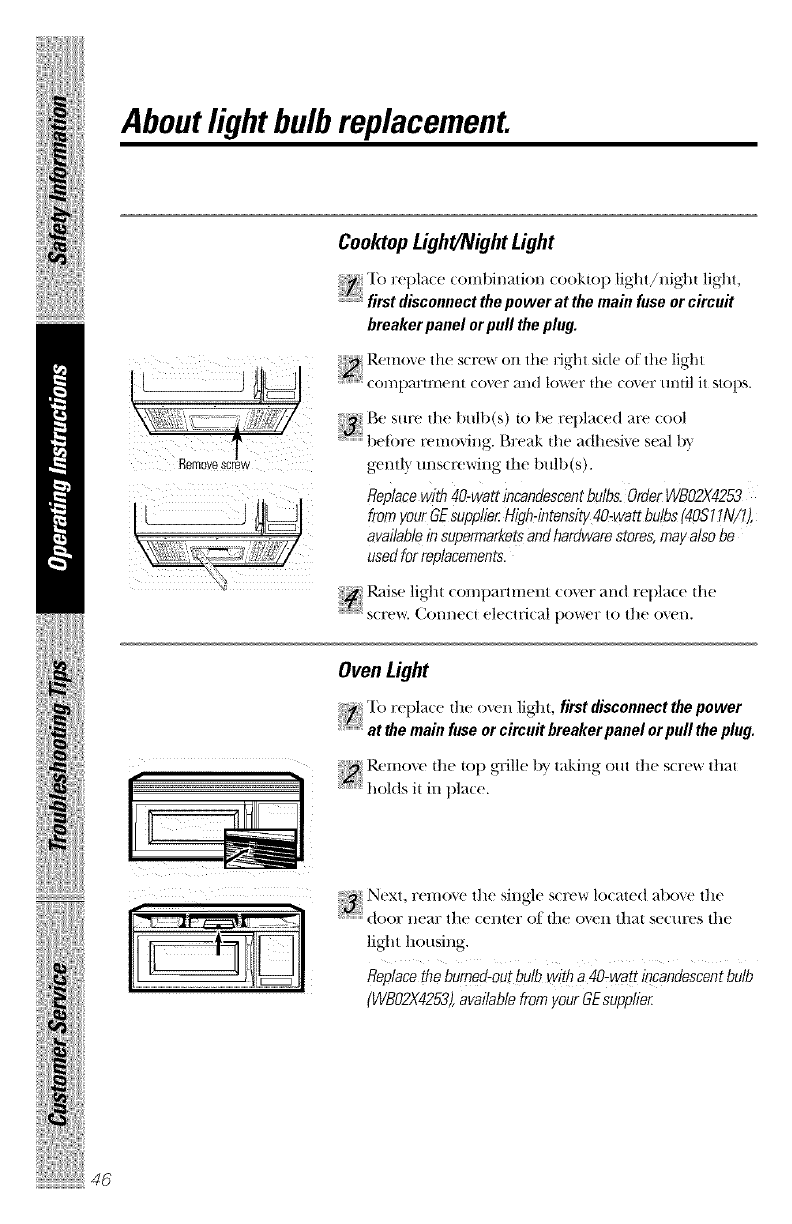
About light bulb replacement.
Removesc_v
CoolaopLight/Night Light
'[b repkl(e (ombination (ookto l) light!night light,
..... first disconnect the power at the main fuse or circuit
breaker panel orpull the plug.
Remo'_e th( s(le;s on th( right side of th( light
: r¢(()l//p_lI'[//l( 11[ ((1"_( F _/]/d lower the (()'_(_l?tll/til it stol)s.
Be sure the 1)ulb(s) to be replaced are (ool
remoxing Break the adhesixe seal b'
g,_:rttl} tmscrewing the bulb(s).
Replacewith 40-watt incandescentbulbs.Order WBO2X4253
from your GEsupplier High-intensity 4g-watt bulbs (40S11N/1),
available in supermarketsand hardware stores, may also be
used for replacements.
SCF(!W.(]onn(_([ electI'ic_.l [)ovvrer to the o'_en.
OvenLight
To repla(e the o',en light, first disconnect the power
at the main fuse or circuit breaker panel or pull the plug.
l),emoxe the top glJlle b_' taking out the s(_:_ rth_zt
.... holds it in place.
Next, remo'_e the single s( F(_vvrlocated abo'_e the
_: door 11(_t17 the (( 111(_1_ ()_ the ()'_(!?ll that se(:tlres the
light housing.
Replace the burned-out bulb with a 4O:watt incandescentbulb
(WBO2X4253),available from your GEsupplier
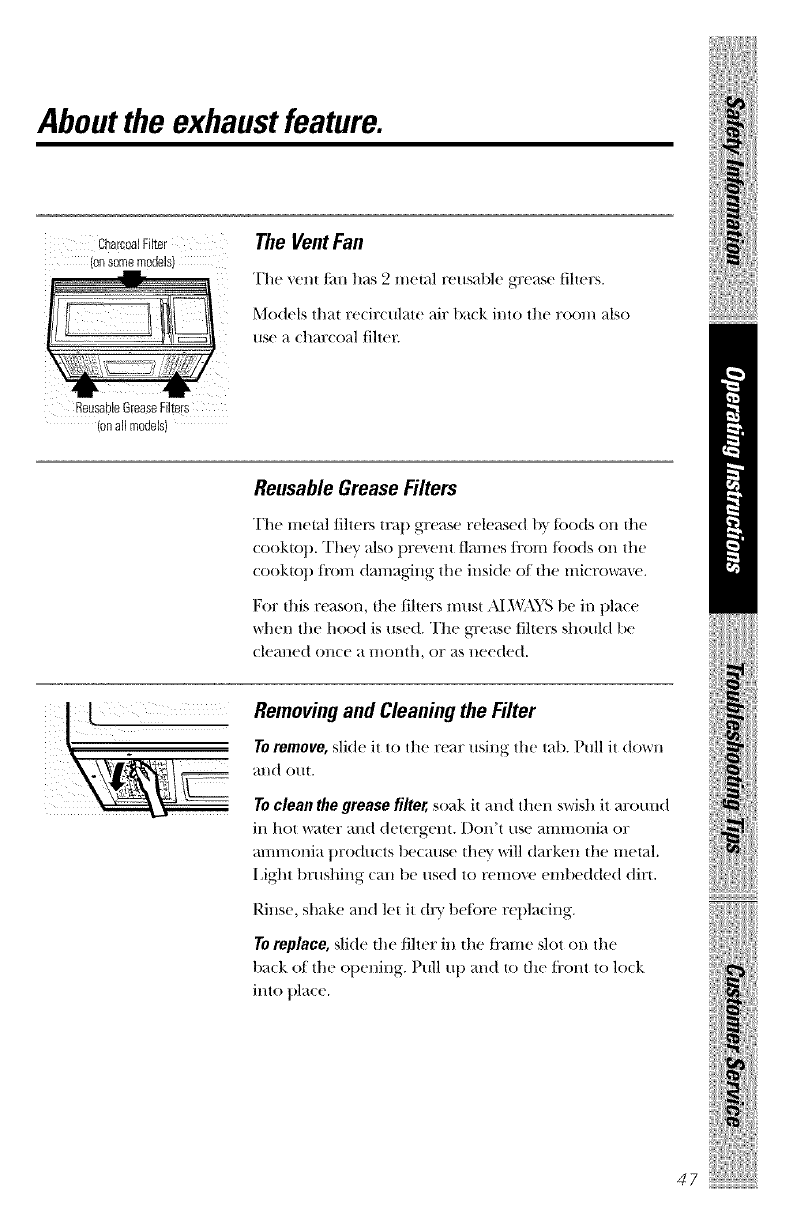
Aboutthe exhaustfeature.
CharcoalFilter
(onsomemodels)
ReusableGreaseFiltels
(onall models)
The Vent Fan
The vent Jim has 2mere] reusable grease tihers.
Models that recirculate air back into the teen/also
use a charcoal/ilte_;
!i iiiii iiiiiii
Reusable Grease Filters
The metal filters tral) grease released b_ t_)o(ts on file
c()()kt()]). They also l)re_ent flames/ir)m leeds on the
(ooktop ti'om damaging tilt' inside el the mi(rowav('.
For dfis reason, tile tihers must AI ,\E\SIS be in place
when the hood is used. The gTease tihers should be
cleaned on(e a momh, or as needed.
Removingand Cleaning the Filter
Toremove, slide it to the rear using the tab. Pull it down
and out.
Toclean the grease filter, soak it and then swish it around
ill hot x_ra|er and (]etergellt. [)on'| /lse _llilIil()nilt or
mmnonia t)roducts because th(_\ will darken the metal.
I Jght brushing can be used to remove embedded dirt.
Rinse, shake and let it dry beIbre replacing.
To replace, slide the fiher in tile Ii_une slot on tile
back of tile opening. Pull u t) and to the ti'ont to lock
into t)la( e.
ii!iiii;{
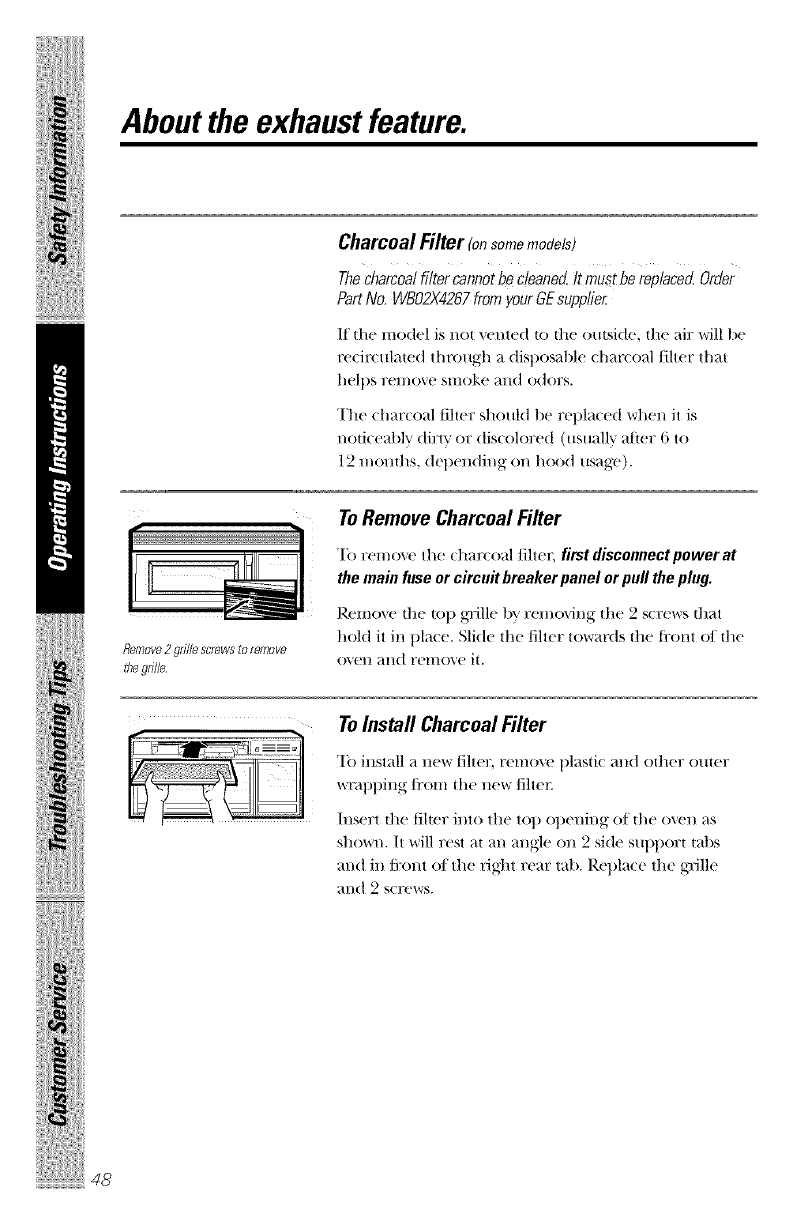
Aboutthe exhaustfeature.
Charcoal Filter (o,somemode!s)
Thecharcoalfilter cannotbe cleaned, It mu_tbe replaced, Order
Part No. WBO2X4267from your GE supplier
If the model is not vented to the outside, the air will be
recirculated through a disposable charcoal Jilter that
helps remo\e smoke and odors.
The charcoal filter should tie replaced when it is
noticeat)lv dirty or discolored (usually atier 6 to
12 n/onths, depending on hood usag-c).
Remove2grille screwsto retT>ove
thegrille.
ToRemove Charcoal Filter
To remove the charcoal filte_; firstdisconnectpower at
themain fuseorcircuitbreakerpanelorpull theplug.
Remove the top grille by removing the 2 screws that
hold it in place. Slide the/iher towards the ti'ont of the
o\en and remo\e it.
ToInstall Charcoal Filter
To instal] a new filter, remo',e p]astk and other outer
wnq_ping fl'om the new filter.
IllSel?t the _ilter illtO the top ot)ellin}g of the o'_ell as
shown. It will rest at an angle on 2 side support tabs
and in ti:ont el the right rear tab. Replace the g_]h'
and 2 screws.
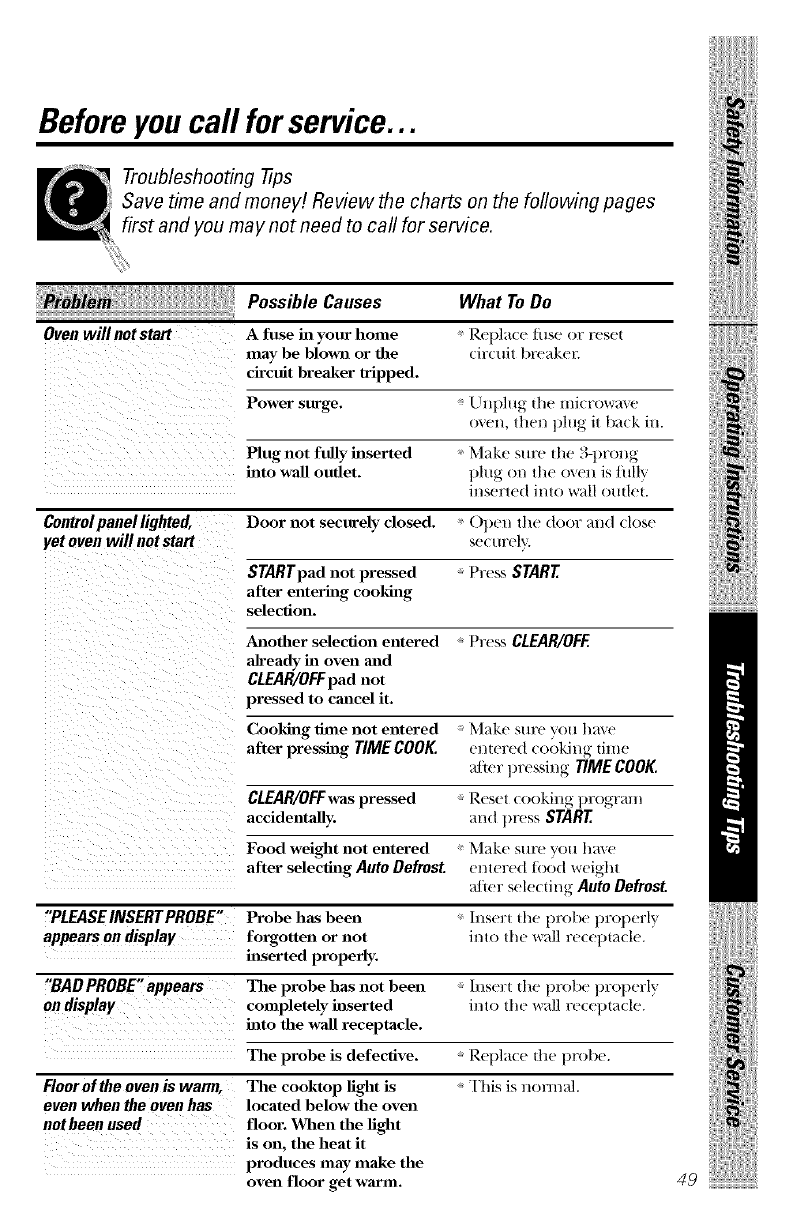
Before you call for service...
Troubleshooting tips
Save time and money! Review the charts on the following pages
first and you may not need to call for service.
Oven will not start
Possible Causes
Afuse hi your home
may be blown or file
circuit breaker tripped.
What ToDo
Replace tuse or reset
drc uit breaker.
Power surge. Unl)lug the microwa_v
OXel/, thel/])lug it back ill.
Plug not fully hlserted
hlto wall outlet. ' Make sm'e the 3-prong
t)lt_g on the oxen is flfllv
inserted into wall outlet.
Controlpanellighted,
yet ovenwill notstart Door not securely closed. ()pen the door and ch)sc
sectlFtqv.
STARTpad not wessed Pre._s START
after enterhlg cooking
selection.
Anod_er selection entered Pre._sCLEAR/OFE
already hi oven mid
CIEAR/OIF pad not
pressed to cmlcel it.
Cooking time not entered Make sure you hme
after presshlg TIMECOOK. entered cooking time
a/ier pressing 77MECOOK.
CLEAR/OFFwas pressed Reset cooking program
accidentally, and press START
Food weight not entered Make sure you ha_e
after selee_lg Auto Defrost. entered tood weight
alter selecting Auto Defrost
"PLEASE INSERT PROBE" Probe has been Insert the |)rol)c t)roper|y
appears on display forgotten or not into the W;I|| re(el)ta(|c.
hlserted properly.
"BAD PROBE"appears The probe has not been Insert the probe t)rol)erb;
on display completely hlserted into the W;I|| Fe(e t)ta(|e.
hlto file wall receptacle.
Floor of the oven is warm,
even when the oven has
notbeeo used
The probe is defective.
The cooktop light is
located below die oven
floor. X_Chenthe light
is on, the heat it
produces may make the
oven floor get warm.
+ Ret)lace the t)robe.
+ This is nom_+d.
49
iiii/i;:;_iii//iii!
iiii i/i
iiiiiiliiliiii!iiii
iiiiiiiiiiiiiiiiii_
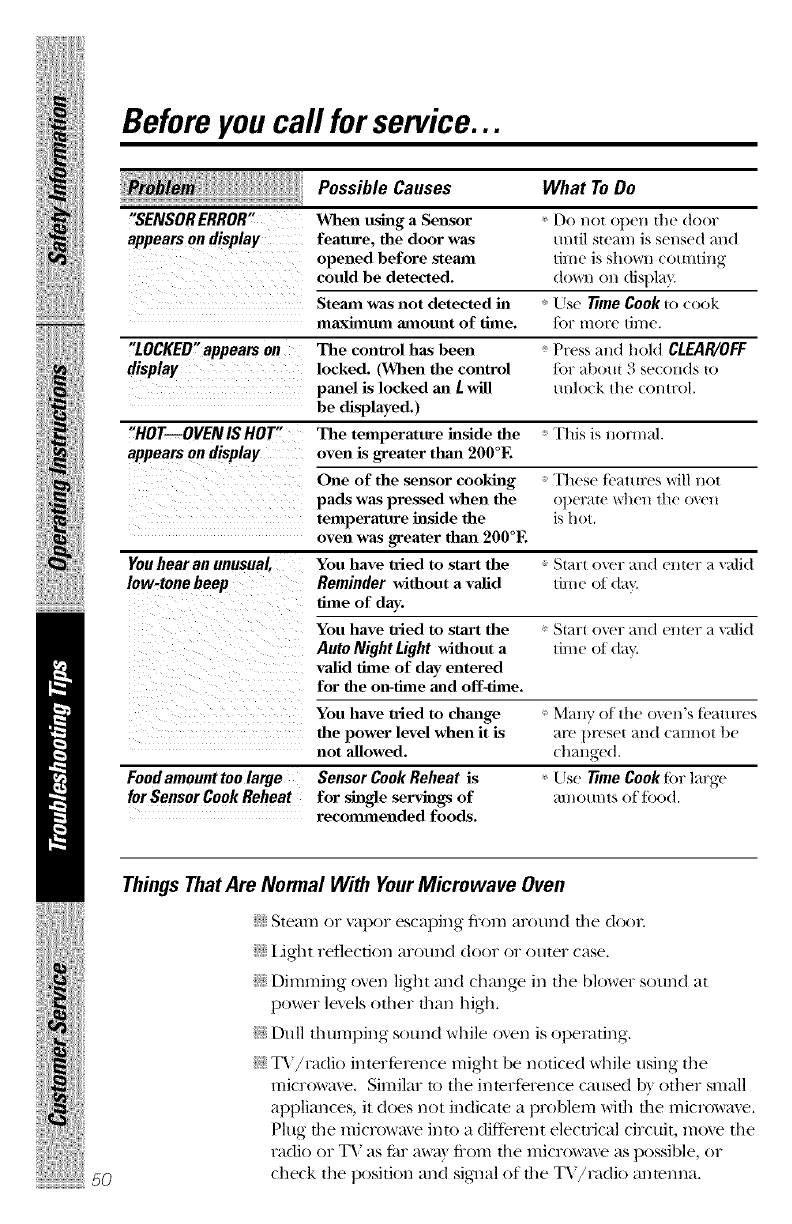
Before you call for service...
Possible Causes What ToDo
"SENSORERROR"
appearson display _%en using a Sensor
feature, die door was
opened before stemn
could be detected.
Do not ot)cll the door
/ll/lil ste_n/l is sel/sed mid
lime is showH COuHliHg
down on displ m.
Stemn was not detected hi "Use l_tne Cook u) cook
nlaxinl_ll anlolnit of liole. /()r//lore lil//e.
"LOCKED"appears on The conn'ol has been t'res,_mzd hold CLEAR/OFF
display locked. (When die control tbr _,l)out B_e(ouds to
panel is locked an Lwill unlock the ( oulrol.
be displayed.)
"WOT--OVEN IS HOT" The tenlperature hlside file [tfis is llorl//_d.
appears on display oven is greater than 200°E
One of the sensor cooking
pads was pressed when file
temperature hlside file
oven was greater fllan 200°E
You have tried to start the
Reminder wifllout a valid
time of day.
You have tried to start the
Auto Night Light wifllout a
valid time of day entered
for file on-time mid off-time.
Youhearan unusual
low-tonebeep
These/i>amres will not
o])cl'a[c wllell the o\eII
is hot.
Food amount too large Sensor Cook Reheat is
for Sensor Cook Reheat for shagle servhlgs of
recolmnended foods.
Start over and emer a v_di(t
time of (tav.
*Start over and enter a v_dkt
time of day.
You have tried to change 'Many of the oven's ti'amres
die power level when it is are l)reset and (am_ot be
not allowed. (bmlge(t.
+Llse time Cook tot large
mnotmts of tood.
5O
Things ThatAre Normal With YourMicrowave Oven
iJJiSteam or xapor escaping- Ii'om m'otmd the dool:
ijj?iJght reflection arotmd door or outer case.
N Dimming o_en light and change in the blower sound at
power levels other than high.
N Dull thumping sotmd while o_en is operating.
N T'_'/radio interference might be noticed while using the
micro_me. Similar to the inmrference caused b\ other small
appliances, it does not indicate a problem with the micro_me.
Plug the microwaxe into a (lifIerent elecn%al circuit, moxe the
radio or TV as fiw mva\ fl'om the micro_me as possible, or
check the position and siglml of the TV/radio antenna.
GEMicrowave Oven Warranty.
Aft warranty service provided by our
Factory Service Centers, or an authorized
Customer Carestechnician. Toschedule
service, on-line, 24hours a day, visit
us at GEAppliance&com, or carl
800.G£CARES(800.432.2737).
Staple your receipt here.
Proof of the original
purchase date is needed
to obtain service under
the warrantg
GEWill Replace:
One Year Anypart oJ 1]|t' Itli(-row_l\(- o\t'll \++rl/it-]| t_d|s duu to a
From the date of the def_.ct ilJ ]]/_{lt.i_i_d.%OV \_ro]_'L]Jl_{|L%])i|). [)l]_ll_ l|]ih full
original purchase one-year warreaq, (;E _ill .Is() |we\Me. free of charge,
;d] ])arts ml(I scr\k'c labor to rcl);dr or rc])l;_cc tilt'
ttcJ+(+t'tivt+])ml.
Ten Years The magnetron,tube, d tb(, U_,_gllto"Iron ttl])_." |m|_"d uc
For the second through lo _ dcIecl in mira,rials or \_orkmmlship. l)uz'Jllg Ibis
the tenth year from the additional nine-year limited warran_ you wil| hi,
date of original purchase r(.spon.qbh- fL)]" _]_r labor or in-born(" ._('r\_((" (-ost._+
;,,! Service l_ips to your home to teach ;_!_Replacement of house fuses or
you how to use file product, reset_g of circuit breakers.
hnproper hlstallallon. _*_Damage to file product caused by
.: Failure of the product if it is accident, fire, floods or acts of God.
abused, lnisused, or used for oilier ;*_Incidental or consequential damage
fllan file hltended purpose or used caused by possible defects wifll flds
colmllercially, appliance.
Thiswarranty is extended to the original purchaser and any succeedingowner for productspurchased
for ordinary home use within the USA, InAlaska, the warranty excludes the cost of shipping or service
calls to your home,
Some states do not allow the exclusionor limitation of Incidental or consequential damages,so the
above limitation or exclusioemay not apply to you. This warranty gives youspecific legal rights, and
you may also haveother rights which vary from state to state. Toknow what your legal rights are,
consult your local or state consumer affairs office or your state's Attorney General
iiiiiiiiiiiiiiliiiiiiii!!li!ii
Warrantor:GeneralElectricCompany.Louisville,KY 40225
51

ConsumerSupport.
GEAppliancesWebsite GEAppliances.com
I lave a question or need assistan(e with your appliance? "liT tile GE Appliances D,'_'bsite
94 hours a (la> ally day of tile year! For greamr ( onvenien(e and fi_ster sel_,Jce, you call
llOW dl)lVlllO_l([ Owllel"S mallllals, order parts, (atalogs, or even st [ledule ser_,Jce i)n-line.
Ybu (all also "Ask Our "Ibam of Experts 1""your questions, and so nm(h more...
ScheduleService GEAppliances.com
Expert GE repair s_rvic( is only one st(l) away tionl your dool= (;el on-line and
sch( dill( VOlll" eel-vile at VOlll (on\eIl[( n(e _4 }lOllrS anv (]av of th( veal-! ()1 (all
800.(;E.C_ERI{S (800.432.2737) during nornml busin( ss hours.
RealLife DesignStudio GEAppliances.com
GE supports the I Jniversal Design (on(ept--produ(ts, ser'd(es and enxironmente that
(all be used by people of all ages, sizes and capabilities. D,k_re(ognize the need to
design till a wide range of ph}:si(al and mental al/iliti_s and inlpairnlents. For details
of GE's I Jniversal I)esign appli(ations, in( hiding kit*:hen design ideas tot people with
disabilities, clleck out our Website toda> For tile hearing impaired, please (all
800.TDD.GEAC (800.833.4322).
ExtendedWarranties GEAppliances.com
Purchase a GE extended warran15' and learn about sp_ cial discoum.s that are available
while your warranty is still ill etti_.{t. }(}Ill (all pur(hase it on-line an)lilne, or (all
800.626.2224 during nornlal business hours. GE (]onsmner Itome SelsJces will
still be there after your warramy expires.
PartsandAccessories GEAppliances.com
Indixiduals qualified to ser'd(e their own ai/plian(es (an hav( parts or a((essories
sent dire(tN to flleir homes (VI&\, MasterCard and Dis(over lards are a(cepted).
Order on-line toda> 24 hours eve W day or by phone at 800.626.2002 during normal
bllsilless hotlrs.
Instructionscontained in this manual cover procedures to be performed byany user. Other
servicing generally should be referred to qualified service personnel. Cautionmust be
exercised, since improperservicing may cause unsafe operation.
ContactUs GEAppliances.com
If you are not satistied with tile servile vou re(eive fiom GE, (onta(t us on our Website
with all tile derails in(luding your phol_e numbel: or write to:
General Managel; Customer Relations
GE Applian(es, Applian(e Park
Louisville, KT 40225
RegisterYourAppliance GEAppliances.com
Register ),our new appliance on-line--at your convenience! Timely produ(t registration
will allow tier enhanced comlllllni( ation and prompt servile un/l(r tile tel'IllS of your
WalTant); should tile need arise. "t}m mav also mail ill tile pre-printed registration card
in(luded ill the pa(king material.
Prlnted in Korea
