GE Side By Refrigerator Manual L0305026
User Manual: GE GE Side by Side Refrigerator Manual GE Side by Side Refrigerator Owner's Manual, GE Side by Side Refrigerator installation guides
Open the PDF directly: View PDF ![]() .
.
Page Count: 40
GEAppliances.com
Safety Instructions ........... 2-4
Operating Instructions
Additional Features ............ 12
Automatic lcemaker ........... 14
Care and Cleaning .......... 16, 17
Crispers and Pmis ............. 13
CustomCool _" • ............... 7, 8
Ice and Water Dispenser ..... 15, 16
Refrigerator Doors ............ 12
Replacing the Light Bulbs ....... 18
Shelves and Bins ........... 10, 11
Temperature Conu'ols ........... 5
TurboCoor" . .................. 6
Water Filter ................... 9
Instagation Instructions
Preparing to Install
the Refrigerator ............ 24, 25
Removing and
Replacing Doors .............. 23
Trim Kits and Panels ........ 19-22
Water Line Installation ...... 26-30
Troubleshooting Tips ....... 32-34
Normal Operating Sounds ...... 31
Consumer Support
Consumer Support ..... Back Cover
Performance Data Sheet ........ 37
Product Registration ........ 39, 40
State of California Water
Treatment Device Certificate ..... 38
Warranty (Canadian) ........... 35
Warranty (U.S.) ............... 36
Write the model and serial numbers hate:
Model #
Serial #
Find these mmlbers on a label inside
the refrigerator compartment at the
top on the right side.
Models23,25,26,27 and29
ProfileC6te _.C6te
Rdfrig6mteurs
Lasectionfra_aise commence_la page
Prof!/e Lado a Lado
Refrigeradores
Lasnccidnanespa_nlnmpiezaenInp_gina78
200D2600POI8 4,9-60195 02-02 JR
IMPORTANTSAFETYINFORMATION.
READALLINSTRUCTIONSBEFOREUSING.
AWARNING!
Usethisapplianceon/},forits intendedpurpose asdescribedin this Owner'sManual
SAFETYPRECAUTIONS
When usingelectrical appliances,basicsafetyprecautionsshouldbe followed,includingthe following:
tyTlaksrefrigerator must be properly imtalled
and located in accordance with the Imtalhtion
Instructions before it is used.
tyDo not allow children to climb, stand or hang
on the shelves in the refrigerator. They could
damage the refrigerator and _riot_sly injure
themselves.
viDo not touch the cold surfaces in the freezer
compartment when hands are damp or wet. Skin
may stick to these extremely cold surfaces.
tyDo nut store or ttse gasoline or other flammable
vapors and fiquids in the vicinity of this or any
other appliance.
ty In refrigerators with atztomafic icemakc_rs,
avoid contact with the moving parts eft the
ejector mechanism, or with the heating element
located on the bottom of the icemaker. Do not
place fingers or hands on the automatic
icemaking mechanism while the rtyvigerator
is plugged in.
ty Keep fingers out of the "pinch point" area.s;
clearances between the doors and between
the doors and cabinet axe nec_ly small.
Be carevifl closing doors when children axe
in the area.
tyUnplug the reviigemtor before cleaning and
making repairs.
NOTE:We suong/yrecommendthatanysotvicingbe
#odmtrmdby a qoalifi_ indivtyual.
vi,Setting either or both controls to 0{off)does not
reluove power to the light circxfit.
viDo not refreeze frozen foods which have
thawed completely.
viAlways clean file C_Cool TM Tray after thawing
food.
2
GF.Appliance_com
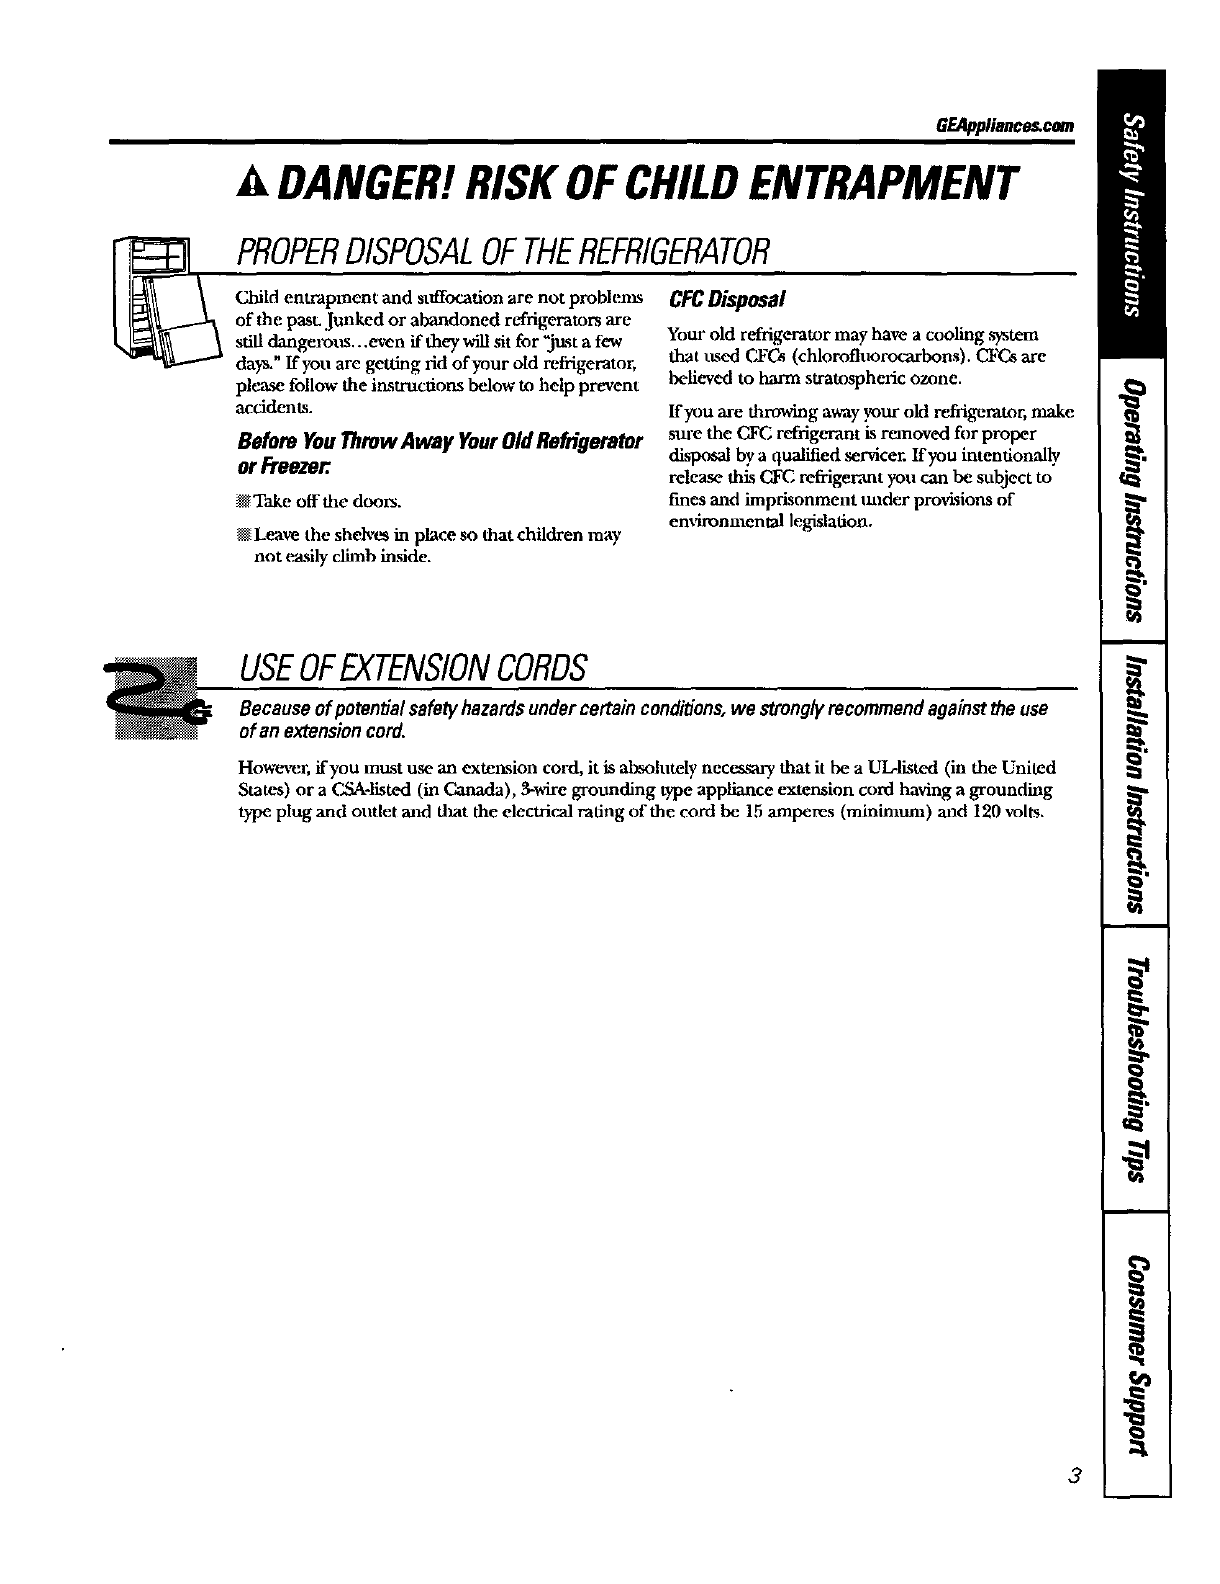
ADANGER!RISK OFCHILDENTRAPMENT
PROPERDISPOSALOFTHEREFRIGERATOR
Child entrapment and sttffo_ation are not problems
of the pasL Junked or abandoned refrigerators are
still dangerous...even if they will sit for _jttst a few
days." ffyou are getting rid of your old refrigerator,
ple&se follow the itxstrucdons below to help prevent
accidents.
BeforeYouThrowAway YourOldRefrigerator
or Freezer.
st Take offthe doors.
st Leave the shek, t_ in place so star children may
not tya.sllyclimb inside.
CFCDisposal
Your old refrig'erator may have a cooling ,systmn
that ttsed CFCs (chlorofluorocarbons). CFC*are
believed to harm stratospheric ozone.
Ify(m are throwing away your old refrigerator, make
sure the CFC refrigerant ksremoved for proper
disposal by a qualified servicer. If you intentionally
relemse this CFC refrigerant yon can be subject to
fraes mad imprisonment uuder proxf.sionsof
emqronmental legislation.
USEOFEXTENSIONCORDS
Because of potentialsafetyhazardsundercertainconditions,we stJ'onglyrecommendagainstthe use
of an extension cord.
Hov,xocer,if you must use an extension cord, it is absolutely necessary that it be a L_-listed (in the United
States) or a C,SA-listed (in Canada), 3-wire grotrading type appliance extension cord having a grounding
type plug and outlet mad dxat the electrical rating of the cord be 15 amperes (mininram) mad 120 volts.
3
IMPORTANTSAFETYINFORMATION.
READALLINSTRUCTIONSBEFOREUSING.
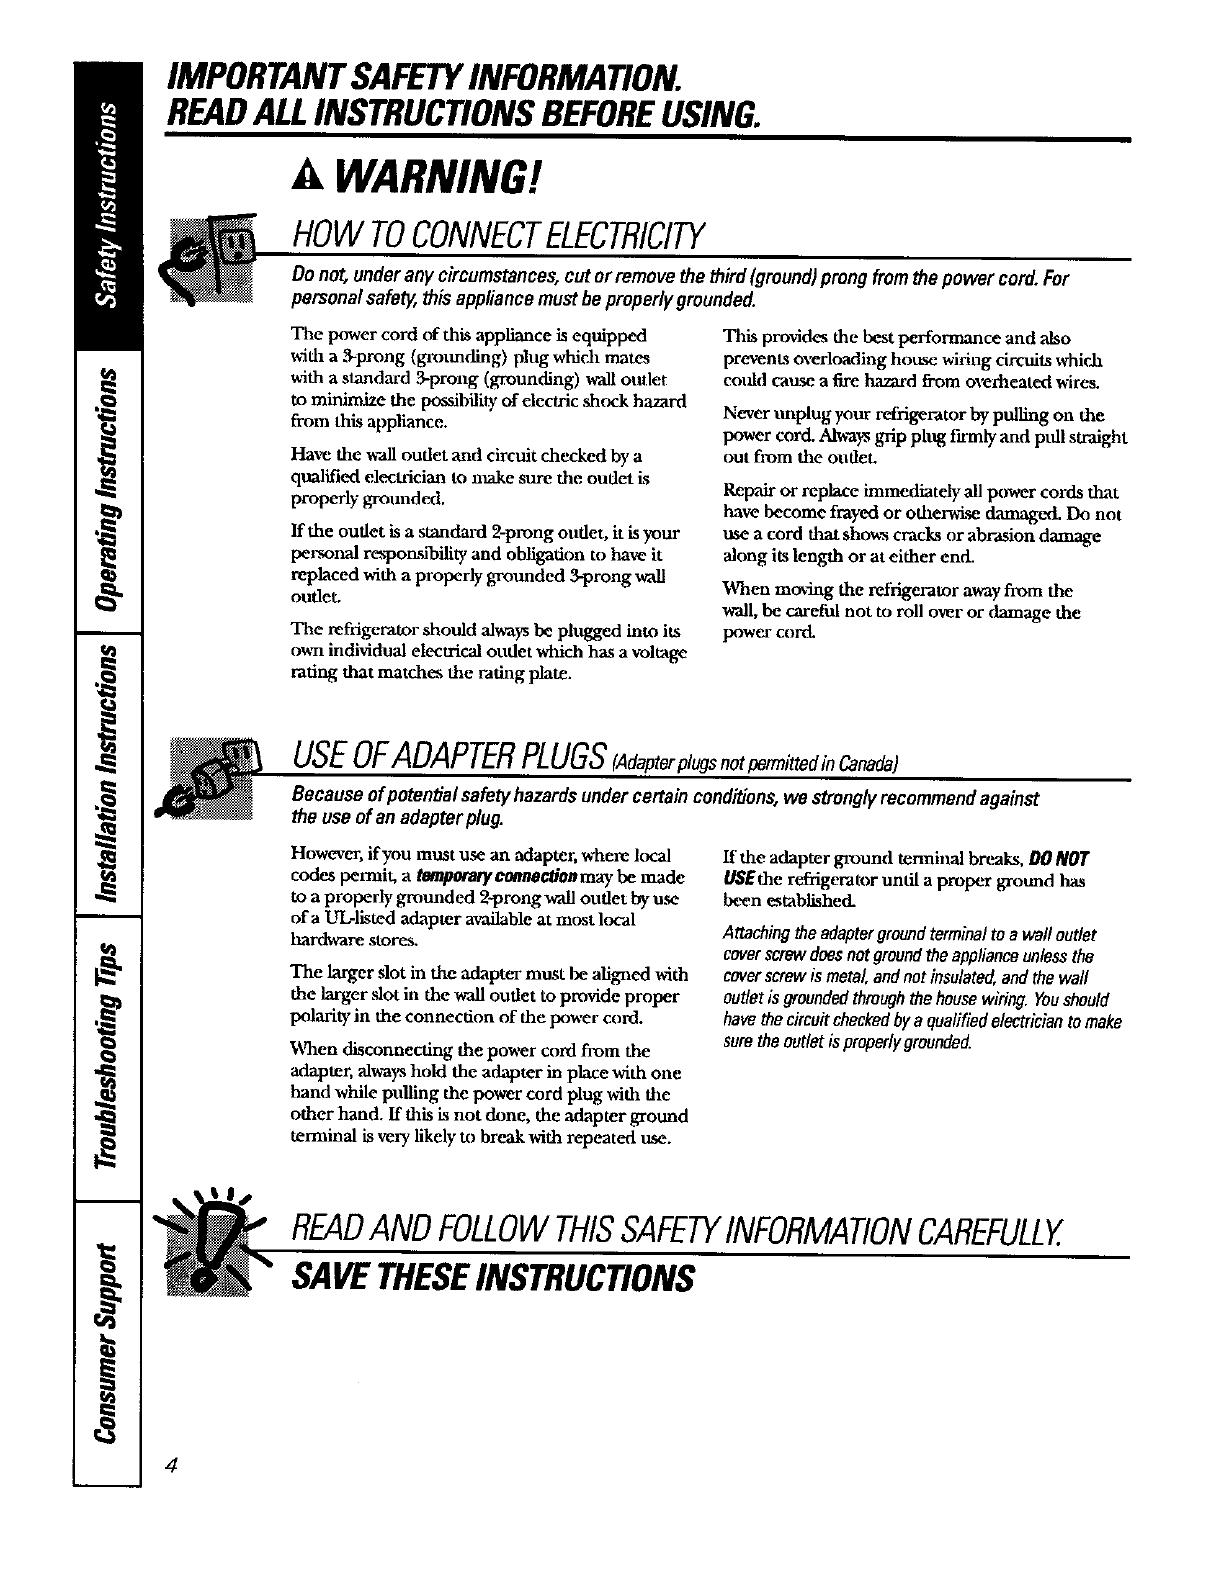
AWARNING!
HOWTOCONNECTELECTRICITY
Do not,underany circumstances,cut orremove the third (ground)prongfromthe power cord.For
personalsafe_, this appliancemustbe properly grounded.
The power cord cffthis appliance is equipped
with a _prong (gmtmding) plug which mates
with a standard 3-prong (grounding) wall outlet
to minimize the possibility of electric shock hazard
from this appliance.
Have the v-an outlet and circuit checked by a
qualified electrician to nmke sure the oudet is
properly" grounded.
If the outlet is a standard 2-prong outlet, it is your
personal responsibility and obligation to have it
replaced with a properly grounded 3--prong _mll
outlet.
The refrigerator should always be plugged into its
own individual electrical oudet wtlich h_ a voltage
rating that matches the rating plate.
This provides the best performance and also
pro,'en ts overloading hoose wiring circuits whidx
could cause a fire hazard from overheated wires.
Never tmplug your retiigemtor by pulling on the
power cord. Alvws grip phkg firmly and Dill straight
out from the ontieL
Repair or replace immediately all lxr_er cords that
have become frayed or othevwi,se damaged. Do not
use a cord that show cracks or abrasion damage
along its length or at either end.
V_nen mo-,iug the refrigerator away from the
wall, be carefifl not to roll over or damage the
power cord.
USEOFADAPTERPLUGS(Adapterplugsnot permitted in Canada)
Because of potential safe_ hazards under certain conditions, we strongly recommend against
the use of an adapter plug.
However, if you must use an adapter, where local
codes permit, a t_apo_F comw_ianmay be made
to a properly grounded 2-prong wan ontlet by u_
of a UL-listed adapter available at most local
lxarchcare stores,
The larger flot in the adapter must be aligned with
the larger slot in the wall outlet to provide proper
polarity in the connection of the power cord.
When disconnecting the power cord from the
adapter, always hold the adapter in place with one
hand while pnlling the power cord plug with the
other hand. ff this is not done, the adapter ground
terminal is very likely to break with repeated use.
If the adapter ground terminal breaks, DO NOT
OSEthe refrigerat_r until a proper ground has
been established.
Attachingtheadaptergroundterminaltoawall outlet
coverscrewdoesnotgroundtheapplianceunlessthe
coverscrewismetal,andnotinsulated,andthe waft
outletis groundedthroughthehousewiring.Youshould
havethecircuitcheckedbya qualifiedelectricianto make
suretheoutletisproperlygrounded.
READANDFOLLOWTHISSAFETYINFORMATIONCAREFULLY.
SAVETHESEINSTRUCTIONS
4
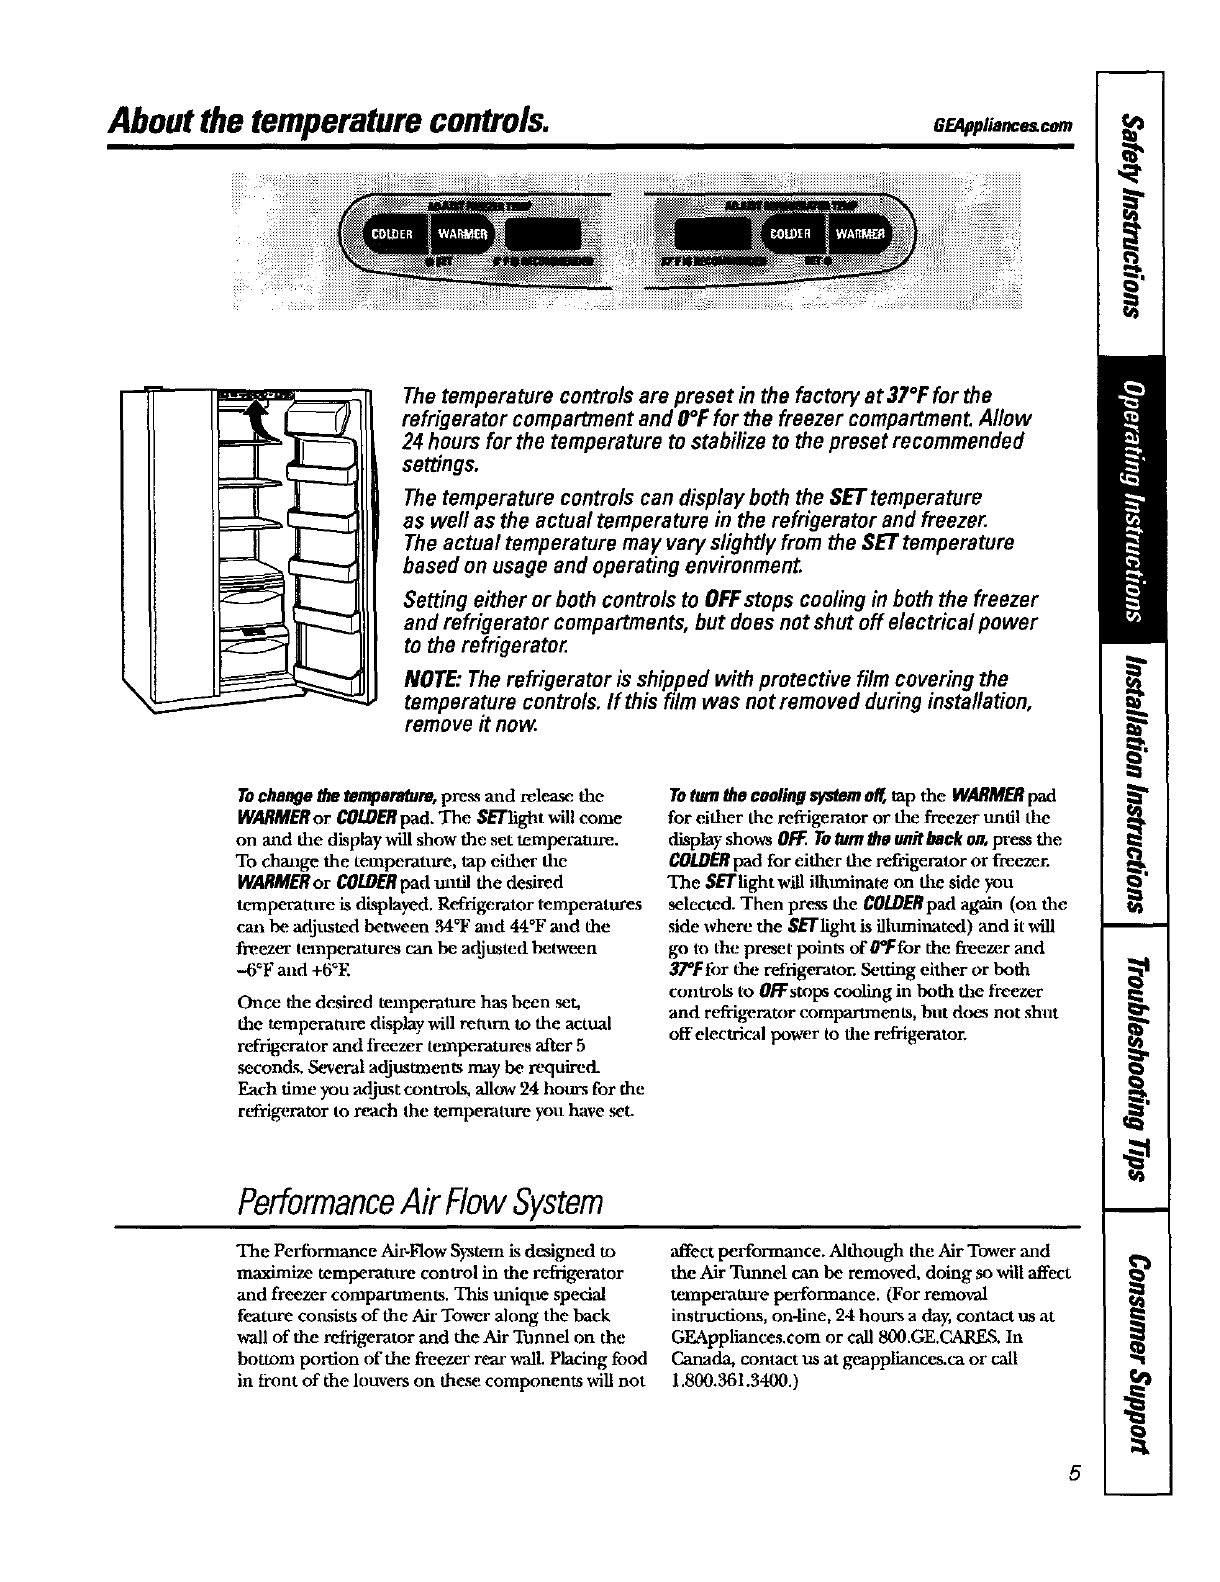
About the temperaturecontrols.
The temperature controls are preset in the factory at 37°1:for the
refrigerator compartment and O°Ffor the freezer compartment. Allow
24 hours for the temperature to stabilize to the preset recommended
settings.
The temperature controls can display both the SET temperature
as well as the actual temperature in the refrigerator and freezer.
The actual temperature may vary slightly from the SET temperature
based on usage and operating environment.
Settingeither orboth controlsto OFFstopscoolingin both the freezer
and refrigerator compartments, but does not shutoff electrical power
to the refrigerator.
NOTE: The refrigerator is shipped with protective film covering the
temperature controls. If this film was not removed during installation,
remove it now.
TochatPge _tem_tature, press and release the
WARMER or COI.tiERpad. The SETlight will come
on and the dLsplay will show the set temperatme,.
To chmlge the tempe, retiree, tap either the
WARMERor COLDERpad mltil the desired
temperature is displayed. Refrigerator temperatures
can be adjusted between _°I." and 44°F mid the
freezer tranperatur¢_, can be adjusted between
--6_F and +6°E
Once the desined temperature has been set,
the temperature disphy will return to the actual
refrigerator and freezer temperatures ",d_er5
seconds. S¢.weral adjustments may be ix'quired.
Each time you adjust controls, all_v24 hours for the
rt_'rigerator to reach the temperatra'e you have set.
Toturn the cooling systemoff, tap the WARMERpad
for either the refrigerator or the freezer until the
ff_play shows 0/:E. Totam the _it back on, press the
COLDERpad for either tile refrigerator or freezer.
The SETlight will ilkuninate on file side you
selected. Then pros file COLBERpwd again (on the
side where the SB'light is illmniuated) and it ,Mll
go m the pr_-aetpoints of 0°Ffor the freezer and
37°E for the refrigerator. Setting either or both
controls m OR:stops coormg in both the freezer
and refrigerator compartments, but do_s not shrzt
offelectrical power to the refrigerator.
PerformanceAir FlowSystem
The Performance Air-Flow System is designed to
maximize temperattu:e control in the refiigerator
and freezer compartments. This tmiq_te special
feature cousists of the Air Tower along the back
wall of the refrigerator and the Air Tnnnel on the
bottom portion of the freezer rear wall. Placing food
in front of the louvers on these components will not
affect performance. Although the Air Tower and
the Air Tunnel can be removed, doing so will affect
temperature performance. (For removal
instrtmfious, on-line, 94 hours a day, contact us at
GEAppliances.com or call 800.GE.CARES. In
Canada, contact us at geappliances._ or call
1.800.361.3400.)
5
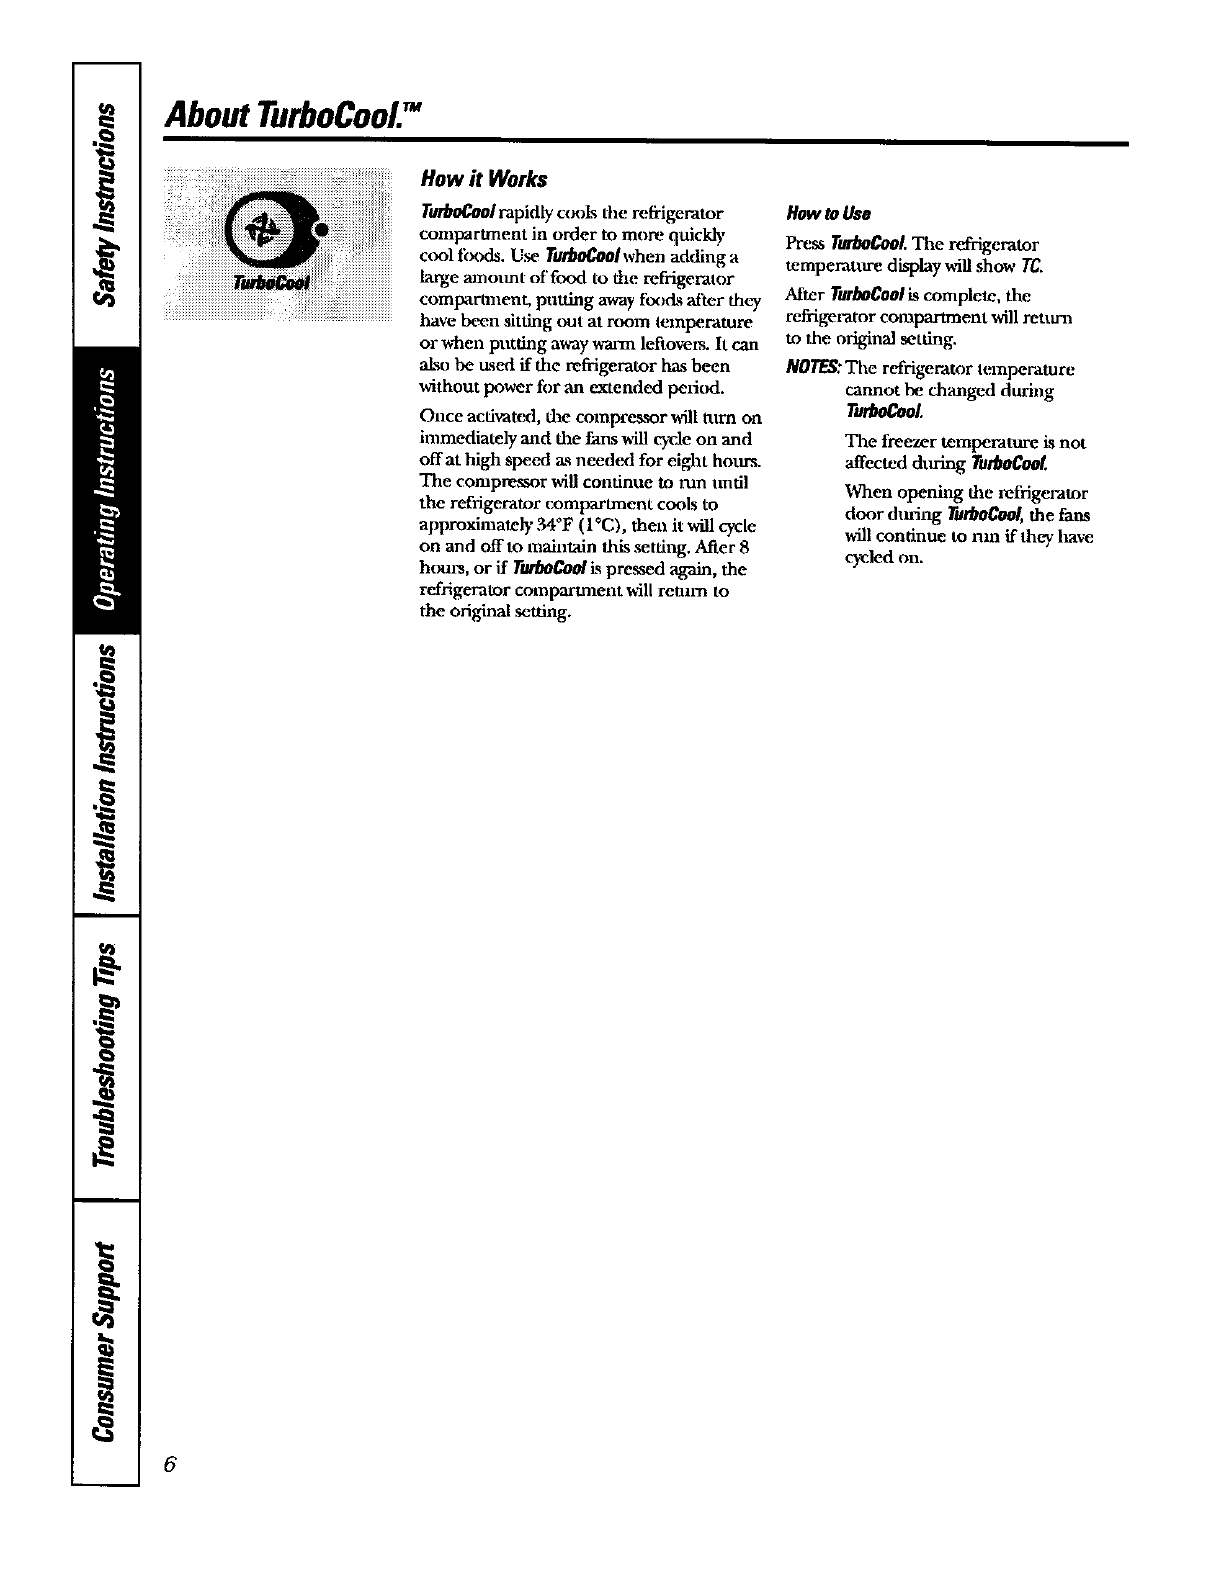
AboutTurboCool.TM
iiiii_iiiiiiiiiiiiiiiiiiiiiiiiiiiiiiiiiiiiiiiiiiiiiiiiiiiiiiiiiiiiiiiiillTM_i_ii
How it Works
TurboCoolvapidly ccK)ls flze lx_frigemtor
compartment in order to more quickly
cool ff×xts. Use TurboCool when adding a
large mnotmt of food to the refrigerator
comparmmnt, putting away fix_cis after they
have been sitting out at room teraperatum
or when pntdng away warm leftovers. It can
also be used ff the refrigerator has been
without power for an extended period.
Once activatorl, the compressor will turn on
immediately and the fans win cyvJe on and
offat high speed a.s needed for eight horn's.
The compressor will continue to run until
the refrigerator compartment cools to
approximately 34°F (IOC), then it will cycle
on and offto maintain this setting. After 8
hours, or if YlmboCoolis pressed again, the
refrigerator compartment will return to
the original setting.
How to Use
Press TurboCool.The refrigerator
temperature display wnl show TC.
After TurboCoo/iscomplete, the
refrigerator compartment will rettuaa
to the original setting.
NOTES."The refrigerator temperature
cannot he changed during
TutboCooI.
The tieezer temperature is not
"affected dm'ing TurboCool.
When opening the refrigerator
door dining TurboCool,the fans
will continue to run if they have
cycled on.
6
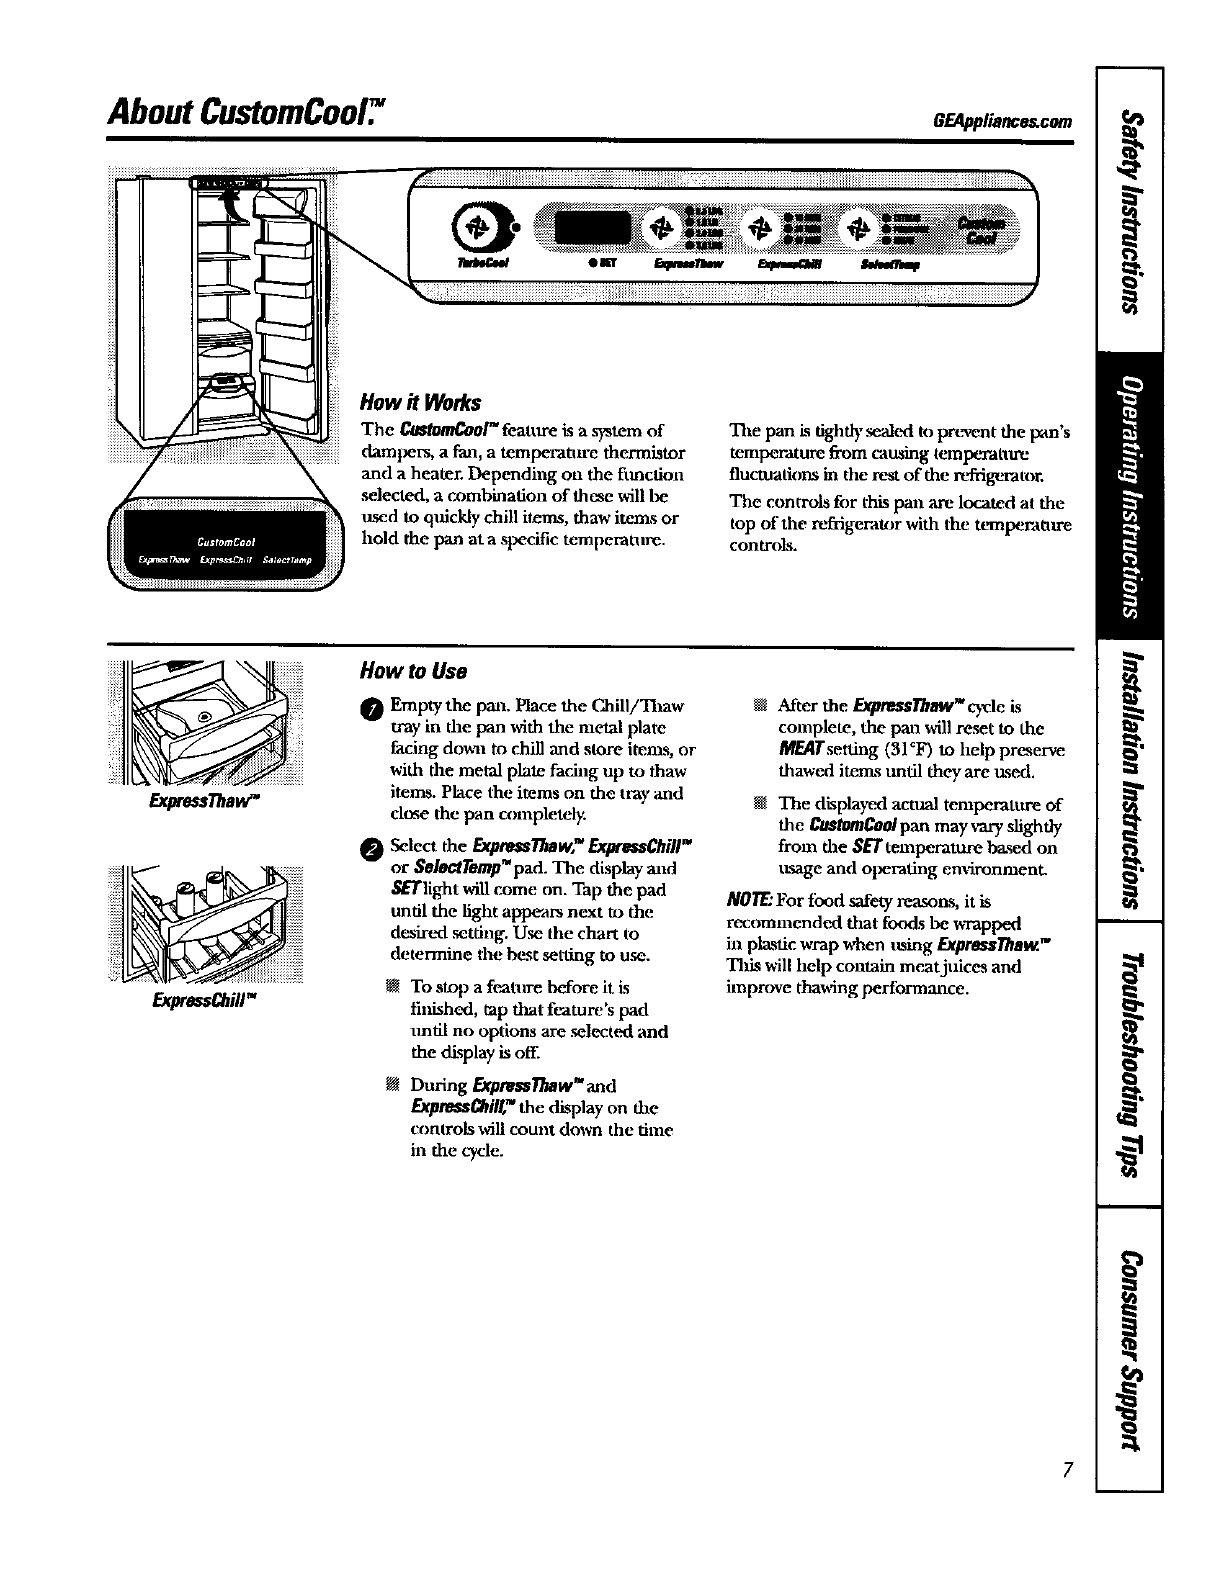
AboutCustomCool7 OrAm == o.
ExpressThavvTM
How it Works
The Cust0mCo01= feature Lsa s)_tem of
dampers, a fan, a temperature thermistor
and a heater. Depending on the ftmctiml
,selected, a combination of these will be
used to quickly chill itmns, thaw items or
hold the pan at a specific temperaalre.
The pan is tightly sealed to prcwen t the van's
temperature from _osing temperatttre
fluctuations in tile rest of the rtffrigera tor.
Tile controls for this pan are located at the
top of the refrigerator with the temperature
controls.
ExpressChillTM
How to Use
0Emptythe pan, Place the Oaill/Thaw
tray in the pan with the metal plate
facing down to chill and store items, or
with the metal plate facing up to thaw
items. P"lacethe items on the tray and
close the pan completely.
Select. the Expresslbaw,TM F_xptessChill"
or SelectTemp'pad. The display and
SETlight will come on. Tap the pad
until the light appears next to the
desirtxt setting. Use the chart to
determine the best setting to use.
To stop a featllre before it is
finished, eap that feature's pad
zmtil no options are selected and
the display is off.
During Expnl_Tlmw_"and
FdcpressChilt"the display on die
controls will count down the time
in the cycle.
After the E_te_Thew" cycleLs
complete, the pan willreset to the
MEATsetting (31¢F) to helppr_erve
thawed itenxs until they are used.
The display_l acu_l temperature of
the CuMomCoolpanmay s-ary slightly
from the SET temperature based ma
usage and operating emJronment,
NOTE.'Fortood safety reasons, it is
recommended that foods lse "m"apped
in pl,xstic wrap when using Expre_Thaw."
This will help cmUain meat juices and
ilnprove thawing performmace.
7
AboutCustomCool7
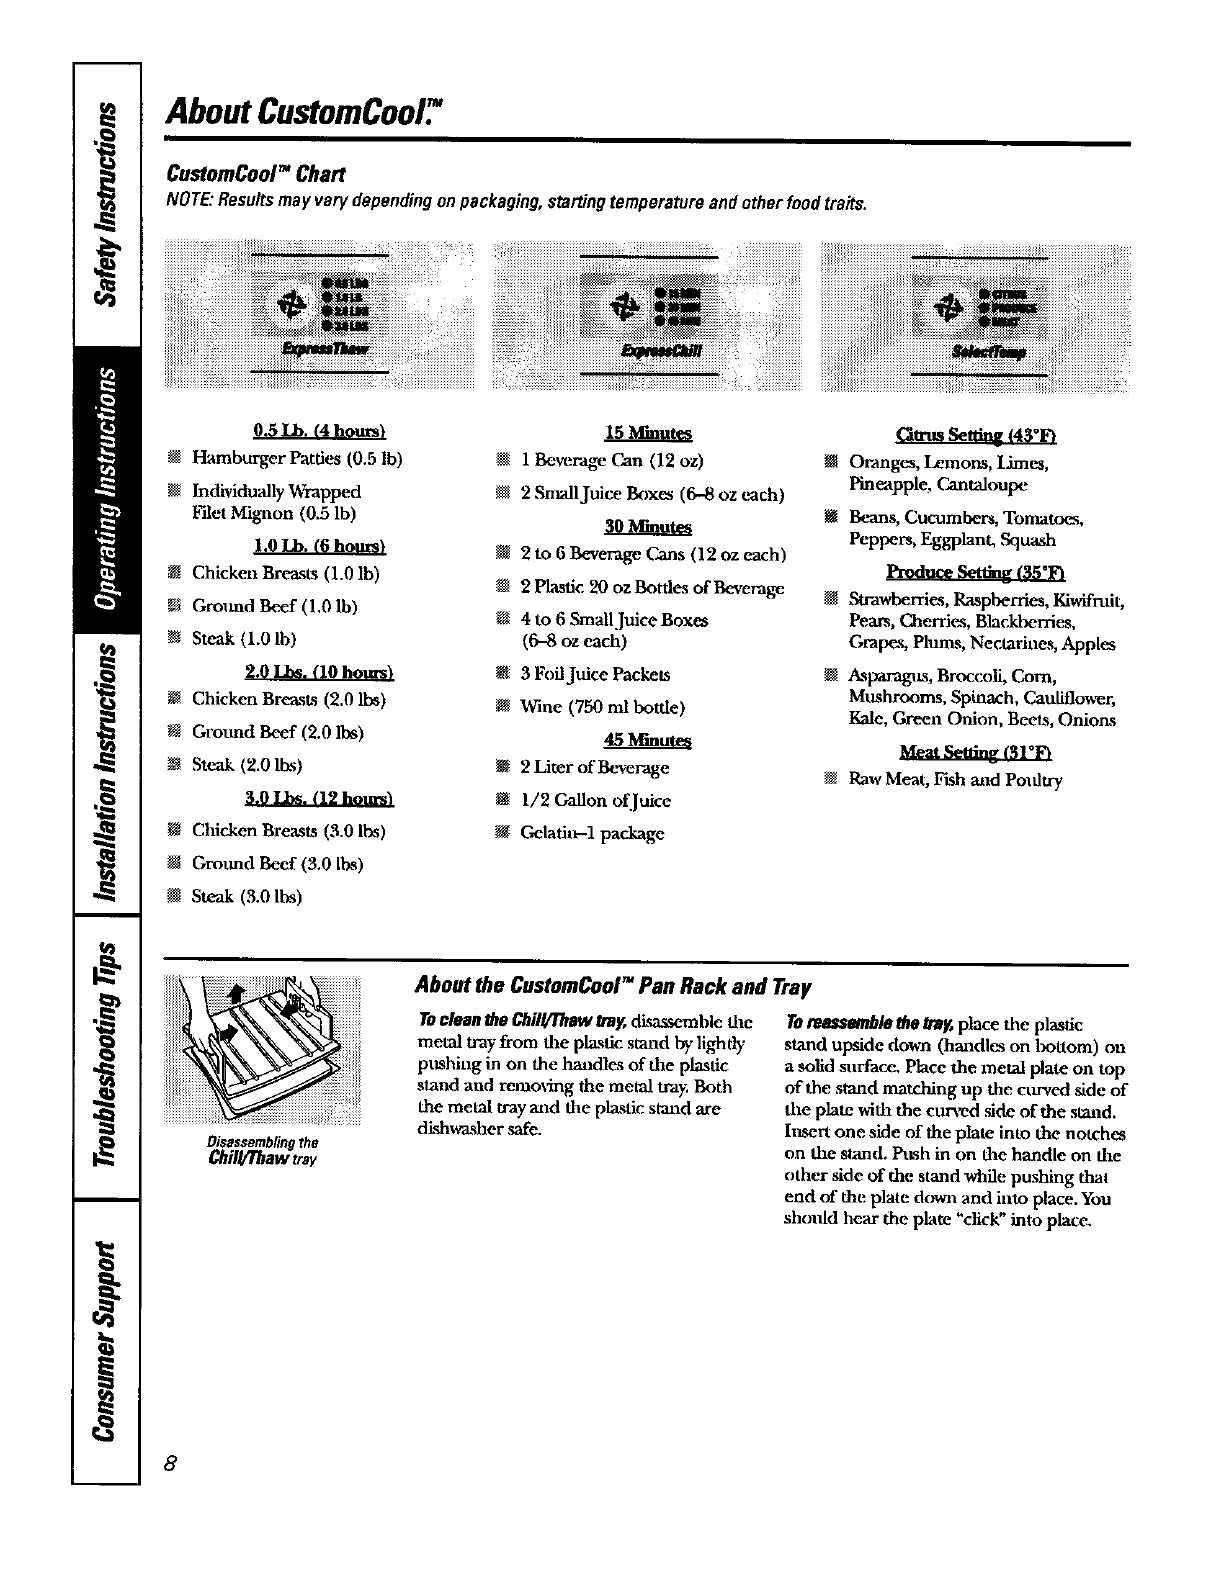
CustomCool TM Chart
NOTE:Resultsmayvarydependingonpackaging,startingtemperatureandotherfoodtraits.
•Hamburger Patties (0.5 lb)
la had2.idu',diy Wrappexl_
_ilet Migalon (0.5 lb)
1.0 Lb. (6 hours)
la Ch2.kel_ B_-'as_s (12. lh)
2. Ground Beef (1.0 lb)
k_ Steak (1.0 lb)
Chicken Brea.sts (2.0 lbs)
Grotmd Beef (2.0 lbs)
la Steak (2.0 lbs)
Chicken Breasts (3.0 lbs)
Grotmd Beef (3.0 II'xs)
Steak (3.0 [[xs)
Disassemblingthe
Chill/Thaw tray
Z_Zm.ut_
la 1 Be,,_ra_ Can (12 oz)
2 S_lJuice Box_ (6--8 oz trach)
2to 6Beverage Cans (12 oz each)
2Plastic 20 oz Bottles of Beverage
la 4 to 6 Small Juice Boxes
(6--8c/z each)
3FoilJuice Packets
la Wine (750 ml bottle)
2 Liter of Beverage
la 1/2 Gallon of Juice
2.laatin-1 package
m Oranges, Lemons, I.imm,
Pineapple, Cantaloupe
t_ Beans, Cucumbers, Tomatoes,
Peppers, Eggplant, S_luash
Swawberri_s, Raspberries, Kiwlfmit,
Pears, Cherrie_s, Bladd_erries,
Crapes, Plu_% Nectarines, Apples
la &_paragus, Broccoli, Corn,
Mushrooms, .Spinach, Gau[iflower,
Kale, Green Onion, Beets, Onions
Raw Meat, lrtsh and Potdtry
Aboutthe CustomCool"Pan Rackand Tray
Toclean Me Chill/Thaw tray,dL_assemble the
metal tray"from file pl_t2, st'mad by,lightly
pttshing in on the haudlas of the plastic
stand and removing the metal tra_ Both
the metal tray and file pl_tic stand are
dL_w_her ,mfe.
Torea_emble thetray, place the plastic
stand ulxside down (handles on l_ottom) on
a solid mwface, Place the metal plate on top
of the stand matching up the CtLrved ,side of
the plate with the curved ,side of the stand.
Irkqertone side of the plate into the notches
on fl_,estand. Ps._h in on t2.e hltndla on the
uther side of the stand wh'fle pushing that
end of the plate dcmal and into place. You
sh(nfld hear the plate "click" into place.
8

Aboutthewater filter.(onsomemodels) GF-Applianccs.cam
iiiiiiiiiiiiiiiiiiiiiiiiiiiiiiiiiiiiiiiiiiiiiiiii_i_¸ _ ......:_i_ii_iiiiiiiiiiiiiiiiiii
Placethe topof the cartridgeup
insidethe cartridgehomerand
slowlytom it to the right.
Water Filter Cartridge
The water filter cartridge, is located in the
back upper fight corner of the refrigerator
compartmenL
When to Replace the Filter
There is a replacement indicator light for
the water filter cartridge on the dispenser,
This light will turn orange m tell you that
you need 1.oreplace the filter soon.
The filter cartridge should be. replaced
when the replacement indicator light mrm
red or if the flow of water to the dispenser
or icemaker decreases.
Installing the Filter Cartridge
0 ffyou are replacing the cartridge, first
remove the old one bysloMy taming
it to the left. DOnntpull down on the
cartridge. A small amount of water may
drip down.
Fill the replacement cartridge with
water from the tap to allow fi)r better
flow from the dispemer immediately
after installation.
@Lining up the arrow on the camidge
and the cartridge holder, place the
top of the new cartridge tap inside
the holder. Oannt push it up into
the holder.
Slowly turn it to the right tmdl the filter
cartridge stops. DONOTOVERTIGHTEN.
A.syou turn the cartridge, itwfil
atttomadcally raise itself into position.
Cartridge will rotate about 1/4 tram.
Run water from the dispenser for
3 minutes (about l_ gallons) to clear
the system and prevent sputtering.
Press and hold the BESET WATERRLTER
pad on the dispenser for 3seCol|ds.
NOTE:A newly-installed water filter
cartridge may cause waWr to spurtfrom
the di,_ttser.
Filter Bypass Plug
You must lxse the filter bypass plug
when a replacenaent filter cartridge is not
available. The dispenser and the, icemaker
will not operate without the filter or filter
bypass plug.
ReplacementFiltet_"
Toorderadditionalfiltercartridges
inIhe UnitedStates,visitourWebsite,
GEAppliance_cam,orcall
GEPartsandAccessories,BO_6262M2.
G_TY
Suggested Retail $34.95 USD
CaLstomers in Cana(la shoafld consult
the yenow pages for the nearest Camco
Service Center.
9

Abouttheshelvesandbins.
Not all features are on all models.
Refrigerator Door Bins and Freezer Door 77It-Out Bins
Refrigeratorbin
_/
Freezertilt-outbin
LargeBins Thesnuggorhe]pspre_m tipping, spilling
The larger _'f'rigemtor door bins and
freezer tilt-out door bins are adjustable.
Toremove:Lift the from of the bin straight
up, then lift up and out.
Toreplace orrelocate:Engage the back side
of the bin in the molded salpports of the
door. Them pz_sh doom on file fixmt of the
bin. Bin will [ock in place.
Small Bins
or sfiding of small items stort_-i on the door
shelf. Place afinger on either side of the
snugger near the rear and move it back
and forth to fit your neecis.
Tor_nove:Lifi the front of the bin straight
up theta ouL
Tor_l_ Position the bin abo_e the
rectangaflar moMed supports on the door.
Then slide the bin down onto the support
to lock it in place.
tO
GEAppliance_eom
Not all features are on all models.
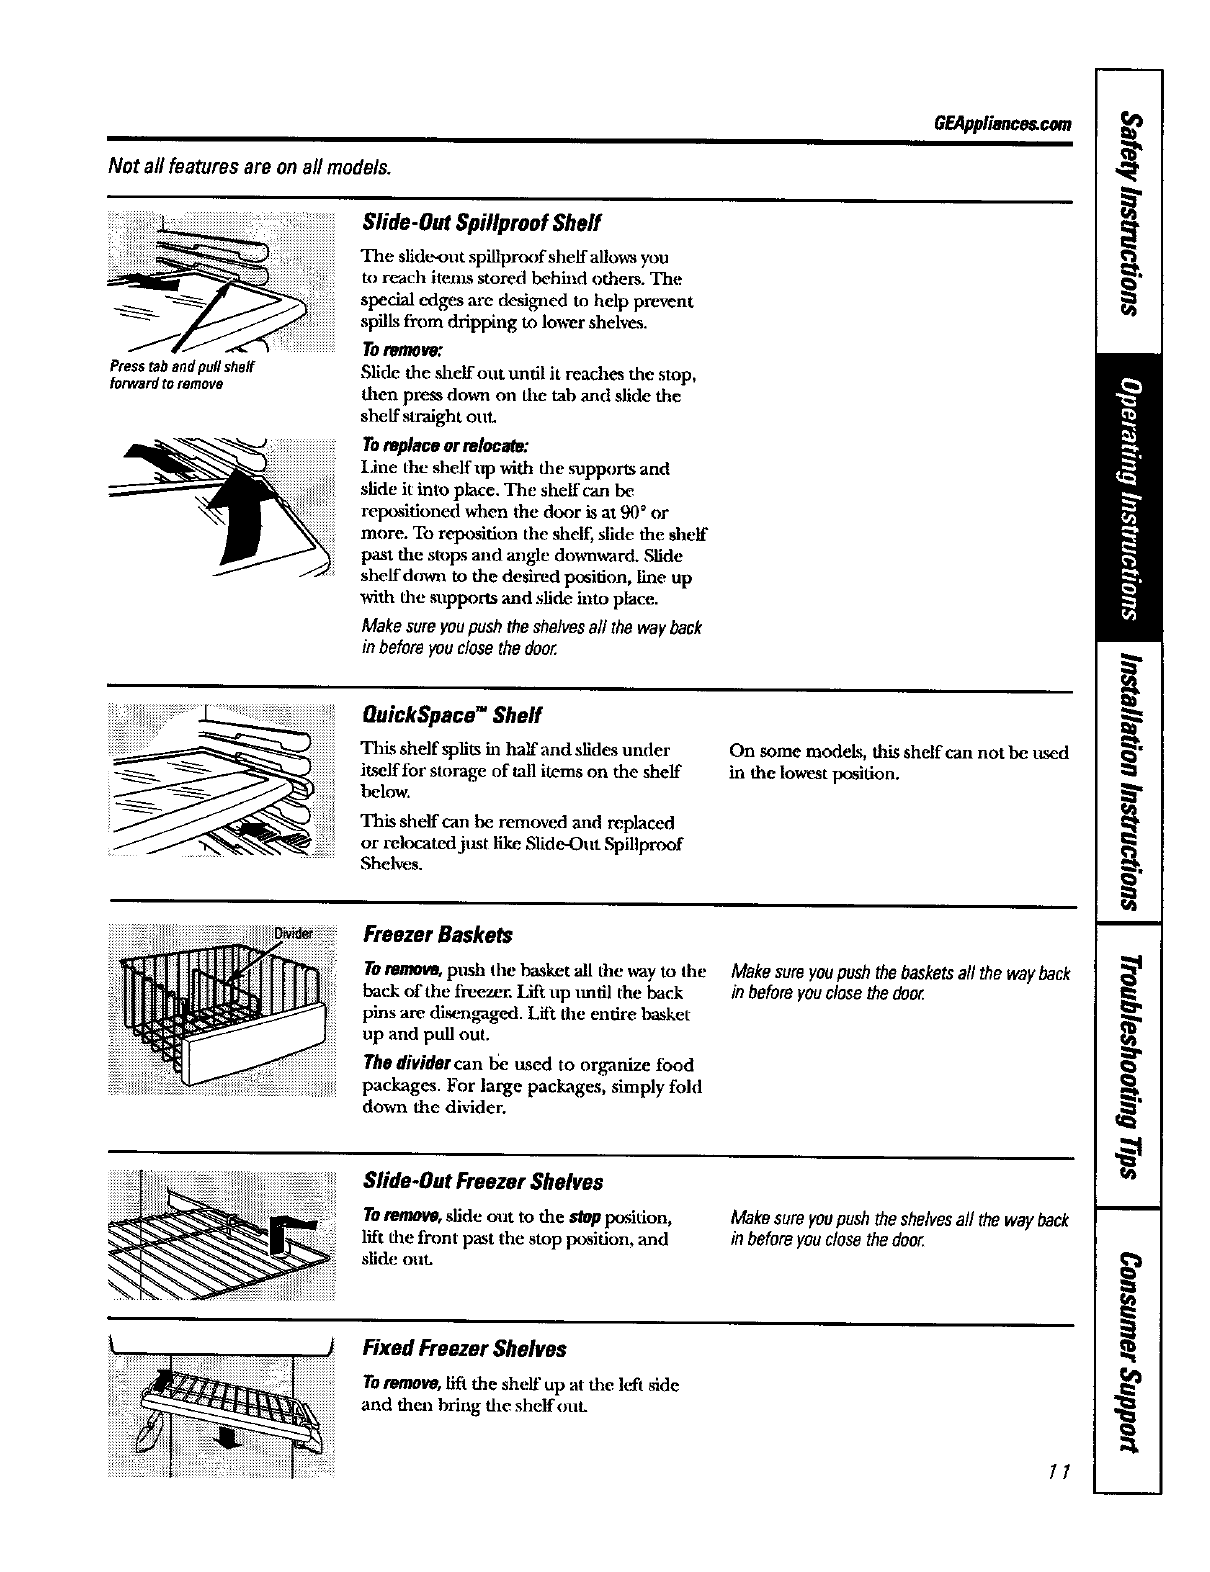
Slide-Out Spillproof Shelf
Presstabandpullshelf
forward toremove
The slide-ont spillpr(xffsheLf allows, you
to re/:achitems stored behind others. The
special edges are designed to help prevent
spills fYom dripping to lower shelves.
Toremove:
Slide the sheLf ont until it reaches the stop,
then p_ dram on the tab and slide the
sheLf straight onL
Toreplace or relocate:
I,ine the shelf up with the suplx)m and
slide it into place. The shelf can be
reposidoned when the door is at 90 ° or
more. To reposidon the shelf, slide the sheLf
past the st_)ps and angle downvrart'L Slide
shelf d(van to the desired position, line up
with the snpports and slide into place.
Make sure youpush the shelvesall the way back
in before you close the door.
QuickSpace TM Sheff
Tiffs shelf splits in haLf and slides under
itself for storage of tall items on the shelf
below.
This shelf can be removed and replaced
or relocated jest like Slide-Out Spillproof
Shelves.
On some models, this shelf can not be t_sed
in the lowest position.
Freezer Baskets
Toremove,push die basket all the way to the
back of the freezer. Lii_ up tmtll the back
pins are disengaged. Lilt file entire basket
up and pull out.
The dividercan be used to organize food
packages. For large packages, simply fold
down the divider.
Makesureyoupushthebasketsallthewayback
in beforeyouclosethedoor.
Slide-OutFreezezShelves
Toremove, slide oaat to the stopposition,
lift the ti-ont past the stop position, and
slide OUL
Makesureyoupushtheshelvesallthe wayback
inbeforeyouclosethedoor.
) Fixed Freezer Shelves
Toremove,lift the sheLf up at the left side
and then bring the shelf(mL
11
Abouttheadditionalfeatures.
Not a// features are on a/I models.
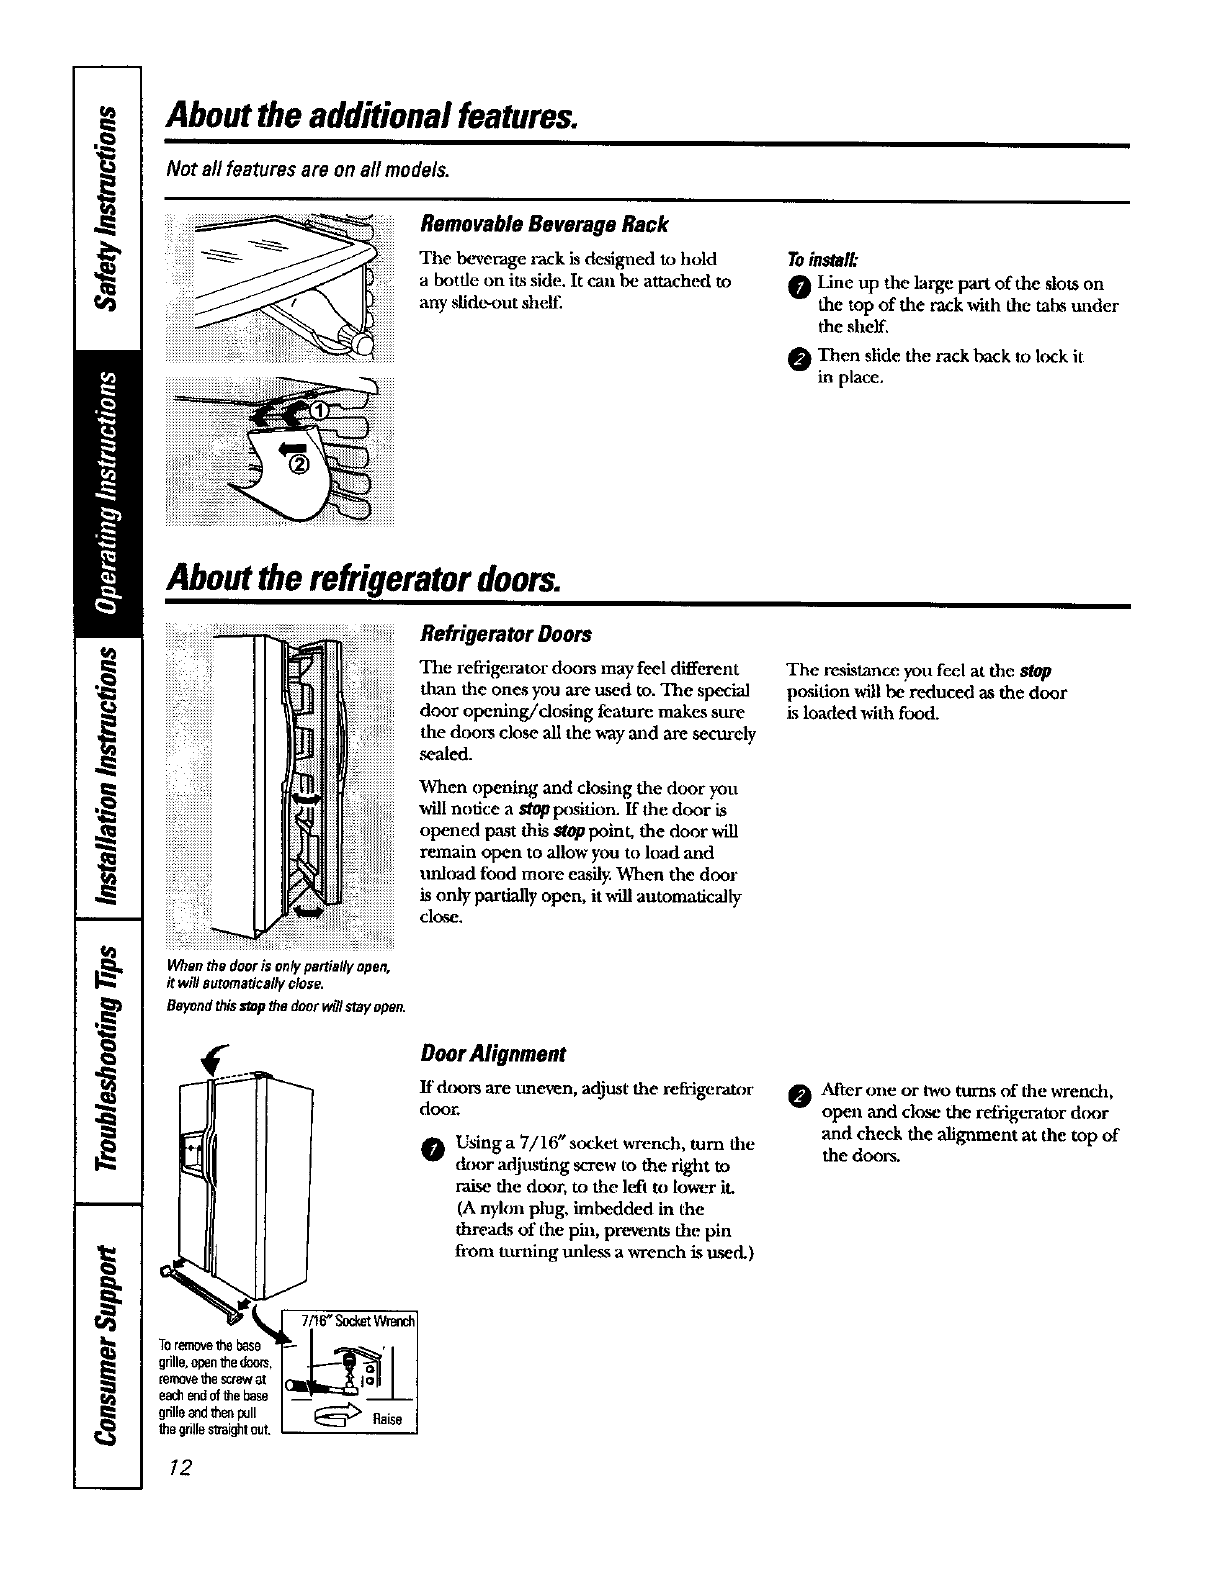
Removable Beverage Rack
Tile beverage rack is designed to hold
a botde on its side. It call be attached to
azly slide-oot shell"
Toinstal/:
OLine up the large part of the slots on
the top of tile rack with the tabs under
the shelf.
Then slide the rack back to lock it
in place.
Abouttherefrigeratordoors.
Refrigerator Doors
The refrigerator doors may feel different
than tile ones you are used to. The special
door opening/dosing feature makes sure
the doors close all the way mid are securely
,sealed.
When opening and closing the door you
will notice a Stop Ix-_sifion. ffthe door is
opened past this stop point, the door will
remain open to allow you to load and
unload food more easily. When the door
is only partially open, it will automatically
close.
The resistance you feel at the Stop
position will be reduced as the door
is loaded with food.
When thedooris on/),partiallyopen,
it wifl automaticallyclose.
BeyondthisMopthe doorwillstayopen.
DoorAlignment
If'doors are uneven, adjust the refi-igeeator
door.
Using a 7/16" socket wrench, turn the
&_)r adjllsting screw to the right to
zaise the door, to the left to lower it.
(A n),lon plug, imbedded in the
threads of the pin, prevents the pin
from tttming unless a wrench ks use&)
_ After one or two turns of tile wrench,
open and dose the retkigerator door
and checkthealignmentatthetopof
thedoors.
Toranovethe base
grille,openthedoocs,
te_e _le screw_t
eat_ end0f the tmso __
grilleandthenpull @Raise
fi_egrillestraightout.
12
About the crispersandpans.
Not all features are on all models.
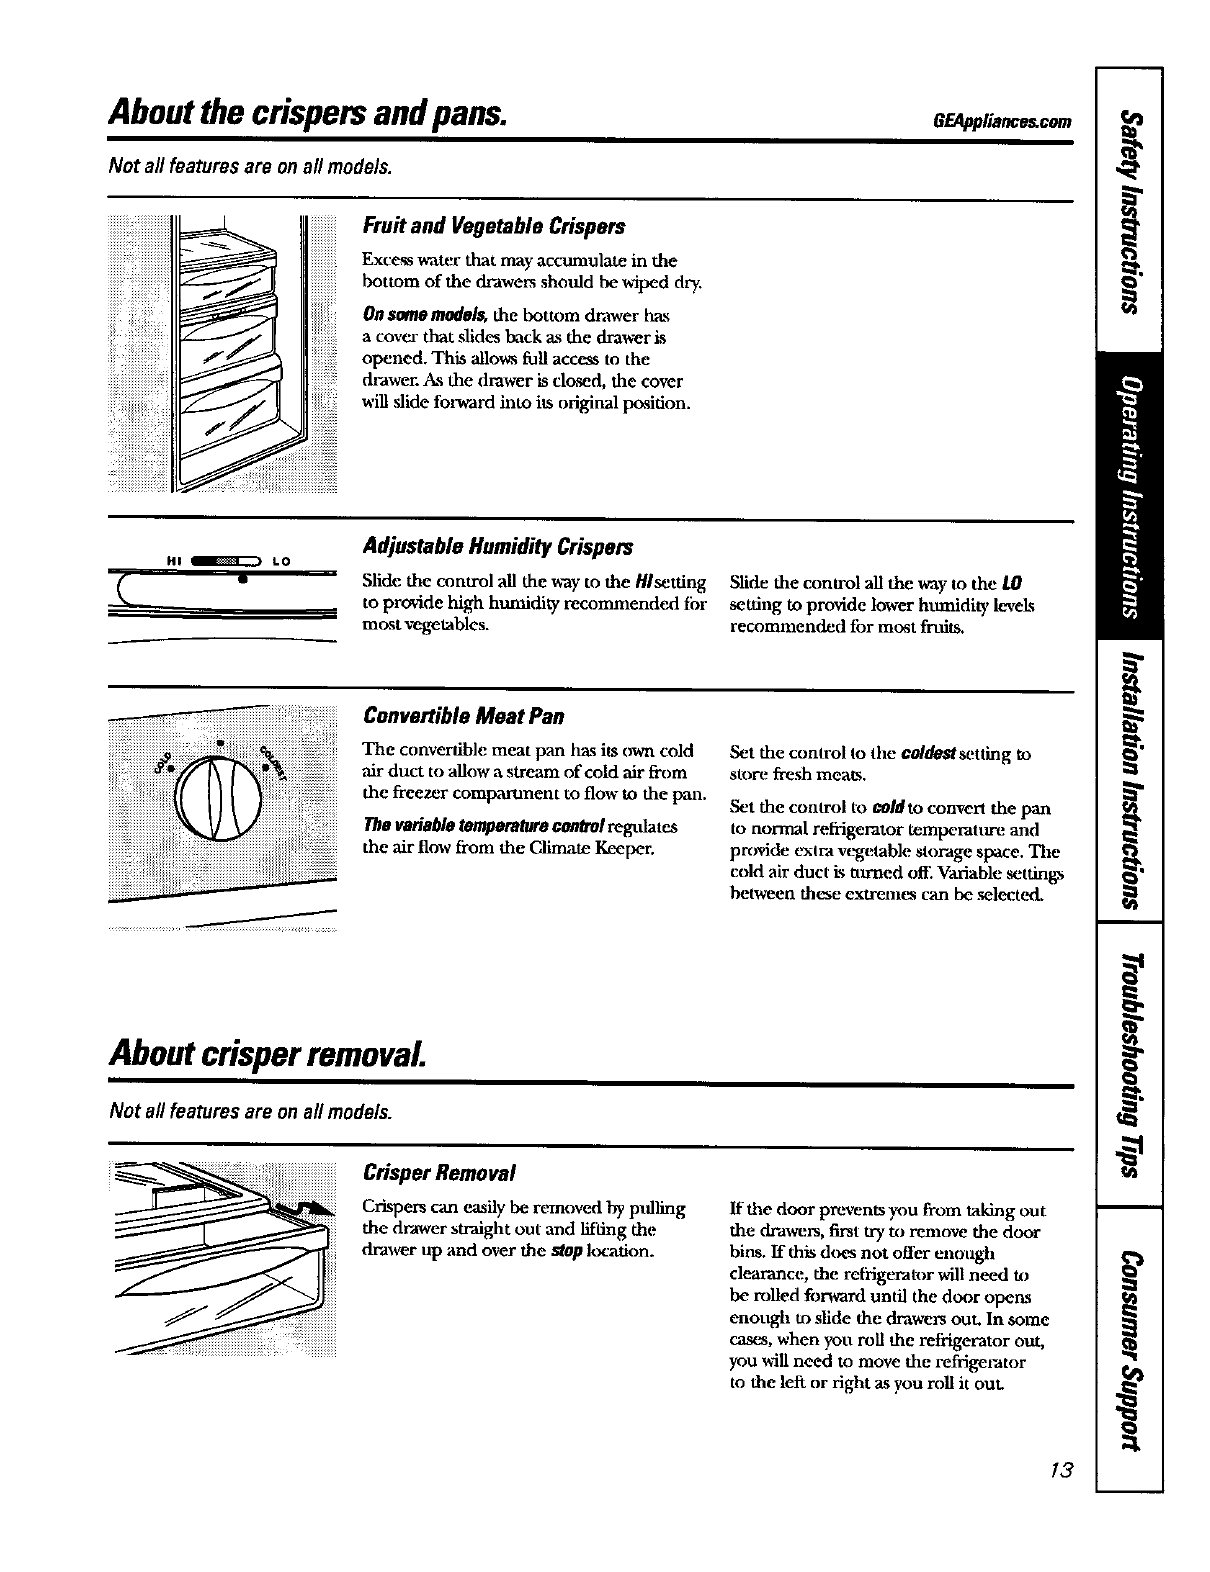
Fruit and Vegetable Crispers
Excess water that may accumulate in the
bottom of the drawers should be wiped dry.
On some m_lel& the bottom drawer has
a covet- that slides back a.s the drawer is
opened. This "allows full access to the
drawer. A.s the drawer is closed, the cover
will slide forward into its original po_,ition.
HI _ LO Adjustable HumidityCrispers
Slide the control all the way to the Hlsetting
to provide high humidity recommended for
most vegetables.
Slide the control all the way to the LO
setting to provide lower htmaidity levels
recommended for most fruits.
Set the control to the co/deStsetting to
store fresh meat_.
Set the control to coldto convert the pan
to normal refrigerator temperatlwe and
prcmde extra vegetable storage space. The
cold air duct is tttrned off. Variable settings
between these extremes can be selected.
AboutcrisperremovaL
/Vat all features are on all models.
Crisper Removal
Crispers can e_ily be removed by p_flllng
the drawer straigiat out and lifting the
drawer up and over the stoplocation.
If the door prevents you from taking out
the drawers, first try Ix_remove the door
bins. If tiffs does not offer enougla
clearance, the refrigerator will need u,
be rolled forward until the door opens
enough to slide the drawers out. In some
cas_, when you roll the refrigerator out,
you will need to move the refrigerator
to the left or right a.syou roll it OUL
13

Abouttheautomaticicemaker.
A newly installed refrigerator may take 12 to 24 hours to begin making ice.
Automatic lcemaker
in a 2,!-honr period, depeoding on freezer
compartment temperature, room
tempemnlre, nm'aber of door openings
mad other ttse conditions.
if 0 n ooOr ope te for
water connecdon is made to the ieemaker,
set the power s_itch in the 0(olOIx_ition.
ii_iii_=_==: =:_.........................i iiii:ii!!iiiiiiiiiiiiiiii
Pulltheupperfreezersheffstraight
outtoaccesstheicemaker.Always
besuretoreplacetheshelf,The
shelfcanbeusedforstorage.
When the refrigerator has heen conneeted
to the water supply, set the power switch to
the I (on)position.
The icemaker v,ill fdl with water when it
cools to 15*F (-10°C), Anewly imtalled
refrigerator Jm)' take 12 to 24 hours to begin
n_Jdng ice ctd_._s.
You will hear a bn_zing sound each time
the icenlaker fills with water.
Throw away the first few batches of ice to
aUow the water line to dear.
Be sure nothing interferes with the s_'eep
of the feeler ann.
When the bin flUs to the level of the feeler
arm, the icemaker will stop producing
ice. It is normal for several culxs to be
joined together.
If ice ksnot t_sed frequently, old ice cubes
_ill become cloudy, laste stale mad shrink.
NOTE:Inhomeswithlower-than-averagewater
pressure,youmayheartheicemaker6,clemultiple
timeswhenmakingonebatchofice.
Ice Storage Drawer
Toaccessice,pull the drawer forward.
Toremovethedrawer,pun it straight out aod
lift it past the stop location.
14
About the ice and water dispenser.(onsomemodels) eF_App/iance=com
I
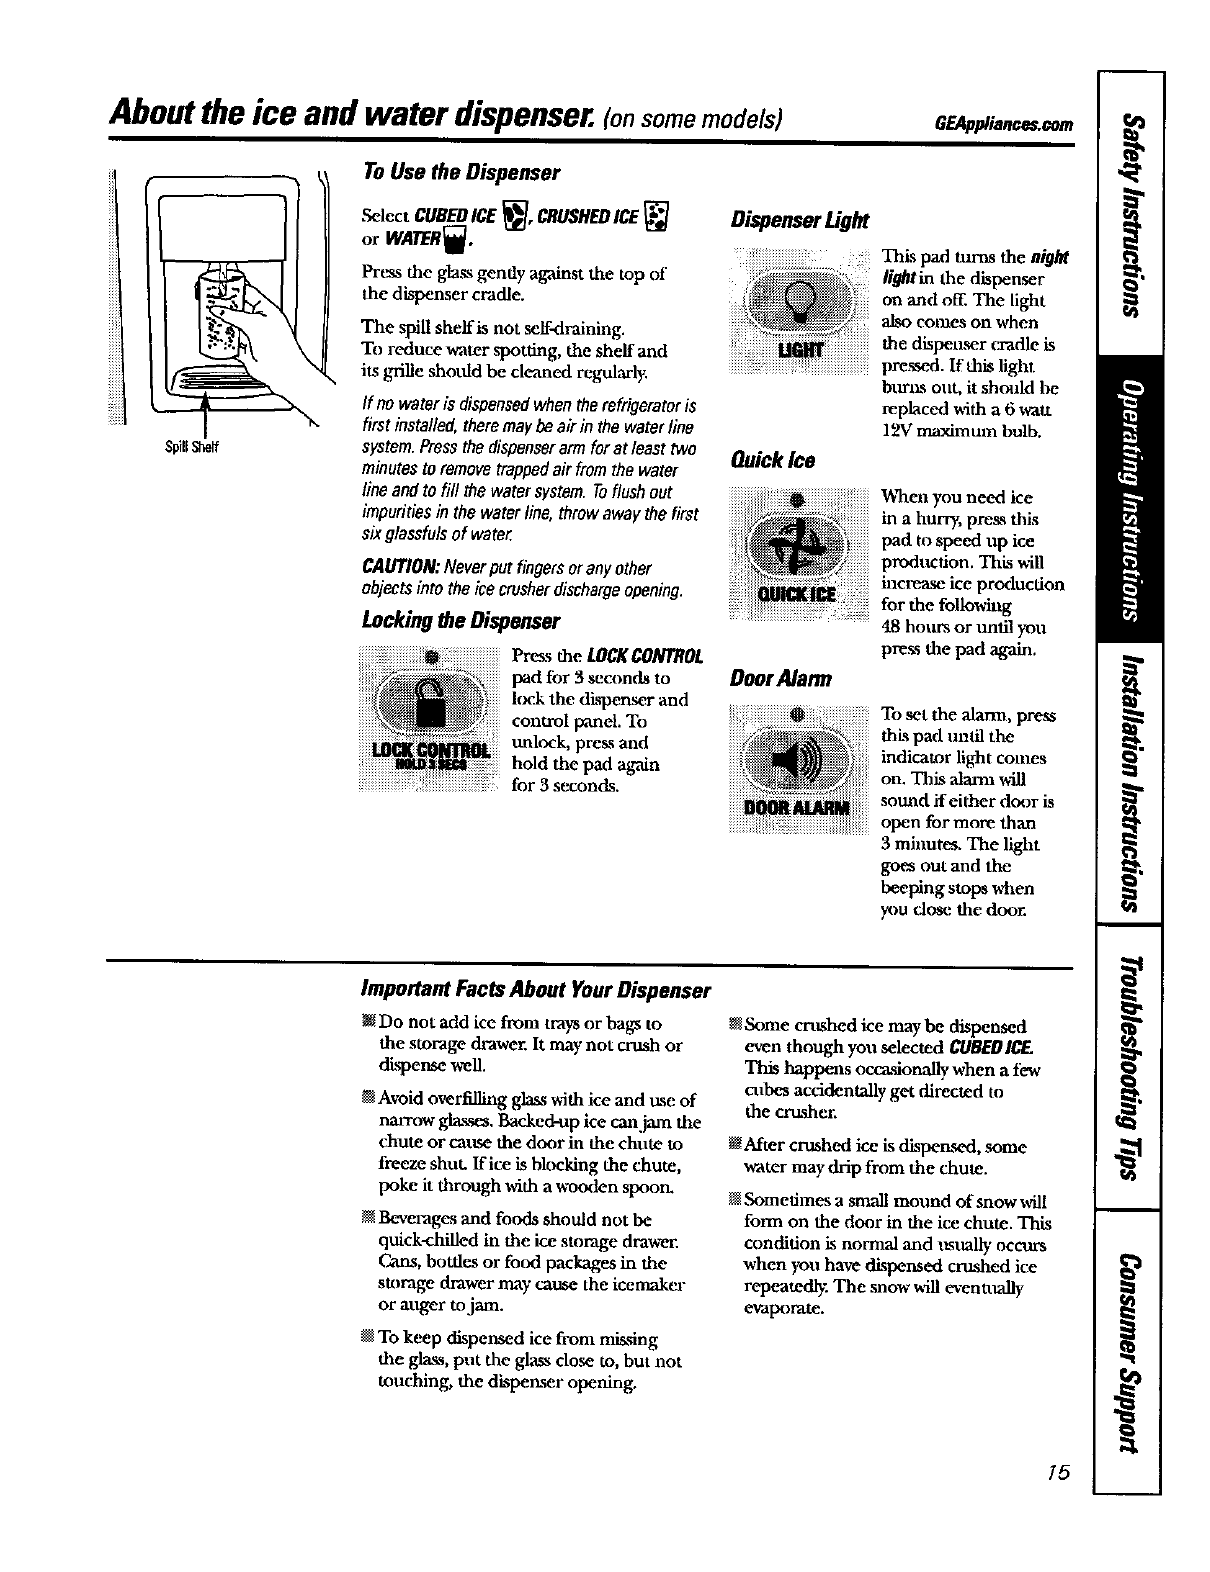
SpillS_elf
To Use the Dispenser
Select CUBEDICE_, CRUSHEDICE
or WA_R_.
Prt.'ss the glass gently against the top of
the dispenser cradle.
The spill shelf is not self-draining.
To reduce water ,spotting, the shelf and
its grille shotdd be cleaned regularly.
If nowateris dispensedwhentherefrigeratoris
firstinstalled,theremaybeairin the waterline
system.Pressthedispenserarmforatleasttwo
minutesto removetrappedairfromthe water
lineandto fill the watersystem.Toflushout
impuritiesin the waterline,throwawaythefirst
sixglassfulsof water.
CAUTION:Neverput fingersoranyether
objectsintothe icecrusherdischargeopening.
Locking the Dispenser
Pros the LOCI(CONTROL
pad for 3seconds to
lock the dispenser and
control panel. To
unlock, press and
hold the pad again
for 3 seconds.
Dispenser LigM
This pad turns the nigM
Quick Ice
lightin the dispenser
on and off. The light
ak_o comes on when
the dispenser cradle is
pressed. If dais light
burns out, it shcafld he
replaced _th a 6 wau
12V maximum bulb.
iiiii iiiiiiiiiiiiiii
ii!ilil iii!i!iiiiiiiiii
!iiiiiiiiiim_ii=;i:ii:iiiii;iiiiiiiiii
!ii:!_!_!!i!iiiiiiiiiiiiiiiiiiii!iii_!ililiiiiii
DoorA/arm
When you need ice
in a hurry, pre_s this
pad to speed up ice
prodnctlon. This will
incrt_se ice proclucdon
for the following
48 hours or until you
press the pad again.
To set the alarm, pre_
thh pad until the
indicator light conies
on. This alann will
sound if either door is
open for more than
3 minutes. The light
goe_ out and the
beeping stops when
pt)u close the door.
Important Facts About Your Dispenser
Do not add ice from trays or ba_ to
the storage th_awer. It may not crush or
dispense well.
Avoid m_rfilling gla_g with ice and use of
nanx_w gl,x_ses. Backed-up ice canjmn the
chute or cattge the door in the chnte to
freeze shut. ffice is bkmking the chute,
poke it through _th a _xxxlen spoon_
_Beverages and foods should not be
quick-chilled in the ice storage drawer.
Cans, bottles or food packages in the
storage drawer may cause the icemaker
or attger to jam.
@To keep dispensed ice from mi_,sing
the glass, put the glass close to, but not
touching, the dispenser opening.
Some crashed ice may be dispensed
even though yon selected CUBEDICE.
This happens occasionally when a few
cubes acddentally get directed to
the crnsher.
t_After crushed ice isdispensed, ._ome
water may drip fix)m the chute.
_ Somedlnes a small mound ofsnowwill
form on the door in the ice chute. This
condition is normal and l_slmlly occurs
when you have dispensed crushed ice
repeatedly= The snow win eventtmlly
evatx)rate.
15
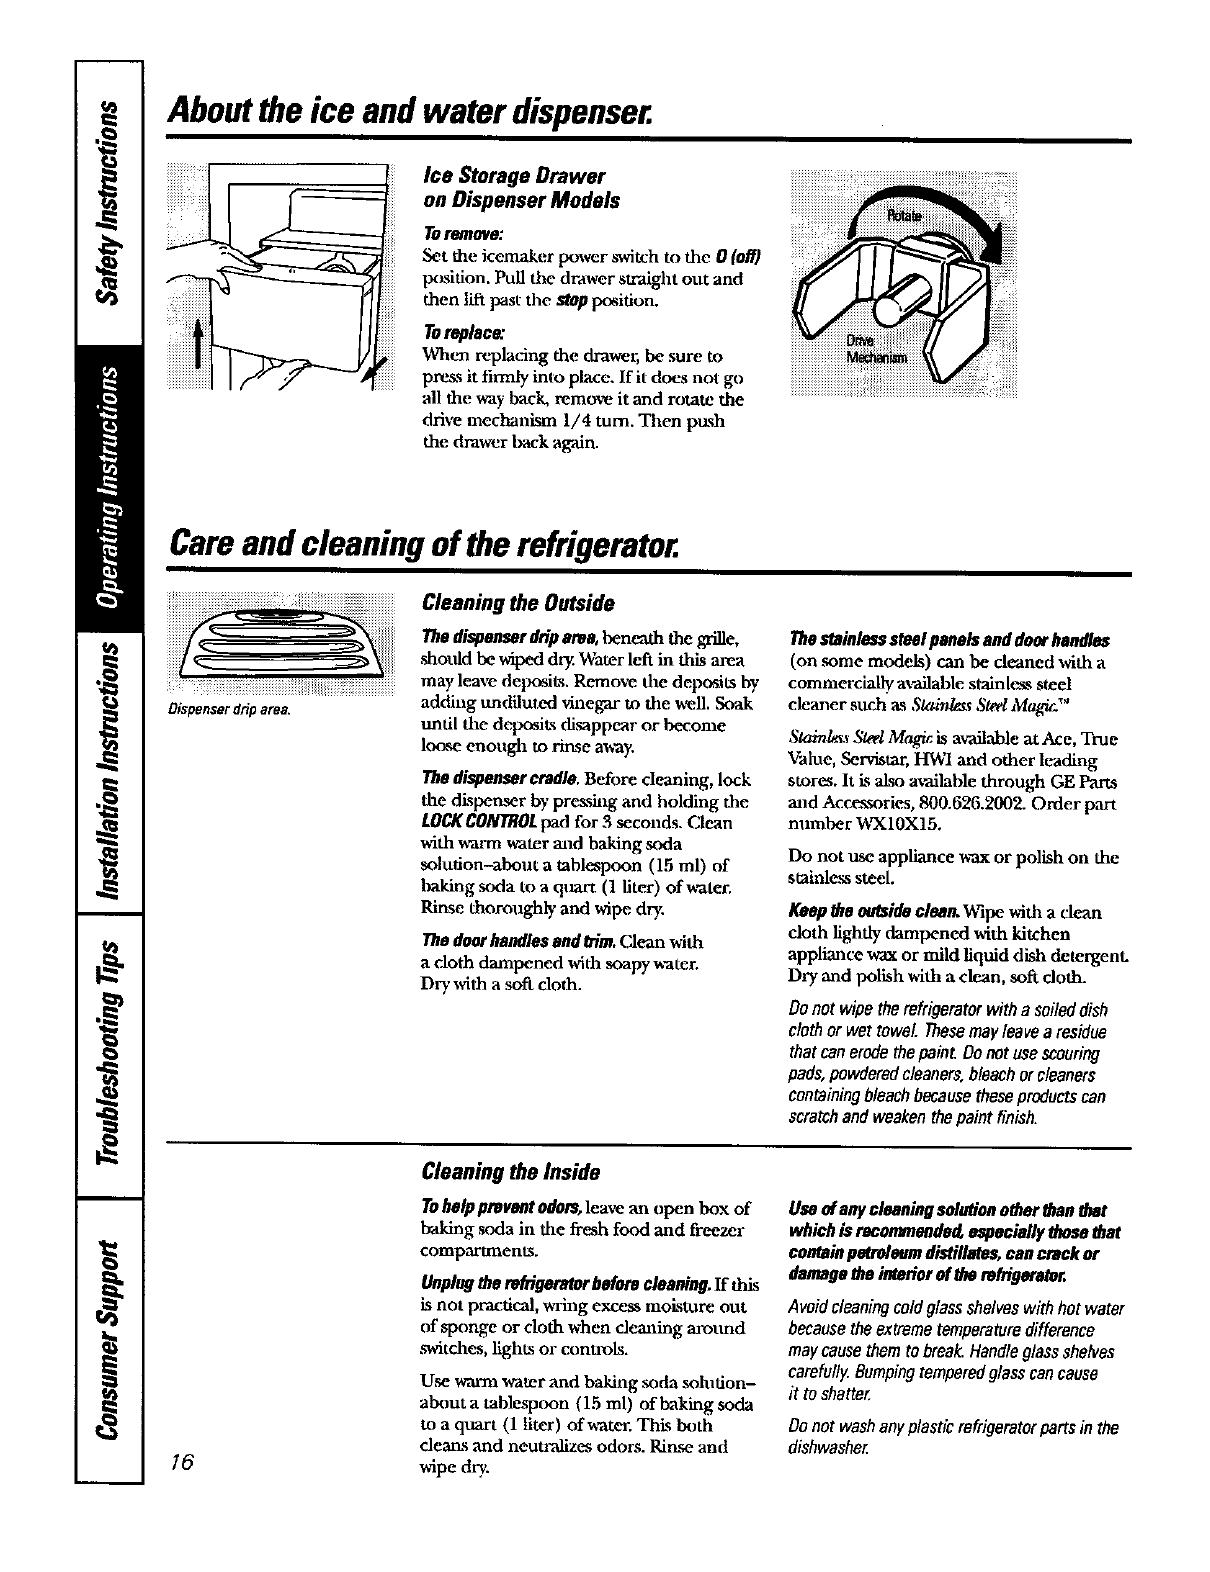
Abouttheice and waterdispenser.
Ice Storage Drawer
on Dispenser Models
Toremose:
Set the icemaker power switch m the 0 (ell)
posidon. Pull the drawer sWaight out and
then lift past tile Mop position.
Toreplec&"
Whom replacing the drawer, be sure to
pre&s it firmly into p"lace, If it does not go
all the way back, remove itand rotate the
drive mechanism 1/4 turn. Then push
the drawer back again.
Care and cleaning of the refrigerator.
Cleaning the Outside
Iba dispenserdrip area, beneath the grille,
sholdd be wiped dry Water left in this area
may leave detx_li,s. Remove die de|x_sits by
Dispenser driparea. adding undiluted vinegar to the well. Soak
undl the de|x_sitx di_ppear or become
loe_se enongh to rinse away.
Thedispensercradle.Before cleaning, lock
the dhpen_r by presshag and homing the
LOCKCONTROLpad for 3 seconds. Clean
with warm water mid baking ,soda
solution-about a tablespoon (15 ml) of
linking soda to a qlmrt (l liter) of,hater.
Rin_ thoroughly and wipe dry.
Thedoorhandlesand b'im.CJean with
a cloth dampened with soapy water.
Dr), with asoft cloth.
Thestainlesssteel panels anddoorhandles
(on some m(xiels) can be cleaned with a
commerciany axailahle staln[ess steel
cleaner such as Stabdes, ,Sled Magit:.TM
Stain/m._ _Magic is available at Ace, True
Value, Servistar, HWI and other leading
stores. It is "aLsoaxailable through GE Parts
mad Accemories, 800.626.2002. Order part
mmlber WX10X15.
Do not use appliance wax or polish on the
stainlexs steel.
Keep the outsideclean.Wipe with aclean
cloth lightly dampened with kitchen
appliance wax or mild liquid dish detergenL
Dry and polish with a clean, soft cloth.
Donot wipetherefrigeratorwithasoileddish
clothor wettowel,lhesemayleavearesidue
thatcanerodethepaint,Donotusescouring
pads,powderedcleaners,bleachorcleaners
containingbleachbecausetheseproductscan
scratchandweakenthepaint hnish.
16
Cleaning the Inside
Tohelp preventodors,leave an open box of
baking _a in the fresh food and freezer
compartments.
Unplugthe refrigeratorbefore cleaning,ff this
is not practical, wring excess moLsture out
of sponge or cloth when cleaning arolmd
_,Atches, lights or controls.
Use warm water and baking .soda solndon-
abeut a tablespoon (15 ml) of baking soda
to a quart (1 liter) of water. This both
deans and neutralizes odors. Rinse and
wipe dry.
UseofanycleaningsolutionoMarthanthat
whichisrecommeaderLespeciallythosethat
containpetroleumdistillates,cancrackor
damagetheinteriorof therefrigerator,
Avoid cleaning cold glass shelveswith hot water
becausethe extreme temperaturedifference
may causethem to break.Handleglass shelves
carefull)_Bumpingtemperedglass cancause
it to shatter.
Donot washanyplasticrefrigeratorpartsin the
dishwasher
GEAppliancelcom
Behind the Refrigerator
Be carefhl when moving the refrigerator
away from the wall. All types of floor
coverings can be damaged, particularly
cushioned coverings and those with
embossed m_rfaces.
Pull the refrigerator straight out and return
it to p_sidon by pushing it straight in.
Moving the refrigerator in a side direction
may resuh in damage to the floor covering
or refrigerator,
Whenpushingtherefrigeratorhack,makesure
youdon'troll overthepowercordor icemaker
supplyline.
Preparing for Vacation
For long vacations or absences, remove
food and unplug the refrigerator. Clean the
interior with a baking ,soda _hzfion of one
tablespoon (15 ml) of holdng sorh to one
quart (1 liter) of water. Igave the doors
Opell.
Set the icemaker txraer sv,qtc.h to the 0(off)
po.sifion and shut off the v*_tter mxpply to
the refrigerator
ff die ternperamre can drop below freezing,
have a qlmlified _rvicer drain the water
supply s'_tem to prevent serions property
dam_e due to flooding.
Preparing to Move
Secnre all loose items such as shelves and
drawers by taping them securely in place
to prevent damage.
When using a hand truck to move the
refrigerator, do not rest the front or back
of the refrigerator against the hand truck.
This could damage the retHgemto_ Handle
only from the sides of the refrigerator,
Besuretherefrigeratorstaysin anupright
positionduringmoving.
17
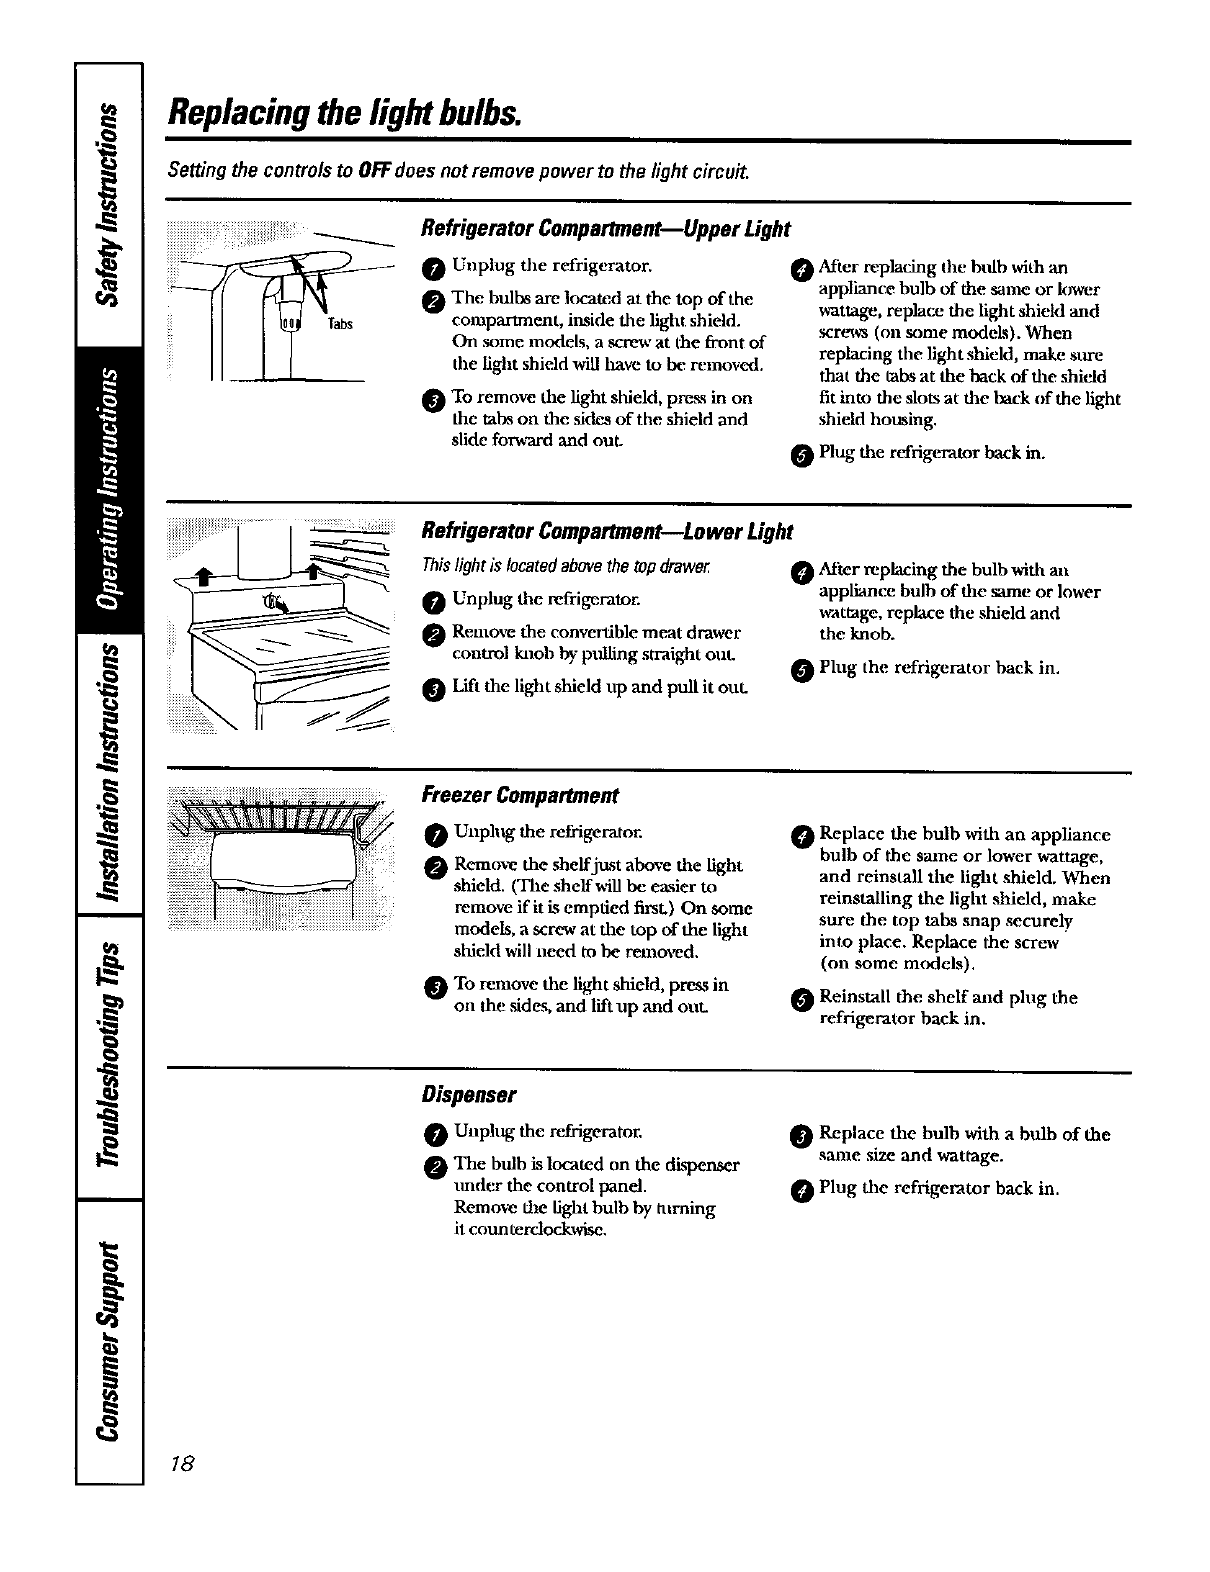
Replacingthelightbulbs.
Setting the controls to OFF does not remove power to the light circuit.
Refrigerator Compartment--Upper Light
0 Unplug the refrigerator.
The hulbs are located at the top of the
compartmeut, il_*ide the light shield.
On ,some models, a ,¢w.rewat the front of
the light shield will have to be removed.
_To remove the light shield, pm_ in on
the tabs on the .sides of the shield and
slide forward and out.
After replacing the hidb with an
appliance bulb of the same or k)wer
wattage, replace the light shield and
screws (on some modek_). When
replacing the light shield, make sttre
that the tabs at the hack of the .shield
fit into the slots at the hack of the light
shield homing.
Plug the refrigerator back in.
Refrigerator Compartment--Lower Light
This light is located above thetop drawer
Unplug the refrigerator.
Q Remove the convertible meat drawer
control I_mh by pulling straight out.
Lift the light shield up and pull it out.
After rep "lacing the bulb with an
app "liance bulb of the same or lower
_,rattage, replace the shield and
the knob.
Plug the refrigerator back in.
Freezer Compartment
Unplitg the refrigerator.
_ Remove the sheifjtLst above the light
shield. (The shelf wili be easier to
remove if it is emptied first.) On some
models, a screw at the top of the light
shield will need to be removed.
To remove the light shield, press in
on the ,sides, and lift up and out.
0Replace the bulb sfith an appliance
bulb of the same or lower wattage,
and reinstall the light shield. When
reinstalling the light shield, make
sure the top tabs snap securely
into place. Replace the screw
(on some models).
_Reinstall the shelf and plug the
refrigerator back in.
Dispenser
Unphtg the refrigerator.
_The bulb is located on the dispenser
trader the control pand.
Remove the light bulb by torning
it corm terdockwise.
Replace flze bulb with a bulb of the
sanxe size and wattage.
Plug dae refrigerator back in.
18
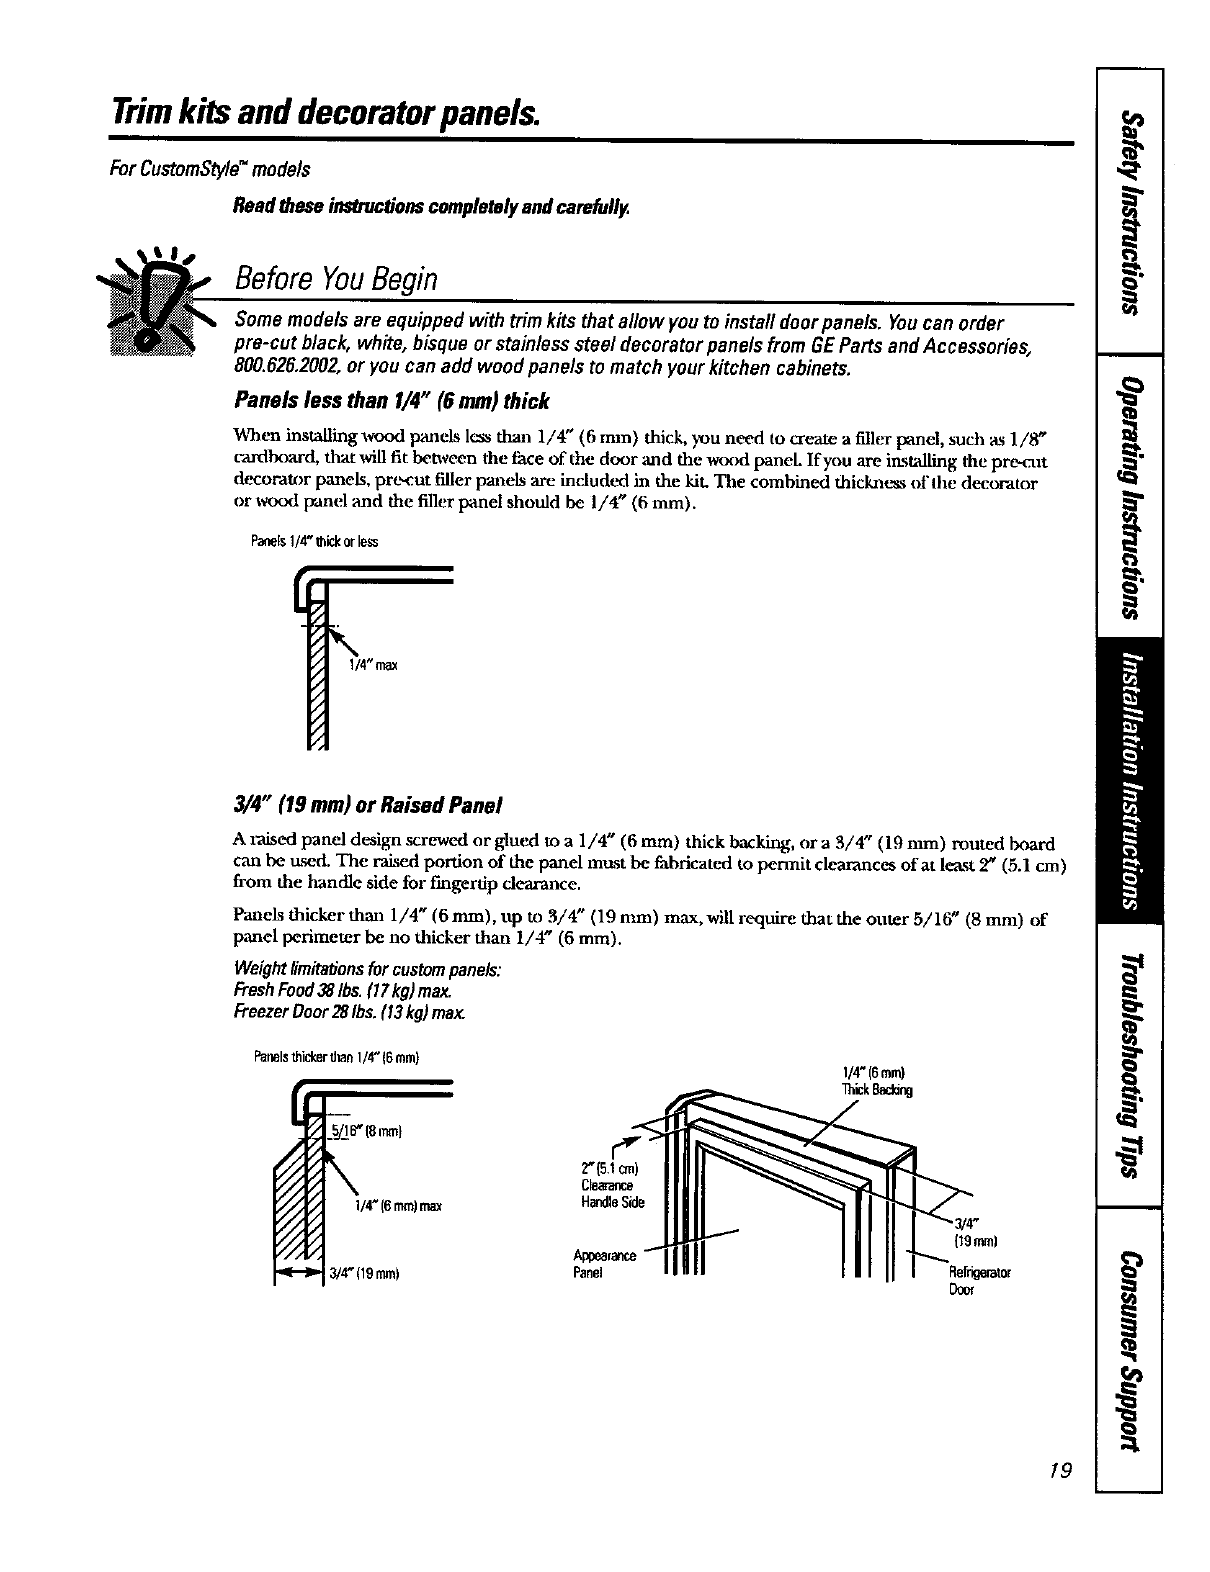
Trimkitsand decoratorpanels.
For CustomSlyle" models
Readthese instructionscompletelyandcarefully.
Before YouBegin
Some models are equipped with trim kits that allow youto install door panels. Youcan order
pre-cut black, white, bisque or stainless steel decorator panels from GEParts and Accessories,
800.626.2002,or you can add wood panels to match your kitchen cabinets.
Panels less than I/4" (6ram)thick
When installing wood panels less than 1/4" (6 mm) thick, you need 1o create afiller pand, such as 1/8"
cardlxmrd, that will fit between tile 6_xzeof the door and the wood panel If you are in.stalling the pre-cut
decorau)r pmaels, prL_ut filler panels are included in the kit. Tile combined thic_less of tile decorator
or wood panel and the filler panel should be 1/4" (6 mm).
Panels1/4"thickorless
1/4_ max
3/4" (19 mm) or Raised Panel
Az'aisedpanel design screwed or glued to a 1/4" (6 mm) thick backing, or a 3/4" (19 ram) muted board
can be used. The raised pordon of the panel must be fabricated to permit clearances of at least 2" (5.1 cm)
fi'oiaxthe handle side for fingerdp clearance.
Panels thicker than 1/4" (6 mm), up to 3/4 _' (19 mm) max, will require that the outer 5/lri" (8 mm) of
panel perimeter be no thicker than 1/4" (6 mm).
Weight h'mitatJonsfor custompaneL_:
FreshFood38Ibs. 117kg)max.
Freezer Door28Ibs. (13kg)max.
Panelsthickerthan114"_6ram)
1/4"(6ram)max
3/4"(19ram)
2"(5.1_)
Clearance
HandleSide
Panel
I/4" (6ram)
_lek Baddng
{19rran)
Flefngerator
Ooor
19
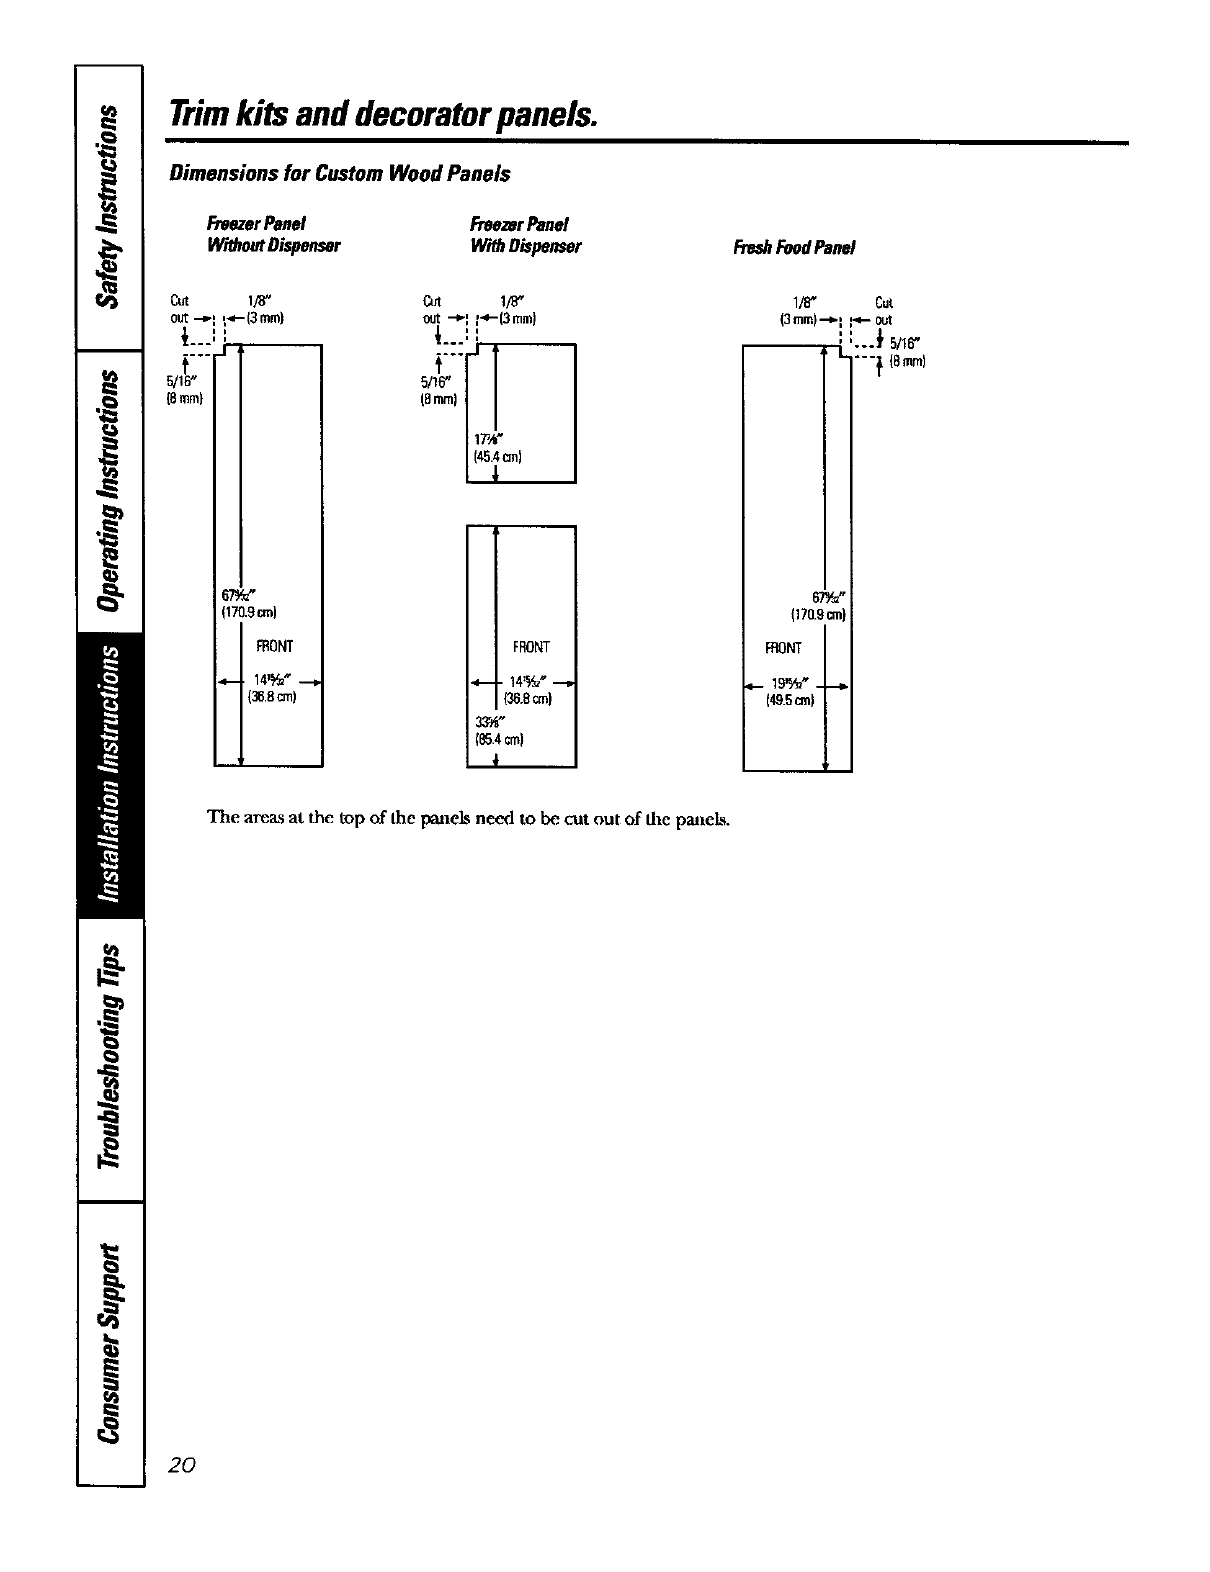
Trimkits anddecoratorpanels.
Dimensions for Custom Wood Panels
FreezerPanel
Vir_houtDispenser
FreezerPanel
With Dispenser FreshFoodPanel
out 1.p_ t_'-(3 ram)
½...:: __
.... ..r'_
5/1_"
18mini
67_
17019 r,m)
FRONT
_.-. 14ek_z"-.4
otJt"-P=_-(3mm)
_-.-:',
5/I_ _r_
(Smm)
FRONT
(36.8an)
33_
(_5.4 cm}
1/8"
(3 mm),.-b]i
i
--"L
(170.9cm)
FRONT
(49.5an)
Cut
_- ot_t
..._ 5/16"
"" "Z 18ram)
/
The areas at the top of the i'_lels neod to be. cut out of die patlel.s.
2O
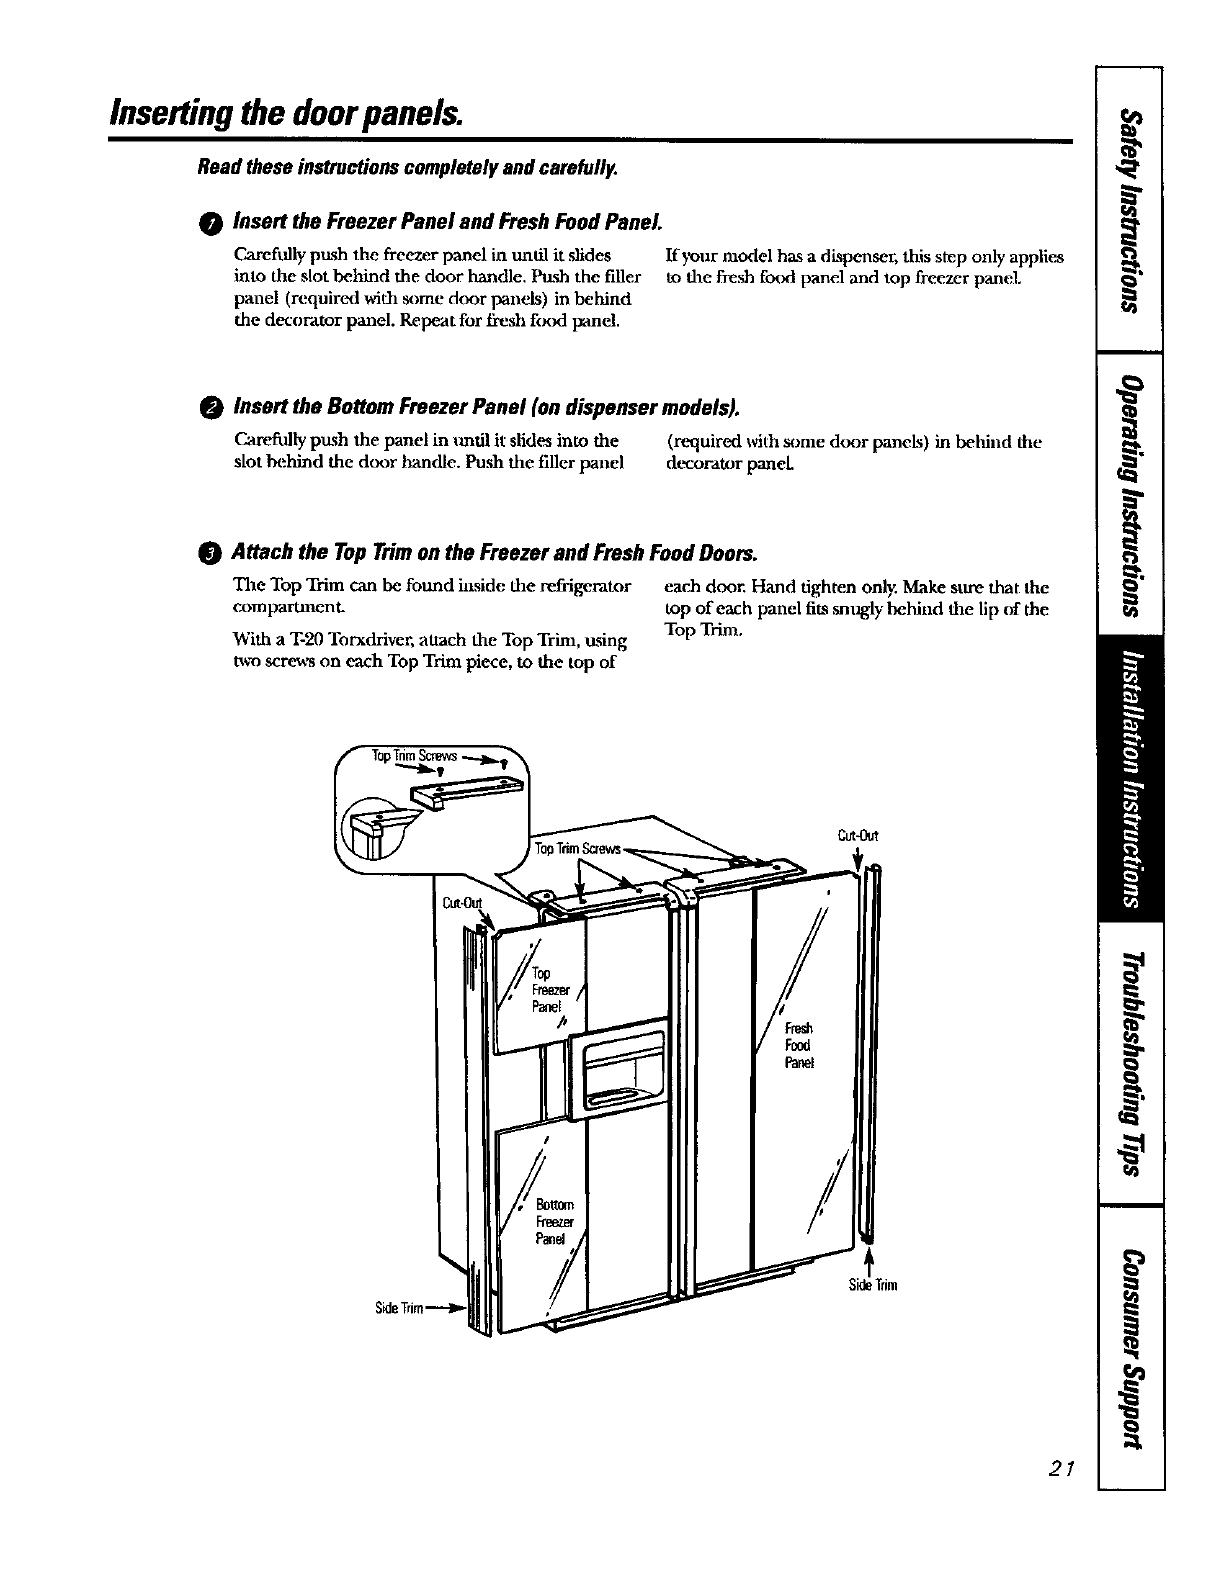
Inserting the doorpanels.
Read these instructions completely and carefully.
0Insert the Freezer Panel and Fresh Food Panel.
Garef_flly push the freezer panel in mllll it .slides
into the slot behind the door handle, hzsh the filler
panel (required with some door panels) in behind
the decorator panel. Repeat for fresh f_ngt panel.
If _our model has a dk_penser, this step only applies
to the fresh food panel and top freezer panel.
Insert the Bottom Freezer Panel (on dispenser models).
Careftflly push the panel in _mtil it slid(_ into the (required with some door panels) in behind the
slot behind the door l_andle. Push the filler panel decorator paneL
Attach the Top Trim on the Freezer and Fresh Food Doors.
The Top Trim can be found inside the refi_gemtor
compartment.
With a T-20 Torxdriver, attach the Top Trim, using
two screws on each Top Trim piece, to the top of
each door,Hand tighten only. Make sure that the
top of each panel fits snugly behind the lip of the
Top Trim.
21
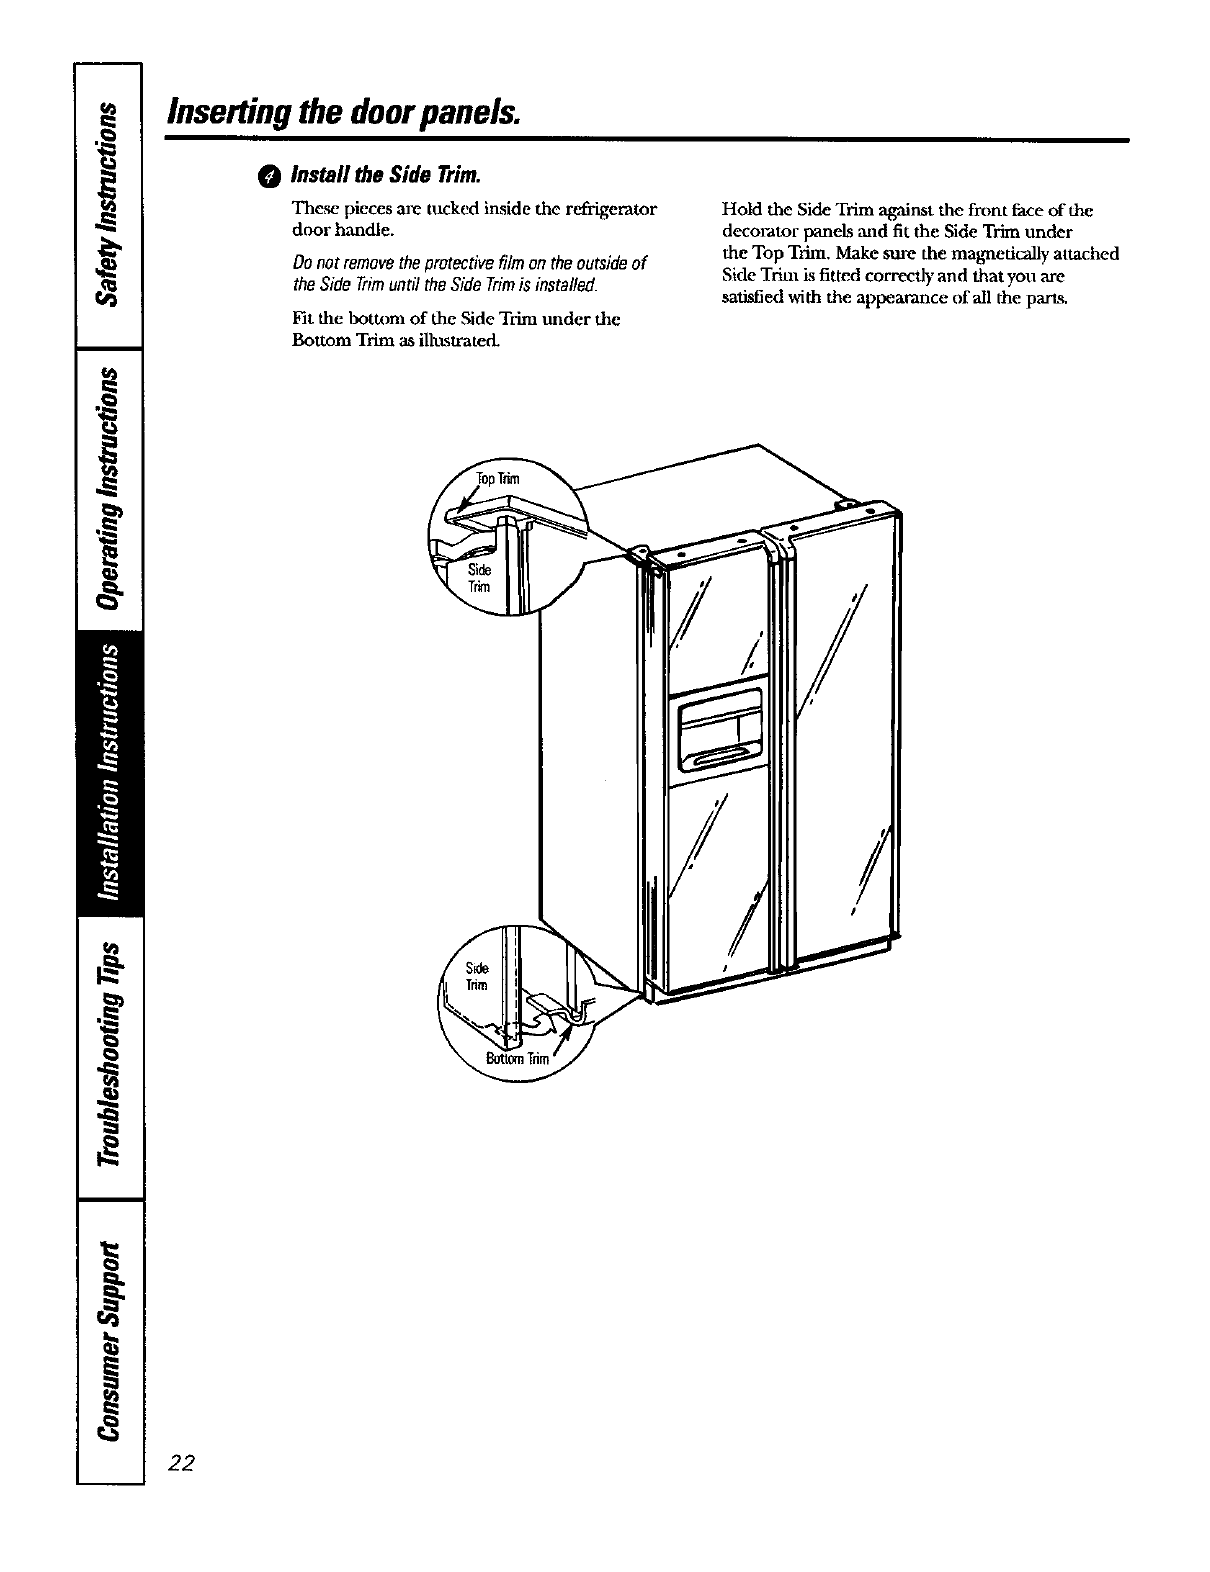
Inserting the doorpanels.
0Install the Side Trim.
These pieces are tucked inside the refrigerator
door h,'mdle.
Donotremovetheprotectivefilmontheoutsideof
theSideTrimuntil theSideTrimis installed.
Fit the bottom of the Side Trim under the
Bottom Trim as illt_strate&
Hold the Side Trim against the fixmt face of the
decorator panels and fit the Side Trim under
the Top TthI1. Make sure the magrnedcally attached
Side Tth_l Lsfitted correctly and that you are
satisfied with the appearance of all the parts.
22
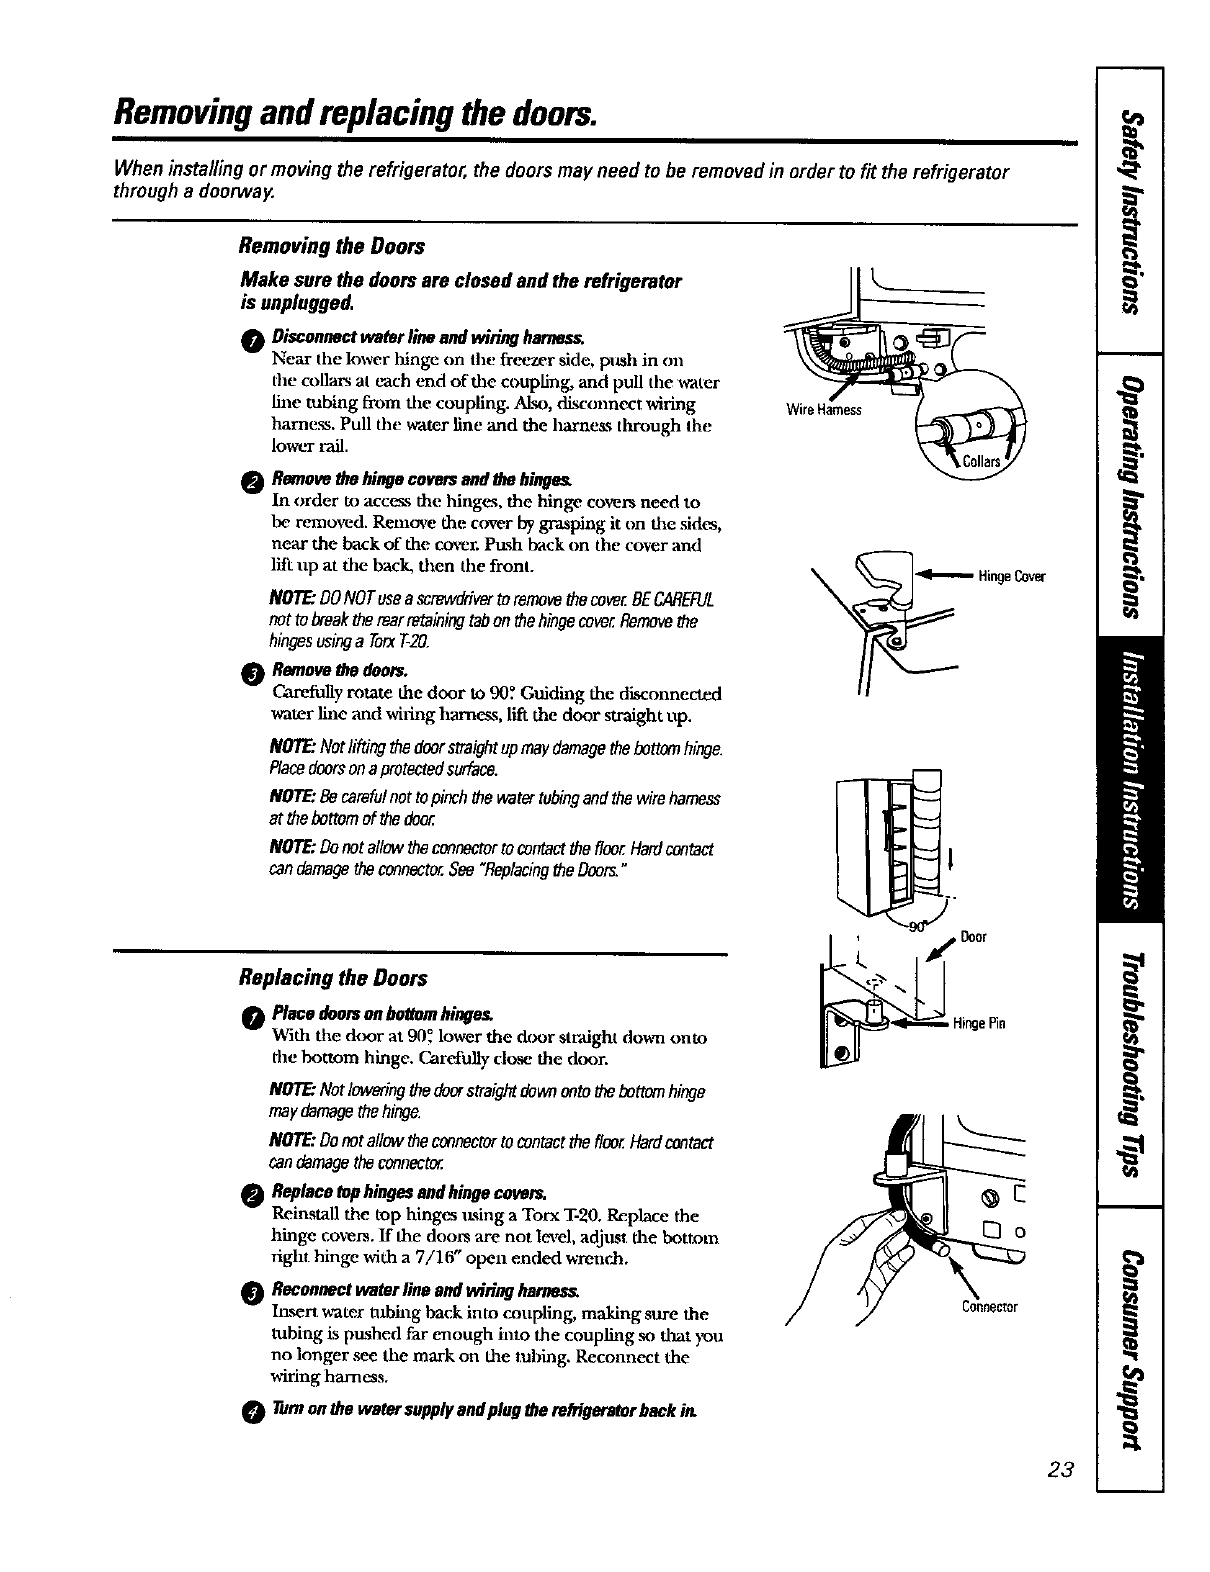
Removingand replacing the doors.
When installing or moving the refrigerator, the doorsmay need to be removed in order to fit the refrigerator
through a doorway.
Removing the Doors
Make sure the doorsare closed and the refrigerator
is unplugged,
0Discananct wator line and wiring hamess_
Near the lower binge on tile freezer .side, push in on
tile collars at each end of the coupfing, and pull the water
fine tubing from tile coupfing. Also, di.sconnect wiring
harness. Pull tile vrater line and the harness through the
lowt"r rail.
0Remove the hinge covers anti the hinges,
In order to acc_s the hinges, the hinge covers need to
be removed. Remove the cover by grasping it on the .sides,
near the back of the cover. Push hack on the cover and
litt up at the back, then the front.
NOTE:DONOTuseascrewdrivertoremovethecove_BECAREFUL
nottobreaktherearretainingtabonthehingecove_Removethe
hingesusinga Torx7"-20.
Removethe doors.
Careiially rotate the door to 90? Guiding the disconnected
water line and wiring harness, lift the door straight up.
NOTE:Notliftingthedoorstraightupmaydamagethebottomhinge.
Racedoorsonaprotectedsurface.
NOTE:Becarefulnottopinchthewatertubingandthewireharness
at thebottomofthedoor.
NOTE;Donotallowthecmnoctortocontactthefloor.Hardcontact
candamagetheconnector.See"ReplacingtheDoors."
Replacing the Doors
Place doorsonbottomhinge_
With the door at 90,° lower the door straight down onto
the bottom hinge. Carofully clo,_ the door.
NOTE:Notloweringthedoorsttaightdownontothebottomhinge
maydamagethehinge.
NO_."Donota/lowtheconnectortocontactthefloor.Hardcontact
candamagetheconoectec
Replace top hinges andhinge cot_rs.
Reinstall the top hinges (tsing a Torx T-20. Replace the
hinge covers, ff the doors are not level, adjust the bottom
right hinge with a 7/16" o_n ended wreurah.
Recounect water line andwiring harness.
Inert mater robing hack into coupling, making sure lhe
tubing is pushed far enough into the coupling so that you
no longer see the mark on the tubing, Reconnect the
wiring harness.
Turnon the water supplyandplug therefrigeratorback irL
_HingeCover
Door
• HingeRn
23
Installation
Instructions Refrigerator
Models23,25,26,27&29
Questions?Carl 800.GE.CARES(800.4321737)or Y.it ourWeh_iteat: GEAppliances.comIn Canada, carl 1.800.361.3400or visit ourWebsiteat:geappliances.ca I
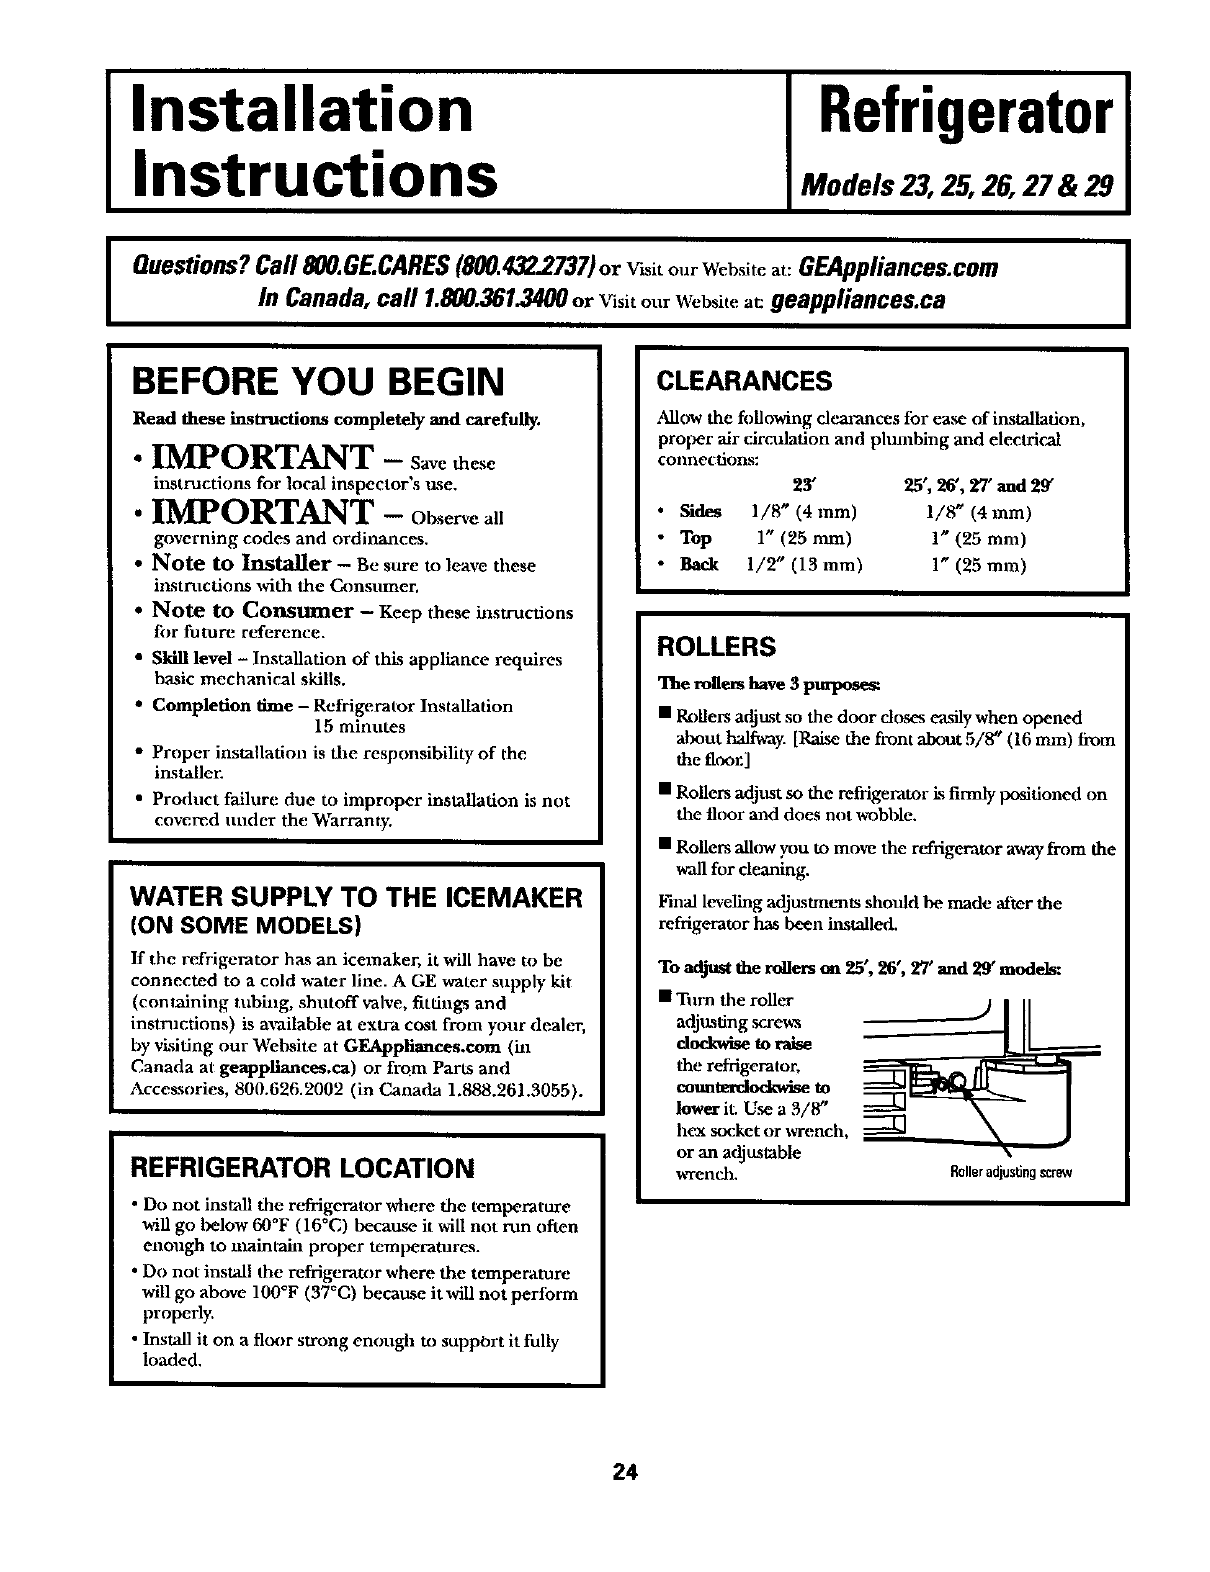
BEFORE YOU BEGIN
Read these instructions completely and carefully.
• IMPORTANT - Savethese
instructions for local inspector's use,
• IMPORTANT - all
governing codes and ordinmaees,
• Note to Ii_taller - Be sure to leave these
instructions ,_th the Consnmer.
• Note to Consumer - Keep these instructions
Inr future rt4"erence.
•Skill level - Installation of this appliance requires
basic mechanical skills.
•Completion time -Refrigerator Installation
15 minutes
•Proper installation is die responsibility of the
installer.
• Product failure due to improper installation is not
covered under the _Narranty.
WATER SUPPLY TO THE ICEMAKER
(ON SOME MODELS)
If the refrigerator has an icernaker, it ,'/ill have to be
connected to a cold water line. AGE water supply kit
(containing tubing, shutoff _alve, fittings and
instructions) is a_ilable at extra cost from your dealer,
by visiting our Welxsite at GEAppliances.oom (ill
Canada at geapplianees.ca) or from Parts and
Accessories, 800.626.2009 (in Canada 1.888.261.3055).
REFRIGERATOR LOCATION
•Do not install the refrigerator where the temperature
will go below 60°F (16°C) because it will not run often
enough to nlaintam proper temperatures.
•Do not install the refrigerator where the ttmaperature
will go above 100°F (37_C) because it will not perform
properly.
• Install it on a flc×_r strong ennugh to support it fully
loaded.
CLEARANCES
Alk_ the fi)llowing deamnces for ease of inshalhdon,
proper air circulation and phmthing and electrical
connections:
23" 25" 26', '27"and 29"
Sides 1/8" (4 ram) 1/8" (4 ram)
• Top l" (25 ram) 1" (25 mm)
•Back 1/2" (13 ram) 1" (25 ram)
ROLLERS
The rollers have 3 purpose_
• Rx)llersadjust so the door doses easily when opened
about halfway. [Raksethe front alxmt 5/8" (16 man) from
the floor]
•Rollers ad.jostso the refrigerator ts firmlypositioned on
the floor and does mat wobble.
• Rollers allow _m to move the refrigerator awayfrom the
wall for deaning.
Final hweling adjttstmcnts sholdd be made after the
refrigerator has been installed.
To adjust the rollers _a 25', 26', 27' and 29' models:
• Turn the roller
dockwise to raiseadjmllng _re'^_ "Jl_-
the refrigerator,
eotmterdodtwise to
lower it. Use a ,3/8"
hex socket or wrench,
or an adjttslable \
wrench. Rolleradjustingscrew
24
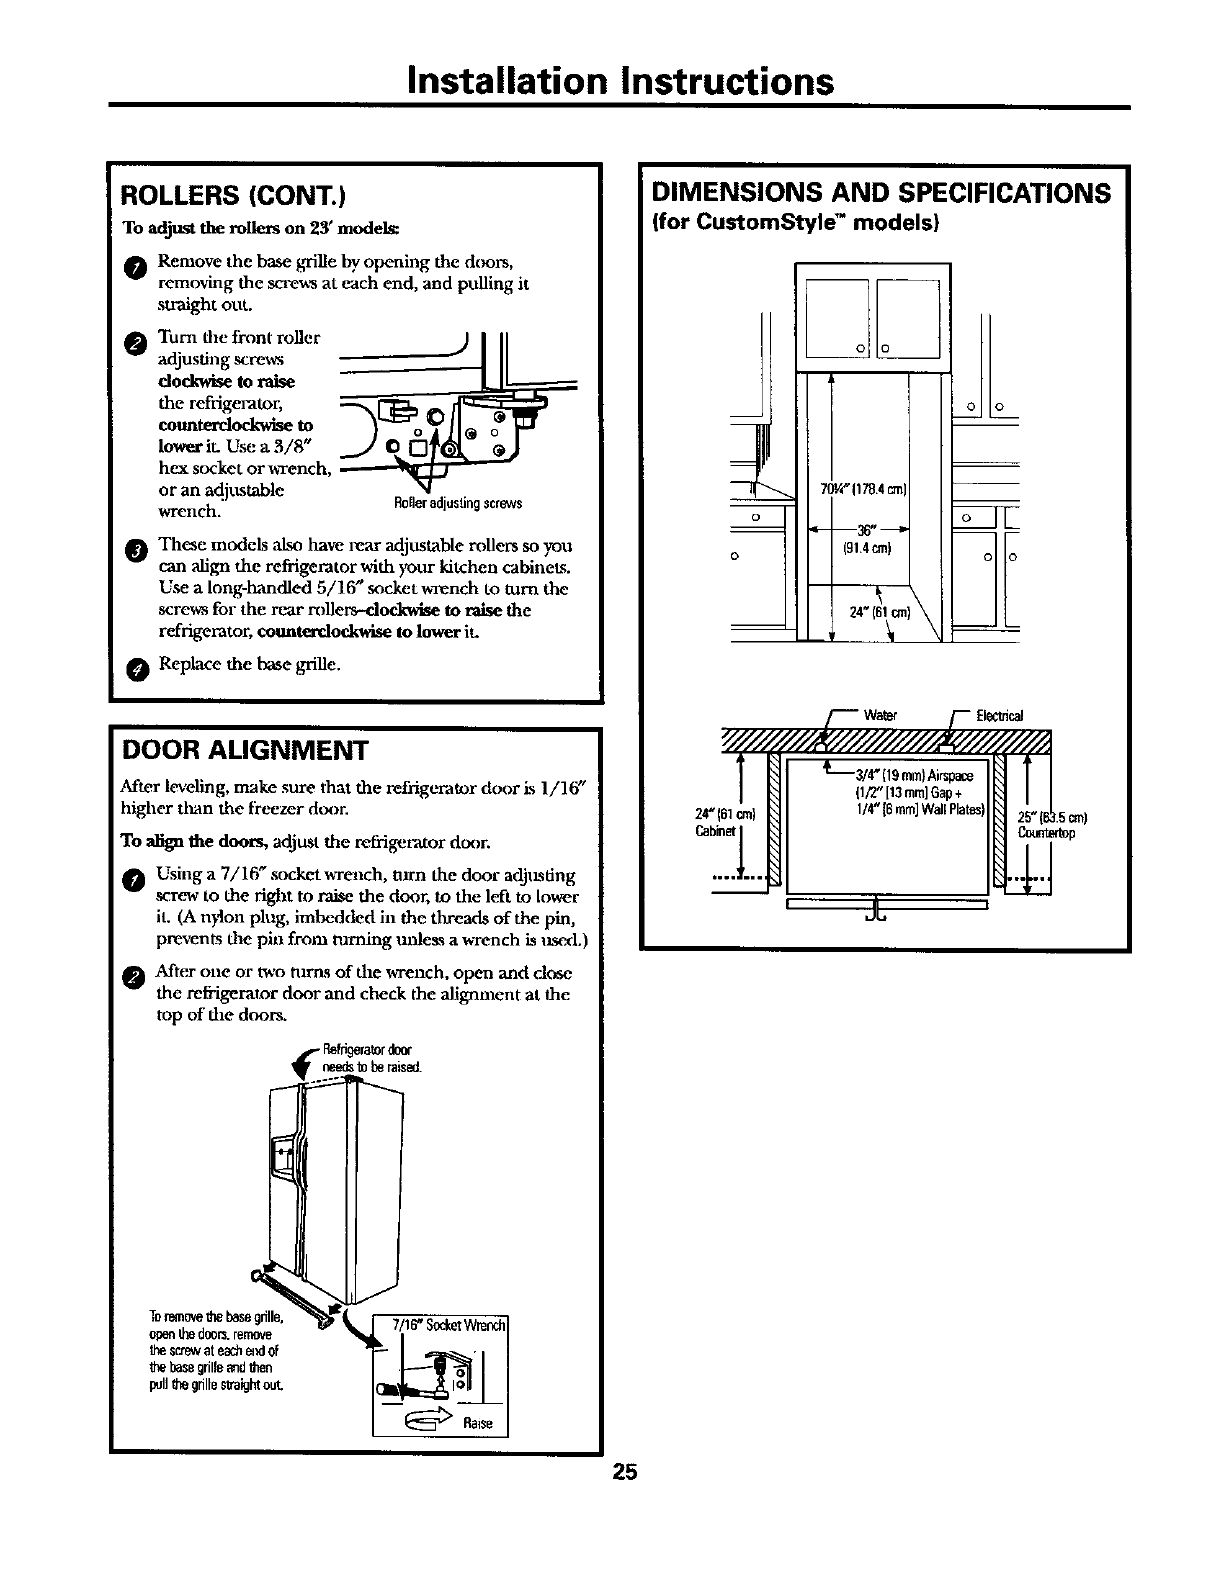
Installation Instructions
ROLLERS (CONT.)
To adjust the rollers on 23' models:
O Remove the base grille by opening the doors,
removing the screws at each end, and ptdling it
straight out.
Turn the tixmt roller _) I II
0 adjusting scr_s | IL_
clockwise to raise t I _
the refrigerator, _r"g_ rl_:::::x::_::::_
co.. o w e. 3 711
hex socket or v_Tench, -- "_],d
or an acljmtable
V,Tench. Rolleradjustingscr6ws
These models also have rear adjustable r_llers so you
can align the refrlgemtor with yottr kitchen cabinets.
Use a long-handled 5/16" ,socket v,Tench to turn the
screws for the rear rnllers-dockwlse to raise the
refrigerator, cotmterdockwise to lower it
Replace the base grille.
DOOR ALIGNMENT
After leveling, make sure that the refrigerator door is 1/16"
higher than the fi'eezer door.
To align the doors, adjust the refrigerator door.
Using a 7/16" socket wrench, turn the door adjmdng
screw to the right to raise the door, to the left to lower
it. (A nylon plug, imbedded in the threads of the pin,
prevents the pin from nlming unless a wrench ksusod.)
_After one or two iaxrrts of die v,xench, open and clca,e
the refrigerator door and check the alignment at the
top of die doors.
Toremovethebasegrille,
openthedoom.remove
thescrewateache4",dof
thebasegdllemd then
pulJff_egrillestraightout.
DIMENSIONS AND SPECIFICATIONS
(for CustomStyle" models)
o
o
(19me)Airspace
(1/2"[13ram]Gap+
1/4"16mm]WailPlates)
J_ I
C0_p
25
Installation Instructions
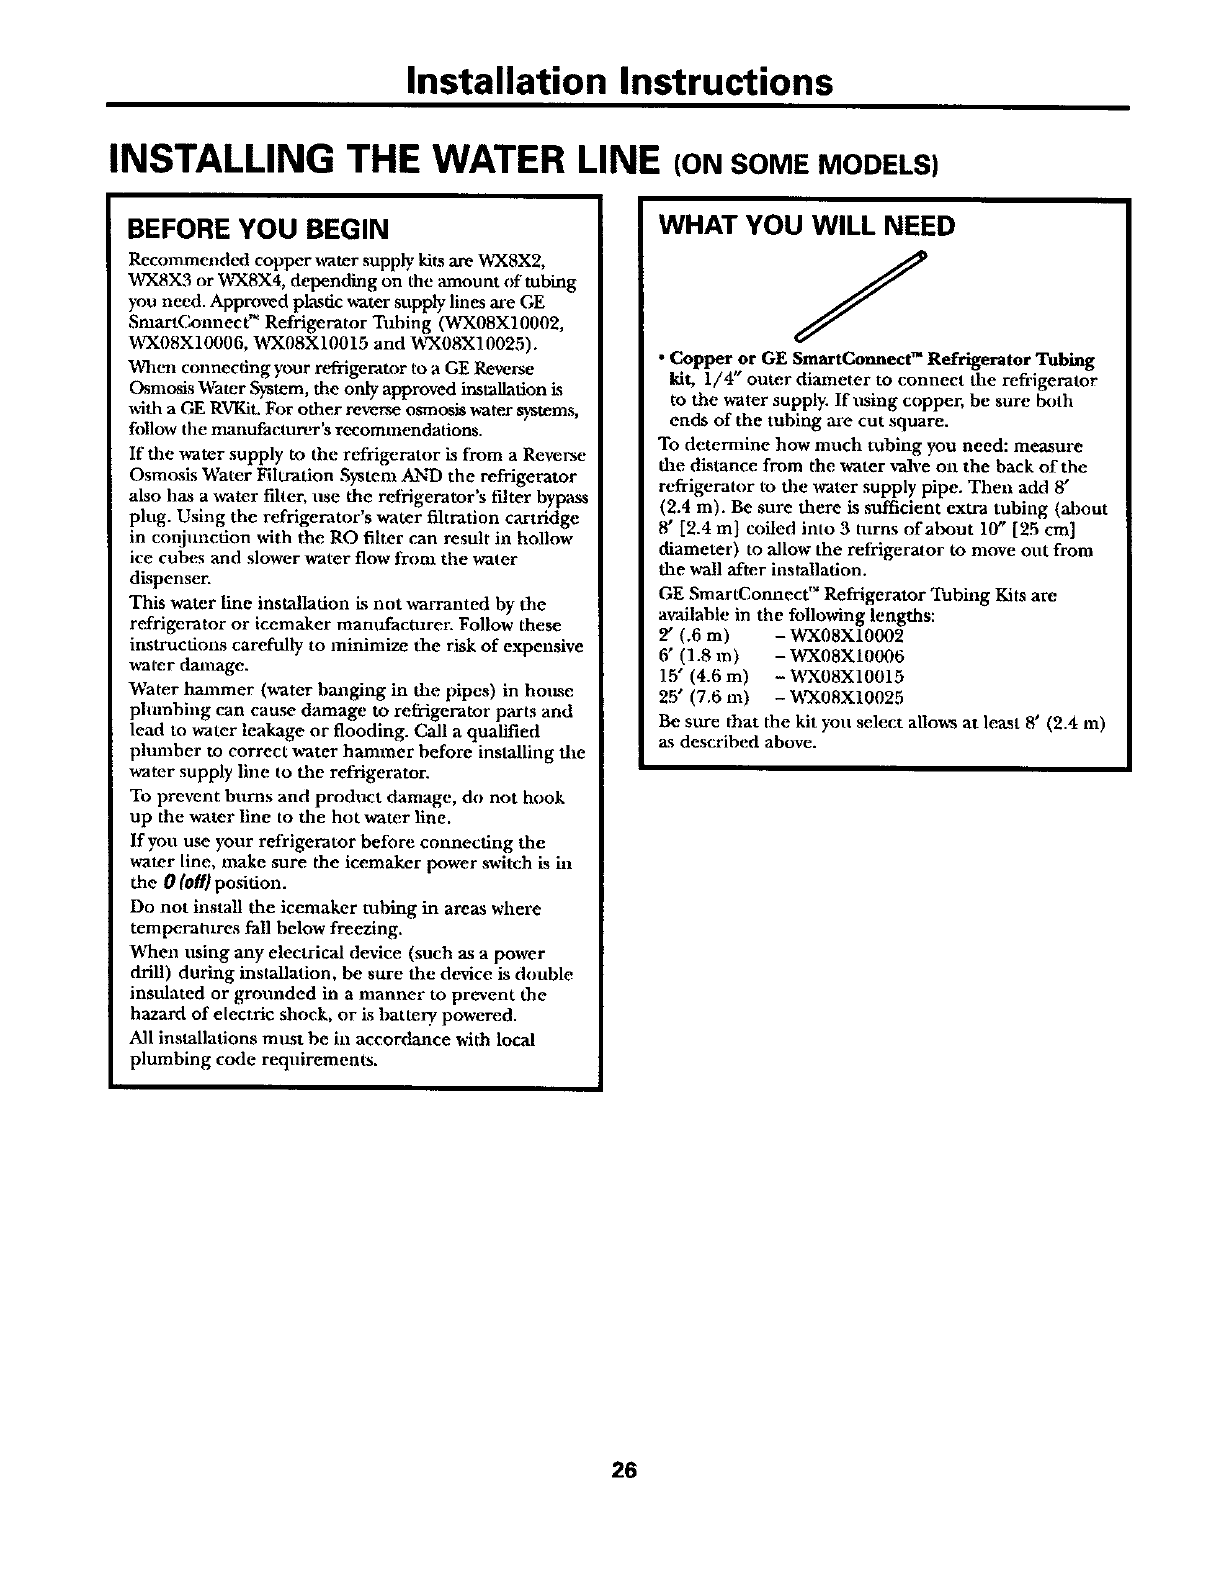
INSTALLING THE WATER LINE (ON SOME MODELS)
BEFORE YOU BEGIN
Recommended copper vrater supply kits are WX8X2,
_X8X3 or WX8X4, depending on the amount of tubing
you need. Approved plastic tater supply lines are GE
SmartConnect TM Refrigerator Tubing 0NX08Xl0002,
WX08Xl0006, V_08X10015 and W,rX08X10025).
xv_qcm connecting your refiigerator to a GE Reverse
Osmosis Water System, the only approved installation ks
with a GE RVKit. For other reverse osmosis water systems,
fnllow the marmfactnrer's recommendations.
If the water supply to the refrigerator is f_rom a Reverse
Osmosis Water Filtration System AND the refrigerator
also has a vrater filter, use the refi'igerator's filter bypass
plug. Using the refrigerator's water filtration cartridge
in conjunction with the RO filter can result in hollow
ice cubes and slower water flow from the water
dispenser.
This water line installation ks not warranted by the
refrigerator or icemaker mamffacmrer. Follow these
instructions carefully to minimize the risk of expensive
water danlage.
"Nater haanmer (water banging in the pipes) in house
phunbing can cause damage to refrigerator parts and
lead to vrater leakage or flooding. Call a qualified
plmnbcr to correct -€ater hammer before installing the
water supply line to the refrigerator.
To prevent burns and product damage, do not hook
up the water line to the hot water llne.
If you use your reli'igerator before connecting the
water line, make sure the icemaker power switch is in
the 0 (off) position.
Do not install the icemaker tubing in areas where
temperanlres fall below freezing.
When using may electrical device (such as a power
drill) during installation, be sure the dc.wice is double
insulated or grounded in a manner to prevent the
hazard of electric shock, or is battery powered.
All installations must be in accordance with local
plumbing code requirements.
WHAT YOU WILL NEED
•Copper or GE SmartConnect TM Refrigerator Tubing
kit, 1/4" onter diameter to connect the refi'igerator
to the water supply. If using copper, be sure bnth
ends of the tubing are cut square.
To detemfine how much tubing you need: measure
die distance from the v,Ttter valve on the back of the
refrigerator to the water supply pipe. Then add 8'
(2.4 m). Be sure there ks sufficient extra tubing (about
8' [2.4 m] culled into 3turns ofabtmt 10" [25 cm]
diameter) to allot,- the refrigerator to move out from
the wall after installation.
GE SmartConnect" Refrigerator Tubing Kits are
available in the following lengths:
2" (.6 m) -WX08X10002
6" (1.8 m) - _A08XI0006
15" (4.6 m) - V_,'X08X10015
25' (7.6 tax) - WX08X10025
Be sttre that the kit you select allov,,s at least 8' (2.4 m)
as described above.
26
Installation Instructions
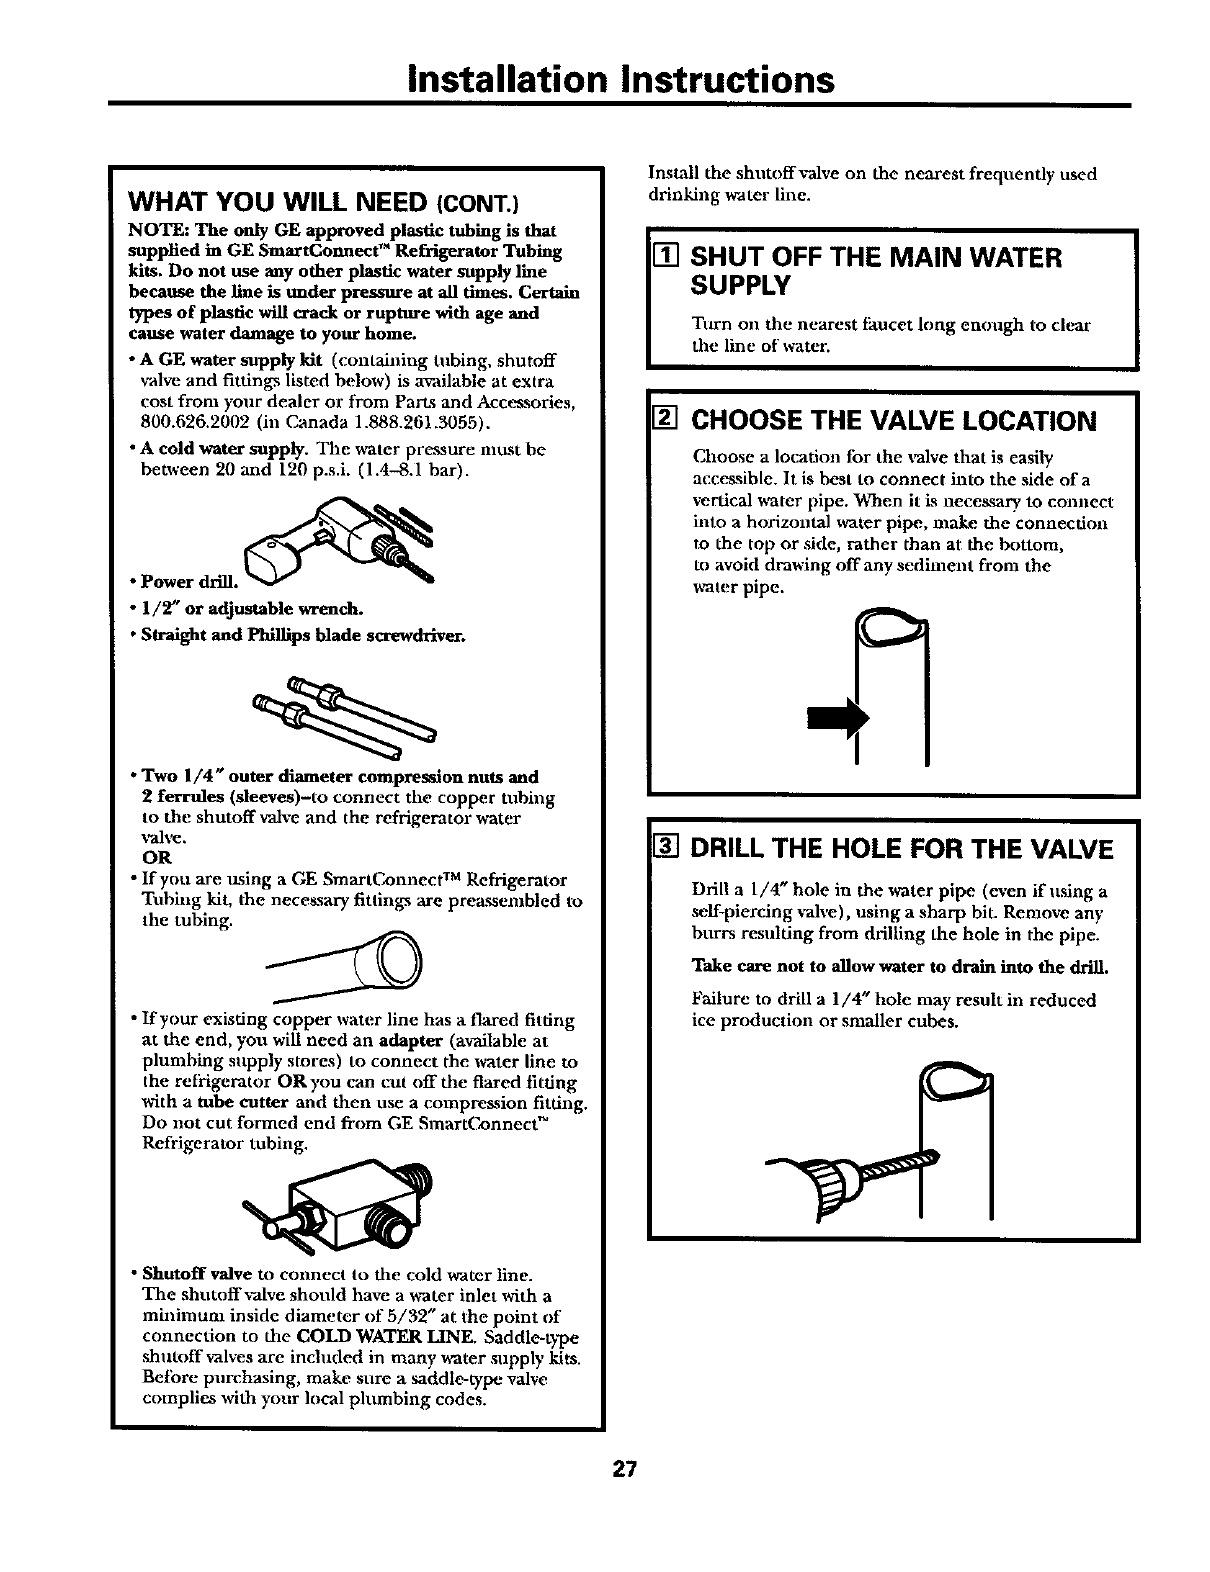
WHAT YOU WILL NEED (CONT.)
NOTE: The only GE approved plastic tubing is that
suppfied in GE SmartConnect TM Refrigerator Tubing
kits. Do not use any other plastic water supply line
because the line is under pressure at all times. Certain
types of plastic will crack or ruptm-e with age and
cause water damage to your home.
• AGE water supply kit (containing tubing, shutoff
_-alve and fittings listed below) is available at extra
cost from your dealer or from ParLs and Accessories,
800.626.2002 (ill Canada 1.888.261.3055).
•A cold water supply. The water pressure must be
between 20 and 120 p.s.i. (1.4-8.1 bar).
• Power drill.
•1/2" or adjustable wrealch.
• Straight and Phillips blade screwdriver.
•Two 1/4" outer diameter compression nuts and
2 ferrules (sleeves)-to connect the copper tubing
to the shutoff valve and the refrigerator water
Va]ve,
OR
• If you are using a GE SmartConnect TM Refrigerator
Tnbing .kit, the necessary fittings are preassembled to
the tubing.
• If your existing copper water line has a flared fitting
at the end, yon will need an adapter {available at
plumbing supply stores) to connect the water line to
the refrigerator ORyou can cut off the flared ftdng
with a tube cutter and then use a compression fitting.
Do not cut formed end from GE SmartC, onnect TM
Refrigerator tubing.
•Shutoff valve to connect to the cold SCaler line.
The shutoff'_alve should have a water inlet with a
minimum inside diameter of 5/32" at the point of
connection to the GOLD WATER LINE. Saddle-type
shutoff valves are included in many water supply kits.
Before purehasing, make sure asaddle-type valve
complies with your local pltunbing codes.
Install the shutnff,,-alve on the nearest frequently used
drinking water line.
SHUT OFF THE MAIN WATER
SUPPLY
Tttrn on the nearest tkucet long emmgh to clear
the line of water.
[] CHOOSE THE VALVE LOCATION
Choose a location for the salve that is easily
accessible. It is best to connect into the side of a
vertical water pipe. When it is necegsary to connect
hlto a horizontal _vater pipe, make the connection
to the top or side, rather than at the bottom,
to avoid drawing off any sediment from the
water pipe.
[] DRILL THE HOLE FOR THE VALVE
Drill a 1/4" hole in the water pipe (even if using a
self-piercing yah'e), using a sharp biL Remove any
burrs resulting from drilling the hole in the pipe.
Take care not to allow water to drain into the drill.
Failure to drill a 1/4" hole may result in reduced
ice production or smaUer cubes.
27
Installation Instructions
INSTALLING THE WATER LINE (CONT.)
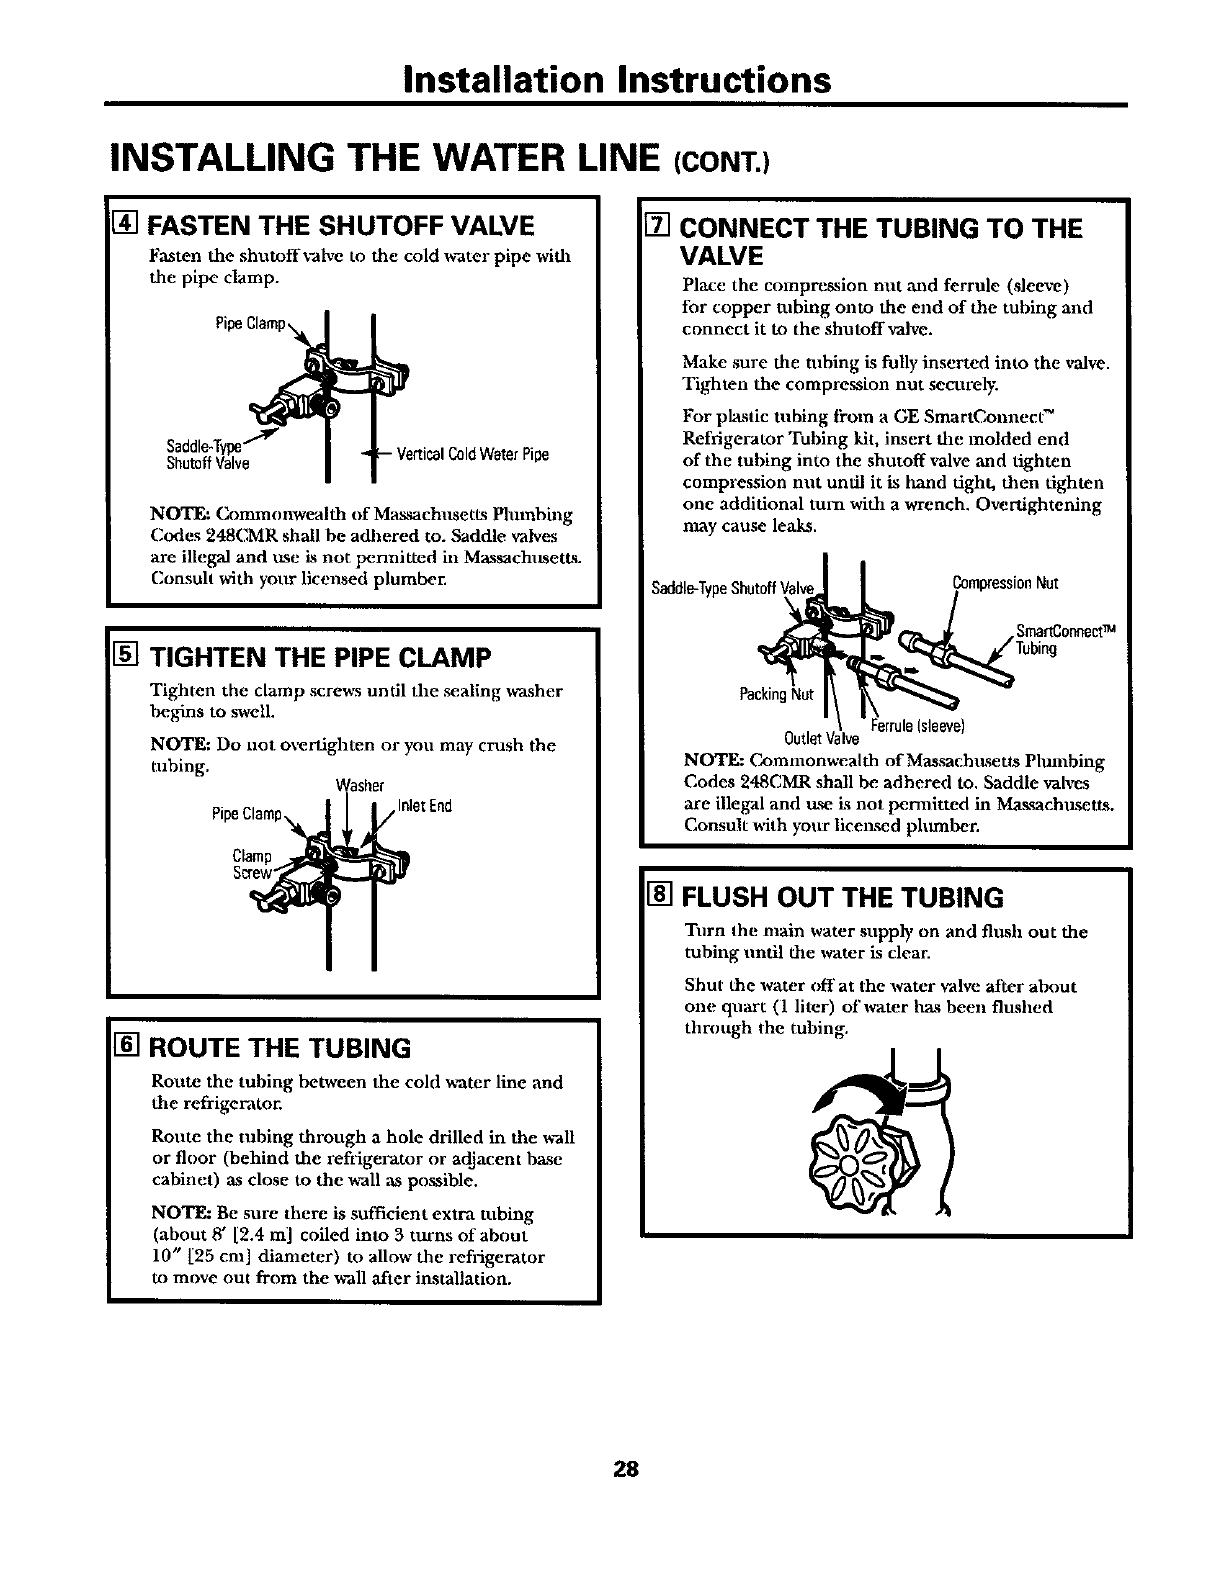
[] FASTEN THE SHUTOFF VALVE
Fasten the shutoff,,-alve to the cold vrater pipe with
the pipe clamp.
SaddIe*TyPe"'"Iv ipe
ShutoffValve
NOTE: Commonwealth of Mas._achusetts Phuubing
Codes 248C, MR shall be adhered to. Saddle v'aNc_
are illegal and use is not permitted ill Massachusetts.
Consult with yottr licensed plumber.
[] TIGHTEN THE PIPE CLAMP
Tighten the clamp screws until the _aling _vaaher
begins to swell.
NOTE: Do not overfighten or you may crush the
tubing. Washer
/Inlet find
PipeClamp\,
[] ROUTE THE TUBING
Route the tubing between the cold water line and
the refrigerator.
Route the tubing through ahole drilled in the vrall
or floor (behind the refiigerator or adjacent base
cabinet) as close to the wall as po_ible.
NOTE: Be sure there is sufficient extra tubing
(about 8' [2.4 m] coiled into 3 turns of about
10" [25 cm] diameter) to allow the refrigerator
to move out from the v-all after installation.
[] CONNECT THE TUBING TO THE
VALVE
Place the compression nut and ferrule (sleeve)
for copper tubing onto the end of the tubing and
connect it to the shutoff valve.
Make sure the robing is fully inserted into the valve.
Tighten the compremion nut securely.
For plastic tubing from aGE SmartConnect TM
Refrigerator Tubing kit, insert the molded end
of the tubing into the shutoff valve and tighten
compression nut until it ks hand tight, then tighten
one additional turn with a wrench. Over'tightening
may cause leaks.
SrnartConneetTM
Packing Nut
NOTE: C_ommonwealth of Massachttaet13 Phambing
Codes 248CMR shall be adhered to, Saddle vah'es
are illegal and use ksnot permitted in Ma,_sachusetts.
Consult with your licel_sed phmther.
[] FLUSH OUT THE TUBING
Turn the main water supply on and flush out the
tubing until the water is clear.
Shut the vrater off at the vrater _-alve after about
one quart (1 liter) of x_rater ha_ been flushed
through the tubing.
28
Installation Instructions
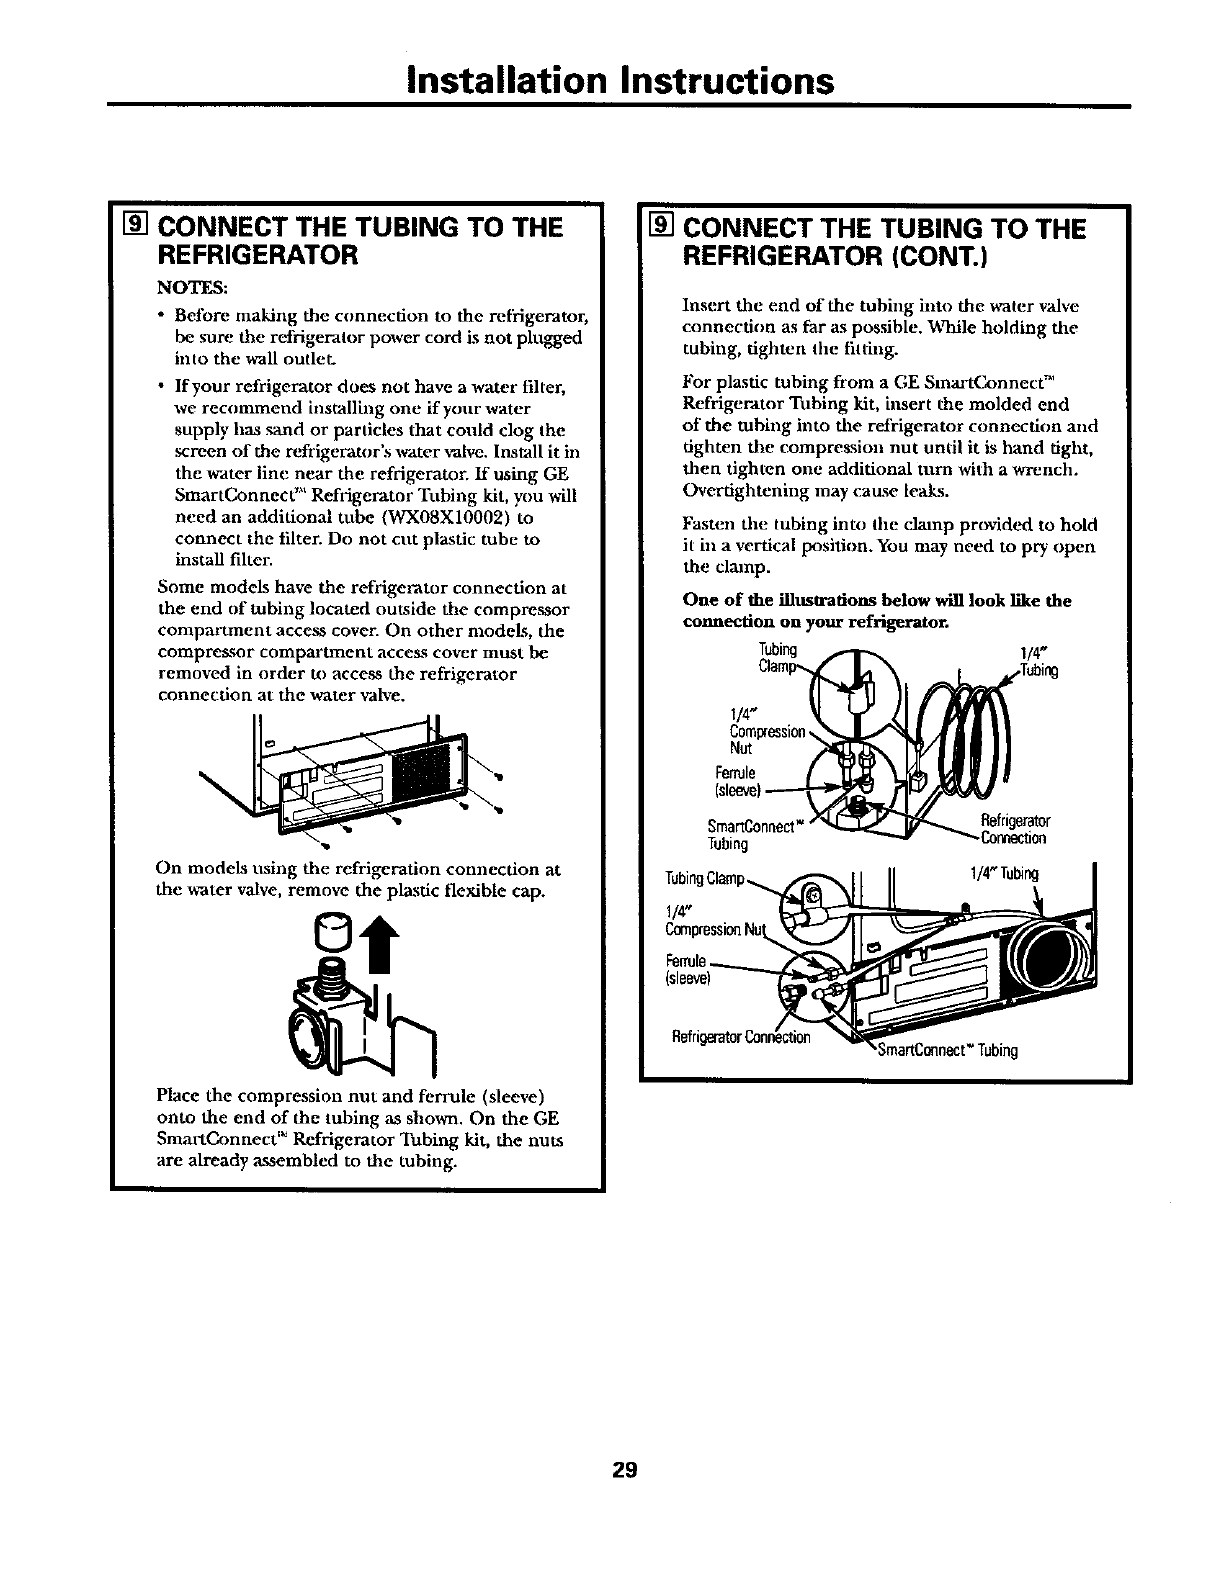
[] CONNECT THE TUBING TO THE
REFRIGERATOR
NOTES:
•Before making the connection to the relkigerator,
be sure the refrigerator pox_er cord is not phtgged
into the wall outlet.
•If your refrigerator does not have a water filter,
we recommend installing one if your -water
supply has sand or particles that could clog the
screen of the refrigeratnr's ,'rater valve. Inseall it in
the water line near the refrigeratur, ff using GE
SmartC..onnect "_ Refrigerator Tubing kit, ynu will
need an additional tribe (WX0gX10002) to
connect the filter. Do not cnt plastic tube to
install filter.
Some models have the refrigerator connection at
the end of tubing located outside the compressor
compartment access cover. On other models, the
compressor comparU_aent access cover must be
removed in order tn acce_ the refrigerator
connection at the water valve.
,ID
On models truing the refrigeration connection at
the water valve, remove the plastic flexible cap.
Place the compression nut and ferrule (sleeve)
onto the end of the tubing as shown. On the GE
SmartCOtlrtect'" Refrigerator Tubing kit, the nut._
are already assembled to the tubing.
[] CONNECT THE TUBING TO THE
REFRIGERATOR (CONT.)
Insert the end of the tobing into the water valve
connection as far as possible. While holding the
tubing, tighten the fitting.
For plastic tubing from a GE SlnartC, onnect TM
Refrigerator Tubing kit, insert the molded end
of the tubing into the refrigerator connection and
tighten the compression nut until it is hand tight,
then tighten one additional turn with a wrench.
Overtightening may cause leaks.
Fasten the tubing into the clamp provided to hold
it in a vertical posltion.You may need to pry open
the clamp.
One of the illustrations below will look llke the
connection on your refrigerator.
Tubing 1/4"
Compression
Nut
Fern_le
SmartConnect_ Refrigerator
.Conr,ection
Tubing
(sleeve)
29
Installation Instructions
INSTALLING THE WATER LINE (CONT.)
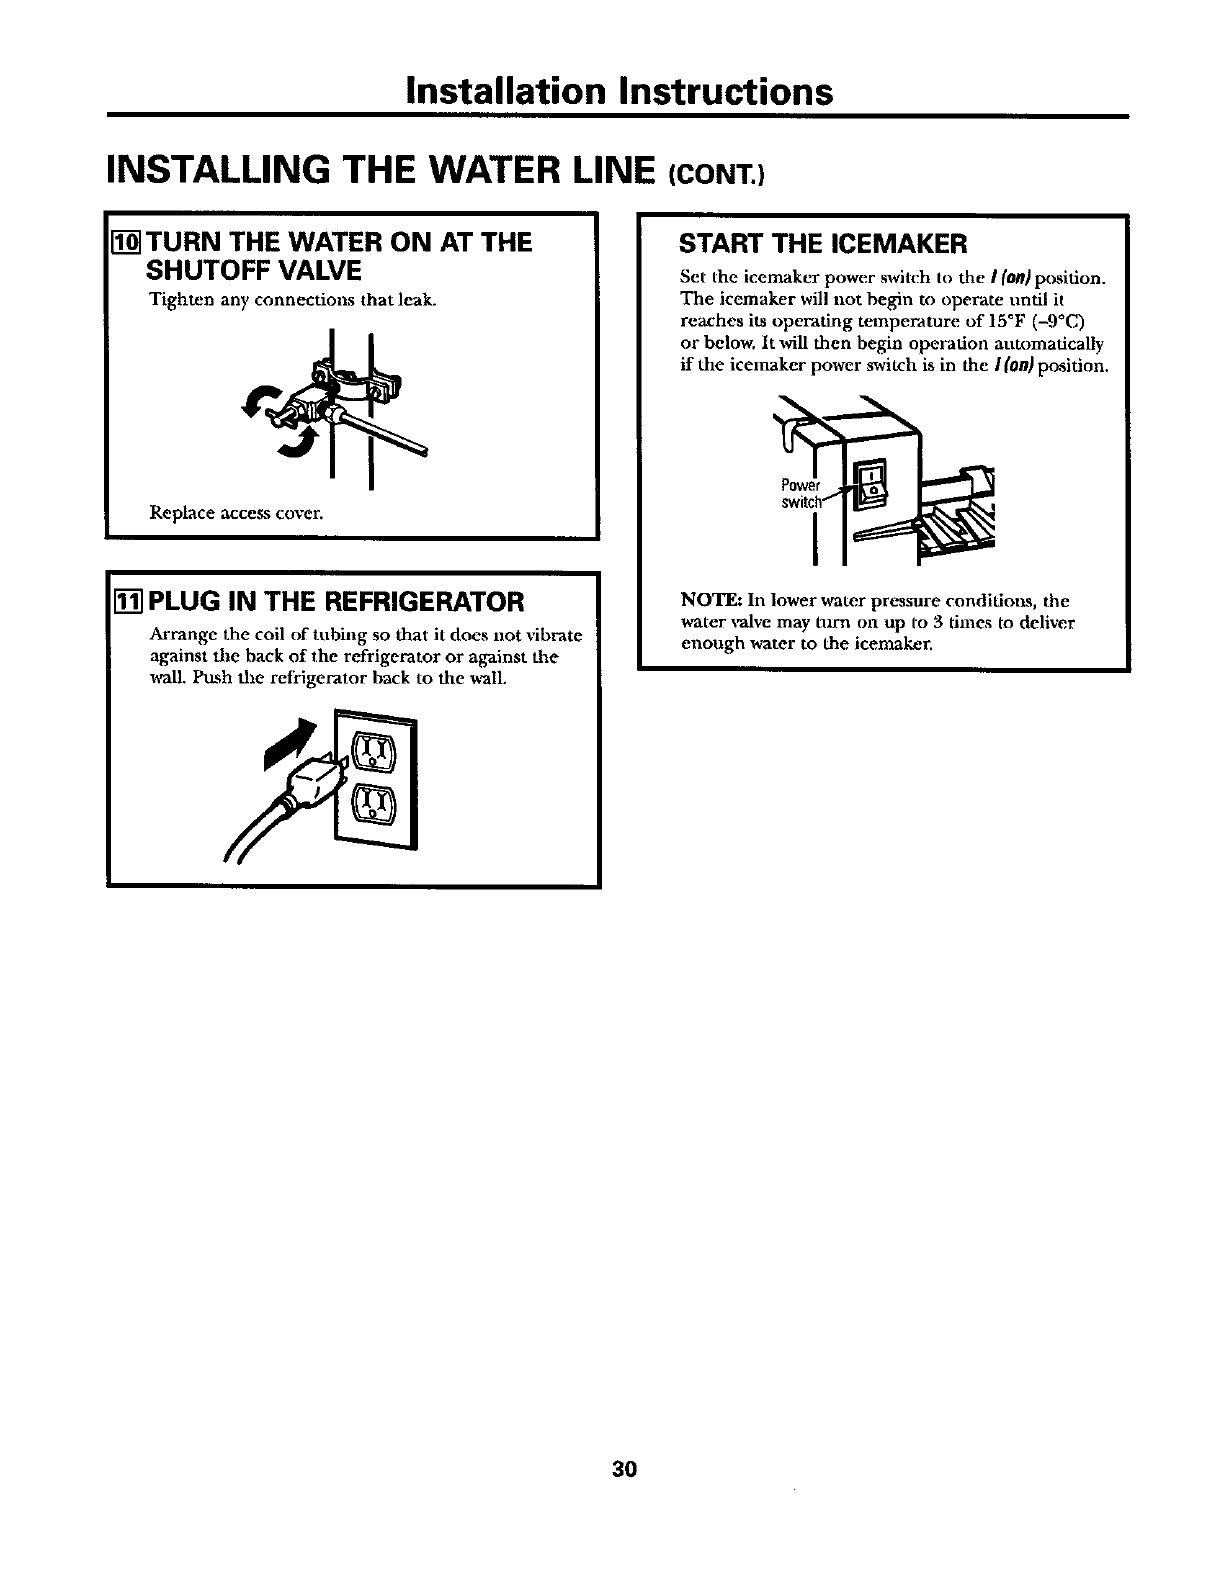
IT-dTURN THE WATER ON AT THE
SHUTOFF VALVE
Tighten any connections that leak.
Replace acce,_s cover.
[] PLUG IN THE REFRIGERATOR
Arrange the coil of tnbhlg so that it does not vibrate
against tile back of the refrigerator or against the
wall. Push tile refrigerator back to the _all.
START THE ICEMAKER
Set the icemaker power switch to tile I (on) position.
The icemaker will not begin to operate undl it
reaches its operating temperature of 15°F (-9°C)
or below. It will then begin operation automaticaUy
if the icemaker power switch is in the I(OR)position.
I
NOTE: In lower water presmlre conditions, the
water _alve may turn on up to 3 times to deliver
enough water to the icemaker.
30
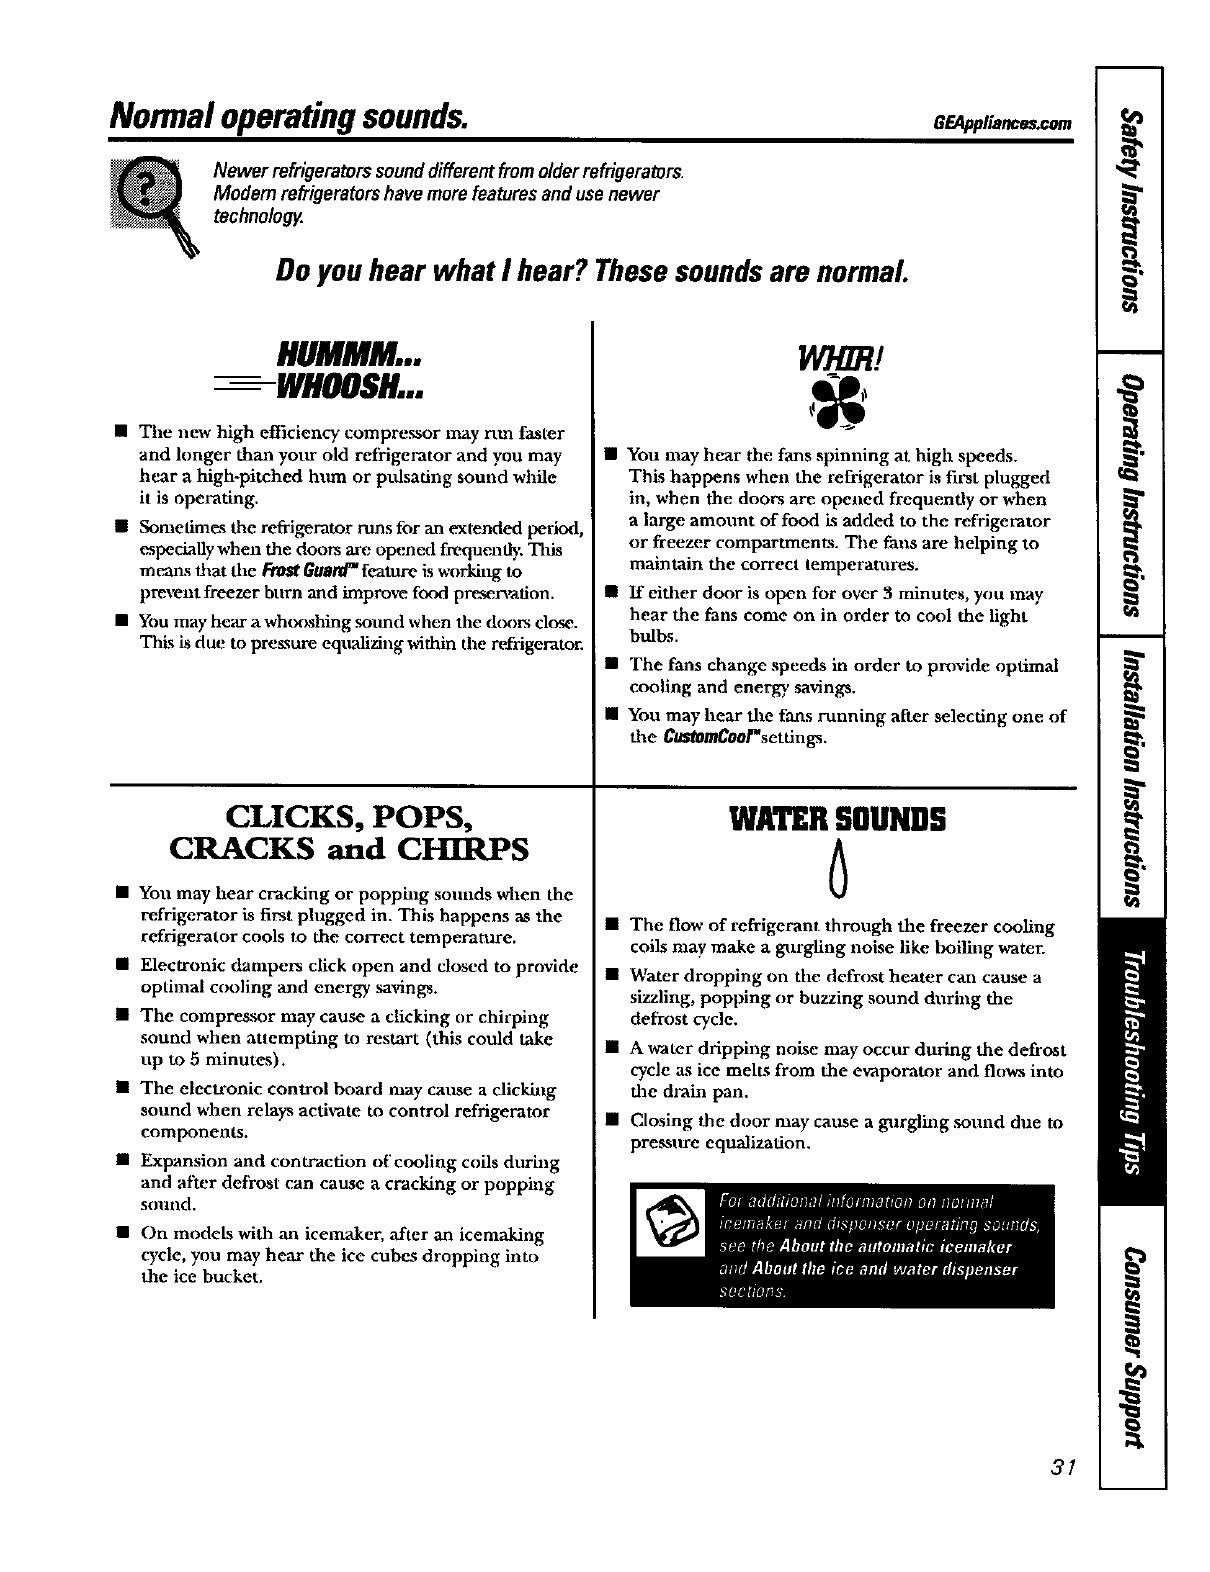
Normaloperatingsounds.
Newer refrigeratorssounddifferentfromolderrefrigerators.
Modern refrigeratorshave morefeaturesanduse newer
technology.
Do you hear what I hear? These soundsare normal
llgMMM...
-- WHOOSH...
•The new high efficiency compressor may rim faster
and longer than yottr old refi'igerator and you may
hear a high-pitched hrun or pulsating sound while
it is operating.
• Sometimes the refrigerator runs for an extended perkxl,
especiaUywhen the doors are opened frequent: This
memxs that the F-ra_ GuardTM feature is working Io
prment freezer burn and improve food pre*ervation.
•Ynu may hem- a wh(×_shing solmd wizen the d(×)rs close.
This is due to pre_,_ureequalizing within the refrigeratoc
CLICKS, POPS,
CRACKS and CHIRPS
•You may hear cracking or popphlg sounds when the
refrigerator is first plugged in. This happens as the
refrigerator cools to the correct temperature.
• Electronic dampers click open and closed to provide
optimal cooling and energy savings.
• The compressor may cause a clicking or chirping
sound when attempting to restart (this could take
up to 5 minutes).
• The electronic control board nmy carrse a clicking
sound wilen relays aeth,ate to control refrigerator
components.
• Expansion and contraction of cooling coils during
and after defrost can cause a cracking or popping
sound.
• On models with an icemaker, after an icemaking
cycle, you may hear the ice cubes dropping into
the ice bucket.
w/!m!
•YOUmay hear the fans spinning at high speeds.
This happens when the refrigerator is first plugged
in, when the doors are opened frequendy or when
a large amount of food Lsadded to the refrigerator
or freezer compartments. The fans are helping to
maintain the correct temperatures.
•If either dour is open for over 3 minutes, you may
hear the fans come on in order to cool the light
bulbs.
• The fans change speeds in order to provide optimal
cooling and energy savings.
•You may hear file fans running after selecting one of
the C_mCool%etdngs.
WATERSOUNDS
6
•The flow of refrigerant through the freezer cooling
coils may make a gaxrgling noise like boilhlg _ter.
• Water dropping on tile defrost heater can cause a
sizzling, popping or buzzing sound during the
defrost cycle.
• A water dripping noise may occur during the defrost
cycle ms ice melts from the evaporator and flows into
the drain pan,
•Closing the door may cause a gurglhlg sound due to
pressure equalization.
31
Beforeyoucall forservice...
_Troubleshootingtips
_p_ Saveti'meandmoney/Reviewthe chartsonthe follovvTng
_pagesfirstandyoumaynotneedto callforsemice.
.... "";" ": Possible Causes What ToDo
_t0r d0e$ UM Refrigerator ha defrost cycle. * Waitabout 30 minutes for defrost cycle to end.
0J_a_ Either or both controls set to OR:. •Set tile conu'oLs to a temperature _tting.
Refrigerator is unplugged. ° Push the plug completely into the oudet.
The fuse is blown/circuit •Replace lose or re,_t the breaker.
breaker is tripped.
The refrigerator is in •Unplug the refrigerator and plug it back in.
showroom mode.
_bration or ra'diim3Rollers need adjusting. .,See Rollers.
(Mightvit_affon
isnonnaO
Motoropera_sfor Normalwhen refrigerator •Wmt 24hoursforthereffigermortocompletdv
is c ,l
(/l_/em tMrigm'_0ts Often occurs when large • This is normal.
Isd//_mornMm'age amotmts of food are
space and a_placed _a refrigerator.
/mezer requiremore Door left open. •Check to ,seeif package is holding door open.
opeta_ _They Hot weather or frequent •ThLsLSnonnal.
,_,n' andstop M/en
mai,_9ineveu door openings.
tampmatm_) Temperature Controls • .SeeAboutthecontrols.
set at the coldest
seUlng.
n
RefriBegal__ _eezer Temperattwe control not set *SeeAboutthe controls.
coa_a/lr///o_ too wan// cold enough.
Warm weather or frequent •Sct the ttanperamrc comrol one step colder
door openings. See Aboutthecontrols.
Door left open. • Check to see if package is holding door open
Ft_torico Crystals Door left open. • Check 1o,see if package is holding door open.
on frozen fo0d
OkOSt_ _kaO eToo frequent or teo long
is P_'mal) door openh_
O'adder/_4_m Automatic energy saver • This helps prevent condensation on the outside.
and hmm_t system circulates
c_ liquid around fr_mtedge
weml of freezer compartment.
AItgIXIW__Icemaker power swltch • Set the power watch to the on posidon.
doosnot work is hathe off position.
Watersupply turned off or * See Installingthewaterline.
not cormected.
Freezer compartment • Walt24 hours for the refrigerator to completeh'
too warm. cool down
Piled up cubes ha the storage "Level cubes by hand.
bha cause tim icemaker
to shut off.
Ice cubes stuck in icemaker.
(Green power light on
icemaker blhddn_.
•Tttru off the tcemaker, remove cubes and tltrn the
memaker back on.
32
GEAppliances,com
"_5,4" _:_ ,_, Possible Causes What ToDo
r-teqaeM "btl_j" _d Ieemaker power switeh is in the * Set the po't,er _itch to the 0 (0f0po,,atzon.Keeping tt
I(on)podtion, but the wamr supply mthellon)po_uon,mlldamagethewater,,ah,e.
to the refrigerator has not been
connected.
i
/C$CU/IO$/lam im_0t/tas_ Ice storage bin needs deanlug. * Empty and wash blu. DL,_ardold cubes.
Food transmitting odor/taste •"v\_aptoods well
to ice cubes.
Interior of refxigerator • SeeCareandcleaning.
needscleaning.
SalMIorho/10wct_ Waterfilter dogged. • Replace filter cartridge _th new cartridge or with plug
,$/OW/gocube _ree_ Door left open. *CJaeck to ,see ff package ts holding door open.
Temperature control not set •See Aboutthecontrols.
cold enough.
C/_ d/sperm' does a¢€ waffr Icemak_- tin-ned off or •Tumonw.emakerorwatersupplv
water supplyturned off.
Ice cubes are frozen to • Remo,,e cubes.
icemaker feeler ran.
Irregular ice clumps in * Break tip,_ath fingertip pre_,oareand dtward remammg clumps.
storage eontainer. • Yreezea may be too warm. Adjust the freezer control to a
colder setang, one po_iuon at a time, unul dump.,, do not form.
Dispenser is LOCKED. • Precs and hold the LOCKCONTROLpad for 5 *conds.
Waf_/Ia$ pool tasfe/0dOr Water dispemer has not been * Dxspensewater umd all "_,'atcrlu sa,stem ts replenMled.
used for a long time.
Wafetin first g/ass is Itta_ Normal when reffigermor *Watt24 hours for the refrlgerator to completely cool down.
is first installed.
Waterdispenser has not been • Dispense water until all water in system is replenkhed
used for a long tlme.
Watersystem has been drained. • Allow _-,'eral houi_ for replenL_hed supply to dull.
Waferdispenserdoe* Water supply llne turned • See Instalhng_aewaterhne.
_lt'etk off or not connected.
Waterfilter dogged. • Replace filter cartridge or remove filter and imlall plug.
.,€firmay be trappedin the water s_t_n. * Pre'-_the dtspenser arm for at least two mluutes.
Dispemer is LOCKED. • Pressand hold the LOCKCONTROLpad for 3 seconds.
spmlringkom Newly-lustalled Fdter cartridge. . P,un _mer from the dLspcn._'rfor 3 minute_ (about
d_t*¢ one and a hail gallons).
l_#er/,.* nat d_med Water in reservffn-is •Call lot service
but i_maker kwoddog frose_
Refrigerator control setting • Set m avrarmer setmag.
is too cold.
NOwaterorice_ _ Supply_ orshutoffvalveisdogg_ • Call a plumber
Water filter dogged. • P_'placefilter cartndge or remm'efilter and in_stallplug.
Dispenser is LOCKED. * Press and hold the LOCKCONTROLpadfor 3 setonds.
i
CUBEDICEwassele_edI_a Lastseulngwas CRUSHEDIgE •A few cubes wexe left mthe crlLsher from the prevtoua
CKUS/fED/CEwasnSsi_nsed setting, Th_s IS iionnal
33
Before you call for service...
Possible Causes What To Do
_mDefrost heater is on. •ThL_ is normal.
_trstmrt
_m/0r Foods transmlttiug *Foods with strong odors should be tighdy _rapped.
odor to refrigerator. • Keep an open tx)x of baking _ in the refrigerator;
replace eve D'three months
Interior needs deaning. • .SeeCareand cleamng.
uoI closingptOpedy Door gasket on hinge side • _apb" paraffin wax to the face of the gasket.
stlddng or folding ove_
Adoor bht is hitting ashelf • Move the door bm up one position.
imlde the refrigerator.
lllff0_ g0rnmon Not unusual during *V_qlX"_ur face dry..
twtsidsangrigsmt_ periods of highhumidity.
n n
Moislare uo//e¢_ i/l_ide Too freqtw_qt or too
[/0/ttmM _ _ long door openings.
canies moisture _o
r_igmnor whe, d_nt
a_ o_md/
n
laBriotligMdoes No power at outlet. • Replace fitse or reset the breaker.
nat m_rk Light bu_ burned out. • See Replacingthe lightbulbs.
Waterou kitc_ BOOrOr Cubes jammed in chute. • Poke ice through vath a wooden spoon.
m/maom at fmtcwr
Holairfrom bosom Normal air flow coolhig motor.
ofndrigetatar In the re_don process, it is
normal that beat be expelled in the
area uml_r the refrigerato_ Some
floor coverings are se_itive and will
discolor at these normal and safe
tempenn._
Rdrig_'af/l_'_ Adaptive defrost keeps •This is nonrtaL The refrigerator v,ill cycle offafter the
affb/ff _compressor running dining door l'ell_taJlL_;cl(xta_dfor 2hotlrs
L_t/pKafmwsaerieOK door openings.
Ra_ijp_mlor_pi_ Door open. *Close door.
_odila't _awit_dff//iag Packaging. • Increase Ume or re.package in plastic
Wrong weight selected. •Sek_-t alarger weight.
Item with high fat content. •Select a larger v._tghL
Not using Ofill/'l'haw tray. • Place items on tray and allow space m between items for
better airflow.
,_taalam_tattn uat Unlt_ua plugged ha. • Allow 24 hottrs for system to stabilize.
m/Italia $_ _Door open for too long. ,, Allow 2.t hottrs for _tem to slabtlize
Warm food added to refrigeratot_ • ,Mlow 24 hours foz sx._tem to stabdize
Defrost cycle is in process. • Allow 24 hours for swstem to stabilize.
Refrigerator compartment • Tlns LSnormal. In order to oummize energy Ik_,_tge,the
temperature control is set Select T_ap featore is disabled when flue refrigerator
at wannest setting, temperature control is set at the .,_armest setting.
w_ki_
3_
CONSUMER WARRANTY
(for customers in Canada)
Your refrigerator is warranted to be free of defects in material and workmanship.
What is covered How Long Warranted Parts Labour
(From Date of Sale) Repair or Replace
at Camco's Option
Compressor Ten (10) Years Ten (10) Years Five (5) Years
Sealed System (including Five (5) Years Five (5) Years Five (5) Years
evaporator, condenser
tubing and refrigerant)
All Other Parts One (1) Year One (1) Year One (1) Year
TERMS AND CONDITIONS:
This warranty applies only for single
family domestic use in Canada when the
Refrigerator has been properly installed
according to the instructions supplied by
Camco and is connected to an adequate
and proper utility service.
Damage due to abuse, accident, commercial
use, and alteration or defacing of the serial
plate cancels all obligations of this warranty.
Service during this warranty must be performed
by an Authorized Camco Service Agent.
Neither Camco nor the Dealer is liable for any
claims or damages resulting from any failure
of the Refrigerator or from service delays
beyond their reasonable control.
To obtain warranty service, purchaser must
present the original bill of sale. Components
repairedor replaced are warrantedthrough the
remainderof the onginalwarranty periodonly.
This warranty is in addition to any statutory
warranty.
WHAT IS NOT COVERED:
•Service trips to your home to teach you how
to use the product.
• Damage to finish after delivery.
•Improper installation-proper installation
includes adequate air circulation to the
refrigeration system, adequate electrical,
plumbing and other connecting facilities.
• Replacement of house fuses or resetting
of circuit breakers.
•Replacement of light bulbs.
•Damage to productcaused by accident,
fire, floods or acts of God.
• Loss of food due to spoilage.
• Proper use and care of product as listed
in the owner's manual, proper setting of
controls.
• WARRANTOR IS NOT RESPONSIBLE
FOR CONSEQUENTIAL DAMAGES.
IMPORTANT
Keep this warranty and your bill of sale as proof of original purchase and purchase date.
Camco Service is available coast to coast.
If further help is needed conceming this warranty, contact:
Manager, Consumer Relations, Camco Inc.,
Suite 310, 1 Factory Lane, Moncton, N.B. ElC 9M3
Staple your receipt here.
Proof of the original purchase
date is needed to obtainservice
under the warranty.
35

Refrigerator Warranty.(Forcustomersi, meUn edStates)
All warranty service provided by our Factory Service Centers,
or an authorized Customer Care_technic/an Toschedule service,
on-fine,24 hoursa day, vlsrtus at GEApp/iances.com, or carl
8OO.GE.CARES(800432.2737).
Staple your reeetpt here I
Proofof the original purchase I
date ts needed to obtain servtce
under the warranty.
One Year Am/part of the refrigcrator which Vailsdue to adefect in materials or _)rkmanshtp During this
Fromthedateof the in_ _ne-ye_r WatraMy_(_E win a_s(__r_4de _free _f charg_ a_ _ab_r aud u``-h_me se_ic_ _ rep_ace
originalpurchase the dd'et th,e part.
_Y_
Fromthedateofthe
originalpurchase
Ar_l_rt of the sealed re#igeratiRg system(the corn pre._sor, coadenscr, e_aporator mad
all connecting tubing) whkh Pailsdue to a defect m maU:nals or workmanstup During tht_
full five-yearsealed refrigerating systemwarranty,GE wiU also provide, free of charge, all "lalx_r
and in-home ._ta,ice to replace the defective part in die _ealed retrigerating _'stem.
Service tr_ to your home to teach you how to use the
product.
"_Improper installation.
_. Failure of the product if it is abused, misused, or used for
othe_ than the intended purpose or used commere_.
_-".Loss of food due to spoilage.
£_Replacement of house fuses or resetting of circuit
breakers.
r
Replacement of the water filter cartridge due to water
pressure that is outside the specified operating range or
due to exces_e sediment in the water supply.
Replacemmt of the water filter cartridge after its
expec_ _efu] life.
Damage to the product cattsed by accideut, fire, floods
or acts of God.
Ix_dental or consequential damage caused by possible
defects with this appliance.
This warranty is extended to the originalpurchaser and an}/succeeding owner for productspurchased for home
use within the USA. In Alaska, the warranty excludes the cost of shippingor service calls to your home.
Some states do not allow the exclusionor limitationof mcidental or consequentialdamages• Thiswarranty gives
you specific legal rights, and you may also have other rights which vary fromstate to state. Toknow what your
legal rights are, consultyour local or state consumeraffairs office or your state's Attorney General.
Warrantor. General Electric Company.Louisville, KY 40225
36
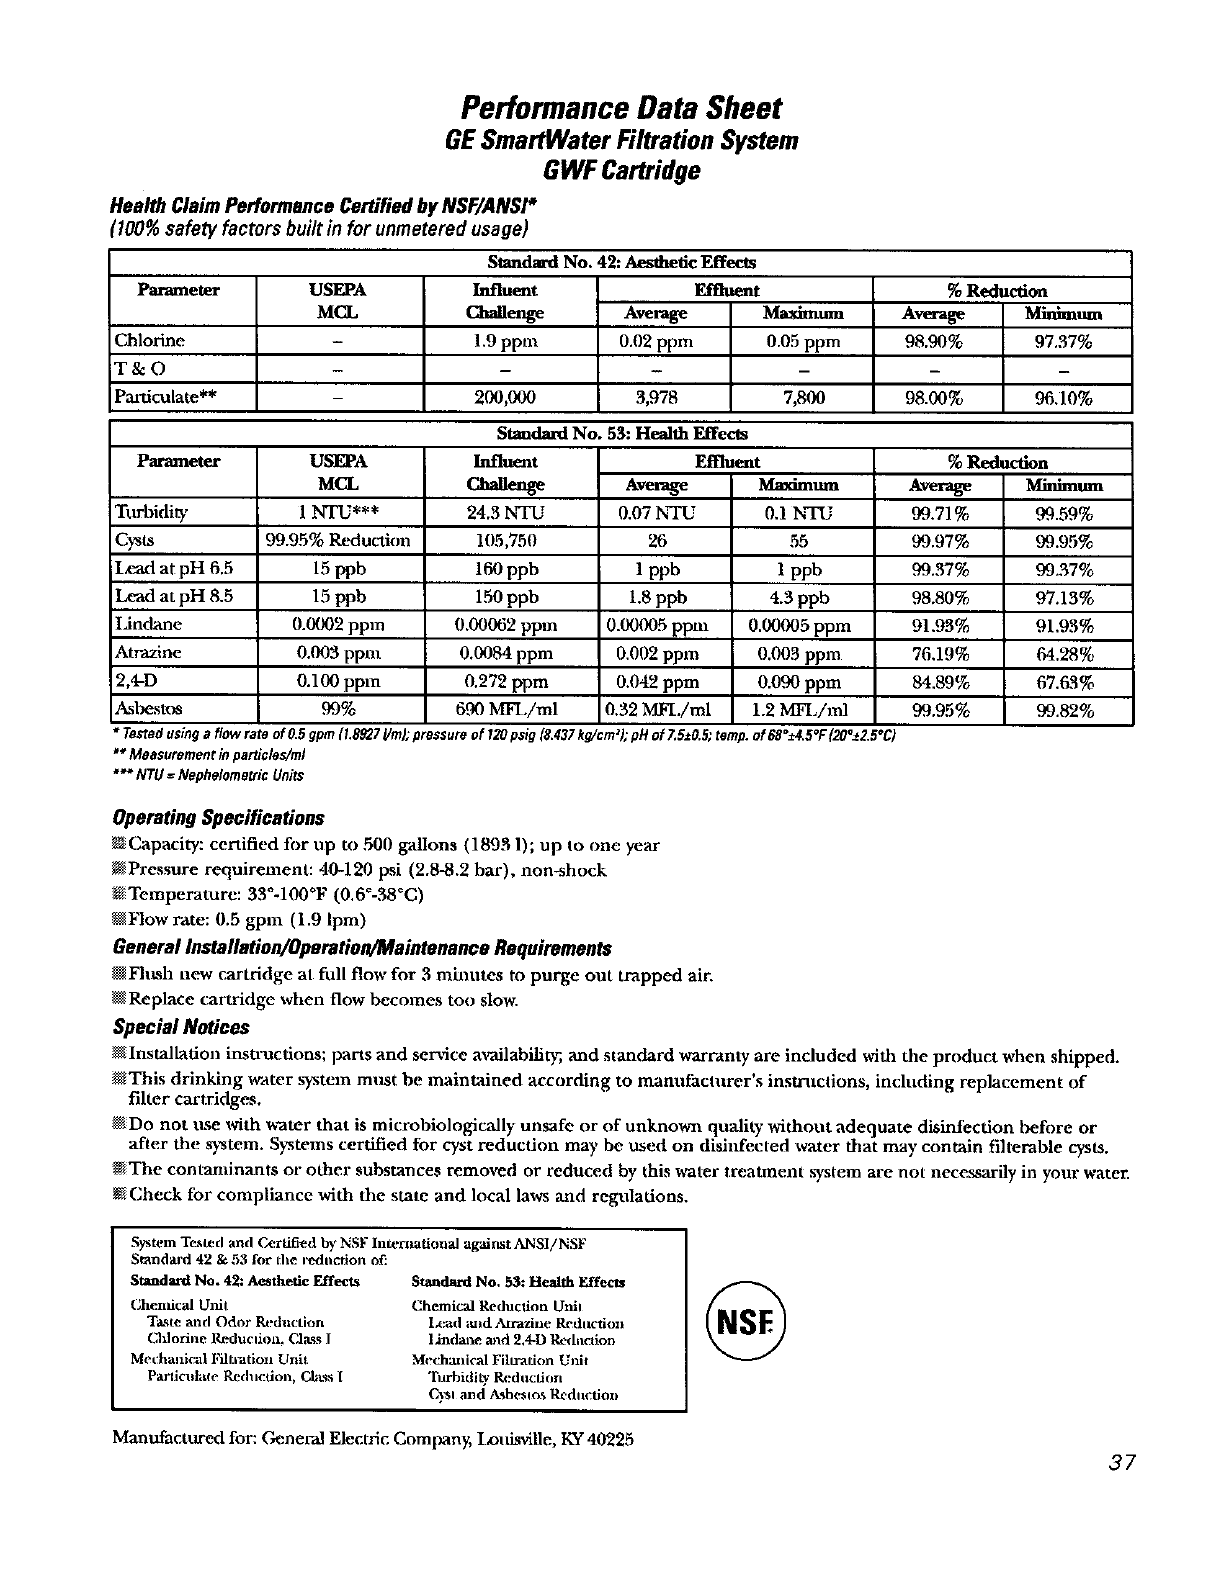
Performance Data Sheet
GE SmartWater Filtration System
GWF Cartridge
Health Claim Performance Certified by NSF/ANSI*
700% safety factors built in for unmetered usage)
Standard No. 42: Aesthetic Effects
Parameter USEPA
M_
Innuefftt
Cha_enge Avexage
98.90%
Chlorine - 1.9 ppra
T&O - -
Particulate** - 200,000 98.00% 96.10%
Standard No. 53: Health Effects
Parameter
Turhidiq,'
Cy3ts
l__td at pH 6.5
lead at pH 8.5
IJndane
Atrazine
2,4-D
A_sbest_s
Effluent
Average I
0.02 ppm 0.05 ppm
m
3,978 7,800
Influ_Ttt
Challenge
24,3 NTU
105,750
160 ppb
150 ppb
0.00062 ppra
0.(_)84 ppm
0.272 ppm
6.c_ MFL/ral
Effluent
Average Mmdmum
0.07 NTU 0,l NTU
20 55
1ppb lppb
1.8 ppb 4.3 ppb
0.00005 ppm 0,00005 ppm
0.002 ppln 0.003 ppm
0.042 ppm 0.090 ppm
0.32 MFI../ral 1.2 MFLiml
USEPA
MCL
1NTU***
99.9.5% Reduction
15 ppb
15 ppb
0.0002 ppra
0.003 ppnt
0.100 ppra
99%
Testedusinga flow rate of0.5 gpm(1.8927Ym);pressureof 120psig(8.437kg/cm_);pHof Z5_0.5; temp.of68°_4.5°F(20°_Z5°C)
** Measurementin particles/ml
*** NTU=Nephelome_'icUnits
%Reduction
Average
99.71%
99.97%
99.37%
98.8O%
91.93%
76,19%
84,89%
99.95%
_xininlurll
99.59%
99.95%
.99.37%
97.13%
91.93%
64.28%
6%63%
99.82%
Operating Specifications
_Capacity: certified for up to 500 gallons (1893 l); up to one year
_Pressure requirement: ,i0-120 psi (2.8-8.2 bar), non-shock
_Teraperature: 33°-100°F (0.6°-38°C)
_Flow rate: 0.5 gpm (1.9 lpra)
General Installntion/Operation/Maintenance Requirements
_Flvsla new cartridge at full flow for 3 rainutes to purge out trapped air.
@Replace cartridge when flow becomes too slow.
Special Notices
_Iustallation instructions; parts and service availability; and standard warranty are included with the product when shipped.
_This drinking water system must be maintained according to manufacturer's instnlctions, including replacement of
filter cartridges.
_Do not use with water that is raicrobiologically unsafe or of unknown quality without adequate disinfection before or
after the systera. Systems certified for cyst reduction may be used on disinfected water that may contain fiherahle cysts.
_The contanfinants or other substances removed or reduced by this water treatment system are not necessarily in your water.
Check for compliance with the state and local laws and regulations.
Syst_,in Tc__ed and CA:rtiffed by NSF Inu_ltational against ,'MNSI/NSF
Smndaaxt 42 & 53 for the t_lnction of.'
Standard No. 42: Aesthetic Effects Standard No, 53: Health Effects
Ghenlical Unit
T,Lste anti Odor Rednction
t_fl orine Reducdoll, CJ_s I
Mechanlc:a] I,Mti_tlon Unit
Particulate Reduction, GLxss [
Chemical Reduction Unit
I_:ad mid Alrazine Redaction
l_aldane and 2A-D P_'dncdon
Mechanical Fikration Unit
Turbidly" Reduction
CySl and A_hesKxs Rednetioz_
Manufactured for: General Electric Company, I.olfisvi/le, KW40225
37
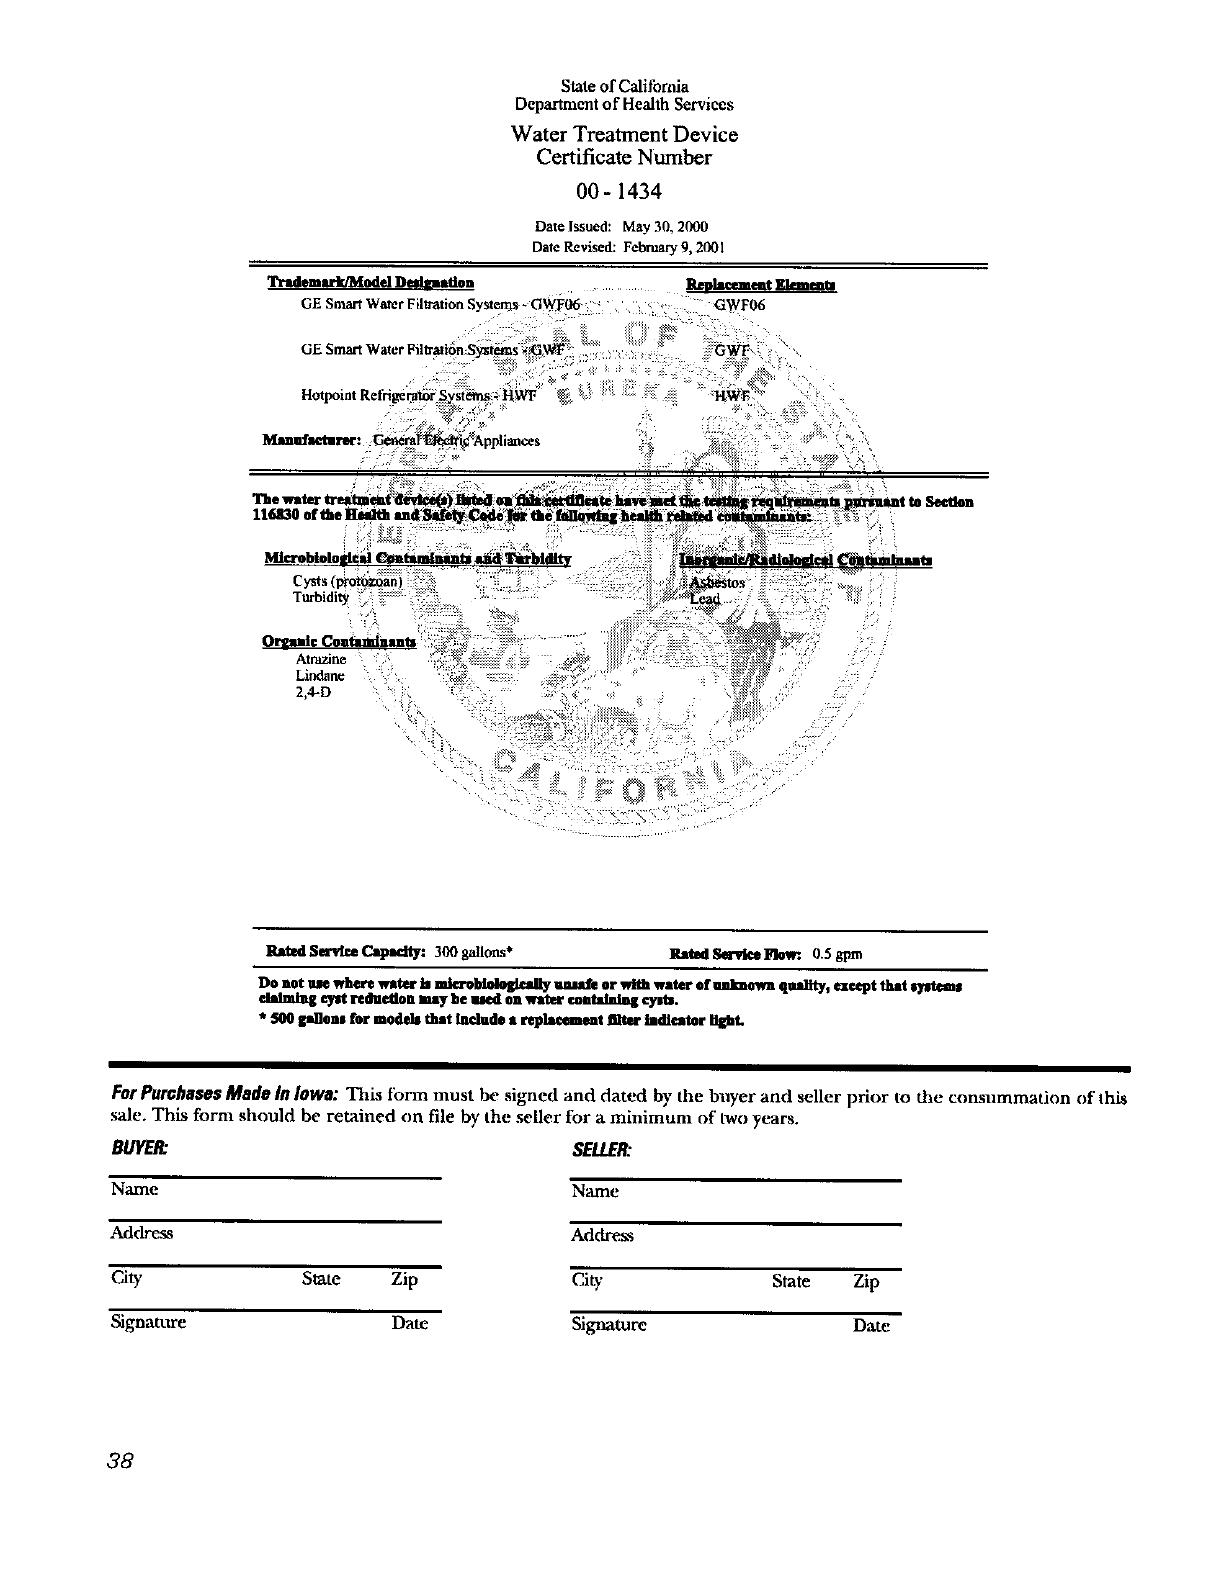
'lgr_lem Jurk/Model DeMmatlon
GE Snmrt Water Filtration Systems ~ G_,VF06
State of Calitbmia
Department of Health Services
Water Treatment Device
Certificate Number
00- 1434
DateIssued: May30, 2000
DaleRevised: Febmarj 9, 2001
....... ]L-_JJU_meat
_ GWF_
GE SmartWater Filtrali6nSysl.ems _F
Hotpoint RetHgem_r _vsl_s -_}IW'_
GWF
KWF
Mlcrobiotoflc_d _.q_ 2"Vrbi_
Cysts (p_o_oan)
Turbidity
_€ CoaSts
Atrazine
Lindar_
2,4-D
]Z_edSelrvlceQt]paelty." 300gallons* RatmlSa-vi_]L?low: 0,5_m
Do not ue wlhere water b mkn-oblolollkaay _m_/e or wi_ water of ulmewa quanty, eXCtlptthat _em s
dalmJb_ cyst reduedon may be u_l on water containing eym.
*500 g_Bom for models that [aclode • t_p_mt _ tadlelttar lll_t.
For Pumha$_s Made In Iowa: This tbrm must be signed and dated by the buyer and seller prior to the consummation of this
sale. This form should be retained on file by the .seller for a minimum of t'woyears.
BUYE& SELLER:
Name Name
Addre_s Address
City State Zip City' State Zip
Signatttre Date Signature Date
38
GE Service Protection Plus TM
GE, a name recognized worldwide for quality and dependability, offers you
Service Protection Plus'_-comprehensive protection on all your appliances-
No Matter What Brand!
Benefits Include:
• Backed by GE
•All brands covered
• Unfimlted service calIs
•All parts and labor costs included
•No out-of-pocket expenses
•No hidden deductibles
• One 800 number to call
We'll CoverAny Appliance.
Anywhere. Anytime.*
You will be completely satisfied with our service protection or you may request your money back
on the remaining x'idue of your contract. No questions asked. It's that simple.
Protect your refrigerator, dishwasher, washer and dryer, range, 'IV, VC'_ mad much more-any brand!
Plus there's no extra charge for emergency service and low monthh., financing is available. Even ict.wnaker
coverage and food spoilage protection is offered. You can rest ea._y, knowillg that all yotJr valuable
hotLsehold products are protected against expensive repail._.
Place your confidence in GE and call us in the U.S. toll-free at 800.626.2224
for more information.
*!t.[1 br'att d._ cove red, Izp to 20 years old, in the obltliltext_d U.S.
........................................................................................... _n.:..,2,2_o_..............
Pleaseplace in envelopeand mail to:
General Electric Company
Warranty Registration Department
P.O. Box 32150
Louisville, KY 40232-2150
39
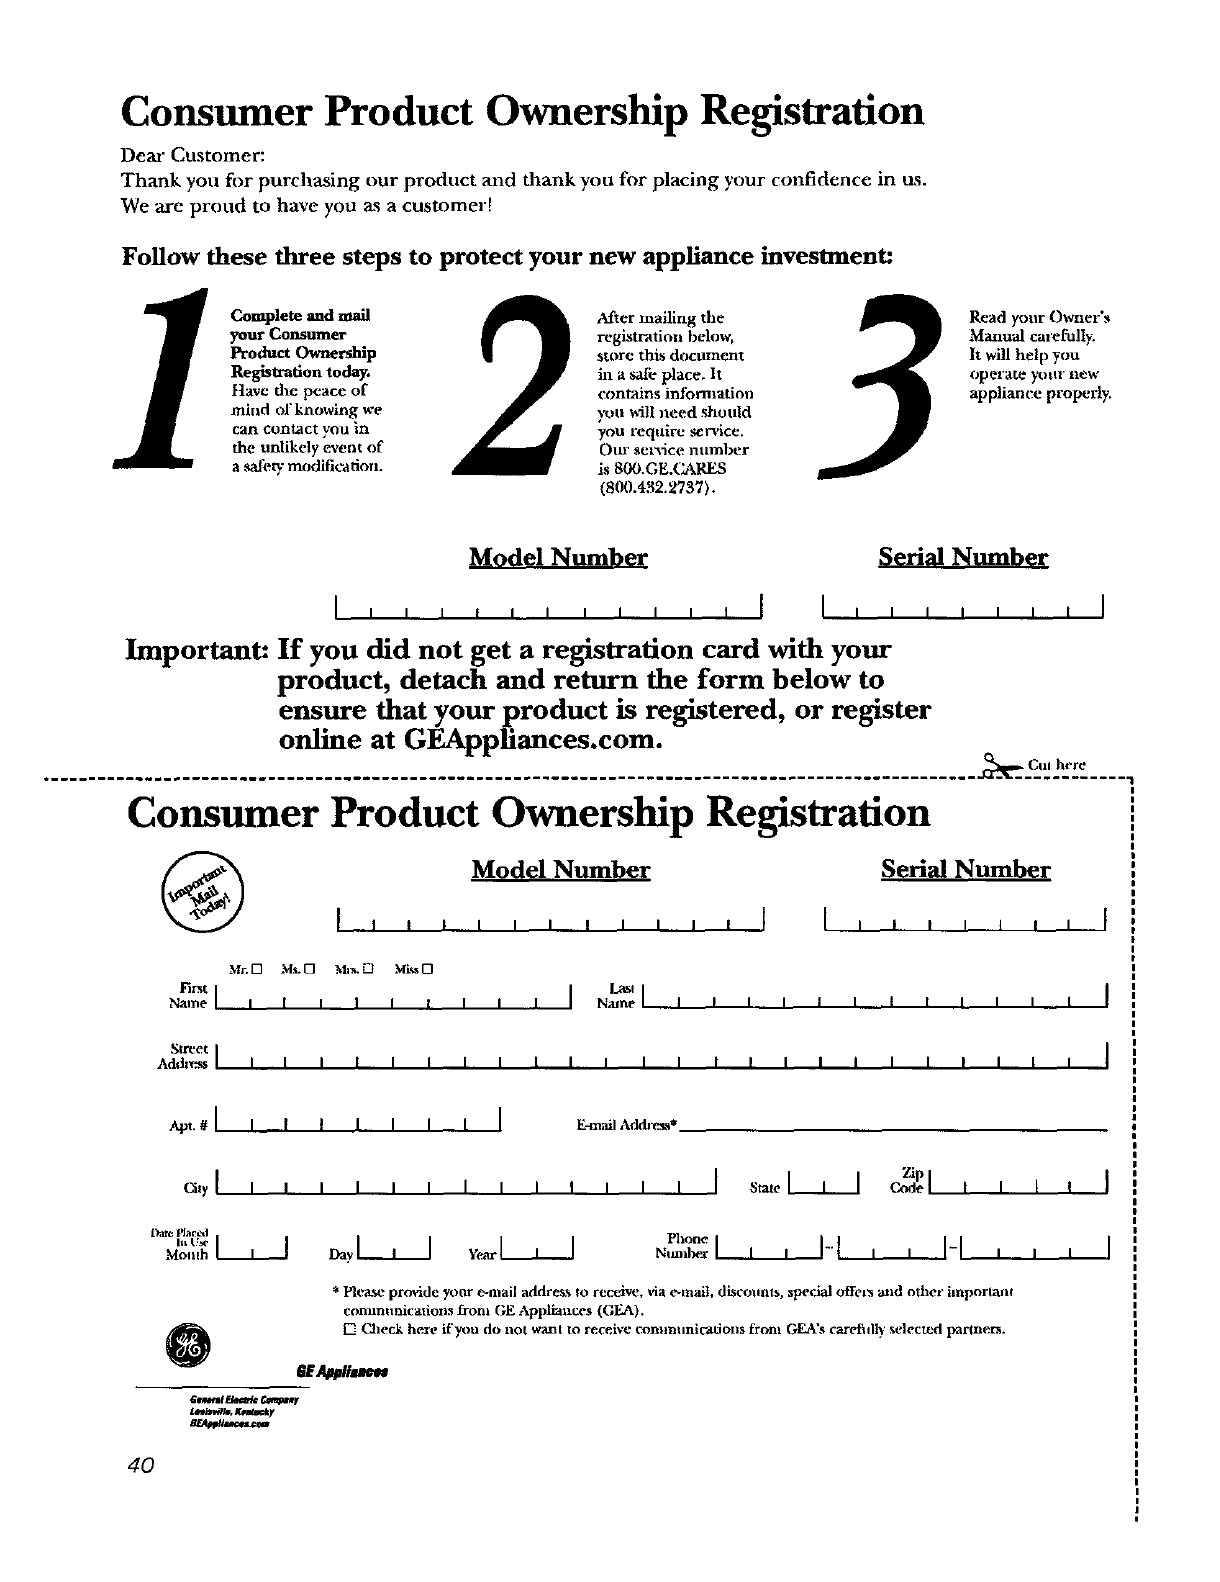
Consumer Product Ownership Registration
Dear Customer:
Thank you for purchasing our product and thank you fi)r placing your confidence in us.
We are proud to have you as acustomer!
Follow these three steps to protect your new appliance investment:
Complete 2
your Consumer
Product Ownership
Registration today.
[lave the peace of
mind of knowing we
can contact you in
the unlikely event of
a ,_k__"modification.
After mailing the
registration below,
store this document
in a saii: place. It
contains intbrmadou
you will need shotfld
you require s_rx4ce.
Ottr set,ice number
is 800.GE.(_RES
(800.4,_2.2737). 3Read your Owner',_
Manual carefully.
It will help you
op cla_ yotil llew
appliance properly.
Model Number Serial Number
,,,,,,, I I I ,,, , ,,I I
Important: If you did not get aregistration card with your
product, detach and return the form below to
ensure that your product is registered, or register
online at GEAppliances.com.
.................................................................. ke:__.'.:,:::.....
Consumer Product Ownership Registration
Model Number Serial Number , I
Mr. [] Ms. [] Mt_- [] Mi_s[]
First I I I_sl II
s_.,I I I I I tI I I tI
N_,_, iIiIiIi i i , Ii i
Street i
A<'e_* IIII I IIIIIII IIIIIIIIIIIII
_,, II I I I I I I I_, Adch_a*
L_IL'e Place| Phone
0
*Please provide yo0r e-mail address to receive, via e-mail, discounts, special otfet_ mid other imporlan¢
commttnicatiolls fi'ont GE Appliances (GEt'k).
I-I Chec_k here ff_m do llOt Wall| I'O receive communications front GEA's careihl b' selected tvarmers.
Ua_/lm
4O
