GE Countertop Microwave Manual L0520586
JES1290SK01 JES1290SK01 GE MICROWAVE - Manuals and Guides L0520586 View the owners manual for your GE MICROWAVE #JES1290SK01. Home:Kitchen Appliance Parts:GE Parts:GE MICROWAVE Manual
User Manual: GE GE Countertop Microwave Manual GE Countertop Microwave Owner's Manual, GE Countertop Microwave installation guides
Open the PDF directly: View PDF ![]() .
.
Page Count: 32
ge.com
©
©
Safety Information ......... 2-6
Operating Instructions
Best Cooking Methods ....... 19
Combination I Feaulres ...... 16
Combination 2 Features ...... 1 7
Convection Features ......... 15
Convenience Features ........ 14
Cookware Tips .............. 20
Grill Feature ............... 18
Microwave Terms ............ 23
Other Features ........... 21,22
Oven Features ............. 7, 8
Power i,evels ................ 9
Timed Features .......... 10-13
Care and Cleaning ......... 24
Troubleshooting Tips ....... 25
Things That Are Normal ...... 25
Consumer Support
Consumer Support ...Back Covet
Product Registration ...... 99, 30
h'arranty .................. 31
9o
@Write the model and serial
numbers here:
Model #
Serial #
You can find them on a label
inside the oven.
49-40429-1 07-05JR
IMPORTANTSAFETYINSTRUCTIONS.
READALLINSTRUCTIONSBEFOREUSING.
^.. WARNING- Foryoursafety,theinformationinthismanualmustbefollowedtominimizetherisk
of fire or explosion, electric shock, or to prevent property damage, personal injury, or loss of life.
PRECAUTIONSTOAVOIDPOSSIBLEEXPOSURE
TOEXCESSIVEMICROWAVEENERGY
(a) Do NotAttempt to operate this oven with the door
open since ol)en<loor operation can result in hai_nflll
eN)osui'e m nlicrowave energy', It is iinl)ortant not to
deteat or tan/per with tile sati4w interlocks.
(b) DoNotPlace any object between tile oven fl'ont titce
and the door or allow soil or cleaner residue to
accunlulate on sealing sui_fitces.
(c) Do Not Operate tile oven if it is danlaged. It is
i)articularly in/i)ortant that tile oven door close
l)rol)erly and that there is no dan/age to tile:
(1) door (bent),
(2) lliil,,es and latches (broken or h)osened),
(3) door seals and sealing sui_fitces.
(d) The Oven Should Not be a(!iusted or rei)aired by
anyone except i)roi)erly qualified service pei_onnel.
IMPORTANTSAFETYINSTRUCTIONS.
When using electrical appfiances basic safety precautions should be followed, including the following.
Use this appfiance only for its intended purpose as described in this Owner's Manual
•]lead and h)lh)w tile specific l)i'e(atl[.ions in tile • Do not stoi'e this al)pliance ot/tdoors. Do not tlse this
Precautions to Avoid Possible Exposure to Excessive
Microwave Energy section above.
• This ai)pliance nlust be grotlnded, Connect only
to a l)rol)erly grounded outlet. See tile Grounding
Instructions section on page 5.
• Install or locate this appliance only in accordance
with tile provided installation instructions.
• This ()veil n/ust be h)cated at least 3 ft. above floor level.
• Be certain to place the ti'ont suriitce of the door
3" or nlore back ti'on] tile counterto I) edge to avoid
accidental ill)ping of tile al)pliance in noimal usage.
• Do not n/ouilt this ai)pliance over a sink.
• Do not II/O/Int tile ii/ici'ol_;tve ()veil over or near }lily
poIlioI] of a heating or cooking al)pliance.
• Do not store aivthing directly Oil top of the nlicrowave
oven surtitce when the n/icrowave oven is in oi)eration.
• Do not opei'am this ai)pliance if it has a danlaged
power cord or phIg, if it is not working i)ropeity or
if it has been danlaged or dropl)ed./f tile power cord
is danlaged, it n/ust be replaced by General Electric
SeiMce or an authorized seiMce agent using a power
cord a\;tilable fl'on] General Electric.
• Do not cover or block any oi)enings on tile api)liance.
•Lrse this ai)pliance only fin" its intended use as described
in this Illantlal. Do not rise corrosive chenlicals or wtpoI'S
in this ai)pliance. This nlicrowave oven is specifically
designed to heat, dry or cook fi)od, and is not inmnded
fin" laboratory or iildustrial use.
• This n/icrowave oven is not approved or tested ti)i"
Ill}t IJIle rise.
i)roduct near watei_t0r exainl)le, in a wet basenlent,
near a swinnning pool, near a sink or in sinlilar locations.
• Kee I) power cord away fl'onl heated sui_fitces.
• Do not iinnlei_e power cord or phIg in wateI:
• Do not let power cord hang over edge ot table or
Co/InteI',
• To reduce tile risk of fire in tile ovei] ca\'il_':
-- Do not overcook toed. Careflillv attend ai)pliance when
papei; plastic or other conlbusfible n/atefials are placed
inside the oven while cooking.
-- Ren/ove wire twist-ties and n/etal handles fl'on] paper or
plastic containei_ 1)eti)i'e placing then/in tile oven.
-- Do not rise tile oveI] fi)r storage puil)oses. Do ilot leave
paper products, cooking utensils or ti)od in tile ()veil
when not in use.
-- If n/aterials inside tile oven ignite, kee I) tile oven door
ch)sed, turn tile oven off' and disconnect tile power
cord, or shut off power at tile flise or circuit breaker
panel. If tile door is opened, tile fire nlay spread.
• See door suretce cleaning instructions in the
Care and cleaning of the microwave oven section
of this nlanual.
• This ai)pliance illttst only be seiMced by qttalified service
i)ei_onnel. Contact nearest authoiized seiMce titcilitv fin,
exan/ination, repair or a(!iustment.
• _&swith any ai)pliance, ch)se supeiMsion is necessai T
when used bv children.
SAVETHESEINSTRUCTIONS
2
g_com
WARNING!
ARCING
If you see arcing, press CLEAB/OFF and correct the problem.
Arcing is the inicrowa;'e term fl)r sparks in the oven.
Arcing is caused by:
• The metal shelf installed incorrect.Iv so it touches
the microwave wall.
• Metal or toil touching the side of the oven.
• Foil not molded to fi)od (upturned edges act
like antemms),
• Met;fl, such as twist-ties, poultI T pins or gold-
rimmed dishes, in the microwave.
• Recycled paper towels containing small metal
pieces being used in the microwave.
FOODS
• \4lien microwaving, place all fl>ods and
containei_ on the glass microwave turntable.
•SUPERHEATEDWATER
Liquids,such as water, coffee or tea are ableto
be overheatedbeyondthe boilingpoint without
appearingto beboiling. Visiblebubblingor boiling
when the container is removedfromthe microwave
ovenis not always present. THISCOULDRESULT
IN VERYHOTLIOUIDSSUDDENLYBOILING0 VER
WHENTHECONTAINERIS DISTURBEDORA
SPOONOROTHERUTENSILIS INSERTEDINTO
THELIOUlD.
To reduce the risk at iqj mT to i)ei_ons:
-- Do not overheat the liquid.
-- Stir the liquid both before and halfway through
heating it.
-- Do not use straight-sided containei_ with
n}l ITOW necks.
--After heating, allow the container to stand in
the microwave oven for a short time before
removing the containei:
-- Use extreme care when inserting a spoon or
other utensil into the containei:
Do not pop popcorn in your microwave oven
unless in a special microwave popcorn accessory
or unless you use popcorn labeled for use in
microwave ovens.
• Some products such as whole eggs and sealed
containei_lbr example, closed jai!--are able
to eN)lode and should not be heated in this
illiCi'Owave oven. Such rise of the illiCi'OW;ive
oven could I'estIlt in injuI T.
• Do not boil eggs in a microwave oven. Pressure
will build up inside egg yolk and will cause it
to bmst, possibly resulting in iqjm>
Operating the microwave with no fl)od inside fi_r
ii/oi'e than a illintlte oF two illay Catlse danmge to
the oven and could start a fire. It increases the
heat around the magnetron and can shorten the
lile of the oven.
• Foods with unbroken outer "skin" such as
potatoes, hot dogs, sausages, tomatoes, apples,
chicken liveIs and other giblets, and egg yolks
should be pierced to allow steam to escape
during cooking.
• Avoid heating baby food in glass jinx, even
with the lid off. Make sure all infimt toad is
thor(mghly cooked. Sdr to()d to distribum the
heat evenly: Be carefill to prevent scalding when
wamfing flimmla. The container may libel cooler
than the titan ula really is. Mwavs test the titan ula
beflwe feeding the baby:
• Don't defrost fl'ozen beverages in narrol_necked
bottles (espedally carbonamd beverages). Even if
the container is opened, pressure can build up.
This can cause the container to bmst, possibly
iesulting in iqjmT:
• Hot foods and steam can cause burns. Be caretul
when opening any containei_ of hot food,
including popcorn bags, cooking pouches and
boxes. To prevent possible iqjm N direct steam
away fi'om hands and face.
• Do not overcook potatoes. Thev could dehwh'ate
and catch fire, causing damage to your oven.
• Cook meat and poult Uthoroughl)_meat to at
least an INTERNAl, temperature of 160°F and
poulti y to at least an INTERNAl, temperature
of 180°E Cooking to these mmperatures usually
promcts against toodborne illness.
• Foods cooked in liquids (such as pasta) may
tend to boil more rapidly than foods cont;fining
less moisture. Should this occm; reter to the
Care and cleaning of the microwave oven section
fi)r instructions on how to clean the inside
of the oxen.
IMPORTANTSAFETYINSTRUCTIONS.
READALLINSTRUCTIONSBEFOREUSING.
WARNING!
4
MICROWAVE-SAFECOOKWARE
Make sure to use suitable cookware during
IIIiCFOW;I*'ecooking. Most glass casseroles, cooking
dishes, measuring cups, custard cups, potmry or
china dim_erware which does not have metallic trim
or glaze with a metallic sheen can be used. Some
cookware is labeled "suitable fin" microwaving."
• Place food or microwavable container directly
on tile glass turntable to cook w)ur food.
• Use of tile black metal tray during microwave
cooking will result in inferior cooking
pe_timnance.
• lfw)u are not sm'e if a dish is microwave-sale,
use this test: Place in the oven both the dish vou
are testing and a glass meas/wing cup filled with
1 cup of water--set tile meas/wing cup either in
or next to the dish. Microwave 30-45 seconds
at high. If the dish heats, it should not be used
for microwaving.
If the dish remains cool and only the water in
the cup heats, then the dish is microwave-sate.
• Oversized fi)od or oversized metal cookware
should not be used in a microwave/convection
oven because they increase the risk of electric
shock and could ca/Ise a fife.
• Sometimes tile oven floe,; turntable and walls
can becollle too hot to to/lch. Be caI'etill
touching tile flora; tm'ntable and walls dm_ing
and after cooking.
• If you use a meat them/ometer while cooking,
make sure it is sale fin" use in microwave ovens.
• Do not use recycled paper products. Recycled
paper towels, napkins and waxed paper can
contain metal flecks which may cause arcing
or ignim. Paper products containing nylon
or m'lon filaments should be avoided, as tile*'
may also ignim.
• Some stvrotoam trays (like those that meat
is packaged on) have a thin strip _ff metal
embedded in tile bottom. _4]/en microwaved,
tile metal can burn tile floor of tile oven or
ignite a paper towel.
• Do not use tile microwave to (hy newspape_.
• Not all plastic wrap is suitable fin" use in
microwave ovens. Check the package fin"
l)I'ol)eI"/Ise.
• Do not use paper products when the
microwave/convection oven is operamd in tile
convection or COll/bination illode.
• Paper towels, waxed paper and plastic wrap
can be used to cover dishes in order to retain
moisture and prevent spattering. Be sm'e to
vent plastic wrap so smam can escape.
• Cookware may become hot because of heat
transferred fl'om tile heated food. Pot holcle_
may be needed m handle tile cookware.
"Boilable" cooking i)ouches and tightly closed
plastic bags should be slit, pierced or vented as
directed by package. If they are not, plastic could
bm_t dm_ing or immediately after cooking,
possibly resulting in injtu T. Also, plastic storage
containe_ should be at least partially/mcovered
because they titan a tight seal. X4]/en cooking
with containe_ tightly covered with plastic wrap,
relnove covering carefldly and direct steam away
fi'om hands and fi_ce.
Use toil only as directed in this guide. TV dim_et_
may be microwaved in fi)il trays less than 3/4"
high; remove tile top foil cover and return tile
troy to tile box. \4lien using foil in tile microwave
oven, kee I) the foil at least 1" away fl'om the sides
of tile oven.
• Plastic cookware>--Plasfic cookware designed fin.
microwave cooking is ve_y useflfl, but should be
used careflfllv Even microwave-sate plastic may
not be as tolerant _ffovercooking conditions as
are glass or ceramic inatefials, and may solten or
char if subjected to short periods of overcooking.
In longer exposures to overcooking, tile fi)od
and cookware could ignite.
• Use of the shelf accessory:
-- Remove tile shelf fl'om tile oven when not in use.
-- Use pot holde_ when handling tile shelf and
cookware. Tile*' Illav be hot.
-- Be sm'e that tile shelf is positioned properly
inside tile oven to prevent product damage.
-- Do not cover tile shelf or any part of tile oven
with metal toil. This will cause overheating of the
Ill ici'o_;l;'e/convection oven.
Follow those guidelines:
UUse microwave-sate plastics only and use
them in strict compliance with the cookware
IIla n ti[il ct t ii'ei"s I'e COlIllI/e n da lions.
_'_ Do not IlliCl'OWa',e ell/l)t},' containei3.
_Do not peru/it children to use plastic
cookware without complete supervision.
ge.com
GRILLING,CONVECTION& COMBINATIONSAFETY
• Use the black nletal tray when grilling, • Use of the rack:
conxecti(in or coi/lbinati(in cooking. Use tile trav
ill the sanle wa) you wouM use a shallow baking
pan or baking tray. Place food, ox en-sate
cookware or the rack directly on the black inetal
tray when cooking,
Use of the glass turntable when grilling,
comecfion or coinbination cooking will result
in inferior cooking i)erfimnance.
Do not coxer the black nletal tray with nletal fifil
in conibination nlode. This will cause arcing in
the ox,en,
• Any non-nletal, oven-sate dish can be used when
ciinlbination cooking in the oven. Any oven-sate
dish can be used when grilling or convection
cooking.
• The oven and door will get hot when grilling,
convection or COillbination cooking,
• Cookware will beconie hot when grilling,
convection or ciinlbinafion cooking. Pot holdeis
or oven mitts will be needed to handle the
cookware.
-- For comection two level baking only.
-- Place dish dii'ecfl_ on the rack.
-- Reinoxe the rack fl'oni the oxen when not in use.
-- Use pot holdeis or oven Initts when handling
the rack. It Ina_ be hot.
-- Be sure that the rack is posidoned i)roi)erly
inside the ()veil to I_I'event product danlage.
-- Do not cover the rack or any part of the ()veil
with nletal fifil. This will cause overheating ot
the ()veil,
• During and after use, do not touch, or let
clothing, pot holdeis or other flanmiable
nlaterials contact the top heating elenient or
guard. These surfaces inav be hot enough
to burn even though they are dark in coloi:
?dlow sufficient tiine for cooling fiist.
• I?,.einove cookware coinpletely fl'on/the oven
beti)re turning todd.
• Do not use paper to_vls or coveiings, containeis
or cooking/roasting bags nlade of fi)il or other
reflective inaterial, plastic, wax or paper when
grilling, convection or conlbination cooking.
• Do not place toDd directly against the top or
bottonl heating elenients.
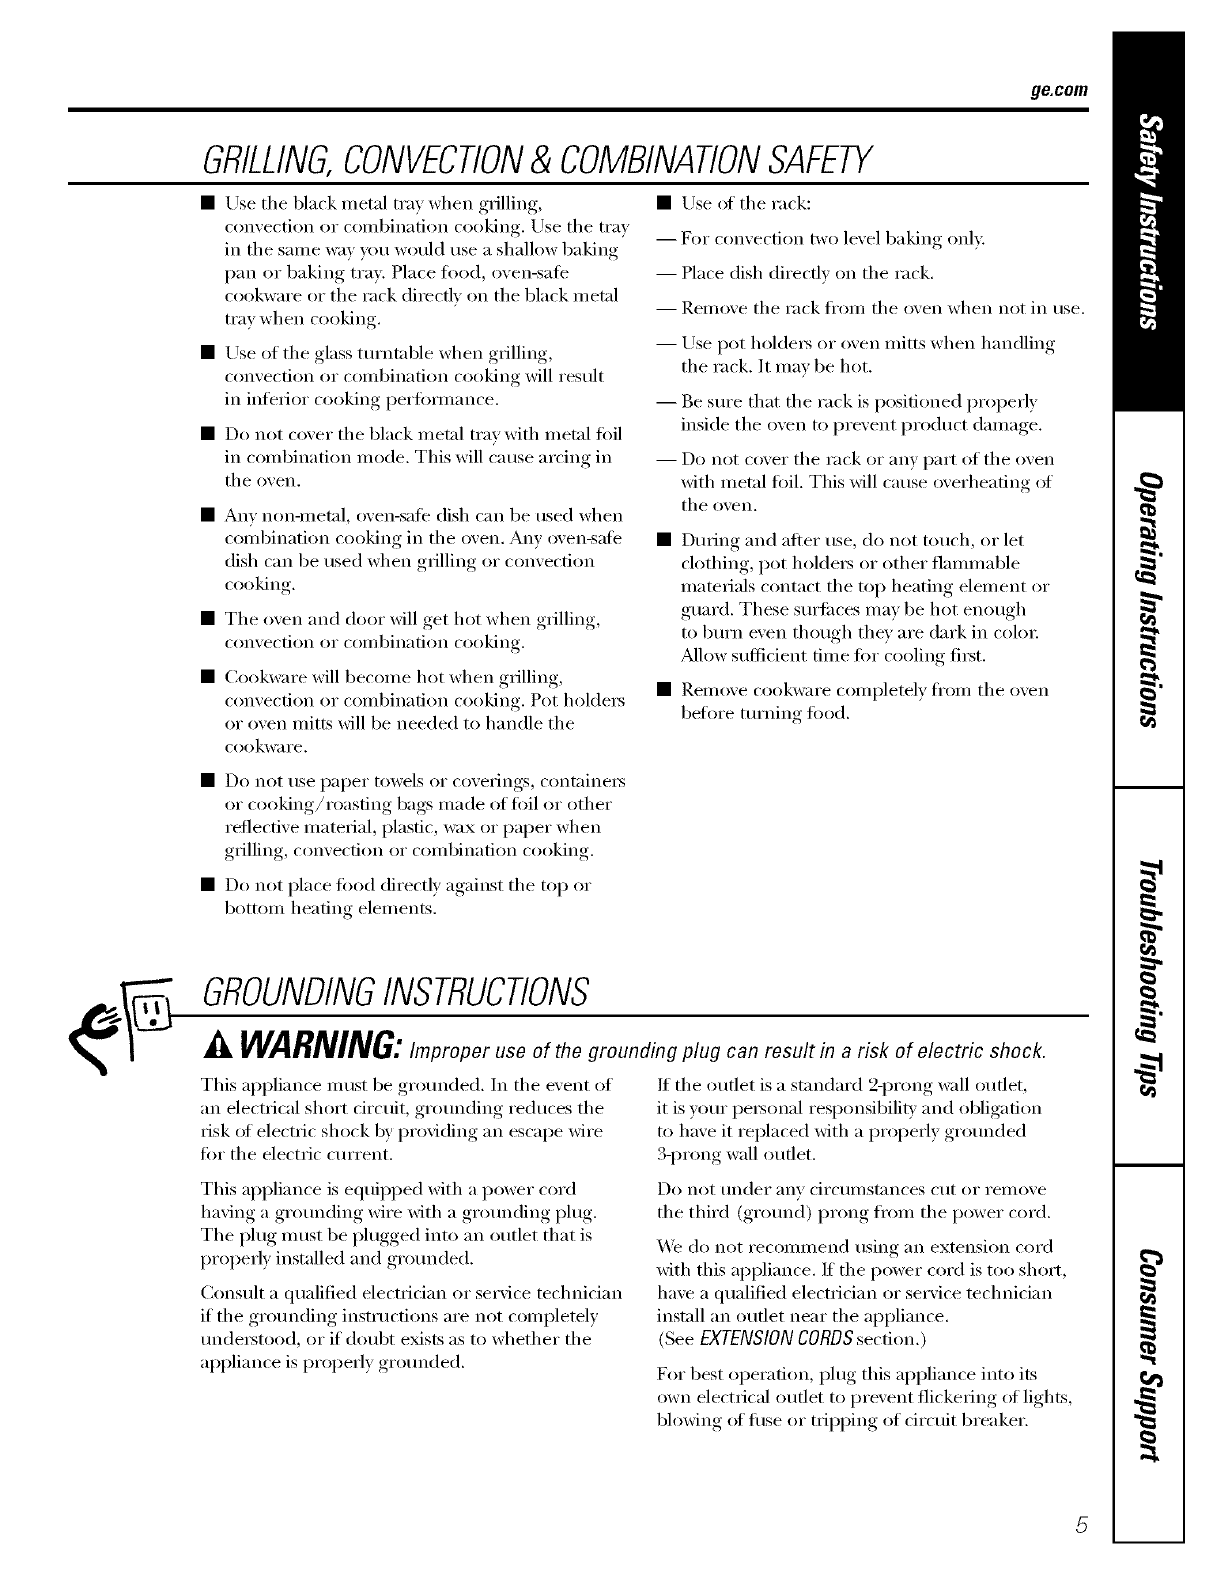
GROUNDINGINSTRUCTIONS
WARNING:I ro eruseof the grounding plug can result in a risk of electric shock.
This api)liance inust be grounded. In the event of
an electrical short drcuit, grounding reduces the
risk ot electric shock 1)yI)roviding an escape wire
ti)i" the electric current.
This api)liance is equipped with a power cord
having a grounding wire with a grounding phig.
The phig inust be phigged into an outlet that is
I)I'oI)erly installed and grounded.
(;IInsult a qualified electrician or seIMce technician
if the grounding instructions are not comi)letely
undeistood, or if doubt exists as to whether the
al)pliance is i)i'opeity grounded.
If the outlet is a standard 2-1)Tong wall outlet,
it is your peisonal resi)onsibili _' and obligation
to have it replaced with a i)i'oi)erly grounded
3-1)Tong wall outlet.
Do not tlndeI" anv ciI'CtlI/lSt;Inces ctlt or I'eIllOVe
the third (ground) i_i'ong fl'oin the power cord.
We do not reconmlend using an extension cord
with this api)liance. If the power cord is to() short,
have a qualified electrician or service mchnician
install an outlet near tile api)liance.
(See EXTENSIONCORDSsection.)
For best oi)ei'afion, phig this ai)pliance into its
own electrical outlet to i)i'exent flickering of lights,
bhIwing of flIse or ti_ii)ping of circuit 1)i'eaker.
IMPORTANTSAFETYINSTRUCTIONS.
READALLINSTRUCTIONSBEFOREUSING.
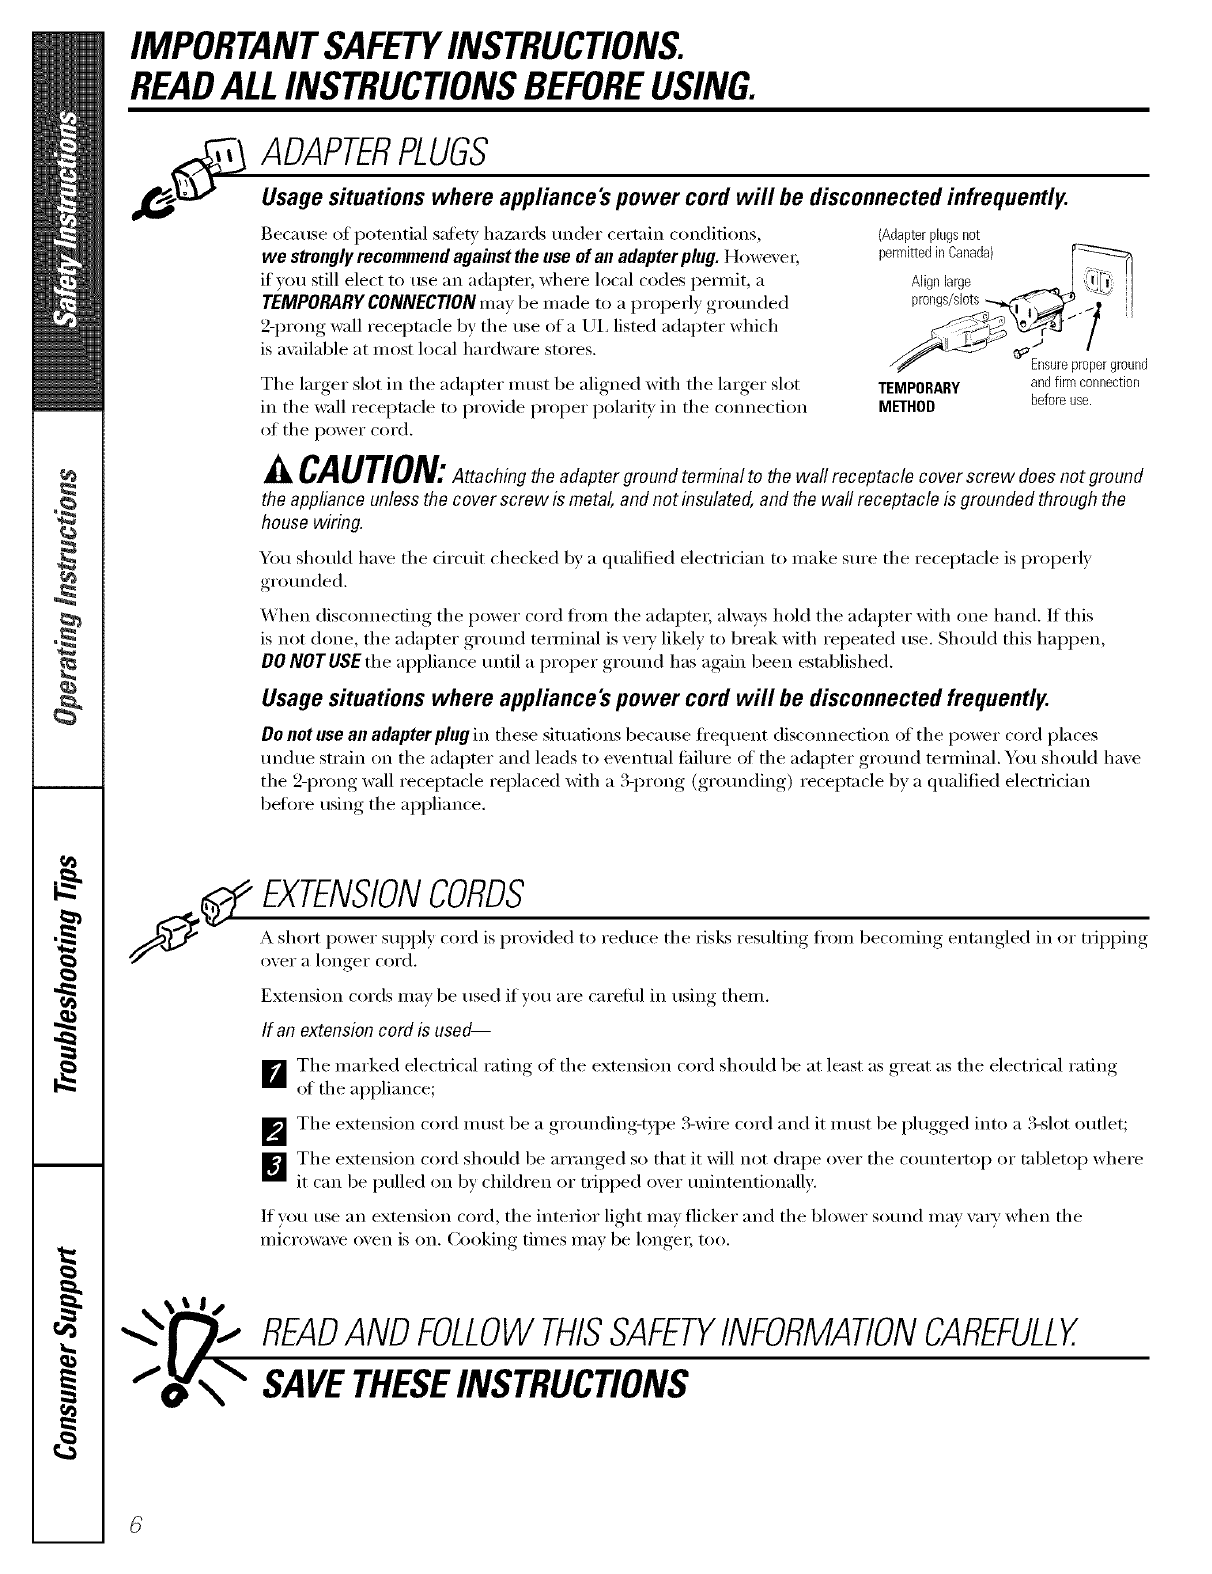
ADAPTERPLUGS
Usage situations where appliance's power cord will be disconnected infrequently.
Because of potential sali-w ha/m'ds under certain conditions,
we strongly recommend against the use of an adapter plug. Howevex;
if you still elect to use an adapter, where local codes pemfit, a
TEMPORARY CONNECTIONmay be inade to a propedy grounded
2-prong wall receptacle by the tlse of a UI, listed adapter which
is a\:filable at most local hardware stores.
Tile larger slot in tile adapter must be aligned with tile larger slot
in the wall receptacle to proxide proper polarit} in the com_ecfion
of the power cord.
{Adapterplugsnot
permittedin Canada)
Align large I I I' I
/_ Ensureproperground
TEMPORARY andfirmconnection
METHOD beforeuse.
A_ CAUTION: Attaching the adaptor ground terminal to the wall receptacle cover screw does not ground
the appliance unlessthe coverscrew is metal,and not insulated,and the wall receptacle is grounded throughthe
house wiring.
You should have tile drcuit checked by a qualified electrician to make sm'e tile receptacle is properly
gro/mded.
When disc(mnecting tile power cord ti'om tile adaptor; always hold tile adapter with (me hand. If this
is not done, tile adapter gro/md temfinal is ve_' likely to break with repeated use. Should this hal)pen,
DONOTUSEtile appliance until a proper ground has again been established.
Usage situations where appliance's power cord will be disconnected frequently.
Do not use an adapter plug in these situations because fl'equent disconnection of the power cord places
tmdue strain on tile adapter and leads to eventual fifilm'e of tile adapter grotmd tem/inal. You should have
tile 2-prong wall receptacle replaced with a 3-prong (gro/mding) receptacle by a qualified electrician
belin'e using tile appliance.
EXTENSIONCORDS
A short power sui)plv, cord is provided to reduce tile risks resulting, ti'om becoming, entangled, in or tfili) _ing,
over a hmger cord.
Extension cords may be used if w)u are carefifl in using them.
If an extensioncord is used--
_r_The marked electrical rating at the extension cord should be at least as great as the electrical radng
at the appliance;
,gr°tlnding-tx, )e 3-wire cord and it illtlSt be )lugged,_ into a 3-slot outlet;
_'_ The extension cord m ust be a ,1 ..... I
_The extension cord should be arranged so that it will not drape oxer tile co/mtertop or tabletop where
it can be pulled on by children or t_ipped oxer tmintentionallv.
If you use an extension cord, tile interior light may flicker and tile bh)wer sound nlav \_lrv when tile
microwave oven is on. Cooking times may be longe_; too.
READANDFOLLOWTHISSAFETYINFORMATIONCAREFULLY.
SAVETHESEINSTRUCTIONS
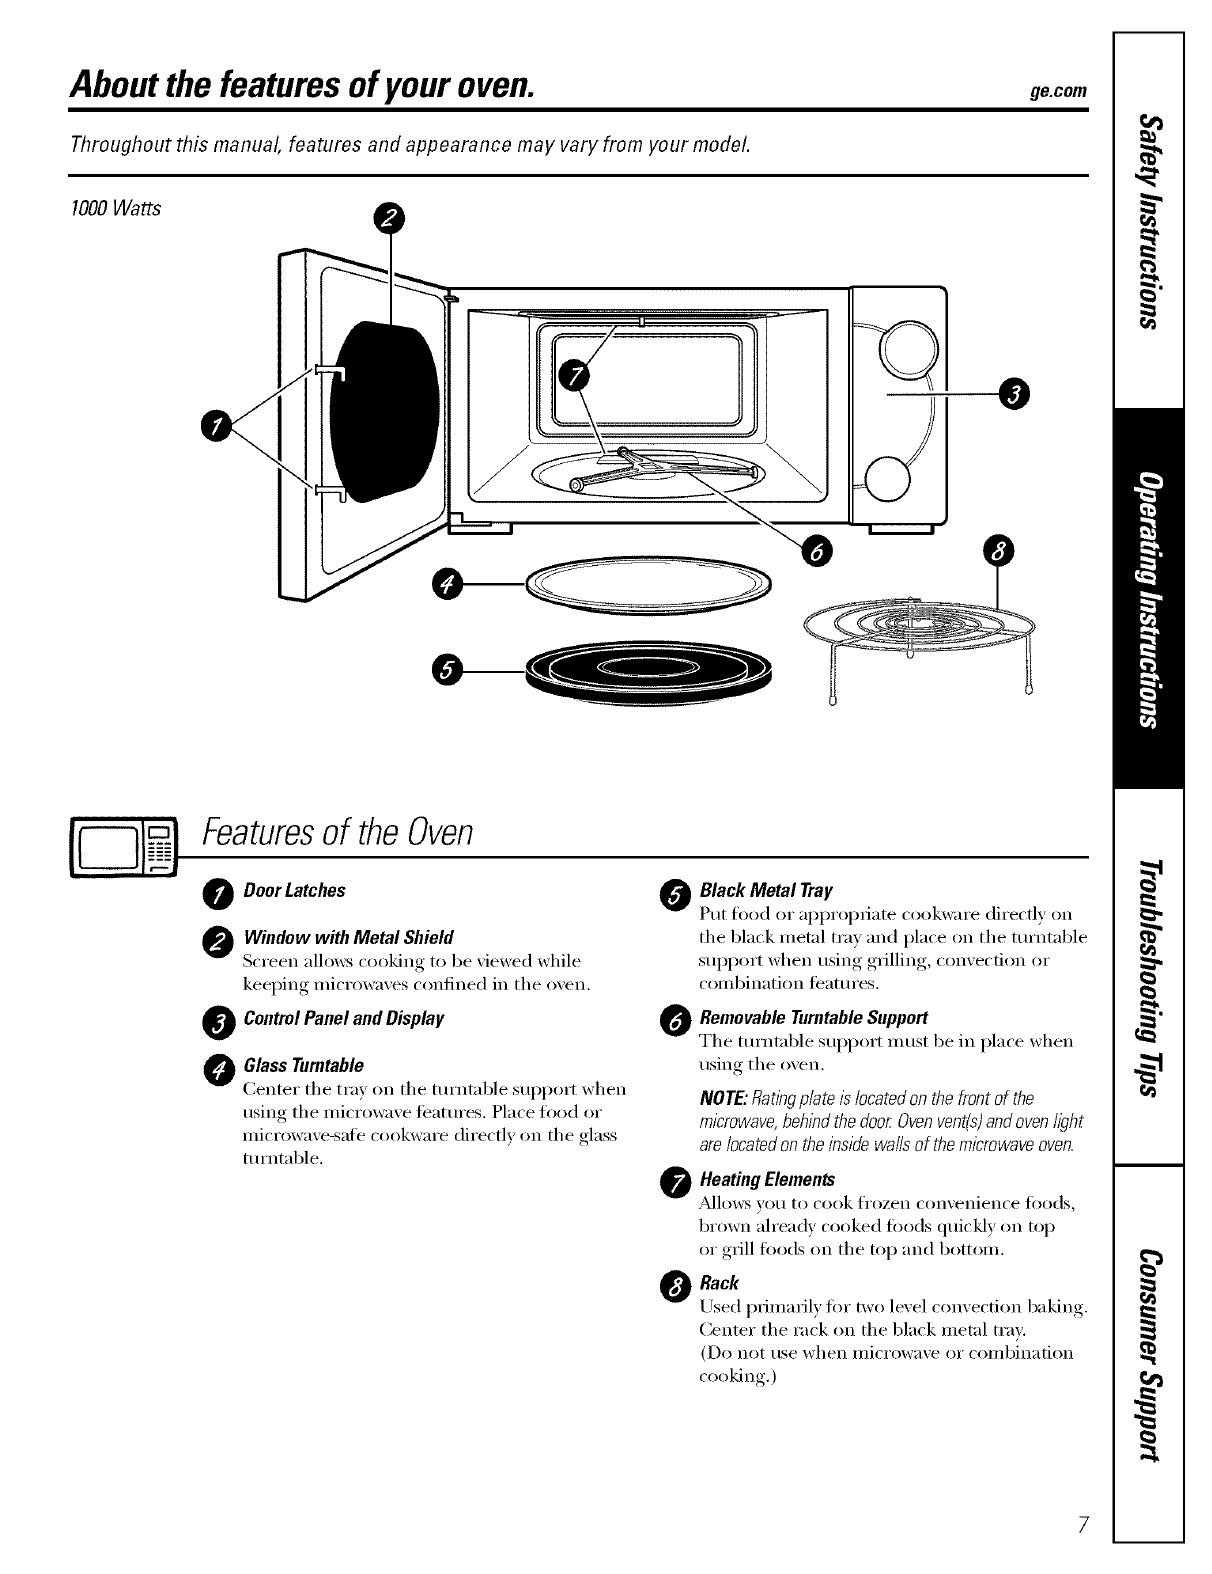
Aboutthe featuresof youroven. gecom
Throughout this manual, features and appearance may vary from your model.
1000Watts
\
0
Featuresof the Oven
Door Latches 0
Window with Metal Shield
Screen allows cooking to be "Aewed while
keeping microwaves confined in the oven.
@Control Panel and Display @
Glass Turntable
Center the tray on the turntable support when
using the microwave teatm'es. Place tood or
microwave-sate cookware directly on the glass
turntable.
Black Metal Tray
Put food or appropriate cookware direcdy on
the black metal tray and place on the turntable
support when usin,*._,grilling,, comecfion or
combination teatm'es.
RemovableTurntableSupport
The turntable support must be in place when
using the oven.
NOTE:Rat/hgplateIslocatedonthefrontof the
microwave,behindthedoorOvenvent(s)andovenhght
are/ocatedontheinsidewaftsof themicrowaveoven.
Heating Elements
_bdlows votx to cook fI'ozen ('on'_enien('e ]'()o(]s,
brown already cooked foods quickly on top
or grill foods on the top and bottom.
Rack
Used prhnaril} tot two level ('onxe('tion baking.
Center the rack on the black metal tra>
(Do not use when microwave or combination
cooking.)
Aboutthe featuresof youroven.
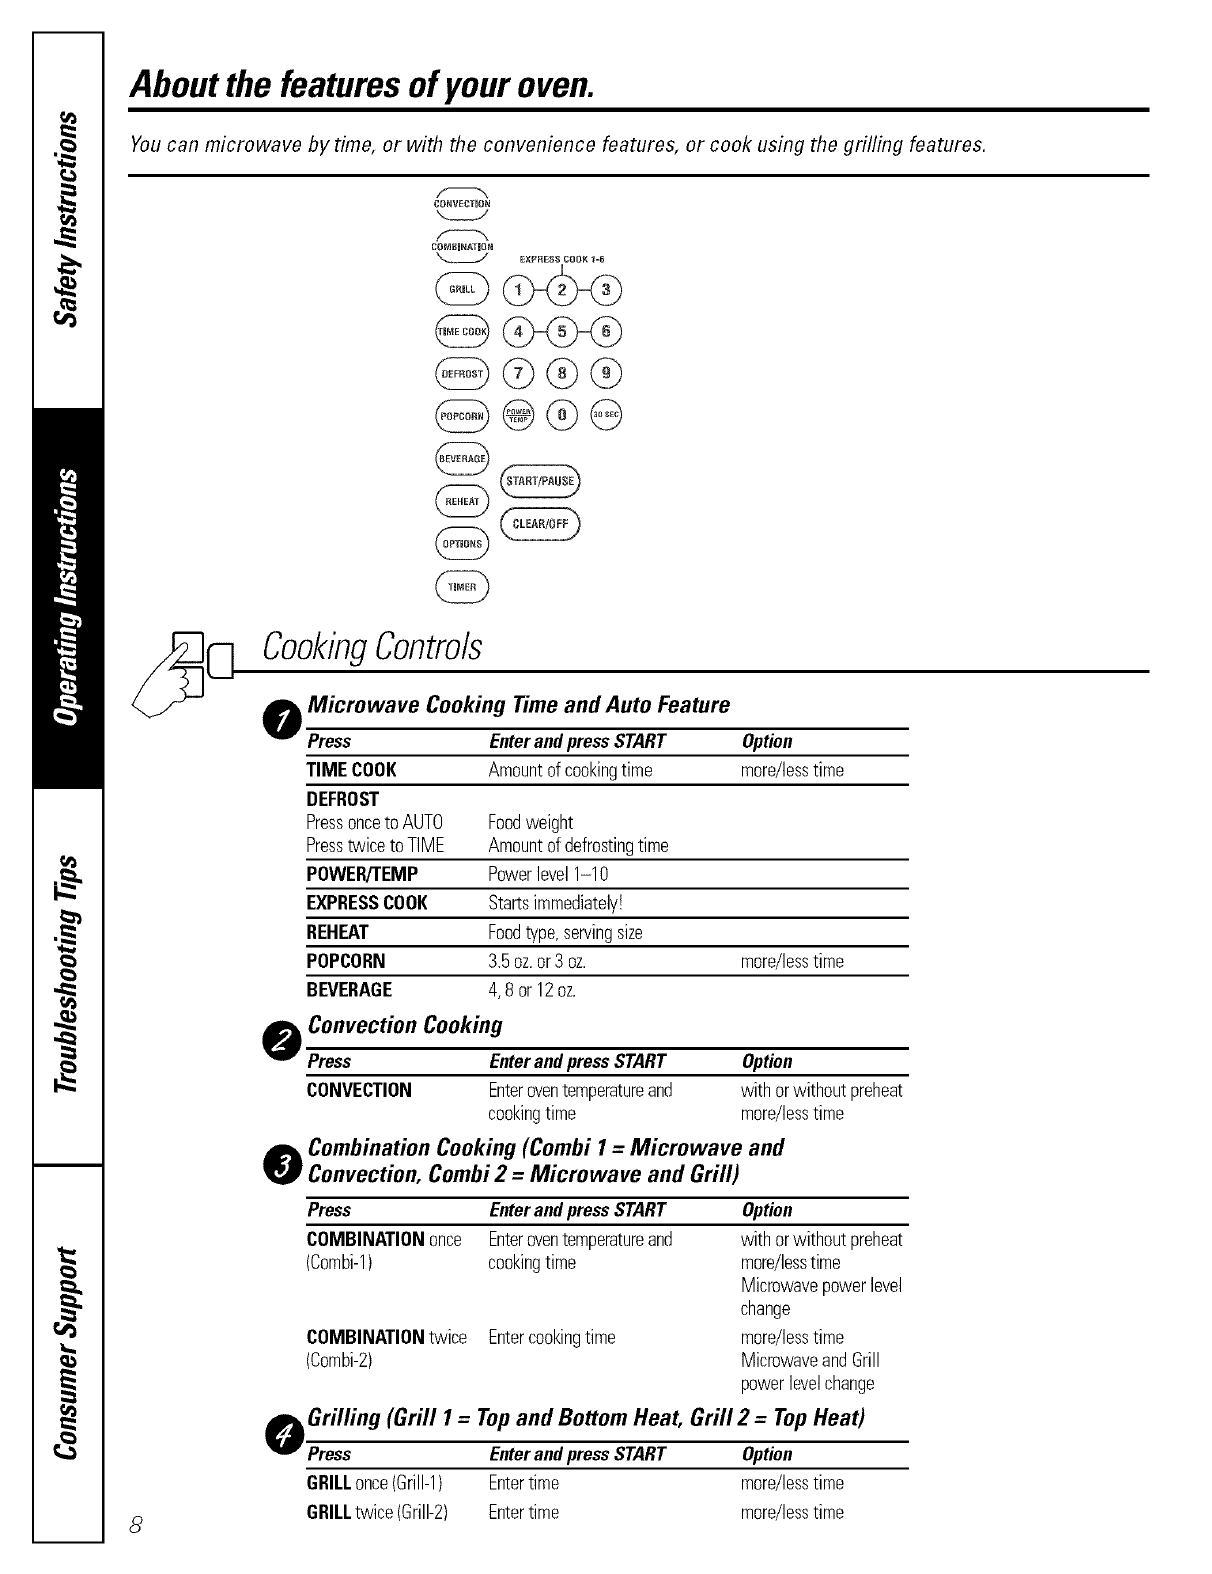
You can microwave by time, or with the convenience features, or cook using the grilling features.
CO_VECTUON
COMB@NATION
EXpF{ESS COOK 1=6
@@®@
@
@
CookingControls
oMicrewave Cooking Time and Auto Feature
Press Enterandpress START Option
TIME COOK Amountof cookingtime more/lesstime
DEFROST
Pressonceto AUTO Foodweight
Presstwiceto TIME Amountof defrostingtime
POWER/"rEMP Powerlevel1-10
EXPRESSCOOK Startsimmediately!
REHEAT Foodtype,servingsize
POPCORN 3.5oz.or3 oz. more/lesstime
BEVERAGE 4,8 or12oz.
oConvection Cooking
Press EnterandpressSTART Option
CONVECTION Enteroventemperatureand withorwithoutpreheat
cookingtime more/lesstime
LCombination Cooking (Combi 1=Microwave and
_W Convection, Combi 2 =Microwave and Grill)
Press EnterandpressSTART Option
COMBINATIONonce Enteroventemperatureand withorwithoutpreheat
(Combi-1) cookingtime more/lesstime
Microwavepowerlevel
change
COMBINATIONtwice Entercookingt_me more/lesstime
(Combi-2) MicrowaveandGrill
powerlevelchange
oGrilling (Grill 1=Top and Bottom Heat, Grill 2 =TopHeat)
Press EnterandpressSTART Option
GRILLonce(Grill-1) Entertime more/lesstime
GRILLtwice(Grill-2) Entertime more/lesstime
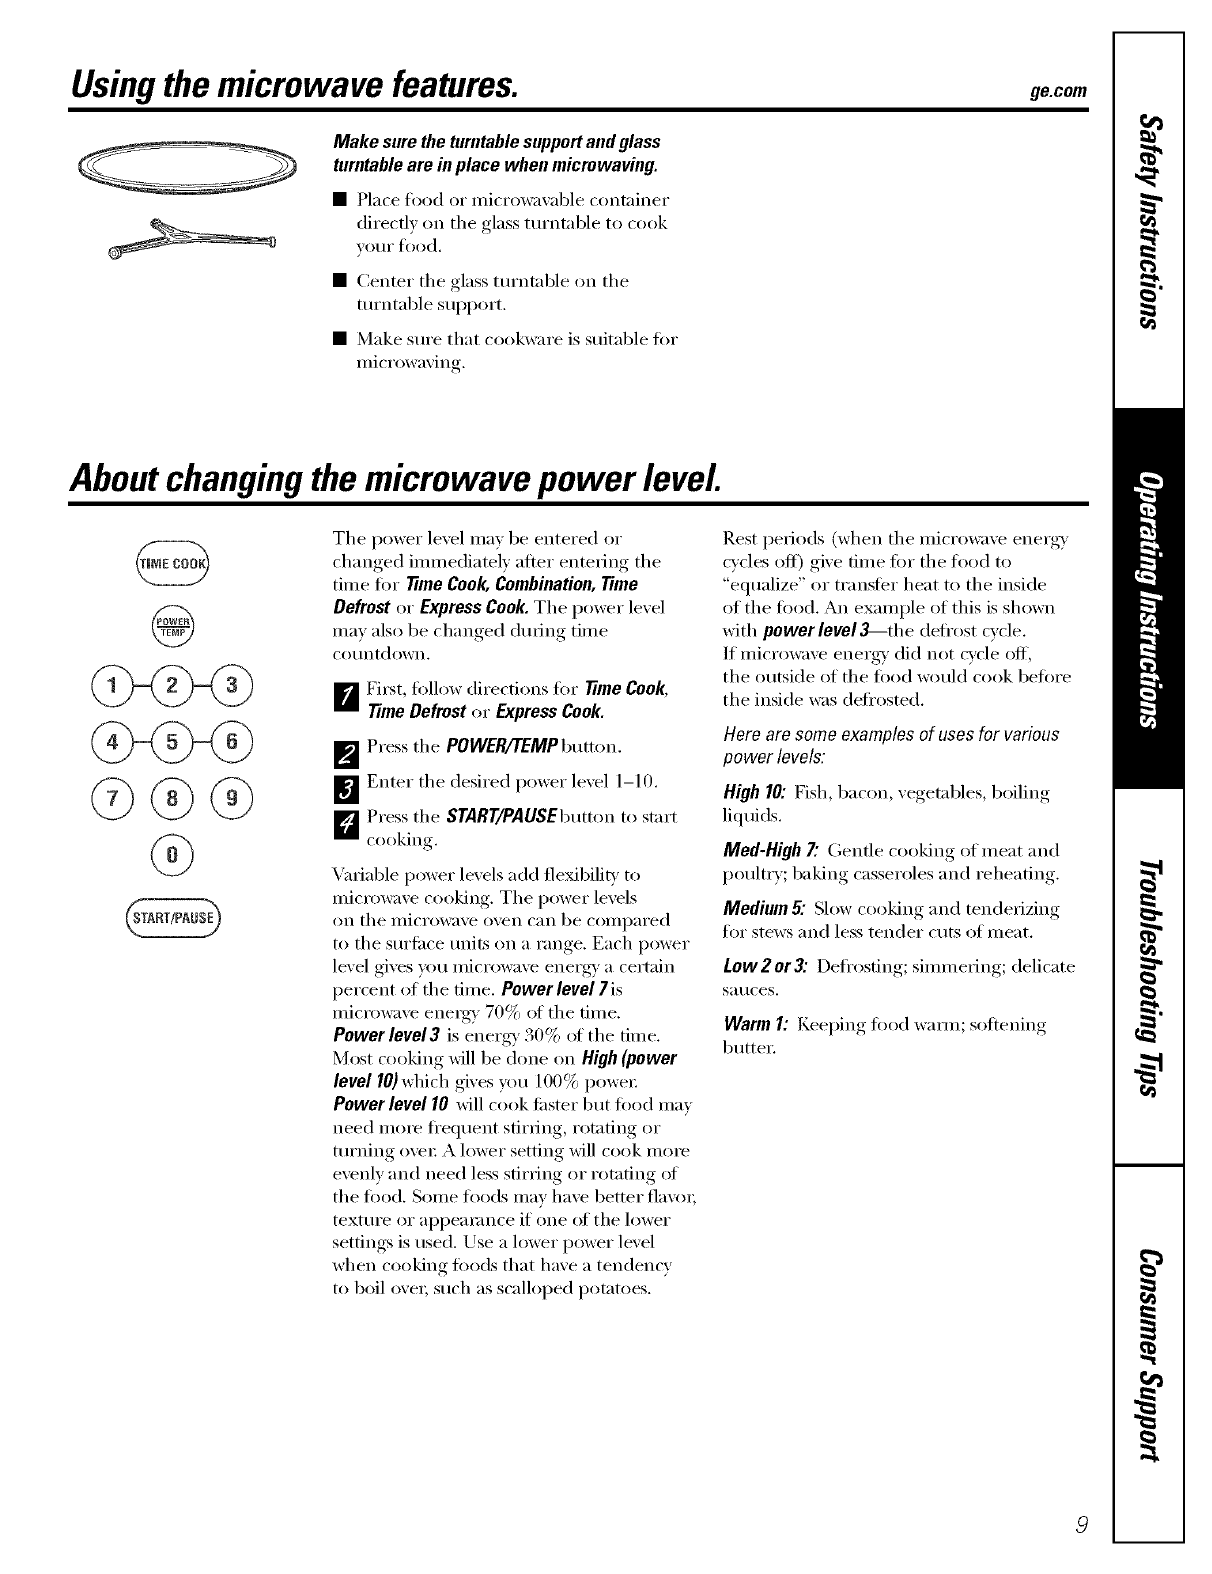
Usingthe microwave features, ge.com
Make suretheturntablesupportandglass
turntable are in place when micrewaving.
•Place fl)od or microwavable container
directly oil the glass turntable to cook
VOUI" _O()d,
• Center the glass turntal)le on the
mrntal)le support.
• Make sure that cookware is suitable fi)r
microwaving.
Aboutchangingthe microwave power level
Tile power level may be entered or
(hanged immediately after entering the
time fi)r Time Cook, Combination, Time
Defrost or Express Cook. The power level
may also be changed dm_ing time
countdown,
BFirst, fi)llow directions fi)r Time Cook,
Time Defrost or Express Cook.
_'_ Press tile POWER/TEMPbutton.
_'] Enter the desired power lexel 1-10.
D Press the START/PAUSEbutton to start
c()()king
Variable power levels add fle_biliD' to
mierm_m'e cooking. The power levels
on the IllicI'o%_lve oven C[lll be COllll)aI'ed
to tile sm'fi_ce milts on a range. Each power
level gives yot! Inicr(m_lve energy a certain
percent of the time, Power level 7is
micr(m_ve energy 70% ot tile time.
Power level3 is energy 30% ot tile time.
Most cooking will be done on High (power
level 10) which gives you 100% powex:
Power level 10 will cook fi_ster but fi)od may
need more fl'equent stirring, rotating or
turning ove_: A lower setting will cook more
evenly and need less stirring or rotating (ff
tile fl)od. Some fl)ods may have better fla\'o_;
texture or appearance if one of tile h)wer
settings is used, Use a h)wer power level
when cooking fi)ods that have a tendency
to boil ove_; such as scalloped potatoes,
Rest periods (when tile microwave energ)'
cycles off) give time fin" the toed to
"equalize" or transter heat to the inside
of tile food. An example of this is shown
with power level_-the defl'ost cycle.
If microwave energy' did not cycle off;
the outside of the fi)od would cook heft)re
the inside was defl'osted,
Hero am some examples of uses for various
power levels:
High 10: Fish, bacon, vegetables, boiling
liquids.
Med-High7."Gentle cooking of meat and
poultry; baking casseroles and reheating.
Medium 5: Slow cooking and mndedzing
for stews and less tender cuts of meat.
Low2or3: Defl'osfing; simmering; delicate
Sauces.
Warm I: Keel)ing, fl)od waxm; softening,
butte_:
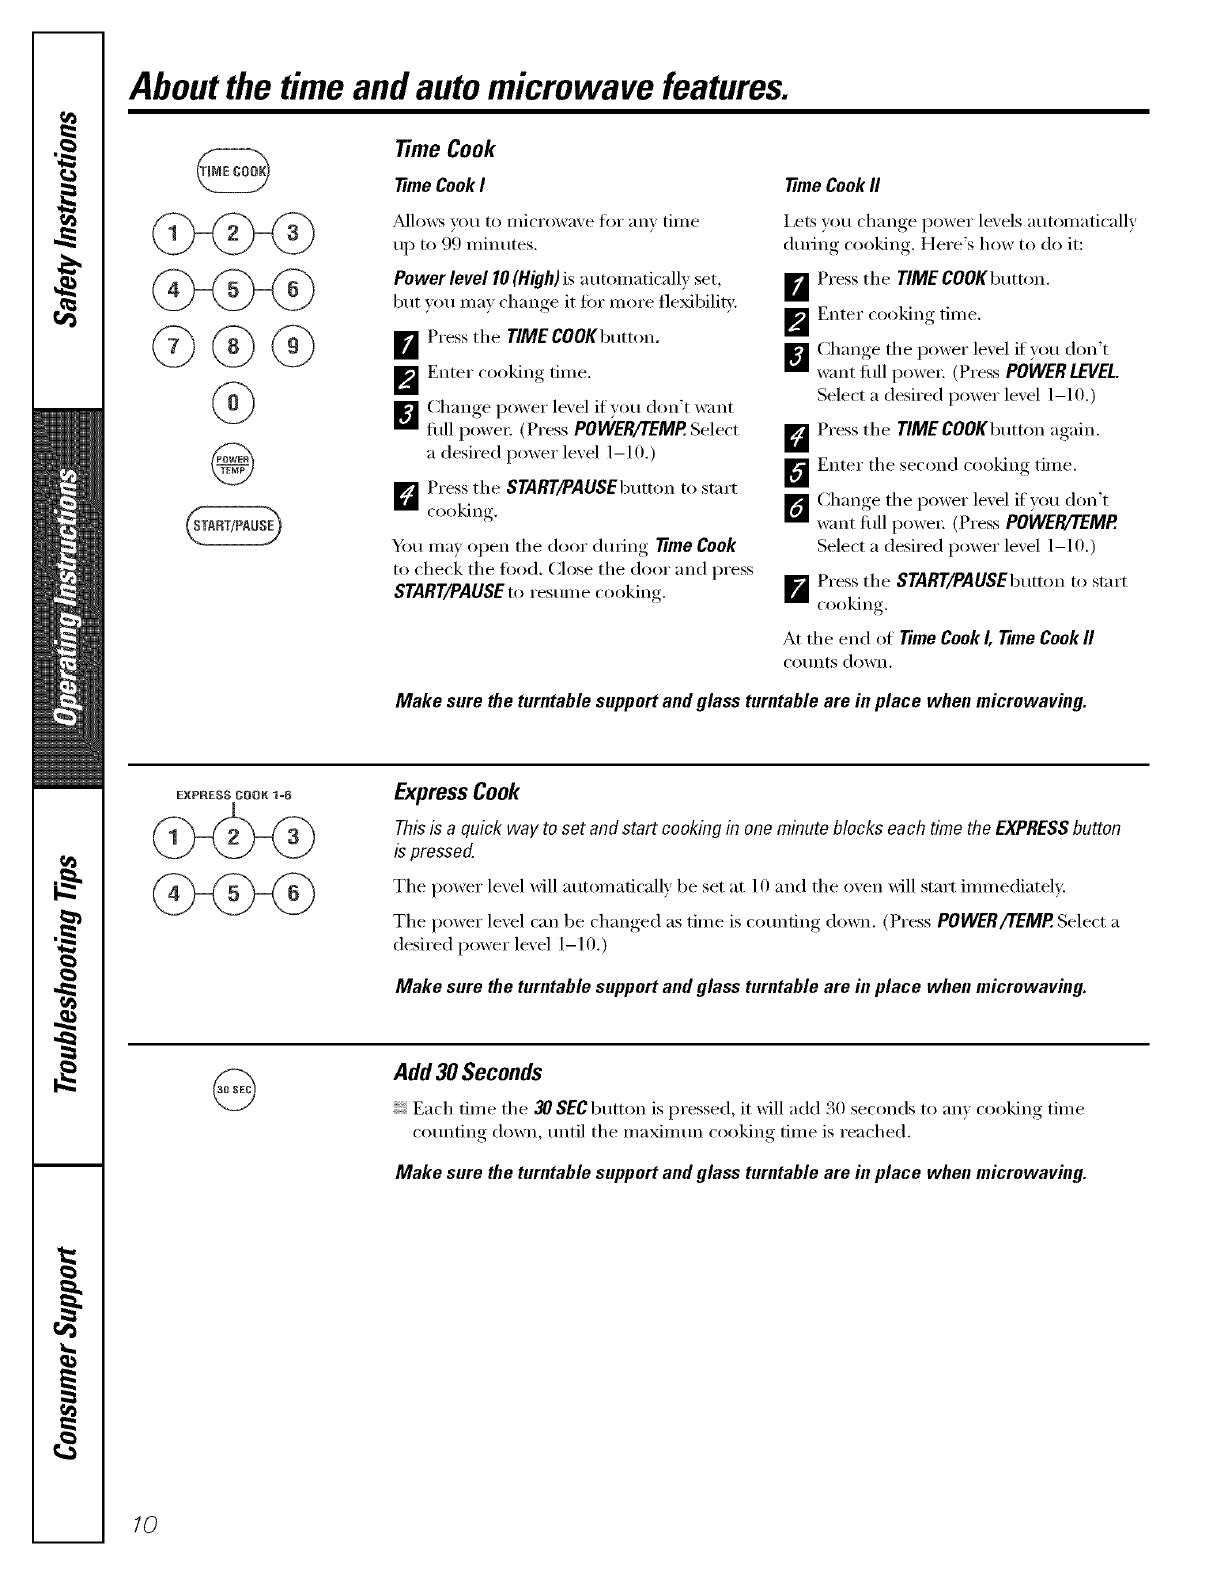
Aboutthe time and automicrowave features.
Time Cook
Time CookI Time Cook II
J_dlows veil 1o microwaxe for _111_ tiille
up to 99 minutes.
Power level I0 (High) is autonmticall] set,
but ion ma] change it fiw more flexibility:
_r_ Press the TIMECOOKbutton.
_'_ Enter cooking time.
_¢J Change power lexel if}on don't want
fifll p()wex: (Press POWERITEMP. Select
a desired power level 1-10.)
L_ Press the STARTIPAUSEbutt(m t() start
CoOkillg.
Ybu may open the door during Time Cook
to check the toed. Close the door and press
START/PAUSE to resume c_ Mng
I,ets you change power levels automatically
dm_ing cooking. Here's how to do it:
D'J Press the TIMECOOKbutton.
_'_ Enter cooking time.
•O
[] Chano-e the power level ityou don't
want fifll powe_: (Press POWER LEVEL
Select a desired i)o_vr level 1-10.)
D Press the TIME COOKbutton again.
_'_ Enter the second cooking time.
•O
[_ Chanoe the power level it}ou don't
want fifll powe_: (Press POWER/'rEMP.
Select a desired power level 1-10.)
_"_ Press the START/PAUSEbutton to start
cooking.
At the end of Time CookI, Time Cook II
CO/lilts dowil.
Make sure the turntable support and glass turntable are in place when microwaving.
Express Cook
This is aquick way to set and start cooking in one minute blocks each time the EXPRESS button
is pressed.
The power level will automatically be set at 10 and the oven will start immediately.
The power le',el can be changed as time is cotmting down. (Press PO[/I/ER//_MP. Select a
desired power level 1-10.)
Make sure the turntable support and glass turntable are in place when microwaving.
Add30 Seconds
Each time the 30 SEC button is pressed, it will add 30 seconds to any cooking time
cotmfing down, tmti] the maximtm cooking time is reached.
Make sure the turntable support and glass turntable are in place when microwaving.
/0
ge.com
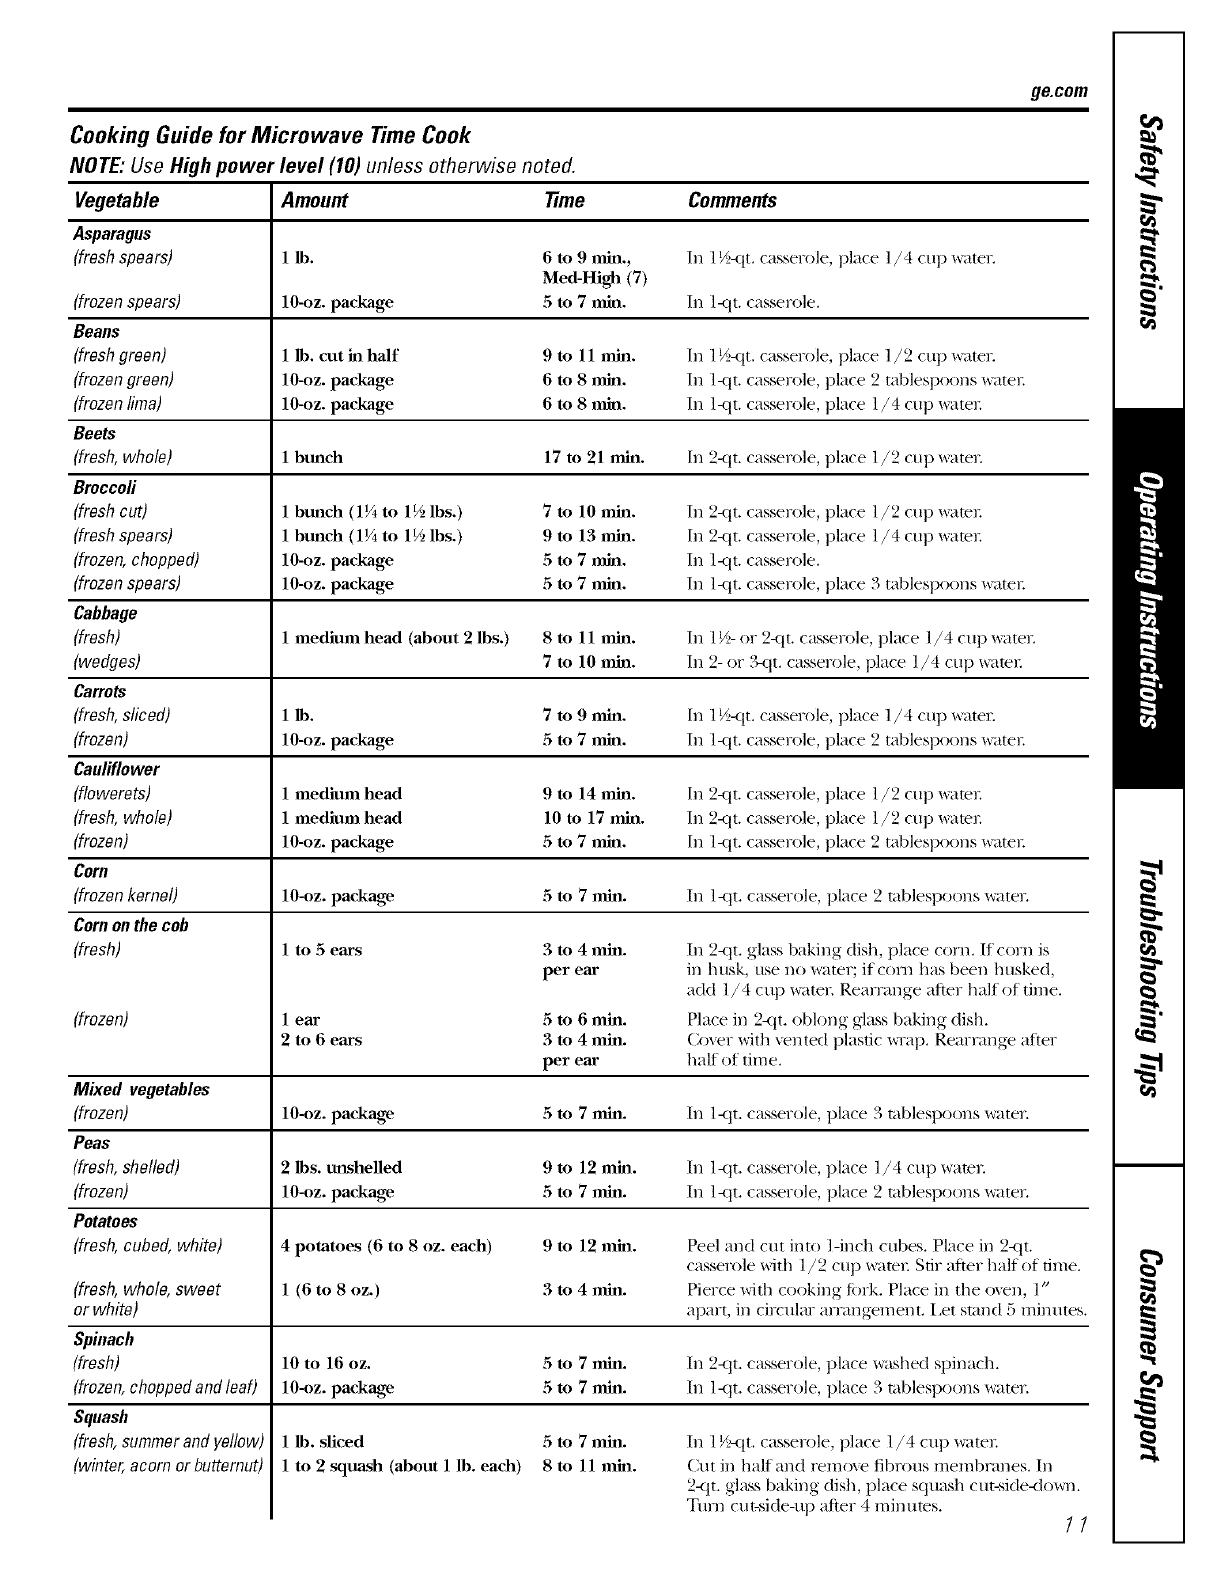
Cooking Guide for Microwave Time Cook
NOTE: Use High power level (10) unless otherwise noted.
Vegetable Amount time Comments
Asparagus
(fresh spears) 1 lb. 6 to 9 rain., In 1½-<tt. casserole, place l/4 cup _ltel:
Med-High (7)
(frozenspears) lO-oz, package 5 to 7nml. In l<tt. casserole.
Beans
(freshgreen) 1lb. cut in half 9 to 11 rain. In 1½-<tt. casserole, place l /2 cup _ltel:
(frozengreen) 10-oz. package 6 to 8rain. In l<tt. casserole, place 2 tablespoons _ater.
(frozen lima) 10-oz. package 6 to 8n_l. In l<tt. casserole, place l/4 cup _ater.
Beets
(fresh, whole) 1 bunch 17 to 21 rain. In 2-<it. casserole, place l/2 cup _ltel:
Broccoli
(fresh cut) 1 bmlch (1¼ to 1½ lbs.) 7 to 10 nfin. In 2-<it. casserole, place l/2 cup _ltel:
(fresh spears) 1bmlch (1¼ to 1½ lbs.) 9 to 13 rain. In 2-<it. casserole, place l/4 cup _ltel:
(frozen, chopped) 10-oz. package 5 to 7nfin. In I-<tL casserole.
(frozenspears) 10-oz. package 5 to 7rain. In l<tt. casserole, place 3 tablespoons _ater.
Cabbage
(fresh) 1medium head (about 2 lbs.) 8 to 11 rain. In 1½- or 2<it. casserole, place l/4 cup _ltel:
(wedges) 7to 10 rain. In 2- or .9_tt. casserole, place l/4 cup _ltel:
Carrots
(fresh, sliced) 1 lb. 7 to 9 rain. In 1½-<tt. casserole, place 1/4 cup _ltel:
(frozen) 10-oz. package 5 to 7nfin. In l<tt. casserole, place 2 tablespoons _atel:
Cauliflower
(flowerets) 1 medium head 9 to 14 rain. In 2<it. casserole, place l/2 cup _tel:
(fresh, whole) 1medium head 10 to 17 rain. In 2-<tLcasserole, place l/2 cup x_ltel:
(frozen) 10-oz. package 5 to 7rain. In l<tt. casserole, place 2 tablespoons _atel:
Corn
(frozen kernel) 10-oz. package 5 to 7 rain. In 1-<tt. casserole, place 2 tablespoons ware1:
Cornon the cob
(fresh) 1 to .5 ears
(frozen)
3 to 4rain.
per ear
(fresh, whole, sweet
or white)
Spinach
(fresh)
(frozen, chopped and leaf)
Squash
(fresh, summerand yellow)
(winter, acorn or butternut)
lear 5to 6 rain.
2to 6 ears 3to 4rain.
per ear
In 2-<it. glass baking dish, place corn. II corn is
in 13t]sk, use no water; if corn has been husked,
add l/4 c up watel: Rearrmlge after half of time.
Place in 2<t t. oblong glass baking dish.
Cover with vented plastic _Tap. Rearrange after
half of time.
Mixed vegetables
(frozen) 10-_)z.package 5 to 7rain. In l<t t. casserole, place 3 tablespoons water:
Peas
(fresh, shelled) 2lbs. unshelled 9 to 12 rain. In l-<tt, casserole, place 1/4 cup water:
(frozen) 10-_)z.package 5 to 7rain. In ]<t t. casserole, place 2 tablespoons water.
Potatoes
(fresh, cubed, white) 4potatoes (6 to 8oz. each) 9 to 12 rain. Peel and cut into l-inch cubes. Place in 2-<it.
casserole with l/2 cup _tel: Stir after half of time.
1(6 to 8 oz.) 3 to 4 rain. Pierce with cooking fi)_k. Place in the oven, l"
apart, in circular arrangement, i,et stand 5 minutes.
10 to 16 oz. 5 to 7 rain. In 2<t t. casserole, place washed spinach.
104)z. package 5 to 7rain. In l<tt. casserole, place 3 tablespoons water:
1lb. sliced
1 to 2squash (about 1 lb. each)
5 to 7rain.
8to 11 rain.
In l V_tt. casserole, place 1/4 cup water:
Cut ill half and relnoxe fibrous melnbranes. In
2-<it. glass baking dish, place squash cut-side<lo_m.
Ttml cut-side-up after 4 minutes. 11
Aboutthe time and automicrowave features.
time Defrost
Use Time Defrost to defrost _'or a selected
length of time.
_r_ Press the DEFROSTbutton twice,
_'_ Enter the defl'osting time,
_] Press the START/PAUSEbutton to start
defl'osfing.
D Turn the toed oxer if the oxen signals
TURN FOOD OVER.
Power level is automatically set at 3, but can
be changed. You can defl'ost small items
quickly by raising the power level after
entering the time. Power level 7 cuts the
total defl'osfing time in about haiti power
level 10cuts the total time to approximately
1/3. HoweveI; filed will need more
fl'equent attention than usual.
A dull thuml)ing noise may be heard
dtwJng defrosting. This is nomml when
oven is not operating at HighpoweI:
Make sure the turntable support and glass
turntable are in place when microwaving.
DefrostingTips
•Foods fl'ozen in paper or plastic c:m be
defrosted in the package. Closed packages
should be slit, pierced or vented AFTER
filed has partially defrosted. Plastic storage
containers shoukl be l)artially tmcovered.
• Family-size, prepackaged fl'ozen climm_
can be defl'osted and microwaved. If the
toed is in a fifil containe_; transter it to a
microwave-sate dish.
• Foods that spoil easily should not be
alh)wed to sit out fi)r more than one hem"
after defl'osting. Room temperatm'e
promotes the gr(m_h of ham/tiff bacteria.
• For more e;'en defl'osfing of larger fi)ods,
such as roasts, use Auto Defrost. Be sm'e
large meats are completely defl'osted
befl)re cooking.
• When defl'osted, filed should be cool
but softened in all areas./t still slightly icy,
return to the microwave ve_y briefly, or
let it stand a tew minutes.
Auto Defrost
Use AutoDefrostfi>r meat, poultr)and fish.
Use Time Defrost fi)r most other frozen foods.
Auto Defrost atltomaficallv sets the
defl'osting times and power levels to give
e;'en defl'osting results fi)r meats, poultry
and fish.
• Remove meat fl'om package and place
on microwaxe-satb dish.
_r_ Press the DEFROSTbutton once.
_'_ Enter the food weight, using the
Conxe_ion (;uide at right.
For example, press 1.2 fi)r 1.9 potmds
(1 p(mnd, 3 oz.).
BPress the START/PAUSEbutton t() start
deli'osting.
D Turn the fi)()d oxer if the oxen signals
TURN FOODOVER.
• Remove defl'osted meat or shield wam_
areas with small pieces (ff fl)il.
• _Mter defl'osting, most meats need to
stand 5 minutes to complete deli'osting.
I,a_ge roasts should stand fi)r about
30 minutes.
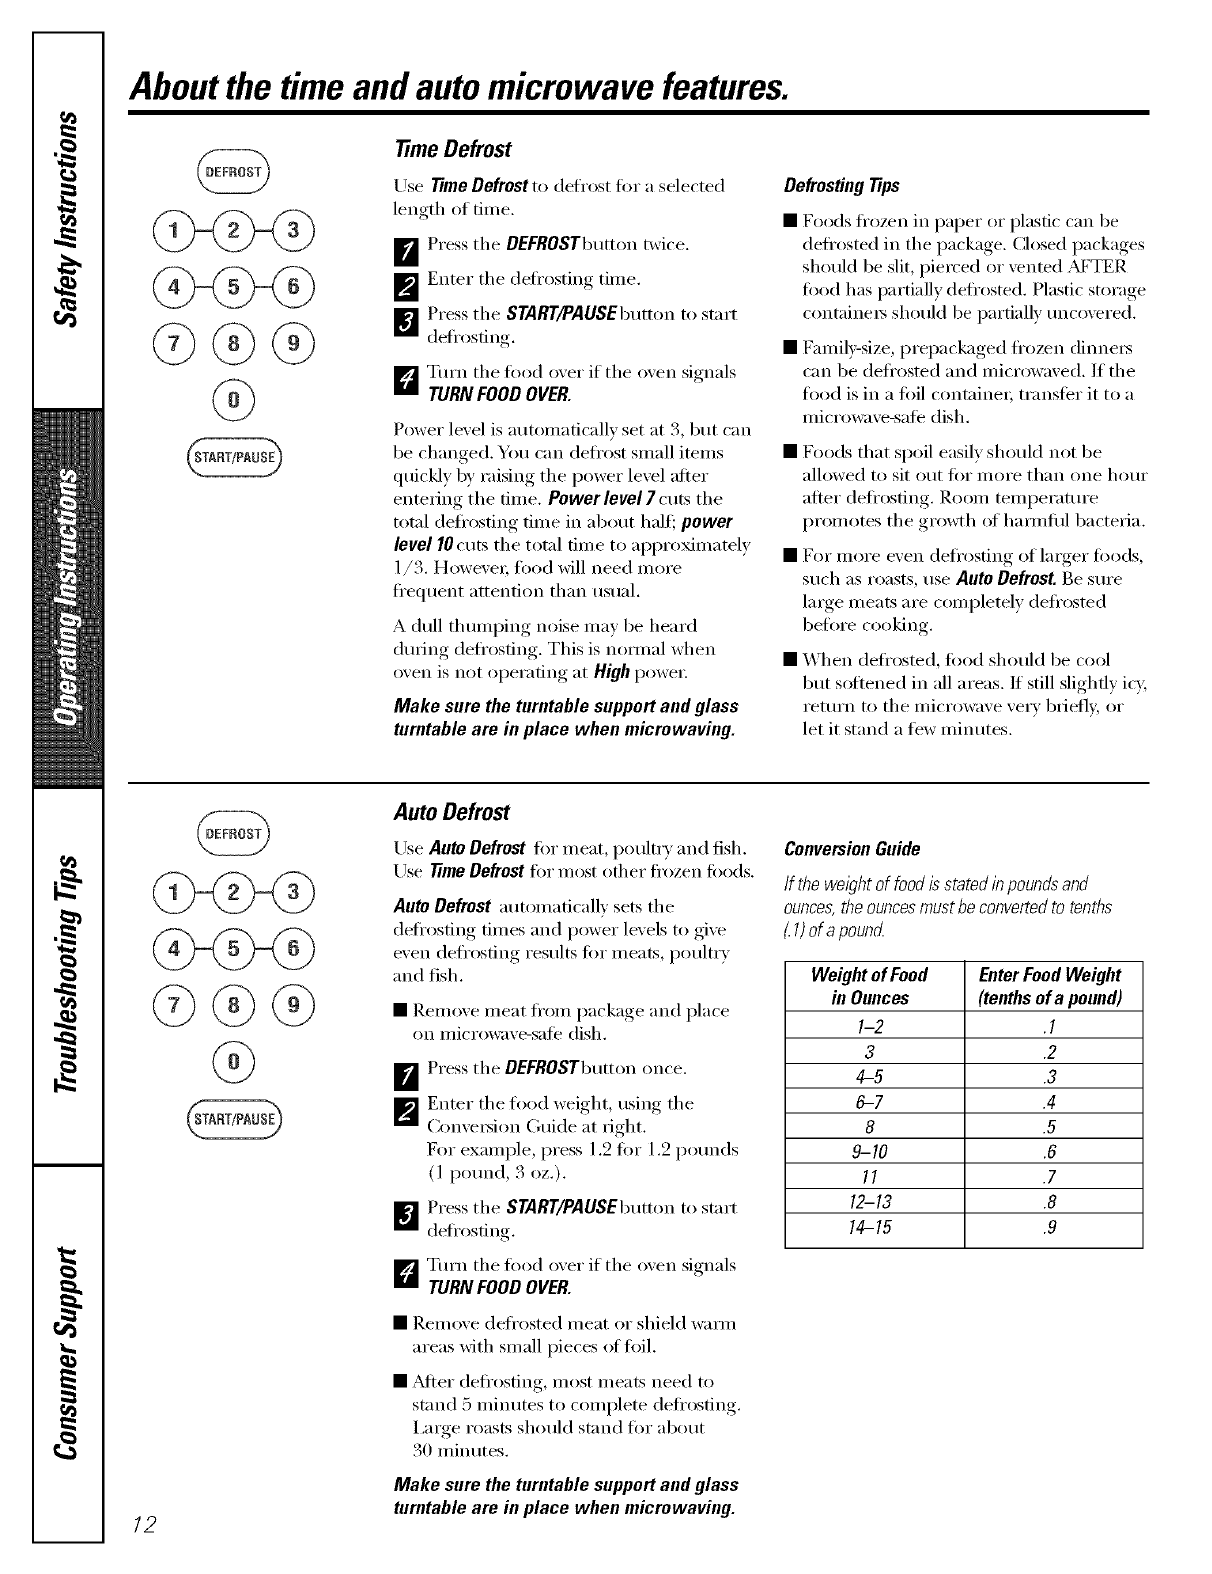
ConversionGuide
If the wel)htof foodisstatedinpoundsand
ounces,theouncesmustbeconvertedto tenths
1)ofa pound
WeightofFood EnterFoodWeight
in Ounces (tenthsofa pound)
1-2 .1
3.2
4-5 .3
6-7 .4
8.5
9-10 .6
11 .7
12-13 .8
14-15 .9
Make sure the turntable support and glass
turntable are in place when micrewaving.
/2
ge.com
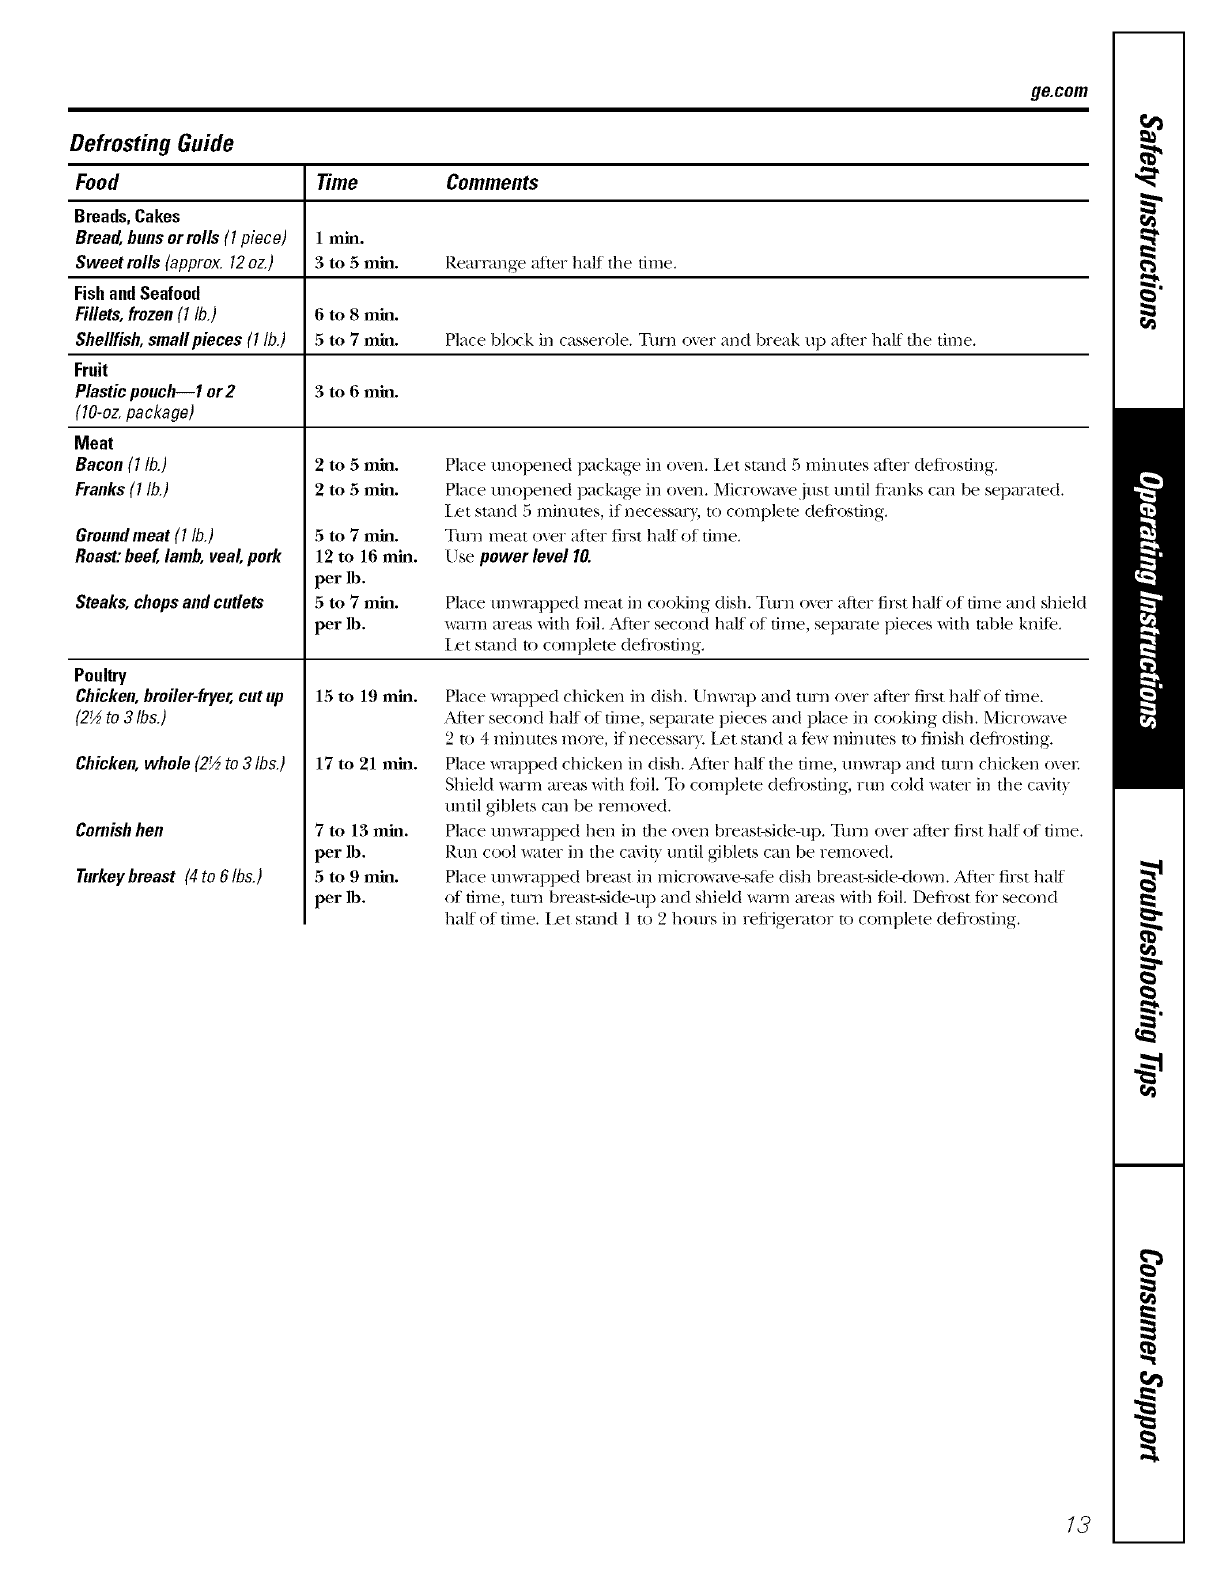
Defrosting Guide
Food Time Comments
Breads, Cakes
Bread, buns orrolls (I piece) !rain.
Sweet rolls (approx. 12 oz.) 3 to 5 rain. Rearrange after half the time,
Fish and Seafood
Fillets, frozen (I lb.) 6 to 8 rain.
Shellfish, smallpieces (I lb.) 5to 7 rain. Place block in casserole. Turn over and break up after half the time.
Fruit
Plastic pouch---1 or2 3to 6 rain.
(10-oz. package)
Meat
Bacon (I lb.)
Franks(I lb.)
Grouudmeat (I lb.)
Roast:beef, lamb,veal, pork
Steaks, chopsandcutlets
Poultry
Chicken,broiler-fryer,cut up
(2½to 3 Ibs.)
Chicken,whole (2½to 3 Ibs.)
Cornishhen
Turkeybreast (4to 6Ibs.)
5to7mm.
12tol6mm.
per_.
5to7mm.
per_.
15 to 19 rain.
17 to 21 rain.
7tol3mm.
per_.
5to9mm.
per_.
Place tmopened package in oven, l_t stand 5 minutes m'ter defi_osdng.
Place tmopened package in o_en. Microwa\ejt]st tmtil fi'anks can be separated.
Iset stand 5 rain tires, if necessm3, to complete defi'osting.
Tuna meat over after first half of time.
Use power level I0.
Place Um_Tapped meat in cooking dish, Turn over after first half of time and shield
warm areas with fi)il. _Mter second half of time, sepm_ite pieces with ruble knife,
Iset stand to complete deli'osfing.
Place _Tapped chicken in dish. Unwrap and turn over after first half of time.
After second half of time, separate pieces and place in cooking dish. Microwave
2to 4 minutes more, if necessar\, iset stand a few minutes to finish deli'osting.
Place _Tapped chicken in dish. _Mter half the time, tm_Ta l) and turn chicken o_el:
Shield warm areas with lifil. _ complete deli'osting, run cold water in the ca\it_
tmtil giblets can be remoxed.
Place Um_Tapped hen in the oven breast-side-up. Tm'n oxer after first half of time.
Rtm cool water in the ca\it) tmtil giblets can be remoxed.
Place tmx_Tapped breast in microwave-sale dish breast-side<loxm. Alter first half
of time, mrn breast-side-up and shield warm areas with li)il. Deli'ost Ii)r second
half of time. ilet stand ] to 2 hours in refi'igerator to complete deJi'osting.
13
Aboutthe conveniencemicrowave features.
Useonlywith prepackaged
microwavepopcornweighing
3,0to 3,5ounces,
Popcorn
Make sure the turntable support and glass
turntable are in place when microwaving.
To use the Popcorn teatm'e:
D'_ Follow )ackaoe instructions, using
Time Cook it the package is less than 3.(1
ounces or larger than 3.5 otmces. Place
the package of popcorn in the center
of the microwave.
[] Press the POPCORNbutt(m once or
twice. The oxen starts immediately.
Press once fin" a regular size (3.5 oz.)
bag of popcorn.
Press twice for a smaller size (3.0 oz.)
bag of popcorn.
If w)u open tile door while POPCORN is
displayed, PAUSEwill appea_; Close the
doo_; press START/PAUSEtoresume
cooking 0Rpress CLEAR/OFFto cancel
the popcorn te'attlre.
If food is tmdercooked after tile
cotmtdown, use time Cookfi)r
additional cooking time.
Toadd time:
Immediately after oven starts, press 9
to add 20 seconds.
Tosubtract time:
Immediately after oven starts, press 1
to subtract 20 seconds.
Beverage
Make sure the turntable support and glass
turntable are in place when microwaving.
To use the Beverage feature:
_r_ Press BEVERAGE.
[]The serving, size is automaticall} set
at 4 ounce_ but can be changed b)
pressing BEVERAGEto select 8 or 12
ounces. Pressing twice selects 8 ounces
and pressing three times selects 12
Otlllt-'es. The oven starts immediately.
Drinks heated with the Beverage feature may
be very hot. Remove the container with care.
If bexerage is not hot enough after the
cotmtdown, use TimeCookfor additional
heating time.
@Reheat
Make sure the turntable support and glass
turntable are in place when micrewaving.
Tile Reheat feature reheats ]-6 servings
of many previously cooked fi)ods.
_r_ Press REHEAT
[] Select fi)od type 1-6. (See ReheatGuide
below).
_¢j Select serving size 1-3.
L_ Press START
NOTE:Serving sizecannotbe changed
duringcooking.
Reheat Guide
Food Type
1. Meats
2. Pasta
3. Pizza slices
4. Plate of leftovers
5. Sauce
6. Vegetables
Comments
Co_er with lid or _ented plastic _Tap.
Co\er with lid or \ented plastic _Tap.
Do not cove1:
Co\er with lid or \ented plastic _Tap.
Co\er with lid or \ented plastic _Tap.
Co\er with lid or \ented plastic _Tap.
14
About the convection features, gecom
Convection cooking uses a heating element to raise the temperature of the air inside the
oven. Any oven temperature fl'om 250°F to 450°F may be set, in increments ofB°E A tim
gently circulates this heated air throughout the oven, over and around the tood, producing
golden brown exterio_ and rich, moist interio_.
Because the heated air is kept constantly moving, not pemfitting a layer ot cooler air
to develop aromld the tood, some toods cook fi_ster than in regular oven cooking.
See the Cookware Tips section for information on suggested cookware.
For Best Results...
[)se tile rack onl_ when doing two le;el baking. Otherwise, place food or oxen-sate dish
directly on metal tray.
CONVECTION
Convection Time Cook with Preheat
BPress the CONVEC770Nbutton.
_'_ Enter tile desired oxen temperature
between 250°F and 450°E Do not enter
COilxectioil cook tiIlle iloxv, (Tile cook
time will be entered latex, after tile oxen
is preheated.)
_ Press tile START/PAUSEbutton
to start preheating.
nX_hen tile oven is preheated, it will
signal. If you do not open tile door
within 1 horn; tile oxen will mrn off
automaticallv.
l_=_ Open tile oven door and, using
caution, place tile tood in tile oxen.
_ Close tile oxen doo_: Enter tile cook
time and press START/PAUSE to start
C()( )lZdllg.
i _ hen cooking is complete, tile oxen
will signal and turn off.
Make sure the turntable support and black metal tray are in place.
Convection Time Cook without Preheating
Blf)our recipe does not require
I)reheating,, press the CONVECTION
button.
_'_ Enter tile desired oven temperatm'e
between 250°F and 450°E
_ Enter tile cook time.
D Press tile START/PAUSEbutton to start
tile o'_ eil.
Make sure the turntable support and black metal tray are in place.
/5
Using the combination 1 (microwave and convection) features.
Combination I Cooking otiex_ the best features of microwave energy' and convection cooking.
Microwaves cook fi)od ti_st and convection dreulafion of heated air browns fl)ods
beautifldlv. Any oven temperature ti'om 250°F to 450°F may be set, in increments of 5°E
CAUTION:When using the combination features, remember that the oven,
door and dishes will be very hot!
• Cookware will become hot. Oven miffs • Be sure to select a size that will rotate
will be needed to handle the cookware, easily.
• Place toed or oven-sate cookware directly
on the black metal tray when cooking.
• Make sure food is cooked all the way
through before browning.
• Use the black metal tray in the same way
w)u would tlse a shallow baking pan or
i)aking tray.
•In addition to the cookware provided,
VO/I C_III /ISe non-illetal casserole dishes,
pie plains and other heat-sate cookware.
Place them directly on the black metal
tI'_IV.
• Place tile black metal tray directly on tile
turntable support.
• Do not rise cookware or covelJngs i/la(le
of paper; plastic or toil when using the
coillbination [eattlI'es.
See the Cookware Tips section for information
on suggested cookware.
CONBINA$|ON Combination 1 Time Cooking with Preheat
BPress the COMBINATIONbumm. []
COMBI-I will be displaxed.
_'_ Enter tile desired oven temperature
between 250°F and 450°E Do not enter
combination cook dine now. (Tile cook
time will be entered late_; after tile oxen
is preheated.)
_ Press tile START/PAUSEbutton to start
preheating.
lAq/en die oven is preheated, it _dll signal.
Ifyou do not open tile door within 1 hour;
tile oxen will turn off automatically.
[]Open the oxen door and, using
caution, place the toed in the oxen.
1_'_ Close the oven doo_: Enter the cook
time. Enter whole minutes. Press tile
START/PAUSEbutton to start cooking.
[] l_q_en cooking is complete, the oxen
will signal and turn off.
Make sure the turntable support and black metal tray are in place.
Combination 1 Time Cooking without Preheat
BIf your recipe does not require
preheating, press the COMBINATION
button.
_'_ Enter tile desired oxen temperature
between 250°F and 450°E
BEnter the cook time.
[]Press tile START/PAUSEbutton
to start tile o_,en.
NOTE:
• Some recipes call fi)r preheating.
• Check the Cookware -tips section fin"
correct cookware when Combination
Cooking.
• Do not use metal cookware when
Combination Cooking.
• Place meat on a trivet in a glass dish to
collect juices and prevent spattering. For
fi)ods that are too tall to fit in tile oven,
w)u can leave ()tit tile trivet.
• For best roasting and browning results,
whole roasts should be cooked in a glass
dish placed directly on tile oxen shelf.
Make sure the turntable support and black metal tray are in place.
/6
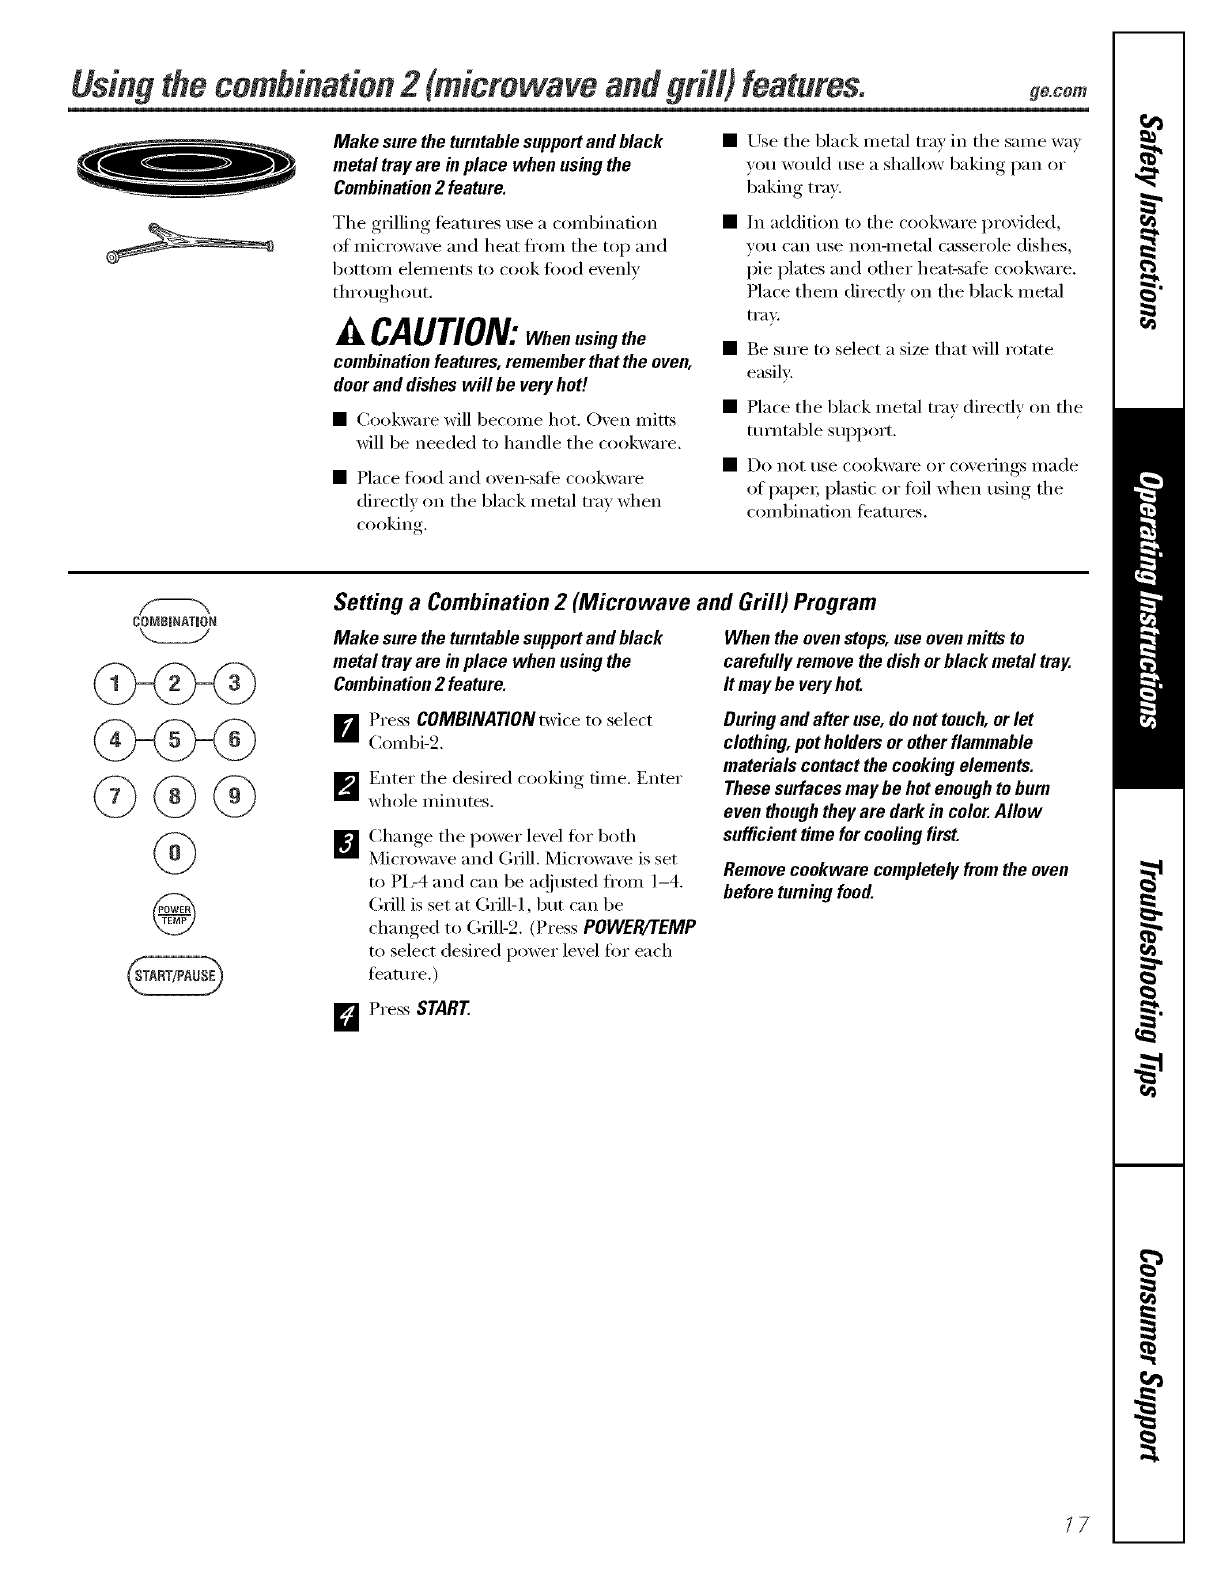
Usingthe combination 2 (microwaveandgrin) features, ge.com
Make sure the turntable support and black
metal tray are in place when using the
Combination2feature.
The grilling teatures use a c()mbination
of microwave and heat fl'on_ the top and
bottoI/l elei/lents to cook _ood evenly
throughout.
ACAUTION:Whenusingthe
combination features, remember that the oven,
door and dishes will be veryhot/.
•Cookware will become hot. Oven mitts
will be needed to handle the cookware.
•Place food and oven-sale cookware
directly on the black metal tray when
cooking
•Use the black metal tray in the same way
you would use a shallow baking pan or
baking tray.
•In addition to the cookware provided,
VO/I ('}lll rise non-ll/etal casserole dishes,
pie plates and other heat-sale cookware.
Place them directly on the black metal
ti'av.
Be sure to select a size that will rotate
easily:
Place the black metal tray directly on the
turntable support.
Do not/lse cookware or covelJngs illa(le
of paper; plastic or ti)il when using the
combination teatures.
CONBJNATIO,_I
\._==_M
Setting a Combination 2 (Microwave and Grill) Program
Make sure the turntable support and black
metal tray are in place when using the
Combination2feature.
When the oven stops, use oven mitts to
carefully remove the dish or black metal tray.
It may be very hot
n
m
[]
Press COMBINATIONtwice to select
Combi-2.
Enter the desired cooking time. Enter
whole mimKes,
Change the power lexel fi)r both
Microwaxe and (;rill. Microwave is set
to PL-4 and can be a(!justed fl'om 1-4.
Grill is set at Grill-l, but can be
changed to Grill-2. (Press POWEg'TEMP
to select desired power level tot each
teature.)
During and after use, do not touch, or let
clothing, pot holders or other flammable
materials contact the cooking elements.
These surfaces may be hot enoughto burn
even though they are dark in color.Allow
sufficient time for cooling first.
Remove cookware completely from the oven
before turning food.
D Press START
;'7
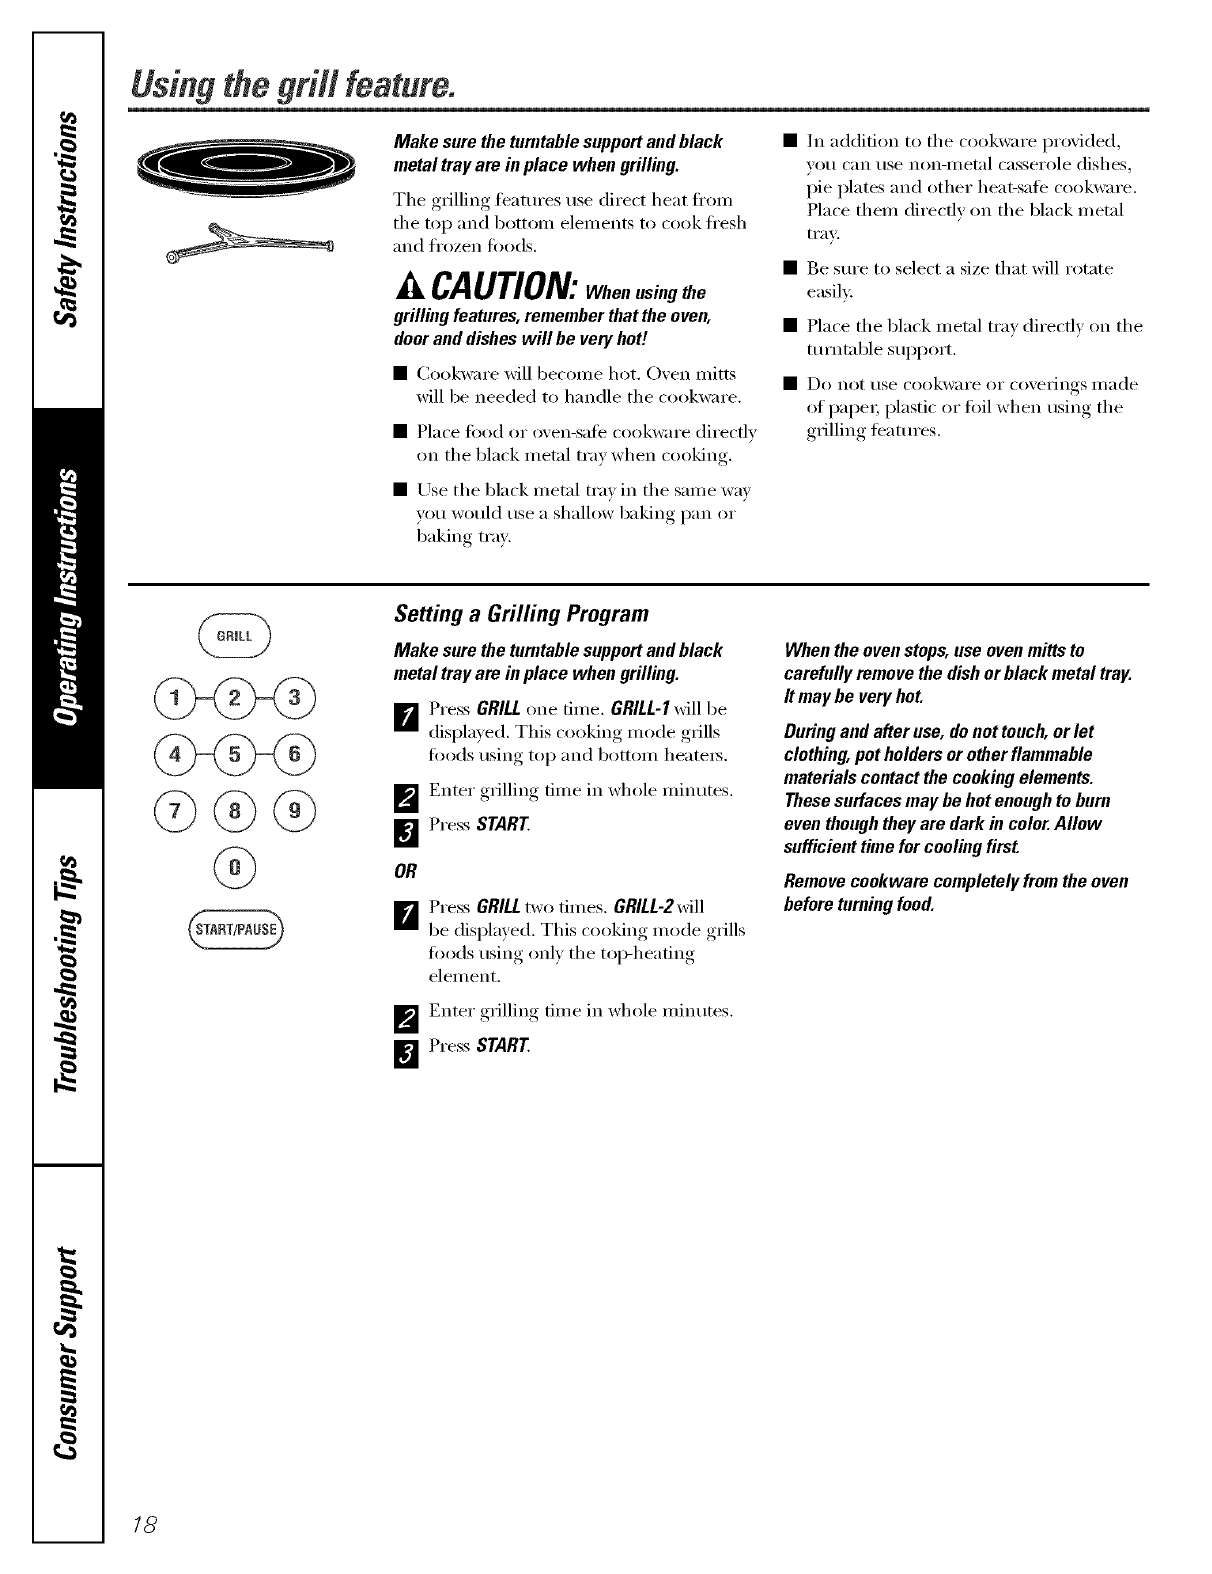
Using the grill feature°
Make sure the turntable support and black
metal tray are in place when grilling.
The grilling featm'es use direct heat fl'om
the top and 1)otmm elements to cook fl'esh
and fl'ozen foods.
CAUTION:Whenusingthe
grilling features, remember that the even,
door and dishes will be very hot/.
• ())okware will becoille hot. (-)yen ii/itts
will be needed to handle the cookware.
• Place fi/od oi" oven-sate cookware directly
on the black metal tray when cooking.
• Use the black metal tray in the salne way
w)u would use a shallow baking pan or
i)aking tra>
In addition to the cookware provided,
VO/I c[In tlse non-ii/et_ll casserole dishes,
pie plates and other heat-sate cookware.
Place them directly on the black metal
tI'aVk
Be sure to select a size that will rotate
easily:
• Place the black metal tray directly on the
turntable SUl)port.
• Do not use cookwai'e oi" coveiJngs II/a(le
of papeI; plastic or fifil when using the
grilling teatures.
Setting a Grilling Program
Make sure the turntable support and black
metal tray are in place when grilling.
_ Px'ess GRILLone tixne. GRILL-I will be
displa_ed. This cooking mode grills
foods using top and bottom heateis.
_'_ Enter grilling time in whole minutes.
_ Press START
OR
D'_ Press GRILLtwo tilnes. GRILL-2will
be displayed. This cooking mode grills
fi)ods using onl) the tol>heating
element.
_'_ Enter grilling time in whole minutes.
[]Press START
When the oven stops, use oven mitts to
carefully remove the dish or black metal tray.
It may be very hot.
During and after use, de net touch, or let
clothing, pot holders or other flammable
materials contact the cooking elements.
These surfaces may be hot enough to burn
even though they are dark in color. Allow
sufficient time for cooling first
Remove cookware completely from the oven
before turning food.
18
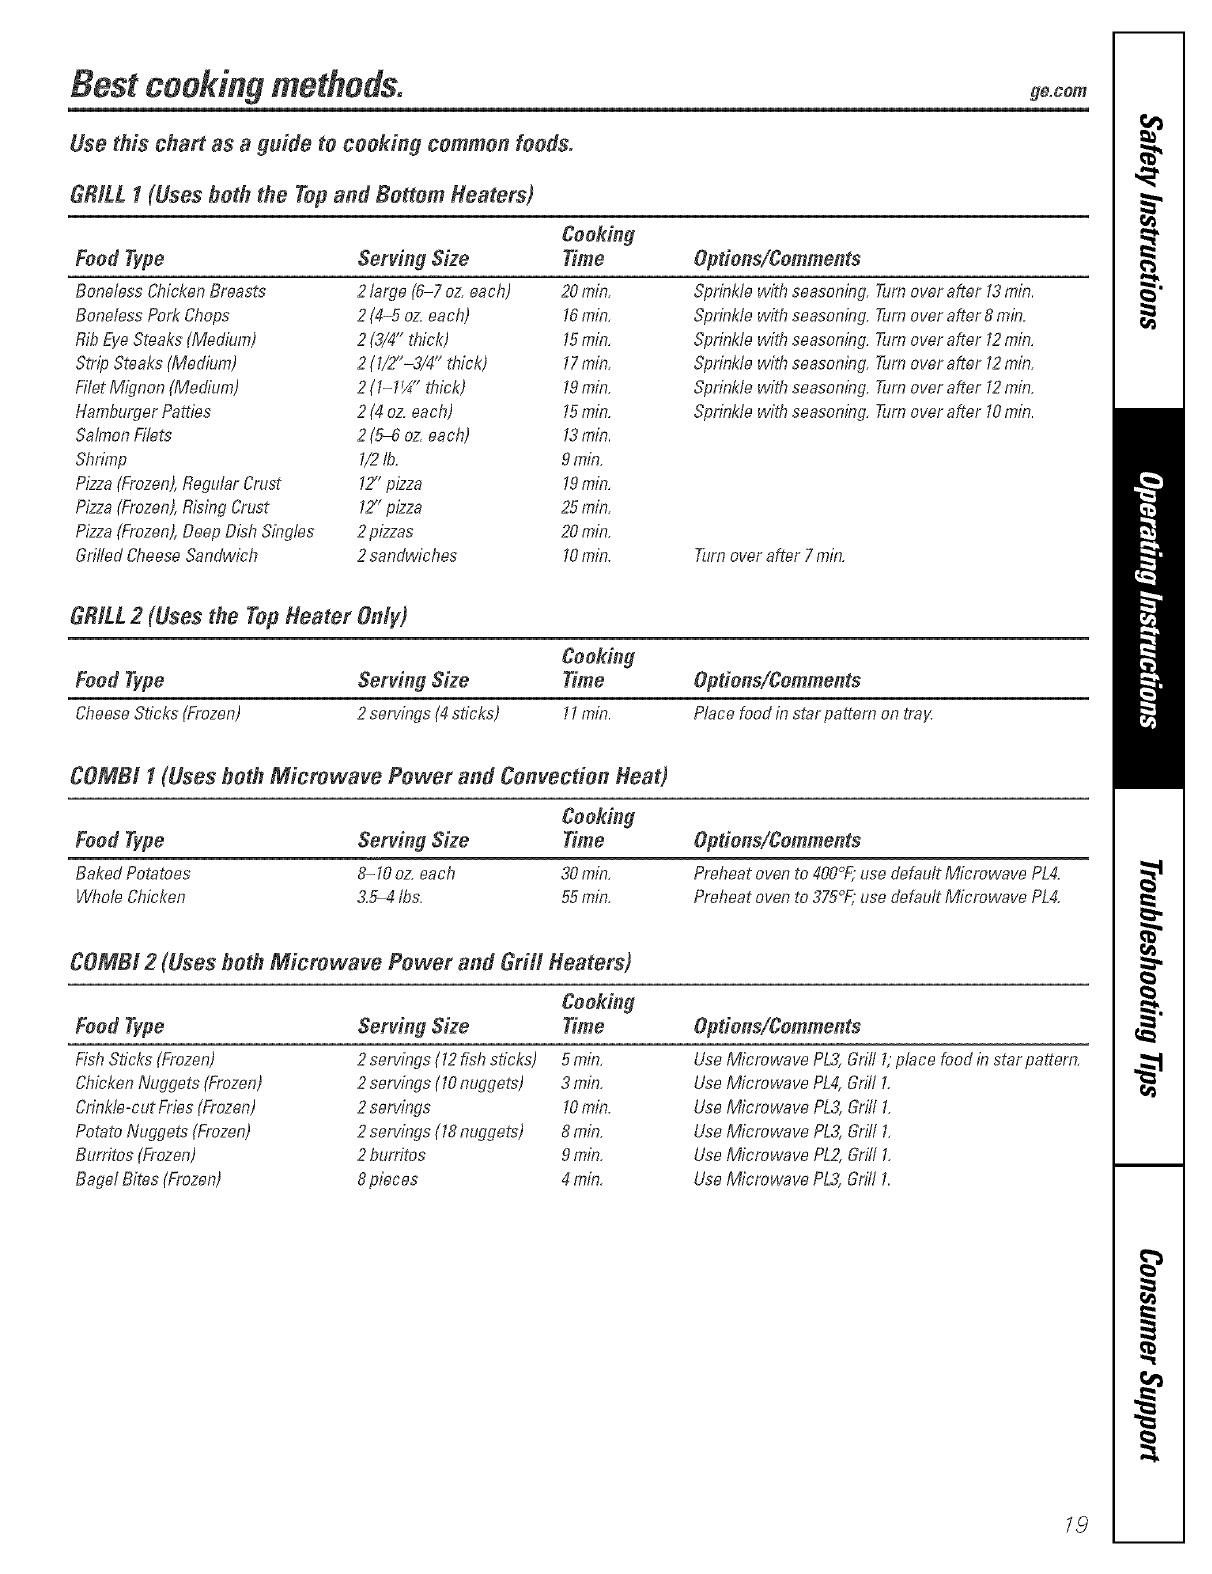
Best cooking methods, gocorn
Use this chart as a guide to cooking common feeds.
GRILL 1 (Uses both the Top and Bottom Heaters)
FoodType
Boneless CMckenBreasts
Boneless Pofi_Chops
Rib EyeSteaks (Medium)
Strip Steaks (Mediom)
Cooking
Serving Size Time
2 targe (6-70z each) 20min,
2 (4-5 oz.each) 16min,
2 (3/4" thick) 15min,
2 (1/2"-3/4" thick) 17min,
Options/Comments
Sprinkle with seasoning. _lm over after 13min.
Sprinkle with seasonbg. Turn over after 8 mb.
Sprinkle with seasonbg. _lm over after 12min,
Sprinkle with seasonfi_g.Turn over after 12ram,
Filet Mignon (Medium)
Hamburger Patties
Salmon Fi/ete
Shrimp
Pizza (F_rozen),Regular Cruet
Pizza (Frozen),Rising Crost
Pizza (Frozen),Deep Dish Singles
Grilled Cheese Sandwich
2(1-1_" t/;,ick)
2 (4 oz. each)
2 (5_ oz.each)
1/2b.
12' pizza
12"pizza
2pizzas
2sandwiches
19min.
15min.
13min.
9min.
19min,
25min.
20min.
10min.
Sprinkle v_;;thseasoning. Turn over after 12min.
Sprinkle with seasoning, Turn over after 10min.
Turnover after 7 min.
GRILL2(Usesthe TopHeater Only)
Cooking
Food Type Serving Size Time Options/Comments
Cheese Sticks (Frozen) 2 sen/ings (4 sticks) 11min. Place food in star pattem on tray.
COMBI 1(Uses both Microwave Power and Convection Heat)
Cooking
Food Type Ser_dng Size Time Options/Comments
Baited Potatoes 8-10 oz. each 30 min, Preheat oven to 4OO°F;use default Microwave PL4.
L4_ho/eChicken 3.5-4 fbs. 55rain. Preheat oven to 375°F;use default Microwave PL4.
COMBI 2(Uses both Microwave Power and Grid Heaters)
FoodType
Fish Sticks (Frozen)
Chicken Nuggets (Frozen)
Crinkle-cut Fries(Frozen)
Potato Nuggete (Erozen)
Burritos (Frozen)
Bagel Bites (Frozen)
Cooking
Serving Size Time
2 sen/ings (12 fish sticks) 5 min,
2 servings (10 nuggets) 3 rain.
2 sen/ings 10min.
2 sen/ings (18 nuggets) 8 min.
2 bu_ritos 9 min.
8 pieces 4 rain.
Options/Comments
Use Microwave PL3,Grill 1;place food inetar pattern,
Use Microwave PL4,Grill 1.
Use Microwave PL3,Grill 1.
Use Microwave PL3,Grid 1,
Use Microwave PL2,Grill 1.
Use Microwave PL3,Grill 1.
18
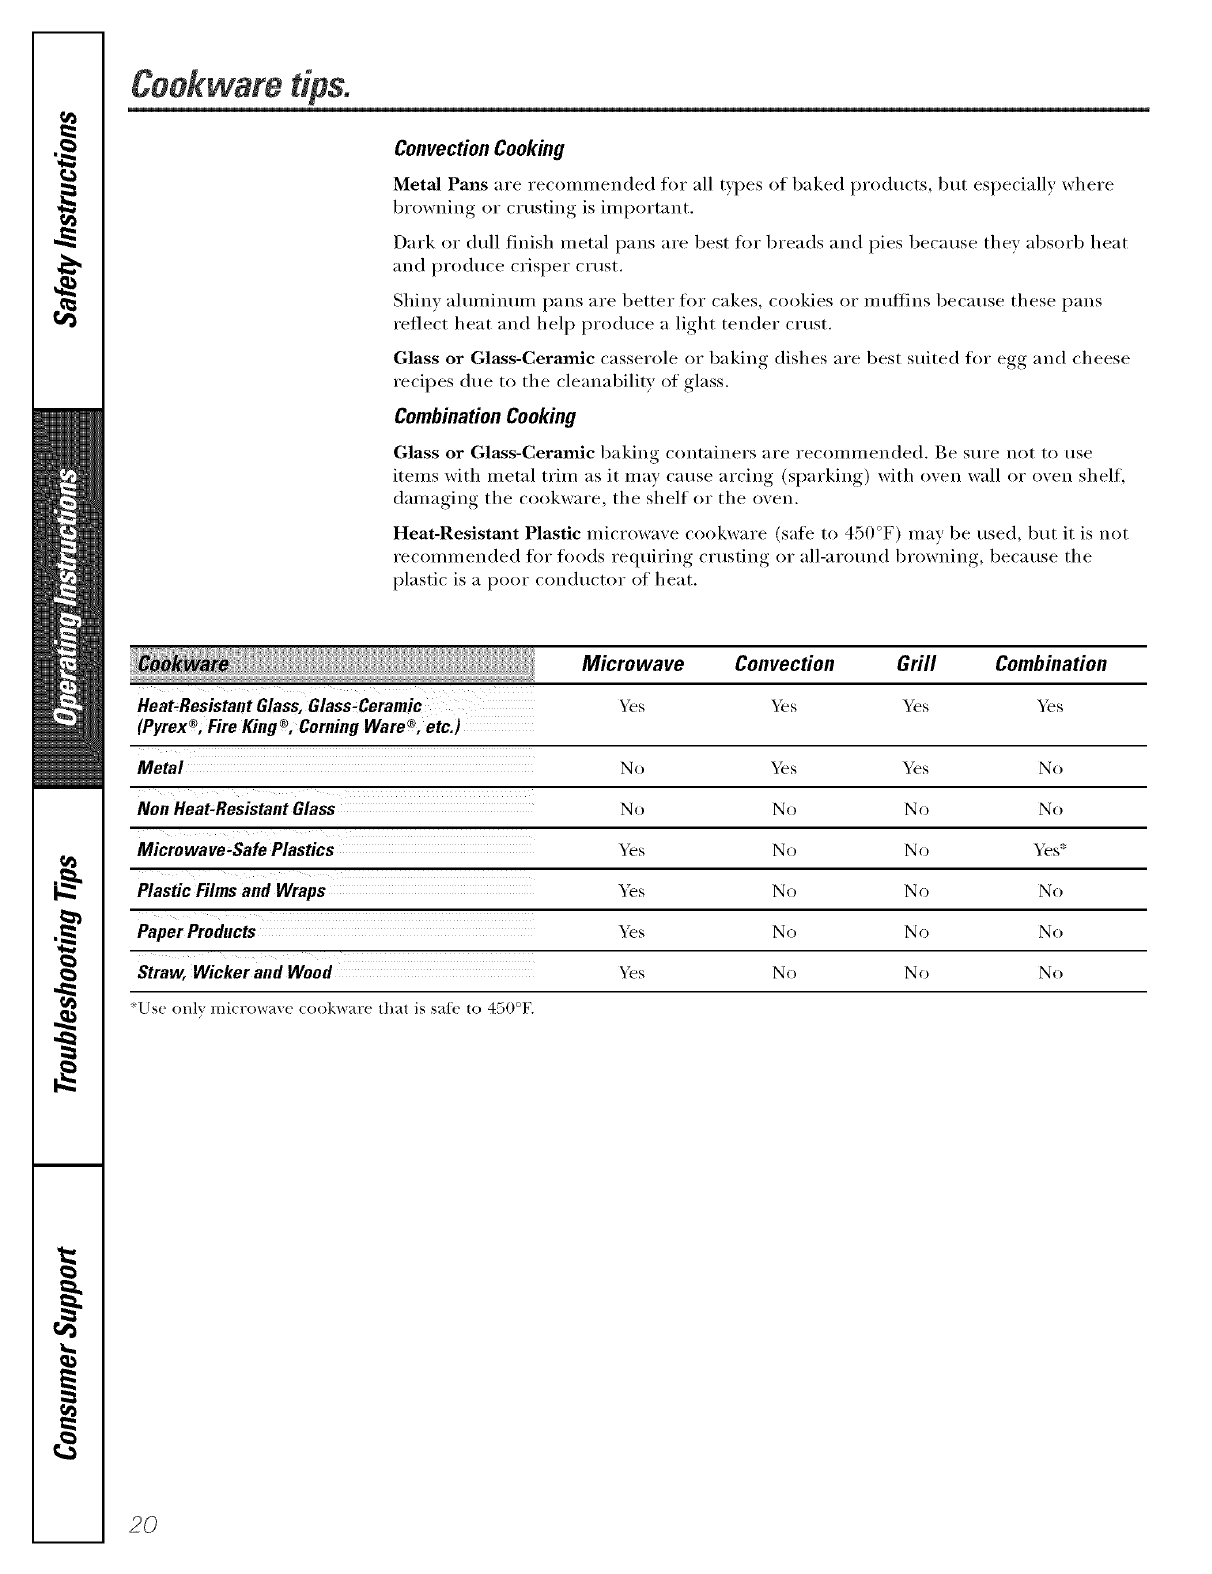
Cookwam@s.
Convection Cooking
Metal Pans are recmmnended for all types ot baked products, but especially where
browning or c_ usting is important.
Dark or dull finish metal pans are best t0r breads and pies because they absorb heat
and produce crisper c_ust.
Shiny almninmn pans are better fl)r cakes, cookies or muffins because these pans
reflect heat and help produce a light tender crust.
Glass or Glass-Ceramic casserole or baking dishes are best suited tot egg and cheese
recipes due to the cleanability of glass.
CombinationCooking
Glass or Glass-Ceramic baking containers are recommended. Be sure not to use
items with metal trim as it may cause arcing (sparking) with oven wall or oven shelf,
damaging the cookware, the shelf or the oven.
Heat-Resistmat Plastic microwave cookware (sati _ to 450°F) may be used, but it is not
recommended for toods requiring ClUsting or all-around browning, because the
plastic is a poor cond/ictor of heat.
Microwave Convection Grill Combination
Heat-Resistant Glass, Glass-Ceramic _s _s Yes _s
(Pyrex®, Fire King®, Coming Ware% etc.)
No _s Yes No
Non Heat-Resistant Glass No No No No
Microwave-SafePlastics "_s No No "_s +:'
_s No No No
_s No No No
Straw, Wicker and Wood _s No No No
'Use only mi(rowaxe (ook'w_tJ'e that is safe to 4:)( I*.
2O
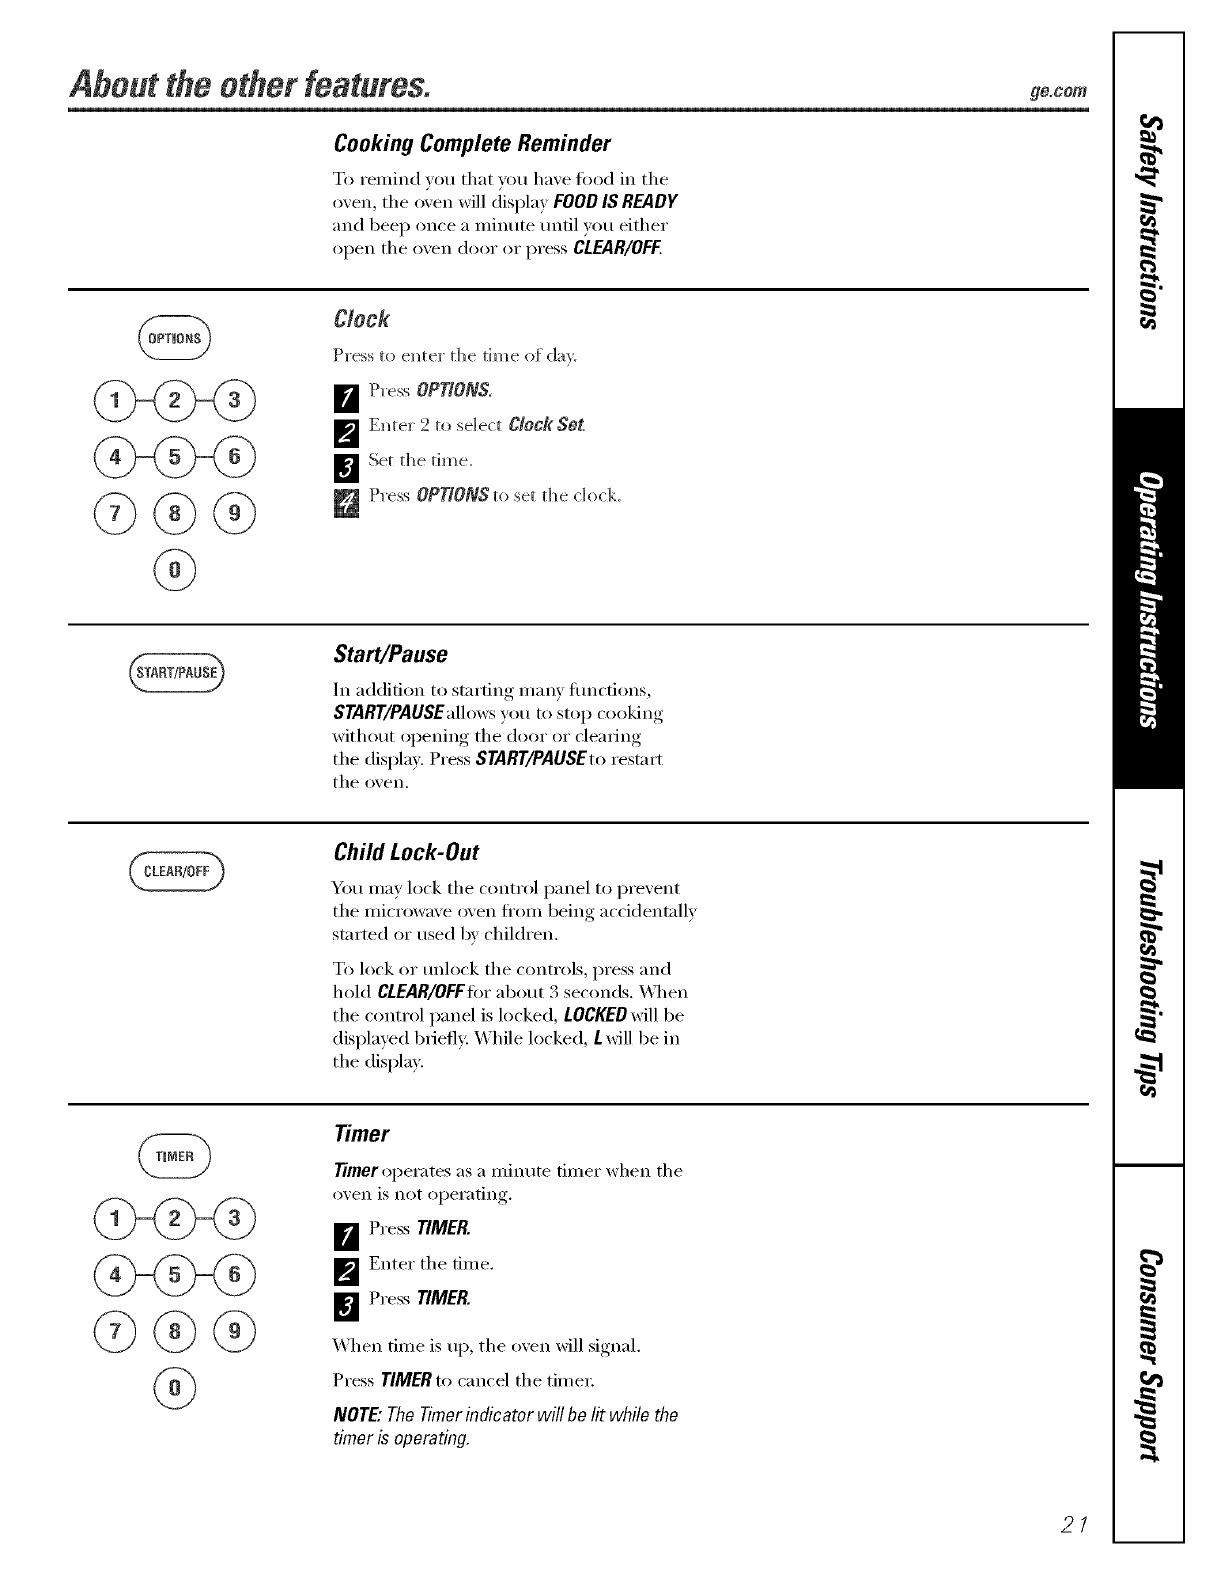
About the other features, go,corn
Cooking Complete Reminder
To renfind you that you have fl)od in the
oven, the oven will display FOOD IS READY
and beep once a nfinute until you either
open the oxen door or press CLEAR/OFF.
Clock
Press to e_ter the time of day.
_ Press OPTIONS.
_'_ E_ter 2to select CtockSet
_l Set the time.
_ Press OPTIONS to set the dock
Start/Pause
In addition to starting many flmcfions,
START/PAUSEallows you to stop cooking
without opening the door or clearing
the display. Press START/PAUSEto restart
the oven.
Child Lock-Out
You may lock the control panel to prexent
the microwaxe oxen fl'om being accidentallx
stnrted or used b_ children.
To lock or tmlock the controls, press and
hold CLEAR/OFFfi)r about 3 seconds. _q/en
the control panel is locked, LOCKEOwill be
displayed briefly. While locked, Lwill be in
the display.
@
1>@@
Timer
Timeroperates as a minute timer when the
o_,en is not o[)ei'ating,.
D'_ Press TIMER.
_'_ Enter the time.
_€] Press TIMER.
X4hen time is up, the oxen _fill signal.
Press TIMERto cancel the timex:
NOTE"The Timerindicator will be lit while the
timeris operating.
21
Aboutthe otherfeatures.
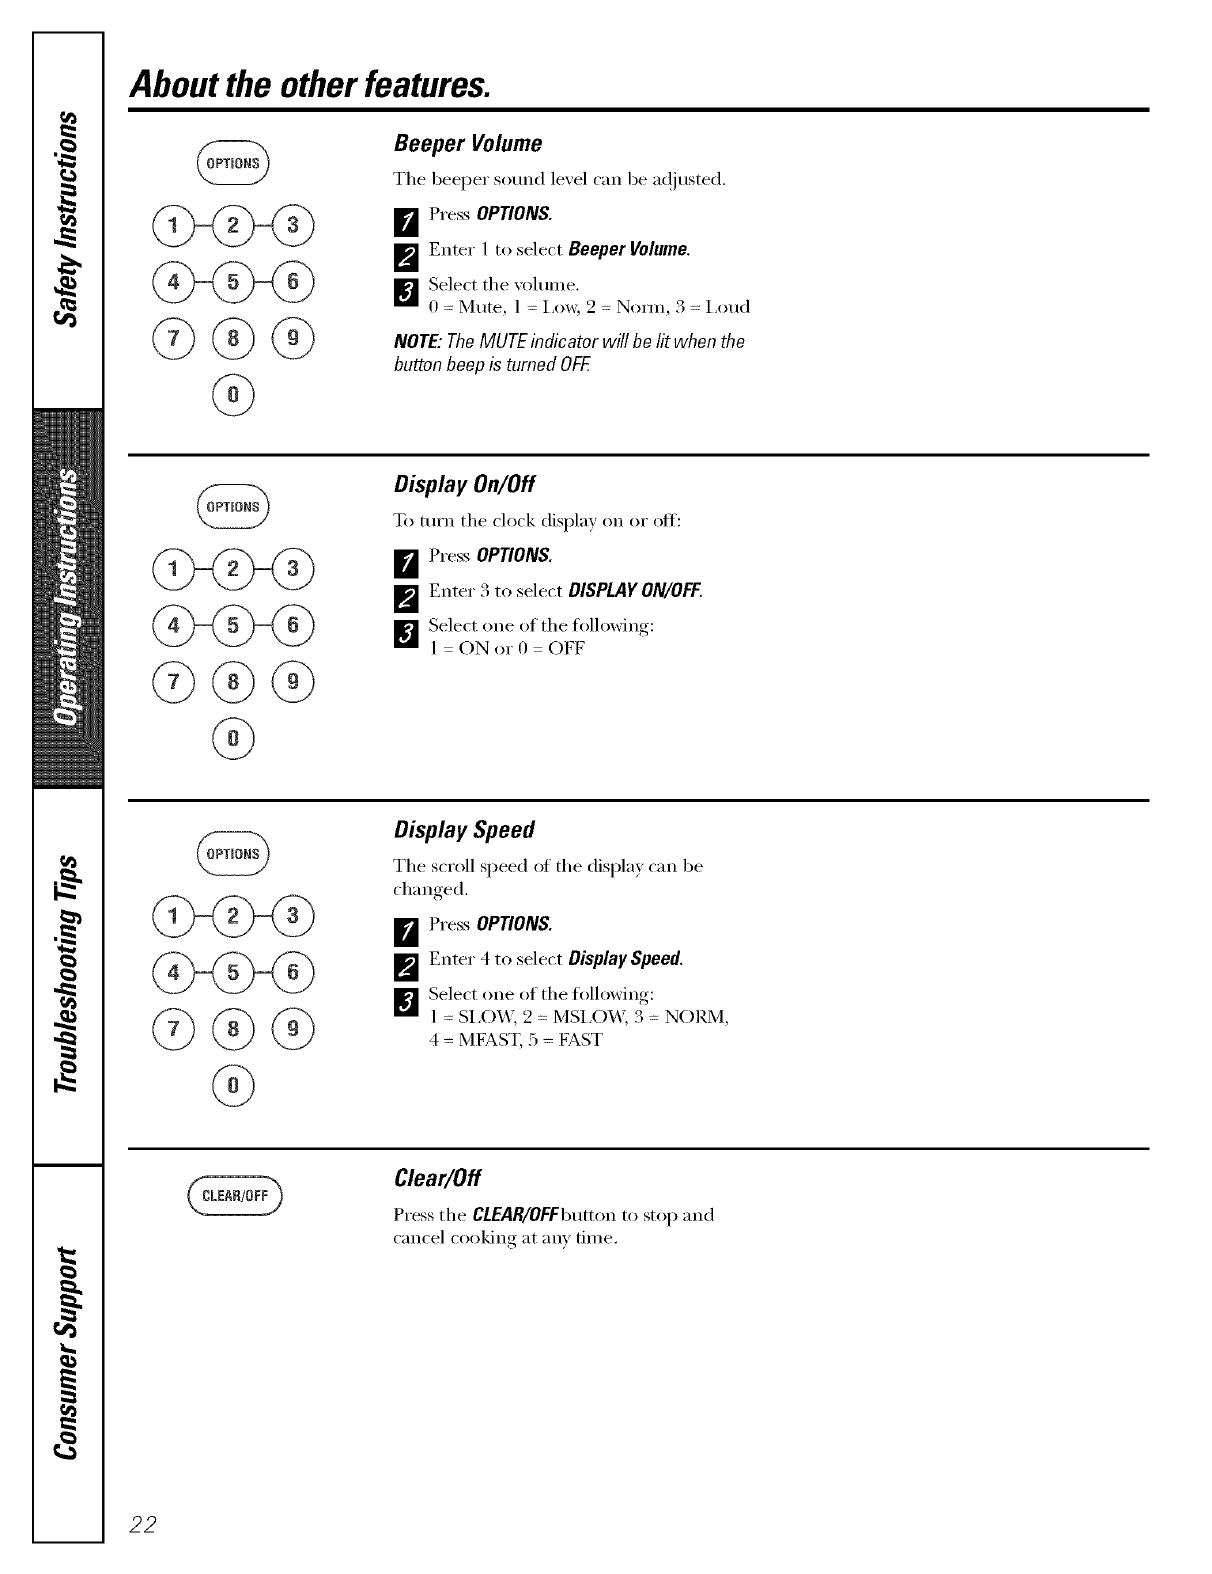
Beeper Volume
The beeper som_d le',el can be a(!iusted.
_ Press OPTIONS.
[]Enter 1 to select Beeper Volume.
[] Select the _olume.
0 = Mtlte, 1 = I,ow, 9 = NoIIll, 3 = I,oud
NOTE:TheMUTEindicator will be litwhen the
button beepis turned OFF.
Display On/Off
To turn the clock display on or off:
BPress OPTIONS.
_'_ Enter 3 to select DISPLAYON/OFF.
_ Select one of the tollowing:
1 = ON or 0 = OFF
Display Speed
The scroll speed ot the (lispla} can be
changed.
BPress OPTIONS.
_'_ Enter 4 to select Display Speed.
I_'] Select one ot the following:
1 = SI,O_, 2 = MSI,(-)_', 3 = NORM,
4 = ME__ST, 5 = E__ST
Clear/Off
Pressthe CLEAR/OFFbuttonto stop and
cancel cooking at am' time.
22
Covering
Shielding
Standing Time
Venting
Definition
Arcim_g is the microwave term for sparks im_the o_e_. Arcim_g is tamed b_:
[] the metal shelf beim_g im_smlled im_correc_ly m_d tol_ him_g the microwave _alls.
[] metal or foil tol_chim_g the side o_ the ove_.
[] foil that is m_ot molded to _bod (l_pmn_ed edges act like m_tem_as).
[] metal swh as twisHies, poultr} p]_/s, gold-rimmed dishes.
[] recycled paper towels col/tab/big small metal pieces.
covelJ_/g _Arith WaX i)_/[)el" _/llows excess steam to escape.
11/ a reglllar ore1/, yol! shield chickel/breasts or baked {i)o(ts to prevel/t o\ e_q)rowl/h/g. \'_3_el/microwavi_/g,
vol_ I_se small strips of f_>il to shield thh/ parts, sl_ch as the tips of whigs mid legs ol/pol_lt_> which wol_ld
\_']/e_/w./u cook with regular ove_/s,foods such as roasts or cakes are allo*_ed to sta_/d to {i_/]sh coold_/g or
to set. Sta_/d!h/g time is especially importm/t h/microwave coold_/g. Note that a micro_aved cake is _/ot
placed o_/a coolh/g rock.
.Mter co_ e_J_/g a dish _rHt_ [:)_StiC W[_:), y{)l_ Ve_t the plastic wrap by tllr_/i_/g back o1/e cor_/er so excess
steam ca_/escape.
2?
Careand cleaning of the microwave oven.
Helpful Hints
An occasional thorough wiping with a solution ot baking soda and water keeps
the inside fl'esh.
Unplug the cord before cleaning any part of this oven.
How to Clean the Inside
Walls, Floor, Inside Window, Heating Elements, Metal and Plastic Parts on the Door
Some spatte_ can be removed with a paper towel; othe_ may require a damp cloth.
Remove greasy spatte_ with a sudsy cloth, then rinse with a damp cloth. Do not use
abrasive cleane_ or shaq) utensils on oven walls.
Toclean the surface of the door and the surface of the oven that come together upon closing,
use only mild, nonabrasive soaps or detergents using a sponge or soft cloth. Rinse with a damp
cloth and drg.
Never use a commercial oven cleaner on any part of your microwave oven.
The heating elements cannot be removed.
Glass Microwave Turntable, Black Metal Tray and Turntable Support
To prevent breakage, allow the glass microwave turntable and black metal tray to cool
completely befin'e cleaning. Wash careflflly in wam_, sudsy water or in the dishwasher:
A soap-tilled scouring pad can also be used to clean the black metal tray: Do not use
abrasives, as they may damage the finish.
Rack
Clean with mild soap and water or in the dishwasher: Do not clean in a self-cleaning oven.
24
How to Clean the Outside
Do not use cleaners containing ammonia or alcohol on the microwave oven. Ammonia or alcohol
can damage the appearance of the microwave oven.
Case
Clean the outside of the microwave oven with a sudsy cloth. Rinse with a damp cloth and
then dr}: Wipe the window clean with a damp cloth.
Control Panel and Door
Wipe with a damp cloth. Dry thoroughly: Do not use cleaning spra}:% large amounts of soap
and water; abrasives or shaq) objects on the panel--they can damage it. Some paper towels
can also scratch the control panel.
Stainless Steel Surfaces
Do not use a steel-wool pad; it will scratch the stmfi_ce.
To clean the stainless steel surlilce, use a hot, damp cloth with a mild detergent suitable fin.
stainless steel surti_ces. Use a dean, hot, damp cloth to remove soap. D_y with a d_' clean
doth. Mways scrub lightly in the direction ot the groin.
Door Surface
It is important to kee I) the area clean where the door seals against the microwave _wen.
Use only mild, non-abrasive detergents applied with a clean sponge or soft cloth. Rinse well.
Power Cord
If the cord becomes soiled, tml)lug and wash with a damp cloth. For stubborn spots, sudsy
wamr may be used, but be certain to rinse with a damp cloth and (h T thoroughly before
plugging cord into outlet.
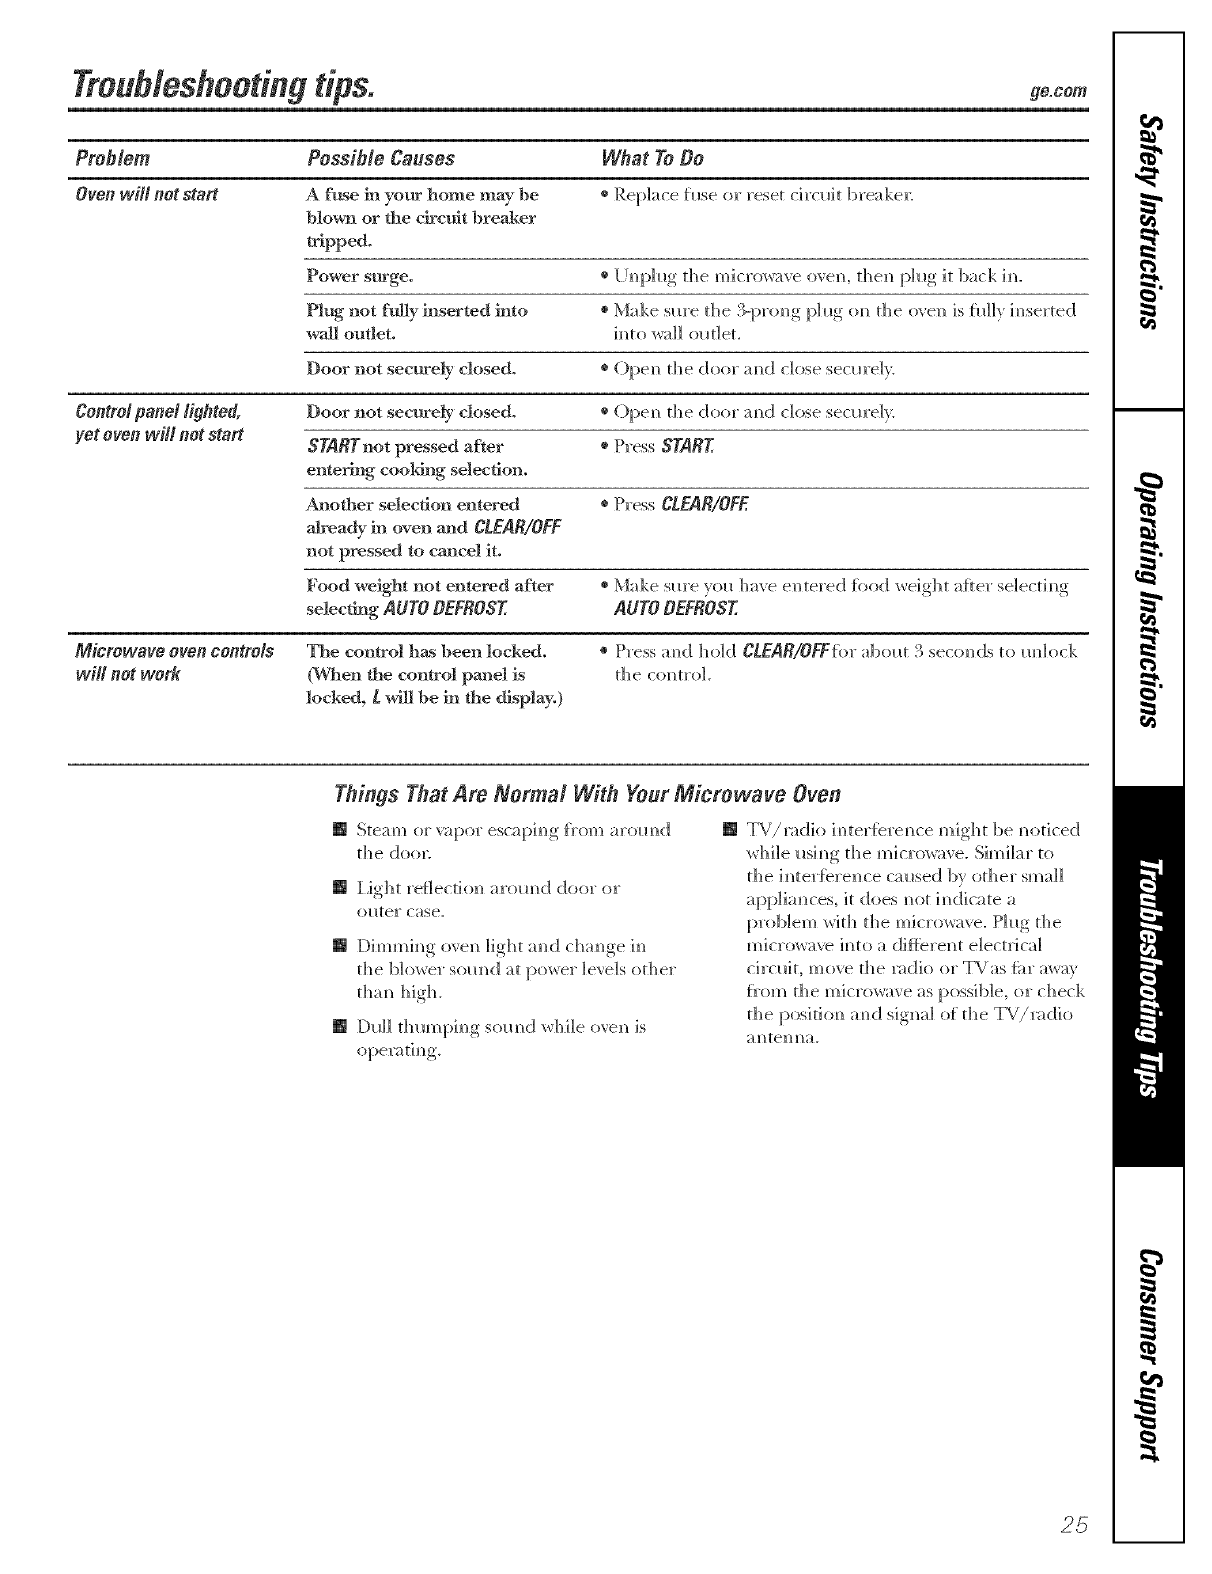
Tmub&shoeti,g tips. go.corn
Problem Pessib& Causes What To Be
Oven will not start Afuse in your home may be ®Replace tl_se o]" reset circuit breaker:
blown or the circuit breaker
tripped.
Power surge. ®[ m_})b_g,the Vd/ic]t'o]v:_veuren. then I_btg, it back imp.
Plug not fully h]serted imo * Make .....sm'etile _'_-})rom_g,}_]ltg,om_the o','e]_ is ht]]'_ im_sertec[
wall outlet, im_to x_r:_]] ola]et.
Door not securely closed. * (7)pem_the dour amid dose secm'e]_.
Control panel lighted, Door not securely closed. * ()pem_ th e do]n" a m_dclose see a'e]_:
yet oven will not start SYAflYnot pressed after ®Press STARE
entering cooking selection.
AnotBer selection entered * Press CLEAR/OFE
akeady in oven and CLEAR/OFF
not pressed to cancel it.
Food weight not entered after * Md_e sure xo_t have e_tered food weight after se]ectim_g
selecfiJlg AUTO DEFROST, AUTO DEFROST,
Microwaveovencontrols
will not work
The control has been locked.
(When the control pmml is
locked, L _ be in ffm display.)
o Press amid hold CLEAR/OFFfi_r abola 3 secom_ds to m_]ock
the colinel.
Things That Are Normal With Your Microwave Oven
[] Steam or ",a[)or esca[)im)g, f]'o]'_) arom)d
the (;[oo]_
[] I,ight re_lectiol_ urom_d dour ur
olaer case.
[] Dimmim_g ovel_ light a_]d chalice i_
the b]ower so_ _ d a t})O]Ve]l" ]eve]s other
[] D_d] thum[)i_g, som_d while ure_ is
[] _/radio i_teHbre_ce might be _oticed
while _si_g the microwave. Similar to
the i_teHbrel_ce camed by other small
app]ia_ces, it does _ot i_dicate a
problem With the m_crowave. Ph*g the
m]cro_ave b_to a d]flbrei_t electrical
circuit, move the _ad]o or TVas {i_r a_av
f_'om the microwave as possible, or check
the posit]o_ a_ d signal ot the TV/_adio
25
q
R
Notes,
2G
Notes.
m
@
w
I
m
m
27

€_
@
cr_
q
Netes.
28
GE Service Protection Plus '_'
(;E, a imme recogifized wor]d_k]e for qua_ky a_]d depeildabi]k), offers )ou
Ser_ke Prote(tkm } ll_s --comp] eheI_s_ e prote(:tio[] (m a]ll }(mr applliai_(:es--
No Matter What Brand!
Benefits Include:
o Backed by GE
o All brands covered
o Unlimited service calls
o A31 parts and labor costs included
oNo out-of-pocket expenses
o No hidden deductibles
o One 800 uumber to call
Wo Ti Corot Any Apptianco.
Anywhoro. Anytimo.
Y(a_ wi]] be completely satisfied wit]] ol_r service protectiom_ or }tin may re(p_est y(a_r mom_ey back
oH the ]'el]_aim_im_ 'valise of y(a_]" COm_tl'acL No (]10estiom_s asked. It's that sim[)]e.
Protect yollr refrige_toi; dis]_wash el; wash el" a_ d dryex; ra_lge, T\/, VCR a_] d m _lc]_ m ore--any brand!
Ph_s there's _o extra c]]arge %r emerge_cy service ai_d ]o_ moi_th]y fi_iai_ci_g is available. Eve]_ icemaker
coverage a_(]! {k)od spoilage protectio]_ is oftere(L _m ca_ rest eas}, ki_ov,]_g that a]] yore" va]_ab]e
ho_seho]d producers are protected aga]_st expe_sive repairs.
for more
'\!1 brmds cov_ r_(I, Iq) m 20 y_ars old, in dl_ c(mdn(mal U,S,
Please place in envelope and mail to:
General Electric Compan_
Warranty Registration Department
P.O. Box 3215{)
Louisville, KY 4{)232-215{)
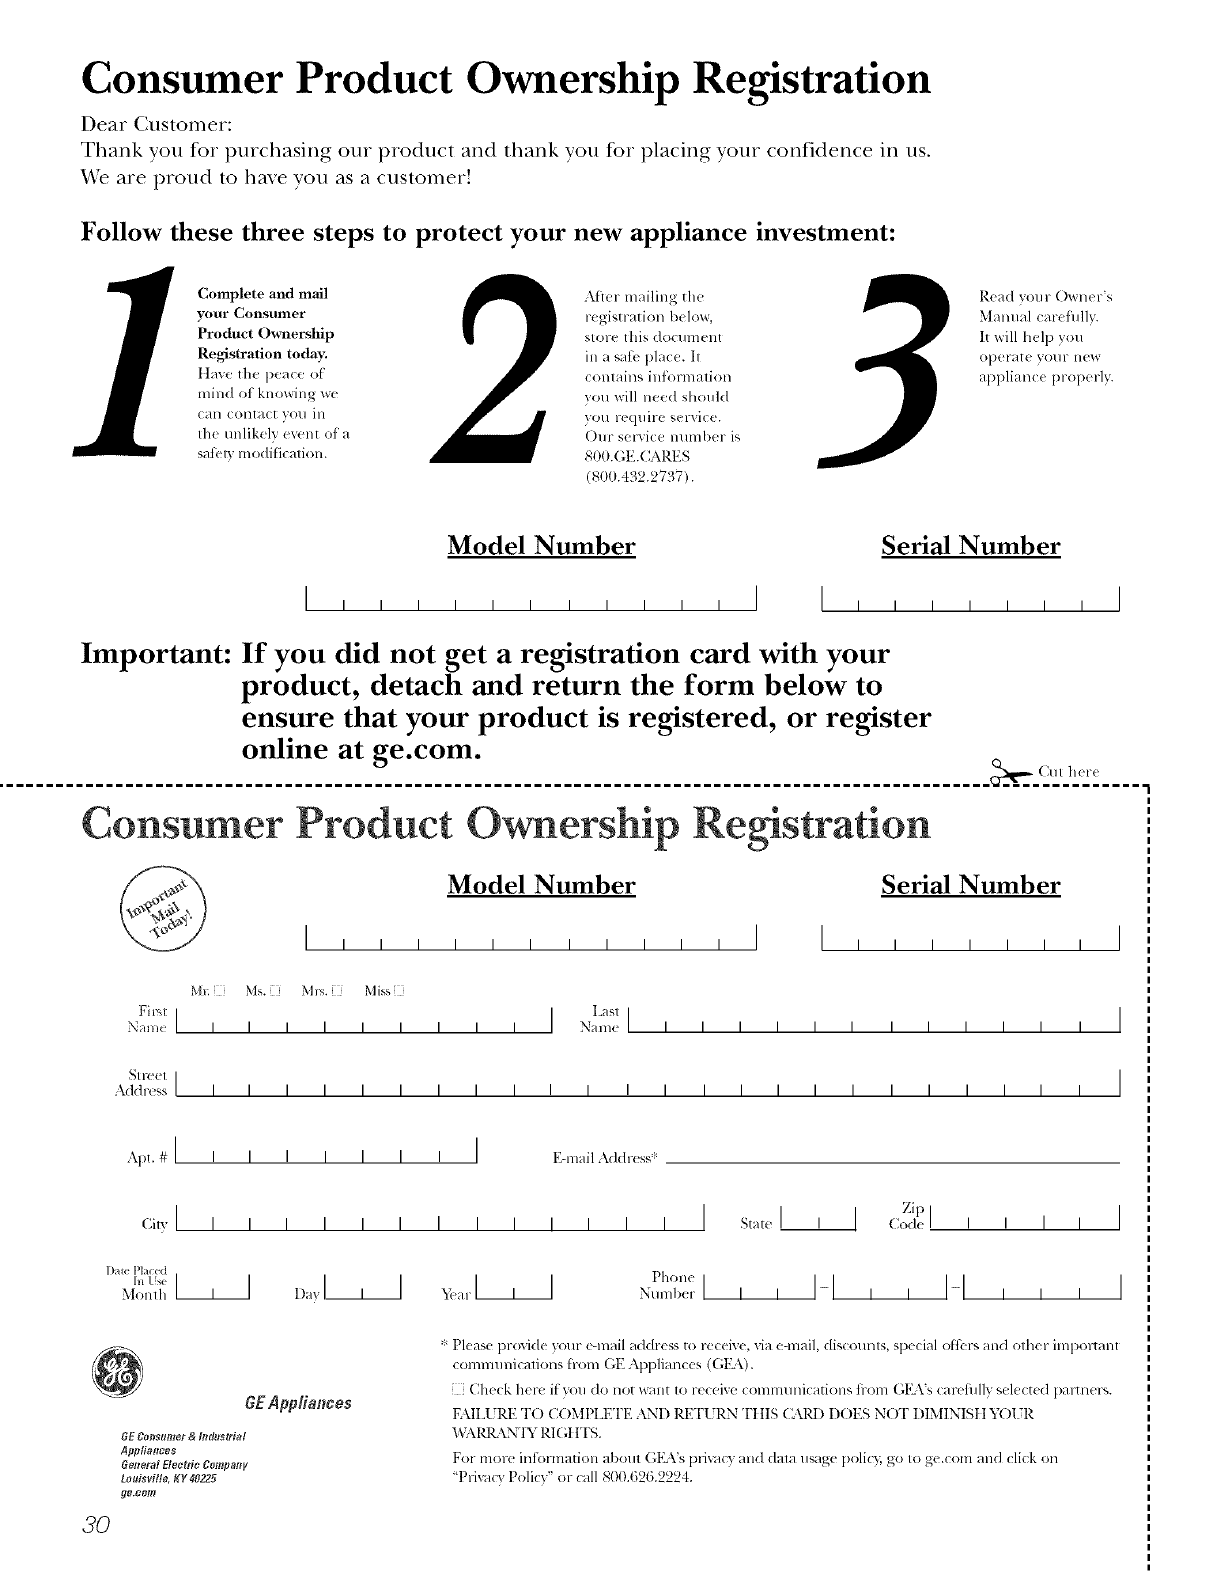
Consumer Product Ownership Registration
Dear Customer:
Thank you for purchasing our product and thank you for placing your confidence in us.
_A/eare proud to ha_e you as a customer!
Follow these three steps to protect your new appliance investment:
Complete and mail
your Consumer
Product Ownership
Registration today.
tlaw' the peace of
mind of knowing wc
call colltact VOl/ ill
tile tmlikely event of a
safiT, modification.
Atter mailing tile
registration below,
store this docmnent
ill a sati' place. It
contains inlormation
you will need should
you require service.
Our selwice number is
800.GE.CARES
(800.432.2737).
Read your Owner's
Manual carefllllv.
It will help you
operate yol/r lie', _,
appliance properly.
Model Number Serial Number
I I I
Important: If you did not get a registration card with your
product, detach and return the form below to
ensure that your product is registered, or register
online at ge.com.
.................................................................................................... _,,,_ (Mr here
Consumer Product Ownership Reg
Model Number Serial Number
*vh Ms. M*>,. Mix_,
Fi,-_tiIL_slI
Nmm I I I I I I I I I Name I I I I I I I I I I I I
_11-( (!1 I
Addr(';s IIIIIIIIIII IIIIIII IIIII I
Apt. # II I
(;i,,I , I
l )ale Placed
hi Use _L_
Monlh
I I I I I IE-lnailAddress,_:
Zip I
IIIIIIIIIIIIs_,_,,I , I (:o_,e ,
_,_,,I I >.l I Pll..,
_,,ll,l,_,,II, II,, II ,
I I
I I
I
I
@GEAppliatmes
6E C_mumer & hldustriM
Apptiaflces
6enar_! E/eet6c gampativ
Lovisvi!le, gY 4_225
3O
* Please pr(wide your e-mail address to rcceive, via e-mail, discounts, special oflbr,, and other impoltant
commmficafions h-ore GE Appliances (GI_\).
[ Check here if you do not wmlt to receixe COlnmunications fi-om GKVs carcfillly selects(1 paltner,,.
FAIIJJRE T() COMPLETE AND RETURN TIIIS C_\R1) DOES NOT DIMINISII YOIR
_,)\1_ \N'IY RI(;IfFS.
For more intormation about G1LVs privet(3 and dala usage policg go to ge.com and click on
'Privacy Policy" or call 800.6L)6.22'24.
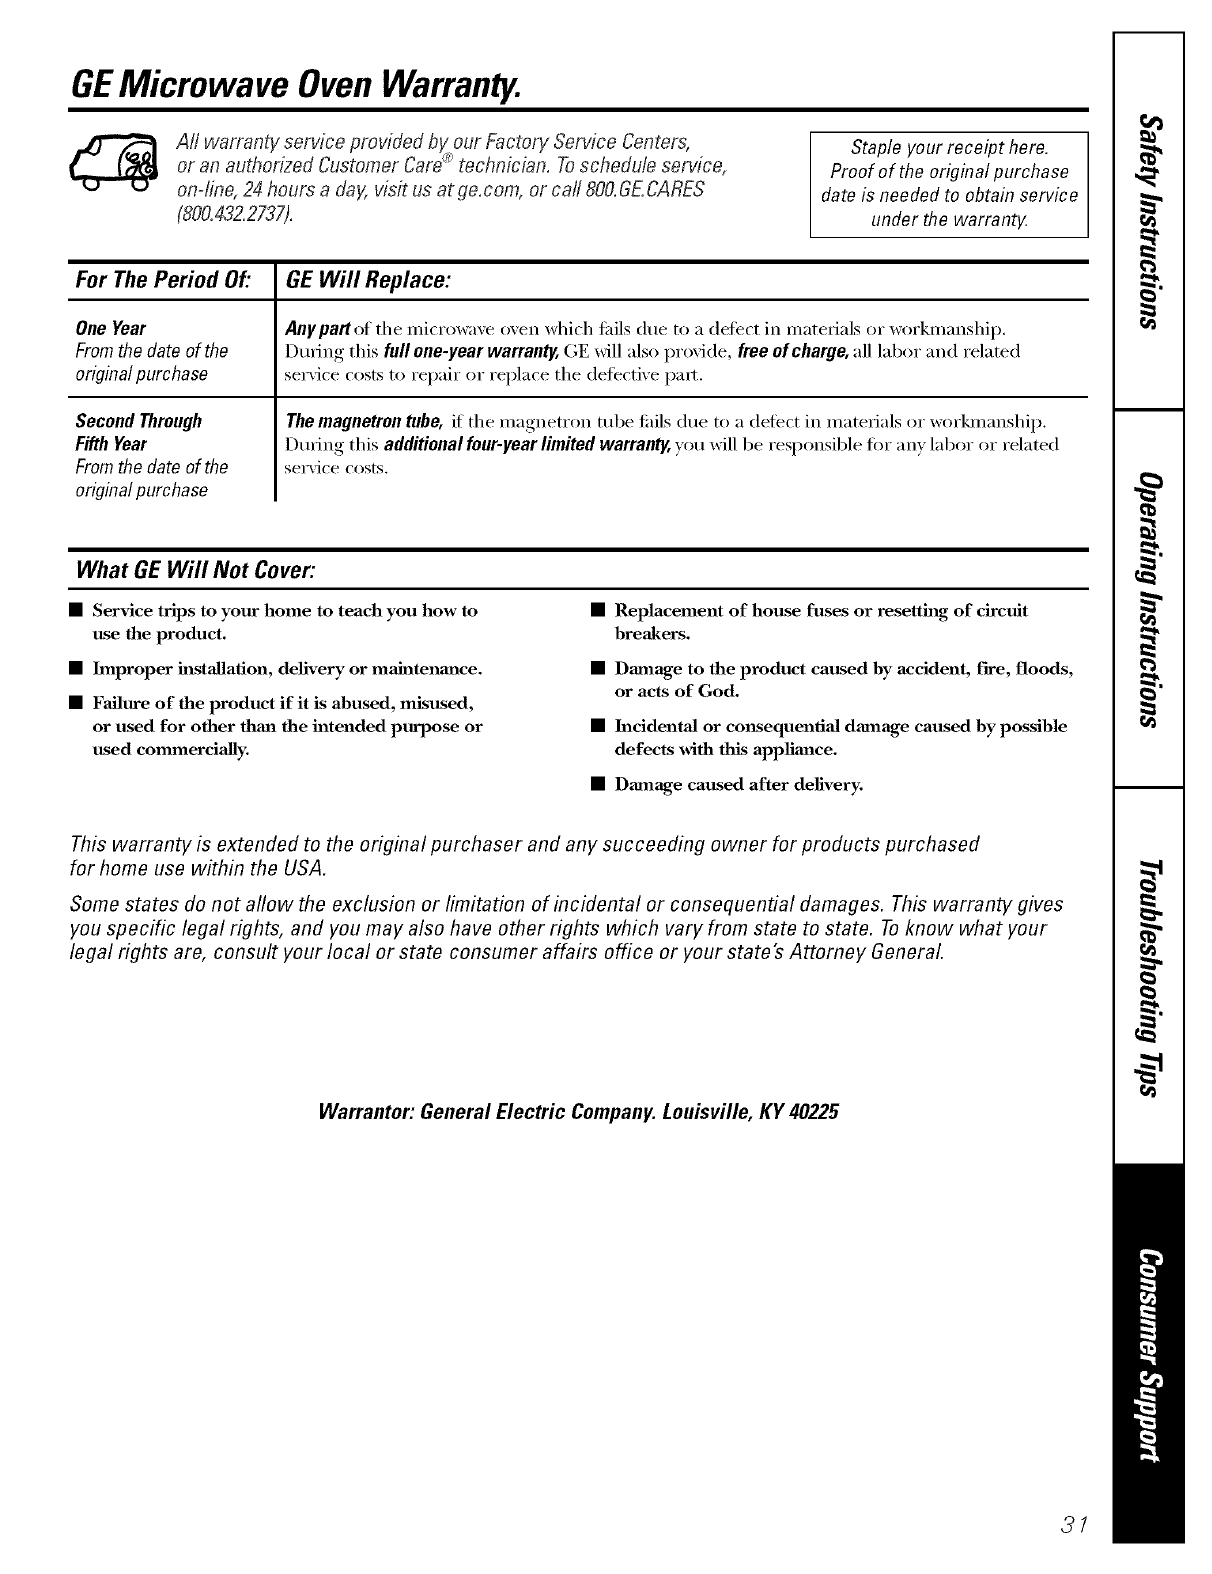
GEMicrowave OvenWarranty.
All warranty service provided by our Factory Service Centers,
or an authorized Customer Care_technician. Toschedule service,
on-/in< 24 hours a day, visit us at ge.com, or cal/ 8OO.GE.CARES
(800.43Z2737).
Staple your receipt here.
Proof of the original purchase
date is needed to obtain service
under the warrant}4
For ThePeriod Of."
OneYear
Fromthe date of the
originalpurchase
SecondThrough
FifthYear
Fromthe date of the
originalpurchase
GEWill Replace:
Anypattot the microwave oven which flfils due to a (letect in materials or _xwkmanship.
Durh_g this full one-year warranty, GE will also provide, free of charge, all labor and related
service costs to repair or replace the defective paxt.
Themagnetron tube, if the magnetron tube tifils due to a defect in materials or workmanship.
During this additionalfour-yearlimitedwarranty,you will be responsible tot anv labor or related
service costs.
What GE Will Not Cover:
• Service trips to your home to teach you how to
use the product.
• Improper installation, delivery or maJntenm_ce.
• Failure of the product if it is abused, misused,
or used for other thml the intended purpose or
used commerciaJly.
• Replacement of house fuses or resetting of circuit
breakers.
• Damage to the product caused by accident, fire, floods,
or acts of God.
• h_ddentaJ or consequential damage caused by possible
defects with this applimace.
• Damage caused after delivery.
This warranty is extended to the original purchaser and any succeeding owner for products purchased
for home use within the USA.
Some states do not aflow the exclusion or limitation of incidental or consequential damages. This warranty gives
you specific legal rights, and you may also have other rights which vary from state to state. Toknow what your
legal rights are, consult your local or state consumer affairs office or your state's Attorney General
Warrantor: General Electric Company. Louisville, KY 40225
31
ConsumerSupport.
gEApplbncesWebsite ge.com
Have a question or need assistance with your appliance? Try the GE Appliances X.Vebsite24 hom_ a day,
any day of the year'. For greater convenience and taster service, you can now download Owner's Manuals,
order parts, catalogs, or even schedule service onqine. You C[lll [llso "Ask OIlY Wean/ of EN)erts .....
your questions, and so much more...
ScheduleService
Expert GE repair se_Mce is onlx one step away fl'om xour doo_: Get on-line and schedule your service at
,,our conxenience 24 hours any (la_ of the year! Or call 800.GE.(:ARES (800.432.2737) (huing nom_al
business hours.
ge.com
RealLifeDesignStudio ge.com
GE SUl_portsthe Uni\'e_al Design concel)t--products, services and environments that can be used by
people of all ages, sizes and capabilities. We recognize the need to design fin" a wide range of physical and
mental abilities and impaimmnts. For details of GE's Universal Design applications, including kitchen
design ideas tot people with disabilities, check out our Website today For the heating impaired, please call
800.TDD.GEAC (800.833.4322).
ExtendedWarranties ge.com
Purchase a (;E extended warrant_ and learn about special discounts that are available while your warranty
is still in effect. You can purchase it on-line an) time, or call 800.626.2224 dtuing nom_al business hours.
GE Consumer Home Serxices will still be there after your vvarran b expires.
PartsandAccessories ge.com
Individuals qualified to service their own appliances can have parts or accessories sent directly to their
homes (VISA, Master(:ard, and Discover cards are accepted). Order on-line today, 24 hom_ every day or
by phone at 800.626.2002 during nom_al business horus.
Instructions contained in this manual cover procedures to be performed by any user. Other servicing generally
should be referred to qualified service personnel. Caution must be exercised, since improper servicing may cause
unsafe operation.
ContactUs ge.com
If you are not satisfied with the service w)u receive fl'om GE, contact us on our X&'ebsite with all the details
including your phone nulnbei; or wi]te to: General Manage_; CtlStOlllei" Relations
GE Appliances, Appliance Park
I,ouisville, K¥ 40225
RegisterYourApplbnce
Register your new applimlce on-line--at your convenience! Timel) l)roduct registration will allow for
ei_hanced COlnlnUlficatioi_ aim prompt service under the terms ot'xour warranty should the need arise.
You may also mail in the pre-p_inted registration card included in the I)ackin°_ material.
ge.com
Printed in Korea
