GE Dishwasher Manual L0709006
GSC3200F01BL GSC3200F01BL GE DISHWASHER - Manuals and Guides L0709006 View the owners manual for your GE DISHWASHER #GSC3200F01BL. Home:Kitchen Appliance Parts:GE Parts:GE DISHWASHER Manual
User Manual: GE GE Dishwasher Manual GE Dishwasher Owner's Manual, GE Dishwasher installation guides
Open the PDF directly: View PDF ![]() .
.
Page Count: 32
GEAppliances
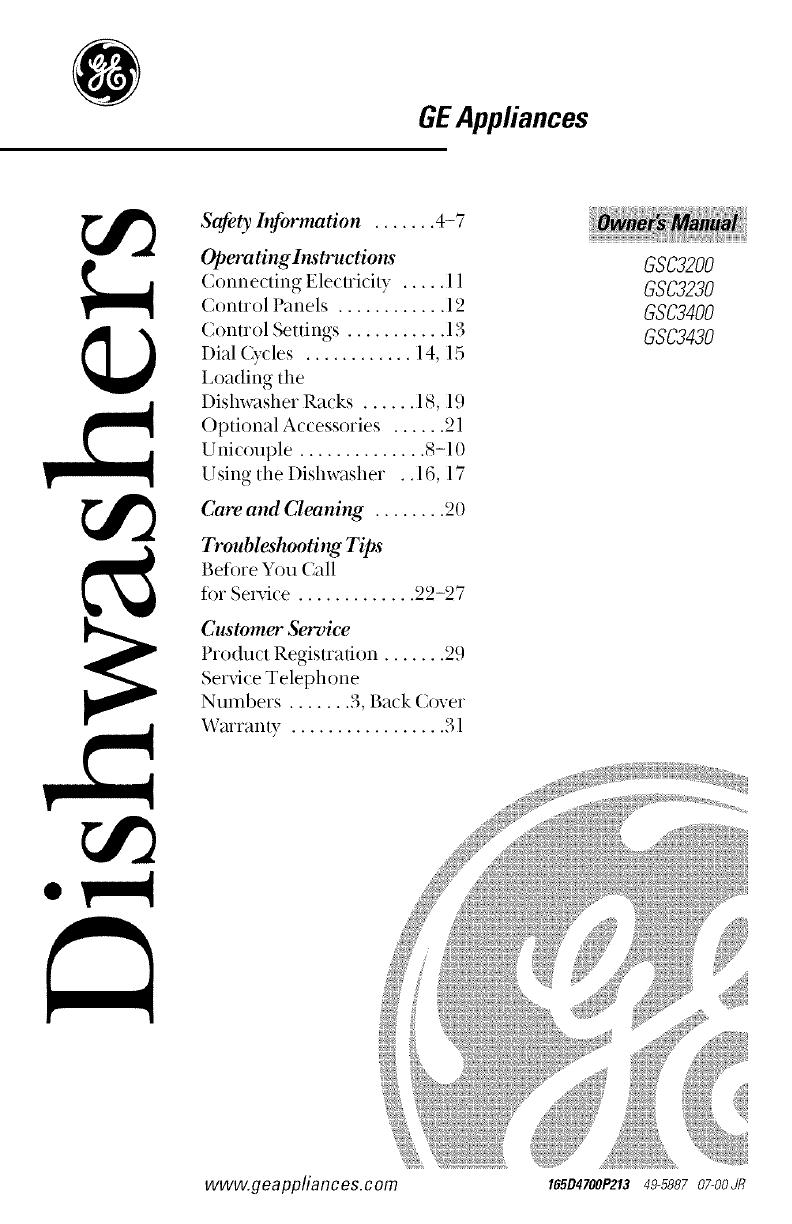
Safety hlformation ....... 4-7
Opera ting lnstructions
Connecting Elecuici/y ..... l l
Control Panels ............ 12
Control Settings ........... 13
Dial Cycles ............ 14, 15
I,oading the
Dishwasher Racks ...... 18, 19
Optional Accessories ...... 21
Unicouple .............. 8-10
Using the Dishwasher . .16, 17
Care and Cleaning ........ 20
Troubleshooting Tips
Before You Call
for Service ............. 22-27
Customer Service
Product Registration ....... 29
Service Telephone
Numbers ....... 3, Back Cover
Win'rainy ................. 31
GSC3200
GSC3230
GSC3400
GSC3430
www.geappliances.com 16504700,°213 49-5887 07-OOJR
_iii!i!_!_ili!!iiiiii!!ii!i!/iiii_
_i_,l_!iiii!iiiii
GE& You,AServicePartnership.
Important!
Two easy ways to register your appliance /.
5_' Throtl¢_h tile ....interrlet at x_ o°eatl:-) -)liances.... (onl
Complete and mail tile enclosed Product Registratior_ Card
Write the model and serial numbershere.
#
#
Youcan find them on the tub wailjust insido the door.
Staple sales slip orcancelled check here.
Proof of the origina/ purchaso date is needed to obtain
service under the warrant.
Manual
Inside ?()u will find many helptill hirers on how to use and maintair_
}our dishwasher properl}, lust a little preventive care (m }our part
can save yOU a g-real deal of time aild nlolley over the lile ot your
dishwasher.
i_iiiiiiiiiliiiHil;ili!!iiii
You'll tind man} answers to common problems here. [tyou review our
chart ot Troubleshooting Tips tirst, you ma) not need to call for sea-vice
atall.
If YouNeedService
lfyou do need service, you can reke_, knowing help is only a phone call
away, A list of toll-ii'ee (alstomer service numbers is included in the back
section. Or you can always call the GE Answer Center <')at 800.626.2000,
94 hours a day, 7 days a week.
OR
Visit our $\ebsite at: www.geappliances.com
iii?iiiiiiiii//!i//i!iiiii7
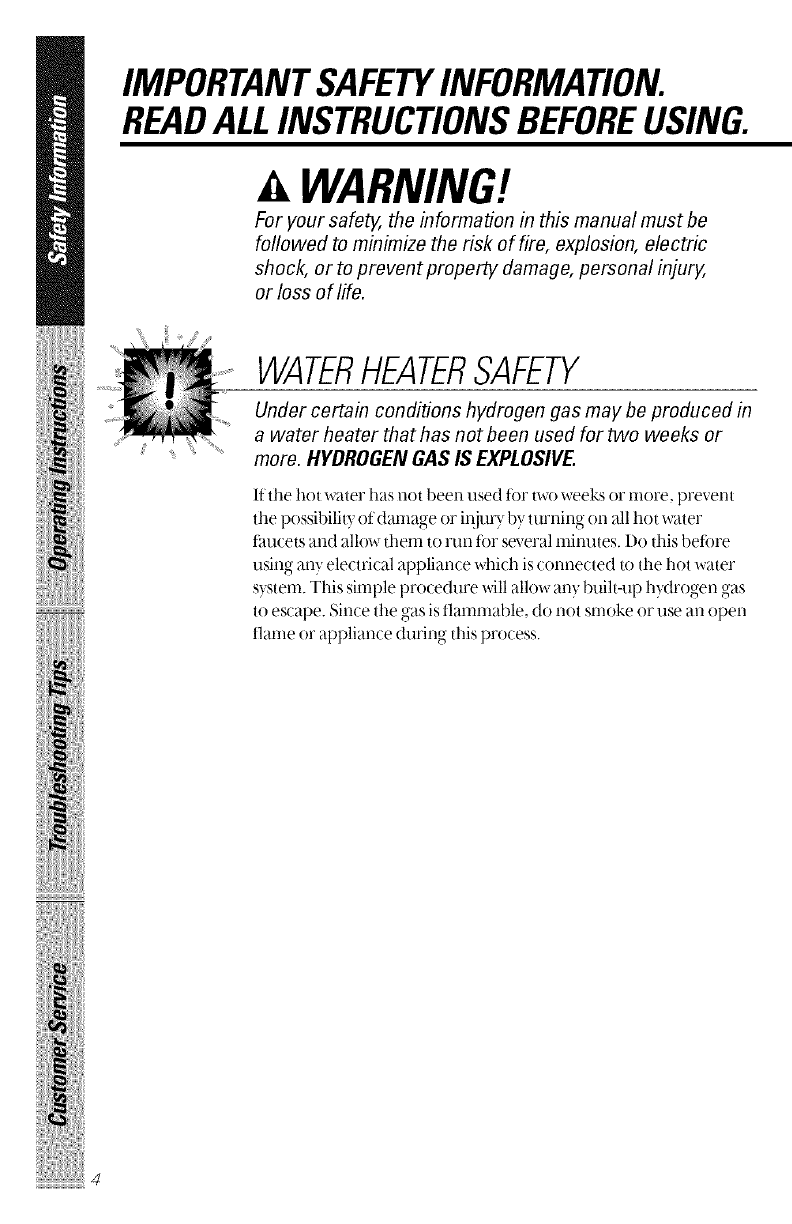
IMPORTANTSAFETYINFORMATION.
READALLINSTRUCTIONSBEFOREUSING.
AWARNING!
For your safe_ the information in this manual must be
foflowed to minimize the risk of fire, explosion, electric
shock, or to prevent property damage, personal injury,
or loss of life.
i!iiiiiiHiiHiililH!iiiiiHi
!iiiii!iN_i!iiil
i_i!ii_i:iiiiii!i
ilii_i:iiii!i:ii!iliii!iiiii_
WATERHEATERSAFETY
Under certain conditions hydrogen gas may be produced in
a water heater thathas notbeen used for two weeks or
more. HYDROGENGAS IS EXPLOSIVE,
If tile hot water has not been tlsed tot two weeks or more, prevent
the possibilit 3of damage or ir{itu), by turning on all hot water
tm_cets and allow them to run tor several minutes. Do this betore
using any electrical appliance which is connected to the hot water
s_stem. This simple procedure will allow any built-up hvdro_,-en oas
to escape. Since the gas is flammable, do not smoke or use an open
fianm or appliance during this process.
Use your dishwasher only for its intended purpose as
described in this Owner's Manual
PROPERINSTALLATION
ANDMAINTENANCE
This dishwasher must be properly installed and located in
accordance with the Installation Instructions before #is
used. If you did not receive an Installation Instructions
sheet with your dishwasher, you can receive one by calling
us toll-free at the GEAnswer Cente_ 800.626.2000.
s_,Connect to a grounded
metal, permarmr_t wiring
system; or run an equipment-
grour_dir_oconductor with
the cirolit conductors and
connect to the equipment-
groundino terminal or lead
of the appliance.
N Improper connection ot the
equipmentNTounding
conductor can resuh in a risk
of electric shock. Check with
a qualified electrician or
service representative if you
are in doubt whether the
appliance is properly
grounded.
_ l)ispose of discarded
appliances and shipping or
packing material properl).
N I)o not attempt to repair
or replace any part ot ?x_ur
dishwasher unless it is
specitically recommended
in this manual. All other
servicing should be reterred
to a qualitied technician.
N To minimize the possibility ot
electric shock, disconnect this
appliance ti'om the power
supply betk_re attempting any
maintenance. NOTE:Turning
the disl'rwasher otl does not
disconnect the appliance
t;'om the power supply.
We recommend having a
qualified technician service
your appliance.
iiiiHi!i iiiiii!!
l{i{{iiii!i>ii_i,!ii{iiiii!ii
iii!!iii i iiiHH
5

IMPORTANTSAFETYINFORMATION.
READALLINSTRUCTIONSBEFOREUSING.
AWARNING!
i!iiiiiiHiiHiililH!iiiiiHi
!iiiii!iN_i!iiil
i_i!ii_iiiiiiii!i
ilili_iiii!ili!iliii!iiiii_
DONOT...
i¢ Do not tamperwith controls.
i_ Do not _tbuse, sit on, or stand
on the door or dish r_tck oi
die dishw_tsher.
i¢ Do not allow children to play
inside, on or with this
appliance or any discarded
appliance.
s_i'I)o not discard a dishwasher
without first removing the
door of the washing
compartment.
i_ Do not store or rise
combustible materials,
g_/soline or other tlammable
vapors and liquids in the
vicinity ot this or any other
appliance.
WHENUSINGYOURDISHWASHER
_ Use only powder, tabs or
liquid detergents, or wetting,
agents recommended for use
in a dishwasher and keep
them out of the reach of
children. Cascade ')
Automatic l)ishwashing
I) r? lere ge -_thas been approved
ti)r use in all GE dishwashers.
s_?'1Jocate sharp items so that
they are not likely to damage
the door seal.
i_ I,oad sharp knives with the
handles up to reduce the risk
ot cut-t}T)e ir_juries.
N I)o not wash plastic items
unless marked dishwashor
solo or the equivalent. For
plastic items not so marked,
check the mamfli_cturer's
recommendations.
_ Non4)ishware Items: Do not
wash items S[lch as electronic
air cleaner fihers, furnace
filters and paint brushes in
your dishwasher, l)amage to
dishwasher and discoloration
or staining of dishwasher
may result.
s_?,I)o not touch the heatino-
element during or
immediately _ffter use.
i¢ Do not operate y)ur
dishwasher unless all
enclosure panels are properly
in place.
N (;lose supervision is necessa U
if this appliance is used by or
near children.
s_i' 1 h( h
oad "g t plastic items so
they Mll not become
dislodged and drop to the
bottom ot the dishwasher-
the} might come into contact
with the heating element and
be damaged.
READAND FOLLOWTHIS
SAFETYINFORMATIONCAREFULLY.
SAVETHESEINSTRUCTIONS
i/}iiii_liJi_'_"lii_/iiii_tii_
7
ilii i:iiii!i:ii ! iliii!iiiii
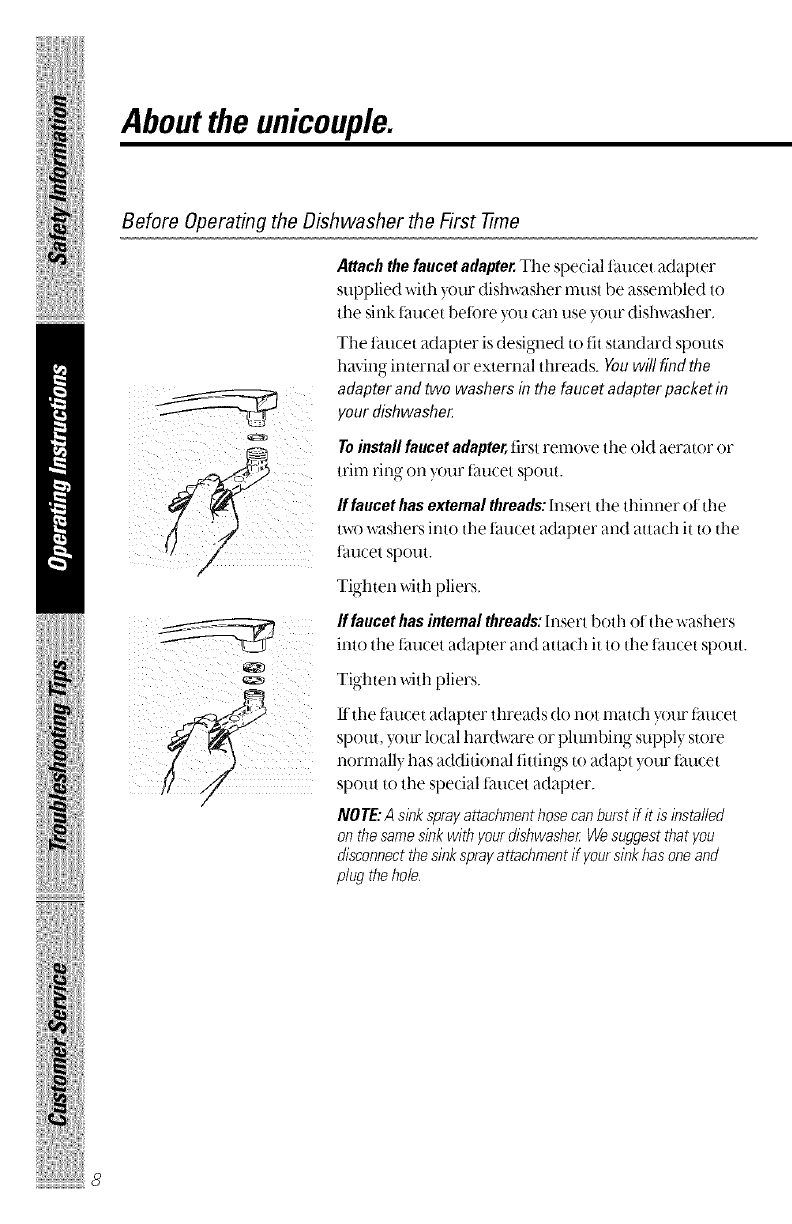
About the unicouple.
Before Operating the Dishwasher the First -time
iii_ iiiiiii _ _iii _ i
iI
/
Attachthefaucetadapter.The special faucet adapter
supplied with your dishwasher must be assembled to
the sink tim(el betbre you can use your dishwasher,
The taucet adapter is designed to tit standard spouts
having internal or external threads. You willfind the
adapter and two washersin the faucet adapter packet in
your dishwashe_
Toinstall faucet adapter, first remove the old aerator or
trim ring on your tm_cet spout.
Iffaucet has external threads: Insert the thinner otthe
m'o washers into tile faucet adapter and attach it to tile
taucet spout.
Tighten with pliers.
Iffaucet has internal threads: Insert both otthe washers
into the faucet adapter and attach it to the faucet spout.
Tighten with pliers.
If tile faucet adapter threads do not match your t_tucet
spout, }our local hardware or phmfl)ing suppl} store
normall} has additional fittings to adapt }our tm_cet
spout to the special faucet adapter.
NOTE: A sink sprayattachment hose can burst ff it is installed
on the samesink with your dishwasher We suggest that you
disconnect the sick spraya ttachmeet ff your sick has one and
plug the hole.
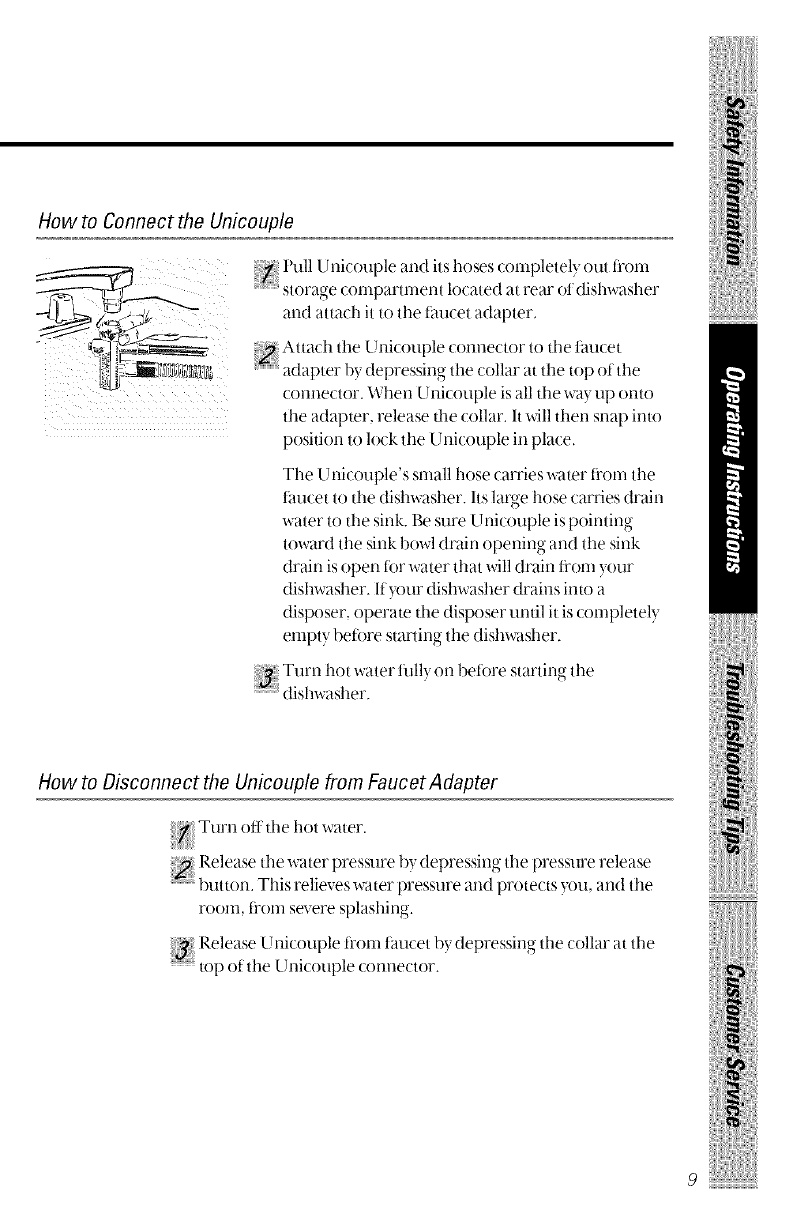
How to Connect the Unicouple
Pull Unicouple and its hoses completely ()tit fl'orn
storage cornpam-ner_t located at rear oI dishwasher
and attach it to the timcet adapter,
Attach tile Unicouple connector to tile taucet
adapter b) depressing the collar at the top of the
connector. When Unicouple is all the way up onto
the adapter, release file collar. It will then snap into
position to h)ck the Unicouple in place.
The U nicouple's small hose carries xcater ti'om tile
tmlcet to the dishwasher. Its large hose carries drain
water to tile sink. Be sure Unicouple is pointing
toward the sink bowl drain opening and tile sink
drain is open tier water that will drain tram your
dishwasher. If your dishwasher drains into a
disposer, operam the disposer until it is completely
empty beti)re starting the dishxcdsher.
Turn hot water rill} on beiore starting the
d shwasher.
iiii iiH!
!i ii iii iiiiii!
How to Disconnect the Unicouple from Faucet Adapter
P,elease tile water pressure b} depressing tile pressure release
btltton. This relieves water pressure and protects '_OII, and the
room, fi'om severe splashing.
Rele_tse Unitouple ti'()nl thucet b} depressing tile collar at tile
.....................top of the Unicouple connector.
iili!i!i!i,liliii
9
About the unicouple.
How to Disconnect the Dishwasher
Remove..... the power (ord plug, fl'om the....wall re(eptacle.
i)isconnect Unicouple fl'om taucet adapter.
NOTE:Whenmotorstopsat theendof thefinal dnse,theUnicouplecanbe
disconnectedandreturnedtostorage,
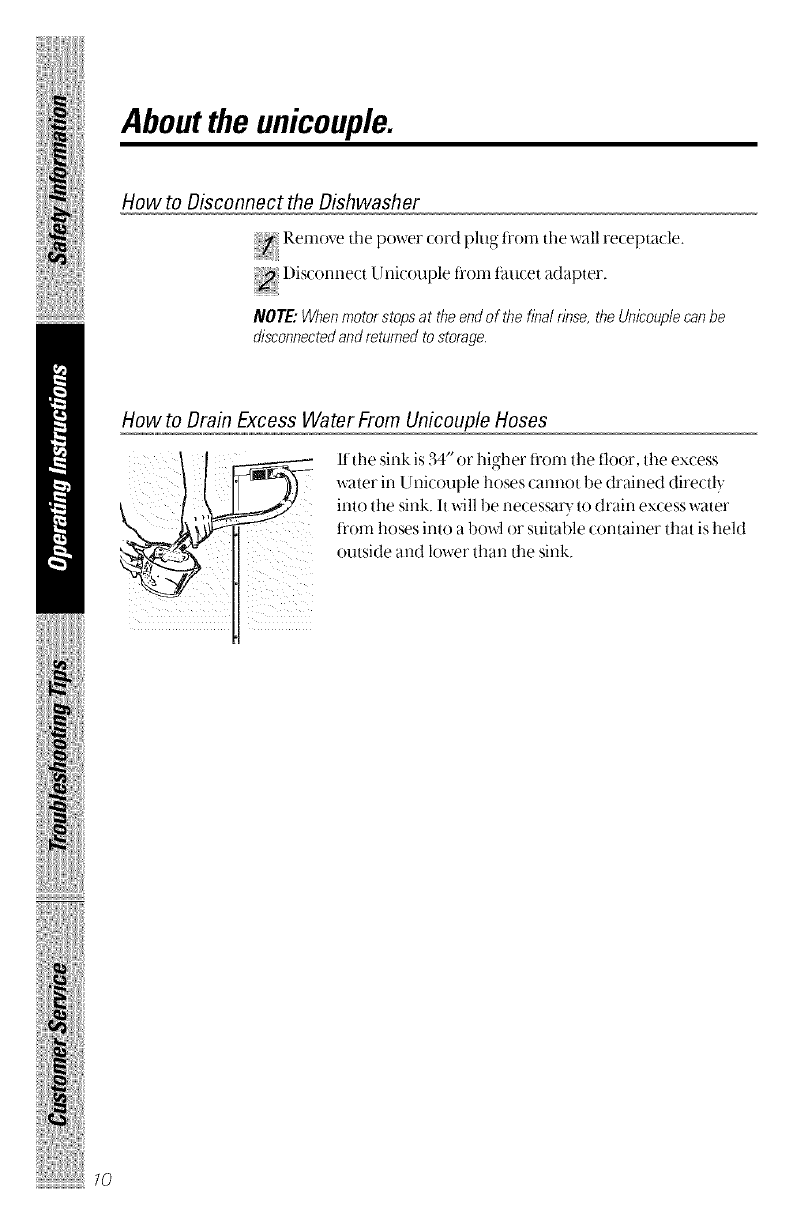
How to Drain Excess Water From Unicouple Hoses
H
11the sink is 34" or higher ti'om the floor, the excess
water in Unicouple hoses cannot be drained directly
into the sink. It will be necessat T to drain excess water
fl'om hoses into a bowl or stfitable container that is held
outside and lower than the sink.
About connecting electricity.
ACAUTION,forpersonalsafety:
DONOTUSEAN EXTENSIONCORDORAN ADAPTERPLUGWITH THIS
APPLIANCE.
DONOT UNDERANY CIRCUMSTANCES,CUTORREMOVETHETHIRD
GROUNDINGPRONGFROMTHEPOWERCORD.
GROUNDINGINSTRUCTIONS--Thisappliance must be grounded. In
the event oI a malflmction or breakdown, grounding will reduce the
risk of electric shock by providing a path ot least resistance tbr
electric current. This dishwasher is equipped with a cord having a
grounding conductor and a grounding plu , The plu , must be
plugged into an appropriate outlet that is installed and grounded in
accordance with the NATIONAt ELECTRICCODE,ANSI/NPFANO. 70.
DANGER--hnproper connection oI the equipment/grounding
conductor can resuh in a risk of electric shock. Check with a
qualified electrician or serviceman ityou are in doubt as to whether
the dishwasher is properl} grounded. [)o not modit_, the plug
provided with the appliance; itit will not fit the outlet, have a proper
outlet installed by a qualified electrician.
iiii iiH!
!i ii iii iiiiii!
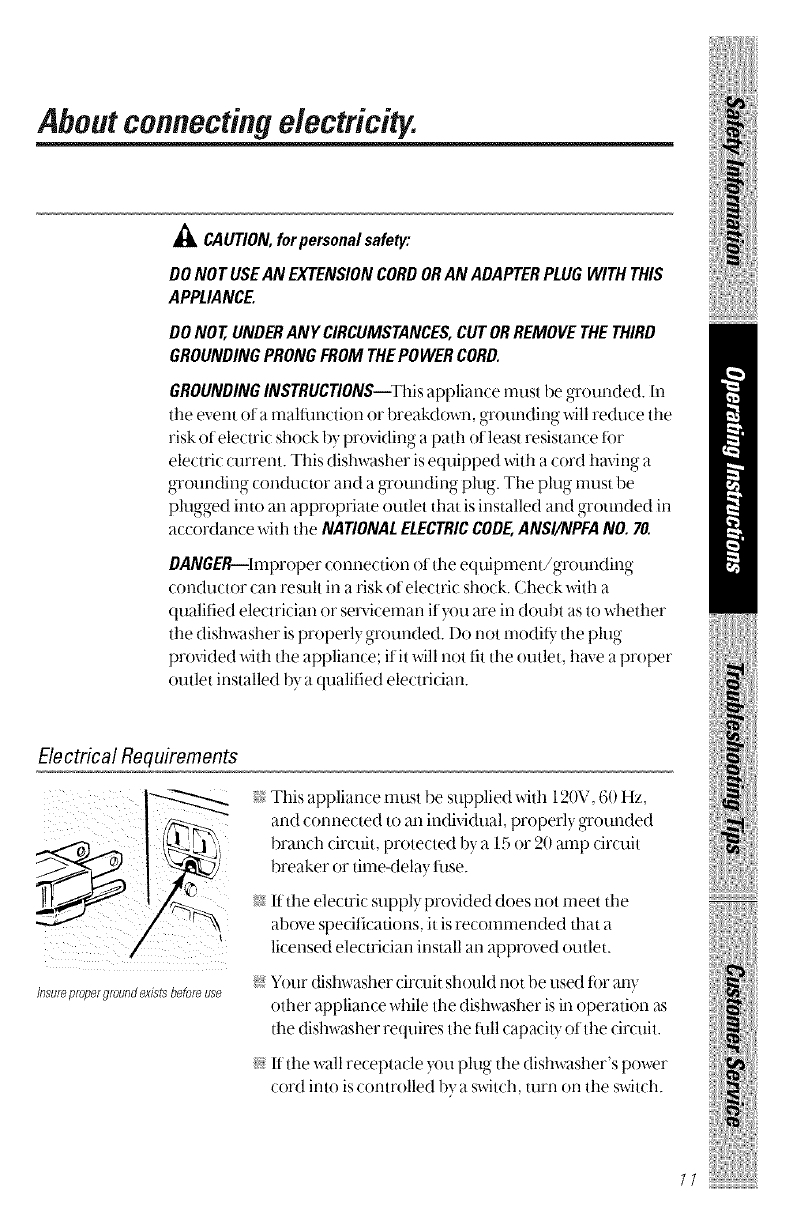
Electrical Requirements
i i i _ /iiii iii:
fllsurepropergroundexistsbetoreuse
:i;"This appliance must be supplied with 120V, 60 Hz,
and connected to an individual, properly grounded
branch circuit, protected by a 15 or 20 amp circuit
breaker or time-delay fuse.
N If the electric supply provided does not meet the
above specifications, it is recommended dmt a
licensed electrician install an approved outlet.
N Your dishwasher cir_fit should not be used tbr any
other appliance while the dishwasher is in operation as
the dishwasher requires the lull capacity otthe drcuit.
_ If the wall receptacle ym ph N the dishwasher's power
cord into is controlled by a switch, turn on the switch.
//
;;;;;;;;;;;;;;;;;;;;;;;;;;;;;;;;;;;;;
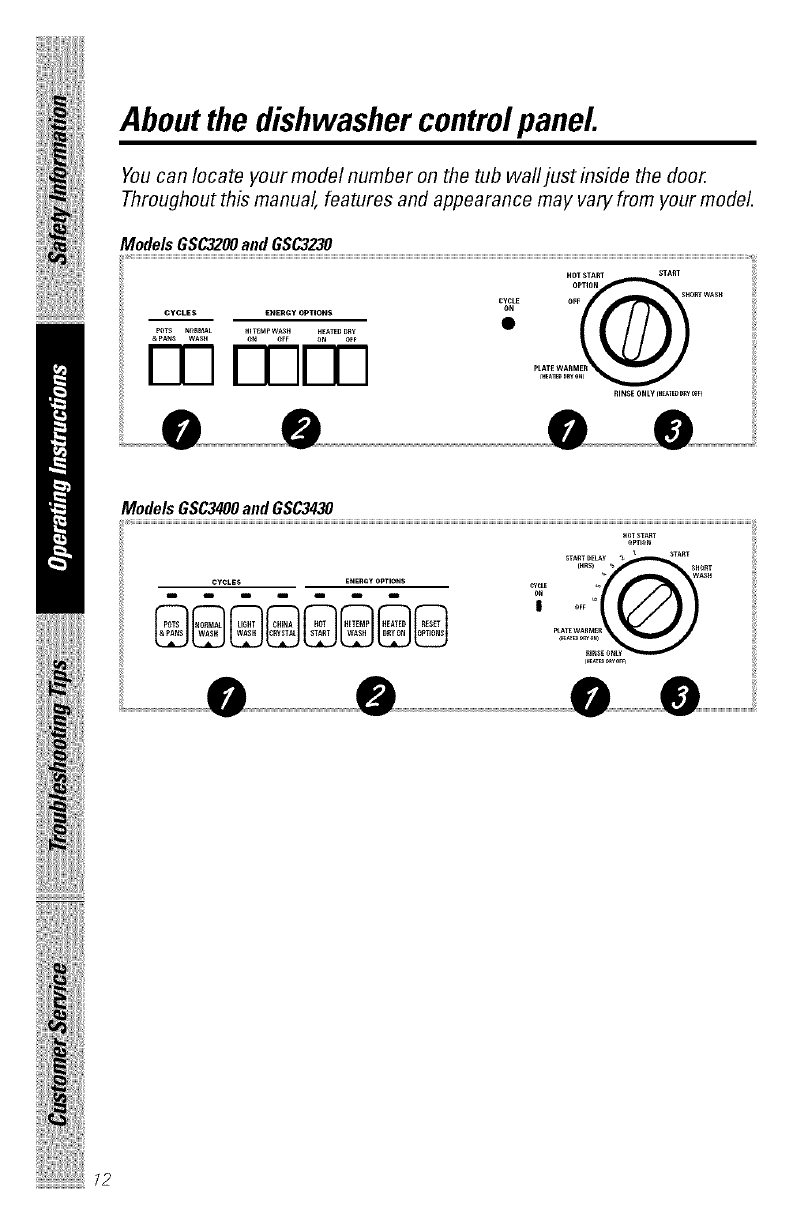
About the dishwasher controlpanel
Youcan locate your model number on the tub wall just inside the door.
Throughout this manual, features and appearance may vary from your model.
Models GSC3200 and GSC3230
CYCLES E_ER_Y OPTIOn,S ON
POTS _ORMAL H_TE_PWASH HEATEDDRY
&PAN_ WASH _N _FP _ _FF
RINSEONLYr._ATEDD_ _r_
Models GSC3400 and GSC3430
CYCLES ENEn_yOPTIONS
@@@@@@@@
_TARTDELAY • _ _TART
[HRS_ _ _HORT
;;;;;;;;;;;;;;;;;;;;;;;;;;;;;;;;;;;;;_2
ControlSettings
OCycles
POTS&
PANS 9.5gal.,63 rain. Rinse-Rinse-Rinse-MainWad_-Rinse-Rinse-Rinse
Forheavilysoileddisl_esorcookwarewith dried-on
or baked-onsoils. Everydaydishesmaybe included.
Tiffscyclewill not removeburned-onfoods.
NORMAL 8.0gal.,63 min. Rinse Rinse_MainWashq:_inse-RinseRinse
WASH Forloadsof everydaydishes,glassesandcookware
witl=mediumsoils.NOTE."Manydisl_esI_avelighter
soil than normal.Choosinga cycle other than
NORMAL WASHwiii saveenergyandwater.
LIGHT 6.7gal.,63 min. Rinse Rinse-MainWash-Rinse-Rinse
WASH Fordisheswith light soils.
SHORT 6.6gal.,55 rain. Rinse MainWasl_Rinseq:_inse-Rinse
WASH Forquicklywashing loadsof everydaydisheswith medium
soilsthat havenot driedoil, su@as loadsconsistingmostly
of glasses.
RINSE 3.9gal.,12min. Rinse Rinseq:_inse
ONLY Forrinsingpartial loadsthat will bewashedlater.
Do not usedetergent
PLATE Forwarming cleandishesandserving plates.Thiscyclewill take
WARMER approximately32 minutes.
HOT adds1.5gal.,30 rain.to selectedcycle. Rinse-StartSelectedCycle
START Preheatswashwater to correcttemperature.
Make sure the l)ial is at the OFFpositiorL
s_' l_atch the door.
OEnergy Options
HITEMP Providesextra heat for bestperformance,it is usedbest
WASH with heavily-soileddishes.
HEATED Turnsthe dryingheater on for fast drying.Thiscycle will extend
DRY ON the time to your wasl_cycle. Availableon aii wasl_cyclesexcept
RINSE ONLY,Addapproximately32minutesto tile cycle.
HEATED Shutsoff tile drying heatoptions.Dishesair dry naturally
DRY OFF andenergyissaved.
OStart
Slowly turn the DiM to the START1)osition. Don't turn it past
the STARTposiuon,or you could accidentally miss a rinse.
There is a time delay between start-up and water 1ill so you
will not hear anywash action right a_cay.
iiii iiH!
!i ii ,iii iiiiii!
i/iiiii_liPhii_/iiii_tii_
13

ilii i:iiii!i:ii!iliii!iiiii
About the dial cycles.
Short Wash
ROT START
OPTION
START DELAy %'_ STAR T
(HRS) '_ SHORT
¢,
OFF
pLATEWARMER
mt_leDDRy_
m
_N_TmDRYOm
For quicklywashing loads ot eve)3(la_,dishes with
medium soils that have not dried on.
_ Select the NORMALWASH(ycleand any options.
_lie sure the door isunlatched.
_ Slowlyturnthe Dial to SHORTWASH,
_I atch the door to start the c?vle.
HDT START
OPTION
START DELAy g'_ START
RINSE ONLY
Rinse Only
For rinsing partial loads that will be washed later. Do not
uso dotorgont
Make sure HEATED DRY OEEis selected.
Be sure the door is unlatched
:_{_ Slowly turn the I)ial to RINSE ONLY.
Iatch the door to start the cycle.
ROTSTART
OPTION
START DELAy g'_ START
(HRS) _SHORT
WASH
PLATE WARMER
Plate Warmer
For warming clean dishes and serving plates. This (7,cle
• . x,t -
wdl take approxlmatel, 32 minutes.
) Ix)ad clean dishware to be'warnle(l
>_, Select HEATED DRY. ON.
lie sure the door is unlatched
Slowly turn the Dial to PLATE WARMER.
l_atch the door to start the cycle
74
HOT START
OPTION
START DELAy _ '_ STAR T
(fiRS) % SHORT
,_- WASH
OFF
P_TEWARMER
_N_TmD
m_O ORYOFF}
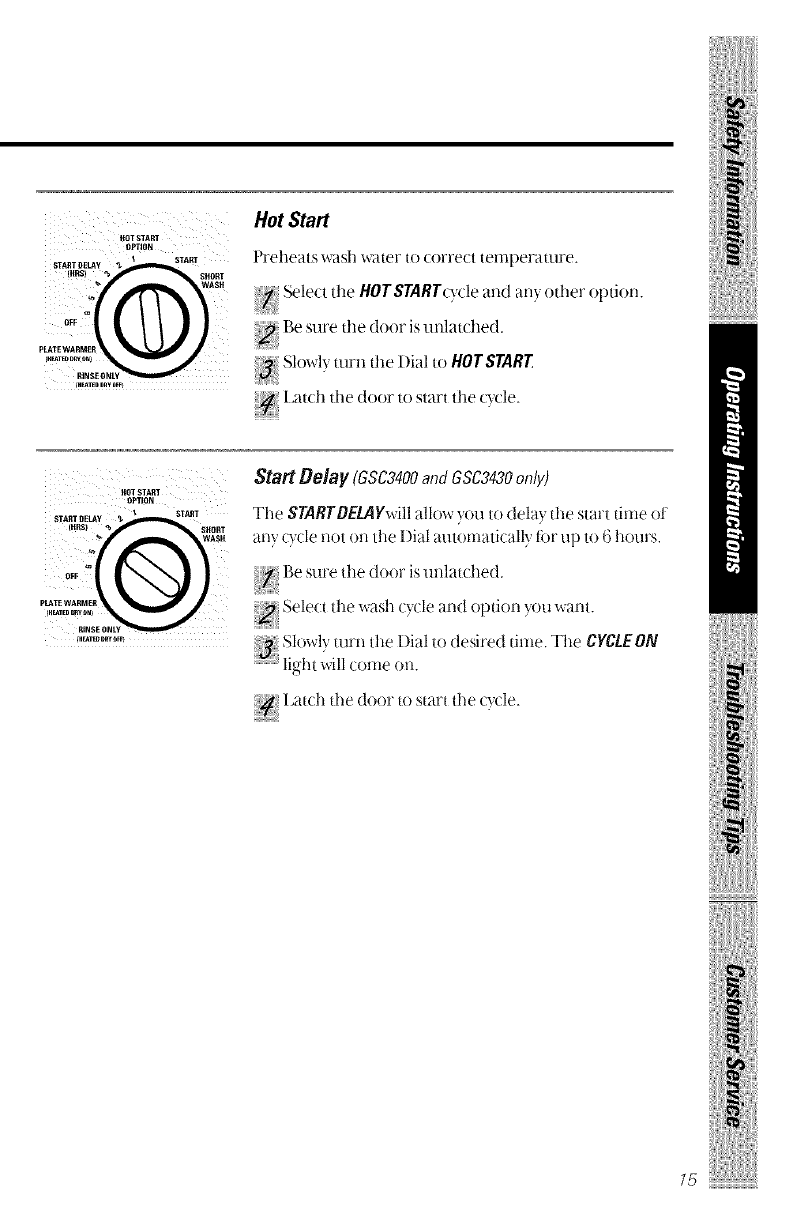
Hot Start
Preheats wash water to correct temperature.
Select the HOT STARTcvcle and am other option.
_{ Be sure the door is unlatched.
Slowl} turn the l)ial to HOTSTART
I_atch the door to start the ode.
iiii iiH!
!i ii ,iii iiiiii!
HOT START
OPT}ON
START DELAY %'_ START
(RRS) '_ SHORT
WASH
OFF
pLATEWARMER
m_TmD.vom
Start Delay (GSC3400andGSC3430only)
The STARTBELAYwill allow you to delay the start time oi
any c) cle not on the ]Dial automatically t{)r up to 6 horn's.
Be sure the door is mflatched.
Select the wash cycle and option }ou want.
Slowly turn the Dial to desired time. The CYCLEON
..............light will come on.
l_atd_ the door to start the (v(le.
{{i::
15
Using the dishwasher.
Checkthe Water Temperature
The entering water must be at least 120°F. and not nlore than
150° F., tbr ettective cleaning and to prevent dish damage. Check
tile water temperature with a candy or meat thermometer. Turn oil
tile hot water taucet nearest the dishwasher, place tile thernlometer
in a glass and let tile water run continuousl} into tile glass until tile
temperature stops rising.
16
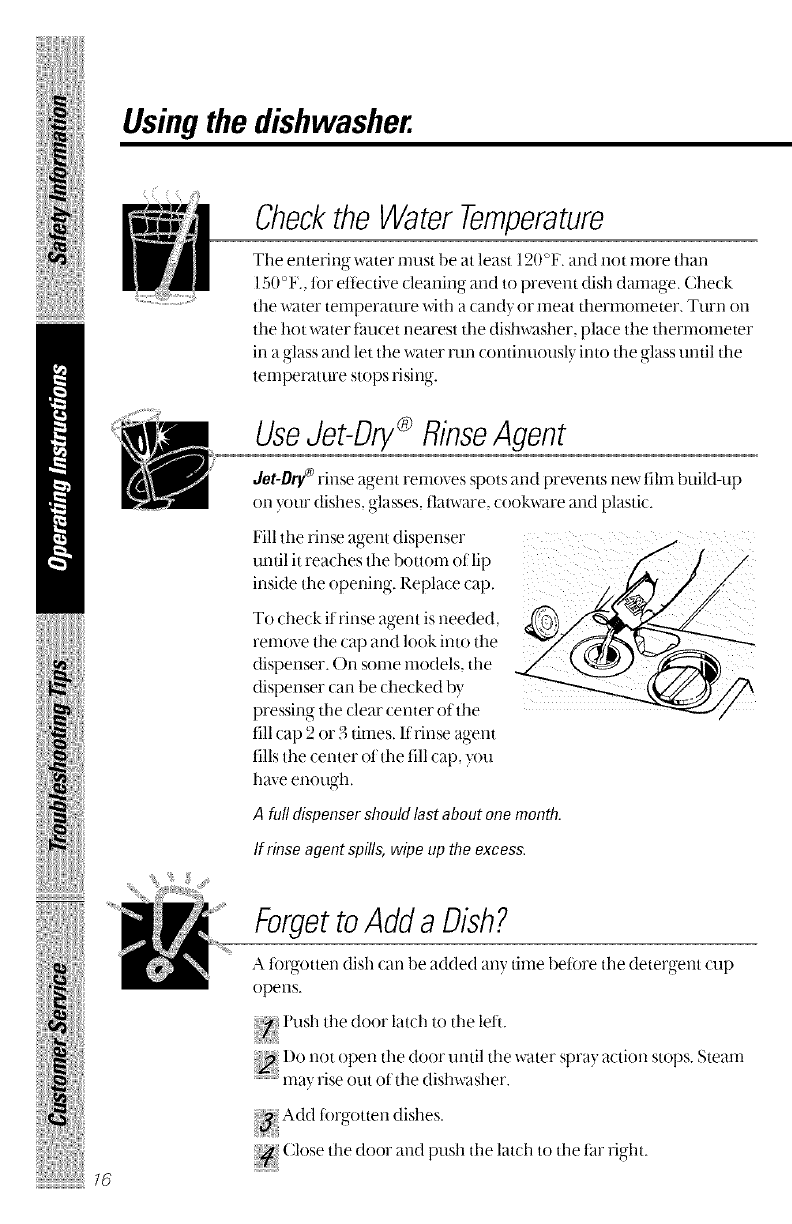
UsedebD,T ® RinseAgent
Jet-Dry_rinse agent removes spots and prevents new tilm build-up
on }our dishes, glasses, tlatware, cookware and plastic.
Fill the rinse agent dispenser
until it reaches the botton_ of lip
inside the opening. Replace cap.
To check it rinse agent is needed,
renlove tile cap and look into tile
dispenser. ()n sonle models, the
dispenser can )e checked by
r s ll-l( h "
p e 's g t e (lear center of the
till cap 2 or 3 times, lt'rinse agent
tills tile center ot the till cap, you
have enough.
A full dispensershould last about one month.
If rinse agent spills, wipe up the excess.
ForgettoAdda Dish?
A forgotten dish can be added any time betore tile detergent cup
opens.
Push tile door latch to tile lefl.
_I)o not open the door tlntil the water spra} action stops. Steam
:: :::::::_II1_-l} rise Ollt of tile dishwasher.
Close tile door and push tile latch to tile far right.

ProperUseof Detergent
Use only detergent specithally made tot use in dishwashers. ( ascade '_
Automatic Dislm_ashing [)ete_\gent has been approved ior use in all GE
dishwashers. Keep your detergent tt'esh and d[)-.Don't put powder
detergent into the dispenser until ?xm're tea@ to _ash dishes.
The amount of detergent to use depends on whether your water is
hard or soft. With hard water, you need extra detergent. With soil
water, you need less detergent.
Protect ;,xmr dishes and distm-asher by contacting ?xmr water
department and asking how hard ?xmr water is. Twelve or more grains
is extremely hard water. A water sotiener is recommended. Without it,
lime can build up in the water valve, which could stick while open and
cause tlooding. Too nmch detergent with soil x_-atercan cm_se a
perrnanent cloudiness of glassuvu'e, called otching.
You'll find two detergent dispensers on the
door ofyour dishwasher. All wash cycles except ipig;_
RINSE ONF require detergent in the main cup.
I fvour dishes h_n,eextra heaw soil or VOllhave
hard water yotl inay want to add detergerH to tile _@_open cup also. X_,rashcycles with two washes will
also use the open cup. _hen using automatic Main"cup.._\ _
dishwashing detergent tabs, simply place one
tab in the main cup and close.
Be sure the Dial is OFFbeiore adding detergent. ()therwise, the
detergent cup will not close and latch properly. Add detergent dlen
close the main cup.
NOTE:To open deteNent (alp after it has ..........
been closed, simply turn the detergent cup
handle counterclockwise until it releases.
A snapping sound may be heard.
iiii iiH!
!i ii ,iii iiiiii!
iliiiii_liii_'_"lii_liiii_tii_
77
Loadingthe dishwasher racks.
For best dishwashing results, follow these loading guidelines. Features and
appearance of racks and silverware baskets may vary from your model
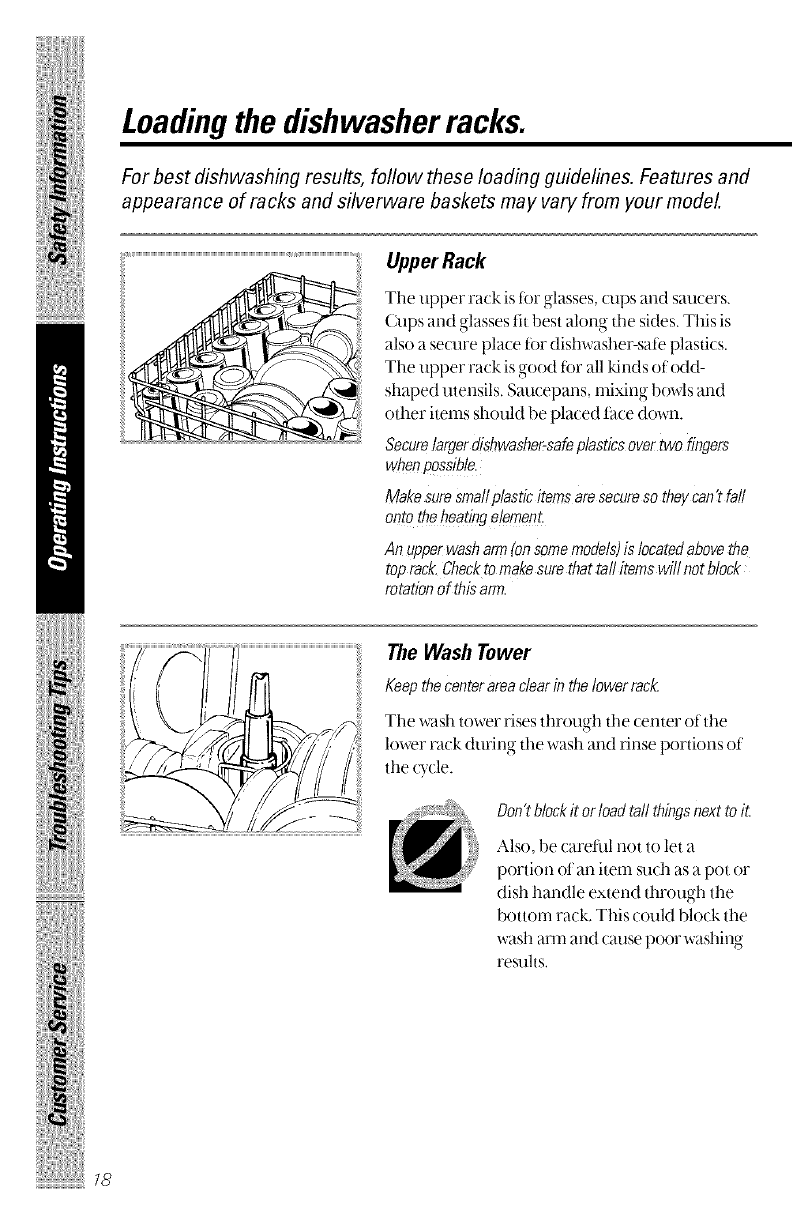
Upper Rack
Tile upper rack is tor glasses, tups and saucers.
CtlpS al-ld glasses fit best alol-l_ tile sides. This is
also a secure place tor dishwasher-sate plastics.
The upper rack is good tot all kinds of odd-
shaped utensils. Saucepans, nlixing bowls and
other items should be placed l_lce down.
Securelargerdishwasher-safeplasticsovertwo fingers
whenpossible.
Makesuresmallplasticitemsaresecuresotheycan?fall
ontotheheatingelement.
An upperwasharm(onsomemodels)is locatedabovethe
toprack.Checkto makesurethattall itemswill notblock
rotationof thisarm.
18
The Wash Tower
Keepthecenterareaclearinthelowerrack.
Tile wash tower rises throtlgh tile tenter of tile
lower rack during the wash and rinse portions of
tile cycle.
Don'tblockit ortoadtall thingsnexttoit.
Also, be careful not to let a
portion otan item such as a pot or
dish handle extend through ttle
bottom rack, This could block tile
wash arm and cause poor washing
results.
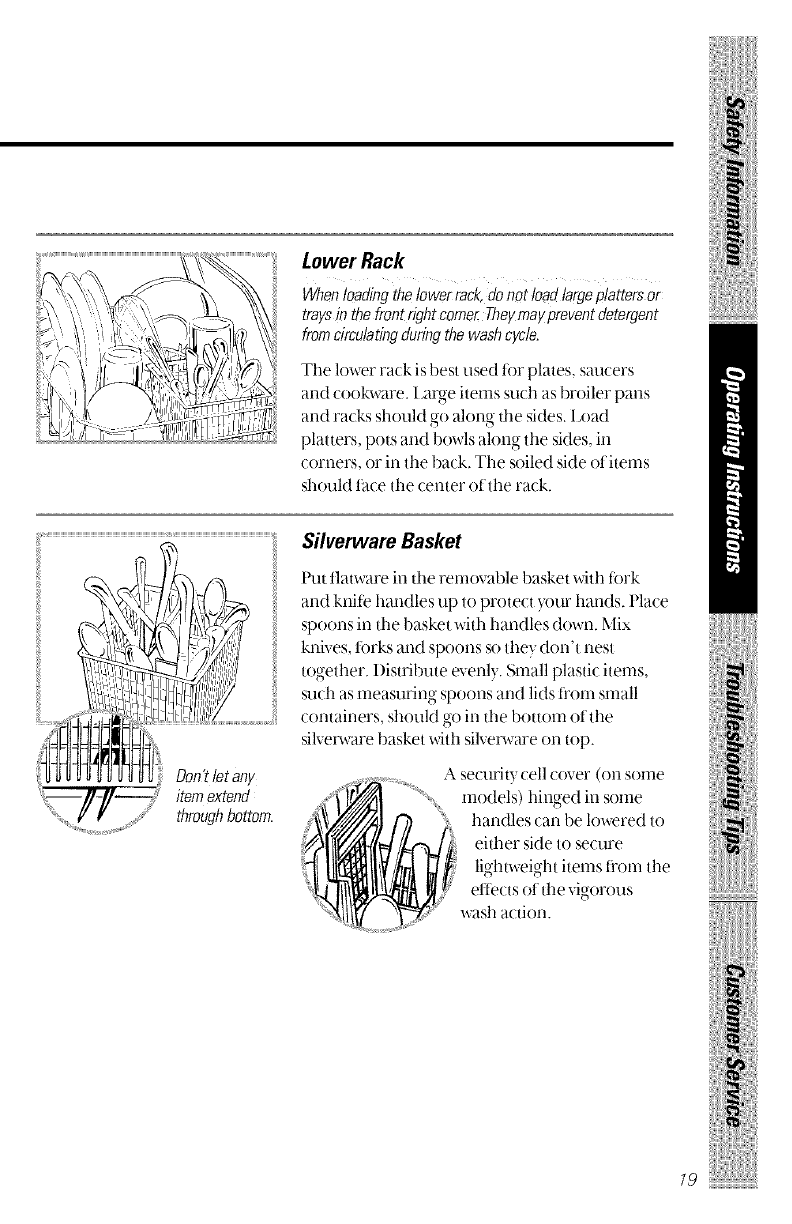
Lower Rack
Whenioadingthelowerrack,donot loadlargepiattersor
traysb thefrontrightcornerTheymaypreventdetergent
fromcirculatingduringthewashcycle.
The lower rack is best used tor plates, saucers
and cookware, IJaNe items such as broiler pans
and racks should go along the sides, 1Joad
platters, pots and bowls along the sides, in
corners, or in the back, The soiled side ot items
should t_lce the center of the rack.
Don,t let any
item extend
through bottom.
Silverware Basket
t'ut flatware in the removable basket with tork
and knil_' handles up to protect your hands. Place
spoons in tile basket with handles down. Mix
knives, torks and spoons so they don't nest
to,,-ether I)istribute exenlx Small plastic items
such as measuring spoons and lids ti'om small
containers, should go in the bottom of the
silverware basket with silverware on top.
A security cell cover (Oil some
...., models) hinged in some
handles can be lowered to
either side to secure
lightweight,,items ti'om the
etlects ot tile vigorous
wash action.
iili!i!i!i,liliii
19

Caringfor the dishwasher.
To clean the control panel use a lightly dampened cloth then dry thoroughly.
To clean the exterior use a good appliance polish wax.
Never use sharp objects, scouring pads or harsh cleaners on any part of
the dishwasher.
Sumpcoverscrews
Protect Against Freezing
II your dishwasher s leti in an unheated pla_e during
tile winter, ask a service technician to:
_{ Cut off electrical power to the dishwasher. Remove
r ftlses or trip c rcut )reaker.
Turn off'the water suppl) and disconnect the water
:::::::::::::::inlet line i]?Ollltile water valve.
:: I)rain water ti'om tile inlet line and water valve.
(Use a pan to catch the water.)
Reconnect tile water inlet line to tile water vah,e.
Remove the plastic sump cover in the tub
bottonl and use a sponge to soak up water in the
rubber boot.
I _ "it'_
Twotypesof _7,.11_1'. II I1_
Checkthe airgap anytime your
dishwasherisn"tdrainingwell.
20
Does YourDishwasher Have an Air Gap?
An air ap pr( tects your dislm asher against xsater
backing up into it it a drain clogs. Tile air gap is not
a part ot the dishwasher. It is not covered byT,xmr
warranty. Not all plumbing codes require air gaps,
so }x)u may not have one.
The air gap is easF to clean.
Turn off'ttle dishwasher and Ritioff tile chrome
lover.
Unscrew ttle plastic cap and clean x_dtha toothpick.
_iiii_liii_,iiiiiiiii!iiii¸
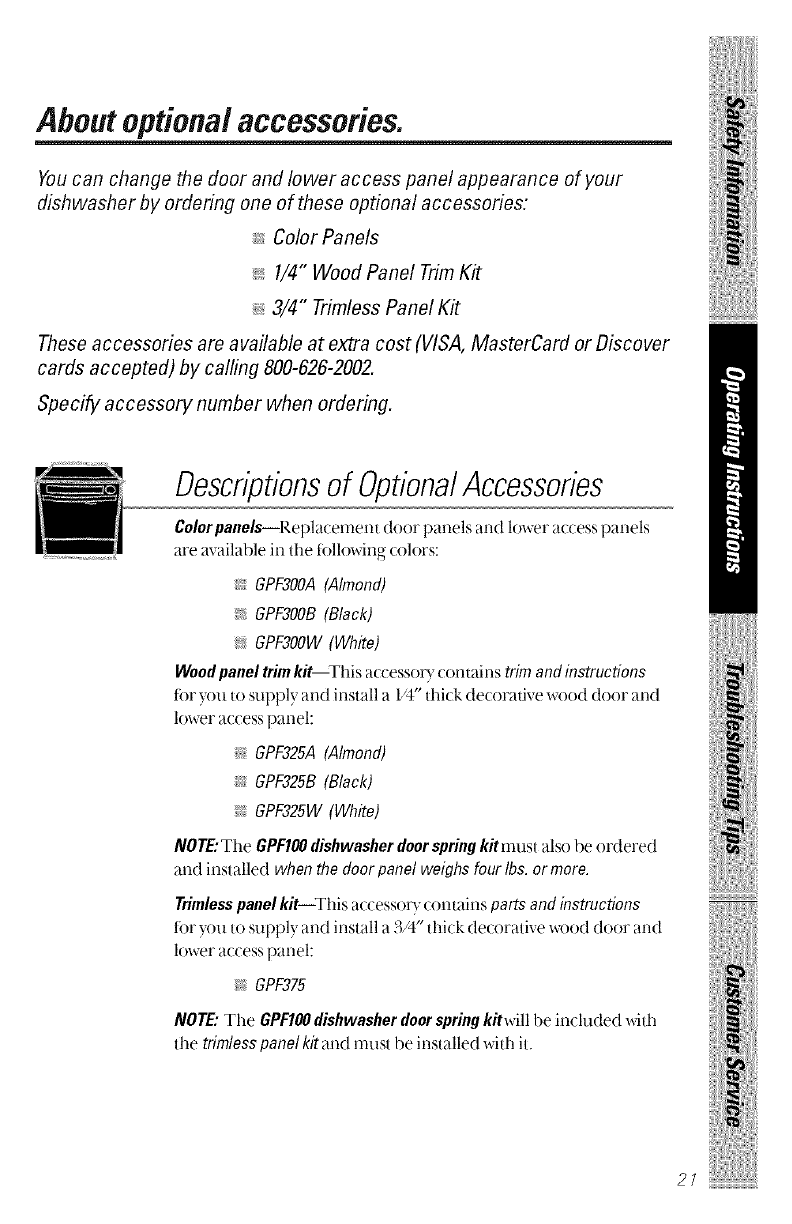
Aboutoptional accessories.
Voucanchangethedoorandloweraccesspanelappearanceofyour 1_
dishwasher by ordering one of these optional accessories:
ColorPanels
1/4" Wood Panel Trim Kit
;_:3/4" Trimless Panel Kit
These accessories are available at extra cost (VISA, MasterCard or Discover
cards accepted) by calling 800-626-2002.
Specify accessory number when ordering.
Descriptionsof OptionalAccessories
Colorpanels--Replacenlent door panels and lower accesspanels
are available in the t_dlowing (olors:
_GPF3OOA(Almond)
i_ GPF3OOB(Black)
_GPF3OOW(White)
Wood panel trim kit--This accessory contains trim and instructions
tor you to supply and install a ['4" thick decorative wood door and
lower access panel:
_; GPF325A(Almond)
_GPF325B(Black)
i_ GPF325W(White)
NOTE:The GPFIO0dishwasherdoorspring kitmust also be ordered
and installed when the doorpanel weighsfour Ibs.ormore.
Trimlesspanel kit--This accesso_)"(ontains partsand instructions
fi)r you to supply and install a 3/4" thick de(:orative wood door and
lower access panel:
NGPF375
NOTE:The GPFIO0dishwasherdoorspring kitwill be included with
the trimless panel kit and must be installed with it.
21
iiiiiiiii!{iiiii!iiiiiiiiiiiiiiiii!7
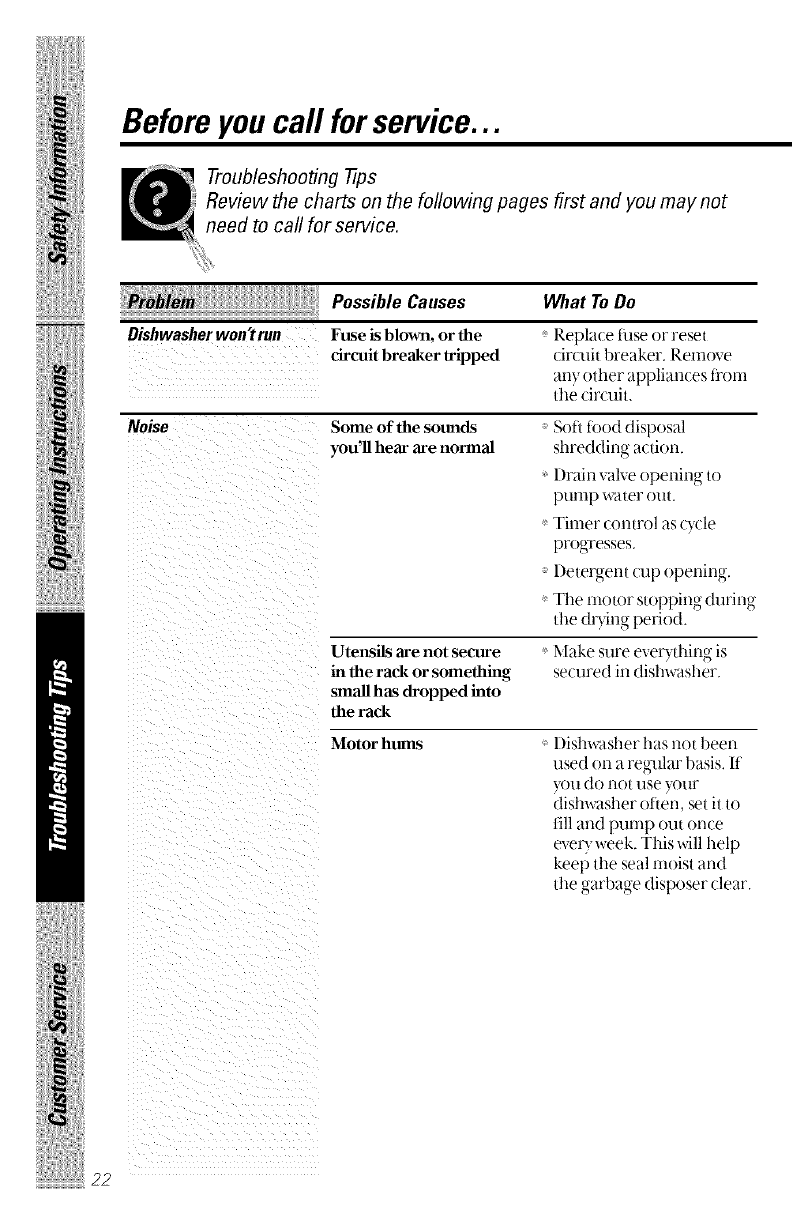
Before you call for service...
Troubleshooting -tips
Review the charts on the following pages first and you may not
need to call for service.
Possible Causes
Dishwasherwon'trun Fuseis blown, or the
circuit breaker lripped
What ToDo
Replace fl_se or reset
cir(_fit breaker. Remove
any other appliances ti'om
the circuit.
Noise Some of the sounds
you'll hear are normal
Soft _()od disposal
shredding action.
Drain valve opening to
pump _ater out.
' Timer control as _ycle
progresses.
Detergent cup opening.
Ttle motor st()ll:) 3ilw..,durin g"
tile (hTing period.
Utensils are not secure
in the rack or something
small has dropped into
the rack
Make sure evel3 thing is
secured in dishwasher.
Motor hums l)istm-asher has not been
used on a reglflar basis, h
}'Oil d() not tlSe }'()[ff
dishwasher often, set it to
fill and pump out once
evervweek. This will help
keep the seal moist and
the garbage disposer clear.
22
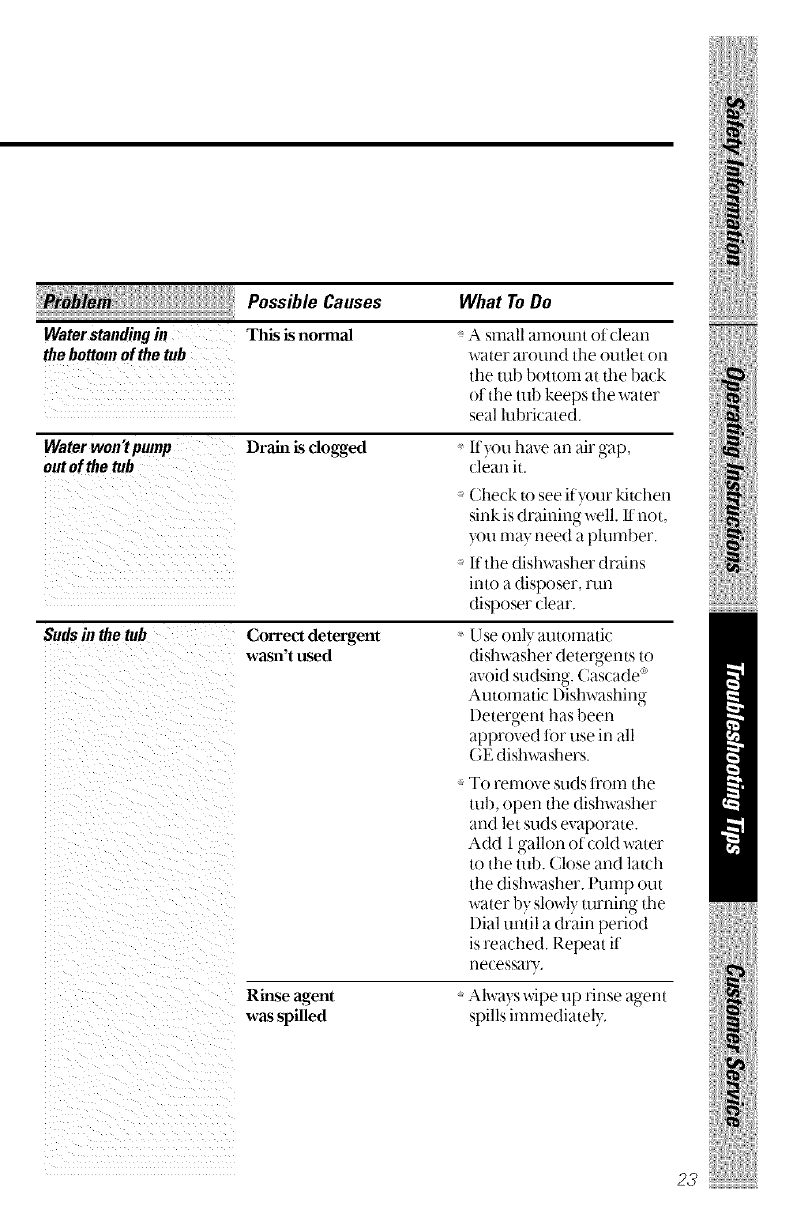
Possible Causes
Water standing in This is normal
the bottom of the tub
Water won'tpmnp Drain is clogged
out of the tub
Suds in the tub Correct detergent
wasn't used
Rinse agem
was spilled
What ToDo
A small amount of clean
water around tile outlet on
tile ufl) bottom at file back
ot tile tub keeps tile water
seal lubricated.
lfy)u have an air gap,
clean it.
Check 1osee ifymr kilchen
sink is draining well. II not,
you may need a plumber.
Ifthe dishwasher drains
into a disposer, run
disposer clear.
' Use only automatic
dishwasher detergents to
avoid sudsing. Cascade':
_utomatic I)ishx_ashim,-
l)etergent has been
approved t0r use in all
GE distm_lshers.
To renlove stlds t]:'oill the
tub, open the dishwasher
and let suds evaporate.
Add 1gMlon of cold water
to the tub. Close and latch
the dishwasher, t'ump out
water by slowly turrfir N tile
Dial until a drain period
is reached. Repeat if
necessa U,
•_b.'_a_,s.wi[p3etl rinse _aoen [
spills mined ateh,,
i_iiiii/iuJ,!,i]{ii{i/i
iiiiiiiii iii!
22
iiilg!{iiiii!iiiiiiiiiiiiiiiii!7
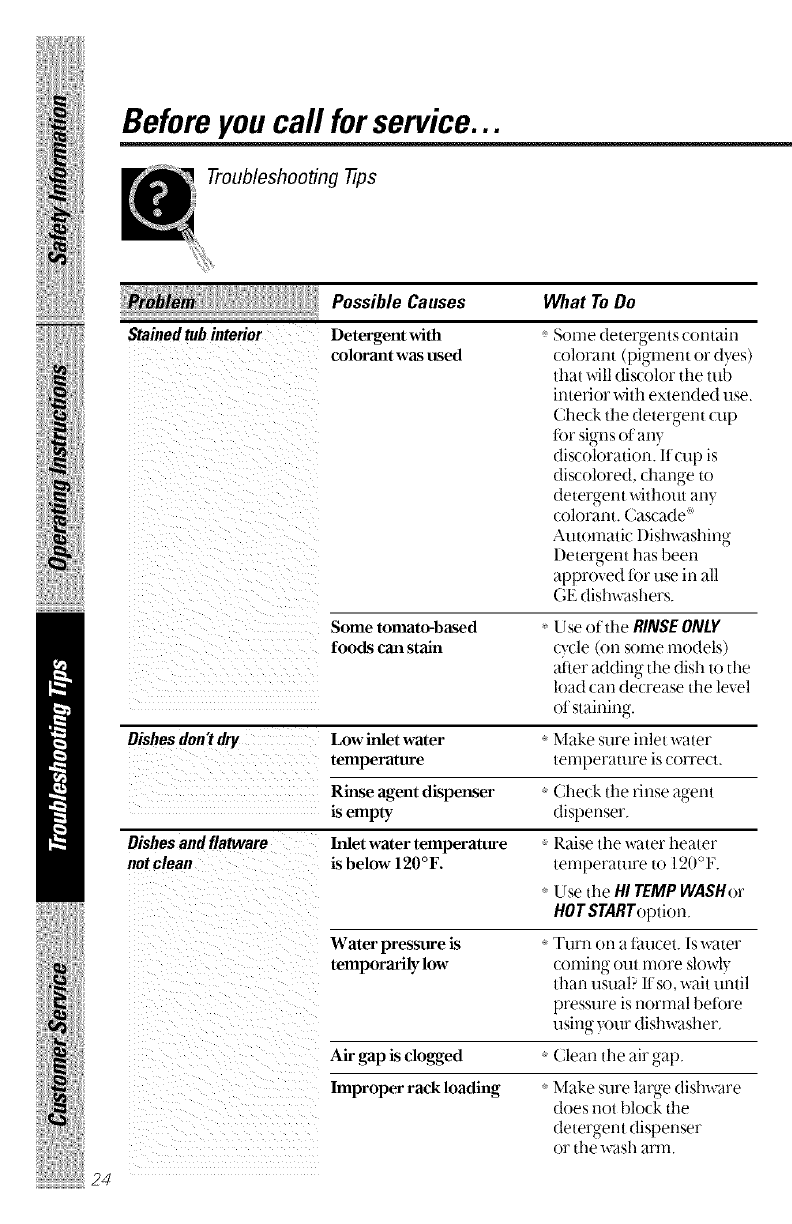
Before you call for service...
Troubleshooting -tips
Possible Causes
Stained tub interior Detergent with
colorant was used
What ToDo
Sorne (tetergents contairi
colorant (pigment or dyes)
that will discolor the mb
interior with extended use.
Check the detergent cup
tor signs oI an)
discoloration. Itcup is
discolored, charNe to
detergerit without an}
colorant. Cascade '>
Automatic I)ish_ ashino
Detergent has been
approved tor use in all
GE dishwashers.
Dishesdon'tdry
Dishesandflatware
notclean
Some tomato-based
foods can stain
Low inlet water
temperature
Rinse agent dispenser
is empty
Inlet water temperature
is below 120°F.
Water pressure is
temporarily low
Air gap is clogged
hnproper rack loading
Use of tile RINSEONLY
c?vle (on some models)
aiier adding tile dish to tile
load call decrease the level
ot stainino
Make sure inlet water
temperature is correct.
Check the rinse agent
dispenser.
Raise the "_caterheater
temperature to 120%.
Use tile HI TEMPWASHor
HOTSTARToption.
TIII'II on a t_iucet. Is water
coming out more slowly
than usual? If so, wait until
pressure is normal bet(_re
using y)ur dishwasher.
Clean the air gap.
Make sure lane dishware
does not block tile
detergent dispenser
or tile wash arm.
24
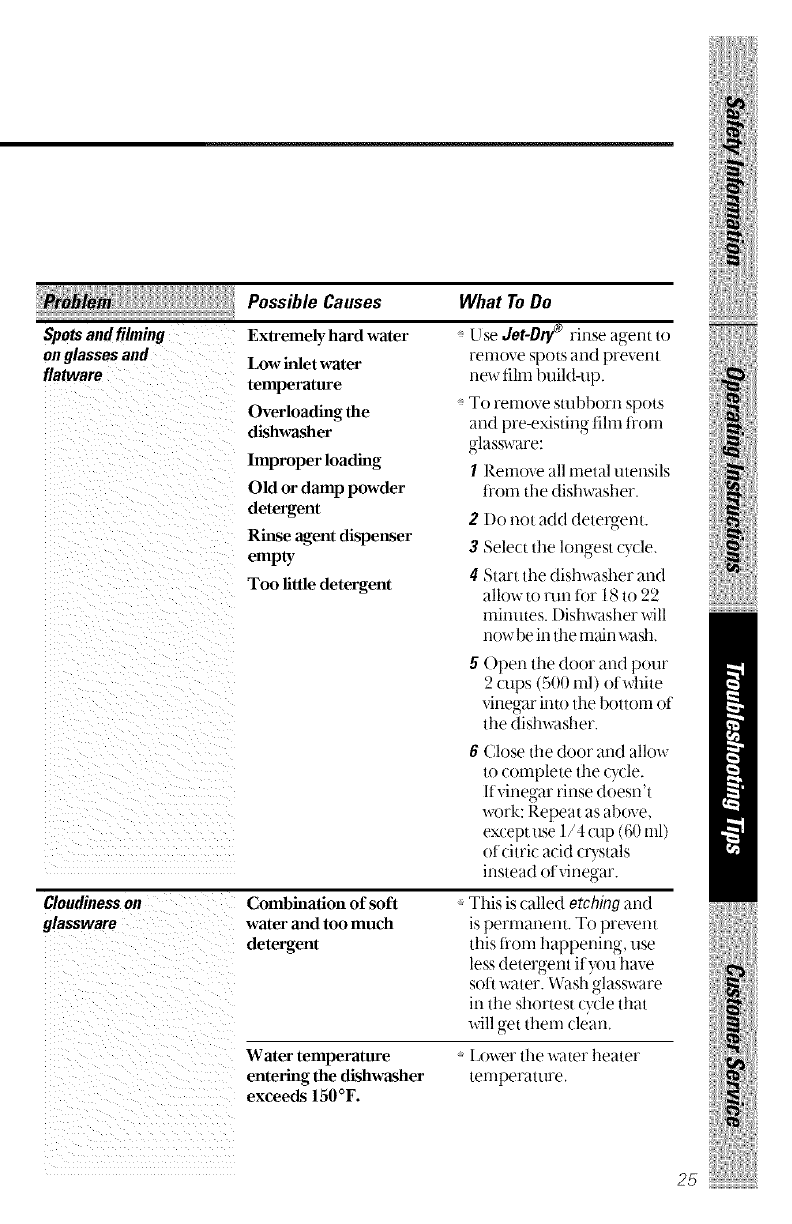
Spotsandfihning
onglassesand
flatware
Possible Causes
Exlremely hard water
Low inlet water
temperature
Overloading the
dishwasher
Improper loading
Old or damp powder
detergent
Rinse agent dispenser
empff
Too little detergent
What ToDo
Use det-Dt_ rinse agent to
renlove spots and prevent
new fihn build-up.
To renlove Stllbborll spots
and pre-existing tilm fl'om
glassware:
IRemove all metal utensils
fl'om the dishwasher.
2I)o not add detergent.
3Select tile longest c7,tie.
4Start the distm-asher and
allow to mn tor 18 to 22
minutes. I)ishwasher will
n()wbe in tile main wash.
5Open tile door and pour
2 (_lps (500 nil) ot white
vinegar into tile bottom of
the distm_asher.
Cloudinesson
glassware
Combination of soft
water and too much
detergent
6Close tile door and allow
to complete tile tycle.
If vinegar rinse doesn't
_mik: Repeat as above,
except use 1/4 {rip (60 ml)
ot citric acid crystals
instead ot vinegar.
This is called otching and
is permanent. To prevent
this ti'om happeMng, use
less detergent ityou have
soft water. Wash glassware
in the shortest c?vle that
will get them clean.
Water temperature Ix_wer tile xx_aterheater
entering the dishwasher temperature.
exceeds 150°F.
i_iiLJ,!,ii{ii{i/i
iiiiiiiii iii!
25
iiiiiiiii!iiiiii!iiiiiiiiiiiiiiiii!7
Before you call for service...
Troubleshooting -tips
Possible Causes
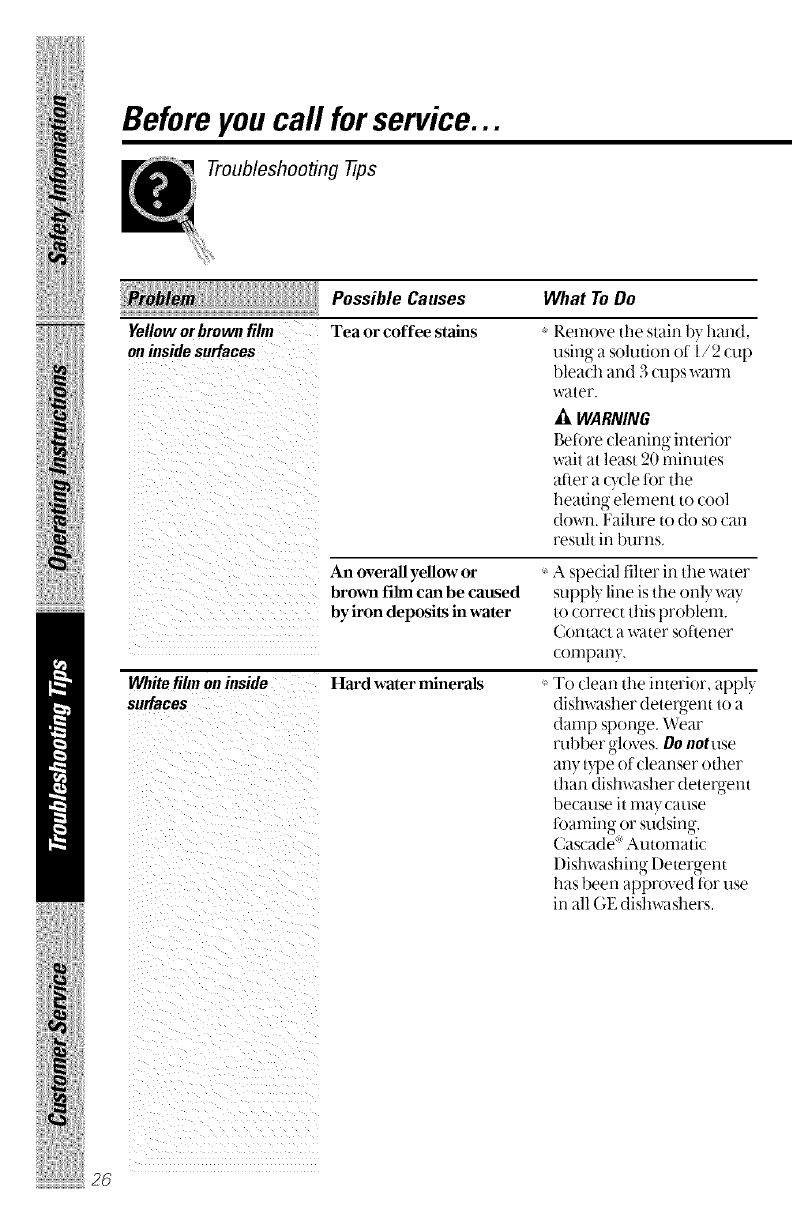
Yelloworbrownfihn
oninsidesurfaces
What ToDo
Tea or coffee stains Remove the stain by hand,
using a solntiorl of i/2 cup
bleach and 3 cups warm
water.
AWARNING
Betore deanir_g interior
wait at least 20 minutes
alter a cT,_lefi)r the
heafir N elernerlt to cool
dowrL l_ailure to do so can
resuh in bl3ri1s.
An overall yellow or
brown film can be caused
by iron deposits in water
A special fiher in the water
supply line is the only way
to correct this problem.
Contact a water sotiener
company.
White fihn on inside
surfaces
Hard water minerals ' To clean the interior, apply
dishwasher detergent to a
damp sponge. Wear
rubber gloves. Donotuse
any type ot cleanser oilier
than dishwasher detergent
because it may cause
foaming or sudsing.
Cascade (_Automatic
l)ishwashing Detergent
has been approved i0r use
in all GE dishxcdshers.
26

Possible Causes What To Do
Detergent cup lid Dial is not in the OFF Turn tlle Dial (o OFF
won't latch position and slide tile door latch to
the lelL
Oetergent left in Dishes are blocking the Reposidon tlle dishes,
dispenser cups detergent cups
Steam This is normal Steam comes through tile
vent by the door latch
during (IDing and when
water is being-lmmped o111,
Black or gray Almninmn utensils have Remove marks with a mild,
marks on dishes rubbed against dishes abrasive cleaner.
iii:llil
i_iiiiiLJ,!,ii{ii{i/i
iiiiiiiii iii!
27
i!iiiiiiHiiHii/ilH!iiiiiHi
i_i!ii_iiiiiiii!i
ilii_i_iiii!i:ii_!_iliii!iiiii_
.....................................28
GE Service Protection Plus TM
(;E, a name recognized worldwide for qualit) and dependabilit},
offers )ou Servke Protection PlusTM--con]prehensive protection on
all )our appliam es--No Matter What Brand!
Benefits Include:
• Backed by GE
•All brands covered
•Unlimited service calls
•All parts and labor costs included
•No out-of-pocket expenses
•No hidden deductibles
•One 800 number to call
We'll CoverAny Appliance.
Anywhere. Anytime.*
You will be completely satistied with our servi(e protection or you may request your
mone) back on the remaining value of)our contract. No questions asked, It's that simple.
Protect your refi'igerator, dishwasher, washer and (h3 er, range, TV, VCR and rnuctl
more--any brand! l'lus there's no extra charge for emergent) servke and low monthl)
financing is available. Even icemaker coverage and food spoilage protection is oflered.
You can rest easy, knowing that all your valuable household products are protected
against e×pensive repairs.
Place your contidence in (;E and call us in the U.S. toll-t_'ee at 800-626-2224
for more illformatioll.
*Allbrm(s(oxere( lp o20}etl'sl)l(,ill he(onin!n IU.S.
............................................................. _,_g.(.:z¢Z,_,ae.....
Please place in envelope and mail to:
General Electric Company
Warranty Registration Department
P.O. Box 32150
Louisville, KY 40232-2150
29
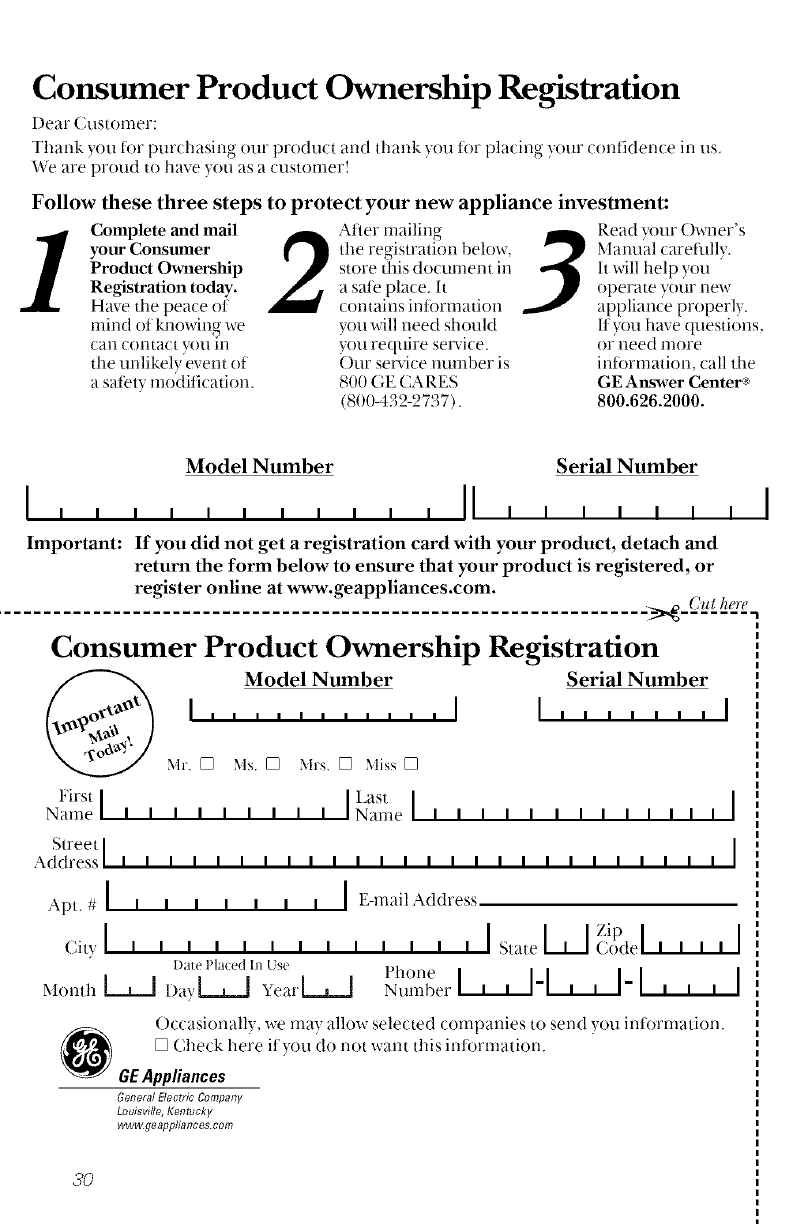
Consumer Product Ownership Registration
I)ear Customer:
Thank )ou for purchasing our product and thank you for placing your contidence in us.
We are proud to have )(Ill as a customer!
Follow these three steps to protect your new appliance investment:
Complete and mail 2M'ter l-nailino
•o
your Consmner tile registratkm below,
Product Ownership store this document in
Registration today, a sate place. It
Have the peace of contains il-lIormation
mind (ff knowin_ we you will need should
Call contact _,-()11ill yOll reqllire service.
the unlikely'event of Our service number is
a satety moditication. 8(t(t C,E CARES
(800432-9737).
3ead your Owner's
Manual careflllly.
It will help you
operate your l-lew
appliance proper b .
ltyou have questions,
or need more
information, call the
GE Answer Center®
800.626.2000.
Model Number Serial Number
I I I I I I I I I I I III I I I I I I I I
Important: If you did not get a registration card with your product, detach and
return the form below to ensure that your product is registered, or
register online at www.geappliances.com.
.................................................................._,,_J.:i,t_e,,e..
Consumer Product Ownership Registration
Model Number Serial Number
I ........... I I,, ,,,, ,I
Mr. [] Ms. [] Mrs. [] Miss []
Name ! ! I I ! I I ! I I Nanle I I I I I I I I I I I I I
Street II
Address l I iiiiiiiiiiiiiiiiiiiiiiiii
Apt#I ,,,,,,,IE-mailAddress
I I I,l ip I I
(itv i i i i i i i i i i i i i State (;(>(let IIII
Date l>la(ed In Use Phone
Month _ l)ayL_ _earL=_ Numberl,, I-I,, I-I ,,,I
()ccasionall), we me} allow selected companies to send )ou information.
[] Check here it)ou do not want this information.
GEAppliances
General Electric Company
Louisville, Kentucky
ww_goapp/iances com
3O
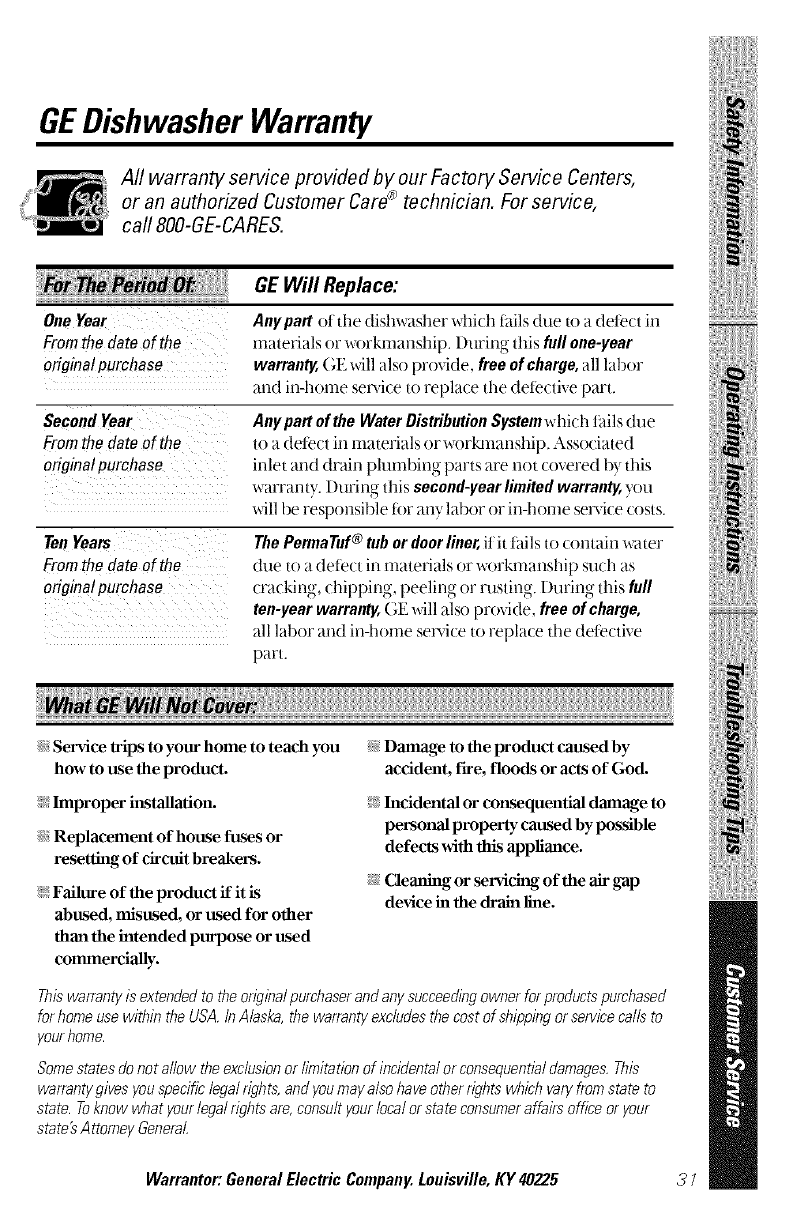
GEDishwasher Warranty
All warranty service provided by our Factory Service Centers,
or an authorized Customer Care®technician. For service,
carl 800-GE-CARES.
GEWill Replace:
One Year
Fromthe date of the
originalpurchase
Anypart ot the dishwasher which iidls due 1oa detect in
materials or workmanship. I)urir_g this fullone-year
warranty,(;E will also provide, free of charge,all labor
and in-home service to replace tl_e detective part.
SecondYear
Fromthe date of the
originalpurchase
Anypartof the WaterDistributionSystemwhich tails due
to a detect in materials or workmanship. Associated
inlet and drain pluml)ing parts are not covered 1)ythis
warranty. I)uring this second-year limited warranty, you
will be responsil)le tor anylabor or in-home service costs.
Ten Years
From the date of the
original purchase
The PennaTaf ®tub or door liner, flit thils to contain _cater
due to a detect in materials or workmanship such as
(xacking, chippir N, peeling or rusting. I)uring this full
ten-year warrant, GE will also provide, free of charge,
all labor and in-home service to repla(e the (tetective
part.
g
1
_Service trips to your home to teach you
how to use the product.
Improper installation.
_ Replacement of house fuses or
resetting of circuit breakers.
i_ Failure of the product if it is
abused, misused, or used for other
than the intended purpose or used
colmnercially.
_Damage to the product caused by
accident, fire, floods or acts of God.
i_ Incidental or consequential dmnage to
personal property caused by possible
defects with this appliance.
_ Cleaning or servicing of the air gap
device in the drain line.
Thiswarranty is extended to the original purchaser and any succeedingowner for products purchased
for home use within the USA, In Alaska, the warranty excludes the cost of shipping or servicecalls to
your home.
Some states do not allow the exclusionor limitation of incidental or consequential damages. This
warranty gives youspecific legal rights, and youmay also haveother rights which varyfrom state to
state. Toknow what your legal rights are, consult your local or state consumer affairs office or your
state's Attorney General
Warrantor:GeneralElectricCompany.Louisville,KY40225 31
_iii!i!_!_ili!!iiiiii!!ii!i!/iiii_
_i_l_!iiii!i{iii
;;;;;;;;;;;;;;;;;;;;;;;;;;;;;;;;;;;;;
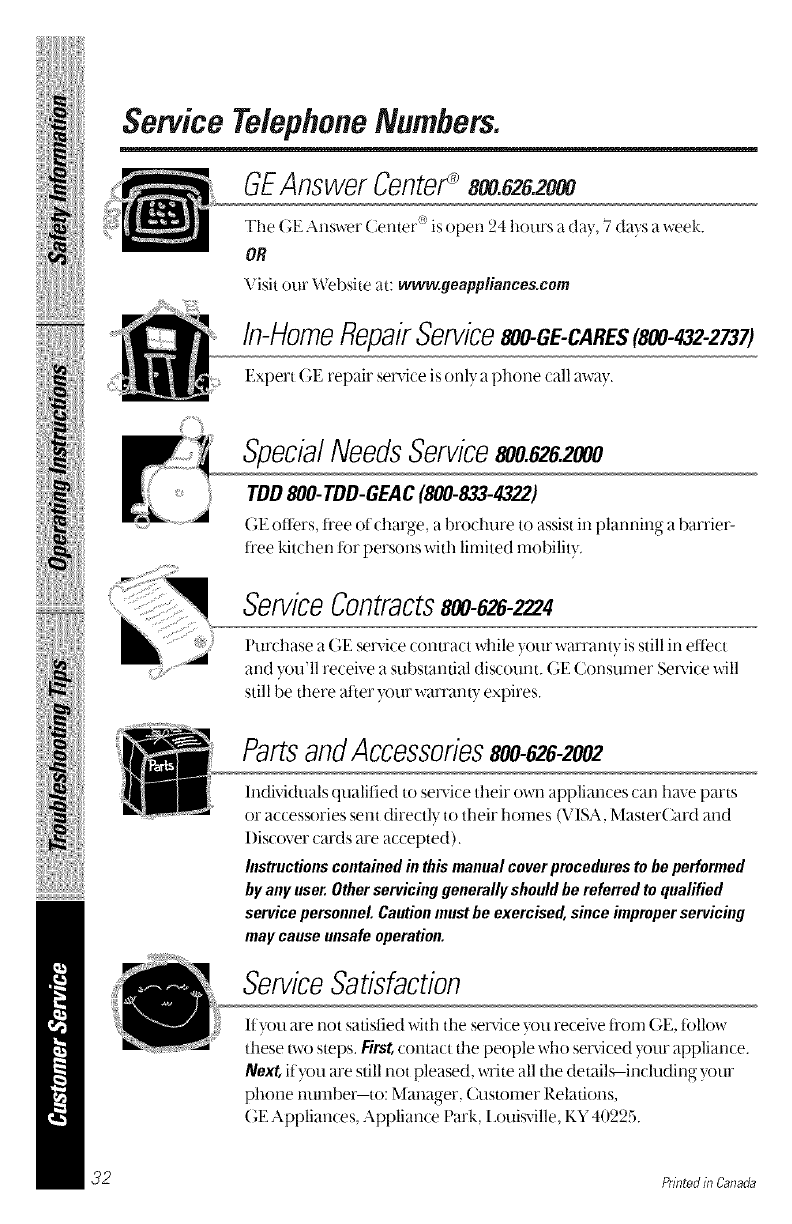
ServiceTelephoneNumbers.
GEAnswer Center_ 800.626.2000
The (_FAnswer (_enter'" is open 24 hours a day. t days a ,,reek.
OR
Visit our _,_ebsite at: ww_geappliances, com
In-HomeRepairService800-GE-CaRES(soo-432-27aa
Expert (;E repair service is only a phone call awa}.
SpecialNeedsService800.626.2000
TDD 800-TDD-GEAC (800-833-4322)
(;E otters, t_'ee of dmrge, a broclmre..... to assist in l)lannin°_ a 1)arrier-
t_'ee k tchen for persons with lint ted mobil tv.
ServiceContractss00-6_-2224
l'urchase a (;E service contract while _our warranty s still in ettect
and you'll receive a substantial discount. (;E Consunmr Service will
still be there after your warrant? expires.
PartsandAccessories800-626-2002
lndMduals qualitied to service their own appliances can have parts
or accessories sent directly to their homes (VISA, MasterCard and
l)iscover cards are accepted).
Instructions contained in this manual cover procedures to be performed
by any user, Other servicing generally should be referred to qualified
service personnel Caution must be exercised, since improper servicing
may cause unsafe operation,
ServiceSatisfaction
lf}x_u are not satistied Mth the service you receive front GE, tollow
these two steps. First,contact the people who serviced your appliance.
Next, if}xm are still not pleased, write all the details--including your
phone number-to: Manager, Cusummr Relations,
GE Appliances, Appliance Park, I.ouisville, KY 4(t225.
32 PrintedinCanada
