GIEC DIGITAL OTT1712B Andriod Set Top Box User Manual
SHENZHEN GIEC DIGITAL CO., LTD Andriod Set Top Box
User manual
GK-MP1113

Contents
1 Safety .......................................................................................................................... 1
2 Appearance .................................................................................................................. 3
3 Rear Panel Connection ................................................................................................ 4
4 Remote ........................................................................................................................ 6
5 Network Settings ......................................................................................................... 9
5.1 Cable connection to the internet using a Modem/Router ......................... 9
5.2 Wi-Fi connection to the internet using a Modem/Router ......................... 9
6 The Home Screen ...................................................................................................... 12
7 Apps Center ............................................................................................................... 12
8 Settings ...................................................................................................................... 14
9 Specification ............................................................................................................. 15

1
1 Safety
End-user Agreement
Please read this Agreement carefully before operating, and guarantee that:
1. Do not disassemble this product without authorization;
2. Do not read or refresh the firmware through non-normal channels;
3. Do not perform reverse-engineering or disassembling to any software and codes
of this product;
4. This product and the Agreement can be transferred to a third party only when the
terms and conditions in this Agreement are accepted.
5. When you transfer all or any part of this product to a third party, the permission to
use this product terminates automatically.
Instructions for User’s Manual:
Before operating, please read the User’s Manual carefully. We are not responsible for
any direct or indirect losses caused by hardware damage, application damage, file lost
or system crash due to improper operation.
It is assumed that you have carefully read and understood the Agreement, and will
abide by the terms and conditions.
Notice:
Dear users, thanks for purchasing this product. Before operating, please read the
following notice:
Do not expose this unit to the rain or moist environment to avoid fire or electric
shock.
To avoid fire, electric shock or product damage, please keep this unit away from rain,
moisture, and water drops or spray.
Safety Guide
1. Please use dedicated adapter only; do not share with other units.
2. Keep the adapter power cord and plug away from heat sources.
3. Do not place any heavy object on the power cord or plug.
4. Do not disassemble the adapter or power cord.
5. To ensure your safety, do not open the shell; please ask qualified personnel for
repair.
Maintenance Tips
1. The product structure is complicated; please ask qualified personnel for
maintenance.

2
2. Do not remove any parts without permission, or else the warranty will be void.
3. Replace the component or part with genuine ones only.
3
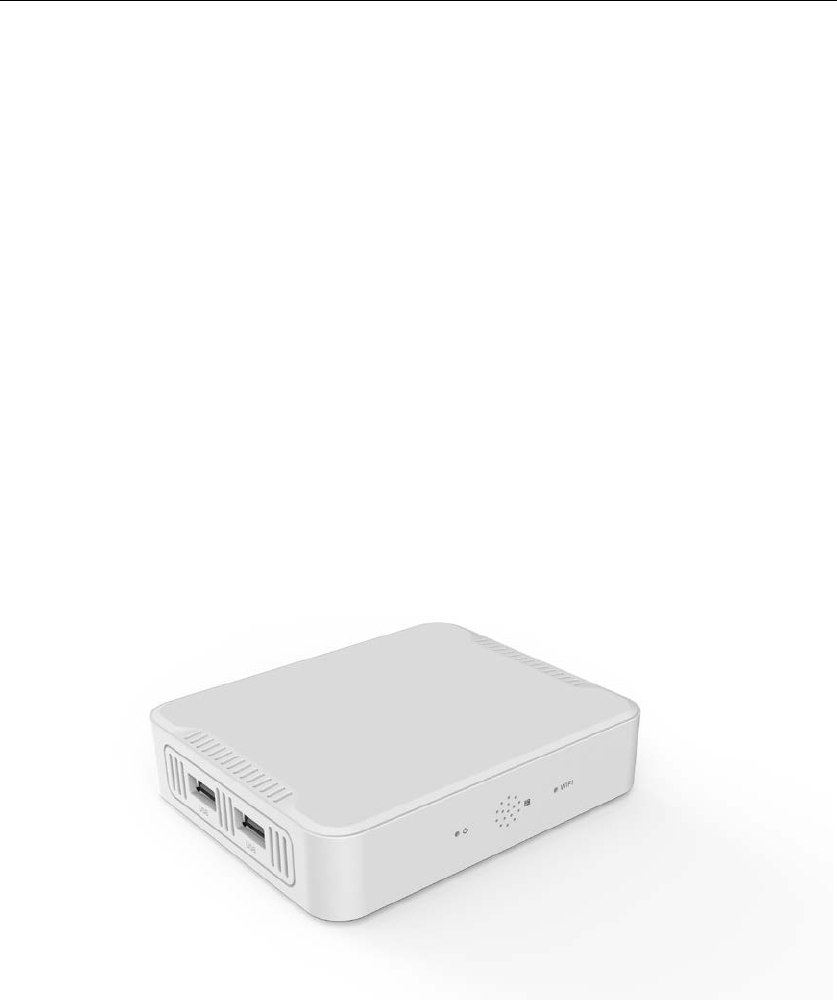
2 Appearance
Front Panel
Rear Panel
4
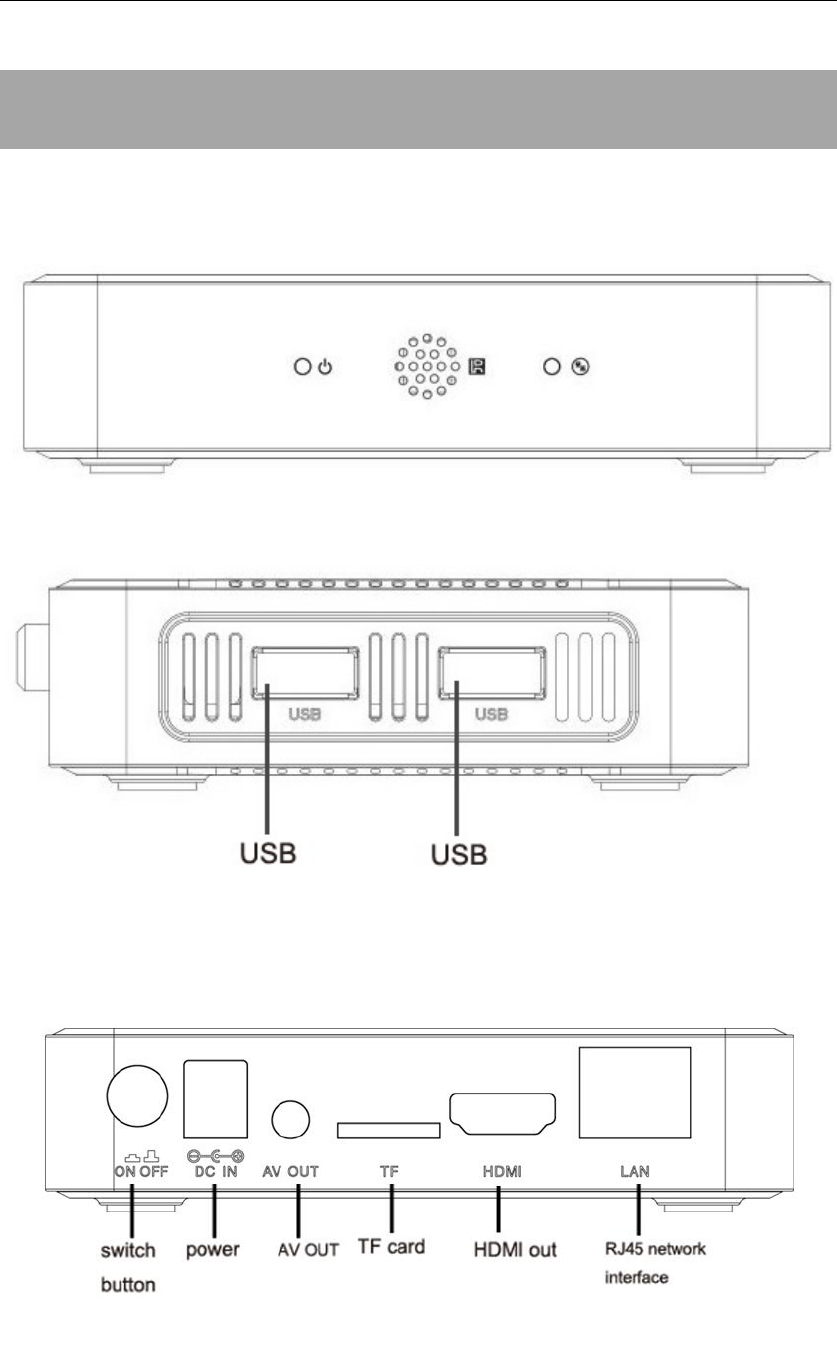
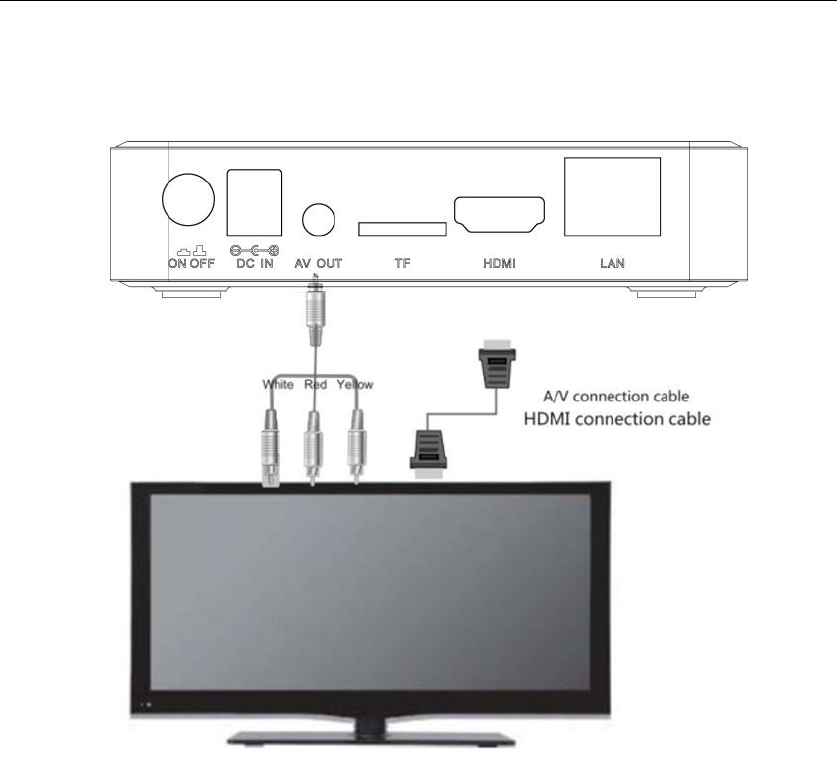
3 Rear Panel Connection
5
6
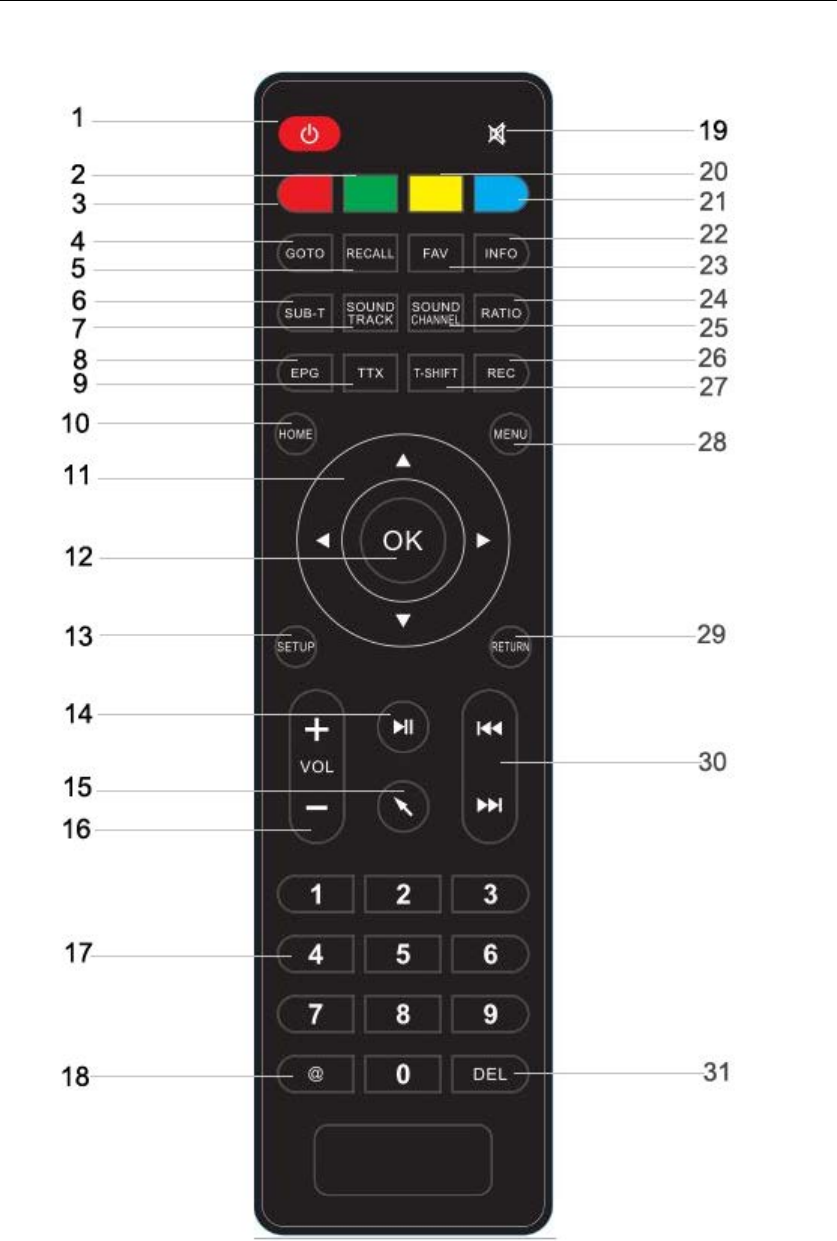
4 Remote
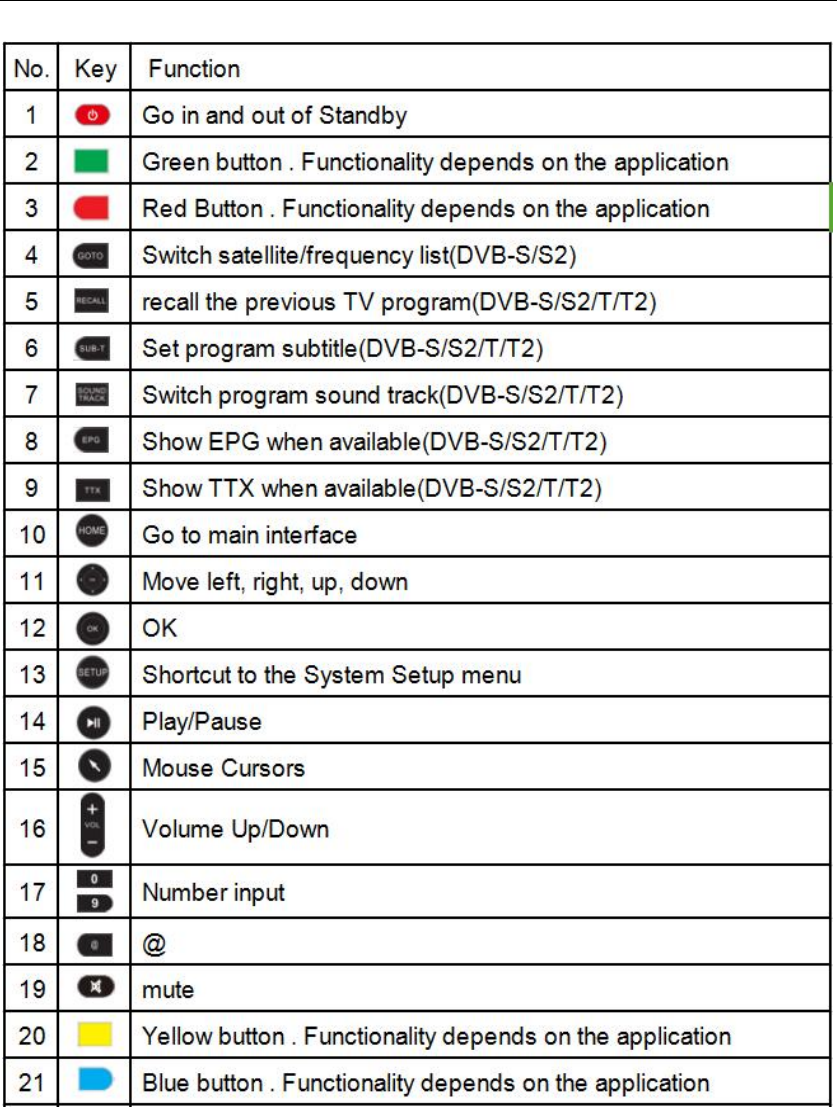
7
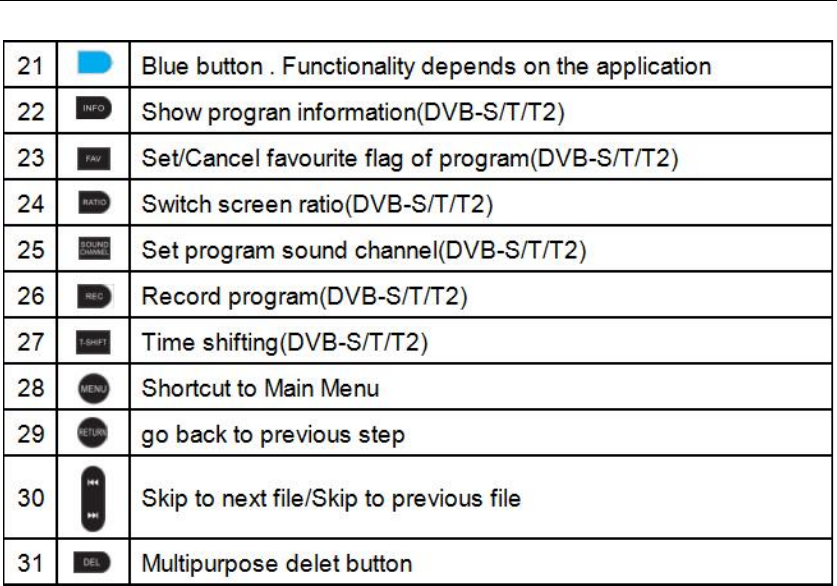
8
9
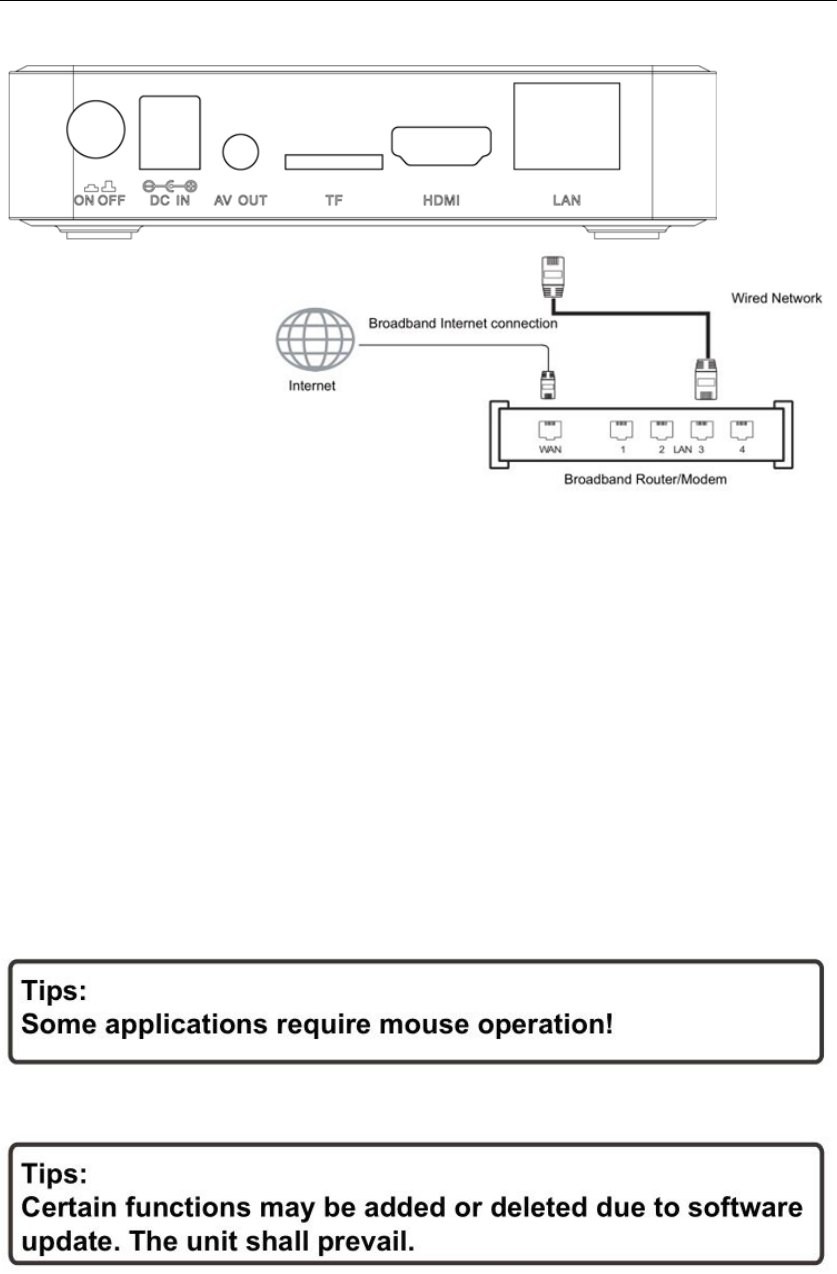
5 Network Settings
5.1 Cable connection to the internet using a Modem/Router
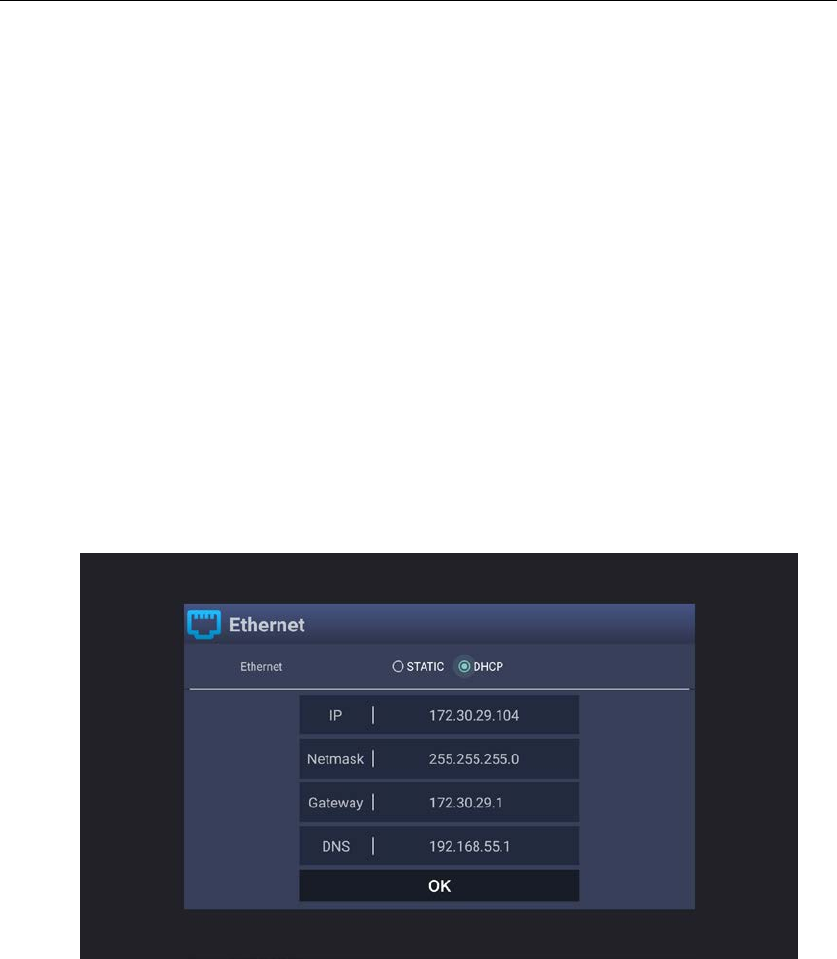
- Go into the "Settings" at the home screen, select "Ethernet" option.
- Connect the network cable to the Media Player and your Modem/Router.
- In most cases your Modem/Router will automatically assign network settings to
your media player and display the screen below. Then click OK. If not, you may
have to:
- Turn on and login into your Modem/Router to ensure an IP address can be
automatically assigned to your Media Player (DHCP (Dynamic Host
Configuration Protocol must be enabled)
- After connection has been successful the below screen will be displayed, showing
IP, Netmask, Gateway and DNS. Then click OK.
-
5.2 Wi-Fi connection to the internet using a Modem/Router
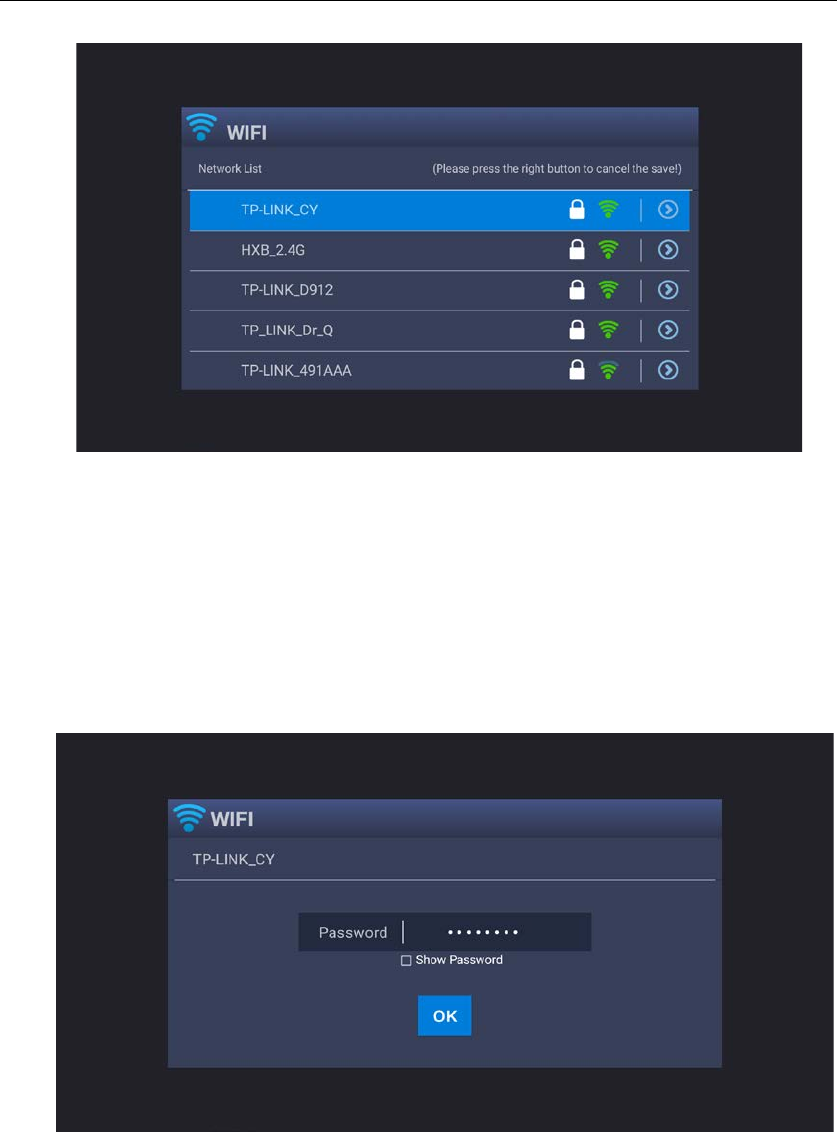
- Go into the "Settings" at the home screen, select "Wi-Fi" option.
- A list of available Wi-Fi connections will be displayed. See the example screen
below. Note: The Ethernet cable musts be unplugged.
10
Note: If the wireless network is not encrypted, you can connect to it directly. If the
network is encrypted, select the Wi-Fi name to pop up the window for password, press
OK on the remote control and call out the soft keypad on the screen, enter the
password, select “Next” on the keypad or press the Return key on the remote control
to hide the keypad, and then select “Connect” to connect to it. (Note: to hide the
keypad on the TV box, press the Return key on the remote control.)
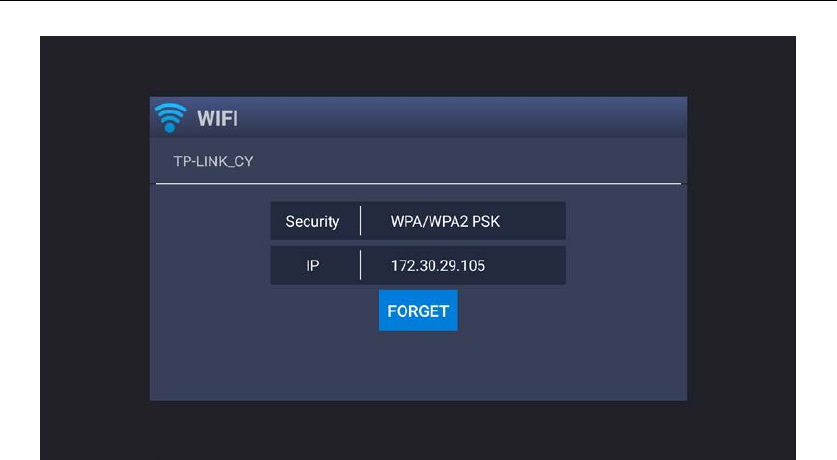
- To forget a WIFI connection, select it and press the Right button on the remote
control. Then the interface shows up as below picture. Choose Forget button to forget
this WIFI information.
11
12
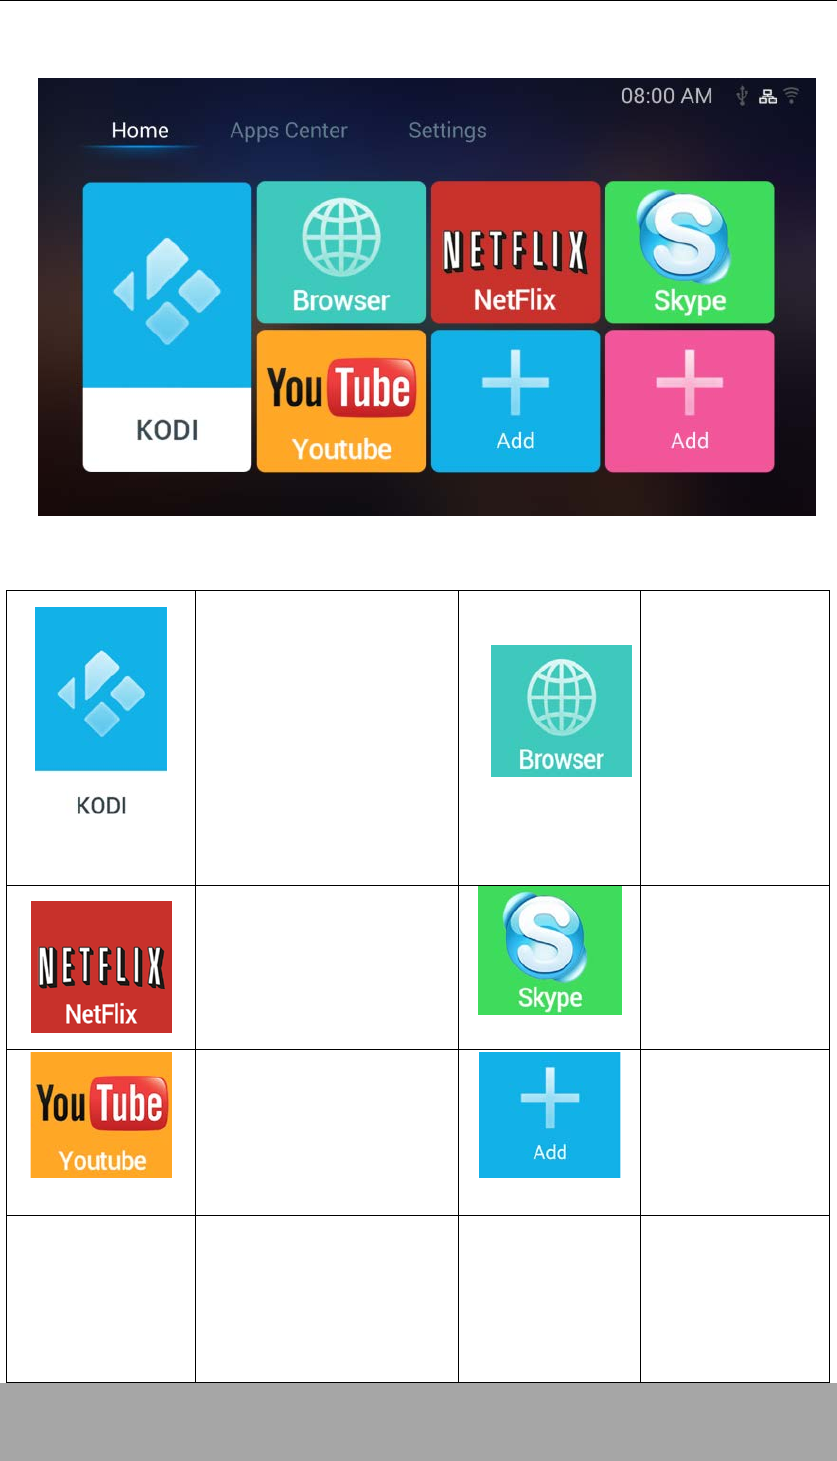
6 The Home Screen
KODI
is a free and open-source
media player software. It
allows users to Play and
view most videos,
music, such as podcasts
from the internet, and
common digital media
files
Browser
Browse the Web
Netflix
Stream Movies and TV for a
Monthly price.
Skype
A
communication
software
YouTuBe
Stream Youtube Videos
+
Add apps to
the Home screen
13
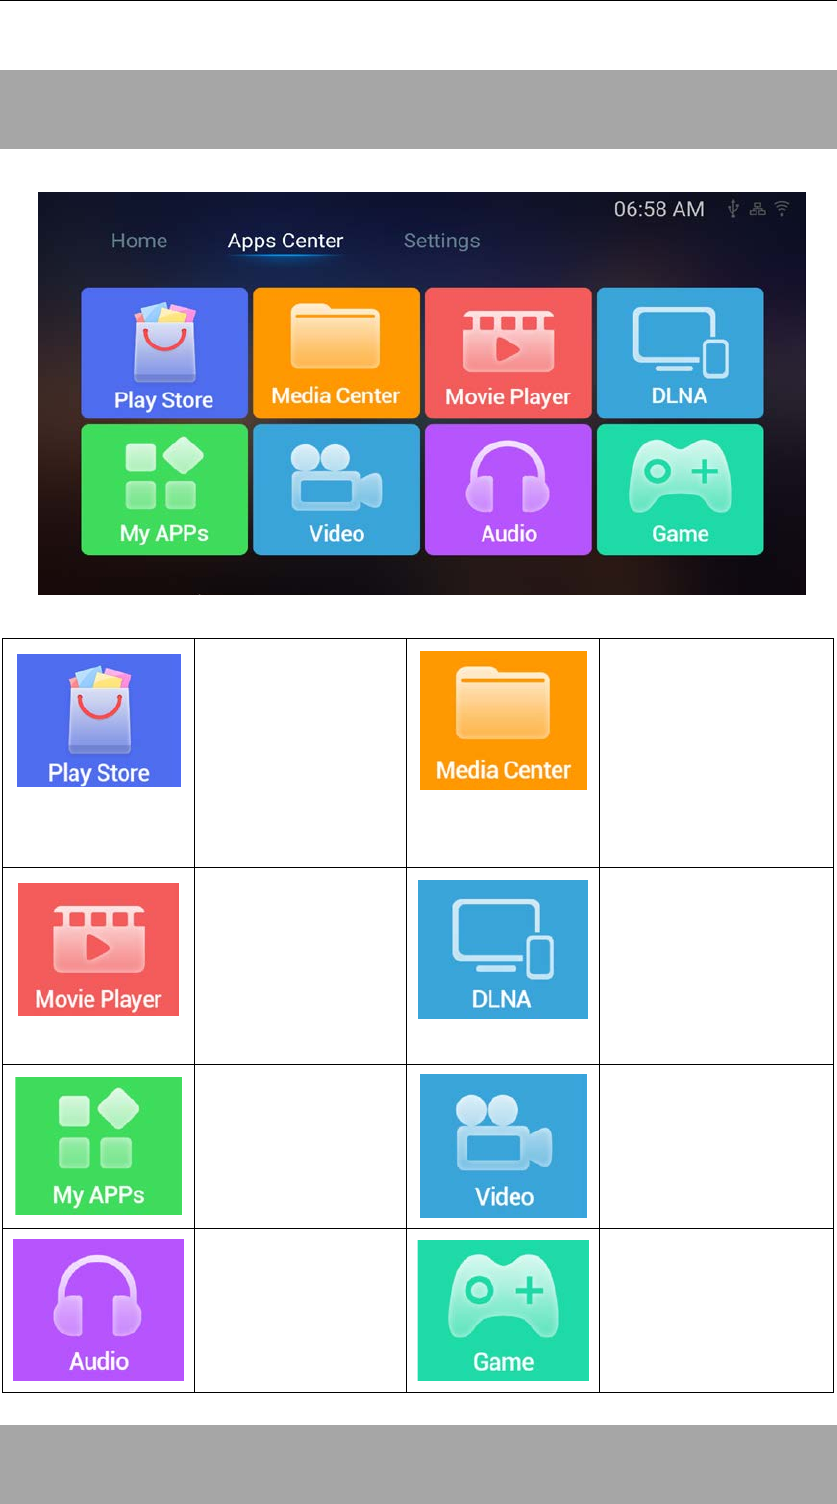
7 Apps Center
Play Store
Access the Google
Play Store.
Purchase and
Download Apps,
music, movies and
more
Media Center
Browser Your files
Media Player
Play Media
through the
device
DLNA
Is the technology
alliance for connected
devices and
streaming media
throughout the home
My APPs
View app the
installed
apps
Video
The installation
directory
Audio
The installation
directory
Game
The installation
directory
14
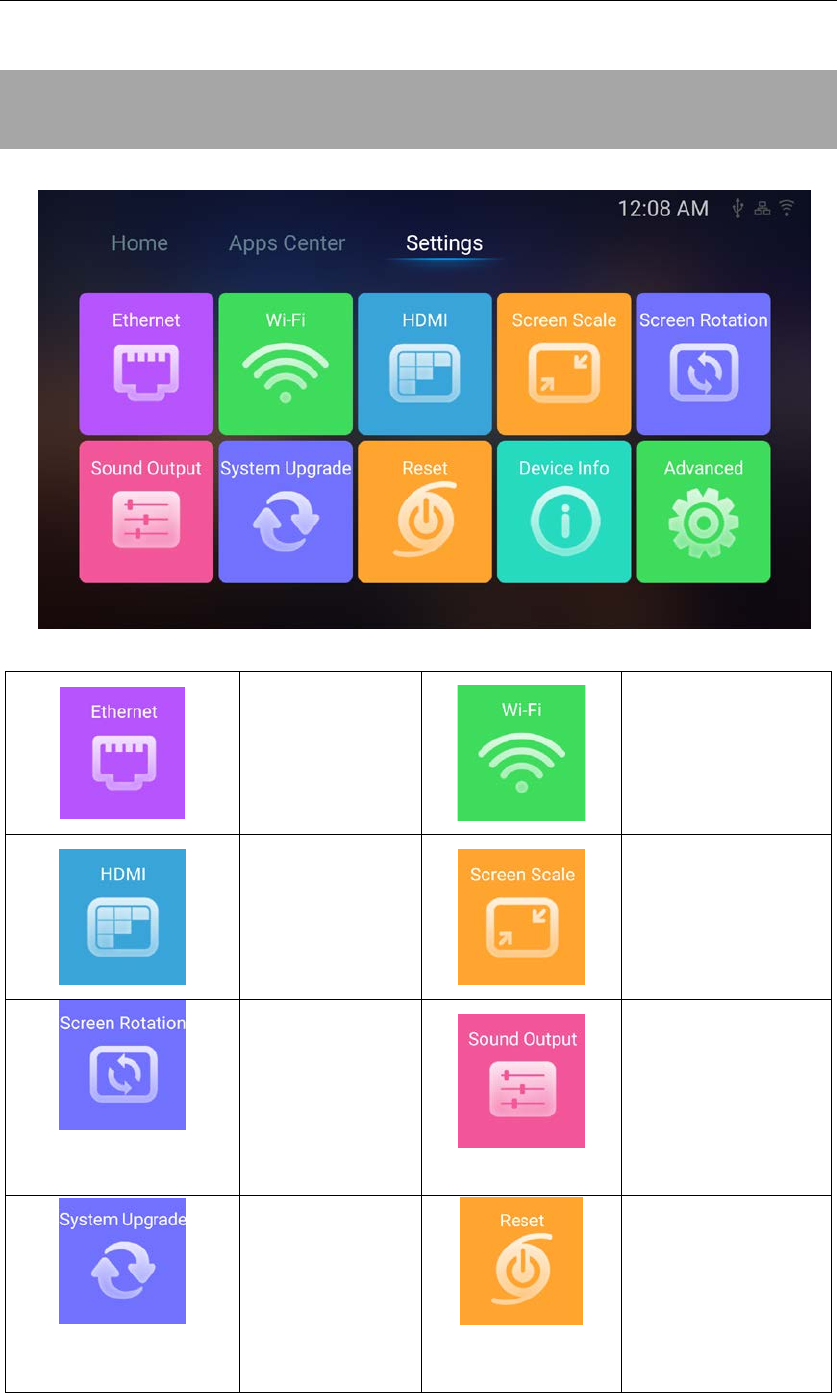
8 Settings
Ethernet
Check the
Ethernet
Settings and IP
information
Wi-Fi
Setup a Wi-Fi
connection
HDMI
Change the
screen
resolution
Screen Scale
Adjust the screen
scale to fit on
screen properly
Screen
Rotation
Adjust the
screen
direction
Sound Output
Change the sound
output
System
Upgrade
Upgrade the
System Either via
Storage or OTA
(Over the Air)
Reset
Factory data reset
15
Device Info
View the device
information
Advanced
Take you to the
Android Settings
pages
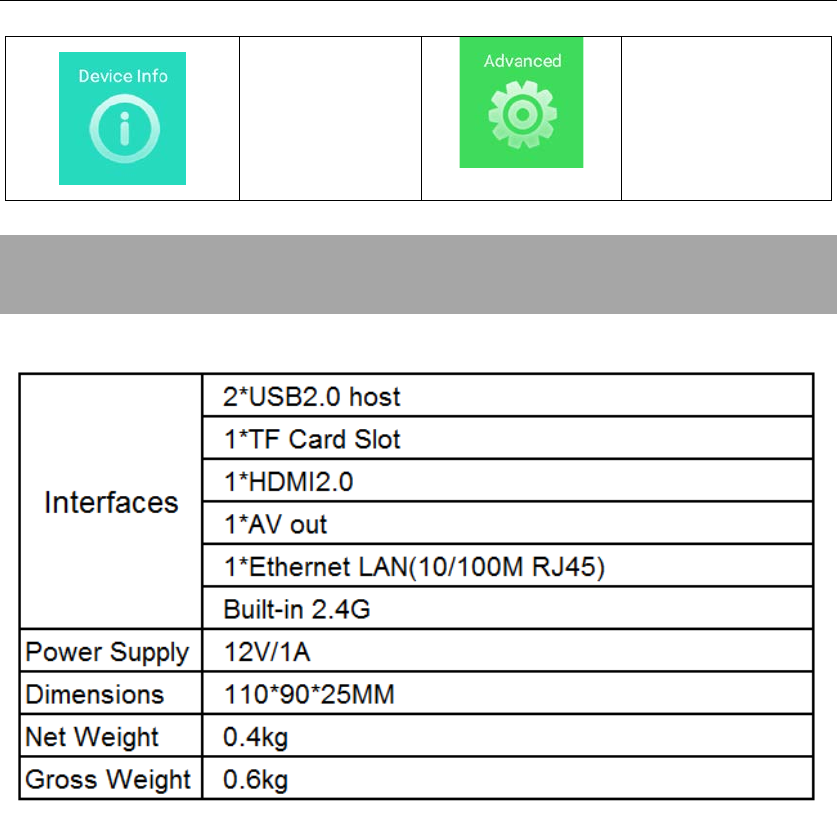
9 Specification

16
FCC Statement
This equipment has been tested and found to comply with the limits for a Class B
digital device, pursuant to Part 15 of the FCC Rules. These limits are designed to
provide reasonable protection against harmful interference in a residential
installation. This equipment generates uses and can radiate radio frequency energy
and, if not installed and used in accordance with the instructions, may cause harmful
interference to radio communications. However, there is no guarantee that
interference will not occur in a particular installation. If this equipment does cause
harmful interference to radio or television reception, which can be determined by
turning the equipment off and on, the user is encouraged to try to correct the
interference by one or more of the following measures:
-- Reorient or relocate the receiving antenna.
-- Increase the separation between the equipment and receiver
-- Connect the equipment into an outlet on a circuit different from that to which the
receiver is connected.
-- Consult the dealer or an experienced radio/TV technician for help.
Changes or modifications not expressly approved by the party responsible for
compliance could void the user's authority to operate the equipment16
The distance between user and products should be no less than 20cm