GIGA BYTE Communications 9QATOMV000 3.5G HSDPA/UMTS/GSM/DCS/PCS PDA Phone User Manual
GIGA-BYTE Communications Inc. 3.5G HSDPA/UMTS/GSM/DCS/PCS PDA Phone
Contents
- 1. user manual
- 2. User manual
- 3. Revised User Manual part1
- 4. Revised User Manual part2
- 5. Revised User Manual part3
- 6. revised user manual part1
- 7. revised user manual part2
- 8. revised user manual part3
- 9. revised2 user manual 09302008 part1
- 10. revised2 user manual 09302008 part2
- 11. revised2 user manual 09302008 part3
user manual

CONTENT
CHAPTER 1 BEFORE USING YOUR MWg Atom V 6
1.1 WHAT’S IN THE BOX 6
1.2 FAMILIARIZING YOURSELF WITH YOUR MWg Atom V 7
1.3 FEATURES 10
1.4 INSERT THE BATTERY & SIM CARD 11
1.5 SIM 12
1.6 BATTERY 12
1.7 LOCK/UNLOCK 13
1.8 POWER 14
CHAPTER 2 GETTING STARTED 16
2.1 DISPLAY INFORMATION 16
2.2 SCREEN ORIENTATION 25
2.3 SETTING TIME & DATE 26
2.4 USING THE STYLUS 26
2.5 SCREEN ALIGNMENT 26
2.6 INPUT METHOD 27
2.7 DRAWING ON THE SCREEN 29
2.8 RECORDING A MESSAGE 29
2.9 EDITING MY INFO 30
2.10 PASSWORD SETUP 30
2.11 MEMORY EXPANSION 30
2.12 DATA BACKUP 30
CHAPTER 3 PHONE FUNCTIONS 32
3.1 PHONE SCREEN AND KEY INTRODUCTION 32
3.2 MAKING A CALL 33
3.3 RECEIVING / IGNORING A CALL 33
3.4 INTERNATIONAL CALLS 33
3.5 EMERGENCY CALLS 34
1

2
3.6 VOLUME ADJUSTMENT 34
3.7 CONTACTS 34
3.8 CREATING A NEW CONTACT 35
3.9 CALL HISTORY 36
3.10 SETTING RING TONE AND PASSWORD 36
3.11 SIM MANAGER 37
CHAPTER 4 SETTINGS 40
4.1 PERSONAL SETTINGS 40
4.2 SYSTEM SETTINGS 43
CHAPTER 5 SYNCHRONIZATION 48
5.1 ABOUT SYNCHRONIZATION 48
5.2 INSTALLING ACTIVESYNC 49
5.3 CHOOSING YOUR SYNCHRONIZATION TYPE 50
5.4 USING ACTIVESYNC TOOLS 51
5.5 ACTIVESYNC ERRORS 53
CHAPTER 6 GETTING CONNECTED 56
6.1 WIRELESS MANAGER 56
6.2 GPRS 57
6.3 BLUETOOTH 58
6.4 WI-FI 63
6.5 USB CARD READER 64
6.6 INTERNET SHARING 64
6.7 CELL BROADCAST SETTING 65
6.8 CONNECTING TO THE INTERNET 65
CHAPTER 7 MESSAGING 68
7.1 SHORT MESSAGE (SMS) 69
7.2 MULTIMEDIA MESSAGES (MMS) 72
7.3 VOICE MAIL 77

3
7.4 E-MAIL 77
7.5 PUSH E-MAIL 79
7.6 WINDOWS LIVE MESSENGER 79
CHAPTER 8 MULTIMEDIA 81
8.1 CAMERA 82
8.2 VIDEO RECORDER 85
8.3 TAKING A GEO TAGGED PHOTO 87
8.4 PHOTO EDITOR 87
8.5 FM RADIO 88
8.6 PICTURES & VIDEOS 89
8.7 JAVA 89
8.8 STREAMING PLAYER 89
8.9 RECORDER 90
8.10 AUDIO MIXER 90
CHAPTER 9 APPLICATIONS 92
9.1 CALENDAR 92
9.2 TASKS 93
9.3 FILE EXPLORER 94
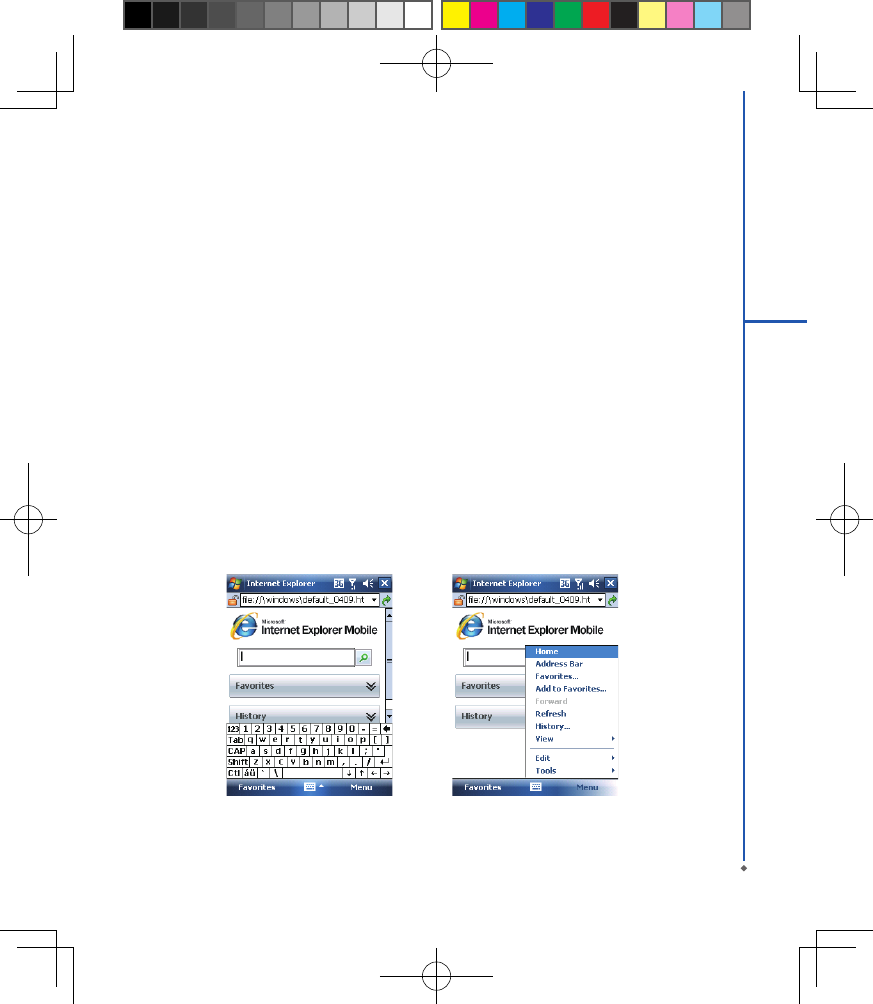
9.4 INTERNET EXPLORER 94
9.5 WINDOWS MEDIA 95
9.6 GAMES 96
9.7 CALCULATOR 96
9.8 ZIP 96
9.9 EXCEL MOBILE 96
9.10 POWERPOINT MOBILE 98
9.11 WORD MOBILE 99
9.12 NOTES 100
9.13 SEARCH 100
9.14 WINDOWS LIVE 101
9.15 GPS TRACKING 101

CHAPTER 10 MANAGING YOUR MWg Atom V 104
10.1 MEMORY MANAGEMENT 104
10.2 RUNNING PROGRAMS MANAGEMENT 104
10.3 ADDING OR REMOVING PROGRAMS 105
CHAPTER 11 IMPORTANT SAFETY INFORMATION 108
11.1 SAFETY INFORMATION 108
11.2 PHONE CARE 108
11.3 DRIVING SAFETY 110
11.4 ELECTRONIC DEVICES 110
11.5 OTHER SAFETY GUIDELINES 111
11.6 CAUTIONS 111
11.7 ABOUT THIS GUIDE 115
CHAPTER 12 SPECIFICATIONS 118
CHAPTER 13 FAQS 122
Index 124
Warranty Card 128
4

Chapter 1
Before Using Your MWg Atom V
1.1 What’s in the box
1.2 Familiarizing yourself with your MWg Atom V
1.3 Features
1.4 Insert the battery & SIM card
1.5 SIM
1.6 Battery
1.7 How to use the capsense keys
1.8 Lock/Unlock
1.9 Power
6
Chapter 1. Before Using Your MWg Atom V
1.1 What’s in the box
Thank you for selecting MWg Atom V. Please check if your package comes with the following items.
If any of them is missing, please contact your retailer.
1
Before Using Your MWg Atom V
M W g A to m V - yo u r
Windows Mobile-based
Pocket PC Phone
Quick Start Guide
Getting Started Disc
User Manual & Warranty Card
USB Cable
Standard
Battery
Universal AC Adapter with
four plugs for different
countries
High Quality Stereo
Wired Headset
Stylus
Do not lend or make
illegal copies of this
software.
Getting Started Disc
for ATOM V
with Windows Mobile
® software
For distribution only
with a Windows Mobile
powered device.
Support for this
product is provided by
MWg.
All rights reserved. Portions
© 2007 Microsoft Corporation.
Includes Microsoft ® ActiveSync ® 4.5, and
Microsoft Office Outlook ® 2007
60-day trial.
7
1
1.2 Familiarizing yourself with your MWg Atom V
This section introduces you to the hardware of the device and its function keys.
No Item Function
1 Touch screen Display screen. Use stylus to select items on the screen.
2 Left soft key Press to execute the function displayed on the bottom left of the screen.
3 Right soft key This is capsense key. Press to execute the function displayed on the
bottom right of the screen.
4 Talk/Send key You can make or answer a call by pressing Talk/Send key, or go to
Phone Dialer screen.
5 End key Press this key to end a call or to return to Today screen
from any screen.
6Windows key Press the Windows key to open Start menu options.
7 OK key To execute or terminate a selected function or application.
85- Way navigation key
The 5-way navigation key . Press up, down, left and right directions
to navigate. Tap the center key to execute the selected function or
application.
9 LED Indicator
The LED indicator indicates the status of your device by showing
different colors.
Blue: Bluetooth is activated.
Orange: Wi-Fi is activated.
Green: Mobile network is detected.
Purple: GPS signal is detected
Red: Notications for e.g. missed calls, low battery, New SMS.
Before Using Your MWg Atom V
No Item Function
12 Soft reset button Press the button with stylus to soft reset your device.
13 Camera key
Press and hold Camera key to launch camera function.
In Camera mode, press half way to focus and full press to capture
pictures.
14 Volume key Slide this key upwards or downwards to adjust volume.Press and hold
this key to directly record voice note.
15 Micro SD card slot You can insert your Micro SD card here.
16 Headset plug Plug in headset, and then you can listen to the FM radio, music via the
headset or use the device's hands-free kit.
17 Stylus holder & stylus Use the stylus to touch the screen panel.
8
1
Before Using Your MWg Atom V
No Item Function
10 Power on/off Press and hold Power key for a few seconds to power on/off your device.
11 Mini USB slot Use USB connector to synchronize data with your desktop PC, transmit
data or charge the battery.
12 Soft reset button Press the button with stylus to soft reset your device.
No Item Function
18 Speaker Besides using stereo headset, you may play music/voice through the
built-in speaker.
19 Flash light Flash light for camera.
20 Camera lens The CMOS camera on the back of the device supports 2-mega-pixel
photo and high quality video.
21 Battery cover Push and slide out the cover to replace battery and unlock SIM card
hatch.
9
1
Before Using Your MWg Atom V

1.3 Features
Your MWg Atom V not only having mobile phone features, it also integrates Personal Digital Assistant (PDA)
capability. The following section provides more information about the device features:
● Touch screen: 2.8” TFT LCD display with 65,536 colors effective.
● 5-way navigation key, Windows key, OK key.
● Speaker.
● Mini-USB slot for connection and battery charging.
● Camera: 2.0 mega pixels.
● Connections: 3.5G, GPRS,Bluetooth, and Wireless LAN.
● Microsoft Windows Mobile 6: Windows Live, Windows Live Messenger, Pocket Outlook, Pocket Explorer, and
Ofce tools (Word, Excel, and PowerPoint). Also features Encryption, Internet Sharing, Windows Update, Pictures
& Videos, Calculator, Games, ActiveSync, and File Explorer.
● Other programs: SIM Manager, FM Radio, Zip, Java, Streaming Player, GPS Tracking, etc.
10
1
Before Using Your MWg Atom V
11
1
Before Using Your MWg Atom V
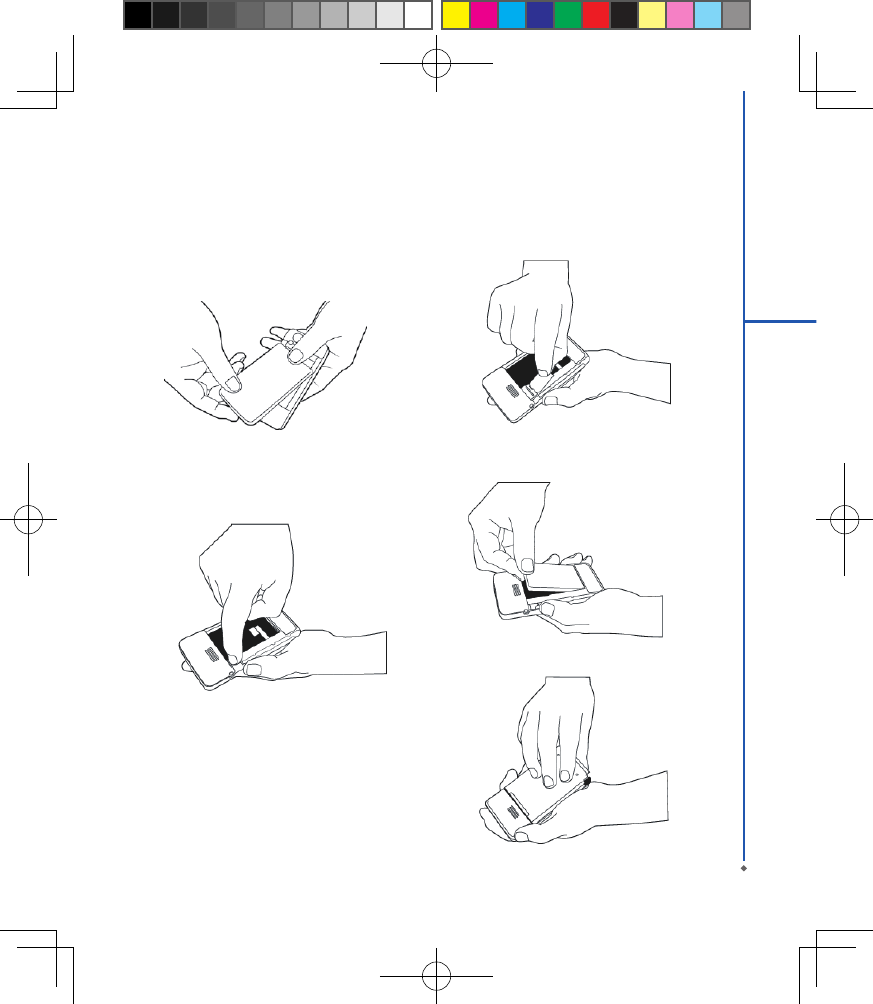
1.4 Insert the battery & SIM card
Before inserting/removing a SIM card, please make sure that your MWg Atom V is powered off and is not connected
to any power supply by the USB cable or charger.
1. Look at the back of your MWg Atom V. Push and slide
out the battery cover.
2. - Remove the Stylus.
- Remove the battery by pulling at the top right hand
lip.
- Pull at the tag on the top left of the battery to remove
the SIM carrier.
3. - Insert the SIM into the carrier, making sure the SIM
is fully aligned inside the carrier.
- Insert the SIM carrier back into the slot with the
metal contacts on the SIM facing down. (do not
force the carrier into the slot)
4. Return the battery, battery cover and stylus back onto
the device in that order.
5. Slide the battery cover back and push until you hear
“click”.
1.5 SIM
Before using your MWg Atom V, you must contact a network operator to get a personal SIM (Subscriber Identity
Module). The phone functions are unusable (except for emergency calls) until a valid SIM card is inserted.
Please note: If the device or the SIM card is lost or stolen, you should contact your network operator immediately in
order to prevent unauthorized use.
1.6 Battery
Your MWg Atom V comes with a removable and rechargeable Lithium Polymer battery. The standby time and talk
time will depend on your actual usage network coverage and whether the device is in standby mode. The battery life
may also vary depending on how frequently the user switches between functions.
Please note: Using any battery pack or AC adapter (charger) not specied/endorsed by MWg on this phone may be
dangerous and may invalidate any warranty and approval given to the device. Unplug the charger from the power
supply when it is not in use.
Charging the battery
Please make sure that the battery is installed and fully charged when using your MWg Atom V for the rst time. You
may charge the battery in the following ways:
1. Universal AC Adapter: Plug your AC adapter into a suitable main power socket and plug the connector to the
charging slot of your MWg Atom V. The phone will start charging automatically.
2. USB cable: Connect your MWg Atom V to your PC’s USB port with the USB cable supplied in your package.
Note: Charging by USB is, however, slower than charging from the mains power supply.
12
1
Before Using Your MWg Atom V
13
1
Before Using Your MWg Atom V
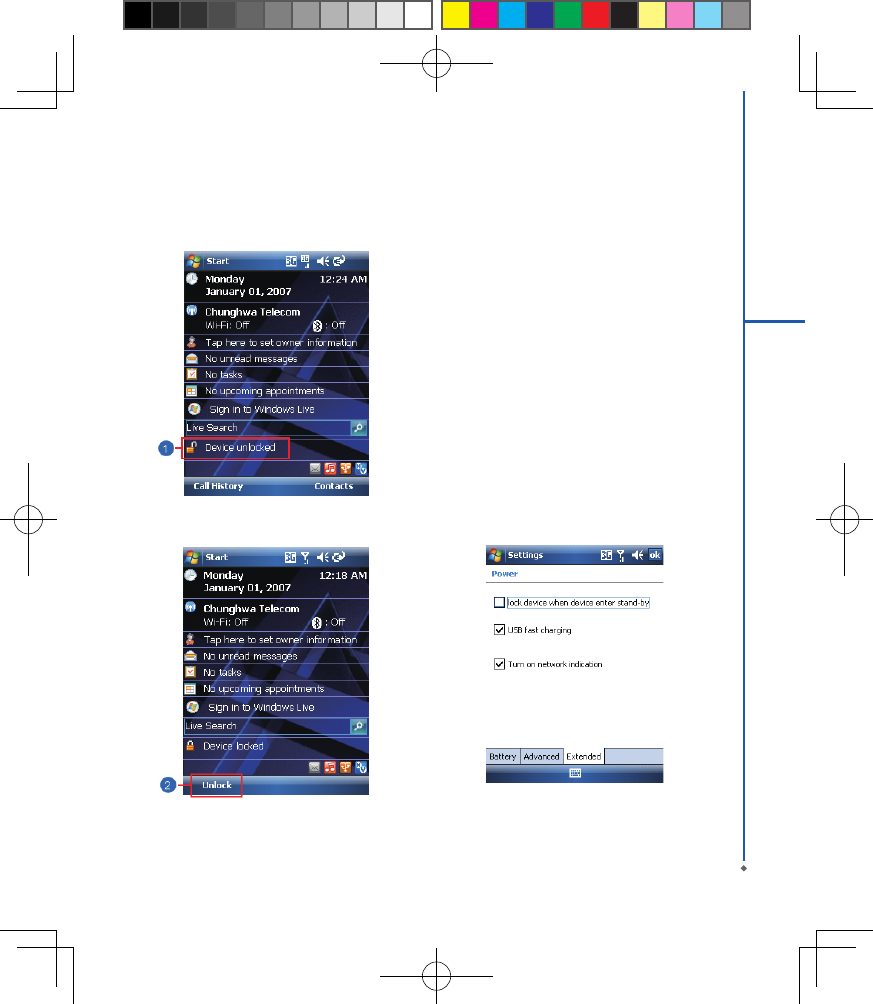
1. Lock the dev ice: On Today screen, tap Devic e
unlocked to lock your MWg Atom V. The device will
not respond to touches on screen nor react to any
input on the keypad when it is locked.
You may also enable the device lock automatically after
the screen backlight is turned off.
2. Unlock the device:
Tap Unlock on the bottom left of the screen.
Then tap Unlock button on the newly appeared screen
and the device is unlocked.
To enable automatic lock:
Ta p S t a r t > S e t t i n g s > S y s t e m ta b > P ow e r >
Extended tab and check lock device when device
enter stand-by. Your MWg Atom V will enable lock
automatically during stand-by.
1.7 Lock/Unlock
14
1
Before Using Your MWg Atom V
1.8 Power
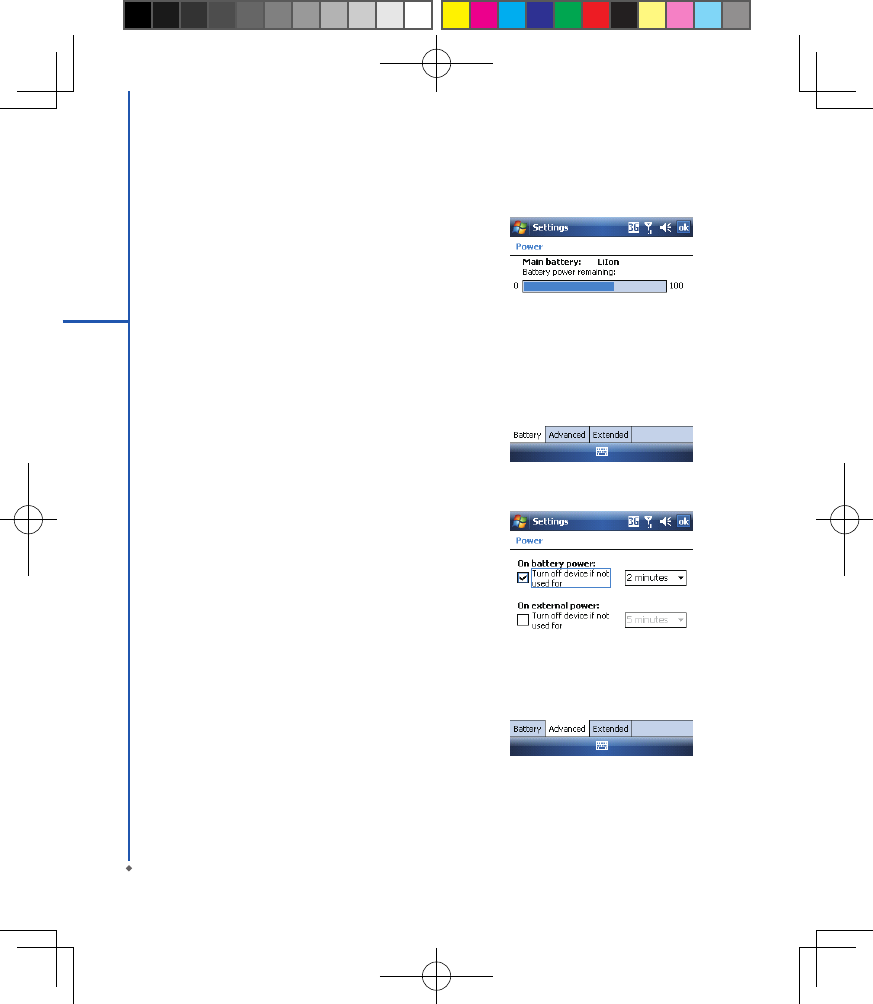
To power on your MWg Atom V
While the device is powered off, press Power key on
the top of the device to power it on.
To power off your MWg Atom V
While the power is on, press and hold Power key on
the top of the device for about 3 seconds to turn it off.
To reduce the power consumption of your device, you
may change the backlight duration and brightness level.
Also, you can save more power by setting the device
to turn off automatically if it is not in use for a specic
period of time.
To check battery power level
Tap Start > Settings > System tab > Power > Battery
tab. The bar indicates the remaining battery power
level.
To turn off the device automatically
Ta p S t ar t > S e t t i ng s > Sy s t e m t a b > Power >
Advanced tab and select the duration before your
MWg Atom V turns off by itself. This feature controls the
screen standby time.
Chapter 2
Getting Started
2.1 Display information
2.2 Screen orientation
2.3 Setting time & date
2.4 Using the stylus
2.5 Screen alignment
2.6 Input method
2.7 Drawing on the screen
2.8 Recording a message
2.9 Editing my info
2.10 Password setup
2.11 Memory expansion
2.12 Data backup
Chapter 2 Getting Started
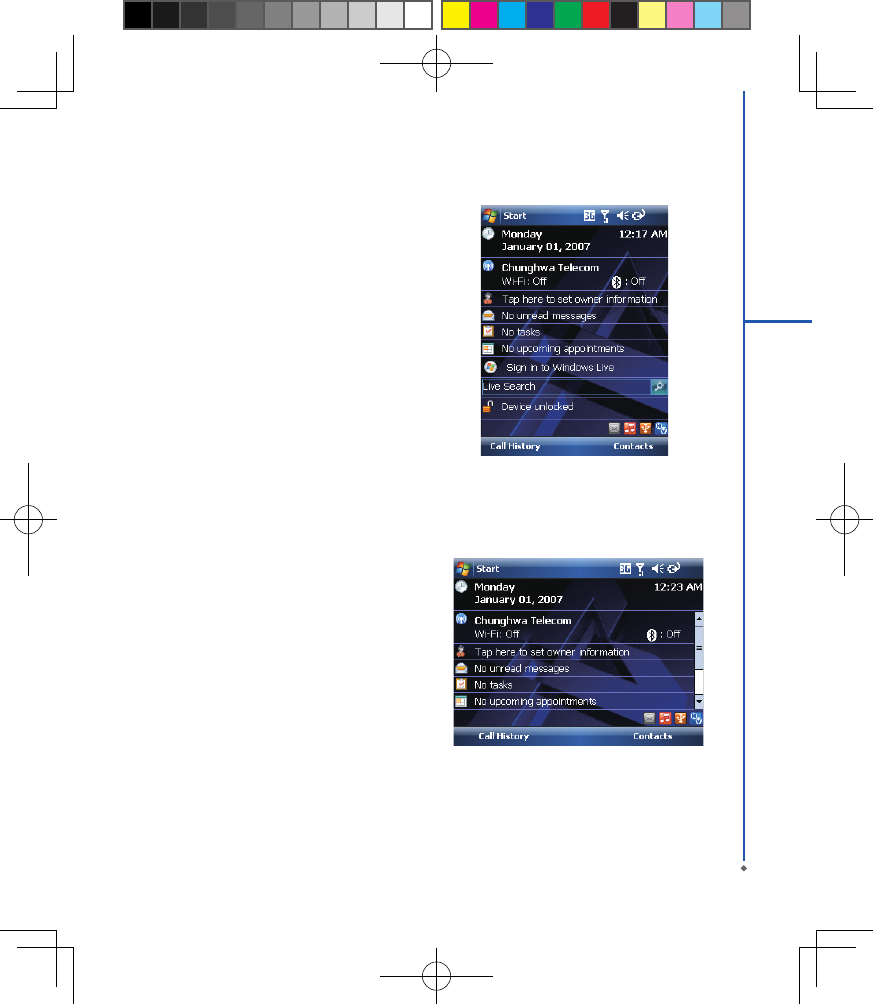
2.1 Display information
The main screen displays the following information:
16
2
Getting started
1. Start menu
Tap here to open Windows Start menu on the top left of the screen. To return to Today screen at any time, tap
Start > Today.
2. Status & Icon area
Displays notication icons and system status. You can tap the icon to look into the detail or settings of the function.
3. Today screen
On Today screen, this area contains shortcuts to certain programs and important information of today. To change
Today screen settings, tap Start > Settings > Personal tab > Today.
4. Command area
Depending on different mode, this area contains different features such as menu options, input panel and
commands to create or edit a le.
5. Pop up menu
This allows you to quickly access an item. Tap on the icon and tap again to perform an action. To cancel it, tap
other areas of the screen.
Start menu
Tap Start to bring up a list of menu:
No Description
1Quick access to certain xed Microsoft programs.
2 The most recent 5 programs you have used.
3 Tap on Programs to enter the Programs menu.
4 Tap on Settings to enter the Settings menu.
5 Tap on Help to see detail information about different features.
17
2
Getting started
Programs
You will see many application icons under your Programs menu. From Programs menu, you may tap the application
icon that you desired to use to execute the application.
From Today screen > Start > Programs
Your MWg Atom V contains the following programs:
18
2
Getting started
Icon Programs Description
Multimedia Audio Mixer, Camera, Photo Editor, Pictures & Videos, Recorder,
JAVA, Streaming Player, FM Radio
Tools Calculator, Easy-Touch Menu, Pocket Remote, Restore to Default,
Zip
Phone Manager Dial Kit, Internet Sharing, SIM Manager
Games Bubbles Breaker, Solitaire
ActiveSync Transmit data between your computer and the device.
Messenger Perform MSN functions.
19
2
Getting started
Icon Programs Description
Notes Write notes, memo, or drawings.
Search Search for all data, programs, and les.
Photo Viewer View all the pictures on your MWg Atom V.
Remote Desktop Mobile To set up the desktop screen information and display.
Windows Live This is your gateway to help with Live Search.
GPS Utility GPS Tracking
Settings
Your MWg Atom V contains Personal, System, and Connections setting items.
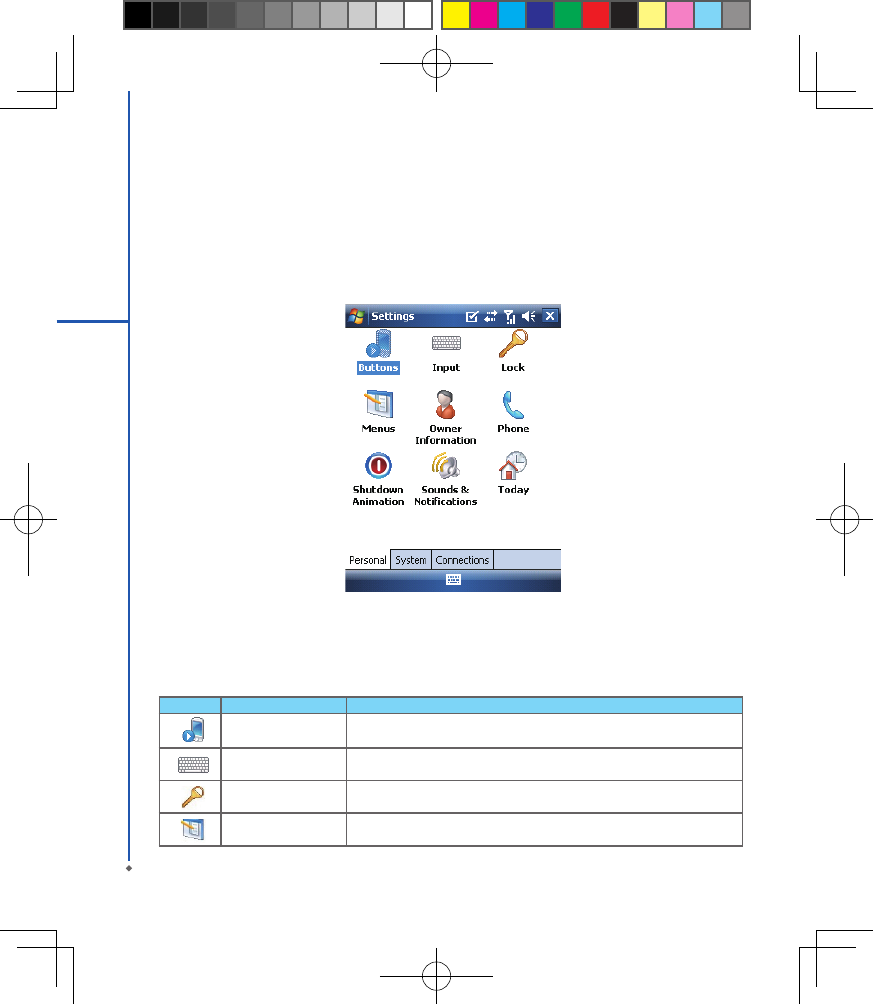
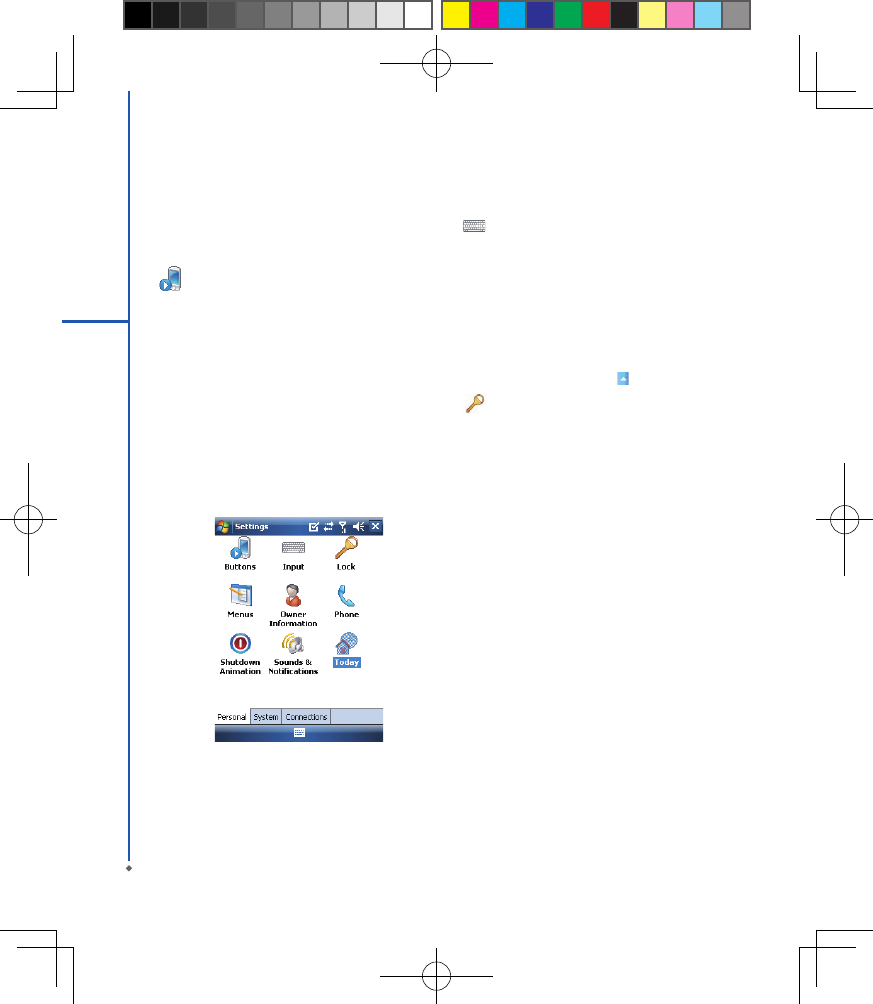
Tap Start > Settings > Personal tab:
20
2
Getting started
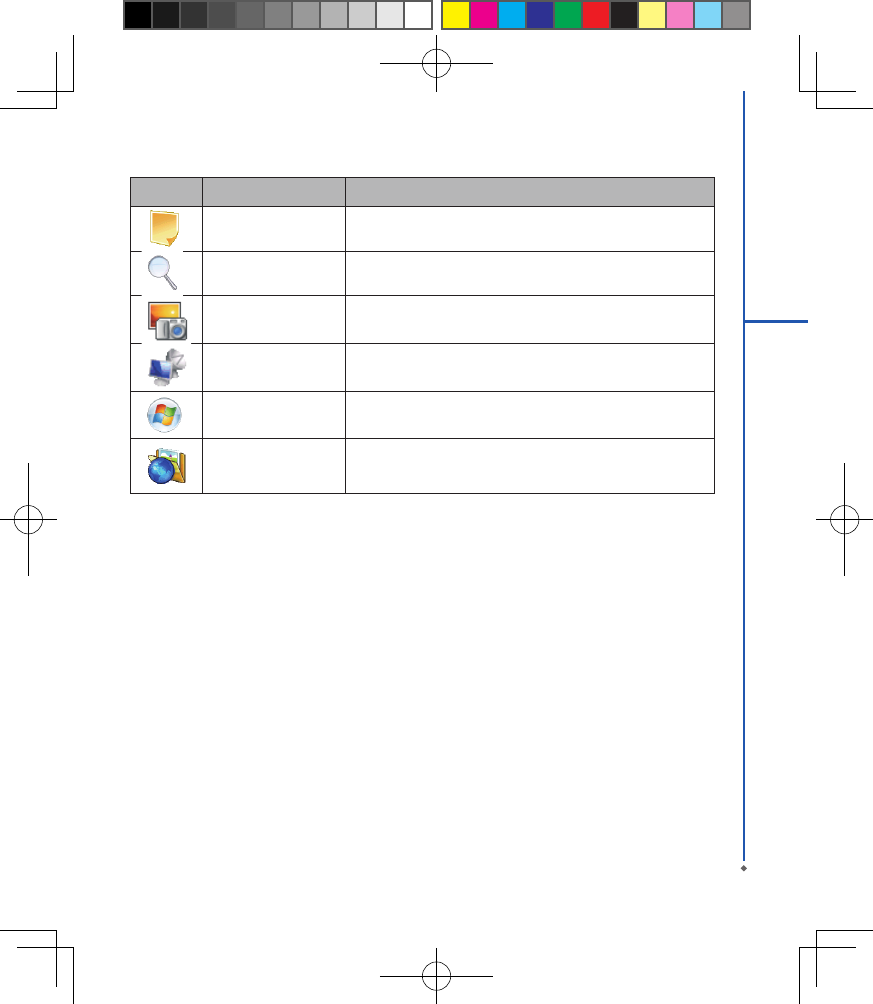
Icon Seetings Description
Buttons You may assign programs to a hardware button.
Input Set your preferred input method.
Lock You may set a personal password to lock your MWg Atom V.
Menus Select the programs to be displayed in Start menu.
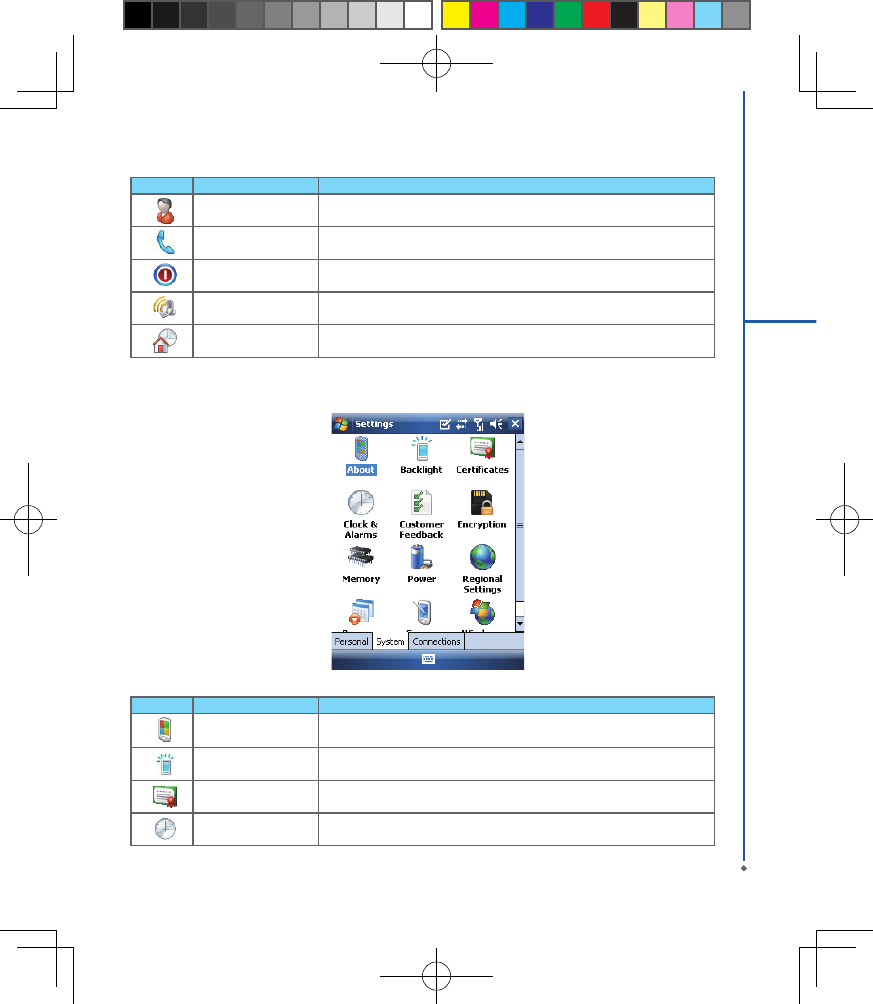
Icon Seetings Description
Owner Information Set your personal information.
Phone Settings for phone functions.
Shutdown Animation Settings for shutdown screen.
Sounds &Notications Settings for alarm and notication sound type.
Today Settings for screen appearance and items displayed on the Today screen.
21
2
Getting started
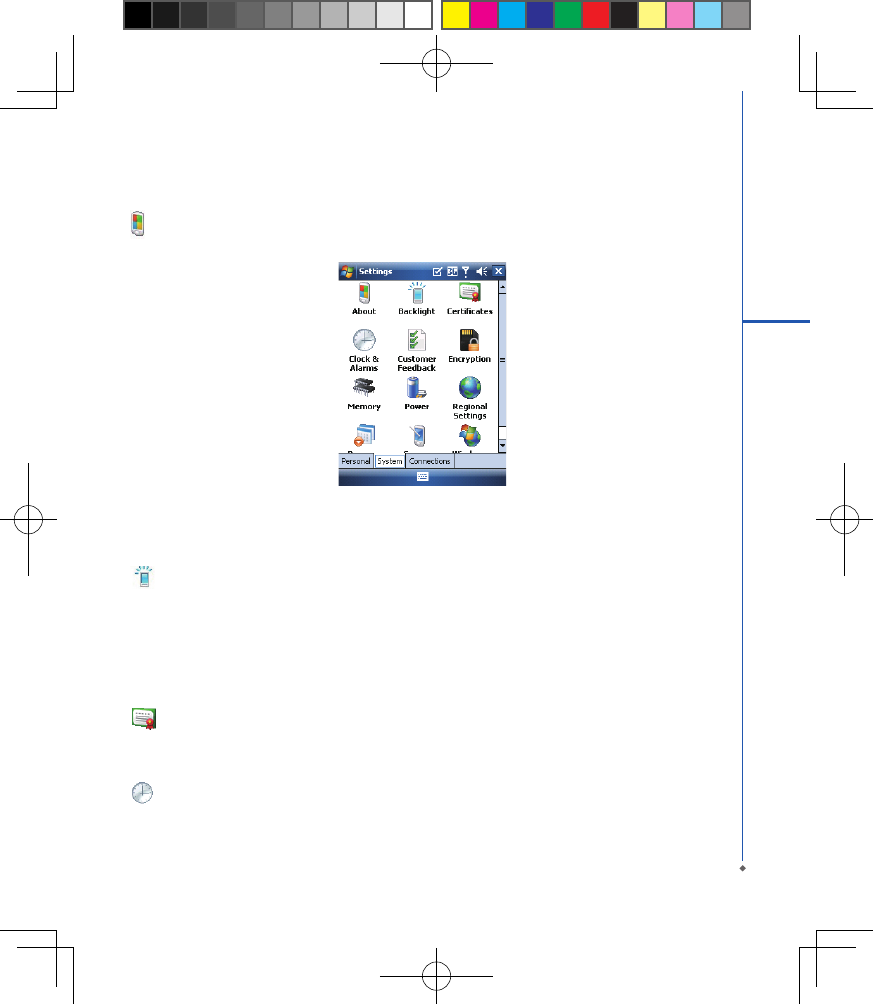
Tap Start > Settings > System tab:
Icon Settings Description
About Contain information about your MWg Atom V.
Backlight Configure the backlight settings and adjusts the brightness level to save
power.
Certicates Information about the certicate issuer and the expiration date.
Clock & Alarms Settings for time and alarms.
22
2
Getting started
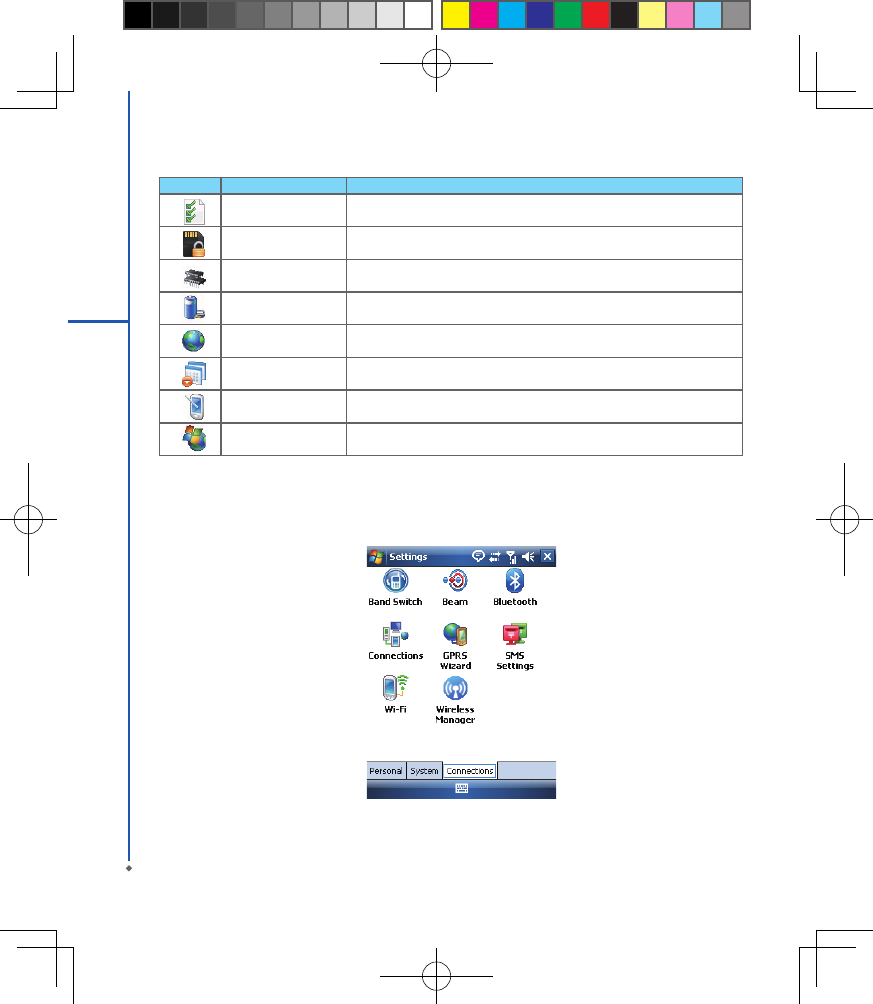
Tap Start > Settings > Connections tab
Icon Settings Description
Customer Feedback Customer Experience Improvement Program from Microsoft®.
Encryption Encrypt les.
Memory Display memory status and programs that are currently running.
Power Battery status and settings.
Regional Settings Settings for region, number, currency, time, and date format.
Remove Programs Remove programs from your MWg Atom V.
Screen Settings for screen orientation, screen alignment, and text size.
Windows Update Download updates for Windows Mobile setup.
23
2
Getting started
Icon Settings Description
Beam You can choose to receive all incoming beams.
Bluetooth Settings for Bluetooth connection.
Cell Broadcast Setting Receive broadcast channel information and news from your
service provider.
Connections Settings and management for modem connections.
GPRS Wizard Basic settings for GPRS connection.
USB Use your MWg Atom V as a micro SD card reader.
Wi-Fi Manage and congure your Wi-Fi settings.
Wi-Fi Utility Details of your Wi-Fi connection.
Wireless Manager Turn on/off Radio, 3G / GPRS data, Wi-Fi and Bluetooth.
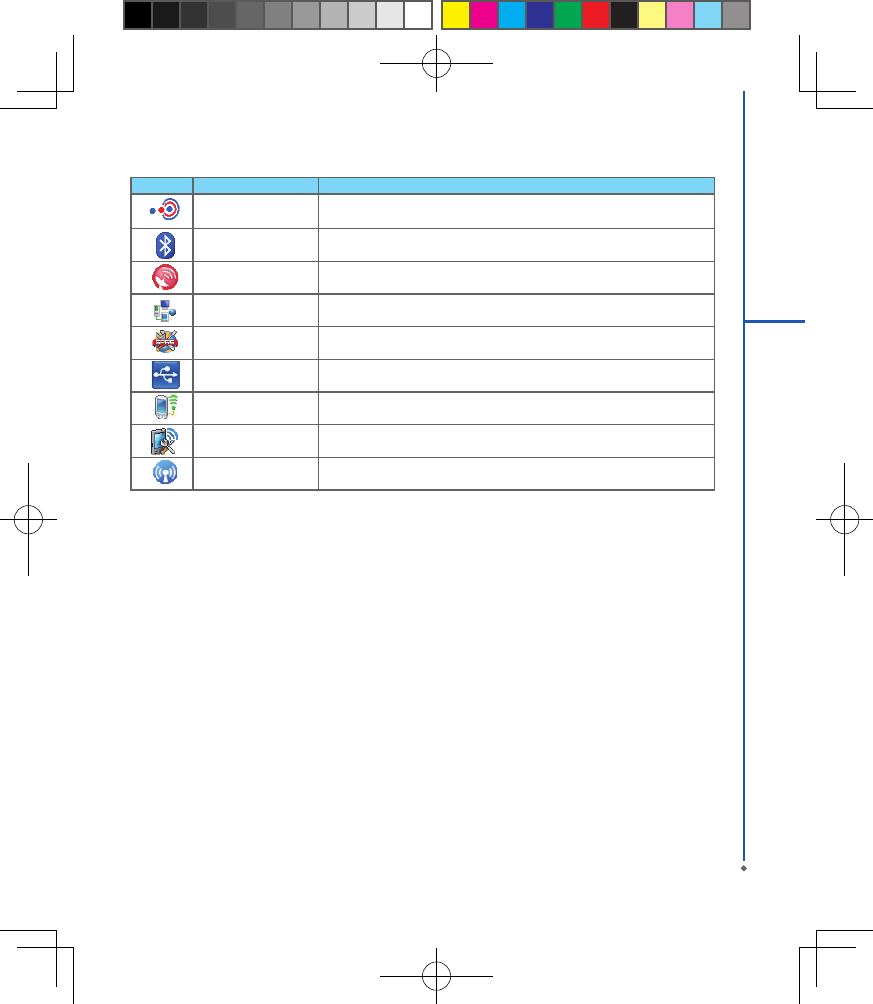
Status Type Icon Description
Battery Main battery power is full. The level of battery power is shown in percentage.
Low battery. Please recharge.
Battery is charging.
Calls Call forward.
Call on hold.
Data call.
You have missed calls.
Voice call in active.
Connection HSDPA network connected.
3G network is connected.
GPRS is in range.
GPRS is connected.
Building connection to GPRS.
Bluetooth is activated.
Wi-Fi is activated; a Wi-Fi network is in range; Wi-Fi network is connected.
Signal Strong signal.
No signal.
Roaming.
GPS Tracking is trying to connect.
GPS Tracking is connected.
Message You have one or more new message(s).
You have one or more new voice mail(s).
You have one or more instant message(s).
Volume System volume.
Phone volume.
Ringer is on.
Ringer is off.
24
2
Getting started
Status & Icon area
This area shows icons of basic system status or alerts. You can tap on the icons to get the denitions or go to the
settings.
Please note: To choose reminder types and sounds for your MWg Atom V, tap Start > Settings > Personal tab >
Sounds & Notifications.
25
2
Getting started
2.2 Screen orientation
You can choose your screen display in Portrait or
Landscape mode. The Portrait mode allows you to get
a better view or a better operation of certain programs
on your MWg Atom V, while Landscape may be optimal
for viewing longer text les. You can also change the
default screen display by following the steps below:
1. Tap Star t > Settings > S ystem t ab > Screen>
General tab.
2 . O n G e n e r a l tab s c re e n , s e l e c t y o u r de s i r e d
orientation, Portrait, Landscape (right-handed), or
Landscape (left-handed).
3. Tap OK, and the screen will be changed accordingly.
Portrait
Landscape

26
2
Getting started
2.3 Setting time & date
When using your MWg Atom V for the rst time, you are
required to set your time zone, time, and date. You can
also tap on the clock icon on Today screen to setup time
and date.
1. Tap Start > Settings > System tab > Clock& Alarms
> Time tab.
2. Select Home or Visiting.
3. Select your time zone.
4. Select AM / PM.
5. Use the up and down arrow aside hour, minute and
second to adjust the highlighted time unit.
6. Tap th e dow n ar r ow asid e th e da te to op en a
calendar, and select a desired month, date, and year.
7. Tap OK, a pop-up window will appear on your screen
to conrm to Save Changes to the clock settings.
8. Tap Yes to save the changes and exit.
Please note: Change the time on Home zone may
change your Calendar schedule.
2.4 Using the stylus
Use the stylus to touch or write on your screen. Using
stylus can avoid damaging your screen. There are 2
ways to use your stylus:
● Tap: softly tap on a desired item by your stylus, and
lift the pen from the screen.
● Press: touch and hold your stylus on a desired item
for a few seconds until a blue dotted circle appears.
This indicates that a pop-up menu is going to be
activated.
2.5 Screen alignment
When using your MWg Atom V for the rst time, screen
alignment is required. If you nd that the device does
not accurately respond to your stylus taps, or you
have performed a system reset, you need to align your
screen again.
1. Tap Start > Settings > System tab > Screen >
General tab.
2. Tap Align Screen on your screen.
3. On the align screen, use your stylus to touch the
crosses on the screen accurately.
4. Tap OK to exit.
2.6 Input method
Block Recognizer
With Blo ck Reco gniz er, you can input charac ter
strokes (using the stylus) that are similar to those used
on other devices.
1. On your screen keyboard, tap the arrow icon next
to the keyboard icon for more input methods. On the
pop-up list, tap Block Recognizer .
2. Write letters and numbers in a corresponding eld,
the system will display the letters/numbers identied
from your handwriting.
3. Do not write letters/numbers continually to prevent
recognition error.
4. Do not write letters outside of the input elds.
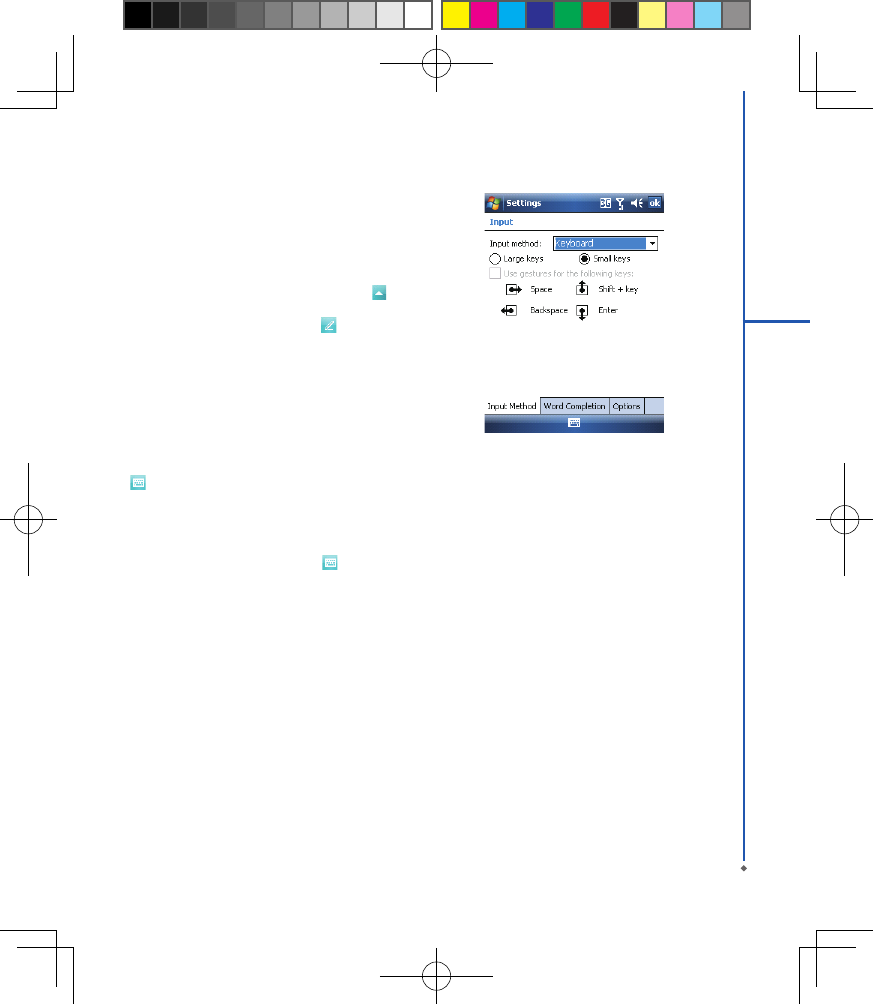
Keyboard
You can input data by using screen keyboard. Tap
icon on your screen to open the screen keyboard.
Follow the steps below to input your data:
1. On your screen keyboard, tap Shift or CAP key to
input a captial letter or to input multiple symbols.
2. Tap the key on your screen keyboard to delete.
3. To close the screen keyboard, tap icon again on
your screen to hide the screen keyboard.
Please note: To change the displayed keyboard size
on the screen, tap the arrow beside keyboard icon
and tap Options. Under Input screen, you may select
either Large keys or Small keys by tapping on its radio
button.
27
2
Getting started
28
2
Getting started
Letter Recognizer
1. On your screen keyboard, tap the arrow icon next
to keyboard icon for more input methods. On the pop-
up list, tap Letter Recognizer .
2. Write letters and numbers in a corresponding eld on
your Letter Recognizer screen. Your MWg Atom V
will display the letters/numbers that you had just input
in Letter Recognizer elds.
3. Tap the key to delete an input.
Transcriber
Transcriber allows you to write on the full screen using
the stylus just as you would write on paper. Unlike
Letter Recognizer and Block Recognizer, you can
write a sentence or more than one sentence. Pause and
let Transcriber change the written characters to typed
characters.
1. On your screen keyboard, tap the arrow icon next
to keyboard icon for more input methods. On the
pop-up list, tap Transcriber .
2. Position the cursor where you want text to appear.
3. Use the stylus to write anywhere on the screen. The
handwriting will be converted to text after you lift the
stylus from the screen.
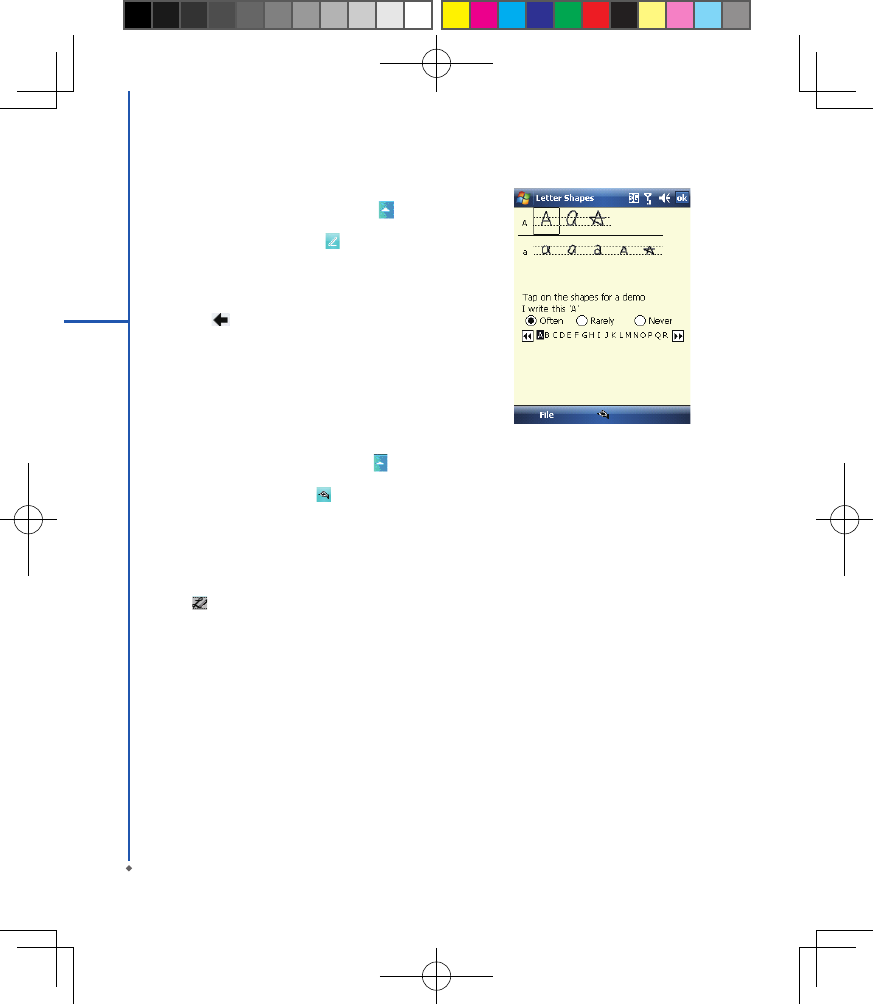
Learning how to write in Transcriber
1. Tap on the tool bar.
2. A Letter Shapes screen will appear, select the
character you wish to explore, tap the picture of this
character on top of the screen, and it will demonstrate
the writing sequence of the letter. Select how often
you write the character using that method.
3. When you nish the practices, you can save these as
a prole by tapping File > Save.
29
2
Getting started
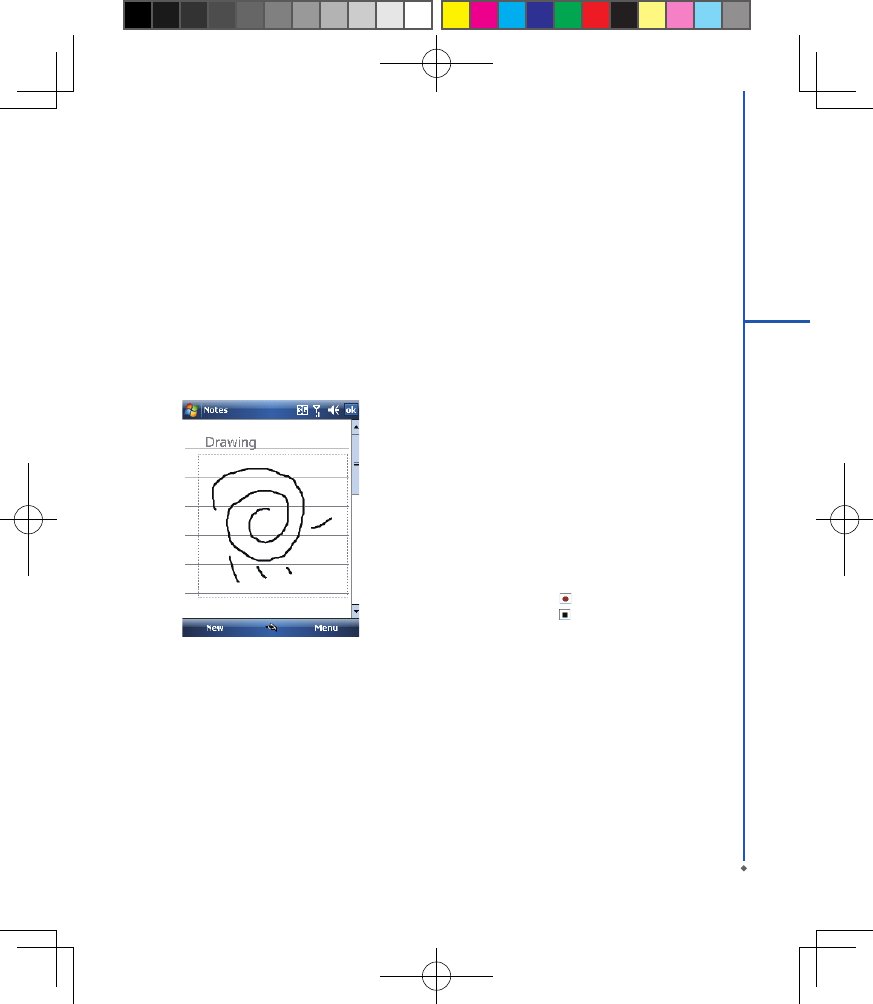
2.7 Drawing on the screen
You can draw on the screen in the same way that you
write on the screen. The difference between writing and
drawing on the screen is how you select items and how
they can be edited. For example, selected drawings can
be resized, while writing cannot.
Creating a drawing:
Cross three ruled lines on your rst stroke. A drawing
box appears. Subsequent strokes in or touching the
drawing box become part of the drawing. Drawings that
do not cross three ruled lines will be treated as writing.
Selecting a drawing
To edit drawing, select it rst.
1. Tap and hold the stylus on the drawing until the
sele c ti o n ha n d l e a p p e a r s . To se l e c t mult ip l e
drawings, deselect the pen button and drag to select
drawings you want.
2. You can cut, copy, and paste selected drawings
by tapping and holding the selected drawing and
tapping an editing command on the pop-up menu, or
by tapping the command on Edit menu. To resize a
drawing, make sure Pen button is not selected, and
drag a selection handle. To change the zoom level so
it is easier to work or view your drawing, tap Tools
and select a zoom level.
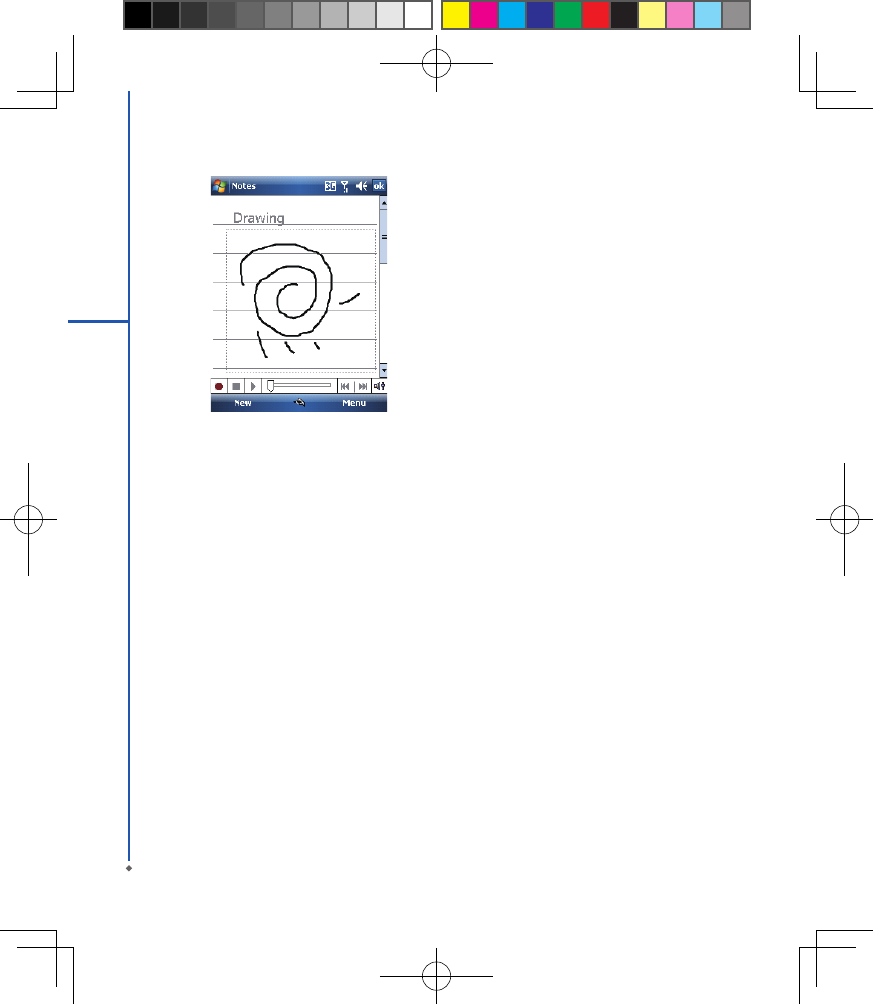
2.8 Recording a message
In any prog r am wh ere you ca n writ e or dr aw on
the screen, you can also quickly capture thoughts,
remin d e r s , and p h o n e number s by r e c o r di n g a
message. In Calendar, Tasks, and Contacts, you can
include a recording in Notes tab.
In Notes, you can either create a standalone recording,
or include a recording in a written note. If you want to
include the recording in a note, open the note rst. In
the Messaging program, you can also add a recording
to an E-mail message.
Creating a recording
1. To add a recording to a note, open the note before
recording. Tap Start > Programs > Notes.
2. If there is no Record/Playback toolbar, tap Menu >
View Recording Toolbar.
3. Hold your device’s microphone near your mouth or
another sound source.
4. To start recording, tap .
5. To stop recording, tap . The new recording appears
in the note list.
6. To play a recording, tap in the open note or tap the
recording in the note list. You can also access the
Record/Playback tool bar by pressing down Volume
key for a whil e. To qui ck ly cre ate a re cording,
hold down Volume key. When you hear the beep,
recording has begun. Release the button when you
are nished. The new recording is stored in the open
note, or as a standalone recording, if no note is
opened.
2.9 Editing my info
You can input your personal information to your MWg
Atom V in Owner Information.
1. Tap Sta r t > Set ting s > Personal tab > Own er
Information > Identification tab.
2. Tap Name eld and input your name.
3. Tap a desired input eld and input your information.
4. Tap Notes tab to input other information you would
like to display on your MWg Atom V.
5. If you want your information to be displayed on the
starting screen, tap Options tab.
2.10 Password setup
You can set your own password to prevent unauthorized
use of your MWg Atom V.
1. Tap Star t > Set ti ng s > Per sonal tab > Lock>
Password tab.
2. On Password tab screen, check Prompt if device
unused for.
3. Select an appropriate time.
4. Select a password type in Password type eld.
5. Input your password in Password eld and reconrm
the password in Confirm eld.
6. Tap OK, a pop-up window will appear to conrm, “ Do
you want to save password settings changes?”.
7. Tap Yes to nish settings and save the changes; No
to cancel.
8. You may also input password hint message under
Hint tab screen.
9. Tap OK to save your inputs.
Please note: If you forget your password, you need to
perform system default, which will lose all your data and
settings.
2.11 Memory expansion
To expand the memory of your MWg Atom V, you can
inser t a Micro SD card into the card slot located at
the top of the phone. Make sure the card is inserted
correctly.
2.12 Data backup
Your MWg Atom V suppo r ts 64M B R AM c apacit y;
however, you may need to back up data and any new
programs that you install in the RAM to guard against
data loss. To back up your Contact, Calendar, etc.,
please set up the synchronization partnership with your
PC and connect the phone with PC. ActiveSync will
start automatically.
30
1
Getting started

Chapter 3
Phone Functions
3.1 Phone screen and key introduction
3.2 Making a call
3.3 Receiving / Ignoring a call
3.4 International calls
3.5 Emergency calls
3.6 Volume adjustment
3.7 Contacts
3.8 Creating a new contact
3.9 Call history
3.10 Setting ring tone and password
3.11 SIM manager
Press Talk/Send key to enter phone functions. Please
insert a SIM card before using these functions.
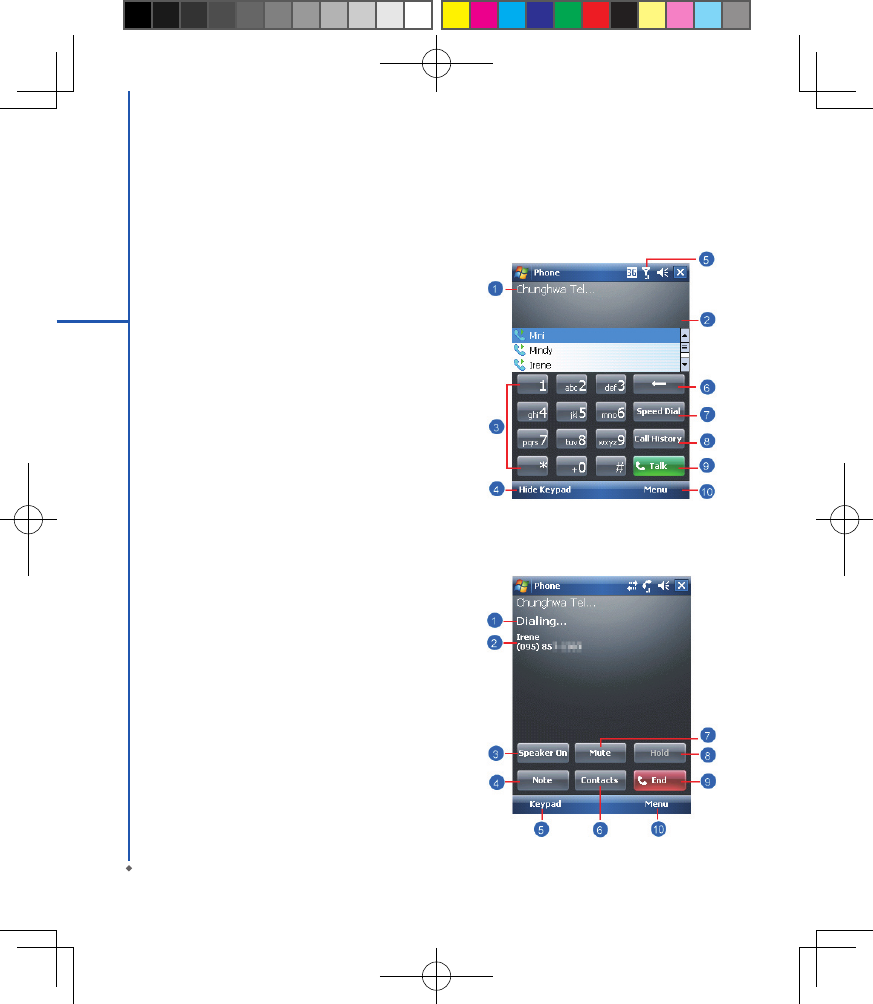
Phone Dialer screen
From Phone Dialer screen, you can access Contacts,
Speed Dial, Call History, and more options under
Menu. This screen has the following features:
1. The name of the network provider
2. The number you entered
3. Touch screen keypad
4. Hide Keypad
5. Signal strength
6. Clear numbers
7. Speed Dial
8. Call History
9. Make/End a voice call
10. Menu to access more options
When a call is connected, the screen displays the
following:
1. The calling status
2. The name and number of the contact you are calling
3. Speaker On/Off
4. Create a note for the call
5. Return to the dialer phone screen
6. Contact list
7. Mute the call
8. Hold the call
9. End the call
10. Menu to access more options
Please note: When there is a call comes in, press
volume up / down will immediately silent off the alert.
Chapter 3 Phone Functions
3.1 Phone Dialer screen and key Introduction
32
3
Phone Functions
33
3
Phone Functions
3.2 Making a call
With your MWg Atom V, you can make a call by entering the phone number, or selecting a number from Contacts,
Speed Dial, and Call History.
1. After entering Phone Dialer screen you can dial a number using the numeric keypad or the keypad on the screen.
2. To delete an error input, use key on the screen.
3. Tap to make a call.
4. Tap to end the call.
Speed dial
You can set ten phone numbers in your speed dial list.
1. After entering Phone Dialer screen tap Speed Dial button on the screen to enter your Speed Dial List.
2. On Speed Dial List screen, you can select a contact on the list to see the contact’s detailed information.
3. On Speed Dial List screen, tap Menu on the bottom right corner of the screen. You can perform New, Edit, or
Delete contacts of the Speed Dial List.
4. To make a call, tap the corresponding number on the keypad to call the contact on Speed Dial List.
5. You can also use the navigation key to select a contact you want to call on Speed Dial List screen, and then
press Talk/Send key to call.
6. Press End key to end the call.
3.3 Receiving / Ignoring a call
When you receive a phone call, a notication message will appear. To answer the incoming call, tap Answer or
press Talk/Send key. To ignore or reject a call, tap Ignore to mute the phone and reject the call. This may divert the
call to your voice mail, depending on your network operator.
3.4 International calls
When you make an international call from any country, you need to insert a special international access code. If you
enter “+” symbol as a prex before the number you are calling, then you do not need to enter the access code for the
country you are calling from.
To make an international call
1. Tap and hold 0 key until + sign appear. + replaces the international prex of the country that you are calling from.
2. Enter the full phone number you want to dial. It should include the country code, area code (without the leading
zero), and phone number.
3. Tap Talk or press Talk/Send key.
34
3.5 Emergency calls
Enter the international emergency number 112, and then tap Talk or press Talk/Send key. Additional emergency
numbers may be included on your SIM card. Contact your network operator for more information.
If your MWg Atom V has entered Device Lock mode, you have to unlock the device first before making an
emergency call.
1. Tap the Unlock on Left Function Key.
2. Tap “Unlock” displayed on the bottom left of the screen.
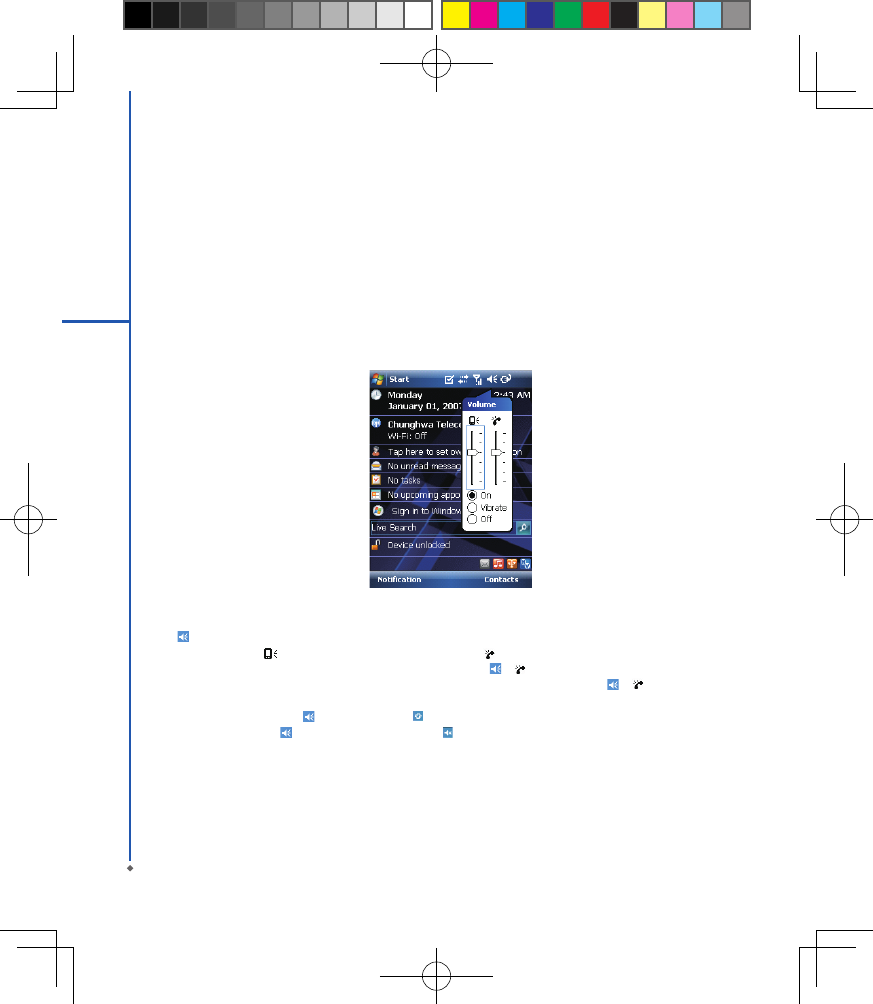
3.6 Volume adjustment
Tap icon on the screen and the volume adjustment window will appear. Adjust the volume of alert tone for all
programs tapping on ,and adjust the ring volume by tapping on .
1. Press Volume Adjustment key on the left side manually or tap > to adjust incoming call volume.
2. If you press the Volume Adjustment key on the left side of your MWg Atom V or tap > icons during a call,
you may adjust the in-call volume of the phone. You can only adjust it during a call.
3. When you select Vibrate, icon will change to icon.
4. When you select Off, icon on screen will change to icon.
3.7 Making a call from contacts
On Today screen, you can tap Contacts on the bottom right of the screen to enter Contacts. Or under Phone
Dialer screen, tap Contacts on the bottom left of the screen to enter Contacts.
1. Enter the contact or phone number you intend to search into the search eld, the phone will search for the contacts
3
Phone Functions
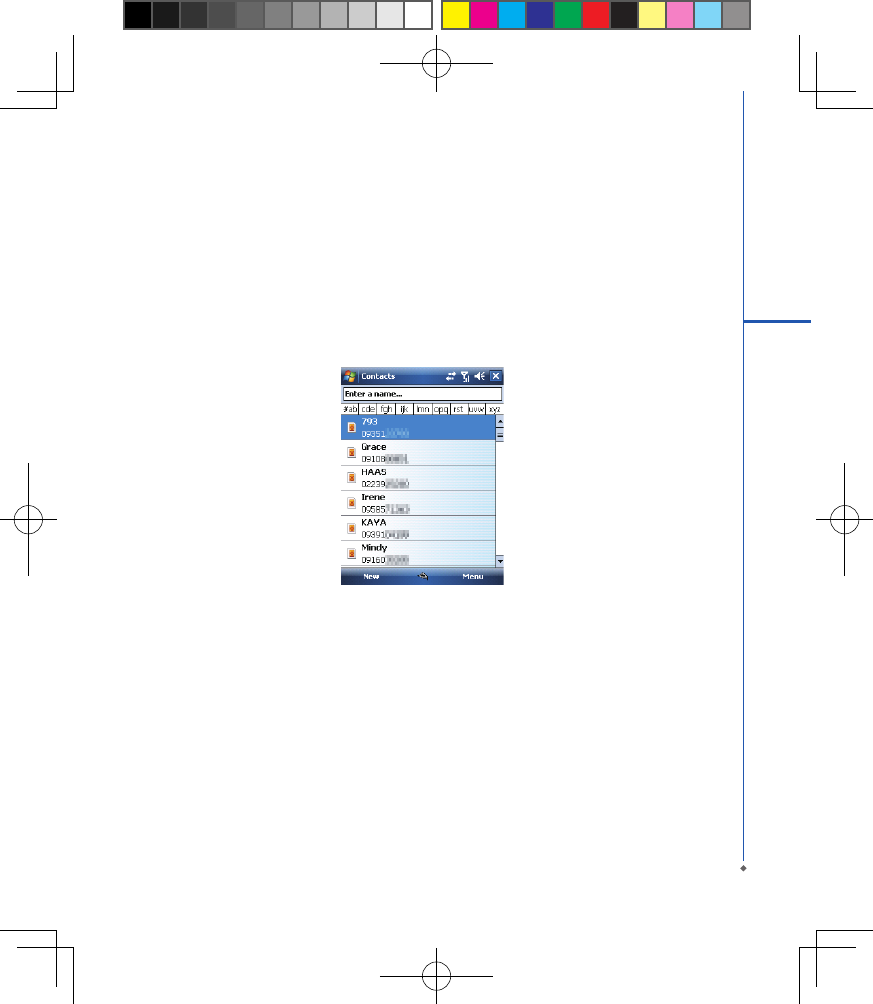
35
3
Phone Functions
that match this condition.
2. Tap and hold 5 Way Navigation key upwards or downwards to browse contacts by initial letters in Contacts. (This
function is available for contacts synchronized from Outlook only).
3. Tap on any contact to view that contact’s information.
4. Under Contacts screen, tap Call on the bottom left of the screen or tap Left Soft key to make a call to that
person.
5. Under Contacts screen, tap Menu on the bottom right of the screen for more options.
If you would like to make a call using a telephone, go to Contacts and highlight the person you would like to call.
Tap Menu > Sounds DTMF; then aim your MWg Atom V to the telephone receiver. Your telephone will dial out to the
desired contact upon reception of the DTMF sounds from your device.
3.8 Creating a new contact
On Contacts screen, tap New on the bottom left of the screen. A blank record will appear.
1. You may set photos in Picture eld for this contact, by which the contact’s photo will display as an incoming call
photo ID.
2. You may also tap Ring tone eld to set different incoming call ring tones for your contacts.
3. Tap OK on the top right of the screen to save the new contact and exit.
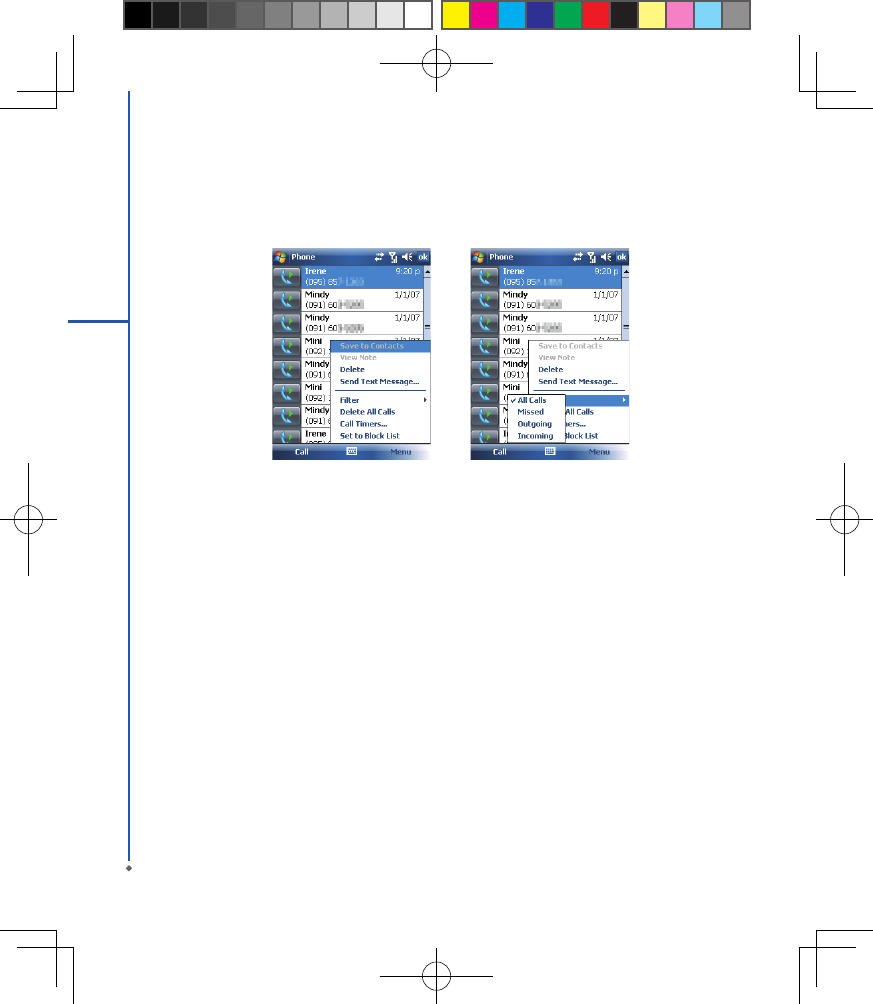
3.9 Call history
Call History contains all outgoing calls, incoming calls, and missed calls. You may choose to display all or only
display highlighted items.
1. On Today screen, tap Call History on the bottom left of the screen.
2. Tap Menu on the bottom right of the screen.
3. Select a desired function to perform. You may change call history display method by selecting Filter; or select
Call Timers to check incoming call numbers, call time, and manage incoming call history.
4. On Call History screen, select the icon on the upper left side of the main screen to redial this number at once.
5. On Call History screen, tap and hold on a phone number to open a drop-down menu for more options.
3.10 Setting ring tone and password
On Phone Dialer screen, tap Menu on the bottom right of the screen. Tap Options > Phone tab.
1. You may select a preferred ring type.
2. If you want to download ring tones, please use ActiveSync program in the computer and copy the ring tone le to
Application Data/ Sounds folder in your MWg Atom V. The ring tone les will be added as the options.
3. You can set keypad tone for dialing.
4. You can set personal password to prevent unauthorized use from others.
36
3
Phone Functions
3.11 SIM manager
SIM card copy
Use this function to copy the contacts in SIM card to the device.
1. From Start > Programs > Phone Manager > SIM Manager
2. Choose the SIM card contacts on the top.
3. All contacts in SIM card will show on the screen.
4. Choose contacts you want to copy then select Copy to phone contacts and your contacts in SIM card will be
copied to Contacts in this device.
5. If you choose Recovery, the contacts will be recovery to your SIM card.
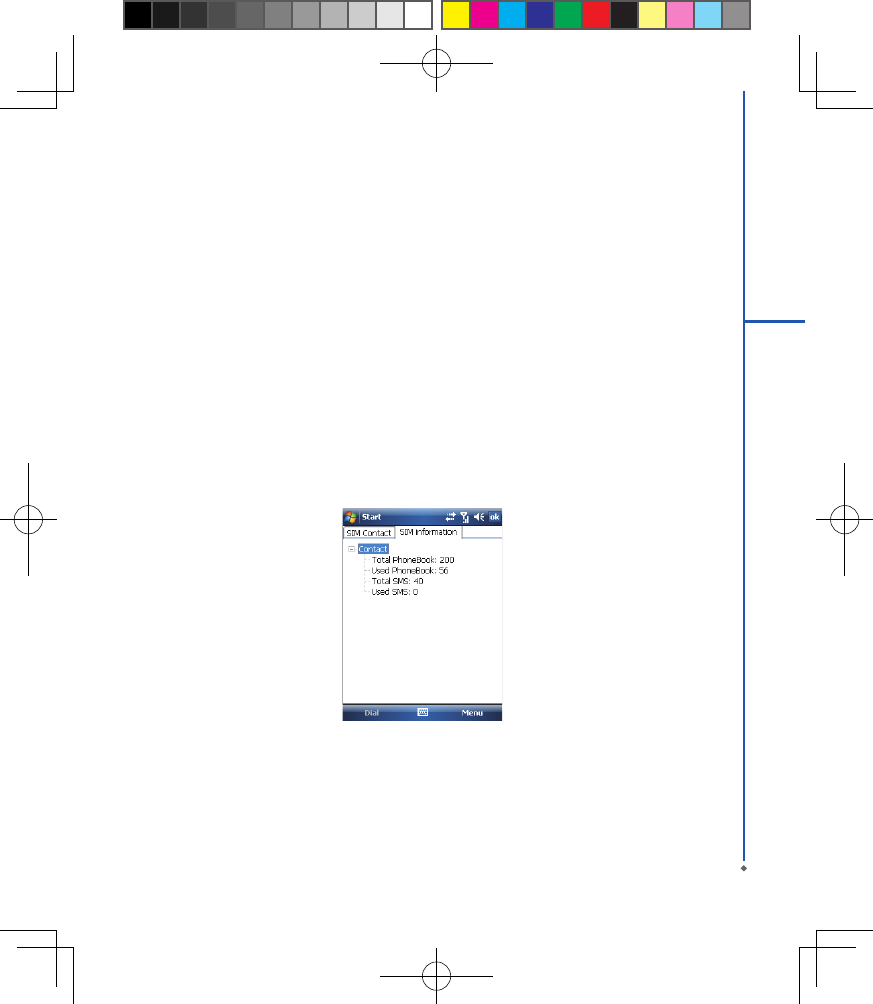
SIM card information
This function will show the information about your SIM card.
1. From Start > Programs > Phone Manager > SIM Manager
2. Choose SIM card information on the top.
3. Show the content of SIM card.
37
3
Phone Functions

38
3
Phone Functions

Chapter 4
Settings
4.1 Personal settings
4.2 System settings
40
4
Settings
Chapter 4 Settings
4.1 Personal settings
You may set your personalized settings by preference.
Buttons
You may assign programs to a hardware button.
You may set certain keys as the activation keys for your
most commonly used programs.
1. Tap Start > Settings > Personal tab > Buttons >
Program Buttons tab.
● Under Select a button, tap the button you want
to assign to a program, and then select a program
from Assign a program.
2. On Up/Down Control tab, Delay before first repeat
changes the time elapsed before scrolling begins.
Repeat rate changes the time it takes to scroll from
one item to the next.
Input
Set your preferred input method.
1. Tap Start > Settings > Personal tab > Input.
2. On Input Method tab, select a desired input method.
On Word Co mple t i o n tab, se lec t the de si r ed
settings for word completion. On Options tab, select
the desired options for writing and recording. These
options apply to any program on your MWg Atom V
where you can record or write. You can also change
input options by tapping the arrow and Options.
Lock
You may set a personal password to lock your MWg
Atom V.
A strong password must have at least 7 characters that
are a combination of uppercase and lower case letters,
numerals, and punctuation.
1. Tap Start > Settings > Personal tab > Lock.
2. To enable this function, select how long your MWg
Atom V must be turned off before the password is
required for using your MWg Atom V by tapping
Prompt if device unused for.
3. Select the type of password you would like to use:
Strong alphanumeric or Simple PIN.
4. Enter the password and,
● If your MWg Atom V is congured to connect to a
network, use a strong password to help protect
network security.
● If you forget your password, you must hard reset
before you can access your MWg Atom V. A hard
reset will erase all les and data you have created
and any programs you have installed.
● If you have used ActiveSync to create a backup
le, all of your program data can be restored.

41
4
Settings
Menus
Select the programs to be displayed in Start menu.
Only 7 programs are allowed in Start menu. To add the
programs you use most often to Start menu:
1. Tap Start > Settings > Personal tab > Menus.
2. Select the programs you want, and then tap OK.
Owner information
Sets layout, items, color and background of Today
display.
1. Tap Start > Set ti ngs > Persona l t ab > Owner
Information.
2 . O n I d e n t i f i c a t i o n t ab, en t er yo u r p er s on al
information.
3. On Notes tab, enter any additional text you want to
display when your MWg Atom V is turned on, such
as: “Welcome!”.
4. On Options tab, select which message will display
when your MWg Atom V is turned on.
Phone
Settings for phone functions.
You can easily view and change set tings, such as
the ring type and ring tone to be used for incoming
calls, and the keypad tone to be used when entering
phone numbers. You can also protect your device from
unauthorized use. There are two ways to change phone
settings:
● Tap Start > Settings > Personal tab > Phone.
● To change the phone settings from Phone screen, tap
Menu > Options.
Pho n e t a b
Under Phone tab, you can set up the following items:
Ring type
You can chang e the way that you are notif i ed of
incoming calls. For example, you can choose to be
notied by a ring, a vibration, or a combination of both.
Tap the Ring type list, and select the desired option.
Ring tone
Tap Ring tone list, and then select the sound you want
to use.
1. To s e t .wav o r . m i d f i le s a s r i ng t o n e s, u s e
ActiveSync on your PC to copy the le to \Windows\
Rings folder on your MWg Atom V. Select the sound
from Ring tone list.
2. To download ring tones, you can make a connection
to the Internet and then download ring tones that are
compatible with the .wav or .mid formats.
Keypad
You can change the tone you hear when entering a
phone number on the keypad. If set to Long tones, the
tone is heard continuously for as long as the number on
the keypad is pressed. If set to Short tones, the tone is
heard only for one or two seconds.
1. Tap Keypad list; then select the option you want.
2. To prevent tones from being heard when entering a
phone number, select Off.
Security
You may check Require PIN when phone is used
to enhance your phone security. Tap Change PIN to
change your SIM PIN number.
S er vic e s ta b
Set t i n g s i n c l u d e C a l l B a r ri n g , C a l l e r I D, Ca l l
Fo r wa rd i ng, Call Waiti ng , Voic e Mail and Text
Messages.
1. Tap Start > Settings > Personal tab > Phone >
Services tab.
2. Check the items you want to select and tap Get
Settings....
3. Tap OK to save settings and return to Personal tab
screen.
42
4
Settings
Please note: All services in Services are provided by operators. Please contact your operator for enquiries
regarding these services.
N et work t a b
Tap Start > Settings > Personal tab > Phone > Network tab.
● Under Current network, tap Find Network to automatically search for the network in use.
● Under Network Selection, select Automatic or Manual to select network automatically or manually.
● Under Preferred networks, tap Set Networks to set your preferred order of networks.
Sounds & Notications
Settings for alarm sound and notications.
Turning off sounds and the notication helps conserve battery power. To change the ring type and volume:
1. Tap Start > Settings > Personal tab > Sounds & Notifications.
2. On Sounds tab, you can select the desired actions.
3. On Notifications tab, you can customize how you are notied about different events. Select the event name and
then select the type of reminder. You can select a special sound, a message, a ash light, or vibrate.
Today
Settings for screen appearance and items displayed on the Today screen.
To change the theme of your Today screen:
1. Tap Start > Settings > Personal tab > Today.
2. On Appearance tab, select the desired theme. To use your own background, select Use this picture as the
background and then tap Browse to locate the desired le.
3. Choose a folder, tap the le you want, and tap OK.
Please note: The recommended picture size for the background is 240x320 pixels in jpeg le format. To beam a
favorite theme to a friend, select the desired theme, and tap Beam on Appearance tab.
Customizing the displayed information:
1. Tap Start > Settings > Personal tab > Today > Items tab.
2. Select the information you want to be displayed on Today screen.
3. To customize the information further, select an information type, and then tap Options (not available for all
information types).
Option Description
Call Barring Block incoming and/or outgoing calls.
Caller ID Display your name and/or phone number for outgoing calls.
Call Forwarding Forward all or selected incoming calls to a different phone number.
Call Waiting Notify you an incoming call while you are on the phone.
Voice Mail and Text
Messages
Set up voice mail and SMS service center.
43
4
Settings
4.2 System settings
About
This function contains information about your MWg Atom V.
Version tab displays important device information, including the amount of memory installed. On the Device ID tab,
you may need to change your device name if you are unable to connect to a network because another device with
the same name is already connected.
Backlight
Congure the backlight settings and adjusts the brightness level to save power.
Using the backlight on battery power substantially reduces batter y life. Tap Start > Settings > System tab >
Backlight.
● Tap Battery power tab to turn ON/OFF the backlight when using battery power.
● Tap External power tab to turn ON/OFF the backlight when using external power.
● Tap Extended tab to adjust the brightness level.
Certicates
Information about the certicate issuer and the expiration date.
Tap Certificates to view the name of the certicate issuer and the expiration date.
Clock & Alarms
Settings for time and alarms.
Tap Start > Settings > System tab > Clock & Alarms.
44
4
Settings
● If you visit a particular time zone often, select it as your Visiting time zone on Time tab so that you can quickly see
the correct date and time.
● You can use your MWg Atom V as a travel alarm clock by setting a wake-up alarm on Alarms tab. Tap the alarm
icon to select the type of alarm you want.
● To change the way the date or time is displayed on your MWg Atom V, go to Regional Settings by tapping Start >
Settings > System tab > Regional Settings.
Customer Feedback
Customer Experience Improvement Program from Microsoft®.
It is Customer Experience Improvement Program designed by Microsoft®. The purpose is to identing trends and
usage patterns to improve the software. You can check Send Feedback to participate or Don't Send Feedback to
reject.
Encryption
Encrypt les.
You can encrypt les stored on the micro SD card by simply checking Encrypt files placed on storage card. Once
encrypted, such les are only readable by this device.
Memory
Display memory status and programs that are currently running.
You may need to stop a program if it becomes unstable or the program memory is low. Tap Start > Settings >
System tab > Memory.
● Main tab displays the amount of memory the system has allocated to le and data storage versus program storage.
This tab also displays the amount of memory in use versus the available memory.
● Storage Card tab displays how much memory is available on the storage card that is inserted into your MWg Atom
V.
● Running Programs tab displays the list of currently active programs. You can stop a program by selecting it in the
list and then tapping Stop, or just tap Stop All to stop all the running programs.
Power
Battery status and settings.
Tap Start > Settings > System tab > Power.
● Battery tab displays the amount of battery power remaining. Battery power depends on the battery type and how
your MWg Atom V is being used.
● Under Advanced tab, you can select options for turning off your MWg Atom V to conserve battery power.
● Under Extended tab, you can check lock MWg Atom V when entering stand-by mode.
When your MWg Atom V enters stand-by mode, it will automatically enable device lock.

45
4
Settings
Regional settings
Settings for region, number, currency, time, and date format.
This feature allows you to customize the unit and format for the region you are in. To access this feature, tap Start >
Settings > System tab > Regional Settings.
Remove programs
Remove programs from your MWg Atom V.
Remove Programs allows you to uninstall programs that are saved in your device’s storage memory. It also shows
the total available storage memory. Select a program that you would like to remove from the program box and tap
Remove.
Screen
Settings for screen orientation, screen alignment, and text size.
● Under General tab, you can adjust the screen’s orientation and align the screen.
● Under Clear Type tab, you can select Enable Clear Type to smooth the edges of screen fonts for many programs.
● Under Text Size tab, you can adjust the text size to see more content or increase the readability in many programs.
System Info
Display the system information.
This feature displays the system information Including hardware information and software (ROM) version.

46
4
Settings

Chapter 5
Synchronization
5.1 About synchronization
5.2 Installing ActiveSync
5.3 Choosing your synchronization type
5.4 Using ActiveSync tools
5.5 ActiveSync errors
48
Chapter 5 Synchronization
5.1 About synchronization
You can synchronize information between your PC or Microsoft® Exchange Server and your MWg Atom V with
ActiveSync on both your MWg Atom V and PC. Before synchronizing information, please install ActiveSync 4.5 on
the PC. Then you can:
● Synchronize information to get the latest information in all locations.
● Add or remove programs on your device.
● Transfer les between your device and a PC.
● Change synchronization settings and the synchronization schedule.
Once you install ActiveSync on your PC, you will be prompted to connect your device and create a synchronization
relationship with the device by using a USB cable or Bluetooth connection. While you are setting up this relationship
you can choose the information you want to synchronize with either your PC or with Microsoft® Exchange Server.
Note: If your PC is using Windows Vista then you will not need to install ActiveSync. Vista already has Windows
Mobile Device Centre installed which is used for synchronising your device and PC.
5
ActiveSync Synchronization Tool

49
5
ActiveSync Synchronization Tool
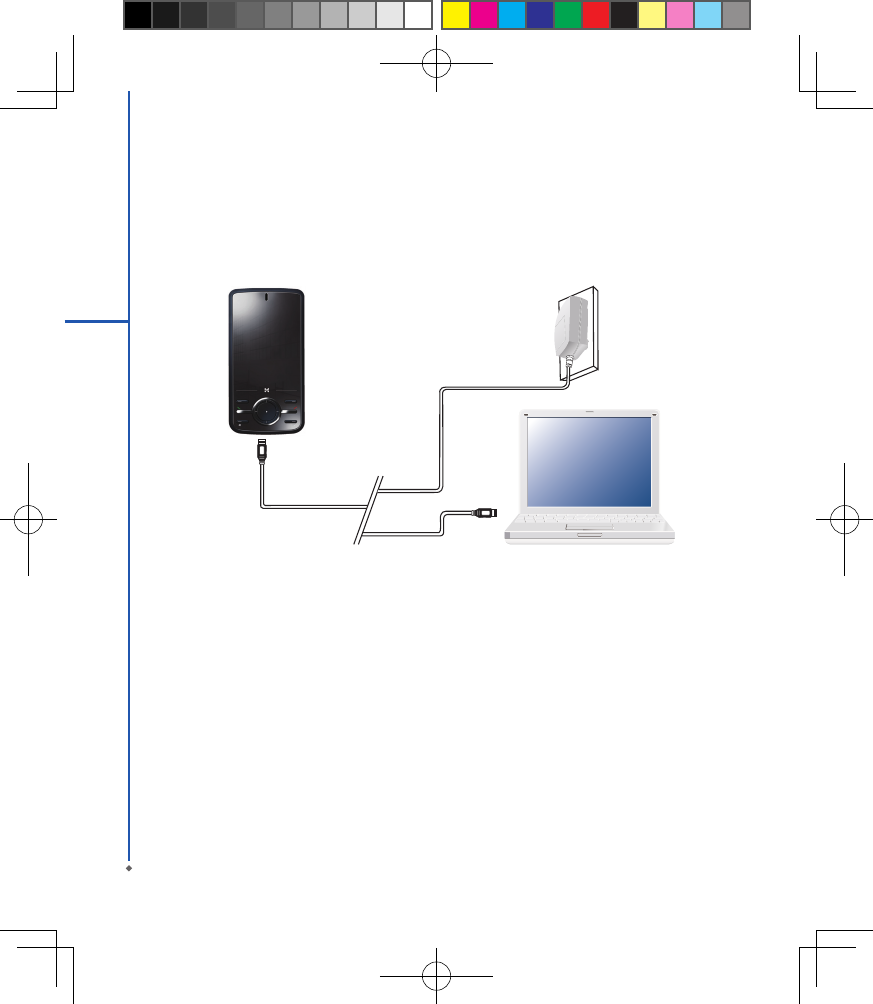
5.2 Installing ActiveSync
Please do not connect your device to the PC before installing ActiveSync 4.5 on the PC from the Getting Started
Disc included in your package. You may only connect the device to the PC by USB cable or Bluetooth after
ActiveSync is installed.
Please note: Your MWg Atom V has built-in ActiveSync already. To install ActiveSync 4.5 in your PC, please
follow the instructions given when you run the Getting Started Disc. After nish installing ActiveSync in your PC,
you will be asked to build a partnership with your device using one of the following connection methods:
● USB cable
● Bluetooth
Do not lend or make
illegal copies of this
software.
Getting Started Disc
for ATOM V
with Windows Mobile
® software
For distribution only
with a Windows Mobile
powered device.
Support for this
product is provided by
MWg.
All rights reserved. Portions
© 2007 Microsoft Corporation.
Includes Microsoft ® ActiveSync ® 4.5, and
Microsoft Office Outlook ® 2007
60-day trial.

50
5.3 Choosing your synchronization type
USB cable
You can connect your device with other devices via a mini-USB connector. You can manually change the connection
settings as follows. The new settings will be used when you connect your device to the PC next time.
1. Tap Start > Programs > ActiveSync.
2. Tap Menu tab > Connections.
3. Choose USB in the drop-down menus and check Synchronize all PCs using this connection.
Bluetooth connection
You can also synchronize your information by using Bluetooth wireless connectivity technology, which allows your
device to connect to a Bluetooth-compatible device within 10 meters. For best connection results, it is recommended
that you connect the device to the PC using USB to establish a synchronization relationship before connecting via
Bluetooth.
To synchronize via Bluetooth connection:
1. Execute ActiveSync Help on the PC and follow the instructions for conguring Bluetooth on your PC to support
ActiveSync.
2. Tap Start > Programs > ActiveSync.
3. Tap Menu > Connect via Bluetooth. Make sure that the device and the PC are within 10 meters or shorter.
4. Tap Sync.
5. After nishing the synchronization, tap Menu > Disconnect Bluetooth.
6. Turn off Bluetooth to preserve battery power if not used.
Please note: Before you connect to this PC via Bluetooth, please make sure that you have set up a
Bluetooth partnership with the PC: Tap Start > Settings > Connections > Bluetooth.
For more details, please refer to Chapter 6 Getting Connected.
5
ActiveSync Synchronization Tool
51
5
ActiveSync Synchronization Tool
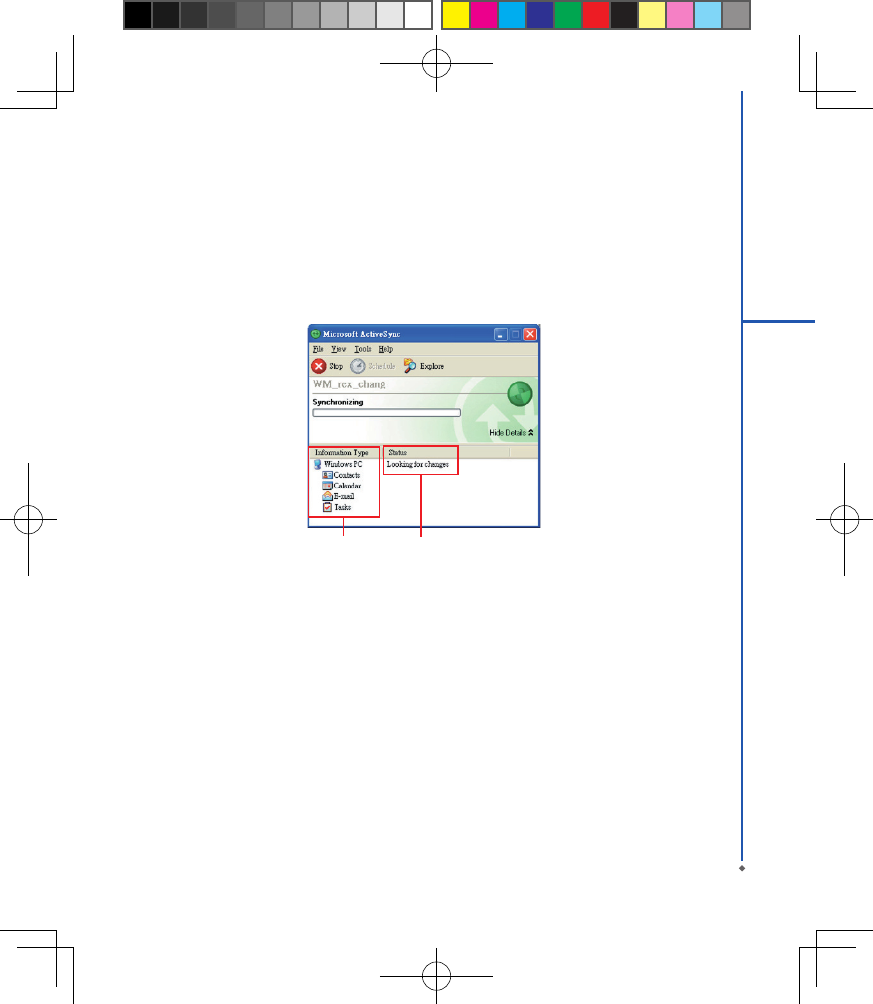
5.4 Using ActiveSync tools
Once you’ve established the connection partnership between your device and pc, you can start synchronization. The
information you can synchronize includes Contacts, Calendar, Outlook E-mail, Tasks, and Notes.
To select a specic data source:
1. Tap Start > Programs > ActiveSync.
2. Tap Menu > Options.
3. Launch ActiveSync on your PC, and turn the synchronization for specic information types on or off as necessary.
Information for
synchronization
Status of
synchronization
Contacts
Contacts stored on your device can be synchronized with Outlook contacts stored on your PC or with Microsoft®
Outlook® 2003 or later.
New items entered in one location are copied to the other during synchronization. Handwritten notes and drawings
are saved as pictures when synchronizing with your PC, but are removed when synchronizing with a server. For
more information on synchronization, see ActiveSync Help on the PC.
Calendar
You can synchronize calendar items on your device with calendar items on your PC or Microsoft®Exchange Server.
You can only synchronize information directly with a Microsoft® Exchange Server if you are running Microsoft®
Outlook 2003 or later. Calendar synchronization is automatically selected in ActiveSync.
Calendar items entered on one computer are copied to the other during synchronization. Handwritten notes and
drawings are saved as metales (pictures).

52
5
ActiveSync Synchronization Tool
Outlook E-mail
After you have selected Inbox for synchronization in ActiveSync, Microsoft® Outlook E-mail messages are
synchronized as part of the general synchronization process. During synchronization:
• Messages are updated from the Inbox folder on your PC or the Microsoft® Exchange server to the Inbox folder
a of the Outlook E-mail account on your device. You can only synchronize information directly with an Microsoft®
Exchange Server if you are running Microsoft® Outlook® 2003 or later. By default, you’ll receive messages from the
last three days only, the rst 100 lines of each new message, and le attachments of less than 100KB in size.
• Messages in the Outbox folder on your device are transferred to Exchange or Outlook and then sent from those
programs.
• Messages on the two computers are linked. When you delete a message on your device, the message will also be
deleted from your PC the next time you synchronize.
• Messages in subfolders in other E-mail folders in Outlook are synchronized only if they have been selected
for synchronization in ActiveSync. For information on initiating Outlook E-mail synchronization or changing
synchronization settings, see ActiveSync Help on the PC or Connections Help.
Please note: Text messages (SMS) and Multimedia messages (MMS) are not received through synchronization.
Instead, they are sent to your device via your network service provider.
Tasks
Tasks stored on your device can be synchronized with Outlook on your PC. Task synchronization is automatically
selected in ActiveSync. New items entered on one computer are copied to your device during synchronization.
Handwritten notes and drawings are saved as metales (pictures). For more information on synchronization, see
ActiveSync Help on the PC.
Notes
Notes can be synchronized between your PC and phone either through notes synchronization or le synchronization.
Notes synchronization synchronizes the notes on your device with Outlook Notes on your PC. File synchronization
synchronizes all notes on your device with My Documents folder on your PC.
To synchronize your notes through notes synchronization, rst select Notes information type for synchronization in
ActiveSync. The next time you synchronize, all notes in My Documents and its subfolder on your device will appear
in Outlook Notes on your PC. Notes that contain only text will appear as regular notes in Outlook on your PC,
while notes containing written text or drawings will appear in the device format. In addition, all notes in Notes group
in Outlook on the PC will appear in Notes on the device.
To synchronize your notes as files, in ActiveSync, select Files information type for synchronization and clear
Notes information type. When you select Files, My Documents folder is created on your PC’s desktop. All .pwi
les placed in My Documents folder on your device and all .doc les placed in \ My Documents folder on your PC
will be synchronized. Password-protected les cannot be synchronized. ActiveSync converts documents during
synchronization. For more information on synchronization or le conversion, see ActiveSync Help on the PC.

53
5
ActiveSync Synchronization Tool
Please note: When you delete or change an item on either your PC or device, the item is changed or deleted in the
other location the next time you synchronize. If you synchronize your notes using le synchronization and then later
decide to use notes synchronization, all of your notes will be synchronized with Outlook on your PC and will no
longer be stored in My Documents folder.
5.5 ActiveSync errors
Whenever ActiveSync cannot successfully synchronize your information, it displays an error on your device and
your PC.
Viewing error information
Press Action button when the error text is displayed. ActiveSync will then display more information about the error
that has occurred. Some types of errors can interfere with automatic synchronization. If you suspect that a scheduled
automatic synchronization has not occurred, you should attempt to manually synchronize your information.
Successfully completing manual synchronization will reset automatic synchronization. For more information, see
Synchronizing Information section of ActiveSync Help on your PC.
Please note: Most firewall applications are intended to block network traffic and secure the PC from incoming
network connections. Since ActiveSync uses TCP ports for data transfer with devices, to avoid this potential
experience, you will need to manually allow this trafc to be un-blocked by Firewall applications for the Device using
ActiveSync. You will need to add ActiveSync application processes into Firewall Programs Exception List.


Chapter 6
Getting Connected
6.1 Wireless manager
6.2 GPRS
6.3 Bluetooth
6.4 Wi-Fi
6.5 USB card reader
6.6 Internet sharing
6.7 Cell broadcast setting
6.8 Connecting to the Internet
56
Chapter 6 Getting Connected
Your MWg Atom V has powerful networking functions that enable you to connect to the Internet or to other devices.
You may use a number of different methods, for example, 3G, GPRS network or Wi-Fi to connect to the Internet. You
can set up connections to the Internet and to a corporate network at work to browse the Internet, send and receive
E-mail, use instant messages, and synchronize with ActiveSync. Via Bluetooth or USB functionalities, you can
also transfer les between your MWg Atom V and other devices. There are two types of connection settings: My
ISP and My Work Network. My ISP settings are used to connect to the Internet, and My Work Network settings
can be used to connect to any private network, such as a corporate network. Fill in the settings and you are ready to
connect to the Internet.
6
Getting Connected
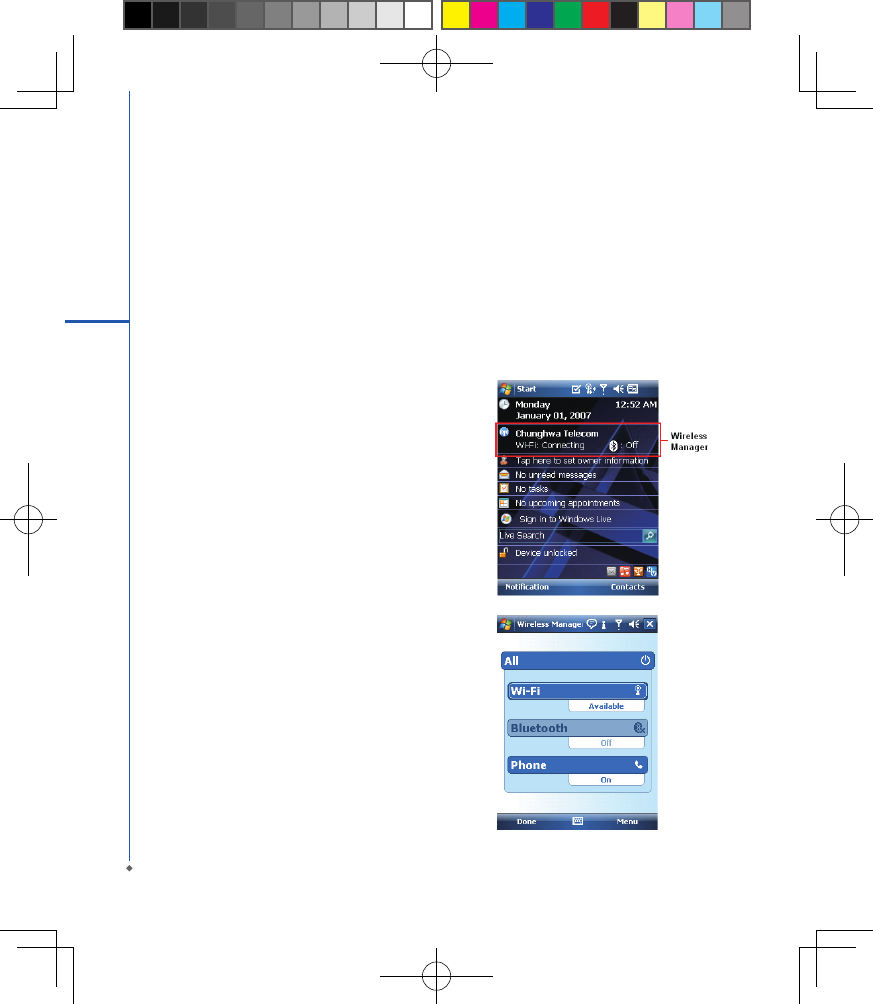
6.1 Wireless manager
Wireless Mana ge r is an inte grat ed i nter f ac e that
combi nes G PRS, B lu et oo th, W irel ess LA N, and
Phone in one function page. To manage these wireless
connections, tap Start > Settings > Connections tab
> Wireless Manager. You may also access Wireless
Manager from Today screen.
Tap All to t ur n on/of f all wireless connec tions. If
you only want to turn off Bluetooth, for example, tap
Bluetooth and the button will become colorless. Tap
Menu to set up these wireless connections.
Flight Mode
While ying, you can turn off the wireless connections
while still using the MWg Atom V for other purposes.
1. Tap Start > Settings.
2. Tap the Connections > Wireless Manager.
3. Tap All Wireless Off, when all buttons are colorless,
wireless functions are off. Your MWg Atom V is now
safe to use on a ight.
57
6
Getting Connected
6.2 GPRS
Before using GPRS to connect to the Internet, please contact your network operator to conrm that the service is
enabled and supported on your SIM card. Using GPRS is convenient for you while traveling or working at home.
You can use this device to browse web pages, read or send E-mail or MMS messages, and sign in Windows Live
Messenger through wireless network.
GPRS connection settings
Your device comes installed with a conguration wizard to install the operator/ carrier settings relevant to your SIM
card. This application should start and attempt to congure the device when you rst turn it on. If your device needs
to have the application run manually please follow the process below:
1. Tap > Start > Programs > Auto Cong
2. Select your Country and Operator and select OK
If your Operator is not listed you will need to contact them directly with the number on your bill to help acquire and
insert the relevant setting.
Activating GPRS connection
1. Tap Start > Internet Explorer.
2. Input an URL address you desire to browse in address eld and tap the arrow icon to go to the URL.
3. After completing connection, icon will become icon.
4. Or you may select Start > Settings > Connections tab > Connections > Tasks tab > Manage Existing
Connection > tap and hold on a connection to open pop-up Menu > Connect. After completing connection, you
may go Internet surng or send and receive E-mail.
Please note: If this device is under ight mode, please turn off ight mode beforehand. Tap icon on Today screen,
then tap Wireless Manager on the pop-up window. Tap on “Phone” to turn the phone function on. The icon will
appear on Today screen when GPRS is activated.
58
6
Getting Connected
6.3 Bluetooth
Bluetooth is a shor t-range wireless communications technology. With Bluetooth, you don’t need to line up the
devices to beam information. The two devices only need to be within a range of about 10 meters. You may use
Bluetooth in the following ways:
1. Exchange information, such as les, appointments, tasks, and contact cards, between devices that have Bluetooth
capabilities. For example, if you and a co-worker each have a device with Bluetooth, you can beam items between
your devices; these items could include les, contact cards, appointments, tasks, etc.
2. Create a dial-up modem connection between your device and a Bluetooth phone. You can then use the Bluetooth
phone as a modem.
Bluetooth settings
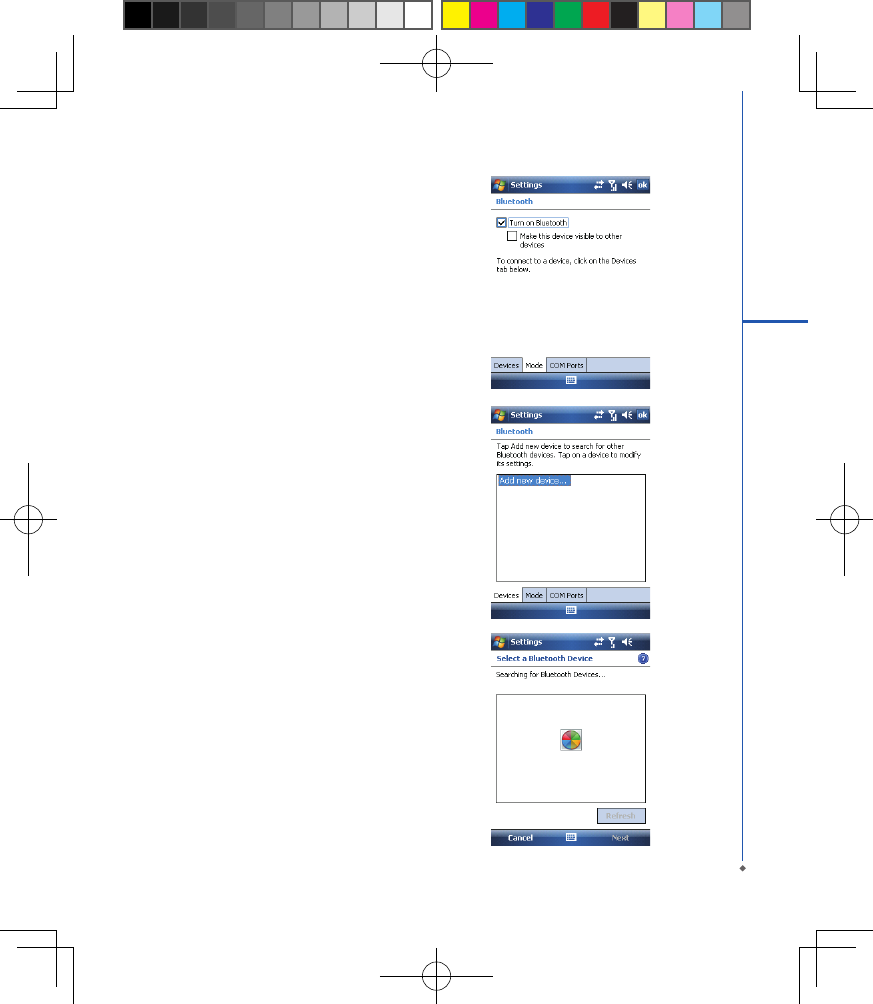
To access the Bluetooth settings screen, tap Start > Settings > Connections tab > Bluetooth. To turn on
Bluetooth, check Turn on Bluetooth option; uncheck the option to turn off. If Bluetooth is turned off, you cannot
use Bluetooth to either send or receive information. In order to conserve the battery power or where radio use is
prohibited, you might want to turn Bluetooth off.
By default, Bluetooth is turned off. If you turn it on, and then turn off your device, the Bluetooth radio also turns off.
When you turn on your device again, the Bluetooth radio automatically turns on the radio. If you wish to turn on the
radio, turn off Bluetooth rst, and then turn on the radio. To make your device visible to other Bluetooth devices,
check Make this device visible to other devices option.
If Bluetooth radio is turned on, then all of the other Bluetooth devices within range (about 10 meters) can detect
your device and attempt to beam information to it, establish a bond, or use a Bluetooth service. In this mode, other
devices can detect your device whether or not a bond has been created; however, in order to receive a beam from
another device, you must accept it on your device. Other Bluetooth devices can now detect your device and attempt
to beam information to it, establish a bond, or use a Bluetooth service. Note that, to receive beamed information,
you must accept it on your device by selecting Make this device visible to other devices; this also turns on your
Bluetooth radio. If you no longer want your device to be visible, uncheck Turn on Bluetooth option or uncheck Make
this device visible to other devices option to leave the radio on, but not allow detection by other devices.
Bonds
To exchange information in a secure manner, you may use a bond to create a relationship between your MWg Atom
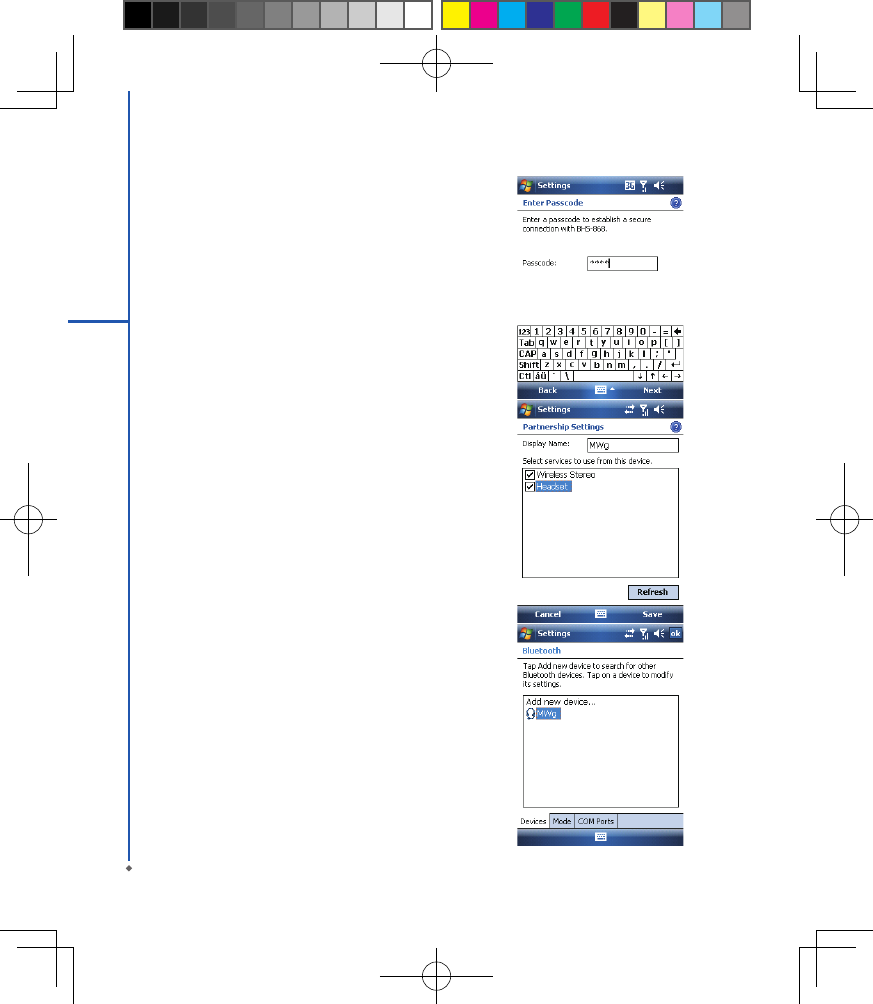
V and another Bluetooth device. To create a bond, you need to enter the same pass code on the two devices that
you want to bond. You need only create a bond once between two devices. Once a bond is created, the devices
recognize the bond and are able to exchange information without your needing to enter PIN again.
To create a bond:
You can create a bond between your device and another device that has Bluetooth. Once you do this,

59
6
Getting Connected
Bluetooth doesn’t need to be in visible mode in order for you to beam information between the two devices; you only
need to have the Bluetooth radio turned on.
1. Tap Start > Settings > Connections tab
2. Tap Bluetooth > Devices tab > New Partnership. Your device searches for other Bluetooth devices and displays
them in the list.
3. Tap the name of the other device in the list, and then Next.
4. Enter a pass code of between 1 and 16 characters and tap Next.
5. Enter the same pass code on the other device.
6. In Display Name, edit the name of the other device if you want.
7. Tap Finish.
Please note: Make sure that the two devices are within 10 meters of one another and that Bluetooth is in visible
mode on both devices.
To accept a bond:
1. Please make sure that Bluetooth is activated and visible to other devices.
2. When prompted to bond with the other device, tap Yes.
3. Enter a pass code of between 1 and 16 characters , and tap Next. You must enter the same pass code that was
entered on the device requesting the bond.
4. In Display Name, edit the name of the device requesting the bond if you want.
5. Tap Finish.
The bond is created. You can now exchange information with the other device.
To rename a bond:
1. Tap Start > Settings > Connections tab.
2. Tap Bluetooth > Devices tab.
3. Tap the bond to rename.
4. In Display Name, enter a new name for the bond and then tap Save.
To delete a bond:
1. Tap Start > Settings > Connections tab.
2. Tap Bluetooth > Devices tab.
3. Tap and hold the bond and then tap Delete.
Beaming information with Bluetooth
1. Tap and hold an item to beam, such as an appointment in Calendar, a task in Tasks, a contact card in Contacts,
or a le in File Explorer.
2. Tap Beam type of item.
3. Tap the device to which you want to send the beam. The item is beamed to the device you selected. If the device
that you want to beam does not appear in the list, make sure that it is turned on, in visible mode, and within 10
meters of your device. Also, make sure that your Bluetooth is turned on.

60
6
Getting Connected
Receiving a Bluetooth beam:
1. Make sure that your device is congured to receive incoming beams and that Bluetooth is in visible mode.
2. Make sure that your device is within 10 meters of the device beaming the information.
3. When prompted to receive an incoming beam, tap Yes. The information is now stored on your device.
61
6
Getting Connected
Bluetooth headset
To set up your device with a Bluetooth headset, you may
refer to the user guide that comes with your Bluetooth
headset and the following instructions:
1. Tap Start > Settings > Connections tab > Bluetooth
> Mode tab and check Turn on Bluetooth and
Make this device visible to other devices.
2 . Ta p S t a r t > S e t t i n g s > C o n n e c t i o n s t a b >
Bluetooth > Devices tab and tap Add new device
to scan for other Bluetooth devices.
3. Your device starts scanning for Bluetooth devices.
62
6
Getting Connected
4. Enter the pass code for the located Bluetooth device.
For information, please refer to documents that come
with your Bluetooth headset.This code is usually
"0000".
5. Dene the display name and the type of service your
Bluetooth device offers.
6. When you finish setup, you will see the Bluetooth
device displayed in the menu.
7. Also, there will be a Bluetooth headset icon indicating
the active connection status.

63
6
Getting Connected
COM ports
For example, when you purchase a Bluetooth GPS-supported navigation software; you can register this device as
an effective serial port by following the instructions on the manual of that product and the steps below:
Tap Start > Settings > Connections tab > Bluetooth > COM Ports tab. To register a new serial port:
1. Tap New Incoming Port to enter setup screen.
2. Select a port to be set.
3. Select Finish.
6.4 Wi-Fi
Wi-Fi is a type of wireless local area network that communicates between two devices by high frequency radio
waves. Your MWg Atom V supports Wireless LAN, which is IEEE 802.11b/g compliant. It allows your device to
connect to the Internet with detected wireless network.
To activate Wi-Fi and connect to a local network
1. Tap Start > Settings > Connections tab > Wireless Manager.
2. Tap Wi-Fi to activate wireless network.
3. Once activated the device will immeduiately look for a local Wi-Fi network, and list those available.
4.Select the appropriate network and you will be promted for a work or internet connection. Usually connect for The
Internet
5.You wil then be promted to enter the network key which is uniuqe for each Wi-Fi network. Enter this code, follow
the prompts and the device will connect to the Wi-Fi network.
To check your Wi-Fi status
Tap Start > Settings > Connections tab > WiFi Utility > Wi-Fi Status tab and you may see the details of your
phone’s wireless LAN connection, including Status, ESSID, BSSID, BSS Mode, Channel, Data Rate, IP Address,
and Signal Strength.
To congure Wi-Fi settings
Tap Start > Settings > Connections tab > WiFi Utility > Setting tab and scroll to set the desired value /mode for
the following setting items: Adhoc Channel, Preamble, Data Rate, Power Save, Power strength, and Auto Power
off. Tab Set button to conrm your setting.
To update IP info
Tap Start > Settings > Connections tab > WiFi Utility > IP Info tab > Renew or Ping button to update IP
information or locate the IP address of the other device.
To search IP address
Tap Start > Settings > Connections tab > Wi-Fi Utility > Site Survey tab > Re-scan button to search the ESSID,
Channel, RSSI, and BSSID of the Wireless LAN.
To change IP address

64
6
Getting Connected
1. Tap Start > Settings > Connections tab > Wi-Fi > Network Adapters tab.
2. In My network card connects to drop-down list, tap either The Internet or Work. If you are connecting to your
ISP at home, tap The Internet. If you are connecting to a private network such as a corporate network at work,
tap Work.
3. Tap the appropriate adapter in Tap an adapter to modify settings box. The IP address will now appear in IP
Address box on IP Address tab.
4. To change TCP/IP settings if your ISP or private network does not use dynamically assigned IP addresses, tap
Use specific IP address and enter the requested information. Contact your ISP or network administrator to get
the IP address, Subnet mask, and/or Default gateway (if needed).
5. To change DNS and WINS settings if your ISP or private network does not use dynamically assigned IP
addresses, tap Name Servers tab and enter the requested information. Servers that require an assigned IP
address may also require a way to map computer names to IP address. DNS and WINS are the resolution options
supported on your MWg Atom V.
Please note: After activating Wi-Fi, a new window, New Network Detected, will appear if any is detected. Select
Connect and enter your password to the local network. Tap Connect to connect this device with local network.
You may use Wi-Fi for up to 2 hours. The actual use time will depend on the power status of your battery. When this
feature is not in use, please disable it to save power.
6.5 USB card reader
You may use the device as a mass storage device or a micro SD card reader.
1. Tap Start > Settings > Connections tab > USB.
2. On USB Connection Mode screen, tap SD-Card Reader, and then tap Change.
3. Connect the phone to the computer with USB cable.
4. Your PC will automatically detect the new hardware. Now you can view or transfer les to and from your micro SD
card.
6.6 Internet sharing
By using utility, you can set your MWg Atom V as a wireless modem. Internet Sharing allows your PC/Notebook be
connected to a wireless network.
1. Tap Start > Programs > Internet Sharing.
2. Select a USB or Bluetooth PAN as PC Connection type.
3. Connect your device via USB cable or Bluetooth to a PC/Notebook, and then tap Connect.
Please note: Before you tap Connect, please make sure that your have installed a GPRS SIM card, and that you
have connected this phone to your PC/Notebook by USB cable or Bluetooth and disabled ActiveSync.
65
6
Getting Connected
6.7 Cell broadcast setting
You can receive broadcast channel information and news from your service provider (please check you’re your
service provider for this service). Tap Start > Settings > Connections tab > Cell Broadcast Setting.
6.8 Connecting to the Internet
Once connected, you can use Internet Explorer to surf the Internet. While surng, you can also download les
and programs to be installed on your device from the Internet or intranet. During synchronization with your PC,
download your favorite links and mobile favorites that are stored in Favorites folder in Internet Explorer on the PC.
To synchronize and download your favorite links from your PC, in your PC’s ActiveSync, select Favorites on Tools
menu > Options > Sync options.
Browsing the Internet
Open Internet Explorer screen by tapping Start > Internet Explorer.
1. In the address bar that appears at the top of the screen, enter the Web address you want to connect to. Tap▼to
choose from previously entered addresses.
2. Tap Back to go back to the previous page.
3. Tap Menu > Refresh to refresh the web page on the screen.
4. Tap Menu > Home to go back to the Home page
5. Tap Favorites, and the favorite address you want to view. To add a favorite link while using your device, go to the
page you want to add, tap and hold on the page, and tap Add to Favorites on the pop-up menu.

66
6
Getting Connected

Chapter 7
Messaging
7.1 Short message (SMS)
7.2 Multimedia messages (MMS)
7.3 Voice mail
7.4 E-mail
7.5 Push e-mail
7.6 Windows Live Messenger

68
Chapter 7 Messaging
You can receive e-mails and text messages in Messaging. Text messages are sent and received through your
network operator by using a phone number as the message address. Before receiving and sending your e-mails or
messages, please make sure that your MWg Atom V has connected to a network.
Your MWg Atom V supports the following messaging services:
SMS (Short Messaging Service)
SMS allows you to send short messages. For receiving and sending text messages (SMS), you only need to ensure
that the phone function is activated by observing the satellite icon on the top of outline bar. It is not necessary to
activate GPRS connection or establish new e-mail account and connection.
MMS ( Multimedia Messaging Service)
MMS allows you to send multimedia messages. You can include text, pictures, photos, sound files or recorded
voice in an MMS message. To send an MMS message, your must register and congure the MMS service with your
network provider.
Voice Mail
You can forward a call to your voice mail box when you are unable to receive a call. The voice mail centre will send
you a notication.
E-mail
You can either use your MWg Atom V to directly send/receive e-mails from e-mail server or by synchronously
updating the Microsoft Outlook / Microsoft Exchange Server E-mail in your MWg Atom V and PC.
Push E-mail
The Direct Push technology enables you to have access to your new incoming e-mails in real time.
Windows Live Messenger
Your MWg Atom V is equipped with Windows Live Messenger. To send instant messages, you need to connect to
the Internet.
7
Messaging
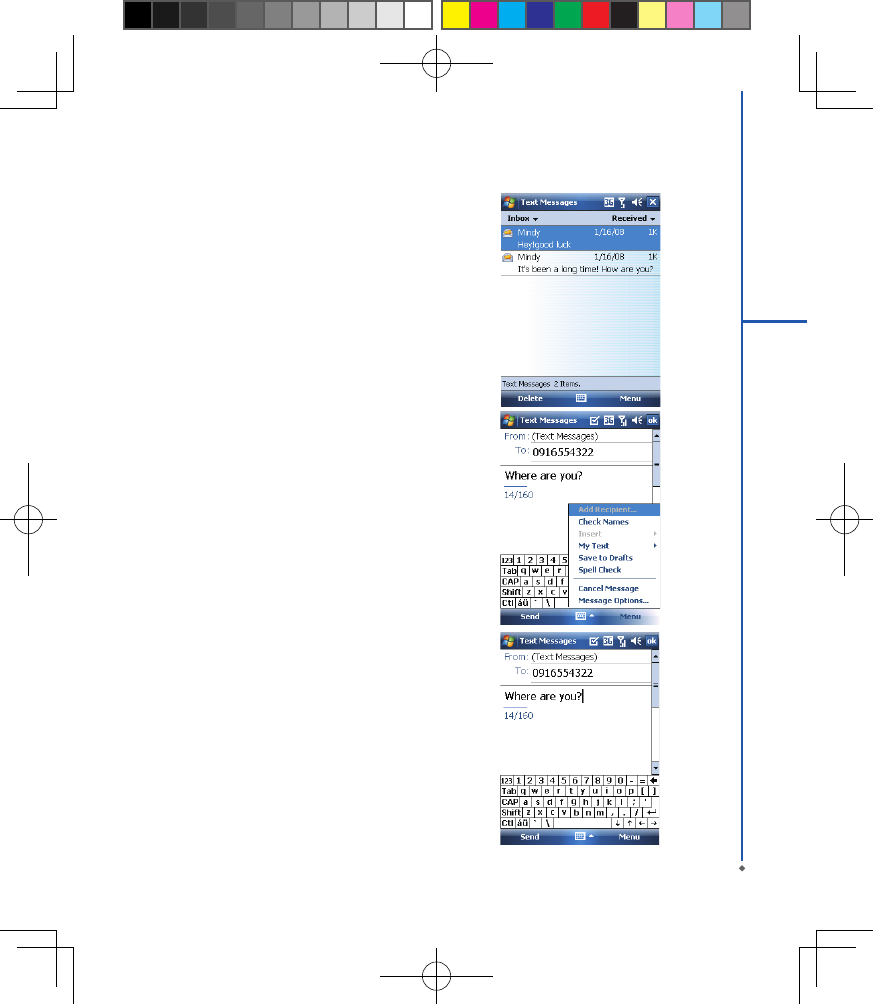
69
7
Messaging
7.1 Short message (SMS)
Writing a text message
1. Tap Start > Messaging > Text Messages > Inbox
folder.
2. Tap Menu > New.
3. Tab To to enter the number of your recipient, and tap
the blank content area to edit the message.
4. To ac cess more editing options, tap Menu. The
options inside enables you to:
● Add Recipient.
● Use predened sentences in My Text.
● Start Spell Check of your text.
● Check Names of your recipients.
● Choose to accept deliver y notication by checking
R e q u es t m e ss a g e d el iv e r y n ot if i ca t i on in
Message Options.
5. To save the message to the draft box, tap Menu >
Save to Draft.
4. To send the message, tap Send.
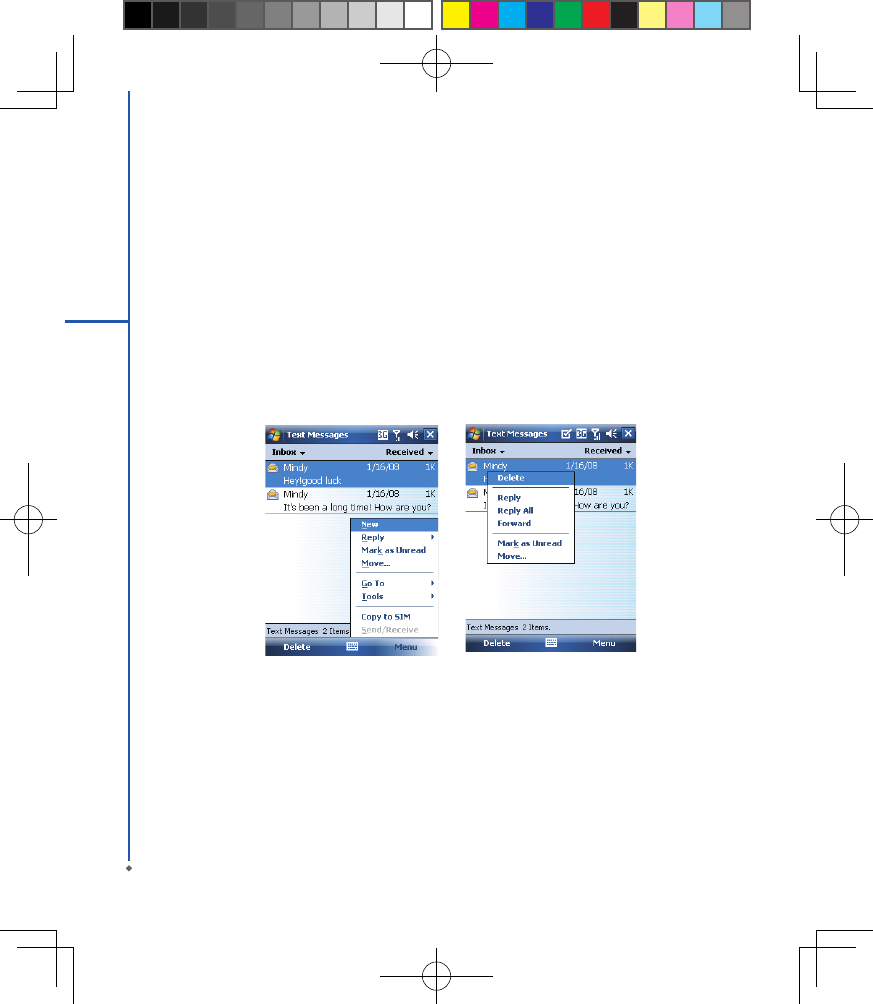
70
7
Messaging
Reading SMS messages
1. Tap Start > Messaging > Text Messages.
2. Tap Inbox to view the sub-folders such as Inbox, Outbox, Drafts, Sent Items, or Deleted Items.
3. Tap Menu to access more options which enable you to:
● Delete the selected message.
● Reply to the sender or Reply All to the included recipients.
● Forward the selected message.
● Move the message to other folders.
● Mark the message as Read or Unread.
● Go To other accounts such as Outlook E-mail or MMS.
● Tools to Manage Folders, Empty Deleted Items, Clear “Text Messages”, create a New Account, and more
Options.
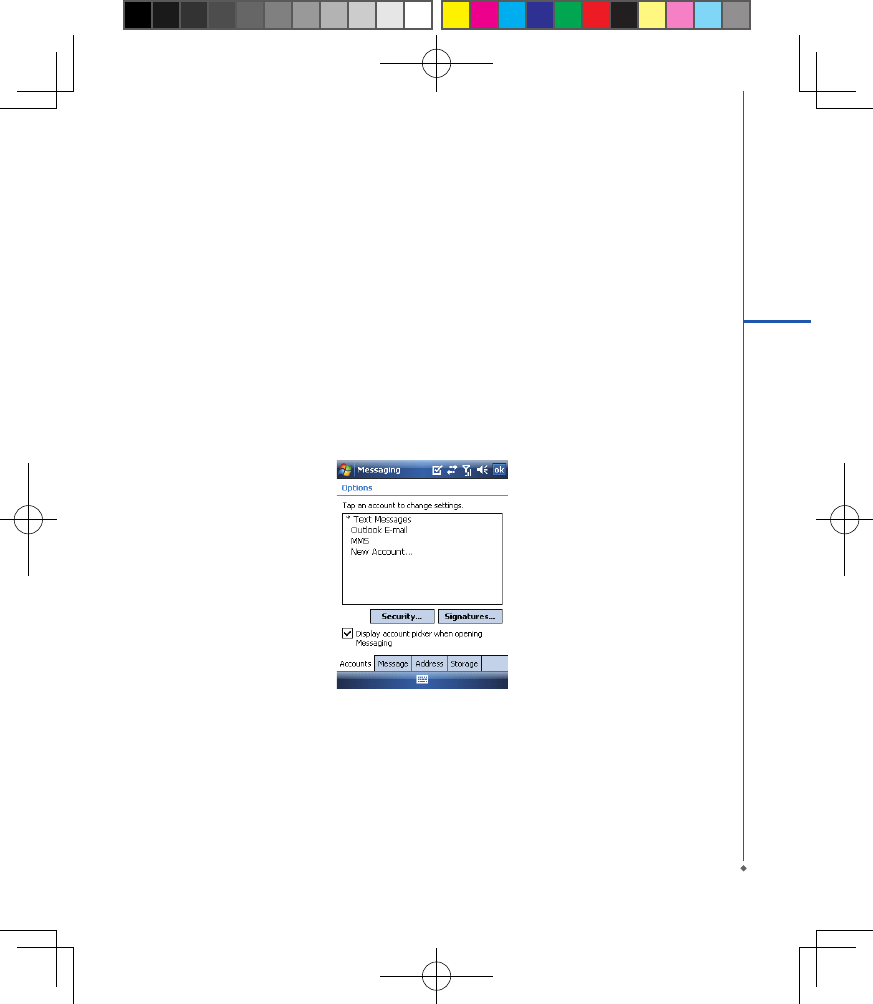
71
7
Messaging
SMS settings
Text Message settings allows you to customize your Accounts, Message, Address and Storage.
1. Tap Start > Messaging and select Text Messages and then Inbox.
2. Tap Menu > Tools > Options.
In Options you can tap the following tabs to modify the settings:
• Accounts tab: Tap an account to change settings. For example, tap *Text Messages to change Request delivery
notifications and Use Unicode when necessary. Tap New Account to set up a new account. Or tap Signatures
to use signatures to designate accounts.
• Message tab: Set up the following messaging features- When replying to e-mail, include body, Keep copies of sent
items in Sent folder, and the After deleting or moving a message feature.
• Address tab: Select whether to get e-mails from all the contacts with e-mail addresses; alternatively, you can
verify names by dening their e-mail addresses.
• Storage tab: Check the memory space of your device, storage card and attachments, Store attachments on
storage card and specify how you want to empty your deleted items.
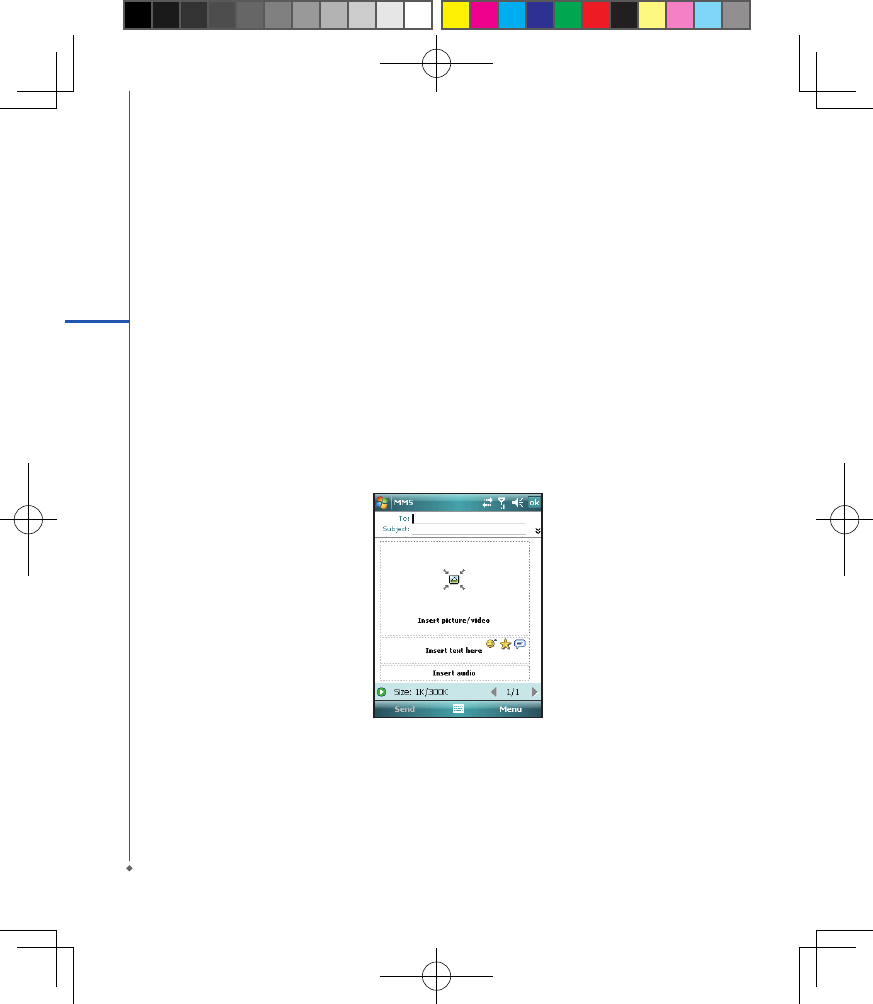
72
7.2 Multimedia messages (MMS)
Your MWg Atom V allows you to create and share your own MMS messages (with photos, videos, text, and audio)
with your contacts. During editing the MMS content, you can use MWg Atom V built-in camera to snap photos, and
they will be directly inserted in the content.
Creating an MMS message
Messages are created by combining various slides. Each slide can consist of a photo or video, audio, and text.
Select New from the menu of any message box screen to compose a new message. Here's a quick run-down of the
Create screen:
1. Tap the__ _ _areas to manually input your address and message subject. Tap To: to select a contact from your
address book. Tap the double down arrow to view the Cc and Bcc elds.
2. Tap here to insert a photo or video.
3. Tap here to input a text message.
4. Tap here to include an audio clip.
5. Tap here to play the message.
6. The message size and the slide number are shown here.
7. The menu lets you do a variety of things (explained later).
8. When you're ready to send your message, tap here.
7
Messaging
If you would like to choose a pre-made message template instead of adding components yourself, choose "New
From Template" from the Template option of Menu.
Please note: You may not automatically be taken to a blank message. If you are instead taken to a page that
displays pre-made templates, choose the template you want. If you would prefer to create a blank message next
time, check the "Always choose custom" box.
1
2
3
4
57
6
8
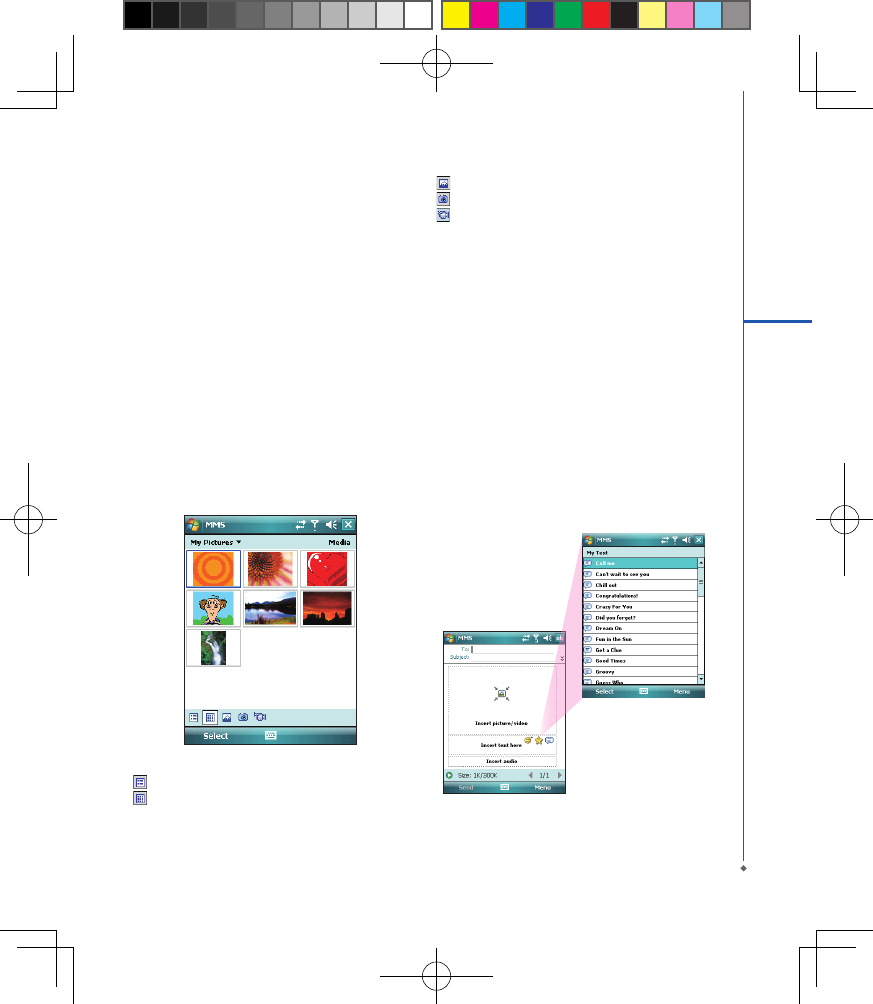
73
7
Messaging
Adding a photo or video
You can add either a still image or a video clip to each
individual slide. After you've tapped the area to add a
photo or video, you'll be allowed to select exactly what
you want to include.
1. This pull-down lets you select a specic location that
contains photos/videos.
2. Tap the specic photo or video clip that you want to
add.
Tap and hold on a file to see the "Add to Message",
"Large View", "File Info" and "Delete" options. "Add to
Message" adds the selected photo/video to the slide.
"Large View" displays individual photos or videos. "File
Info" displays the le name, resolution, date, and size of
a photo. When you are viewing video le information,
the duration of the video is also listed. "Delete" deletes
the le.
Tap Select to add the selected photo/video to the slide.
Or tap Cancel to return to the previous screen.
1
2
The following options are available:
- Displays photos/videos as a le list.
- Displays thumbnails (as shown here).
- Displays individual photos.
- Lets you take a new picture.*
- Lets you capture a new video.*
*May not be available in all versions.
Adding text
You can add text to any slide. You can either enter in
new text with the keyboard, or use "My Text." You can
also insert an emotion icon or a favorite website link into
your message. My Text is previously saved words or
phrases.
Tap the My Text icon to see a list of pre-saved text
me ssa ges . Tap th e on e yo u want , an d th en tap
"Select" to add it into the message.
Tap "Menu" in the My Text screen to view additional
options:
New: Lets you enter in a new canned text message.
Edit: Lets you modify an existing canned text message.
Delete: Removes the selected canned text from the list.
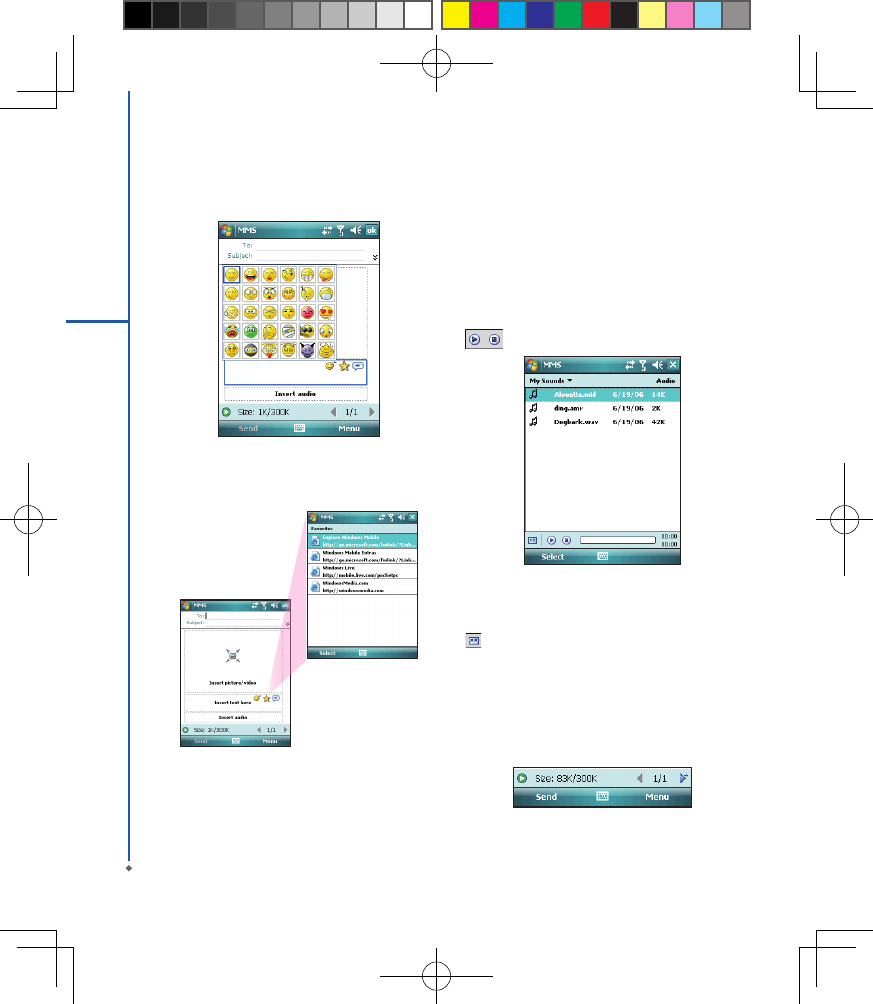
74
7
Messaging
Tap the smiling face icon to see a table of Emoticon
icons. Tap the one you want to add it into the message.
Tap the star icon to see a list of favorite links. Tap the
one you want, and then tap "Select" to add it into the
message
Adding audio
Single audio clips can be added to each slide. You can
either include an existing sound file, or record a new
one.
1. From the pull-down, select a location that contains
audio les.
2. Tap the le you'd like to use.
You can view le information similar to the way you can
with photos and videos. Tap and hold on a file, then
choose "Play Audio," "File info" or "Delete." The file
name, duration, date, and size are shown when you
select "File info." You can also choose to delete the le.
You can use the playback controls to preview the audio:
(Play/Pause and Stop controls are available.)
1
2
Highlight a file then tap "Select." Or tap "Cancel" to
return to the previous screen.
- Tap this button to activate controls that allow you
to record new audio:
Record - Tap this button to begin recording.
Stop - Tap this button to stop recording.
Menu commands
The following commands are available along the bottom
of the Create screen:

75
7
Messaging
- Tap here to preview your message.
- Takes you to the previous slide.
- Takes you to the next slide.
- The rst number indicates the current slide
you are viewing. The second indicates the total number
of slides. Tap here to see a pop-up list of slides; tap the
number you wish to see.
Menu options
Add Recipients - Choose and add recipients from your
address book. (The option is only available when you
are in the "To" eld).
Insert Media - Insert a picture/video, audio track, or
My Text into the current slide. This works the same as
doing it on the slide directly.
Remove Me dia - Del ete the picture/ vi de o, audio
track, or text from the current slide. (The option is not
available if you have not inserted media).
Slides - Insert a slide or delete the current slide. You
can also press “Organize" to arrange the slide order and
display the duration of each slide.
• Tap and drag a slide to move it to a different spot.
• Tap the directional arrows beneath each slide to
increase or decrease the display time.
• Tap and hold for more options (move slide forward/
backward, auto t duration (adjusts duration to match
audio length), delete.
Insert - Insert a slide into the message.
Template - Choose "New from Template…" to create
a message with preset content. Choose " Save as
Template" to save your current message as a new
template.
Capture - Take a picture, or record video or audio.
(Some or all these options may not be available).
Attachments - Attach a vCard, vCalendar, or other
le (from the menu, select the type of le you wish to
attach). You can delete any attachment as well.
Send via SMS - Sends the text content to the recipient
via SMS.
Cancel Message - Cancels the creation of the message.
Options - Set the following options of the message.
Background - Choose a background color for the slide.
Text Layout - Choose a layout for the text in the slide.
Text Size - Choose small, normal or large text.
Text Color - Choose a color for the text.
Text Background - Choose a background color for the
text.
Send - Sends the message.
Send Options - Here you can view and edit your send
preferences:
• From the "Delivery" pull-down, select when you’d like
to deliver the message.
• From the "Expiration" pull-down, select how long you’
d like the message to be stored on the server. The
ser ver will stop attempting to deliver the message
after the set time expires.
• Set the message priority from the “Priority” pull-down.
• Delivery report / Read report: By checking these
boxes, you will be notified when your message is
delivered and read, respectively.

76
7
Messaging
Tap "Menu” to choose "Save as default" or "Restore
factor y default." Choose " Cancel" to retur n to the
previous screen.
Viewing MMS messages
When viewing messages that you receive or send, or
when previewing a message you're working on, you
have a variety of options.
Use the Play/Pause/Stop buttons to view the message.
Use the button to display the message in full screen
mode. Use the Left/Right Arrow buttons to skip among
the various slides (if applicable.) You don't need to see
the message straight through; you can skip among the
various slides.
Ta p " M e n u " to vi e w de t a i led i nfor ma tion of t h e
message.
Tapping "Objects" displays a list of all the message
components. Tap any component to open/view it.
"Info" displays the le name, resolution/duration, date,
and size of an object.
"Menu" contains follow options:
• Save - Stores the current selected object.
• Save into "My Text" - Saves the text into the "My
Text" list.
• Assign to Contact - Lets you associate the selected
image le as a caller ID or audio le as ringer ID. (May
not be available in all versions).
MMS conguration
To view and edit your M MS conf iguration, choose
"Tools" in the menu that appear s at the bottom of
the screen while viewing any message box, choose
"Options", and then choose "MMS" in Accounts.
Note: Not all options are available in all versions.
Retrieve messages imme diately - Typically, you
receive a notification whenever a new message is
available. Checking this box downloads new messages
automatically. You can also choose to download only
while on your home network.
OK to download when roaming - Downloads messages
after your conrmation when you are roaming.
Save sent messages - Check this option to save a
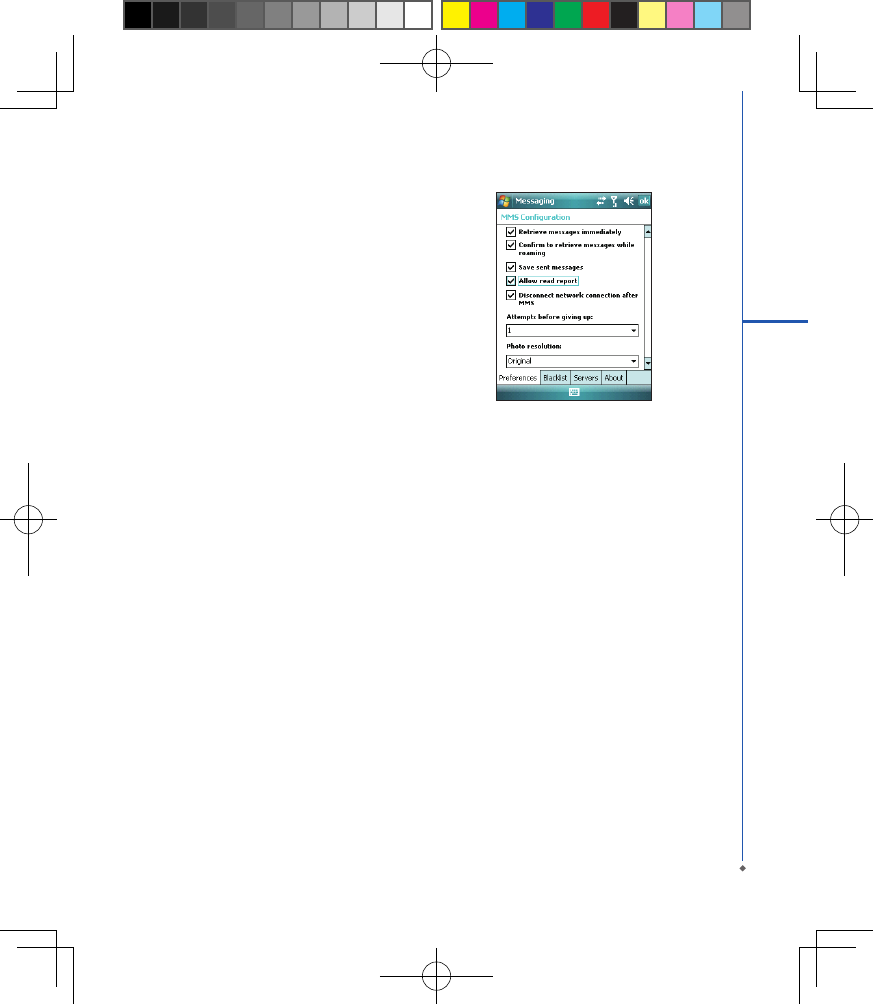
77
7
Messaging
copy of messages that you send.
Reject all messages - Check this option to refuse all
incoming MMS messages.
De ny a n o n y m o u s me s s a g e s / a d v e r ti se m e n t
message - Check this option to refuse all the incoming
anonymous or advertisement MMS messages.
Allow delivery report / Allow read report - These
commands allow delivery and read reports to be sent
after you receive and read messages, respectively.
Show sending prompt - Check this option to display a
prompt when you send a message.
Show receiving prompt - Check this option to display
a prompt when you receive a message.
Show sent successfully prompt - Check this option
to display a prompt when the message has been sent
successfully.
Show new message prompt - Check this option to
display a prompt when you receive a new message.
Show download successfully prompt - Check this
option to display a prompt when the message download
is nished.
Show message details - Check this option to display
message information after playing a message.
Disconnect network connection after MMS - Check
this option to disconnect the network connection after
sending a message.
Attempt s befo re giving up - This value sets the
number of times the program will attempt to send your
message before stopping.
Crea tio n mo de - Ch oo se the mo de to u se when
creating a message.
Photo resolut ion - Choose the re solutio n for t he
images that you send. You may want to decrease the
original resolution to shorten the send/receive time.
7.3 Voice mail
This function enables you to divert received calls to
a voice mail c enter where callers can leave voice
messages under the following circumstances:
● You are currently on the phone.
● Your phone is switched off or is not able to receive
signals.
● You did not answer the call.
This voice mail service is SIM card and network dependent.
If the voice mail service is not included in your mobile
network operator’s package, you will have to subscribe
to the service separately and configure the settings
manually. Once you have successfully subscribed this
service, you will be notied of a voice mail message by
an icon on Today screen.
Calling the voice mail center
Initiate Phone screen > Speed Dial and call Speed Dial 1.
You will enter the voice mail center.
7.4 E-mail
Synchronously processing E-mail
With synchronization, messages are synchronized

78
7
Messaging
between your MWg Atom V a nd the PC by using
Ac t iveSy nc an d Mi c ros of t Exc ha nge or Ou t loo k .
If you want to synchronously process E- mail, you
must activate the Inbox synchronization function
in ActiveSync beforehand. For more information on
Inbox synchronization, please refer to Chapter 5
Synchronization.
Please be aware of the following Inbox Synchronization
process rules:
• Please select a desired cooperation relationship on
New Cooperation Relationship screen in computer to
synchronously transmit information. If you select not
to perform synchronization, you may manually copy
or move E-mail messages between your MWg Atom V
and the computer.
• Only the mails in Inbox of your c omputer will be
synchronized.
• O nly the mails in E xchange or O ut lo ok can be
synchronized.
• The mail from Outbox folder in your MWg Atom V
will be sent to your computer first, and then it will
be delivered through Microsoft Exchange Server or
Microsoft Outlook.
• If a specic letter is deleted in your MWg Atom V, then
it will also be deleted in your computer when you
reconnect your device with computer.
• SMS in your device will not be synchronized.
Establishing E-mail services
If you have E- mail accounts from IS P or company
network, you may use Messaging to receive or send
e-mails. Please refer to the following instructions to set
up a new E-mail account in Messaging.
1. Please acquire the following information from ISP or
company network administrator:
• E-mail address, user name and password.
• POP3 or IMAP4 server name of Intranet E-mail.
• SMTP server name for outgoing E-mail.
2. Establish E-mail services:
Tap St ar t > Messaging > M enu > Tools > New
Account, and then follow the instructions on the
screen to set up a new E-mail account.
3. See Section 6.1 Wireless Manager to connect your
MWg Atom V to a network and start receiving and
sending e-mails and messages.
4. Connect with E-mail Server:
• Tap Messaging > Menu > Send and Receive.
• Tap Messaging > Menu > Tools > Opt ions >
Accounts tab to change E-mail account settings.
When you finish, your new E-mail account will be
displayed under this menu. You can start connecting
to your E-mail server at this point. You can set up
several E-mail accounts, including your Outlook
E-mail account.
Connecting to the server
You may directly receive new e -mails from E-mail
server without c onnecting to a computer. You may
select to use it online or ofine; if it is online, you may
directly read and reply mail when your MWg Atom V is
connected to E-mail server. You can reply a mail directly
by simply tapping Send.
You may select to disconnec t to the internet af ter
downloading only the subjects of new messages or
partial messages and decide whether to download
the full me ss ag e late r. Wh en you r ec onne ct next
time, Inbox will download in accordance to appointed
methods, and send out unsent e-mails in Outbox.
You may choose to read just the e-mails within the last
few days, mail subjects only, or complete mail. You can
also choose to receive only the attachments less than
specific file size. To make these settings, tap Start >
Messaging > Menu > Tools > Options, and change
E-mail account setup by requirement.
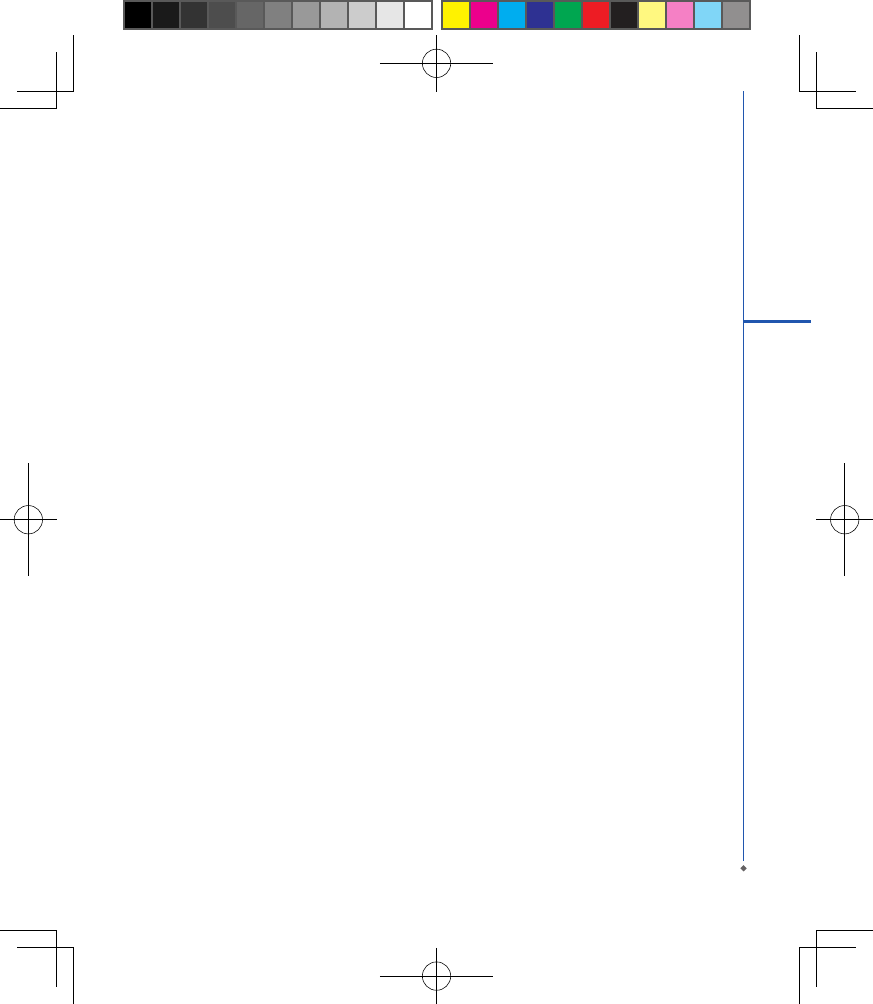
79
7
Messaging
Composing and sending an e-mail
Tap Start > Messaging > New to write a new e-mail.
After writing a new e-mail, select Send on the bottom
left of the screen to send this new e-mail.
When composing a new e-mail, you can:
1. Tap Bcc, Cc, To fields to input recipients’ E-mail
addresses.
2. Tap Subject field to input a subject for your new
e-mail.
3. You may enter mail content in the empty area on the
bottom half of the screen.
4. Tap Send to start sending your e-mail.
5. Select the icon on the bottom center of the screen to
activate or disable screen keypad.
6. Tap Menu to open menu.
Reading and replying an e-mail
Tap Start > Messaging > Menu, and then select Send
and Receive from Menu to start sending and receiving
new e-mails. Select Inbox on the top left of the screen
to view Inbox. Tap on any unread e-mail to view its
content.
When reading e-mails, you can:
1. Tap on a contact in Bcc, Cc, or To eld to save this
contact as a new contact.
2. Tap Reply to compose a reply e-mail.
3. Tap Menu to open menu.
On the e - mail content screen, select and hold to
activate pop-up Menu.
7.5 Push e-mail
With Push E-mail, you can access e-mails in real time.
This Direct Push Technology can be enabled by the
Exchange Server 2003 administrator, bringing the latest
information to you. To use Push E-mail, please turn on
Wi-Fi or GPRS to connect to the Exchange Server.
Enabling Direct Push on your MWg Atom V
1. On your MWg Atom V, tap Star t > Programs >
ActiveSync > Menu > Add Server Source.
2. Input the address of your server in Server Address.
3. Input your net wor k User n ame, Password, and
Domain, and then tap NEXT.
4. In ActiveSync on your MWg Atom V, tap Menu >
Schedule.
5. Set Peak times to As items arrive and Off-peak
times to As items arrive. Tap OK.
Now you have established a cooperative relationship for
your MWg Atom V and the Exchange Server. The next
time when you tap Star t > Programs > ActiveSync
> Sync, you may synchronize with Exchange Server
using Wi-Fi or GPRS.
Once you are connected to the network, you may look
up your Global Address List over the air from your
MWg Atom V by tapping Contacts. You may send
an e-mail to a contact on your Global Address List
following the same steps as sending E-mail to a contact
saved on your MWg Atom V.
Please note: To be able to use direct push, you need to
have an exchange server. Microsoft Exchange Server
2003 also supports useful functions such as remote
device wipe. To nd out more on the benet and usage
of Microsoft E xchange server, please consult your
company administrator or visit Microsoft’s website:
http://www.microsoft.com
7.6 Windows Live Messenger
Windows Live Messenger provides functions including
Messenger, Hotmail, and Sync. To use these functions,
you will need to turn on GPRS or Wi-Fi.
Signing in Windows Live Messenger
1. Select Start > Programs > Messenger.
2. Tap on the arrows to choose your sign in status and
then tap “Sign in”.
3. Enter your Windows Live Messenger or Hotmail email
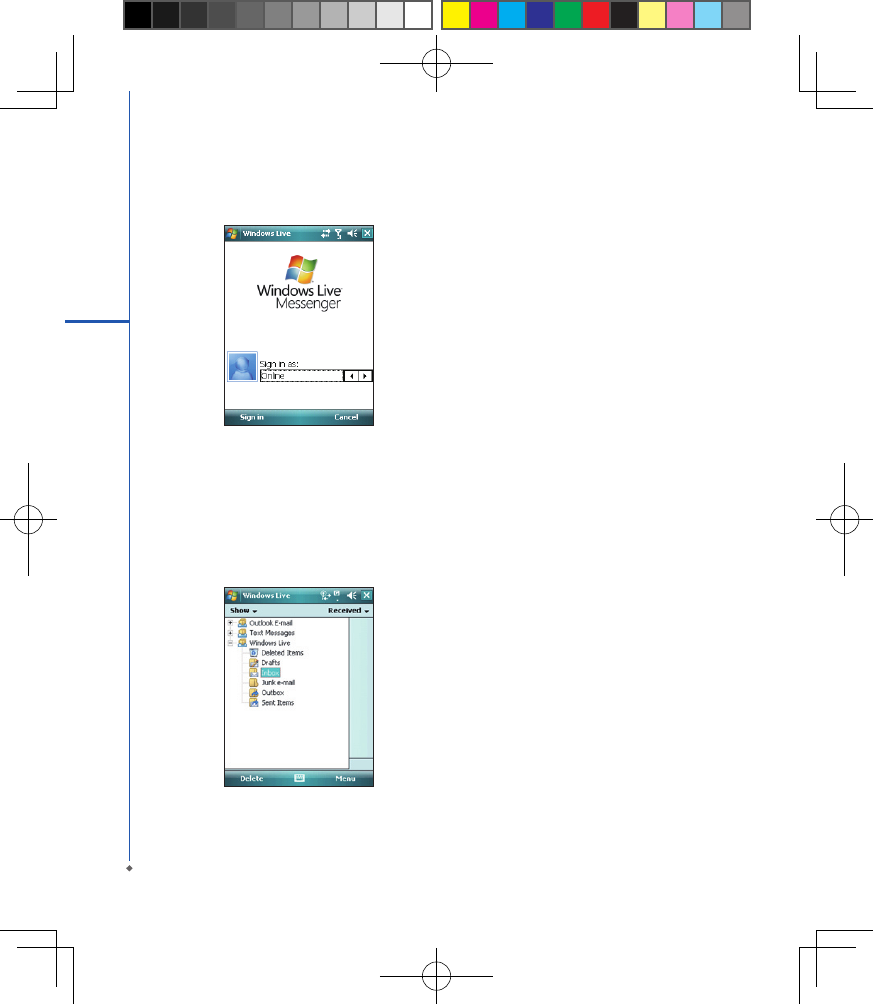
80
7
Messaging
address and password.
4. Select “Sign In”.
Hotmail
1. After signing in Messenger, wait for the sync to nish
and then select Start > Messaging.
2. Select Windows Live Inbox from the drop down menu
on the top left corner. You will nd incoming emails to
your Hotmail account in the Windows Live Inbox.
Composing Hotmail
1. After signing in Messenger, wait for the sync to nish
and then select Start > Messaging.
2. Select Windows Live Inbox from the drop down menu
on the top left corner.
3. Tap Menu > New.

Chapter 8
Multimedia
8.1 Camera
8.2 Video recorder
8.3 Taking a Geo tagged photo
8.4 Photo editor
8.5 FM radio
8.6 Pictures & videos
8.7 JAVA
8.8 Streaming player
8.9 Recorder
8.10 Audio Mixer
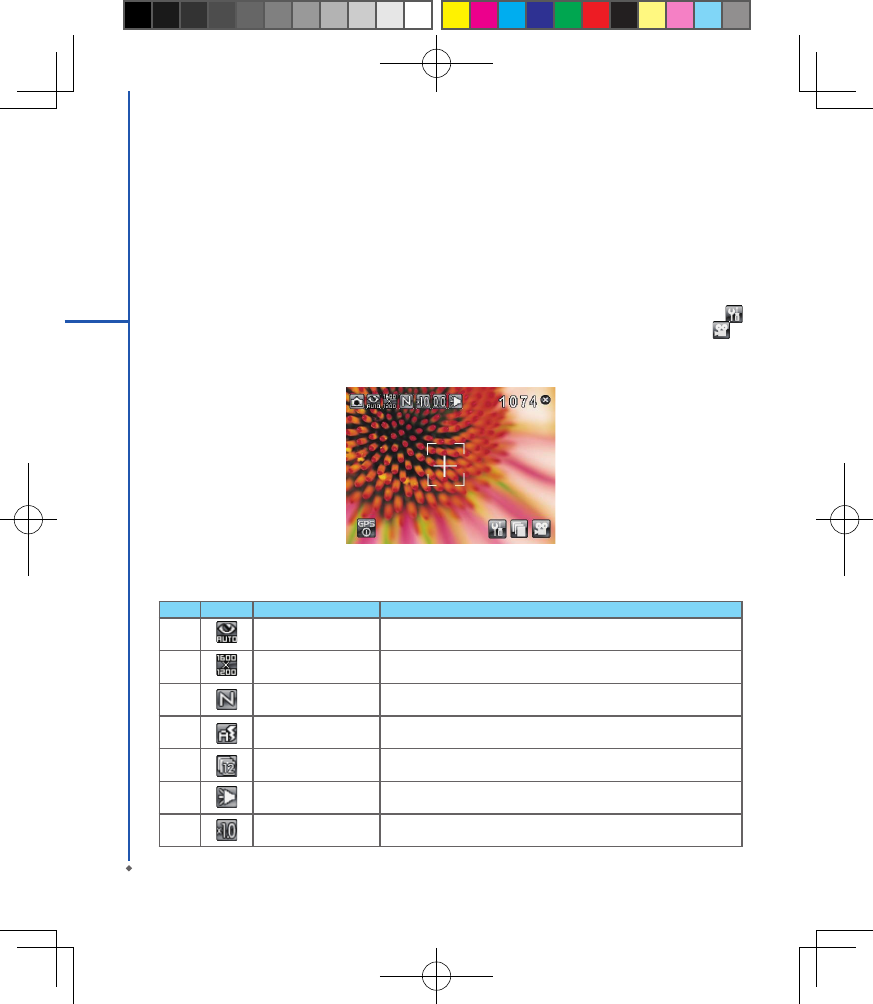
82
Chapter 8 Multimedia
8.1 Camera
You may use camera function in your MWg Atom V to capture important moments.
Tap Start > Programs > Camera, or press down Camera key to launch camera.
Capture mode
During capture mode, you can tap the icons on the top of the screen to switch through different modes, or tap
to open the full camera options menu. To switch to Video mode, simply press the center navigation key or tap to
enter the video standby mode.
No. Icon Function Description
1 Image Mode Includes the following modes: Auto (default) / Day /
Cloudy / Fluorescent and Night
2 Image Size You can choose among:1600 x 1200 / 1280 x 960 / 800x 600 / 640 x
480 (default) / 320 x 240 / 160 x 120
3 Image Quality Normal (default), Fine, Low.
4 Flash Light Auto (default), On, Off.
5 Sequential Shot 18,12,6,3,Off (default)
6 Shutter Sound On (default), Off
7Zoom Zoom Range: 1.0x (default) / 1.2x / 1.4x / 1.6x / 1.8x /2.0x / 2.2x / 2.4x
8
Multimedia

83
8
Multimedia
No Icon Function Description
8 EV Compensation Provides the following values: +2.0 / +1.5 / +1.0 / +0.5 /0.0 (default) /
-0.5 / -1.0 / -1.5 / -2.0
9 Macro/Normal mode Tap this icon to switch between Macro (within 10~60
cm) mode and normal mode.
10 Remained Shots Indicates estimate number of photos you can take
using the current storage location.
11 Exit Tap this icon to exit camera mode.
12 Options Menu
Tap this icon to open options menu, in which the
following options are provided: Mode, Effect, EV ,
Size, Quality, Timer, Sequential Shot, Flash, Shutter
Sound, Storage, Reset Camera Settings and Flicker Frequency.
13 Pictures & Videos Tap this icon to go to Pictures & Videos where the
taken photos and videos are stored.
14 Video Mode Tap this icon to change to Video mode.
Taking a photo
1. On Camera capture mode, focus on the object.
2. You can also tap on the icons on the top or open options menu to change camera settings.
3. Half way press Camera key to auto-focus, fully press Camera key to take photo.
4. After you take a photo, the image will be categorized in Pictures& Videos.
Please note: The default storage location is phone memory.
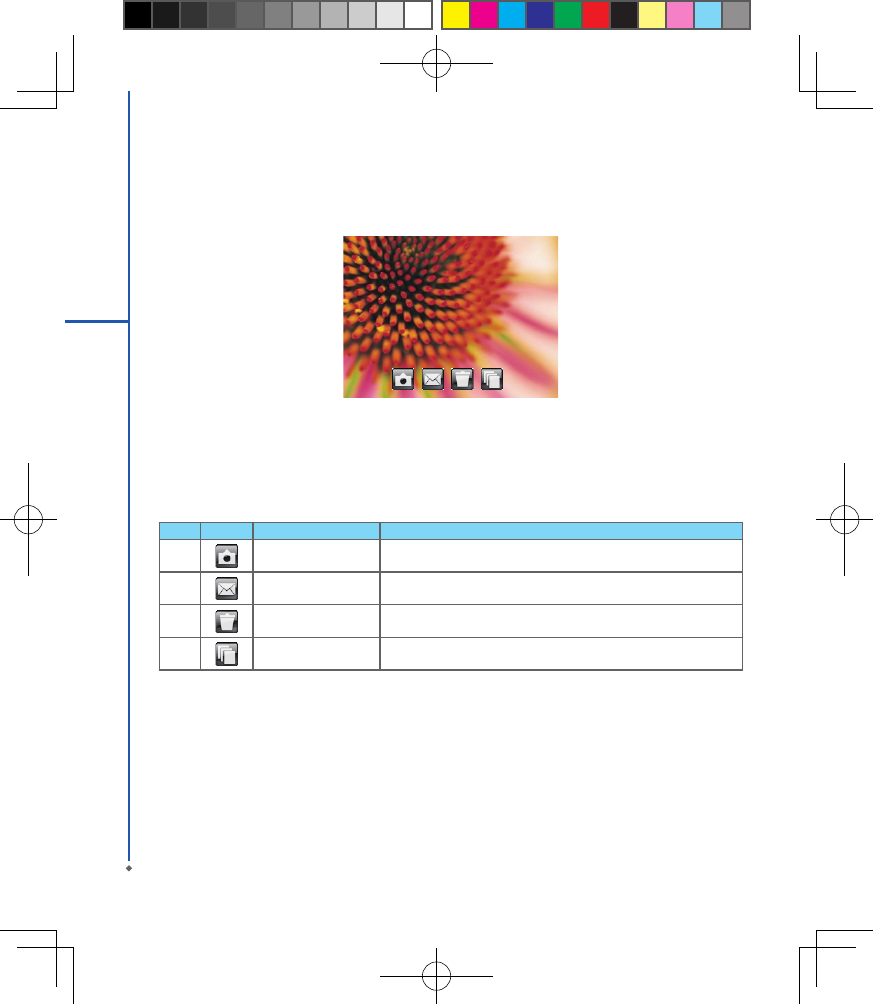
84
Photo conrm screen
After taking a photo, you will enter the conrm screen where you can choose to delete or send out the image.
On this screen you can tap the following icons to:
No Icon Function Description
1 Camera Return to camera capture mode.
2 Send Choose to send out this photo via E-mail or MMS.
3 Delete Delete the photo on screen.
4 Pictures & Videos Go to Pictures & Videos.
8
Multimedia
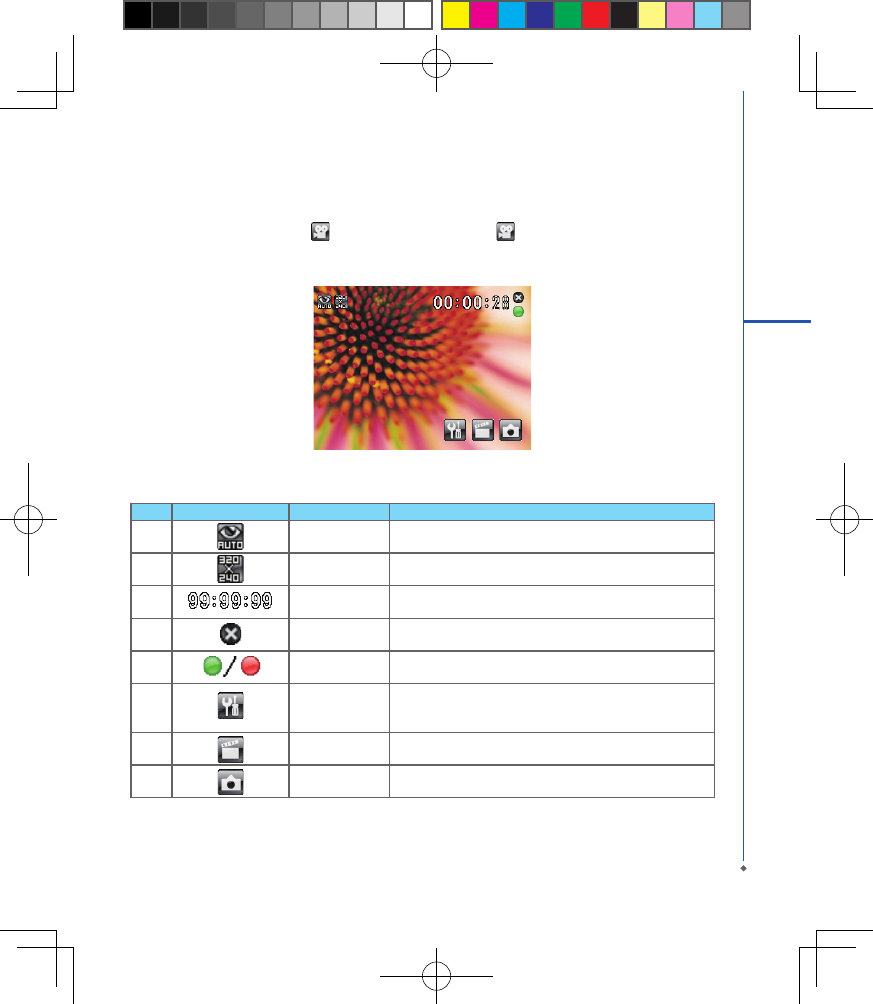
85
8
Multimedia
8.2 Video recorder
The phone camera can also be used as a video recorder to record memorable moments of your life.
Tap Start > Programs > Camera > , or directly press Camera key > to enter video mode.
No Icon Function Description
1 Video Mode Tap this icon to switch among the following modes: Auto
(default) / Day / Cloudy /Fluorescent and Night.
2 Video Size Set to be 320 x 240.
3Remained Video
Length
Indicates the estimated length of video you can take using the
current storage location.
4 Exit Tap this icon to exit video mode.
5
Prepared to
record
/Recording Indicates the video recorder status.
6 Options Menu
Tap this icon to open options menu, in which the following
options are provided: Mode, Effect, Video Format, MMS
Video, Storage and Flicker Frequency.
7 Pictures & Videos Tap this icon to go to Pictures & Videos where the taken clips
are stored.
8 Video Mode Tap this icon to change to Video mode.
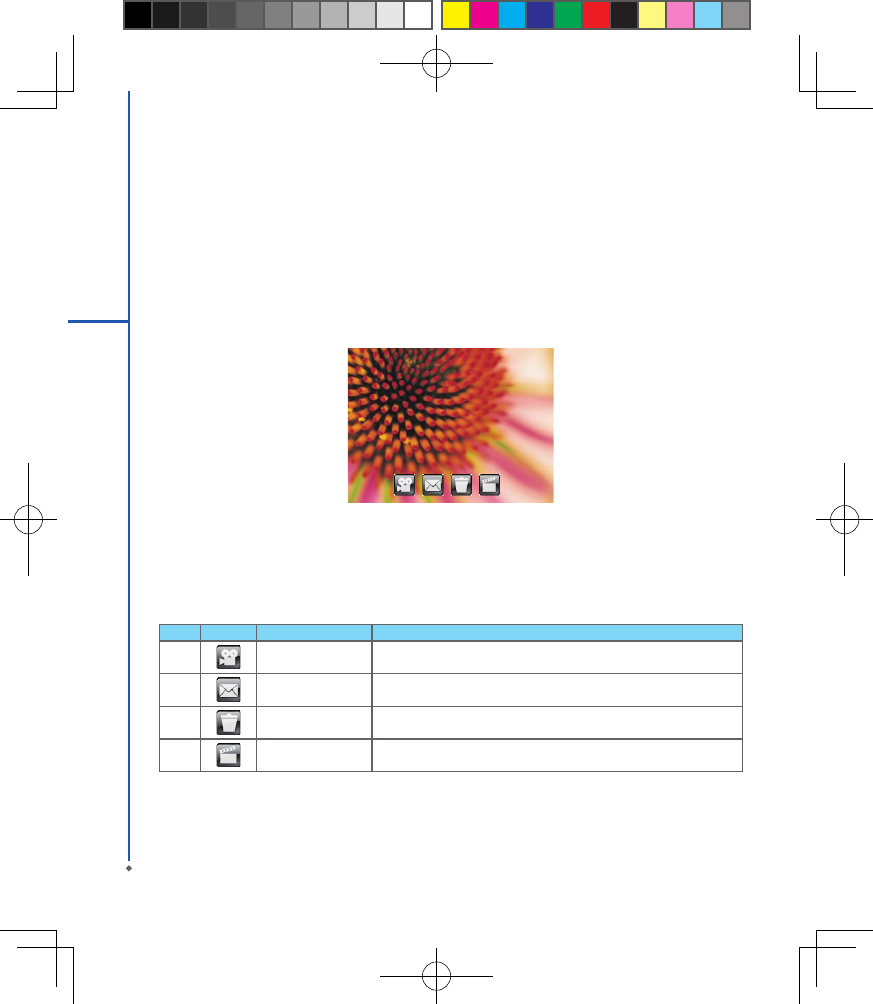
86
Recording a clip
1. On Video recorder mode, focus on the object. You can also tap on the icons on the top or open options menu to
change video recorder settings.
2. Press Camera key to start video lming.
3. Press Camera key again to stop lming.
4. After you record a clip, it will be categorized in Pictures & Videos.
Please note: The default storage location is phone memory.
Video conrm screen
After recording, you will enter the conrm screen where you can choose to delete or send out the clip.
On this screen you can tap the following icons to:
No Icon Function Description
1 Video Return to video mode.
2 Send Choose to send out this clip via E-mail or MMS.
3 Delete Delete the photo on screen.
4 Pictures & Videos Go to Pictures & Videos.
8
Multimedia
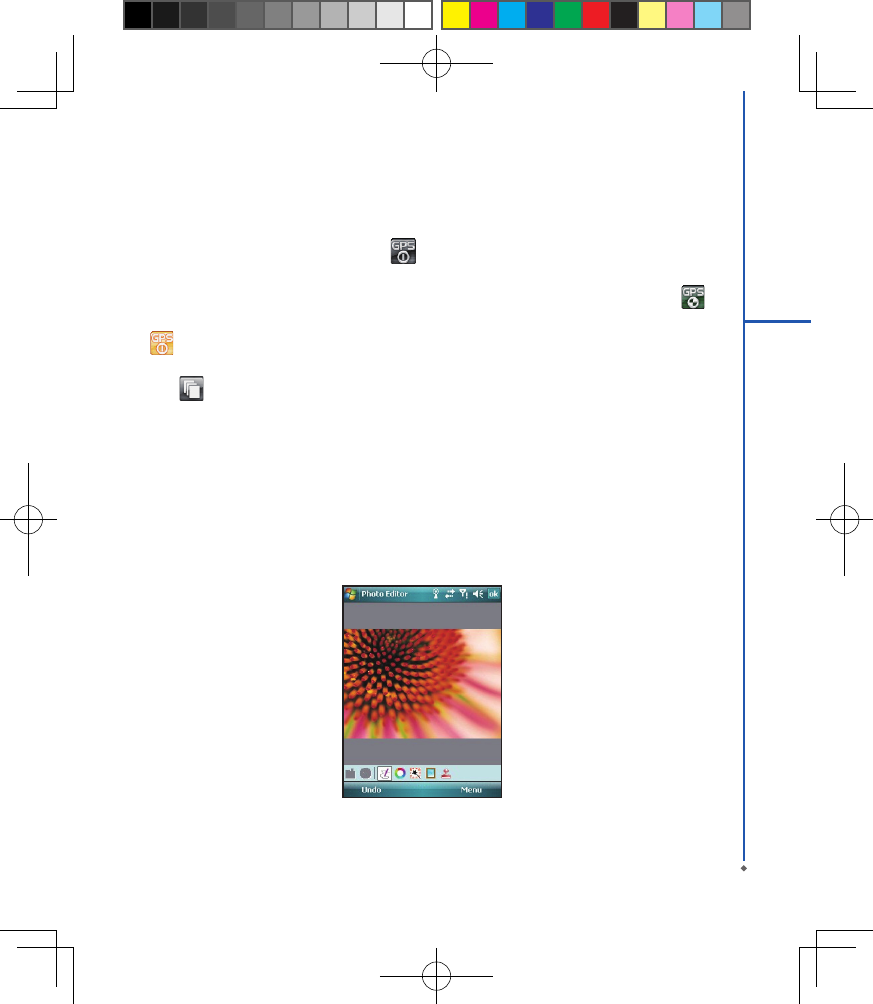
87
8
Multimedia
8.3 Taking a Geo tagged photo
You can take GeoTagged photos (photos that carry the coordinates of where you were when you took them) and
easily share them with friends through online albums like ickr.
1.After turning on the camera, tap the GPS button on the bottom left of the preview screen to enable/disable
the GPS coordinates photograph function.
2.After turning on GPS, it will start searching the current GPS coordination and the GPS button will display as .
3.When the device GPS has successfully locked on satellite signals, the GPS button will present the status as GPS
ON . Under this mode, the photos you take will carry the current coordinates of where you are at in EXIF.
4.Aim the camera at the item you would like to capture, press halfway to focus, full press to take the picture.
5.Tap the button to view the photo you just took in “Pictures & Videos”.
Note: For your ease of use, the lename of photos with coordinates always ends with (GPS) on this device. Example:
Camera0024 (GPS).jpg
8.4 Photo editor
You can handwrite messages on photos, or apply colorful frames and stamps by tapping Start > Programs > Photo
Editor.
On the editor screen, you can tap Undo to reverse the steps, or tap Menu to get further editing options.
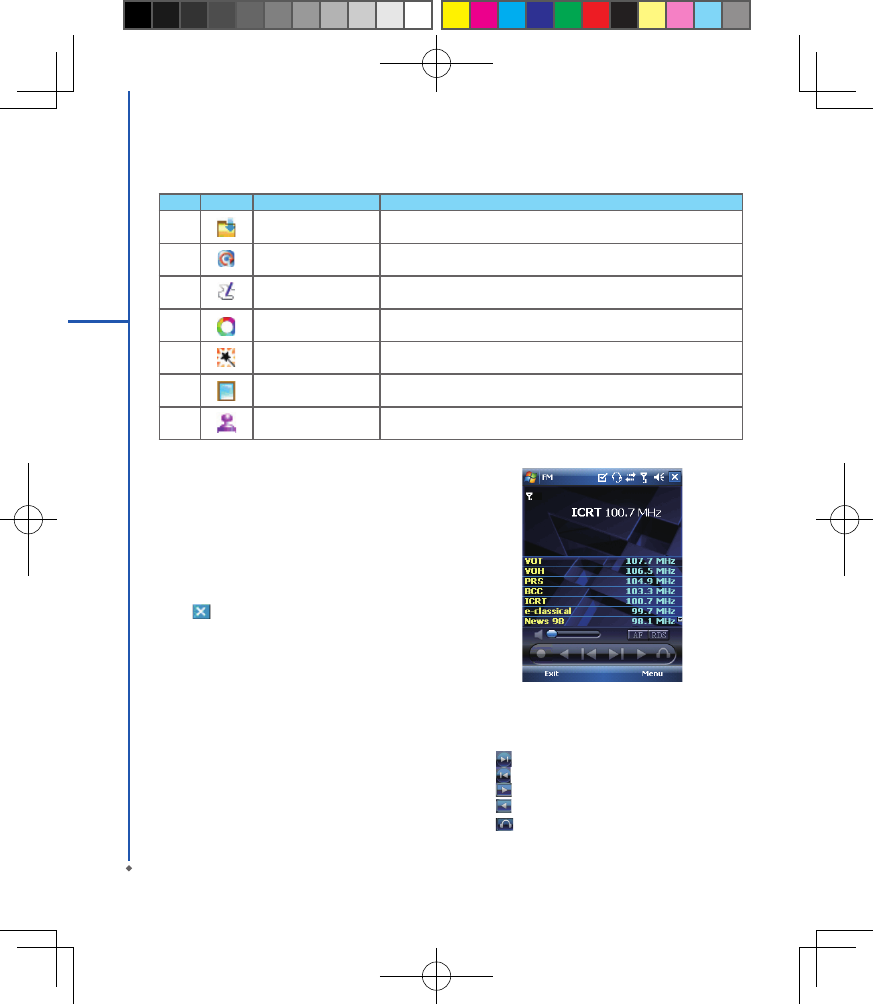
88
8
Multimedia
8.5 FM radio
You can listen to FM radio through your MWg Atom V by
searching channels. Please plug in the stereo headset
before listening to FM radio.
1. Select Start > Programs > FM Radio.
2. You may use function bar or number key on radio
screen to enter your favorite channel.
3. Tap Exit to turn off the radio and exit, or
4. Tap on the top right of screen to exit radio screen
and play the radio on the background. Now the radio
function is still running and you may use some other
applications at the same time.
Radio Function Bar:
1. Channel Tuner: you may use this bar to tune to your
desired channel.
2. Tap to switch to the next available channel.
3. Tap to switch to the previous available channel.
4. Tap to increase frequency by 0.1 MHz.
5. Tap to decrease frequency by 0.1 MHz.
6. Tap to switch between loudspeaker or headset
mode.
The tool bar on the bottom also provides 7 functions:
No Icon Function Description
1 Save This button appears after you have modied a picture. Tap this to save
the current image.
2 Undo Revert
3 Pen Size Choose a brush size.
4 Choose Color Choose a c olor of your pen from c olor palette or mix a paint by
yourself .
5 Effect 5 effects are available: Gray / Blur / Emboss / Negative / Classic
6 Choose Frame 3 photo frames are available: Star / Fall / Flower
7 Add Stamp 5 stamps for you to add more fun touches to your picture.
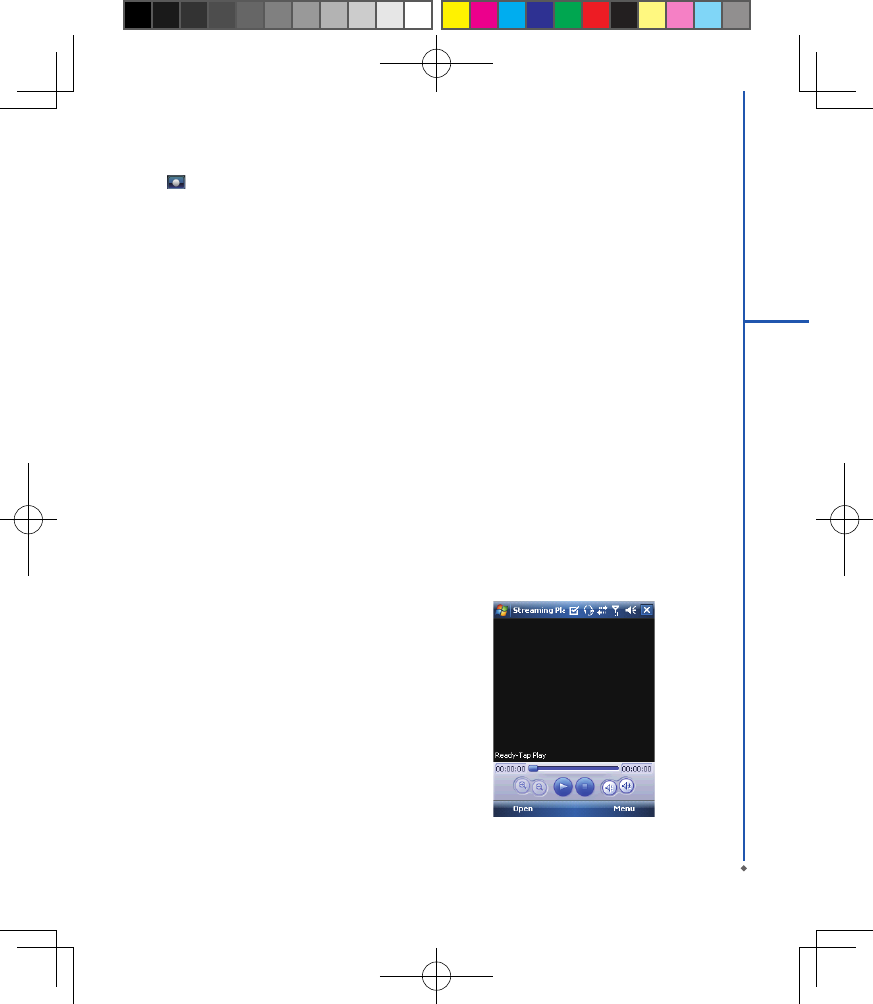
89
8
Multimedia
7. Tap to start recording the FM radio broadcast
of the channel you are currently listening to. The
recording time will be displayed on the top of screen.
Tap “STOP” to stop recording.
Options:
Tap Options for the following options:
● About: display information related to this program.
● Recorded File: display the radio recording folder.
● Exit: press exit to completely close radio function.
Radio Volume Control Method:
You may adjust radio volume using the volume control
key on the side of mobile phone. Slide the volume
control key upwards or downwards, and then select
a suitable volume by tapping on the pop-up volume
adjustment bar.
8.6 Pictures & videos
You may use Pictures & Videos function to manage
your photos or videos. By tapping Start > Programs >
Pictures & Videos, you can:
1. Enter different folders.
2. Select photo arrangement.
3. Tap on a thumbnail picture to view the picture.
4. Select Menu for more options.
8.7 JAVA
This device supports JAVA, providing you the freedom
of using JAVA applications and games. You can manage
and execute the Java applications here.
Installing JAVA applications
You can run the installation of a JAVA application stored
on your device or storage card:
Please note:
A JAVA application suite normally consists of a .jad le
and a .jar le that have the identical le name.
They ought to be stored at the same location.
1. Tap Star t > Programs > JAVA > Menu > Install,
and select My Documents, Storage Card, or From
URL.
2. Double tap the .jad le you wish to install.
3. Choose the category you wish the application to be
placed in, and the installation will begin.
Running JAVA applications
1. Once a JAVA application is successfully installed,
you can tap Start > Programs > JAVA, and enter
the category to locate the application.
2. Select the application and tap Option > Launch to
execute it.
3. You can also choose Make a shortcut to create a
shortcut in Programs.
8.8 Streaming player
You can use this function to watch TV or listen to the
streaming video on internet or operator WAP portal.
This function supports all the streaming files. TV and
radio content are provided by your operator, click any
streaming link on Pocket Internet Explorer will launch
this player.
Go to streaming client:
Today > Start > Streaming Player.
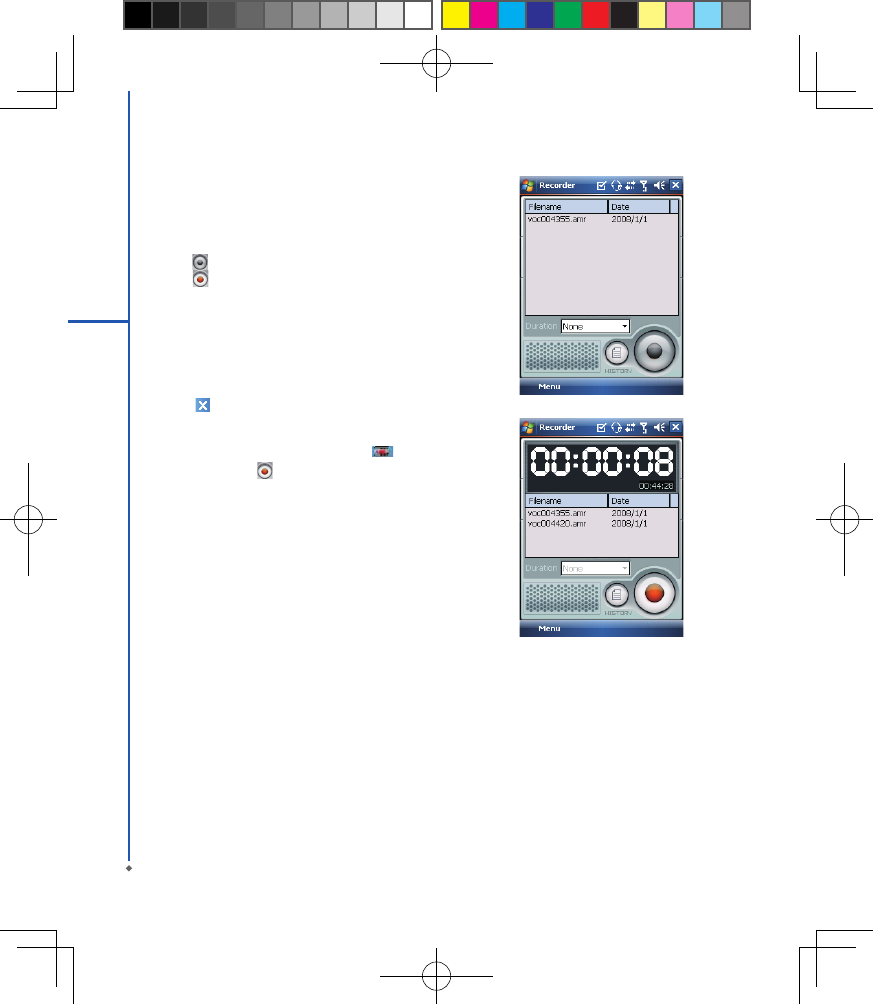
90
8
Multimedia
8.9 Recorder
Use Recorder to record voice memo and make note
taking simple and efficient. Tap Start > Programs >
Recorder.
1. Tap to activate sound recording function.
2. Tap to stop recording sound.
3. Before you start recording, you may set the recording
time in Duration.
4. Check History to show all your recorded les.
Tap on any recorded le on your history list to play
the le.
5. Uncheck History to hide the history window.
6. Tap Menu > Save To to choose the le location.
7. Tap to leave recorder screen while still keep
recording on the background; or tap Menu > Exit, to
stop recording and exit.
8. When recording in the background, tap to return
to Recorder. Tap to stop recording.
Pl ease note: If the re is an incom in g c all dur ing
re c o r d ing, an swe r i n g t h e c a ll w ill au t oma t i c a lly
terminate recording. If you want to continue recording
after ending the call, you need to reactivate recording
function.
8.10 Audio Mixer
Audio Mixer enables you to congure bass, treble, and
3D effect while listing to the music. Use Media Player
to play your audio les and then activate Audio Mixer to
adjust the settings. To activate Audio Mixer, tap Start>
Programs > Multimedia > Audio Mixer.
Note: If you use an A2DP Bluetooth headset to listen to
the music, Audio Mixer won’t work.

Chapter 9
Applications
9.1 Calendar
9.2 Tasks
9.3 File explorer
9.4 Internet explorer
9.5 Windows media
9.6 Games
9.7 Calculator
9.8 ZIP
9.9 Excel mobile
9.10 PowerPoint mobile
9.11 Word mobile
9.12 Notes
9.13 Search
9.14 Windows live
9.15 GPS tracking

92
Chapter 9 Applications
9.1 Calendar
Appointments and meetings
You may use Calendar to arrange appointments, meetings, and other events. You may view your appointments in
different display modes. You may select preferred display mode by tapping on the bottom left of screen to switch
between day, week, month, and year.
1. Tap Start > Calendar, Select a date to go to the desired date.
2. Select an appointment on the list to view or edit appointment details.
3. Tap on Day (or Week, Month, Year and Agenda) on the bottom left of the screen to switch between display
modes.
4. Tap on the keypad icon to activate or hide screen keypad.
5. Tap Menu on the bottom right of the screen to open menu.
6. Tap Options in Menu, you may change the display setup of Calendar by preference.
Creating an appointment
1. Tap Start > Calendar. Select the date and time of appointment.
2. Highlight the desired date and time, and then tap Menu > New Appointment.
3. Tap OK to save the entry and return to calendar.
4. Tap Subject to edit the eld or select predened text.
5. Tap Location to edit the eld.
6. Tap Start to select the start time.
7. Tap Ends to change the end time.
8. You can add your personal notes in Notes tab.
9. Tap OK to save the appointment and return to Calendar screen.
If you select Remind Me in Reminder eld, then your MWg Atom V will remind you according to the settings in Start
> Settings > Personal tab > Sounds & Notifications.
Viewing and updating calendar
Select an appointment on Calendar to view appointment summar y. If you want to change the details of an
appointment, tap Edit.
Sending a meeting notice
You may use Calendar to set meeting notice by combining with the information on Outlook or Pocket Outlook.
When you synchronize messages or connect your MWg Atom V with e-mail server, meeting reminders will be
generated automatically. Tap Calendar > Menu > Tools > Appointments tab, and select desired meeting sending
method in Send meeting requests via eld.
9
Applications

93
9
Applications
Generating a meeting notice
1. Tap Start > Calendar > Menu > New Appointment.
2. Tap Attendees field, and then tap Add Required Attendee and/or Add Optional Attendee. You will enter
Contacts.
3. Select attendees from the e-mail addresses of your contacts.
4. The new meeting notice will be generated automatically and saved in Outbox folder.
9.2 Tasks
You may use Tasks to help you track unnished tasks.
1. To add a new task, tap Tap here to add a new task.
2. ” ! ” Represent rst priority.
3. Select a single item to enter the details screen of this time.
4. Select a single item and hold to activate the pop-up menu.
5. You may change the arrangement of the tasks list. On Tasks screen, tap Menu > Sort By.
6. You may choose to display a specic task category on your tasks list. Tap Menu > Filter.
Adding a new task
1. On Tasks screen, tap Tap here to add a new task to add the new text’s subject. The newly created task will show
on Tasks list.
2. Tap on the new task to enter the detail information screen of task.
3. Tap Edit to enter the editing screen.
4. Select Starts and Due eld to set the rst and the last day of the task.
4. You may select Occurs to select whether this task has periodicity.
5. You may select Reminder to set a time to remind you or select None (unnecessary to alert).
6. To appoint a task as certain category, tap on Categories eld to select a category from the options list.
7. To add notes, tap Note tab and input desired content here.
8. Tap OK to save the task and return to tasks screen.
Checking and updating tasks
You may select a task from tasks list to view task summary. To change the details of this task, select Edit.
94
9.3 File explorer
This feature allows you to view and manage all the les saved in your MWg Atom V or theme memory card. To
access File Explorer, tap Start > Programs > File Explorer. Select the source of where the les are saved.
To sort les by its types, tap Sort By and select a sorting method: Name, Date, Size, and Type. Tap Up to go up a
level on the le hierarchy.
Tap Menu to access options:
9
Applications
Option Description
My Documents Display les saved in My Document.
Open Path Create a new path to open a le.
Send Send the selected document via e-mail.
Beam File Send the le via Infrared or Bluetooth.
Refresh Refresh the document display screen.
Show All Files Show all the stored les.
New Folder Create a new folder.
Rename Rename a le.
Delete Delete a le.
Edit Manage the le list by using Undo, Cut, Copy, Paste, Paste Shortcut, and Select All.
Tap and hold on a le for more options:
Option Description
Set As Ringtone Set the le (must be in music format) as your current ringtone.
Set As Today Background Set the le (must be in picture format) as your Today background.
Add to Zip File Compress the le.
9.4 Internet explorer
Connecting to the web
1. Connect your MWg Atom V with the Internet using GPRS or WI-FI.
2. Tap Start > Internet Explorer.
3. Input website address in the blank text eld.
● Select the arrow next to the blank eld to go to the link.
● You may use navigation keys or the scroll on browser screen to adjust your screen browsing content.
● Tap Back to return to previous page.
● Tap the keypad icon in the bottom center to hide or reveal screen input panel or select input method.
● Tap Menu to open Menu.
● Select and hold any location of website content to open the pop-up menu.
95
9
Applications
Viewing favorites
1. On browser screen, tap Menu > Favorites.
2. On Favorites screen, select the website you want to view.
● Select the website you would like to go to.
● You may add or delete folders or URL links.
Mobile Favorites folder
After installing ActiveSync to your computer, Mobile Favorites folder will be added to Favorites in your computer.
Only items saved in Mobile Favorites can be synchronized with your MWg Atom V. Follow the steps below to add
your favorite website to Mobile Favorites:
1. On your computer, select Internet Explorer > Tools > Create Mobile Favorites.
2. To change name, enter the new name in the new window.
3. To change storage location, select Create In > to create a new folder or select a folder in the new window.
4. Click on OK to add this website to your Mobile Favorites folder.
9.5 Windows media
You can use Microsoft Windows Media Player 10 to play the audio and video les stored in your MWg Atom V or from
Internet.
1. Tap Start > Programs > Windows Media to activate Windows Media Player.
2. Tap Menu > Library to display the library screen.
3. Select a library folder.
4. Tap Menu, and then select Open File to open les not in the library; Select Update Library to update library list.
5. Select and hold the le or folder for playing, and then select Play or Queue Up.
6. By tapping Back icon, you can return to the Windows Media Player control panel.
Playing Audio or Video Files
1. Tap to view in full screen.
2. Tap to connect to Windows Media Mobile website, from which you can nd the music and image.
3. you want to play.
4. Tap to return to the beginning of current le or previous le.
5. Tap or to play or pause.
6. Tap to skip to next le.
7. Tap or to adjust volume.
8. Tap the icon to active or disable sound.
You may use synchronization to copy sound and image les from your computer to this device. The Windows Media
Player in this device can play Windows Media and MP3 les.

96
9
Applications
9.6 Games
You may access Games to select games you like in your MWg Atom V for entertainment.
1. Tap Start > Programs > Games.
2. Tab Bubble Breaker or Solitaire to launch a game.
9.7 Calculator
Calculator allows you to run simple operations in your MWg Atom V.
Tap Start > Programs > Calculator to use your calculator.
9.8 ZIP
You can save storage space and increase efciency of your MWg Atom V by compressing some of your les with this
ZIP tool.
Zipping les
1. To zip a le, tap Start > File Explorer.
2. Tap and hold on a le you would like to zip. A pop-up menu will appear.
3. Select Add to Zip le in the pop-up menu. In the newly appeared window, you may:
● Select a zip method according to your need.
● Set a password, which will be asked for when you unzip the le.
4. Tap Start to start compressing the le.
Unzipping Files
1. To unzip a le, tap Start > Programs > ZIP.
2. Tap Unzip button on the pop-up window. A list of zipped les will appear.
3. You may select a different folder for more zip les. In the le list, tap on the le you would like to unzip.
4. Tap OK and enter the password (if required) to decompress the zip le.
9.9 Excel mobile
You may use Excel Mobile in your MWg Atom V with Microsoft Excel in your computer to easily copy or move les
between your MWg Atom V and your computer. Through computer synchronization, you can keep updated content in
both your MWg Atom V and your computer.
Creating a new Excel document
Tap Start > Office Mobile > Excel Mobile > New, and the screen will open a new Excel le.
Please note: Your Excel Mobile can only open one le at a time. When you open a second le at the same time,
your MWg Atom V will ask you to save rst le. The saved Excel Mobile le in your MWg Atom V could be opened by
selecting from Excel Mobile list screen.

97
9
Applications
Deleting / copying or sending a document
To delete, copy or send a le, tap and hold the desired le name to open pop-up menu. Your Excel Mobile provides
basic worksheet tools, for example, formula, function, sorting and ltering. To show toolbar, tap View > Toolbar.
Synchronizing with Excel les on you PC
Excel Mobile workbooks can be synchronized with Excel workbooks on your PC. To synchronize les, select the
Files type for synchronization in ActiveSync Options settings on your PC. When you select Files, a \My Documents
folder is created on your PC’s desktop. Place all the les you want to synchronize with your MWg Atom V in this
folder. Password-protected les cannot be synchronized. All Excel Mobile les that are stored in \My Documents
and its subfolders are synchronized with the PC. ActiveSync converts documents during synchronization. When
you delete a le on your PC or your MWg Atom V, the le will be deleted in the other location the next time you
synchronize. For more information on synchronization or le conversion, see ActiveSync Help on the PC.
Workbook conversion
Excel les (.xls) and templates (.xlt), created in Excel version 5.0/95 or later on the PC, will be converted to Excel
Mobile workbook (.pxl) or template (.pxt) les. The conversion takes place during the following actions:
● During le synchronization.
● When you copy an Excel le to your device from the PC.
● When you open an e-mail message with an Excel le as an attachment.
Excel Mobile workbooks are converted to Excel workbooks when they are synchronized or copied back to the PC.
Tips:
When working with Excel Mobile, the following tips will help simplify your tasks:
1. Tap View > Full Screen to view in full screen. To exit full screen view, tap View > Full Screen to return to general
view.
2. You can freeze panes: select a cell, then tap View > Freeze Panes. You may freeze the top and most left window
cell on worksheet. Once you freeze the panes, you can see the frozen window cell no matter where the screen is
scrolled.
3. You can split the worksheet to view different areas of this worksheet on the same screen. Tap View > Split, and
then drag the split line to the desired location. To remove the split, select View > Remove Split.
4. Display or hide full horizontal and vertical lines. To hide a row or a column, select any cell on the row or column
you wish to hide, then tap Menu > Format > Row or Column > Hide. To unhide a column or row, Menu > Format
> Row or Column > and select Unhide.
Please note: When you are synchronizing or copying les from your MWg Atom V to PC, Excel Mobile les will be
transformed into Excel les. While most of the settings will be kept during this transformation, some of the format
and properties may be lost.

98
9
Applications
9.10 PowerPoint mobile
You may use PowerPoint Mobile in your MWg Atom V with Microsoft PowerPoint in your computer to easily copy or
move document between your MWg Atom V and your computer. Through computer synchronization, you may keep
the les in both your MWg Atom V and your computer updated. You may use PowerPoint Mobile to browse or play
PowerPoint le.
Opening a PowerPoint le
Tap Start > Office Mobile > PowerPoint Mobile, the screen will show your PowerPoint les list, from which select
the le you want to open.
1. Select the folder type displayed in the list.
2. Select Name (or Date, Size, Type) to change the arrangement of list.
3. Select the document to open.
4. Select and hold a document to activate pop-up menu.
5. Tap Open to open a le.
6. Select the keypad icon to hide or reveal screen input panel and select input method.
7. Tap Menu for options.
Overriding the playback options in a PowerPoint presentation
1. Tap Start > Office Mobile > PowerPoint Mobile.
2. Open the presentation le you want to view, tap ▲ > Show Options.
3. Tap playback tab, select the Override playback options for all les, and do any of the following:
● To turn off builds and other animations, select Show without animation.
● To prevent slide transitions from playing, select Show without slide transition.
● To use the timings recorded with each slide in a presentation, select Use timings, if present.
● To automatically advance to the rst slide after the last slide in a presentation, select Loop continuously.
4. Tap OK.
Zooming in / out
Zoom in to see a portion of a slide in more detail and zoom out to see the entire slide again.
1. In a PowerPoint Mobile presentation, tap▲ arrow > Zoom In.
2. Do one of the following:
● To zoom in another level, tap .
● To zoom out, tap .
● To return to the slide show, tap .
99
9
Applications
9.11 Word mobile
You may use Word Mobile in your MWg Atom V with Microsoft Word in your computer to easily copy and move
document between the phone and your computer. Through computer synchronization, you may keep updated
contents in both your MWg Atom V and your computer. You may use Word Mobile to generate documents like
letters, meeting minutes and reports.
Generating a new word document
Tap Start > Office Mobile > Word Mobile > New, a new blank document will appear on screen. You may also select
default settings from Menu > Options.
Please note: Your Word Mobile can only open one document at a time. When you open a second document at the
same time, your MWg Atom V will ask you to save the rst document rst. When creating a new document or editing
an old document, you may choose to save in the following format:
Word le, RTF le and text-only le.
The saved Word Mobile le in your MWg Atom V could be opened by selecting from Word Mobile list screen. To
delete, copy, or send a le, select and hold desired le names to open pop-up menu. After opening a Word Mobile
le, you may tap View to set Toolbar, Wrap to Window, and Zoom.
1. Select a folder category shown on list display eld.
2. Tap Name (or Date, Size, Type) to change the arrangement of list.
3. Tap on a le to open it.
4. Tap and hold a le to open pop-up menu.
5. Tap New to create a new document.
6. Tap the keypad icon to show or hide screen input panel and select input method.
7. Tap Menu to open menu for more options.
Synchronizing with Word les on you PC
Word Mobile documents can be synchronized with Word documents on your PC. To synchronize les, select the
Files type for synchronization in ActiveSync Options settings on your PC. When you select Files, a \My Documents
folder is created on your PC’s desktop. Place all the les you want to synchronize with your MWg Atom V in this
folder. Please note that password protected les cannot be synchronized. All Word Mobile les that are stored in
\My Documents and its subfolders are synchronized with the PC. ActiveSync will convert the documents during
synchronization. When you delete a le on your PC or your MWg Atom V, the le will be deleted in the other location
the next time you synchronize. For more information on synchronization, or le conversion, see ActiveSync Help on
the PC.
Document Conversion
The Word documents (.doc) and templates (.dot), created in Word 6.0 or later on the PC, are converted to Word
Mobile documents (.psw) and templates (.psw). The conversion takes place during the following actions:
● During le synchronization.
● When you copy a Word le from the PC to your MWg Atom V.
● When you open an e-mail message with an attached Word le on your MWg Atom V.

Please note: When you are synchronizing or copying les from your MWg Atom V to PC, Word Mobile les will be
transformed into Word les. While most of the text and paragraphing will be kept during this transformation, some of
the format and properties may be lost.
9.12 Notes
You may use text notes or voice notes to record information. You may also record voice in Notes. If a note le
contains voice notes in addition to text, a small icon representing voice notes will appear in the content area of the
note. If notes recording is done under the notes le list, then the recording content will be saved as a single le. You
can also share your notes with others through e-mail and PC synchronization.
Creating a new note
Tap Menu > View Recording Toolbar to show or hide recording tool bar. To add a new note:
1. On Notes screen, tap New.
2. You may generate notes by writing, drawing, text entry and recording.
● Tap the keypad icon to hide or display screen input panel.
● Tap ▲ next to the keypad icon to select input method.
Applications
● Tap Menu for Options.
● Tap OK to save the note and return to Notes screen.
3. To insert the date in a note, deselect and make sure that no drawings are selected. Next, tap and hold anywhere
on the note and tap Insert Date.
Sending a note by e-mail
In Notes, Word Mobile, Excel Mobile, PowerPoint Mobile, and Pictures & Videos, you can send files and
information to other devices via e-mail.
1. First you must set up Messaging to send and receive messages.
2. From the program, select the item you want to send.
3. Tap Menu > Send. A new message is created with the item attached.
4. Enter the recipient name and subject and tap Send. The message will be sent the next time you synchronize your
MWg Atom V.
Beaming a note
To beam a note, on the note list, tap and hold the note. On the pop-up menu, tap Beam File.
9.13 Search
This feature allows you to search a le easily.
Finding a le
1. Tap Start > Programs > Search.
2. Enter the le name on Search for eld and select a le type in Type eld.
100
9
Applications
101
9
Applications
3. Tap Search to start searching and the result will be displayed in Results eld.
9.14 Windows live
Go to Windows Live:
Today > Start > Programs > Windows Live
Windows Live provides a rich set of Windows Live services including e-mail, IM, search and more.
1. Windows Live Messenger: Send IMs or join group chats to stay connected.
• Set status (online, ofine and mobile) and see the presence of friends and colleagues.
• Send messages via voice as well as text.
• Use emoticons to express exactly how you feel.
2. Windows Live Mail: Powerful, free e-mail with security features.
• Get up-to-date access to Hotmail or Windows Live Mail.
• View graphics, Web links, and contact photos in e-mails.
• Respond to e-mails with voice recordings.
• With push e-mail your inbox is always up-to-date.
3. Live Search: Quickly search the Web for information, directions, maps and images.
• Find local listings for business and entertainment.
• Access one-click calling to phone numbers.
• Get maps and driving directions.
• Get answers via SMS with Instant Answers.
9.15 GPS tracking
This feature allows you to record the routes you travel through GPS tracking. You can use any mapping software
which supports .kml or .gpx le format, such as Google Earth, to display the routes.
1.Tap Start > Programs > GPS Application > GPS Tracking. After entering GPS Tracking, the device will activate
GPS and search for the coordinates. The screen shows current connecting information, such as GPS status,
Satellites, GPS Time, etc.
2.When GPS is connected, tap “Start’ to start recording tracks.
3.During track recording, tap to pause the route tracking, and tap to resume.
4.Then GPS stays connected, tap to create your own landmark (you can take a picture as your landmark). The
next page allows you to add the name of the landmark and descriptions. Then tap to save the landmark.
5.Tap to stop recording routes. On the pop-up window, you may choose to save or cancel the records. If you
want to save the record, edit the Beginning, Destination, and File Name; selecting File Type and Save to.
6.Tap to clean up all the records unsaved.

102
9
Applications
on task bar on Today screen shows that GPS is trying to connect.
on task bar on Today screen shows that GPS is connected.

Chapter 10
Managing Your MWg Atom V
10.1 Memory management
10.2 Running programs management
10.3 Adding or removing programs

104
Chapter 10 Managing Your MWg Atom V
10.1 Memory management
When the memory is insufcient, this device cannot automatically allocate memory, you may follow the steps below
to free up more memory:
Moving some les to micro SD card
1. Tap Start > Programs > File Explorer.
2. Tap and hold selected items.
3. Tap Cut on the pop-up menu.
4. Switch to Storage Card category.
5. Tap and hold and then tap Paste.
Deleting the unwanted les
1. Tap Start > Programs > File Explorer.
2. Tap and hold selected items.
3. Select Delete.
Saving attachments to micro SD card
1. Tap Start > Messaging > Menu > Tools > Options > Storage tab.
2. If you have inserted a memory card, check Store attachments on storage card.
3. E-mail attachments will automatically be saved to memory card.
Clearing histories and deleting les from Internet Explorer
1. Tap Start > Internet Explorer > Menu > Tools > Options > Memory tab.
2. Tap Clear History and Delete Files to delete browsed web page related record.
10.2 Running programs management
1. Tap Start > Settings > System tab > Memory > Main tab:
Display current memory status of this device.
2. Tap Start > Settings > System tab > Memory > Storage Card tab:
Display the memory status of storage card in this device.
3. Tap Start > Settings > System tab > Memory > Running Programs tab:
Display all current running programs in this device. Select any program from Running Programs List, you may
select to Activate or Stop.
10
Managing Your MWg Atom V

105
10
Managing Your MWg Atom V
Activate: run the highlighted programs.
Stop: stop running highlighted programs.
Stop All: stop running all programs on Running Programs List.
10.3 Adding or removing programs
All programs pre-installed in the device will be saved in ROM (Read Only Memory) and are not removable. Data
saved in ROM will not be lost by accident. All programs that you installed will be saved in RAM (Random Access
Memory). As long as there is sufcient space in this device, you may install suitable programs by preference.
Adding programs through ActiveSync
1. Before installing the program, please make sure that your MWg Atom V processor is suitable for the software. Tap
Start > Settings > System tab > About > Version tab to check for information of this device.
2. Download the desired software to your computer (Please select software that is designed for Pocket PC and this
device).
3. Read installation instructions, readme le, or accompanied programs provided to you.
4. Connect your computer with this device.
5. Install executive le to your computer.
If this file contains installation program, the installation wizard will automatically activate. Please follow the
instructions on screen. Once the installation on your computer is completed, the program will automatically be
installed to this device. If this le does not contain any installation program, an error message will show on the
screen and tell you this program is invalid, which is not suitable for your computer. You must move this program to
this device manually. If you cannot nd any installation instructions for this program, please use “Browse” function
of ActiveSync to copy program le to Program Files folder in this device. After completing installation, tap Start >
Programs, and then select the program icon to launch that program.
Adding programs through Internet
You may download software suitable for this device from Internet.
1. Before installing the program, please make sure that your MWg Atom V processor is suitable for the software. Tap
Start > Settings > System tab > About > Version tab to check information in this device.
2. Directly download programs to this device by using Internet Explorer in this device. (Please select programs
designed for Pocket PC and this device).
3. Read installation instructions, readme le, or accompanied programs provided to you.
4. Run installation executive le in your computer.
Adding programs to Start menu
Tap Start > Settings > Personal tab > Menu.
1. Check the programs to be displayed on Start menu.
2. Tap OK to save settings and return to Personal tab screen.
Removing programs
Tap Start > Settings > System tab > Remove Programs.

Select the programs you would like to delete from Programs in storage memory list, and then select Remove to
delete highlighted programs. If the installed programs list does not contain the program you intend to remove, you
may use File Explorer in this device to nd the program and delete it by selecting and holding the program’s name
and then select Delete from the pop-up menu.
106
10
Managing Your MWg Atom V

Chapter 11
Important Safety Information
11.1 Safety information
11.2 Phone care
11.3 Driving safety
11.4 Electronic devices
11.5 Other safety guidelines
11.6 Cautions
11.7 About this guide

108
Chapter 11 Important Safety Information
11.1 Safety information
Read this information
Your MWg Atom V Pocket PC Phone has been designed, manufactured and tested not to exceed the limits for
exposure to electromagnetic elds recommended by the Council of the European Union. These limits are part of
comprehensive guidelines developed by independent scientic organizations.
European standards provide for the amount of radio frequency electromagnetic energy absorbed by the body when
using a phone to be measured by reference to the Specic Absorption Rate (SAR). The SAR limit for the general
public is currently 2 watts per kilogram averaged over 10 grams of body tissue.
The maximum SAR values for MWg Atom V are:
GSM900: 0.059 W/kg
DCS1800: 0.082 W/kg
WCDMA: 0.198 W/kg
11.2 Phone care
You should never attempt to open the phone casing. There are no user-serviceable parts inside and you might
damage sensitive electronic circuits and components. Unauthorized disassembly will void the warranty.
You should never leave your phone in the window of your car or otherwise expose it to strong sunlight or excessive
heat for a prolonged period. This may damage it.
You should never handle your phone with wet hands or expose it to moisture or liquids of any kind. Continuous
changes from a cold a warm environment may lead to condensation inside the phone, resulting in corrosion and
possible damage.
If you pack your phone in your suitcase during travel, beware damage. Cramming a suitcase may crack the LCD
display. Remember to switch off your wireless connections during air travel.
As with all other radio devices, touching the built-in antenna area during telephone conversation may impair the
quality and lead to shorter standby time due to increased power consumption.
The battery
Your phone is equipped with a high-performance Li-lon battery. Optional battery types may be available; check with
your local retailer. Observe the maintenance guidelines and your battery should give you a long service life.
1. At the beginning of the battery’s life, fully charge and discharge (let it go at) three times.
2. Do not overcharge the Li-lon battery, as this can result in a reduction in battery performance and lifespan. The
recommended maximum charge time is 4 hrs.
3. Avoid repeated short charging. It is preferable to let the battery o at and then recharge it completely.
11
Important Safety Information

109
11
Important Safety Information
4. Avoid charging in strong heat of extreme cold. Ambient room temperature is preferable. The battery has its
optimum performance in an ambient temperature of + 5 oC to + 50 oC.
5. Don’t store a battery near a re or heat source.
6. Use only the battery approved by the manufacturer.
7. Never replace the battery with a non-approved battery.
8. Never soak the battery in water or any other uid.
9. Never try to open the battery as it contains substances that might be harmful if swallowed or allowed to come into
contact with unprotected skin.
10. Never short-circuit the battery, as it may overheat and cause a re. Keep it away from jewellery and other metal
objects.
11. Never dispose of the battery in a re. It could explode and release harmful substance into the environment.
12. Never dispose of the battery with your regular household waste. Take it to a hazardous material collection point.
13. Do not touch the battery terminals.
The charger
1. Use only the charger supplied with your phone.
2. Never pull the charger cord to release it from the mains- pull the charger itself.
Memory card
1. Do not remove or insert a memory card or turn off the handset while data on the card is being edited.
2. Do not touch the metal terminals with your hands or metal objects.
3. Don not bend the memory card or subject it to violent impacts. Keep it away from water and high temperatures.
4. Keep all memory cards out of the reach of small children.
5. Do not short circuit the contact points or expose it to liquids or moisture. When not in use, keep in the antistatic
container it came in.
6. Do not use force when inserting or Handling the card, and do not expose it to excessive hear or strong magnetic
elds.
Cleaning and storing
1. Your phone should always be handled with care and protected from dirt, dust and dampness. To avoid scratches,
never place your phone face down.
2. If cleaning is necessary, switch the phone off and wipe carefully with a soft, slightly damp (not wet) cloth. Use
a cotton swab to clean the camera lens. Allow the phone to dry completely before switching it on. Never use
solvents for cleaning.
3. If you are not going to use your phone for some time, fully charge the battery and store the phone in a dry place
away from direct sunlight. Your phone should be switched off during storage. Recharge every 6 to 12 months.
4. Never expose your phone to hear or strong sunlight.
5. Never expose your phone to moisture or liquids of any kind.
6. Do not paint your phone or otherwise block the keypad, microphone or earpiece function, i.e. with stickers.

110
11
Important Safety Information
11.3 Driving safety
Never use th handheld phones while driving. Ti’s an offence while driving to hold a phone or cradle it in your neck,
at any point during the setup, making or taking of a phone call, text message or any other data related mobile
communication. Use of fully installed car kits are still permitted, as are the use of alternate handsfree accessories.
In the interest of safety, we would recommend use of a cradle while using any form of handsfree accessory.
While driving, we recommend that you use voicemail wherever possible, and that you listen to your messages when
you are not in the car. If you must make a handsfree call when driving, keep it brief.
An airbag inates with great force. Do not place objects, including both installed or portable wireless equipment, in
the area over the airbag or in the airbag deployment area. If in-vehicle wireless equipment is improperly installed and
the air bag inates, serious injury could result.
11.4 Electronic devices
Most modern electronic equipment is shielded from RF energy. However, certain electronic equipment may not be
shielded against the RF signals from your Pocket PC phone.
Pacemakers
The Health Industry Manufacturers’ Association recommends that a minimum separation of six inches be maintained
between a phone and a pacemaker to avoid potential interference with the pacemaker. These recommendations are
consistent with the independent research by and recommendations of Wireless Technology Research.
If you have a pacemaker:
1.Always keep your phone more than six inches from your pacemaker when turned on.
2.Do not carry your phone in a breast pocket.
3.Use the ear opposite the pacemaker to minimize the potential for interference.
4.If you have any reason to suspect that interference is taking place, turn your phone off immediately.
Hearing aids
Some digital phones may interfere with some hearing aids. In the event of such interference, call MWg Customer
Service to discuss alternatives.
Other medical devices
If you use any other personal medical device, consult the manufacturer of your device to determine if it is adequately
shielded from external RF energy. Turn your phone off in healthcare facilities when any regulations posted in these
areas instruct you to do so. Hospitals or healthcare facilities may be using equipment that could be sensitive to
external RF energy.
Vehicles
RF signals may affect improperly installed of inadequately shielded electronic systems in motor vehicles. Check
with the manufacturer or its representative regarding your vehicle. You should also consult the manufacturer of any
equipment added to your vehicle.

111
11
Important Safety Information
Posted facilities
Turn you phone off when posted notices so require.
Magnetic media
Magnetic elds generated by PC Phone phones may damage data on magnetic storage media, such as credit cards,
computer discs or tapes. Do not place your phone next to such media.
11.5 Other safety guidelines
Aircraft
Regulations prohibit using your phone while in the air. Switch off your phone before boarding an aircraft or turn off
the wireless connections.
Blasting areas
To avoid interfering with blasting operations, turn you phone off when in a blasting area or in areas posted: turn off
two-way radio. Obey all sighs and instructions.
Potentially explosive environments
Turn you phone off when in any area with a potentially explosive environment and obey all signs and instructions
Sparks in such areas could cause an explosion or re resulting in bodily injury or even death. Areas with a potentially
explosive environment are often, but not always, clearly marked. They include fuelling areas such as gas stations,
below decks on boats, fuel or chemical transfer or storage facilities, vehicles using liqueed petroleum gas (such as
propane or butane), area where the air contains chemicals or articles, such as grain, dust, or metal powders, and
any other area where you would normally be advised to turn off you vehicle’s engine.
Choking
Keep your phone away from children as the SIM card and other small parts present a choking hazard.
11.6 Cautions
Your Pocket PC Phone is a high quality piece of equipment. Before operation, read all instructions and cautionary
markings on (1) AC Adaptor (2) Battery and (3) Product Using Battery.
1.Do not use this equipment in an extreme environment where high temperature or high humidity exists.
2.Do not abuse the equipment. Avoid striking, shaking or giving it a shock. When not using the unit, lay it down to
avoid possible damage due to instability.
3.Do not expose this equipment to rain or spilled beverages.
4.Do not use unauthorized accessories.
5.Do not disassemble the phone or its accessories. If service or repair is required, return the unit to an authorized
service center. If the unit is disassembled, a risk of electric shock or re may result.
6.Do not short-circuit the batter terminals with metal items.

FCC Regulations:
● This device complies with part 15 of the FCC Rules. Operation is subject to the following two conditions: (1) This
device may not cause harmful interference, and (2) this device must accept any interference received, including
interference that may cause undesired operation.
● This device has been tested and found to comply with the limits for a Class B digital device, pursuant to Part 15
of the FCC Rules. These limits are designed to provide reasonable protection against harmful interference in
a residential installation. This equipment generates, uses and can radiated radio frequency energy and, if not
installed and used in accordance with the instructions, may cause harmful interference to radio communications.
However, there is no guarantee that interference will not occur in a particular installation If this equipment does
cause harmful interference to radio or television reception, which can be determined by turning the equipment off
and on, the user is encouraged to try to correct the interference by one or more of the following measures:
-Reorient or relocate the receiving antenna.
-Increase the separation between the equipment and receiver.
-Connect the equipment into an outlet on a circuit different from that to which the receiver is connected.
-Consult the dealer or an experienced radio/TV technician for help.
Changes or modications not expressly approved by the party responsible for compliance could void the user‘s
authority to operate the equipment.
RF Exposure Information (SAR)
This device meets the government’s requirements for exposure to radio waves. This device is designed and
manufactured not to exceed the emission limits for exposure to radio frequency (RF) energy set by the Federal
Communications Commission of the U.S. Government.
The exposure standard for wireless devices employs a unit of measurement known as the Specific Absorption
Rate, or SAR. The SAR limit set by the FCC is 1.6W/kg. *Tests for SAR are conducted using standard operating
positions accepted by the FCC with the device transmitting at its highest certied power level in all tested frequency
bands. Although the SAR is determined at the highest certied power level, the actual SAR level of the device while
operating can be well below the maximum value. This is because the device is designed to operate at multiple
power levels so as to use only the poser required to reach the network. In general, the closer you are to a wireless
base station antenna, the lower the power output.
The highest SAR value for the device as reported to the FCC when tested for use at the ear is 0.422 W/kg for PCS
Head SAR and 0.422 W/kg for WLAN Head SAR and when worn on the body, as described in this user guide, is
1.36 W/kg for PCS Body SAR and 1.36 W/kg for WLAN Body SAR. (Body-worn measurements differ among device
models, depending upon available enhancements and FCC requirements.)
While there may be differences between the SAR levels of various devices and at various positions, they all meet the
government requirement.
The FCC has granted an Equipment Authorization for this device with all reported SAR levels evaluated as in
compliance with the FCC RF exposure guidelines. SAR information on this device is on le with the FCC and can be
found under the Display Grant section of http://www.fcc.gov/oet/fccid after searching on FCC ID: UJU9QDENIM000.
112
11
Important Safety Information

For body worn operation, this device has been tested and meets the FCC RF exposure guidelines for use with an
accessory that contains no metal and the positions the handset a minimum of 1.5 cm from the body. Use of other
enhancements may not ensure compliance with FCC RF exposure guidelines. If you do no t use a body-worn
accessory and are not holding the device at the ear, position the handset a minimum of 1.5 cm from your body when
the device is switched on.
European Union Notice
Products with CE marking comply with the R&TTE Directive (99/5/ EC), the EMC Directive (89/336/EEC), and the
Low Voltage Directive (73/23/EEC) issued by the Commission of the European Community. Compliance with these
directives implies conformity to the following European Norms (in parentheses are the equivalent international
standards).
o EN 60950-1 (IEC 60950-1)
o Safety of Information Technology Equipment.
o ETSI EN 301 511
o Global system for mobile communications (GSM); Harmonized EN for mobile stations in the GSM 900 and GSM
1800 bands, covering essential requirements of article 3.2 of the R&TTE directive (1995/5/EC ).
o ETSI EN 301 489-1
o Electromagnetic compatibility and Radio spectrum Matters (ERM); Electromagnetic Compatibility (EMC) standard
for radio equipment and services; Part 1: Common technical requirements.
o ETSI EN 301 489-7
o Electromagnetic compatibility and Radio spectrum Matters (ERM); Electromagnetic Compatibility (EMC) standard
for radio equipment and services; Part 7: Specic conditions for mobile and portable radio and ancillary equipment
of digital cellular radio telecommunications systems (GSM and DCS).
o ETSI EN 301 489-17
o Electromagnetic compatibility and Radio spectrum Matters (ERM); Electromagnetic Compatibility (EMC) standard
for radio equipment and services; Part 17: Specic conditions for 2.4 GHz wideband transmission systems and 5
GHz high performance RLAN equipment. Accessories Model NumberCradlePH15x.
o ETSI EN 300 328
o Electromagnetic compatibility and Radio spectrum Matters (ERM); Wideband Transmission systems; data
transmission equipment operating in the 2.4 GHz ISM band and using spread spectrum modulation techniques.
o EN 50360:2001
o Product standard to demonstrate the compliance of mobile phones with the basic restrictions related to human
exposure to electromagnetic elds (300 MHz - 3 GHz).
o EN 50371:2002
113
11
Important Safety Information

114
11
Important Safety Information
o Generic standard to demonstrate the compliance of low power electronic and electrical apparatus with the basic
restrictions related to human exposure to electromagnetic elds (10 MHz -300 GHz) - General public.
Warning! DANGER OF EXPLOSION IF BATTERY IS INCORRECTLY REPLACED. TO REDUCE RISK OF FIRE
OR BURNS, DO NOT DISASSEMBLE, CRUSH, PUNCTURE, SHORT EXTERNAL CONTACTS, EXPOSE TO
TEMPERATURE ABOVE 60˚C (140˚F), OR DISPOSE OF IN FIRE OR WATER. REPLACE ONLY WITH SPECIFIED
BATTERIES. RECYCLE OR DISPOSE OF USED BATTERIES ACCORDING TO THE LOCAL REGULATIONS OR
REFERENCE GUIDE SUPPLIED WITH YOUR PRODUCT.
WEEE Notice
The Directive on Waste Electrical and Electronic Equipment (WEEE), which entered into force as European law on
13th February 2003, resulted in a major change in the treatment of electrical equipment at end-of-life.
The purpose of this Directive is, as a rst priority, the prevention of WEEE, and in addition, to promote the reuse,
recycling and other forms of recovery. The WEEE logo ( ) on the product or on its box indicates that this product must
not be disposed of or dumped with your other household waste. You are liable to dispose of all your electronic or
electrical waste equipment by relocating over to the specied collection point for recycling of such hazardous waste.
Isolated collection and proper recovery of your electronic and electrical waste equipment at the time of disposal
will allow us to help conserving natural resources. Moreover, proper recycling of the electronic and electrical waste
equipment will ensure safety of human health and environment. For more information about electronic and electrical
waste equipment disposal, recovery, and
collection points, please contact your local city centre, household waste disposal service, shop from where you
purchased the equipment, or manufacturer of the equipment.
PC Requirement to Run ActiveSync4.5
To connect your device to the PC, you have to installed Microsoft® ActiveSync® program on your PC. ActiveSync 4.5
is included in the Installation CD, which is compatible with the following operating systems and applications:
o Microsoft® Windows® 2000 Service Pack 4
o Microsoft® Windows® Server 2003 Service Pack 1
o Microsoft® Windows® Server 2003 IA64 Edition Service Pack 1
o Microsoft® Windows® Server 2003 x64 Edition Service Pack 1
o Microsoft® Windows® XP Professional Service Packs 1 and 2
o Microsoft® Windows® XP Home Service Packs 1 and 2
o Microsoft® Windows® XP Tablet PC Edition 2005
o Microsoft® Windows® XP Media Center Edition 2005
o Microsoft® Windows® XP Professional x64 Edition
o Microsoft® Outlook® 98, Microsoft® Outlook® 2000 and Microsoft® Outlook® XP, and Microsoft® Outlook®

115
11
Important Safety Information
2003 messaging and collaboration clients
Microsoft® Ofce 97, excluding Outlook
Microsoft® Ofce 2000
Microsoft® Ofce XP
Microsoft® Ofce 2003
Microsoft® Internet Explorer 4.01 or later (required)
Microsoft® Systems Management Server 2.0
11.7 About this guide
This document is provided as a user guide to the MWg Atom V Pocket PC Phone and to this system only. MWg Atom
V is a trademark of the MWg group of companies.
The latest version of the user guide can be found on our website: www.MWg.com
Year of Manufacturing:2008


Chapter 12
Specications
118
Chapter 12 Specications
12
Specications
Item Specications
System Information
Operating System Windows Mobile® 6 professional
Processor PXA 270 Processor at 520 MHz
Memory 256 MB ROM, 64 MB RAM
Size
Dimensions (mm) 116(L) x 59(W) x 14.95(T) mm
Weight (in grams) 133 g
Battery
Battery capacity Lithium Polymer battery, 1,300mAh
Standby time 150 Hr
Talk time 3.5 Hr
Charging time
Charger 4 Hr
Display Characteristics
Type 2.8” LTPS, 65K-colour TFT LCD display with touch panel
Resolution 320 x 240 QVGA
Band
Band HSDPA, WCDMA 2100MHz, GSM 850/900/1800/1900
Connectivity
Bluetooth 2.0
WLAN IEEE 802.11b/g
GPRS EDGE class 12
WAP Yes
CSD Yes
USB 2.0
Image
Format JPG, BMP, GIF, PNG
Max size (per) Depends on available RAM
Audio
Format MIDI, MP3, WMA, WAV, AMR, AAC, AAC+
Max size Depends on available RAM
119
12
Specications
Item Specications
Video
Format 3GPP, MP4, RTSP
Max size Depends on available RAM
Phonebook
Size Depends on available RAM
Ring tone
Type MP3, WMA, WAV, MIDI
Polyphone 192 Polyphonic
Digital camera
Type CMOS
Camera 2 mega pixels
Auto focus Yes
Video recording Yes
Messaging
Push E-mail Windows Direct Push
SMS Yes
MMS Yes
E-mail Yes
Windows Live Messenger Yes
External memory
Type Micro SD CARD


Chapter 13
FAQs

122
Chapter 13 FAQs
Why can’t I turn on my device as I press Power key?
Either you didn’t press the key long enough, or the device has shut down because the battery power level is too low
to make calls. Please recharge the battery.
How do I suspend the screen display or wake up the device?
Press and hold Power key to turn off the device. If the screen display is off, press Power key to wake up your device.
Why does the screen freezes and does not respond to my commands or input?
Reboot the system to free up memory. The system shall operate more efficiently. If the system still lags after
rebooting, you will need to clean boot your MWg Atom V. To clean boot, power off your MWg Atom V and then press
down and hold Camera key and Power Key at the same time, for about 5 seconds. Your MWg Atom V will reset to
factory defaults and reboot.
Please note:
When you perform a clean boot on this device, all your personalized settings, information, and programs installed
will be removed. The system will reset to factory defaults.
Why does my device display “INSUFFICIENT MEMORY” when I open a le or a program?
The device memory is shared by both storage and programs. You can free up some memory by removing some of
the rarely used programs you installed or removing rarely used les.
How can I free up RAM memory?
You can free up RAM memory by closing the programs that are running in the background. Tap the MWg Menu icon
on the bottom of Today screen to view all the running programs. You could close the programs you do not need to
use.
Why doesn’t the screen respond accurately to my stylus taps?
Tap Start > Settings > System tab > Screen > General tab. Select Align Screen to align the screen.
Why does my MWg Atom V launch wrong programs or ignore my command when I press a device key?
Tap Start > Settings > Personal tab > Buttons and check whether the programs assigned to each key is correct.
You can change these key assignments by preference.
My MWg Atom V can’t form a successful connection with ActiveSync.
Please make sure you have installed ActiveSync 4.5 or later on your computer. You can nd ActiveSync in the
installation CD, or you can download the latest version from Microsoft’s website. Please make sure you have
connected your MWg Atom V to the computer by plugging in the USB cable to both your MWg Atom V and the
computer. Make sure that you are not running another program that uses the same serial port. If the connection still
13
FAQs
123
13
FAQs
fails, remove ActiveSync on your computer and reinstall it.
Why does my device display ‘Insert SIM’, what does this mean?
Please insert the SIM card before you can use the device. If it is already installed, remove and clean the metal
contacts area with a dry cloth, and then insert it again.
Why does my device display ‘EMERGENCY ONLY’, what does this mean?
You may not have your SIM card properly installed, or you are out of network range.
Why does my device display ‘NO NETWORK’, what does this mean?
You’re outside network range. If you’re inside a building or a basement, try moving towards a window.
Why are there double entries in my Contacts list?
You may have selected Show SIM Contacts in Contacts menu. If you have already copied your SIM contacts to the
device, then you do not need to select this option.
I found that some calls are not processed, why does it happen?
Certain call barring function may have been set to restrict phone usage. Check the call barring status and cancel it
as necessary.
Can I send and receive emails and surf the Mobile Internet on my device?
Your MWg Atom V allows you to access the Internet from your device. For sending and receiving emails, please refer
to the user manual or contact MWg Customer Service.
Why can’t my device make any sound alerts?
Tap on the speaker icon on the top right corner of the screen, and then adjust the alert or ring volume. You could
also use the volume key on the left side of the device to adjust volume.
Where can I check why my device has gone wrong?
Please have your warranty card and device ready and contact your local dealer.
Why do I need to upgrade / reash my ROM?
A ROM upgrade/ Reash may help to solve the following issues–slow response, no response, device freeze and
drop calls”
Where can I nd the Rom upgrade?
You can go to www.MWg.com an look under ‘Support’.

124
Index
Index
A
About 2,4,10,14,17,21,37
42,43,47,48,53,58
89,105,107,114
115,122
ActiveSync Tool 2,47,51
Applications 3,53,88,89,91,92
100,114
Attachments 52,71,75,78,104
B
Background 41,42,75,88,90,94
122
Backlight 13,14,21,43
Backup 2,15,30,40
Battery 1, 5,6,7,8,9,10,11
12,14,22,24,42,43
44,50,58,64
108,109,111
114,118,122
Beam 23,42,58,59,60,94
100
Block Recognizer 27,28
Bluetooth 2,7,10,23,24,48,49
50,55,56,58,59,60
61,62,63,64,90,
118
Buttons 20,40,56,76,122
C
Calculator 3,10,18,91,96
Calendar 3,26,29,30,51,59
75,91
Call Barring 42,123
Call Forwarding 42
Call History 2,31,32,33,36
Call Waiting 41,42
Caller ID 42,76
Camera 3,8,10,18,72,81,82
83,84,85,86,87,
109,119
Cell Broadcast Setting 2,23,55,65
Certicates 21,43
Connections 10,20,22,23,50,52
56,57,58,59,61,63
,64,65,108,111
Contacts 2,11,29,31,32,33,
34,35,37,51,59,71
,72, 79,93,114,123
D
Device Lock 13,34,44
DNS 64
Download 22,36,41,65,76,77
78,105,122
E
E-mail 3,29,51,52,56,57
67,68,70,71,77
Excel Mobile 3,91,96,97,100
F
Favorites 65,95
File Explorer 3,10,59,91,94,96
104,106
Frame 87,88
G

125
Index
Games 3,10,18,89,91,96
GPRS 2,10,23,24,5 5,56
57,64,68,68,79,94
118
GPS 3,7,10,19,24,63,87
91,101,102
H
I
Input 7, 13, 16, 20, 27,
28, 29, 31, 45, 46,
64
Input Method 1, 15, 20, 27, 28,
29, 46, 104, 109,
110, 113
Insert the battery & SIM card 1, 5, 11
Installing ActiveSync 2, 55, 57, 105
Internet Explorer 3, 49, 50, 65, 75,
99, 101, 104, 105,
119, 120
Internet Sharing 2, 10, 18, 75
ISP 74, 88
J
JAVA 3,10,18,81,89
K
Keyboard 27 28 73
L
Landscape 25
Letter Recognizer 28
Lock 1,5,9,13,20,31,34
40,44,87
M
Making a call 1,31,33,34
Memory 1, 4 ,15 , 2 2, 3 0, 4 3
44,45,71,83,86,94
103,104,105,106
109,118,119,122
Menus 20,41,50
Messaging 2,29,67,68,69,70
71,78,79,80,
100,104,115,119
Microsoft® Exchange Server 69,78,79
Multimedia messages (MMS) 2,52,67,68,72
N
Navigation Key 7,10,33,35,82,94
Notes 3,19,29,30,41,51
52,53,91,92,93,
100
O
Owner Information 21,30,41
P
Password 1,2,15 , 20, 30, 31
36,40,52,64,78,79
80,96,97,99

126
Index
Personal settings 2,39,40
Phone 1,4,6,7,10,12,18, 21
24,29,30,31,32,33,
34,35,36,37,41,42,
56,58,64,68,77,83,
85,86,89,99,101,
107,108,109,110,111,
113,115,123
Photo Editor 3,18,81,87
Pictures & Videos 3,10,18,81,83,84,85
, 86,87,89,100
PIN 40,41,58
POP3 78
Portrait 25
Power 1,5,6,8,11,12,13,14
21,22,24,43,44,50
58,63,64,108,112,
114,122
Power on/off 8
PowerPoint Mobile 3,91,98,100
Programs 4,10,16,17,18,19,20
22,25,29,30,34,37,
40,41,44,45,48,
50,51,52,53,57,64
65,79,82,87,88,89,
90,94,95,96,100,
101,103,104,015
106,122
R
Recorder 3,18,81,85,86,90
Recording Time 89,90
Regional Settings 22,44,45
Remove Programs 22, 54, 56, 120
Reset 8,26,40,53,75,83,
122
S
Screen 1,7,8,10,13,14,15,16
18,19,21,22,25,26,
27,28,29,30,32,33,
34,35,36,37,41,42,
45,56,57,58,63,64,
65,72,73,74,76,77,
78,79,82,84,86,87,
88,89,90,92,93,94,
95,96,96,97,98,99,
100,101,102,105,
122,123
Search 3,19,34,42,59,63,
87,88,91,100,101,
110,112
Shutter Sound 82,83
SIM 1,2,5,9,10,11,12,31
32,34,37,40,41,44,
57,84,74,77,78,82,
90,96,97,111,123
SMS 2,7,42,52,67,68,69
70,71,75,78,101,119
Sounds & Notications 24,42,92
Speed Dial 32,33,77
System Info 45,118
T
Tasks 3,29,51,52,57,58,59
91,93,97,102
Today 7,13,16,18,21,26,34
41,42,56,57,77,89,
94,101,102,122
Transcriber 28

U
USB Cable 6,11,12,48,49,50,64
122
V
Vibrate 34,42
Voice Mail 2,24,33,41,42,67,68
77
W
Wi-Fi 2,7,23,24,55,56,63
64,79,94
Wi-Fi Utility 23,63
Windows Media 3,91,95
Wireless LAN 10,56,63
Wireless Manager 2,23,55,56,57,63,
78
Word Mobile 3,91,99,100
Z
ZIP 3,10,18,91,94,96
127
Index

MWG WARRANTY CARD
CONGRATULATIONS ON THE PURCHASE OF THIS MWg PRODUCT.
ON-LINE HELP
If you have any questions about your MWg device, please visit our website at www.mwg.com
and click Tutorials User tips. You can also contact our Helpdesk by completing the form
Support Contact Us Helpdesk.
WARRANTY
We warrant that your MWg device is at the time of its original purchase free of defects in
materials and workmanship. For Limited Warranty Statement, please go to www.mwg.com and
select your device within the “Support”. To claim warranty service, please go to www.mwg.com
and select Support Contact Us Collection Points.
PLEASE DO NOT REMOVE THIS PAGE. COMPLETE THE SALES RECORD
ON THE NEXT PAGE. YOU WILL NEED TO PRESENT THIS BOOKLET AND
PROOF OF PURCHASE AT THE COLLECTION POINT, IF YOU REQUIRE
WARRANTY SERVICE.
CUSTOMER SALES RECORD
NAME:
IMEI NUMBER:
MAKE & MODEL:
DATE OF PURCHASE: / /
COMPLETE THE SALES RECORD WITH DEALER STAMP. PRESENT THIS
BOOKLET AND YOUR PROOF OF PURCHASE AT THE COLLECTION POINT
IF YOU NEED REPAIR OR SERVICE.
DEALER SIGNATURE AND STAMP