GIGA BYTE Communications 9QSTEAL000 Mobile Phone with Bluetooth and 802.11bg User Manual 20060822 indd
GIGA-BYTE Communications Inc. Mobile Phone with Bluetooth and 802.11bg 20060822 indd
Contents
- 1. USERS MANUAL 1
- 2. USERS MANUAL 2
- 3. revised users manual 1
- 4. revised users manual 2
revised users manual 1
Chapter 1
Before Using Your O2 Xda Stealth
1.1 What’s in the box
1.2 Familiarizing yourself with your O2 Xda Stealth
1.3 Key definitions
1.4 Features
1.5 Insert the battery & SIM card
1.6 SIM
1.7 Battery
1.8 Lock/Unlock
1.9 Memory expansion
1.10 Data backup
1.11 Power management

4
Chapter 1. Before Using Your O2 Xda Stealth
1.1 What’s in the box
Thank you for selecting O2 Xda Stealth. Please check if your package comes with the following items.
If any of them is missing, please contact your retailer.
O2 Xda Stealth—your Windows Mobile-based Pocket PC phone
Stylus
Standard Battery
Universal AC Adapter with four plugs for different countries
High Quality Stereo Wired Headset
USB Cable
ActiveSync and Application Software CD
User Manual
Quick Start Guide
Warranty Card
1
Before Using Your O2 Xda Stealth
5
1
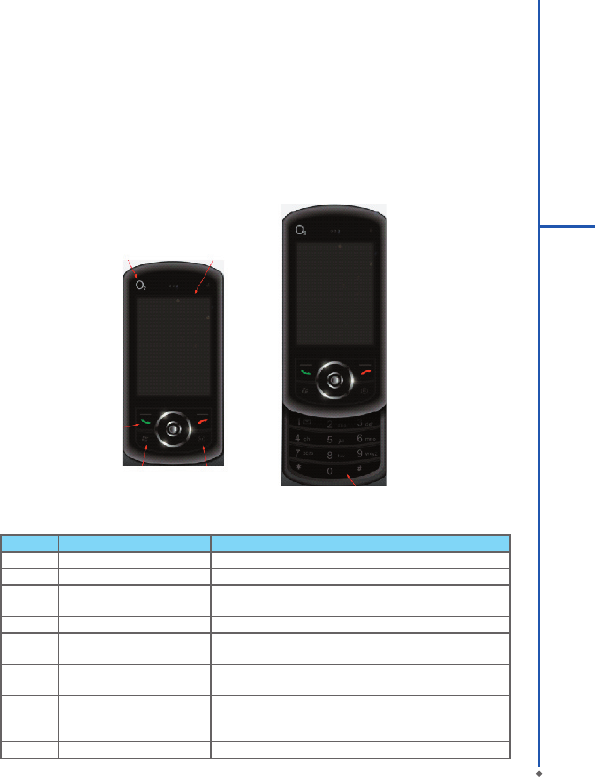
1.2 Familiarizing yourself with your O2 Xda Stealth
This section introduces you to the hardware of the device and its function keys
No. Item Function
1 Receiver You can hear caller’s voice through receiver.
2 Touch screen Display screen. Use stylus to select items on the screen.
3 Call key You can make or answer a call by pressing Call key, or
press to launch Phone screen.
4 key Press the key to open Start menu options.
5 End key Press this key to end a call or to return to Today screen
from any screen.
6 OK key Press this key to execute or terminate a selected function
or application.
7 5- Way navigation key Use up, down, left and r ight direc tions to navigate.
Press the center key to execute the selected function or
application.
8 Dial keypad You can use the dial keypad to dial telephone numbers.
Before Using Your O2 Xda Stealth
6
1
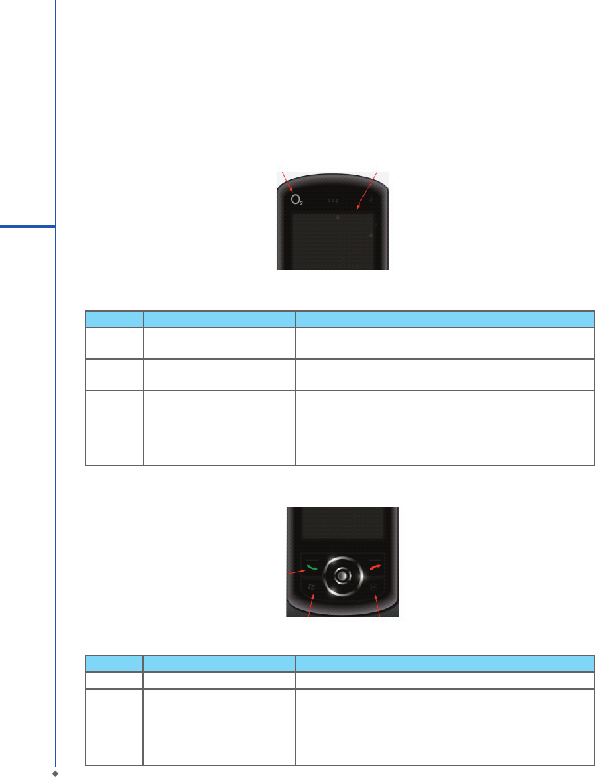
Getting started
No. Item Function
12 Microphone Talk on the phone.
13 Mini USB / Charging slot Connect a charger adapter to this slot to start charging.
This slot is also a USB slot. You may connect your O2
Xda Stealth to computers or other devices with a USB
cable and transfer files between the phone and that
device.
No. Item Function
9 Power on/off Press and hold Power key for a few seconds to power
on/off your device.
10 Monophonic speaker Besides using earphones, you may play music /voice
through the built-in speaker.
11 LED indicator The LED indicator indicates the status of your device by
showing different colors.
Blue: Bluetooth is activated.
Orange: Wi-Fi is activated.
Green: mobile network is detected.
7
1
Getting started
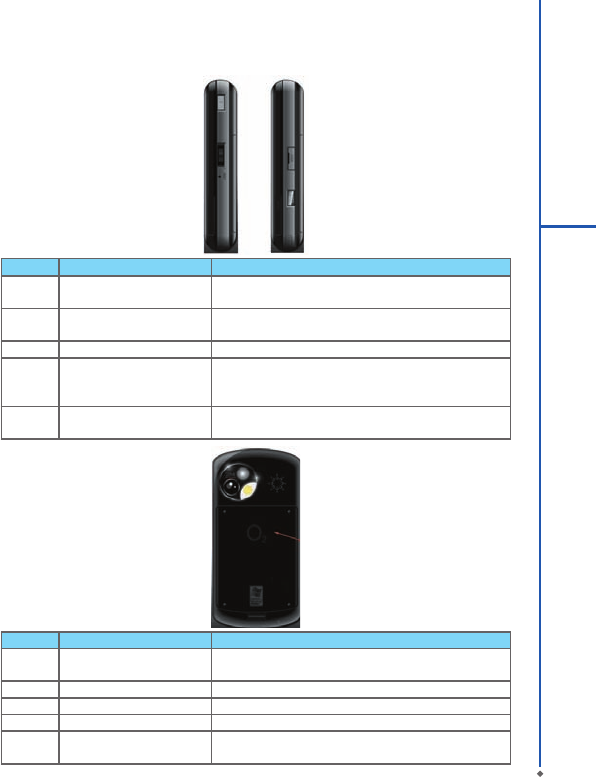
No. Item Function
14 Headset plug Plug in stereo headset and then you can listen to the
music via the headset or use the phone’s hands-free kit.
15 Mini SD card slot You can insert your Mini SD card here to save data in
your card.
16 Soft reset button Press the button with the stylus to soft reset your phone.
17 Camera key Press and hold Camera key to launch camera function.
In Camera mode, press as 2-step shutter key to capture
pictures.
18 Volume key Slide this key upwards or downwards to adjust volume.
Press and hold this key to directly record voice note.
No. Item Function
19 Flash light Support Auto Flash, Forced Flash On, and Forced
Flash Off modes.
20 Stylus holder & Stylus Use the stylus to touch the screen panel.
21 Battery Power your O2 Xda Stealth.
22 Battery lock Pull down the battery lock to remove the battery.
23 Camera lens The CMOS camera supports 2-mega-pixel photo and
high quality video.
8
1
Getting started
1.3 Key definitions
Key Function
5-way navigation key – Up Move cursor up.
5-way navigation key – Down Move cursor down.
5-way navigation key – Left Move cursor to the left.
5-way navigation key– Right Move cursor to the right.
5-way navigation key - Center Execute your selection.
Call Pick up calls and make new calls.
End Press: return to Today screen.
Press and hold: torch light.
Power on/off Press: enter suspend mode.
Press and hold: power off.
key Press: display or hide Start menu.
OK key Press: execute the function of the top right screen ( or ).
Press and hold: switch screen display to portrait or landscape.
Camera key Press and hold: enter camera mode.
Volume key Slide up: increase volume.
Slide down: decrease volume.
Press: activate voice command.
Press and hold: activate voice note.
Soft reset button Soft reset your O2 Xda Stealth.
1.4 Features
Like a standard mobile phone, your O2 Xda Stealth supports basic dialing features. Besides, it
also integrates Personal Digital Assistant (PDA) capability. The following section provides more
information about the phone’s features:
● Touch screen: 2.4” TFT LCD display with 65,536 colors effective.
● 5-way navigation key.
● Windows key.
● Monophonic speaker & microphone.
● Slide-to-answer Mode.
● Mini-USB connector for connection and battery charging.
● Camera: 2.0 mega pixels.
● Connections: Bluetooth, and Wireless LAN.
● Microsoft Windows Mobile 5.0: Pocket MSN, Pocket Outlook, Pocket Explorer, and Office tools
(Word, Excel, and PowerPoint). Also features Windows Media Player 10, Terminal Services Client,
Pictures & Videos, Calculator, Games, ActiveSync, and File Explorer.
● O2 programs: O2 Connect, O2 AutoInstaller
● Other programs: Answering Machine, Phone Recording, Recorder, GPRS Monitor, Auto Configurator,
Java support, Torch, ClearVue PDF viewer, etc.

9
1
Getting started
1.5 Insert the battery & SIM card
Before inserting/removing a SIM card, please make sure your O2 Xda Stealth is powered off and is not
connected to any power supply by the USB cable or charger.
● Look at the back of the phone. Pull down the battery lock and lift the battery upward as shown below
in order to remove it.
● Find the SIM card slot and insert the SIM card with the metallic part facing down and the clipped
corner in the left direction.
● Insert the battery back to the battery slot.

10
1
Getting started
1.6 SIM
Before using your O2 Xda Stealth, you must contact a network operator to get a personal SIM
(Subscriber Identity Module). The SIM card contains your O2 Xda Stealth number, the services
included in your subscription, and your personal data such as your phonebook and messages. The
phone is unusable (except for emergency calls) until a valid SIM card is inserted.
Please note: If the phone or the SIM card is lost or stolen, you should contact your network operator
immediately in order to prevent unauthorized use.
1.7 Battery
Your O2 Xda Stealth comes with a removable and rechargeable Li-Ion battery. The standby time and
talk time will depend on your actual usage network coverage and whether the phone is on standby
mode. The battery life may also vary depending on how frequently the user switches between
functions.
Please note: Using any battery pack or AC adapter (charger) not specified/endorsed by O2 on this
phone may be dangerous and may invalidate any warranty and approval given to the phone. Unplug
the charger from the power supply when it is not in use.
Charging the battery
Please make sure that the battery is installed and fully charged when using your O2 Xda Stealth for
the first time. You may charge the battery in the following ways:
● Universal AC Adapter: Plug your AC adapter into a suitable main power socket and plug the
connector to the charging slot of your O2 Xda Stealth. The phone will start charging automatically.
● USB cable: Connect your O2 Xda Stealth to your PC’s USB port with the USB cable supplied in your
package as shown below.
11
1
Getting started
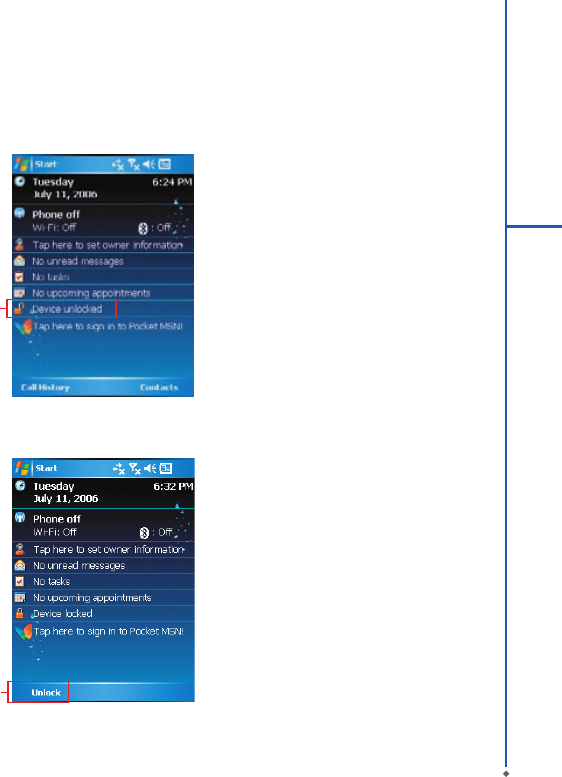
1.8 Lock/Unlock
1. Lock the phone: On Today screen, tap Device
unlocked to lock your O2 Xda Stealth. The
phone will not respond to touches on screen
nor will it react to any input on the keypad
when it is locked.
Yo u m a y a l s o e n a b l e t h e d e v i c e l o c k
automatically after the backlight of the screen is
turned off.
To enable automatic lock:
Tap Start > Settings > System tab > Power
> Extended tab and check the box shown on
the screen. Your O2 Xda Stealth will enable lock
automatically during stand-by.
2. Unlock the phone:
● Tap Unlock on the bottom left of the screen,
● T h e n t ap U n l o c k b u tt o n o n t he n e w l y
appeared screen and the phone is unlocked.
1
2

1.9 Memory expansion
To expand the memory of your O2 Xda Stealth,
you can insert a Mini SD card into the card slot
located at the right side of the phone. Make sure
the card is inserted correctly.
1.10 Data backup
Your O2 Xda St eal t h sup p or t s 64 M B R A M
capacity; however, you may need to back up
data and any new programs that you install in
the RAM to guard against data loss. To back up
your Contact, Calendar, etc., please set up the
synchronization partnership with your PC and
connect the phone with PC. ActiveSync will start
automatically.
1.11 Power management
To power on your O2 Xda Stealth
While the phone is powered off, press Power
key on the top of the phone to power it on.
To power off your O2 Xda Stealth
While the power is on, press and hold Power
key on the top of the phone for about 3 seconds
to turn off the device.
To reduce the power consumption of your phone,
you may change the back light duration and
brightness level. Also, you can save more power
by setting the phone to turn off automatically if it
is not in use for a specific period of time.
To check battery power level
Tap Start > Settings > System tab > Power
> Batter y tab. A bar indicates the remaining
battery power level.
To turn off the device automatically
Tap Start > Settings > System tab > Power >
Advanced tab and select the duration before
your device turns of f by itself. T his feature
controls the screen standby time.
To reduce the brightness level
Tap Start > Settings > System tab > Backlight
> Extended tab and adjust the brightness level
of B at ter y Power or External Power, from
darkest to brightest.
To adjust the backlight duration
Tap Start > Settings > System tab > Backlight
> Battery Power tab or External Power tab
to select backlight duration and condition for
backlight on/off under either battery power or
external power supply.
12
1
Getting started
Chapter 2
Getting Started
2.1 Display information
2.2 Screen orientation
2.3 Setting time & date
2.4 Using the stylus
2.5 Screen alignment
2.6 Input method
2.7 Drawing on the screen
2.8 Recording a message
2.9 Editing my info
2.10 Password setup
● Start menu: Tap here to open Windows Start menu on the top left of the screen. To return to Today
screen at any time, tap Start > Today.
● Status & Icon area: It displays notification icons and system status such as battery status,
connection status, SIM card status, time, signal, volume, message arrival, etc. You can tap the
icon to view the detail or settings of the function.
● Today screen: On Today screen, this area contains shortcuts to certain programs and important
information of Today. To change Today screen settings, tap Start > Settings > Personal tab
>Today.
● Command area: Depending on the current mode, this area contains different features such as input
panel and commands to create or edit a file. On Today screen, it shows Call History on the left
and Contacts on the right.
Chapter 2. Getting Started
2.1 Display information
The main screen displays the following information:
Start menu Status & Icon area
Today
screen
Command area
14
2
Getting started
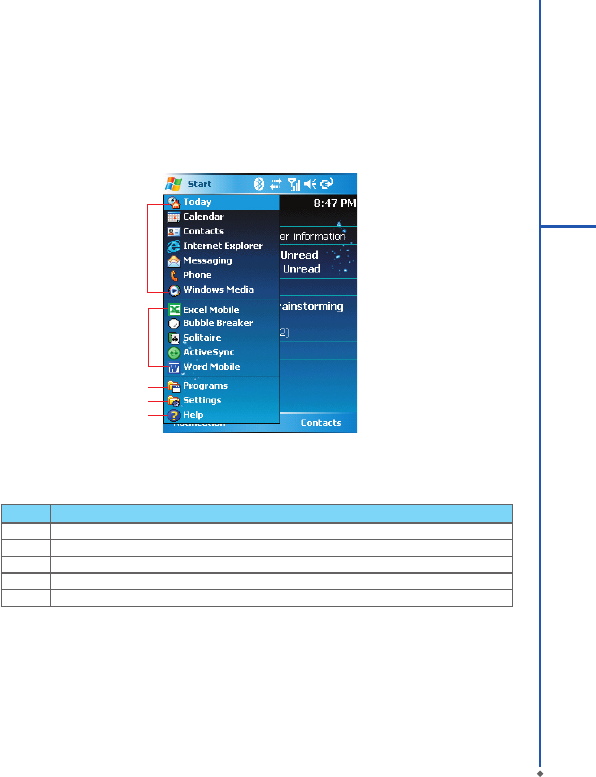
Start menu
Tap Start to bring up a list of menu:
1
2
3
4
5
No Description
1 Quick access to certain fixed Microsoft programs.
2 The most recent 5 programs you have used.
3 Tap on Programs to enter the programs screen.
4 Tap on Settings to enter the settings screen.
5 Tap on Help to see detail information about your O2 Xda Stealth.
15
2
Getting started
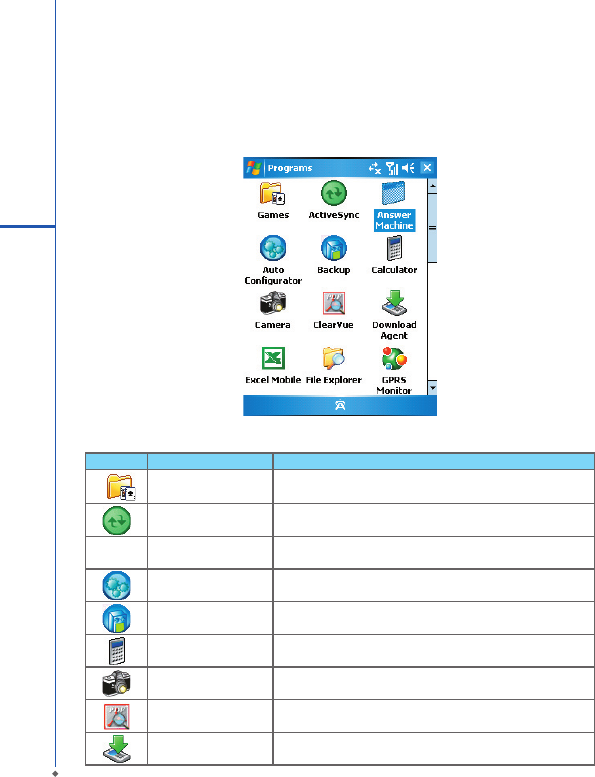
Programs
You will see many application icons on your Programs screen. From Programs screen, you may
touch on the application icon that you desired to use to execute the application.
Icon Programs Description
Games Provide games such as Bubble Breaker and Solitaire.
ActiveSync Transmit data between your computer and your O 2 Xda
Stealth.
Answering Machine Activate/deactivate Answering Machine function.
Auto Configurator Configure your network operator settings.
Backup Create backup of your O2 Xda Stealth’s settings and data.
Calculator Perform basic calculations.
Camera Take photos and record video clips.
ClearVue PDF Support viewing of PDF files.
Download Agent Manage your download applications.
Your O2 Xda Stealth contains the following programs:
16
2
Getting started
Icon Programs Description
Excel Mobile Create, edit and view Excel files.
File Explorer View all the files on your O2 Xda Stealth.
GPRS Monitor Monitor your GPRS traffic and cost.
Internet Sharing Connect your PC /Notebook via your O2 Xda Stealth as a
modem.
JAVA Manage your Java applications.
Notes Write notes, memo, or drawings.
O2 AutoInstaller Lead you to the installation of extra O2 applications.
O2 Connect Connect to O2 website and download the latest software
updates.
Photo Editor Edit your photos on your O2 Xda Stealth.
Pictures & Videos Your images and videos.
Pocket MSN Access for MSN services.
PowerPoint Mobile View PowerPoint files on your O2 Xda Stealth.
Recorder Record your voice memos.
Search Search for all data, programs, and files.
Tasks Keeps trac k of your appointments and creates meet ing
requests.
STK The service’s availability depends on your operator.
Te r m i n a l S e r v i c e s
Client Allow you to connect to a defined terminal server.
Torch Use the LED light on the phone as a torch.
Voice Speed Dial Record your voice tags and initiates voice commanding
environment.
Word Mobile Create, edit and view Word files.
Zip Compresses your files in the phone to save memory space.
17
2
Getting started
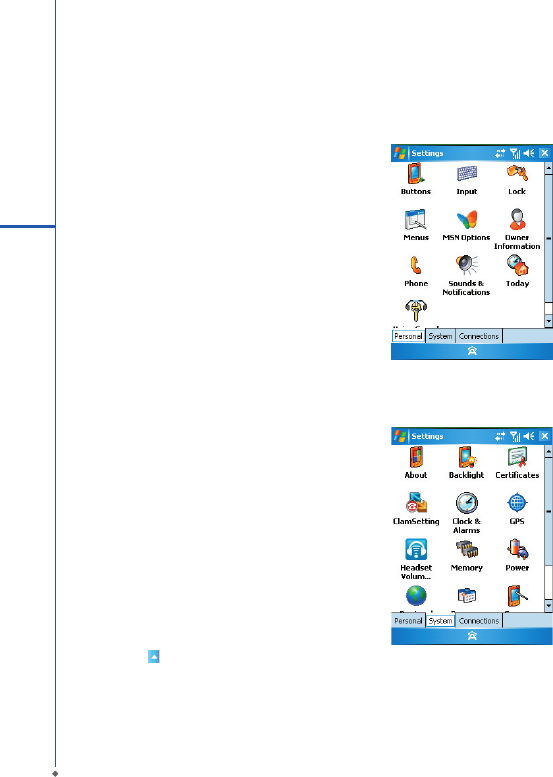
Settings
Your O2 Xda Stealth contains Personal, System, and Connections setting items.
Icon Settings Description
Buttons You may assign application programs to a hardware button.
Input Set your preferred input method.
Lock You may set a personal password for your O2 Xda Stealth.
Menus Select the programs to be displayed in Start menu.
MSN Options You may set MSN password, account, and other details.
Owner Information You may input your personal information.
Phone Settings for phone functions.
Sounds & Notifications Settings for alarm sound and notification.
Today Settings for screen appearance and items displayed on the
Today screen.
Voice Speed Dial Record your voice tags for contacts or applications.
Tap Start > Settings > Personal tab:
18
2
Getting started
Icon Settings Description
About Contain information about your O2 Xda Stealth.
Input Configures the backlight settings and adjusts the brightness
level to save power.
Certificates Information about the certificate issuer and the expiration
date.
Slide setting Enable you to answer calls by sliding the phone
Clock & Alarms Settings for time and alarms.
GPS Settings for using GPS function.
Memory D isplay memory status and programs that are currently
running.
Power Battery status and settings.
Regional Settings Settings for region, number, currency, time, and date.
Remove Programs Remove programs from your O2 Xda Stealth.
Screen Settings for screen orientation, screen alignment, and text
size.
System Info Display the system information.
H e a d s e t V o l u m e
Limiter Modify your headset volume to safer and better quality.
Tap Start > Settings > System Tab:
19
2
Getting started
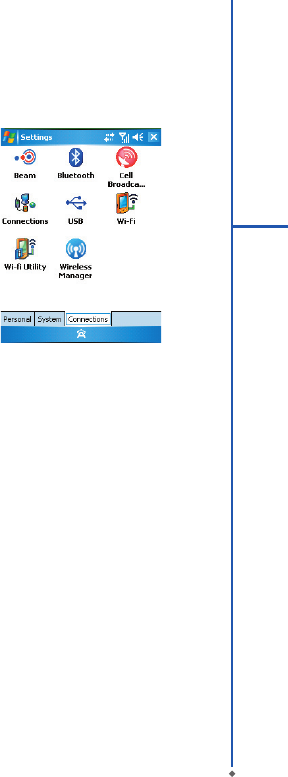
Icon Settings Description
Beam You can choose to receive all incoming beams.
Bluetooth Settings for Bluetooth connection.
Cell Broadcast Setting Receive broadcast channel information and news from your
service provider.
Connections Settings and management for modem connections.
USB Use your O2 Xda Stealth as a mini SD card reader.
Wi-Fi Manage and configure your Wi-Fi settings.
Wi-Fi Utility Details of your Wi-Fi connection.
Wireless Manager Turn on/off Bluetooth or flight mode.
Tap Start > Settings > Connections Tab
20
2
Getting started
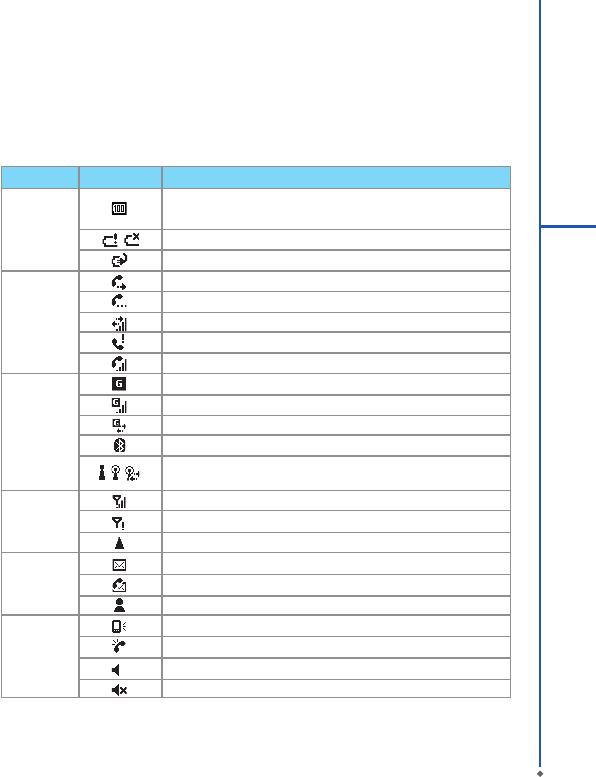
Status Type Icon Description
Battery Main battery power is full; the number shows the percentage of
remaining battery power.
Low battery. Please recharge.
Battery is charging.
Calls Call forward.
Call on hold.
Data call.
You have missed calls.
Voice call.
Connection GPRS is in range.
GPRS is connected.
Building connection to GPRS.
Bluetooth is activated.
Wi-Fi is activated/Wi-Fi network is in range / Wi-Fi network is
connected.
Signal Strong signal.
No signal.
Roaming.
Message You have one or more new message(s).
You have one or more new voice mail(s).
You have one or more instant message(s).
Volume System volume,
Phone volume,
Ringer is on,
Ringer is off,
Status & Icon area
This area shows icons of basic system status or alerts. You can tap on the icon to get the definitions
or go to the settings.
Please note: To choose reminder types and sounds for your O2 Xda Stealth, tap Start > Settings >
Personal tab > Sounds & Notifications.
21
2
Getting started
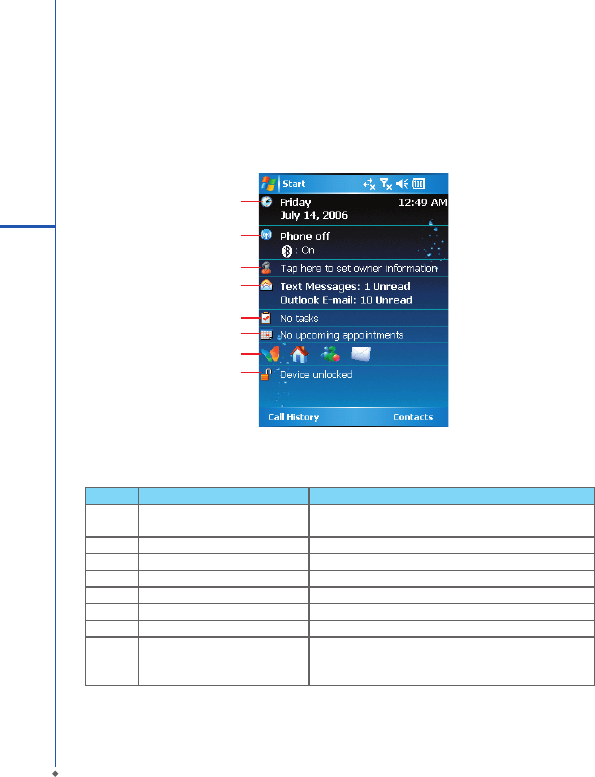
Today screen
This screen contains the following items for quick access and convenient viewing.
1
2
3
4
5
6
7
8
No. Item Description
1Time and Date View time and date information or tap to edit the
alarms.
2 Wireless Manager Show all your current connections status.
3 Owner Information Tap to edit your contact information.
4 Message Notification Remind you of incoming messages and E-mails.
5 Tasks Remind you of unfinished tasks.
6 Appointments Reminder Remind you of an appointment.
7 Pocket MSN Services Quick access to MSN services.
8 Device Lock
Di s p l ay y o u r O 2 X d a S te a l t h l o c k st a t u s . T his
feature prevents your screen and keypad from being
accidentally touched or pressed.
22
2
Getting started
2.2 Screen orientation
You can also choose your screen display in
Portrait or Landscape. The Portrait mode allows
you to get a better view or a better operation
of cer t ain pr ogram s on your S te alth, while
Landscape may be optimal for viewing longer
text files.
Press and hold OK any time when your O 2
Xda Stealth is on to switch your screen display
between Portrait and Landscape.
You can also change the default screen display
by following the steps below:
1. Tap Start > Settings > System tab > Screen
> General tab.
2. On General tab screen, select your desired
orientation, Por t rai t, Lan dsc ape (r ight-
handed), or Landscape (left-handed).
3.Tap OK, and the s creen wil l be changed
accordingly.
23
2
Getting started

2.3 Setting time & date
When using your O2 Xda Stealth for the f irst
time, you are required to set your time zone,
time, and date. You can also tap on the clock
icon on Today screen to setup time and date.
1. Tap Start > Settings > System tab > Clock
& Alarms > Time tab.
2. Select Home or Visiting.
3. Select your time zone.
4. Select AM / PM.
5. Use the u p and dow n arrow asi de hour,
minute and second to adjust the highlighted
time unit.
6. Tap the down arrow aside the date to open
a calendar, and select a desired month, date,
and year.
7. Tap OK, a pop-up window will appear on your
screen to confirm to Save Changes to the
clock settings.
8. Tap Yes to save the changes and exit.
2.4 Using the stylus
Use the stylus to touch or write on your screen.
Using stylus can avoid damaging your screen.
There are 2 ways to use your stylus:
● Tap: softly t ap on a desire d item by your
stylus, and lift the pen from the screen.
● Press: touch and hold your stylus on a desired
item for a few seconds until a blue dotted
circle appears. This indicates that a pop-up
menu is going to be activated.
2.5 Screen alignment
When using your O2 Xda Stealth for the f irst
time, screen alignment is required. If you find
that the phone does not accurately respond
to your stylus taps, or you have per formed a
system reset, you need to align your screen.
1. Tap Start > Settings > System tab > Screen
> General tab.
2. Tap Align Screen on your screen.
3. On the align screen, use your stylus to touch
the crosses on the screen accurately.
4. Tap OK to exit.
24
2
Getting started
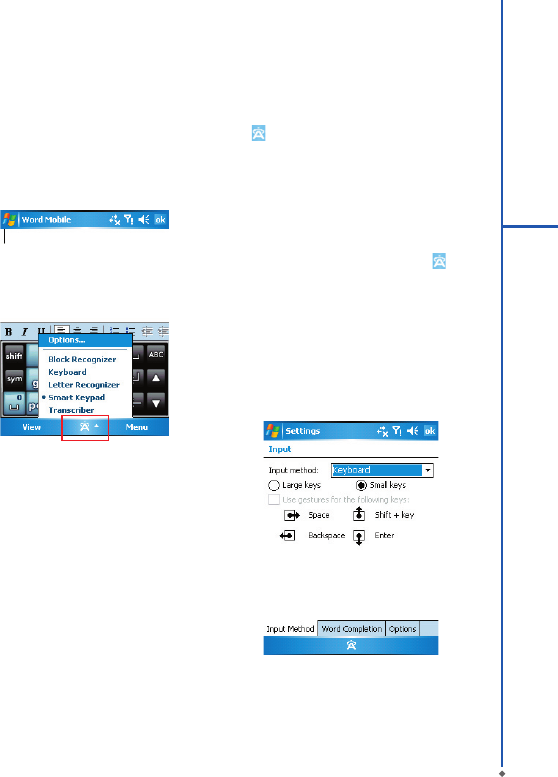
2.6 Input method
Your O2 Xda Stealth provides the following input
methods for you to edit text. You can choose
among the input methods by tapping the arrow
next to the input panel button.
Block Recognizer
With Block Recognizer, you can input character
strokes (using the st ylus) that are similar to
those used on other devices.
1. On your screen keyboard, tap the arrow icon
next to the keyboard icon for more input
meth ods. On the pop - up lis t, tap Block
Recognizer.
2. Write letters and numbers in a corresponding
fiel d, the system will display the letters /
numbers identified from your handwriting.
3. Do not write letters / numbers continually to
prevent recognition error.
4. Do not write letters outside of the input fields.
Keyboard
You can input data by using screen keyboard.
Tap icon on your screen to open the screen
keyboard. Follow the steps below to input your
data:
1. On your screen keyboard, tap Shift or CAP
key to input a Capitalized letter or to input
multiple symbols.
2. Tap the key on your scr ee n keyb oard to
delete.
3. To close the screen keyboard, tap icon
again o n your scr ee n to hide the s creen
keyboard.
Please note: To change the displayed keyboard
size on t h e screen, t a p th e ar r o w b e s i d e
Keyboard icon and tap Options. Under Input
screen, you may select either Large keys or
Small keys by tapping on its radio button.
25
2
Getting started
Letter Recognizer
1. O n your screen keyboard, t ap the ar row
icon next to Keyboard icon for more input
meth ods. On the pop - up list , ta p Let t er
Recognizer.
2. Write letters and numbers in a corresponding
fi eld on your Lett er Recogniz er screen.
Your O2 Xda Stealth will display the letters
/ numbers that you had just input in Letter
Recognizer fields.
3. Tap the key to delete an input.
Smart Input
This input method allows you to edit tex t by
either tapping on scree n panel or pres sing
12- key ph one keypa d. Usi n g t his met h o d,
the number of key presse d required will be
dramatically reduced.
1. On your screen keyboard, tap the next to
icon for more input methods. On the pop-
up list, tap Zi for Smart Keypad.
2. Tap i con to sw itch b et ween Numer ic
keypad and Alphabetic keypad. For example,
to input “Stealth,” simply tap the combination
of the letters assigned to the following number
string: “7832584.” Select the spelling until it
displays on the list on top left screen. To insert
a symbol, tap “1” to open a quick symbol list
or tap icon to get more symbols.
3. To use the 12-key phone keypad, you can
start by pressing the key and the screen panel
will close. For example, to input “Stealth,”
simply press the combination of the letters
assigne d to the following number string:
“7832584.” Confirm the spelling you want by
pressing 5-way Key– Center icon. To insert
a symbol, press “1” to open a quick symbol.
You can also clear a letter by pressing “#” or
add space by pressing “0”.
Transcriber
Transcriber allows you to write on the full screen
using the stylus just as you would write on
paper. Unlike Letter Recognizer and Block
Recognizer, you can write a sentence or more
than one sentence. Pause and let Transcriber
c h an g e th e w r i t t en c ha r ac t er s t o t y p e d
characters.
1. On your screen keyboard, tap the arrow
icon next to icon for more input methods.
On the pop-up list, tap Transcriber.
2. Position the cursor where you want text to
appear.
3. Use t he stylus to write any w he re on the
screen. The handwriting will be converted to
text after you lift the stylus from the screen.
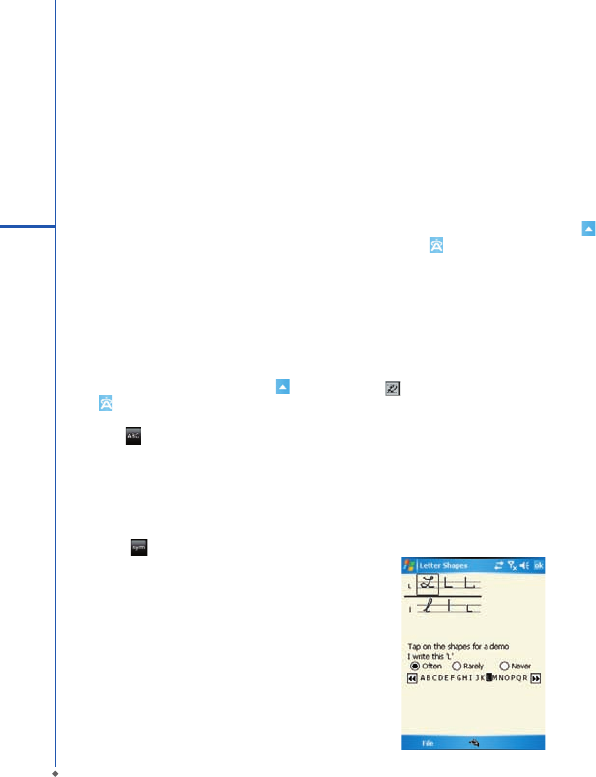
● Learning how to write in Transcriber:
1. Tap on the tool bar.
2. A Letter Shapes Selector screen will appear,
select the character you wish to explore, tap
the picture of this character on top of the
screen, and it will demonstrate the writing
sequence of the letter. Select how often you
write the character using that method.
3. When you finish the selecting all the letters,
you can save these as a profile by tapping
File > Save.
26
2
Getting started
2.7 Drawing on the screen
You can draw on the screen in the same way
that you write on the screen. The difference
bet ween writing and dr awing on the screen
is how you select items and how they can be
edited. For example, selected drawings can be
resized, while writing cannot.
Creating a drawing:
Cross three ruled lines on your first stroke. A
drawing box appears. Subsequent strokes in or
touching the drawing box become part of the
drawing. Drawings that do not cross three ruled
lines will be treated as writing.
Selecting a drawing
To edit drawing, select it first.
1. Tap and hold the stylus on the drawing until
th e sele c tion hand le ap p ear s. To sele c t
multiple drawings, deselect the pen button
and drag to select drawings you want.
2. You c a n c u t , cop y, a n d p a ste selec ted
drawings by tapping and holding the selected
drawing and tapping an editing command on
the pop-up menu, or by tapping the command
on Edit menu. To resize a drawing, make
sure Pen button is not selected, and drag a
selection handle. To change the zoom level so
it is easier to work or view your drawing, tap
Tools and select a zoom level.
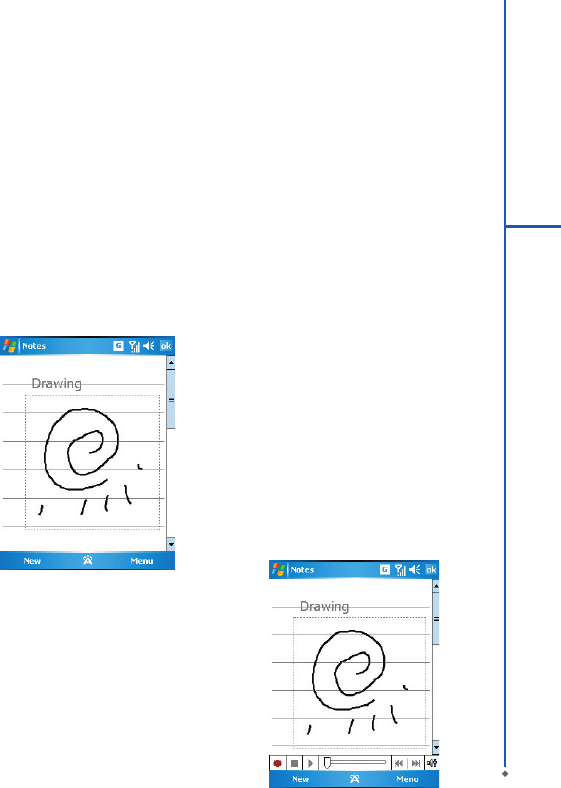
2.8 Recording a message
In any program where you can write or draw
on the screen, you can also quickly capture
thoughts, reminders, and phone numbers by
recording a message. In Calendar, Tasks, and
Contacts, you can include a recording in Notes
tab.
In Notes, you can either create a standalone
recording, or include a recording in a written
note. If you want to include the rec ording in
a note, open the note first. In the Messaging
program, you can also add a recording to an
E-mail message.
Creating a recording
1. To add a recording to a note, open the note
before recording. Tap Start > Programs >
Notes.
2. If there is no Record/Playback toolbar, tap
Menu > View Recording Toolbar.
3. Hold your phone’s microphone near your
mouth or another sound source.
27
2
Getting started
4. To start recording,
5. To stop recording, tap . The new recording
appears in the note list .
6. To play a recording, tap in the open note or
tap the recording in the note list.
You can also acc ess the Re cord / Playback
toolbar by pressing down Volume key for a
while.
To qu i c k l y crea t e a recordin g , ho l d dow n
Volume key. When you hear the beep, recording
has begun. Release the button when you are
finished. The new recording is stored in the open
note, or as a standalone recording, if no note is
opened.
2.9 Editing my info
You can input your personal information to your
O2 Xda Stealth in Owner Information.
1. Tap S t ar t > S etti ngs > Per sona l tab >
Owner Information > Identification tab.
2. Tap Name field and input your name.
3. Ta p a des ired inp ut f i eld an d input your
information.
4. Tap Notes tab to input other information you
would like to display on your O2 Xda Stealth.
5. If you want your information to be displayed
on the starting screen, tap Options tab.
2.10 Password setup
You can set your own passwo rd to prevent
unauthorized use of your O2 Xda Stealth.
1. Tap Start > Settings > Personal tab > Lock
> Password tab.
2. On Password tab screen, check Prompt if
device unused for.
3. Select an appropriate time.
4. Select a password type in Password type
field.
5. Input your password in Password field and
reconfirm the password in Confirm field.
6. Tap O K, a pop -up window will appear to
confirm, “ Do you want to save password
settings changes?”.
7. Tap Yes to f ini sh set tin gs and save the
changes; No to cancel.
8. You may also input password hint message
under Hint tab screen.
9. Tap OK to save your inputs.
Please note: If you forget your password, you
need to perform system default, which will lose
all your data and settings.
28
2
Getting started
Chapter 3
Phone Functions
3.1 Phone screen and key introduction
3.2 Making a call
3.3 Receiving / Ignoring a call
3.4 International calls
3.5 Emergency calls
3.6 Volume adjustment
3.7 Contacts
3.8 Creating a new contact
3.9 Call history
3.10 Setting ring tone and password

3.1 Phone screen and key
introduction
Press key to enter phone functions. Please
insert a SIM card before using these functions.
Phone screen
From Phone screen, you can access Contacts,
Speed Dial, Call Histor y, and more options
under Menu. This screen has the f ollow ing
features:
1. The name of the network provider
2. The number you entered
3. Touch screen keypad
4. Contacts list
5. Signal strength
6. Clear numbers
7. Received, dialed and missed call history
8.Quick dial a number
9. Make/End a call
10. Access more options
1
2
3
4
5
6
7
8
9
10
When a call is connected, the screen displays
the following:
1. The calling status
2. The name and number of the contact you are
calling
3. Speaker On/Off
4. Create a note for the call
5. Return to the pone screen
6. Contact list
7. Mute the call
8. Hold the call
9. End the call
10. Access more options
1
2
3
4
5 6 10
7
8
9
Chapter 3. Phone Functions
30
30
3
Getting started
30 31
3
Getting started
3.2 Making a call
With your O2 Xda Stealth, you can make a call
by entering the phone number, or selecting a
number from Contacts, Speed Dial, and Call
History.
1. After entering the phone function, you can dial
a number using the dial keypad or the keypad
on your screen.
2. To delete an error input, use key on your
screen.
3. Press Key to make a call.
4. Press Key to end the call.
Speed dial
You can set ten phone numbers in your speed
dial list.
1. After entering phone function, press Speed
Di al but to n on your screen to enter your
Speed Dial List.
2. On Speed Dial List screen, you can select
a contact on your list to see the contact’s
detailed information.
3. On Speed Dial List screen, tap Menu on the
bottom right corner of the screen. You can
perform New, Edit, or Delete contacts on
your Speed Dial List.
4. To make a c all, pres s the corresponding
number on your keypad to call the contact on
your speed dial list.
5. You can also use the navigation key to select
a contact you want to call on the speed dial
screen, and then press Key to call.
6. Press Key to end the call.
3.3 Receiving / Ignoring a call
When you receive a phone call, a notification
message will appear. To answer the incoming
call, tap Answer or press .
To ignore or reject a call, tap Ignore or press to
mute the phone and reject the call.
This may divert the call to your voice mail,
depending on your network operator.
3.4 International calls
When yo u make an int ernati o nal call fr om
an y c o u ntr y, y ou need to inse r t a spec i a l
intern at ional a cces s co de. If yo u enter “+”
symbol as a prefix before the number you are
calling, then you do not need to enter the access
code for the country you are calling from.
To make an international call
1. Tap and hold 0 key until + sign appears. +
replaces the international prefix of the country
that you are calling from.
2. Enter the full phone number you want to dial.
It should include the country code, area code
(without the leading zero), and phone number.
3. Tap Talk or press the .
32
3.5 Emergency calls
Enter the internati onal em ergen cy num ber
112, and then tap Talk or press . Additional
emergency numbers may be included on your
SIM card. Contact your network operator for
more information.
If your O2 Xda Stealth has entered Device Lock
mode, you have to unlock the phone first before
placing emergency call.
1. Press the Unlock on left soft key.
2. Press “Unlock” displayed on the middle of
screen again.
3.6 Volume adjustment
Tap icon on screen and the volume adjustment
window will appear. Adjust the volume of alert
tone for all programs tapping on , and adjust
the ring volume by tapping on .
1. Press the volume adjustment key on the side
manually or tap > to adjust incoming call
volume.
2. If you press the volume adjustment key on
the side of your O2 Xda Stealth or tap >
icons during a call, you may adjust the in-call
volume of the phone. You can only adjust it
during a call.
3. When you select Vibrate, icon will change
to icon.
4. When you select Off, icon on screen will
change to icon
3
Getting started
3.7 Contacts
On Today screen, you can tap Contacts on the
bottom right of the screen to enter Contacts.
Or under Phone screen, tap Contacts on the
bottom left of the screen to enter Contacts.
1. Enter the contact or phone number you intend
to search into the search field, the phone
will search for the contacts that match this
condition.
2. P ush and h old 5 Wa y Na v i g a t i o n Ke y
upwards or downwards to browse contacts
by initial letters in Contacts. (This function
is available for contacts synchronized from
Outlook only.)
3. Tap on any contact to view that contact’s
information.
4. Under Conta cts screen, tap Call on the
bottom left of the screen or press the left
function key to make a call to that person.
5. Under Contacts screen, tap Menu on the
bottom right of the screen for more options.
I f y o u w oul d l i k e t o m ak e a c a l l u si ng a
telephone, go to Contacts and highlight the
person you would like to make a call to. Tap
Menu > Sounds DTMF; then aim your O2 Xda
Stealth to the telephone receiver. Your telephone
will dial out to the desired contact upon reception
of the DTMF sounds from your phone.

33
3
Getting started
3.8 Creating a new contact
On Contacts screen, tap New on the bottom left
of the screen. A blank record will appear.
1. You may set photos in Picture field for this
contact, by which the contact s photo will
display as an incoming call photo ID.
2. You may also tap Ring tone field to set different
incoming call ring tones for your contacts.
3. Tap OK on the top right of the screen to save
the new contact and exit.
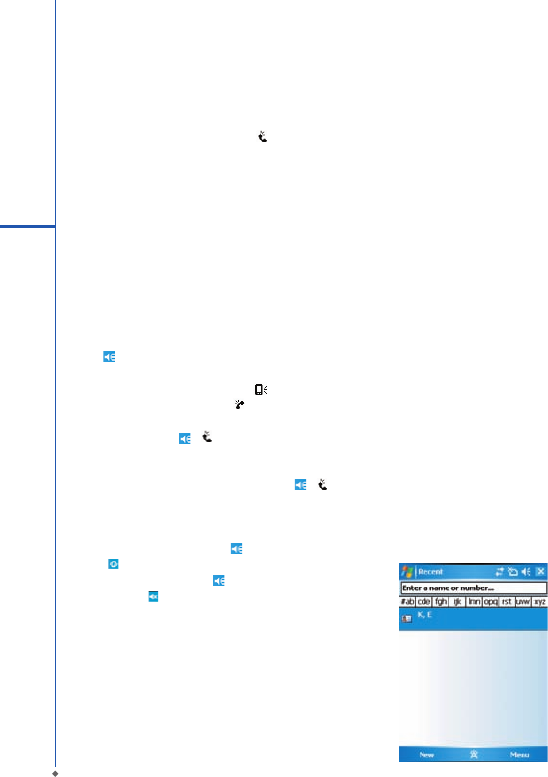
3.9 Call history
Cal l Hi s t o r y c on t a i n s a l l outg oi n g c a l l s ,
inco mi ng c alls, and mis sed calls. You may
choose to display all or only display highlighted
items.
1. Under Today screen, tap Call History on the
bottom left of the screen.
2. Tap Menu on the bottom right of the screen.
3. Select a desired function to perform. You
may change call history display method by
selecting Fil ter; or select Ca ll Timers to
check incoming call numbers, call time, and
manage incoming call history.
4. Under Call History screen, select the icon on
the upper left side of the main screen to redial
this number at once.
5. Under Call History screen, tap and hold on a
phone number to open a drop-down menu for
more options.
3.10 Setting ring tone and
password
On Phone screen, tap Menu on the bottom right
of the screen. Tap Options > Phone tab.
1. You may select preferred ring type.
2. If you want to download ring tones, please
use ActiveSync program in computer and
copy the ring tone file to Application Data
/ Sounds folder in your O2 Xda Stealth. The
ring tone files will be added as the options.
3. You can set keypad tone for dialing.
4. You can set personal password to prevent
unauthorized use from others.

34
1
Getting started
Chapter 4
Settings
4.1 Personal settings
4.2 System settings
36
4
Getting started
Chapter 4. Settings
4.1 Personal settings
You may set your pers onal ized set tings by
preference.
Buttons
You may set certain keys as the activation keys
for your most commonly used programs.
1. Tap S t ar t > S etti ngs > Per sona l tab >
Buttons > Program Buttons tab.
● Under Select a button, tap the button you
want to assign to a program, and then select a
program from Assign a program.
2. In Up/Down Control tab, Delay before first
re pea t change s the tim e elapse d before
scrolling begins. Repeat rate changes the
time it takes to scroll from one item to the
next.
● Press and hold the up/down control to scroll
through the items in a list to adjust.
Input
1. Tap Start > Settings > Personal tab > Input.
2. On Input Method tab, select a desired input
method. On Word Completion tab, select
the desired settings for word completion. On
Options tab, select the desired options for
writing and recording. These options apply to
any program on your O2 Xda Stealth where
you can record or write.
Yo u c a n a l s o c h a n g e i n p u t o p t i o n s by
tapping the arrow and Options.
Lock
A st r o ng p as sw o rd mu s t h a v e a t l e as t 7
characters that are a combination of uppercase
a n d l o w e r c a s e l e t t e r s , nu m e r a l s , a n d
punctuation.
37
4
Getting started
1. Tap Start > Settings > Personal tab > Lock.
2. To enable this function, select how long your
O2 Xda Stealth must be turned off before the
password is required for using your O2 Xda
Stealth by tapping Prompt if device unused
for.
3. Select the type of password you would like to
use: Strong alphanumeric or Simple PIN.
4. Enter the password and,
● If your O2 Xda Stealth is configured to connect
to a network, use a strong password to help
protect network security.
● If you forget your password, you must hard
reset before you can access your O2 Xda
Stealth. A hard reset will erase all files and
data you have created and any programs you
have installed.
● If you have used A cti ve Syn c to create a
backup file, all of your program data can be
restored.
Menus
Only 7 programs are allowed in Start menu. To
add the programs you use most often to Start
menu:
1. Tap S t ar t > S etti ngs > Per sona l tab >
Menus.
2. Select the programs you want, and then tap
OK.
MSN options
Under MSN Options, you can configure settings
for MSN applications.
38
Option Description
General To increase phone security, you can select to Clear Saved Password.
Hotmail Select the E-mail delivery options, filtering level of junk mails, and choose whether to
activate Download new E-mail automatically.
Messenger Enter your display name when you sign in to MSN Messenger.
SMS Select to acti vate SMS for receivin g MSN mes senger mess ag e whe n dat a
connection is temporarily unavailable.
Switch User Press Switch User button to sign in with a new login name.
4
Getting started
Owner information
1. Tap Start > Settings > Personal tab > Owner Information.
2. On Identification tab, enter your personal information.
3. On Notes tab, enter any additional text you want to display when your O2 Xda Stealth is turned on,
such as: “Welcome!”
4. On Options tab, select which message will display when your O2 Xda Stealth is turned on.
Phone
You can easily view and change settings, such as the ring type and ring tone to be used for incoming
calls, and the keypad tone to be used when entering phone numbers. You can also protect your phone
from unauthorized use. There are two ways to change phone settings:
● Tap Start > Settings > Personal tab > Phone.
● To change the phone settings from Phone screen, tap Menu > Options.
Phone ta b
Under Phone tab, you can set up the following items:
Ring type
You can change the way that you are notified of incoming calls. For example, you can choose to be
notified by a ring, a vibration, or a combination of both. Tap the Ring type list, and select the desired
option.
Ring tone
Tap Ring tone list, and then select the sound you want to use.
1. To set .wav or .mid files as ring tones, use ActiveSync on your PC to copy the file to \Windows\
Rings folder on your O2 Xda Stealth. Select the sound from the Ring tone list.
2. To download ring tones, you can make a connection to the Internet and then download ring tones
that are compatible with the .wav or .mid formats.
Keypad
You can change the tone you hear when entering a phone number on the keypad. If set to Long
tones, the tone is heard continuously for as long as the number on the keypad is pressed. If set to
39
4
Getting started
Short tones, the tone is heard only for one or two seconds.
1. Tap Keypad list; then select the option you want.
2. To prevent tones from being heard when entering a phone number, select Off.
Security
You may check Require PIN when phone is used option to enhance your phone security. Tap
Change PIN icon to change your SIM PIN number.
S er vic e s tab
Settings include Call Barring, Caller ID, Call Forwarding, Call Waiting,
Voice Mail and Text Messages.
1. Tap Start > Settings> Personal tab > Phone > Services tab.
2. Check the items you want to select and tap.
3. Tap OK to save settings and return to Personal tab screen.
Option Description
Call Barring Block incoming and/or outgoing calls.
Caller ID Display your name and/or phone number for outgoing calls.
Call Forwarding Forward all or selected incoming calls to a different number.
Call Waiting Notify you an incoming call while you are on the phone.
Voice Mail and
Text Messages
Set up voice mail and SMS service center.
Please note: All services in Services are provided by operators. Please contact your operator for
enquiries regarding these services.
N et wor k t ab
Tap Start > Settings> Personal tab > Phone > Network tab
● Under Current network, tap Find Network to automatically search for the network in use.
● Under Network Selection, select Automatic or Manual to select network automatically or
manually.
● Under Preferred networks, tap Set Networks to set your preferred order of networks.
In fo r m ation ta b
This tab provides device related phone information.
Sounds & Notifications
Turning off sounds and the notification helps conserve battery power. To change the ring type and
volume:

40
1. Tap Start > Settings > Personal tab > Sounds & Notifications.
2. On Sounds tab, you can select the desired actions.
3. On Notifications tab, you can customize how you are notified about different events. Select the
event name and then select the type of reminder. You can select a special sound, a message, or a
flashing light.
Today
To change the theme of your Today screen:
1. Tap Start > Settings > Personal tab > Today.
2. On Appearance tab, select the desired theme. To use your own background, select Use this
picture as the background and then tap Browse to locate the desired file.
3. Choose a folder, tap the file you want, and tap OK.
Please note: The recommend picture size for the background is 240x320 pixels in jpeg file format. To
beam a favorite theme to a friend, select the desired theme, and tap Beam on Appearance tab.
Customizing the displayed information:
1. Tap Start > Settings > Personal tab > Today > Items tab.
2. Select the information you want to be displayed on Today screen.
3. To customize the information further, select an information type, and then tap Options (not available
for all information types).
Voice Speed Dial
You can record voice tags to dial a phone number or launch programs by speaking to the device.
There are three ways to create a voice tag. To create a voice tag for a phone number.
1. Tap Start > Contacts and select the contact person by pressing and holding down to add a voice
tag.
• Alternatively, select the contact person and press Menu > Add Voice Tag.
• Press the contact person and select the phone number. On the right side, press the Menu to select
Add Voice Tag.
2. You can also tap Start > Settings > Voice Speed Dial and go to the Contacts page.
4
Getting started
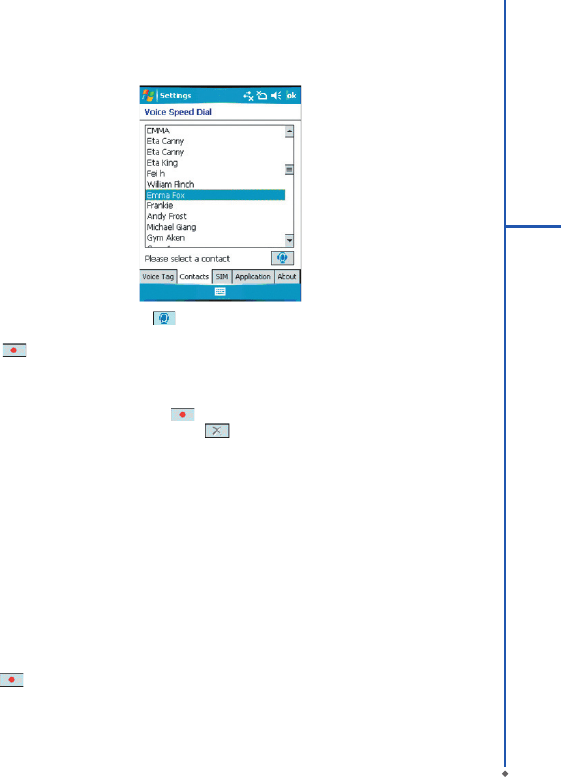
41
4
Getting started
3. Select one contact and then press to create a voice tag.
4. If the contact person has multiple phone numbers, select one to create a voice tag.
5. Tap . After the beep sound, it will start to record your voice. The system will now build the
recorded voice tag.
6. When prompted, if the voice tag was successfully built, a voice tag icon willbe displayed on the right
of the item.
7. You can rebuild a voice tag by tapping again.
8. To delete a voice tag, select the item and tap ; the system will then remove this item’s voice tag
Please note
To improve your accuracy, please record in a quiet place.
To create a voice tag for a program:
1. Tap Start > Settings > Personal tab> Voice Speed Dial .
2. This setting page will display all installed applications on the Pocket PC’s Start menu and
Programs folder.
Please note
If the entry has a voice tag icon on the right side, this means that you have built a voice tag for this
item.
3. Example: To create a voice tag for “Internet Explorer”.
4. Launch Voice Speed Dial, tap Application setting page.
5. Go to Internet Explorer.
6. Tap .
7. After the beep, say “IE”.
8. The system will now build the recorded voice tag.
9. After the voice tag is successfully built, a voice tag icon will be displayed on the right of the item.
10. You can launch Voice Speed Dial; after the beep sound, say “IE” directly to launch “Internet
Explorer”.

42
4
Getting started
11. You can rebuild the voice tag by tapping again.
To delete a voice tag, select the item and tap ; the system will remove this item’s voice tag.
To make a call or launch programs using a voice tag:
1. Tap Start > Programs > Voice Speed Dial or long press the Down volume key on the left side of
the O2 Xda Stealth Exec.
2. After the beep, say the word that you have assigned to the phone number or programs you want
to call. The Pocket PC will play back the recorded voice tag and dial out or launch programs
automatically.
3. If the system fails to recognize the voice, try again; speak more clearly and reduce surrounding
noise, if possible.
To view and play voice tags:
1. Tap Start > Settings > Voice Speed Dial > Voice Tag.
2. The system will list all voice tags here.
3. Select the item.
4. You can tap these buttons as below:
: The system will play the created voice tag.
: You can re-record the voice tag.
: The system will remove this item’s voice tag

43
4
Getting started
4.2 System settings
About
V e r s i o n t a b d i s p l a y s im p o r t a n t d ev ic e
information, including the amount of memor y
installed. On the Device ID tab, you may need
to change your O2 Xda Stealth name if you are
unable to connect to a network because another
device with the same name is already connected
Backlight
U s i n g t h e b a c k l i g h t o n b a t t e r y p o w e r
substantially reduces battery life. Tap Start >
Settings > System tab > Backlight.
● Tap Battery power tab to turn ON/OFF the
backlight when using battery power.
● Tap External power tab to turn ON/OFF the
backlight when using external power.
● Tap Extended tab to adjust the brightness
level.
Certificates
This item displays the name of the cer tificate
issuer and the expiration date.
Clock & Alarms
Tap Start > Settings > System tab > Clock &
Alarms.
● If you visit a particular time zone often, select
it as your Visiting time zone on Time tab so
that you can quickly see the correct date and
time.
● You can use your O2 Xda Stealth as a travel
alarm clock by setting a wake-up alarm on
Alarms tab. Tap the alarm icon to select the
type of alarm you want.
● To c h a n g e t h e w a y t h e date or t im e i s
displayed on your O2 Xd a Stealt h, go to
Reg i o n a l S e t t in g s by t a p p i n g S t a r t >
Settings > System tab > Regional Settings.
Slide Setting
To answer and end the calls by sliding open and
close, check Use Slider to answer phone call.
This function enables your O2 Xda Stealth easy
to use even in the dark since there is no looking
for the right buttons to press.
Clock & Alarms
Tap Start > Settings > System tab > Clock &
Alarms.
● If you visit a particular time zone often, select
it as your Visiting time zone on Time tab so
that you can quickly see the correct date and
time.
● You can use your O2 Xda Stealth as a travel
alarm clock by setting a wake -up alarm on
Alarms tab. Tap the alarm icon to select the
type of alarm you want.
● To c h a n g e t h e w a y t h e date or t im e i s
disp layed on yo ur O2 Xd a Steal th, g o to
Re g i o na l S e t ti n g s by t ap pi n g S t a r t >
Settings > System tab > Regional Settings.
GPS
● Under Programs tab, you can choose the port
that your phone will use to obtain GPS data.
● Under Hardware tab, you can specif y the
hardware port to which your GPS device is
connected. Settings include GPS hardware
port and Baud rate.
● Under Access tab, you can activate Manage
G P S a u to ma t i ca l l y. Yo u a r e s t ro ng l y
advised to activate this feature; doing so will
enable Windows Mobile to manage access
to your GPS device, and allows multiple
programs to obtain GPS data simultaneously.
Memory
You may need to stop a program if it becomes
unstable or the program memor y is low. Tap
Start > Settings > System tab > Memory.
● Main tab displays the amount of memory the
system has allocated to file and data storage
ve r s u s pr o g r a m st o r a g e. T h i s tab also

44
4
Getting started
displays the amount of memory in use versus
the available memory.
● Storage Card tab displays how much memory
is ava ilab le on th e stor age car d that is
inserted into your O2 Xda Stealth.
● Running Programs tab displays the list of
currently active programs. You can stop a
program by selecting it in the list and then
tapping Stop, or just tap Stop All to stop all
the running programs.
Power
Tap Start > Settings > System tab > Power.
● Battery tab displays the amount of battery
power remaining. Battery power depends on
the battery type and how your O2 Xda Stealth
is being used.
● Under Advanced tab, you can select options
fo r t u r ni ng o f f yo u r O 2 Xd a S t e al th t o
conserve battery power.
● Under Extended tab, you can check lock O2
Xda Stealth when entering stand-by mode.
When your O2 Xda Stealth enters stand-by
mode, it will automatically enable lock.
Regional settings
This feature allows you to customize the unit and
format for the region you are in. To access this
feature, tap Start > Settings > System tab >
Regional Settings.
Remove programs
Re move Pr ogr ams all ow s you to uninstall
programs that are saved in your phone’s storage
memory. It also shows the total available storage
memory. Select a program that you would like to
remove from the program box and tap Remove.
Screen
● Under General tab, you can adjust the screen’
s orientation and align the screen.
● Under Clear Type tab, you can select Enable
Clear Type to smooth the edges of screen
fonts for many programs.
● Under Text Size tab, you can adjust the text
size to see more content or increase the
readability in many programs.
System Info
This feature displays the system information.
Headset Volume Limiter
This application enhances the pleasure of music
by providing you an easy access to equalize
system sound during music playing. You can
drag the parameter with st ylus to adjust the
bands on the panel to tune a best sound volume
profile!
Chapter 5
ActiveSync Synchronization Tool
5.1 About synchronization
5.2 Installing ActiveSync
5.3 Choosing your synchronization type
5.4 Using ActiveSync tools
5.5 ActiveSync errors

46
Chapter 5. ActiveSync Synchronization Tool
5.1 About synchronization
You can synchronize information between your PC or Microsoft® Exchange Server and your O2 Xda
Stealth with ActiveSync on both your O2 Xda Stealth and PC. Before synchronizing information,
please install ActiveSync 4.2 on the PC. Then you can:
● Synchronize information to get the latest information in all locations.
● Add or remove programs on your device.
● Transfer files between your device and a PC.
● Change synchronization settings and the synchronization schedule.
Once you install ActiveSync on your PC, you will be prompted to connect your device and create a
synchronization relationship with the device by using a USB cable or Bluetooth connection. While you
are setting up this relationship you can choose the information you want to synchronize with either
your PC or with Microsoft® Exchange Server.
5
Getting started

47
5
Getting started
5.2 Installing ActiveSync
Please do not connect your device to the PC before installing ActiveSync 4.2 on the PC from the
ActiveSync and Application Software CD included in your package. You may only connect the device
to the PC by USB cable or Bluetooth AFTER ActiveSync is installed.
Please note: Your O2 Xda Stealth has built-in ActiveSync already. To install ActiveSync 4.2 in your
PC, please follow the instructions given when you run the ActiveSync and Application Software CD.
After finish installing ActiveSync in your PC, you will be asked to build a partnership with your device
using one of the following connection methods:
● USB cable
● Bluetooth

48
5.3 Choosing your synchronization type
USB cable
You can connect your device with other devices via a mini-USB connector. You can manually change
the connection settings as follow. The new settings will be used when you connect your device to the
PC next time.
1. Tap Start > Programs > ActiveSync.
2. Tap Menu tab > Connections.
3. Choose USB in the drop-down menus and check Synchronize all PCs using this connection.
Bluetooth connection
You can also synchronize your information by using Bluetooth wireless connectivity technology,
which allows your device to connect to a Bluetooth-compatible device within 10 meters. For best
connection results, it is recommended that you connect the device to the PC using USB to establish a
synchronization relationship before connecting via Bluetooth.
To synchronize via Bluetooth connection:
1. Execute ActiveSync Help on the PC and follow the instructions for configuring Bluetooth on your
PC to support ActiveSync.
2. Tap Start > Programs > ActiveSync.
3. Tap Menu > Connect via Bluetooth. Make sure that the device and the PC are within 10 meters or
shorter.
4. Tap Sync.
5. After finishing the synchronization, tap Menu > Disconnect Bluetooth.
6. Turn off Bluetooth to preserve battery power if not used.
Please note: Before you connect to this PC via Bluetooth, please make sure that you have set up a
Bluetooth partnership with the PC: Tap Start > Settings > Connections > Bluetooth.
For more details, please refer to Chapter 6 Getting Connected.
5
Getting started
49
5
Getting started
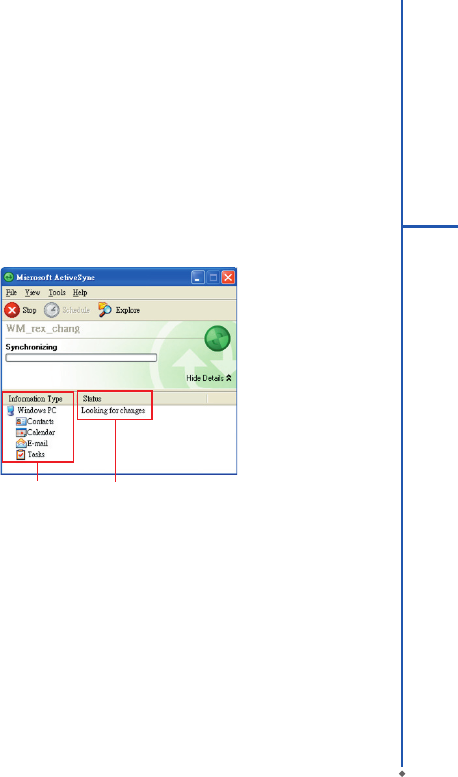
5.4 Using ActiveSync tools
Once you’ve established the connection par tnership between your device and the other mobile
device, you can start synchronization. The information you can synchronize includes Contacts,
Calendar, Outlook E-mail, Tasks, and Notes.
To select a specific data source:
1.Tap Start > Programs > ActiveSync.
2.Tap Menu > Options.
3.Launch ActiveSync on your PC, and turn the synchronization for specific information types on or
off as necessary.
Information for
synchronization
Status of
synchronization
Contacts
Contacts stored on your device can be synchronized with Outlook contacts stored on your PC or
with Microsoft® Outlook® 2002 or later.
New items entered in one location are copied to the other during synchronization. Handwritten
notes and drawings are saved as pictures when synchronizing with your PC, but are removed when
synchronizing with a server. For more information on synchronization, see ActiveSync Help on the
PC.
Calendar
You can synchronize calendar items on your device with calendar items on your PC or Microsoft®
Exchange Server. You can only synchronize information directly with a Microsoft® Exchange Server
if you are running Microsoft® Outlook® 2002 or later. Calendar synchronization is automatically
selected in ActiveSync.
Calendar items entered on one computer are copied to the other during synchronization. Handwritten

50
5
Getting started
notes and drawings are saved as metafiles (pictures).
Outlook E-mail
After you have selected Inbox for synchronization in ActiveSync, Microsoft®
Outlook E-mail messages are synchronized as part of the general synchronization process. During
synchronization:
● Messages are updated from the Inbox folder on your PC or the Microsoft®
Exchange server to the Inbox folder a of the Outlook E-mail account on your device. You can only
synchronize information directly with an Microsoft® Exchange Server if you are running Microsoft
® Outlook® 2002 or later. By default, you’ll receive messages from the last three days only, the first
100 lines of each new message, and file attachments of less than 100KB in size.
● Messages in the Outbox folder on your device are transferred to Exchange or Outlook and then
sent from those programs.
● Messages on the two computers are linked. When you delete a message on your device, the
message will also be deleted from your PC the next time you synchronize.
● Messages in subfolders in other E-mail folders in Outlook are synchronized only if they have
been selected for synchronization in ActiveSync. For information on initiating Outlook E-mail
synchronization or changing synchronization settings, see ActiveSync Help on the PC or
Connections Help.
Please note: Text messages (SMS) and Multimedia messages (MMS) are not received through
synchronization. Instead, they are sent to your device via your network service provider.
Tasks
Tasks stored on your device can be synchronized with Outlook on your PC. Task synchronization is
automatically selected in ActiveSync.
New items entered on one computer are copied to your phone during synchronization. Handwritten
notes and drawings are saved as metafiles (pictures). For more information on synchronization, see
ActiveSync Help on the PC.
Notes
Notes can be synchronized between your PC and phone either through notes synchronization or file
synchronization. Notes synchronization synchronizes the notes on your device with Outlook Notes
on your PC. File synchronization synchronizes all notes on your device with My Documents folder on
your PC.
To synchronize your notes through notes synchronization, first select Notes information type for
synchronization in ActiveSync. The next time you synchronize, all notes in My Documents and its
subfolder on your device will appear in Outlook Notes on your PC. Notes that contain only text will
appear as regular notes in Outlook on your PC, while notes containing written text or drawings will
appear in the device format. In addition, all notes in Notes group in Outlook on the PC will appear in
Notes on the device.
To synchronize your notes as files, in ActiveSync, select Files information type for synchronization

51
5
Getting started
and clear Notes information type. When you select Files, My Documents folder is created on
your PC’s desktop. All .pwi files placed in My Documents folder on your device and all .doc files
placed in \ My Documents folder on your PC will be synchronized. Password-protected files cannot
be synchronized. ActiveSync converts documents during synchronization. For more information on
synchronization or file conversion, see ActiveSync Help on the PC.
Please note: When you delete or change an item on either your PC or device, the item is changed
or deleted in the other location the next time you synchronize. If you synchronize your notes using
file synchronization and then later decide to use notes synchronization, all of your notes will be
synchronized with Outlook on your PC and will no longer be stored in My Documents folder.
5.5 ActiveSync errors
Whenever ActiveSync cannot successfully synchronize your information, it displays an error on your
device and your PC.
Viewing error information
Press Action button when the error text is displayed. ActiveSync will then display more information
about the error that has occurred. Some types of errors can interfere with automatic synchronization.
If you suspect that a scheduled automatic synchronization has not occurred, you should attempt to
manually synchronize your information. Successfully completing manual synchronization will reset
automatic synchronization. For more information, see Synchronizing Information section of
ActiveSync Help on your PC.
Please note: Most firewall applications are intended to block network traffic and secure the PC from
incoming network connections. Since ActiveSync uses TCP ports for data transfer with Devices, to
avoid this potential experience, you will need to manually allow this traffic to be un-blocked by Firewall
applications for the Device using ActiveSync. You will need to add ActiveSync application processes
into Firewall Programs Exception List.
Chapter 6
Getting Connected
6.1 Wireless Manager
6.2 GPRS
6.3 Bluetooth
6.4 Wi-Fi
6.5 USB card reader
6.6 Internet Sharing
6.7 Terminal Services Client
6.8 Cell Broadcast Setting
6.9 VPN
6.10 USB cable
6.11 Connecting to the Internet
54
Chapter 6. Getting Connected
Your O2 Xda Stealth has powerful networking functions that enable you to connect to the Internet or
to other devices. You may use a number of different methods, for example, GPRS network or Wi-Fi to
connect to the Internet.
You can set up connections to the Internet and to a corporate network at work to browse the Internet,
send and receive E-mail, use instant messages, and synchronize with ActiveSync. Via Bluetooth or
USB functionalities, you can also transfer files between your O2 Xda Stealth and other devices.
There are two types of connection settings: My ISP and My Work Network. My ISP settings are used
to connect to the Internet, and My Work Network settings can be used to connect to any private
network, such as a corporate network. Fill in the settings and you are ready to connect to the Internet.
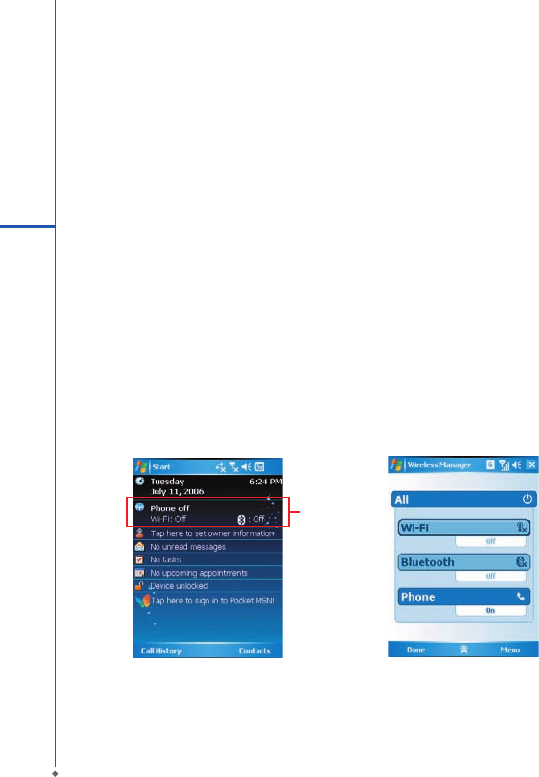
6.1 Wireless Manager
Wireless Manager is an integrated interface that combines Bluetooth, Wi-Fi, and Phone in one
function page. To manage these wireless connections, tap Start > Settings > Connections tab >
Wireless Manager. You may also access Wireless Manager from Today screen.
6
Getting started
Tap All to turn on/off all wireless connections. If you only want to turn off Bluetooth, for example, tap
Bluetooth and the button will become colorless. Tap Menu to set up these wireless connections.
Wireless
Manager

55
6
Getting started
6.2 GPRS
Before using GPRS to connect to the Internet, please contact your network operator to confirm that
the service is enabled and supported on your SIM card. Using GPRS is convenient for you while
traveling or working at home. You can use this device to browse web pages, read or send E-mail, text
or MMS messages, and sign in Pocket MSN through wireless network.
GPRS connection settings
1. Select Start > Settings > Connections tab > Connections > Advanced tab.
2. Tap Select Networks to open Network Management screen.
3. Select a desired network name from the list, or tap New to add available network to the list. Tap
Edit to modify existing network setup content.
4. Tap OK to save and exit.
Please Note: The simplest way to get your O2 Xda Stealth connected to the network is to activate O2
Auto Configurator (Please refer to Section 9.15 Auto Configurator).
Activating GPRS connection
1. Tap Start > Internet Explorer.
2. Input an URL address you desire to browse in address field and tap the arrow icon to go to the URL.
3. After completing connection, icon will become icon.
4. Or you may select Start > Settings > Connections tab > Connections > Tasks tab > Manage
Existing Connection > tap and hold on a connection to open pop-up Menu > Connect.
After completing connection, you may go Internet surfing or send and receive E-mail.
Please note: If this device is under flight mode, please turn off flight mode beforehand. Tap icon on
Today screen, then tap “Wireless Manager” on the pop-up window. Tap on “Phone” to turn the phone
function on. The icon will appear on Today screen when GPRS is activated.
When using GPRS or connecting to the Internet, you will not able to answer a call. If you make a
call, your device will automatically disconnect to the Internet and reconnect to the Internet after the
conversation ends.
56
6
Getting started
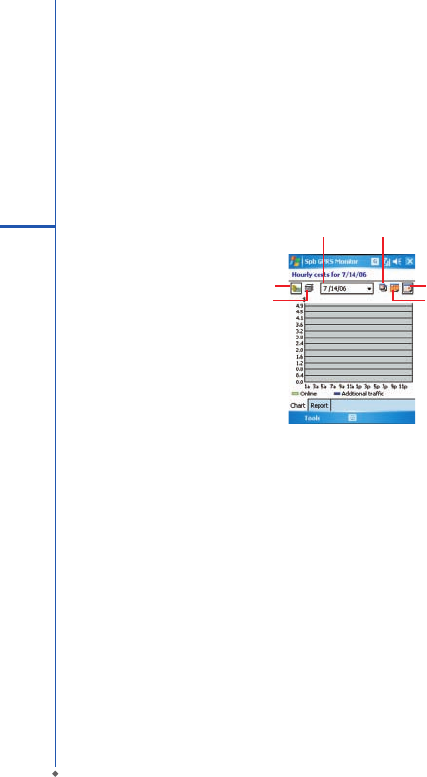
GPRS Monitor
This program allows you to monitor GPRS traffic and cost in hourly, daily, monthly or yearly view. To
monitor GPRS traffic:
1. Tap Start > Programs > GPRS Monitor > Chart tab.
2. Select an icon to view its details:
Date Monthly traffic
By
costs
By data
size
Hourly
traffic
Daily
traffic
To view the GPRS report:
Tap Start > Programs > GPRS Monitor > Report tab.
Connecting with your PC
If you want to connect this phone with your PC, please see Chapter 5 ActiveSync Synchronization
Tool.
6.3 Bluetooth
Bluetooth is a short-range wireless communications technology. With Bluetooth, you don’t need to
line up the devices to beam information. The two devices only need to be within a range of about 10
meters. You may use Bluetooth in the following ways:
1. Exchange information, such as files, appointments, tasks, and contact cards, between devices
that have Bluetooth capabilities. For example, if you and a co-worker each have a device with
Bluetooth, you can beam items between your devices; these items could include files, contact
cards, appointments, tasks, etc.
2. Create a dial-up modem connection between your device and a Bluetooth phone. You can then use
the Bluetooth phone as a modem.

57
6
Getting started
Bluetooth settings
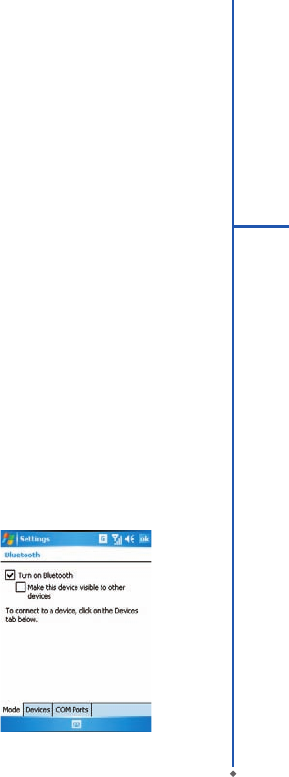
To access the Bluetooth settings screen, tap Start > Settings > Connections tab > Bluetooth.
To turn on Bluetooth, check Turn on Bluetooth option; uncheck the option to turn off. If Bluetooth is
turned off, you cannot use Bluetooth to either send or receive information. In order to conserve the
battery power or where radio use is prohibited, you might want to turn Bluetooth off.
By default, Bluetooth is turned off. If you turn it on, and then turn off your phone, the Bluetooth radio
also turns off. When you turn on your device again, the Bluetooth radio automatically turns on the
radio. If you wish to turn on the radio, turn off Bluetooth first, and then turn on the radio. To make your
phone visible to other Bluetooth devices, check Make this device visible to other devices option.
If Bluetooth radio is turned on, then all of the other Bluetooth devices within range (about 10 meters)
can detect your device and attempt to beam information to it, establish a bond, or use a Bluetooth
service. In this mode, other devices can detect your device whether or not a bond has been created;
however, in order to receive a beam from another device, you must accept it on your device.
Other Bluetooth devices can now detect your device and attempt to beam information to it, establish
a bond, or use a Bluetooth service. Note that, to receive beamed information, you must accept it on
your phone by selecting Make this device visible to other devices; this also turns on your Bluetooth
radio. If you no longer want your phone to be visible, uncheck Turn on Bluetooth option or uncheck
Make this device visible to other devices option to leave the radio on, but not allow detection by
other devices.
Bonds
To exchange information in a secure manner, you may use a bond to create a relationship between
your O2 Xda Stealth and another Bluetooth device. To create a bond, you need to enter the same
passcode on the two devices that you want to bond. You need only create a bond once between
two devices. Once a bond is created, the devices recognize the bond and are able to exchange
information without your needing to enter PIN again.
To create a bond:
You can create a bond between your device and another device that has Bluetooth. Once you do this,
Bluetooth doesn’t need to be in visible mode in order for you to beam information between the two
devices; you only need to have the Bluetooth radio turned on.
1. Tap Start > Settings > Connections tab
2. Tap Bluetooth > Devices tab > New Partnership. Your device searches for other Bluetooth
devices and displays them in the list.
3. Tap the name of the other device in the list, and then Next.
4. Enter a passcode of between 1 and 16 characters and tap Next.
5. Enter the same passcode on the other device.
6. In Display Name, edit the name of the other device if you want.
7. Tap Finish.
Please note: Make sure that the two devices are within 10 meters of one another and that Bluetooth

58
6
Getting started
is in visible mode on both devices.
To accept a bond:
1. Please make sure that Bluetooth is activated and visible to other devices.
2. When prompted to bond with the other device, tap Yes.
3. Enter a passcode of between 1 and 16 characters , and tap Next. You must enter the same
passcode that was entered on the device requesting the bond.
4. In Display Name, edit the name of the device requesting the bond if you want.
5. Tap Finish.
The bond is created. You can now exchange information with the other device.
To rename a bond:
1. Tap Start > Settings > Connections tab.
2. Tap Bluetooth > Devices tab.
3. Tap the bond to rename.
4. In Display Name, enter a new name for the bond and then tap Save.
To delete a bond:
1. Tap Start > Settings > Connections tab.
2. Tap Bluetooth > Devices tab.
3. Tap and hold the bond and then tap Delete.
Beaming information with Bluetooth
1. Tap and hold an item to beam, such as an appointment in Calendar, a task in Tasks, a contact card
in Contacts, or a file in File Explorer.
2. Tap Beam type of item.
3. Tap the device to which you want to send the beam. The item is beamed to the device you selected.
If the device that you want to beam to does not appear in the list, make sure that it is turned on, in
visible mode, and within 10 meters of your device. Also, make sure that your Bluetooth is turned on.
Receiving a Bluetooth beam:
1. Make sure that your device is configured to receive incoming beams and that Bluetooth is in visible
mode.
2. Make sure that your device is within 10 meters of the device beaming the information.
3. When prompted to receive an incoming beam, tap Yes. The information is now stored on your
device.
Using a Bluetooth phone as a modem
You can use a phone that has Bluetooth capabilities as a modem for your device.
To do this, you create a Bluetooth modem connection on your device and then send information to the
59
6
Getting started
phone by using Bluetooth. The phone relays the information over the phone line and then sends back
to your device any information that you had requested over the connection.
Once you create a modem connection to the Bluetooth phone, you can reuse it whenever you want to
use the phone as a modem.
1. Make sure that the Bluetooth phone is turned on, that your device’s and the phone’s Bluetooth
radios are turned on, and that your device and the phone are within 10 meters of one another.
2. If you have not already done so, create a Bluetooth phone connection using the method described
below:
3. Tap Start > Settings > Connections tab > Connections > Add a new modem connection.
4. Enter a name for the connection.
5. In Select a modem list, tap Bluetooth > Next.
6. Make sure that the device is visible. Some phones may also need to be pairable in order to accept
a bonding request.
7. If the device appears in My Connections list, skip to step 14. If not, tap Add new device and follow
the remaining steps.
8. In the list, tap the device and then Next.
9. Enter a passcode of between 1 and 16 characters, and tap Next.
10. Enter the same passcode on the phone.
11. If you want, in Display Name, edit the name of the phone.
12. Tap Finish.
13. In My Connections list, tap the device, and then Next.
14. Enter the phone number to dial for this connection and tap Next.
15. In User name, Password, and Domain; enter the logon information for this connection and tap
Finish.
Bluetooth headset
To set up your phone with a Bluetooth headset,
you may refer to the user guide coming with your
Bluetooth headset and the following instructions:
1. Tap Start > Settings > Connections tab >
Bluetooth > Mode tab and check Turn on
Bluetooth and Make this device visible to
other devices.
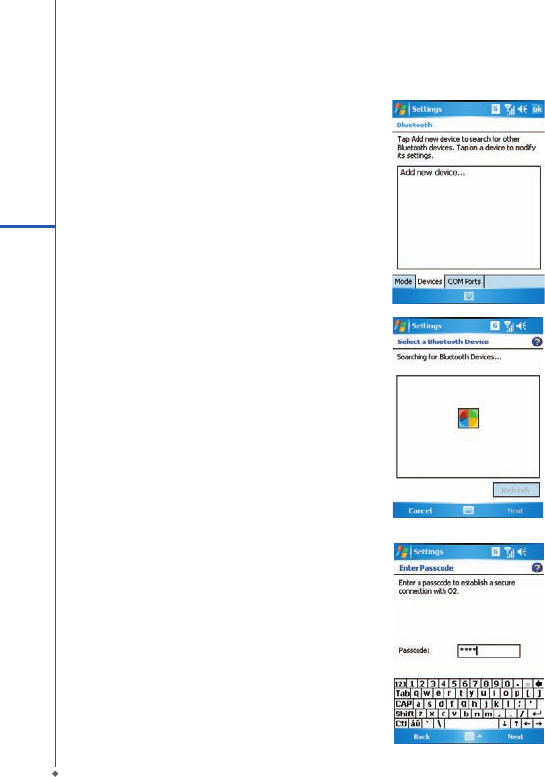
60
6
Getting started
2. Tap Start > Settings > Connections tab >
Bluetooth > Devices tab and tap Add new
device to scan for other Bluetooth devices.
3. Your device starts scanning for Bluetooth
devices.
4. Enter the passcode for the located Bluetooth
Device. For information, please refer
to documents coming with your Bluetooth
headset.
61
6
Getting started
6. W hen y ou fini sh setup, you will see the
Bluetooth device displayed in the menu.
5. Def ine the disp lay name and the ty pe of
service your Bluetooth device offers.
7. Also, there will be a Bluetooth headset icon
indicating the active connection status.

COM ports
For example, when you purchase a Bluetooth
GPS-supported navigation soft ware; you can
register this device as an effective serial port by
following the instructions on the manual of that
product and the steps below:
Tap Start > Set tings > Connections tab >
Bluetooth > COM Ports tab. To register a new
serial port:
1. Tap New Incoming Port to enter setup screen.
2. Select a port to be set.
3. Select Finish
6.4 Wi-Fi
Wi-Fi is a type of wireless local area network
that communicates between two devices by high
frequency radio waves. Your O 2 Xda Stealth
supports Wireless LAN, which is IEEE 802.11b/g
compliant. It allows your device to connect to the
Internet with detected wireless network.
To activate Wi-Fi
1.Tap Star t > Settings > Connections tab >
Wireless Manager.
2. Tap Wi-Fi to activate wireless network.
3. Tap Done to exit.
To check your Wi-Fi status
Tap Start > Settings > Connections tab > WiFi
Utility > Wi-Fi Status tab and you may see the
details of your phone’s wireless LAN connection,
including Status, ESSID, BSSID, BSS Mode,
Channel, Data Rate, IP Address, and Signal
Strength.
To configure Wi-Fi settings
Tap Start > Settings > Connections tab > WiFi
Utility > Setting tab and scroll to set the desired
value / mode f or the following setting items:
Adhoc Channel, Preamble, Data Rate, Power
Save, Power strength, and Auto Power off. Tab
Set button to confirm your setting.
To update IP info
Tap Start > Settings > Connections tab > WiFi
Utility > IP Info tab > Renew or Ping button to
update IP information or locate the IP address of
the other device.
To search IP address
Tap Start > Settings > Connections tab
> Wi- Fi Utility > Site Survey tab > Re-scan
button to search the ESSID, Channel, RSSI, and
BSSID of the Wireless LAN.
To change IP address
1. Tap Start > Settings > Connections tab >
Wi-Fi > Network Adapters tab.
2. In My network card connects to drop-down
list, tap either The Internet or Work. If you
are connecting to your ISP at home, tap The
Internet. If you are connecting to a private
network such as a corporate network at work,
tap Work.
3. Ta p the app r o p r i ate ada p ter in Tap a n
ad ap ter to mo di f y setting s box.The IP
address will now appear in IP Address box
on IP Address tab.
4. To change TCP/IP set tings if your ISP or
private network does not use dynamically-
assigned IP addresses, tap Use specific IP
address and enter the requested information.
Contact your ISP or network administrator to
get the IP address, Subnet mask, and/or
Default gateway (if needed).
5. To change DNS and WINS settings if your ISP
or private network does not use dynamically-
assigned IP addresses, tap Name Servers
tab and enter the requested information.
Servers that require an assigned IP address
may also require a way to map computer
names to IP address. DNS and WINS are the
resolution options supported on your O2 Xda
Stealth.
62
6
Getting started

Plea se n ot e: After activating W i-Fi, a new
window, New Network Detected, will appear if
any is detected. Select Connect and enter your
password to the local network. Tap Connect to
connect this device with local network. You may
use Wi-Fi for up to 2 hours. The actual use time
will depend on the power status of your battery.
While this feature is not in use, please disable it
to save power.
6.5 USB card reader
You may use the device as a mass storage
device or a mini SD card reader.
1. Tap Start > Settings > Connections tab >
USB
2. On US B Co nne ctio n Mod e sc ree n, t ap
SD-Card Reader, and then tap Change.
3. Connect the phone to the computer with USB
cable.
4. Your PC will automatically detect the new
hardware. Now you can view or transfer files
to and from your mini SD card.
6.6 Internet Sharing
By using utility, you can set your O2 Xda Stealth
as a wireless modem. Internet Sharing allows
your PC/Notebook be connected to a wireless
network. Before creating a new modem via the
selected connection type, you still need to install
the drivers on your PC/ Notebook. Please find
the drivers in the ActiveSync and Application
Software CD.
1. Tap Start > Programs > Internet Sharing.
2.S e l ect a USB or Bluet o o t h PA N as P C
Connection type.
3. C on n e c t your p h o n e via U S B c a b l e or
Bluetooth to a PC/ Notebook, and then tap
Connect.
Please note: Before you tap Connect, please
make sure that your have installed a GPRS SIM
card, and that you have connected this phone to
your PC/Notebook by USB cable or Bluetooth
and disabled ActiveSync.
6.7 Terminal Services Client
Using Terminal Services Client, you can log
onto a PC running Terminal Services or Remote
Desktop and use all of the programs available on
that PC from your mobile device. For example,
instead of running Word Mobile, you can run the
PC version of Word and access all of the .doc
files on that PC from your device. Connecting
to a terminal server starts a remote connection
to the ser ve r via a G PRS or Wi re less LA N
connection:
1. Tap Start > Programs > Terminal Services
Client.
2. To connect to a server you have previously
connect ed to, define a ser ver in Rec e nt
ser vers. To connect to a new server, enter
the server’s name in the Server box. Check
Limit size of server desktop to fit on this
screen box only when using applications that
have been specifically sized for use with the
device.
3. Tap Connect.
Pl e a se not e : I f the net work ad min ist r ato r
ha s conf i gur ed Te r min a l S er v ices Clien t
to reconnec t to disconnected sessions, and
you previously disconnected from a Terminal
Server without ending the session, the Terminal
Services Client will reconnect to that session.
N a v i g a t i n g w i t h i n T e r m i n a l
Services Client
Once connected to the server, the PC’s screen
may more than fill your phone’s screen. If scroll
bars are displayed on the server’s screen, you
will see more than one set of scroll bars on your
device: one to scroll information on the PC, and
one to scroll the PC display through Terminal
63
6
Getting started

64
6
Getting started
Services window in Terminal Services Client.
To ensure that you are scrolling the PC display
through Terminal Services Client, use the five
directional buttons at the bottom of Terminal
Services Client screen.
To better fit information onto your mobile device’
s screen, select Limit size of server desktop
to fit on this screen. For best effect, programs
on the desktop computer should be maximized.
Disconnecting without ending a
session
The following commands must be accessed
fr o m S ta r t me nu in the Ter min al Se r v ices
window used to access the PC’s commands. Do
not use Start menu on your phone.
1. In Terminal Services window on your PC, tap
Start > Shutdown.
2. Tap Disconnect.
If your administrator has configured Terminal
Services Client to reconnect to disconnected
sessions, you will be reconnected to this session
the next time you connect to this server.
D i s c o n n e c t i n g a n d e n d i n g a
session
1. In Terminal Services Client window, tap
Start > Shutdown.
2. Tap Log Off.
6.8 Cell Broadcast Setting
You can receive broadcast channel information
and news from your service provider (please
chec k with y o u r s e r vi c e provider f o r t h i s
service). Tap Start > Settings > Connections
tab > Cell Broadcast Setting.
6.9 VPN
VPN is the network that allows authorized users
to access and transmit data.
To create a VPN connection:
1. Tap Star t > Settings > Connections tab
> Connections > Add a new VPN ser ver
connection.
2. Enter the VPN server IP and tap Next.
3. Select the way to authenticate IPSec /L2TP
connections and tap Next.
4. Enter My VPN details and tap Advanced tab
to continue further setup or Finish to exit.
6.10 USB cable
To access the Internet, you may connect your
device to a PC via a USB cable. Make sure
that the PC you are connected can access the
Internet.
6 .11 C o n n e c t i n g t o t h e
Internet
Once connected, you can use Internet Explorer
to surf the Internet. While surfing, you can also
download files and programs to be installed on
your device from the Internet or intranet. During
synchronization with your PC, download your
favorite links and mobile favorites that are stored
in Favorites folder in Internet Explorer on the
PC. To synchronize and download your favorite
links from your PC, in your PC’s ActiveSync,
select Favorites on Tools menu > Options >
Sync options.
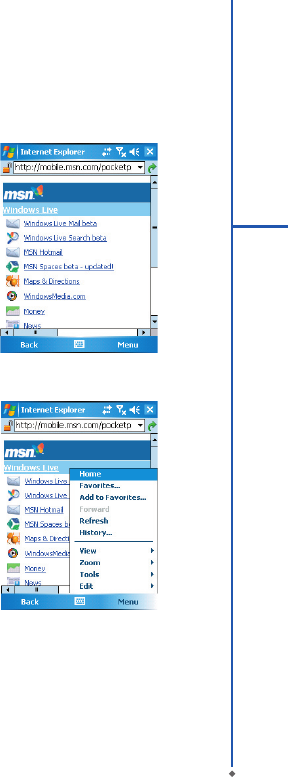
65
6
Getting started
Browsing the Internet
Open Internet Explorer screen by tapping Start
> Internet Explorer.
1. In the address bar that appears at the top of
the screen, enter the Web address you want
to connect to. Tap▼to choose from previously
entered addresses.
2. Tap Back to go back to the previous page.
3. Tap Menu > Refresh to refresh the web page
on the screen.
4. Tap Menu > Home to go back to the Home
page.
5. Tap Favorites, and the favorite address you
want to view. To add a favorite link while using
your device, go to the page you want to add,
tap and hold on the page, and tap Add to
Favorites on the pop-up menu.
Chapter 7 Messaging
7.1 Short Message (SMS)
7.2 Multimedia messages (MMS)
7.3 Voice mail
7.4 E-mail
7.5 Push E-mail

68
You can rec eive e - mail and tex t messages
in Messaging. Text messages are sent and
received through yo ur net wo rk operator by
using a phone number as the message address.
Before receiving and sending your e-mail or
message, please make sure that your O2 Xda
Stealth has connected to a network.
Your O2 Xda Stealth supp or t s the follow ing
messaging services:
SMS (Short Messaging Service)
SMS allows you to send shor t messages. For
receiving and sending text messages (SMS),
you only need to ensure that the phone function
is activated by observing the satellite icon on the
top of outline bar. It is not necessary to activate
GPRS con nec t ion or e stab lis h new e - m ail
account and connection.
For SMS (Shor t Messaging Service), please
read Section 7.1 Short Message.
M M S ( M u l t i m e d i a M e s s a g i n g
Service)
MMS allows you to send multimedia messages.
You can include text, pictures, photos, sound
files or recorded voice in a MMS message. To
send an MMS message, your must register and
configure the MMS service with your network
provider.
For MMS (Multimedia Message Service), please
read Section 7.2 Multimedia messages.
Voice Mail
You can forward a call to your voice mail box
when you are unable to receive a call. The voice
mail centre will send you a notification.
For Voice mail, please read Section 7.3 Voice
Mail.
7
Getting started
E-mail
You can eit her us e your O 2 Xda Ste alth to
directly send/receive e-mails from e-mail server
or by sync hronously updat ing the Microsof t
Outlook / Microsoft Exchange Server E-mail in
your O2 Xda Stealth and PC.
For e-mail, please read Section 7.4 E-mail.
Plea se n ote: If you want to synchronously
pr o c es s e -m a i l , y o u m u s t a c t iv a t e I n b ox
sy n c hro n i zat i o n f u n c t i o n in A c t i v e S y n c
beforehand. For more information on I nbox
synchronization, please see the online Help of
ActiveSync in your computer.
Push E-mail
The Direct Push technology enables you to have
access to your new incoming e-mail in real time.
For Push E-mail, please read Section 7.5 Push
E-mail.
Pocket MSN
Your O2 Xda Stealth is equipped with Pocket
MSN application. To send instant messages,
you need to connect to the Internet.
For Pocket MSN , pleas e re ad Se ctio n 7.6
Pocket MSN.
Chapter 7 Messaging
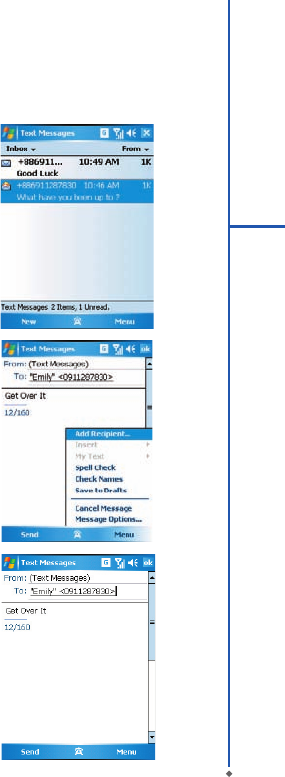
69
7
Getting started
7.1 Short Message (SMS)
Writing a text message
1. Tap Start > Messaging > Inbox folder.
2. Tap New.
3. Tab To to enter the number of your recipient,
and tap the blank content area to edit the
message.
4. To access more editing options, tap Menu.
The options inside enables you to:
● Add Recipient.
● Use predefined sentences in My Text.
● Start Spell Check of your text.
● Check Names of your recipients.
● Choose to accept delivery notification by
c e c k i n g Re q ue s t m e s s a g e d e l i v e r y
notification in Message Options.
5. To save the message to the draft box, tap
Menu > Save to Draft.
6. To send the message, tap Send.
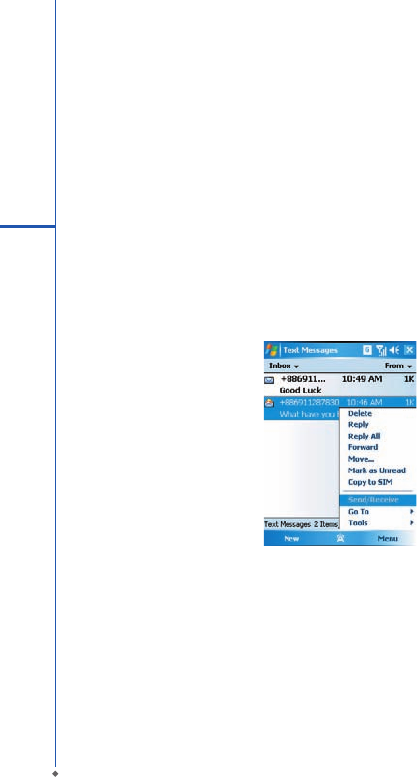
70
7
Getting started
Reading SMS messages
1. Tap Start > Messaging.
2. Tap Inbox, select Text Messages to view the sub-folders such as Inbox, Outbox, Drafts, Sent
Items, or Deleted Items.
3. Tap Menu to access more options which enable you to:
● Delete the selected message.
● Reply to the sender or Reply All to the included recipients.
● Forward the selected message.
● Move the message to other folders.
● Mark the message as Read or Unread.
● Go To other accounts such as Outlook E-mail or MMS.
● Tools to Manage Folders, Empty Deleted Items, Clear �Text Messages�, create a New
Account, and more Options.
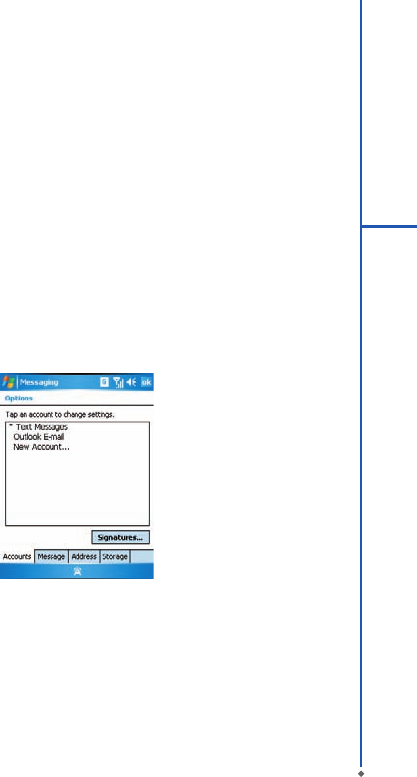
71
7
Getting started
SMS settings
Text Message settings allows you to customize your Accounts, Message, Address and Storage.
1. Tap Start > Messaging and select Text Messages and then Inbox.
2. Tap Menu > Tools > Options.
In Options you can tap the following tabs to modify the settings:
● Accounts tab: Tap an account to change settings. For example, tap *Text Messages to change
Request delivery notifications and Use Unicode when necessary. Tap New Account to set up
a new account. Or tap Signatures to use signatures to designate accounts.
● Message tab: Set up the following messaging features- When replying to e-mail, include body,
Keep copies of sent items in Sent folder, and the After deleting or moving a message feature.
● Addr ess t ab: Select whether to get e-mails from all the cont acts with e- mail addresses;
alternatively, you can verify names by defining their e-mail addresses.
● Storage tab: Check the memory space of your phone, storage card and attachments, Store
attachments on storage card and specify how you want to empty your deleted items.
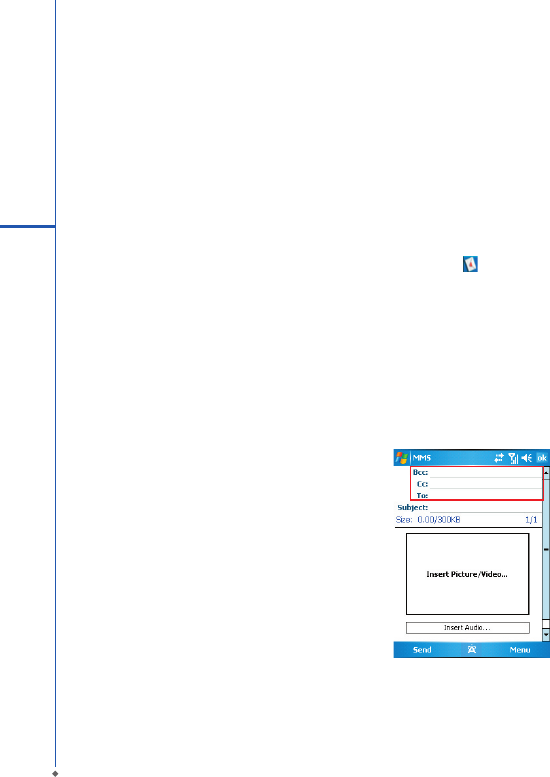
72
7.2 Multimedia messages (MMS)
Your O2 Xda Stealth allows you to create and share your own MMS messages (with photos, videos,
text, and audio) with your contacts. During editing the MMS content, you can use Stealth’s built-in
camera to snap photos, and they will be directly inserted in the content.
Creating an MMS message
O2 Xda Stealth provides you multiple ways to create MMS. You can access a MMS composing screen
from:
● Pictures & Photos: Select any picture in My Pictures folder, tap Menu > Send and select an
account- MMS.
● Camera or Camcorder: After capturing a picture or a video clip. Tap on the preview screen
and select an account- MMS.
● Tapping Start > Messaging and selecting MMS folder, then select New.
Before using MMS, please go to Messaging.select Inbox under MMS , tap Menu > MMS Settings to
setup MMS.
Composing an MMS message
MMS messages are created by combing various slides. Each slide can include a photo, an audio or
video clip, plus text.
7
Getting started
1.Tap Bcc, Cc, or To fields to input recipient’s
phone number or address.
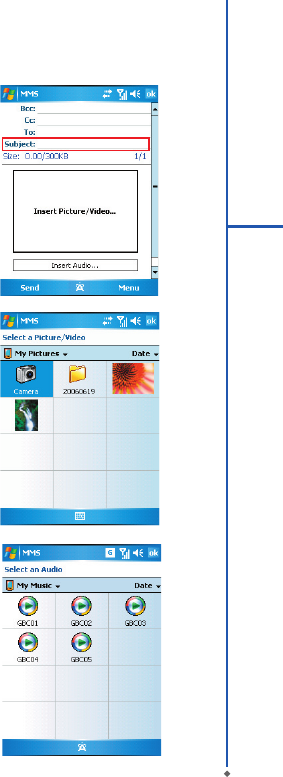
73
7
Getting started
2. Tap Subject field to input a subject for your
new message.
3. Tap Insert Picture / Video to select a picture
/ video as an attachment.
4. You may also tap Insert Audio to attach an
audio file.
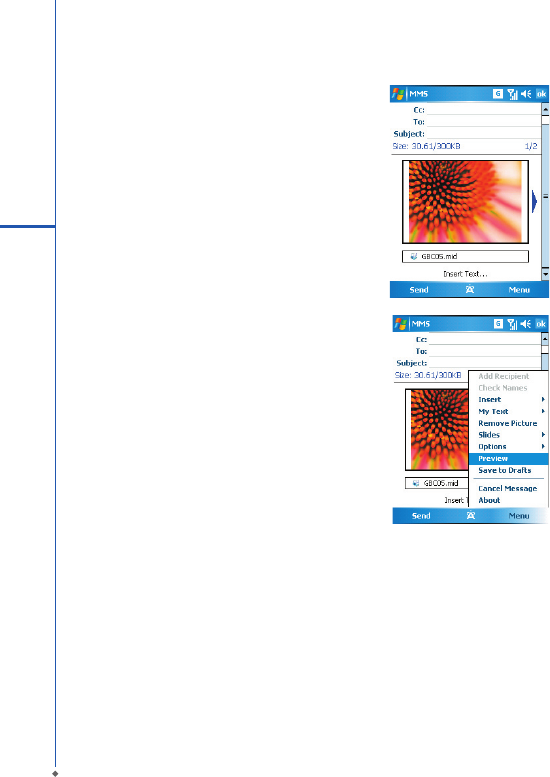
74
5. To input text content, tap in the empty area,
Insert Text on the bottom half of the screen
and start editing.
6. If the message contains more than 1 page,
you may switch between pages by tapping on
the blue arrows next to message content.
7
Getting started
7. Tap Preview in Menu to preview the edited
message.
8. Tap Send to start sending your message.
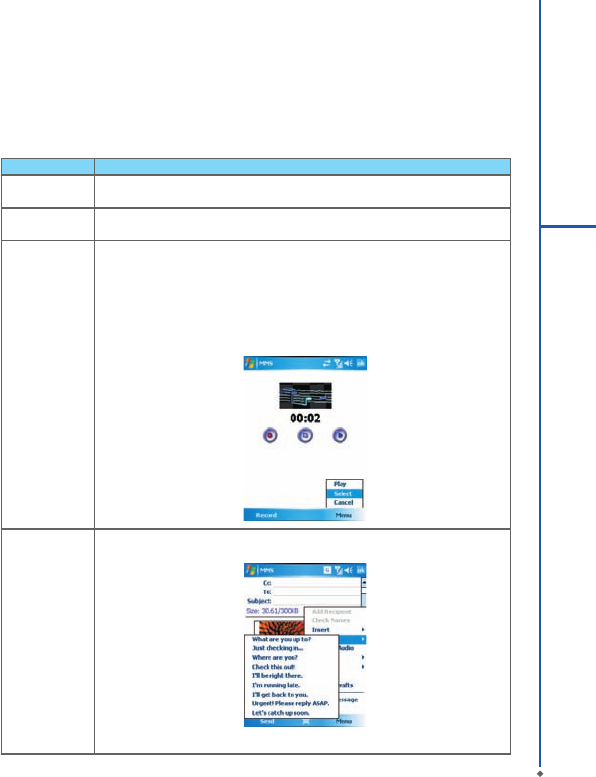
Item Description
Add Recipient When the curser is in Bcc, Cc or To fields, choose this to add a new contact
from your Contacts list.
Check Names Helps you to search for the names beginning with the letters of the alphabet that
you entered in Bcc, Cc or To fields.
Insert You can select the file type that you wish to be inserted: Picture, Video, Audio,
Sound Recorder, vCalendar, vCard or File. If the slide already contains an
audio or image file, then the video file cannot be inserted.
If you select Sound Recorder, a recorder screen will appear, you can directly
record an audio file, tap Menu > Select to save it and it will be inserted to the
message.
My Text Provides several pre-defined sentences that are frequently used in messages.
75
7
Getting started
MMS menu options
When composing a MMS message, you can select Menu to access more editing options:
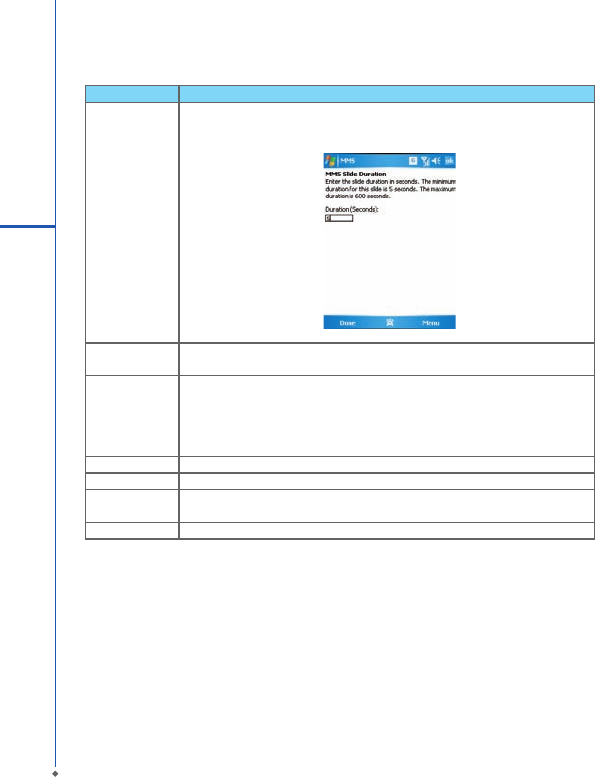
Item Description
Remove
Recipient/
Subject,
Picture/
Video/Audio/
Text)
The option title shown here will vary according to where the curser locates. If the
curser is at an inserted audio object, the title will show Remove Audio.
Slides You can go to Next or Previous slides, Insert/Delete a slide, or specify the
display Duration of each slide.
Options ● Background Color: You can select a background color from a color palette
for your message.
● Message options: You can change settings for Priority, Validity period
(maximum, 12 hours, 1 day, 1 week, and 1 month), reception of a Delivery
report , Read report or Hide Sender.
Preview To play the MMS message you have composed before sending it.
Save to Drafts Save the message to Drafts folder without sending out.
C a n c e l
Message
To cancel the composing of the message and return to Inbox without saving.
About The information about the software.
76
7
Getting started

77
7
Getting started
MMS Inbox options
In MMS Inbox, the received messages will be listed by time, with the icons showing the message
has been (marked) read, or showing the message is (marked) unread.
On MMS Inbox list, you can tap Menu to access functions for a single message or for the whole
Inbox.
Item Description
Delete Delete the selected message. The deleted message will be stored in Deleted
Items folder.
Reply Reply to the sender of the selected message. You can edit the original message
before sending it.
Reply All Reply to all the senders and recipients referred in Cc and Bcc fields. You can
edit the original message before sending it.
Forward Forward the selected message to other recipients.
Move Move the selected message to a different folder.
Mark as Read/
Unread
Mark the selected message as read or unread.
Download
Message
Download the message from the server.
Send/Receive Connect to the server to refresh and download the pending messages.
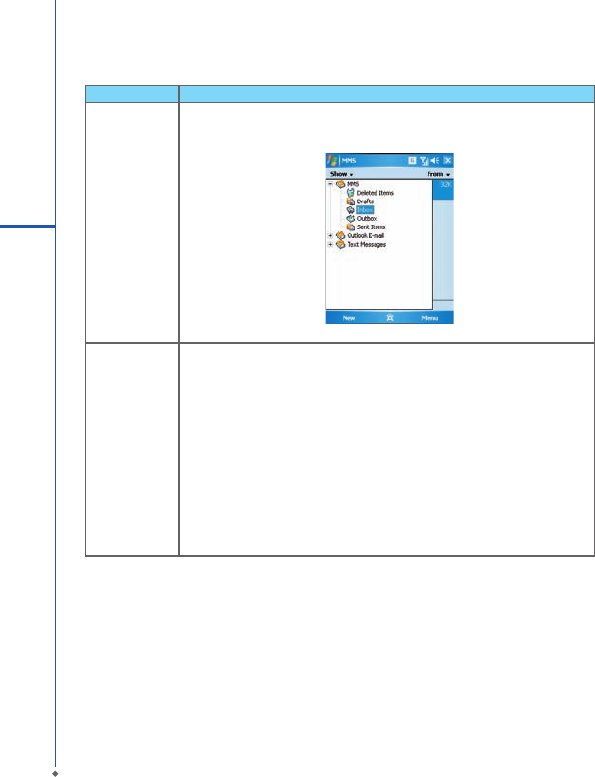
78
7
Getting started
Item Description
Go To You can select Folders to see the list of all the folders in Messaging, or enter
other account folders.
Tools Helps you to Sort the MMS, Manage Folders, Empty Deleted Items, Clear
ōMMS�, create New Account, and access more features.
● Manage Folders: Shows the list of MMS folders, where you can create new
folders, rename, delete and view the folder options.
Please note: The system folders (including Inbox, Deleted Items, Draf ts,
Outbox, and Sent Items) cannot be deleted.
● Empty Deleted Items: You will be asked by an alert message if you want to
delete all messages permanently, which cannot be recovered once deleted.
● Clear ōMMS�: To clear all the messages and subfolders under MMS folder.
Tap Yes to confirm deleting.
● New Account: To create a new e-mail account.
● Options: You can edit the settings for your account and messages, address
book and storage.
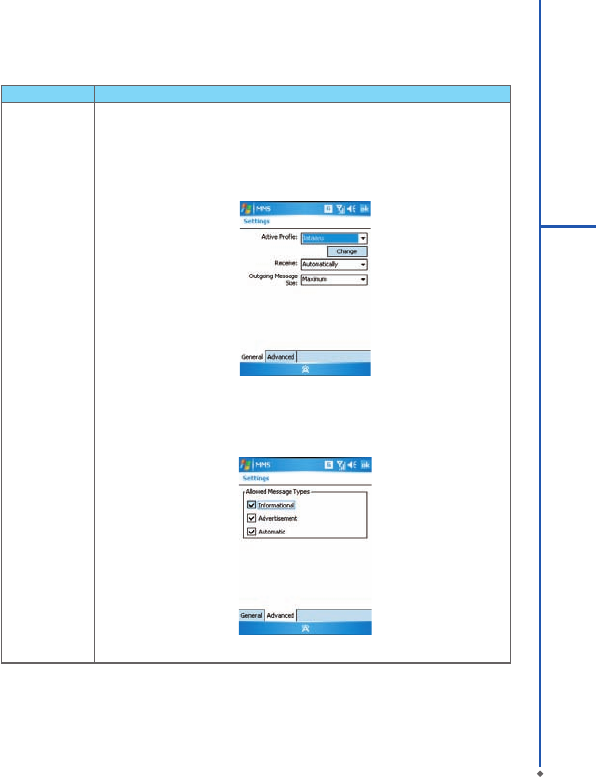
Item Description
MMS Settings ● General tab: You can modify the settings of the connection profile here. A
profile contains connection details such as the address of the MMS server,
gateway, username, and password for authentication by the gateway, IP
address and port number. You can also modify Outgoing Message Size and
Receive
● Advanced tab: You can choose which message types you would allow
to download; the types may be set as Informational, Advertisement or
Automatic.
79
7
Getting started
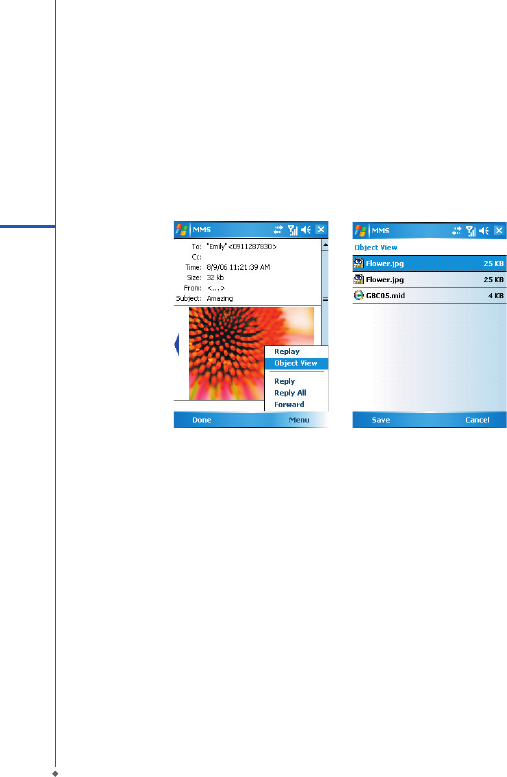
80
Reading MMS messages
You can tap on a single MMS message to view the content. During viewing a message:
1. You can use the playback controls Play/Pause or Stop to view the message
2. To see the list of attached files, tap Menu > Object View, If you want to save a particular file, tap it,
and then choose Save from Tools menu.
3. To view the slides manually, use the navigation buttons to scroll through the message.
7
Getting started
7.3 Voice mail
This function enables you to divert received calls to a voice mail center where callers can leave voice
messages under the following circumstances:
● You are currently on the phone.
● Your phone is switched off or is not able to receive signals.
● You did not answer the call.
This voice mail service is SIM card and network dependent. If the voice mail service is not included
in your mobile network operator’s package, you will have to subscribe to the service separately and
configure the settings manually. Once you have successfully subscribed this service, you will be
notified of a voice mail message by an icon on Today screen.
Calling the voice mail center
Initiate Phone screen > Speed Dial and call Speed Dial 1. You will enter the voice mail center.

81
7
Getting started
7.4 E-mail
You can receive e-mail in Messaging. E-mails are sent by using an address that you receive from
your Internet network operator (ISP), an e-mail network operator, or your employer. You can also send
and receive e-mail by synchronizing with your PC, or by connecting to a Post Office Protocol 3 (POP3)
or Internet Message Access Protocol 4 (IMAP4) mail server. Aside from the default Outlook E-mail
account, you need to manually set up other e-mail accounts.
How you download copies of messages depends on how you are receiving messages:
● If you receive e-mail messages through a remote e-mail server, follow the instructions as described
in the 7.5 Push E-mail.
● If you receive e-mail messages through ActiveSync, begin synchronization.
Synchronously processing e-mail
With synchronization, messages are synchronized between your O2 Xda Stealth and the PC by using
ActiveSync and Microsoft Exchange or Outlook. If you want to synchronously process e-mail, you
must activate the Inbox synchronization function in ActiveSync beforehand. For more information on
Inbox synchronization, please refer to Chapter 5 Synchronization”
Please be aware of following Inbox Synchronization process rules:
● Please select a desired cooperation relationship on New Cooperation Relationship screen in
computer to synchronously transmit information. If you select not to perform synchronization, you
may manually copy or move e-mail messages between your O2 Xda Stealth and the computer.
● Only the mails in Inbox of your computer will be synchronized.
● Only the mails in Exchange or Outlook can be synchronized.
● The mail from Outbox folder in your O2 Xda Stealth will be sent to your computer first, and then it
will be delivered through Microsoft Exchange Server or Microsoft Outlook.
● If a specific letter is deleted in your O2 Xda Stealth, then it will also be deleted in your computer
when you reconnect your phone with computer.
● SMS in your phone will not be synchronized.
Establishing e-mail services
If you have e-mail accounts from ISP or company network, you may use Messaging to receive or
send e-mail. Please refer to the following instructions to set up a new e-mail account in .Messaging
of your O2 Xda Stealth.
1. Please acquire the following information from ISP or company network administrator:
● E-mail address, user name and password.
● POP3 or IMAP4 server name of Intranet mail
● SMTP server name for outgoing mail
2. Establish e-mail services:
Tap Messaging > Menu > Tool > New Account, and then follow the instructions on the screen to
set up a new e-mail account.
3. See Section 6.1 Internet Access to connect your O2 Xda Stealth to a network and start receiving

82
7
Getting started
and sending e-mail and messages.
4. Connect with e-mail Server:
● Tap Messaging > Menu > Send and Receive.
● Tap Messaging > Menu > Tool > Options > Account tab to change e-mail account settings.
When you finish, your new e-mail account will be displayed under this menu. You can start connecting
to your e-mail server at this point. You can set up several e-mail accounts, including your Outlook
e-mail account.
Connecting to the server
You may directly receive new e-mail from e-mail server without connecting to a computer. You may
select to use it online or offline; if it is online, you may directly read and reply mail when your O2 Xda
Stealth is connected to e-mail server. You can reply a mail directly by simply tapping Send.
You may select to disconnect to the internet after downloading only the subjects of new messages
or partial messages and decide whether to download the full message later. When you reconnect
next time, Inbox will download in accordance to appointed methods, and send out unsent e-mail in
Outbox.
You may choose to read just the mail within the last few days, mail subjects only, or complete
mail. You can also choose to receive only the attachments less than specific file size. To make
these settings, tap Messaging > Menu > Tools > Options, and change e-mail account setup by
requirement.
Composing and sending a mail
Tap Messaging > New to write a new mail. After writing a new mail, select Send on the bottom left of
the screen and send this new mail.
When composing a new mail, you can:
1. Tap BCC, CC, To fields to input recipients’ e-mail addresses.
2. Tap Subject field to input a subject for your new mail
3. You may enter mail content in the empty area on the bottom half of the screen.
4. Tap Send to start sending your mail.
5. Select the icon on the bottom center of the screen to activate or disable screen keypad.
6. Tap Menu to open menu.
Reading and replying a mail
Tap Messaging > Menu, and then select Send and Receive from Menu to start sending and
receiving new mail. Select Inbox on the bottom left of the screen to view Inbox. Tap on any unread
mail to view its content.
When reading mail, you can:
1. Tap on a contact in BCC, CC, or To field to save this contact as a new contact.
2. Tap Reply to compose a reply e-mail.
3. Tap Menu to open menu.

83
7
Getting started
On the mail content screen, select and hold to activate pop-up Menu.
7.5 Push E-mail
With push e-mail, you can have access to new incoming e-mail in real time. This Direct Push
Technology can be enabled by the Exchange Ser ver 2003 administrator, bringing the latest
information to you. To use push e-mail, please turn on Wi-Fi or GPRS to connect to the Exchange
Server.
Enabling Direct Push on your O2 Xda Stealth
1. On your O2 Xda Stealth, tap Start > Programs > ActiveSync > Menu > Add server source.
2. Input the IP address of your server in Server Address.
3. Input your network login name, password, and domain name, and then tap NEXT.
4. In ActiveSync on your O2 Xda Stealth, tap Menu > Schedule.
5. Set Peak times to As items arrive and Off-peak times sync time to As items arrive. Tap OK.
Now you have established a cooperative relationship for your O2 Xda Stealth and the Exchange
Server. The next time when you tap Start > ActiveSync > Sync, you may synchronize with Exchange
Server using Wi-Fi or GPRS.
Once you are connected to the network, you may look up your Global Address List over the air
from your O2 Xda Stealth by tapping Contacts. You may send an e-mail to a contact on your Global
Address List following the same steps as sending e-mail to a contact saved on your O2 Xda Stealth.
Please note: To be able to use direct push, you need to have an exchange server. Microsoft Exchange
Server 2003 also supports useful functions such as remote device wipe. To find out more on the
benefit and usage of Microsof t Exchange server, please visit Microsoft’s website: http://w ww.
microsoft.com
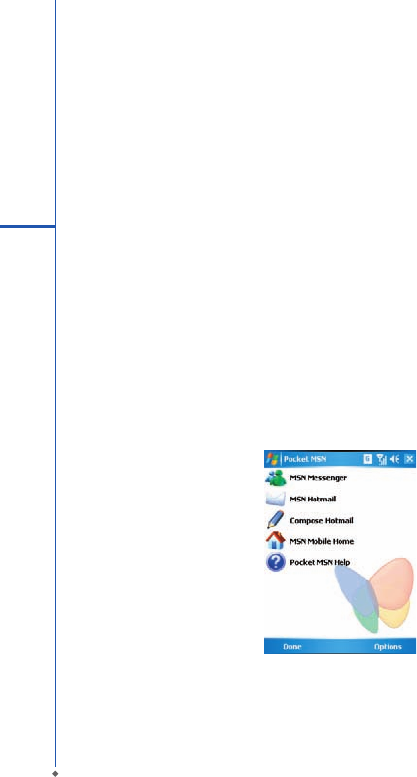
84
7.6 Pocket MSN
Pocket MSN provides you MSN features including:
● Seeing your contacts list.
● Sending and receiving instant messages.
● Instant chatting with your single contact or with groups of contacts.
● Editing and showing your MSN title.
● Notifying contacts of your on-line status.
● Blocking contacts from seeing your status or sending you messages.
● Composing your MSN Hotmail.
● Connecting to MSN Mobile Home.
● Getting help from Pocket MSN Help.
Before using the MSN Messenger, you will need to:
● Register an MSN Messenger account or Hotmail account.
● Turn on your GPRS or Wi-Fi connection
● Sign in to MSN Messenger.
To register a Microsoft Passport account, go to http://www.passport.com.
To set up a Hotmail account, go to http://www.hotmail.com.
7
Getting started

85
7
Getting started
Signing in MSN Messenger
1. Set up the connection to the Internet
2. Tap Start > Program > Pocket MSN > MSN Messenger > Tap here to sign in.
3. Enter your MSN or Hotmail E-mail address and password. Your sign-in name is usually in the form:
username@domain.com
4. Tap Sign In.
Please note: Signing in to an Exchange account may take several minutes depending upon your
connection speed.
MSN Hotmail
1. Tap Start > Programs > Pocket MSN > MSN Hotmail.
2. Input your MSN or Hotmail E-mail address and password.
3. Tap Sign In to enter MSN Hotmail Inbox screen.
4. In MSN Hotmail Inbox, you may receive your MSN or Hotmail E-mail through network.
Compose Hotmail
1. Tap Start > Programs > Pocket MSN > Compose Hotmail.
2. Input your MSN or Hotmail E-mail address and password.
3. Tap Sign In to enter MSN Hotmail Inbox screen.
MSN Mobile Home Page
Tap Start > Programs > Pocket MSN > MSN Mobile Home Page.
Pocket MSN Help
1. Tap Start > Programs > Pocket MSN > Pocket MSN Description.
2. Select a topic of interest by tapping on the topic.

86
1
Getting started

87
1
Getting started
Chapter 8 Multimedia
8.1 Camera
8.2 Video recorder
8.3 JAVA
8.4 Photo Editor
8.5 Pictures & Videos
8.6 Recorder
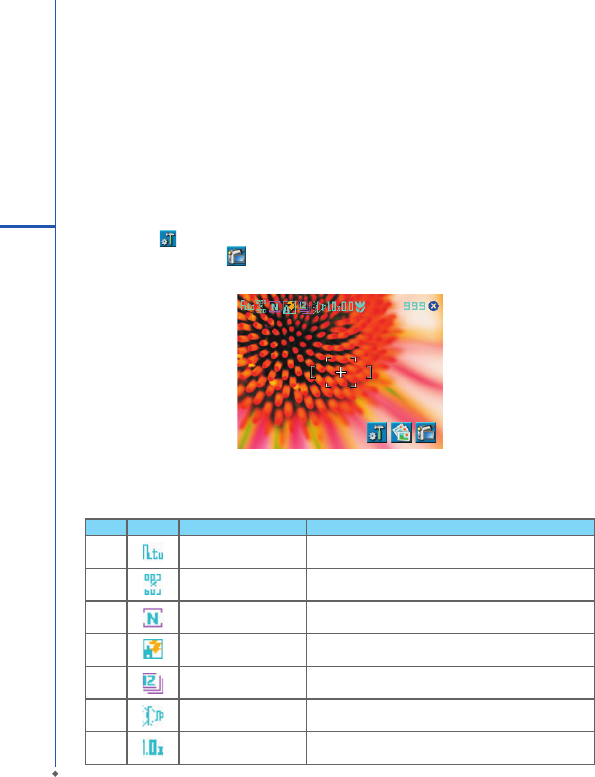
88
Chapter 8 Multimedia
8.1 Camera
You may use camera function in your O2 Xda Stealth to capture important moments.
Tap Start > Programs > Camera, or press and hold Camera key at standby mode to launch camera.
Capture mode
During capture mode, you can tap the icons on the top of the screen to switch through different
modes, or tap to open the full camera options menu. To switch to Video mode, simply press the
center navigation key or tap to enter the video standby mode.
No Icon Function Description
1 Image Mode Includes the following modes: Auto (default) / Day /
Cloudy / Fluorescent and Night
2 Image Size You can choose among:1600 x 1200 (default) / 1280 x
960 / 800 x 600 / 640 x 480 / 320 x 240 / 160 x 120
3 Image Quality Normal (default), Fine, Low.
4 Flash Light Auto (default), On, Off.
5 Sequential Shot 18,12,6,3,Off (default)
6 Shutter Sound On (default), Off
7 Zoom Zoom Range: 1.0x (default) / 1.2x / 1.4x / 1.6x / 1.8x /
2.0x / 2.2x / 2.4x
8
Getting started
89
8
Getting started
No Icon Function Description
8 EV Compensation Provides the following values: +2.0 / +1.5 / +1.0 / +0.5 /
0.0 (default) / -0.5 / -1.0 / -1.5 / -2.0
9 Macro/Normal mode Tap this icon to switch between Macro (within 10~60
cm) mode and normal mode
10 Remained Shots Indicates estimate number of photos you can take
using the current storage location.
11 Exit Tap this icon to exit camera mode
12 Options Menu
Tap this icon to o pen options menu, in which the
following options are provided: Mode, Effec t, E V
Compensation, Size, Quality, Timer, Sequential Shot,
Flash, Shutter Sound, Storage, Time Stamp, and
Confirm Frame.
13 Pictures & Videos Tap this icon to go to Pictures & Videos where the
taken photos and videos are stored.
14 Video Mode Tap this icon to change to Video mode
Taking a photo
1. On Camera capture mode, focus on the object.
2. Use volume adjustment side key to zoom in and out.
3. You can also tap on the icons on the top or open options menu to change camera settings.
4. Lightly press Camera key to auto-focus, fully press Camera key to shoot.
5. After you take a photo, the image will be categorized & Videos.
Please note: The default storage location is phone memory, and will automatically change to Mini SD
card if the Mini SD card is plugged in before launching camera.

90
Photo confirm screen
After taking a photo, you will enter the confirm screen where you can choose to delete or send out the
image. To skip this confirmation step, turn off Confirm Frame in Options menu.
On this screen you can tap the following icons to:
No Icon Function Description
1 Camera Return to camera capture mode.
2 Send Choose to send out this photo via E-mail or MMS.
3 Delete Delete the photo on screen.
4 Pictures & Videos Go to Pictures & Videos.
Viewing & editing photos
For details of photo viewing, please refer to Section 8.5 Pictures & Videos; for editing photos,
please refer to Section 8.4 Photo Editor.
8
Getting started
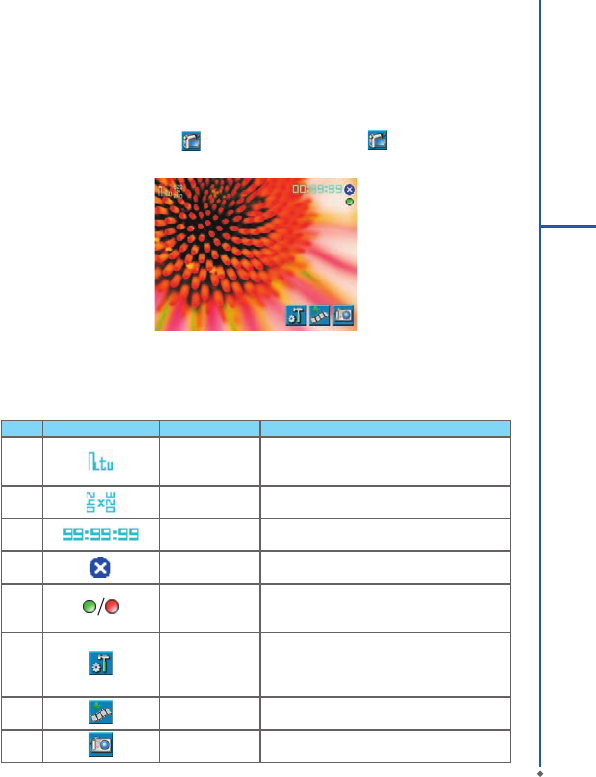
91
8
Getting started
8.2 Video recorder
The phone camera can also be used as a video recorder to record memorable moments of your life.
Tap Start > Programs > Camera > , or directly press Camera key > to enter video mode.
No Icon Function Description
1 Video Mode
Tap this icon to switch among the following
m o de s : Au to ( d ef a u lt) / D ay / C l o u dy /
Fluorescent and Night
2 Video Size Set to be 320 x 240
3Remained Video
Length
Indicates the estimated length of video you can
take using the current storage location.
4 Exit Tap this icon to exit video mode
5
P r e p a r e d t o
record/
Recording
Indicates the video recorder status
6 Options Menu
Tap this icon to open options menu, in which
the following optio ns a re p rovi ded: Mo de,
Effect, Video Format, MMS Video,Storage and
Confirm Frame.
7 Pictures & Videos Tap this icon to go to Pictures & Videos where
the taken clips are stored.
8 Video Mode Tap this icon to change to Video mode
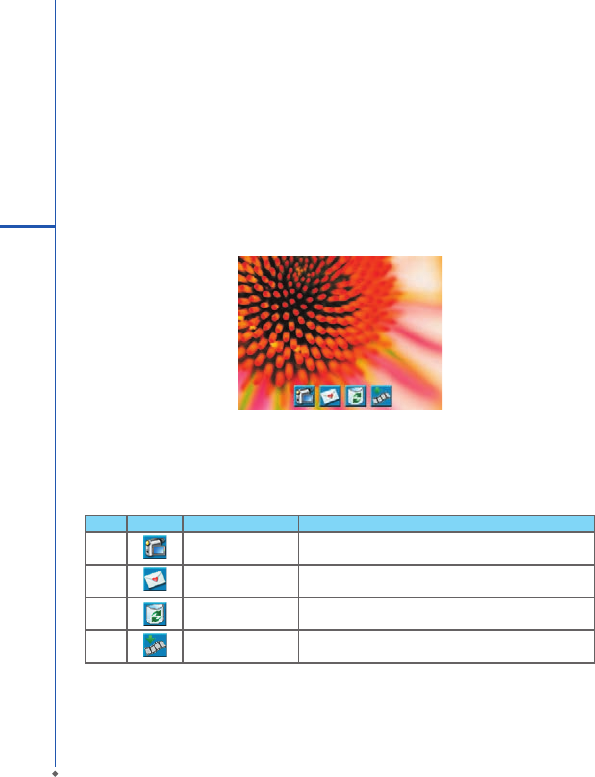
92
Recording a clip
1. On Video recorder mode, focus on the object. You can also tap on the icons on the top or open
options menu to change video recorder settings.
2. Press Camera key to start video filming.
3. Press Camera key again to stop filming.
4. After you record a clip, it will be categorized in Pictures & Videos.
Please note: The default storage location is phone memory, and will automatically change to Mini SD
card if the Mini SD card is plugged in before launching Camera.
Video confirm screen
After recording, you will enter the confirm screen where you can choose to delete or send out the clip.
To skip this confirmation step, turn off Confirm Frame in Options menu.
On this screen you can tap the following icons to:
No Icon Function Description
1 Video Return to video mode.
2 Send Choose to send out this clip via E-mail or MMS.
3 Delete Delete the photo on screen.
4 Pictures & Videost Go to Pictures & Videos.
Viewing video clips
For details of video viewing, please refer to Section 8.5 Pictures & Videos.
8
Getting started
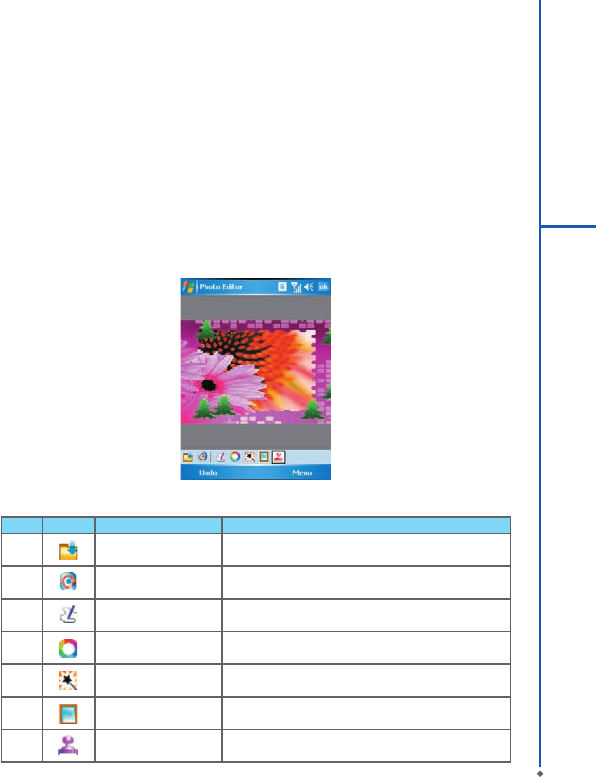
93
8
Getting started
8.3 JAVA
This device supports JAVA, providing you the freedom of using JAVA applications and games. You
can manage and execute the Java applications here.
8.4 Photo Editor
You can handwrite messages on photos, or apply colorful frames and stamps by tapping Start >
Programs > Photo Editor.
On the editor screen, you can tap Undo to reverse the steps, or tap Menu to get further editing
options.
The tool bar on the bottom also provides 7 functions:
No Icon Function Description
1 Save This button appears after you have modified a picture.
Tap this to save the current image.
2 Undo Revert
3 Pen Size Choose a brush size
4 Choose Color Choose a color of your pen from color palette or mix a
paint by yourself
5 Effect 5 effects are available: Gray / Blur / Emboss / Negative
/ Classic
6 Choose Frame 3 photo frames are available: Star / Fall / Flower
7 Add Stamp 5 stamps for you to add more fun touches to your
picture.
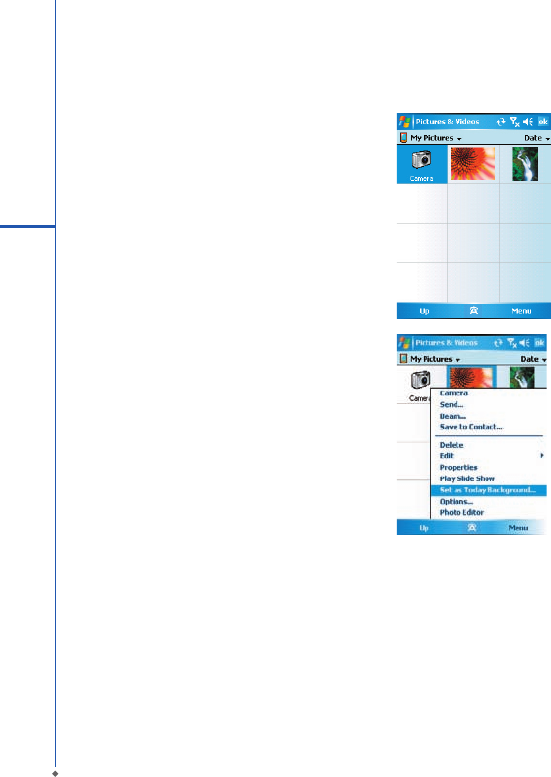
94
8.5 Pictures & Videos
You may use Pictures & Videos function to
manage your photos or videos. By tapping Start
> Programs > Pictures & Videos, you can:
1. Enter different folders
2. Select photo arrangement
3. Tap on a thumbnail picture to view the picture.
4. Select Menu for more options.
8
Getting started
In Me nu, yo u may resiz e the p icture , al so
per f o r m fun c t i o n s su c h as S et A s To da y
Background, and Play Slide Show, or Send.
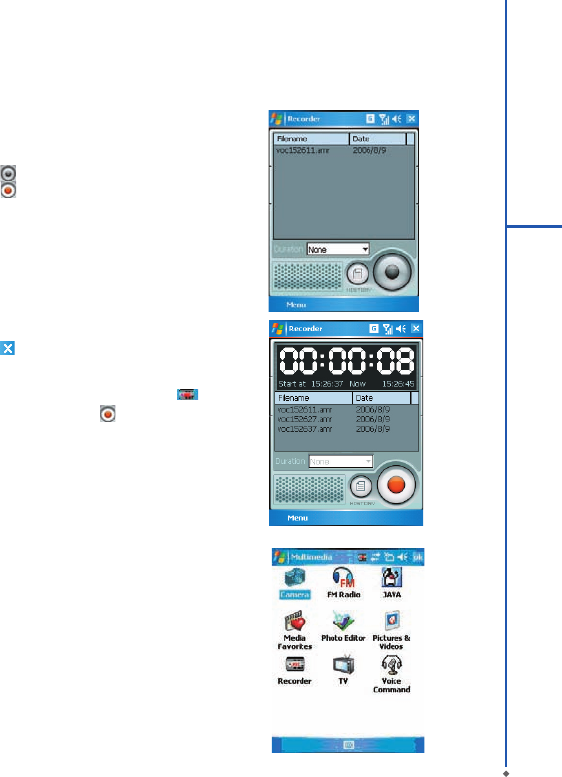
95
8
Getting started
8.6 Recorder
Use Recorder to record voice memo and make
note taking simple and efficient. Tap Start >
Programs > Recorder.
1. Tap to activate sound recording function.
2. Tap to stop recording sound.
3. Before you start recording, you may set the
recording time in Duration to set the duration
of the recording.
4. Check History to show all your recorded files.
Tap on any recorded file on your history list to
play the file.
5. Uncheck History to hide the history window.
6. Tap Men u > Save To to cho ose the file
location.
7. Tap to leave recorder screen while still
keep recording on the background; or tap
Menu > Exit, to stop recording and exit.
8. When recording in the background, tap to
return to Recorder. Tap to stop recording.
Please note: If there is an incoming call during
recording, answering the call will automatically
terminate recording. If you want to continue
re c o rdin g a f te r e n di n g c al l, y o u n ee d t o
reactivate recording function.
Chapter 9 Applications
9.1 Calendar
9.2 Tasks
9.3 File Explorer
9.4 Internet explorer
9.5 Windows Media
9.6 Games
9.7 Download Agent
9.8 STK (SIM Tool Kit) service
9.9 Calculator
9.10 Backup
9.11 Torch
9.12 ZIP
9.13 Auto Configurator
14 ClearVue PDF
9.15 Excel Mobile
9.17 PowerPoint Mobile
9.18 Search
9.19 Voice Speed Dial
9.20 Word Mobile
9.21 Answering Machine

98
Chapter 9 Applications
9.1 Calendar
Appointments and meetings
You may use Calendar to arrange appointments, meetings, and other events. You may view your
appointments in different display modes. You may select preferred display mode by tapping on the
bottom left of screen to switch between day, week, month, and year.
1. Tap Start > Calendar, Select a date to go to the desired date.
2. Select an appointment on the list to view or edit appointment details.
3. Tap on Day (or Week, Month, Year) on the bottom left of the screen to switch between display
modes.
4. Tap on the keypad icon to activate or hide screen keypad.
5. Tap Menu on the bottom right of the screen to open menu.
6. Tap Options in Menu, you may change the display setup of Calendar by preference.
Creating an appointment
1. Tap Start > Calendar. Select the date and time of appointment.
2. Highlight the desired date and time, and then tap Menu > New Appointment.
3. Tap OK to save the entry and return to calendar.
4. Tap Subject to edit the field or select predefined text.
5. Tap Location to edit the field.
6. Tap Starts to select the start time.
7. Tap Ends to change the end time.
8. You can add your personal notes in Notes tab.
9. Tap OK to save the appointment and return to Calendar screen.
If you select Remind Me in Reminder field, then your O2 Xda Stealth will remind you according to the
settings in Start > Settings > Personal tab > Sounds & Notifications.
Viewing and updating Calendar
Select an appointment on Calendar to view appointment summary. If you want to change the details
of an appointment, tap Edit.
Sending a meeting notice
You may use Calendar to set meeting notice by combining with the information on Outlook or
Pocket Outlook. When you synchronize messages or connect your O2 Xda Stealth with e-mail
server, meeting reminders will be generated automatically. Tap Calendar > Menu > Options >
Appointments tab, and select desired meeting sending method in Send meeting requests via field.
9
Getting started

99
9
Getting started
Generating a meeting notice
1. Tap Calendar > Menu > New Appointment.
2. Tap Attendees field. You will enter Contacts.
3. Select attendees from the e-mail addresses of your contacts.
4. The new meeting notice will be generated automatically and saved in Outbox folder.
9.2 Tasks
You may use Tasks to help you track unfinished tasks.
1. To add a new task, tap Tap here to add a new task.
2. ” ! ” Represent first priority.
3. Select a single item to enter the details screen of this time.
4. Select a single item and hold to activate the pop-up menu.
5. You may change the arrangement of the tasks list. On Tasks screen, tap Menu > Sort By.
6.You may choose to display a specific task category on your tasks list. Tap Menu > Filter.
Adding a new task
1. On Tasks screen, tap �Tap here to add a new task� to add the new text’s subject. The newly
created task will show on Tasks list.
2. Tap on the new task to enter the detail information screen of task.
3. Tap Edit to enter the editing screen.
4. Select Starts and Due field to set first and last day of task.
4. You may select Occurs to select whether this task has periodicity.
5. You may select Reminder to set a time to remind you or select None (unnecessary to alert).
6. To appoint a task as certain category, tap on Categories field to select a category from the options
list.
7. To add notes, tap Note tab and input desired content here.
8. Tap OK to save the task and return to tasks screen.
Checking and updating tasks
You may select a task from tasks list to view task summary. To change the details of this task, select
Edit.
100
9.3 File Explorer
This feature allows you to view and manage all the files saved in your O2 Xda Stealth or theme
memory card. To access File Explorer, tap Start > Programs > File Explorer. Select the source of
where the files are saved.
To sort files by its types, tap Sort By and select a sorting method: Name, Date, Size, and Type. Tap
Up to go up a level on the file hierarchy.
Tap Menu to access options:
9
Getting started
Option Description
My Documents Display files saved in My Document.
Open Path Create a new path to open a file.
Send Send the selected document via e-mail.
Beam File Send the file via Infrared or Bluetooth.
Refresh Refresh the document display screen.
Show All Files Show all the stored files.
New Folder Create a new folder.
Rename Rename a file.
Delete Delete a file.
Edit Manage the file list by using Undo, Cut, Copy, Paste, Paste Shortcut,
and Select All.
Tap and hold on a file for more options:
Option Description
Set As Ringtone Set the file (must be in music format) as your current ringtone.
Add to Zip File Compress the file.
9.4 Internet explorer
Please refer to 6.11 Connecting to the Internet
9.5 Windows Media
You can use Microsoft Windows Media Player 10 to play the audio and video files stored in your O2
Xda Stealth or from Internet.
Tap Start > Windows Media to activate Windows Media Player.
1. Tap the arrow icon next to Library to enter library screen.
1. Select a library folder.