GIGA BYTE TECHNOLOGY 28713GHOSTRX Ghost Macro Station User Manual Uranium Manual indd
GIGA-BYTE TECHNOLOGY CO., LTD. Ghost Macro Station Uranium Manual indd
Users Manual

Contents
Introduction
Package Content & Support
Installation
Mouse Instructions
GHOST Macro Station
GHOST Macro Engine
Battery & Charging
Safety
Maintenance
Users’ manual in other languages can be downloaded from GIGABYTE’s ocial website.
Please visit www.gigabyte.com for more product information.
02
02
03
06
08
11
22
23
24

2 Aivia Uranium
Introduction
The Aivia Uranium wireless gaming mouse equipped with revolutionary
GHOST Macro Station which allows dynamic mouse status update and
prompt assignment for mouse buttons. Introducing GIGABYTE’s patent
pending technology, built-in memory into the receiver ensures your gaming
commands are executed directly from the receiver and free from any risk of
signal loss or delay.
With 6500dpi, 1000Hz polling rate, and amazing 50hrs continuous gaming
capability, Aivia Uranium performs as well cordless as it does corded, giving
you an unparalleled freedom of frenzy motion on the battlefield.
Support
Register your Aivia Uranium on the Aivia Forum www.aivia.gigabyte.com for
free online technical support.
Package Contents
• Aivia Uranium Wireless Gaming Mouse
• GHOST Macro Station (OLED receiver)
• 2*AA NiMH 2100mAh Rechargeable Battery
• Spare Teon Mouse Feet Pads
• Cleaning Cloth
• Users’ Guide
Aivia Uranium 3
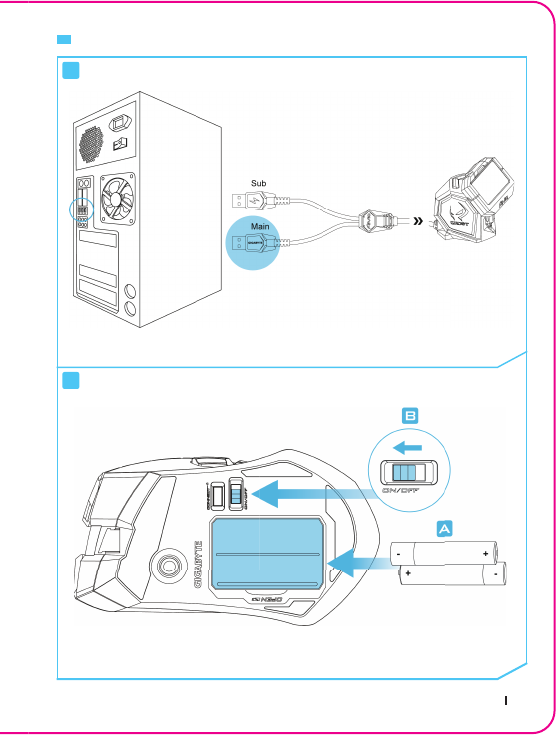
Installation
Connect the GHOST Macro Station
OS support: Windows® 98/ 2000/ XP/ 7/ 8
Insert AA Rechargeable Batteries
We’ve included 2 rechargeable NiMH batteries, but it will also run on normal
AA alkaline batteries.
1
2
4 Aivia Uranium
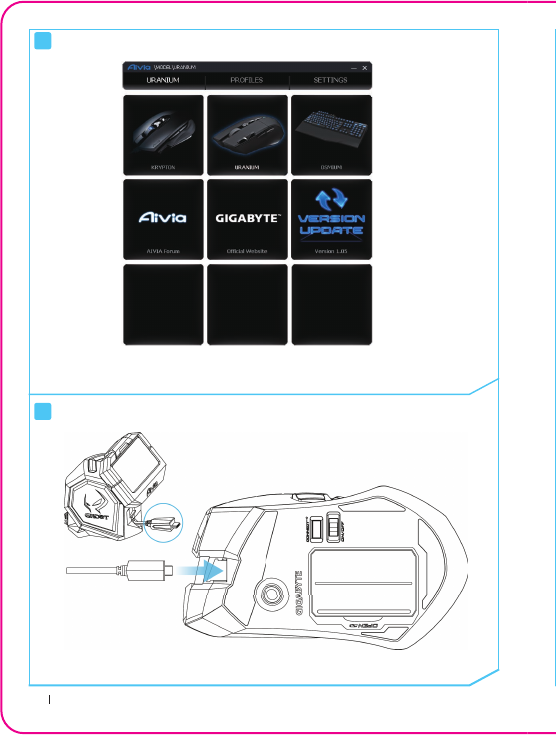
Install Aivia GHOST Engine
Download the Aivia GHOST software from GIGABYTE's of cial website
for further macro recording.
Instant Power Charging
Pull out the charging cable for instant power supply.
You can use the mouse while charging.
3
4
Aivia Uranium 5
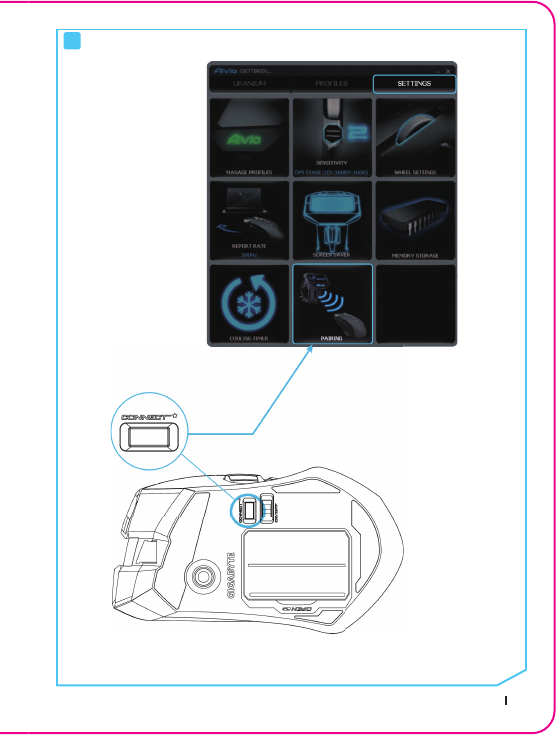
Install Aivia GHOST Engine Synchronize Mouse and Receiver
The re-pairing process is needed only when the mouse loses connection
with the receiver.
5
6 Aivia Uranium
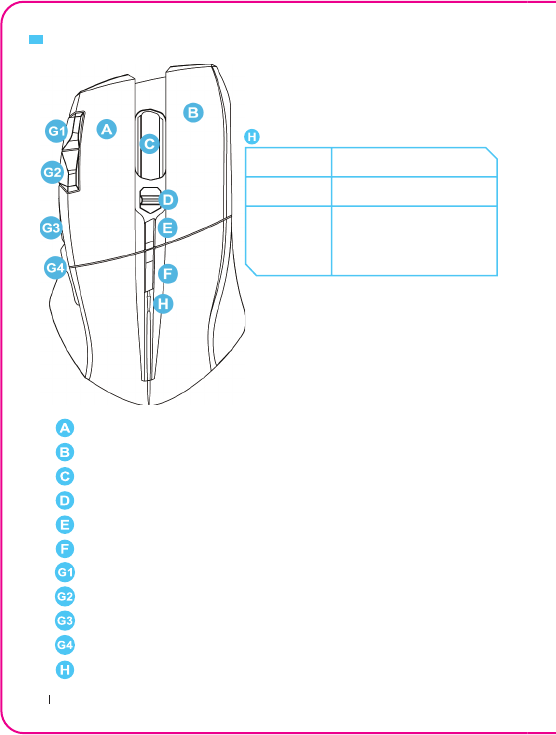
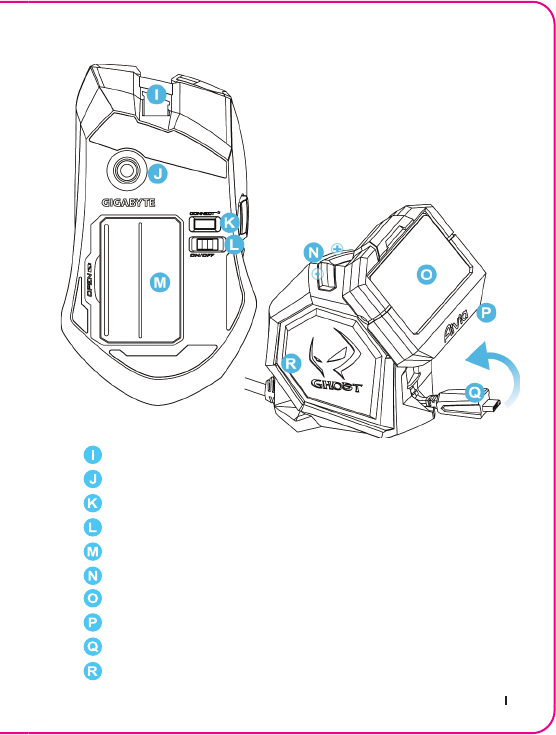
Mouse Instructions
– Left Click
– Right Click
– Scroll Click and 4-direction Wheel
– On-the- y DPI Adjustment
– Wheel Controller Lock
– Pro le Switch
– Gaming Button (unassigned)
– Gaming Button (unassigned)
– Gaming Button (forward)
– Gaming Button (backward)
– Power & Wheel Indicator
Switch On
Low Power Blinking red light
Live-editing
Mode
Blue LED continuously
lit up till unlocked
(refer to page08 GHOST
Macro Station)
Blue LED lit up for 5sec
Power & Wheel Indicator
Aivia Uranium 7
– Micro USB Connector Jack
– Twin-eye Laser Sensor
– Pairing Button (Connect)
– Power ON/OFF
– AA Battery Slot
– Screen Brightness Adjustment
– OLED Display
– 5-color Pro le Indicator
– Retractable Micro USB Charging Cable
– Built-in GHOST Macro Engine
8 Aivia Uranium
GHOST macro station is your control center built for your gaming task,
features dynamic status display, hot-switchable macro system and instant
charging dock.
Dynamic Display Mode
Dynamic update and display DPI value, report rate, gaming profiles, and
remaining battery life of your Aivia Uranium.
Live Editing Mode
Prompt re-assign macro hotkeys and set-up DPI value directly through
GHOST station.
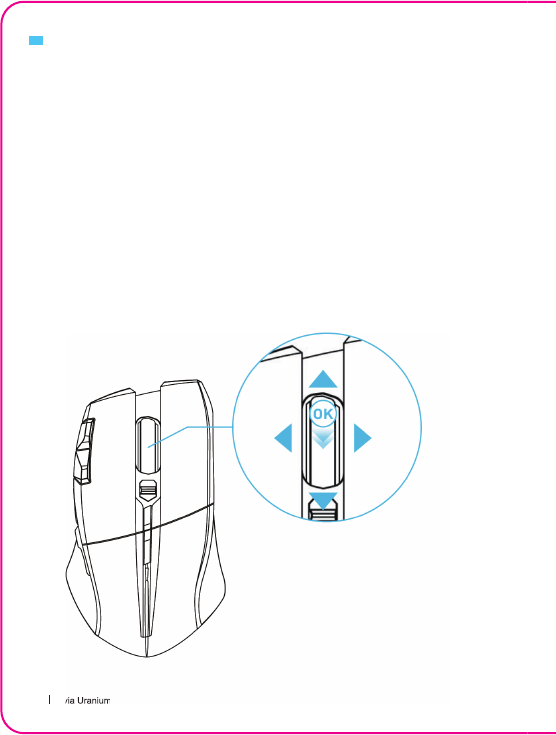
Switch on the “wheel controller lock” to use the mouse wheel like a D-pad
controller for OLED on-screen settings.
GHOST Macro Station
Aivia Uranium
Tilt right to enter
Tilt left to go back
Scroll up and down to select items
Press down on wheel to con rm changes
Aivia Uranium 9
GHOST Macro Station
Profi le
Select one of the profi les you
wish to program
Select a mouse button you
wish to program
1
4
2
3
3
Select the function category:
Basic/Key Mapping/Macro
(refer to page13)
Choose the function and
press scroll click to confirm
setting
10 Aivia Uranium
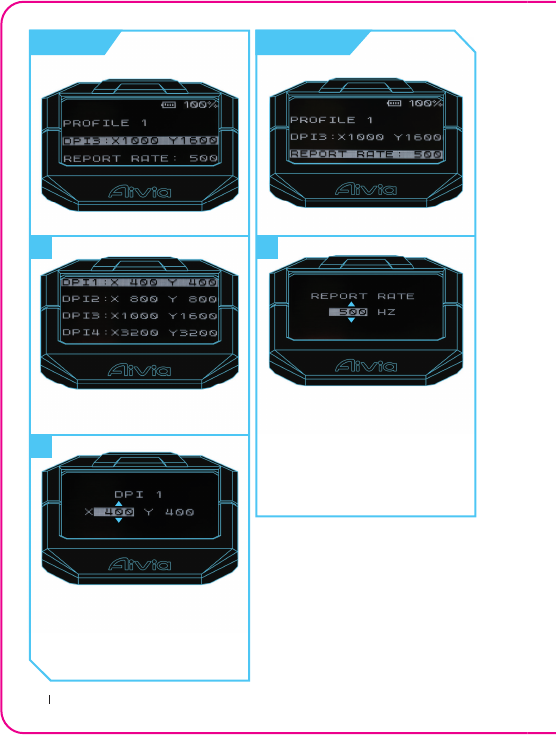
Scroll backward and for ward
the wheel to adjust DPI value
for both X and Y axle.
Press scroll click to save
the change
Scroll backward and forward
the wheel to adjust how fast
the reports
(125/142/166/200/250/333/
500/1000Hz selectable)
Press scroll click to save
the change
11
2
DPI Value
Select the DPI stage you wish
to defi ne
Report Rate
Aivia Uranium 11
GHOST Macro Engine
GHOST Macro Engine supports Windows 98, Windows 2000, Windows XP,
Windows 7, and Windows 8.
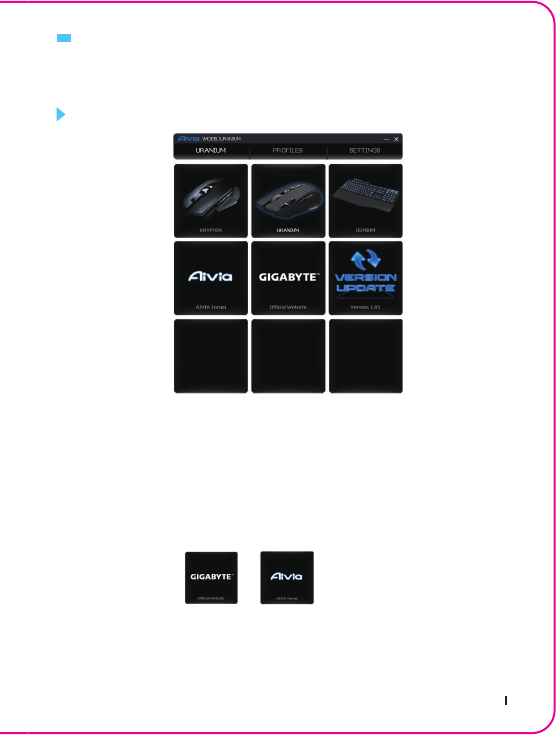
MAIN PAGE
The main page is the home page when you fi rst install GHOST Macro Engine.
More than one model may appear when you install other Aivia products.
1. Choose the Aivia model you wish to set up.
2. Click “PROFILES” to set up button assignments for the particular model.
3. Click “SETTINGS” to set up performance, lighting, and manage pro les.
You may also link to or for more product information.
You may also link to or for more product information.
You may also link to or for more product information.
12 Aivia Uranium
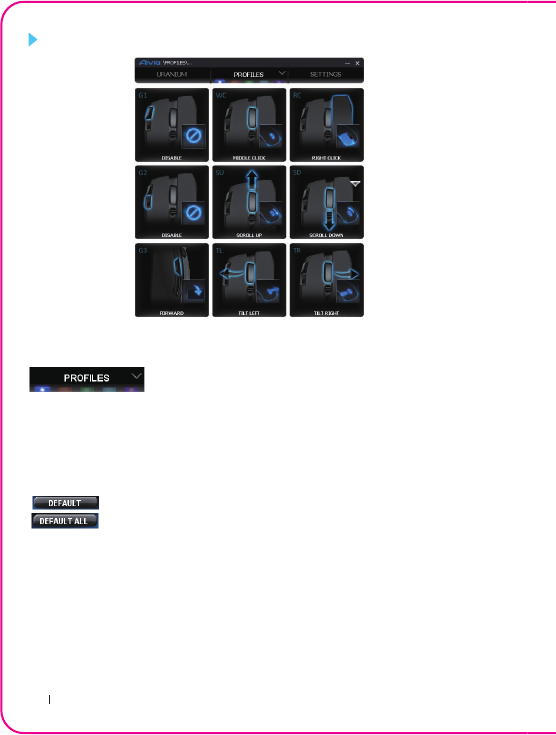
PROFILES
In the PROFILES tab, there are 5 pro les which appear as 5 LED bars
underneath PROFILE to program for your speci c games.
A single LED bar indicates the current profile you are accessing. For each
profile, you can assign either BASIC functions or advanced MACROS to
particular buttons. Click on any mouse button you wish to set up, you will then
enter into the function menu.
( T h e r e a r e a l s o h i d d e n b u t t o n s b y c l i c k i n g t h e d o w n w a r d a r r o w h e a d -
is to reset all settings for the current profi le back to default;
is to reset all 5 pro les back to factory default.)
is to reset all settings for the current profi le back to default;
is to reset all settings for the current profi le back to default;
is to reset all 5 pro les back to factory default.)
is to reset all settings for the current profi le back to default;
Aivia Uranium 13
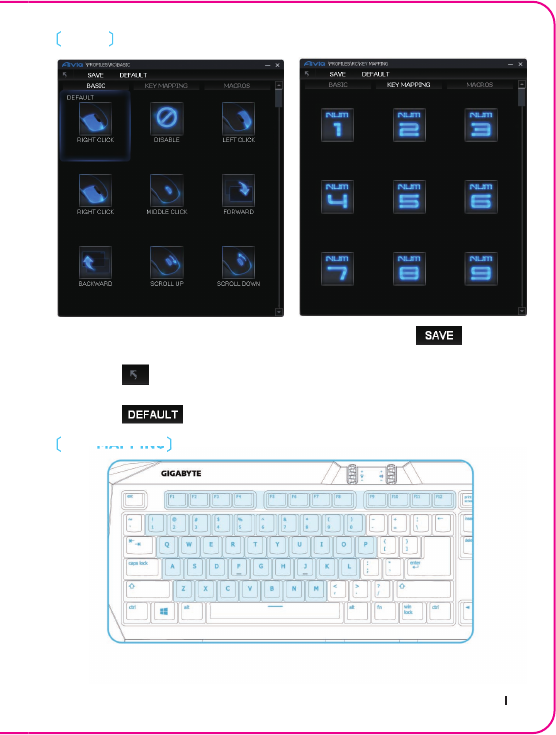
KEY MAPPING
BASIC
1. Select any button function you wish to change, and click or
double-click to save the changes
2. or click to ignore the change and go back to
previous page
3. or click to return the default setting.
1. Select any button function you wish to change, and click or
double-click to save the changes
2. or click to ignore the change and go back to
previous page
3. or click to return the default setting.
KEY MAPPING
You may simply maps a mouse button to a specific key on the keyboard,
includes A~Z, num1~0, F1~F12
14 Aivia Uranium
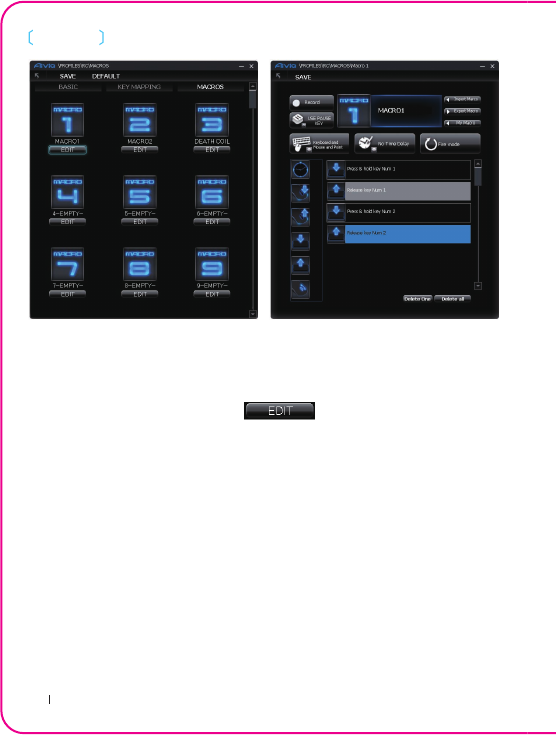
MACROS
Macro depot is where you can pre-record a series of keystrokes and button
presses with precise time interval for gaming commands. Here you have 70
blank macro cartridges. Pre-de ne the macro scripts and then assign to any
mouse buttons.
Select any empty macro and click , and you will then enter into
the macro depot.
Select any empty macro and click , and you will then enter into
Aivia Uranium 15
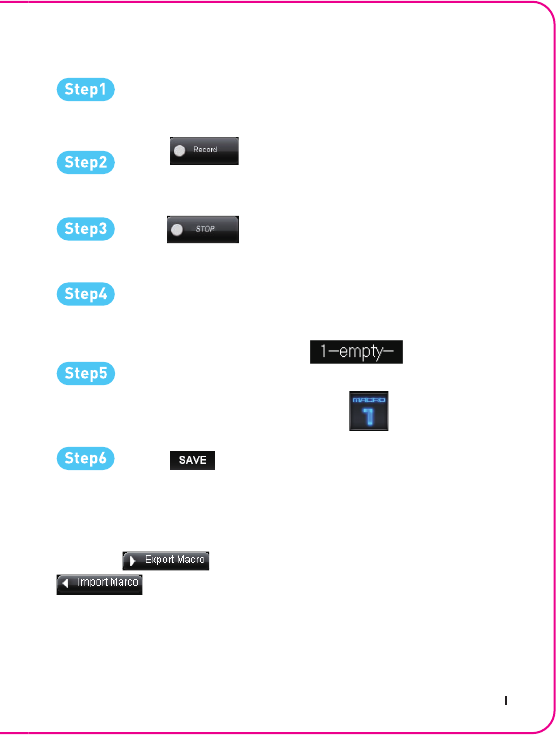
How to record a macro script?
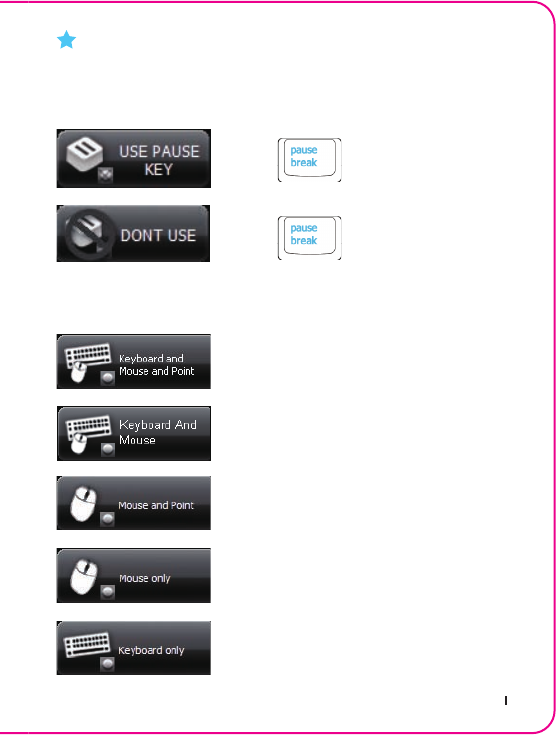
1. Understanding your Tool Box
Enable to stop
Disable to stop
Chose your recording objects
Enable to stop
Disable to stop
Enable / Disable Pause Key to stop recording
Record both keystrokes and mouse
button press.
Record keystrokes, mouse button press
and also cursor’s coordinates.
Only record keystrokes but ignore
mouse button press.
Only record mouse button press
but ignore keystrokes.
Record mouse button press and also
cursor’s coordinates.
16 Aivia Uranium
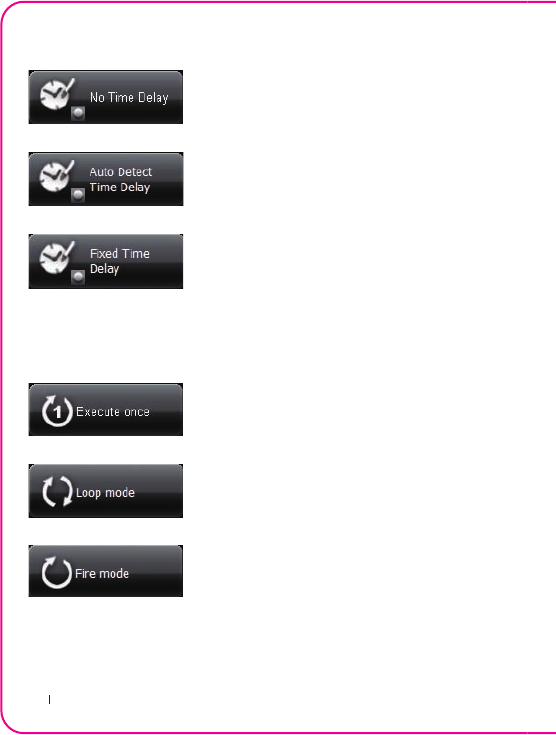
Time delay (interval)
Action mode
Do NOT record any time delay in-between
commands.
Record the real delay in-between as how it
is entered.
Key-in the time interval as a fi xed
time delay.
Execute a macro once as press the
mouse button once.
Execute a macro continuously, and press
again to stop the running macro.
Execute a macro continuously until you
release the assigned button.
Aivia Uranium 17
Type on (the blue box) to rename this
macro. Moreover, you may also change icon of your
personal macro by clicking on
Click to save the editing of this macro.
Click to end recording
2. Now begin to record a macro
3. More:
You may the macros you’d edited to the PC, and also
a macro back to GHOST macro engine.
Click to end recording
Type on (the blue box) to rename this
You may the macros you’d edited to the PC, and also
a macro back to GHOST macro engine.
Click to save the editing of this macro.
Modify your tool box buttons to set up your recording
preference.
Click and start keying in keystrokes or button
presses.
You may also insert additional commands from the
“Quick-insert bar” the left menu.
18 Aivia Uranium
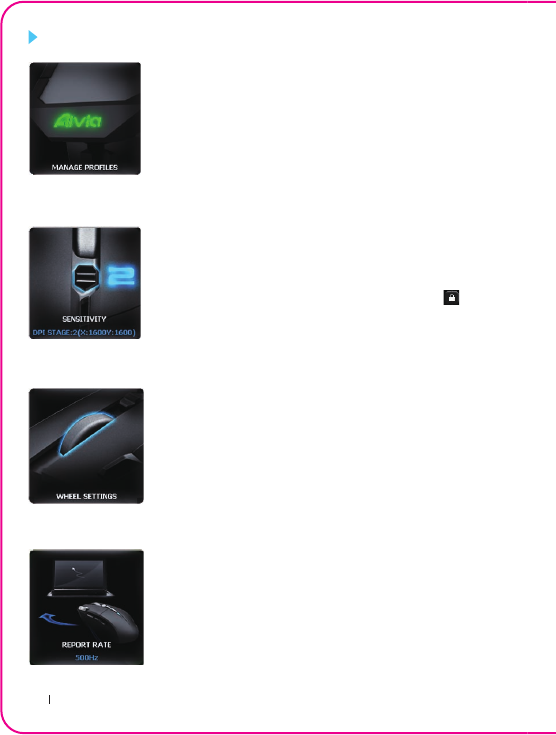
MANAGE PROFILES
SENSITIVITY
WHEEL SETTINGS
REPORT RATE
You may either disable or enable a whole profi le and also
change the color of the profi le indicator in this page.
Sensitivity is how fast the mouse cursor travels across
the screen.You can create 4 preferred sensitivity stages
by moving the single adjusting slider, and click to set
different sensitivity value of X-Y axis independently.
Default: 800 / 1600 / 3200 / 5600 DPI.
You can adjust the scrolling and tilt speed by moving the
knob on the slider.
The report rate determines the time intervals that your
PC retrieves data from your mouse. You can switch
between to 125Hz, 142Hz, 166Hz, 200Hz, 250Hz, 333Hz,
500Hz, or 1000Hz on the slider.
Default setting: 500Hz
SETTINGS
Aivia Uranium 19
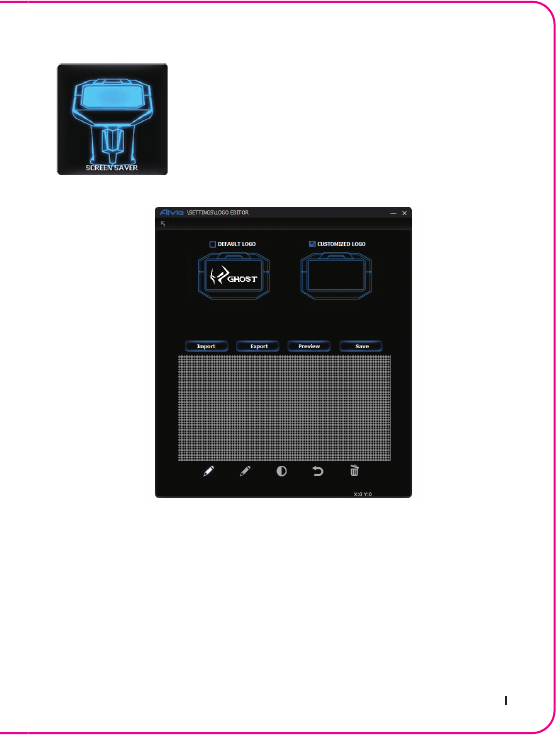
SCREEN SAVER
The OLED screen will shows screen saver logo when the
mouse stop working for 10mins. Except the default logo,
you can customize the other display logo as a screen
saver for your GHOST Macro Station.
You may directly import a photo (bmp format only) from PC or manually draw
on the bitmap.
20 Aivia Uranium
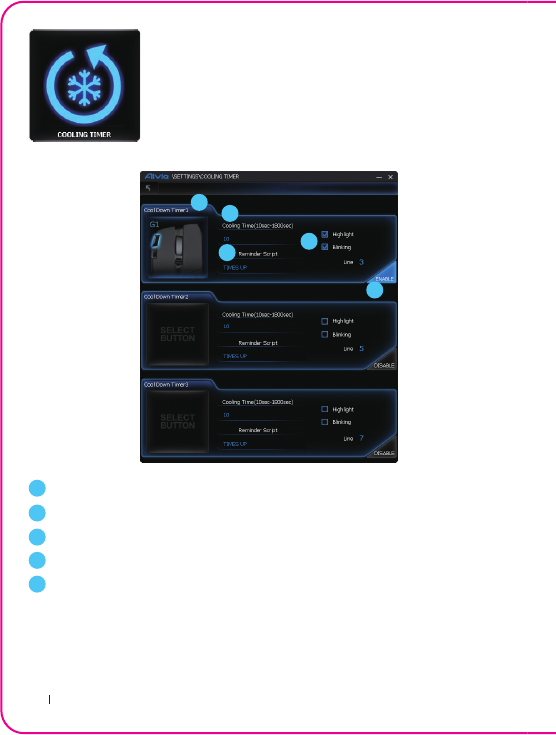
COOLING TIMER
The cooling timer allows you to release a specific
command again in the game which would limit the
command execution interval. There are three timers for
pre-setup.
Select a mouse button which you would use for a gaming command
Input the cooling time interval
Type on the reminder script for this timer to remind yourself
Select the show-up effect: Highlight/ Blinking
Click Enable/ Disable to activate the timer
1
1
2
2
3
3
4
4
5
5
Note!
The cooling timer is effective only when running Aivia GHOST. Exiting the
Aivia GHOST software will automatically close the timer function.

Aivia Uranium 21
MEMORY STORAGE
PAIRING
When the mouse loses connection with the receiver for
some reason, you can re-connect them by this setting.
Click Pairing and then press the rubber button on the
bottom of mouse.
Note!
Please DO NOT remove the mouse during processing in case
memory damages.
Note!
You may need another mouse to control the cursor during pairing process.
The mouse will be reinstated once the pairing process is complete.
Erase all data on memory, such as
settings and macros
Back up the profi le settings or macros
to your PC
Restore the backed up the settings or
data from your PC

22 Aivia Uranium
• For best condition, please fully charge the battery the rst time you use
Aivia Uranium. It takes about 4 hours to fully charge 2*AA NiMH 2100mAh
rechargeable batteries as you plug the single main USB connector. You
may speed up the charging time by plugging both the USB connectors of
the charging dock.
• The remaining battery life info shown on the OLED screen may temporarily
uctuate when powering on or suddenly terminating charging process.
It will recalibrate after few minutes to provide the proper battery life.
• When the battery was running too low and shut down the mouse eventually,
please restart the mouse after fully charging.
• The battery charging process may be affected by using non-powered USB
port from certain USB hub, keyboard, or other devices.
• Remove the batteries if they are worn out or before storing your mouse for
an extended period of time.
• Charge only with the recharger provided with the product.
• Operation times and performance of battery may vary depending on
operator network configuration, signal strength and usage.
Battery and Charging
Important information
Long period of repetitive motion using an improperly set-up workplace, or
incorrect body posture may be associated with physical discomfort and injury
to nerves, tendons, and muscles.

Aivia Uranium 23
Safety
Caution:
• Please DO NOT directly look into the laser beam.
• Keep batteries away out of children.
• Dispose or recycle the worn-out batteries in accordance of Local and
National Disposal Regulations.
• Risk of explosion if battery is replaced by an incorrect type. Use and
replace only with the same type and rating as the batteries provided.
• Risk of explosion if charging with the non-rechargeable batteries.
• In order to avoid the electric shock generated by energy hazard, the
input power of this product should be SELV.
FCC Declaration:
• This device has been tested and found to comply with the limits for
a Class B digital device, pursuant to Part 15 of the FCC Rules. These
limits are designed to provide reasonable protection against harmful
interference in a residential installation. This equipment generates, uses
and can radiated radio frequency energy and, if not installed and used in
accordance with the instructions, may cause harmful interference to radio
communications. However, there is no guarantee that interference will
not occur in a particular installation If this equipment does cause harmful
interference to radio or television reception, which can be determined by
turning the equipment off and on, the user is encouraged to try to correct
the interference by one or more of the following measures:
• This device complies with part 15 of the FCC Rules. Operation is subject
to the following two conditions: (1) This device may not cause harmful
interference, and (2) this device must accept any interference received,
including interference that may cause undesired operation.
- Reorient or relocate the receiving antenna.
- Increase the separation between the equipment and receiver.
- Connect the equipment into an outlet on a circuit different from that to
which the receiver is connected.
- Consult the dealer or an experienced radio / TV technician for help.

24 Aivia Uranium
FCC Caution:
• Changes or modications not expressly approved by the party responsible
for compliance could void the user‘s authority to operate the equipment.
• The antenna(s) used for this transmitter must not be co-located or
operating in conjunction with any otherantenna or transmitter.
Aivia Uranium Wireless Gaming Mouse
Model No.: GM-Uranium
Production Information
Maintenance
1. Should you have trouble operating the mouse properly, please contact
GIGABYTE customer service center on www.gigabyte.com for support.
Do not attempt to service or x the device yourself at any time.
2. Do not take the mouse apart (doing so will also void your warranty).
3. Keep your mouse away from liquid, humidity or moisture. Operate your
mouse only within the specied temperature range of 0°C (32°F) to 40°C
(104°F). Should you operate it in a temperature that is beyond this range,
unplug and switch off the device in order to let the temperature stabilize
within the optimal temperature range.