GIGA BYTE TECHNOLOGY 3160HMW Slate PC User Manual
GIGA-BYTE TECHNOLOGY CO., LTD. Slate PC
User Manual

REGULATORY NOTICES
CB :
● Only use batteries designed for this computer. The wrong battery type may explode, leak or damage the
computer.
● Donotremoveanybatteriesfromthecomputerwhileitispoweredon.
● Donotcontinuetouseabatterythathasbeendropped,orthatappearsdamaged(e.g.bentortwisted)
inanyway.Evenifthecomputercontinuestoworkwithadamagedbatteryinplace,itmaycausecircuit
damage,whichmaypossiblyresultinre.
● RechargethebatteriesusingtheSlatPC’ssystem.Incorrectrechargingmaymakethebatteryexplode.
● Donottrytorepairabatterypack.Referanybatterypackrepairorreplacementtoyourservice
representativeorqualiedservicepersonnel.
● Keepchildrenawayfrom,andpromptlydisposeofadamagedbattery.Alwaysdisposeofbatteries
carefully.Batteriesmayexplodeorleakifexposedtore,orimproperlyhandledordiscarded.
● Keepthebatteryawayfrommetalappliances.
● Afxtapetothebatterycontactsbeforedisposingofthebattery.
● Donottouchthebatterycontactswithyourhandsormetalobjects.
RF Exposure :
Thisequipmentmustbeinstalledandoperatedinaccordancewithprovidedinstructionsandmustnotbe
co-located or operating in conjunction with any other antenna or transmitter. End-users and installers
mustbeprovidedwithantennainstallationinstructionsandtransmitteroperatingconditionsforsatisfyingRF
exposure compliance.
CE Notice (European Union) :
This symbol indicatesthisSlatPCcomplieswiththeEMCDirective2004/108/ECandtheEuropeanUnion’s
LowVoltageDirective2006/95/EC.ThissymbolalsoindicatesthatthisSlatPC meets the following technical stan-
dards:
● EN55022—“LimitationsandMethodsofMeasurementfortheRadioInterferencesofInformation
TechnologyEquipment.”
● EN55024—“Informationtechnologyequipment-Immunitycharacteristics-Limitsandmethodsof
measurement.”
● EN61000-3-2—“Electromagneticcompatibility(EMC)-Chapter3:Limits-Section2:Limitsonthe
harmoniccurrentemissions(Equipmentinputcurrentuptoandincluding16Aperphase).”
● EN61000-3-3—“Electromagneticcompatibility(EMC)-Chapter3:Limits-Section3:Limitsonthe
voltageuctuationsandickerinlow-voltagepowersupplysystemsforequipmentwithratecurrentupto
andincluding16A.”
NOTE:EN55022emissionsrequirementsprovidefortwoclassications.
(1) ClassAgovernscommercialuse
(2) ClassBgovernsresidentialuse
Declaration of Conformity for EU countries
Hereby,GIGABYTE,declaresthatthisSlatPCseriesisincompliancewiththeessentialrequirementsand
otherrelevantprovisionsofDirective1999/5/EC.

BSMI Notice (Taiwan Only)
● ThesymbolabovemustbeattachedtotheproductindicatingcompliancewiththeBSMIstandard.
● MostSlatPCareclassiedbytheBureauofStandards,MeteorologyandInspection(BSMI)asClassB
informationtechnologyequipment(ITE).
● Caution:Suggesttooperateunder40˚C
CCC (China only)
● OnClassAsystems,thefollowingwarningwillappearneartheregulationlabel:
● Warning:ThisisaClassAproduct.Inadomesticenvironment,thisproductmaycauseradiointerference,
inwhichcaseusersmayberequiredtotakeadequatemeasures.
Federal Communications Commission Notice :
ThisequipmenthasbeentestedandfoundtocomplywiththelimitsforaClassBdigitalservice,
pursuanttoPart15oftheFCCrules.Theselimitsaredesignedtoprovidereasonableprotectionagainst
harmfulinterferenceinaresidentialinstallation.Anychangesormodificationsmadetothisequipment
mayvoidtheuser’sauthoritytooperatethisequipment.Thisequipmentgenerates,uses,andcanradiateradio
frequencyenergy,andifnotinstalledandusedinaccordancewiththeinstructions,maycauseharmful
interferencetoradiocommunications.However,thereisnoguaranteethatinterferencewillnotoccurina
particularinstallation.Ifthisequipmentdoescauseharmfulinterferencetoradioortelevisionreception,
whichcanbedeterminedbyturningtheequipmentoffandon,theuserisencouragedtotrytocorrectthe
interference by one or more of the following measures:
● Reorientorrelocatethereceivingantenna.
● Increasetheseparationbetweentheequipmentandreceiver.
● Connecttheequipmentintoanoutletonacircuitdifferentfromthattowhichthereceiverisconnected.
● Consultthedealeroranexperiencedradio/TVtechnicianforhelp.
● Allexternalcablesconnectingtothisbasicunitmustbeshielded.
ThisdevicecomplieswithPart15oftheFCCRules.Operationissubjecttothefollowingtwoconditions:
(1)Thisdevicemaynotcauseharmfulinterference,and
(2)Thisdevicemustacceptanyinterferencereceived,includinginterferencethatmaycauseundesired
operation.
The FCC RF safety requirement:
TheradiatedoutputpowerofthewirelessLANMiniPCICardandBluetoothcardisfarbelowtheFCC
radiofrequencyexposurelimits.Nevertheless,theSlatePCseriesshallbeusedinsuchamannerthatthe
potential for human contact during normal operation is minimized as follows:
(1)UsersarerequestedtofollowtheRFsafetyinstructionsonwirelessoptiondevicesthatareincludedinthe
user’smanualofeachRFoptiondevice.
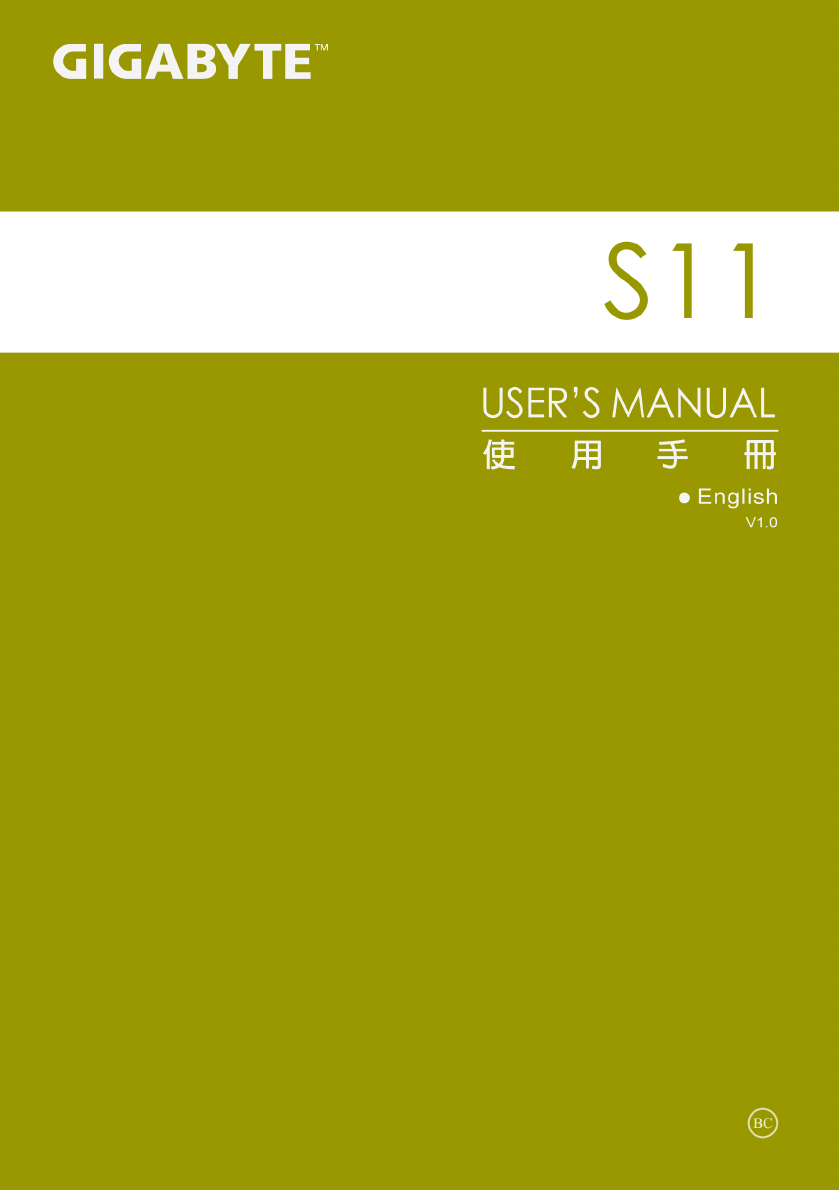
CAUTION:TocomplywithFCCRFexposurecompliancerequirements,aseparationdistanceof
atleast20cm(8inches)mustbemaintainedbetweentheantennafortheintegratedwirelessLAN
MiniPCICardbuiltintothescreensectionandallpersons.
MainAuxiliary
NOTE:ThewirelessMiniPCIadapterimplementsatransmissiondiversityfunction.Thefunction
doesnotemitradiofrequenciessimultaneouslyfrombothantennas.Oneoftheantennasisselected
automaticallyormanually(byusers)toensuregoodqualityradiocommunication.
(2)Animproperinstallationorunauthorizedusemaycauseharmfulinterferencetoradiocommunications.Also
anytamperingoftheinternalantennawillvoidtheFCCcerticationandyourwarranty.
CAUTION:Anychangesormodicationsnotexpresslyapprovedbythegranteeofthisdevicecould
voidtheuser’sauthoritytooperatetheequipment
Notice: Canadian users
CANICES-3(*)/NMB-3(*)
*Inserteither“A”or“B”butnotbothtoidentifytheapplicableClassofITE.
KCC Notice :
● “B”classequipment(telecommunicationsequipmentforhouseholdpurpose)
● AsthisequipmenthasundergoneEMCregistrationforhouseholdpurpose(“B”Class),thisproductcanbeused
in any area and designed to be used mainly in a household.

Battery Maintenance Guidance
BeforeyouuseyourSlatPContheroad,youwillhavetochargethebatterypack.Thebatterypackbeginsto
chargeassoonastheSlatPCisconnectedtoexternalpowerusingthepoweradapter.Fullychargethebattery
packbeforeusingitforthefirsttime.AnewbatterypackmustcompletelychargebeforetheSlatPCis
disconnectedfromexternalpower.IttakesafewhourstofullychargethebatterywhentheSlatPCisturned
OFF.Pleasenotethebatterystopschargingifthetemperatureistoohighorthebatteryvoltageistoohigh.
NOTE:Donotleavethebatterypackdischarged.Thebatterypackwilldischargeovertime.Ifnot
usingabatterypack,itmustcontinuedtobechargedeverythreemonthtoextendrecoverycapacityor
elseitmayfailtochargeinthefuture.Lithium-Ionrechargeablebatteriesrequireroutinemaintenance
andcareintheiruseandhandling.ReadthroughbelowinstructionandyourSlatPCwillachievethe
maximum battery life span.
Battery Maintenance :
● Donotleavebatteriesunusedforextendedperiodsoftime,eitherintheSlatPCorinstorage.Whena
batteryhasbeenunusedfor3months,checkthechargestatusandchargeordisposeofthebatteryas
appropriate.
● ThetypicalestimatedlifeofaLithium-Ionbatteryisabouttwotothreeyearsor300to500chargecycles,
whicheveroccursrst.Onechargecycleisaperiodofusefromfullycharged,tofullydischarged,andfully
rechargedagain.Useatwotothreeyearlifeexpectancyforbatteriesthatdonotrunthroughcomplete
charge cycles.
● RechargeableLithium-Ionbatterieshavealimitedlifeandwillgraduallylosetheircapacitytoholda
charge.Thislossofcapacityisirreversible.Asthebatterylosescapacity,thelengthoftimeitwillpower
theSlatPCdecreases.
● Theruntimeofyourbatterywillvarydependingontheproduct’scongurationandtheapplicationsthat
yourun.Routinelycheckthebattery’schargestatus.
● Batteryterminalsmustavoidcontactwithanymetallicsubstance.Forpreventingshortage,avoidsilver
coins,tinselsandanyothermetallicsubstancestocontactthe+and-terminalsofthebattery.For
example,Itmighthappenbyinsertingthebatteriestoacoatpocketoraleatherhandbagwithsome
metallicsubstancesmountedonit(metalbuttonsorzippers).Thereishighpossibilityofcausingshort
circuits and connection damage of the battery.
● Considerreplacingthebatterywithanewoneifyounoteeitherofthefollowingconditions:
(1)Thebatteryruntimedropsbelowabout80%oftheoriginalruntime.
(2)Thebatterychargetimeincreasessignicantly.
(3)Ifabatteryisstoredorotherwiseunusedforanextendedperiod,besuretofollowthestorageinstructions
inP10.Ifyoudonotfollowtheinstructions,andthebatteryhasnochargeremainingwhenyoucheckit,
considerittobedamaged.Donotattempttorechargeitortouseit.Replaceitwithanewbattery.
Charging :
TheLithium-IonbatteryisrechargedinternallyusingtheACadapter.Torechargethebattery,makesurethe
batteryisinstalledandtheSlatPCisconnectedtotheACadapter.Thechargetimeswillbesignicantly
longerifyourSlatPCisinusewhilethebatteryischarging.Ifyouwanttochargethebatterymorequickly,
putyourcomputerintoSuspendmodeorturnitoffwhiletheadapterischargingthebattery.Pleasealways
followthecharginginstructionsprovidedwithyourSlatPC.
* If you happen to leave your battery pack to go through an extended period of self-discharge, say more
than three months, the battery voltage level will become too low and needs to be Pre-Charged (to bring the
battery voltage level high enough) before it automatically resumes its normal Fast Charge. Pre-Charge may
take 30 minutes. Fast Charge usually takes 2~3 hours.

Low Battery State :
Whenthebatterylevelislow,anotificationmessageappears.Ifyoudonotrespondtothelowbattery
message,thebatterycontinuestodischargeuntilitistoolowtooperate.Whenthishappens,yourSlatPC
goesintoSuspendmode.ThereisnoguaranteeyourdatawillbesavedoncetheSlatPCreachesthispoint.
CAUTION:ToprotectyourSlatPCfromdamage,useonlythepoweradapterthatcamewithit
because each power adapter has its own power output rating.
OnceyourSlatPCgoesintosuspendmodeasaresultofadeadbattery,youwillbeunabletoresume
operationuntilyouprovideasourceofpowereitherfromanadapterorachargedbattery.Onceyouhave
providedpower,youcanpresstheSuspend/Resumebuttontoresumeoperation.InSuspendmode,your
dataismaintainedforsometime,butifapowersourceisnotprovidedpromptly,thepowerindicatorstops
flashingandthengoesout,inwhichcaseyouhavelostthedatathatwasnotsaved.Onceyouprovide
power, you can continue to use your computer while an adapter charges the battery.
Storage :
● Chargeordischargethebatterytoapproximately50%ofcapacitybeforestorage.
● Chargethebatterytoapproximately50%ofcapacityatleastonceeverythreemonths.
● RemovethebatteryandstoreitseparatelyfromtheSlatPC.
● Storethebatteryattemperaturesbetween5°Cand20°C(41°Fand68°F).
CAUTION:Thebatteryself-dischargesduringstorage.Highertemperatures(above20°Cor
68°F)reducethebatterystoragelife.
Handling Precautions :
● Donotdisassemble,crush,orpunctureabattery.
● Donotshorttheexternalcontactsonabattery.
● Donotdisposeofabatteryinreorwater.
● Donotexposeabatterytotemperaturesabove60°C(140°F).
● Keepthebatteryawayfromchildren.
● Avoidexposingthebatterytoexcessiveshockorvibration.
● Donotuseadamagedbattery.
● Ifabatterypackhasleakingfluids,donottouchanyfluids.Disposeofaleakingbatterypack(see
DisposalandRecyclingsection).Incaseofeyecontactwithuid,donotrubeyes.Immediatelyusheyes
thoroughlywithwaterforatleast15minutes,liftingupperandlowerlids,untilnoevidenceoftheuid
remains.Seekmedicalattention.
Transportation :
Alwayscheckallapplicablelocal,national,andinternationalregulationsbeforetransportingaLithium-Ion
battery.Transportinganend-of-life,damaged,orrecalledbatterymay,incertaincases,bespecicallylimited
or prohibited.
Disposal and Recycling :
Lithium-Ionbatteriesaresubjecttodisposalandrecyclingregulationsthatvarybycountryandregion.Always
checkandfollowyourapplicableregulationsbeforedisposingofanybattery.Contactyourlocalbattery
recyclingorganization.Manycountriesprohibitthedisposalofwasteelectronicequipmentinstandardwaste
receptacles.Placeonlydischargedbatteriesinabatterycollectioncontainer.Useelectricaltapeorother
approvedcoveringoverthebatteryconnectionpointstopreventshortcircuits.
Thesymbolofthecrossedoutwheeledbinindicatesthattheproduct(electricalandelectronic
equipment)shouldnotbeplacedinmunicipalwaste.Pleasechecklocalregulationsfordisposalof
electronic products.
English
1
Congratulations on your purchase of the GIGABYTE Tablet PC!
This manual will help you to get started with setting up your Tablet PC. The final product
conguration depends on the model at the point of your purchase. GIGABYTE reserves the
right to amend without prior notice. For more detailed information, please visit our website at
http://www.gigabyte.com
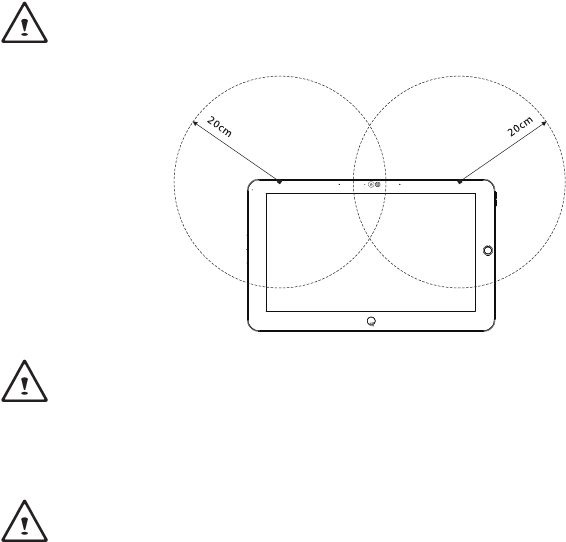
Using GIGABYTE Tablet PC for the First Time
1Connect the power cord to the AC adapter.
2Connect the AC adapter to the DC-in jack of the Tablet PC.
3Connect the power cord to the power outlet.
4While the Battery Indicator lights on, press the Power Button to turn on the Tablet PC
1
2
43
Keyboard base application

English
2
Panoramic View
6
7
8
9
135 4 2
1Directing Hot Key
2Microphone
3Light sensor
4Webcam
5Webcam Indicator
6Power Status Indicator
7Left Button of Mouse
8Right Button of Mouse
9Windows Button
To control mouse direction; press the directing hot key
to simulate as left key of mouse.
● Back to Windows 8 Style UI mode.
● Resume from sleep or hibernate mode.
Tip: “Left click + Right click of mouse + Directing Hot Key” operate as the function of “Ctrl+Alt+Del”.
GIGABYTE Tablet PC Tour
Ctrl Alt Delete
English
3
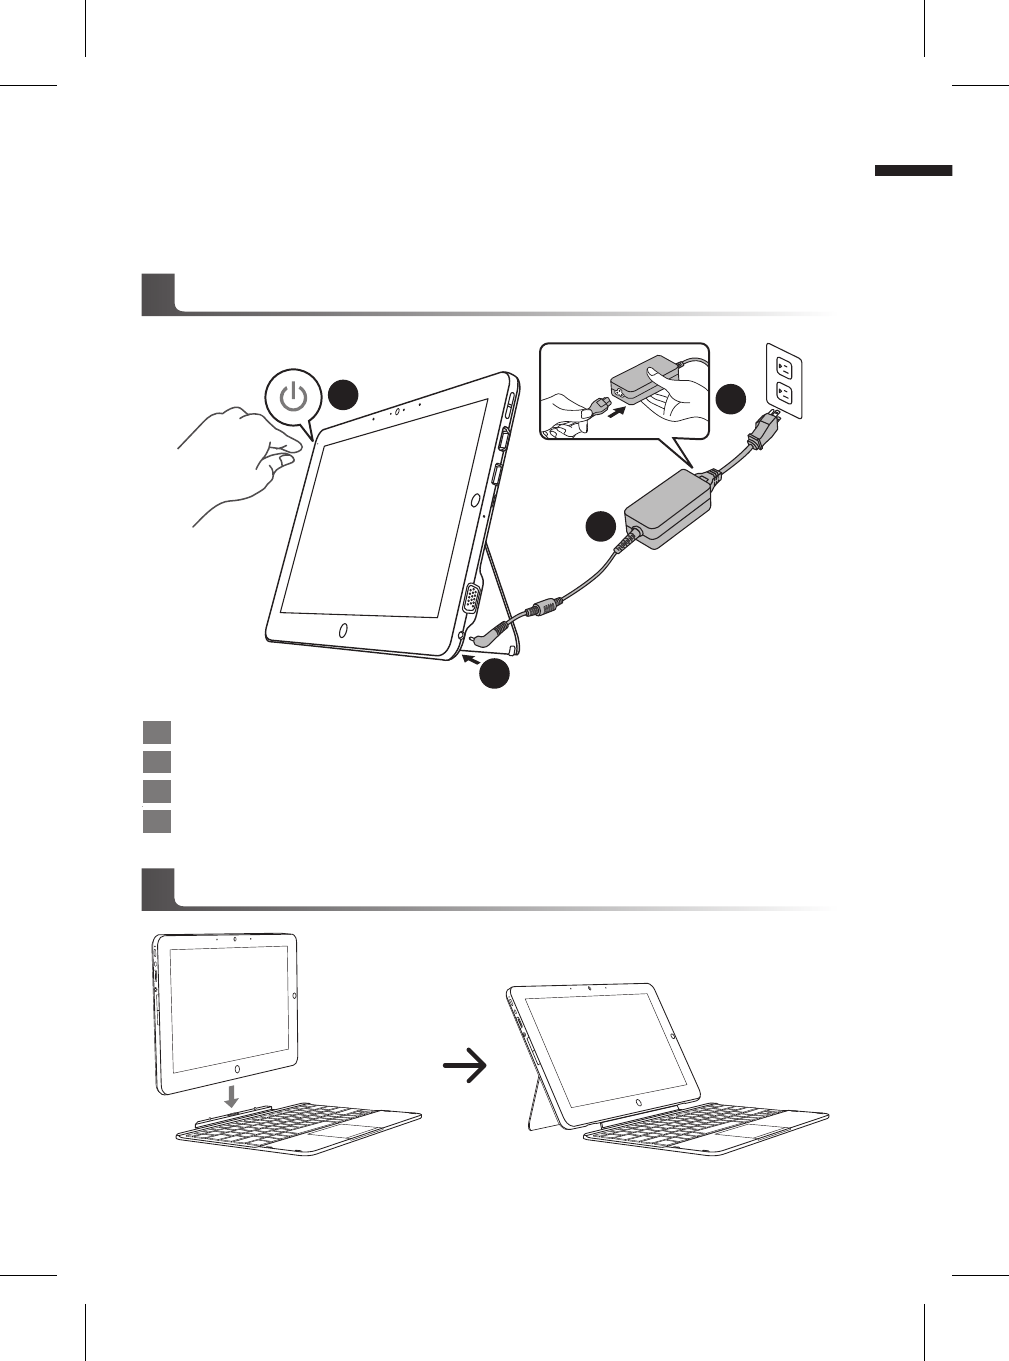
Left View
1 3 4 5 62
1 3 4 5 62 7
Tip: Press the “-” volume button when the computer is off and the display will indicate the battery capacity status.
1DC-in
2D-sub (VGA) Port
3Micro SD Card Reader
4USB Port
5HDMI Port
6SIM Card Slot
7Volume Control Key
1Power Button
2Rotation Lock Button
3USB Port
4Headphone-in
5Left Button of Mouse
6Right Button of Mouse
Press “+” or “-” to control volume.
● Press and release the Power Button to turn on the
operation system. Press “+” to enter into GIGABYTE
BIOS Setup Utility. USB keyboard is recommended
to use for setting up BIOS functions under
GIGABYTE BIOS Setup Utility.
● Press and release the Power button to turn on the
operation system. Press “-” to enter into GIGABYTE
System Recovery. Use Directing Hot Key to operate
GIGABYTE Smart Recovery.
Right View
Main Battery
English
4
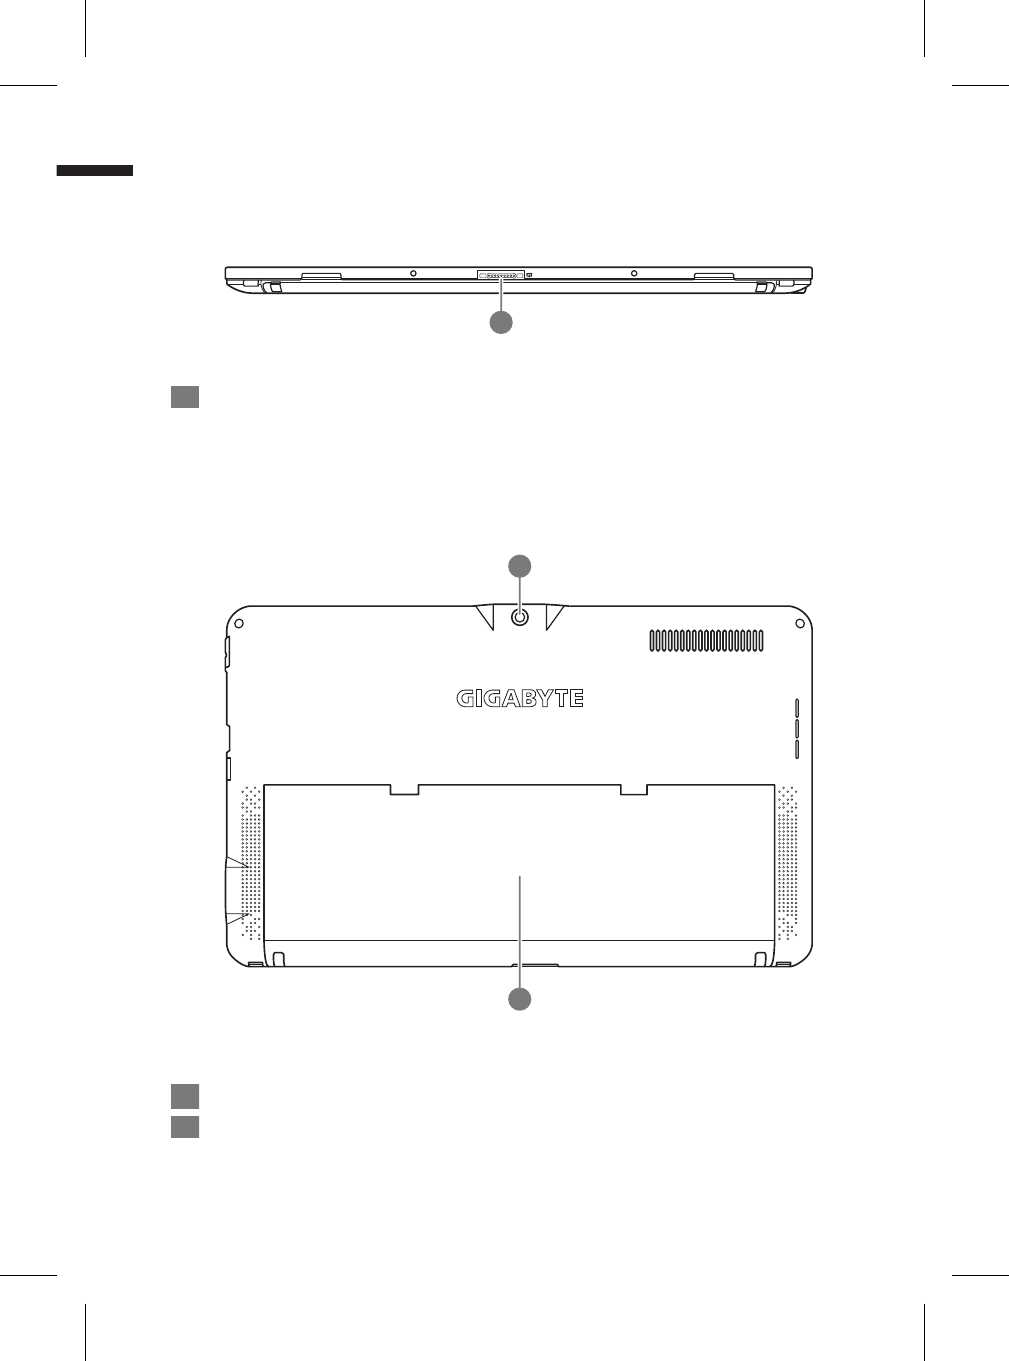
Base View
Rear View
1Keyboard docking connection port
1Rear Camera
2Kickstand
Enjoy movies and entertainment without any hassle by
simply unfold the stand.
1
1
2

English
5
Keyboard Top View
2
1
3
4
1Keyboard docking connection port
2Keyboard
3TouchPad
4TouchPad Button
English
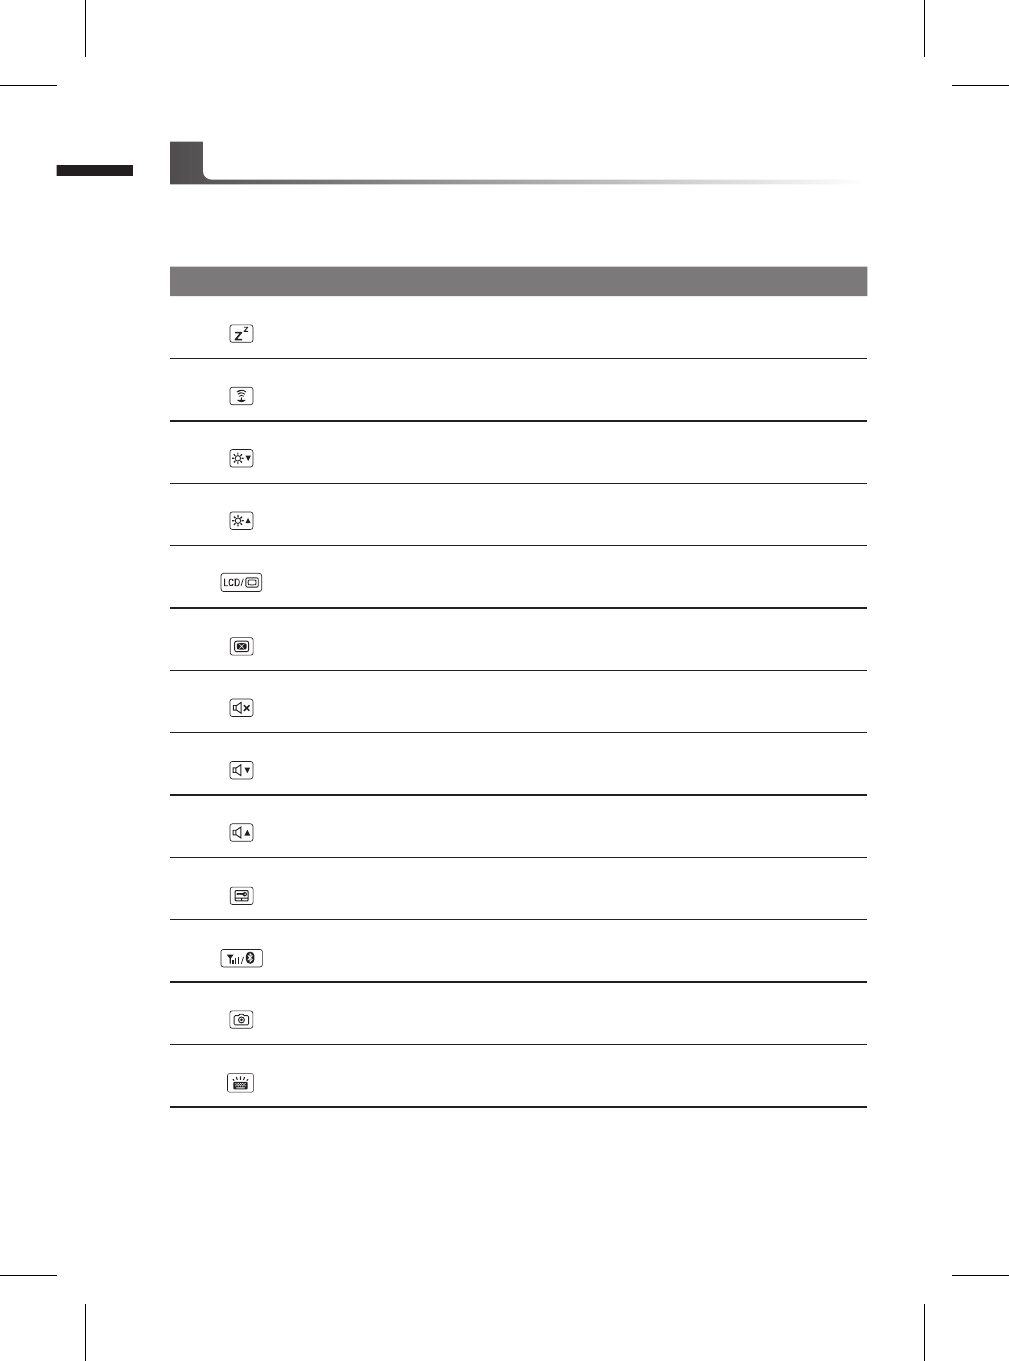
6Hotkeys
The computer employs hotkeys or key combinations to access most of the computer’s controls
like screen brightness and volume output. To activate hotkeys, press and hold the <Fn> key
before pressing the other key in the hotkey combination.
Hotkey Function Description
Fn+F1 Sleep Put the computer in Sleep mode.
Fn+F2 Wireless LAN Enables/disables the Wireless LAN function.
Fn+F3 Brightness Down Decrease the screen brightness.
Fn+F4 Brightness Up Increases the screen brightness.
Fn+F5 Display Toggle Switche display output between the display screen,
external monitor (if connected) and both.
Fn+F6 Screen Display
Toggle Turn the screen display on and off.
Fn+F7 Speaker Toggle Turn the speaker on and off.
Fn+F8 Volume Down Decrease the sound volume.
Fn+F9 Volume Up Increases the sound volume.
Fn+F10 Touchpad Toggle Turn the internal touchpad on and off.
Fn+F11 Bluetooth Enables/disable the Bluetooth function.
Fn+F12 Webcam Turn the internal webcam on and off.
Fn+Space
Keyboard
Backlight Toggle Turn the keyboard backlight on and off.
This function is limited to the keyboard which has backlight.

English
7
GIGABYTE Smart Manager
You can activate GIGABYTE Smart Manager by double clicking on the shortcut icon on the
desktop if the machine you purchased has the operation system built-in. GIGABYTE Smart
Manager is an icon-based control interface, enabling users to intuitionally access common
system setup as well as GIGABYTE exclusive utilities. Please be noted that the GIGABYTE
Smart Manager interface, icons, utilities and software versions may vary based on the
purchased models. Please operate GIGABYTE Smart Manager according to the default built-in
version.
GIGABYTE Driver Update Utility
You can search devices driver and update it online by double clicking on the shortcut icon on
the desktop if the machine you purchased has the operating system built-in. GIGABYTE Driver
Update Utility can search the latest drivers and be downloaded automatically. Users are able to
tell from the driver version on the machine and online that decide to update drivers.
Activate GIGABYTE BIOS Setup Utility
Press and release the Power Button to turn on the operation system. Press “+” to enter into
GIGABYTE BIOS Setup Utility. It is recommended to use USB keyboard for setting up BIOS
functions under BIOS setup Utility.
GIGABYTE Software Application

English
8
System Recovery (Restore your laptop operating system)
When something is going wrong with the laptop operating system, the storage of the laptop has
a hidden partition containing a full back up image of the operating system that can be used to
restore the system to factory default settings.
Caution
Once the “Recovery” is selected, your personal
data and les will be deleted after the laptop starts
restoring, and the operating system will be reset to
factory default settings.
The recovery will be activated and you will see the option
buttons on the window. Click on “Recovery” to start it.
All ready to go
Make sure your PC is plugged in. This will take a few minutes.
2
1
3
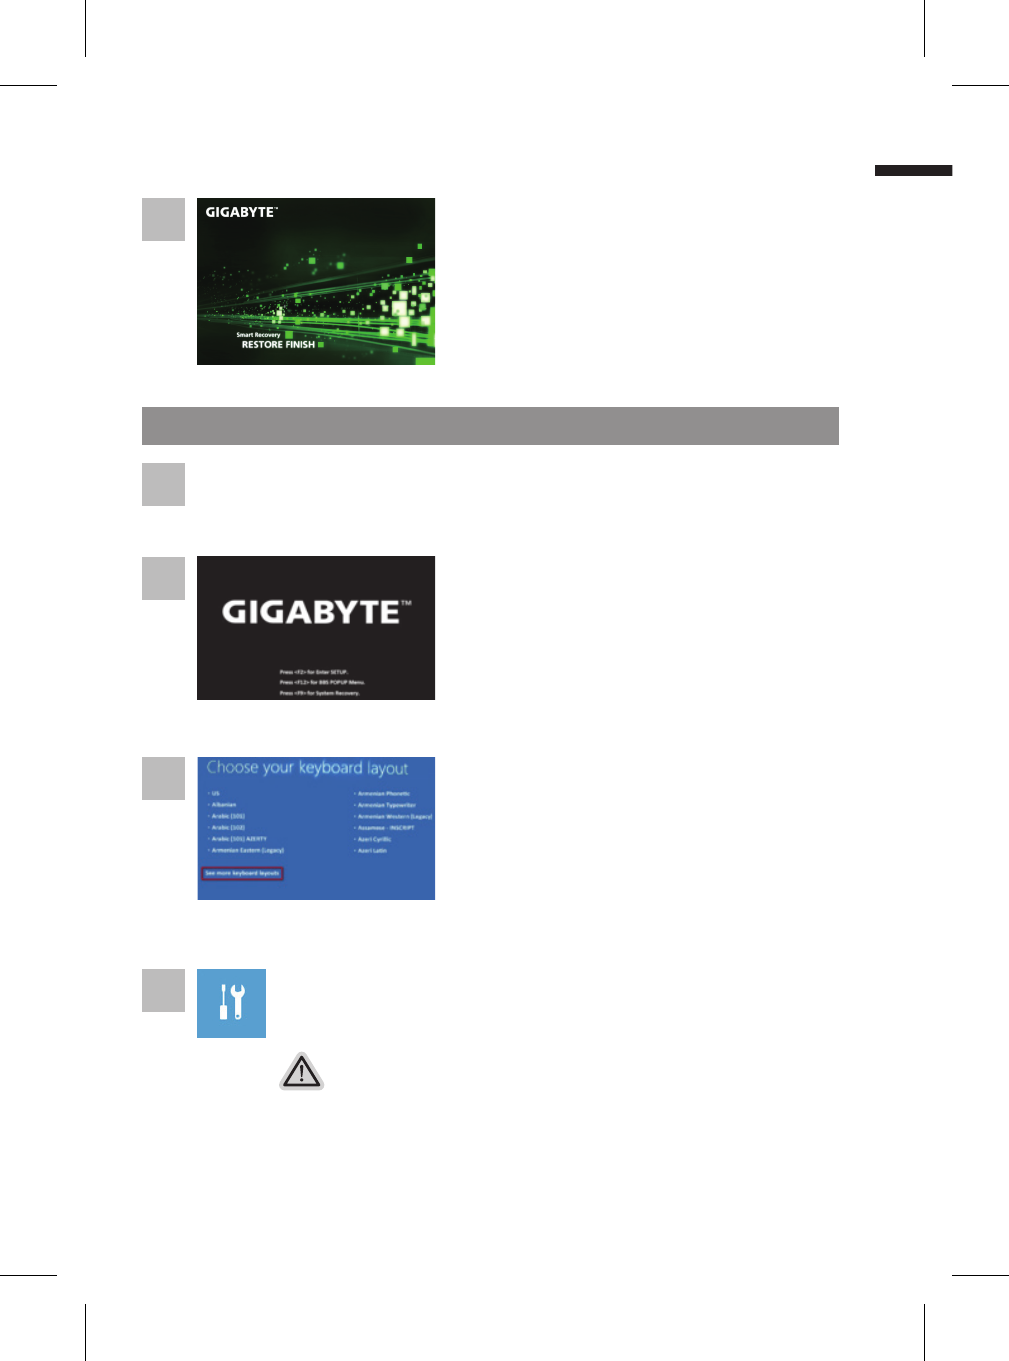
A progress indicator bar will show on the window when
the recovery process is running. Please make sure the
AC-adapter is plugged in and do not turn off the laptop.
4
Recovery Guide
Note
˙If the storage has been switched or the partition deleted, the recovery option will no longer be
available and a recovery service will be needed.
˙The recovery function is only available on devices with O/S preinstalled. Devices with DOS do not
have the recovery function.
Launch System Recovery
The system recovery feature is preinstalled before the laptop is shipped from the factory. The
option menu allows you to launch the Windows recovery tool to reinstall the operating system to
factory default.
The brief introduction below will show you how to start the recovery tool and restore your system.
Windows 7 Recovery Guide
Turn off and restart the laptop.
Press and release the Power button to turn on the
operation system. Press “-” to enter into GIGABYTE
System Recovery. Use Directing Hot Key to operate
GIGABYTE Smart Recovery.
English
9
Reboot the laptop after the system recovery is complete.
Windows 8 Recovery Guide
Choose your keyboard layout.
You can press “See more keyboard layouts” to see
next page of languages.
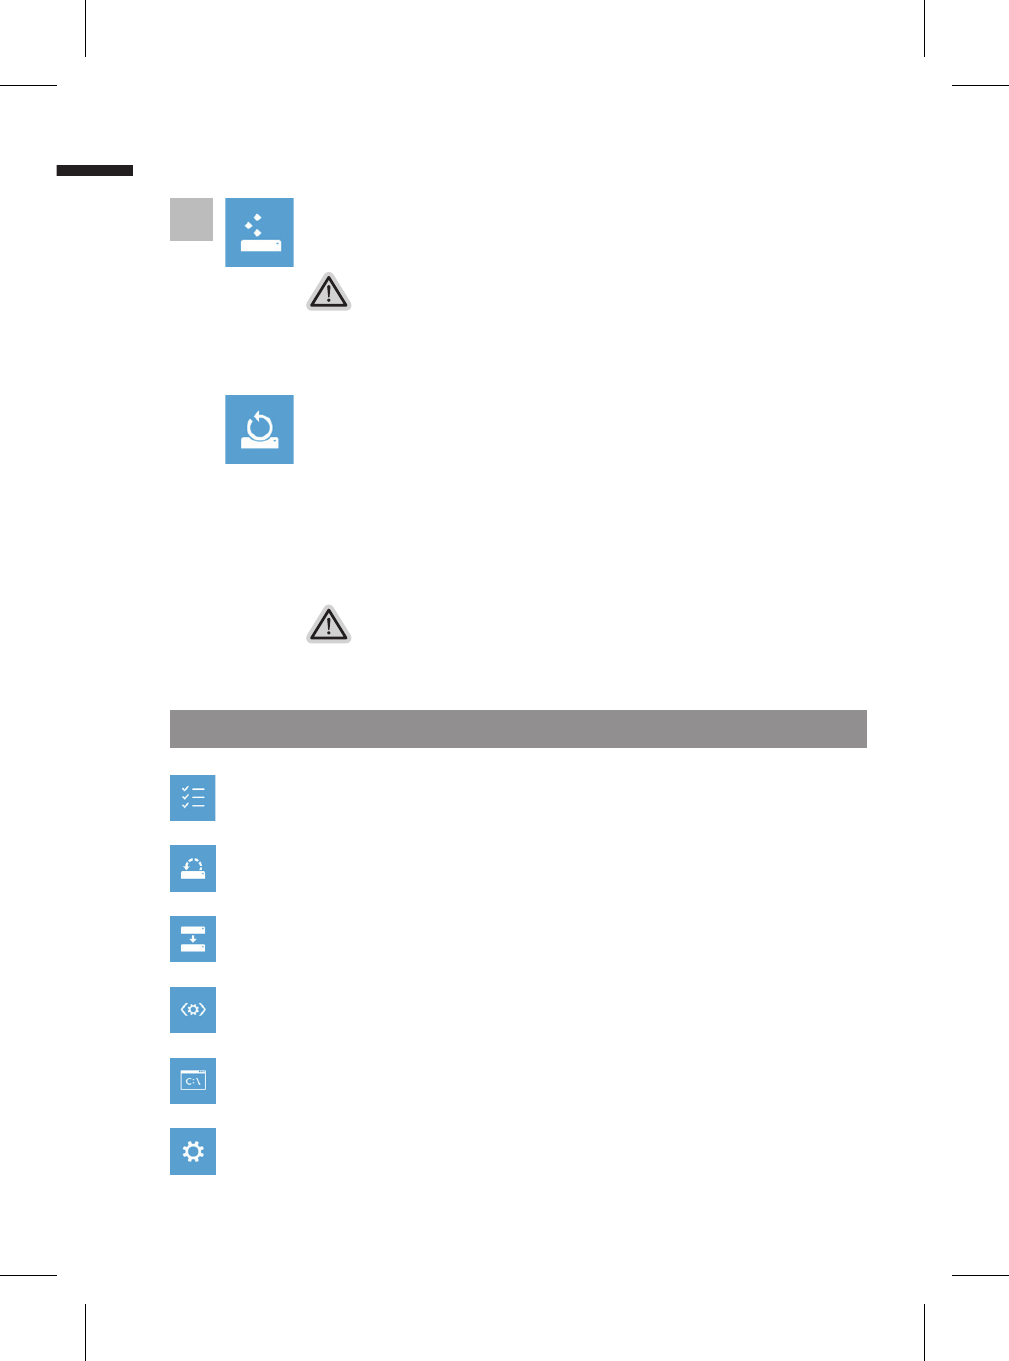
There are two options for system recovery
˙Refresh your PC
You can refresh your laptop to improve the system stability without losing your
les.
˙ Reset your PC
If you want to remove all of your les, you can reset your PC completely.
Caution: All personal data and les will be lost.
5
Press and release the Power button to turn on the
operation system. Press “-” to enter into GIGABYTE
System Recovery. Use Directing Hot Key to operate
GIGABYTE Smart Recovery.
2
1
3
4
Turn off and restart the laptop.
Choose “Troubleshoot” to enter the recovery settings.
(Also you can choose “Continue” to exit recovery system and continue to
Windows 8 for les or data backup.)
English
10
Here are what will happen
˙Your les and personalization settings won’t be changed.
˙Your PC settings will be restored to factory default settings.
˙Apps from Windows Store will be kept.
˙Apps you installed from discs or websites will be removed.
˙A list of removed apps will be saved on your desktop.
Here are what will happen
˙All of your personal les and apps will be removed.
˙Your PC settings will be restored to factory default settings.
▓Choose “Refresh your PC”
[Click on “Next”] > [Choose a target operating system.] > [Click on “Windows 8”.] >
[Click on “Refresh” to execute recovery function.]
Advanced options
System Restore
Use a restore point recorded on your PC to restore Windows.
System Image Recovery
Recover Windows using a specic system image le.
Automatic Repair
Fix problems that keep Windows from loading.
Command Prompt
Use the Command Prompt for advanced trobleshooting.
UEFI Firmware Settings
Change settings in your PC’s UEFI rmware.
Remark
5
▓▓▓▓▓Choose “Reset your PC”
[Click on “Next”] > [Choose a target operating system.] > [Click on “Windows 8”.] >
[Choose an option to recover your system]
Just remove my les
Only personal data and les will be removed, but computer settings will
be kept.
Fully clean the drive
The drive will be completely restored to factory default settings. It takes
more time. > [Click on “Reset” to execute recovery function.]

English
11
Warranty & Service :
Warranty and service and related information please refer to the warranty card or GIGABYTE
service website as the below link:
http://www.gigabyte.com/support-downloads/technical-support.aspx
FAQ :
FAQ (Frequent Asked Questions) please refer to the below link:
http://www.gigabyte.com/support-downloads/faq.aspx
Appendix
