GIGA BYTE TECHNOLOGY GN-BR402W Wireless Broadband Router User Manual GN BR402WUserMan
GIGA-BYTE TECHNOLOGY CO., LTD. Wireless Broadband Router GN BR402WUserMan
Contents
- 1. users manual 1
- 2. users manual 2
users manual 2
32
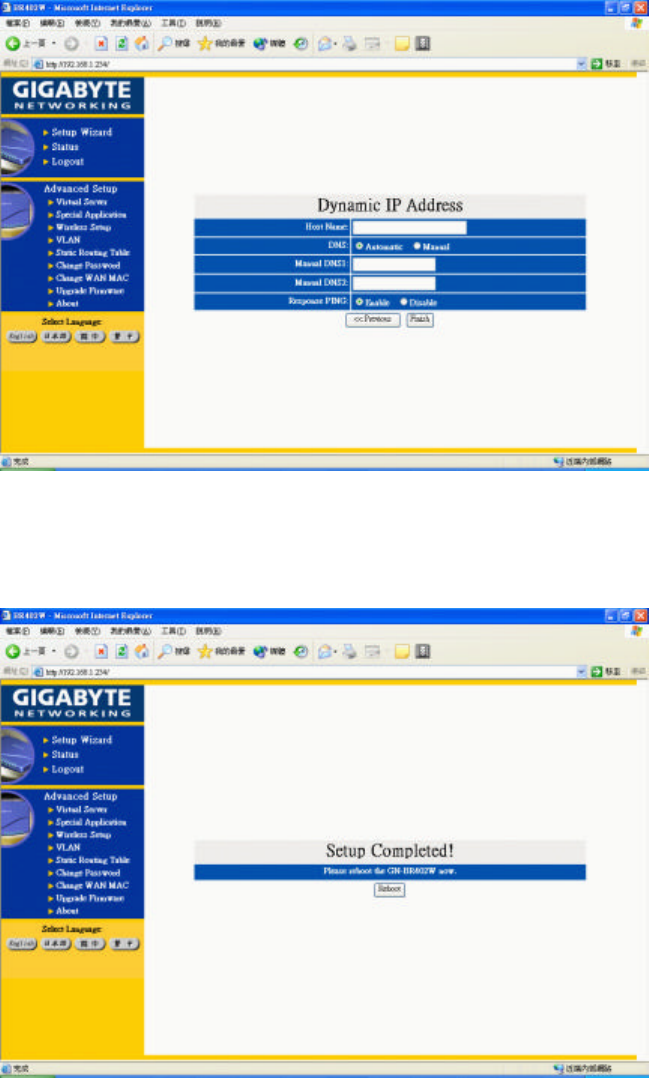
Step 11. If you select the “Dynamic IP Address” in the WAN TYPE SELECT, the following
screen will appear. First, select “Automatic” or “Manual” DNS. Please key in the Host
Name and Manual DNS IP address if you select “Manual” DNS. Press “Finish” to go to
next step.
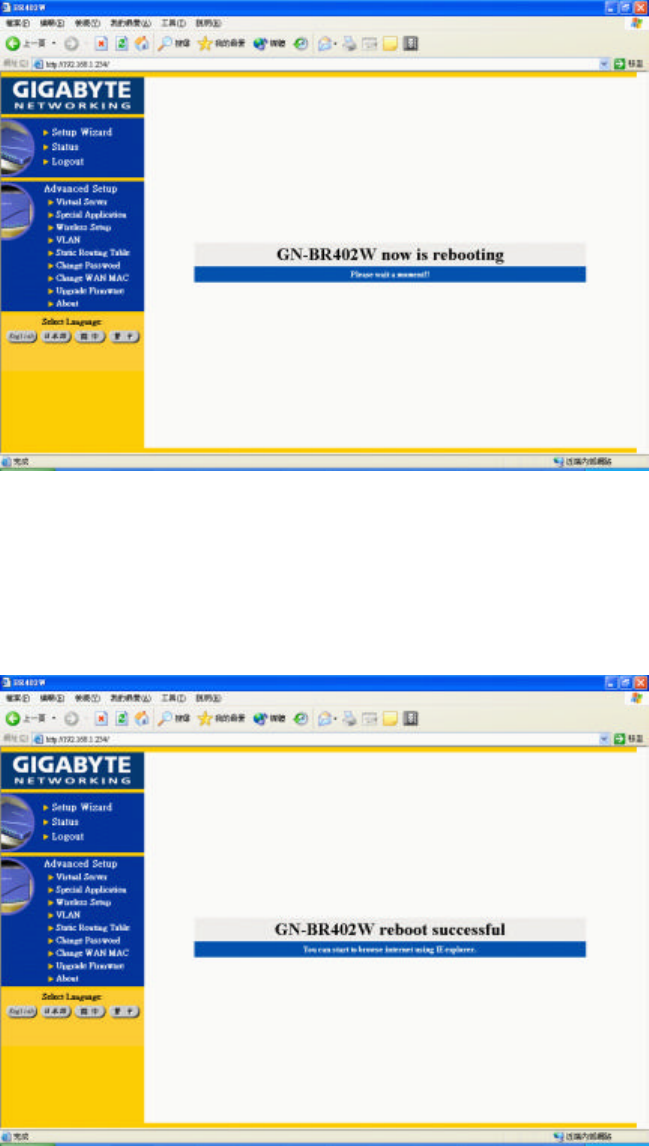
Step 12. After “Reboot” is pressed, it proceeds with the next step.
33
Step 13. Please wait a moment.
Step 14. The IE browser will be automatically connected to the main
menu, and the setup is completed by then. Please use your IE
connect to Internet.
If you can connect to the Internet , the setting is completed. If you use the Wireless Lan Card
connection , please continue to section 3-4 Wireless Basic Setting.
34
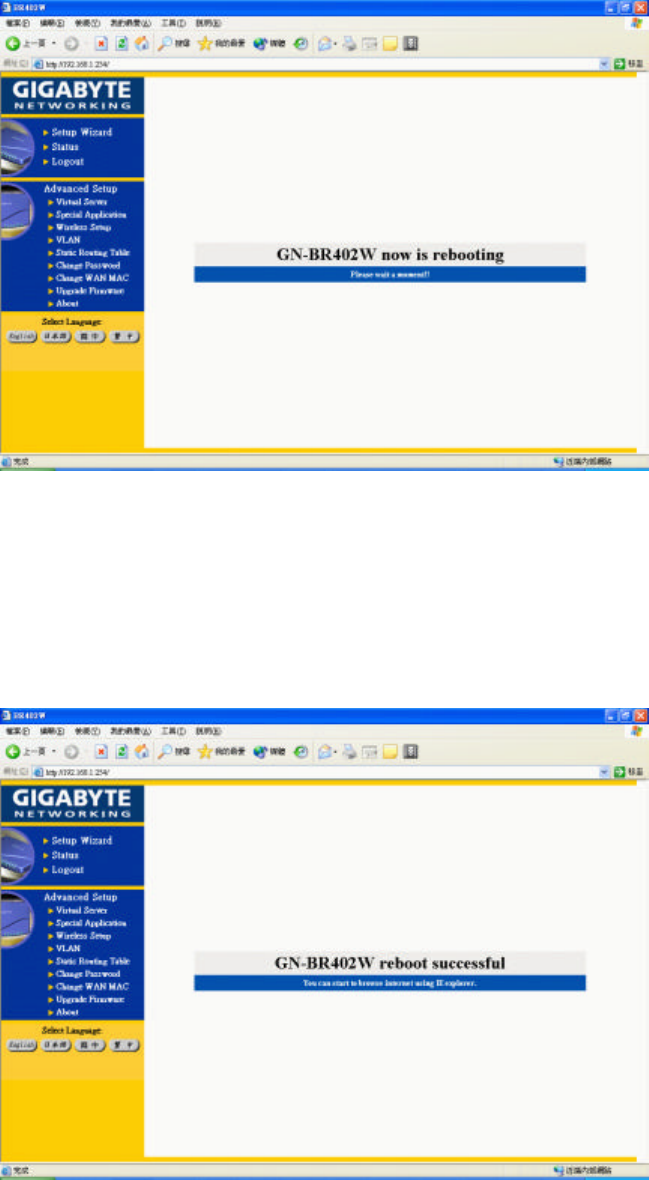
Step 15. If you select “Static IP Address” in the WAN TYPE SELECT, please key in the data
provided by the wideband company in the following fields as shown below:
Note: a. If your wideband company gives you more than one IP address, then select one of them to
fill in the column in the above figure, and refer to Appendix A for the use of other IP
addresses.
b. Static IP Setup
Normal Users please use "NAT enable" then connect to Internet in general.
Step 15. After “Reboot” is pressed, it proceeds with the next step.

35
Step 16. Please wait for a moment.
Step 17. The IE browser will be automatically connected to the main
menu, and the setup at the PC end is completed by then.
Please use your IE connect to Internet.
If you can connect to the Internet , the setting is completed . If you use the Wireless Lan Card
connection , please continue to section 3-4 Wireless Basic Setting.
36
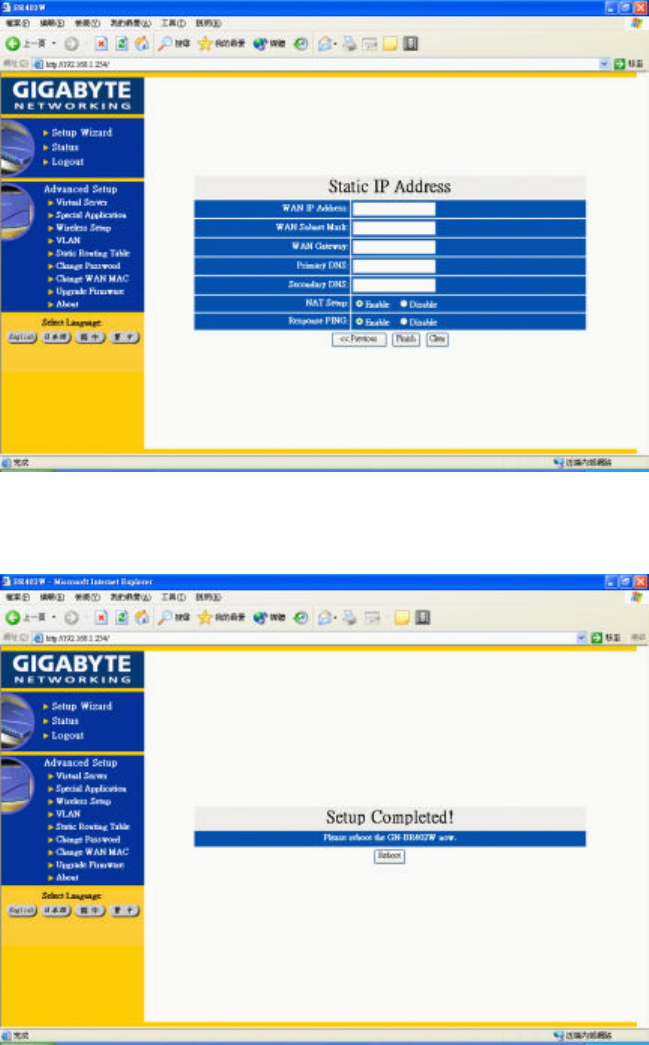
Step 18. If you select “PPP(Modem)” in the WAN TYPE SELECT, please key in the data provided
by the ISP company in the following blanks , then click “finish” , shown as below:
Step 19. After “Reboot” is pressed, it proceeds with the next step.
37
Step 20. Please wait for a moment.
Step 21. The IE browser will be automatically connected to the main
menu, and the setup at the PC end is completed by then.
Please use your IE connect to Internet.
If you can connect to the Internet, it means you have finished the setting. If you use the Wireless Lan
Card connection, please continue to 3-4 Wireless Basic Setting.
38
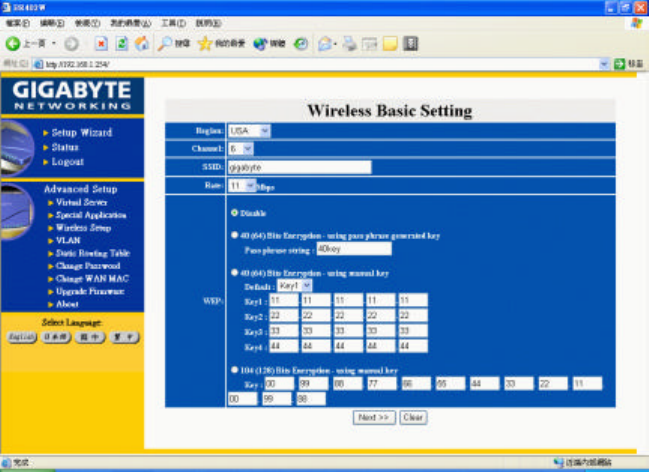
3-4 Wireless Basic Setting
Step 1. Please key in the data.
Region
Because of the different region has different open channel regulations, please choose your local
area, system will change to your local area utilize channel list automatically.
Channel
Please choose the Channel where you at, different area has different channel range, the default
value is channel 6.
SSID
The default value is “gigabyte”, if the setup value is the default value, like “router”, Only can
accept the computer connection, which use the Wireless card ESSID (or SSID) set up, is “router”.
(Note: The maximum length of SSID is 32bit letter of English or numeral and remember
what you type, its case sinstive.)
Rate
There are four chooses for the Maximum transition rates, 11Mbps/5.5Mbps/2Mbps/1Mbps.
WEP Setup
Five chooses as following:
1. Not use.
2. Using 64-bit WEP encryption, and using pass phase change to the key. For the wireless card
portion, please setup the first set password value.
3. Using 64-bit WEP encryption, enter to the key manually, and be able to choose what group
of key as well.
4. Using 128-bit WEP encryption, and using pass phase change to the key. For the wireless card
portion, please fill up the password on the first set password area.
5. Using 128-bit WEP encryption, enter to the key manually.
39
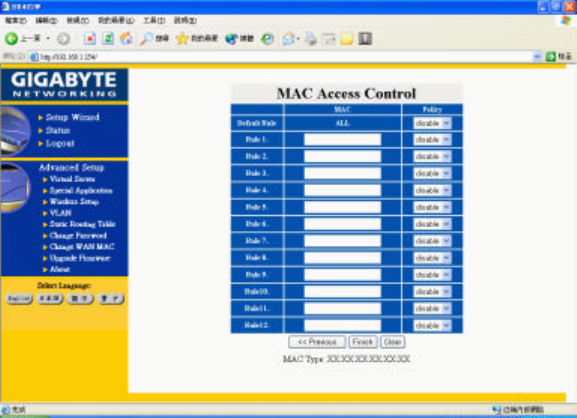
Step2. “MAC Access Control” shown as the diagram. You can set up either “allow” or “deny” the
user can connect to the Internet by setting the MAC address.
Default Rules : Disable/Allow/Deny
Disable : Disable MAC Address control.
Allow : The user can connect to the Internet.
Deny : The user cannot connect to the Internet.
The format of MAC address is XX:XX:XX:XX:XX:XX.(exp. “01:23:45:67:89:AB”)
Note
Condition 1: "allow" It allows all users can connect to the Internet, except the users who
set up under “deny” condition.
Condition 2: "deny" It denies all users can connect to the Internet, except the users who set
up under “allow” condition.
Condition 3: All of the regulations from 1~12 won’t work if the status of default rule is
“Disable”. All users can connect to the Internet. (The wireless card should
enter correct SSID and WEP password value.)
For instance:
Case 1. Default Rule is “Allow”.
Rule1: the MAC address is ”11:22:33:44:55:66” and the status is “deny”.
Rule2: the MAC address is “77:88:99:AA:BB:CC” and the status is “deny”.
c It allows all users can connect to the Internet, except the users whose MAC
Address are “11:22:33:44:55:66” or “77:88:99:AA:BB:CC”.
Case 2. Default Rule is “Deny”.
Rule1: the MAC address is ”11:22:33:44:55:66” and the status is “allow”.
Rule2: the MAC address is “77:88:99:AA:BB:CC” and the status is “allow”.
c It denies all users can connect to the Internet, except the users whose MAC
Address are “11:22:33:44:55:66” or “77:88:99:AA:BB:CC”.

40
Step3. Please wait for a moment.
Step4. After the Wireless Basic setting is completed, check the status of the WAN connection. If
the status is “connect” then you can use IE to the Internet, else please click the “connect”
bottom to reconnect.
41
3-5 Logout
After you finish GN-BR402W setup, please choose “ Logout”.
Note : After 5 minutes idle time, the system will be automatically logout.
42
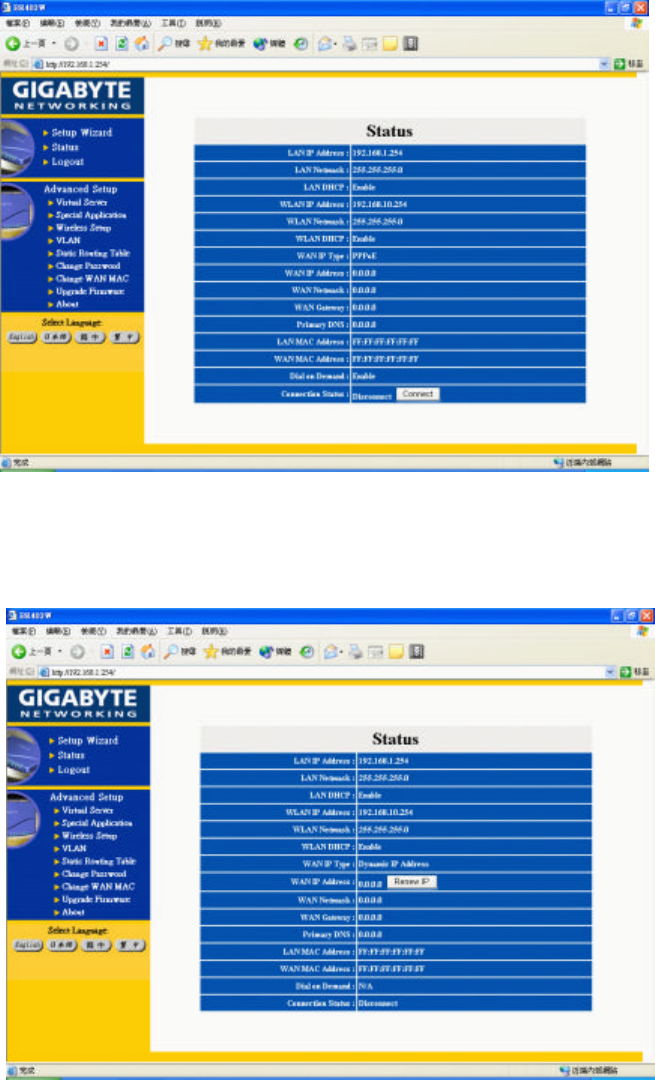
4. Status
-“ Status” screen shows the current basic network setting status.
Status 1. If you select “PPPoE” in the WAN TYPE SELECT, press “Status”, and the screen shows
as follows:
Note: your network service provider automatically obtains each of the above IP address at the WAN
end.
Status 2. If you select “Dynamic IP Address” in the WAN TYPE SELECT, press “Status” screen as
follows:
Note: your network service provider automatically obtains Each IP address of the above WAN end.

43
Status 3. If you select “Static IP Address” in the WAN TYPE SELECT, press “Status”, and the
screen shows as follows:
Status 3. If you select “PPP (Modem)” in the WAN TYPE SELECT, press “Status”, and the screen
shows as follows:
44
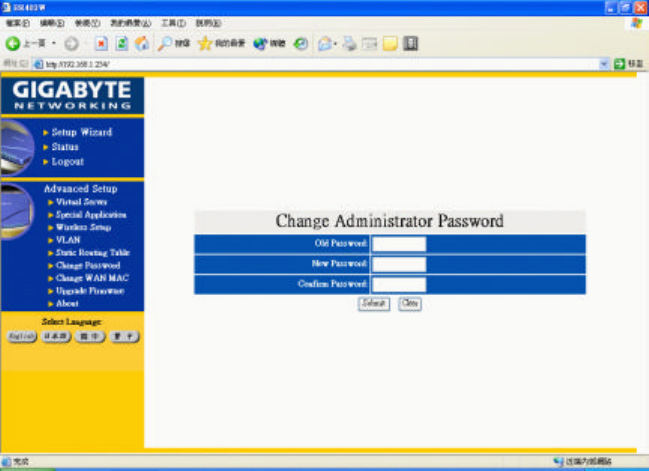
5. Change Password
- Key in your old password, and key in your new password. After your confirmation, key in
your new password once again, and the procedure will complete after you press: “Submit”.
45
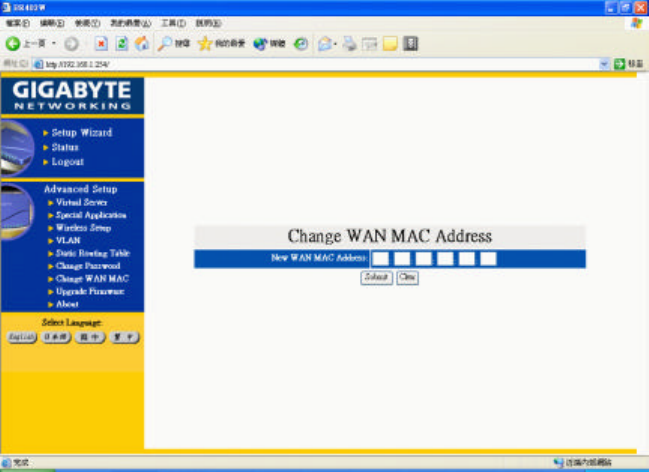
6. Change MAC address
-If your ISP Company asks you to use the original MAC address. You can enter your MAC address
at this place.
PS: MAC address is from your NIC that you registered with your ISP Company. If you want to
restore to the factory default, please use “reset MAC” from GN-BR402W install CD.
46
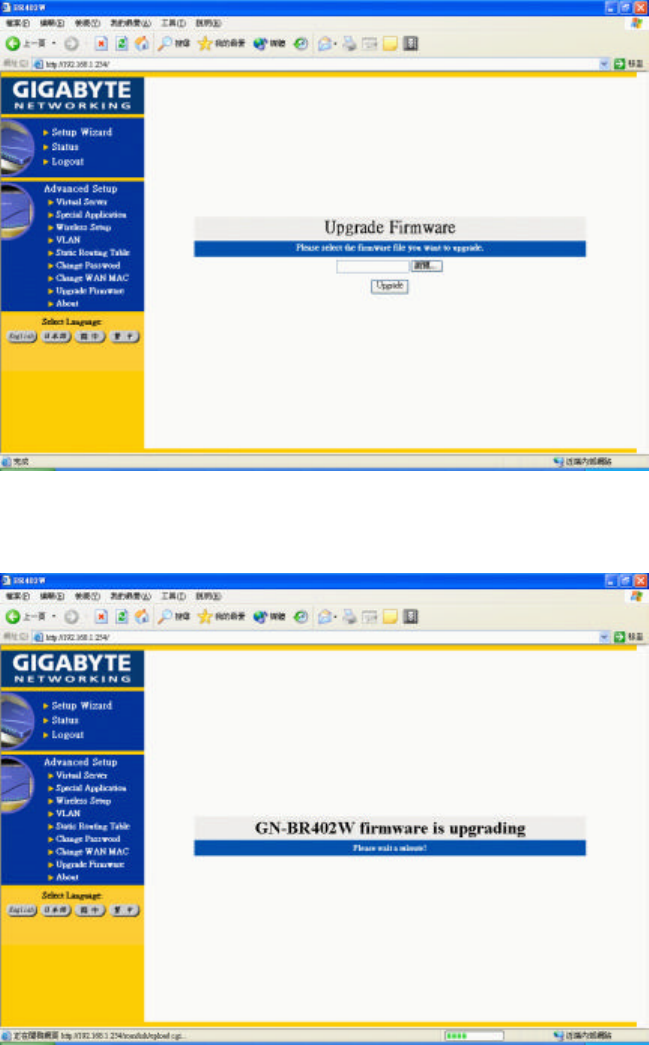
7. Firmware Upgrade
- Please browse and select your desired upgrade file (firmware version), and press upgrade.
Note: you can download the upgraded firmware version from Gigabyte website.
Please wait a moment, and the IE browser will be automatically connected to the main menu, and
the setting of our firmware upgrade is completed.

47
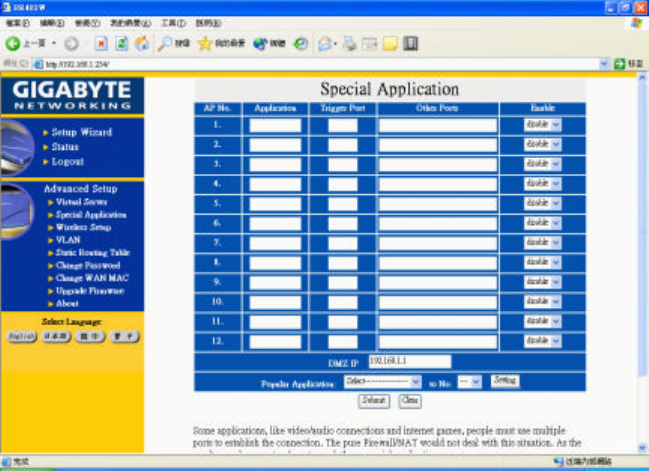
8. Instruction of Using Special Application
When special application program users at the LAN end want to use a certain network application
program, such application program needs more set up than the regular connection, and most of these
application programs are games or audio/video multimedia. Take AOK (Age of Kings) for
example:
- Application: AOK
- Trigger Port: 47624
- Other Ports: 2300 2400,28800 29000
- Enable: enable
1. Application: Key in the desired software name, such as AOK (Age of Kings); it only needs an
input for this field, and its value will not affect the operation of the BR402W.
2. Trigger Port: A port number.
3. Other Ports: The port interval of each section that needs to open is separated by a “space” (e.g.
2300 2400), and each interval is separated by a “comma” (2300 2400, 28800 29000).
4. Enable: Select “enable” to open such setting.
Several common application program set-ups are provided at the bottom of the screen. The user can
complete the settings by clicking the mouse.
48
8-1 Instruction of Using DMZ
If we do not know how to set up certain game or software or the field for set up cannot satisfy the
need, then the virtual IP Address (such as 192.168.1.1) obtained the PC at the LAN terminal can be
used to input to the field of DMZ. Taking NetMeeting for example, if you just want to call an
external computer from the computer at the LAN terminal, it does not need any set up. However, if
you want to let the external PC to call the computer at the LAN terminal, then the virtual IP Address
must be filled in the field of DMZ.)

49
8-2 Instruction of Using Netmeeting
1. If we need to actively call the PC of the external network from the PC at the LAN terminal, it
does not need special set up.
2. To let a PC at the WAN end call a PC at the LAN end, set the virtual IP Address (such as
192.168.1.1) of the PC at the LAN end to the DMZ field in the Special Application as shown in
the following figure. The PC at the WAN end can call the external IP Address (provide by the
ISP) of the BR402W, and the internally connects to such PC.
50
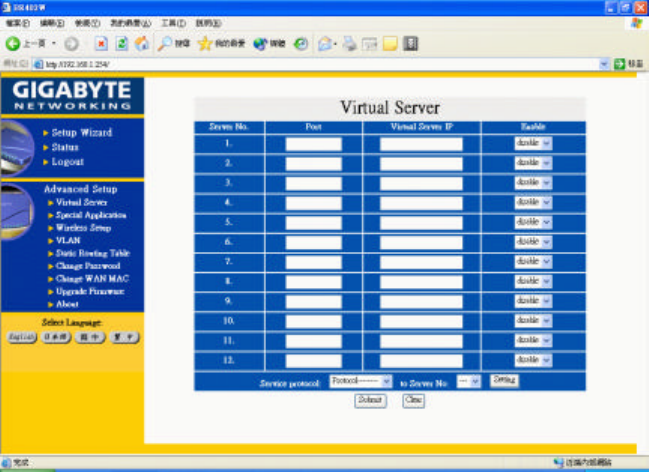
9. Instruction of Using the Virtual Server
Virtual server provides a way to let the PC at the WAN end connect to a server of a PC at the LAN
end.
Taking the IP Address 192.168.1.1 of a PC on a FTP (port:21) at the LAN end for example:
Port: 21
Virtual Server IP: 192.168.1.1
Enable: enable
The PC at the WAN end can connect to the internal FTP server at the IP address 192.168.1.1 via the
WAN end of the IP Address of the FTP BR402W.
At the bottom of the screen, we provide several common server port numbers for the setting, and the
user can click one of them, and then fill in the virtual IP address set for the server to complete the set
up.

51
10. VLAN
VLAN is using for 4 LAN ports that can be divided into maximum four different virtual LANs.
Although each different virtual LAN user’s IP is in the same subnet, however the communication
between each other will be limited. This function is for dividing the user in the same subnet, usually
provided for high-end switch.
52
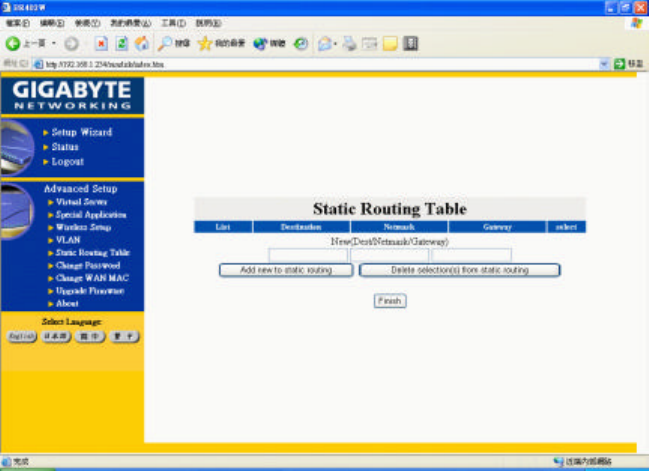
11. Static Routing Table
Under some of Internet environments, some of the subnet do not go through the default gateway.
Users can add those routing information to Static Routing Table by themselves.
You can enter new routing information and click “Add new to Static routing” then there will add the
new routing information to Static Routing Table. Otherwise, you can mark the checkbox of the
routing table that you want to delete and click “Delete selection(s) from static routing” then there
will delete the marked routing information from Static routing table. Press “Finish”.
53
12. Troubleshooting
Q: What to do if you forget your password or forget the IP address of the GN-BR402W?
Please press the “Reset” bottom on the GN-BR402W about 4 sec. The GN-BR402W will be
restart and the system setting will restore to default value.
Q: Unable to connect to Internet?
n Please confirm whether or not the power cord is properly connected, and the power
indicating light of the GN-BR402W is normal.
n Please confirm whether or not all of the settings described in this manual are set
n Please confirm if ADSL or Cable Modem operates properly, and if the ISP network service
expires.
n Please confirm if your network cable is connected properly, and the LED status is normal
54
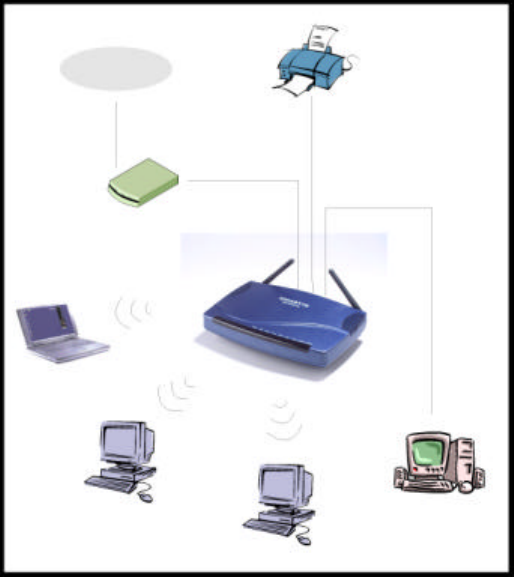
13. Appendix
(A) GN-BR402W Functional Diagram
Printer
Internet
Cable/ADSL
Modem
LAN port
WAN port
PC
PC+PCMCIA
PC+PCMCIA
PC+PCMCIA
55
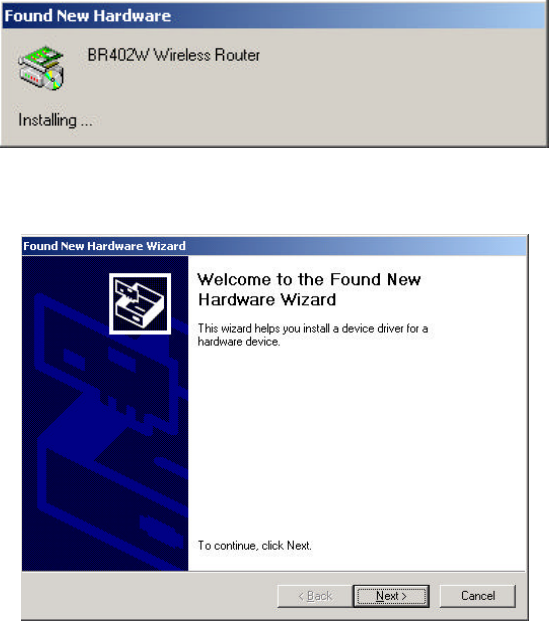
(B) USB Driver Installation
Preface
1. Before installing the USB driver, please refer to Section 3-2 for the installation at your PC end.
If “obtain an IP address automatically” is not selected in the installation at your PC, then you
should know the following information:
IP address ranges from “192.168.2.1” to “92.168.2.252”
Subnet Mask “255.255.255.0”
Default Gateway “192.168.2.253”.
2. Follow the “Found New Hardware Wizard” to complete the GN-BR402W USB Driver
Installation.
Steps:
Please connect the power to the GN-BR402W and wait until the GN-BR402W completely boots up
(when the status LED is off). Connect the USB cable to the USB slot on your computer and the
USB slot of the GN-BR402W.
The following screen will appear:
Please press “Next” for next step.
56
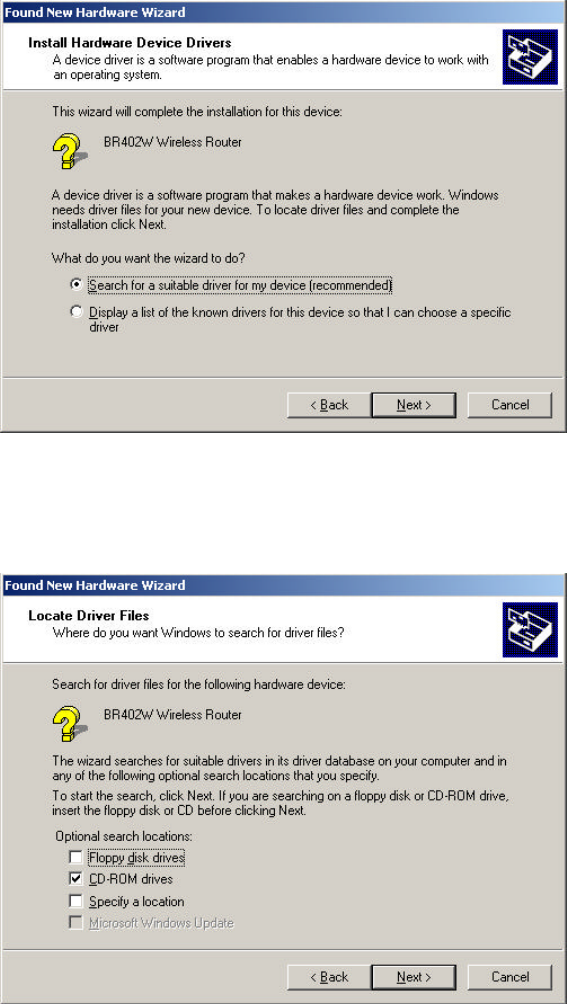
Please choose “Search for a suitable driver for my device (recommended)”, and then press “Next”
for next step.
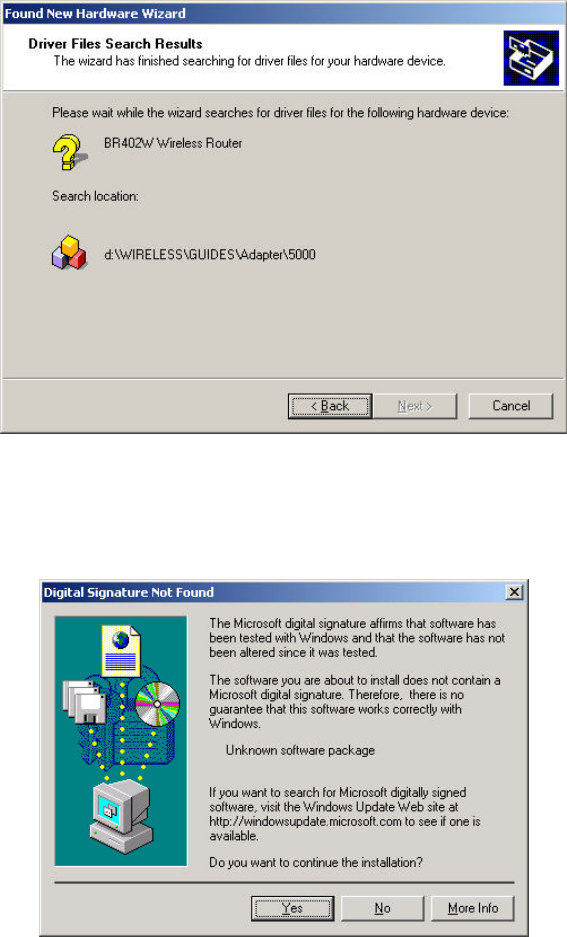
Please choose the location where you place the GN-BR402W Driver , and then press “next”.
57
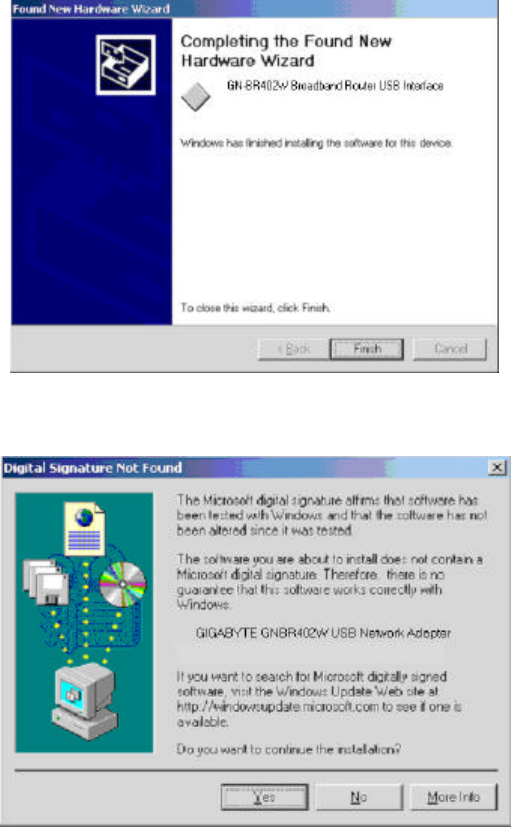
Please click “Next” for next step.
Please click “Yes” for next step.
58
Please click “Finish” for next step.
Please click “Yes”. NOW YOU HAVE COMPLETED THE USB DRIVER INSTALLATION.

59
(C) Instruction of Printer Server
The GN-BR402W Wireless Broadband Router can be as a Printer Server, Please follow the setup
procedure in Printer Setting. Example as follow:
Start > Setting > Printer, Double-Click Add Printer. The Add Printer Wizard dialog will be displayed,
please select the Local Printer option and press “Next”.
Select Create a new port option, Type: “Standard TCP/IP Port” then press “Next”.
60
Press “Next”.
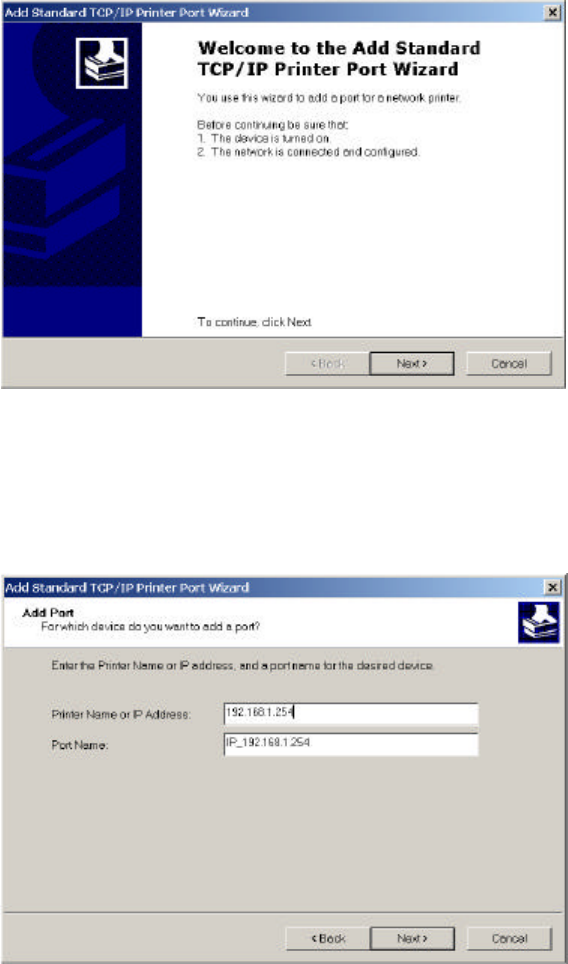
Please enter the Printer Name or IP Address : 192.168.1.254 and the Port Name : IP_192.168.1.254,
Press “Next”.
61
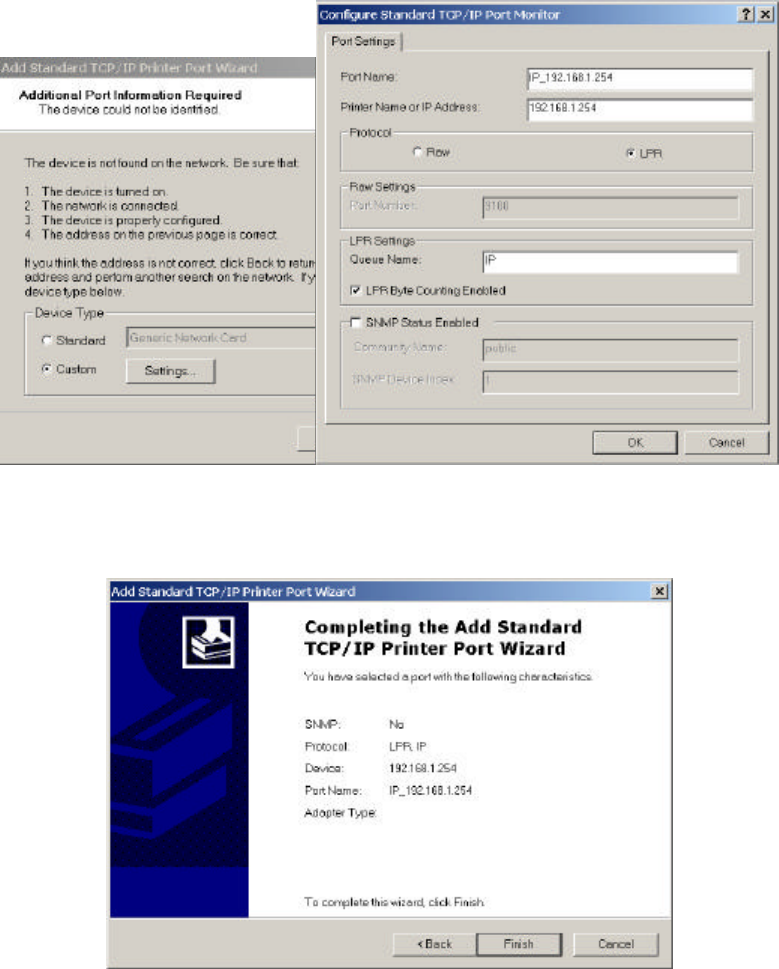
The Device Type selects Custom option and press “Setting”. The Configure Standard TCP/IP Port
Monitor dialog will be displayed. Enter the Port Name: IP_192.168.1.254 and Printer Name or IP
Address is 192.168.1.254. Select the LPR Protocol and enter the Queue Name: lp and select the
LPR Byte Counting Enabled check box in the LPR setting then press “OK”.
Press “Finish”.
62
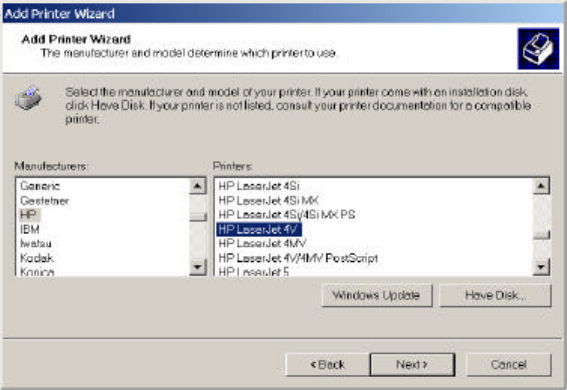
Select the manufacturer and model of your printer. (If your pr inter is not listed, click “Have Disk ”
to install your printer driver.) Click “Next”, the wizard will help you finish the installation
automatically.

63
Limited Warranty
1-Year Warranty
Gigabyte warrants to the original consumer/purchaser that the adapter product free from defects
in material and workmanship for no limited time from the original manufactory shipment date.
This warranty does not cover the adapter product if it is damaged in the process of being
installed or improperly used.
Gigabyte may replace or repair the adapter product with either new or reconditioned parts.
Repaired or replaced adapter products will be returned to you at the same revision level as
received or higher at Gigabyte’s option. Gigabyte reverses the right to replace discounted adapter
products with an equivalent generation adapter product.
KEEP THIS STUB FOR YOUR PURCHASING RECORD
Customer:
Phone No:
Address:
Email:
Model:
Serial:
Date of Purchase:
Place of Purchase:
From Whom:
Distributor:
64
Safety, Care and Regulatory Information
Important safety instructions
Read and follow all instructions marked on the product and in the documentation before you
operate your system. Retain all safety and operating instructions for future use.
The product should be operated only from the type of power source indicated on the rating label.
If your computer has a voltage selector switch, make sure that the switch is in the proper position
for your area. The voltage selector switch is set at the factory to the correct voltage.
The plug-socket combination must be accessible at all times because it serves as the main
disconnecting device.
All products hipped with a three-wire electrical grounding-type plug only fits into a
grounding-type power outlet. This is a safety feature. The equipment grounding should be in
accordance with local and national electrical codes. The equipment operates safely when it is
used in accordance with its marked electrical ratings and product usage instructions
Do not use this product near water or a heat source.
Set up the product on a stable work surface or so as to ensure stability of the system.
Openings in the case are provided for ventilation. Do not block or cover these openings. Make
sure you provide adequate space around the system for ventilation when you set up your work
area. Never insert objects of any kind into the ventilation openings.
To avoid electrical shock, always unplug all power cables and modem cables from the wall
outlets before removing covers.
Allow the product to cool before removing covers or touching internal components.
Use only the power cord and batteries indicated in this manual. Do not dispose of batteries in a
fire. They may explode. Check with codes for possible special disposal instructions.
Precautions for Products With Modems, Telecommunications, or Local Area Network Options
Observe the following guidelines when working with options:
Avoid using a telephone (other than a cordless type) during an electrical storm. There may be a
remote risk of electric shock from lightning.
CAUTION - To reduce the risk of fire, use only No. 26 AWG or larger telecommunication line
cord.
Do not plug a modem or telephone cable into the network interface controller (NIC) receptacle.
Disconnect the modem cable before opening a product enclosure, touching or installing internal
components, or touching an uninsulated modem cable or jack.
Do not use a telephone line to report a gas leak while you are in the vicinity of the leak.
Do not use this product near water, for example, near a bath tub, wash bowl, kitchen sink or
laundry tub, in a wet basement or near a swimming pool.
65
Federal Communications Commission (FCC) Statement
NOTE
This equipment has been tested and found to comply with the limits for a Class B digital device,
pursuant to Part 15 of the FCC Rules. These limits are designed to provide reasonable protection.
This equipment generates, uses and can radiated radio frequency energy and, if not installed and
used in accordance with the instructions, may cause harmful interference to radio
communications. However, there is no guarantee that interference will not occur in a particular
installation If this equipment does cause harmful interference to radio or television reception,
which can be determined by turning the equipment off and on, the user is encouraged to try to
correct the interference by one or more of the following measures:
-Reorient or relocate the receiving antenna.
-Increase the separation between the equipment and receiver.
-Connect the equipment into an outlet on a circuit different from that to which the receiver is
connected.
-Consult the dealer or an experienced radio/TV technician for help.
Changes or modifications not expressly approved by the party responsible for compliance could
void the user‘s authority to operate the equipment.