GIGA BYTE TECHNOLOGY M1022 Booktop Computer User Manual M1022 0302 2
GIGA-BYTE TECHNOLOGY CO., LTD. Booktop Computer M1022 0302 2
UserManual.wiki
>
GIGA BYTE TECHNOLOGY
>
M1022 User Manual
UserMan
Navigation menu
Upload a User Manual
Namespaces
Wiki Guide
HTML
PDF
Info
Views
User Manual
Discussion / Help
Navigation
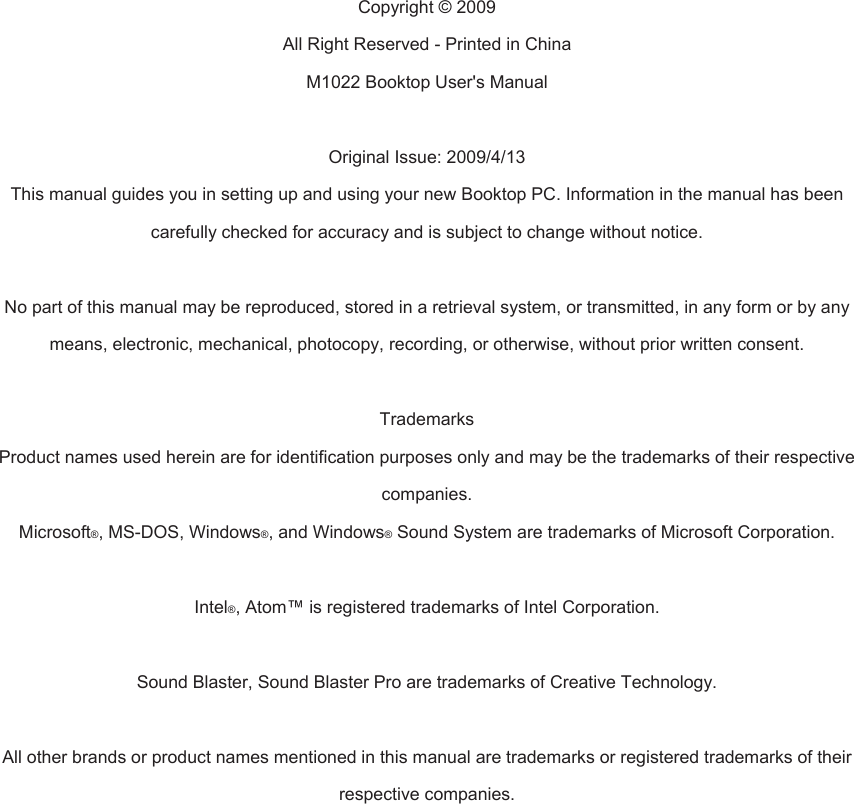
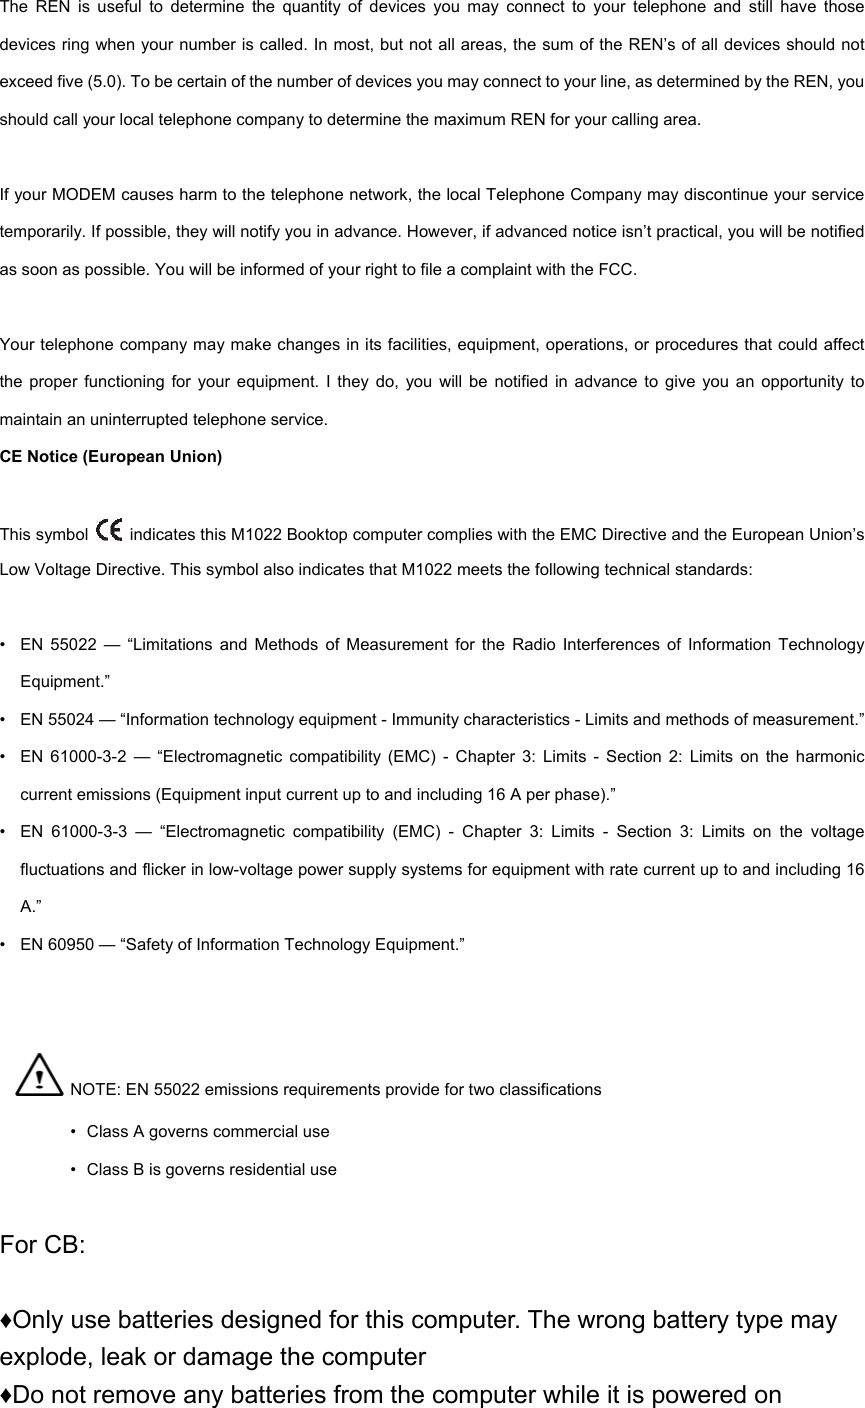


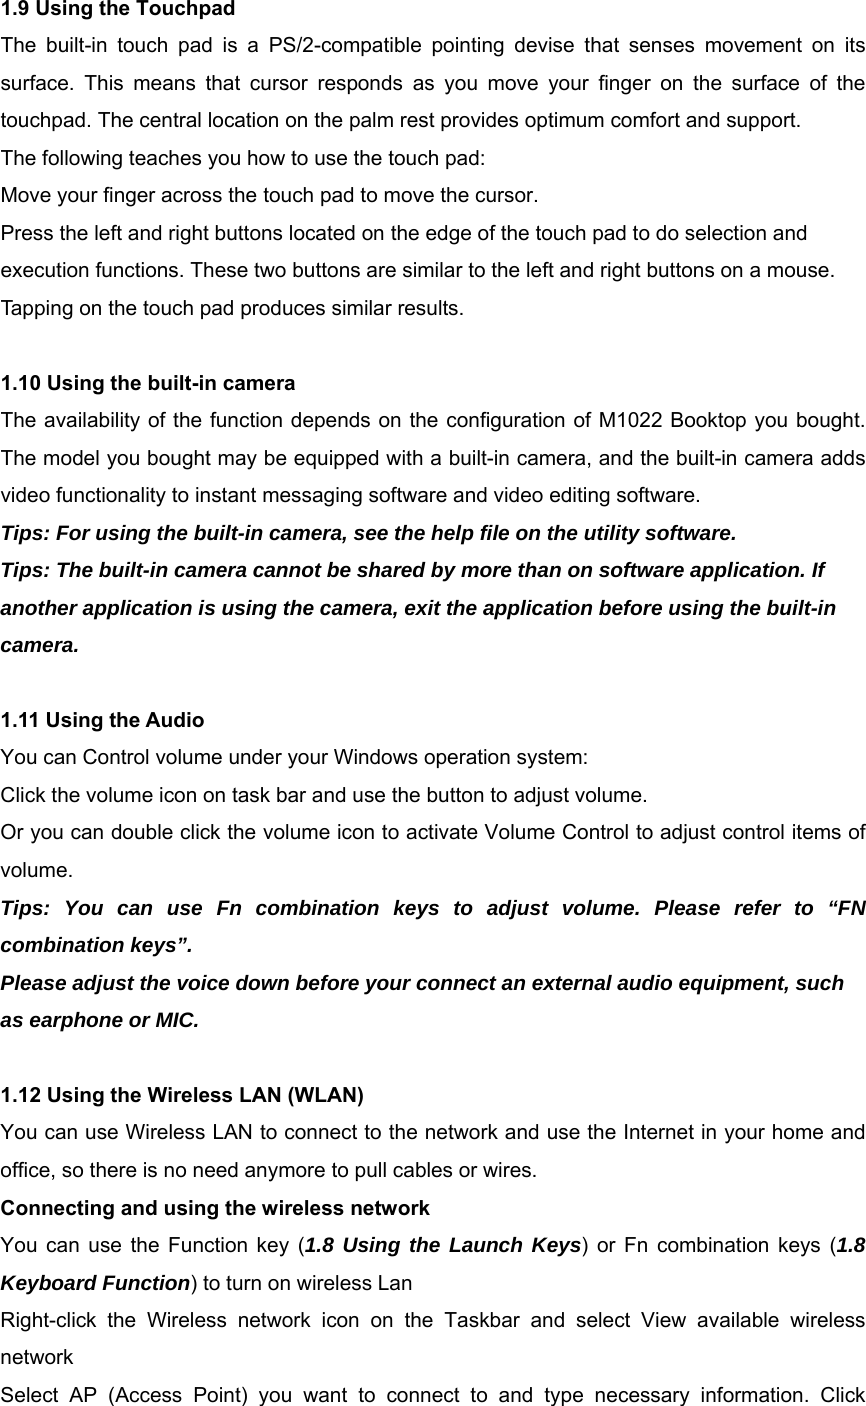


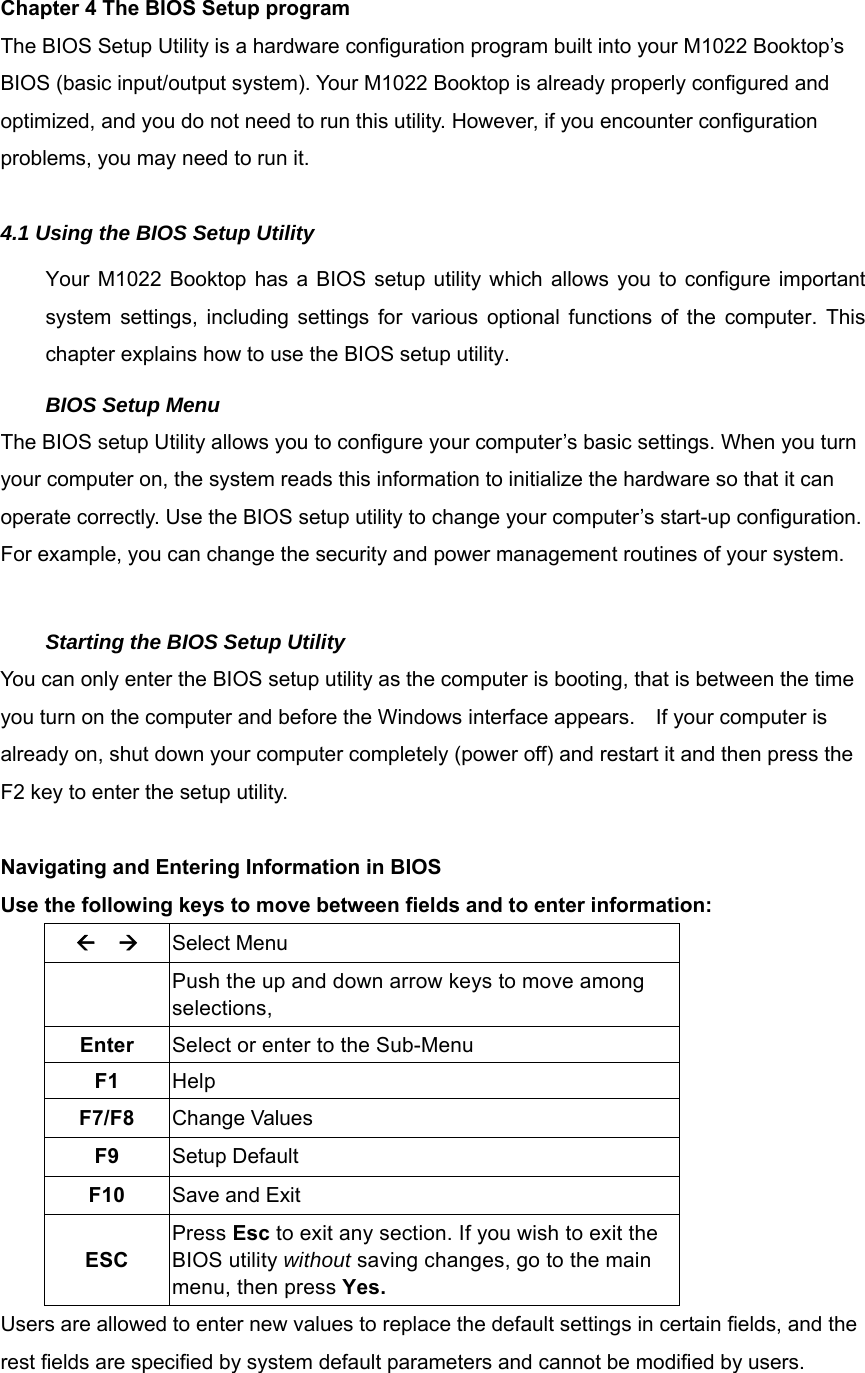
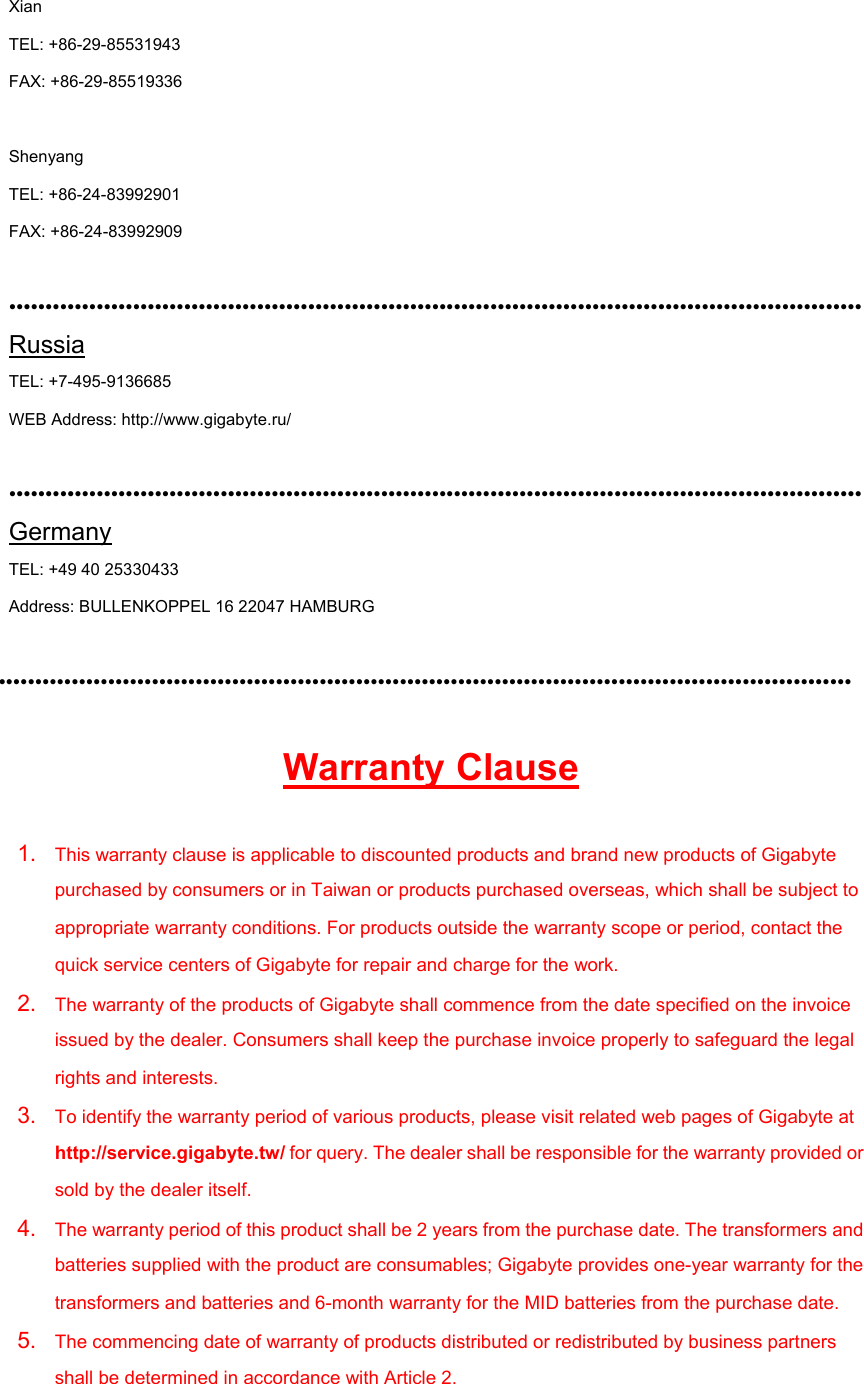
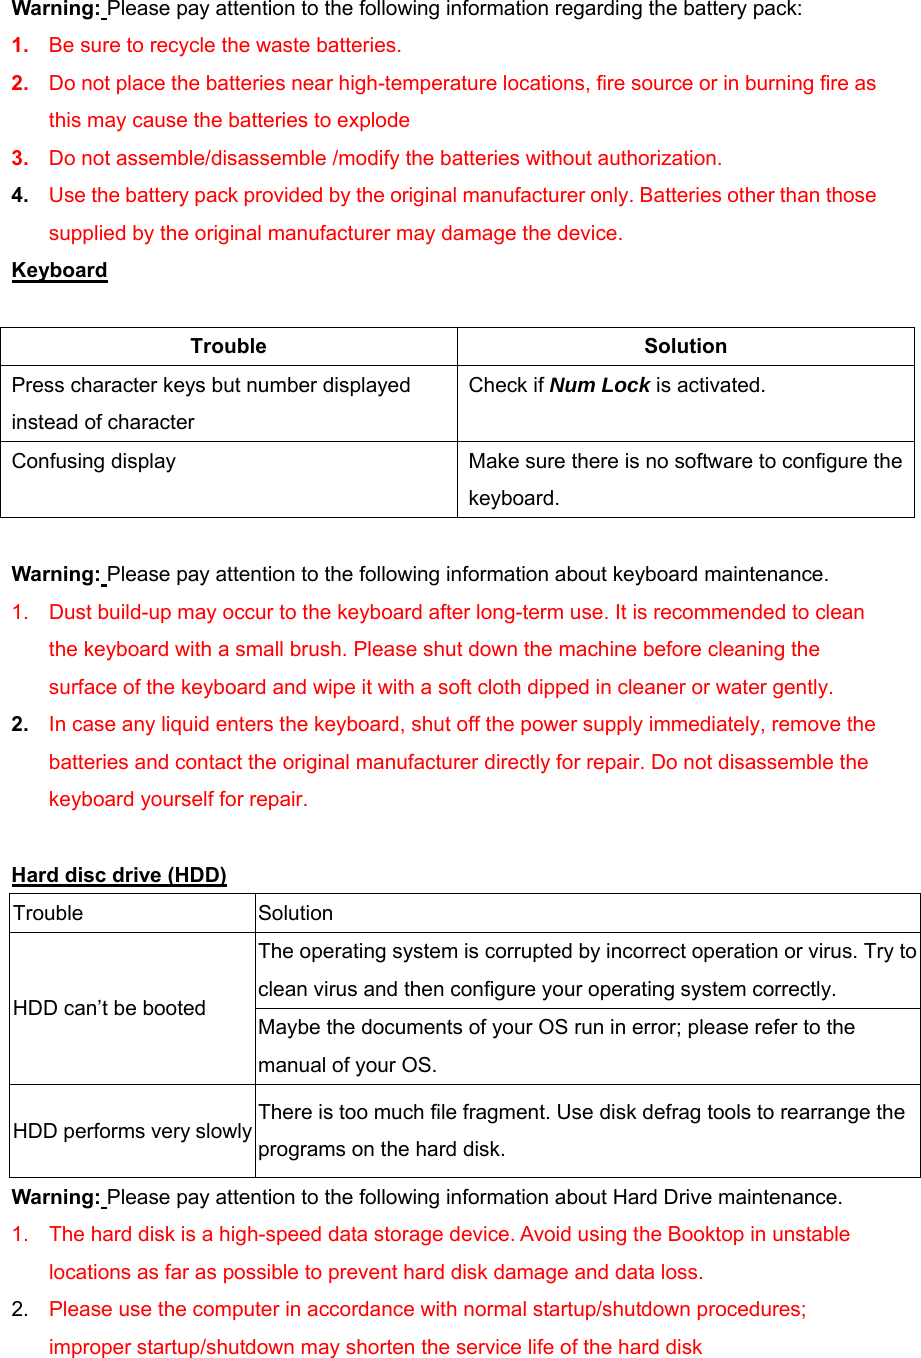
![4.2 The Main Menu InsydeH20 Setup Utility Main Advanced Security Boot Exit System BIOS Version M1022.v10. Processor Type Intel ® Atom ™ CPU N270 @ 1.60GHz System Bus Speed 533MHz System Memory Speed 533MHz Cache RAM 0512 KB Total Memory 1024 MB System Time [19:14:50] System Date [Thu 01/01/2009] Item Specific Help F7: Reduce Number; F8: Increase Number; No action for Number Keys F1 Help ↑↓ Select Item F7/F8 Change Values F9 Setup Default ESC Exit ←→ Select Menu Enter Select►Menu F10 Save and Exit System Time Allows you to change the system time using the hour:minute:second format of your M1022 Booktop computer. Enter the current time for reach field and use the <F7>, <F8> key to move from one field or back to another. You can also change the system time from your operating system. System Date Allows you to set the system date using the month/date/year format. Enter the current time for reach field and use the <F7>, <F8> key to move from one field or back to another. You can also change the system time from your operating system.](https://usermanual.wiki/GIGA-BYTE-TECHNOLOGY/M1022/User-Guide-1085640-Page-27.png)
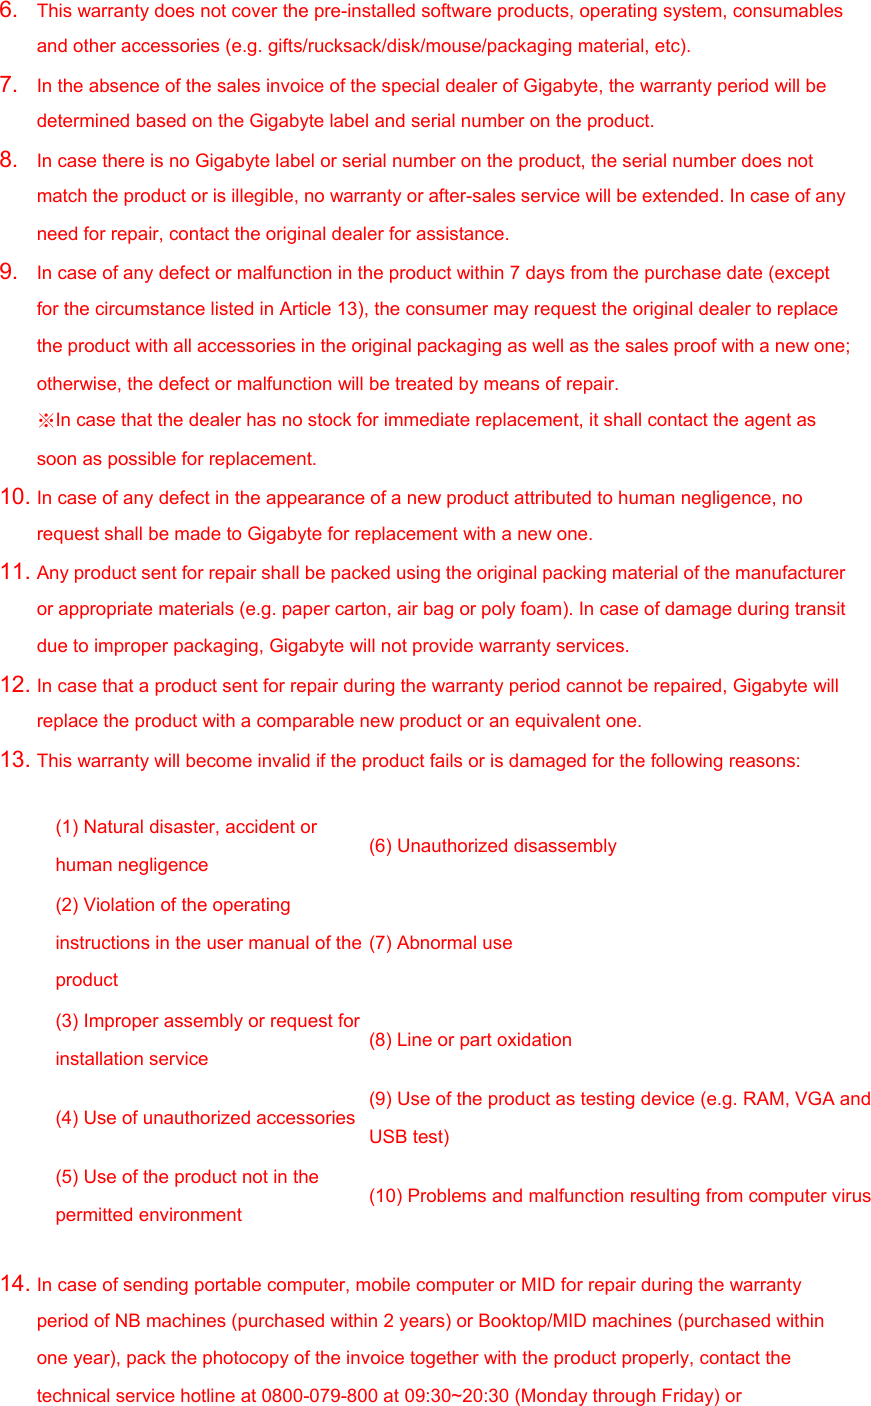
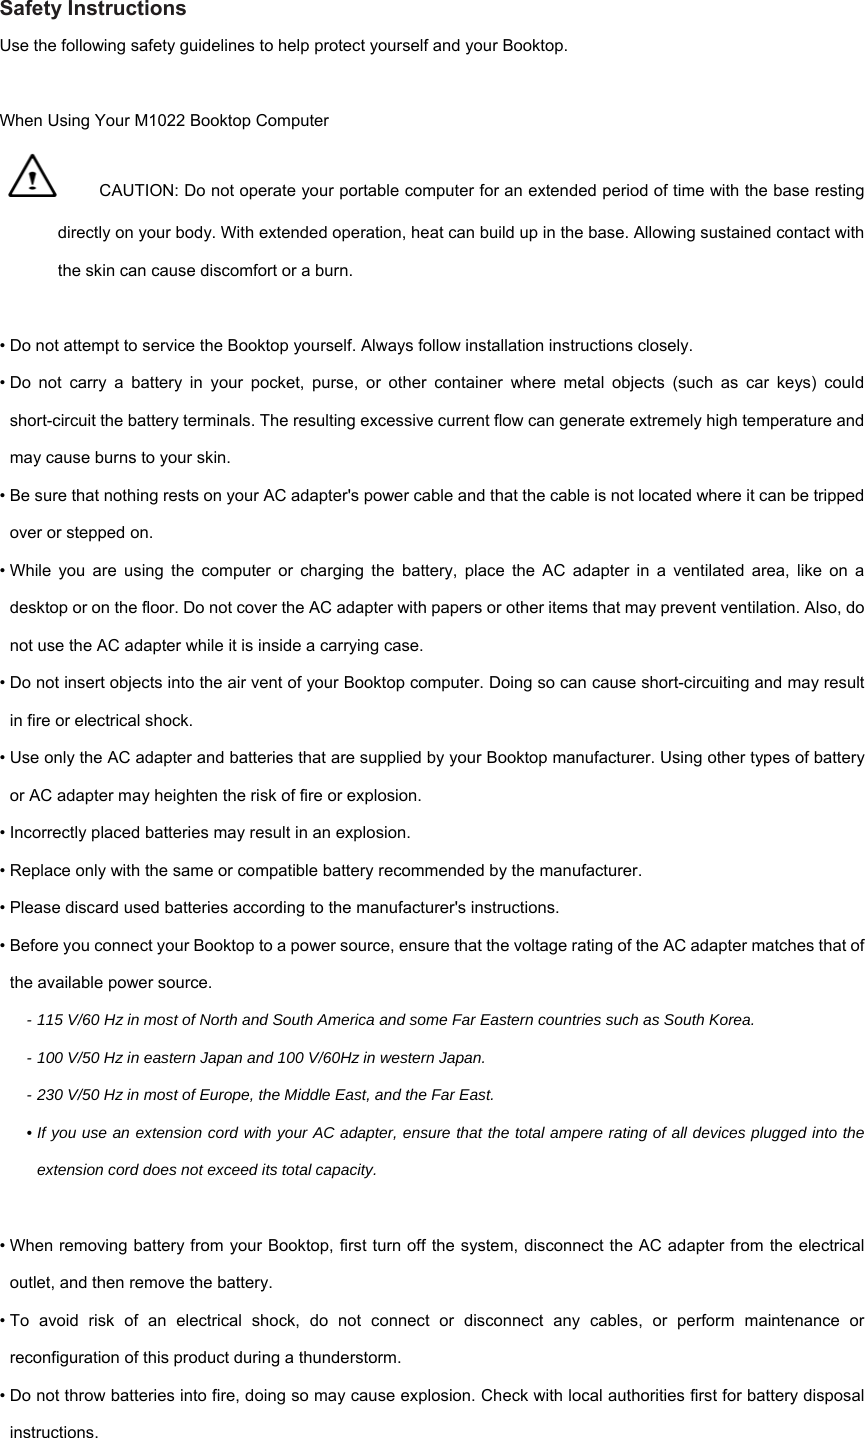
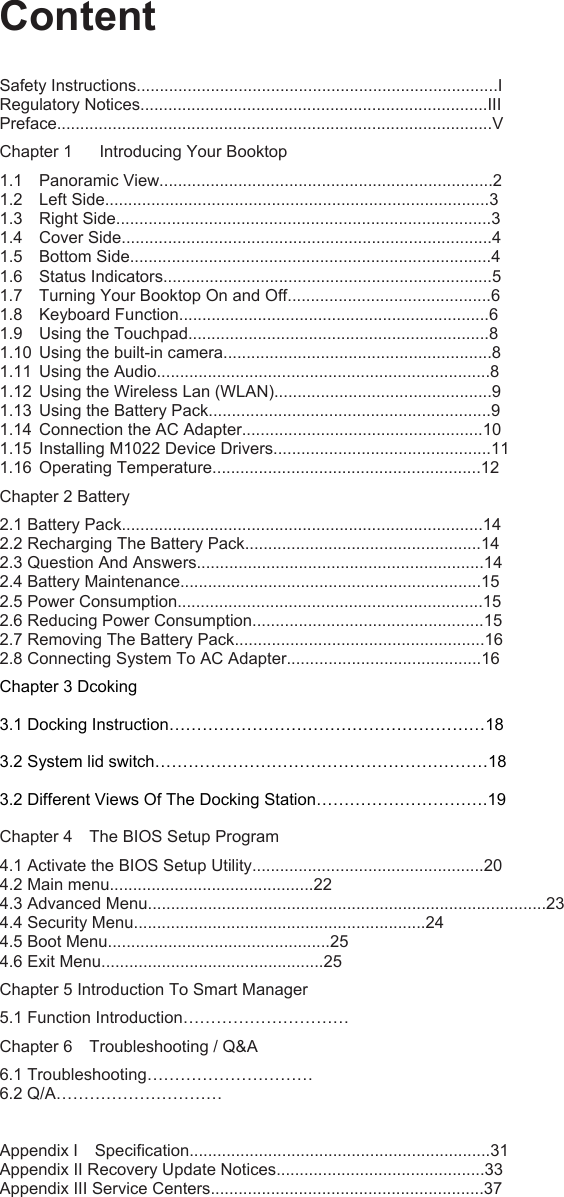
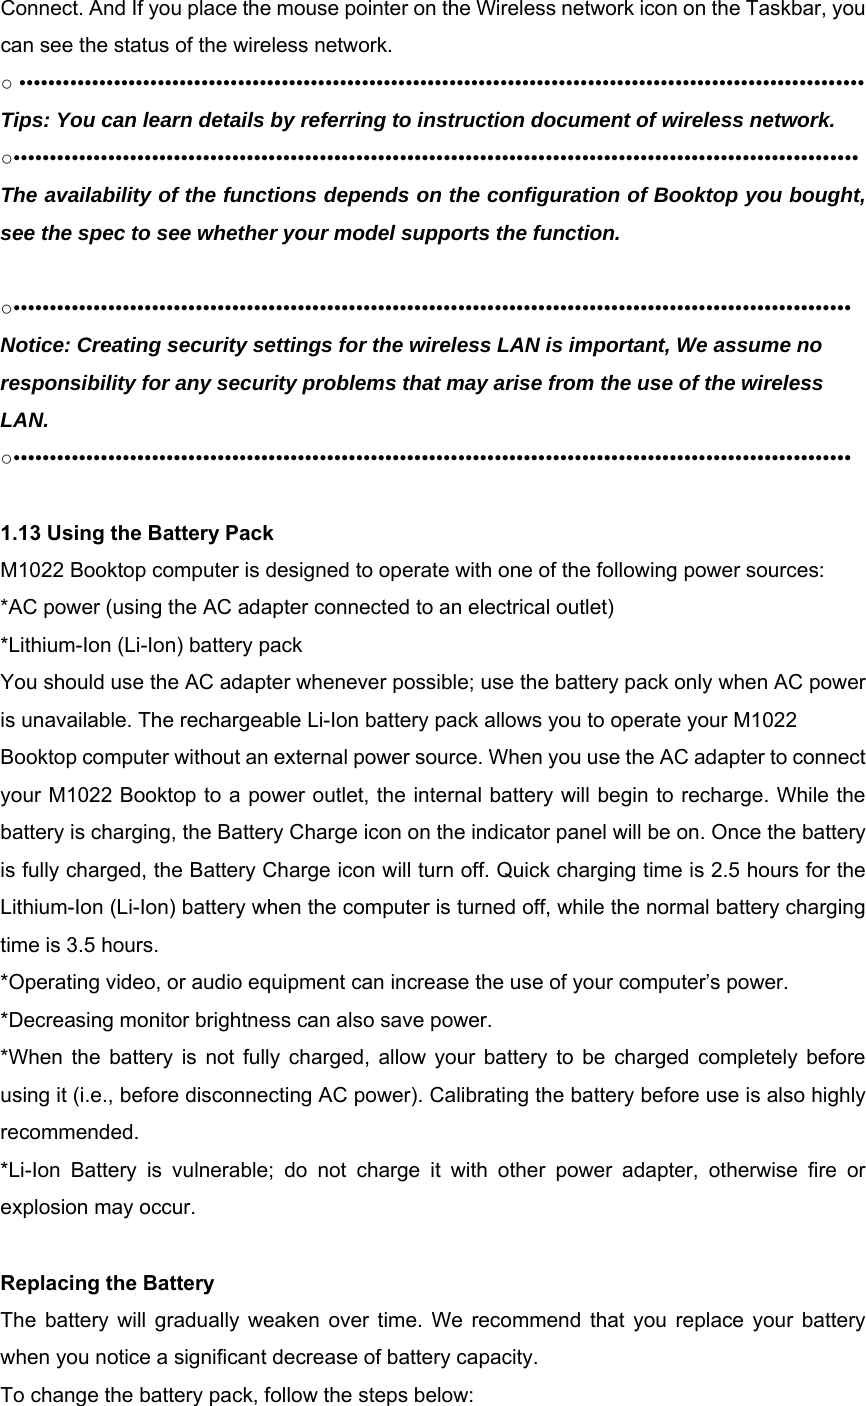
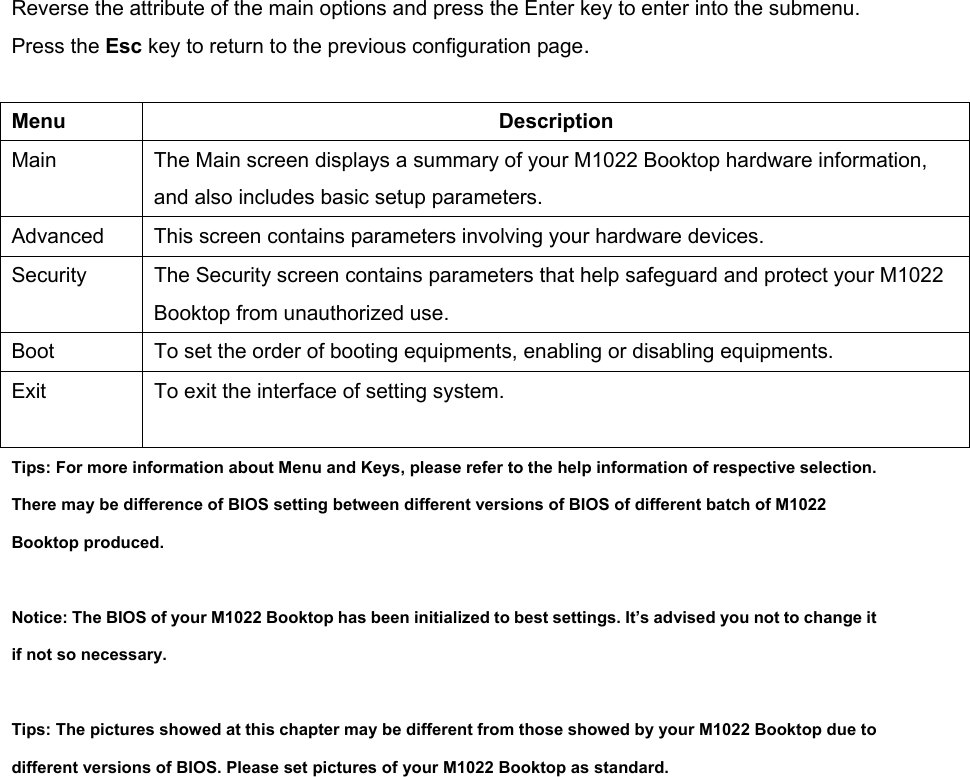
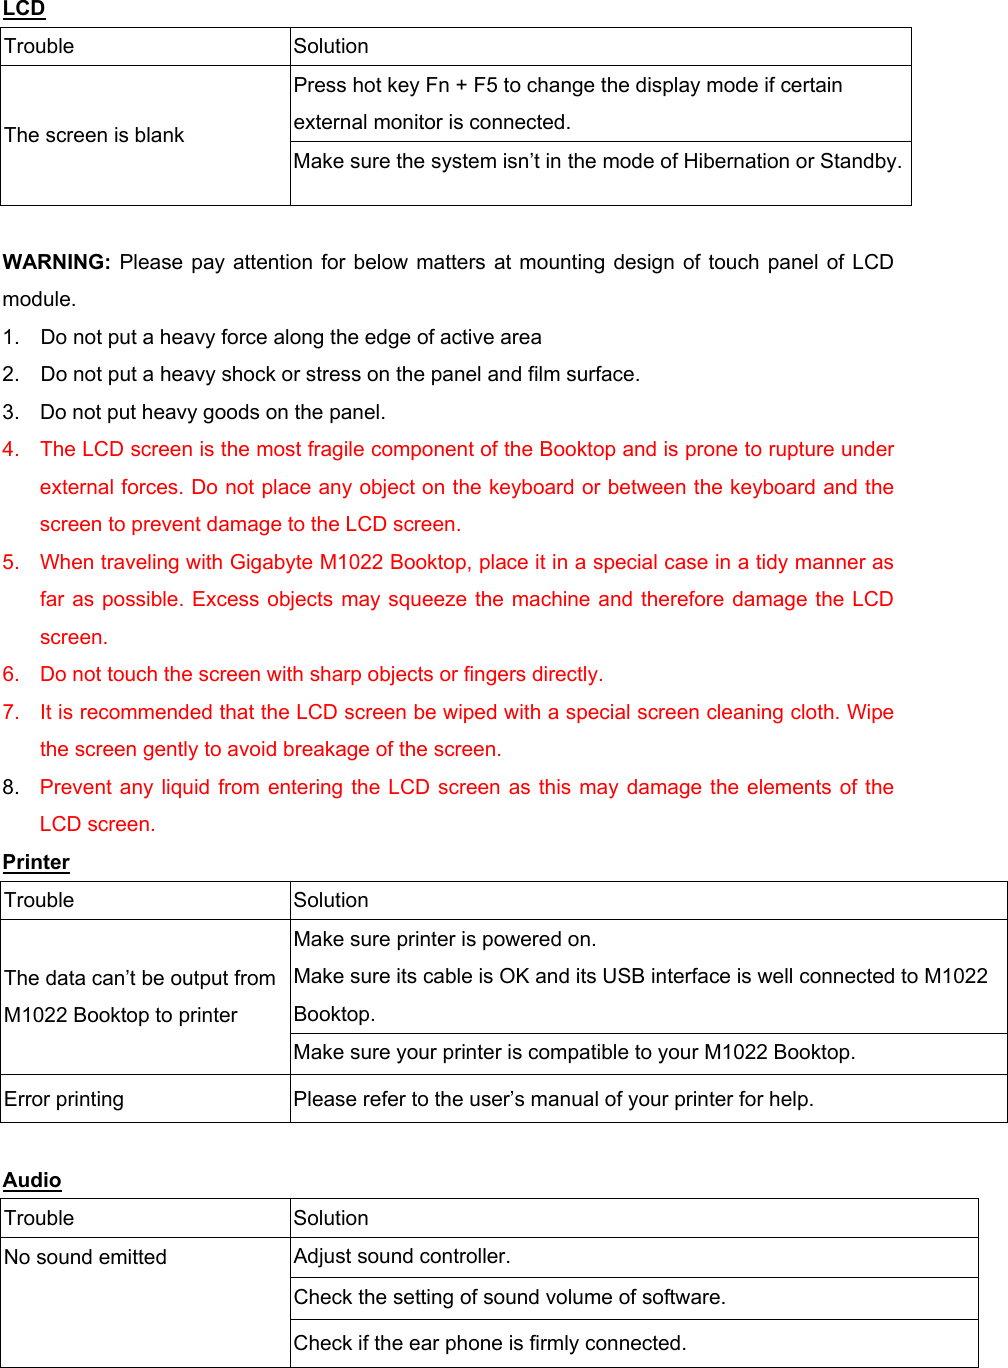
![4.3 Advanced Menu InsydeH20 Setup Utility Main Advanced Security Boot Exit ►Boot Configuration ►Peripheral Configuration ►IDE Configuration ►USB Configuration ►Platform Power Management (Power Manual) Advanced S3: [Disable, Default] [Enable] Keyboard language: [US, Chinese, Default] [Disable] [US, Chinese] = 01h [UI] = 02h [Japan] = 03h [Korea] = 04h [Germany] = 05h Item Specific Help Configures Boot Settings. F1 Help ↑↓ Select Item F7/F8 Change Values F9 Setup Default ESC Exit ←→ Select Menu Enter Select►Menu F10 Save and Exit 4.4 Security Menu InsydeH20 Setup Utility Main Advanced Security Boot Exit Supervisor Password : Not Installed User Password : Not Installed Set Supervisor Password Set User Password Item Specific Help Install or Change the password and the length Of password must be Greater than one word. F1 Help ↑↓ Select Item F7/F8 Change Values F9 Setup Default ESC Exit ←→ Select Menu Enter Select►Menu F10 Save and Exit](https://usermanual.wiki/GIGA-BYTE-TECHNOLOGY/M1022/User-Guide-1085640-Page-28.png)
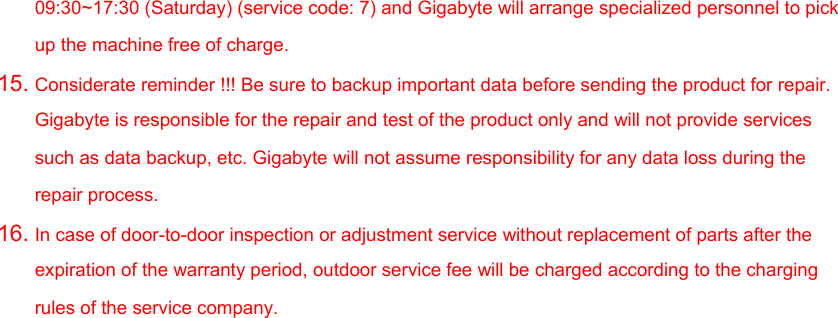
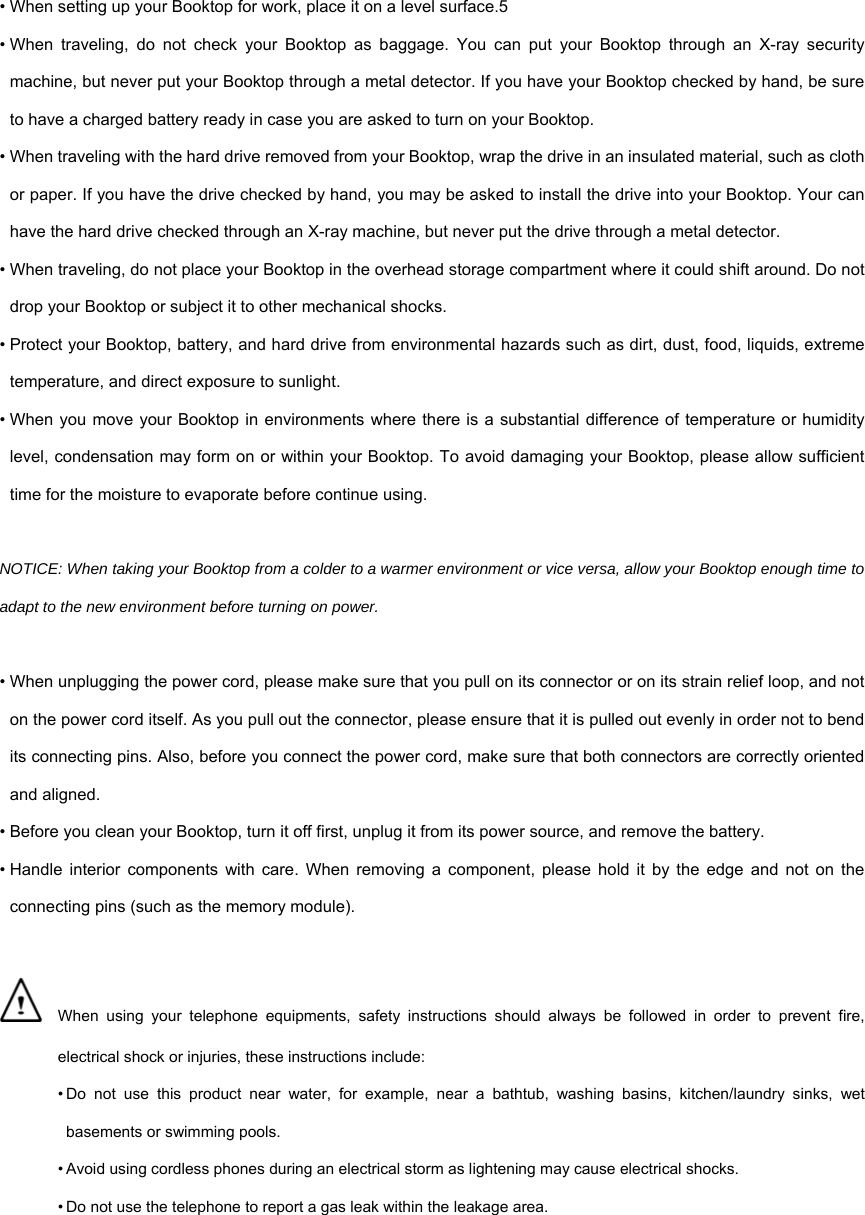
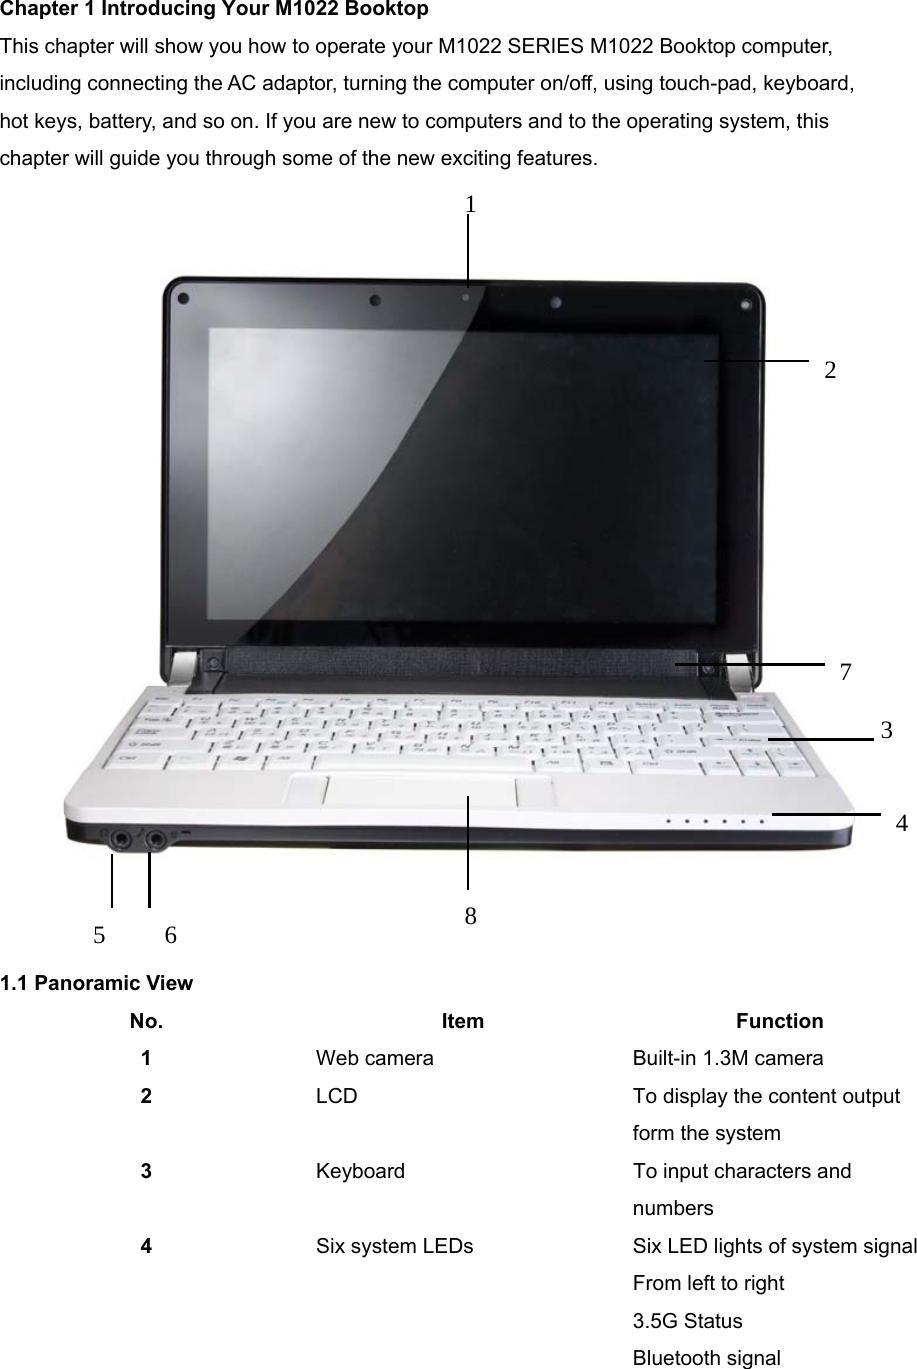
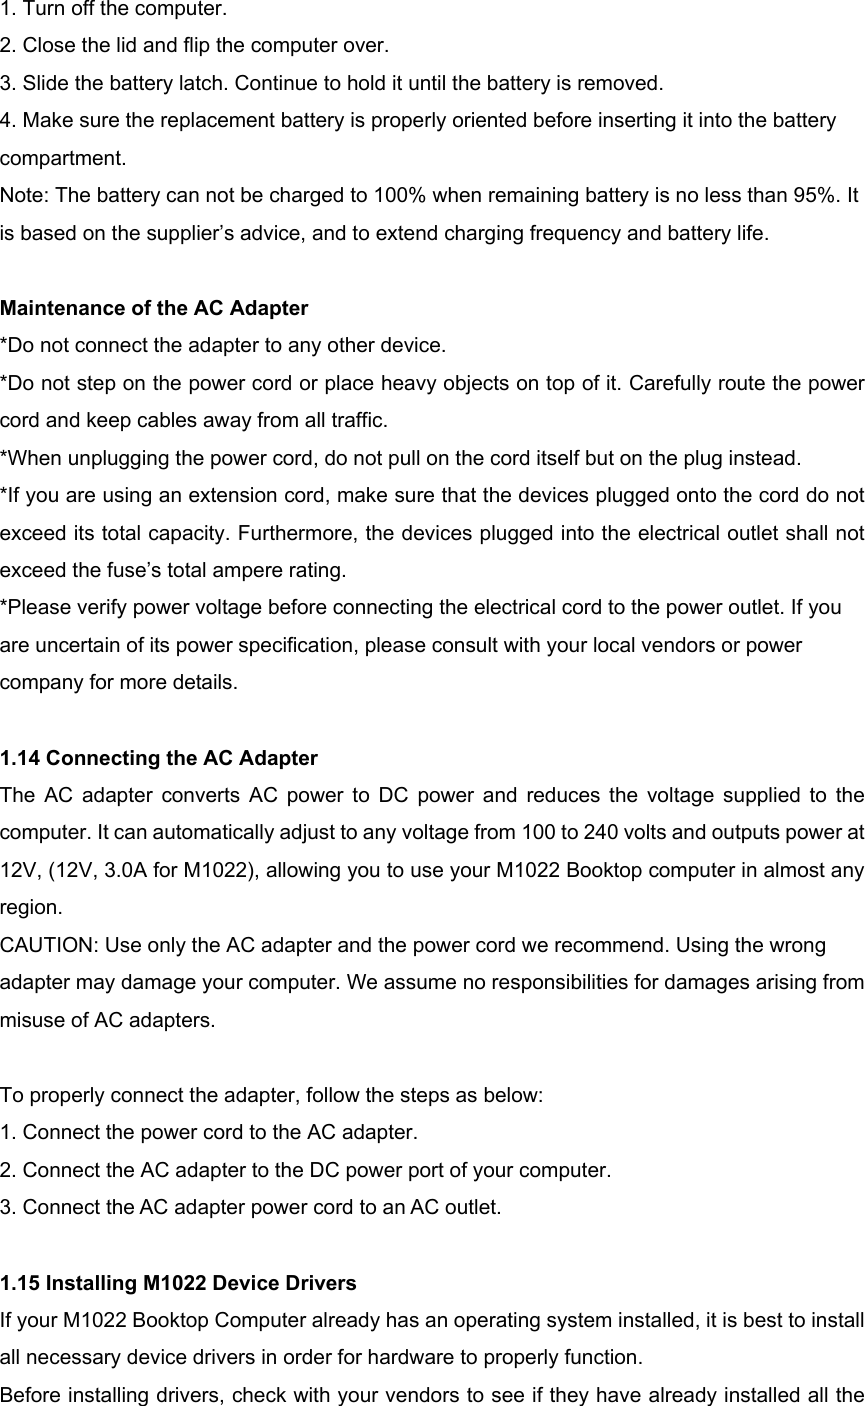
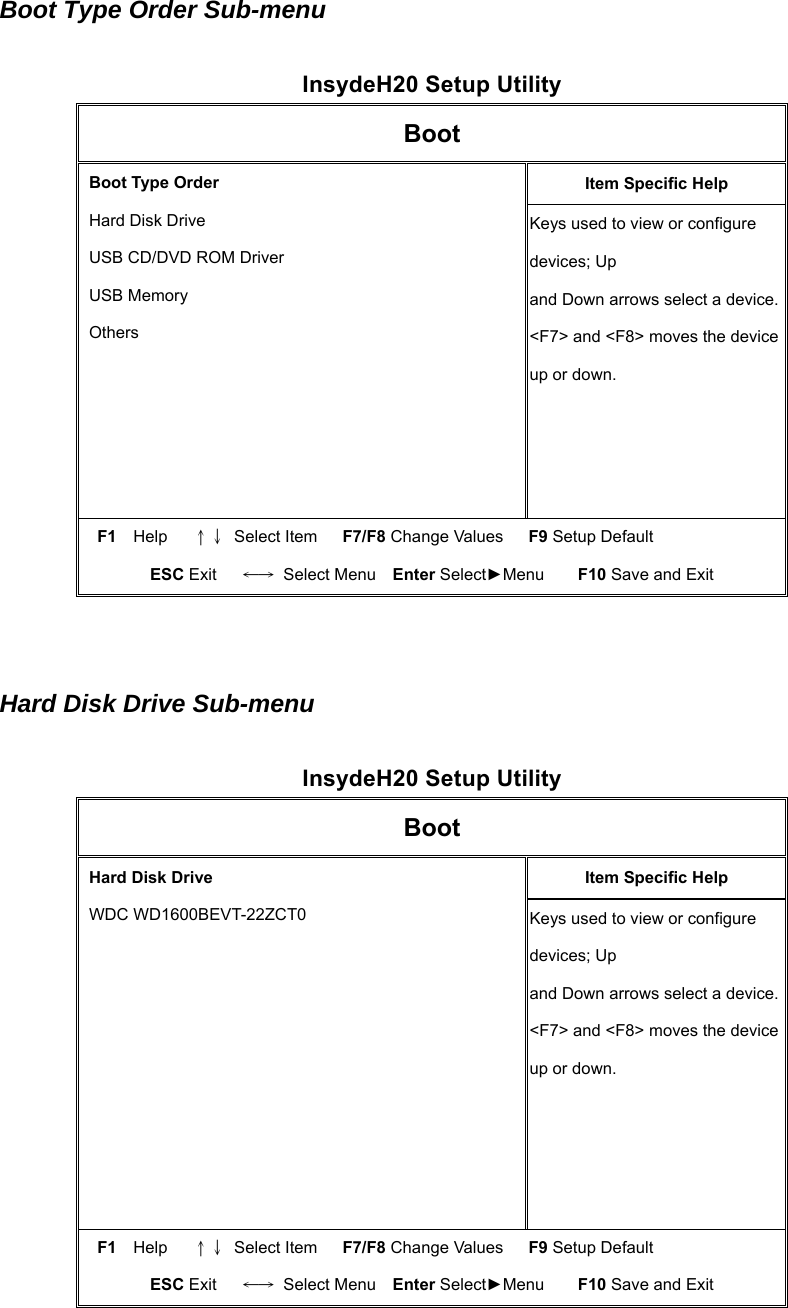
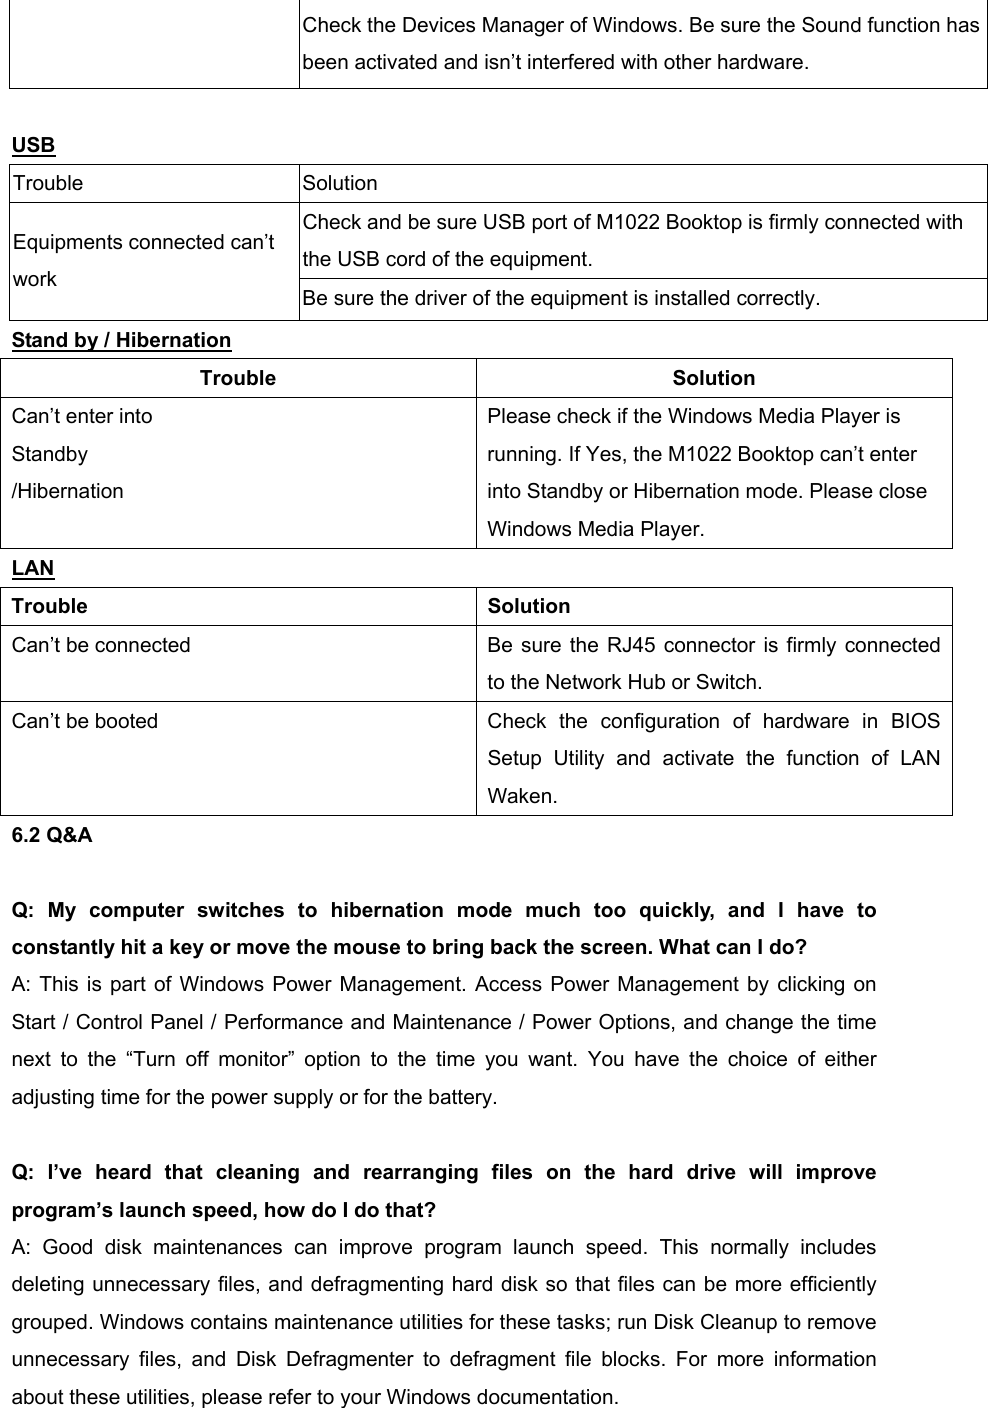
![Set Supervisor Password A supervisor password must be set before a lower-level user password can be set. After selecting Change Supervisor Password, press Enter. You will be prompted for the new password, and then again to verify it. Type in 6 or fewer keystrokes. If you make an error, press Esc to start over. Set User Password With a User password, you can enter the Setup Utility and change or remove the User password, but you cannot enter the Setup Utility and change or remove the Supervisor password, nor enable diskette access if it has been disabled. 4.5 Boot menu InsydeH20 Setup Utility Main Advanced Security Boot Exit Quiet Boot [Enable] USB boot [Enable] ACPI Selection [ACPI 3.0] ►Boot Type Order ►Hard Disk Drive Item Specific Help Disables or enables Booting in Text Mode. F1 Help ↑↓ Select Item F7/F8 Change Values F9 Setup Default ESC Exit ←→ Select Menu Enter Select►Menu F10 Save and Exit](https://usermanual.wiki/GIGA-BYTE-TECHNOLOGY/M1022/User-Guide-1085640-Page-29.png)
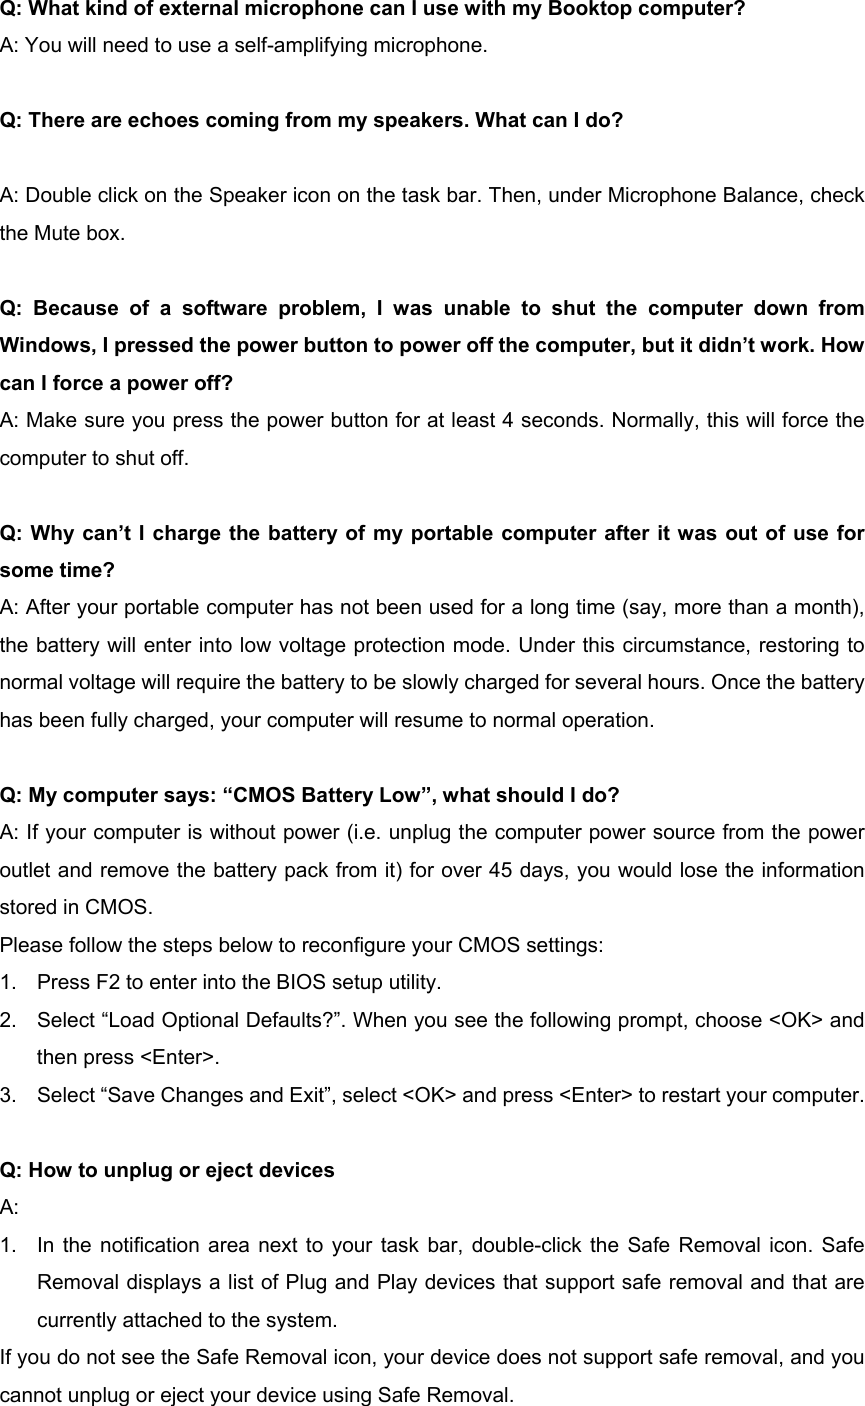
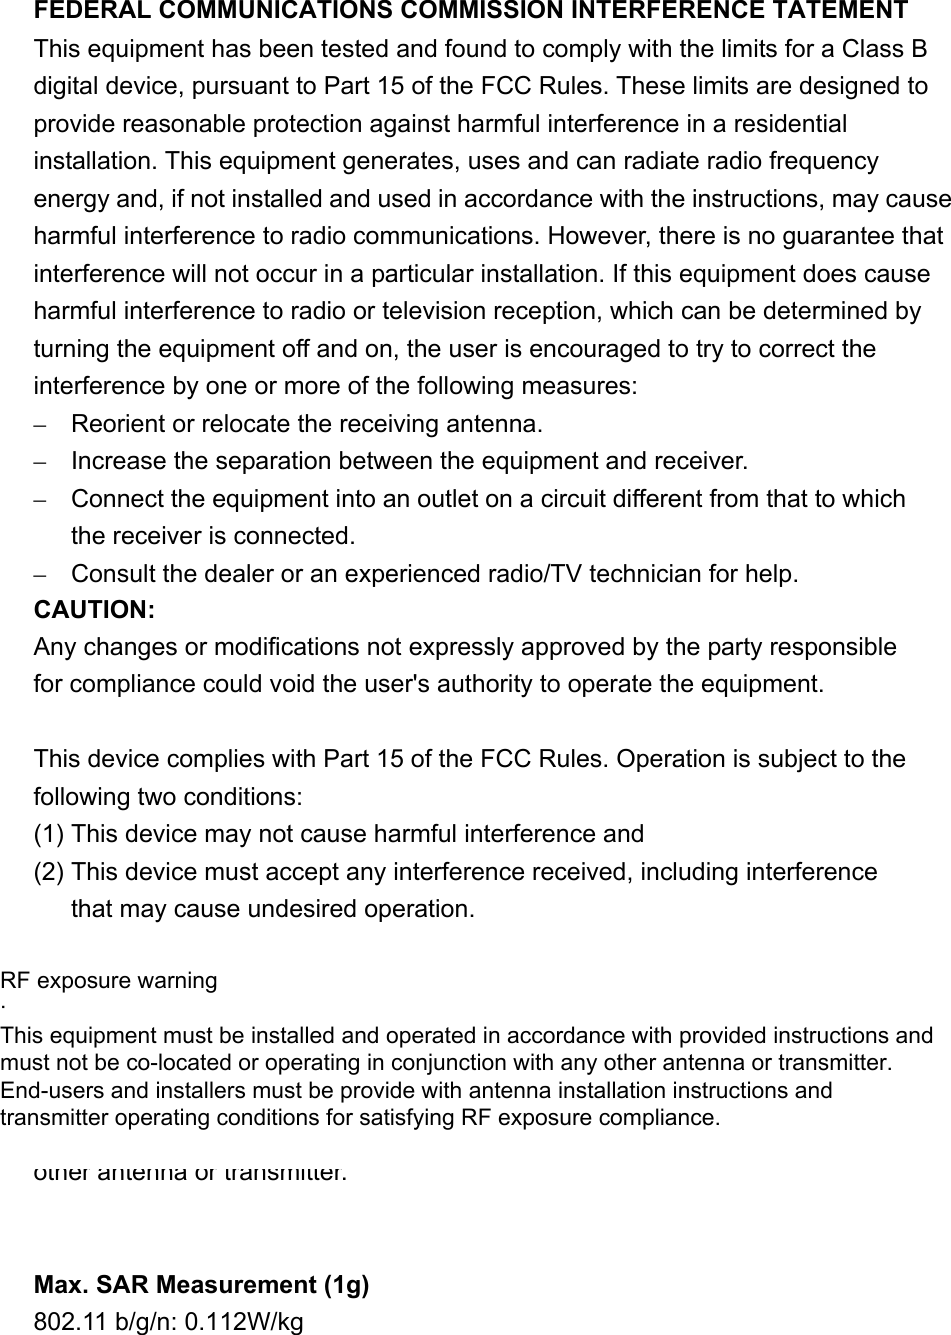
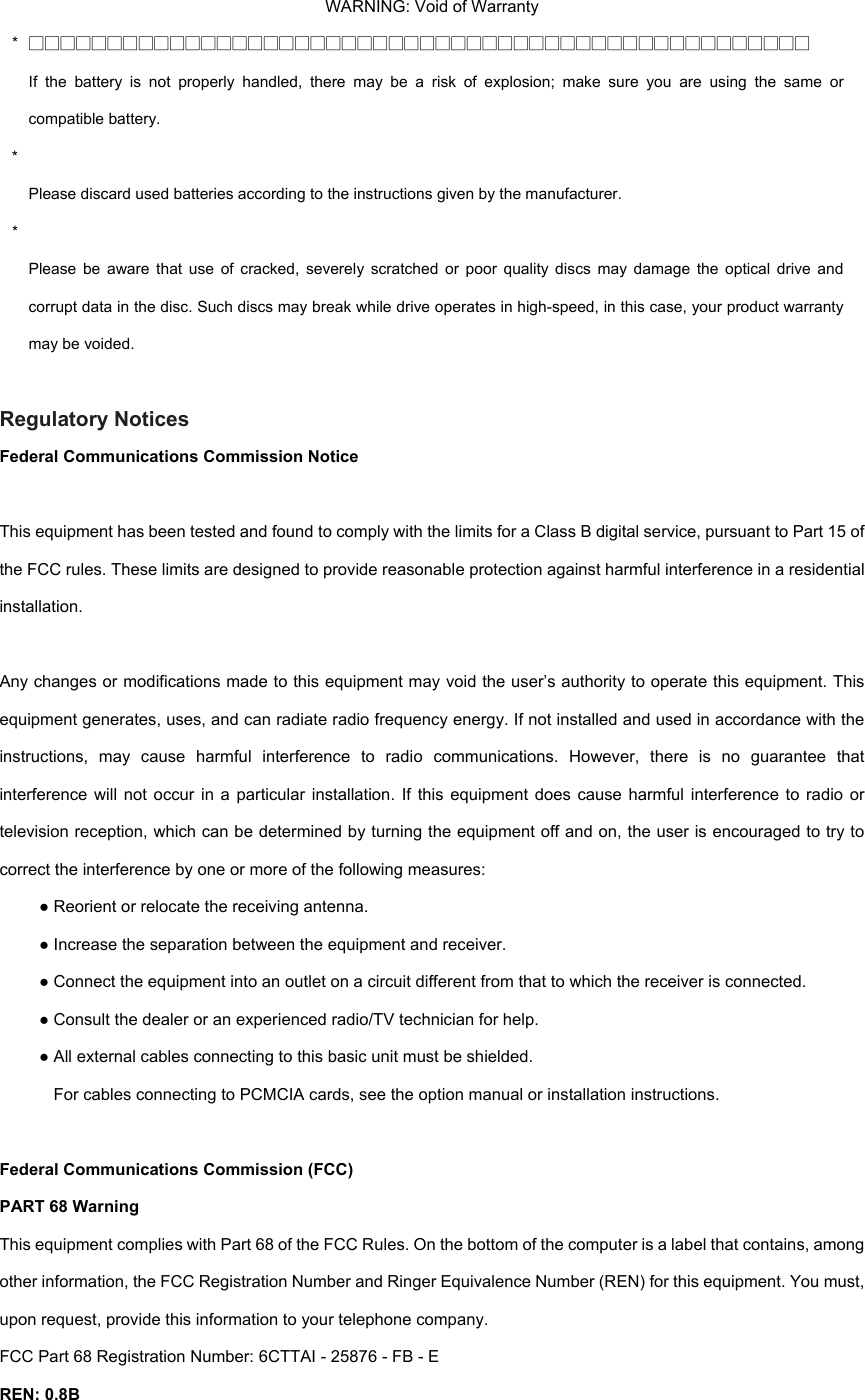
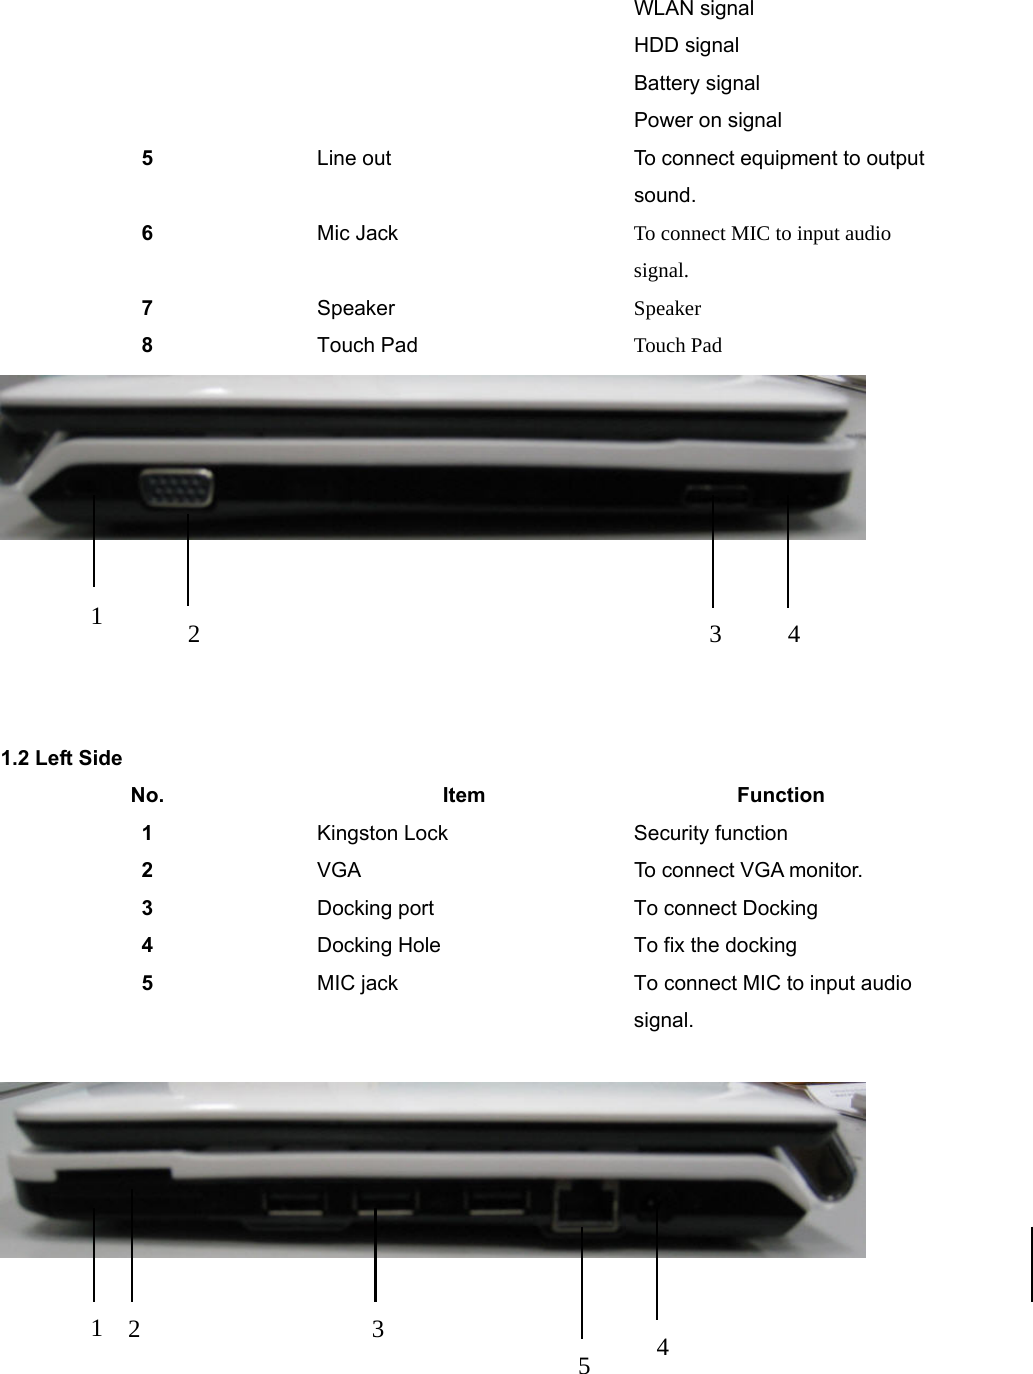
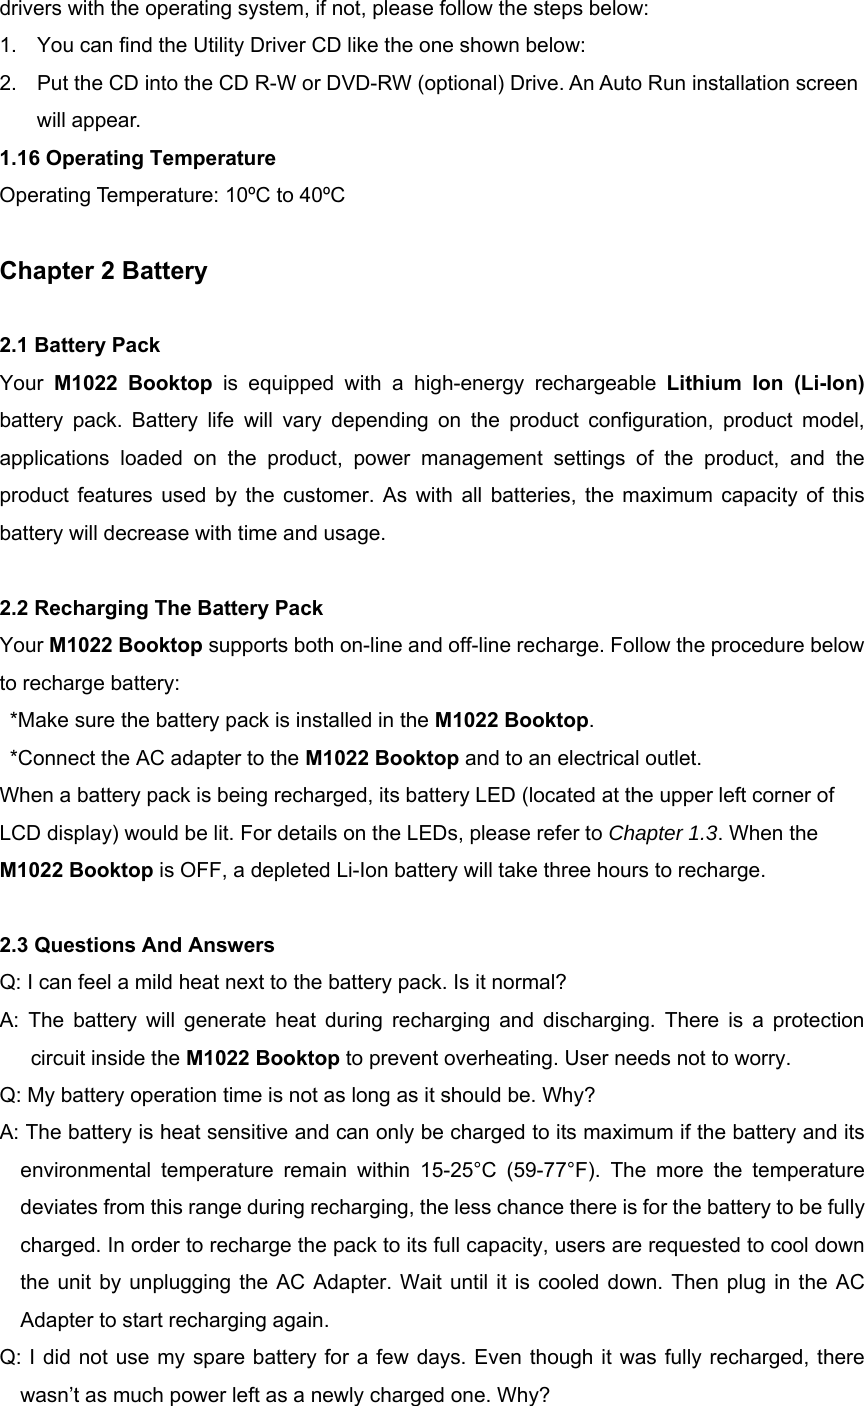
![A. In the M1022 BIOS configuration screen, select the operating system you install from [Advanced] setting-> option, As long as you install any of the following operating systems Windows XP, Windows Vista, or Linux Ubuntu, you need to choose the “WinXP” option. In the meanwhile, you should note that if the above operating systems are set to “Other”, or an incorrect option is set for other operating system, it is possible that the ACPI data may not be read properly by the operating system. Appendix I Specification Processor Intel® Atom 1.6GHz N270 OS Microsoft Windows XP compliance / Linux/ VISTA Core Logic Intel® 945GSE ] Memory DDRII-533 SO-DIMM X 1, Max 2 GB For the compatible HDDs & RAMs by model, please refer to GIGABYTE AVL List Video Interface Intel® 945GSE Display 10.1”LCD panel/WSVGA 1024x600 10.1”LCD panel/WXGA 1366x768 Hard Disk Drive 2.5” ,9.5mm S-ATA HDD 160/250/320GB/500GB Optical Drive External ODD by USB connection Input Device 80 key keyboard/Touch Pad I/O Port USB X 3,Mic in/Earphone out/D-SUB RJ45 / SD/MMC/MS Card Reader / Express card Audio Speaker 1.5 watt x 2 Bluetooth Bluetooth 2.1 built-in Web Camera](https://usermanual.wiki/GIGA-BYTE-TECHNOLOGY/M1022/User-Guide-1085640-Page-41.png)