GIGA BYTE TECHNOLOGY M912 Netbook Laptop Computer User Manual manual
GIGA-BYTE TECHNOLOGY CO., LTD. Netbook Laptop Computer manual
manual
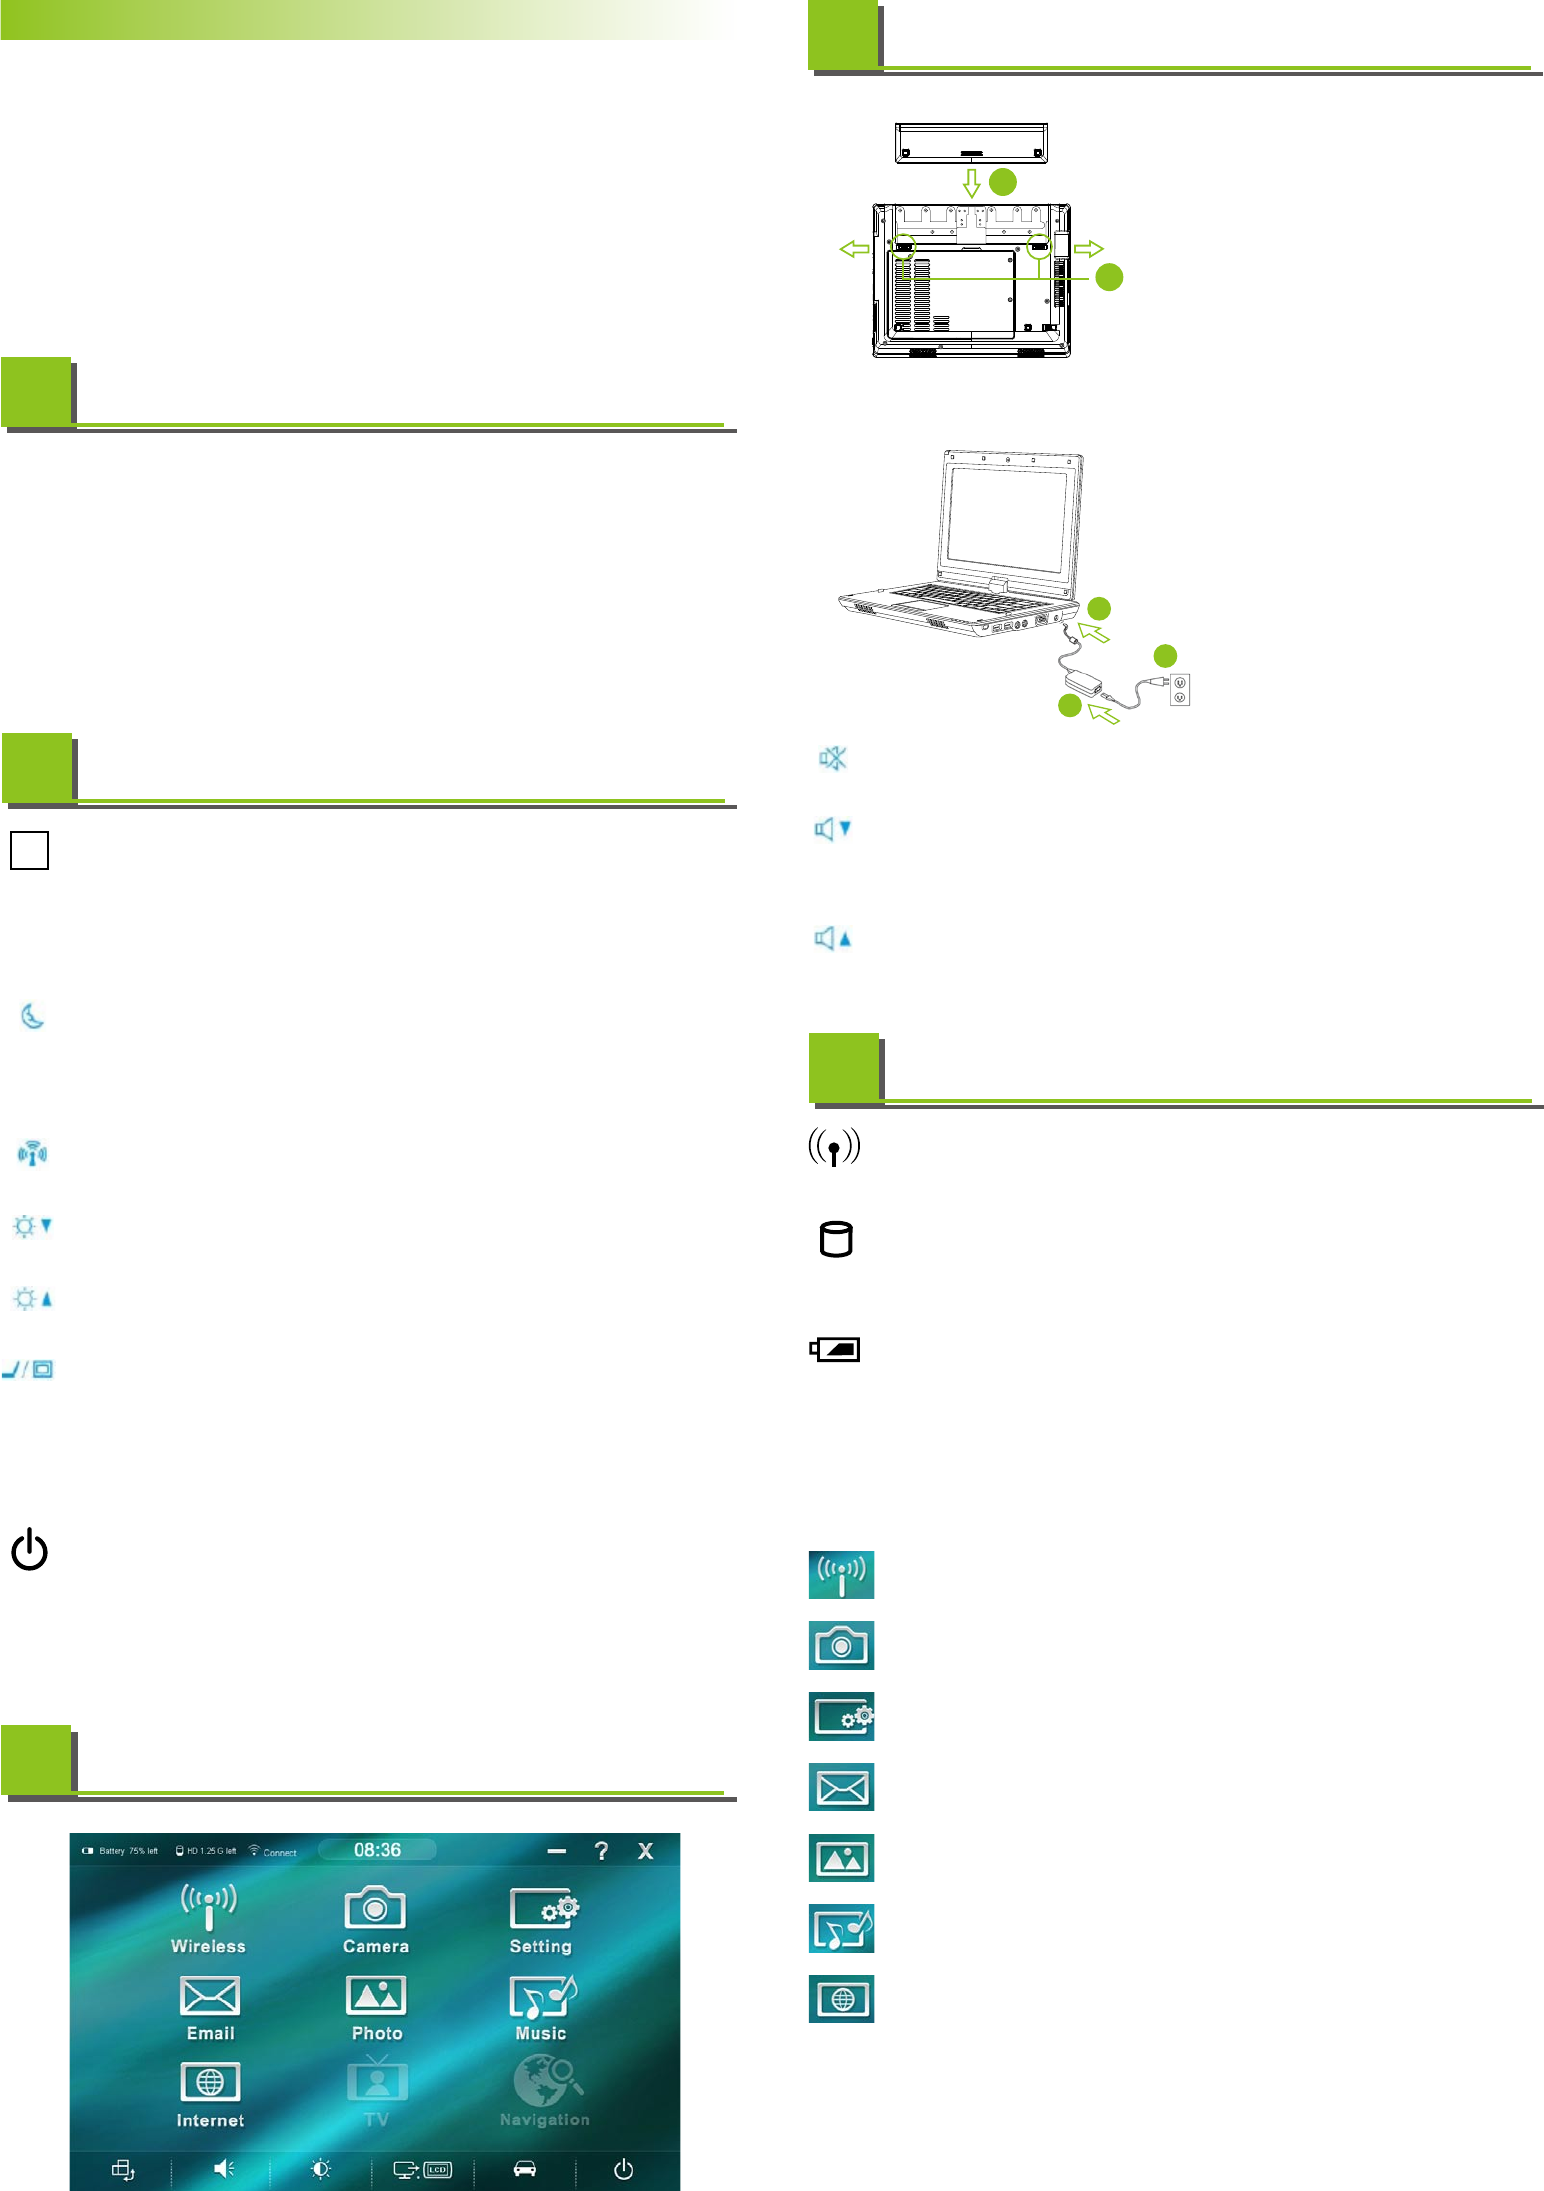
Insert the Battery Pack • 插入電池組 • 插入电池组 • バッテリーパックを装着します • 배터리팩 제거하기
• Make sure the system is properly shutdown.
確定系統已正常關機 / 确定系统已正常关机 / システムが適切にシャ
ットダウンされたことを確かめて下さい /
시스템이 올바르게 꺼졌는지 확인합니다
• Flip the system upside down as shown.
如圖示把翻轉系統主機 / 如图标把翻转系统主机 / 図に示されるよ
うに、本体を裏返しに置きます /
시스템을 그림과 같이 뒤로 젖혀 뒤집습니다
• Insert the battery pack as shown by #1.
如圖#1將電池鎖往左右兩邊推開 /
• Push the battery install the system as shown by #2.
如圖#2將電池往下裝入系統主機
• Then push the battery lock to the lock position.
再將電池鎖推回lock位置 /
1
2
歡迎使用M912行動電腦!
Congratulations on your purchase of the M912 Netbook. This Quick Start Guide offers information to guide you through
a successful Netbook M912 Setup.
感謝您選擇M912行動電腦。為協助您順利使用M912行動電腦,我們特地設計這份「快速安裝說明」來協助您開始設定您
的M912行動電腦。
感谢您选择M912行动电脑。为协助您顺利使用M912行动电脑,我们特地设计这份「快速入门指南」来协助您开始设定您的
M912行动电脑。
GIGABYTE製品をお買いいただき、誠にありがとうございます。 このクィックスタートガイドの指示に従って、M704ウルトラモバイルPCの設定を
完成します。
M912 울트라 모바일 PC를 구입하신 것을 축하드립니다. 이 요약 설명서는 울트라 모바일 PC M912를 성공적으로 설정하실 수 있도록 길
잡이 역할을 하는 정보를 제공합니다.
Checking What You Received
檢查您收到的產品 • 检查您收到的产品 • お買い上げ品の確認 • 포장 내용물 점검하기
• The Ultra Mobile PC / 超級行動電腦 / 超级行动电脑 / ウルトラモバイルPC / 울트라 모바일 PC
• AC Adapter / AC變壓器 / AC变压器 / ACアダプタ / AC 어댑터
• AC Power Cord / AC電源線 / AC电源线 / AC電源コード / AC 전원 코드
• CD Disc (Including Drivers and User’s Guide) / CD片(內含驅動程式和使用手冊) / CD片(内含驱动程序和用户手册) /
CDディスク(ドライバおよびユーザーズガイドを収録) / CD 디스크(드라이버와 사용 설명서 포함)
• Battery Pack / 電池組 / 电池组 / バッテリパック / 배터리 팩
• Utility CD / 驅動程式CD / 驱动程序CD / ユーティリティCD / 유틸리티 CD
• Protection Bag / 保護袋 / 保护袋 / 保護バッグ / 보호 가방
• Warranty Card / 保固卡 / 保固卡 / 保証書 / 보증서
• Extra stylus pen / 觸控筆 / 触控笔 / スタイラス・ペン / 추가 스타일러스 펜
Examining Your Computer
檢查您的電腦 • 检查您的计算机 • コンピュータ各部の認識 • 컴퓨터 검사하기
Welcome!
1
2
Fn Keys
Fn鍵 • Fn键 • Fnキー • Fn 키×
By pressing the Fn keys with other keys, it can simulate all keyboard functions of a regular
desktop keyboard.
同時按下Fn按鍵和其他按鍵後,可模擬一般桌上型電腦鍵盤的所有鍵盤功能。
同时按下Fn按键和其它按键后,可仿真一般桌上型计算机键盘的所有键盘功能。
Fnキーは他のキーと組み合わせることによって、各キーに割り付けてある機能を使うことができます。
Fn 키와 다른 키를 함께 눌러 다음 키보드 기능을 시뮬레이션할 수 있습니다.
Connecting System To AC Adapter
連接系統到AC變壓器 • 连接系统到AC变压器 • 本体をACアダプタと接続 • 시스템을 AC 어댑터에 연결하기
•
Connect AC adapter to system unit as shown by #1. /
如圖#1所示連接AC變壓器到系統主機。 / 如图#1所示连
接AC变压器到系统主机。 / #1 に示されるように、ACアダ
プタを本体に接続します / AC 어댑터를 #1과 같이 시스
템 유닛에 연결합니다
•
Connect AC power cord to AC adapter as shown by #2.
/ 如圖#2 所示連接AC電源線到AC變壓器 。 / 如图#2 所
示连接AC电源线到AC变压器。 / #2 に示されるように、
AC電源コードをACアダプタと接続します / AC 전원 코드
를 #2와 같이 AC 어댑터에 연결합니다
•
Connect other end of power cord to an electrical outlet
as shown by #3. / 如圖#3所示連接AC電源線另一端到
電源插座。 / 依图#3所示连接AC电源线另一端到电源插
座。 / #3に示されるように、電源コードの他端をコンセン
トに接続します / 전원 코드의 반대쪽을 #3과
1
3
2
FN
[Fn]+[F1]: Hibernation
Press this key combination to make system enter hibernation mode.
In this mode, the back light of the LCD panel would be turned off and a host of inter
nal devices would enter into a stage of lower power consumption.
[Fn]+[F2]: Wireless LAN
To activate Wireless LAN.
[Fn]+[F3]: Brightness decreasing
Press this key combination to decrease the brightness of the LCD.
[Fn]+[F4]: Brightness increasing
Press this key combination to increase the brightness of the LCD.
[Fn]+[F5]: LCD / Video-out Switch
Press this key combination to switch between:
LCD mode only;
Video-out mode only;
LCD and Video-out simultaneously mode
Notice:
This function works under certain setting of OS, please refer to your instruction of OS.
[Fn]+[F6]: CCD Enable/Disable
Press this key combination to enable/disable webcam function
Fn Combination Keys (Hot Keys)
Fn熱鍵功能
3
[Fn]+[F7]: Mute
Press this combination to open/close output of audio signal.
[Fn]+[F8]: Voice weakening
Press this key combination to weaken the voice output.
Notice: This function works under certain setting of OS, please refer to your instruction
of OS.
[Fn]+[F9]: Voice strengthening
Press this key combination to strengthen the voice output.
Notice: This function works under certain setting of OS, please refer to your instruction
of OS.
The Status of Four System LEDs/Switches/Buttons
4個系統LED/開關/按鈕的狀態 • 4个系统LED/开关/按钮的状态 •
4個のシステムLED • 다섯 개의 시스템 LED
4
The Wireless LAN LED
無線區域網路燈號 • 无线局域网络灯号 • ワイヤレスLAN LED • 무선 LAN LED
This LED would be lit when the Wireless LAN is powered on.
當啟動無線區域網路通訊時,此LED燈號會亮 / 当激活无线局域网络通信时,此LED灯号会亮
このLEDは、ワイヤレスLANの電源がオンになると点灯します / 이 LED는 무선 LAN이 켜질 때 켜집니다.
The HDD Access LED
硬碟(HDD)存取燈號 • 硬盘(HDD)存取灯号 • HDDアクセスLED • HDD 액세스 LED
This LED would be lit when system is accessing the HDD drive.
當系統在存取硬碟時,此LED燈號會亮。/ 当系统在存取硬盘时,此LED灯号会亮。
このLEDは、システムがHDDドライブにアクセス中に点灯します
。
/ 이 LED는 시스템이 HDD 드라이브에 액세스할 때 켜집
니다.
The Battery Pack LED
電池組燈號 • 电池组灯号 • バッテリーパックLED • 배터리 팩 LED
On Battery pack is being recharged: fast-charge or pre-charge.
Blinking 電池組在充電中:快速充電或預先充電 / 灯亮 电池组在充电中:快速充电或预先充电
閃爍 バッテリー充電中(急速充電またはプレ充電を行っています)
点滅 배터리 팩이 재충전 중입니다: 고속 충전 또는 사전 충전.
Off Battery pack is not under recharge.
熄滅 電池組不在充電中 / 熄灭 电池组不在充电中/ 消灯 バッテリー非充電
꺼짐 배터리 팩이 재충전 상태가 아닙니다.
The Power On LED
電源燈號 • 电源灯号 • 電源オンLED • 전원 켜기 LED
Off Powered off, or in Hibernate mode.
熄滅 電源關閉或處於休眠模式 / 熄灭 电源关闭或处于休眠模式 /
消灯 システムはオフまたはハイバネーションモード
꺼짐 시스템이 꺼져 있거나 최대 절전 모드에 있습니다.
On Full operation.
燈亮 通用操作 / 灯亮 通用操作 / 点灯 システムは稼働中。
켜짐 시스템이 전체 동작 상태에 있습니다.
5
Instruction on Optimized Mobility Menu for Mobility Center
最佳化行動設定選單說明 • 最佳化行动设定选单说明
モビリティセンターの最適化モビリティメニュウの説明
Wiireless: 按下此選項可開啟或關閉無線網路
Press this button to enable or disable the wireless function.
Camera: 按下此選項可開啟或關閉照相機功能
Press the opinion to enable or disable the webcam function.
Setting: 按下此選項可以進行螢幕校準/電源管理/音量調整功能
Press the opinion to do the screen calibration / Power Management / Volume control function.
E-Mail: 按下此選項可以開啟電子郵件程式
Press this opinion to run the E-Mail application.
Photo: 按下此選項可以開啟我的圖片程式瀏覽照片
Press this opinion to view the “My Picture” folder picture.
Music: 按下此選項可以開啟我的音樂程式播放音樂
Press this opinion to play the music from “My Music” folder.
Internet: 按下此選項可以開啟IE瀏覽器瀏覽網頁.
Press this opinion to run the Internet Explore application.
420mm
2ZAXXX-XXXXX-XXX
在選單中有四個選項:"RESTORE"(復原資料),"ABOUT"(顯示XR3軟體相關資
訊)與"REBOOT"(取消復原並重新開機)。我們建議選擇"RESTORE"來復原原廠設定。
在選單中有四個選項:"RESTORE"(復原資料),"ABOUT"(顯示XR3軟件相關信息),
与"REBOOT"(取消复原并重新開机)。我們建議選擇"RESTORE"来复原原厂設定。
メニュー上に4つのオプションがあります。「RESTORE」(データを復元)「ABOUT」(XR3ソフトウ
ェ関連の情報を表示)と「REBOOT」(リカバリをキャンセルし、コンピュータを再起動)。工場デ
フォルト値に復元するには、「RESTORE」を選ぶようにお勧めします。
메뉴에는 세 가지 옵션이 있습니다: “RESTORE”(복원: 데이터 복원용), “ABOUT”(프로그
램 XR3 소프트웨어 관련 정보 표시), “REBOOT”(재부팅: 복원을 취소하고 컴퓨터를 재시
작)“RESTORE”(복원)를 선택하여공장 기본값을 복원할 것을 권장합니다.
4. Then the prompt "Restore Image?" will appear on the menu. We recommend you to
select "YES" to restore an image file.
* "Imagefile" is a compressed file that compresses all the Windows operation system
data. Recovery an image file allows you to restore your operation system to factory
defaults.
接著,選單畫面會出現「Restore Image?」(是否回復映像檔?)。建議您點選「YES」
(是)以回復映像檔。
* 「映像檔」是根據您的Windows作業系統檔案所製成的一個壓縮檔;回復映像檔即可將作
業系統還原成出廠的預設狀態。接著,選單畫面會出現「Restore Image?」(是否回復映
像檔?)。建議您點選「YES」(是)以回復映像檔。
*「映像文件」是根据您的Windows操作系統檔案所製成的一個壓縮檔;回復映像文件即可將
操作系統還原為出廠的預設狀態。
ここでプロンプト、「イメージを復元します?」がメニューに表示されます。イメージファイル*を復 元するには「YES」を選ぶようお勧めし
ます。「イメージファイル」とは、Windowsオペレーティングシステムデータ全部を圧縮した圧縮ファイルのことです。イメージファイル
の復元により、オペレーティングシステムは工場デフォルト値復元します。
복원을 선택하면 “Restore Image?”(이미지 복원?)이 메뉴에 표시됩니다 “YES”(예)를 선택하여 이미지 파일을 복원할것을 권장합
니다.* “이미지 파일”은 모든 Windows 운영 체제 데이터를 압축하는 압축 파일입니다 이미지 파일을 복원하면 운영 체제를 공장
기본값으로 복원할수 있습니다.
5. After all the selections have been made, the screen shows "RESTORE NOW…", indicat-
ing your computer is now recovering the operation system data. When the recovery is
complete, the computerwill auto-matically restart and restore to factory defaults.
此時,所有選項步驟皆已完成,畫面出現"Restore Now",表示您的電腦正在回復作業系統
資料。當資料回復完畢,電腦會自動重新開機並回復到出廠預設值。
此時,所有選項步驟皆已完成,畫面出現"RestoreNow",表示您的筆計本正在回複作業系
統數據。當數據回複完畢,筆計本會自動重新開機並回複到出廠預設值。
すべての選択がされた後に、画面は「RESTORE NOW…」を示し、コンピュータが現在オペレー
ティングシステムデータを回復していることを表示します。復元が完了すると、コンピュータは
Time to restore : When your computer is infected by virus or there is any other reason that you want to restore your operation
system to the factory defaults.
使用時機:當您的電腦中毒、或是其他因素令您想要重灌作業系統以回到出廠預設狀態時。
使用時機:當您的筆計本中毒、或由于其它原因令您想要重裝操作系統以回到出廠預設狀態時。
復元する時機:コンピュータがウイルスに感染したか、オペレーティングシステムを工場デフォルト値に復元したい何らかの理由がある
場合。
복원 시간: 컴퓨터가 바이러스에 감염되거나 운영 체제를 공장 기본값으로 복원하고 싶은 다른 이유가 있을 때.
Execute Xpress Recovery3 Lite (XR3 Lite) Professional Recovery Utility. Please take the following procedures:
執行Xpress Recovery3 (XR3 Lite)專業回復設定,請依照以下程序執行:
執行XpressRecovery3Lite(XR3Lite)專業回複設定,請依照以下程式執行:
Xpress Recovery3 Lite (XR3 Lite)プロフェッショナルリカバリユーティリティを実行します。以下の手順で行います:
Xpress Recovery3 Lite (XR3 Lite) 전문 복원 유틸리티를 실행합니다 다음 절차를 따르십시오:
1. Start up your computer first. Restart your computer if it has already booted into system.
請先啟動電腦。若已在開機狀態,請重新啟動。/ 請先啟動筆計本。若已在開機狀態,請重新啟動。
まずコンピュータを起動させます。システムがすでに稼働中の場合は、コンピュータを再起動させます。
먼저 컴퓨터를 실행합니다 이미 시스템이 부팅되어 있을 경우 컴퓨터를 재시작합니다.
2. Right after you see the startup screen (such as trademark, logo or text), the DOS screen will appear. Press F9.
* F9 is a typical hotkey to restore professional settings. Please consult with your computer manufacture if your hotkey doesn't
function.
當您看見螢幕上的啟動畫面(商標、圖案、文字)結束並出現DOS畫面時,請按下「F9」鍵。*通常F9是開啟回復專業設定的熱鍵,
假如沒有作用請洽詢您的電腦製造商。
當您看見螢幕上的啟動畫面(商標、圖案、文字)結束並出現DOS畫面時,請按下「F9」鍵。*通常F9是開啟回複專業設定的便捷
鍵,假如沒有作用請洽詢您的計本製造商。
起動画面(トレードマーク、ロゴ、またはテキストなど)が表示された直後、DOSの画面が表示されます。ここでF9を押します
* F9は、プロフェッショナルな設定を復元する一般的なホットキーです。ホットキーが機能しない場合、コンピュータの製造元にご相
談ください
시작 화면이 보인 직후(상표, 로고 또는 텍스트와 같은), DOS 화면이 표시됩니다 F9를 누릅니다.
* F9는 전문가용 설정을 복원하기 위한 일반적 핫키입니다 핫키가 기능하지 않을 경우 컴퓨터 제조업체에 문의하십시오.
3. There are four options on the menu: "RESTORE" (to restore data), "ABOUT" (to display XR3 soft ware related information)
and "REBOOT" (to cancel the recovery and restart the computer). We recommend you to select "RESTORE" to restore factory
defaults.
How to restore your Netbook to factory defaults
如何回復您的行動電腦出廠預設狀態 • 如何將您的行动电脑回復到出廠預設狀
ウルトラモバイルPCを工場デフォルト値に復元する方法 •
Netbook를 공장 기본값으로 복원하는 방법
6
自動的に再起動し、工場デフォルト値に復元されます。
모든 선택을 완료하면 화면에 “RESTORE NOW…”(지금 복원...)가 표시되어 컴퓨터가 운영 체제 데이터를 복원하고 있음을 나타냅
니다.복원이 완료되면 컴퓨터가 자동으로 재시작하여 공장 기본값으로 복원됩니다.
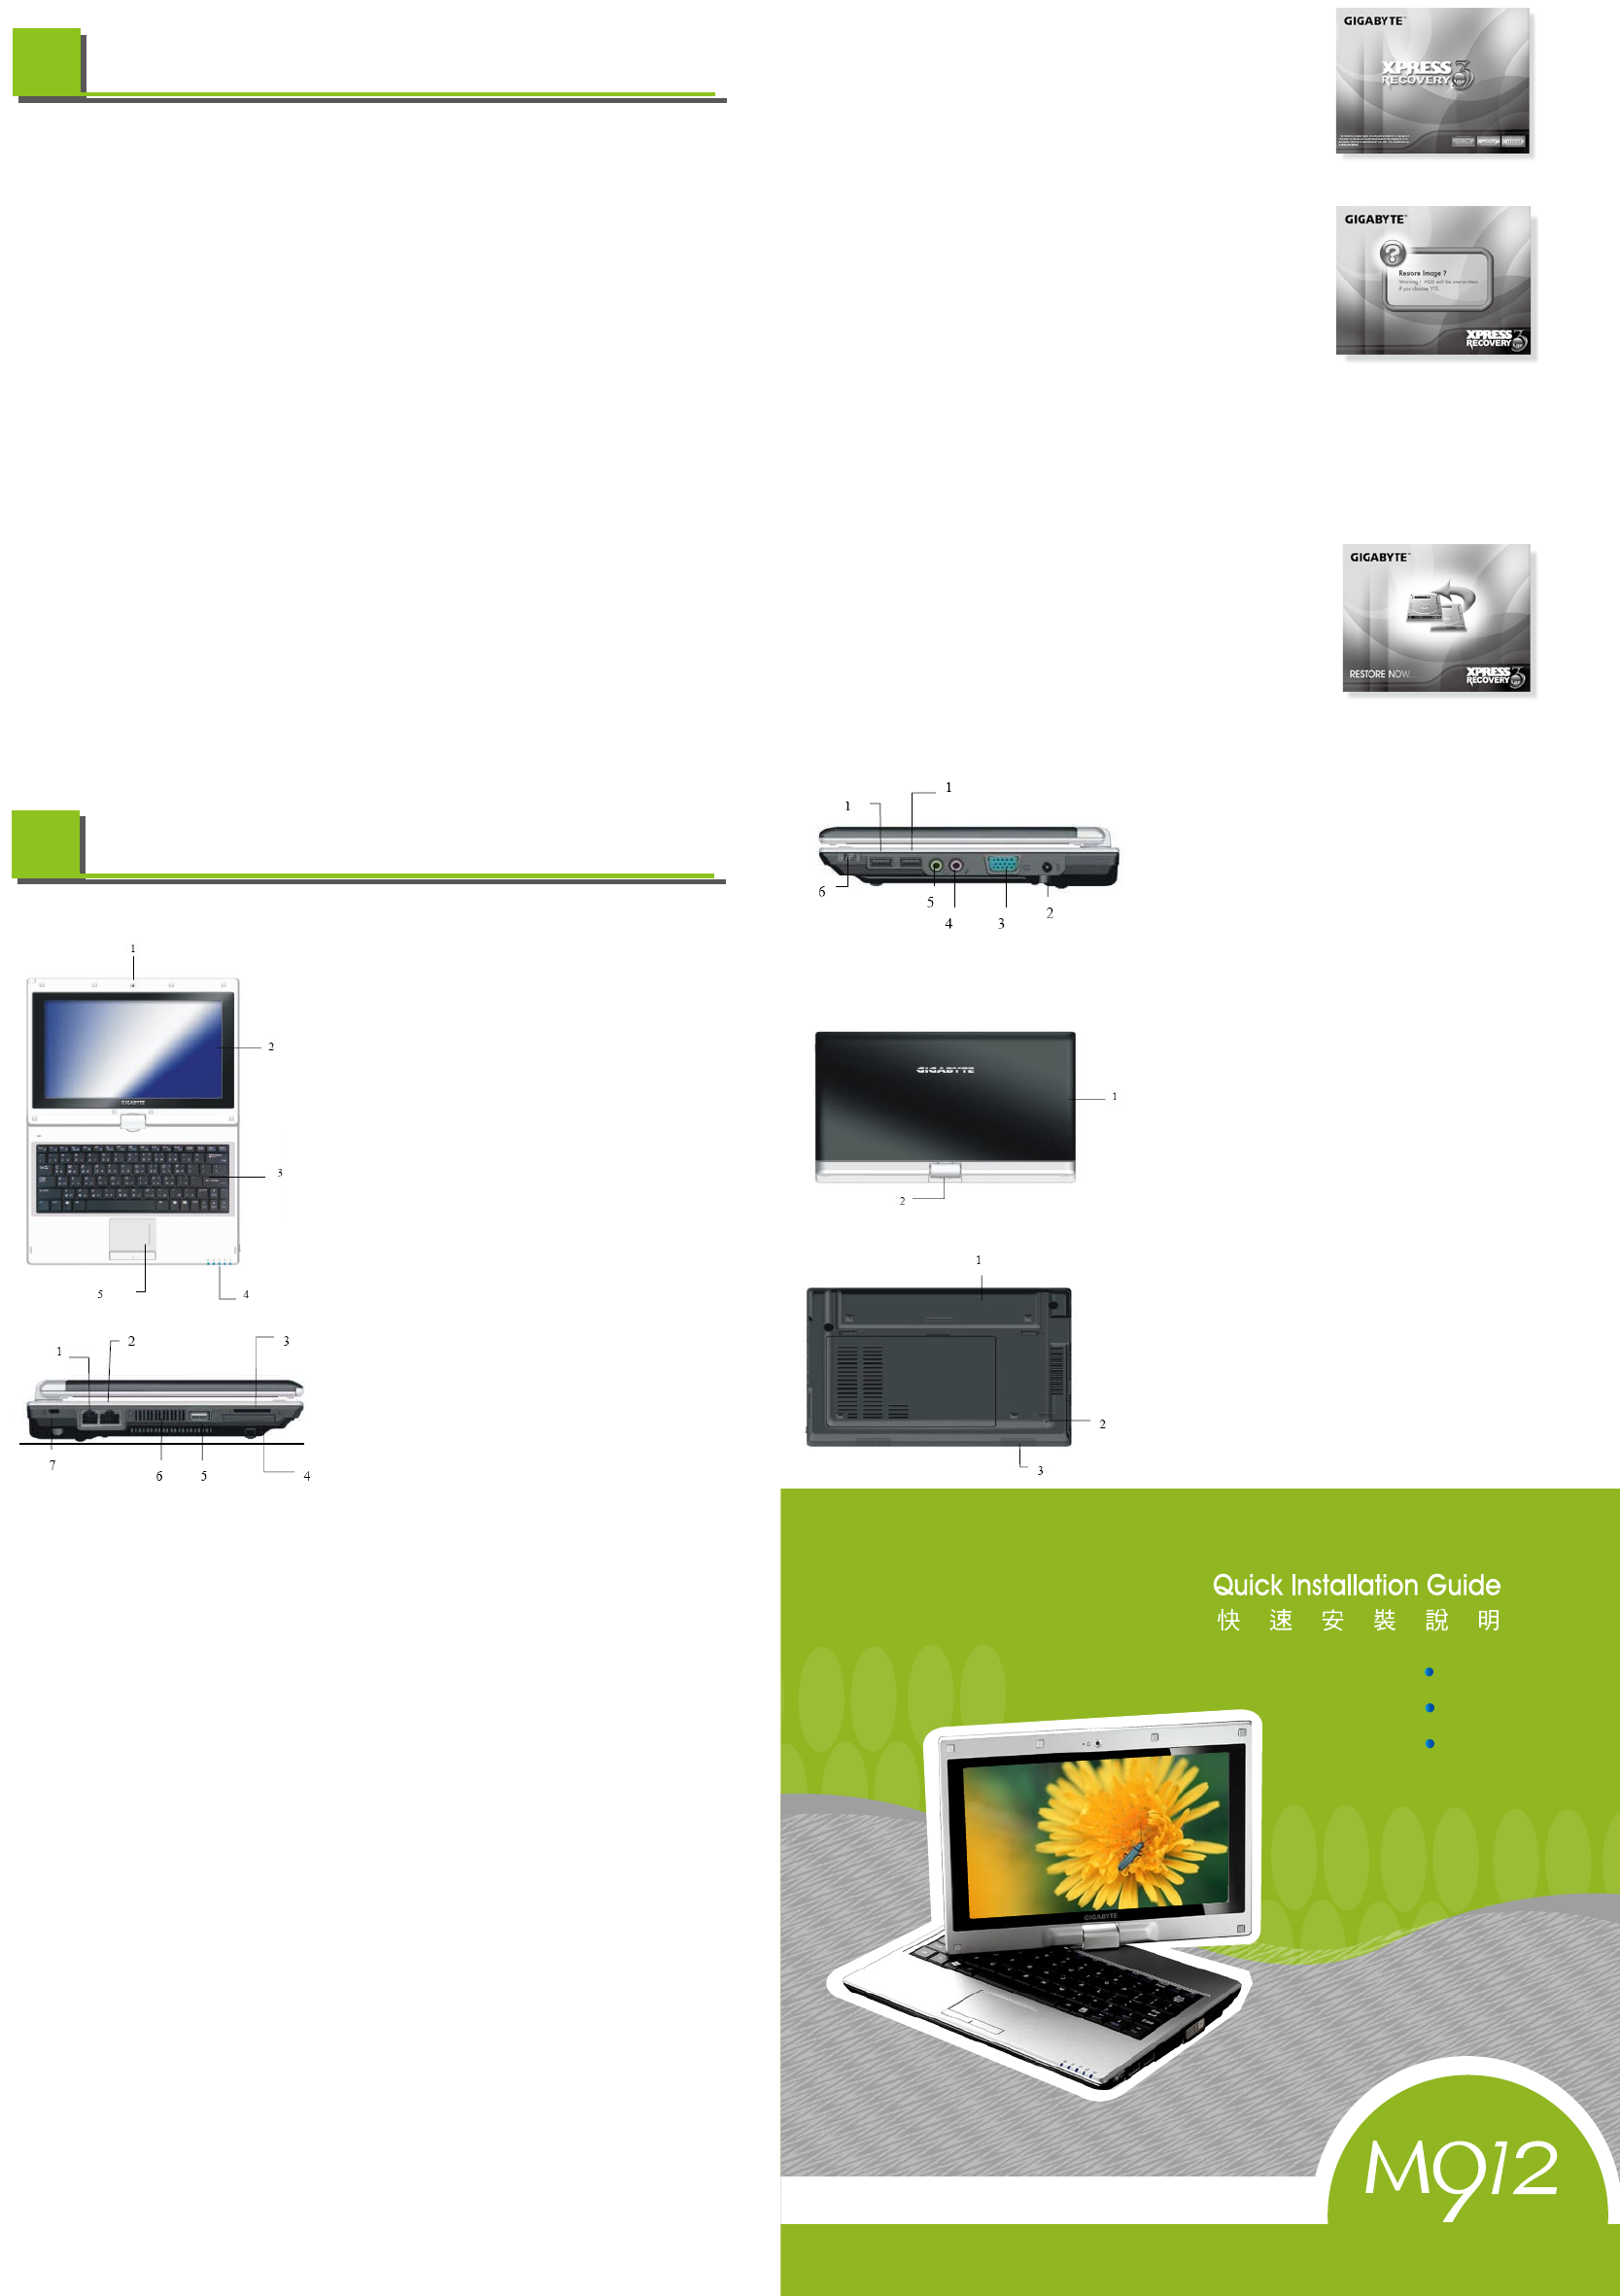
Know your M912 Netbook •
認識您的M912行動電腦 • 认识您的M912行动电脑
Top View • 俯視圖 • 俯视图 • 平面図 • 상면도
1. Web Cam / 視訊攝影機 / 视讯摄影 / ウェブ・カム / 웹 캠
2. LCD Screen / 液晶螢幕 / 液晶屏幕 /
タッチスクリーンLCD / 터치 스크린 LCD
3. Keyboard / 鍵盤 / 键盘 / キーボード / 키보드
4. Five System LEDs / 5個系統(LED)燈號 / 5个(LED)灯号 /
システムLED 5個 / 다섯 개의 시스템 LED
5. Touch Pad / 觸控板 / 触控板 / タッチパッド / 터치 패드
Left View • 左側圖 • 左侧图 • 左側面図 • 좌측면도
1. LAN RJ45 Jack
2. RJ11 Phone Port
3. Media Card Slot(SD/MMC)
4. Express Card slot
5. USB port
6. Air Vent
7. Kensington lock
7
This chapter will show you how to operate your M912 SERIES Netbook computer, including connecting the AC adaptor,
turning the computer on/off, using touch-pad, keyboard, hot keys, battery, and so on. If you are new to computers and to the
operating system, this chapter will guide you through some of the new exciting features.
Right View • 右側圖 • 右侧图 • 右側面図 • 우측면도
1. USB port
2. DC-in hole
3. VGA Port
4. USB port
5. MIC jack
6. Power key
Cover Side •
1. Cover
2. Axle
Bottom Side •
1. Battery Pack
2. Stylus Pen Slot
3. Speaker
This Quick Start Guide is intended for use only as a quick reference. For more detailed infor-
mation and procedures, please consult the user manual included in your package or visit us
at http://www.gigabyte.com.tw
「快速安裝說明」是協助您的簡易快速參考指南。如果您需要更多關於電腦功能和資訊請仔細查閱
您的「使用手冊」。另外您也可以利用我們的官方網站 http://www.gigabyte.tw 查詢您需要的資
料。
「快速安装说明」是协助您的简易快速参考指南。如果您需要更多关于电脑功能和信息请仔
细查阅您的「使用手册」。另外您也可以利用我们的官方网站 http://www.gigabyte.com.tw
查询您需要的数据。
このクィックスタートガイドは迅速な対応のためのドキュメントです。詳細な情報と手順はパッケージに付属されたユ
ーザーマニュアルをご参照して、または当社ウェブサイト:http://www.gigabyte.com.twをご訪問ください。
이 요약 설명서는 간편하게 참조하기 위한 설명서일 뿐입니다. 상세 정보와 절차에 대해서는 제품 포
장 내용물에 포함된 사용 설명서를 참조하거나 http://www.gigabyte.com.tw을 방문하십시오.
Netbook
V1.0
繁體中文
English
簡體中文
FEDERAL COMMUNICATIONS COMMISSION INTERFERENCE STATEMENT
This equipment has been tested and found to comply with the limits for a Class B digital
device, pursuant to Part 15 of the FCC Rules. These limits are designed to provide
reasonable protection against harmful interference in a residential installation. This
equipment generates, uses and can radiate radio frequency energy and, if not installed
and used in accordance with the instructions, may cause harmful interference to radio
communications. However, there is no guarantee that interference will not occur in a
particular installation. If this equipment does cause harmful interference to radio or
television reception, which can be determined by turning the equipment off and on, the
user is encouraged to try to correct the interference by one or more of the following
measures:
– Reorient or relocate the receiving antenna.
– Increase the separation between the equipment and receiver.
– Connect the equipment into an outlet on a circuit different from that to which the
receiver is connected.
– Consult the dealer or an experienced radio/TV technician for help.
CAUTION:
Any changes or modifications not expressly approved by the party responsible for
compliance could void the user's authority to operate the equipment.
FCC RF Radiation Exposure Statement
This equipment complies with FCC RF radiation exposure limits set forth for an
uncontrolled environment.
This equipment must not be co-located or operating in conjunction with any other antenna
or transmitter.