GN Audio USA ACTIVA24 2.4 GHz Cordless Telephone User Manual users manual
GN Netcom Inc 2.4 GHz Cordless Telephone users manual
users manual
Activa 2.4
Headset
User Guide
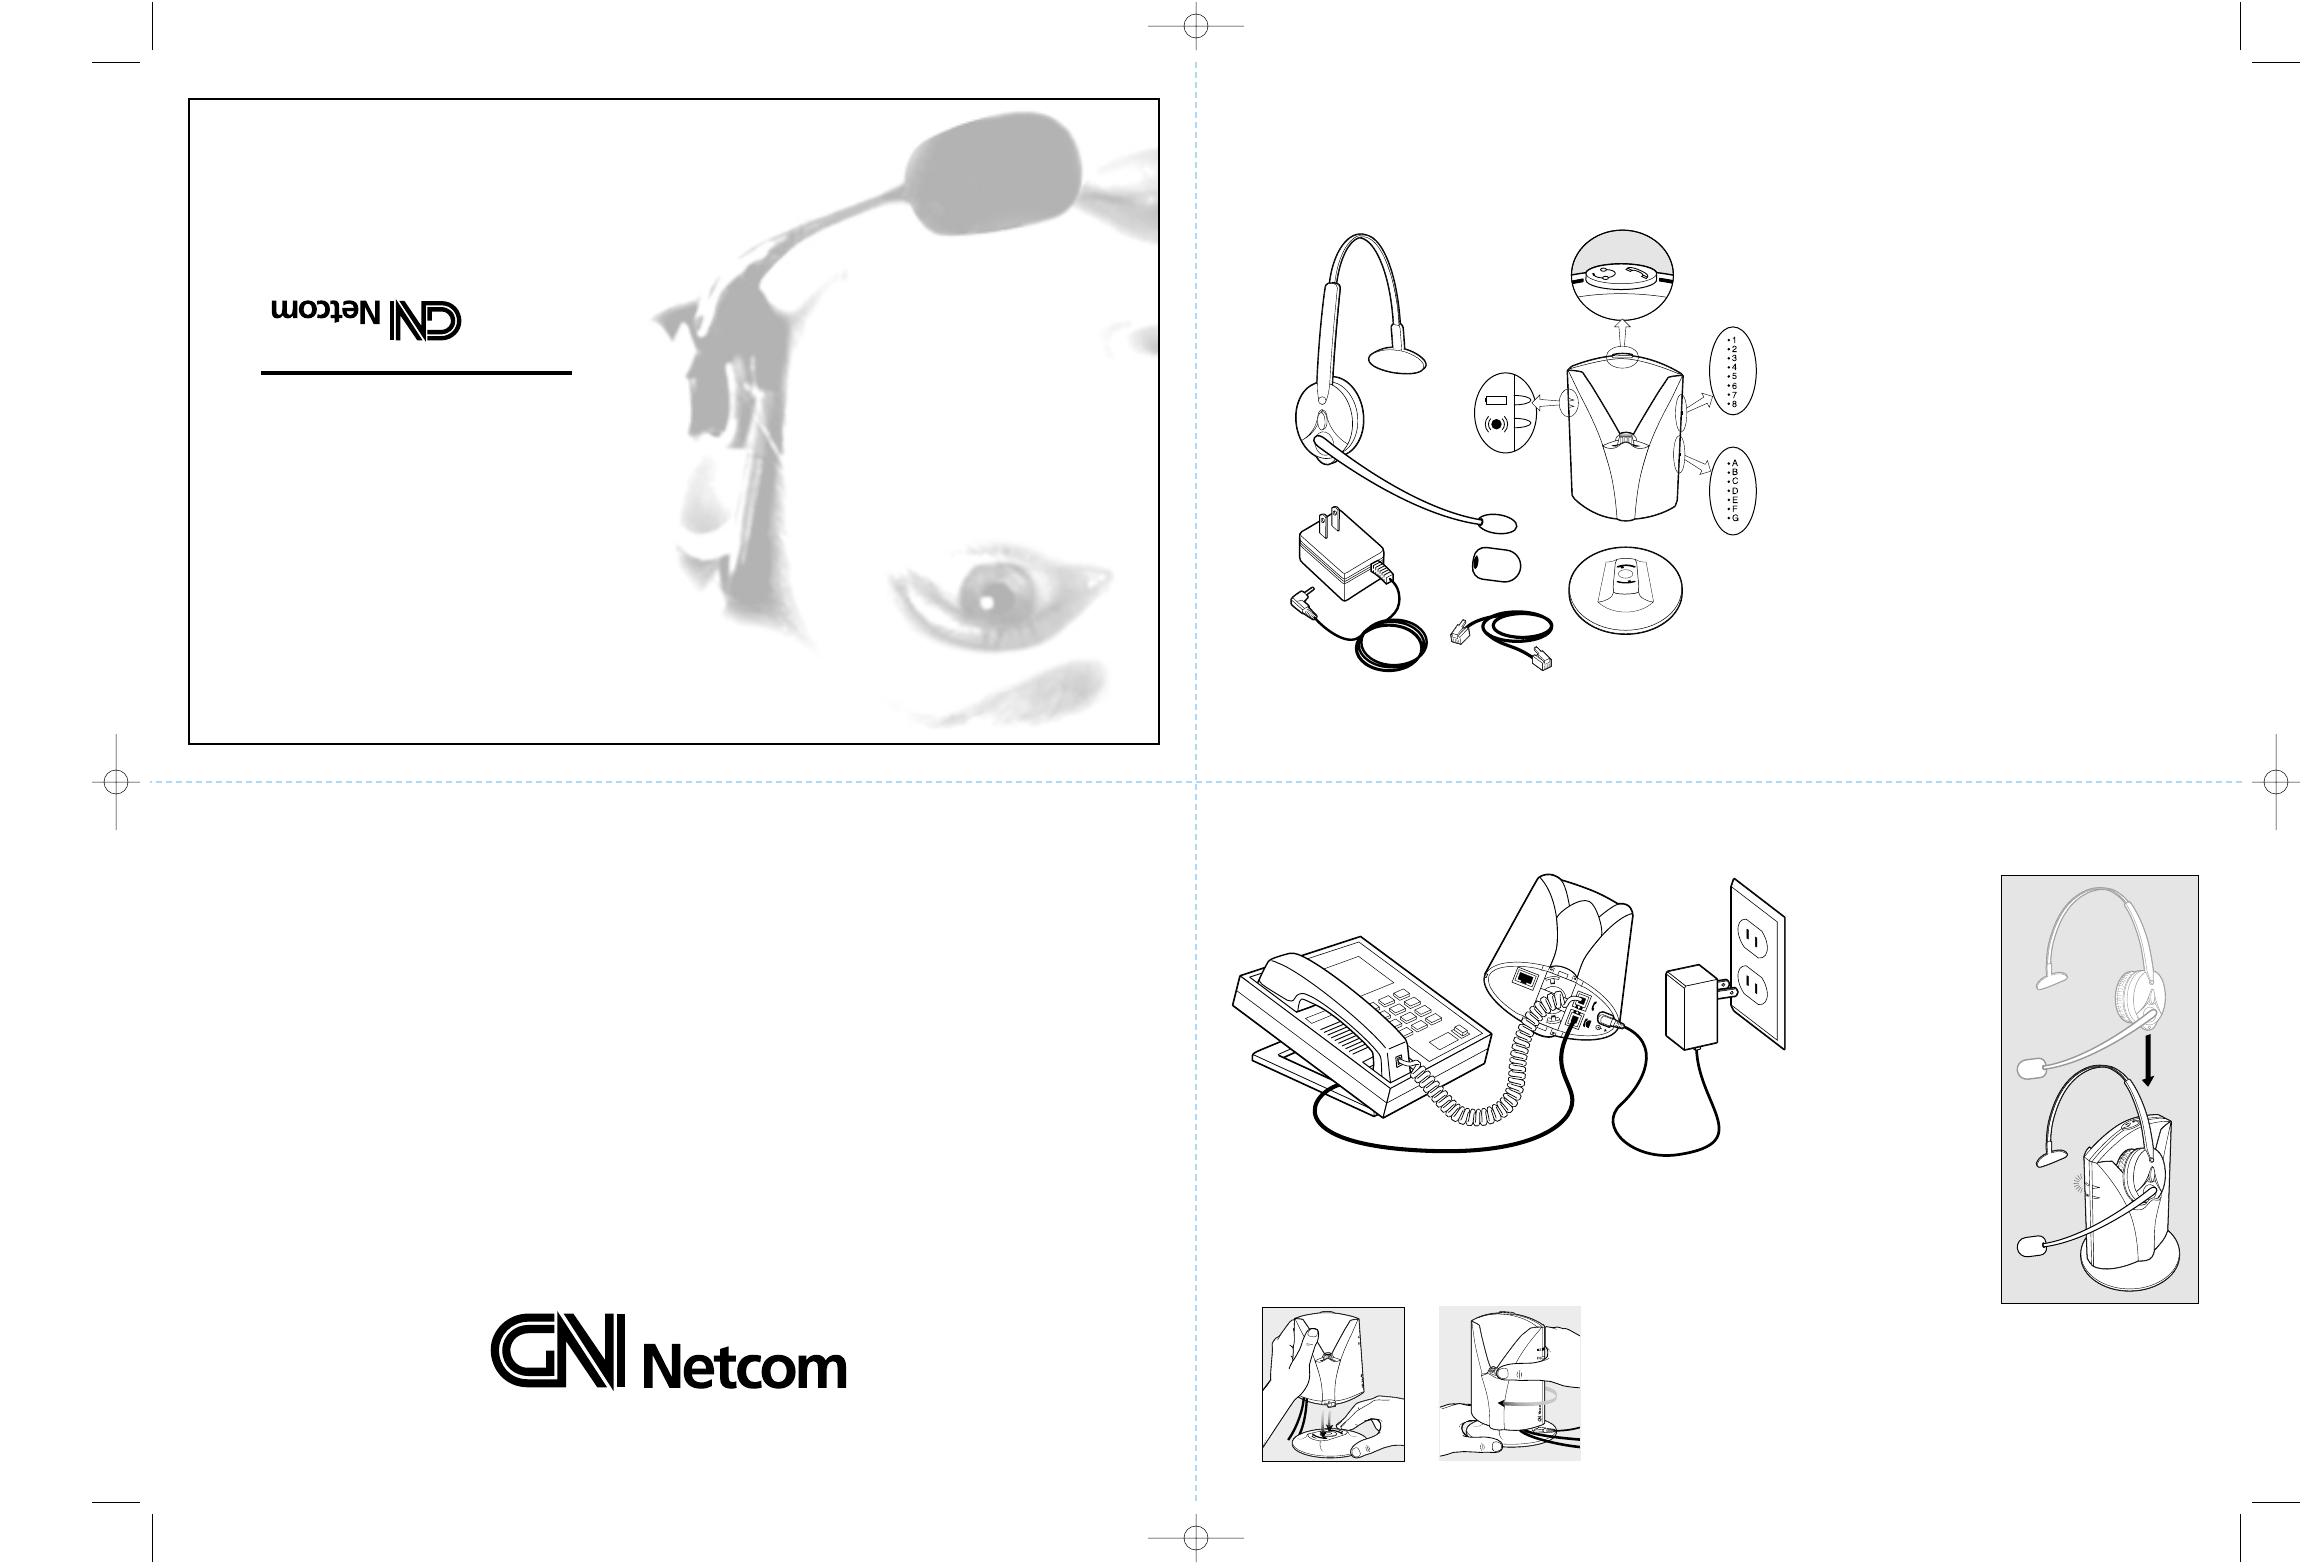
Components 1. Base
A. Headset/Handset Selector
B. Microphone Volume Control
C. Telephone Compatibility Settings
D. Battery Charging Indicator
E. On-Line Indicator (base)
2. Stand
3.Telephone Interface Cord
4. AC Power Adapter
5. Receiver Housing
F. Ear Cushion Mounted on Earplate
G. Mute Button
H. Receive Volume Control Button
I. On-Line Indicator (headset)
6. Adjustable Headband
7. Stabilizer
8. Flexible Microphone Boom
9. Microphone
10. Foam Cover for Microphone
6.
2.
5.
4.
3.
C.
10.
7. 1.
9.
8.
A.
B.
D.
E.
F.
H.
I.
G.
77 Northeastern Blvd. • Nashua, NH 03062 USA
1-800-826-4656 • www.gnnetcom.com
54-????-A
Printed in USA
August 2000
Assembling
1Connect all cords.
2Attach the base to the stand.
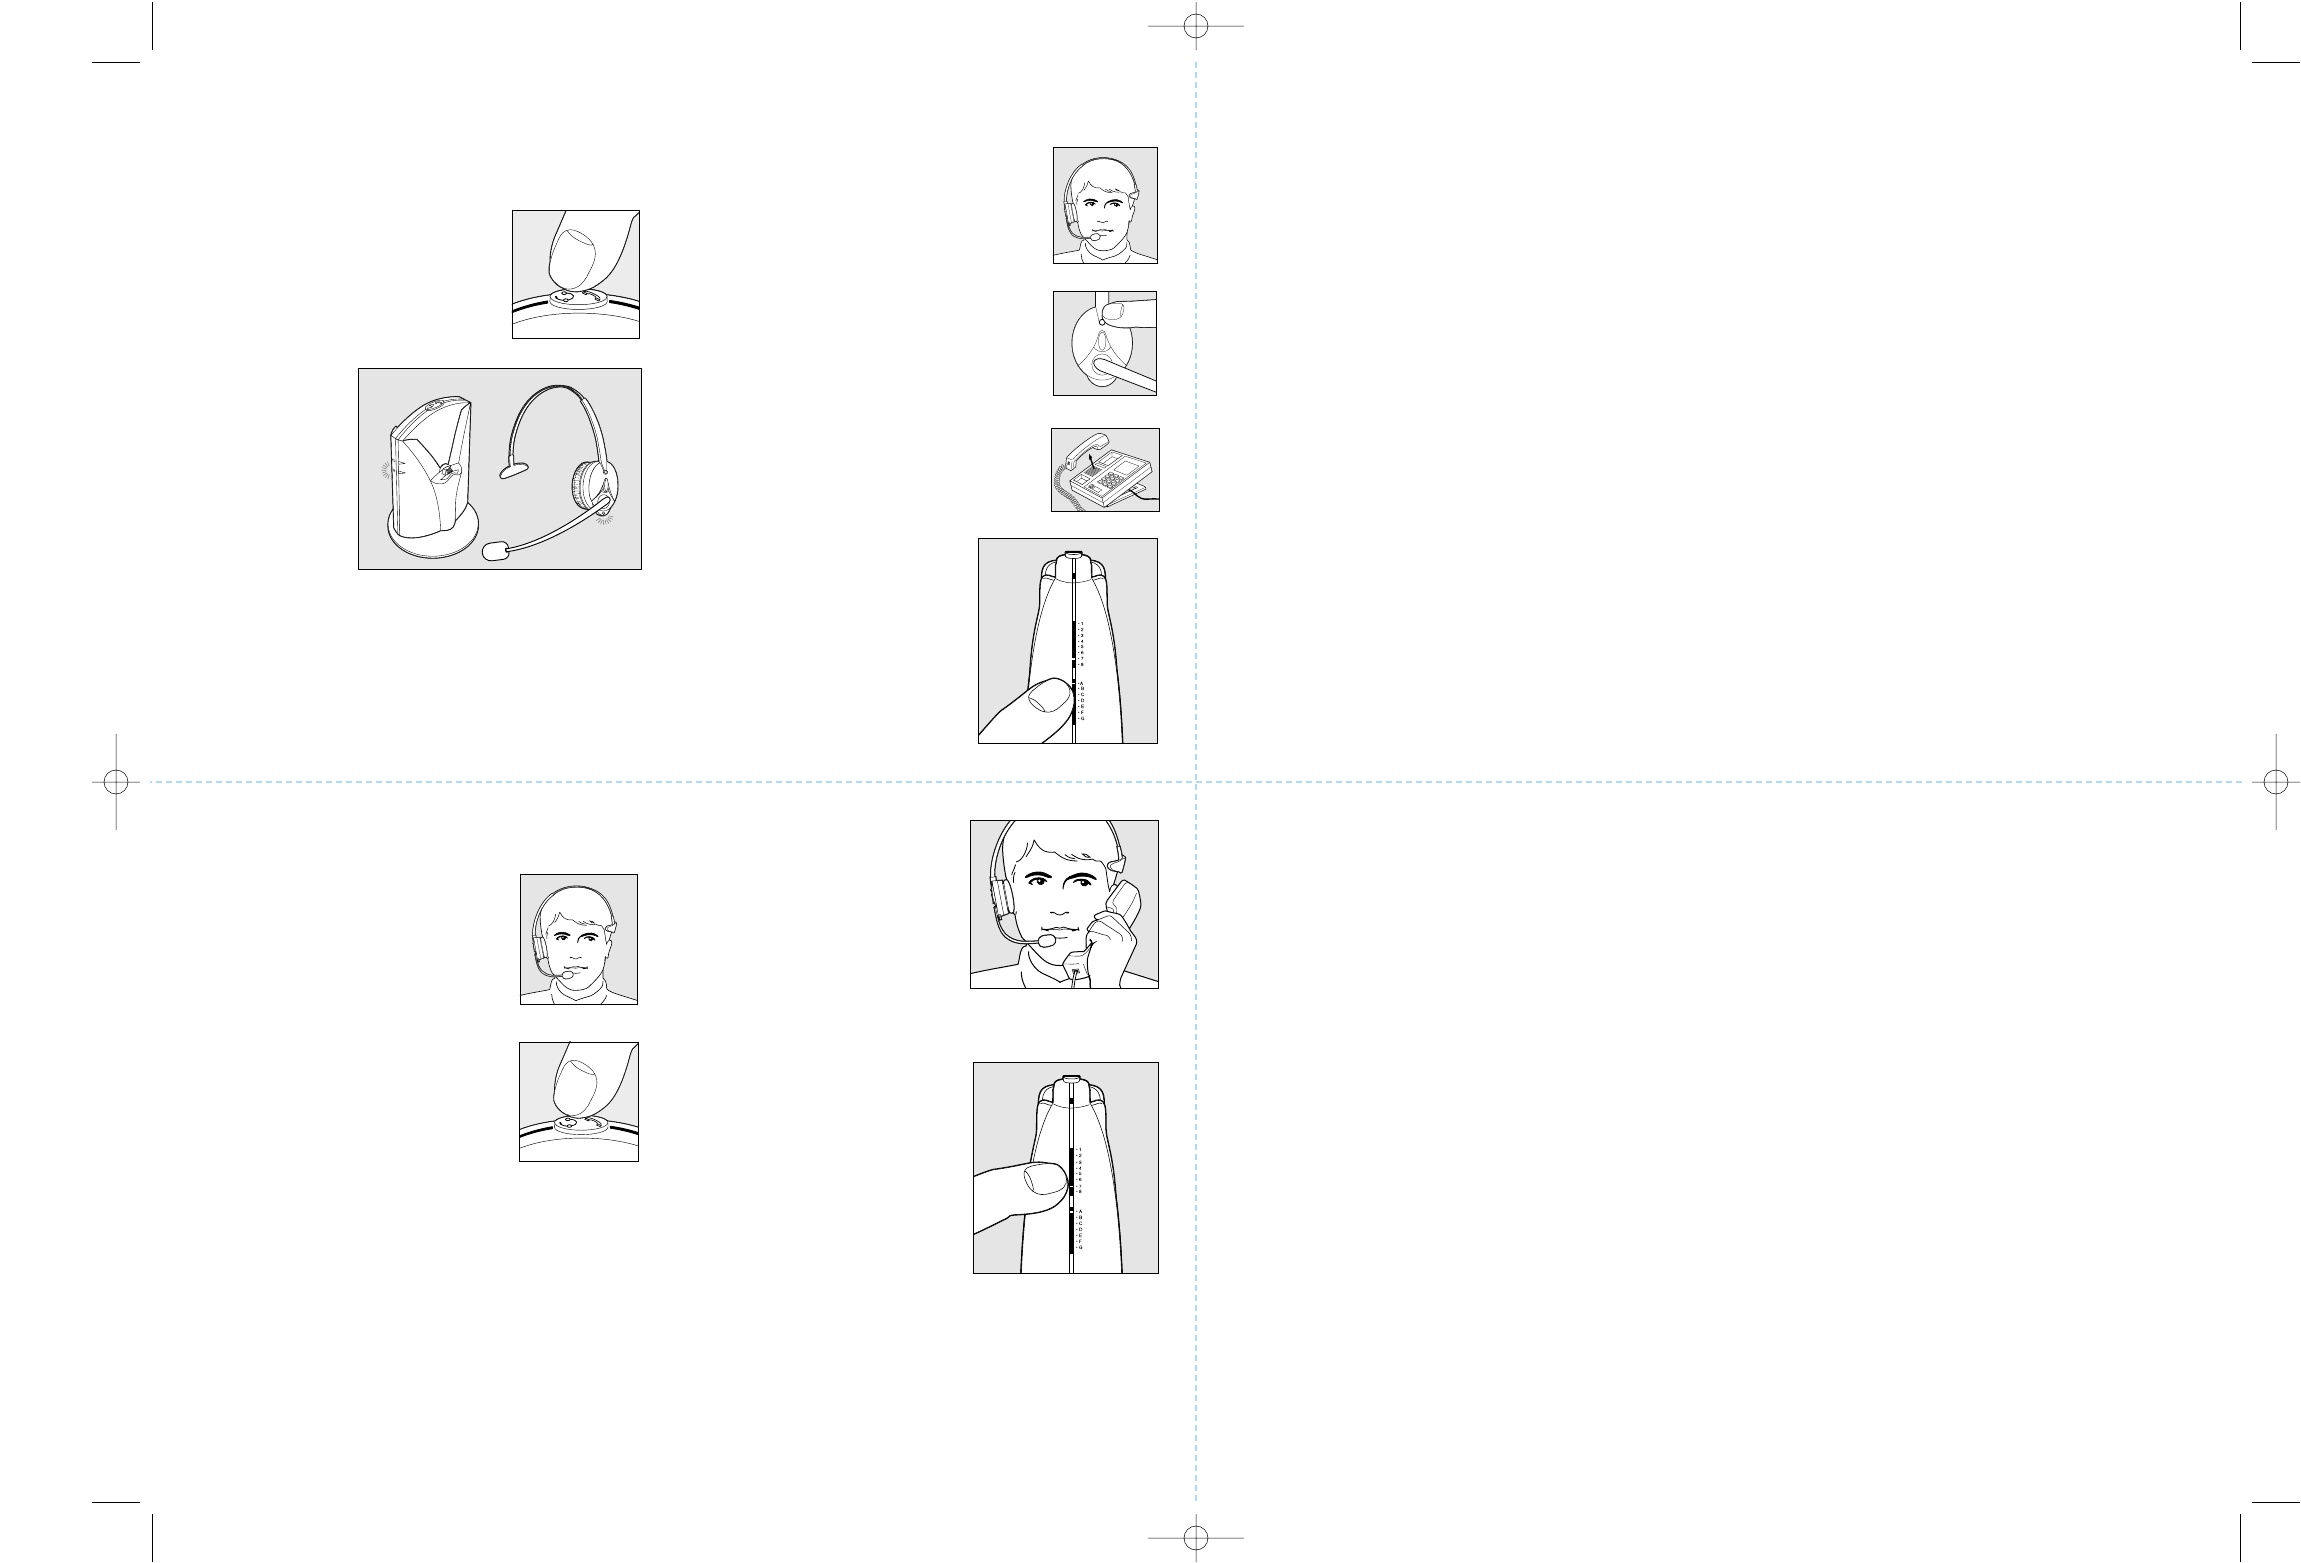
Charging the Battery
3Insert the headset
into the base (either
side can be used).
The battery charg-
ing indicator on the
base illuminates.
4The headset battery
is not charged when
delivered. Place the
headset in the base
for at least 30
minutes before
making the follow-
ing adjustments.
It takes 3 hours
to fully charge the
battery. When fully
charged, the battery
charging indicator
flashes. A fully
charged battery
provides 7 hours
of talktime.
Act-Assembly
54-???? Activa2.4 7/14/00 4:01 PM Page 1
Adjusting the Microphone Volume
15 Put on the headset.
16 Press the headset/handset selector
to switch to handset mode.
17 Call someone using your handset and ask the person
to help you evaluate the volume of your voice.
18 Using the
headset/handset selector
to toggle back and forth
between handset and
headset mode, adjust
the microphone volume
control from 1 to 8 by
first talking in the
handset and then in the
headset in each switch position.
19 When the person hears
no difference whether
you talk in the handset
or headset, you have the
correct setting. If the set-
ting is 7 or 8, it may be
necessary to more the
telephone compatibility
setting to G.
Checking the System
5If your telephone has volume control, set the
volume in the middle position.
6Press the headset/handset
selector to switch on the
headset.
7The on-line indicator on
the base illuminates.
8The on-line
indicator on
the headset
begins flash-
ing within 10
seconds. If
the on-line
indicator does
not flash,
recheck
assembly.
9The system is now working.
10 If the lights are still off, the headset/handset selector
is in handset position. Press the headset/handset
selector once.
Adjusting to your Telephone
11 Put on the headset.
12 Make sure the mute
function is off. If
you hear a signal
every 3 seconds, the
mute function is on.
Turn off the mute
function by pressing
the mute button
once.
13 Lift the handset
from your telephone
and listen for a dial
tone in your headset.
14 If there is no dial
tone, adjust the tele-
phone compatilibility
setting until the dial
tone is clear. If dial
tone is clear for both
A and G, set to A.
Warranty
GN Netcom, Inc. warrants this product against all defects in material and workmanship for a period of one year from the date of
original purchase. The conditions of this warranty and our responsibilities under this warranty are as follows:
• The warranty is limited to the original purchaser.
• The warranty is void if the serial number, date code label or product label is removed, or if the product has been subject to
physical abuse, improper installation, modification, or repair by unauthorized third parties.
• The responsibility of GN Netcom, Inc. under this warranty shall be limited to the repair or replacement of the product at the
sole discretion of GN Netcom, Inc.
• Any implied warranty on GN Netcom, Inc. products is limited to one year from the date of purchase on all parts, including the
cords and connectors. Specifically exempt from warranty are limited-life consumable components subject to normal wear and
tear, such as microphone windscreens, ear cushions, ear tips, decorative finishes, batteries, and other accessories. GN Netcom,
Inc. is not liable for any incidental or consequential damages arising from the use or misuse of any GN Netcom, Inc. product.
• A copy of your receipt or other proof of purchase is required. Without proof of purchase, your warranty is defined as beginning
on the date of manufacture as labeled on the product.
• This warranty gives you specific legal rights and you may have other rights which vary from state to state.
Unless otherwise instructed in the User Guide, the user may not, under any circumstances, attempt any service, adjustments or
repairs on this unit, whether in or out of warranty. It must be returned to the factory or authorized service agency for all such work.
To Obtain Service
For customer service and technical support, call GN Netcom, Inc. at 1-800-826-4656.
If it becomes necessary to send a unit in for repair, it is not necessary to call for a Return Material Authorization (RMA) number, as
one will be assigned upon receipt of the package at the factory.
Ship the product in a suitable shipping container, fully insured and with the shipping charges prepaid. Include the following with the
product:
• Your name, company name, address and telephone number.
• A description of the problem.
• A copy of the receipt or other proof of purchase (without proof of purchase, your warranty will be defined as beginning on the
date of manufacture as labeled on the product).
Or, for out of warranty products:
• A purchase order which authorizes repair.
In warranty products are warranted for one year from the repair date or for the remainder of the original warranty period, whichever
is longer. Out of warranty products will be repaired or replaced at the prevailing charge and carry a one year warranty from repair
date.
GN Netcom, Inc. will not assume any responsibility for any loss or damage incurred in shipping. Any repair work on GN Netcom,
Inc. products by unauthorized third parties voids any existing GN Netcom, Inc. warranty.
Ship To:
GN Netcom, Inc. • 77 Northeastern Boulevard • Nashua, NH 03062 • 1-800-826-4656
54-???? Activa2.4 7/14/00 4:01 PM Page 2
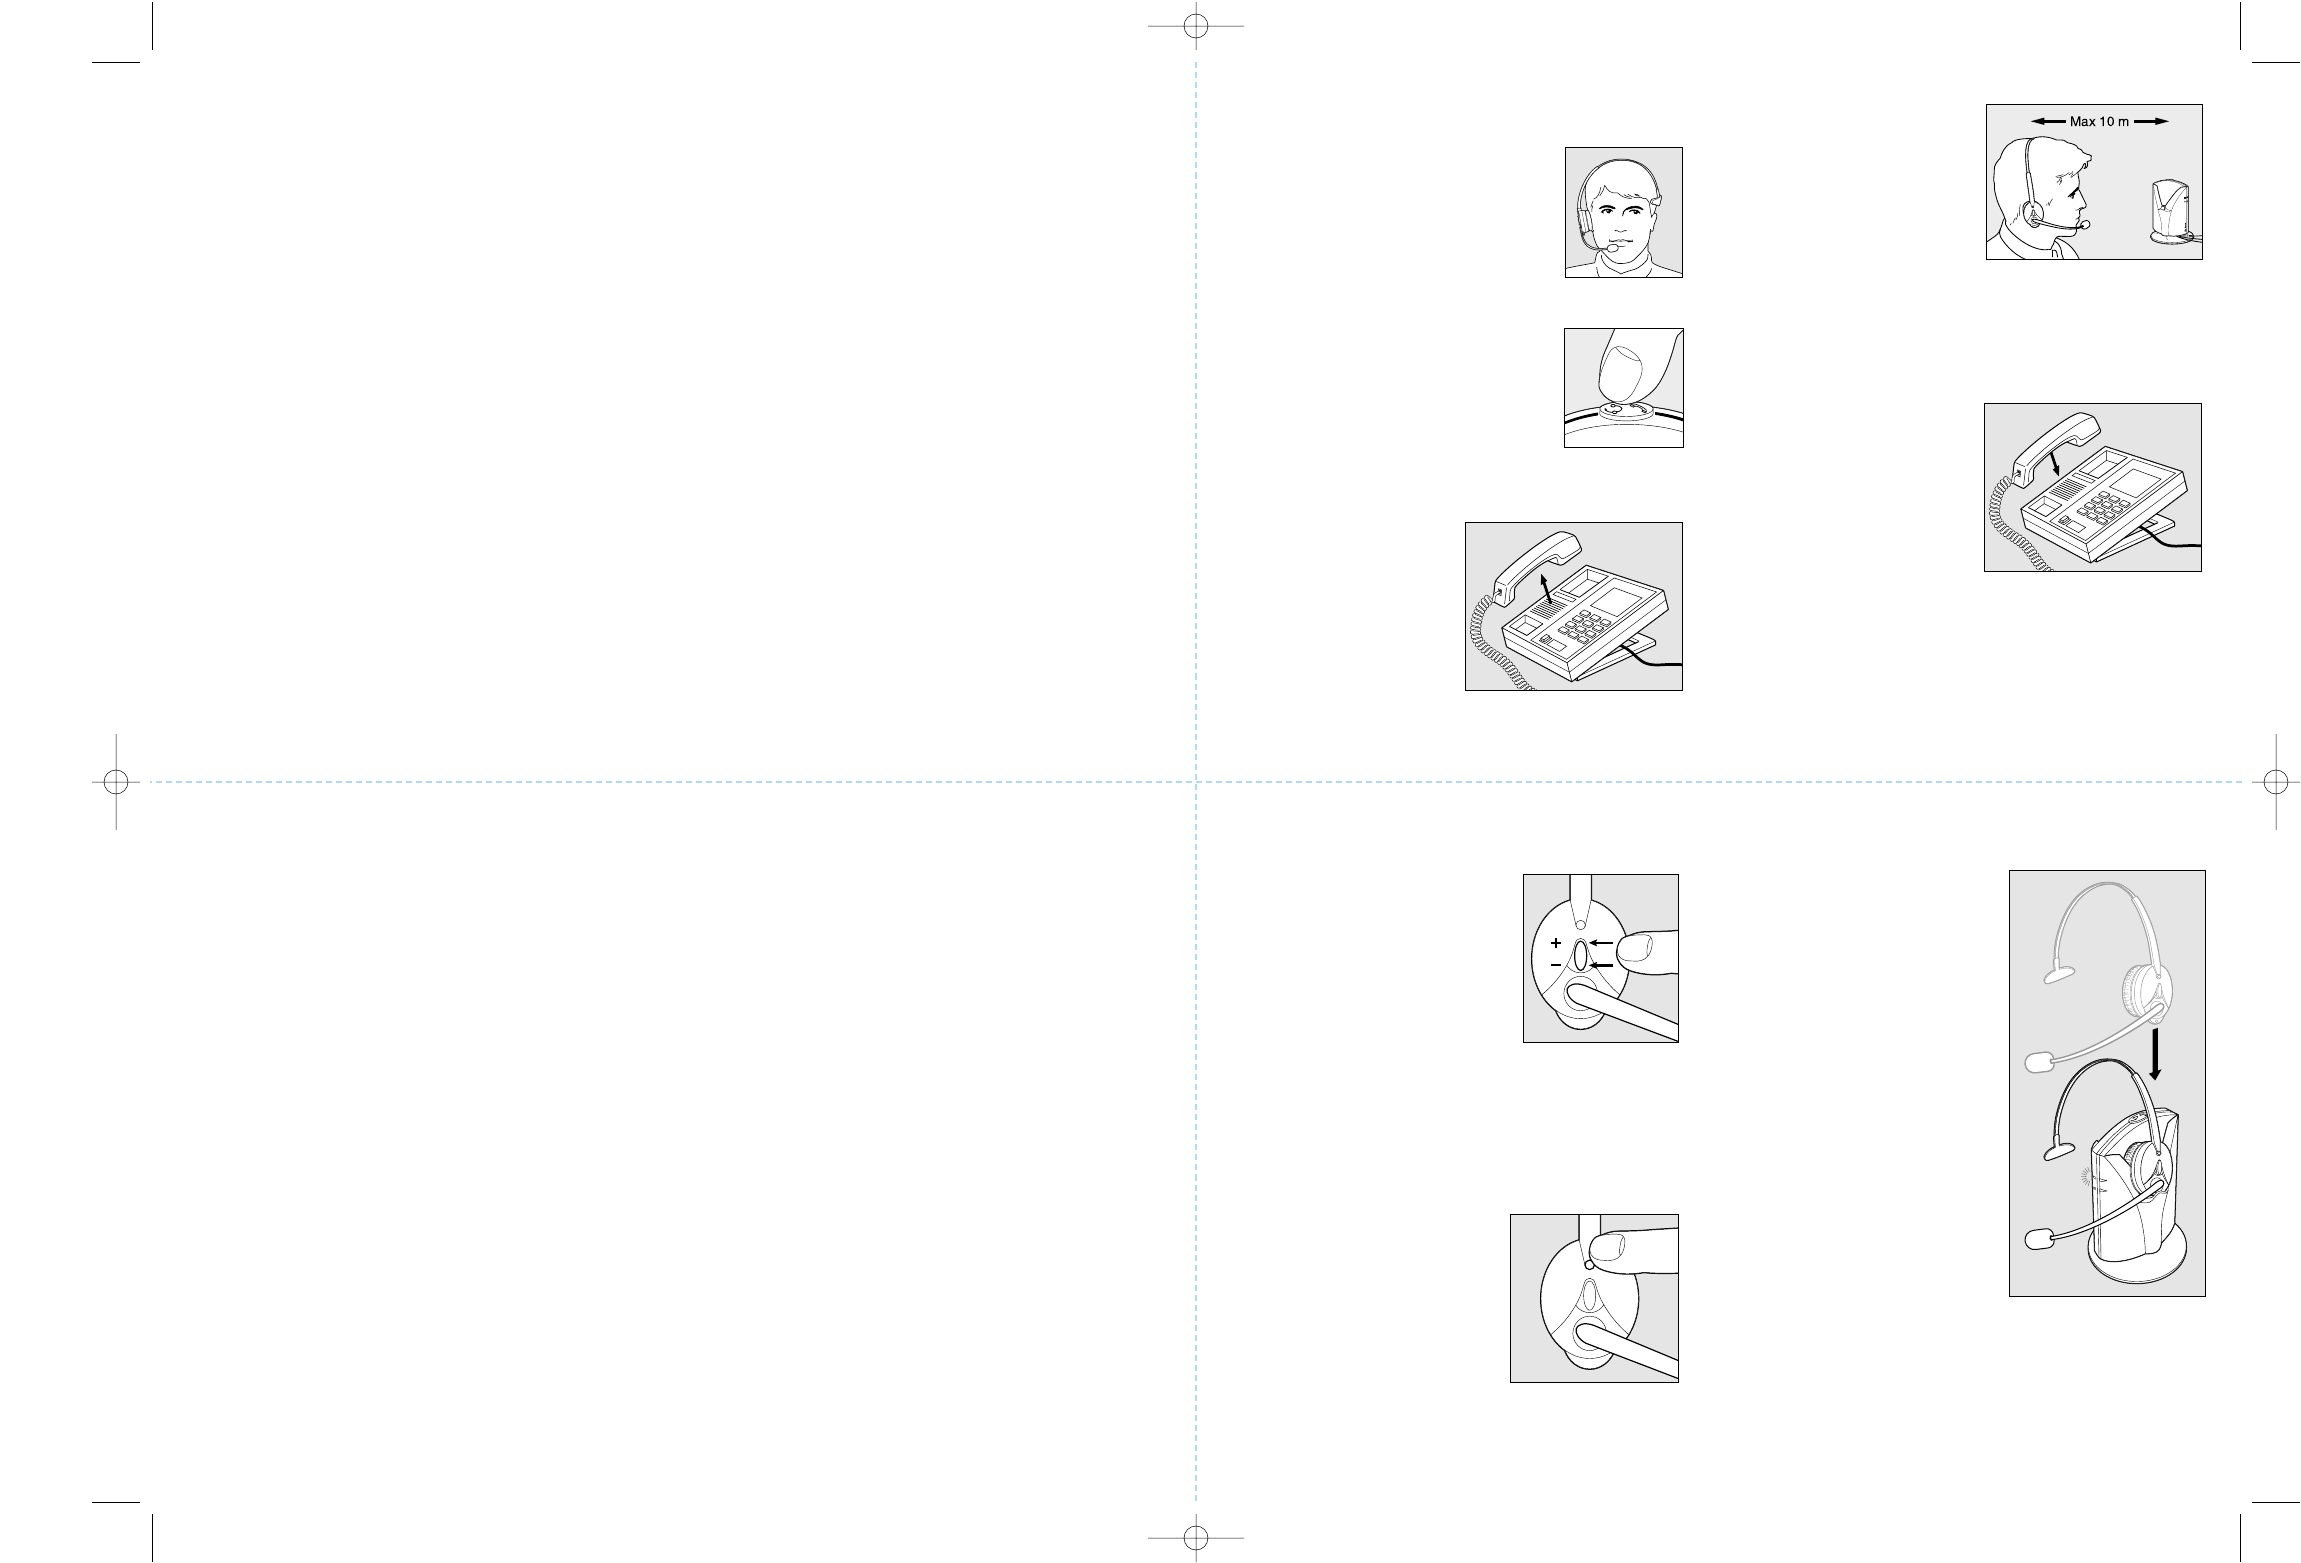
Answering and Placing Calls
20 Put on the headset.
21 Set the headset/handset selector
to headset position.
22 Lift the handset
from the phone.
Answer or place
the call.
23 You can now move
freely up to 10
meters away from the
base (depending on
the environment of
your office). If you
move out of trans-
mission range, you
will hear a signal in
the headset every 10
seconds.
24 To end the call,
replace the handset
on the phone.
Adjusting the Receive Volume
25 To increase or decrease the
volume, press the upper (+)
or lower (-) part of the oval
volume control on the head-
set. When the volume reach-
es maximum or minimum,
you will hear a signal in
your headset.
Muting the Microphone
26 To talk without the other
party hearing you, press
the mute button on the
headset. When the micro-
phone is muted, you will
hear a signal every 3 sec-
onds. When the mute
function is on, you can
still hear the other party.
Recharging the Battery
27 To ensure optimum
battery life, when not
in use, place the headset
in the base with the
headset/handset selector
in the handset position.
The battery charging
indicator illuminates
during recharging. It
takes 3 hours to fully
charge the battery.
When fully charged, the
indicator flashes. A
fully charged batter
provides 7 hours of
talktime. If battery
power gets too low, you
will hear a signal in
your headset every 20
seconds.
FCC Notice to Users
Upon request only, you must notify your telephone utility company (telco) of your intention to install or permanently remove an
FCC Part 68 registered device or system. Include the FCC Registration Number and the Ringer Equivalence Number (REN) located
on the amplifier label.
The telco has the right to make changes to their network, which may affect the operation of your equipment, provided you are given
adequate advance written notice to permit correct operation.
This device complies with part 15 of the FCC Rules and ICES-003 Operation is subject to the following two conditions:
1. This device may not cause harmful interference.
2. This device must accept any interference received, including interference that may cause undesired operation.
Note: This equipment has been tested and found to comply with the limits for a Class B digital device, pursuant to part 15 of the
FCC Rules. These limits are designed to provide reasonable protection against harmful interference in a residential installation.
This equipment generates uses and can radiate radio frequency energy and, if not installed and used in accordance with the
instructions, may cause harmful interference to radio communications. However, there is no guarantee that interference will not
occur in a particular installation. If this equipment does cause harmful interference to radio or television reception, which can be
determined by turning the equipment off and on, the user is encouraged to try to correct the interference by one or more of the
following measures:
• Reorient or relocate the receiving antenna.
• Increase the separation between the equipment and receiver.
• Connect the equipment into an outlet on a circuit different from that to which the receiver is connected.
• Consult the dealer or an experienced radio/TV technician for help.
IC Notice to Users
The Industry Canada label identifies certified equipment. This certification means that the equipment meets telecommunications
network protective, operational and safety requirement as prescribed in the appropriate Terminal Equipment Technical Resource
Document(s). The department does not guarantee the equipment will operate to the user’s satisfaction.
Before installing this equipment, users should ensure that it is permissible to be connected to the facilities of the local
telecommunications company. The equipment must also be installed using an acceptable method of connection. The customer
should be aware that compliance with the above conditions may not prevent degradation of service in some situations.
Repairs to certified equipment should be coordinated by a representative designated by the supplier. Any repairs or alterations
made by the user to this equipment, or equipment malfunctions, may give the telecommunications company cause to request the
user to disconnect the equipment.
Users should ensure for their own protection that the electrical ground connections of the power utility, telephone lines and
internal metallic water pipe system, if present, are connected together. This precaution may be particularly important in rural
areas. Caution: Users should not attempt to make such connections themselves, but should contact the appropriate electric
inspection authority, or electrician, as appropriate.
NOTICE: The Ringer Equivalence Number (REN) assigned to each terminal device provides an indication of the maximum
number of terminals allowed to be connected to a telephone interface. The termination of an interface may consist of any
combination of devices subject only to the requirement that the sum of the ringer equivalence Numbers of all the devices does
not exceed 5.
54-???? Activa2.4 7/14/00 4:01 PM Page 3
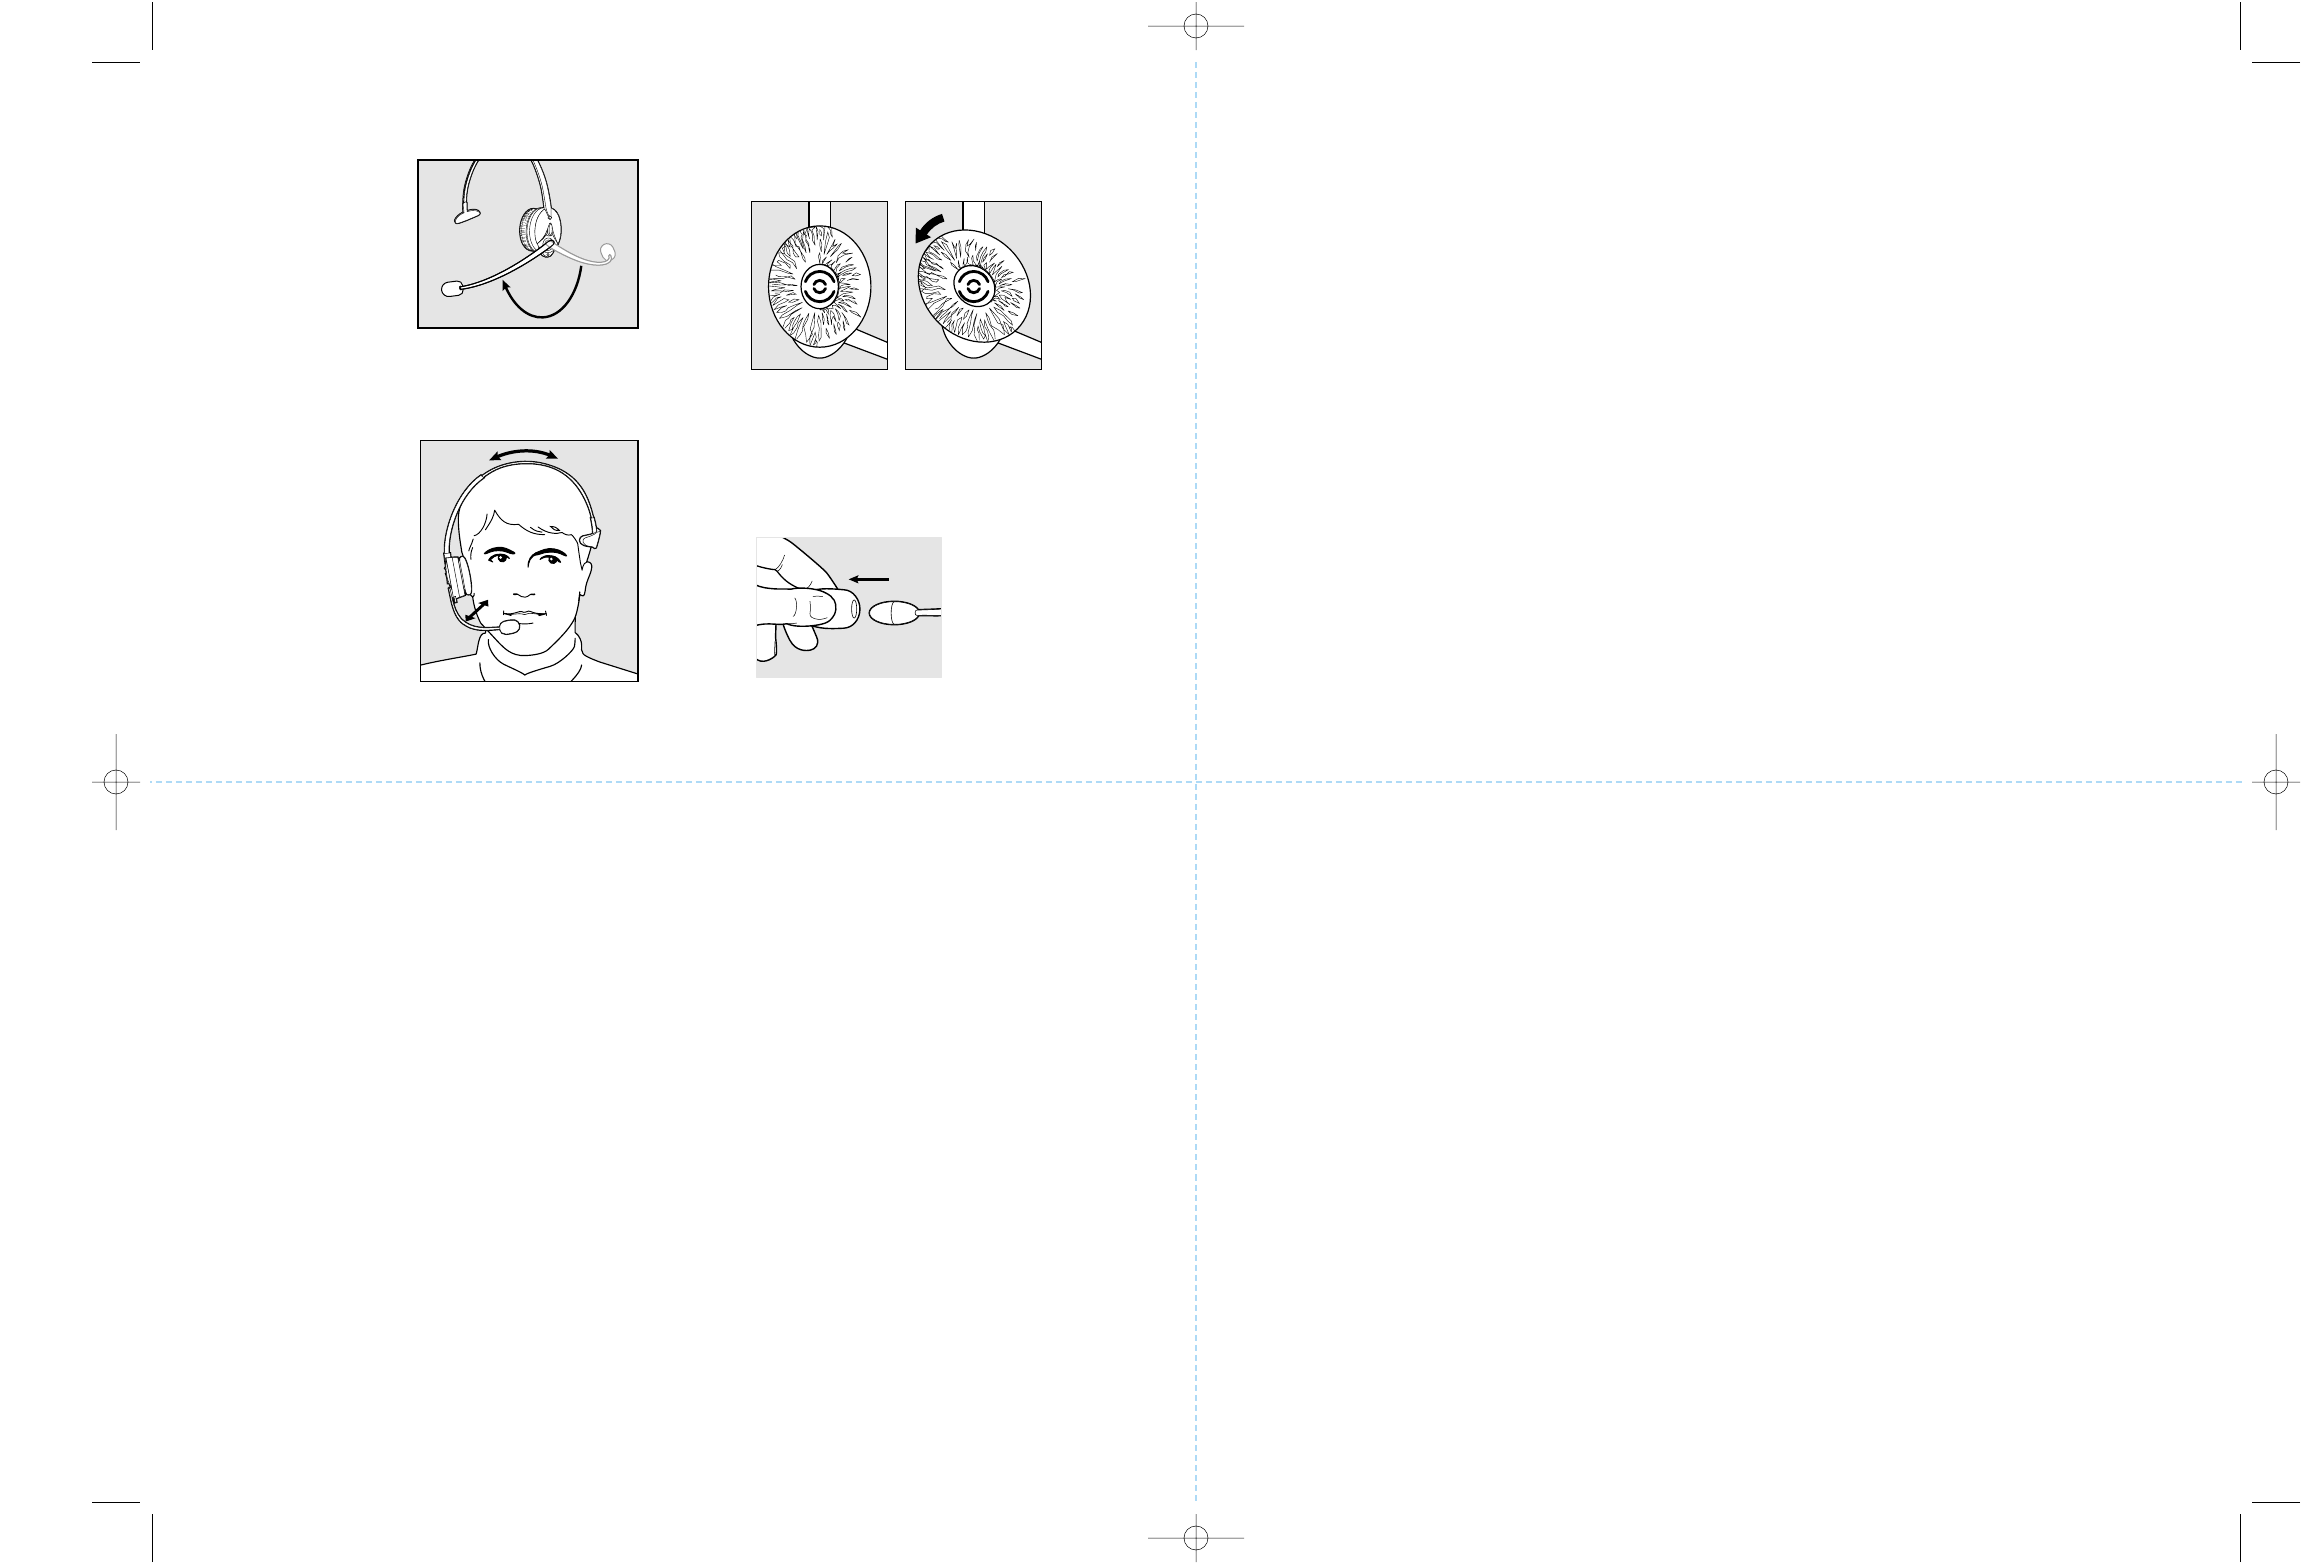
Comfort Adjustments
28 You can wear the
headset on your
right or left ear,
whichever side you
prefer. To switch
sides, simply rotate
the microphone
boom below the
headband. NOTE:
Do not force the
boom over the top
of the headset.
29 Adjust the length of
the headband so the
headset rests com-
fortably on your
head. The stabilizer
should be placed just
above your free ear.
Adjust the flexible
microphone boom so
the microphone is
positioned approxi-
mately 1/2” (12 mm)
from your mouth.
30 To change or clean the ear cushion, first remove the
earplate by turning the earplate 45 degrees counter-
clockwise. Once removed, the ear cushion can be
taken off the earplate.
31 To clean or change the mircrophone foam cover, just
pull it off gently.
Frequently Asked Questions
Why can’t I hear a dial tone?
• Check that all cords are connected correctly.
• Be sure the AC power adapter is plugged in and power
is turned on.
• Be sure the headset/handset selector is in headset
position and the on-line indicators are illuminated.
• Be sure the battery is fully charged.
• Be sure the serial numbers on the base and headset
match. The numbers must match for operation.
Why do I hear a signal in my headset?
• A signal every 20 seconds means the battery is getting
low and needs to be charged. For proper charge, be
sure the battery charging indicator is illuminated when
the headset is placed in the base. The battery may need
up to three charge and discharge cycles to reach full
capacity.
• A signal every 10 seconds means that you are out of
range. Move closer to the base.
• A signal every 3 seconds means that the mute function
is on. Turn the mute function off.
Why doesn’t the other person hear me?
• Be sure the mute function is off.
• Re-adjust the microphone volume.
• Check the position of the microphone making sure that
it is placed at the corner of your mouth.
• You may be out of range. Move closer to the base.
Why do I hear a buzz or humming noise in my
headset?
• The base may be too close to your telephone. Move the
base further away.
Cautionary Notes to Computer Users
When using any headset with a computer, care should be taken in dry or low humidity environments to protect the user from electrostatic discharge from
the monitor (CRT). Computer monitors can induce a substantial electrostatic charge when turned on or off, or when there is a power failure, and the
resulting electrostatic discharge can be passed through the headset to ground.
A user in close proximity to or touching the computer may feel a common “shock” sensation, similar to touching a doorknob after walking across a carpet,
causing no harm to the user. This discharge is entirely due to the computer monitor; the headset is merely the shortest path to ground.
To minimize the possibility of electrostatic discharge through the headset, you can:
• Use a grounded screen in front of the monitor.
• Use static dissipative wrist straps.
• Increase the relative humidity in the room to 60% or more.
• Install static dissipative carpets or floor coverings (anti-static sprays can be helpful).
• Remove the headset before turning the computer on or off.
GN Netcom, Inc. headsets meet all OSHA, UL, FCC and CS standards.
Safety Instructions
• Never try to dismantle the product yourself. None of the internal components can be repaired by users.
• Do not expose the headset to rain or other liquids.
• The headset is equipped with a rechargeable NiMH battery (nickel-metal-hydride). For battery replacement, please
contact your distributor or reseller.
54-???? Activa2.4 7/14/00 4:01 PM Page 4