GN Audio USA BT100 BT100 Bluetooth Headset User Manual users manual
GN Netcom Inc BT100 Bluetooth Headset users manual
users manual
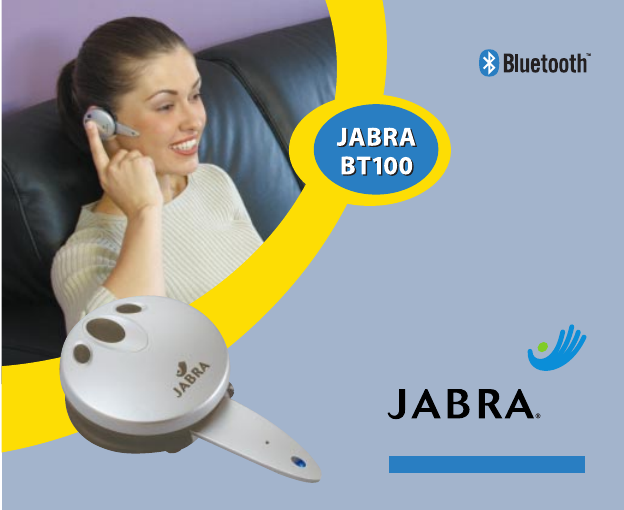
JABRA BT100
User Manual
Bluetooth Mobile Headset
FOR ALL BLUETOOTH MOBILE PHONES

English
Introduction ....................................................................................................................................................... 4
What’s in the package .................................................................................................................................... 5
JABRA BT100 Bluetooth Headset Features ............................................................................................ 6
Charging & Battery Time .............................................................................................................................. 7
Linking the Headset to the Phone ............................................................................................................ 8
Choosing Right or Left Ear Wearing Style ............................................................................................ 12
Placing the Headset on your Ear ............................................................................................................. 13
Speaker Volume & Volume Control Buttons ........................................................................................ 14
Using your JABRA BT100 Headset ........................................................................................................... 15
Resetting the Headset ................................................................................................................................. 17
Audio & Visual Indicators ............................................................................................................................ 18
FCC Notice to Users / Product Statements........................................................................................... 20
Safety & General Information .................................................................................................................... 21
English ....................................................................................... 3
Français ................................................................................. 22
Deutsch ................................................................................. 42
Italiano ................................................................................... 62
Nederlands ......................................................................... 82
Español ............................................................................... 102
2 3

What’s in the Package?
Your JABRA BT100 Bluetooth headset package comes equipped with a headset and
charging solution.
In this package you will find:
•
One JABRA BT100 Bluetooth Headset
•
One Headset Mains Charger unit
•
One Headset In-car Charger Unit (Not available in some packages)
•
One JABRA BT100 User Guide
(Please use only the approved and compatible chargers for this device)
Introduction
Any device that you want to use with the JABRA BT100 Bluetooth headset has to be
compatible with Bluetooth wireless technology and support the headset profile.To be
able to use the headset with a mobile phone, the phone needs to have built-in Bluetooth
technology, or a compatible Bluetooth phone adapter.
The JABRA BT100 is a cordless handsfree headset based on Bluetooth wireless
technology. Please read the user booklet before you start using the product and make
sure that you:
•
Charge your JABRA BT100 headset for up to 2 hours before you use
it the first time. (See page 7)
•
Make sure that you pair the headset with your Bluetooth phone (or
other device) before you start making calls. (See page 8)
Thank you for choosing to buy the JABRA BT100, we hope that you
are happy with your choice!
4 5
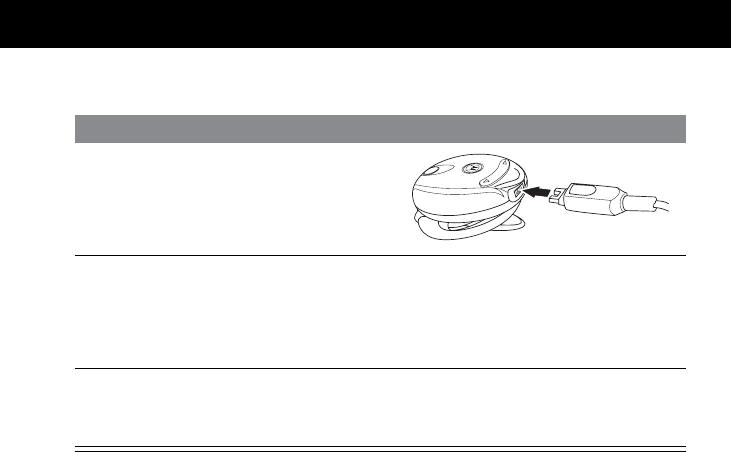
Charging & Battery Time
Before you can use your headset, you need to charge the
headset’s self-contained battery for up to two hours.
To charge the headset, please follow this guide:
1. Plug the mains travel charger (or
in-car charger) into your headset
charging port with the headset
facing up.
2. Insert the travel charger’s electrical
plug into an electrical outlet, or the
in-car charger into the socket in
your vehicle.
3. While charging, the blue headset
indicator light is on and remains on
until charging is complete.
4. When charging is complete, the
light will go out, you then remove
the charger from the headset.
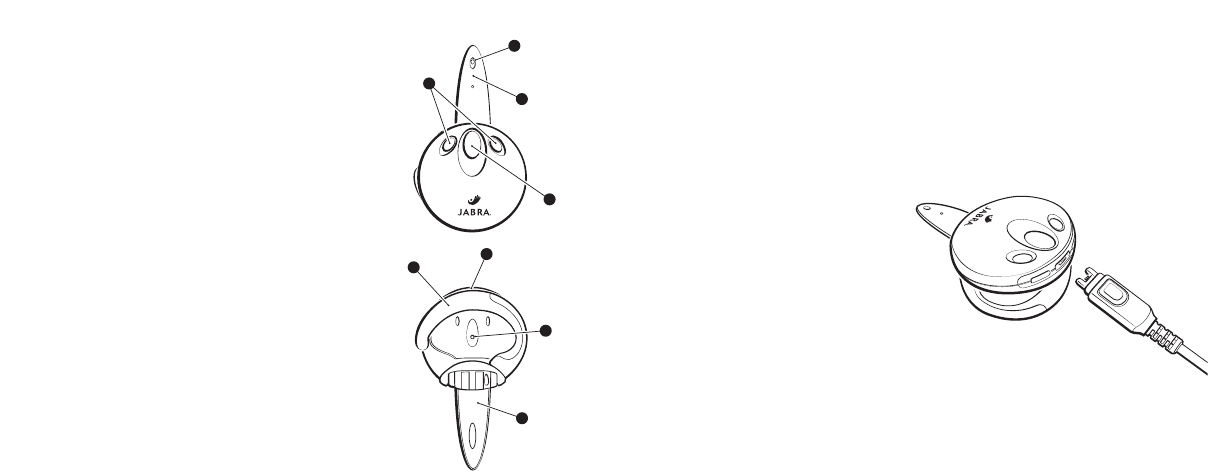
JABRA BT100 Bluetooth
Headset Features
1. Blue Indicator Light: provides the status
of the headset (on call, standby).
2. Volume Control: adjusts the speaker
(receive) volume.
3. Multifunction Button (MFB): controls
various functions of the headset.
4. Speaker: receiver for the other party’s voice.
5. Microphone: voice input for transmission.
6. Boom: contains the microphone and controls
the power (on/off) status of the headset.
7. Earhook: how the headset is worn on either
ear (turn around for left/right ear).
8. Charging Port: receptacle for battery charger.
1
4
7
8
5
6
2
3
6 7

a) Configuration Mode
Before you can pair your headset you need to put it into configuration mode.
Configuration mode is used to perform two functions – ‘pairing’ and Audio mode
selection. Configuration mode is entered simply by pressing and holding down the
Multi-Function Button (MFB) with the headset boom closed until the Blue indicator
light turns on, then release the MFB.The LED will remain on. The headset is now in
configuration mode and stays in this mode for 3 seconds awaiting further user
action. The headset will then return to the “off” state if no further action is taken.
b) Pairing Headset to the Phone
1. With the headset boom closed and the headset close to the phone (within 30
feet), enter configuration mode as described above. During pairing it is
recommended that the headset and phone (or device) are not more than 1metre
(3 feet) apart – with no solid objects in between.
2. Within the 3 seconds, open the boom.The LED will remain on and the headset is
now in pairing mode and will remain in pairing mode for 5 minutes.
Perform a “device discovery” from the mobile phone. For details on device
discovery consult your phone user guide. Please Note: it may take several seconds
to establish connections.
A fully charged battery provides up to 3 hours of talktime, and over 2 weeks of
standby/off time. 3 hours of talk time, 7.5 hours of standby time (Bluetooth data link – no
audio), 36 hours of standby time (no Bluetooth link, boom open) and 20 days of storage
time (boom closed).
Low Battery Warning Tones: When you hear five rapid high tones through the headset’s
speaker at 20-second intervals, the headset needs recharging, and you will then need to
follow the above steps 1-4.
Linking the Headset to the Phone (Pairing)
Before you use your headset for the first time, you must first pair the headset with the
device you want to use it with – for example – a mobile phone.The Bluetooth connection
between the headset and your phone can be established by setting up a paired link. With
a paired link, the phone remembers the headset's ID, and these 2 items are then ‘paired’
together - eliminating the need to repeat the set up process with future use. Only paired
devices can utilize Auto-Answer™ and Auto-Transfer™ functions.
Please use the following easy to follow guide –
8 9

11
To toggle between audio modes, simply follow the procedure below.
1. Starting with the boom in the closed position, enter Configuration Mode as described
on page 9.
2. With boom still closed, and the indicator light on solid (indicating Configuration
Mode) press either Volume button.
3. Watch the indicator light (one flash for Audio Mode1 or two flashes for Audio Mode2,
then off).
4. Open boom and verify repeated indicator light flash signal. (Single flash for Audio
Mode1, double flash for Audio Mode2).
5. Now the headset is ready for use in the selected mode, just follow pairing the headset
on page 9.
3. Enter the passkey 0000 , when your phone menu prompts you, and the phone
will start to pair the headset with the phone (the device ID is now stored in the
phone’s memory).
4. Your phone screen will advise that pairing has been successful, and the headset
indicator light flashes to let you know this also.
5. If the pairing is unsuccessful. Please return to step 1 and follow the steps 1-4.
6. Once the headset and phone have successfully paired you are ready to place and
receive calls (see page 15 “Making a Call”).
7. Please note that once paired the first time, the headset automatically connects to your
phone upon opening the boom.
(Note: The default headset passkey is 0000.)
c) Two Paired Devices (Audio Mode1/Audio Mode2 Operation)
It is possible for your headset to store pairing data with two different Bluetooth
devices.This means that you could have two Bluetooth phones paired, or 1 phone and
1 other device. Operation of the headset in Audio Mode1 will recall the last device
that the headset paired to while in Audio Mode1. Similarly, operation in Audio Mode2
will recall the last device that the headset paired to while in Audio Mode2.
10
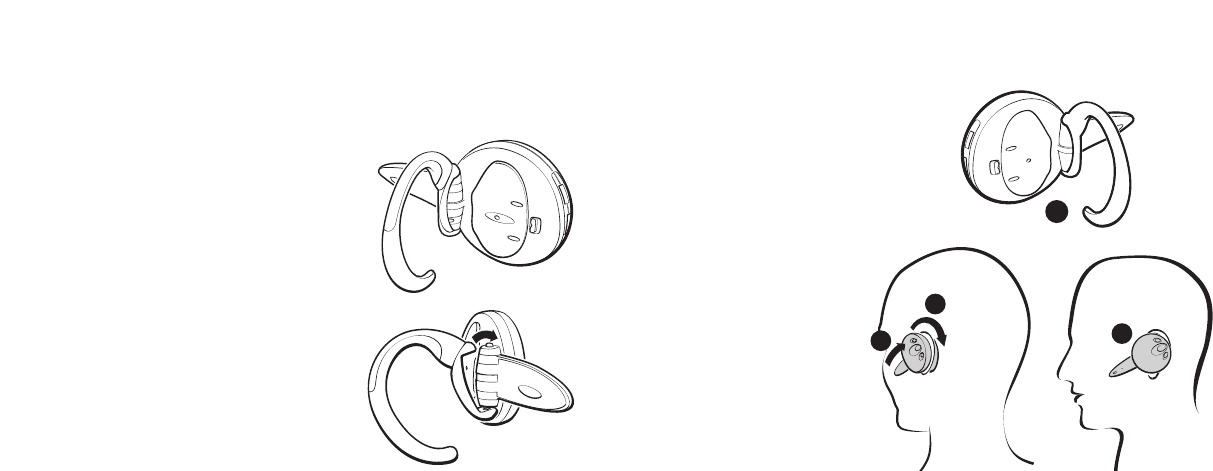
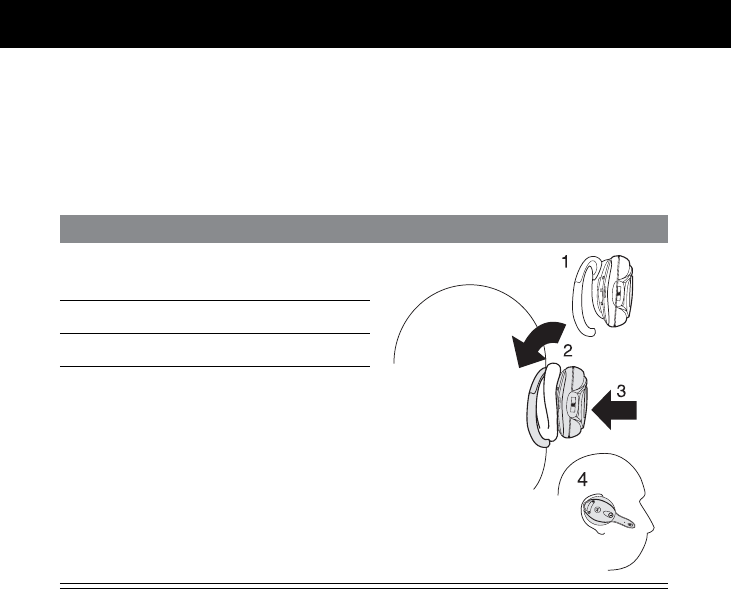
Placing the Headset on your Ear
In order to wear the headset
please follow these instructions:
1. Open the boom.
2. Put the earhook in its
open position (90° away
from the headset).
3. Loop the ear hook
behind your ear.
4. Close the headset
towards your ear.
5. The boom will then point
towards your mouth.
2
34
1
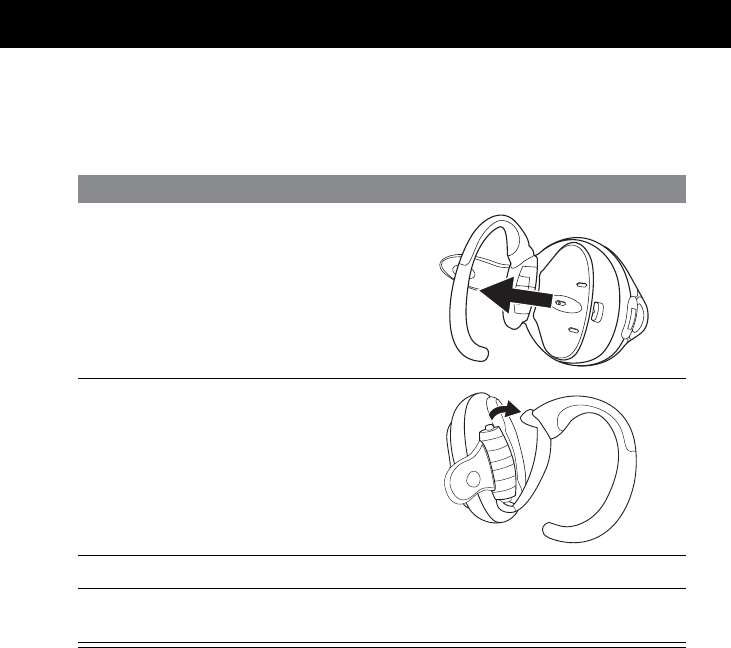
Choose Right or Left Ear Wearing Style
The JABRA BT100 Bluetooth headset comes configured for wearing on your right ear.
To change for left ear wearing please use the simple instructions as follows:
1. Open the boom.
2. Put the earhook in its open position.
3. Gently lift and pull the top of the earhook
up from the upper hinge pin and pull away
to remove.
4. Turn the headset over.
5. Hook the bottom of the earhook on to the
lower hinge pin and lift and pull the top of
the earhook over the upper hinge pin.
6. The Volume Up/Down buttons will re-orient
automatically – so up will always be up, and
down will always be down.
12 13

Using your JABRA BT100 Headset
a) Making a call with the headset
There are different ways to make a call using your JABRA BT100 headset. (In each case
you will need to make sure that you pair / link your headset and phone as described
on page 9.)
If your mobile phone supports voice dialing, you can use this feature with the
headset. Please refer to your phone’s user documentation for more information on
voice control.
Making a call from the Mobile Phone
1. Place the headset on your ear in the desired wearing style.
2. Using the phone’s keypad, dial the phone number.
3. To send the call, press the phone’s SEND / CALL key – the phone initiates the call.
Making a call Using Voice Dialing (Voice dialing on your phone must be turned On
and voice tags stored)
1. Place the headset in the desired wearing style.
2. On the Headset - Press the Multi Function Button. (MFB)
3. A tone prompts you to say the name of the person you wish to call (as entered in
the phone’s voicedial phonebook directory).
Speaker Volume & Volume Control Buttons
To increase the speaker (receive) volume, press and
hold the upper volume control button until the
desired level is reached. To decrease the speaker
(receive) volume, press and hold the lower volume
control button until the desired level is reached.
An audible tone is played when either the minimum
or maximum volume has been achieved.
The headset is equipped with intelligent volume
re-orientation control so that it does not matter
whether you are wearing the headset on the left or
right ear. When you change the earhook from right
to left wearing style - the top volume control button
will always increase the speaker volume and the
bottom volume control button will always decrease
the speaker volume.
14 15

If not wearing the headset – Off position (boom closed):
Open the headset’s boom to auto-answer the call through to the headset, then place
the headset on your ear in the normal wearing position.
e) Transferring a Call
Transferring a call from the headset to your phone:
Must be initiated by the phone (refer to the user guide that accompanied your phone).
Transferring a call from your phone to the headset:
•
Open the boom to activate the Auto-Transfer feature,
or
•
If boom is already open and the call is on the mobile phone, press the headset’s
MFB button.
Resetting the headset
If the phone and headset fail to communicate properly, you may need to reset them. To
reset the headset, plug charging jack into headset with charger pulled into appropriate AC
socket. Verify the LED turns on, indicating the start of charging, then remove charging jack.
This resets the headset.
4. Speak the voice tag name.
5. The phone automatically dials your selection, and you see the details of the call on
the phone screen.
6. When connected you are free to communicate normally.
(Please refer to the phone’s user guide for instructions on storing voice tags. Some
Mobile Phones need you to initiate voice dialing from the handset.)
b) Ending a call from the headset
To end a call when wearing the headset - press the headset’s MFB button. Also if you
remove the headset – the call can also be ended by closing the boom arm.
c) Disconnecting your Bluetooth link
To terminate the Bluetooth connection between the headset and your phone, turn
the headset Off (just close the boom). If you are on a call when the boom is closed, the
call will be held at the phone for up to 30 seconds while the user is prompted to
transfer the call back to the phone. Without a response by the user, the call will be
terminated after the 30 seconds.
d) Receiving/ Answering a call
When wearing the headset - On and Linked:
A ring tone will sound in your headset, just press the headset’s MFB button to answer
the call.
16 17

Audio Indicator Chart
Headset State Audio Indication
Volume Limit Repeated single high tone when either lower or
upper limit achieved
Low Battery Tone Five rapid high tones repeated every 20 seconds
Out of Range No audio indications, deterioration of audio quality
will alert user
Incoming Call Ring tone
Pairing Confirmation Single high tone
Establish Audio Link Series of 4 tones, low to high
Initiate Voice Dial Single low tone
Voice Tag not Recognized Dual high-low tone
End Call/Audio Link Closed Series of 4 tones, high to low
Power On/OFF No audible tone
Audio & Visual Indicators
Indicator Light Chart
Headset State LED Indication State
Power Off LED OFF (no charger)
Charging In Process LED ON (charger plugged in)
Charging Complete LED OFF (charger plugged in)
Configuration Mode LED ON (no charger) with boom closed
Pairing Mode LED ON (no charger) with boom opened
Pairing Successful Series of 10 rapid flashes
Search, Park, Link Flash or Double-Flash 0.1 sec ON, 2.9 sec OFF
(pulse with 3 second interval)
Audio Link (on a call) Flash or Double-Flash 0.5 sec ON, 1.5 sec OFF
18 19

SAFETY AND GENERAL INFORMATION
Electro Magnetic Interference / Compatibility – Note : Nearly every electronic device is
susceptible to electromagnetic interference (EMI) if inadequately shielded, designed, or
otherwise configured for electromagnetic compatibility.
Aircrafts & Hospitals – Please switch OFF the headset before boarding any aircraft to
prevent interference with the aircraft communication systems. Also please switch OFF
the headset in any facility where posted notices instruct you to do so. Hospitals and
Healthcare facilities may be using equipment that is sensitive to EMI .
Warranty – Thank you for choosing to buy this JABRA product. JABRA (a GNNetcom
Company) warrants the product to be free from defects in material and workmanship at
the time of purchase by the consumer, for a subsequent period of 24 months. Please
make sure that you carefully read the instruction booklet in order to have safe and
efficient use. Also save your original receipt. You will need to present the original receipt
for warranty and repair claims. Should you need to do this please return to the supplier
for full details of the warranty process.
FCC Notice to Users / Product Statements
This device complies with part 15 of the FCC Rules. Operation is subject to the following
conditions : (1) This device may not cause harmful interference, and (2) This device must
accept any interference received, including interference that may cause undesired
operation.
Users are not permitted to make changes or modify the device in any way. Changes or
modifications not expressly approved by JABRA (GNNetcom) will void the user’s authority
to operate the equipment.
BLUETOOTH is a trademark owned by the Bluetooth SIG, Inc.
20 21
Macey Noyes Associates
January 2, 2002
UNIQUE MOTOROLA ACCESSORIES
MAC4256_UNIQUE_THOR_UserGd_Tri
MOTOROLA and the Stylized M Logo are registered in the US Patent & Trademark Office. All other
product or service names are the property of their respective owners. The Bluetooth trademarks
are owned by their proprietor and used by Motorola, Inc. under license. (C) Motorola, Inc. 2001.
MOTOROLA et le logo M stylisé sont enregistrés au United States Patent and Trademark Office.
Tous les autres noms de produits ou de services sont la propriété de leurs détenteurs respectifs.
Les marques de commerce BLUETOOTH sont la propriété de leur détenteur et sont utilisées sous
licence par Motorola, Inc. © Motorola, Inc. 2001.
MOTOROLA y el logo estilizado de la M están registrados en la Oficina de patentes y marcas
registradas de EE.UU. Todos los otros nombres de productos y servicios son propiedad de sus
respectivos dueños. Las marcas comerciales de Bluetooth corresponden a marcas registradas de
su propietario y son utilizadas por Motorola, Inc. bajo licencia. (C) Motorola, Inc. 2001.
9887570M01
Imported to Canada by
Motorola Canada Limited
Mississauga, Ontario L4Z 2H4
Importé au Canada par
Motorola Canada Limitée
Mississauga (Ontario) L4Z 2H4

Welcome
Welcome to Motorola’s “connected” world of Bluetooth™ personal area wireless
networking.
You can place a call directly from your Bluetooth Wireless Headset by using your
Bluetooth capable phone and your phone’s voice activation feature. The headset
provides handsfree convenience and freedom from cables and wires. Bluetooth
technology makes all connections quickly and
without any cables
.
All Motorola wireless products are designed and manufactured to meet Motorola’s
rigorous specifications and world-class quality standards. During development, our
testing team took the Motorola Bluetooth Wireless Headset through rigorous
durability tests including temperature, humidity, shock, dust, vibration, and drop
tests.
We are confident that you will find your Bluetooth Wireless Headset to be a
convenient and secure way to make clear, crisp phone calls. Thank you for choosing a
Motorola Bluetooth product!
Welcome.fm Page 1 Monday, January 14, 2002 1:40 PM
Personal Communications Sector
600 North U.S. Highway 45
Libertyville, Illinois 60048
1-800-331-6456 (United States)
1-888-390-6456 (TTY/TDD United States)
1-800-461-4575 (Canada)
www.motorola.com
MOTOROLA, the Stylized M Logo and all other trademarks indicated as such herein
are trademarks of Motorola, Inc. ® Reg. U.S. Pat. & Tm. Off. The BLUETOOTH
trademarks are owned by their proprietor and used by Motorola, Inc., under license.
TrueSync is a trademark of Starfish, Inc., a wholly owned subsidiary of Motorola, Inc.
All other product or service names are the property of their respective owners.
© 2001 Motorola, Inc. All rights reserved. Printed in the U.S.A.
Manual number: 9887570M01-O
Welcome.fm Page 2 Monday, January 14, 2002 1:40 PM

3
Contents
Safety and General Information
. . . . . . . . . . . . . . . . . . . . . . . . . . . . 4
Introduction
. . . . . . . . . . . . . . . . . . . . . . . . . . . . . . . . . . . . . . . . . . 7
What Is Bluetooth Wireless Technology? . . . . . . . . . . . . . . . . . . . . . . . . . . . . . . 7
How Can I Use My Bluetooth Wireless Headset? . . . . . . . . . . . . . . . . . . . . . . . 7
What Is Included in This Kit? . . . . . . . . . . . . . . . . . . . . . . . . . . . . . . . . . . . . . . 8
Headset Features . . . . . . . . . . . . . . . . . . . . . . . . . . . . . . . . . . . . . . . . . . . . . . . 9
Using Your Headset
. . . . . . . . . . . . . . . . . . . . . . . . . . . . . . . . . . . . 10
Charging Your Headset . . . . . . . . . . . . . . . . . . . . . . . . . . . . . . . . . . . . . . . . . 10
Wearing the Headset . . . . . . . . . . . . . . . . . . . . . . . . . . . . . . . . . . . . . . . . . . . 12
Linking Your Headset and Phone . . . . . . . . . . . . . . . . . . . . . . . . . . . . . . . . . . 15
Controlling Headset Volume . . . . . . . . . . . . . . . . . . . . . . . . . . . . . . . . . . . . . . 17
Placing a Call . . . . . . . . . . . . . . . . . . . . . . . . . . . . . . . . . . . . . . . . . . . . . . . . 18
Ending a Call from the Headset . . . . . . . . . . . . . . . . . . . . . . . . . . . . . . . . . . . 20
Receiving a Call . . . . . . . . . . . . . . . . . . . . . . . . . . . . . . . . . . . . . . . . . . . . . . . 21
Transferring a Call . . . . . . . . . . . . . . . . . . . . . . . . . . . . . . . . . . . . . . . . . . . . . 21
Disconnecting the Bluetooth Link . . . . . . . . . . . . . . . . . . . . . . . . . . . . . . . . . . 22
Using Your Headset Indicators . . . . . . . . . . . . . . . . . . . . . . . . . . . . . . . . . . . . 23
Resetting the Headset . . . . . . . . . . . . . . . . . . . . . . . . . . . . . . . . . . . . . . . . . . 25
Paired Link to Two Devices . . . . . . . . . . . . . . . . . . . . . . . . . . . . . . . . . . . . . . . 25
BluetoothTOC.fm Page 3 Monday, January 14, 2002 1:41 PM
4
Safety and General Information
IMPORTANT INFORMATION ON SAFE AND EFFICIENT OPERATION. READ
THIS INFORMATION BEFORE USING YOUR PHONE.
Users are not permitted to make changes or modify the device in any way. Changes
or modifications not expressly approved by the party responsible for compliance
could void the user’s authority to operate the equipment. See 47 CFR Sec. 15.21.
This device complies with part 15 of the FCC Rules. Operation is subject to the
following two conditions: (1) This device may not cause harmful interference, and (2)
this device must accept any interference received, including interference that may
cause undesired operation. See 47 CFR Sec. 15.19(3).
Electromagnetic Interference/Compatibility
Note:
Nearly every electronic device is susceptible to electromagnetic interference
(EMI) if inadequately shielded, designed, or otherwise configured for
electromagnetic compatibility.
Facilities
To avoid electromagnetic interference and/or compatibility conflicts, turn off your
phone in any facility where posted notices instruct you to do so. Hospitals or health
care facilities may be using equipment that is sensitive to external RF energy.
Safety.fm Page 4 Monday, January 14, 2002 1:42 PM

5
Safety and General Information
Aircraft
When instructed to do so, turn off your phone when on board an aircraft. Any use of
a phone must be in accordance with applicable regulations per airline crew
instructions.
Medical Devices
Pacemakers
The Health Industry Manufacturers Association recommends that a minimum
separation of 6 inches (15 centimeters) be maintained between a handheld wireless
phone and a pacemaker. These recommendations are consistent with the
independent research by, and recommendations of, Wireless Technology Research.
Persons with pacemakers should:
•ALWAYS keep the phone and Bluetooth phone module more than six inches (15
centimeters) from your pacemaker when the phone is turned ON.
•NOT carry the phone and Bluetooth phone module in the breast pocket.
• use the ear opposite the pacemaker to minimize the potential for interference.
• turn OFF the phone immediately if you have any reason to suspect that
interference is taking place.
Hearing Aids
Some digital wireless phones may interfere with some hearing aids. In the event of
such interference, you may want to consult with your hearing aid manufacturer to
discuss alternatives.
Safety.fm Page 5 Monday, January 14, 2002 1:42 PM

Safety and General Information
6
Other Medical Devices
If you use any other personal medical device, consult the manufacturer of your device
to determine if it is adequately shielded from RF energy. Your physician may be able
to assist you in obtaining this information.
FCC Notice to Users
This equipment has been tested and found to comply with the limits for a Class B
digital device, pursuant to part 15 of the FCC Rules. These limits are designed to
provide reasonable protection against harmful interference in a residential
installation. This equipment generates, uses and can radiate radio frequency energy
and, if not installed and used in accordance with the instructions, may cause harmful
interference to radio communications. However, there is no guarantee that
interference will not occur in a particular installation. If this equipment does cause
harmful interference to radio or television reception, which can be determined by
turning the equipment off and on, the user is encouraged to try to correct the
interference by one or more of the following measures:
• Reorient or relocate the receiving antenna.
• Increase the separation between the equipment and the receiver.
•Connect the equipment to an outlet on a circuit different from that to which the
receiver is connected.
• Consult the dealer or an experienced radio/TV technician for help.
Safety.fm Page 6 Monday, January 14, 2002 1:42 PM
7
Introduction
What Is Bluetooth Wireless Technology?
Bluetooth
wireless technology propels you into a new dimension in connectivity.
Bluetooth devices communicate without wires, using built-in radio transceivers that
operate on a globally available radio frequency to ensure worldwide compatibility.
Your Bluetooth Wireless Headset can communicate with other Bluetooth devices
within a range of approximately 10 meters (33 feet).
How Can I Use My Bluetooth Wireless Headset?
The Bluetooth Wireless Headset lets you connect with a Bluetooth device such as a
Motorola 270c wireless phone with attached Bluetooth module
• Use your phone hands-free.
• Handle incoming and outgoing calls with the headset multifunction control
button.
• Use voice activation to make calls.
Note:
Connecting your headset requires Bluetooth Headset Profile Support. Consult
your User’s Guide for more information.
Intro.fm Page 7 Monday, January 14, 2002 1:42 PM

Introduction
8
What Is Included in This Kit?
This package includes the following:
• Bluetooth headset
• Motorola charger
• Headset pouch with built-in belt clip
• Lanyard option for carrying the headset
Intro.fm Page 8 Monday, January 14, 2002 1:42 PM
9
Introduction
Headset Features
1—Headset Indicator light
Provides visual cue about headset status.
2—Volume Control
Adjusts speaker (receive) volume up and down.
3—Microphone
Picks up your voice input.
4—Boom
Contains microphone and controls power (On/Off) status of headset.
5—Earhook
Attaches headset to ear.
6—Speaker
Plays the sound you receive on the call.
7—Charging Port
Receives the plug for your battery charger.
8—Lanyard Loop
Lets you attach a lanyard to the headset, so you can wear the
headset around your neck and always keep it near.
9—Multifunction Button
E
Controls several headset functions.
1
2
9
3
4
56
7
8
Headset On
(boom open)
Headset Off
(boom closed)
Intro.fm Page 9 Monday, January 14, 2002 1:42 PM

10
Using Your Headset
Charging Your Headset
When to Charge
First-Time Use
—Before you can use your headset, you need to charge its self-
contained battery for two hours.
Recharging
—When you hear five rapid high tones through the headset speaker,
repeated at 20-second intervals, the headset battery needs to be recharged.
Over extended periods of time, batteries gradually wear down and require longer
charging times. This is normal. The more you talk on the phone with the headset, the
less standby time your battery has.
The rechargeable batteries that power this product must be disposed of
properly and may need to be recycled. Contact your local recycling center
for proper disposal methods. Never dispose of batteries in a fire because
they may explode.
Using.fm Page 10 Monday, January 14, 2002 1:43 PM
11
Using Your Headset
How to Charge
Note:
You can also use a Motorola Original Vehicle Power Adapter to charge the
headset while in your vehicle.
A fully charged headset battery provides approximately:
• talk time—2.5 hours
• standby time (boom open)—10 hours
• storage time (boom closed)—20 days
Step
1
Plug the Motorola charger into the
headset, with the charger’s release
tab and the headset both facing up.
2
Plug the other end of the charger into an electrical outlet.
During charging, the headset indicator turns on and remains lit until charging
is complete. Your headset requires approximately two hours to receive a full
charge.
3
When charging is complete (indicator is off), remove the charger from the
electrical outlet, press the release tab, and detach the charger cord from the
headset.
Using.fm Page 11 Monday, January 14, 2002 1:43 PM
Using Your Headset
12
Wearing the Headset
Placing the Headset on Your Ear
When packaged, the headset is configured for wear on the right ear.
Step
1
Open the boom, then open the
earhook (90˚ from the headset).
2
Loop the earhook over your ear.
3
Press the headset to your ear.
4
Point the boom toward your mouth.
Using.fm Page 12 Monday, January 14, 2002 1:43 PM
13
Using Your Headset
Changing for Wear on the Left Ear
When packaged, the headset is configured for wear on the right ear.
To change it for wear on your left ear:
Step
1
Open the boom, then open the
earhook (90˚ from the headset).
2
Gently lift and pull the top of the
earhook up and off the upper hinge
pin. Then pull it away to remove it.
3
Flip the headset over.
4
Hook the bottom of the earhook onto the lower hinge pin, then lift and pull
the top of the earhook over the upper hinge pin.
Using.fm Page 13 Monday, January 14, 2002 1:43 PM
Using Your Headset
14
Storing Your Headset in its Holster
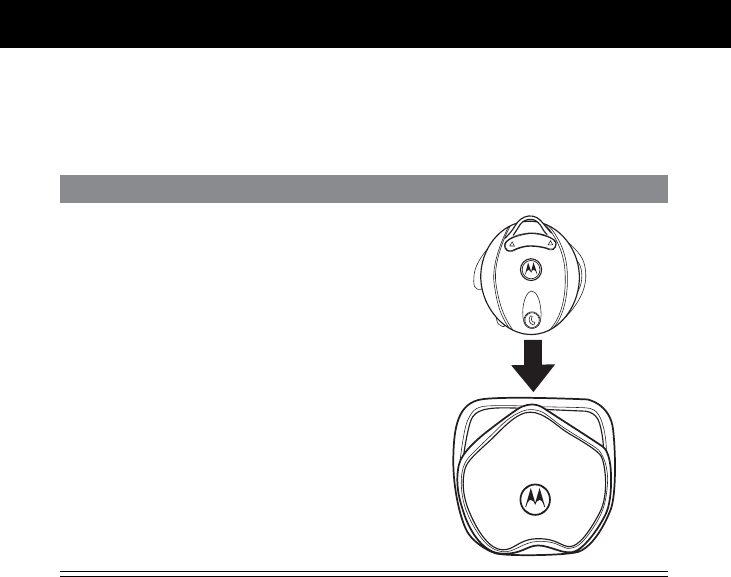
Your headset comes with a holster where you can store it when you are not using it.
To fit your headset into its holster:
Step
Slip the headset down into the
holster, with the lanyard tab pointing
up and the earhook facing the inside
of the holster.
Using.fm Page 14 Monday, January 14, 2002 1:43 PM

15
Using Your Headset
Linking Your Headset and Phone
Note:
You must link your headset and phone before you can make a call.
You establish a Bluetooth link between your headset and phone with a paired link.
When you set up a paired link, the phone remembers the headset’s ID. Once your
headset and phone are paired, your headset automatically connects to your phone
any time you open the boom.
Paired Link
With the headset and phone in close proximity:
Step Result
1
With the headset’s boom closed, press
and hold the Multifunction Button
E
for two seconds.
The headset indicator turns on.
2
Open the headset boom. The indicator remains lit.
Using.fm Page 15 Monday, January 14, 2002 1:43 PM

Using Your Headset
16
3
Perform a
device
discovery
from the
phone. For Motorola phones, perform
device discovery by selecting these
options:
Settings
>
Connection
>
Bluetooth
Link
>
Hands
Free
>
Scan
All
For details on device discovery for
another phone, refer to the user’s
guide for the phone.
When the scan is complete, the
phone displays:
Bond with Motorola headset
4
Press the
YES
soft key on the phone to
bond to the headset. It may take several seconds to
establish a connection.
5
When
Enter Bluetooth Passkey
appears, enter the passkey
0000
, then
press
OK
on the phone to pair the
headset with the phone.
The device ID is now stored in the
phone’s memory.
Pairing is successful when the
headset indicator flashes 10 times
rapidly.
Step Result
Using.fm Page 16 Monday, January 14, 2002 1:43 PM

17
Using Your Headset
Controlling Headset Volume
Increasing and Decreasing Volume
To increase speaker volume, press the top of the volume button repeatedly until you
reach the desired volume level.
To decrease speaker volume, press the bottom of the volume button repeatedly until
you reach the desired volume level.
Note:
Because the headset is equipped with Volume Orientation Technology, it does
not matter whether you wear the headset on the right or left ear. Pressing the top of
the volume key always increases the volume, and pressing the bottom always
decreases the volume.
6
Press the
Link
soft key on the phone. The audio gateway is established
between your phone and headset.
7
Press the
END
key on the phone to exit
the Bluetooth menu The phone returns to idle.
You can now place and receive calls.
(See “Placing a Call” on page 18
and “Receiving a Call” on page 20.)
Step Result
Using.fm Page 17 Monday, January 14, 2002 1:43 PM

Using Your Headset
18
Placing a Call
You can place a call with your headset in these three ways:
• using voice activation
• dialing a number from the phone
• redialing a number with the headset’s Multifunction Button
E
In all three cases, you must first link your headset and phone as described in
“Linking Your Headset and Phone” on page 15.
Using Voice Activation with Motorola Phones
Note:
To use voice activation, you must turn on
Voice Dial
in your phone’s
Bluetooth Link menu.
Step Result
1
Press the Multifunction Button
E
.A tone sounds to prompt you to
speak the name of the person you
wish to call (as entered in the
phone’s phonebook.)
2
Say the voice tag name. Your phone finds the entry, pauses
two seconds, then places the call.
Using.fm Page 18 Monday, January 14, 2002 1:43 PM

19
Using Your Headset
Notes:
•Voice tags must be stored in the phone. Consult your phone’s User Guide for
more information.
• If the voice tag name is not recognized, you will hear a high/low tone in the
headset.
Dialing a Number from the Phone Keypad
Step
1
Using the phone’s keypad, dial the phone number.
2
To send the call:
•
Press the standard key for sending calls from your phone.
or
•
Momentarily press the headset’s Multifunction Button
E
.
Using.fm Page 19 Monday, January 14, 2002 1:43 PM

Using Your Headset
20
Redialing a Number with the Headset (Motorola Phones)
Note:
To redial a number with the headset, you must turn OFF voice activation
(voice dialing) in your phone’s Bluetooth Link menu.
Ending a Call from the Headset
To end a call, press the headset’s Multifunction Button
E
. A tone indicates that the
call has ended.
Receiving a Call
With the Headset On and Linked
When you receive an incoming call with the headset on (the boom is open) and
linked, a ring tone sounds in your headset. To link your phone, see “Linking Your
Headset and Phone” on page 15.
Answer the call by pressing the headset’s Multifunction Button
E.
Step
1
Press the headset’s Multifunction Button E once to recall the last number
dialed.
2
Press the Multifunction Button E again to send the call.
Using.fm Page 20 Monday, January 14, 2002 1:43 PM

21
Using Your Headset
With the Headset Off (Paired Link Only)
When you receive a call with the headset off, open the headset’s boom. The Auto-
Answer feature enables you to answer the call through the headset.
Transferring a Call
Headset to Phone
The transfer must be initiated by the phone. (See the user’s guide for your phone.)
Phone to Headset
Open the boom to activate the Auto-Transfer feature.
If the boom is already open and the call is on the phone, press the headset’s
Multifunction Button E.
Disconnecting the Bluetooth Link
To terminate the Bluetooth connection between the headset and phone, turn the
headset off by closing the boom.
If you terminate the Bluetooth connection during an active call, the call is held at the
phone for 30 seconds to let you transfer the call back to the phone. If you do not
transfer the call, it is terminated at the end of the 30 seconds.
Using.fm Page 21 Monday, January 14, 2002 1:43 PM

Using Your Headset
22
Using Your Headset Indicators
Headset Indicator
With charger plugged in:
With no charger attached:
Headset Indicator Headset
ON charging in progress
OFF charging complete
Headset Indicator Headset
OFF power off
ON (steady) pairing mode
10 rapid flashes pairing successful
flashes at a 3-second interval
(.1 seconds ON, 2.9 seconds OFF) standby (not on a call)
flashes at a 2-second interval
(.5 seconds ON, 1.5 seconds OFF) connected (on a call)
Using.fm Page 22 Monday, January 14, 2002 1:43 PM

23
Using Your Headset
Audio Tones
Audio Tone Headset Status
single high tone when button released volume up or down
five rapid high tones, repeated every 20
seconds low battery
no audio indications; deteriorating
audio quality out of range
series of 4 tones, low to hight audio link open
ring tone incoming call
single high tone pairing confirmation
single low tone initiate voice activation
dual high/low tone voice tag not recognized
single high tone end call
series of 4 tones, high to low audio link closed
no tone power ON/OFF
Using.fm Page 23 Monday, January 14, 2002 1:43 PM

Using Your Headset
24
Resetting the Headset
If the phone and headset fail to communicate, you may need to reset the headset.
Paired Link to Two Devices
Your headset can store pairing information for two different Bluetooth devices:
• In Mode 1, the headset connects to the last device it was paired to in Mode 1.
• In Mode 2, the headset connects to the last device it was paired to in Mode 2.
Step
1
Plug the headset into the charger (see “How to Charge” on page 11).
2
Wait 5 seconds.
3
Detach the headset from the charger.
Note: Resetting the headset does not affect paired links or device data.
Using.fm Page 24 Monday, January 14, 2002 1:43 PM

25
Using Your Headset
To toggle between Modes 1 and 2:
Step Result
1
With the headset’s boom closed,
hold the Multifunction Button E
for two seconds.
The headset indicator light turns on.
2
With the boom still closed, press
either volume button The indicator flashes once for Mode 1,
twice for Mode 2.
3
Open the boom and verify the
LED flash. The indicator flashes once for Mode 1,
twice for Mode 2.
4
Pair with a device as described in
“Paired Link” on page 15.
Using.fm Page 25 Monday, January 14, 2002 1:43 PM
Using.fm Page 26 Monday, January 14, 2002 1:43 PM

Macey Noyes Associates
January 2, 2002
UNIQUE MOTOROLA ACCESSORIES
MAC4256_UNIQUE_THOR_UserGd_Tri
MOTOROLA and the Stylized M Logo are registered in the US Patent & Trademark Office. All other
product or service names are the property of their respective owners. The Bluetooth trademarks
are owned by their proprietor and used by Motorola, Inc. under license. (C) Motorola, Inc. 2001.
MOTOROLA et le logo M stylisé sont enregistrés au United States Patent and Trademark Office.
Tous les autres noms de produits ou de services sont la propriété de leurs détenteurs respectifs.
Les marques de commerce BLUETOOTH sont la propriété de leur détenteur et sont utilisées sous
licence par Motorola, Inc. © Motorola, Inc. 2001.
MOTOROLA y el logo estilizado de la M están registrados en la Oficina de patentes y marcas
registradas de EE.UU. Todos los otros nombres de productos y servicios son propiedad de sus
respectivos dueños. Las marcas comerciales de Bluetooth corresponden a marcas registradas de
su propietario y son utilizadas por Motorola, Inc. bajo licencia. (C) Motorola, Inc. 2001.
9887570M01
Imported to Canada by
Motorola Canada Limited
Mississauga, Ontario L4Z 2H4
Importé au Canada par
Motorola Canada Limitée
Mississauga (Ontario) L4Z 2H4