GN Audio USA DC800 Motorola DC800 User Manual DC800 UG EN
GN Netcom Inc Motorola DC800 DC800 UG EN
Manual

motorola.com
Bluetooth
®
Tra n s c e i ver
DRAFT
1
Welcome
Welcome to the world of Motorola
digital wireless communications! We
are pleased that you have chosen the
Motorola DC800 Bluetooth
®
Transceiver.
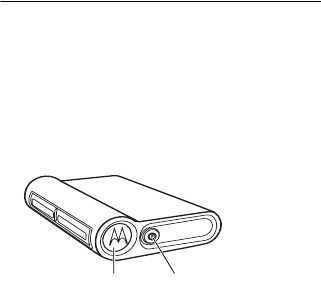
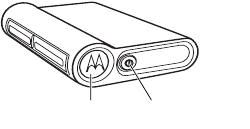
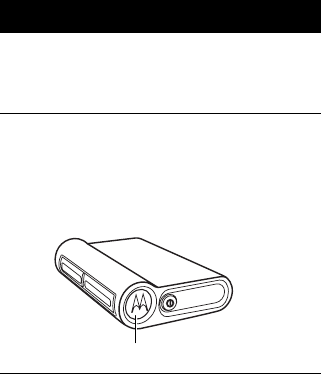
1 Pairing Button. 2 Power Button.

DRAFT
2
Transceiver Indicators
Stereo
Tr a n s c e i v e r
Status LED Indicator
Power Off Off
Pairing Mode On (Steady)
Pairing
Successful
10 rapid flashes
Standby (No
Music Playing)
Flashes every
3-seconds
(0.1 seconds ON,
2.9 seconds OFF)
Standby (Music
Playing)
Flashes every
8-seconds
(2.0 seconds ON,
6.0 seconds OFF)
DRAFT
3
Motorola, Inc.
Consumer Advocacy Office
1307 East Algonquin Road
Schaumburg, IL 60196
www.hellomoto.com
1-800-331-6456 (United States)
1-888-390-6456 (TTY/TDD United States for
hearing impaired)
1-800-461-4575 (Canada)
The use of wireless devices and their accessories
may be prohibited or restricted in certain areas.
Always obey the laws and regulations on the use
of these products.
MOTOROLA and the Stylized M Logo are
registered in the US Patent & Trademark Office.
The Bluetooth trademarks are owned by their
proprietor and used by Motorola, Inc. under
license. All other product or service names are
the property of their respective owners.
© Motorola, Inc., 2005.
6809489A95-O

DRAFT
5
Contents
Introduction
. . . . . . . . . . . . . . . . . . . 12
Transceiver Controls . . . . . . . . . . . 14
Using Your Transceiver
. . . . . . . . . . 17
Connecting To Your Home Audio
System . . . . . . . . . . . . . . . . . . . . . 18
Pairing Your Transceiver with a
Bluetooth Headset . . . . . . . . . . . . 23
Transceiver Features . . . . . . . . . . . 29
Transceiver Indicators . . . . . . . . . . 31
Export Law Assurances
. . . . . . . . . 34

DRAFT
6
Safety Information
Safety
Information
IMPORTANT INFORMATION ON SAFE
AND EFFICIENT OPERATION. READ
THIS INFORMATION BEFORE USING
YOUR DEVICE.
Users are not permitted to make
changes or modify the device in any
way. Changes or modifications not
expressly approved by the party
responsible for compliance could void
the user’s authority to operate the
equipment. See 47 CFR Sec. 15.21.
This device complies with part 15 of the
FCC Rules. Operation is subject to the
following two conditions: (1) This device
may not cause harmful interference, and
DRAFT
Safety Information
7
(2) this device must accept any
interference received, including
interference that may cause undesired
operation. See 47 CFR Sec. 15.19(3).
Electromagnetic
Interference/Compatibility
Note:
Nearly every electronic device is
susceptible to electromagnetic
interference (EMI) if inadequately
shielded, designed, or otherwise
configured for electromagnetic
compatibility.
Facilities
To avoid electromagnetic interference
and/or compatibility conflicts, turn off
your device in any facility where posted
notices instruct you to do so. Hospitals
or health care facilities may be using
DRAFT
8
Safety Information
equipment that is sensitive to external
radio frequency (RF) energy.
Aircraft
When instructed to do so, turn off your
device when on board an aircraft. Any
use of a device must be in accordance
with applicable regulations per airline
crew instructions.
Medical Devices
Hearing Aids
Some devices may interfere with some
hearing aids. In the event of such
interference, you may want to consult
with your hearing aid manufacturer to
discuss alternatives.
Other Medical Devices
If you use any other personal medical
device, consult the manufacturer of your
device to determine if it is adequately
DRAFT
Safety Information
9
shielded from RF energy. Your physician
may be able to assist you in obtaining
this information.
Industry Canada Notice to
Users
Operation is subject to the following
two conditions: (1) This device may not
cause interference and (2) This device
must accept any interference, including
interference that may cause undesired
operation of the device. See Ref IC: RSS
210 Sec. 5.11. The term “IC:” before the
certification/registration number
signifies that registration was
performed based on a Declaration of
Conformity indicating that Industry
Canada technical specifications were
met. It does not imply that Industry
Canada approved the equipment. See
DRAFT
10
Safety Information
Ref IC Self-Marking 6(f) and RSP-100
Sec. 4.
FCC Notice to Users
This equipment has been tested and
found to comply with the limits for a
Class B digital device, pursuant to part
15 of the FCC Rules. These limits are
designed to provide reasonable
protection against harmful interference
in a residential installation. This
equipment generates, uses and can
radiate radio frequency energy and, if
not installed and used in accordance
with the instructions, may cause
harmful interference to radio
communications. However, there is no
guarantee that interference will not
occur in a particular installation. If this
equipment does cause harmful
interference to radio or television
DRAFT
Safety Information
11
reception, which can be determined by
turning the equipment off and on, you
are encouraged to try to correct the
interference by one or more of the
following measures:
•
Reorient or relocate the receiving
antenna.
•
Increase the separation between
the equipment and the receiver.
•
Connect the equipment to an
outlet on a circuit different from
that to which the receiver is
connected.
•
Consult the dealer or an
experienced radio/TV technician
for help.

DRAFT
12
Introduction
Introduction
Your stereo Bluetooth
®
transceiver
connects to your home audio system
turning it into a wireless music system!
•
Listen to music from your phone’s
built-in MP3 player over your
home audio system speakers
•
Play CDs on your home audio
system and send the music
wirelessly to your Motorola
Bluetooth Stereo Headset
•
Use high power Bluetooth (Class
1) which allows you to roam
around your house and even as
far as 300 feet (10 meters) while
listening to music
DRAFT
Introduction
13
•
Play MP3’s from your home
computer or laptop and listen to
them over your home audio
speakers using the Motorola USB
Adapter. Your computer and
stereo can be up to 300 feet (100
meters) apart.
•
Use your transceiver with any
Bluetooth audio device, even
products from other
manufacturers
DRAFT
14
Introduction
Transceiver Controls
1 Pairing Button —
Connects
transceiver to other Bluetooth devices,
such as the HT820 headset.
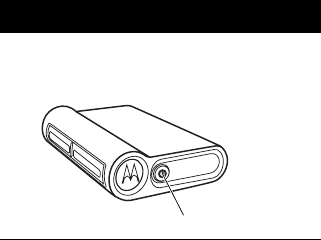
2 Power Button —
Turns transceiver
on or off.
1 Pairing Button. 2 Power Button.
DRAFT
Introduction
15
.
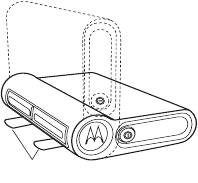
3 Housing Feet —
Built-in recessed
feet rotate 90 degrees allowing
the transceiver to stand vertically.
Feet fold flush for compact
storage.
3 Housing Feet.
DRAFT
16
Introduction
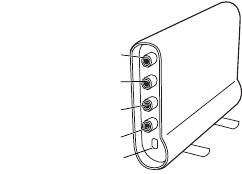
4 a & b Audio Out Left / Audio Out
Right —
Music output from your
transceiver to play on your home
audio system.
5 a & b Audio In Left / Audio In
Right —
Music input to your
transceiver to play on the remote
device.
6 Power Jack —
Plug in power
supply.
4a Audio Out Left
4b Audio Out Right
5a Audio In Left
5b Audio In Right
6 Power Jack

DRAFT
Using Your Transceiver
17
Using Your
Transceiver
Your transceiver can connect to any
device that contains audio input and
output jacks. The following steps
describe how to connect to your home
audio system. The steps are the same
to connect the transceiver to any other
device with audio input and output
jacks.
DRAFT
18
Using Your Transceiver
Connecting To Your
Home Audio System
The transceiver transmits stereo music
to a Bluetooth
®
enabled device such as
the HT820 Stereo Bluetooth Headset. It
also also receive stereo music from a
Bluetooth enabled device such as a
mobile phone, MP3 player, or PC.
DRAFT
Using Your Transceiver
19
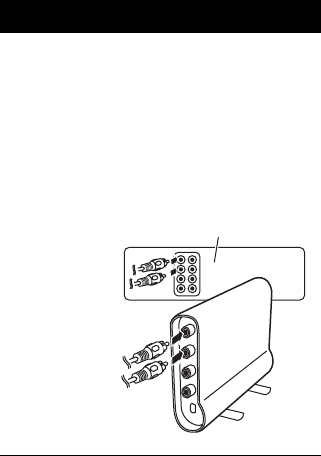
To connect your transceiver:
Step
1
Use the included RCA cables to
connect the
Audio Out Left
and
Audio Out Right
jacks on the
transceiver to unused Audio In Left
and Audio In Right jacks on your
home audio system.
Audio Out Right
Audio Out Left
Audio Out Right
Audio Out Left
Home Audio System
DRAFT
20
Using Your Transceiver
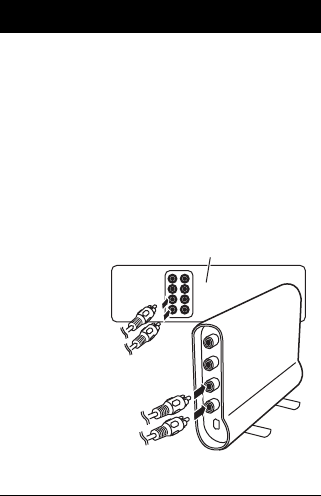
2
Using the remaining RCA cables,
connect the
Audio In Left
and
Audio In Right
jacks on the
transceiver to an unused Audio Out
Left and Audio Out Right jacks
(sometimes labeled Tape Out or
CD-R Out) on your home audio
system.
Step
Audio In Right
Audio In Left
Audio In Right
Audio In Left
Home Audio System
DRAFT
Using Your Transceiver
21
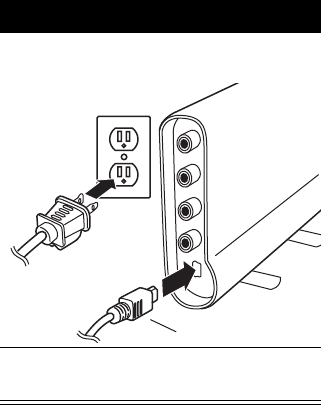
3
Plug the included AC power supply
into the
Power Jack
.
4
Plug the other end of the power
supply into a wall outlet.
Step
Power Jack
DRAFT
22
Using Your Transceiver
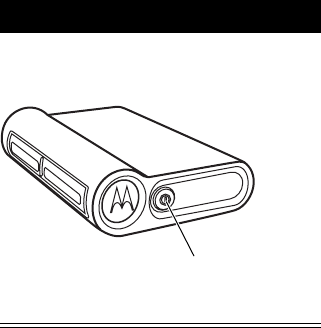
5
Turn the transceiver on by pressing
the
Power Button
.
Step
Power Button.
DRAFT
Using Your Transceiver
23
Pairing Your
Transceiver with a
Bluetooth Headset
Note:
You must pair your transceiver
with another device in order to transmit
music to the other device.
“Pairing” links devices equipped with
Bluetooth wireless technology and
allows the devices to remember the
other device’s unique ID. After your
devices are paired, they automatically
connect when they are in range and
turned on.
DRAFT
24
Using Your Transceiver
To pair your transceiver with a Bluetooth
headset, place them close to each other
and:
Step
1
Put your headset into pairing mode
(refer to your headset’s user’s
guide).
2
With the headset in pairing mode,
press and hold the
Pairing Button
on the transceiver for about 5
seconds until the Pairing Button
remains solidly lit.
Pairing Button.

DRAFT
Using Your Transceiver
25
3
When the transceiver finds the
headset the
Pairing Button
flashes
rapidly indicating that pairing is
successful.
You can now transmit stereo music
from the transceiver to your stereo
headset.
4
On your home stereo, select the
output the transceiver is connected
to and listen on your stereo
Bluetooth
headset.
Note:
You need to perform pairing
one time with each new device.
After your devices are paired, they
automatically connect when they
are in range and turned on.
Step
DRAFT
26
Using Your Transceiver
Pairing your Transceiver
with a Bluetooth Phone or
Music Player
To pair your transceiver with a stereo
enabled Bluetooth phone or music
player, place them close to each other
and:
Step
1
Turn on the transceiver by pressing
the
Power Button
.
Power Button.

DRAFT
Using Your Transceiver
27
2
Put your phone or music player into
Pairing Mode (refer to the device’s
user’s guide).
When the pairing scan completes,
the phone or music player displays
the devices found to pair with.
3
Select
Motorola DC800
from the
device list and continue responding
to the screen prompts.
4
When prompted, enter the passkey,
0000, and confirm the pairing of the
transceiver with the phone or music
player.
Pairing is successful when the
Pairing Button on the transceiver
flashes rapidly.
The device ID is now stored in the
phone’s memory.
Step
DRAFT
28
Using Your Transceiver
Pairing to Additional
Devices
Your transceiver can store pairing
information for up to eight different
Bluetooth wireless devices. Device IDs
are stored in the “Paired Device List” in
memory in the order entered. If you try
to pair more than eight devices, the
oldest paired device is removed from
the list.
When any of the eight paired devices is
turned on and close to the transceiver, it
automatically pairs with the transceiver.
When your transceiver is turned on, it
pairs with the
last
device it was
connected to
. To connect your
transceiver to another device in the
paired device list, start the connection
from that device. The last device to start

DRAFT
Using Your Transceiver
29
a connection with the transceiver
becomes the “last connected” device.
Transceiver Features
To use transceiver features:
Device Status
Bluetooth
Device Transceiver Action
Enter Pairing (Configuration) Mode:
On Off Hold Pairing
Button 5
seconds until
LED remains
solidly lit.
Transceiver
searches for
Bluetooth
devices.

DRAFT
30
Using Your Transceiver
Turn On the Transceiver:
On in idle On Press the
Power Button.
The transceiver
attempts to
connect to the
last device it
was connected
to.
Turn Off the Transceiver:
On On Press the
Power Button.
Stop Audio Transmission:
On On–
Audio
Transmitting
Short press
Pairing Button
.
Device Status
Bluetooth
Device Transceiver Action

DRAFT
Using Your Transceiver
31
Transceiver Indicators
Re-enable Audio Transmission:
On On Short press
Pairing Button
.
LED blinks
rapidly.
Stereo
Transceiver
Status LED Indicator
Power Off Off
Pairing Mode On (Steady)
Pairing
Successful
10 rapid flashes
Device Status
Bluetooth
Device Transceiver Action

DRAFT
32
Using Your Transceiver
Standby (No
Music Playing)
Flashes every
3-seconds
(0.1 seconds ON,
2.9 seconds OFF)
Standby (Music
Playing)
Flashes every
8-seconds
(2.0 seconds ON,
6.0 seconds OFF)
Stereo
Tr a n s c e i v e r
Status LED Indicator

DRAFT
33
Export Law Assurances
Export Law
Assurances
This product is controlled under the
export regulations of the United States
of America and Canada. The
Governments of the United States of
America and Canada may restrict the
exportation or re-exportation of this
product to certain destinations. For
further information contact the U.S.
Department of Commerce or the
Canadian Department of Foreign Affairs
and International Trade.
Motorola Limited 1 Year Warranty for Accessories
Coverage:
Motorola, Inc. warrants this accessory (“Accessory”)
against defects in materials and workmanship under normal
consumer use for 1 year from the date of purchase. Motorola, at its
option, will at no charge repair, replace or refund the purchase
price of this Accessory should it not conform to this warranty. This
limited warranty is a consumer’s exclusive remedy, extends only to
the first consumer purchaser, is not transferable and is valid only
on Accessories purchased by consumers in the United States or
Canada.
Exclusions:
Normal Wear and Tear:
Periodic maintenance, repair and
replacement of parts due to normal wear and tear are excluded
from coverage.
Batteries:
Only batteries whose fully charged capacity falls below
80% of their rated capacity and batteries that leak are covered by
this limited warranty.
Miscellaneous:
This warranty does NOT cover defects or damage
that result from: (a) improper operation, storage, misuse or abuse,
accident or neglect, such as physical damage (cracks, scratches,
etc.) to the surface of the Accessory resulting from misuse; (b)
contact with liquid, water, rain, extreme humidity or heavy
perspiration, sand, dirt or the like, extreme heat, or food; (c) use of
the Accessory for commercial purposes or subjecting the
Accessory to abnormal usage or conditions; (d) service,
installation, alteration, or modification in any way by someone other
than Motorola, or its authorized service centers and, (e) other acts
which are not the fault of Motorola.
Obtaining Service:
To obtain service or information, please call
800-331-6456 in the USA or 800-461-4575 in Canada. You will
receive instructions on how to ship the Accessory, at your expense,
to a Motorola Service Center. To obtain service, you must include a
copy of your receipt or other comparable dated proof of purchase,
a written description of the problem and your address and
telephone number.
What Other Limitations Are There?
ANY IMPLIED
WARRANTIES, INCLUDING WITHOUT LIMITATION THE
IMPLIED WARRANTIES OF MERCHANTABILITY AND FITNESS
FOR A PARTICULAR PURPOSE, SHALL BE LIMITED TO THE
DURATION OF THIS LIMITED WARRANTY, OTHERWISE THE
REPAIR, REPLACEMENT, OR REFUND AS PROVIDED UNDER
THIS EXPRESS LIMITED WARRANTY IS THE EXCLUSIVE
REMEDY OF THE CONSUMER, AND IS PROVIDED IN LIEU OF
ALL OTHER WARRANTIES, EXPRESS OF IMPLIED. IN NO
EVENT SHALL MOTOROLA BE LIABLE, WHETHER IN
CONTRACT OR TORT (INCLUDING NEGLIGENCE) FOR
DAMAGES IN EXCESS OF THE PURCHASE PRICE OF THE
ACCESSORY, OR FOR ANY INDIRECT, INCIDENTAL, SPECIAL
OR CONSEQUENTIAL DAMAGES OF ANY KIND, OR LOSS OF
REVENUE OR PROFITS, LOSS OF BUSINESS, LOSS OF
INFORMATION OR DATA, SOFTWARE OR APPLICATIONS OR
OTHER FINANCIAL LOSS ARISING OUT OF OR IN
CONNECTION WITH THE ABILITY OR INABILITY TO USE THE
ACCESSORY OR ANY PRODUCT USED WITH THE
ACCESSORY TO THE FULL EXTENT THESE DAMAGES MAY
BE DISCLAIMED BY LAW.
Some states and jurisdictions do
not allow the limitation or exclusion of incidental or
consequential damages, or limitation on the length of an
implied warranty, so the above limitations or exclusions may
not apply to you. This warranty gives you specific legal rights,
and you may also have other rights that vary from state to
state or from one jurisdiction to another.
The internal antennas used for this
portable transmitter must not be
co-located or operating in conjunction
with any other antenna or transmitter.
RFExposure statement

motorola.com