GN Audio USA GN9300US GN9300 UPCS Handset User Manual
GN Netcom Inc GN9300 UPCS Handset
UserManual.wiki
>
GN Audio USA
>
GN9300US User Manual
>
user manual
Contents
1.
user manual
2.
UserMan
user manual
Navigation menu
Upload a User Manual
Namespaces
Wiki Guide
HTML
PDF
Info
Views
User Manual
Discussion / Help
Navigation
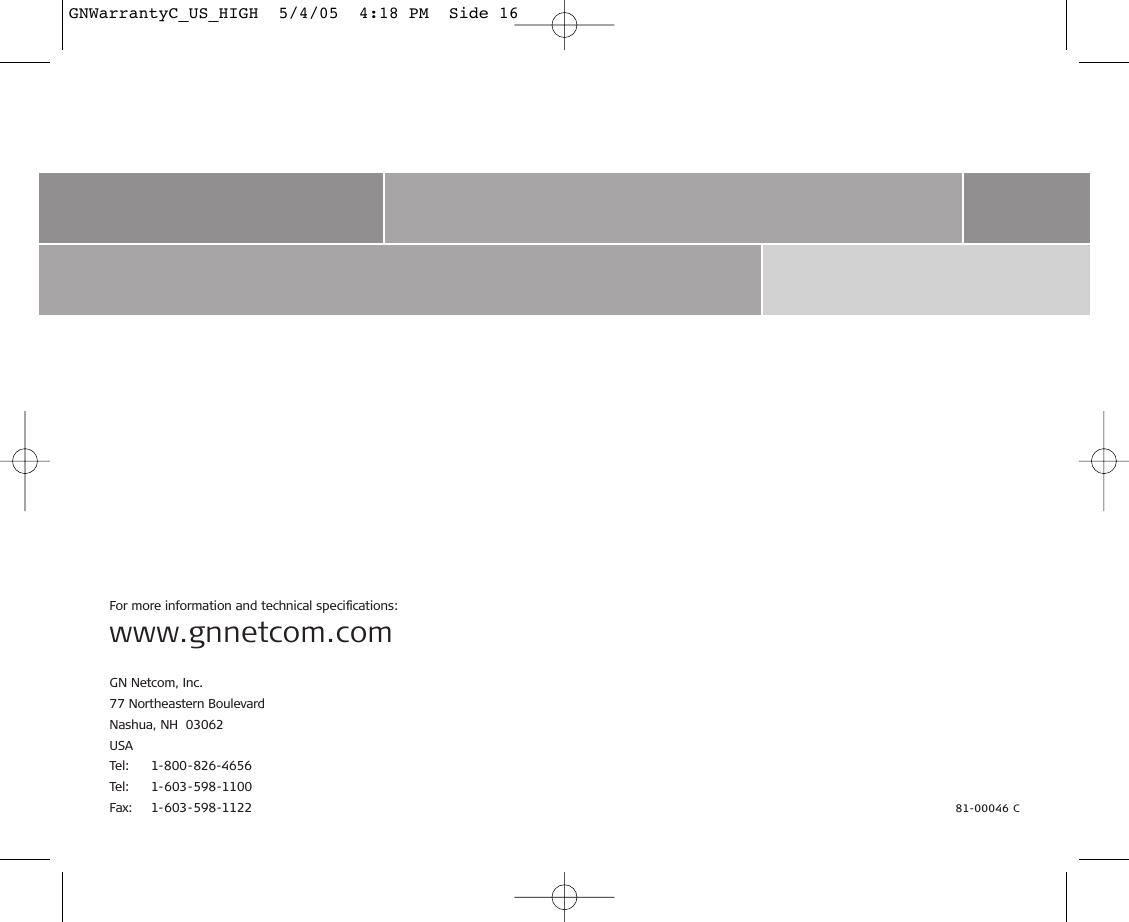
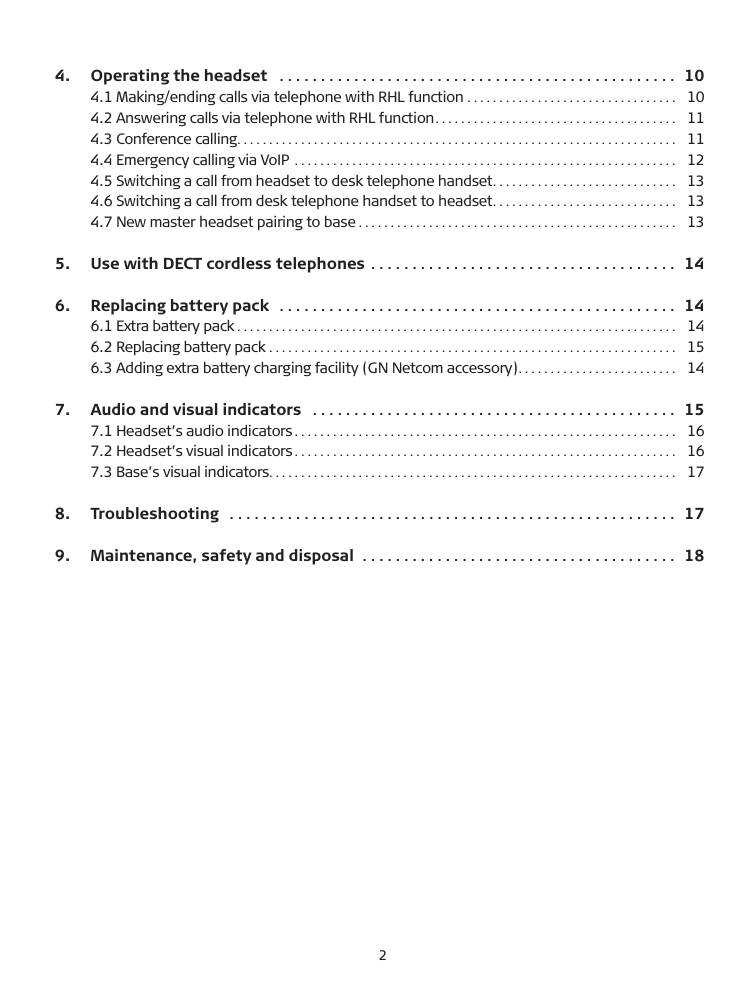
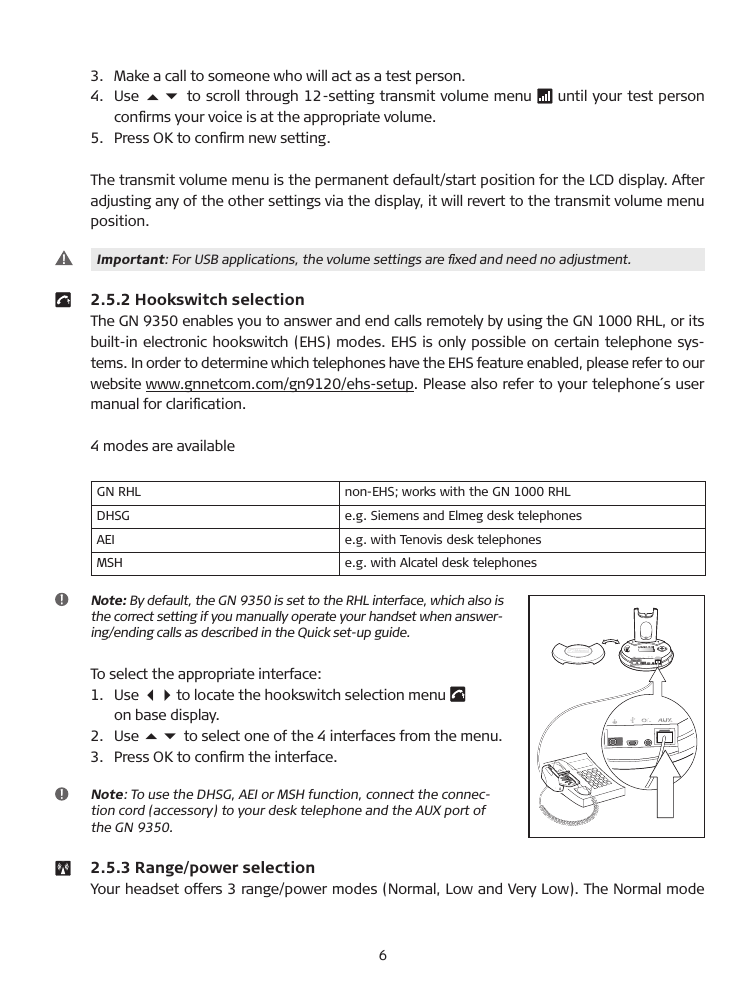
![',*+)-('&/.Overview headset1Description micro-casque[1] Micro[2] Perche micro (télescopique)[3] Voyant “en ligne”[4] Réglage volume et fonction Secret[5] Touche Conversation[6] Ecouteur[7] Batterie supplémentaire[8] Serre-tête[9] Contour d’oreille[10] Contour de nuqueNote : vous trouverez une description détaillée des boutons et des fonctions dans le Guide des fonctions additionnelles, chapitre 7.Overview headset[1] Microphone[2] Boom arm (extendable)[3] Link indicator[4] Volume control with mute switch[5] Talk button[6] Speaker[7] Battery pack, extra[8] Headband[9] Earhook[10] NeckbandNote: for detailed information about but-tons and functions, please see Guide for additional functions chapter 7.Descripción del microcasco[1] Micrófono[2] Varilla (extensible)[3] Indicador de conexión[4] Control del volumen y conmutador de silencio “mute”[5] Botón de conversación[6] Receptor[7] Paquete adicional de baterías[8] Diadema[9] Gancho para la oreja[10] Sujeción en el cuelloNota: para obtener más información sobre botones y funciones, consulte el capítulo 7 de la Guía de funciones adicionales. | English | Français | EspañolDescripción microcascoDescription micro-casquePage 2Page 3](https://usermanual.wiki/GN-Audio-USA/GN9300US.user-manual/User-Guide-613620-Page-2.png)
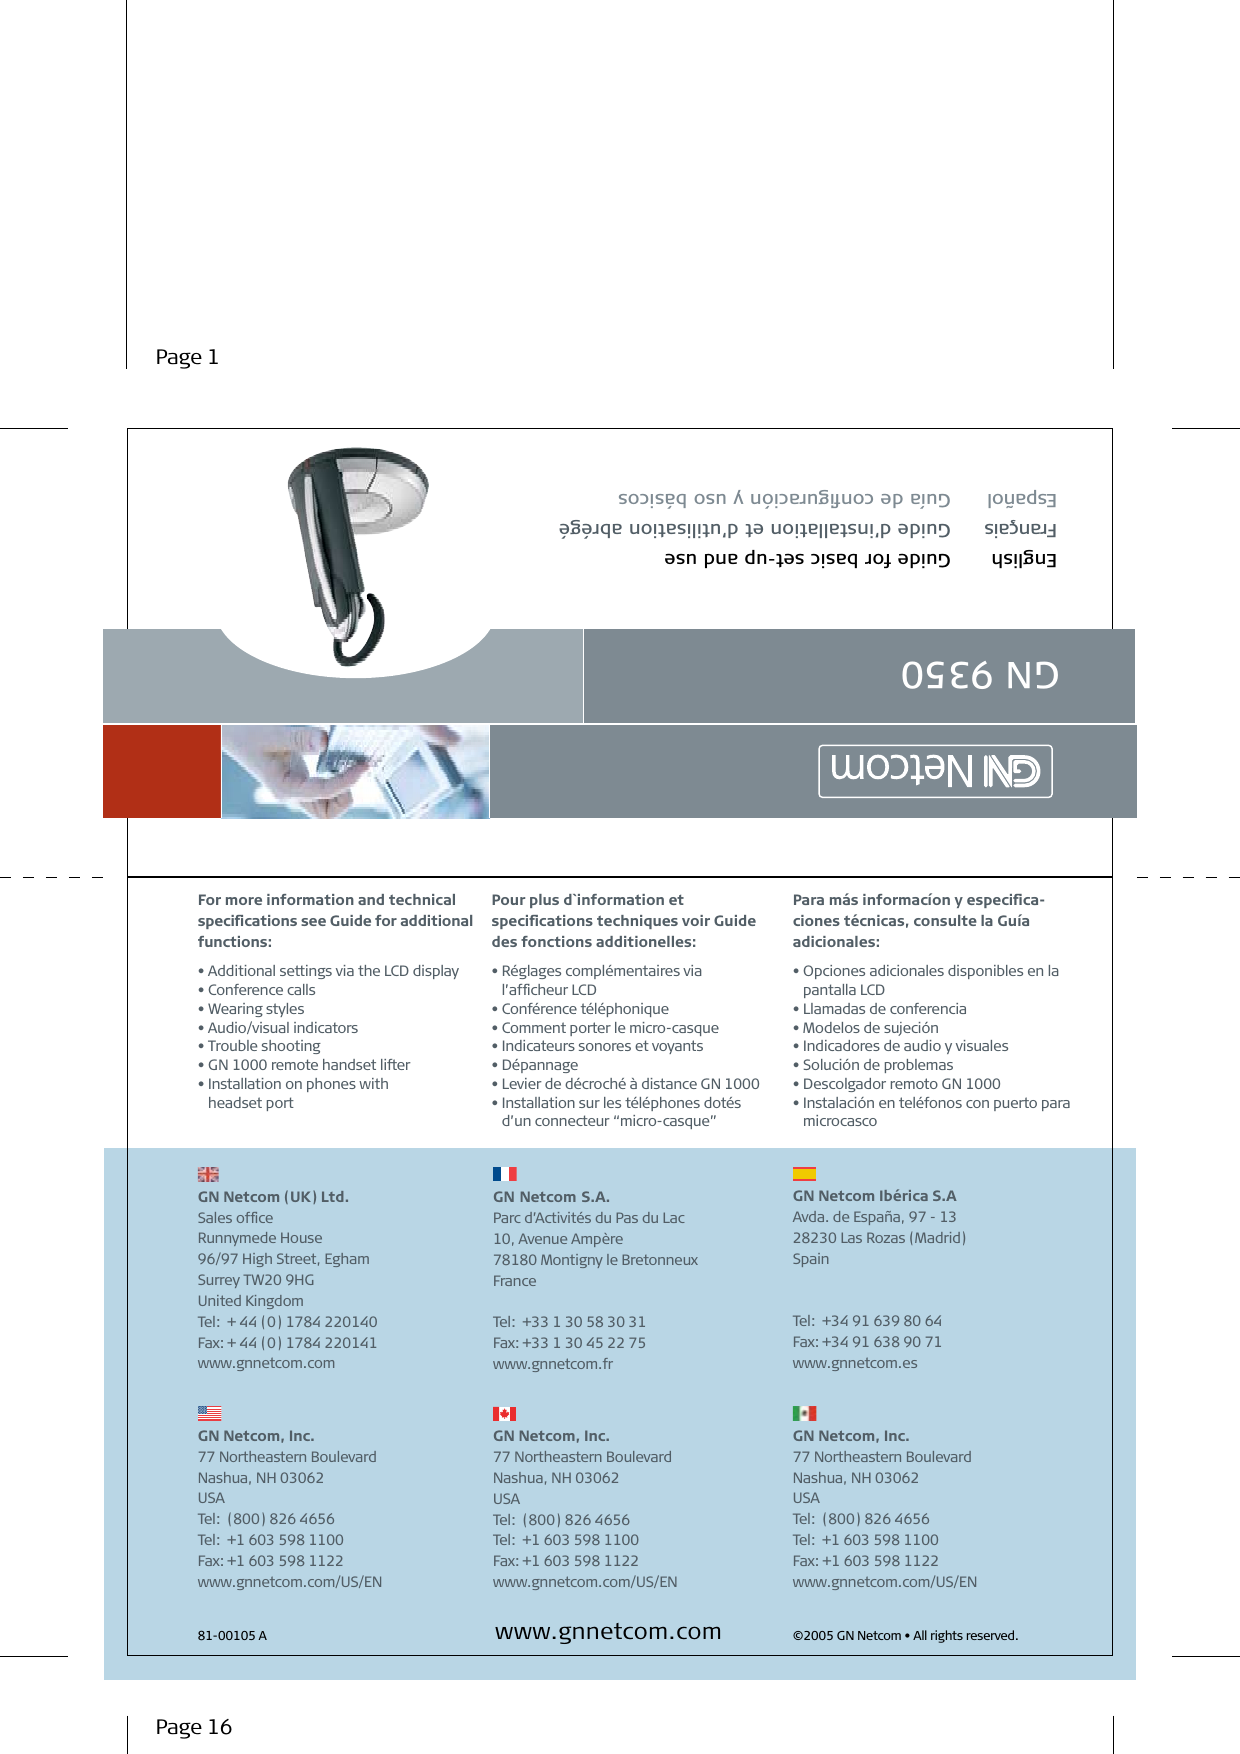
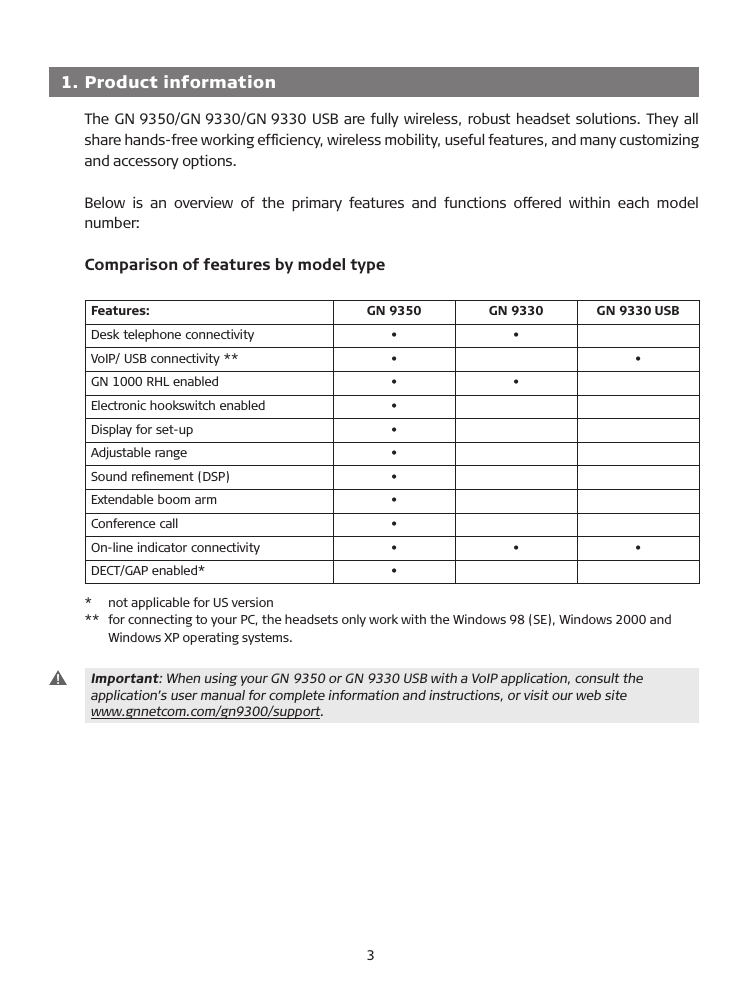
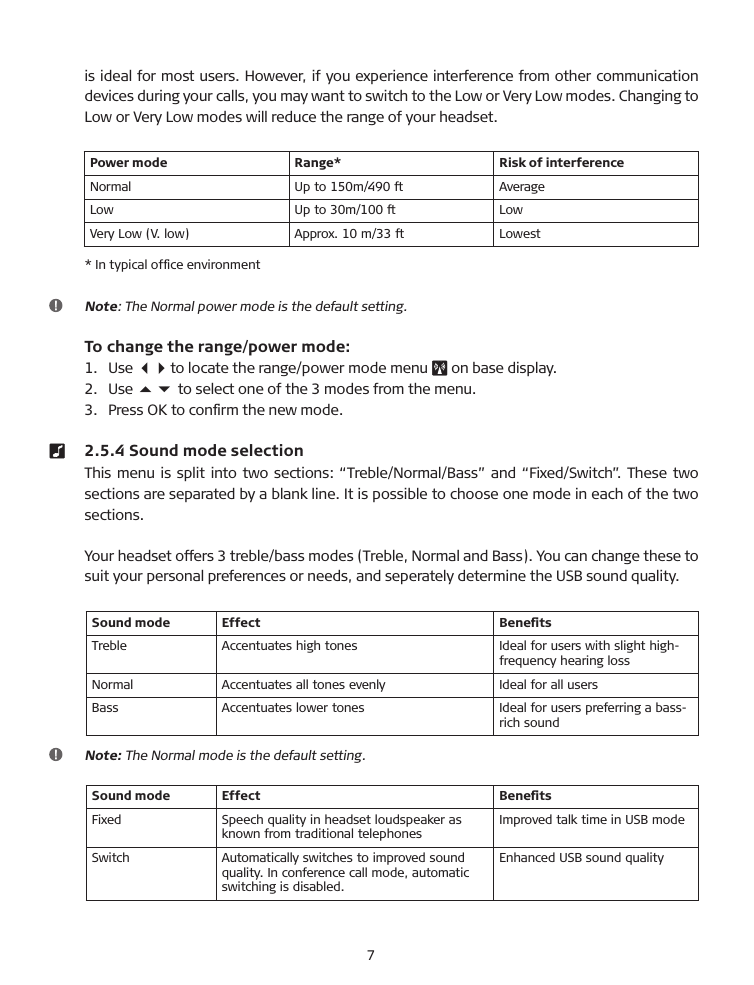
![1131 30292426 2728251217 191316 21201823221415Overview base Description de la base Descripción de la base2Description de la base[11] Couvercle[12] Berceau de charge du micro-casque[13] Chargeur supplémentaire[14] Réglage de la tonalité[15] Afficheur LCD[16] Port cordon téléphonique[17] Port combiné[18] Port adaptateur secteur[19] Port USB[20] Port indicateur “en ligne” (OLI)[21] Port AUX[22] Touche de couplage[23] Menu de l’afficheur LCD[24] Chargeur batterie[25] Touche mode USB (avec voyant).[26] Voyant Secret[27] Voyant de batterie (4 diodes)[28] Touche mode Téléphone (avec voyant)[29] Cordon adaptateur secteur[30] Cordon USB[31] Cordon téléphonique Descripión de la ase[11] Base [12] Cargador del microcasco[13] Cargador para batería adicional[14] Regulador de tono[15] Pantalla LCD[16] Puerto del cable del teléfono[17] Puerto del microteléfono[18] Toma alimentador[19] Puerto USB[20] Puerto de indicador de “en línea” (OLI)[21] Puerto auxiliar para descolgador GN 1000[22] Botón de emparejamiento[23] Control de pantalla LCD[24] Torre de carga[25] Botón de modo USB (con indicador)[26] Indicador de silencio “mute”[27] Indicador de batería (4 diodos)[28] Botón de modo telefónico (con indicador)[29] Cable de alimentación de CA[30] Cable del conector USB[31] Cable de teléfonoOverview base[11] Base cover[12] Headset charge facility[13] Extra battery charge facility[14] Clear dial tone switch[15] LCD display[16] Telephone cord port[17] Handset port[18] A/C power adapter port[19] USB port[20] Online indicator port (OLI)[21] AUX port[22] Pairing button[23] LCD display control[24] Charge tower[25] USB mode button (with indicator)[26] Mute indicator[27] Battery indicator (4 diodes)[28] Telephone mode button (with indicator)[29] A/C power cord[30] USB connector cord[31] Telephone cord | English | Français | EspañolPage 4Page 5](https://usermanual.wiki/GN-Audio-USA/GN9300US.user-manual/User-Guide-613620-Page-3.png)
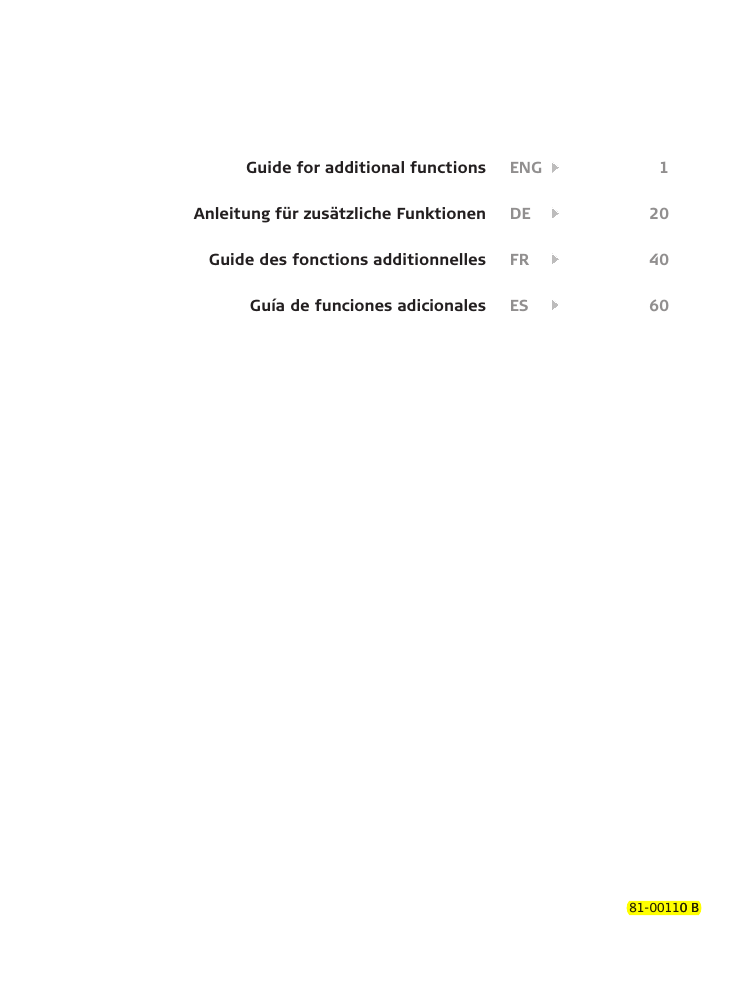
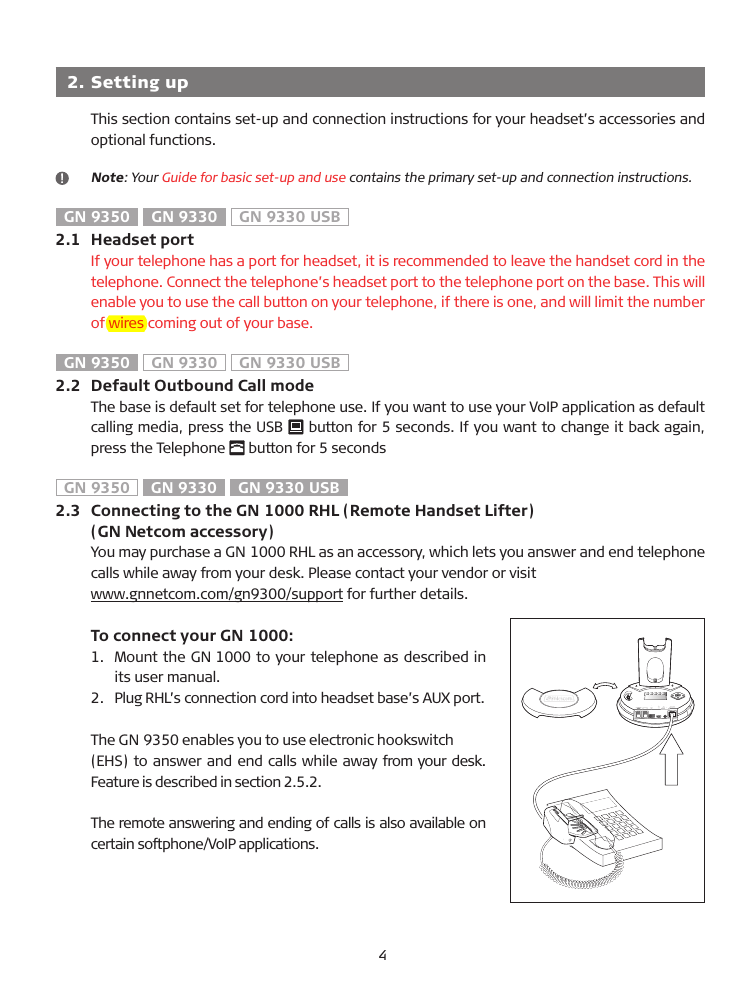
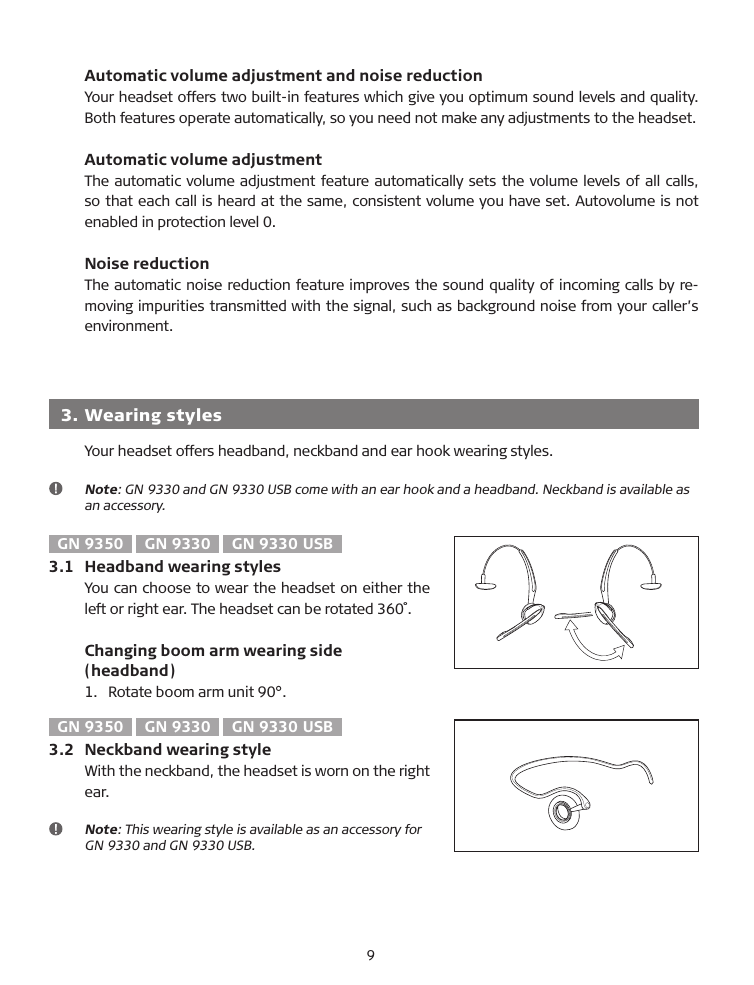
![3.13.23.33.4-3.53.6-3.7Setting up Installation Configuración | If your telephone has a separate headset port, please refer to the “Guide for ad-ditional functions” for setting up and using this port. | Si votre téléphone possède un connecteur micro-casque, consultez le Guide des fonctions additionnelles. | Si su teléfono dis-pone de un puerto para microcascos independiente,consulte la ”Guía de funciones adicionales” para configurar utilizar este puerto.3 | See Guide for additional func-tions for setting up with remote handset lifter functionality and an external OLI. | Voir Guide des fonctions addi-tionnelles pour l’installation avec le levier de dé-croché à distance et un accessoire OLI externe. | Consulte la Guía de funciones adicionales para configurar la fun-cionalidad de des-colgador remoto de microteléfono y un indicador OLI externo. | English | Français | EspañolInstallationVotre micro-casque peut se configurer de deux manières : soit téléphone OU ordinateur, soit téléphone ET ordinateur.Raccordement au téléphone[3.1] Sur le téléphone, débranchez le combiné.[3.2] Raccordez le combiné à la base.[3.3] Branchez le cordon de la base sur le téléphone.Raccordement USB à l’ordinateurNote : l’appareil est reconnu sous le nom GN 9350.[3.4] Branchez la petite extrémité du cordon USB sur le port USB de la base.[3.5] Branchez la grosse extrémité sur le port USB de l’ordinateur. 4 Le système utilise des pilotes stan-dard. Systèmes d’expl. compatibles : voir Guide des fonctions additionnelles.Raccordement électrique[3.6] Branchez l’adaptateur sur la base.[3.7] Branchez l’adaptateur sur une prise. 4 La touche Téléphone s’allume.ConfiguraciónPuede configurarlo para utilizarlo con teléfono/PC o con ambos.Conexión al teléfono[3.1] Desench. cable microteléfono.[3.2] Enchufe microteléfono a base.[3.3] Enchufe cable base a teléf.Conexión al PC mediante USBNota: El identificador aparecerá como GN 9350.[3.4] Enchufe extremo peq. de cable USB al puerto USB de base.[3.5] Enchufe extremo grande de cable USB al puerto USB de PC. 4 Se usarán controladores estándar. Consulte la Guía de funciones adiciona-les para conocer SO compatibles.Conexión a alimentación[3.6] Enchufe adaptador a base.[3.7] Enchufe adapt. a toma eléc. 4 El botón de modo telefónico se iluminará.Setting upYou can set up your headset in 2 ways: use with either telephone or PC or use with both telephone and PC.Connecting to telephone[3.1] Unplug handset cord.[3.2] Plug handset cord to base.[3.3] Plug base’s cord to telephone.Connecting to PC via USBNote: Unit ID will appear as GN 9350.[3.4] Plug small end of supplied USB cord to base’s USB port.[3.5] Plug large end of supplied USB cord to PC’s USB port. 4 Your PC’s standard drivers will be used. See Guide for additional functions for supported operating systems.Connecting to power[3.6] Plug power adapter into base.[3.7] Plug power adapter into electrical outlet. 4 Telephone mode button will light.Page 6Page 7](https://usermanual.wiki/GN-Audio-USA/GN9300US.user-manual/User-Guide-613620-Page-4.png)
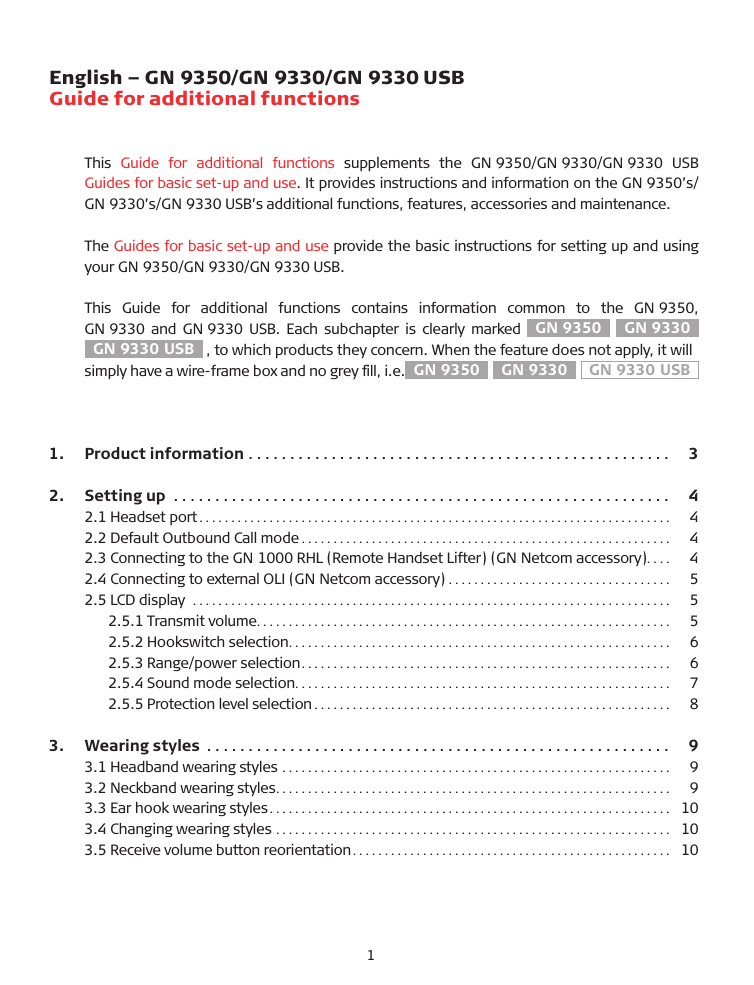
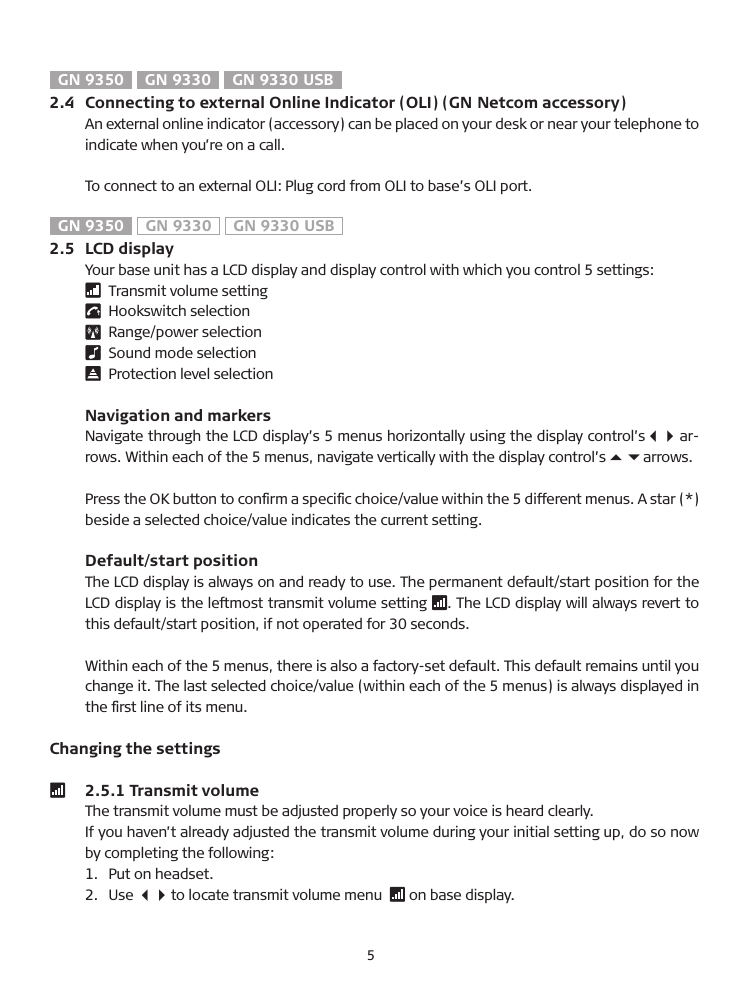
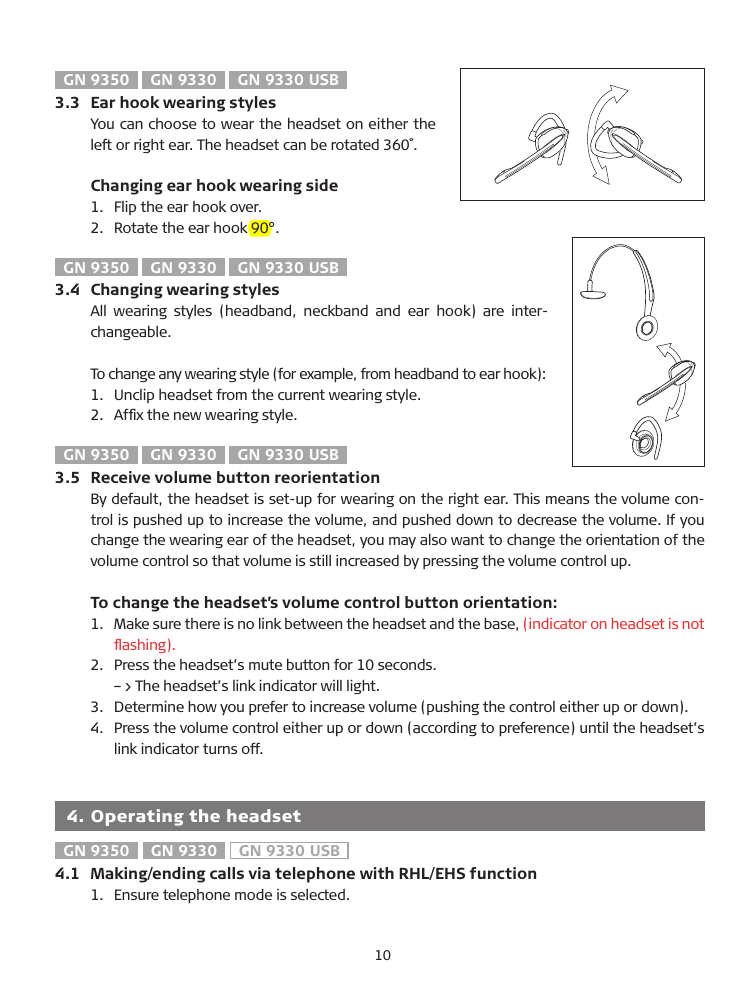
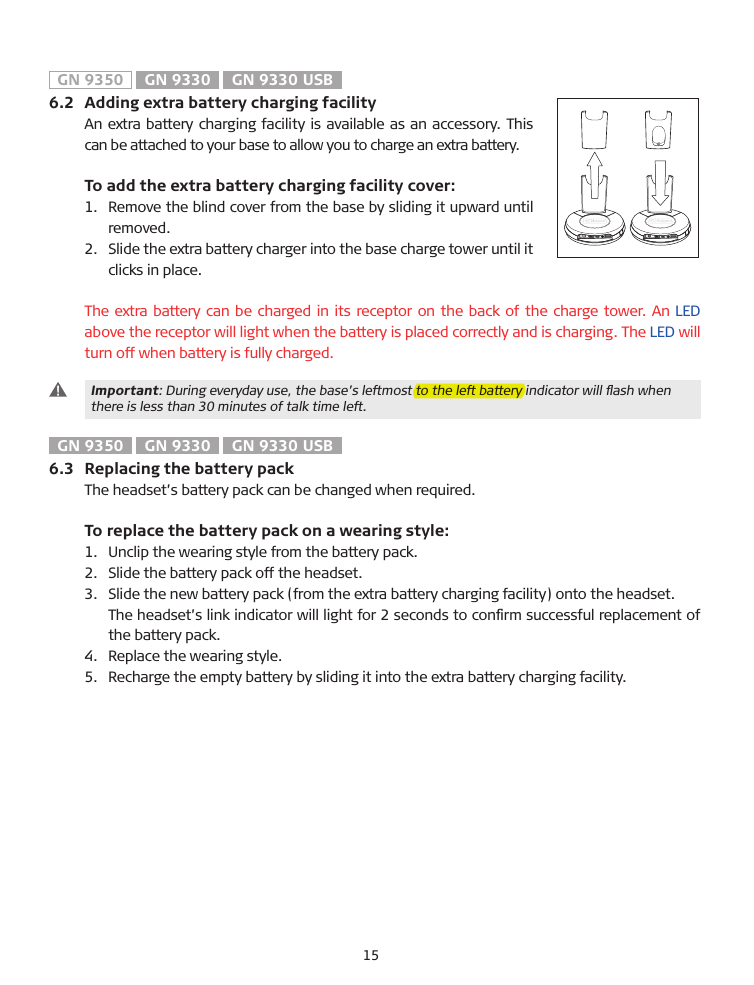
![1 sec ))) 25 % 100 % A B C D E F G4.1-4.2 4.34.4 4.5 4.6-4.7Charging/Dial tone Charge/Tonalité Carga/tono de llamada4 | See www.gnnetcom.com/gn9300/support for more about clear dial tone adjustment. | Pour plus d’infos sur le réglage de la tonalité, consultez www.gnnetcom.com/gn9300/support. | Visite www.gnnetcom.com/gn9300/support para obtener más información acerca del ajuste de tono de llamada claro. | See Guide for additional func-tions for instructions on changing the battery. | Pour changer la batterie, voir Guide des fonctions addi-tionnelles. | Consulte la Guía de funciones adicionales para obtener instruc-ciones acerca de cómo cargar la batería.ChargingChargeCargaClear dial tone adjustmentRéglage de la tonalitéAjuste de tono de llamada | English | Français | EspañolCharge[4.1] Placez le micro-casque dans le berceau de charge. 4 Toutes les diodes du voyant de batterie s’allument 1 seconde. La perche micro doit être rétractée pendant la charge.[4.2] Chargez le micro-casque au moins 30 mn (charge complète : 3 h). 4 Le nombre de diodes allumées indique le niveau de charge, même si le micro-casque n’est pas dans la base.[4.3] La batterie supplémentaire peut être chargée sur le socle de charge.Réglage de la tonalité[4.4] Mettez le micro-casque.[4.5] Décrochez le combiné, vous entendez la tonalité dans le casque. 4 En l’absence de tonalité ou si elle n’est pas nette, poursuivez le réglage, voir 4.6.[4.6] Retirez le couvercle pour accéder à la molette de réglage de la tonalité.[4.7] Faites-la coulisser de A à G pour obtenir une tonalité nette. Si celle-ci est aussi nette sur A que sur G, restez sur A.Charging[4.1] Put headset in base to charge. 4 All Battery indicator diodes will light for 1 sec. The boom arm must be in retracted position for charging.[4.2] Charge headset for minimum 30 min. before use. A full charge takes 3 h. 4 The number of lit battery indicator diodes show level of charge, even with headset out of base.[4.3] The extra battery can be charged in its receptor (on charge tower).Clear dial tone adjustment [4.4] Put on headset.[4.5] Lift handset and listen for dial tone in headset. 4 If no/unclear dial tone is heard, continue adjustment to 4.6.[4.6] Remove base cover and locate clear dial tone switch.[4.7] Slide the switch (through A-G settings) until dial tone is clear. If dial tone is just as clear in position A as in position G, leave switch in position A.Carga[4.1] Ponga microcasco en la base. 4 Todos los diodos del indicador de batería se iluminarán un segundo. Para realizar la carga, la varilla debe estar en posición retráctil!.[4.2] Antes de usar microc., cargar mín. 30 min. Carga completa: 3 h. 4 El nº de diodos iluminados indica nivel de carga de batería, incluso con microc. fuera de base.[4.3] La batería adicional puede cargarse en su receptor (en la torre de carga).Ajuste de tono de llamada[4.4] Póngase el microcasco.[4.5] Levante el microteléfono y espe-re a oír el tono de llamada. 4 Si no se oye tono o éste no es claro, realice el paso siguiente.[4.6] Retire la tapa de la base y localice el conmutador de tono de llamada claro.[4.7] Desplace el conmutador (por A-G). Si el tono es igual de claro en A que en G, déjelo en A.Page 8Page 9](https://usermanual.wiki/GN-Audio-USA/GN9300US.user-manual/User-Guide-613620-Page-5.png)
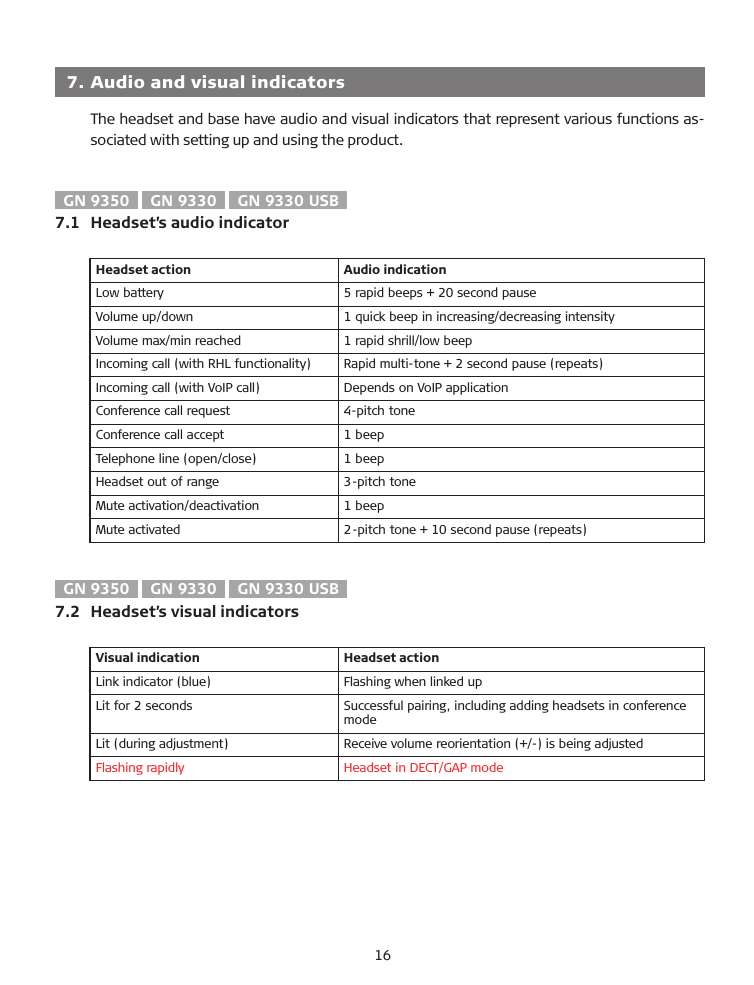
![5.1 5.2 5.35.5 5.75.65.4Volume Volume Volumen5 | For a USB application, the computer’s settings deter-mine transmit volume. | Avec une application USB, le volume de transmission se règle sur l’ordinateur. | Si utiliza una aplicación USB, la configuración del equipo determinará el volumen de transmisión.Transmit volume settingRéglage du volume de transmissionAjuste del volumen de transmisiónAdjusting speaker volumeRéglage du volume de réceptionAjuste de vol. de recepciónExtendable boom armPerche micro extensibleVarilla extensible | English | Français | EspañolPage 10Page 11Réglage du volume de transmission Ce réglage est indispensable pour que votre voix soit clairement audible.[5.1] Mettez le micro-casque.[5.2] Sur le menu de l’afficheur de la base, recherchez réglage du volume de transmission .[5.3] Appelez la personne qui doit vous aider pour l’essai.[5.4] Faites défiler le menu réglage du volume de transmission (12 réglages) jusqu’à ce que la personne confirme que le volume de votre voix est correct.[5.5] Appuyez sur OK pour confirmer le nouveau réglage.Réglage du volume de réception[5.6] Pour régler le volume, déplacez la commande vers le haut/bas. 4 Le casque émet des bips indiquant le volume sonore.Perche micro extensible[5.7] En environnement bruyant, vous pouvez allonger la perche micro. Pour cela, tirez doucement jusqu’à ce qu’elle se bloque. Pour rétracter la perche, enfoncez-la doucement.Ajuste del volumen de transmisión Este ajuste es muy importante para que su voz se oiga claramente!.[5.1] Póngase el microcasco.[5.2] En el menú de la base, localice el ajuste de volumen de transmisión .[5.3] Realice una llamada de prueba a alguien.[5.4] Desplácese por las 12 opciones del menú de ajuste del volumen de transmisión hasta que se le confirme un volumen de voz adecuado.[5.5] Pulse OK (Aceptar) para confir-mar la nueva configuración.Ajuste de vol. de recepción[5.6] Mueva el conmutador de vo-lumen arriba y abajo para ajustar el volumen de recepción. 4 Los tonos del microcasco indican el nivel del volumen.Varilla extensible[5.7] La varilla del microcasco es extensible y puede alargarse si el am-biente es ruidoso. Para ello, tire de la varilla suavemente hasta el tope. Para devolver la varilla a la posición retráctil, empújela suavemente.Transmit volume setting This setting is critical for your voice to be heard clearly.[5.1] Put on headset.[5.2] From base’s display menu, locate transmit volume adjustment .[5.3] Make a call to someone who will act as test person.[5.4] Scroll through 12-setting trans-mit volume adjustment menu until your test person confirms your voice is at appropriate volume.[5.5] Press OK to confirm new setting.Adjusting speaker volume[5.6] Push volume switch up/down to adjust receive volume. 4 Tones in headset indicate volume level.Extendable boom arm[5.7] The headset’s boom arm is extendable and may be extended if in a noisy environment. Extend the boom arm by gently pulling it until it stops. Retract the boom arm by gently push-ing it back.](https://usermanual.wiki/GN-Audio-USA/GN9300US.user-manual/User-Guide-613620-Page-6.png)
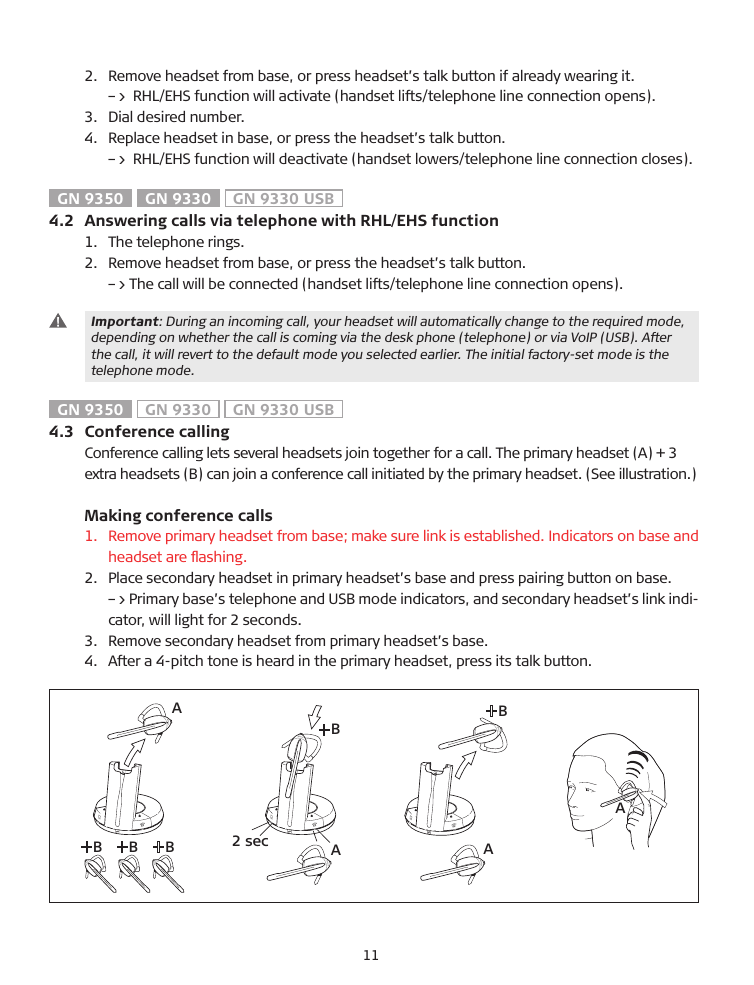
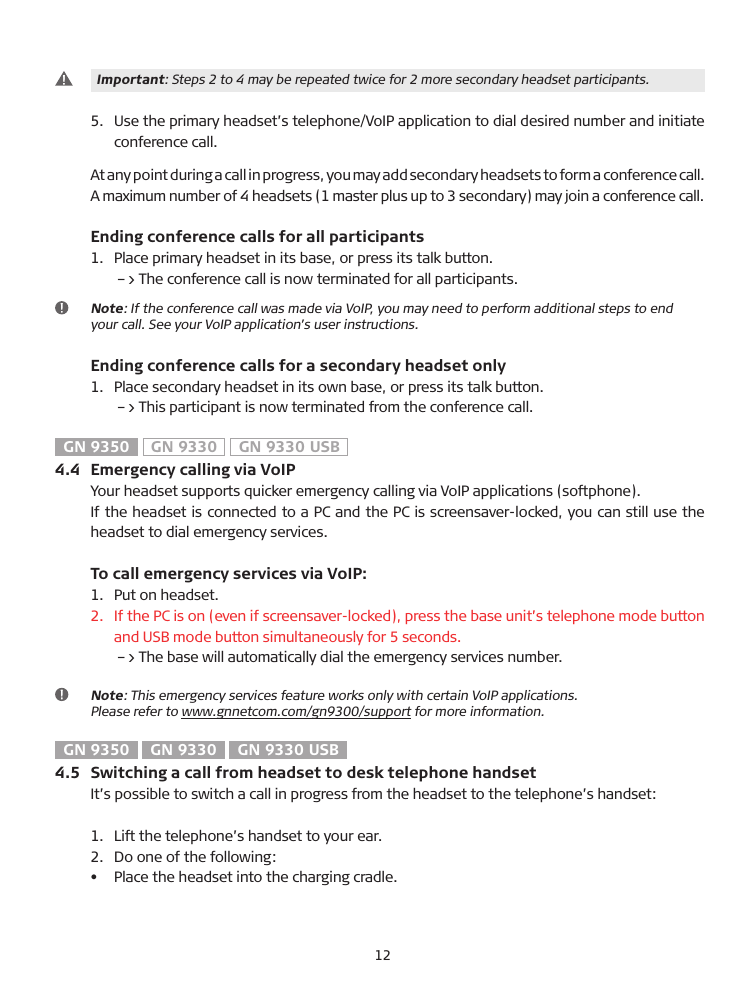
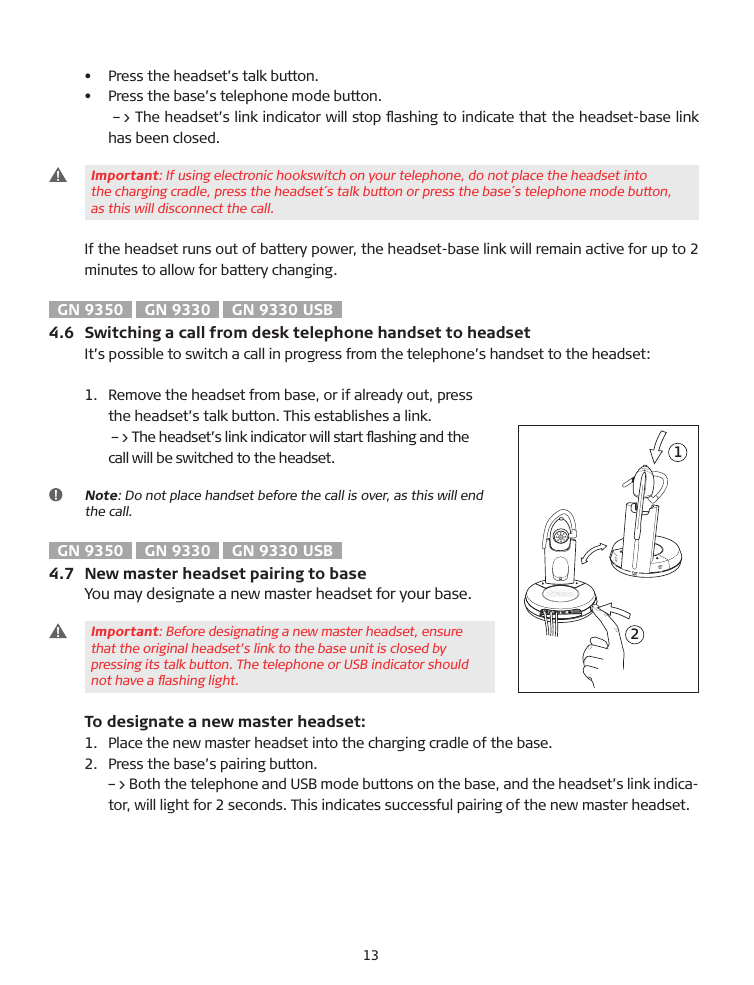
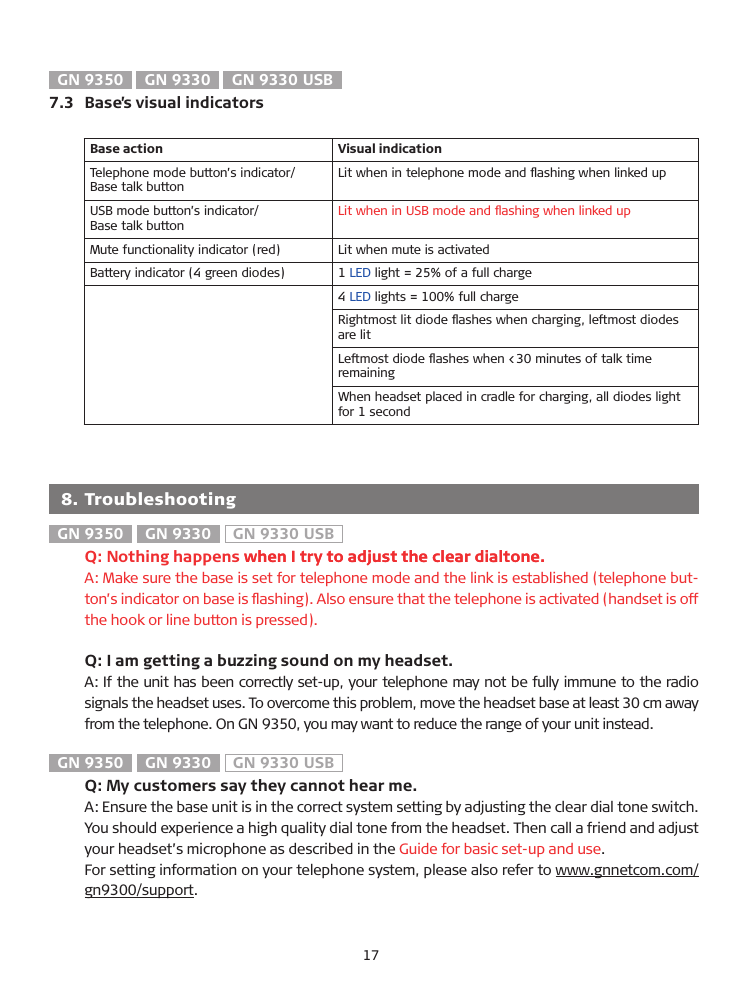
![6.7 6.8 6.9 6.10 6.116.1 6.2 6.3 6.4 6.5 6.6Calling Téléphoner Realizar llamadas6 | USB/Telephone mode button in-dicators: Lit when base is in selec-ted mode (USB or telephone) and flashing when link in the selected mode is active. | Voyants des touches USB/-Téléphone : allumés quand la base se trouve dans le mode sélectionné (USB ou Téléphone) et clignotants quand la liaison est établie dans le mode sélectionné | Indicadores del botón de modo USB/teléfono: se iluminan cuando la base está en modo selec-cionado (USB o teléfono) y parpadea cuando la conexión en el modo seleccio-nado está activa. Making calls via telephone[6.1] Ensure telephone mode is selected.[6.2] Remove headset from base, or press headset’s talk button if already wearing headset.[6.3] Lift telephone’s handset and wait for dial tone.[6.4] Dial desired number.Ending calls[6.5] Place telephone’s handset.[6.6] Place headset in base, or press headset’s talk button.Making calls via PC/VoIP application[6.7] Remove headset from base, or press headset’s talk button if already wearing headset.[6.8] Ensure USB mode is selected. USB button’s indikator will light.[6.9] Complete call according to your PC application’s instructions.Ending calls[6.10] End call according to your PC application’s instructions.[6.11] Place headset in base, or press headset’s talk button. | To make/end calls remotely via telephone using remote handset lifting functionality. See Guide for additional functions for instructions. | Pour appe-ler/raccrocher à distance via le téléphone à l’aide de la fonc-tion de décroché à distance, voir instructions du Guide des fonctions addi-tionnelles. | También puede realizar y finali-zar llamadas de forma remota a través de la funcionalidad de descolgador remoto de mi-croteléfono.Consulte la Guía de funciones adicionales para obtener instruc-ciones.Making calls via telephonePasser un appel via le téléphoneLlamadas a través del teléfonoMaking calls via PC/VoIP applicationPasser un appel via un ordinateur (VoIP)Realización de llamadas a través de una aplicación VoIP o el PC | English | Français | EspañolPasser un appel via le téléphone[6.1] Vérifiez que le mode Téléphone est sélectionné.[6.2] Retirez le micro-casque de la base ou, si vous le portez déjà, ap-puyez sur sa touche Conversation.[6.3] Décrochez le combiné et atten-dez la tonalité.[6.4] Composez le numéro.Terminer un appel[6.5] Raccrochez le combiné téléphonique.[6.6] Replacez le micro-casque dans la base, ou appuyez sur le bouton de conversation du micro-casque.Passer un appel via un ordinateur (VoIP)[6.7] Prenez le micro-casque dans la base ou, si vous le portez déjà, ap-puyez sur sa touche Conversation.[6.8] Vérifiez que le mode USB est sélectionné. Le voyant de la touche USB s’allume.[6.9] Passez l’appel selon les instruc-tions de votre logiciel.Terminer un appel[6.10] Terminez l’appel selon les instructions de votre logiciel.[6.11] Replacez le micro-casque dans la base, ou appuyez sur le bouton de conversation du micro-casque.Llamadas a través del teléfono[6.1] Asegúrese de haber seleccionado el modo de teléfono.[6.2] Retire el microcasco de la base, o bien pulse el botón de conversación si ya lleva el microcasco.[6.3] Levante el microt. y espere a oír el tono de llamada.[6.4] Marque el número deseado.Finalización de llamadas[6.5] Vuelva a colocar el microteléfono en su sitio.[6.6] Coloque el microcasco en la base, o pulse el botón de conversación del microcasco.Realización de llamadas a través de una aplicación VoIP o el PC[6.7] Retire el microcasco de la base, o bien pulse el botón de conversación si ya lleva el microcasco.[6.8] Asegúrese de seleccionar el modo USB. Se iluminará el indicador del botón de USB.[6.9] Finalice la llamada siguiendo las instrucciones de la aplicación de PC.Finalización de llamadas[6.10] Finalice la llamada siguiendo las instrucciones de la aplicación de PC.[6.11] Coloque el microcasco en la base, o pulse el botón de conversación del microcasco.Page 12Page 13](https://usermanual.wiki/GN-Audio-USA/GN9300US.user-manual/User-Guide-613620-Page-7.png)
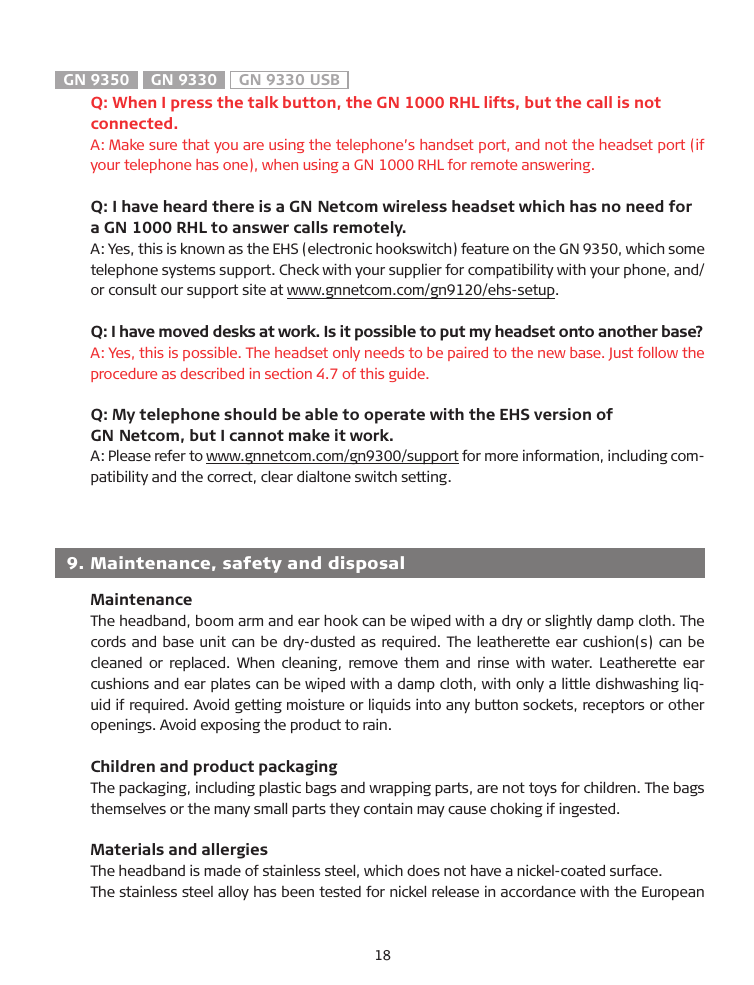
![Answering calls via telephoneRépondre à un appel via le téléphoneCómo responder llamadas a través del teléfonoAnswering calls via VoIP application manuallyRépondre via une application VoIP manuellementCómo responder llamadas a través de una aplicación VoIP manualmente7.2 7.37.1Mute functionalityFonction SecretFuncionalidad de silencio7.4 7.5 7.77.6Answering calls Répondre à un appel Responder llamadas7 | When receiving calls, the unit automatically selects the required tele-phone or VoIP mode. When the call is finished, it reverts back to the manually-selected mode. | A l’arrivée d’un appel, l’appareil sélectionne au-tomatiquement le mode télé-phone ou VoIP. En fin d’appel, il revient au mode sélectionné manuellement. | Al recibir llamadas, la unidad auto-máticamente selecciona el modo requerido de teléfono o VoIP. Al finalizar la llamada, vuelve al modo seleccionado manualmente.Répondre à un appel via le téléphone[7.1] Le téléphone sonne.[7.2] Prenez le micro-casque dans la base ou, si vous le portez déjà, ap-puyez sur sa touche Conversation.[7.3] Décrochez le combiné télépho-nique. 4 L’appel est transféré au micro-cas-que.Répondre via une application VoIP manuellement[7.4] L’application VoIp de votre ordi-nateur signale les appels entrants.[7.5] Prenez le micro-casque dans la base. 4 L’appel est transféré.[7.6] Activez manuellement la fonction de prise d’appel de l’application VoIP. 4 L’appel est transféré.Fonction Secret[7.7] Pour activer/désactiver la fonc-tion Secret, appuyez sur le bouton de réglage du volume. 4 En mode Secret, vous entendez des bips réguliers dans le casque et le voyant Secret de la base s’allume.Note : Certaines applications VoIP permet-tent de prendre les appels/raccrocher à dis-tance et transmettent le signal de sonnerie. Voir www.gnnetcom.com/gn9300/support pour plus de détails.Cómo responder llamadas a través del teléfono[7.1] El teléfono sonará.[7.2] Retire el microcasco de la base, o bien pulse el botón de conversación si ya lleva el microcasco.[7.3] Levante el microteléfono. 4 La llamada se dirigirá al microcasco.Cómo responder llamadas a través de una aplicación VoIP manualmente[7.4] La aplicación VoIP de su PC le indicará cuando tiene una llamada entrante.[7.5] Retire el microcasco de la base. 4 Se realizará la conexión de llamada.[7.6] Active manualmente la funcio-nalidad para responder llamadas de la aplicación VoIP del PC. 4 Se realizará la conexión de llamada.Funcionalidad de silencio[7.7] La funcionalidad de silencio (“mute”) se activa/desactiva pulsando el silenciador del control del volumen. 4 Cuando la funcionalidad de silencio está activada, el microcasco emite un tono a intervalos regulares y el indica-dor de silencio de la base se ilumina.Nota: Algunas aplicaciones VoIP permiten responder y finalizar llamadas remotas y transmitir la señal de llamada. Consulte el sitio www.gnnetcom.com/gn9300/support para obtener más detalles.Answering calls via telephone[7.1] The telephone will ring.[7.2] Remove headset from base, or press headset’s talk button if wearing headset.[7.3] Lift telephone’s handset. 4 The call will be directed to headset.Answering calls via VoIP application manually[7.4] Your computer’s VoIP application will notify you of an incoming call.[7.5] Remove headset from base. 4 The call will be connected through.[7.6] Manually activate your compu-ter’s VoIP application’s call answer functionality. 4 The call will be connected through.Mute functionality[7.7] Mute functionality is activated/deactivated by pressing the volume control’s mute switch. 4 When mute is activated, a tone in regular intervals is heard in headset, and mute indicator on base lights.Note: Some VoIP applications allow remote answering and ending of calls and transmit the ring signal. See www.gnnetcom.com/gn9300/support for more details. | English | Français | EspañolPage 14Page 15](https://usermanual.wiki/GN-Audio-USA/GN9300US.user-manual/User-Guide-613620-Page-8.png)
![Note: Switch is the default setting. To change the sound mode:1. Use 34 to locate the sound mode menu on base display.2. Use 56 to select one of the 3 modes from the menu, and choose between fixed/switched from the menu.3. Press OK to confirm the setting. 2.5.5 Protection level selection Your headset offers a choice of 4 protection levels (plus its additional basic protection level). These levels protect you against sudden, overly-loud sound spikes that may come from the phone network (such as shrill telefax signals or network interference), and provide a limit to the maximum noise exposure from the headset during your workday.The number of hours (on average) you spend on the telephone per day determines the set-ting you should select. All 4 protection levels meet and exceed de facto global protection levels, and are compliant with NIOSH standards, and EU health and safety codes of 85 d�(A). The TT4 protection level is compliant with pertinent Australian legislation. Important: In some jurisdictions, applicable regulations or laws may mandate the required setting you use. The Default level provides a protection level of 118 d�(A). Your headset protects you against overly-loud sound spikes. If you use the telephone’s handset for calling, you will not have this protection.Protection level Criteria for selectingLevel 0 �asic protection against overly-loud sound spikes [118 db(A)]. Auto volume disabledLevel 1 Less than 4 hours on telephone/dayLevel 2 4-8 hours on telephone/dayLevel 3 More than 8 hours on telephone/dayLevel 4 (TT4) Required Australian protection level* Compliant with Directive 2003/10/EC of the European Parliament and Council of 6 February 2003. To change the protection level:1. Use 34 to locate the protection level menu on base display.2. Use 56 to select one of the 5 modes from the menu.3. Press OK to confirm the new mode.8](https://usermanual.wiki/GN-Audio-USA/GN9300US.user-manual/User-Guide-613620-Page-18.png)
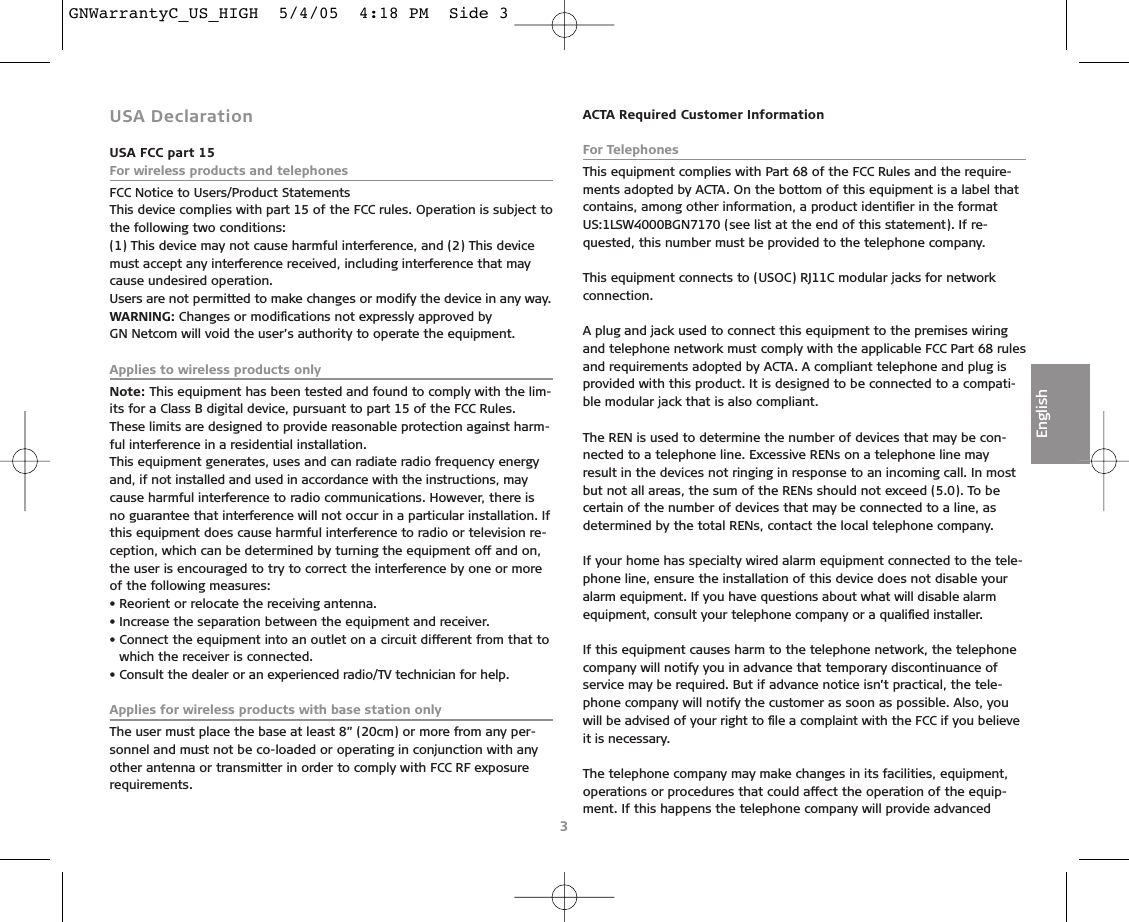
![notice in order for you to make necessary modifications to maintainuninterrupted service.If this equipment is causing harm to the telephone network, the tele-phone company may request that you disconnect the equipment untilthe problem is solved. Connection to party line service is subject to state tariffs. Contact thestate public utility commission, public service commission or corporationcommission for information.NOTICE: If your home has specially wired alarm equipment connected tothe telephone line, ensure the installation of this [equipment] does notdisable your alarm equipment. If you have questions about what willdisable alarm equipment, consult your telephone company or a qualifiedinstaller.There are no repairs that the customer can perform. Defective unitsmust be returned to GN Netcom for repair.Canada DeclarationIC Notice to Users/Product StatementsOperation is subject to the following two conditions:(1) This device may not cause interference and (2) This device mustaccept any interference, including interference that may cause undesiredoperation of the device.The term “IC:” before the certification/registration number only signifiesthat registration was performed based on a Declaration of Conformityindicating that Industry Canada technical specifications were met. Itdoes not imply that industry Canada approved the equipment.Canada Terminal equipmentIC Notice to Users/Product StatementsNOTICE: This equipment meets the applicable Industry Canada TerminalEquipment Technical Specifications. This is confirmed by the registrationnumber.The Ringer Equivalence Number (REN) assigned to each terminal deviceprovides an indication of the maximum number of terminals allowed tobe connected to a telephone interface. The termination of an interfacemay consist of any combination of devices subject only to the require-ment that the sum of the ringe equivalence numbers of all the devicesdoes not exceed 5.Repairs to certified equipment should be coordinated by a representativedesignated by the supplier. Any repairs or alterations made by the userto this equipment, or equipment malfunctions, may give the tele-communications company cause to request the user to disconnect the equipment.Users should ensure for their own protection that the electrical groundconnections of the power utility, telephone lines and internal metallicwater pipe system, if present, are connected together. This precautionmay be particularly important in rural areas. Caution: Users should NOTattempt to make such connections themselves, but should contact theappropriate electric inspection authority, or electrician, as appropriate.Description on safety in headsetsFor your protection and comfort GN Netcom has implemented several pro-tective measures in this headset as described above. These protectionswere carefully designed to maintain safe volume levels and to ensure thatthe headset operates in compliance with government safety standards.To further ensure your safety, please abide by the guidelines listed below.Warning!Headsets are capable of delivering sounds at loud volumes and high-pitched tones. Exposure to such sounds can result in permanent hearingloss damage. Please read the safety guidelines below prior to using thisheadset.Safety guidelines1. Prior to use of this product follow these steps:• before putting on the headset, turn the volume control to its lowestlevel,• put the headset on, and then• slowly adjust the volume control to a comfortable level and pitch.4GNWarrantyC_US_HIGH 5/4/05 4:18 PM Side 4](https://usermanual.wiki/GN-Audio-USA/GN9300US.user-manual/User-Guide-613620-Page-33.png)
![Appendum - USA FCC part 15RF Exposure Headset (DECT):Tests for SAR are conducted using standard operating positions specified by the FCC with the UPCS headset transmitting at its highest certified power level in all tested frequency bands. Although the SAR is determined at the highest certified power level, the actual SAR level of the UPCS headset while operation can be well below the maximum value. This is because the headset is designed to operate at multiple power levels so as to use only the power required to reach the network. In general, the closer you are to a wireless base station antenna, the lower the power output. Before a Headset model is available for sale to the public, it must be tested and certified to the FCC that it does not exceed the limit established by the government-adopted requirement for safe exposure. The tests are performed in positions and locations (e.g., at the ear) as required by the FCC for each model. While there may be differences between the SAR levels of various UPCS headsets and at various positions, they all meet the government requirement for safe exposure.Health and Safety Information FCC:Exposure to Radio Frequency (RF) SignalsYour wireless headset is a radio transmitter and receiver. It is designed and manufactured not to exceed the emission limits for exposure to radio frequency (RF) energy set by the Federal Communications Commission of the U.S. Government. These limits are part of comprehensive guidelines and establish permitted levels of RF energy for the general population. The guidelines are based on the safety standards previously set by both U.S. and international standards bodies:This EUT has been shown to be capable of compliance for localized specific absorption rate > (SAR) for uncontrolled environment/general population exposure limits specified in ANSI/IEEE> Std. C95.1-1992 and had been tested in accordance with the measurement procedures specified in FCC/OET Bulletin 65 Supplement C (2001) and IEEE Std. 1528-2003 Detember 2003).The standards include a substantial safety margin designed to assure the safety of all persons, regardless of age and health. The exposure standard for wireless UPCS headset employs a unit of measurement known as the Specific Absorption Rate, or SAR. The SAR limit set by the FCC and IC Canada is 1.6W/kg *.* In the U.S. and Canada, the SAR limit for mobile phones used by the public is 1.6 watts/kg (W/kg) averaged over one gram of tissue. The standard incorporates a substantial margin of safety to give additional protection for the public and to account for any variations in.RF Exposure Headset (900 Mhz):This device and its antenna must not be co-located or operating in conjunction with any other antenna or transmitter. This kind of equipment is below 60/frequency[GHz] mW(TCB Exclusion List) so that SAR testing is excluded.](https://usermanual.wiki/GN-Audio-USA/GN9300US.user-manual/User-Guide-613620-Page-44.png)