GOLF IMPACT DYNPRO CLUB HEAD MODULE User Manual USERS MANUAL
GOLF IMPACT LLC CLUB HEAD MODULE USERS MANUAL
USERS MANUAL

Copyright Golf Impact LLC 2009
GOLF IMPACT LLC
Golf Dynamics Pro: Users Manual

Copyright Golf Impact LLC 2009
FCC Information:
GOLF IMPACT LLC - FCC ID: XSCDYNPRO
GOLF IMPACT LLC - FCC ID: XSCDYNUSB
THIS DEVICE COMPLIES WITH PART 15 OF THE FCC RULES. OPERATION IS SUBJECT TO THE FOLLOWING
TWO CONDITIONS: (1) THIS DEVICE MAY NOT CAUSE HARMFUL INTERFERENCE, AND (2) THIS DEVICE
MUST ACCEPT ANY INTERFERENCE RECEIVED, INCLUDING INTERFERENCE THAT MAY CAUSE
UNDESIRED OPERATION.
THE MANUFACTURER IS NOT RESPONSIBLE FOR ANY RADIO OR TV INTERFERENCE CAUSED BY
UNAUTHORIZED MODIFICATIONS TO THIS EQUIPMENT. SUCH MODIFICATIONS COULD VOID THE USER’S
AUTHORITY TO OPERATE THE EQUIPMENT.
Golf Impact LLC

Copyright Golf Impact LLC 2009
Table of Contents
Introduction: Golf Dynamics Pro ........................................................................ 1
How the “Golf Dynamics Pro” Works .......................................................................................2
What is included in the box ................................................................................... 3
1. Quick Start Guide: ............................................................................................................3
2. Club Head Module:...........................................................................................................4
3. USB Module .....................................................................................................................4
4. Golf Dynamics Pro CD:....................................................................................................4
5. Batteries CR2032:.............................................................................................................5
6. Double Sided Adhesive Tape............................................................................................5
7. Rubber Tape Removal Pad................................................................................................5
Computer System Requirements............................................................................ 5
Operating System..............................................................................................................5
Screen Display Resolution................................................................................................5
Processor...........................................................................................................................5
Memory RAM...................................................................................................................5
USB 2.0 Ports....................................................................................................................5
For Outdoor Use ...............................................................................................................5
Quick Start - Using Golf Dynamics Pro Right Now............................................. 5
Install Driver Software ...............................................................................................................5
Vista Operating System Driver Installation Process................................................................6
XP Operating System Driver Installation Process...................................................................9
Install User Application Software ............................................................................................12
Mount and Turn on Club Head Module....................................................................................14
Installing and Removing Batteries...................................................................... 15
Battery Installation ...................................................................................................................15
Battery Removal.......................................................................................................................15
Attaching and Removing Club Head Module..................................................... 17
Attaching the Club Head Module to Golf Club Head...............................................................17
Apply two strips of double sided tape ......................................................................................17
Removing the Club Head Module from the Golf Club Head ...................................................18
Golf Dynamics Pro User Applications Software and Usage .............................. 19
Launching The Golf Dynamics Pro Application ......................................................................19
Golf Dynamics Pro Main Application Window .......................................................................19
1. USB Set Up:....................................................................................................................20
2. Club Head Module Set Up:.............................................................................................20
3. Golfer Profile Set Up: .....................................................................................................20
Golf Dynamics Pro – User Software Applications.............................................. 21
Main Application Window .......................................................................................................21
Sport Gauge – User Application...............................................................................................23
Real Time Graph – User Application .......................................................................................24
Swing Capture - User Application............................................................................................25
Swing Consistency – User Application ....................................................................................26

Golf Impact LLC Golf Dynamics Pro: User Guide
1
Introduction: Golf Dynamics Pro
Congratulation on your purchase of the Golf Dynamics Pro product. Golf Impact LLC’s Golf
Dynamics Pro is a first of a kind real time swing and impact analyzer available to the consumer
market. The product consists of three main components:
“Club Head Module” : measures physical parameters of the club head motion and
wirelessly transmits those results.
“USB Module” : receives the wireless signal from the golf club head module and
transfers that information into your laptop for processing.
“Application Software” : Software that is loaded one time on your computer and resides
on your laptop computer. The application software does computations on the
information it receives from the “Club Head Module” then converts it to usable
information for the Golfer.
The product is a combination of advanced sensor and wireless technologies married with
sophisticated computation analysis software applications that reduce immense data results into
meaningful and easy to understand metrics that are important to golfers such as:
Golf club head time varying velocity profile.
Multi-dimension acceleration profiles for your entire swing including backswing, pause,
power stroke, impact and follow through.
Full swing consistency comparison from swing to swing.
Oscillation that can occur at club head from shaft wobble.
Club face acceleration at maximum velocity.
Club head rotation timing and rate of rotation during follow through.
Time duration of back swing.
Time duration of pause.
Time duration of power stroke (down swing).
2
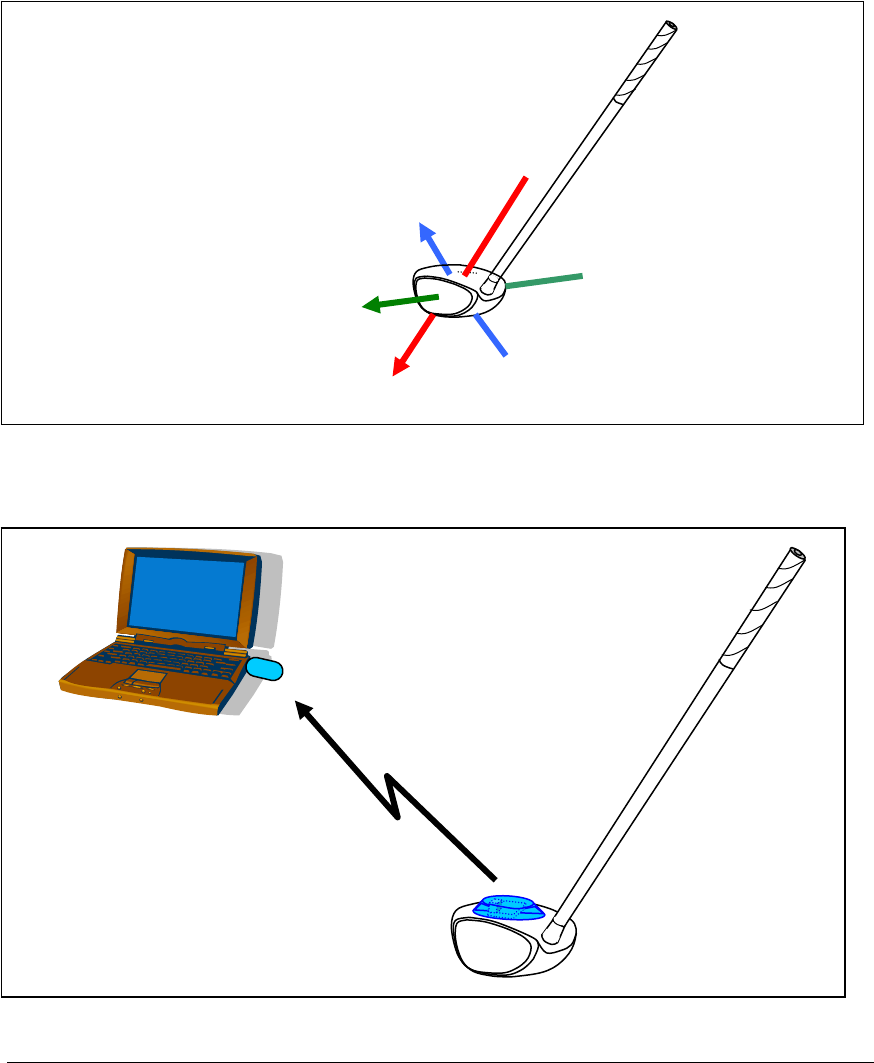
How the “Golf Dynamics Pro” Works
How the Golf Dynamics Pro works is a combination of three accelerometers arranged to measure
each of the axis directions of the club head as shown in Figure 1. This diagram shows the
direction reference of each axis. However, the actual point of measure is slightly above the club
head top surface.
The sensor data collected by the “Club Head Module” is then transmitted wirelessly to the USB
Module which is plugged into your computer or laptop, as shown below.
Radial Acceleration
Club Face Acceleration
(Tangential Acceleration)
Neutral Acceleration
3
Once the computer receives the data, the “User Application” software processes that data
instantaneously into useful information for presentation to the golfer through a rich graphics
interface on the computer screen.
The following chapters in this users guide will describe in more detail the product, how to use the
product, and review results.
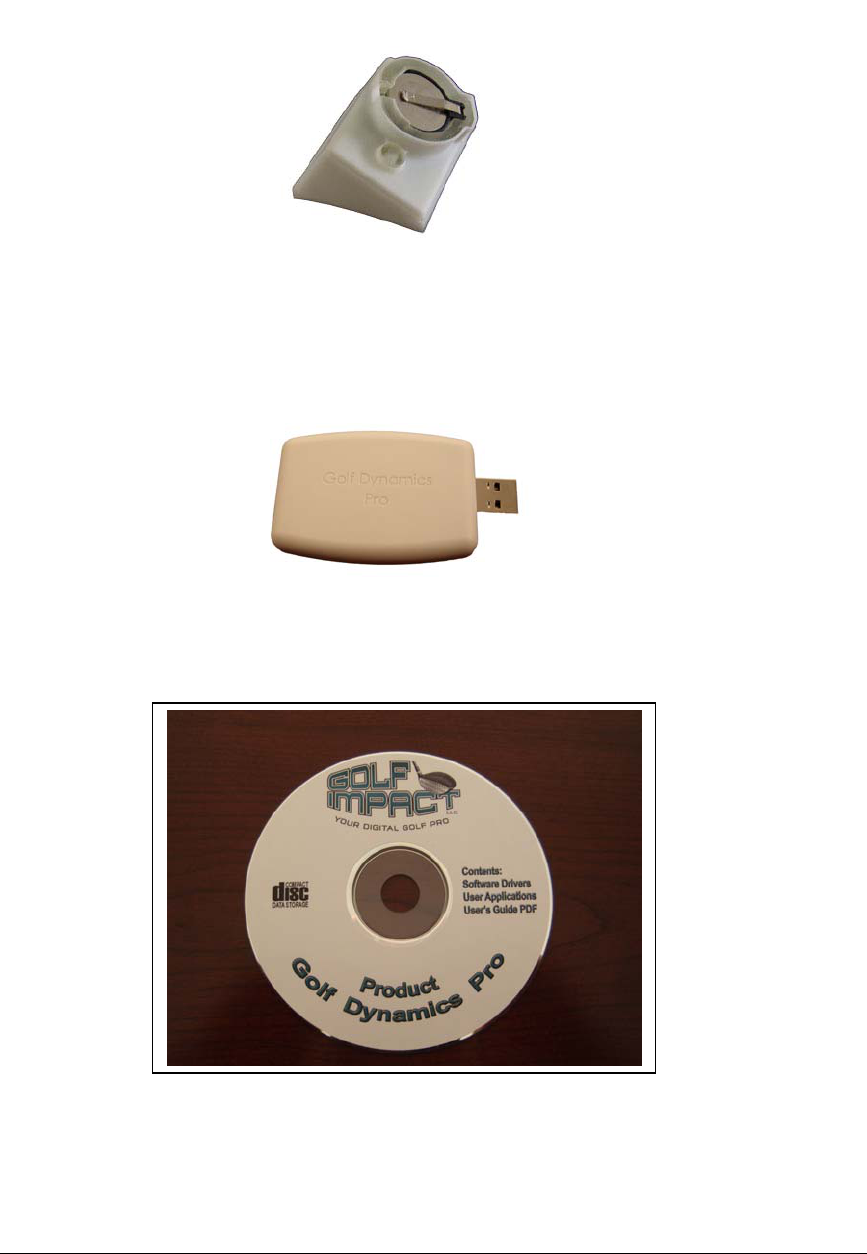
What is included in the box
The contents of the box you receive should include the following items.
1. Quick Start Guide:
The quick start guide is printed and included in your box to allow fast set up the Golf Dynamics
Pro software.
4
2. Club Head Module:
3. USB Module
4. Golf Dynamics Pro CD:

5
5. Batteries CR2032:
Your package includes two coin type lithium batteries that are CR2032 in size. This is a standard
size and can be purchased in many retail locations.
6. Double Sided Adhesive Tape
Your package includes 4 strips of double sided adhesive tape for attaching the “Club Head
Module” to the golf club head. The tape is 3M Multipurpose Indoor Mounting Tape 4008.
7. Rubber Tape Removal Pad
The rubber pad included in your product package is to help remove left over tape on the club
head after the “Club Head Module” is removed.
If you do not have any of these components when you receive your package or any of the items
appear to be damaged, please go to the Golf Impact website, www.golfimpactstore.com/return-
policy.aspx .
Computer System Requirements
The Golf Dynamics Pro product requires a computer with the following attributes:
Operating System: Window XP (Service Pack 3) or Vista 32 bit.
Screen Display Resolution : Minimum Resolution 1024x768.
Processor:: 1.5 GHz Processor or above.
Memory RAM: 1 GByte or greater.
USB 2.0 Ports: Must have at least one free USB port available.
For Outdoor Use: It is recommended that the Laptop have a non glossy non glare
screen for better viewing in sunlight.
Quick Start - Using Golf Dynamics Pro Right Now
Install Driver Software
There are a few simple steps that are required to get you up and running immediately. This can be
done in a step by step procedure.
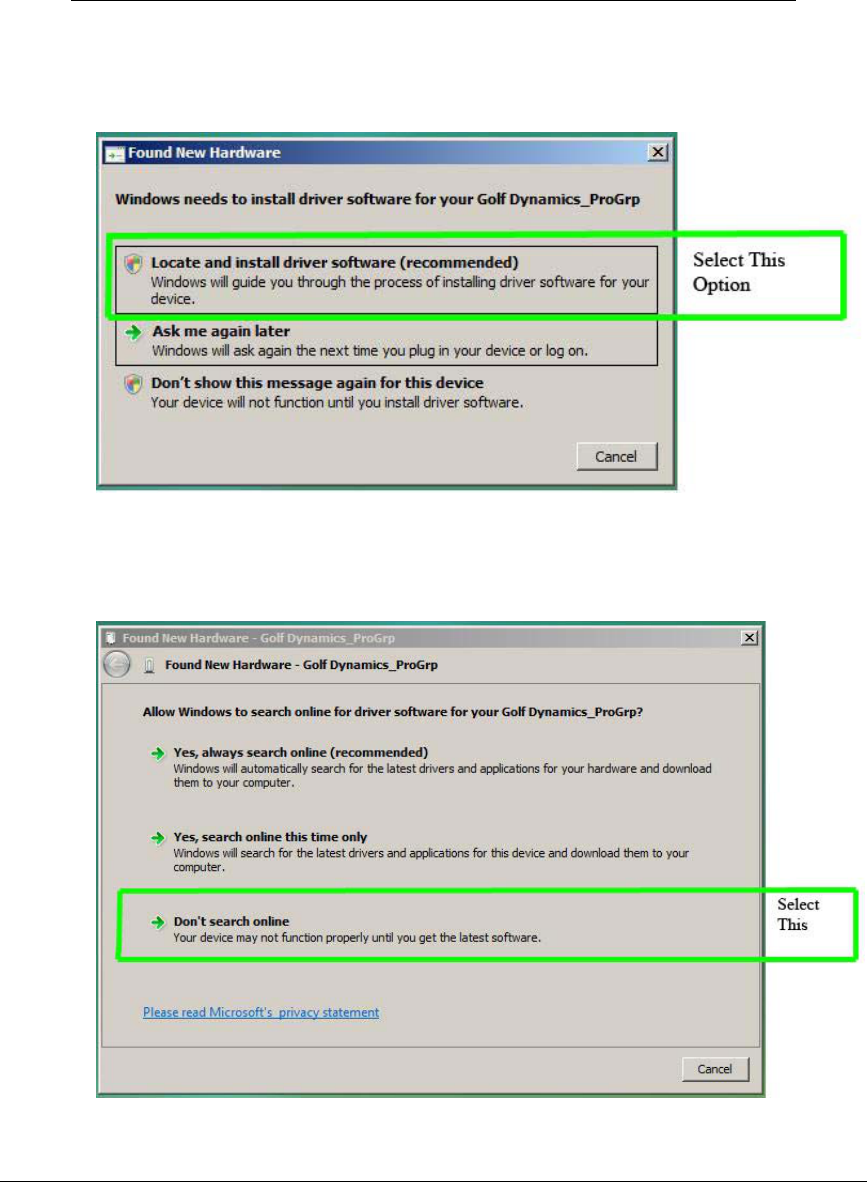
VISTA OPERATING SYSTEM DRIVER INSTALLATION PROCESS
1. Insert Golf Impact USB Module into an available USB port on your computer. You
should see the Following screen appear. Select the top option “Locate and install
driver software”
2. Now the install wizard will ask you were to search for the Golf Dynamics driver files.
Since they are located on the CD provided in your package, you need to select
“Don’t Search online” as shown below.
7
3. Now insert the Golf Dynamics Pro CD into your computer’s CD/DVD drive.
4. Now a Microsoft window will appear that asks if you want to continue with
installation, so you select “Install the driver software anyway” as shown below.
8
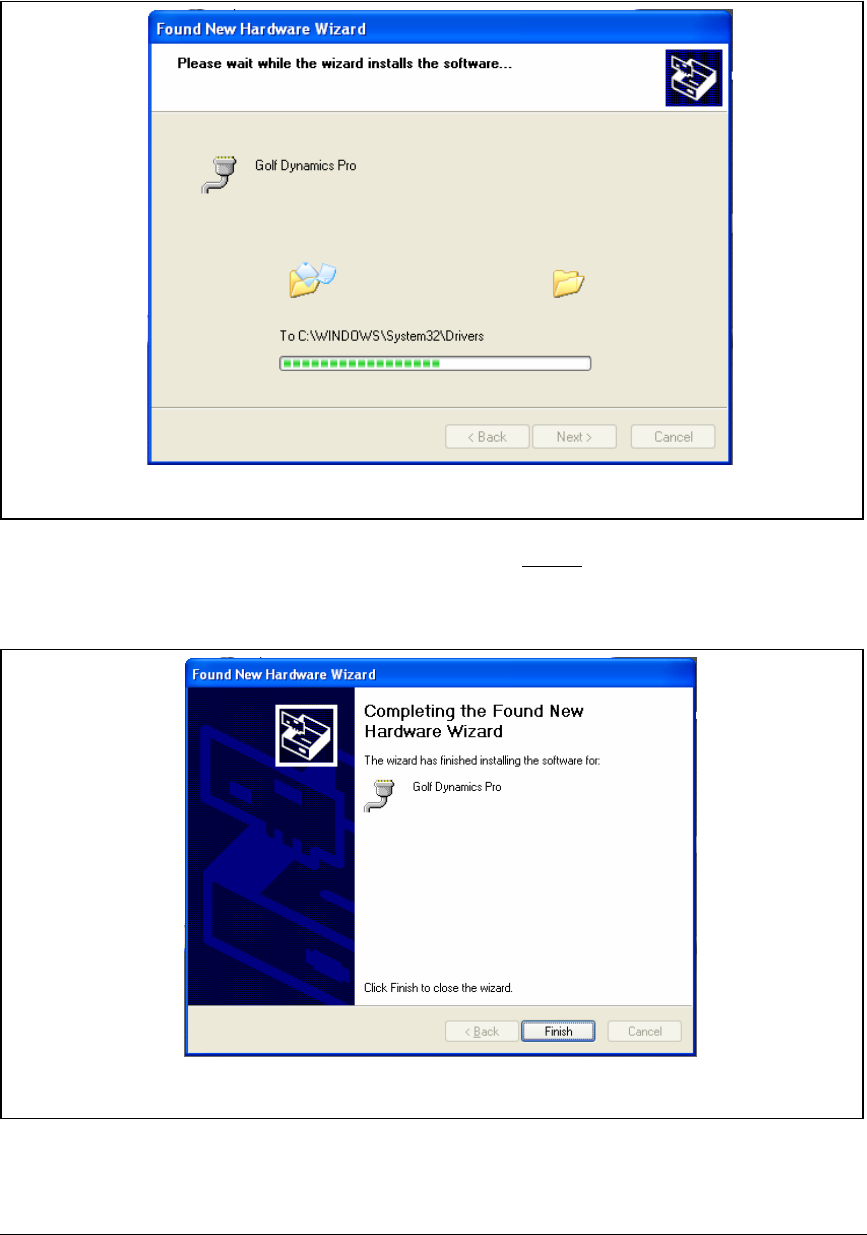
5. Now you have completed the installation of the drivers for your Golf Impact
product Golf Dynamics Pro. Now simply select the close button to complete the
software driver installation.
9
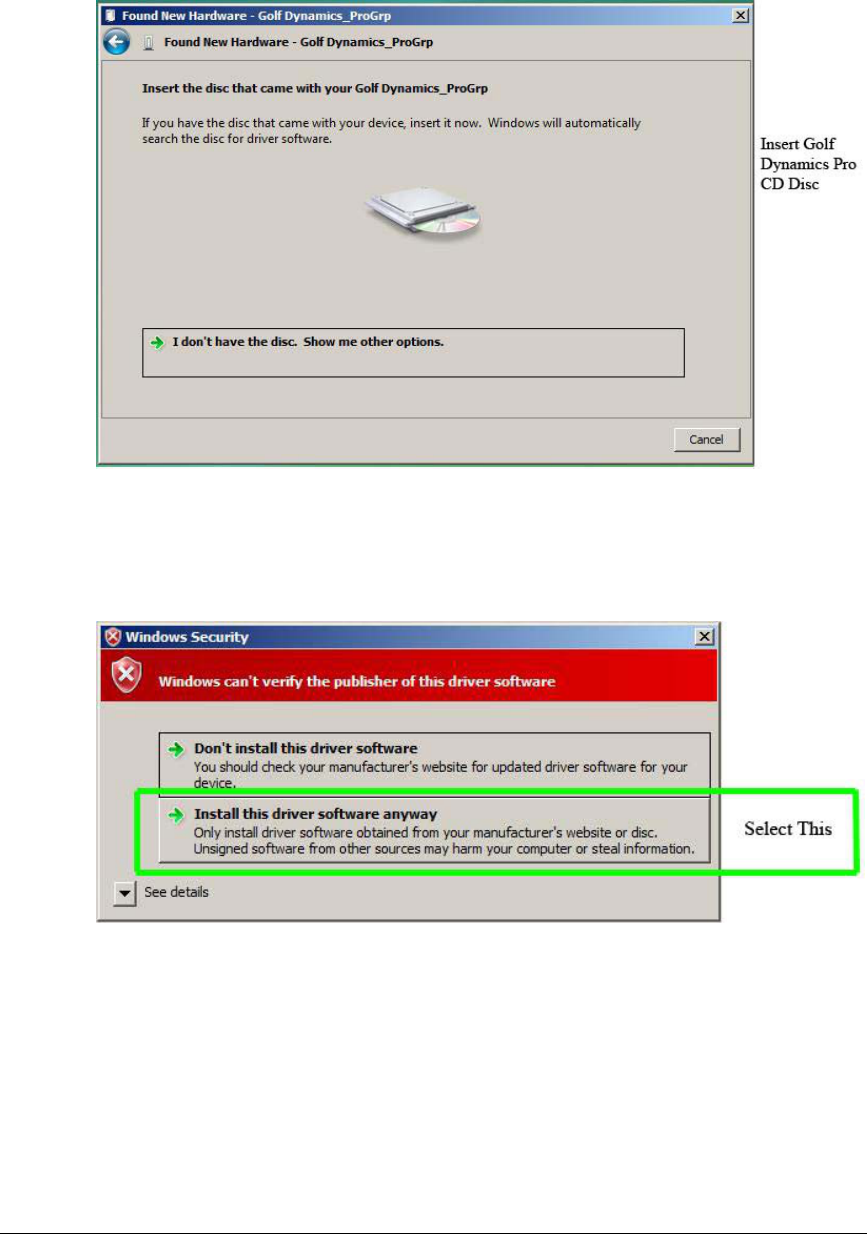
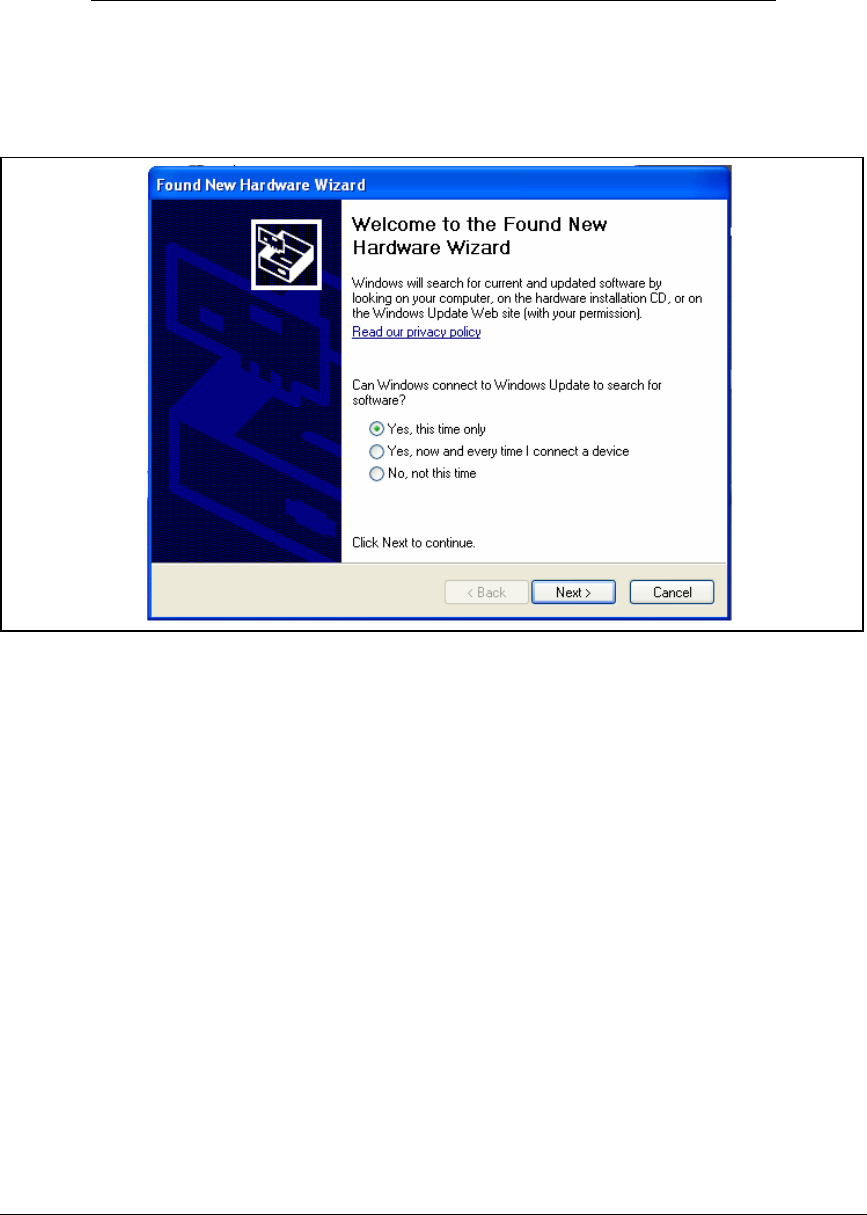
XP OPERATING SYSTEM DRIVER INSTALLATION PROCESS
1. Insert “USB Module” into an available USB port on your computer. You should see the
Following screen appear. Select the top option “Yes, this time only”
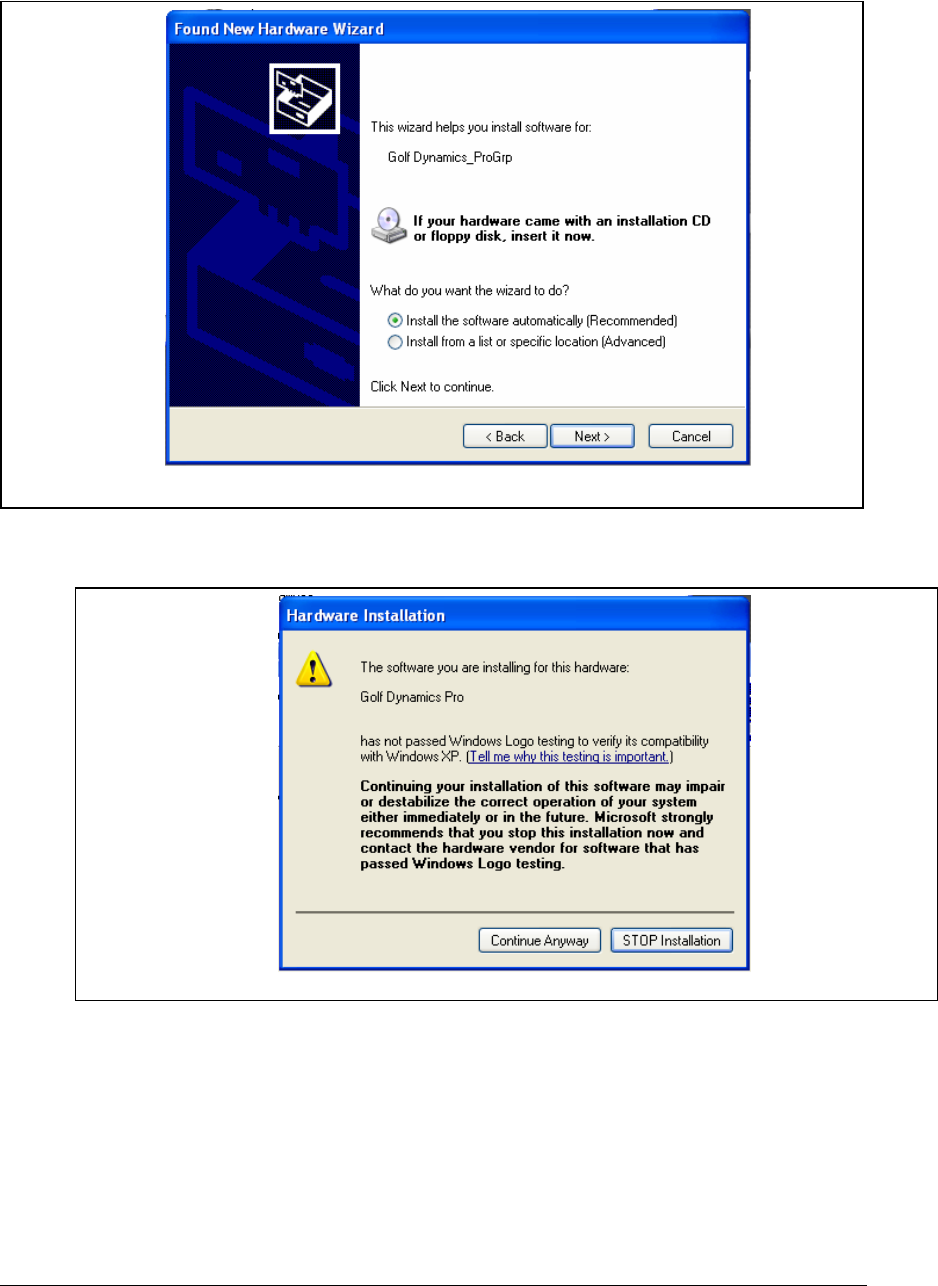
2. Now the install wizard will ask you where to search for the Golf Dynamics driver files.
Since they are located on the CD provided in your package, you need to first insert the
CD into the computers CD/DVD drive and then select “ Install the software
automatically (Recommended)” as shown below.
10
3. Now a Microsoft window will appear that asks if you want to continue with installation,
so you select “Continue anyway” as shown below:
11
4. Now a Microsoft window will appear briefly that shows file install progress.
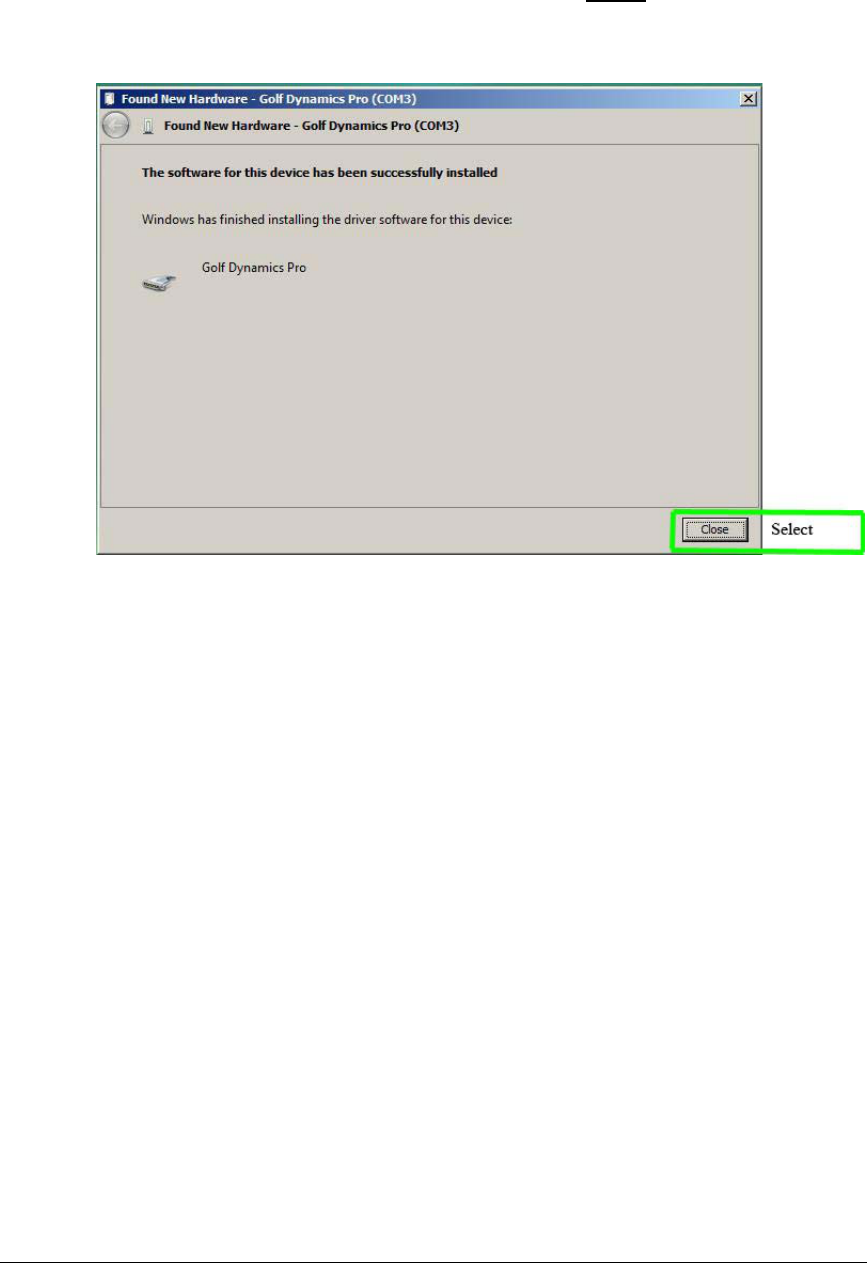
5. Now you have completed the installation of the drivers for your Golf Impact product
Golf Dynamics Pro. Now simply select the close button to complete the software driver
installation.
12
Install User Application Software
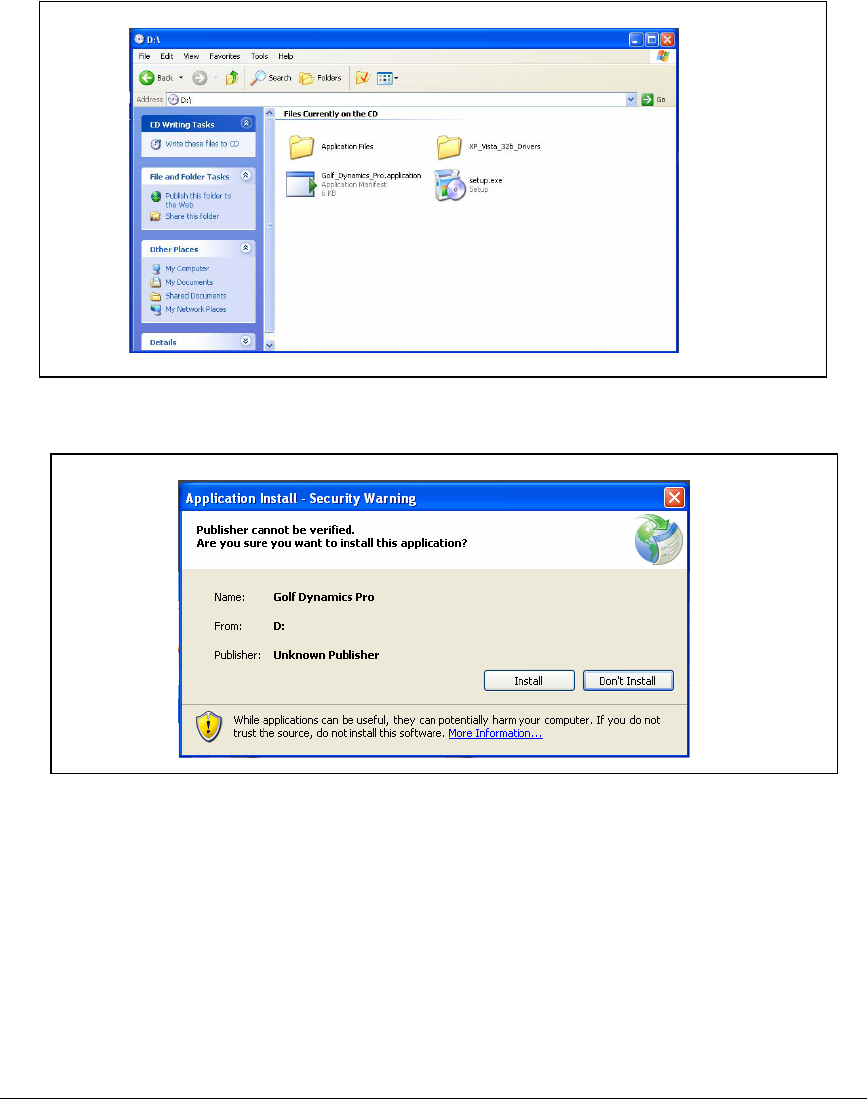
1. Navigate to Golf Impact CD in you DVD/CD drive.
2. Click on the “Setup.exe” file that will install the user application.
3. The standard installation security notices appear, click install.
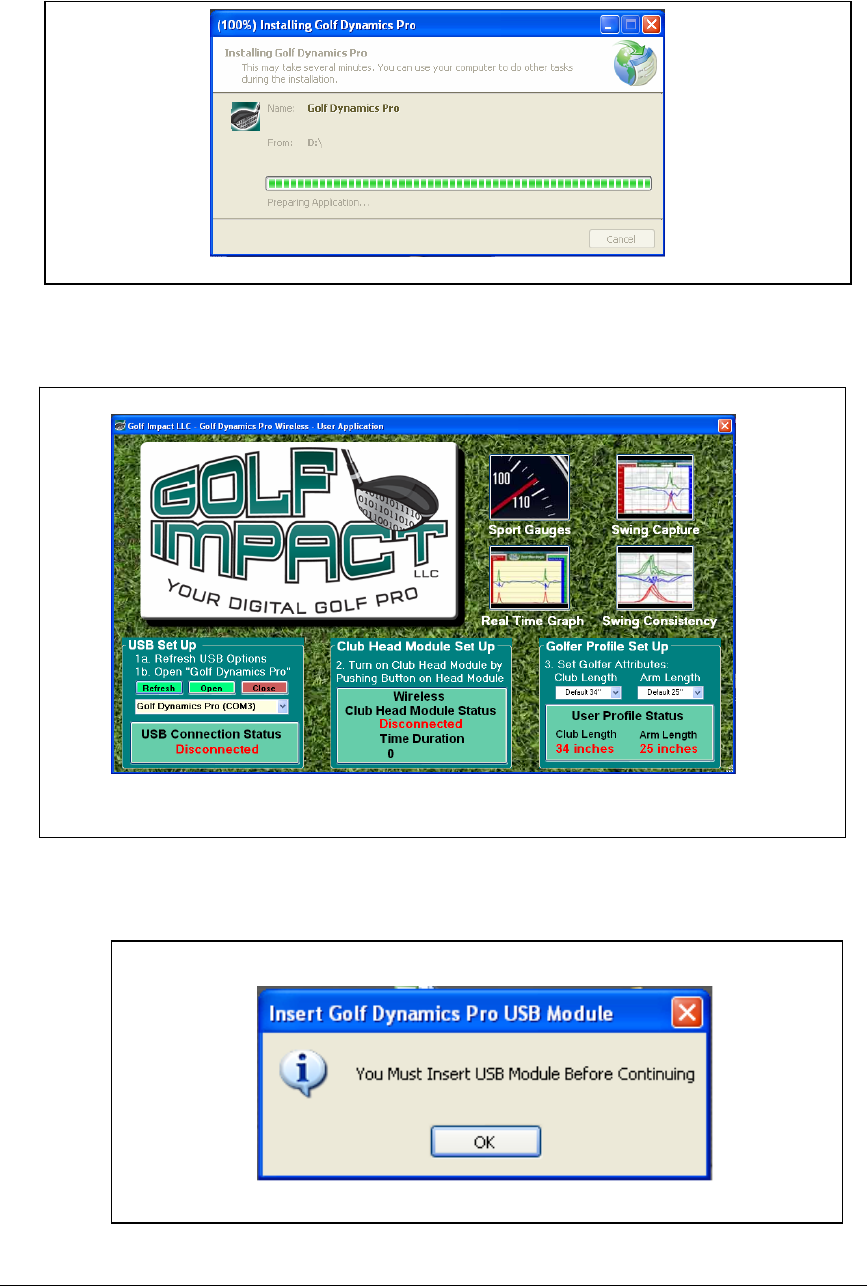
4. Now a window appears briefly as the necessary files are installed.
13
5. Once installed the program should automatically start running, if it does not it is now
available in the start menu of your computer.
a. If you do not have the “USB Module” plugged into the computer you will be
prompted to do so.

14
6. Now initiate the USB device communication with the computer by clicking the “Open”
button and you will see the USB connection status change from “Disconnected” to
Connected”.
Mount and Turn on Club Head Module
1. Using doubled sided tape provided, attach “Club Head Module” to club head.
2. Push button on Club Head Module and you will see the “Wireless Club Head Module
Status” change from “Disconnected to Connected”.
15
You should now be up and running and can select any of the four “User Applications” by
clicking on their representative image in the upper right quadrant of the main window shown
above.
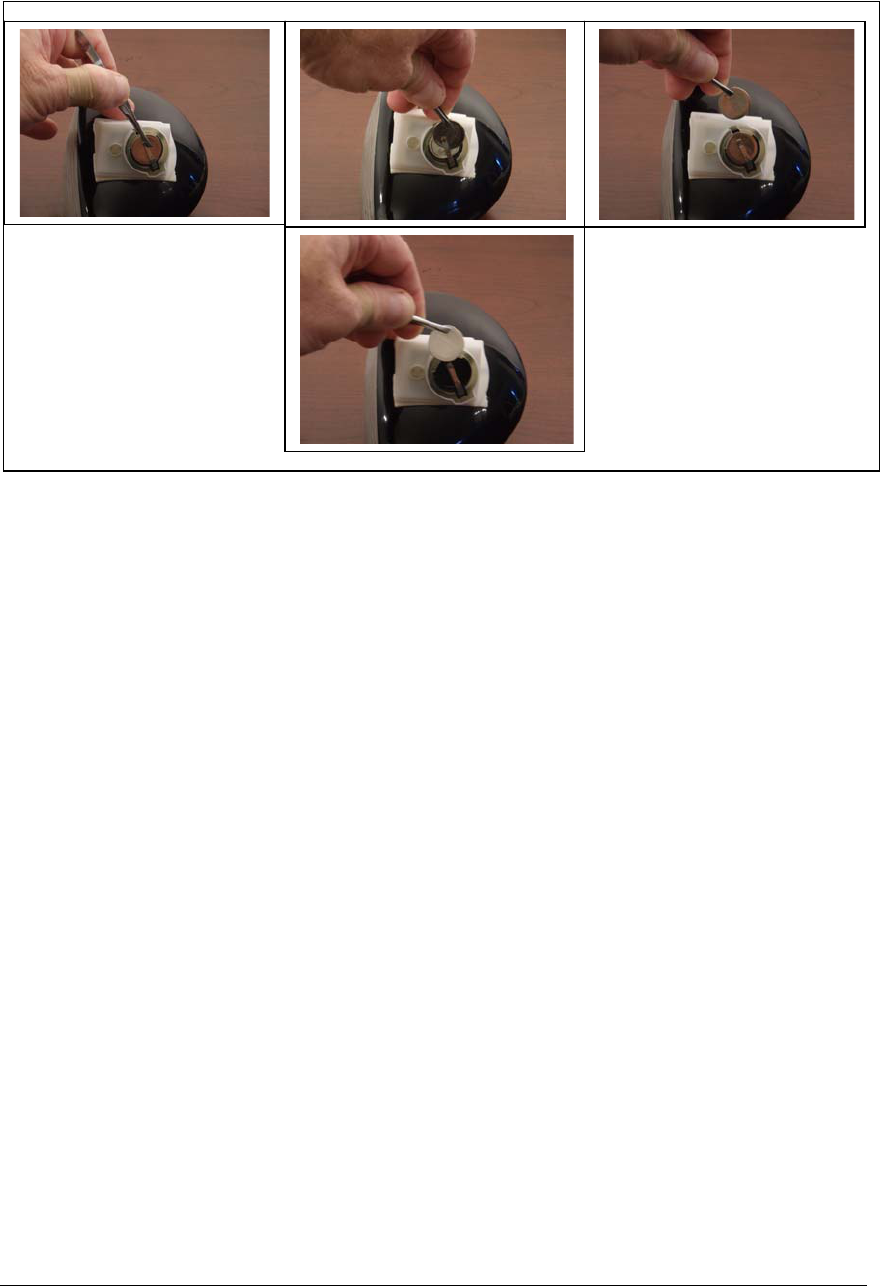
Installing and Removing Batteries
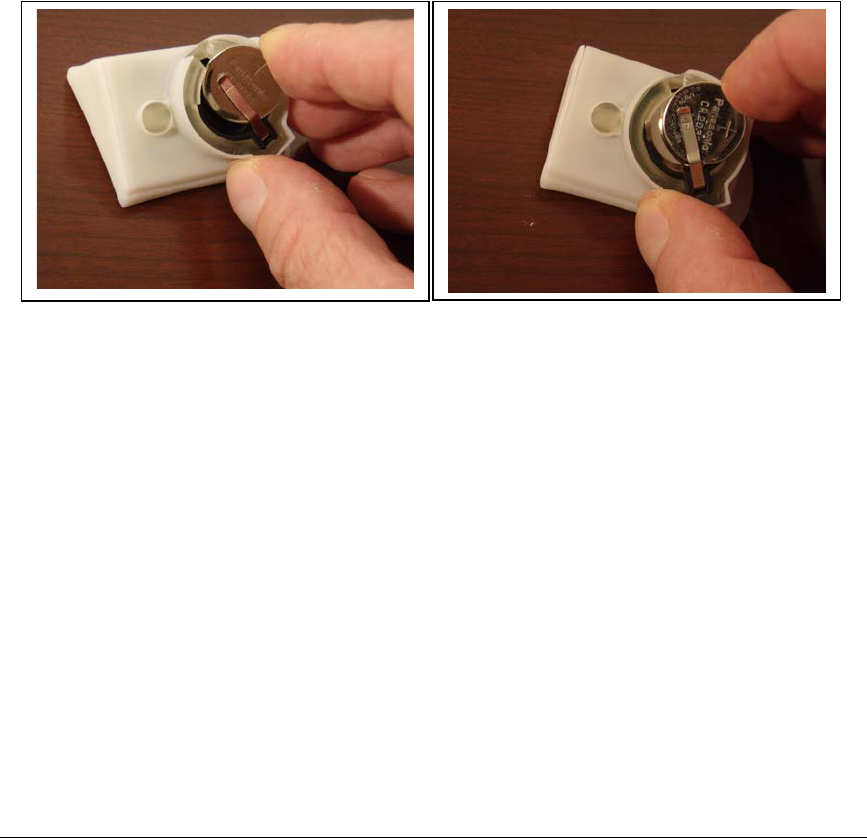
The installing and removing batteries with the correct procedure is important to ensure the device
is not physically damaged. The batteries in the club head module have been designed to be very
firmly held in place because of the extreme forces that the club head module experiences.
Battery Installation
The correct procedure for installing the coin batteries (standard size CR2032) is done by sliding
the batteries in from the side of the clip one at a time as shown in the image below.
Battery Removal
The procedure for removing the batteries requires the use of standard tweezers, in which one
battery at a time is removed. As shown in the image below, insert the tweezers in the slot in the
the front of the housing and firmly grip the battery, then lift the front of the battery and pull out
of the housing while avoiding bending the metal spring tab that contact the top of the batteries.
16
17
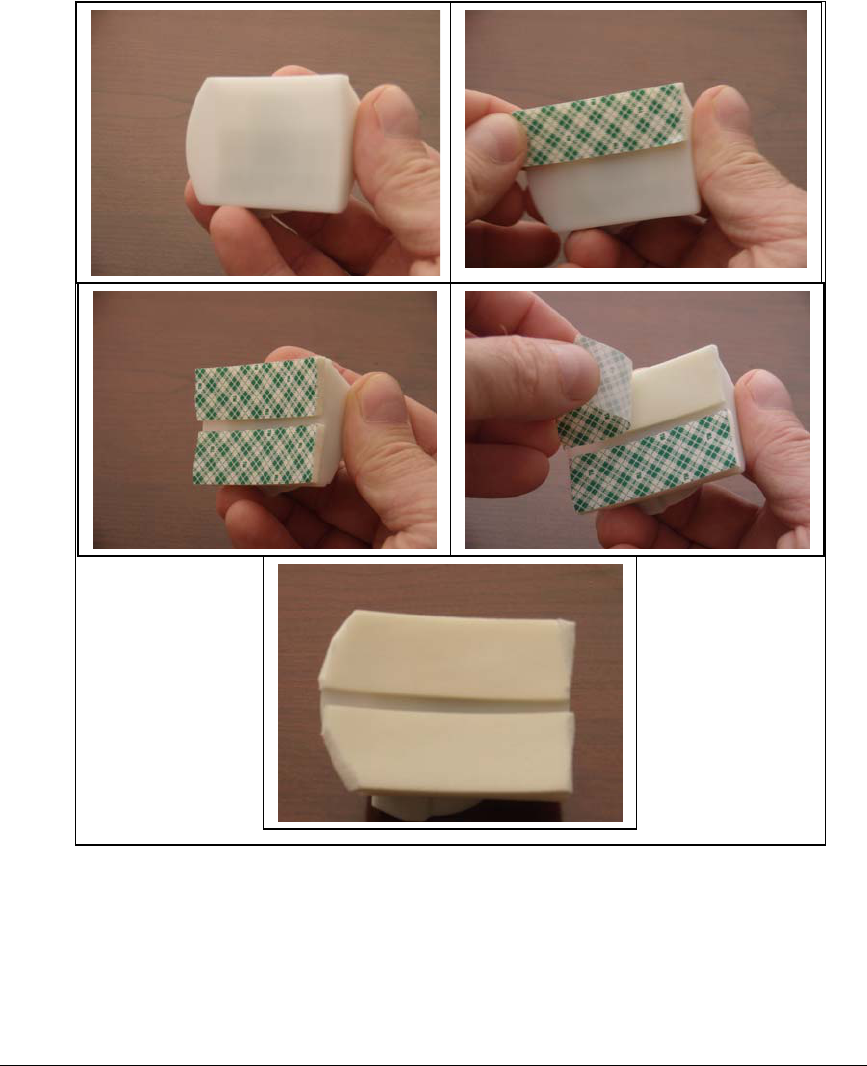
Attaching and Removing Club Head Module
Attaching the Club Head Module to Golf Club Head
The attachment of the Club Head Module to the golf club head is a simple two step procedure.
Apply two strips of double sided tape to the bottom of the Club Head Module as shown in the
image below:
18
Align the front of the Club Head Module parallel with the club face and align about ½ inch back
from the club face and firmly press the module onto the club head as shown below. The double
sided adhesive tape is the 3M 4008 tape which is 1/8” thick.
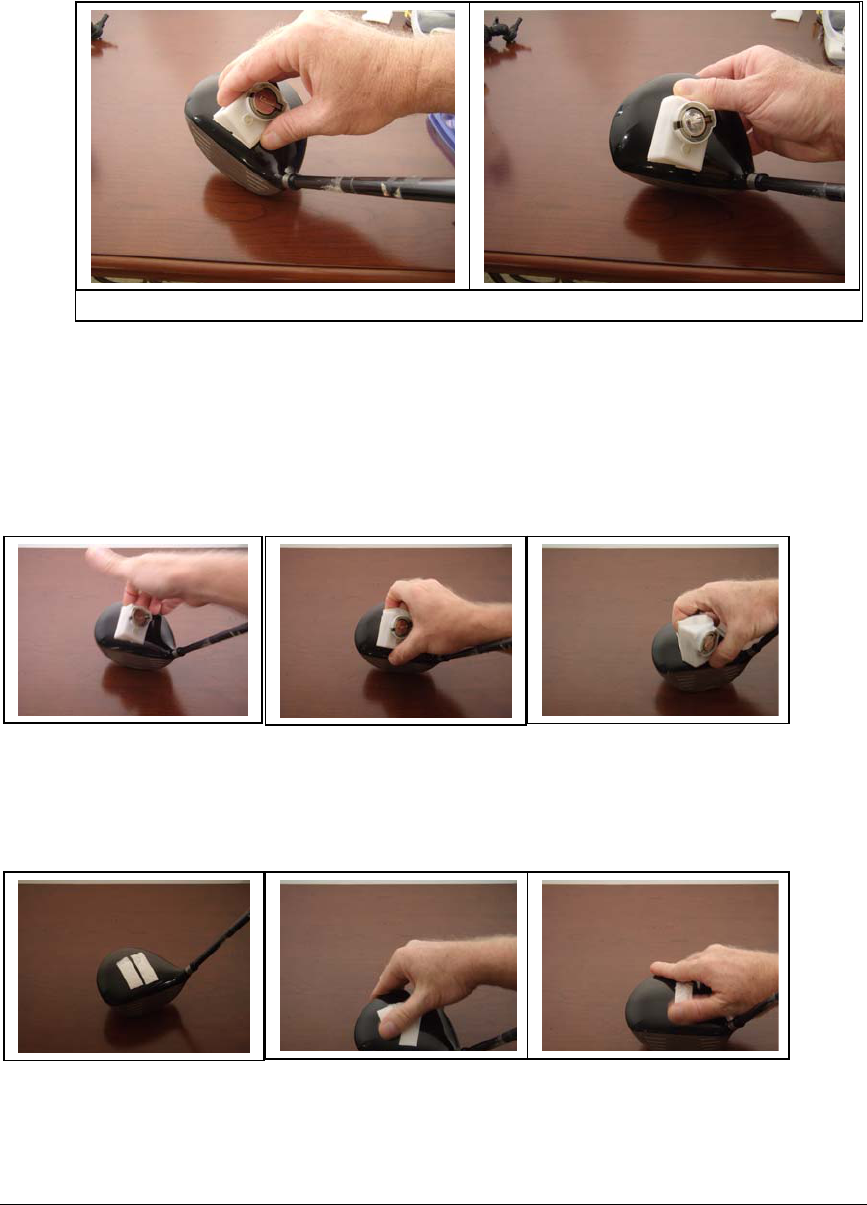
Removing the Club Head Module from the Golf Club Head
Removal of the club head module from the club head is done by gradually pulling upward on the
back of the club head module letting the tape release from the club head. Sometimes the tape will
separate in the middle as shown below.
Once the club head module is removed, the remaining tape must be removed from the club head.
One method is to roll the tape off of the club head with your thumb, which is the safest way to
remove the tape with out damaging the club head paint.
19
For removing the tape remains from the Club Head Module, use the same technique with your
thumb and then clean with rubbing alcohol so the surface is shinny and the module is then ready
for future use.
Golf Dynamics Pro User Applications Software and
Usage
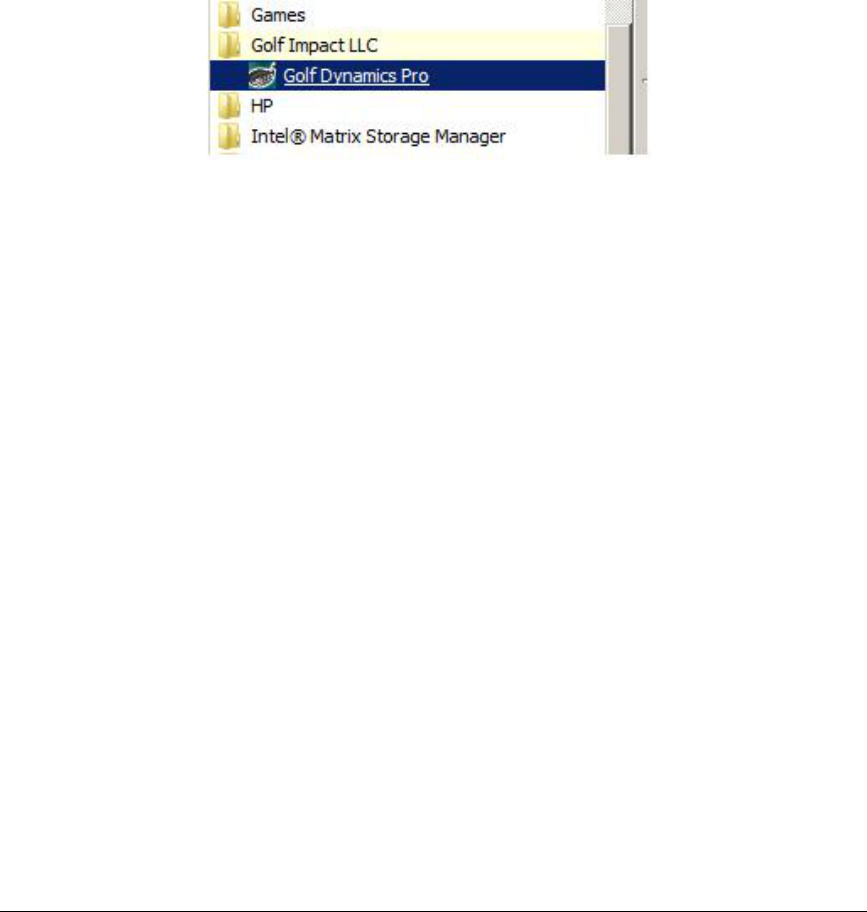
Launching The Golf Dynamics Pro Application
The first step is to always insert the Golf Dynamics USB Module into a USB port on your
computer. Then you go to the “Start” menu on your computer and select view all application and
then select the folder named “Golf Impact LLC” and then double click the “Golf Dynamics Pro”
application.
Golf Dynamics Pro Main Application Window
Now the Golf Dynamics Pro Main Application window opens as shown below which allows you
to set up your Golf user session. The main window is comprised of three steps to start your golf
session:

20
1. USB Set Up: Enable the communication between the Golf Dynamics USB Module
and your computer operating system. This is done by left clicking the “Refresh”
button in the USB set up block. Then you will see “Golf Dynamics Pro (Com#)”
shown in the selection window. Now left click the “Open” button, which changes the
USB connection status from “Unconnected” to “Connected”.
2. Club Head Module Set Up: This step enables the wireless communication between the
USB Module and the Club Head Module. Simply push the button on the top of the
Golf Club Head Module as shown below. In 1 to 2 seconds the Club Head module
registers with the USB module and the wireless link is enabled. In the “Club Head Set
Up” block of the “Golf Dynamics Pro Main Application” window the status of the
“Wireless Club Head Module Status” Changes from “Disconnected” to “Connected”.
3. Golfer Profile Set Up: The step allows the correct calculations of some of the golf
swing metrics that are displayed in the user application windows. Using the pull down
menus, select the “Club Length” and “Arm Length” in inches. The club length is
defined as the distance between the bottom of the lower hand on the grip to the top of
Step 1:
USB Connection
Set Up
Step 2:
Club Head Module
Wireless Set Up
Step 3:
Golfer Profile
Set Up

21
the club head. The arm length is defined as the distance from the top of your shoulder
to the center of the palm of your hand.
Now your system set up is complete and you now are ready to use the system and view your golf
metrics through a variety of user application.
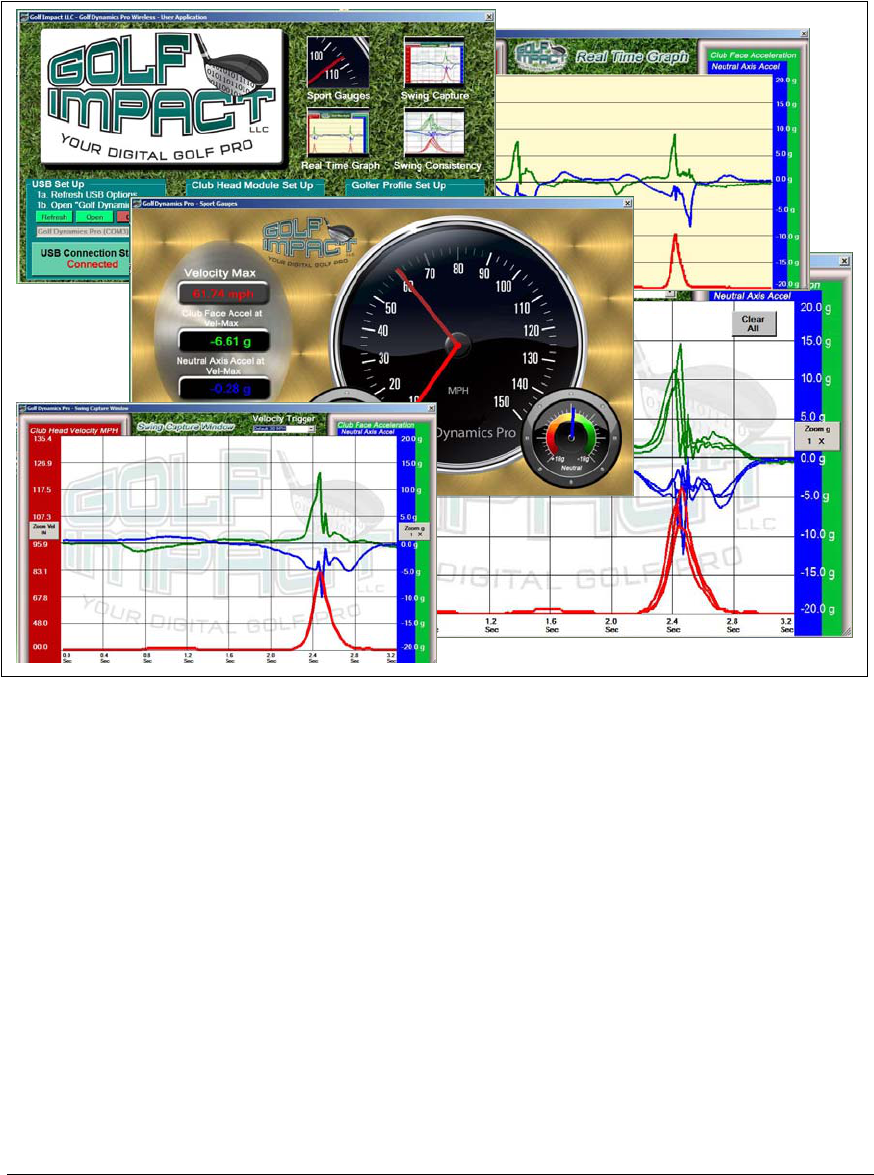
Golf Dynamics Pro – User Software Applications
Main Application Window, allows you to select any of four different applications to view
golf data and golf metrics. The four different user applications are named:
Sport Gauges
Real Time Graph
Swing Capture
Swing Consistency
The user applications are launched by simply clicking on the image representing that application.

22
User Applications:
Select by Clicking On
Image

23
Sport Gauge – User Application
The Sport Gauge application is a great way to see your swing velocity and the associated
acceleration forces in gs ( unit of gravity) at the specific point in time when maximum velocity is
reached or a ball impact takes place. The maximum velocity and the club face acceleration and the
neutral axis acceleration are captured and stored in the digital gages on the left. To reset the
digital gauges simply click the “Reset Maximum Velocity” button.
Capture: Velocity Max
Capture: Club Face Acceleration at Velocity Max
Capture: Neutral Axi Acceleration at Velocity Max
V
elocity Max Marke
r
Real Time Velocity Indicato
r
BUTTON
Reset Maximum Velocity
and associated Acceleration
Measurements
24
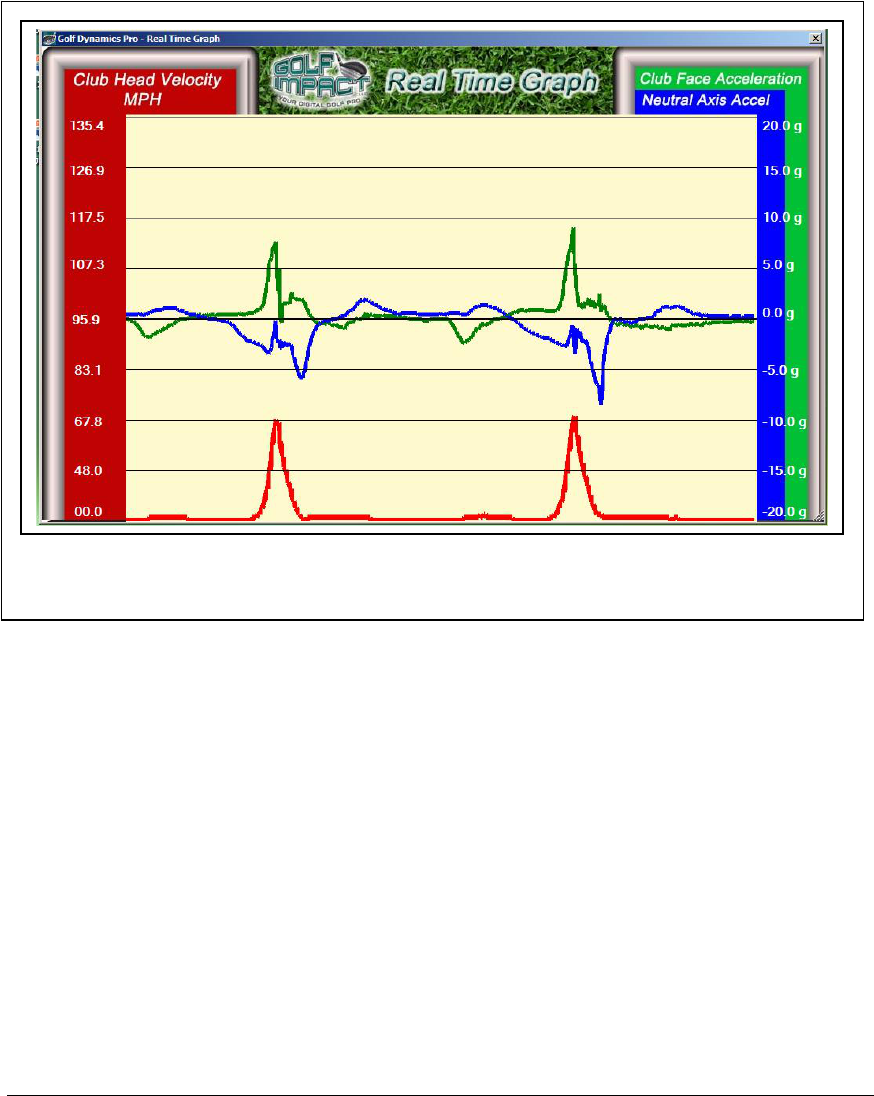
Real Time Graph – User Application
The real time graph allows you to see the changes in velocity and the acceleration forces in real
time as you swing the club. This can help you to understand the relationship of what changes you
make in your swing and how it affects the physics that are taking place at the golf club head.
25
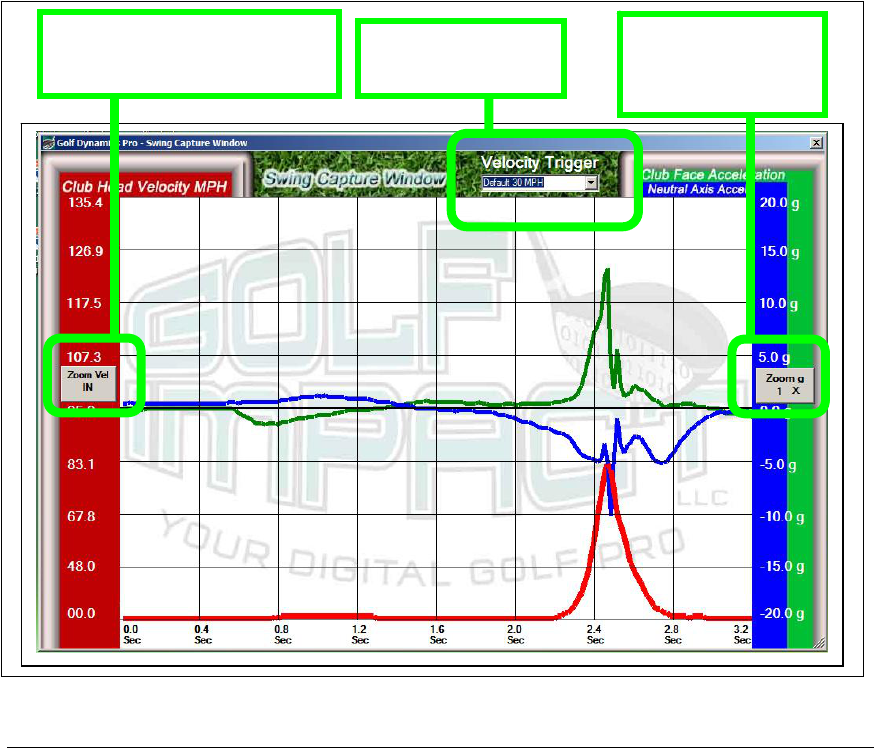
Swing Capture - User Application
The Swing Capture Window as the name implies captures all the data of your swing and displays
it in a still form for examination. The display stay on the screen until another swing is detected.
One a new swing is detected, the previous swing information is erased and the new swing data is
displayed. What determines the detection of a new swing is called the “Swing Trigger”. The
swing trigger is a threshold that is detected which results in the capture and storage of data before
and after that point in time for display on the screen. The “Swing Trigger” value can be set by
you the golfer using the pull down menu near the top of the Swing capture Window.
The swing capture also has separate zoom controls for the velocity measurement (the scale on the
left side of the window) and for the acceleration axis measurements on the scales on the right
hand side of the screen. When using either of the two zoom buttons, the new zoom conditions
that are set go into effect on the next swing. The zoom buttons do not zoom what is currently
on the screen. By pushing a zoom button it is always zooming inward until maximum zoom is
reached and then goes back to no zoom.
These zoom buttons are a convenient way to look at more detailed data such the smoothness of
the backswing or if there are oscillation in the in the shaft from the club head coming to rest
before the down stroke begins.
Velocity Trigger
Pull Down Menu
Zoom Button
Velocity Measurement
Zoom Button
Acceleration
Measurements
26
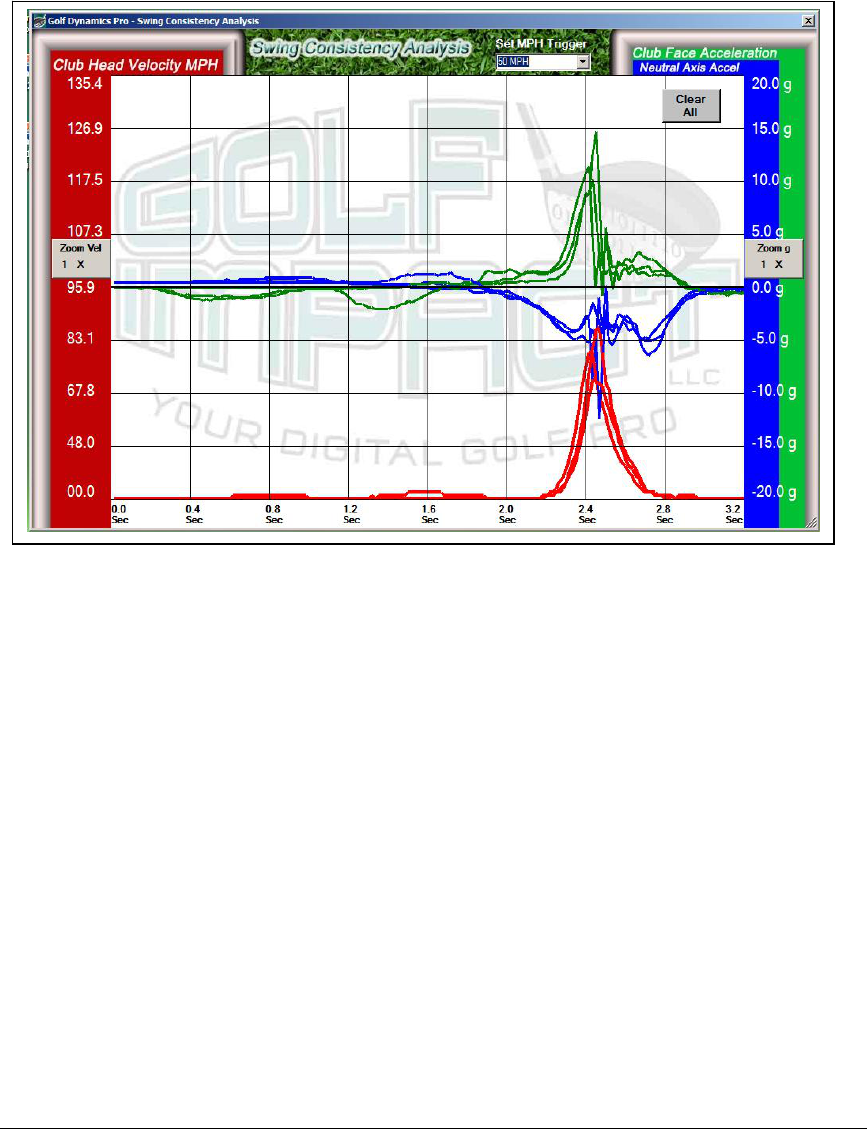
Swing Consistency – User Application
The Swing Consistency Analysis window is the most comprehensive way to compare consistency
of your entire swing by comparing the 3 dimensional time varying data from one swing to
multiple other swings.