GTRAN Wireless GPC-3000 CDMA Data Modem User Manual
GTRAN Wireless, Inc. CDMA Data Modem
User Manual

G
nGrGpUGGGGGGGGGGGGGGGGGGGGGGGGGGGGGGGGGGGGGGGGGGGGGGGGGGGGGGGG2001-05-07G
G
GX
/
DotSurfer
DotSurferDotSurfer
DotSurfer
User
UserUser
User
Manual
ManualManual
Manual
G
G
G
G
G
G
G
G
G
G
G
G
G
G
G
G
G
G
G
Version:
Version: Version:
Version: 1.0.0
1.0.01.0.0
1.0.0

G
nGrGpUGGGGGGGGGGGGGGGGGGGGGGGGGGGGGGGGGGGGGGGGGGGGGGGGGGGGGGGG2001-05-07G
G
GY
TABLE OF CONTENTS
GkzGp UUUUUUUUUUUUUUUUUUUUUUUUUUUUUUUUUUUUUUUUUUUUUUUUUUUUUUUUUUUUUUUUUUUUUUUUUUUU[G
G~pukv~zGYWWWVwGw UUUUUUUUUUUUUUUUUUUUUUUUUUUUUUUUUUUUUUUUUUUUUUUUUUUUUUUUUUUU\G
XUGkGp UUUUUUUUUUUUUUUUUUUUUUUUUUUUUUUUUUUUUUUUUUUUUUUUUUUUUUUUUUUUUUUUUUUUUUUUUUUUUUUUUUUUUUUUUUUUUUUUUUUUUUUUUUUUUUU]G
YUGkG UUUUUUUUUUUUUUUUUUUUUUUUUUUUUUUUUUUUUUUUUUUUUUUUUUUUUUUUUUUUUUUUUUUUUUUUUUUUUUUUUUUUUUUUUUUUUUUUUUUUUUUUUUU _G
ZUGkG|UUUUUUUUUUUUUUUUUUUUUUUUUUUUUUUUUUUUUUUUUUUUUUUUUUUUUUUUUUUUUUUUUUUUUUUUUUUUUUUUUUUUUUUUUUUUUUUUUUUUUUUUUUUUUU _G
G~pukv~zG`_VtlGwUUUUUUUUUUUUUUUUUUUUUUUUUUUUUUUUUUUUUUUUUUUUUUUUUUUUUUUUUUUUUUUU`G
XUGkGp UUUUUUUUUUUUUUUUUUUUUUUUUUUUUUUUUUUUUUUUUUUUUUUUUUUUUUUUUUUUUUUUUUUUUUUUUUUUUUUUUUUUUUUUUUUUUUUUUUUUUUUUUUUUU XWG
XUXG~G`_ UUUUUUUUUUUUUUUUUUUUUUUUUUUUUUUUUUUUUUUUUUUUUUUUUUUUUUUUUUUUUUUUUUUUUUUUUUUUUUUUUUUUUUUUUUUUUUUUUUUUUU XWG
XUYG~GtlUUUUUUUUUUUUUUUUUUUUUUUUUUUUUUUUUUUUUUUUUUUUUUUUUUUUUUUUUUUUUUUUUUUUUUUUUUUUUUUUUUUUUUUUUUUUUUUUUUUUU XZG
YUGkG|UUUUUUUUUUUUUUUUUUUUUUUUUUUUUUUUUUUUUUUUUUUUUUUUUUUUUUUUUUUUUUUUUUUUUUUUUUUUUUUUUUUUUUUUUUUUUUUUUUUUUUUUU X[G
ZUGkG|UUUUUUUUUUUUUUUUUUUUUUUUUUUUUUUUUUUUUUUUUUUUUUUUUUUUUUUUUUUUUUUUUUUUUUUUUUUUUUUUUUUUUUUUUUUUUUUUUUUUUUUUUUUU X[G
G~pukv~zGYWWWVwGG~pukv~zG`_VtlGwUUUUUUUUUUUUUUUUUUUUUX\G
XUGn{GkGppG UUUUUUUUUUUUUUUUUUUUUUUUUUUUUUUUUUUUUUUUUUUUUUUUUUUUUUUUUUUUUUUUUUUUUUUUUUUUUUUUUUUUUUUUUUUUUUUU X]G
XUXGpGUUUUUUUUUUUUUUUUUUUUUUUUUUUUUUUUUUUUUUUUUUUUUUUUUUUUUUUUUUUUUUUUUUUUUUUUUUUUUUUUUUUUUUUUUUUUUUUUUUUUUU X]G
XUYG|Gp UUUUUUUUUUUUUUUUUUUUUUUUUUUUUUUUUUUUUUUUUUUUUUUUUUUUUUUUUUUUUUUUUUUUUUUUUUUUUUUUUUUUUUUUUUUUUUUUUUU X_G
XUZGyGw UUUUUUUUUUUUUUUUUUUUUUUUUUUUUUUUUUUUUUUUUUUUUUUUUUUUUUUUUUUUUUUUUUUUUUUUUUUUUUUUUUUUUUUUUUUUU X_G
YUGn{GkGppG|Gt UUUUUUUUUUUUUUUUUUUUUUUUUUUUUUUUUUUUUUUUUUUUUUUUUUUUUUUUUUUUUUUUUUUUUUUUUUUUUUUUUUUUUUUUU YWG
YUXGtGzGGp UUUUUUUUUUUUUUUUUUUUUUUUUUUUUUUUUUUUUUUUUUUUUUUUUUUUUUUUUUUUUUUUUUUUUUUUUUUUUUUUUUUU YWG
YUYGuGjGGkUUUUUUUUUUUUUUUUUUUUUUUUUUUUUUUUUUUUUUUUUUUUUUUUUUUUUUUUUUUUUUUUUUU YYG
YUZGjGGpUUUUUUUUUUUUUUUUUUUUUUUUUUUUUUUUUUUUUUUUUUUUUUUUUUUUUUUUUUUUUUUUUUUUUUUUUUUUUUUUUUUUU YYG
YU[GzGGyGztz UUUUUUUUUUUUUUUUUUUUUUUUUUUUUUUUUUUUUUUUUUUUUUUUUUUUUUUUUUUUUUUUUUUUUUUUUUUUUUU YZG
YU\GhGiGtUUUUUUUUUUUUUUUUUUUUUUUUUUUUUUUUUUUUUUUUUUUUUUUUUUUUUUUUUUUUUUUUUUUUUUUUUUUUU Y[G
YU]GzG|G{GGvUUUUUUUUUUUUUUUUUUUUUUUUUUUUUUUUUUUUUUUUUUUUUUUUUUUUUUUUUUUUUUUUUUUUUUUUUUUUUUUUU Y\G
YU^GhGkG|GpUUUUUUUUUUUUUUUUUUUUUUUUUUUUUUUUUUUUUUUUUUUUUUUUUUUUUUUUUUUUUUUU Y^G
ZUGn{Gp UUUUUUUUUUUUUUUUUUUUUUUUUUUUUUUUUUUUUUUUUUUUUUUUUUUUUUUUUUUUUUUUUUUUUUUUUUUUUUUUUUUUUUUUUUUUUUUUUUUUUUUUUUUUUU Y_G
ZUXGn{GpG|Gt UUUUUUUUUUUUUUUUUUUUUUUUUUUUUUUUUUUUUUUUUUUUUUUUUUUUUUUUUUUUUUUUUUUUUUUUUUUUUUU Y_G
ZU[Gn{GpGp UUUUUUUUUUUUUUUUUUUUUUUUUUUUUUUUUUUUUUUUUUUUUUUUUUUUUUUUUUUUUUUUUUUUUUUUUUUUUUUUUUUUUUUUUUU Y`G
G~GjlGw UUUUUUUUUUUUUUUUUUUUUUUUUUUUUUUUUUUUUUUUUUUUUUUUUUUUUUUUUUUUUUUUUUUUUUUUUUUUUUUZWG
XUGkGpGGjvtwhxGwhx UUUUUUUUUUUUUUUUUUUUUUUUUUUUUUUUUUUUUUUUUUUUUUUUUUUUUUUUUUUUUUUUUUUUUUUUUUUUU ZXG
YUGjGGpUUUUUUUUUUUUUUUUUUUUUUUUUUUUUUUUUUUUUUUUUUUUUUUUUUUUUUUUUUUUUUUUUUUUUUUUUUUUUUUUUUUUUUUUUUUUUU Z[G
ZUGn{GkG|GtUUUUUUUUUUUUUUUUUUUUUUUUUUUUUUUUUUUUUUUUUUUUUUUUUUUUUUUUUUUUUUUUUUUUUUUUUUUUUUUUUUUUUUUUUUUUU Z\G
ZUXGzGGyGztz UUUUUUUUUUUUUUUUUUUUUUUUUUUUUUUUUUUUUUUUUUUUUUUUUUUUUUUUUUUUUUUUUUUUUUUUUUUUUUUUUUUUUUUUU Z\G
ZUYGkGztzGGU UUUUUUUUUUUUUUUUUUUUUUUUUUUUUUUUUUUUUUUUUUUUUUUUUUUUUUUUUUUUUUUUUUUUUUUUUUUUUUUUUUUUUUUU Z^G

G
nGrGpUGGGGGGGGGGGGGGGGGGGGGGGGGGGGGGGGGGGGGGGGGGGGGGGGGGGGGGGG2001-05-07G
G
GZ
Gspu|Gw UUUUUUUUUUUUUUUUUUUUUUUUUUUUUUUUUUUUUUUUUUUUUUUUUUUUUUUUUUUUUUUUUUUUUUUUUUUUUUUUZ_G
XUGzUUUUUUUUUUUUUUUUUUUUUUUUUUUUUUUUUUUUUUUUUUUUUUUUUUUUUUUUUUUUUUUUUUUUUUUUUUUUUUUUUUUUUUUUUUUUUUUUUUUUUUUUUUUUUUUUUUUU Z`G
YUGp UUUUUUUUUUUUUUUUUUUUUUUUUUUUUUUUUUUUUUUUUUUUUUUUUUUUUUUUUUUUUUUUUUUUUUUUUUUUUUUUUUUUUUUUUUUUUUUUUUUUUUUUUUUUUUUUUUUUUUUUU [WG
YUXUGpGGrGz UUUUUUUUUUUUUUUUUUUUUUUUUUUUUUUUUUUUUUUUUUUUUUUUUUUUUUUUUUUUUUUUUUUUUUUUUUUUUUUUUU [WG
YUYUGhGGrGtUUUUUUUUUUUUUUUUUUUUUUUUUUUUUUUUUUUUUUUUUUUUUUUUUUUUUUUUUUUUUUUUUUUUUUUUUUUUUUUUUUUUU [WG
YUZUGyGrGt UUUUUUUUUUUUUUUUUUUUUUUUUUUUUUUUUUUUUUUUUUUUUUUUUUUUUUUUUUUUUUUUUUUUUUUUUUUUUUUUUU [XG
ZUG|Gj UUUUUUUUUUUUUUUUUUUUUUUUUUUUUUUUUUUUUUUUUUUUUUUUUUUUUUUUUUUUUUUUUUUUUUUUUUUUUUUUUUUUUUUUUUUUUUU [YG
ZUXG}GzUUUUUUUUUUUUUUUUUUUUUUUUUUUUUUUUUUUUUUUUUUUUUUUUUUUUUUUUUUUUUUUUUUUUUUUUUUUUUUUUUUUUUUUUUUUUUUUUUUU [YG
ZUYGoGG|GwwwUUUUUUUUUUUUUUUUUUUUUUUUUUUUUUUUUUUUUUUUUUUUUUUUUUUUUUUUUUUUUUUUUUUUUUUUUUUUUUUUUUUUUUUUUUUUUUU [YG
[UGoGG|GkzGtGw UUUUUUUUUUUUUUUUUUUUUUUUUUUUUUUUUUUUUUUUUUUUUUUUUUUUUUUUUUU [ZG
G
G
nGrGpUGGGGGGGGGGGGGGGGGGGGGGGGGGGGGGGGGGGGGGGGGGGGGGGGGGGGGGGG2001-05-07G
G
G[
D
Do
ot
tS
Su
ur
rf
fe
er
r
I
In
nt
tr
ro
od
du
uc
ct
ti
io
on
n
G
G
G
G
G
G
G
G
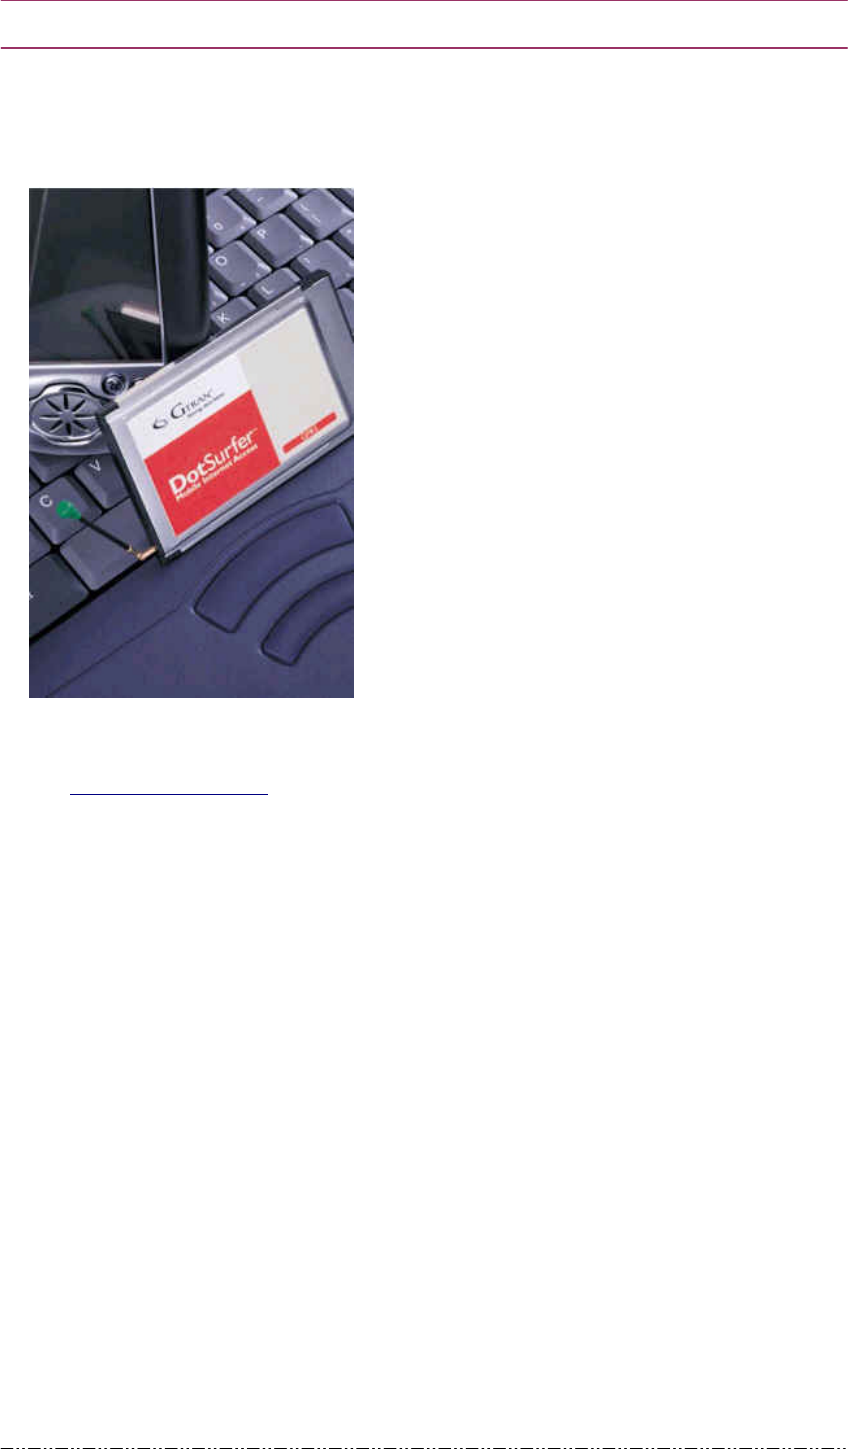
GTRAN DotSurfer 1X PCMCIA Card is high-speed
Wireless Modem that supports up to 153Kpbs
under cdma2000 1X Network.
Product Features
Product FeaturesProduct Features
Product Features
Supports wireless connection up to 153Kbps under cdma2000 1x Network
Minimizes laptop battery power consumption through self Power control
Send and Receive SMS under any operating system
Can check for card status while online
Supports OS that majority of the users use such as Windows 98, 2000, XP, CE
3.0 and Linux. (Plans to support MacOS and PalmOS)
Provides Application Program in order to maximize user’s convenience.

G
nGrGpUGGGGGGGGGGGGGGGGGGGGGGGGGGGGGGGGGGGGGGGGGGGGGGGGGGGGGGGG2001-05-07G
G
G\
W
WI
IN
ND
DO
OW
WS
S
2
20
00
00
0/
/X
XP
P
P
Pr
ro
oc
ce
ed
du
ur
re
es
s
1.
1.1.
1.
Driver Install
Driver InstallDriver Install
Driver Install
2.
2.2.
2.
Driver
Driver Driver
Driver U
UU
Uninstall
ninstallninstall
ninstall
3.
3.3.
3.
Drive
DriveDrive
Driver Update
r Updater Update
r Update
G
nGrGpUGGGGGGGGGGGGGGGGGGGGGGGGGGGGGGGGGGGGGGGGGGGGGGGGGGGGGGGG2001-05-07G
G
G]
1
11
1
1
11
1.
..
.
.
..
.
D
DD
D
D
DD
Dr
rr
r
r
rr
ri
iii
i
iiiv
vv
v
v
vv
ve
ee
e
e
ee
er
rr
r
r
rr
r
I
II
I
I
II
In
nn
n
n
nn
ns
ss
s
s
ss
st
tt
t
t
tt
ta
aa
a
a
aa
al
lll
l
llll
lll
l
lll
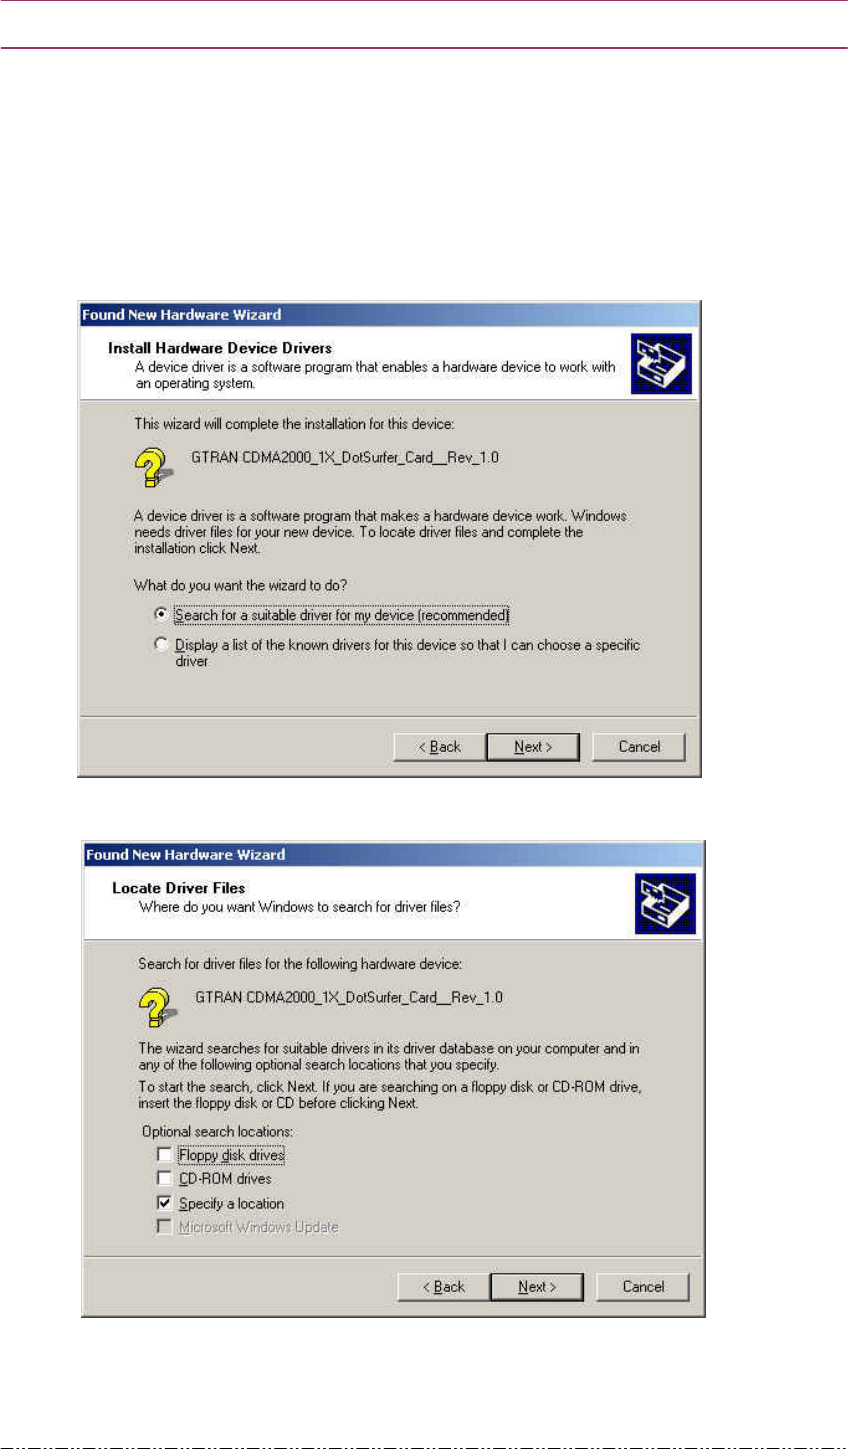
①. Insert the Card.
When Found New Hardware Check Wizard
Found New Hardware Check WizardFound New Hardware Check Wizard
Found New Hardware Check Wizard screen appears, choose the option as
below and click Next
NextNext
Next> button.
②. Choose location to search for Driver file and click Next
NextNext
Next>
> >
> button.
③. Assign file path and click OK
OK OK
OK button.

G
nGrGpUGGGGGGGGGGGGGGGGGGGGGGGGGGGGGGGGGGGGGGGGGGGGGGGGGGGGGGGG2001-05-07G
G
G^
④. From the assigned route, search for driver file. Once file is found, you’ll see a
screen that says “Found New Hardware Wizard
Found New Hardware WizardFound New Hardware Wizard
Found New Hardware Wizard”.
Click Next
NextNext
Next>
>>
> button and go to the next step.
⑤. You’ll see the screen below since we currently do not have digital name provided
by Microsoft. Continue with the installation. Click Yes
YesYes
Yes button and the installation
will be complete.
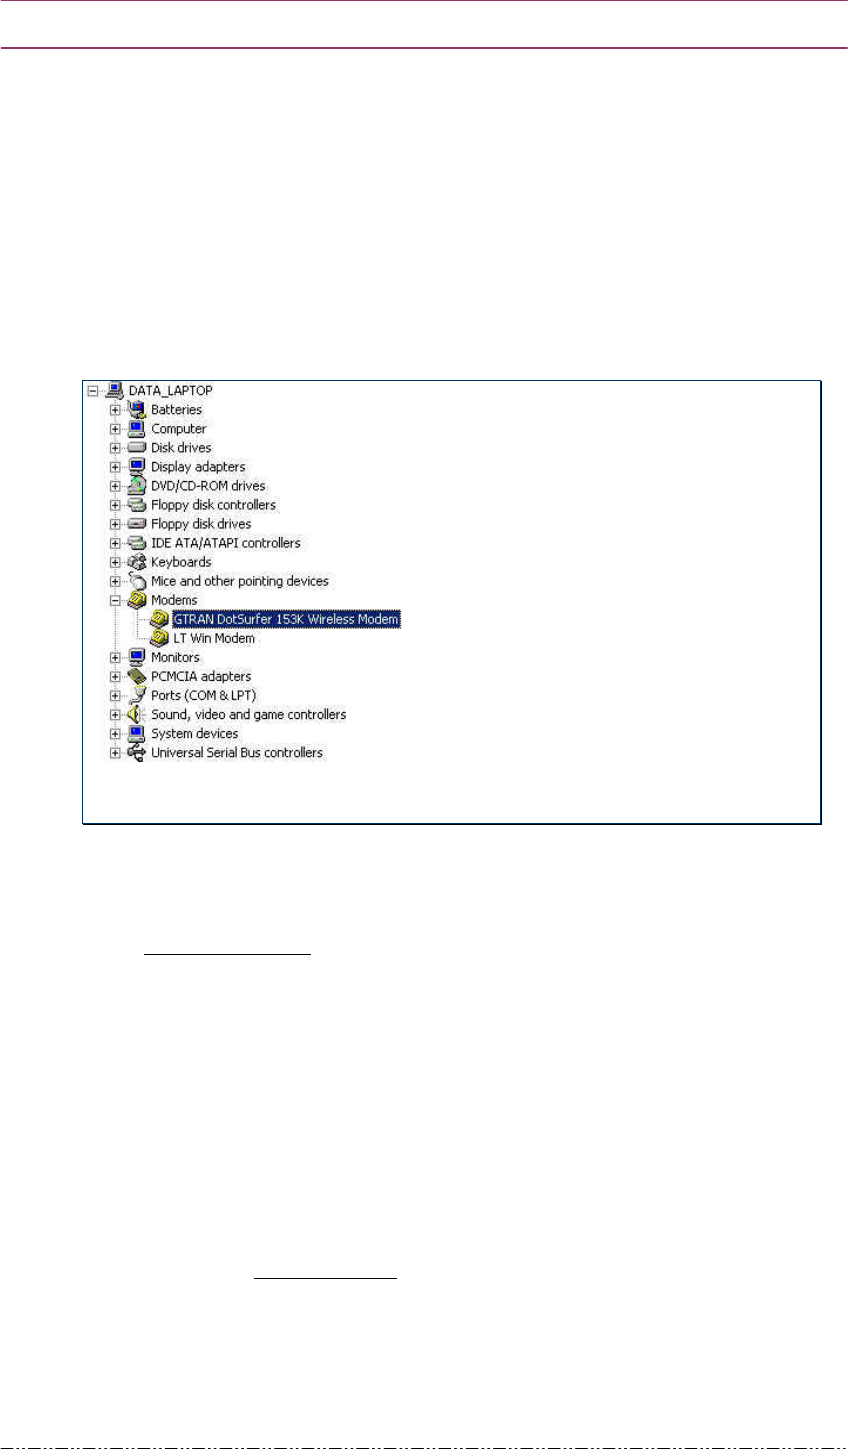
⑥. To check if Driver installation is complete, go to Start
Start Start
Start -
--
-> Properties
> Properties> Properties
> Properties-
--
-> Control
> Control > Control
> Control
Panel
PanelPanel
Panel-
--
-> System
> System > System
> System -
--
-> Hardware
> Hardware > Hardware
> Hardware -
--
-> Device Manager
> Device Manager > Device Manager
> Device Manager -
--
-> Modem.
> Modem.> Modem.
> Modem. You can verify that
GTRAN DotSurfer 153K Wireless Modem
GTRAN DotSurfer 153K Wireless Modem GTRAN DotSurfer 153K Wireless Modem
GTRAN DotSurfer 153K Wireless Modem is installed.
G
nGrGpUGGGGGGGGGGGGGGGGGGGGGGGGGGGGGGGGGGGGGGGGGGGGGGGGGGGGGGGG2001-05-07G
G
G_
2
22
2
2
22
2.
..
.
.
..
.
D
DD
D
D
DD
Dr
rr
r
r
rr
ri
iii
i
iiiv
vv
v
v
vv
ve
ee
e
e
ee
er
rr
r
r
rr
r
u
uu
u
u
uu
un
nn
n
n
nn
ni
iii
i
iiin
nn
n
n
nn
ns
ss
s
s
ss
st
tt
t
t
tt
ta
aa
a
a
aa
al
lll
l
llll
lll
l
lll
①. Go to Start
StartStart
Start and choose Properties
PropertiesProperties
Properties
-
--
-> Control Panel
> Control Panel> Control Panel
> Control Panel-
--
-> System.
> System.> System.
> System.
②. Go to System Properties
System PropertiesSystem Properties
System Properties window and choose Hardware
Hardware Hardware
Hardware -
--
-> Device Manager
> Device Manager> Device Manager
> Device Manager tab.
③. Go to Device Manager
Device ManagerDevice Manager
Device Manager window and choose Modem
ModemModem
Modem-
--
->
>>
>
GTRAN Dotsurfer
GTRAN DotsurferGTRAN Dotsurfer
GTRAN Dotsurfer….
④. Choose GTRAN DotSurfer..
GTRAN DotSurfer..GTRAN DotSurfer..
GTRAN DotSurfer.. Modem and right click the mouse. Choose Uninstall
UninstallUninstall
Uninstall
from the pop-up menu and uninstall will start.
3
33
3
3
33
3.
..
.
.
..
.
D
DD
D
D
DD
Dr
rr
r
r
rr
ri
iii
i
iiiv
vv
v
v
vv
ve
ee
e
e
ee
er
rr
r
r
rr
r
U
UU
U
U
UU
Up
pp
p
p
pp
pd
dd
d
d
dd
da
aa
a
a
aa
at
tt
t
t
tt
te
ee
e
e
ee
e
①. Follow 2. Driver uninstall
2. Driver uninstall2. Driver uninstall
2. Driver uninstall procedure shown above and remove the device driver.
②. Click subfolder I
IIINF
NFNF
NF which is under Windows folder. However, you may not see
the INF folder. In this case, go to View
ViewView
View, click Option
OptionOption
Option, and choose Show All Files
Show All FilesShow All Files
Show All Files.
③. In the INF
INFINF
INF folder, find all the INF type files that begin with OEM.
④. Open this file from a text editor such as Notepad. If you see a phrase GTRAN
1X Dotsurfer on top of the text, delete the file that has PNF extension that is the
same name.
⑤. Prepare the newest version of Win2K(or XP) DotSurfer Device Driver.
⑥. Remove the Card and reinsert. Then select and install the newest version device
driver by following 1. Driver install
1. Driver install1. Driver install
1. Driver install procedure.

G
nGrGpUGGGGGGGGGGGGGGGGGGGGGGGGGGGGGGGGGGGGGGGGGGGGGGGGGGGGGGGG2001-05-07G
G
G`
W
WI
IN
ND
DO
OW
WS
S
9
98
8/
/M
ME
E
P
Pr
ro
oc
ce
ed
du
ur
re
es
s
1.
1.1.
1.
Driver install
Driver installDriver install
Driver install
- Windows 98
- Windows ME
2.
2.2.
2.
Driver uninstall
Driver uninstallDriver uninstall
Driver uninstall
3.
3.3.
3.
Driver Update
Driver UpdateDriver Update
Driver Update

G
nGrGpUGGGGGGGGGGGGGGGGGGGGGGGGGGGGGGGGGGGGGGGGGGGGGGGGGGGGGGGG2001-05-07G
G
GXW
1
11
1
1
11
1.
..
.
.
..
.
D
DD
D
D
DD
Dr
rr
r
r
rr
ri
iii
i
iiiv
vv
v
v
vv
ve
ee
e
e
ee
er
rr
r
r
rr
r
I
II
I
I
II
In
nn
n
n
nn
ns
ss
s
s
ss
st
tt
t
t
tt
ta
aa
a
a
aa
al
lll
l
llll
lll
l
lll
1
11
1
1
11
1.
..
.
.
..
.1
11
1
1
11
1
W
WW
W
W
WW
Wi
iii
i
iiin
nn
n
n
nn
nd
dd
d
d
dd
do
oo
o
o
oo
ow
ww
w
w
ww
ws
ss
s
s
ss
s
9
99
9
9
99
98
88
8
8
88
8
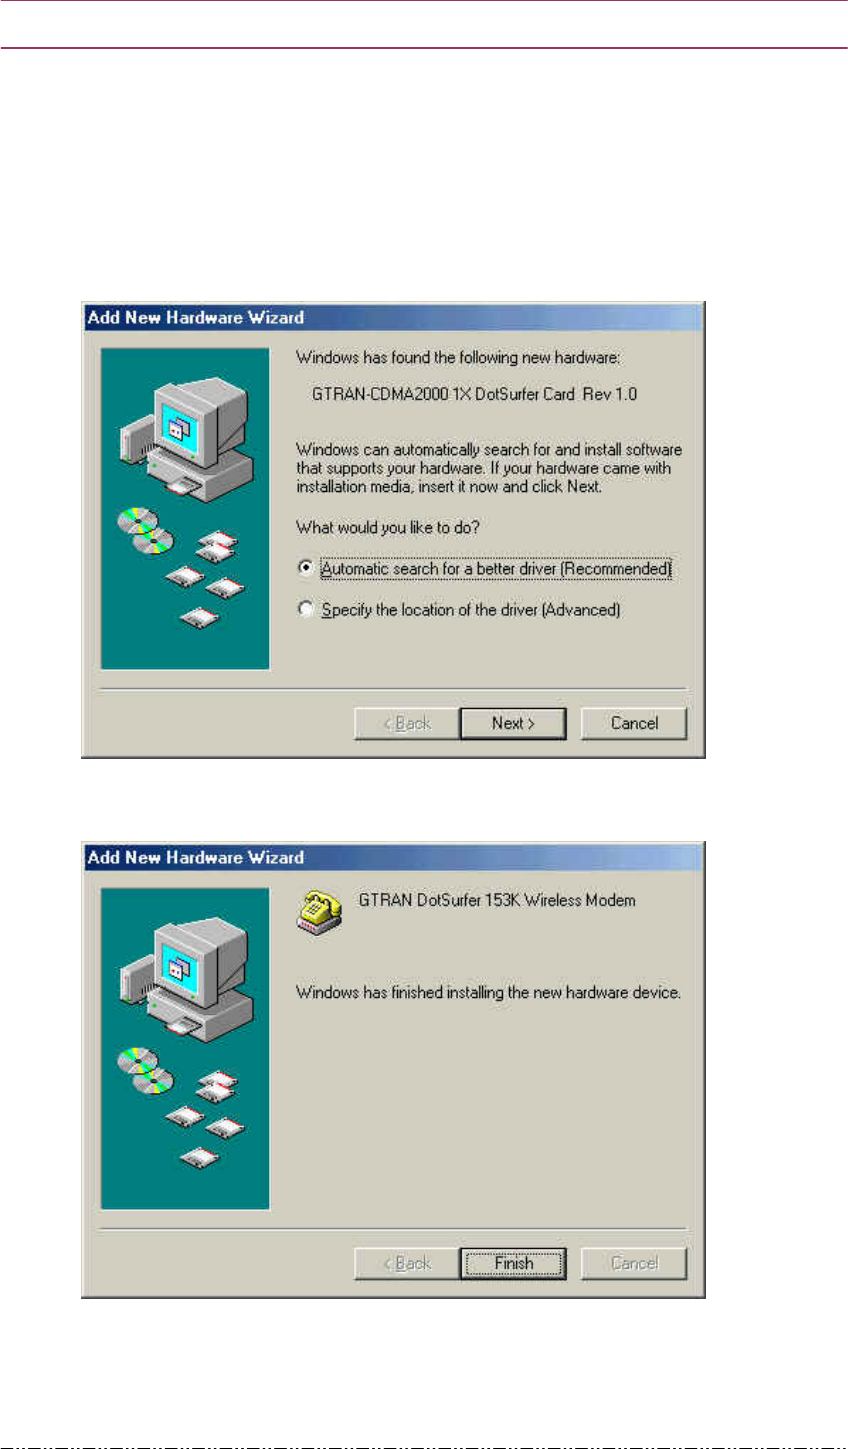
①. Insert the Card.
When “Add New Hardware Check Wizard
Add New Hardware Check WizardAdd New Hardware Check Wizard
Add New Hardware Check Wizard
“ screen appears, choose the option as
below and click Next
NextNext
Next>
>>
> button.
G
②. Choose the option as shown below and click Next
NextNext
Next>
> >
> button.
G

G
nGrGpUGGGGGGGGGGGGGGGGGGGGGGGGGGGGGGGGGGGGGGGGGGGGGGGGGGGGGGGG2001-05-07G
G
GXX
③. Select the location to search for new Driver and click Next>
Next>Next>
Next>
button.
④. Once Driver file is found from the assigned location, you’ll see a screen showing
the search result. Click Next
NextNext
Next>
>>
> button.
G
nGrGpUGGGGGGGGGGGGGGGGGGGGGGGGGGGGGGGGGGGGGGGGGGGGGGGGGGGGGGGG2001-05-07G
G
GXY
⑤. Once Driver installation is complete, go to Start
Start Start
Start and click Settings
Settings Settings
Settings-
--
-> Control
> Control > Control
> Control
Panel
PanelPanel
Panel-
--
-> Modem
> Modem> Modem
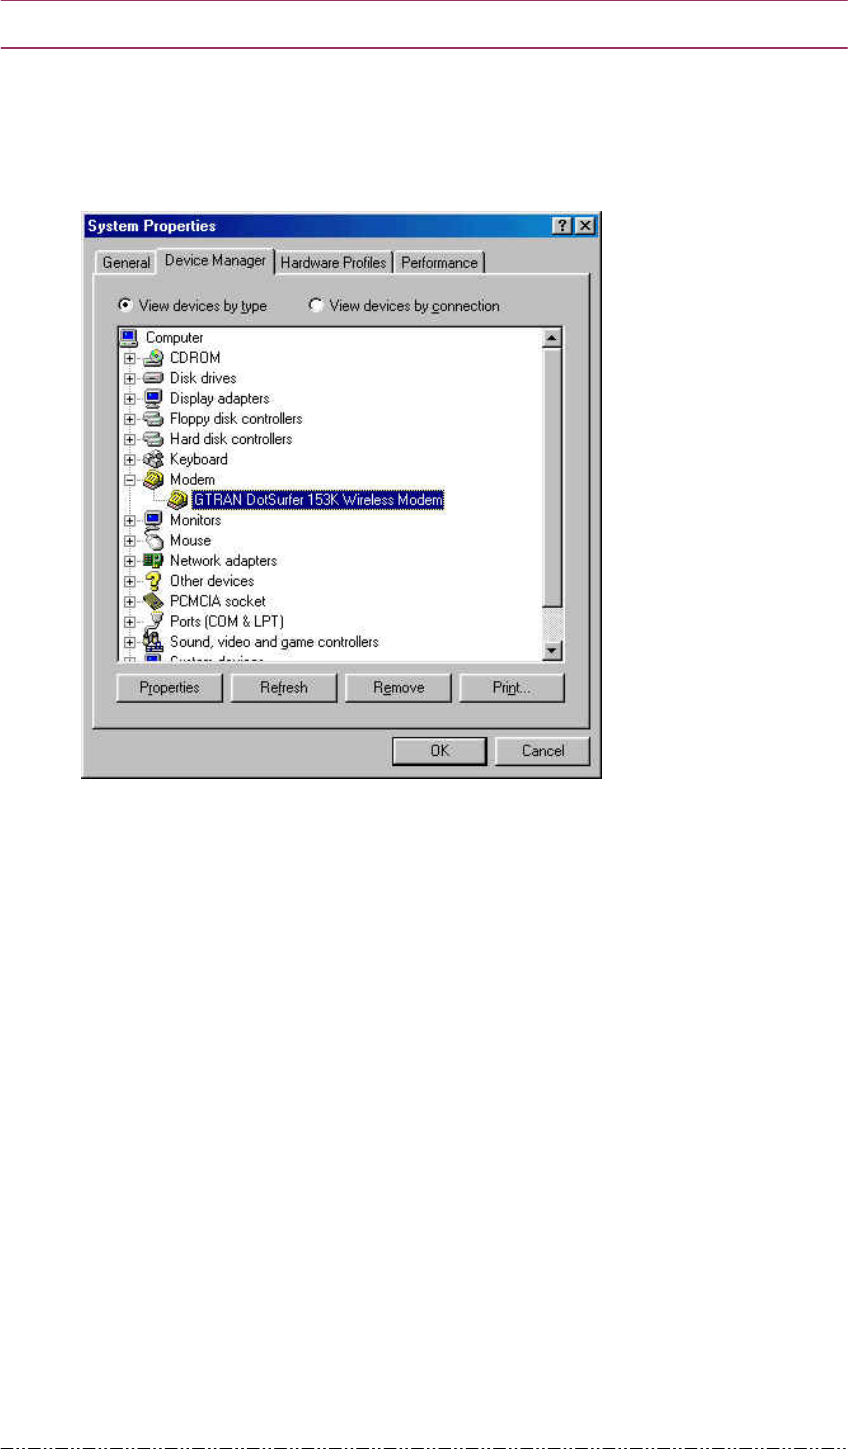
> Modem. You will be able to check whether GTRAN DotSurfer 153K
GTRAN DotSurfer 153K GTRAN DotSurfer 153K
GTRAN DotSurfer 153K
Wireless Modem
Wireless ModemWireless Modem
Wireless Modem is installed.
G
nGrGpUGGGGGGGGGGGGGGGGGGGGGGGGGGGGGGGGGGGGGGGGGGGGGGGGGGGGGGGG2001-05-07G
G
GXZ
1
11
1
1
11
1.
..
.
.
..
.2
22
2
2
22
2
W
WW
W
W
WW
Wi
iii
i
iiin
nn
n
n
nn
nd
dd
d
d
dd
do
oo
o
o
oo
ow
ww
w
w
ww
ws
ss
s
s
ss
s
M
MM
M
M
MM
ME
EE
E
E
EE
E
①7 Insert the CD.G
②. Insert the Card. When “Add New Hardware Wizard
Add New Hardware Wizard Add New Hardware Wizard
Add New Hardware Wizard “ screen appears, choose the
option as below and click Next
NextNext
Next>
>>
> button.
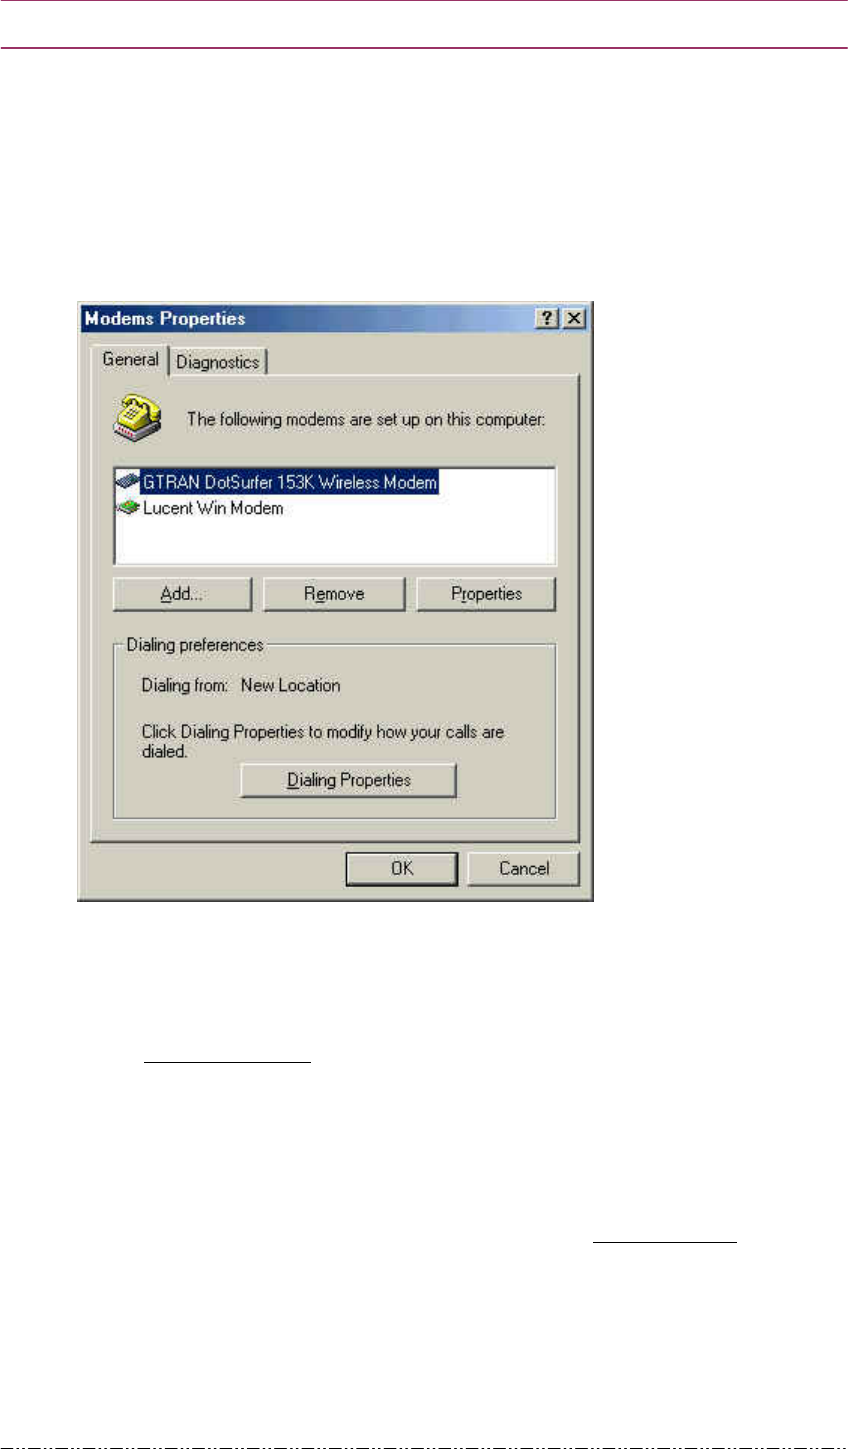
③. If the install is completed regularly, then the screen appears as below.
Click Finish
FinishFinish
Finish button.
G
nGrGpUGGGGGGGGGGGGGGGGGGGGGGGGGGGGGGGGGGGGGGGGGGGGGGGGGGGGGGGG2001-05-07G
G
GX[
2
22
2
2
22
2.
..
.
.
..
.
D
DD
D
D
DD
Dr
rr
r
r
rr
ri
iii
i
iiiv
vv
v
v
vv
ve
ee
e
e
ee
er
rr
r
r
rr
r
U
UU
U
U
UU
Un
nn
n
n
nn
ni
iii
i
iiin
nn
n
n
nn
ns
ss
s
s
ss
st
tt
t
t
tt
ta
aa
a
a
aa
al
lll
l
llll
lll
l
lll
①. Go to Start
Start Start
Start and select Setting
SettingSetting
Settings-
--
-> Control Panel
> Control Panel> Control Panel
> Control Panel-
--
-> Modem
> Modem> Modem
> Modem.
②. From Modem Registration Information
Modem Registration InformationModem Registration Information
Modem Registration Information window, select GTRAN Dotsurfer 153
GTRAN Dotsurfer 153 GTRAN Dotsurfer 153
GTRAN Dotsurfer 153
Wireless Modem.
Wireless Modem.Wireless Modem.
Wireless Modem.
③. While selected, click Remove
Remove Remove
Remove button.
3
33
3
3
33
3.
..
.
.
..
.
D
DD
D
D
DD
Dr
rr
r
r
rr
ri
iii
i
iiiv
vv
v
v
vv
ve
ee
e
e
ee
er
rr
r
r
rr
r
U
UU
U
U
UU
Up
pp
p
p
pp
pd
dd
d
d
dd
da
aa
a
a
aa
at
tt
t
t
tt
te
ee
e
e
ee
e
①. Follow 2. Driver uninstall
2. Driver uninstall2. Driver uninstall
2. Driver uninstall procedure shown above and remove the device driver.
②. Click subfolder INF
INFINF
INF which is under Windows folder.
③. Click subfolder OTHER
OTHEROTHER
OTHER which is under INF
INFINF
INF.
④. From this directory, delete file that begins with GTRAN 1X
GTRAN 1XGTRAN 1X
GTRAN 1X.
⑤. Get newest version of Win98 DotSurfer Device Driver
Win98 DotSurfer Device DriverWin98 DotSurfer Device Driver
Win98 DotSurfer Device Driver.
⑥. Remove the card and reinsert follow procedures under 1. Driver install
1. Driver install1. Driver install
1. Driver install
to install.
Here, select the newest version of Device Driver.
G

G
nGrGpUGGGGGGGGGGGGGGGGGGGGGGGGGGGGGGGGGGGGGGGGGGGGGGGGGGGGGGGG2001-05-07G
G
GX\
W
WI
IN
ND
DO
OW
WS
S
2
20
00
00
0/
/X
XP
P
a
an
nd
d
W
WI
IN
ND
DO
OW
WS
S
9
98
8/
/M
ME
E
P
Pr
ro
oc
ce
ed
du
ur
re
es
s
1.
1.1.
1.
GT Dialer II Installation
GT Dialer II InstallationGT Dialer II Installation
GT Dialer II Installation
6/ Initial Install
6/ Update Install
6/ Uninstall
2.
2.2.
2.
GT Dialer II Program User Manual
GT Dialer II Program User ManualGT Dialer II Program User Manual
GT Dialer II Program User Manual
6/ Main Screen and Icon Description
6/ Network Connect and Disconnect
6/ Internet Connection
6/ SMS Send and Receive
6/ Address Book Management
6/ Theme and Other Configuration
6/ Call History
3.
3.3.
3.
GT Indicator
GT Indicator GT Indicator
GT Indicator
6/ GT Indicator User Manual
6/ GT Indicator Icon Description
G
nGrGpUGGGGGGGGGGGGGGGGGGGGGGGGGGGGGGGGGGGGGGGGGGGGGGGGGGGGGGGG2001-05-07G
G
GX]
1
11
1
1
11
1.
..
.
.
..
.
G
GG
G
G
GG
GT
TT
T
T
TT
T
D
DD
D
D
DD
Di
iii
i
iiia
aa
a
a
aa
al
lll
l
llle
ee
e
e
ee
er
rr
r
r
rr
r
I
II
I
I
II
II
II
I
I
II
I
p
pp
p
p
pp
pr
rr
r
r
rr
ro
oo
o
o
oo
og
gg
g
g
gg
gr
rr
r
r
rr
ra
aa
a
a
aa
am
mm
m
m
mm
m
1
11
1
1
11
1.
..
.
.
..
.1
11
1
1
11
1
I
III
I
IIIn
nn
n
n
nn
ni
iii
i
iiit
tt
t
t
tt
ti
iii
i
iiia
aa
a
a
aa
al
lll
l
lll
i
iii
i
iiin
nn
n
n
nn
ns
ss
s
s
ss
st
tt
t
t
tt
ta
aa
a
a
aa
al
lll
l
llll
lll
l
lll
③. Run Setup.exe
Setup.exeSetup.exe
Setup.exe. Install Shield Wizard will start in order to assist the installation
process.
④. Assign path to install the program and click Next>
Next>Next>
Next>
button.
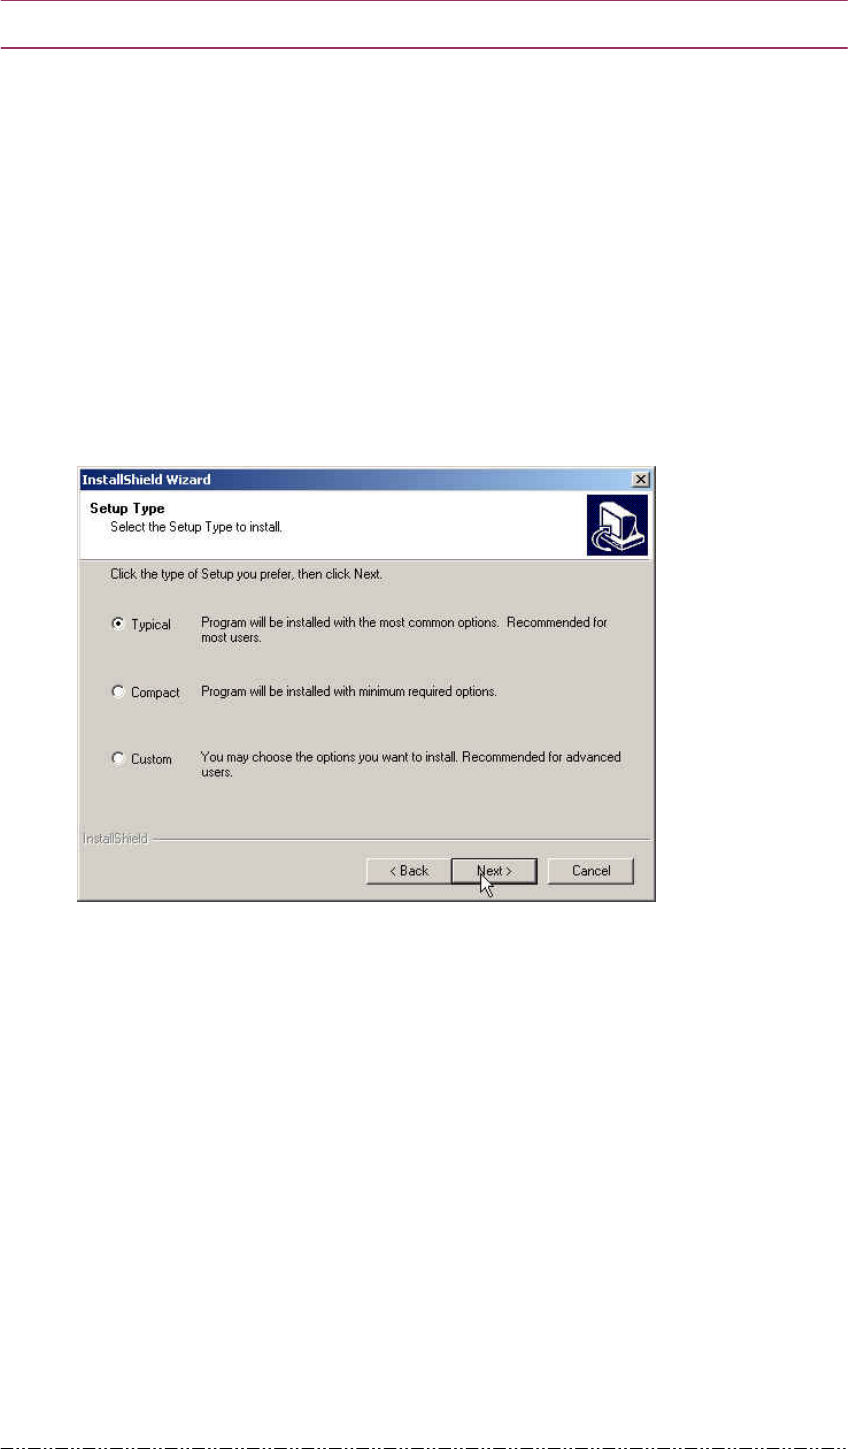
⑤. From the screen asking for the installation type, choose the type you want and
click Next
NextNext
Next>
>>
> button.
Procedures for each installation method are explained below.
1
11
1
1
11
1.
..
.
.
..
.1
11
1
1
11
1.
..
.
.
..
.1
11
1
1
11
1
S
SS
S
S
SS
St
tt
t
t
tt
ta
aa
a
a
aa
an
nn
n
n
nn
nd
dd
d
d
dd
da
aa
a
a
aa
ar
rr
r
r
rr
rd
dd
d
d
dd
d
I
III
I
IIIn
nn
n
n
nn
ns
ss
s
s
ss
st
tt
t
t
tt
ta
aa
a
a
aa
al
lll
l
llll
lll
l
llla
aa
a
a
aa
at
tt
t
t
tt
ti
iii
i
iiio
oo
o
o
oo
on
nn
n
n
nn
n
①. Select Standard Installation
Standard Installation Standard Installation
Standard Installation and click Next>
Next> Next>
Next> button as shown above. Install
Shield Wizard will automatically complete the installation.
Under Standard Installation
Standard InstallationStandard Installation
Standard Installation, GT Dialer II, GT Indicator, GT Updater,
Basic Theme file, document file, and Device Driver file will be installed.
②. While installing, if msvcrt.dll
msvcrt.dllmsvcrt.dll
msvcrt.dll file already exists, you’ll see the screen below.
Complete the installation by clicking Ignore
IgnoreIgnore
Ignore.

G
nGrGpUGGGGGGGGGGGGGGGGGGGGGGGGGGGGGGGGGGGGGGGGGGGGGGGGGGGGGGGG2001-05-07G
G
GX^
1
11
1
1
11
1.
..
.
.
..
.1
11
1
1
11
1.
..
.
.
..
.2
22
2
2
22
2
M
MM
M
M
MM
Mi
iii
i
iiin
nn
n
n
nn
ni
iii
i
iiim
mm
m
m
mm
mu
uu
u
u
uu
um
mm
m
m
mm
m
I
III
I
IIIn
nn
n
n
nn
ns
ss
s
s
ss
st
tt
t
t
tt
ta
aa
a
a
aa
al
lll
l
llll
lll
l
llla
aa
a
a
aa
at
tt
t
t
tt
ti
iii
i
iiio
oo
o
o
oo
on
nn
n
n
nn
n
Select Minimum Installation
Minimum Installation Minimum Installation
Minimum Installation and click Next>
Next> Next>
Next> button
from the Installation Type
Select screen. Install Shield Wizard will automatically complete the
installation.
Under Minimum Installation, GT Dialer II, GT Updater, Basic Theme file will be
installed.
1
11
1
1
11
1.
..
.
.
..
.1
11
1
1
11
1.
..
.
.
..
.3
33
3
3
33
3
C
CC
C
C
CC
Cu
uu
u
u
uu
us
ss
s
s
ss
st
tt
t
t
tt
to
oo
o
o
oo
om
mm
m
m
mm
m
I
III
I
IIIn
nn
n
n
nn
ns
ss
s
s
ss
st
tt
t
t
tt
ta
aa
a
a
aa
al
lll
l
llll
lll
l
llla
aa
a
a
aa
at
tt
t
t
tt
ti
iii
i
iiio
oo
o
o
oo
on
nn
n
n
nn
n
①. Select Custom Installation
Custom Installation Custom Installation
Custom Installation and click Next>
Next> Next>
Next> button
from the Installation Type
Installation Type Installation Type
Installation Type
Select
SelectSelect
Select screen.
②. Select the item that the install program install and click Next>
Next> Next>
Next> button.
. .
. Install
Shield Wizard will automatically complete the installation.
If you select GT Indicator program, ‘Basic program file’ and ‘GT Dialer II Skin
file’ will automatically be selected as well.
<Caution>
GT Indicator Program runs properly only under IE 5.01 version or higher.

G
nGrGpUGGGGGGGGGGGGGGGGGGGGGGGGGGGGGGGGGGGGGGGGGGGGGGGGGGGGGGGG2001-05-07G
G
GX_
1
11
1
1
11
1.
..
.
.
..
.2
22
2
2
22
2
U
UU
U
U
UU
Up
pp
p
p
pp
pd
dd
d
d
dd
da
aa
a
a
aa
at
tt
t
t
tt
te
ee
e
e
ee
e
I
III
I
IIIn
nn
n
n
nn
ns
ss
s
s
ss
st
tt
t
t
tt
ta
aa
a
a
aa
al
lll
l
llll
lll
l
lll
①. Connect System from the Network.
②. Go to Start
StartStart
Start and run Program
ProgramProgram
Program-
--
-> GTRAN
> GTRAN> GTRAN
> GTRAN-
--
-> GT Dialer
> GT Dialer> GT Dialer
> GT Dialer II
II II
II-
--
-> GT Updator
> GT Updator> GT Updator
> GT Updator.
Connect Gtran server for update GT Dialer, then choose item.
③. Select the item to be updated and click Update
UpdateUpdate
Update. This updates new features of
GT Dialer II and Device Driver Update in the user’s system.
④. Once the Update is properly finished, you’ll read Updated
UpdatedUpdated
Updated under State
StateState
State
and ‘2
22
2’ Item Update Finished
Item Update Finished Item Update Finished
Item Update Finished’ on bottom line
on bottom line on bottom line
on bottom lineG
1
11
1
1
11
1.
..
.
.
..
.3
33
3
3
33
3
R
RR
R
R
RR
Re
ee
e
e
ee
em
mm
m
m
mm
mo
oo
o
o
oo
ov
vv
v
v
vv
ve
ee
e
e
ee
e
P
PP
P
P
PP
Pr
rr
r
r
rr
ro
oo
o
o
oo
og
gg
g
g
gg
gr
rr
r
r
rr
ra
aa
a
a
aa
am
mm
m
m
mm
m
1
11
1
1
11
1.
..
.
.
..
.3
33
3
3
33
3.
..
.
.
..
.1
11
1
1
11
1
R
RR
R
R
RR
Re
ee
e
e
ee
em
mm
m
m
mm
mo
oo
o
o
oo
ov
vv
v
v
vv
ve
ee
e
e
ee
e
f
ff
f
f
ff
fr
rr
r
r
rr
ro
oo
o
o
oo
om
mm
m
m
mm
m
S
SS
S
S
SS
Se
ee
e
e
ee
et
tt
t
t
tt
tu
uu
u
u
uu
up
pp
p
p
pp
p
p
pp
p
p
pp
pr
rr
r
r
rr
ro
oo
o
o
oo
og
gg
g
g
gg
gr
rr
r
r
rr
ra
aa
a
a
aa
am
mm
m
m
mm
m
①. Run Setup.exe
Setup.exeSetup.exe
Setup.exe.
②. InstallShield Wizard will run the screen shown below will appear.
Click Remove
Remove Remove
Remove and click Next>
Next> Next>
Next> button.
G

G
nGrGpUGGGGGGGGGGGGGGGGGGGGGGGGGGGGGGGGGGGGGGGGGGGGGGGGGGGGGGGG2001-05-07G
G
GX`
③. When Remove Confirmation screen appears, start the removal process by
clicking OK
OKOK
OK.
1
11
1
1
11
1.
..
.
.
..
.3
33
3
3
33
3.
..
.
.
..
.2
22
2
2
22
2
R
RR
R
R
RR
Re
ee
e
e
ee
em
mm
m
m
mm
mo
oo
o
o
oo
ov
vv
v
v
vv
vi
iii
i
iiin
nn
n
n
nn
ng
gg
g
g
gg
g
f
ff
f
f
ff
fr
rr
r
r
rr
ro
oo
o
o
oo
om
mm
m
m
mm
m
t
tt
t
t
tt
th
hh
h
h
hh
he
ee
e
e
ee
e
C
CC
C
C
CC
Co
oo
o
o
oo
on
nn
n
n
nn
nt
tt
t
t
tt
tr
rr
r
r
rr
ro
oo
o
o
oo
ol
lll
l
lll
P
PP
P
P
PP
Pa
aa
a
a
aa
an
nn
n
n
nn
ne
ee
e
e
ee
el
lll
l
lll
①. Click Start
Start Start
Start -
--
->
>>
> Settings
Settings Settings
Settings -
--
-> Control Pa
> Control Pa> Control Pa
> Control Panel
nel nel
nel -
--
-> Add/Remove Programs
> Add/Remove Programs> Add/Remove Programs
> Add/Remove Programs.
②. Among the programs currently installed, select GT Dialer
GT DialerGT Dialer
GT Dialer II
II II
II
and delete by
clicking Add/Remove.
Add/Remove.Add/Remove.
Add/Remove.
G
nGrGpUGGGGGGGGGGGGGGGGGGGGGGGGGGGGGGGGGGGGGGGGGGGGGGGGGGGGGGGG2001-05-07G
G
GYW
2
22
2
2
22
2.
..
.
.
..
.
G
GG
G
G
GG
GT
TT
T
T
TT
T
D
DD
D
D
DD
Di
iii
i
iiia
aa
a
a
aa
al
lll
l
llle
ee
e
e
ee
er
rr
r
r
rr
r
I
II
I
I
II
II
II
I
I
II
I
U
UU
U
U
UU
Us
ss
s
s
ss
se
ee
e
e
ee
er
rr
r
r
rr
r
M
MM
M
M
MM
Ma
aa
a
a
aa
an
nn
n
n
nn
nu
uu
u
u
uu
ua
aa
a
a
aa
al
lll
l
lll
To run GT Dialer
GT Dialer GT Dialer
GT Dialer II
IIII
II, go to Start
StartStart
Start and select Program
ProgramProgram
Program-
--
-> GTRAN
> GTRAN> GTRAN
> GTRAN-
--
-> GT Dialer
> GT Dialer > GT Dialer
> GT Dialer II
IIII
II
or double-
click Shortcut to GT
Shortcut to GTShortcut to GT
Shortcut to GT Dialer II
Dialer II Dialer II
Dialer II icon from wall paper.
2
22
2
2
22
2.
..
.
.
..
.1
11
1
1
11
1
M
MM
M
M
MM
Ma
aa
a
a
aa
ai
iii
i
iiin
nn
n
n
nn
n
S
SS
S
S
SS
Sc
cc
c
c
cc
cr
rr
r
r
rr
re
ee
e
e
ee
ee
ee
e
e
ee
en
nn
n
n
nn
n
a
aa
a
a
aa
an
nn
n
n
nn
nd
dd
d
d
dd
d
I
III
I
IIIc
cc
c
c
cc
co
oo
o
o
oo
on
nn
n
n
nn
ns
ss
s
s
ss
s
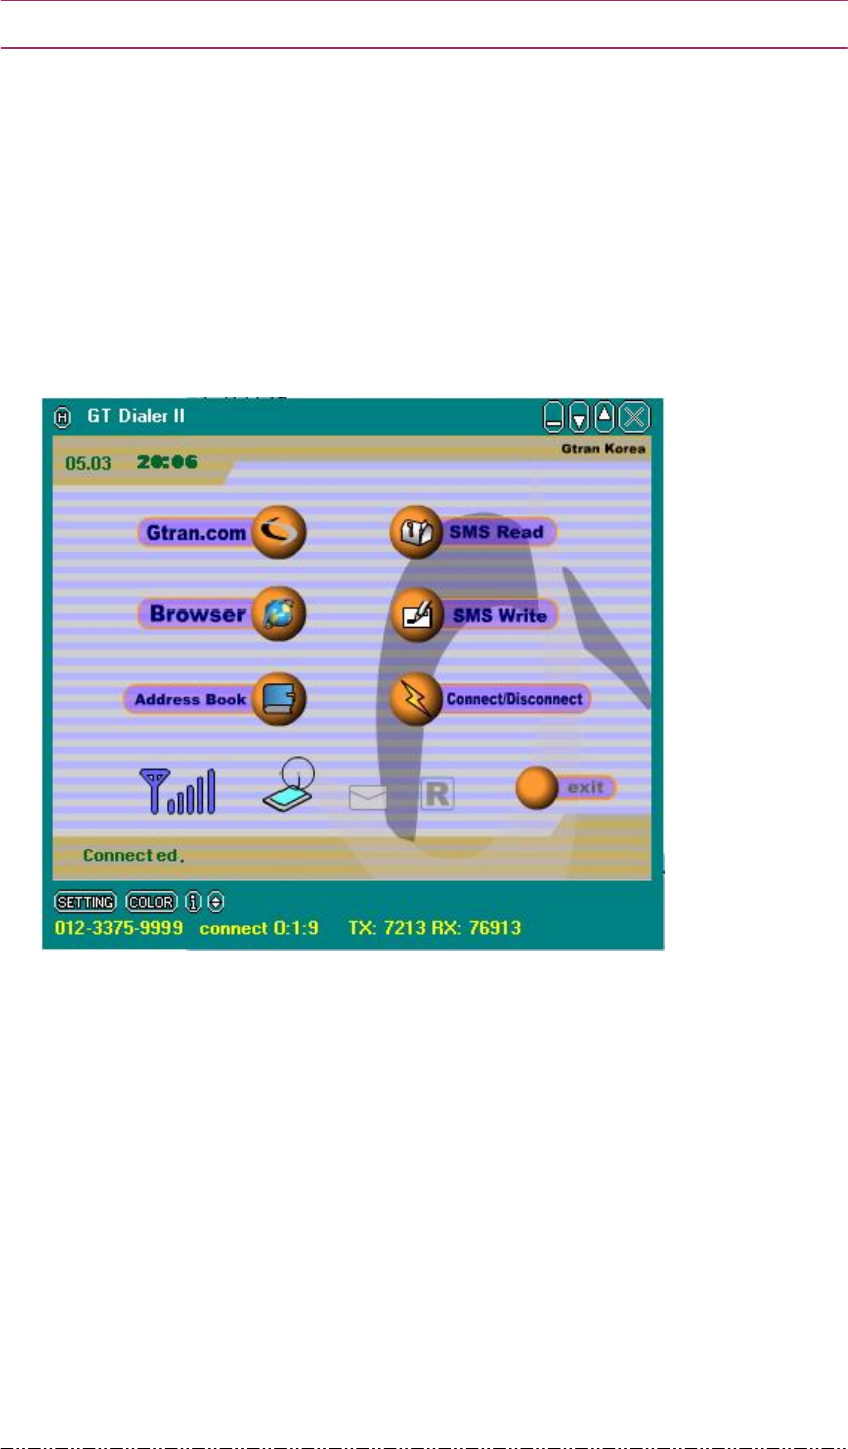
Main screen shown below will appear once GT Dialer
GT Dialer GT Dialer
GT Dialer II
IIII
II
starts running.
G
nGrGpUGGGGGGGGGGGGGGGGGGGGGGGGGGGGGGGGGGGGGGGGGGGGGGGGGGGGGGGG2001-05-07G
G
GYX
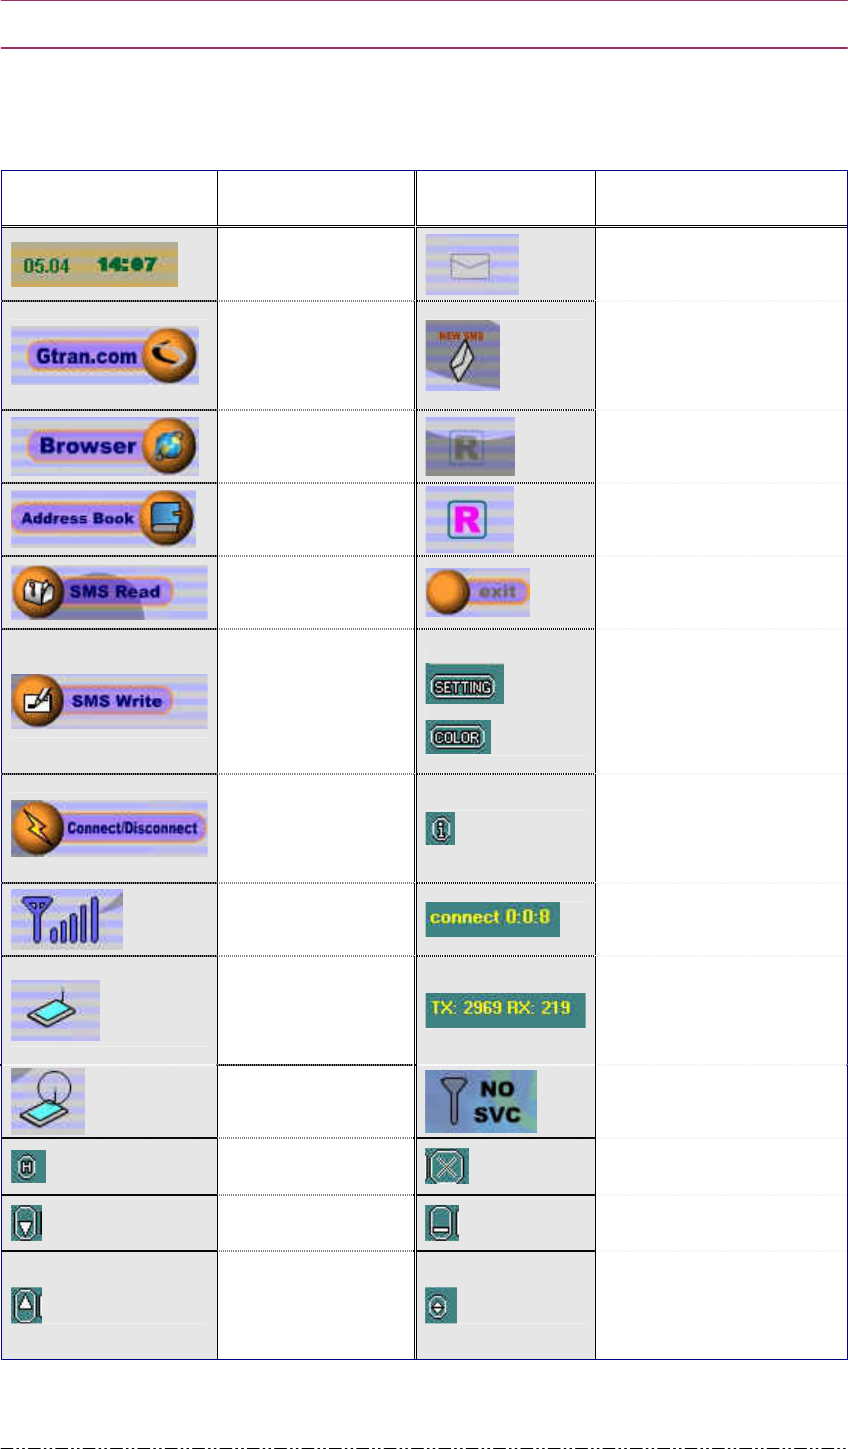
The feature and meaning of each icon on the main screen is shown below.
p
pp
pG
GG
G k
kk
kG
GG
G p
pp
pG
GG
G k
kk
kG
GG
G
/
GPS Time
No new message
G
Connect to
www. gtran.com
website
New message arrived
G
Connect to
general website
Roaming Off
G
Phone Directory
Roaming
G
Check for SMS
received
Exit GT Dialer
G
Send SMS
Theme,
Default Home Page,
SMS tone,
Theme color set up
G
Network Connect
or Disconnect
Modem Diagnostic
Information and
Call History
G
Signal Strength
Network Connected
Time.
G
Card is inserted in
the notebook
Once Connected,
Transfer/Receive Byte
Size
G
Connected to
Network
No Service
GHelp Close application
GReduce Monitor Minimize monitor
GEnlarge Monitor
Display Phone number,
Connection time and
Sending/Receiving byte

G
nGrGpUGGGGGGGGGGGGGGGGGGGGGGGGGGGGGGGGGGGGGGGGGGGGGGGGGGGGGGGG2001-05-07G
G
GYY
2
22
2
2
22
2.
..
.
.
..
.2
22
2
2
22
2
N
NN
N
N
NN
Ne
ee
e
e
ee
et
tt
t
t
tt
tw
ww
w
w
ww
wo
oo
o
o
oo
or
rr
r
r
rr
rk
kk
k
k
kk
k
C
CC
C
C
CC
Co
oo
o
o
oo
on
nn
n
n
nn
nn
nn
n
n
nn
ne
ee
e
e
ee
ec
cc
c
c
cc
ct
tt
t
t
tt
t
a
aa
a
a
aa
an
nn
n
n
nn
nd
dd
d
d
dd
d
D
DD
D
D
DD
Di
iii
i
iiis
ss
s
s
ss
sc
cc
c
c
cc
co
oo
o
o
oo
on
nn
n
n
nn
nn
nn
n
n
nn
ne
ee
e
e
ee
ec
cc
c
c
cc
ct
tt
t
t
tt
t
2
22
2
2
22
2.
..
.
.
..
.2
22
2
2
22
2.
..
.
.
..
.1
11
1
1
11
1
C
CC
C
C
CC
Co
oo
o
o
oo
on
nn
n
n
nn
nn
nn
n
n
nn
ne
ee
e
e
ee
ec
cc
c
c
cc
ct
tt
t
t
tt
ti
iii
i
iiin
nn
n
n
nn
ng
gg
g
g
gg
g
①. On the main menu, click Connect/Disconnect
Connect/DisconnectConnect/Disconnect
Connect/Disconnect, and you will be connected to
the network.
②. As Connect/Disconnect
Connect/Disconnect Connect/Disconnect
Connect/Disconnect runs, if GT Dialer
GT Dialer GT Dialer
GT Dialer II
IIII
II does not recognize the card, an
error message as shown below will appear.
If this screen appears, check for card condition and restart GT Dialer
GT Dialer GT Dialer
GT Dialer II
IIII
II.
2
22
2
2
22
2.
..
.
.
..
.2
22
2
2
22
2.
..
.
.
..
.2
22
2
2
22
2
C
CC
C
C
CC
Ca
aa
a
a
aa
an
nn
n
n
nn
nc
cc
c
c
cc
ce
ee
e
e
ee
el
lll
l
lll
①. While connected to the network, click Connect/Disconnect
Connect/DisconnectConnect/Disconnect
Connect/Disconnect.
②. Network will be disconnected.
2
22
2
2
22
2.
..
.
.
..
.3
33
3
3
33
3
C
CC
C
C
CC
Co
oo
o
o
oo
on
nn
n
n
nn
nn
nn
n
n
nn
ne
ee
e
e
ee
ec
cc
c
c
cc
ct
tt
t
t
tt
ti
iii
i
iiin
nn
n
n
nn
ng
gg
g
g
gg
g
t
tt
t
t
tt
to
oo
o
o
oo
o
I
III
I
IIIn
nn
n
n
nn
nt
tt
t
t
tt
te
ee
e
e
ee
er
rr
r
r
rr
rn
nn
n
n
nn
ne
ee
e
e
ee
et
tt
t
t
tt
t
①. Establish network connection by clicking Connect/Disconnect
Connect/Disconnect Connect/Disconnect
Connect/Disconnect from the main
screen. By clicking Browser
Browser Browser
Browser or Gtran.com
Gtran.comGtran.com
Gtran.com icons, you will go to a web browser.
Browser
Browser Browser
Browser goes to the website set up under Setting
SettingSetting
Setting-
--
-> Default Home Page
> Default Home Page > Default Home Page
> Default Home Page and
Gtran.com
Gtran.comGtran.com
Gtran.com goes to ‘www.gtran.com’ homepage.
G
nGrGpUGGGGGGGGGGGGGGGGGGGGGGGGGGGGGGGGGGGGGGGGGGGGGGGGGGGGGGGG2001-05-07G
G
GYZ
2
22
2
2
22
2.
..
.
.
..
.4
44
4
4
44
4
S
SS
S
S
SS
Se
ee
e
e
ee
en
nn
n
n
nn
nd
dd
d
d
dd
di
iii
i
iiin
nn
n
n
nn
ng
gg
g
g
gg
g
a
aa
a
a
aa
an
nn
n
n
nn
nd
dd
d
d
dd
d
R
RR
R
R
RR
Re
ee
e
e
ee
ea
aa
a
a
aa
ad
dd
d
d
dd
di
iii
i
iiin
nn
n
n
nn
ng
gg
g
g
gg
g
S
SS
S
S
SS
SM
MM
M
M
MM
MS
SS
S
S
SS
S
2
22
2
2
22
2.
..
.
.
..
.4
44
4
4
44
4.
..
.
.
..
.1
11
1
1
11
1
S
SS
S
S
SS
Se
ee
e
e
ee
en
nn
n
n
nn
nd
dd
d
d
dd
di
iii
i
iiin
nn
n
n
nn
ng
gg
g
g
gg
g
S
SS
S
S
SS
SM
MM
M
M
MM
MS
SS
S
S
SS
S
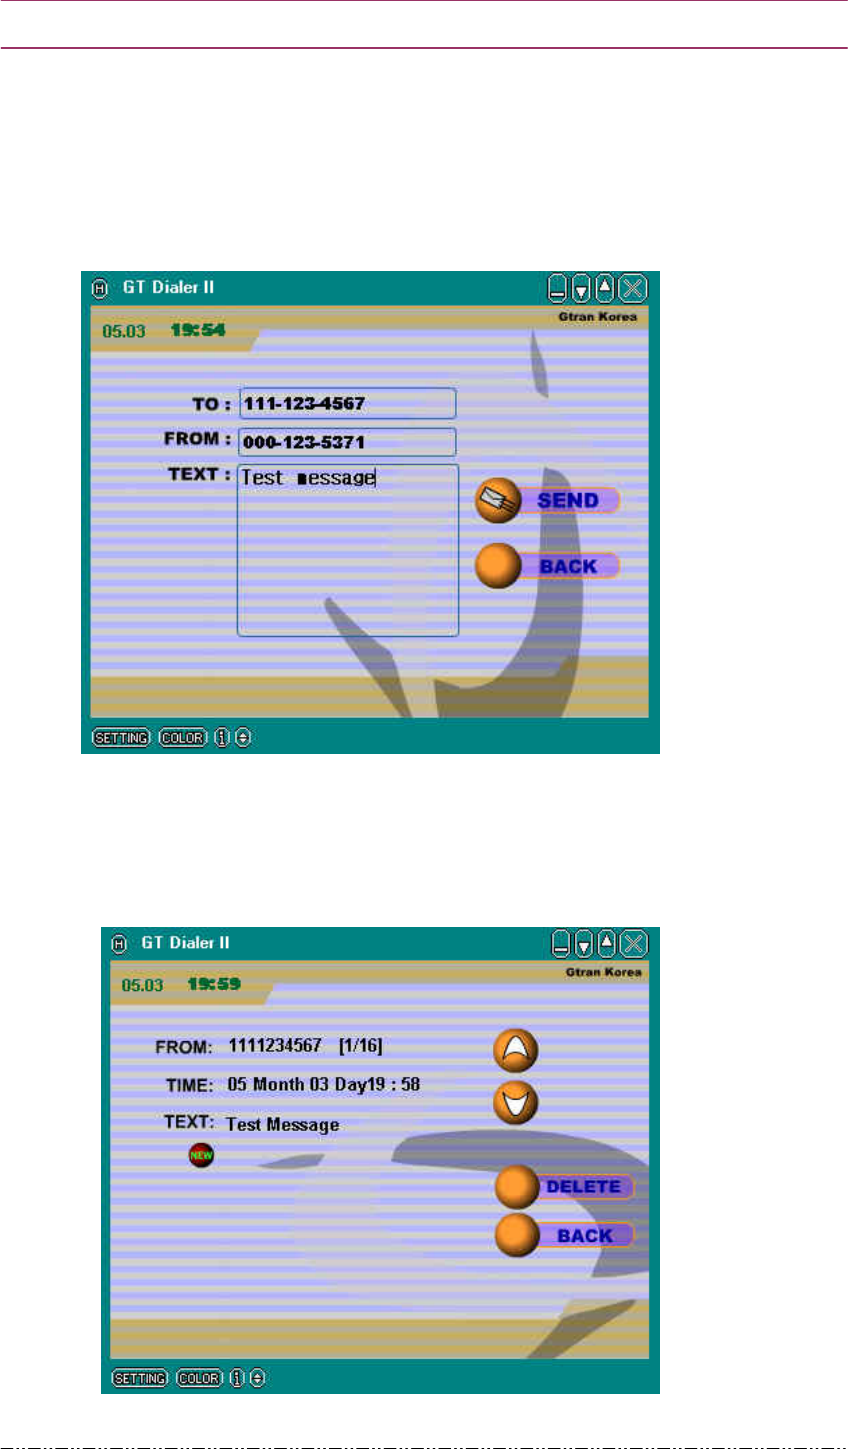
①. From the main screen, click SMS Write
SMS Write SMS Write
SMS Write icon. Send SMS screen will appear.
②. Input receiver’s phone number and text.
③. Once finished inputting, click SEND
SENDSEND
SEND button and the message will be sent.
2
22
2
2
22
2.
..
.
.
..
.4
44
4
4
44
4.
..
.
.
..
.2
22
2
2
22
2
R
RR
R
R
RR
Re
ee
e
e
ee
ea
aa
a
a
aa
ad
dd
d
d
dd
di
iii
i
iiin
nn
n
n
nn
ng
gg
g
g
gg
g
S
SS
S
S
SS
SM
MM
M
M
MM
MS
SS
S
S
SS
S
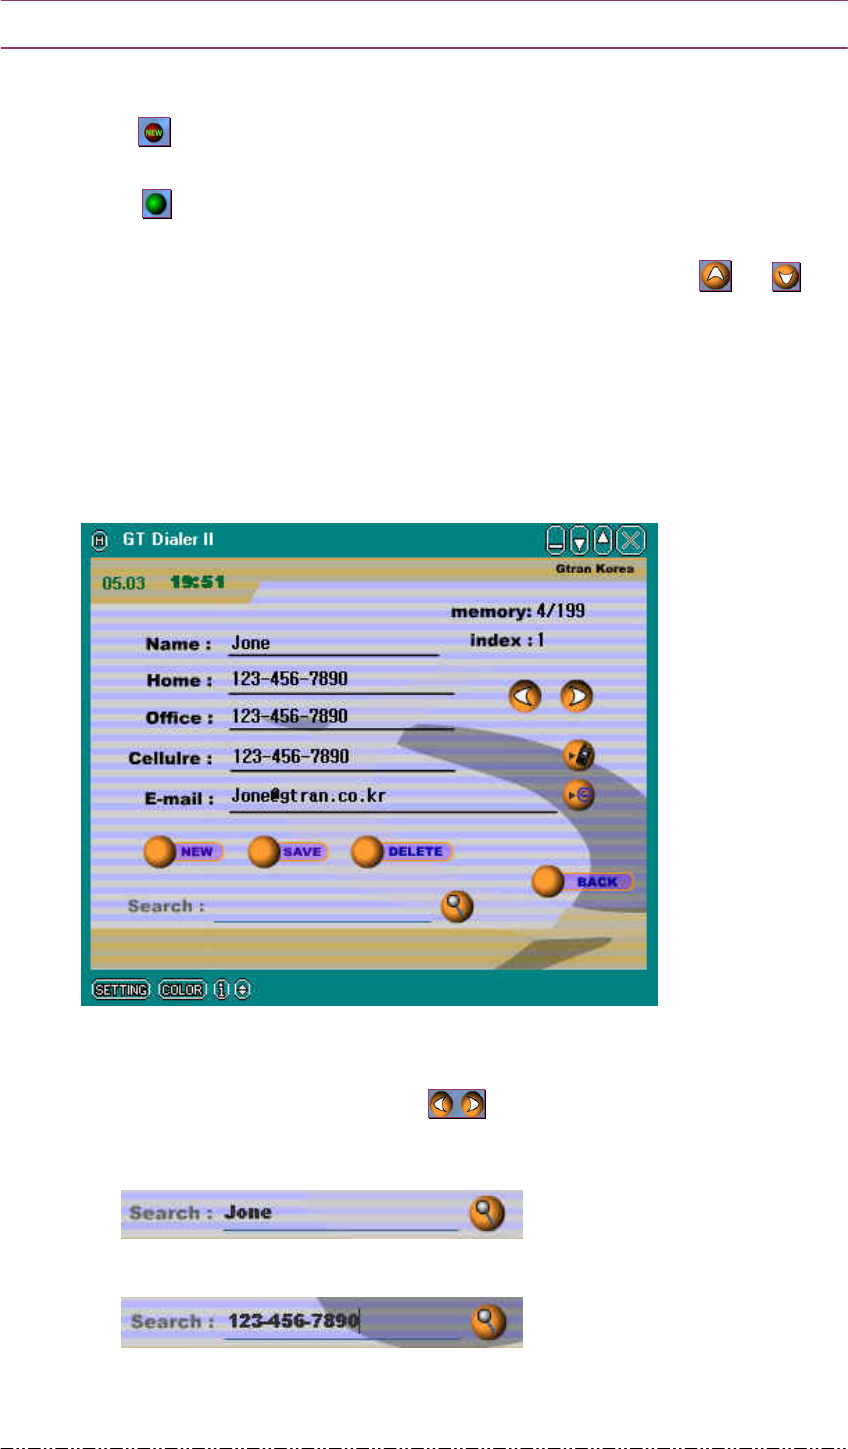
①. From the main screen, click SMS Read
SMS Read SMS Read
SMS Read icon. Receive SMS screen will appear.
G
nGrGpUGGGGGGGGGGGGGGGGGGGGGGGGGGGGGGGGGGGGGGGGGGGGGGGGGGGGGGGG2001-05-07G
G
GY[
new message
read message.
②. To continue to read other messages, select them by clicking or .
③. To delete the message, click DELETE
DELETEDELETE
DELETE.
2
22
2
2
22
2.
..
.
.
..
.5
55
5
5
55
5
A
AA
A
A
AA
Ad
dd
d
d
dd
dd
dd
d
d
dd
dr
rr
r
r
rr
re
ee
e
e
ee
es
ss
s
s
ss
ss
ss
s
s
ss
s
B
BB
B
B
BB
Bo
oo
o
o
oo
oo
oo
o
o
oo
ok
kk
k
k
kk
k
M
MM
M
M
MM
Ma
aa
a
a
aa
an
nn
n
n
nn
na
aa
a
a
aa
ag
gg
g
g
gg
ge
ee
e
e
ee
em
mm
m
m
mm
me
ee
e
e
ee
en
nn
n
n
nn
nt
tt
t
t
tt
t
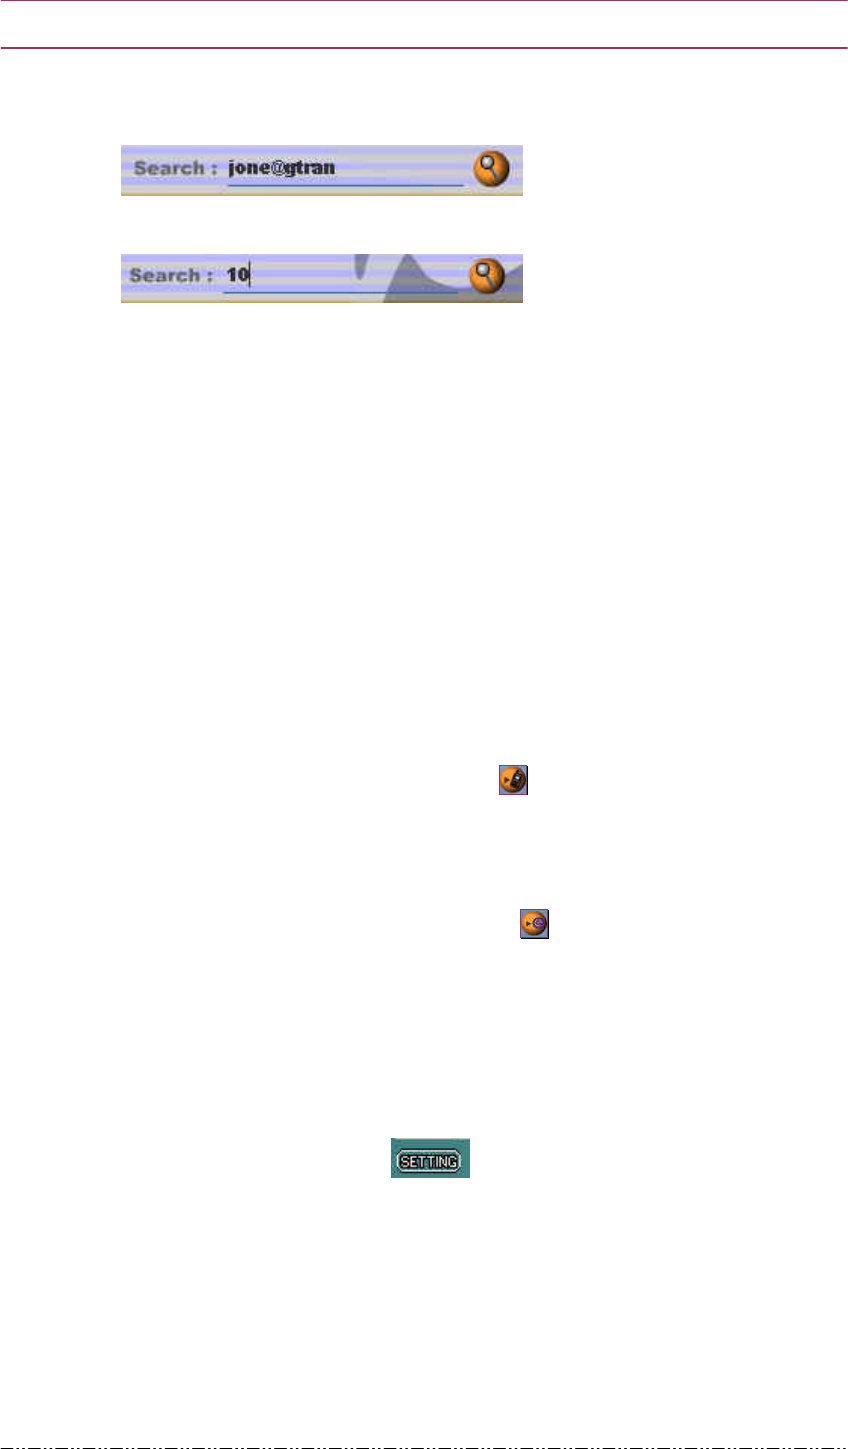
On the main screen, click Address Book
Address Book Address Book
Address Book icon and Address Book
Address Book Address Book
Address Book screen will appear as
shown below.
2
22
2
2
22
2.
..
.
.
..
.5
55
5
5
55
5.
..
.
.
..
.1
11
1
1
11
1
R
RR
R
R
RR
Re
ee
e
e
ee
ea
aa
a
a
aa
ad
dd
d
d
dd
d
a
aa
a
a
aa
an
nn
n
n
nn
nd
dd
d
d
dd
d
S
SS
S
S
SS
Se
ee
e
e
ee
ea
aa
a
a
aa
ar
rr
r
r
rr
rc
cc
c
c
cc
ch
hh
h
h
hh
h
A
AA
A
A
AA
Ad
dd
d
d
dd
dd
dd
d
d
dd
dr
rr
r
r
rr
re
ee
e
e
ee
es
ss
s
s
ss
ss
ss
s
s
ss
s
B
BB
B
B
BB
Bo
oo
o
o
oo
oo
oo
o
o
oo
ok
kk
k
k
kk
k
①. To read stored addresses, click and select.
②. To search by Name,
③. To search by Phone Number,
G
nGrGpUGGGGGGGGGGGGGGGGGGGGGGGGGGGGGGGGGGGGGGGGGGGGGGGGGGGGGGGG2001-05-07G
G
GY\
④. To search by E-mail,
⑤. To search by Index,
2
22
2
2
22
2.
..
.
.
..
.5
55
5
5
55
5.
..
.
.
..
.2
22
2
2
22
2
A
AA
A
A
AA
Ad
dd
d
d
dd
dd
dd
d
d
dd
di
iii
i
iiin
nn
n
n
nn
ng
gg
g
g
gg
g
t
tt
t
t
tt
to
oo
o
o
oo
o
A
AA
A
A
AA
Ad
dd
d
d
dd
dd
dd
d
d
dd
dr
rr
r
r
rr
re
ee
e
e
ee
es
ss
s
s
ss
ss
ss
s
s
ss
s
B
BB
B
B
BB
Bo
oo
o
o
oo
oo
oo
o
o
oo
ok
kk
k
k
kk
k
①. From Address Book
Address BookAddress Book
Address Book screen, click NEW
NEWNEW
NEW.
②. Input Name, Home, Office, Mobile, and E-mail. Click SAVE
SAVE SAVE
SAVE and inputted data
will be stored.
2
22
2
2
22
2.
..
.
.
..
.5
55
5
5
55
5.
..
.
.
..
.3
33
3
3
33
3
E
EE
E
E
EE
Ed
dd
d
d
dd
di
iii
i
iiit
tt
t
t
tt
t
A
AA
A
A
AA
Ad
dd
d
d
dd
dd
dd
d
d
dd
dr
rr
r
r
rr
re
ee
e
e
ee
es
ss
s
s
ss
ss
ss
s
s
ss
s
B
BB
B
B
BB
Bo
oo
o
o
oo
oo
oo
o
o
oo
ok
kk
k
k
kk
k
①. Select the Index to edit and modify appropriate category.
②. When editing is finished, click SAVE
SAVESAVE
SAVE.
2
22
2
2
22
2.
..
.
.
..
.5
55
5
5
55
5.
..
.
.
..
.4
44
4
4
44
4
D
DD
D
D
DD
De
ee
e
e
ee
el
lll
l
llle
ee
e
e
ee
et
tt
t
t
tt
te
ee
e
e
ee
e
f
ff
f
f
ff
fr
rr
r
r
rr
ro
oo
o
o
oo
om
mm
m
m
mm
m
A
AA
A
A
AA
Ad
dd
d
d
dd
dd
dd
d
d
dd
dr
rr
r
r
rr
re
ee
e
e
ee
es
ss
s
s
ss
ss
ss
s
s
ss
s
B
BB
B
B
BB
Bo
oo
o
o
oo
oo
oo
o
o
oo
ok
kk
k
k
kk
k
①. Select the Index to delete and click DELETE
DELETEDELETE
DELETE.
2
22
2
2
22
2.
..
.
.
..
.5
55
5
5
55
5.
..
.
.
..
.5
55
5
5
55
5
M
MM
M
M
MM
Mi
iii
i
iiis
ss
s
s
ss
sc
cc
c
c
cc
ce
ee
e
e
ee
el
lll
l
llll
lll
l
llla
aa
a
a
aa
an
nn
n
n
nn
ne
ee
e
e
ee
eo
oo
o
o
oo
ou
uu
u
u
uu
us
ss
s
s
ss
s
①. To send SMS from Address Book, click .
This screen is the same screen as the one you get from clicking SMS Write
SMS Write SMS Write
SMS Write
from the main screen. The method of sending messages is also same.
②. To send E-mail from Address Book, click .
Clicking the icon will take you to the new message in Outlook Express.
2
22
2
2
22
2.
..
.
.
..
.6
66
6
6
66
6
S
SS
S
S
SS
Se
ee
e
e
ee
et
tt
t
t
tt
t
U
UU
U
U
UU
Up
pp
p
p
pp
p
T
TT
T
T
TT
Th
hh
h
h
hh
he
ee
e
e
ee
em
mm
m
m
mm
me
ee
e
e
ee
e
a
aa
a
a
aa
an
nn
n
n
nn
nd
dd
d
d
dd
d
O
OO
O
O
OO
Ot
tt
t
t
tt
th
hh
h
h
hh
he
ee
e
e
ee
er
rr
r
r
rr
r
2
22
2
2
22
2.
..
.
.
..
.6
66
6
6
66
6.
..
.
.
..
.1
11
1
1
11
1
S
SS
S
S
SS
Se
ee
e
e
ee
et
tt
t
t
tt
t
u
uu
u
u
uu
up
pp
p
p
pp
p
T
TT
T
T
TT
Th
hh
h
h
hh
he
ee
e
e
ee
em
mm
m
m
mm
me
ee
e
e
ee
e
a
aa
a
a
aa
an
nn
n
n
nn
nd
dd
d
d
dd
d
O
OO
O
O
OO
Ot
tt
t
t
tt
th
hh
h
h
hh
he
ee
e
e
ee
er
rr
r
r
rr
r
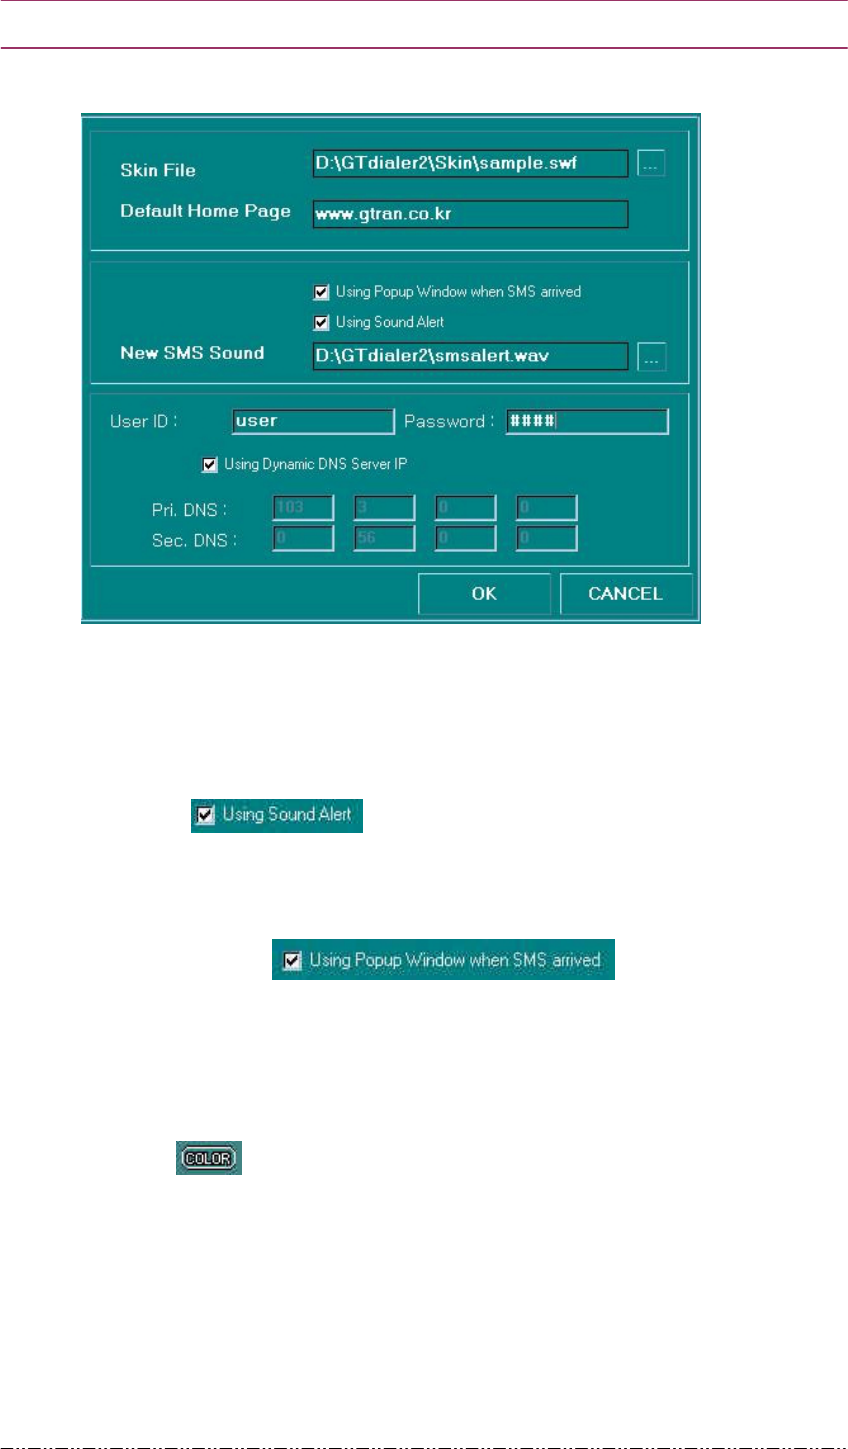
①. From the main screen, click which is at the bottom of the screen.
Screen shown below will appear.
G
nGrGpUGGGGGGGGGGGGGGGGGGGGGGGGGGGGGGGGGGGGGGGGGGGGGGGGGGGGGGGG2001-05-07G
G
GY]
G
②. To change the Theme, go to Skin File
Skin File Skin File
Skin File Gselect the desired file.
③. To set up a website that appears from clicking Browser
BrowserBrowser
Browser icon on the main
screen, go to Default Home Page
Default Home Page Default Home Page
Default Home Page to set up.
④. To set up SMS sound when new message arrives, put a check mark as
shown and select the sound. To remove the SMS
received sound, remove the check mark.
⑤. To set up SMS Pop-Up window when new message arrives, Put a check
mark as shown .
⑥. To connect network, input the User ID, Password, and DNS Server IP.
⑦. Once all the set up is finished, click OK
OKOK
OK.
2
22
2
2
22
2.
..
.
.
..
.6
66
6
6
66
6.
..
.
.
..
.2
22
2
2
22
2
C
CC
C
C
CC
Co
oo
o
o
oo
ol
lll
l
lllo
oo
o
o
oo
or
rr
r
r
rr
r
S
SS
S
S
SS
Se
ee
e
e
ee
et
tt
t
t
tt
t
U
UU
U
U
UU
Up
pp
p
p
pp
p
①. Click which is at the bottom of the main screen.
Once a color is selected, outline color of Theme screen will change.

G
nGrGpUGGGGGGGGGGGGGGGGGGGGGGGGGGGGGGGGGGGGGGGGGGGGGGGGGGGGGGGG2001-05-07G
G
GY^
2
22
2
2
22
2.
..
.
.
..
.7
77
7
7
77
7
A
AA
A
A
AA
Ac
cc
c
c
cc
cc
cc
c
c
cc
ce
ee
e
e
ee
es
ss
s
s
ss
ss
ss
s
s
ss
s
D
DD
D
D
DD
De
ee
e
e
ee
et
tt
t
t
tt
ta
aa
a
a
aa
ai
iii
i
iiil
lll
l
llle
ee
e
e
ee
ed
dd
d
d
dd
d
U
UU
U
U
UU
Us
ss
s
s
ss
sa
aa
a
a
aa
ag
gg
g
g
gg
ge
ee
e
e
ee
e
I
III
I
IIIn
nn
n
n
nn
nf
ff
f
f
ff
fo
oo
o
o
oo
or
rr
r
r
rr
rm
mm
m
m
mm
ma
aa
a
a
aa
at
tt
t
t
tt
ti
iii
i
iiio
oo
o
o
oo
on
nn
n
n
nn
n
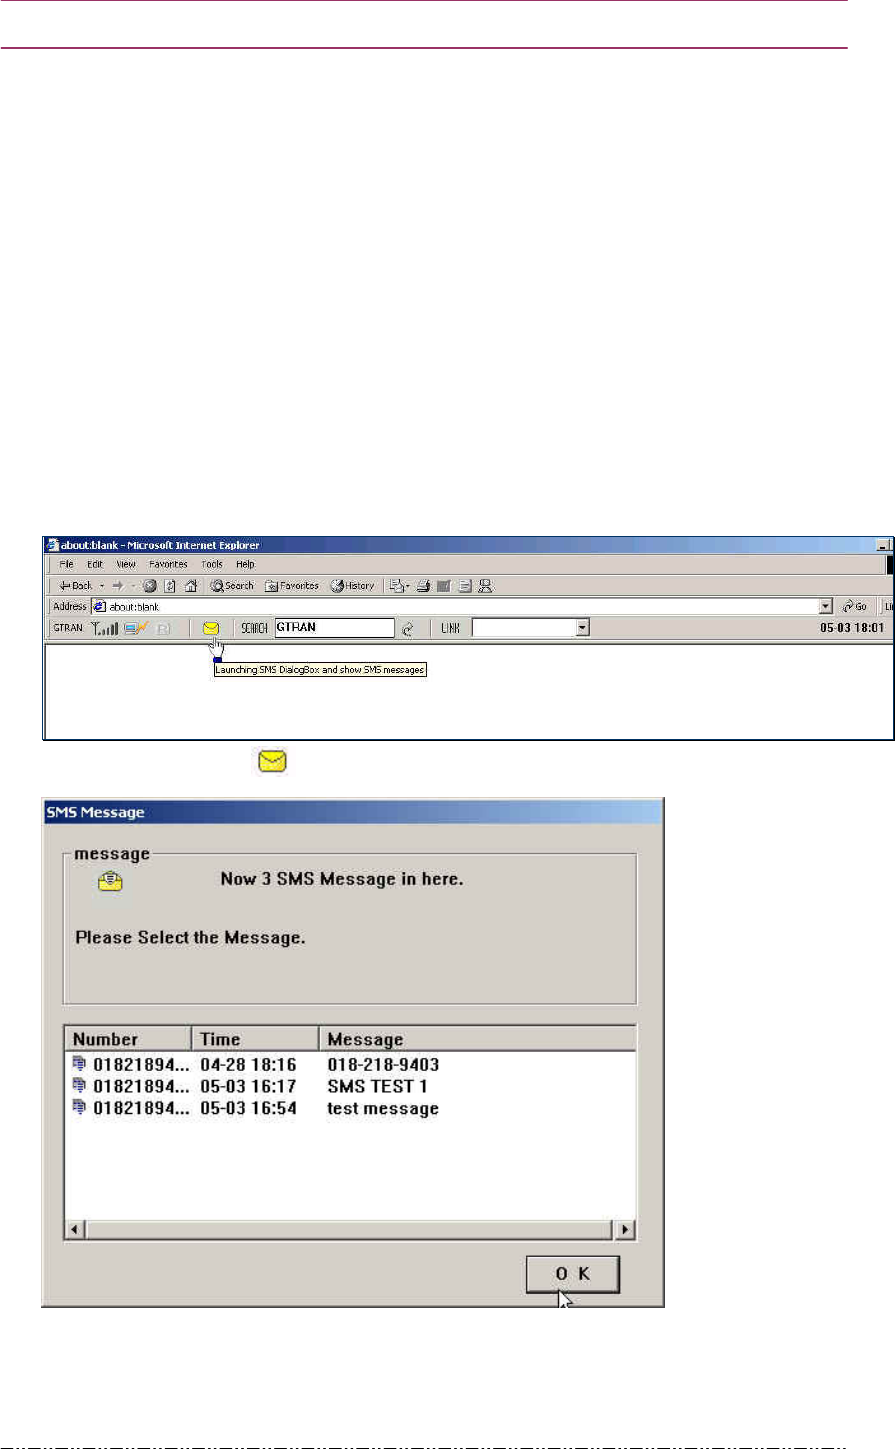
①. Click which is at the bottom of the main screen and you will see a screen
shown below.
②. Detailed usage information is explained below:
- Time Used
GG
Total: Accumulated time of usage before resetting
This Mon: Accumulated usage time for this month
Last Mon: Accumulated usage time for last month
- Accumulated data volume
TX: Transferred packet size since network is connected till disconnected
RX: Received packet size since network is connected till disconnected
G
nGrGpUGGGGGGGGGGGGGGGGGGGGGGGGGGGGGGGGGGGGGGGGGGGGGGGGGGGGGGGG2001-05-07G
G
GY_
3
33
3
3
33
3.
..
.
.
..
.
G
GG
G
G
GG
GT
TT
T
T
TT
T
I
II
I
I
II
In
nn
n
n
nn
nd
dd
d
d
dd
di
iii
i
iiic
cc
c
c
cc
ca
aa
a
a
aa
at
tt
t
t
tt
to
oo
o
o
oo
or
rr
r
r
rr
r
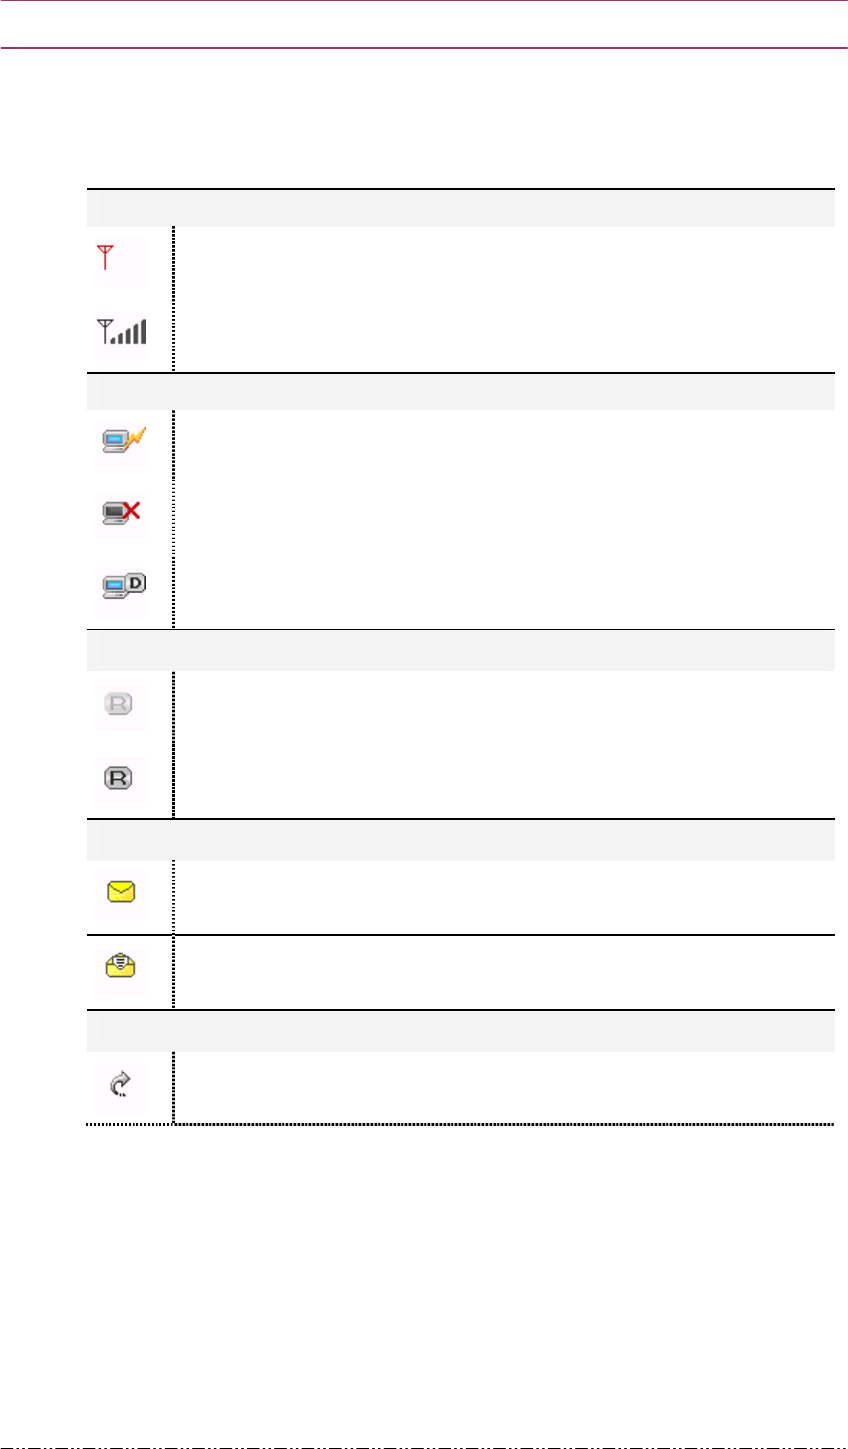
GT Indicator Program is a supplemental program for GT Dialer
GT DialerGT Dialer
GT Dialer. When web browsing by
using IE, the indicator shows information on DotSurfer on top of the screen.
Basic user setting should be IE 5.01 or higher and GT Dialer
GT DialerGT Dialer
GT Dialer should be running properly.
3
33
3
3
33
3.
..
.
.
..
.1
11
1
1
11
1
G
GG
G
G
GG
GT
TT
T
T
TT
T
I
III
I
IIIn
nn
n
n
nn
nd
dd
d
d
dd
di
iii
i
iiic
cc
c
c
cc
ca
aa
a
a
aa
at
tt
t
t
tt
to
oo
o
o
oo
or
rr
r
r
rr
r
U
UU
U
U
UU
Us
ss
s
s
ss
se
ee
e
e
ee
er
rr
r
r
rr
r
M
MM
M
M
MM
Ma
aa
a
a
aa
an
nn
n
n
nn
nu
uu
u
u
uu
ua
aa
a
a
aa
al
lll
l
lll
cUG vGpGl
pGlpGl
pGlUG
.GGo to View -> Toolbars
> Toolbars> Toolbars
> Toolbars and select GT Indicator
GT IndicatorGT Indicator
GT Indicator.
.GDragging down the right below of address window with the mouse and GT
GT GT
GT
Indicator
Indicator Indicator
Indicator will appear as shown below.
④. To read sms, Click .
G
nGrGpUGGGGGGGGGGGGGGGGGGGGGGGGGGGGGGGGGGGGGGGGGGGGGGGGGGGGGGGG2001-05-07G
G
GY`
3
33
3
3
33
3.
..
.
.
..
.4
44
4
4
44
4
G
GG
G
G
GG
GT
TT
T
T
TT
T
I
III
I
IIIn
nn
n
n
nn
nd
dd
d
d
dd
di
iii
i
iiic
cc
c
c
cc
ca
aa
a
a
aa
at
tt
t
t
tt
to
oo
o
o
oo
or
rr
r
r
rr
r
I
III
I
IIIc
cc
c
c
cc
co
oo
o
o
oo
on
nn
n
n
nn
ns
ss
s
s
ss
s
RSSI Status Indicator Icon
No Service
Signal Strength (RSSI).
CONNECTION Status Indicator Icon
Modem is connected to Network
Network is disconnected
Dormant Mode
ROAMING Status Icon
Roaming Off
Roaming
SMS Dialog Box Viewer Icon
No New SMS Message
New SMS Message
Click the icon to read SMS message
GO to Web Page Search Icon
GMoves to set up URL page

G
nGrGpUGGGGGGGGGGGGGGGGGGGGGGGGGGGGGGGGGGGGGGGGGGGGGGGGGGGGGGGG2001-05-07G
G
GZW
W
Wi
in
n
C
CE
E
P
Pr
ro
oc
ce
ed
du
ur
re
es
s
1.
1.1.
1.
Driver Install
Driver InstallDriver Install
Driver Install for COMPAQ iPAQ
for COMPAQ iPAQ for COMPAQ iPAQ
for COMPAQ iPAQ
2.
2.2.
2.
GT Dialer Install
GT Dialer InstallGT Dialer Install
GT Dialer Install
6/ Connect to Internet
6/ GT Dialer User Manual
/

G
nGrGpUGGGGGGGGGGGGGGGGGGGGGGGGGGGGGGGGGGGGGGGGGGGGGGGGGGGGGGGG2001-05-07G
G
GZX
1
11
1
1
11
1.
..
.
.
..
.
D
DD
D
D
DD
Dr
rr
r
r
rr
ri
iii
i
iiiv
vv
v
v
vv
ve
ee
e
e
ee
er
rr
r
r
rr
r
I
II
I
I
II
In
nn
n
n
nn
ns
ss
s
s
ss
st
tt
t
t
tt
ta
aa
a
a
aa
al
lll
l
llll
lll
l
lll
f
ff
f
f
ff
fo
oo
o
o
oo
or
rr
r
r
rr
r
C
CC
C
C
CC
CO
OO
O
O
OO
OM
MM
M
M
MM
MP
PP
P
P
PP
PA
AA
A
A
AA
AQ
QQ
Q
Q
QQ
Q
i
iii
i
iiiP
PP
P
P
PP
PA
AA
A
A
AA
AQ
QQ
Q
Q
QQ
Q
①. Run ‘MicroSoft Active Sync’ then synchronize PC and iPAQ PDA.
G
②. Open PC Explorer and run setup.exe
setup.exe setup.exe
setup.exe which is in Window CE folder under
DotSurfer1X Card Install folder.
③. From the Welcome
Welcome Welcome
Welcome window, click Next >
Next > Next >
Next > button.
/
④. On the License Agreement
License AgreementLicense Agreement
License Agreement screen, click Yes
YesYes
Yes.
⑤. On the screen asking to install in Default Installation Folder, click Yes
YesYes
Yes.
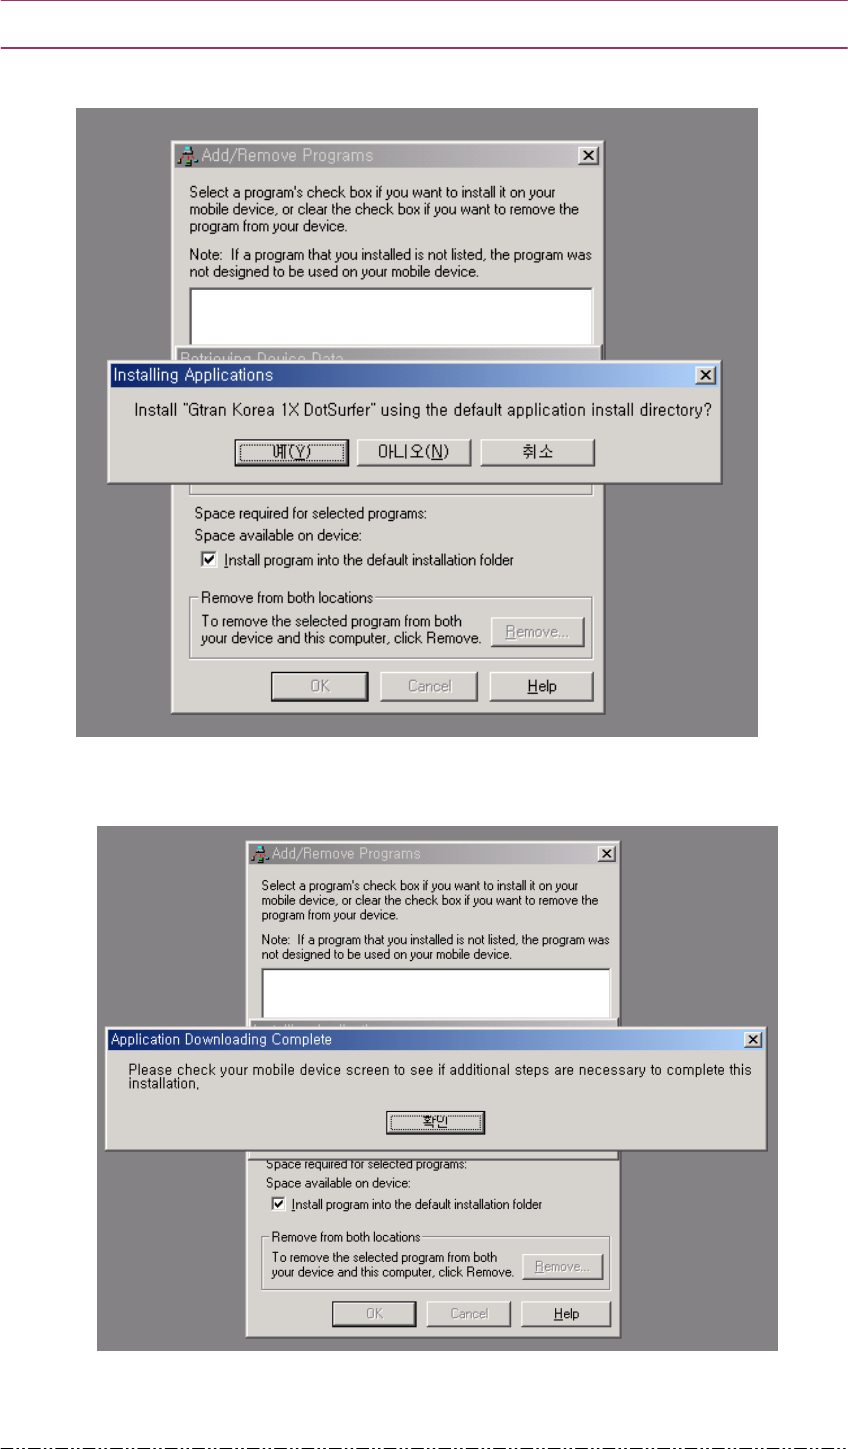
G
nGrGpUGGGGGGGGGGGGGGGGGGGGGGGGGGGGGGGGGGGGGGGGGGGGGGGGGGGGGGGG2001-05-07G
G
GZY
G
⑥. When installation is complete, screen will appear as shown below.
As this screen appears, installation automatically will run in iPAQ PDA.
/
G

G
nGrGpUGGGGGGGGGGGGGGGGGGGGGGGGGGGGGGGGGGGGGGGGGGGGGGGGGGGGGGGG2001-05-07G
G
GZZ
⑦. Insert DotSurfer 1x card after separated iPAQ PDA from the cradle to stop
synchronization between PC and iPAQ.
⑧. Insert the card. Using iPAQ’s stylus, press the hole on the right bottom of the PDA
to Soft
SoftSoft
Soft-
--
-Reset
ResetReset
Reset.

G
nGrGpUGGGGGGGGGGGGGGGGGGGGGGGGGGGGGGGGGGGGGGGGGGGGGGGGGGGGGGGG2001-05-07G
G
GZ[
2
22
2
2
22
2.
..
.
.
..
.
C
CC
C
C
CC
Co
oo
o
o
oo
on
nn
n
n
nn
nn
nn
n
n
nn
ne
ee
e
e
ee
ec
cc
c
c
cc
ct
tt
t
t
tt
ti
iii
i
iiin
nn
n
n
nn
ng
gg
g
g
gg
g
t
tt
t
t
tt
to
oo
o
o
oo
o
I
II
I
I
II
In
nn
n
n
nn
nt
tt
t
t
tt
te
ee
e
e
ee
er
rr
r
r
rr
rn
nn
n
n
nn
ne
ee
e
e
ee
et
tt
t
t
tt
t
①. Go to Start -> Programs -> Connections ->DotSurfer 1X.
②. When you see the screen below, input user ID, password, etc. and click Connect
ConnectConnect
Connect.
③. Once connected, go to Start –> Internet Explorer and start surfing the web.
G
nGrGpUGGGGGGGGGGGGGGGGGGGGGGGGGGGGGGGGGGGGGGGGGGGGGGGGGGGGGGGG2001-05-07G
G
GZ\
3
33
3
3
33
3.
..
.
.
..
.
G
GG
G
G
GG
GT
TT
T
T
TT
T
D
DD
D
D
DD
Di
iii
i
iiia
aa
a
a
aa
al
lll
l
llle
ee
e
e
ee
er
rr
r
r
rr
r
U
UU
U
U
UU
Us
ss
s
s
ss
se
ee
e
e
ee
er
rr
r
r
rr
r
M
MM
M
M
MM
Ma
aa
a
a
aa
an
nn
n
n
nn
nu
uu
u
u
uu
ua
aa
a
a
aa
al
lll
l
lll
①. Go to Start
Start Start
Start –> Programs
> Programs > Programs
> Programs -
--
-> GT Dialer
> GT Dialer> GT Dialer
> GT Dialer.
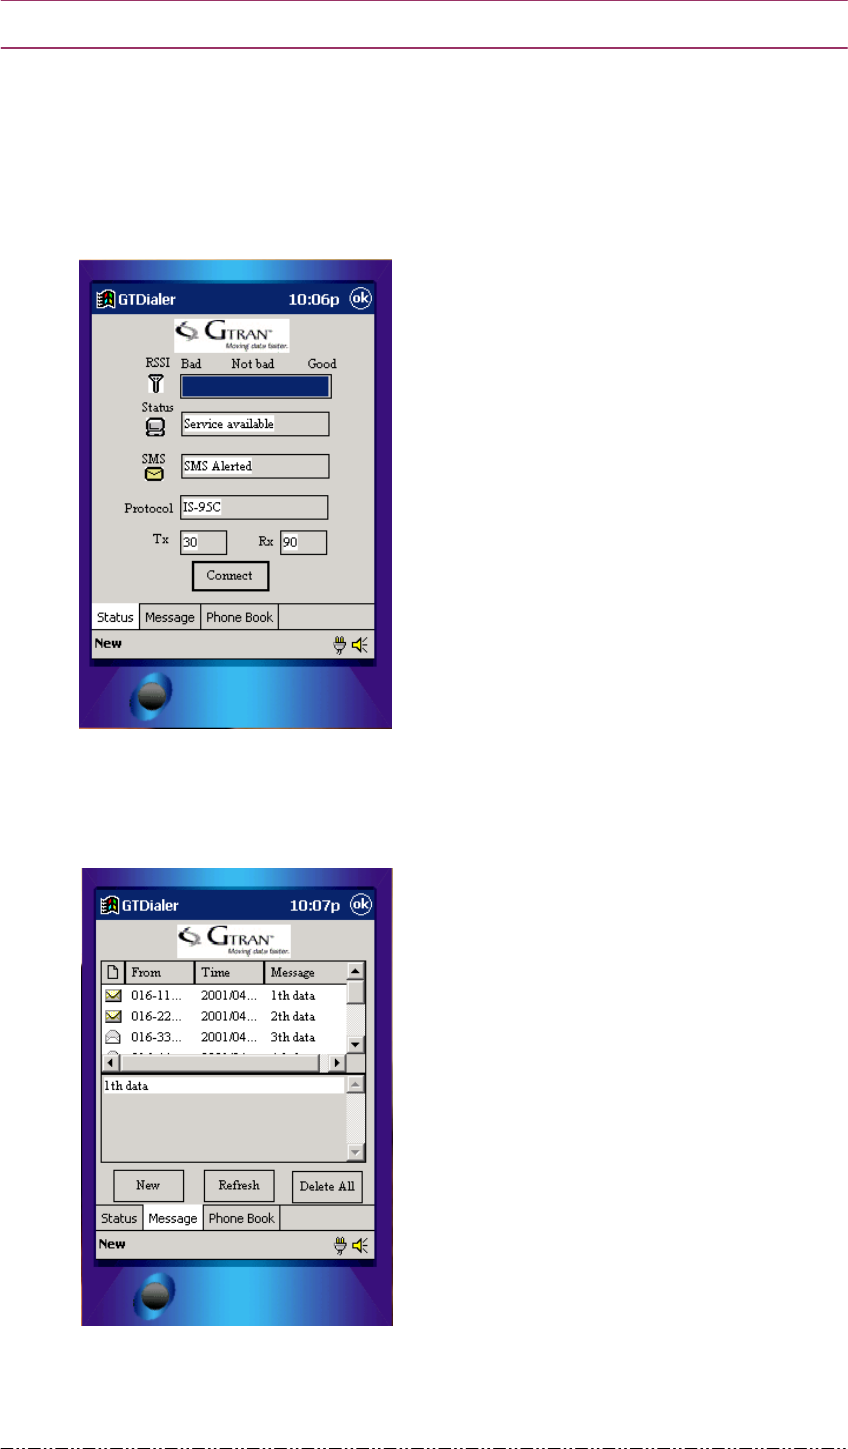
②. Screen showing DotSurfer 1X status will appear.
G
G
TG RSSI: Current Signal Strength
TG Status: Current Service Status
TG SMS: Alerts when SMS arrives
TG Protocol: Protocol-Type currently
connected
TG TX, RX: Transferred/Received Byte
Size.
3
33
3
3
33
3.
..
.
.
..
.1
11
1
1
11
1
S
SS
S
S
SS
Se
ee
e
e
ee
en
nn
n
n
nn
nd
dd
d
d
dd
d
a
aa
a
a
aa
an
nn
n
n
nn
nd
dd
d
d
dd
d
R
RR
R
R
RR
Re
ee
e
e
ee
ea
aa
a
a
aa
ad
dd
d
d
dd
d
S
SS
S
S
SS
SM
MM
M
M
MM
MS
SS
S
S
SS
S
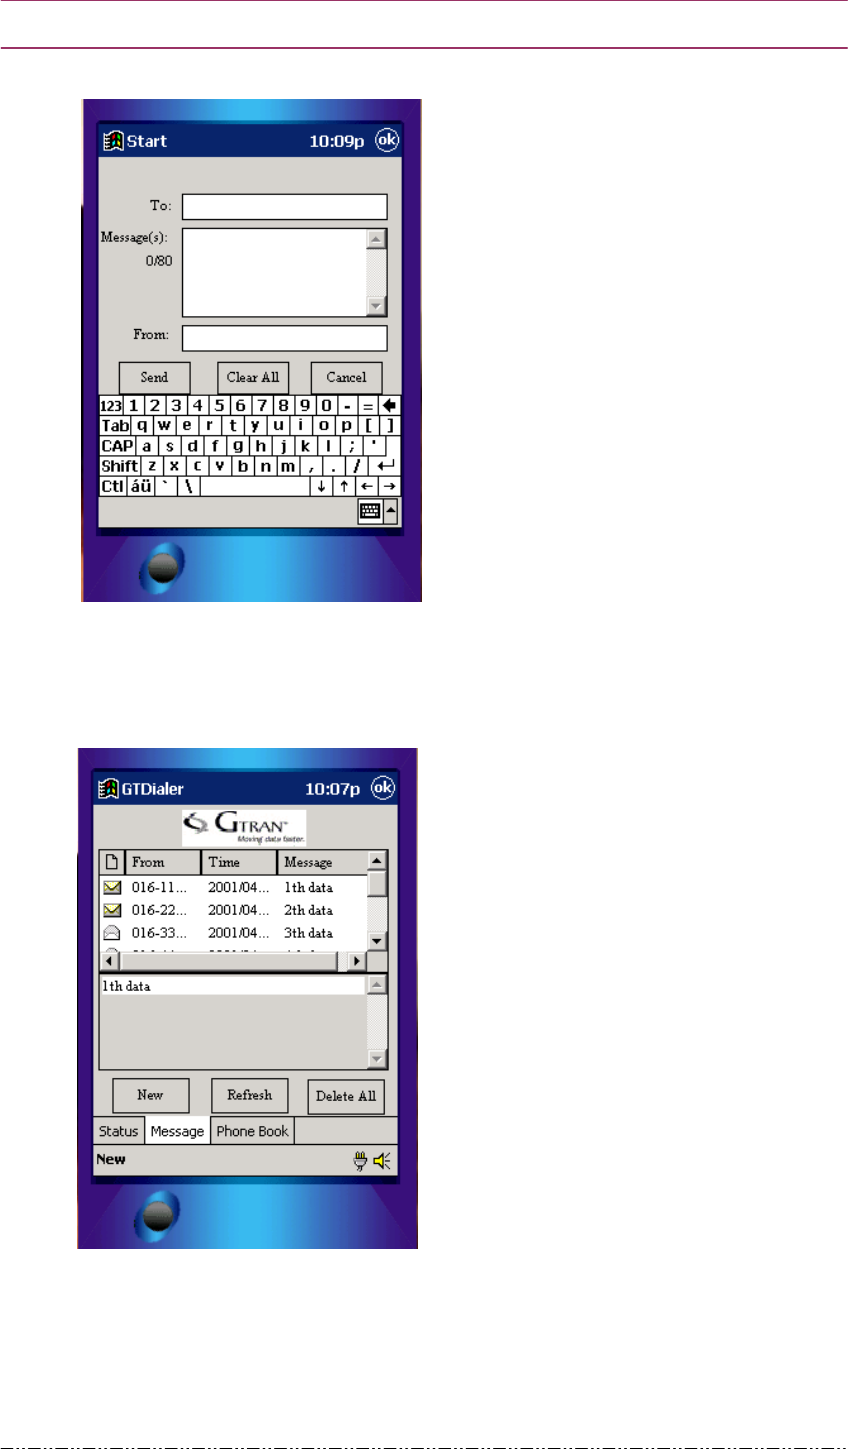
UG After run “Start
Start Start
Start –> Programs
> Programs > Programs
> Programs -
--
->GTDialer
>GTDialer>GTDialer
>GTDialer” , click “Message
MessageMessage
Message”
tab on the bottom. G
G
G
②. To send SMS, click “New
NewNew
New” button on the bottom.
G
nGrGpUGGGGGGGGGGGGGGGGGGGGGGGGGGGGGGGGGGGGGGGGGGGGGGGGGGGGGGGG2001-05-07G
G
GZ]
③. After in-put the receiver’s number and text message, Click “Send
SendSend
Send” button.
In the sender’s number, already included my number.
④. To read SMS, select ‘list’.
Double click the line of list’s header, when can’t see the whole message.

G
nGrGpUGGGGGGGGGGGGGGGGGGGGGGGGGGGGGGGGGGGGGGGGGGGGGGGGGGGGGGGG2001-05-07G
G
GZ^
3
33
3
3
33
3.
..
.
.
..
.2
22
2
2
22
2
D
DD
D
D
DD
De
ee
e
e
ee
el
lll
l
llle
ee
e
e
ee
et
tt
t
t
tt
te
ee
e
e
ee
e
S
SS
S
S
SS
SM
MM
M
M
MM
MS
SS
S
S
SS
S
a
aa
a
a
aa
an
nn
n
n
nn
nd
dd
d
d
dd
d
e
ee
e
e
ee
et
tt
t
t
tt
tc
cc
c
c
cc
c.
..
.
.
..
.
①. To delete SMS, select the message.
Then run Stylus’s tap-and-hold, display the pop-up menu.
Select the pop-up menu’s “Delete
DeleteDelete
Delete”
②. To reply the receive message, select it and run Stylus’s tap-and-hold.
Select pop-up menu’s “Reply”.
③. To forward message to others, run Stylus’s tap-and-hold and select pop-up
menu’s “Forward
ForwardForward
Forward” .

G
nGrGpUGGGGGGGGGGGGGGGGGGGGGGGGGGGGGGGGGGGGGGGGGGGGGGGGGGGGGGGG2001-05-07G
G
GZ_
L
LI
IN
NU
UX
X
P
Pr
ro
oc
ce
ed
du
ur
re
es
s
1.
1.1.
1.
Summary
SummarySummary
Summary
2.
2.2.
2.
Driver Install
Driver InstallDriver Install
Driver Install
6/ Install in Kernel Source
6/ Add to Kernel Module
6/ Replace Kernel Module
3.
3.3.
3.
Using communication
Using communicationUsing communication
Using communication
6/ Verify Setting
6/ How to Use PPP
6/ How to Use DotSurfer Messenger Program

G
nGrGpUGGGGGGGGGGGGGGGGGGGGGGGGGGGGGGGGGGGGGGGGGGGGGGGGGGGGGGGG2001-05-07G
G
GZ`
1
11
1
1
11
1.
..
.
.
..
.
S
SS
S
S
SS
Su
uu
u
u
uu
um
mm
m
m
mm
mm
mm
m
m
mm
ma
aa
a
a
aa
ar
rr
r
r
rr
ry
yy
y
y
yy
y
This section describes DotSurfer PCMCIA card user manual for Linux based laptops.
Need the following in order to use DotSurfer Card:
- Linux Kernel 2.2 or higher
- Basic Module and setup needed to use PCMCIA Card
- setserial 2.17 or higher
This document does not explain the basic items regarding how to use a PCMCIA card in
the laptop nor does Gtran Korea provide technical support regarding this. However, you
should not worry. Most of the current Linux Package take PCMCIA users into
consideration. Unless under a special condition, you should be able to easily use PCMCIA
slot. Incase of difficulties, refer to resources such as PCMCIA-HOWTO.
You can confirm the user’s setserial version as a below
setserial
setserial setserial
setserial –V
VV
V
Use capital V for option. If version is lower than 2.17, use setserial command without
option and verify whether you can use 16950, 16954 which is listed under uart option. If
they are not listed under the option list, current setserial being used should be upgraded
to the newest version.
You can get the newest version of setserial package from http://sourceforge.net/.
CD provided for user’s convenience includes setserial-2.17.tar.gz file.

G
nGrGpUGGGGGGGGGGGGGGGGGGGGGGGGGGGGGGGGGGGGGGGGGGGGGGGGGGGGGGGG2001-05-07G
G
G[W
2
22
2
2
22
2.
..
.
.
..
.
I
II
I
I
II
In
nn
n
n
nn
ns
ss
s
s
ss
st
tt
t
t
tt
ta
aa
a
a
aa
al
lll
l
llll
lll
l
lll
There are three methods of installing DotSurfer 1X Device Driver.
TG Install in Kernel Source
TG Add to Kernel Module
TG Replace Kernel Module
Before installing, login under the root account and decompress dotsurf_drv_1.0.tar.gz file
from an appropriate location.
2
22
2
2
22
2.
..
.
.
..
.1
11
1
1
11
1.
..
.
.
..
.
I
III
I
IIIn
nn
n
n
nn
ns
ss
s
s
ss
st
tt
t
t
tt
ta
aa
a
a
aa
al
lll
l
llll
lll
l
lll
i
iii
i
iiin
nn
n
n
nn
n
K
KK
K
K
KK
Ke
ee
e
e
ee
er
rr
r
r
rr
rn
nn
n
n
nn
ne
ee
e
e
ee
el
lll
l
lll
S
SS
S
S
SS
So
oo
o
o
oo
ou
uu
u
u
uu
ur
rr
r
r
rr
rc
cc
c
c
cc
ce
ee
e
e
ee
e
①. If Kernel source is installed in the system, you can replace the existing Kernel
serial Device Driver with DotSurfer Driver. Because device driver of DotSurfer is
based on the existing serial Device Driver and supports all general serial
communication functions, it should not be a problem to use general serial port.
②. In order to combine DotSurfer Driver with Kernel source and upgrade, run install
installinstall
install-
--
-
in
inin
in-
--
-kernel
kernelkernel
kernel script and follow instruction.
③. Kernel source is generally installed in /usr/src/linux. Once you assign the
location of Kernel source and complete the remaining procedures, source install
completes.
④. Run Kernel compile process
⑤. After the entire Kernel compile/install completes, reboot your computer and your
installation will be complete.
2
22
2
2
22
2.
..
.
.
..
.2
22
2
2
22
2.
..
.
.
..
.
A
AA
A
A
AA
Ad
dd
d
d
dd
dd
dd
d
d
dd
d
t
tt
t
t
tt
to
oo
o
o
oo
o
K
KK
K
K
KK
Ke
ee
e
e
ee
er
rr
r
r
rr
rn
nn
n
n
nn
ne
ee
e
e
ee
el
lll
l
lll
M
MM
M
M
MM
Mo
oo
o
o
oo
od
dd
d
d
dd
du
uu
u
u
uu
ul
lll
l
llle
ee
e
e
ee
e
Adding to Kernel source and installing is a very good method. However, having to go
through Kernel compile procedures makes it very inconvenient. More fast way is that
device driver is loaded into kernel modules only when DotSurfer card is inserted.
①. First, using make
makemake
make command, compile the driver.
②. Once compile is complete, run add
addadd
add-
--
-module
modulemodule
module script.
③. Once the installation is complete, insert the card.

G
nGrGpUGGGGGGGGGGGGGGGGGGGGGGGGGGGGGGGGGGGGGGGGGGGGGGGGGGGGGGGG2001-05-07G
G
G[X
2
22
2
2
22
2.
..
.
.
..
.3
33
3
3
33
3.
..
.
.
..
.
R
RR
R
R
RR
Re
ee
e
e
ee
ep
pp
p
p
pp
pl
lll
l
llla
aa
a
a
aa
ac
cc
c
c
cc
ce
ee
e
e
ee
e
K
KK
K
K
KK
Ke
ee
e
e
ee
er
rr
r
r
rr
rn
nn
n
n
nn
ne
ee
e
e
ee
el
lll
l
lll
M
MM
M
M
MM
Mo
oo
o
o
oo
od
dd
d
d
dd
du
uu
u
u
uu
ul
lll
l
llle
ee
e
e
ee
e
This method applies only to the case where serial Device Driver is installed as a dynamic
Module. However, installation is possible in other cases as well.
Generally, serial Device Driver is included in Kernel as static and most Linux packages
will have kernel that has static serial device driver. You can change the ‘serial.o
serial.oserial.o
serial.o’ file to
new one if your kernel has serial.o
serial.oserial.o
serial.o modules separatory, or you did compile so.
Run make
makemake
make
command and compile the driver.
①. Run replace
replacereplace
replace-
--
-module
modulemodule
module script
script script
script and install module.
②. Once the installation is complete, insert the card.
<
< <
< Caution
CautionCaution
Caution >
> >
>
* Make sure to select only one of the three methods from above.
Make sure to select only one of the three methods from above. Make sure to select only one of the three methods from above.
Make sure to select only one of the three methods from above. If you are not
If you are not If you are not
If you are not
sure about which method
sure about which method sure about which method
sure about which method to
toto
to use, follow the third method.
use, follow the third method. use, follow the third method.
use, follow the third method.

G
nGrGpUGGGGGGGGGGGGGGGGGGGGGGGGGGGGGGGGGGGGGGGGGGGGGGGGGGGGGGGG2001-05-07G
G
G[Y
3
33
3
3
33
3.
..
.
.
..
.
U
UU
U
U
UU
Us
ss
s
s
ss
si
iii
i
iiin
nn
n
n
nn
ng
gg
g
g
gg
g
C
CC
C
C
CC
Co
oo
o
o
oo
om
mm
m
m
mm
mm
mm
m
m
mm
mu
uu
u
u
uu
un
nn
n
n
nn
ni
iii
i
iiic
cc
c
c
cc
ca
aa
a
a
aa
at
tt
t
t
tt
ti
iii
i
iiio
oo
o
o
oo
on
nn
n
n
nn
n
3
33
3
3
33
3.
..
.
.
..
.1
11
1
1
11
1
V
VV
V
V
VV
Ve
ee
e
e
ee
er
rr
r
r
rr
ri
iii
i
iiif
ff
f
f
ff
fy
yy
y
y
yy
y
S
SS
S
S
SS
Se
ee
e
e
ee
et
tt
t
t
tt
tt
tt
t
t
tt
ti
iii
i
iiin
nn
n
n
nn
ng
gg
g
g
gg
g
If the driver is installed, you can have wireless network connection using DotSurfer Card.
While the card is inserted, DotSurfer card should have a port such as /dev/ttyS1 allotted
and in such a case, there should be a /dev/modem link under the applicable port.
①. Using setserial /dev/ttyS1
setserial /dev/ttyS1 setserial /dev/ttyS1
setserial /dev/ttyS1
q
q q
q command, verify whether the port is set up as
below:
/dev/ttyS1, UART:16950/954, Port: 0x2f8, IRQ: 3 flags
/dev/ttyS1, UART:16950/954, Port: 0x2f8, IRQ: 3 flags/dev/ttyS1, UART:16950/954, Port: 0x2f8, IRQ: 3 flags
/dev/ttyS1, UART:16950/954, Port: 0x2f8, IRQ: 3 flags:spd_cust
:spd_cust:spd_cust
:spd_cust
Because Port and IRQ change depending on the system and situation, you dont
need to worry about it.
②. Also, using ls
ls ls
ls -
--
-l /dev/DotSurfer
l /dev/DotSurfer l /dev/DotSurfer
l /dev/DotSurfer command, verify whether there is a device file as
below:
crw
crwcrw
crw-
--
-rw
rwrw
rw-
--
-rw
rwrw
rw-
--
- 1 root root
1 root root 1 root root
1 root root/
//
/ 202, 1 1
202, 1 1 202, 1 1
202, 1 1 월
월월
월 1 12:00 /dev/DotSurfer
1 12:00 /dev/DotSurfer 1 12:00 /dev/DotSurfer
1 12:00 /dev/DotSurfer
③. If there is no such file, you can create it using mknod
mknod mknod
mknod command.
DotSurfer Card provides high-speed data speed of 230400bps. However, it is
not necessary to modify the speed of the application in use to 230400bps.
Speed of all the communication programs such as gau, and kppp must be set at
115200bps. You may think that application programs are communicated at
115kbps but the actual speed provided by device driver is 230kbps.
<
< <
< Caution
CautionCaution
Caution >
> >
>
Keep in
Keep in Keep in
Keep in mind that if application program speed is selected as other than
mind that if application program speed is selected as other than mind that if application program speed is selected as other than
mind that if application program speed is selected as other than
115200bps, you cannot use DotSurfer card
115200bps, you cannot use DotSurfer card115200bps, you cannot use DotSurfer card
115200bps, you cannot use DotSurfer card.
..
.
3
33
3
3
33
3.
..
.
.
..
.2
22
2
2
22
2
H
HH
H
H
HH
Ho
oo
o
o
oo
ow
ww
w
w
ww
w
t
tt
t
t
tt
to
oo
o
o
oo
o
U
UU
U
U
UU
Us
ss
s
s
ss
se
ee
e
e
ee
e
P
PP
P
P
PP
PP
PP
P
P
PP
PP
PP
P
P
PP
P
When connecting to PPP, noauth
noauthnoauth
noauth option must be used. But noauths option is only roots
permission. Also, PPP connection program run roots permission.
There are various ways to connect to PPP using pppd
pppdpppd
pppd. Which method to use is not
important.
Note: Run pppd with roots authority as noauth option.
Please refer to various online references for information on how to use pppd
pppdpppd
pppd.

G
nGrGpUGGGGGGGGGGGGGGGGGGGGGGGGGGGGGGGGGGGGGGGGGGGGGGGGGGGGGGGG2001-05-07G
G
G[Z
4
44
4
4
44
4.
..
.
.
..
.
H
HH
H
H
HH
Ho
oo
o
o
oo
ow
ww
w
w
ww
w
t
tt
t
t
tt
to
oo
o
o
oo
o
U
UU
U
U
UU
Us
ss
s
s
ss
se
ee
e
e
ee
e
D
DD
D
D
DD
Do
oo
o
o
oo
ot
tt
t
t
tt
tS
SS
S
S
SS
Su
uu
u
u
uu
ur
rr
r
r
rr
rf
ff
f
f
ff
fe
ee
e
e
ee
er
rr
r
r
rr
r
M
MM
M
M
MM
Me
ee
e
e
ee
es
ss
s
s
ss
ss
ss
s
s
ss
se
ee
e
e
ee
en
nn
n
n
nn
ng
gg
g
g
gg
ge
ee
e
e
ee
er
rr
r
r
rr
r
P
PP
P
P
PP
Pr
rr
r
r
rr
ro
oo
o
o
oo
og
gg
g
g
gg
gr
rr
r
r
rr
ra
aa
a
a
aa
am
mm
m
m
mm
m
DotSurfer Messenger program is an X application that allows usage of DotSurfer’s various
supplemental functions. The system must have GTK+ Library installed. Most of the
Package have GTK+ Library. Through DotSurfer Messenger program, you can check for
various card status and utilize supplemental functions such as send/receive SMS.
Program is distributed as binary RPM package.
After installing messenger
messengermessenger
messenger-
--
-1.0.0
1.0.01.0.0
1.0.0-
--
-1.i386.rpm
1.i386.rpm1.i386.rpm
1.i386.rpm file, run /usr/bin/messenger
/usr/bin/messenger/usr/bin/messenger
/usr/bin/messenger.
G

Warning
This equipment complies with part 15 of the FCC rules. Any
changes or modifications not expressly approved by the GTRAN
WIRELESS, INC. could void the user’s authority to operate the
equipment.