GTRAN Wireless GPC-6210 DOTSURFER GPC-6210 User Manual R0207165Mnl
GTRAN Wireless, Inc. DOTSURFER GPC-6210 R0207165Mnl
Contents
- 1. User Manual
- 2. Revised Users Manual
Revised Users Manual

D
D
Do
o
ot
t
tS
S
Su
u
ur
r
rf
f
fe
e
er
r
r
6
6
62
2
21
1
10
0
0
U
U
US
S
SE
E
ER
R
R
M
M
Ma
a
an
n
nu
u
ua
a
al
l
l
2002 GTRAN Wireless Inc. All rights reserved. No reproduction in whole or
in part is permitted, without prior written approval.
GTRAN Wireless Inc. and DotSurfer are registered trademarks of GTRAN
Wireless Inc.
The information in this user manual is subject to change without notice and
does not represent a commitment on the part of GTRAN Wireless, Inc.
Model Number: GPC-6210
Version 1.0

GTRAN Wireless Inc.
2
TABLE of CONTENS
1. DOTSURFER 6210 INTRODUCTION ................................... 3
2. LAPTOP.................................................................................... 4
2.1 INSTALLATION.................................................................................................................................4
2.2 UNINSTALLING THE DOTSURFER DRIVER AND PROGRAM......................................................8
2.3 USING GT DIALER III ............................................................................................................................9
2.4 SMS..........................................................................................................................................................13
3. PDA ........................................................................................ 18
3.1 INSTALLATION .....................................................................................................................................18
3.2 USING GT DIALER3 .............................................................................................................................20
APPENDIX A: PRODUCT SPECIFICATIONS ............................... 32
SYSTEM REQUIREMENTS .......................................................................................................................32
ENVIRONMENTAL AND ELECTRICAL SPECIFICATIONS .................................................................32
APPENDIX B: SAFETY AND REGULATORY INFORMATION ..... 33
SAFETY AND HAZARDS...........................................................................................................................33
REGULATORY INFORMATION ................................................................................................................33

GTRAN Wireless Inc.
3
1. DOTSURFER 6210 INTRODUCTION
GTRAN Wireless DotSurfer 6210 is a high-speed wireless Type II PCMCIA modem card that
fits into major laptops, PDAs, and other mobile devices that utilize MS Windows Operating
Systems and a PCMCIA Type II expansion slot. Allowing for wireless Internet connectivity under
CDMA 1xEV-DO network, DotSurfer modem card delivers unmatched speed at up to 2.4 Mbps.
At 86 mm in length, DotSurfer modem card is small, compact and inserts perfectly into a mobile
device and has a flexible antenna applicable for all mobile users.
All DotSurfer modem card packages include the following components:
- DotSurfer PCMCIA modem card with the flexible antenna
- Quick Start Guide
- CD-ROM containing the GT Dialer software and the User Manual
Product Features
- Flexible antenna
- Supports wireless data connection speeds up to 2.4 Mbps
- Minimizes laptop battery power consumption through Self Power Control
- Compact, lightweight 86 x 54 x 5 mm and only 35 grams
- Sends and receives SMS messages on networks that support 2-Way SMS
- Real time modem card status indicators while on-line
- Supports Windows 98, 2000, ME, XP, CE 3.0, and PPC 2002
* To check for software updates for your product, please visit GTRAN Wireless’ website at
www.gtranwireless.com.
GTRAN Wireless Inc.
4
2. IBM ThinkPad I-Series 1661 WINDOW ME
2.1 INSTALLATION
Step 1: Software Installation
You must install the software from the CD before inserting the DotSurfer
modem card!
a. Make sure that the DotSurfer card is not inserted into the PCMCIA slot.
b. Close all the other programs that are running before starting the application. Insert the
installation software CD into your CD-ROM drive. The InstallShield Wizard should run
automatically. If it does not, click Start-> Run and enter d:\Setup.exe. Replace d: with the
drive letter for your CD-ROM drive, if necessary.
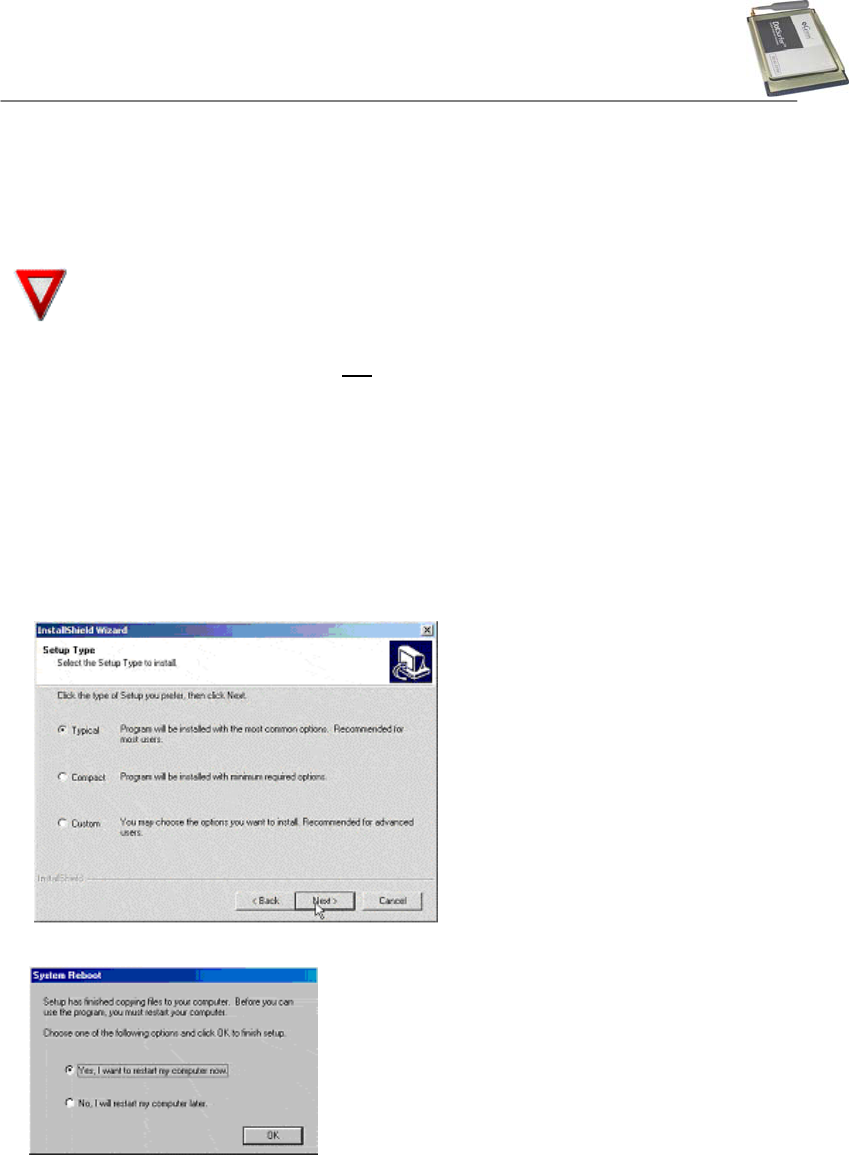
c. The
InstallShield Wizard will guide you through the installation.
d. From the Setup screen, choose Typical and click Next> and follow the rest of the
instructions.
e. Restart your computer.
Step 2: Driver Installation
Insert the DotSurfer modem card into the PC slot of your laptop.
GTRAN Wireless Inc.
5
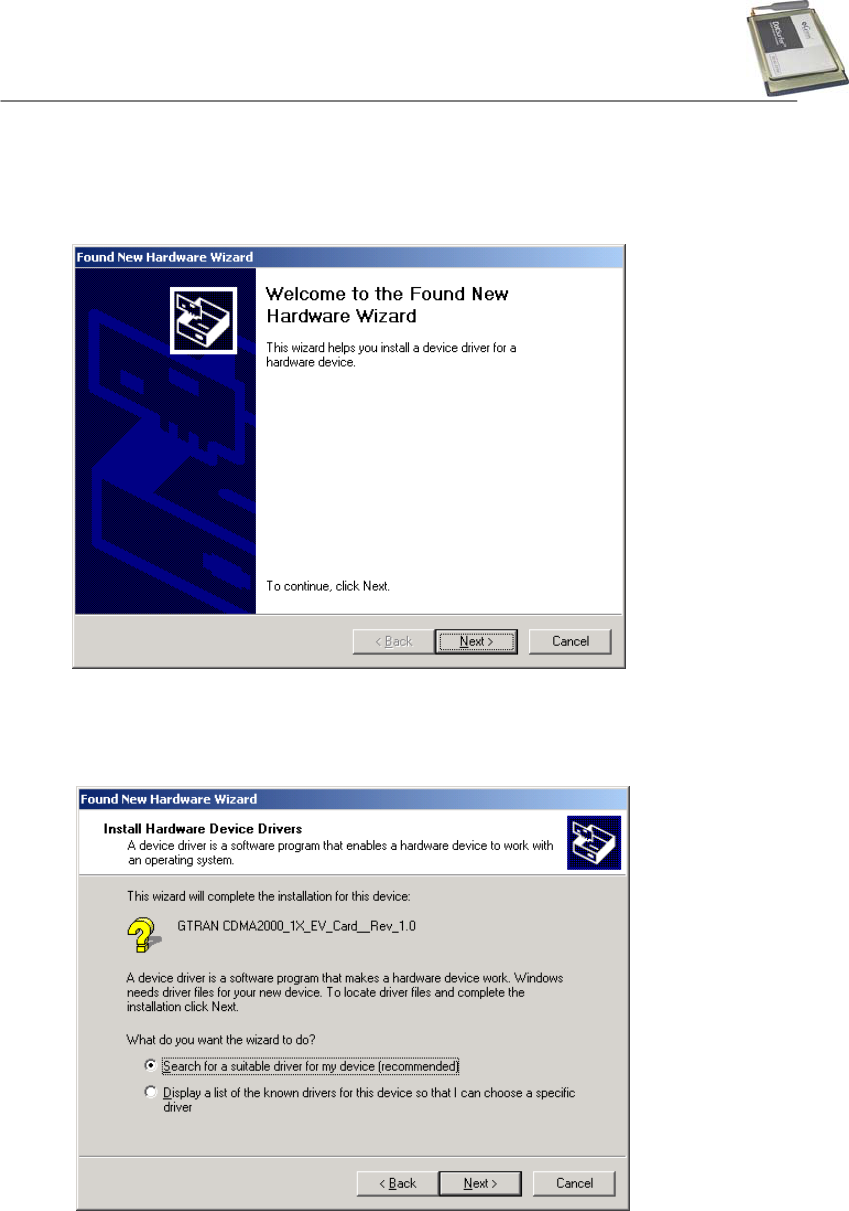
a. When PCMCIA Card is inserted, the window of the Add New Hardware Wizard is popped
up. Click the “Next” button on the window.
b. To find the driver file, select the item as the same as below on the window. Then, click the
“Next” button on the window.
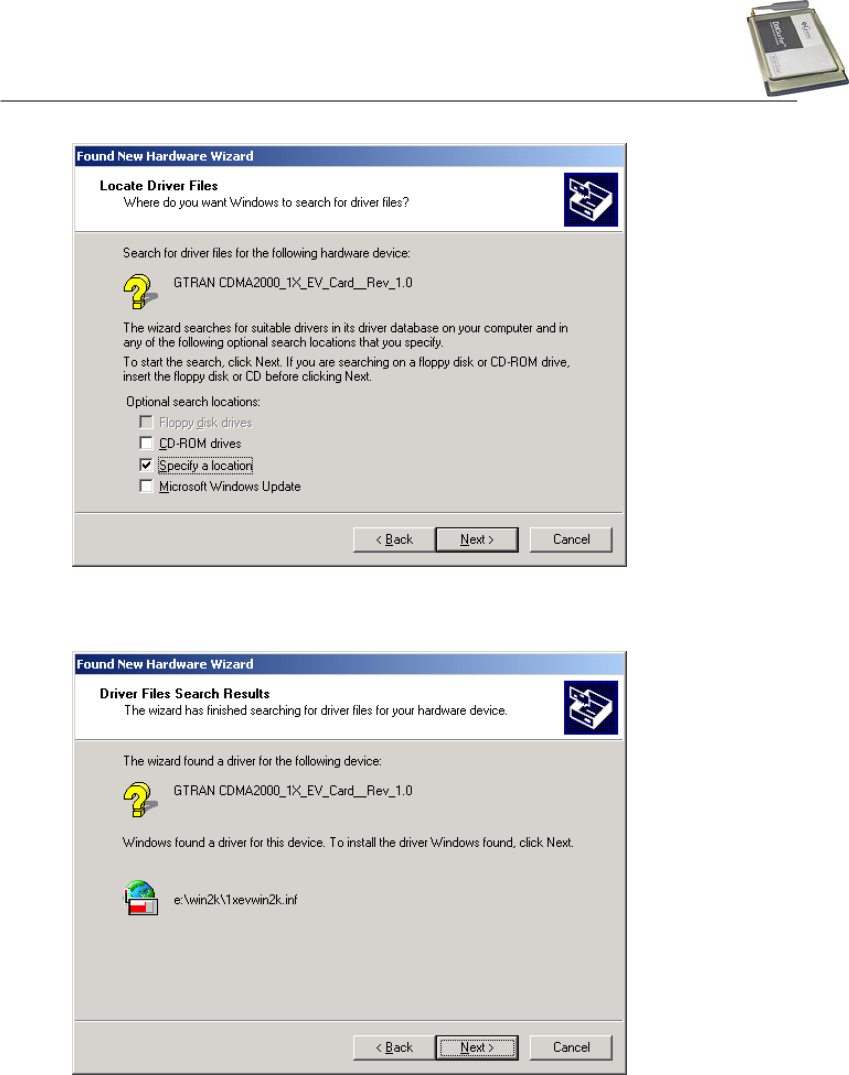
c. When the window as below is popped up, it is ready to find the driver for your PCMCIA Card.
Select the item as the same as below on the window. Then, click the “Next” button on the
window.
GTRAN Wireless Inc.
6
d. When the driver file has been found from the authorized path, click the “Next” button on the
window.
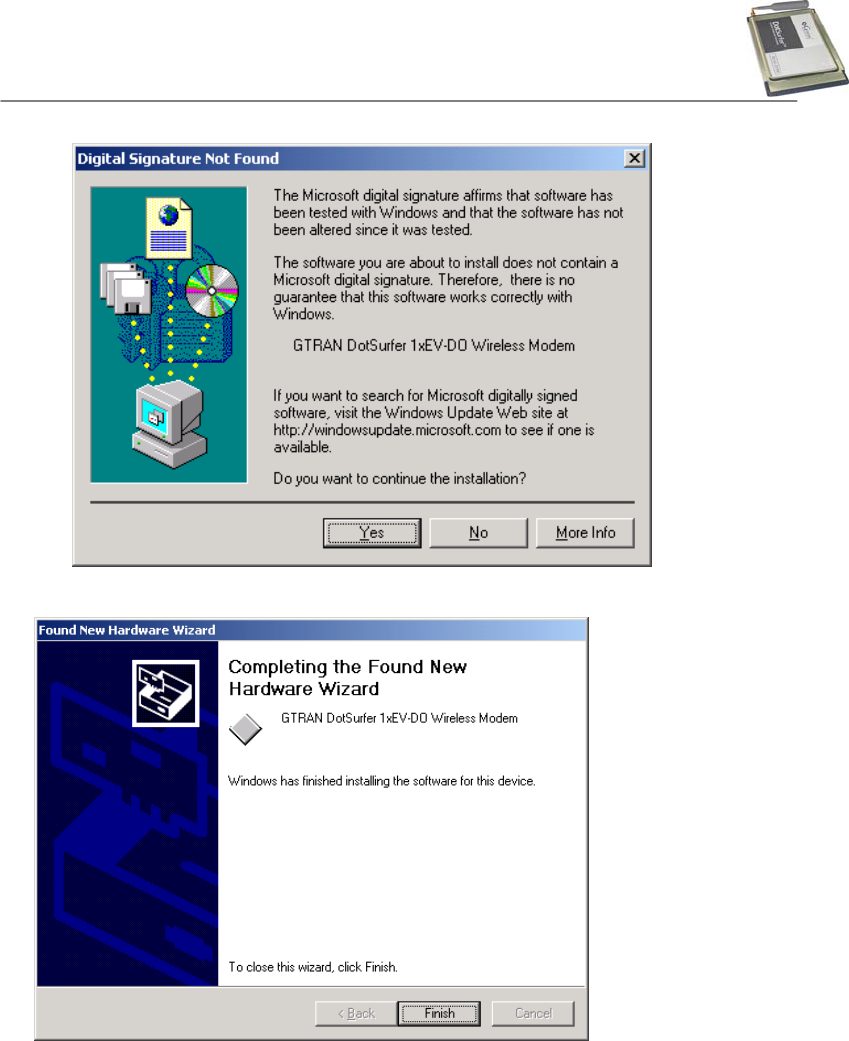
e. The window below is popped up because there is none of Digital Signature from Microsoft in
your laptop. It is safe, so just click Yes button on the window. Then, installation will be
continued.
GTRAN Wireless Inc.
7
f. Click “Finish” button on the window to complete the installation.

GTRAN Wireless Inc.
8
2.2 UNINSTALLING THE DOTSURFER DRIVER AND PROGRAM
a. G
Go
o
t
to
o Settings -> Control Panel -> System.
b. Select the Hardware -> Device Manager tab.
c. Select
Modem -> GTRAN DotSurfer 1xEV-DO Wireless Modem.
d. Click GTRAN DotSurfer... modem with the right button of mouse. Then, select remove on
the pop-up menu. It will remove the PCMCIA card from your laptop.
e. Go back to Control Panel -> Add/Remove Programs.
f. Select
GT Dialer 3 on the window of the Add/Remove Programs Properties, then click
Install/Uninstall button to remove the GT Dialer 3.
GTRAN Wireless Inc.
9
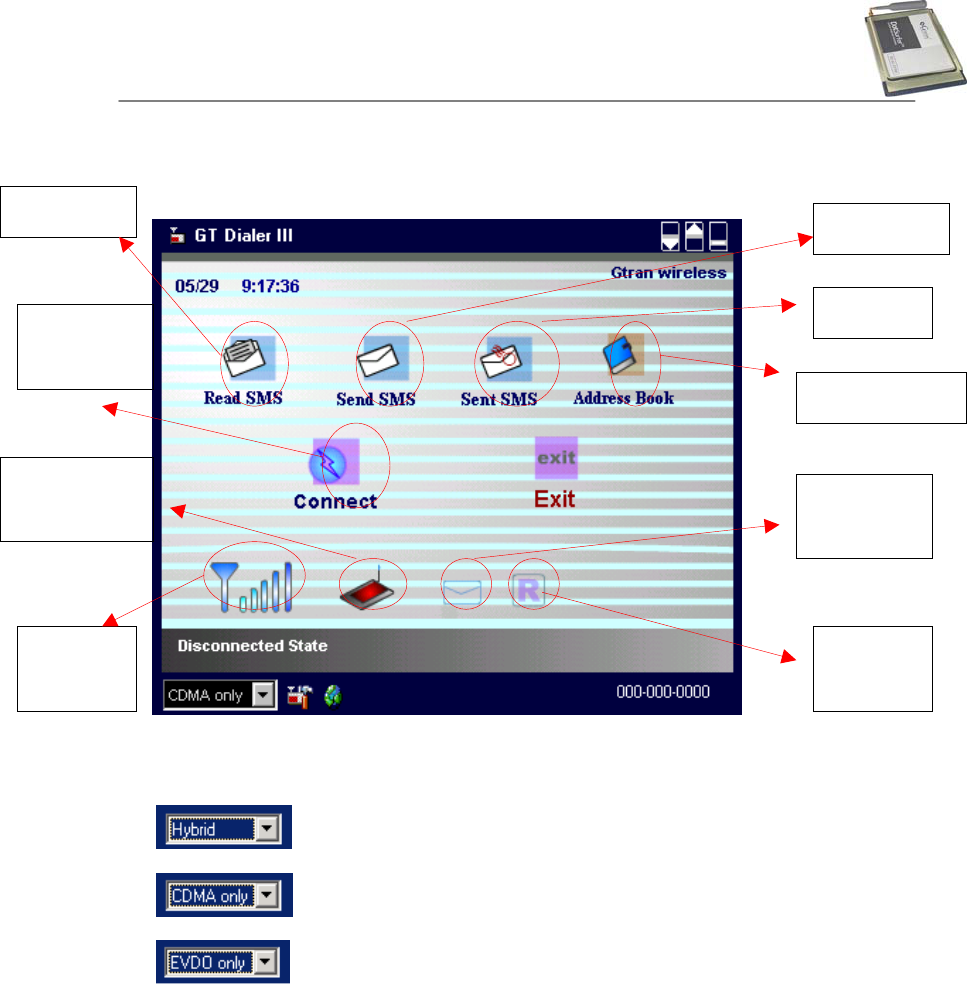
2.3 USING GT DIALER III
Main screen shown below will appear once GT Dialer III starts running.
2.3.1 Choosing Connect Mode
Preference call try to 1xEV-DO mode
Only connect to IS-2000 mode
Only connect to 1xEV-DO mode
Signal
strength
Connected to
network
Roaming
on/off
N
o/new
message
Connect/
Disconnect
Address Book
Sent
Write SMS
Read SMS
GTRAN Wireless Inc.
10
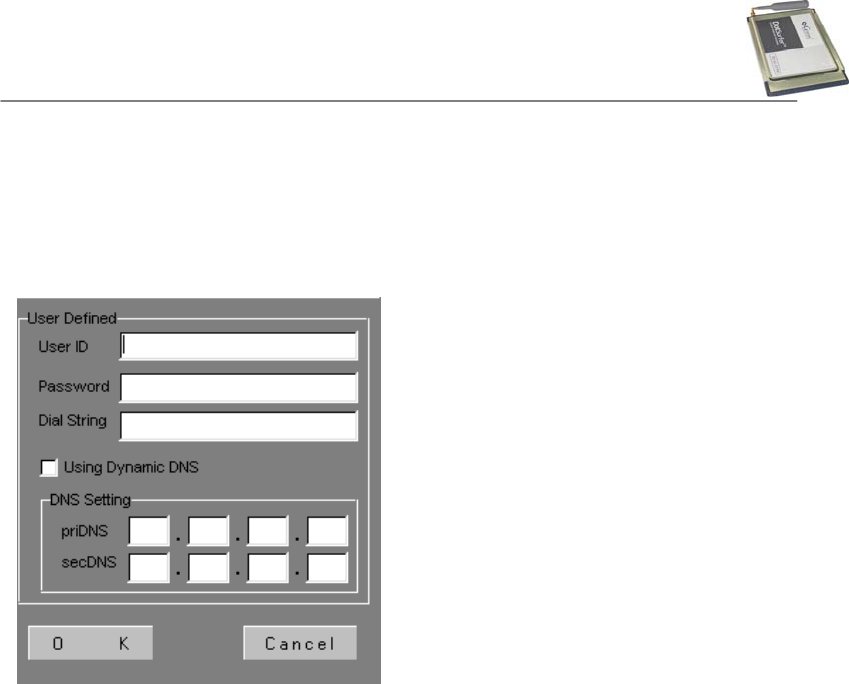
2.3.2 Connecting to Network
a. On the main GT Dialer III, go to Setting and input required information under User
Defined and DNS Setting. Click OK when finished.
b. Click Connect from the GT Dialer III.
GTRAN Wireless Inc.
11
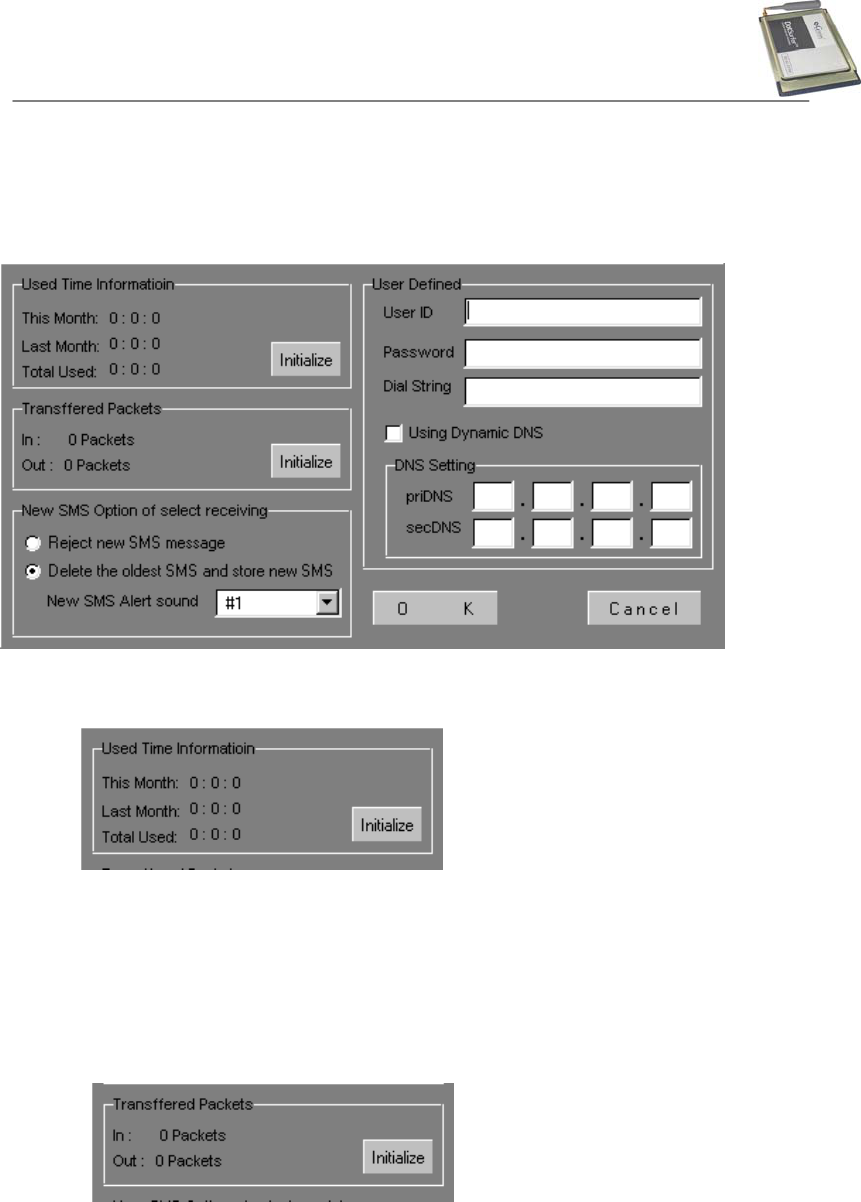
2.3.3 Setting
From the main screen, click “Setting” button. Screen shown below will appear.
- Connection Times
This Month: Accumulated usage time for this month.
Last Month: Accumulated usage time for last month.
Total: Accumulated time of usage before resetting.
- Accumulated Data Volume
Out: Transferred packet size since network is connected till disconnected.
In: Received packet size since network is connected till disconnected.
< Reference >
- A packet size defines to 512 bytes.
Reset
GTRAN Wireless Inc.
12
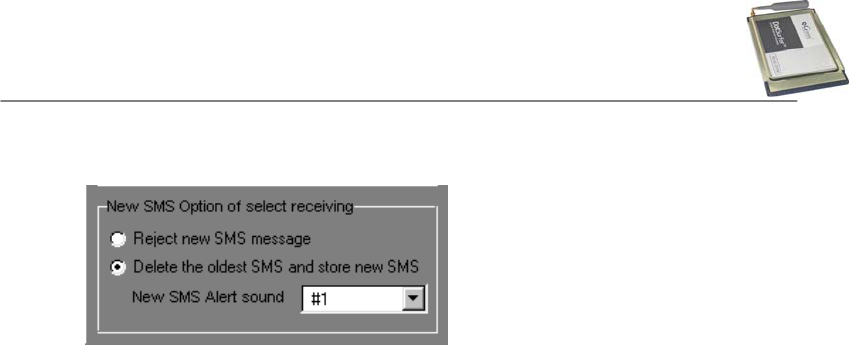
- Receiving New SMS Message Option
GTRAN Wireless Inc.
13
2.4 SMS
2.4.1 Read SMS
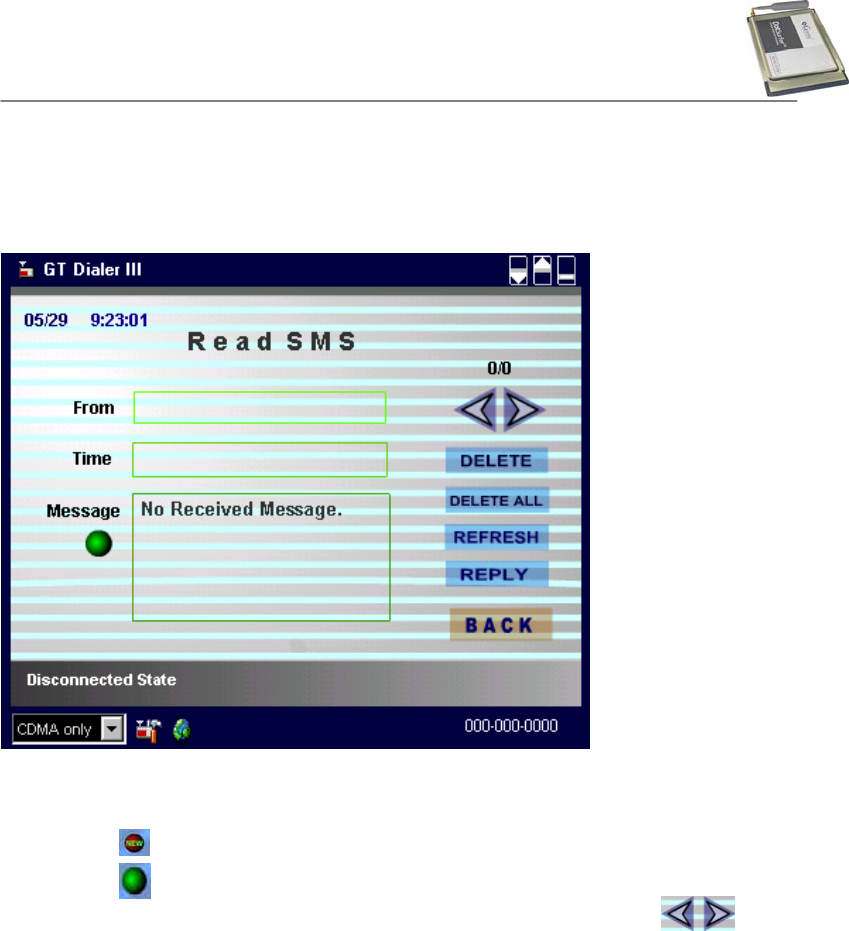
From the main screen, click SMS Read icon, Receive SMS screen will appear.
< Reference >
- Can save up to 30 SMS messages
New Message
Read Message
. To continue to read other messages, select them by clicking
. “Delete” Deletes the message
. “Delete All” Deletes all read message
. “Reply” Replies to sender
. “Refresh” To read new message, while you read message
. “Back” Goes back to the main page
GTRAN Wireless Inc.
14
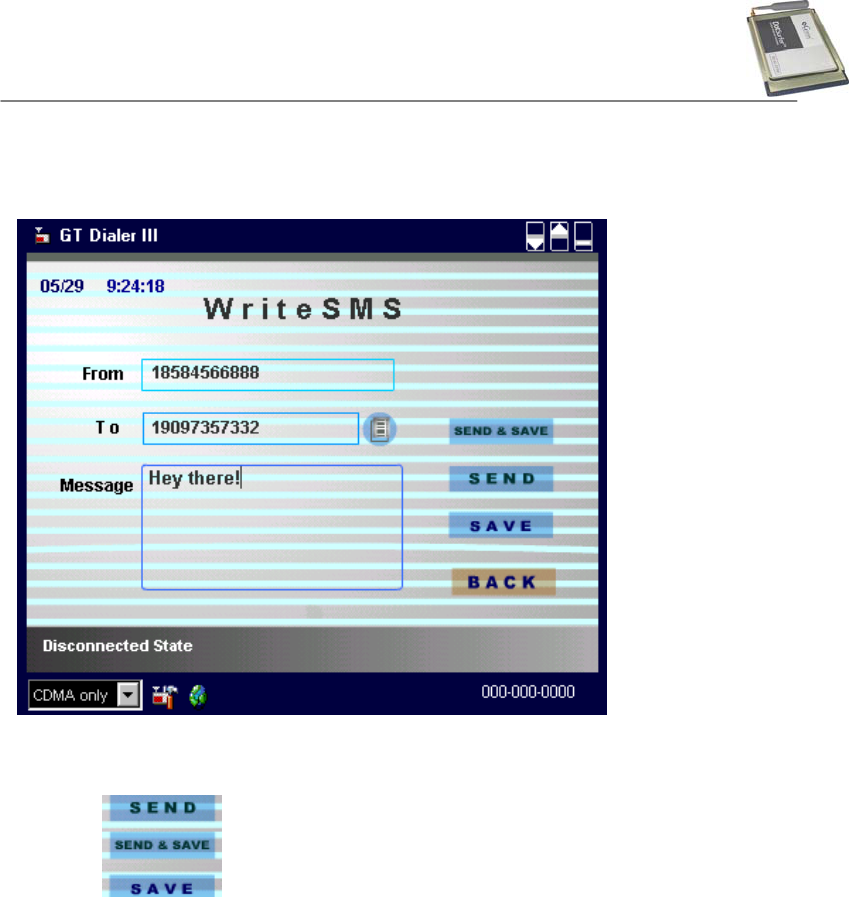
2.4.2 Write SMS
a. From the main screen, click “Write Messages” icon. Write Message screen will appear.
b. Input receiver’s phone number and text.
c. Once finished inputting, click one of the three buttons: Send, Send & Save, or Save.
Sends new message without saving in Sent box.
Sends new message and saves in Sent box.
Saves new message in Sent box without sending.
d. “Back” Goes back to main page.
GTRAN Wireless Inc.
15
2.4.3 Send SMS (Sent Box)
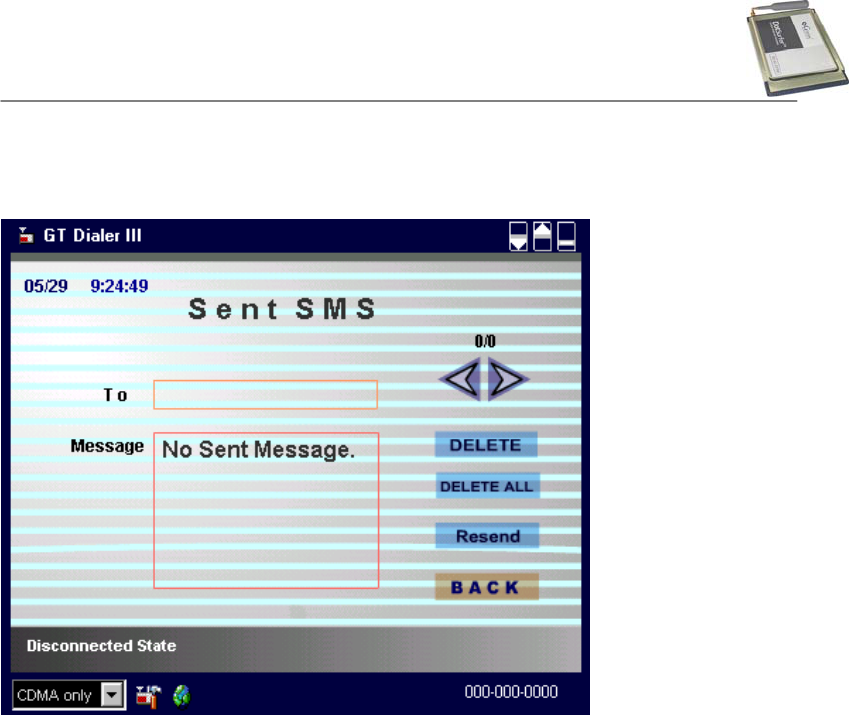
Click “Sent SMS” button from the main screen.
< Reference >
- Can save up to 30 sent SMS messages
“Delete” Deletes a sent message
“Delete all” Deletes all sent message in the Sent Box
“Resend” To resend the message
GTRAN Wireless Inc.
16
2.4 4 Address Book Management
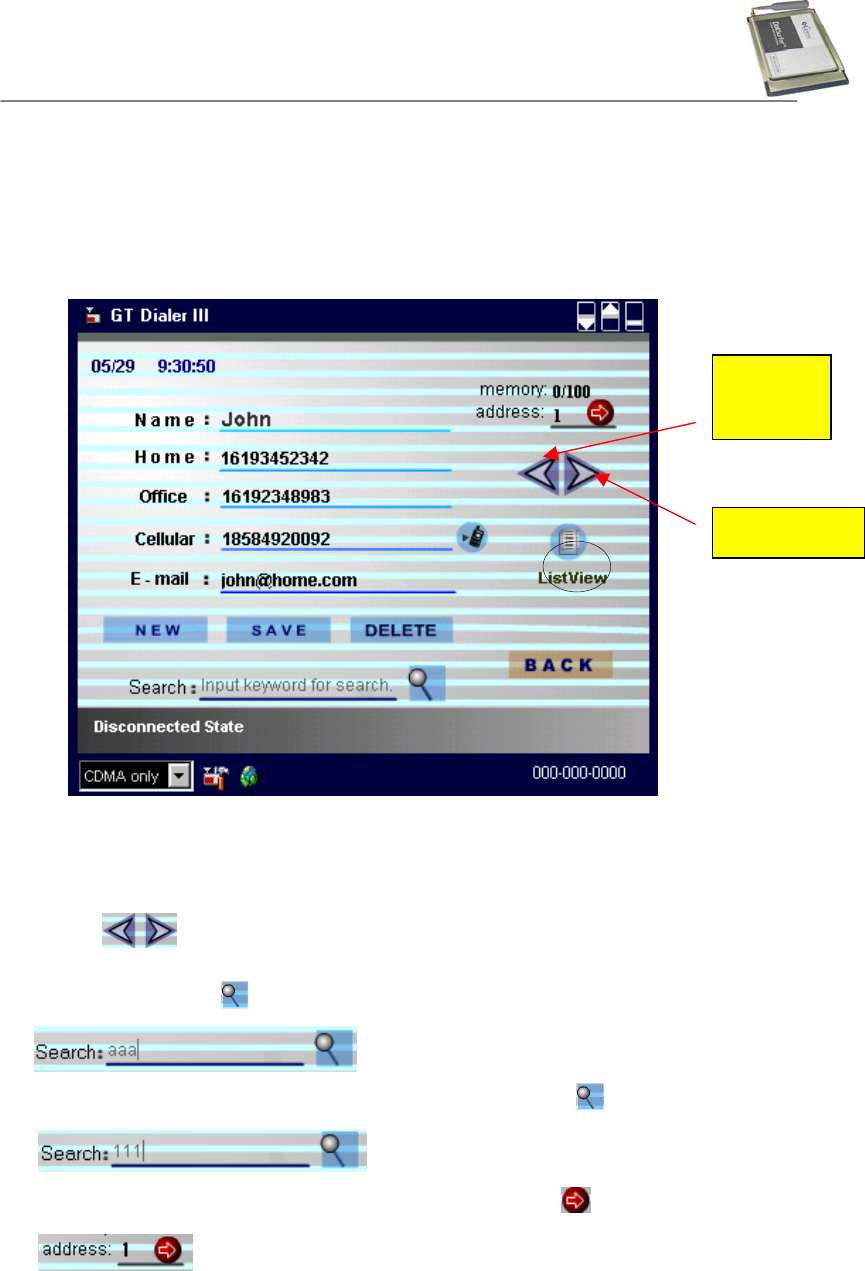
On the main screen, click “Address Book” icon and Address book screen will appear as
shown below.
< Reference > - Can save up to 100 addresses
Search and Read Address Book
a. Click icon to find an address by index number.
b. You may search by name, by phone number, by e-mail, or by index number. Input the
information and click icon.
c. Search by phone number, input a phone number and click icon.
d. Search by index number, input an index number and click icon.
N
ext Address
Previous
Address
GTRAN Wireless Inc.
17
Add to Address Book
a. From Address Book screen, Click “New”.
b. Input name, home number, office number, mobile number, and e-mail address. Click
“Save” and the inputted data will be stored.
Edit Address Book
a. Select the address to edit and update information.
b. When editing is finished, click “Save”.
Delete from Address Book
Select the address to delete and click ”Delete”
Other
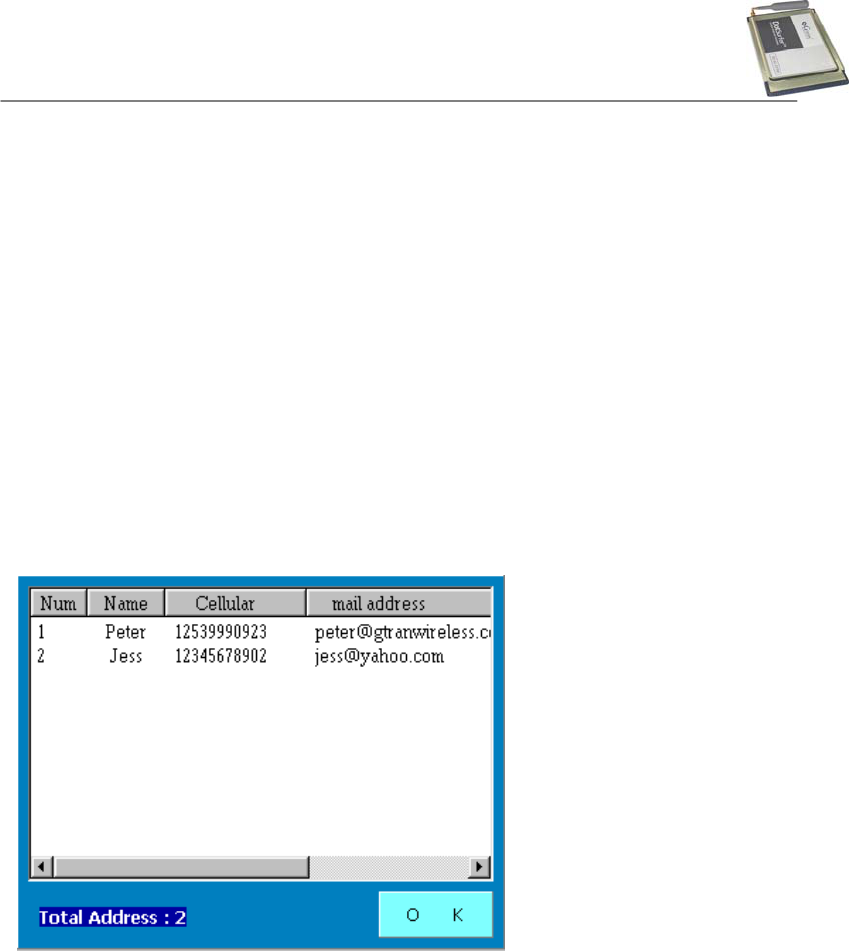
a. Click “List” to see all the list of addresses.
b. When you double click the index number, will see all detail.
GTRAN Wireless Inc.
18
3. COMPAQ IPAQ 3870 WINDOWS PPC2002
3.1 INSTALLATION
In addition to your iPAQ, you need the following:
- USB cradle
- Desktop or laptop PC
- PC card expansion pack
- Microsoft ActiveSync 3.1 or higher
Note: Do NOT insert the DotSurfer modem card in your iPAQ until the
software is installed.
a. Make sure that the DotSurfer card is not inserted into the PCMCIA slot.
b. Synchronize your iPAQ and computer by inserting the Microsoft ActiveSync 3.1 CD into your
computer. For instructions on this procedure, please refer to the iPAQ user manual.
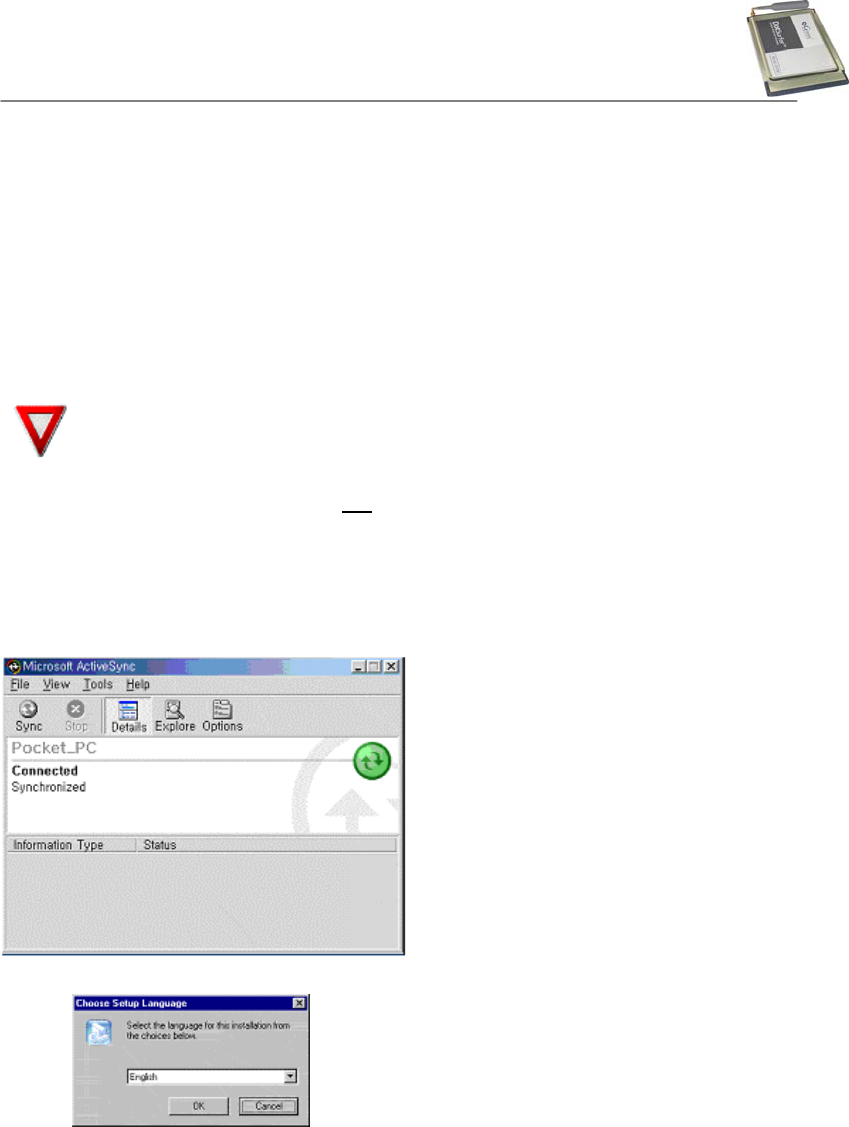
c. Once the computer and the iPAQ are synchronized, you should see the screen shown
below on your PC.
d. Insert the DotSurfer installation CD into your PC. Click Cancel on the following screen.
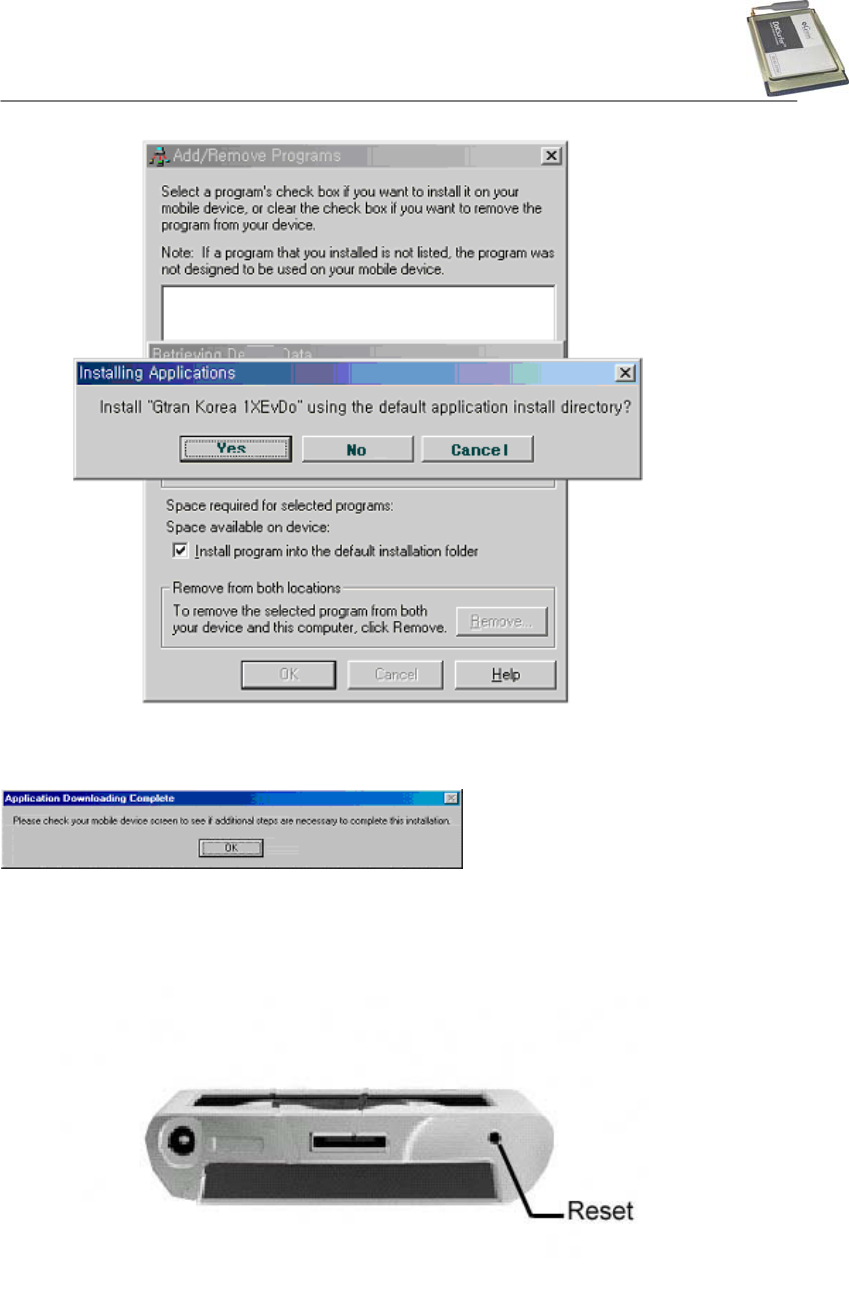
e. Run “setup_1XEvDo_PPC_VERIZON.exe” located on WinCE Directory in CD.
f. Follow the on-screen instructions.
g. On the screen asking to install Default Installation Folder, click Yes.
GTRAN Wireless Inc.
19
h. When the installation is complete, the screen will appear as shown below. Click OK and the
installation will automatically run in your iPAQ PDA.
i. When the synchronization is complete, take the iPAQ out of the cradle. Attach the PC card
expansion pack to the PDA and insert the DotSurfer modem card into the PC card slot.
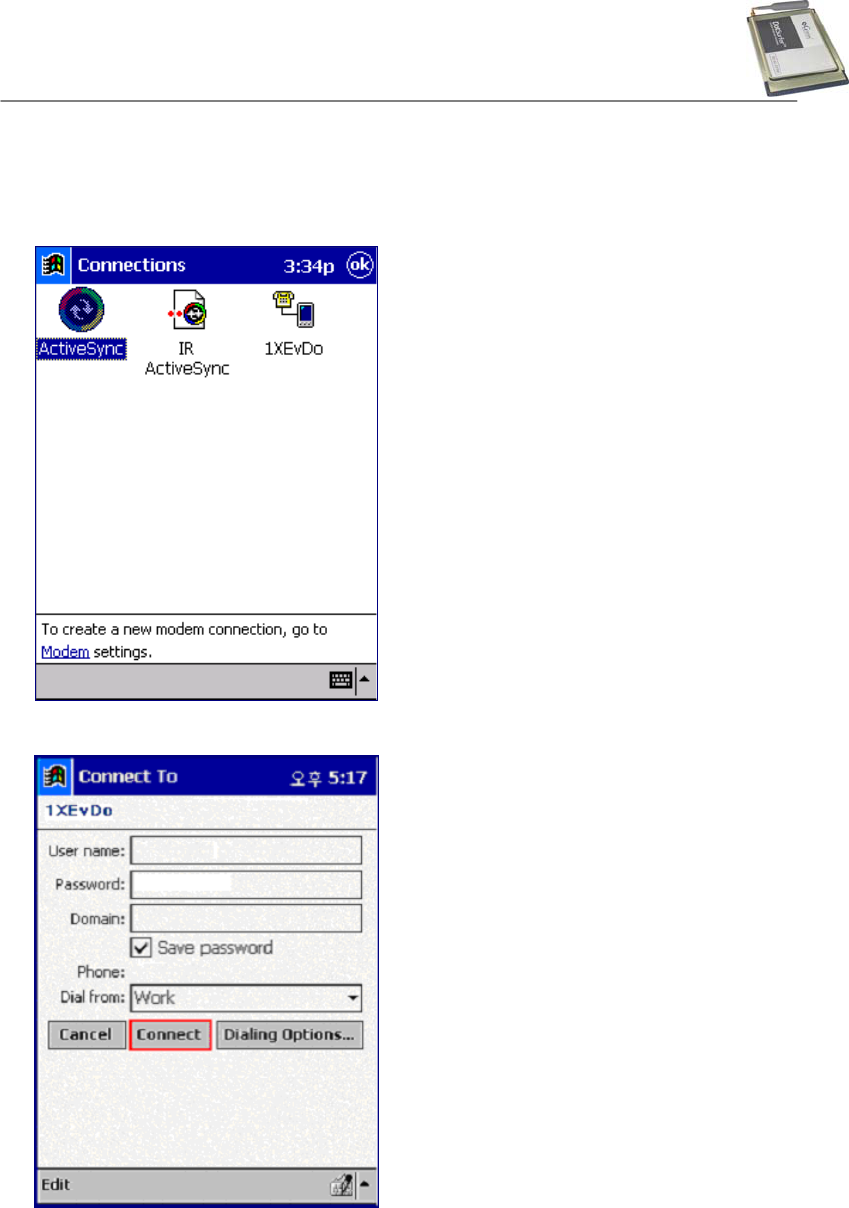
j. Using iPAQ's stylus, press the reset button on the right bottom of the PDA.
GTRAN Wireless Inc.
20
3.2 USING GT DIALER3
3.2.1 Network Connection
a. Go to Start -> Programs -> Connections ->1XEvDo.
b. When you see the screen below, input user ID, password, etc. and click Connect”
c. Once connected, go to Start –> Internet Explorer and start surfing the web.
GTRAN Wireless Inc.
21
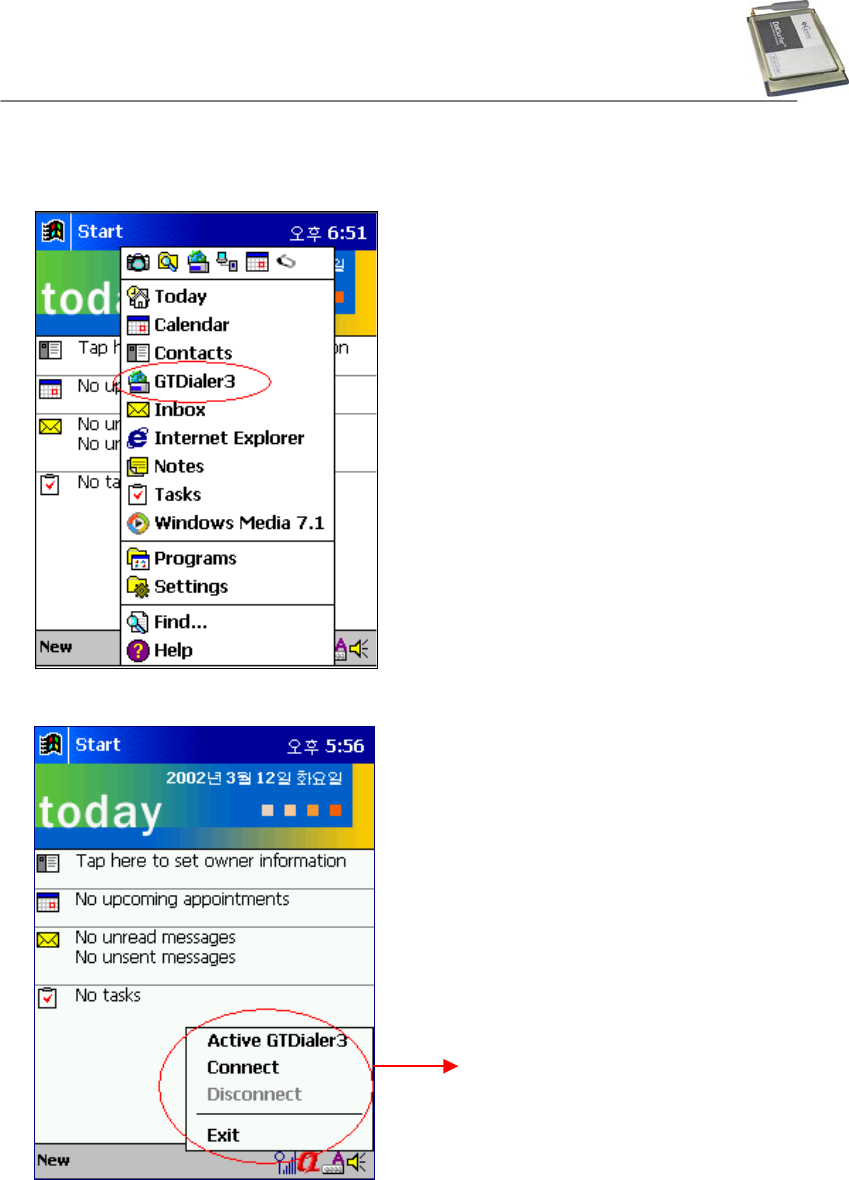
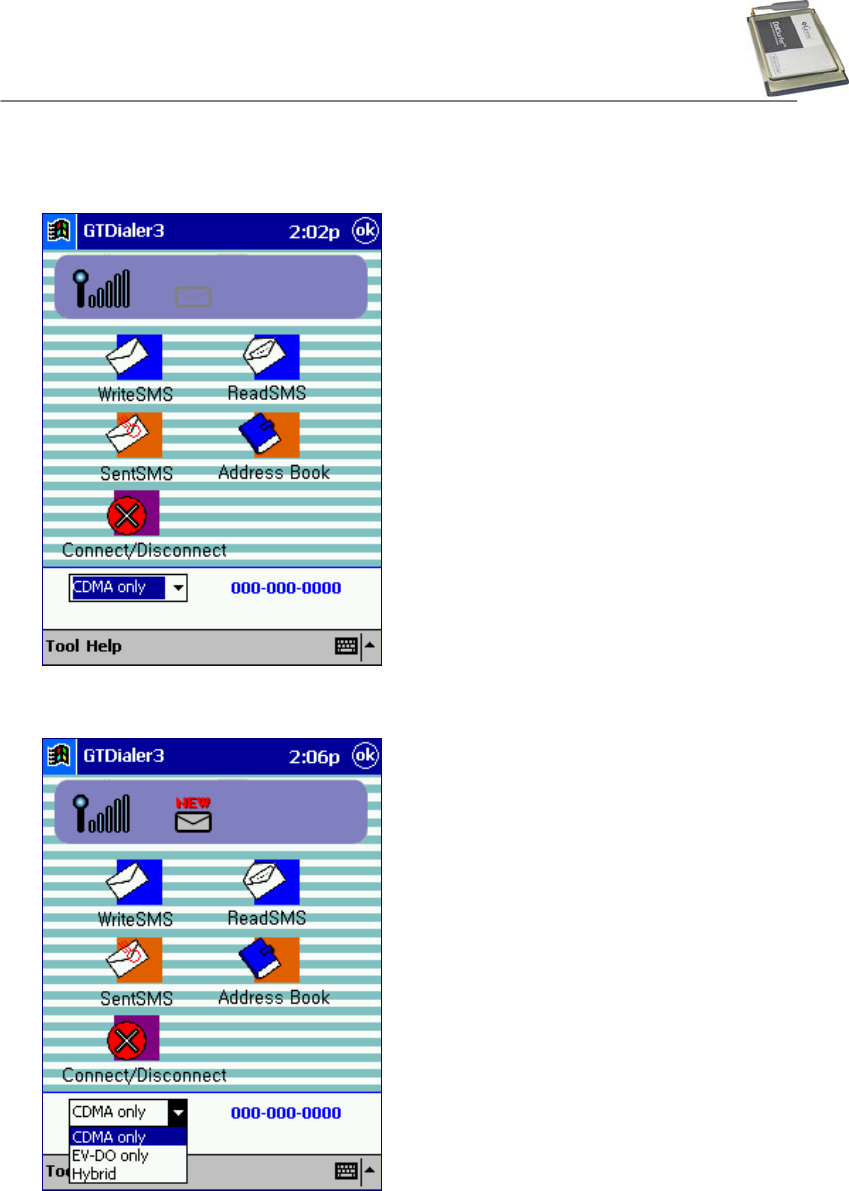
d. After the initial connection setting is complete, you can connect to network as the following:
Go to Start->GTDialer3 as below window.
You can find out the status of 1xEV-DO on today.
Active GT Dialer 3
Connect
Disconnect
GTRAN Wireless Inc.
22
GT Dialer3
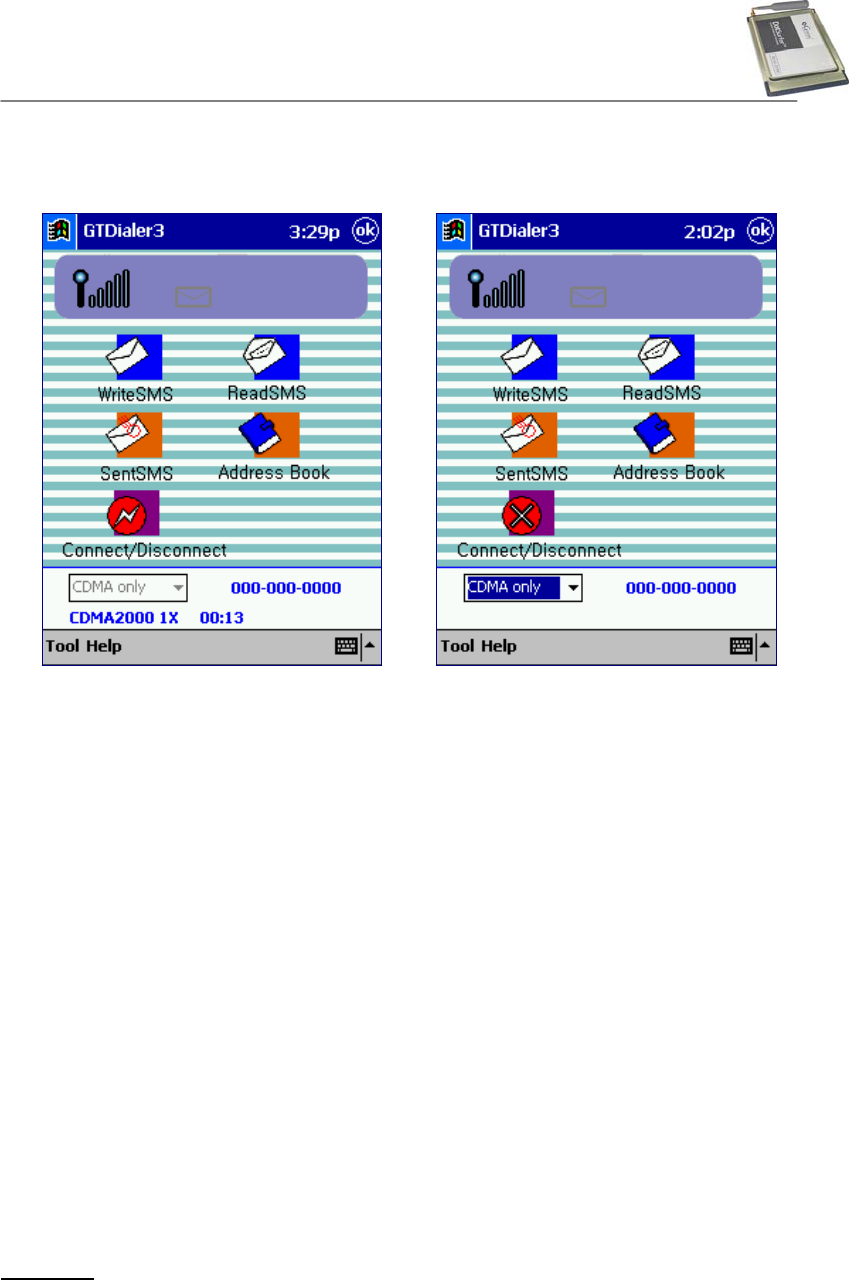
3.2.2 Select Mode
1) Hybrid: Preference call try to 1xEV-DO mode
2) CDMA only: Only connect to IS-2000 mode
3) EV-DO only: Only connect to 1xEV-DO mode
GTRAN Wireless Inc.
23
3.2.3 Internet Connect/Disconnect
Click “Connect/Disconnect” button as below.
< Before connection > < After connection >
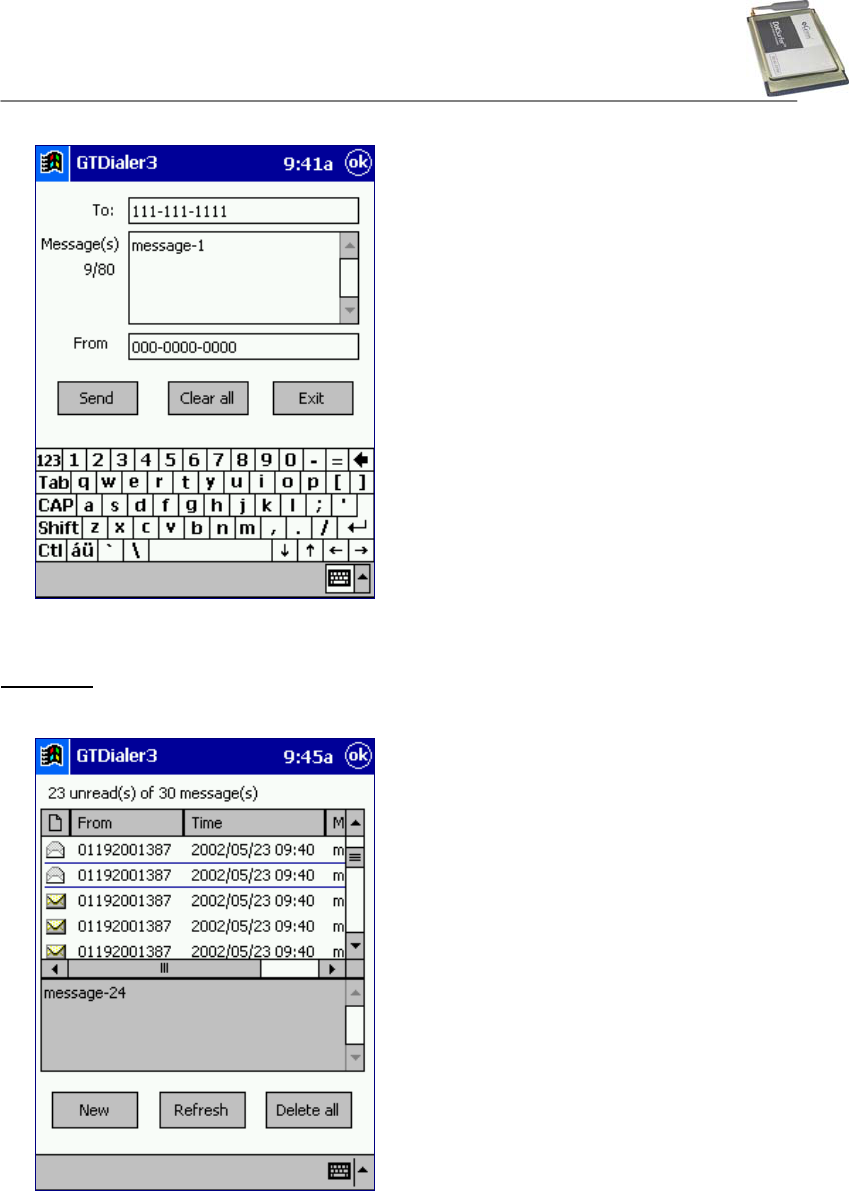
3.2.4 SMS
Write SMS
a. Click ”Write SMS” button of GT Dialer3 main screen.
b. Input a number & message and click “Send”. Message will send.
GTRAN Wireless Inc.
24
c. If you click “Clear all” button, message will be delete all.
Read SMS
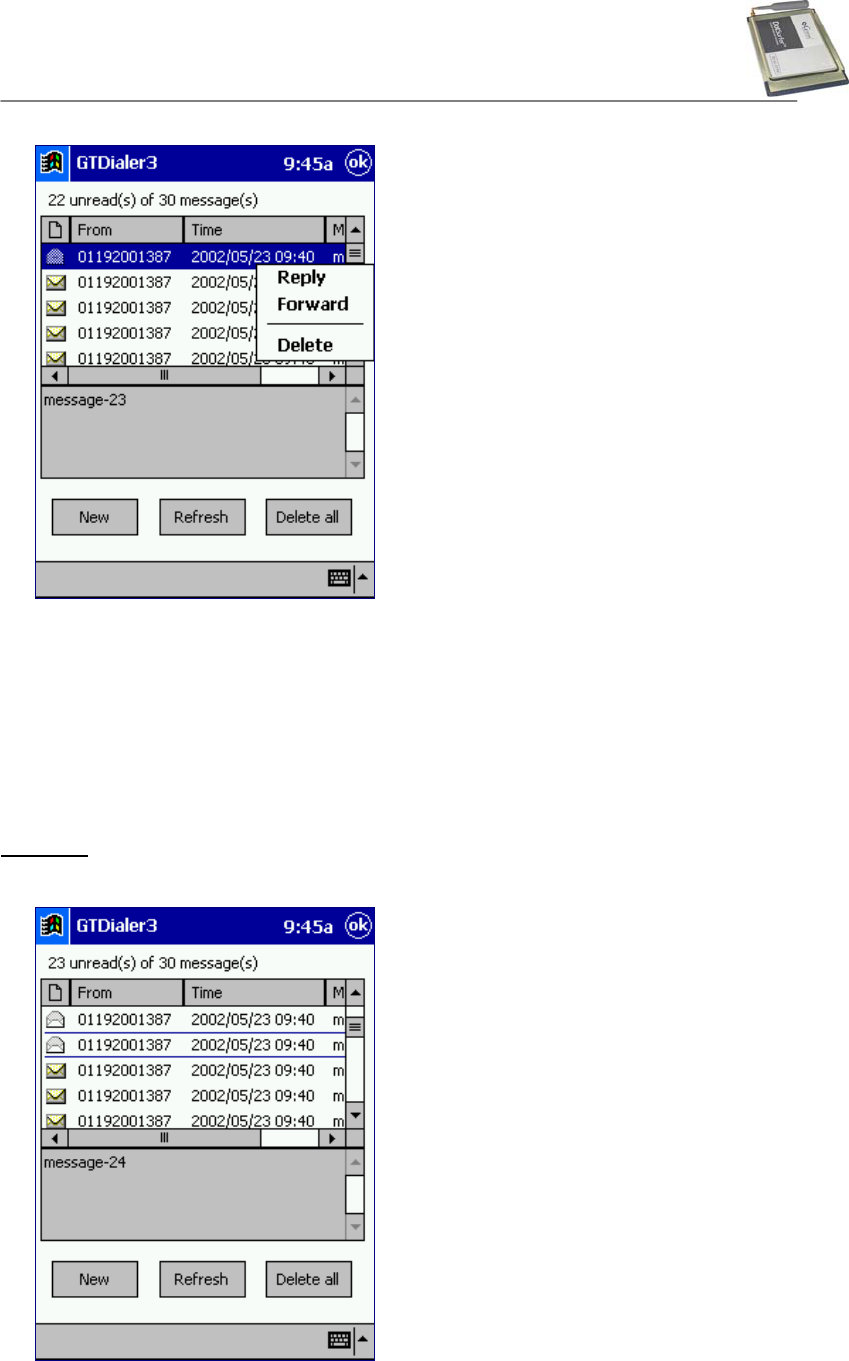
a. Click “Read SMS” button, to read message from GTDialer3.
b. To reply to the received message, select the message and with the Stylus, tap and Hold.
Select “Reply” from the pop-up menu.
GTRAN Wireless Inc.
25
c. To forward a message to others, using the stylus, tap and hold. Select “Forward” from
menu.
d. To delete a message, select the message. Using the stylus, tap and hold, which will display
the pop-up menu. Select “Delete” from the pop-up menu.
e. To delete all messages, click “Delete all” button.
f. To check SMS by manually, click “Refresh” button.
Sent SMS
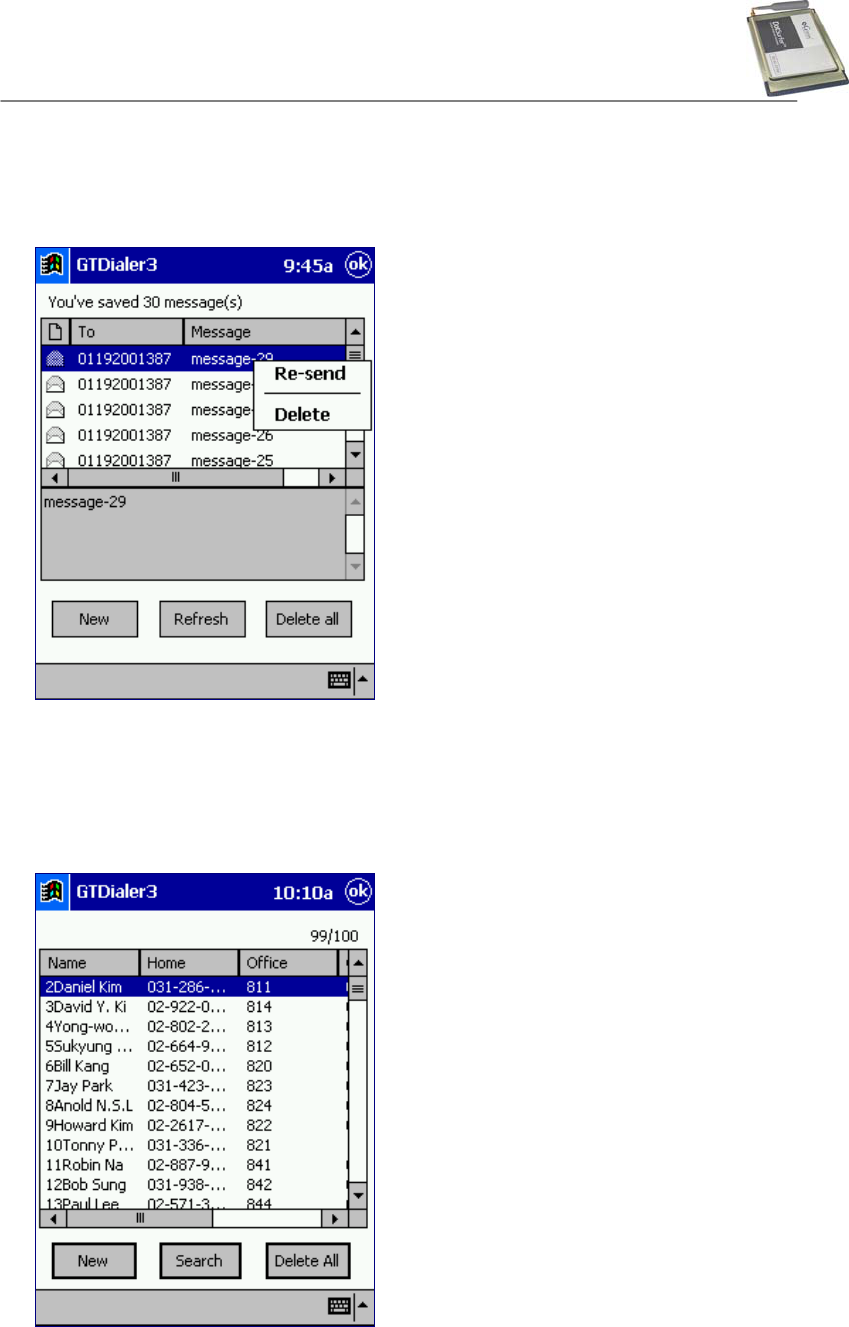
a. Click “SMS Sent” button from GTDialer3 main screen.
GTRAN Wireless Inc.
26
b. To check a new SMS by manually, click “Refresh” button.
c. To delete all messages, click “Delete all” button.
d. To re-send the message, click “Re-send” button from pop-up menu.
a. To delete an SMS message, select the message. Using the Stylus, tap and hold, which will
display the pop-up menu. Select “Delete” from the pop-up menu.
3.2.5 Phone Book
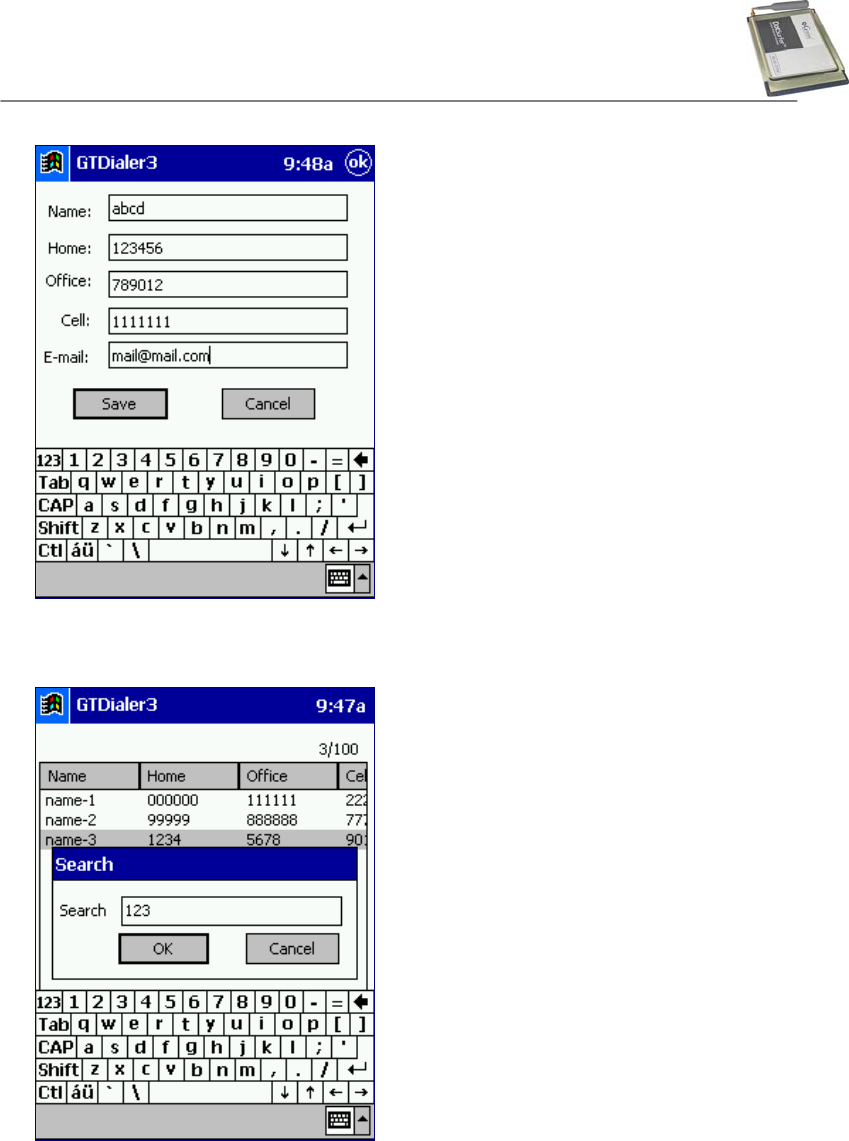
a. Click “Phone Book” tab from main GTDialer3 screen. Will appear a screen as a below.
b. To add new number, click “New” button, input the info and click “Save” button.
GTRAN Wireless Inc.
27
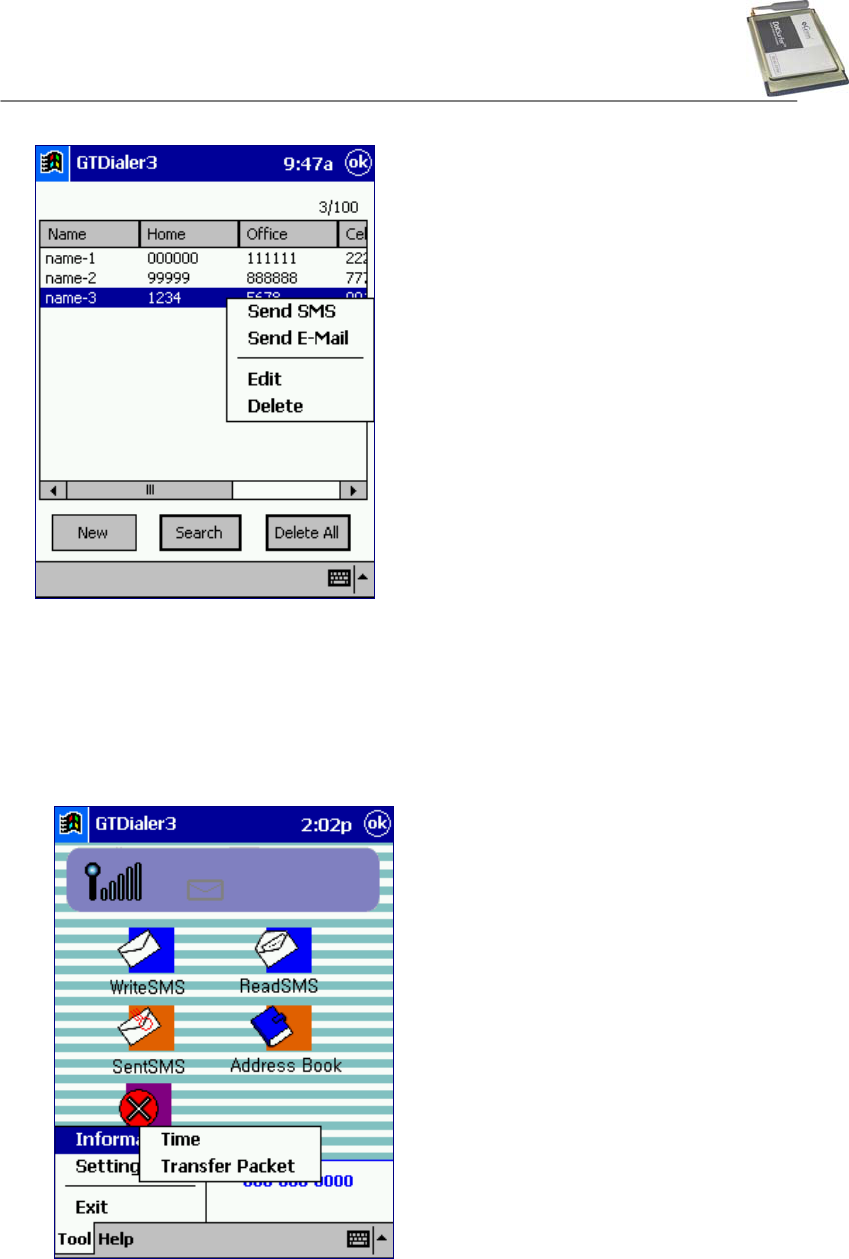
c. To search fro the phone number or string from your contact list, click “Search” button. Enter
a number or string and click “OK” button.
d. To delete the entire list, click the “Delete All” button.
e. To useful each menu, use Tab-and-hold in menu.
GTRAN Wireless Inc.
28
Send E-Mail: E-mail sending
Edit: To edit a contact from the list
Delete: To delete a contact from the list
3.2.6 Other Displays
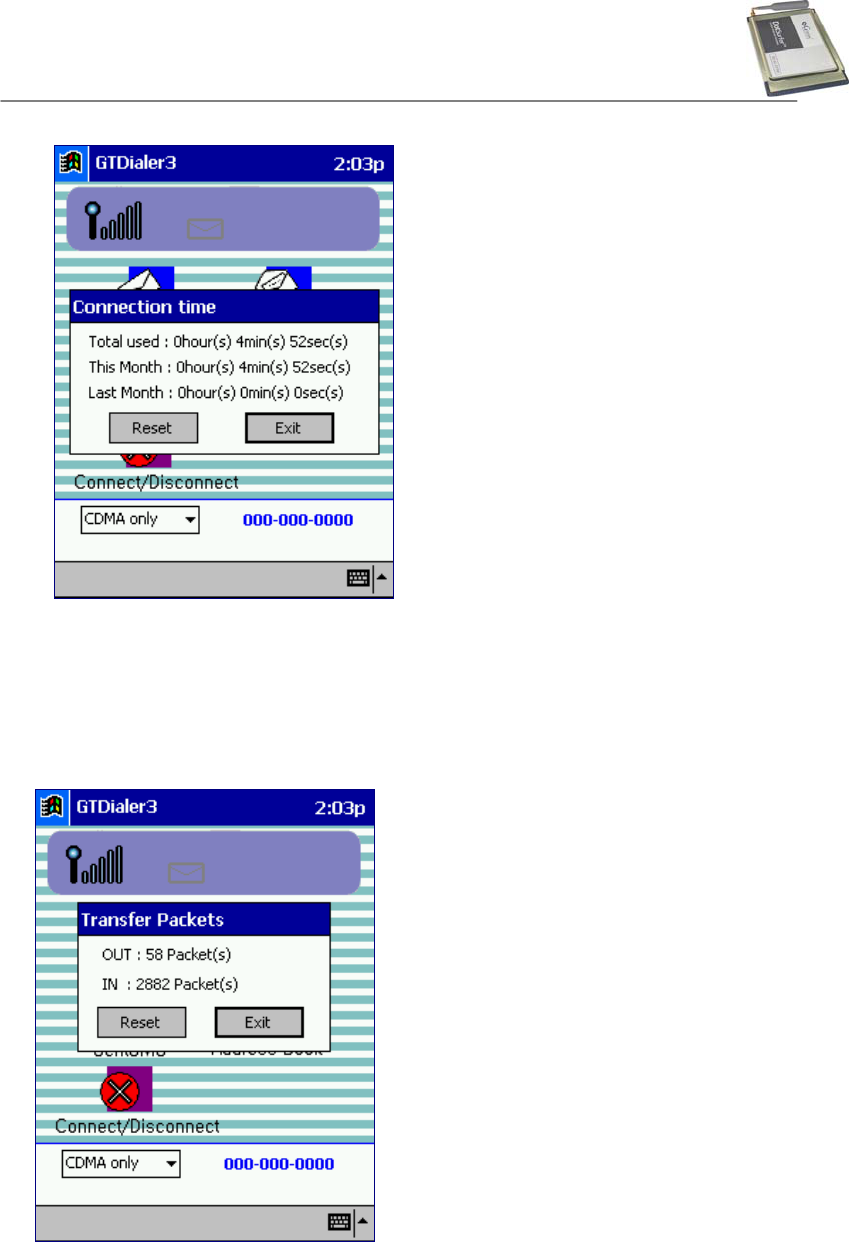
a. From GT Dialer3 main screen, click “Tool->Information” button.
- To access connection time display “Tool->Information -> Time”
Total used : Total time used prior to
resetting the accumulated
time.
This Month : Accumulated time for this
month.
Last Month : Accumulated time for last
month.
GTRAN Wireless Inc.
29
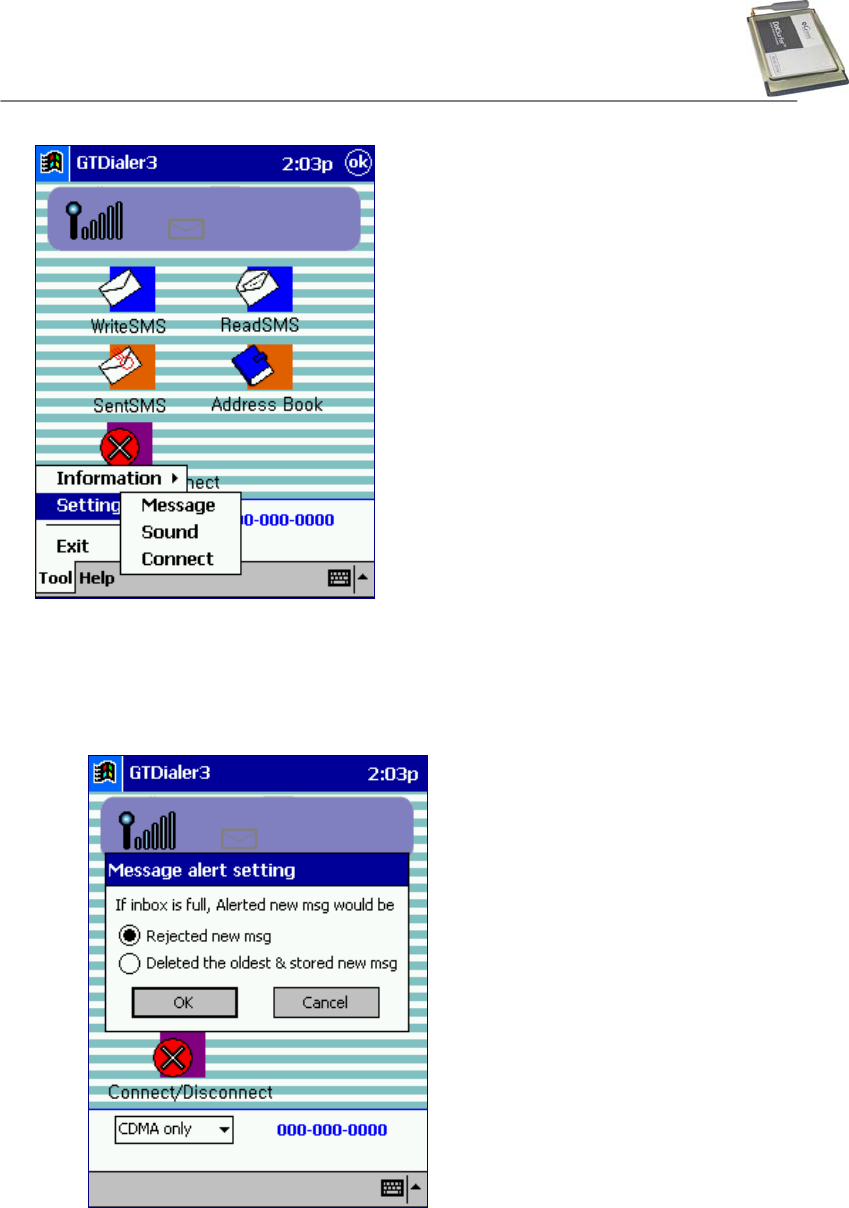
- Go to “Tool ->Information ->Transfer Packets”
Card displays the transfer packets. A packet size defines to 512 bytes.
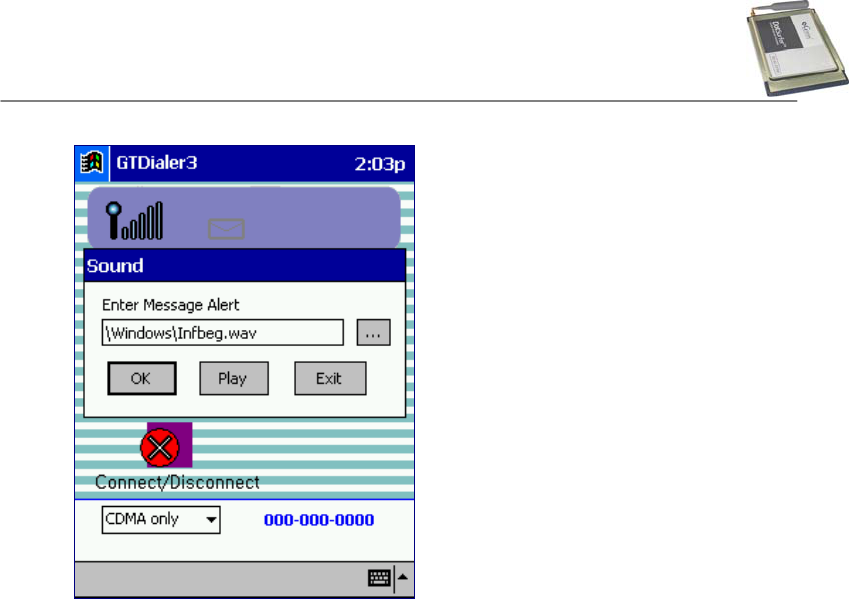
b. From GT Dialer3 main screen, click “Tool->Setting” button, You’ll see two options on the
pop-up menu: Message and Sound.
OUT: Received packets during connection.
IN: Sent packets during connection.
GTRAN Wireless Inc.
30
- To select a method of receiving, go to “Tool-> Setting -> Message”
If inbox is full, select Rejected new msg and select Deleted the oldest & stored new
msg.
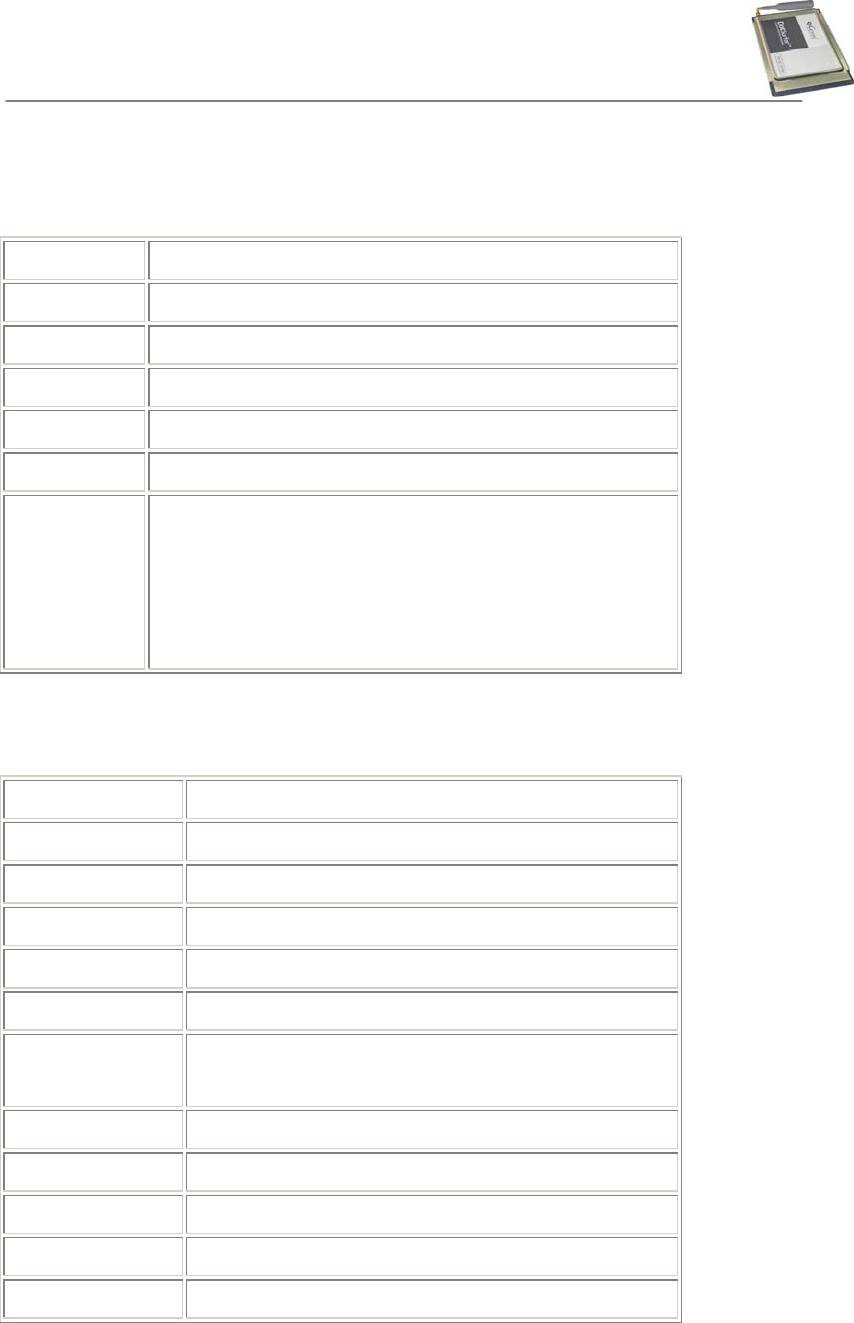
- To select a sound of SMS notice “Tool -> Setting -> Sound”
: Select a wav file that you want and click “OK” button.
GTRAN Wireless Inc.
31
GTRAN Wireless Inc.
32
APPENDIX A: PRODUCT SPECIFICATIONS
SYSTEM REQUIREMENTS
Card Slot 1 Type II PCMCIA
Processor P133 or higher
Disk Space 20 MB
RAM 64 MB
Disk Drive CD-ROM Drive
Internet MS Internet Explorer 4.0 or higher
Operating
System
Windows 98 and 98SE
Windows ME
Windows 2000
Windows XP
Windows CE 3.0 and Pocket PC 2002 for iPAQ
ENVIRONMENTAL AND ELECTRICAL SPECIFICATIONS
Operating Temp: -30º C - +60º C Ambient, outside PC card enclosure
Storage Temp: -40º C ~ +85º C
Humidity: 95%
Vibration: 100 ~ 500 Hz
Drop: 90 Cm
Voltage 3.3 VDC
Current TX 850 mA MAX, RX 150 mA MAX, Sleep Mode 30 mA
MAX
Transmit Power 200 mW MAX
Transmit Frequency DotSurfer 3000: 824 MHz - 848 MHz
Receive Frequency DotSurfer 3000: 869 MHz - 893 MHz
Channel Spacing 45 MHz
Frequency Stability +/- 300Hz

GTRAN Wireless Inc.
33
APPENDIX B: SAFETY AND REGULATORY INFORMATION
SAFETY AND HAZARDS
The DotSurfer modem card should not be used in locations where the use of radio frequency
equipment is restricted or prohibited. DotSurfer can transmit signals that could interfere with
various systems in aircraft, medical equipments, and life support equipments. Please do not use
the DotSurfer modem card in these restricted locations.
REGULATORY INFORMATION
TBD

GTRAN Wireless Inc.
34
Licensed by QUALCOMM Incorporated under one or more of the following United States
Patents and/or their counterparts in other nations:
4,901,307 5,490,165 5,056,109 5,504,773 5,101,501
5,506,865 5,109,390 5,511,073 5,228,054 5,535,239
5,267,261 5,544,196 5,267,262 5,568,483 5,337,338
5,600,754 5,414,796 5,657,420 5,416,797 5,659,569
5,710,784 5,778,338